learning objectives - autodeskaucache.autodesk.com/.../v2_ma5221_publishertipsand… · web...
TRANSCRIPT
Tips and Tricks for Getting the Most Out of Autodesk® Inventor® Publisher
Loren Welch – Autodesk
MA5221
This class will cover as many tips and tricks for Autodesk® Inventor® Publisher that can be packed into the allotted time. Everything from basic setup to high-impact publishing tips will be jammed into this action-packed and interactive class.
Learning ObjectivesAt the end of this class, you will be able to:
Import 3D CAD data efficiently into the Autodesk® Inventor® Publisher environment
Author a wealth of views and annotations to fit your documentation needs
Create custom annotation styles and colors
Learn essential RMB commands to make you more productive
Effectively publish to video, document, image, social and mobile formats
About the Speaker
Loren Welch is a Technical Account Manager at Autodesk. Loren works closely with the Business Development and Key Accounts teams within the Manufacturing Industry Group. With over eleven years in the CAD industry, Loren joined Autodesk in January of 2008 and is an Autodesk® Inventor® certified expert.
Loren has diversified experience in multiple CAD/CAM/CAE/PDM software applications, as well as rapid prototyping solutions. Loren was a co-speaker at AU 2009 & 2010 as well as many other national webcasts and tradeshows for Autodesk. Loren is an active Autodesk manufacturing community blogger (http://manufacturingtoolbox.typepad.com/), and you can also follow him on twitter @lorenwelch and YouTube (http://www.youtube.com/lwelch15).
Tips and Tricks for Getting the Most Out of Autodesk® Inventor® Publisher
The Basics: Tips & Tricks for inserting 3D geometry, navigating the UI, exploding geometry, creating detail and section views, along with adding storyboards and snapshots in Autodesk® Inventor® Publisher
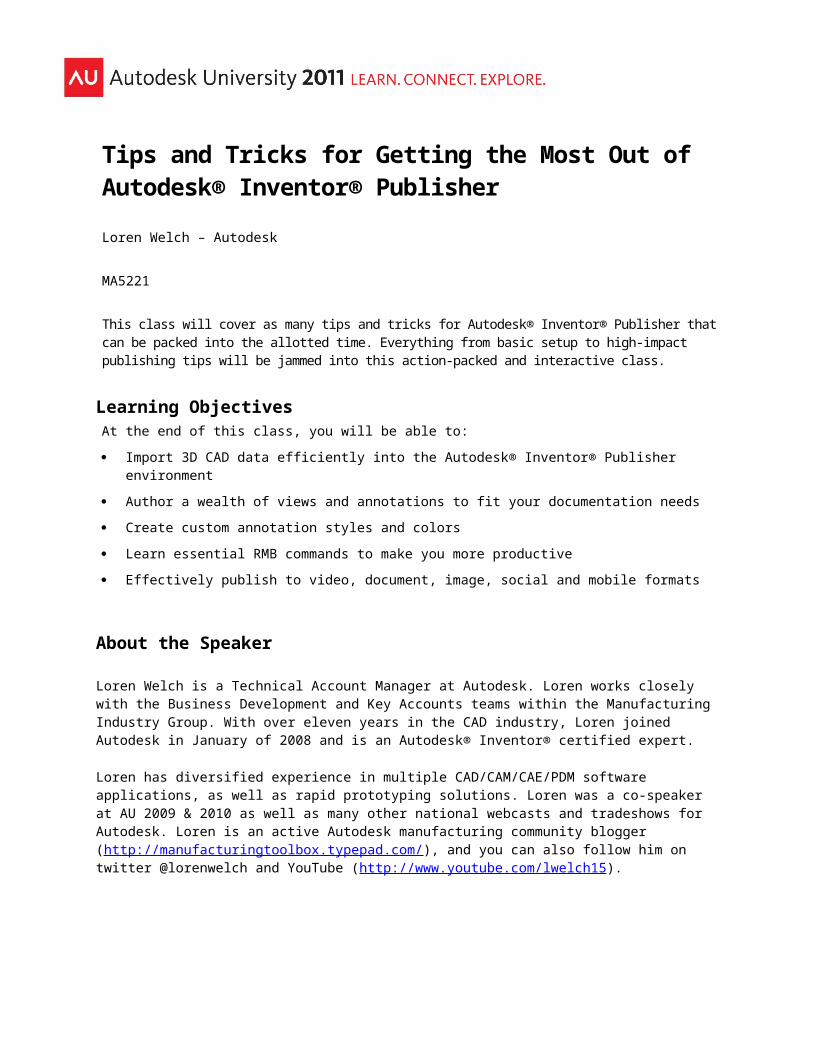
The Basics, Part 1: Inserting Geometry 1. Autodesk® Inventor® Publisher allows you to read in a variety of neutral and native 3D
CAD file formats.
Inserting large 3D assembly files can be challenging from a performance and usability standpoint. Many times, just inserting relevant sub-assemblies is a better approach than inserting the entire assembly which may include extra data that is not needed for the documentation you are creating.
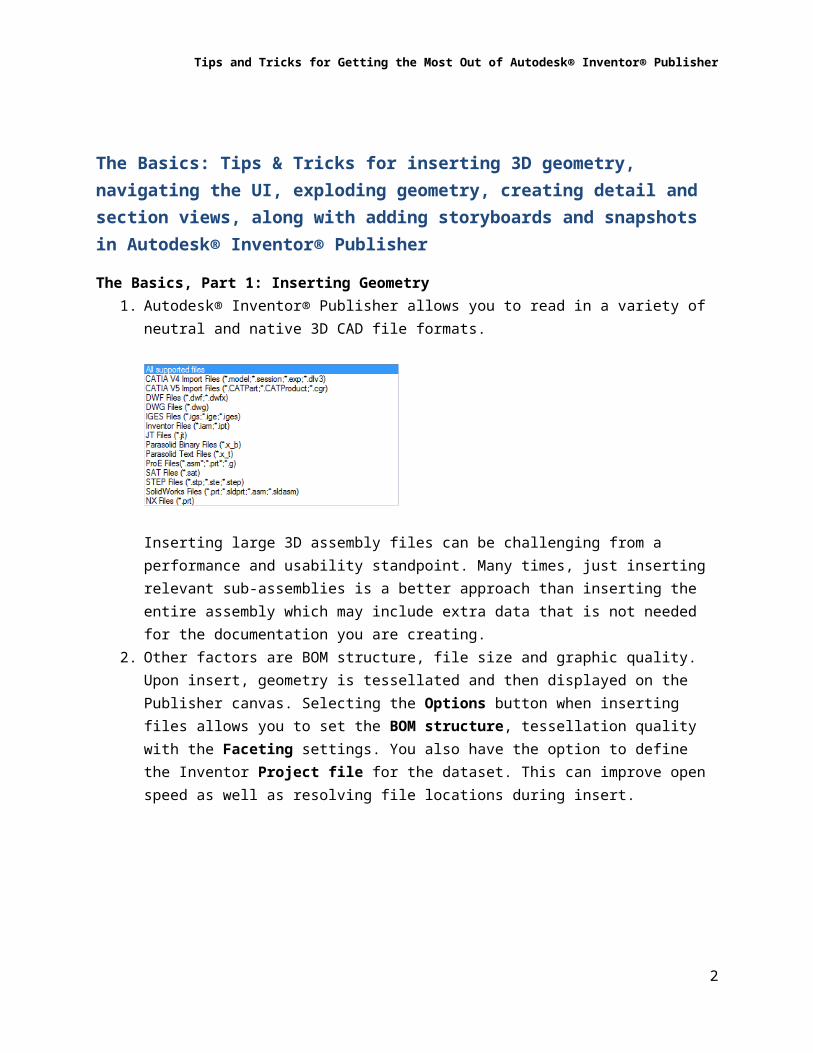
2. Other factors are BOM structure, file size and graphic quality. Upon insert, geometry is tessellated and then displayed on the Publisher canvas. Selecting the Options button when inserting files allows you to set the BOM structure, tessellation quality with the Faceting settings. You also have the option to define the Inventor Project file for the dataset. This can improve open speed as well as resolving file locations during insert.
2
Tips and Tricks for Getting the Most Out of Autodesk® Inventor® Publisher
(Note: this becomes important to file size. Especially important for Publish to Mobile publishing)
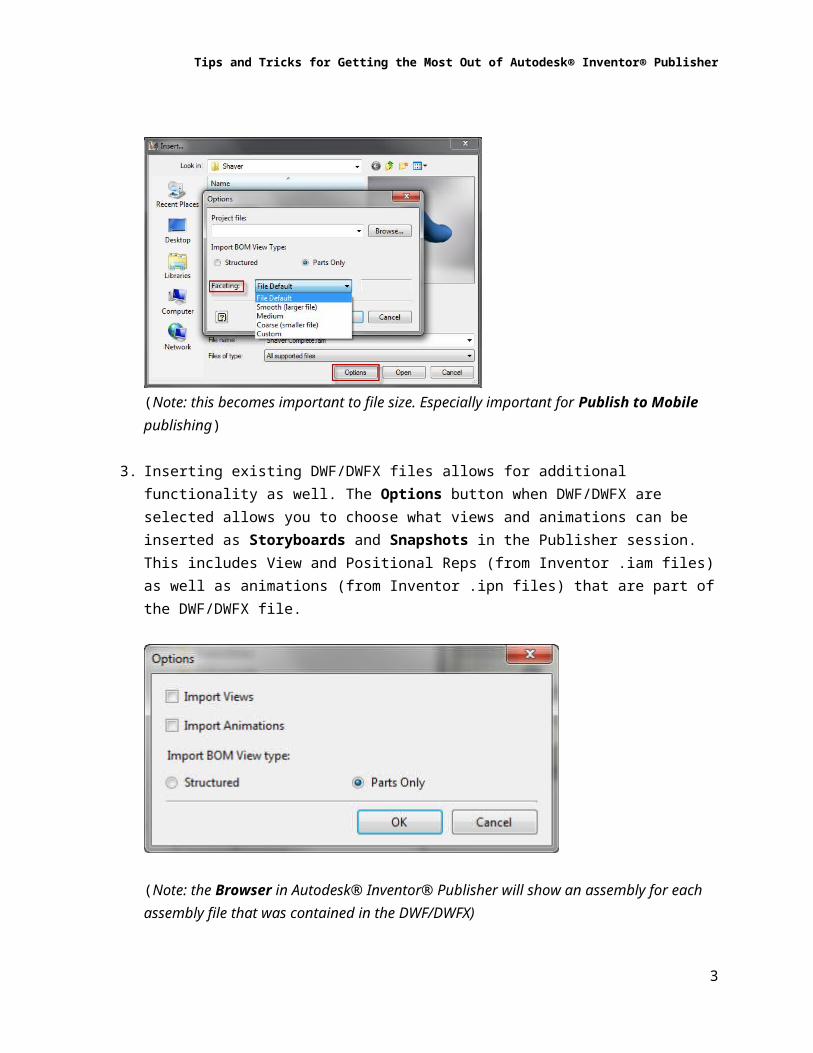
3. Inserting existing DWF/DWFX files allows for additional functionality as well. The Options button when DWF/DWFX are selected allows you to choose what views and animations can be inserted as Storyboards and Snapshots in the Publisher session. This includes View and Positional Reps (from Inventor .iam files) as well as animations (from Inventor .ipn files) that are part of the DWF/DWFX file.
(Note: the Browser in Autodesk® Inventor® Publisher will show an assembly for each assembly file that was contained in the DWF/DWFX)
The Basics, Part 2: Selection Tools1. As can be expected from an Autodesk product, selection in the graphic area is: Right to
Left window selection – inside window area, Left to Right window selection – crossing the window area.
2. Right Mouse Button (RMB) selection of a component will allow for a variety of selection options.
a. Invert Selection selects everything on the canvas except the selected component.
b. Isolate turns off the visibility of all other components.c. Save Selection creates a selection set in the Publisher Browser that can be
activated when needed.d. Find in Browser will expand and highlight components location in the Publisher
Browser
3

Tips and Tricks for Getting the Most Out of Autodesk® Inventor® Publisher
3. RMB on the component or sub-assembly in the Publisher Browser will allow for the same selections as in the graphic area, along with:
a. Visibility glyph for easy on/off toggling of component(s) visibility in the canvasb. Suppress Assembly Features glyph will toggle on/off any assembly features
from an Inventor assembly
The Basics, Part 3: Auto Explode (and its friends) 1. Auto Explode can be accessed from either the Ribbon Toolbar or the Marking Menu.
a. Explode One Level will explode top level components and sub-assemblies.b. Explode All Levels will explode all components as if there were no sub-
assemblies or components.c. Manual Explode allows for manual definition of explode components and
direction.
2. Pre selecting the components you want to be part of the Auto Explode can be selected in the canvas or from the browser.
3. The Exploded Configuration mini toolbar gives users the ability to see how many explode steps were created (and the order in which they were created), set the spacing of the exploded components and save either the final exploded view or create snapshots of each explode step.
4

Tips and Tricks for Getting the Most Out of Autodesk® Inventor® Publisher
(Note: the Auto Explode bases explode steps based on a components position relative to all the components being exploded)
4. Trail Visibility will show trail lines for exploded components. It shows a direct line from where the components are placed during explode to their home position unless Auto Elbow is turned on. Additional Trail Elbows can be created via RMB>Add Trail Elbow
The Basics, Part 3: Storyboards and Snapshots1. It is very useful to have a Storyboard for each of the desired outputs that are being
authored (i.e. a storyboard for printed instructions, a storyboard for mobile instructions, a storyboard for just images, etc).
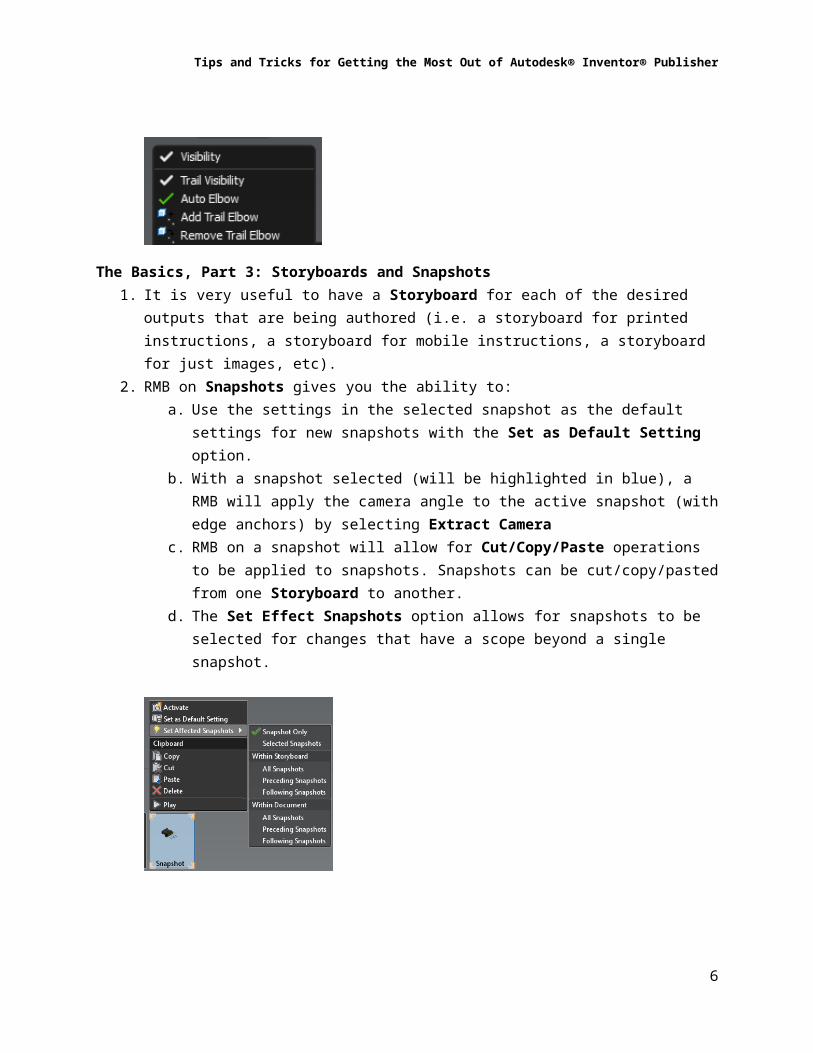
2. RMB on Snapshots gives you the ability to:a. Use the settings in the selected snapshot as the default settings for new
snapshots with the Set as Default Setting option.b. With a snapshot selected (will be highlighted in blue), a RMB will apply the
camera angle to the active snapshot (with edge anchors) by selecting Extract Camera
c. RMB on a snapshot will allow for Cut/Copy/Paste operations to be applied to snapshots. Snapshots can be cut/copy/pasted from one Storyboard to another.
d. The Set Effect Snapshots option allows for snapshots to be selected for changes that have a scope beyond a single snapshot.
5
Tips and Tricks for Getting the Most Out of Autodesk® Inventor® Publisher
6

Tips and Tricks for Getting the Most Out of Autodesk® Inventor® Publisher
The Basics, Part 4: Detail and Section Views1. After a Section View is created, the effected components can be edited via a RMB on
Section Group in the Publisher browser.
2. When creating Detail Views the following options can be set by hovering over the settings glyph:
a. Scale sets the scale of the detail view relative to the model on the canvasb. Sync will regenerate the detail view to reflect the model appearance styles that
are on the canvasc. Lock Focal is a toggle to keep detail view up to date if anchor location is movedd. Associate is a toggle to automatically sync
3. Double-clicking on the Detail View allows for editing of the detail view canvas. Appearance style, component visibility, and annotation placement can be set different from that of the main canvas.
The Basics, Part 5: Navigation1. Autodesk Inventor Publisher take advantage of the standard View Cube, Navigation
Wheel and View Toolbar familiar across Autodesk products2. Selecting the glyph on the View Cube allows for setting user defined Home, Top and
Front views. This is helpful if shadows and reflections are being used.
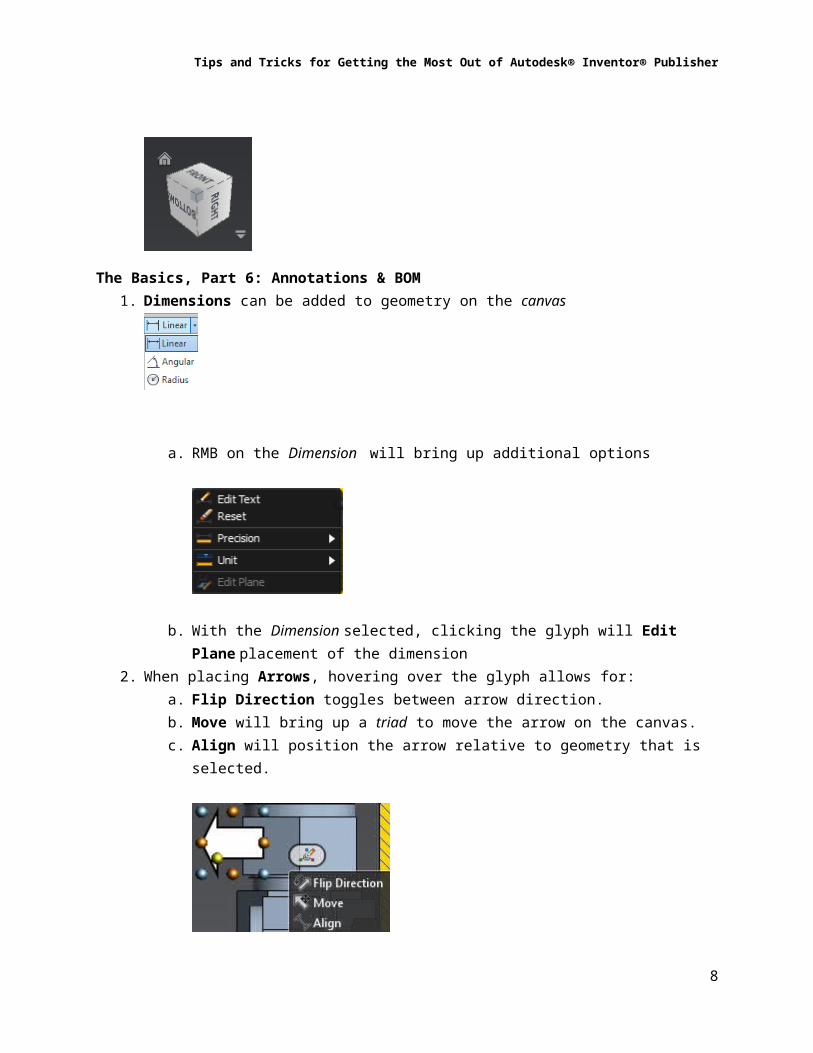
The Basics, Part 6: Annotations & BOM1. Dimensions can be added to geometry on the canvas
7
Tips and Tricks for Getting the Most Out of Autodesk® Inventor® Publisher
a. RMB on the Dimension will bring up additional options
b. With the Dimension selected, clicking the glyph will Edit Plane placement of the dimension
2. When placing Arrows, hovering over the glyph allows for:a. Flip Direction toggles between arrow direction.b. Move will bring up a triad to move the arrow on the canvas.c. Align will position the arrow relative to geometry that is selected.
8

Tips and Tricks for Getting the Most Out of Autodesk® Inventor® Publisher
Make Publisher Your Own: Tips & Tricks for customizing appearance styles, colors, materials, etc. for optimizing your productivity and reuse in Autodesk® Inventor® Publisher
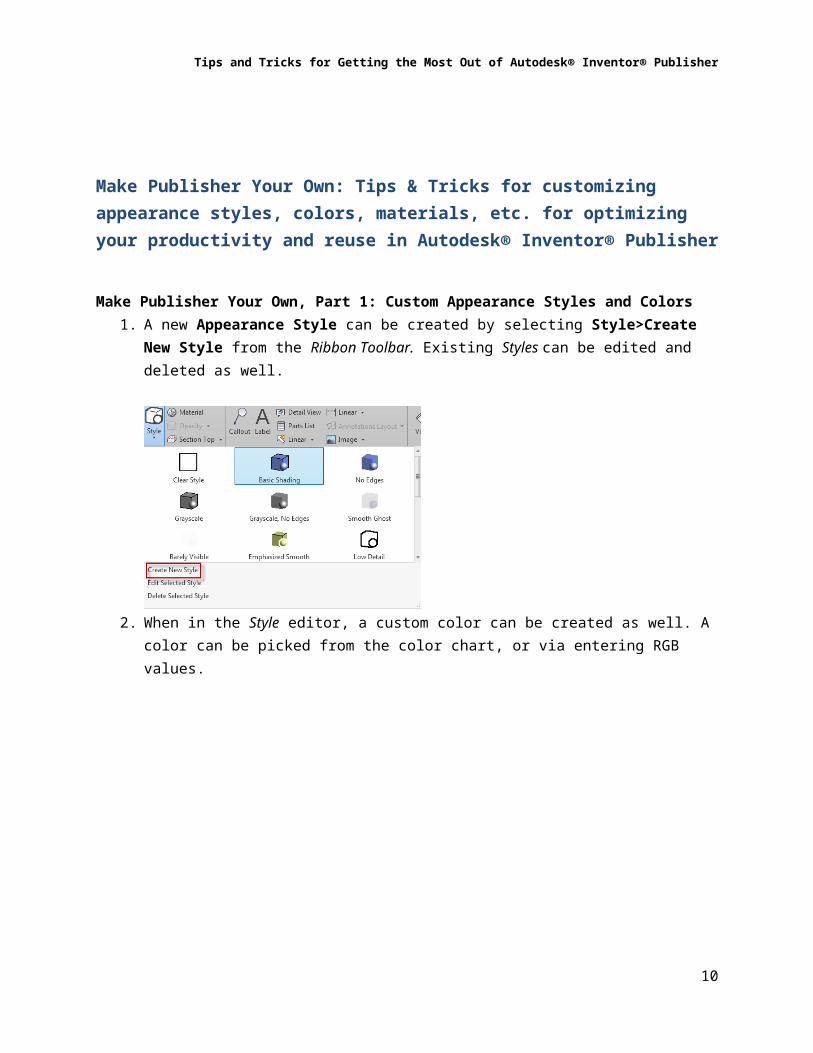
Make Publisher Your Own, Part 1: Custom Appearance Styles and Colors1. A new Appearance Style can be created by selecting Style>Create New Style from the
Ribbon Toolbar. Existing Styles can be edited and deleted as well.
2. When in the Style editor, a custom color can be created as well. A color can be picked from the color chart, or via entering RGB values.
9
Tips and Tricks for Getting the Most Out of Autodesk® Inventor® Publisher
Make Publisher Your Own, Part 2: Templates?1. Alas, there are no ‘templates’ in Autodesk Inventor Publisher…but, you can create
empty Publisher files (.ipb) that can be used as templates2. For a ‘template’ file, simply insert a single part file into a Publisher session and add any
Styles, Colors, Label, Callout, Dimension, BOM, Arrow, Detail View, etc. that is typically used in a Publisher session:
a. Upon adding these items, set your Font, Font Size, Outline, Fill, Leader, etc.
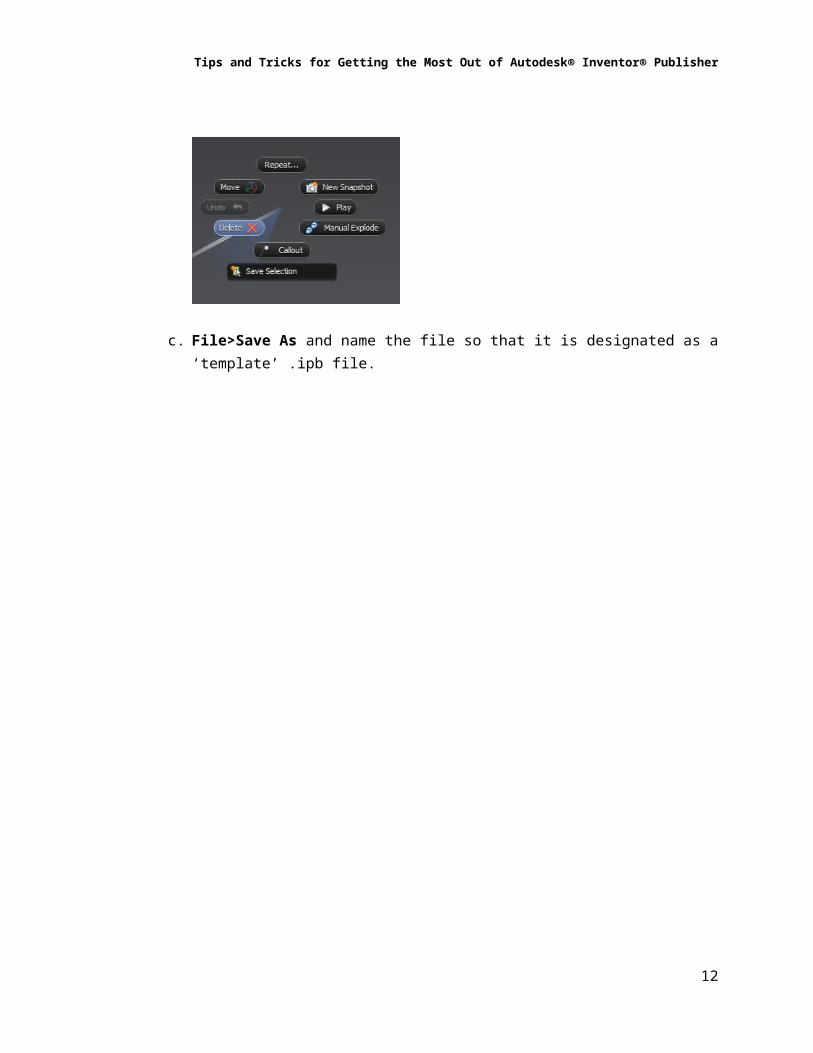
b. RMB on the geometry in the canvas and select Delete
c. File>Save As and name the file so that it is designated as a ‘template’ .ipb file.
10

Tips and Tricks for Getting the Most Out of Autodesk® Inventor® Publisher
Let’s Publish Something: Tips & Tricks publishing high quality documents, videos, images and mobile output in Autodesk® Inventor® Publisher
Let’s Publish Something, Part 1: Publish Area1. The Publish Area defines the area on the canvas that is extracted for Publishing
documents
2. Depending on the size of your display, you can set the Publish Area to your screen resolution or your desired output resolution by hovering over the Settings glyph and selecting Edit
11
Tips and Tricks for Getting the Most Out of Autodesk® Inventor® Publisher
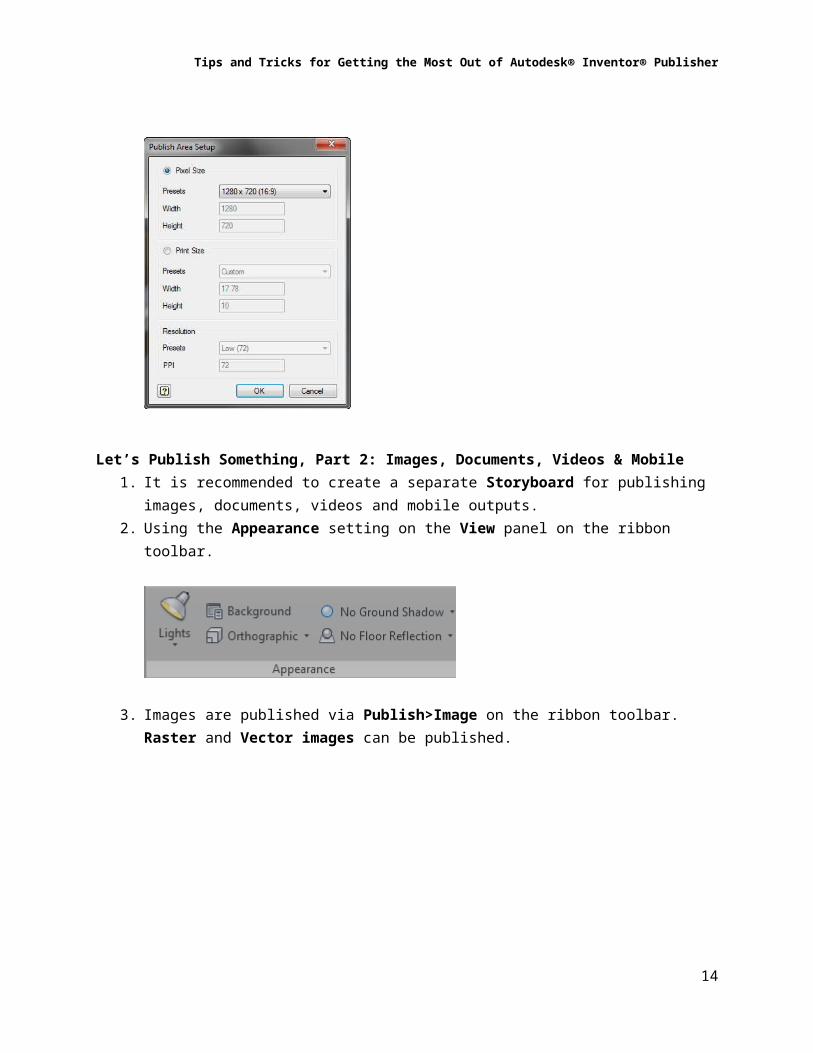
Let’s Publish Something, Part 2: Images, Documents, Videos & Mobile1. It is recommended to create a separate Storyboard for publishing images, documents,
videos and mobile outputs.2. Using the Appearance setting on the View panel on the ribbon toolbar.
3. Images are published via Publish>Image on the ribbon toolbar. Raster and Vector images can be published.
4. The key to publishing quality Documents [Word, PDF and PowerPoint] is setting up templates to meet documentation requirements.
5. Information is extracted from Autodesk Inventor Publisher via Custom Content Tags. In MS Word, for example, the Developer tab on the ribbon can be turned on via File>Options>Customize Ribbon. With the Developer tab active, new custom content tags can be created for a new Publisher Word template.
12

Tips and Tricks for Getting the Most Out of Autodesk® Inventor® Publisher
6. With the 2012 release of Autodesk Inventor Publisher, an add-in for Word can be installed. This allows for associative insertion of Publisher snapshots into a Word document.
7. For optimal Video output, a solid background should be used to avoid ‘banding’. Timing and Transitions can be set on the Storyboard by RMB and toggling them on.
8. To preview what the video output will be, RMB on the canvas and select Play
13
Tips and Tricks for Getting the Most Out of Autodesk® Inventor® Publisher
9. Mobile output is very similar to video output. A separate storyboard is recommended as some annotations are not visible for mobile publishing [Arrows, for example]. It is also recommended to have separate snapshots for component movements and camera movements.
14