learning objective-c by developing iphone games · · 2014-04-22learning objective-c by...
TRANSCRIPT

Learning Objective-C by Developing iPhone Games
Amy M. Booker
Joseph D. Walters
Chapter No. 1
"The Environment – Installing and Working with Xcode"

In this package, you will find: A Biography of the authors of the book
A preview chapter from the book, Chapter NO.1 "The Environment – Installing and
Working with Xcode"
A synopsis of the book’s content
Information on where to buy this book
About the Authors Amy M. Booker is new to writing. Along the way, she has become a happy gamer and
has been raising her family to enjoy and appreciate the art of games, whether card, board,
or video. As an advocate of special needs, specifically Autism, she hopes to write a book
or design a game to support those with special needs.
Amy lives in San Ramon, California, with her husband and their two boys.
Thanks to my whole-hearted, supportive husband, Randy, who
encouraged me to embark on the adventure of writing.
I appreciate and thank my two boys for their meagre allowance of
computer time so that I may write.
Thank you mom and dad for always believing in me and expecting me
to take the risks needed for me to grow.
Thank you Paige and Joseph for being so astonishingly trustful. You
led me on this path, and I thank you for it.
For More Information: www.packtpub.com/learning-objective-c-by-developing-iphone-games/book

Joseph D. Walters has been immersed in the creativity, technology, and business of
software and game development for over 20 years. He currently is a partner at Third
Track Inc., a game development and game technology company. Before Third Track Inc.,
he was the CEO at MindFuse Games, where he helped raise capital from angel investors
and led the development of a massive multiplayer-gaming world. Joseph was also a full
partner and technical director at Skunk Studios, one of the leading full-service developers
dedicated to bringing casual games to the mass market. Prior to founding Skunk Studios,
he was a senior engineer at Shockwave. com, where he developed some of the most
popular titles on Shockwave's website. Before starting at Shockwave.com, Joseph owned
a top consulting firm that advised some of the largest technology firms in the world,
including IBM, Compaq, AT&T, Bell Labs, and countless others.
I would like to thank my family for all of their support throughout the
development of this book. Without them, I would not have been able
to accomplish this.
I would like to specially thank Mark Lemmons for his help on the
game art, and Skunk Studios for allowing me to use their audio.
For More Information: www.packtpub.com/learning-objective-c-by-developing-iphone-games/book

Learning Objective-C by Developing iPhone Games The introduction of the Apple App Store has empowered thousands, even millions of
people to embrace software development. Using Objective-C and the Xcode IDE, you
can produce awesome games and launch them on the App Store, allowing you to make
and sell games quickly and easily.
Welcome to Learning Objective-C by Developing iPhone Games. This book will offer
you a step-by-step process to develop iPhone games using the Objective-C programming
language. You will be intrigued by the use of old games, such as Galaga and Space
Invaders, as teaching tools to receive a hands-on understanding of game development.
We will teach you everything you need to know in order to use Apple's Xcode integrated
development environment. When you are finished, you will be able to program your own
games from the ground up using graphics, animations, sounds, and interactivity.
What This Book Covers Chapter 1, The Environment – Installing and Working with Xcode, covers how to
download, set up, and install Xcode. You will also learn what Xcode is and how we will
be using it. This will introduce you to the development environment and the space they
will be working on.
Chapter 2, Programming and Objective-C, is a soft introduction to programming
languages in general, or a programming language primer if you prefer. When we are done
with this chapter, you will have a general understanding of how most programming
languages are structured and how this works in games. We will take you through the
basics of object-oriented programming and a description of how Objective-C uses
classes. We will wrap up the chapter with an explanation of how the model-view-
controller design pattern applies to iOS programming.
Chapter 3, iPhone Game Development Basics – The Matching Game, explains the
CoreGraphics, Foundation, and UIKit frameworks. We will build a simple user interface
using Xcode's interface builder in a single view application. Then, we will use this to
create a simple memory game using some basic game logic, UIButtons, and other
standard library components.
Chapter 4, Drawing Pictures – Space Invaders, teaches you to program a Space Invaders
game using images, views, and the view controller. You will learn how to display a
background image for your game and program your alien to drop bombs. You will use
these to try and destroy your player using CoreAnimation. You will also create timers in
your game using NSTimer methods.
For More Information: www.packtpub.com/learning-objective-c-by-developing-iphone-games/book

Chapter 5, The Game Engine – Space Invaders Part 2, will expand the Space Invaders
game by examining NSObjects and basic object-oriented programming structures to
create enemies. You will learn the basics of artificial intelligence, collision detection, and
storing information about your invader in objects, properties, and arrays. You will also
learn the basics of how to debug your code.
Chapter 6, The Audio Engine – The Simon Memory Game, will create a simple audio-
based memory game. In this chapter, you will learn about all of the different audio
formats and data formats that can be used for iOS audio. We will explain the AVAudio
Foundation frameworks in order for you to add sounds and music to your app. You will
learn how to use different types of audio, which can be played back inside your game for
both background music and as audio effects.
Chapter 7, User Interactivity – Mini Golf, teaches different ways of programming touch
controllers for your app using touch events. We will show you how to program your
graphics to move using buttons, gestures, and multitouch interactivity.
Chapter 8, The Galaxy Game, talks about resource management and some basics on
planning for what is being used, what is planned to be used, and how these resources are
stored. We will use this and everything you have learned previously in order to create
your final game similar to Galaga.
Chapter 9, Releasing Your Game, speaks about what needs to be done once you have
completed your game; it's not yet finished. You will still need to get your app into the
App Store. Preparing your game for the App Store can be a very confusing process;
however, we will try and make it a bit easier for you. In this chapter, we are going to
introduce you to iTunes Connect, provisioning profiles, and development profiles. We
will show you how to set up your code and prepare it for release in the Apple Store and
how to avoid some issues that all developers run into at one point or another.
Chapter 10, Conclusion, gives an overview of what we covered in the book and covers
in brief other technologies that Apple has to offer.
For More Information: www.packtpub.com/learning-objective-c-by-developing-iphone-games/book
The Environment – Installing and Working with Xcode
In this chapter, you will learn how to download, set up, and install the Xcode development tools and Software Development Kit (SDK). You will also learn what the Xcode IDE is and how you will be using it. This will introduce you to the development environment and the space you will be working on most of the time while you are developing.
In this chapter, we will cover the following topics:
• Becoming an Apple developer• Becoming an iOS developer• Downloading and installing Xcode• The Xcode IDE• Opening Xcode for the fi rst time• The Xcode workspace
Becoming an Apple developer Before you can begin building apps and games for the iPhone, you will need to become a certifi ed Apple developer, which gives you free access to Apple's developer website, programming tools, tutorials, documentation, and much more. As a certifi ed Apple developer, you are able to create apps and games for Mac, Safari, and iOS.
For More Information: www.packtpub.com/learning-objective-c-by-developing-iphone-games/book

The Environment – Installing and Working with Xcode
[ 8 ]
Apple requires you to register as an Apple developer fi rst. The registration is free and provides you with access to all of the tools and the iOS SDK required to develop apps for iPhone and iPad. Registering also gives you access to exclusive Apple content such as development videos, guidelines, tutorials, Q&As, and sample code. You will also have access to Apple's developer forums should you run into any questions that can be answered by the developer community. You can register at https://developer.apple.com/register/.
The free tier of Apple registration gives you access to the basic levels of development for Apple products. This limited access allows you to test your game on your computer (simulator) to make your game work, but without the ability to sell your game at the Apple Store.
Registering as an Apple developerIf you are not already an Apple developer, you just have one option available and that is to create an ID. The registration page looks as follows:
For More Information: www.packtpub.com/learning-objective-c-by-developing-iphone-games/book
Chapter 1
[ 9 ]
The following are the steps available for you depending on whether you are registered as an Apple developer:
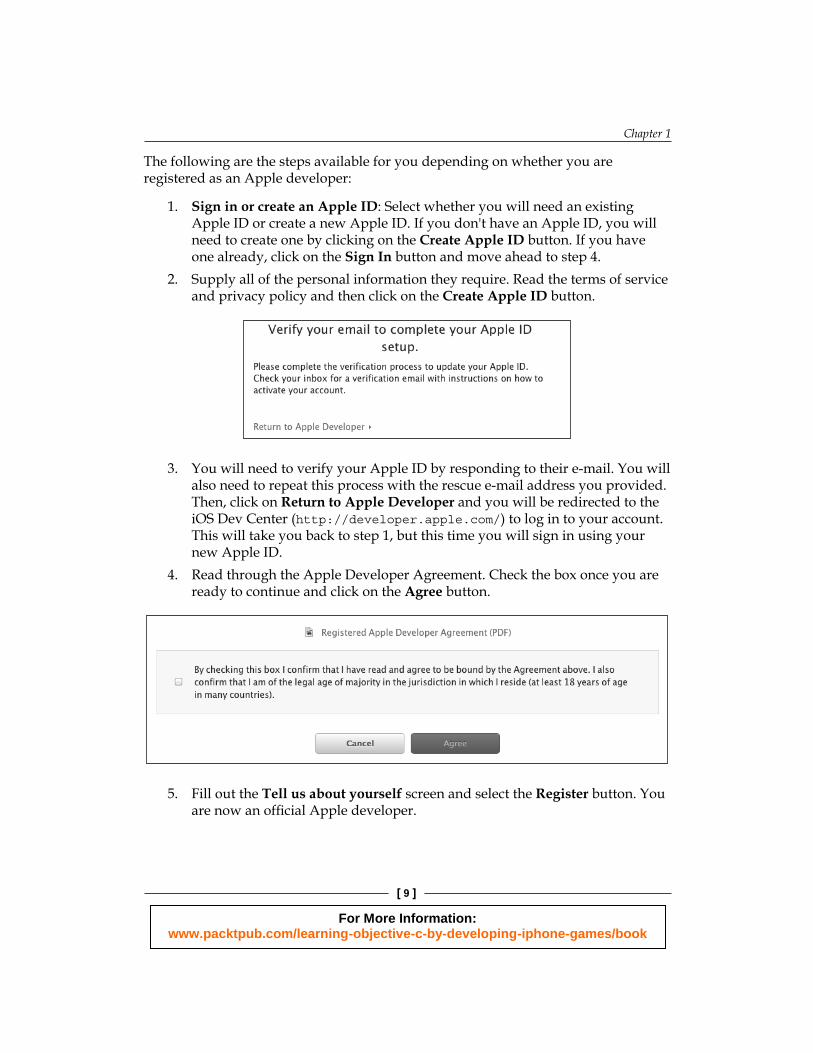
1. Sign in or create an Apple ID: Select whether you will need an existing Apple ID or create a new Apple ID. If you don't have an Apple ID, you will need to create one by clicking on the Create Apple ID button. If you have one already, click on the Sign In button and move ahead to step 4.
2. Supply all of the personal information they require. Read the terms of service and privacy policy and then click on the Create Apple ID button.
3. You will need to verify your Apple ID by responding to their e-mail. You will also need to repeat this process with the rescue e-mail address you provided. Then, click on Return to Apple Developer and you will be redirected to the iOS Dev Center (http://developer.apple.com/) to log in to your account. This will take you back to step 1, but this time you will sign in using your new Apple ID.
4. Read through the Apple Developer Agreement. Check the box once you are ready to continue and click on the Agree button.
5. Fill out the Tell us about yourself screen and select the Register button. You are now an offi cial Apple developer.
For More Information: www.packtpub.com/learning-objective-c-by-developing-iphone-games/book

The Environment – Installing and Working with Xcode
[ 10 ]
Becoming an iOS developerGoing a step further and becoming a certifi ed iOS developer is a requirement to release your app or game for iOS devices. In other words, to perform testing on iPhones and iPads, gain access to beta software, or to release products in the Macintosh Apple Store or the iOS Apple Store, you will need to join one of the paid developer programs. You can join either the iOS Developer Program or the Macintosh Developer Program depending on which store you prefer to release from, or join both. It costs 99 USD per year per program, and it offers several resources that are helpful for programming and releasing your apps to the public. It is recommended to sign up for the iOS Developer Program as it will make testing much more realistic, especially when testing anything that has to do with touch.
Registering as an iOS developerRegister for the iOS Developer Program at the link that is shown in the following screenshot using the following steps:
For More Information: www.packtpub.com/learning-objective-c-by-developing-iphone-games/book

Chapter 1
[ 11 ]
1. Once you are at the website, select the Enroll Now button. The next screen describes everything you need to develop and distribute apps for iOS and OS X. Review the steps and click on the Continue button.
2. You will need to log in with your newly created Apple ID and hit the Continue button.
3. You will be redirected to the Sign in or create an Apple ID page. Youshould already be logged in with your Apple ID, so you can just hit the Continue button.
4. Choose whether you are registering as a company or as an individual. If you register as a company, you will be able to add additional team members who can access the program's resources and a company name will appear in the seller information in the App Store. If you register as an individual, your name will appear as the seller in the App Store and you will be the sole developer in your team.
For More Information: www.packtpub.com/learning-objective-c-by-developing-iphone-games/book
The Environment – Installing and Working with Xcode
[ 12 ]
5. On the Enter your billing information for identity verifi cation page, you will need to enter your credit card information and then hit Continue.
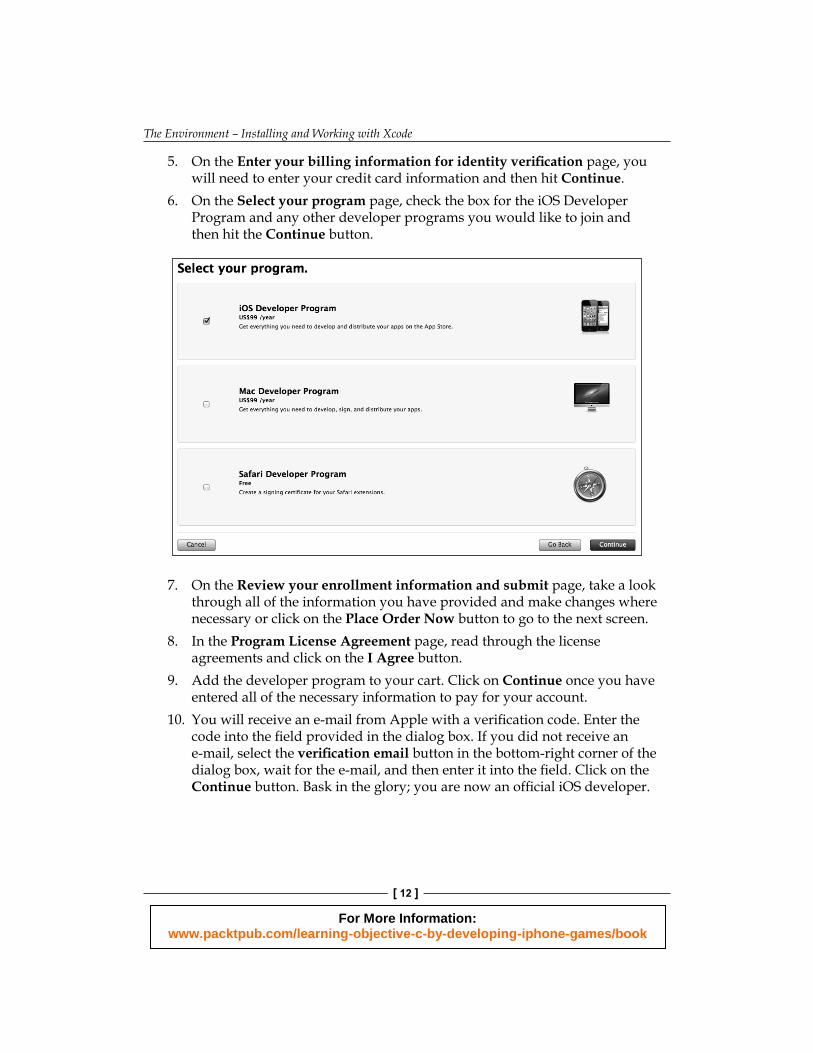
6. On the Select your program page, check the box for the iOS Developer Program and any other developer programs you would like to join and then hit the Continue button.
7. On the Review your enrollment information and submit page, take a look through all of the information you have provided and make changes where necessary or click on the Place Order Now button to go to the next screen.
8. In the Program License Agreement page, read through the license agreements and click on the I Agree button.
9. Add the developer program to your cart. Click on Continue once you have entered all of the necessary information to pay for your account.
10. You will receive an e-mail from Apple with a verifi cation code. Enter the code into the fi eld provided in the dialog box. If you did not receive an e-mail, select the verifi cation email button in the bottom-right corner of the dialog box, wait for the e-mail, and then enter it into the fi eld. Click on the Continue button. Bask in the glory; you are now an offi cial iOS developer.
For More Information: www.packtpub.com/learning-objective-c-by-developing-iphone-games/book

Chapter 1
[ 13 ]
11. Click on the Continue button when you are ready.
And that's all there is to it; you are now an offi cial iOS developer. You can download the beta software, test on the actual hardware, and distribute your apps to your heart's content.
Downloading and installing XcodeOnce you are registered, you will need to download and install the Xcode developer tools by performing the following steps:
1. You can download and install Xcode from the Macintosh App Store at http://itunes.apple.com/us/app/xcode/id497799835?ls=1&mt=12.
2. Select the Free or Install button on the App Store page. Once it has completed the install process, just launch Xcode from your Applications folder.
3. You can fi nd additional development tools from the Apple developer website at https://developer.apple.com/.
Removing XcodeFor Xcode 4.3 and later versions, if you need to remove Xcode, just drop it in the trash like most Mac applications. If you run into issues installing a new version of Xcode or just want to remove an older version and you need to completely remove Xcode from your system, you will need to run a special command-line instruction:sudo <Xcode>/Library/uninstall-devtools --mode=all
This will ensure all of the associated fi les are removed from your library directory. <Xcode> is the directory where tools are installed. For typical installations, the full path is /Xcode4/Library/uninstall-devtools.
Before doing this, it is best to make sure this is really what you want to do, because once it is done, it is removed completely and thoroughly. You will always have the option of reinstalling Xcode, but you will need to go through the entire install process from the beginning and any additional resources you installed will also need to be reinstalled.
For More Information: www.packtpub.com/learning-objective-c-by-developing-iphone-games/book

The Environment – Installing and Working with Xcode
[ 14 ]
The Xcode IDEXcode is Apple's Integrated Development Environment (IDE) for developing for both iOS and Mac OS X. In other words, most of what you will need in order to develop software for the Mac or iOS devices is integrated into one nice, clean application. When you install Xcode on your Mac, you get everything needed to develop for both the Mac and iOS devices. The IDE takes everything from your program and puts it all together into a single executable application; this is referred to as compiling. If you are compiling on your Mac or the iOS simulator, you can run your application once everything is compiled. However, it gets a bit more complicated when compiling for iOS devices, but we will run through that later.
Opening Xcode for the fi rst timeLet's begin by opening the Xcode IDE and explore how to create an app for the fi rst time:
1. Open Xcode.app either through your fi nder in the applications directory or through Apple's Launchpad. If you have never created or opened an Xcode project before, you should be presented with a screen that looks similar to the following:
For More Information: www.packtpub.com/learning-objective-c-by-developing-iphone-games/book

Chapter 1
[ 15 ]
2. In the Welcome to Xcode dialog, select the Create a new Xcode project button. If you have created a project with Xcode previously, this dialog panel may not show up. If this is the case, you can navigate to File | New | Project.... This will open a new project window with the Choose a template for your new project dialog, as shown in the following screenshot:
3. In the left-hand side column, you will see a choice of operating systems and a list of types of templates. Apple provides several precreated templates for both OS X and iOS apps. We will discuss some of the different template types later in the book. For now, select Application under the iOS operating system. Select Single View Application from the precreated templates area and then click on the Next button.
For More Information: www.packtpub.com/learning-objective-c-by-developing-iphone-games/book
The Environment – Installing and Working with Xcode
[ 16 ]
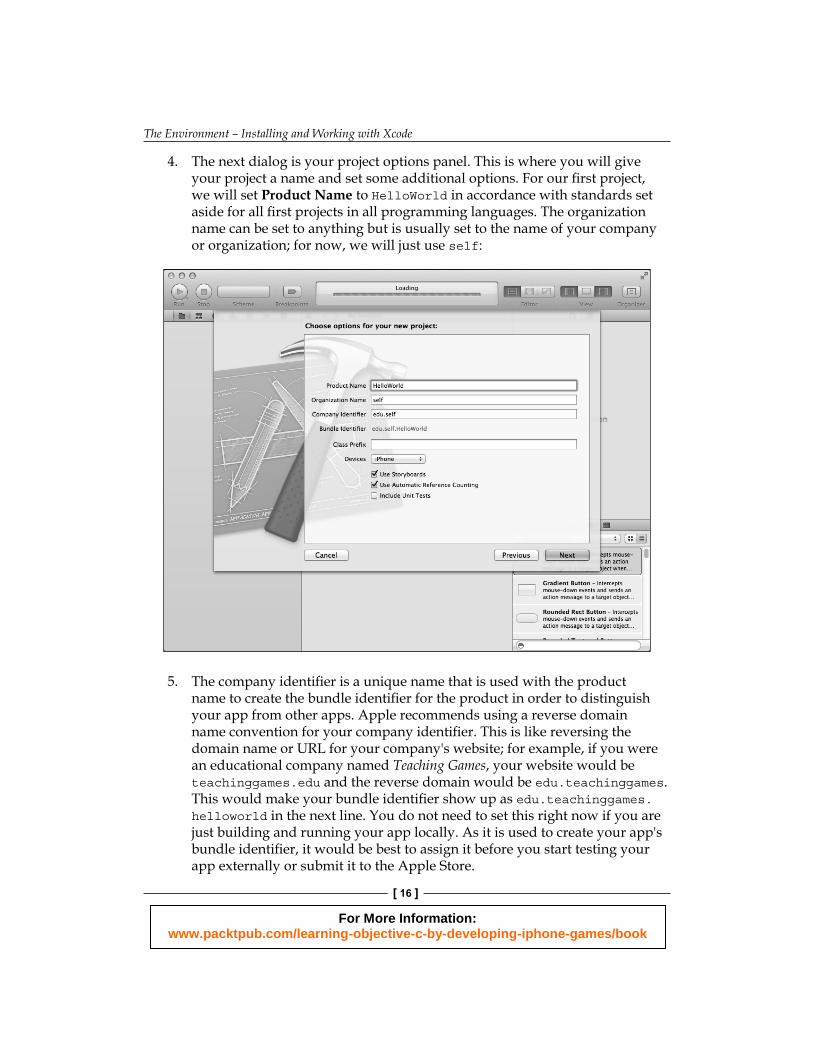
4. The next dialog is your project options panel. This is where you will give your project a name and set some additional options. For our fi rst project, we will set Product Name to HelloWorld in accordance with standards set aside for all fi rst projects in all programming languages. The organization name can be set to anything but is usually set to the name of your company or organization; for now, we will just use self:
5. The company identifi er is a unique name that is used with the product name to create the bundle identifi er for the product in order to distinguish your app from other apps. Apple recommends using a reverse domain name convention for your company identifi er. This is like reversing the domain name or URL for your company's website; for example, if you were an educational company named Teaching Games, your website would be teachinggames.edu and the reverse domain would be edu.teachinggames. This would make your bundle identifi er show up as edu.teachinggames.helloworld in the next line. You do not need to set this right now if you are just building and running your app locally. As it is used to create your app's bundle identifi er, it would be best to assign it before you start testing your app externally or submit it to the Apple Store.
For More Information: www.packtpub.com/learning-objective-c-by-developing-iphone-games/book

Chapter 1
[ 17 ]
6. The class prefi x is a string of letters that will show up in front of the names of any custom classes you create for your project. This should be a short prefi x. Some people will use their company's name, an acronym for their project, or their initials. Although this is not necessary, it does prevent collisions with other classes that may end up having the same names.
7. Once you have all of your information entered, click on the Next button.8. Choose a place to save your project and click on the Create button.
9. You have now created your fi rst iOS application. Once it is created, you are brought to the workspace window of Xcode. If you click on the Run button in the upper-left corner of the window, it will open the iOS simulator and run your app. As we have not added any code to tell the app what to do, it will only bring up a blank white screen.
You may have noticed the Create local git repository for this project checkbox below the fi le list. We will not be covering Git or any version control system in this book, but if you know what Git is and you are comfortable creating a repository, feel free to check this box. Otherwise, just leave it unchecked since it creates a lot of hidden fi les on your hard drive. If you are interested in learning about Git, feel free to check out their site: http://git-scm.com.
For More Information: www.packtpub.com/learning-objective-c-by-developing-iphone-games/book

The Environment – Installing and Working with Xcode
[ 18 ]
The Xcode workspaceOnce you have created your project, you are presented with the Xcode workspace. Most of what you will need to program for the iOS environment is contained within a single development environment: the workspace. The workspace is broken up into several sections, as shown in the following screenshot:
The toolbarThe toolbar rests at the top of your workspace area and stores your frequently used workspace management tools for quick access and reference. Not to state the obvious, but the toolbar is a bar where all of your tools like to live. The following screenshot portrays the toolbar:
Going from left to right, the toolbar contains the following tools.
For More Information: www.packtpub.com/learning-objective-c-by-developing-iphone-games/book

Chapter 1
[ 19 ]
The Run buttonThe Run button can actually change based on the task you are running, but the primary function is to build and run your code. If your code builds correctly, it will run your app and start a debug session.
The Stop buttonIf you have a running session, the Stop button will activate and allow you to stop the active app and the current session.
The Scheme pop-up menuA scheme is a collection of targets that your app is set up to build. This pop-up menu allows you to choose which collection you wish to build.
The Activity viewerThe Activity viewer gives you information on everything going on in your app. If something is wrong with your code, this will be the fi rst place you see a notifi cation. If you do get a warning or alert, you can get detailed information from the issues navigator (see the Navigation area in the screenshot of the workspace).
The Editor buttonsThe Editor buttons allow you to choose from three different types of editors. The fi rst button is the standard editor, which is what will be used in most cases and changes based on what you are editing. The second button is the assistant editor, which brings up an additional text editor window. The third button is the version editor, which is used when your app is tied to a source control system.
The View buttonsThe View buttons turn on/off the different panes in the workspace window. The Editor area will always be available, but you can turn on/off (in this order) the Navigator, Debugger, and the Utility areas by clicking on the buttons corresponding to their position.
For More Information: www.packtpub.com/learning-objective-c-by-developing-iphone-games/book
The Environment – Installing and Working with Xcode
[ 20 ]
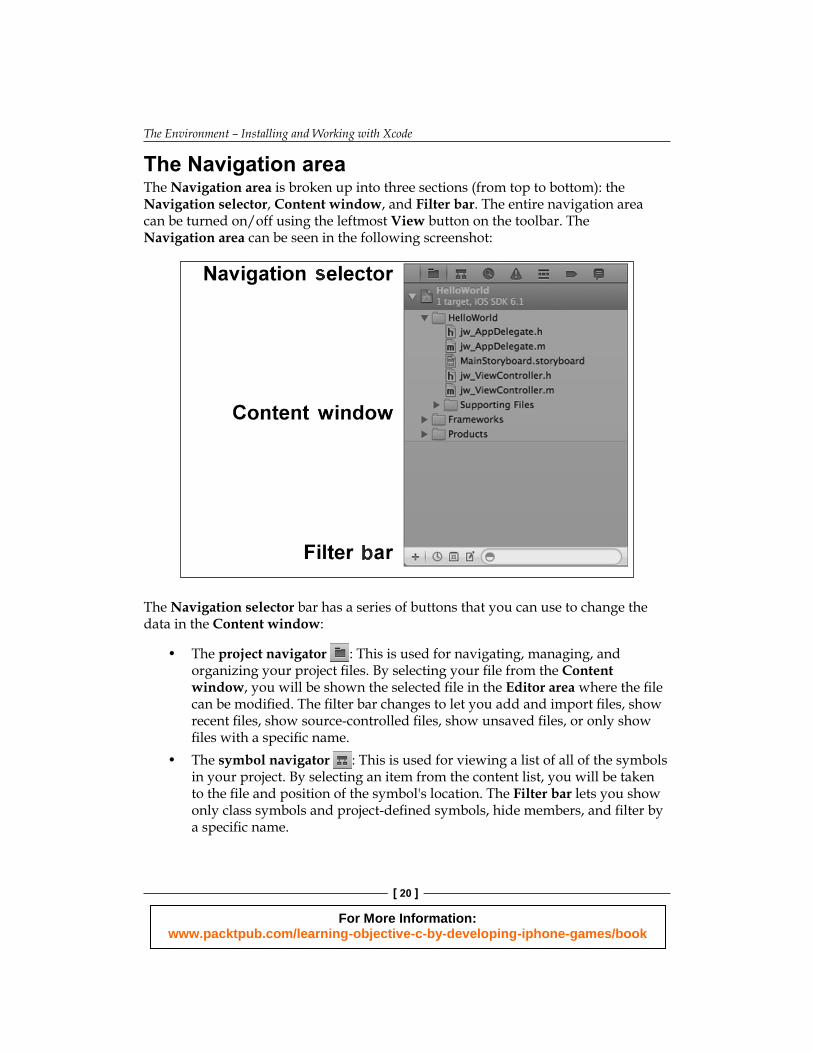
The Navigation areaThe Navigation area is broken up into three sections (from top to bottom): the Navigation selector, Content window, and Filter bar. The entire navigation area can be turned on/off using the leftmost View button on the toolbar. The Navigation area can be seen in the following screenshot:
The Navigation selector bar has a series of buttons that you can use to change the data in the Content window:
• The project navigator : This is used for navigating, managing, and organizing your project fi les. By selecting your fi le from the Content window, you will be shown the selected fi le in the Editor area where the fi le can be modifi ed. The fi lter bar changes to let you add and import fi les, show recent fi les, show source-controlled fi les, show unsaved fi les, or only show fi les with a specifi c name.
• The symbol navigator : This is used for viewing a list of all of the symbols in your project. By selecting an item from the content list, you will be taken to the fi le and position of the symbol's location. The Filter bar lets you show only class symbols and project-defi ned symbols, hide members, and fi lter by a specifi c name.
For More Information: www.packtpub.com/learning-objective-c-by-developing-iphone-games/book

Chapter 1
[ 21 ]
• The search navigator : This is used for searching and optionally replacing the content of your data, returning any matches to the Content window. You can search your project by typing what you would like to fi nd in the search fi eld at the top of the content area. If you select anything in the Content window, the Editor area will take you to the line of content matching your search. The fi lter bar changes so you can fi lter your results to show only specifi c fi lenames.
• The issue navigator : This shows a list of active errors and warnings in the Content window. If you select an item from the list of errors, the editor will identify the item with the issue and if appropriate will take you to the line of code with the problem. Your Filter bar changes to show only items from the current build, to show only errors, or to display specifi c content.
• The debug navigator : When in debug mode, this will show a list of the running threads and the related stack information. When an item is selected in the Content window, information about the item is displayed in the Editor and Debugger areas. The Filter bar changes to show a Thread Filter button, which only shows relevant threads and a Call Stack Slider, which shows a list of stack frames. You can adjust the slider to show the most relevant to all of the stacks.
• The breakpoint navigator : This displays a list of active breakpoints in the Content window. The Filter bar lets you add or delete specifi c breakpoints, show only active breakpoints, or fi lter by specifi c matching content.
• The log navigator : This shows an active history of your tasks and session events that have happened during your development process. When an item is selected in the Content window, the matching log displays in the Editor area. You can fi lter content by most recent or by specifi c names using the Filter bar.
The Content window is the area where your data is displayed based on which navigation button you have selected. Typically, if you select an item in this area, the fi le's data will be displayed for modifi cation in the Editor area of the workspace window. For specifi cs on what is displayed in the Content window, see the corresponding navigation button listed previously.
For More Information: www.packtpub.com/learning-objective-c-by-developing-iphone-games/book

The Environment – Installing and Working with Xcode
[ 22 ]
The Filter bar reduces the amount of information returned to the Content window. The options available to the Filter bar change based on the navigation button that is selected. For details on which options become available, see the corresponding navigation button information listed previously.
The Editor areaThe Editor area is where most of your development will take place. The type of editor window can be changed in the toolbar using the Editor buttons (see the screenshot of the toolbar). For now, we are going to go through the standard editor window:
No matter which type of editor you are using, you will have access to a jump bar. There are three items available in the Jump Bar; they are as follows:
• The Related items button lists additional selections relevant to your currently opened fi le.
• The Next and Previous history buttons are used to jump back and forth through the fi les you have opened. If you press and hold either of the history buttons, a drop-down list will appear with a list of your entire history.
For More Information: www.packtpub.com/learning-objective-c-by-developing-iphone-games/book

Chapter 1
[ 23 ]
• The hierarchy list is used to navigate to the currently opened fi le:
The type of editor that will be displayed will depend on what you have selected in the Content window:
• The source editor: This enables the user to write and edit source code, set and facilitate or stop breakpoints, as well as enable the user to implement the control program.
• The project editor: This enables the user to view and edit project and target settings such as build options.
• The property list editor: This enables the user to view and edit a multitude of types of property lists or plists, which store a series of objects.
• The rich text editor: This enables the user to open, create, and edit rich text (.rtf) fi les similar to TextEdit.
• The Core Data model editor: This enables the user to execute and/or adjust a Core Data copy.
• The mapping model editor: This enables the user to graphically create and edit a mapping between an old Core Data model and a new Core Data model.
• The interface builder: This enables the user to graphically generate and/or edit user interface fi les.
• The script editor: This enables the user to create and/or edit AppleScript script fi les.
• The scripting dictionary editor: This enables the user to create and edit the scripting defi nition (.sdef) fi le for your application.
The Debugger areaThe Debugger area of the workspace window is turned off by default, but it can be turned on or off using the middle View button on the toolbar. The Debugger area is used for examining detailed information about your application while it is running. The buttons at the top-left corner of this area are for stepping line-by-line through your code and for viewing what is happening in your code as it runs. The three buttons on the right-hand side of the top bar control what is displayed in the Content window of the Debugger area. The left button is to show your variables, the right is for the console only, and the middle button shows both. We will discuss how this works in greater detail in the debugging section of the book.
For More Information: www.packtpub.com/learning-objective-c-by-developing-iphone-games/book

The Environment – Installing and Working with Xcode
[ 24 ]
The Debugger area can be seen in the following screenshot:
The Utility areaThe Utility area of the workspace window, sometimes referred to as the Inspector area, can be turned on or off using the rightmost View button on the toolbar. The Utility area displays specifi c details for what is shown in the Editor area. Depending on what is in the Editor area, the Utility area could be limited to information about the fi le itself, such as size and date created, or it could end up offering multiple types of utilities for the data. The Utility area can be seen in the following screenshot:
For More Information: www.packtpub.com/learning-objective-c-by-developing-iphone-games/book

Chapter 1
[ 25 ]
The Inspector selector bar lets you change the content in the Inspector pane. There are several options that will appear in the bar depending on what kind of content is in the Editor area. The fi le inspector and quick help will always be available, but the rest will appear or hide depending on what is needed.
The following are items you will fi nd on the Inspector selector bar:
• The fi le inspector : This shows all of the metadata that is available for the selected fi le. This may be the name and fi le information or it could include subcategorized information associated with the fi le. We will describe these items as necessary throughout the book, but for now, just know that the information can change.
• Quick help : This will display the declaration, description, platform, and operating system (OS) availability, as well as where it is declared, reference information, guides, or sample locations.
The following is a list of inspectors that may be available in some editors:
• The identity inspector : This enables the user to view and manage metadata for an object, such as its class name.
• The attributes inspector : This enables the user to confi gure attributes of the selected object. The attributes available are directly related to the selected object.
• The size inspector : This enables the user to assign characteristics, such as autosizing, for an object.
• The connections inspector : This enables the user to view the outlets and actions for an object, make new connections, and sever existing connections.
• The bindings inspector : This enables the user to generate, view, and/or confi gure bindings for view objects.
• The effects inspector : This enables the user to identify settings for animation and other visual characteristics of a chosen object.
For More Information: www.packtpub.com/learning-objective-c-by-developing-iphone-games/book

The Environment – Installing and Working with Xcode
[ 26 ]
Use the library pane to access libraries of resources that are ready to use in your project:
• File templates : These are templates for general types of fi les and code constructs. To use a template, drag it from the library to the project navigator.
• Code snippets : These are frequently used, short pieces of source code for use in your software. To use one, drag the snippet into your source fi le.
• Objects : These are interface objects. To use them, drag them directly into your nib fi le in the interface builder editor window.
• Media fi les : These comprise of graphics, icons, and sound fi les. To use them, drag them directly to your nib fi le in the Interface Builder editor window.
The iOS Simulator The iOS Simulator is a standalone app that imitates everything about iOS devices. It saves you a tremendous amount of time by allowing you to run and test your code in a software-based environment before releasing it on the hardware. The iOS Simulator can simulate iPhone and iPad using different versions of the operating system.
You can access the iOS Simulator by going to Xcode | Open Developer Tool | iOS Simulator. A second way to access the simulator is by running an iOS product and selecting one of the simulator schemes; in that way, the iOS Simulator will automatically launch.
The Hardware menu lets you access the simulated hardware and modify it to better suit your needs:
• Rotate left / Rotate right: These rotate the simulator window to the left or right.
• Shake Gesture: This simulates a shake on your device. • Home: This simulates the Home button on your iOS device.• Lock: This will lock the simulator and take you to the slide to unlock the
screen that you would normally see on your iOS device. • Simulate Memory Warning: This will send the active app a low
memory warning.
For More Information: www.packtpub.com/learning-objective-c-by-developing-iphone-games/book

Chapter 1
[ 27 ]
• Toggle In-Call Status Bar: This brings up the fl ashing green Active Call bar and replaces the standard status bar. This is very useful to see how your app's user interface will react while a phone call is running.
• Simulate Hardware Keyboard: This turns on/off the iOS keyboard.• TV Out: This simulates a TV out signal from the simulator.
To simulate a touch or gesture, you can use the following mouse clicks and motions:
• Tap: This is achieved by a mouse click• Touch and hold: Hold the mouse button• Double tap: This is acheived by double-clicking a mouse button• Swipe: Click, drag, and release your mouse• Flick: Click, drag, and release your mouse• Drag: Click, hold your mouse button down, and release at your fi nal position• Pinch: Continuously hold the option key down on your keyboard, move
the fi nger position in circles by moving your mouse, hold the shift key on your keyboard to move the center point of the pinch, and click-and-drag to simulate the pinch
For More Information: www.packtpub.com/learning-objective-c-by-developing-iphone-games/book

The Environment – Installing and Working with Xcode
[ 28 ]
SummaryIn this chapter, we covered how to navigate Apple's website to become an Apple developer, download and install Xcode, and the basics of working your way around the Xcode IDE. Everything you learned in this chapter will be referenced throughout the book and you will most likely fi nd yourself back here trying to fi nd out where something in Xcode is located.
In our next chapter, we will introduce you to programming in Xcode and learning the Objective-C language. We will be covering the basics on how to program as well as details on object-oriented programming.
For More Information: www.packtpub.com/learning-objective-c-by-developing-iphone-games/book

Where to buy this book You can buy Learning Objective-C by Developing iPhone Games from the Packt
Publishing website:
.
Free shipping to the US, UK, Europe and selected Asian countries. For more information, please
read our shipping policy.
Alternatively, you can buy the book from Amazon, BN.com, Computer Manuals and
most internet book retailers.
www.PacktPub.com
For More Information: www.packtpub.com/learning-objective-c-by-developing-iphone-games/book