learning module 1 static structural · pdf filelm-st-1 1 learning module 1 static structural...
TRANSCRIPT

LM-ST-1
1
Learning Module 1 Static Structural Analysis
Title Page Guide What is a Learning Module? A Learning Module (LM) is a structured, concise, and self-sufficient learning resource. An LM provides the learner with the required content in a precise and concise manner, enabling the learner to learn more efficiently and effectively. It has a number of characteristics that distinguish it from a traditional textbook or textbook chapter: • An LM is learning objective driven, and its scope is clearly defined and bounded. The
module is compact and precise in presentation, and its core material contains only contents essential for achieving the learning objectives. Since an LM is inherently concise, it can be learned relatively quickly and efficiently.
• An LM is independent and free-standing. Module-based learning is therefore non-sequential and flexible, and can be personalized with ease.
Presenting the material in a contained and precise fashion will allow the user to learn effectively, reducing the time and effort spent and ultimately improving the learning experience. This is the first module on structural analysis and covers a static structural study in FEM. It goes through all of the steps necessary to successfully complete an analysis, including geometry creation, material selection, boundary condition specification, meshing, solution, and validation. These steps are first covered conceptually and then worked through directly as they are applied to an example problem. Estimated Learning Time for This Module Estimated learning time for this LM is equivalent to three 50-minute lectures, or one week of study time for a 3 credit hour course. How to Use This Module The learning module is organized in sections. Each section contains a short explanation and a link to where that section can be found. The explanation will give you an idea of what content is in each section. The link will allow you to complete the parts of the module you are interested in, while being able to skip any parts that you might already be familiar with. The modularity of the LM allows for an efficient use of your time.

LM-ST-1
2
Table of Contents
1. Learning Objectives ................................................................................................................ 3 2. Prerequisites ............................................................................................................................ 3 3. Pre-test .................................................................................................................................... 3 4. Tutorial Problem Statements................................................................................................... 4 5. Conceptual Analysis ............................................................................................................... 5 6. Abstract Modeling .................................................................................................................. 7 7. Software-Specific FEM Tutorials ........................................................................................... 7 8. Post-test ................................................................................................................................... 7 9. Assessment .............................................................................................................................. 7 10. Practice Problems.................................................................................................................. 8 Attachment A. Pre-test ................................................................................................................ 9 Attachment B. Conceptual Analysis ......................................................................................... 11 Attachment C1. SolidWorks-Specific FEM Tutorial 1............................................................. 15 Attachment C2. SolidWorks-Specific FEM Tutorial 2............................................................. 27 Attachment C3. SolidWorks-Specific FEM Tutorial 3............................................................. 42 Attachment D. CoMetSolution-Specific FEM Tutorials .......................................................... 52 Attachment E. Post-test ............................................................................................................. 53 Attachment F. Assessment ........................................................................................................ 56 Attachment G. Practice Problems ............................................................................................. 59

LM-ST-1
3
1. Learning Objectives The objective of this module is to introduce the user to the process of static structural analysis using FEM. Upon completion of the module, the user should have a good understanding of the necessary logical steps of an FEM analysis, and be able to perform the following tasks:
• Creating the solid geometry • Assigning material properties • Imposing displacement boundary conditions • Applying external forces • Meshing • Running the analysis • Verifying model correctness • Processing needed results
2. Prerequisites In order to complete the learning module successfully, the following prerequisites are required:
• By subject area: o Statics; o Mechanics of Materials or Elasticity
• By topic: knowledge of o force balance o statically equivalent force systems o elastic deformation o Young’s modulus o Poisson’s ratio o displacement o strain o stress o von Mises stress o Saint Venant’s principle o tension, bending, or torsion loading mode
3. Pre-test The pre-test should be taken before taking other sections of the module. The purpose of the pre-test is to assess the user's prior knowledge in subject areas relevant to static structural analysis such as Mechanics of Materials. Questions are focused towards fundamental concepts including stress, strain, displacement, kinematic relationship, constitutive relationship, equilibrium, and material properties.

LM-ST-1
4
The pre-test for this module given in Attachment I. � Link to Pre-test
4. Tutorial Problem Statements A good tutorial problem should focus on the logical steps in FEM modeling and demonstrate as many aspects of the FEM software as possible. It should also be simple in mechanics with an analytical solution available for validation. Three tutorial problems are covered in this learning module. Tutorial Problem 1 An L-shaped beam in a horizontal plane is fixed to a rigid support at one end, as shown in Figure 1. The other end of the beam is subjected to a force of 3000 lbf in the direction as shown. The beam has a circular cross-section of diameter 1.5”, except for a groove in the leg that was fixed to the wall with l = 12” and a = 6”. The groove, 5” from the wall, has a semicircular cross-section with a radius of 0.10” and runs around the entire perimeter. The beam is elastic and has the following material properties: modulus of elasticity is 30 Mpsi, and Poisson’s ratio is 0.3.
Figure 1. An L-shaped beam rigidly fixed on one end and loaded on the other end Tutorial Problem 2 A uniform, round bar is restrained on one end and subjected to a torque of 1000 lbf-in and a downward force of 500 lbf on the other, as shown in Figure 2. The beam is made of AISI 1020 steel, has a diameter of 3 inches, and an overall length of 30 inches.
a) Find the normal stress due to bending at the center of the member b) Find the maximum shear stress in the member

LM-ST-1
5
c) Plot the normal stress and shear stress along the top of the member as a function of x
Figure 2. A circular bar rigidly fixed on one end and loaded on the other end
Tutorial Problem 3 A rectangular plate with two notches in the middle of the top and bottom edges is restrained on one end, as shown in Figure 3. The other end has a distributed force that induces a bending moment of 500 lbf-in over the member. The plate has the dimensions listed in the figure below, a thickness of ½ inch, and the notch radius is 0.5 inch. The member has an elastic modulus of 30 Mpsi, poisson’s ratio of .3 and mass density of .3 lb/in3.
Figure 3. A notched rectangular plate
5. Conceptual Analysis
500 lbf
1000 lbf-in
16 in
5 in 500 lbf·in
r=0.5 in

LM-ST-1
6
Conceptual analysis is the abstraction of the logical steps in performing a task or solving a problem. Conceptual analysis for FEM simulation is problem type dependent but software-independent, and is fundamental in understanding and solving the problem. Conceptual analysis for static structural analysis reveals the following general logical steps:
1. Pre-processing o Geometry creation o Material property assignment o Restraint and applied load specification o Mesh generation
2. Solution 3. Post-processing 4. Validation
Attachment II discusses the conceptual analysis for the tutorial problem in this module. � Link to Conceptual Analysis

LM-ST-1
7
6. Abstract Modeling Abstract modeling is a process pioneered by CometSolutions Inc. Abstract modeling enables all attributes of an FEM model (such as material properties, constraints, loads, mesh, etc.) to be defined independently in an abstract fashion, thus reducing model complexity without affecting model accuracy with respect to the simulation objective. It detaches attributes from one another, and emphasizes conceptual understanding rather than focusing on software specifics. Evidently, abstract modeling is independent of the specific software being used. This is a fundamental departure from the way most FEM packages operate. Conceptual analysis focuses on the abstraction of steps necessary for an FEM simulation, while abstract modeling focuses on the abstraction and modularization of attributes that constitute an FEM model. They are powerful enabling instruments in FEM teaching and learning.
7. Software-Specific FEM Tutorials In software-specific FEM tutorial section, the tutorial problem is solved step by step in a particular software package. This section fills in the details of the conceptual analysis as outlined in previous section. It provides step by step details that correspond to the pre-processing, solution, post-processing and validation phases using a particular software package. Two commercial FEM packages are covered in this module: SolidWorks and CometSolution. Below are the two links: � Link to SolidWorks FEM Tutorials � Link to CometSolution FEM Tutorials
8. Post-test The post-test will be taken upon completion of the module. The first part of the post-test is from the pre-test to test knowledge gained by the user, and the second part is focused on the FEM simulation process covered by the tutorial. � Link to Post-test
9. Assessment The assessment is provided as a way to receive feedback about the module. The user evaluates several categories of the learning experience, including interactive learning, the module format, its effectiveness and efficiency, the appropriateness of the sections, and the overall learning experience. There is also the opportunity to give suggestions or comments about the module. � Link to Assessment

LM-ST-1
8
10. Practice Problems The user should be able to solve practice problems after taking the module. The practice problems provide a good reinforcement of the knowledge and skills learned in the module, and can be assigned as homework problems in teaching, or self study problems to enhance learning. These problems are similar to the tutorial problem worked in the module, but they involve different geometries and loading modes, stress concentration, and statically indeterminate beams. � Link to Practice Problems

Attachment A. Pre-test
9
Attachment A. Pre-test 1. The internal force per unit area acting inside a body when forces are applied to the body is
called
O Stress O Strain O Displacement O Reaction
2. In most Mechanics textbooks, the notation σxx implies
O Normal stress acting on an internal x-plane pointing in x direction O Shear stress acting on an internal x-plane pointing in x direction O Shear stress acting on an internal y-plane pointing in z direction O Von Mises stress in x direction
3. In most Mechanics textbooks, the notation τxy refers to
O Normal stress acting on an internal xy-plane O Shear stress acting on an internal x-plane pointing in y direction O Shear stress acting on an internal y-plane pointing in x direction O Shear force in xy plane
4. The stress state of a uniform bar with a round cross-section under torsion is predominantly
O Normal stress O Shear stress O Bending stress O No stress
5. Bending moment applied to a beam induces mostly
O Tensile stress O Compressive stress O Both tensile and compressive stress O Shear stress
6. Which of the following statements about von Mises stress is correct?

Attachment A. Pre-test
10
O von Mises stress is a scalar. O von Mises stress is maximum along a principal direction. O von Mises stress has 6 independent components. O von Mises stress is equal to yield strength of the material.
7. For a bar of uniform cross-section under axial loading in x direction, the Poisson’s ratio is
equal to
O The ratio of the lateral y-strain to the x-normal strain O The ratio of the xy-shear stress to the x-normal stress O The ratio of the xy-shear stress to the xy-shear strain O The ratio of the axial x-displacement to the applied force
8. For a bar of uniform cross-section under axial loading in x direction, the Young’s modulus
is equal to
O The ratio of the axial displacement to the axial normal stress O The ratio of the x-normal stress to the x-normal strain O The ratio of the xy-shear stress to the x-normal stress O The ratio of the xy-shear stress to the xy-shear strain
9. For a square plate of uniform thickness under unequal bi-axial loading in x and y directions,
the shear modulus is equal to
O The ratio of the x-normal stress to the x-normal strain O The ratio of the y-normal stress to the y-normal strain O The ratio of the xy-shear stress to the xy-shear strain O The ratio of the x-displacement to the x-normal stress
10. If the von Mises stress of material point A is equal to the von Mises stress of material point
B, then each of the six stress components (i.e., σxx, σyy, σzz, τxy, τyz, and τzx) of point A is equal to the corresponding stress component of point B.
O True O False
Continue to Section 3: Statement of Tutorial Problem

Attachment C. SolidWorks-Specific FEM Tutorial
11
Attachment B. Conceptual Analysis Conceptual Analysis of Static Structural Simulation Conceptual analysis for a static structural problem using finite element analysis reveals that the following logical steps and sub-steps are needed:
1. Pre-processing (building the model) 1. Geometry creation 2. Material property assignment 3. Boundary condition specification
o Prescribed displacement boundary condition (holding the model) o Applied force boundary condition (loading the model)
4. Mesh generation 2. Solution (running the simulation) 3. Post-processing (getting results) 4. Validation (checking)
The above steps are explained in some detail as follows. 1. Pre-processing The pre-processing in FEM simulation is analogous to building the structure or making the specimen in physical testing. Several sub-steps involved in pre-processing are geometry creation, material property assignment, boundary condition specification, and mesh generation. The geometry of the structure to be analyzed is defined in the geometry creation step. After the solid geometry is created, the material properties of the solid are specified in the material property assignment step. The material required for the FEM analysis depends on the type of analysis. For example, in the elastic deformation analysis of an isotropic material under isothermal condition, only the modulus of elasticity and the Poisson’s ratio are needed. For most novice users of FEM, the boundary condition specification step is probably the most challenging of all pre-processing steps. Two types of boundary conditions are possible. The first is prescribed displacement boundary condition which is analogous to holding or supporting the specimen in physical testing. The second is applied force boundary condition which is analogous to loading the specimen. Several factors contribute to the challenge of applying boundary conditions correctly:
1) Prescribed displacement boundary conditions expressed in terms such as
constuaboundary
= or constx
u
bboundary
=∂∂
are mathematical simplifications, and

Attachment C. SolidWorks-Specific FEM Tutorial
12
frequently only represent supports in real structures approximately. As a result, choosing a good approximate mathematical representation can be a challenge.
2) How a boundary is restrained depends also on the element type. For example, for the "clamped" or "built-in" support, a boundary should be restrained as having zero nodal displacement if solid element is used, while for the same support, the boundary should be restrained as having zero nodal displacement and zero nodal rotation if shell element is used.
3) Frequently, the structure to be analyzed is not fully restrained from rigid body motion in the original problem statement. In order to obtain an FEM solution, auxiliary restraints become necessary. Over-restraining the model, however, leads to spurious stress results. The challenge is then adding auxiliary restraints to eliminate the possibility of rigid body motion without over-restraining the structure.
Because of the above challenges, one learning module will be devoted to boundary condition specification.
Mesh generation is the process of discretizing the body into finite elements and assembling the discrete elements into an integral structure that approximates the original body. Most FEM packages have their own default meshing parameters to mesh the model and run the analysis while providing ways for the user to refine the mesh. 2. Solution The solution is the process of solving the governing equations resulting from the discretized FEM model. Although the mathematics for the solution process can be quite involved, this step is transparent to the user and is usually as simple as clicking a solution button or issuing the solution command. 3. Post-processing The purpose of an FEM analysis is to obtain wanted results, and this is what the post-processing step is for. Typically, various components or measures of stress, strain, and displacement at any given location in the structure are available for putout. Additional quantities for output may include factory of safety, energy norm error, contact pressure, reaction force, strain energy density, etc. The way a quantity is outputted depends on the FEM software. 4. Validation Although validation is not a formal part of the FEM analysis, it is important to be included. Blindly trusting a simulation without checking its correctness can be dangerous. The validation usually involves comparing FEM results at one or more selected positions with exact or approximate solutions using classical approaches such as elasticity or mechanics of materials. Going through validation strengthens conceptual understanding and enhances learning.

Attachment C. SolidWorks-Specific FEM Tutorial
13
Conceptual Analysis of the Given Problem The goal of the FEM simulation is to analyze the behavior of the solid with the given forces acting on it. The problem shows an L-shaped steel beam in the horizontal plane which is fixed at one end and has a force of 3000 lbf acting at the center of the other end at an angle of tan-1 (4/3) to the horizontal. The modulus of elasticity is 30 Mpsi and Poisson’s ratio is 0.3. Conceptual analysis of the current problem is described as follows.
1. Pre-processing (building the model) The geometry of the structure is first created using the design feature of the FEM package. Next, a material is assigned to the solid model. In the given problem, the material of the beam is given as steel. Depending on the software, the material is either directly selected as steel from the material library, or the properties of the material given in the problem are inputted directly. After assigning the material properties, the boundary conditions are specified. The end that is attached to the wall will need a fixed restraint, which means zero displacement for all boundary nodes due to the solid mesh. The load is applied on the other end at the center of the face at an angle of tan-1 (4/3) to the horizontal. The angle of the force can be set different ways depending on the different software being used. The next step is to mesh the solid to discretize it into finite elements. Generally, commercial FEA software has automatic default meshing parameters such as average element size of the mesh, quality of the mesh, etc. Here the default parameters provided by the software is used.
2. Solution (running the simulation) The next step is to run the simulation and obtain a solution. Usually the software provides several solver options. The default solver usually works well. For some problems, a particular solver may be faster or give more accurate results.
3. Post-processing (getting results) After the analysis is complete, the post-processing steps are performed. Results such as von Mises stress, various stresses, displacements, and strains can be viewed.
4. Validation (checking) Validation is the final step in the analysis process. In this step, the stresses acting on the beam are calculated by hand. These analytical solutions are compared with the software generated results to check the validity of the analysis.

Attachment C. SolidWorks-Specific FEM Tutorial
14
This completes the Conceptual Analysis section. Click the link below to continue with the learning module. Continue to Section 5: Abstract Modeling

Attachment C. SolidWorks-Specific FEM Tutorial
15
Attachment C1. SolidWorks-Specific FEM Tutorial 1 Overview: In this section, three tutorial problems will be solved using the commercial FEM software SolidWorks. Although the underlying principles and logical steps of an FEM simulation identified in the Conceptual Analysis section are independent of any particular FEM software, the realization of conceptual analysis steps will be software dependent. The SolidWorks-specific steps are described in this section. This is a step-by-step tutorial. However, it is designed such that those who are familiar with the details in a particular step can skip it and go directly into the next step.
Tutorial Problem 1. A cantilever L-shape beam under combined tension, shear, bending and torsion loading
0. Launching SolidWorks
SolidWorks Simulation is an integral part of the SolidWorks computer aided design software suite. The general user interface of SolidWorks is shown in Figure 1.
Figure 1: general user interface of SolidWorks.
Main menu Frequently used command icons Help icon
Roll over to display “File”, “Tools” and other menus

Attachment C. SolidWorks-Specific FEM Tutorial
16
In order to perform FEM analysis, it is necessary to enable the FEM component, called SolidWorks Simulation, in the software.
Step 1: Enabling SolidWorks Simulation
o Click "Tools" in the main menu. Select "Add-ins...". The Add-ins dialog window appears, as shown in Figure 2.
o Check the boxes in both the “Active Add-ins” and “Start Up” columns corresponding to SolidWorks Simulation.
o Checking the “Active Add-ins” box enables the SolidWorks for the current session. Checking the “Start Up” box enables the SolidWorks for all future sessions whenever SolidWorks starts up.
Figure 2: Location of the SolidWorks icon and
the boxes to be checked for adding it to the panel.
1. Pre-Processing Purpose: The purpose of pre-processing is to create an FEM model for use in the next step of the simulation, Solution. It consists of the following sub-steps:
• Geometry creation • Material property assignment • Boundary condition specification • Mesh generation.
1.1 Geometry Creation The purpose of Geometry Creation is to create a geometrical representation of the solid object or structure to be analyzed in FEM. In SolidWorks such a geometric model is called a part. In this tutorial, the necessary part has already been created in SolidWorks. The following steps will open up the part for use in the FEM analysis.
Step 1: Opening the part for simulation. One of the following two options can be used.
Check “SolidWorks Simulation” boxes

Attachment C. SolidWorks-Specific FEM Tutorial
17
o Option1: Double click the following icon to open the embedded part file, L-Shaped Beam.SLDPRT, in SolidWorks.
Click SolidWorks part file icon to open it ==>L-Shaped
Beam.SLDPRT
o Option 2: Download the part file “L-Shaped Beam.SLDPRT” from the web site http://www.femlearning.org/. Use the “File” menu in SolidWorks to open the downloaded part.
The SolidWorks model tree will appear with the given part name at the top. Above the model tree, there should be various tabs labeled “Features”, “Sketch”, etc. If the “Simulation” tab is not visible, go back to steps 1 and 2 to enable the SolidWorks Simulation package.
Step 2: Creating a Study o Click the “Simulation” tab above the model tree o Click on the drop down arrow under “Study” and select “New Study” as in
Figure 3 o In the “Name” panel, give the study the name “Static Study on 3D Beam” o Select “Static” in the “Type” panel to study the static equilibrium of the part
under the load
o Click “OK” to accept and close the menu

Attachment C. SolidWorks-Specific FEM Tutorial
18
Figure 3: The SolidWorks “Study” menu. 1.2 Material Property Assignment The Material Property Assignment sub-step assigns materials to different components of the part to be analyzed. All components must be assigned with appropriate material properties.
Step 3: Opening the material property manager
o In the upper left hand corner, click “Apply Material”. o The “Material” window appears as shown in Figure 4.
Figure 4: The “Material” window.
This will apply one material to all components. If the part is made of several components with different materials, open the model tree and apply this process to individual components. SolidWorks has a built-in material library that can be directly selected for the part. However, in this tutorial, material properties are defined using user input option.
Step 4: Defining custom material properties
o In the “Material” window, on the left panel under “Select Material Source”, select “Custom defined”
o On the right panel, select “Linear Elastic Isotropic” in “Model Type” o Select “English (IPS)” under “Units”

Attachment C. SolidWorks-Specific FEM Tutorial
19
o In the lower half of the panel, enter “30e6” for “Elastic modulus”, “0.3” for “Poisson’s ratio”, and “0.3” for “Mass density”.
As other materials data are not needed in solving this problem, their values are left empty or unchanged. 1.3 Boundary Condition Specification In the Boundary Condition Specification sub-step, the restraints and loads on the part are defined. Here, the face of the beam attached to the wall needs to be restrained, and the force in the proper direction needs to be applied on the other end of the beam.
Step 5: Opening the fixtures property manager
o Right click on “Fixtures” in the model tree and select “Fixed Geometry” o Move the cursor into the graphic window.
As the cursor traverses the image of the model, notice a small icon accompany the cursor, and this icon change shapes when the cursor is at different locations. This indicates that the SolidWorks is in graphical selection mode, and different shapes indicate different identities would be selected: a square (icon) indicates the surface underneath the cursor will be selected if the mouse is clicked, a line (icon) for an edge or a line, and a dot (icon) for a point. In this tutorial problem, the entire end surface is restrained.
Figure 5: Applying an immovable restraint to the beam.

Attachment C. SolidWorks-Specific FEM Tutorial
20
At the initial orientation, however, the end to be restrained is not visible, and could not be selected. The model should be rotated to make the fixed end visible. To rotate the model either hold down the scroll bar and rotate with the mouse or change the orientation by clicking on the “View Orientation” icon in the top middle area of the workspace. Once the desired face is visible, select the face on which to apply the restraint. Note that in the display panel, within the second box in the “Type” panel, “Face<1>” appears, indicating that one surface is being selected. Clicking on this face in the graphics panel would deselect the face.
Step 6: Restraining the member o Select the face as in Figure 5 o Once the face has been selected, click the green check mark to close the
“Fixture” menu The next step is to load the beam with the applied force. The total force applied is 3000 lbf with 3/5 of it acting in the horizontal direction and 4/5 of it acting in the vertical direction. Splitting the force up into its components results in 1800 lbf in the horizontal direction, and 2400 lbf in the vertical direction.
Figure 6: Applying the vertical component of the applied force. Step 7: Applying the vertical force component
o Right click on “External Loads” in the model tree and select “Force”.
Attachment C. SolidWorks-Specific FEM Tutorial
21
o Under the “Force/Torque” tab, click the “Faces, Edges, Vertices, Reference Points for Force” input field box to activate it, if not already active.
o Click on the face on which the force is applied in the graphics window. Make sure the face is highlighted (turns blue) and appears in the input field box.
o Choose “Selected direction” instead of “Normal”. Click the “Face, Edge, Plane, Axis for Direction” input field box to activate it.
o Click the square box in front of the SolidWorks Flyout menu on the upper left corner of the graphics window, , to expand it.
o Select the Top Plane from the Flyout menu for force direction. o The plane should appear in the pink box underneath “Selected direction”. o Use IPS units and type in a force of 1800 lb in the third component box which
is perpendicular to the top plane. o Check the “Reverse direction” box if the force is pointing in the wrong
direction, as shown in Figure 6. o Click “OK” to close the menu.
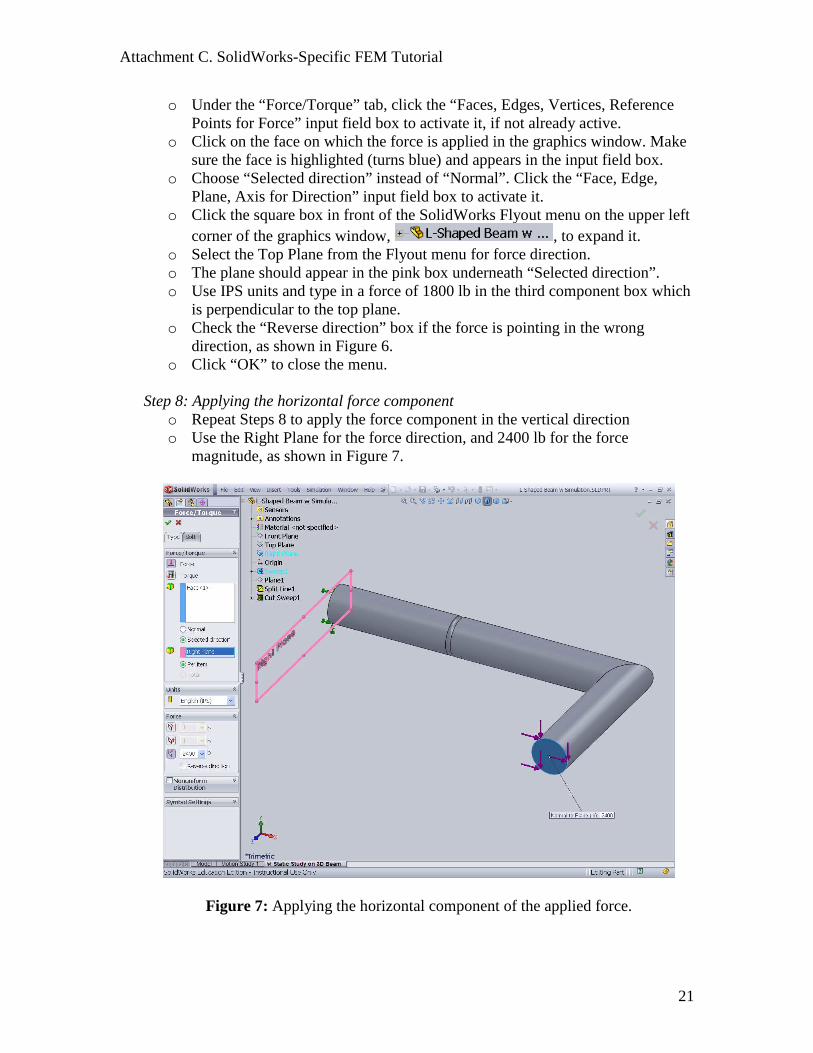
Step 8: Applying the horizontal force component
o Repeat Steps 8 to apply the force component in the vertical direction o Use the Right Plane for the force direction, and 2400 lb for the force
magnitude, as shown in Figure 7.
Figure 7: Applying the horizontal component of the applied force.

Attachment C. SolidWorks-Specific FEM Tutorial
22
1.4 Mesh Generation Purpose: The purpose of the Mesh Generation sub-step is to discretize the part into elements. The mesh consists of a network of these elements.
Step 9: Creating the mesh
o Right click “Mesh” in the model tree and select “Create mesh” o Leave the mesh bar on its default value o Drop down the “Advanced” menu and make sure the mesh is high quality, not
draft quality, by making sure the “Draft Quality Mesh” checkbox is not clicked
o Figure 8 shows the completed mesh o Click “OK” to close the menu and generate the mesh.
Figure 8: A completed mesh. “Mesh Control” in SolidWorks may be used to refine the mesh locally. The guiding principle is to refine mesh at locations of high stress gradient, such as regions around stress concentrators and locations of geometric changes. For the current problem, local mesh refinement is not pursued. 2. Solution

Attachment C. SolidWorks-Specific FEM Tutorial
23
Purpose: The Solution is the step where the computer solves the simulation problem and generates results for use in the Post-Processing step.
Step 1: Running the simulation
o At the top of the screen, click “Run” o When the analysis is finished, the “Results” icon will appear on the model tree
3. Post-Processing Purpose: The purpose of the Post-Processing step is to process the results of interest. For this problem, the von Mises stress, the normal stress in the X direction, and the shear stress in the XZ direction are of interest.
Step 1: Creating a stress plot
o Right click “Results” on the model tree and select “Define Stress Plot” o Select “von Mises” as the stress type and “psi” as the unit o Unclick the “Deformed Shape” box and click “OK” to close the menu
Figure 9 shows the resulting stress plot.
Figure 9: The von Mises stress plot.
Step 2: Plotting normal stress

Attachment C. SolidWorks-Specific FEM Tutorial
24
o Repeat steps 1-3 for an “X-Normal Stress” plot and view the results. Step 3: Plotting shear stress
o Repeat steps 1-3 for an “XZ-Shear Stress” plot and view the results. o These results can now be compared to analytical solutions for validation.
Note: If you want to view the stress at a particular point, right click on the stress plot and select “Probe”. Also in “Chart Options”, you can choose to display the minimum and maximum stress on the figure.
4. Validation Purpose: The purpose of the Validation step is to compare FEM solutions with analytical solutions, or known published results, to validate the correctness of the FEM model. For the current problem, closed form solutions based on elementary beam theory from Mechanics of Materials are computed and compared with the FEM results. This will reveal whether or not the results of the finite element analysis are reasonable. What mechanical or physical quantities at which locations from analytical solution are used for comparison is a matter of judgment call. Mechanics formulas are usually more accurate for locations away from restraints or applied loads, as well as away from any sudden change in geometry. For this reason, the point on top of the beam, halfway in between the wall (point O) and the groove, is chosen. This turns out to be 2.5” away from the wall, as shown in Figure 10. Stresses σx and τxz at this point will be calculated.
Figure 10: Location O for .
O

Attachment C. SolidWorks-Specific FEM Tutorial
25
The beam at location O is subjected to a combined tension, transverse shear, bending, and torsion. The stress equations from elementary beam theory are:
Tension: A
F σ
xx =
Transverse shear: It
VQ τxy =
Bending: I
My σx =
Torsion: J
Tr τx =θ
Where σx is the normal stress in the x-direction, τxy is the shear stress on the xy-plane, F is the internal axial tensile force resultant at location O, A is the cross-sectional area at location O, M is the internal moment about z-axis at location O, y is the distance from the center to point O, I is the second moment of area for the cross-section at O, T is the internal torque about x-axis at location O, r is the radius from the center to O, J is the second polar moment of area for the cross-section at O, V is the internal shear force resultant at location O, Q is the first moment of area for the cross-section at O, and t is the z-thickness of the cross-section at O. Normal stresses from tension and bending are combined to give
I
My
A
F σ
xx +=
where A = ¼πd2 and 64
πd I
4
= . The shear stress at O from transverse shear is zero. Shear
stress τxθ from torsion becomes xzτ . The second polar moment of area for a circular
cross-section is 32
πd J
4
= . With Fx = 1800 lbf, d = 1.5 in, y = 0.75 in, M = 22800 lbf·in,
and T = 14400 lbf·in, σx is found to be 69830 psi, and τxz is 21730 psi. The follows are steps to obtain corresponding results from SolidWorks for comparison:
Step 1. Creating normal and shear stress plots o Right click on the “Results” folder. o Create two new plots that display normal stress in the x-direction and shear
stress in the xy-plane. Step 2. Probing needed stress components
o Right click on one of the charts and select “Settings”. o Under “Boundary Options”, click on the drop down menu and choose “Mesh”
to display the mesh on the plot. o Using the probe on these plots to obtain σx = 69370 psi and τxz = 21580 psi.

Attachment C. SolidWorks-Specific FEM Tutorial
26
The following table compares the FEM results with elementary beam theory solutions:
Stress Component SolidWorks Elementary Beam Theory % Error σx 69370 psi 69830 psi 0.66 % τxz 21580 psi 21730 psi 0.70 %
The percent error is low for both stress components. The good agreement between the results using elementary beam theory and the FEM results validates the correctness of the FEM analysis.

Attachment C. SolidWorks-Specific FEM Tutorial
27
Attachment C2. SolidWorks-Specific FEM Tutorial 2
Tutorial Problem 2. A uniform round bar cantilevered on one end and subjected to a torque and a downward force on the other 0. Launching SolidWorks
In order to perform FEM analysis, it is necessary to enable the FEM component, called SolidWorks Simulation, in the software.
Step 1: Enabling SolidWorks Simulation o Click "Tools" in the main menu. Select "Add-ins...". The Add-ins dialog
window appears, as shown in Figure 2. o Check the boxes in both the “Active Add-ins” and “Start Up” columns
corresponding to SolidWorks Simulation. o Checking the “Active Add-ins” box enables the SolidWorks for the current
session. Checking the “Start Up” box enables the SolidWorks for all future sessions whenever SolidWorks starts up.
1. Pre-Processing Purpose: The purpose of pre-processing is to create an FEM model for use in the next step of the simulation, Solution. It consists of the following sub-steps:
• Geometry creation • Material property assignment • Boundary condition specification • Mesh generation.
1.1 Geometry Creation The purpose of Geometry Creation is to create a geometrical representation of the solid object or structure to be analyzed in FEM. In SolidWorks such a geometric model is called a part. In this tutorial, the necessary part has already been created in SolidWorks. The following steps will open up the part for use in the FEM analysis.
Step 1: Opening the part for simulation. One of the following two options can be used.
o Option1: Double click the following icon to open the embedded part file “Round Bar.SLDPRT” in SolidWorks.
Click SolidWorks part file icon to open it ==>Round
Bar.SLDPRT
Attachment C. SolidWorks-Specific FEM Tutorial
28
o Option 2: Download the part file “Round Bar.SLDPRT” from the web site http://www.femlearning.org/. Use the “File” menu in SolidWorks to open the downloaded part.
Step 2: Creating a Study
o Click the “Simulation” tab above the model tree o Click on the drop down arrow under “Study” and select “New Study”. o In the “Name” panel, give the study the name “Static Study on Round Bar” o Select “Static” in the “Type” panel to study the static equilibrium of the part
under the load
o Click “OK” to accept and close the menu
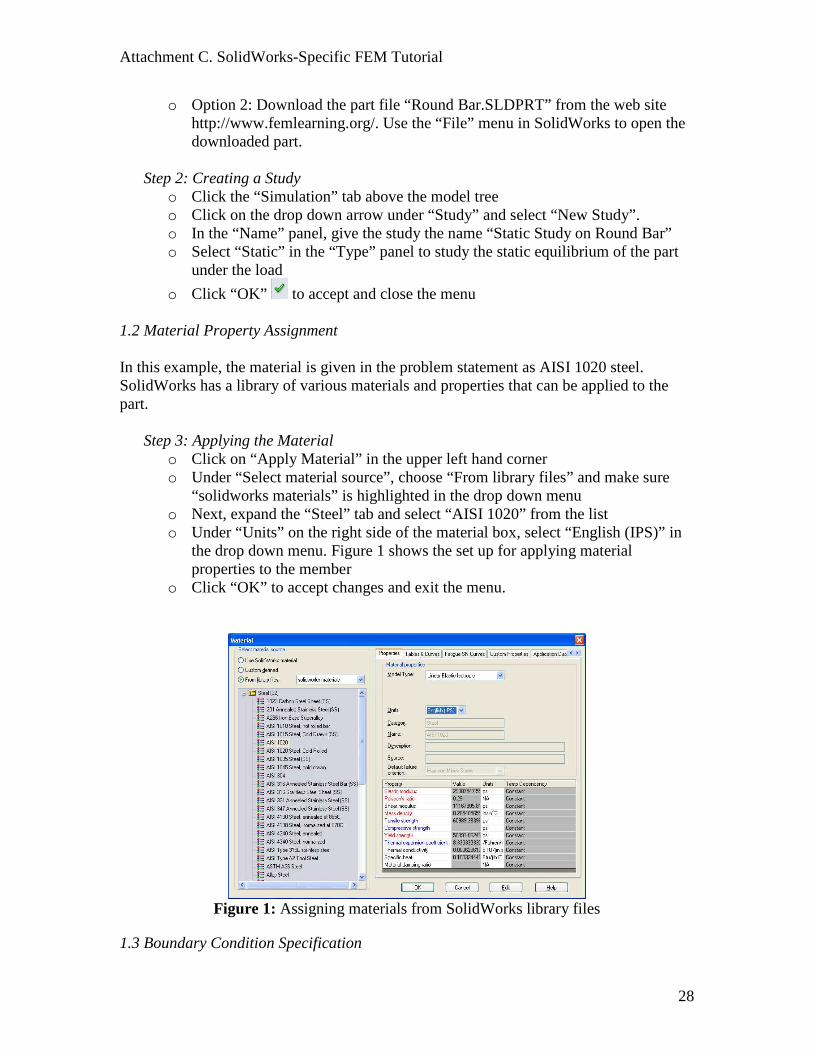
1.2 Material Property Assignment In this example, the material is given in the problem statement as AISI 1020 steel. SolidWorks has a library of various materials and properties that can be applied to the part.
Step 3: Applying the Material o Click on “Apply Material” in the upper left hand corner o Under “Select material source”, choose “From library files” and make sure
“solidworks materials” is highlighted in the drop down menu o Next, expand the “Steel” tab and select “AISI 1020” from the list o Under “Units” on the right side of the material box, select “English (IPS)” in
the drop down menu. Figure 1 shows the set up for applying material properties to the member
o Click “OK” to accept changes and exit the menu.
Figure 1: Assigning materials from SolidWorks library files
1.3 Boundary Condition Specification

Attachment C. SolidWorks-Specific FEM Tutorial
29
The member in the problem statement is fully restrained on one of the ends. This will be simulated by applying a fixed geometry to one of the circular faces.
Step 4: Restraining the member o Click on the drop down arrow under “Fixtures” in the upper left hand corner
and select “Fixed Geometry” o In the fixture property manager, highlight the green box under “Standard
(Fixed Geometry)” and select the left face of the shaft by rotating the view and clicking on the face. The face of the part should turn green and “Face<1>” should appear in the green box
o Click the green check mark to accept the geometry and exit the property manager.
Now that the member has been restrained, the torque and the point force need to be applied. To accomplish this, first create two reference geometries to tell the software exactly where the force is applied and what axis the torque rotates on. The horizontal axis that is created first to apply the torque.
Step 5: Creating the axis o On the main menu, go to “Insert” -> “Reference Geometry” -> “Axis” o Select the “Cylindrical/Conical Face” option and then click on the outer face
of the member. Figure 2 shows the set up for creating an axis running through the center of the part
o Click the green check mark to create the axis and exit the manager
Figure 2: Creating reference axis
Next, a split line will be created on the part so that the force can be applied at the top of the member. Applying a split line in SolidWorks creates an arbitrary edge on the member that a force can be applied to.
Step 6: Creating the split line o On the main menu, go to “Insert” -> “Curve” -> “Split Line”

Attachment C. SolidWorks-Specific FEM Tutorial
30
o Under “Type of Split”, select “Silhouette” and then highlight the first box underneath “Selections”
o In the pink box, select the front plane from the model tree o Highlight the green box underneath and select the outer face of the member.
Figure 3 shows the set up for inserting the split line o Click the green check box to create the line and exit the manager.
Figure 3: Creating split line for reference point
The part now has enough reference points to apply the force and torque. The next steps will go over how to apply the different forces.
Step 7: Apply the downward force o Click on the drop down menu under “External Loads” and select “Force” o In the box underneath “Force/Torque”, select the intersection of the split line
and the circular face at the un-restrained end of the member o Underneath the box, change from “Normal” to “Selected direction” and
highlight the pink box underneath o In the model tree, click on the top plane to apply the force normal to the top
plane o Click on the “Reverse direction” box underneath the “Force” menu if the force
is not already pointing downward o Change “Units” to “English (IPS)” and then enter “500” as shown in Figure 4. o Click the green check mark to create the force and exit the manager.

Attachment C. SolidWorks-Specific FEM Tutorial
31
Figure 4: Applying the downward force of 500 lbf
Applying a torque in SolidWorks requires both a face and an axis of direction. The axis already created and the unrestrained circular will be selected.
Step 8: Apply the torque o Click on the drop down menu under “External Loads” and select “Torque” o When the green box is highlighted, click on the unrestrained circular face of
the member to select it o Next highlight the pink box underneath and select “Axis1” from the model
tree o Change the units from “SI” to “English (IPS)” and enter 1000 in the final box
under the “Force/Torque” menu as shown in Figure 5 o Click the green check mark to create the torque and exit the manager.

Attachment C. SolidWorks-Specific FEM Tutorial
32
Figure 5: Applying the torque of 1000 lbf-in
The member has now been fully restrained and loaded according to the problem statement. The next section will discuss generating the mesh and getting results. 1.4 Mesh Generation
Step 9: Create the mesh o Right click on the “Mesh” icon and select “Create Mesh” o The default mesh parameters will work for this problem so do not adjust the
coarseness of the mesh o Click the green check mark to create the mesh.
2. Solution
Step 1: Running the simulation
o At the top of the screen, click “Run” o When the analysis is finished, the “Results” icon will appear on the model tree
3. Post-Processing Purpose: The purpose of the Post-Processing step is to process the results of interest. Different plots for shear stress and normal stress in the x-direction will be created and compared to analytical solutions for verification. In this problem, the normal stress and the shear stress are needed. The downward force creates a bending moment on the beam that contributes to the normal stress. The shear stress in this example is composed of shear due to torsion as well as shear due to the downward force. The normal stress due to bending is examined first.

Attachment C. SolidWorks-Specific FEM Tutorial
33
Step 1: Create first stress plot
o Right click on the “Results” folder and select “Define Stress Plot” o Under the “Display” menu in the property manager, select “SX: X Normal
Stress” from the first drop down menu o Change the units to “psi” in the next menu o Uncheck the box next to “Deformed Shape” to display the plot without
deformation o Click the green check box to create the first plot.
Step 2: Displaying the mesh on the plot along with the stress concentrations
o Right click on the plot and select “Chart Options” o Click on the drop down menu underneath “Boundary Options” and change to
“Mesh” o Click the green check box to accept changes.
With the mesh displayed, the probe tool can be used to acquire stress values at each element or along an edge. The top of the member will be probed first, where the member is in tension and the stress is positive.
Step 3: Rotating the member and bring up the probe o Use the “View Orientation” icon in the top of the workspace to view the top
of the member o Right click on the stress plot and select “Probe” to bring up the probe property
manager. When “At location” is selected under the “Options” menu, the probe can be used to click on individual elements and it will display the stresses on the plot and underneath the “Results” section. If “On selected entities” is selected, the probe can be used to find all the elements on a face, edge or vertex.
Step 4: Using the probe o Choose “On selected entities” from the “Options” menu and highlight the first
box underneath the “Results” menu o Select the split line created earlier in the example and click on the “Update”
button to display the results in the spreadsheet o The problem asks for the normal stress in the middle of the beam, so scroll
down on the spreadsheet and find “15” under the “X(in)” column o Figure 6 shows the probe property manager and the stress at the desired point,
2898.4 psi.

Attachment C. SolidWorks-Specific FEM Tutorial
34
Figure 6: Probe results showing normal stress in the middle of the member
Next the probe will be used to plot the normal stress along the split line.
Step 5: Plotting the stress o Under “Report Options”, click on the plot icon o Figure 7 shows the plot of normal stress due to bending as x increases o Leave the plot open and close out of the probe property manager by clicking
on the green check mark

Attachment C. SolidWorks-Specific FEM Tutorial
35
Figure 7: Plot of normal stress as a percent of the length
Notice the linear pattern of the stress in the middle of the plot and how the slope changes drastically at the beginning and at the end of the beam. This shows an important topic in FEM analysis called Saint Venant’s principle, which states that the FEM method is only valid in regions away from boundary conditions such as restraints and forces. This principle will be applied again when the shear stress is plotted along the top of the beam. When using the probe, it is important to remember to select elements far enough away from boundaries to ensure accurate data. The data is also slightly choppy in the linear portion of the graph. This choppiness could be decreased if the mesh was turned up to a finer quality. Increasing the fineness of the mesh would create more elements on the member and increase the smoothness of the graph. The next steps will analyze the shear stress and then compare the simulation results to the hand calculations.
Step 6: Creating the second stress plot o Right click on the “Results” folder and select “Define Stress Plot” o Under the “Display” menu in the property manager, select “TXY: Shear in Y
Dir. on YZ Plane” from the first drop down menu o Change the units to “psi” in the next menu o Uncheck the box next to “Deformed Shape” to display the plot without
deformation

Attachment C. SolidWorks-Specific FEM Tutorial
36
o Click the green check box to create the second plot.
Step 7: Displaying the mesh along with the stress concentrations o Right click on the plot and select “Chart Options” o Click on the drop down menu underneath “Boundary Options” and change to
“Mesh” o Click the green check box to accept changes.
Step 8: Rotating the member and bringing up the probe
o Use the “View Orientation” icon in the top of the workspace to view the back of the member
o Right click on the stress plot and select “Probe” to bring up the probe property manager.
Step 9: Using the probe
o Use the “At location” selection underneath “Options” and select nodes at varying points on the member to see how the shear stress varies
o Figure 8 shows selected elements and the corresponding shear stress o Notice how the shear stress is at a max in the center and decreases as the
points move up or down but elements selected on the same horizontal line are mostly the same.
o The max shear stress from this figure is 284.5 psi
Figure 8: Shear stress values at various nodes
Step 10: Using the probe to plot shear stress along the beam
o Choose “On selected entities” from the “Options” menu and highlight the first box underneath the “Results” menu

Attachment C. SolidWorks-Specific FEM Tutorial
37
o Select the split line created earlier in the example and click on the “Update” button to display the results in the spreadsheet
o Under “Report Options”, click on the plot icon o Figure 9 shows the plot of normal stress due to bending as x increases o Leave the plot open and close out of the probe property manager by clicking
on the green check mark
Figure 9: Shear stress on top of the beam as a function of x
This graph more clearly illustrates St. Vernant’s principle. The shear stress in a beam varies along the y-axis instead of the x-axis, so in this case it is just a constant line except at the two boundaries. There is an extreme variance at the two boundaries of the member, where the shear stress spikes drastically. Remember to use the probe only on elements away from the boundary conditions. 4. Validation Purpose: The purpose of the Validation step is to compare FEM solutions with analytical solutions, or known published results, to validate the correctness of the FEM model. Results from SolidWorks were as follows:
a) σx = 2898.4 psi b) τxy = 284.5 psi

Attachment C. SolidWorks-Specific FEM Tutorial
38
The normal stress from bending is checked first. The basic equation for shear stress in the x direction due to bending is:
Where M is the moment at the point of interest, c is the distance from the center to the point of interest, and I is the moment of inertia of the member. The normal stress from bending varies as a function of y and is shown in Figure 10.
Figure 10: Normal stress along the beam
The figure shows the normal stress is at its largest magnitude when it is the farthest away from the center, which is at the top and bottom of the circle. The top section of the part is in tension and the bottom section is in compression, which give positive and negative values. Since the member is a circle and the normal stress on the top surface of the member is of interest, the equations are as follows:
Combining the above numbers into the original equation gives:
Next calculate the maximum theoretical shear stress. In this case, there exist shear stress due to the torsion and shear stress due to the downward force. Figure 11 and Figure 12 reveals how the shear stress varies along the cross section of the member.
x
y

Attachment C. SolidWorks-Specific FEM Tutorial
39
Figure 11: Shear stress due to the downward shear force along the cross section of the
member
Figure 11 shows that the shear stress due to the downward force is zero at the top and bottom and a maximum across the middle of the member. To find the maximum shear stress, select point B on the member and use the following equation:
Where V is the shear force and A is the cross sectional area of the member.
Figure 12: Shear stress due to torsion along the cross section of the member
From Figure 12 shows how the torque affects the shear stress along the cross section of the beam. The shear stress is a minimum at the center point and increases linearly as the radius increases. The shear stress from point B is used again to calculate the overall shear stress by using the equation:
A
B
A
B

Attachment C. SolidWorks-Specific FEM Tutorial
40
Where T is the applied torque, c is the distance from the center of the member to the point of interest, and J is the area moment of inertia. The equation shows that the shear stress from torsion varies directly with the radius. Since the shear stresses exist at the same point on the member, they can be added together using above two equations to find the maximum value. First the shear stress due to torsion.
Combining the above numbers into the original equation gives:
Now the shear stress due to the downward force.
Combining the above numbers into the original equation gives:
Sum the previous two shear forces at point B to combine them.
SolidWorks Simulation Hand Calculation Percent Difference σx (psi) 2898.4 2829.5 2.4% τxy (psi) 284.5 282.9 0.5%

Attachment C. SolidWorks-Specific FEM Tutorial
41
Both the numbers from the SolidWorks Simulation and the hand calculation came out to be under 2.5%, which is pretty good. It is important to compare the simulation results to the theoretical values to ensure the simulation was set up and run correctly.

Attachment C. SolidWorks-Specific FEM Tutorial
42
Attachment C3. SolidWorks-Specific FEM Tutorial 3
Tutorial Problem 3. A notched rectangular plate subjected to bending
0. Launching SolidWorks
In order to perform FEM analysis, it is necessary to enable the FEM component, called SolidWorks Simulation, in the software.
Step 1: Enabling SolidWorks Simulation o Click "Tools" in the main menu. Select "Add-ins...". o Check the boxes in both the “Active Add-ins” and “Start Up” columns
corresponding to SolidWorks Simulation. o Checking the “Active Add-ins” box enables the SolidWorks for the current
session. Checking the “Start Up” box enables the SolidWorks for all future sessions whenever SolidWorks starts up.
1. Pre-Processing Purpose: The purpose of pre-processing is to create an FEM model for use in the next step of the simulation, Solution. It consists of the following sub-steps:
• Geometry creation • Material property assignment • Boundary condition specification • Mesh generation.
1.1 Geometry Creation The purpose of Geometry Creation is to create a geometrical representation of the solid object or structure to be analyzed in FEM. In SolidWorks such a geometric model is called a part. In this tutorial, the necessary part has already been created in SolidWorks. The following steps will open up the part for use in the FEM analysis.
Step 1: Opening the part for simulation. One of the following two options can be used.
o Option1: Double click the following icon to open the embedded part file “Plate with Notches.SLDPRT” in SolidWorks.
Click SolidWorks part file icon to open it ==>Plate with
Notches.SLDPRT
Attachment C. SolidWorks-Specific FEM Tutorial
43
o Option 2: Download the part file “Plate with Notches.SLDPRT” from the web site http://www.femlearning.org/. Use the “File” menu in SolidWorks to open the downloaded part.
Step 2: Creating a Study
o Click the “Simulation” tab above the model tree o Click on the drop down arrow under “Study” and select “New Study”. o In the “Name” panel, give the study the name “Static Study on Plate with
Notches” o Select “Static” in the “Type” panel to study the static equilibrium of the part
under the load
o Click “OK” to accept and close the menu 1.2 Material Property Assignment
Step 3: Applying the material properties o Click on “Apply Material” in the upper left hand corner of the screen o In the window, on the left panel under “Select Material Source”, select
“Custom defined” o On the right panel, select “Linear Elastic Isotropic” o In “Model Type”, select “English (IPS)” under “Units” o In the lower half of the panel, enter “30e6” for “Elastic modulus”, “0.3” for
“Poisson’s ratio”, and “0.3” for “Mass density” o If the program asks for a yield strength, type in “50,000” psi.
1.3 Boundary Condition Specification
Step 4: Restraining the plate o Under the “Fixtures” tab, select “Fixed Geometry” o In the “Standard (Fixed Geometry)” menu, select the thin left face of the plate o Click the green check mark to close the box and accept the change.
To apply the other boundary condition, a distributed force across the free face of the plate is applied that will induce a bending moment. To accomplish this, a reference geometry called a point is inserted. The point will allow us to define a coordinate system on the right face of the plate, which will make it easier to apply the non-uniform force.
Step 5: Creating the point o On the main toolbar, go to “Insert” -> “Reference Geometry” -> “Point” o Highlight the first box under “Selections” and select the right face of the
plate o Click on the “Center of Face” icon in the property manager as shown in
Figure 1 o Click the green check mark to create the plane

Attachment C. SolidWorks-Specific FEM Tutorial
44
Figure 13: Creating a reference point
Step 6: Creating the axis
o On the main toolbar, go to “Insert” -> “Reference Geometry” -> “Coordinate System”
o In the first box underneath “Selections”, click on the point just created o Leave the rest of the boxes blank and verify that the coordinate system is
oriented as shown in Figure 2 o Click the green check mark to create the coordinate system
Figure 14: Inserting a coordinate system

Attachment C. SolidWorks-Specific FEM Tutorial
45
Now the reference coordinate system has been created, the force can be applied. A non-uniform distributed force F(x,y) in SolidWorks has the following form:
SolidWorks requires the user to provide coefficients A to F and the summation of the
absolute force values on the face, i.e., ∫= dA)y,x(FFtotal . k is actually not required.
For a linear force with the axis system defined in previous step, all coefficients except for C are zeroes, while C is 1. In order to create a moment of 500 lbf-in, k must equal 96
3in/lbf , for which totalF turns out to be 300 lbf 1.
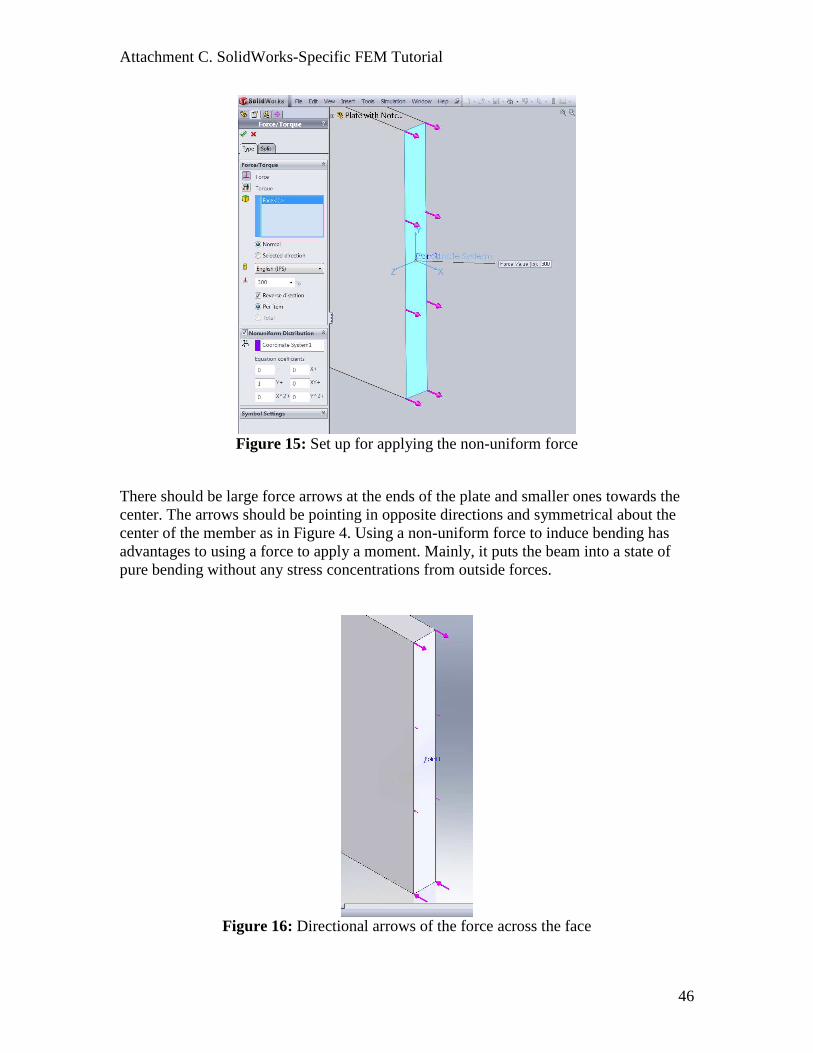
Step 7: Applying the non-uniform force
o Under “External Loads”, select “Force” o Highlight the green box in the “Force/ Torque” menu and select the thin right
face of the plate o Change the units to “English (IPS)” and enter “300” in the “Force Value” box o Check the “Nonuniform Distribution” box to open the menu. o Highlight the first box and select the coordinate system from the model tree o Enter “1” for the Y coefficient and “0” for the rest of the boxes as shown in
Figure 3 o If the arrows are backwards, check the “Reverse direction” box o Click the green check mark to create the force
1 The moment resulting from the distributed normal force F(x,y) is
∫∫−
==2/h
2/h
ytdy)y,x(FydA)y,x(FM
where kCy)y,x(F = . Since C is 1, integrating the above equation gives
12
kthM
3
=
or 33
in/lbf96th
M12k ==
The summation of the absolute force values on the face is therefore
( )( ) lbf300ydy5.0962kytdy2tdy)y,x(FdA)y,x(FF2/h
0
2/h
0
2/h
2/h
total ===== ∫∫∫∫−
Attachment C. SolidWorks-Specific FEM Tutorial
46
Figure 15: Set up for applying the non-uniform force
There should be large force arrows at the ends of the plate and smaller ones towards the center. The arrows should be pointing in opposite directions and symmetrical about the center of the member as in Figure 4. Using a non-uniform force to induce bending has advantages to using a force to apply a moment. Mainly, it puts the beam into a state of pure bending without any stress concentrations from outside forces.
Figure 16: Directional arrows of the force across the face

Attachment C. SolidWorks-Specific FEM Tutorial
47
1.4 Mesh Generation In this example the focus is on the stresses around the notches in the middle of the plate. Since a small part of the member is of concern, the mesh control can be used to create a fine mesh around the notches that will give more accurate data. The rest of the part can have a coarse mesh to save on calculation time. The next steps will explain how to use the mesh control.
Step 8: Applying the mesh control o Right click on “Mesh” in the model tree and select “Apply Mesh control” o Highlight the green box titled “Selected Entities” and select the faces of the
notches as well as the two circular edges o In “Mesh Parameters”, type in .136 for the element size in the second box and
1.2 for “a/b” in the third box (The “a/b” box controls how rapidly the mesh size changes from the dense areas around the center to the course area on the rest of the plate)
o Verify the set up with Figure 5 o Click the green check mark to set the mesh control and exit the property
manager
Figure 17: Applying a mesh control
Step 9: Creating the mesh
o Right click on “Mesh” in the model tree and select “Create Mesh” o Under “Mesh Parameters”, type “.50in” next to the “Global Size” icon o Click the green check mark to create the mesh
You should see the smaller element sizes around the notches and how they transition into the larger sizes on the edge of the plate. This will give us more accurate data in the area of interest without slowing down the overall computation time too much.

Attachment C. SolidWorks-Specific FEM Tutorial
48
2. Solution Purpose: The Solution is the step where the computer solves the simulation problem and generates results for use in the Post-Processing step.
Step 1: Running the simulation
o At the top of the screen, click “Run” o When the analysis is finished, the “Results” icon will appear on the model tree
3. Post-Processing Purpose: The purpose of the Post-Processing step is to process the results of interest.
Step 1: Creating the stress plot
o Right click on the “Results” icon after it has finished running and select “Define Stress Plot”
o In the first drop down menu underneath “Display”, select “SX: X Normal Stress”
o Change the units to “English (IPS)” in the next menu o Uncheck the box next to “Deformed Shape” o Click the green check mark to finish creating the stress plot
Step 2: Displaying the mesh on the plot
o Right click on the stress plot and select “Settings” o In the drop down menu underneath “Boundary Options”, select “Mesh” to
display the mesh elements on the stress plot o Click the green check mark to accept the changes and exit the property
manager Figure 6, below, shows the stress plot along with the mesh and boundary conditions. Notice the uniform tension and compression along the face of the plate. The distributed force has put the plate into pure bending and the normal stress is constant any point on the plate that is the same distance from the neutral axis. The next few steps will use the probe tool to acquire stress values at the top face as well as inside the circular notch.

Attachment C. SolidWorks-Specific FEM Tutorial
49
Figure 18: Plot of normal stress with mesh
Step 3: Using the probe to find the stress at the top face
o Right click on the stress plot and select “Probe” o Under “Options”, select “At location” o Click on various elements on the top face of the plate where the normal stress
is the highest o Stresses at this location should be around 240 psi
Step 4: Using the probe to find the maximum stress in the notch
o Choose “On selected entities” from the “Options” menu and highlight the first box underneath the “Results” menu
o Select the face of the notch in the plate and click on the “Update” button to display the results in the spreadsheet
o Under the “Summary” spreadsheet, look for the “Min” and “Max” rows The minimum and maximum stresses in the notch should have the same magnitude but different signs. The points are equal because they are equally spaced from the center of the plate, however one is in tension and the other is in compression so they have opposite signs. Figure 7 shows the probe property manager and the stresses at the desired point: 757.25 psi.

Attachment C. SolidWorks-Specific FEM Tutorial
50
Figure 19: Using the probe to find the maximum stress on the inside face
4. Validation Purpose: The purpose of the Validation step is to compare FEM solutions with analytical solutions, or known published results, to validate the correctness of the FEM model. From elementary beam theory, the maximum normal stress due to bending is
where
3th12
1I =
Solving for the normal stress at the top face and at the edge of the circle gives the following: psi240x =σ To calculate the maximum bending stress at the root notch, the formula from a stress concentration handbook is used, which gives 0tmaxx K σ=σ
where ( ) ( ) psi375r2ht12/1
)rh5.0(M30 =
−−=σ and 95.1K t = for the structure being considered.
maxxσ is therefore 731.25.

Attachment C. SolidWorks-Specific FEM Tutorial
51
xσ from FEM is obtained by probing the top face midway between the notch and the
right end face. It turns out to be 239.5 MPa. maxxσ from FEM is obtained by probing
three points (front face, mid-thickness, and back face) at the root of the notch and averaging the probed values. It turns out to be (716.7+755.2+719.1)/3=730.3 MPa. The comparisons are listed in the table below, and the agreement is excellent.
SolidWorks Analytical Solution Percent Difference σx 239.5 240 -0.21%
maxxσ 730.3 731.25 -0.13%

Attachment D. CoMetSolution-Specific FEM Tutorial
52
Attachment D. CometSolution-Specific FEM Tutorials Overview: In this section, the tutorial problem will be solved using commercial FEM

Attachment E. Post-test
53
Attachment E. Post-test 1. The internal force per unit area acting inside the body when a force is applied on
the body is called:
O Stress O Strain O Displacement O Other
2. Factor of safety is:
O Stress acting / elastic limit. O Elastic limit / stress acting. O Stress / strain. O Force / area.
3. The notation σxx implies:
O Normal stress in x direction. O Shear stress in xy plane. O Shear stress in yz plane. O Normal stress in z direction.
4. τxy refers to:
O Shear stress in XY plane O Normal stress in X direction O Sum of normal stress in X and Y direction O Shear stress in YZ plane
5. Torsional loads produce:
O Shear stress O Bending stress O Normal stress O No stress

Attachment E. Post-test
54
6. Bending moment induces:
O Tensile stress O Compressive stress O Both tensile and compressive stress O Shear stress
7. What is von Mises stress?
O The principle stress O The normal stress O A scalar value that represents the total stress O A stress vector
8. What is Poisson’s ratio?
O The ratio of the contraction strain to the axial strain O The ratio of the shear stress to the normal stress O The ratio of the displacement to the normal stress O The ratio of shear stress to shear strain
9. What is Young’s modulus?
O The ratio of the normal stress to the normal strain O The ratio of the shear stress to the normal stress O The ratio of the displacement to the normal stress O The ratio of shear stress to shear strain
10. What is the shear modulus?
O The ratio of the normal stress to the normal strain O The ratio of the shear stress to the normal stress O The ratio of the displacement to the normal stress O The ratio of shear stress to shear strain
11. What is a restraint?
O Restriction for motion O Force acting O Stress in the body O A type of mesh

Attachment E. Post-test
55
12. What type of restraint is used to restrain a solid body when it is fixed to a support?
O Fixed O Immovable O Sliding O Restraining
13. What is a mesh?
O A type of restraint O A type of material O A material property O A grid of finite elements
14. What are the advantages and disadvantages of having a fine mesh? 15. What material properties are needed for a successful analysis?

Attachment F. Assessment
56
Attachment F. Assessment 1. Do you feel it was bad to not have a teacher there to answer any questions you
might have? O It didn’t matter O It would have been nice O I really wanted to ask a question
2. How did the interactivity of the program affect your learning?
O Improved it a lot O Improved it some O No difference O Hurt it some O Hurt it a lot
3. The six levels of Bloom’s Taxonomy are listed below. Rank how well this
learning module covers each level. 5 meaning exceptionally well and 1 meaning very poor.
1. Knowledge (remembering previously learned material)
O 5 O 4 O 3 O 2 O 1
2. Comprehension (the ability to grasp the meaning of the material and give examples) O 5 O 4 O 3 O 2 O 1
3. Application (the ability to use the material in new situations) O 5 O 4 O 3 O 2 O 1

Attachment F. Assessment
57
4. Analysis (the ability to break down material into its component parts so that its organizational structure may be understood) O 5 O 4 O 3 O 2 O 1
5. Synthesis (the ability to put parts together to form a new whole) O 5 O 4 O 3 O 2 O 1
6. Evaluation (the ability to judge the value of the material for a given purpose) O 5 O 4 O 3 O 2 O 1
4. Do you think the mixed text and video format works well?
O Yes O Indifferent O No
5. Do you think the module presents an affective method of learning FEA?
O Yes O Indifferent O No
6. Did you prefer this module over the traditional classroom learning experience?
Why or why not.

Attachment F. Assessment
58
7. How accurate would it be to call this module self-contained and stand-alone?
O Very accurate O Accurate O Indifferent O Inaccurate O Very inaccurate
8. What specifically did you like and/or dislike about the module. 9. How useful were the practice problems?
O Very helpful O Helpful O Indifferent O Unhelpful O Very unhelpful
10. Was there any part of the module that you felt was unnecessary of redundant?
Was there a need for any additional parts? 11. Please list any suggestions for improving this module. 12. Overall, how would you rate your experience taking this module?
O Excellent O Fair O Average O Poor O Awful

Attachment G. Practice Problems
59
Attachment G. Practice Problems 1. A beam made of steel has one of its ends fixed to the wall. The beam has a width w =
4” and a height h = 5”. The length of the beam is l = 15”. A load of 8000 lbf acts vertically downwards on the other end of the beam as shown in the figure. Modulus of elasticity of the material of the beam is 30 Mpsi and the Poisson’s ratio is 0.3. Find the stress in the beam.
Problem 1 2. A beam as shown in the figure is subjected to a force acting vertically upwards having a
magnitude of 15000 lbf at one end of the beam. The other end of the beam is fixed to the wall. The beam has a uniform taper of 10 degrees over a length of 10”. The remaining part of the beam has a height of 5”. The total length of the beam is 20”. Find the behavior of the beam under the given loading conditions.
Problem 2

Attachment G. Practice Problems
60
3. A cantilever beam is made of AISI 304 steel with an elastic modulus of 190 GPa and Poisson's ratio of 0.29. The beam is freely supported on an edge at a distance of 12” from the fixed end. The total length of the beam is 20”. A load of 20000 lbf acts vertically downwards on the other end of the beam. Find the stresses in the beam.
Problem 3
4. If the free support in the previous problem is replaced by a fixed support, find the changes in the behavior of the body under the same forces.
5. A shaft of diameter D = 5” is fixed at one end. A point load of 20000 lbf is acting
vertically downwards at the point as shown in figure. The length of the shaft is 15”. Find the stresses in the shaft.

Attachment G. Practice Problems
61
Problem 5
6. In the previous problem, the restraints are maintained the same but the load is changed from an eccentric point load to a torque on the free end. The value of the torque acting is 5000 lb-in. Find the shear stress in the shaft due to the torque.