learning microsoft excel 2007 - macros & buttons
DESCRIPTION
Sample pages from Chapter 15 of Learning Microsoft Excel 2007 by Greg Bowden which demonstrates how to create macros and use buttons to run them. It includes recording macros, assigning shapes to run macros, editing and deleting macros, button properties, looking at the macro steps and deleting macros.TRANSCRIPT

Learning Microsoft Excel 2007By Greg Bowden
Guided Computer Tutorialswww.gct.com.au
Using Macros and Buttons
Chapter 15
PUBLISHED BY
GUIDED COMPUTER TUTORIALSPO Box 311Belmont, Victoria, 3216, Australia
www.gct.com.au
© Greg Bowden
This product is available in Single or Multi User versions.
Single-user versions are for single person use at any particular time, just as a single text book would be used. If you intend to use the notes with multiple students the single user version should be upgraded to the multi-user version.
Multi-user versions allow the school or institution to print as many copies as required, or to place the PDF files on the school network, intranet and staff laptops. A certificate of authentication is provided with multi-user versions. Bookmarks provide links to all headings and sub-headings, and individual chapters are provided.
First published 2007
ISBN: 1 921217 44 8 (Module 1) 1 921217 45 6 (Module 2)PDF document on CD-ROM
Every effort has been made to ensure that images used in this publication are free of copyright, but there may be instances where this has not been possible. Guided Computer Tutorials would welcome any information that would redress this situation.
© Guided Computer Tutorials 2007 15-1
Chapter
15Using Macros and ButtonsMicrosoft Excel allows you to record the steps that you carry out within a spreadsheet. These recordings are called MACROS and they can be played back as often as required. You can assign a shape to represent a MACRO. In this way the user of the spreadsheet can simply click on the shape (button) to play back the MACRO.
Using a Simple Discount Table
To see how MACROS and BUTTONS work a simple discount system for a retail store will be set up. It offers discounts of 5%, 10% or no discount at all depending on the time of year.
A Opening a Sample File
1 LoadMicrosoftExcelorclosethecurrentfile. 2 Click on the OPEN icon in the QUICK ACCESS TOOLBAR or in the OFFICE
BUTTON. Access the CHAPTER 15 folder of the EXCEL 2007 SUPPORT FILES, loadthefile:
Macros and select YES to the READ-ONLY dialogue box.
B Setting a 5% Discount Macro
We want the spreadsheet to automatically add 5% discount in the DISCOUNT ALLOWED column.
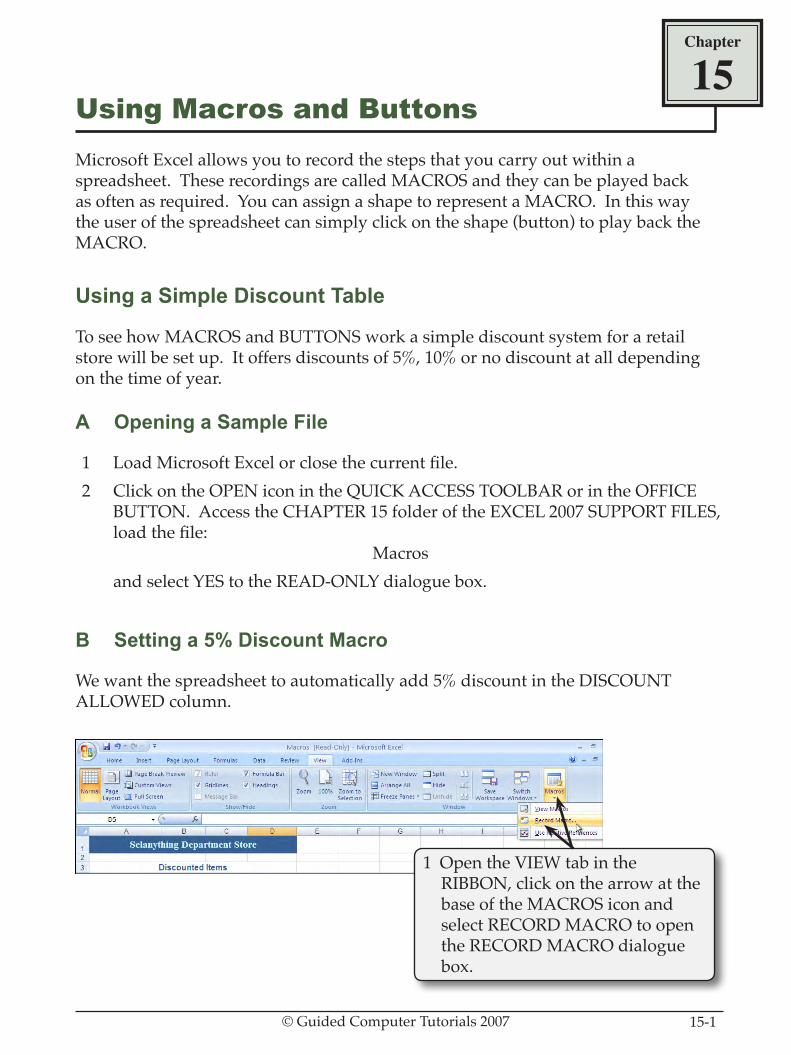
1 Open the VIEW tab in the RIBBON, click on the arrow at the base of the MACROS icon and select RECORD MACRO to open the RECORD MACRO dialogue box.

© Guided Computer Tutorials 200715-2
Learning Microsoft Excel 2007
NOTE: MACRO names cannot have spaces or mathematical symbols such as %.
NOTE: The formula looks to see if there is an entry in the cell to the left of the DISCOUNT ALLOWED column. If there is, 5% is entered, otherwise a blank space is inserted.
2 In the MACRONAMEboxenter:Discount_5_percent
3 Click on OK and the recording will commence.
4 Move the cursor to cell C9 and entertheformula:
=IF(B9<>””,5%,””)
5 Fill the formula down to cell C17 as we may want to add more items to the table at a later date.

© Guided Computer Tutorials 2007 15-3
15Using Macros and Buttons
6 Click outside COLUMN C to remove the highlight then click on the MACROS icon arrow in the RIBBON and select STOP RECORDING.
7 Open the HOME tab in the RIBBON and format the DISCOUNT ALLOWED column to PERCENT with no decimal places.

© Guided Computer Tutorials 200715-4
Learning Microsoft Excel 2007
C Setting a 10% Discount Macro
A second macro to set a discount of 10% will be created in the same way as the 5% macro.
1 Ensure that the cursor is not at cell C9. 2 Open the VIEW tab in the RIBBON, click in the arrow at the base of the
MACROS icon and select RECORD MACRO.
NOTE: A discount of 10% should now be applied to all the items.
3 Namethemacro:Discount_10_percent
and select OK to commence the recording.
4 Set the cursor at cell C9 and enter theformula:
=IF(B9<>””,10%,””)
5 AutofilltheformulafromcellC9to cell C17.

© Guided Computer Tutorials 2007 15-5
15Using Macros and Buttons
D Setting a No Discount Macro
We also need a macro that sets the DISCOUNT ALLOWED column to zero when no discount is to be given.
6 Click outside COLUMN C to remove the highlight then click on the MACROS icon arrow in the RIBBON and select STOP RECORDING.
1 Start recording a NEW macro called:
No_Discount then click on OK to start the
recording process.
2 Move the cursor to cell C9 and entertheformula:
=IF(B9<>””,0%,””)
3 AutofilltheformulatocellC17.

© Guided Computer Tutorials 200715-6
Learning Microsoft Excel 2007
E Using the Macros
The macros that you have recorded can be used whenever they are required.
1 In the VIEW tab of the RIBBON click on the arrow at the base of the MACROS icon and select VIEW MACROS. The three macros you recorded should be displayed in the MACRO dialogue box.
NOTE: You can also click directly on the MACROS icon to display the MACRO dialogue box.
4 Click outside COLUMN C to remove the highlight then click on the MACROS icon arrow in the RIBBON and select STOP RECORDING.
2 Click on the DISCOUNT_5_PERCENT macro and select RUN.