learner management guide - edexcel
TRANSCRIPT
Learner Management
guideManaging Learners
qualifications management application
Version 09.02

02
2 P 7
Contents
1 Manage Learners P 3 This user guide is written for centre staff who use Pearson’squalifications management application - Learner Management.
This can be accessed by the following user roles:• Centre Administrator• Assessor
The Learner Management app, located on the Navigational Bar within the qualifications management application, allows you to add and make changes to learner records through the Create and Manage menus.
Within this guide, you will learn the steps required to manage the following activities:
• How to manage learner records• How to manage registration orders• How to manage external assessments (test bookings)• How to manage invoice data
About this guide
Cancelling a Registration Order
Front cover image by Sue Barr
3 Managing External Assessments P10
4 Managing Invoices P13

03
Manage Learners
1
Section Overview
Having uploaded and registered a learner you may be required to check the qualification(s) your learner is on or you may need to edit a learner’s details.
This section focuses on how to amend learner details, as well as checking the learner’s qualifications or apprenticeships history and how to incorporate additional information such as photos and signatures.

04Manage LearnersThis section will explain how to manage learners and find their Pearson Learner ID that you have created. It will also show how to edit a learner’s details and view qualifications your learner has been registered against.
To Begin, click Learner Management App > Learner Management menu > Manage > Learners
Step 1
From the Search tab you are able to locate a learner that you have created, using the filters within the embedded table or using the additional filters in the dropdown menu. A list of learners that meet the search criteria will appear. Alternatively, click on the refresh icon at bottom right to display all learners registered at your centre. The first column will give the Pearson Learner ID.
Once you have located your learner, click on the Pearson Learner ID to view the learner details.
05Manage Learners (continued)
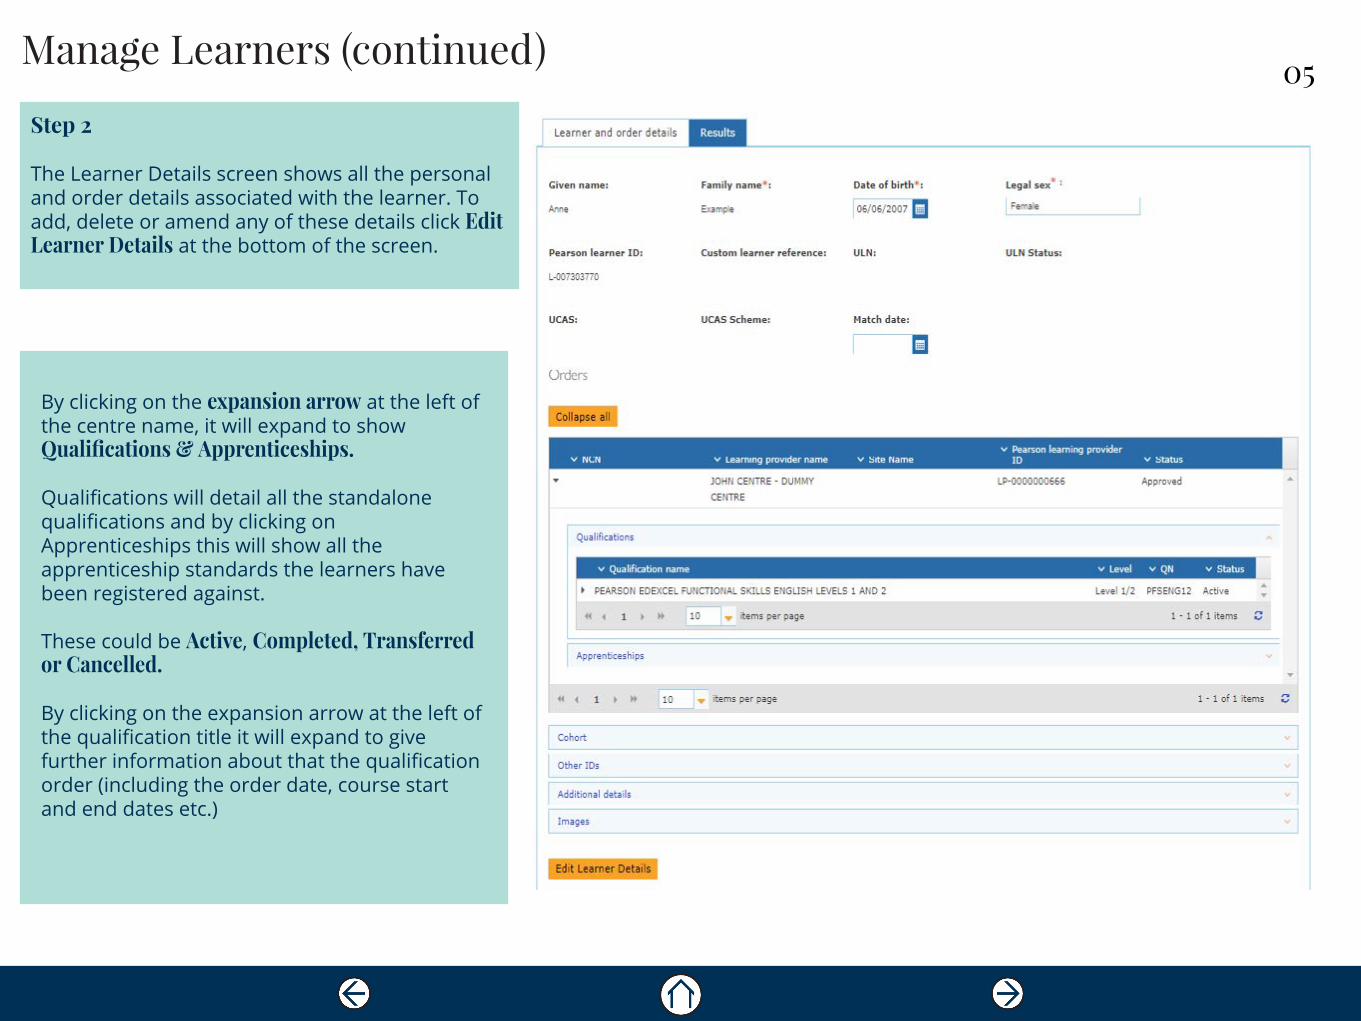
Step 2
The Learner Details screen shows all the personal and order details associated with the learner. To add, delete or amend any of these details click Edit Learner Details at the bottom of the screen.
By clicking on the expansion arrow at the left of the centre name, it will expand to show Qualifications & Apprenticeships.
Qualifications will detail all the standalone qualifications and by clicking on Apprenticeships this will show all the apprenticeship standards the learners have been registered against.
These could be Active, Completed, Transferred or Cancelled.
By clicking on the expansion arrow at the left of the qualification title it will expand to give further information about that the qualification order (including the order date, course start and end dates etc.)

06Manage Learners (continued)
Step 3
When editing details of a learner you are allowed to make one amendment, such as; Given name, Family name, Legal sex and Date of birth. If further details need to be changed you should contact your dedicated Account Specialist.
For some of our qualifications you are required to upload an image and signature for the learner to their record.
To add or amend a learner’s photo or signature, you must save the images on your computer. Once on the learner details page, click on Images and then Select files.
You should also input the supplied date for each image.
Click Save at bottom left of page to save any amendments you have made.

07
Cancelling a Registration Order
2Section Overview
Please note, this can only be carried out by a Centre Administrator.
In order to cancel a registration order, you will need to ensure that:
• No tests have taken place• No tests have been booked• No results are linked to the qualification• No outcomes have been added for internally assessed units• No claim has been made for the qualification (i.e. qualification is complete)
If any of the above has occurred, users will be unable to cancel the order registration and the cancel button will beinactive.
At the present time, there has been no change to the charges associated with cancellations; therefore providing that an invoice has not been processed, you will not be charged for the registration.
If you cancel a pre-invoiced or invoiced order and also require a refund, please contact CustomerServices for support.

08Cancelling a Registration OrderThis part of the guide focuses on cancelling a registration order for a learner. This section assumes the registration order has previously been made against a qualification / apprenticeship.
To begin, click Learner Management App > Learner Management menu > Manage > Learners
Step 1
From the Search tab you are able to locate a learner that you have created, using the filters within the embedded table or using the additional filters in the dropdown menu.
Once you have located your learner, click on the Pearson Learner ID to view the learner details.

09Cancelling a Registration Order (continued)
Step 2
Scroll to the bottom of the page and click on Edit Learner Details.
Select the registration / order you would like to cancel.
If it can be cancelled, the Cancel button will be active (highlighted in orange).
If it is unable to be cancelled, the Cancel button will be inactive (faded).
Assuming the registration / order can be cancelled, click Cancel. A warning message will appear on screen asking if you’re sure you wish to cancel the registration.Click Ok.
The registration / order will be cancelled and the status will change from Active to Cancelled.

10
3
Managing External Assessments
Section Overview
Having made an External Assessment booking you will be required to visit the Manage External Assessment screen as per below.
The reasons for this would be to:
1. Cancel a Test Booking2. Amend a Test Booking3. Launch an Onscreen Test (Online)4. Download an Onscreen Test (Offline)5. Mark a Test as Absent (for Onscreen tests only)
This section focuses on the processes for each of the above five actions.

11Managing External Assessments
This section will explain how to manage your external assessments for testable qualifications.
To begin, click Learner Management App > Learner Management menu > Manage > External Assessments
Step 1
Using the search function you can find any future test booking.
Alternatively, click on the refresh icon at the bottom right to view all bookings at present and in the future.
Each learner is listed separately giving you flexibility in managing their test.
To view the Assessment Modeand additional time click theexpansion arrow on the left

12Managing External Assessments (continued)
Step 2
Cancel BookingTo cancel a test, select the booking using the tick box on the left and click Cancel. A pop-up screen will appear asking you to confirm. (Please note that past test bookings cannot be cancelled this way; see instructions under Mark test as absent below).
Amend BookingTo amend a test, select the booking using the tick box on the left and click Amend. You can then amend the date and time of the test, the mode of the test (i.e. Classroom, Offline, Online) or add additional time. You are only able to make amendments if you have not entered the testing window. Please note that if you have already downloaded your test package you must download it again after making the amendment. Failure to do this will prevent you from uploading your answer package successfully.
Launch Online Onscreen TestTo Launch an Online Onscreen test select the booking using the tick box on the left and click Launch test. If installed the Online Onscreen test player will launch the test.
Download Offline Onscreen TestTo Download an Offline Onscreen test select the booking using the tick box on the left and click Download test. Your Pearson Onscreen Platform PIN will be assigned to the download so only you can launch the test. A pop-up screen will appear asking you to confirm the download. Click on Confirm. The download will run four checks which are all required to be passed. If a fail appears next to any of the four checks press F5 on your keyboard which will refresh the screen. You will then be asked to confirm the download again.
Mark test as absentTo mark a test as absent, select the booking using the tick box on the left and click Mark test as absent. A pop-up screen will appear asking you to confirm. Please note that this is only available for onscreen test bookings; you will not be able to use this screen to mark paper-based tests as absent. You will only be able to mark tests as absent if the scheduled start time of the test is in the past, up to a maximum of 21 days.

13
4
Managing Invoices
Section Overview
The Manage Invoices function provides detailed information about the transactions for which you will beinvoiced and includes:
• Detailed information about the transactions (aligned with your centre’s billing schedule)• Learner-level data associated with registration, booking and certification transactions• Centre-related information such as who created an order and when• Filters so you can search for an invoice and related transactions using customised search criteria• Linked credit notes
By using the functionality, learning providers can search invoiced transactions, track and assess invoice totals, andconfirm that all learners have been registered correctly.
This section explains how to access invoices, create customisable searches, and get the most value from theinformation displayed.

14Managing InvoicesThis section will explain how to manage invoices assuming you have created at least one order which has at least one product and cost associated with it.
To begin, click Learner Management App > Learner Management menu > Manage > Invoices
Step 1
This will direct you to the Manage invoices page. By clicking on the first search field, a drop down menu will appear to enable you to narrow down your search. Alternatively, click Search or the Refresh icon and a list of invoices that have previously been generated will be displayed.
Step 2
To sort invoices according to your specifications, click on the arrows in the columns. Locate your invoice and click Open at right. You can narrow your search down by using the ‘Search’ boxes.
This will allow you to enter a specific date range, Purchase Order number, Learner Reference and / or invoice number. You can click on Add Another if you wish to include further search criteria.

15Managing Invoices (continued)
Step 3
The Invoice Description page has now loaded and lists all details for the relevant invoice such as the Purchase Order Number, Qualification and Quantity. It displays a breakdown of invoice line items and includes the associated invoice number, total amount for all orders as well as product information. To view the learners linked to the invoice, click on the Invoice line. This will expand the Learners associated at the bottom of the screen, as shown on the following page.
Please note that invoices often contain a number of separate orders. You can filter the results of your search by clicking on the arrows in the column heading(s).

16Managing Invoices (continued)
Step 4
The learners screen will now appear. This will display the learner, order and invoice details. It also displays the type of transaction you have been invoiced for under the heading Type. This will show as either one of the following Booking, Registration or Certification.
A helpful tip would be to create your own reference name or number when creating an order. Once an invoice has been issued, you can then search by your customised Purchase Name or Number in the Invoice Description page of Manage Invoices.
Please note that this will only work when creating multiple orders for the same product within the same billing period. You will just see the one invoice line per product. If the Purchase Order Number is different then you will see multiple lines per product on one invoice.
If the financial year is different, transactions will be placed on a new invoice with a new invoice number.

17Managing Invoices (terms of reference)
Field Description Use
Pearson Invoice IDUnique QMA-specific invoice reference number, which also appears on the hard copy invoice. Also referred to as the Invoice Number.
Enter this reference number in to the search box above the columns to locate a specific invoice
Start Date First date of invoice period (aligned with your centre’s billing cycle) You can sort invoices according to Start Date by clicking on the arrow in the column
End Date End date of invoice period (aligned with your centre’s billing cycle) You can sort invoices according to End Date by clicking on the arrow in the column
Financial YearFinancial Year associated with the invoice (September - August) You can see which invoices that have been created for which financial year
(associated with course start date)
Total AmountTotal amount of the invoice If viewed before invoice period ends, can be used to assess the running total of
costs associated with a particular invoice period
Purchase Order (PO)Number
Free text reference number (up to 30 numbers and characters allowed) that can be entered by the learning provider while making an order
This reference can be used for centres internal admin purposes. The reference number can relate to the name of the teacher, name of the contract if learners are coming from external sources, time of the enrolment or anything else that would help the learning provider in administering their invoices. Create your PO Number by entering in a customised reference name or number in the ‘Purchase Order Number’ field when creating an order
Credit Note NumberQMA-specific reference number given for each credit note Please see linked credit notes
Linked Credit NotesIf a transaction is cancelled after it has already been charged, e.g. registra-tion, test booking etc - a credit note will be issued and appear in the Linked Credit Note column of the applicable invoice line item (not learner)
Learning provider will be able to link the learners to the credit notes that offset them
TypeRefers to the type of transaction being charged - either: Registration fee, Certification fee, Booking fee (for an exam booking)
Learning provider can differentiate the type of transactions that learners have been invoiced for
Invoice Line Description
Title of the qualification together with a high level fee type (registration or certification)
This is what will appear on the physical copy of the invoice and can be used to trace/ confirm the product against the hard copy
Pearson Product ID QMA specific reference number given to each product Can be used to search for the product on QMA pages
Qualification Number (QN)
Qualification (QN) or Accreditation Number if the Product is a unit Can be cross referenced against Ofqual register
Product NameThe title of a qualification Can be cross referenced against Ofqual register
QuantityThe number of learners that the invoice line item applies to Can be used to confirm if correct number of learners have been
registered / booked for a test or certificated
Sub amountFee (registration: registration or booking, certification) charger per learner Can be used to identify the initial fee associated with a particular learner for an
order
VAT AmountVAT amount charger per learner Indicates associated VAT amount charged. Note - learning providers that are fully or
partially exempt from VAT might see a value of 0 if no VAT is charged
Order NumberQMA-specific reference number created for each order made by the learning provider
Can be used to trace / confirm the order

18