leadcare ii user manual
TRANSCRIPT

ESA, Inc.
LEADCARE II® Blood Lead Testing System
For Professional and In Vitro Diagnostic Use Only
A Rapid, On-site Test for the Quantitative Determination of
Lead Levels in Human Blood Samples
_______________________________ ____________ Laboratory Director Date
1.

TABLE of CONTENTS
Page Number Contents 3 Title 4 Intended Use 4 - 5 Background Summary and Explanation of Test Principle of the Procedure 6 Specimen Collection 7 - 9 Analyzer and Materials Storage and Stability Precautions Analyzer Set-up Battery Operation AC Adapter Operation 10 - 16 Test Procedure Prepare for Testing Analyzer Calibration Blood Lead Testing 17 -18 Test Results and Interpretation 18 Limitations 18 - 19 Quality Control
19 - 20 Comments and Technical Assistance 20 - 23 Performance Characteristics 24 References
2.

This procedural outline is intended to provide a ready outline reference for performance of the assay. These abbreviated directions are not intended to replace the complete package insert.
LeadCare II® Blood Lead Testing System
For Professional and In Vitro Diagnostic Use Only
A Rapid, On-site Test for the Quantitative Determination of
Lead Levels in Human Blood Samples
3.

INTENDED USE
The LeadCare II Blood Lead Test Kit is for in vitro diagnostic use only. The Test Kit is for the quantitative measurement of lead in fresh whole blood. This product is for professional use only. Sensors and Treatment Reagent of the Test Kit are specific for lead only. Contents of this LeadCare II Blood Lead Test Kit must only be used with a LeadCare II Analyzer.
BACKGROUND
Summary and Explanation of the Test Blood lead poisoning can adversely impact the health and well-being of both adults and children, and, if left unchecked at elevated concentrations, can lead to death. In the case of children in the United States, lead continues to be a serious health problem. It is important to note that decreased intelligence and impaired neurobehavioral development have been associated with blood lead levels as low as 10 micrograms of lead per deciliter of whole blood (10 ug/dL). Conventional blood lead assays usually require that the blood specimen(s) be collected and transported to a laboratory that has the necessary instrumentation and expertise to perform the analysis. Frequently, it can take from days to weeks to obtain the results; not surprising when you consider the time required for sample collection, packaging, shipping, analysis, and reporting. With the LeadCare II (Waived) Blood Lead Testing System, it is possible to make a rapid diagnosis and to initiate early intervention, since the quantitative analysis of lead in blood is conducted on-site. An entire blood lead test including sample preparation and analysis can be performed in less than 5 minutes. Principle of the Test The technology used by the LeadCare II Blood Lead Testing System is derived from that employed in the ESA Anodic Stripping Voltammetry (ASV) method that has been used by clinical laboratories for over three decades to measure blood lead concentrations. ASV relies on two electrochemical reactions. The initial reaction is the plating step or reduction process that occurs when, under the influence of a high negative potential, lead in its +2 (ionized) form receives two electrons and is converted to its metal form, or neutral lead (Pb°). The second reaction, which is the stripping cycle, occurs when the electrode potential is shifted from a negative to a more positive value. As the potential/voltage reaches the formal potential of lead (the potential at which lead oxidizes/reduces), the neutral lead gives up its two electrons and returns to its original +2 state. The transfer of electrons that occurs during this stripping cycle gives rise to an electrical current that is directly proportional to the concentration of lead in the sample.
4.

Principle of the Test (cont.) In the LeadCare II System’s sensor (test electrode), gold particles are used in place of the mercury, since mercury is considered a hazardous material. Fifty microliters of whole blood are added to 250 microliters of dilute hydrochloric acid reagent in a LeadCare Treatment Reagent tube. An aliquot of the resulting mixture is placed onto the disposable LeadCare II Sensor. The lead in the mixture is deposited onto the gold particle test electrode for 140 seconds, using controlled potential electrolysis at -530 mV. At the end of the 140 seconds, a square-wave waveform (moving in a more positive potential direction) is superimposed on the gold particle electrode. This results in the deposited lead being stripped off the gold particles. The area of the resulting lead peak is converted to a temperature corrected blood lead concentration by comparison to an internal calibration curve stored in the electronics module. The blood lead value is reported to one decimal place on a liquid crystal display in units of micrograms per deciliter (µg%, µg Pb/dL).
5.

SPECIMEN COLLECTION
Method Of Collection Obtain samples of whole blood from either a skin puncture (for example a finger-stick) or a veni- puncture. Follow the procedures of your institu- tion for the proper choice of blood collection site and method. For detailed Sample collection instructions, refer to the CDC’s instructional CD rom provided in the LeadCare II Analyzer Kit
Collection Container Use capillaries or blood collection tubes that
contain an anticoagulant. Use only heparin or EDTA as the anticoagulant. EDTA collection tubes must be at least half filled with blood. Use lead-free blood collection devices. LeadCare II requires 50 µL of blood
Special Patient Preparation Requirements If using the finger-stick method for the collection of whole blood, wash, rinse and dry the hands thoroughly (with “lead-free” materials) before wiping the “target” finger with a “lead-free” alcohol wipe and gauze pad. Similarly, when collecting a venous sample of blood, wipe the “target” area with a “lead-free” alcohol wipe and gauze pad before inserting the needle. Wash, rinse, and dry the “target” area (before the alcohol wipe, etc.), when the area is visibly dirty. Handling Conditions Use only fresh, unrefrigerated, whole blood with the LeadCare Treatment Reagent. Use whole blood within 24 hours of collection. Criteria Store blood at 50°-90° F (10°-32° C).
6.

ANALYZER and MATERIALS
Contents of Analyzer Kit 1 - LeadCare II® Analyzer
1 - AC Adapter 4 - Batteries (alkaline, AA, standard)
1 - Sensor Retainer
1 - User’s Guide
1 - Quick Reference Card 1 – LeadCare II® instructional CD-ROM
1 – CDC Finger Guidelines for Collecting and Handling Blood Lead Samples 1 - Warranty Card Contents of Test Kit 48 - LeadCare II Sensors 48 - LeadCare Treatment Reagent tubes 50 - LeadCare II Capillaries and Plungers 50 - LeadCare II Droppers 1 - Analyzer Calibration Button 1 - Package Insert 1 – Labels and worksheet Storage and Stability All of the above instrumentation, equipment, and reagents can be stored at room temperature, i.e., 59°-97° F (12°-36° C) until, in the case of the Treatment Reagent Tubes, Sensors and Capillaries, the expiration date is reached.
7.
Precautions
FOR In Vitro DIAGNOSTIC USE ONLY. Do not mix Sensors from different lots. Do not use Treatment Reagent tubes after the stated expiration date.
Treatment Reagent is slightly acidic. Avoid contact with eyes or mucous membranes. In the event of accidental contact, wash thoroughly with water.
Standard guidelines for handling infectious agents and chemical reagents should be observed throughout all procedures. All contaminated waste such as finger stickers, alcohol wipes, gauze pads, used sensors, used Treatment Reagent Tubes, needles, blood tubes, etc. should be disposed of properly. To obtain accurate results, package insert instructions must be followed. Analyzer Set-up Battery Operation
The battery holder is on the back panel of the Analyzer. Turn the analyzer to access the battery area. The battery holder is at the display-end of the Analyzer. While holding the Analyzer, press the locking tab with one or both thumbs and slide the panel away from the analyzer. Insert four 1.5V AA size alkaline batteries. Replace the battery compartment panel by sliding it into place. Make certain that it “clicks” into place. Turn the analyzer so that the front is facing you.
AC Adapter Operation The AC Adapter is attached to the connector on the back side of the Analyzer. NOTE: You may use the AC Adapter along with the battery. When you connect the AC Adapter to the Analyzer, it receives power from the AC Adapter and not from the battery. The Analyzer has two automatic shut-off time limits. Each is based on the source of power used:
Battery 15 minutes AC Adapter 60 minutes
Following automatic shut-off, turn on the analyzer by pushing the on/off switch toward the left on the right left side of the back panel of the analyzer.
8. Analyzer Set-up (cont.)

Attaching the Sensor Retainer
Attach the Sensor Retainer to the Analyzer. Slide the Sensor Retainer into the Sensor Connector Thermal Deck.
CAUTION !!
Do NOT use the LeadCare II Blood Lead Test System without the Sensor Retainer attached to the Analyzer. Failure to do so could result in falsely low blood lead results.
9. TEST PROCEDURE

Before performing the following instructions, please make certain that you have set up the Analyzer as directed in the previous section -- Analyzer Set-up. Analyzer Performance Verification
The Analyzer contains a built-in self test. The self test checks the functions of the Analyzer’s electronics. The Analyzer performs this self test each time that it is turned on.
To turn on the analyzer push the on/off switch towards the left (indicated by the I) on the right side of the back panel of the analyzer.
After the Analyzer has been turned on for about one second, the Analyzer will “beep” and show an initial startup display then:
ESA LeadCare II VERSION 1.01 COPYRIGHT 2005 ALL RIGHTS RESERVED
Next, the display will perform the “SELF TEST” for about one second the display will indicate:
SELF TEST PASSED If the test is successful, the following display will show:
PREPARE SAMPLE USE SENSOR LOT xxxxx OR RECALIBRATE THEN INSERT SENSOR
NOTE: If the SELF TEST fails, the Analyzer will not function and the window display will show: ELECTRONIC QC CHECK FAILED. CALL TECH SERVICE ERROR X
If your Analyzer shows this Error Code, refer to the section called Trouble Shooting in your Quick Reference Guide or Summary of Display Messages in your User’s Guide. Finally if the analyzer has not been calibrated before the display will read:
PLEASE CALIBRATE ANALYZER WITH BUTTON 10.
Calibrating the Analyzer

Calibration must be performed before using each new Test Kit. Each Test Kit contains a Calibration Button. The electronic information programmed into this button must be transferred to the Analyzer.
1. Remove the Calibration Button from the new Test Kit. 2. Check the 5-digit number on each of the following: The lot number on the end of the Test Kit carton. The code number on the Calibration Button. The lot number on the Sensor containers. Verify that all of these items have the same 5-digit number.
NOTE: The Treatment Reagent lot number will be the only one that differs from the lot numbers on the three other items.
3. Check the expiration date on the end of the Test Kit box. Do NOT use your Test Kit
if any of the lot numbers do NOT match each other (other than Treatment Reagent). The expiration date on the Test Kit box (or any of the separate items) has passed. Failure to follow these precautions could result in erroneous test results.
4. Make sure that your Analyzer is still turned on. If it is off, turn on the analyzer by pushing the on/off on the back panel of the analyzer and wait for the SELF TEST cycle to finish before proceeding. The analyzer display will read PLEASE CALIBRATE ANALYZER WITH BUTTON
5. Press the round metallic end of the Calibration Button to the Calibration Reader. The Calibration Reader is on the top right hand side of the analyzer.
The Analyzer should beep, briefly display CALIBRATION SUCCESSFUL and then read:
PREPARE SAMPLE USE SENSOR LOT xxxxx
OR RECALIBRATE THEN INSERT SENOR
6. Make sure that the calibration code on the Analyzer’s display matches the calibration
code printed on the Calibration Button.
If the calibration code does not match the Analyzer display, then repeat the process described in Step 5. above. If the problem persists refer to the Section called
11.
Calibrating the Analyzer (cont.)

CLEANING, TROUBLESHOOTING, DISPLAY CODES for help – See Trouble Shooting in your Quick Reference Guide or Summary of Display Messages in your User’s Guide
Your Analyzer is now calibrated for the new Test Kit and you are ready to analyze samples. IMPORTANT NOTES: You need only calibrate the Analyzer once for each lot of Test Kits. The Analyzer stores the calibration program even when it is off. Throw away the Calibration Button after finishing a Test Kit. This will prevent the accidental use of an old Calibration Button with a new Test Kit. Blood Lead Testing The following items are needed in order to perform the lead analysis: A calibrated Analyzer LeadCare II Test Kit Alcohol swabs – purchased separately Lancing devices or venipucture sample collection supplies–purchased separately Gauze pads or laboratory wipes – purchased separately LeadCare II Controls
Place all of the above items in front of you on a clean work surface. Leave the individual items in their packaging until ready to use. This reduces the chances for lead contamination.
1. Prepare the Analyzer: Turn on the analyzer by pushing the on/off switch toward the I
on the back panel of the analyzer. Wait for the SELF TEST to finish. The display will show:
PREPARE SAMPLE USE SENSOR LOT xxxxx OR RECALIBRATE THEN INSERT SENOR
Verify that the calibration code on the Analyzer matches that of the Test Kit that is being used. If they do not match, follow the calibration procedure in the Calibrating the Analyzer Section above.
12.
Blood Lead Testing (cont.)
2. Obtain the Blood Sample:
Obtain samples of whole blood from either skin puncture (finger stick) or venipuncture. Follow the procedures of your institution for the proper choice of blood collection site and method. Use capillaries or blood collection tubes that contain an anticoagulant. Use only heparin or EDTA as the anticoagulant. EDTA tubes must be at least half filled. Use lead-free blood collection devices.
3. Measure the Blood Sample To remove a 50 microliter volume of blood from a capillary blood collection device or from a venous blood collection device, perform the following steps: Make certain that the Blood Sample is at Room Temperature. ROCK or INVERT the BLOOD SAMPLE MULTIPLE TIMES to ENSURE that IT IS WELL MIXED
Remove a Capillary from the Capillary/Plunger Tube. Holding the capillary almost horizontally with the green band on top, fill the capillary to the black fill line. Filling stops when the sample reaches the black line. Wipe, in a downward motion, the surface of the capillary with a clean gauze pad or laboratory wipe to remove excess blood on the capillary.
CAUTION !!
Make sure that the blood sample does not contain clots. Make sure to measure exactly 50 microliters of blood. Check to be certain that there are no gaps or bubbles in the blood in the tip of the capillary. Use only fresh blood within 24 hours of collection. Do NOT refrigerate the blood prior to mixing with the Treatment Reagent. NOTE: Failure to follow these precautions could cause erroneous test results.
13.
Blood Lead Testing (cont.)
4. Mix the Blood Sample with the Treatment Reagent:

Gently tap a tube of Treatment Reagent on a work surface to allow the liquid to collect at the bottom of the tube. After doing this, carefully remove the cap and place it upright on a clean gauze surface. Do NOT allow the inside of the cap to touch anything. This could lead to sample contamination.
Mix the sample by inverting the tube 8-10 times. Thoroughly mix all of the Treatment Reagent with all of the blood sample. The resulting color of the Treatment Reagent-Blood Sample solution is brown. Coat the entire inside surface of the tube by inverting and rocking. A lack of thorough mixing can result in inaccurate results.
Allow the tube to stand upright for a minute or so. This will allow the “brown” solution to drain down to the bottom of the tube. NOTE: Once the blood is mixed with the Treatment Reagent, it is not necessary to perform the
test immediately. The Blood-Treatment Reagent mixture is stable for up to 48 hours at room temperature, and up to 7 days if refrigerated.
LABEL THE TUBE WITH THE PATIENT’S IDENTIFICATION. This is very important if the Blood-Treatment Reagent solution is not analyzed immediately.
5. Apply Blood-Reagent Mixture to Sensor:
Remove a Sensor from its package. Handle the Sensor only by the letter/number combination of the sensor. Insert the Sensor into the analyzer (makes sure the black bars are facing up and go in first). When the sensor is inserted properly the analyzer beeps and the display reads: ADD 1 DROP OF SAMPLE TO X ON SENSOR SENSOR LOT # xxxxx
Obtain a dropper from the dropper vial.
If the brown, Blood-Treatment Reagent has been refrigerated, it is very important that the solution be brought to room temperature and thoroughly mixed before it is sampled.
14.
Blood Lead Testing, Apply Blood-Reagent Mixture to Sensor(cont.)

With a finger and thumb press the walls of the dropper. Then, while holding the walls together insert the dropper to the bottom of the brown, Blood-Treatment Reagent solution. Release the walls of the dropper. This allows the Blood-Treatment Reagent mixture to enter the dropper.
NOTE: The exact volume of the brown, Blood-Treatment Reagent solution that is drawn into the dropper is not critical.
Touch the dropper tip to the X on the sensor and squeeze the walls to dispense the sample
CAUTION !!
Do not use Sensors that have dropped on the floor. Contamination may have occurred. Do not use Sensors if broken, scratched, or damaged in any way.
6. Run the Test
After dispensing the Blood-Treatment Reagent solution on the X, the analyzer will automatically begin a 180 second countdown. The display will show:
TESTING XXX SECONDS TO GO SENSOR LOT # xxxxx At the end of the 180 seconds, the Analyzer will display the blood lead result. The display will show:
RECORD TEST RESULT 6.5 µg/dL Pb
THEN REMOVE SENSOR SENSOR LOT # xxxxx
Remove the used Sensor from the Analyzer. Then, discard the used materials in an appropriate biohazard container.
7. Running Additional Tests
The Analyzer is ready to run additional tests when the display reads:
15.
Blood Lead Testing, Running Additional Tests (cont.)

LAST TEST RESULT 6.5 µg/dL Pb
INSERT SENSOR SENSOR LOT # xxxxx
CAUTION !!
If the sample is run and the Analyzer automatically shuts-off, the sample will have to be rerun. After an automatic shut-off, you must turn on the analyzer by
pushing the on/off switch toward the left on the left side on the back panel of the analyzer. Wait for the SELF TEST to finish. The display will show:
PREPARE SAMPLE USE SENSOR LOT xxxxx OR RECALIBRATE THEN INSERT SENOR
NOTE: If the power source of the Analyzer is interrupted a LOW POWER message
will be displayed. If your Analyzer shows this Error Code, refer to the section called Trouble Shooting in your Quick Reference Guide or Summary of Display Messages in your User’s Guide.
Remember the Analyzer has two automatic shut-off time limits depending on the power source being used: Battery 15 minutes AC Adapter 60 minutes
Following automatic shut-off, turn on the analyzer by pushing the on/off switch toward the I on the back panel of the analyzer.
If you have any problems while performing a blood lead test, please refer to the section called Trouble Shooting in your Quick Reference Guide or Summary of Display Messages in your User’s Guide.
16.
TEST RESULTS and INTERPRETATION Test Results:

The Analyzer's display window shows the blood lead result. The result is in micrograms (µg) of lead per deciliter (dL) of whole blood. No calculation is needed. Results are displayed to one decimal place. The reportable range of the test is 3.3 to 65 µg/dL. "Low" in the display window indicates a blood lead test result less than 3.3 µg/dL. When this occurs, report the blood lead result as less than (<) 3.3 µg/dL. "High" in the display window indicates a blood lead test result greater than 65.0 µg/dL. If this occurs, report the blood lead result as greater than (>) 65 µg/dL. IMPORTANT: Report blood lead results to the proper state or federal agency. Interpretation of Results: Blood lead levels less than 10µg/dL is below the “level of concern”. Blood lead levels above 10µg/dL indicate possible lead poisoning, which is a serious medical condition. Patients with blood lead levels above 10µg/dL must be confirmed with a venous sample. The following table shows when to test patients again if the result is above 10µg/dL4.
If Blood Lead Result of screening test is:
Perform diagnostic test on venous blood within:
10-19 µg/dL 3 months
20-44 µg/dL 1 month - 1 week (the higher the result, the more urgent the need for follow-up testing)
45-59 µg/dL 48 hours
60-69 µg/dL 24 hours
Greater than or equal to 70 Immediately as an emergency lab test When the LeadCare II display reads “High”, the analyzer has detected a blood lead level greater than 65 µg/dL, “High” results on LeadCare II should be followed up immediately as an emergency laboratory test. Venous confirmation samples can be tested on the LeadCare II system to rule out contamination in the first sample. However, if the result of the venous sample is also above 10 µg/dL, ESA recommends that you send the venous sample to a reference lab for confirmation by another method. NOTE: If you are concerned about the accuracy of results near the 10 µg/dL threshold, ESA recommends that you set the confirmation threshold at 8 µg/dL, and have venous samples sent out for confirmation by a reference laboratory.
17. Interpretation of Results (Continued):

Consult your local public health department or the Centers for Disease Control and Prevention, for further information on blood lead results that are greater than 10 µg/dL.4
LIMITATIONS
1. Analyzer Test results can be adversely influenced by ambient testing conditions, if they are outside the following ranges: 54° - 97°F (12° - 36°C) 12% - 80% Relative Humidity 2. The analysis of refrigerated blood can lead to erroneous blood lead results. 3. Blood samples must be tested or mixed with the Treatment Reagent solution within 24 hours of collection. Erroneous results can be obtained if this is not done.
4. Blood samples that have been thoroughly mixed with the Treatment Reagent solution and stored at room temperature must be tested within 48 hours. 5. Blood samples that have been thoroughly mixed with the Treatment Reagent solution
and immediately refrigerated (2° - 8°C) must be analyzed within 7 days of refrigeration. Erroneous test results can be obtained if this is not done.
6. The LeadCare II Blood Lead Testing System is an in vitro, diagnostic device that is
used in-the-field and in medical facilities to test children and adults for lead exposure and absorption.
QUALITY CONTROL
Quality Control specimens should be tested on a routine basis. It will indicate whether or not the LeadCare II Blood Lead Test System is working properly. The following procedure is recommended for the LeadCare II System. However, please conform to any additional quality control requirements specified by local, state, and/or federal regulations or accreditation requirements of your country. NOTE: Unless this device is modified by a laboratory, the laboratory’s compliance with these quality control instructions will satisfy the applicable requirements of 42 CFR 493.1202(c)3 for users in the U.S.A. Choice of Control Materials:
Both a high and a low blood lead control material should be used to test the operation of the LeadCare II Blood Lead Test System. LeadCare Blood Lead Controls were specifically designed to work with the LeadCare II System. Other controls can be used with the LeadCare II System, but LeadCare II ranges must be established for these controls, if they
18. Choice of Control Materials (Continued):

do not exist. For users in the U.S.A., the procedure in 42 CFR 493.1218(2)3 must be used to establish the LeadCare II ranges of acceptability for the control materials.
Preparation of Control Materials: Follow the instructions that come with your control materials. Check the expiration date.
Follow the instructions given in the “Blood Lead Testing” portion of this document. Use each control specimen as if it were a typical patient blood sample. Frequency of Use of Controls:
Use on each New Lot of Test Kits received. Use on each New Shipment of Test Kits received.
Use to test the technique of new users.
Use if you suspect improper storage of the Test Kits.
Use any time that you believe that the System is not working properly. Refer to the package insert provided with the Control Kit for additional important information on quality control. The test results of each control should be in range before any patient samples are tested. If either control level is outside of the stated “acceptable” range, a re-test of the control(s) must be conducted, using another aliquot from the Control Vial(s). If this does not correct the problem, refer to the section called Trouble Shooting in your Quick Reference Guide or Summary of Display Messages in your User’s Guide.
COMMENTS and TECHNICAL ASSISTANCE Potential Sources of Lead: The major source of lead in the blood of children is lead-containing paint -- peeling, chipping, dust particles, etc. -- that is usually found in/on/around older homes. These homes are frequently found in the inner-city and/or in areas that are socio-economically depressed. Children that suffer from pica, will ingest these forms of lead, with a resulting increase in their blood lead concentrations. Other potential sources of lead exposure are: pottery/ceramics (usually of non-U.S. origin), battery reclamation/manufacturing operations, mining/smelting operations, antique car restoration, older
19. Potential Sources of Lead (Continued):

water (lead) pipes, orchards that used lead-arsenate for pest control, soil around older (paint-scraped) homes, soil on or near former lead-working sites, water from wells in certain geographical/geological areas, acidic foodstuffs packaged in lead-soldered cans, eating lead shot-containing game, encountering areas contaminated by lead from the exhaust of automobiles using leaded gasoline, etc. Technical Service Representative
Technical Support ESA Biosciences, Inc
22 Alpha Road Chelmsford, MA 01824 Phone: 1-800-275-0102
Fax: 1-978-250-7092
PERFORMANCE CHARACTERISTICS
Sensitivity: The Limit of Sensitivity of the LeadCare II System is: 3.3 ug/dL. Blood Lead Level Range: The LeadCare II range is: 3.3 - 65.0 ug/dL.
NOTE: LeadCare II reports blood Lead concentrations greater than 65 ug/dL as “HIGH”. Precision (defined as CV): The precision of the LeadCare® II Blood Lead Testing System was determined by testing samples at four concentration levels on six LeadCare® II analyzers over twenty days. The results are provided in the table below.
Table 1: Precision Pooled Across LeadCare® II Instruments LC II Avg.
(µg/dL)
PooledTotal CV
Pooled Total SD
N
5.3 12.1% 0.64 120 11.0 7.6% 0.83 120 22.9 5.5% 1.26 120 51.7 3.5% 1.80 120
20.
Results of CLIA Waiver Study:

A clinical study was conducted at ten sites located in three different regions of the United States. Five neighborhood health centers in Brooklyn, New York, administered by Lutheran Healthcare; three Women Infant and Children’s clinics in Vermont administered by the Vermont State Health Department; and two clinics in Chicago, Illinois, administered by the Chicago Department of Health. Each site had one operator except for site number ten, Chicago Department of Health, which had two operators. The eleven participants who were not given any training on the use of the test operated the LeadCare II device at the ten clinical sites. The study involved running 462 samples (352 patient samples and 110 spiked samples) over a two month period at 10 sites. Additionally, 85 patients’ samples from Battery workers in Canada were included in the study. The comparative method was Graphite Furnace Atomic Absorption Spectroscopy (GFAAS). Specimens were collected by both venous and capillary methods. 50 µL of sample was tested by LeadCare II and the remaining portion of the original sample was sent to ESA Laboratories Inc. for analysis by GFAAS. Of the 547 samples run on LeadCare II, 516 (94.3%) were analyzed by GFAAS. Samples that could not be analyzed by GFAAS were due to clotted samples or a procedure error. The study was intended to demonstrate that after reading only the test instructions, participants were able to obtain results on the LeadCare II that were as accurate as those obtained on GFAAS using the following performance limits: Allowable Total Error (ATE) is defined as (GFAAS result ± 6 µg/dL) for GFAAS results ≤ 40 µg/dL and (GFAAS result ± 15%) for GFAAS results > 40 µg/dL (Occupational Safety and Health Administration of U.S. Department of Labor (OSHA) recommendations for blood lead proficiency testing). The results of the study were as follows:
Range of GFAAS values (µg/dL)
Total number of samples
Number of samples within
ATE
Percent of samples within ATE
0 to 10.0 314 312 99.4%
10.1 to 40.0 138 132 95.7%
40.1 to 65.0 64 61 95.3%
0 to 65.0 516 505 97.9% The percentage of samples over the entire range that fall within the ATE zone is 97.9% (505/516) with a lower bound of 95% confidence interval of 96.6%. Values in the zones of Limits for Erroneous Results (LER) are considered dangerous. Any samples in the LER zone indicate a failure by LeadCare II to properly identify hazardous blood lead concentrations. In the study, no samples were in the LER zone (0% with an upper bound of 95% confidence interval of 0.5%).
21.
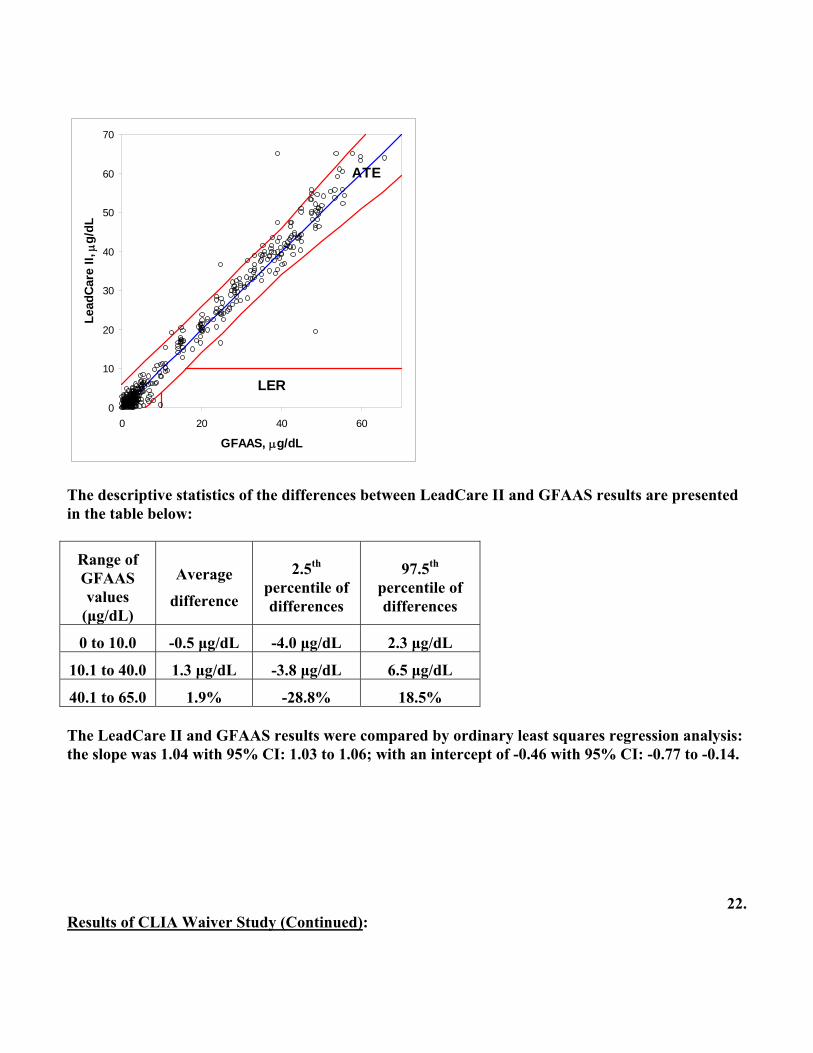
Results of CLIA Waiver Study (Continued): The scatter plot of the study results with ATE and LER zones is presented in the figure below:
0
10
20
30
40
50
60
70
0 20 40 60
GFAAS, µg/dL
Lead
Car
e II,
µg/
dL
LER
ATE
The descriptive statistics of the differences between LeadCare II and GFAAS results are presented in the table below:
Range of GFAAS values
(µg/dL)
Average
difference
2.5th percentile of differences
97.5th percentile of differences
0 to 10.0 -0.5 µg/dL -4.0 µg/dL 2.3 µg/dL
10.1 to 40.0 1.3 µg/dL -3.8 µg/dL 6.5 µg/dL
40.1 to 65.0 1.9% -28.8% 18.5% The LeadCare II and GFAAS results were compared by ordinary least squares regression analysis: the slope was 1.04 with 95% CI: 1.03 to 1.06; with an intercept of -0.46 with 95% CI: -0.77 to -0.14.
22.
Results of CLIA Waiver Study (Continued):

The systematic differences between LeadCare II and GFAAS results estimated by regression analysis are presented in the table below:
GFAAS (µg/dL)
Systematic difference between LeadCare II and GFAAS (µg/dL)
10 -0.0
20 0.4
45 1.5
23. REFERENCES

1. Department of Health and Human Services, Centers for Disease Control and Prevention.
CDC Guidelines for Collecting and Handling Blood Lead Samples – 2004. 2. CDC (Centers for Disease Control and Prevention). 1997. Screening Young Children for Lead Poisoning: Guidance for State and Local Public Health Officials. Atlanta: CDC, 1997. 3. Preventing Lead Poisoning in Young Children. Guidance for State and Local Public Health
Officials, Centers for Disease Control and Prevention 1997. 4. http://www.cdc.gov/nceh/lead/publications/pub_Reas.htm or call the Centers for Disease
Control at 1.888.232.6789 for a copy of the document.
5. You can find additional information about lead poisoning at this web address http://www.cdc.gov/nceh/lead/lead.htm
24.