layout-house floor joist layout
TRANSCRIPT

QUEENSLAND433 Wondall RdTingalpa, QLDPh: 07 3249 9888Email: [email protected]
Shipping
Lot 2 Build My House PlaceBrisbane
CreatedJanuary 07, 2021
DesignerJRC
Ground FloorI Joist (Flush)
Label Description Depth Width Qty Plies Pcs LengthBlk.1 Dindas RFPI 20-H2S 300 45 1 600
J1 Dindas RFPI 20-H2S 300 45 4 2100J2 Dindas RFPI 20-H2S 300 45 1 3900J4 Dindas RFPI 20-H2S 300 45 2 5100J5 Dindas RFPI 20-H2S 300 45 3 6000J6 Dindas RFPI 20-H2S 300 45 5 6300J7 Dindas RFPI 20-H2S 300 45 4 10200J12 Dindas RFPI 20-H2S 300 45 6 5400J13 Dindas RFPI 20-H2S 300 45 2 5100J14 Dindas RFPI 20-H2S 300 45 2 10200J15 Dindas RFPI 20-H2S 300 45 1 10200J3 Dindas RFPI 400-H2S 300 52 8 4500J8 Dindas RFPI 400-H2S 300 52 4 3900J9 Dindas RFPI 400-H2S 300 52 1 10200J16 Dindas RFPI 400-H2S 300 52 2 3900J17 Dindas RFPI 400-H2S 300 52 3 3900J10 Dindas RFPI 70-H2S 300 58 8 4500
Rim BoardLabel Description Depth Width Qty Plies Pcs LengthRB1 Dindas Rim Board-
H2S 300 X 17300 17 6 2400
HangerBeam/Girder Supported
MemberLabel Pcs Description Skew Slope fasteners fasteners
H2 9 FB45220 26 - Nail 35 x 3.15 mm
12 - Nail 35 x 3.15 mm
H3 4 LF300/45 8 - Pryda WTF12-35 WTF12-35
1 - Timber Screw 30 x 6 mm
H4 26 LF300/45 12 - Nail 40 x 3.75 mm
1 - Timber Screw 30 x 6 mm
H5 17 LF300/53 12 - Nail 40 x 3.75 mm
1 - Timber Screw 30 x 6 mm
H6 11 LF300/60 12 - Nail 40 x 3.75 mm
1 - Timber Screw 30 x 6 mm
Design MethodAsNzsLSD
RevisedApril 17, 2021
MerchantDindas Australia
BuilderDrannac Solutions
Ground Floor
3600 3900
10800
337
5400 3600
3271
300 300450
Stair VoidOpening
Beam FB2 deeper than floor system. Wall above to be adjusted to suit final beam height
Beam FB3 deeper than floor system. Wall above to be adjusted to suit final beam height
600mm ctrs 450mm ctrs
600mm ctrs450mm ctrs
= Do not cut this endLedger plate(s) to steel beams MUST be constructed as per manufacturers detailsSteel beam location to be confirmed off engineers plansIt is a minimum requirement to 'pack out' the steel beam with MGP / LVL structuralframing at the bolting locations to add support for the bolted connection.
J12
Blk.1
J10
J4J13J16J17J8
J2
J5
J3
J15J7
J1
J6
J9
J14
SB.2
FB13
FB4
FB11
FB11
FB10
FB10
FB12
SB.1
FB7
FB8
FB6
FB3 FB2
RB1
RB1
RB1
LP1
LP1
S/C
leat
H2
H4
H2H2
H4H2-ws
H6H5H4H5H4
H5 H6
H4
H4
H3
Layout DisclaimerThis drawing is a general interpretation of the construction drawings for this project and assumes the adequacy of the supporting structure. It is intended only as a general guide for the engineered wood products placement. All Dimensions, quantities and details must be carefully checked, verified by comparison to the actual site conditions and are the responsibility of the client, architect/engineer and builder. Engineered floor system does not account for roof loading unless noted otherwise.
1. PRELIMINARY JOIST LAYOUT ONLY - NOT TO BE USED FOR CONSTRUCTION
1. All JOISTS and BEAMS to be kept clear of plumbing penetrations. 2. It is the responsibility of the installer to check all plumbing postions BEFORE
installing the floor system3. Floor joist positions marked are indicative only, they may be adjusted to suit
Service requirements provided nominated joist spacings are NOT exceeded4. Proposed layouts are at all times to be read and constructed in accordance with
architectural and engineers plans.5. All Floor structural members are to be installed as per the supplied Installation
Guide6. Please refer to the supplied Installation Guide for connection details7. All external walls are assumed as loadbearing and any beams/joists drawn
above are designed to be fully supported unless noted otherwise8. Whilst every care is taken with this layout and quantity schedules, it remains the
client’s responsibility to check the layout and the quantities prior to placing an order.
9. It is the builders responsibility to ensure all point loads created by floor beams, roof beams, header lintels and roof girder trusses are correctly supported and transfered
1. B# = Blocking (eg. B1)
FLOOR JOIST LAYOUTProject
Layout-House
DescriptionTest design
Plan #49904651
NOTE: This layout contains active QR codes for your reference. For full product information and installation guides please see below.
Lightweight Metal ConnectorsNote:All metal connections within this design solution are standard Zinc Galvanised coating class Z275 (unless referenced otherwise) Proximity to the Coast or an identified Industrial Zone must be checked by the builder / installer to ensure fit for purpose. Dindas Australia stocks a specific selection of Stainless Steel 316 hangers and fixings should these be required. Dindas Australia will not accept any liability for the incorrect selection of any hanger type within the structure.
Dindas Design Suite Version 21.20.301 Powered by iStruct Dataset: embedded

QUEENSLAND433 Wondall RdTingalpa, QLDPh: 07 3249 9888Email: [email protected]
Shipping
Lot 2 Build My House PlaceBrisbane
CreatedJanuary 07, 2021
DesignerJRC
Ground FloorLVL/LSL (Flush)
Label Description Depth Width Qty Plies Pcs LengthLP1 Dindas LVL13-H2S 240 45 2 7500
Total 15000FB4 Dindas LVL13-H2S 300 45 1 4500FB8 Dindas LVL13-H2S 300 45 1 2 2 8100
FB10 Dindas LVL13-H2S 300 45 2 2400FB11 Dindas LVL13-H2S 300 45 2 4200FB12 Dindas LVL13-H2S 300 45 1 2100FB13 Dindas LVL13-H2S 300 45 1 6000
Total 42000FB7 Dindas LVL13-H2S 300 63 1 5400
Total 5400Glulam (Flush)
Label Description Depth Width Qty Plies Pcs LengthFB2 Dindas GL17c 330 85 1 7200
Total 7200FB3 Dindas GL17c 395 85 1 5700
Total 5700FB6 Dindas GL17c-H3 360 85 1 5700
Total 5700Hanger
Beam/Girder Supported Member
Label Pcs Description Skew Slope fasteners fastenersH2 9 FB45220 26 - Nail 35 x 3.15
mm12 - Nail 35 x 3.15
mmH3 4 LF300/45 8 - Pryda
WTF12-35 WTF12-35
1 - Timber Screw 30 x 6 mm
H4 26 LF300/45 12 - Nail 40 x 3.75 mm
1 - Timber Screw 30 x 6 mm
H5 17 LF300/53 12 - Nail 40 x 3.75 mm
1 - Timber Screw 30 x 6 mm
H6 11 LF300/60 12 - Nail 40 x 3.75 mm
1 - Timber Screw 30 x 6 mm
Design MethodAsNzsLSD
RevisedApril 17, 2021
MerchantDindas Australia
BuilderDrannac Solutions
Ground Floor Not to Scale
Stair VoidOpening
Beam FB2 deeper than floor system. Wall above to be adjusted to suit final beam height
Beam FB3 deeper than floor system. Wall above to be adjusted to suit final beam height
600mm ctrs 450mm ctrs
600mm ctrs450mm ctrs
= Do not cut this endLedger plate(s) to steel beams MUST be constructed as per manufacturers detailsSteel beam location to be confirmed off engineers plansIt is a minimum requirement to 'pack out' the steel beam with MGP / LVL structuralframing at the bolting locations to add support for the bolted connection.
3600 3900
10800
337
5400 3600
3271
300 300450
Stair VoidOpening
Beam FB2 deeper than floor system. Wall above to be adjusted to suit final beam height
Beam FB3 deeper than floor system. Wall above to be adjusted to suit final beam height
600mm ctrs 450mm ctrs
600mm ctrs450mm ctrs
= Do not cut this endLedger plate(s) to steel beams MUST be constructed as per manufacturers detailsSteel beam location to be confirmed off engineers plansIt is a minimum requirement to 'pack out' the steel beam with MGP / LVL structuralframing at the bolting locations to add support for the bolted connection.
SB.2
FB13
FB4
FB11
FB11
FB10
FB10
FB12
SB.1
FB7
FB8
FB6
FB3 FB2
LP1
LP1
S/C
leat
H2
H4
H2H2
H4H2-ws
H6H5H4H5H4
H5 H6
H4
H4
H3
Layout DisclaimerThis drawing is a general interpretation of the construction drawings for this project and assumes the adequacy of the supporting structure. It is intended only as a general guide for the engineered wood products placement. All Dimensions, quantities and details must be carefully checked, verified by comparison to the actual site conditions and are the responsibility of the client, architect/engineer and builder. Engineered floor system does not account for roof loading unless noted otherwise.
1. PRELIMINARY BEAM LAYOUT ONLY - NOT TO BE USED FOR CONSTRUCTION
1. B# = Blocking (eg. B1)
FLOOR BEAM LAYOUTProject
Layout-House
DescriptionTest design
Plan #49904651
NOTE: This layout contains active QR codes for your reference. For full product information and installation guides please see below.
LVL Notches and PenetrationsNotches, cuts and holes in beams, bearers, joists and rafters (Solid LVL Only)
Notches, cuts and holes in beams, bearers, joists and rafter members (LVL) may have penetrations and notches performedin accordance with AS1684.2, Clause 4.1.6 Figure 4.1. Guidance for the common holes through the thickness and depth.
Hole through THICKNESSDepth - <200mm = D/3 or MAXIMUM 50mm diameterDepth - >200mm = D/4 or MAXIMUM 50mm diameter
NOTE: Not more than ONE (1) hole per 1.8m of span.
Glulam Notches and PenetrationsNotches, cuts and holes in GLULAM beams, bearers, joists and rafters are NOT permitted through beams of any size or grade.
Please contact us directly for specific design and installation guidance
Dindas Design Suite Version 21.20.301 Powered by iStruct Dataset: embedded
QLD Heat Map433 Wondall RoadTingalpa, Brisbane, 4173Ph: 07 3249 9888Email: [email protected]
Shipping
Lot 2 Build My House PlaceBrisbane
CreatedJanuary 07, 2021
DesignerJRC
Design MethodAsNzsLSD
RevisedApril 17, 2021
MerchantDindas Australia
BuilderDrannac Solutions
Layout DisclaimerThis drawing is a general interpretation of the construction drawings for this project and assumes the adequacy of the supporting structure. It is intended only as a general guide for the engineered wood products placement. All Dimensions, quantities and details must be carefully checked, verified by comparison to the actual site conditions and are the responsibility of the client, architect/engineer and builder. Engineered floor system does not account for roof loading unless noted otherwise.
1. PRELIMINARY JOIST LAYOUT ONLY - NOT TO BE USED FOR CONSTRUCTION
HEAT MAP JOIST LAYOUTProject
Layout-House
DescriptionTest design
Plan #49904651
NOTE: This layout contains active QR codes for your reference. For full product information and installation guides please see below.
1. All JOISTS and BEAMS to be kept clear of plumbing penetrations. 2. It is the responsibility of the installer to check all plumbing postions BEFORE
installing the floor system3. Floor joist positions marked are indicative only, they may be adjusted to suit
Service requirements provided nominated joist spacings are NOT exceeded4. Proposed layouts are at all times to be read and constructed in accordance with
architectural and engineers plans.5. All Floor structural members are to be installed as per the supplied Installation
Guide6. Please refer to the supplied Installation Guide for connection details7. All external walls are assumed as loadbearing and any beams/joists drawn
above are designed to be fully supported unless noted otherwise8. Whilst every care is taken with this layout and quantity schedules, it remains the
client’s responsibility to check the layout and the quantities prior to placing an order.
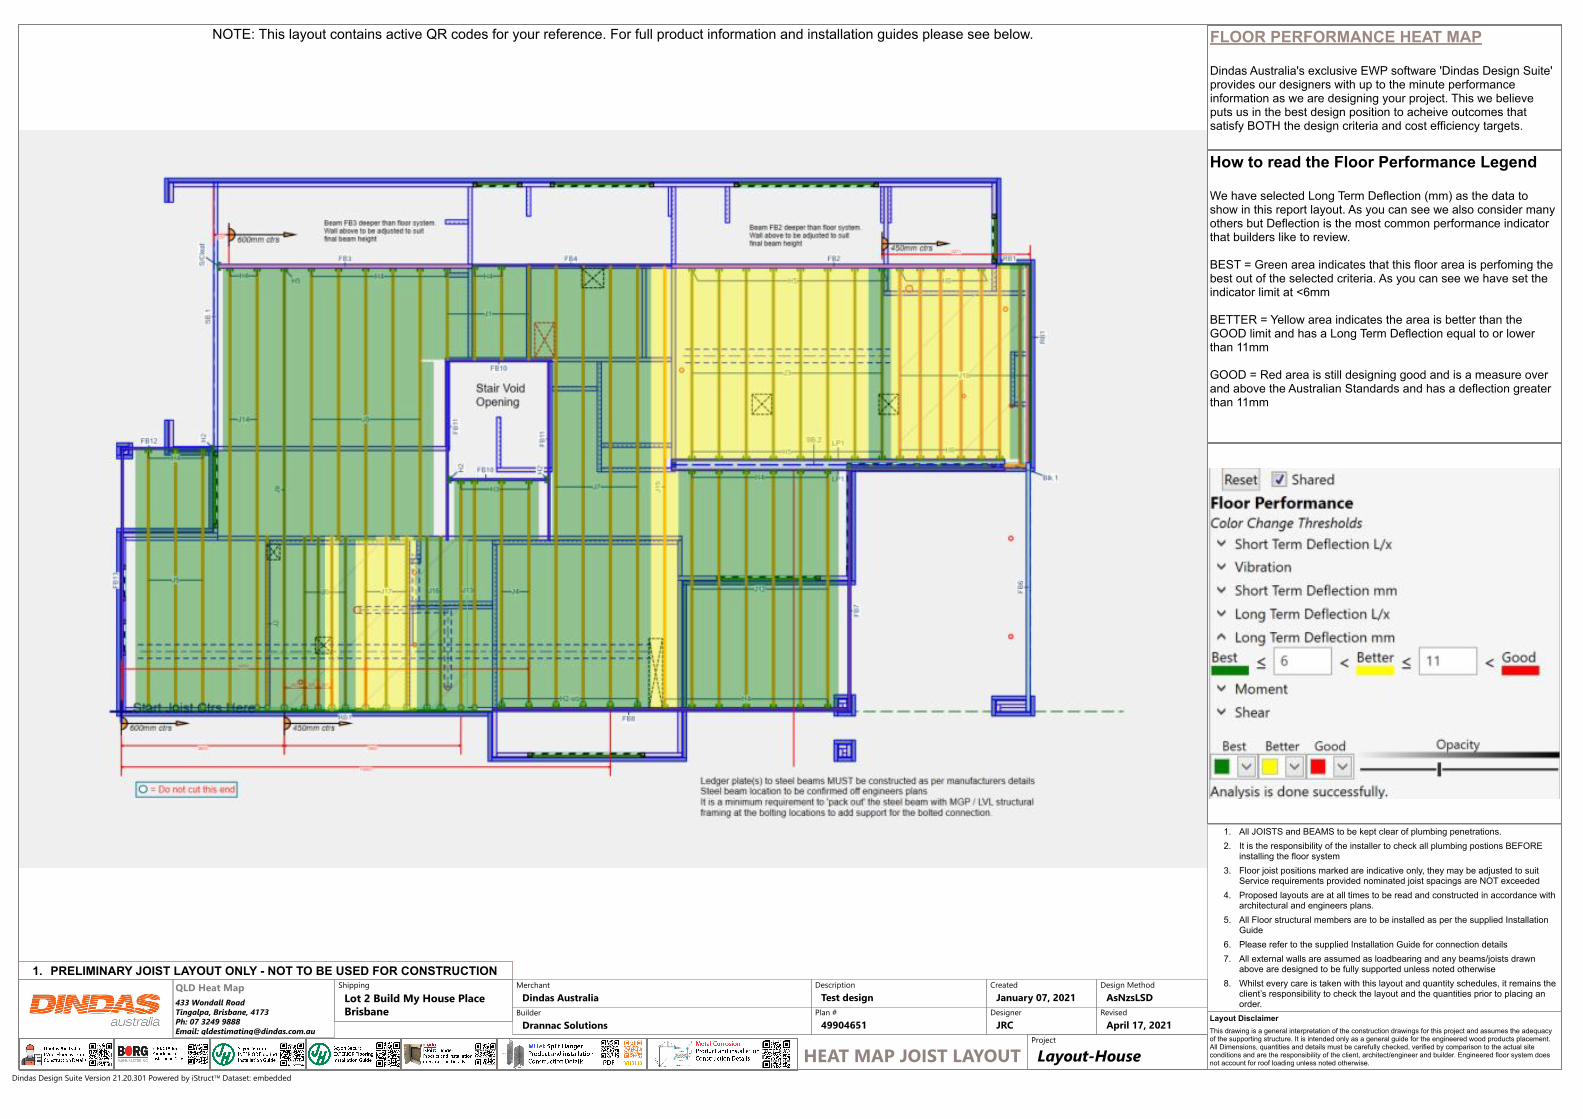
FLOOR PERFORMANCE HEAT MAP
Dindas Australia's exclusive EWP software 'Dindas Design Suite' provides our designers with up to the minute performance information as we are designing your project. This we believe puts us in the best design position to acheive outcomes that satisfy BOTH the design criteria and cost efficiency targets.
How to read the Floor Performance Legend
We have selected Long Term Deflection (mm) as the data to show in this report layout. As you can see we also consider many others but Deflection is the most common performance indicator that builders like to review.
BEST = Green area indicates that this floor area is perfoming the best out of the selected criteria. As you can see we have set the indicator limit at <6mm
BETTER = Yellow area indicates the area is better than the GOOD limit and has a Long Term Deflection equal to or lower than 11mm
GOOD = Red area is still designing good and is a measure over and above the Australian Standards and has a deflection greater than 11mm
Dindas Design Suite Version 21.20.301 Powered by iStruct Dataset: embedded