launch website in 2 steps
TRANSCRIPT


Overview
Online presence is now became an important part of our life, we our
self now became intertwined with a network of social group over the years we have
seen various social networks (orkut, hi5, facebook, twitter, instagram, linkedin etc)
now we can go far beyond and setup our own personal website for sharing
information, blogging, selling etc
Starting a new website is as easy as it comes because now a days you need not
type hundreds & hundreds of hours in coding, lots of free open source out there in
market like (drupal, wordpress etc) today we are starting with wordpress and with
this you can easily start and run a website at ease
A website can be a personal one were you talk about are a business website
were you describe your organisation or something like a blog were you could earn a
extra source or a professional bloging.
STEP 1: CHOOSE A DOMAIN NAME AND WEB HOSTING FOR YOUR WEBSITE
To start a new website online, two essential things are needed,
A domain name (.com, .net, .in web address)
Hosting (a service (hosting server) that connects your site to the internet)
Where do I get a domain name and hosting?
I’ e ostly used .hostgato . o as a e hosti g a d do ai egist a the e are other hostting service (www.bluehost.com, www.godaddy.com etc ). Domain
name is very important for a website so choosing a name is as important as
If you’ e aki g a e site fo you usi ess, you do ai a e should at h your company name. For example: YourCompanyName.com
If you’ e pla i g to set up a e site fo you self, the website with
yourname can be a great option.
Domain names usually end with .com, .org or .net, but in recent a huge amount of
domain extensions like .edu .agency to .ca.
Domain
If your website is going to be a brand For example, if you make a tutorial site then
study.com is not a good choice: languagetutorial.com or mathstutorial.com is much
better.
Domain name should be memorable and easy to remember. Short, punchy and clear
domain names are much easier to remember. If your domain name is too fuzzy, too
long or spelled in a strange way, visitors may forget it.
How to register a domain name
After you have chosen a domain name for your website, you will have to register
your domain name.
The domain name can be registered through a domain name registrar authorized by
ICANN.
Note: It is not possible for the end user to register a domain name directly with
ICANN - the user should choose a registrar to do that or take advantage of a indirect
registration through a hosting provider (godaddy, hostgator etc)
These registrars set the costs of the domain registration individually. A domain name
is usually registered on an annual basis.
Determine Your Needs
Getting started with your web hosting account is not complicated. The first step is
determine what you need to do.
Do you already have a web site or are you starting from scratch?
If you're starting from scratch, go to step 2 below.
Do you need to transfer your web site from a previous host?
If so, HostGator can help you with that.
Simply fill out the form at: https://transfer.hostgator.com/
Once the transfer process is completed, proceed to step 2.
Change Your DNS
In order to get your web site working, you must change your name servers. This is an
easy, but necessary step you must follow to get started.
If you registered your domain name with HostGator during signup, we have
taken care of this step for you.
If you have registered your domain name with another company (i. e.
GoDaddy, NameCheap, etc.), you must follow the steps outlined on this page
(http://www.hostgator.com/dns).
Once your DNS changes have been made, it takes roughly 24-48 hours for your web
site to start resolving to HostGator's servers. To avoid downtime during the move,
please read our moving page. If it takes longer than two days for your web site to
start working, please contact our support team.
Uploading Your Web Site
You can begin uploading to your account now by using an FTP Client or cPanel's File
Manager.

If you are using an FTP client, put in your site's IP address under the "FTP
address" field. Use the username and password sent to you in your welcome
email. FTP always runs on Port 21.
Once your FTP is connected, go into the "public_html" folder and begin
uploading your site. To replace the default place holder page, you must
upload an index.html in all lowercase lettering or delete the page and replace
it with your own index page.
Please note that by default, you do not have an email address setup with
HostGator. You will need to configure this yourself in cPanel (link below).
After registration you will receive a email to the registered email address with the
domain name and the cpanel link and it user name and password.
STEP 2: SETUP YOUR WORDPRESS WEBSITE
O e you’ e ought you do ai a e a d set up you hosti g, you’ e ell on your way!
No it’s ti e to get you e site up a d u i g. The fi st thi g you’ll eed to do is install WordPress to your domain.
If you signed up with hostgator or any other similar hosting company, you should
find your 1-click-installation in your account control panel.
Here are the steps you should follow (should be similar/same on all the major web
hosting companies):
1. Log in to your hosting account.
2. Go to your control panel.
3. Look for the WordPress icon.
4. Choose the domain where you want to install your website.
5. Click the Install Now button and your ready with WordPress website.
Choosing a Theme for your site
Once you have successfully i stalled Wo dP ess to you do ai , you’ll see a very basic yet clean site:
He e’s ho to fi d a the e you like:
1. Log into your WordPress dashboard (If you’ e ot su e ho , type i : http://yoursite.com/wp-admin (replace yoursite with your domain)).

This is what the WordPress dashboard looks like:
Every field are labelled for easy access. If you find it to be dificult please read below.
Access FREE themes
O e you’ e i the dash oa d, Just look along the side bar for Appearance ,
then click Themes .
if you are looking for more professional theme then look into genesis
framework or themeforest.net they got huge library for themes from which you can
pick from at varying costs.
But before you do that, I suggest you try spending time with wordpress theme
twentysixteen which will help you greatly understand how wp theme works and you
can do better with other paid themes.

As you can see above, installing a new theme for your website is very easy.
You can search for specific keywords and/or use filters to find themes that suit
you style. Fi di g the pe fe t the e a take a hile, ut it’s o th it.
You should also look for themes that are responsive , as this means they will
look good on any mobile device.
Install your new theme
Once you have found a theme you like, installing it is as simple as clicking Install
followed by Activate .
IMPORTANT: Cha gi g the es o ’t delete you p e ious posts, pages a d o te t. You can change themes as often as you want without having to worry about lose
what you’ e eated.
Before heading any further i would recommend you to create a child theme so in
future if the theme gets updated there will not be any changes to your preferences.
How to setup a child theme
Why use a Child Theme?
There are a few reasons why you would want to use a child theme:

If you modify a theme directly and it is updated, then your modifications may
be lost. By using a child theme you will ensure that your modifications are
preserved.
Using a child theme can speed up development time.
Using a child theme is a great way to learn about WordPress theme
development.
How to Create a Child Theme
Child Theme directory structure
A child theme consists of at least one directory (the child theme directory) and two
files (style.css and functions.php), which you will need to create:
The child theme directory
style.css
functions.php
The child theme directory
The first step in creating a child theme is to create the child theme directory,
which will be placed in public_html/wp-content/themes. (so if your parent theme is
the Twenty sixteen theme then the child theme 'twentysixteen-child'(without any
space).
The next step is to create your child theme's stylesheet (style.css). The stylesheet
must begin with the following (the stylesheet header):
style.css
/* Theme Name: Twenty Sixteen Child Theme URI: http://example.com/twenty-sixteen-child/ Description: Twenty Sixteen Child Theme Author: example Author URI: http://example.com Template: twentysixteen Version: 1.0.0 License: GNU General Public License v2 or later License URI: http://www.gnu.org/licenses/gpl-2.0.html Tags: light, dark, two-columns, right-sidebar, responsive-layout, accessibility-ready Text Domain: twenty-sixteen-child */
A couple things to note:
( You will need to replace the example text with the details relevant to your theme.)

functions.php
<?php add_action( 'wp_enqueue_scripts', 'theme_enqueue_styles' ); function theme_enqueue_styles() { wp_enqueue_style( 'parent-style', get_template_directory_uri() . '/style.css' ); } ?>
Your child theme is now ready for activation. Log in to your site's administration
panel, and go to Administration Panels > Appearance > Themes. You should see your
child theme listed and ready for activation.
How do I add content and create new pages?
With you the e i stalled, you’ e eady to sta t eati g o te t. Let’s ui kly run through some of the basics:
Adding and editing pages
Create a new page
Look along the sidebar in the WordPress Dashboard for Pages -> Add
New .
O e you’ e li ked, you’ll fi d a s ee that looks a lot like hat you’ e maybe seen in Microsoft Word. Add text, images and more to build the page
you a t, the sa e it he you’ e do e.
create a subpage
Go to Administration > Pages > Add New panel.
In the right menu, click the "Page Parent" drop-down menu. The drop-down
menu contains a list of all the Pages already created for your site.
Select the appropriate parent Page from the drop-down menu to make the
current Page a child Page.
Add content to the subpage.
Click Publish when ready.
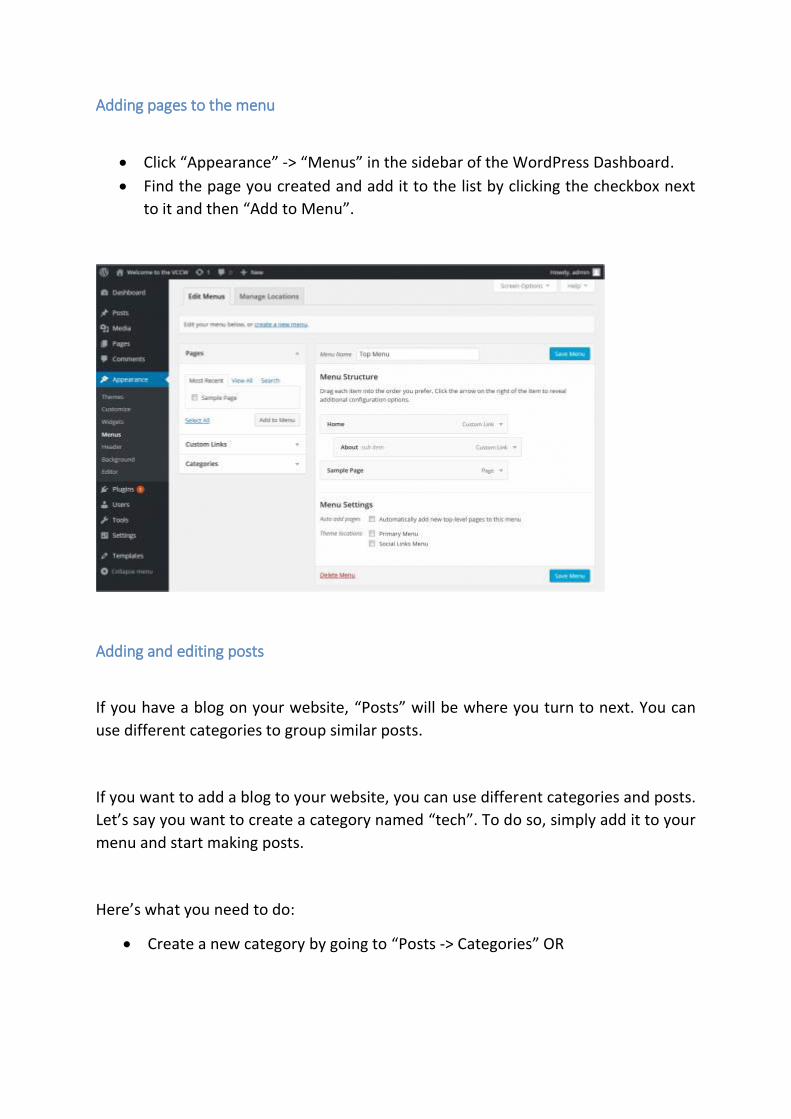
Adding pages to the menu
Click Appearance -> Menus in the sidebar of the WordPress Dashboard.
Find the page you created and add it to the list by clicking the checkbox next
to it and then Add to Menu .
Adding and editing posts
If you have a blog on your website, Posts will be where you turn to next. You can
use different categories to group similar posts.
If you want to add a blog to your website, you can use different categories and posts.
Let’s say you a t to eate a atego y a ed tech . To do so, simply add it to your
menu and start making posts.
He e’s hat you eed to do:
Create a new category by going to Posts -> Categories OR

Create a blog post by going to Posts -> Add New . O e you’ e fi ished writing your blog post blog post is ready, you need to add the right category
for it.
O e you’ e eated you atego y, si ply add it to the e u, a d you’ e i business!
Customizations & Tweaks (Widgets, comments etc)
I this se tio I’ll o e so e of the asi s thi gs
Changing Your Title and Tagline
You should use a unique title on every page of your site and Taglines are added at
the end of titles across every page.
In order to change the title and tagline on your website, go to Settings ->
General and fill in the form below:
Setting Up a Static Front Page
Some people get frustrated over their home page change whenever a new
blog post is added. You can fix that by making your home page static .
A stati page is a page that does ’t ha ge. U like a log, he e the fi st e article will show up at the top every time, a static page will show the same
content every time someone comes to the site – like a ho e page you’ e designed.
To set up a static front page:
1. Go to Settings -> Reading
2. Choose a static page that you have created. Front Page denotes your home
page, Posts page is the f o t page of you log (if you e ti e site is ’t a blog).
Editing sidebar
Most WordPress themes have a side a o the ight side (i so e ases it’s o the left).

to edit how your sidebar appears and what needs to appears in a sidebar you need to
do the following.
1. Go to Appearance -> Widgets .
2. F o he e, you a use d ag ’ d op to add diffe e t boxes to your sidebar,
o e o e the ite s you do ’t a t.
The e’s also a HTML box – a text box where you can use HTML code. For beginners,
do ’t o y a out this it – just d ag a d d op the ele e ts you’d like i you sidebar.
Installing Plugins to Get More out of WordPress
What is a plugin?
Plugins are extensions that are built to expand WordPress capabilities, adding
featu es a d fu tio s to you site that do ’t o e uilt-in. They’ e sho t uts to getting your site to do what you want to, without having to code the feature from
scratch.
You can use plugins to do everything from adding photo galleries and
submission forms to optimizing your website and creating an online store.
How do I Install a new Plugin?
1. go to Plugins -> Add New and simply start searching. (There are thousands
of free plugins to choose from but also remember not to load your website
with to much with plugins)
2. Installation is easy – once you find a plugin just click Install .
To save you trouble, I’ e put togethe a list of the plugins that are very useful which i
personally prefer.
Jetpack by wordpress:
contact form: o y A out page. It’s a a eso e featu e to ha e, as people (like you) can fill in the form and send you an email with ease
Post by email: for a blogger for every new post can be posted by just sending a
email the post gets updated.
Publicize: using this plugin you can post to all your social website with the
same post while posting on your app

Yoast SEO for WordPress: If you want to make your WordPress site even more SEO-
friendly, this plugin is a must-ha e. It’s f ee, a d it’s a eso e. You’ll e a le to edit your title tags, meta descriptions and more, all from within the page itself – no more
fussing with WordPress settings.
With these you will be able to launch you website with ease.
Thank you for your interest for more visit us at http://www.zeboros.com