laulima tips tricks - university of hawaii · laulima: tips and tricks contents adding an avatar to...
TRANSCRIPT

1
Laulima: Tips and Tricks
Contents Adding an Avatar to Discussion and Private Messages ..................................................................................... 2
Creating a Web page using Laulima .................................................................................................................. 6
Adding an image to your web page: ............................................................................................................... 8
Adding a link to your web page: ................................................................................................................... 10
Linking the web page to your Homepage area: ............................................................................................ 14
Embedding a YouTube Video .......................................................................................................................... 19
Embedding a video into Modules: ................................................................................................................ 19
Embedding video into Assignments: ............................................................................................................ 23

2
Adding an Avatar to Discussion and Private Messages
An Avatar is a graphic image used to represent a user. An avatar does not have to be a real-life digital photo
of a person. The image can be of anything meant to project the users’ personality or sometimes an alter ego.
An avatar can bring more personality to class or group discussions in an on-line environment and help users
feel more connected to their classmates or group members.
To add an avatar to your Discussion and Private Messages postings, go to the Discussion and Private
Messages tool in any site in Laulima. It does NOT matter which site you go to, once you add an avatar for one
site, it will appear in all sites and any postings made so far. In the Discussion and Private Messages tool, click
the “My Profile” link.
In the Discussion
and Private
Messages tool, click
the “My Profile” link.

3
In the “My Profile” area, you will see your account information and options for other information about yourself
that you can make available to others such as an Instant Messenger account and personal web site address.
At the bottom of the My Profile area you will see the Avatar Control Panel.
To add an avatar, there are two options. You can either upload an image from your computer or you can copy
and paste a URL to an image you already have uploaded to another account such as a PhotoBucket or Picasa
account. In this example, an image will be uploaded from the computer.

4
To upload your avatar, click the “Browse” button and select the file from your computer. Click the “Submit”
button.
You should then see the image of your avatar in your profile area.
To return to the main Discussion and Private Messages area, scroll to the top of the page and click the
“Discussion Home” link. Or you can refresh tool by clicking the double blue arrows in the top left corner.
Use the “Browse”
button to select
your file.
Click “Submit” to
upload your image.
To return to the main
area, click
“Discussion Home”
or the double blue
arrows.
5
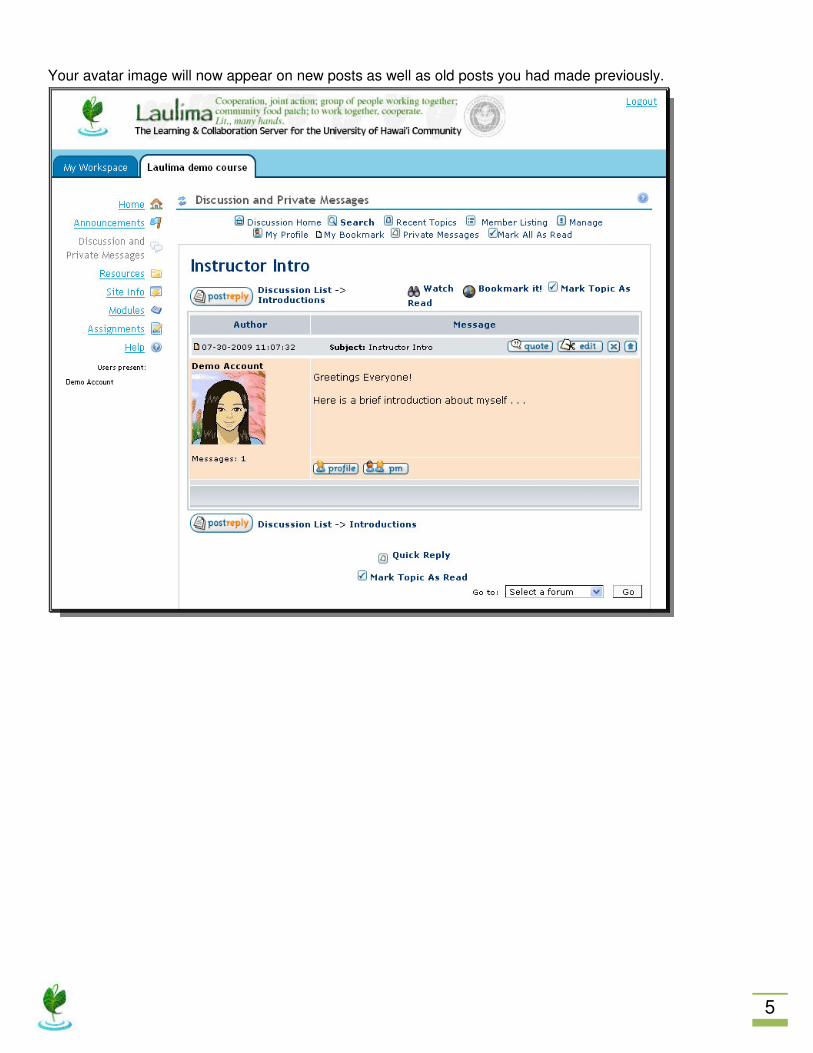
Your avatar image will now appear on new posts as well as old posts you had made previously.

6
Creating a Web page using Laulima Homepage looking a little boring? Add some interest to your homepage with images. A homepage
can help set the tone for the class as well as provide important or updated information to those in the site. This
section covers creating a web page within Laulima and then linking it to your Homepage.
For web page (html) files and images, we suggest keeping these files in your “My Workspace” area. By doing
this, the file does not need to be copied to a new course every semester or for every section of the course you
teach.
To begin, we will create a folder in the Resources of the My Workspace area.
Upload your image files to this new folder.
In your My Workspace
Resources, add a
folder with the title of
the course.
Upload the image you
want to use to the
folder you just created.

7
To create a new web page in Laulima, click the “Add” drop-down menu next to your folder and click “Create
HTML page”.
You can then create your web page using the html editor options similar to using Microsoft Word. You can
also copy and paste text from Word if you already have it typed out.

8
Adding an image to your web page:
When you are ready to insert your image, put your cursor where you want your image to appear and click the
“Insert/Edit Image” button.
On the Insert/Edit Image window that appears, you can either copy and paste the URL for an image or you can
click on the “Browse Server” button.
Click the
“Insert/Edit Image”
button.
Either copy and
paste the URL for
your image or use
the “Browse Server”
button.

9
You will then see the folders of sites you are the instructor/maintainer for listed on the left. Image files and
folders will appear in the main area. Click on the title of the folder for the course you are making the
homepage for and then click the image you want to insert.
The URL for the image will automatically be put into the box. A preview of what the image looks like will
appear. You can also change the size of the image if it is too big. If your image looks alright to you, click the
“OK” button.
Click on the
image you want
to use.
URL will be
added
automatically.
When ready, click
“OK” button.
Size of image
can be adjusted.

10
Adding a link to your web page:
You can also add link to other web pages. You can list suggested or interesting articles for the students to
read. For instance, you can link to a specific CNN news article or video.
To do this, on a separate browser window, go to the web page you want to link to and copy the URL from the
address bar. Copy the URL by right clicking while the mouse is on the URL and then select “Copy”. Or by
going to “Edit” and selecting “Copy” from the drop-down menu.
After copying the URL, go back to your other browser where you are editing your web page and type the text
you want as your link. Then highlight that text and click the “Insert/Edit link” icon.
Highlight text.
Click “Insert/Edit
Link” icon.
11
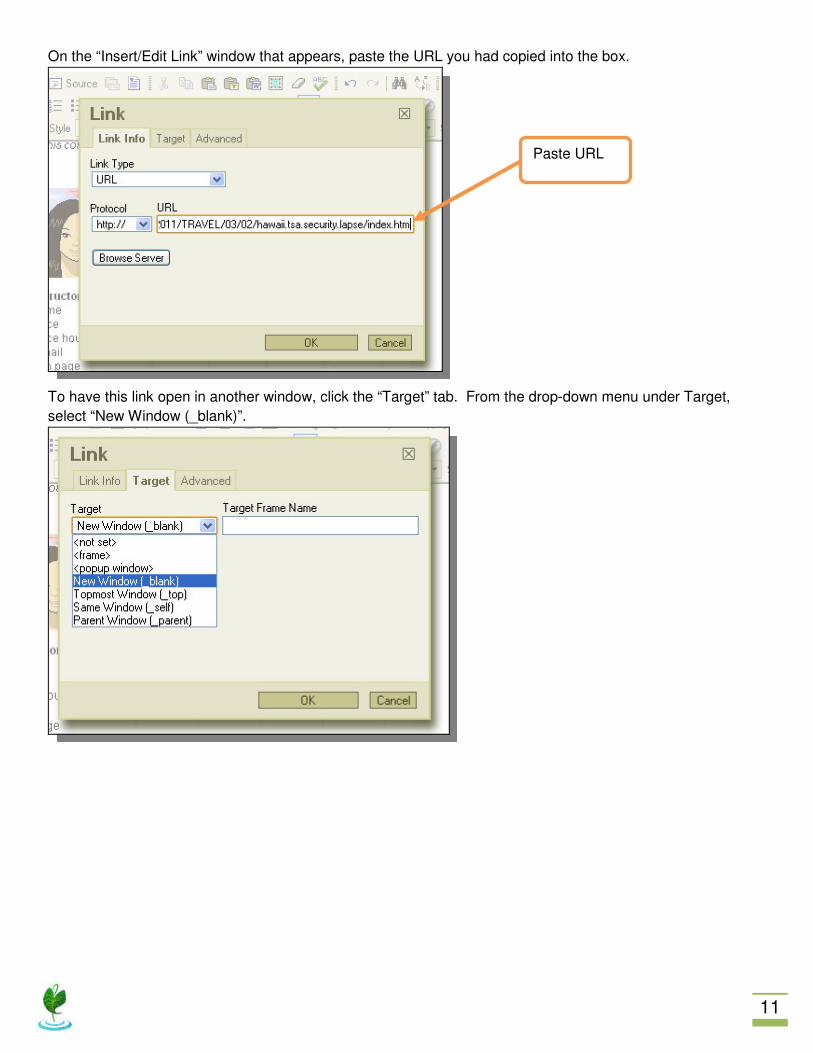
On the “Insert/Edit Link” window that appears, paste the URL you had copied into the box.
To have this link open in another window, click the “Target” tab. From the drop-down menu under Target,
select “New Window (_blank)”.
Paste URL

12
Once you are done with your URL, click the “OK” button and your text will appear as a link. This link will not go
to the web page until you save the file and open it in a browser.
When you are ready to finish your web page, click the “Continue” button to save the file.
When ready to save,
click “Continue”
button.

13
Name the file of your web page. Example: “homepage.html”. You should add either .html or .htm to the title of
the file or the web page may not work. Click the “Finish” button.
You will then see your new web page listed in your Resources folder. To view your web page, click on the link.
Type in a title for your
web page. Title
MUST end in .html or
.htm for file to work.
Click “Finish”
button.
To view the
web page, click
on the link
14
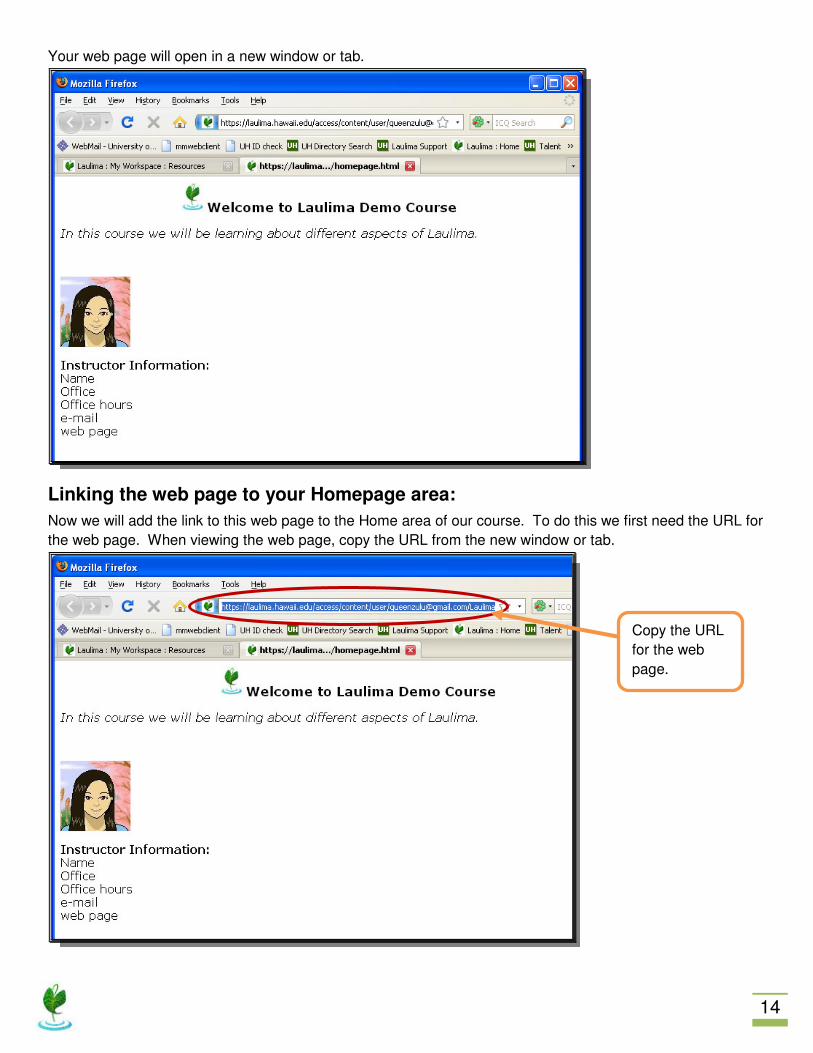
Your web page will open in a new window or tab.
Linking the web page to your Homepage area:
Now we will add the link to this web page to the Home area of our course. To do this we first need the URL for
the web page. When viewing the web page, copy the URL from the new window or tab.
Copy the URL
for the web
page.

15
Go to the site you would like to link the web page to. To link to the Home area, click the “Options” link.
On the Options page, paste the URL for the web page in the box labeled, “Site Info URL”. Then click the
“Update Options” button.
To link to the
Home area, click
the “Options” link.
Paste the URL from
the web page into
the Site Info URL
box.
Click “Update
Options” button
to save.

16
Your web page will then appear on the Home area of your site.
*NOTE: Web page and image files MUST be made publicly viewable or your students/participants will NOT be
able to see them. If the files are not publicly viewable, the students/participants will see the error message
below.

17
To make these files publicly viewable, go back to the Resources in your My Workspace. Because all the files
in the Laulima_demo_course folder need to be view able in the site, we will make the folder publicly viewable.
Individual files can also be made publicly viewable. To do this click the “Actions” drop-down menu to the right
of the folder. Click on “Edit Details”.
To make files
publicly viewable,
click “Edit Details”
in the Actions drop-
down menu.

18
On the Edit Details page, select the radio button next to “This folder and its contents are publicly viewable.”
Click the “Update” button to save.
Your folder/files will then be labeled as public. Members of your site will then be able to view those files.
Select “This folder
and its contents are
publicly viewable.”
Click “Update”
button to save.
The folder and all
the files in it are
publicly viewable.

19
Embedding a YouTube Video YouTube, as well as other embeddable videos can be added to some tools in Laulima. Videos can help
illustrate an idea, provide additional information, and add visual interest to your site. This manual will cover
embedding a video into the Modules and Assignments tool.
Embedding a video into Modules:
Begin by locating the video you would like to add to your Modules.
To the right of the video, copy the Embed code.
Copy the
Embed coding

20
Go to your Laulima site you would like to add the video to and go to the Modules area.
*Note: The Modules are NOT a default tool and will have to be added if not done so already.
Add a new Content section to a module and select “Compose Content with Editor”.
Create new
Content Section
and select
“Compose content
with editor”

21
In the editor, click the “Source” button and paste the Embed code from YouTube into the box. By clicking the
“Source” button, it grays out the other buttons and takes you into an html code view.
Click the “Add” link to save and add the content section to your module.
Click the “Source”
button and paste
the Embed code
from YouTube into
the box.
Click the “Add”
link to add the
content section.
22
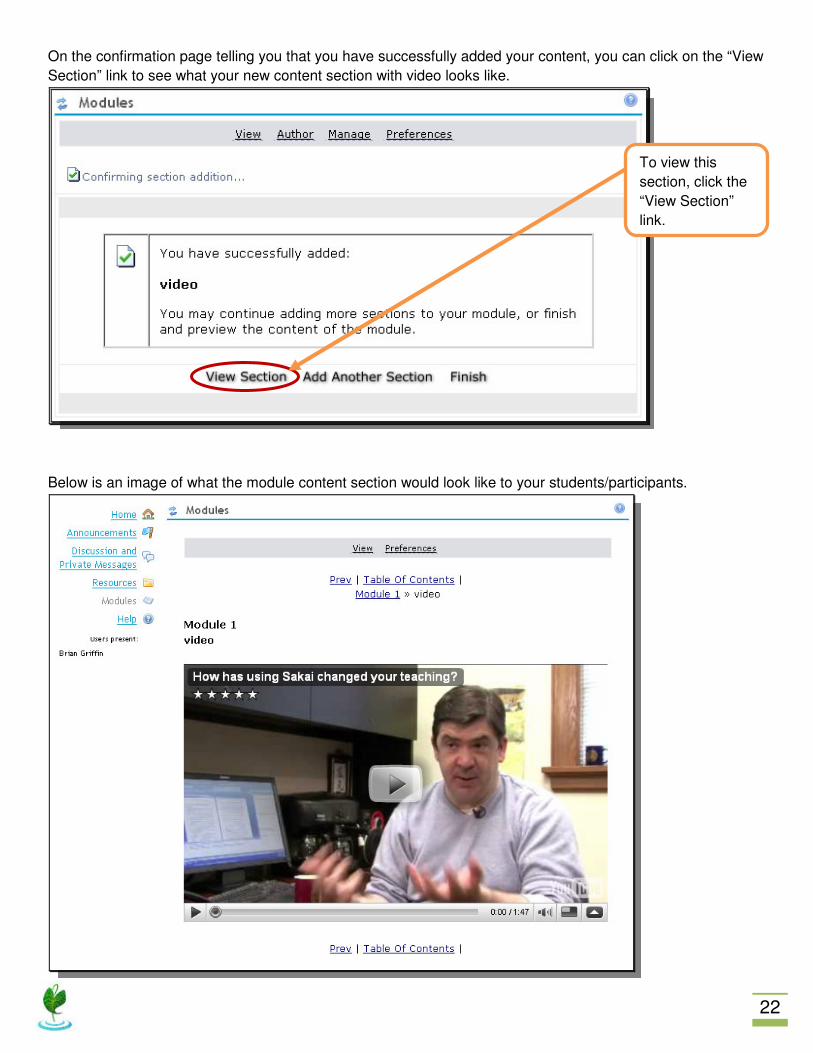
On the confirmation page telling you that you have successfully added your content, you can click on the “View
Section” link to see what your new content section with video looks like.
Below is an image of what the module content section would look like to your students/participants.
To view this
section, click the
“View Section”
link.

23
Embedding video into Assignments:
Videos can also be embedded into assignments made in the Assignments tool. A video in an assignment can
also provide additional information and visual interest, but can also used as part of the assignment itself.
While this process is similar to embedding in the Modules tool, a few adjustments must be made to the code
before the video will play in the Assignment.
After copying the Embed code from YouTube, go to your Laulima site and click on the Assignments.
*Note: Assignments is not a default tool and will need to be added, if not done so already.
Click the “Add” link to add a new assignment.
Click on the
Assignments tool.
Add a new
assignment.

24
Add a title for your Assignment and any other settings. In the editor tools, click the “Source” button in the top
left-hand corner and paste the Embed code from YouTube into the box.
The Assignments tool does not work well with certain parameters. The parts highlighted will need to be
deleted.
Add a title and
any settings you
need for your
assignment
Click the “Source”
button and paste
the YouTube code
into the box.
25
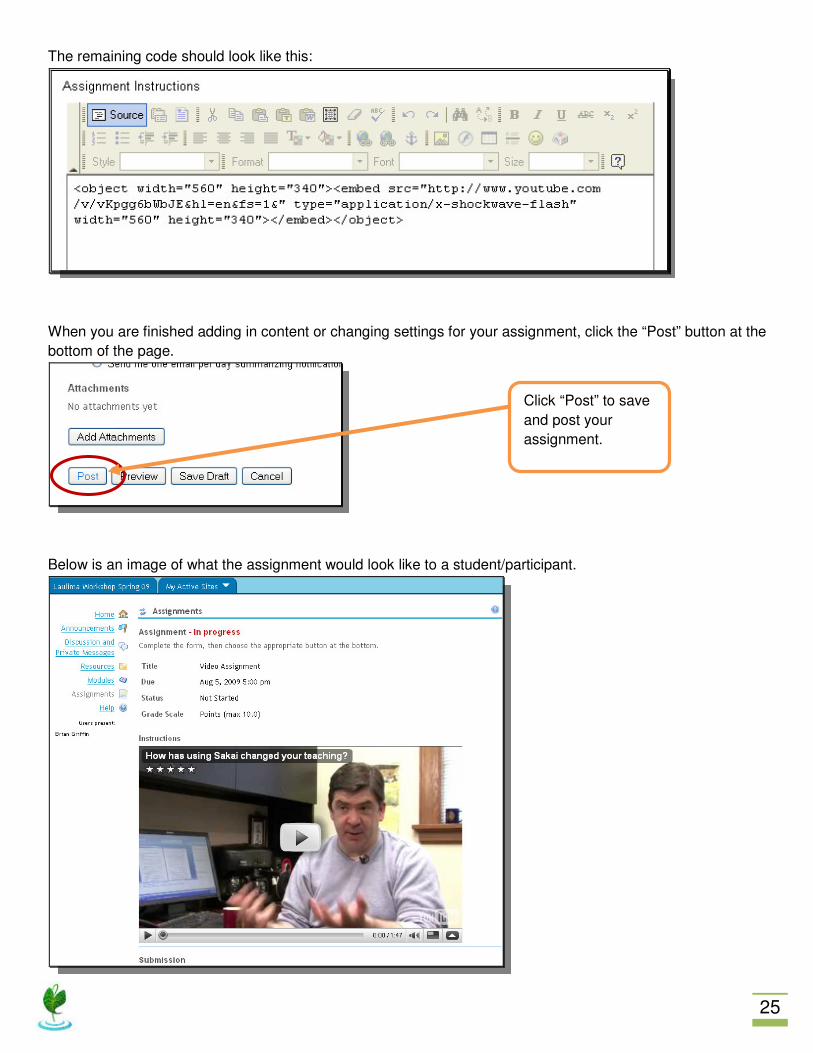
The remaining code should look like this:
When you are finished adding in content or changing settings for your assignment, click the “Post” button at the
bottom of the page.
Below is an image of what the assignment would look like to a student/participant.
Click “Post” to save
and post your
assignment.