laser cut guide - cpb-ap-se2.wpmucdn.com · if you ˜nd you have been working in cmyk colour mode...
TRANSCRIPT
This document is prepared so students can correctly set up their Adobe Illustrator �les laser cutting. Following the instructions in this document will assist us in understanding what you want from your
job and us getting your job done as e�ciently and correctly as possible.
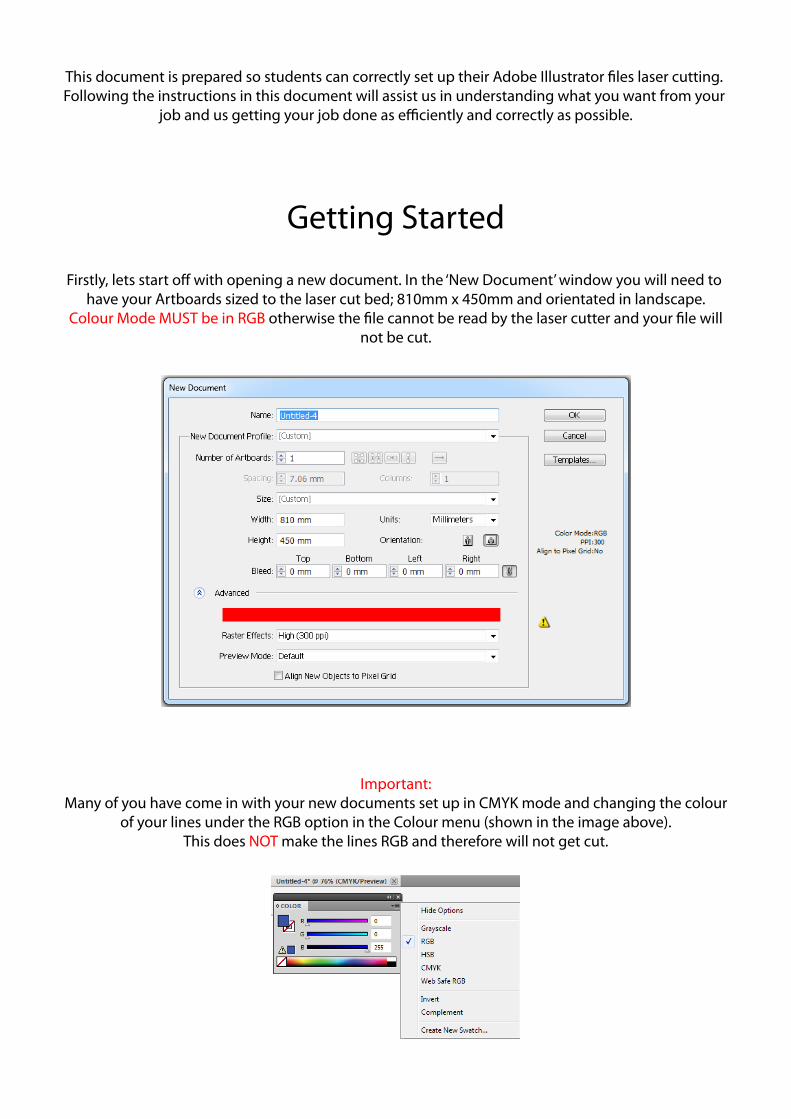
Firstly, lets start o� with opening a new document. In the ‘New Document’ window you will need to have your Artboards sized to the laser cut bed; 810mm x 450mm and orientated in landscape.
Colour Mode MUST be in RGB otherwise the �le cannot be read by the laser cutter and your �le willnot be cut.
Important:Many of you have come in with your new documents set up in CMYK mode and changing the colour
of your lines under the RGB option in the Colour menu (shown in the image above).This does NOT make the lines RGB and therefore will not get cut.
Getting Started

There are eight colours that you can use to distinguish what needs to be done i.e. line engraving, raster engraving, and cutting.
The following table shows you what colours we use.
If for some reason you require multiple depths of raster or line engraving then you mayuse the other colours usually reserved for othe functions provided you explicitly state this
in your �le or explained to us in person.Magenta and Cyan are reserved for such purposes.
This is how your colour panel should look for raster engraving, line engraving, and cutting respectively.
You will notice with raster engraving the red is in a di�erent box to the other two. No outline is needed.For the line engraving and cutting there MUST be no �ll.
Each colour (function) MUST be placed in a seperate layer and named accordingly.
Line weights MUST be 0.01mm.
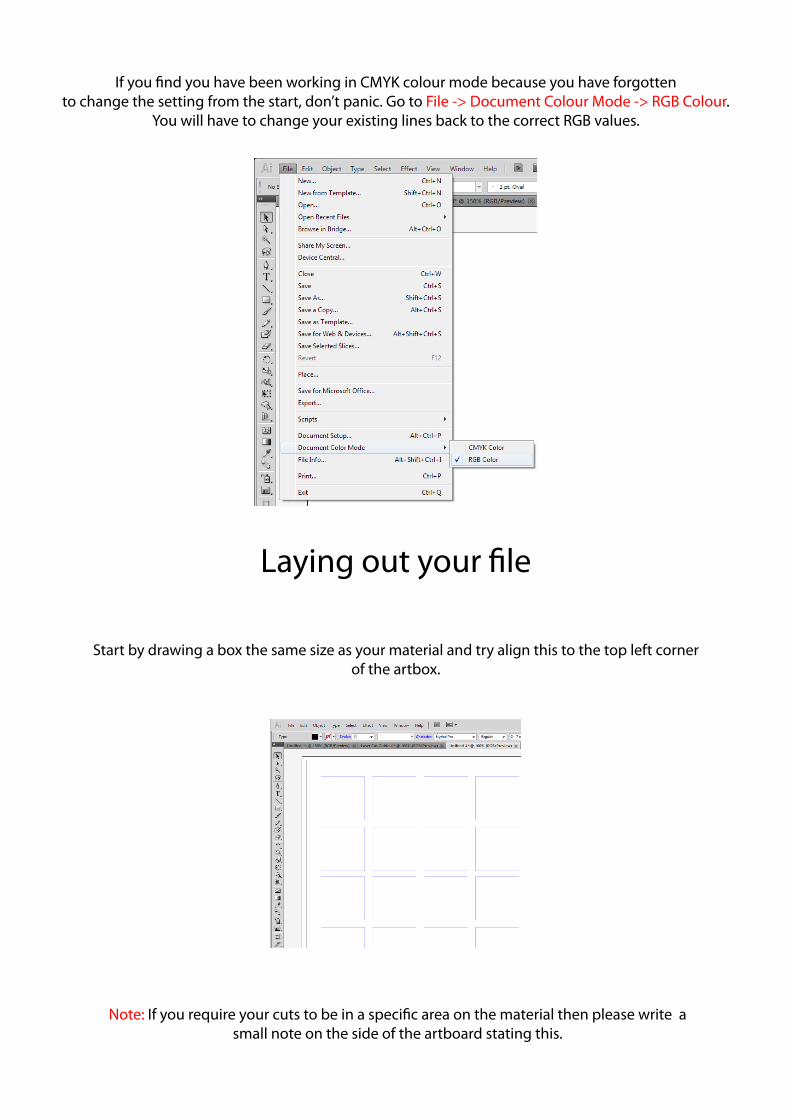
If you �nd you have been working in CMYK colour mode because you have forgottento change the setting from the start, don’t panic. Go to File -> Document Colour Mode -> RGB Colour.
You will have to change your existing lines back to the correct RGB values.
Laying out your �le
Start by drawing a box the same size as your material and try align this to the top left cornerof the artbox.
Note: If you require your cuts to be in a speci�c area on the material then please write asmall note on the side of the artboard stating this.

When laying out your �les try to do it so there are no multiple lines sitting on topone another. This will be a problem when there are multiple engrave lines which
may end up cutting through your material. This isn’t so much a problem with cutting butwe still recommend you tidy up your line work anyway as more lines equate to
longer cut time which in turn means more money spent.
Do NOT lay your �les out like above. This will result in multiple cut lines and taking a lot longer than required.If you are cutting a lot of similar or same objects, do not lay them out as seperate objects.
Instead, try to organise them so they share one or more cut lines like above. Please do notcopy and paste objects so that there are multiple overlapping lines. To remove
overlapping lines, use the white cursor (circled in red) and select all the overlappinglines and delete.
You can check if you have double lines by closely inspecting the colours of the lines.If they appear darker than the other lines of the same colour then it means you
have overlapping lines.
Important: Squares are used in the images as an example only. If we �nd that your �leis just a bunch of squares, rectangles, or strips then we will not be cutting it
unless you have a good reason to do so. Simple geometries can be cut by hand or machinery in the workshop.

Label your �les and materials with your UPI.
Make sure we know you have dropped of your materials.
Materials must be as �at as possible.
Bring extra material if you can. We make mistakes too.
Advise us if you need your materials taped up.
One �le per job. Use multiple artboard if neccesary and label yourartboards if you have di�erent materials or di�erent sized materials.
If you can, cram everything on to your page as tightly as possible. This will save you materialin the long run.
If you are using a whole piece of acrylic, please take o� the protective layer.
Try not to cut strips of acrylic. The acrylic heats up and warps resulting in very curvedstrips of acrylic.
Try not to cut anything smaller than 5mm x 5mm. Small pieces tend to fall throughthe honeycomb on the lasercut bed.
Other points
For lighter material i.e. paper, thin card, card etc. it is a good idea to leave oneside line engraved if you need all the cut pieces.
There is a constant jet of air blowing through the laser cut head which will displacelighter material when cutting therefore having one side intact will save you
from recutting the lost pieces. This is not necessary but highly recommended.