large format posters - welcome to centre for heart lung … · · 2015-08-26large format posters...
TRANSCRIPT
1
Large Format Posters
07-04-2011
Programs – Why Power Point? There are many different ways to build a poster and you can use many different programs like: Corel Draw, Illustrator, Power Point and Adobe In Design. We believe that most people will use Power Point to make posters because the program is available on all computers here, almost everyone has used the program and most feel comfortable with it. Often people use slides that they have already created for other presentations to make their posters, so it makes a lot of sense to use Power Point. We like it because excel and word integrate so well with it, and are fully editable once they are embedded. This is not always the case with the Adobe products. Limitations of Power Point Some limitations of Power Point are:
1. Size restraints You can‟t make a poster that is longer than 56 inches when working at a100% scale. Chances are that you won‟t need to go larger, but if you do this can be worked around by making a smaller poster and then scaling the size up when it is printed. For example a 36” x 56” poster can be scaled to 44”x 68” when it is printed. (As noted below there is a poster template available that can be scaled to 36” x 60”).
2. Conversion and compression of images to unknown formats Once images are put into Power Point they are “magically compressed”. Image quality is not affected enough to be concerned for a poster, however if your poster needs to be used later for publishing, Power Point is not the program to use.
3. File conversions for printing What you see is not always what you get. If your poster looks good on regular printers, it may not on our large format printer. We have experienced major problems with images that are not RGB jpgs (indexed colour and some images generated from the confocal microscope).
4. Macintosh Files Power Point and Excel Files created on a Macintosh sometimes give us problems. Please try to create all of you files on a PC, if this is not possible then let us know ahead of time.
Size and Resolution Our printer is capable of 42” wide by 90 feet long (way beyond the capability of Power Point). It will print up to a resolution of 2880 x 1440 dpi. This high quality will not be necessary in most cases for posters which we will print at 1440 x 720 dpi. We have three paper sizes: 24”, 36” and 42”. The 24” paper comes in double weight matte as well as semi gloss photo paper. The 36” paper comes in semi-gloss and glossy, while the 42” comes only in the semi-gloss. The semi-gloss paper is the most popular for final posters but the glossy can also look very professional if you have a lot of images/graphics. Templates To simplify things, we have made a few different poster “templates” as well as a logo Power Point and Poster Making Instructions. They are located on: Internet (externally): http://www.hli.ubc.ca/posters/posters.html Intranet (internally): http://home.hli.ubc.ca/services/imaging/imaging.html#posters

2
The poster templates are called:
3x4 – 3 col.ppt 3x4 – 4 col.ppt 3x4 – 5 col.ppt 3x5 – 3 col.ppt 3x5 – 4 col.ppt 3x5 – 5 col.ppt 3x6 – 6 col.ppt
The best to get logos internally is at: O:/Imaging/logos These will be the most updated versions of all logos. If you are looking for a logo that you don‟t see or need a different colour of a logo please contact Imaging Services at [email protected]. There is also a file containing logos in the same location as the poster templates (logos.ppt). We have used the term “template” loosely because in fact it is not really a template in Power Point lingo, but a presentation. A template is a file that is applied to an existing file to set the background colours, font size, colours, and background images of the slide master. Cost: We are currently charging:
Price (inside / outside users)
Test poster (proof) on single-weight matte Free
Test poster (proof) on double-weight matte $8.00
Final poster per square foot $5.50
Examples: 36 x 48 final $66.00
36 x 56 final $77.00
Using the large format poster prepared files (templates) *Please Note: for anyone using PowerPoint 2007, the menu structure for PPT 2007 is very different from previous versions so you may need to hunt around to find the same functions. Imaging is using the 2007 version so if you have questions please ask! 1. Get the files and save them: The most commonly used file is: large format poster 3x4 4 col template.ppt or 3x5 4 col template.ppt JHRC Users:
Save the template file you want in your own directory
Use the instructions below to create your poster
When your poster is ready for a test print save it in O:/Imaging/posters to print. Make your own directory (folder) using your name. example: O:/Imaging/posters to print/06-15-2010 Jenn Myers/test/jenn myers.ppt
Outside Users:
When your poster is ready for a test print email it to us if it is under 8MB or bring it to us on a CD or other storage device.
3
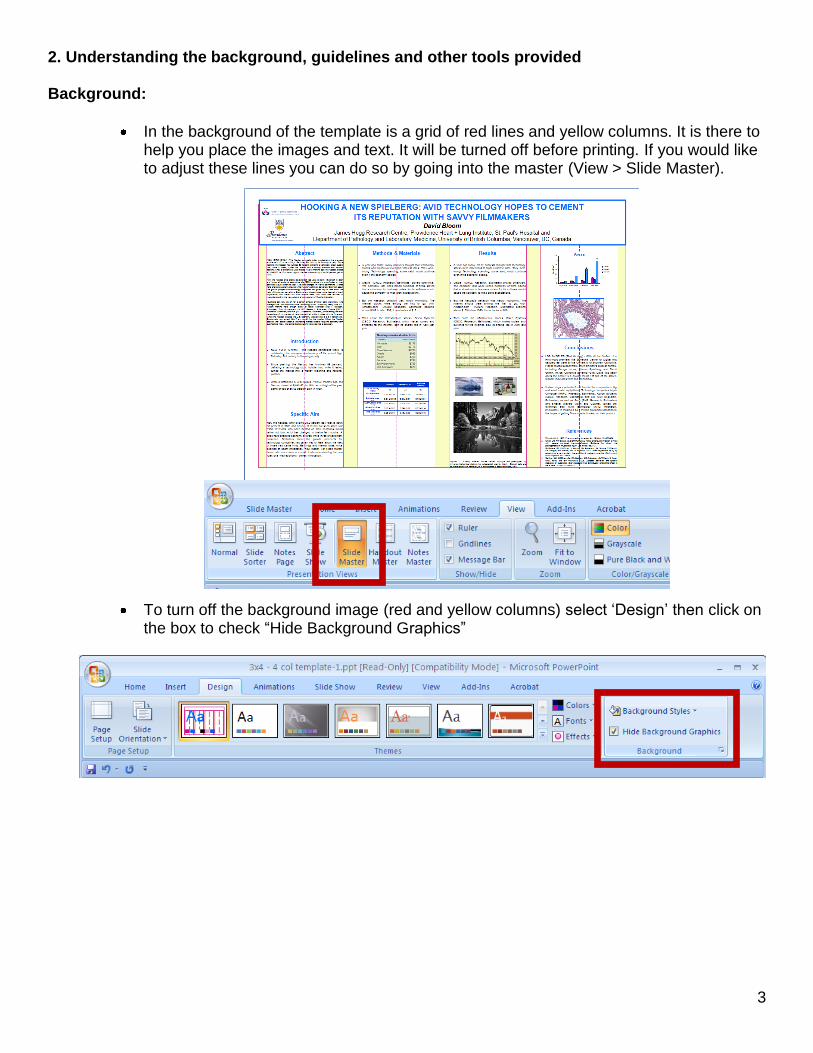
2. Understanding the background, guidelines and other tools provided Background:
In the background of the template is a grid of red lines and yellow columns. It is there to help you place the images and text. It will be turned off before printing. If you would like to adjust these lines you can do so by going into the master (View > Slide Master).
To turn off the background image (red and yellow columns) select „Design‟ then click on the box to check “Hide Background Graphics”

4
3. Adding content Adding Power Point Slides- If you are taking content from previously made slide presentations, open the presentation and poster template and arrange them side by side. You can do this by opening both Power Point files, click on “Windows” in the top menu bar and then choose “Arrange All” or “Cascade”.
Copy and Pasting each Individual Slide: There are two ways to get your information from your presentation onto your poster template:
1) You can copy each section from your presentation and paste it over the existing text on the template using the paste special function, see below. (shortcut = Control Alt V). If you do this the text will automatically format to what is already on the poster template (much faster).

5
2) Or you can highlight the text in your presentation and drag it onto the poster template. If you do this the text will not be formatted therefore you will have to format it manually.
Adding Content from MS Word- Open the word file. Select the paragraphs. Copy them. Minimize or close the word file. Select the template text box and paste using the same past special function as seen above.The text will now adopt the format of the text on the template. Alternatively you can make a new text box. The size will have to be changed to match the other text boxes later (this will create more steps and therefore take you more time).
Tables
With the new powerpoint making visually pleasing tables is easy. Just go to Insert, then tables. Use the table grid to highlight the correct size table. Below I am creating a 4 column 5 row table.
Shortcut!!
6
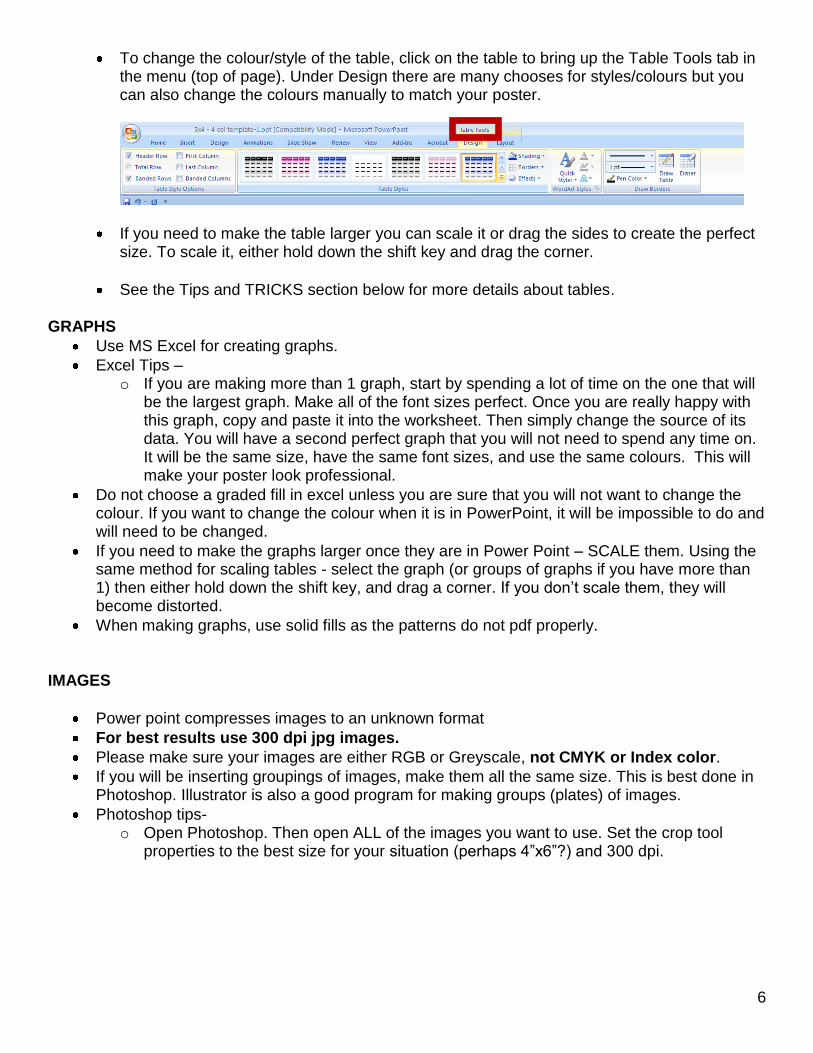
To change the colour/style of the table, click on the table to bring up the Table Tools tab in the menu (top of page). Under Design there are many chooses for styles/colours but you can also change the colours manually to match your poster.
If you need to make the table larger you can scale it or drag the sides to create the perfect size. To scale it, either hold down the shift key and drag the corner.
See the Tips and TRICKS section below for more details about tables. GRAPHS
Use MS Excel for creating graphs.
Excel Tips – o If you are making more than 1 graph, start by spending a lot of time on the one that will
be the largest graph. Make all of the font sizes perfect. Once you are really happy with this graph, copy and paste it into the worksheet. Then simply change the source of its data. You will have a second perfect graph that you will not need to spend any time on. It will be the same size, have the same font sizes, and use the same colours. This will make your poster look professional.
Do not choose a graded fill in excel unless you are sure that you will not want to change the colour. If you want to change the colour when it is in PowerPoint, it will be impossible to do and will need to be changed.
If you need to make the graphs larger once they are in Power Point – SCALE them. Using the same method for scaling tables - select the graph (or groups of graphs if you have more than 1) then either hold down the shift key, and drag a corner. If you don‟t scale them, they will become distorted.
When making graphs, use solid fills as the patterns do not pdf properly. IMAGES
Power point compresses images to an unknown format
For best results use 300 dpi jpg images.
Please make sure your images are either RGB or Greyscale, not CMYK or Index color.
If you will be inserting groupings of images, make them all the same size. This is best done in Photoshop. Illustrator is also a good program for making groups (plates) of images.
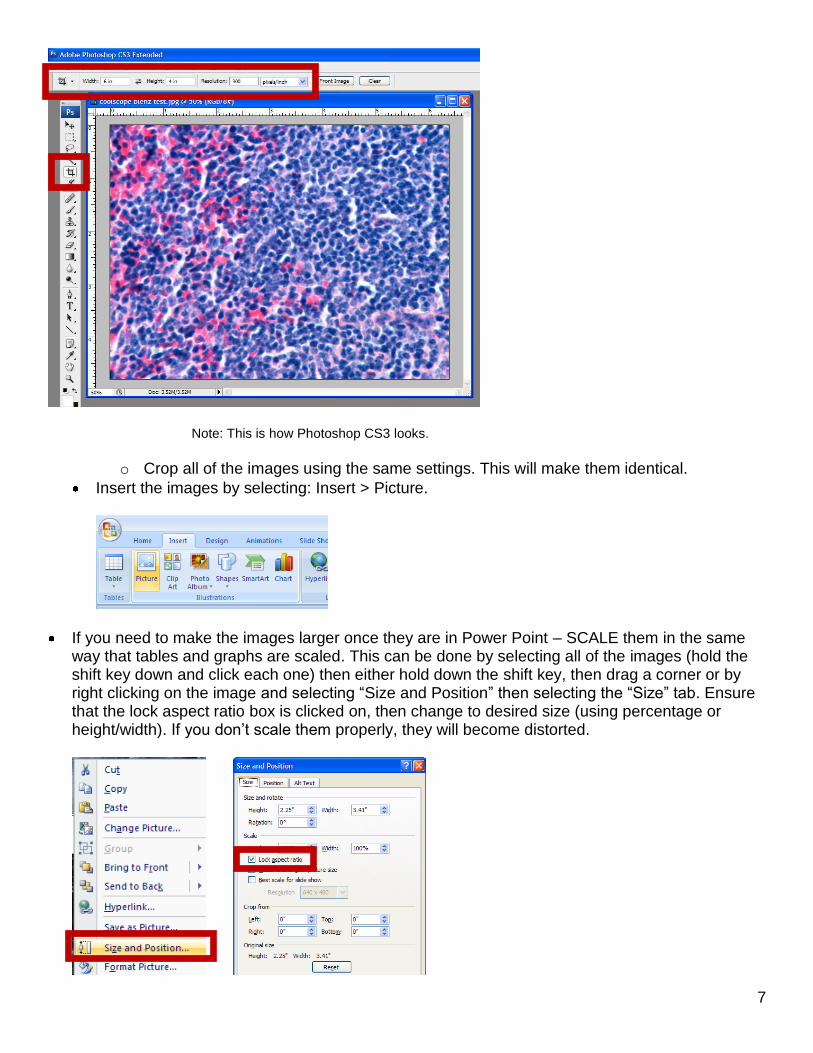
Photoshop tips- o Open Photoshop. Then open ALL of the images you want to use. Set the crop tool
properties to the best size for your situation (perhaps 4”x6”?) and 300 dpi.
7
Note: This is how Photoshop CS3 looks.
o Crop all of the images using the same settings. This will make them identical.
Insert the images by selecting: Insert > Picture.
If you need to make the images larger once they are in Power Point – SCALE them in the same way that tables and graphs are scaled. This can be done by selecting all of the images (hold the shift key down and click each one) then either hold down the shift key, then drag a corner or by right clicking on the image and selecting “Size and Position” then selecting the “Size” tab. Ensure that the lock aspect ratio box is clicked on, then change to desired size (using percentage or height/width). If you don‟t scale them properly, they will become distorted.
8
Tips and Tricks
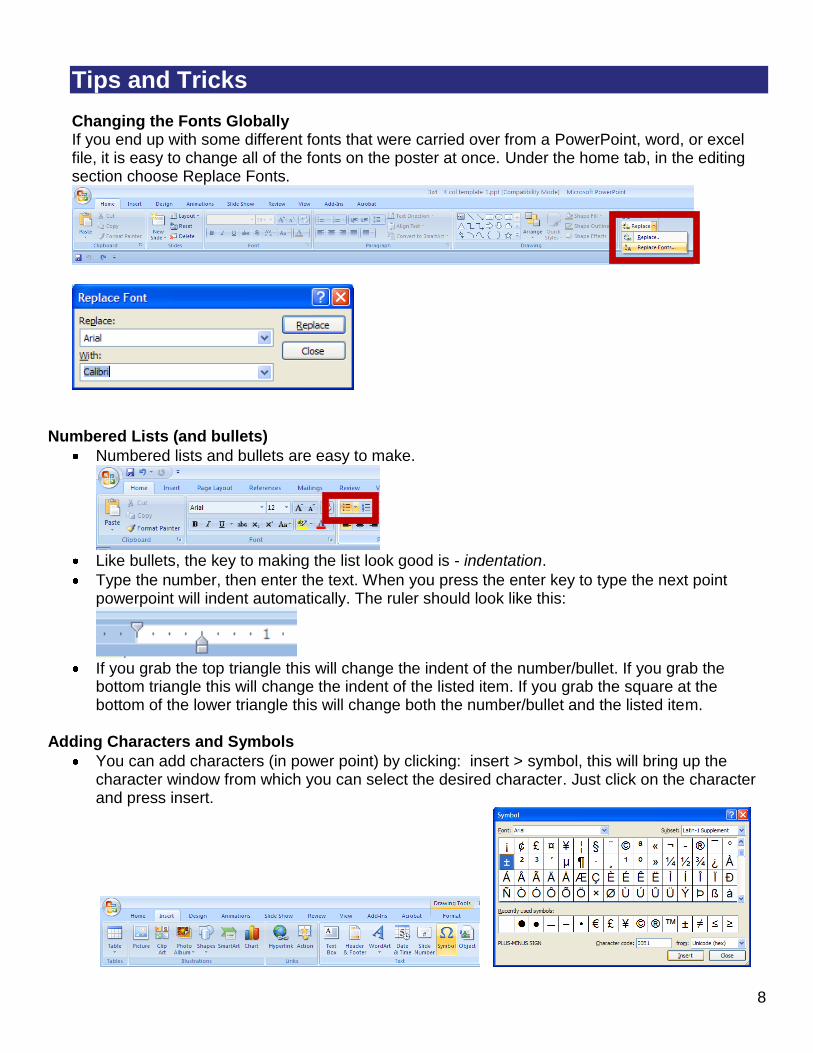
Changing the Fonts Globally If you end up with some different fonts that were carried over from a PowerPoint, word, or excel file, it is easy to change all of the fonts on the poster at once. Under the home tab, in the editing section choose Replace Fonts.
Numbered Lists (and bullets)
Numbered lists and bullets are easy to make.
Like bullets, the key to making the list look good is - indentation.
Type the number, then enter the text. When you press the enter key to type the next point powerpoint will indent automatically. The ruler should look like this:
If you grab the top triangle this will change the indent of the number/bullet. If you grab the
bottom triangle this will change the indent of the listed item. If you grab the square at the bottom of the lower triangle this will change both the number/bullet and the listed item.
Adding Characters and Symbols
You can add characters (in power point) by clicking: insert > symbol, this will bring up the character window from which you can select the desired character. Just click on the character and press insert.

9
For that Professional Look Make sure everything is uniform.
o Titles are all the same size, same font, same colour, and same justification. o Text boxes are identical widths, are the same colour, are the same font size, are the
same style, and same justification. The choice of font should have a clean scientific look such as Arial.
o Bullets should be properly and identically indented and all be the same colour. o All legends for graphs should be the same size. o Images should be exactly the same size o Graphs should all be created from one beautiful graph to ensure that the size, fonts and
colours are the same.
Using colours that match colours in the images can give you poster a more professional feel.
Generally a slight colour with a gradient in the background like light blue, beige or yellow works well and is easier on the eyes than white. If you want a dark background then make sure your text is very light in colour (ie: white or yellow)
Tools that Help Guidelines
Rulers
JHRC Poster Templates
When copying and pasting text don‟t‟ forget to use: PASTE SPECIAL >UNFORMATTED TEXT
Please do not! Please don‟t use Asian fonts as we do not have them and they cause our printer to crash.
Please don‟t use old templates, the files on the intranet or the internet work well with our system and do not cause us problems.
Do not fill your boxes with transparent colors…choose a lighter colour instead of changing the transparency:
When we PDF the file adobe will fill the transparency with a pattern.

10
Please use current Logos! in the folder: O:/Imaging/Logos OR Internet (externally): http://www.hli.ubc.ca/posters/posters.html Intranet (internally): http://home.hli.ubc.ca/services/imaging/imaging.html#posters
Bar graphs: please do not use patterns as they will not pdf or print properly (use solid fills where possible).
Contact info If you have any questions you can contact Dean and Jenn at: local 62094 (604-682-2344 ext 62094) [email protected] Imaging office - room 242 Burrard Building
Remember to give us a few days with your poster. A test print should be ready 2-3 days before the final print!!