land vehicle for education: chassis, motor, …edge.rit.edu/content/p11211/public/msd ii...
TRANSCRIPT

Multi-Disciplinary Senior Design Conference
Kate Gleason College of Engineering Rochester Institute of Technology
Rochester, New York 14623
Copyright © 2011 RIT Senior Design Team P11211
Project Number: P11211
LAND VEHICLE FOR EDUCATION: CHASSIS, MOTOR,
POWER
Jonathan Fabian - EE Ryan Sutton - ME
Jesse Keyser - ME Matthew O’Neill – ME
ABSTRACT
A robotic platform was designed to be used in a
freshman level engineering class. The robot is
designed to accept a modular attachment designed and
built by the students that will be mounted in order to
accomplish some task defined within the class. Some
examples of this include, picking up, moving and
rearranging small objects. This project was a new
iteration of older families of projects, of varying sizes
and budget ranges.
This platform is capable of supporting the desired
attachment and operating successfully, in addition to
being manufactured primarily in-house. Although the
current design fell short when it came to the
customer’s mass production budget (overall, the
system was over budget by ~10%, not including
shipping costs). This led to redesign proposals that
focused on driving down overall cost. If all the
proposed recommendations are implemented, a total
savings of $448.75 would be recognized, leading to a
per unit price of $125.46 for 10 chassis.
NOMENCLATURE
LVE – Land Vehicle for Education, the robotic
platform designed during the course of this project
MSA – Modular Student Attachment, A student
designed device meant to extend the functionality of
the LVE for educational competitions
WOCCS – Wireless Open-source/Open-architecture
Command and Control System, the RF Module used to
wirelessly control the robot
RF – Radio Frequency, the spectrum of
electromagnetic energy that surrounds and penetrates
everything, can be harnessed for communications
H-Bridge – Motor control solution for Permanent
Magnet DC motors, can utilize PWM for speed
control.
PWM – pulse width modulation, method of
controlling the voltage across a circuit by rapidly
toggling on and off a switching device
FEA – Finite Element Analysis , a numerical technique
for finding approximate solutions of partial differential
equations (PDE) as well as of integral equations. This
is utilized here to analyze stress in complex 3d
situations.
INTRODUCTION
The Land Vehicle for Education (LVE) is a robotic
platform designed for use with a future mechanical
engineering class. It is designed so that freshmen
engineering students can create a modular attachment
utilized to perform a set task. It is based upon prior
senior design robotic platforms, such as RP1, 10, 100,
as well as the LV1. For communication, it pulls from
the WOCCS family of projects to provide a low cost,
open source/open architecture wireless solution. This
iteration represents a further refinement of the
platform, focused specifically on cutting the
production costs associated with the device in order to
make it economically feasible for production.
PROCESS
Before starting the design, it was necessary to
communicate with our customer, the head of the

Copyright © 2011 RIT Senior Design Team P11211
mechanical engineering department Dr. Edward
Hensel, to understand the project goals and his
requirements for the design. Following our meeting
with Dr. Hensel, we synthesized a list of 16 critical
customer criteria, as seen in table 1, which related
directly to our subsystem of the LVE. The needs were
rated on their importance to the customer, and served
as a guideline for development activities.
Table 1. Table of Critical Customer Needs
Customer Need #
Importance Description
CN1 4 MSA Interfaces are Multipurpose and Easy to use
CN2 9 Cheap and Easy to Maintain
CN3 8 Inexpensive and Easy to Manufacture
CN4 7 Easy to Operate
CN5 13 Easy to Store
CN6 6 Be able to withstand multiple years of use/abuse
CN7 3 Be able to handle the weight of MSA and payload
CN8 11 Safe for use by students and faculty
CN9 12 Sustainable Design
CN10 2 Stable platform for the MSA
CN11 5 Standardized attachments for the MSA
CN12 16 Standardized geometric tolerances and dimensions
CN13 10 Employ manufacturing processes available in RIT Labs
CN14 15 Logical and easy to follow manufacturing Instructions
CN15 1 Stable source of power for Controls and MSA
CN16 14 Aesthetically Pleasing
This information, in conjunction with the system level
specifications, was used to develop preliminary
engineering specifications , shown in table 2a and 2b,
that guided our decision making process during the
design selection procedure. The systems level
specifications were developed by the systems level
engineers in response to the overall customer needs.
Table 2a. Table of Engineering Specifications Engr.
Spec. # System Spec
Chassis CN
Description
1 1.2 3/13 Chassis Cost per mass production
2 1.3 3/13 Chassis Cost per Prototype
3 2.1 5/7 Unloaded LVE Weight
4 2.2 7/10 Able to support specific payload weight
5 2.3 4/7 Move LVE at adequate speed
6 2.4 4 Turning radius
7 2.5 5/10 Height of Chassis
8 2.6 5/10 Base Area of LVE Platform
9 2.7 4/7 Ability to travel up incline
10 2.8 6 Able to Withstand being dropped from
minimal height
11 3.1 2/4/15 Run Time
12 3.2 2/4 Recharge Time
13 4.1 8 Surface Temperature
14 4.2 8 Number of tissue layers torn through when run against edge
15 4.3 9 Minimize Material Waste
16 4.4 3 Max. Lead Time for parts
17 4.5 12 Use limited number of screw types
18 4.5/4.7 9 Minimize machined parts per LVE
19 5.4 16 Limit exposed wires
Table 2b. Continuation of Engineering Specifications Engr.
Spec. # Metric Value Importance
1 ($/Unit) <150 1
2 ($/Unit) <250 2
3 (lbs) <10 6
4 (lbs) <5 5
5 (mi/h) >0.5 10
6 (in) <12 8
7 (in) <8 16
8 (in 2̂) <144 7
9 deg 15 17
10 (ft) 3 4
11 (min) >90 3
12 (hr) <4 9
13 (°F) <130 12
14 (Count) <3 13
15 (lbs) <1 19
16 (Weeks) <2 18
17 (Count) 4 14
18 (Count) <20 15
19 (Count) <5 11
The assumptions made during this design included that
the LVE will be run on industrial carpet, hardwood
flooring, concrete and rubber track. It was also
assumed that the only obstacle that would be
encountered would be a 15 degree incline. It would be
battery operated, wirelessly controlled, with additional
functionality of autonomous control in the future.
Lastly, we assumed that we would use permanent
magnet DC motors.
Several concepts were generated and rated using
various grading criteria. Concepts produced were a
Rectangular shape, a Circular shape, a Triangular
shape, a Car shape with Flat Roof, a “Pick-up”
shape with MSA Mounted in the Bed, and a Trapezoid
shaped vehicle when viewed from the side. Some of
the concepts that we modeled are shown in Figure 1a-
c. The selection criteria was “Ease of Manufacturing”,
“Aesthetically Pleasing”, “Material Waste”, “Storage
Ability”, “Internal Space Utilization”, “Platform
Surface Area”, and “Cost”. These were each weighted
and then graded for each design. We also followed
this process for deciding on materials, MSA

Proceedings of the Multi-Disciplinary Senior Design Conference Page 3
Copyright © 2011 RIT Senior Design Team P11211
attachment method, wheel mounting position, battery
type and drivetrain/steering method.
Figure 1a. Circular Shape
Figure 1b. Rectangular Shape
Figure 1c. Pickup Shape
The concept chosen was the “pick up” with two wheel
differential steering and castors. The “pick up” went
through several iterations to meet ours as well as the
other LVE family groups’ needs. In the end the final
design was a “reverse pickup” with the front wheels
being the differential drive wheels and the rear wheels
being castors. The MSA platform or the “pickup bed”
is mounted at the front to allow for easier placement of
the MSA when the vehicle is driven. The “cab” of the
pickup is where the control boards and RF board are
mounted. The battery is located within the chassis
under the MSA platform. The motors are mounted
under the chassis attached using motor mounts. The
finalized concept can be seen in Figures 2a-b.
Figure 2a. Final Prototype Exterior
Figure 2b. Final Prototype Interior
During the concept selection process, there were a
number of physical system needs that had to be
determined, such as the torque and speed requirements
Copyright © 2011 RIT Senior Design Team P11211
for the motors, battery capacity, clearances, layout of
components and structural integrity.
To determine the motor torque requirements the total
weight of the LVE needed to be estimated. This was
accomplished by using the maximum allowable
weight of 10 pounds for the LVE Chassis and 5
pounds for the MSA. Using a factor of safety of four,
the torque required to move this weight was calculated
to be 25.5 in-oz. The next step was to understand the
terrain the LVE would traverse. The most demanding
task would be to climb an incline of fifteen degrees.
The following calculations show how we came to the
required torque of 25.5 in-oz for flat ground with a
factor of safety of four and 112 in-oz for the fifteen
degree incline with a factor of safety of two because it
was not as critical of a costumer need.
The factor of safety required was determined using
table 3, as recommended by the faculty advisor.
Table 3. Table used to determine requisite factor of
safety
Consequences
Low High
Uncertain 1.2 2
Certain 2 4
Rolling Torque:
1)
Static Torque:
2)
(
)
Incline Torque:
Figure 3. Incline Free Body Diagram
3) [ ( ) ]
[ ( )]
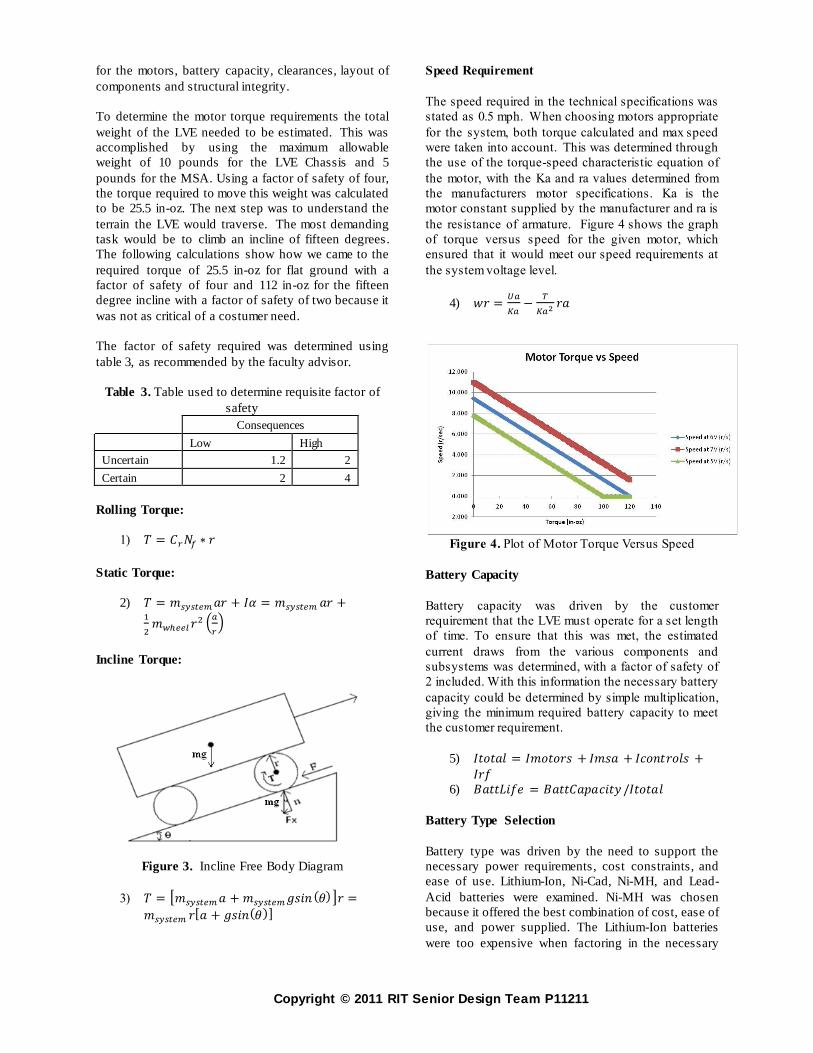
Speed Requirement
The speed required in the technical specifications was
stated as 0.5 mph. When choosing motors appropriate
for the system, both torque calculated and max speed
were taken into account. This was determined through
the use of the torque-speed characteristic equation of
the motor, with the Ka and ra values determined from
the manufacturers motor specifications. Ka is the
motor constant supplied by the manufacturer and ra is
the resistance of armature. Figure 4 shows the graph
of torque versus speed for the given motor, which
ensured that it would meet our speed requirements at
the system voltage level.
4)
Figure 4. Plot of Motor Torque Versus Speed
Battery Capacity
Battery capacity was driven by the customer
requirement that the LVE must operate for a set length
of time. To ensure that this was met, the estimated
current draws from the various components and
subsystems was determined, with a factor of safety of
2 included. With this information the necessary battery
capacity could be determined by simple multiplication,
giving the minimum required battery capacity to meet
the customer requirement.
5)
6)
Battery Type Selection
Battery type was driven by the need to support the
necessary power requirements, cost constraints, and
ease of use. Lithium-Ion, Ni-Cad, Ni-MH, and Lead-
Acid batteries were examined. Ni-MH was chosen
because it offered the best combination of cost, ease of
use, and power supplied. The Lithium-Ion batteries
were too expensive when factoring in the necessary

Proceedings of the Multi-Disciplinary Senior Design Conference Page 5
Copyright © 2011 RIT Senior Design Team P11211
monitoring circuits, and lead-acid batteries would have
necessitated an increase in weight and driven up other
costs in the design.
Wheels: Interface
The selection of the drive wheels for the LVE was an
involved process that included several driving factors.
The most critical being the ability to meet the max
torque requirement to traverse an incline of 15
degrees. This calculation would rely on the overall
mass of the LVE and the radius of the wheels. Figure
5 shows the max torque vs. radius graph that assisted
in the proper wheel selection. The yellow data point
shows that the 45mm radius wheel selection would
require an 84 in-oz. motor. Next, the drive wheels
would have to meet the 0.5 mph top speed requirement
for the LVE. An analysis was done comparing the
RPM of several motors vs. several wheel radii. Lastly,
the cost was a large driving factor in the wheel
selection. After completing and reviewing our analysis
for these factors, the 90x10mm Pololu wheels were
selected for the LVE.
Figure 5. Torque Required for 15 degree Incline per
Motor
Figure 6. Wheel with Motor and Hubs
Material Selection
The materials considered for the construction of the
LVE were aluminum, steel, carbon fiber, plastic and
titanium. The selection criteria were weight, cost
appearance, durability and machinability, with an
emphasis placed on cost and durability. A concept
matrix was generated and lead to the decision to use
aluminum and steel for the LVE base platform and
uprights, and plastic for the LVE body panels. The
reason aluminum was not used exclusively for the
structural components were due to a concern
expressed by the customer of the durability of the
threads in the aluminum components. Plastic was used
for the body panels in place of aluminum due to
reduced weight, cost and machinability. The ability to
use the laser cutter to cut out the RIT logo in the back
body panel was a very attractive option that would
help satisfy the customer needs.
Figure 7. Lasercut Back Panel with RIT Logo
Machining
Four primary machining processes were used in the
construction of the LVE. The base platform and
uprights were machined using the band saw and mill.
The body panels were machined using the laser cutter
and break. The machining time was approximately 20
hours in total, with the steel and aluminum
components consuming approximately 16 hours and
the body panels consuming the remaining 4 hours. The
parts were produced using the mechanical drawings
generated from the LVE CAD model.
Clearances/Layout of Components
The size and shape of the LVE presented challenges
when designing the layout of the various internal
components of the device. The electronics were
concentrated in the tower section of the LVE, which
resulted in a very confined space needing to
accommodate three boards, and their associated wiring
and connectors. In addition to the physical volume
constraints, the location of the casters on the bottom
presented challenges for the proposed mounting
locations of the boards, with the desired layout
interfering with the caster plates. The casters were
eventually moved, which allowed the boards’ supports
to clear the plates. The front of the LVE (the area
below the MSA attachment) was dedicated to the
battery compartment to avoid damaging components
with the battery. Additionally, the low height of the
front section limits what could be placed in it, even
without the constraints posed by the battery. A partial

Copyright © 2011 RIT Senior Design Team P11211
internal layout can be seen in figure 8, which shows
the internal location of the main components that
needed to be accommodated.
Figure 8. Internal Electrical Layout of LVE
MSA Interface
The MSA Interface was the major mechanical
interface the needed to be managed across team
boundaries. It was a very fluid interface, with many
changes over the course of the project in response to
customer requirements and manufacturing concerns.
Initially, the chassis was to include the plate for the
MSA to mount to, with the interface itself being the
holes in the plate. This was adjusted when it became
apparent that the customer would require more MSA
units then chassis units so that the MSA now included
the mounting plate. This allowed the plate to be used
independently of the chassis for construction, and then
easily attached to the chassis when the students were
ready to test. Following this change, there was still
discussion back and forth between the teams as to
where the mounting holes for the plate would be and
what type of connectors would be used.
Stress Analysis (FEA Analysis)
Stress analysis was performed on both the base plate
of the chassis as well as the upright supports used in
the final design. The uprights were loaded with 5 lbs.
normal to the top face (Figure 9) and resulted in a
maximum deflection of 9.7 x 10⁻⁷
in and a peak stress
of 8.5 psi.
Figure 9. Stress of loaded Vertical Support
The base plate was loaded with 5 lbs equally
distributed over the msa support attachment points and
0.33 lbs over the “cab” attachment points, with the
wheel mount locations held constant (Figure 10).
This resulted in a max deflection of 1.4 x 10⁻⁴
in and a
peak stress of 102 psi. All forces were calculated from
the expected weight at those point times a factor of
safety of 4.
Figure 10. Stress of loaded Base Plate
Stress Analysis of Unibody Design
A unibody design was proposed by the customer to
reduce cost. The following is an analysis of the
feasibility of the design. A normal force of 10 lb. was
applied uniformly on 4 faces, with the same wheel
mounting locations as on the base plate analysis held
constant (Figure 11). This produced a max Von Mises
Stress of 3554 psi, and a max deflection of
6.9205 x10⁻⁴
inch.

Proceedings of the Multi-Disciplinary Senior Design Conference Page 7
Copyright © 2011 RIT Senior Design Team P11211
Figure 11. Stress of loaded Base Plate
Additional Considerations for the Unibody Design:
Problems:
1. Difficult to maintain internal components
2. Cannot replace individual structural
components – if chassis breaks, an entirely
new chassis is needed
3. Difficult to bend multiple sides in metal
bender
4. According to Baja-SAE Project Manager,
ability to bend on campus is non-existent
5. Lack of internal clearance for tools
6. Need to modify MSA attachment (pins are
not possible)
7. Steel will require protection to prevent
rusting
8. Difficult to keep hole tolerances on bent plate
9. Difficult to machine on RIT equipment due to
size limitations
10. Unibody part is more expensive then parts it
would replace (~$92 oppose to ~$40)
Advantages:
1. Less Parts
2. Similar weight characteristics to current
design
3. Will support MSA weight
RESULTS AND DISCUSSION
In order to validate our project and make sure it meets
the needs of our customer we devised a list of testing
criteria to put the LVE Chassis through. All of the
tests were derived from our Engineering
Specifications. Each tests’ purpose was to ensure that
we developed what the customer wanted. The testing
was completed with the Chassis as a complete
subassembly. This means that the testing was done
without the controls or MSA. The complete system
assembly testing with controls and MSA is to be
carried out by the Systems group. The following
tables show the tests and the results. In the end we
successfully passed all of our tests except for two.
There was a failure during the drop test as well as not
meeting the mass production cost. We were over the
mass production cost by $20.33.
Table 4a. Verification Testing
Test # Test Name Related Engineering
Specification Pass Criteria
1 Drop Test LVE will be able to
withstand being dropped from 3 feet on the wheels
LVE shows no signs of
fatigue and passes functional test after
being dropped from 3 ft on the wheels
2 Payload Weight
LVE will support a specific payload weight of
5 lbs
LVE platform will support 5 lbs with no obvious deformation
while loaded or upon removal of load
3 Unloaded
LVE weight The unloaded LVE will
weigh < 10 lbs LVE weighs < 10 lbs
4 Base Area
of LVE Platform
The LVE Platform will be less than 144 in
2
LVE Platform is > 144 in
2
5 Tissue Test < 3 Tissues torn through
< 3 Tissues torn through when tissue is
ran along each exposed edge
6 Minimize Material
Waste
< 2 lbs of reusable material waste at the end
of machining
< 2 lbs of reusable material waste at the
end of machining
7 Limited
number of screw types
Use < 4 screw types for LVE Chassis
< 4 screw types used for LVE
8 Battery
Recharge Time
It will take < 4 hrs to
recharge LVE Battery
< 4 hrs to recharge
battery
9
LVE Run
Time
The LVE will run for > 90
minutes
It will take > 90 minutes to drop
battery below 7V
10 Unloaded
LVE speed
Move LVE at speeds >
0.5 mph
LVE maintains a top
speed > 0.5 mph
11 Turning Radius
< 12 Inch Turning Radius The LVE will be able to turn within a 2 ft
diameter circle
12 Surface
Temperature All exposed surfaces will
be < 130 degrees F Exposed surfaces <
130 degrees F
13 Chassis prototype
cost
The LVE chassis prototype cost will be <
$250
LVE prototype cost <
$250
14
Chassis Per Unit Cost
(Mass Production)
The LVE per unit mass production cost will be <
$150
LVE mass production
cost < $150
15 Maximum
lead time for parts
Maximum lead time for parts will be 2 weeks
Lead time for parts < 2 weeks

Copyright © 2011 RIT Senior Design Team P11211
Table 4b. Testing Results Test
# Test Name Results Pass/Fail
1 Drop Test
LVE ran for one ten foot straight-line pass and then the gearbox
stripped a gear
Conditional Failure
2 Payload Weight LVE platform
supports 5 lbs with no deformation
Pass
3 Unloaded LVE
weight 8.102 lbs Pass
4 Base Area of LVE
Platform 96 in
2 Pass
5 Tissue Test < 3 Tissues torn through for each exposed edge
Pass
6 Minimize Material
Waste 1.06 lbs Pass
7 Limited number of
screw types 2 Screw types Pass
8 Battery Recharge
Time 1 hr 10 min Pass
9 LVE Run Time Observed 90 minutes Pass
10 Unloaded LVE
speed 1.104 mph Pass
11 Turning Radius LVE stays within the
2 ft diameter circle Pass
12 Surface
Temperature
111 degrees F at
motor Pass
13 Chassis prototype
cost $204.21 Pass
14 Chassis Per Unit
Cost (Mass Production)
$170.33 Fail
15 Maximum lead time for parts
All parts < 2 week lead time
Pass
CONCLUSIONS AND RECOMMENDATIONS
Overall, the design met the majority of the customer
needs. It is capable of supporting the desired
attachment and operating successfully, in addition to
being manufactured primarily in-house. It did not,
however meet the customer’s mass production budget
requirement (overall, the system was over budget by
~10%, not including shipping costs). This led to
redesign proposals that focus on driving down overall
cost.
Some of the drawbacks of our design are that it weighs
more than other alternatives considered; this leads to
the requirement of larger motors and battery. This
weight also puts a larger amount of stress on the motor
mounts, and the shaft protruding out of the gearbox on
the end of the motor. This design had a larger number
of parts and overall more complex machining.
We believe the motor failures were due to the weak
gearbox. We assumed the attached gearbox would be
robust enough to support the torque output of the
motors being that these came together as a unit.
Major changes were instituted to drop the mass
production price below the customers’ requirements,
starting with changing the major structure to a simple
box. This change dropped the overall weight of the
chassis dramatically (8.1 lbs down to 4.8 lbs), which
allowed for additional changes . This includes a
reduction in the size of the motors, which proved to be
a major cost savings. If all the proposed
recommendations are implemented, a total savings of
$448.75 would be realized, leading to a per unit price
of $125.46 for 10 chassis.
These changes aren’t without their tradeoffs however,
such as the need for modifications at the MSA
attachment points and a less aesthetically pleasing
robot. The customer must weigh these considerations
and make a final decision about which path they wish
to pursue. Improving upon the existing design with
better direction from the customer will be a project for
a future MSD team.
ACKNOWLEDGEMENTS
We would like to thank the RIT Mechanical
Engineering Department, Dr. Edward Hensel, Phil
Bryan, Leo Farnand, Vince Burolla as well as Robert
Kraynik, and Steven Kosciol of the ME machine shop.
REFERENCES
1) Hibbeler, R. C., and P. Schiavone.
Engineering Mechanics Dynamics. 11th ed.
Singapore: Pearson/Prentice-Hall, 2007.
Print.
2) "Pololu - 154:1 Metal Gearmotor 20Dx44L
Mm." Pololu Robotics and Electronics. Web.
29Apr.2011.<http://www.pololu.com/catalog/
product/1109>.
3) "All-Battery.com: Tenergy 7.2V 3000mAh
High Power Flat NiMH Battery Packs W/
Tamiya Connectors for RC Cars." All-
Battery.com - Rechargeable Batteries &
Chargers. Web. 29 Apr. 2011.
<http://www.all-
battery.com/72v300mahflatnimhhighpower38
adrainratebatterypackswithtamiyaconnectors1
1120.aspx>.
4) McMaster-Carr. Web. 29 Apr. 2011.
<http://www.mcmaster.com/>.
5) Jones, Joseph L., and Anita M. Flynn. Mobile
Robots: Inspiration to Implementation .
Wellesley, MA: A.K. Peters, 1993. Print.