lagoon450 ma a 04a - yacht2sail · of a catamaran. the fact that the boat will not hee l over could...
TRANSCRIPT

LAGOON 450Owner's Manual
www.cata-lagoon.com


We share a common passion for the sea: we, LAGOON as shipbuil-ders and you who want to live your passion on the Seven Seas.We are delighted to welcome you to the great family of LAGOON boat owners and we congratulate you on it.This manual was meant to help you to enjoy your boat comfortably and safely. It includes the boat specifications, the equipment provided or installed, the systems and tips on her operation and maintenance. Read this manual carefully before you put out to sea so that you can make the most of her and avoid any damage and any trouble. Get to know your boat before you sail.We keep improving our boats as we want you to benefit from the tech-nological developments, new equipment or materials and our own ex-perience. That is the reason why the specifications and information given are not contractual, they may be modified without prior notice or up dates.This instruction guide has a general purpose and it may mention some equipment or accessories or deal with some points or questions that are not relevant to your own boat ; if in doubt, refer to the inventory that you received on delivery of your boat.
If this is your first boat or if you change to a new type of boat which you are not used to, get some training in boat control and sailing to en-sure your safety and comfort. Your dealer, your international sailing association or your yacht club will be very happy to recommend local sailing schools or professional instructors.Even if everything has been provided for and designed for the safety of the boat and the safety of her users, don't forget that sailing highly depends on the weather conditions, the sea condition, and that only an experienced and very fit crew, handling a well-maintained boat can sail satisfactorily.The sea and wind conditions that correspond to the design categories A,B or C are changeable and are dependent on the ha-zards of unusually strong waves or gusty winds. Therefore total safety cannot be guaranteed, even if your boat meets the requirements of a category.
Our network of LAGOON authorized dealers will be at your dis-posal to help you get acquainted with your boat and will be the most qualified to take care of her maintenance.
Always listen to the weather forecast before you put out to sea.Make sure the sea and wind conditions will correspond to the category of your boat and you and your crew are able to han-dle the boat in these conditions.

The sea and the water are not the natural environment of Man and one has to respect their laws and strength.Adapt the use of your boat to her condition that wears out with time and use.Any boat, however solid she may be, may be severely damaged if ba-dly used. This is not compatible with a secure navigation. Always adapt the speed and direction of your boat to the conditions of the sea.The 'COLREG', an international regulation in order to prevent collision at sea, published by the International Maritime Organization, specifies the steering and course regulations, the navigation lights etc. throu-ghout the world Make sure you know these regulations and you have on board a manual that explains them.In numerous countries, a licence, an authorization or a training course is requested.Make sure you have this legal authorization before you use your boat.Always use an experienced technician for the maintenance of your boat, the fitting of accessories and the carrying out of small modifica-tions. The written authorization of the builder or his legal representati-ve is compulsory for modifications that alter the specifications of the boat, in particular the vertical layout of the grounds (putting up of a ra-dar, modification of the mast, change of the engine etc.).
The users of the boat are informed of the following:- The entire crew must be trained properly.- The boat shall not be loaded more with than the maximum load re-
commended by the builder, in particular the total weight of the food supplies, of the different equipment that are not supplied by the buil-der and of the persons on board. The weight of the boat shall be pro-perly distributed.
- The water in the bilge shall be kept at its minimum.- The stability is reduced when you add weight in the upper parts.- In case of heavy weather, the hatches, lockers and doors shall be
closed in order to minimize the risk of water coming in.- The stability may be reduced when you tow a boat or when you lift
heavy weights with the davits or the boom.- Breakers are serious dangers to stability.- In the boat there shall be all the proper safety equipment (harness,
flares, liferaft etc.) depending on the type of boat, the country, the weather
- The crew must be familiar with the use of all the safety equipment and the emergency safety procedures (MOB, towing etc.).
- Anyone on the deck shall wear a life jacket or a buoyancy aid. Please note that in some countries it is compulsory to wear an homologated buoyancy aid permanently.For the essential or optional equipment (engine, electronics
etc.) refer to their respective manual delivered with your boat.Keep this manual in a safe place and hand it over to the new owner if you sell your boat.

CONTENTS
Chapter Page
Using your boat
Construction and equipment
1 Navigation................................................................................................................................ 52 Winter Storage....................................................................................................................... 233 Launching .............................................................................................................................. 27
4 Hull & Deck ............................................................................................................................ 355 Interior.................................................................................................................................... 456 Electricity ............................................................................................................................... 557 Plumbing................................................................................................................................ 698 Engine .................................................................................................................................... 819 Rigging and Sails .................................................................................................................. 9710 Safety ................................................................................................................................... 11311 General specifications........................................................................................................ 127
Notes
UPDATE 01/2011 - INDEX A
3


Navigation 1
GETTING UNDER WAY ................................................. 7
VISIBILITY IN NAVIGATION .......................................... 7
NAVIGATION UNDER MOTOR ....................................... 9
NAVIGATION UNDER SAIL ......................................... 11
MOORING ................................................................... 17
TOWING ...................................................................... 17
ANCHORING ............................................................... 17
DAVIT (OPTIONAL) ..................................................... 21
ENVIRONMENT ........................................................... 21
5

NAVIGATION
6
GETTING UNDER WAY
1. Battery switch of negative terminal - Port engine2. Battery switch Positive - Port engine3. Relay coupler
Lay out of: Port aft cabin
4. Battery switch - Common negative 5. Battery switch - Positive engine - To starboard6. Battery switch - Service positive
Lay out of: Starboard aft cabin
1 - Switch - Saloon - Central.2 - Switch - Saloon - Side.3 - Switch - Night lamps.
LOCKING -SLIDING DOOR
ENTRY SWITCHES
LAGOON 450

1NAVIGATION
7
NAVIGATION
The sliding door locks in three different positions: closed, ajar (airing position) and open. A latch on the doorframe enables locking from inside the saloon.
Switch on the main power of the boat by activating the battery swit-ches located in the port and starboard aft cabins,then activate the different accessory switches on the electrical panel.
Check the charge rate of the batteries, the water level in the tanks and the fuel level (see ELECTRICITY and MOTORIZATION chap-ter).
Carry out the inventory of compulsory safety equipment and instruct the crew concerning its location and operation.
The international regulations to prevent collision at sea (COLREG) and the course regulations make mandatory a permanent and pro-per surveillance and the respect of priority.Make sure there is no other boat on your way.
The visibility from the steering station may be obstructed in the fol-lowing conditions:
- Load and load distribution.- Sea conditions, rain, spray, fog or darkness.- Lights on inside the boat.- Persons and removable equipments in the helmsman's field of vi-
sibility.
Getting under way
RECOMMENDATIONWhile sailing block the sliding door shut.
RECOMMENDATIONWhen entering the saloon be careful of the step leading down into the port hull.
DANGERRemember to disconnect the shore power supply before casting off.
Visibil i ty in navigation
LAGOON 450

NAVIGATION
8
FUEL VALVE
FUEL VALVE
located directly on the tanks
LAGOON 450

1NAVIGATION
9
NAVIGATION
Before starting the engine:- Ensure that the fuel valves are open.- Open the valves for the engine cooling systems. (See "Motorisa-
tion" chapter).
To start the engines, refer to the manufacturer's manual too.
• ENGINE STARTER
Turn on the battery switches located in the port and starboard aft ca-bins.- Disengage the reverse gear (it will make the acceleration possible
when in neutral).- Proceed in the following order:After starting the engine check for cooling water running out of the exhaust and observe the color of exhaust gases.
• BATTERY COUPLING
In the case of low engine battery power use the battery coupling function by turning on the coupling handle located in the aft cabin.Once the engines have been restarted make sure that the coupling handle is turned back to its original position.
• NAVIGATION
When the engine is running, avoid making noise and chops near the other users.Respect speed limits.
Navigation under motor
WARNINGNever switch off or de-energize the electric system when the engine is running.
LAGOON 450

NAVIGATION
10
RIGHTING MOMENT
CATAMARANWeight of vessel: 10 tons
d: distance between centre of buoyancy and cen-tre of gravity
SINGLE-HULLWeight of vessel: 10 tons
RMmax: Weight of vessel x d(RMmax: Righting moment Maximum)
RMmax Single-hull: 10 tons x 0,5 metres : 5 tons.metres
RMmax Catamaran: 10 tons x 3 metres : 30 tons.metres
Illustration showing the difference between the righting moments of a single-hull ves-
seland a catamaran of 10m length.
LAGOON 450

1NAVIGATION
11
NAVIGATION
• BEWAREA catamaran presents 6 times greater heel resistance than a single-hull vessel. In terms of ship design we speak of righting moment (multiplication of the vessel's weight by the transverse distance between the centre of gravity and the centre of flotation (or buoyan-cy)).See illustration on previous page.
This fact has real consequences for the handling and sail-trimming of a catamaran.
The fact that the boat will not heel over could conceal an excessive sail surface area in use, which could be dangerous for the crew and the vessel. It is therefore essential to constantly monitor the real wind speed and to trim the sail surface area as a priority in accor-dance with this speed.
These latter adjustments are valid in calm seas. In rough seas one should take the precaution of reducing 10% earlier in terms of real wind speed. Generally speaking, it is essential to constantly look to relieve the vessel rather than to put it under stress.One should always look for the sail angle of attack to be headed to the apparent wind and the sails to be not over-trimmed so that the airflows leaving the sail are parallel to each other, that is to say they do not create turbulence behind the sail.
Failure to follow the above recommendations can be dangerous for the boat and the crew, and the manufacturer cannot be held respon-sible in the event of an accident.
• CLOSE HAULED TRIMMING (between 75 and 50° to true wind)
Given wind force in apparent wind- From 0 to 16 knots: full sail ; mainsail traveler 30 cm to windward
of center, mainsail trimmed with a slightly opened leech (boom centered).The Genoa jib is trimmed near the spreader,the Genoa traveler is placed so that the angle of the Genoa sheet forms a straight line with the clew and the luff, at 40% of its height.
- From 16 to 20 knots: full sail ; the mainsail traveler moves up to 60 cm to windward of center, mainsail trimmed with a slightly more open leech (boom still in line: so the sheet will have to be slacke-ned).The Genoa traveler does not change position but adjust the sheet so that the leech is 10 cm from the spreader.
- From 20 to 26 knots: 1 Reef, full Genoa ; the mainsail traveler co-mes back to 30 cm to windward of center.The Genoa traveler does not change position but adjust the sheet so that the leech is 20 cm from the spreader.
- From 26 to 30 knots: 1 Reef, 75% of the Genoa ; the mainsail traveler comes back to 60 cm to windward of center.The Genoa traveler remains in place or moves slightly forward but it is adjusted so that the leech forms a propeller, the upper part dumping air out under strong gusts of wind.
- From 30 to 36 knots: 2 Reef, 60% of the Genoa ; the mainsail traveler returns to the 30 cm to windward of center, the boom is slackened to fly 50 cm leeward.The Genoa traveler is moved slightly forward, the adjustment re-mains the same.
Navigation under sail
LAGOON 450

NAVIGATION
12
SAILS
CLASSICAL MASTI. 17.89 mJ. 4.57 mP. 17.65 mE. 6.63 m
SAILS SURFACE
CLASSICAL MASTBatten mainsail - Classical: 79 m²
1 Reef: 63 m²2 Reef: 47 m²3 Reef: 30 m²
Large gaff sail: 81 m²1 Reef: 65 m²2 Reef: 49 m²3 Reef: 31 m²
Furling genoa: 49 m²Landmark 1: 39 m²Landmark 2: 29 m²
Gennaker: 104 m²
LAGOON 450

1NAVIGATION
13
NAVIGATION
- From 36 to 45 knots: 2 Reef, 40% of the Genoa. The mainsail traveler is dead center and the boom veers 1 meter to leeward.The Genoa traveler moves forward slightly, the sheet is slackened to open wide in strong wind conditions.
- From 45 to 55 knots: 3 Reefs alone (either storm sail or lie to), traveler in the center,mainsail out by 1 meter.The boat will be more at ease scudding in this weather.
- Over 55 knots: lie to, drag anchor or, preferably, scud bare poles.
• CLOSED REACHED TRIMMING (between 75 and 130° to true wind)
- From 0 to 23 knots: full sail ; the traveler is positioned between 1 meter from centre up to windward of center, depending on the wind angle, the sheet is slackened so that boom is veering out any-thing from 50 cm in calm weather to 2 meters when the wind is for-cing.In every case no more than one batten should be allowed to chafe at the shroud at the fastest speeds.The Genoa jib is slackened so that its average attack angle is head on to the apparent wind.
- From 23 to 28 knots: 1 Reef, full Genoa. The adjustments are identical.
- From 28 to 33 knots: 2 Reef, 80% of the Genoa. The adjustments are identical.
- From 33 to 38 knots: 2 Reef, 60% of the Genoa. The adjustments are identical.
- From 38 to 45 knots: 3 Reef (or mainsail lowered and a little more Genoa), 40% of the Genoa. The adjustments are identical.
- From 45 to 55 knots: mainsail lowered, 40 to 30% of the Genoa, sufficiently trimmed so as not to flap.
- Over 55 knots: scudding,depending on the sea conditions the mooring lines can be looped round behind the vessel and attached on the opposite side to act as a brake.
These indications are given for your information only and are de-pendant on outside conditions.
WARNINGYour boat is designed to sail without the need to climb onto the roof for any maneuvers.It is dangerous to climb or stay on the roof particularly in the event of gibing.Keep children under close supervision.
LAGOON 450

NAVIGATION
14
SYSTEM COMMON - OVERVIEW
1. System - Mast foot2. Genoa sheets3. System - Mainsail (classic)4. System - Genoa furler5. Work area6. Arm + Spinnaker sheetSee Chapter Fittings - Rigging, for details
1
3
2
4
6
5
LAGOON 450

1NAVIGATION
15
NAVIGATION
• REDUCING SAIL
The boat is fitted with 3 reefs.Reefs n°1 and n°2 are automatic, n°3 is traditional.The luff eyelet of reef n°3 is fitted with a strap with a snap shackle to clip on to the eye bolt on the boom.
Putting in reefs n°1 and n°2:
1 - Head the boat into the wind.2 - Pull tight the topping lift.3 - Slacken the mainsail sheet.4 - Slacken the mainsail halyard and then trim reef line n°1 or n°2,
as needed, until the reefing blocks which correspond to the luff and the mainsail leech are a few centimeters from the boom.
5 - Close the line cam cleat of the respective reef.6 - Hoist taut the mainsail halyard.7 - Slacken the topping lift and take in the mainsail sheet.
Follow the lowering and raising of the sail with the help of the head downhaul.
Putting in reef n°3:Repeat steps 1 to 3 as before, then:4- Slacken the mainsail halyard then trim reef line n°3 until the main-
sail leech block is a few centimeters away from the boom.- Clip the snap shackle on the luff eyelet of reef n°3 onto the eye bolt
located on the boom.- Take up the slack in the lines of reefs n°1 and 2.- Repeat steps 5 to 7 as before.
Refer to the running rigging diagram (chapter on RIGGING AND SAILS) for identification of ropes.
• NAVIGATION WIND ASTERN
- Do not fall off more than 150° to the apparent wind.- Put the traveler out as far as possible and slacken the sheet slight-
ly.- Make sure the mainsail does not touch the shrouds ; the rubbing
of the battens will wear the material and cable very rapidly.- Keep mainsail + solent up to 15 knots speed and put in one reef or
more if the accelerations are sudden and strong or if sea condi-tions deteriorate.
RECOMMENDATIONFor safety, the reef line used should always stay on the winch with 3 turns around the drum.Re-close the cam cleat for greater safety.
LAGOON 450

NAVIGATION
16
DECK LAYOUT
1 - Midship cleat for towing. 3 - Swimming ladder.5 - Outboard engine bracket (not supplied). The maximum
weight of the outboard engine (not supplied) on the pus-hpits should not exceed 20 kg.
2 - Mooring cleats. 4 - Ring lifebuoy bracket + Support flag.
LAGOON 450

1NAVIGATION
17
NAVIGATION
A sufficient number of mooring lines suitably sized and suitable for the environment shall be on board for mooring your boat.- Always manoeuvre your boat using the engine.- Make allowance for the current and wind when you handle your
boat.- Protect your boat to the highest degree with suitably sized fenders.- Always keep the mooring ropes unfouled and stored away.- Handle your boat at a reduced speed.
AFTER MOORING- Protect the mooring lines against chafing with plastic sleeves.- Make allowance for the variations in tides if need be.
TOWING BOAT- Tow another boat at a reduced speed and as smoothly as you can.- Pay particular attention when you throw or catch the towing rope
(it may foul on the propeller).
NOTE: The stability may be reduced when you tow a boat.
TOWED BOAT- Keep steering your boat and see to it that you stay in the wake of
the towing boat.
As a rule, set the anchor in at least 3 times the depth of water.
• PREPARATION OF ANCHORING (Illustrations following page)
- Install the bridle by fixing it to the chain plates located at the ends of the fore beam.
- Put the bridle through the stem bow roller.- Shackle the bridle to the central cleat during the lowering of the
chain.
• MANUAL ANCHORING
- Have your boat pointed into the wind and without speed.- Release the brake on the chain lifter.- Pay out the chain while moving back slowly.- Secure the anchor chain on the bridle.- Lead out the chain until the guy becomes taut.
Mooring
DANGERDon't try to stop the boat with your foot, your hand or a boat hook.
Towing
Anchoring
RECOMMENDATIONBefore anchoring check the depth of water, the power of the current and the nature of the sea bed.
LAGOON 450

NAVIGATION
18
ANCHORING
OPERATION RELAYLay out of: Compartment - Generator
(Starboard forward)
1 - Anchor2 - Bow fitting3 - Cleat
4 - Handle position5 - Drum head6 - Chain lifter 12mm diameter
7 - Remote control8 - Handle storage9 - Clench
9 - ClenchWINDLASS CIRCUIT BREAKER - 125A
(STARBOARD AFT CABIN)
LAGOON 450

1NAVIGATION
19
NAVIGATION
• MOORING WITH ELECTRIC WINDLASS
Activate the windlass with the control found in the windlass locker or from the steering station.If the port engine is not functioning,the windlass can work on service batteries (if available) by switching on the port engine ignition only (the engine alarm will then sound while the windlass is in use).
NOTE: The batteries can be recharged via the generator (optional extra) if the engines do not start.
• HEAVING UP THE ANCHOR
- Lock the cable lifter snubber.- Ensure the chain is properly set on the cable lifter.- Slowly go near the anchor, using your engine (Don't use your win-
dlass to winch the boat).- Release the bridle from the chain.- Heave the anchor completely.- Visually check the last meters till the anchor gets into contact with
the davit.- Secure the anchor or anchor chain to the cleat.
In the case of electrical failure use the winch handle on the windlass to lift anchor.
• MAINTENANCE
After each trip rinse the windlass and mooring line with fresh water.
Refer to the manufacturer's instructions for windlass maintenance at the beginning or end of the season.
WARNINGNobody should be aboard the tender during maneuvers car-ried out with the davits.
WARNINGWindlass operations are dangerous:- Always keep the anchor line unfouled and free.- Always proceed with care, using gloves and always wea-
ring shoes.
LAGOON 450

NAVIGATION
20
DAVIT
BREAKER - 80A
1 - Davit2 - Attach davit lines3 - Electric winch davit
ELECTRIC WINCH DAVITLay out of: Passageway - Starboard aft
LAGOON 450

1NAVIGATION
21
NAVIGATION
• INSTALLING A TENDER ONTO THE DAVITS
- Fix the davit line hooks to the forward and aft of the tender.- Close the blockers found on the davits.- Pull the bow of the tender up to halfway using the cockpit winch.- Repeat the operation for the stern.- Alternatively raise bow and stern until the tender comes into con-
tact with the davits.
• LAUNCHING A TENDER FROM THE DAVITS
- Ensure that the blockers on the davits are closed.- Thread the davit rope attached to the stern of the tender around
the winch (minimum of 3 turns).- Open the blocker and let the line feed out until halfway.- Close the blocker.- Repeat the procedure for the bow.- Alternatively lower stern and bow until the tender comes into con-
tact with the water.
Do not discharge oil into the sea.Take every precaution to prevent hydro-fuel overflow when filling the engine tank.
When in port,only use the onboard toilets if they are equipped with organic waste reservoirs.
The use of detergents is implicated in the destruction of marine plantand animal life. Choose fully biodegradable cleaning products.Do not throw plastic bags and bin bags into the sea. Use the bins provided for this purpose at ports.
Davit (optional)
WARNINGNobody should be aboard the tender during maneuvers car-ried out with the davits.Tie up the tender out of the way during maneuvers.
WARNINGWhen under sail remove the tender engine and store it on board the boat.Secure the tender according to sea conditions.
WARNINGThe davits are designed to support a maximum load of 250 kg and a tender of 3,80 meters in length at maximum.
Environment
RECOMMENDATIONWe share a love for the ocean. Help us to preserve them !
LAGOON 450


2Winter Storage
LAYING UP ................................................................. 25
PROTECTION AND MAINTENANCE ............................ 25
23

WINTER STORAGE
24
BLOCKING THE BOAT ASHORE
LAGOON 450

2WINTER STORAGE
25
WINTER STORAGE
- Take ashore all the ship's documents, any lines that are not used for mooring, galley equipment, supplies, clothes, safety equipment, bat-teries and gas bottles.
- Mark again the safety equipment, check the expiration dates, have the liferaft overhauled.
- Take advantage of this laying up to draw up a complete inventory of the equipment.
• BLOCKING THE BOAT ASHOREPreparation for each hull:- A large rectangular wooden block of 1 m in length and a tire to be pla-
ced under the stern, across the keel.- A steel jack-stand of a minimum of 1 m in height which will be placed
under the forward part of the forward bulkhead.
Make sure that the aft part of the keel is well-chocked (on its block) be-fore very carefully lowering the forward section onto the jack-stand.
• INSIDE
- Drain all the fresh water pipes and rinse them with water and vinegar (do not use a chlorine based product).
- Lubricate and close all the water inlet valves and thru-hull fittings. Rin-se and completely drain the heads bowls and pumps.
- Leave refrigerator door open to prevent mildew.- Bleed the cockpit shower circuits and the deck washing pump to pre-
vent freezing.- Completely empty the black water system before stationing the vessel
in negative temperatures.- Retract the sounder and speedometer sensors.- Seal air inlets as much as you can.- Installed in the square of a dehumidifier air leaving the cabin doors and
open storage (cupboards, coolers).- Leave the cushions outside for long before putting them back into the
boat in the upright and side position in order to have minimum contact surfaces.
• OUTSIDE- Thoroughly rinse the hull and deck.- Lubricate all the mechanical and mobile parts with vaseline (bolts, hin-
ges, locks etc.).- Protect all ropes and mooring lines against chafing.- Protect the boat to the highest degree with fenders.- Make sure the boat is properly moored.All these recommendations do not make up an exhaustive list. Your dealer will give you the advice you need and will carry out the technical maintenance of your boat.
• ENGINES
Laying up
Protection and maintenance
RECOMMENDATION- To prevent odors caused by organic waste in pipes one
should clarify the circuit after each use. For this procedure, drive about ten times the manual pump of the toilet or for a mi-nute if it is an electrical pump.
- When you leave the ship for several days, flush the toilets cir-cuit assembly with fresh water. Purify with specific products (for example a health additive to clean, disinfect and neutrali-ze odors).
RECOMMENDATIONWinter storage of the engines is the domain of professionals. Depending on the boat location, afloat or ashore, winterization is different.
LAGOON 450


3Launching
RECOMMENDATIONS ................................................. 29
STEPPING THE MAST ................................................. 31
27

LAUNCHING
28
POSITIONING OF HOISTING STRAPS
NOTE: The measures are expressed in mm.
LAGOON 450

3LAUNCHING
29
LAUNCHING
A lot of skill and care is required to commission your LAGOON boat.The proper working of all your boat equipments in the future results from the quality of the commissioning operations.
The initial launching and the first tests of the different equipments shall be carried out by your LAGOON dealer or agent so you can expect to enjoy the warranty in case of some equipment failure.
• BEFORE LAUNCHING
- If your boat is to be fitted with sounder and speedometer, allow for the relevant fittings and their installation.
- Check the water intake strain box for cleanliness.- Check the engine and reduction gear oil levels (refer to engine ma-
nual).- All the optional accessories shall be sealed with paste.- Retract the speedometer into its housing (it may be damaged by
the handling belts).- Turn off all the water inlet and drain valves (sink, washbasin,
heads, engine).
• HOISTING
Install a fore rope, a rear rope and fenders.Prepare:- 2 Straps (minimum 11 meters).- 4 slings (see diagram opposite).- Attach the 4 slings to the belts.
Recommendations
RECOMMENDATIONAll future maintenance should be carried out with the grea-test care by professionals.If the LAGOON boatyard is not involved in maintenance ope-rations, your guarantee will not cover any incidents linked to handling errors.
LAGOON 450

LAUNCHING
30
PACKING
FURTHER INFORMATION RELATIVE TO THAT GIVEN IN THE GENERAL SPECIFICATIONS CHAPTER
NOTE: The measures are expressed in mm.
LAGOON 450

3LAUNCHING
31
LAUNCHING
- Put it slightly under tension ; the sling hooks should be situated at the boat's centre of gravity,either in the longitudinal centre or plumb with the shroud chain-plates in the transverse plane.
Hoist gently,and control the movement of the boat with dock lines.
• AFTER LAUNCHING
- Check the sounder and speedometer fittings for tightness if need be.
- Open the valves and make sure that they are tight with the hull and relevant hose.
Before starting the engine, refer to the MOTORIZATION chapter.
If later you have to step the mast anywhere other than at your LA-GOON dealer:
• BEFORE MAST INSTALLATION
- Protect the mast against possible chafing by the crane hook and-cable.
- Tie down the shrouds and all the riggings to the base of the mast with a lashing long enough to guide the mast heel when stepping the mast.
- Protect the spreader end fittings and the roller furler drum.- Put a rope of about 1,50 with an eye and thimble at both ends and
covered with rags round the mast. Place the rope under the se-cond tier of spreaders.
- Link together both thimbles (that are ahead of the mast) with a shackle large enough to receive the crane hook.
- Raise the whole till it is taut under the spreader bases.
• DURING MAST INSTALLATION
- Take the necessary steps to avoid damaging the mast head equi-pments.
- Use the backstay and lashing at the base of the mast to control the handling.
- Engage the electrical harness in the mast base.- Make sure the base of the mast integrally bears on its base plate.
DANGERDo not stay on board or under the boat during hoisting.
RECOMMENDATIONNever place belts or fenders in contact with the large glass windows in the hulls.
Stepping the mast
LAGOON 450

LAUNCHING
32
CONNECTION - STEPPING THE MAST
DUCTS FOR CABLES
Lay out of: Saloon
LAGOON 450

3LAUNCHING
33
LAUNCHING
• AFTER MAST INSTALLATION
- Lubricate all the bottle screws (see recommendations in the RIG-GING chapter)).
- Stretch tightly the rigging (refer to RIGGING chapter for settings).- Reconnect the electrical cables in the junction box at the base of
the mast located in the forward cockpit locker after running the ca-bles through the gooseneck located at the front of the mast (see ELECTRICITY chapter).
- Carefully check the tightness of the turnbuckle cotter pins,and pro-tect with adhesive tape.
- Put the boom back. Refit all ropes.
• UNSTEPPING THE MAST
Proceed by carrying out the operations recommended for stepping the mast in reverse order,taking care to mark the line locations with stickers.
RECOMMENDATIONAdjust the mast after a few trips.
RECOMMENDATIONBefore all dismasting operation, remember to disconnect the electric cablesPull gently while guiding the cables.
LAGOON 450


4Hull &Deck
CONSTRUCTION ......................................................... 37
MAINTENANCE ........................................................... 37
CARREENING ............................................................. 38
GEL-COAT REPAIR ..................................................... 41
STEERING GEAR ........................................................ 41
PUMP FOR DECK WASHING (OPTIONAL) ................... 43
35

HULL& DECK
36
CARREENING
Wetted area (including appendices): 58 m²
LAGOON 450

4HULL
& DECK
37
HULL & DECK
The LAGOON 450 is built of balsawood sandwich (monolithic below the water line),polyester resin and vinyl-ester; the counter-mould sare monolithic and the partitions are made of laminated plywood.
The nacelle and deck are of balsawood sandwich composite.
The materials and equipments of your boat have been selected be-cause of their high quality and performance and ease of maintenan-ce.However you shall carry out a minimum maintenance in order to protect your boat from outside attacks (salt, sun, electrolysis ...).
Preferably wash your boat on shore.Use as few cleaning agents as possible.Don't use solvents or aggressive detergent agents.Don't discharge your cleaning product into the water.
Regularly brush the deck with a degreasing shampoo and fresh wa-ter.
DECK FITTING- Rinse thoroughly all your equipments with fresh water.- Periodically lubricate blocks, sheaves, bottle screws, winches,
rails and travellers with a water-repellent grease.- Stainless steel that is showing small spots or blisters of rust should
be cleaned and polished with a chrome and steel renovator.SOLID WOOD ON EXTERIOR WOODEN PANELLINGRegularly clean the woodworks with fresh water using a sponge (if need be add some gentle soap).
EXTERIOR CUSHIONSBring the removable cushions inside (washed with soapy water then dried) when the vessel is inoccupied.
STAINLESS STEELStainless steel is not incorruptible and requires a minimum of up-keep:
- The use of chrome tools is preferable whenever handling stainless steel.
Re-nourish the protective film regularly with passivation paste (con-sult your dealer).
PLEXIGLAS- Rinse plexiglas with fresh water.- Brighten up with a soft rag soaked with liquid paraffin.- Use polish paste to remove scratches.
Construction
Maintenance
RECOMMENDATIONWe strongly advise you against using a pressure washer.You shall not use hot water or steam.
LAGOON 450

HULL& DECK
38
STEERING GEAR
A (tin-free) anti-fouling painting every year will make it possible to avoid tedious and frequent careening. An epoxy coat is recommended befo-rehand. You are reminded that any excessive sanding before your antifouling paint attacks your gel coat and impairs its reliability.
Your boat may regain her shine as new if polished. If a lasting and isolated problem arises, contact your dealer.
Carreening
PRECAUTION- When applying the anti-fouling paint do not paint over the electronic instrument sensors nor the anodes.- All bronze or steel surfaces, including the propellers, should be protected by a suitable antifouling paint (consult your dealer).
RECOMMENDATION- During the refit, check the anodes (See "Motorisation" chapter).- When the boat is stored at a dry dock, the corrosion protection is not as effective due to oxidation of the anodes: even the new
anodes oxidize the surface. Before returning the boat into the water, clean the anodes.- Cleaning anodes: use sandpaper.
Do not use metal brushes or steel tools to clean the boat, it may damage the galvanic protection.- Replacing the anodes: the anodes are fastened with screws and nuts. First, remove the screws and nuts that hold the anode,
then clean the contact surface. Press the new anode to obtain a good electrical contact.
LAGOON 450

4HULL
& DECK
39
HULL & DECK
SHEAVES BOX(STARBOARD AFT CABIN)
CABLE TENSION SYSTEM
1 - Steering rack.2 - Ropes3 - Sheaves box.4 - Connecting rod.5 - Autopilot ram (optional).
LAGOON 450

HULL& DECK
40
LAGOON 450

4HULL
& DECK
41
HULL & DECK
MIXING RATIOOur products contain an accelerator, you just have to add the cata-lyst (a colourless liquid). The usual ratio is 2 %.The gel setting time (working time) is about 1/2 h, curing takes about 10 h.
APPLICATION- To fill up a blister hole or a scratch, sand and clean the area with
acetone.- Prepare the necessary amount of gel coat, preferably on a glass
plate.- Apply the product with a spatula or a point and the layer shall be
thick enough to make possible a further sanding.- In order to blend minor touching up on smooth surfaces, stick sel-
lotape (or even better, a mylar tape) on the freshly applied gel coat.- Remove sellotape after curing.- To get a highly shiny finish, sand with extra fine abrasive and water
then polish.
STORAGETo keep them properly, store the gel coat components in a cool dry and dark place.
Keep the components 6 months maximum.Polyester products are flammable ; take the usual precautions.
CLEANING YOUR TOOLSClean all your tools with acetone.
The steering system is accessed via the engine compartment.
- Regularly check its tension.- Don't tighten the steering cables excessively.- Lubricate all the elements.Maintain the nylon, ertalon or teflon bushes only with WD40.
Proper settings result in gentle steering resistance,without hard points and without looseness.
Gel-coat repair
WARNINGPlease respect the following conditions to repair success-fully:- Dry weather.- Temperature between 15° C and 25° C.
DANGERThe catalyst is a dangerous product:- Keep it out of the reach of children.- Avoid contact with skin and mucous membranes.- In case of contact wash with soapy water and rinse thorou-
ghly.
Steering Gear
LAGOON 450

HULL& DECK
42
PUMP FOR DECK WASHING
Connecting bridge washing(Landmark 1)
Seawater inlet(Landmark 3)
Control -Pump for deck washing
(Sea water)(Landmark 5)
Valve selection of water board / Sea water
(Landmark 2)
Pump for deck washing(Supply - Sea water)
Water unit (Supply - House wa-ter)
(Landmark 4)
LAGOON 450

4HULL
& DECK
43
HULL & DECK
Valve selection of water board / Sea water.Lay out of: Cockpit locker Forward.
It is on 12 V supply as soon as the boat's power is turned on (Ser-vice battery switch).Its entry into service is by the switch located under the electrical pa-nel.
Pump for deck washing (optional)
LAGOON 450


5Interior
INTERIOR MAINTENANCE .......................................... 47
FABRICS ..................................................................... 47
COCKPIT TABLE......................................................... 49
PORTHOLES AND DECK HATCHES ............................ 49
WASHING MACHINE - DISHWASHER (OPTIONS)........ 51
MICROWAVE OVEN (OPTIONAL) ................................ 51
TELEVISION (OPTIONAL) ........................................... 51
AIR CONDITIONING (OPTIONAL) ................................ 53
45

INTERIOR
46
INTERIOR
3 cabin version. 4 cabin version
LAGOON 450

5INTERIOR
47v
INTERIOR
- Take advantage of the fine weather to take the settee and berth cushions out.
- Put the cushions vertically if you leave the boat for long.- Use blinds to protect the inside of the boat against UV rays.- Make sure the bilges are clean and dry.
• INSIDE VARNISH- Rinse the inside varnish with fresh water mixed with spot remover
and shampoo.- Polish the inside varnish with shammy leather.
ADVICE: Mark up each cover and foam when dismantling.
• STAIN REMOVAL
- Remove as much stain as you can with a knife blade (from the edge towards the centre).
- Dab with a clean rag.- Remove the stain with solvent on a clean rag. Never pour the sol-
vent directly over the stain.
- Rub with a clean and dry rag.- Brush the fabric against the grain.- Use the vacuum cleaner when the fabric is dry.
PVC OR COATED FABRICS- Use a sponge and water and soap (household soap type).- Dab away resistant stains with a rag soaked with white spirit, do
not rub them.
100% POLYESTER/DRALON JACQUARDIf you cannot remove the fabric:
- Clean with the vacuum cleaner.- Clean with synthetic foam (please refer to the product instruc-
tions).If you can remove the fabric:
- Hand wash with an ordinary washing powder at 30° C.In both cases, dry cleaning is possible. Remove the stains as soon as possible with a damp rag.
Interior maintenance
RECOMMENDATIONUse as few cleaning agents as possible.Don't discharge your cleaning product into the water.
Fabrics
RECOMMENDATIONFor the PVC fabrics, don't use any solvent or solvent based product (pure alcohol, acetone, trichloroethylene).
LAGOON 450

INTERIOR
48
DECK HATCH
LOCKING DECK HATCH
SIDE PORTHOLES MOSQUITO NET / BLACKOUT CURTAIN
p
WARNING- Must be closed while sailing.
LAGOON 450

5INTERIOR
49v
INTERIOR
COTTON JACQUARD- Dry clean.- Do not iron.- Do not use hypochlorite.- Remove the stains with fractionated petrol.
LEATHER- Use a leather cream for ordinary care.- Do not use detergent.- Do not use silicone based products.- Clean with a sponge and soapy water.- Remove ball point pen marks with methylated spirit.- Remove the grease stains with an absorbent powder (e.g. talcum
powder).
The square tables and cockpit are interchangeable.
The portholes and deck hatches are equipped with latch systems to keep them in a closed position.At mooring,intermediate opening positions allow for airing of the boat.
Cockpit table
Portholes and deck hatches
LAGOON 450

INTERIOR
50
DISHWASHER - MICROWAVE OVEN - TELEVISION
NOTE: Same position for the other layouts.
DISHWASHER
Lay out of: GalleySupply valve:
Port passageway - Aft220V breaker
Lay out of: Starboard pasageway - Aft
MICRO-WAVE OVEN TELEVISION
Lay out of: GalleyLay out of:
Owner cabin1. Breaker2. Inverter
Lay out of: Technical room
LAGOON 450

5INTERIOR
51v
INTERIOR
- Make sure that there is sufficient fresh water before using the washing (Dishwasher).
- Open the water supply and drain valves.
Water supply:Washing machine: Within the cabinet in the toilet before port.Dishwasher: Under the galley sink.
Drainage:Washing machine: Within the cabinet in the toilet before port.Dishwasher: Connected to the galley sink drains.
- Connect the shore power supply or start the generator (Optional equipment:, see ELECTRICITY chapter).
- Switch circuit breakers (Starboard pasageway).- Switch on the relevant machine.
For use and maintenance of the material consult the manufacturer instructions.
- Connect the shore power supply or start the generator (Optional equipment:, see ELECTRICITY chapter).
- Turn the breaker: Standard equipment: Sockets 220 V.- Switch on the relevant machine.
For use and maintenance of the material consult the manufacturer instructions.
OPERATIONThe televisions power, supplied by a transformer which is powered with batteries of service, operates at 12V.
Starting up: First turn on the circuit breaker, then switch on the TV. The transformer is switched on and off automatically when you turn on or off the breaker..
Washing machine - Dishwasher (Options) Microwave oven (optional)
Television (optional)
WARNINGThe transformer has a ON / OFF button.
LAGOON 450

INTERIOR
52
AIR CONDITIONING
COMPRESSORS -LAY OUT OF
CONTROL
1. Seawater inlet2. Seawater pump
Lay out of: Port passageway -Starboard pasageway
Relay box - Seawater pumpLay out of: Cupboard - Aft - Star-
board pasageway
SOCKET 220V
Lay out of: Starboard cockpit
MASTER SWITCHLay out of:
Electrical panel
CIRCUIT BREAKERSLay out of: Cupboard - Aft - Starboard
pasageway
from left to right:Compressor - Port forwardCompressor - SaloonCompressor - Starboard aftCompressor - Port aftPump - To portPump - To starboard
DRAINAGE - SEA WATER
LAGOON 450

5INTERIOR
53v
INTERIOR
AIR CONDITIONING
• GENERAL POINTS:
The air-conditioning cools the air temperature inside the boat (only when the boat is floating in water).The cooling circuit consists of one or more compressors that operate independently. A compressor is called "reversible" be-cause it can heat the boat if the sea water temperature exceeds 10°C.In winter, you can program the dehumidifier function of the air-conditioning in controls panel.The refrigeration compressors are made by one or two seawater pumps. These pumps are powered by 220V or 110V and are gui-ded by one or two relay boxes.The sea water is evacuated by a hull equipped with a valve, loca-ted above the waterline.Each compressor has its own disposal hull. It is advisable to check visually the evacuation of the water from the moment com-missioning of air conditioning starts.
• OPERATION:
Before starting the engine::- Open the valves of supply and drainage of seawater.- Open the valves of sea water supply and drainage (dock or gene-
rator).If the power is obtained from the docks: plug into the dock ;If the power is obtained through a generator: before turning on the air conditioning, leave the generator rotating during 3 minutos.
The air conditioning is running:- Switch the circuit breakers 220V ,from the air conditioning,ON.Select the temperature of each compressor by using control boxes.
Air conditioning (optional)
WARNINGWhen the vessel is left for long periods, install a de-humidi-fier in the saloon making sure that all interconnecting doors are left open (bathroom, cabin and saloon)along with the cu-pboard and icebox doors.Clean and dry all of the accessories installed in the bathrooms.
LAGOON 450


6Electricity
BATTERIES AND CIRCUIT BREAKERS ....................... 57
USE OF 12 V CIRCUIT ................................................. 59
110 V - 220 V SYSTEM ................................................ 61
TECHNICAL ROOM ..................................................... 61
GENERATOR .............................................................. 63
BATTERY CHARGER (OPTIONAL) .............................. 65
INVERTER (OPTIONAL) .............................................. 65
SHORE POWER SOCKET ............................................ 67
MAST HARNESS ......................................................... 67
ELECTRONIC .............................................................. 67
55

ELECTRICITY
56
ELECTRICAL LAYOUT
The positions are the same for the other layout version.
LAY OUT OF - BATTERIES LAY OUT OF - BATTERY SWITCH
Set - Service batteries3 x 140A
Spare battery3 x 140A
(Reference 2)
Battery stock - engine2 x 110A
(Reference 1)
Landmark 1Lay out of:
Port aft cabin1. Battery switch of negative ter-
minal -Port engine
2. Battery switch Positive -Port engine
3. Relay coupler
Landmark 2Lay out of:
Starboard aft cabin4. Battery switch -
Common negative 5. Battery switch -
Positive engine - To star-board
6. Battery switch -Service positive
LAGOON 450

6ELECTRICITY
57
ELECTRICITY
The electricity onboard is 12 V DC.The electrical system consists of service batteries. The batteries supply power to all the functions on board (see SPECIFICATIONS chapter for battery capacity).
The general 12 V system is turned on by switching to ON the battery switches located in the port and starboard aft cabins.
• MAINTENANCE
Keep the batteries charged enough (essential to ensure them a cor-rect service life).It is possible to operate with the battery store charged to 80% on the condition that the batteries are charged weekly to 100%.
The discharge of the batteries must not exceed 70% of the rating.
Use the battery charger when in a marina in order to start sailing with properly charged batteries.
A battery monitor (DC meter meter on the electrical panel) enables control of the charge,voltage and depletion rate of the service bat-teries and of the generator (optional).For its use see the instruction guide.
Always check the battery and charge system condition before you put out to sea.Keep the batteries clean and dry in order to avoid premature wear.Have the acidity level of the battery checked if unused for long. Check the level regularly. Tighten and maintain the terminal connectors lubricating them regu-larly with vaseline.
Batteries and circuit breakers
WARNINGA damaged battery will never recover its original capacity.The service batteries should be charged to their maximum.
LAGOON 450

ELECTRICITY
58
ELECTRICAL PANEL
1 - General fuse 12V - 100A2 - SHUNT 12V 100A (used to measure current)Lay out of: Starboard aft cabin
LAGOON 450

6ELECTRICITY
59
ELECTRICITY
In case an electric appliance is not energized, check:
- The main power supply.- The switches and circuit breakers on the line.- the relevant electrical unit.
Use of 12 V circuit
RECOMMENDATIONNever leave the boat unattended when the electric fitting is on (except the safety equipments directly connected to the battery and protected by a circuit breaker).
WARNINGNever work on a live electric fitting.
RECOMMENDATION- Never modify an electric fitting and relevant diagrams
yourself.- Call in a technician skilled in marine electricity to carry out
any electric modification.- Never change the breaking capacity (amperage) of the
overcurrent safety devices.- Never install or replace the electric appliances (or any elec-
tric equipement) by components exceeding the capacity (amperage) of the circuit.
LAGOON 450
ELECTRICITY
60
TECHNICAL ROOM
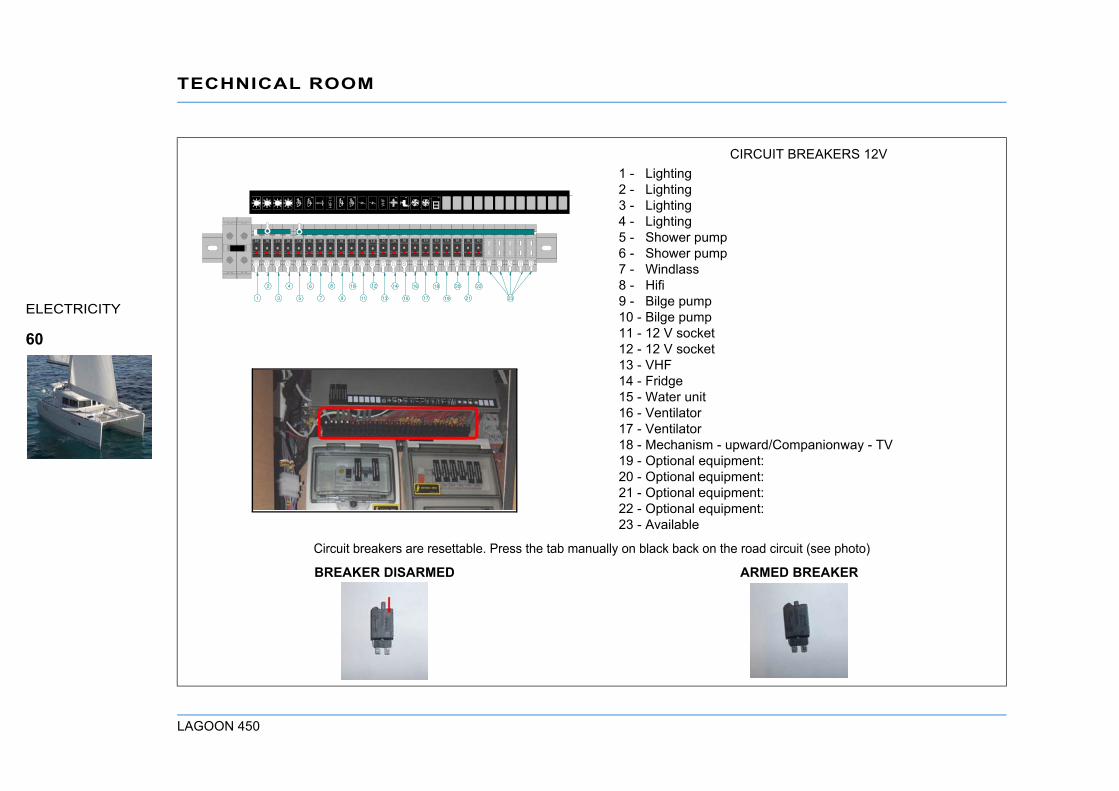
CIRCUIT BREAKERS 12V1 - Lighting2 - Lighting3 - Lighting4 - Lighting5 - Shower pump6 - Shower pump7 - Windlass8 - Hifi9 - Bilge pump10 - Bilge pump11 - 12 V socket12 - 12 V socket13 - VHF14 - Fridge15 - Water unit16 - Ventilator17 - Ventilator18 - Mechanism - upward/Companionway - TV19 - Optional equipment:20 - Optional equipment:21 - Optional equipment:22 - Optional equipment:23 - Available
Circuit breakers are resettable. Press the tab manually on black back on the road circuit (see photo)
BREAKER DISARMED ARMED BREAKER
�� �� �� �� �� �� �� �� �� �� �� �� �� �� �� �� �� �� �� �� �� ��
22 1
VH
F
1 2
HIF
I1
1 2
1 3 5 7 9 11 13 15 17 19 21 23
2 4 6 8 10 12 14 16 18 20 22
LAGOON 450

6ELECTRICITY
61
ELECTRICITY
• SWITCHING ON DEVICES FUNCTIONING ON 110 V - 220 V
To use appliances that work on 110 V - 220 V (Washing machine, Water maker, etc.), proceed as follows:- Make sure that the appliances are OFF on the electrical panel.- Switch to the 110 V - 220 V source ()start the generator or plug in-
tothe shore power supply.- Select the proper source on the electrical panel for it to supply the
electrical panel.- Switch on the circuit breaker for the appliance to be used (Washing
machine, Water maker, etc.) on the electrical panel.Once the above has been carried out,turn on the appliance using its own controls.
For air conditioning 110 V - 220 V, wait 10 to 15 seconds between turning on each unit (in order to allow the generator to stabilize and to deliver the necessary power for switching on).
• SWITCHING OFF DEVICES FUNCTIONING ON 110 V - 220 V
To turn off appliances functioning on 110 V - 220 V (Washing ma-chine, Water maker, etc.), proceed as follows:
- Stop the apparatus using its own controls.
To stop 110 V - 220 V equipment wait 3 to 4 seconds after turning off each device (in order to allow the generator to stabilize).
- Switch off the circuit breaker of the relevant apparatus on the elec-trical panel.
- Turn the 110 V - 220 V source selector to OFF (generator or shore power supply).
- Stop the generator or unplug the shore power supply.
• PROTECTION
Connect the metallic covers or boxes of the electric appliances that are installed to the protective conductor of the boat (green conduc-tor with yellow stripes).
The service compartment where the fuses are located is situated behind the electrical panel.
110 V - 220 V system
WARNINGBefore turning the OFF V - 110 V source selector to 220, en-sure that no other appliance is in use (danger of an electric arc which can destroy the switch and damage the genera-tor).
Technical room
LAGOON 450

ELECTRICITY
62
GENERATOR
Position of elements
1. Remote control2. Generator/shore commutatorLay out of: Electrical panel
1. Outlet2. Drainage - Sea water3. Battery switch - Positive4. Battery switch - Negative terminal5. Pull switch - Selection (Supply - Diesel - Port tank / Starboard tank)6. diesel filter7. Sea water filter8. Water - Gas separator9. Water trap10. Tank - Cooling liquid11. Generator12. Battery charger13. Ventilator - Generator compartment
Seawater inletLay out of: Starboard pasageway
LAGOON 450

6ELECTRICITY
63
ELECTRICITY
GENERATOR - SCHEMA
• GENERAL POINTS:
A generator is a device that can produce electricity (220V or 110V) from a mechanical energy (fuel). The generator will fed the onboard equipment operating at 220V or 110V, moored or sailing.
• OPERATION:
- Open the valves of supply and drainage of seawater.- Switch the generator of the battery ON.- Switch the generator breaker (referencie 5) ON.- Turn the generator on by remote control (located on the nautical
chart table) or your at your own generator.- Check that any device is not running 220V or 110V. Then, change
the switch spring / generator (located at the table charts).
• OPERATION:
- Supply - Diesel:The generator is fed by fuel through the fuel tank port. The fuel filter (reference 1) is located at the generator circuit.- Refrigeration:
The generator is cooled::by seawater (inlet valve reference 8 sea water and sea water filter reference 2) ;and by air (air exhaust duct, thats runs through a ventilator and through the fresh air inlet).- Electricity:The generator includes its own battery to start the engine. The ge-nerator is connected to earth by a ground plane wich is located beneath the hull.- Rejection:The cooling water and exhaust gases are separated in the separa-tor (reference 7) to avoid noise pollution.The seawater is discharged below the waterline (Landmark 9). The exhaust- pipe is located above the waterline (Landmark 10).
Selection of the supply generator.Lever pushed: Supply - Tank.Lever pulled: Supply - Tank.Concerning use and maintenance of the generator,refer to its ins-tructions.
Generator
LAGOON 450

ELECTRICITY
64
GENERATOR SYNOPTIC
Generator Synoptic
REF Designation1 Fuel filter2 Sea water filter3 Water trap4 Anti-siphonage item5 Differential circuit breaker6 Generator7 Water - Gas separator8 Seawater inlet9 Drainage - Sea water10 Outlet
LAGOON 450

6ELECTRICITY
65
ELECTRICITY
The battery charger can be used with shore power supply or with the generator in use.Lay out of: Starboard transom extension.- Turn on the charger with the circuit breaker on the electrical panel.
• OPERATION
- The battery charger operates based on a signal processor that converts alternating current (220V or 110V) into a direct current (12V). The operation of the charger is fully automatic, after selec-ting the type of battery and load type (Refer to the instructions for use).
Charger power:1. Charger - Standard: 60A.2. Charger (Optional equipment: - Spare batteries): 40A.
Concerning use and maintenance of the charger refer to its instruc-tions.
The inverter enables 220 V equipment to operate from 12 V supply.- Turn on the inverter with the circuit breaker on the electrical panel.- The 220V is powered by default converter.For use and maintenance of the inverter refer to its instructions.
Battery charger (optional) Inverter (optional)
InverterLay out of:
Technical room
Lay out of:Electrical panel:1. Control - Step/Stop2. Master switch
LAGOON 450

ELECTRICITY
66
SHORE POWER SUPPLY CIRCUIT BREAKER
220V SHORE POWERLay out of: Starboard transom extension
BREAKERLay out of: Starboard transom extension1. General circuit breaker2. Breaker - Air conditioning
LAGOON 450

6ELECTRICITY
67
ELECTRICITY
During mast-stepping insert the cables through the base of the mast.
The connection is made at the switch box on the mast bulkhead. See LAUNCHING chapter.
Do not install electronic instruments or repeaters less than 1,50 m away from the radio loudspeakers,if your boat has them.
Do not place the autopilot compass less than 0,50 m away from the electrical harnesses.
For best results, remove any metal compass.
• ELECTRONICS PACKS (OPTIONS)
Different electronics packs are offered on option.
Shore power socket
DANGERNever let the end of the boat/shore supply cable hang in the water: The result may be an electric field liable to hurt or kill the swimmers nearby.
RECOMMENDATIONIn order to reduce the risks of electic shock and fire:- Before you plug in or unplug the boat/shore supply cable,
switch off the shut off device connected to the shore sup-ply.
- Plug in the boat/shore supply cable in the boat before you plug it into the shore supply socket.
- Unplug the boat/shore supply cable on shore first. Close the shore socket cover.
- Do not modify the connections of the boat/shore supply ca-ble.
Mast harness
Electronic
RECOMMENDATIONFor your electrical requirements, we recommend you con-sult a specialist or our network of technicians.
LAGOON 450

ELECTRICITY
68
TRANSDUCER LOCATION - AUTO PILOT
AUTO PILOTLay out of: Starboard transom extension
1. Piston - Auto pilot2. Vessel Management Unit3. Gyrocompass
LAGOON 450

7Plumbing
WATER TANKS ........................................................... 71
FRESH WATER SYSTEM ............................................. 71
GAS SYSTEM .............................................................. 71
DRAINAGE SYSTEM ................................................... 75
SANITARY EQUIPMENT .............................................. 77
69

PLUMBING
70
FILLING CIRCUIT
WATER TANKLAY OUT OF: STARBOARD PASAGEWAY / TO PORT
CAPACITY: 2 X 175 LADDITIONAL TANKS: 2 X 175 L
GAUGE - ELECTRICAL PANEL
Refer to the instructions for useTank 1: Port tank
Tank 2: Starboard tank
DECK FILLER ''WATER'' VALVE TO SELECT TANKLAY OUT OF: PASSAGEWAY - TO PORT
LAGOON 450

7PLUMBING
71
PLUMBING
• FILLING
In order to prevent any handling mistakes, never fill the water and fuel tanks at the same time.During filling, avoid handling contaminants near the fillers.
Open and close the filler caps with the suitable key.Check the filler cap seals for condition during filling.The tanks are fitted with overflow outlets and vents.Never insert the water filling hose deep down into the system in or-der to prevent any over-pressure in the systems.
• MAINTENANCE
Inspection ports are provided on tanks and make possible the clea-ning of the inside.
NOTE: It may happen that the capacity of the fresh water tank or tanks indicated on the page "Specifications" cannot be completely used depending on the trim and load of the boat.
The water pump is switched on at the electrical panel.
Refer to the SAFETY chapter.Refer to "Fresh water and gas" diagram.When changing the cylinder, refit the cap in place on the regulator threaded section (to avoid corrosion).
Water tanks
RECOMMENDATION- Pay attention to the quality of the water for the filling up.
Check if it is drinking water.- It is possible to sterilize the tanks with a Clonazione tablet
(sold at the Chemist's).- If the boat is not used for long, purify the tanks and pipes
with acetic acid (or white vinegar).
Fresh water system
RECOMMENDATION- Never operate the water system equipment when the valve
is closed or the tank is empty (the electrical equipment may be damaged).
- Check the water filter for condition (refer to manufacturer's instructions).
Gas system
RECOMMENDATIONShut off the gas safety valve and the regulator tap when the stove is not in use.
WARNINGTurn off shore water before leaving the vessel.
LAGOON 450

PLUMBING
72
DISTRIBUTION CIRCUIT
WATER PUMP 12VLAY OUT OF:
PASSAGEWAY - TO PORT
220V 60L WATER HEATERLAY OUT OF:
PORT AFT CABIN
SHORE POWER SOCKET -FRESH WATER
Lay out of: Starboard transom extension
COCKPIT SHOWER SPRAY
Operation: The water comes directly to the group on water, no valve.
1 - Mixer tap2 - Cockpit shower sprayLay out of: Starboard transom extension
FOOT PUMP
Control
VALVE SELECTION OF WA-TER BOARD / SEA WATER SPOUT
SEAWATER INLETPORT AFT CABIN
Lay out of: Port passageway
LAGOON 450


PLUMBING
74
WASTE WATER SYSTEM
WASHROOM
Ordering evacuation shower
Drain plug -Shower draining
Washbasin drainingShower pumps
Lay out of: Port passa-geway & To starboard
Hand spray evacuation valveLay out of
To port
To starboard
GalleySink draining
watertight compartment - Port and starboard1- Drainage - Forward compartment2 - Drainage - Engine compartment
LAGOON 450

7PLUMBING
75
PLUMBING
Refer to the SAFETY chapter.When changing the cylinder, refit the cap in place on the regulator threaded section (to avoid corrosion).
A main sump well is located under the floor of each hull.It is drained by:- A manual bilge pump in cockpit.- A manually activated electric bilge pump (Electrical panel).- An electric pump to automatic sump located in the sump.
The fore compartments and the engine bilges are watertight. A hose equipped with a valve enables water that enters accidentally to run into the sump.Under normal conditions these remain closed.Lay out of - Vannes: Sump.
Waste water from the heads is drained off by a thru-hull fitting with ball valve (the valve is closed when the valve handle is perpendicu-lar to the hose, the valve is open when the valve handle is in line with the hose).
• MAINTENANCE
- Regularly check the valves and thru-hull fittings for proper opera-tion and watertightness.
- Turn off the valves when the water system is not in use.- Visually check the water pump flow.- Check the clamps and flexible hose connections for tightness. Pay
attention to the seals for condition.- Regularly make sure that the sump and bilge are perfectly clean.
Gas system
RECOMMENDATIONShut off the gas safety valve and the regulator tap when the stove is not in use.
Drainage systemRECOMMENDATIONImmediately switch off the electric system in case a pump is running while all the water supplies are turned off.- In case of a leak check the system.
WARNINGThe bilge pump system is not designed to provide buoyancy to the boat in case of damage.The bilge pump system is designed to drive out the water being either sea spray or leaks but absolutely not the water coming through a hole in the hull, this hole being the result of a damage.
LAGOON 450

PLUMBING
76
SCHEMATIC DIAGRAM - BILGE PUMP SYSTEM
1 - Automatic bilge pump.2 - Stuffing box.3 - Non-return valve.4 - Electric bilge pump.5 - Collector.
6 - Waste water drainage from bathroom.7 - Manual bilge pump.8 - Sump.9 - Draining valve.
LAGOON 450

7PLUMBING
77
PLUMBING
• USE OF THE WASHBASINS AND SHOWERS
Waste water from the shower room is evacuated to the sump by an automatic start pump (located under the trough).In the event of a breakdown in the automatic system,use the switch to action the pump manually (located next to the pump).
Clean filters and trays regularly.
• RESPECT OF THE ENVIRONMENT
- Remain informed of local regulations concerning the environment and follow the codes of best practice.
- Do not drain the contents of the sewage tank near the coast or in zones where it is forbidden.
- Make use of the port or marina pump facilities to drain the sewage tank before leaving port.
- Find out the international regulations against marine pollution (Marpol) and follow them as far as possible.
• USE OF THE MARINE HEADS
Before you use the heads, check that the water intake valve and draining valve are open.
To empty the bowl:- Set the control lever of the pump slantwise (FLUSH).- Operate the pump.
To dry the bowl:- Set the lever back vertical (DRY).- Operate the pump.
• ELECTRIC TOILET (OPTIONAL)
Ensure the valve opening.The electric toilets are activated by the switch on the electrical pa-nel.Lay out of - Fuses: Starboard aft cabin.
For use and maintenance of the material consult the manufacturer instructions.
In order to avoid clogging the heads, use absorbent paper exclusi-vely.Schedule a regular rinsing through of the heads with fresh water.Close the valves after each use (in particular when the boat is unat-tended).
Sanitary equipment
RECOMMENDATIONWhen you are in a marina, use the club-house sanitary faci-lities (if there are).Since it is prohibited to discharge the waste waters in some marinas or countries, you shall use a waste holding tank (WHT).
LAGOON 450

PLUMBING
78
BLACK WATER CIRCUIT
HEADS WATER INTAKE WC - QUIET FLUSH
WC - To portLay out of:
Passageway - To port1 - Heads water intake - Forward2 - Heads water intake - Aft
WC - To starboardLay out of:Washroom
Control 1 - Electric pump - WC2 - Sea water filter
DRAINAGE TO SEA
DECK DRAINAGE
Filler cap ''WASTE''
WC - To portLay out of: Passageway
1. Drainage to sea - WC - Forward
2. Drainage to sea - WC - Aft
WC - To starboardLay out of:Washroom
Sewage tankCapacity: 80 l
LAGOON 450

7PLUMBING
79
PLUMBING
The port aft toilets are fitted with a soil water tank. The other toilets-can have them fitted as, optional extra.
Before use ensure that the drain valve on the bowl is closed in order to avoid any inadvertent discharge (valve is closed when the valve handle is perpendicular with the pipe).
To empty the tank:- In an authorized area, open the draining valve.- In a marina equipped with a system to suck the waste waters, put
the sucking hose into the tank through the deck filler, then start the suction.
The filler caps are opened and closed with an appropriate key.When the tank is empty, check the cap seal for condition then close the filler.To rinse out the system: Fill the tank with fresh or sea water,then empty. Only use domestic cleaning products.
The tanks must be empty when the boat is moored in negative tem-peratures.
WARNINGAsk for information about the laws in force in your country or your marina about discharging your waste waters into the sea.
RECOMMENDATIONUse the pump system at ports or marinas to empty the waste holding tanks.
RECOMMENDATIONFor the protection of the environment, do not discharge the contents of the waste holding tanks near the shore.
RECOMMENDATION- To prevent odors caused by organic waste in pipes one
should clarify the circuit after each use. For this procedu-re, drive about ten times the manual pump of the toilet or for a minute if it is an electrical pump
- .When you leave the ship for several days, flush the toilets circuit assembly with fresh water. Purify with specific pro-ducts (for example a health additive to clean, disinfect and neutralize odors).
LAGOON 450


8Engine
FUEL TANKS .............................................................. 87
FUEL FILTER .............................................................. 89
ENGINES .................................................................... 91
INSTRUMENT PANEL .................................................. 93
PROPELLERS AND ANODES ...................................... 93
81

ENGINE
82
ENGINE - DIAGRAM - LAY OUT OF
LAGOON 450

8ENGINE
83
ENGINE
LAGOON 450

ENGINE
84
ENGINE
LAGOON 450

8ENGINE
85
ENGINE
1. Key - Filler cap2. Deck filler - Fuel3. Engine4. Anti-siphonage item5. Water trap6. Fan7. Outlet8. Sea water filter9. diesel filter10. Accumulator tank11. Diesel tank - 500 liter12. Battery switch - To port13. Port engine battery 12V 110A14. Engine instrument panel15. Box - Engine control16. Starboard engine battery 12V 110A17. Battery switch - To starboard18. Fan19. Engine compartment ventilator 12V20. Sail drive21. Propeller
A. Inlet - fresh air - Port engine - 100 mm diameterB. Hot air extraction - Port engine - 70 mm diameterC. Hot air extraction - Starboard engine - 70 mm diameterD. Inlet - fresh air - Starboard engine - 100 mm diameterE. Extinguisher access hole
LAGOON 450

ENGINE
86
FILLING CIRCUIT
Fuel tankLay out of: Aft cabinCapacity: 2 x 500 l
GaugeRefer to the instructions for use
Deck filler
LAGOON 450

8ENGINE
87
ENGINE
The boat is fitted with 2 tanks (1 in each hull).They are both filled independently.They both have a fuel gauge on the engine panel.
• FILLING
Take the general precautions stated in chapter 7 about the water tank filling.Fill the tanks using the 2 fuel fillers.In order to protect the deck from possible fuel splash, wet the area around the filler with sea water before you remove the filler cap.In case of splashes, rinse the deck thoroughly (after fitting back the filler cap).
• MAINTENANCE
- Regularly check the O ring of the filler for good condition (in order to prevent water entries).
- Do not turn off the fuel tap after each use (except in case the boat is unattended for long).
- Keep the fuel tank as full as possible (to avoid condensation).
- Every 5 years clean the tank to remove possible sludge deposi-tion.
- Every year check the fuel system for condition (hose, valves, etc.).
NOTE: The capacity of the fuel tank or tanks indicated in the page "Specifications" cannot be completely used according to the trim and load of the boat.
Always keep 20 % fuel as a reserve.
Fuel tanks
DANGERStop the engine and refrain from smoking during fuel tank filling.
RECOMMENDATIONHave a professional to carry out the works on the damaged parts of the fuel system.
LAGOON 450

ENGINE
88
ENGINE INSTALLATION
1 - Sea water filter.2 - Accumulator tank.3 - diesel filter.4 - Water trap.5 - Anti-siphonage item.
6 - Ventilators - Engine compartment.7 - Box - Steering (Optional dual: Branch junc-tion box and electrical cables to the engine ma-nagement to).
LAGOON 450

8ENGINE
89
ENGINE
The engine running problems may have different origins, among which dirty fuel.The injection pump may wear out if there is water in the system.The water results either from the condensation resulting from an in-sufficiently filled tank, or from a filler cap either not closed properly or with a damaged seal.
In order to prevent any water infiltration, the fuel runs through two filters:- The first filter is on the pipe that joins the tank to the engine,it has
the functions of a water decanter and pre-filter.- A second filter is an integral part of the engine its role is to filter fuel
very finely. To know when you have to intervene and how fre-quently you have to change it, please refer to the engine's manual.
Drain by undoing the knurled screw at the base of the decantation bowl(but not removing it).Allow to flow into a box till the fuel looks clean.
Do it several times a year.Change the pre-filter at least once a year (access to it when you re-move the bowl).
Fuel f i lter
LAGOON 450
ENGINE
90
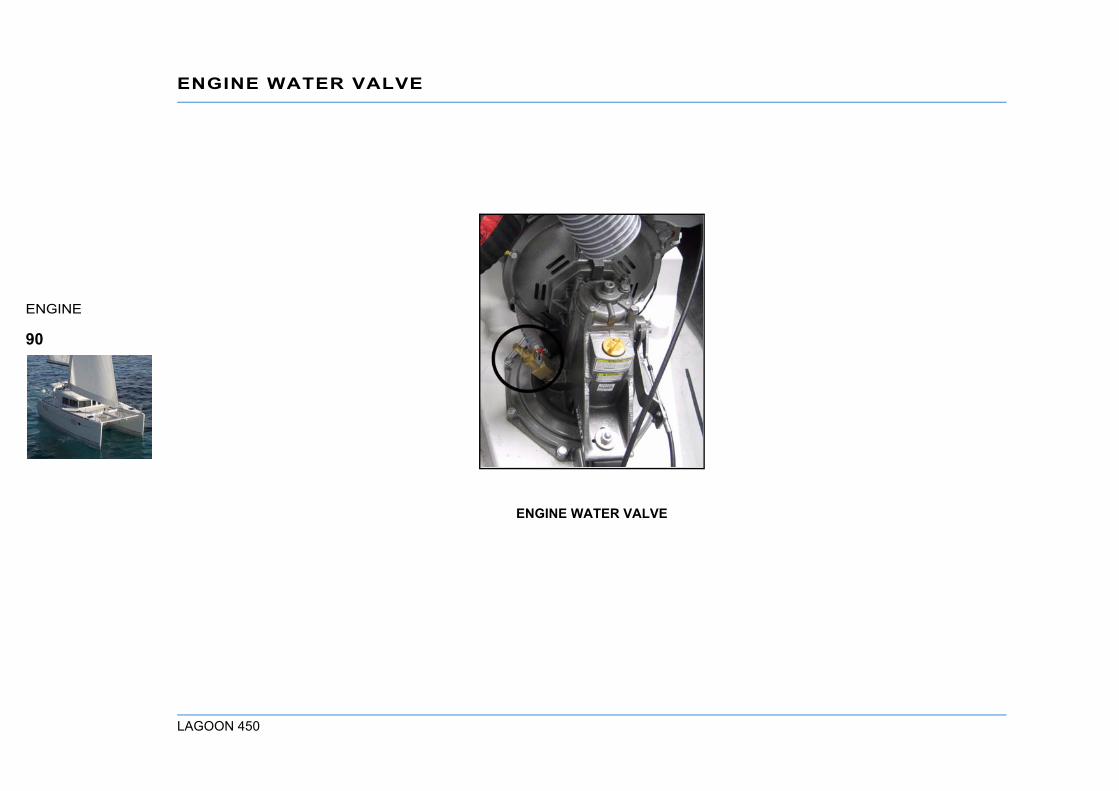
ENGINE WATER VALVE
ENGINE WATER VALVE
LAGOON 450

8ENGINE
91
ENGINE
• ACCESS TO THE ENGINE
The engine access is through the rear apron.
• ENGINE WATER VALVE
The water inlet valves are essential for the operation of the engine.These valves must be open before the engine is started (risk of ra-pid deterioration of the exhaust pipe and of major damage to the en-gine).
- Keep the strainer under the hull as clean as possible.- Brush the strainer when the boat is careened.- Do not cover the strainer with antifouling paint.
ADVICE: Get used to checking immediately after starting the engine if water is expelled with the exhaust gases.If water does not flow out:- Stop the engine immediately.- Check that the valve is open.
Close the water inlet valve if the boat is unattended for long.Inspect and clean the water filter regularly.
Engines
RECOMMENDATIONCarefully read the instructions given with your boat.
WARNINGNever run the engine when the boat is hauled out:
RECOMMENDATIONStop the engine before opening the hatches.In case of an intervention when the engine is running:- Stay away from belts and mobile parts.- Be careful with full clothes, long hair, rings etc. (you may
be caught).- Wear appropriate clothes (gloves, caps etc.).
LAGOON 450

ENGINE
92
FUEL VALVE / ANODES / INSTRUMENT PANEL
FUEL VALVE ANODE(On hull,under water line)
INSTRUMENT PANEL - ENGINERefer to the instructions for use
Lay out of: Roof (Master control) Lay out of: Chart table
LAGOON 450

8ENGINE
93
RIGGING & SAILS
• FUEL
Refill before the fuel tanks have almost run dry (the fuel system may be stopped for lack of fuel).Make sure you have enough fuel before sailing.
• MAINTENANCE
Refer to the manufacturer's manual given with your boat.Be careful with any possible risk of oil and fuel spillage.Check the exhaust gas colour. In the case of excessive white or black smoke,consult an engine specialist.
The instrument panel has all the testing functions of the engine and it does not require any special precaution (refer to engine leaflet).
The propellers fitted as standard to your boat result from trials car-ried out in collaboration with the engine manufacturer.
Remove the foldaway propellers (optional extra) at the end of each season,dismantle them and clean them carefully.Grease the thrust bearing surfaces and teeth. Check that the pro-peller blades move easily.If necessary,install new anodes (on hulls and base plates).
Replace anodes before they are 50% corroded.
Use anodes corresponding to the zone of navigation of the boat (fresh water / sea water).
Instrument panel
Propellers and anodes
RECOMMENDATIONDo not change the propeller without specialist's advice.
RECOMMENDATIONEnsure that the base plate anodes have good metal contact with the transmissions.Never paint the anodes.Assemble the propellers before re-launching the boat.
WARNING- Change the anode if necessary (Before it lost 50% of its
weight).- Use anodes corresponding to the zone of navigation of the
boat (fresh water / sea water).- If bases are raised, anodes are outside the water: respect
the recommendations of the motoriste.
WARNING- Change systematically anodes at the end of the first 3 or 4
months of launch of the new boat: their wear is accelerated during this period.
LAGOON 450

ENGINE
94
ENGINE CONTROL LEVER - JOYSTICK
ENGINE CONTROL LEVER JOYSTICK (For manoeuvring vessel at low speed)
REF DESCRIPTION FUNCTION / OPERATION3 and 4 In case of twin engine (not in use on this boat)
5 CTRL
Selection / deselection of the stationThe lever has to be in neutral position for the selection of the station.Press the button twice briefly to select the station : the led 1 lights up.To deselect the station press the button twice briefly : the led 1 flashes.
6 WARMNeutral positionPress the button with lever in neutral position : the led 2 lights up.This function can be disabled by pressing the button briefly while lever is in neutral position.
7 SYNC
Limitation of RPMPress the button during 2seconds when lever is in neutral position. The red led on the right of the button lights up
Twin commandPress the button quickly when 2 levers are both in reverse position. We hear a quick beep and green led on the left of the button lights up.
8 HIGH IDLELimitation of idlePress the button briefly. The red led on the right of the button lights up.
LAGOON 450

8ENGINE
95
ENGINE
WARNINGS
In case of malfunction, the Power A system warns the operator when it detects any fault by means of a sound code and by the flashing of LEDs 2 and 3 respectively for the left and/or the right motor.
N° TITLE DESCRIPTION AUDIBLE ALARM
1Lever position sensor error. Control station failure. If there is a second station, it is possible to use the
system, otherwise the system is set in a safety condition (throttles at mini-mum and shifts in neutral).
Short, Short, Short.
2
Actuator communication error. In the event of communication error, the system is set in a safety condition (throttles at minimum and shifts in neutral). When the lever is put in idle po-sition again, a restoration attempt is made and the system tries to take the normal functionalities again. If the error persists, the system stops.
Short, Short, Long.
3
Running engagement error. The system is set in a safety condition (throttles at minimum and shifts in neutral). When the lever is put in idle position again, a restoration attempt is made and the system tries to take the normal functionalities again. If the er-ror persists, the system stops.
Short, Long, Short.
4Throttle actuation error. In the event of mechanical throttle failure (if it is present), the system waits
for two seconds and then tries to put itself in a safety condition (throttles at minimum and shifts in neutral).
Short, Long, Long.
5 Troll actuation error. Long, Short, Short.
6
Throttle warning. Warnings indicate external situations that could limit the system performan-ce as low supply voltage or mechanical overloads of the cables connecting actuators and motors. The system tries to maintain the functionalities. In the event of persistent mechanical cable locking, the system does not signal a warning any more but an alarm.
Long, Short, Long.
7
Running engagement warning. Warnings indicate external situations that could limit the system performan-ce as low supply voltage or mechanical overloads of the cables connecting actuators and motors. The system tries to maintain the functionalities. In the event of persistent mechanical cable locking, the system does not signal a warning any more but an alarm.
Long, Long, Short.
LAGOON 450


9Rigging and Sails
STANDING RIGGING ................................................. 101
RUNNING RIGGING ................................................... 103
WINCHES .................................................................. 103
SAIL SETTING .......................................................... 109
SAILS........................................................................ 111
97

RIGGING& SAILS
98
RUNNING RIGGING
CLASSICAL MAST
1
2
3
4
5
LAGOON 450

9RIGGING& SAILS
99
RIGGING & SAILS
Classical mast
Referen-ce Designation Number Diameter (mm) Length (m)
1 Forestay 1 16 18.66
2 Upper shroud 2 16 17.64
3 Lower shroud 2 12 10.94
4 Diamond 1 (Upper) 2 12 9.98
5 Diamond 2 (Lower) 2 12 10.25
LAGOON 450


9RIGGING& SAILS
101
RIGGING & SAILS
• CABLE ADJUSTMENT
Your mast will have been pre-set both by the boatyard and by the mast manufacturer during the first mast stepping.
However,after a few sea trips,the mast should be reset once the ca-bles have "given" to their full length.proceed as follows:- Slacken the lower shrouds.- Tighten the topping lift or use the mainsail halyard in its place.- Loosen the lazy-jacks.- Take up the upper and lower diamonds,evenly in order to obtain a
straight profile. The mast should now curve evenly towards aft.- The forestay is pre-adjusted to have an angle of 2,6° to aft.- ension the backstays by tightening the turnbuckles with a wrench
and a 30 cm pipe (check that the mast head is centered).- Take the tension back up in the lower shrouds by turning the tur-
nbuckles by hand.- Take the lazy-jacks back up.- The mast should remain curved towards aft.
Under sail with a 20 knot apparent cross wind,it is normal for the leeward rigging to be slightly slack; if necessary,thread a shock cord between the backstay and the lower shroud leeward to stop any flapping .
• MAINTENANCE
Before each trip, carefully inspect the mast from top to bottom. Pe-riodically check the rigging tightening and the lock nut or pin locking (you should check it for the first time after a few days sailing in all types of weather).Secure and lubricate the bottle screws with tallow, graphite grease or other (Never lubricate the bottle screws with silicone).Check the bottle screw tightening.Inspect the bottle screws for possible wear (due to the chainplate friction if the rigging is slack).Change any shroud or stay with severed wires or kinks.Regularly check the chain-plates for wear.
ADVICE: Your LAGOON dealer can carry out all the maintenance operations.
Standing rigging
DANGERTo hoist a crew member up to the top of the mast, make a bowline with the halyard directly on the bosun's chair ring (never use the halyard snap shackle or shackle).Do not hoist a crew member when sailing in heavy weather.
LAGOON 450

RIGGING& SAILS
102
RUNNING RIGGING - SYSTEM - MAST FOOT
1. Spinnaker halyard2. Jib halyard3. Uphaul - Mainsail (classic)4. Reef 15. Main halyard6. Reef 37. Reef 28. After affalage mainsail
1
2
4
3
5
67
8
LAGOON 450

9RIGGING& SAILS
103
RIGGING & SAILS
Lubricate the sheaves with silicone. Change any distorted or dented sheave. Inspect the pins of the sheaves at the top of the mast once a year.Regularly check the jam cleat jaws for condition.Inspect the halyards for wear and condition.Regularly clean the blocks (waste grease, corrosion spot).Slightly lubricate the block pins.Avoid untimely gybes in order to reduce the premature wear on the sheets and attachment points.
Avoid rope jamming during winch handling.Do not leave loose ropes on the winches but fasten them on cleats.Adjust the winches on receipt of your boat (rinse them regularly du-ring the season).The winches should rotate freely, they need overhaul as soon as it slightly seizes.
• MAINTENANCECarry out the complete maintenance of the winches regularly (befo-re and during the sailing season).- Remove the drums and clean them.- Lubricate the drums with a film of white grease or Teflon to reduce
the friction and fight against corrosion (this type of grease is clean, non toxic and biodegradable).
Running rigging
Winches
WARNINGRefer to the manufacturer's instructions to remove the win-ches and put them back.Improper refitting may result in accidents (e.g. kick of the crank handle).
RECOMMENDATIONA winch drum is designed to have a minimum number of turns necessary so that it does not slip and that the stress is not passed on to the self-tailing mechanism.Make at least 3 or 4 turns on the winch.
WARNINGKeep hands away electric winches (optional) when used.Close the doors after use of switches.
LAGOON 450

RIGGING& SAILS
104
RUNNING RIGGING
Designation Quantity Diameter (mm) Length (m)
Uphaul 1 12 46
Main sheet 1 14 34
Two-way switch - Traveller 2 10 19
Reef 1 (Automatic) 1 14 32
Reef 2 (Automatic) 1 14 40
Reef 3 (manual) 1 14 36
Genoa sheet 2 14 19
Genoa halyard 1 12 44
Spinnaker halyard / Gennaker 1 14 48
Gennaker sheet 2 14 29
Spinnaker sheet 2 12 18
LAGOON 450

9RIGGING& SAILS
105
RIGGING & SAILS
ELECTRIC WINCH
Lay out of
135A breakerLay out of: Technical room
LAGOON 450

RIGGING& SAILS
106
RUNNING RIGGING - TRAVELLER - MAINSAIL (CLASSIC)
1. Pig tail2. Pig tail3. Swivel single pulley4. Main sheet5. Traveller adjustment - Mainsail (classic) - To port6. Traveller adjustment - Mainsail (classic) - To starboard
A. Pig tail - FixingB. Main sheet
4
5
A
B
1
2
3
6
LAGOON 450

9RIGGING& SAILS
107
RUNNING RIGGING - WORK AREA
1. Genoa sheet2. Spinnaker halyard3. Genoa halyard4. Uphaul - Mainsail (classic)5. Reef 1
1. Main sheet2. Traveller - Mainsail (classic)3. Genoa furler line4. After affalage mainsail5. Reef 26. Reef 37. Main halyard8. Genoa sheet
1
2345
4
5
6
7
8
3
1
2
LAGOON 450


9RIGGING& SAILS
109
RIGGING & SAILS
• FURLING GENOABefore getting under way take advantage of a windless period of time and hoist the genoa.Hand pre-roll the drum to set the furling line on it.Pay attention to the drum winding direction: The sacrificial strip of the genoa shall be wrapped outside.
- Secure the head and halyard to the swivel. Secure the tack to the drum and sheets.
- Insert the bolt rope into the hole and hoist it and take care that you do not tear it.
- Have the halyard taut enough but hoist less taut than a sail on a normal stay.
Hoist it until the horizontal creases disappear (Adjust the tension of the luff after a few sea trips).- Before you furl the genoa, remove the ring that is used to guide the
bolt rope. Keep this ring in a safe place and put it back before any handling (lowering etc.).
- Pull on the line from the cockpit to furl the genoa.
Never force it in case it seizes when you furl or unfurl the head sails. Make sure a halyard is not jammed in the furler. Verify that the sail is not too much tarque.
• MAINTENANCE- Regularly rinse the drum and swivel.- Lubricate the bearings if recommended by the manufacturer.- Unrig the sails if your boat is not to be used for long.
• MAINSAIL (CLASSIC)To hoist the mainsail:- Head into the wind.- Slacken the mainsail sheet.- Hoist the sail taking care that the battens do not catch up on the
lazy-jacks.
• GENNAKERBefore getting under way take advantage of a windless period of time and hoist the genoa.
- Fix the chain swivel to the gennaker head.- Fix the halyard to the head chain swivel.- Put the take-up drum on to the spar with a snap shackle.- Fix the halyard to the head chain swivel.- Hoist the gennaker.Use the take-up drum stopper to furl or unfurl the gennaker.
• SHEETS- Fix the sheets to the gennaker clews.- Thread the sheets around the outside of the stay and of the
shrouds and over the jack-lines.- Fasten the sheet return blocks to the bolts.- Lead the sheets back to the Genoa sheet winches.
Sail setting
WARNINGDe-rig the gennaker when not in use (danger of damage through UV rays and accidental unfurling).
LAGOON 450

RIGGING& SAILS
110
GENNAKER
FIXING OF THE GENNAKER HA-LYARD ONTO THE HEAD
CHAIN SWIVEL TAKE-UP DRUM
RETURN BLOCK FOR GENNAKER SHEET WINCHES - GENNAKER
LAGOON 450

9RIGGING& SAILS
111
RIGGING & SAILS
How long a sail lasts mainly depends on its regular maintenance.Piece of advice: At the end of the sailing season, and if possible be-fore winter, leave your sails to a specialist to have efficient mainte-nance and repairs.
When sailing, trim the sails properly in accordance with the stresses in order to reduce the harmful strains on the fabric.
Avoid tears and wear: Use protective items against chafing on the the accessories with rough surfaces (protective items for spreaders, stanchions etc.).
Between two sea trips, slacken the halyard (for the sails on furler) and the mainsail foot tuning line.
Have a sail maker's kit and a user's manual so that you may carry out the emergency repairs waiting for the sailmaker's assistance.
• CLEANING AND MAINTENANCE
Rinse the sails with fresh water from time to time and dry quickly in order to avoid mildew.Avoid drying the sails to windward when on the mast (when the sails lift, the seams are worn, the sails may be torn by the rigging).
To remove grease stains: Use trichlorethylene then immediately rin-se with water.
• SAIL STORAGE/FOLDING
Avoid storing a wet sail to prevent mildew from appearing.Accordion fold the sail parallel to the foot, then roll it up to the bag dimensions.
• PROTECTION
UV rays are harmful to polyester and nylon.If the sails remain on the mast, even for *1 h, protect them with a co-ver or a protection fabric placed on the leech and foot of the furled sails.
Our agents' network offers you accessories that have been selected by the yard and are consistent with your needs.
Sails
LAGOON 450

RIGGING& SAILS
112
SYSTEM - GENOA FURLER + SPINNAKER
Gennaker Gennaker + Spinnaker1. Swivel single pulley 3. Swivel single pulley2. Gennaker sheet 4. SHEET + Spinnaker guy
A. Spinnaker sheetB. Line - Jib reeferC. Spinnaker guy
B
3
1
AC
1
2
3
4
LAGOON 450

10Safety
SAFETY EQUIPMENT ................................................ 115
GAS SYSTEM SAFETY INSTRUCTIONS .................... 117
FIGHT AGAINST FIRE ............................................... 121
BILGE PUMP SYSTEM .............................................. 123
EMERGENCY TILLER ................................................ 123
CAPSIZING ............................................................... 125
ENGINE ..................................................................... 125
GENERAL POINTS .................................................... 125
113

SAFETY
114
POSITION OF THE LIFERAFT / SWIMMING LADDER
SWIMMING LADDER(means of coming back onboard)Lay out of: Starboard transom ex-
tension
FASTENERBe careful to leave the swim lad-der unfastened while sailing so
that someone may fold it out from the water if necessary
LAGOON 450

10SAFETY
115
SAFETY
- Before you sail, list the compulsory safety equipment.
- Attach jack-lines to the deck and underneath the nacelle body (clo-se to the manholes).
- Don't exceed the number of persons indicated in the chapter 'Spe-cifications'.
- When you don't take into account the number of persons, the total weight of the persons and equipment shall never exceed the maxi-mum load recommended by the manufacturer.
• LIFERAFT (not supplied)
The life raft was located in the rear beam.
• SWIMMING LADDER (means of coming back onboard)
Safety Equipment
WARNINGThe inventory of safety equipment required is a class certi-fication.
RECOMMENDATIONClose the deck hatches and fore portholes each time before each trip.
RECOMMENDATIONBefore you sail to sea, carefully read the instructions indica-ted on the liferaft to launch it.
DANGER- Some boats are equipped with a retractable ladder or remo-
vable. Make sure the ladder is in place and deployed as soon as you are on board.
- Reduce speed in waves.
LAGOON 450

SAFETY
116
GAS SYSTEM
1. Gas cylinder locker2. Thru-hull fitting3. Drain4. Gas system5.Supply valve - Gas
Supply valve - Gas (Landmark 5)
A diagram enables it to be found easily
Gas bottle locker (Landmark 1)
1
3
2 4 5
LAGOON 450

10SAFETY
117
SAFETY
The gas bottles are located in the starboard locker of the aft cockpit.The type of bottle (butane) is according to the current standards in your country.
Close the valves on the system and on the cylinder when the ap-pliances are not used.Close the valves before you change cylinders and immediately in case of emergency.Never leave unattended an appliance that is working.Don't install or store flammable materials above or over the stove (curtains, papers, napkins etc.).Don't use the oven or stove as back up heaters.Never obstruct the fast access to the components of the gas sys-tem.Make sure that the valves of the appliances are closed before you open the cylinder or hose valve.In case you smell gas or find that the burners have gone out (althou-gh appliance models cut off automatically if the flames go out), turn off the valves of the appliances. Do ventilate the boat in order to get rid of any residual gas .Find the cause of the problem.Regularly test the gas system in order to detect any gas leak.Check all the connections using water and soap or detergent, clo-sing the valves of the appliances and opening the valve on the cy-linder.If you detect a leak, close the valve of the cylinder and repair before you use it again.
The appliances use the oxygen of the cabin and release combusti-ble gases .Ventilate your boat when using appliances.Don't obstruct the air vents and at least leave the door open.Lock the stove oven when being not used in order to avoid dama-ging the tubes when sailing.Keep the taps of the empty cylinders turned off and the cylinders disconnected.Keep the protection, lids, covers and taps in their places.Store the empty and spare cylinders on the deck or in a locker with a ventilation to the open air.Don't use the gas cylinder storage place to store other equipment .Only use the proper locker to store the gas cylinders.Regularly check and replace the rubber tubings that link the cylinder to one end of the circuit and the stove to the other one, depending on the norms and regulations in force in your country.Pay particular attention to keep in good condition the screw thread of the cylinder on which the regulator is .Check the condition of the regulator every year and change it if necessary. Use regulators identical to the ones that are fitted.
Have the repairs carried out by someone skilled.
Gas system safety instructions WARNING- Don't use a solution containing ammonia.- Don't use a flame to detect leaks.- Don't smoke, don't use a naked flame when you change the
gas cylinder.
LAGOON 450
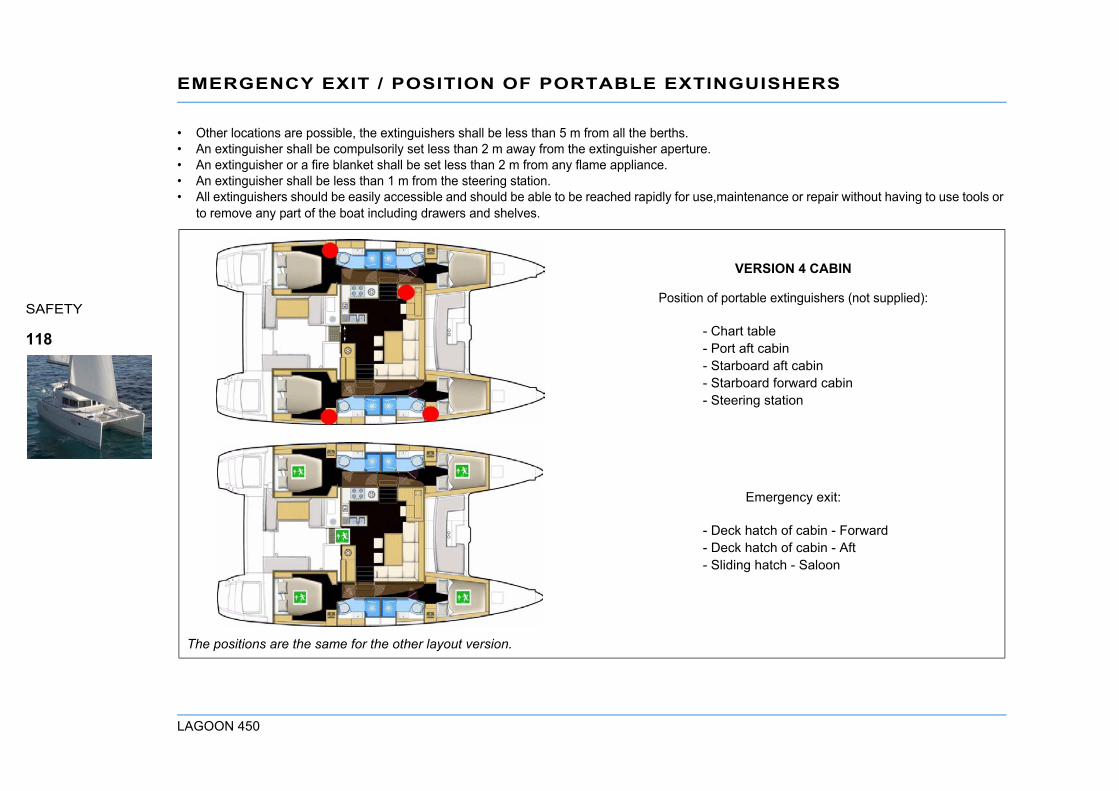
SAFETY
118
EMERGENCY EXIT / POSITION OF PORTABLE EXTINGUISHERS
• Other locations are possible, the extinguishers shall be less than 5 m from all the berths.• An extinguisher shall be compulsorily set less than 2 m away from the extinguisher aperture.• An extinguisher or a fire blanket shall be set less than 2 m from any flame appliance.• An extinguisher shall be less than 1 m from the steering station.• All extinguishers should be easily accessible and should be able to be reached rapidly for use,maintenance or repair without having to use tools or
to remove any part of the boat including drawers and shelves.
VERSION 4 CABIN
Position of portable extinguishers (not supplied):
- Chart table- Port aft cabin- Starboard aft cabin- Starboard forward cabin- Steering station
Emergency exit:
- Deck hatch of cabin - Forward- Deck hatch of cabin - Aft- Sliding hatch - Saloon
The positions are the same for the other layout version.
LAGOON 450

10SAFETY
119
SAFETY
Position of portable extinguishers (not supplied):
- Chart table- Port aft cabin- Starboard aft cabin- Steering station
VERSION 3 CABIN
Position of portable extinguishers (not supplied):
- Deck hatch of cabin - Forward- Deck hatch of cabin - Aft- Sliding hatch - Saloon
LAGOON 450

SAFETY
120
SAFETY
Extinguisher access hole -Engine compartmentLay out of: Aft cabins
LAGOON 450

10SAFETY
121
SAFETY
The extinguishers must be within easy access and kept away from a possible fire source.
It is the owner's or the skipper's responsibility:- To have the extinguishers checked in pursuance of the instructions
given.- To replace the extinguishers by others with an equal or a greater
capacity if the extinguishers have expired or are empty.- Make sure the extinguishers can be reached easily when people
are on board.To tell the crew:- where the extinguishers are and how they work.- where the release aperture is situated in the engine compartment.- where the emergency exits are.
Use only compatible spare parts for the extinguishers. The parts shall have the same specifications or be technically equivalent as to their resistance to fire.
Keep the bilge clean.Regularly check whether there is fuel oil or gas vapour.Always fasten the curtains with their snap fasteners when the gas cooker is working.
Fight against fire
WARNINGThe boat is delivered without extinguishers ; you are res-ponsible for applying your country's fire safety laws (num-ber of extinguishers, capacity, type and location).
WARNINGKeep an extinguisher handy in case the fire should start again.
WARNINGNever:- Obstruct the ways to the emergency exits.- Obstruct the safety controls (fuel oil valves, gas valves,
power switches).- Block the extinguishers placed in shelves.- Leave the boat unattended when a stove or heater is wor-
king.- Use gas lamps in the boat.- Alter the boat systems (electricity, gas or fuel oil).- Fill up a tank or change a gas cylinder when an engine is
running, a stove or heater is on.- Smoke while handling fuels or gas.
WARNINGThe CO2 extinguishers shall be used only to fight electrical fires.Clear the area immediately after use in order to avoid suffo-cation. Air before entering.
LAGOON 450

SAFETY
122
BILGE PUMP / EMERGENCY TILLER
MANUAL BILGE PUMPLay out of: Cockpit Operation
ELECTRIC BILGE PUMPLay out of: Passageway - Port and starboard
Capacity: 20 liter / minute
AUTOMATIC BILGE PUMPLay out of: Passageway - Port and starboard
Capacity: 129.1 liter / minute
EMERGENCY TILLER SECTOR ACCESS HOLE
LAGOON 450

10SAFETY
123
SAFETY
• ELECTRIC BILGE PUMPS
The electric pumps for bilge,sump and engine compartment operate automatically.See PLUMBING chapter.
• MANUALS BILGE PUMPS
The manual bilge pumps are located along the sides of the aft cock-pit bench.The control arm of the pump shall be kept accessible whatever the circumstances.
The liferaft should be placed in a cockpit locker. It must be easily ac-cessible.To operate the tiller:- Use a winch handle to unscrew one of the emergency tiller deck
plates located on the first step of the rear transom.- Insert the emergency tiller in the rudder stock and make sure it is
fully engaged.Regularly check tension of the turnbuckles on the turnbuckles stee-ring cables.
Bilge pump system Emergency ti l ler
RECOMMENDATIONThe emergency tiller is designed only to sail at a reduced speed in case of a wheel failure.
LAGOON 450

SAFETY
124
ESCAPE ''EXITS''
LAGOON 450

10SAFETY
125
SAFETY
Panels "exits" are provided in the rear cabin.The security bar (anti-theft device) automatically detaches if the boat capsizes.
The life-rafts are accessible on the transom (see the beginning of the chapter).
- Never start the engine when the boat is out of the water.- Never turn the propellers when the boat is out of the water.- Be careful not to cut yourself on the sharp edges of the propellers.- Be careful not to injure yourself when opening or closing the bla-
des.
- Stop the engine before diving or swimming around the boat.- The propeller blades are sharp and can cause major damage
when rotating.- Never attempt to release a fishing net or line caught in the propel-
ler when it is rotating.
- Before setting sail,check that the propellers are working in both fore and aft positions.
- In the event of unusual noises or vibrations emanating from the propellers,stop the engines immediately.
If the problem persists,contact the builder or your nearest supplier.
If you are using a propeller with fold-away blades,read the manufac-turer's use and maintenance instructions carefully.
- Always proceed with care, using gloves and always wearing shoes.
Areas forbidden when sailing:
- Bimini top .- Rear skirt.
Capsizing
Engine
General points
LAGOON 450


11Generalspecifications
DESIGN CATEGORY ................................................. 128
GENERAL SPECIFICATIONS - LAGOON 450............. 129
127

GENERAL SPECIFICATIONS
128
DESIGN CATEGORY
This boat is designed for sailing in winds that may exceed force 8 on the Beaufort scale and in waves of a significant height of 4 m and more, and the boat is to a large extent self-sufficient. Unusual con-ditions such as hurricanes are excluded.You may meet with such conditions when you sail long crossings, for instance across the oceans, or close to the shore, when you are not protected from the wind or waves over several hundreds of nau-tical miles.
This boat is designed for sailing in winds that may exceed force 8 on the Beaufort scale and in waves of a significant height of 4 mm or less.You may meet with such conditions when you sail on the open sea or close to the shore, when you are not protected from the wind or waves over several hundreds of nautical miles. You may also meet with these conditions on an inland sea with a size sufficient to gene-rate the wave height in question.
This boat is designed for sailing in winds that may exceed force 6 on the Beaufort scale and in waves of a significant height of 2 mm or less.You may meet with such conditions in exposed inland waters, in es-tuaries and in coastal waters with moderate weather conditions.
This boat is designed for sailing in winds not exceeding force 4 on the Beaufort scale and in waves of a corresponding height (signifi-cant height of 0,5 mm or less).You may meet such conditions in protected inland waters and in coastal waters when the weather is fine.
• Note:
The significant height of a wave is the average height of the upper third of the waves, that approximately corresponds to the height of a wave an experienced observer can assess. Some waves will be twice as high as this value.
Category A
Category B
Category C
Category D
CE CATEGORY MAXIMUM NUMBER OF PER-SONS
A 12B 14C 20D 30
LAGOON 450

11GENERAL
SPECIFICATIONS
129
GENERAL SPECIFICATIONS - LAGOON 450
Length - Hull............................................................................13,96 mL.O.A - Standard .....................................................................13,96 mL.O.A - with Optional equipment .............................................14,45 mL.W.L.......................................................................................13,38 mOverall width .............................................................................7,87 mWaterline beam.........................................................................7,27 mAir draught - max ....................................................................23,05 mDraught - min ............................................................................1,30 mLight displacement ...............................................................16 900 kgMaximum load (Category A) ..................................................5 115 kgMaximum load (Category B) ..................................................5 120 kgMaximum load (Category C) ..................................................5 620 kgMaximum load (Category D) ..................................................6 410 kgDisplacement with maximum load (Category A) ..................22 015 kgDisplacement with maximum load (Category B) ..................22 150 kgDisplacement with maximum load (Category C)..................22 520 kgDisplacement with maximum load (Category D)..................23 350 kgIncluding the mass of the persons who are authorized on board (75 kg per adult), the supplies, the liquids that can be used (fresh water and fuel) in fixed completely full tanks, the additional loads, the optional equipments, the liferaft and the scope for load.Total mass of liquids (all tanks full) ........................................1 740 kgSewage water capacity (in each bathroom)...................................80 lFreshwater capacity...................................... 2 x 175 l / 2 x 46 US galFreshwater capacity - additional ............................... 110 l / 29 US galFuel oil tank capacity .................................. 2 x 500 l / 2 x 132 US gal
Refrigeration unit capacity.........................................130 l / 34 US galRefrigeration unit capacity - additional .........................................130 lBattery capacity - House ......................................... 3 x 140 Ah (12 V)Battery capacity - Engine ........................................ 2 x 110 Ah (12 V)Spare batteries........................................................ 3 x 140 Ah (12 V)Engine .................................................................................. 110,4 kWArchitect ............................. VAN PETEGHEM / LAURIOT PREVOST
Classical mastBatten mainsail....................................................................... 63 m²Furling genoa ......................................................................... 49 m²Gennaker (optional) ............................................................. 104 m²
I ...........................................................................................17,74 mJ ............................................................................................4,70 mP..........................................................................................17,65 mE............................................................................................5,63 mLP..........................................................................................5,62 m
Boat
Sails
LAGOON 450

YOUR LAGOON 450
NAME OF THE BOAT: ....................................................................
VERSION:........................................................................................
DELIVERY DATE: ...........................................................................
REGISTRATION NUMBER: ............................................................
DOOR KEY NUMBER: ....................................................................
HULL NUMBER: ..............................................................................
MAKE OF ENGINE:.........................................................................
ENGINE KEY NUMBER: .................................................................
ENGINE SERIAL NUMBER TO STARBOARD: ..............................
TRANSMISSION SERIAL NUMBER TO STARBOARD:.................
ENGINE SERIAL NUMBER TO PORT:...........................................
TRANSMISSION SERIAL NUMBER TO PORT: .............................
NAME OF THE OWNER: ................................................................
ADDRESS: ......................................................................................
........................................................................................................
........................................................................................................
Telephone N° / Address to be contacted in case of emergency
www.cata-lagoon.com162, quai de Brazza - 33100 Bordeaux - France Tél. 33 (0) 557 80 92 80 Fax 33 (0) 557 80 92 81 E-mail : [email protected]

Dealer stamp
The present document is not contractual and since we constantly desire to improve our models, we reserve the right to modify them without notice.
PERSONAL NOTES
........................................................................................................
........................................................................................................
........................................................................................................
........................................................................................................
........................................................................................................
........................................................................................................
........................................................................................................
........................................................................................................
........................................................................................................
........................................................................................................
........................................................................................................
................................................................................
................................................................................
.........................................................................................................
.........................................................................................................
.........................................................................................................
.........................................................................................................
.........................................................................................................
.........................................................................................................
.........................................................................................................
.........................................................................................................
.........................................................................................................
.........................................................................................................
.........................................................................................................
...............................................................................
...............................................................................


www.cata-lagoon.com162, quai de Brazza - 33100 Bordeaux - France Tél. 33 (0) 557 80 92 80 Fax 33 (0) 557 80 92 81 E-mail : [email protected]