labwindowstm - tauflaxer/edu/course/computerappl/gettingstarted_ver8.pdf · getting started with...
TRANSCRIPT
LabWindowsTM/CVITM
Getting Started with LabWindows/CVI
Getting Started with LabWindows/CVI
October 2005373552A-01
Support
Worldwide Technical Support and Product Information
ni.com
National Instruments Corporate Headquarters
11500 North Mopac Expressway Austin, Texas 78759-3504 USA Tel: 512 683 0100
Worldwide Offices
Australia 1800 300 800, Austria 43 0 662 45 79 90 0, Belgium 32 0 2 757 00 20, Brazil 55 11 3262 3599, Canada 800 433 3488, China 86 21 6555 7838, Czech Republic 420 224 235 774, Denmark 45 45 76 26 00, Finland 385 0 9 725 725 11, France 33 0 1 48 14 24 24, Germany 49 0 89 741 31 30, India 91 80 51190000, Israel 972 0 3 6393737, Italy 39 02 413091, Japan 81 3 5472 2970, Korea 82 02 3451 3400, Lebanon 961 0 1 33 28 28, Malaysia 1800 887710, Mexico 01 800 010 0793, Netherlands 31 0 348 433 466, New Zealand 0800 553 322, Norway 47 0 66 90 76 60, Poland 48 22 3390150, Portugal 351 210 311 210, Russia 7 095 783 68 51, Singapore 1800 226 5886, Slovenia 386 3 425 4200, South Africa 27 0 11 805 8197, Spain 34 91 640 0085, Sweden 46 0 8 587 895 00, Switzerland 41 56 200 51 51, Taiwan 886 02 2377 2222, Thailand 662 278 6777, United Kingdom 44 0 1635 523545
For further support information, refer to the Technical Support and Professional Services appendix. To comment on National Instruments documentation, refer to the National Instruments Web site at ni.com/info and enter the info code feedback.
© 1994–2005 National Instruments Corporation. All rights reserved.
Important Information
WarrantyThe media on which you receive National Instruments software are warranted not to fail to execute programming instructions, due to defects in materials and workmanship, for a period of 90 days from date of shipment, as evidenced by receipts or other documentation. National Instruments will, at its option, repair or replace software media that do not execute programming instructions if National Instruments receives notice of such defects during the warranty period. National Instruments does not warrant that the operation of the software shall be uninterrupted or error free.
A Return Material Authorization (RMA) number must be obtained from the factory and clearly marked on the outside of the package before any equipment will be accepted for warranty work. National Instruments will pay the shipping costs of returning to the owner parts which are covered by warranty.
National Instruments believes that the information in this document is accurate. The document has been carefully reviewed for technical accuracy. In the event that technical or typographical errors exist, National Instruments reserves the right to make changes to subsequent editions of this document without prior notice to holders of this edition. The reader should consult National Instruments if errors are suspected. In no event shall National Instruments be liable for any damages arising out of or related to this document or the information contained in it.
EXCEPT AS SPECIFIED HEREIN, NATIONAL INSTRUMENTS MAKES NO WARRANTIES, EXPRESS OR IMPLIED, AND SPECIFICALLY DISCLAIMS ANY WARRANTY OF MERCHANTABILITY OR FITNESS FOR A PARTICULAR PURPOSE. CUSTOMER’S RIGHT TO RECOVER DAMAGES CAUSED BY FAULT OR NEGLIGENCE ON THE PART OF NATIONAL INSTRUMENTS SHALL BE LIMITED TO THE AMOUNT THERETOFORE PAID BY THE CUSTOMER. NATIONAL INSTRUMENTS WILL NOT BE LIABLE FOR DAMAGES RESULTING FROM LOSS OF DATA, PROFITS, USE OF PRODUCTS, OR INCIDENTAL OR CONSEQUENTIAL DAMAGES, EVEN IF ADVISED OF THE POSSIBILITY THEREOF. This limitation of the liability of National Instruments will apply regardless of the form of action, whether in contract or tort, including negligence. Any action against National Instruments must be brought within one year after the cause of action accrues. National Instruments shall not be liable for any delay in performance due to causes beyond its reasonable control. The warranty provided herein does not cover damages, defects, malfunctions, or service failures caused by owner’s failure to follow the National Instruments installation, operation, or maintenance instructions; owner’s modification of the product; owner’s abuse, misuse, or negligent acts; and power failure or surges, fire, flood, accident, actions of third parties, or other events outside reasonable control.
CopyrightUnder the copyright laws, this publication may not be reproduced or transmitted in any form, electronic or mechanical, including photocopying, recording, storing in an information retrieval system, or translating, in whole or in part, without the prior written consent of National Instruments Corporation.
In regards to components used in USI (Xerces C++, ICU, and HDF5), the following copyrights apply. For a listing of the conditions and disclaimers, refer to the USICopyrights.chm.
This product includes software developed by the Apache Software Foundation (http:/www.apache.org/). Copyright © 1999 The Apache Software Foundation. All rights reserved.
Copyright © 1995–2003 International Business Machines Corporation and others. All rights reserved.
NCSA HDF5 (Hierarchical Data Format 5) Software Library and UtilitiesCopyright 1998, 1999, 2000, 2001, 2003 by the Board of Trustees of the University of Illinois. All rights reserved.
TrademarksNational Instruments, NI, ni.com, and LabVIEW are trademarks of National Instruments Corporation. Refer to the Terms of Use section on ni.com/legal for more information about National Instruments trademarks.
Other product and company names mentioned herein are trademarks or trade names of their respective companies.
Members of the National Instruments Alliance Partner Program are business entities independent from National Instruments and have no agency, partnership, or joint-venture relationship with National Instruments.
PatentsFor patents covering National Instruments products, refer to the appropriate location: Help»Patents in your software, the patents.txt file on your CD, or ni.com/patents.
WARNING REGARDING USE OF NATIONAL INSTRUMENTS PRODUCTS(1) NATIONAL INSTRUMENTS PRODUCTS ARE NOT DESIGNED WITH COMPONENTS AND TESTING FOR A LEVEL OF RELIABILITY SUITABLE FOR USE IN OR IN CONNECTION WITH SURGICAL IMPLANTS OR AS CRITICAL COMPONENTS IN ANY LIFE SUPPORT SYSTEMS WHOSE FAILURE TO PERFORM CAN REASONABLY BE EXPECTED TO CAUSE SIGNIFICANT INJURY TO A HUMAN.
(2) IN ANY APPLICATION, INCLUDING THE ABOVE, RELIABILITY OF OPERATION OF THE SOFTWARE PRODUCTS CAN BE IMPAIRED BY ADVERSE FACTORS, INCLUDING BUT NOT LIMITED TO FLUCTUATIONS IN ELECTRICAL POWER SUPPLY, COMPUTER HARDWARE MALFUNCTIONS, COMPUTER OPERATING SYSTEM SOFTWARE FITNESS, FITNESS OF COMPILERS AND DEVELOPMENT SOFTWARE USED TO DEVELOP AN APPLICATION, INSTALLATION ERRORS, SOFTWARE AND HARDWARE COMPATIBILITY PROBLEMS, MALFUNCTIONS OR FAILURES OF ELECTRONIC MONITORING OR CONTROL DEVICES, TRANSIENT FAILURES OF ELECTRONIC SYSTEMS (HARDWARE AND/OR SOFTWARE), UNANTICIPATED USES OR MISUSES, OR ERRORS ON THE PART OF THE USER OR APPLICATIONS DESIGNER (ADVERSE FACTORS SUCH AS THESE ARE HEREAFTER COLLECTIVELY TERMED “SYSTEM FAILURES”). ANY APPLICATION WHERE A SYSTEM FAILURE WOULD CREATE A RISK OF HARM TO PROPERTY OR PERSONS (INCLUDING THE RISK OF BODILY INJURY AND DEATH) SHOULD NOT BE RELIANT SOLELY UPON ONE FORM OF ELECTRONIC SYSTEM DUE TO THE RISK OF SYSTEM FAILURE. TO AVOID DAMAGE, INJURY, OR DEATH, THE USER OR APPLICATION DESIGNER MUST TAKE REASONABLY PRUDENT STEPS TO PROTECT AGAINST SYSTEM FAILURES, INCLUDING BUT NOT LIMITED TO BACK-UP OR SHUT DOWN MECHANISMS. BECAUSE EACH END-USER SYSTEM IS CUSTOMIZED AND DIFFERS FROM NATIONAL INSTRUMENTS' TESTING PLATFORMS AND BECAUSE A USER OR APPLICATION DESIGNER MAY USE NATIONAL INSTRUMENTS PRODUCTS IN

COMBINATION WITH OTHER PRODUCTS IN A MANNER NOT EVALUATED OR CONTEMPLATED BY NATIONAL INSTRUMENTS, THE USER OR APPLICATION DESIGNER IS ULTIMATELY RESPONSIBLE FOR VERIFYING AND VALIDATING THE SUITABILITY OF NATIONAL INSTRUMENTS PRODUCTS WHENEVER NATIONAL INSTRUMENTS PRODUCTS ARE INCORPORATED IN A SYSTEM OR APPLICATION, INCLUDING, WITHOUT LIMITATION, THE APPROPRIATE DESIGN, PROCESS AND SAFETY LEVEL OF SUCH SYSTEM OR APPLICATION.

© National Instruments Corporation v Getting Started with LabWindows/CVI
Contents
About This ManualConventions ................................................................................................................... ixRelated Documentation..................................................................................................x
Chapter 1Introduction to LabWindows/CVI
LabWindows/CVI Program Development Overview....................................................1-1Organizing Application Components ..............................................................1-3
LabWindows/CVI Environment ....................................................................................1-4Standard Libraries..........................................................................................................1-5User Interface Development ..........................................................................................1-6
Generating a Program Shell with CodeBuilder ...............................................1-7Developing and Editing Source Code............................................................................1-7Instrument Control and Data Acquisition ......................................................................1-7
Using the Instrument Control and Data Acquisition Libraries........................1-7Using the Instrument I/O Assistant .................................................................1-8Using the DAQ Assistant ................................................................................1-8Developing Instrument Drivers .......................................................................1-8
Learning About LabWindows/CVI ...............................................................................1-9
Chapter 2Building a Graphical User Interface
User Interface Editor......................................................................................................2-1Source Code Connection ...............................................................................................2-1CodeBuilder ...................................................................................................................2-1Sample Project ...............................................................................................................2-2Setting Up ......................................................................................................................2-2Building a User Interface Resource (.uir) File...............................................................2-3
Creating a .uir File ...........................................................................................2-3Adding Command Buttons ..............................................................................2-3Adding a Graph Control ..................................................................................2-4Saving the Project Files ...................................................................................2-5
Generating the Program Shell with CodeBuilder ..........................................................2-6Analyzing the Source Code ...........................................................................................2-8
main Function..................................................................................................2-8AcquireData Function .....................................................................................2-9QuitCallback Function.....................................................................................2-10
Running the Generated Code .........................................................................................2-10
Contents
Getting Started with LabWindows/CVI vi ni.com
Chapter 3Using Function Panels and Libraries
Function Panel Fundamentals........................................................................................ 3-1Accessing Function Panels.............................................................................. 3-1Function Panel Controls.................................................................................. 3-1Function Panel Help........................................................................................ 3-2
Setting Up...................................................................................................................... 3-2Generating an Array of Data ......................................................................................... 3-2Building the PlotY Function Call Syntax...................................................................... 3-3Running the Completed Project..................................................................................... 3-5
Chapter 4Editing and Debugging Tools
Setting Up...................................................................................................................... 4-1Editing Tools ................................................................................................................. 4-1Step Mode Execution .................................................................................................... 4-3Breakpoints.................................................................................................................... 4-5
Fixed Breakpoints ........................................................................................... 4-5Conditional Breakpoints ................................................................................. 4-7
Displaying and Editing Data ......................................................................................... 4-7Variables Window........................................................................................... 4-8
Editing Variables .............................................................................. 4-9Array Display Window ................................................................................... 4-9Memory Display Window............................................................................... 4-10String Display Window................................................................................... 4-11Watch Window ............................................................................................... 4-11Tooltips ........................................................................................................... 4-12Graphical Array View..................................................................................... 4-13
Chapter 5Adding Analysis to Your Program
Setting Up...................................................................................................................... 5-1Modifying the User Interface.......................................................................... 5-1Writing the Callback Function........................................................................ 5-3Running the Program ...................................................................................... 5-5
Contents
© National Instruments Corporation vii Getting Started with LabWindows/CVI
Chapter 6Distributing Your Application
Setting Up ......................................................................................................................6-1Creating a New Distribution ..........................................................................................6-1Editing the Distribution .................................................................................................6-1Deploying the Application to a Target Computer .........................................................6-3
Chapter 7Additional Exercises
Base Project ...................................................................................................................7-1Exercise 1: Setting User Interface Attributes Programmatically...................................7-2
Assignment ......................................................................................................7-2Exercise 2: Storing the Waveform on Disk ...................................................................7-3
Assignment ......................................................................................................7-3Exercise 3: Using Pop-Up Panels ..................................................................................7-4
Assignment ......................................................................................................7-4Exercise 4: Adding User Interface Events .....................................................................7-5
Assignment ......................................................................................................7-6Exercise 5: Timed Events ..............................................................................................7-7
Assignment ......................................................................................................7-7
Appendix ATechnical Support and Professional Services
Glossary
Index
© National Instruments Corporation ix Getting Started with LabWindows/CVI
About This Manual
Getting Started with LabWindows/CVI is a hands-on introduction to the LabWindows™/CVI™ software package. This manual is intended for first-time LabWindows/CVI users. To use this manual effectively, you should be familiar with DOS, Microsoft Windows, and the C programming language.
ConventionsThe following conventions appear in this manual:
» The » symbol leads you through nested menu items and dialog box options to a final action. The sequence File»Page Setup»Options directs you to pull down the File menu, select the Page Setup item, and select Options from the last dialog box.
This symbol also leads you through the LabWindows/CVI Library Tree to a function panel. For example, User Interface Library»Pop-up Panels» InstallPopup directs you to expand the User Interface Library in the Library Tree, expand Pop-up Panels, and select InstallPopup.
This icon denotes a tip, which alerts you to advisory information.
This icon denotes a note, which alerts you to important information.
bold Bold text denotes items that you must select or click in the software, such as menu items and dialog box options. Bold text also denotes parameter names.
italic Italic text denotes variables, emphasis, a cross reference, or an introduction to a key concept. Italic text also denotes text that is a placeholder for a word or value that you must supply.
monospace Text in this font denotes text or characters that you should enter from the keyboard, sections of code, programming examples, and syntax examples. This font is also used for the proper names of disk drives, paths, directories, programs, subprograms, subroutines, device names, functions, operations, variables, filenames, and extensions.
About This Manual
Getting Started with LabWindows/CVI x ni.com
Related DocumentationThe following documents contain information that you may find helpful as you read this manual:
• Harbison, Samuel P. and Guy L. Steele, Jr. C: A Reference Manual. Englewood Cliffs, NJ: Prentice-Hall, Inc. 1995.
• LabWindows/CVI Help
• LabWindows/CVI Quick Reference
• LabWindows/CVI Instrument Driver Developers Guide
• LabWindows/CVI Release Notes
• NI-DAQmx Help
• DAQ Getting Started Guide
• DAQ Assistant Help
• Traditional NI-DAQ (Legacy) Function Reference Help
• NI-VISA Help
• NI-488.2 Help
© National Instruments Corporation 1-1 Getting Started with LabWindows/CVI
1Introduction to LabWindows/CVI
This chapter contains an overview of the LabWindows/CVI software development system. It briefly describes the LabWindows/CVI environment, standard libraries, user interface development, and source code editing tools. These topics are discussed in greater detail in subsequent chapters. This chapter also includes an introduction to using hardware with LabWindows/CVI and suggestions for learning more about LabWindows/CVI.
LabWindows/CVI Program Development OverviewLabWindows/CVI is a software development environment for C programmers. LabWindows/CVI provides powerful function libraries and a comprehensive set of software tools for data acquisition, analysis, and presentation that you can use to interactively develop data acquisition and instrument control applications.
You can edit, compile, link, and debug ANSI C programs in the LabWindows/CVI development environment. Additionally, you can use compiled C object modules, dynamic link libraries (DLLs), C libraries, and instrument drivers in conjunction with ANSI C source files when you develop programs.
Typical LabWindows/CVI applications include the following elements:
• User interface
• Data acquisition
• Data analysis
• Program control
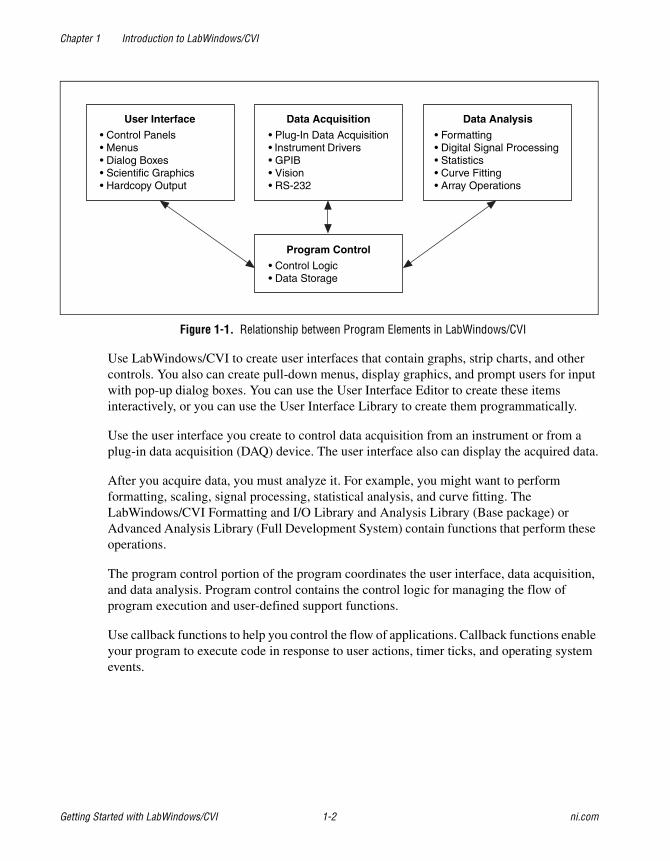
Figure 1-1 shows an outline of the relationship between these program elements. Program control elements receive input from the user interface, data acquisition, and data analysis elements. Each element has several sub-components.
Chapter 1 Introduction to LabWindows/CVI
Getting Started with LabWindows/CVI 1-2 ni.com
Figure 1-1. Relationship between Program Elements in LabWindows/CVI
Use LabWindows/CVI to create user interfaces that contain graphs, strip charts, and other controls. You also can create pull-down menus, display graphics, and prompt users for input with pop-up dialog boxes. You can use the User Interface Editor to create these items interactively, or you can use the User Interface Library to create them programmatically.
Use the user interface you create to control data acquisition from an instrument or from a plug-in data acquisition (DAQ) device. The user interface also can display the acquired data.
After you acquire data, you must analyze it. For example, you might want to perform formatting, scaling, signal processing, statistical analysis, and curve fitting. The LabWindows/CVI Formatting and I/O Library and Analysis Library (Base package) or Advanced Analysis Library (Full Development System) contain functions that perform these operations.
The program control portion of the program coordinates the user interface, data acquisition, and data analysis. Program control contains the control logic for managing the flow of program execution and user-defined support functions.
Use callback functions to help you control the flow of applications. Callback functions enable your program to execute code in response to user actions, timer ticks, and operating system events.
User Interface
• Control Panels• Menus• Dialog Boxes• Scientific Graphics• Hardcopy Output
Data Acquisition
• Plug-In Data Acquisition• Instrument Drivers• GPIB• Vision• RS-232
Program Control
• Control Logic• Data Storage
Data Analysis
• Formatting• Digital Signal Processing• Statistics• Curve Fitting• Array Operations
Chapter 1 Introduction to LabWindows/CVI
© National Instruments Corporation 1-3 Getting Started with LabWindows/CVI
Organizing Application ComponentsUse projects and workspaces to organize files and manage application development in LabWindows/CVI. A project (.prj) file contains the files needed to run your application. A project must include one or more of the following files:
• source (.c) files
• object (.obj) files
• library (.lib) files
You may also include the following files in a project:
• header (.h) files
• user interface resource (.uir) files
• instrument driver function panel (.fp) files
• instrument driver program files
You can include one or more projects in a workspace. A workspace (.cws) file contains the settings that do not affect the way a project builds, such as breakpoints, window positions, tag information, and debugging levels. To edit the list of projects the current workspace contains, select Edit»Workspace.
Chapter 1 Introduction to LabWindows/CVI
Getting Started with LabWindows/CVI 1-4 ni.com
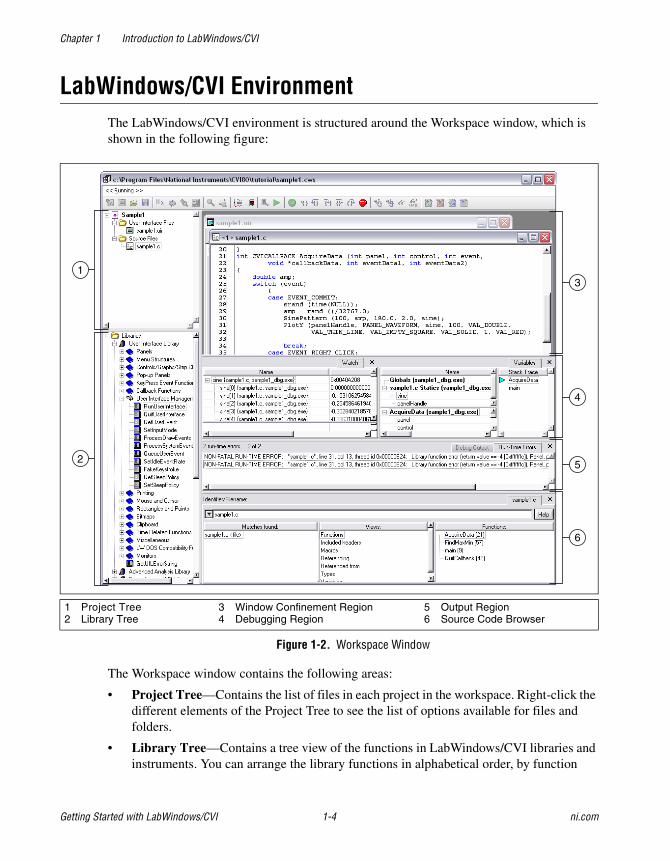
LabWindows/CVI EnvironmentThe LabWindows/CVI environment is structured around the Workspace window, which is shown in the following figure:
Figure 1-2. Workspace Window
The Workspace window contains the following areas:
• Project Tree—Contains the list of files in each project in the workspace. Right-click the different elements of the Project Tree to see the list of options available for files and folders.
• Library Tree—Contains a tree view of the functions in LabWindows/CVI libraries and instruments. You can arrange the library functions in alphabetical order, by function
1 Project Tree2 Library Tree
3 Window Confinement Region4 Debugging Region
5 Output Region6 Source Code Browser
1
2
3
4
5
6
Chapter 1 Introduction to LabWindows/CVI
© National Instruments Corporation 1-5 Getting Started with LabWindows/CVI
name or function panel title, or in a flat list instead of a hierarchical class structure. Right-click the Library Tree and select Find to search for a specific function within the tree.
• Window Confinement Region—Contains open Source, User Interface Editor, Function Tree Editor, and function panel windows.
• Debugging Region—Contains the Variables, Watch, and Memory windows. Use these windows to view and edit variable values and program memory during debugging.
• Output Region—Contains the Build Errors, Run-Time Errors, Source Code Control Errors, Debug Output, and Find Results windows. These windows contain lists of errors, output, and search matches.
• Source Code Browser—Contains browse information for selected files, functions, variables, data types, and macros in a program.
Select Window»Release Window to move a window that is contained within the Window Confinement Region, Debugging Region, Output Region, or Source Code Browser outside of the Workspace window.
Note You cannot release the Project Tree or Library Tree from the Workspace window. However, you can select Options»Environment and then enable the Auto hide Project and Library Trees option to remove the Project and Library Trees from the Workspace window when they are not in focus.
The menus and toolbar buttons available within the LabWindows/CVI Workspace window differ depending on what window is active. To learn about what each menu item does, right-click the menu and select Menu Help. LabWindows/CVI launches the LabWindows/CVI Help topic that describes the items in the selected menu.
Standard LibrariesLabWindows/CVI provides a large set of built-in run-time libraries you can use to develop applications. You can browse the Library Tree or press <Ctrl-Shift-P> in a Source window to find a specific library function.
LabWindows/CVI includes the following standard libraries:
• User Interface Library—Functions for creating and controlling a graphical user interface.
• Analysis Library (Base Package)/Advanced Analysis Library (Full Development System)—Functions that operate on arrays to simulate and analyze large sets of numerical data quickly and efficiently.
• Formatting and I/O Library—Functions for inputting and outputting data to files and manipulating the format of data in a program.
Chapter 1 Introduction to LabWindows/CVI
Getting Started with LabWindows/CVI 1-6 ni.com
• Utility Library—Functions that perform various operations, including using the system timer, managing disk files, launching another executable, and using multiple threads in a program.
• ANSI C Library—The ANSI C standard library functions.
• VXI Library—Functions for communicating with and controlling VXI devices.
• GPIB/GPIB 488.2 Library—Functions for communicating with and controlling devices on the General Purpose Interface Bus (GPIB).
• RS-232 Library—Functions for controlling multiple RS-232 ports using interrupt-driven I/O.
• VISA Library—Functions for controlling VXI, GPIB, serial, and other types of instruments.
• TCP Support Library—Functions that provide a platform-independent interface to the reliable, connection-oriented, byte-stream, network communication protocol.
• Internet Library—Functions that communicate with and receive files and commands from remote servers.
• DDE Support Library—Functions that you can use to create an interface with other Windows applications using the DDE standard.
• ActiveX Library—Functions that create and control ActiveX servers.
• DIAdem Connectivity Library—Functions that you can use to log test data in National Instruments DIAdem file format (.tdm).
• .NET Library—Functions that facilitate calling .NET assemblies.
User Interface DevelopmentYou can use LabWindows/CVI to develop graphical user interfaces (GUIs) that consist of panels, command buttons, pull-down menus, graphs, strip charts, knobs, gauges, and many other controls and indicators. You can use the User Interface Editor to build a GUI in LabWindows/CVI interactively. The User Interface Editor is a drag-and-drop editor that includes tools for designing, arranging, and customizing user interface objects.
You also can use the User Interface Library to create GUIs programmatically in LabWindows/CVI. The User Interface Library provides functions that you can use to add to, change, or build the entire GUI as the application runs.
To learn more about the available user interface elements and the functions that you can use to connect your interface to the rest of your program, refer to the Using LabWindows/CVI»Developing a Graphical User Interface and the Library Reference»User Interface Library sections of the LabWindows/CVI Help.
Chapter 1 Introduction to LabWindows/CVI
© National Instruments Corporation 1-7 Getting Started with LabWindows/CVI
Generating a Program Shell with CodeBuilderAfter you design a GUI in the User Interface Editor, you can use CodeBuilder to automatically generate a program shell based on the components in the GUI. CodeBuilder writes code for all control callback functions and creates a program skeleton that loads and displays GUI windows at program startup. CodeBuilder saves development time by automating many of the common coding tasks required for writing a Windows program. You use CodeBuilder in activities later in this tutorial.
Developing and Editing Source CodeUse the Source window in LabWindows/CVI to develop C source files for projects. LabWindows/CVI is compatible with the full ANSI C language specification. You can use any ANSI C language structures or standard library functions in the source code you develop in this window. LabWindows/CVI provides code generation tools that streamline source code development.
You can use the menu items in the Source window to edit files, debug code, compile files, and so on. You use Source window features in activities later in this tutorial. For more information about the Source window, refer to Using LabWindows/CVI»Writing Source Code in the LabWindows/CVI Help.
Instrument Control and Data AcquisitionYou can use LabWindows/CVI to develop instrument control and data acquisition applications. LabWindows/CVI libraries provide functions for controlling GPIB, RS-232, serial, Ethernet, and National Instruments DAQ devices and modular instruments. LabWindows/CVI also provides interactive assistants you can use to generate code to communicate with different devices and to create and edit NI-DAQmx tasks.
Using the Instrument Control and Data Acquisition LibrariesLabWindows/CVI installs the GPIB/GPIB 488.2, VISA, and VXI libraries. However, LabWindows/CVI does not install the GPIB, VISA, or VXI drivers. Therefore, the GPIB/GPIB 488.2, VISA, and VXI libraries are listed in the Library Tree, but you must install the drivers to use the functions in an application. You can install these drivers from the NI Device Drivers CD. LabWindows/CVI does not install the NI-DAQmx, Traditional NI-DAQ, or IVI libraries or drivers. You also can install these libraries and drivers from the NI Device Drivers CD.
Chapter 1 Introduction to LabWindows/CVI
Getting Started with LabWindows/CVI 1-8 ni.com
If you want to use instrument control and data acquisition libraries in LabWindows/CVI, you must make sure LabWindows/CVI is configured to load these libraries on startup. To do so, Select Library»Customize and check the libraries you want to use. All of the libraries are checked by default.
For a list of hardware library documentation resources, refer to the Related Documentation section of the About This Manual chapter.
Using the Instrument I/O AssistantYou can use the NI Instrument I/O Assistant to generate code to communicate with devices such as serial, Ethernet, and GPIB instruments without using an instrument driver. To launch the Instrument I/O Assistant from within the LabWindows/CVI environment, select Tools»Create Instrument I/O Task. For more information about using the Instrument I/O Assistant, refer to the Using LabWindows/CVI»Wizards and Tools»Creating an Instrument I/O Task section of the LabWindows/CVI Help.
Note You must install the NI Instrument I/O Assistant feature from the NI Device Drivers CD to use the Instrument I/O Assistant.
Using the DAQ AssistantYou can use the NI DAQ Assistant to configure measurement tasks, channels, and scales. You also can use the DAQ Assistant to generate NI-DAQmx code from a task. To launch the DAQ Assistant from within the LabWindows/CVI environment, select Tools»Create/Edit DAQmx Tasks. For more information about using the DAQ Assistant, refer to the Using LabWindows/CVI»Data Acquisition»Taking an NI-DAQmx Measurement in LabWindows/CVI section of the LabWindows/CVI Help.
Note You must install NI-DAQmx from the NI Device Drivers CD to use the DAQ Assistant.
Developing Instrument DriversIf you plan to develop your own instrument driver, refer to the LabWindows/CVI Instrument Driver Developers Guide. This document provides information about developing and adding instrument drivers to LabWindows/CVI. It is intended for programmers who develop instrument drivers to control programmable instruments such as GPIB, PXI, and RS-232 instruments. Also refer to the Using LabWindows/CVI»Instrument Drivers section of the LabWindows/CVI Help for fundamental instrument driver information you must consider if you create or modify a driver.
Chapter 1 Introduction to LabWindows/CVI
© National Instruments Corporation 1-9 Getting Started with LabWindows/CVI
Learning About LabWindows/CVIComplete the exercises in the remaining chapters of this tutorial to learn how to build, debug, and deploy applications in LabWindows/CVI. The tutorial\solution folder includes completed tutorial exercises you can use for reference.
As you work through this tutorial, refer to the LabWindows/CVI documentation set for more information about the concepts presented in this manual. Use the Guide to LabWindows/CVI Documentation topic in the LabWindows/CVI Help to learn more about and access the documents in the LabWindows/CVI documentation set. To launch the LabWindows/CVI Help, select Help»Contents.
After you complete this tutorial, review the example programs included in the \samples folder of the LabWindows/CVI installation. These examples illustrate the LabWindows/CVI features and the concepts in this manual. You can use NI Example Finder to search for example programs included in the LabWindows/CVI installation and on ni.com. To launch NI Example Finder, select Help»Find Examples.
© National Instruments Corporation 2-1 Getting Started with LabWindows/CVI
2Building a Graphical User Interface
In the remaining chapters of this tutorial, you develop a project that consists of a GUI controlled by a C source file. In this chapter, you learn to design a user interface with the User Interface Editor.
User Interface EditorThe User Interface Editor is an interactive drag-and-drop editor for designing custom GUIs. You can select a number of different controls from the Create menu and position them on the panels you create. You can customize each control through a series of dialog boxes in which you set attributes for the control appearance, source code connection settings, and label appearance.
Source Code ConnectionAfter you design a user interface in the User Interface Editor, you can write C source code to control the GUI. To connect elements on the user interface to the source code, you must assign a constant name to each panel, menu, and control on your user interface. Then, you can use those names in the C source code to differentiate the controls on the GUI. You also can assign a callback function to a control that is called automatically when you operate that control during program execution. Use the Edit dialog box for a control to associate a constant name and a callback function with that control in the User Interface Editor.
After you save a user interface as a .uir file, LabWindows/CVI automatically generates an include (.h) file that defines all the constants and callback functions you have assigned.
CodeBuilderAfter you complete the .uir file, you can use CodeBuilder to create a source file that contains skeleton code for your GUI. CodeBuilder automatically includes in the source file the callback functions specified in your .uir file. For more information about CodeBuilder, refer to the Using LabWindows/CVI»Developing a Graphical User Interface»Generating Code from the GUI section of the LabWindows/CVI Help.

Chapter 2 Building a Graphical User Interface
Getting Started with LabWindows/CVI 2-2 ni.com
Sample ProjectIn the next several chapters of this tutorial, you build a sample program that acquires and displays a waveform on a GUI. The development process includes the following steps:
1. Create a user interface in the User Interface Editor (this chapter).
2. Generate a program shell source file using CodeBuilder (this chapter).
3. Add source code to generate and display a waveform (Chapter 3, Using Function Panels and Libraries).
4. Edit and debug the application (Chapter 4, Editing and Debugging Tools).
5. Develop a callback function to compute the maximum and minimum values of the waveform (Chapter 5, Adding Analysis to Your Program).
6. Create a distribution to deploy your application on another computer (Chapter 6, Distributing Your Application).
Setting UpLaunch LabWindows/CVI by selecting Start»Programs»National Instruments»LabWindows CVI x.x»NI LabWindows CVI. When you open LabWindows/CVI, you see an empty Workspace window.
Chapter 2 Building a Graphical User Interface
© National Instruments Corporation 2-3 Getting Started with LabWindows/CVI
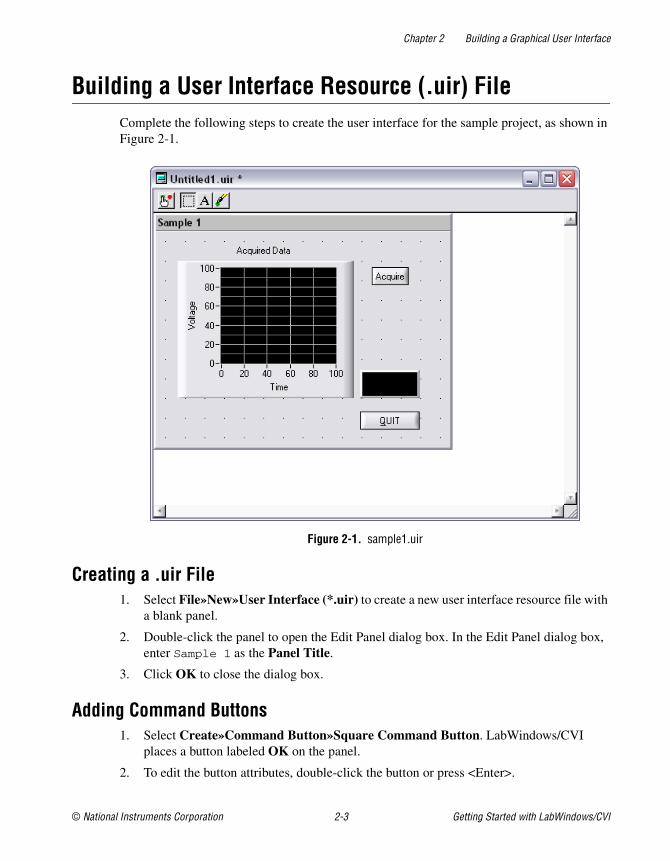
Building a User Interface Resource (.uir) FileComplete the following steps to create the user interface for the sample project, as shown in Figure 2-1.
Figure 2-1. sample1.uir
Creating a .uir File1. Select File»New»User Interface (*.uir) to create a new user interface resource file with
a blank panel.
2. Double-click the panel to open the Edit Panel dialog box. In the Edit Panel dialog box, enter Sample 1 as the Panel Title.
3. Click OK to close the dialog box.
Adding Command Buttons1. Select Create»Command Button»Square Command Button. LabWindows/CVI
places a button labeled OK on the panel.
2. To edit the button attributes, double-click the button or press <Enter>.
Chapter 2 Building a Graphical User Interface
Getting Started with LabWindows/CVI 2-4 ni.com
3. Assign a constant name to the button. The C source code uses this constant name to identify the button. LabWindows/CVI creates a default name for you, but you can assign your own constant name. Enter ACQUIRE as the Constant Name.
4. Assign a function name that the program calls when a user clicks the Acquire button. Enter AcquireData as the Callback Function. In Chapter 3, Using Function Panels and Libraries, you write the source code for the AcquireData function.
5. To change the label on the command button, enter Acquire in place of the existing characters, __OK, in Label. If you type a double underscore before any letter in Label, the letter is underlined on the user interface. The user can select the control by pressing <Alt> and the underlined letter, provided that no accessible menu bars contain a menu with the same underlined letter.
6. (Optional) Click the ... button next to the Label control to customize the font for your button. Click OK in the Edit Label Attributes dialog box when you finish.
7. Click OK in the Edit Command Button dialog box.
8. To add the QUIT button, select Create»Custom Controls»Quit Button. Custom controls are frequently used control configurations. The QUIT button already has a callback function, QuitCallback, assigned. It is not necessary to modify the default settings for the QUIT button.
Adding a Graph Control1. You also can add controls to a panel by right-clicking the panel and selecting the
appropriate control. Right-click the Sample 1 panel and select Graph»Graph. LabWindows/CVI places a graph control labeled Untitled Control on the panel.
2. To size the panel, click and drag one of its corners. Use the commands in the Edit menu and the Arrange menu to cut, copy, paste, align, and space user interface controls in the editor so they appear as shown in Figure 2-1. You also can use the grid lines on the panel to align the controls.
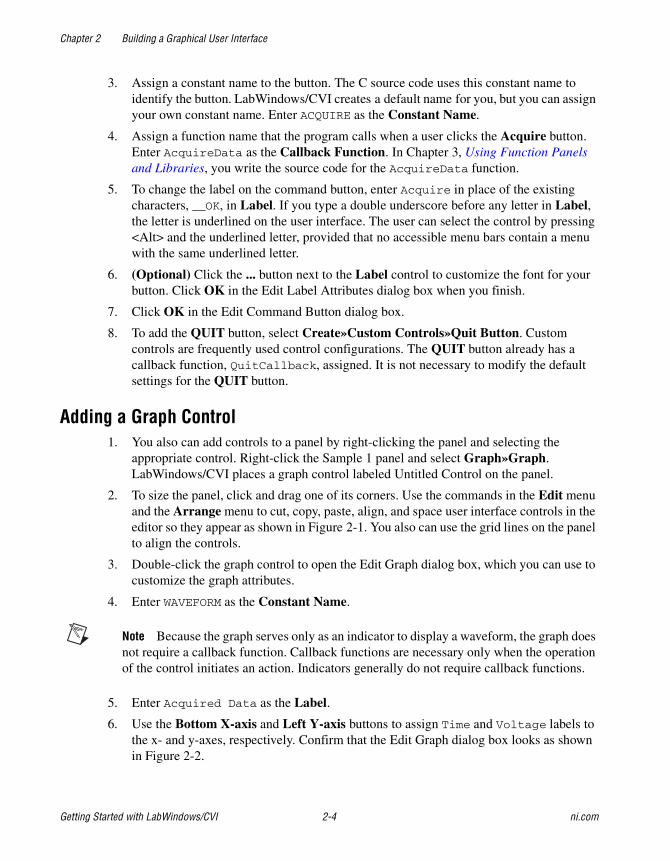
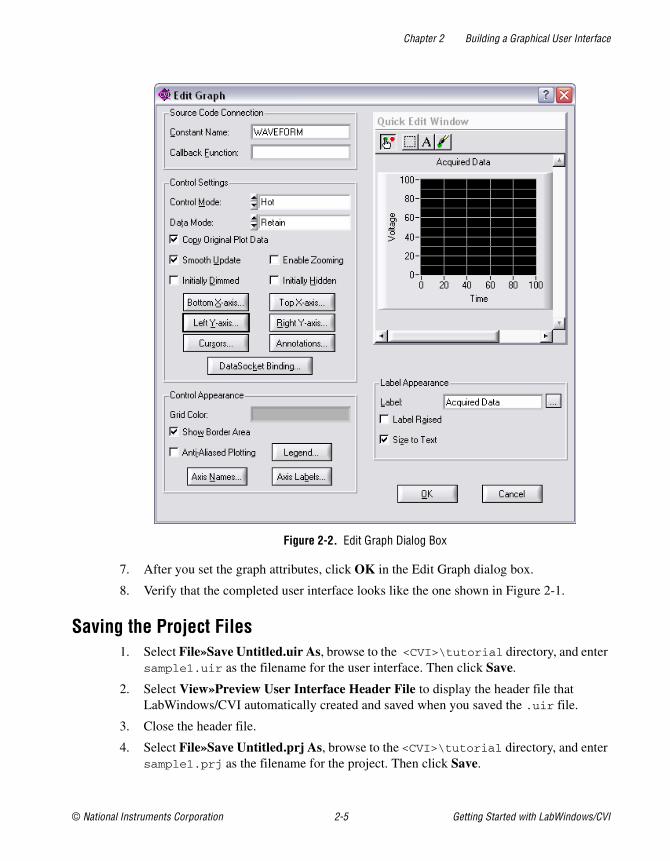
3. Double-click the graph control to open the Edit Graph dialog box, which you can use to customize the graph attributes.
4. Enter WAVEFORM as the Constant Name.
Note Because the graph serves only as an indicator to display a waveform, the graph does not require a callback function. Callback functions are necessary only when the operation of the control initiates an action. Indicators generally do not require callback functions.
5. Enter Acquired Data as the Label.
6. Use the Bottom X-axis and Left Y-axis buttons to assign Time and Voltage labels to the x- and y-axes, respectively. Confirm that the Edit Graph dialog box looks as shown in Figure 2-2.
Chapter 2 Building a Graphical User Interface
© National Instruments Corporation 2-5 Getting Started with LabWindows/CVI
Figure 2-2. Edit Graph Dialog Box
7. After you set the graph attributes, click OK in the Edit Graph dialog box.
8. Verify that the completed user interface looks like the one shown in Figure 2-1.
Saving the Project Files1. Select File»Save Untitled.uir As, browse to the <CVI>\tutorial directory, and enter
sample1.uir as the filename for the user interface. Then click Save.
2. Select View»Preview User Interface Header File to display the header file that LabWindows/CVI automatically created and saved when you saved the .uir file.
3. Close the header file.
4. Select File»Save Untitled.prj As, browse to the <CVI>\tutorial directory, and enter sample1.prj as the filename for the project. Then click Save.

Chapter 2 Building a Graphical User Interface
Getting Started with LabWindows/CVI 2-6 ni.com
5. You must add the .uir file to the project. Select Edit»Add Files to Project»User Interface (*.uir). In the Add Files to Project dialog box, select sample1.uir and click Add. Then click OK to exit the dialog box. Notice that LabWindows/CVI now displays sample1.uir in the Project Tree.
6. Now save the workspace by selecting File»Save Workspace.
Generating the Program Shell with CodeBuilderNow that you have built a GUI in the User Interface Editor, use the CodeBuilder feature to automatically generate a program shell for your GUI.
1. Before you use CodeBuilder, you must specify the events to which your program must respond. Select Code»Preferences»Default Control Events. In the Control Callback Events dialog box, shown in Figure 2-3, the EVENT_COMMIT and EVENT_TIMER_TICK callback events are checked.
Note LabWindows/CVI generates the EVENT_TIMER_TICK event for timer control callback functions only.
Figure 2-3. Control Callback Events Dialog Box
Chapter 2 Building a Graphical User Interface
© National Instruments Corporation 2-7 Getting Started with LabWindows/CVI
2. In Chapter 7, Additional Exercises, you develop code to display help when a user right-clicks a GUI control. To establish this functionality, you now must place a checkmark beside EVENT_RIGHT_CLICK in the list. Click OK to save your settings.
The callback functions in your program now can respond to the following two events:
• EVENT_COMMIT—A commit event (click or <Enter>) that generates data and plots it on the graph
• EVENT_RIGHT_CLICK—A right-click event that displays help
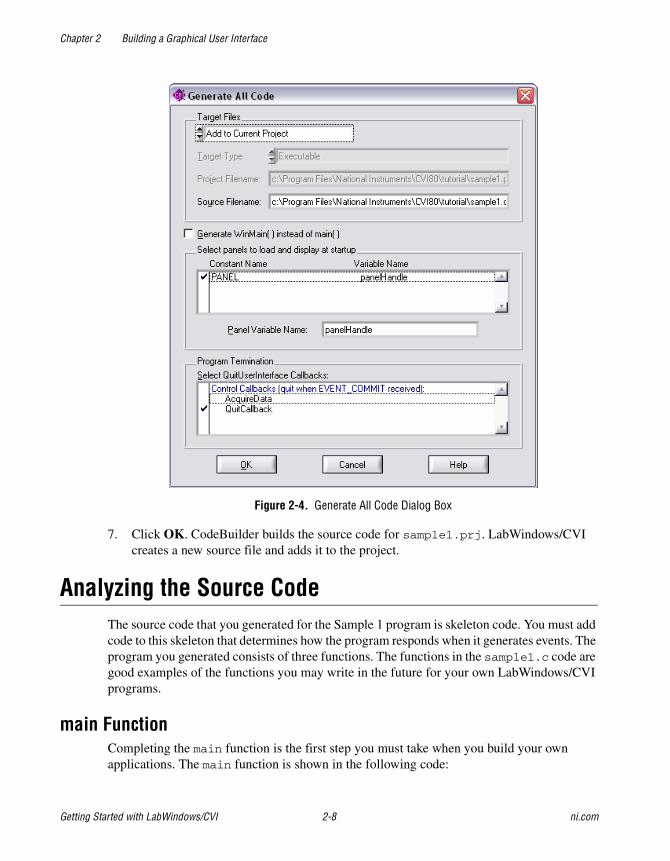
3. Select Code»Generate»All Code to open the Generate All Code dialog box. You must specify several options in this dialog box.
4. In the Target Files section, select Add to Current Project.
5. You must decide which panels to display at program startup. In this case, only one user interface panel exists. Select this item so that the program displays this panel at startup.
Note For this exercise, the panel variable name must be panelHandle. Enter the correct name as the Panel Variable Name, if necessary.
6. The Program Termination section lists the callback functions in the .uir file. Select a function from this list that causes the program to terminate execution. In this case, verify that the QuitCallback function is selected. Verify that the Generate All Code dialog box matches the one shown in Figure 2-4.
Chapter 2 Building a Graphical User Interface
Getting Started with LabWindows/CVI 2-8 ni.com
Figure 2-4. Generate All Code Dialog Box
7. Click OK. CodeBuilder builds the source code for sample1.prj. LabWindows/CVI creates a new source file and adds it to the project.
Analyzing the Source CodeThe source code that you generated for the Sample 1 program is skeleton code. You must add code to this skeleton that determines how the program responds when it generates events. The program you generated consists of three functions. The functions in the sample1.c code are good examples of the functions you may write in the future for your own LabWindows/CVI programs.
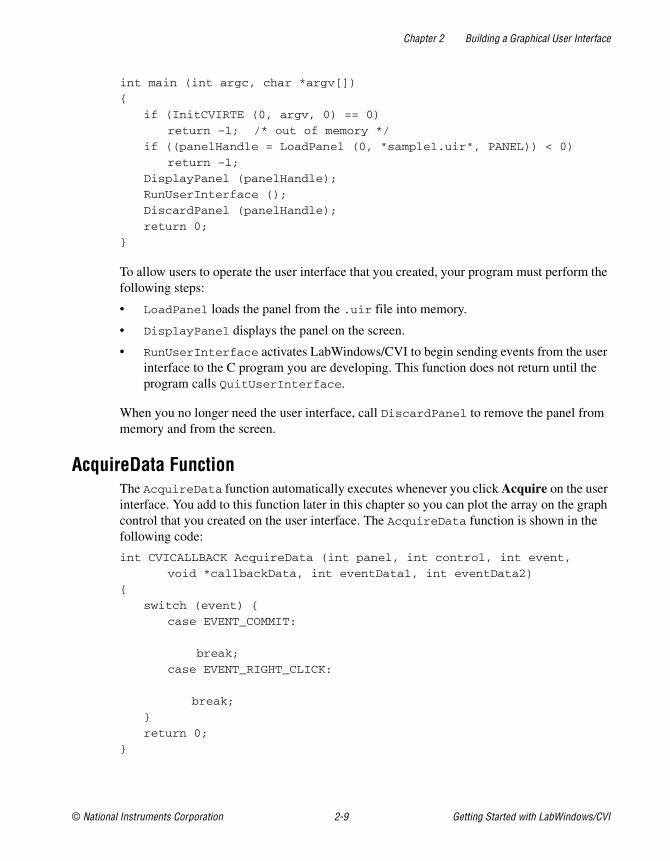
main FunctionCompleting the main function is the first step you must take when you build your own applications. The main function is shown in the following code:
Chapter 2 Building a Graphical User Interface
© National Instruments Corporation 2-9 Getting Started with LabWindows/CVI
int main (int argc, char *argv[])
{
if (InitCVIRTE (0, argv, 0) == 0)
return –1; /* out of memory */
if ((panelHandle = LoadPanel (0, "sample1.uir", PANEL)) < 0)
return –1;
DisplayPanel (panelHandle);
RunUserInterface ();
DiscardPanel (panelHandle);
return 0;
}
To allow users to operate the user interface that you created, your program must perform the following steps:
• LoadPanel loads the panel from the .uir file into memory.
• DisplayPanel displays the panel on the screen.
• RunUserInterface activates LabWindows/CVI to begin sending events from the user interface to the C program you are developing. This function does not return until the program calls QuitUserInterface.
When you no longer need the user interface, call DiscardPanel to remove the panel from memory and from the screen.
AcquireData FunctionThe AcquireData function automatically executes whenever you click Acquire on the user interface. You add to this function later in this chapter so you can plot the array on the graph control that you created on the user interface. The AcquireData function is shown in the following code:
int CVICALLBACK AcquireData (int panel, int control, int event,
void *callbackData, int eventData1, int eventData2)
{
switch (event) {
case EVENT_COMMIT:
break;
case EVENT_RIGHT_CLICK:
break;
}
return 0;
}
Chapter 2 Building a Graphical User Interface
Getting Started with LabWindows/CVI 2-10 ni.com
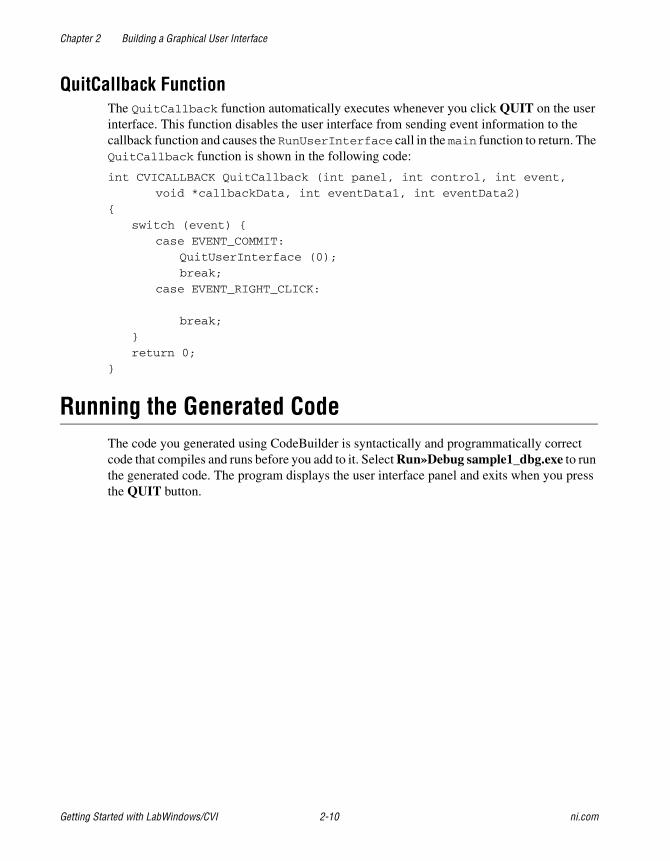
QuitCallback FunctionThe QuitCallback function automatically executes whenever you click QUIT on the user interface. This function disables the user interface from sending event information to the callback function and causes the RunUserInterface call in the main function to return. The QuitCallback function is shown in the following code:
int CVICALLBACK QuitCallback (int panel, int control, int event,
void *callbackData, int eventData1, int eventData2)
{
switch (event) {
case EVENT_COMMIT:
QuitUserInterface (0);
break;
case EVENT_RIGHT_CLICK:
break;
}
return 0;
}
Running the Generated CodeThe code you generated using CodeBuilder is syntactically and programmatically correct code that compiles and runs before you add to it. Select Run»Debug sample1_dbg.exe to run the generated code. The program displays the user interface panel and exits when you press the QUIT button.
© National Instruments Corporation 3-1 Getting Started with LabWindows/CVI
3Using Function Panels and Libraries
In this chapter of the tutorial, you use LabWindows/CVI function panels to generate code. You then use this code to plot an array on the graph control on the user interface that you built in Chapter 2, Building a Graphical User Interface.
Function Panel FundamentalsA function panel is a graphical view of a library function in LabWindows/CVI. Function panels serve several important purposes in LabWindows/CVI.
• With function panels, you can execute each LabWindows/CVI function interactively before incorporating it into the program. With this feature, you can experiment with the parameter values until you are satisfied with the operation of the function.
• Function panels provide help that discusses the purpose of each function in the LabWindows/CVI libraries and of each parameter in the function call.
• Function panels generate code automatically so that you can insert the function call syntax into your program source code.
Accessing Function PanelsThe Library Tree includes function panels for all of the libraries in LabWindows/CVI. You can search quickly through the hierarchy of the library to find the right function. To find a particular function, right-click the Library Tree, select Find, and enter the name of the function.
Function Panel ControlsThe controls on the function panel represent parameters. Enter values in the controls to specify parameter values. There are eight types of controls, and these controls are explained as you encounter them in the examples that follow. Some controls contain a ... button next to them. These controls provide additional dialog boxes to help you select input for parameters.
Chapter 3 Using Function Panels and Libraries
Getting Started with LabWindows/CVI 3-2 ni.com
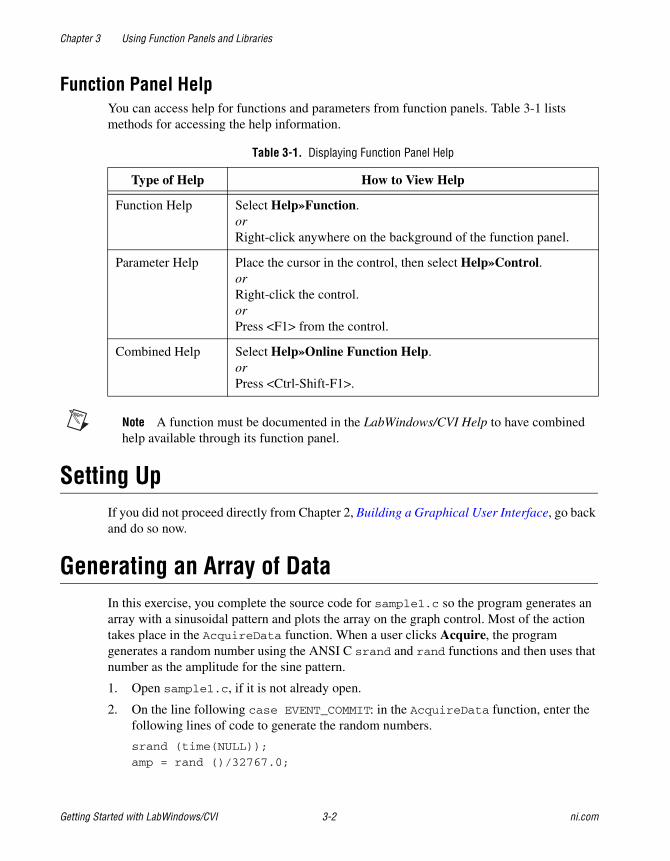
Function Panel HelpYou can access help for functions and parameters from function panels. Table 3-1 lists methods for accessing the help information.
Note A function must be documented in the LabWindows/CVI Help to have combined help available through its function panel.
Setting UpIf you did not proceed directly from Chapter 2, Building a Graphical User Interface, go back and do so now.
Generating an Array of DataIn this exercise, you complete the source code for sample1.c so the program generates an array with a sinusoidal pattern and plots the array on the graph control. Most of the action takes place in the AcquireData function. When a user clicks Acquire, the program generates a random number using the ANSI C srand and rand functions and then uses that number as the amplitude for the sine pattern.
1. Open sample1.c, if it is not already open.
2. On the line following case EVENT_COMMIT: in the AcquireData function, enter the following lines of code to generate the random numbers.
srand (time(NULL));
amp = rand ()/32767.0;
Table 3-1. Displaying Function Panel Help
Type of Help How to View Help
Function Help Select Help»Function.orRight-click anywhere on the background of the function panel.
Parameter Help Place the cursor in the control, then select Help»Control.orRight-click the control.orPress <F1> from the control.
Combined Help Select Help»Online Function Help.orPress <Ctrl-Shift-F1>.
Chapter 3 Using Function Panels and Libraries
© National Instruments Corporation 3-3 Getting Started with LabWindows/CVI
3. Position the cursor on the line following amp = rand ()/32767.0.
4. Right-click the Library Tree, select Find, enter SinePattern for Find What, and click Find Next to locate the Sine Pattern function panel. Double-click the function panel to open it.
Note If LabWindows/CVI cannot find a match, right-click the Library Tree and select Show Function Names. Then repeat step 4.
5. Select Code»Set Target File. Select sample1.c and click OK.
6. Enter 100 in the Number of Elements control.
7. Enter amp in the Amplitude control. Select Code»Declare Variable and enable the Add declaration to current block in target file “sample1.c” option. Click OK.
8. Enter 180.0 in the Phase (Degrees) control.
9. Enter 2.0 in the Number of Cycles control.
10. Enter sine in the Sine Pattern control. Select Code»Declare Variable.
11. In the Declare Variable dialog box, enter 100 as the Number of Elements and enable the Add declaration to top of target file “sample1.c” option. Click OK.
12. Select Code»Insert Function Call. LabWindows/CVI pastes the SinePattern function from the function panel into the sample1.c source code at the position of the text cursor.
Tip In the Source window, you can place your cursor anywhere in a LabWindows/CVI library function call and then select View»Recall Function Panel to open the function panel for the selected function. When you recall a function panel, the controls automatically reflect the state of the function call in the Source window.
Building the PlotY Function Call SyntaxComplete the following steps to generate a line of code that plots the random data array on the graph control.
1. Position the cursor in the Source window on the line following the SinePattern function call within the AcquireData function.
2. Type PlotY and then press <Ctrl-P> to open the Plot Y function panel.
3. In the Panel Handle control, select Code»Select Variable. The dialog box contains a list of variable names used in your program. Choose panelHandle from the list and click OK.
If panelHandle is not listed, enable the Show Project Variables option and click Build The Project. During the compile process, LabWindows/CVI recognizes that the
Chapter 3 Using Function Panels and Libraries
Getting Started with LabWindows/CVI 3-4 ni.com
program is missing the ansi_c.h and analysis.h include statements. Click Yes to add these include files in your program.
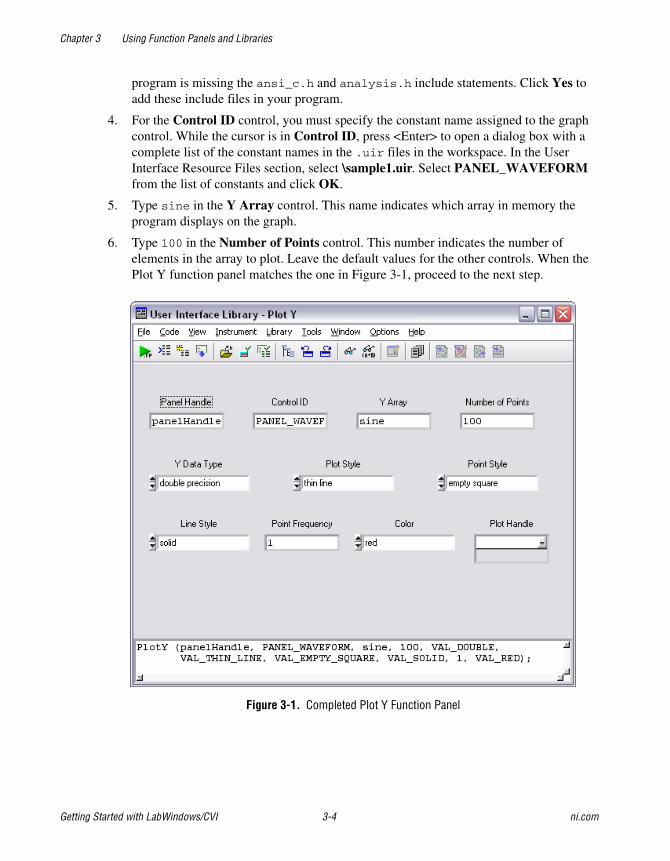
4. For the Control ID control, you must specify the constant name assigned to the graph control. While the cursor is in Control ID, press <Enter> to open a dialog box with a complete list of the constant names in the .uir files in the workspace. In the User Interface Resource Files section, select \sample1.uir. Select PANEL_WAVEFORM from the list of constants and click OK.
5. Type sine in the Y Array control. This name indicates which array in memory the program displays on the graph.
6. Type 100 in the Number of Points control. This number indicates the number of elements in the array to plot. Leave the default values for the other controls. When the Plot Y function panel matches the one in Figure 3-1, proceed to the next step.
Figure 3-1. Completed Plot Y Function Panel
Chapter 3 Using Function Panels and Libraries
© National Instruments Corporation 3-5 Getting Started with LabWindows/CVI
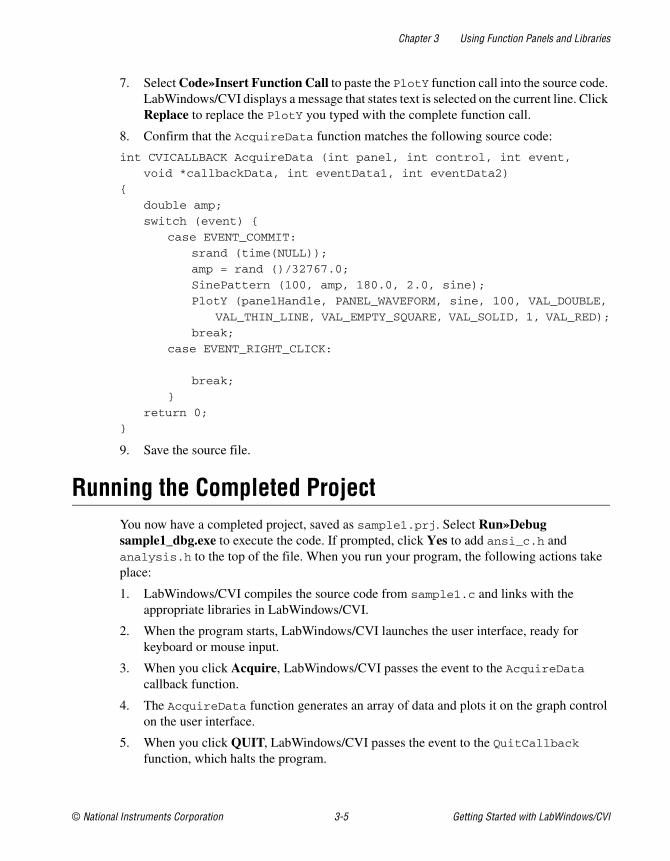
7. Select Code»Insert Function Call to paste the PlotY function call into the source code. LabWindows/CVI displays a message that states text is selected on the current line. Click Replace to replace the PlotY you typed with the complete function call.
8. Confirm that the AcquireData function matches the following source code:
int CVICALLBACK AcquireData (int panel, int control, int event,
void *callbackData, int eventData1, int eventData2)
{
double amp;
switch (event) {
case EVENT_COMMIT:
srand (time(NULL));
amp = rand ()/32767.0;
SinePattern (100, amp, 180.0, 2.0, sine);
PlotY (panelHandle, PANEL_WAVEFORM, sine, 100, VAL_DOUBLE,
VAL_THIN_LINE, VAL_EMPTY_SQUARE, VAL_SOLID, 1, VAL_RED);
break;
case EVENT_RIGHT_CLICK:
break;
}
return 0;
}
9. Save the source file.
Running the Completed ProjectYou now have a completed project, saved as sample1.prj. Select Run»Debug sample1_dbg.exe to execute the code. If prompted, click Yes to add ansi_c.h and analysis.h to the top of the file. When you run your program, the following actions take place:
1. LabWindows/CVI compiles the source code from sample1.c and links with the appropriate libraries in LabWindows/CVI.
2. When the program starts, LabWindows/CVI launches the user interface, ready for keyboard or mouse input.
3. When you click Acquire, LabWindows/CVI passes the event to the AcquireData callback function.
4. The AcquireData function generates an array of data and plots it on the graph control on the user interface.
5. When you click QUIT, LabWindows/CVI passes the event to the QuitCallback function, which halts the program.

© National Instruments Corporation 4-1 Getting Started with LabWindows/CVI
4Editing and Debugging Tools
In this chapter, you become acquainted with the following tools available for editing and debugging in the interactive LabWindows/CVI environment.
• Source window
• Step modes of execution
• Breakpoints
• Variables window
• Array Display window
• Memory Display window
• String Display window
• Watch window
• Graphical Array View
Setting UpThis chapter uses the project you developed in Chapter 3, Using Function Panels and Libraries. If you did not proceed directly from Chapter 3, go back and do so now.
Editing ToolsThe LabWindows/CVI Source window has a number of quick editing features that are helpful when you work with source files. Complete the following steps to view some of the editing features available in LabWindows/CVI.
1. Open sample1.c if it is not already open. Select View»Line Numbers to display a column to the left of the window that shows line numbers.
2. The programs you develop in LabWindows/CVI often refer to other files, such as header files or user interface files. To view these additional files quickly, place the cursor on the filename in the source code and select File»Open Quoted Text, press <Ctrl-U>, or right-click the filename and select Open Quoted Text.
Place the cursor on the userint.h filename in sample1.c and press <Ctrl-U>. LabWindows/CVI opens the userint.h header file in a separate Source window. Scroll through and then close the header file.
Chapter 4 Editing and Debugging Tools
Getting Started with LabWindows/CVI 4-2 ni.com
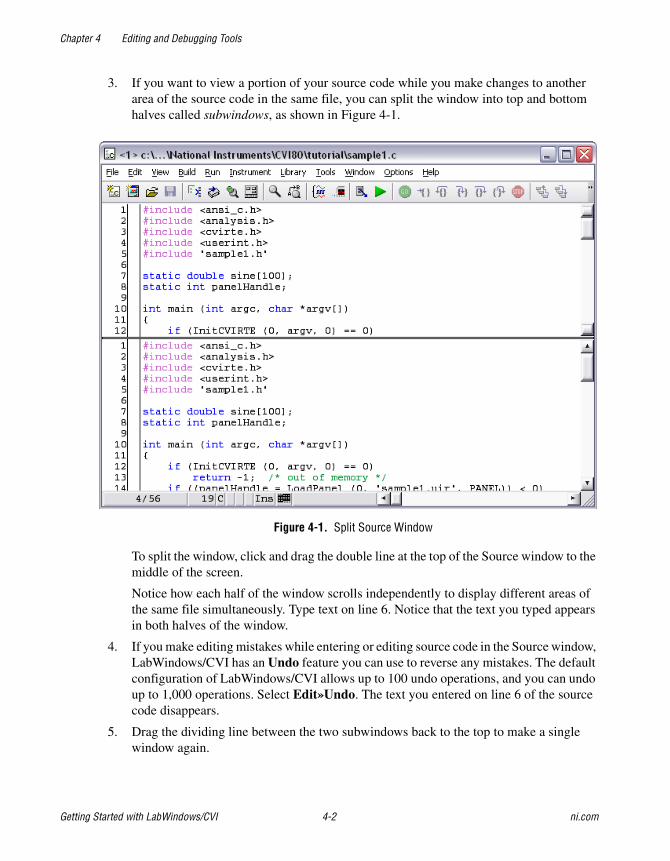
3. If you want to view a portion of your source code while you make changes to another area of the source code in the same file, you can split the window into top and bottom halves called subwindows, as shown in Figure 4-1.
Figure 4-1. Split Source Window
To split the window, click and drag the double line at the top of the Source window to the middle of the screen.
Notice how each half of the window scrolls independently to display different areas of the same file simultaneously. Type text on line 6. Notice that the text you typed appears in both halves of the window.
4. If you make editing mistakes while entering or editing source code in the Source window, LabWindows/CVI has an Undo feature you can use to reverse any mistakes. The default configuration of LabWindows/CVI allows up to 100 undo operations, and you can undo up to 1,000 operations. Select Edit»Undo. The text you entered on line 6 of the source code disappears.
5. Drag the dividing line between the two subwindows back to the top to make a single window again.
Chapter 4 Editing and Debugging Tools
© National Instruments Corporation 4-3 Getting Started with LabWindows/CVI
6. You can use two different methods to quickly move to a particular line of code in your source file. If you know the line number you want to view, select View»Line and enter the line number.
7. You also can set tags on particular lines to highlight lines of code to which you can jump quickly. Place the cursor on line 3. Select View»Toggle Tag. A green square appears in the left-hand column of the Source window.
Move the cursor to line 12 of the Source window and add another tag. Select View»Next Tag, and the cursor jumps to the next tagged line in your source code. You also can press the <F2> key to jump between tags. Select View»Clear Tags, make sure all of the tags are checked, and then click OK to remove the tags from the source file.
8. You also can navigate through the Source window by finding specific text in the code. Select Edit»Find to open the Find dialog box, in which you enter the text you want to locate and specify various searching preferences. Enter panelhandle in the Find What control and leave the remaining controls set to their default values. Then click Find Next. LabWindows/CVI highlights the first match in the text and displays a list of all matches in the Find Results window. You can click an entry in the Find Results window to locate the corresponding text in the Source window.
Select Edit»Quick Search and type disc. When you use the Quick Search command, LabWindows/CVI performs an incremental search. Notice that LabWindows/CVI finds matches of the letters you have typed. The selection changes as you type more letters.
Step Mode ExecutionStep mode execution is a useful run-time tool for debugging programs. To step through sample1.c, complete the following steps:
1. Select Run»Break on»First Statement to stop execution at the first statement in the source code.
2. Select Run»Debug sample1_dbg.exe to begin program execution. After the program compiles, the main function line in the program is highlighted in the Source window, indicating that program execution is currently suspended.
3. To execute the highlighted line, select Run»Step Into.
Chapter 4 Editing and Debugging Tools
Getting Started with LabWindows/CVI 4-4 ni.com
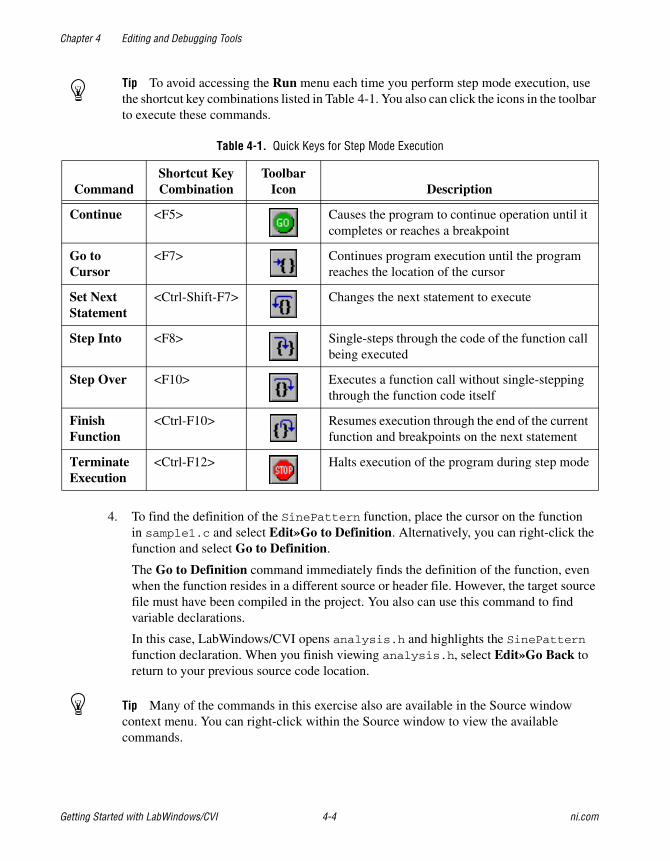
Tip To avoid accessing the Run menu each time you perform step mode execution, use the shortcut key combinations listed in Table 4-1. You also can click the icons in the toolbar to execute these commands.
4. To find the definition of the SinePattern function, place the cursor on the function in sample1.c and select Edit»Go to Definition. Alternatively, you can right-click the function and select Go to Definition.
The Go to Definition command immediately finds the definition of the function, even when the function resides in a different source or header file. However, the target source file must have been compiled in the project. You also can use this command to find variable declarations.
In this case, LabWindows/CVI opens analysis.h and highlights the SinePattern function declaration. When you finish viewing analysis.h, select Edit»Go Back to return to your previous source code location.
Tip Many of the commands in this exercise also are available in the Source window context menu. You can right-click within the Source window to view the available commands.
Table 4-1. Quick Keys for Step Mode Execution
CommandShortcut Key Combination
Toolbar Icon Description
Continue <F5> Causes the program to continue operation until it completes or reaches a breakpoint
Go to Cursor
<F7> Continues program execution until the program reaches the location of the cursor
Set Next Statement
<Ctrl-Shift-F7> Changes the next statement to execute
Step Into <F8> Single-steps through the code of the function call being executed
Step Over <F10> Executes a function call without single-stepping through the function code itself
Finish Function
<Ctrl-F10> Resumes execution through the end of the current function and breakpoints on the next statement
Terminate Execution
<Ctrl-F12> Halts execution of the program during step mode
Chapter 4 Editing and Debugging Tools
© National Instruments Corporation 4-5 Getting Started with LabWindows/CVI
5. Use Step Into to begin stepping through the program. Notice that when the main function is executed, the highlighting moves to the function and traces the instructions inside the function. Continue to step through the program until the DisplayPanel (panelHandle); statement is highlighted.
6. You can select the next statement to execute with the Run»Set Next Statement command. Place the cursor on the line with the call to DiscardPanel (panelHandle);. Select Run»Set Next Statement. The highlighting moves to that line. Press <F5> to continue program execution. Notice that the program exits without having run the user interface because the program execution skipped over the RunUserInterface function call.
BreakpointsBreakpoints are another run-time tool that you can use to debug programs in LabWindows/CVI. A breakpoint is a location in a program at which LabWindows/CVI suspends execution of your program. You can invoke a breakpoint in LabWindows/CVI in the following ways:
• Fixed Breakpoint—Insert a breakpoint at a particular location in the Source window. You can turn breakpoints on or off even while your program is executing.
• Instant Breakpoint—When an application is running, press <Ctrl-F12> while a window is active in the LabWindows/CVI environment.
• Breakpoint on Library Errors—Select Run»Break on»Library Errors to cause LabWindows/CVI to pause at a particular location when a library function returns an error.
• Conditional Breakpoint—Cause LabWindows/CVI to pause at a particular location when a user-specified condition becomes true.
• Programmatic Breakpoint—In your code, call the Breakpoint function.
• Watch Expression Breakpoint—Cause LabWindows/CVI to pause when the value of a watch expression changes.
Fixed BreakpointsTo insert a breakpoint at a specific location in your source code, click in the left column of the Source window on the line on which you want to suspend execution. Complete the following steps to insert a breakpoint inside the AcquireData function.
1. Stop program execution by selecting Run»Terminate Execution, if necessary.
2. Disable Run»Break on»First Statement. The checkmark next to the First Statement menu item disappears.
Chapter 4 Editing and Debugging Tools
Getting Started with LabWindows/CVI 4-6 ni.com
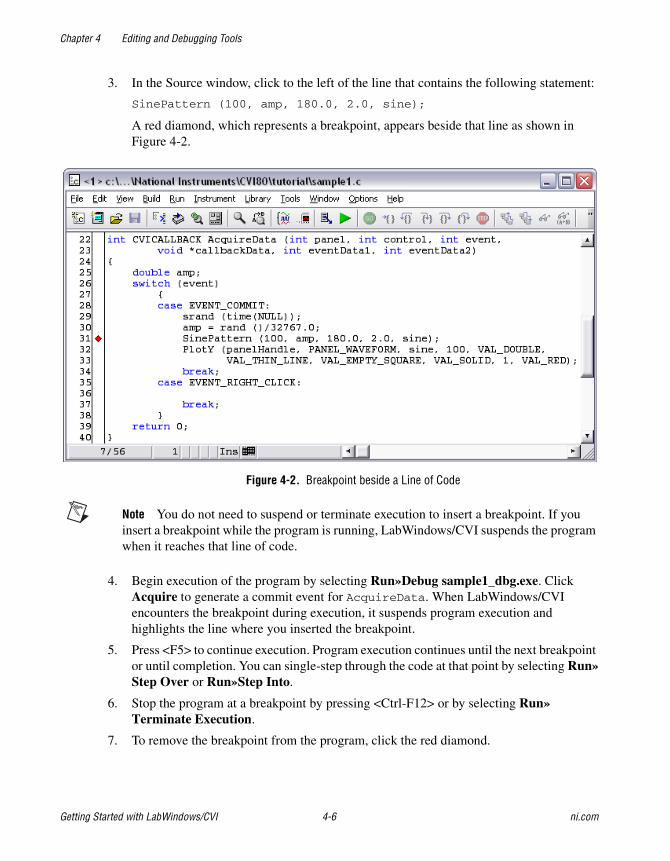
3. In the Source window, click to the left of the line that contains the following statement:
SinePattern (100, amp, 180.0, 2.0, sine);
A red diamond, which represents a breakpoint, appears beside that line as shown in Figure 4-2.
Figure 4-2. Breakpoint beside a Line of Code
Note You do not need to suspend or terminate execution to insert a breakpoint. If you insert a breakpoint while the program is running, LabWindows/CVI suspends the program when it reaches that line of code.
4. Begin execution of the program by selecting Run»Debug sample1_dbg.exe. Click Acquire to generate a commit event for AcquireData. When LabWindows/CVI encounters the breakpoint during execution, it suspends program execution and highlights the line where you inserted the breakpoint.
5. Press <F5> to continue execution. Program execution continues until the next breakpoint or until completion. You can single-step through the code at that point by selecting Run»Step Over or Run»Step Into.
6. Stop the program at a breakpoint by pressing <Ctrl-F12> or by selecting Run»Terminate Execution.
7. To remove the breakpoint from the program, click the red diamond.
Chapter 4 Editing and Debugging Tools
© National Instruments Corporation 4-7 Getting Started with LabWindows/CVI
Conditional BreakpointsUse conditional breakpoints to halt program execution only when the specified condition is true. Complete the following steps to use conditional breakpoints in your program.
1. Select Run»Breakpoints to open the Breakpoints dialog box.
2. In the Breakpoints dialog box, click Add/Edit Item to open the Edit Breakpoint dialog box.
3. In the Edit Breakpoint dialog box, enter 32 for Line, and enter amp > 0 as the Condition. Leave the default values for the remaining controls and click Add.
4. Click OK to exit the Breakpoints dialog box. LabWindows/CVI displays a yellow square to the left of line 32 to indicate the conditional breakpoint.
5. Select Run»Debug sample1_dbg.exe to begin program execution. Click Acquire to run the code in the commit event case for AcquireData. LabWindows/CVI halts execution at line 32 because the breakpoint condition was met. Hover the mouse cursor over amp to verify its value is greater than 0.
6. Select Run»Terminate Execution to stop the program.
7. Right-click the conditional breakpoint icon to the left of line 32 and select Breakpoints to open the Breakpoints dialog box.
8. Click Add/Edit Item to open the Edit Breakpoint dialog box. Replace the Condition text with amp < 0 and click Replace. Then click OK to exit the Breakpoints dialog box.
9. Repeat step 5. Notice that LabWindows/CVI does not halt execution at line 32 because the breakpoint condition is no longer true.
10. Click <Ctrl-F12> twice to stop the program. To remove the breakpoint, select Run»Breakpoints, ensure the breakpoint is highlighted, and click Delete Item. Then click OK to exit the dialog box.
For more information about breakpoints, refer to breakpoints in the LabWindows/CVI Help index.
Displaying and Editing DataStep mode execution and breakpoints are useful tools for high-level testing. However, you often need to look beyond your source code to test your programs. The LabWindows/CVI interactive environment provides the following displays for viewing and editing the data for your program.
• Variables window
• Array Display window
• Memory Display window
• String Display window
Chapter 4 Editing and Debugging Tools
Getting Started with LabWindows/CVI 4-8 ni.com
• Watch window
• Tooltips
• Graphical Array View
Variables WindowThe Variables window shows all variables currently declared in the LabWindows/CVI interactive program. To view the Variables window, select Window»Variables.
The Variables window lists the name, value, and type of currently active variables. LabWindows/CVI displays variables in categories according to how they are defined, such as global or local. The Stack Trace section shows the current call stack of functions. To view variables that are active elsewhere in the call stack, double-click the corresponding function in the Stack Trace.
You can view the Variables window at any time to inspect variable values. This feature is especially useful when you step through a program during execution. Complete the following steps to step through the program and view the Variables window at different points in the execution of the program.
1. Select Run»Break on»First Statement.
2. Select Run»Debug sample1_dbg.exe, or press <Shift-F5>, to run the program. When the program begins execution, LabWindows/CVI highlights the main function in the Source window.
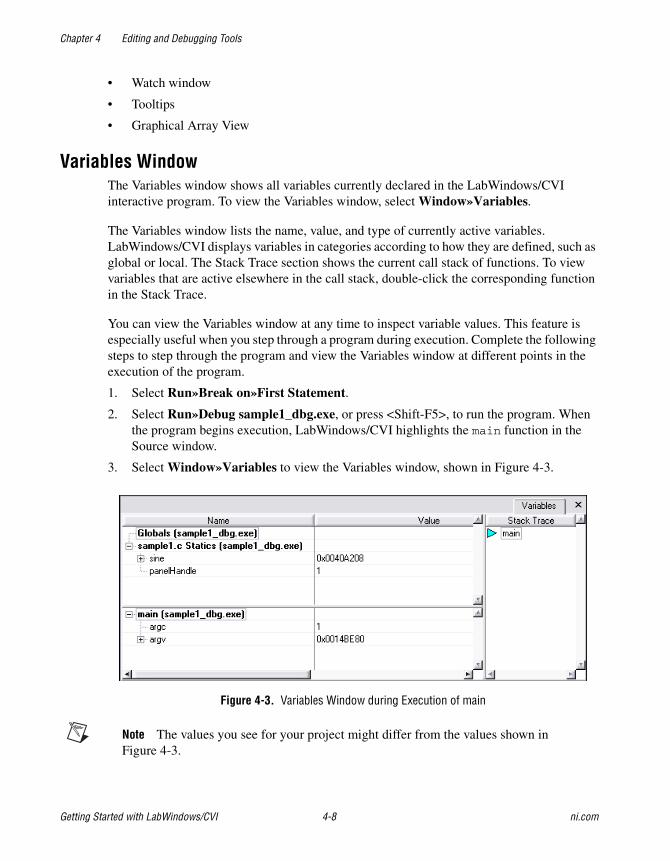
3. Select Window»Variables to view the Variables window, shown in Figure 4-3.
Figure 4-3. Variables Window during Execution of main
Note The values you see for your project might differ from the values shown in Figure 4-3.
Chapter 4 Editing and Debugging Tools
© National Instruments Corporation 4-9 Getting Started with LabWindows/CVI
4. Insert a breakpoint on the line with the following code:
SinePattern (100, amp, 180.0, 2.0, sine);
5. Press <F5> to continue program execution. Click Acquire. LabWindows/CVI halts program execution on the statement with the breakpoint. In the Variables window, LabWindows/CVI now lists AcquireData in the Stack Trace section. The Variables window shows the variables that are declared locally to that function.
6. Leave the program suspended and continue to the next section, Editing Variables.
Editing VariablesIn addition to displaying variables, you can use the Variables window to edit the contents of a variable. Complete the following steps to use the Variables window for this purpose.
1. Make sure the sample1.c program is still suspended on the following line:
SinePattern (100, amp, 180.0, 2.0, sine);
2. Highlight the amp variable in the Source window and select Run»View Variable Value. LabWindows/CVI highlights the amp variable in the Variables window.
3. From the Variables window, press <Enter> to edit the value of amp. Enter .2 in the value column and press <Enter>.
4. In the Source window, select Run»Continue. Notice that the sine pattern amplitude is now .2. The change you made using the Variables window took effect immediately in the execution of the program.
Array Display WindowAnother useful data display in the LabWindows/CVI interactive program is the Array Display window. The Array Display window shows the contents of an array of data. You can use the Array Display window to edit array elements in the same way that you edited variables using the Variables window.
1. Click Acquire to put the program in breakpoint mode again.
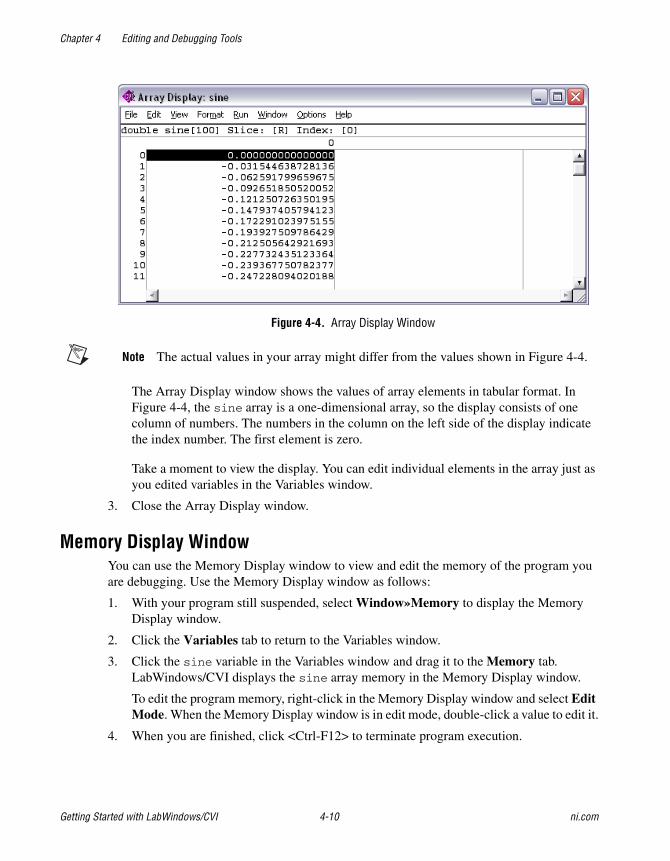
2. Right-click sine in the Variables window and select View»Array Display to view the array values as shown in Figure 4-4.
Chapter 4 Editing and Debugging Tools
Getting Started with LabWindows/CVI 4-10 ni.com
Figure 4-4. Array Display Window
Note The actual values in your array might differ from the values shown in Figure 4-4.
The Array Display window shows the values of array elements in tabular format. In Figure 4-4, the sine array is a one-dimensional array, so the display consists of one column of numbers. The numbers in the column on the left side of the display indicate the index number. The first element is zero.
Take a moment to view the display. You can edit individual elements in the array just as you edited variables in the Variables window.
3. Close the Array Display window.
Memory Display WindowYou can use the Memory Display window to view and edit the memory of the program you are debugging. Use the Memory Display window as follows:
1. With your program still suspended, select Window»Memory to display the Memory Display window.
2. Click the Variables tab to return to the Variables window.
3. Click the sine variable in the Variables window and drag it to the Memory tab. LabWindows/CVI displays the sine array memory in the Memory Display window.
To edit the program memory, right-click in the Memory Display window and select Edit Mode. When the Memory Display window is in edit mode, double-click a value to edit it.
4. When you are finished, click <Ctrl-F12> to terminate program execution.
Chapter 4 Editing and Debugging Tools
© National Instruments Corporation 4-11 Getting Started with LabWindows/CVI
String Display WindowAnother useful data display is the String Display window. You can select a string variable from the Variables window to launch the String Display window. The String Display window is similar to the Array Display window except that you use the String Display window to view and edit elements of a string. Operations in the String Display window are similar to the operations you performed in the Array Display window. For more information about the String Display window, refer to Using LabWindows/CVI»Debugging Tools»Using the Array and String Display Windows in the LabWindows/CVI Help.
Watch WindowThe Watch window is a powerful debugging tool because you can view values of variables changing dynamically as your program executes. You also can use the Watch window to view expression values and set conditional breakpoints when variable or expression values change. Complete the following steps to use the Watch window to view variables during program execution.
1. With sample1.prj still loaded as the current project, ensure that Run»Break on»First Statement is enabled. Click the breakpoint on the SinePattern line of code to remove it.
2. Select Run»Debug sample1_dbg.exe, or press <Shift-F5>, to start program execution. Execution breaks with the main function highlighted.
3. In the Variables window, right-click the sine variable and select Add Watch Expression to add the sine variable to the Watch window. LabWindows/CVI displays the Add/Edit Watch Expression dialog box.
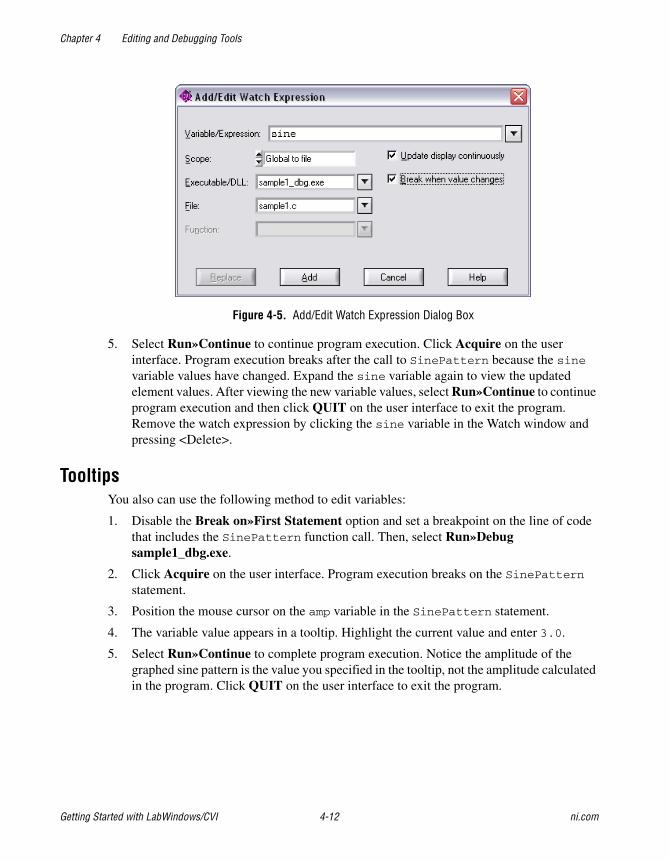
4. Enable the Break when value changes option so that the dialog box matches the one shown in Figure 4-5. Then click Add to close the dialog box. LabWindows/CVI displays the sine variable within the Watch window. Expand the sine variable within the Watch window to view the individual elements within the array.
Chapter 4 Editing and Debugging Tools
Getting Started with LabWindows/CVI 4-12 ni.com
Figure 4-5. Add/Edit Watch Expression Dialog Box
5. Select Run»Continue to continue program execution. Click Acquire on the user interface. Program execution breaks after the call to SinePattern because the sine variable values have changed. Expand the sine variable again to view the updated element values. After viewing the new variable values, select Run»Continue to continue program execution and then click QUIT on the user interface to exit the program. Remove the watch expression by clicking the sine variable in the Watch window and pressing <Delete>.
TooltipsYou also can use the following method to edit variables:
1. Disable the Break on»First Statement option and set a breakpoint on the line of code that includes the SinePattern function call. Then, select Run»Debug sample1_dbg.exe.
2. Click Acquire on the user interface. Program execution breaks on the SinePattern statement.
3. Position the mouse cursor on the amp variable in the SinePattern statement.
4. The variable value appears in a tooltip. Highlight the current value and enter 3.0.
5. Select Run»Continue to complete program execution. Notice the amplitude of the graphed sine pattern is the value you specified in the tooltip, not the amplitude calculated in the program. Click QUIT on the user interface to exit the program.

Chapter 4 Editing and Debugging Tools
© National Instruments Corporation 4-13 Getting Started with LabWindows/CVI
Graphical Array ViewThe Graphical Array View shows the values of arrays in a graph view. This display is available for 1D and 2D arrays during debugging. To open the Graphical Array View, complete the following steps:
1. Clear the existing breakpoint. Then, set a breakpoint on the line of code that includes the call to PlotY.
2. Select Run»Debug sample1_dbg.exe and click Acquire on the user interface.
3. In the Variables window, highlight the sine variable and select View»GraphicalArray View to view the sine values in a graph. You also can right-click the variable name in the Source window and select Graphical Array View. The Graphical Array View displays the value of the array on a graph.
4. Select Run»Continue to complete program execution. Then click QUIT on the user interface to exit the program.
© National Instruments Corporation 5-1 Getting Started with LabWindows/CVI
5Adding Analysis to Your Program
In Chapter 3, Using Function Panels and Libraries, you generated code to plot the sine pattern array on the graph control. The plotting function that you generated was placed in a callback function triggered by clicking the Acquire button. In this chapter, you add analysis code that computes the maximum and minimum values of the random array you generate. To do this, you write a callback function that finds the maximum and minimum values of the array and displays them in numeric indicators on the user interface.
Setting UpThis chapter builds on the concepts that you learned in Chapter 3, Using Function Panels and Libraries. If you did not complete the exercise in Chapter 3, go back and do so now.
1. Remove all breakpoints and close all windows except the Workspace window.
2. Run sample1.prj to verify the operation of the program. Click QUIT to terminate the execution.
Modifying the User InterfaceComplete the following steps to modify the existing user interface:
1. Open sample1.c. Place the cursor at the end of the file. CodeBuilder uses that location for the new callback function that it generates later in this chapter.
2. Without closing the sample1.c source code, open sample1.uir. Your goal is to modify the .uir to match the user interface shown in Figure 5-1.
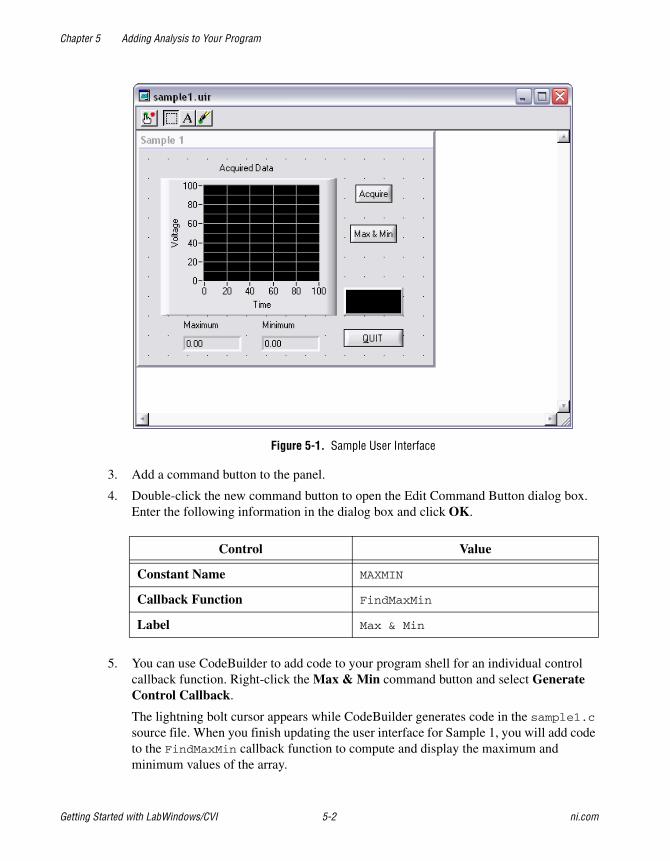
Chapter 5 Adding Analysis to Your Program
Getting Started with LabWindows/CVI 5-2 ni.com
Figure 5-1. Sample User Interface
3. Add a command button to the panel.
4. Double-click the new command button to open the Edit Command Button dialog box. Enter the following information in the dialog box and click OK.
5. You can use CodeBuilder to add code to your program shell for an individual control callback function. Right-click the Max & Min command button and select Generate Control Callback.
The lightning bolt cursor appears while CodeBuilder generates code in the sample1.c source file. When you finish updating the user interface for Sample 1, you will add code to the FindMaxMin callback function to compute and display the maximum and minimum values of the array.
Control Value
Constant Name MAXMIN
Callback Function FindMaxMin
Label Max & Min
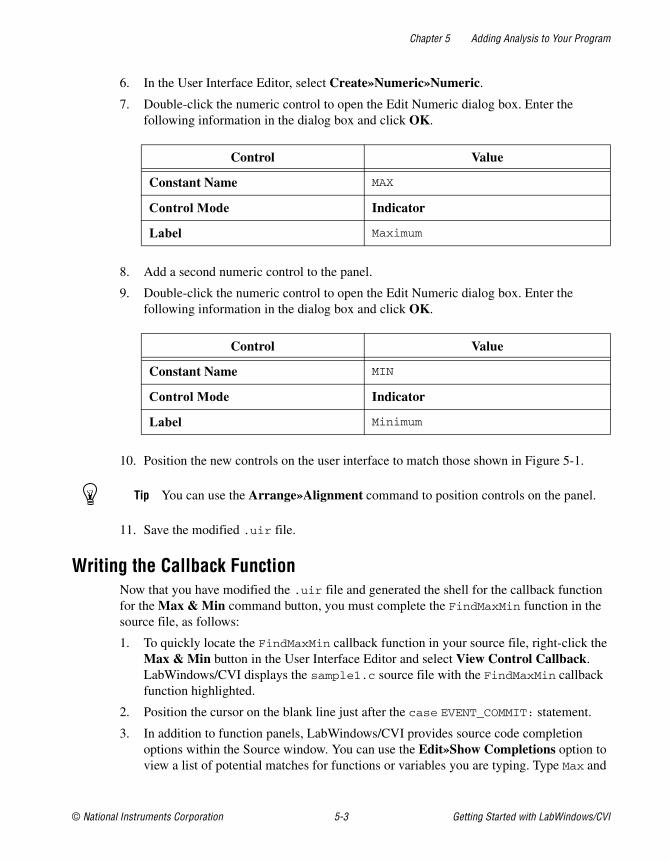
Chapter 5 Adding Analysis to Your Program
© National Instruments Corporation 5-3 Getting Started with LabWindows/CVI
6. In the User Interface Editor, select Create»Numeric»Numeric.
7. Double-click the numeric control to open the Edit Numeric dialog box. Enter the following information in the dialog box and click OK.
8. Add a second numeric control to the panel.
9. Double-click the numeric control to open the Edit Numeric dialog box. Enter the following information in the dialog box and click OK.
10. Position the new controls on the user interface to match those shown in Figure 5-1.
Tip You can use the Arrange»Alignment command to position controls on the panel.
11. Save the modified .uir file.
Writing the Callback FunctionNow that you have modified the .uir file and generated the shell for the callback function for the Max & Min command button, you must complete the FindMaxMin function in the source file, as follows:
1. To quickly locate the FindMaxMin callback function in your source file, right-click the Max & Min button in the User Interface Editor and select View Control Callback. LabWindows/CVI displays the sample1.c source file with the FindMaxMin callback function highlighted.
2. Position the cursor on the blank line just after the case EVENT_COMMIT: statement.
3. In addition to function panels, LabWindows/CVI provides source code completion options within the Source window. You can use the Edit»Show Completions option to view a list of potential matches for functions or variables you are typing. Type Max and
Control Value
Constant Name MAX
Control Mode Indicator
Label Maximum
Control Value
Constant Name MIN
Control Mode Indicator
Label Minimum
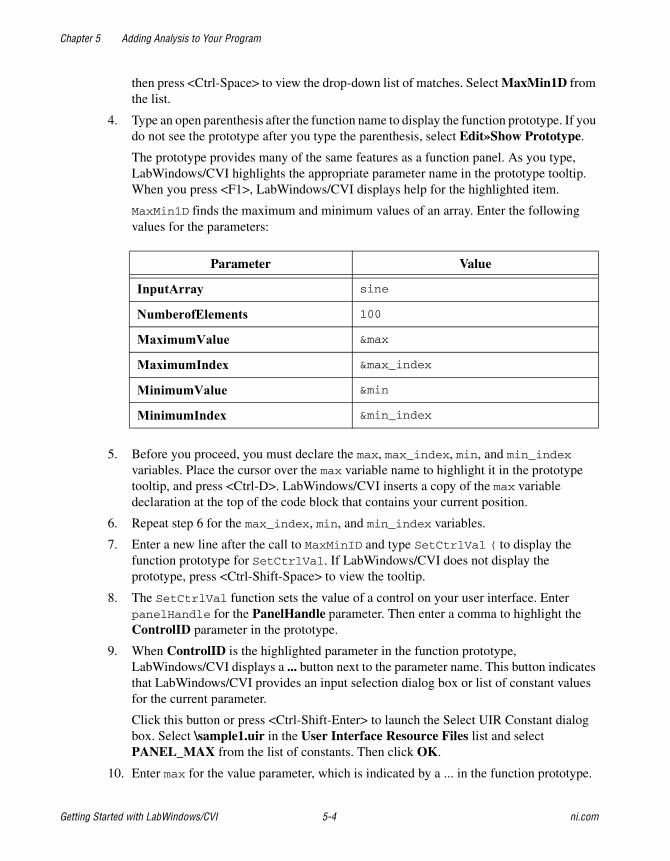
Chapter 5 Adding Analysis to Your Program
Getting Started with LabWindows/CVI 5-4 ni.com
then press <Ctrl-Space> to view the drop-down list of matches. Select MaxMin1D from the list.
4. Type an open parenthesis after the function name to display the function prototype. If you do not see the prototype after you type the parenthesis, select Edit»Show Prototype.
The prototype provides many of the same features as a function panel. As you type, LabWindows/CVI highlights the appropriate parameter name in the prototype tooltip. When you press <F1>, LabWindows/CVI displays help for the highlighted item.
MaxMin1D finds the maximum and minimum values of an array. Enter the following values for the parameters:
5. Before you proceed, you must declare the max, max_index, min, and min_index variables. Place the cursor over the max variable name to highlight it in the prototype tooltip, and press <Ctrl-D>. LabWindows/CVI inserts a copy of the max variable declaration at the top of the code block that contains your current position.
6. Repeat step 6 for the max_index, min, and min_index variables.
7. Enter a new line after the call to MaxMinID and type SetCtrlVal ( to display the function prototype for SetCtrlVal. If LabWindows/CVI does not display the prototype, press <Ctrl-Shift-Space> to view the tooltip.
8. The SetCtrlVal function sets the value of a control on your user interface. Enter panelHandle for the PanelHandle parameter. Then enter a comma to highlight the ControlID parameter in the prototype.
9. When ControlID is the highlighted parameter in the function prototype, LabWindows/CVI displays a ... button next to the parameter name. This button indicates that LabWindows/CVI provides an input selection dialog box or list of constant values for the current parameter.
Click this button or press <Ctrl-Shift-Enter> to launch the Select UIR Constant dialog box. Select \sample1.uir in the User Interface Resource Files list and select PANEL_MAX from the list of constants. Then click OK.
10. Enter max for the value parameter, which is indicated by a ... in the function prototype.
Parameter Value
InputArray sine
NumberofElements 100
MaximumValue &max
MaximumIndex &max_index
MinimumValue &min
MinimumIndex &min_index
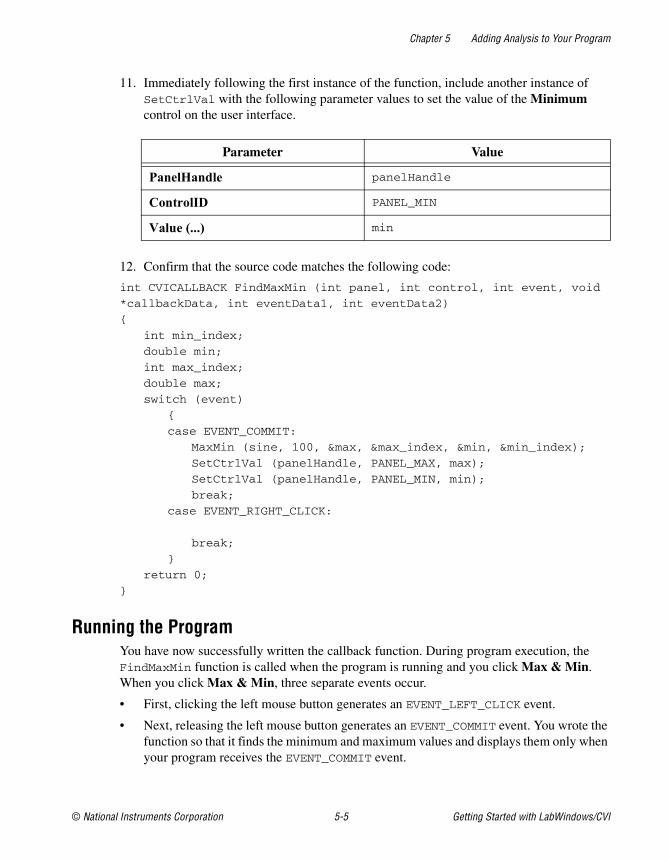
Chapter 5 Adding Analysis to Your Program
© National Instruments Corporation 5-5 Getting Started with LabWindows/CVI
11. Immediately following the first instance of the function, include another instance of SetCtrlVal with the following parameter values to set the value of the Minimum control on the user interface.
12. Confirm that the source code matches the following code:
int CVICALLBACK FindMaxMin (int panel, int control, int event, void
*callbackData, int eventData1, int eventData2)
{
int min_index;
double min;
int max_index;
double max;
switch (event)
{
case EVENT_COMMIT:
MaxMin (sine, 100, &max, &max_index, &min, &min_index);
SetCtrlVal (panelHandle, PANEL_MAX, max);
SetCtrlVal (panelHandle, PANEL_MIN, min);
break;
case EVENT_RIGHT_CLICK:
break;
}
return 0;
}
Running the ProgramYou have now successfully written the callback function. During program execution, the FindMaxMin function is called when the program is running and you click Max & Min. When you click Max & Min, three separate events occur.
• First, clicking the left mouse button generates an EVENT_LEFT_CLICK event.
• Next, releasing the left mouse button generates an EVENT_COMMIT event. You wrote the function so that it finds the minimum and maximum values and displays them only when your program receives the EVENT_COMMIT event.
Parameter Value
PanelHandle panelHandle
ControlID PANEL_MIN
Value (...) min
Chapter 5 Adding Analysis to Your Program
Getting Started with LabWindows/CVI 5-6 ni.com
• Finally, the button gets the input focus, and an EVENT_GOT_FOCUS event is generated. For more practice with user interface events, complete Exercise 4: Adding User Interface Events of Chapter 7, Additional Exercises.
1. Save the file.
2. Run the project.
3. Close the file before moving on to Chapter 6, Distributing Your Application.

© National Instruments Corporation 6-1 Getting Started with LabWindows/CVI
6Distributing Your Application
This chapter describes how to distribute an application you create in LabWindows/CVI. You can use the LabWindows/CVI distribution creation and management features to develop and edit multiple distributions for an application. This tutorial includes steps for creating a basic Windows Installer (.msi). For more advanced information about distributing applications, refer to the Using LabWindows/CVI»Managing Projects»Building a Project»Distributing Applications»Step-by-Step Guide to Creating and Editing an Installer in the LabWindows/CVI Help.
Setting UpIn this chapter, you build a distribution for the project you created in previous chapters. If you did not complete the tutorial exercises in Chapter 2 through Chapter 5, go back and do so now.
Creating a New DistributionComplete the following steps to create a new distribution for your application.
1. Select Build»Distributions»Manage Distributions to open the Manage Distributions dialog box. The dialog box lists the distributions available for the current workspace.
2. Click New to launch the New Distribution dialog box. By default, Windows Installer (.msi) is selected as the Type. Enter Sample Distribution as the Name. Verify that <CVI>\tutorial\Sample1.cds is specified as the Settings file. Then click OK.
Editing the DistributionWhen you create a new distribution, LabWindows/CVI launches the Edit Installer dialog box. The dialog box contains tabs in which you can specify various distribution components and features. Complete the following steps to verify and edit the distribution settings for your application.
1. In the General tab, verify that <CVI>\tutorial\cvidistkit.Sample Distribution is specified as the Output Directory. LabWindows/CVI builds the installer in this location.
2. Verify that the Auto-increment option is enabled. This option ensures that LabWindows/CVI increments the version number each time you build the installer.

Chapter 6 Distributing Your Application
Getting Started with LabWindows/CVI 6-2 ni.com
Note National Instruments recommends you install an upgrade installer—an installer that has a higher version number than the previous installer—every time you install an application to a location where another version of that application might be installed. Upgrade installers uninstall the previous version of the application before installing the updated version.
3. Click the Files tab. By default, LabWindows/CVI adds the project output (sample1.exe) and dependencies to the installation. These files are listed in the Installation Files & Directories section of the dialog box.
Note Notice that Sample1 Output (sample1.exe) is listed in red text. Red text indicates that LabWindows/CVI cannot locate the file on your computer. In this case, you must build the executable for LabWindows/CVI to include it in the installer. It is not necessary to exit the Edit Installer dialog box and build the executable. LabWindows/CVI builds the target automatically when it builds the distribution, as it does in step 9.
4. Click the Shortcuts tab. Notice that, by default, LabWindows/CVI includes a shortcut for sample1.exe in the [Start»Programs]\Sample Distribution directory.
5. Click the Drivers & Components tab. Notice that LabWindows/CVI includes the full LabWindows/CVI Run-Time Engine in the installer.
6. Click Check Module Dependencies to ensure that any merge modules on which the selected drivers and components depend are included in the installer. The LED on the button glows green to indicate that there are no missing dependencies.
7. (Optional) Click the Registry Keys and Advanced tabs to view the available options. For this application, it is not necessary to modify any of the settings in either of these tabs.
8. When you finish viewing and verifying the Edit Installer dialog box settings, click OK to exit the dialog box. Then click OK to exit the Manage Distributions dialog box.
9. Select Build»Distributions»Build Sample Distribution. Click Yes in the message box LabWindows/CVI displays to prompt you to build the project. In some cases, LabWindows/CVI prompts you to insert an NI product installation CD during the build.
During the build process, LabWindows/CVI launches a dialog box that displays the build status. When LabWindows/CVI finishes building the installer, click Close. You are now ready to deploy the application to the target computer.
Chapter 6 Distributing Your Application
© National Instruments Corporation 6-3 Getting Started with LabWindows/CVI
Deploying the Application to a Target ComputerOnce you create the installer, you can deploy it to a target computer. Complete the following steps to copy the installer files and run the installer on the target computer.
1. In the previous steps, you built an installer that generated the files in the <CVI>\tutorial\cvidistkit.Sample Distribution folder. This folder contains one or more Volume folders, the number of which depends on the size of the installer and the distribution media size. In this exercise, there is only one folder, Volume1.
2. Copy the Volume1 folder and its contents to the target computer. For this exercise, the target computer can be your development computer.
3. Double-click setup.exe to launch the installer for your application.
4. The installer displays a series of panels in which a user specifies the installation preferences. When the installer finishes updating the target system, click Finish.
5. To uninstall the application, use the Add or Remove Programs option in the Windows Control Panel. If you also want to uninstall the LabWindows/CVI Run-Time Engine and any other National Instruments software that was included in the installer, select National Instruments Software from the list of currently installed programs, and then click Remove. Select the NI products you want to remove and click Remove.
© National Instruments Corporation 7-1 Getting Started with LabWindows/CVI
7Additional Exercises
This chapter provides additional exercises that build on the concepts you have used throughout this tutorial. Each exercise adds to the code that you develop in the preceding exercise.
You can access the solutions to all the exercises in this chapter in \tutorial\solution. If you have trouble completing one of the exercises but would like to continue to the next topic, use the solution from the previous exercise.
Base ProjectAll of the exercises in this chapter build on the sample project that you completed in Chapter 5, Adding Analysis to Your Program. If you did not complete the sample project, go back and do so now. If you have trouble successfully completing the Chapter 5 exercise, start with sample1.prj from the solution directory.
The Sample 1 project generates a waveform and displays it on a graph control when you click the Acquire button. After you display the data, you can find and display the maximum and minimum values of the data points by clicking the Max & Min button. The project uses the SinePattern function to generate the data. The user interface for the project is shown in Figure 7-1.
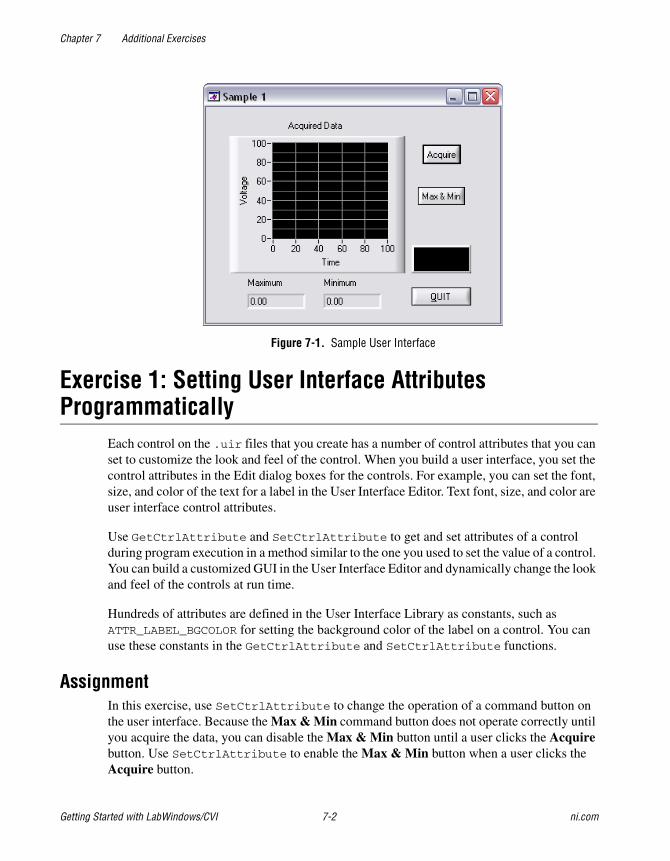
Chapter 7 Additional Exercises
Getting Started with LabWindows/CVI 7-2 ni.com
Figure 7-1. Sample User Interface
Exercise 1: Setting User Interface Attributes Programmatically
Each control on the .uir files that you create has a number of control attributes that you can set to customize the look and feel of the control. When you build a user interface, you set the control attributes in the Edit dialog boxes for the controls. For example, you can set the font, size, and color of the text for a label in the User Interface Editor. Text font, size, and color are user interface control attributes.
Use GetCtrlAttribute and SetCtrlAttribute to get and set attributes of a control during program execution in a method similar to the one you used to set the value of a control. You can build a customized GUI in the User Interface Editor and dynamically change the look and feel of the controls at run time.
Hundreds of attributes are defined in the User Interface Library as constants, such as ATTR_LABEL_BGCOLOR for setting the background color of the label on a control. You can use these constants in the GetCtrlAttribute and SetCtrlAttribute functions.
AssignmentIn this exercise, use SetCtrlAttribute to change the operation of a command button on the user interface. Because the Max & Min command button does not operate correctly until you acquire the data, you can disable the Max & Min button until a user clicks the Acquire button. Use SetCtrlAttribute to enable the Max & Min button when a user clicks the Acquire button.
Chapter 7 Additional Exercises
© National Instruments Corporation 7-3 Getting Started with LabWindows/CVI
Tip To ensure multiple plots do not accumulate on the graph control, add a line of code to delete any existing plots before you call PlotY.
Hints• Start by disabling (dimming) the Max & Min command button in the User Interface
Editor.
• Use SetCtrlAttribute from the User Interface Library to enable the Max & Min button.
• The attribute that you need to set is the dimmed attribute.
Solution: exer1.prj
Exercise 2: Storing the Waveform on DiskUsers often acquire large amounts of data and want to save it on disk for future analysis or comparison. LabWindows/CVI provides a selection of functions from the ANSI C Library for reading from and writing to data files. If you are already familiar with ANSI C, you know these functions as the stdio library. In addition to the stdio library, LabWindows/CVI has its own set of file I/O functions in the Formatting and I/O Library.
Tip When you must store very large data sets, National Instruments recommends that you use the DIAdem Connectivity Library, which is optimized for handling large amounts of data.
AssignmentUse the file I/O functions in the ANSI C Library to save the sine array to a text file. Write the program so that the file is overwritten each time you acquire the data. Do not append data to the file as you acquire it.
Hints• Remember that you must first open a file before you can write to it.
• Open the file as a text file so you can view the contents in any text editor later.
• Open the file with the Create/Open flag and not the Append flag so that the file is overwritten each time.
• Use the fprintf function in a loop to write the data to disk.
• Use the Utility Library GetProjectDir and MakePathname functions to create the pathname for the file.
Solution: exer2.prj
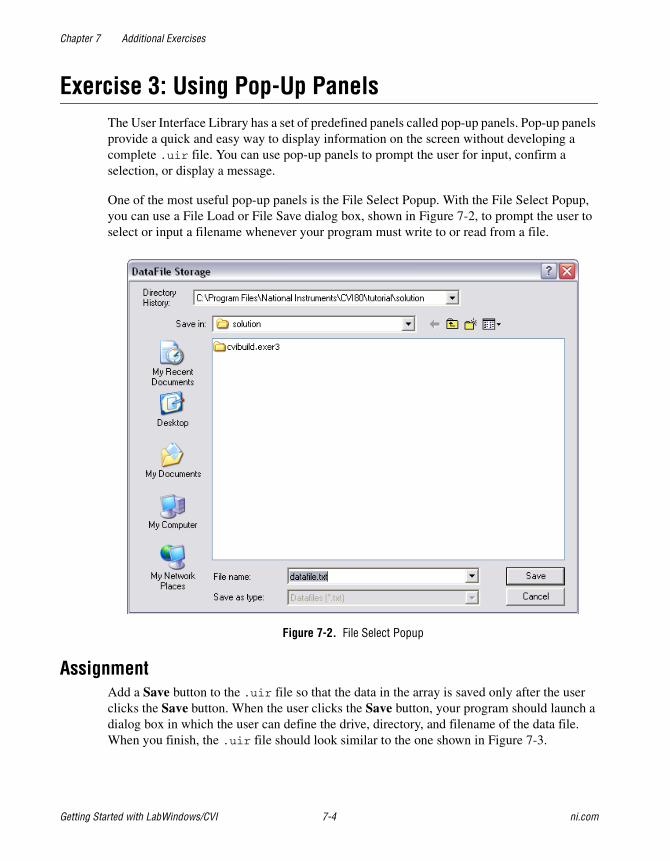
Chapter 7 Additional Exercises
Getting Started with LabWindows/CVI 7-4 ni.com
Exercise 3: Using Pop-Up PanelsThe User Interface Library has a set of predefined panels called pop-up panels. Pop-up panels provide a quick and easy way to display information on the screen without developing a complete .uir file. You can use pop-up panels to prompt the user for input, confirm a selection, or display a message.
One of the most useful pop-up panels is the File Select Popup. With the File Select Popup, you can use a File Load or File Save dialog box, shown in Figure 7-2, to prompt the user to select or input a filename whenever your program must write to or read from a file.
Figure 7-2. File Select Popup
AssignmentAdd a Save button to the .uir file so that the data in the array is saved only after the user clicks the Save button. When the user clicks the Save button, your program should launch a dialog box in which the user can define the drive, directory, and filename of the data file. When you finish, the .uir file should look similar to the one shown in Figure 7-3.
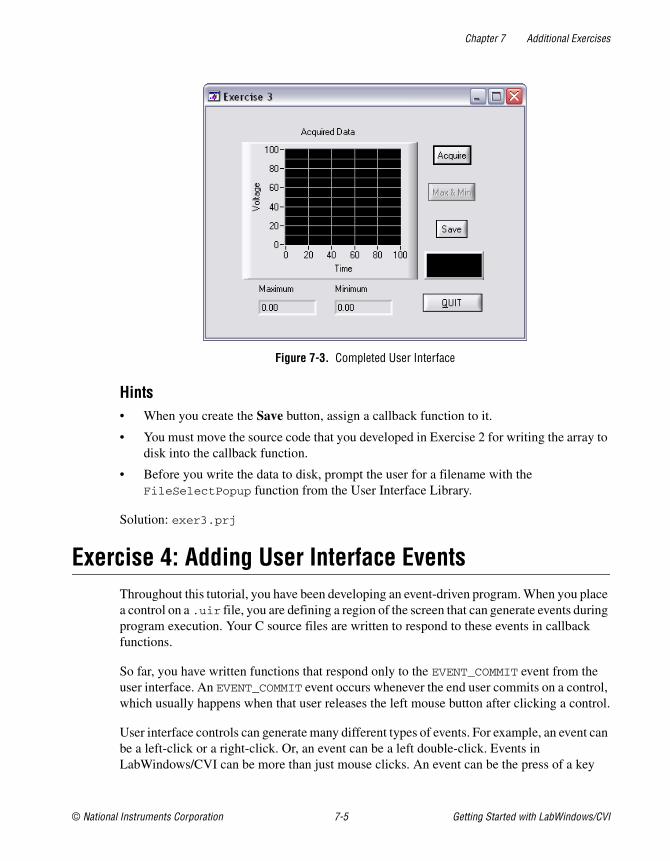
Chapter 7 Additional Exercises
© National Instruments Corporation 7-5 Getting Started with LabWindows/CVI
Figure 7-3. Completed User Interface
Hints• When you create the Save button, assign a callback function to it.
• You must move the source code that you developed in Exercise 2 for writing the array to disk into the callback function.
• Before you write the data to disk, prompt the user for a filename with the FileSelectPopup function from the User Interface Library.
Solution: exer3.prj
Exercise 4: Adding User Interface EventsThroughout this tutorial, you have been developing an event-driven program. When you place a control on a .uir file, you are defining a region of the screen that can generate events during program execution. Your C source files are written to respond to these events in callback functions.
So far, you have written functions that respond only to the EVENT_COMMIT event from the user interface. An EVENT_COMMIT event occurs whenever the end user commits on a control, which usually happens when that user releases the left mouse button after clicking a control.
User interface controls can generate many different types of events. For example, an event can be a left-click or a right-click. Or, an event can be a left double-click. Events in LabWindows/CVI can be more than just mouse clicks. An event can be the press of a key

Chapter 7 Additional Exercises
Getting Started with LabWindows/CVI 7-6 ni.com
or a move or size operation performed on a panel. Each time one of these events occurs, the callback function associated with the user interface called executes.
To view the events that each user action generates, click the icon shown at left, which puts the User Interface Editor into operate mode. When the User Interface Editor is in operate mode, LabWindows/CVI displays events under the User Interface Editor menu bar as you operate the user interface controls. Refer to the Events Overview topic in the LabWindows/CVI Help for a list of the events you can generate from a GUI.
When the callback function is called, the event type is passed through the event parameter to the callback function. Performing one simple operation on the user interface, such as clicking a command button, can call the callback function for that button three times.
The first time, the callback function is called to process the EVENT_LEFT_CLICK event. The second time, it is called to process the EVENT_COMMIT event. The third time, the callback function is called to process the EVENT_GOT_FOCUS event if the button did not have the input focus before you clicked it. For this reason, all of the callback functions you have worked on check the event type first and execute only when the event is an EVENT_COMMIT. Therefore, the operations in the callback functions happen only once with each event click, rather than three times.
AssignmentMany times, the person operating a LabWindows/CVI program is not the person who developed the program. The GUI might be very easy to use, but usually it is preferable to add help for the controls on .uir panels to assist the operator. Modify exer4.prj to display a short description for each command button when the user right-clicks the button.
Hints• Use MessagePopup to display the help.
• Remember that the event type is passed to each callback function in the event parameter.
• The event that you must respond to is EVENT_RIGHT_CLICK.
Tip If you want to add pop-up documentation to controls, use SetCtrlToolTipAttribute. You can find this function by expanding the Library Tree to Programmer’s Toolbox»User Interface Utilities»SetCtrlToolTipAttribute.
Solution: exer4.prj
Chapter 7 Additional Exercises
© National Instruments Corporation 7-7 Getting Started with LabWindows/CVI
Exercise 5: Timed EventsYou have developed an event-driven program that responds to events generated by mouse clicks or keypresses from the user. With the LabWindows/CVI timer control, you can generate events at specified time intervals to trigger program actions without requiring an action from the user.
You can include timer controls in your program by creating them in the User Interface Editor. The timer control is visible only at design time in the User Interface Editor. At run time, the timer control does not appear. You can specify a constant name, callback function, and timer event interval in the Edit Timer dialog box. LabWindows/CVI automatically calls the specified timer callback function with an event of type EVENT_TIMER_TICK each time the specified time interval elapses. The interval value is specified in seconds with a resolution of 1 millisecond between timer events.
AssignmentAdd a thermometer control to the user interface and use a timer control to generate a random number and display it on the thermometer once each second.
Hints• Set the timer interval to 1.
• Use CodeBuilder to generate the shell for the timer control callback function.
• Use SetCtrlVal to display the random number on the thermometer.
Solution: exer5.prj
© National Instruments Corporation A-1 Getting Started with LabWindows/CVI
ATechnical Support and Professional Services
Visit the following sections of the National Instruments Web site at ni.com for technical support and professional services:
• Support—Online technical support resources at ni.com/support include the following:
– Self-Help Resources—For answers and solutions, visit the award-winning National Instruments Web site for software drivers and updates, a searchable KnowledgeBase, product manuals, step-by-step troubleshooting wizards, thousands of example programs, tutorials, application notes, instrument drivers, and so on.
– Free Technical Support—All registered users receive free Basic Service, which includes access to hundreds of Application Engineers worldwide in the NI Developer Exchange at ni.com/exchange. National Instruments Application Engineers make sure every question receives an answer.
For information about other technical support options in your area, visit ni.com/services or contact your local office at ni.com/contact.
• Training and Certification—Visit ni.com/training for self-paced training, eLearning virtual classrooms, interactive CDs, and Certification program information. You also can register for instructor-led, hands-on courses at locations around the world.
• System Integration—If you have time constraints, limited in-house technical resources, or other project challenges, National Instruments Alliance Partner members can help. To learn more, call your local NI office or visit ni.com/alliance.
If you searched ni.com and could not find the answers you need, contact your local office or NI corporate headquarters. Phone numbers for our worldwide offices are listed at the front of this manual. You also can visit the Worldwide Offices section of ni.com/niglobal to access the branch office Web sites, which provide up-to-date contact information, support phone numbers, email addresses, and current events.
© National Instruments Corporation G-1 Getting Started with LabWindows/CVI
Glossary
A
active window The window affected by keyboard input at a given moment. The title of an active window appears highlighted.
API Application programming interface.
Array Display window A window for viewing and editing numeric arrays.
B
binary control A function panel control that resembles a physical on/off switch and can produce one of two values depending on the position of the switch.
breakpoint An interruption in the execution of a program. Also, a function in code that causes an interruption in the execution of a program.
C
checkbox A dialog box item that allows you to toggle between two possible execution options.
click A mouse-specific term; to quickly press and release the mouse button.
CodeBuilder The LabWindows/CVI feature that creates code based on a .uir file to connect a GUI to the rest of a program. You can compile and run this code as soon as it is generated.
command button A user interface item that, when selected, executes a command associated with the item.
control Function panel: An input or output device that appears on a function panel for specifying function parameters and displaying function results.
User interface: An object on a panel that displays information or accepts input from a user.
Glossary
Getting Started with LabWindows/CVI G-2 ni.com
cursor The flashing rectangle that shows where you can enter text on the screen. There is also a rectangular mouse cursor, or pointer, that shows the position of the mouse.
D
Debugging Region An area of the Workspace window that contains the Variables, Watch, and Memory windows.
default command The action that takes place when <Enter> is pressed and no command is specifically selected. Default command buttons in dialog boxes have an outline around them.
dialog box A prompt mechanism in which you specify additional information needed to complete a command.
DLL Dynamic link library.
double-click A mouse-specific term; to click the mouse button twice in rapid succession.
F
.fp file A file that contains information about the function tree and function panels of an instrument driver.
function panel A user interface to the LabWindows/CVI libraries that allows interactive execution of library functions and is capable of generating code for inclusion in a program.
function tree The hierarchical structure in which the functions in instrument drivers and LabWindows/CVI libraries are grouped.
G
global control A function panel control that displays the value of a global variable within a function.
GPIB General Purpose Interface Bus.
Glossary
© National Instruments Corporation G-3 Getting Started with LabWindows/CVI
Graphical Array View
A window in which you can view the values of arrays in a graph.
GUI Graphical user interface.
H
highlight To make a LabWindows/CVI screen item ready for input.
I
input control A function panel control in which a value or variable name is entered from the keyboard.
instrument driver A group of several subprograms related to a specific instrument that reside on disk in a special language-independent format. An instrument driver is used to generate and execute code interactively through menus, dialog boxes, and function panels.
Interactive Execution window
A LabWindows/CVI work area in which sections of code can be executed without creating an entire program.
L
Library Tree An area in the Workspace window that contains a tree view of the LabWindows/CVI libraries and instruments.
list box A dialog box item that displays a list of possible choices for completing a command.
M
menu An area accessible from the menu bar that displays a subset of the possible menu items.
mouse cursor A mouse-specific term; the rectangular block on the screen that shows the current mouse position.
Glossary
Getting Started with LabWindows/CVI G-4 ni.com
O
output control A function panel control that displays the results of a function.
Output Region An area of the Workspace window in which LabWindows/CVI displays errors, output, and search matches.
P
point A mouse-specific term; to move the mouse until the pointer rests on the item you want to click on.
pointer A mouse-specific term; the rectangular block on the screen that shows the current mouse position.
project A list of files, usually including a source file, user interface resource file, and header file, that your application uses.
Project Tree An area of the Workspace window that contains the lists of projects and files in the current workspace.
R
return value control A function panel control that displays a function result returned as a return value rather than as a formal parameter.
ring control A control that displays a list of options one option at a time. Ring controls appear on function panels and in dialog boxes.
S
select To choose the item that the next executed action will affect by moving the input focus (highlight) to a particular item or area.
shortcut key commands A combination of keystrokes that automatically executes a command.
slide control A function panel control that resembles a physical slide switch and inserts a value in a function call that depends on the position of the cross-bar on the switch.
Source Code Browser A cross-reference tool that lists browse information for selected files, functions, variables, data types, and macros.
Glossary
© National Instruments Corporation G-5 Getting Started with LabWindows/CVI
Source window A LabWindows/CVI work area in which you edit and execute complete programs. The file extension .c designates a file that appears in this window.
standard libraries The LabWindows/CVI ActiveX, Advanced Analysis (or Analysis), DDE Support, DIAdem Connectivity, Formatting and I/O, GPIB/GPIB-488.2, Internet, .NET, RS-232, TCP Support, User Interface, Utility, VISA, and VXI libraries and the ANSI C Library.
step mode A program execution mode in which a program is manually executed one instruction at a time. Each instruction in the program is highlighted as it is executed.
String Display window A mechanism for viewing and editing string variables and arrays.
subwindow A Source window, split into two scrollable editing areas for the same file.
T
text box A dialog box item in which the user enters text from the keyboard to complete a command.
timer control A user interface control that schedules the periodic execution of a callback function. A typical use of this control might be to update a graph every second.
tooltip A small, yellow box that displays variable and expression values or function prototypes in a Source window.
U
User Interface Editor A graphical drag-and-drop editor for designing user interfaces for programs.
User Interface Library A set of functions for controlling the interface programmatically.
V
Variables window A display that shows the values of variables currently defined in LabWindows/CVI.
VXI VME eXtensions for Instrumentation (bus).
Glossary
Getting Started with LabWindows/CVI G-6 ni.com
W
window A working area that supports operations related to a specific task in the development and execution processes.
Window Confinement Region
An area of the Workspace window that contains open Source, User Interface Editor, and Function Tree Editor windows, and function panels.
workspace A file that contains settings that do not affect the way a project builds, such as breakpoints, window position, tag information, and debugging levels. A workspace can contain one or more projects.
Workspace window The main work area in LabWindows/CVI; contains the Project Tree, Library Tree, Window Confinement Region, Debugging Region, Output Region, and Source Code Browser.
© National Instruments Corporation I-1 Getting Started with LabWindows/CVI
Index
Symbols.NET Library, 1-6
Aaccessing function panels, 1-4, 3-1ActiveX Library, 1-6Add Files to Project command, 2-6Add/Edit Watch Expression dialog box, 4-11Advanced Analysis Library, 1-5Analysis Library, 1-5ANSI C specifications, 1-7Arrange menu, 2-4Array Display window
displaying arrays, 4-9arrays
declaring from function panels, 3-3displaying, 4-9displaying in graph, 4-13
attributes, setting programmatically, 7-2
BBreak on First Statement command, Run
menu, 4-3, 4-8, 4-11breakpoints
breakpoint on error, 4-5conditional, 4-5definition, 4-5fixed breakpoints, 4-5instant breakpoints, 4-5programmatic breakpoints, 4-5watch expression breakpoints, 4-5
Ccallback functions
adding with CodeBuilder, 5-2locating with CodeBuilder, 5-3processing events (example), 7-5writing, 5-3
code generationautomatic. See CodeBuilder
Code menuFunction Panel windows
Insert Function Call command, 3-5code. See source filesCodeBuilder, 2-1
adding control callback function, 5-2generating program shell, 2-6
commit events, 5-5, 7-5conditional breakpoints, 4-5constant name, 2-1, 2-4constants, displaying in .uir file, 3-4Continue command, Run menu (table), 4-4Control Callback Events dialog box, 2-6controls
command button control, 2-3, 5-2graph control, 2-4numeric control, 5-3timer control, 7-7
conventions used in the manual, ixCreate Instrument I/O Task command, 1-8Create/Edit DAQmx Tasks command, 1-8custom controls, 2-4
DDAQ Assistant, 1-8data
displayingGraphical Array View, 4-13
Index
Getting Started with LabWindows/CVI I-2 ni.com
displaying and editingarrays, 4-9strings, 4-11variables, 4-8
generating array of data, 3-2data acquisition, 1-7data acquisition libraries, using, 1-7data files, functions for reading and
writing, 7-3DDE Support Library, 1-6Debug command, Run menu
step mode execution, 4-4debugging programs
breakpointsfixed breakpoints, 4-5instant breakpoints, 4-5programmatic breakpoints, 4-5watch expression breakpoints, 4-5
displaying and editing dataArray Display window, 4-9String Display window, 4-11Variables window, 4-8Watch window, 4-11
displaying data, Graphical Array View, 4-13
step mode execution, 4-3Debugging Region, 1-5deploying applications, 6-3developing graphical user interfaces (GUI).
See graphical user interface (GUI), buildingDIAdem Connectivity Library, 1-6diagnostic tools (NI resources), A-1DiscardPanel, 2-9displaying and editing data
strings, 4-11variables, 4-8
DisplayPanel, 2-9distributing applications, 6-1documentation
conventions used in manual, ixLabWindows/CVI, 1-9
NI resources, A-1related documentation, x
drivers (NI resources), A-1
EEdit Installer dialog box, 6-1
Drivers & Components tab, 6-2Files tab, 6-2General tab, 6-1Shortcuts tab, 6-2
Edit menuSource and Interactive Execution
windowsGo To Definition command, 4-4Undo command, 4-2
editing datastrings, 4-11tooltips, 4-12variables, 4-9
EVENT_COMMIT, 2-7, 5-5EVENT_GOT_FOCUS, 5-6EVENT_LEFT_CLICK, 5-5EVENT_RIGHT_CLICK, 2-7EVENT_TIMER_TICK, 2-6, 7-7events
timed events, 7-7user interface events, 7-5
Example Finder, 1-9examples (NI resources), A-1
Ffile I/O functions, ANSI C library, 7-3File menu
Source and Interactive Execution windows, Open Quoted Text command, 4-1
User Interface Editor, 2-3FileSelectPopup, 7-5Find command, Source window, 4-3
Index
© National Instruments Corporation I-3 Getting Started with LabWindows/CVI
finding functionsfinding definitions, 4-4using CodeBuilder, 5-3
Finish Function command, Run menu, 4-4Formatting and I/O Library, 1-5function panels
accessing, 1-4, 3-1controls, 3-1declaring arrays, 3-3definition, 3-1finding functions
function definitions, 4-4using CodeBuilder, 5-3
help, 3-2purpose and use, 3-1recalling, 3-3
GGenerate All Code command, Code menu, 2-7Generate All Code dialog box, 2-7Generate Control Callback command, 5-2generating code automatically. See
CodeBuilderGetCtrlAttribute, 7-2Go to Cursor command, Run menu, 4-4Go To Definition command, Edit menu, 4-4GPIB/GPIB 488.2 Library, 1-6graph controls, adding to user interface, 2-4Graphical Array View, displaying arrays, 4-13graphical user interface (GUI), building
adding command button controls, 2-3adding graph controls, 2-4adding timer controls, 7-7building a user interface resource (.uir)
file, 2-3main function, 2-8modifying, 5-1running the program, 5-5setting up attributes
programmatically, 7-2
writing callback function, 5-3graphs, drawing with function panels, 3-2
Hheader files, for user interface, viewing, 2-5help information, adding to controls, 7-6Help menu, Function Panel windows, 3-2help, technical support, A-1
Iinstrument control, 1-7instrument control libraries, using, 1-7instrument drivers
developing, 1-8NI resources, A-1
Instrument I/O Assistant, 1-8interactive code generation tools
drawing graphs using function panels, 3-2function panel controls, 3-1function panel help, 3-2
Internet Library, 1-6
KKnowledgeBase, A-1
LLabWindows/CVI
overview, 1-1starting, 2-2
Library Tree, 1-4, 3-1Line command, View menu, 4-3Line Numbers command, View menu, 4-1LoadPanel, 2-9
Index
Getting Started with LabWindows/CVI I-4 ni.com
MManage Distributions command, 6-1Memory Display window, 4-10menu help, 1-5
NNational Instruments support and
services, A-1Next Tag command, View menu, 4-3numeric controls
adding to user interface, 5-3
OOpen Quoted Text command, File menu, 4-1Output Region, 1-5
Ppop-up panels, 7-4Preview User Interface Header File command,
View menu, 2-5program development overview, 1-1program shell, building. See CodeBuilderprogramming examples (NI resources), A-1programming graphical user interfaces. See
graphical user interface (GUI), buildingprogramming tutorial
additional exercisessetting user interface attributes
programmatically, 7-2storing data on disk, 7-3timed events, 7-7user interface events, 7-5using pop-up panels, 7-4
debugging programsbreakpoints
programmatic breakpoints, 4-5displaying and editing data
Array Display window, 4-9
String Display window, 4-11Variables window, 4-8Watch window, 4-11
displaying data, Graphical Array View, 4-13
step mode execution, 4-3editing tools, 4-1function panels
accessing, 1-4controls, 3-1declaring arrays, 3-3help information, 3-2
graphical user interfaceadding command button controls, 2-3adding graph controls, 2-4adding timer controls, 7-7building a user interface resource
(.uir) file, 2-3generating array of data, 3-2main function, 2-8modifying, 5-1running the program, 5-5setting attributes
programmatically, 7-2source code connection, 2-1writing callback function, 5-3
project file, 1-3Project Tree, 1-4projects
See also source filesaccessing and viewing files within, 1-4
QQuick Search command, 4-3QuitUserInterface, 2-9
Index
© National Instruments Corporation I-5 Getting Started with LabWindows/CVI
Rrelated documentation, xRelease Window command, 1-5RS-232 Library, 1-6Run menu
Source and Interactive Execution windows
Continue command, 4-4, 4-12Debug command, 3-5, 4-3Step Into command, 4-5, 4-6Step Over command, 4-4, 4-6Terminate Execution command,
4-4, 4-6View Variable Value command, 4-9
Workspace windowBreak on First Statement command,
4-3, 4-8, 4-11Debug command, 3-5
RunUserInterface, 2-9
SSelect Variable command, 3-3Set Next Statement command, 4-5Set Next Statement command, Run menu, 4-4SetCtrlAttribute, 7-2shells, building. See CodeBuildersoftware (NI resources), A-1solutions to tutorial, 7-1Source Code Browser, 1-5source files
analyzing code, 2-8displaying in Source window, 1-7displaying referenced files, 4-1moving to specific lines of code, 4-3source code connection, 2-1
Source windowcompatibility with ANSI C
specifications, 1-7displaying generated code, 2-7opening subwindows, 4-2
Stack Trace (Variables window), 4-8standard libraries, 1-5starting LabWindows/CVI, 2-2Step Into command, Run menu, 4-3, 4-4, 4-6step mode execution, 4-3Step Over command, Run menu, 4-4, 4-6String Display window, displaying and editing
string variables, 4-11subwindows, opening subwindows for one
source file, 4-2support, technical, A-1
Ttagged lines, 4-3TCP Support Library, 1-6technical support, A-1Terminate Execution command, Run menu,
4-4, 4-6timed events, 7-7timer controls, adding to user interface, 7-7Toggle Tag command, View menu, 4-3tooltips, editing variables, 4-12training and certification (NI resources), A-1troubleshooting (NI resources), A-1
Uuir files. See user interface resource (.uir) filesUndo command, Edit menu, 4-2upgrade installer, 6-2user interface development, 1-6User Interface Editor window
operate mode, 7-6purpose and use, 2-1
user interface events. See eventsUser Interface Library, 1-5
Index
Getting Started with LabWindows/CVI I-6 ni.com
user interface resource (.uir) files, building, 2-3
adding a graph control, 2-4adding command button controls, 2-3
user interface. See graphical user interface (GUI)
Utility Library, 1-6
Vvariables
displaying, 4-7editing, 4-9editing using tooltips, 4-12
Variables windowopening, 4-8stepping through programs, 4-8
View Control Callback command, 5-3View menu
Line command, 4-3Line Numbers command, 4-1Next Tag command, 4-3Preview User Interface Header File, 2-5Toggle Tag command, 4-3
View Variable Value command, Run menu, 4-9
VISA Library, 1-6VXI Library, 1-6
Wwatch expressions, 4-5Watch window
displaying variables during program execution, 4-11
purpose and use, 4-11waveform generation project, storing
waveform on disk, 7-3Web resources, A-1Window Confinement Region, 1-5Windows Installer, 6-1workspace file, 1-3Workspace window, 1-4