laboratorio: desarrollo de aplicaciones web con genexus evolution 3 y salto (continuación)
TRANSCRIPT

Lab: “Web applications development”
GeneXus Salto

GeneXus Salto Lab: “Web applications” | 2
Copyright 1988 - 2015| Artech Consultores S. R. L.
All rights reserved. This document may not be reproduced on any media except upon express authorization by Artech Consultores S.R.L. The information contained herein is for personal use only.
Registered Trade Marks
Artech and GeneXus are registered trademarks of Artech Consultores S.R.L. All other trademarks referred to in this document are the property of their respective owners.

GeneXus Salto Lab: “Web applications” | 3
Contents
Objective .............................................................................................................................................. 4
Creation of KB, database, and load of initial data ......................................................................... 4
RWD – Observing a responsive application in action .................................................................... 8
RWD - Web Abstract Editor .............................................................................................................. 10
RWD – Various layouts for different screen sizes ........................................................................ 12
RWD – Hiding a column in a grid .................................................................................................... 15
RWD – Changing font color and size in accordance with screen size ....................................... 19
Smooth – Updating ONLY part of the page .................................................................................. 21
Smooth – Updating ONLY lines on a grid ...................................................................................... 23
Smooth - Transitions (Single-Page Applications - SPA) ............................................................... 27
Live editing ......................................................................................................................................... 28
Thank you for participating! ............................................................................................................ 31
Glossary .............................................................................................................................................. 32

GeneXus Salto Lab: “Web applications” | 4
Objective
Learn about the tools and functionalities available to design and generate web
applications.
The application to be built consists of a product catalog. Throughout this lab, we will see
how to handle screen design, colors, and functionalities such as Responsive Web Design
(RWD) and Smooth.
Creation of KB, database, and load of initial data
For this lab activity, we will be using the GeneXus Salto version and Chrome will be the
browser.
The icon associated with GeneXus is in the desktop. Execute it.
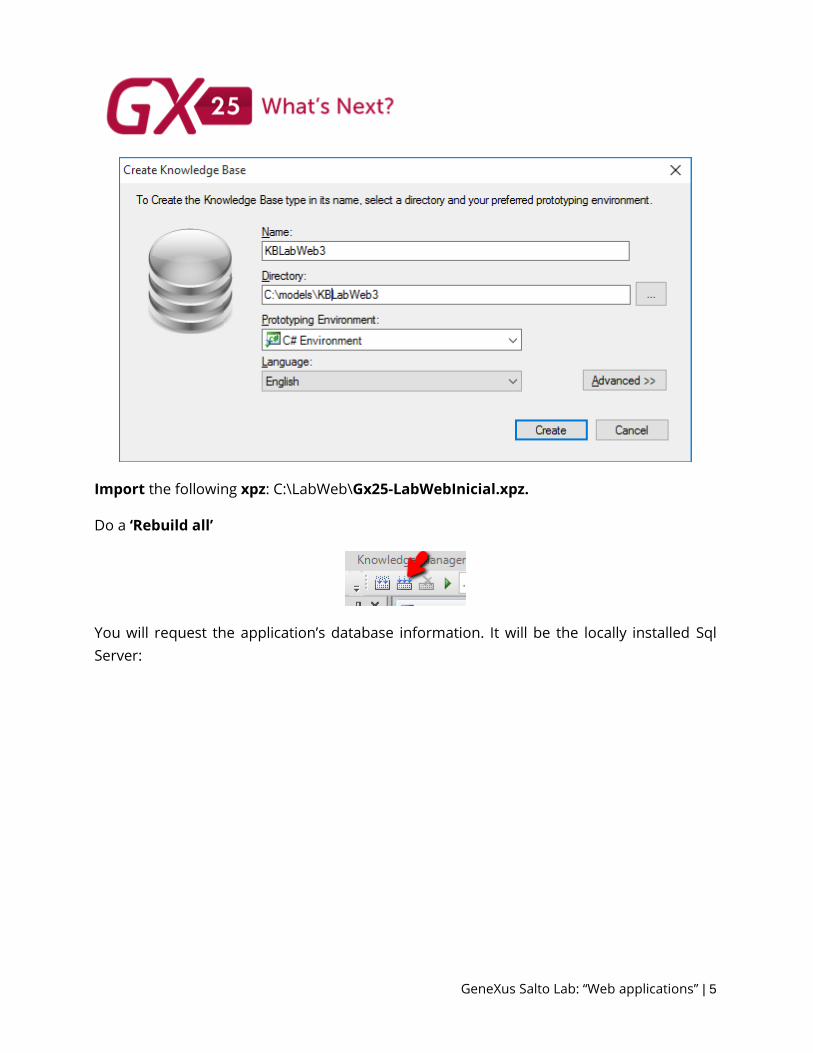
The first step is to create a new Knowledge Base with the setting:
Name = “KBLabWeb<NroUsuario>” The User number is on the monitor.
Directory = C:\Models
Prototyping Environment = C# Environment
GeneXus Salto Lab: “Web applications” | 5
Import the following xpz: C:\LabWeb\Gx25-LabWebInicial.xpz.
Do a ‘Rebuild all’
You will request the application’s database information. It will be the locally installed Sql
Server:

GeneXus Salto Lab: “Web applications” | 6
Click on the ‘Finish’ button, followed by the ‘Create’ button to execute the reorganization.
Once the tables have been create, you will have to load initial data. To do so, execute the
DataInit procedure.

GeneXus Salto Lab: “Web applications” | 7
You will get an output like the one shown below in GeneXus:
========== DataInit Compilation for Default (C# Web) started ========== gxexec "C:\models\KBLabWeb\CSharpModel\web\bldadatainit.cs" -r:GxBaseBuilder.dll -arg:csc="C:\WINDOWS\Microsoft.NET\Framework\v3.5\csc.exe" DataInit Compilation for Default (C# Web) Success ========== Web config update started ========== Updating web config ... Web config update Success ========== Execution started ========== " C:\models\KBLabWeb\CSharpModel\web\bin\adatainit.exe" Execution Success Run DataInit Success
GeneXus Salto Lab: “Web applications” | 8
RWD – Observing a responsive application in action
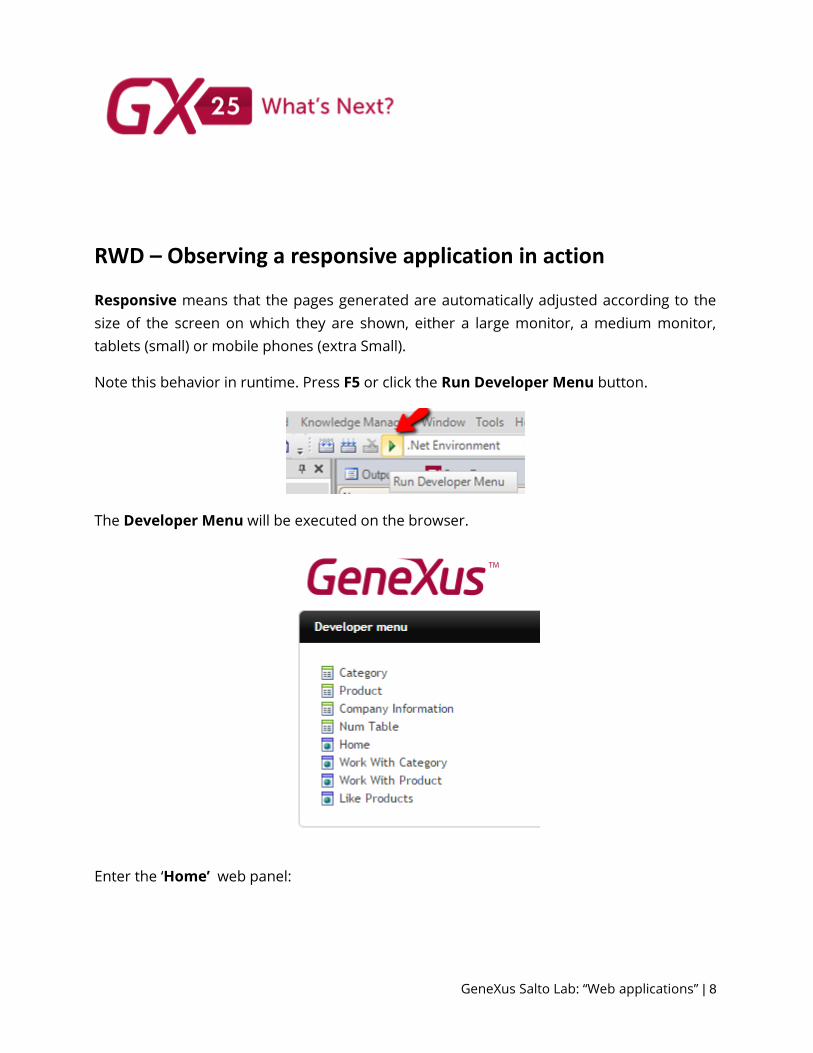
Responsive means that the pages generated are automatically adjusted according to the
size of the screen on which they are shown, either a large monitor, a medium monitor,
tablets (small) or mobile phones (extra Small).
Note this behavior in runtime. Press F5 or click the Run Developer Menu button.
The Developer Menu will be executed on the browser.
Enter the ‘Home’ web panel:

GeneXus Salto Lab: “Web applications” | 9
Note the responsive behavior by entering the “Work With Products”.
Try changing the size of the browser window

GeneXus Salto Lab: “Web applications” | 10
Note how columns are automatically
‘deleted’ as the window is reduced in size
–instead of getting scrollbars- and they
appear again as the window is enlarged.
Note how the location of the Insert
button is modified, as the screen size
changes.
Note how a new button is generated to
access filters
RWD - Web Abstract Editor
To generate responsive applications we must use the new editor known as Abstract
Layout.

GeneXus Salto Lab: “Web applications” | 11
This editor uses Responsive Tables to generate these pages. As opposed to an HTML
table, a Responsive Table allows the configuration of various sizes for different screens.
Let’s see an example. Open the WWProduct web panel (it is under Root – Transactions –
Product – WorkWithProduct)
Note the controls and properties. The responsive tables are the ‘pink’ controls. Let us now
see their properties: select the Main table and go to its property “Responsive Sizes”.
You will get to the following dialog, where you may design several things for the various
screen sizes by just setting up properties.
Note how by changes the values of the Size combo we can make designs vary from Extra
Small size (cell phones) to other sizes

GeneXus Salto Lab: “Web applications” | 12
RWD – Various layouts for different screen sizes
We should now see something in practice.
We want to change the “View Product” so that in the Medium and Large screens the
product’s photo is to the left of the product data. And making the space for that photo
equal to 33%, leaving 67% for the data space (instead of 50% and 50%).
That means that, instead of viewing it like this

GeneXus Salto Lab: “Web applications” | 13
We want it to look like this:
GeneXus Salto Lab: “Web applications” | 14
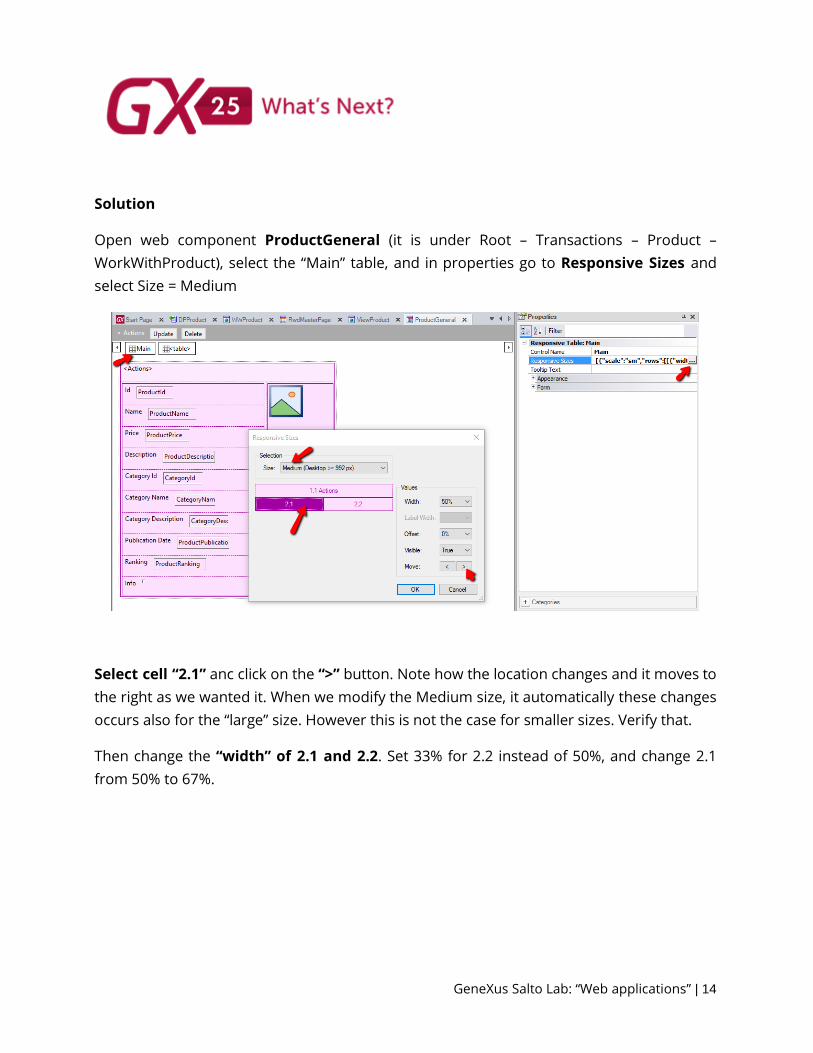
Solution
Open web component ProductGeneral (it is under Root – Transactions – Product –
WorkWithProduct), select the “Main” table, and in properties go to Responsive Sizes and
select Size = Medium
Select cell “2.1” anc click on the “>” button. Note how the location changes and it moves to
the right as we wanted it. When we modify the Medium size, it automatically these changes
occurs also for the “large” size. However this is not the case for smaller sizes. Verify that.
Then change the “width” of 2.1 and 2.2. Set 33% for 2.2 instead of 50%, and change 2.1
from 50% to 67%.

GeneXus Salto Lab: “Web applications” | 15
Press OK, and execute F5.
In runtime, browse to the view of any product and try the changes through several sizes to
verify the result of what we wanted to do.
RWD – Hiding a column in a grid
In responsive applications, only relevant data is shown on mobile devices. We can see this,
for instance, in the WWProduct, where an “Extra Small” screen shows only some columns,
while the larger screens show all columns.
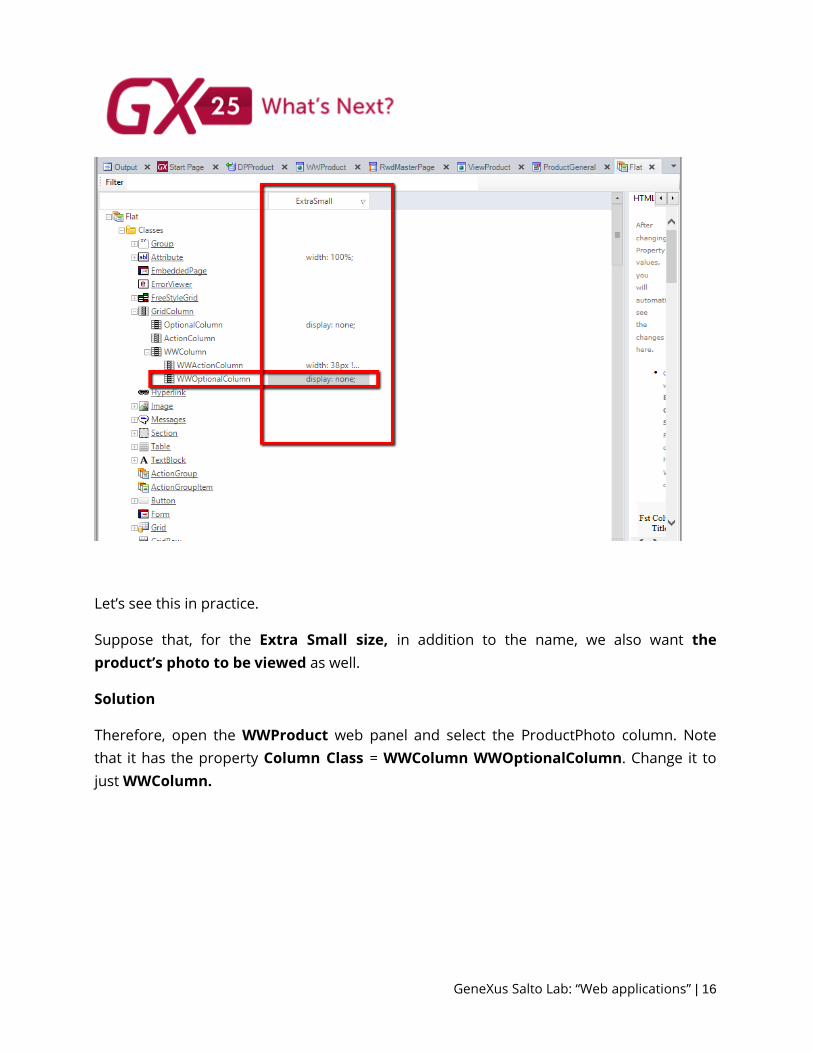
This may be done by using the Column Class property in the grid columns and values
WWColumn and WWOptionalColumn in the Flat theme. Those classes have rules
conditioned by size, as shown in the following capture:
GeneXus Salto Lab: “Web applications” | 16
Let’s see this in practice.
Suppose that, for the Extra Small size, in addition to the name, we also want the
product’s photo to be viewed as well.
Solution
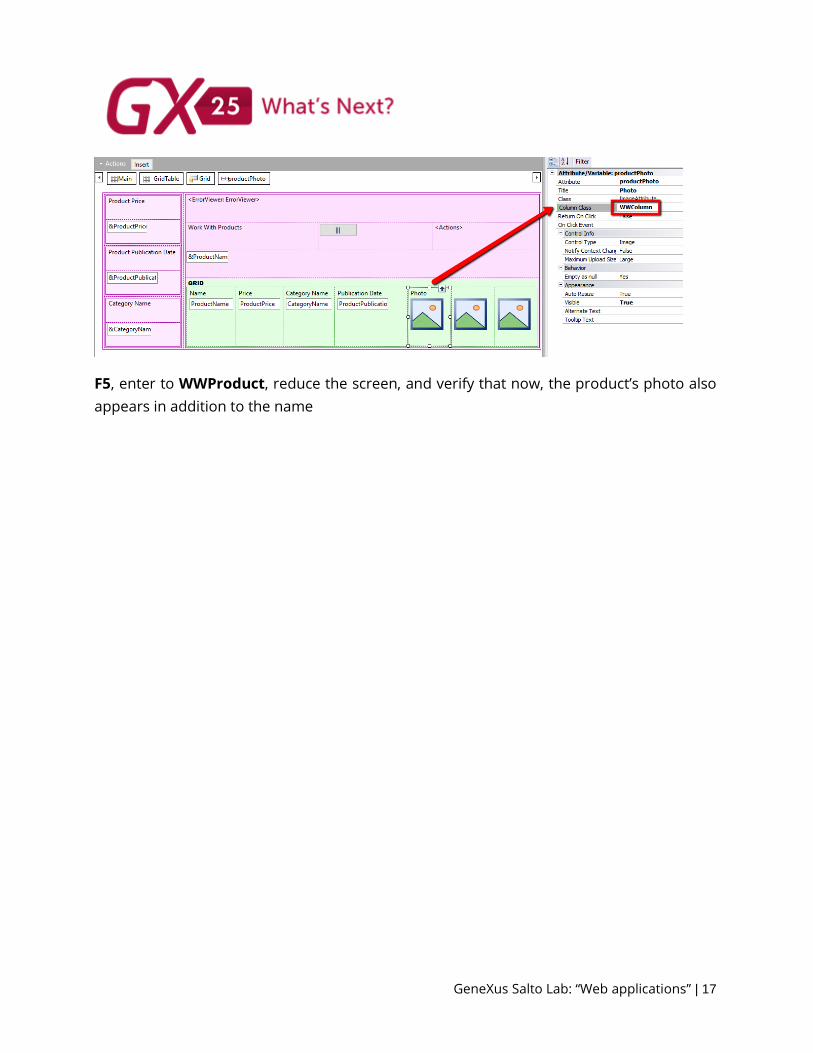
Therefore, open the WWProduct web panel and select the ProductPhoto column. Note
that it has the property Column Class = WWColumn WWOptionalColumn. Change it to
just WWColumn.
GeneXus Salto Lab: “Web applications” | 17
F5, enter to WWProduct, reduce the screen, and verify that now, the product’s photo also
appears in addition to the name

GeneXus Salto Lab: “Web applications” | 18

GeneXus Salto Lab: “Web applications” | 19
RWD – Changing font color and size in accordance with screen
size
We now want to change the color of buttons and the font sizes, in accordance with the size
of the screen. For devices (Extra Small size), set the buttons with blue color and set the
font size on the grid lines to 18pt.
The interface we want for mobile devices is the following:

GeneXus Salto Lab: “Web applications” | 20
Solution
Open the Flat them (it is under Customization – Themes) and let’s now change two
properties only for the “ExtraSmall” column of classes DescriptionAttributte and
BtnEnter.
In the BtnEnter class change to Background Color = SteelBlue.
In the WWColumn class change to FontSize=18 (under the Lines Font group)

GeneXus Salto Lab: “Web applications” | 21
Press F5 and verify the changes made.
Note: It si possible that you have to press CTRL+F5 in order to see the changes made,
instead of using cached values.
Smooth – Updating ONLY one part of the page
A web panel is required to allow the selection of products from a grid on the left, while the
data on the products is loaded on the right and ONLY the component on the right is
refreshed as different products are clicked on.

GeneXus Salto Lab: “Web applications” | 22
Solution
Open the LikeProducts web panel (it is under Root Module)

GeneXus Salto Lab: “Web applications” | 23
Note that we have a grid and a component, where the Green on the left is the grid with the
list of products, and the component on the right is where the data of the productName will
be loaded upon clicking on it.
Go to Events and add the following Event
Event ProductName.Click
ProductDetailWC.Object=Create(ProductDetail, ProductId)
Endevent
Press F5 (Run), and, from the Developer Menu, call the LikeProducts web panel.
Note that when we click on ProductName, this generates the load of the
web component ONLY, showing all data on the product, and WITHOUT
refreshing the rest of the page.
To have this type of applications in GeneXus, all we need to do is select the
Smooth value in the “Web user Experience” property. This property may
be found both at the version level and at the object level.
Smooth – Updating ONLY the lines on a grid
We now want to record and view the number of “Likes” of each product in the
LikeProducts web panel. So, clicking on the “Like” image will add one more “like” to the
ProductLikesQty attribute (which records the cumulated number of “likes”).

GeneXus Salto Lab: “Web applications” | 24
Solution
Open the LikeProducts web panel (located in the Root), and add two columns to the grid.
To do this from the Toolbox, drag the “Attribute/Variable” control and select the &like
variable and the attribute by selecting the ProductLikesQty attribute prior to pressing OK.

GeneXus Salto Lab: “Web applications” | 25

GeneXus Salto Lab: “Web applications” | 26
And we will get this layout:
Now add the following Event:
Event &like.Click
OneLike.Call(ProductId, ProductLikesQty)
Endevent
This will enable – with a click on the “Like” image – the trigger of the OneLike procedure
(already in the KB) that receives the product identifier and updates the number of “likes”.
Press F5 to execute the application and try the newly implemented functionality, adding
‘Likes’ to products.
Note that by clicking on the “Like” image only the corresponding line is
refreshed. The rest of the page is not reloaded.

GeneXus Salto Lab: “Web applications” | 27
Smooth – Transitions (Single Page Applications - SPA)
Now, we want to change the effect of the transition between pages in the application. We
decide that when page B is called from page A, the effect of page B will be to push up from
below, and the effect of page A will be to push down.
Solution
Open the Flat theme and edit the properties of the Form class.
Select the effect desired in the Enter/Exit Effect properties.

GeneXus Salto Lab: “Web applications” | 28
Execute the application again – F5 – and enter the Home link and then Work With
Products. Then return to Home. Note how pages appear and disappear when you browse
through them.
Note: we must do a CTRL+F5 on the browser to avoid using the theme´s prior version,
because it might be cached in the browser.
Live editing
We previously saw how to change class properties in the Flat them to later generate,
execute, and even do CTRL+F5 to view the changes.
What if we could change the theme and view the changes directly on the browser
WITHOUT generating?
“Live editing” has been implemented -and is already included in the Beta version- to make
this possible and make screen design significantly more agile.
Let´s now see how this is activated and how it works.
In the IDE, select Live Editing from the combo in the GeneXus bar.
Note that when se select it, we are enabling the “Live Editing” option in the Knowledge
Base Navigator. Click on it.

GeneXus Salto Lab: “Web applications” | 29
Then do Run (F5), and access the “Home” link, where we will be working.
Note: This F5 sólo is only needed once, following the actioning of the Live editing.
Verify the green light indicating that the “Live Editing” is on.
Open the Flat theme, change some classes and verify, on the browser, that the changes
are automatically reflected.
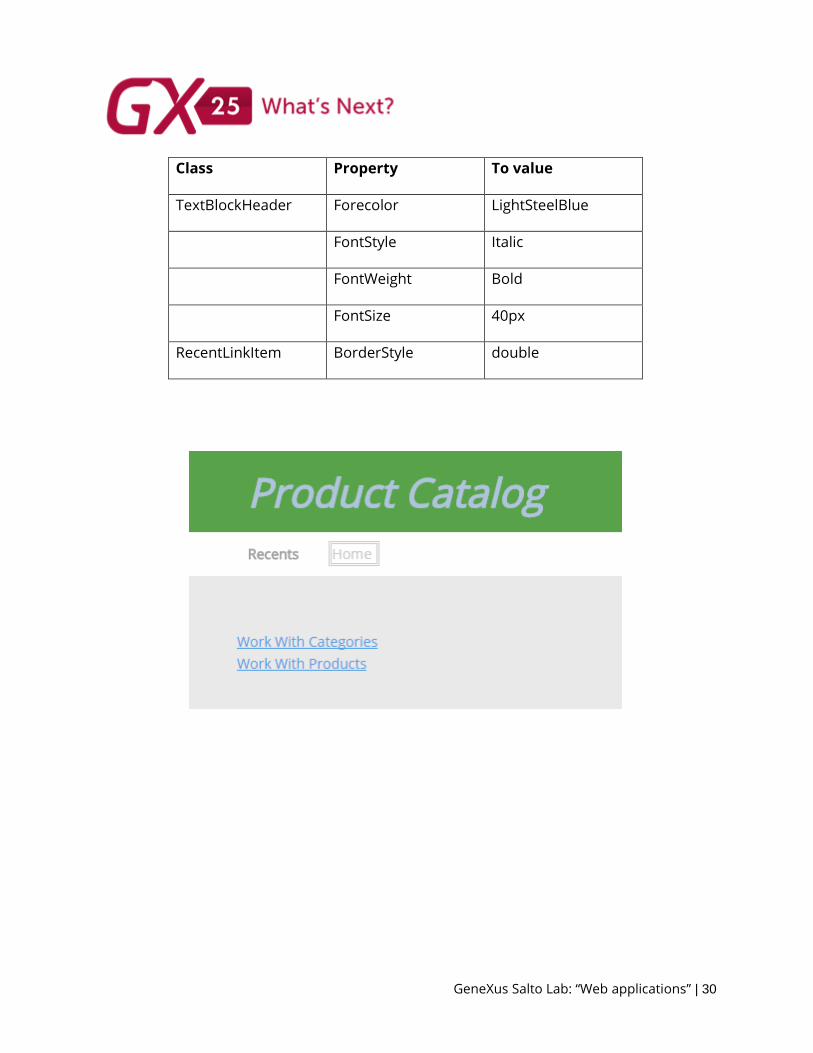
For example, change the following properties. (We suggest using the theme editor´s “Filter”
to locate the class that is to be changed.)
Change them one by one, and note the changes made in home.aspx on the browser.
GeneXus Salto Lab: “Web applications” | 30
Class Property To value
TextBlockHeader Forecolor LightSteelBlue
FontStyle Italic
FontWeight Bold
FontSize 40px
RecentLinkItem BorderStyle double

GeneXus Salto Lab: “Web applications” | 31
Thank you for participating!
GeneXus Salto Lab: “Web applications” | 32
Glossary
In the links shown below, you will find documents with in-depth details of what has been
presented during this lab, as well as additional related documents that might be of interest
to you.
Responsive Web Design (RWD)
http://wiki.genexus.com/commwiki/servlet/hwikibypageid?25186
Web Abstract Editor
http://wiki.genexus.com/commwiki/servlet/hwikibypageid?24795
Smooth
http://wiki.genexus.com/commwiki/servlet/hwikibypageid?25801
Single Page Applications (SPA)
http://wiki.gxtechnical.com/commwiki/servlet/hwikibypageid?22455
Transitions
http://wiki.genexus.com/commwiki/servlet/hwikibypageid?22460
Live Editing in Web Applications
http://wiki.genexus.com/commwiki/servlet/hwikibypageid?27771