labor distribution module (ldm) - your.yale.edu distribution module (ldm) user ... log on to the...
TRANSCRIPT

General Accounting
Labor Distribution Module
(LDM)
User Guide
(February 2016)

Labor Distribut ion User Guide Revis ion Date : 2 -04
Labor Distribution Module (LDM) User Guide February 2016 The official version of this information will only be maintained in an on-line web format. Any and all printed copies of this material are dated as of the print date. Please make certain to review the material on-line prior to placing reliance on a dated printed version.
Page 1 of 52
Table of Contents
Introduction to Oracle's Labor Distribution Application .. . . . . . . . . . . . . . . . . . . . . . . . . . . . 2 Learning Objec tives . . . . . . . . . . . . . . . . . . . . . . . . . . . . . . . . . . . . . . . . . . . . . . . . . . . . . . . . . . . . . . . . . . . . . . . . . . . . . . . . . . . . . . . . . . . . . . . . . . . . 2
Support (Who do I Contact) . . . . . . . . . . . . . . . . . . . . . . . . . . . . . . . . . . . . . . . . . . . . . . . . . . . . . . . . . . . . . . . . . . . . . . . 3
Oracle Application Responsibilities – Grants & Contracts .. . . . . . . . . . . . . . . . . . . . . . . . . . 4 LD Roles & Responsib il i t ies . . . . . . . . . . . . . . . . . . . . . . . . . . . . . . . . . . . . . . . . . . . . . . . . . . . . . . . . . . . . . . . . . . . . . . . . . . . . . . . . . . . . . . . . 4
Launching the Oracle Application .. . . . . . . . . . . . . . . . . . . . . . . . . . . . . . . . . . . . . . . . . . . . . . . . . . . . . . . . . . . . . . 6
Labor Schedules (Record “Future” Charging) . . . . . . . . . . . . . . . . . . . . . . . . . . . . . . . . . . . . . . . . . . . . 9 Labor Scheduling Form . . . . . . . . . . . . . . . . . . . . . . . . . . . . . . . . . . . . . . . . . . . . . . . . . . . . . . . . . . . . . . . . . . . . . . . . . . . . . . . . . . . . . . . . . . . . . . . 9
Find Person .......................................................................................................................................................... 12 Schedule Lines Form . . . . . . . . . . . . . . . . . . . . . . . . . . . . . . . . . . . . . . . . . . . . . . . . . . . . . . . . . . . . . . . . . . . . . . . . . . . . . . . . . . . . . . . . . . . . . . . . . 13
Accounting Flexfield ........................................................................................................................................... 18
Distribution Adjustments (Correct “Previous” Charging) . . . . . . . . . . . . . . . . . . . . . . . . . 21 Defining a Dis tr ibution Adjustment . . . . . . . . . . . . . . . . . . . . . . . . . . . . . . . . . . . . . . . . . . . . . . . . . . . . . . . . . . . . . . . . . . . . . . . . . . . . 21
Find Person .......................................................................................................................................................... 21 Effort Report Coordination (Effort Report Status) .............................................................................................. 23 Distribution Adjustments Form ........................................................................................................................... 23 Distribution Adjustment Information Box ........................................................................................................... 28 Distribution Adjustment Approval (Status) ......................................................................................................... 29 Submit and Approve Windows ............................................................................................................................ 32 Approving a Distribution Adjustment ................................................................................................................. 33 Find Batches Window.......................................................................................................................................... 33 Approve Adjustments Form ................................................................................................................................ 34
Prepare Distr ibut ion Adjustment for G&C . . . . . . . . . . . . . . . . . . . . . . . . . . . . . . . . . . . . . . . . . . . . . . . . . . . . . . . . . . . . . . . . . . . 38 Attach Suppor t ing Documenta tion for G&C . . . . . . . . . . . . . . . . . . . . . . . . . . . . . . . . . . . . . . . . . . . . . . . . . . . . . . . . . . . . . . . . . 40 Depar tment Approval fo r G&C . . . . . . . . . . . . . . . . . . . . . . . . . . . . . . . . . . . . . . . . . . . . . . . . . . . . . . . . . . . . . . . . . . . . . . . . . . . . . . . . . . . 41 Selec t “Approve” ( from main “Naviga tor” menu) . . . . . . . . . . . . . . . . . . . . . . . . . . . . . . . . . . . . . . . . . . . . . . . . . . . . . . . . . 41 Enter Batch Sta tus (“Approved by Depar tment ”) for G&C . . . . . . . . . . . . . . . . . . . . . . . . . . . . . . . . . . . . . . . . . . . . . 43
User Reports .. . . . . . . . . . . . . . . . . . . . . . . . . . . . . . . . . . . . . . . . . . . . . . . . . . . . . . . . . . . . . . . . . . . . . . . . . . . . . . . . . . . . . . . . . . . . 45 Access ing the User Reports . . . . . . . . . . . . . . . . . . . . . . . . . . . . . . . . . . . . . . . . . . . . . . . . . . . . . . . . . . . . . . . . . . . . . . . . . . . . . . . . . . . . . . . . 45 Distr ibut ion Adjustment Submitted by Employee Report . . . . . . . . . . . . . . . . . . . . . . . . . . . . . . . . . . . . . . . . . . . . . . . 47 Distr ibut ion History by Org . . . . . . . . . . . . . . . . . . . . . . . . . . . . . . . . . . . . . . . . . . . . . . . . . . . . . . . . . . . . . . . . . . . . . . . . . . . . . . . . . . . . . . . 50 Employee Labor Schedule Repor t . . . . . . . . . . . . . . . . . . . . . . . . . . . . . . . . . . . . . . . . . . . . . . . . . . . . . . . . . . . . . . . . . . . . . . . . . . . . . . . 51
Labor Distribut ion User Guide Revis ion Date : 2 -04
Labor Distribution Module (LDM) User Guide February 2016 The official version of this information will only be maintained in an on-line web format. Any and all printed copies of this material are dated as of the print date. Please make certain to review the material on-line prior to placing reliance on a dated printed version.
Page 2 of 52
Introduction to Oracle's Labor Distribution Application This training manual will describe the use of Oracle’s Labor Distribution (LD) module. From this point forward
the application will be referred to as LD.
LD is the Oracle application that distributes employee earnings to the appropriate PTAEO or PTAEOs, an
accounting instruction comprised of five segments (Project, Task, Award, Expenditure type, Organization). For
information about the segments of the PTAEO, please consult the Chart of Accounts Handbook
(www.yale.edu/coa.)
This on-line application will allow the user to:
ENTER labor schedules for C&T (Clerical & Technical), M&P (Managerial & Professional), CAS (Casual),
STH (Student Hourly), and FAC (Faculty) employee earnings
UPDATE labor schedules to reflect start and end dates of funding sources
MONITOR and MAINTAIN labor schedules based on budgetary and funding source requirements and staffing
changes
DEFINE and APPROVE Distribution Adjustments
REVIEW LD User Reports
INCREASE efficiency and accuracy of labor cost management
Learning Objectives
After completing this course you will be able to:
Understand the Oracle Labor Distribution process
Log on to the Oracle Labor Distribution Module (LD)
Exit the Oracle Application
Understand the components of the Labor Distribution Module
Create labor schedules for various employee classifications
Maintain existing labor schedules for various employee classifications, when applicable
Define and/or approve distribution adjustments by employee name, assignment number, specific pay periods,
and earnings elements
Generate and print Labor Distribution User reports
Distribution Adjustment Submitted by Organization
Distribution Adjustment Submitted by Employee
Distribution History by Org
Employee Labor Schedule Report

Labor Distribut ion User Guide Revis ion Date : 2 -04
Labor Distribution Module (LDM) User Guide February 2016 The official version of this information will only be maintained in an on-line web format. Any and all printed copies of this material are dated as of the print date. Please make certain to review the material on-line prior to placing reliance on a dated printed version.
Page 3 of 52
Support (Who do I Contact) This Oracle business application is not complicated. That said, business processing at the University is not a trivial
affair. Various sources of funding, new applications, upgrades to existing applications, new and changing policies,
procedures and compliance issues are just some of the issues all departments have to deal with.
Always remember that you are not alone. Support partners you will need to call on include…
ITS Help Desk at 432-9000
Business Solutions ([email protected]).
Your instructor for this application:
Roseann McNulty
Business Solutions
203-432-9701

Labor Distribut ion User Guide Revis ion Date : 2 -04
Labor Distribution Module (LDM) User Guide February 2016 The official version of this information will only be maintained in an on-line web format. Any and all printed copies of this material are dated as of the print date. Please make certain to review the material on-line prior to placing reliance on a dated printed version.
Page 4 of 52
Oracle Application Responsibilities – Grants & Contracts
Important Note: There are important User Access differences for people doing Grant & Contract accounting
transfers as compared to those not involving Grants. Please read below…
In 2007 the University introduced a new process for employees needing "with grants" added to their Labor
Distribution (LD) Oracle responsibility.
The Learning Center no longer teaches Cost Transfer Certification (CTC). Cost Transfer Certification is now taught
by Grants & Contracts Financial Administration (GCFA). Cost Transfer Certification is a two hour instructor led
session followed by an on-line examination which must be passed successfully.
This is how the new process works:
1. Register for LD class
2. Attend LD class and get access to standard responsibility
3. Register via TMS for Cost Transfer Principles class
4. Pass the online test for above course
5. Client Accounts is notified by GCFA to add "with grants" responsibility to the employee’s user profile.
LD Roles & Responsibilities
Any responsibility with grants will not be approved until the user has attended the “Allowability of Costs and Cost Transfer Principles” class and passes the certification.
YULD_Department_Grant_Approver YULD_STUCAS_ Department_Grant_Approver
Create Labor Schedules with or with/out grants
Prepare and Approve Distribution Adjustments with or with/out grants
YULD STUCAS-access all undergraduate students, casual employees and Retiree’s
YULD_Phase 2 Dept Manager With NO Grants YULD STUCAS Dept Manager With NO Grants
Create Labor Schedules with/out grants
Prepare and Approve Distribution Adjustments with/out grants
YULD STUCAS-access all undergraduate students, casual employees and Retiree’s
YULD_Phase 2 Dept LD Accountant With Grants
YULD STUCAS Dept LD Accountant with Grants
Create Labor Schedules with grants
Prepare Distribution Adjustments with grants

Labor Distribut ion User Guide Revis ion Date : 2 -04
Labor Distribution Module (LDM) User Guide February 2016 The official version of this information will only be maintained in an on-line web format. Any and all printed copies of this material are dated as of the print date. Please make certain to review the material on-line prior to placing reliance on a dated printed version.
Page 5 of 52
YULD STUCAS-access all undergraduate students, casual employees and Retiree’s
YULD_Phase 2 Dept LD Accountant With NO Grants YULD STUCAS Dept LD Accountant With NO Grants
Create Labor Schedules with/out grants
Prepare Distribution Adjustments with/out grants
YULD STUCAS-access all undergraduate students, casual employees and Retiree’s
5. YULD_Phase 2 Dept LD Specialist
Create Labor Schedules with/out grants
Labor Distribut ion User Guide Revis ion Date : 2 -04
Labor Distribution Module (LDM) User Guide February 2016 The official version of this information will only be maintained in an on-line web format. Any and all printed copies of this material are dated as of the print date. Please make certain to review the material on-line prior to placing reliance on a dated printed version.
Page 6 of 52
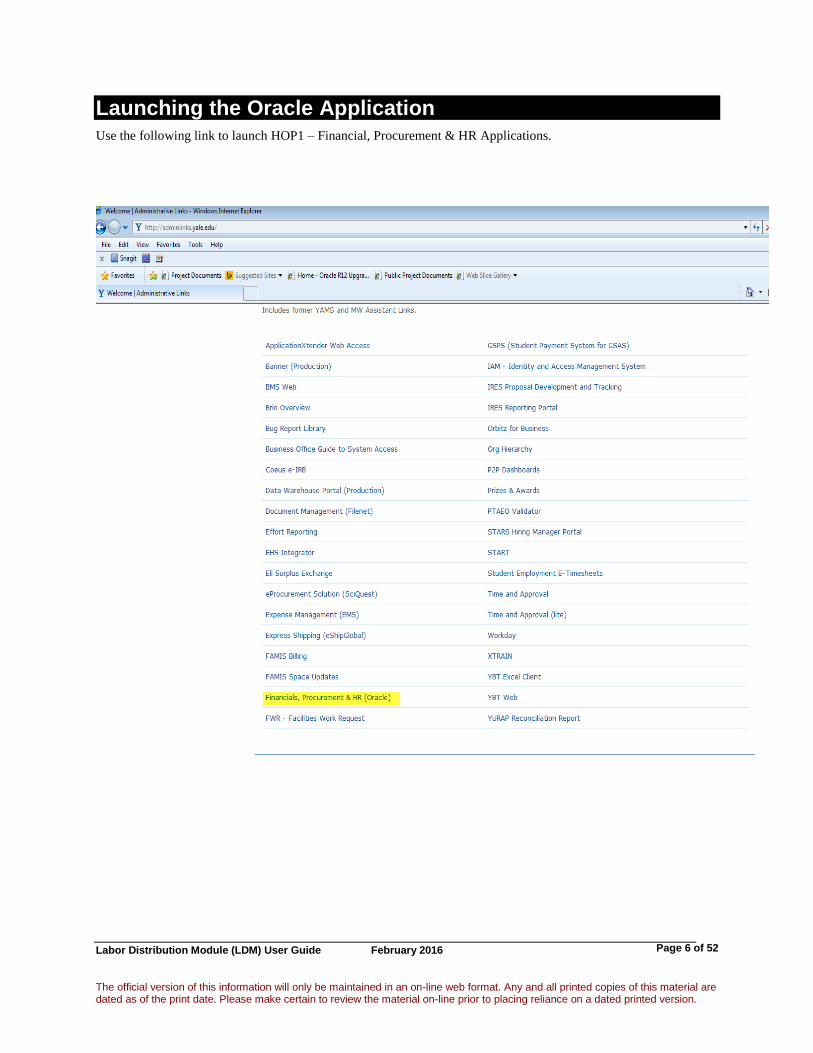
Launching the Oracle Application Use the following link to launch HOP1 – Financial, Procurement & HR Applications.

Labor Distribut ion User Guide Revis ion Date : 2 -04
Labor Distribution Module (LDM) User Guide February 2016 The official version of this information will only be maintained in an on-line web format. Any and all printed copies of this material are dated as of the print date. Please make certain to review the material on-line prior to placing reliance on a dated printed version.
Page 7 of 52
Once the user clicks on Financial, Procurement and Human Resources in the Yale Application Links window, a
University Authorized User Agreement message box appears. By clicking on the OK button you agree to the
terms in the message box.
After clicking OK, CAS (Central Authentication Service) will display.
.
To log on/access the Oracle Application, take the following steps:
1. Log on to identify yourself as a user. The user name identifies each user to the system. It is used to establish
levels of responsibility for entering, viewing and modifying data.
2. Complete the NetID field with your NetID.
3. Enter your Password. Users should use their email password to log on.
4. Click the Login button. The Welcome Menu window will display as shown below. Your self-service and core
applications may vary slightly compared to the list seen below.

Labor Distribut ion User Guide Revis ion Date : 2 -04
Labor Distribution Module (LDM) User Guide February 2016 The official version of this information will only be maintained in an on-line web format. Any and all printed copies of this material are dated as of the print date. Please make certain to review the material on-line prior to placing reliance on a dated printed version.
Page 8 of 52
5. Within the Welcome Menu Navigate list, select the appropriate LD Responsibility. This action will launch
the Oracle application.

Labor Distribut ion User Guide Revis ion Date : 2 -04
Labor Distribution Module (LDM) User Guide February 2016 The official version of this information will only be maintained in an on-line web format. Any and all printed copies of this material are dated as of the print date. Please make certain to review the material on-line prior to placing reliance on a dated printed version.
Page 9 of 52
Labor Schedules (Record “Future” Charging) The Labor Schedules function of Labor Distribution is the tool used by a department’s Business Manager or his or
her designee to charge employees’ labor costs to one or more PTAEOs. In addition, labor schedules enable the
creation of labor commitments (see http://www.yale.edu/ppdev/Procedures/fpm/Commitments/toc.htm for more
about commitments.)
To access labor schedules:
1. From the Navigator window, select the option Labor Schedules.
2. Once selected, press the Enter key on the keyboard, click once on the Open button, or double-click on the
option. The Labor Scheduling form will open.
Labor Scheduling Form
The Labor Scheduling form displays information about the employee whose labor schedule is to be updated. The
information is accessed using the Find Employees window.

Labor Distribut ion User Guide Revis ion Date : 2 -04
Labor Distribution Module (LDM) User Guide February 2016 The official version of this information will only be maintained in an on-line web format. Any and all printed copies of this material are dated as of the print date. Please make certain to review the material on-line prior to placing reliance on a dated printed version.
Page 10 of 52
Frame 1 – Employee
This frame displays specific information about the employee. The information is retrieved from the Human
Resource Management System (HRMS) application by using the Find Employees window.
Frame 2 – Assignment
Information about the employee's assignment will display in Frame 2 of the Labor Scheduling form as seen below.
This information, which is generated from the HR application, is protected against data entry.
The Distribution Instructions, on the right side of the frame, will show whether a scheduling hierarchy has been
created for an employee at any time. When distributing labor costs after a payroll has processed, LD will look first
for accounting instructions at the Element level, then at the Assignment level, and finally, at the Organizational
Default level, when applicable.
Field Name Description
Full Name This field displays the full name of the employee.
Employee No. This field displays the employee ID number.
Employee UPI This field displays the queried employee’s University Personal Identifier.

Labor Distribut ion User Guide Revis ion Date : 2 -04
Labor Distribution Module (LDM) User Guide February 2016 The official version of this information will only be maintained in an on-line web format. Any and all printed copies of this material are dated as of the print date. Please make certain to review the material on-line prior to placing reliance on a dated printed version.
Page 11 of 52
If an employee is scheduled at the Element level, only the portion of the employee’s pay that was entered in the
employee’s Human Resource (HR) record for that element for that time period will be charged to the PTAEO or
PTAEOs indicated on the Element level schedule. For example, if an employee receives pay in the element One
Time Extra Comp, this amount of pay will be charged to the indicated PTAEO if and only if the labor schedule has
a current element level schedule for the element One Time Extra Comp. The Element level accounting instructions
are entered on the Schedule Lines window (see page 16.)
All of an employee’s pay that is not charged at the Element level is charged according to the Assignment level
labor schedule. The Assignment level accounting instructions are entered on the Schedule Lines window (see
below.)
If there is no current Assignment level labor schedule, the employee’s pay will be charged according to the Org Def
(Organization Default Account or Organization Default Labor Schedule if supplied by the department.) The
Organization Default Account is the schedule to which S&M, Casual, Undergraduate, and Non-GSPS Graduate
students compensation is automatically charged, if no other accounting instructions are entered. The Organization
Default Labor Schedule is the schedule to which C&T, M&P, and faculty compensation is automatically charged,
if no other accounting instructions are entered. The Organization Default Labor Schedule cannot include a grant
account. Please see the Labor Distribution Procedures at
http://www.yale.edu/ppdev/GA/LaborDistribution/procedures.htm for more information on the Organization Default
accounts.
Please note that the indicator in the Org Def column will be turned on for every assignment, even if the organization
does not have an Organization Default Account or Organization Default Labor Schedule.
Column Description
Assignment No. Assignment No. is based on the employee number (Employee No.) that is
displayed in Frame 1. It will show the same value if the employee has only
has one assignment within the University. Assignment numbers for a second,
third, etc., assignment have the ending -02 (-03, etc.) added.
Job This column represents the job classification for the employee; i.e., FAC for
faculty; CT for Clerical & Technical; MP for Managerial & Professional,
CAS for Casual, and STH for Student Hourly.
Position This column displays the employee’s job title.

Labor Distribut ion User Guide Revis ion Date : 2 -04
Labor Distribution Module (LDM) User Guide February 2016 The official version of this information will only be maintained in an on-line web format. Any and all printed copies of this material are dated as of the print date. Please make certain to review the material on-line prior to placing reliance on a dated printed version.
Page 12 of 52
Begin This column displays the date on which the assignment of the employee
became effective. If a new employee, it is the employee’s Date of Hire.
End This column represents the end date for the given assignment.
FTE Full Time Equivalent is that part of full time that a given employee is
engaged.
Org. Def. This field will be checked for each assignment.
Assignment The Assignment level is the level at which an employee’s regular salary or
wages should be charged if there is no element level schedule or if the
employee’s regular salary or wages should be charged differently from the
default account/labor schedule. An ‘X’ in this column indicates that the
employee has one or more specific PTAEO(s) for some period of time at the
assignment level.
Element Group This level is currently not in use at Yale.
Element The Element level is the first level of the hierarchy. Each Earnings Element
represents a compensation or benefit type over and above an employee’s
regular salary. An ‘X’ in this column indicates that a specific earnings
element(s) has one or more specific PTAEO(s) for some period of time.
The Schedule Lines button opens the Schedule Lines form.
Find Person
Information that displays on the Labor Scheduling window is retrieved from the Human Resource Management
System (HRMS) application. By using the Find button on the Toolbar, the user will open the Find
Employees window, which is used to find a specific employee’s record.
To search: Type information in one field and select the Find button. Information will populate on the Labor
Scheduling form.

Labor Distribut ion User Guide Revis ion Date : 2 -04
Labor Distribution Module (LDM) User Guide February 2016 The official version of this information will only be maintained in an on-line web format. Any and all printed copies of this material are dated as of the print date. Please make certain to review the material on-line prior to placing reliance on a dated printed version.
Page 13 of 52
Field Name Description
Full Name This field is used to query the full name of the employee record. It is recommended to
initiate a query by typing the last name of the employee.
Employee No. This field is used to enter the employee ID number of the employee to be queried.
Employee UPI This field is searchable and is used to enter the University Personal Identifier number
of the employee to be queried.
The Clear button will clear the window.
The New button has no functionality, and will return the user to the Labor
Scheduling form.
The Find Button will initiate the search based on the criteria above. The results will
display on the Labor Scheduling form.
Schedule Lines Form
The Schedule Lines form is used to enter accounting instructions for employees who need the Organization Default
overridden or if there is no Organization Default. It is also used to enter accounting instructions for any individual
elements that should have different accounting instructions from the assignment level schedule or the Organization
Default. The form is divided into four frames. Each frame is described below.

Labor Distribut ion User Guide Revis ion Date : 2 -04
Labor Distribution Module (LDM) User Guide February 2016 The official version of this information will only be maintained in an on-line web format. Any and all printed copies of this material are dated as of the print date. Please make certain to review the material on-line prior to placing reliance on a dated printed version.
Page 14 of 52
Frame 1-- Employee
This frame contains specific information about the employee as taken from the Oracle HRMS application. It is
reproduced from Frame 1 of the Labor Scheduling form.
Field Description
Full Name This field displays the full name of the employee.
Employee No. This field displays the employee ID number of the employee.
Employee UPI This field displays the University Personal Identifier number of the employee.

Labor Distribut ion User Guide Revis ion Date : 2 -04
Labor Distribution Module (LDM) User Guide February 2016 The official version of this information will only be maintained in an on-line web format. Any and all printed copies of this material are dated as of the print date. Please make certain to review the material on-line prior to placing reliance on a dated printed version.
Page 15 of 52
Frame 2 -- Assignment
This frame displays specific information about the employee as taken from the Oracle HRMS application.
Field Name Field Description
Assignment The Assignment field contains the number that identifies the employee’s assignment. It
is the same number as the Employee ID No. All employees have at least one
Assignment. Employees may have more than one Assignment, in which case the
HRMS application will add a hyphen and a number to the Assignment number.
FTE The Full Time Equivalent field is used in calculating accruals and commitments.
Org. This field is used to display the employee’s primary organization.
Payroll This field is generated based upon the employee’s job classification; i.e., FAC and
M&P – Calendar Month; C&T – Bi-week; Casuals and Students – Week. It displays
the frequency with which an employee is paid.
Begin This field represents the date that an employee’s particular assignment starts.
End This field represents the date that an employee’s particular assignment ends or is
scheduled to end.

Labor Distribut ion User Guide Revis ion Date : 2 -04
Labor Distribution Module (LDM) User Guide February 2016 The official version of this information will only be maintained in an on-line web format. Any and all printed copies of this material are dated as of the print date. Please make certain to review the material on-line prior to placing reliance on a dated printed version.
Page 16 of 52
Frame 3 -- Schedule Hierarchy
The Schedule Hierarchy is used to create a hierarchy for an employee at either the Assignment level or the
Element Type level. A new hierarchy must be created for each element. This must be created before accounting
instructions can be entered on the Schedule Lines. This area is also used to move from the assignment schedule to
the various element schedules. To move to a different schedule, click on one of the radio buttons, and use the
appropriate arrow key on the keyboard.
Field Name Field Description
Assignment This level of the Schedule Hierarchy is used to apply the appropriate accounting
instructions for an employee’s regular salary and any other types of compensation that
should be charged to the same PTAEO(s). This is the second level of instruction in the
Schedule Hierarchy after the Element Type Labor Schedule.
Element Group The Element Group field is currently not in use at Yale.
Element Type This level of the Schedule Hierarchy is used to apply the appropriate accounting
instructions for anticipated earnings types over and above an employee’s regular salary
that should be charged differently from any earnings specified at either the Assignment
level or the Organization Default Account/Labor Schedule. These earnings types
include overtime, faculty summer compensation, on going extra compensation, etc.
The Copy To button is currently not in use at Yale.

Labor Distribut ion User Guide Revis ion Date : 2 -04
Labor Distribution Module (LDM) User Guide February 2016 The official version of this information will only be maintained in an on-line web format. Any and all printed copies of this material are dated as of the print date. Please make certain to review the material on-line prior to placing reliance on a dated printed version.
Page 17 of 52
Frame 4 – Schedule Lines
Schedule Lines are used to enter the specific PTAEO(s) to which an employee’s labor costs are to be charged.
Field Name Field Description
GL Account This field is used to enter the accounting instructions in PTAEO format. It is
strongly recommended that the List of Values ( or F9 key) function be used
to enter the appropriate PTAEO in the Accounting Flexfield (see section on
Accounting Flexfield, page 17.)
Start Date This field is used to enter the date the schedule line begins. Labor costs will be
charged to the PTAEO as of this date.
End Date This required field is used to enter the end date of the schedule line as
applicable. This is the last date the labor costs will be charged to this PTAEO.
% This field is used to enter the percentage of labor costs to be distributed to the
PTAEO. The total percentage(s) for a particular time period must equal 100%.
Default Account This field is currently not in use at Yale.
Totals This field is used to display the total percentage of the labor costs entered on
the schedule line(s).
This function button is used to display the Matrix for the schedule lines
entered. The percentage of distribution of labor for the specific time period
will display in the Matrix.
This function button is currently not in use at Yale.
This function button is currently not in use at Yale.

Labor Distribut ion User Guide Revis ion Date : 2 -04
Labor Distribution Module (LDM) User Guide February 2016 The official version of this information will only be maintained in an on-line web format. Any and all printed copies of this material are dated as of the print date. Please make certain to review the material on-line prior to placing reliance on a dated printed version.
Page 18 of 52
This function button is currently not in use at Yale.
Accounting Flexfield The recommended way to enter a PTAEO is to use the Accounting Flexfield. This window validates the
segments of the PTAEO against the project number and allows the user to use List of Values functionality on
each segment of the PTAEO. Please note that any value of the PTAEO that is linked or has ever been linked to
the project will display in the list of values.
To use the Accounting Flexfield:
1. With the cursor in the GL Account field, use the List of Values button or the F9 key to open the
Accounting Flexfield.
2. Type the Project number in the Project field.
Note: It is very important to use the proper Project number, as the values for the remaining fields are called up
based upon the Project number.
3. When the cursor moves to the Task field, use the List of Values button on the Accounting Flexfield
window (or the F9 key) to open a list of all the tasks that have ever been linked to the project. If only one
Task has been linked to the Project, it will automatically fill in the Task field.

Labor Distribut ion User Guide Revis ion Date : 2 -04
Labor Distribution Module (LDM) User Guide February 2016 The official version of this information will only be maintained in an on-line web format. Any and all printed copies of this material are dated as of the print date. Please make certain to review the material on-line prior to placing reliance on a dated printed version.
Page 19 of 52
4. The cursor will move to the Award field. (Note: If the task has been manually entered in the field and is
shorter than eight characters, the cursor must be moved to the Award filed using the tab key.)
5. Use the List of Values to call up all Awards that have ever been linked to the Project, and select one, or
type in the award number.
6. Do not use the List of Values to call up the Expenditure type. This List of Values contains all the
expenditure types that exist. Instead, type in the appropriate Expenditure Type number. Instead, type the
Expenditure Type number.

Labor Distribut ion User Guide Revis ion Date : 2 -04
Labor Distribution Module (LDM) User Guide February 2016 The official version of this information will only be maintained in an on-line web format. Any and all printed copies of this material are dated as of the print date. Please make certain to review the material on-line prior to placing reliance on a dated printed version.
Page 20 of 52
7. The cursor will move to the Organization field. Use the List of Values to call up all Organizations that
have ever been linked to the Project, and select one.
If the Balancing Segment field is blank, enter the value 02.
8. Select the OK button. The PTAEO will fill in the GL Account field.

Labor Distribut ion User Guide Revis ion Date : 2 -04
Labor Distribution Module (LDM) User Guide February 2016 The official version of this information will only be maintained in an on-line web format. Any and all printed copies of this material are dated as of the print date. Please make certain to review the material on-line prior to placing reliance on a dated printed version.
Page 21 of 52
Distribution Adjustments (Correct “Previous” Charging) The Distribution Adjustments form allows the end user to make corrections or adjustments to labor charges after
payroll has been processed through the Labor Distribution module. As soon as the end user is aware that a correction
or adjustment is necessary, the user should enter the appropriate corrections in order to redistribute labor costs
because of new funding, delays in funding, reassignment of personnel or other factors.
To access distribution adjustments:
Under Distribution Adjustments in the Navigator window, select and open the Define option.
Defining a Distribution Adjustment
Find Person
Once the option, Define, has been selected, the Find Distributions window will display as seen below. This
window is used to define the specific employee, time period and element of the distribution adjustment.

Labor Distribut ion User Guide Revis ion Date : 2 -04
Labor Distribution Module (LDM) User Guide February 2016 The official version of this information will only be maintained in an on-line web format. Any and all printed copies of this material are dated as of the print date. Please make certain to review the material on-line prior to placing reliance on a dated printed version.
Page 22 of 52
Field Description
Employee Name The Employee Name field may be used to find the record that is being adjusted. Enter
the last name of the employee and tab to see a list of all employees with that last name.
Assignment Type in the employee’s assignment number and tab. The Employee Name will auto-
populate. This is the faster way to search for the employee name and assignment number.
Begin Date This field is used to enter the beginning date of the specific payroll period for which an
adjustment is to be made.
End Date This field is used to enter the end date of the specific payroll period for which an
adjustment is to be made.
Earnings Element This field is used to enter the specific Earnings Element that is being modified or
adjusted.
Leave this field blank to see all elements charged for the selected time period.
The Earnings Element may be selected from a list of values that will only contain
the Earnings Elements that were paid to the selected employee in the specific
payroll period. Use the List of Values button or F9 key to access the available
Earnings Elements.
This button is used to clear entries that have been made in the Find Distributions fields.
This button is used to access the distribution to be adjusted according to the parameters
entered in the Find Distributions window.

Labor Distribut ion User Guide Revis ion Date : 2 -04
Labor Distribution Module (LDM) User Guide February 2016 The official version of this information will only be maintained in an on-line web format. Any and all printed copies of this material are dated as of the print date. Please make certain to review the material on-line prior to placing reliance on a dated printed version.
Page 23 of 52
Effort Report Coordination (Effort Report Status)
The Labor Distribution Adjustment Form will do a call to the Effort Reporting System for the current status of
individuals Effort Reports. If the individual is not in the Effort Reporting System (no data found for individual) a
note box will not appear. This is an informational box only.
Distribution Adjustments Form
The Distribution Adjustments form will open as displayed below. The Distribution Adjustments form is divided
into three frames. A description of each frame follows.
Labor Distribut ion User Guide Revis ion Date : 2 -04
Labor Distribution Module (LDM) User Guide February 2016 The official version of this information will only be maintained in an on-line web format. Any and all printed copies of this material are dated as of the print date. Please make certain to review the material on-line prior to placing reliance on a dated printed version.
Page 24 of 52
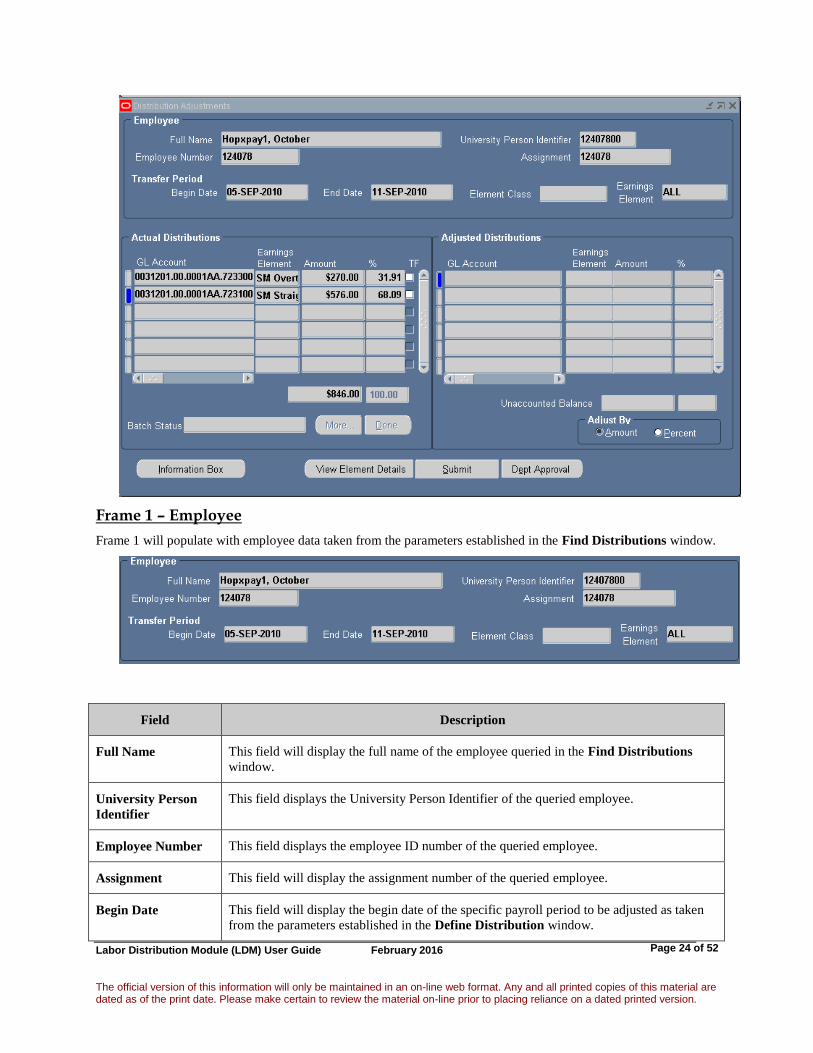
Frame 1 – Employee
Frame 1 will populate with employee data taken from the parameters established in the Find Distributions window.
Field Description
Full Name This field will display the full name of the employee queried in the Find Distributions
window.
University Person
Identifier
This field displays the University Person Identifier of the queried employee.
Employee Number This field displays the employee ID number of the queried employee.
Assignment This field will display the assignment number of the queried employee.
Begin Date This field will display the begin date of the specific payroll period to be adjusted as taken
from the parameters established in the Define Distribution window.

Labor Distribut ion User Guide Revis ion Date : 2 -04
Labor Distribution Module (LDM) User Guide February 2016 The official version of this information will only be maintained in an on-line web format. Any and all printed copies of this material are dated as of the print date. Please make certain to review the material on-line prior to placing reliance on a dated printed version.
Page 25 of 52
End Date This field will display the end date of the specific payroll period to be adjusted as taken
from the parameters established in the Define Distribution window.
Element Class This field is currently not in use at Yale.
Earnings Element This field will display the specific Earnings Element to be adjusted as taken from the
parameters established in the Define Distribution window.
Frame 2 – Actual Distributions
This frame will display the PTAEO(s) to which the queried employee’s labor costs were actually distributed by LD
after payroll ran.
Column Description
GL Account The PTAEO of the original distribution appears in this field.
Earnings Element The earnings element paid for the period specified.
Amount This field contains the actual dollar amount paid through the selected earnings element.
% The value in this field is the percentage of the employee’s total pay for the selected
element and the selected period that was charged to this PTAEO.
The TF column is used to select the schedule line(s) that is to be transferred to the
Adjusted Distributions side of the form for adjustment. Only lines from a single
element may be selected at one time.
The More button is used to adjust multiple earnings elements within one adjustment
batch. When the Adjusted Distribution total is zero, select the More button to enable the
selection of more Actual Distributions to be moved. When the More button is selected,

Labor Distribut ion User Guide Revis ion Date : 2 -04
Labor Distribution Module (LDM) User Guide February 2016 The official version of this information will only be maintained in an on-line web format. Any and all printed copies of this material are dated as of the print date. Please make certain to review the material on-line prior to placing reliance on a dated printed version.
Page 26 of 52
lines that have already been adjusted will turn blue.
The Done button is used to transfer the selected Actual Distribution to the Adjusted
Distributions side of the form. The button will bold once a Actual Distribution line has
been selected for transfer.
Frame 3 – Adjusted Distributions
This frame will display the PTAEO that was transferred from the Actual Distributions side of the form. It is also
used to enter the correct PTAEO(s) for the Adjusted Distributions.
Field Description
GL Account The PTAEO of the original distribution appears on the top line in this field.
Correcting PTAEOs should be entered into this field on subsequent lines.
Earnings Element The earnings element paid for the period specified.
Amount This field displays the dollar amount to be distributed to the appropriate PTAEO(s)
on the top line, and the amount to be distributed on the correcting lines. In most
cases, the original amount will display as a negative number, indicating the PTAEO
that will be credited, and correcting amounts will show as positive (debit) amounts.
If the original in this column is a positive amount, the correcting entry must be
made as a percentage, as the application will not allow users to enter negative
dollar amounts.
% This field is used to enter the specific percentage of labor costs to be charged to
that PTAEO.
Unaccounted Balance These fields display both the dollar amount and the percentage that is to be
adjusted. Both values must be brought to zero in order to complete the

Labor Distribut ion User Guide Revis ion Date : 2 -04
Labor Distribution Module (LDM) User Guide February 2016 The official version of this information will only be maintained in an on-line web format. Any and all printed copies of this material are dated as of the print date. Please make certain to review the material on-line prior to placing reliance on a dated printed version.
Page 27 of 52
Distribution Adjustments process.
Adjust By This selector displays the preferred method of adjustment; i.e., the adjustment is
made either by a dollar amount or a specific percentage.

Labor Distribut ion User Guide Revis ion Date : 2 -04
Labor Distribution Module (LDM) User Guide February 2016 The official version of this information will only be maintained in an on-line web format. Any and all printed copies of this material are dated as of the print date. Please make certain to review the material on-line prior to placing reliance on a dated printed version.
Page 28 of 52
Distribution Adjustment Information Box
The Labor Distribution Adjustment Form will display an information box which will provide information on the
batch being created. This information will only appear once you have created the Adjusted Distributions. The
information box will provide the following information.
1. If a Federal Award has been used in this batch
2. If the time period selected has any previously certified effort.
3. If the time period selected creates a grant cost transfer that is over 90 days
4. If the total amount of the batch is over the allowed threshold for grant cost transfers
This “Information Box” is for information purposes only.

Labor Distribut ion User Guide Revis ion Date : 2 -04
Labor Distribution Module (LDM) User Guide February 2016 The official version of this information will only be maintained in an on-line web format. Any and all printed copies of this material are dated as of the print date. Please make certain to review the material on-line prior to placing reliance on a dated printed version.
Page 29 of 52
Distribution Adjustment Approval (Status)
Distribution Adjustment Approval Status

Labor Distribut ion User Guide Revis ion Date : 2 -04
Labor Distribution Module (LDM) User Guide February 2016 The official version of this information will only be maintained in an on-line web format. Any and all printed copies of this material are dated as of the print date. Please make certain to review the material on-line prior to placing reliance on a dated printed version.
Page 30 of 52
Additional Buttons
For LD users authorized to prepare adjustments, the following two buttons will appear on the distribution adjustment
form.
For LD users authorized to approve adjustments, the following three buttons will appear on the distribution
adjustment form.

Labor Distribut ion User Guide Revis ion Date : 2 -04
Labor Distribution Module (LDM) User Guide February 2016 The official version of this information will only be maintained in an on-line web format. Any and all printed copies of this material are dated as of the print date. Please make certain to review the material on-line prior to placing reliance on a dated printed version.
Page 31 of 52
Button Description
Selecting this button opens a display window that contains information on the
distribution line selected. This detailed information includes a breakdown of all the
individual payroll periods included in the distribution line.
When all adjustments have been made to the record, select the Submit button to
open the Submit window.
Available only for labor distribution adjustment authorized approvers. Selecting
this button approves the transaction; it will not receive further review. The
Approve window will open; a batch name and comments must be entered.

Labor Distribut ion User Guide Revis ion Date : 2 -04
Labor Distribution Module (LDM) User Guide February 2016 The official version of this information will only be maintained in an on-line web format. Any and all printed copies of this material are dated as of the print date. Please make certain to review the material on-line prior to placing reliance on a dated printed version.
Page 32 of 52
Submit and Approve Windows
These windows are used to name the batch of the distribution that is being adjusted. Comments must be entered,
and will appear on certain reports. The comment is part of the audit trail for this transaction.
Note: Using the Submit button will open the Submit window; using the Approve button opens the Approve
window. It is recommended that LD users check to see which window they are on to be sure they have selected the
correct function.
Field Name Field Description
Batch Name This field is used to enter the name of the batch to be submitted for approval. When
entering a batch name, the end user should be consistent with the naming
convention used.
Comments This field is used to enter an appropriate description as to why the adjustment is
being made. The comments should be used for the purpose of an audit trail. This is
a required field.
This button may be used to exit the Submit or Approve window. Selecting the
Cancel button will return the end user to the Distribution Adjustments form.
This button is used to complete the submission or approval process. Once the end
user has selected the OK button, the adjustment is submitted for approval or
approved in the approve form.

Labor Distribut ion User Guide Revis ion Date : 2 -04
Labor Distribution Module (LDM) User Guide February 2016 The official version of this information will only be maintained in an on-line web format. Any and all printed copies of this material are dated as of the print date. Please make certain to review the material on-line prior to placing reliance on a dated printed version.
Page 33 of 52
Approving a Distribution Adjustment
All Distribution Adjustments must be approved in order to transfer the correction to the General Ledger.
Distribution adjustments created by an authorized approver that have been approved at the time of data entry, do not
need to be approved on this form. All other distribution adjustments (all distribution adjustments that have been
submitted) must be approved on the Approve Adjustments form.
Under Distribution Adjustments in the Navigator window, select and open the Approve option.
Find Batches Window
This window is used to access the batch that is to be approved.

Labor Distribut ion User Guide Revis ion Date : 2 -04
Labor Distribution Module (LDM) User Guide February 2016 The official version of this information will only be maintained in an on-line web format. Any and all printed copies of this material are dated as of the print date. Please make certain to review the material on-line prior to placing reliance on a dated printed version.
Page 34 of 52
Field Description
Batch Name This field is used to query the batch to be approved. The beginning of the batch name
(as defined on the Submit window) followed by a percent sign (%) may be entered to
access the batch. If more than one batch begins with the characters typed, a List of
Values will show all choices. Select the correct batch by double clicking, and select the
Find button.
This button is used to clear entries that have been made in the Batch Name field.
This button is used to access the batch once the Batch Name field has been completed.
Approve Adjustments Form
The Approve Adjustments form is used to approve batches submitted from the Distribution Adjustments form.
The form is divided into three frames. Each frame is described below.

Labor Distribut ion User Guide Revis ion Date : 2 -04
Labor Distribution Module (LDM) User Guide February 2016 The official version of this information will only be maintained in an on-line web format. Any and all printed copies of this material are dated as of the print date. Please make certain to review the material on-line prior to placing reliance on a dated printed version.
Page 35 of 52
Frame 1 – Employee
This frame shows the parameters that were selected for the distribution adjustment. All fields are shaded to show
that no data entry is possible.
Field Description
Full Name This field displays the full name of the employee.

Labor Distribut ion User Guide Revis ion Date : 2 -04
Labor Distribution Module (LDM) User Guide February 2016 The official version of this information will only be maintained in an on-line web format. Any and all printed copies of this material are dated as of the print date. Please make certain to review the material on-line prior to placing reliance on a dated printed version.
Page 36 of 52
University Person Identifier This field displays the University Person Identifier (UPI) of the employee.
Employee Number This field displays the ID number of the employee.
Assignment This field displays the Assignment number of the employee.
Begin Date This field displays the begin date of the specific payroll period being adjusted.
End Date This field displays the end date of the specific payroll period being adjusted.
Element Class This field is currently not in use at Yale.
Earnings Element This field displays the specific Earnings Element being adjusted.
Frame 2 – Actual Distributions
This frame will not display any information from the Actual Distributions for the specific payroll period as
established. It will be shaded gray.
Frame 3 – Adjusted Distributions
This frame will display information from the Actual Distributions form for the specific payroll period as previously
defined. It will reflect the incorrect and correct PTAEOs and the specific dollar amounts and percentages being
adjusted.
Incorrect lines will be highlighted in blue. Lines turn blue when the PTAEO that was entered on the adjustment is
no longer valid. Any incorrect adjustment PTAEO may be corrected by changing the PTAEO to a different,
currently valid PTAEO.
If the distribution adjustment is approved on the same day it is defined, this problem will not occur.
Adjustments should be approved as soon as possible after they are defined.
Actual Distribution lines (lines that the charges are being moved from – usually the negative dollar
amount) cannot be changed on this form. If the PTAEO is for a grant that has ended, contact GCFA about
re-opening the award.

Labor Distribut ion User Guide Revis ion Date : 2 -04
Labor Distribution Module (LDM) User Guide February 2016 The official version of this information will only be maintained in an on-line web format. Any and all printed copies of this material are dated as of the print date. Please make certain to review the material on-line prior to placing reliance on a dated printed version.
Page 37 of 52
Only the PTAEO may be changed on incorrect lines. If the dollar amount/percentage should be changed,
reject the entire batch (click the Reject button) and define a new distribution adjustment for this employee
for this time period.
Field Description
GL Account This field will display the original and updated PTAEOs of the distribution
adjustment.
Amount This field displays the dollar amount, positive or negative, associated with the
PTAEO on that line.
% This field displays the percentage associated with the PTAEO on that line
Unaccounted Balance This field will display the value “zero” for both the amount and percentage (%) that
is being adjusted.
Adjust By This field displays the method of adjustment used by the end user; i.e., the
adjustment was made either by a dollar amount or a specific percentage. The field
will be shaded.
This button may be used when an LD Dept Manager needs to correct PTAEOs on
the Adjusted Distributions form but does not have all the data. The Manager would
correct as many PTAEOs as he/she can and would then click the Save button and
close the form. Once the rest of the PTAEO information is obtained, the Manager
can query the batch again, complete the corrections and approve the batch.
Additional Buttons

Labor Distribut ion User Guide Revis ion Date : 2 -04
Labor Distribution Module (LDM) User Guide February 2016 The official version of this information will only be maintained in an on-line web format. Any and all printed copies of this material are dated as of the print date. Please make certain to review the material on-line prior to placing reliance on a dated printed version.
Page 38 of 52
Button Description
Information Box This button is used to display cost transfer information (i.e. transfer over 90 days,
Federal Award, amount over threshold etc.)
View Element Details Selecting this button opens a display window that contains information on the
distribution line selected. This detailed information includes a breakdown of all the
individual payroll periods included in the distribution line.
Approve This button is used to approve the Distribution Adjustment once the LD
Department Manager has reviewed the PTAEO and Comments.
Reject This button is used by the Department Manager to reject a Distribution
Adjustment when the adjustment is not correct. If the distribution adjustment is
rejected, it must be redefined before it may be approved.
Comments This button is used to access the Comments window. The Department Manager
should review the Comments entered by the LD Accountant before approving the
batch.
Cost Transfer Process Flow
Department Preparer
1. Prepare Distribution Adjustment
2. Complete the “Cost Transfer Justification” Form
3. Scan Supporting Documentation (including the scanning submission form cover sheet)
4. Attach Supporting Documentation
5. Submit Distribution Adjustment
Department Approver
1. Dept Approver reviews “Cost Justification Form”
2. Dept Approver reviews Attached Supporting Documentation
3. Dept Approver Approves or Rejects Batch
Prepare Distribution Adjustment for G&C
1. Select “Define” (from main “navigator” menu)
2. Find Distributions (find individual and begin date & end date)
3. Select Individual
4. Check “TF” Code (on line to be adjusted)
5. Select new Account Number(s)

Labor Distribut ion User Guide Revis ion Date : 2 -04
Labor Distribution Module (LDM) User Guide February 2016 The official version of this information will only be maintained in an on-line web format. Any and all printed copies of this material are dated as of the print date. Please make certain to review the material on-line prior to placing reliance on a dated printed version.
Page 39 of 52
Complete Cost Transfer Justification Form for G&C
To access the Justification Form:
1. Click “Zoom” icon to open the Justification Form (the “toaster” icon)
2. Question #1 – Select Reason
“Correction of an erroneously charged expense”
“Allocation of costs that benefit more than one project”
“Transfer pre-award costs from a department holding account”
“Intra-inter-department billing for internal services”
“Other” – Contact your GCFA Representative before using “Other”
3. Enter detailed description (applicable for the reason selected)
4. Question #2 – Indicate if correction is being made late
“Is the transfer within 90 days form the end of the calendar month which the transaction appeared?”
a. If “No” enter detailed reason

Labor Distribut ion User Guide Revis ion Date : 2 -04
Labor Distribution Module (LDM) User Guide February 2016 The official version of this information will only be maintained in an on-line web format. Any and all printed copies of this material are dated as of the print date. Please make certain to review the material on-line prior to placing reliance on a dated printed version.
Page 40 of 52
5. Question #3 – Describe why charge should be charged to proposed award and how it will benefit
this project
6. Click in “Name” field (list-of-values)
7. Enter “Last Name” of PI (name fragement followed by “%”)
8. Hit “Tab”
9. Select Person Click “OK”
10. Click “Justification Complete”
11. Click “OK” (note what documentation must be attached)
Attach Supporting Documentation for G&C
Use scanning submission form to scan hard copy documentation that needs to be attached to the distribution
adjustment batch.
To attach soft copy documentation Click “Attachments” (the “paperclip” icon)

Labor Distribut ion User Guide Revis ion Date : 2 -04
Labor Distribution Module (LDM) User Guide February 2016 The official version of this information will only be maintained in an on-line web format. Any and all printed copies of this material are dated as of the print date. Please make certain to review the material on-line prior to placing reliance on a dated printed version.
Page 41 of 52
1. In “Category” bring up LOV, enter % and find. Select category. 2. Select “File” in “Data Type” (Oracle upload file page will drop to the bottom of your screen)
3. Complete “Oracle Upload a File” (“browse” to find file)
4. Select file and Click “OK”
5. Close “Oracle Upload Form”
6. Has File Been Uploaded Successfully, Click “Yes”
7. Click “Open Document” (optional step to view attached document if desired)
8. Close “Attachments” window
Department Approval for G&C
Select “Approve” (from main “Navigator” menu)
1. Enter “Batch” for Search (e.g. “%KTM-07-NOV%)
2. Click “Find”
3. Click “Zoom” icon (review “Cost Justification Form” and correct where applicable)
4. Click “Justification Complete”
5. Click “OK”
6. Click “Attachment” icon (review attachments and correct and reattach where applicable)

Labor Distribut ion User Guide Revis ion Date : 2 -04
Labor Distribution Module (LDM) User Guide February 2016 The official version of this information will only be maintained in an on-line web format. Any and all printed copies of this material are dated as of the print date. Please make certain to review the material on-line prior to placing reliance on a dated printed version.
Page 42 of 52
7. Click “Open Document”
8. Close Window (after reviewing attached file)
9. Click a new attachment line (the next unused line)
10. Select “Department Comment” in “Category” (List of Values)
(or enter “de” for “Department Comment” …” and Tab to next field)
11. Click “OK”
12. Select “Short Text” in “Data Type” (list-of-values)
(or enter “sh” for “File” and Tab to next field)
13. Click “OK”
14. Click “Save” icon
15. Click “Yes” (“Has File Been Uploaded Successfully”)
16. Click “Save” icon

Labor Distribut ion User Guide Revis ion Date : 2 -04
Labor Distribution Module (LDM) User Guide February 2016 The official version of this information will only be maintained in an on-line web format. Any and all printed copies of this material are dated as of the print date. Please make certain to review the material on-line prior to placing reliance on a dated printed version.
Page 43 of 52
Enter Batch Status (“Approved by Department”) for G&C
Entering this status confirms that the Dept Approver is satisfied with (1) LD charging detail, (2) Transfer
Justification Form, (3) Attachments and certifies that this LD Batch is ready for Dept Approval.
1. Click Batch Status
2. Select “Ready for GCFA Approval” and click save button or click “Dept Approval” button
which will automatically change the batch status to “Ready for GCFA Approval”.
3. Click “OK”

Labor Distribut ion User Guide Revis ion Date : 2 -04
Labor Distribution Module (LDM) User Guide February 2016 The official version of this information will only be maintained in an on-line web format. Any and all printed copies of this material are dated as of the print date. Please make certain to review the material on-line prior to placing reliance on a dated printed version.
Page 44 of 52
Distribution Adjustments – Approved Batches
This form will show all the details of a Distribution Adjustment after the batch has been approved.

Labor Distribut ion User Guide Revis ion Date : 2 -04
Labor Distribution Module (LDM) User Guide February 2016 The official version of this information will only be maintained in an on-line web format. Any and all printed copies of this material are dated as of the print date. Please make certain to review the material on-line prior to placing reliance on a dated printed version.
Page 45 of 52
User Reports There are several reports available to end users for use with Labor Distribution. The purpose of these reports is
specific for the information provided.
Two reports show information regarding submitted Distribution Adjustments. These reports are:
Distribution Adjustment Submitted by Employee
Distribution Adjustment Submitted by Organization
Accessing the User Reports
On the Navigator window, select the option, User Reports. Double click User Reports to expand the option.
Distribution Adjustment Submitted by Organization Report
The Distribution Adjustment Submitted by Organization report is used to show the end user a list of distribution
adjustments that were created between selected dates for a specific home organization. The adjustments shown have
been submitted to the Labor Distribution module (LD) but have not yet been approved, or have been approved but
not yet processed by the Central LD Administrator. The report may be generated any time after Distribution
Adjustments have been submitted.
Distribution Adjustment Submitted by Organization Report Form
Once the option, Dist Adj Submitted by Org has been selected, the Parameters for Submitted Distribution
Adjustment Transaction Register will display as seen below.

Labor Distribut ion User Guide Revis ion Date : 2 -04
Labor Distribution Module (LDM) User Guide February 2016 The official version of this information will only be maintained in an on-line web format. Any and all printed copies of this material are dated as of the print date. Please make certain to review the material on-line prior to placing reliance on a dated printed version.
Page 46 of 52
Field Description
Submitted Distribution
Adjustment Dates
This field is used to enter a date range, which must include the date the
distribution adjustment was created. Please note that this is not the actual dates
worked (not the payroll period dates).
This button is used to display all Organizations to which the end user has YAS
access.
This button is used to run the Distribution Adjustment Submitted by
Organization report.
After the Show Organizations button has been selected, a Restrictions Criteria window will display as seen
below.

Labor Distribut ion User Guide Revis ion Date : 2 -04
Labor Distribution Module (LDM) User Guide February 2016 The official version of this information will only be maintained in an on-line web format. Any and all printed copies of this material are dated as of the print date. Please make certain to review the material on-line prior to placing reliance on a dated printed version.
Page 47 of 52
Field Description
Enter Your Restriction for
Organization Name
This field is used to search for organizations by name (FESADM), or by
organization number (621201). When searching by short org name, the
organization name must be entered in all capital letters. This search is case
sensitive. Any organizations to which the user has YAS access may be queried.
This button may be used to exit the Restrictions Criteria window. Selecting the
Cancel button will return the end user to the Parameters for Submitted
Distribution Adjustment Transaction Register.
This button is used to complete the organization search. Once the end user has
selected the OK button, all organizations to which the end user has YAS access
will display.
Distribution Adjustment Submitted by Employee Report
The Distribution Adjustment Submitted by Employee report is used to show the end user a list of distribution
adjustments that were created between selected dates for a specific home employee. The adjustments shown have
been submitted to the Labor Distribution module (LD) but have not yet been approved, or have been approved but
not yet processed by the Central LD Administrator. The report may be generated any time after Distribution
Adjustments have been submitted.
Distribution Adjustment Submitted by Employee Report Form
Once the option, Dist Adj Submitted by Emp has been selected, the Parameters for Submitted Distribution
Adjustment Transaction Register will display as seen below.

Labor Distribut ion User Guide Revis ion Date : 2 -04
Labor Distribution Module (LDM) User Guide February 2016 The official version of this information will only be maintained in an on-line web format. Any and all printed copies of this material are dated as of the print date. Please make certain to review the material on-line prior to placing reliance on a dated printed version.
Page 48 of 52
Field Description
Submitted Distribution
Adjustment Dates
This field is used to enter a date range, which must include the date the
distribution adjustment was created. Please note that this is not the actual dates
worked (not the payroll period dates).
This button is used to display all employees that the end user has YAS access to.
This button is used to run the Distribution Adjustment Submitted by Employee
report.
After the Show Employees button has been selected, a Restrictions Criteria window will display as seen below.

Labor Distribut ion User Guide Revis ion Date : 2 -04
Labor Distribution Module (LDM) User Guide February 2016 The official version of this information will only be maintained in an on-line web format. Any and all printed copies of this material are dated as of the print date. Please make certain to review the material on-line prior to placing reliance on a dated printed version.
Page 49 of 52
Field Description
Enter Your Restriction for
Employee Name
This field is used to search for an employee by name. This field is not case
sensitive. Any employee to whom the user has YAS access may be queried.
This button may be used to exit the Restrictions Criteria window. Selecting the
Cancel button will return the end user to the Parameters for Submitted
Distribution Adjustment Transaction Register.
This button is used to complete the employee search. Once the end user has
selected the OK button, all employees to whom the end user has YAS access will
display.

Labor Distribut ion User Guide Revis ion Date : 2 -04
Labor Distribution Module (LDM) User Guide February 2016 The official version of this information will only be maintained in an on-line web format. Any and all printed copies of this material are dated as of the print date. Please make certain to review the material on-line prior to placing reliance on a dated printed version.
Page 50 of 52
Distribution History by Org The Distribution History by Org report is used to provide prior payroll distribution charges by org.

Labor Distribut ion User Guide Revis ion Date : 2 -04
Labor Distribution Module (LDM) User Guide February 2016 The official version of this information will only be maintained in an on-line web format. Any and all printed copies of this material are dated as of the print date. Please make certain to review the material on-line prior to placing reliance on a dated printed version.
Page 51 of 52
Employee Labor Schedule Report
The Employee Labor Schedule Report is used to verify labor schedules for a time period specified in the
parameters.