labelmark 3 tutorials - lanshack.com · labelmark 3 tutorials 2 t1: using the online user's...
TRANSCRIPT

LabelMark 3 Tutorials

i
Table Of Contents Basic LabelMark Tutorials.......................................................................................................................... 1
T1: Using the Online User's Guide Tutorial ............................................................................................. 1 T2: LabelMark Essentials Tutorial ........................................................................................................... 5 T3: Simple Serialization and WireMarking Tutorial .............................................................................. 11 T4: Repeating Commands Tutorial......................................................................................................... 16 T5: Date & Time Information Tutorial ................................................................................................... 22 T6: Printing Tutorial ............................................................................................................................... 28
Advanced LabelMark Tutorials................................................................................................................ 37 T7: Advanced Serialization Tutorial....................................................................................................... 37 T8: LabelMark Templates Tutorial......................................................................................................... 48 T9: Importing Data Into LabelMark Tutorial ......................................................................................... 53 T10: Flip-Flop and Find/Replace Tutorial .............................................................................................. 64 T11: Favorite Parts List Tutorial............................................................................................................. 68 T12: 110/BIX Block & Patch Panel Tutorial.......................................................................................... 73 T13: Continuous Parts Tutorial............................................................................................................... 77
LabelMark Plus Tutorials ......................................................................................................................... 85 T14: LabelMark Plus Essentials Tutorials .............................................................................................. 85 T15: Importing Into LabelMark Plus Tutorial ........................................................................................ 93 T16: LabelMark Plus Templates Tutorials ............................................................................................. 98
Index .......................................................................................................................................................... 105


T1: Using the Online User's Guide Tutorial 1
Basic LabelMark Tutorials T1: Using the Online User's Guide Tutorial Overview This tutorial explains how to:
• Display and browse through the user guide
• Use the Contents, Index and Search tabs to find information
• Differentiate between jump links and drop-down text links
• Use the browser forward and back buttons
Display and Browse Through the User Guide To display the online User's Guide, select Help User’s Guide from within LabelMark or LabelMark Plus.
Note: You can browse through topics with the buttons (Previous Topic and Next Topic).
The online user guide appears in a standard web browser window.
Use the Contents, Index and Search Tabs to Find Information There are three tab buttons across the top of the screen – Contents, Index and Search – that provide different ways to locate the information you need.
LabelMark 3 Tutorials
2 T1: Using the Online User's Guide Tutorial
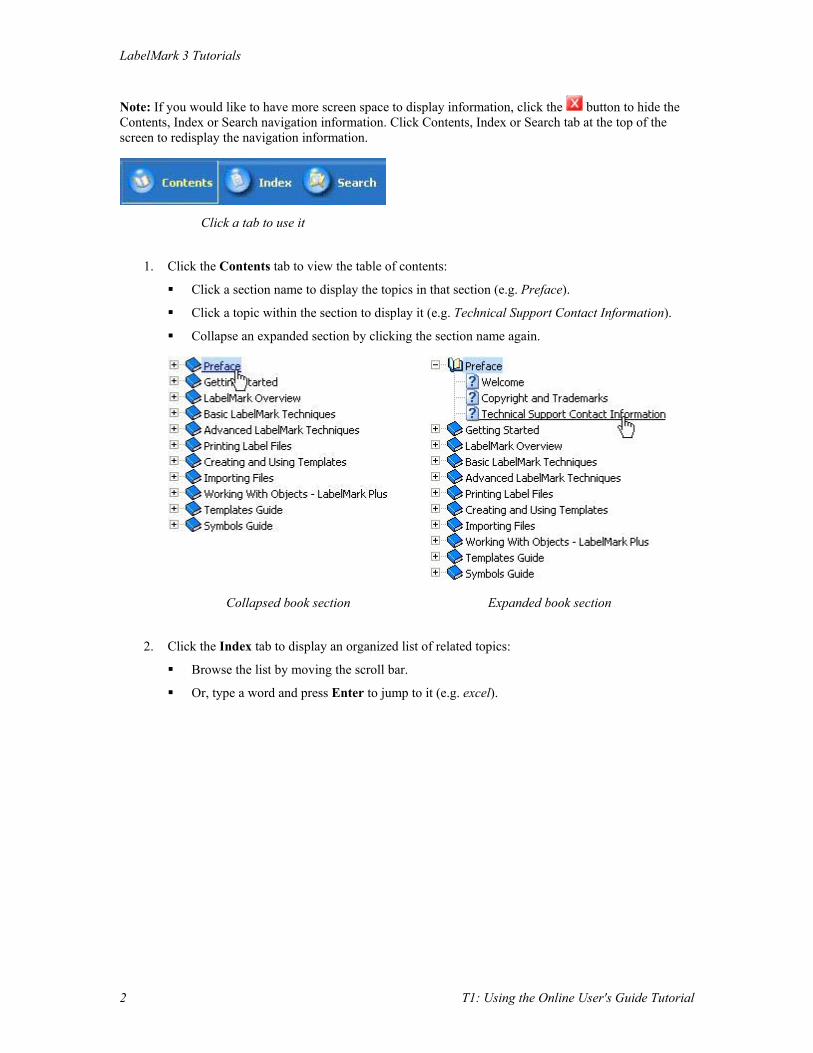
Note: If you would like to have more screen space to display information, click the button to hide the Contents, Index or Search navigation information. Click Contents, Index or Search tab at the top of the screen to redisplay the navigation information.
Click a tab to use it
1. Click the Contents tab to view the table of contents:
Click a section name to display the topics in that section (e.g. Preface).
Click a topic within the section to display it (e.g. Technical Support Contact Information).
Collapse an expanded section by clicking the section name again.
Collapsed book section Expanded book section
2. Click the Index tab to display an organized list of related topics:
Browse the list by moving the scroll bar.
Or, type a word and press Enter to jump to it (e.g. excel).

Basic LabelMark Tutorials
T1: Using the Online User's Guide Tutorial 3
Click an index entry to jump to the associated topic (e.g. import process).
List of index entries
3. Click the Search tab to look for words and phrases within the full text of the user's guide:
Type a word and press Enter (or click Go) to perform the search (e.g. import). The system displays a list of the topics that contain the word in your search.
Type additional words separated by spaces to refine your search (e.g. import excel manual). The system displays a list of the topics that contain all of the words in your search.
Click a topic to display it (e.g. Importing Data into LabelMark Plus).
Broad search Refined search
Differentiate Between Jump Link and Drop-Down Text Links You will see various types of hyperlinks in the user's guide and tutorials:
• A hyperlink is underlined text that lets you jump to a new location or display additional relevant information.
• When you pass the mouse cursor over a hyperlink, the arrow turns into a pointing hand.

LabelMark 3 Tutorials
4 T1: Using the Online User's Guide Tutorial
• The user guide and tutorials include two types hyperlinks: jump links and drop-down text.
Jump links allow you to immediately go to another topic or a web site by clicking a blue-underlined hyperlink.
Click Back on your browser to return to your starting point.
Jump links take you to a new topic or web site
Drop-down text links allow you to display or hide detailed information by clicking a green-underlined hyperlink (preceded by a graphic).
Drop-down text link with details hidden
Drop-down text link with details shown

Basic LabelMark Tutorials
T2: LabelMark Essentials Tutorial 5
T2: LabelMark Essentials Tutorial Overview This tutorial explains how to:
• Create a new file in LabelMark
• Add text and format it
• Change to a different label part
• Save and close the file
Create a new file in LabelMark
1. Double-click the icon on the Windows® desktop to start LabelMark.
2. When you start LabelMark the Welcome screen appears. Select Create new file and click OK. (If LabelMark is already running, click File New….)

LabelMark 3 Tutorials
6 T2: LabelMark Essentials Tutorial
3. Select the printer and label part to use on the New file screen:
The New dialog lists available printers and label parts
Select the Printer from the list (e.g. Bradyprinter Model 2461 or some other appropriate printer).
Select the Printer type from the list (e.g. Thermal).
Select the Part family from the list (e.g. Die-Cut).
Click your desired Part Name in the table or type the part name in the Label part box (e.g. THT-116).

Basic LabelMark Tutorials
T2: LabelMark Essentials Tutorial 7
Click OK to create label file.
The Multiple Label Layout view displays the labels approximately as they will print
For more information on this topic, see Quick Start Guide - Creating a Basic Text Label in the LabelMark User's Guide.
Add text to the file and format it 1. Type your desired text (e.g. A1-001).
2. With the text line selected (blue dashed outline and flashing text cursor), format it as desired (e.g.
click Bold ). LabelMark displays the formatted text:
Before After
For more information on this topic, see Label Editor Screen or Format Toolbar in the LabelMark User's Guide.
Change to a different label part LabelMark allows you to switch to a different label part after you create your label file.
For the purposes of this tutorial, assume you want to change from a 2-line to a 4-line label part.
LabelMark 3 Tutorials
8 T2: LabelMark Essentials Tutorial
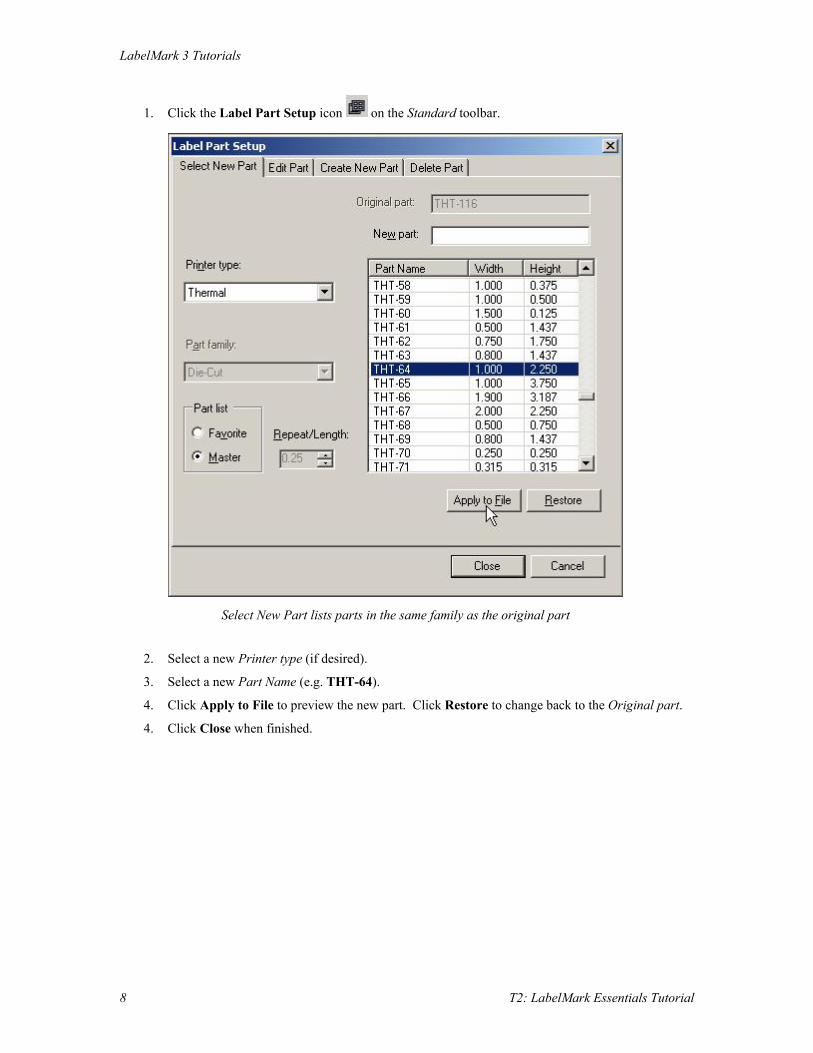
1. Click the Label Part Setup icon on the Standard toolbar.
Select New Part lists parts in the same family as the original part
2. Select a new Printer type (if desired).
3. Select a new Part Name (e.g. THT-64).
4. Click Apply to File to preview the new part. Click Restore to change back to the Original part.
4. Click Close when finished.

Basic LabelMark Tutorials
T2: LabelMark Essentials Tutorial 9
5. LabelMark displays your modified label file.
For more information on this topic, see Selecting a Different Label Part in the LabelMark User's Guide.
Save and close the file 1. Save the label file:
Click File Save… (or click the Save icon on the toolbar). The Save As dialog box appears.
Type the file name and click Save (e.g. LMFile1).
LabelMark displays the default file location. You may change to a different folder or change the default location (see Changing User Defaults in the LabelMark User Guide).
2. Close the label file:
Click File Close.

LabelMark 3 Tutorials
10 T2: LabelMark Essentials Tutorial
For more information on this topic, see Saving a File in the LabelMark User's Guide.

Basic LabelMark Tutorials
T3: Simple Serialization and WireMarking Tutorial 11
T3: Simple Serialization and WireMarking Tutorial Overview This tutorial explains how to:
• Open an existing label file
• Copy a label
• Serialize labels
• WireMark labels
Open an existing label file Open the label file you created in the LabelMark Essentials Tutorial:
• Select File Open….
• Select the file you want to open and click Open (e.g. LMFile1.lmf). Note: If you did not complete the LabelMark Essentials Tutorial, open the C:\Program Files\Brady\LabelMark3\Tutorial Data\T2-Essentials.lmf file.
The system displays the files for the open application – LabelMark or LabelMark Plus
• Change the A1-001 text in label 1 to Brady.
• Click the Center Justify button to center the Brady text on the label.
LabelMark 3 Tutorials
12 T3: Simple Serialization and WireMarking Tutorial
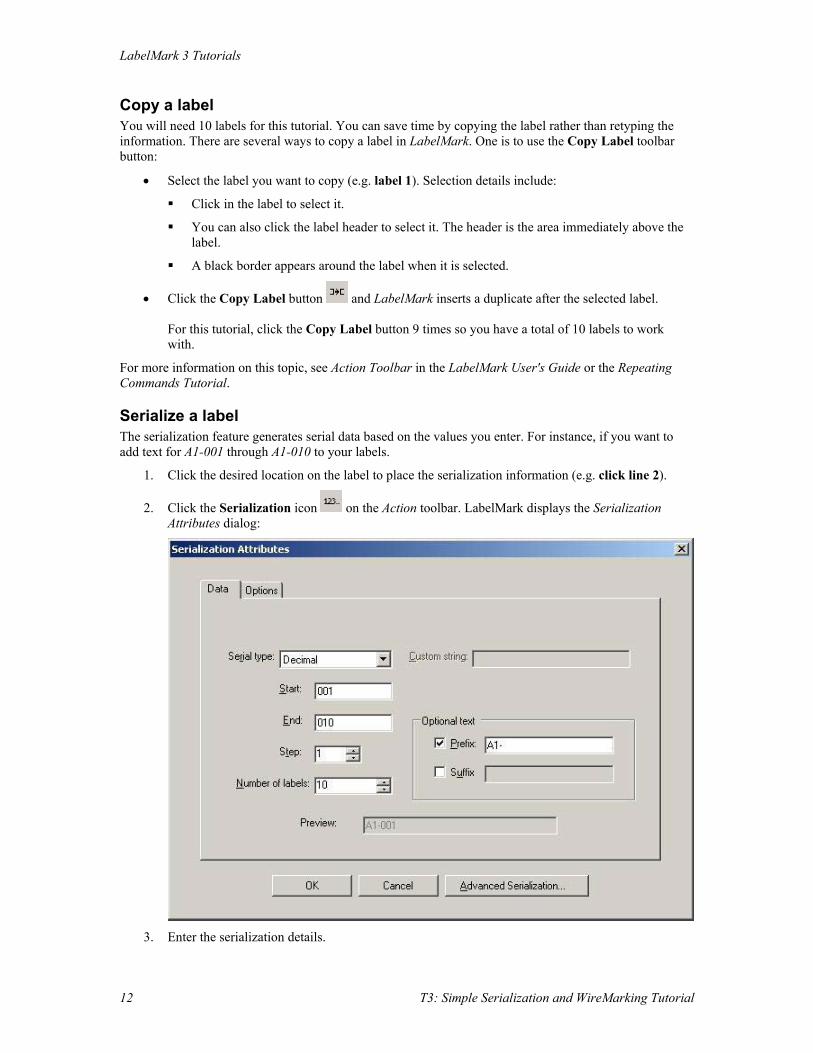
Copy a label You will need 10 labels for this tutorial. You can save time by copying the label rather than retyping the information. There are several ways to copy a label in LabelMark. One is to use the Copy Label toolbar button:
• Select the label you want to copy (e.g. label 1). Selection details include:
Click in the label to select it.
You can also click the label header to select it. The header is the area immediately above the label.
A black border appears around the label when it is selected.
• Click the Copy Label button and LabelMark inserts a duplicate after the selected label. For this tutorial, click the Copy Label button 9 times so you have a total of 10 labels to work with.
For more information on this topic, see Action Toolbar in the LabelMark User's Guide or the Repeating Commands Tutorial.
Serialize a label The serialization feature generates serial data based on the values you enter. For instance, if you want to add text for A1-001 through A1-010 to your labels.
1. Click the desired location on the label to place the serialization information (e.g. click line 2).
2. Click the Serialization icon on the Action toolbar. LabelMark displays the Serialization Attributes dialog:
3. Enter the serialization details.

Basic LabelMark Tutorials
T3: Simple Serialization and WireMarking Tutorial 13
Start – Type 001.
End – Type 010.
Prefix – Select the Prefix check box and type A1-.
4. Click OK. LabelMark displays your serialized labels.
To modify a serialization, double-click one of the serialization objects
For more information on this topic, see Serializing Labels (Simple) or Serializing Labels (Advanced) in the LabelMark User's Guide.
WireMark labels WireMarking copies text as many times as it will fit on the label so you can read the label on the wire from any angle. To WireMark your labels:
1. Select the label(s) you want to WireMark (e.g. click Select All ).
2. Click the Bottom Justification icon to align the text at the bottom of the printable area of the label. (This ensures that you won't cover the text as you wrap the label around the wire.)

LabelMark 3 Tutorials
14 T3: Simple Serialization and WireMarking Tutorial
3. Click the WireMark icon on the Action toolbar. LabelMark WireMarks the selected labels.
To remove WireMarking from your labels:
1. Select the label(s) (e.g. click Select All again).
2. Click the WireMark icon again.
Save the label file:
1. Click the Save icon .

Basic LabelMark Tutorials
T3: Simple Serialization and WireMarking Tutorial 15
The finished label file looks like this:
For more information on this topic, see WireMarking Labels in the LabelMark User's Guide.

LabelMark 3 Tutorials
16 T4: Repeating Commands Tutorial
T4: Repeating Commands Tutorial Overview This tutorial explains how to use the Command Multiplier to:
• Copy a label(s) multiple times
• Copy a line(s) multiple times
• Insert multiple labels
• Delete multiple labels
The Command Multiplier provides more flexibility in copying labels and lines and also lets you insert or delete labels. It’s particularly useful when working with a large number of labels.
For more information on these topics, see Repeating Common Commands in the LabelMark User's Guide.
Copy a label(s) multiple times In the Simple Serialization and WireMarking Tutorial you repeatedly copied a single label with the Copy Label toolbar button. The Command Multiplier simplifies the copy process:
1. Create a new file (as described in the LabelMark Essentials Tutorial) with a Bradyprinter Model 2461 thermal printer (or some other appropriate printer) and a THT-64 die-cut label part.
2. Type Panel A in the first line of label 1.
3. Now create 9 additional copies of label 1 with the Command Multiplier:
Select the label(s) you want to copy (e.g. Label 1).

Basic LabelMark Tutorials
T4: Repeating Commands Tutorial 17
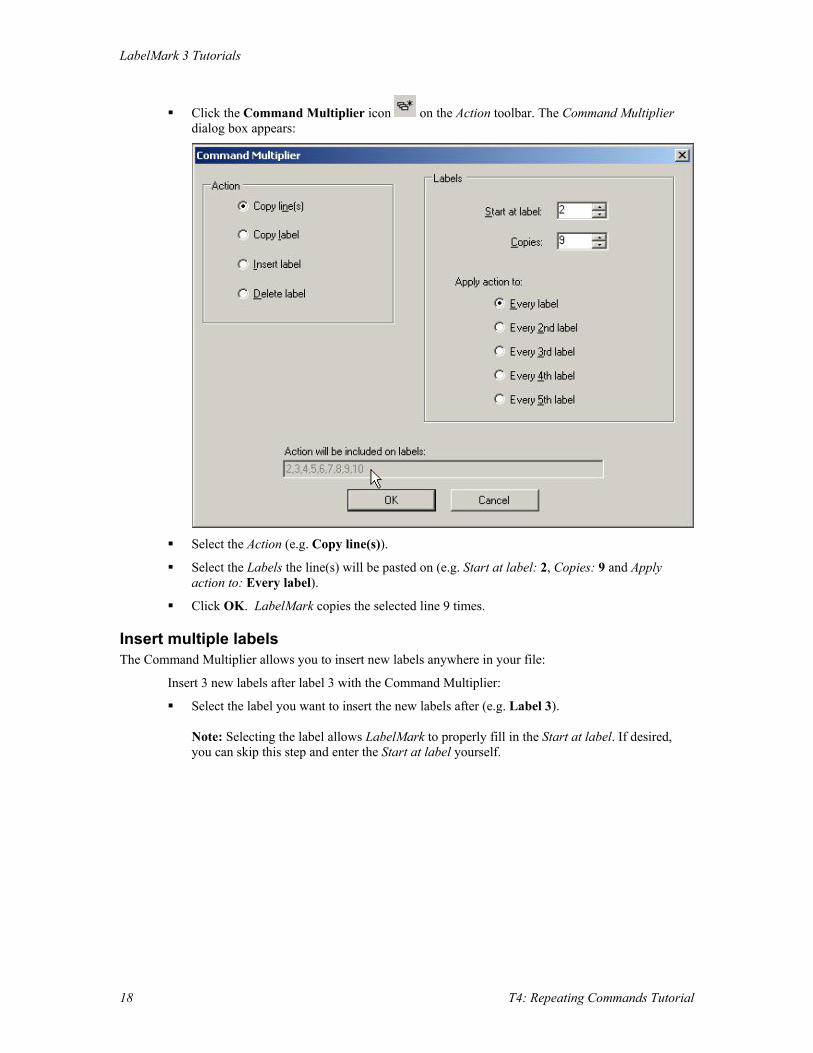
Click the Command Multiplier icon on the Action toolbar. The Command Multiplier dialog box appears:
Select the Action (e.g. Copy label).
Select the Labels to be created and where to create them (e.g. Start at label: 2, Copies: 9 and Apply action to: Every label). Note: The Action will be included on: field tells you which labels will be affected.
Click OK. LabelMark copies the selected label 9 times.
Copy a line(s) multiple times The Command Multiplier allows you to copy a line or several lines of text from one label to others:
1. Type Zone 5 in the second line of label 1.
2. Now copy the line to the other labels in the file with the Command Multiplier:
Select the line(s) you want to copy (e.g. Zone 5).
LabelMark 3 Tutorials
18 T4: Repeating Commands Tutorial
Click the Command Multiplier icon on the Action toolbar. The Command Multiplier dialog box appears:
Select the Action (e.g. Copy line(s)).
Select the Labels the line(s) will be pasted on (e.g. Start at label: 2, Copies: 9 and Apply action to: Every label).
Click OK. LabelMark copies the selected line 9 times.
Insert multiple labels The Command Multiplier allows you to insert new labels anywhere in your file:
Insert 3 new labels after label 3 with the Command Multiplier:
Select the label you want to insert the new labels after (e.g. Label 3). Note: Selecting the label allows LabelMark to properly fill in the Start at label. If desired, you can skip this step and enter the Start at label yourself.
Basic LabelMark Tutorials
T4: Repeating Commands Tutorial 19
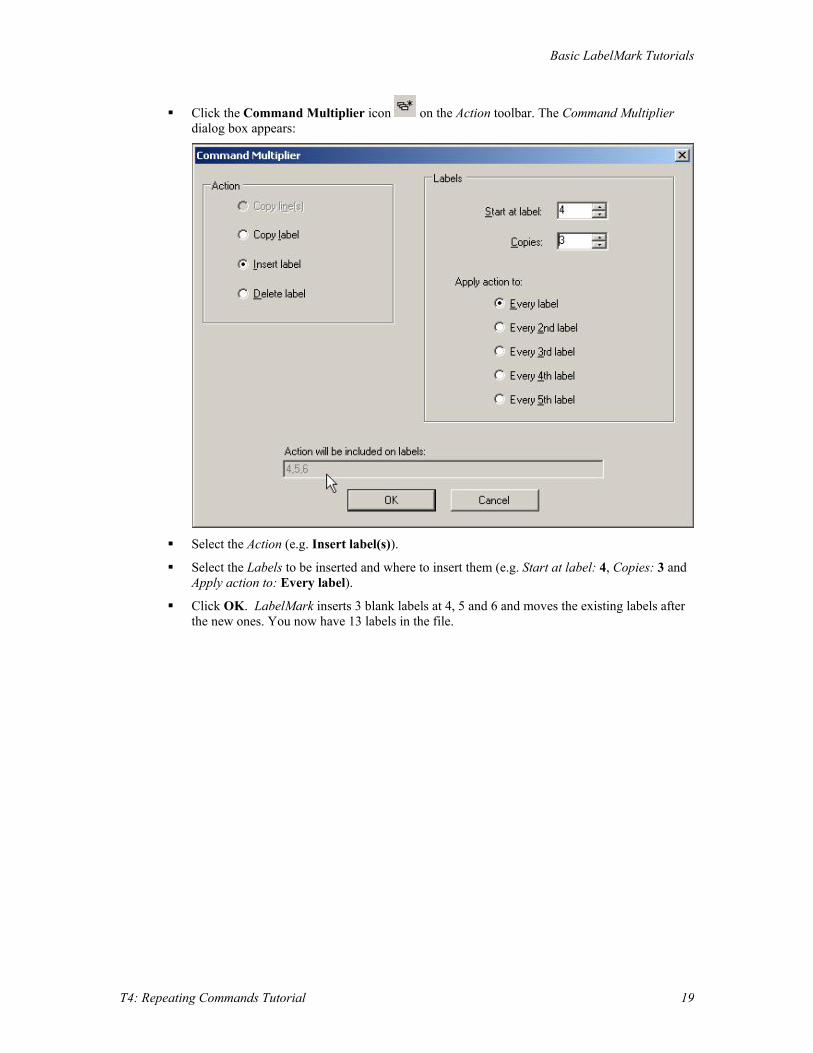
Click the Command Multiplier icon on the Action toolbar. The Command Multiplier dialog box appears:
Select the Action (e.g. Insert label(s)).
Select the Labels to be inserted and where to insert them (e.g. Start at label: 4, Copies: 3 and Apply action to: Every label).
Click OK. LabelMark inserts 3 blank labels at 4, 5 and 6 and moves the existing labels after the new ones. You now have 13 labels in the file.
LabelMark 3 Tutorials
20 T4: Repeating Commands Tutorial
Delete multiple labels The Command Multiplier allows you to delete labels anywhere in your file:
Delete the 3 new labels you just inserted with the Command Multiplier:
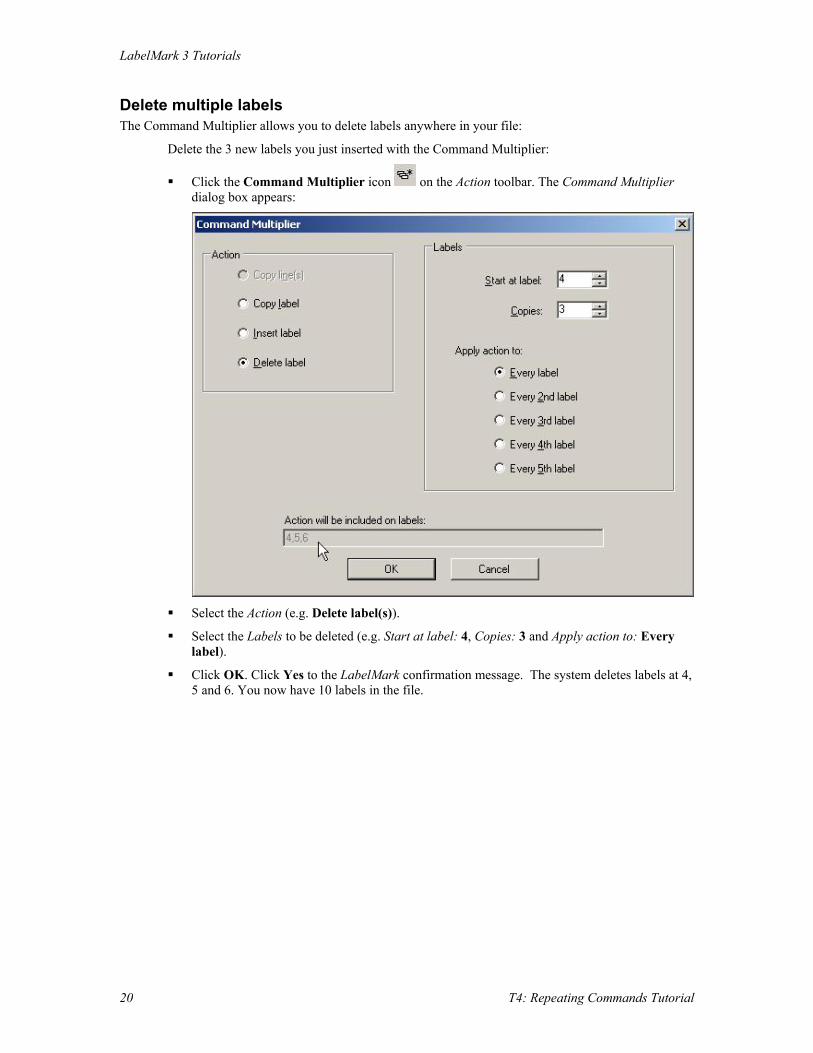
Click the Command Multiplier icon on the Action toolbar. The Command Multiplier dialog box appears:
Select the Action (e.g. Delete label(s)).
Select the Labels to be deleted (e.g. Start at label: 4, Copies: 3 and Apply action to: Every label).
Click OK. Click Yes to the LabelMark confirmation message. The system deletes labels at 4, 5 and 6. You now have 10 labels in the file.

Basic LabelMark Tutorials
T4: Repeating Commands Tutorial 21
The finished label file looks like this:
LabelMark 3 Tutorials
22 T5: Date & Time Information Tutorial
T5: Date & Time Information Tutorial Overview This tutorial explains how to:
• Insert date/time information
• Modify date/time information
• Delete date/time information
• Format date/time information
For more information on these topics, see Inserting Date and Time Information in the LabelMark User's Guide.
Setup The Date/Time function allows you to easily insert date and time information into your label file.
1. Create a new file (as described in the LabelMark Essentials Tutorial) with a Bradyprinter Model 2461 thermal printer (or some other appropriate printer) and a THT-19 die-cut label part.
2. Type Date: in the first line of label 1.
3. Copy the Date: line to the nine labels that follow (as described in Repeating Commands Tutorial).
Insert date/time information Now add the date and time to the ten labels in the file:
1. Click the desired location on the label to place the date/time information (e.g. the second line of label 1).
Basic LabelMark Tutorials
T5: Date & Time Information Tutorial 23
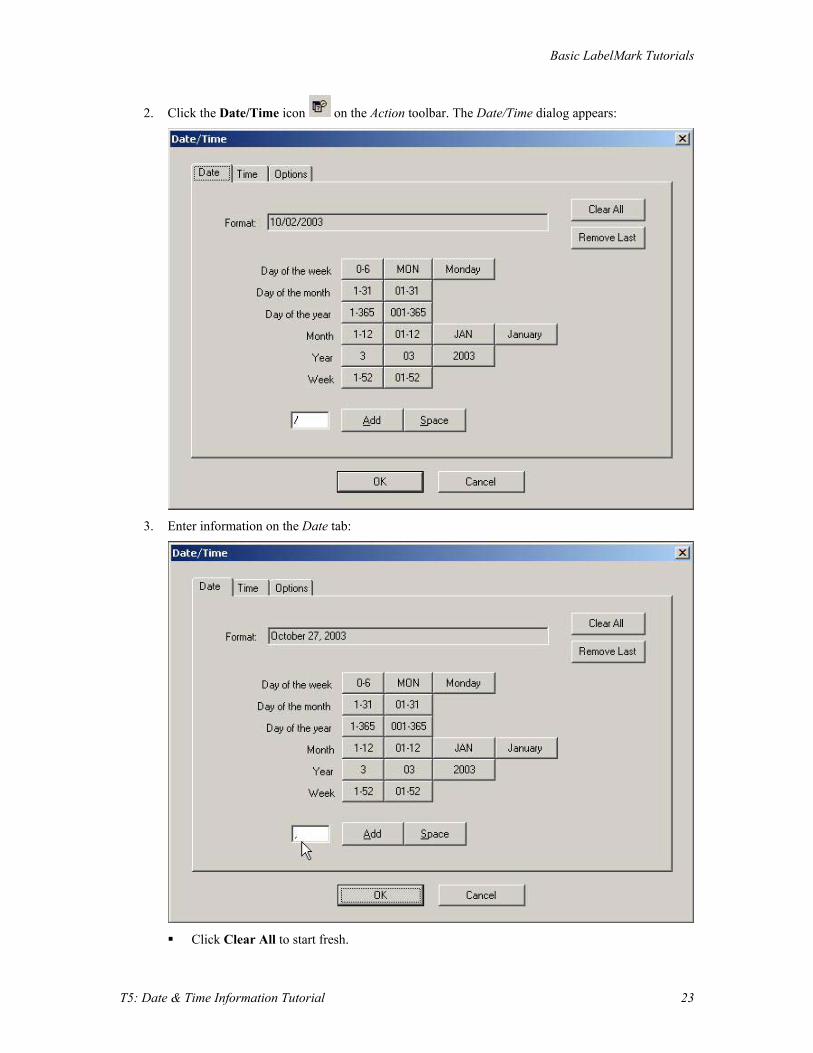
2. Click the Date/Time icon on the Action toolbar. The Date/Time dialog appears:
3. Enter information on the Date tab:
Click Clear All to start fresh.
LabelMark 3 Tutorials
24 T5: Date & Time Information Tutorial
If you make a mistake while adding elements, click Remove Last to delete the element you added most recently.
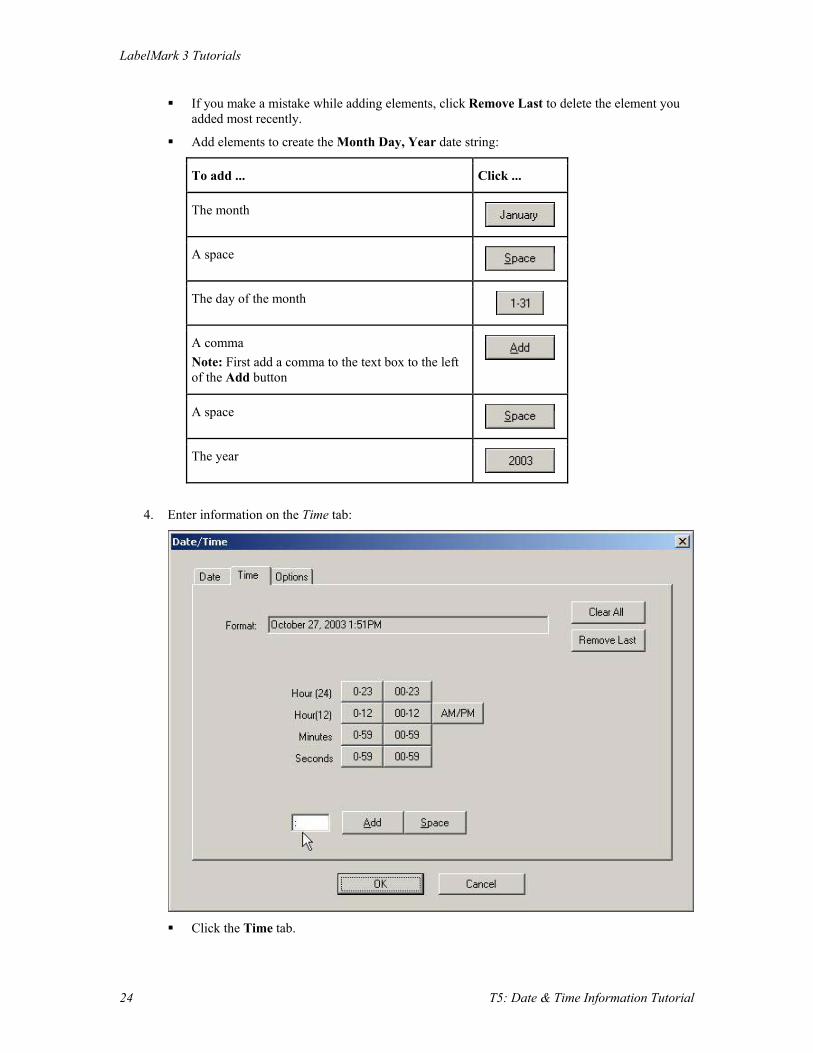
Add elements to create the Month Day, Year date string:
To add ... Click ...
The month
A space
The day of the month
A comma Note: First add a comma to the text box to the left of the Add button
A space
The year
4. Enter information on the Time tab:
Click the Time tab.
Basic LabelMark Tutorials
T5: Date & Time Information Tutorial 25
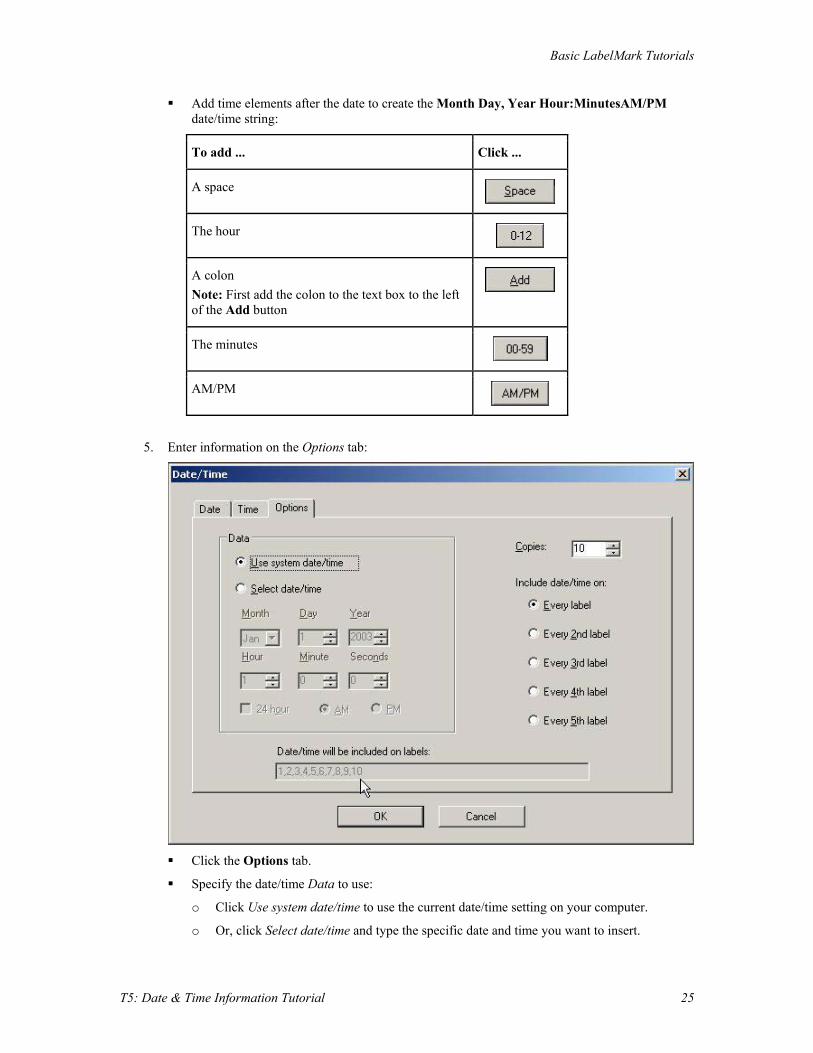
Add time elements after the date to create the Month Day, Year Hour:MinutesAM/PM date/time string:
To add ... Click ...
A space
The hour
A colon Note: First add the colon to the text box to the left of the Add button
The minutes
AM/PM
5. Enter information on the Options tab:
Click the Options tab.
Specify the date/time Data to use:
o Click Use system date/time to use the current date/time setting on your computer.
o Or, click Select date/time and type the specific date and time you want to insert.

LabelMark 3 Tutorials
26 T5: Date & Time Information Tutorial
o For this tutorial, select Use system date/time.
Set the number of labels on which to insert the date/time field with Copies. For this tutorial enter 10.
Select an Include date/time on radio button to skip labels if desired. For this tutorial, select Every label.
The Date/time will be included on labels field tells you where the system will insert the date/time fields.
6. Click OK to add the date/time string to the first 10 labels in file.
Modify date/time information When you insert a date/time field, LabelMark creates linked objects. The linked objects contain the attributes for modifying the item. As a result, you cannot manually edit linked objects, you must modify their attributes through the original dialog box. To edit date/time objects:
1. Double-click one of the date/time objects
2. The system displays the Date/Time dialog with the original attributes
3. Modify the attributes as desired and click OK to regenerate the date/time fields
Delete date/time information If you select a date/time object and press Delete, the system asks if you want to delete all items linked to those in the current selection?:
• If you select No, the system deletes only the selected date/time object
• If you select Yes, the system deletes all of the linked date/time objects
• If you select Cancel, the system deletes nothing
Format date/time information To format date/time objects:
1. Click one of the date/time objects
2. Select Edit Select All Linked Objects
3. Format the objects as desired (e.g. click Italic )

Basic LabelMark Tutorials
T5: Date & Time Information Tutorial 27
The finished label file looks like this:

LabelMark 3 Tutorials
28 T6: Printing Tutorial
T6: Printing Tutorial Overview This tutorial explains how to:
• Select a printer
• Preview a print job
• Select a range or ranges of labels to print
• Print multiple copies of labels
• Print a label file
For more information on this topic, refer to the Printing a Label File in the LabelMark User's Guide.
Setup LabelMark offers many options for printing your label files. Open the LMFile1.lmf file you created and altered in the LabelMark Essentials Tutorial and Simple Serialization and WireMarking Tutorial so you have something to work with as we explain the options.
• Select File Open….
• Select the file you want to open and click Open (e.g. LMFile1.lmf). Note: If you did not complete the previous tutorials, open the C:\Program Files\Brady\LabelMark3\Tutorial Data\T3-SerializeWireMark.lmf file.
Select a printer LabelMark allows you to set a default printer for all label files. It also allows you to select a printer just for the active label file.

Basic LabelMark Tutorials
T6: Printing Tutorial 29
To set the default LabelMark printer:
1. Select Tools User Defaults…. The User Default Options dialog appears:
2. On the General tab:
Select your default LabelMark printer from the drop-down list.
If you chose the TLS2200 Brady portable thermal transfer printer, select the COM port it uses.
3. Click OK. Note: All of your future LabelMark and LabelMark Plus print jobs will be directed to this printer until you change it.
To override the LabelMark default printer for the active file:
Note: LabelMark remembers the printer you use when you create a label file. This procedure also allows you to use an existing file with a new printer.
LabelMark 3 Tutorials
30 T6: Printing Tutorial
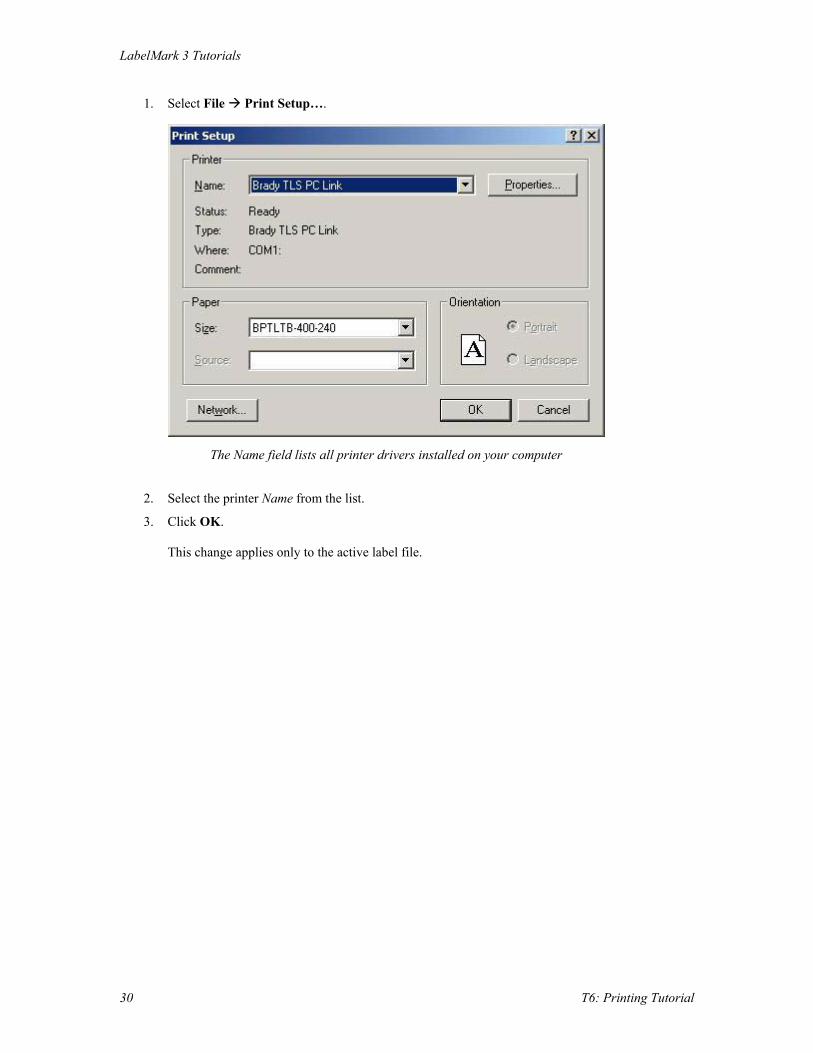
1. Select File Print Setup….
The Name field lists all printer drivers installed on your computer
2. Select the printer Name from the list.
3. Click OK. This change applies only to the active label file.

Basic LabelMark Tutorials
T6: Printing Tutorial 31
Preview a print job If you would like to see approximately how your job will print before actually printing it:
• Click Preview on the Standard toolbar. The preview dialog looks like this:
Click Next and Prev to scroll through the pages in your file.
Click Zoom In and Zoom Out to look at varying levels of detail.
Click Close to exit the preview without printing.
Click Print… to display the Print dialog box.
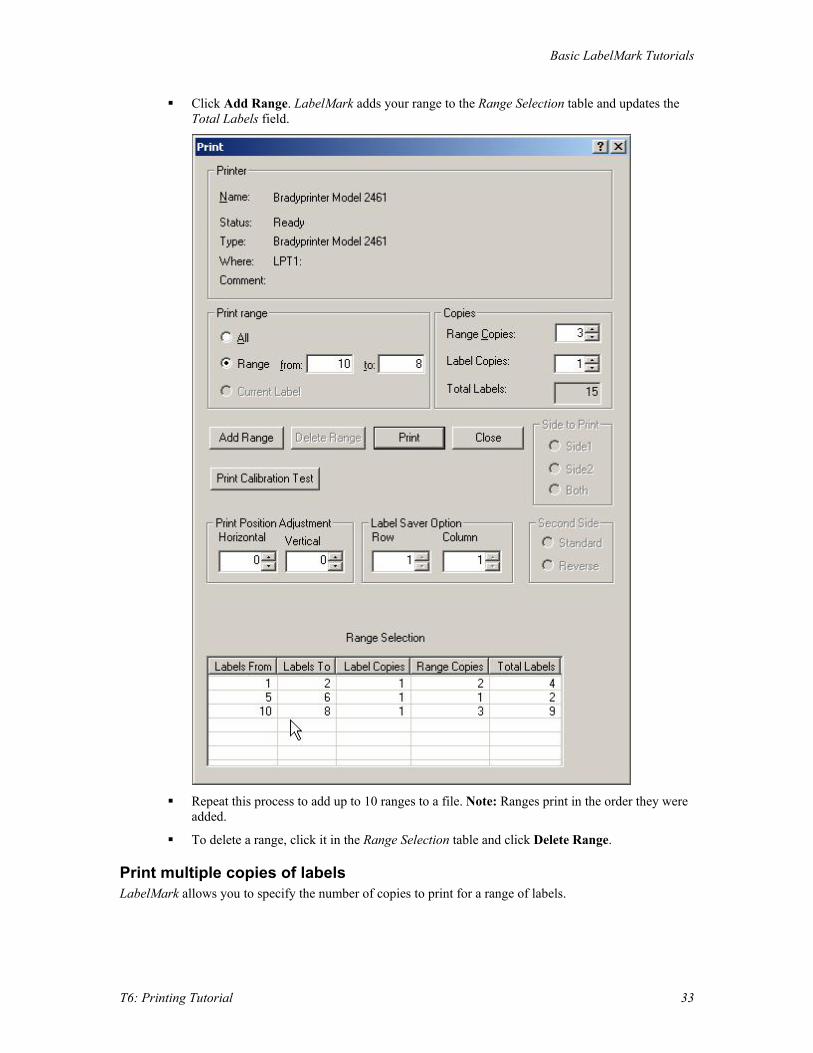
Select a range or ranges of labels to print LabelMark allows you to designate a range or several ranges of labels to print. A range is a subset of the label file.
• To quickly select a single range of labels to print, select the desired labels before clicking Print:
Click and drag to select labels 4 and 5 (or Ctrl+click the two labels).
Click Print on the Standard toolbar.

LabelMark 3 Tutorials
32 T6: Printing Tutorial
LabelMark pre-fills the Range from: and Range to: label numbers in the Print dialog:
Click Print to print the two labels.
• To specify multiple label ranges to print:
Click the Range radio button in the Print dialog box.
Type the from: (starting label number) and to: (ending label number) for your range. These entries can be in ascending or descending order (e.g. from: 1 to: 2 or from: 10 to: 8).
If required, set the number of copies to print (see below).
Basic LabelMark Tutorials
T6: Printing Tutorial 33
Click Add Range. LabelMark adds your range to the Range Selection table and updates the Total Labels field.
Repeat this process to add up to 10 ranges to a file. Note: Ranges print in the order they were
added.
To delete a range, click it in the Range Selection table and click Delete Range.
Print multiple copies of labels LabelMark allows you to specify the number of copies to print for a range of labels.

LabelMark 3 Tutorials
34 T6: Printing Tutorial
To specify the number of copies of the active range to print:
• Set the number of copies:
To set the number of copies to print for the active range, change the Range Copies. For example, if you set Range Copies to 2 for the range of labels 1 through 3, the label sequence will print as follows:
#1 #2 #3 #1 #2 #3
To change the number of times a label will print before printing the next label, change the Label Copies. For example, if you set Label Copies to 2 for the range of labels 1 through 3, the label sequence will print as follows:
#1 #1 #2 #2 #3 #3
Note: If you set both the Range Copies and Label Copies, LabelMark applies the Label Copies first and then it applies the Range Copies. For example, if you set Range Copies to 2 and Label Copies to 2 for the range of labels 1 through 3, the label sequence will print as follows:
#1 #1 #2 #2 #3 #3 #1 #1 #2 #2 #3 #3
Print a label file
1. Click Print on the Standard toolbar.

Basic LabelMark Tutorials
T6: Printing Tutorial 35
2. From the Print dialog, click Print Calibration Test to confirm that the printer is properly calibrated. LabelMark prints three concentric rectangles centered on the label and spaced .05" (1.27 mm) apart. Refer to your printer documentation to adjust the printer, if needed.
3. Select your desired print options:
If required, change the range of labels to print (see above).
If required, set the number of copies to print (see above).
If required, change the Print Position Adjustment settings to fine tune the way your labels print. These settings are saved with the label file, so you will not have to make the changes again the next time you open the file.
If required, skip previously printed labels on sheet fed parts by using the Label Saver Option. Enter the Row and Column number you want to begin printing on.
If required, set the options for a two-sided sleeve part. See Setting Two-Sided Sleeve Print Options in the LabelMark User's Guide.
4. Click Print or click Close to exit without printing.


T7: Advanced Serialization Tutorial 37
Advanced LabelMark Tutorials T7: Advanced Serialization Tutorial Overview This tutorial explains how to:
• Create an advanced serialization
• Modify an advanced serialization
Setup Create a new label file to work with (as described in the LabelMark Essentials Tutorial):
1. Create a new file with a Bradyprinter Model 2461 thermal printer (or some other appropriate printer) and a THT-9 die-cut, overlaminate label part.
2. Click the Decrease Font Size icon until the font size in 9 points.
3. Click the Center Justify icon to center the text on the label.
4. Click the Bottom Justification icon to align the text at the bottom of the printable area of the label.
5. The completed file looks like this:
Create an advanced serialization The advanced serialization function allows you to define serialization strings comprised of multiple components that increment or decrement separately. The steps below explain how to create the following serialization: A1-001, A1-002, A1-003, A2-001, A2-002, A2-003, B1-001, B1-002, B1-003, B2-001, B2-002 and B2-003.
1. Select the label and text line you would like to start on (e.g. label 1, line 1).

LabelMark 3 Tutorials
38 T7: Advanced Serialization Tutorial
2. Select Tools Serialization Advanced…. The Advanced Serialization Wizard introduction screen appears. Click Next to continue.
3. Define the wiring closet portion (A to B) of the serialization:
Serial type – Select the type of serialization (e.g. Alpha).

Advanced LabelMark Tutorials
T7: Advanced Serialization Tutorial 39
Start – Enter the starting value (e.g. A).
End – Enter the ending value (e.g. B).
Step – Enter a positive number by which to increment or decrement the count (e.g. 1).
Priority # – Set the order in which this component will increment (e.g. 3 – after the decimal components).
Click Yes to the more component strings message.
Click Next.
3. Define the building floor portion (1 to 2) of the serialization:
Serial type – Select the type of serialization (e.g. Decimal).
Start – Enter the starting value (e.g. 1).
End – Enter the ending value (e.g. 2).
Step – Enter a positive number by which to increment or decrement the count (e.g. 1).
Priority # – Set the order in which this component will increment (e.g. 2 – after the alpha component).
Click Yes to the more component strings message.
Click Next.
LabelMark 3 Tutorials
40 T7: Advanced Serialization Tutorial
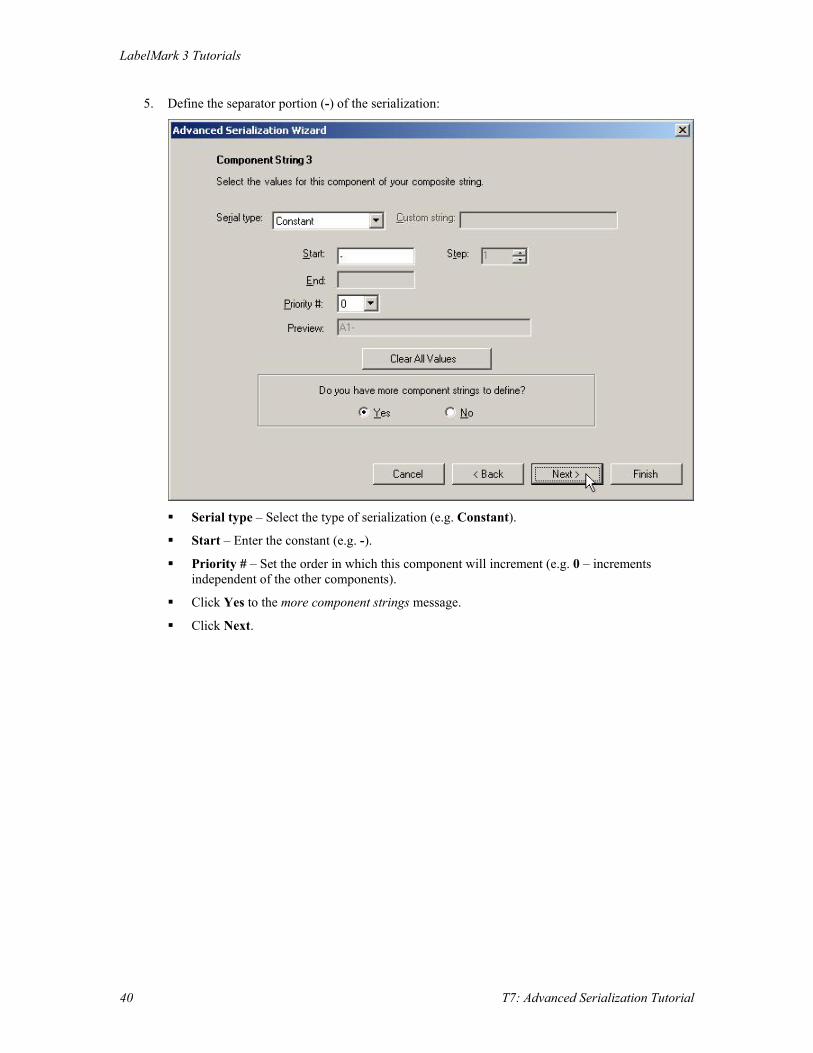
5. Define the separator portion (-) of the serialization:
Serial type – Select the type of serialization (e.g. Constant).
Start – Enter the constant (e.g. -).
Priority # – Set the order in which this component will increment (e.g. 0 – increments independent of the other components).
Click Yes to the more component strings message.
Click Next.

Advanced LabelMark Tutorials
T7: Advanced Serialization Tutorial 41
6. Define the cable number portion (001 to 003) of the serialization:
Serial type – Select the type of serialization (e.g. Decimal).
Start – Enter the starting value (e.g. 001).
End – Enter the ending value (e.g. 003).
Step – Enter a positive number by which to increment or decrement the count (e.g. 1).
Priority # – Set the order in which this component will increment (e.g. 1 – before the other components).
Click No to the more component strings message.
Click Next.

LabelMark 3 Tutorials
42 T7: Advanced Serialization Tutorial
5. Review and modify the composite string:
You can change the Type, Priority, Start, End or Step by clicking it in the grid and selecting
or typing the revised value.
Click Next.

Advanced LabelMark Tutorials
T7: Advanced Serialization Tutorial 43
6. Set final options (as needed):
Refer to Serializing Labels (Simple) in the LabelMark User's Guide for details.
7. Click Finished to serialize the labels. The serialized labels look like this:

LabelMark 3 Tutorials
44 T7: Advanced Serialization Tutorial
For more information, see Serializing Labels (Advanced) and Serialization Types Table in the LabelMark User's Guide.
Modify an advanced serialization You can easily edit an existing serialization. The steps below explain how to change the serialization to: C1-001, C1-002, C1-003, C2-001, C2-002, C2-003, D1-001, D1-002, D1-003, D2-001, D2-002 and D2-003.
1. Double-click one of the serialization objects.

Advanced LabelMark Tutorials
T7: Advanced Serialization Tutorial 45
2. LabelMark displays the Advanced Serialization Attributes dialog. Make the following changes to the dialog:
Changing the Priority of the Decimal component

LabelMark 3 Tutorials
46 T7: Advanced Serialization Tutorial
Changing the Priority of the Decimal component
Click the Start setting for the alpha component and to C.
Click the End setting for the alpha component and to D.

Advanced LabelMark Tutorials
T7: Advanced Serialization Tutorial 47
3. Click OK to regenerate the serialization. The regenerated serialized labels look like this:
For more information, see Working with Linked Objects in the LabelMark User's Guide.
LabelMark 3 Tutorials
48 T8: LabelMark Templates Tutorial
T8: LabelMark Templates Tutorial Overview This tutorial explains how to:
• Build and save a template
• Create a label file based on the template
• Modify the template
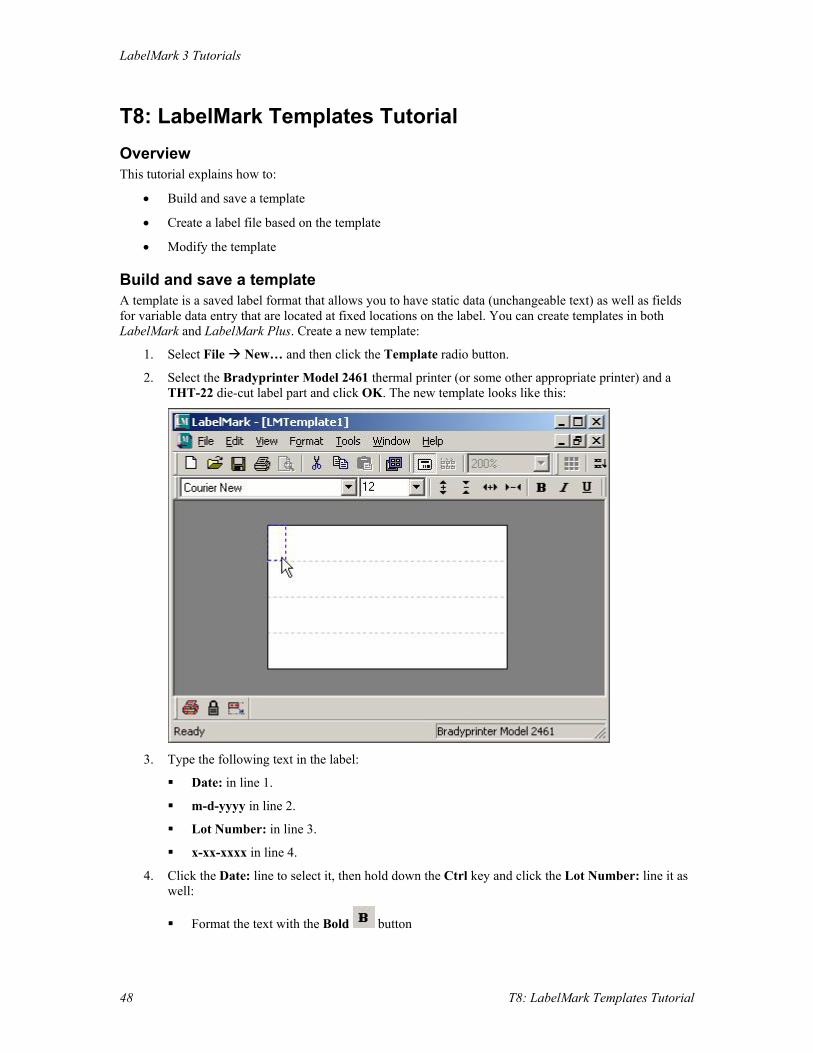
Build and save a template A template is a saved label format that allows you to have static data (unchangeable text) as well as fields for variable data entry that are located at fixed locations on the label. You can create templates in both LabelMark and LabelMark Plus. Create a new template:
1. Select File New… and then click the Template radio button.
2. Select the Bradyprinter Model 2461 thermal printer (or some other appropriate printer) and a THT-22 die-cut label part and click OK. The new template looks like this:
3. Type the following text in the label:
Date: in line 1.
m-d-yyyy in line 2.
Lot Number: in line 3.
x-xx-xxxx in line 4.
4. Click the Date: line to select it, then hold down the Ctrl key and click the Lot Number: line it as well:
Format the text with the Bold button

Advanced LabelMark Tutorials
T8: LabelMark Templates Tutorial 49
Click the Decrease Font Size icon so all of the lines fit on the label.
Lock the text so users cannot change it when they use the template. Click the Lock object
button.
5. Click the m-d-yyyy line to select it, then hold down the Ctrl key and click the x-xx-xxxx line to select it as well:
Allow the lines to grow to accommodate the text users enter when they use the template.
Click the Autosize object button. Autosize automatically unlocks the line so users can enter data in it when they use the template.
Note: The m-d-yyyy and x-xx-xxxx text will be overwritten by the data users enter when they use the template.
6. Select File Save As… and save the template (e.g. T8-Template.lmt). The completed template looks like this:
7. Select File Close to close the template.
For more information on this topic, see Creating a Template in the LabelMark User's Guide.
Create a label file based on the template Now create a new label file based on the template:
1. Select File New…:
Select the File radio button.
Check the Use template check box.
Click the Browse… button, select the desired template file (e.g. T8-Template.lmt) and click Open.

LabelMark 3 Tutorials
50 T8: LabelMark Templates Tutorial
The completed dialog box looks like this:

Advanced LabelMark Tutorials
T8: LabelMark Templates Tutorial 51
2. Click OK to create a new label file based on the template. The new label file based on the template looks like this:
3. Type your text in the green-outlined, unlocked fields:
Use the and arrow keys on the keyboard to move through the unlocked fields and from label to label.
Use the Tab key to move to the next label (Shift+Tab to move to the previous label).
4. Save your label file (e.g. LMFile8.lmf).
For more information on this topic, see Creating a Label File from a Template in the LabelMark User's Guide.
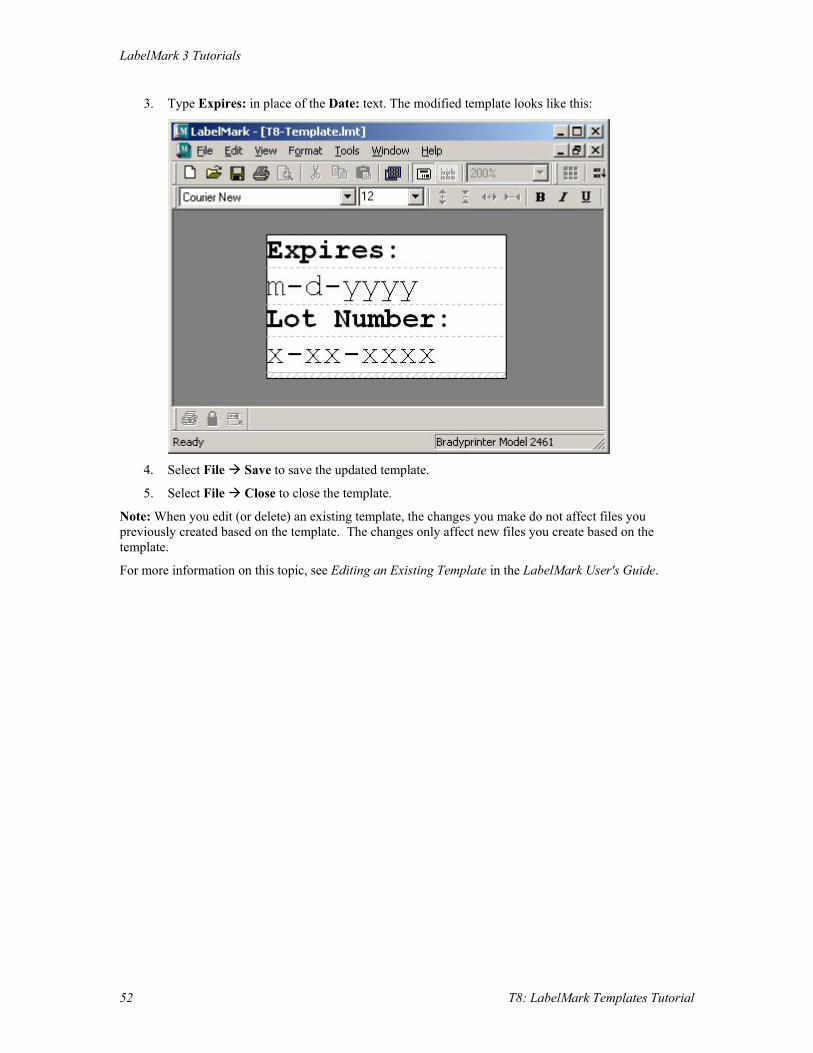
Modify the template Now change the Date: text to Expires: in the template you created:
1. Select File Open…:
Change Files of type selection to LabelMark Templates.
Change to the Templates folder.
Select the template file and click Open (e.g. T8-Template.lmt).
2. Click on the Date: text line and use the Backspace and Delete keys to clear the text.
LabelMark 3 Tutorials
52 T8: LabelMark Templates Tutorial
3. Type Expires: in place of the Date: text. The modified template looks like this:
4. Select File Save to save the updated template.
5. Select File Close to close the template.
Note: When you edit (or delete) an existing template, the changes you make do not affect files you previously created based on the template. The changes only affect new files you create based on the template.
For more information on this topic, see Editing an Existing Template in the LabelMark User's Guide.

Advanced LabelMark Tutorials
T9: Importing Data Into LabelMark Tutorial 53
T9: Importing Data Into LabelMark Tutorial Overview This tutorial explains how to:
• Import data into a blank label file
• Import data into a file based on a template
• Modify imported data
LabelMark and LabelMark Plus allow you to import data from other sources. You can import data into a standard label file or into a label file based on a template. This tutorial explains how to import a tab-delimited ASCII text file called Data.txt, but you can also import Microsoft® Excel™ and Lotus 1-2-3™ spreadsheets and database files.
Import data into a blank label file To import data into a label file:
1. Create a new label file to work with (as described in the LabelMark Plus Essentials Tutorial):
Select a Bradyprinter Model 2461 thermal printer (or some other appropriate printer).
Select a THT-22 die-cut label part.
2. Select the starting point for the data import by clicking the desired label and line (e.g. label 1, line 1).

LabelMark 3 Tutorials
54 T9: Importing Data Into LabelMark Tutorial
3. Select Tools Import Data…, select the type of data to import (e.g. Text) and click Next.
4. Select the text file and delimiter:
Click Browse.
Locate and select the ASCII text file (e.g. C:\Program Files\Brady\LabelMark3\Tutorial Data\Data.txt).
Click Open.
Advanced LabelMark Tutorials
T9: Importing Data Into LabelMark Tutorial 55
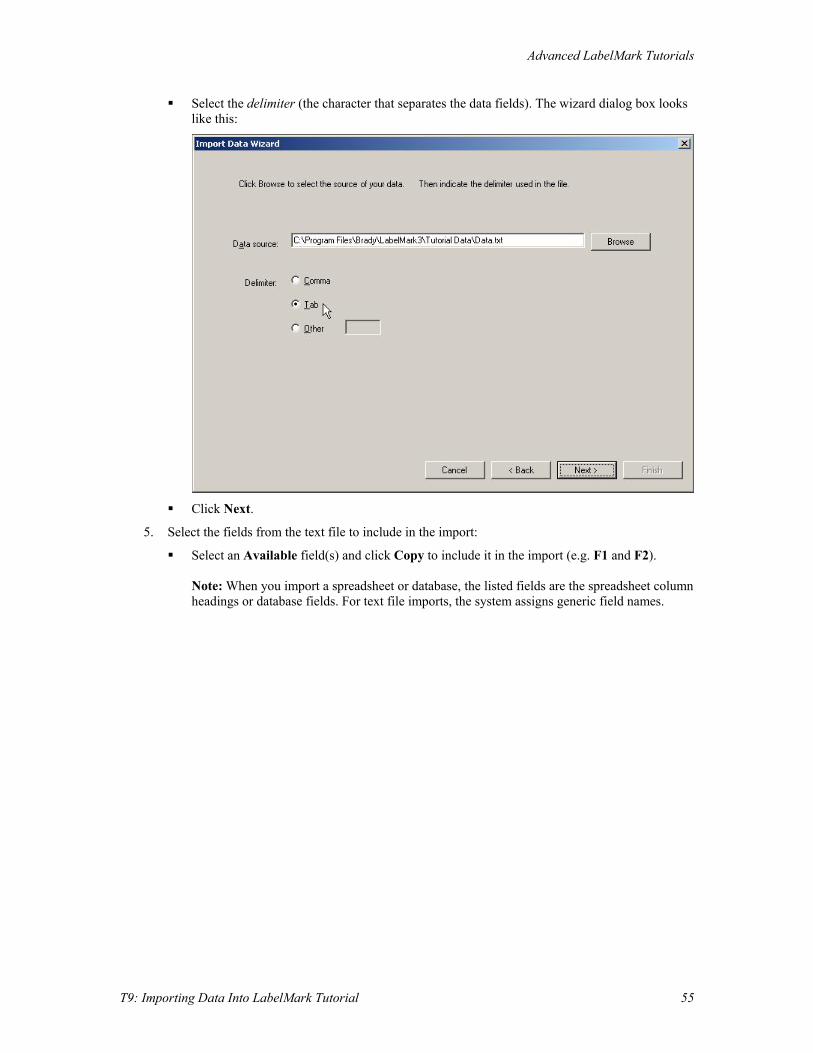
Select the delimiter (the character that separates the data fields). The wizard dialog box looks like this:
Click Next.
5. Select the fields from the text file to include in the import:
Select an Available field(s) and click Copy to include it in the import (e.g. F1 and F2). Note: When you import a spreadsheet or database, the listed fields are the spreadsheet column headings or database fields. For text file imports, the system assigns generic field names.

LabelMark 3 Tutorials
56 T9: Importing Data Into LabelMark Tutorial
The wizard dialog box looks like this:
Click Next.
6. (Optional) Filter the data and click Next:
Advanced LabelMark Tutorials
T9: Importing Data Into LabelMark Tutorial 57
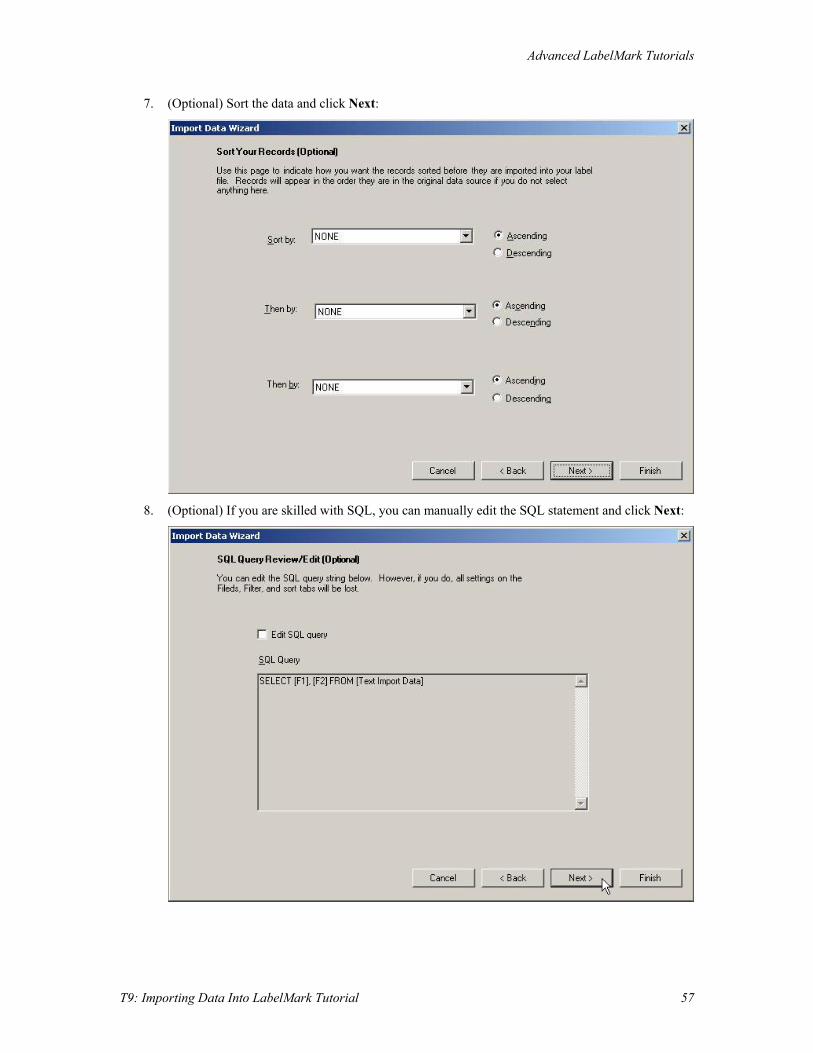
7. (Optional) Sort the data and click Next:
8. (Optional) If you are skilled with SQL, you can manually edit the SQL statement and click Next:

LabelMark 3 Tutorials
58 T9: Importing Data Into LabelMark Tutorial
9. Review the resulting data and click Next:
If the results are not what you expect, click Back and modify the import settings.
10. Set layout options (as needed) and click Finish:
See Serializing Labels (Simple) in the LabelMark User's Guide for descriptions of the options.

Advanced LabelMark Tutorials
T9: Importing Data Into LabelMark Tutorial 59
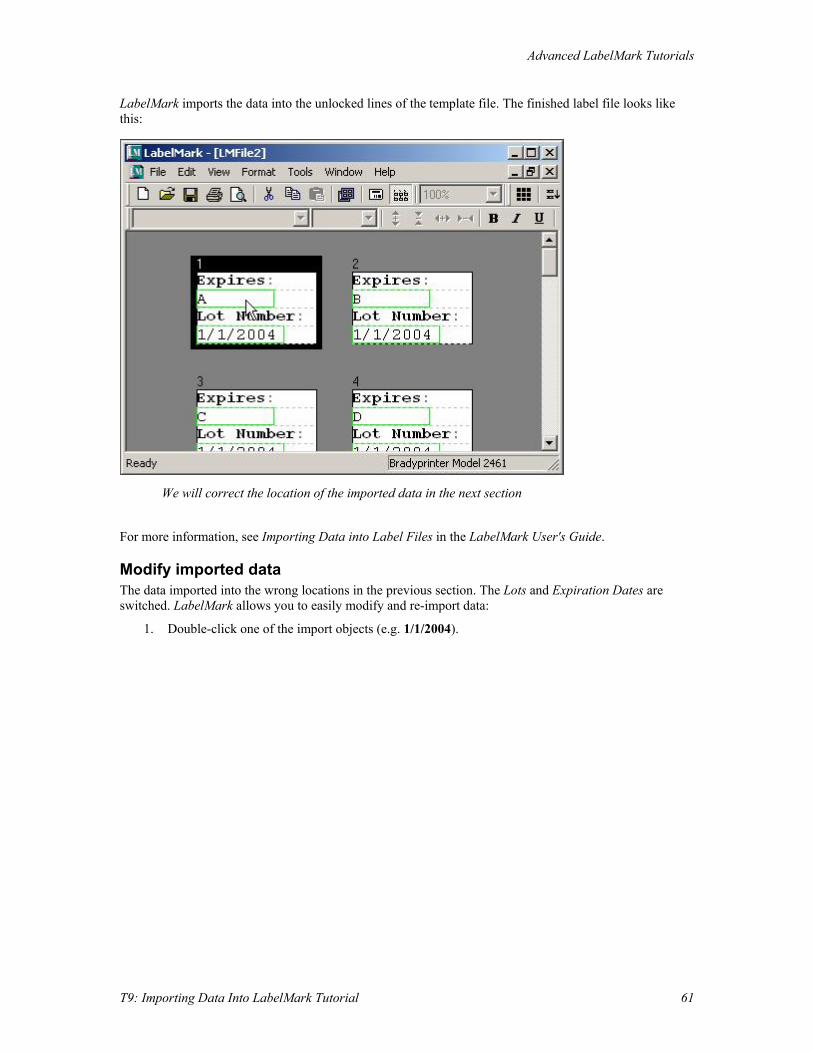
LabelMark imports the data into the label file. Each line (or record) in the text file creates one label in the label file. The finished label file looks like this:
For more information, see Importing Data into Label Files in the LabelMark User's Guide.
Import data into a file based on a template Now import the same text into a file based on the template created during the LabelMark Templates Tutorial.
To import data into a label file based on a template:
1. Select File New…:
Select the File radio button.
Check the Use template check box.
Click the Browse… button, select the desired template file (e.g. T8-Template.lmt) and click Open.
Click OK to create a new label file based on the template.

LabelMark 3 Tutorials
60 T9: Importing Data Into LabelMark Tutorial
2. The new label file based on the template looks like this:
3. Select the starting point for the data import by clicking the desired label and line (e.g. label 1, line
2).
4. Repeat steps 3 through 10 from the "Import data into a blank label file" section of this tutorial to import the text file.
Advanced LabelMark Tutorials
T9: Importing Data Into LabelMark Tutorial 61
LabelMark imports the data into the unlocked lines of the template file. The finished label file looks like this:
We will correct the location of the imported data in the next section
For more information, see Importing Data into Label Files in the LabelMark User's Guide.
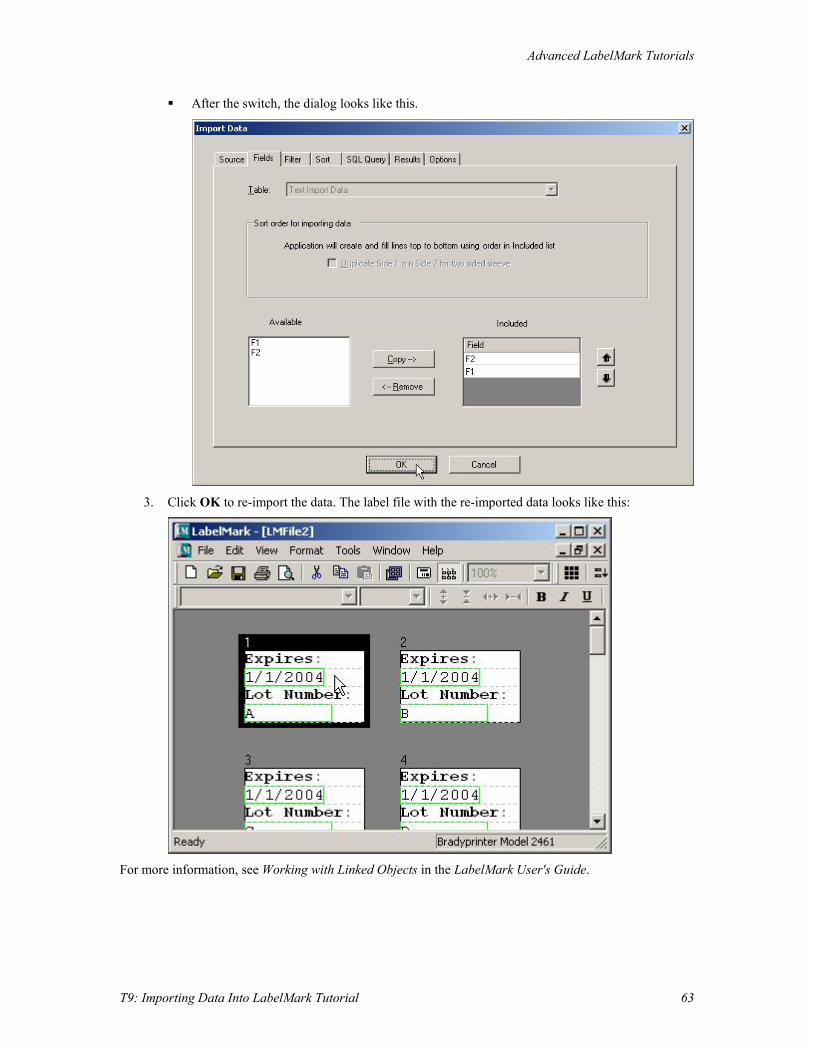
Modify imported data The data imported into the wrong locations in the previous section. The Lots and Expiration Dates are switched. LabelMark allows you to easily modify and re-import data:
1. Double-click one of the import objects (e.g. 1/1/2004).

LabelMark 3 Tutorials
62 T9: Importing Data Into LabelMark Tutorial
2. LabelMark displays the Import Data dialog. Make the following changes to the dialog:
Click on the Fields tab.
Click F1 in the Included column
Click to move it after F2.
Advanced LabelMark Tutorials
T9: Importing Data Into LabelMark Tutorial 63
After the switch, the dialog looks like this.
3. Click OK to re-import the data. The label file with the re-imported data looks like this:
For more information, see Working with Linked Objects in the LabelMark User's Guide.

LabelMark 3 Tutorials
64 T10: Flip-Flop and Find/Replace Tutorial
T10: Flip-Flop and Find/Replace Tutorial Overview This tutorial explains how to:
• Flip-flop label text
• Remove the flip character
• Find and replace text
Setup Create a new label file (as described in the LabelMark Essentials Tutorial) to work with. Select a Laser printer and a LAT-31 die-cut label part.
Flip-flop label text The flip-flop feature is useful for identifying parts that are connected end-to-end. It allows you to transpose text around a flip point. For example Input 123 | Output 123 would flip-flop to Output 123 | Input 123. You designate the flip point by placing the flip character in a line of text. The default flip character is the pipe symbol “|” (found on the “\” key on your keyboard). See Changing User Defaults in the LabelMark User's Guide to designate a different character to use.
To perform a flip-flop:
1. Type Input 5 | Output 5 in the first label.
2. Copy the label twice.
3. Change 5 to 6 in label 2.
4. Change 5 to 7 in label 3.
5. The completed file will look like this:
6. Select the labels you want to flip (e.g. click Select All Labels ).
Advanced LabelMark Tutorials
T10: Flip-Flop and Find/Replace Tutorial 65
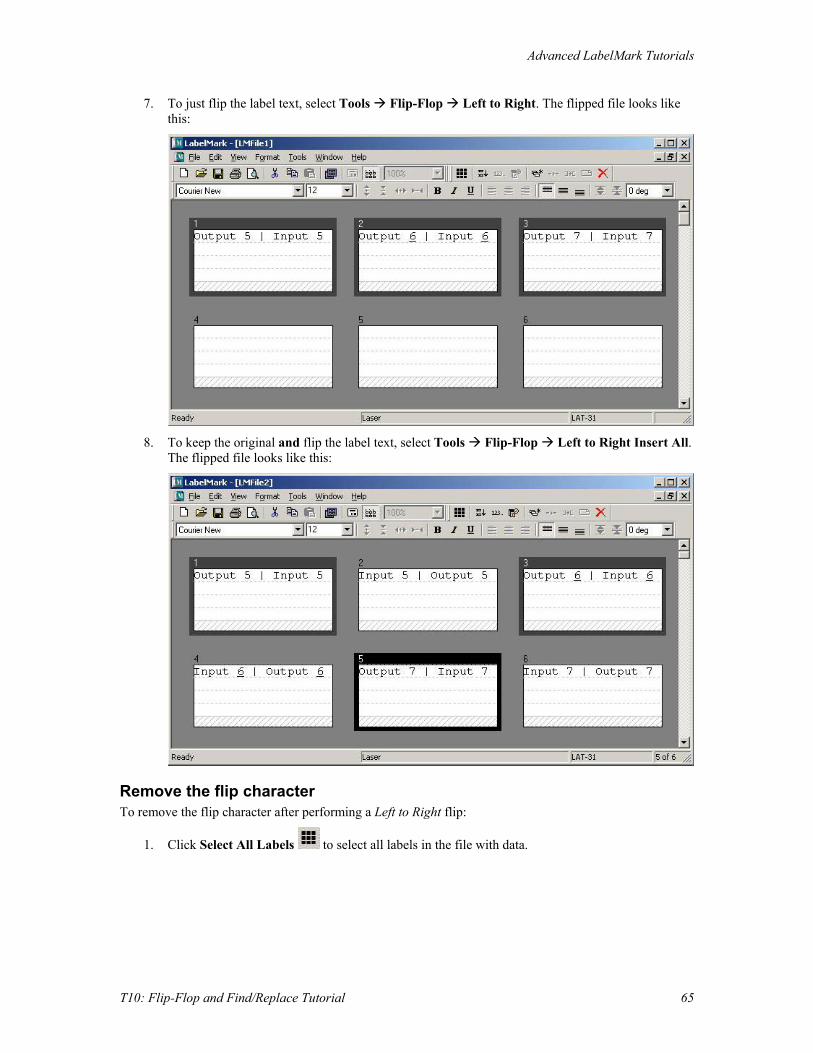
7. To just flip the label text, select Tools Flip-Flop Left to Right. The flipped file looks like this:
8. To keep the original and flip the label text, select Tools Flip-Flop Left to Right Insert All.
The flipped file looks like this:
Remove the flip character To remove the flip character after performing a Left to Right flip:
1. Click Select All Labels to select all labels in the file with data.

LabelMark 3 Tutorials
66 T10: Flip-Flop and Find/Replace Tutorial
2. Select Tools Flip-Flop Remove Flip Character to delete the flip characters. The finished file looks like this:
Note: A flip character is unnecessary for the Top to Bottom flip options. Top to Bottom flips use the vertical center point of label like this:
Label before top-to-bottom flip Label after top-to-bottom flip
For more information on this topic, see Using the Flip-Flop Feature in the LabelMark User's Guide.
Find and replace text LabelMark allows you to find or find and replace text within labels. Replace "put " with "-" in the text you flip-flopped earlier:
1. Select the label you want to begin the search in.
2. Select Edit Replace.
3. Enter the Replace details:
Type the text you want to search for in the Find what box (e.g. type put followed by a space).
Type the text you want to replace it with in the Replace with box (e.g. type a hyphen).
Check Match case if you want to find the exact text including upper and lowercase characters (e.g. do not check this option).

Advanced LabelMark Tutorials
T10: Flip-Flop and Find/Replace Tutorial 67
Select the Direction for the search (e.g. click Down). The completed dialog looks like this:
3. Click Find Next and click Replace to confirm each occurrence of the replace or click Replace All
to immediately replace all occurrences of the text in the file (e.g. click Replace All).
4. The finished file looks like this:
Note: You can find text in linked objects (imported, serialized or date/time fields), but you cannot replace it. To modify a linked object, double-click it (see Working with Linked Objects in the LabelMark User's Guide).

LabelMark 3 Tutorials
68 T11: Favorite Parts List Tutorial
T11: Favorite Parts List Tutorial Overview This tutorial explains how to:
• Create your favorite parts list
• Use your favorite parts list
• Set user defaults for your favorite parts list
Create your favorite parts list LabelMark allows you to create and save a list of the label parts you commonly use. You can then use the list to quickly select the part you need rather than searching through the entire master parts list. To create a favorite parts list:
1. Select Tools Favorite Parts List….
2. Select the Printer type (e.g. Thermal) and the Part family (e.g. Die-Cut). LabelMark displays the
appropriate parts in the Master parts list.
3. Scroll to your desired part in the Master parts list (e.g. type THT in the Label part box to jump down to that portion of the list).
4. Use click and Shift+click to select a continuous series of parts (e.g. click THT-1 and Shift+click THT-10 to select all 10 parts).
5. Use Ctrl+click to add other parts to the selection (e.g. hold down the Ctrl key while clicking THT-17 and THT-20).

Advanced LabelMark Tutorials
T11: Favorite Parts List Tutorial 69
6. Click Copy to add the parts to your Favorite parts list. Note: Parts added to the Favorite parts list grid remain in the Master parts list grid.
7. To remove a part from your favorites list, select the part from the Favorite parts list grid and click Remove (e.g. THT-4). The finished dialog looks like this:
8. Repeat steps 2 through 7 for other Printer types and Part families you commonly use. When you
are finished, click OK.
For more information on this topic, see Creating a Favorite Label Parts List in the LabelMark User's Guide.
Use your favorite parts list Once you have created a favorite parts list, you have the option to select from that list when you create a file.

LabelMark 3 Tutorials
70 T11: Favorite Parts List Tutorial
1. Select File New…. The New dialog box appears:
2. Select Favorite from the Part List. LabelMark displays your favorite parts list.
Only the Printer types and Part families in your favorite parts list are listed.
LabelMark displays your favorite Part Names for the selected Printer type and Part family.
If you selected a default label part in User Defaults, the system pre-selects it.
3. Select the part and create the file as you normally would.
For more information on this topic, see Using a Favorite Parts List in the LabelMark User's Guide.
Advanced LabelMark Tutorials
T11: Favorite Parts List Tutorial 71
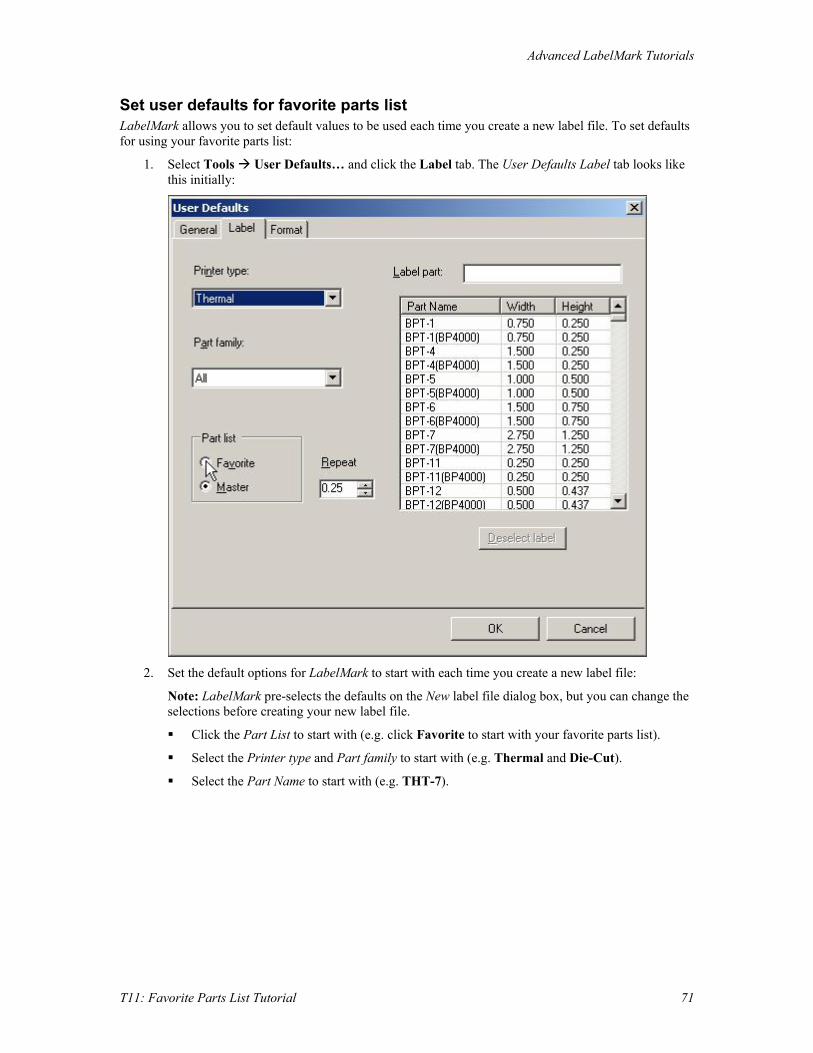
Set user defaults for favorite parts list LabelMark allows you to set default values to be used each time you create a new label file. To set defaults for using your favorite parts list:
1. Select Tools User Defaults… and click the Label tab. The User Defaults Label tab looks like this initially:
2. Set the default options for LabelMark to start with each time you create a new label file:
Note: LabelMark pre-selects the defaults on the New label file dialog box, but you can change the selections before creating your new label file.
Click the Part List to start with (e.g. click Favorite to start with your favorite parts list).
Select the Printer type and Part family to start with (e.g. Thermal and Die-Cut).
Select the Part Name to start with (e.g. THT-7).

LabelMark 3 Tutorials
72 T11: Favorite Parts List Tutorial
The completed User Defaults dialog looks like this:
3. Click OK to save your defaults.
The next time you create a new label file, your defaults will be the Favorite Part list, Thermal Printer type, Die-Cut Part family and the THT-7 Label part.
For more information on this topic, see Changing User Defaults in the LabelMark User's Guide.

Advanced LabelMark Tutorials
T12: 110/BIX Block & Patch Panel Tutorial 73
T12: 110/BIX Block & Patch Panel Tutorial Overview This tutorial explains how to create:
• A 110/BIX Block horizontal serialization
• A 110/BIX Block backbone serialization
• A patch panel
Create 110/BIX Block horizontal serialization LabelMark can serialize labels to identify each pair of wires for a backbone installation and serialize each 4-Pair cable for a horizontal run application. To create and serialize a 110/BIX Block:
1. Create a new label file to work with (as described in the LabelMark Essentials Tutorial):
Select a Laser printer.
Select a LAT-177-4 Pair (110 Block) die-cut label part.
2. Create a 110/BIX Block Horizontal serialization:
Select Tools Serialization 110/BIX Block….
The 110/BIX Block Serialization Attributes dialog box appears:
o Select 110/BIX Horizontal as the serialization Type.
o Type the starting number (e.g. 001).
o Type the number of label strips (e.g. 2).
Note: A 5-pair has 10 sections per label strip, a 4-pair has 12 sections per label strip and a 3-pair has 16 sections per label strip.

LabelMark 3 Tutorials
74 T12: 110/BIX Block & Patch Panel Tutorial
o Click OK. The completed label file looks like this:
Create 110/BIX Block backbone serialization 1. Create another new label file to work with (as described in the LabelMark Essentials Tutorial):
Select a Laser printer.
Select a LAT-177-4 Pair (110 Block) die-cut label part.
2. Create a 110/BIX Block Backbone serialization:
Select the label you want to start the serialization on by clicking it (e.g. label 25).
Select Tools Serialization 110/BIX Block….
Select 110/BIX Backbone as the serialization Type.
Enter the starting number (e.g. 1).
Enter the number of strips (e.g. 2).
Click OK. The completed label file looks like this:
For more information on this topic, see Serializing 110/BIX Blocks and 110 Block, BIX Block and Patch Panel Parts in the LabelMark User's Guide.
Create a patch panel 1. Create another new label file to work with (as described in the LabelMark Essentials Tutorial):
Select a Laser printer.
Select a LAT-43 (4 Port Patch Panel) die-cut label part.
2. Now serialize the ports (e.g. 001 through 024):
Click the desired label and location to start the serialization (e.g. click label 1, line 1).

Advanced LabelMark Tutorials
T12: 110/BIX Block & Patch Panel Tutorial 75
Click the Serialization icon . LabelMark displays the Serialization Attributes dialog:
Enter the serialization details:
o Start – Type 001.
o End – Type 024.
o Click OK.
Center the port numbers:
o Select Edit Select All Linked Objects
o Click the Center Justify icon to center the text on the label.
o Click the Middle Justification icon to place the text at the vertical center of the label.
LabelMark 3 Tutorials
76 T12: 110/BIX Block & Patch Panel Tutorial
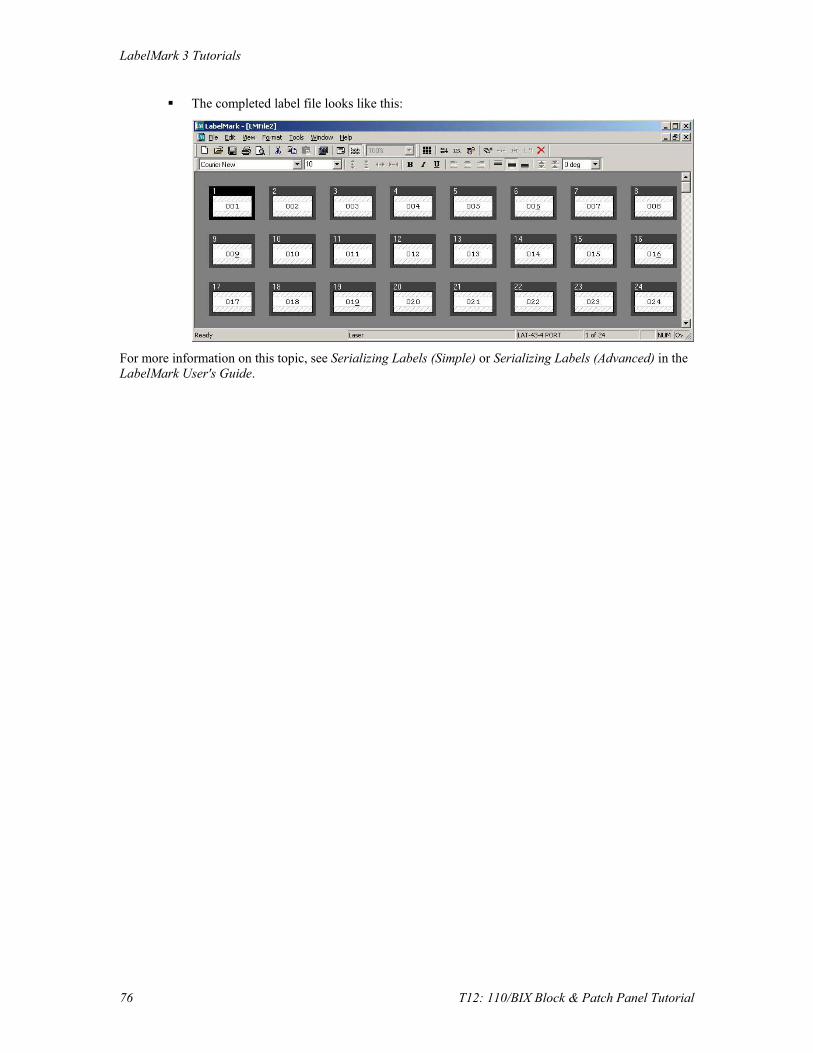
The completed label file looks like this:
For more information on this topic, see Serializing Labels (Simple) or Serializing Labels (Advanced) in the LabelMark User's Guide.
Advanced LabelMark Tutorials
T13: Continuous Parts Tutorial 77
T13: Continuous Parts Tutorial Overview This tutorial explains how to:
• Create a terminal block label file
• Create a banner label file
Create a terminal block label file Create a terminal block:
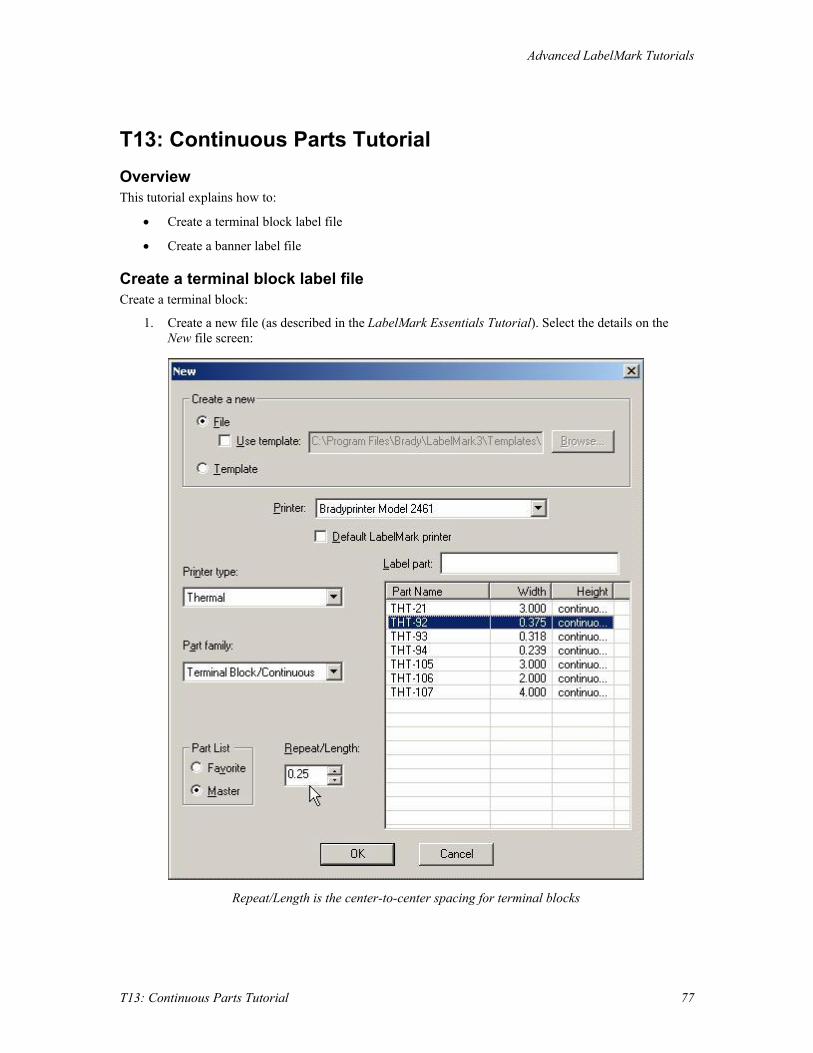
1. Create a new file (as described in the LabelMark Essentials Tutorial). Select the details on the New file screen:
Repeat/Length is the center-to-center spacing for terminal blocks

LabelMark 3 Tutorials
78 T13: Continuous Parts Tutorial
Select the Printer from the list (e.g. Bradyprinter Model 2461 or some other appropriate printer).
Select the Printer type from the list (e.g. Thermal).
Select the Part family from the list (e.g. Terminal Block/Continuous).
Select the Part (e.g. THT-92).
Set the center-to-center spacing for termination points with Repeat/Length (e.g. 0.25", 6.35 mm). Note: Repeat value limits are 0.1” (2.54 mm) minimum to 32” (812.8 mm) maximum.
Click OK to create the label file.
2. Serialize the termination points:
Click the location to start the serialization (e.g. click line 1 on label 1).
Click the Serialization icon .
Enter the serialization details:
o Start – Type 001.
o End – Type 010.
Click OK. LabelMark displays your serialized labels.

Advanced LabelMark Tutorials
T13: Continuous Parts Tutorial 79
3. Format the labels:
Select Edit Select All Linked Objects.
Click the Center Justify icon to center the text on the label (left-to-right).
Click the Middle Justification icon to place the text at the vertical center of the label (top-to-bottom).
The finished terminal block looks like this:
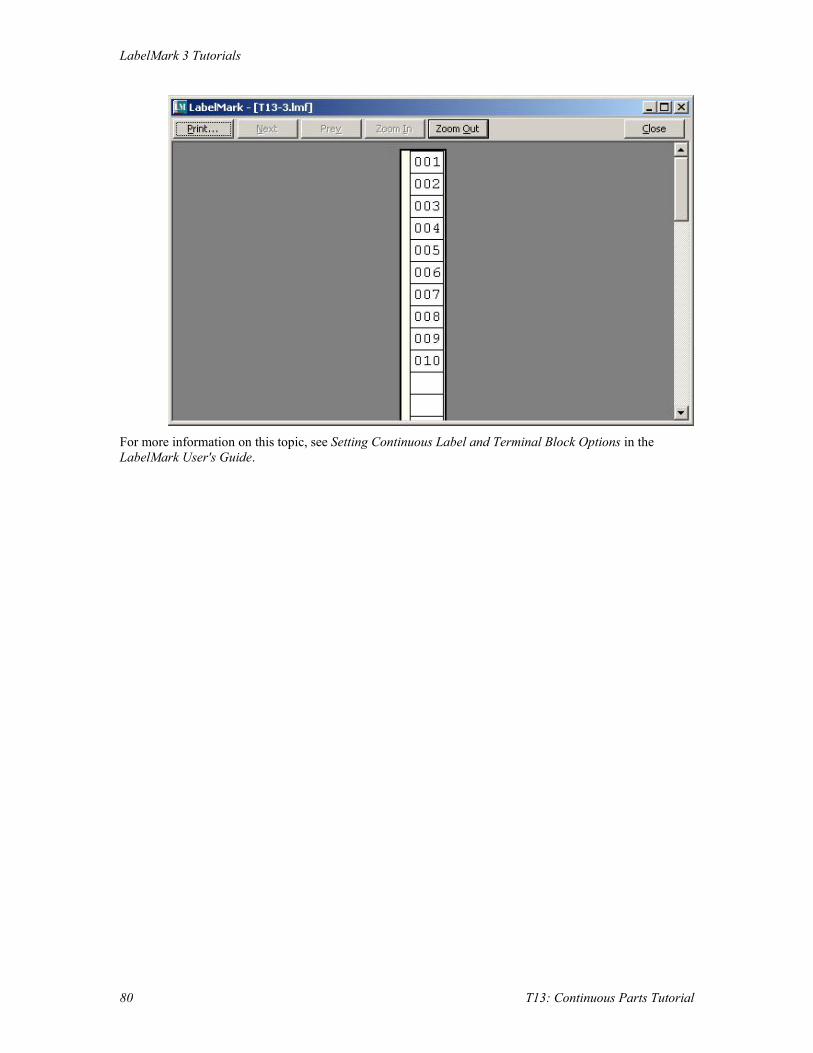
4. Click Print Preview . LabelMark displays your file as it will print: Click Close to exit Print Preview mode
LabelMark 3 Tutorials
80 T13: Continuous Parts Tutorial
For more information on this topic, see Setting Continuous Label and Terminal Block Options in the LabelMark User's Guide.

Advanced LabelMark Tutorials
T13: Continuous Parts Tutorial 81
Create a banner label file Create a banner:
1. Create a new file (as described in the LabelMark Essentials Tutorial). Select the details on the New file screen:
Repeat/Length is actually the width of the finished banner
Select the Printer from the list (e.g. Bradyprinter Model 2461 or some other appropriate printer).
Select the Printer type from the list (e.g. Thermal).
Select the Part family from the list (e.g. Terminal Block/Continuous).
Select the Part (e.g. THT-21).
Set the length of the banner label with Repeat/Length (e.g. 8.0", 203.2 mm). Note: Repeat value limits are 0.1” (2.54 mm) minimum to 32” (812.8 mm) maximum. The maximum length for continuous TLS PC Link parts is 6” (152.4 mm).

LabelMark 3 Tutorials
82 T13: Continuous Parts Tutorial
Click OK to create the label file.
2. Set the font size and orientation:
Select the desired size from the Font Size list (e.g. 72 points).
Bold the text.
Rotate the text on the label so it runs down the length of the banner. Select the desired rotation
from the Rotate list (e.g. 90 degrees).
Click the Middle Justification icon to place the text at the vertical center of the label.
3. Add text to the banner:
Click the first line of the banner to place the cursor.
Type the first line of text (e.g. CAUTION!).
Press Enter to move to the second line.
Type the second line of text (e.g. High Voltage!).

Advanced LabelMark Tutorials
T13: Continuous Parts Tutorial 83
4. Click Print Preview . LabelMark displays your banner as it will print: Click Close to exit Print Preview mode.
For more information on this topic, see Setting Continuous Label and Terminal Block Options in the LabelMark User's Guide.


T14: LabelMark Plus Essentials Tutorials 85
LabelMark Plus Tutorials T14: LabelMark Plus Essentials Tutorials Overview This tutorial explains how to:
• Create a file in LabelMark Plus
• Add text to the file
• Add a date to the file
• Add a barcode to the file and modify it
• Add an image to the label
• Save the label file
Create a file in LabelMark Plus Create a new file to work with in LabelMark Plus:
1. Double-click the icon on the Windows® desktop to start LabelMark Plus.
2. When you start LabelMark Plus the Welcome screen appears. Select Create new file and click OK. (If LabelMark Plus is already running, click File New….)

LabelMark 3 Tutorials
86 T14: LabelMark Plus Essentials Tutorials
3. Select the printer and label part to use on the New file screen:
The New dialog lists available printers and label parts
Select the Printer from the list (e.g. TLS2200 or some other appropriate printer).
Select the Printer type from the list (e.g. TLS2200 / TLS PC Link or some other appropriate printer type).
Select the Part family from the list (e.g. Die-Cut).
Click your desired Part Name in the table or type the part name in the Label part box (e.g. PTL-109-427).

LabelMark Plus Tutorials
T14: LabelMark Plus Essentials Tutorials 87
Click OK to create label file.
LabelMark Plus adds an Object toolbar (on the bottom of the screen) and a Draw toolbar (on the right)
For more information on this topic, see Quick Start Guide - Creating a Basic Text Label in the LabelMark User's Guide.
Add text to the file Adding text to a label in LabelMark Plus is slightly different than in LabelMark:
1. Click the Text icon on the Draw toolbar.
2. Click the desired location on the label to place the text object.
3. Type your information (e.g. Lot 724-042).
4. Press Enter and type a second line of text (e.g. Sample 1000). Note: This creates a "block" of text lines that you can manipulate as a group.
5. Click the Select tool on the Draw toolbar and click the text block to select it.
6. Drag (click and hold down the left mouse button while moving the mouse) the text block to the top of the label.

LabelMark 3 Tutorials
88 T14: LabelMark Plus Essentials Tutorials
7. Click the Center Horizontally icon on the Object toolbar to center the text on the label. The label looks like this:
For more information on this topic, see Inserting Text and Modifying Text in the LabelMark User's Guide.
Add a date to the file LabelMark Plus allows you to add text and a date/time object on the same "line" of the label:
1. Click the Text icon on the Draw toolbar.
2. Click just below the text block you created.
3. Type your information (e.g. Date:).
4. Click the Text icon on the Draw toolbar again.
5. Click to the right of the Date: text.
6. Click the Date/Time icon on the Action toolbar and insert the date as described in the Date & Time Information Tutorial.
7. If the date object does not fit on the label, the system makes it red. See Making Data Fit on a Label in the LabelMark User's Guide for tips on making the data fit.
8. Click the Date: text and hold down the Ctrl key while clicking the Date/Time field to select both.
Click the Align Bottom button to line up the bottoms of the Date: text and Date/Time field. The label looks like this:

LabelMark Plus Tutorials
T14: LabelMark Plus Essentials Tutorials 89
Add a barcode to the file and modify it LabelMark Plus allows you to add barcodes to your labels:
1. Select the Barcode icon on the Draw toolbar.
2. Click on the desired location on the label for the barcode (the location you click becomes the top-left corner of the barcode).
Note: If the barcode will not fit in the selected location, the system beeps and displays a message in the status bar. Click a different location.
3. Type your information (e.g. 1000).
Note: You are only allowed to type the characters valid for the symbology you are using.
4. Change the barcode symbology by clicking an option from the Symbology drop-down list
on the Object toolbar (e.g. Code 128).
5. Select the barcode object using the Select tool.
6. Click the Properties icon on the Object toolbar and click the Barcode tab. LabelMark Plus displays the barcode's settings.
Note: The list allowed you to quickly change the symbology, but there are other changes you can make to the barcode:
Turn off the human readable text by unchecking the box.
Change the Height of the barcode to 0.30" (7.62 mm).
Change the Narrow bar width to 15 mils.

LabelMark 3 Tutorials
90 T14: LabelMark Plus Essentials Tutorials
The modified Properties dialog looks like this:
7. Click OK to implement the changes to the barcode.
8. Click the Center Horizontally icon on the Object toolbar to center the barcode on the label. The label looks like this:
For more information on this topic, see Inserting Barcodes and Modifying Barcodes in the LabelMark User's Guide.

LabelMark Plus Tutorials
T14: LabelMark Plus Essentials Tutorials 91
Add an image to the label LabelMark Plus allows you to insert bitmap images into your labels:
1. Select the Images icon on the Draw toolbar.
2. Click the desired location on the label for the image (the location you click becomes the top-left corner of the image).
3. Browse to the location of the bitmap image (e.g. C:\Program Files\Brady\LabelMark3\Tutorial Data\Brady.bmp), select it and click Open. LabelMark Plus sizes the image to fit in the available space if it is too large.
4. With the Select tool , “grab” one of the solid blue sizing handles on the image and drag it to re-size (e.g. make it slightly smaller).
5. Click the Center Horizontally icon on the Object toolbar to center the image on the label. The label looks like this:
For more information on this topic, see Inserting Images, Modifying Images and Symbol Library in the LabelMark User's Guide.

LabelMark 3 Tutorials
92 T14: LabelMark Plus Essentials Tutorials
Save the label file 1. Save the label file:
Click File Save… (or click the Save icon on the toolbar). The Save As dialog box appears.
LabelMark Plus files have an LPF extension.
Type the file name and click Save (e.g. LMPlusFile1).
LabelMark Plus displays the default file location. You may change to a different folder or change the default location (see Changing User Defaults in the LabelMark User Guide).
2. Close the label file:
Click File Close.
For more information on this topic, see Saving a File in the LabelMark User's Guide.
LabelMark Plus Tutorials
T15: Importing Into LabelMark Plus Tutorial 93
T15: Importing Into LabelMark Plus Tutorial Overview This tutorial explains how to:
• Map fields and import data into LabelMark Plus
• Modify import data
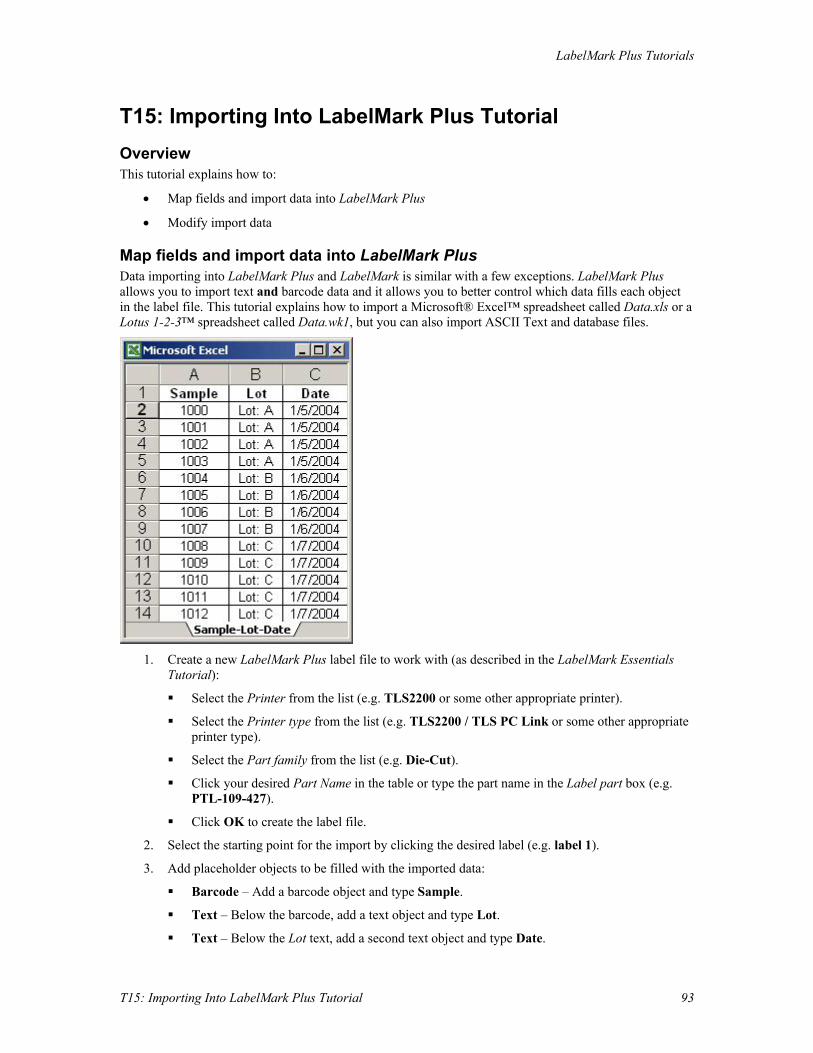
Map fields and import data into LabelMark Plus Data importing into LabelMark Plus and LabelMark is similar with a few exceptions. LabelMark Plus allows you to import text and barcode data and it allows you to better control which data fills each object in the label file. This tutorial explains how to import a Microsoft® Excel™ spreadsheet called Data.xls or a Lotus 1-2-3™ spreadsheet called Data.wk1, but you can also import ASCII Text and database files.
1. Create a new LabelMark Plus label file to work with (as described in the LabelMark Essentials
Tutorial):
Select the Printer from the list (e.g. TLS2200 or some other appropriate printer).
Select the Printer type from the list (e.g. TLS2200 / TLS PC Link or some other appropriate printer type).
Select the Part family from the list (e.g. Die-Cut).
Click your desired Part Name in the table or type the part name in the Label part box (e.g. PTL-109-427).
Click OK to create the label file.
2. Select the starting point for the import by clicking the desired label (e.g. label 1).
3. Add placeholder objects to be filled with the imported data:
Barcode – Add a barcode object and type Sample.
Text – Below the barcode, add a text object and type Lot.
Text – Below the Lot text, add a second text object and type Date.

LabelMark 3 Tutorials
94 T15: Importing Into LabelMark Plus Tutorial
The completed label looks like this:
4. Start the import wizard by selecting Tools Import Data....
5. Select the type of data to import (e.g. Excel spreadsheet or Lotus spreadsheet) and click Next.
6. Select the data file and click Next:
Select the spreadsheet file (e.g. C:\Program Files\Brady\LabelMark3\Tutorial Data\Data.xls for Excel or Data.wk1 for Lotus 1-2-3) to import and click Open
7. When the Fields dialog appears, select your fields and mapping details and click Next:
Select the Table that contains the data you want to import (e.g. SampleLotDate).
Select the Manual import option. Note: The Manual option allows you to specify which data field fills which object on the label.
Select the table fields in the Available list you want to import and click Copy to move them to the Included list.
Map each data field to the appropriate object on the label. Click the Object assigned to the field and select the desired object to import the field into from the list that appears.

LabelMark Plus Tutorials
T15: Importing Into LabelMark Plus Tutorial 95
The completed dialog looks like this:
8. Filter the data (if desired) and click Next.
9. Sort the data (if desired) and click Next.
10. Manually edit the SQL statement (if desired) and click Next.
11. Review the resulting data and click Next.
12. Set layout options (as needed) and click Finish:. The completed label file looks like this:

LabelMark 3 Tutorials
96 T15: Importing Into LabelMark Plus Tutorial
Modify import data LabelMark Plus allows you to easily modify and re-import data:
1. Double-click one of the import objects (e.g. 1000 barcode).
2. LabelMark Plus displays the dialog. Modify the import so you only get samples greater than 1010:
Click on the Filter tab.
Click Sample Data in the Field list
Click > in the Operator list
Type 1010 in the Value field
Click Add to include this filter when the system re-imports the data.

LabelMark Plus Tutorials
T15: Importing Into LabelMark Plus Tutorial 97
With the filter added, the dialog looks like this:
3. Click OK to re-import the data. The label file with the re-imported data looks like this:
For more information, see Working with Linked Objects in the LabelMark User's Guide.

LabelMark 3 Tutorials
98 T16: LabelMark Plus Templates Tutorials
T16: LabelMark Plus Templates Tutorials Overview This tutorial explains how to:
• Build and save a template in LabelMark Plus
• Create a label file based on the template
• Use a stock label template
Build and save a template in LabelMark Plus A template is a saved label format that allows you to have static data (unchangeable text) as well as fields for variable data entry that are located at fixed locations on the label. You can create templates in both LabelMark and LabelMark Plus. Create a new rating plate template in LabelMark Plus:
1. Select File New… in LabelMark Plus and then click the Template radio button.
2. Select a laser printer and a LAT-33 die-cut label part and click OK. The steps that follow will help you create a template that looks like this:
3. Type and format the information headings:
Add Model heading:
o Click the Text icon .
o Click the desired location on the label for the text object.
o Type your heading information (e.g. Model).
LabelMark Plus Tutorials
T16: LabelMark Plus Templates Tutorials 99
Add Part heading:
o Click the desired location on the label for the text object.
o Type your heading information (e.g. Part).
Add Serial No. heading:
o Click the desired location on the label for the text object.
o Type your heading information (e.g. Serial No.).
Click the Model text object to select it, then hold down the Ctrl key and click the Part and Serial No. objects to select them as well.
Format the text with the Bold button.
Click the Lock object button, so users cannot change the headings when they use the template.
4. Add placeholders for data to be entered: Note: The placeholder text helps you identify the correct object when using the Manual data import method to map data to your template objects. The placeholder text is replaced by your data when you create a file based on the template.
Add the Model data object:
o Click the Text icon .
o Click below the Model heading.
o Type your placeholder information (e.g. T####).
Add the Part data object:
o Click below the Part heading.
o Type your placeholder information (e.g. ####-#).
Add the Serial No. data object:
o Click below the Serial No. heading.
o Type your placeholder information (e.g. 000###).
Click the T#### text object to select it, then hold down the Ctrl key and click the ####-# and 000### objects to select them as well.
Click the Autosize object button to allow the lines to grow to accommodate the text users enter when they use the template.
Remove the bold typeface by clicking the Bold button again.
Note: Select several objects and click an alignment icon to align the objects in relation to each other (by their left, center, right, top, middle or bottom). Items are aligned to the last item selected. The icons are disabled if one object or no objects are selected.
5. Add lines above and below the rating plate information:
Select the Line icon on the Draw toolbar.
LabelMark 3 Tutorials
100 T16: LabelMark Plus Templates Tutorials
Click on the desired starting location and drag the mouse (with the left mouse button pressed) to draw the line. Release the mouse button to place the line. Repeat for the second line.
6. Add the Underwriters Laboratories symbol to the label as described in the LabelMark Plus Essentials Tutorial: Note: The UL symbol is part of the LabelMark symbol library installed with the application. For more information, see Symbol Library in the LabelMark User's Guide.
Select the Images icon .
Click the desired location on the label for the image.
Browse to the location of the bitmap image (e.g. C:\Program Files\Brady\LabelMark3\Images\TT UL.bmp), select it and click Open.
Drag the blue handles to resize the image if necessary.
7. Add non-printing instructions to label:
Click the Text icon .
Click the desired location on the label for the text object.
Type the instruction text (e.g. Part is required!)
Click the Decrease Font Size icon several times to make the font 8 point. (You may have to reduce the font size before you can finish typing the text.)
Click the Non-Printable Object icon to make the instructions appear on the computer screen, but not on the printed label.
Make the typeface Bold and Italic .
8. Select File Save As… and save the template (e.g. T16-Template.lpt).
9. Select File Close to close the template.
For more information on this topic, see Creating a Template in the LabelMark User's Guide.
Create a label file based on the template Now create a new label file based on the template:
1. Select File New…:
Select the File radio button.
Check the Use template check box.
Click the Browse… button, select the desired template file (e.g. T16-Template.lpt) and click Open.
LabelMark Plus Tutorials
T16: LabelMark Plus Templates Tutorials 101
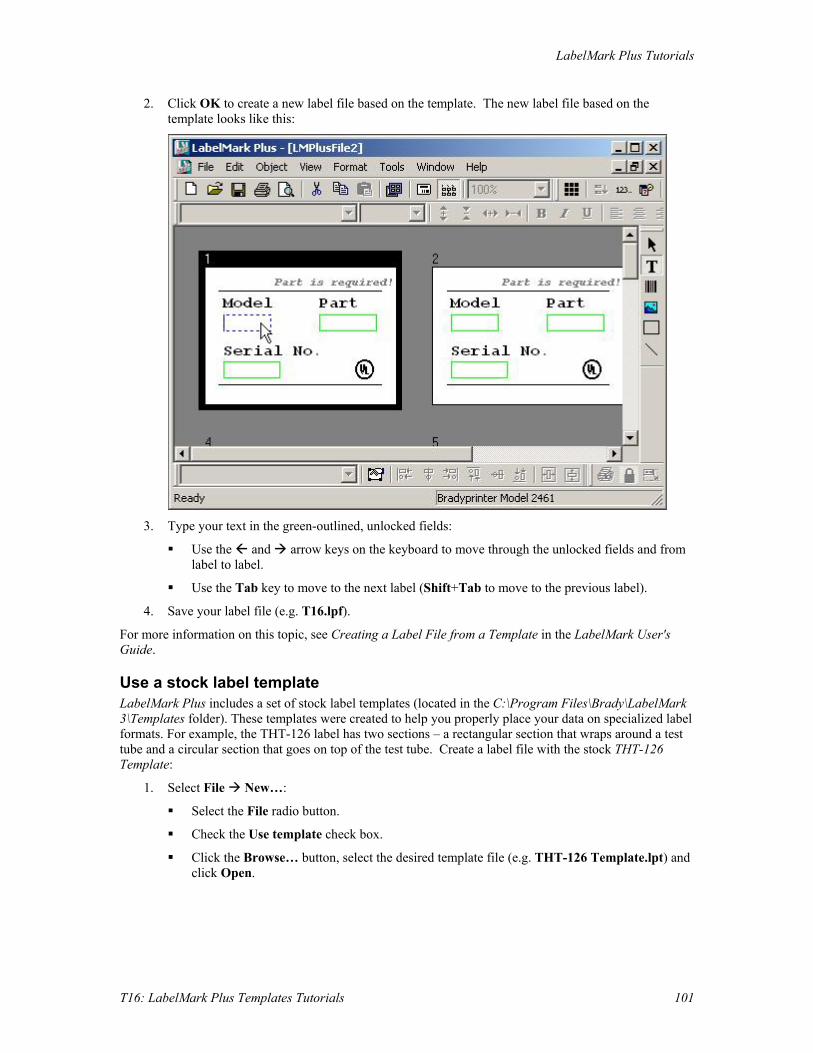
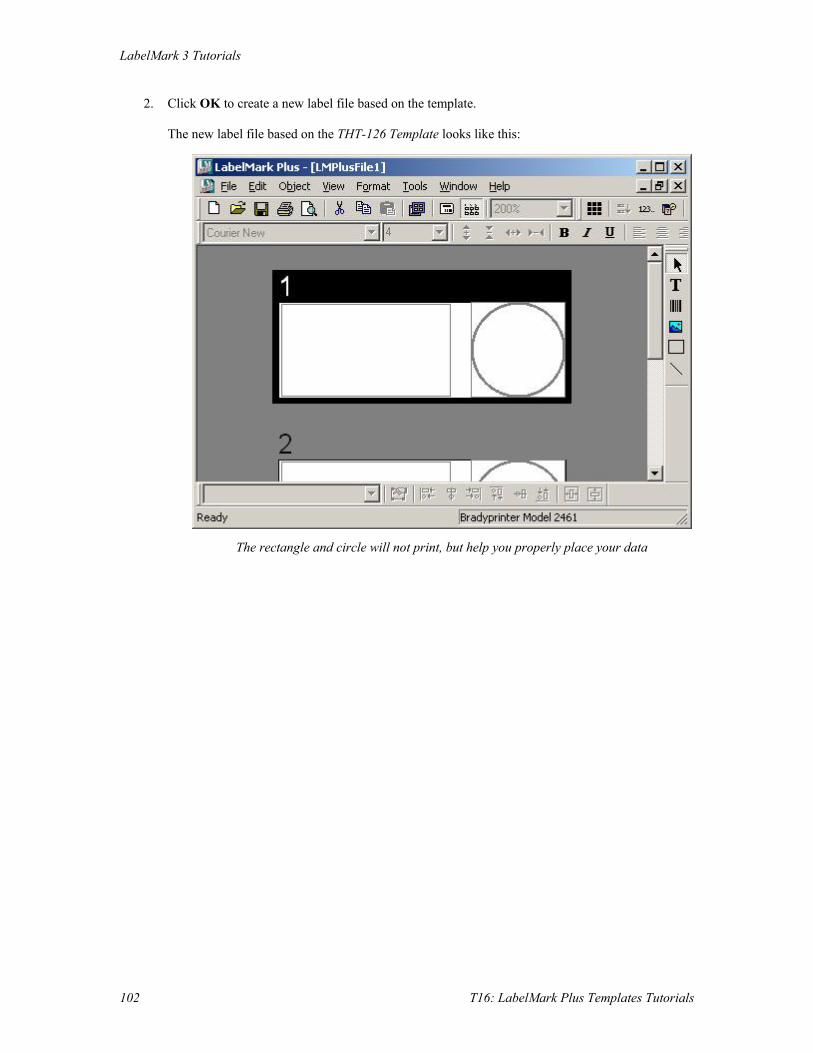
2. Click OK to create a new label file based on the template. The new label file based on the template looks like this:
3. Type your text in the green-outlined, unlocked fields:
Use the and arrow keys on the keyboard to move through the unlocked fields and from label to label.
Use the Tab key to move to the next label (Shift+Tab to move to the previous label).
4. Save your label file (e.g. T16.lpf).
For more information on this topic, see Creating a Label File from a Template in the LabelMark User's Guide.
Use a stock label template LabelMark Plus includes a set of stock label templates (located in the C:\Program Files\Brady\LabelMark 3\Templates folder). These templates were created to help you properly place your data on specialized label formats. For example, the THT-126 label has two sections – a rectangular section that wraps around a test tube and a circular section that goes on top of the test tube. Create a label file with the stock THT-126 Template:
1. Select File New…:
Select the File radio button.
Check the Use template check box.
Click the Browse… button, select the desired template file (e.g. THT-126 Template.lpt) and click Open.
LabelMark 3 Tutorials
102 T16: LabelMark Plus Templates Tutorials
2. Click OK to create a new label file based on the template. The new label file based on the THT-126 Template looks like this:
The rectangle and circle will not print, but help you properly place your data
LabelMark Plus Tutorials
T16: LabelMark Plus Templates Tutorials 103
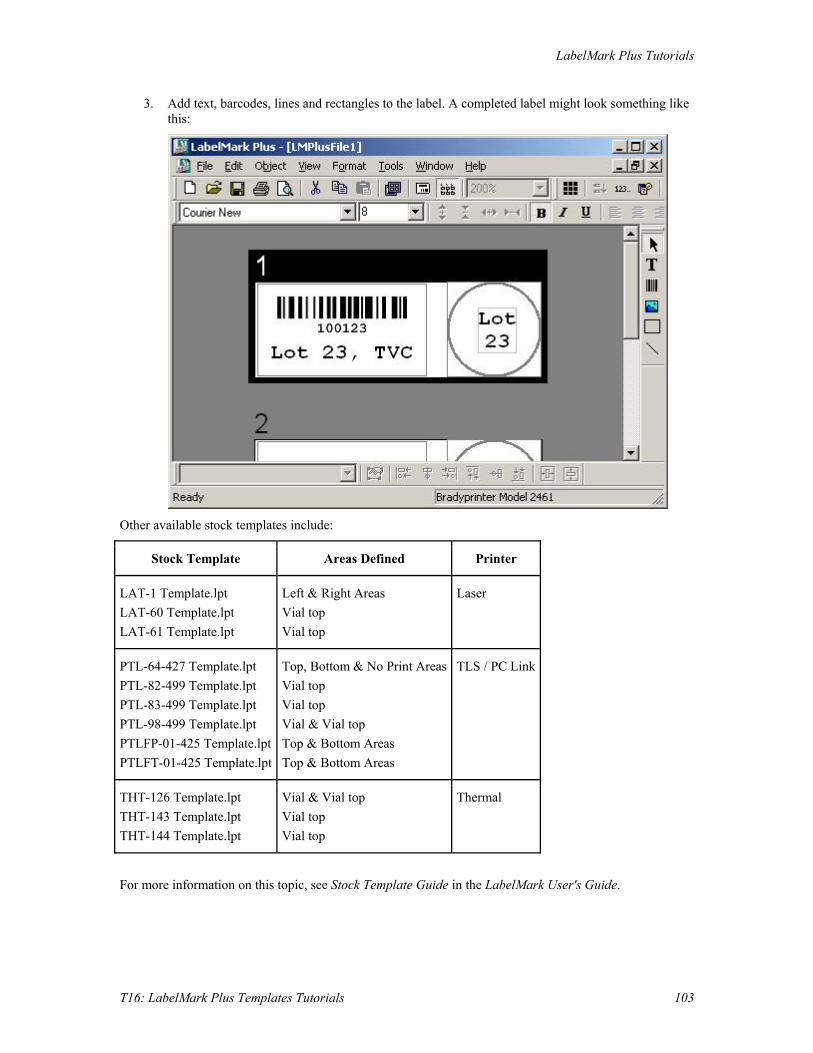
3. Add text, barcodes, lines and rectangles to the label. A completed label might look something like this:
Other available stock templates include:
Stock Template Areas Defined Printer
LAT-1 Template.lpt LAT-60 Template.lpt LAT-61 Template.lpt
Left & Right Areas Vial top Vial top
Laser
PTL-64-427 Template.lpt PTL-82-499 Template.lpt PTL-83-499 Template.lpt PTL-98-499 Template.lpt PTLFP-01-425 Template.lpt PTLFT-01-425 Template.lpt
Top, Bottom & No Print AreasVial top Vial top Vial & Vial top Top & Bottom Areas Top & Bottom Areas
TLS / PC Link
THT-126 Template.lpt THT-143 Template.lpt THT-144 Template.lpt
Vial & Vial top Vial top Vial top
Thermal
For more information on this topic, see Stock Template Guide in the LabelMark User's Guide.

Index 1 multiple labels ............................................. 17
multiple lines ............................................... 17 110/BIX block create backbone serialization ..................................79
new file .....................................................5, 91 horizontal serialization .................................79 new file based on template ...................49, 106 1-2-3 spreadsheet
D import .....................................................54, 99
A data
import .....................................................54, 99 add date barcode .........................................................91
add to label .................................................. 23 date/time .......................................................23 default image ............................................................91
label part ...................................................... 74 multiple labels ..............................................17 printer .......................................................... 29 serialization ............................................11, 37
delete wiremark.......................................................11 multiple labels ............................................. 17 advanced serialization ....................................37
documentation ASCII text online user's guide ......................................... 1 import .....................................................54, 99
drop-down link................................................. 1 autosize
E template object .....................................49, 106
B Excel spreadsheet
import .....................................................54, 99 backbone serialization
F 110/BIX block ..............................................79
banner favorite parts
creating .........................................................83 create list...................................................... 74
C file
close..........................................................5, 91 close create ........................................................5, 91 file.............................................................5, 91 create new.................................................5, 91 command multiplier .......................................17 create new based on template ...............49, 106 contents..............................................................1 import .....................................................54, 99 continuous open existing................................................ 11 parts ..............................................................83 save...........................................................5, 91 copy
find label ..............................................................11 text ............................................................... 68 labels with flip-flop ......................................68
T16: LabelMark Plus Templates Tutorials 105

LabelMark 3 Tutorials
flip-flop wiremark...................................................... 11
label part label data.......................................................68
remove flip character....................................68 add to favorite parts list ............................... 74
format change............................................................ 5
template objects ....................................49, 106 continuous.................................................... 83
text............................................................5, 91 select .............................................................. 5
H setup............................................................... 5
LabelMark horizontal serialization add text .......................................................... 5 110/BIX block ..............................................79 essentials........................................................ 5 hyperlink ...........................................................1 format text ..................................................... 5 I import data................................................... 54 image................................................................91 repeat common commands .......................... 17 import templates...................................................... 49 data into LabelMark .....................................54
LabelMark Plus index...................................................................1 barcode ........................................................ 91 insert create file ..................................................... 91 barcode .........................................................91 image ........................................................... 91 date/time .......................................................23 import data................................................... 99 image ............................................................91 save.............................................................. 91 multiple labels ..............................................17 templates.................................................... 106 serialization ..................................................11 text ............................................................... 91 wiremark.......................................................11
lock J template object......................................49, 106
jump link ...........................................................1 Lotus 1-2-3 spreadsheet
L import .....................................................54, 99
label M
add barcode...................................................91 Microsoft Excel spreadsheet
add date/time ................................................23 import .....................................................54, 99
add image .....................................................91 modify
copy multiple................................................17 date/time data............................................... 23
copy single....................................................11 imported data ..........................................54, 99
flip-flop data .................................................68 serialization.............................................11, 37
import data..............................................54, 99 O insert multiple...............................................17 open print ..............................................................29
existing file .................................................. 11 serialize...................................................11, 37
106 T16: LabelMark Plus Templates Tutorials

Index
P part
add to favorite parts list ................................74
select label part ...............................................5
part family
select...............................................................5
label copies ...................................................29
label file........................................................29
preview .........................................................29
range copies..................................................29
set range........................................................29
printer
select...............................................................5
select type .......................................................5
set LabelMark default.............................29, 74
R range
set print range ...............................................29
repeat/length
setting ...........................................................83
replace
text................................................................68
rotate
text................................................................83
S save
file...................................................................5
search................................................................ 1
serialization
110/BIX block ............................................. 79
advanced ...................................................... 37
simple .......................................................... 11
spreadsheet
import .....................................................54, 99
T template
autosize object ......................................49, 106
create ....................................................49, 106
create label file based on.......................49, 106
import data into.....................................54, 106
lock object ............................................49, 106
modify.......................................................... 49
text
add to label ...............................................5, 91
copy lines..................................................... 17
find............................................................... 68
format ............................................................ 5
import .....................................................54, 99
replace.......................................................... 68
rotate ............................................................ 83
time
add to label .................................................. 23
W wiremark ........................................................ 11
T16: LabelMark Plus Templates Tutorials 107