l a remov & tion loca
TRANSCRIPT
2
1
4
3
© 12/2008 ALL RIGHTS RESERVED. Technical changes possible. No liability for misprints.
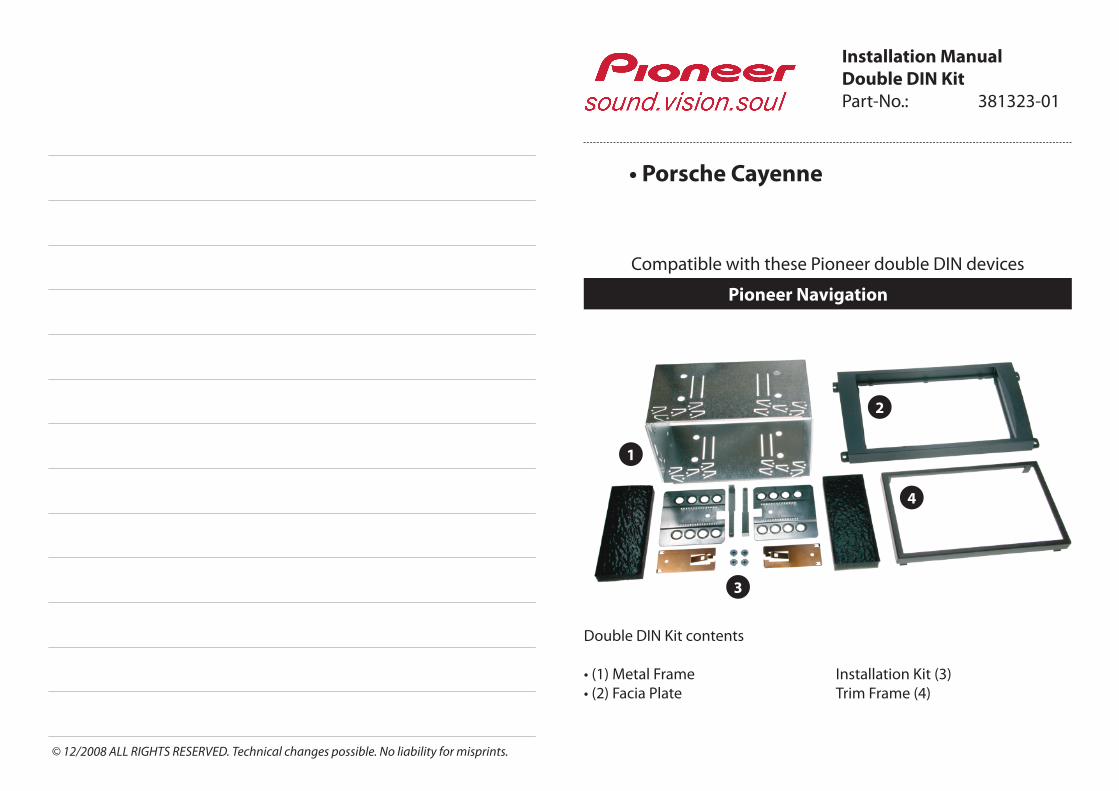
Compatible with these Pioneer double DIN devices
Pioneer Navigation
• Porsche Cayenne
Double DIN Kit contents
• (1) Metal Frame• (2) Facia Plate
Installation Kit (3)Trim Frame (4)
Installation ManualDouble DIN KitPart-No.: 381323-01

LOCATION & REMOVAL
With the head unit now removed locate the power ISO plug and the Black optical plug shown below.
Insert OPTICAL leads into TOOKI-POR loom and car loom to create loop, see diagram below
To remove the (out) fibre optic cable from the factory con-nector you will need to remove the black outer casing and push out the blue locking insert. You will need to do the same to insert the cable into the supplied loom. (shown in previous fig)
Next connect the Yellow to 12v+ perm and the Black to 12v– ground (you may use the 12v+ & 12v- from the power iso) , plug in the microphone (supplied) and insert optical plug into the interface.
INSTALLATION
Installation is made at the front unit.
To remove the head unit you will need to remove the surrounding trim then the 4 screws securing the unit, as below. Some models are removed with specific radio keys.
TOOKI-POR is designed to work with a radio that has a factory SIM card based GSM phone option rather than Bluetooth. As such, certain functions displayed on the radio are not supported by the TOOKI-POR.
The factory phone module (if fitted) will need to be re-moved from its power and optical connection (optical cables must be re-connected to continue loop) This module is located under the drivers (O/S) seat on all models. It is possible to install the TOOKI kit at the Fac-tory phone location and allocate 12v+ perm and ground.
INTERFACE CAR CONNECTOR
OUT cable from screen
IN cable from interface
1. Press TEL on PCM Radio.
2. “Tooki Searching” indicates no phone connected.
3. Start the pairing procedure on your mobile phone.
Make sure the Bluetooth feature is turned on.
Consult your phone’s manual for phone-specific
pairing procedures.
4. Once your mobile phone discovers Tooki xxxx
(last 4 digits will vary), select and pair Tooki.
5. When prompted for a passkey, enter 6888 on your
mobile phone.
6. Once pairing is complete, go to the head unit and
select “dialled calls” Choose the phone you wish to
pair, choose select,. Go down to “dial” and press
bottom right rotary control. After a short while you
should see your signal strength indicator on the
PCM Radio. Pressing “Tel” will then show you
your network provider and signal strength.
7. You may pair up to 5 different mobile phones.
For information on phone selection, section 6
8. To delete a paired phone select phone book, scroll to the phone name you wish to delete, select the name by pushing the rotary button. When the name is se-lected press the “phone up” hard key on the unit and you should see the message “deleting”
OPERATING INSTRUCTIONS
Mount the metal brackets to the double DIN head unit.
The position of the coppercoloured holder can be adjusted to your needs for perfect fit.(see sample)
(sample photo) (sample photo)
Installation Manual Double DIN Kit 381323-01
1. Porsche Cayenne with OEM head unit.
3. Place facia plate on the dash-board. Fix it with the 4 original screws.
Push the Metal Frame into the facia plate
Connect all required circuit points and push the double DIN head unit in the metal frame until it snaps in.
Place the trim frame.
Reinstall everything in reverse order to finish installation.
All installation work must be performed by a qualified professional installer only.The manufacturer / dealer is not liable for any kind of incidential or indirect damages.
2. Remove trim frame, surrounding the OEM head unit.
Remove the 4 screws.
Remove the OEM head unit.