l 2: restriction e d (cutting ofauthors.fhcrc.org/441/12/dna_lab_#2_student.pdfthe particular enzyme...
TRANSCRIPT
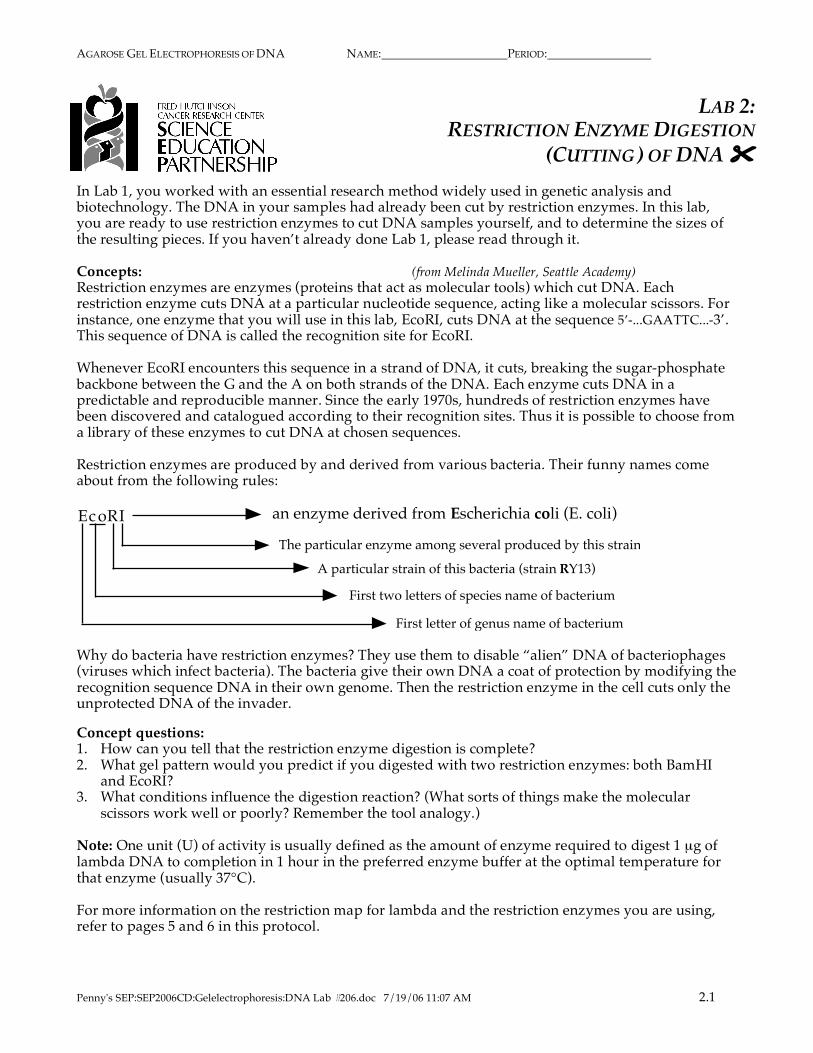
AGAROSE GEL ELECTROPHORESIS OF DNA NAME: PERIOD:
Penny's SEP:SEP2006CD:Gelelectrophoresis:DNA Lab #206.doc 7/19/06 11:07 AM 2.1
LAB 2: RESTRICTION ENZYME DIGESTION
(CUTTING) OF DNA
In Lab 1, you worked with an essential research method widely used in genetic analysis and biotechnology. The DNA in your samples had already been cut by restriction enzymes. In this lab, you are ready to use restriction enzymes to cut DNA samples yourself, and to determine the sizes of the resulting pieces. If you haven’t already done Lab 1, please read through it. Concepts: (from Melinda Mueller, Seattle Academy) Restriction enzymes are enzymes (proteins that act as molecular tools) which cut DNA. Each restriction enzyme cuts DNA at a particular nucleotide sequence, acting like a molecular scissors. For instance, one enzyme that you will use in this lab, EcoRI, cuts DNA at the sequence 5’-...GAATTC...-3’. This sequence of DNA is called the recognition site for EcoRI. Whenever EcoRI encounters this sequence in a strand of DNA, it cuts, breaking the sugar-phosphate backbone between the G and the A on both strands of the DNA. Each enzyme cuts DNA in a predictable and reproducible manner. Since the early 1970s, hundreds of restriction enzymes have been discovered and catalogued according to their recognition sites. Thus it is possible to choose from a library of these enzymes to cut DNA at chosen sequences. Restriction enzymes are produced by and derived from various bacteria. Their funny names come about from the following rules: Ec oRI an enzyme derived from Escherichia coli (E. coli)
The particular enzyme among several produced by this strain
A particular strain of this bacteria (strain RY13)
First two letters of species name of bacterium
First letter of genus name of bacterium Why do bacteria have restriction enzymes? They use them to disable “alien” DNA of bacteriophages (viruses which infect bacteria). The bacteria give their own DNA a coat of protection by modifying the recognition sequence DNA in their own genome. Then the restriction enzyme in the cell cuts only the unprotected DNA of the invader. Concept questions: 1. How can you tell that the restriction enzyme digestion is complete? 2. What gel pattern would you predict if you digested with two restriction enzymes: both BamHI
and EcoRI? 3. What conditions influence the digestion reaction? (What sorts of things make the molecular
scissors work well or poorly? Remember the tool analogy.) Note: One unit (U) of activity is usually defined as the amount of enzyme required to digest 1 µg of lambda DNA to completion in 1 hour in the preferred enzyme buffer at the optimal temperature for that enzyme (usually 37°C). For more information on the restriction map for lambda and the restriction enzymes you are using, refer to pages 5 and 6 in this protocol.
AGAROSE GEL ELECTROPHORESIS OF DNA NAME: PERIOD:
Penny's SEP:SEP2006CD:Gelelectrophoresis:DNA Lab #206.doc 7/19/06 11:07 AM 2.2
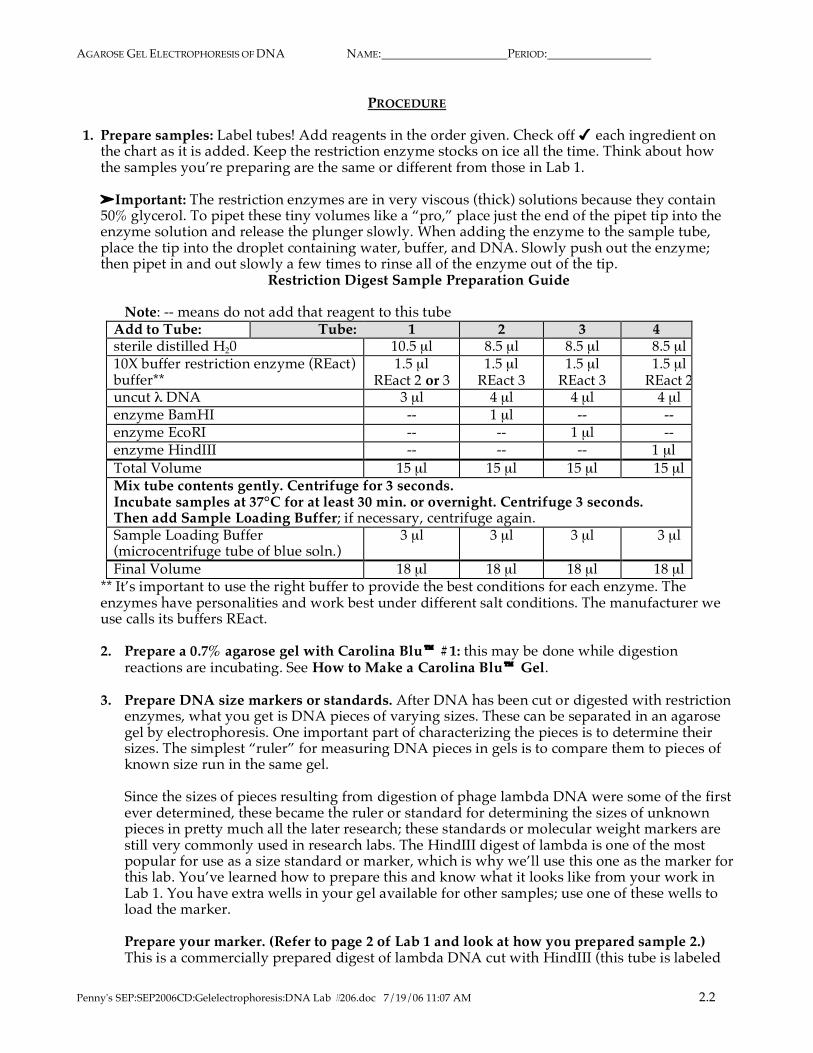
PROCEDURE 1. Prepare samples: Label tubes! Add reagents in the order given. Check off each ingredient on
the chart as it is added. Keep the restriction enzyme stocks on ice all the time. Think about how the samples you’re preparing are the same or different from those in Lab 1. Important: The restriction enzymes are in very viscous (thick) solutions because they contain 50% glycerol. To pipet these tiny volumes like a “pro,” place just the end of the pipet tip into the enzyme solution and release the plunger slowly. When adding the enzyme to the sample tube, place the tip into the droplet containing water, buffer, and DNA. Slowly push out the enzyme; then pipet in and out slowly a few times to rinse all of the enzyme out of the tip.
Restriction Digest Sample Preparation Guide
Note: -- means do not add that reagent to this tube Add to Tube: Tube: 1 2 3 4 sterile distilled H20 10.5 µl 8.5 µl 8.5 µl 8.5 µl 10X buffer restriction enzyme (REact) buffer**
1.5 µl REact 2 or 3
1.5 µl REact 3
1.5 µl REact 3
1.5 µl REact 2
uncut λ DNA 3 µl 4 µl 4 µl 4 µl enzyme BamHI -- 1 µl -- -- enzyme EcoRI -- -- 1 µl -- enzyme HindIII -- -- -- 1 µl Total Volume 15 µl 15 µl 15 µl 15 µl Mix tube contents gently. Centrifuge for 3 seconds. Incubate samples at 37°C for at least 30 min. or overnight. Centrifuge 3 seconds. Then add Sample Loading Buffer; if necessary, centrifuge again. Sample Loading Buffer (microcentrifuge tube of blue soln.)
3 µl 3 µl 3 µl 3 µl
Final Volume 18 µl 18 µl 18 µl 18 µl ** It’s important to use the right buffer to provide the best conditions for each enzyme. The enzymes have personalities and work best under different salt conditions. The manufacturer we use calls its buffers REact.
2. Prepare a 0.7% agarose gel with Carolina Blu #1: this may be done while digestion
reactions are incubating. See How to Make a Carolina Blu Gel.
3. Prepare DNA size markers or standards. After DNA has been cut or digested with restriction enzymes, what you get is DNA pieces of varying sizes. These can be separated in an agarose gel by electrophoresis. One important part of characterizing the pieces is to determine their sizes. The simplest “ruler” for measuring DNA pieces in gels is to compare them to pieces of known size run in the same gel.
Since the sizes of pieces resulting from digestion of phage lambda DNA were some of the first ever determined, these became the ruler or standard for determining the sizes of unknown pieces in pretty much all the later research; these standards or molecular weight markers are still very commonly used in research labs. The HindIII digest of lambda is one of the most popular for use as a size standard or marker, which is why we’ll use this one as the marker for this lab. You’ve learned how to prepare this and know what it looks like from your work in Lab 1. You have extra wells in your gel available for other samples; use one of these wells to load the marker.
Prepare your marker. (Refer to page 2 of Lab 1 and look at how you prepared sample 2.) This is a commercially prepared digest of lambda DNA cut with HindIII (this tube is labeled
AGAROSE GEL ELECTROPHORESIS OF DNA NAME: PERIOD:
Penny's SEP:SEP2006CD:Gelelectrophoresis:DNA Lab #206.doc 7/19/06 11:07 AM 2.3
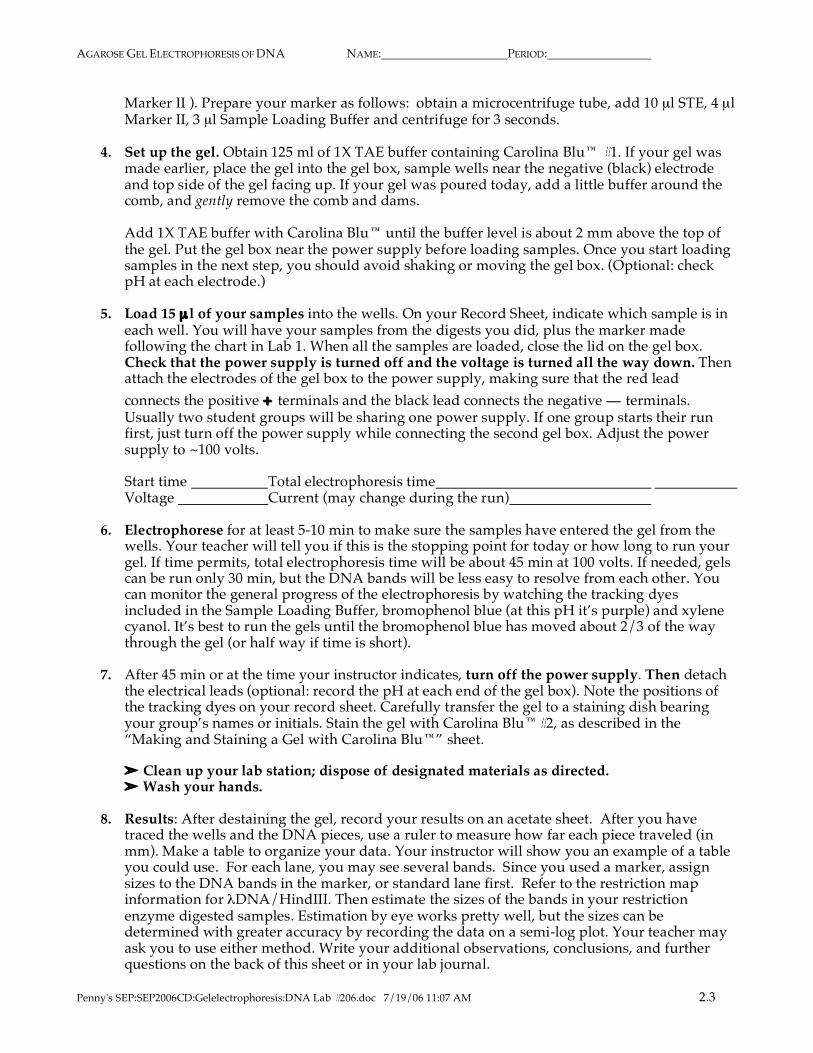
Marker II ). Prepare your marker as follows: obtain a microcentrifuge tube, add 10 µl STE, 4 µl Marker II, 3 µl Sample Loading Buffer and centrifuge for 3 seconds.
4. Set up the gel. Obtain 125 ml of 1X TAE buffer containing Carolina Blu #1. If your gel was
made earlier, place the gel into the gel box, sample wells near the negative (black) electrode and top side of the gel facing up. If your gel was poured today, add a little buffer around the comb, and gently remove the comb and dams.
Add 1X TAE buffer with Carolina Blu until the buffer level is about 2 mm above the top of the gel. Put the gel box near the power supply before loading samples. Once you start loading samples in the next step, you should avoid shaking or moving the gel box. (Optional: check pH at each electrode.)
5. Load 15 µ l of your samples into the wells. On your Record Sheet, indicate which sample is in
each well. You will have your samples from the digests you did, plus the marker made following the chart in Lab 1. When all the samples are loaded, close the lid on the gel box. Check that the power supply is turned off and the voltage is turned all the way down. Then attach the electrodes of the gel box to the power supply, making sure that the red lead connects the positive ++ terminals and the black lead connects the negative —— terminals. Usually two student groups will be sharing one power supply. If one group starts their run first, just turn off the power supply while connecting the second gel box. Adjust the power supply to ~100 volts.
Start time Total electrophoresis time Voltage Current (may change during the run)
6. Electrophorese for at least 5-10 min to make sure the samples have entered the gel from the
wells. Your teacher will tell you if this is the stopping point for today or how long to run your gel. If time permits, total electrophoresis time will be about 45 min at 100 volts. If needed, gels can be run only 30 min, but the DNA bands will be less easy to resolve from each other. You can monitor the general progress of the electrophoresis by watching the tracking dyes included in the Sample Loading Buffer, bromophenol blue (at this pH it’s purple) and xylene cyanol. It’s best to run the gels until the bromophenol blue has moved about 2/3 of the way through the gel (or half way if time is short).
7. After 45 min or at the time your instructor indicates, turn off the power supply. Then detach
the electrical leads (optional: record the pH at each end of the gel box). Note the positions of the tracking dyes on your record sheet. Carefully transfer the gel to a staining dish bearing your group’s names or initials. Stain the gel with Carolina Blu#2, as described in the “Making and Staining a Gel with Carolina Blu” sheet.
Clean up your lab station; dispose of designated materials as directed. Wash your hands.
8. Results: After destaining the gel, record your results on an acetate sheet. After you have traced the wells and the DNA pieces, use a ruler to measure how far each piece traveled (in mm). Make a table to organize your data. Your instructor will show you an example of a table you could use. For each lane, you may see several bands. Since you used a marker, assign sizes to the DNA bands in the marker, or standard lane first. Refer to the restriction map information for λDNA/HindIII. Then estimate the sizes of the bands in your restriction enzyme digested samples. Estimation by eye works pretty well, but the sizes can be determined with greater accuracy by recording the data on a semi-log plot. Your teacher may ask you to use either method. Write your additional observations, conclusions, and further questions on the back of this sheet or in your lab journal.
AGAROSE GEL ELECTROPHORESIS OF DNA NAME: PERIOD:
Penny's SEP:SEP2006CD:Gelelectrophoresis:DNA Lab #206.doc 7/19/06 11:07 AM 2.4
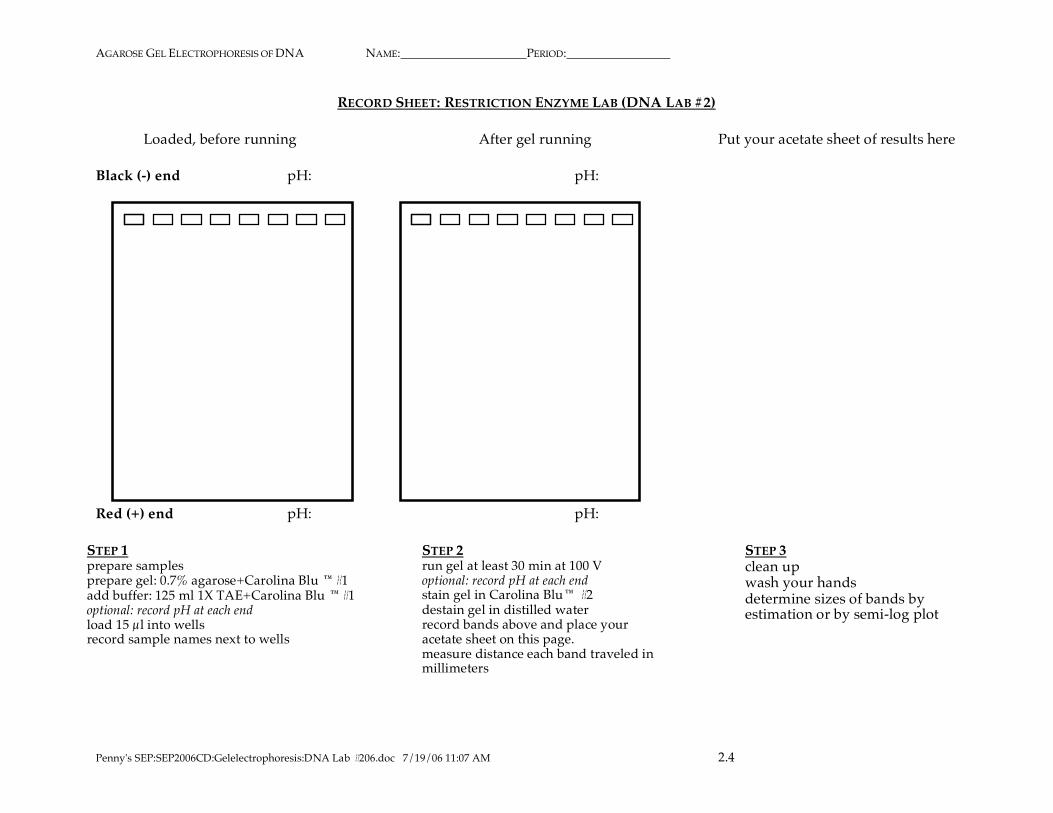
RECORD SHEET: RESTRICTION ENZYME LAB (DNA LAB #2)
Loaded, before running After gel running Put your acetate sheet of results here Black (-) end pH: pH: Red (+) end pH: pH:
STEP 1 prepare samples prepare gel: 0.7% agarose+Carolina Blu #1 add buffer: 125 ml 1X TAE+Carolina Blu #1 optional: record pH at each end load 15 µl into wells record sample names next to wells
STEP 2 run gel at least 30 min at 100 V optional: record pH at each end stain gel in Carolina Blu #2 destain gel in distilled water record bands above and place your acetate sheet on this page. measure distance each band traveled in millimeters
STEP 3 clean up wash your hands determine sizes of bands by estimation or by semi-log plot

AGAROSE GEL ELECTROPHORESIS OF DNA NAME: PERIOD:
Penny's SEP:SEP2006CD:Gelelectrophoresis:DNA Lab #206.doc 7/19/2006 11:07 AM 2.5

AGAROSE GEL ELECTROPHORESIS OF DNA NAME: PERIOD:
Penny's SEP:SEP2006CD:Gelelectrophoresis:DNA Lab #206.doc 7/19/2006 11:07 AM 2.6