kronos webta 4 - united states department of...
TRANSCRIPT

Kronos webTA 4.2 DOC Employee User Guide

© 2015, Kronos Incorporated. Kronos and the Kronos logo are registered trademarks and webTA is a trademark of Kronos Incorporated or a related company. All other product and company names are used for identification purposes only and may be the trademarks of their respective owners. All specifications are subject to change. All rights reserved.
Published by Kronos Incorporated 297 Billerica Road, Chelmsford, Massachusetts 01824-4119
Phone: 978-250-9800, Fax: 978-367-5900
webTA 4.2 DOC Employee User Guide Document Revision History
Document Revision Product Version Release Date A Version 4.2.6 August 2015
webTA 4.2 DOC Employee User Guide i ©2015 Kronos Incorporated
Table of Contents Introduction ................................................................................................................................... 1
About the Employee Main Menu ............................................................................................................. 1
Timekeeping Cycle ....................................................................................................................................... 1
Employee and Timesheet Profiles................................................................................................ 2
About Employee Profiles............................................................................................................................ 2
Viewing your employee profile ......................................................................................................... 4
Editing your employee profile ........................................................................................................... 4
About Timesheet Profiles .......................................................................................................................... 4
About Telework Profiles ............................................................................................................................ 8
Accounts ......................................................................................................................................... 9
Working with My Accounts ..................................................................................................................... 11
Selecting My Accounts ....................................................................................................................... 11
Removing My Accounts ..................................................................................................................... 11
About Census Agency Accounts............................................................................................................. 11
Creating My Accounts (Census) ..................................................................................................... 11
Removing My Accounts (Census) .................................................................................................. 13
Editing My Accounts (Census) ........................................................................................................ 13
Schedules ...................................................................................................................................... 14
About default schedules ........................................................................................................................... 14
Working with Default Schedules ........................................................................................................... 15
Adding default schedules .................................................................................................................. 15
Editing default schedules .................................................................................................................. 15
Deleting default schedules ............................................................................................................... 16
About Census Agency Default Schedules ........................................................................................... 16
Adding default schedules (Census) ............................................................................................... 16
Editing default schedules (Census) ............................................................................................... 17
About advanced schedules ...................................................................................................................... 18
Viewing your advanced schedule .................................................................................................. 18

webTA 4.2 DOC Employee User Guide ii ©2015 Kronos Incorporated
Time Entry ................................................................................................................................... 19
Working with Timesheets ....................................................................................................................... 21
Adding timesheet transactions ....................................................................................................... 21
Editing timesheet transactions ....................................................................................................... 22
Deleting timesheet transactions .................................................................................................... 22
About Census Agency Timesheets ........................................................................................................ 23
Adding timesheet transactions (Census) .................................................................................... 23
Editing timesheet transactions (Census) ................................................................................... 24
About Timesheet Remarks ...................................................................................................................... 26
Adding a pay period remark to a timesheet .............................................................................. 26
Adding a daily remark to a timesheet .......................................................................................... 26
Deleting remarks from timesheets ............................................................................................... 27
About Validating Timesheets ................................................................................................................. 27
Validating timesheets ......................................................................................................................... 28
About the Timesheet Summary ............................................................................................................. 29
Opening and printing Timesheet Summaries ........................................................................... 29
About Processed Timesheets ................................................................................................................. 30
Viewing processed timesheets ....................................................................................................... 30
Leave Balances ............................................................................................................................ 31
About Leave Balances ............................................................................................................................... 31
Viewing your leave balances ........................................................................................................... 31
Leave Requests ............................................................................................................................ 33
Working with Leave Requests ............................................................................................................... 35
Viewing your leave requests ........................................................................................................... 35
Adding your leave requests ............................................................................................................. 36
Editing your leave requests ............................................................................................................. 38
Deleting your leave requests ........................................................................................................... 38
Premium Pay Requests ............................................................................................................... 39
Working with Premium Pay Requests ................................................................................................ 39
Viewing your premium pay requests ........................................................................................... 39
Adding your premium pay requests ............................................................................................. 40

webTA 4.2 DOC Employee User Guide iii ©2015 Kronos Incorporated
Editing your premium pay requests............................................................................................. 40
Deleting your premium pay requests .......................................................................................... 41
Telework Agreements and Requests ......................................................................................... 42
Adding telework agreements .......................................................................................................... 44
Modifying telework agreements .................................................................................................... 44
Deleting telework agreements ....................................................................................................... 44
Terminating telework agreements ............................................................................................... 45
Adding telework requests ................................................................................................................ 46
Modifying telework requests .......................................................................................................... 46
Deleting telework requests .............................................................................................................. 47
Leave Donations .......................................................................................................................... 48
Adding your leave donations .......................................................................................................... 48
Editing your leave donations .......................................................................................................... 49
Deleting your leave donations ........................................................................................................ 49
About Census Agency Leave Donations ............................................................................................. 50
Adding leave donations (Census) .................................................................................................. 50
Continuation of Pay .................................................................................................................... 52
Viewing COP leave balances ............................................................................................................ 52
Adding COP leave time in timesheets .......................................................................................... 53
Emergency Contacts ................................................................................................................... 54
Adding your emergency contacts .................................................................................................. 54
Editing your emergency contacts .................................................................................................. 54
Deleting your emergency contacts ................................................................................................ 54
Viewing your emergency contacts ................................................................................................ 55
Changing the call order...................................................................................................................... 55
Reports ......................................................................................................................................... 56
Leave Audit Report ..................................................................................................................................... 56

webTA 4.2 DOC Employee User Guide 1 ©2015 Kronos Incorporated
Introduction The purpose of this guide is to reinforce concepts, tasks and procedures covered in your webTA training. It provides detailed, step-by-step instructions accompanied by screenshots, examples, and, where appropriate, Agency policy and processes.
The tasks in this guide are written for users assigned the Employee role in the webTA system. These tasks include accurately maintaining your timesheet, submitting leave and premium pay requests, and running reports.
NOTE: Some features and procedures are specifically designed for Census Agency employees. The notation (Census) is appended to procedures that are unique to Census Agency employees.
About the Employee Main Menu The Employee main menu lists functions that are available to the Employee role. Most of the tasks that you will do begin on this page. An example of the Employee main menu page is shown below.
Timekeeping Cycle The webTA system pay period schedule is based on the Agency’s two-week pay period. As the Time Entry section explains, employees enter time in quarter-hour and hourly increments.
For accurate payroll processing, maintain timesheets daily and promptly resolve system warnings or errors. Contact your Supervisor with questions about your timesheet editing and validation process.

webTA 4.2 DOC Employee User Guide 2 ©2015 Kronos Incorporated
Employee and Timesheet Profiles The system creates two profiles when an employee is added to webTA: an employee profile and a timesheet profile. The employee profile identifies who the employee is (name, user ID), the role and licenses to which they have access, where they are assigned (agency), and to whom they are assigned (Timekeeper and Supervisor.) The timesheet profile identifies the employee’s basic pay plan, employee status, leave-related information, and the method for working with accounts.
About Employee Profiles The Employee Profile includes a separate page for each of the sections below:
• Settings
• Licenses
• Calendars
• Locator Info
• Roles
• Timesheet Details
Employees may edit certain fields in their employee profile, such as the e-mail address or contact information on the Locator Info page. Once you have specified this information, it is unlikely you will need to change it.
Below is a sample Employee Profile > Settings page.
webTA 4.2 DOC Employee User Guide 3 ©2015 Kronos Incorporated
Employee Profile page contents--Settings page
• No Time Tracking. Identifies whether the user records time and attendance in webTA. • User ID. The login ID for the employee. • Password. The employee’s webTA user password. Passwords must conform to Agency
guidelines. Employees may update passwords on this page. • Name fields. The employee's first, middle and last name. • Active. Indicates whether the employee is active (that is, eligible to use webTA) or inactive.
When employees are inactivated, none of their records are deleted from the system, but they will no longer be able to log into the system, and their records are ignored during verification, certification, and transmission file builds.
• Timekeeper. The employee's assigned Timekeeper. • Supervisor. The employee's assigned Supervisor. • Organization. The employee's assigned organization and agency. • E-mail Address. The e-mail address that the employee has been assigned so they can send
and receive webTA messages from the designated e-mail application. Employees may update their e-mail address.
• Timezone. The time zone in which the employee is located. • Start Page. Specify the default role for the main menu, if the employee is assigned more than
one role.
Licenses page The Licenses page lists all webTA licenses to which the employee is given access. This page is view-only for employees.
Calendars page contents The Calendars page lists all holiday calendars to which the employee is assigned. This page is view-only for employees.
Locator Info page contents This page contains employee work address and contact information. Employees may update Locator Info fields.
Roles page contents The Roles page identifies the webTA role(s) to which the employee is given access. This page is view-only for employees.
Timesheet Details page contents The Timesheet Details page includes settings that determine the type of timesheet and whether data is pre-populated in new timesheets. This page is view-only for employees.

webTA 4.2 DOC Employee User Guide 4 ©2015 Kronos Incorporated
Viewing your employee profile To view your employee profile, take these steps:
1. Click Settings on the Utility menu in the upper right corner of any page.
The Employee Profile > Settings page opens.
2. Click the links on the left side of the page to see additional pages such as the Licenses page, Timesheet Details, Timesheet Profile, and so forth.
3. Click the Employee role tab to return to the Employee main menu.
Editing your employee profile Employees may update their Password and E-mail Address on the Settings page, and work contact information on the Locator Info page. To edit your employee profile, take these steps:
1. Click Settings on the Utility menu in the upper right corner of any page.
The Employee Profile > Settings page opens.
2. Update the information.
3. When you are done, click Save.
A message confirms the action.
4. Click the Employee role tab to return to the Employee main menu.
About Timesheet Profiles Timesheet profiles identify the pay period, employee status, pay plan details, leave and other related details. All fields on the timesheet profile are read-only for employees.
The Timesheet Profile page is shown below.
webTA 4.2 DOC Employee User Guide 5 ©2015 Kronos Incorporated
webTA 4.2 DOC Employee User Guide 6 ©2015 Kronos Incorporated
Timesheet Profile page contents The Timesheet Profile page includes the following sections: Pay Period, Status Change, Status, Pay Details, Overtime/Standby, Leave, Accounting, and Pay Provider. Each section is described below.
Pay Period
• Pay Period. The pay period to which the timesheet profile corresponds.
Status Change
• Status Change Type. Indicates the type of status change (Start or End) for mid-pay period accession and separations.
• Status Change Day. Indicates the day in the two-week pay period when the status starts or ends.
Status
• Oath of Office. Identifies an employee who is new to the agency. This also identifies the employee’s first timesheet reported.
• Final Report. Indicates that this is the last timesheet report that is being sent for the employee. • On Hold. Indicates that no timesheet data will be transmitted for payroll processing for the
employee.
Pay Details
• Pay Plan. Identifies the Employee’s pay plan. • Tour of Duty. Indicates if an Employee is full time, part time, or intermittent.
NOTE: To satisfy OPM guidelines for Phased Retirement, a new tour of duty (Phased Retirement), 35 transaction codes and relevant exceptions and restrictions are available in webTA. The new transactions codes are restricted for use by employees assigned to the Phased Retirement tour of duty, also referred to as Work Schedule-R. A timesheet validation warning displays if employees exceed the tour of duty hours.
• Duty Hours. Displays the total number of biweekly hours that the Employee is expected to work. • Work Week. Defines a typical work week for an Employee. • Alternative Work Schedule. Indicates if the Employee is assigned to an alternate work
schedule (ex.5/4/9 Schedule, Variable Workday, etc.)
OT/Standby • RSO/Salary Cap. Identifies regularly scheduled overtime settings for the Employee. • Standby Hours Week 1. Indicates an Employee’s entitlement to premium pay for standby duty
in Week 1. • Standby Hours Week 2. Indicates an Employee’s entitlement to premium pay for standby duty
in Week 2. • Standby AUO Percent. Defines the applicable percentage for the number of hours of standby
used in week 1 and week 2 or the Administratively Uncontrollable. Overtime (AUO) percentage for this Employee.
Leave
• Service Computation Date. Used to calculate the leave accrual category. • Leave Category Override. Establishes the accrual category override that is not dependent on
the SCD.

webTA 4.2 DOC Employee User Guide 7 ©2015 Kronos Incorporated
• Leave Ceiling Override. Specifies the leave ceiling that overrides the default leave ceiling for the Employee.
• Home Leave Computation Date. Indicates the start date for an Employee to participate in the home leave accrual program.
• Home Leave Category. Establishes the amount of home leave an Employee will accrue per pay period.
• Home Leave End Date. Indicates the end date for participation in the home leave accrual program.
• VLTP Recipient. Indicates the employee is a recipient of hours from the voluntary leave transfer program (VLTP).
• VLTP Recipient. Indicates the employee is a recipient of hours from the voluntary leave transfer program (VLTP).
• ELTP Recipient. Indicates the employee is a recipient of hours from the emergency leave transfer program (VLTP).
• FMLA Invoked, FMLA Expiration Date. A check mark in the FMLA Invoked check box indicates that the employee's leave request for FMLA has been invoked and approved. A date in the FMLA Expiration Date field identifies the date that the employee's FMLA expires; this date is 12 months from the Start Date in the leave request. The check box and the date may be system-generated, or manually entered by a user. Two scenarios are described below. • webTA enables FMLA Invoked and populates the FMLA Expiration Date. This scenario takes
place when an employee invokes and submits an FMLA leave request, and the employee’s Supervisor approves the request. Upon Supervisor approval, webTA enables the FMLA Invoked check box in the employee’s Timesheet Profile and populates the FMLA Expiration Date. The FMLA Expiration Date is 12 months from the Start Date in the leave request. • If the Supervisor denies the FMLA request, there are no changes in the Timesheet
Profile. • If the Supervisor reverts an approved request to Pending, the system clears both the
FMLA Invoked check box and the FMLA Expiration Date field. • Users manually enable the check mark and type the FMLA Expiration Date. Users who have
system permission to edit the Timesheet Profile (Timekeepers, Master Timekeepers, HR Administrators, and Administrators) may manually enable the FMLA Invoked check box and type the FMLA Expiration Date, or clear the check box and FMLA Expiration Date. This may be useful if the leave request is adjusted and a manual update is required.
• FMLA Military Invoked, FMLA Military Expiration Date. (Please see the explanation above for FMLA Invoked, FMLA Expiration Date.)
• Military Regular Leave Flag. Indicates that the employee is entitled to military regular leave and generates the automatic accrual.
• Military Emergency Leave Flag. Indicates that the employee is entitled to military emergency leave and generates the automatic accrual.
Accounting • Accounting Type. If the agency has implemented accounting, time in pay and dollar
transactions must have an accounting code associated with them. Each agency may specify the method of entry for account information in the employee's timesheet. The following options are available: • Manual entry. The employee selects an account for each line of time in pay and dollar
transactions. • Local. The employee selects an account that is stored locally in webTA rather than at NFC.
webTA then includes the accounting data in the transmission file to NFC. This option is useful
webTA 4.2 DOC Employee User Guide 8 ©2015 Kronos Incorporated
for agencies that want to generate reports from webTA that are based on account codes, but have set accounts for employees.
• Stored. The employee selects an account that is stored at NFC. This option is useful for agencies in which all time in pay and dollar transactions are charged to the same account.
Pay Provider-NFC • Agency. The agency that the employee's Timekeeper is assigned to. This data is populated from
the Timekeeper's timekeeper profile. • State Code. The state that the employee's Timekeeper is assigned to. This data is populated
from the Timekeeper's timekeeper profile. • Town. The town that the employee's Timekeeper is assigned to. This data is populated from the
Timekeeper's timekeeper profile. • Unit. The unit that the employee's Timekeeper is assigned to. This data is populated from the
Timekeeper's timekeeper profile. NOTE: For Census Agency employees, the value in this field determines the employee’s Division. The Division is the first segment of the Census Agency account string. The employee’s Division is associated with a list of projects.
• Timekeeper. The Timekeeper's ID. This data is populated from the Timekeeper's timekeeper profile.
• New Contact Point. Whether the contact information has been updated.
About Telework Profiles Employees who are licensed to use the webTA Telework module may have a telework profile. All fields on the telework profile are read-only for employees.

webTA 4.2 DOC Employee User Guide 9 ©2015 Kronos Incorporated
Accounts Employees may select (get) accounts available from their assigned Timekeeper. This topic explains how to select and remove accounts from the My Accounts page.
NOTE: Census Agency accounts require using different procedures. For details, see About Census Agency Accounts below.
The My Accounts page lists accounts that you may use on timesheets, default schedules, and any other system function that requires selecting an account. An example My Accounts page is shown below.
If you need to use additional accounts, click the Get Account(s) button to access a complete list of all accounts available to you. The Select Accounts page opens, shown below.

webTA 4.2 DOC Employee User Guide 10 ©2015 Kronos Incorporated
Type search clues in the filters provided in the My Accounts search box, and then click Search. Search results are listed below. Click the Select button on one or more rows that identify accounts you want to use. The next time you work with your timesheet or any other function that involves accounts, the account will be available from the Accounting pop-up window, as shown below.
webTA 4.2 DOC Employee User Guide 11 ©2015 Kronos Incorporated
Working with My Accounts
Selecting My Accounts To select (get) accounts, take these steps:
1. Click Accounts on the Employee main menu.
The My Accounts page opens.
2. Click Get Account(s).
The Select Accounts page opens.
3. Click Select on the row that identifies the account.
The Select button is replaced by the status “Selected.”
4. Continue selecting accounts.
–OR–
Click the Employee Role tab to go back to the main menu.
Removing My Accounts You may remove accounts that you no longer need to use. When you remove an account, it is not deleted from the system. It is simply removed from the list of accounts available to you.
To remove accounts, take these steps:
1. Click Accounts on the Employee main menu.
The My Accounts page opens.
2. Click the “X” on the row that identifies the account you want to remove.
A message confirms the account was removed. To restore the account to your list, see the procedure “Selecting My Accounts.”
3. Click the Employee Role tab to go back to the main menu.
About Census Agency Accounts Employees assigned to the Census Agency work with a different account structure and must follow different procedures. Census Agency employees search for, select and remove accounts; in addition, Census Agency employees may add new accounts to the system. The My Accounts page for Census Agency employees is shown below. Depending on how your accounts are set up, default values such as existing accounts may appear on the page.
To reset the Branch value to “00”, type 00 in the Division field. To see a default list of Projects, type 14 in the Division field.
Creating My Accounts (Census) To add new accounts, Census Agency employees may take these steps:
1. Click Accounts (Census) on the Employee main menu.

webTA 4.2 DOC Employee User Guide 12 ©2015 Kronos Incorporated
The My Accounts page opens.
NOTE: Depending on how accounts are set up, default values may display when you enter the My Accounts page. The screenshots in this procedure are examples and may differ from your setup.
2. Under Add an Account, type a 2-digit Division code.
The system populates associated values in the Branch and Project drop-down lists.
3. Select a code from the Branch drop-down list.
4. Select a code from the Project drop-down list.
5. Type a code in the Task field.
6. Type a code in the Function field.
7. Click Create.
The My Accounts page refreshes with the account string and a Description field.
8. Type a brief description and then click Save.
The My Accounts page returns to its original state. The new account is listed under the Existing Accounts table, as shown below. You may now use the account in your timesheet and elsewhere in the system.

webTA 4.2 DOC Employee User Guide 13 ©2015 Kronos Incorporated
9. Create another account.
–OR–
Click the Employee Role tab to go back to the main menu.
Removing My Accounts (Census) You may remove accounts that you no longer need to use. When you remove an account, it is not deleted from the system. It is simply removed from the list of accounts available to you.
To remove accounts, Census Agency employees may take these steps:
1. Click Accounts (Census) on the Employee main menu.
The My Accounts page opens.
2. Click the “X” on the row that identifies the account you want to remove.
A pop-up box asks you to confirm the action. Click OK to remove the account or click Cancel to dismiss the action.
Editing My Accounts (Census) You may edit account descriptions.
To edit an account description, Census Agency employees may take these steps:
1. Click Accounts (Census) on the Employee main menu.
The My Accounts page opens.
2. Under the Existing Accounts table, locate the account.
3. Place the cursor in the Description field and make changes.
4. Click Save Description.
5. Click the Employee Role tab to go back to the main menu.
webTA 4.2 DOC Employee User Guide 14 ©2015 Kronos Incorporated
Schedules Depending on your agency’s implementation of webTA, you may be able to add and maintain a default schedule that displays the transaction code and account to which hours are charged, and a bi-weekly schedule of work hours. Entries from the default schedule are displayed on the Schedule tab near the bottom of your timesheet; entries may also be populated in the timesheet cells, depending on how timesheets are configured at your agency. If the Employee main menu lists “Default Schedule” as an option under the Time section, you have a default schedule.
If your agency has implemented Advanced Schedules, additional features such as Regular Days Off, temporary schedules, additional pay period options, and a Supervisor approval process may be in place. Timekeepers maintain and submit advanced schedules on behalf of their employees; Supervisors approve or deny schedule requests. If the Employee main menu lists “Schedule” as an option under the Time section, you have an advanced schedule.
NOTE: Census Agency employees use slightly different procedures when working with default schedules. For details, see About Census Agency Default Schedules below.
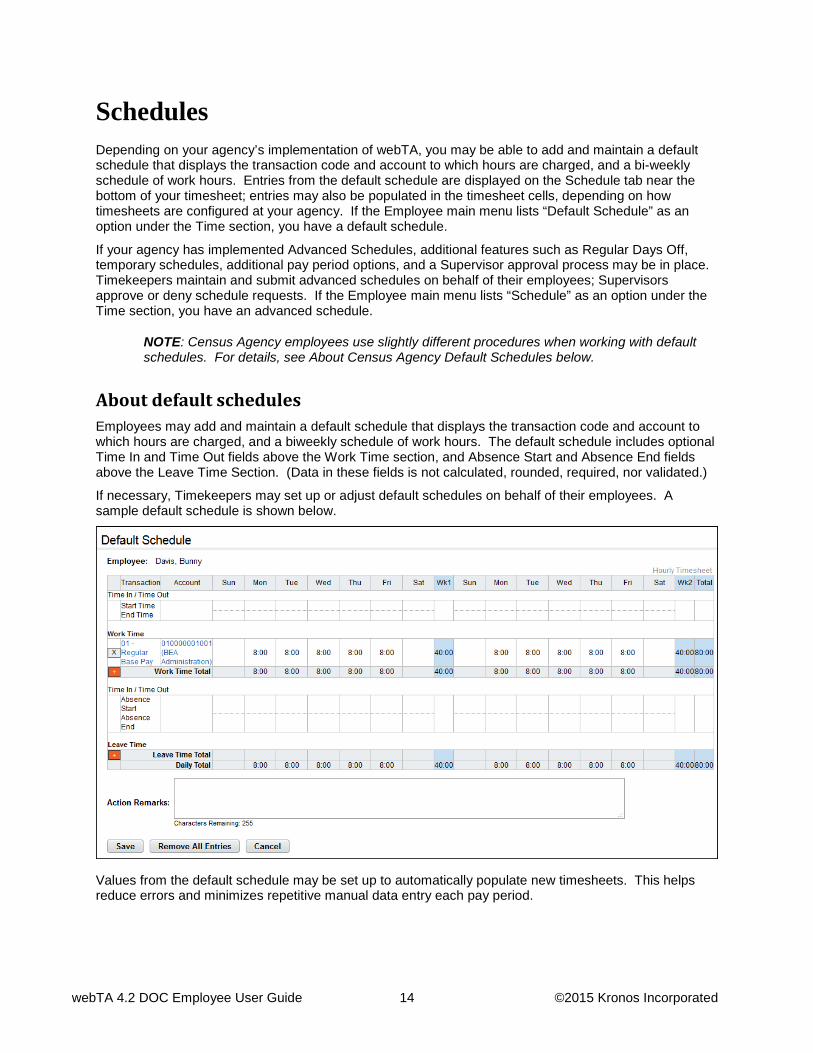
About default schedules Employees may add and maintain a default schedule that displays the transaction code and account to which hours are charged, and a biweekly schedule of work hours. The default schedule includes optional Time In and Time Out fields above the Work Time section, and Absence Start and Absence End fields above the Leave Time Section. (Data in these fields is not calculated, rounded, required, nor validated.)
If necessary, Timekeepers may set up or adjust default schedules on behalf of their employees. A sample default schedule is shown below.
Values from the default schedule may be set up to automatically populate new timesheets. This helps reduce errors and minimizes repetitive manual data entry each pay period.
webTA 4.2 DOC Employee User Guide 15 ©2015 Kronos Incorporated
Working with Default Schedules
Adding default schedules To add your default schedule, take these steps:
1. Click Default Schedule on the Employee main menu.
The Default Schedule page opens.
2. Click the plus sign (+) under Work Time.
A new row appears.
3. Accept the default transaction code.
−OR−
Click the transaction code link to select a different transaction code. The Select Values pop-up opens. Choose the transaction code from the drop-down list and then click Select Work Time Transaction. The pop-up is removed and the transaction code populates.
4. Accept the default account.
−OR−
Click the account code link to select a different account. The Accounting pop-up opens. Click Select on the row that identifies the account. The pop-up is removed and the account populates.
5. Press the Tab key to move the cursor to the appropriate cell and type the duration using the format hh.mm (hours and minutes in 15 minute increments, separated by a colon.) For example, type 7.5 for seven hours and thirty minutes. Complete the schedule by entering the duration for each day.
6. Click Save to save the default schedule.
7. Click the Employee role tab to return to the Employee main menu.
Editing default schedules To edit your default schedule, take these steps:
1. Click Default Schedule on the Employee main menu.
The Default Schedule page opens.
2. To edit existing time entries, click the cursor in the field that you want to edit and press the Backspace key to delete the existing hours. Type the new hours and then click Save.
3. To select a different transaction code, click the transaction code link. The Select Values pop-up opens. Choose the transaction code from the drop-down list and then click Select Work Time Transaction. The pop-up is removed and the transaction code populates.
4. To select a different account, click the account code link. The Accounting pop-up opens. Click Select on the row that identifies the account. The pop-up is removed and the account populates.
5. Click Save to save the default schedule.
6. Click the Employee role tab to return to the Employee main menu.
webTA 4.2 DOC Employee User Guide 16 ©2015 Kronos Incorporated
Deleting default schedules To delete your default schedule, take these steps:
1. Click Default Schedule on the Employee main menu.
The Default Schedule page opens.
IMPORTANT! Deleted information cannot be restored; once deleted, data must be re-entered.
2. To delete a time entry, insert the cursor in the cell that contains the value and press the Backspace key. You can type a new entry. When you are done, click Save.
3. To delete a row, click the "X" at the beginning of the row.
The row is removed.
4. To delete all entries, click Remove All Entries. Click Yes to respond to the confirmation message.
All rows are removed.
5. Click Save to save changes.
6. Click the Employee role tab to return to the Employee main menu.
About Census Agency Default Schedules Census Agency employees use slightly different procedures when working with default schedules. The procedures follow.
Adding default schedules (Census) To add a new default schedule, Census Agency employees may take these steps:
1. Click Default Schedule on the Employee main menu.
The Default Schedule page opens.
2. Click the plus sign (+) under Work Time.
The New Timesheet Entry page opens.
3. Click Select on the row that identifies the account if it is listed under the Existing Accounts table. The New Timesheet Entry page refreshes and the account populates.
−OR−
Search for an account and then click Select. To search for an account, take these steps:
a. Under Add an Account, type a 2-digit Division code.
Existing accounts that contain the two digit code are listed.
b. Click Select on the row that identifies the account.
The New Timesheet Entry page refreshes and the account populates.
4. Select a transaction code from the Transaction drop-down list.
5. Click Save.
You return to the default schedule. The transaction code and account display under the Work Time or Leave Time section of the grid.

webTA 4.2 DOC Employee User Guide 17 ©2015 Kronos Incorporated
6. Press the Tab key to move the cursor to the appropriate cell and type the duration using the format hh.mm (hours and minutes in 15 minute increments, separated by a colon.) For example, type 7.5 for seven hours and thirty minutes. Complete the schedule by entering the duration for each day.
7. Click Save to save the default schedule.
8. Click the Employee role tab to return to the Employee main menu.
Editing default schedules (Census) To edit a default schedule, Census Agency employees may take these steps:
1. Click Default Schedule on the Employee main menu.
The Default Schedule page opens.
2. To edit existing time entries, click the cursor in the field that you want to edit and press the Backspace key to delete the existing hours. Type the new hours and then click Save.
3. To select a different transaction or account, click the E icon that appears above the plus-sign (+).
The Edit Timesheet Entry page opens.
9. Click Select on the row that identifies the account if it is listed under the Existing Accounts table. The New Timesheet Entry page refreshes and the account populates.
−OR−
Search for an account and then click Select. To search for an account, take these steps:
a. Under Add an Account, type a 2-digit Division code.
Existing accounts that contain the two digit code are listed.
b. Click Select on the row that identifies the account.
The New Timesheet Entry page refreshes and the account populates.
4. Select a transaction code from the Transaction drop-down list.
5. Click Save.
You return to the default schedule. The transaction code and account display under the Work Time or Leave Time section of the grid.
6. Make additional changes and then click Save to save the default schedule.
7. Click the Employee role tab to return to the Employee main menu.
To delete default schedules, use the procedure Deleting default schedules.
webTA 4.2 DOC Employee User Guide 18 ©2015 Kronos Incorporated
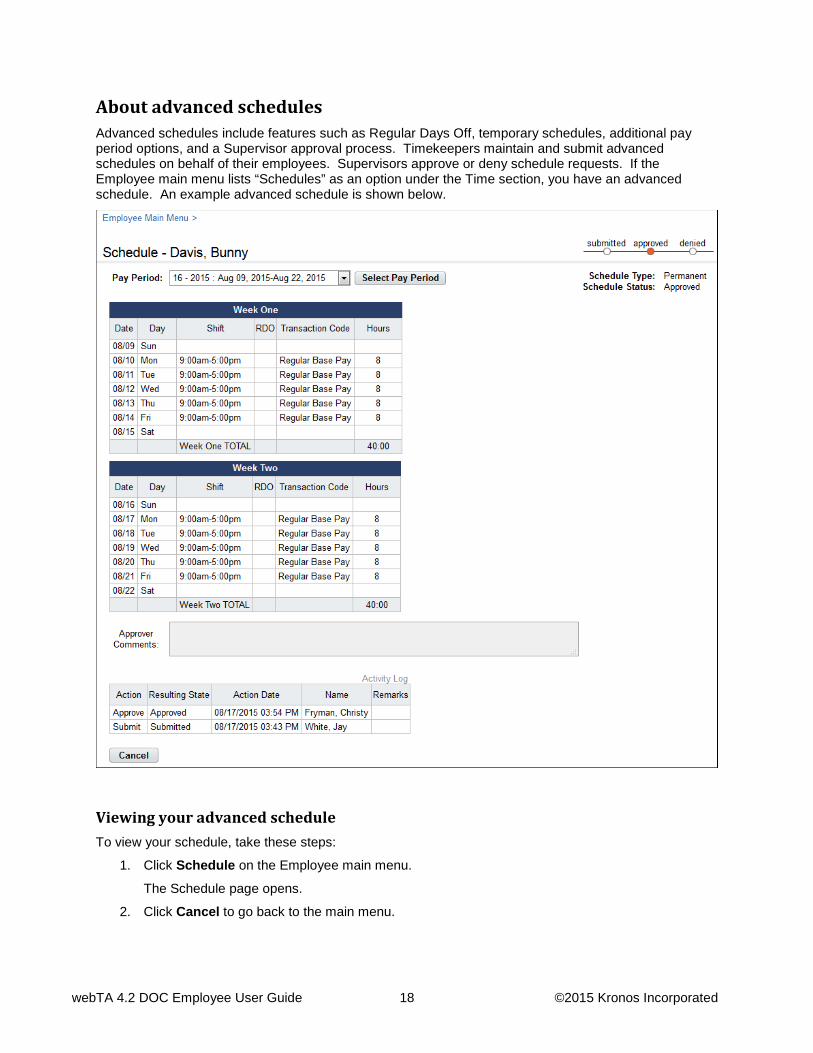
About advanced schedules Advanced schedules include features such as Regular Days Off, temporary schedules, additional pay period options, and a Supervisor approval process. Timekeepers maintain and submit advanced schedules on behalf of their employees. Supervisors approve or deny schedule requests. If the Employee main menu lists “Schedules” as an option under the Time section, you have an advanced schedule. An example advanced schedule is shown below.
Viewing your advanced schedule To view your schedule, take these steps:
1. Click Schedule on the Employee main menu.
The Schedule page opens.
2. Click Cancel to go back to the main menu.

webTA 4.2 DOC Employee User Guide 19 ©2015 Kronos Incorporated
Time Entry Timesheet tasks include entering, editing, validating (i.e., completing) and correcting or amending work and leave hours. Depending on how your Employee Profile is set up and whether you have a schedule, new timesheets may be pre-populated with data. This reduces repetitive data entry and the possibility of errors.
NOTE: Census Agency employees use slightly different procedures when working with timesheets. For details, see About Census Agency Timesheets, below.
Here is an example of a timesheet.
For work and leave hours, dollars, and miles, the system requires a transaction code associated with an account. The timesheet contains a separate row for each combination of transaction code and account in the pay period.
If you have an approved telework agreement, telework transaction codes may be included in the Transaction code drop-down list in the Select Values pop-up. For details, see the section Telework Agreements and Requests.
About the timesheet layout Timesheets include the following features:

webTA 4.2 DOC Employee User Guide 20 ©2015 Kronos Incorporated
• The pay period drop-down list near the top of the timesheet contains a list of past, previous, current, and future pay periods. Select a pay period from the list and then click Select Pay Period to view the timesheet. For example, select 16 – 2015: Aug 09, 2015-Aug 22, 2015 *S
• Depending on the status of the timesheet, a code may be appended to the end of the pay period date. Codes and corresponding descriptions are listed below: * (asterisk) = Current Pay Period
S = Saved. The data was saved automatically by the system and/or the user clicked the Save button.
VE = Validated by Employee. The employee validated the timesheet.
VT = Validated by Timekeeper. The Timekeeper validated the timesheet.
C = Certified. The Supervisor certified the timesheet.
(C) = Corrected. The employee or Timekeeper amended (corrected) the timesheet.
P = Processed. The system processed and transmitted the timesheet to the payroll provider.
CO = Corrected and Processed. The employee or Timekeeper amended (corrected) the timesheet, the Supervisor approved it, and the system has processed and transmitted the timesheet for payroll processing.
VO = Validation Overridden. The Master Timekeeper overrode existing timesheet errors to force the timesheet into a validated state.
• The Timesheet Status bar in the upper right corner indicates whether the timesheet is unvalidated, validated, certified or has been sent for payroll processing.
• The timesheet contains up to four sections: Work Time, Leave Time, Dollar Transactions, and Mile Transactions.
• Each section includes a plus-sign (+) for adding new transactions, and an “X” for deleting transactions. Census Agency timesheets also include an “E” icon for editing transactions.
• The Schedules, Totals, Remarks, Leave Balances, and Telework tabs near the bottom of the timesheet display additional information.
• Census Agency employee timesheets include these additional features. • Mile Transactions. Use this section of the timesheet to record reimbursement mileage. • Timesheet Entry Page. Use this page to add transactions. • E icon (Edit Timesheet Entry). Click the "E" on a transaction row to open the Timesheet
Entry page and edit the transaction. • Change Default Sort. Use this option to sort work and leave transactions, dollar transactions,
and mileage transaction.
webTA 4.2 DOC Employee User Guide 21 ©2015 Kronos Incorporated
Working with Timesheets
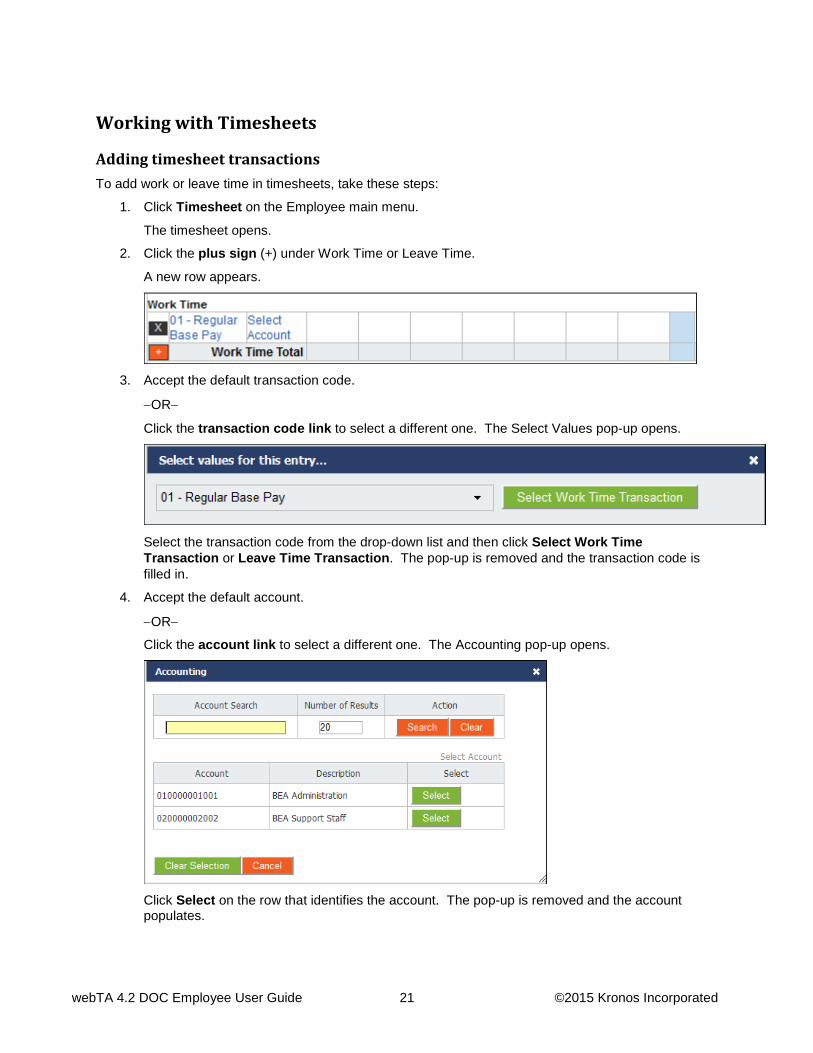
Adding timesheet transactions To add work or leave time in timesheets, take these steps:
1. Click Timesheet on the Employee main menu.
The timesheet opens.
2. Click the plus sign (+) under Work Time or Leave Time.
A new row appears.
3. Accept the default transaction code.
−OR−
Click the transaction code link to select a different one. The Select Values pop-up opens.
Select the transaction code from the drop-down list and then click Select Work Time Transaction or Leave Time Transaction. The pop-up is removed and the transaction code is filled in.
4. Accept the default account.
−OR−
Click the account link to select a different one. The Accounting pop-up opens.
Click Select on the row that identifies the account. The pop-up is removed and the account populates.

webTA 4.2 DOC Employee User Guide 22 ©2015 Kronos Incorporated
5. Press the Tab key to move the cursor to the appropriate cell and type the duration using the format hh.mm (hours and minutes in 15 minute increments, separated by a colon.) For example, type 7.5 for seven hours and thirty minutes.
6. Optionally, to record dollar transactions, click the plus sign (+) under the Dollar Transactions section. A new row appears. Specify the transaction code and account, and type the dollar amount using the format dollars and cents, separated by a decimal. For example, type 14.50.
7. Click Save and then click Cancel to go back to the main menu.
Editing timesheet transactions Make the following types of edits to work or leave time in timesheets:
• Change a specific duration. For example, you might change 8.00 to 6.00 in the cell for Monday. The transaction code and account remain the same. In this case, simply use the Backspace key to clear the current entry and type in the new entry, or double-click on the entry to modify it.
• Change the transaction code and account associated with an entire row. For example, you might change the transaction code from 01-Regular Base Pay to 01-Telework Home-Routine for an entire row. In this case, select the transaction code and/or account from the appropriate drop-down list.
To edit time entries and transactions in a timesheet, follow these steps:
1. Click Timesheet on the Employee main menu.
The timesheet opens.
2. To edit existing time entries, click the cursor in the field that you want to edit and press the Backspace key to delete the existing hours. Type the new hours and then click Save.
3. To select a different transaction code, click the transaction code link. The Select Values pop-up opens. Select the transaction code from the drop-down list and then click Select Work Time Transaction or Select Leave Time Transaction. The pop-up is removed and the transaction code is filled in.
4. To select a different account, click the account link. The Accounting pop-up opens. Click Select on the row that identifies the account. The pop-up is removed and the account populates.
5. Click Save and then click Cancel to go back to the main menu.
Deleting timesheet transactions There are several types of deletions that can be done in timesheets. You may delete a time entry, an entire row, all entries in the timesheet, or the timesheet itself.
IMPORTANT! Deleted information cannot be restored; once deleted, you must re-enter the data.
To delete time entries in timesheets, take these steps:
1. Click Timesheet on the Employee main menu.
The timesheet opens.
2. To delete a time entry, insert the cursor in the cell that contains the value and press the Backspace key or the Delete key. You can type a new entry. When you are done, click Save.
3. To delete a row, click the "X" at the beginning of the transaction row.
webTA 4.2 DOC Employee User Guide 23 ©2015 Kronos Incorporated
The row is removed.
4. To delete all transactions on a timesheet (including Remarks), click Remove All Entries. Click Yes to respond to the confirmation message.
All rows are removed.
5. Click Save and then click Cancel to go back to the main menu.
About Census Agency Timesheets Employees assigned to the Census Agency use slightly different procedures when working with timesheet transactions.
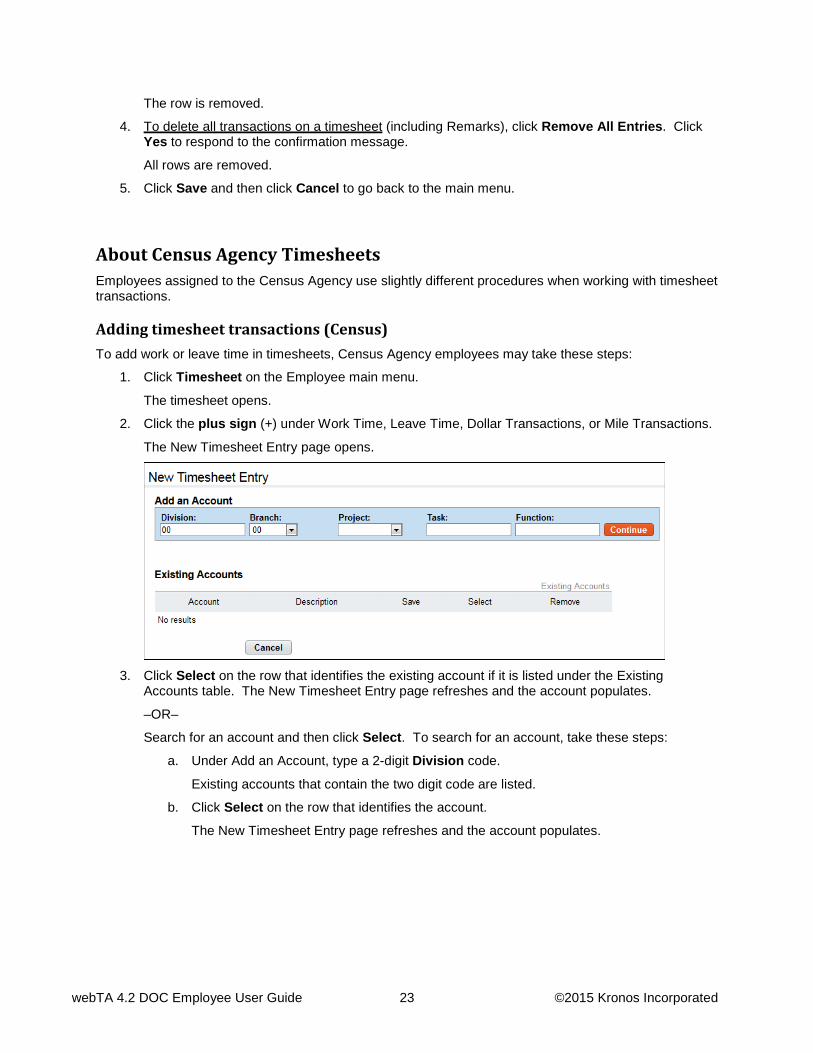
Adding timesheet transactions (Census) To add work or leave time in timesheets, Census Agency employees may take these steps:
1. Click Timesheet on the Employee main menu.
The timesheet opens.
2. Click the plus sign (+) under Work Time, Leave Time, Dollar Transactions, or Mile Transactions.
The New Timesheet Entry page opens.
3. Click Select on the row that identifies the existing account if it is listed under the Existing
Accounts table. The New Timesheet Entry page refreshes and the account populates.
–OR–
Search for an account and then click Select. To search for an account, take these steps:
a. Under Add an Account, type a 2-digit Division code.
Existing accounts that contain the two digit code are listed.
b. Click Select on the row that identifies the account.
The New Timesheet Entry page refreshes and the account populates.
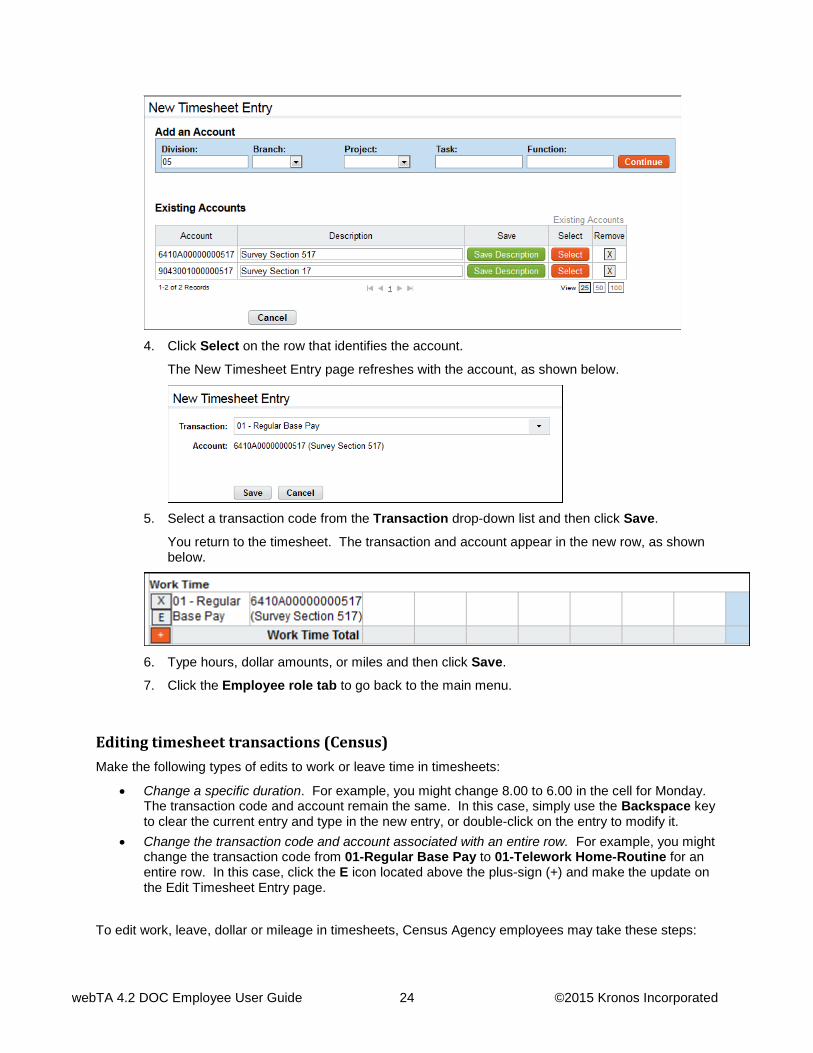
webTA 4.2 DOC Employee User Guide 24 ©2015 Kronos Incorporated
4. Click Select on the row that identifies the account.
The New Timesheet Entry page refreshes with the account, as shown below.
5. Select a transaction code from the Transaction drop-down list and then click Save.
You return to the timesheet. The transaction and account appear in the new row, as shown below.
6. Type hours, dollar amounts, or miles and then click Save.
7. Click the Employee role tab to go back to the main menu.
Editing timesheet transactions (Census) Make the following types of edits to work or leave time in timesheets:
• Change a specific duration. For example, you might change 8.00 to 6.00 in the cell for Monday. The transaction code and account remain the same. In this case, simply use the Backspace key to clear the current entry and type in the new entry, or double-click on the entry to modify it.
• Change the transaction code and account associated with an entire row. For example, you might change the transaction code from 01-Regular Base Pay to 01-Telework Home-Routine for an entire row. In this case, click the E icon located above the plus-sign (+) and make the update on the Edit Timesheet Entry page.
To edit work, leave, dollar or mileage in timesheets, Census Agency employees may take these steps:

webTA 4.2 DOC Employee User Guide 25 ©2015 Kronos Incorporated
1. Click Timesheet on the Employee main menu.
The timesheet opens.
2. To edit existing time or dollar entries, click the cursor in the field that you want to edit and press the Backspace key to delete the existing hours or dollars. Type the new entry and then click Save.
3. To edit a transaction, click the E (Edit) icon located above the plus sign (+) under Work Time, Leave Time, Dollar Transactions, or Mile Transactions.
The Edit Timesheet Entry page opens.
4. Click Select on the row that identifies the existing account if it is listed under the Existing
Accounts table.
–OR–
Search for an existing account and then click Select.
5. Click Save and then click Cancel to go back to the main menu.
Census Agency employees may refer to Deleting timesheet transactions for procedures on deleting time entries and transactions.

webTA 4.2 DOC Employee User Guide 26 ©2015 Kronos Incorporated
About Timesheet Remarks Employees may enter two types of remarks in timesheets: Pay Period Remarks and Daily Remarks. A pay period remark might apply to several days or the entire pay period, for example, “Attended a conference, week 1, Mon-Wed." A daily remark might apply to a particular time entry, for example, “Late -- weather related.”
The number of daily remarks appears in parentheses in the Remarks tab header, for example, “Remarks (1).” The example screenshot below contains a pay period remark in the Pay Period Remarks field, and a daily remark under the Daily Remark column.
The name, user ID, date, time and role of the user (for example, Employee, Timekeeper, or Supervisor) are recorded along with the remark. This information also appears in the Timesheet Summary under the Remarks section.
Adding a pay period remark to a timesheet To add a pay period remark to a timesheet, take these steps:
1. Click Timesheet on the Employee main menu.
The Timesheet page opens.
2. Click the Remarks tab near the bottom of the timesheet.
The tab opens.
3. Place the cursor in the Pay Period Remarks field and type the text.
4. Click Save.
Adding a daily remark to a timesheet To add a daily remark to a timesheet, take these steps:
1. Click Timesheet on the Employee main menu.
The Timesheet page opens.
2. Click the cursor on the time entry to add a remark.
3. Double-click or press the Shift & R keys. The Remarks tab near the bottom of the timesheet opens and a new row appears. The row is populated with the date of the time entry (for example, Fri 7/19), the type of entry (for example, 01-Regular Base Pay), the user name, user ID, the current date and time, and the user’s role.
−OR−

webTA 4.2 DOC Employee User Guide 27 ©2015 Kronos Incorporated
Click the Remarks tab near the bottom of the timesheet. The tab opens. Click the plus sign (+) under the Add column. A new row appears. The row is populated with the user name, user ID, the current date and time, and the user’s role. Select the date from the Date drop-down list and then go to the next step.
4. Type the text in the Daily Remark field.
5. Click Save Remarks.
A red triangle appears in the upper right corner of the time entry cell to indicate that a remark has been added as shown below.
6. Continue working in the timesheet.
−OR−
Click Save and then click Cancel.
Deleting remarks from timesheets To delete remarks from timesheets, take these steps:
1. Click Timesheet on the Employee main menu.
The Timesheet page opens.
2. Click the Remarks tab near the bottom of the timesheet.
The tab opens.
3. Click the “X” on the row that identifies the daily remark that you want to delete. Click Save Remarks.
−OR−
Click the cursor in the field under Pay Period Remarks and use the Backspace key to delete the text. Click Save.
NOTE: You cannot add or delete remarks after the timesheet has been sent to Payroll for processing.
About Validating Timesheets Once the timesheet has been completed, you must initiate the validation process. Your Timekeeper has the capability to initiate this process if you are unable to do so, such as when you are on leave. The validation feature checks the timesheet against a set of business rules (for example, Regular Base Pay hours may not exceed 8 hours on a single day for certain employee schedules.)
webTA 4.2 DOC Employee User Guide 28 ©2015 Kronos Incorporated
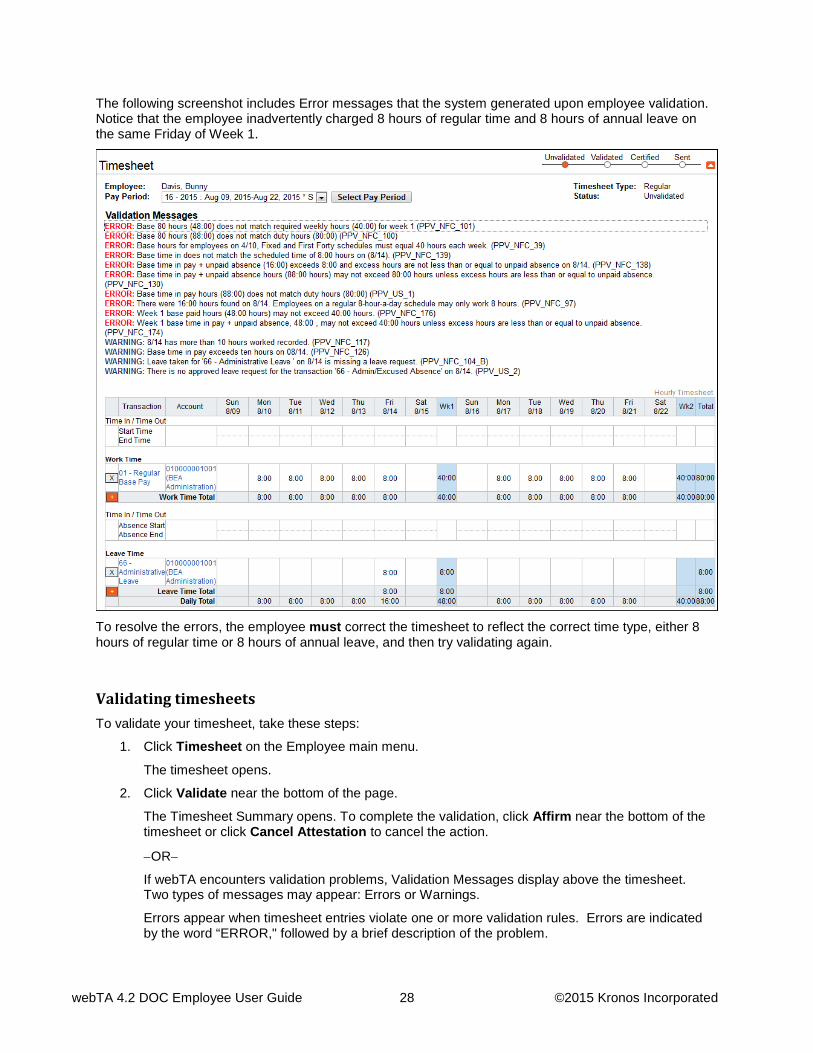
The following screenshot includes Error messages that the system generated upon employee validation. Notice that the employee inadvertently charged 8 hours of regular time and 8 hours of annual leave on the same Friday of Week 1.
To resolve the errors, the employee must correct the timesheet to reflect the correct time type, either 8 hours of regular time or 8 hours of annual leave, and then try validating again.
Validating timesheets To validate your timesheet, take these steps:
1. Click Timesheet on the Employee main menu.
The timesheet opens.
2. Click Validate near the bottom of the page.
The Timesheet Summary opens. To complete the validation, click Affirm near the bottom of the timesheet or click Cancel Attestation to cancel the action.
−OR−
If webTA encounters validation problems, Validation Messages display above the timesheet. Two types of messages may appear: Errors or Warnings.
Errors appear when timesheet entries violate one or more validation rules. Errors are indicated by the word “ERROR," followed by a brief description of the problem.
webTA 4.2 DOC Employee User Guide 29 ©2015 Kronos Incorporated
IMPORTANT! Errors must be corrected in order to properly validate your timesheet and proceed to the next step.
Warnings display when the system identifies data that may be a problem. However, the problem will not be severe enough to delay routing the timesheet to the Supervisor for certification.
3. Resolve the validation message. Make updates and then click Validate again. If necessary, contact your Timekeeper or Supervisor for assistance.
Up until a timesheet has been certified by the Supervisor, employees may continue to make changes to validated timesheets.
About the Timesheet Summary Every timesheet has a corresponding Timesheet Summary that provides, by pay period, a read-only snapshot of the following types of information:
• Validation messages • Timesheet hours and associated daily totals • Default work schedule • Weekly and biweekly totals • Remarks • Dollar transactions • Mileage transactions • Leave requests and status • Premium pay requests and status • Leave data • Timesheet profile data • Activity log of actions taken by other roles
Opening and printing Timesheet Summaries To open and print your timesheet summary, take these steps:
1. Click Timesheet Summary on the main menu.
The Timesheet Summary page opens.
2. Accept the default pay period and go to the next step.
–OR–
Select a different pay period from the Pay Period drop-down list and click Select Pay Period.
The Timesheet Summary page for the selected pay period opens.
3. Click Printable Version at the bottom of the page.
A window opens with the printable version of the timesheet summary.
4. Click Print and then click Cancel to go back to the previous page.

webTA 4.2 DOC Employee User Guide 30 ©2015 Kronos Incorporated
About Processed Timesheets Use the Processed Timesheets option to view a list of processed timesheets (also referred to as certified timesheet summaries.)
Viewing processed timesheets To view a list of processed timesheets, take these steps:
1. Click Processed Timesheets on the main menu.
The Processed Timesheets page opens.
2. Click the pay period link on the row that identifies the processed timesheet you want to view:
The Timesheet Summary page opens.
3. Click Cancel to return to the previous page.
webTA 4.2 DOC Employee User Guide 31 ©2015 Kronos Incorporated
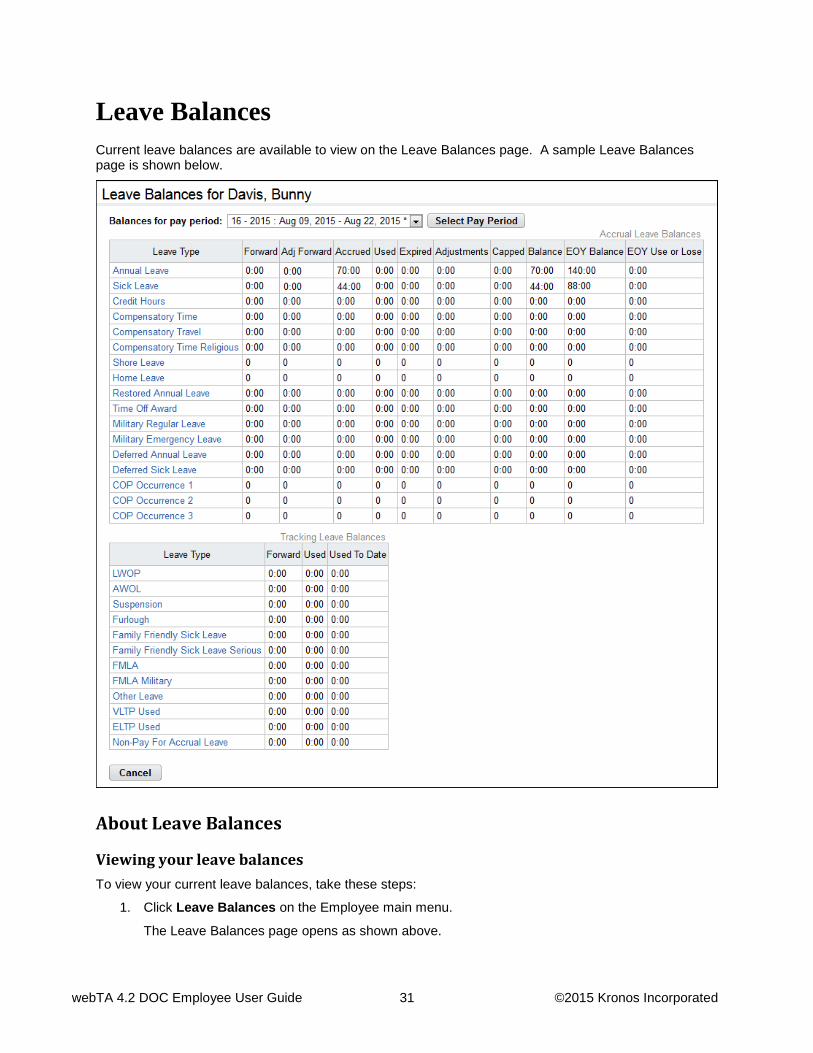
Leave Balances Current leave balances are available to view on the Leave Balances page. A sample Leave Balances page is shown below.
About Leave Balances
Viewing your leave balances To view your current leave balances, take these steps:
1. Click Leave Balances on the Employee main menu.
The Leave Balances page opens as shown above.

webTA 4.2 DOC Employee User Guide 32 ©2015 Kronos Incorporated
2. Optionally, click on the leave type to see details for a specific leave balance.
The Details page opens.
3. Click Cancel to go back to the Leave Balances page.
webTA 4.2 DOC Employee User Guide 33 ©2015 Kronos Incorporated
Leave Requests Employees use the Leave Request function to add and submit leave requests to Supervisors for review and approval, track the status of leave requests, and view historical leave requests.
The leave request form is based on the OPM-71 (formally SF-71) Request for Leave or Approved Absence form. Additional features that webTA offers are listed below:
• The form displays current leave balances for the selected leave type. • Requests can include multiple days for a single leave type. • The Leave Balance Calculator lets you select a leave type, enter a date in the future, and then
view the estimated future balance.
IMPORTANT! Whether or not you submit a leave request, employees must enter leave transactions directly in the timesheet.
A leave request is shown below:

webTA 4.2 DOC Employee User Guide 34 ©2015 Kronos Incorporated

webTA 4.2 DOC Employee User Guide 35 ©2015 Kronos Incorporated
Working with Leave Requests
Viewing your leave requests To view your leave requests, take these steps:
1. Click Leave Requests on the Employee main menu.
The Leave Requests − Current page opens. The Leave Requests table displays current and future requests.
2. Click the Leave Request Status link to open a request.
The Leave Request Form opens. Click Cancel to go back to the previous page.
−OR−
Click History to view historical leave requests. The Leave Requests − History page opens. The Leave Requests − History table displays historical requests. Click Current to return to the Leave Requests − Current page.
−OR−
Click View Calendar to see leave requests displayed in a calendar view.
The Leave Calendar page opens. Click the month drop-down list to view a different month. Click the request link to open a specific request.
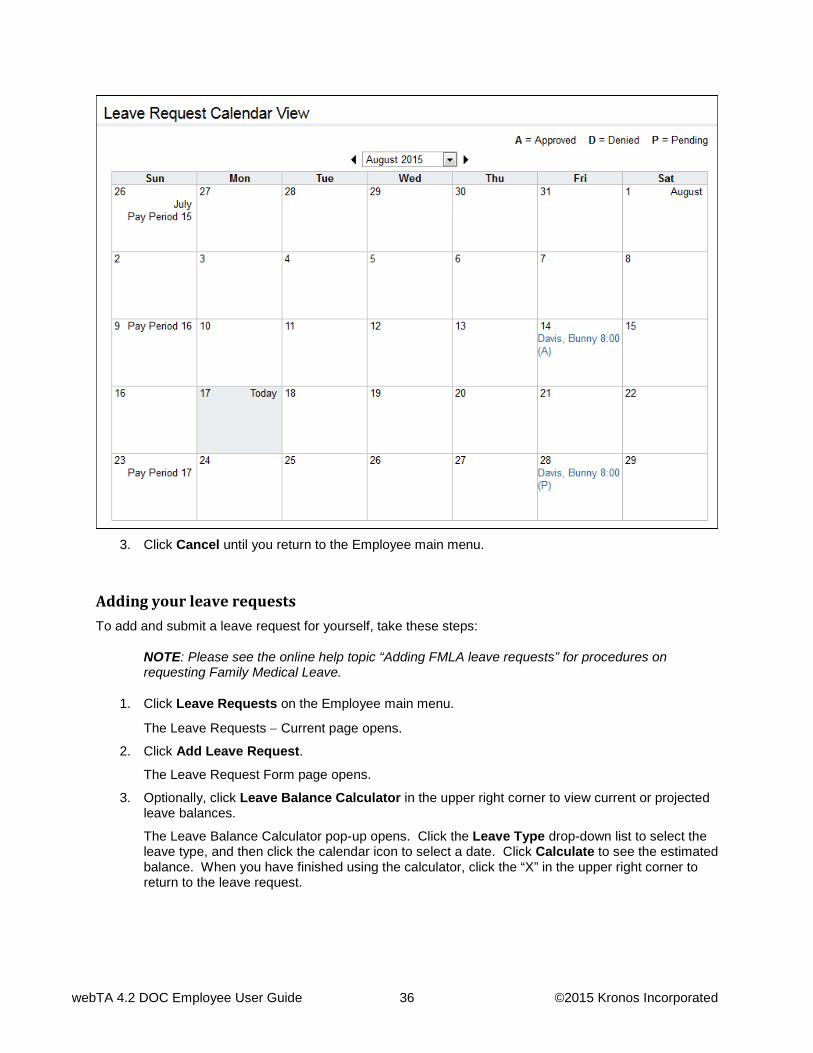
webTA 4.2 DOC Employee User Guide 36 ©2015 Kronos Incorporated
3. Click Cancel until you return to the Employee main menu.
Adding your leave requests To add and submit a leave request for yourself, take these steps:
NOTE: Please see the online help topic “Adding FMLA leave requests” for procedures on requesting Family Medical Leave.
1. Click Leave Requests on the Employee main menu.
The Leave Requests − Current page opens.
2. Click Add Leave Request.
The Leave Request Form page opens.
3. Optionally, click Leave Balance Calculator in the upper right corner to view current or projected leave balances.
The Leave Balance Calculator pop-up opens. Click the Leave Type drop-down list to select the leave type, and then click the calendar icon to select a date. Click Calculate to see the estimated balance. When you have finished using the calculator, click the “X” in the upper right corner to return to the leave request.

webTA 4.2 DOC Employee User Guide 37 ©2015 Kronos Incorporated
4. Select the leave type from the Leave Type drop-down list located at the top of the page.
The current leave balance appears below the drop-down list.
5. Click the Start Date calendar icon to select a start date or type the date in mm/dd/yy format; click the End Date calendar icon to select an end date or type the date in mm/dd/yy format.
6. Optionally, click the All Day check box to indicate that the leave spans the regularly scheduled shift.
– OR –
Type the Start Time and Stop Time in hh:mm format.
– OR –
Type the Daily Hours.
When you submit the request, the Start Time, Stop Time, Daily Hours, and/or Total Hours populate.
7. To add another row for an additional entry that uses the same leave type, click Add New Row and repeat the previous step. To remove a row, click Delete on the row that you want to remove.
8. If the leave type involves sick leave, specify a reason. Click to select a reason listed under the Sick Leave Purpose section of the form. If you click Other, type the accompanying reason in the Submitter Remarks text box.
NOTE: See the online help topic “Adding FMLA leave requests” for procedures on requesting Family Medical Leave.
9. When the form is complete, click Submit located at the bottom of the form.
If the request is successful, a confirmation appears at the top of the form. The form is routed to the Supervisor for approval.
If the request cannot be processed, an explanation appears at the top of the form. For example, a request may not be processed if the request will result in a negative balance. Select a different leave type or contact your Supervisor for assistance.
10. Click Cancel to return to the previous page.
Employees may update or delete pending requests. Once requests have been approved, changes cannot be made unless the Supervisor restores the request to Pending status.
webTA 4.2 DOC Employee User Guide 38 ©2015 Kronos Incorporated
Editing your leave requests Requests that have been approved or denied cannot be edited. If a change needs to be made to a request that has already been approved or denied, contact your Supervisor to restore the request to a Pending status. Employees may edit requests that are in Pending status.
To edit a pending request, take these steps:
1. Click Leave Requests on the Employee main menu.
The Leave Requests - Current page opens.
2. Click the Leave Request Status link on the row that identifies the request you want to edit.
The Leave Request Form page opens.
3. Make changes.
4. Click Submit.
If the request is successful, a confirmation message appears at the top of the form. The form is routed to the Supervisor.
If the request cannot be processed, an explanation appears at the top of the form; for example, a request may not be processed if the request will result in a negative balance. Select a different leave type or contact your Supervisor for assistance.
5. Click Cancel to return to the previous page.
Deleting your leave requests Requests that have been approved cannot be deleted. If you need to delete a request that has already been approved, contact your Supervisor to restore the request to a Pending status. Employees may delete requests that are in Pending status.
To delete a pending request, take these steps:
1. Click Leave Requests on the Employee main menu.
The Leave Requests − Current page opens.
2. Click the Leave Request Status link on the row that identifies the request you want to edit.
The Leave Request Form page opens.
3. Click Delete Request at the bottom of the page.
A message asks you to confirm that you want to delete the request. Click Yes to proceed; the request is removed and you return to the previous page.
−OR−
Click Cancel to dismiss the action.
4. If necessary, delete the leave transaction from the timesheet.

webTA 4.2 DOC Employee User Guide 39 ©2015 Kronos Incorporated
Premium Pay Requests Employee use the Premium Pay Request function to create and submit premium pay requests to Supervisors for review and approval, track the status of premium pay requests, and view historical requests.
IMPORTANT! Whether or not you submit a premium pay request, you must enter premium pay transactions directly in the timesheet.
A sample premium pay request is shown below:
Working with Premium Pay Requests
Viewing your premium pay requests To view your premium pay requests, take these steps:
1. Click Premium Pay Requests on the Employee main menu.
The Premium Pay Request page opens.

webTA 4.2 DOC Employee User Guide 40 ©2015 Kronos Incorporated
2. Click the Premium Pay Request Status link on the row that identifies the request you want to view.
The Premium Pay Request page opens. If the request has been approved or denied, a read-only copy of the request will be displayed. If the request is pending, an editable version of the request is displayed.
3. Click Cancel to go back to the previous page.
Adding your premium pay requests To add premium pay requests, take these steps:
1. Click Premium Pay Request on the Employee main menu.
The Premium Pay Requests page opens.
2. Click Add Premium Pay Request.
The Premium Pay Request page opens.
3. Select the premium pay type from the Transaction drop-down list.
4. Click the Start Date and End Date icons to select the date range. Type the Start Time and Stop Time for each entry.
- OR -
Type the daily hours.
NOTE: Click Add New Rows to enter additional hour entries for the premium pay transaction type.
5. Click Submit.
NOTE: The system calculates the total hours and populates the Total Hours field. If you skipped entering a Start Time and Stop Time, the system populates 12:00 am in the Start Time field and a Stop Time that corresponds to the total hours.
The form is routed to the Supervisor for approval.
6. Click Cancel to return to the previous page.
Editing your premium pay requests Employees may edit or delete pending premium pay requests. If a change needs to be made to a request that has already been approved or denied, contact your Supervisor to restore the request to a Pending status.
To edit a pending premium pay request, take these steps:
1. Click Premium Pay Request on the Employee main menu.
The Premium Pay Requests page opens.
2. Click the Premium Pay Request Status link on the row that identifies the request you want to edit.
The Premium Pay Request page opens.
3. Make changes.
4. Click Submit.

webTA 4.2 DOC Employee User Guide 41 ©2015 Kronos Incorporated
If the request is successful, a confirmation appears at the top of the form. The form is routed to the Supervisor.
If the request cannot be processed, an explanation appears at the top of the form. Select a different transaction type or contact your Supervisor for assistance.
5. Click Cancel to return to the previous page.
Deleting your premium pay requests Pending requests may be deleted by employees. To delete a pending request, take these steps:
1. Click Premium Pay Request on the Employee main menu.
The Premium Pay Requests page opens.
2. Click the Premium Pay Request Status link on the row that identifies the request you want to delete.
The Premium Pay Request page opens.
3. Click Delete Request at the bottom of the page.
A message asks you to confirm that you want to delete the request. Click Yes to proceed; the request is removed and you return to the previous page.
−OR−
Click Cancel to dismiss the action.
4. If necessary, delete the leave transaction from the timesheet.
webTA 4.2 DOC Employee User Guide 42 ©2015 Kronos Incorporated
Telework Agreements and Requests If the webTA Telework module has been implemented at your agency, the Telework section may appear on the Employee main menu. This section explains how employees work with telework agreements and requests.
IMPORTANT! Whether or not you submit a telework request, you must enter telework transactions directly in the timesheet.
Employees who telework intermittently on an ad hoc basis may submit one-time telework requests. The request is routed to the Supervisor for approval. Intermittent telework is referred to in webTA as situational telework. The employee's Timekeeper may submit telework requests on behalf of employees. The system sends workflow notifications to the employee, Timekeeper, and Supervisor as the request is routed.
Employees who telework on a regular basis may be scheduled using the default schedule or Advanced Scheduling. A request form is not required. Regularly occurring telework is referred to in webTA as regular or routine telework.
Whether employees use situational or routine telework features, all employee who participate in telework must submit a telework agreement for Supervisor approval. Approved agreement dates may impact workflow notifications, timesheet validations, validation error messages, and whether the employee is classified as "Ready" in the employee profile. (Employees with approved agreements are identified as "Ready." Job positions are identified as "Eligible.")
About telework agreements The Telework Agreements page lists pending, approved, denied and terminated agreements. A sample Telework Agreement page is shown below.

webTA 4.2 DOC Employee User Guide 43 ©2015 Kronos Incorporated
webTA 4.2 DOC Employee User Guide 44 ©2015 Kronos Incorporated
Adding telework agreements Employees and Supervisors may add and submit telework agreements. To add and submit a telework agreement, take these steps:
1. Click Telework Agreements under the Telework section on the Employee main menu.
The Telework Agreements page opens.
2. Click Add New Agreement
The Telework Agreement page opens.
3. Complete the fields.
4. Click Submit.
–OR–
Click Cancel to dismiss changes and return to the previous page.
Modifying telework agreements Employees and Supervisors may modify telework agreements. Telework agreements must be in pending status before they can be modified. Supervisors may revert telework agreements to pending status.
To modify a pending telework agreement, take these steps:
1. Click Telework Agreements under the Telework section on the Employee main menu.
The Telework Agreements page opens.
2. Click the telework agreement status link on the row that identifies the agreement you want to modify.
The Telework Agreement page opens.
3. Make changes.
4. Click Submit.
–OR–
Click Cancel to dismiss changes and return to the previous page.
Deleting telework agreements Employees and Supervisors may delete telework agreements. Telework agreements must be in pending status before they can be deleted. Supervisors may revert telework agreements to pending status.
Data from deleted telework agreements is removed from the webTA system.
To delete a telework agreement, take these steps:
1. Click Telework Agreements under the Telework section on the Employee main menu.
The Telework Agreements page opens.
2. Click the telework agreement status link on the row that identifies the agreement you want to delete.
The Telework Agreement page opens.
3. Click Delete.

webTA 4.2 DOC Employee User Guide 45 ©2015 Kronos Incorporated
A confirmation message appears.
4. Click Yes to delete the agreement.
–OR–
Click Cancel to dismiss the operation.
Terminating telework agreements If a telework agreement needs to be closed before the Agreement Expires date, Employees and Supervisors may terminate the agreement. Data from terminated agreements remains in the webTA system. To terminate a telework agreement, take these steps:
1. Click Telework Agreements under the Telework section on the Employee main menu.
The Telework Agreements page opens.
2. Click the telework agreement status link on the row that identifies the agreement you want to terminate.
The Telework Agreement page opens.
3. Type or specify a date in the Termination Date field.
4. Specify a reason from the Reason drop-down list.
5. Type a brief explanation in the Terminator Remarks text box.
6. Click Terminate.
A message confirms that the action was successful.
About telework requests The Telework Requests page lists pending, approved, and denied requests. A sample Telework Request page is shown below.

webTA 4.2 DOC Employee User Guide 46 ©2015 Kronos Incorporated
Adding telework requests Employees and Timekeepers may add and submit telework requests. To add and submit a telework request, take these steps:
1. Click Telework Requests under the Telework section on the Employee main menu.
The Telework Request page opens.
2. Click Add New Request
The Telework Request page opens.
3. Complete the fields.
4. Click Submit.
–OR–
Click Cancel to dismiss changes and return to the previous page.
Modifying telework requests Employees and Timekeepers may modify telework requests. Telework requests must be in pending status before they can be modified. Supervisors may revert telework requests to pending status.
To modify a pending telework request, take these steps:
1. Click Telework Requests under the Telework section on the Employee main menu.
webTA 4.2 DOC Employee User Guide 47 ©2015 Kronos Incorporated
The Telework Request page opens.
2. Click the telework request status link on the row that identifies the request you want to modify.
The Telework Request page opens.
3. Make changes.
4. Click Submit.
–OR–
Click Delete to delete the request. A confirmation message displays. Click Yes to delete the request or click Cancel.
–OR–
Click Cancel to dismiss changes and return to the previous page.
Deleting telework requests To delete a telework request, take these steps:
1. Click Telework Requests under the Telework section on the Employee main menu.
The Telework Request page opens.
2. Click the telework request status link on the row that identifies the agreement you want to delete.
The Telework Request page opens.
3. Click Delete.
A confirmation message appears.
4. Click Yes to delete the agreement.
–OR–
Click Cancel to dismiss the operation.
webTA 4.2 DOC Employee User Guide 48 ©2015 Kronos Incorporated
Leave Donations If a voluntary leave transfer program has been implemented at your agency, the Leave Donations section may appear on the Employee main menu. Depending on agency policy, employees may donate leave at any time if there is sufficient leave available, and the agency’s limitation on donations has not been exceeded.
Leave donations must be approved by the HR Administrator before the donation can be used by the recipient. After an account is closed by the HR Administrator, webTA restores unused leave back to donors.
NOTE: Census Agency employees use slightly different procedures when working with leave donations. For details, see About Census Agency Employee Leave Donations.
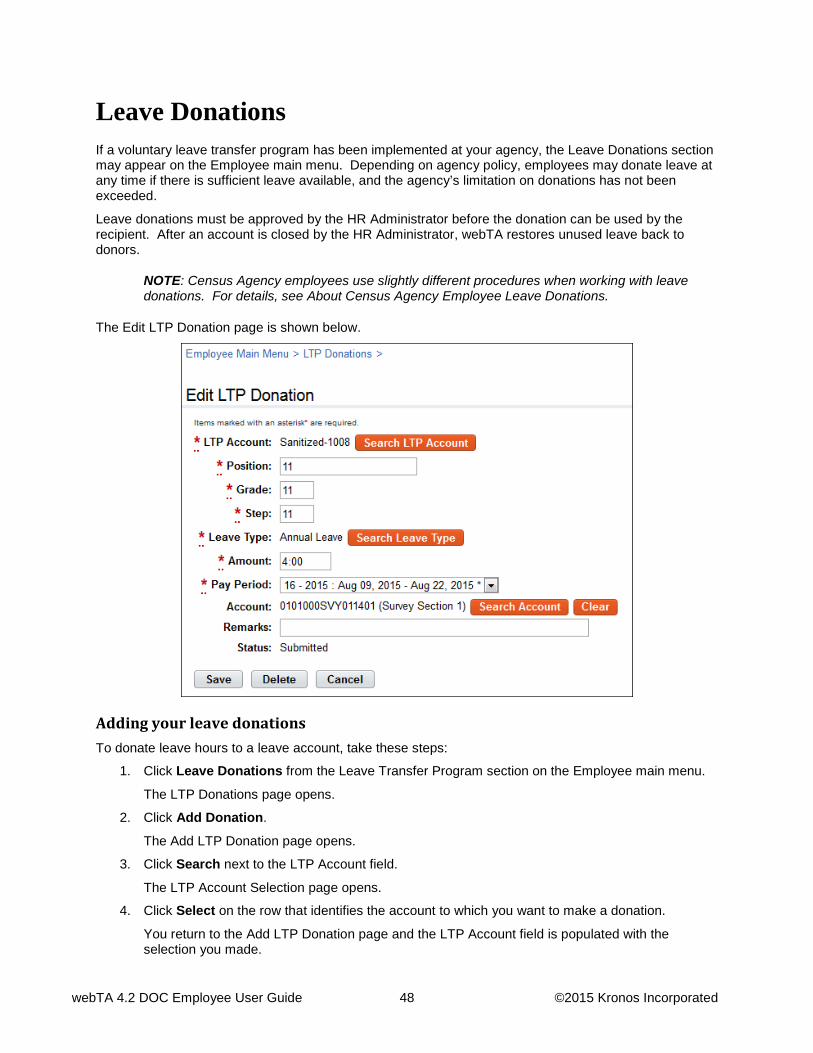
The Edit LTP Donation page is shown below.
Adding your leave donations To donate leave hours to a leave account, take these steps:
1. Click Leave Donations from the Leave Transfer Program section on the Employee main menu.
The LTP Donations page opens.
2. Click Add Donation.
The Add LTP Donation page opens.
3. Click Search next to the LTP Account field.
The LTP Account Selection page opens.
4. Click Select on the row that identifies the account to which you want to make a donation.
You return to the Add LTP Donation page and the LTP Account field is populated with the selection you made.
webTA 4.2 DOC Employee User Guide 49 ©2015 Kronos Incorporated
5. Enter your Position, Grade and Step.
6. Click Search next to the Leave Type field.
The Leave Balances page opens.
7. Click the leave type name link that identifies the type of leave you want to donate.
You return to the Add LTP Donation page and the Leave Type field is populated with the selection you made.
8. Enter the number of hours to donate in the Amount field.
9. Select the pay period from the Pay Period drop-down menu. This identifies the pay period from which the leave hours will be deducted. The pay period may be a current or future pay period.
10. Click Search Account next to the Account field.
The Account Values page opens.
11. Click Select on the row that identifies the account from which your donation will be made.
You return to the Add LTP Donation page and the Account field is populated with the selection you made.
12. Optionally, enter remarks.
13. Click Save.
A message confirms the donation was successful.
–OR–
An alert message identifies an issue that must be resolved. Correct the issue and then click Save again.
Editing your leave donations Leave donations that have been submitted but not yet approved may be edited or deleted.
To edit a pending leave donation take these steps:
1. Click Leave Donations from the Leave Transfer Program section on the Employee main menu.
The LTP Donations page opens.
2. Click the LTP account name link that identifies the donation you want to edit.
The Edit LTP Donation page opens.
3. Make changes.
4. Click Save.
5. Click the Employee role tab to return to the Employee main menu.
Deleting your leave donations Leave donations that have been submitted but not yet approved may be edited or deleted.
To delete a pending leave donation take these steps:
1. Click Leave Donations from the Leave Transfer Program section on the Employee main menu.
The LTP Donations page opens.

webTA 4.2 DOC Employee User Guide 50 ©2015 Kronos Incorporated
2. Click the LTP account name link that identifies the donation you want to delete.
The Edit LTP Donation page opens.
3. Click the "X" on the row that identifies the donation to delete.
A confirmation message appears.
4. Click OK to delete the donation.
-OR-
Click Cancel to dismiss the operation.
5. Click the Employee role tab to return to the Employee main menu.
About Census Agency Leave Donations Employees assigned to the Census Agency use slightly different procedures when adding leave donations.
Adding leave donations (Census) To donate leave hours to a leave account, Census Agency employees may take these steps:
1. Click Leave Donations from the Leave Transfer Program section on the Employee main menu.
The LTP Donations page opens.
2. Click Add Donation.
The Add LTP Donation page opens.
3. Click Search next to the LTP Account field.
The LTP Account Selection page opens.
4. Click Select on the row that identifies the account to which you want to make a donation.
You return to the Add LTP Donation page and the LTP Account field is populated with the selection you made.
5. Enter your Position, Grade and Step.
6. Click Search next to the Leave Type field.
The Leave Balances page opens.
7. Click the leave type name link that identifies the type of leave you want to donate.
You return to the Add LTP Donation page and the Leave Type field is populated with the selection you made.
8. Enter the number of hours to donate in the Amount field.
9. Select the pay period from the Pay Period drop-down menu. This identifies the pay period from which the leave hours will be deducted. The pay period may be a current or future pay period.
10. Click Search Account next to the Account field.
The Account Selection page opens.
11. Click Select on the row that identifies the account if it is listed under the Existing Accounts table. You return to the Add LTP Donation page and the Account field is populated with the selection you made.

webTA 4.2 DOC Employee User Guide 51 ©2015 Kronos Incorporated
–OR–
Search for an account and then click Select. To search for an account, take these steps:
a. Under Select an Account, type a 2-digit Division code.
Existing accounts that contain the two digit code are listed.
b. Click Select on the row that identifies the account if it is listed under the Existing Accounts table. You return to the Add LTP Donation page and the Account field is populated with the selection you made.
12. Optionally, enter remarks.
13. Click Save.
A message confirms the donation was successful.
–OR–
An alert message identifies an issue that must be resolved. Correct the issue and then click Save again.
To edit or delete pending leave donations, see Editing your leave donations and Deleting your leave donations.

webTA 4.2 DOC Employee User Guide 52 ©2015 Kronos Incorporated
Continuation of Pay Employees who are injured while engaged in official work activities or on work premises may be eligible for Continuation of Pay (COP). If the employee meets eligibility criteria, the COP Administrator creates a COP event in webTA. After the event is created, the employee may view event details from the COP Events option on the Employee main menu. The COP Event Details page is shown below.
Viewing COP leave balances COP leave is entered on the employee's timesheet by the employee or their Timekeeper. Using any COP leave on a given day is tracked in day increments on the employee’s timesheet Leave Balances tab, and on the Timesheet Summary. If the employee uses one hour of COP leave on a given day, the employee (or Timekeeper) records the start and stop time in hour increments on the timesheet, but the Leave Balances tab tracks the leave as an entire day.
To view COP leave balances in timesheets, take these steps:
1. Click Timesheet on the Employee main menu. The timesheet opens. Click the Leave Balances tab to view COP leave balances.
-OR-
Click Timesheet Summary on the Employee main menu. The Timesheet Summary opens. Scroll down to the Leave Data section to view COP leave balances.
-OR-
Click Leave Balances on the Employee main menu. The Leave Balances page opens. View COP leave balances on the COP Occurrence row.
2. Click Cancel until you return to the main menu.

webTA 4.2 DOC Employee User Guide 53 ©2015 Kronos Incorporated
Adding COP leave time in timesheets To add COP leave time in hourly timesheets, take these steps:
1. Click Timesheet on the Employee main menu.
The timesheet opens.
2. Click the plus sign (+) under Leave Time.
A new row appears.
3. Click the transaction code link to select a COP leave time transaction code.
The Transaction Code pop-up opens.
4. Select the transaction code from the drop-down list and then click Select Leave Time Transaction.
NOTE: COP leave transaction codes use the prefix "67", such as "67-OWCP Injury Leave" or "67 OWCP Injury Leave, Shift 1."
The pop-up is removed and the transaction code is filled in.
5. Select the event from the COP Event drop-down list. The same employee may have multiple events; select the event to which the leave transaction code will be charged.
NOTE: Any charge to a COP leave transaction code during a day constitutes the use of that day toward the 45-day limit.
6. Accept the default account or click the account link to select a different one.
The Accounting pop-up opens. Click Select on the row that identifies the account. The pop-up is removed and the account is filled in.
7. Press the Tab key to move the cursor to the appropriate cell and type the duration using the format HH:mm (hours and minutes, separated by a colon.) For example, type 7.5 for seven hours and thirty minutes.
NOTE: Any charge to a COP leave transaction code during a day constitutes the use of that day toward the 45-day limit.
8. Click Save and then click Cancel to go back to the main menu.

webTA 4.2 DOC Employee User Guide 54 ©2015 Kronos Incorporated
Emergency Contacts If your agency has implemented the Emergency Contact Management module, the Emergency Contacts section may appear on the Employee main menu. Depending on agency policy, employees may be required to add a minimum number of emergency contacts and regularly maintain and update contact information.
Adding your emergency contacts To add your contact information, take these steps:
1. Click My Contacts from the Emergency Contacts section on the main menu.
The Emergency Contacts page opens. The system automatically populates your name.
2. To complete your own information, click your first name link or last name link. The Emergency Contact Details page opens.
-OR-
To add new contacts, click Add New.
The Emergency Contact Details page opens.
3. Complete the information and then click Save.
NOTE: An asterisk indicates required fields.
4. Click Cancel to go back to the previous page.
Editing your emergency contacts To update your contact information, take these steps:
1. Click My Contacts from the Emergency Contacts section on the main menu.
The Emergency Contacts page opens.
2. Click the first name link or last name link on the row that identifies the contact you want to work with.
The Emergency Contact Details page opens.
3. Make changes and then click Save.
4. Click Cancel to go back to the previous page.
Deleting your emergency contacts To delete contact information, take these steps:
1. Click My Contacts from the Emergency Contacts section on the main menu.
The Emergency Contacts page opens.
2. Click the “X” under the Delete column on the row that identifies the contact you want to remove.
The row is deleted.
3. Click Cancel to go back to the previous page.
webTA 4.2 DOC Employee User Guide 55 ©2015 Kronos Incorporated
Viewing your emergency contacts To view your contact information, take these steps:
1. Click My Contacts from the Emergency Contacts section on the main menu.
The Emergency Contacts page opens.
2. Click the first name link or last name link on the row that identifies the contact you want to view.
The Emergency Contact Details page opens.
3. Click Cancel to go back to the previous page.
Changing the call order The Call Order determines the priority in which emergency contacts will be called.
To change the call order, take these steps:
1. Click My Contacts from the Emergency Contacts section on the main menu.
The Emergency Contacts page opens.
2. Insert the cursor in the Call Order field on the row that you want to change and press the Backspace key to delete the number. Type in a different number.
The list is adjusted.
3. Click Save and then click Cancel to go back to the previous page.

webTA 4.2 DOC Employee User Guide 56 ©2015 Kronos Incorporated
Reports Employees may run, view, save or print webTA reports to manage their various leave accounts. The Leave Audit report is available to employees and is described below.
Leave Audit Report The Leave Audit report displays your leave balances and adjustments for a specified type of leave within a designated range of pay periods.
The following columns are included in the Leave Audit Report:
• Pay Period. The pay period number followed by the pay year. For example, 22-2013. • Manual Adjust. Any adjustment that was made to the available leave in the pay period. • Forward. The leave balance that was forwarded from the prior pay period. • Accrued. The amount of leave accrued during the pay period. The column is blank for leave
types that do not accrue, such as LWOP. • Available. The total amount of leave that is available for use in the pay period. The column is
blank for leave types that do not accrue, such as LWOP. • Used. The amount of leave used by the employee in the pay period. This is usually the sum
from the timesheet data submitted by the employee for the pay period. For annual leave and sick leave, it may also include LTP donations.
• Balance. The ending balance for the leave type in the pay period. This is usually the available leave minus the leave used. For non-accruable leave, this is usually the forwarded amount minus the used amount.
• Maximum Available. This column is included if the selected leave type is "Annual." It shows the maximum annual leave amount currently available. Usually, this is the sum of your current balance plus your projected accruals through the end of the Leave Year.
To generate a Leave Audit report, take these steps:
1. Click Reports from the Reports section on the main menu.
The Reports page opens.
2. Click Leave Audit.
The page opens.
3. Use the following parameters:
• Type optional text in the Report Header field. The text will appear in the report title. • Specify the pay period range. Select the starting pay period from the From PP drop-down list
and the ending pay period from the To PP drop-down list.

webTA 4.2 DOC Employee User Guide 57 ©2015 Kronos Incorporated
• Click the Leave Type drop-down list to select the type of leave.
4. Click Run Report.
5. To save the report in PDF, Excel, HTML, or CSV format, click the option at the top of the report. The File Download box opens. Click Save. The Save As dialog opens. Choose the location and then click Save.
6. Click Cancel to go back to the Reports page.