kitting overview - esopro.com
TRANSCRIPT

Kitting Overview Page 1 of 16 Last Reviewed 2/15/2018
Kitting Overview Owner of this document is: Scott Wiacek – [email protected]
Purpose of this document
This document illustrates how to setup, manage and build Kits, like backpacks or food boxes in Ceres.
Copyright © Feeding America 2014, All Rights Reserved.
This document may be printed and reproduced only by Feeding America and member organizations.

Kitting Overview Page 2 of 16 Last Reviewed 2/15/2018
Table of Contents
PURPOSE ..................................................................................................................................................... 3
SETTING UP KITTING ................................................................................................................................. 3
SPECIFYING SUBSTITUTE ITEMS ON THE KIT BOM .............................................................................. 6
SETUP THE KIT ITEM .................................................................................................................................. 8
BUILDING KITS FOR INVENTORY ............................................................................................................. 8
DISASSEMBLY OF KITS IN CERES ......................................................................................................... 12
RELATED TOPICS: .................................................................................................................................... 16
Kitting Overview Page 3 of 16 Last Reviewed 2/15/2018
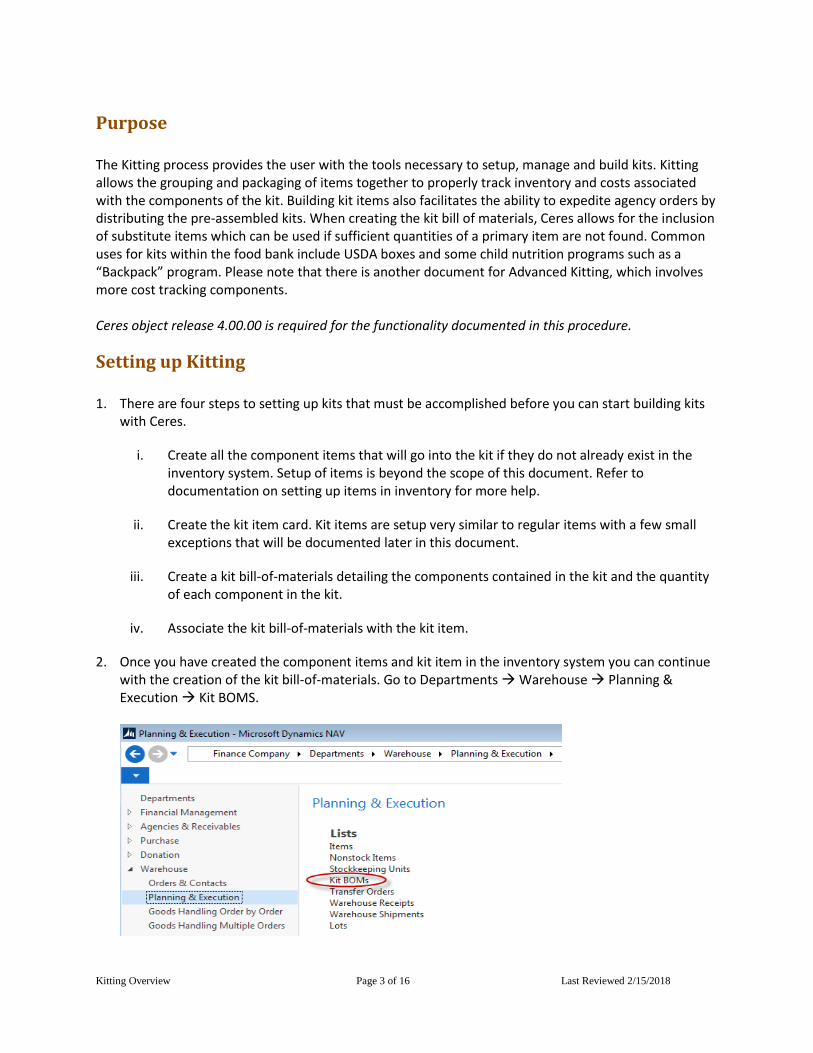
Purpose The Kitting process provides the user with the tools necessary to setup, manage and build kits. Kitting allows the grouping and packaging of items together to properly track inventory and costs associated with the components of the kit. Building kit items also facilitates the ability to expedite agency orders by distributing the pre-assembled kits. When creating the kit bill of materials, Ceres allows for the inclusion of substitute items which can be used if sufficient quantities of a primary item are not found. Common uses for kits within the food bank include USDA boxes and some child nutrition programs such as a “Backpack” program. Please note that there is another document for Advanced Kitting, which involves more cost tracking components. Ceres object release 4.00.00 is required for the functionality documented in this procedure.
Setting up Kitting 1. There are four steps to setting up kits that must be accomplished before you can start building kits
with Ceres.
i. Create all the component items that will go into the kit if they do not already exist in the inventory system. Setup of items is beyond the scope of this document. Refer to documentation on setting up items in inventory for more help.
ii. Create the kit item card. Kit items are setup very similar to regular items with a few small exceptions that will be documented later in this document.
iii. Create a kit bill-of-materials detailing the components contained in the kit and the quantity of each component in the kit.
iv. Associate the kit bill-of-materials with the kit item.
2. Once you have created the component items and kit item in the inventory system you can continue with the creation of the kit bill-of-materials. Go to Departments Warehouse Planning & Execution Kit BOMS.

Kitting Overview Page 4 of 16 Last Reviewed 2/15/2018
3. To enter a new Kit BOM, click Home New. To edit an existing Kit BOM, click Home Edit and the Kit BOM card will be displayed. The Kit BOM consists of two FastTabs; General, and Kit BOM Lines.
General FastTab
No.: This is the main identifier for the Kit BOM, which can be entered as any combination of text and numbers. Ceres can be set up to automatically number each Kit BOM Card for you, or you can enter the number manually. While the Kit BOM can be any number, many food banks will associate the Kit BOM number with the kit item card as we have done here. Kit BOM “KCK001” will be used on kit item “KCK001”. If you intend to keep old kit BOMs you might consider a No. that incorporates the item number and a time period. (For Example: KCK001-Nov-2010) This can be useful to later see what components where used in previous builds.
Description: Here you can enter a descriptive title of the Kit-BOM. If you intend to keep old bill-of-material Kit BOMS it might be helpful to enter a time period as part of title (For example: Kid’s Café Backpack Nov 2010).

Kitting Overview Page 5 of 16 Last Reviewed 2/15/2018
Unit of Measure Code: This unit of measure should match the base unit of measure of the kit item.
Status: There are four statuses to choose from. You will only be able to build items with a Kit BOM status of “Certified”. The other statuses are available to show various stages of the KIT BOM. The available statuses are:
New: Indicates a new or planned Kit BOM. This status usually indicates the Kit BOM has never been built before. Modifications to the Kit BOM are allowed under this status.
Under Development: Indicates a Kit BOM that has been used in builds before, however is now undergoing some modifications. If you wish to make changes to a Kit BOM that has a status of Certified, you must change it to this status “Under Development” before making the changes.
Certified: This status indicates that Kit BOM is complete and ready to be used in builds. Changes to the Kit BOM are not allowed under this status.
Closed: This status indicates that the Kit BOM is no longer in use but is being retained for historical purposes. No changes to the Kit BOM are allowed under this status. Kit BOM with a status of “Closed” can be reopened by changing the status to “Under Development” or “Certified”
Note: Ceres does not prevent the changing of status of a Kit BOM in any way at any time. The different statuses allow users to accurately identify the correct status of a Kit BOM and also prevent builds of kits that are not yet ready for building and also the accidental changes of Kit BOMs.
Search Name: Here you can enter a search name. You can use the Search Name field to search for a Kit BOM when you cannot remember the Kit BOM number. “USDA November 2010” for example. When you enter something in the Description field and press Tab, Ceres automatically copies the contents to the Search Name field. The contents of the Search Name field do not need to be the same as those of the Description field.
Note: If the search name was inserted automatically by Ceres, it will be changed each time you change the Description field. If you inserted the search name manually, it will not be changed automatically when the Description field is changed.
Last Date Modified: This field is updated by Ceres and will reflect the date the kit was last changed.
Process Substitutions By: This field is disabled. Currently Ceres only support “Using Substitute Item”.
Kitting Overview Page 6 of 16 Last Reviewed 2/15/2018
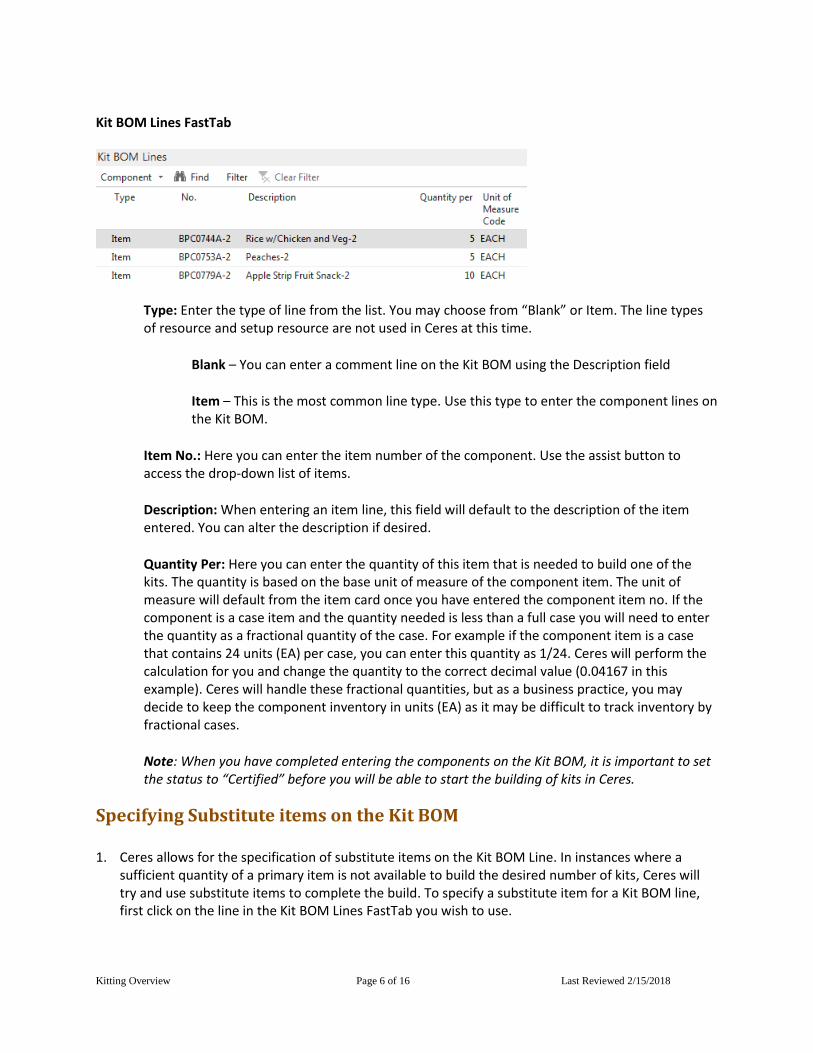
Kit BOM Lines FastTab
Type: Enter the type of line from the list. You may choose from “Blank” or Item. The line types of resource and setup resource are not used in Ceres at this time.
Blank – You can enter a comment line on the Kit BOM using the Description field
Item – This is the most common line type. Use this type to enter the component lines on the Kit BOM.
Item No.: Here you can enter the item number of the component. Use the assist button to access the drop-down list of items.
Description: When entering an item line, this field will default to the description of the item entered. You can alter the description if desired.
Quantity Per: Here you can enter the quantity of this item that is needed to build one of the kits. The quantity is based on the base unit of measure of the component item. The unit of measure will default from the item card once you have entered the component item no. If the component is a case item and the quantity needed is less than a full case you will need to enter the quantity as a fractional quantity of the case. For example if the component item is a case that contains 24 units (EA) per case, you can enter this quantity as 1/24. Ceres will perform the calculation for you and change the quantity to the correct decimal value (0.04167 in this example). Ceres will handle these fractional quantities, but as a business practice, you may decide to keep the component inventory in units (EA) as it may be difficult to track inventory by fractional cases.
Note: When you have completed entering the components on the Kit BOM, it is important to set the status to “Certified” before you will be able to start the building of kits in Ceres.
Specifying Substitute items on the Kit BOM 1. Ceres allows for the specification of substitute items on the Kit BOM Line. In instances where a
sufficient quantity of a primary item is not available to build the desired number of kits, Ceres will try and use substitute items to complete the build. To specify a substitute item for a Kit BOM line, first click on the line in the Kit BOM Lines FastTab you wish to use.

Kitting Overview Page 7 of 16 Last Reviewed 2/15/2018
2. To access the kit line substitutions click Component Substitutions.
3. Here we have substituted item BPC0799A-1 for BPC0799A-2. Enter the item number of the
substitute item in the “Substitute Item No.” field. If the weights are different between the primary item and the substitute item, you will receive a warning.

Kitting Overview Page 8 of 16 Last Reviewed 2/15/2018
Setup the Kit Item You must now associate the kit item with the Kit BOM. This can be done from the Item Card. Go to Departments Warehouse Planning & Execution Lists Items to access the Item Card. Navigate to the kit item. Select the Kitting Fast Tab and fill in the “Kit BOM No” field and check the “FB Kit Item” field. The “Kit Disassembly BOM No.” field will default to the same as the “Kit BOM No.” field. You may use the drop-down list to select from a list of available Kit BOMs.
Building Kits for Inventory Building kits in Ceres is accomplished through the BOM Journal. The BOM Journal handles the receipt of finished kits into inventory and the posting the consumption of components relieved from inventory. Go to Departments Warehouse Inventory Tasks BOM Journals to access the BOM Journal Page.
1. Begin by filling in the “Posting Date”, “Document No.”, and then enter the Kit Item to be built in the
“Item No.” field.
Kitting Overview Page 9 of 16 Last Reviewed 2/15/2018
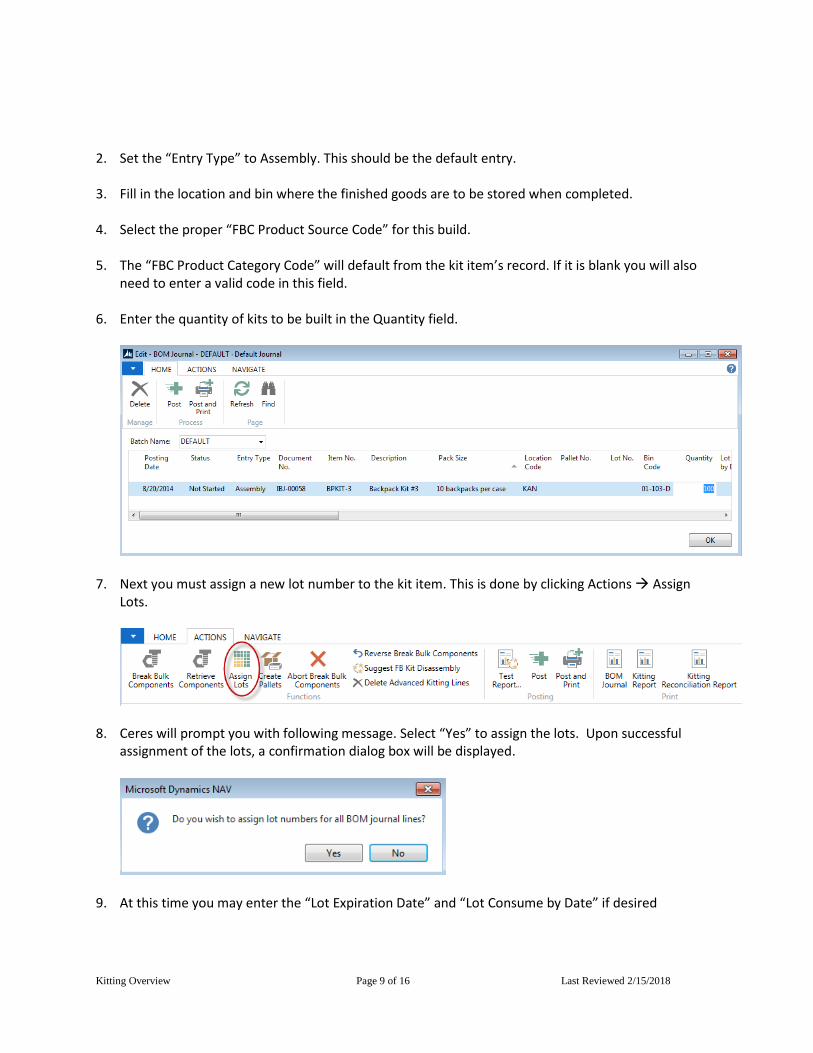
2. Set the “Entry Type” to Assembly. This should be the default entry.
3. Fill in the location and bin where the finished goods are to be stored when completed.
4. Select the proper “FBC Product Source Code” for this build.
5. The “FBC Product Category Code” will default from the kit item’s record. If it is blank you will also need to enter a valid code in this field.
6. Enter the quantity of kits to be built in the Quantity field.
7. Next you must assign a new lot number to the kit item. This is done by clicking Actions Assign
Lots.
8. Ceres will prompt you with following message. Select “Yes” to assign the lots. Upon successful assignment of the lots, a confirmation dialog box will be displayed.
9. At this time you may enter the “Lot Expiration Date” and “Lot Consume by Date” if desired

Kitting Overview Page 10 of 16 Last Reviewed 2/15/2018
10. The next step is to retrieve the components from the kit. This process has been enhanced in Ceres to automatically select the component inventory utilizing the FEFO (First Expired First Out) method. Ceres will select the correct lots, bins and quantities for each component pulling from multiple lots if necessary. It will also handle the substitutions if necessary. To retrieve components click Actions Retrieve Components.
11. If there is insufficient component quantity to create the kits, an error will display. To resolve, you
can setup substitutions for component with insufficient quantity, reduce the number of kits you are creating, or update the Kit BOM with a different component. In this example, the number of kits that are being created was reduced from 100 to 10.
12. Once the components have been retrieved you can view the kit lines by clicking Navigate Kit
Lines.
13. Currently Ceres does not allow any changes to the kit lines for non-palletized items. You can close
the display of the Kit BOM Journal Lines by clicking on the OK button.

Kitting Overview Page 11 of 16 Last Reviewed 2/15/2018
14. You can print a list showing the kit build by clicking Actions BOM Journal
15. This is a sample report showing the kit to be assembled and each component needed with quantity and location of each. The Kit is shown with an Entry Type of Assembly and the components with an Entry Type of blank.
16. If the kits you are creating are a palletized item, you will need to create pallets before you can post the BOM Journal. Enter a quantity in the Tier and Height field. Then click Actions Create Pallets.
17. Ceres will prompt you with following option. Select one of the options to create pallets and/or print labels. Upon successful creation of the pallets, a confirmation dialog box will be displayed.
18. Posting the BOM journal is the final step in building the kit. Click Actions Posting Post. Alternatively you can select “Post and Print”.

Kitting Overview Page 12 of 16 Last Reviewed 2/15/2018
19. Ceres will prompt you to confirm the posting of the BOM Journal. Answer “Yes” to post the BOM Journal. Once completed, Ceres will confirm successful posting of the journal.
20. The entries that were created can be viewed from the Item Ledger Entries.
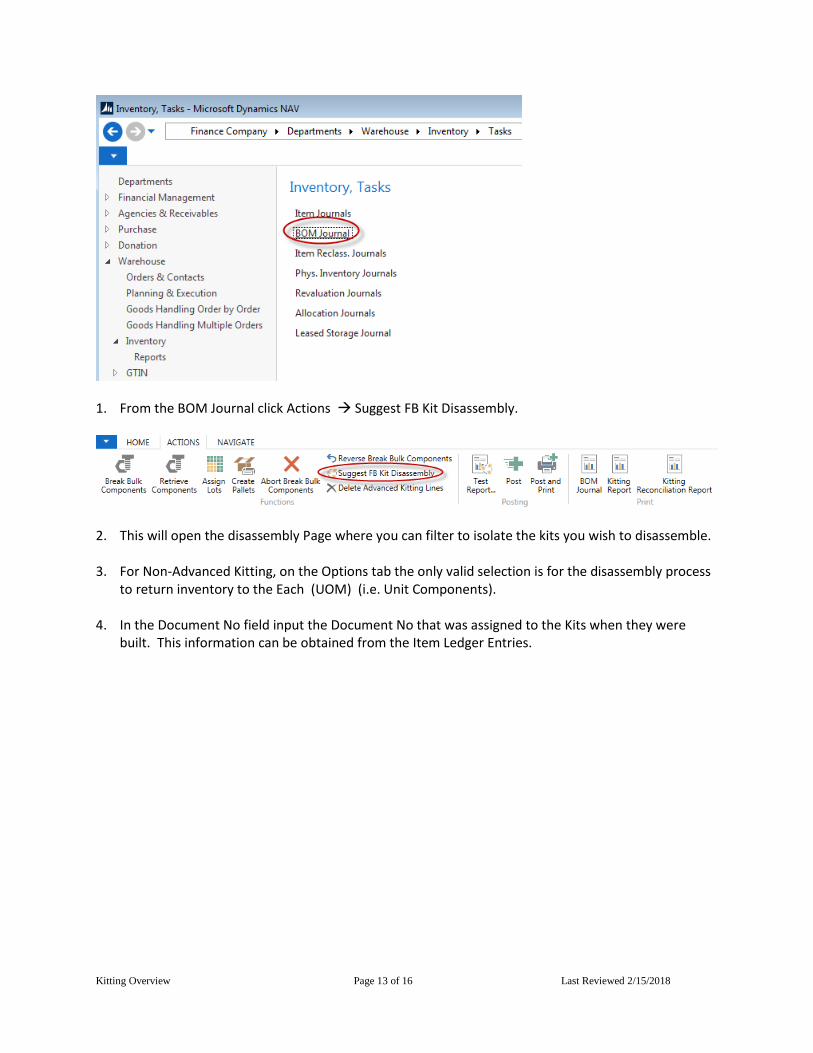
Disassembly of Kits in Ceres Once kits are built in Ceres, it may still be possible to disassemble the kits back into component inventory. This function is called “FB Kit Disassembly” and can be accessed from the same BOM Journal used to build the kits originally. Ceres will allow the disassembly process to return the components back to unit component inventory or completely to the bulk items they were taken from. This can be useful if some reason, the wrong bulk items was used in the creation of the kits. To being the disassembly function. Go To Departments Warehouse Inventory Tasks BOM Journals to access the BOM Journal Page.
Kitting Overview Page 13 of 16 Last Reviewed 2/15/2018
1. From the BOM Journal click Actions Suggest FB Kit Disassembly.
2. This will open the disassembly Page where you can filter to isolate the kits you wish to disassemble.
3. For Non-Advanced Kitting, on the Options tab the only valid selection is for the disassembly process
to return inventory to the Each (UOM) (i.e. Unit Components).
4. In the Document No field input the Document No that was assigned to the Kits when they were built. This information can be obtained from the Item Ledger Entries.

Kitting Overview Page 14 of 16 Last Reviewed 2/15/2018
5. Click OK to continue. Ceres will return the followinig message.
6. Ceres will dissameble the kits and the associated components.

Kitting Overview Page 15 of 16 Last Reviewed 2/15/2018
7. Click Actions Click Actions Posting Post. Alternatively you can select “Post and Print”.
8. Ceres will ask you to confirm the posting. Select “Yes” and Ceres will then confirm the posting.
9. Ceres will prompt you to confirm the posting of the BOM Journal. Answer “Yes” to post the BOM Journal. Once completed, Ceres will confirm successful posting of the journal.
10. The entries that were created can be viewed from the Item Ledger Entries.
Kitting Overview Page 16 of 16 Last Reviewed 2/15/2018
Related Topics: 1. Advanced Kitting Overview 2. Bin Overview 3. Item Overview 4. Item Journal Repack and Item Reclass