kip system setup & apps installation operator guidekip-asia.com/home/kip software manuais/kip...
TRANSCRIPT

KIP System Setup & Apps Installation
Operator Guide


KIP System Setup & Installation
This information is solely for use of KIP Personnel and KIP Authorized Dealers. No part of this publication may be copied, reproduced or distributed in any form without express written permission from KIP. © 2011 KIP.
Index
Basic Setup - LAN Connection .................................................................................................................... 1
Enter Keycodes for Monochrome Copy, Scan and Network Printing ................................................... 2
Enter Keycodes for Color Copy and Color Scan-to-file .......................................................................... 3
Installation of KIP Software ........................................................................................................................... 5
KIP PrintNet Client .......................................................................................................................................... 6
KIP Windows Driver ........................................................................................................................................ 7
KIP AutoCAD Driver ....................................................................................................................................... 8
KIP Request ..................................................................................................................................................... 9
KIP Convert Kit .............................................................................................................................................. 12
Unified Accounting Tool ............................................................................................................................. 14
KIP Windows Driver Removal ..................................................................................................................... 16
KIP Software Operator Manuals ................................................................................................................. 17
KIP Learning Center ..................................................................................................................................... 18
KIP Website ................................................................................................................................................... 19
Browse CD ..................................................................................................................................................... 20
KIP System Setup & Installation
This information is solely for use of KIP Personnel and KIP Authorized Dealers. No part of this publication may be copied, reproduced or distributed in any form without express written permission from KIP. © 2011 KIP.
- 1 -
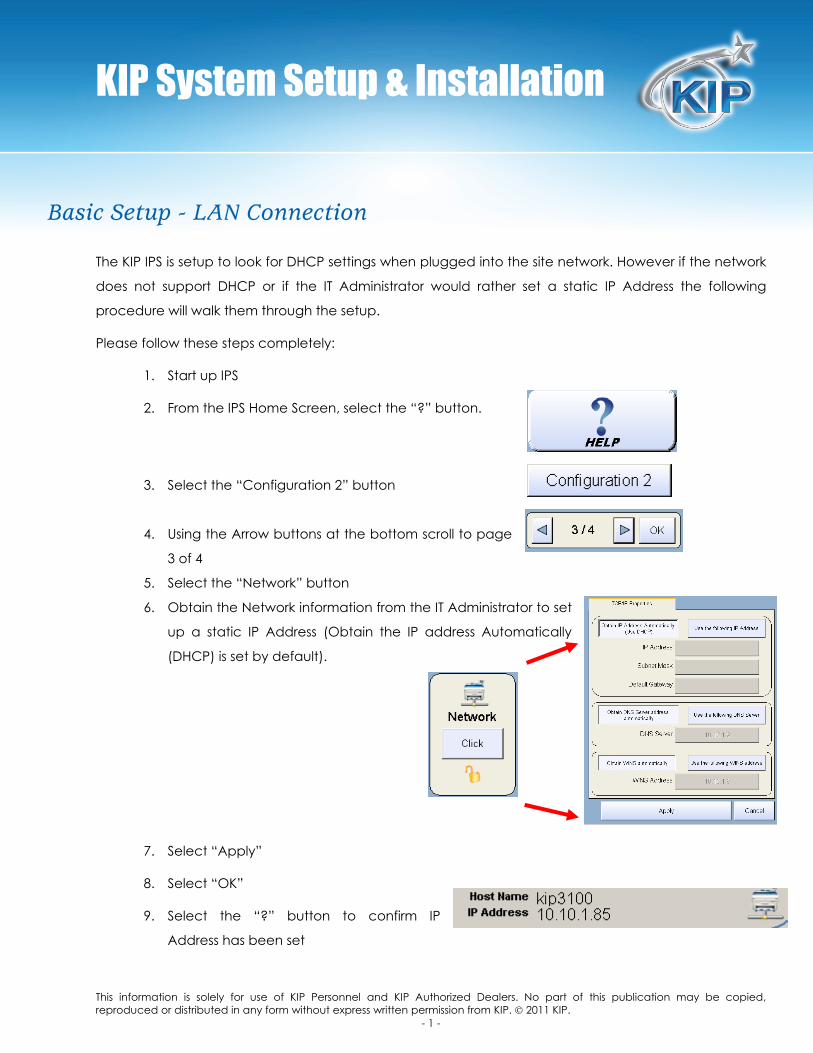
Basic Setup - LAN Connection
The KIP IPS is setup to look for DHCP settings when plugged into the site network. However if the network
does not support DHCP or if the IT Administrator would rather set a static IP Address the following
procedure will walk them through the setup.
Please follow these steps completely:
1. Start up IPS
2. From the IPS Home Screen, select the “?” button.
3. Select the “Configuration 2” button
4. Using the Arrow buttons at the bottom scroll to page
3 of 4
5. Select the “Network” button
6. Obtain the Network information from the IT Administrator to set
up a static IP Address (Obtain the IP address Automatically
(DHCP) is set by default).
7. Select “Apply”
8. Select “OK”
9. Select the “?” button to confirm IP
Address has been set

KIP System Setup & Installation
This information is solely for use of KIP Personnel and KIP Authorized Dealers. No part of this publication may be copied, reproduced or distributed in any form without express written permission from KIP. © 2011 KIP.
- 2 -
Enter Keycodes for Monochrome Copy, Scan and Network Printing
Once the IP Address has been set the Keycodes for the purchased options need to be entered.
1. From the IPS Graphical User Interface, select the “?” button.
2. Select the “Configuration 2” button
3. Using the Arrow buttons at the bottom scroll to page 2 of 7
4. Select the “Options” button as all check boxes will be blank.
5. Using the onscreen keyboard enter in the
last Keycode in the list of available
keycodes that were provided (not
including the keycode that starts with a $).
6. When all 15 digits have been entered the
“OK” button on the keyboard will become
active.
KIP System Setup & Installation
This information is solely for use of KIP Personnel and KIP Authorized Dealers. No part of this publication may be copied, reproduced or distributed in any form without express written permission from KIP. © 2011 KIP.
- 3 -
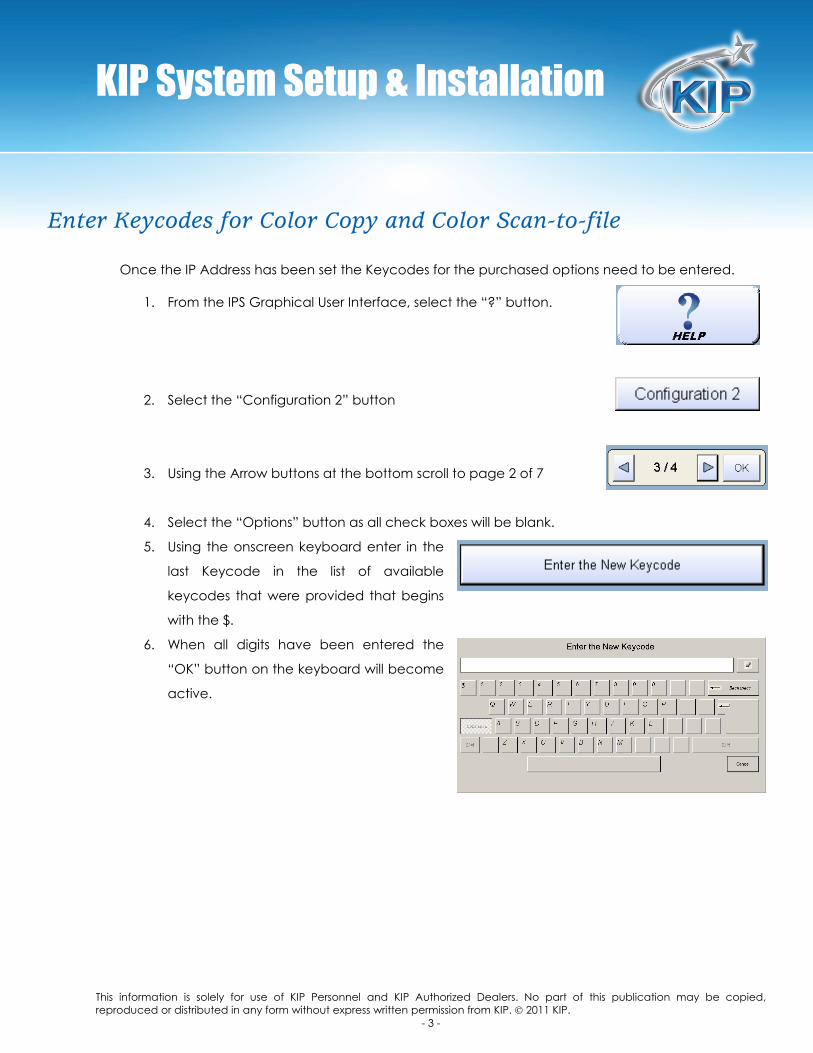
Enter Keycodes for Color Copy and Color Scan-to-file
Once the IP Address has been set the Keycodes for the purchased options need to be entered.
1. From the IPS Graphical User Interface, select the “?” button.
2. Select the “Configuration 2” button
3. Using the Arrow buttons at the bottom scroll to page 2 of 7
4. Select the “Options” button as all check boxes will be blank.
5. Using the onscreen keyboard enter in the
last Keycode in the list of available
keycodes that were provided that begins
with the $.
6. When all digits have been entered the
“OK” button on the keyboard will become
active.
KIP System Setup & Installation
This information is solely for use of KIP Personnel and KIP Authorized Dealers. No part of this publication may be copied, reproduced or distributed in any form without express written permission from KIP. © 2011 KIP.
- 4 -
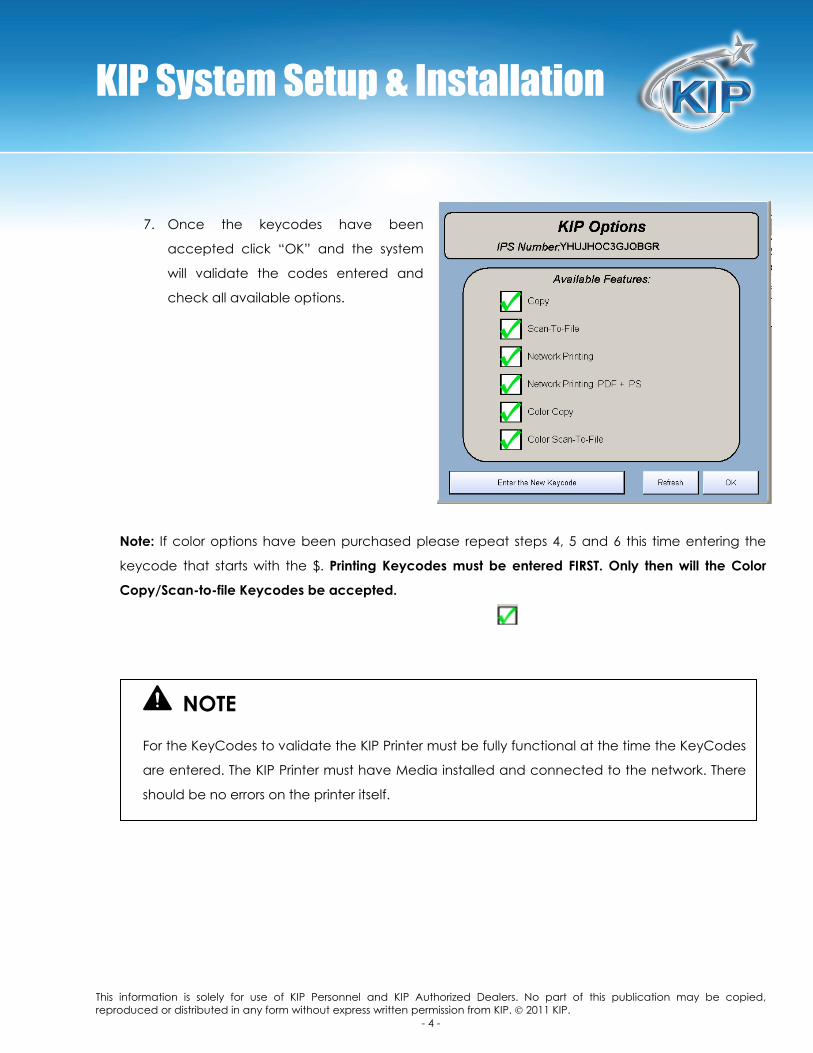
7. Once the keycodes have been
accepted click “OK” and the system
will validate the codes entered and
check all available options.
Note: If color options have been purchased please repeat steps 4, 5 and 6 this time entering the
keycode that starts with the $. Printing Keycodes must be entered FIRST. Only then will the Color
Copy/Scan-to-file Keycodes be accepted.
NOTE
For the KeyCodes to validate the KIP Printer must be fully functional at the time the KeyCodes
are entered. The KIP Printer must have Media installed and connected to the network. There
should be no errors on the printer itself.

KIP System Setup & Installation
This information is solely for use of KIP Personnel and KIP Authorized Dealers. No part of this publication may be copied, reproduced or distributed in any form without express written permission from KIP. © 2011 KIP.
- 5 -
Installation of KIP Software
Once the above two steps are completed (network Configuration and Keycode Entry) the KIP printer is
ready to for printing. All KIP printers ship with the most current Software and Operations Guide CD.
Operator Manual can be found in the Welcome kit that ships with the printer in a white DVD case.
To install KIP software at a workstation, please use
the following steps:
1. Insert the KIP Software Installation CD. If the PC
is configured to “Autoplay” CDs, the following
menu will be displayed. If “Autoplay” is
disabled, browse the CD and double-click on
autorun.exe
2. The KIP Software Installation CD will automatically search for installed KIP printers on the network
(firewall permissions may be required). If no KIP printers are found, the user can install software
manually by typing the printer’s IP address.
KIP System Setup & Installation
This information is solely for use of KIP Personnel and KIP Authorized Dealers. No part of this publication may be copied, reproduced or distributed in any form without express written permission from KIP. © 2011 KIP.
- 6 -
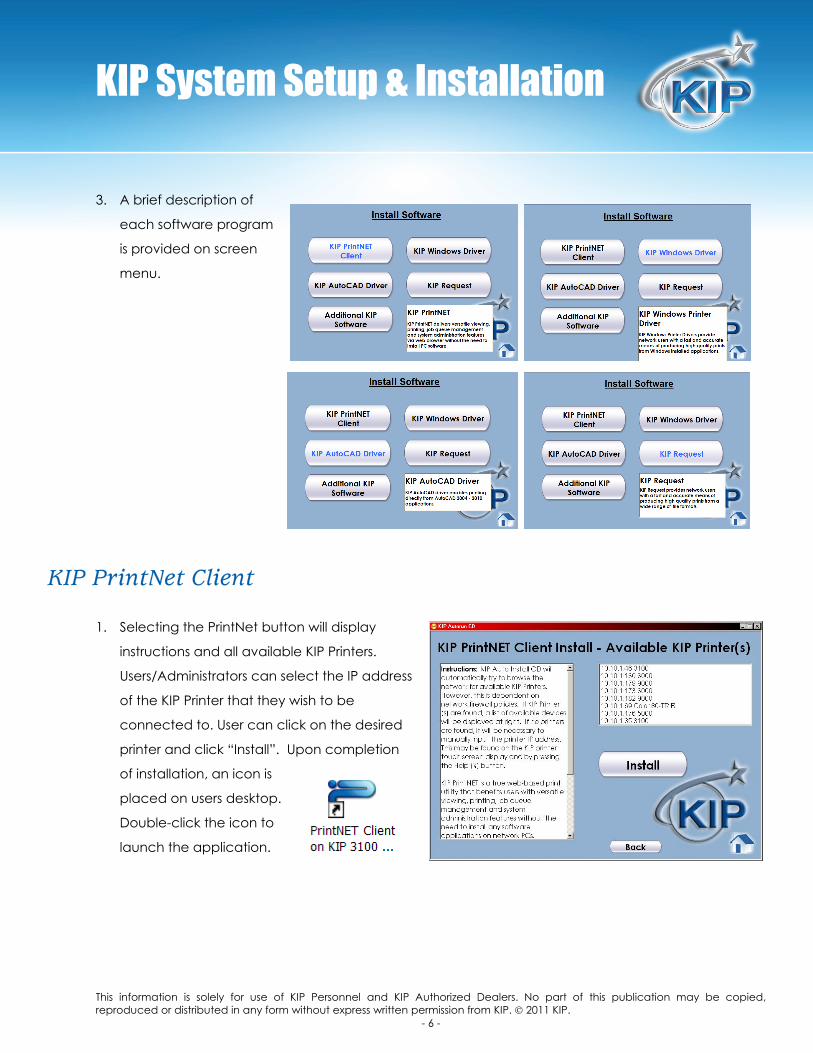
3. A brief description of
each software program
is provided on screen
menu.
KIP PrintNet Client
1. Selecting the PrintNet button will display
instructions and all available KIP Printers.
Users/Administrators can select the IP address
of the KIP Printer that they wish to be
connected to. User can click on the desired
printer and click “Install”. Upon completion
of installation, an icon is
placed on users desktop.
Double-click the icon to
launch the application.
KIP System Setup & Installation
This information is solely for use of KIP Personnel and KIP Authorized Dealers. No part of this publication may be copied, reproduced or distributed in any form without express written permission from KIP. © 2011 KIP.
- 7 -
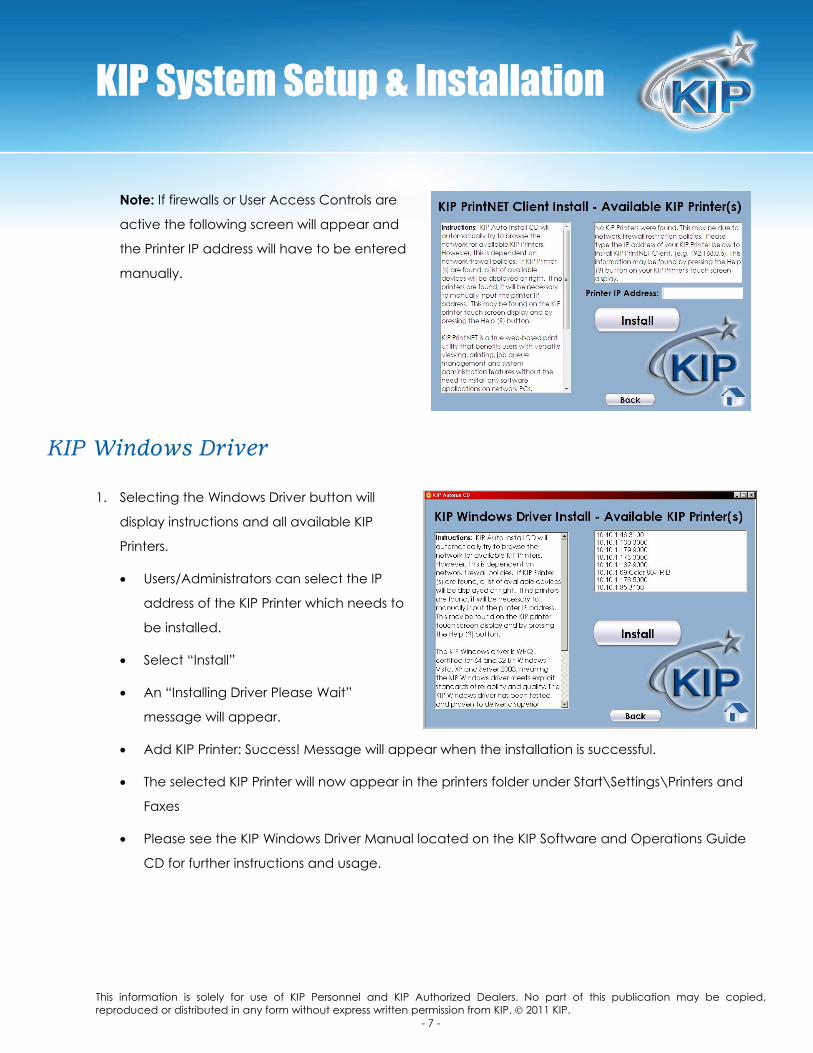
Note: If firewalls or User Access Controls are
active the following screen will appear and
the Printer IP address will have to be entered
manually.
KIP Windows Driver
1. Selecting the Windows Driver button will
display instructions and all available KIP
Printers.
• Users/Administrators can select the IP
address of the KIP Printer which needs to
be installed.
• Select “Install”
• An “Installing Driver Please Wait”
message will appear.
• Add KIP Printer: Success! Message will appear when the installation is successful.
• The selected KIP Printer will now appear in the printers folder under Start\Settings\Printers and
Faxes
• Please see the KIP Windows Driver Manual located on the KIP Software and Operations Guide
CD for further instructions and usage.

KIP System Setup & Installation
This information is solely for use of KIP Personnel and KIP Authorized Dealers. No part of this publication may be copied, reproduced or distributed in any form without express written permission from KIP. © 2011 KIP.
- 8 -
Note: If firewalls or User Access Controls are
active the following screen will appear and
the Printer IP address will have to be entered
manually.
KIP AutoCAD Driver
1. Selecting the AutoCAD Driver button will
display instructions and notes on the different
versions of AutoCAD the driver can be used
with.
Note: The AutoCAD driver will need to be
installed from within the AutoCAD application
and cannot be installed automatically from
the Software CD.
KIP System Setup & Installation
This information is solely for use of KIP Personnel and KIP Authorized Dealers. No part of this publication may be copied, reproduced or distributed in any form without express written permission from KIP. © 2011 KIP.
- 9 -
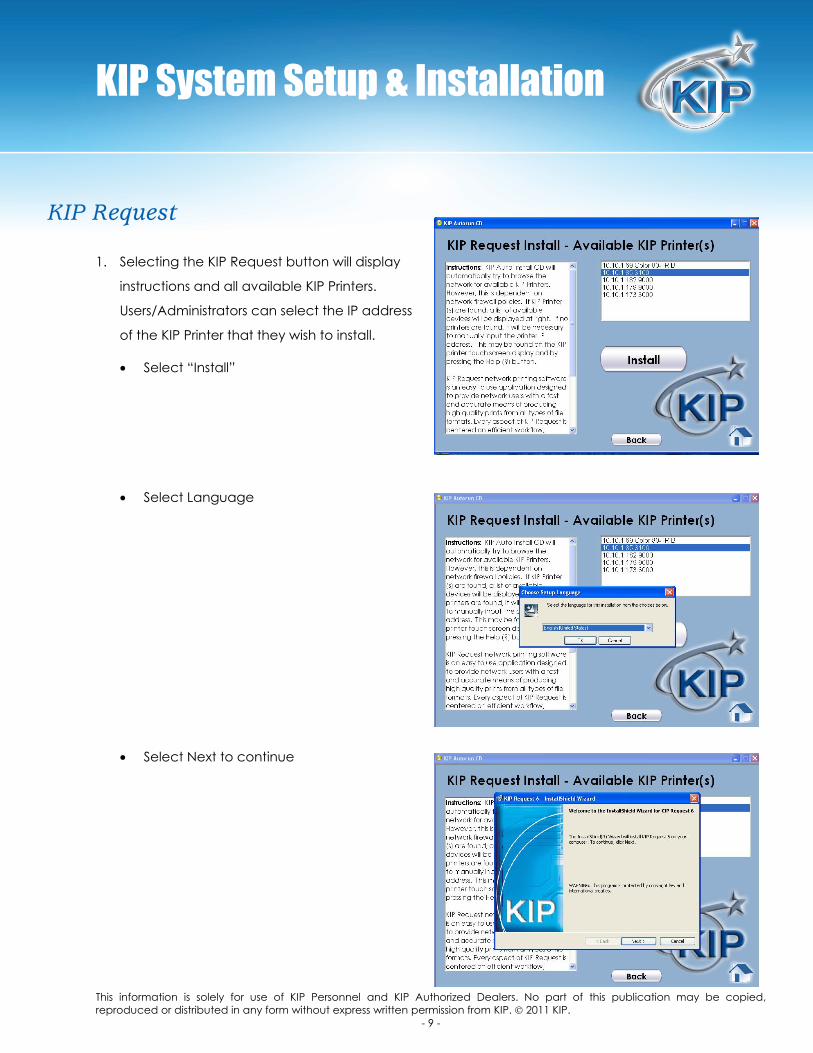
KIP Request
1. Selecting the KIP Request button will display
instructions and all available KIP Printers.
Users/Administrators can select the IP address
of the KIP Printer that they wish to install.
• Select “Install”
• Select Language
• Select Next to continue

KIP System Setup & Installation
This information is solely for use of KIP Personnel and KIP Authorized Dealers. No part of this publication may be copied, reproduced or distributed in any form without express written permission from KIP. © 2011 KIP.
- 10 -
• Select “I accept the License Agreement”
• Set User Name
• Accept the install location or select
“Change” to install to a different location.

KIP System Setup & Installation
This information is solely for use of KIP Personnel and KIP Authorized Dealers. No part of this publication may be copied, reproduced or distributed in any form without express written permission from KIP. © 2011 KIP.
- 11 -
• Select English or metric settings.
Additionally, Unified Accounting can be
turned on at this point in case Job tracking
accounting information needs to be used.
• Click “Install” to begin the installation
process.
• Once installation is finished select “Finish” a
Shortcut for KIP Request will be placed on
the desktop.
KIP System Setup & Installation
This information is solely for use of KIP Personnel and KIP Authorized Dealers. No part of this publication may be copied, reproduced or distributed in any form without express written permission from KIP. © 2011 KIP.
- 12 -
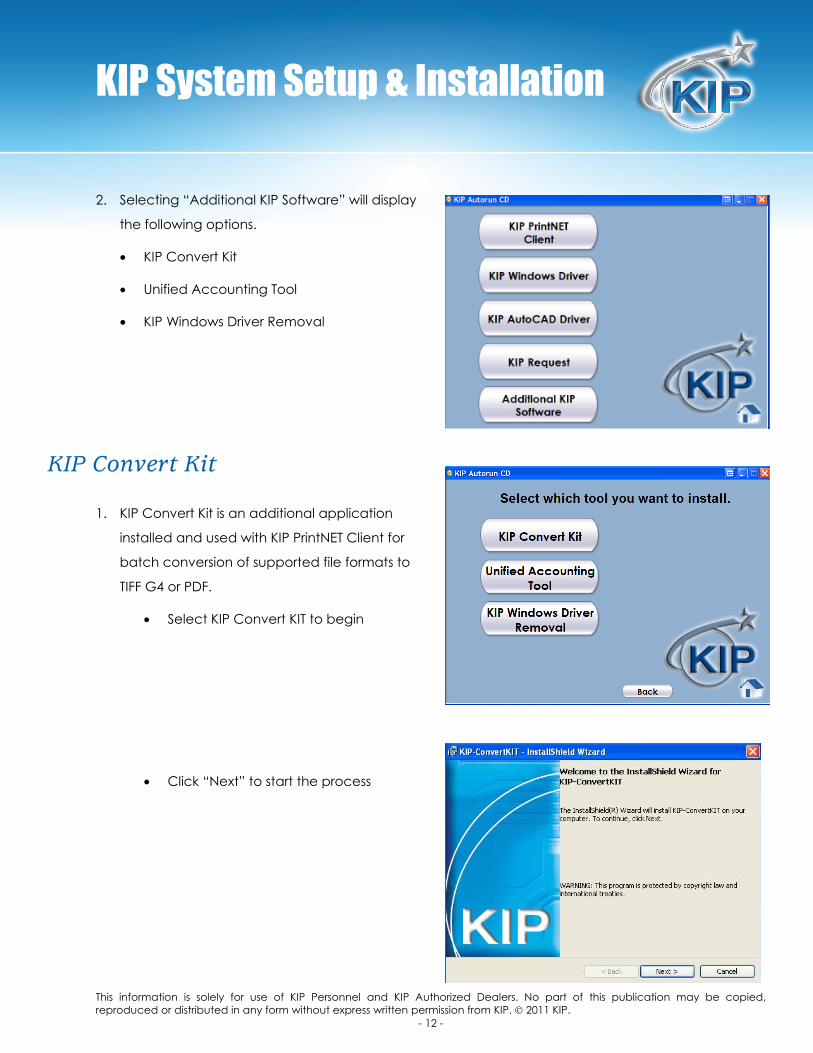
2. Selecting “Additional KIP Software” will display
the following options.
• KIP Convert Kit
• Unified Accounting Tool
• KIP Windows Driver Removal
KIP Convert Kit
1. KIP Convert Kit is an additional application
installed and used with KIP PrintNET Client for
batch conversion of supported file formats to
TIFF G4 or PDF.
• Select KIP Convert KIT to begin
• Click “Next” to start the process
KIP System Setup & Installation
This information is solely for use of KIP Personnel and KIP Authorized Dealers. No part of this publication may be copied, reproduced or distributed in any form without express written permission from KIP. © 2011 KIP.
- 13 -
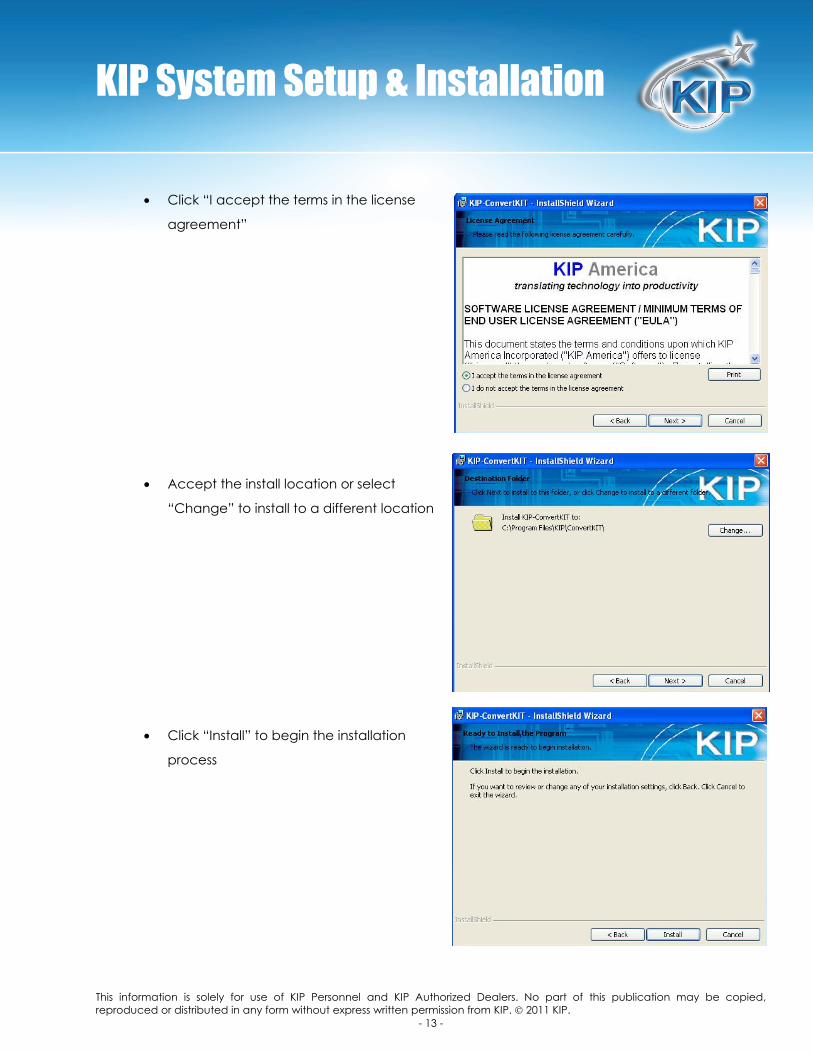
• Click “I accept the terms in the license
agreement”
• Accept the install location or select
“Change” to install to a different location
• Click “Install” to begin the installation
process

KIP System Setup & Installation
This information is solely for use of KIP Personnel and KIP Authorized Dealers. No part of this publication may be copied, reproduced or distributed in any form without express written permission from KIP. © 2011 KIP.
- 14 -
• Once installation is complete select
“Finish”
Unified Accounting Tool
1. KIP Unified Accounting Tool provides
administrators a method of quickly and
efficiently adding multiple users, job numbers
and descriptions to the KIP software. All KIP
client applications may utilize this data for
accurate cost recovery.
• Selecting the Unified Accounting Tool will
open the following window. The password
needed is the same as the password
used to enter Service mode on the IPS
Touch Screen
KIP System Setup & Installation
This information is solely for use of KIP Personnel and KIP Authorized Dealers. No part of this publication may be copied, reproduced or distributed in any form without express written permission from KIP. © 2011 KIP.
- 15 -
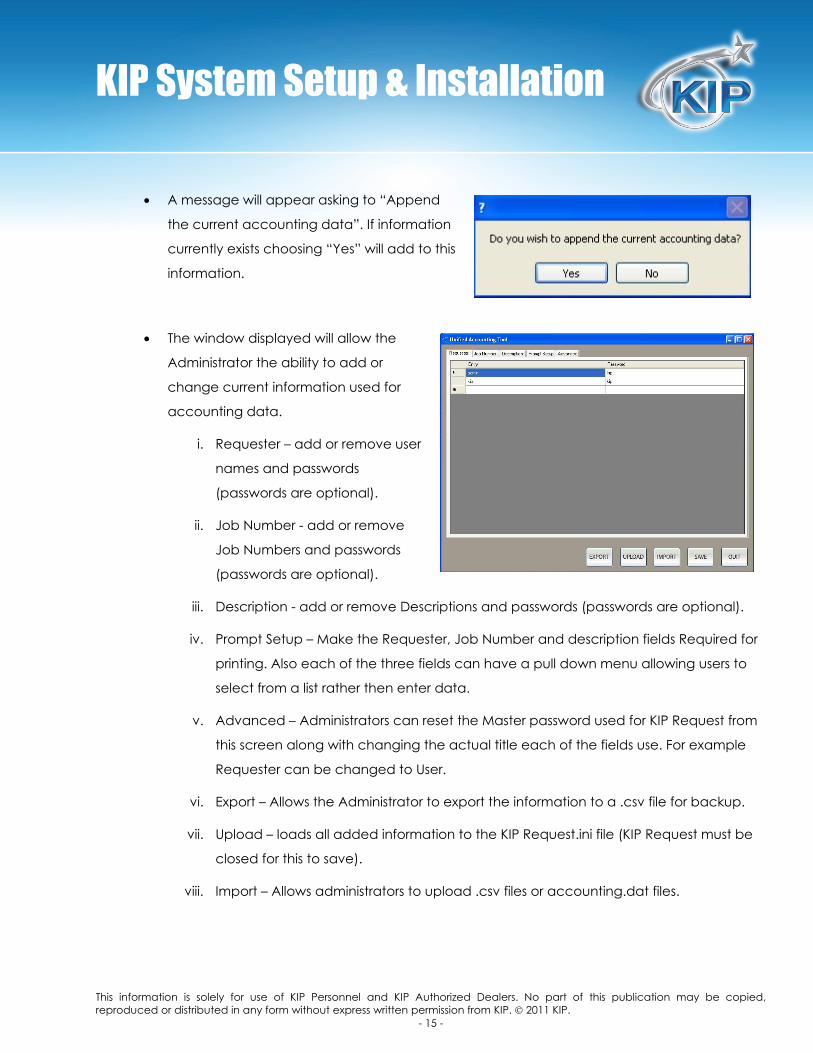
• A message will appear asking to “Append
the current accounting data”. If information
currently exists choosing “Yes” will add to this
information.
• The window displayed will allow the
Administrator the ability to add or
change current information used for
accounting data.
i. Requester – add or remove user
names and passwords
(passwords are optional).
ii. Job Number - add or remove
Job Numbers and passwords
(passwords are optional).
iii. Description - add or remove Descriptions and passwords (passwords are optional).
iv. Prompt Setup – Make the Requester, Job Number and description fields Required for
printing. Also each of the three fields can have a pull down menu allowing users to
select from a list rather then enter data.
v. Advanced – Administrators can reset the Master password used for KIP Request from
this screen along with changing the actual title each of the fields use. For example
Requester can be changed to User.
vi. Export – Allows the Administrator to export the information to a .csv file for backup.
vii. Upload – loads all added information to the KIP Request.ini file (KIP Request must be
closed for this to save).
viii. Import – Allows administrators to upload .csv files or accounting.dat files.
KIP System Setup & Installation
This information is solely for use of KIP Personnel and KIP Authorized Dealers. No part of this publication may be copied, reproduced or distributed in any form without express written permission from KIP. © 2011 KIP.
- 16 -
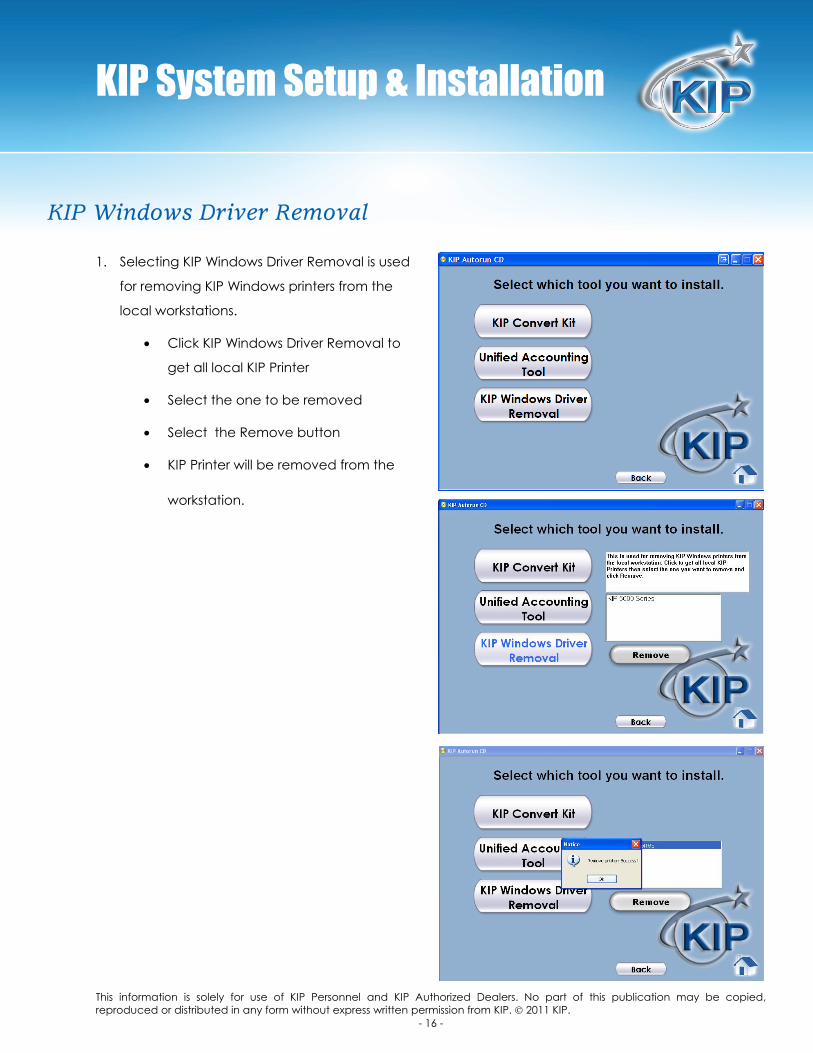
KIP Windows Driver Removal
1. Selecting KIP Windows Driver Removal is used
for removing KIP Windows printers from the
local workstations.
• Click KIP Windows Driver Removal to
get all local KIP Printer
• Select the one to be removed
• Select the Remove button
• KIP Printer will be removed from the
workstation.
KIP System Setup & Installation
This information is solely for use of KIP Personnel and KIP Authorized Dealers. No part of this publication may be copied, reproduced or distributed in any form without express written permission from KIP. © 2011 KIP.
- 17 -
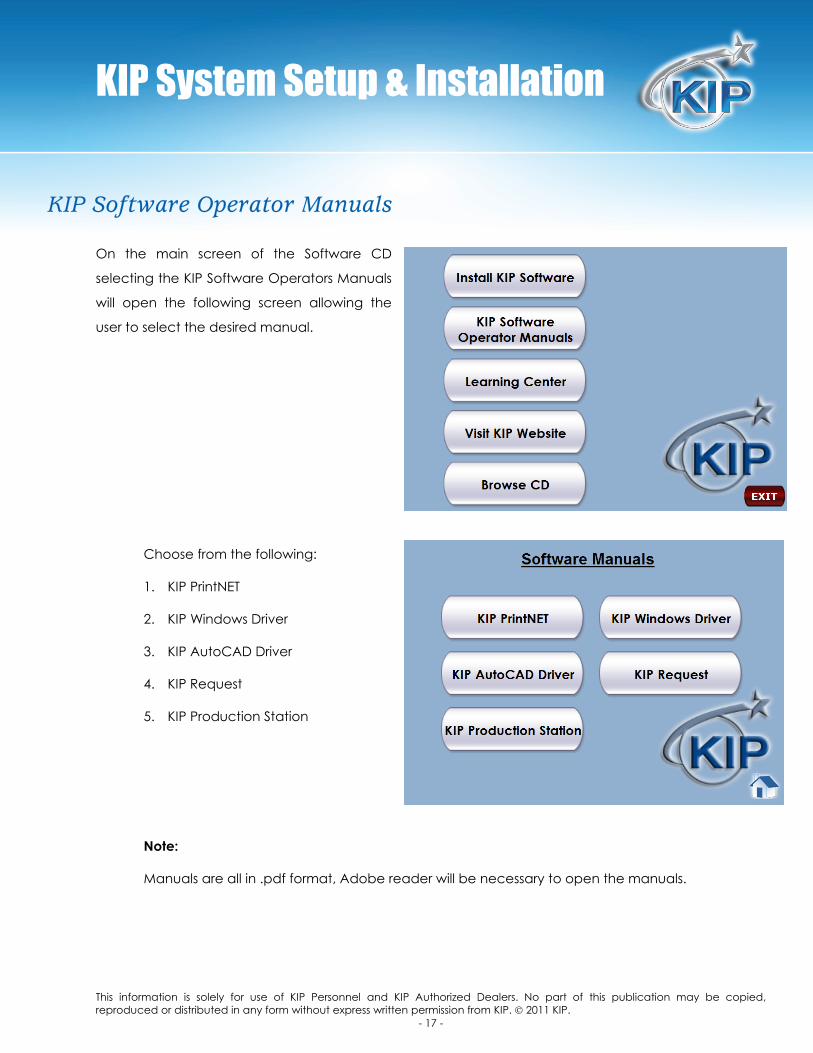
KIP Software Operator Manuals
On the main screen of the Software CD
selecting the KIP Software Operators Manuals
will open the following screen allowing the
user to select the desired manual.
Choose from the following:
1. KIP PrintNET
2. KIP Windows Driver
3. KIP AutoCAD Driver
4. KIP Request
5. KIP Production Station
Note:
Manuals are all in .pdf format, Adobe reader will be necessary to open the manuals.

KIP System Setup & Installation
This information is solely for use of KIP Personnel and KIP Authorized Dealers. No part of this publication may be copied, reproduced or distributed in any form without express written permission from KIP. © 2011 KIP.
- 18 -
KIP Learning Center
On the main screen of the Software CD
selecting the Learning Center will open the
following screen allowing the user to select
the desired tutorials.
Choose from the following:
1. KIP PrintNET
2. KIP Windows Driver
3. KIP AutoCAD Driver
4. KIP Request
5. KIP Production Station
Selecting any of the available training tutorials will open a user friendly walkthrough presentation
for installation of the selected application along with basic steps for using the software.

KIP System Setup & Installation
This information is solely for use of KIP Personnel and KIP Authorized Dealers. No part of this publication may be copied, reproduced or distributed in any form without express written permission from KIP. © 2011 KIP.
- 19 -
KIP Website
On the main screen of the Software CD
selecting the Visit KIP Website will open the
internet browser to the KIP website. This will
allow users to access the KIP Website and
utilize the features and functions of the site.
KIP System Setup & Installation
This information is solely for use of KIP Personnel and KIP Authorized Dealers. No part of this publication may be copied, reproduced or distributed in any form without express written permission from KIP. © 2011 KIP.
- 20 -
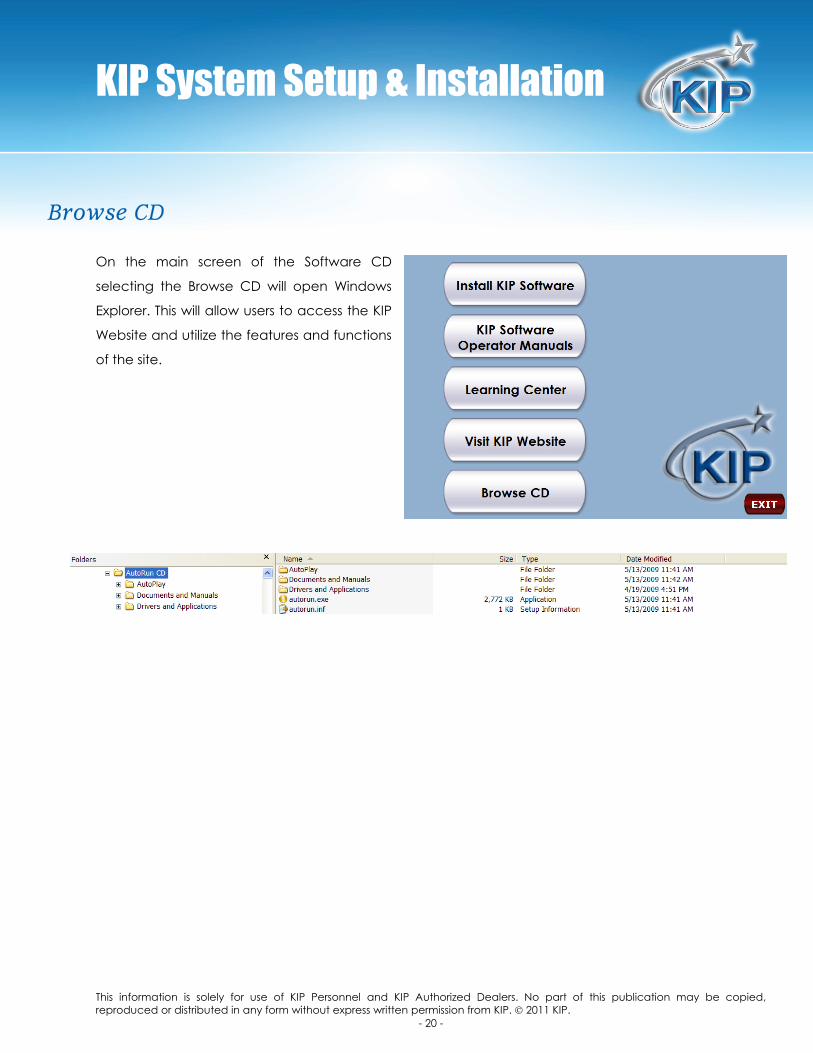
Browse CD
On the main screen of the Software CD
selecting the Browse CD will open Windows
Explorer. This will allow users to access the KIP
Website and utilize the features and functions
of the site.

KIP is a registered trademark of the KIP Group. All other product names mentioned herein are trademarks of their respective companies. All product features and specifications are subject to change without notice. Complete product specifications are available upon request.