king county green building handbook
TRANSCRIPT

Department of Permitting and Environmental Review (DPER)
KING COUNTY
GREEN BUILDINGHANDBOOKDepartment of Permitting and Environmental Review (DPER)
m̂ King County

rev. May 2016, Version 11605_4454w_DPER_0gs_COVER_ACK.indd
King County Green Building Handbook
Acknowledgments The King County Green Building Handbook was prepared by the Department of Permitting and Environmental Review (DPER) in support of the King County Green Building Ordinance 17709. The handbook would not have been possible without the leadership of King County Executive Dow Constantine and DPER Director John Starbard. Handbook development was led by the DPER Executive Team of Lisa Verner, Molly Johnson, and Chris Ricketts and supported by the King County GreenTools program. Consultant assistance was provided by O’Brien & Company. Wendy Gable Collins, of King County IT/Department of Natural Resources and Parks, produced the graphic layout of the Handbook.
The team behind the handbook is also appreciative of the many contributions by DPER staff in answering surveys, providing input on content and format, beta testing the document, and participating in trainings, and for the review and input from the following subject matter experts:
Aaron Adelstein, Leah Missik, and Ellen Cole (Built Green / MBA of King and Snohomish Counties)
Tom Balderston (Conservation Services Group)
Darrick Philp (BELRED)
Kinley Deller (King County GreenTools)
February 2015
ResourcesFor the complete King County Green Building Handbook and individual Green Sheet PDF files, please visit our website at: http://kingcounty.gov/depts/permitting-environmental-review/publications/Greenbuild. For additional information, please email [email protected] or call 206-296-6600.

Department of Permitting and Environmental Review (DPER)
DP
ER
GR
EE
N S
HE
ET
Feb. 2015, Version 1
King County Green Building HandbookProvided by the Department of Planning and Environmental Review (DPER)
IntroductionWhether you are building new, remodeling, or just replacing a broken system, green building can save you money, protect your health, contribute to your community, and preserve King County’s great natural resources. The King County Green Building Handbook is your guide to over 20 ways you can increase efficiency in your project and reap rewards.
Strategies included in this handbook benefit you in many ways:
• Making the cost of operating and maintaining a home more affordable;
• Protecting air quality and health in your home and community;
• Supporting regional businesses and local jobs;
• Keeping local services like drinking water and waste collection available and reliable; and
• Protecting natural resources and the global environment.
The measures in the handbook also help you meet important county code requirements and can help your project earn recognition through a green building certification program or receive incentives through local utilities.
Each measure or strategy is detailed in a “Green Sheet” that helps you pull together the right ingredients for your project. Each sheet details the benefits of the measure, when and where it applies, and provides guidance and resources to help you implement it. The handbook also explains how some of the measures can be bundled together, like a combination of ingredients, to create a recipe for success on certain types of projects. Turn to the Table of Contents for a full list of measures covered in the recipe cards and the suggested bundles by project type.
Simple, low-cost measures are the first step to save energy in your home or business. Do these first before investing in more complex, higher-cost system or changes to the building. Source: Minnesota Power
The Green Building Handbook may be found on the DPER website with active hyperlinks at www.kingcounty.gov/property/ permits.aspx
The Pyramid of C O N S E R V A T I O N residontial version•A Rx/utaBon in Enemy EfOOeney0 A Solar
Electric
Windows
" Furnaces with ECMs ( W Heal Pumps A/C
Drain Water Heat Recovery T Smart Pak Solar Tliermal
Water Heating
n & VentilationW Attics WallsW Foundations Crawl Spaces
Refrigerators Dishwashers Clothes Washers W Appliance Roundup Dehumidrfiers
Sealing Bypasses in Attics, Walls & Foundations Caulking and Weatherstripping Windows & Doors
Temperature Settings/Programmable Thermostats Hot Water Settings Home Entertainment Centers
Computers Unplug Portable Devices Routine Maintenance
Power of One Portal Action Ptan Online Resources Tips and Tools On-Site Analysis New Construction Design
www.mnpower.com/powerolonehome c«wvi o jot. an i Mm** mm. m nun Oman, m %**»
Conservation - where do I begin?The choice to be more energy efficient may be dear, but the daring point can be more difficult to determine. The Pyramid of Conservation is designed to help you pnontue steps and develop an action plan that's nght tor you. By esttMttfilng a foundation in energy efficiency and gaining a better understanding about how you use energy, you can more effectively work your way up the pyrar
No-Cost
UmlurstHiulinu
2
Feb. 2015, Version 11502_4454w_DPER_0gs_INTRO.indd
Green Building Handbook Introduction continued
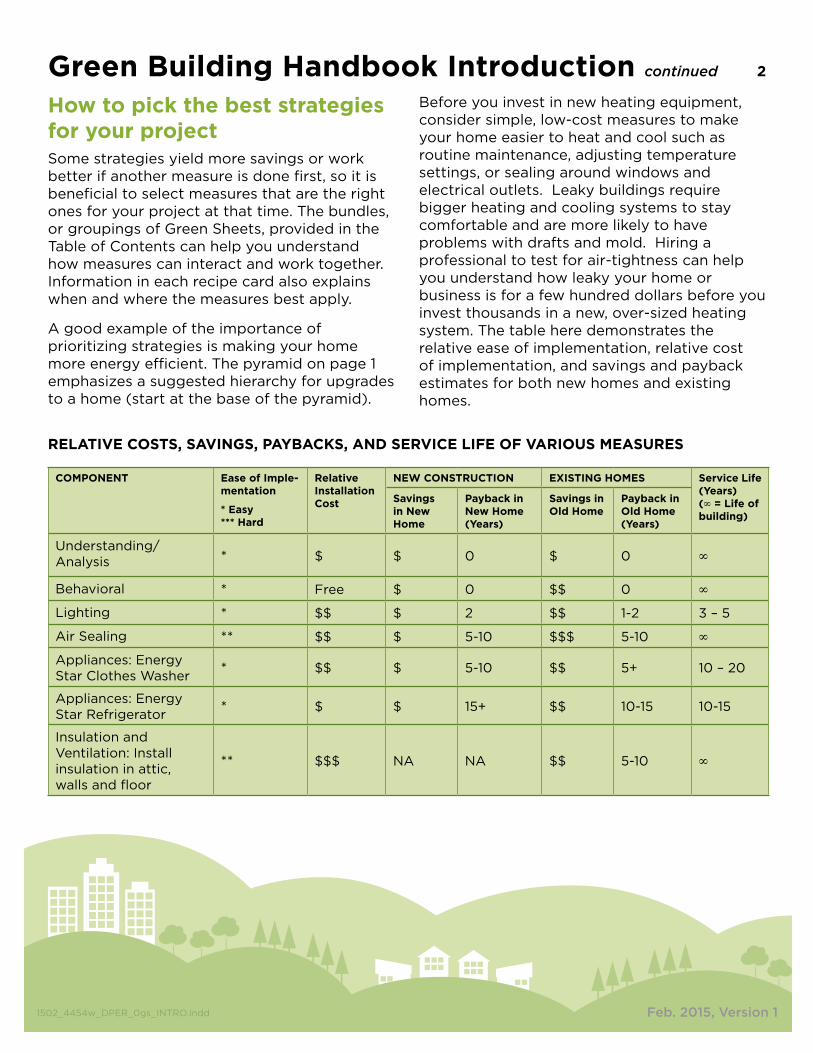
How to pick the best strategies for your projectSome strategies yield more savings or work better if another measure is done first, so it is beneficial to select measures that are the right ones for your project at that time. The bundles, or groupings of Green Sheets, provided in the Table of Contents can help you understand how measures can interact and work together. Information in each recipe card also explains when and where the measures best apply.
A good example of the importance of prioritizing strategies is making your home more energy efficient. The pyramid on page 1 emphasizes a suggested hierarchy for upgrades to a home (start at the base of the pyramid).
Before you invest in new heating equipment, consider simple, low-cost measures to make your home easier to heat and cool such as routine maintenance, adjusting temperature settings, or sealing around windows and electrical outlets. Leaky buildings require bigger heating and cooling systems to stay comfortable and are more likely to have problems with drafts and mold. Hiring a professional to test for air-tightness can help you understand how leaky your home or business is for a few hundred dollars before you invest thousands in a new, over-sized heating system. The table here demonstrates the relative ease of implementation, relative cost of implementation, and savings and payback estimates for both new homes and existing homes.
RELATIVE COSTS, SAVINGS, PAYBACKS, AND SERVICE LIFE OF VARIOUS MEASURES
COMPONENT Ease of Imple-mentation
* Easy*** Hard
Relative Installation Cost
NEW CONSTRUCTION EXISTING HOMES Service Life (Years) (∞ = Life of building)
Savings in New Home
Payback in New Home (Years)
Savings in Old Home
Payback in Old Home (Years)
Understanding/ Analysis * $ $ 0 $ 0 ∞
Behavioral * Free $ 0 $$ 0 ∞
Lighting * $$ $ 2 $$ 1-2 3 – 5
Air Sealing ** $$ $ 5-10 $$$ 5-10 ∞
Appliances: Energy Star Clothes Washer * $$ $ 5-10 $$ 5+ 10 – 20
Appliances: Energy Star Refrigerator * $ $ 15+ $$ 10-15 10-15
Insulation and Ventilation: Install insulation in attic, walls and floor
** $$$ NA NA $$ 5-10 ∞

3
Feb. 2015, Version 11502_4454w_DPER_0gs_INTRO.indd
Green Building Handbook Introduction continued
COMPONENT Ease of Imple-mentation
* Easy*** Hard
Relative Installation Cost
NEW CONSTRUCTION EXISTING HOMES Service Life (Years) (∞ = Life of building)
Savings in New Home
Payback in New Home (Years)
Savings in Old Home
Payback in Old Home (Years)
Insulation and Ventilation: Upgrade insulation in attic, walls and floor
** $$$ $ 10-20 $$ 10-15 ∞
Water Heating: 1.5 gpm showerhead * $ $ <1 $ <1 5-10
Water Heating: Efficiency Upgrade ** $$$ $$ 2-10 $$$ 1-5 12 – 25
Heating & Cooling: Switch from oil or electric to gas or heat pump
*** $$$$NA
5-15 $$$ 3-10 15 – 25
Heating & Cooling: Efficiency Upgrade *** $$$$ $$ 5-15 $$$ 3-10 15 – 25
Windows ** $$$$ $ 20-30 $$ 15-20 5 – 30
Renewable Options *** $$$$$ $$ 6-20 $$ 10-20 15 – 30
As a general rule, first gather information to understand the costs and benefits of a building project, then investigate the less-complex, lower-cost steps first to make sure you’ve built a good foundation for assuring the best value of any investment in more complex improvements or larger scale projects.
Green Codes and Green Building Certification SystemsWhat do codes and green building rating systems have to do with your project? A lot!
Our region, and King County specifically, are national leaders in using green building to help create a prosperous community and healthy environment. The King County Strategic Plan goals include growing vibrant, thriving and sustainable communities and safeguarding and enhancing King County’s natural resources and environment. Green building is a key way that all buildings, including your project, can contribute to achieving these goals.
So how do you get started? Check out this Contractor Checklist to ensure you ask the right questions when finding a contractor for your next green project.
RELATIVE COSTS, SAVINGS, PAYBACKS, AND SERVICE LIFE OF VARIOUS MEASURES cont.

4
Feb. 2015, Version 11502_4454w_DPER_0gs_INTRO.indd
Green Building Handbook Introduction continued
Green building rating systems help describe and quantify the benefits of green building beyond green codes and set up structures to reward and support those that take advantage of these benefits and exceed code expectations.
The County Council passed an updated Green Building and Sustainable Development Ordinance in 2013 that requires King County-owned projects to achieve the highest level of certification available in an applicable green building rating system.
While these requirements do not apply directly to your home, they show that King County is doing its part. 98 percent of all county-owned projects are using green building practices and certification processes; this leadership in setting and following the highest green building standards helps to reduce environmental impact, reduces risk, saves money, and increases community resilience.
By using this handbook, you will better understand the value to you, your project, and your community from green code requirements, how you can capture additional financial, health, and environmental benefits from incorporating these green strategies into the “recipe” for your project, and where those strategies contribute to certification in green building rating systems.
Choosing and Using Green Building Certification Systems For homes and small businesses in King County, there are currently about a half-dozen options to consider when choosing a green building certification system (detailed below). The first question, however, is why certify your project at all? There are three key benefits to
Traditional building codes, green codes and green building certification systems work together to lessen the impact of the built environment, reduce risk, and increase our community’s resiliency.
The County’s commitment to these goals is reflected in requirements in the local building, energy, stormwater, and plumbing codes. Increasingly, national and international code agencies that set guidelines for local jurisdictions understand there is a link between the fundamental life safety purpose of codes and the necessity to build in a way that doesn’t put our built environment and the people that it serves at greater risk from air or water pollution, interruption of important services, or damages from natural disasters. This knowledge has led to a growth of green building codes that set a higher baseline of what is safe, healthy, and responsible when building. King County’s green codes, which are designed to safeguard human health, sustain regional energy and water systems, and protect our natural resources, are a great example.
Envi
ronm
enta
l Im
pact
Current Day
A Future Green Building ^ero Rating Systems impact
A Current Green Building Rating Systems
Early Green Building Rating Systems
Green Building Codes
Traauonat Building Codes
TimeReproduction of dtoorom produced by
U$ Green Bu'Hding Council

5
Feb. 2015, Version 11502_4454w_DPER_0gs_INTRO.indd
Green Building Handbook Introduction continued
consider when deciding to use a green building certification system.
• Information and Accountability. The first reason is the information and support available through the program, which can be as simple as reading the rating system checklist to get a broad view of strategies or measures that might be right for your project, and the third-party verification that
Data from the multiple listing shows green properties continue to generate and hold value. Analysis provided by GreenWorks Realty.
the measures you chose were implemented. This is required in most rating systems now and comes at an additional cost. Third-party verification can be particularly valuable if you are hiring a contractor who may or may not be familiar with all the green strategies you or your designer selected.
• Property Valuation. The second is to strengthen your property value whether you are planning to sell soon or hold for the long-term. The Multiple Listing Service (MLS) now includes information about green building certifications in their data about properties and many buyers in the Northwest consider green properties more desirable. Even during recent economic downturns, green residential properties had higher average valuations.
• Commitment and Marketability. The third is your own personal satisfaction at a job well done, or if you operate a business from your property, the opportunity to market your contribution to the local community and environment.
So what is involved with certification? This graphic depicts typical tasks necessary to meet the requirements of most green building rating systems.
Design
Construction
Certification
• Join relevent organization, enroll project
• Complete preliminary checklist, hire a verifier
• Track green features (documents, photos)
• Verifier performs necessary testing and inspections
• Verifier submits final signed checklist
• Clarifications/Certification
Certification systems typically include key milestones during design, construction, and certification.
Environmentally Certified and Non-Certified New Home Sales King
County, WashingtonC Cert Homes Median Pnct (SI Cert Homes Median Price (SI
>575,000
>550,000
>575,000
HML0M
>475,000
>450,000
>425,000
>400,000
>375,000
$300,000
Sap-07 Jan-Of) May-08 Sap-OH lan-09 May-OO Sap-Of lao-10 May-10 Sap-10 Jan-11 May-11 Sap-11 Jart-12
ECeit Report prepared by kwGrevnWorks with dotajrom Northwest Multiple Listing Service Af rights reserved
Environmentally Certified and Non-Certified New Home Sales King
County, WashingtonmMortcet Shore (%) —Price Difference ($)
>120,000
>100,000 AN
sao.ooo B!
>00,000
>40,000 A .>20,000 WR
K -
-;r OH
lllllHl540,000
MM$80,000
■wifi j-'-.-i: ).' OaJar-11 May-11 Jui-11 Sap-11
tCert Report prepared by kw6reenWorks with data from Northwest Multiple Listing Service AN rights reserved

6
Feb. 2015, Version 11502_4454w_DPER_0gs_INTRO.indd
Green Building Handbook Introduction continued
THE MOST APPLICABLE GREEN BUILDING CERTIFICATION SYSTEMS FOR KING COUNTY RESIDENTIAL AND SMALL BUSINESS PROJECTS
Built Green®Built Green is an environmentally-friendly, non-profit, residential building program of the Master Builders Association of King and Snohomish Counties. The program certifies single family, multifamily, remodel, energy retrofits and projects and communities to the 3, 4, 5-star and Emerald level based on scoring points across a broad range of environmental categories. www.builtgreen.net
Northwest ENERGYSTAR® HomesThe Northwest ENERGY STAR Homes program is a regional initiative intended to promote the construction of energy efficient homes using the guidelines set forth by the Environmental Protection Agency (EPA). Homes that have earned the ENERGY STAR label are at least 15 percent more efficient than homes built to current state building codes.www.northwestenergystar.com
LEED® for HomesLeadership in Energy & Environmental Design (LEED) is a green building certification program that recognizes best-in-class building strategies and practices. Building projects satisfy prerequisites and earn points to achieve Certified, Silver, Gold or Platinum levels of certification. LEED for Homes is available for building design and construction projects for single family homes and multifamily projects.http://www.usgbc.org/leed
Living Building Challenge™The Living Building Challenge (LBC) is a building certification program, advocacy tool and philosophy that defines the most advanced measure of sustainability in the built environment possible today. The Challenge is comprised of seven performance categories with total of twenty imperatives that must be met on all projects. LBC can be applied to almost every type of building project. www.living-future.org/lbc
Passive HousePassive House is the world’s leading standard for energy efficient construction. It combines building enclosure efficiency and passive solar strategies in a system for designing and building cost effective, comfortable, energy efficient buildings. It is effective in all different types of climate including the Northwest and works for projects from single family homes to large commercial projects. www.phnw.org
Salmon SafeSalmon-Safe is a peer-reviewed certification programs linking land management practices with the protection of agricultural and urban watersheds. Salmon Safe offers certification for farms, vineyards, residential developments, parks, golf courses, and campuses that meet requirements for management practices that protect water quality and restore habitat. www.salmonsafe.org
Is^BuiltGreen
N O R T H W E S T
g$ 1 ■1L' ■ l11"-’? ;
mL E E D ”
FOR H O M E S
LIVINGmWf Z BUILDING
CHALLENGE'
PHIUSPassive House Institute US
SAIGON
Safe

7
Feb. 2015, Version 11502_4454w_DPER_0gs_INTRO.indd
Green Building Handbook Introduction continued
Green Sheets’ Table of Contents and BundlesBundles
Green Sheet Env
elo
pe:
K
eep
ing
the
O
utsi
de
Out
and
th
e In
sid
e In
Sit
e an
d
Lan
dsc
apin
g
Hea
ting
and
C
oo
ling
Yo
ur
Ho
me
Co
nstr
ucti
on
Mat
eria
ls: W
hat
to B
uild
wit
h an
d
Ho
w t
o U
se it
.
Thi
ngs
that
us
e en
erg
y an
d w
ater
in
your
ho
me.
E
qui
pm
ent,
F
ixtu
res,
and
A
pp
lianc
es
Do
ing
it
Rig
ht: G
ener
al
Res
our
ces
Introduction X X X X X X
Exterior Topics 1. Amended Soils X
2. Rainwater Reuse X
3. Permeable Surfaces / Driveways X
4. Roofing Materials X X X
General Green Building Topics 5. Routine Home
Maintenance X X X X X X
6. EcoCool Remodel Tool X X X X X X
7. Green Products X X
8. What To Do With C & D Materials X X
9. Advanced Framing X X X
Energy-Using Systems 10. Air Sealing Your Home X X
11. Duct Sealing X X
12. High Efficiency Appliances X X
13. Insulation X X
14. Fresh Air Ventilation X
15. Toilets, Showers, and Faucets X
16. Thermostats X X
17. Right Sizing Heating and Cooling Systems X X
18. Furnace Replacement X X
19. Alternative Heating Systems X X
20. Solar Energy X

8
Feb. 2015, Version 11502_4454w_DPER_0gs_INTRO.indd
Green Building Handbook Introduction continued
ResourcesFor the complete King County Green Building Handbook and individual Green Sheet PDF files, please visit our website at: http://kingcounty.gov/property/permits/publications/greenbuild.aspx. For additional information, please email [email protected] or call 206-296-6600.
*

Department of Permitting and Environmental Review (DPER)
DP
ER
GR
EE
N S
HE
ET
Feb. 2015, Version 1
Amended SoilsOverview Native soils that have been compacted by construction activity or where topsoil has been removed or eroded can become impermeable to water infiltration, causing high volumes of stormwater to run off your property into local water bodies, or cause flooding homes, sidewalks and roads. This rapid runoff carries sediment, nutrients and pesticides into local water bodies or storm sewers that harm aquatic habitat and cost municipalities a lot to treat. Soils impacted by construction can be improved by tilling in well-composted organic material improving soil health and allowing soils to absorb and retain more moisture and nutrients.
Careful protection of native soils saves you money, protects the drainage potential of your site, and provides optimal growing conditions for plants. King County photo.
DefinitionsSoil Amendments - Natural additions to soil that improve both the structure and health of soils, increasing the space between particles, and allowing soils to absorb and retain more moisture and nutrients.
Integrated Pest Management (IPM) - An approach to pest management that relies on a combination of healthy, biologically active soils and natural predators to minimize pest damage with few or no chemical pesticides.
When is This Applicable? Amending soil is valuable any time you do site work. If your soil and landscaping are not healthy or thriving, or you are having problems with flooding, using best practices for amending soil may provide you with many cost-effective benefits.
King County’s Clearing and Grading Regulations (King County Code 16.82) require that soil amendments be added to any new or significantly redesigned landscaping areas, as well as to any landscaping areas disturbed or compacted during construction. Soil amendments should be added once the area is free from compaction or disturbance, or when new soil is installed, and before planting.
Healthy soil structure includes plentiful pathways for water, mineral, and nutrients to migrate. Source: Food and Agriculture Organization.
NU
MB
ER
1
/ T
::/
iI i
* .
*>
4-
nMn
836Muroporca H n
AO " t»
Ml wlixral
jrass•X
%«*» mincrjU
^7 ^►rKJni^ nmVf r
\:- ■- - -

2
Feb. 2015, Version 1
Amended Soils continued
1502_4454w_DPER_1gs_AMENDEDsoils.indd
What Makes it Green? Adding organic matter to soils enhances the function and performance of soils on your site in many ways.
• Improves structure, aeration and nutrient balance of the soil, which in turn supports more of the organisms and micro-organisms that improve soil function and makes more nutrients available to plants.
• Improves water absorption, reduces erosion and supports healthier plant growth and disease resistance, making the land more productive.
• Landscaped areas are easier to maintain, needing less frequent watering and less application of fertilizers and pesticides.
• Improves aquatic habitat and protects the health of salmon, trout and other species popular in King County.
• Helps you earn Built Green and LEED for Homes points for protect natural features and processes on site.
These illustrate the difference between healthy soil (left) vs compacted soil (right). The pore space shown in the healthy soil is important for effective drainage and optimal plant growth. Source: Colorado State University Extension.
Best PracticesRequired Process:
SELECT Soil Management Option[In prioritized order]1) Leave native soil undisturbed2) Amend existing soil in place 3) Import topsoil with five or ten
percent organic matter for turf and planting beds, respectively
4) Stockpile site soil, reapply, and amend in place
IMPLEMENT the Soil Management PlanDepending on the Soil Management Option chosen, mix compost, import soil mixture, or reapply stockpiled soil to your disturbed site. Till compacted subsoils prior to amendments. Only amend between May 1 and Oct. 1. Save receipts of compost/soil purchase or delivery.Save test results for pH and soil mix percentages.
PREPARE Soil Management PlanReview site conditions, landscape, and grading planSelect soil treatment option and suitable pH for planting areasCalculate compost and/or topsoil volumes for each areaIdentify compost and/or topsoils to be applied and retain recordsTurn in completed Soil Management Plan to DPER
r
□□□□□
□
□□□
's/--------------------------------------------\r

3
Feb. 2015, Version 1
Amended Soils continued
1502_4454w_DPER_1gs_AMENDEDsoils.indd
Design Guidelines for Amended Soils: • Define clearing limits and restrict any
compaction or disturbance beyond these.• Keep vehicles and machinery off of the
planned landscape areas.• Limit impacts to specific areas to
reduce the total area compacted. Compacting soil limits water and nutrient availability for plants and soil biology, and may hinder root development. It is extremely difficult, in the short term, to return compacted soils to their original hydrological and biological function.
• Within clearing limits, save topsoil/duff.• Retain the duff layer and native topsoil
in an undisturbed state.• Stockpile any duff layer or topsoil
removed during grading on-site in a designated. controlled area not adjacent to public resources and critical areas.
• After construction, replace duff after amending if needed.
• Ensure areas that have been cleared and graded have the soil moisture holding capacity restored to that of the original undisturbed soil native to the site.
• Amend soils only between May 1 and October 1.
• Replace topsoil to a minimum of eight inches thick to ensure conditions equivalent to the soil moisture-holding capacity native to the site.
• Confirm replaced topsoil has organic matter content between five and ten percent dry weight and a pH suitable for the proposed landscape plants.
Buying compost or pre-amended topsoil: Buy compost at your local nurseries, hardware stores, or home improvement stores. Use EnviroStars to find Landscape Supply Stores and Nurseries.
Ask suppliers for product test results to verify organic matter content and pH – you will need these results and receipts during your inspection.
Go Further: Implement an ‘Integrated Pest Management’ (IPM) system for landscaped areas; healthy, biologically active soils help to increase the success of using IPM – see Resources for more information.
The difference between heavily compacted and healthy amended soil from the same site is very apparent. Source: Dirt Doctor.
f * l* i
1. t
Jf

4
Feb. 2015, Version 1
Amended Soils continued
1502_4454w_DPER_1gs_AMENDEDsoils.indd
Applicable References/Standards King County – Achieving the Post-construction Soil Standard
2009 King County Surface Water Design Manual: (see especially: 4A – Grading Code Soil Amendment Standard, and 4C – Landscape Management Plan Guidelines).
DPER Bulletin #28, Clearing and Grading Permits
DPER Residential Clearing & Grading Questionnaire
Resources / Incentives For the complete King County Green Building Handbook and individual Green Sheet PDF files, please visit our website at: http://kingcounty.gov/property/permits/publications/greenbuild.aspx. For additional information, please email [email protected] or call 206-296-6600.
See these related DPER Green Sheets (GS):
• Permeable Surfaces and Driveways, GS Number 3
• Routine Maintenance, GS Number 5
King County – Composting Guidance
City of Bellingham – Advanced Methods and Materials: Amended Soils
Seattle Public Utilities Integrated Pest Management (IPM): IPM Fact Sheets
Washington State University (WSU) ‘Hortsense’ – IPM Fact Sheets
Permit TipsA grading permit is required if you are disturbing more than 100 cubic yards of soil (equivalent to a 900 square foot area, excavated three feet deep). The following tips will help ensure success with your permit and inspection process.
• Your site plan must show which soil amendment choice will be used.
• Plan ahead to save time and hassle; talk to a DPER Residential Engineer if you need clarification prior to submitting your application.
• DPER will conduct an onsite inspection to verify the depth of material and to check your documentation of material purchase.

Department of Permitting and Environmental Review (DPER)
DP
ER
GR
EE
N S
HE
ET
Feb. 2015, Version 1
Rainwater Harvesting for Outdoor Use OverviewRainwater harvesting is defined as collection, conveyance, storage and use of roof runoff for domestic, irrigation, and outdoor uses. A home installation of a collection system includes components such as a catchment area (typically a roof), gutters and downspouts, an above or below-ground cistern, a pump or gravity feed, possibly filtration, and in some cases treatment. On a 1,000 square foot roof, one inch of precipitation will yield almost 650 gallons of water. That’s 25,000 gallons per year in a typical King County location, which is more than 50 percent of the annual consumption of a family of four!
Outdoor use of captured rainwater can reduce the use of potable water for outdoor activities. Below are some ideas on when and why to use this free and abundant resource, as well as helpful guidance for best practices associated with rainwater harvesting for outdoor use.
DefinitionsPotable Water – Water safe enough to be consumed by humans.
Rain barrels and cisterns provide an easy option for collecting rainwater to use within your landscaping. Source: King County.
When is This Applicable? Outdoor Use: Rainwater harvesting can be integrated on almost any residential (or commercial) project – existing or new construction – that has an appropriate roof area for collecting water and a space for a storage tank or cistern. Collected rainwater can be used for landscape or garden irrigation, and potentially for outdoor washing needs such as for cars, home exterior, or garage exterior. Rainwater harvesting is one of the approved BMPs for meeting King County’s surface water management requirements. A water rights permit may be needed for commercial collection of rainwater but not for residential collection. See Permit Tips below for more details.
Indoor Use (NOT covered in this document): Rainwater may be used indoors after obtaining a permit from Seattle-King County Department of Public Health. For indoor uses other than toilets or clothes washers, the water must also meet drinking water standards. For sites where groundwater is very deep and well development costs are preclusive, rainwater
NU
MB
ER
2
73ii
J-i t
?~iSl
,r•jqr *“
*
\p\

2
Feb. 2015, Version 1
Rainwater Harvesting for Outdoor Use continued
1502_4454w_DPER_2gs_RAINWATERharv.indd
harvesting may be a cost-effective off-grid alternative water supply.
What Makes it Green? Rainwater harvesting for outdoor use provides numerous benefits, including the following:
• Protects salmon and water quality by reducing or eliminating the rapid runoff of storm water from your roofprint;
• Protects against flooding by reducing your site’s stormwater runoff;
• Protects valuable water resources by supplying an on-site source of non-potable water for irrigation or other outdoor uses; and
• Saves money by reducing pumping from your well and reducing water/sewer fees.
During emergencies, such as contaminated water or extended power outages, rainwater catchment may also be a back-up source of water (which must be sterilized before consumption). Additionally, capturing and using rainwater may earn you points toward Built Green or LEED certification.
Best PracticesIn order to optimize the benefits of rainwater harvesting, consider the following best practices.
Catchment Design
• Determine how you will use the water before designing your system – this will affect the size of your catchment and cistern, how you will move the water to your cistern and from it to the point of use, and
determine what treatment you will need.
• Select a catchment area that is high up and, if possible, store your water above the point of use – make gravity work for you.
• Select a catchment that is unsheltered from prevailing wet season winds and, if possible away from trees to limit leaf contamination.
• Make your cistern dark - to inhibit algal growth - and bug-tight to prevent mosquitoes.
Catchment systems are available in numerous shapes and sizes, including a cube-shaped tank as pictured here. Source: Batt + Lear.
Roof Materials
• Water quality is an important consideration. Coated metal roofs make the best catchments. Concrete and terracotta tile work reasonably well. Asphalt is not favorable because of the particulates that can wash off.
• Based on a recent Department of Ecology collaborative study with King County and Roof Manufacturers, it’s best to avoid roof types with the following materials to prevent the release of additional pollutants
1.

3
Feb. 2015, Version 1
Rainwater Harvesting for Outdoor Use continued
1502_4454w_DPER_2gs_RAINWATERharv.indd
in runoff:• Treated wood panels - copper
and arsenic
• PVC panels - arsenic
• Copper panels – high copper concentrations
• Zincalume® and EPDM roof - zinc
Also see “Roofing Materials” Green Sheet Number 4.
Filtration
• Filter the water sufficiently on the way into the cistern to prevent sediment build-up inside the cistern.
• If for indoor use, “polish” the water on the way to the point of use, with fine filters (sand, activated carbon) and sterilize with UV light, if necessary.
Maintenance
• Inspect the collection area for debris and other material that could impede the entrance and/or exit of surface flows.
• Inspect periodically the effectiveness of the filtering system and replace or replenish filters as recommended by the manufacturer.
• Utilize the captured water for irrigation during the dry season. Be sure the storage tank is empty by the beginning of the wet season (usually around early October) in order to provide the needed capacity for an entire wet season.
• Keep a maintenance log on site with the dates of maintenance performed. King County inspection staff may request to view the maintenance log at any time.
Applicable References/Standards 2009 King County Surface Water Design Manual - In particular, Appendix C: C.2.7 RAINWATER HARVESTING.
King County Public Health Document Code No. Product/Method #10-004 Effective January 25, 2011- This document provides an explanation of code requirements for outdoor use of rainwater.
Resources For the complete King County Green Building Handbook and individual Green Sheet PDF files, please visit our website at: http://kingcounty.gov/property/permits/publications/greenbuild.aspx. For additional information, please email [email protected] or call 206-296-6600.
See these related DPER Green Sheets (GS):
• Roofing Materials, GS Number 4
• Amended Soils, GS Number 1
• Permeable Surfaces and Driveways, GS Number 3
• Routine Maintenance, GS Number 5
WA Department of Ecology, Investigation of Toxic Chemicals in Roof Runoff – This report summarizes findings from a roof study related to toxics in roof runoff.
Eastside Harvest House Case Study – This King County GreenTools Case Study showcases a recent Built Green 5 star home that incorporated rainwater harvesting.

4
Feb. 2015, Version 1
Rainwater Harvesting for Outdoor Use continued
1502_4454w_DPER_2gs_RAINWATERharv.indd
King County Rain Barrel Information and Sources – This website provides do it yourself instructions, resources for buying barrels, and numerous links to related resources and information.
EPA Green Infrastructure – This website covers rainwater harvesting and rain gardens and provides examples, benefits, fact sheets, and links to more resources related to these topics.
Permit Tips Will you need a permit? For small-scale collection systems such as rain barrels, you do not need a permit. However, if you are installing a large cistern and/or using rainwater catchment as a Best Management Practice (BMP) for surface water management, you will need a permit.
To qualify as a BMP for surface water management, the system must be designed to collect and use at least 95 percent of the average annual runoff from the impervious roof area you are targeting. The size of your cistern will depend on the size of your catchment area and the rate of water use over an annual cycle:
• If you plan to use the cistern for summer irrigation, it will have to be large enough to accommodate 95 percent of the annual runoff from your roof area, because you’ll use very little water off for irrigation during the wet season;
• If you plan to use the cistern for domestic use – such as laundry or toilet flushing – your cistern can be smaller because you will continually draw water out for indoor use, freeing up storage capacity for more rain (indoor use is not addressed in this document).
To demonstrate compliance with the requirement, the system designer must perform a water balance calculation and indicate on the plans and permit submittal that the cistern is large enough to prevent overflowing during the wettest time of the year, when the storm water management is most important.
DPER will inspect the system for consistency with plans and calculations. The inspector will also verify system specific maintenance and operations instructions from the manufacturer, or installer, are included with the system.
A common challenge to implementing rainwater harvesting is property size. In some cases, the property is not large enough to deal with overflow, or the code requirement for a five foot setback prohibits system installation.

Department of Permitting and Environmental Review (DPER)
DP
ER
GR
EE
N S
HE
ET
Feb. 2015, Version 1
Permeable Surfaces and DrivewaysOverview In nature, most of the rain that falls is absorbed into the ground where it is taken up by plants, recharges ground water or flows slowly downhill to valley bottoms where it surfaces in creeks and rivers. When rain falls on roofs, roads and parking lots – even lawns and golf courses – it stays on the surface and runs off more quickly into creeks and rivers, often carrying sediment and other pollutants. This rapid runoff results in less groundwater recharge, erosion from higher streamflows in winter, and low stream flow from low water tables in the summer. By using permeable surfaces, which allows percipitation to trickle through, for driveways, patios, parking areas and roads, the effects of development on water quality, erosion and groundwater levels can be reduced.
Permeable surfaces are typically used for low-traffic, low-load areas, such as pathways and patios whereas permeable pavements are structural surfaces capable of supporting traffic loads. Permeable pavements may be made up of impermeable pavers, with spaces between them that allow water to soak into the ground below, or of porous material, which has an open network of spaces built into it, allowing the water to soak through the pavement itself.
Instead of running off, water flows right through porous concrete. Source: JJ Harrison.
When is This Applicable? Depending on the scope of your project and size of your site, you may be required to include measures to improve the permeability of your site. Permeable surfaces are examples of what are called Flow Control Best Management Practices or BMPs, which are listed in Appendix C of the King County Surface Water Design Manual. Permeable Paving is one of the potential BMPs (described in Section C.2.6. of Appendix C).
Whether you are using permeable surfaces to meet your surface water requirements or not, they can always be used instead of traditional impermeable surfaces for most common applications.
NU
MB
ER
3
OTV
■
mm -V. '*3$
i vr. *i.
si •>£#*MSH
f tj<x ,f

2
Feb. 2015, Version 1
Permeable Surfaces and Driveways continued
1502_4454w_DPER_3gs_PERMsurfaces.indd
What Makes it Green? Permeable surfaces help to reduce or even eliminate the negative impacts of rapid stormwater runoff, such as flooding, uneven stream bed erosion and sedimentation, pesticide, gasoline and heavy metal pollution, elevated stream temperatures, reduced groundwater recharge, and low summertime stream flows. All of these effects contribute to loss of aquatic habitat in stream and rivers and ultimately affects the quality of Puget Sound habitat that supports healthy fish, bird and mammal populations that are icons of King County’s commercial fisheries and tourism industries.
Besides contributing to Flow Control BMPs, benefits of permeable paving include:
• Decreased runoff into nearby areas• Faster drying of the surface, including faster
snowmelt• Greater resilience to freeze/thaw impacts
such as cracking – if sub-surface storage is properly sized, designed and installed
• Counts towards green rating system certification, including Built Green and LEED for Homes
Permeable grass pavers are an attractive permeable alternative for parking areas and patios. Source: Immanuel Giel.
Best Practices Driveways and parking areas are especially good places to install permeable pavement, as they receive less wear and tear than roads.
Initial Steps as a Homeowner if you want to install a permeable surface or pavement:
1. Decide which type of permeable surface best matches your budget, needs, and property:

3
Feb. 2015, Version 1
Permeable Surfaces and Driveways continued
1502_4454w_DPER_3gs_PERMsurfaces.indd
APPLICATION EXAMPLES
Application Most Suitable Relative cost
Considerations
Driveways Porous Asphalt $$ Not suitable for heavy vehicles or point loads (such as emergency vehicle jacks)
Patios and play areas
Permeable Pavers
Modular Grid Pavement
Grassed Modular Grid Pavement
Porous rubber mats
$$$
$$
$$
$$$
Selection should be based on planned use, desired surface stability
Parking areas High-traffic – Porous asphalt
Low-traffic – Modular Grid Pavement
$$$
$$
Tight soils: Porous asphalt or concrete with deep storage layer beneath
Free-draining soils: Conventional asphalt or concrete that drains to raingardens/infiltration facilities
Sidewalks Permeable asphalt
Permeable pavers, Modular Grid Pavement,
$$
$$$
$$
Gravel not recommended for high-traffic areas and where accessibility is required.
Roads Porous concrete $$$$ Typically requires thicker sections for design load. Generally not for high-speed pavement
2. Hire a contractor with experience working with designers and installers of the system you want to use.
When hiring a contractor, ensure she/he is familiar with the best practices for installing permeable pavement including:
• Provide sufficient sub-surface materials—typically crushed rock or gravel—to temporarily hold the water that flows through the paving material, until it is absorbed into the underlying soil. It should
be designed to perform even during very heavy precipitation.
• Establish “No Heavy Equipment” zones to protect the subsoils under future permeable paving from compaction. Do not allow construction debris or concrete “wash-out” in these areas.
• Protect the permeable paving from sedimentation to the extent feasible. Avoid grading plans that direct runoff from landscape areas onto permeable paving areas. The sediment load of this run-off may choke the permeability of the permeable paving area.

4
Feb. 2015, Version 1
Permeable Surfaces and Driveways continued
1502_4454w_DPER_3gs_PERMsurfaces.indd
This mock up shows a typical cross section of engineered subsurface that contributes to permeable surfaces. Source: O’Brien & Company.
Maintenance RequirementsA typical permeable pavement system has a life expectancy of approximately 25-years; this duration can be protected with ongoing maintenance.
• Inspect permeable pavements after one major storm each year to make sure it is working properly. Prolonged ponding or standing water on the pavement surface is a sign that the system is defective and may need to be replaced.
• Keep the surface of the permeable pavement clean and free of leaves, debris,
and sediment through regular sweeping or vacuum sweeping.
• For vegetated surfaces, regularly mow and maintain the grassed surface of the pavement in a good condition. Replant all bare spots in the spring or fall.
Guidance on best practices in permeable pavement design and installation is available in the King County Surface Water Design Manual, Appendix C.
Applicable References/Standards 2009 King County Surface Water Design Manual (SWDM): Appendix C and Section C.2.6 Permeable Pavement
2012 LID Technical Guidance Manual for Puget Sound: Note: While this is an excellent resource with helpful guidance, some of the strategies in this manual will not specifically meet the requirements for Unincorporated King County. Refer to SWDM Appendix C.
DPER Bulletins:29 Drainage Review
34B Surface Water Design Manual Variances or Adjustments
Resources For the complete King County Green Building Handbook and individual Green Sheet PDF files, please visit our website at: http://kingcounty.gov/property/permits/publications/greenbuild.aspx. For additional information, please email [email protected] or call 206-296-6600.
jr:
3*
< v*
•:V . >
*ii
-> ‘-7:WR . *v “*5v

5
Feb. 2015, Version 1
Permeable Surfaces and Driveways continued
1502_4454w_DPER_3gs_PERMsurfaces.indd
See these related DPER Green Sheets (GS):
• Amended Soils, GS Number 1• Roofing Materials, GS Number 4• Routine Maintenance, GS Number 5
The National Ready Mix Concrete Association (NRMCA) hosts a website specific to Porous Concrete.
NRMCA’s database provides contact information for Certified Permeable Pavement Contractors – choose Pervious Concrete Craftsman, Installer, or Technician from the drop-down menu.
Watch Martha Rose’s crew install Pervious Pavement.
Permit Tips If your project involves clearing, filling, or grading more than 2,000 square feet of area, then a grading permit is required, in addition to following the applicable reference standards and requirements above.
When permitting permeable paving projects the following will help smooth the process:
• Know your soil conditions prior to submittal. You may need to have them tested to determine if they are conducive to permeable pavements.
• Know that inspections will include a preapproval field check to verify soil conditions and a final inspection for compliance with the Surface Water Design Manual.
• Permeable pavement may have unique or specialized standards or permit requirements, so ask your contractor or DPER.
• There are specific requirements for sub-surface materials (e.g. drainage rock) and a site subgrade review or inspection may be required by a qualified professional.
• Permeable concrete should be installed by an NRMCA-certified contractor.
• Permeable concrete and asphalt mixes must meet local codes and development standards (e.g. King County Road Design and Construction Standards).

Department of Permitting and Environmental Review (DPER)
DP
ER
GR
EE
N S
HE
ET
Feb. 2015, Version 1
Roofing Materials Overview The roof is the first line of defense against the elements, protecting the people and things you value on the inside of your home or structure. Beyond this critical role, roofs can improve your home’s performance and comfort. For instance, the slope of the roof, color and material type can help reflect rather than absorb solar heat and reduce stormwater runoff.
Additionally, roof materials play a major part in affecting local water quality. Some roofing materials contain harmful ingredients such as arsenic, cadmium, copper, lead, and zinc and the stormwater runoff from roofs often filters directly into the local water table. You can help protect your local ecosystems while potentially reducing cooling needs and utility bills through informed and strategic roofing material choices. Below you will find different options, best practices, and important things to consider when upgrading, repairing or building your new roof.
DefinitionsSolar Heat Gain – The increase in temperature in a space, object or structure that results from solar radiation.
Stormwater Runoff – Precipitation that flows over impervious surfaces, accumulating debris, chemicals, sediment and other pollutants as it goes, and does not percolate immediately into the ground.
Vegetated Roof – A roof that is partially or completely covered with vegetation and a growing medium, planted over a waterproof membrane.
Solar Reflectance Index (SRI) – The measure of a material’s ability to reject solar heat, as shown by a small temperature rise. It is defined so that a standard black is measured at 0 and a standard white is 100.
When is This Applicable? Whether you are repairing or replacing your roof or planning to build a new structure, there are opportunities to consider roofing material choices and how your roof water runoff will be handled. When doing roof work, you might also consider pre-wiring for solar, even if you have no immediate plans to install a solar array; integrating the pre-wiring into the roof is a better approach than drilling holes in a good roof later.
Roofing is covered in the following code areas: stormwater/infiltration, structure, and innovations (solar installation).
Composite Roofing with solar photovoltaic panels. Source: O’Brien & Company.
NU
MB
ER
4

2
Feb. 2015, Version 1
Roofing Materials continued
1502_4454w_DPER_4gs_ROOFING.indd
What Makes it Green? Consumers have many choices when it comes to roofing materials. While initial cost is often a driving force, there are numerous other considerations that factor into the total lifetime costs and benefits of your roof including many that deliver green benefits.
Roofing MaterialsDurable roofing materials offer long lasting and require less frequent replacement, saving natural resources and money while adding value to your property.
Roof RunoffYou can make roofing choices that minimize pollution transported to our water bodies through roof runoff. For example:
• Choose roofs that are not pollution-generating in order to avoid the need for additional treatment of roof runoff for water quality mitigation. Metal roofs are considered pollution-generating impervious surface unless they are treated to prevent leaching of zinc and other water pollutants.
• Consider using a vegetated roof to help you meet the requirements for full infiltration of roof runoff for your project (See Appendix C of the Surface Water Design Manual). Vegetated roofs reduce stormwater runoff by facilitating some infiltration, slowing peak flows, and increasing evapotranspiration when conditions allow. This in turn decreases the demand on our stormwater systems. Vegetated roofs can also help promote clean air and increase wildlife habitat.
InstallationAir sealing and proper insulation will improve home comfort and thermal performance of the roofing assembly, reducing energy consumption and saving money on your energy bills.
Rooftop Solar OptionsAdding solar photovoltaic panels or solar thermal collectors to your roof increase your energy independence and reduce your carbon footprint. The cost of solar energy systems is falling rapidly – some forecast photovoltaic systems will be cheaper than grid electricity in King County in the near future.
• Even if this is not an option for you now, prewiring for solar is a great way to make the possibility easier in the future.
• You can save money and later hassle by properly detailing the structural and conduit while someone is working on your roof, making the addition of solar panels a plug-and-play opportunity for you or a future owner.
Metal Roofing. Source: Studio Hamlet Architects.
J&>k
m£■>:

3
Feb. 2015, Version 1
Roofing Materials continued
1502_4454w_DPER_4gs_ROOFING.indd
Best Practices Solid-Surface Roofing • Pay careful attention to the design of your
roof – think like water when looking at the design. Is there a free path for the water from the point of impact to the bottom of the downspout? Even the best flashing and materials will fail if water flows are concentrated and constrained by roof lines.
• Use durable materials to reduce the frequency of replacement. Some varieties of shingles have 40-year to lifetime warranties, while some aluminum or steel shingles have 50-year warranties and include a coating that is HUD-approved for rainwater collection suitability.
• Consider one of numerous composite roofing material options that can provide lower maintenance along with durability. Because some composite materials may contain zinc, it is important to identify the ingredients of your options before making a decision.
• Give preference to shingles with recycled content, preferably at least 25 percent post-consumer content.
• Asphalt shingles typically contain recycled “mixed” waste paper or reclaimed mineral slag, some resulting in 20 to 25 percent recycled content.
• Roof panels made from recycled plastic resins provide a lightweight roofing alternative.
• Recycled aluminum shingles may contain up to 100 percent recycled content.
• Based on a recent Department of Ecology collaborative study with King County and Roof Manufacturers, it’s best to avoid the following materials to prevent the release of additional pollutants in runoff:
• Treated wood panels - copper and arsenic
• PVC panels - arsenic• Copper panels – high copper
concentrations • Zincalume® and EPDM roof - zinc
If you consider a vegetated roof (and want it to count as an impervious surface): • The roof must be designed to carry the
added load of a vegetated roof system; therefore design by a structural engineer may be needed.
• A 60- to 80-millimeter reinforced PVC membrane must be placed on the roof surface to provide waterproofing and protect against root penetration, or if the roof is asphalt-based, the membrane must be high-density polyethylene (HDPE).
• If the roof surface is flat or has a pitch flatter than 1 in 12, an underdrain system or layer must be provided to drain excess water away from the root zone of the soil layer.
• The growing medium must have the capacity to store a minimum depth of 3 inches of water for full Best Management
Salvaged Tile Roof. Source: O’Brien & Company.

4
Feb. 2015, Version 1
Roofing Materials continued
1502_4454w_DPER_4gs_ROOFING.indd
Practices (BMP) credit, partial credit will be given for reduced storage.
• The soil layer must be adequately contained on the roof with sidewalls or other appropriate means.
• The composition of the soil layer must be confirmed by a civil engineer as meeting the desired soil storage and the maximum allowable loading specified by the structural engineer.
• Plant grass or other vegetative cover suitable for shallow soils and harsh roof conditions (e.g., various species of sedum, sempervivum, creeping thyme, allium, phloxes, anntenaria, armeria, and aubrieta).
• Vegetated roofs must not be subject to any use that would significantly compact the soil.
• Provision must be made for supplemental irrigation during the first dry season to ensure plant survival, along with replacing dead plants, removing weeds and leaves, and clearing drain inlets.
MaintenanceAfter installation, continued roof maintenance is the most important factor in prolonging the life and performance of your roof.
• Visually inspect your roof for damage or debris (algae, fungus, moss, leaves, etc.) on a regular basis to identify trouble as soon as possible and avoid cumulative effects of disrepair. Do this by walking around your home and, if accessible, by climbing a ladder. Also schedule routine professional inspections every few years.
• Check the flashing around all exterior penetrations, such as vents and chimneys, for signs of deterioration.
• Make sure your gutters are clear, continuous and well attached to your home.
• Remove overhanging tree limbs to avoid pest infestation and potential damage from falling branches.
• If you have one, inspect your attic ceiling to identify any issues that may not be visible from the exterior. Look out for streaks or staining from water leakage as well as holes and insulation damage from pests.
Roof Removal / Disposal You may be able to recycle your old roof. Check King County’s interactive website What do I do with... , which allows you to select the materials you are looking to recycle/dispose of and see locations and contact information for many sites, as well as King County’s 2012 Construction Recycling Directory.
Vegetated (green) roof. Source: O’Brien & Company.
u
a
/
&

5
Feb. 2015, Version 1
Roofing Materials continued
1502_4454w_DPER_4gs_ROOFING.indd
Applicable References/Standards 2009 King County Surface Water Design Manual: In particular, Appendix C:
• Section C.1.3.1 Small Lot BMP Requirements • Section C.2.8 Vegetated Roof C-71
Bulletin 9 – Obtaining a Residential Building Permit: Submittal Requirements.
Resources For the complete King County Green Building Handbook and individual Green Sheet PDF files, please visit our website at: http://kingcounty.gov/property/permits/publications/greenbuild.aspx. For additional information, please email [email protected] or call 206-296-6600.
See these related DPER Green Sheets (GS):
• Green Products, GS Number 7• Solar Energy, GS Number 20• Permeable Surfaces and Driveways,
GS Number 3• Routine Maintenance, GS Number 5
ASTM International www.astm.org/Standards/roofing-standards.html
National Roofing Contractors Association (NRCA) www.nrca.net/
WA Department of Ecology, Investigation of Toxic Chemicals in Roof Runoff https://www.casqa.org/asca/investigation-toxic-chemicals-roof-runoff
Permit Tips If you are increasing your existing roof load by more than five percent, you will need a permit. DPER will inspect the roof typically during the framing inspection.
Be sure to clearly show the roofing on your plan sections and include elevation views within the building plans.

Department of Permitting and Environmental Review (DPER)
DP
ER
GR
EE
N S
HE
ET
Feb. 2015, Version 1
Routine Home Maintenance OverviewAs with any investment, regular maintenance and upkeep are essential to protect the value and safety of your home. Without your regular attention and maintenance, your home may experience similar issues: pest problems due to vegetation overgrowth; poor indoor air quality from dirty air filters; and even health risks due to dirty fireplaces and dryer vents that can cause house fires.
Through preventive, proactive, and incremental maintenance, you can reduce the need for big, costly replacements and new materials while prolonging the life of existing materials and systems. This card helps identify important home maintenance measures, when to perform them, and how frequently.
When is This Applicable? Maintenance strategies have different schedules, depending on the structure or system in question, but nearly all building structures and systems need some level of maintenance.
In some cases, as noted in the table below, code requires maintenance. Many of these code-related strategies also require maintenance documentation to provide a record for future property owners and ensure consistent maintenance and operation procedures are followed. For example, the Surface Water Design Manual’s Flow Control Best Management Practices (BMPs) requires maintenance and operation instructions be recorded as an attachment
to the required declaration of covenant and grant of easement (Requirement 3 of Section C.1.3.3 [p. C-18]). These instructions are intended to be a minimum; DPER may require additional instructions based on site-specific conditions.
What Makes it Green? Keeping structures strong and systems running efficiently through maintenance activities reduces the demand on natural resources. For example, maintenance can lower our impact on resources (a properly running heating system will consume less energy) and conserve virgin resources used for building (a well-maintained deck will not need to be replaced as often, reducing the consumption of lumber or other decking materials).
Furthermore, regular, preventative maintenance keeps more ‘green’ in your pocketbook. By performing these routines at the right time, homeowners can save money (and time!) by:
• increasing the life of equipment and materials;
• preventing potentially avoidable maintenance issues;
• protecting the health of occupants and costs associated with health issues; and
• protecting the overall investment in the structure or system.
Finally, for projects using the LEED or Built Green rating systems, both require Homeowners Manuals to encourage proper operations and maintenance of the green features within a home.
NU
MB
ER
5

2
Feb. 2015, Version 1
Routine Home Maintenance continued
1502_4454w_DPER_5gs_ROUTINEmaint.indd
Best Practices This chart outlines different maintenance strategies and actions with a recommended schedule. The default should always be to follow the manufacturer’s recommended maintenance schedules.
INSIDE THE HOMEIndoor Air Quality / Health and SafetyCheck/replace batteries in CO monitors and fire alarms Twice a yearClean fire places and chimneys Every FallClean or replace welcome/shoe mats Every SpringMaintain all carpets Vacuum weekly, clean annuallyClean main dryer vent AnnuallyInspect seal between garage and home Twice a yearProperly dispose of unnecessary chemicals kept in the home or garage Twice a yearHeating, Cooling and Ventilation SystemsCheck furnace filter Check monthly, replace as
necessaryAdjust thermostat for seasonal changes At the beginning of each seasonRegular air conditioner and heating system servicing Every few years, or as suggested
by the manufacturerMake sure no leaves or debris are around outside air conditioning condenser
Each Spring and Fall
Clean in and around grills and registers; vacuum inside of ducts Every FallCheck the basement for moisture and air out if damp Every season changeCheck that roof/soffit vents are open and debris-free if vented Every FallVacuum ductless heat pump filters MonthlyClean whole house or bathroom exhaust fans covers/filters Twice a yearLightingReplace incandescent with CFL or LED if possible. Look for Energy Star certified product replacements.
As needed
Make sure time-controlled or light-sensor lighting is operating on schedule Every Spring and FallPlumbingImmediately address any toilet or faucet leaks As needed, check annuallyAvoid frozen pipes by turning off outdoor faucets Every WinterKeep water heater temperature at 120F Check every Winter and SummerCheck hot water heater for mineral buildup, drain, and refill Every two yearsAppliancesUse power strips to reduce phantom loads from chargers, TV, etc. Always if possibleClean lint screen in the dryer After each useIf replacing appliances, use only ENERGY STAR-labeled appliances As neededVacuum behind and under all appliances AnnuallyInterior finishesInspect and /repair caulking/grout in and around showers/baths AnnuallyTouch up scuffs and scratches with low- or no-VOC paint As needed

3
Feb. 2015, Version 1
Routine Home Maintenance continued
1502_4454w_DPER_5gs_ROUTINEmaint.indd
OUTSIDE THE HOMEBuilding Structure ExteriorSiding: wash if needed, monitor condition of paint, spot re-paint as needed
Every Summer
Windows: wash, re-caulk if needed Every SummerDoors: wash, check weather stripping, re-paint as needed Every SummerRoof: physically (not chemically) remove moss off sloped areas, clear debris from gutters/downspouts
Every Spring and Fall
Decks and stairs: wash Every SpringFoundation: monitor for cracking, check vent covers, check for pests Every SpringInspect roofing and flashing for signs of wear or damage and repair or replace damaged areas immediately
Every Spring and Fall
Septic Systems Professional septic tank inspection Every 3 yearsPump septic tank As often as indicated by sludge
and scum levels determined by the septic professional during the inspection. According to the EPA, “If the bottom of the scum layer is within six inches of the bottom of the outlet, or if the top of the sludge layer is within 12 inches of the outlet, your tank will need to be pumped.”
Raingardens Vegetation should be maintained as follows: 1) replace all dead vegetation as soon aspossible; 2) remove fallen leaves and debris as needed; 3) remove all noxious vegetation whendiscovered; 4) manually weed without herbicides or pesticides;5) during drought conditions, use mulch to prevent excess solar damage and water loss.
After major storm events: check for proper working order of the overflow system
As needed: stabilize any bare areas with soil, plant materials, mulch, or landscape rock
Annually: Inspect for physical defects
Infiltration / Permeable Surfaces To help extend the useful life of the system, the surface of the permeable pavement should be kept clean and free of leaves, debris, and sediment through regular sweeping or vacuum sweeping. Owners are responsible for the repair of all ruts, deformation, and/or broken paving units.
After major storm events: check for proper drainage; prolonged ponding or standing water is a sign the system is defective and may need replaced
Annually: Inspect for physical defects

4
Feb. 2015, Version 1
Routine Home Maintenance continued
1502_4454w_DPER_5gs_ROUTINEmaint.indd
OUTSIDE THE HOMERainwater Harvesting Inspect the collection area (e.g., roof) for debris and other material that could impede the entrance and/or exit of surface flows
Inspect the filtering system periodically for effectiveness and replace or replenish as recommended by the manufacturer.
Keep a maintenance log on site with all inspection and maintenance information and dates.
Weekly: inspect the collection area
Periodically / As indicated by manufacturer: inspect the filtering system
Annually between May 1st and September 30th: completely drain the storage device during the dry season in order to provide the needed capacity for an entire wet season.
Vegetated Roof A supplemental watering program may be needed the first year to ensure the long-term survival of the roof vegetation.
Vegetation should be maintained as follows:
1) replace all dead vegetation as soon as
possible;
2) remove fallen leaves and debris as needed;
3) remove all noxious vegetation when
discovered;
4) manually weed without herbicides or pesticides.
After major storm events: check for proper working order of the overflow system
As needed: stabilize erosion channels or bare spots with additional soil similar to the original material
Annually: Inspect for physical defects
Irrigation Systems Make sure sprinklers do not spray areas that do not require irrigation (ex. Sidewalks, home exterior, etc.) and confirm no leaks. Time a walk-through when the system is on to perform visual check.
Inspect at the beginning of irrigation season, monitor visually and through utility bill tracking (where applicable) throughout the watering season
LandscapingConfirm landscaping is at least 2 feet from the home Monitor throughout Spring and
SummerReplace landscaping mulch Every few yearsAerate lawn/overseed/top dress with compost Every SpringInspect property for proper drainage grades Every Spring and FallTurn off and drain irrigation systems WinterStore fire wood off the ground and away from the home AlwaysAvoid chemical or toxic de-icers WinterDo not use toxic chemicals for pest control or fertilizer Always
continued

5
Feb. 2015, Version 1
Routine Home Maintenance continued
1502_4454w_DPER_5gs_ROUTINEmaint.indd
Applicable References/Standards 2009 King County Surface Water Design Manual: In particular Appendix C.
Resources For the complete King County Green Building Handbook and individual Green Sheet PDF files, please visit our website at: http://kingcounty.gov/property/permits/publications/greenbuild.aspx. For additional information, please email [email protected] or call 206-296-6600.
See these related DPER Green Sheets (GS):
• EcoCool Remodel Tool GS Number 6• Air Sealing Your Home, GS Number 10• Alternative Heating Systems, GS Number 19• Amended Soils, GS Number 1• Duct Sealing, Green GS Number 11 • Fresh Air Ventilation, GS Number 14• Furnace Replacement, GS Number 18• High Efficiency Appliances, GS Number 12 • Permeable Surfaces and Driveways,
GS Number 3• Rainwater Reuse for Outdoor Uses,
GS Number 2 • Right Sizing Heating/Cooling Systems,
GS Number 17• Roofing Materials, GS Number 4• Thermostats, GS Number 16
ENERGY STAR’s Heating and Cooling Maintenance Checklist
EPA’s Septic Smart Home Maintenance Guide
Green Building in Rural Areas – This King County publication discusses green building for rural areas and includes a sprinkling of upkeep and maintenance tips throughout.
King County Green Cleaning Recipes and Methods and Green Cleaning Guide
National Association of Home Builder’s (NAHB)’s Routine Home Maintenance Guide

Department of Permitting and Environmental Review (DPER)
DP
ER
GR
EE
N S
HE
ET
Feb. 2015, Version 1
EcoCool Remodel ToolOverviewWhat is the EcoCool Remodel Tool? This free, interactive online tool is a fun, engaging way to get helpful green remodeling tips and resources, by exploring a virtual home room by room, as well as outside of the home, and by common remodel topics. In each room, you can click on an informational icon to pull up relevant sustainable remodeling strategies and tips, and go further in your research and exploration by clicking through to the “More Information” pages which include detailed information and helpful resources.
Below is a list of home areas and topics covered by this tool.
Explore by Rooms or Areas:• Home Exterior • Kitchen• Bathroom• Utility Room • Living Room • Bedroom • Addition • Garage• Yard• Roof• Crawlspace
Explore by Remodel Topics: • Plumbing• Heating, Cooling, & Ventilation • Paints & Coatings• Lighting • Flooring• And last but not least, there are also
two downloadable and print-friendly resources– a Contractor Checklist and a Materials Checklist.
When is This Applicable? Anytime! Whether you are remodeling a single room, a whole house, or just interested in greening your daily living, you will find valuable information and resources in this tool.
The Contractor Checklist is a great resource to review in advance and then use it to help guide interviews with prospective contractors before you hire. Likewise, the Materials Checklist is a helpful resource to help navigate the many product and materials choices before you buy.
What Makes it Green? Awareness and knowledge are keys to reducing your environmental impact and the EcoCool Remodel Tool provides indispensible insights, resources, and advice for sustainable living and building.
These tips help you:
• Protect your family’s health through best practices;
• Conserve resources and save money through energy efficiency;
NU
MB
ER
6
m

2
Feb. 2015, Version 1
EcoCool Remodel Tool continued
1502_4454w_DPER_6gs_ECOCOOLtool.indd
• Save money with wise product choices that emphasize long life and durable, easier-to-maintain products;
• Protect your site through best practices related to landscaping and water flow control; and
• Save time researching considerations for your project.
^ King County ^2SEES3
Solid Waste Division Whatdoldowtth...? Facilitiesreduce, reuse, recycle ■JJ.MrUf.lHL'MIrll.'J.'ffy^^^M
DNRP SWD Green Balding Eco-Coo! Remodel Tool
Garbage & Recycling Calendar About Us j Contact Us
g^nterterm(s): Searcl
Tools Eco-Cool Remodel ToolPowered by ihe Solid Waste Division
?i. ym<w»
Eco-Cool Remodel Tool
Garage Kitchen
Bedroom Exterior
Utility Room Bathroom Addition
Living Room
Crawlspace Roof
Yard Materials
Energy: heating, cooling andventilationFlooring
Lighting
Paints and CoatingsPlumbing
Contractor
EcoCrtbz
GreenTools for Builders & Homeowners
King County Green Building
Construction & Demolition Recycling
King County Sustainable Cities
GreenTools Newsletter
Contacts
Calendar
News
Documents
Links
»v
J
as
i 25

Department of Permitting and Environmental Review (DPER)
DP
ER
GR
EE
N S
HE
ET
Feb. 2015, Version 1
Resources For the complete King County Green Building Handbook and individual Green Sheet PDF files, please visit our website at: http://kingcounty.gov/property/permits/publications/greenbuild.aspx. For additional information, please email [email protected] or call 206-296-6600.

Department of Permitting and Environmental Review (DPER)
DP
ER
GR
EE
N S
HE
ET
Feb. 2015, Version 1
Green Product ChoicesOverview Whether you are shopping at a small local specialized store, or a big, all–inclusive building material supply store, the range of products and materials can be overwhelming, especially when trying to make environmentally responsible choices. Increasingly, third party certifications are making it easier to quickly identify building materials and products that have been vetted and given a stamp of approval. By familiarizing yourself with these certifications, you can make more informed and reliable green product purchasing decisions.
DefinitionsGreenwashing - False claims that a product is greener than it really is. Beware of marketing hype and packaging design that suggest green attributes without proof. Third party labels help guard against greenwashing.
When is This Applicable? Just about any home project means that you’ll be buying materials or products at some point along the way. Often times you can repurpose or reuse materials you already have on hand – better for your
pocket book and a more resource-efficient approach – but inevitably you’ll likely end up shopping online or in stores for at least some of what you need. Whether you’re doing the work yourself or hiring a contractor, this shopping guide can help prioritize products that are better for you and better for the environment.
What Makes it Green? When you purchase products that use fewer resources, save energy, last longer, and don’t contain harmful chemicals, you’re getting immediate savings in your pocket from operational efficiencies, cutting down on future replacement costs and hassle, and minimizing or eliminating negative health impacts. Being an informed shopper can save you time, hassle, money and rework. Additionally, product choices can earn you points in Built Green and LEED for Homes and help meet requirements for Northwest ENERGYSTAR Homes.
Best Practices The table on the next pages provides you with important information to consider and labels to look for when you are shopping for various products.
NU
MB
ER
7
L* | King County

2
Feb. 2015, Version 1
Green Product Choices continued
1502_4454w_DPER_7gs_GREENchoices.indd
PRACTICAL SHOPPING GUIDE
When shopping for...
Consider the following…
And look for these third party logos...
Lighting • Fixtures: Consider repurposing your own fixtures or looking for used fixtures that can be fitted with high-efficiency LED or CFL lamps. Many salvage or second-use stores carry fixtures that can work with modern lighting, while also adding character to your project. See Resources for Salvage Stores.
• Select either CFL or LED bulbs for long lasting and energy saving lighting.
• Choose bulbs with the right light ‘temperature’ for your needs – a warm white will feel more like an incandescent, while a cool white will have a brighter, daylight-like feel.
• Choose bulbs based on the total delivered lumens (light output).
• Not all fixtures are dimmable, and not all light bulbs/lamps are dimmable. If you desire dimming, ask for the most appropriate fixture/lamp combination that can meet your needs.
Appliances
Please refer to the High Efficiency Appliances Green Sheet for more information.
• Choose ENERGY STAR certified air purifiers, clothes washers, dehumidifiers, dishwashers, freezers, refrigerators and water heaters.
• Consider tankless (point-of-use) water heaters to avoid standby and transmission heat loss and to save space.
• Choose front-loading washers, which are generally more energy and water efficient than top loading, and also use less detergent.
• Pick the appliance size that meets your needs – going larger takes up more space, costs more money, and typically uses more energy.
• Consider a high efficiency induction stove. If you have natural gas, select a model that has an electric ignition rather than a standing pilot light to reduce indoor air pollution and wasted resources.
hmshibeei

3
Feb. 2015, Version 1
Green Product Choices continued
1502_4454w_DPER_7gs_GREENchoices.indd
When shopping for...
Consider the following…
And look for these third party logos...
Paints & Coatings
• Think ‘less is more’: consider using minimal or no finishes.
• Use low- or no-VOC paints.• Look for the GreenSeal label to ensure the product
has been tested for performance and environmental and health safety.
• Alternatively, consider a GreenGuard certified product. These have also been evaluated for low emissions and indoor air quality.
• Avoid polyurethane products that contain isocyanates.
Wood products• Look for salvaged products first. • If purchasing new wood, choose lumber products
certified through the Forest Stewardship Council (FSC) to ensure sustainable harvesting and land management practices.
• For composite wood products, such as oriented strand board (OSB), medium density fiberboard (MDF) or particleboard, make sure there is no added urea formaldehyde (NAUF) in the adhesive binders.
Cabinets & Countertops
• Consider using a salvaged item rather than traditional laminate countertops.
• If choosing wood/laminate products, choose NAUF products, especially those that are SCS-certified to be NAUF.
/ mwanTjwod | VidXBCCKCM1 (MUODI
\S
3S£
S7
.mi i^ J>('ss'k Kil

4
Feb. 2015, Version 1
Green Product Choices continued
1502_4454w_DPER_7gs_GREENchoices.indd
When shopping for...
Consider the following…
And look for these third party logos...
Flooring • Consider using minimal or no additional flooring products, such as polished or stained concrete.
• Prioritize hard surface flooring over carpets. Carpets trap dirt and allergens, which are hard to remove and can then contribute to poor indoor air quality.
• If you do install carpet, choose products certified by the Carpet & Rug Institute under their Green Label program which have low emissions and provide better indoor air quality.
• If using resilient or hard surface flooring, look for the FloorScore label, which indicates the product has been tested and approved for low emissions.
• Consider a GreenGuard certified product. These have been evaluated for low emissions and indoor air quality.
• Avoid vinyl (contains PVC) flooring entirely. Due to the severe environmental impacts, especially near where PVC is produced, the use of PVC should be minimized where possible.
• Make sure all adhesives used are low- or no-VOC.
Siding • Consider fiber-cement siding with recycled content. Although it requires a significant amount of energy to produce, it performs very well over a long time, often with a 50-year warranty.
• Prioritize products with very long warranties and those which need less maintenance or additional products applied.
• Avoid vinyl siding. Due to the severe environmental impacts, especially near where PVC is produced, the use of PVC should be minimized where possible.

5
Feb. 2015, Version 1
Green Product Choices continued
1502_4454w_DPER_7gs_GREENchoices.indd
When shopping for...
Consider the following…
And look for these third party logos...
Decks & Fencing
• Consider using salvaged products rather than new materials.
• If pursuing a new wood product, choose FSC-certified wood.
• Prioritize wood that is more resistant to rot or wood that doesn’t need frequent coatings or treatment.
• Consider a wood alternative, such as composite products which contain a high amount of recycled plastic and wood.
• If you use pressure-treated wood, ask suppliers for their greenest alternative and follow instructions for careful handling and use.
Resources For the complete King County Green Building Handbook and individual Green Sheet PDF files, please visit our website at: http://kingcounty.gov/property/permits/publications/greenbuild.aspx. For additional information, please email [email protected] or call 206-296-6600.
See these related DPER Green Sheets (GS):
• Advanced Framing, GS Number 9• What To Do with C&D Materials,
GS Number 8
Ballard Reuse: A used and salvaged building materials super store.
King County’s EcoCool Remodel Tool (see the card by the same title in this Green Building Handbook) provides helpful hints by each room of the house and also contains a Materials Checklist.
EPA’s Choosing Green Materials and Products: This website provides background information about choosing products as well as numerous additional resources and links.
EarthWise Architectural Salvage: Architectural salvage & used building materials resource center.
Green Building Supply: This site provides numerous investigations related to green washing
LED Lighting Makeover Takeover: Home Depot Shopping Trip
Second Use: Salvaged building materials, deconstruction and salvage services company.
The Habitat Store: features building salvage materials and donation pick ups from your next project.
What Makes a Product Green: This article from BuildingGreen.com walks through descriptions of numerous product attributes and what to look for when choosing products.

Department of Permitting and Environmental Review (DPER)
DP
ER
GR
EE
N S
HE
ET
Feb. 2015, Version 1
What To Do with Construction and Demolition MaterialsOverviewWhen you throw something “away,” where exactly is “away?” As a King County Resident, “away” is the 920-acre Cedar Hills Regional Landfill located in Maple Valley. The landfill is owned by King County, operated by the Solid Waste Division, and receives over 800,000 tons of solid waste a year. Cedar Hills is the only remaining landfill in King County; once it fills up, waste will have to travel further for disposal, increasing transportation and environmental impacts, and increasing costs for all county residents. So how do you help keep reusable or recyclable materials out of the landfill? One of the best opportunities is smart management of construction and demolition (C&D) materials when building new or remodeling.
Nearly all construction projects - whether building a new structure or embarking on a remodel - produce some quantity of leftover construction and demolition materials as well as wastes like paint cans and insulation scraps. Unless these materials are intentionally handled as recyclable materials they will end up in a landfill. Past research has found that roughly 92% of construction and demolition materials generated in King County have value for reuse, recycling, or as a highly processed fuel source. But this value, and associated cost savings, is only realized if materials are diverted from disposal (it is usually impossible to recycle C&D materials once they have gone into the landfill). Knowing your options and best practices can help you minimize waste, save
money, and keep valuable resources out of the landfill.
DefinitionsConstruction and Demolition (C&D) Materials – Result from construction, remodeling, repair or demolition of buildings, roads or other structures. It includes (but is not limited to) wood, concrete, drywall, masonry, roofing, siding, metal, wire, insulation, asphalt, and packaging materials related to construction or demolition.
Deconstruction – The systematic disassembly of a building, to salvage valuable construction and architectural materials for reuse or to be recycled.
Transfer Stations – Facilities where garbage hauling companies, businesses and King County residents can bring their waste. Drop box facilities are smaller facilities where residents and businesses can bring a limited amount of waste. The waste is consolidated at these locations and then transported to the Cedar Hills Regional Landfill for disposal.
Recycling – The processing of a material into a new product, which keeps resources in useful circulation and out of landfills.
When is This Applicable? King County and Washington State both have requirements related to the handling of C&D materials that permit holders and project contractors should know about and be compliant with. These include the following:
NU
MB
ER
8
m

2
Feb. 2015, Version 1
What to Do with Construction and Demolition Materials continued
1502_4454w_DPER_8gs_CandDdebris.indd
If you are deconstructing or demolishing a structure, you will need a demolition permit (see Bulletin #3).
To be compliant with Washington State code (WAC 173-345-040), if a location has a diversion/recycling collection container there must also be a container present for the collection of waste (destined for a landfill).
Knowing where to take C&D materials and what is accepted at these locations will ensure compliance with the King County Waste Acceptance Rule [disposal].
You and your contractor are required to meet health and safety requirements related to C&D materials [lead/asbestos/safe hauling].
Additionally:
• When planning for any minor or major remodel, deconstruction, demolition, or new project, planning out material quantities carefully in advance, can help you or your contractor more efficiently manage C&D materials, and save time and money during the project.
• During any project, know what to do with C&D materials and identify safe, convenient places to store them for recycling or disposal so they don’t get in the way of your project or get contaminated (it typically costs more to dispose of contaminated materials).
• For projects pursuing Built Green or LEED for Homes, you’ll need documentation showing how much of the C&D materials were diverted throughout the duration of the project.
What Makes it Green? Using just the right amount of materials and recycling or reusing the leftovers is inherently good for the environment and for your pocketbook.
• Reducing the amount of materials used in the first place results in less energy used to harvest and extract raw materials from the earth, and to process and manufacture building products. It also means you spend less to begin with.
• Planning ahead to minimize the amount of waste that is generated and sent to the landfill will save you money in tipping fees. For example, taking cardboard to the recycling bin at transfer stations is free, and taking clean wood to a private transfer station costs $75/ton, whereas mixed construction debris costs at least $129/ton.
• Reducing the amount of materials used reduces the need for transportation associated with hauling; this, in turn, reduces air pollution and greenhouse gas production, as well as minimizing impacts on roads and other infrastructure.
• Reusing leftover materials on your next project saves time and money.
• Recycling leftover construction materials further conserves natural resources, extending the life and usefulness of materials.
• If you are pursuing LEED for Homes or Built Green certification for a project, you can earn points based on the amount of materials diverted from the waste stream; the higher your diversion rate, the more points you earn.

3
Feb. 2015, Version 1
What to Do with Construction and Demolition Materials continued
1502_4454w_DPER_8gs_CandDdebris.indd
Best Practices
Certi�ed Facilities
Designated C&D Waste Handling Facilities
Disposal Ban Veri�cation Points
2015 King County Construction and Demolition Materials Management Proposal
Single Commodity Recycling Facility
Intermodal Rail Yard
Land�lls
Recycling/Commodity Processor or End Market
Construction Site Commingled Processing Facility
ProcessingResidual
Transfer StationsDepartment of Natural Resources and ParksSolid Waste Division
O O
<|
JL
King CountytH Toolsig County
Powered by the Solid Waste Di'

4
Feb. 2015, Version 1
What to Do with Construction and Demolition Materials continued
1502_4454w_DPER_8gs_CandDdebris.indd
Best practices for minimizing waste generated from construction projects starts with identifying ways to reduce, reuse or repurpose as much of the material as possible before exploring options for recycling or disposal. Involve your contractor in the planning process as you consider the following:
Planning: For whole structure removal, consider alternatives to standard demolition including whole building removal or building disassembly. Review the King County Building Removal Assessment Guide for resources about building relocation and salvage and deconstruction companies that you can contact to help assess your situation.
• Before beginning your project, consider the types of C&D materials that will be generated, and research different options for minimizing waste, and know in advance where to take materials that you cannot use (see the Resources section, including Salvage options).
• When buying materials, buy only what you need in order to minimize leftover materials.
• State law requires that any time there is a collection container for recyclables a garbage container must also be provided. Plan on having two containers at the jobsite and make sure they are both used appropriately.
• To find place in King County to take your C&D materials, or to find someone to haul them for you, refer to the King County “What Do I Do With...?” database.
• If you plan to have someone else haul your C&D debris, see the King County/Seattle Construction Recycling Directory for a directory of haulers.
On Site and Hauling: During your project, have the appropriate number of bins to be able to source-separate major material groups and be sure to properly label those containers. Depending on if you self-haul or hire someone to haul for you, you may be able to co-mingle recyclableconstruction materials, but keep in mind that source separating always results in higher resource recovery rates, lower fees for getting rid of the material and less landfill-destined materials.
Separating waste onsite helps improve the overall recycling rate and can save you money.
Proper labeling has a big impact on the success of your materials management. Be sure to use multiple languages if you are working with contractors and contractor subs whose first language is not English.
RECYCLE
TO!CTC\JK&\S£

5
Feb. 2015, Version 1
What to Do with Construction and Demolition Materials continued
1502_4454w_DPER_8gs_CandDdebris.indd
Some separated materials (ex. cardboard) can be dropped off by King County residents at Bow Lake, Cedar Falls, Enumclaw, Houghton, Renton, Skykomish, Shoreline and Vashon transfer stations and drop boxes. Recycling services vary by facility. None of the transfer stations or drop boxes currently accept commingled C&D materials for recycling. Download a printable copy of “Your Guide to King County Solid Waste Recycling and Transfer Facilities” The Factoria transfer station also offers a household hazardous waste service for residential customers and pre-approved small businesses. Additional options for recycling C&D materials can be found by looking in the “What Do I Do With…?” database.
Further best practices include:
• If the materials are something that can be reused, then use them in other projects; ask your contractor to repurpose them, or ask a salvage store if they will take it.
• Small amounts of residential C&D materials are accepted for disposal at King County solid waste transfer stations. Customers using dump trucks, flat beds that dump, or roll-off boxes may not dispose of C&D materials at these transfer stations unless they comprise less than 10 percent of the total volume of the load. (Note: Dump trucks, flat beds and roll-offs with C&D are accepted at the Vashon transfer station.) Other restrictions also apply – see Your Guide to King County Solid Waste Recycling and Transfer Facilities.
Safety Considerations: • If asbestos or vermiculite insulation is
found, you’ll need to ensure you know what can go where. Check “What Do I Do With…” website to determine where to take materials and quantity limitations. Note that guidance for vermiculite can be found under “asbestos.” Contact Puget Sound Clean Air Agency for permit/info.
• If working in a house built prior to 1978, it may contain lead paint. If you are hiring a contractor, they are required by law to follow safe practices. Although homeowners are not required to follow the same rules, to protect your health and your family’s health, follow best practice guidelines.
• Safely hauling materials (Securing your Load) is not only important, it’s the law.
Applicable References/Standards King County Waste Acceptance Rule: King County accepts wastes for disposal at County facilities pursuant to this Rule. This Rule promotes governmental efficiency and affords citizens fair notice and process. This Rule is promulgated to preserve and protect the public health, safety, and welfare.
Secure your load: This is a safety measure, is important for consumers, and is an RCW state law.
King County’s Asbestos Fact Sheets: These links provide helpful information for identification and removal of asbestos.
Lead Paint Requirements for Salvage/Deconstruction: Outlines legal requirements

6
Feb. 2015, Version 1
What to Do with Construction and Demolition Materials continued
1502_4454w_DPER_8gs_CandDdebris.indd
and best practices related to lead paint on salvage, remodel, and deconstruction projects.
DPER Bulletin #3: Demolition Permits for Commercial and Residential Structures
Washington State code (WAC 173-345-040) requires any location with a diversion/recycling collection container to also have a waste collection container (for materials destined for a landfill).
Resources For the complete King County Green Building Handbook and individual Green Sheet PDF files, please visit our website at: http://kingcounty.gov/property/permits/publications/greenbuild.aspx. For additional information, please email [email protected] or call 206-296-6600.
See these related DPER Green Sheets (GS):
• Advanced Framing, GS Number 9 • Green Products, GS Number 7
Salvage Options Ballard Reuse: A used and salvaged building materials super store.
Dedicated Deconstruction: Provides salvage and deconstruction services
EarthWise Architectural Salvage: Architectural salvage & used building materials resource center.
Second Use: Salvaged building materials, deconstruction and salvage services company.
The Habitat Store: features building salvage materials and donation pick ups from your next project.
Recycling ResourcesKing County/Seattle Construction Recycling Directory: This guide attempts to gather the essential information that a construction and demolition contractor working in King County needs at the jobsite to greatly minimize the amount of materials leaving their jobsite as waste.
What do I do with...: King County’s interactive website allows you to indicate the materials you are looking to recycle/dispose of and provides location contact information for many sites.
LinkUp: The LinkUp program may have resources for you or your contractor to help determine what you can recycle and where. There are many links to numerous resources.
Built Green and LEED are third party verification programs that help ensure projects are built.
Permit TipsYou will need a permit if you are doing any substantial deconstruction or demolition. If more than one structure will remain, you will need to provide a site plan as part of your application. Speak with a Permit Review Coordinator for clarification. See DPER Bulletin #3.

Department of Permitting and Environmental Review (DPER)
DP
ER
GR
EE
N S
HE
ET
Feb. 2015, Version 1
Advanced FramingOverview The majority of homes in King County are built using light weight wood framing, often referred to as “stick built.” Advanced framing is a tried and tested approach to stick framing that allows you to do more with less – more performance with less wood. By using standardized dimensions and optimizing the layout and alignment of the joists, studs and trusses, you can build a structurally-sound, code-compliant building that uses less wood, takes less labor to build it, and leaves more space in the walls for insulation to save energy and keep you comfortable.
DefinitionsThermal bridging – Heat loss through the wall or roofs where wood studs or other materials cause breaks or reductions in the amount of insulation.
When is This Applicable? Advanced framing is applicable to most one- and two- story buildings and additions. On taller buildings, it may be applicable for the top two stories only. The International Residential Building Code (IRC 2012 with amendments) includes standard, code-approved advanced framing options (Chapter 6 and Table R602.3 (5) for walls and Chapter 8 for ceilings and roofs). Use of advanced framing and other approaches may be permitted if designed by a structural engineer.
What Makes it Green? Advanced framing is a win-win technique. It lowers construction cost, resource consumption, and pollution while contributing to a comfortable, more efficient home. Here are some reasons why.
• With fewer nails to pound and cuts to make, framers experienced with advanced framing find it saves time and money and reduces waste.
• With wider spacing between studs, and different stud layouts at openings, corners and wall intersections, and features like raised heel trusses, advanced framing allows more insulation in the walls and ceiling and reduces thermal bridging.
Ladder blocking at wall intersections accommodates insulation of exterior wall. Source: Olympia Master Builders Built Green® Field Guide.
Suggested approaches to advanced framing. The double top plate is only needed if you are not stacking. Source: Olympia Master Builders Built Green® Field Guide.
NU
MB
ER
9
E3
Metal Framing
| 12* on centerReduced < ripples
! i _
3®T TT'***
1 UM>| ana>rM*
UK*
SR

2
Feb. 2015, Version 1
Advanced Framing continued
1502_4454w_DPER_9gs_ADVframing.indd
• This increase in insulation and reduced thermal bridging means the walls and ceiling have a more even temperature across the surface to help make your house more comfortable and efficient.
• Reduced energy use for heating reduces environmental impacts and air pollution from producing power or burning fossil fuels.
• There are related requirements for Northwest ENERGY STAR Homes and there are many points available in the Built Green checklist for using advanced framing practices. In both Built Green and LEED for Homes, these practices contribute to better predicted energy performance which earns more points.
Best Practices There are many key elements of advanced framing that provide benefits; the more elements you include, the more benefits you will achieve.
• Design on 24” or 48” modules.• Switch stud, joist, and rafter spacing from
16” to 24”.• Prioritize simple forms and standard
dimensions over complex forms and irregular dimensions.
• Align openings with at least one edge of a 24” module.
• Design wall heights and eaves to accommodate full depth ceiling insulation.
• Work with a WA State licensed engineer to make an Advanced Framing plan.
• Keep studs, floor joists, and roof trusses in line vertically – called stacking. In some
construction, a single top plate may be used with stacked framing.
• Minimize framing around doors and windows by using metal hangers.
• Use open corners to provide space for additional insulation.
• Use flat-stud or ladder blocked intersections to allow full insulation.
• Create headers by “sandwiching” foam insulation between plywood and small framing members.
• Include raised heel height requirements in your roof truss order (cost premium should be minimal if any) and specify R49 instead of R38 ceiling insulation.
Be sure to use sheathing and drywall that is rated for a 24” span. Having fewer studs in contact with wall planes actually reduces risk of deflection due to warped or crowned studs. While some flexible siding materials may bow more over the longer span if not supported by a rigid backer, there are decades of examples of successful advanced framed homes with long-lasting benefits.
Go Further: To enhance the green benefits of advanced framing, source sustainably-harvested wood such as that certified through the Forest Stewardship Council (FSC) – see Resources for more information.
Applicable References/Standards King County DPER documents: Chapters 6 and 8 of the King County Residential code (IRC 2012 with amendments) describe the prescriptive options for advanced framing.
2012 Washington State Energy Code: Section 402 in particular describes framing and the thermal value of wall assemblies.

3
Feb. 2015, Version 1
Advanced Framing continued
1502_4454w_DPER_9gs_ADVframing.indd
Resources For the complete King County Green Building Handbook and individual Green Sheet PDF files, please visit our website at: http://kingcounty.gov/property/permits/publications/greenbuild.aspx. For additional information, please email [email protected] or call 206-296-6600.
See these related DPER Green Sheets (GS):
• Air Sealing, GSNumber 10• Insulation , GSNumber 13• Right Sizing Heating/Cooling Systems,
GS Number 17
Additional fact sheets about Advanced Framing include the Department of Energy Advanced Framing Fact Sheet, Seattle Department of Planning and Development Tip 341 Advanced Framing, and Bellingham’s Advanced Methods and Materials AMM400.
The Future of Framing is Here: An article by Joe Lstiburek that appeared in Fine Homebuilding, October/November 2005.
Forest Stewardship Council: Promoting environmentally appropriate, socially beneficial, and economically viable management of the world’s forests.
Other resources:
• APAwood.org (advanced framing guide)• GreenAdvisor.com (pros and cons)
Permit Tips Be sure to include framing details on your plans and clearly call out the advanced framing techniques. DPER will review the building plan to verify advanced framing code compliance and inspect the advanced framing techniques during an onsite framing inspection.
These stud arrangements enable insulation to be fit into the full depth of the corner with minimal framing. Photo shows a nailer for drywall, drawings shows clip placements. Photo source: O’Brien & Company. Diagram from the Olympia Master Builders Built Green® Field Guide.
Standard trusses (top) do not allow for full depth insulation at the exterior, whereas raised heel trusses (above) allow for full dept insulation. From https://basc.pnnl.gov/resource-guides/attic-eave-minimum-insulation#block-views-guide-static-blocks-block-2
Interior Sheet rock clip support
m
Insulation baffle
Insulation
nsulaUc rMKM
Soffit dam (cardboard or rigid foam board)
Soffit dam (cardboard or rigid foam board)

4
Feb. 2015, Version 1
Advanced Framing continued
1502_4454w_DPER_9gs_ADVframing.indd
TABLE R 602.3(5) SIZE, HEIGHT AND SPACING OF WOOD STUDSStud Size (Inches)
Bearing Walls Nonbearing WallsLaterally
unsupport-ed stud height (feet)
Maximum spacing when supporting a roof-ceiling
assembly or a habitable attic assembly, only
(inches)
Maximum spacing when
supporting one floor,
plus a roof-ceiling
assembly or a habitable
attic assembly (inches)
Maximum spacing when
supporting two floors, plus a roof-
ceiling assembly or a habitable
attic assembly (inches)
Maximum spacing when
supporting one floor heighta (inches)
Laterally unsupport-
ed stud heighta (feet)
Maximum spacing (inches)
2 X 3b - - - - - 10 16
2 x 4 10 24c 16c - 24 14 24
3 x 4 10 24 24 16 24 14 242 X 5 10 24 24 - 24 16 242 X 6 10 24 24 16 24 20 24
For SI: 1 inch = 25.4 mm, 1 foot = 304.8 mm, 1 square foot = 0.093 m2.
a. Listed heights are distances between points of lateral support placed perpendicular to the plane of the wall. Increases in unsupported height are permitted where justified by analysis.
b. Shall not be used in exterior walls.
c. A habitable attic assembly supported by 2 x 4 studs is limited to a roof span of 32 feet. Where the roof span exceeds 32 feet, the wall studs shall be increased to 2 x 6 or the studs shall be designed in accordance with accepted engineering practice.
A A A

Department of Permitting and Environmental Review (DPER)
DP
ER
GR
EE
N S
HE
ET
Feb. 2015, Version 1
Air Sealing Your HomeOverviewAir sealing is a strategy to reduce heat loss in a home where possible leakage areas between the outside environment and the indoors exist. Spaces such as crawlspaces, garages and attics are considered ‘outdoor’ and may have cracks, holes or gaps in materials, which allow outside air to leak into the home. Some new homes, but especially older homes, often have major air leakage problems. This leakage may not be readily visible to you but the impacts are substantial on the comfort, air quality, and durability of a home. Sealing these air leaks has considerable financial and comfort benefits to the homeowner and occupants.
DefinitionsAir Changes per Hour (ACH) - Describes how often all the air in your home is replaced with outside air through leakage or ventilation. The number is either presented as “normal” (ACHn) to estimate leakage under normal conditions, or with a subscript number, such as 50 (ACH50 ). The 50 indicates 50 pascals of pressure – a standard pressure for air leakage measurement.
Blower Door Test - A specialized procedure that measures and quantifies the total air leakage in a home. The test can calculate the air leakage under normal conditions (ACHn ) or at a standard pressure (ACH50 ). Either number can help you estimate the leakage and potential for improvement, comply with code or third party rating systems, and compare a home’s leakage to other similar homes.
When is Air Sealing Applicable? For existing homes: When building an addition, performing a substantial renovation, or just making minor improvements. For best results and safety, it is highly suggested you work with a general contractor or home performance contractor. However, a handy homeowner can do much of this work. For new construction: The 2012 Washington State Energy Code (WSEC) requires new homes to test at less than or equal to 5.0 ACH50.
A blower door test during construction measures the home’s air leakage at a standardized pressure. Source: O’Brien & Company
NU
MB
ER
10
" :.*r
ft.
Sri
r-t

2
Feb. 2015, Version 1
Air Sealing Your Home continued
1502_4454w_DPER_10gs_AIRsealing.indd
These pictures show before and after air sealing efforts at plumbing penetrations. Source: O’Brien & Company
What Makes it Green? Air sealing is a fundamental part of making your home more efficient, comfortable, and durable.
• Energy and cost savings from reduced operation of heating and cooling systems.
• Reduces energy use for heating and cooling, which decreases environmental impacts and air pollution from producing power or burning fossil fuels.
• Increases comfort by reducing cold air drafts and loss of conditioned air.
• Improves indoor air quality by keeping out dust, pollen and vapors from outside, garages, crawlspaces and attics.
• Enhances durability by preventing moisture-laden air from condensing on cold surfaces, creating opportunities for mold.
• Closes openings that can invite insects or rodents into your home.
• Leakage rates lower than 5.0 ACH50 contribute towards meeting prerequisites and earning points in LEED for Homes, and Built Green. The Northwest ENERGY STAR homes program requires even less leakage at or below a rate of 3.0 ACH50.
Best PracticesWhen air sealing your home, consider the following guidance.
Minimize air leakage and control air changes through ventilation.
If you are inclined to do the work yourself, begin by learning more about air sealing and how to do the work safely with the Seal and Insulate with Energy Star website and the DIY Guide.
Consult with a general contractor or home performance contractor for increased safety and effectiveness.
Wear personal protective equipment, including eye protection, respiratory protection, and body & clothing protection, like gloves and coveralls.
Target the largest leaks first – the most common large air leaks are:
• Plumbing penetrations, like around tub, toilet and sink drains and where plumbing supply lines come into cabinets in kitchens and bathrooms

3
Feb. 2015, Version 1
Air Sealing Your Home continued
1502_4454w_DPER_10gs_AIRsealing.indd
In a kitchen or bathroom remodel, or new construction, sealing plumbing penetrations is easy and effective. Source: O’Brien & Company
• Electrical penetrations, like where wires run through top plates, bottom plates or other wood materials
In an addition, new construction or a gut remodel, there are many opportunities to seal electrical penetrations and top and bottom plates. Source: O’Brien & Company
• Around chimneys and flues (be sure to use non-combustible sealing materials in these areas)
• Around bathroom fans and kitchen range exhaust
• Around doors (and sometimes windows)• Between an attic access hatch and drywall• Behind attic kneewalls• Rim, or band, joists although these are often
hard to access in existing homes
Air sealing with expanding foam or caulk at a rim joist is an effective means of sealing leaks. Source: O’Brien & Company
• Use the right sealing material for the size of the leak; for gaps smaller than 3/8” use caulk, for 3/8” to 1” use 1-part expanding foam, and for leaks larger than 1” begin by adding a solid backing like foam board insulation or plywood before sealing with caulk or expanding foam.
. Is
fil,
NBfflr. t
V;
.7 .ML,,
* 4mI *’ IP
i s7 .~ Y' ** /
n\vBL- .'I
” V/ / a
r
/IS
, i

4
Feb. 2015, Version 1
Air Sealing Your Home continued
1502_4454w_DPER_10gs_AIRsealing.indd
• Seek out low VOC and low emitting products to reduce offgassing of vapors while working and when products dry/cure.
• Ensure the sealant you use is compatible with what you’re sealing.
This picture shows the “flash” portion of a “flash and batt” installation. The flash coat of spray-in-place foam insulation creates a tight air seal. Source: O’Brien & Company
Applicable References/Standards Energy Compliance Form: This required form includes tables of information for required insulation levels in different framed elements of your home. It also includes a description of the air barrier and insulation installation criteria for each component in your home in Table R402.4.1.1.
Resources / IncentivesFor the complete King County Green Building Handbook and individual Green Sheet PDF files, please visit our website at: http://kingcounty.gov/property/permits/publications/greenbuild.aspx. For additional information, please email [email protected] or call 206-296-6600.
See these related DPER Green Sheets (GS):
• Duct Sealing, GS Number 11• Fresh Air Ventilation, GS Number 14• Furnace Replacement, GS Number 18 • Insulation, GS Number 13 • Right Sizing Heating/Cooling Systems,
GS Number 17• Routine Maintenance, GS Number 5
Seal and Insulate with ENERGY STAR: A comprehensive, guided approach to choosing the scope of your project and how to get started on each part. Partner this with the Seal and Insulate DIY Guide and you’re ready to go.
Puget Sound Energy; Energy efficiency rebates and offers: Current offers for rebates on a variety of items, including energy use evaluations on existing homes.
EcoBuilding Guild Technical Flash Cards: This project includes easy-to-use flash cards on specific topics. This link takes you directly to Air Sealing where you can choose topics such as “Air Seal Cove Ceiling” and “Seal Soffit at Ceiling Plane.”
Air Sealing Video: This WSU Extension Energy Program video walks through air sealing details of an old home.
Air Leakage Guide: This Department of Energy Brochure provides a resource for understanding air leakage requirements in the International Energy Conservation Code (which could potentially be adopted by King County), as well as best practices and case studies.

Department of Permitting and Environmental Review (DPER)
DP
ER
GR
EE
N S
HE
ET
Feb. 2015, Version 1
Duct SealingOverviewDuct systems carry cooled or heated air from your furnace or heat pump to rooms throughout your home. Washington State energy code requires that new duct systems are sealed, but there are no regulations around existing systems, which may have been poorly sealed, not sealed at all, or developed gaps overtime. Tightly sealing the joints and seams in ducts and air handlers ensures that all the conditioned air reaches the rooms rather than escaping into attics, crawlspaces and garages and it keeps out dust and other particulates from these spaces. Save money and keep your home clean and healthy by sealing or resealing your ducts.
Definitions
Conditioned air – Air that has been heated, cooled or dehumidified by a mechanical system.
Duct Leakage Test – Duct leakage can be tested using a calibrated fan and digital pressure gauge.
Duct Mastic – A low-cost, highly durable paste-like sealant used to seal leaks in a duct system.
Asbestos Tape – Fibrous tape, typically white, wrapped around joints on a metal duct system. Asbestos tape should NOT be disturbed – instead a professional can safely encapsulate it in duct mastic or remove it.
When is This Applicable? If you are building a new home, duct leakage compliance, confirmed by testing, is required by code. When a central forced air system is altered by the installation or replacement of furnace, heat pump, air handler, coil or heat exchanger, the duct system that is connected to the new system must be tested. The test results must be provided to the building official and the homeowner. If the results fall short of the code target (see “Best Practices”), you may consider sealing your ducts to reap some of the numerous benefits listed below.
Duct systems in homes built before 2009 are generally not well sealed, unless the home was certified under Northwest Energy Star Homes, LEED for Homes or Built Green. If you have ducts that run through an unconditioned attic or crawl space, and don’t have a good mastic seal on every joint and seam, there’s a good chance you could benefit from sealing your ducts.
Duct leakage testing in a new home. Non-toxic smoke can be used to locate leakage areas, especially during framing in new construction. Source: O’Brien & Company.
NU
MB
ER
11
UAKing County

2
Feb. 2015, Version 1
Duct Sealing continued
1502_4454w_DPER_11gs_DUCTsealing.indd
What Makes it Green? Sealing ducts, particularly those in attics and crawl spaces, is one of the most cost-effective ways to save energy and improve indoor air quality and thermal comfort. Here are some reasons why:
• Air you’ve paid to heat (or cool) is delivered to your rooms, rather than heating the attic or crawl space;
• The right amount of air is supplied to each space, maintaining comfort;
• Warm air leaking into cold spaces can lead to humidity and mold problems;
• Leaky return ducts can draw in poor-quality air from the attic, crawl space, or garage; and
• Northwest ENERGY STAR Homes, Built Green, and LEED for Homes have air sealing requirements and optional points available for exceeding those requirements.
Best Practices In order to most effectively seal your ducts:
• Use water-based duct mastic for sheet metal ducts
• For flex duct, use appropriate Panduit straps (like big cable ties) – one to secure the inner liner to the duct terminal; another to secure insulation and outer cover over the inner liner
• Focus particularly on all joints at right angles and:
• Where the filter rack sits in the plenum or trunk
• Between trunks and branches• At elbows and “Y”s; • Between a duct and the boot that
connects to the room register• Seal the boots to the floor, wall or ceiling• Discuss alternative sealing techniques
(blown-in duct sealant) with a mechanical contractor.
• Temporarily remove any insulation from these fittings to expose the metal or flex duct linerWear proper protective equipment such as a dust mask and gloves. If you suspect asbestos tape, contact a certified asbestos abatement contractor immediately replace and re-secure insulation.
Go Further: While checking ducts, be sure to check for water pipe insulation as well. You can save water, energy, and money by insulating your water pipes (don’t forget the corners where the pipe bends).
This metal duct elbow seam is properly sealed with duct mastic. If the ducts are in the crawl space, attic, or garage, they should be insulated after being well sealed. Source: O’Brien & Company.
m

3
Feb. 2015, Version 1
Duct Sealing continued
1502_4454w_DPER_11gs_DUCTsealing.indd
Ducts Inside? While most duct systems are located in attics, garages and crawlspaces, bringing ducts inside your home – by placing them in floor cavities or interior soffits - has many benefits including:
• Reducing the size and cost of furnace and ducts
• Reducing air leaks to the outside, which improves comfort and savings
• Improving indoor air quality*note* if all your ducts are within the conditioned space, you are not required to test your ducts.
So how tight is tight? Duct leakage targets are expressed as a flow rate (cubic feet per minute, or CFM) at a pressure of either 25 or 50 Pascals and are based on the square feet of area served by the system. The target for new construction is 0.06 x floor area served (in square feet), with the air handler installed (0.04CFM25 x floor area, without the air handler).
Applicable References/Standards DPER Bulletin 36 Mechanical Permits FAQ : Frequently asked questions on mechanical permits; heating, cooling, ventilation, refrigeration.
Residential Mechanical Permit Application / Affidavit Form: Installer and equipment information. Permit fee schedule.
Unincorporated King County RESIDENTIAL CONSTRUCTION ENERGY COMPLIANCE FORM: General disclosures on energy
performance, including duct systems in new homes and existing homes.
Washington State Energy Code Duct Testing Standard (RS-33)
ResourcesFor the complete King County Green Building Handbook and individual Green Sheet PDF files, please visit our website at: http://kingcounty.gov/property/permits/publications/greenbuild.aspx. For additional information, please email [email protected] or call 206-296-6600.
See these related DPER Green Sheets (GS):
• Air Sealing Your Home, GS Number 10• Alternative Heating Systems, GS Number 19 • Fresh Air Ventilation, GS Number 14 • Furnace Replacement, GS Number 18• Right Sizing Heating/Cooling Systems,
GS Number 17• Routine Maintenance, GS Number 5
Insulation instant rebates from Puget Sound Energy; Performance-tested duct sealing: Suite of rebates related to ducts, duct sealing, and duct insulation.
2012 Energy Code Related Documents: This WSU Extension Energy Program website provides numerous links to related documents, including Duct Testing Standard and presentations.
Puget Sound Clean Air Agency’s Asbestos Resources: This site provides resources related to asbestos, and a reminder that “anyone who works or has the potential of working with products containing asbestos must fully comply with all regulatory requirements.”

Department of Permitting and Environmental Review (DPER)
DP
ER
GR
EE
N S
HE
ET
Feb. 2015, Version 1
High Efficiency AppliancesOverviewHigh efficiency appliances are designed to deliver comparable or improved performance over conventional appliances, while using fewer resources such as electricity, gas and water. High efficiency designations exist for a wide variety of appliances, and knowing the best efficiency ranking will help you select the best product. While some high efficiency appliances may have a slightly higher up-front cost, they will save resources and money during use, delivering a quick return on your investment. Your utility company may offer incentives for replacing older appliances or buying new high efficiency appliances.
When is This Applicable? Replacing old appliances with new, energy efficient ones makes sense when renovating or when an appliance wears out, but it’s also worth looking at if you notice a jump in your utility bills. If an appliance is 15 years old or older, it may be a good candidate for a high efficiency replacement. When you’re building a new home, high efficiency appliances should be your first choice.
What Makes it Green? High efficiency appliances offer a third party evaluation of energy & water efficiency as well as performance, so you’ll be sure to save on resources and operational costs. Additional resource and money saving features of high efficiency appliances include:
• Lower overall water, gas and electricity usage;
• Automatic water level adjustment on clothes washers to prevent over-filling;
• Less detergent and other laundry products needed per wash;
• Soil sensors on dishwashers to reduce wash and rinse time;
• Less standby heat loss from water heaters;
• More controllability for various types of wash cycles; and
• Finer control of refrigerator and freezer temperature.
• Northwest ENERGY STAR Homes requires ENERGY STAR labeled appliances and high efficiency water heaters, and you can earn additional points in Built Green and LEED for Homes for choosing high efficiency appliances.
Look for the ENERGY STAR label when choosing appliances such as dishwashers, refrigerators, and clothes washers/dryers. Source: O’Brien & Company.
NU
MB
ER
12
2:
► •
&

2
Feb. 2015, Version 1
High Efficiency Appliances continued
1502_4454w_DPER_12gs_HEappliances.indd
Best Practices In order to find the most efficient appliances, look for a third party efficiency label such as ENERGY STAR or Consortium for Energy Efficiency (CEE). The ENERGY STAR label signifies a measurable improvement in efficiency, while CEE goes beyond ENERGY STAR and delivers greater savings. In conjunction with product selection, check your local utility providers and the ENERGY STAR website for rebates on high efficiency appliances. This graph shows the relationship between ENERGY
STAR and CEE Tiers. Source: http://www.cee1.org/content/cee-tiers-and-energy-star.
ENTRY LEVEL AND HIGHER EFFICIENCY CONSIDERATIONS FOR HOME APPLIANCES
Appliance Entry level label
Most efficient label Considerations
Dishwasher ENERGY STAR
CEE Tier 1 ENERGY STAR dishwashers are not more expensive than a comparable non-ENERGY STAR unit. Dishes don’t need to be pre-rinsed – they can simply be scraped.
Refrigerator ENERGY STAR
CEE Tier 1, 2 or 3 ENERGY STAR and CEE Tier 1 both are 10 percent more efficient than federal minimum standards. CEE Tier 2 is 15 percent more efficient and Tier 3 is 20 percent more efficient.
Side-by-side refrigerator freezers use more electricity than over-under. Further energy savings is possible through purchasing the smallest fridge that meets your needs. Products without ice makers use the least energy, while through-the-door ice models use the most.
ENERGY STAR’for market differentiation
CEE specifications for programs
Most Efficient
2011 CEE AdvancedTier
Save More.beti.Mcwi tawrwi CEE Tier 2, 3, 4
CEE Tier 1
Top 2S*t of energy performers in a mass market product category

3
Feb. 2015, Version 1
High Efficiency Appliances continued
1502_4454w_DPER_12gs_HEappliances.indd
Appliance Entry level label
Most efficient label Considerations
Clothes washer
ENERGY STAR
CEE Tier 1, 2 or 3 Tier 3 is most efficient. Higher modified energy factor (MEF) means more clothes washing with less electricity and remaining water. Lower water factor (WF) means more efficient use of wash water.
Clothes dryer ENERGY STAR
ENERGY STAR heat pump clothes dryer
Dryers with a higher Combined Energy Factor (CEF) mean a more efficient appliance. Look for low heat drying, moisture sensors and/or auto-cycle termination.
Range and Oven
Induction range (if electric)
Cooking typically consumes only 5 percent of annual household energy, so savings opportunities are relatively low. Avoid gas units with a standing pilot light. Convection style ovens cook more effectively at lower temperatures. Keep cook-tops and ovens clean for more efficient cooking.
Water Heaters
Gas storage tank water heater
ENERGY STAR or CEE Tier 1
CEE Tier 2 For highest efficiency and indoor air quality, pick a direct vent or sealed combustion model.
Gas tankless water heater
ENERGY STAR or CEE Tier 1
For highest efficiency and indoor air quality, pick a direct vent or sealed combustion model.
Electric storage tank water heater
Not applicable
Not applicable Northwest ENERGY STAR Homes requires 0.93 EF for electric resistance tank water heaters.
Heat Pump Water Heaters
ENERGY STAR
ENERGY STAR labeled units are the most efficient as they use heat pump technology.

4
Feb. 2015, Version 1
High Efficiency Appliances continued
1502_4454w_DPER_12gs_HEappliances.indd
MaintenanceKeep your appliances running as efficiently as possible and prolong their life by following these best practices:
• If you have a tank water heater, check the outside for corrosion, which can lead to cracks and leaks.
• Remove mineral buildup from your dishwasher by running an empty machine using a cup of vinegar or a biobased detergent as a cleaning agent. If your
Tank or Tankless Water Heaters? Storage tank water heaters are the most common style among U.S. households – with 60 percent of the market using natural gas for water heating. Storage tanks are inexpensive, simple, and the easiest to maintain.
Tankless water heaters do not have a large storage tank and instead contain a small chamber for heating water. One significant advantage of a tankless unit is the smaller footprint. They are compact, typically wall mounted and leave more usable space in a room or garage. Drawbacks of tankless water heaters include the high up-front cost, mechanical and electronic complexity, as well as the need for a larger gas line compared to a tank heater. The projected savings originally touted by tankless manufacturers may not be realized in all situations.
Gas or Electric?When considering a water heater in a new home or a replacement heater in an existing home, consider the following:
• Gas water heaters, both tank and tankless, require venting. Think about how the appliance will be vented to the outside.
• Electric tank water heaters do not require venting, but heat pump models need access to more room air for efficient operation, and may perform better with access to outside air.
• Gas tankless water heaters typically require a 120v electrical outlet at the appliance, which may complicate or increase install cost. This adds a new plug load in the house as well.
See the links in Resources for more guidance and calculators to help find the least expensive and most energy efficient way to heat water in your home.
dishwasher has a removable filter, rinse out any built up food debris. Clean the door gaskets to make sure the seal is secure.
• Check washer and dryer hoses, vents and wiring for broken or kinked lines every couple of months. Make sure the exterior dryer exhaust is free from lint build up or debris.

5
Feb. 2015, Version 1
High Efficiency Appliances continued
1502_4454w_DPER_12gs_HEappliances.indd
Resources For the complete King County Green Building Handbook and individual Green Sheet PDF files, please visit our website at: http://kingcounty.gov/property/permits/publications/greenbuild.aspx. For additional information, please email [email protected] or call 206-296-6600.
See these related DPER Green Sheets (GS):
• Alternative Heating Systems, GS Number 19 • Duct Sealing, GS Number 11• Fresh Air Ventilation, GS Number 14 • Furnace Replacement, GS Number 18• Insulation, GS Number 13 • Right Sizing Heating/Cooling Systems,
GS Number 17• Routine Maintenance, GS Number 5• Thermostats, GS Number 16
PSE Rebates and Offers: PSE offers numerous rebates; click on “Appliances” to find appliances-related rebates and current offers.
ENERGY STAR; Qualified Products: Database of efficient appliances and key criteria. Use the gallery of menu items under “For Your Home.”
American Council for an Energy-Efficient Economy; Water Heating: Consumer page on water heating that includes guidance on fuel choice, sizing, and life cycle costs.
Consortium for Energy Efficiency; Program Resources: Database of efficient appliances and key criteria. Be sure to expand the menu for “Residential.”
Energy cost calculator for electric and gas water heaters: This resource from DOE helps you calculate potential savings from various choices of water heaters.

Department of Permitting and Environmental Review (DPER)
DP
ER
GR
EE
N S
HE
ET
Feb. 2015, Version 1
InsulationOverviewInsulation serves a variety of purposes in a home. Insulation reduces energy consumption, increases comfort, reduces noise, and prevents condensation and moisture issues in building cavities. The variety of product choices may make insulation selection daunting, and this guide offers information to help you select the correct type of insulation for your application.
DefinitionsR-value – Resistance to heat flow. A higher R-value means higher resistance and therefore conserves more energy.
Cellulose Insulation – Product made from a high percentage of recycled newspaper and cardboard.
Low-VOC – Low volatile organic compound (VOC). VOCs are additives that outgas from building products and pollute indoor air.
Formaldehyde-Free – A product with zero or ultra-low levels of formaldehyde, a carcinogen and chemical known to pollute indoor air.
Wind washing – Wind driven air passing through or behind the thermal insulation within a home, causing significant heat loss, drafts and possibly condensation.
When is This Applicable? Attics, walls and floors can be insulated at any time, but it is often easier, less expensive and more effective during new construction or a renovation. Insulation is
required any time you build a new home or addition, and an update to existing insulation may be required depending on the extent of remodel or retrofit. The energy code has specific insulation minimums.
Adding or replacing insulation may also be applicable if the original installation was insufficient, installed poorly, or has been disturbed. Common errors in installation include gaps between pieces of insulation, compression, and improper cutting around wall penetrations such as ductwork, plumbing or electrical wiring, and ceiling penetrations such as can lights or fans. Examples of activities that may disturb insulation include:
• Use of attics for storage;• Repairs to plumbing or electrical system;• Additions of low voltage wiring, like
networking, security, video, audio and cable or satellite TV wiring;
• Rodent activity;• Installation of ducts and vents; • Effects of gravity on floor insulation; and • General home maintenance.
What Makes it Green? Adequate and properly installed insulation has major benefits to the homeowner, including both financial and comfort improvements. Additionally, maximizing the R-value of insulation will improve comfort and reduce utility bills. Lastly, improved whole-building energy performance can contribute to meeting requirements for Northwest ENERGY STAR Homes and help earn you points through Built Green and LEED for Homes. Insulation with low-emitting and recycled content often earns points in these rating systems as well.
NU
MB
ER
13
L* | King County

2
Feb. 2015, Version 1
Insulation continued
1502_4454w_DPER_13gs_INSULATION.indd
Best Practices Before choosing standard fiberglass batt insulation, review the pros and cons and other considerations of the following options.
INSULATION TYPE
R-VALUE PER INCH
PROS AND CONS
BEST PRACTICES
WHERE TO INSTALL
Cellulose 2.9 to 3.6 High recycled content. Can be recycled. Fills cavities more effectively than batts.
Select an ammonium sulfate-free product.
Attics, new walls, existing walls.
Fiberglass batt 2.6 to 4.3 Lower first cost. Familiarity among installers. Requires close attention and careful detailing around wiring and pipes, etc.
Select high density batts for slightly higher R-value and better resilience. Many options available with high recycled content.
Prioritize GreenGuard-labeled products to protect your health.
Floors, attics, new walls.
Blown-in Fiberglass (BiB) 3.6 to 4.4 Fills cavities more effectively than batts.
Select high recycled content and low VOC products.
Attics, new walls, existing walls.
. r^
*
Iassi
'.'4

3
Feb. 2015, Version 1
Insulation continued
1502_4454w_DPER_13gs_INSULATION.indd
INSULATION TYPE
R-VALUE PER INCH
PROS AND CONS
BEST PRACTICES
WHERE TO INSTALL
Spray Foam Insulation 5 to 6 Best at stopping air flow. High R-value per inch. High embedded energy. Higher first cost than batts. Not recyclable.
Choose a qualified installer and ensure you completely fill cavities either with spray foam alone or a “flash and batt” technique combined with fiberglass batts.
Use a minimum of two pound foam to avoid air bubbles and potential condensation.
Walls, underside of roof, rim joists, knee walls. Optimal for use in homes with limited space due to stud spacing.
Rockwool 3.7 to 4.2 Rockwool is vapor-permeable, fire-retardant, and moisture- resistant and works will to provide exterior insulation on existing or new wall assemblies.
Rockwool comes in batts or panels.
Consider the fastening system when installing siding and furring strips (if using a rain screen) over thick layers of rockwool.
Exterior side of new or existing walls, wall cavities, roof cavities
Rigid Insulation / Foam board
High embedded energy, concerns about ozone depleting byproducts of manufacturing process. Flammable. High R-value per inch. Not recyclable.
Exterior side of new walls. Inside or outside of basement walls. Provides improved envelope efficiency.
.
»*
ssn
' U I _ fl

4
Feb. 2015, Version 1
Insulation continued
1502_4454w_DPER_13gs_INSULATION.indd
In order to most effectively insulate your home:
• Air seal cracks and penetrations before installing any insulation to ensure full R-value.
• Regardless of which type or brand of insulation you select, hire a contractor who will guarantee a “RESNET Grade I” installation quality – this will ensure you get the full R-value and best possible performance.
• Install a blown-in product rather than batt when possible – a higher quality install and better coverage are more likely.
Any attic insulation should be smooth across the entire home. Mounding, lumps, valleys, voids and other problems with uniformity significantly reduce the overall R-value of the insulation. Source: O’Brien & Company.
Here, loose-fill blown cellulose insulation covers the attic correctly – there is no indication of more or less insulation in any one area. Depth is uniform and smooth, and the code-required insulation ruler is visible near the back left to demonstrate insulation depth. Source: O’Brien & Company.
Some houses may contain vermiculite insulation; a shiny, brown rock-like material roughly the size of a pea. This insulation potentially contains asbestos and could be a health hazard if disturbed and inhaled. If you find this type of material:
• Do not perform any work that might disturb the material.
• Hire an AHERA Building Inspector to evaluate and test vermiculite.
• Conform to local remediation requirements and hire an abatement contractor as necessary.
• You may need to file a notification with your jurisdiction to remediate, renovate or demolish a building containing asbestos.
Vermiculite insulation is often nugget-shaped and silver-gold or gray-brown. Source: Agency for Toxic Substances & Disease Registry
m
*

5
Feb. 2015, Version 1
Insulation continued
1502_4454w_DPER_13gs_INSULATION.indd
• In attics where there is more room, add more insulation than required by code.
• Utilize raised heel trusses to enable more insulation around the perimeter of the attic/roof.
• Install eave baffles in vented attics to prevent wind washing at exterior walls from reducing the R-value.
• Select fiberglass products with high recycled content and no-added urea formaldehyde. Look for the GreenGuard label.
• Select cellulose insulation with 100 percent sodium borate additive and no ammonium sulfate, which can release an ammonia odor if it gets damp or wet.
Applicable References/Standards Energy Compliance Form: This required form includes tables of information for required insulation levels in different framed elements of your home. It also includes a description of the air barrier and insulation installation criteria for each component in your home in Table R402.4.1.1.
Resources For the complete King County Green Building Handbook and individual Green Sheet PDF files, please visit our website at: http://kingcounty.gov/property/permits/publications/greenbuild.aspx. For additional information, please email [email protected] or call 206-296-6600.
See these related DPER Green Sheets (GS):
• Air Sealing Your Home, GS Number 10• Alternative Heating Systems, GS Number 19• Duct Sealing, GS Number 11 • Fresh Air Ventilation, GS Number 14 • Furnace Replacement, GS Number 18• Right Sizing Heating/Cooling Systems,
GS Number 17• Thermostats, GS Number 16
Insulation Overview: This resource from Green Building Advisor covers the basics of insulation. Additional resources, such as insulation types, require a subscription to the site, but there are many free resources available.
Greener Options for Fiber Glass and Cellulose Insulation: List of products third-party tested for high recycled content and low emission of VOCs.
Puget Sound Energy; Energy efficiency rebates and offers: Current offers for rebates on a variety of items, including insulation.
Puget Sound Clean Air Agency; Regulating Asbestos: Local considerations, guidance and resources on asbestos containing materials.
Permit Tips If you are adding insulation to an existing home (to the attic, walls, or floor/crawlspace/basement),typically you do not need a permit. However, if you are building new, adding on, or embarking on a significant remodel, then insulation is required as part of Energy Code requirements and inspections are required prior to drywall or cover. Plan reviewers will look for the insulation levels that are required by code.

Department of Permitting and Environmental Review (DPER)
DP
ER
GR
EE
N S
HE
ET
Feb. 2015, Version 1
Fresh Air VentilationOverviewFresh air can do wonders for a home and there are a number of ways to provide an appropriate supply of outside air. By installing design features such as operable windows, skylights and through-wall vents, as well as mechanical equipment such as exhaust fans and ventilators, you can ensure adequate fresh air will be brought into a home to dilute and remove contaminants, such as emissions from furniture and cleaning products. These measures can also help mitigate and avoid the effects of excessive moisture inadvertently introduced through daily activities such as cooking and showering.
When is This Applicable? A mechanical ventilation system is required to meet code in all new construction projects, and highly recommended in all projects where you are adding additional insulation and air-sealing, as well as when you are doing kitchen and bathroom renovations. Even if a home has mechanical ventilation, it is worth testing its efficiency and effectiveness if you are planning a remodel, so an upgrade can be included in the scope if needed.
Improving insulation and air sealing of your home (which sometimes includes window replacement) reduces the amount of heat that escapes during the winter, reducing your energy bills. However, since it also reduces the amount of air moving in and out of your house, it is important to improve your ventilation system at the same time to maintain adequate fresh air supply.
What Makes it Green? One solution to indoor pollution is dilution! Indoor air quality is affected by emissions from paints, glues, furnishings and cleaning products, pesticides, engine oil and gasoline (brought in on clothing and shoe soles), as well as pet hair and other allergens. Moisture from cooking, cleaning, bathing and breathing may also raise the relative humidity of indoor air to the point where the house feels uncomfortable and mold may grow on cool surfaces, introducing more contaminants. Points to consider when selecting home ventilation equipment:• Code ventilation requirements reflect a
nationally-approved standard for what is an adequate supply of fresh air to ensure good indoor air quality in normal occupancy conditions.
• By choosing ENERGY STAR fans to meet the code requirements and completing the necessary King County permit forms, you are meeting the prerequisite requirements related to ventilation for LEED for Homes, Built Green and Northwest ENERGY STAR Homes.
• If you choose energy- or heat-recovery ventilation and/or get your fan flows tested by an independent energy rater/verifier you could earn additional points under LEED for Homes and Built Green and save money over time.
Best Practices Operable windows are a great source of fresh air ventilation. A mechanical ventilation system helps to ensure you have sufficient fresh air, even during the heating season when windows tend to stay closed for extended periods. There are three typical approaches to mechanical ventilation in homes:
NU
MB
ER
14
L* | King County

2
Feb. 2015, Version 1
Ventilation continued
1502_4454w_DPER_14gs_VENTILATION.indd
Exhaust ventilation – This is the most common approach in King County in recent years. This approach uses an exhaust fan (choose ENERGY STAR labeled fans only), running continuously to pull air out of the house. Fresh “make-up” air is pulled in through leaks in the building shell or through small “trickle” air vents in window frames. The code requires that make-up air is provided directly to living spaces, kitchen, sleeping rooms and other regularly occupied spaces. This approach typically has the lowest installation cost and is moderately effective.
Window trickle vents are used in conjunction with whole house exhaust fans to provide fresh air ventilation. With proper planning and controls, the bathroom exhaust fan can double as the whole house exhaust fan. Source: O’Brien & Company.
Supply ventilation – In homes with a ducted forced air system, a fresh air duct from outside the house is connected to the return plenum of the duct system, with a mechanical damper which opens and closes to control the fresh air flow. The damper is controlled by a “smart cycler” which monitors heating system runtime to make sure you get sufficient ventilation and opens and closes the fresh air damper to make sure you don’t get too much. Ducts provide make-up air to all regularly occupied spaces. This option is moderate in cost, and moderately effective, though it may increase your heating and electricity bills if your furnace has a single speed fan.
Going Further - Energy and Heat Recovery Ventilators (ERV/HRV)
If you have a very airtight home (significantly below the code minimum), balanced ventilation with energy recovery will provide the most effective ventilation and make sure you get the best from your energy efficient home. An energy recovery ventilator uses heat from stale exhaust air to pre-warm the incoming fresh air, without mixing the two streams. ERVs capture the latent energy of the humidity in the air in addition to the heat exchange only (as in an HRV).
If you or your family have allergies or chemical sensitivities, an ERV with a high-efficiency filter will allow you to increase ventilation rates to improve your indoor air quality without spending a lot more on heating. ERVs are not certified by ENERGY STAR; look for a Home Ventilation Institute (HVI) rating with a Sensible Recovery Efficiency of 75% or higher and fan efficacy of 0.8CFM/Watt or higher.
' iA J ,4'v -: :
iS WS% S5
4

3
Feb. 2015, Version 1
Ventilation continued
1502_4454w_DPER_14gs_VENTILATION.indd
Balanced Ventilation – This approach uses both a supply fan and an exhaust fan whose controls are connected to ensure they operate at the same time and flow rate to provide balanced flow. Exhaust and make-up air are ducted from and to occupied spaces, either through a dedicated duct system, or through a central forced air system. Energy recovery ventilation is an upgrade that provides balanced ventilation, improved thermal comfort
and energy efficiency. This approach is more expensive than the other systems, but is the most effective approach. Energy recovery typically offsets the energy cost of added ventilation and fan operation and generally saves money in the long run.
The following table includes considerations applicable when choosing a ventilation strategy and equipment.
VENTILATION STRATEGY AND EQUIPMENT CONSIDERATIONSPhase/Component Considerations More Information Design / Planning • Hire a contractor who is familiar with
all the ventilation options.
• Ensure that they will perform the necessary calculations and design the system accordingly.
• Understand which ventilation approach suits the systems in your home.
Ask the contractors you are talking to about which ventilation system they recommend and confirm that calculations and system sizing are included in their scope.
Check the state code ventilation requirements for the size and occupancy of your home.
Equipment • Ask for ENERGY STAR fans rated for continuous operation. Variable speed fans with DC motors are the quietest and most energy efficient, and can be adjusted if you need more ventilation.
• If installing a supply ventilation system, ensure that your contractor includes a smart cycler in your system specification.
• Ensure the contractor tests the system as part of the installation scope to be sure it is functioning properly.
• Request clear instructions for use from the contractor / installer.
A variable speed fan with a DC motor may use as much as 80% less energy than a single speed fan with an AC motor.
A supply ventilation system integrated into your central forced air system without a smart cycler will significantly increase your heating costs in winter and will not give you adequate ventilation in summer.
Ducting • Sheet metal duct is preferred.
• All ducts should be sealed with appropriate sealant to the fan box, at joints and where they penetrate the building envelope.
• The fan box must be sealed to the ceiling.

4
Feb. 2015, Version 1
Ventilation continued
1502_4454w_DPER_14gs_VENTILATION.indd
VENTILATION STRATEGY AND EQUIPMENT CONSIDERATIONSPhase/Component Considerations More Information Testing / Maintenance Testing after installation
• Have the fan flow tested once it is installed to ensure it is delivering the required flow – an energy rater can do this, or ask the contractor to provide a testing certificate.
Maintenance
• Clean fans and any filters every 6 months or more frequently according to manufacturer’s guidance.
• Periodically ensure the exterior duct “flappers” are functioning properly, and air is flowing in or out during operation.
• If you have a “smart cycler” (see Supply Ventilation above), hire an energy rater or HVAC contractor to confirm proper operation every few years or as needed.
continued
ResourcesFor the complete King County Green Building Handbook and individual Green Sheet PDF files, please visit our website at: http://kingcounty.gov/property/permits/publications/greenbuild.aspx. For additional information, please email [email protected] or call 206-296-6600.
See these related DPER Green Sheets (GS):
• Furnace Replacement, GS Number 18• Alternative Heating Systems, GS Number 19• Thermostats, GS Number 16• Right Sizing Heating/Cooling Systems,
GS Number 17• Duct Sealing, GS Number 11 • Insulation, GS Number 13
Designing a Good Ventilation System – This article from Green Building Advisor discusses standards, choices, and pros and cons of ventilation system types.
This is one example of a heat recovery ventilator located within a conditioned space. Source: O’Brien & Company.
Applicable References/Standards Energy Compliance Form: This required form includes ventilation rate tables for continuous and intermittent ventilation.

5
Feb. 2015, Version 1
Ventilation continued
1502_4454w_DPER_14gs_VENTILATION.indd
Permit TipsMechanical ventilation is required with the permitting of all new, heated spaces > 500s.f. Since there are many options for ventilation, research your options and identify your preferences before filing a permit application. Making an informed decision may provide you with additional energy, comfort, health, and durability benefits.

Department of Permitting and Environmental Review (DPER)
DP
ER
GR
EE
N S
HE
ET
Feb. 2015, Version 1
Toilets, Showers & FaucetsOverviewYou can get big savings through easy, small improvements to your home’s water fixtures. Whether you are dealing with a constantly running toilet, a barely-there leak in the background, or an older showerhead – you might be surprised at how much water these seemingly small culprits consume. Simple water conservation measures incorporated into individual projects are easy to do, have little to no cost premium, and can save you money on your energy bill while also stretching our region’s water resources.
DefinitionsGallons per Minute (gpm), Gallons per Flush (gpf) – The unit for measurement of water use by different fixture types. Faucets and showers are measured in gallons per minute, toilets and urinals in gallons per flush.
Potable Water – Water safe enough to be consumed by humans.
Aerator - A flow restrictor device that can be screwed into the tip of modern indoor water faucets, delivering a mixture of water and air to reduce water use but maintain performance.
When is This Applicable? You can crack down on high water using fixtures as an individual side project or as part of a remodel, as well as make water-smart choices on new fixtures and appliances for new construction projects. Code requires flow rates that are set by the Energy Policy Act (EPAct92), yet there are
many cost-neutral or cost-effective choices for even more efficient options. Out of date water fixtures are usually relatively easy to replace with new and more efficient options, so any chance a project has to update fixtures is a great opportunity for both water and septic savings. Most fixtures which comply with code do not cost more and do not require costly design considerations. It’s easy!
What Makes it Green? The average metered household in the U.S. spends $1,100 per year in water costs, but can save $350 from retrofitting with WaterSense labeled fixtures and ENERGY STAR® qualified appliances. According to the U.S. EPA, if all U.S. households installed water-efficient fixtures and appliances, the
Worldwide, only 3 percent of all water is freshwater—but most of it is frozen or underground and difficult to harvest. In fact, only about 0.3 percent of the water on the planet is freshwater that we can actually access and use. Researchers have found that, since 1900, U.S. water use has increased six times while the population has only doubled. Clearly, our limited water reserves are an important resource to protect, but how can your project help?
• Efficient water fixtures can significantly reduce the amount of potable water used and lessen the stress on the local water table.
• More efficient toilets have a big impact: toilet flushing is the largest single use of water (consuming up to 40 percent of residential water use).
NU
MB
ER
15
L* | King County

2
Feb. 2015, Version 1
Toilets, Showers & Faucets continued
1502_4454w_DPER_15gs_WATERfixtures.indd
country would save more than 3 trillion gallons of water. Saving water also saves a significant amount of pumping energy (whether on wells or municipal water) and treatment energy (municipal water). The following additional benefits make the case for choosing high efficiency water fixtures:
• Reducing water use reduces wastewater and thus prolongs the life of septic fields and tanks;
• Water efficient fixtures help lower household energy use, such as reducing the amount of water heated for showers; and
• Choosing high efficiency water fixtures can help you obtain Northwest ENERGYSTAR
Homes, LEED for Homes, and Built Green certification
• WaterSense New Home certification
Best Practices • Consider using non-potable water, such
as rainwater (see the Rainwater Card) or greywater for toilet flushing.
• Prioritize fixtures with the WaterSense logo, which are independently certified to help save water, energy, and money without sacrificing performance. The table below shows WaterSense savings beyond code, along with other fixture-specific considerations:
For all water fixtures, look for the WaterSense Logo
Maximum Flow Rate to meet code (as determined by the Energy Policy Act)
WaterSense Flow Rate Other considerations
Toilets
Close up of a dual-flush mechanism:
1.6 gallons per flush (gpf)
1.28 gpf
Or
1.6 / 1.1 gpf for dual-flush models
Toilets comprise at least 30 percent of daily household water use, making it the main source of water use.
Dual flush toilets can significantly reduce water use by providing a low-flush option for liquid waste (between .8 gpf and 1.1gpf), and a full flush option for solid waste (between 1.28gpf and 1.6gpf). Use the MaP Test to find an effective and efficient toilet.
If interested in using non-potable water, such as rainwater or greywater, for toilets, contact the Department of Public Health.

3
Feb. 2015, Version 1
Toilets, Showers & Faucets continued
1502_4454w_DPER_15gs_WATERfixtures.indd
For all water fixtures, look for the WaterSense Logo
Maximum Flow Rate to meet code (as determined by the Energy Policy Act)
WaterSense Flow Rate Other considerations
Showerheads 2.5 gallons per minute (gpm)
1.75 gpm There are showerheads that are effective at even lower flow rates (1.25 – 1.5 gpm), and reducing shower times also effectively save a lot of water.
Faucets Bathroom Faucet:
2.2 gallons per minute (gpm)
Kitchen Faucet:
2.2 gallons per minute (gpm)
Bathroom Faucet: 1.0 gpm
Kitchen Faucets are not rated by WaterSense
Consider retrofitting existing fixtures with aerators. Choose aerators for bathroom faucets (< 1.0 gpm) and kitchen faucets (< 1.75 gpm) to provide a steady stream of water pressure while reducing water flow.
Resources For the complete King County Green Building Handbook and individual Green Sheet PDF files, please visit our website at: http://kingcounty.gov/property/permits/publications/greenbuild.aspx. For additional information, please email [email protected] or call 206-296-6600.
See these related DPER Green Sheets (GS):
• Rainwater Harvesting for Outdoor Uses, GS Number 2
• High Efficiency Appliances, GS Number 12
Saving Water Partnership: This partnership of local water utilities in King County and Seattle works together to help customers save water and money. Look for Toilet Rebates, water use calculators, and helpful tips for your home, garden, and landscaping.
WaterSense: Information on water use reduction and appliance and fixture certification.
Doing Our Business: This one-page brochure discusses septic systems dos and don’ts and discusses greywater use both inside and outside the house.
iJmi

Department of Permitting and Environmental Review (DPER)
DP
ER
GR
EE
N S
HE
ET
Feb. 2015, Version 1
Thermostats OverviewAs you know, a thermostat allows you to control the heating and/or cooling system in your home. What you might not know is that there are quite a few different types that vary from a simple temperature range dial, to one that can be programmed with a customized schedule, to newer super high-tech “smart” thermostats that include occupancy sensors, remote control, learning algorithms, and even voice control! Regardless of the bells and whistles, most thermostats and heating/cooling systems are truly capable of only two modes; on or off. That said, be aware that some systems, such as gas furnaces and heat pumps, may be capable of a low and a high stage, and therefore the thermostat should be compatible with system capabilities.
DefinitionsSet point – The preferred target temperature on a heating and cooling system’s thermostat.
Setback – A strategy where the temperature set point is temporarily expanded outside the typical temperature setting, for example, at night or during the work day.
Electric heat lock out – A heat pump thermostat feature where electric heat (also called strip heat, auxiliary heat, or emergency heat) is temporarily locked out to allow the compressor to run longer in very cold weather. When heat pumps use electric strip heat, their efficiency plummets so it is advantageous to prevent the strip heat from being necessary.
Deadband – A programmed temperature buffer that prevents inefficient or overlapping system operation between heating and cooling needs.
When is This Applicable? This is a simple and inexpensive change that can save you money. For new construction and mechanical system replacements, the 2012 Washington State Energy Code (R403.1.1) requires that any forced-air furnace have a programmable thermostat capable of a weekday program and a weekend program. It also requires a minimum 5°F deadband between heating and cooling set points, a vacation setback mode, auto start with intelligent recovery, and heat pump electric heat lockout capabilities. For existing systems, now is the best time to start operating your system optimally, or considering whether a new thermostat is beneficial to you and your home.
What Makes it Green? Learning to optimally use your existing thermostat or purchasing a new thermostat may improve the energy efficiency of your home and help reduce utility costs. Optimally controlling your heating and cooling equipment can also help prolong the life of your equipment which is good for your pocketbook and the environment.
Best Practices Whether you are looking to make the most of what you already have, exploring options for replacement, or building new, consider the following best practice opportunities.
NU
MB
ER
16
L* | King County

2
Feb. 2015, Version 1
Thermostats continued
15021_4454w_DPER_16gs_THERMOSTATS.indd
Using the thermostat you have now:• First, ensure your thermostat is best
matched with your system type. Look at the user’s manual for your furnace or heating system, and confirm whether you have a single-stage or dual-stage system. Ensure your thermostat enables compatible features. If you have questions, call a qualified, licensed mechanical contractor.
• Next, ensure you are using your thermostat optimally.
• For manual thermostats – only turn the system to your desired set point when you are present; otherwise, adjust the set point to save energy while you are away.
• For programmable thermostats – confirm the programmed schedule matches your current lifestyle including reducing the thermostat at night (68 degrees in winter and 78 degrees in summer).
• Learn to use the features of your thermostat in conjunction with the heating and/or cooling system, especially setting back. Many thermostat user manuals are easily found by searching for the make/model online.
• Consider that programmable thermostats do not necessarily save energy automatically. In a recent study, only 50 percent of homes used their
programmable thermostat correctly/optimally. To improve efficiency, ensure you use your according to your schedule.
• If using a heat pump, make sure it has an outdoor thermostat – this ensures the system does not run in the less efficient auxiliary or emergency heat mode. This feature is also called electric heat lock out.
Choosing a new thermostat:All of the tips for existing thermostats apply to choosing and using new thermostats as well. Consider the following when choosing among the numerous options for new thermostats.
• If replacing an old, mercury switch style thermostat, the thermostat must be treated as hazardous waste and disposed of properly (see resources).
• Consider a smart or learning thermostat, one that gathers information about your temperature preferences and automatically adjusts hourly and weekly programming to fit. There is rapid development in this industry. Some smart thermostats even provide troubleshooting data about your heating and cooling system to alert you of problems.
• Pick the thermostat that best fits your desired level of interaction with it.

3
Feb. 2015, Version 1
Thermostats continued
15021_4454w_DPER_16gs_THERMOSTATS.indd
NEW THERMOSTAT CONSIDERATIONS Manual Thermostats are the simplest type of thermostat. Some only have the current set point while others may display the current temperature, the current set point, and have buttons for higher or lower temperature. These may be digital or simple dials.
Programmable thermostats provide added features for occupants who want to have heating and cooling based upon a regular schedule. These allow for multiple, pre-determined set-back periods and temperature set points. Most allow for 2-4 programs per weekday and on the weekend. For example, a Monday to Friday schedule may mimic the schedule of a workday, whereas the weekends reflect more time at home. This is the most common pre-programmed schedule for these thermostats. They are geared for people who work outside the home during the week and spend time at home on the weekend. These programs can be changed and also have manual override features.
Source: O’Brien & Company
Smart, or Learning thermostats have all the same functionality of a programmable thermostat with added capability to track manual changes to programming and adjust accordingly. Since this type of thermostat adjusts to occupant patterns, it minimizes the need to manually refine programming over time, as it is done automatically.
Smart thermostats that are integrated with your phone or computer typically send your information, system control patterns and set points to an information gathering database. This information is used in aggregate for customer research and product improvement, and for some may be a privacy issue.
The Nest Thermostat Source
Source: O’Brien & Company
o|b

4
Feb. 2015, Version 1
Thermostats continued
15021_4454w_DPER_16gs_THERMOSTATS.indd
NEW THERMOSTAT CONSIDERATIONS Remote access thermostats can be controlled with an internet connected device such as a computer, tablet or smart phone. If you leave home in a hurry and forget to turn off your system, you can shut it off remotely. Or, if you’re returning home earlier than normal and want to start the system before your arrival, a remote access thermostat can do this. Adding to the interactivity, some remote access thermostats will alert you by e-mail or text message if the temperature unexpectedly changes dramatically, when a filter needs to be changed, or if there is a problem with a part of the system. Some are capable of generating reports and providing usage information.
Example remote access thermostat enables control from various wireless devices. Source
Fun Fact: You can operate some thermostats from your smart phone!
Is a “smart” or “learning” thermostat right for you?
Do you:
• Prefer to have one main program run automatically and adapt to your manual adjustments?
• Have a budget that allows for additional initial cost of an upgrade?
• Have an interest in remote access or control?
• Have an interest in cutting edge technology?
If you answered “yes” to at least one of the above, then you might consider a smart thermostat. However, you may want to research compatibility with your equipment type and lifestyle or consult with a mechanical contractor first. The benefits and estimated savings of these thermostats may not be applicable to all systems.
Applicable References/Standards King County’s “What Do I Do With…” website provides a searchable database for where you can take your mercury-containing thermostats.
The 2012 Washington State Energy Code (Section 403 in particular) describes thermostats if you want to dig into the specifics.
continued
75— a tz

5
Feb. 2015, Version 1
Thermostats continued
15021_4454w_DPER_16gs_THERMOSTATS.indd
Resources For the complete King County Green Building Handbook and individual Green Sheet PDF files, please visit our website at: http://kingcounty.gov/property/permits/publications/greenbuild.aspx. For additional information, please email [email protected] or call 206-296-6600.
See these related DPER Green Sheets (GS):
• Air Sealing Your Home, GS Number 10• Alternative Heating Systems, GS Number 19• Duct Sealing, GS Number 11 • Fresh Air Ventilation, GS Number 14 • Furnace Replacement, GS Number 18• Right Sizing Heating/Cooling Systems,
GS Number 17• Routine Maintenance, GS Number 5
Thermostat Center: Helpful resources, including a “Buying Guide.”
Washington State University Extensions; Electric Heat Lock Out on Heat Pumps: Guidance on electric heat pump lockouts for new and existing systems.
Puget Sound Energy; Home heating rebates: Current offers for new and existing systems, including Heat Pump Sizing and Lock-out Control for your heat pump.
EPA’s Proper Use Guidelines for Programmable Thermostats: This Guide claims that proper use of a programmable thermostat (using the four pre-programmed settings) can save about $180* every year in energy costs.
Smart Residential Thermostats: Capabilities, Operability, and Potential Energy Savings: If you really want to geek out on smart thermostats, this 2012 study by WSU Extension Energy Program provides a helpful comparison table of features at the very end of the document.
Permit TipsIf submitting a permit for new construction, include a note on your plans to indicate the type of thermostat that will be installed.

Department of Permitting and Environmental Review (DPER)
DP
ER
GR
EE
N S
HE
ET
Feb. 2015, Version 1
Right Sizing Heating/ Cooling Systems OverviewSize matters! Whether you are installing equipment in a new home or replacing existing equipment, the size of the equipment should match the needs of your home. DPER requires comprehensive heating load calculations and subsequent equipment sizing calculations for new construction, but currently does not ask for calculations for furnace or system replacements. The absence of requirement should not stop you from ensuring your replacement equipment is right sized. This document provides general information about sizing regardless of building new or replacing equipment, benefits of right sizing, best practices, and resources for more information.
When is This Applicable? For new construction, the Washington State Energy Code R403.6 Equipment sizing requires heating and cooling equipment to be sized in accordance with ACCA Manual S based on building loads calculated in accordance with ACCA Manual J or other approved heating and cooling calculation methodologies. For furnace or system replacements, sizing calculations are not required but are highly recommended in order to achieve related benefits.
What Makes it Green? When equipment is right sized, the following benefits are possible:
• Save money on initial equipment cost. • Save wear and tear on equipment by
preventing short-cycling which can occur if it isn’t properly sized.
• Improve comfort and health when equipment and ducts are properly sized and positioned.
Best PracticesWhether building new, remodeling, or replacing, it is important and valuable to consider a whole house approach to heating and cooling. Improvements or changes in one part of the house, such as increasing attic insulation or air sealing, can improve the energy efficiency of your home thereby decreasing the size needed for your heating and cooling equipment.
In order to achieve the biggest bang for your buck:
• Ensure the whole house, including any planned upgrades, is fully considered when sizing equipment.
• For furnace or equipment replacement, ask your mechanical contractor to provide the load calculations prior to providing equipment estimates. Communicate any planned changes in your home including air sealing, insulations, window replacements, or additions.
• Ensure ducts (where applicable) are well sealed and properly positioned to optimize distribution of heated or cooled air throughout your home.
A snapshot view of the sizing estimation portion of the DPER Energy Compliance Form.
NU
MB
ER
17

2
Feb. 2015, Version 1
Right Sizing Heating/Cooling Systems continued
1502_4454w_DPER_17gs_SIZINGheatcool.indd
Manual J is the Industry’s standard for calculating residential heating and cooling loads. Ask your mechanical contractor to follow this standard instead of rules of thumb. Source: O’Brien & Company.
Applicable references/standards Bulletin 36: Mechanical Permits FAQs. Application requirements include, but are not limited to:
• Name and license number of Contractor • Manufacturer, Size and Model Number
of Furnace
ResourcesFor the complete King County Green Building Handbook and individual Green Sheet PDF files, please visit our website at: http://kingcounty.gov/property/permits/publications/greenbuild.aspx. For additional information, please email
[email protected] or call 206-296-6600.
See these related DPER Green Sheets (GS):
• Furnace Replacement, GS Number 18• Thermostat, GS Number 16• Duct Sealing, GS Number 11• Fresh Air Ventilation, GS Number 14 • Insulation, GS Number 13• Alternative Heating Systems, GS Number 19
PSE Rebates and Offers: Puget Sound Energy offers rebates for various energy efficient approaches.
Strategy Guideline: HVAC Equipment Sizing: describes the equipment selection of a split system air conditioner and furnace for an example house in Chicago, Illinois, as well as a heat pump system for an example house in Orlando, Florida. While these climates are different than King County, this resource is included because it contains useful definitions and process tips.
An Energy Upgrade on a Budget: This article covers an interesting case study of a residential energy upgrade and includes a subsection about energy calculations.
ACCA Manual J Brochure and ACCA Manual S Brochure: These resources provide consumers with information of how heating and cooling loads and equipment size, respectively, are properly calculated. While you will still need to complete the Energy Compliance Form, these are helpful resources
Saving Energy with Manual J and Manual D: This provides straight talk about the resistance to performing necessary calculations as well as the actual and perceived benefits of right sizing.
frki I
'd _■
A rf

3
Feb. 2015, Version 1
Right Sizing Heating/Cooling Systems continued
1502_4454w_DPER_17gs_SIZINGheatcool.indd
Permit Tips For New Construction: Sizing your heating and cooling systems is included as part of your building permit for new construction. Talk to a DPER plans examiner prior to submitting your permit to better understand and implement the requirements. The following tips will also save you time and hassle:
• Provide Manual J (or S) Forms along with permit application.
In addition to the Energy Compliance Form, clearly note the size and location of your heating and cooling equipment on your plans.
DPER will conduct an inspection (most often during framing), so be sure your heating and cooling equipment are accessible and documentation (either on the equipment itself or with the manual) is easy for the inspector to access.
For existing system upgrades/changes, DPER does not require sizing forms. See the Best Practices section for tips to have your system properly sized even if the calculations are not required.
Residential Heating System Sizing EstimationHeating and cooling systems for residential projects shall be sized in accordance with ACCA Manual S or equiv.
Indoor Design Temperature 70Outdoor Design Temp Tov'Rn^'pe
and City:Design Temperature Difference = (Use 22 for Design default if outdoor design temperature Is not Known)
(Indoor - Outdoor Design Temp) _________________ (recommended outdoor design temperatures shown on page 5)
Conditioned Floor Area (ft^) = Average floor height = ft.Conditioned Volume (floor area X average floor height) =
Sum of UA (heat loss of bldg)Envelope Heat Load
Sum of UA X Design Temperature Difference =
other fuels electric
Btu / Hour KWAir Leakage Heat Load
CV X 0.6 X Design Temperature Difference X.018 =
Concert Bru / hr to electric KW: Btu * 3413
Btu / Hour KWBuilding Design Heat Load
Air Leakage + Envelope Heat Load = Btu / Hour KWBuilding and Duct Heat Load
Buildina Desian Heat Load x 1.15 or 1.0 ( )= Btu / Hour KWUse 1.15 if ducts are located in unconditioned space; Building Design Heat Load X 1.15
Use 1.0 if ducts are located in conditioned space: Building Design Heat Load X 1.0
Maximum Heating Equipment OutputUse Building and Duct Heat Load X 1.40 for Forced Air Furnace =
Lfse Building and Duct Heat Load X 1.25 for Heat Pump system =Actual heat sizing calculation to be supplied by mechanical contractor at time of equipment installation.
Btu / Hour KW

Department of Permitting and Environmental Review (DPER)
DP
ER
GR
EE
N S
HE
ET
Feb. 2015, Version 1
Furnace ReplacementOverviewReplacing the furnace and air handler in your central, forced-air heating system with a new, energy efficient unit with closed combustion is a quick, relatively non-invasive way to reap energy savings. An inefficient furnace can seriously affect the comfort of your home while emptying your pocketbook through inflated utility bills.
Installing a new furnace can help reduce the amount of energy needed to heat your home but may be a higher first cost than other intermediate steps such as air sealing and duct sealing. That said, rising utility costs can accumulate quickly with an old, inefficient system, thereby shortening the time to see a return on your investment of a new unit.
High Efficiency Energy Star Furnace with direct vent and condensate line. This furnace also includes ducted fresh air (not shown in the photo). Source: O’Brien & Company.
DefinitionsAir Handler Unit (AHU) – Typically refers to both the furnace which heats the air and the fan that moves it around your home.
Annual Fuel Utilization Efficiency (AFUE) – This value identifies the thermal efficiency of combustion equipment like furnaces, boilers, and water heaters.
Flue Gases – The gases generated from the burning of fuel, which includes water vapor, carbon monoxide and unburned hydrocarbons. Gas burns cleaner than oil, but an older furnace that is out of adjustment may generate more toxins than a new furnace.
Condensing Furnace – In a conventional furnace, only about 80 percent of the heat energy in the fuel is transferred to the air in your home. The other 20 percent goes “up the chimney” in the water vapor and other gases. A high efficiency furnace captures half to three quarters of that 20 percent by condensing the water vapor in the flue and recycling the heat to the heat exchanger.
Modulating or Multi-stage/2-Stage burner – Single stage burners only operate at full power so they adjust heat delivery by turning off and on. A modulating or multi-stage burner adjusts the size of the flame according to how much heat is needed, which allows the furnace to run more consistently and give more even heat, while conserving fuel.
Electrically Commutated Motor (ECM) – Single speed motors only allow for one fan speed, whereas ECMs enable a variable speed of air flow across a burner within a furnace. ECMs coupled with modulating burners can improve the efficiency of your system, improve comfort, and potentially
NU
MB
ER
18
I
CZEl
<*:

2
Feb. 2015, Version 1
Furnace Replacement continued
1502_4454w_DPER_18gs_FURNACEreplace.indd
increase the life of your furnace by reducing the on-off cycles of the equipment.
When is this Applicable? If your system is more than 15 years old, is noisy or in need of frequent repair, if your heating bills are going up, or if your carbon monoxide detector goes off periodically, replacement may be a good idea. If you are doing a major rennovation you may be required to upgrade your furnace to current code efficiency standards – see Permit Tips.
For new construction projects or when considering changing your heating/cooling system entirely, see “Alternative Heating Systems” within the Green Building Handbook.
What Makes it Green? Benefits of furnace replacement include:
• Reduced energy costs:• Efficiency – a new furnace may use
15 to 20 percent less fuel than a 15 year old furnace.
• Fuel-switching – propane and particularly natural gas are lower cost than oil and much lower cost than an electric furnace.
• Improved comfort and quietness of system – new furnaces can have multi-stage burners and variable speed fans (ECMs) for more consistent temperatures and quieter operation.
• Improved health / air quality – older furnaces can leak flue gases into your home from the flue or through failing heat exchangers.
• Potential to earn additional points through Built Green and LEED for Homes based on the efficiency of equipment or the overall home performance.
Best Practices • Invest in envelope air sealing, duct sealing
and insulation BEFORE spending more money on an efficiency upgrade.
• Consider hiring an energy analyst or work with a local energy efficiency program. They will help you determine if your furnace needs replacing and what size is appropriate, based on your home and duct system design.
• Select a reputable contractor – see “Heating & Air Conditioning Installation Bid Comparison Checklist” listed in Resources.
• Ensure they size the system properly, rather than installing a same-sized unit:
• Check that they account for added or planned insulation, new windows, envelope and duct sealing, additional rooms, etc. in the load calculation and sizing selection.
• Check that the duct system can handle the airflow from the new AHU.
• Buy an Energy Star direct vent condensing furnace with modulating burner and electronically commutated motor (ECM) with AFUE greater than or equal to 95%. The first cost is higher, but the benefits include fuel savings, improved comfort, and quiet operations. And, there is likely a PSE rebate for the upgrade.
• Determine if a switch to a different system (such as ductless mini-split heat pump) may be applicable for your home. Ductless heat pumps are an increasingly popular option for replacing oil, electric, and propane

3
Feb. 2015, Version 1
Furnace Replacement continued
1502_4454w_DPER_18gs_FURNACEreplace.indd
furnaces, often providing an especially good return on investment. See the Heat Pumps Green Sheet for more information.
• See http://www.energystar.gov/index.cfm?c=heat_cool.pr_maintenance for a heating system maintenance checklist.
References/Standards DPER Bulletin 36: Mechanical Permits FAQs
Energy Compliance Form: This required form includes guidance for the heat loss calculations that determine system sizing.
Residential Mechanical Permit Application /Affidavit Form: This can be filled out by homeowners or mechanical contractors but must be completed for any furnace replacement.
ResourcesFor the complete King County Green Building Handbook and individual Green Sheet PDF files, please visit our website at: http://kingcounty.gov/property/permits/publications/greenbuild.aspx. For additional information, please email [email protected] or call 206-296-6600.
See these related DPER Green Sheets GS):
• Air Sealing Your Home, GS Number 10• Alternative Heating Systems, GS Number 19• Duct Sealing, GS Number 11 • Fresh Air Ventilation, GS Number 14 • Insulation, GS Number 13 • Right Sizing Heating/Cooling Systems,
GS Number 17• Routine Maintenance, GS Number 5• Thermostats, GS Number 16
PSE Rebates and Offers: PSE offers numerous rebates; click on “Home Heating” to find furnace-related rebates and current offers.
Energy Saver 101 Infographic: Learn everything you need to know about home heating.
Certified gas furnaces labeled with the standard ENERGY STAR logo will be up to 16 percent more energy efficient than baseline models and can save an average of $94 in energy costs per year. Source: ENERGYSTAR
What about my ducts? The efficiency (tightness) of your duct system has a huge impact on energy use, comfort, and even durability of your home. When installing a new system in new construction, be sure to test and seal the ducts during framing for optimum results. For furnace and system replacements, prioritize duct sealing as much as equipment choice and when possible bring them inside! Ducts located outside the conditioned space of your home (i.e. in your attic, garage, or crawlspace) greatly impact the efficiency and air quality. If all your ducts are “inside,” duct testing is not required by code because duct leakage is less of a concern. See the “Duct Sealing” card for additional information.
ENERGY STAR

4
Feb. 2015, Version 1
Furnace Replacement continued
1502_4454w_DPER_18gs_FURNACEreplace.indd
Heating & Air Conditioning Installation Bid Comparison Checklist: Use this when hiring an HVAC Contractor.
WSU Extension Energy Program: This website provides a wealth of information and resources related to the energy code and energy efficiency in Washington State.
Permit Tips For furnace replacements, the permit is “over the counter” and no plan review is required. Since a sizing form is not required for furnace replacements, see the “Sizing Heating/Cooling Systems” card for best practices associated with sizing. DPER will conduct an onsite inspection once a furnace is installed, so keep the equipment and installation documentation attached to the furnace.
If a furnace is part of a building permit, the sizing calculations (Energy Compliance Form) are reviewed by DPER staff. To ensure success, consider consulting a mechanical contractor to help with the requirements by providing a Manual S calculation.
If you are installing a propane furnace and adding a new propane tank on your property, you will also need to apply for a Fire Permit. Call the Customer Service Center for details.

Department of Permitting and Environmental Review (DPER)
DP
ER
GR
EE
N S
HE
ET
Jan. 2015, Version 1
Heat PumpsOverviewMany homes in King County use one of the following heating systems:
• Oil-, natural gas- or propane-fired forced air
• Electric resistance heating – baseboard or fan coil
• Electric forced airThese systems are familiar, reliable and cost effective for conventional homes. However, as new and remodeled homes become better insulated and more airtight, many of these systems simply have much more heating capacity than is needed.
In response to these changing needs, heating systems that used to be seen as “alternative” are now becoming more mainstream. These systems fall into two main categories – 1) high efficiency systems, such as heat pumps; and, 2) renewable energy systems, such as active or passive solar design. This Green Sheet provides information about Heat Pumps; for information about solar design, see the Solar Energy Green Sheet.
When is This Applicable? Heat pumps can be installed to meet code requirements provide a source of heating in all occupiable spaces in new construction, major renovations and commercial remodels.
They may also be used to replace an existing heating appliance upon failure or near the end of its service life, or when adding a cooling system.
What Makes it Green? Heat pumps are typically selected by owners who value energy efficiency, renewable sources of energy, energy independence, and low-carbon emissions, or whose homes are very energy efficient and in need of smaller heating systems to optimize their performance.
Air-source and ground source heat pumps can help meet the energy performance prerequisites and earn additional credit in Northwest ENERGY STAR Homes, Built Green, and LEED for Homes, as will renewable energy heating systems, such as solar thermal collectors and passive solar design.
Typically, while some alternative heating systems may have a higher installed cost than conventional systems, they offer long term energy consumption savings and protection from the future volatility of energy prices. Ductless heat pumps, for example, can be more than three times as efficient as electric resistance heat, and are small, modestly priced, and quiet. Ductless heat pumps are relatively easy to install into existing homes.
NU
MB
ER
19
L* | King County

2
Jan. 2015, Version 1
Heat Pumps continued
1501_4454w_DPER_19gs_HEATpumps.indd
Best Practices The table on the following pages provides considerations and examples of heat pumps for your project.
SYSTEM TYPE CONSIDERATIONS BENEFITS Heat Pumps (general) A heat pump is an electric appliance that works in a similar way to a refrigerator or air conditioner, but in reverse. The system uses electricity to drive a refrigeration loop that moves heat from a source (outside your house) to a point of use (inside your house). Heat pumps can be at least three times as efficient as electric resistance heating.
Air Source Heat Pump The heat source is the outside air (or a heated space that requires cooling, when your home requires heating).
Sketch of a typical air source heat pump. From VippHeating.
Ductless mini-split heat pump. From RevisionHeat
• Moderately priced to install, and very energy efficient.
• Current “inverter” technology performs much better than typical single speed central forced air heat pump systems common until the end of the last century.
• Inverter-based heat pumps can provide substantial heating even when the outside air temperature is zero degrees Fahrenheit.
• Ductless heat pumps are great for open plan homes, and may be a good choice for modest retrofit projects, as a replacement for an oil or electric forced air furnace. They are easily sized to fit additions, bonus rooms, and similar projects. View more DHP products at www.goductless.com.
Ductless mini-split heat pumps (DHPs) are small, quiet and can be easily installed into existing homes.
Energy Star certified DHPs generally have variable speed condensers, so they can be sized to provide adequate heat on the coldest day of the year while still performing efficiently when heating loads are smaller.
Heat pumps should be controlled by heat pump-specific thermostats that are designed to optimize the performance of the heat pump.
DHPs can be more than three times as efficient as electric resistance heat.njfnu
k?

3
Jan. 2015, Version 1
Heat Pumps continued
1501_4454w_DPER_19gs_HEATpumps.indd
SYSTEM TYPE CONSIDERATIONS BENEFITS Ground Source Heat PumpThe heat source is the ground, groundwater or sometimes a lake, river or pond (permit requirements may be complex if using a natural – not manmade – water body as the heat source).
Diagram of a ground source heat pump horizontal loop. Source: Department of Energy.
• Expensive to install, but very efficient.
• Heat exchange loops require vertical wells (for small sites or poor soils), horizontal trenches (for large sites with good soils), or a large pond or lake as the heat source.
• Loop installation contractor must be qualified and experienced to ensure long-term performance – poorly installed systems may never meet their efficiency potential.
If your priority is the most efficient heating system money can buy, ground source heat pump is likely for you.
Ground source heat pumps can be three to five times as efficient as electric resistance heating.
Applicable References/Standards Bulletin 36: Mechanical Permits FAQs
ResourcesFor the complete King County Green Building Handbook and individual Green Sheet PDF files, please visit our website at: http://kingcounty.gov/property/permits/publications/greenbuild.aspx. For additional information, please email
[email protected] or call 206-296-6600.
See these related DPER Green Sheets (GS):
• Furnace Replacement, GS Number 18• Thermostats, GS Number 16• Right Sizing Heating/Cooling Systems,
GS Number 17• Duct Sealing, GS Number 11 • Fresh Air Ventilation, GS Number 14 • Insulation, GS Number 13
PSE Rebates and Offers: This provides information for current Puget Sound Energy rebates.
Closed Loop SystemsHorizontal /---------------- s.
i

4
Jan. 2015, Version 1
Heat Pumps continued
1501_4454w_DPER_19gs_HEATpumps.indd
Ground Source Heat Pump at 21 Acres Farm: This site provides the project details and design and permitting process for a local installation of a ground source heat pump system.
Permit Tips Alternative heating systems are covered with mechanical permits, but the following tips provide additional considerations to smooth your permit application and inspection process.
• For solar thermal panels, you will need to engineer the roof for dead loads of the panels and note the information on your plans.
• Clearly show the energy credit option you are pursuing on your Energy Compliance Form and on your plans.
Talk to a plans examiner and permit review coordinator before submitting your application.
m

Department of Permitting and Environmental Review (DPER)
DP
ER
GR
EE
N S
HE
ET
Feb. 2015, Version 1
Solar EnergyOverviewThe sun is the primary source of energy on planet Earth. You already use it to provide light and warmth directly into your home. You can increase your use of this clean, free, renewable energy by installing photovoltaic (PV) panels and solar thermal collectors to heat water or generate electricity on-site, reducing your dependence on grid-supplied energy. PV and solar thermal systems are eligible for Federal tax credits, State sales tax exemptions and other incentives. The price of PV panels has fallen significantly in recent years, making this an attractive investment opportunity
When is This Applicable? A solar energy system can be installed on almost any new or existing residential, commercial or agricultural property. You need a location that gets direct, unfiltered sunshine for most of the year. Systems are typically mounted on a south-sloping roof where load and height limit regulations must be considered, but other locations and orientations may be workable.
What Makes it Green? Solar energy systems will reduce your utility bills. They produce clean energy that helps meet County greenhouse gas reduction goals. Solar energy systems that include battery storage can reduce or even eliminate your dependence on the electrical grid, making them attractive for home sites with no existing power supply, and locations that are prone to electrical power outages.
Solar energy systems can earn additional credit in Built Green, LEED for Homes, Passive House and other green building rating systems.
NU
MB
ER
20
L* | King County

2
Feb. 2015, Version 1
Solar Energy continued
1502_4454w_DPER_20gs_SOLAR.indd
Best Practices CONSIDERATIONS AND EXAMPLES FOR SOLAR ENERGY SYSTEMS FOR YOUR PROJECTSystem Type Considerations Benefits Solar Photovoltaic (PV) Panels absorb the sun’s energy and convert it into direct current (DC) electricity, which can be stored or converted into alternating current (AC) electricity (using an inverter) for use in your home.
There are two main types of PV panels – rigid crystalline panels tend to be more efficient at converting solar energy to electricity; thin film PV is lighter, more flexible and generally cheaper, but less efficient.
Solar PV system being installed on a metal roof. Source: Studio Hamlet Architects.
• PV systems producing AC current can be connected to the electricity grid through a utility net-metering arrangement which allows you to “sell” electricity to the grid when you have a surplus, and “buy” electricity from the grid when you need more than you can produce.
• DC systems typically store electricity in on-site battery banks. Stored electricity can be converted from DC to AC before use in a home that is also connected to the grid. Some off-grid homes use DC throughout the house, but this limits lighting and appliance options
• The capacity of a PV array is typically defined by “Peak Wattage” – a measure of maximum energy output in standardized test conditions. A typical panel is about 15 square feet in area and is rated at 250 to 300 Peak Watts.
• Actual PV output depends largely on roof design, including available space, angle and orientation to the sun, amount of shading, and hours of sunlight exposure. For King County, an easy rule of thumb is that one 250 Watt PV panel with good exposure will generate about 250 kWh per year.
• In late 2014, PV panels cost about $1 to $1.50 per Peak Watt. Installed cost is roughly three to four times the panel cost, for an average total cost in the range of about $3 to $6 per Peak Watt.
A solar electric system produces clean, renewable energy for almost no cost, once the system is installed.
A grid-connected system can be optimized to give you the best output during the summer months, while letting you use utility electricity during the winter. If you produce more than you consume, your electric meter will literally run backwards.
In addition to the sales tax exemption (available through June, 2018) Washington State also pays you a “production incentive” of almost three times what you pay for electricity (with some restrictions, and expiring 2020 – See Solar Washington for details)
PV panels are very durable and have low maintenance requirements.
In recent years, the simple payback for a solar PV system has improved dramatically, from about 20 years to less than six years today, and costs are still declining rapidly.

3
Feb. 2015, Version 1
Solar Energy continued
1502_4454w_DPER_20gs_SOLAR.indd
CONSIDERATIONS AND EXAMPLES FOR SOLAR ENERGY SYSTEMS FOR YOUR PROJECTSystem Type Considerations Benefits Solar Thermal Collectors or Solar Water Heaters absorb and collect the sun’s radiant heat and transfer it to a hot water system.
There are two main types of collectors: “flat plate,” and “evacuated glass tube.” Flat plate collectors tend to have lower initial cost and are more durable. Evacuated glass tube collectors are more expensive, however they are generally believed to generate more heat in King County’s cloudy weather.
Flat Plate solar thermal collector. Source: EPA
Solar Thermal Collection on Williams Apartments. Source: Plymouth Housing.
• In King County, solar thermal is a good choice for domestic water heating, especially in multifamily buildings, but less effective for space heating because solar thermal is most efficient in the summertime, when space heating is not required.
• In addition to solar collectors, you will also require a larger than average, well-insulated combined solar/electric tank water heater, or a separate “solar pre-heat” tank to store your heated water, before running it into the regular water heater.
• Select a reputable solar installer who will properly assess your needs and the site’s best solar assets, size and design your system. Make sure they tell you what scope is included in their bids.
• Typically, the payback for solar thermal is longer than solar PV.
Go Further:
• In some “net zero energy” projects, where value is not only measured in dollars, solar thermal collectors may be used to capture and store summertime heat in the ground. A heat pump (see Heat Pumps) is then used to move that heat into the house in the winter.
Solar thermal collectors are very efficient, moderately priced and have long service life with moderate maintenance.
The best application for solar thermal is for domestic hot water heating. A standard sized system can reduce an average household’s water heating bill by 50 percent.
n% S*

4
Feb. 2015, Version 1
Solar Energy continued
1502_4454w_DPER_20gs_SOLAR.indd
CONSIDERATIONS AND EXAMPLES FOR SOLAR ENERGY SYSTEMS FOR YOUR PROJECTSystem Type Considerations Benefits Passive Solar Design Passive solar design is a heating concept used for centuries. In its current form, it typically involves a very efficient thermal envelope, with most glazing facing to the South or South west, to collect heat from the low angle winter sun, with deep horizontal shading to shade it from the summer sun. Inside these windows, a large thermal mass (such as a concrete slab floor or masonry wall) is used to buffer heat gain and store daytime thermal energy to keep the house warm at night.
Diagram of passive solar principles. Source: Wikipedia.
• With a passive solar design, you will still be required to install a mechanical heating system as a back-up. If the design performs well, the back-up heating will rarely be required. For this application, a simple efficient system, such as a ductless heat pump, will give you the lowest operating cost, but low-cost electric resistance heaters may be more cost effective overall because of the small annual demand.
• Well-designed passive solar homes in King County can meet 60 percent to 80 percent of their annual heating loads with solar only.
• Some passive solar techniques can be utilized with existing homes, such as increasing thermal mass, or smart use of window shading devices (leaving blinds open during the day and closed at night, for example).
• To get the best out of a passive solar home, the occupants must be actively involved in tuning and adjusting shading devices and other controls to get optimum performance.
In the right location, with good solar access, careful planning and design, quality construction and an active approach to tuning the home to the changing weather and occupant numbers and needs, a passive solar home can provide thermal comfort at moderate initial cost and low energy bills.
Winter Sun
Distribution
Sun naiSui
Q Control \
.
Absorber
teertm ThermalMass% *

5
Feb. 2015, Version 1
Solar Energy continued
1502_4454w_DPER_20gs_SOLAR.indd
Applicable References/Standards Bulletin 36: Mechanical Permits FAQs
ResourcesFor the complete King County Green Building Handbook and individual Green Sheet PDF files, please visit our website at: http://kingcounty.gov/property/permits/publications/greenbuild.aspx. For additional information, please email [email protected] or call 206-296-6600.
See these related DPER Green Sheets (GS):
• Insulation, GS Number 13 • Right Sizing Heating/Cooling Systems,
GS Number 17• Roofing Materials, GS Number 4
PSE Rebates and Offers: This provides information for current Puget Sound Energy rebates.
Solar Water Heaters: This Department of Energy site provides additional information for system type, storage considerations, and installation and maintenance details.
Solar Washington: This nonprofit organization works to advance the solar industry in our state. Provides information on financial incentives for installing solar.
Office of Energy Efficiency & Renewable Energy Solar Photovoltaic Resources: This site contains a plethora of information, cost estimates, market data, and resources.
Permit Tips Solar energy systems must comply with applicable fire, electrical and plumbing code requirements. The following tips provide additional considerations to smooth your permit application and inspection process.
• For solar thermal or PV panels, you will need to engineer the roof for dead loads of the panels (meaning their weight) and note the information on your plans. Many systems do not exceed the standard dead load limits for roof design;
• Talk to a plans examiner and permit review coordinator before submitting your application.
• Certain solar panel installations are exempt from obtaining a building permit (reference K.C.C. 1602)