kidding - cornerstone farm
TRANSCRIPT
Kidding
Caution: This page contains actual photographs of a doe in labor which may not be appropriate for
some children. These pictures are located at the bottom of page 8 this content.
When does Kidding start? For me kidding starts well before the doe is old enough to breed and well before she is even bred. The health and
maturity of a doe is one of the most important aspects of raising good solid Nigerian Dwarf Dairy Goats. Good health and a mature animal will cause less problems in the kidding pen and after.
A Nigerian Dwarf Goat should be no less than 7 months old when bred and of good weight and height to be able to allow the body to give nourishment to the growing kids and sustain her own health and growth. She also
needs to be in good condition; not too thin nor too fat. I have seen does that can barely sustain themselves on what their "keepers" are providing for them in nutrition and then they wonder why there is no milk for the kids,
or the kids die. On the other extreme are the "owners" that kill their goats with love and feed them too much,
causing more and different problems due to overweight. The key here is to have your doe in the proper weight and size before breeding and maintaining that good condition throughout her gestation and lactation periods.
The Gestation Period A typical gestation period in most Nigerian Dwarf Goats is 145 days and up to 150 days. Do not panic if the time
even reaches 157, but much longer than that it is advisable to have a vet check for any complications. During the early months, management does not need to change at all. Keep giving your doe enough grain for the growing kids with hay and water free choice for the first 4 months.
During the colder months of October through March, we choose to give our goats warm water twice a day. This
helps to keep them hydrated and flushes the excess toxins produced by the kids through the elimination of urine. Our goats drink more water if it is warmed then cold. This also helps the bucks keep their tract cleansed.
Hoof trimming should be done no later than 8 weeks prior to kidding. The pressure placed on the doe's abdomen during hoof trimming is very uncomfortable, stressful and not necessary.
Month Five in the Gestation Period Between 37 and 45 days prior to your calculated due date, you need to administer the proper dosage of CD&T to
your doe. This will pass the immunities onto the kids in utero. Should you miss this don't worry, there are boosters that can be given to the kids at birth and in the weeks following. Just remember to inoculate your doe a
while after she freshens. The time period of 37 - 45 days prior is critical due to that research has found that either prior or after this time, the immunities are not passed on to the kids.
At 5 weeks prior to freshening, start to increase the doe's daily intake of grain. The major growth formation of the kids is in the last month, so it is important that the doe receives enough food intake for herself and her
growing kids. Her daily intake of grain should double over a 7-day span and continue during the last 4 weeks of pregnancy and continue for her lactation period to keep in condition.
Two weeks prior to kidding is optional to clip her udder and rear of hair. This enables her to stay cleaner after she does freshen. Be careful not to chaff her by clipping too close. This is also a time to prepare a "kidding pen"
for your doe. A kidding pen is a temporary secure area where your doe will be placed a few days before she kids. It should be dressed in clean straw and large enough for 2 people to move in should your doe need assistance.
Getting Closer to Kidding As your doe is days away from kidding, you will notice changes in her. She will start to paw her straw as if
making a nest, this would be a good time to place her in her own kidding pen. She becomes more agitated and
looking towards her goatherder for companionship and comfort. The importance here is knowing it will be soon and being on guard to offer assistance as needed. This is where the baby monitor comes in handy. A baby
monitor saves you many trips back and forth to the barn to see how she is coming along. Listen closely to her talking, as she will let you know when she is truly in labor.
If you are kidding out a doe for the first time make sure you have someone you can turn to if you need help. I
keep the phone number of my veterinarian and a close friend in my kidding box on a 3x5 card. You can't depend on memory if you are in need of help and trying to call someone.
Signs that the time is close and the miracle of life in all its glory will be seen
* The udder will fill slowly during the last 4 - 5 weeks of pregnancy. As time approaches her udder will fill with
"fresh" milk, become firmer and sometimes have a shine to it.
* Sunken hips. The kids will drop and your doe will appear to have lost a lot of weight near the hip bones
* Tail ligaments loosen. Even some seasoned breeders have trouble catching this one. The day she is due to
kid her tail ligaments will "disappear", these are the 2 ligaments that travel in a V from the base of the tailbone to the pin bones, forming a type of peace sign. When these ligaments can no longer be felt and the
doe's rear end is very loose, almost feeling like broken, she is preparing for the birth of her kids.
* Kids moving. As long as you can still feel the kids moving within the doe, you have about twelve hours to wait. The kids can be felt or seen on the right side of the doe. As they move into position for delivery,
Movement becomes almost nonexistent as they line up so to speak to make their grand entrance.
* Restlessness. As mentioned above, she will become restless. As the time gets closer, you will observe her
getting up and down, moving, pawing and the thing I hate is the crying and talking to her kids. It seems she
is in such distress. You want to do something to help her and all you can do is wait. This starts about 24 - 48 hours before kidding.
* Great display of affection for her goatherdsman. She will look at you and lick your hands and plead with her eyes for you to be with her. This is a great bonding time for you and your goat. I have seen where if you
are attentive to a usually runner type goat that giving her the time during kidding will make good friends between you.
* Looking back sideways and talking. She will put her head on her flank as she talks to her kids. She may
stare off into space for 30 - 60 seconds, this is early contractions
* Heavy breathing and a worried look. Her breaths will become very long and labored. This is the beginning
stages of labor.
* Mucus string discharge. There is a mucus plug that is released about 8 hours prior to kidding. It is a natural
lubricant. The string may come in short little lengths at first. A long milky string is a sure sign that the time
is fast approaching.
* Bloodshot eyes. Within hours of kidding, if you pull gently down on her eyelids and they are bloodshot, she
is within hours of kidding.
* Off feed. She may refuse to eat or just nibble when she normally has a good appetite.
* She lies down and vocalizes as the tail rising and falls. This signifies the beginning of heavy labor
* The teats fill. About 24 hours prior to kidding, the doe's teats will fill with milk. You can check this by feeling
the teat, but do NOT milk any out, as this will release the natural plug that prevents bacteria from entering the teat and udder.
* Water breaks. The water sac around the kid may break. This is not a concern just one more sign that the
kids are at life's door and coming soon.
The kidding pen As stated prior, a kidding pen should be made available for the doe to kid in away from the rest of the herd. If
you own more than one goat, you are well aware of how curious they are and how difficult is is to keep them out of what you are working on. Having a kidding pen allows you to concentrate on the one doe without running interference for her.
The pen should be well bedding with clean, deep, soft bedding. No water should be placed in the kidding pen
when your doe is in labor. It is dangerous, can cause a big mess and she is not interested in drinking. If you dam-raise your kids, make sure the water bucket is low enough for your doe to drink from, but high enough that the kids cannot drown.
Preparing yourself It is important for you to stay calm during all the final stages of labor. This will allow you to make any necessary decisions should the need arise. Most deliveries go off without a problem and the miracle of life occurs without
assistance by us. In those few instances that help is needed, remain calm and decide; is this something I can handle? if yes, go on and handle it and don't look back. If no, call your friend or your vet to help with the delivery.
Stage II Labor It's now time for her to really start going into heavy labor. She will push and some will throw their head backwards and "scream" (don't let this unnerve you). The contractions will start to come closer and stronger; she
will stretch all four legs out as she is lying on her side. Within 30 minutes of this starting, visual progress should
be evidenced. You will sometimes see a bubble come out and go back in with each contraction - this too is normal. As the contractions and pushing become stronger you will see two little feet and then a head come which
is resting on the feet. As long as progress is being made, there is no reason to assist. Another good push and the kid’s shoulders with body following, come out.
This is your chance to help with a soft clean towel. Make sure the sac is broken and taken away from the kid before wiping down. Most Nigerians deliver their kids lying down so it is critical in assistance to get the kids out of
the water created by the birth. Don't be afraid to rub vigorously to stimulate the kids and get air into those lungs. Present the kids to the doe so they can bond if you are dam-raising. If bottle-raising, whisk the kid away from its dam as quickly as you can to prepare for the next kid out.
Sometimes with dam-raising your kids, your doe will "forget" there are more kids still inside wanting out. Try removing the kid from under her nose, but not so far away to cause her anxiety.
Once all kids are delivered, make sure all soiled bedding is removed and fresh bedding placed down. Provide a
"Goat-Tea" for your doe. Goat tea is a warm water and molasses mixture. This helps replenish lost body fluids and provides an energy source.
Some Concerns
Your doe is in hard labor, pushing with nothing happening for over 30 minutes. Time to go inside and help her or
if you cannot handle it yourself, call that friend of yours or the vet. A doe should not be in hard labor for over an hour. If she is, exhaustion will take over and she will not be able to the deliver the kids. There should only be
about 15 - 20 minutes between multiple birth kids, if the time between extends longer than that, assistance in needed.
If you need to enter the doe, just remember - STAY CALM, you can do this. You may think, I can get my hand in the doe, it's too big and she's so small. There may be the rare case of this, that your doe just hasn't dilated
enough and she can get the kids out, but for the most part, your hand will be able to reach into her with no problem.
First, make sure your nails are clipped very short. This should be done a couple days prior to your goat kidding so they become rounded with no sharp edges. Clean your hands well and put on sterile surgical gloves, making sure you don't touch ANYTHING except going into the doe. Lubricate the doe and your hands with KY jelly.
Now it's time to go in and see what is happening in your doe. Gently enter the doe slowly with a couple of fingers
first to see how wide she is. As you enter, she will try to push your hand back out. Continue in slowly until you can feel what is being presented in the birth canal. Become familiar with the anatomy of the kid so as you feel blindly, you can tell what you are feeling. Closing your eyes helps your hands to "see" what they are doing.
Once you know how the kid(s) positioned, start to work it out as explained it the diagrams further down in this section.
After kidding
Your doe will pass an afterbirth or placenta after all kids are delivered. Usually this will occur within 2 hours for
delivery, but should happen within 12. Do NOT assist in taking the placenta from the doe. If you pull on it, you can cause permanent damage to the uterus and possible internal bleeding resulting in death. Sometimes when
the placenta is passed the doe will have contractions as if delivering another kid. Some does will eat the afterbirth. There are 2 schools of thought on this. One is let them, the other is don't. For those that let the doe
eat it, they feel it is the natural thing the doe does and provides nutrients to the doe. For those that don't, they
feel it can cause disruption in the rumen and you end up with problems after, as the afterbirth is not sanitary. We choose to sit with the new family until the afterbirth is passed and all are content, fed, and sleepy. Then it's time for us to take a well-deserved nap as well.
For a few days after kidding, your doe will have a bloody discharge. If it is flowing and looks like hemorrhaging,
call your vet ASAP. After a few days of the bloody discharge, your doe will continue discharging fluids, but the color and consistency will be that of reddish-brown pudding. This too is normal and can start and stop over the next 3 - 4 weeks.
Taking care of the kids
The kids need some care right after birth. Make sure all are healthy and suckling from their mom. It is important for Nigeria Dwarfs to get colostrum into them within a half hour to an hour after birth. Standard size dairy goats
take longer, so don't get confused and wait too long. We make sure all our kids have nursed from the udder at least twice by forcing them on to it and once on their own before we leave them. Make sure the milk plug is
released from each teat prior to getting the kids on the teat. You do this by milking out a couple squirts of colostrum. The smell of the colostrum will help in stimulating the kid to find the teat and suckle.
The kids come out looking for the udder. Within minutes they are up on their feet and nosing towards the udder. Try to keep the first born away until all kids are delivered. Once all kids are out and you have a pretty clean area
to work in, by laying down or squatting near the does udder, place a kids mouth on a teat and hold there while it suckles. I know you may feel this is extreme, but it is faster to teach the kids this and know they have gotten
colostrum in them, then to wonder if they will find the teats and survive. Even though the bucks are the gluttons, they are the slowest to learn where the teats are, so have a little more patience with them.
Once the kids have had a good little fill of colostrum of if there is time between the kids being delivered, navels need to be dipped in 7% tincture of iodine. At this time, it is good to check their sexes and for any abnormalities
in your kids. The first feces of kids come out in a black tarry type consistency, after a couple of days this will
change to a yellow looking stool for a few days and then finally to the greenish black color of the adult goat. When it changes to this color, the shape can also be very similar to that of rat droppings, so don't think that unwanted vermin have moved in.
Sometimes the kid’s legs are pinned in the womb in some strange positions and they are born with their legs
looking a little strange. One of the most common is for the rear legs to have an almost double-jointed appearance where the hocks bend in the wrong direction. Leg problems generally work themselves out over the first week or two as they get to running around and strengthening their muscles.
Once everyone is well set for the needed rest, place a good pile of hay near the doe so she can get some food.
She is tired and exhausted and placing hay within her reach so she does not have to stand will help her regain her strength. Offering some grain to your doe will be good also.
Watch the kids closely over the next 3 weeks to make sure they are receiving enough milk and the doe is doing a good job mothering. Check the doe's udder periodically to make sure it is being nursed evenly and no it has infection.
Umbilical Cords Should the umbilical cord not break during delivery, tie it off about two inches from the kid’s stomach using
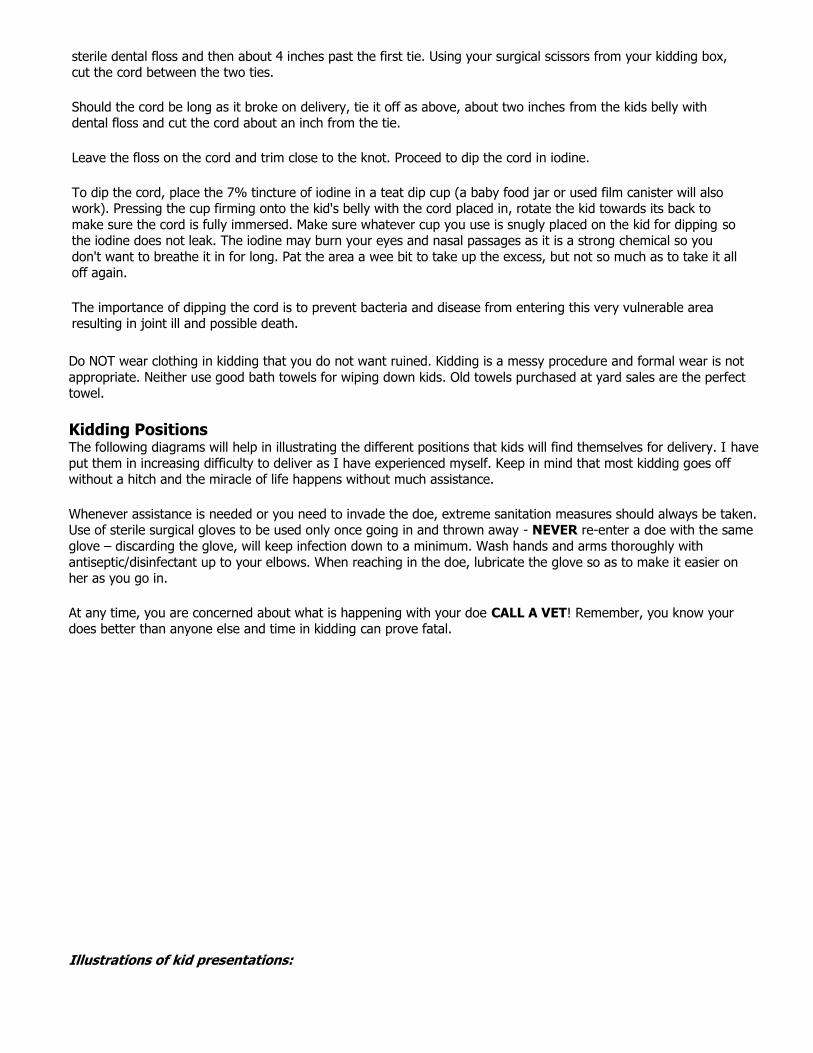
sterile dental floss and then about 4 inches past the first tie. Using your surgical scissors from your kidding box, cut the cord between the two ties.
Should the cord be long as it broke on delivery, tie it off as above, about two inches from the kids belly with dental floss and cut the cord about an inch from the tie.
Leave the floss on the cord and trim close to the knot. Proceed to dip the cord in iodine.
To dip the cord, place the 7% tincture of iodine in a teat dip cup (a baby food jar or used film canister will also work). Pressing the cup firming onto the kid's belly with the cord placed in, rotate the kid towards its back to
make sure the cord is fully immersed. Make sure whatever cup you use is snugly placed on the kid for dipping so the iodine does not leak. The iodine may burn your eyes and nasal passages as it is a strong chemical so you
don't want to breathe it in for long. Pat the area a wee bit to take up the excess, but not so much as to take it all off again.
The importance of dipping the cord is to prevent bacteria and disease from entering this very vulnerable area resulting in joint ill and possible death.
Do NOT wear clothing in kidding that you do not want ruined. Kidding is a messy procedure and formal wear is not
appropriate. Neither use good bath towels for wiping down kids. Old towels purchased at yard sales are the perfect towel.
Kidding Positions The following diagrams will help in illustrating the different positions that kids will find themselves for delivery. I have
put them in increasing difficulty to deliver as I have experienced myself. Keep in mind that most kidding goes off without a hitch and the miracle of life happens without much assistance.
Whenever assistance is needed or you need to invade the doe, extreme sanitation measures should always be taken. Use of sterile surgical gloves to be used only once going in and thrown away - NEVER re-enter a doe with the same
glove – discarding the glove, will keep infection down to a minimum. Wash hands and arms thoroughly with
antiseptic/disinfectant up to your elbows. When reaching in the doe, lubricate the glove so as to make it easier on her as you go in.
At any time, you are concerned about what is happening with your doe CALL A VET! Remember, you know your does better than anyone else and time in kidding can prove fatal.
Illustrations of kid presentations:
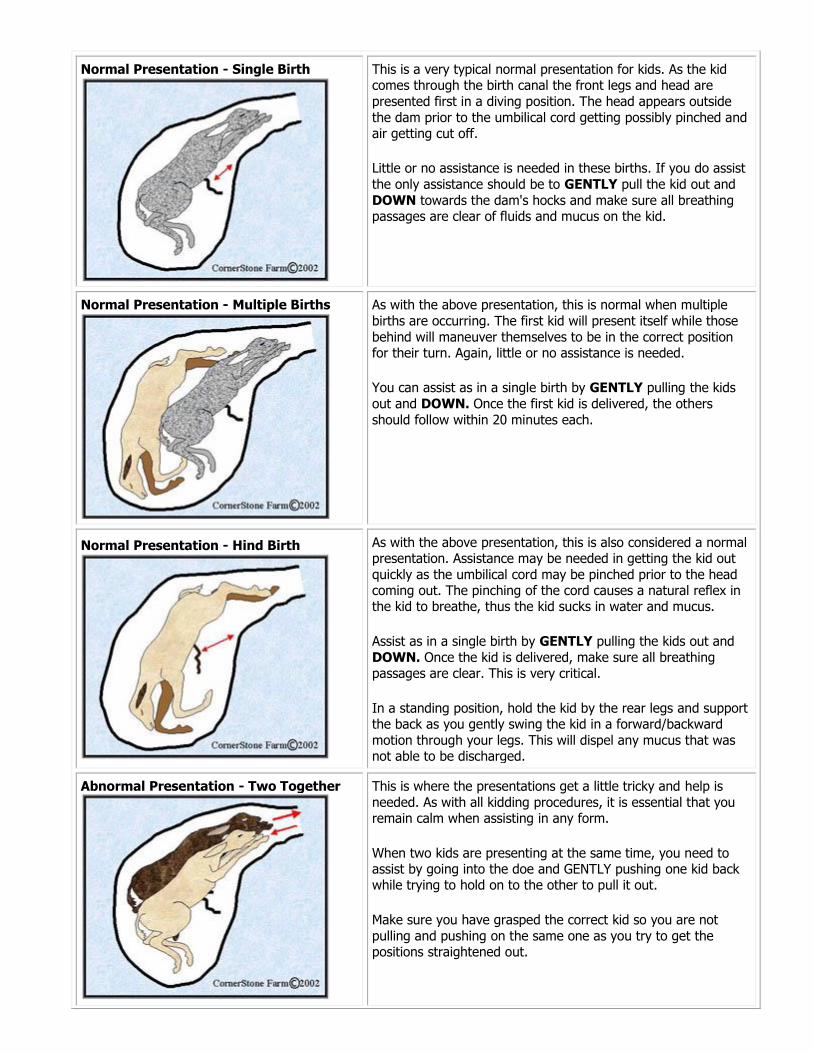
Normal Presentation - Single Birth
This is a very typical normal presentation for kids. As the kid comes through the birth canal the front legs and head are
presented first in a diving position. The head appears outside
the dam prior to the umbilical cord getting possibly pinched and air getting cut off.
Little or no assistance is needed in these births. If you do assist
the only assistance should be to GENTLY pull the kid out and
DOWN towards the dam's hocks and make sure all breathing passages are clear of fluids and mucus on the kid.
Normal Presentation - Multiple Births
As with the above presentation, this is normal when multiple
births are occurring. The first kid will present itself while those
behind will maneuver themselves to be in the correct position for their turn. Again, little or no assistance is needed.
You can assist as in a single birth by GENTLY pulling the kids
out and DOWN. Once the first kid is delivered, the others
should follow within 20 minutes each.
Normal Presentation - Hind Birth
As with the above presentation, this is also considered a normal presentation. Assistance may be needed in getting the kid out
quickly as the umbilical cord may be pinched prior to the head coming out. The pinching of the cord causes a natural reflex in the kid to breathe, thus the kid sucks in water and mucus.
Assist as in a single birth by GENTLY pulling the kids out and
DOWN. Once the kid is delivered, make sure all breathing passages are clear. This is very critical.
In a standing position, hold the kid by the rear legs and support the back as you gently swing the kid in a forward/backward
motion through your legs. This will dispel any mucus that was not able to be discharged.
Abnormal Presentation - Two Together
This is where the presentations get a little tricky and help is
needed. As with all kidding procedures, it is essential that you remain calm when assisting in any form.
When two kids are presenting at the same time, you need to assist by going into the doe and GENTLY pushing one kid back while trying to hold on to the other to pull it out.
Make sure you have grasped the correct kid so you are not
pulling and pushing on the same one as you try to get the positions straightened out.
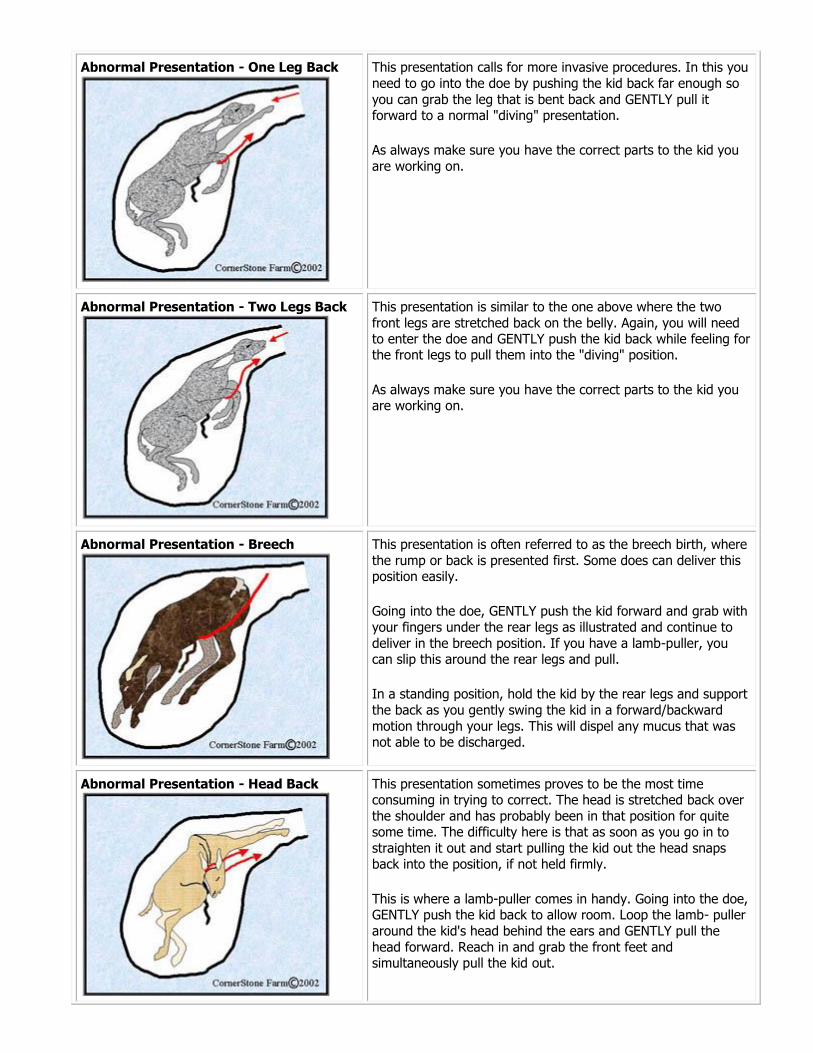
Abnormal Presentation - One Leg Back
This presentation calls for more invasive procedures. In this you
need to go into the doe by pushing the kid back far enough so
you can grab the leg that is bent back and GENTLY pull it forward to a normal "diving" presentation.
As always make sure you have the correct parts to the kid you
are working on.
Abnormal Presentation - Two Legs Back
This presentation is similar to the one above where the two
front legs are stretched back on the belly. Again, you will need to enter the doe and GENTLY push the kid back while feeling for the front legs to pull them into the "diving" position.
As always make sure you have the correct parts to the kid you are working on.
Abnormal Presentation - Breech
This presentation is often referred to as the breech birth, where
the rump or back is presented first. Some does can deliver this position easily.
Going into the doe, GENTLY push the kid forward and grab with
your fingers under the rear legs as illustrated and continue to
deliver in the breech position. If you have a lamb-puller, you can slip this around the rear legs and pull.
In a standing position, hold the kid by the rear legs and support
the back as you gently swing the kid in a forward/backward
motion through your legs. This will dispel any mucus that was not able to be discharged.
Abnormal Presentation - Head Back
This presentation sometimes proves to be the most time consuming in trying to correct. The head is stretched back over
the shoulder and has probably been in that position for quite some time. The difficulty here is that as soon as you go in to
straighten it out and start pulling the kid out the head snaps back into the position, if not held firmly.
This is where a lamb-puller comes in handy. Going into the doe, GENTLY push the kid back to allow room. Loop the lamb- puller
around the kid's head behind the ears and GENTLY pull the
head forward. Reach in and grab the front feet and simultaneously pull the kid out.
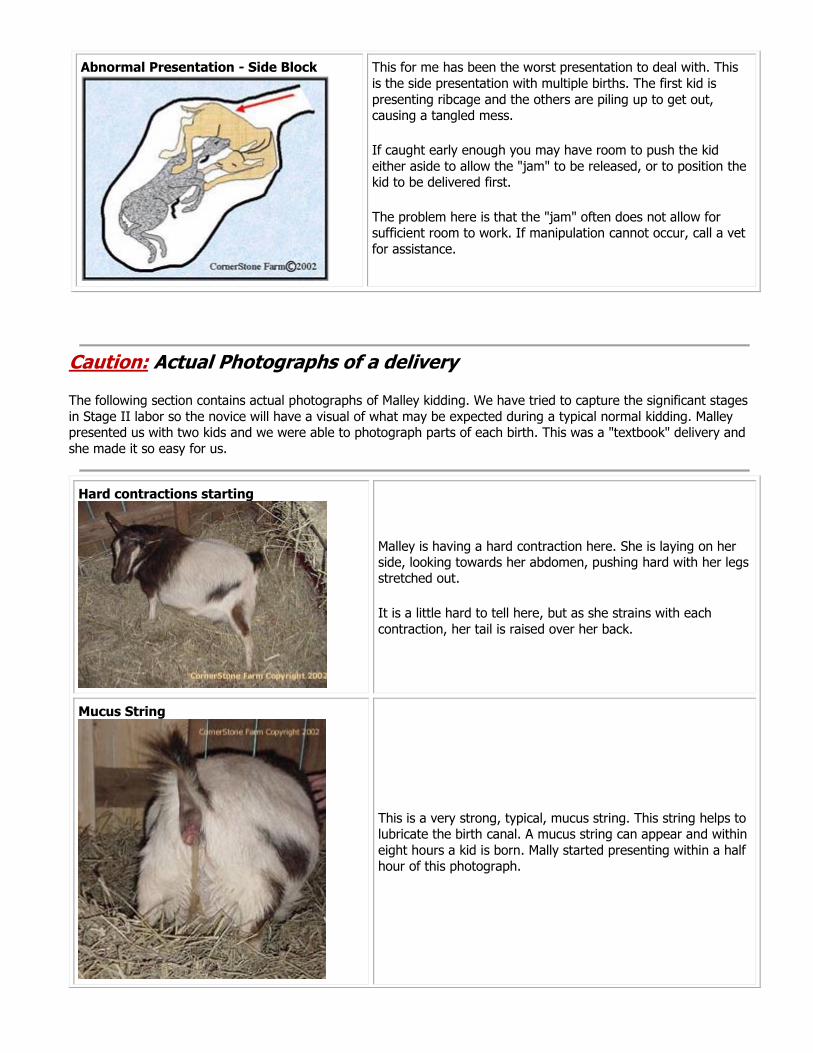
Abnormal Presentation - Side Block
This for me has been the worst presentation to deal with. This
is the side presentation with multiple births. The first kid is
presenting ribcage and the others are piling up to get out, causing a tangled mess.
If caught early enough you may have room to push the kid
either aside to allow the "jam" to be released, or to position the kid to be delivered first.
The problem here is that the "jam" often does not allow for sufficient room to work. If manipulation cannot occur, call a vet
for assistance.
Caution: Actual Photographs of a delivery
The following section contains actual photographs of Malley kidding. We have tried to capture the significant stages
in Stage II labor so the novice will have a visual of what may be expected during a typical normal kidding. Malley presented us with two kids and we were able to photograph parts of each birth. This was a "textbook" delivery and
she made it so easy for us.
Hard contractions starting
Malley is having a hard contraction here. She is laying on her side, looking towards her abdomen, pushing hard with her legs stretched out.
It is a little hard to tell here, but as she strains with each
contraction, her tail is raised over her back.
Mucus String
This is a very strong, typical, mucus string. This string helps to lubricate the birth canal. A mucus string can appear and within
eight hours a kid is born. Mally started presenting within a half hour of this photograph.
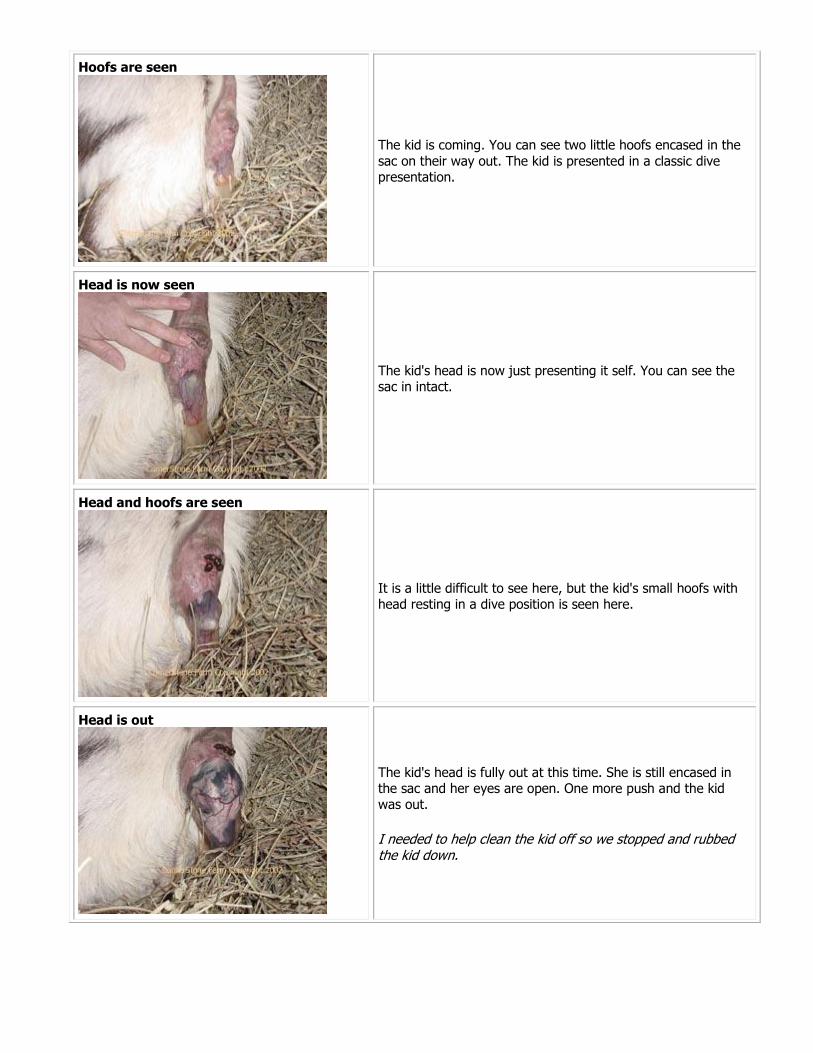
Hoofs are seen
The kid is coming. You can see two little hoofs encased in the
sac on their way out. The kid is presented in a classic dive presentation.
Head is now seen
The kid's head is now just presenting it self. You can see the sac in intact.
Head and hoofs are seen
It is a little difficult to see here, but the kid's small hoofs with head resting in a dive position is seen here.
Head is out
The kid's head is fully out at this time. She is still encased in the sac and her eyes are open. One more push and the kid was out.
I needed to help clean the kid off so we stopped and rubbed the kid down.

Cleaning off the kid
With the kid expelled from the dam, we take towels and make
sure all mucus is gotten from around the head so the kid can breathe without taking in fluids or suffocating. There is mucus
still on the legs and hoofs in this photograph.
Bonding
If you are dam-raising your kids, do not wipe the kid completely of mucus and fluids. Present the kid to the dam so
she can clean the kid and start the bonding process. It is
thought that if all fluids are removed, some dams may reject the kid.
More bonding
The doe will get up at times between delivery of kids. Sometimes they get so involved in cleaning the kids they forget
there are more to come. Try holding the kid away from the dam to get her attention back to the delivery. If this upsets the
doe too much, place the kid just in reach of the dam so she can see the kid, yet get back to work.
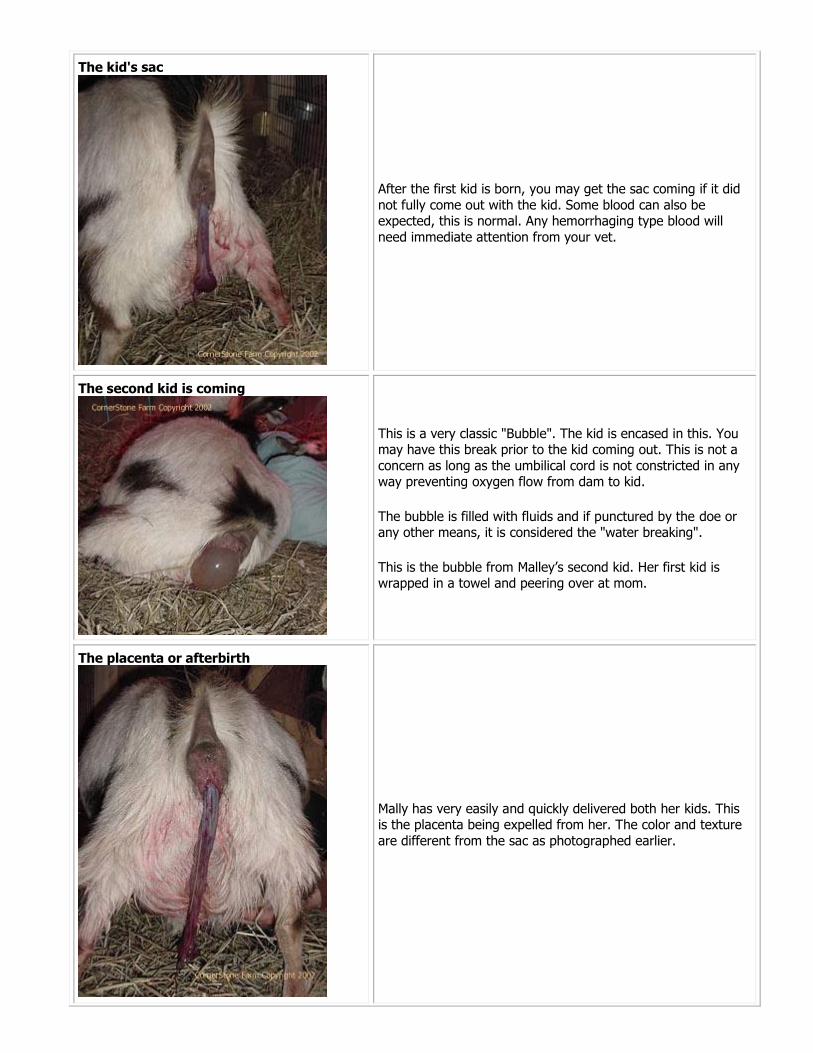
The kid's sac
After the first kid is born, you may get the sac coming if it did
not fully come out with the kid. Some blood can also be expected, this is normal. Any hemorrhaging type blood will
need immediate attention from your vet.
The second kid is coming
This is a very classic "Bubble". The kid is encased in this. You may have this break prior to the kid coming out. This is not a
concern as long as the umbilical cord is not constricted in any way preventing oxygen flow from dam to kid.
The bubble is filled with fluids and if punctured by the doe or any other means, it is considered the "water breaking".
This is the bubble from Malley’s second kid. Her first kid is wrapped in a towel and peering over at mom.
The placenta or afterbirth
Mally has very easily and quickly delivered both her kids. This is the placenta being expelled from her. The color and texture
are different from the sac as photographed earlier.
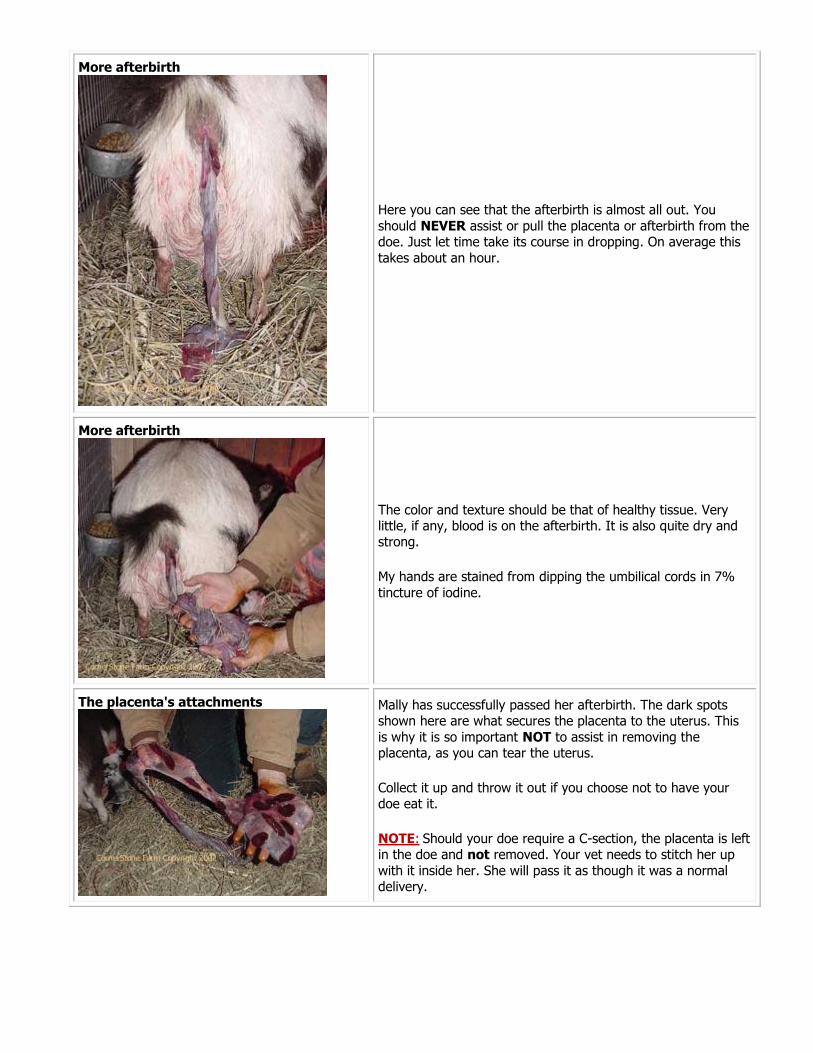
More afterbirth
Here you can see that the afterbirth is almost all out. You
should NEVER assist or pull the placenta or afterbirth from the doe. Just let time take its course in dropping. On average this
takes about an hour.
More afterbirth
The color and texture should be that of healthy tissue. Very little, if any, blood is on the afterbirth. It is also quite dry and strong.
My hands are stained from dipping the umbilical cords in 7%
tincture of iodine.
The placenta's attachments
Mally has successfully passed her afterbirth. The dark spots shown here are what secures the placenta to the uterus. This
is why it is so important NOT to assist in removing the placenta, as you can tear the uterus.
Collect it up and throw it out if you choose not to have your doe eat it.
NOTE: Should your doe require a C-section, the placenta is left in the doe and not removed. Your vet needs to stitch her up
with it inside her. She will pass it as though it was a normal delivery.
KIDDING As told by Dr. Reynolds, DVM on February 11, 2001
The following article was originally written from a meeting in which a local Veterinarian from New Jersey presented a workshop to goat enthusiasts on kidding. Some information is repeated from above, but I felt it worthy to be printed
in its entirety. Keep in mind that it was a presentation and I have tried to make it flow as best as I can without detracting from the original content. Editorialized by: Barb Halligan:
Normal births
Kid comes out like divers with both front feet stretched out and head facing front resting on legs. Contractions of the
uterus cause the kid to be pushed up and out in a U shape. When assisting the kids out, do not pull straight out, but pull kid down towards hocks in a slow steady movement. 80 – 90% of goats that kid quickly will kid in a lying down
position and the kids will just “fall out” of the dam. The fluid in the sack works as a lubricant to help expel the kid. The hoofs generally break the sack. In breech births, hind legs appear first in a reverse dive. This is also considered
by many to be a normal birth, but some extra attention by the goatherder may be warranted. With breech births the
main concern is the umbilical cord. In the normal front presentation, the umbilical cord is flexible and long, with breech births the cord gets stretched and air flow can be constricted. Kids will then gulp for air and suck in uterine
fluids. This puts fluids in the lungs and the kids die. With breech deliveries it is important to get kids out quickly. In normal births, the breaking of the umbilical cord is what triggers the breathing response, so in breech if the cord is collapsed in any way it causes the kid to breathe in utero and hence death will follow if not removed quickly.
Signs that your doe is going into labor: Milk coming into teats. If no milk in teats the teats are floppy Hollowing out of the hips. This means the kids have dropped and are getting into position to be born.
Vulva bigger and redder. Signifies doe is dilating in order for kids to pass.
Pelvis area comes apart. Seams in girdle are fibrous and they come apart for kids to get through. Bloodshot eyes
Mucus string Talking to babies
Nest building
Affectionate towards owner Some does wait to chore time to delivery - BEWARE
Nutrition needs of pregnant of doe
Hay needs to be of the best quality in the last month of pregnancy. A tender, well cured, third or fourth cutting is
desired. The doe has little room for food intake during final stages of pregnancy so what she ingests needs to be of the highest quality. Hay intake also effects the early stages of lactation so the best should be supplied at that time
also. It takes three times as much hay to maintain proper health of a goat in lactation. If you want a top producer, you need to feed the best hay with high digestibility. Increase feed quantity and quality gradually during last trimester and throughout lactation.
Pregnancy toxemia This disease occurs within two weeks of kidding and 2 weeks after kidding, also known as ketosis. The doe uses her own fat to feed her kids and herself, giving off ketones in the system, causing the doe and kids to become toxic.
Ketosis is brought on by an imbalance to food intake. This can either happen if fed too much or too little grain. Be careful with how you feed during the late stages of pregnancy.
Problems in presentation Even with proper management and feed, you can still have problems with kidding. The first key to any problem
delivery is to make the kid smaller. As you are assisting in getting the kid out, give yourself a mental picture of what you are feeling in the doe and how you can position the kid to make it smaller for ease of presentation. If you need
to, take a few seconds and actually position yourself as you feel the kid and then think through how to manipulate
limbs to reduce the kid's size. Remember to stay calm and focused in helping your doe through delivery. For a five-pound kid, you can exert ten to fifteen pounds of pressure (in pull) to assist them out.
Difficult presentations
First and most common are the elbows getting caught on the pelvis. Position is like “praying” instead of front legs
extended in a “dive”. If you can, get a string tied around one of the front legs (a lock knot – not a noose to cut off
circulation) and pull it out gently but firmly. Hold the string with leg out as you go in for the other front leg. Once
both legs are out, pull as in a dive position. If more than one kid is presenting, hold on to the string and push the other kid back in.
Head and one leg presentation, meaning the one leg is back alongside body. Put string around leg that is presented and reach in by sliding hand down the side with the other leg. Gently try to get leg forward to place in dive position.
Cover hoof with hand as best you can so as it will not tear anything. Use the same procedure for both legs being
back and head presenting. The use of string on the legs prevents the kid from slipping back and delaying getting the kid out. If you can keep control of the kid by just using your handgrip, then the string will not be necessary. Remember these kids are well lubricated and can continually slip from your grasp.
Legs forward in normal dive position with head turned back on body. Usually, these kids are not the healthiest so you
need to work quickly to get them out. One thing to remember in this type of presentation is that the kid has probably been in that position long enough that when you get the head pull forward, the muscles have a tendency to snap it
back in a backwards position again. For this procedure it is important to tie the legs so the kid does not slip back in as you try to maneuver the head in position. You need to reach in and try to locate the head. The easier way to
figure this out is to locate the neck and shoulders. Try to grab the lower jaw, cup hand over head and kind of push it out towards the front while pulling on twine at the same time. Legs are the easiest to get out, head is the most
difficult. Use of milk machine cleaning tubing is very helpful in these presentations also. It enables you to get it around the kid’s head behind the ears and pull to to kid out.
Worst of all deliveries is where the doe is in hard labor and nothing is presented. This is generally a backbone presentation. Reach in and go for hind legs by feeling for tail and hocks. Grab hold of hind legs, if possible, attach cord and pull the kid out.
Should you have four feet presenting at the same time you need to figure out which legs belong to what kid and
make sure you have legs attached from that kid. Try to push one back making sure there is not another one behind it and cause damage to the doe. Pull the first kid out and the others will generally follow naturally.
There are times when a doe has been in heavy labor for an extended period of time that she may go into uterine inertia. This results in the inability for the doe to push anymore. You will need to reach in and artificially deliver the
kids. Do NOT invade the uterus unless absolutely necessary, the vagina is stronger. The uterus is thin and can be damaged more easily. Make sure finger nails are clipped short when assisting in delivery. Cutting them a couple days prior to enable them to get smoothed out is preferable.
Make sure during an assisted delivery all kids are out This is essential where multiple births are involved. Looking
towards the doe’s rump, wrap your arms around her and bump her belly to see if any kids are still inside. Another
way to check if there are kids still left inside, is to place the doe over a bale of straw. This will force the kids to either side of the abdomen where they can be easily seen. This brings the kid up in the uterus and you can reach in to get them. Sometimes during an assisted birth, a kid will fight back to better position itself for presentation.
Dead kids If you suspect a dead kid there will be no movement and contractions will be poor. You will need to go in and remove the body. Dead kids are usually dry and have no lubrication to help expel them. Use of a good lubricant like
KY jelly can help. If the kid should still be in the sack, the fluids will be dark and smelly. You don’t need to be concerned about the kid, think about the doe. The kid needs to come out and generally it will fall apart as you try to
get it out. Try to get out as much of the kid as possible so infection will not occur. This is by no means a pleasant process as you pull the kid out piece by piece, but if you want to save the doe it has to be done.
After removing as much of the dead kid as possible, draw out 10cc of Penicillin G into a syringe. REMOVE THE NEEDLE!! and syringe the penicillin into the uterus. Boluses have a tendency to pop out so getting the penicillin in by syringe is better.
Weak kids
If you experience a weak kid birth, stimulate by rough quick rubs to feel heartbeat. Make sure nose is unclogged to let air in. Swinging the kids, by grabbing the hind legs in one hand and resting the chest in the other and proceed in

a pendulum motion will help dislodge mucus in the respiratory tract. Continuous rubbing with towels will keep the kid stimulated, keep this up until the kid is standing on its own.
If you don’t feel a heartbeat, do CPR on the chest to stimulate the heart. Kids are tough so don’t be afraid the be rough if you want to save the kid.
If you have a chilled or cold kid that needs quick warmth, place the kid, unclean in a plastic bag leaving the head out
and place in a bucket of 120-degree water to bring temperature up. DO NOT SUBMERSE THE KID, keep the head above water. Keeping the kid in the water tight bag, place kid in water, up to neck, for 10 - 15 seconds,
remove for a few seconds and keep repeating until kid warms. Trying to get the kid to nurse in between placing in water will help build up strength. Once the kid responds you can give it back to the dam to bond if dam raising.
Post kidding The placenta of a healthy birth will be glistening and slippery and have the look of healthy organ tissue. During
normal births all the placenta should come out. Dark smelly placentas are associated with births having dead kids. Use of oxytocin to help the uterus contract is recommended only if the doe comes in with little or no milk, or if you
believe there is partial retained placenta. Oxytocin will help in milk let down. It takes about 20 minutes to work and
then 20 minutes to contract the uterus, which reduces the uterus to about 2/3 its size in about 40 minutes. USE OXYTOCIN SPARINGLY and only after 48 hours has elapsed after a bad birth.
The majority of births are normal and as breeders you should be striving towards that in your breeding program.
Breeding has a lot to do with how easy they kid. If you dam raise your kids leave some mucus on the kid after toweling for the dam to bond with the kid.
Kid care Iodine the naval with 7% Tincture of Iodine. Use of a dip cup is more effective then spray. If kids are dam raised,
make sure the teat orifice is open, giving milk, and kids suckle. Nigerian Dwarf goat kids sometimes need assistance
in finding the teat and making sure they suckle. Make sure kids are dry and warm and sheltered. Make sure kids have colostrum in them within 30 minutes of birth. The kids can only process the colostrum for their first 72 hours.
You can freeze colostrum which preserves it for three to four years.
At bit on BoCe Trivia Custer lost the battle of Little Big Horn, because his horses were selenium deficient and could not perform in battle. Research to find out if you live in a selenium deficient area. The cause of this deficiency are heavy rain areas that wash away selenium from the soil. Also check where your forage is coming from, if your hay is not deficient then you
will probably be fine. Another source of selenium is in commercial grains. Read the label on the bag to see if it
contains selenium for your area. If your forage or grain is supplying ample selenium then you will not need to supplement as an overdose can cause deaths.
If you feel you need to give selenium shots after researching your feeds, then 1/2cc to 1cc is needed on Nigerian
Dwarfs. Do not give during pregnancy as selenium has been seen to cause abortions. If kids contract white muscle
disease from selenium deficiency, they will get weak and referred to as floppy kid syndrome. You have a couple days to reverse this. CONTACT YOUR VET IMMEDIATELY to save the kids.
A note on hay For those of us that are fortunate enough to have facility to store hay, place your best hay (3rd – 4th cutting) in an
area you can access during the later stages of your does pregnancy so she is getting high quality feed prior to delivery and during lactation. Try not to feed 1st or 2nd cut hay during this time as the nutrient value is less.
Happy Kidding!