key stage 1 (years 1 & 2) athletic activities - sasp · pdf fileathletic activities. ......
TRANSCRIPT
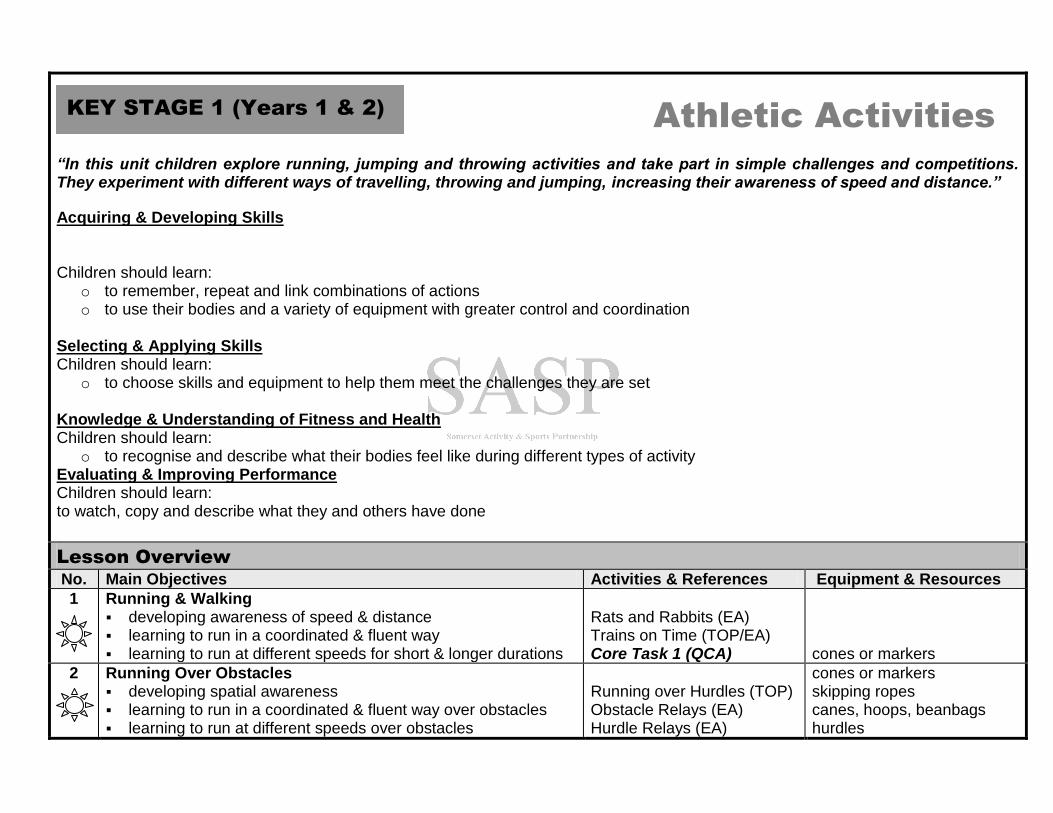
“In this unit children explore running, jumping and throwing activities and take part in simple challenges and competitions. They experiment with different ways of travelling, throwing and jumping, increasing their awareness of speed and distance.”
Acquiring & Developing Skills Children should learn:
o to remember, repeat and link combinations of actions o to use their bodies and a variety of equipment with greater control and coordination
Selecting & Applying Skills Children should learn:
o to choose skills and equipment to help them meet the challenges they are set Knowledge & Understanding of Fitness and Health Children should learn:
o to recognise and describe what their bodies feel like during different types of activity Evaluating & Improving Performance Children should learn: to watch, copy and describe what they and others have done
Lesson Overview
No. Main Objectives Activities & References Equipment & Resources
1
Running & Walking developing awareness of speed & distance learning to run in a coordinated & fluent way learning to run at different speeds for short & longer durations
Rats and Rabbits (EA) Trains on Time (TOP/EA) Core Task 1 (QCA)
cones or markers
2 Running Over Obstacles developing spatial awareness learning to run in a coordinated & fluent way over obstacles learning to run at different speeds over obstacles
Running over Hurdles (TOP) Obstacle Relays (EA) Hurdle Relays (EA)
cones or markers skipping ropes canes, hoops, beanbags hurdles
KEY STAGE 1 (Years 1 & 2)
Athletic Activities
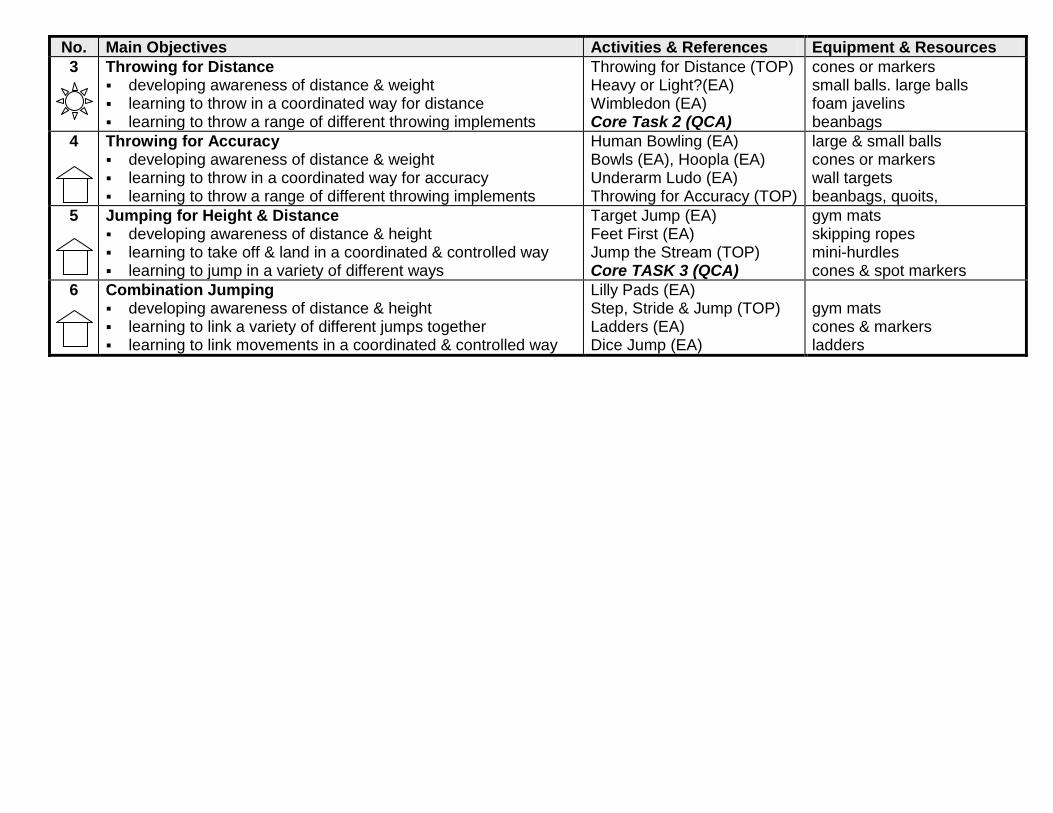
No. Main Objectives Activities & References Equipment & Resources
3
Throwing for Distance developing awareness of distance & weight learning to throw in a coordinated way for distance learning to throw a range of different throwing implements
Throwing for Distance (TOP) Heavy or Light?(EA) Wimbledon (EA) Core Task 2 (QCA)
cones or markers small balls. large balls foam javelins beanbags
4 Throwing for Accuracy developing awareness of distance & weight learning to throw in a coordinated way for accuracy learning to throw a range of different throwing implements
Human Bowling (EA) Bowls (EA), Hoopla (EA) Underarm Ludo (EA) Throwing for Accuracy (TOP)
large & small balls cones or markers wall targets beanbags, quoits,
5
Jumping for Height & Distance developing awareness of distance & height learning to take off & land in a coordinated & controlled way learning to jump in a variety of different ways
Target Jump (EA) Feet First (EA) Jump the Stream (TOP) Core TASK 3 (QCA)
gym mats skipping ropes mini-hurdles cones & spot markers
6
Combination Jumping developing awareness of distance & height learning to link a variety of different jumps together learning to link movements in a coordinated & controlled way
Lilly Pads (EA) Step, Stride & Jump (TOP) Ladders (EA) Dice Jump (EA)
gym mats cones & markers ladders
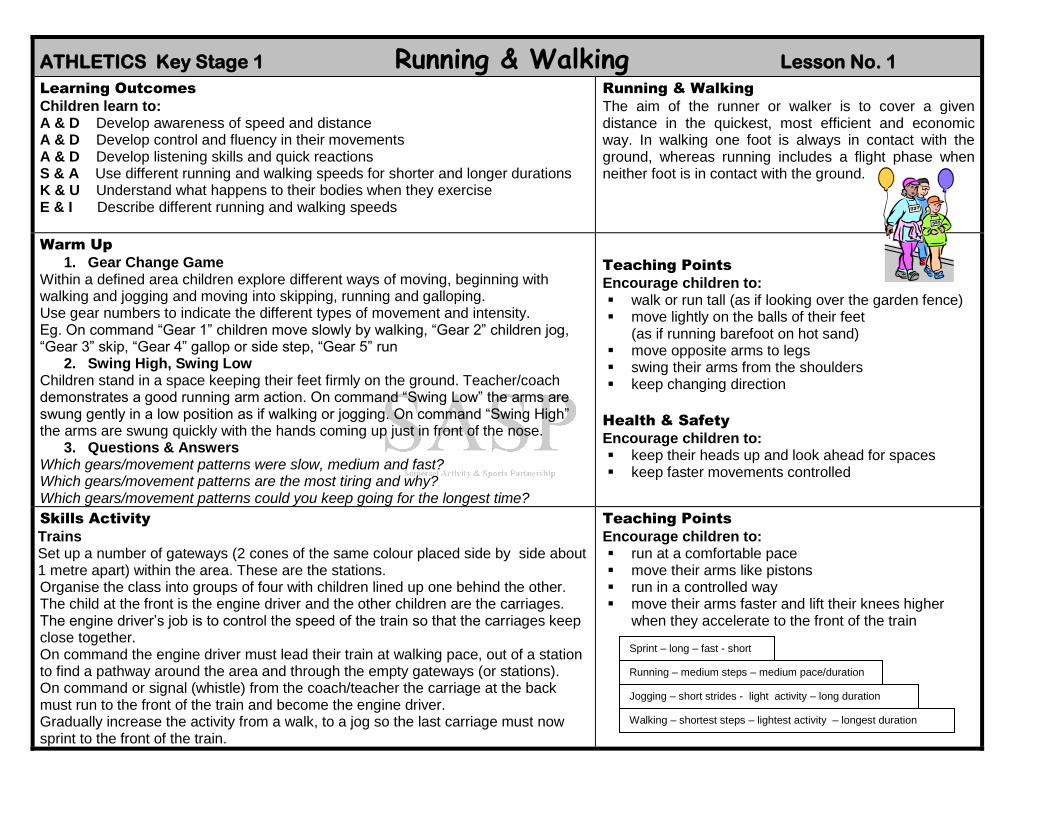
ATHLETICS Key Stage 1 Running & Walking Lesson No. 1
Learning Outcomes
Children learn to: A & D Develop awareness of speed and distance A & D Develop control and fluency in their movements A & D Develop listening skills and quick reactions S & A Use different running and walking speeds for shorter and longer durations K & U Understand what happens to their bodies when they exercise E & I Describe different running and walking speeds
Running & Walking
The aim of the runner or walker is to cover a given distance in the quickest, most efficient and economic way. In walking one foot is always in contact with the ground, whereas running includes a flight phase when neither foot is in contact with the ground.
Warm Up
1. Gear Change Game
Within a defined area children explore different ways of moving, beginning with walking and jogging and moving into skipping, running and galloping. Use gear numbers to indicate the different types of movement and intensity. Eg. On command “Gear 1” children move slowly by walking, “Gear 2” children jog, “Gear 3” skip, “Gear 4” gallop or side step, “Gear 5” run
2. Swing High, Swing Low Children stand in a space keeping their feet firmly on the ground. Teacher/coach demonstrates a good running arm action. On command “Swing Low” the arms are swung gently in a low position as if walking or jogging. On command “Swing High” the arms are swung quickly with the hands coming up just in front of the nose.
3. Questions & Answers Which gears/movement patterns were slow, medium and fast? Which gears/movement patterns are the most tiring and why? Which gears/movement patterns could you keep going for the longest time?
Teaching Points
Encourage children to: walk or run tall (as if looking over the garden fence) move lightly on the balls of their feet
(as if running barefoot on hot sand) move opposite arms to legs swing their arms from the shoulders keep changing direction
Health & Safety
Encourage children to: keep their heads up and look ahead for spaces keep faster movements controlled
Skills Activity
4. Trains 4. Set up a number of gateways (2 cones of the same colour placed side by side about
1 metre apart) within the area. These are the stations. Organise the class into groups of four with children lined up one behind the other. The child at the front is the engine driver and the other children are the carriages. The engine driver’s job is to control the speed of the train so that the carriages keep close together. On command the engine driver must lead their train at walking pace, out of a station to find a pathway around the area and through the empty gateways (or stations). On command or signal (whistle) from the coach/teacher the carriage at the back must run to the front of the train and become the engine driver. Gradually increase the activity from a walk, to a jog so the last carriage must now sprint to the front of the train.
Teaching Points
Encourage children to: run at a comfortable pace move their arms like pistons run in a controlled way move their arms faster and lift their knees higher
when they accelerate to the front of the train
Running – medium steps – medium pace/duration
Jogging – short strides - light activity – long duration
Walking – shortest steps – lightest activity – longest duration
Sprint – long – fast - short

Game Group Activity
5. Fish & Chips Organise the children into pairs, one is Fish, the other Chips. All the Fish form a row and the Chips form a row behind in line with their partner. The two rows of children stand about 5 metres back from a line or row of markers. On command the Fish get themselves into a starting position as instructed by the coach/teacher. Starting positions might include sitting cross-legged, lying supine, lying prone, kneeling, facing the cones or facing their partners. On command “Fish” the front row of children get to their feet as quickly as possible and run to the line of markers. If the coach/teacher calls “Chips” all of the children remain still. Fish and Chips now swap roles. If the coach/teacher calls “Chips” the front row of children must run, if “Fish” is called they remain still. Allow a number of goes for each group, before moving onto the next game.
6. Fish & Chips (or Rats & Rabbits) The above reaction/speed game is extended to one of chase. The pairs stand back to back along a line with a 5 metre line of markers opposite both rows of children. If the teacher/coach calls “Fish” then the fish must run to their markers as quickly as they can before they are caught by their partner who must react to the command, turn and make chase. On reaching the marker without being caught the Fishes win a point and the children return to the starting position to await the next call. * Bibs could be used as tails tucked into the back of shorts which the children aim to grab when making chase in order to win a point.
5 metres
Teaching Points
Encourage children to: keep low at the start move their arms quickly
listen for the command, (and not to guess)
Health & Safety
Ensure: there is plenty of space between children children walk back to their starting point children are not running towards walls
Fish & Chips
Cool Down
7. Shake & Stretch The children move around the area at a slow jog & shake their arms whilst moving. On command they stop and the teacher/coach leads the class in a simple stretch. The children now walk and on command stop to make another stretch. The children find a space and make their final stretch. Stretches might include: stretch tall, stretch wide, curl up small & slowly stretch tall.
Evaluation/Post Lesson Notes
Equipment
cones or markers, bibs
Think STEP Space, Task, Equipment, People CF/03/06
CORE TASK 1 – could either be introduced as an extension to Trains or follow the Fish & Chips activities. In a defined area scatter 15 – 20 cones about three to five metres apart. On command the children try to touch as many different cones as they can in 30 seconds, 20 secs, 15 secs, etc?

ATHLETICS Key Stage 1 Running over Obstacles Lesson No. 2
Learning Outcomes:
Children learn to: A & D Develop spatial awareness in negotiating obstacles A & D Develop awareness of height and distance A & D Develop fluency, rhythm and balance in running over obstacles S & A Use different techniques and speeds to tackle a variety of obstacles K & U Understand what happens to their bodies with exercise E & I Count the number of strides they take between obstacles
Running over Obstacles
The aim of the runner is to take the obstacles in their stride with minimal disruption to the fluency, speed and economy of the running style.
Teaching Points
Encourage children to: Go over the obstacles in following ways: hop (1
foot to 1 foot), bound (1 foot to other foot), or jump run with control and fluency keep their heads up and look ahead
Health & Safety
Ensure: there is adequate space between obstacles only one person at a time over an obstacle
Warm Up:
1. What’s in my Path? Create an obstacle zone using a selection of equipment: ropes, markers, cones, hoops) and lines of the playground. Children find a space on the outside of the area. On command children move into the area. Starting at a walking pace the children explore different ways of getting over the obstacles. Encourage the children to use these ways of getting over the equipment at a slightly faster pace (a jog or a steady run), this time trying to take the obstacles in their stride without stopping.
2. Questions & Answers
Which ways did you use to get over the obstacles? Which ways worked best for different obstacles?
Skills Activity
3. Rhythm Running Set out rows of obstacles of varying heights (ropes, canes along the ground, cones or mini hurdles) but with roughly equal distance between the obstacles (approximately 3 to 5 adult strides). Organise children in roughly equal groups to the number of rows of obstacles. Children take turns to run over the obstacles counting the number of running strides they make between each obstacle. Children return down the side of obstacles. The next runner starts when the person in front has reached the end cone.
* Spotters could be used at each row to straighten fallen obstacles 4. Challenge
How many steps does it take you between each of the obstacles? How can you make fewer steps between the obstacles?
Obstacle Zone

Game Group Activity
5. Hurdle Relay The obstacle course could be kept the same or changed to add more and different obstacles depending upon the equipment available to you. In teams of five or six the first child carrying a bean bag runs over the obstacles around the end cone and returns by running back down the channel alongside the hurdles. The first runner in the team hands the beanbag to the second child who does the same. When each child in the team has run the children sit down in their relay order to show that they are finished.
Teaching Points
Encourage children to: run tall (as if looking over the garden fence) pick their knees up as they approach the obstacle
Health & Safety
Ensure: the obstacles will give or fall when struck children run to the last cone and return down the
side of the row of obstacles there is adequate space between each row children run over the obstacles in one direction
Cool Down
6. Letter Stretches Children collect the equipment and put it away. Teacher/coach leads children through simple stretches in the shape of letters using the whole or limbs of their bodies. These could be performed standing up or sitting down.
7. Questions & Answers
Can you think of physical obstacles we have to get up or over in our daily lives? Eg. stairs, steps, pavements, climbing over or stepping over things at home or on the way to school.
Letter Stretches
Evaluation/Post Lesson Notes Equipment
markers or cones, hoops, canes, beanbags, ropes, folding plastic hurdles
Think STEP Space, Task, Equipment, People CF/03/06
X
P
T L
i V

ATHLETICS Key Stage 1 Throwing for Distance Lesson No. 3
Learning Outcomes
Children learn to: A & D Develop awareness of distance and weight A & D Throw with coordination and force S & A Choose different ways of throwing to suit heavy or light implements K & U Understand how throwing activities can help to make them stronger E & I Describe different throwing actions Push & Pull
Throwing (Push and Pull Throws)
The thrower aims to apply a force to send an object to a selected target or for distance. The thrower chooses the technique best suited to the throwing implement. Push Throw: The throw begins from in front of the body close to the chest, neck or chin and can be one or two-handed. The thrower forces the implement forwards with a powerful pushing action.
Pull Throw: The throw begins from behind the shoulders and can be one or two-handed. The thrower forces the implement forwards with a fast pulling action
Warm Up:
1. Claptastic Organise the class into pairs and ask the children to stand facing each other. Show them how to do the following clapping sequence, together slowly at first and then see how fast they can get. Sequence: clap your hands together three times, clap both your hands against your partners, clap your hands together twice, clap your hands against your partners, clap your hands together once, clap your hands against your partners. Repeat.
2. Pass it On Organise the class into teams of five or six. Stand teams in a line, one behind the other. On command the child at the front of the line with a large ball twists from the waist to pass the ball to the child behind. When the ball reaches the child at the end of the line then that child moves to the front. The activity continues until the child who started at the front is at the front once again.
Skills Activity
3. Heavy or Light? Introduce the children to a selection of throwing implements. Pass these around the groups so that the children can get a feel for the size, dimensions and weight of the throwing implements. Set up four different throwing stations within the area. At each of the stations set out a range of targets (cones, hoops, boxes, buckets, wall targets, etc) from about two to fifteen metres from the throwing line. At each station put a selection of throwing implements. Station 1 (soft, small balls), Station 2 (large, soft balls), Station 3 (heavier, large balls), Station 4 (bean bags)
Teaching Points
Encourage children to: twist from the waist without moving their feet
Health & Safety
Safety rules & good practice should be introduced from an early age with throwing activities. Ensure: children wait and look before collecting their
throwing implements implements are always thrown away from people children walk when collecting throwing implements
CORE TASK 2 – links closely with Heavy or Light? and could be introduced as an extension or alternative activity. In pairs, in their throwing areas, the children set up simple challenges. Child A performs 5 jumps from the throwing line and marks the distance with a cone. Child B then attempts to throw further than the distance jumped. Swap roles. Variations and extensions might include using one hand only, throw sitting down, use only the push throw. Use non-dominant hand, etc.

Divide the class into fours & allow children to practise the pull throw at their station. Encourage children to try one and two-handed pull throws, and decide which works best for the throwing implements at their station. On command children then move onto the next station and practise a range of pull throws using different implements, again deciding which works best. Introduce the children to the push throw. At the third station they explore one and two-handed push throws. At station four the children decide which of the four throws is best to use.
4. Questions & Answers Which throwing implements are light or heavy? Would you use one hand or two hands to throw them and why? Which throwing implements travel the furthest and why?
Teaching Points
Encourage children to: stand side on to the direction of the throw (pull throw) bring their arm through from behind the shoulder (pull thow) start with the ball in front of the body (push throw) throw from the chest or the neck/chin (push throw) stand with one foot in front of the other (push throw) keep their eye on the target (both) find a balanced starting stance (both)
Small Soft Balls Beanbags
Large Soft Balls Heavier Large Balls
Game Group Activity
4. Wimbledon Set up benches or a low net across the area. Organise the class into pairs. One child is the thrower and the other is the ball boy or girl. The ball boys and girls position themselves on the sides of the throwing area and watch to track where their partner’s ball lands and travels. Their job is to collect the ball and return it to their partner by carrying or rolling. The throwers may push or pull their throwing implement to try to get it to go over the net or barrier. The ball boys and girls must wait until all of the throwers have thrown and for the teacher/coach to call “Wimbledon” before they collect. Have three goes and swap round.
Cool Down Children collect the equipment and put it away
Teacher/coach takes children through simple stretches
Evaluation/Post Lesson Notes
Equipment
large balls (soft balls, footballs), soft javelins, beanbags, small balls (tennis, rounders ball, soft ball, foam balls), net or benches and markers
Think STEP Space, Task, Equipment, People CF/03/06

ATHLETICS Key Stage 1 Throwing for Accuracy Lesson No. 4
Learning Outcomes
Children learn to: A & D Develop awareness of weight and distance A & D Throw underarm for accuracy towards a given target S & A Select and apply different force to targets at varying distances K & U Understand how throwing activities can help to make them stronger E & I Understand the basic skills required to make an accurate throw E & I Describe different types of throws
Throwing (Fling Throw)
The thrower aims to apply a force to send an object to a selected target or for distance. The thrower chooses the technique best suited to the throwing implement. FlingThrow: The fling throw is an underarm throw and can be performed facing the target for accuracy or by standing side on from the direction of the throw when generating force. The throwing implement is released midway between the waist and shoulder.
Warm Up:
1. Human Bowling Define an area. The teacher/coach selects three or four children to be bowlers, the rest are skittles. The children who are skittles are positioned in the zone and are allowed to jump to avoid the balls, but they must keep inside their zone, until struck by a ball. The children who are bowling aim to strike the human skittles by rolling the balls along the ground. Once a skittle is hit they step to the side and help to collect the balls by returning them to the bowlers. Once all the skittles have been hit start a new game with different bowlers. Encourage the bowlers to keep score of how many strikes they make
Health & Safety
Ensure: children keep the balls to the ground balls are not too hard
Skills Activity
2. Throwing Stations Divide the class into groups of three or four. Set up six or eight stations of which three or four will be repeated so that each group rotates three or four times around the different stations which make use of a range of throwing implements and targets. The stations might include:
Station 1 (Quoits): Children take turns to roll a quoit towards a target eg. cone
Station 2 (Hoopla): Children aim to throw beanbags into a target eg. hoop, box
Station 3 (Wall Target): Children aim to throw a ball or beanbag to strike a target on a wall with force
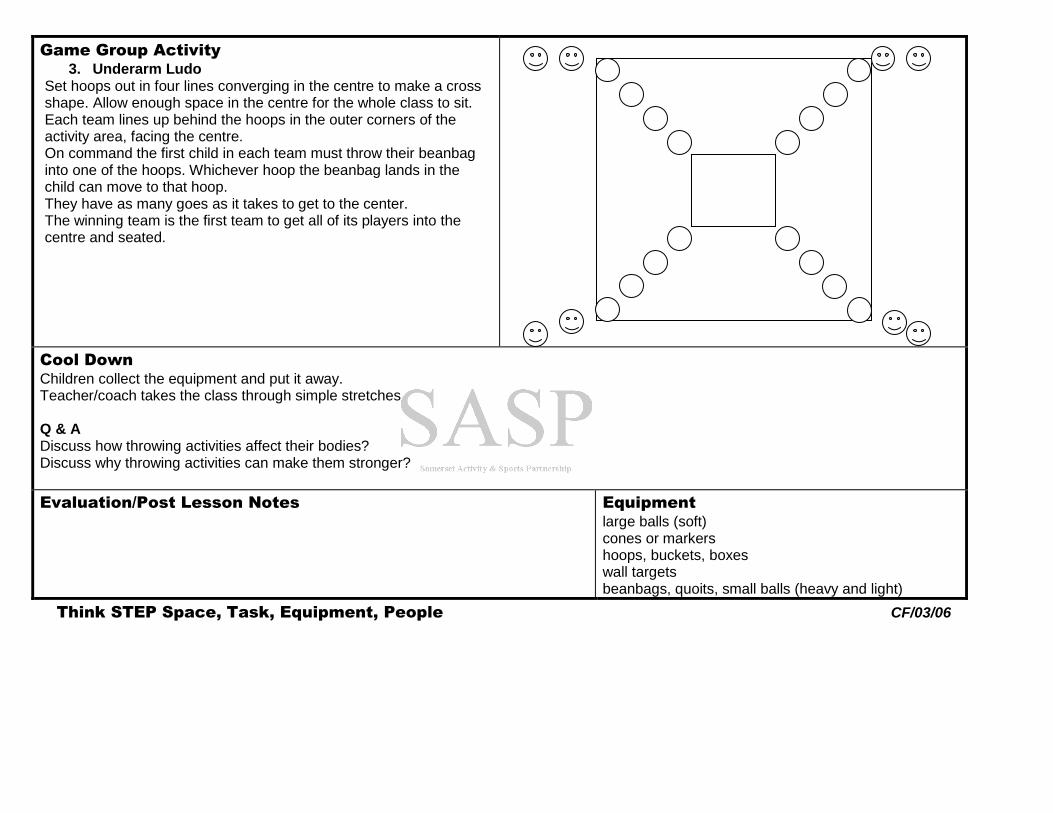
Station 4 (Ladders): Children aim to throw beanbags into the spaces of a ladder marked on the floor (use cones as markers instead of ladders)
Teaching Points
Encourage children to: stand with opposite foot forward to throwing arm point toes and fingers towards the target keep their eyes on the target
Health & Safety
Ensure: children throw away from others
Game Group Activity
3. Underarm Ludo Set hoops out in four lines converging in the centre to make a cross shape. Allow enough space in the centre for the whole class to sit. Each team lines up behind the hoops in the outer corners of the activity area, facing the centre. On command the first child in each team must throw their beanbag into one of the hoops. Whichever hoop the beanbag lands in the child can move to that hoop. They have as many goes as it takes to get to the center. The winning team is the first team to get all of its players into the centre and seated.
Cool Down
Children collect the equipment and put it away. Teacher/coach takes the class through simple stretches Q & A Discuss how throwing activities affect their bodies? Discuss why throwing activities can make them stronger?
Evaluation/Post Lesson Notes
Equipment
large balls (soft) cones or markers hoops, buckets, boxes wall targets beanbags, quoits, small balls (heavy and light)
Think STEP Space, Task, Equipment, People CF/03/06
ATHLETICS Key Stage 1 Jumping for Height & Distance Lesson No. 5
Learning Outcomes
Children learn to: A & D Develop awareness of height and distance A & D Take off in different ways and land in a coordinated way A & D Work in small groups taking turns S & A Apply different take offs to different jumping activities K & U Describe the effects of jumping activities on their bodies E & I Watch and copy each other jumping and recognise good jumps E & I Describe the basic techniques for jumping
Jumping
The jumper aims to maximise the distance or height covered through the phases of approach, take off, flight and landing.
Warm Up:
1. Kangaroos In a defined area ask children to jog around on the balls of their feet. On command: “Kanagroo, over the fence!” the children must jump with their arms and legs as high in the air as they can “Kangaroos, side to side!” the children must jump with two feet together on the spot but side to side “Kangaroos, paws on your head!” children make small jumps forwards with hands on their heads Kanagaroos, fast as you can!” children make small jumps with their legs together Kanagaroos, slow as you can!” children make slow exaggerated jumps, bigger leaps with softer landings
Teaching Points
Encourage children to: swing their arms forwards at take off bend their knees at take off and landing (think of a
tightly coiled spring ready to be released)
Health & Safety
Jumping activities are very demanding on the body. Ensure: children are wearing appropriate footwear the bursts of jumping activity are short
Skills/Game Activity
In this lesson the skills practice is combined with personal challenges and games with children competing against themselves to see if they can jump further or higher.
2. How many ways? Children find a space and teacher/coach takes children through two standing jumps: 1 foot to 2 feet 2 feet to 2 feet Allow the children time to practise in their space. Questions & Answers Recap on the jumping techniques as in the teaching points above. Which one works best? Which one gets you the furthest?
3. Jumping Stations Set up eight stations (two sets of four stations detailed below). Organise children into groups of three or four.
Health & Safety
Ensure: children take turns at each station children jump in one direction only gym mats are used where appropriate in order to
cushion the landing (these may need taping down)
Teaching Points
Encourage children to: jump from a balanced starting position land softly by bending the knees explore different body shapes in flight (these might
include long and thin, tuck and star)

Children rotate around the different jumping stations spending 2 to 3 minutes at each
Jump the River: Use two ropes to create a river, which starts narrow and becomes wider. Children take turns to start at the narrow part of the river and work their way up to the widest part. (1 foot to 2 feet jump) or (2 feet to 2 feet) Feet First: Using a gym mat children take turns to jump from the edge of the mat onto the mat, each time trying to jump a little further (2 feet to 2 feet jump). Children mark where they land with a cone and try to improve their distance. High Bounce: Using a low hurdle or cones and a cane children take turns to jump the obstacle (2 feet to 2 feet) either side ways or forwards. Target Jump: Using some sort of target on the wall (eg. post its) children take turns to stand side onto the wall and jump and reach for the target with their inside arm to the wall.
4. Questions & Answers
Reinforce teaching points. In what other games do we need to be able to jump? (eg. skipping, jumping for a frisbee, jumping to save a ball in football) How do our bodies feel after jumping activities? Which parts of our bodies have been doing most of the work?
Cool Down
5. Letter Stretches Children collect the equipment and put it away. Teacher/coach takes children through simple letter stretches (see lesson 2)
Evaluation/Post Lesson Notes
Equipment
mats ropes cones or markers hurdles canes
Think STEP Space, Task, Equipment, People CF/03/06
Jump the River
Feet First
High Bounce
Target Jump

ATHLETICS Key Stage 1 Combination Jumping Lesson No. 6
Learning Outcomes
Children learn to: A & D Take off and land in different ways A & D Work in pairs and small groups taking turns A & D Make different body shapes in flight S & A Use different jumps to make jumping sequences K & U Understand the effects of jumping activities on their bodies E & I Watch each other jump, copy and recognise good jumps
Combination Jumping
Combination jumping is where more than one jump is put together in a sequence as in the game of hop scotch. Combination jumps might include two or more of the following jumps:
1 foot to 2 feet (jump)
2 feet to 2 feet (jump)
1 foot to the other foot (bound)
1 foot to the same foot (hop)
2 feet to 1 foot (jump)
Warm Up:
1. Touch the Floor (Body Awareness) In a defined space children move around the area looking for spaces Starting at a walking pace and gradually moving into a jog, skip or side step. On command “Touch the Floor with……” and teacher/coach calls a body part (eg. hand, knee, tummy, etc) the children touch the floor with that part of their body.
Health & Safety
Ensure: the ground surface is dry and safe children keep their heads up and look for spaces move to the ground without diving
Skills/Game Activity
2 Copy me In pairs the children stand facing each other about two to three metres apart. One child is the leader and performs a series of jumps in different directions. These could be sideways, forwards, backwards, upwards. Their partner must try to mirror these jumps. The children swap roles. Extend the activity so that one child is now leader and the other follows from behind as a shadow. After a few minutes swap roles. The leader now makes a combination of jumps (two to five jumps) whilst the other child watches and once the sequence has finished they repeat the sequence. Children swap roles. 3. Hop Swap Remaining in pairs each child collects a cone. The cones should be placed about three metres apart with each child standing beside the cone facing their partner On command of “Hop, Swap” the children hop to their partner’s cone as quickly as possible. The aim of the game is to see who can get to the other side first. The children could explore different types of jumps and different finishing positions. Eg. Finish by sitting down or making a star shape
Teaching Points
Encourage children to: explore making different shapes in the air
(eg. tuck, star, long thin shape) land with soft and bent knees try a variety of hop and jump combinations
touch the ground lightly with their feet (as if barefoot on hot sand)
Health & Safety
Ensure: children are working in a space the activity is kept to short bursts children hop to the right of the cone

4. Questions & Answers Discuss the different types of jumps, recapping on Lesson 5. Can you describe the different body shapes you made in the air? Which shapes worked best? Which shapes were easiest to hold?
5. Jumping Stations Set out six to eight jumping stations using a variety of equipment, with three or four of the stations being repeated twice. Organise the children into small groups of four or five at each of the stations. The children rotate around the different stations taking turns to make different combinations of jumps. The stations might include the following: Ladders: Children take turns to throw a beanbag into one of the spaces in the ladder and then make a combination of jumps up the ladder to retrieve the bean bag (as in the game of hop scotch). Broken Bridge/Stepping Stones: Children take turns to make a combination of jumps to get across the river. Use spot markers which the children can stand on or cones for them to jump alongside. Dice Jump: Children take turns to roll the die and make a combination of jumps to that number from a starting line or marker. They then record their finishing point with a cone and repeat the sequence aiming to beat their own distance. Lily Pads: Place two gym mats about five metres apart. The children take turns to cross from one mat to the other using different combinations of jumps. How few jumps does it take them to get from one lily pad to the other?
Ladders
Dice Jump Lily Pads
Cool Down
6. Small & Tall, Thin & Wide Children collect equipment and put it away. Teacher/coach takes children through simple gymnastic shapes to cool down. Eg. Tuck Shape, Straddle Shape, Pencil Shape, Star Shape
Evaluation/Post Lesson Notes
Equipment
mats cones or spot markers ladders, ropes or cones
Think STEP Space, Task, Equipment, People CF/03/06
Stepping Stones