kenmore - c.searspartsdirect.com · sears kenmore microwave oven "use and care manual"-...
TRANSCRIPT
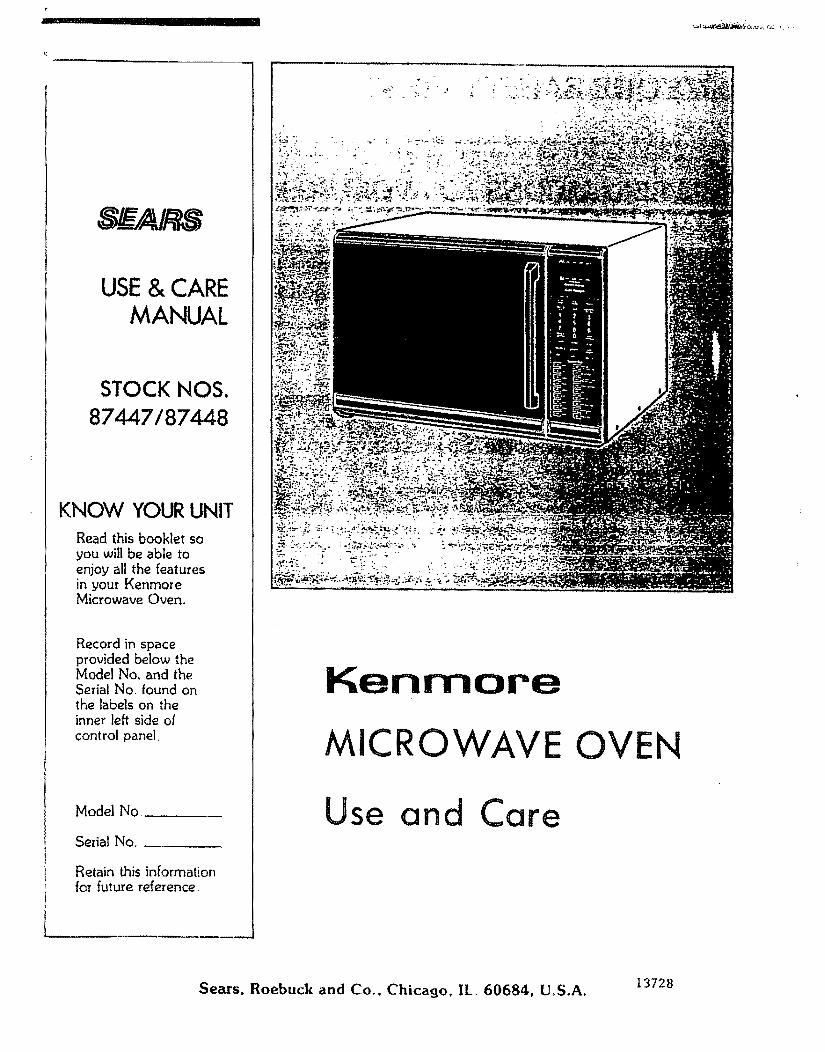
R
USE& CAREMANUAL
STOCK NOS.
87447/87448
KNOW YOUR UNITRead this booklet soyou will be able toenjoy all the featuresin your KenmoreMicrowave Oven.
Record in spaceprovided below theModel No. and theSerial No. found onthe labels on theinner left side ofcontrol panel_
Model No..
Serial No,
Retain this informationfor future reference,.
Kenmore
MICRO
Use and Care
E OVEN
Sears, Roebuck and Co_, Chicago, II_ 60684, UoS.A. 13728
YOUR SAFETY FIRST
2
The Sears Kenmore Microwave Oven, though simple to use, is not a toy° Respect it as an electric cookingappliance. Become familiarwith microwave energy, its uses and limitations.
PRECAUTIONS TO AVOID POSSIBLE EXPOSURETO EXCESSIVE MICROWAVE ENERGY(a) DO NOT ATTEMPT to operate this oven with the door open since open-door operation can
result in harmful exposure to microwave energy. It is important not to defeat or tamper with thesafety interlocks.
(b) ' DO NOT PLACE any object between the oven front face and the door or allow soil or cleanerresidue to accumulate on sealing surfaces.
(c) DO NOT OPERATE the oven if it is damaged. ]t is particularly important that the oven doorclose properly and that there is no damage to the:(!) DOOR (bent)(2) HINGES AND LATCHES (broken or loosened)(3) DOOR SEALSAND SE.AL.INGSURFACES.
(d) THE OVEN SHOULD NOT BE ADJUSTED OR REPAIRED BY AhP!ONE EXCEPTPROPERLY QUAE!FIED SERVICE PERSONNEL
IMPORTArffr--FOR PROPER AND SAFE USE OF YOUR OVEN
• The oven must be level,
• The glass tray must be in the oven during cooking,
• Place the cookware gently on the glass tray and handle the tray carefully to avoid pasta'alebreakage._
• When a browning d_shis used, the browning dish bottom must be at least 3/16 in_above cooking tray°Carefully read and follow the instructions for the brown_ins dish. incorrect usagemay cause the glass trayto break.
• The oven should be thoroughly checked by a trained service technician, should it be dropped ordamaged, before it is operated asain_
• The electrical power cord must be kept dry and must not be pinched or crushed in any way_
• The oven has severalbuilt-in safetyswitchesto make sure the power remains off when the door is open.DO NOT try to defeat these switches°
DON'TS
* DO NOT attempt to operate this oven with the door open.
- DO NOT run the oven empty without food in it.
, DO NOT cook bacon directly on the slags tray to avoid excessive local heating of the glass tray.
, DO NOT ieave the temperature probe unplugged in the cavity when operating the oven_
, DO NOT let the temperature probe touch the side walls, glass tray or door of the cavity when in use.
o DO NOT plug the pointed end of the temperature probe into the socket inside the cavity_
, DO NOT use the temperature probe in a regular oven,. 'This probe is designed for microwave ovenonly,
= DO NOT store burnable material, such as food, in your microwave oven_
, DO NOT heat any types of baby bottles or baby food,, Uneven heating may occur and possibly causepersonal injury.
o DO NOT heat small-necked containers, such as syrup bottles, in the microwave oven..
" DO NOT use this microwave oven for commercial purposes. This Sears Kenmore Microwave Oven ismade for household use only,
SAFETY CERTIFICATION
The Sears Kenmore Microwave Oven is designed and thoroughly tested to meet exactin 9 safety standards,. Itmeets UL and FCC requirements and complies with safety performance standards of the U,S Department ofHealth and Human Services.,
IMPORTANT SAFETY INSTRUCTIONS
When using electrical appliances basic safety precautions should be followed, includin9 the following:
I 17A'r111_ TTI_ T,I"_W._I_INII'NL.3--To reduce the risk ofbums, electric shock, fire, injury to persons orexposure to excessive microwave energy:
5, Install or locate this appliance only inaccordance with the provided installationinstructions.
io Read all instructions before using the appliance_
2. Read and follow the specific "PRECAUTIONSTO AVOID POSSIBLE EXPOSURE TO EXCESSIVE MICROWAVE ENERGY" found on
Page 2o
3,. As with most cooking appliances, closesupervision is necessary to reduce the risk of afire in the oven cavity.
6_ Some products such as whole eggs, water withoil or fat, sealed containers and closed glass jarsfor example may explode and should not beheated in this oven_
7 Use this appliance only for its intended use asdescribed in this manua!.
8, As with any appliance, dose supervision isnecessary when used by children.
NOTE: If a fire should start:
*KEEP THE OVEN DOOR CLOSED*TURN THE OVEN OFF*AND DISCONNECT THE POWER CORD
OR SHUT OFF POWER AT THE FUSE ORCIRCUIT BREAKER PANEL..
a,, Do NOT grossly overcook foods_ As manygrossly overcooked foods will cause fires inthe oven cavity, carefully attend the oven;especially, if paper, plastic, or othercombustibles are placed inside the oven.
b_ Do NOT store combustible items such as,bread, cookies, etc. inside the oven because iflightning strikes the power lines it may causethe oven to turn ON.
9. Do not operate thisappliance if it has a damagedcord or plug, if it is not working properly, or if ithas been damaged or dropped.
]'his appliance should be serviced only byqualified service personnel. Contact nearestauthorized service facility for examination,repair or adjustmenL
Ii. Do not cover or block any openings on theappliance.
12 Do not use outdoors,
13. Do not immerse cord or plug in water°
14. Keep cord away from heated surfaces.
C_ Do not use wire twist-ties in the oven. Be sureto inspect purchased items for wire twist-tiesand remove them before the item is placed inthe ovem
4. ]'his appliance must be grounded Connect onlyto properly 9rounded out]eL See "GROUND.tNG INSTRUC'['IONS" found on Page 6.
15,,
16.
Do not let cord hang over edge of table orcounter.
Whe_l cleaning surfaces of door and oven thatcome together on closing the door, use only.mild, nonoabrasive soaps or detergents appliedwith a sponge or soft cloth. (See "Care andCleaning" instructions on Page 3!0)
SAVE THESE INSTRUCTIONS
3

TABLE OF CONTENTS
General Instructions
[] Location of Model Number Label 5
S IMPORTANT -- Electrical Grounding Instructions ............................................................ 6
Ill Installation .................................................................................................... 7
n Setting "Time of Day" .......................................................................................... 7
[] Names of Oven Paris ........................................................................................... 8
II Oven Control Panel ................................................................................................ 9
Use Instructions
[]EasyUse Chart...................................................................................................10
[] Recall and Change of Settings........................................................................................ II
[] Pause Between Stages ........................................................................................... 11
[] Regular Timer ....................................................................... .,........................ 12
[] Hold Warm ..................................................................................................................... 12
Detailed Directions
n Cooking Guide for "Multi-Power" Settings ......................................................................... 13
HI "Hi-Power"/"Mutti-Power" Cooking ............................................................................... !4
[] '¢Temperature Controlled" Cooking .......................................................................... 15--]7
m Temperature Controlled "HI-PoweF'/"Malti-Power" Cooking ............................................ 18
[] Automatic Defrost ................................................................................................... 19--20
II Mtdti,Stage Cooking ............................................................................................. 21--22
[]Delay Start Cooking...................................................................................................23
[]Whole Meal Cooking .................................................................................................23
[] Preset Recipe Cooking ...................................................................................................24--25
* Use of Quantity Key ................................................ ; .......................................................... 24
[] Programming Blew Recipes ................................................................................ 26--29
Utensils ..................................................................................................................... 30
Care and Cleaning .............................................................................................. 31
Questions and Answers............................................................................................... 32--33
Before Calling for Service................................................................................................. 34
Sears Service .............................................................................................................................. 35
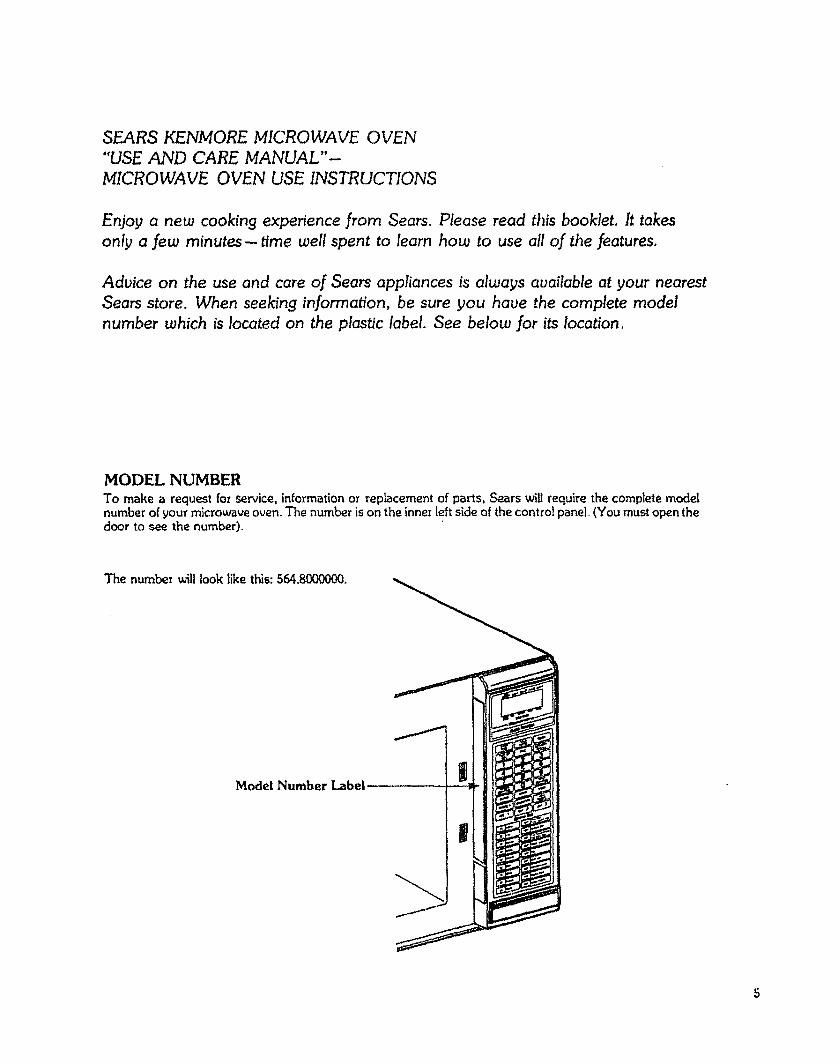
SEARS KENMORE MICROWAVE OVEN
"USE AND CARE MANUAL"-
MICROWAVE OVEN USE INSTRUCTIONS
Enjoy a new cooking experience from Sears. Please read this booklet. It takesonly a few minutes - time well spent to learn how to use all of the features.
Aduice on the use and care of Sears appliances is always available at your nearestSears store. When seekT"nginformation, be sure you haue the complete model
number which is located on the plastic label. See below for its location.
MODEL NUMBERTo make a request for service, information or replacement of parts, Sears ,,viii require the complete modelnumber of your microwave oven. The number is on the inner left side of the control panel. (You must open thedoor to see the number).
The number will took like this:564.8000000.
Model Number Label|
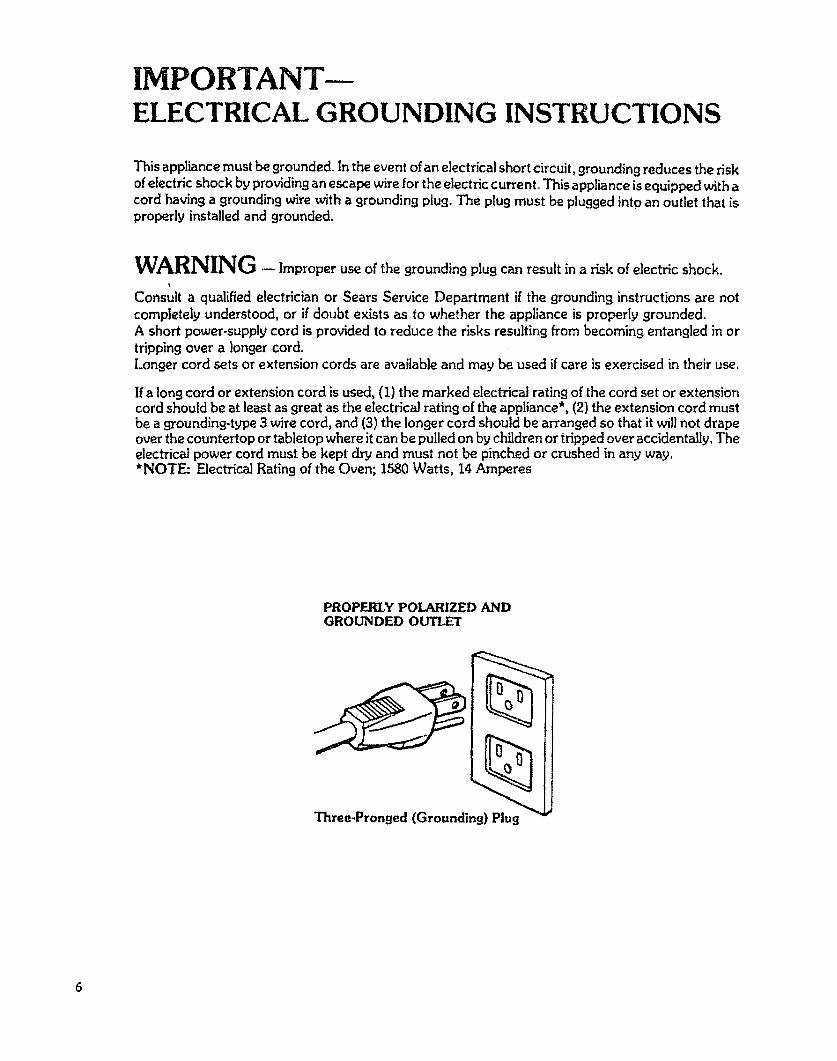
IMPORTANT--ELECTRICAL GROUNDING INSTRUCTIONS
This appliance must be grounded. In the event of an electrical short circuit, grounding reduces the riskof electric shock by providing an escape wire for the electric current° This appliance is equipped with a
cord having a grounding wire with a grounding plug. The plug must be plufl.qed into an outlet that isproperly installed and grounded°
WARNING - Improper use of the grounding plug can result in a risk of electric shock.
Consult a qualified electrician or Sears Service Department if the flrounding instructions are not
completely understood, or if doubt exists as to whether the appliance is properly grounded_A short power-supply cord is provided to reduce the risks resulting from becoming entangled in or
tripping over a longer cord.Longer cord sets or extension cords are available and may be used if care is exercised in their use.
If a long cord or extension cord is used, (1) the marked electrical rating of the cord set or extensioncord should be at least as great as the electrical rating of the appliance*, (2) the extension cord mustbe a grounding4!,rpe 3 wire cord, and (3) the longer cord should be arranged so that it will not drapeover the countertop or tabletop where it can be pulled on by children or tripped over accidentally_ Theelectrical power cord must be kept dry and must not be pinched or crushed in any way.*NOTE: Electrical Rating of the Oven; 1580 Watts, 14 Amperes
PROPERLY POLARIZED ANDGROUNDED OUTLET
Three-Pronged (Grounding) Plug
INSTALLATION
Install your oven by following these four simple steps:
Step i: Remove all packing material and accessories
Step 2: Place the oven in the level location of your choice, but make sure there is at least one inch of space onthe top and at the rear for proper ventilation. The top of the oven should be kept clear and the plasticfeet must be kept on the oven so there is air flow for ventilation. An exhaust outlet is at the rear of theoven, Blocking the outlet can damage the oven.
Step 3: Plug your oven into a Standard 120 volt/60 Hz household outlet. Be sure the electricai drcuit is at least15 amp and that your microwave oven is the only appliance on the circuit.
Step 4: When your microwave oven is plugged in for the first time or when power resumes after a powerinterruption, the numbers in the display window will show "0:00" plus the hours and minutes that haveelapsed since the oven was plugged in or the power was restored° This means that the TLMEOF DAYclock must be seL Refer to "Setting T_me of Day" below
NOTE: If your oven does not operate properly unplug the oven from the 120 volt/60 Hz household outlet andthen plug it back in.This unit is not designed for 50 Hz or any circuit other than a 120 volt/60 Hz AC circuit°
SETTING TIME OF DAY
* Touch CLEAR* Touch TIME OF DAY
* Touch numbers indicating the correct time= Touch TIME OF DAY
(This is also explained in the "Easy Use Chart" Time of Day Section on Page I0.)
DIMENSIONS
Height:. 15-1/2"Width: 23"Depth: 20_1/4"Weight: 58 lbs.
NOTE: If you want this microwave oven"Built-in", either by itsetf or over Sears Kenmore electric built-in ovenmodels 42151, 42158, 42159, 4214X, 42209, 42249, 4228X, 42359, 4233X, 4238)(, 42489, 42549 and4258X (where X may be 2, 4, 6, 8 or 9) Sears Kenmore Built-in Trim Kit Model _9,84t92 is available_Contact your nearest Sears Store or the catalog.
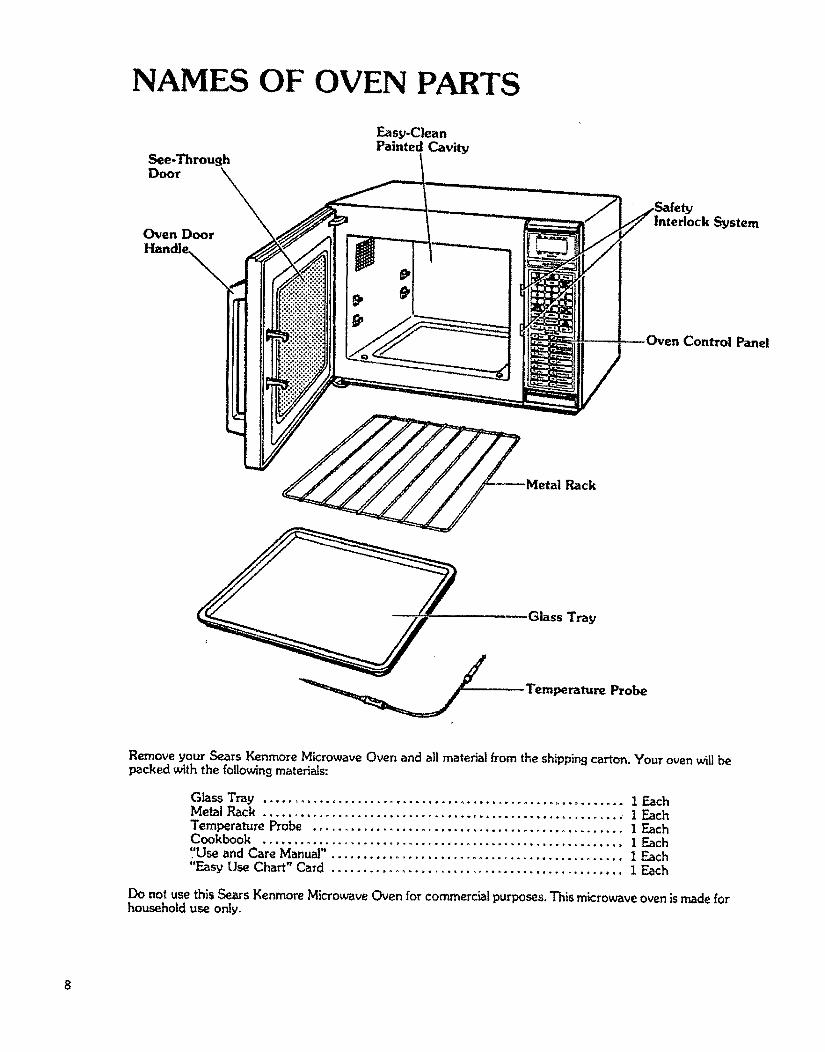
NAMES OF OVEN PARTS
See-Through
Door X_Oven Door
Easy-CleanPainted Cavity
Interlock System
Control Panel
_ _Metal Rack
Glass Tray
Temperature Probe
Remove your Sears Kenmore Microwave Oven and all material from the shippingcarton. Your oven will bepacked with the followingmaterials:
Glass Tray ......................................................... t EachMetal Rack ......................................................... I EachTemperature Probe ................................................. I EachCookbook ......................................................... i Each7Use and Care Manual". ............................................. 1 Each"Easy Use Chart" Card .............................................. 1 Each
Do not use this Sears Kenmore Microwave Oven for commercial purposes. This microwave oven is made forhousehold use only.
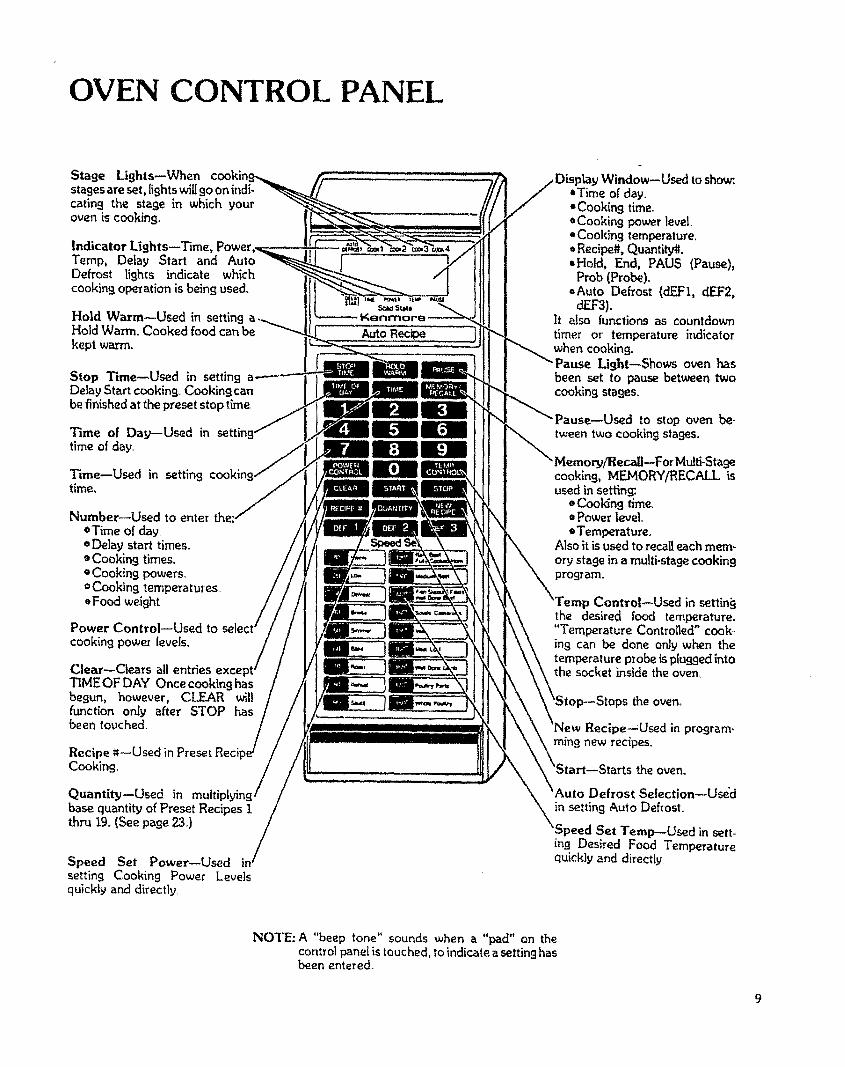
OVEN CONTROL PANEL
Stage Lights--When co,kinstages are set, lights wiUgo on indi-cating the stage in which youroven is cooking.
Indicator Lights--Time,Temp, Delay Start and AutoDefrost lights indicate whichcooking operation is being used.
Hold Warm--Used in settingHold Warm. Cooked food can be
kept warm.
Stop Time--Used in settingDelay Start cooking, Cooking canbe finished at the preset stop time
Time of Day--Used in settintime of day°
[0]Time--Used in settingtime,
Number--Used to enter the..• Time of day.¢ Delay start times.• Cooking times.o Cooking powers= Cooking temperatures,, Food weight
Power Control--Used tocooking pow_ levels,
Clear--Clears all entries
TIMEOF DAY Once cooking hasbegun, however, CLEAR willfunction only after STOP hasbeen touched.
Recipe *t--Used in Preset ReciCooking,
Quantity--Used in multibase quantity of Preset Recipes 1thru 19.(See page 23,)
Speed Set Power--Usedsetting Cooking Power Levelsquickly and directly
Auto Recipe )
,Window--Used to sh_.,Time of day"Cooking time.*Cooking power love[, Cookin9 temperature,, Recipe#. Quantity_.,Hold, End, PAUS (Pause),
Prob (Probe)._,Auto Defrost (dEF1, dEF2,
dEF3).It also functions as countdowntimer or' temperature indicatorwhen cooking_
Light--Shows oven hasbeen set to pause between twocooking stages_
z--Used to stop oven be-tween two cooking stages.
ForMulfi-Staflecooking, MEMORY/RECALL isused in setting:.
=Cooking time,• Power level.=Temperature,
Also it is used to recall each mere-or,,/stage in a multi-stage cooking
J Control--Used in settin_the desired |ood temperatme."Temperature Controlled" cook-ing can be done onlyw_'anthetemperatureprobeispluggedintothe socket inside the oven,,
the oven_
Recipe--Used in program_rain9 new recipes
theoven,
Defrost Selection--Usedin setting Auto Defrost
'Speed Set Temp_Osed in sett-in9 Desired Food Temperaturequickly and directly.
NOTE: A "beep tone" sounds when a "pad" on thecontrol panel is touched, to indicate a setting hasbeen entered.
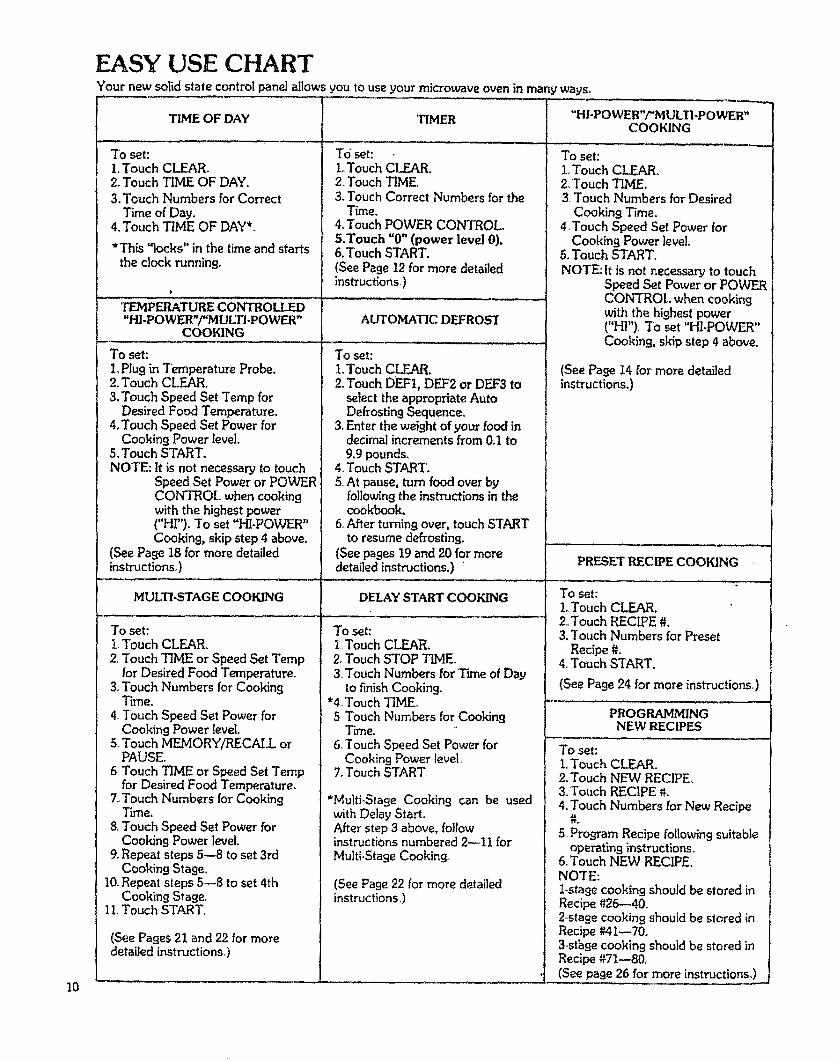
EASY USE CHARTYour new solid state control panel allows you to use your microwave oven in many ways_
10
TIME OF DAY
To set:1,Touch CLEAR,2.Touch TBALEOF DAY.3, Touch Numbers for Correct
Time of Day.4, Touch TIME OF DAY*,
*This "locks" in the time and startsthe clock running.
TEMPERATUP_ECONTROLLED"HLPOWF_"/"MUKTLPOWER"
COOKING
To set:1oPlug in Temperature Probe.2. Touch CLEARo3.Touch Speed Set Temp for
Desired Food Temperature,,4. Touch Speed Set Power for
Cooking Power level.5.,Touch START.NOTE: It is not necessary to touch
Speed Set Power or POWERCONTROL when cookingwith the highest power("HF'), To set "HI-POWER"Cooking, skip step 4 above.
(See Page 18 for more detailedinstructions.)
MULTI-STAGE COOKING
To set:1.Touch CLEAR°
2,,Touch "lIME or Speed Set Tempfor Desired Food Temperature.
3.Touch Numbers for CookingTime.
4. Touch Speed Set Power forCookingPower level
5.Touch MF-MORYARECALL orPAUSE.
6.Touch TIME or Speed Set Tempfor Desired Food Temperature.
7_Touch Numbers for CookingTLme.
8.Touch Speed Set Power forCookingPower level.
9.Repeat steps 5--8 to set 3rdCooking Stage.
10.Repeat steps 5--8 to set 4thCooking Stage.,
11 Touch START.,
(See Pages 21 and 22 for moredetailed instructions°)
TIMER
To set:1.Touch CLEAR,2,Touch TIME,3,Touch Correct Numbers for the
Time.4.,Touch POWER CONTROL5,Touch "0" (power level 0).6.Touch START.(SeePage 12 for more detailedinstructions.)
AUTOMATIC DEFROS'I
To set:l..TouchCLEAR.2.Touch DEF1, DEF2 or DEF3 to
select the appropriate AutoDefrosting Sequence.
3.Enter the weight of your food indecimal increments from 0d to9.9 pounds.
4.Touch START,5,At pause,turn food over by
following the inst-mctions in thecookbook.
6oAfter turning over, touch STARTto resume defrosting.
(See pages19 and 20 for moredetailed instructions.) "
DELAY START COOKING
"To set:1.Touch CLEAR.2, Touch STOP 3_VIE,
3 Touch Numbers for Time of Dayto finish Cooking.
*4.Touch TIME,5 Touch Numbers for Cooking
Time.6,Touch Speed Set Power for
Cooking Power level.7. Touch START,
*MultioStage Cooking can be usedwith Delay Start.After step 3 above, followinstructions numbered 2--11 forMultioStageCooking..
(See Page22 for more detailedinstructions )
"HI-POWER"/"M ULTI-POWER"COOKING
To set:1oTouch CLEAR..2, 'TouchTIME,3 Touch Numbers for Desired
Cooking Time.4_Touch Speed SetPower forCookingPower level,
5. Touch START,NOTE: It is not necessary to touch
Speed Set Power or POWERCONTROL whencookingwith the highest power("HP')o 7'o set "HI-POWER"Cooking,skip step 4 above.
PRESET R_ECIPE COOKING
To set:L Touch CLEAR.2, Touch RECIPE #.3. Touch Numbers for PresetRecipe#.
4,,Touch START,
(See Page 24 for more instructions.,)
PROGRAMJ_INGNEW PJECIPES
To set:L Touch CLEAR,2, Touch NEW RECIPE,3, Touch RECIPE #.4, Touch Numbers for New Recipe
5_Program Recipe following suitableoperating instructions,
6, Touch NEW RECIPE.NOTE:Lstage cooking should be stored inRecipe #26--40.2-stage cooking should be stored inRecipe #41--70.3,,sthgecooking should be stored inRecipe#71--80_(See page 26 for more instructions.)
(See Pa_e 14 for more detailedinstructions,)
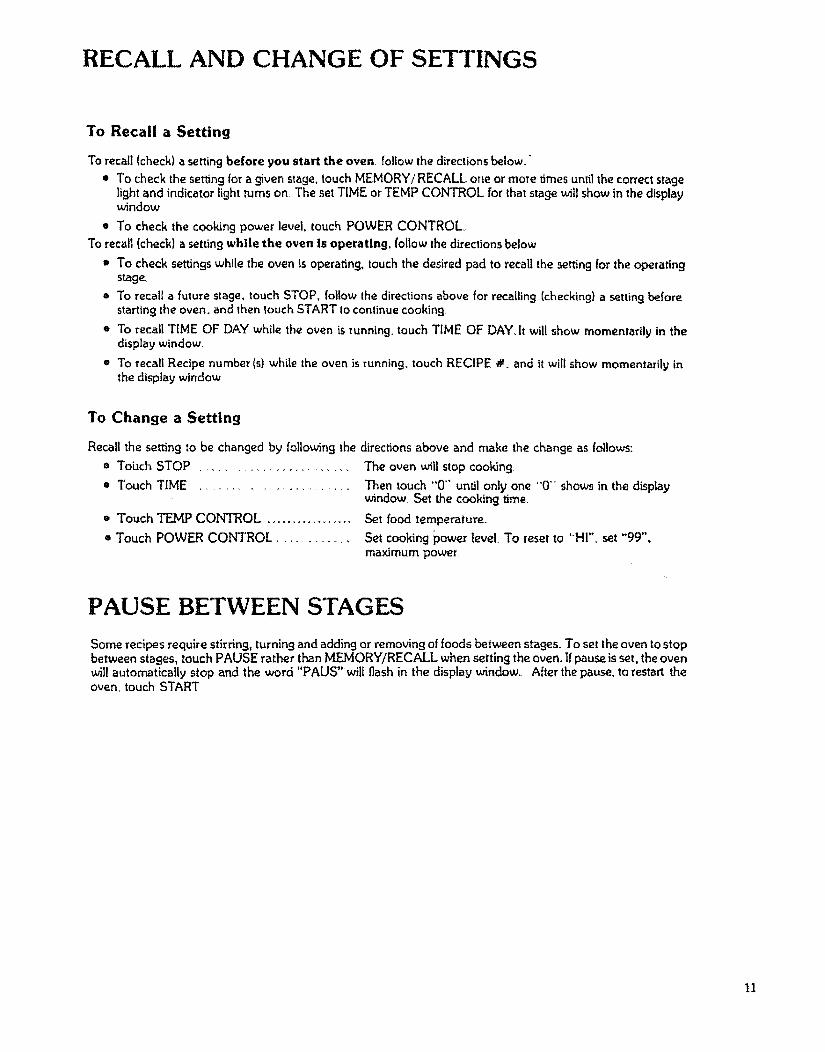
RECALL AND CHANGE OF SETTINGS
To Recall a Setting
To recall (check) a setting before you start the oven follow the directionsbelow_,"* To check the setting for a given stage, touch MEMORY/RECALL one or more times until the correct stage
light and indicator lightturns on. The setTIME or TEMP CONTROL for that stage will show in the displaywindow
* To check the Cooking power level, touch POWER CONTROL
To recall (check) a setting while the oven Is operating, follow the directions below,
* To check settings while the oven is operating, touch the desired pad to recall the retting for the operatingstage,
o To recall a future stage, touch STOP. follow the directions above for recalling (checking} a setting beforestarting the oven. and then _ouch START to continue cooking
* To recall TIME OF DAY while the oven is running touch TIME OF DAY.It will show momentarily in thedisplay window.
= To recall Recipe number (s) while the oven is running, touch RECIPE #. and it will show momentarily inthe display window
To Change a Setting
* Touch TEMP CONTROL .................
* Touch POWER CONTROL .............
Recall the setting to be changed by following the directions above and make the change as follows:
= Tobch STOP ............................... The oven will stop cooking..
* Touch 'rIME ................................... Then touch "0 °' until only one "0"" shows in the displaywindow. Set the cooking time.
Set food temperature_
Set cooking power level. To reset to "HI"_ set "99",maximum power.
PAUSE BETWEEN STAGES
Some recipes require stirring, turning and adding or removing of foods between stages. To set the oven to stopbetween stages, touch PAUSE rather than MEMORY/RECALL when setting the oven. If pause is set, the ovenwill automatically stop and the word "PAUS" will flash in the display window.. After the pause, to restart theoven,,touch START
11
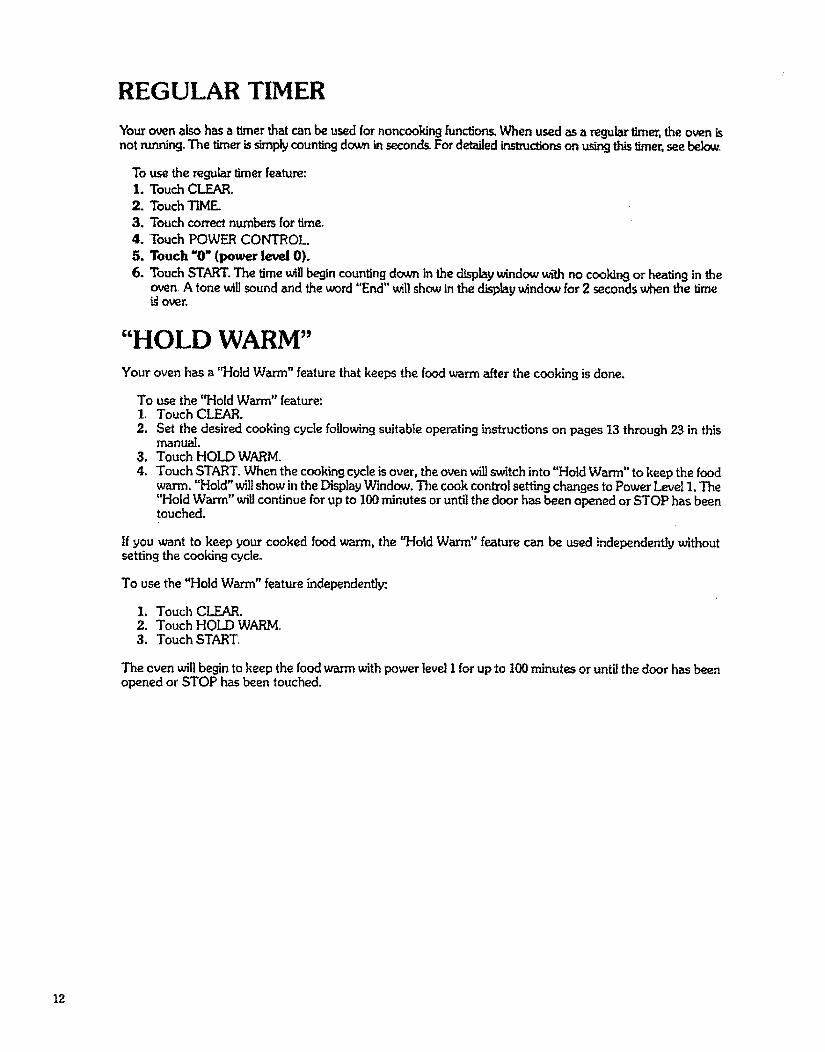
REGULAR TIMER
Yourovenalsohasa timerthatcanbe usedfornoncooking[unctions,When usedasa regulartimer,theovenisnotrunning.The timerissimplycountingdc_,n inseconds.For detailedLrLst_ctionson using this timer,seebelow.
To use the regular timer feature:1. Touch CLEAR.
2. Touch TIME.3. Touch correct numbers for time.
4. Touch POWER CONTROL.
5. Touch "O"(powerlevel0).
6. TouchSTART.The time willbegin countingdown in the displaywindow with no cooking or heating in theoven A tone willsoundand the word "End" will show in the displaywindowfor 2 seconds when the timeigover.
"HOLD WARM"Your oven has a "Hold Warm" feature that keeps the food warm after the cooking is done.
To use the "Hold Warm" feature:i. Touch CLEAR.
2. Set the desired cooking cycle following suitable operating instructions on pages t3 through 23 in thismanual.
3. Touch HOLD WARM.
4. Touch START. When the cooking cycle is over, the _Jen willswitch into "Hold Warm" to keep the foodwarm. "Hold" will show in the Di_tav Window. The cook control setting changes to Power Level 1. "The"Hold Warm" will continue for up to 100 minutes or until the door has been opened or STOP has beentouched.
If you want to keep your cooked food warm, the "HoldWarm" feature can be used independendy withoutsetting the cookingcycle.
To use the "Hold Warm" feature independentt!r.
I. Touch CLEAR.2. Touch HOLD WARM,3. Touch START,
The oven will begha to keep the food wasm with power level I for up to I00 minutes or until the door has beenopened or STOP has been touched.
12
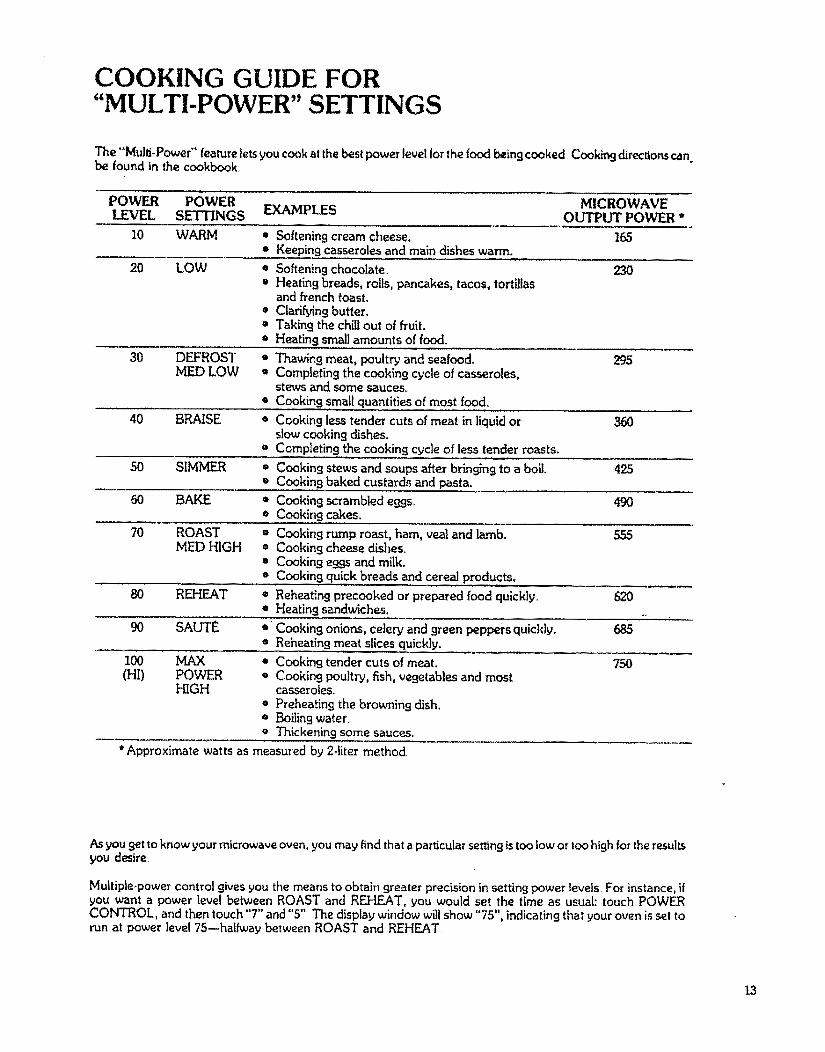
COOKING GUIDE FOR"MULTI-POWER" SETTINGS
The "'Mulli-Power" feature letsyou cookat the bestpower level for the food beingcooked Cookingdirection.scanbe found in thecookbook
POWER POWER MICROWAVELEVEL SETTINGS EXAMPLES OUTPUT POWER *
10 WARM • Softening cream cheese. 165• Keeping casserolesand main dishes warm.
20 LOW * Softening chocolate_ 230• Heatingbreads, rolls, pancakes, tacos, tortillas
and french toast.• Clarifying butter.= Taking the chill out of fruit.= Heating smallamounts of food.
30 DEFROST • Thawing meat, poultry and seafood. 295MEI) LOW * Completing the cooking cycle of casseroles,
stews and some sauces,,e Cooking small quantitiesof most food,
40 BRAISE * Cooking less tender cuts of meat in liquid or 360slow cooking dishes.
=' Completing the cooking cycle of less tender roasts.
50 SIIVLMER * Cookingstews and soups after bringingto a boil. 425e Cookingbaked custards and pasta.
60 BAKE * Cooking scrambled eggs,. 490• Cookir!gcakes.
70 ROAST = Cooking rump roast, ham, veal and lamb. 555MED HIGH = Cooking cheese dishes_
• Cooking e99s and milk.• Cookingquick breads and cereal products.
80 REHEAT = Reheating precooked or prepared food quickly.. 620• Heating sandwiches. ..
90 SAUTE *' Cooking onions, celery and green peppers quickly. 685• Reheating meat slicesquickly.
100 MAX * Cooking tender cuts of meat, 750(HI) POWER * Cooking poultry, fish, vegetables and most
HIGH casseroles.• Preheating the browning dish.• Boiling water,• Thickening some sauces,
• Approximate watts as measured by 2-liter method.
As you get to know your microwave oven, you may find that a particular setting is too low or too high for the resultsyou desire,
Multiple-power control gives you the means to obtain greater precision in setting power levels, For instance, ifyou want a power level between ROAST and REHEAT, you would set the time as usual: touch POWERCONTROL, and then touch "7" and "5", The display window will show "75", indicating that your oven is set torun at power level 7S--halfway between ROAST and REHEAT,
13
"HI-POWER"/"MULTI-POWER" COOKING
"HI" gives the highestpower cooking possiblewith your microwave oven. It is the recommended settingfor cookingfoods with high moisture content or for cooking foods that need fast cooking to maintain their natural flavor and texture+Many foods need slower cooking (at tess than full power) in order to give youthe best results+ In addition to "HI" there areninety-nine multi-power settingsoThe cookbook tells you which_powersetting is recommended for the food beingcooked+
To Cook
1. Touch CLEAR, and a beep tone will be heard. TheCLEAR erases all previoussettings+
2. Touch T_V[Eo The lights above TIME and belowCOOK 1 will go on. ("0" wig show in the displaywindow.)'
3_ Touch the correct numberson the control panel toset the cooking time. The time set will show in thedisplay window at the top of the control panel. Forexample:
= To set 30 seconds,you would touch "3" and then
• To set 3 minutes,touch "3", "0" and "0".
e To set 3-1/2 minutes, touch "3", "3" and "0"
Remember, the timer is a digital clock that is dividedinto 60 seconds. Therefore, I/2 minute is equal to 30seconds.Touch 30and not 50 as with a calculatortoindicate !/2.
. Touch Speed Set Power forCooking Power level. Forexample, if the recipe calls for cooking at the "80(REHEAT)" setting, youwould touch "80" on the leftend (next to Reheat) of the Speed Set Power Strip.The displaywindow willshow"80".+This means that inthe REHEAT setting, the oven is cooking at powerlevel 80.
NOTE: It is not necessaryto touch SpeedSet Poweror POWER CONTROL when cooking with thehighest power ("HT'). To set "HI-POWER" cooking,skip step 4 above, However, if POWER CONTROL istouched, the light above POWER wilt9o on and theword "HI" willshow in the display window. This is tolet you know that the oven will be operating on "HI"power unless a different power setting is chosen+
Touch START° The oven begins to cook and thedisplay window will show the time counting down inseconds. A tone will sound and the word "End" willshow in the display window for two seconds when thecooking time is completed,+Then the oven will shutitself off+
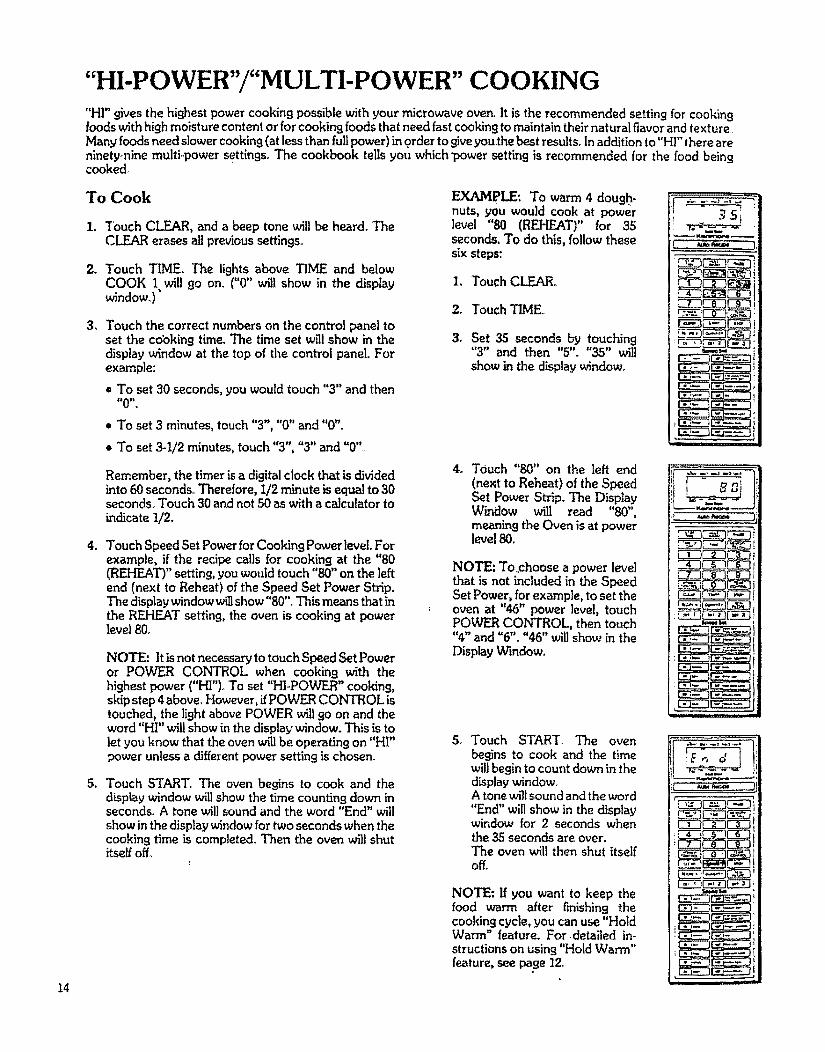
EXAMP_: To warm 4 dough-nuts, you would cook at powerlevel "80 (REHEAT)" for 35seconds.To do this, follow thesesix steps:
1. Touch CLEAR+
2+ Touch TIME+
3. Set 35 seconds by touching"3" and then "5"+ "35" willshow in the display window.
4_ TOuch "80" on the left end(next to Reheat) of the SpeedSet Power Strip.The DisplayWindow will read "80",meaning the Oven is at powerlevel 80.
NOTE: To+choose a power levelthat is not included in the SpeedSet Power, for example, to set theoven at "46" power level, touchPOWER CONTROL, then touch"4" and "6", "46" will show in theDisplay Window.
5. Touch START. The ovenbegins to cook and the timewill begin to count down in thedisplay window.A tonewfJ]sound and the word"End" will show in thedisplaywindow for 2 seconds whenthe 35 seconds are over.The oven wilt then shut itselfoff.
NOTE: Ifyou want to keep thefood warm after finishing thecooking cycle, you can use"HoldWarm" feature. For.detailed in-structions on using "Hold Warm"feature, see page12+
_ :.._; ._,._
,_ ,,K,m=,_
CZ_CZ_
_r-_---q_
.........itEo d
I4
"TEMPERATURE CONTROLLED" COOKING
The temperature probe is used to judge doneness whencooking or reheating food. Set the desired food tempera-ture with the TEMP CONTROL and the desired powerleue! with the POWER CONTROL. When"Hold Warm"
is set, after completing the cooking cycle the oven willhold the food warm up to 100 minutes_
TEMPERATURE SETTING &DISPLAY TEMPERATURE
Temperatures from 90_F to 200 ° F can be chosen and setin the oven. Temperature can be set in one-degreeincrements, and the Display will show the rise in foodtemperature in one, degree increments, Display Windowwilt not accurately show food temperature below 90°F..
Sensitive__ Area
TemperatureProbe Temperature
ProbeSensor
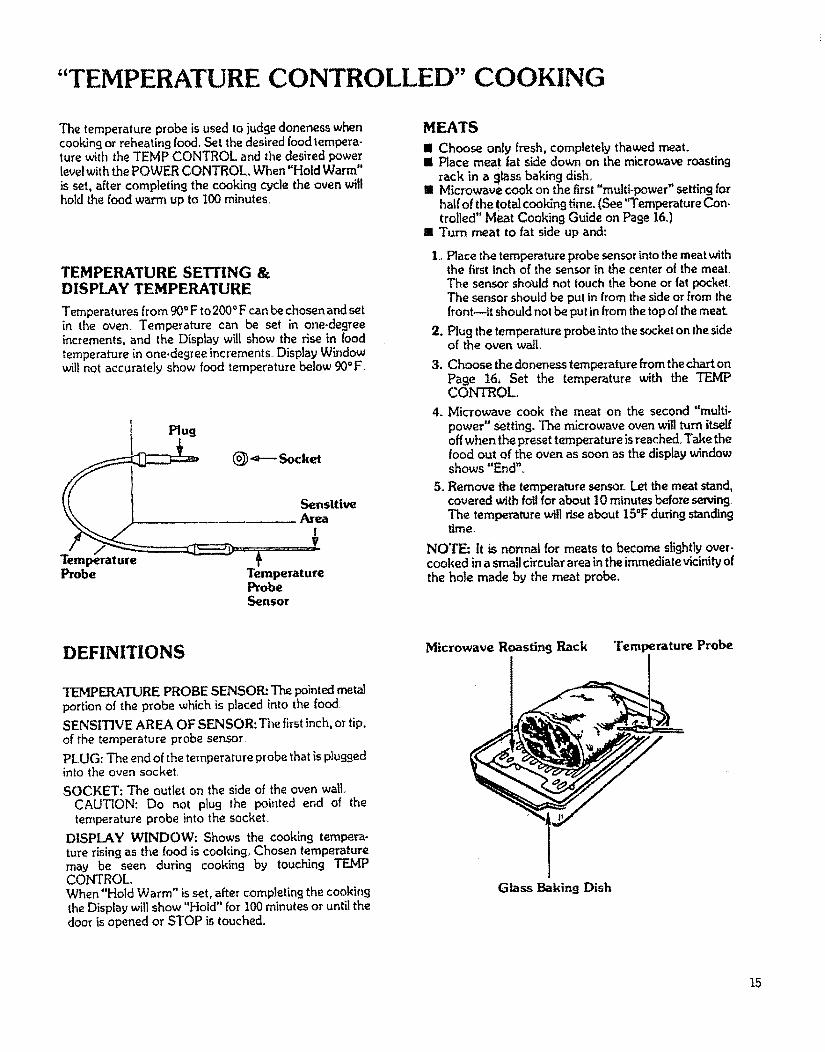
MEATS
Ill Choose only fresh, completely thawed meat.IIi Place meat fat side down on the microwave roasting
rack in a glass baking dish.n Microwave cook on the first "multi-power" setting for
half of the totalcooking time. (See"Temperature Con-trolled" Meat Cooking Guide on Page 16.)
II Turn meat to fat side up and:
,
3.
Place the temperature probe sensor into the meat withthe first Inch of the sensor in the center of the mealThe sensor should not touch the bone or fat pocketThe sensor should be put in from the side or from thefront--it should not be put in from the top of the meat.
Plug the temperature probe into the socket on the sideof the oven wall
Choose the doneness temperature from the chart on
Page 16, Set the temperature with the TEMPCONTROL°
4. Microwave cook the meat on the second "multi-
power" setting. The microwave oven will turn itselfoff when the preset temperature is reached, Take thefood out of the oven as soon as the display windowshows "End".
5. Remove the temperature sensoryLet the meat stand,covered with foil for about 10 minutes before _r'The temperature will rise about 15°F during standingtime..
NOTE: It is normal for meats to become slightly over-cooked in a small circular area in the immediate vicinity ofthe hole made by the meat probe.
DEFINITIONS Microwave Roasting Rack Temperature Probe
"IEMPERATURE PROBE SENSOR: The pointed metal
portion of the probe which is placed into the food,
SENSITIVE AREA OF SENSOR: The first inch, or tip,of the temperature probe sensor.
PLUG: The end of the temperature probe that is pluggedinto the oven socket.
SOCKET: The outlet on the side of the oven wall.CAUTION: Do not plug the pointed end of the
temperature probe into the socket
DISPLAY WINDOW: Shows the cooking tempera-
ture rising as the food is cooking_ Chosen temperaturemay be seen during cookin9 by touching TEMPCONTROL.When "Hold Warm" is set, after completing the cooking
the Display will show "Hold" for 100 minutes or until thedoor is opened or STOP is touched.
Glass Baking Dish
15
"TEMPERATURE CONTROL" POINTS TO REMEMBER
DO• Place the temperature probe sensor into the thickest
part of the meat or in the center of the food to bereheated. Avoid touchin 9 bone or [at
• Check that the first inch of the sensor is in the densest
part of the food to be cooked,• Remove the temperature probe from the oven after
USe.
• Be sure to turn meat between first and second settings,• Refer to cookbook for other information.
DO NOT
• Do not operate the oven empty with the temperatureprobe plu99ed in+
• Do not leave the temperature probe unplugged in thecavity when operating the oven.
+ Do not let the temperature probe touch the sidewalls, glass tray or door of the cavity when in use+
• Do not l:_Ug the pointed end of the temperatureprobe into the socket inside the cavity.
• Do not use the temperature probe in a regular oven.This probe is designed for microwave oven only.
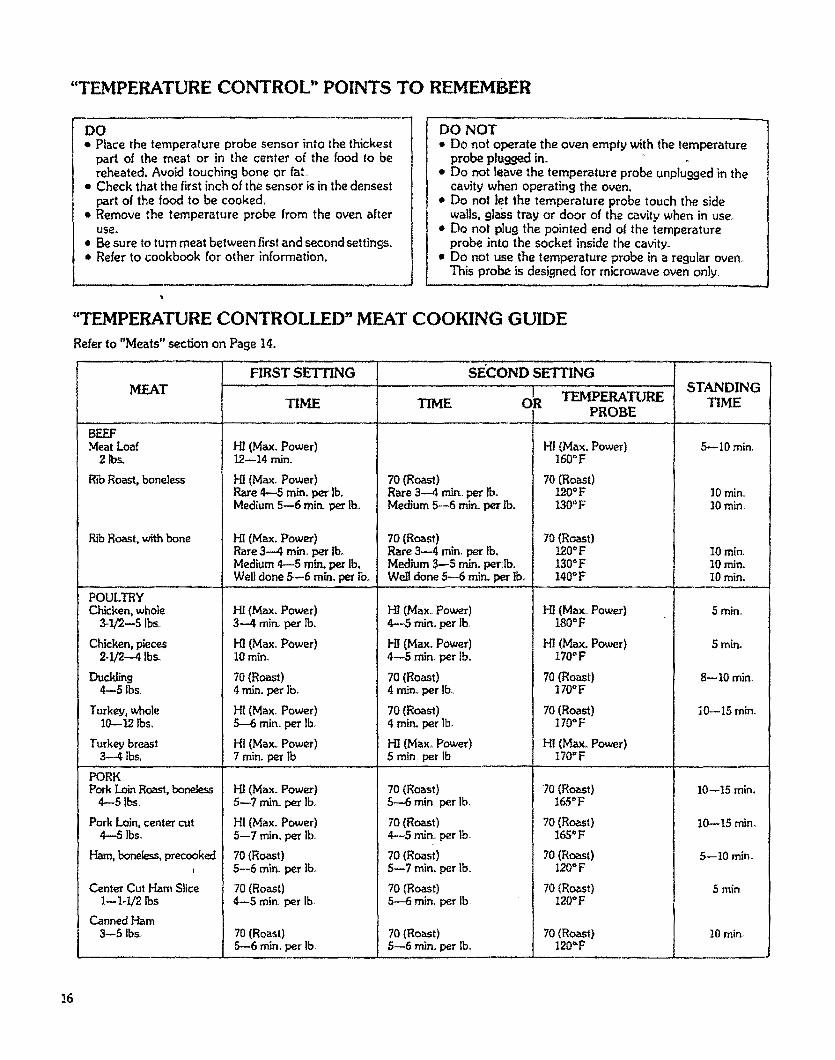
"TEMPERATURE CONTROLleD" MEAT COOKING GUIDE
Refer to "Meats" section on Page 14.
MEAT
BEEFMeat Loaf
2 Ibs.
R_ Roast, bone}ass
R_ Roast, with bone
POULTRYChicken,whole
_.1/2--5 It_,,
Chicken,pieces2-1/2-4 I_
Turkey, whole10--!2 Ibs.
Turkey breast3-4 lbs_
PORKPork Lain Roast,bo_
4-5 tbs,
Pork Loin, center cut4--5 lbs,
Ham, boneless,precookedI
Center Cut Ham Slice1--1-1/2 ]bs,
Canned Ham3--5 Ibs+
HI (Max. Power)12--14 rain.
HI (Max. Power)Raze 4--5 rain. per lb.Medium 5--6 mir_ per lbo
HI (Max. Power)Rare3--4 rain, per lb,Medium4---5rain. per lb,Weltdone 5--6 m/n,per lb.
H! (Max+ Power)3--.4 rain+per lb.,
HI {Max+Power)10 rain+
70(Roast)4 mL_.perlb.
HI(Max+Power)5--6 rain. per ]b,
HI (Max,,Power)7 rain. per lb
HI (Max. Power)5--7 rrfirLper lb.+
HI (Max. Power)
TITHE
SECOND SETfLNG
O_ TEMPERATUREPROBE
70 (Roast)Rate 3--4 rain., per lboMedium 5-6 rain. per lb.
70 (Roast)Rare 3--4 rain. per rv,Medium 3--5iron,perJb.Walldone 5--6rain.perIbo
HI(Max,,Power)4--5 min, per tb,,
HI (Max.Power)4--5rain,per lb.
70 (Roast)4 mir_, per lb,
70(Roast)4 rain. per lb0
Ill (Max_Power)5 rain, per Ib
70 (Roast)5.--6rain, per lb.
70 (Roast)
HI (Max°Power)160°F
70 (Roast)120°F130°F
70 (Roast)120°F130°F140°F
H! (Max.. Power)180°F
HI (Max. Power)170OF
70 (Roast)170°F
70 (Roast)170°F
H! (Max. Power)170°F
70 (Roast)t65°F
70 (Roast)5--7 rain, per rb°
70 (Roast)5--6 rain. per tbo
70 (Roast)4--5 min_per Ib
70 (Roast)5--6 rnin. per lb
4--5 rain., per Ib,
70 (Roast)5-7 rain. per lb,
70 (Roast)5-6 rnin per lb.
70 (Roast)5--6 rain. per lb.
165°F
70 (Roast)120=F
70 (Roast)120°F
70 (Roast)I20,_F
STANDINGTIME
,5--10 min_
10 rain,10 rain,
10 rain,,10 rain.t0 min,+
5 min+
5 mir,.
8--10min,
10--15 rain,,
10--15rain+
I0--15mira
5,--10rain+
5 rain.
I0 rain+,
!6
REHEATING FOODS
• Place the temperatureprobe sensorinto the food to bereheatedwith the first inch of the sensorin the centerof the food.
• Plu9 the temperature probe into the socket on the sideof the ovenwall.
• Cover the food if desired.
• Set the temperature of the desired doneness. (See chartbelow.)
e Select "multi-power" settin9 as shown below.
e The microwa0e ovea wilt stop cookingwhen the settemperature is reached and then it will be "HoldWam_" when "Hold Warm" is set_
• Remove the temperature probe fromthe oven after use.
"TEMPERATURE CONTROLLED" REHEATING GUIDE
FOOD SETTING
Beverages Hi (MAX POWER)
Soups 80 (REHF_'r)
PrecookedCasseroles
CannedVegetables
Leftovers
Meat Sandwiches
Baked Foods
80 (REHEAT)
so (REHEAT)
8O(REHEA'D
8O(P_.HEAT)
8O(REHEAT)
DONENESS INSTRUCTIONS
150°F Place the temperature probesensor in the center ofthe beverage 9lass. ,
150° F
150OF
150°F
150°F
120°F
120°F
Place the temperature probesensor into the centerof the soup. Covet withcasserole lid,waxed paper,or plastic wrap.
Place the temperature probesensorinto the centerof the food. Cover with a casserolelid, waxed papez-,or plasticwrap.
Place t_zetemperature probe sensor into the centero! the food to be reheated.The sensitivearea of thesensor should rest in the middle of the food.
Place the temperatureprobe sensorin the densestor largest amount of food.
Place the temperatureprobe sensorinto thethickest par of the sandwichto be warmed.Thesensitivearea of the ser_sorshouldbe located in thesandwich fillins.
Place the temperature probe sensor into the centerof the food to be reheated° The sensitive area of thesensor should rest in the middle of the food.
Syrup 70 (ROAST) 150°F Place the temperature p_obe sensor into the centerof the container.
CAUTION: From time to time, the same kind of foodsmay vary in shape, form and density, and, therefore willnotproduce the same results each time_For this reason,we donot recommend usin9 the temperature _ontrolledsettings for thin food items or for foods that require
tenderizlns by simmering. Also, in some cases themicrowave oven may shut off prematurely° This meansthat either the temperature probe is not placed properlyor that it should not be used with this type of food,
I7
TEMPERATURE CONTROLLED "HI-POWER"/"MULTI-POWER" COOKING
The "Temperature Controlled Meat Cooking Guide" and "Reheating Guide" on Pages !6 and 17 will show you whichmulti-power setting and temperature setting are recommended for the food you are cooking. When cooking with thetemperature control settings, the timer is not used.
18"
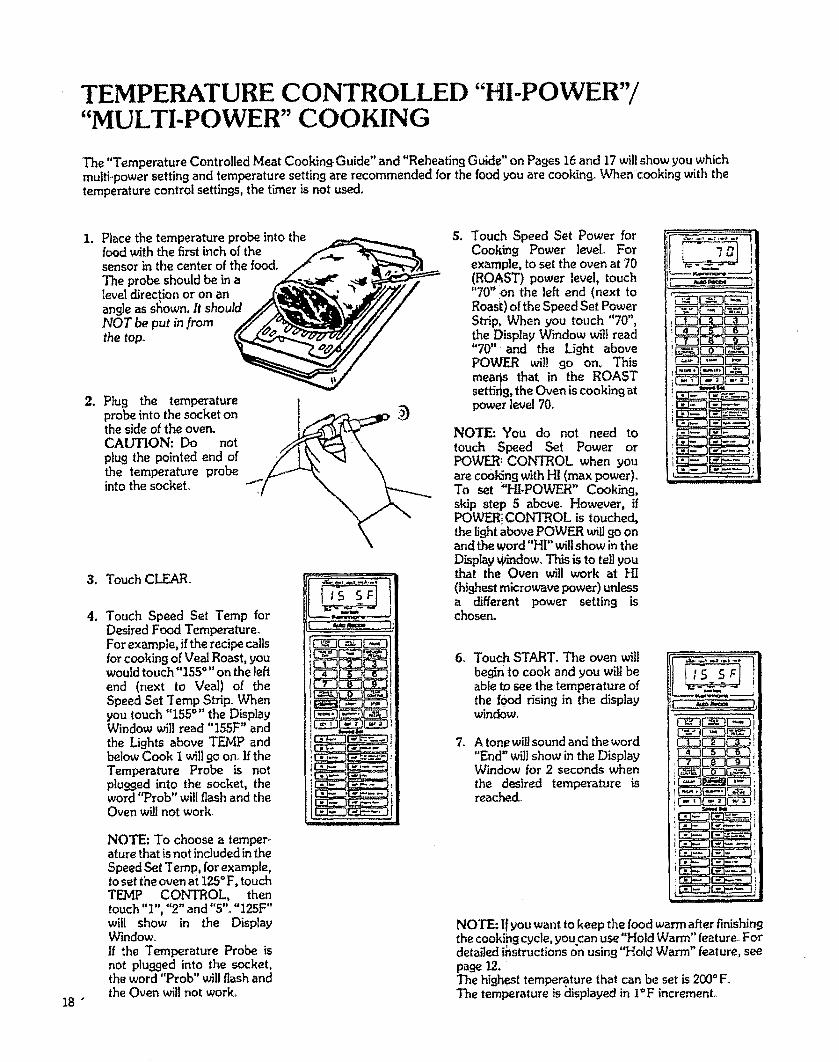
1. Place the temperature probe into thefood with the first inch of thesensor in the center of the food.The probe should be in alevel direction or on anangle as sfiown, It shouldNOT be put in fromthe top.
od.
2. Plug the temperatureprobe into the socket onthe sideof the oven.CAlfHON: Do notplug the pointed end ofthe temperature probe
into the socket
3. Touch CLEAR.
° Touch Speed Set Temp forDesired Food Temperature_For example, if the recipe ceilsfor cookingof Veal Roast,youwould touch"iS5 °" on the leftend (next to Vead) of theSpeed Set Temp Strip. Whenyou touch "155°" the DisplayWindow will read "155F" andthe Lights above TEMP andbelowCook Iwill goon. IftheTemperature Probe is notplugged into the socket, theword "Prob" will flash and theOven wi!l not work.
NOTE: To choose a temper.ature that is not included in theSpeedSet Temp, for example,to set the ovenat 125°F, touchTF_MP CONTROL, thentouch "1", "2" and "5". "125F"will show in the DisplayWindow_,If the Temperature Probe isnot p]ufl.qed into the socket,the word "Prob" will flash andthe Oven will not work°
54 Touch Speed Set Power forCooking Power level.. Forexample, to setthe oven at 70(ROAST) power level,touch"70" :on the left end (next toRoasi:)of the Speed Set PowerStrip, When you touch "70",the Display Window wii! read"70" and the Light abovePOWER wil! 9o on. Thismeaqs that in the ROASTsettirig, the Oven is cooking atpower level 70.
NOTE: You do not need totouch Speed Set Power orPOWER: CONTROL when youare codking with HI (max power).To set "HI.POWF_" Cooking,skip step 5 above, However, ifPOWERi CONTROL is touched,the light above POWER will go onand the word "HI" will show in theDisplay u_ndowoThis is to tell youthat the: Oven will work at HI(highest microwave power) unlessa different power setting ischosen.
6_
7_
Touch START. The oven willbegin to cook and you will beable tDsee the temperature ofthe food rising in the displaywindow_
A tone will sound and the word"End" wilt show in the DisplayWindow for 2 secondswhenthe desired temperature isreached.
NOTE: l! you want to keep the food warm after finishingthe cookibg cycle, you can use"Hold Warm" feature. Fordetailed instructions on using "Hold Warm" feature, seepale 12.The highest temperature that can be set is 200=F.The temperature is displayed in I°F increment.
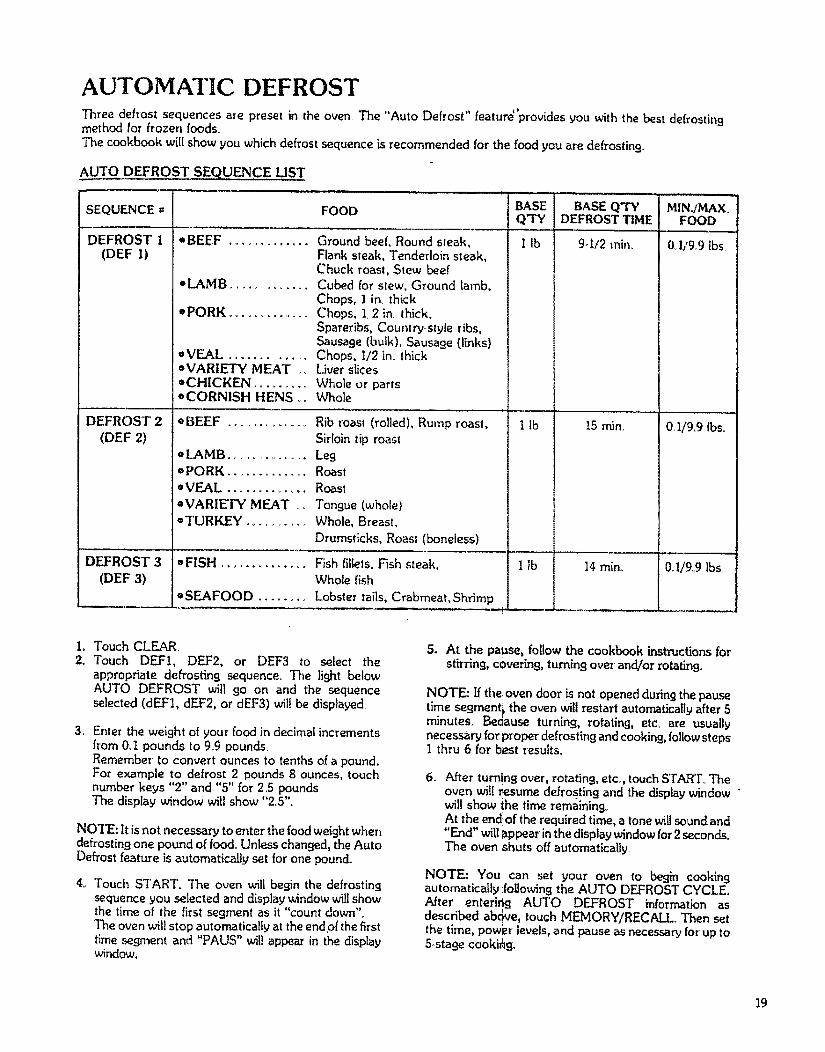
AUTOMATIC DEFROSTThree defrost sequences ate preset in the oven. The "Auto Defrost" featur_'prouides you with the best defrostingmethod for frozen foods_
The cookbook will show you which deft'=st sequence is recommended for the food you are defrosting..
AUTO DEFROST SEQUENCE LIST,u,.,..,,.
FOODSEQUENCE =
DEFROST 1(DEF I)
DEFROST 2(DEF 2)
DEFROST 3(DEF 3)
=BEEF .............
=LAMB ..............
=PORK .............
=VEAL ..............=VARIETY MEAT ..=CHICKEN ..........=CORNISH HENS o.
=BEEF .................
o LAMB ................¢PORK .............oVEAL .............=VARIETY MEAT .o=TURKEY ..........
Ground beef, Round sleak,Flank steak, Tenderloin steak,Chuck roast, Stew beef
Cubed for stew, Ground lamb,Chops, ] in, thickChops, 1. 2 in. lhick,Spareribs, Country-style ribs,Sausage (bulk), Sausage (links)Chops, I/2in,, thickLiver slices
Whole or partsWhole
Rib roast (rolled), Rump roast,
Sirloin tip roast
LegRoast
Roast
Tongue (whole)
Whole, Breast,
Drumsticks, Roast (boneless)
• FISH .............. Fish fillets,Fish steak,Whole fish
=SEAFOOD ........ Lobster tails, Crabmeat,Shrimp
BASEQ'TY
I ib
I Ib
1 Ib i
,,,,,, ,
BASE QTY MIN,fMAX.DEFROST TIME FOOD
9,.tt2 rain,. 0,1/9,,9 lbs,
!5 min.
14 rain,,
0,1/9,9 lbs,
0,I/9,9 Ibs.
L Touch CLEAR,2, "Touch DEF1, DEF2, or DEF3 to select the
appropriate defrosting sequence_ The light belowALTO DEFROST _t] 9o on and the sequenceselected (dEFt, dEF2, or dEF3) will be displayed.
3,_ Enter the weight of your food in decimal incrementsflora 0_1 pounds to 9_9 pounds.Remember to convert ounces to tenths of a pound.For example to defrost 2 pounds 8 ounces, touchnumber keys "2" and "5" for 2,5 pounds.The display window will show "25".
NO'I_ It is not necessary to enter the food weight whendefrosting one pound of food,,Unless changed, the AutoDefrost feature is automatically set for one pound.
4,, Touch STAR"['. The oven will begin the defrostingsequence you selected and display window will showthe time of the first segment as it "count down".The oven wil! stop automatically at the end of the first
time seg"ment and "PADS" wil! appear in the displaywindow_
5. At the pause, follow the cookbook Lnstructions forstirring, covering, turning over and/or rotating°
NOTE: If the. oven door is not opened during the pausetime segment i the oven will restart automatically after 5
minutes. Bedause turning, rotating, etc, are usuallynecessary for proper defrosting and cooking, follow steps1 thru 6 for best resuks.
= After tur!!n9 over, rotating, etc..,touch START..Theoven will resume defrosting and the display window "will show the time remaining.At the end:ofthe required time, a tone witlsound and"End" willappear in the display windowfor 2seconds.The oven shutsoff automatically_
NOTE: Y'ou can set your oven to begin cookingautomatically Jollowing the AUTO DEFROST CYCLE,After enterir_ AUTO DEFROST informationasdescribed ab(_Me,touch MEMORY/RECP, I !. Then setthe time, powBr levels, and pause as necessaryfor-up toS-stase cookirhg.
19
AUTOMATIC DEFROST (Cont'd)
2O
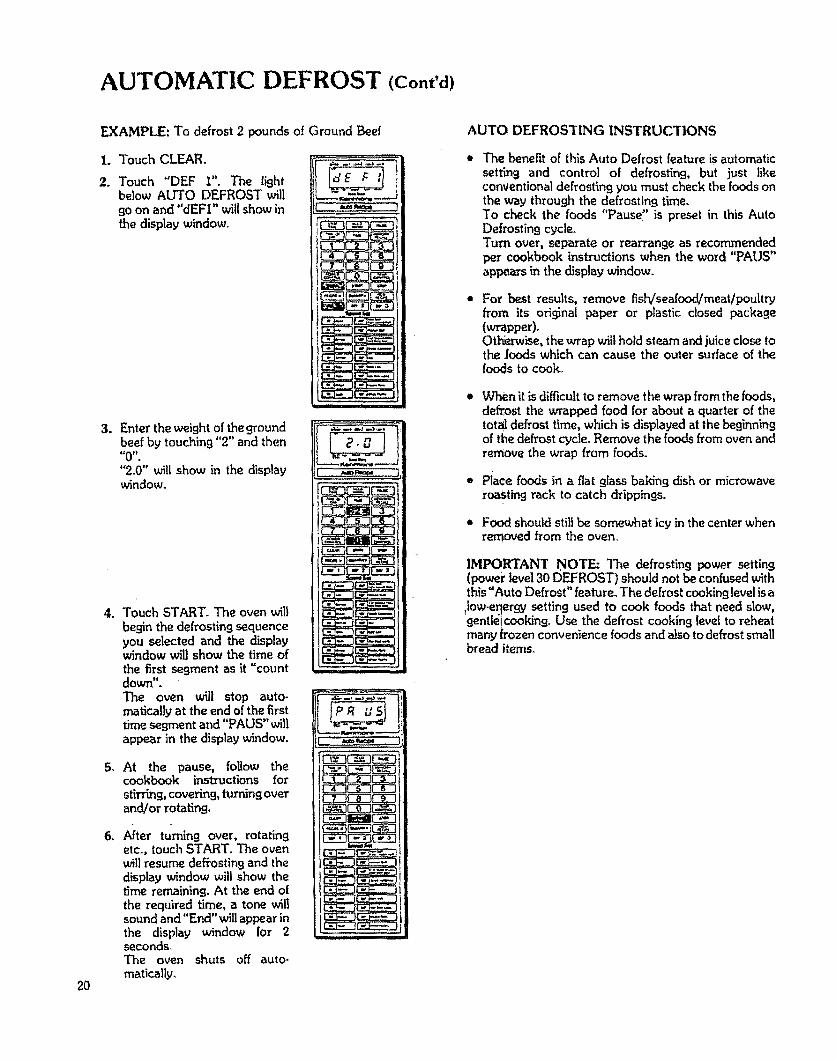
EXAMPLE: To defrost 2 pounds of Ground Beef
L Touch CLEAR.
. Touch "DEF I", The lightbelow AUTO DEFROST willgo on and "dEFI" will show inthe display window_,
3. Enter the weight of the groundbeef by touching "2" and then_€0 _,
"2.0" _II show in the displaywindow.
,
5_
,
Touch START. The ovenwill
beginthedefrostingsequenceyou selected and the displaywindow will show the time ofthe first segment as it "countdown".The oven will stop auto-mafically at the endof the firsttime segment and "PAUS" willappear in the display window.
At the pause, foUow thecookbook instructions forstirring, covering, turning overand/or rotating.
Aher turning over, rotatingetc., touch START. The ovenwit]resume defrosting and thedisplay window will show thetime remaining. At the end o[the required time, a tone willsoundand "End" witl appear inthe display window for 2seconds,The oven shuts off auto.matically,
AUTO DEFROSTING INSTRUCTIONS
The benefit of this Auto Defrost feature is automaticsetting and control of defrosting, but just likeconventional defrostingyou must check the foodsonthe way throughthe defrosting time.TO check the foods "Pause" is preset in this AutoDefrosting cycle°Turn over, separate or rearrange as recommendedper cookbook instructions when the word "PAUS"appe_s in the display window.
For best results, remove fish/seafood/meat/poultryfrom its original paper or plastic closed package(wrapper),Othm-wise,the wrap wilthold steam and juiceclosetothe (oods which can cause the outer surface of thefoods to cook.
When it is difficult to remove the wrap from the foods,defrost the wrapped food for about a quarter of thetotal defrost time, which is displayed at the beginningof the defrostcycle.Remove the foods fromoven andremove the wrap from foods.
Piece foods in a flat glass baking dish or microwaveroasting rack to catch drippings.
,= Food shouldstill be somewhat icy in the center whenremoved from the oven.
IMPORT&ANT NOTE: The defrosting power setting(poweirlevel30 DEFROST) should not be confused withthis"Auto Defrost" feature. The defrost cooking level isa,low-er{ergy setting used to cook foods that need slow,flentleicooking, Use the defrost cooking level to reheatmany frozen convenience foods and also to defrost smallbread items.
MULTI-STAGE COOKINGMulti-Stage cooking allows you to set the oven to cook in one stage at a certain power level for a chosen time ortemperature and then in a second, a third and a fourth stages at a different power level for a chosen time or temperature.'-The cooking processcan be set for five memory stageswhen Auto Defrost is included as the firststage.The stagesareset before cooking and will follow automatically when oven is started.
L Touch CLEAR.2. Touch TIME or Speed Set Temp for Cooking
Temperature° Lights above TIME or TEIvLP andbelow COOK 1 goon.When you touch TIME, "0" will show in the DisplayWindow.Touch Numbers for time of the first cootdn9 stage.
3. Touch Speed Set Power for Cooking Power level.4. Touch MEMORY/RECALL or PAUSE, Light below
COOK 2 goeson. Display Window willread "0".5. Touch TiME or Speed Set Temp for Desired Food
Temperature,,6. Touch Numbers foe time of the second cooking
stage.7. Touch Speed Set Power for Cooking Power level in
the second cooking stage (if other than "HI"),8A. Touch START for two-stage cooking.8B. Ifthree-stage or four.stage cooking is desired, touch
MEMORY/RECALL or PAUSE The light belowCOOK 3 will go on. The display window willshow"0"oRepeat steps 5-7 above to set the third cooking stageat the same or a different power ]eve] for a chosentime or temperature.,
9A. Touch START for three.stage cooking.9B_ If four-stagecooking is desired, touch MEMORY/
RECALL or PAUSE. The light below COOK 4 wiltgoon,. The display window will show "0".Repeat steps 5-7 above to set the fourth cookingstage at the same or a different power level for achosentime or temperature.
10, Touch START_
EXAMPL!_" (Four.stage cooking)All-American Meat Balls(10 minutes, power level 70) (PAUSE)(3 minutes, ,power level 70) (PAUSE)(2 minutes, power level 70)(MEMORYfRECAI I )(5 minutes, power level 0)
Tim following stepsexplain howto set the oven.
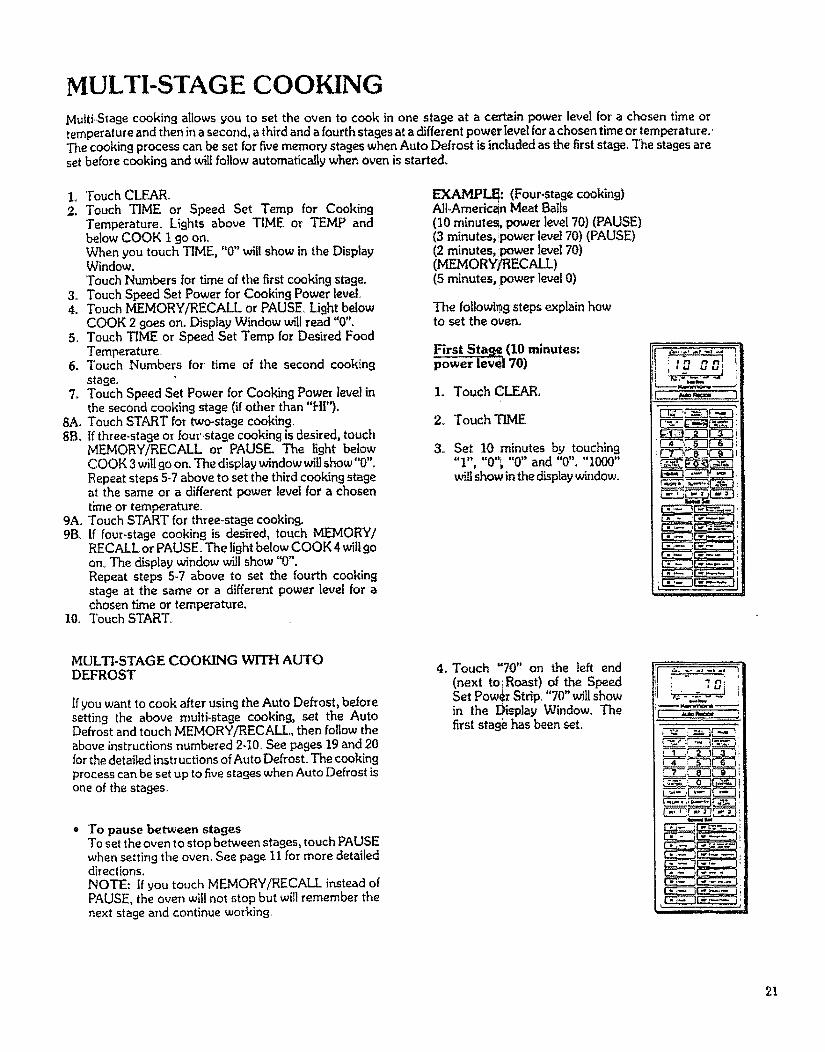
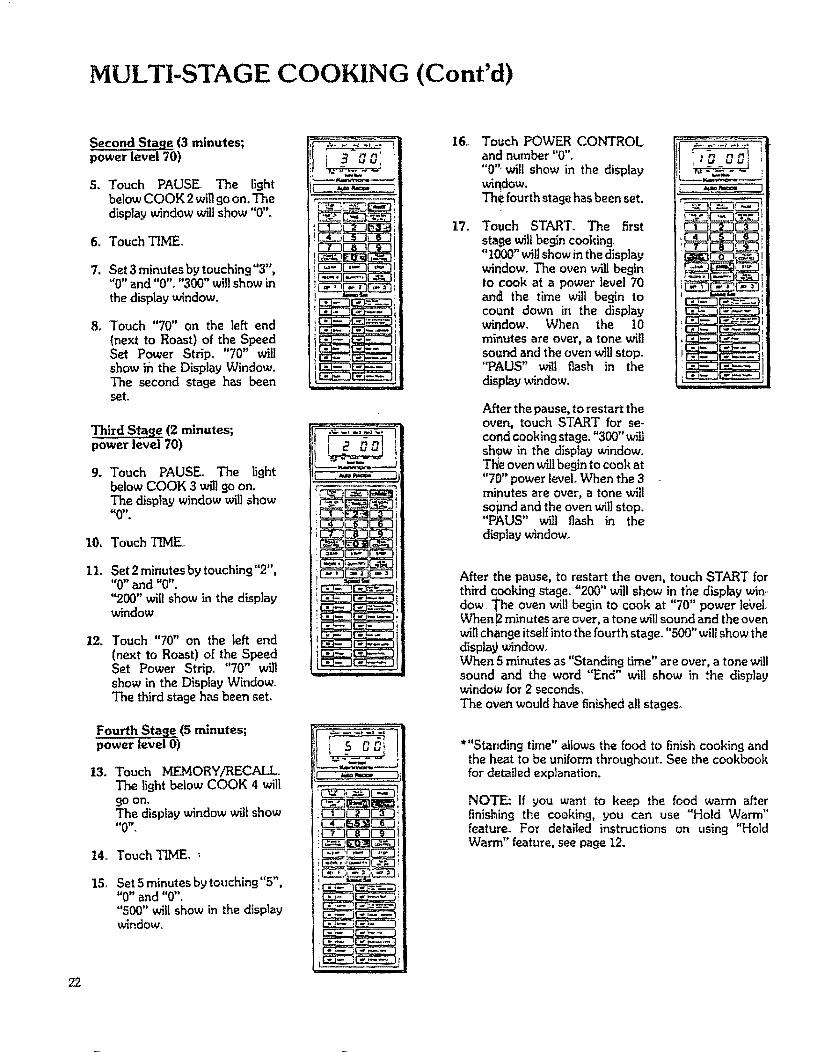
First Sta,,q_ (10 minutes:level70)
1. Touch CLEAR.
2_ Touch TIME.
3,. Set 10 minutes by touching"1", "0"_ "0" and "0". "1000"will show in the display window.
;tO cBJ
h=,rw=== ]
MULTI-STAGE COOKING WITH AUTODEFROST
If you want to cook after using the Auto Defrost, beforesetting the above multi.stage cooking, set the AutoDefrost and touch MEMORY/RECALL, then follow theabove instructions numbered 2-10,, See pages 19 and 20for the detailed instructions of Auto DefrosL The cooking
process can be set up to five stages when Auto Defrost isone of the stages
To pause between stagesTo set the oven to stop between stages, touch PAUSEwhen setting the oven See page i1 for more detaileddirections.NOTE: If you touch MEMORY/RECALL instead ofPAUSE, the oven will not stop but will remember thenext stage and continue working,
4. Touch "70" on the left end(next to lRoast) of the SpeedSet Power Strip "70" willshowin the Display Window. Thefirst stag_ has been set.
21
MULTI-STAGE COOKING (Cont'd)
Second Stage (3 minutes;power level 70)
5. Touch PAUSE. The fightbelow COOK 2willgo on. Thedisplay window will show "0"°
6. TouchTIME_
7. Set 3 minutes by touching"3","0" and "0". "300" will show inthe display window.
8_ Touch "70" on the left end(next to Roast) of the SpeedSet Power Strip. "70" willshow ih the Display Window..The second stage has beenset.
Third Stage (2 minutes;power level 70)
9. Touch PAUSE. The lightbelow COOK 3 will go on.The displaywindow wig show=cOY' *
10. Touch TIMEo
11. Set 2minutes by touching"2","0" and "0"."200" will show in the displaywindow,.
12. Touch "70" on the left end(next to Roast) of the SpeedSet Power Strip_ "70" wi]]show in the Display V_ndow_The third stagehas been seL
Fourth Stage (5 minutes;power level O)
13. Touch MEMORY/RECALLThe light below COOK 4 will9o on.The display window will showt_0W _
14o Touch T]HE,_
15, Set 5 minutesby touching"5","0" and "0"."500" will show in the displaywindow,
i 30o:'16o
17.
Touch POWER CONTROLand number "0"."0"; wil! show in the displaywh_ow.
The fourth stagehas been set.
Touch START_ The firststage will begin cooking°"1000"wilt show in the displaywindow, The oven will beginto cook at a power level 70an_ the time will begin tocount down in the displaywindow, When the 10minutes are over, a tone willsoundand the ovenwigstop."PAUS" will flash in the
display window.
After the pause,to restart theoven, touch START for se-cond cooking stage. "300" willshow in the display window.Tl_e oven willbegin to cook at"70" power level. When the 3minutes are over, a tone willsopnd and the oven willstop."PAUS" will flash in thedisplay window°
............_A'-t"._
After _hepause, to restart the oven, touch START forthird qooking stage. "200" w_31show in the display win-,dow.,The ovenwillbegin to cook at "70" power le_'et..When 12minutes are over, a tone will sound and the ovenwill change itself intothe fourth stage. "500" will show thedispla9window°When 5 minutes as "Standing time" are over, a tonewillsound and the word "End" will show in the displaywindow for2seconds,
The ovenwouldhavefinishedallstages,
*"Standing time" allows the food to finish cooking andthe heat to be uniform throughouL See the cookbookfor detailed explanation.
NOTE: If you want to keep the food warm afterfinishing the cooking, you can use "Hold Warm"feature. For detailed instructions on using "HoldWarm" feature, see page 12,
22
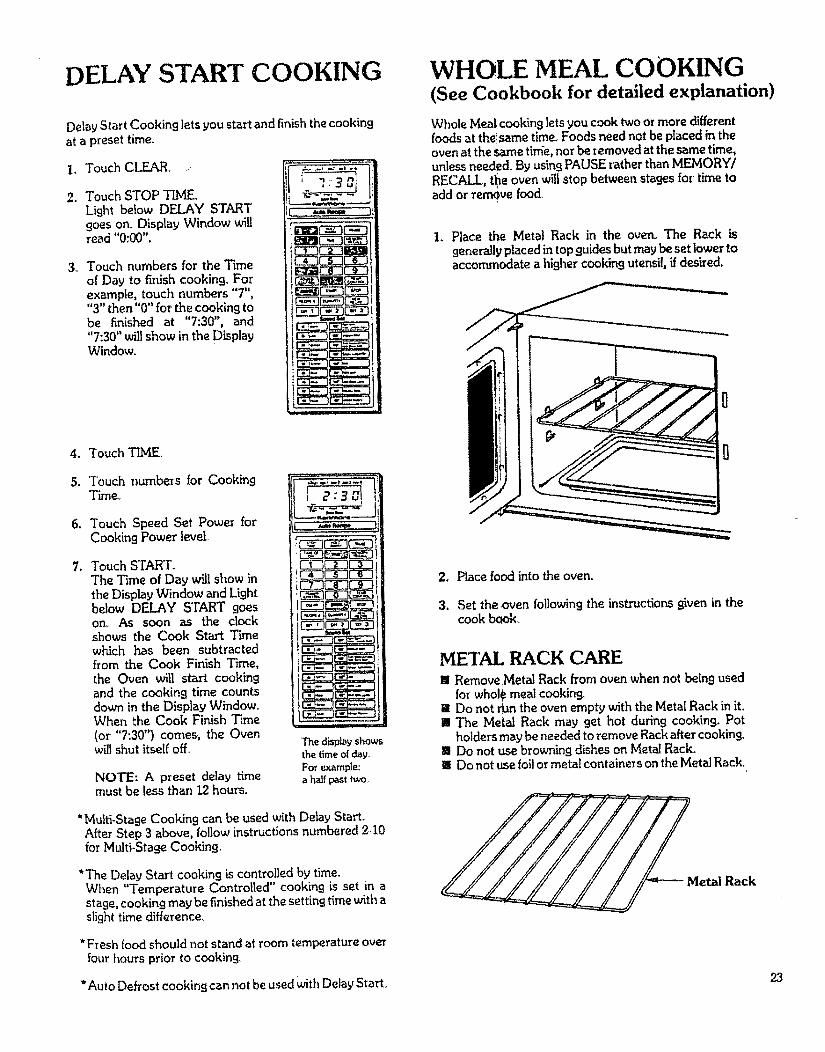
DELAY START COOKING
DelayStart Cooking lets you start and finish the cookingat a preset time,.
1, Touch CLEAR....
2. Touch STOP TLME.Light below DELAY STARTgoes on. Display Window willread "0:00".
3. Touch numbers for the Timeof Day to finish cooking. Forexample, touch numbers "7","3" then"0" for the cooking tobe finished at "7:30", and"7:30" will show inthe DisplayWindow°
4_
5.
6_
,
Touch TIME
Touch numbers for CookingTime,,
Touch Speed Set Power forCooking Power level..
Touch START.The Time of Day will show inthe Display Window and Lightbelow DELAY STARTgoesom As soon as the clockshows the Cook Start Timewhich has been subtractedfrom the Cook Finish Trine,the Oven will start cookingand the cooking time countsdown in the Display Window.When the Cook Finish Time(or "7:30") comers, the Ovenwill shut itself off.
NOTE.: A preset delay timemust be less than 12 hours.
I
The displayshowsthe time of clay..For example:a half past two,
*Multi-Stage Cooking can be used with Delay Start.After Step 3 above, follow instructions numbered 2..10for Multi-Stage Cooking.
*'['he Delay Start cooking is controlled by time.When "Temperature Controlled" cooking is set in astage, cooking may be finished at the setting time withaslight time difference_
*Fresh food should not stand at room temperature overfour hours prior to cooking.,
WHOLE MEAL COOKING(See Cookbook for detailed explanation)
Whole Meal cookinglets you cook two or more differentfoodsat thelsame time. Foods neednot be placed in theovenat the same tinie, nor be removedat the sametime,unless needFd.By using PAUSE r_ther than MFJvIORY/RECALL, the oven w_l stop between stages for time toadd or ren_ve food_
1. Place Lhe Metal Rack in the oven. The Rack isgenerally placedin top guides but may be set lower toaccommodate a higher cooking utensil, if desired°
2. Place food into the oven°
3. Set the oven followingthe instructions given in thecook book.
METAL RACK CARE11iRemove.Metal Rack from oven when not being used
for whole meal cookin.q,!11Do not dan the oven empty with the Metal Rack in it.!1 The Metal Rack may get hot during cookin 9. Pot
holdersmaybe needed to remove Rack after cooking.I Do not use browning dishes on Metal Rack.Ii!1Do not use foil or metal containers on theMetal Rack.,
Metal Rack
"Auto Defrost cooking can not be usedwithDelay Start. 23
PRESET RECIPE COOKING
You can set the oven for cooking 80 recipes by sh'nplytouching RECIPE #, the numberscorrespondingwith thedesired preset recipe, then START,
The presetcontrol systemintheoven contains25 recipesthat have been preseL The Times or Temperatures andPower Levels for these recipes cannot be changed.However the amount of food cooked in presetrecipes#1through 17 can be increased up to 5.9 times the presetquantity, and up to 2,9 times in recipes #18 and 19. Toincreasethe quantityinthese recipes,followthe directionon this page, Refer to the cookbook for detailedinstructionson the 25 preset recipes.
You can preset favorite recipes oftenused°These can beassignedas Recipes _6--80°
I stage recipes should be stored in #26--40°2 stage recipes should be stored in #41--70o3 stage recipes should be stored in #71--80
Directions for settingnew recipes is on page26.
To cook one of these preset recipes, simply follow thestepsbelow.
1. Touch CLEAR.2, Touch RECIPE #.
"0" will show in the Display V_ndowo3. Touch Number(s) for Preset Recipes, by following
Preset Recipes List on the cookbook.EXAMPLE: If you cook Brownie Mix of Recipe #19,touch "1" then "9". "19" will show in the displaywindow.
4. Touch START_Time of the first cooking stage willshow in the DisplayWindow and you can see the time counting down. Assoon as the first cooking stage is over, the secondcooking stagebegins°When the second cooking stageis over, a tone will soundand the oven w_ shut itselfoff.
USE OF QUANTITY KEY
To Increase Quantity of Recipes #1--#19
I. Touch CLEAR.2. Touch RECIPE#.3, Touch Numbers for the Preset Recipe_4. Touch QUANTH'Y.
"0.0":v_ show in theDisplayWindow.5.Touch numbersforthemultiplicationfactor.
To doubletherecipe,touch_" and "0"oTo tripletherecipe,touch"3"and "0"o
6.Touch START°
NOTES: The range of multiplication is 1,1 times to 59times (Recipes #i--17) and to 2.9 times (Recipes#18 and 19) of the Base Quantity which is presetin the oven, Increment within the above range is
O.L Multiplication can be used in Recipes #1--19. When you set the multiplication of BaseQuantity beyond the range of 1.1--5.9 (Recipes#I.--17) or I.I--2,9 (Recipes #18 and 19), theoven will not start even if you touch START.
EXAMPt_..:To cook three hotdogsper Recipe#4.i,Touch CLEAR,2.Touch RECIPE #.3.Touch "4".
4. Touch QUANTIFY.5. Touch "3" and "0".6. Touch START,Ifyou havenot storeda recipeinRecipe#26to Recipe _80, the Display Window wilt flashand tells you that no preset recipe has beenstored in theovenfor that recipe number.
24
PRESET RECIPES LIST (RECIPES #1--#25)25 recipes have been stored in this oven,By touching the recipe number corresponding to preset recipe, cooking can be done_ These 25 recipes havebeen preset,so you can not erase or substitutethem.Refer to the cookbook for detailed instructions on the 25 presetrecipes_
Recipe# Ingredients Base Q'ty Directions
1. Cup of Coffee ........................... 1 cup (8 ozo)
2. Bacon ..................................... 2 slices(2 oz.)
3. Baked Potato ............................. 1 potato (6 0z.) ....................... Turn Potatoes over at Pause.
4. Hot Dos ................................. 1hot dog (3 oz.) ................ Place Hot Dog in bun at Pause.
5. Scrambled Eggs ........................ 2 eggs (5-1/2 oz.) ............... Stir Eggsat Pause.
6. Fresh Corn-on-The Cob ............... 1ear (7 oz.)
7. Basic White Rice ........................ 1/2 cup (3/4 th.)
8. Frozen Vegetables ............................... 10 oz. pkg
9. Defrosting Grow_d Beef ................. 1 lb.......................................... Removed thawedportions.Return unthawed portions at Pause.
10° Melted Butter ...................................... 2
11. Hamburger Patty .......................... 1
12. FLsh Steaks ......................................... 2
13. Chicken Pieces _.......................... 8
14, Pork Chop, 3/4" thick ................. 1
15. Scalloped Potatoes ..................... 7
16. Basic White Sauce .......................... 1
tablespoons
patty (1/4 lb.) ..................... Turn Patty over at Pause.
steaks, 8 oz. each (1 lb.) ......."['urnFish over at Pause.
oz .................................... Rearrange Pieces at Pause.
chop (8 oz.) .................... Turn Chops over at Pause.
oz_ pkg (2 lbs.)
cup (10 oz.) ..................... Stir Flour into butter untilwellblendedat 1st Pause. _._nisk inmilk, pepperand nutmeg at 2nd Pause.
17. Pudding Mix .................... ............... 3-I/4 ozo pk9 (21 oz.) ........... Stir Pudding MIXat pause.
18. Cake Mix ..................................... 1 layer, 9 oz. pkg, (19 oz.) ...... Rotate I/4 turn at pause.
19. Brownie Mix .................. . ........... 16 oz. pkgo (I-I/3 Ib) ............ Rotate 1/4 turn at pause.
20. Muffins ..................................... 6 muffins .......................... Repeat three times to cook 18muffins°
21. Canned Entr_.e ......................... 16oz ........................... Plug in Temperature Probe.
22. Canned Soup ............................ 1 can (1 lb.--t-1/2 lbs.) ......... Plug in Temperature Probe.
23. Meat Loaf ............................... 1-I/2 lb. 9"round beef ............... Plug in Temperatme Probe.(3 lbs.)
24. Precooked Ham ............................ 3--5 lbs ........................... Plug in Temperature Probe. TurnHam over at Pause-
25° Reheating Casserole ......................... 4--6 servings ...................... Plug in Temperature Probe.
*( ) shows total weight including all ingredients in the recipe.
NOTE: Temperature affects cooking time. The preset recipe times are based on that food at its norma!storage temperature. For example, meats and dairy productsare refrigerator temperature, Canned goodsare room temperature
25
PROGRAMMING NEW RECIPES
In addition to the 25 preset recipes, you canprogram 55 more favorite recipes. To store thedesired recipes in the oven, folIow these steps:
1. Touch CLEAR,
2. Touch NEW RECIPE.The Display Window reads "0",
3, Touch RECIPE ft,
4. Touch suitable number from 26 to 80 according tocooking method of your recipe as shown below.
=Store One.stage Cooking betweenRECIPE #26 and 40.
restore Two-stage Cooking betweenRECIPE #41 and 70.
.Store Three,.stage Cooking betweenRECIPE #71 and 80.
EXAMPLE: Touch "T' then "3"°The Display Window reads "73"°
5. Program your new recipe foilowinguseinstructions.
6. Touch NEW RECIPE.New recipe is now programmed and Time of Day vailappear in the Display Window.
NOTES: A recipe which has been stored in this mannercan be changed to a new recipe. If you w-ant tochange to a new recipe, the previously storedr_cipe is erased when a new recipe is enteredover the old recipe.
The Back-up Energizer (Capacitor) built into thisoven protects the Programmed Recipes for about24 hours° If power failure lasts longer than 24hours, the 55 customer Programmed Recipesmaybe erased°
Make a list of the recipe numbers and theirrecipes which are stored in this manner so thatyou can ]',aveeasy reference for a later time_Pages 27°29are printed for this purpose,.
26
NEW RECIPESRecipe # Name Directions
26
27
28
29
3O
31
32
33
34
35
Recipe #
36
37
38
39
40
41
42
43
44
45
Name Directions
27
NE_ RERecipe t_ Name
46
47
48
49
5O
51
53
55
28
Directions Recipe #56
57
58
59
6O
61
.,,: H 62
63
64
65
Name Directions
NEW RECIPESRecipe # Name Directions
"-66
68
69
7O
71
72
73
74
75
Recipe #
76
77
78
79
8O
Name Directions
29
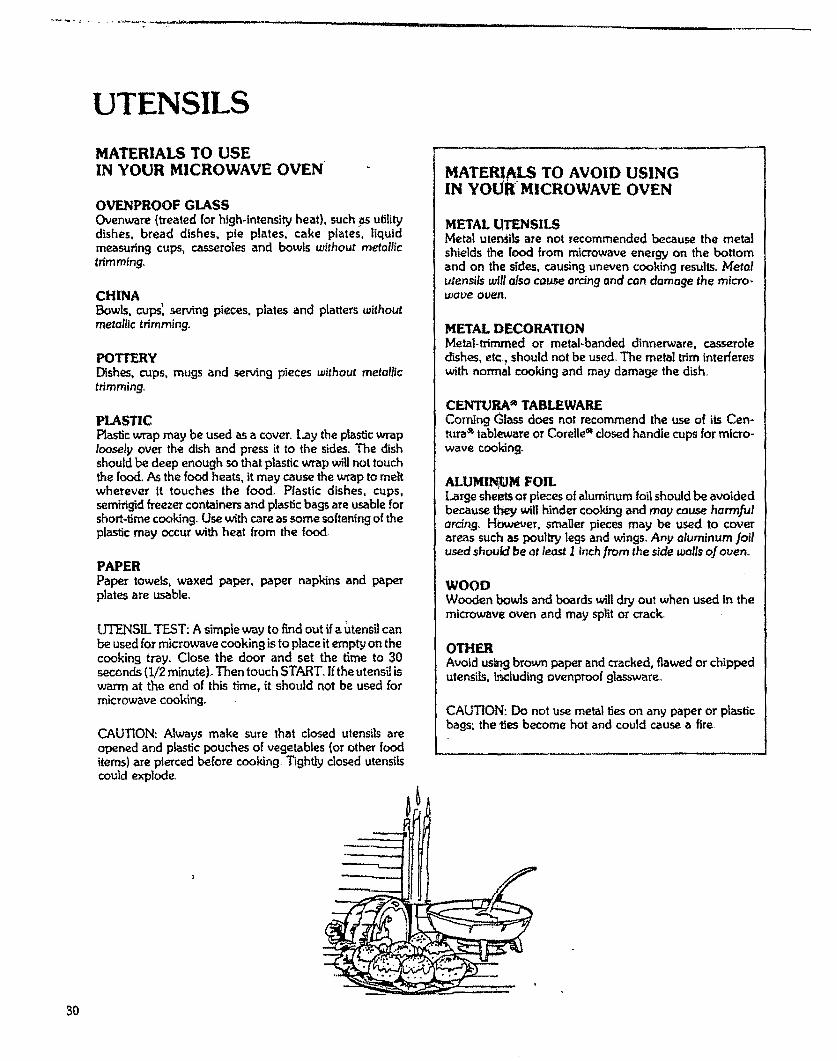
UTENSILS
3O
MATERIALS TO USEIN YOUR MICROWAVE OVEN
OVENPROOF GLASSOvenware (treated for high-intensRy heat), suchasutilitydishes, bread dishes, pie plates, cake plates, liquidmeasuringcups, casserolesand bowls without metallictrimming_
CHINABowls, cups',servingpieces,plates and ptatters withoutmetanlc trimming,
POTTFJRYDishes, cups, mugs and serving pieceswithout metallictrimming,,
PLASTICPlastic wrap may be usedasa cover..Lay the plasticwraploosely over the dish and press it to the sides.The dishshouldbe deep enough sothat plasticwrapwill nottouchthe food. As the food heats, it may causethe wrap to meltwherever it touches the food. Plastic dishes, cups,semirigidfreezercontainersand plastic bags are usableforshort.timecooking.Usewithcareassomesofteningoftheplastic may occurwith heat from the food,
PAPERPaper towels, waxed paper, paper napkins and paperplatesare usable.
UTENSIL TEST: A simpleway to find out ff autensilcanbe usedfor microwave cookingis to placeit empty on thecooking tray. Close the door and set the time to 30seconds(1/2 minute)° Then touch START, If the utensiJiswarm at the end of this time, it should not be used formicrowave cooking.
CAUTION: Always make sure that dosed utensils areopened and plastic pouchesof vegetables(or other fooditems) are piercedbefore cooking.Tightly closedutensilscould explode,
-'---'---x..._
MATERIALS TO AVOID USINGIN YOUR MICROWAVE OVEN
METAL UTENSILSMetal utenSRsare not recommended because the metal
shields the food from microwave energy on the bottomand on the sides,causinguneven cooking results.Metalutensils will also cause arcing and con damage the micro-wave oven,
METAL DECORATIONMetal-trimmed or metal-banded dinnerware, casseroledishes, etc_should notbe used The metal triminterfereswith normal cooking and may damage the dish,,
CENTURA ® TABLEWAREComing Glassdoes not recommend the use o{ its Cen-tufa_ tablewareor Corelle® dosed handle cupsfor micro-wave coo_-
ALUMINUM FOILLargesheetsor pieces o!aluminumfoil shouldbe avoidedbecause they will hinder cookingand may causeharmfulardng. H_,uever, smaller piecesmay be used to coverareas suchas poultry legs and wings.,Any aluminum .foilusedshoutd be at least I inch from the sidewalls of oven_
WOODWooden bowls and boards will dry out when used in themicrowave oven and may splitor crack.
OTHER
Avoidusingbrown paperandcracked,flawedorchippedutensils, i_.luding ovenproofglassware._
CAUTION: Do not use metal ties on any paper or plasticbags: the ties become hot and could cause a fire.

CARE AND CLEANING
Wipe the microwave inside and outside with a soft cloth and a mild detergent solution, The rinse and wipe dry,This should be done on a weekly basis--more often if needed. Never use rough powders or pads,_
REMOVABLE PARTS
• The following removable parts may be removed as desoibedo They should be washed in warm (not hot} waterwith a mild detergent and a soft cloth. Once they are dean, rinse them weU and dry _th a soft cloth Never userough cleaning powders, steel wool or rough cleaning pads_
• Aftereachuseof the temperature proberit must be removed from thesocket.Use potholder, asthewire, plugand sensorsections may be hot. Wipe food or liquid from the ser,.sorwith a soft damp cloth,
= Theglosstray may be removed forcleaning at the sink.Wipe up spi_overswith a paper towelor clothbeforeremovalof the tray. Be carefulnot to chipor scratchthe edgesof the tray as thismay cause the tray to breakdudrK3 use
* The oven inside top (stirrer shield) can be gentlywit_d in placeorremoved forwashingat the sink. Excessiveoil spatters on the inside top (stirrer shield)will make them difficult to refllove, if left for many days.Wipe them with a wet paper towel especiallyafter cooking chicker_ or bacon°The stirzer shield sets in slots alonf:the sides and in the rear of the oven and is held by three tabs in front. Pullthe front edgedown and forward to remove_Wash onlyin warm (Mothot) detergent water, rinse and wipedry. Avoid hitting or bending the metal st_'er blade, as this could cause uneven cooking or microwave powerloss. To replace shield, slide it into the sideand rear slots, and fit the front edgeof the shield with the threetabs. After replacing it, make sure that it fits securely in place_
SPECIAL CARE
For best performance and safety, the inner door panel and the oven front frame should be free of foodor9_easebuildup. Wipe both often with a mild detergent. Then rinse andwipe dry. Never use rough powders or pads.
After cleaning the control panel, touch CLEAR. This will clear any entries that might have been enteredaccidentally whilecleaningthe panel
31
QUESTIONS AND ANSWERS
OPERATION
Q What is wrong when the oven light will not glow during cooking or when the oven door is open?
A. There may be several reasons why the oven light will not _towoPerhaps:• Door is not closed and locked, Push doorfirmty to be sure that door is lockedproperly.• The light bulb has burned out.
QWhy does steam come out of the air exhaust vent?
A. Steam is normally produced during cooking_ The microwaue oven has beendesigned to vent this steamout the rear vent.
Q.Will the microwave oven be damaged if it operates empty?
A Yes. Never operate the oven empty or without the glass tray.
Q_Does microwave energy pass through the viewing screen in the door?
A_No,, The metal screen bounces back the energy to the oven cauity. The holes (or ports) are made toallow light to pass through. They do not let microwave energy pass through,
Q_Why does the "beep tone" sound when a "pad" on the control panel is touched?
A, The "beep tone" sounds to assure that the setting is being properly entered.
Q. Why does the disptayshow "0:00'?
Ao This indicates that there has been a temporary loss of electrica/power to the oven, and the TIME OFDAY must be reset. Prolonged/ass of power can also resu!_ in loss of programmable recipes,_ Be surethey are properly recorded, _o that they can be reentered.
Q. Can my microwave oven be dan=agedif food is cooked for too long a period of time?
A, Like any other cooking appliance, it is possible to ouercook Jood to the point of destruction which may
result in the food creating smoke and euen possible fire damqge to the inside of the oven. It is always bestto attend the oven while it is in the cooking process, See ,/mportanl Safety Instructions on Page 3,
QWhen the oven is plugged into awall outlet for the first time, it might not work properly,rWhat is wrong?
A.. Only when the oven _s plugged in for the first time or when power resumes after o power interruption,the microcomputer used in the oven control assembly may temporarily become scrambled and fail tofunction as programmed_Unplug the oven from the 120ovo/l household outlet and then plug it back inoThe microcomputer will bereset for proper/'unction thereafter_,
Q, Why do ! see light reflection around the outer case?
A_This light is from the ouen light which is located outside the oven cavity,,
32
QUESTIONS AND ANSWERS (Cant'd)
FOODS
Q.What is wrong when baked foods have a hard, dry, brown spot?
Ao A hard, dry, brown spot shows overcooking. Shorten the cooking or reheating time.
Q,Why do eggs sometimes pop?
A. When baking, .frying or poaching eggs, the yolk may pop due to steam build.up inside the yolkmembrane, To prevent this, simply pierce the yolk with a toothpick before cooking it.
CAUTION: Never microwave cook eggs in the shell,
QoWhy are scrambled eggs sometimes a little dry after cooking?
A_Eggs dry out if they are overcooked Though the same recipe is usedeach time, one may need to varythe cooking time for one of these reasons:
• Eggs vary in size,.• Eggs are at room temperature one time and at refrigerator temperature another time,• The shapes of utensils vary, thereby making it necessary to vary the cooking time,• Eggs continue cooking during standing time..
Q, is it possible to pop corn in a microwave oven?
A. Yes, if using one of the tu_omethods described below.(1) Microwave.popping devices designed specifically for" this type of microwave cooking or(2) Prepackaged commercial microwave popcorn that contains specific times and power outputs
needed for an acceptable final product.
FOLLOW EXACT DIRECTIONS GIVEN BY EACH MANUFAGTURER FOR THE_ POPCORNPOPPING PRODUCT AND DO NOT LEAVE TilE OVEN U_TTENDED WI_L_ THE CORN ISBEING POPPED°IF CORN FAILS TO POP AFTER THE SUGGESTED TIMES, DBCONT_UE COOKING.OVERCOOK/NG COULD RESUL T IN AN OVEN FIRE,,
CAUTION: NEVER USE A BROWN PAPER BAG FOR POPPt_,]G COP_{,
Q, What is wrong when three potatoes bake thoroughly and the fourth one is still not cooked?
A. The fourth potato may be slightly heavier' than the other's and should be cooked30 to 50 seconds longer°Remember to allow space around each potato when baking ALso, for more even cooking, put potatoesin a circle,
Q Why do baked apples sometimes burst during cooking?
A, The peeling has not beenremoved from the top half of each apple,to allow for expansion of the interior ofthe apple during cooking_As in regular cooking methods, the interior of the apple expands during thecooking process.
Q How are boil-overs avoided?
K When cooking foods that tend to boil over, use a larger utensil than usualforcookin9. If you open theoven door or touch STOP, the food will stop boiling. (Remember to touch START agaln after closing thedoor to restart the cooking cycle,,)
Q, Why iS a standing time recommended after' microwave cooking is over?
A Standing time is recommended after microwave cooking is ouer. This is to allow foods to continuecooking euenty throughout for a few moments after the actuat microwave oven cooking cycler Theamount of standing time depends upon the density of the food.
QoWhy is an additional time required for cooking food stored in reffiferator?
A As in conventional cooking, the initial temperature of food affects total cooking time_ More time isneeded to cook the food just taken out o] a refrigerator than food at a,,room temperature 33
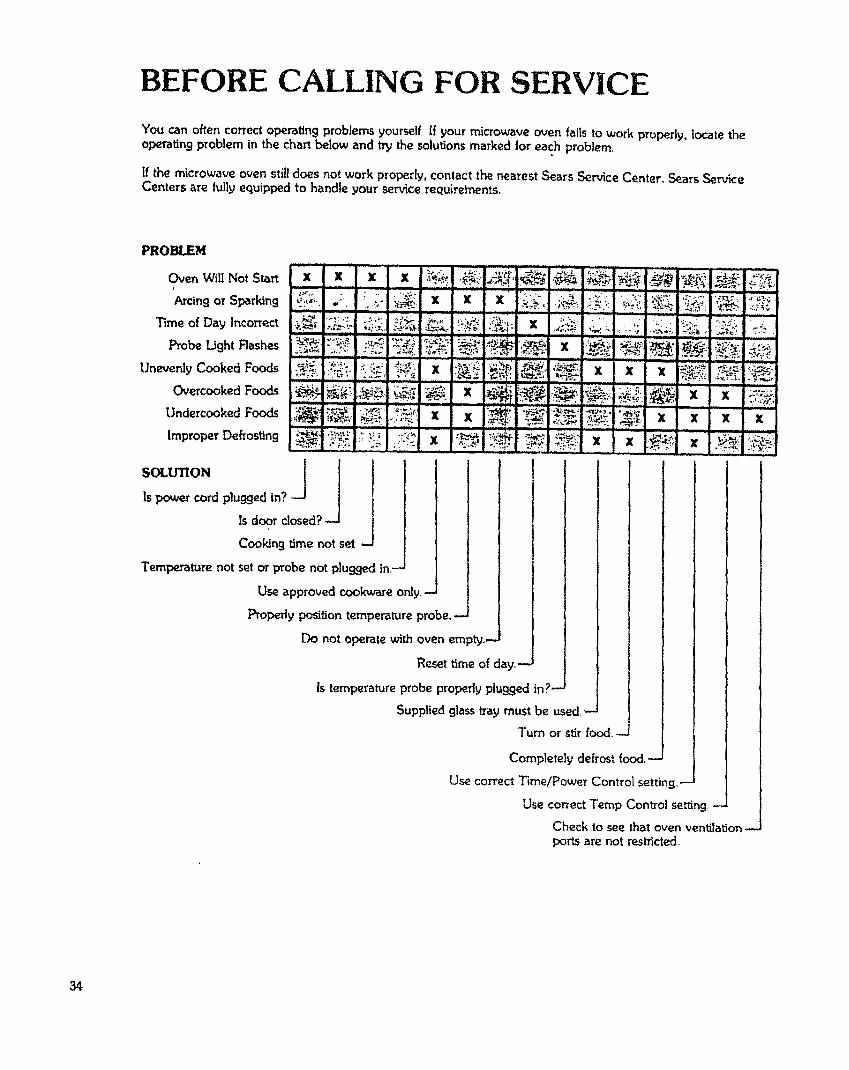
BEFORE CALLING FOR SERVICE
You can often correct operating problemsyourself rf your microwave oven falls to work properly, locate theoperating problem in the chart below and try the solutions marked for each problem
tf the microwave oven stilldoes not work properly, contact the nearest Sears Service Center. Sears ServiceCenters are fully equipped to handle your servicerequirements,
PROBLEM
Oven Will Not Start
_rcing or Sparking
Time of Day Incorrect
Probe Light Rashes
Unevenly Cooked Foods
Overcooked Foods
Undercooked Foods
Improper Defrosting
:_:',_'_ -*',_;I _..':..._.............I.*_ _ _"-:le ',_i_
. , ....'_" '_" " i _ _
SOt.U'nON ] _ 1
Is power cord pluggedin?
Is door closed?--J
Cool,3ngtime not seL
Tempe,at'are not set _ probe not p_ugged in_-
Use approved cookware only.-
Properly position tempe_t_._re probe.,-
Do not operate with oven empty.,-
Resettime of day**--
Is temperatureprobe propedy ptt_ggedin?-
Suppliedglasstray must be used-
Turn or stir food....
Completely defrost food,-
Use correct Time/Power Control setting,-
Use correct Temp Control setting+.--
Check to see that oven ventilafior_--ports are not res_cted.
34
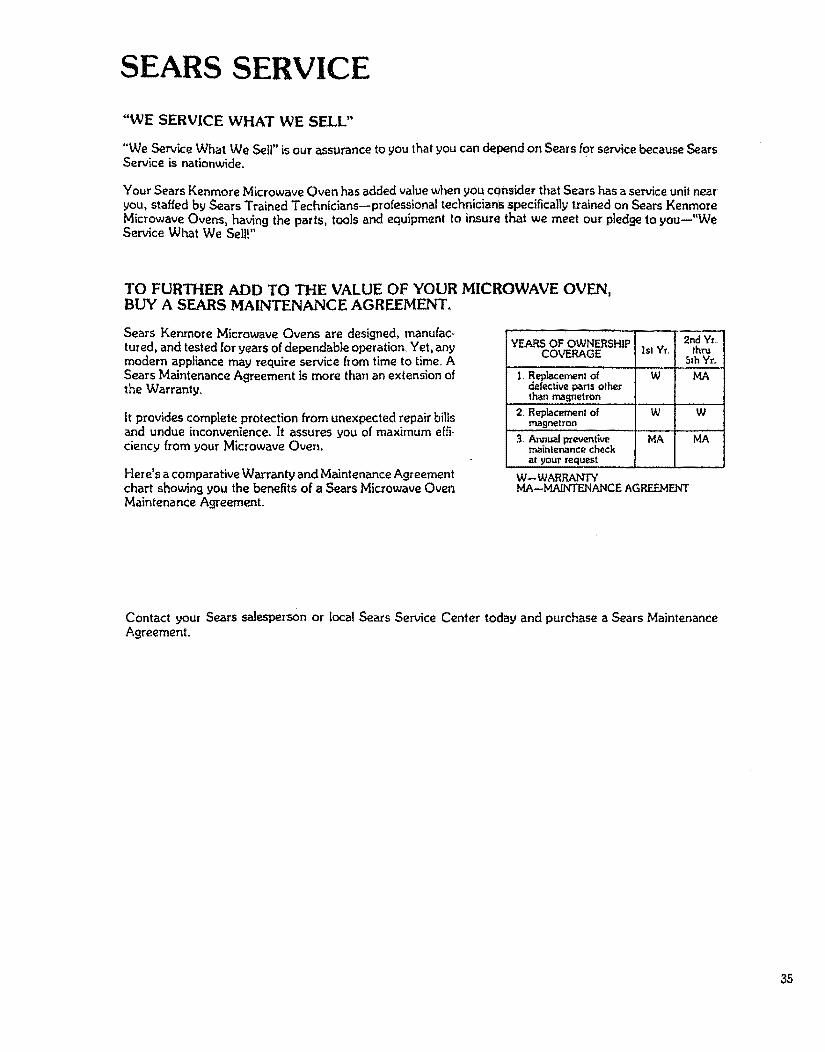
SEARS SERVICE
"WE SERVICE WHAT WE SELL"
"We Servk:e What We Sell" is our assurance to you that you can depend on Sears for service because SearsService is nationwide.
Your SearsKenmore Microwave Oven has added value when you consider that Sears has a service unit nearyou, staffed by Sears Trained Technicians--professional technicians specificallytrained on Sears KenmoreMicrowave Ovens, having the parts, tools and equipment to insure thai we meet our pledge to you--"WeService What We Sell!"
TO FURTHER ADD TO THE VALUE OF YOUR MICROWAVE OVEN,BUY A SEARS MAINTENANCE AGREEMENT.
Sears Kenmore Microwave Ovens are designed, manufacotu_ed, and tested for years of dependable operation_Yet, anymodern appliance may require service from time to time, ASearsMaintenanceABreementismore thananextensionofthe Warranty,
tt provides complete protection from unexpected repair billsand undue inconvenience_ ]t assures you of maximum effi-ciency from your Microwave Oven.
Here's a comparative Warranty and Maintenance Agreementchart showing you the benefits of a Sears Microwave OvenMaintenance Agreement.
2M Yr,,"_.ARS OF OWNERSHIPCOVERAGE ]st Yr,, thru
5th Yr.
1,. Replacement of W MA
defective parts otherthan magnetron
2, RepLacement o[ W Wmagnet,'on
3 Annual preventive MA M.Amaintenance checkat your request
W--WARRAt, TI'YIvlA--_ENANCE AGREEMENT
Contact your Sears salesperson or local Sears Service Center today and purchase a Sears MaintenanceAgreement°
35
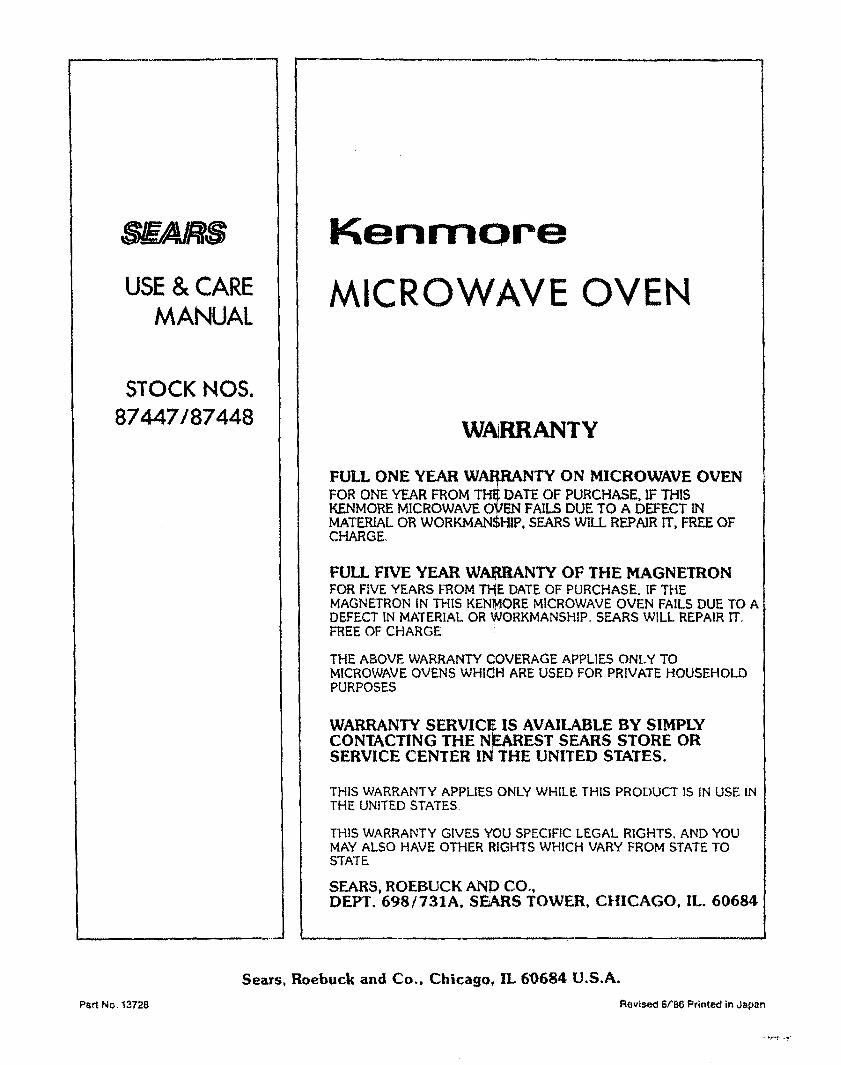
USE& CAREMANUAL
STOCK NOS.
87447/87448
Kenmore
MICROWAVE OVEN
W. RRANTY
FULL ONE YEAR W_NTY ON MICROWAVE OVENFOR ONE YEAR FROM Th_ DATE OF PURCHASE, IF THISKENMORE MICROWAVE OVEN FALLS DUE TO A DEFECT INMATERIAL OR WORKMANSHIP, SEARS WILL REPAIR IT, FREE OFCHARGE
FUll FIVE YEAR WARRANTY OF THE MAGNETRONFOR FIVE YEARS FROM THE DATE OF PURCHASE. IF THEMAGNETRON [NTHIS KENMORE MICROWAVE OVEN FAILS DUE TO ADEFECT IN MATERIAL OR WORKMANSHIP. SEARS WILL REPAIR rroFREE OF CHARGE.
THE ABOVE WARRANTY (_OVERAGE APPLIES ONLY TOMICROWAVE OVENS WHICH ARE USED FOR PRIVATE HOUSEHOLDPURPOSES,
WARRANTY SERVICE IS AVAILABLE BY SIMPLYCONTACTING THE NEAREST SEARS STORE ORSERVICE CENTER IN THE UNITED STATES.
THIS WARRANTY APPLIES ONLY WHILE THIS PRODUCT IS IN USE INTHE UNITED STATES,
THIS WARRANTY GIVES YOU SPECIFIC LEGAL RIGHTS, AND YOUMAY ALSO HAVE OTHER RIGHTS WHICH VARY FROM STATE TOSTATE
SEARS, ROEBUCK AND CO.,DEPT. 698/731A, SEARS TOWER, CHICAGO, IL 60684
Part NO, 13728
Sears. Roebuck and CoN, Chicago, 1l. 60684 U.S.A.
Revised 6/'86 Printed in Japan