kb 100 lessons
TRANSCRIPT

8/4/2019 KB 100 Lessons
http://slidepdf.com/reader/full/kb-100-lessons 1/12
Ergonomics
Ergonomics is the science concerned with designing safe and comfortable machines forhumans. Following these rules will increase your speed and accuracy at the computer as well ashelping your body cope with long sessions at the keyboard. Check out these 7 tips for better
posture!
The Magic behind keyboarding
There really is no "magic" or secret about good typing ability. It just takes time and lots and lotsof practice. However there are some important things that will help you in the process:

8/4/2019 KB 100 Lessons
http://slidepdf.com/reader/full/kb-100-lessons 2/12
**NOTE It is also important to strike the keys with a short quick stroke.
The HOME ROW!
Typically your biggest challenge is learning where all the keys are located and learning whichfingers hit which keys. However some people find that keeping fingers on the Home Row is thehardest thing to learn.
Home Row Keys.. (Click on the keyboard to return to the top)
Another thing to keep in mind is that your goal at first should be to learn the keys and HOMEROW before you begin to build speed. Accuracy is much more important to a beginning typist.
Below is a finger chart showing which fingers strike which keys:

8/4/2019 KB 100 Lessons
http://slidepdf.com/reader/full/kb-100-lessons 3/12
Why are the keys all mixed up?
The reason for all the keys are mixed up was to speed up typing while slowing down thetypist. True, history shows that Christopher Latham Shole in 1872 invented the machine calledthe "Type-Writer." Strangely enough, the first typewriter finally was designed to slow down thetypist. Sholes had developed his machine for convenience, but was faced with a huge problem:
the keys jammed if the typist went too fast. Sholes tried for months to fix this problem. Finally,in desperation, Sholes took a step that still remains today with our keyboard. Sholes redesignedthe layout of the letters on the keyboard to force the typist to slow down. We call his layout the "
What is the keyboard's official name?
The official name of the keyboard is "Qwerty". The keyboard is named after the top row of letters on the keyboard. If you don't think so just look on your keyboard.
When was the first keyboard invented?
The first keyboard was first invented in 1864.
Technology and keyboard styles have changed, but the art of typing has remained the same.Anyone who spends hours, or even minutes, sitting in front of a computer can benefit fromtyping lessons. While the thought of typing lessons perhaps used to conjure up images of a bunch

8/4/2019 KB 100 Lessons
http://slidepdf.com/reader/full/kb-100-lessons 4/12
of women sitting in a large secretary pool, they are now a necessity for folks of all ages, gendersand occupations to enhance their computer usage.
1. Significanceo Keyboards were not created randomly, although to the beginner they may seem
that way. While the first-time user may ask why the letters are not simply set upalphabetically, there is a good reason. Keyboard letters are actually arranged sothe most widely used letters fall under the strongest fingers. One will thus notethat the index and middle fingers get the brunt of the most popular letters of e, t, r,s, n, and d. Letters such as p, q and z are delegated to the pinkie fingers.
Function
o The purpose of typing lessons is not to torture someone, although early learnersmay feel that way. Typing lessons are imperative to memorize the keyboard, askill that will increase typing speed and accuracy. Users are trained not to look at
the keyboard at all, which helps them perform rote typing while reading from adocument or other tasks that need the eyes to focus on something else, such as thecomputer screen.
Types
o People who want to learn how to type have several options. Many localcommunity colleges, trade schools or other organizations may offer classes opento anyone interested. Folks can also purchase typing lesson books, which willcontain many of the same exercises used in the classes, and teach themselves.Online lessons or exercises are also widely available. See the Resources section
below for a link. Structured classes in a classroom setting will help ensure peoplepractice often.
Features
o Lessons include lots of repetition. The more people practice, the quicker they willlearn. Series of exercises focus on certain letters until letter combinations arelearned. Lessons start with single letters, move on to the memorization of thehome row, or center row of letters on the keyboard, and then advance to popularwords, such as "the," "and" and "is." One of the most useful sentences that popsup in most typing lessons is the phrase: "The quick brown fox jumped over the
lazy dogs." This sentence is incredibly helpful for learning the keyboard becauseit contains every single letter of the alphabet.
Considerations
o One of the most difficult aspects of typing is learning to use the pinkie fingers.Small, weak and largely forgotten, the pinkie fingers are important in typingletters and function keys, such as the shift and enter keys, that are found on the

8/4/2019 KB 100 Lessons
http://slidepdf.com/reader/full/kb-100-lessons 5/12
outer edges of the keyboard. Overall hand and finger strength, which is needed forlearning to type, can be enhanced with simple hand exercises. Fingers can beflexed and relaxed around a squishy ball meant to enhance circulation andstrength.
Learning how to type on a keyboard is an essential skill to have in today's modern, technology-driven society. If you don't know how to type, you could limit yourself in your career andpersonal life. You may think that it's too late to learn. However, learning to type is a matter of just getting the beginner principles down, and from there, practice, practice, practice.
1. Home Keyso You'll need to first learn about the home keys and their importance while typing.
The home keys anchor you to the keyboard and are the keys where all typinghappens from. The home keys are "a," "s," "d," "f" and "j," "k," "l," ";." Placeyour smallest finger of the left hand on the "a" key, and the three other fingersfrom that hand on the other home keys on the left side, and then place your
smallest finger from your right hand on the ";" key and the other three fingers onthe home keys on the right side. Practice being comfortable in this position andmemorize which key is under each finger. Practice typing out each of the homekeys.
Typing from the Home Keys
o After you become comfortable with the home keys and can memorize where eachone is, it's time to branch out to the other parts of the keyboard. Imagine yourkeyboard is split down the middle, from the letter "t," "g" and "b" and left. All of those letters to the left will by typed by your left hand, while the rest of your
fingers still rest on the home keys. The right side will be typed with your righthand. Practice on your position and always return fingers back to the home keysafter you type a letter that isn't on the home keys. Practice typing a few commonwords using all of the different keys on the keyboard.
Typing Exercises
o Test out your new skills by practicing your typing prowess while duplicating texton your keyboard. A good way to practice is to get your daily newspaper, open aword processing program, and then duplicate the day's top stories. It will probablytake a while, and you may get frustrated, but keep at it. Soon you will begin to
remember where all of the letters are, not just the home keys, and be able to typewithout looking at the keyboard. Practice is the key, so get on the computer asoften as you can.
Learning how to type properly can be a prerequisite to success in many work environments. Youmay also benefit from having typing ability in school, and even during general personalcomputer use. As a beginner-level typist, there are keyboard lessons you can benefit from toquickly improve your typing ability.

8/4/2019 KB 100 Lessons
http://slidepdf.com/reader/full/kb-100-lessons 6/12
1. Positioning and Posture for Lessonso Effective typing entails knowing how your hands and body should be positioned
as you work from the keyboard. Typing instructors teach a hand position knownas the "perch." The perched position indicates that your hands are cupped likethose of a bird. Perching aligns your fingertips. This makes typing from the home
key position easier than keeping your hands flat, as your fingers are all differentlengths.
Body posture is equally important to effective typing, especially when typing forprolonged periods of time. Sit upright with your back straight and at as close to a90-degree angle with your legs as possible. Set your chair and desk up so thatyour elbows are at your waist and your feet are squarely on the floor or a footrest.
2. Home Keys Lessonso The first and most important keyboard lesson for beginner-level typists is learning
the home keys. These keys are where your fingers should rest between keystrokes.
On your standard "QWERTY" keyboard, place and keep your left little finger onthe "A" key. Place and keep your left ring, middle and index finger on the "S,""D" and "F" keys respectively. The right little, ring, middle and index fingerscorrespond to the ";", "L," "K" and "J" keys respectively. These keys all exist onthe middle row of lettered keys on your keyboard.
The "F" and "J" keys, which correspond to your index fingers, may have a smallbump or elevated region. This exists to help you locate the home keys at all timeswithout having to look at the keyboard---or, by touch.
The earliest home keys lessons entail typing small nonsensical words that
combine letters corresponding to the home keys such as "aass," ";;ll," "fdsa,"";lkj" and so forth. Online and software-based typing instructors will time yourtyping speed and accuracy as you type these words.
The home row of the keyboard is the most important to the touch-typist.
When at rest the typist's fingers are positioned, lightly, on the A-S-D-F keys for the left hand,and the J-K-L-; keys for the right hand.
The left index finger will control the F and G keys, the right index finger willcontrol the J and H keys.
The left middle finger will control the D key, the right middle finger will controlthe K key.
The left ring finger will control the S key, the right ring finger will control the L key. The left little finger will control the A key, the right little finger will control the ;
key. The spacebar is controlled by the right thumb.

8/4/2019 KB 100 Lessons
http://slidepdf.com/reader/full/kb-100-lessons 7/12
The home row. LEFT HAND RIGHT HAND LF RF MF IF IF IF IF MF RF LF
A S D F G H J K L ;
LF = little finger, RF = ring finger, MF = middle finger, IF = index finger
The F and J keys often have small raised bumps on their tops, a tactile aid for the typist.
The locations of all the other keys on the keyboard are learned in relation to these home keys sothe touch-typist must be able to find the home keys by touch.
Using the raised bumps on the F and J keys as a guide, see if you can put your fingers on thehome row correctly, without looking at the keyboard . No peeking.
Make sure you are sitting up straight, your feet flat on the floor. Keep your elbows close to yourbody, your wrists straight and your forearms level, and remember - take regular breaks.
The third row of the keyboard is a celebrity in our midst. The Q-W-E-R-T-Y row.
The keys of early typewriters were, sensibly enough, laid out in alphabetical order. The impetusfor change was not exactly the yearning for blistering speed that has brought us together heretoday, but rather necessity. Early typewriters were mechanical and prone to jamming. TheQWERTY layout solved that problem by spreading the popular keys across the board,inadvertently creating an ideal layout for distributing the effort of typing to all ten fingers rather
than the traditional hunt and peck method. Progress and fate hand in hand once more.
The left index finger will control the R and T keys, the right index finger will controlthe Y and U keys.
The left middle finger will control the E key, the right middle finger will control the Ikey.
The left ring finger will control the W key, the right ring finger will control the O key. The left little finger will control the Q key, the right little finger will control the P key.
The QWERTY row.
LEFT HAND RIGHT HAND
LF RF MF IF IF IF IF MF RF LF
Q W E R T Y U I O P
A S D F G H J K L ;
LF = little finger, RF = ring finger, MF = middle finger, IF = index finger

8/4/2019 KB 100 Lessons
http://slidepdf.com/reader/full/kb-100-lessons 8/12
In our last lesson we learned the locations of the home row keys, enough in themselves to allowus to type some words without looking at the keyboard already.
The QWERTY row, as well as being the most celebrated on the keyboard is also the hardestworking. Four of the five vowels, E-I-O-U are to be found in this row. After completing the
second lesson you should discover that you are already well on the way to being a touch typistand your fingers are becoming ever more adept at finding the right key without your consciousthought.
The first row of the keyboard, the Z-X-C-V-B row cannot claim the importance in the pursuit of touch typing of the home row. Nor can it contest the international fame or high profile of thehard working QWERTY row. But there is one way in which it can surpass them both. Once youhave mastered the first row you will have learned all the alpha keys on the keyboard, the mostpopular punctuation keys, and have completed three lessons of our five lesson course. Bravo!
In keeping with the intensive nature of our course, and to keep your interest at a fever pitch, we
shall introduce capitals in this lesson. Your keyboard should have two shift keys, one to the left,one to the right. The proficient typist will use the little finger of their inactive hand to work oneof the shift keys when capitals are needed.
So, if you are to type a capital R, you will strike the R key with the index finger of your lefthand whilst depressing the shift key with the little finger of your right hand. A team game forthe opposing forces of left and right.
The left index finger will control the V and B keys, and the right index finger willcontrol the N and M keys.
The left middle finger will control the C key, and the right middle finger will control
the , key. The left ring finger will control the X key, and the right ring finger will control the .
key. The left little finger will control the Z key, and the right little finger will control the /
key. The left shift key is controlled by the left little finger and the right shift key is controlled
by the right little finger
LEFT HAND RIGHT HAND
LF RF MF IF IF IF IF MF RF LF
Q W E R T Y U I O PA S D F G H J K L ;
Z X C V B N M , . /
LF = little finger, RF = ring finger, MF = middle finger, IF = index finger
Some people find the downward stretching for the new finger positions awkward at first but itsoon passes.
8/4/2019 KB 100 Lessons
http://slidepdf.com/reader/full/kb-100-lessons 9/12
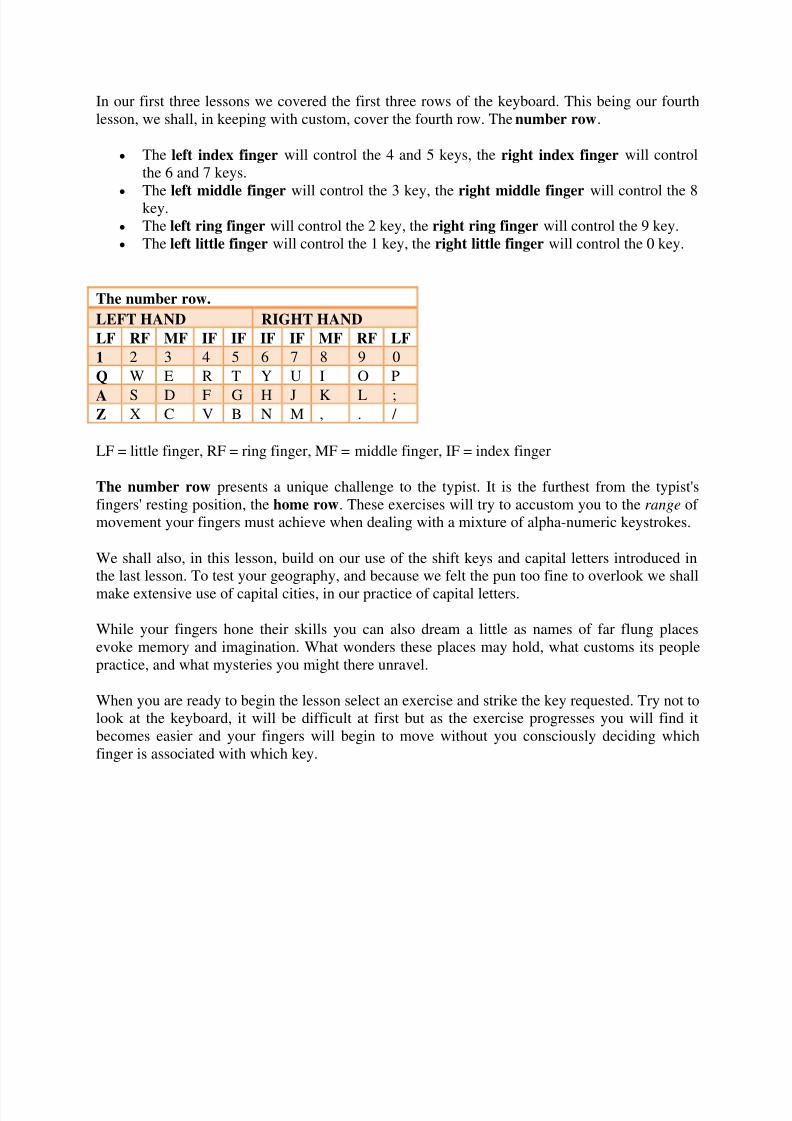
In our first three lessons we covered the first three rows of the keyboard. This being our fourthlesson, we shall, in keeping with custom, cover the fourth row. The number row.
The left index finger will control the 4 and 5 keys, the right index finger will controlthe 6 and 7 keys.
The left middle finger will control the 3 key, the right middle finger will control the 8key.
The left ring finger will control the 2 key, the right ring finger will control the 9 key. The left little finger will control the 1 key, the right little finger will control the 0 key.
The number row.
LEFT HAND RIGHT HAND
LF RF MF IF IF IF IF MF RF LF
1 2 3 4 5 6 7 8 9 0
Q W E R T Y U I O P
A S D F G H J K L ;Z X C V B N M , . /
LF = little finger, RF = ring finger, MF = middle finger, IF = index finger
The number row presents a unique challenge to the typist. It is the furthest from the typist'sfingers' resting position, the home row. These exercises will try to accustom you to the range of movement your fingers must achieve when dealing with a mixture of alpha-numeric keystrokes.
We shall also, in this lesson, build on our use of the shift keys and capital letters introduced inthe last lesson. To test your geography, and because we felt the pun too fine to overlook we shall
make extensive use of capital cities, in our practice of capital letters.
While your fingers hone their skills you can also dream a little as names of far flung placesevoke memory and imagination. What wonders these places may hold, what customs its peoplepractice, and what mysteries you might there unravel.
When you are ready to begin the lesson select an exercise and strike the key requested. Try not tolook at the keyboard, it will be difficult at first but as the exercise progresses you will find itbecomes easier and your fingers will begin to move without you consciously deciding whichfinger is associated with which key.

8/4/2019 KB 100 Lessons
http://slidepdf.com/reader/full/kb-100-lessons 10/12
Different keyboards touch-typing assumes that all keyboards have the same layout. There isclearly no point in training yourself to touch-type if you cannot expect the keyboards to be laidout in a uniform manner. However, while the QWERTY layout is widely used around the worldand almost exclusively in the English speaking world, there are slight variations which arerelevant to this lesson, so look at the menu above and click on your keyboard type.
This is the last lesson in our touch-typing course. We hope you have found it enjoyable. Youshould by now be comfortable with touch-typing. Hands on the keyboard, eyes on the screen.Both your accuracy and your speed will improve with practice.
The exercises in this lesson focus on character keys. It will be of particular use to those involvedin computer programming and we have used snippets of computer code for some of theexercises.
Lowercase - the shift key is NOT held down.
LEFT HAND RIGHT HAND
LF LF RF MF IF IF IF IF MF RF LF LF LF1 2 3 4 5 6 7 8 9 0 - =
q w e r t y u i o p [ ]
a s d f g h j k l ; ' \
` z x c v b n m , . /
UPPERCASE - the shift key IS held down.
LEFT HAND RIGHT HAND
LF LF RF MF IF IF IF IF MF RF LF LF LF
! @ # $ % ^ & * ( ) _ +
Q W E R T Y U I O P { }A S D F G H J K L : " |
~ Z X C V B N M < > ?
LF = little finger, RF = ring finger, MF = middle finger, IF = index finger
The number pad keys are arranged in four columns and five rows. In our first lesson we willcover the 4-5-6-+ row.
When at rest the fingers of the typist's right hand are positioned, lightly, on the 4-5-6-+ keys.
The right index finger will control the 4 key. The right middle finger will control the 5 key. The right ring finger will control the 6 key. The right little finger will control the + key. The 0 is controlled by the right thumb.

8/4/2019 KB 100 Lessons
http://slidepdf.com/reader/full/kb-100-lessons 11/12
Numberpad
IF MF RF LF
4 5 6 +
IF = index finger, MF = middle finger, RF = ring finger, LF = little finger
The 5 key often has a small raised bump on its top, a tactile aid for the typist.
The locations of all the other keys on the number pad are learnt in relation to this home key sothe touch-typist must be able to locate the home key by touch.
In our second lesson we will cover the 1-2-3 row and the . key.
The right index finger will control the 1 key. The right middle finger will control the 2 key.
The right ring finger will control the 3 and . keys.
Numberpad
IF MF RF LF
4 5 6 +
1 2 3
.
IF = index finger, MF = middle finger, RF = ring finger, LF = little finger
Different keyboards touch-typing assumes that all number pads have the same layout. There isclearly no point in training yourself to touch type if you cannot expect the number pads to be laidout in a uniform manner. However, while the layout of the number keys is constant, there are slight variations in the position of the operator keys which are relevant to this lesson, so look atthe menu above and click on your number pad type.
In our third lesson we will cover the 7-8-9-+ row .
The right index finger will control the 7 key. The right middle finger will control the 8 key. The right ring finger will control the 9 key. The right little finger will control the + key.

8/4/2019 KB 100 Lessons
http://slidepdf.com/reader/full/kb-100-lessons 12/12
Numberpad has big plus(+) key
IF MF RF LF
7 8 9 +
4 5 6
1 2 3.
IF = index finger, MF = middle finger, RF = ring finger, LF = little finger
In our fourth lesson we will cover the operator keys of the /-*-- row .
The right middle finger will control the / key. The right ring finger will control the * key.
The right little finger will control the - key.
Numberpad has big plus(+) key
IF MF RF LF
/ * -
7 8 9 +
4 5 6
1 2 3
.
IF = index finger, MF = middle finger, RF = ring finger, LF = little finger