jurassic park pinball mayhem - pinball guide by...
TRANSCRIPT

Page 1 of 30
Jurassic Park Pinball Mayhem Table Guide By ShoryukenToTheChin
1 2
3
4
6
5
7
8 9 10
11
Page 2 of 30
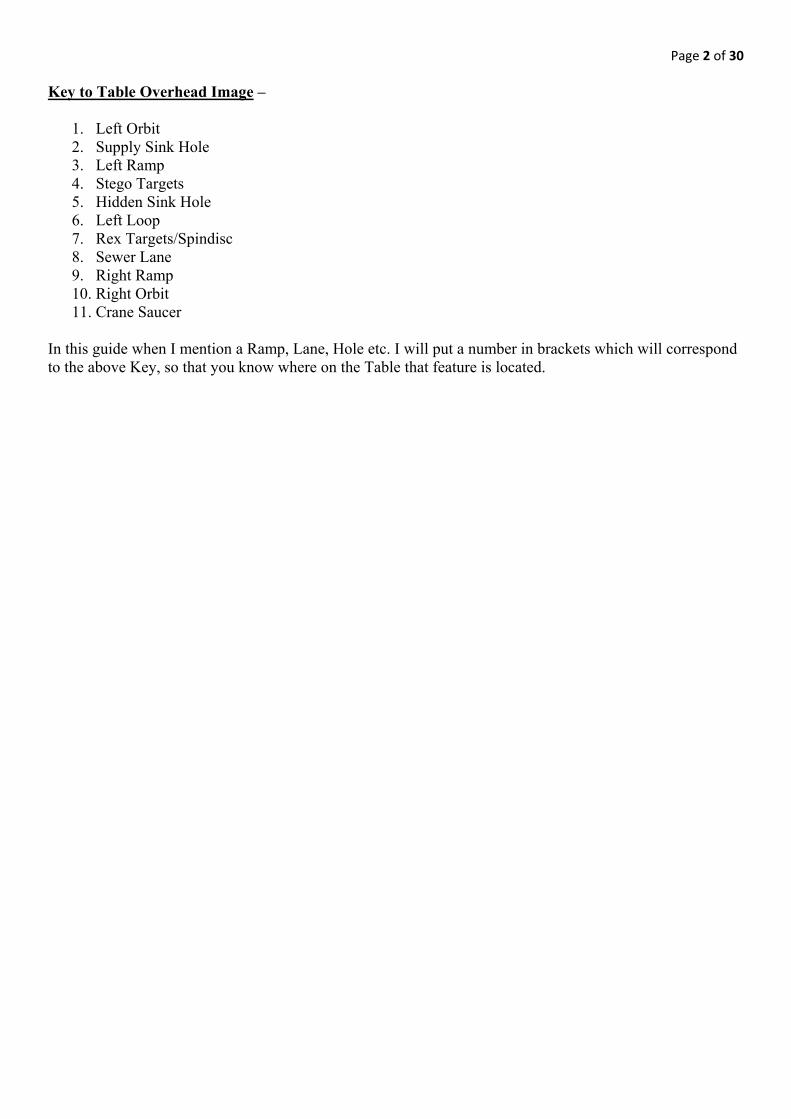
Key to Table Overhead Image –
1. Left Orbit 2. Supply Sink Hole 3. Left Ramp 4. Stego Targets 5. Hidden Sink Hole 6. Left Loop 7. Rex Targets/Spindisc 8. Sewer Lane 9. Right Ramp 10. Right Orbit 11. Crane Saucer
In this guide when I mention a Ramp, Lane, Hole etc. I will put a number in brackets which will correspond to the above Key, so that you know where on the Table that feature is located.

Page 3 of 30
TABLE SPECIFICS
Notice: This Guide is based off the Pinball FX3 (PS4) version of the Table on default controls. Some of the controls will be different on the other versions (Steam, etc...), but everything else in the Guide remains
the same.
INTRODUCTION In collaboration with Universal Brand Development, Zen Studios celebrates the 25th anniversary of Jurassic Park™ by releasing a three-pack of prehistoric pinball perfection for Pinball FX3. Jurassic World Pinball is comprised of thrilling tables themed around the history and lore of the iconic film franchise. Jurassic Park Pinball Mayhem - following the events of the first movie, the multitude of dinosaurs that scientists once thought were securely confined have escaped their enclosures and are now roaming free in the surrounding area of the Visitor Center. A crew of construction workers arrives on the scene to rebuild the park to its formal glory, underestimating the dangers posed by the dinosaurs roaming the park area. Now that the enraged carnivores and herbivores are bent on demolishing buildings you must save the trapped Jurassic Park workers, evacuate the rest of the people from the affected area, contain the fierce predators and hunt them down one by one in this action-packed pinball jungle! Add to all that various audio works from the characters of the film themselves to add that extra bit of authenticity. I hope my Guide will help you understand the Table better.

Page 4 of 30
Evacuation & Switching Areas
When the Table starts the number of evacuated construction workers of all areas is at its minimum. To change the actual area, use the Evacuation Vehicle – Hit the Right Ramp (9) several times to initiate a Ball lock and the Area Switch. The Park Sign will always indicate the actual part of the Island. Evacuate the trapped construction workers by completing the relevant side missions. Increasing evacuation levels in an area raises overall scoring. Evacuation percentages awarded for certain objectives:
Side Modes (Sentinel Escape, EVAC!) score 5% Evacuation when completed. Main Modes score 20% Evacuation when completed. 50 rotations of the Spinner will award 5% Evacuation.
Differences between districts:
‐ EAST DOCK– raised Ramp scores. ‐ NORTH DOCK – raised Target scores. ‐ HAMMONDS LODGE –raised Bumper and Hole scores. ‐ VISITORS CENTER – raised Spindisc and Saucer scores.
Reach at least 75% evacuation rate in each area by completing Side Modes, Main Modes or Multiballs to raise the evacuation level and overall scoring.

Page 5 of 30
Skill Shot - The Stegosaurus starts swinging its tail - you must launch the Ball at the correct time with the right amount of strength (using the manual launch function) so that it reaches its tail just when it’s ready to shoot it across the Table for a Skill Shot.
Super Skill Shot If you manage to score a Skill Shot, you will then for a limited time be able to score a Super Skill Shot by hitting the Ball into the T-Rex’s gaping jaw for a Super Skill Shot!

Page 6 of 30
Hidden Skill Shot Now there is a hidden Skill Shot on this Table. To attain it you will need to send the Ball with enough momentum to land into the Hidden Sink Hole (5).

Page 7 of 30
Kickbacks & Ball Save Kickbacks – To activate both kickbacks you need to perform a 5-way combo. Consecutive shots during single-Ball play are counted as Combos. The Image below shows the lanes which can be hit in succession to chain combos.
*Note – Any Kickbacks that have been activated will remain as such upon the Ball draining. * Ball Save - Ball Save can be activated once both Kickback have been activated first. Simply repeat the combo process, gaining a 5-way combo to activate the Ball Save. Ball Save is also temporary activated at the start of the many Game Modes.
*Note – This Ball Save will expire once its 30 Second timer expires or you drain the Ball, whichever comes first. *

Page 8 of 30
Extra Balls There are 5 Ways to achieve an Extra Ball; Collect the Extra Balls by hitting the Ball at the Supply Sink Hole (2) –
Method 1: Supply Award; look later in the section titled ‘Side Modes - Supply Awards” for information on how to get this Extra Ball.
Method 2: Rescuing 3 Sentinel Helicopters in the Sentinel Escape Mode; look later in the Guide
under “Side Modes – Sentinel Escape” section for information on how.
Method 3: Raising an area evacuation level to 75%; look earlier in the Guide under “Evacuation & Switching Areas” section for information on how.
Method 4: Completing 3 Main Modes; look later in the Guide under “Main Modes” section for
information on how.
Method 5: Taking down 20 Raptor drop down Targets; look later in the Guide under “Side Modes – Security Breach Hurry Up” section for information on how.
Raising the Multiplier To raise the Multiplier level of the Table you will need to hit the Bumpers several times to do so.

Page 9 of 30
Supply Awards Hit the Supply Sink Hole (2) several times to gain a supply award.
These awards are the following:
‐ Extra Ball. ‐ Big Score. ‐ Small Score. ‐ Triceratops Mini-game. ‐ Kickbacks. ‐ Ball Saver. ‐ Rescue Construction Workers.

Page 10 of 30
Side Game Modes
EVAC! Emergency – Activation: Collect the 5 “EVAC!” letters on the Rollovers to start the Emergency hurry up. Use the Flipper Buttons to alternate the lit Rollovers.
Completion: An Evacuation Vehicle has crashed at a remote location. A Lane will start to blink. Quick, get the medical team there in time! There is also a bonus for reaching the patients via the shortest route.
A E V V !

Page 11 of 30
Security Breach Hurry Up – Activation: Hit the Left Loop (6) several times to start-up this hurry up.
Completion: Hit the Raptor Drop Down Targets which will appear randomly one after another on the Playfield. Hitting 20 of them will result in lighting up Extra Ball for collection.

Page 12 of 30
Dinosaur Duel – Activation: Hit either Orbits – Left (1) & Right (10) once in rapid succession.
Completion: The two Dinosaurs will engage in a deadly fight. You must defeat the enemy Dinosaur! You will either be the Stegosaur or T-Rex; If the selected Dinosaur is the Stegosaur, hit the Bumpers several times to land a tail punch on the T-Rex.

Page 13 of 30
If the T-Rex is the selected Dinosaur, hit the Spindisc (7) to land a bite attack.
The enemy Dinosaur will also land a hit in regular intervals. The first Dinosaur who lands an attack 3 times will win the Mode. Hitting the enemy will reset the attack timer.

Page 14 of 30
Sentinel Escape – Activation: Hit the Left Ramp (3) several times.
Completion: Sentinels arrive with a helicopter to keep the T-Rex under surveillance. As they circle around the T-Rex grabs one of the legs of the helicopter. Hit the Right Ramp (9) quickly to save the helicopter!
If you manage to save 3 of them, it will result in lighting up Extra Ball for collection.

Page 15 of 30
We Need More Hands – Activation: Spin the Spinner via the Right Orbit (10) several times.
Completion: You must spin the Spinner via the Right Orbit (10) and this in-turn raises the evacuation level in your current area. Not to mention Jackpot values are directly connected to the Rebuilding Effort efficiency!

Page 16 of 30
Breakout – Activation: Shoot all Lanes with Electric Fence lights, making the yellow light blink slower, then lighting up the blue light, and then finally turning off the lights.
Completion: On turned off lights a Dinosaur Cardboard will emerge at the base of the Lane - shooting this Cardboard Target will earn a Jackpot and make the cycle begin again!

Page 17 of 30
No REX Zone – Activation: Hit the Rex Targets (7) to knock down all 3 of the “REX” letters to open the way to the Spindisc (7).
Completion: The T-Rex starts to crush the Main Gate on the left. Spin the Spinner by sending the Ball into the Spindisc (7) to distract the T-Rex and make it stop destroying the gate.

Page 18 of 30
Multiball Modes –
Crane Multiball *2 Ball*: Activation – Hit the Crane Saucer (11) several times to lock the Ball at the bottom of the Crane.
After the Ball is magnetized to the bottom of the Crane, it will then start to move side to side and the 2 Ball Multiball Mode will begin. Mode itself - 2 Ball Multiball Begins; hit the flashing Lanes for regular Jackpots, or hit the locked Ball to gain a Super Jackpot. If a Ball drains, the Crane will release the locked Ball and there will be no option to gain a Super Jackpot until one of the Balls enter the Crane Saucer (11) again for a lock. This Multiball Mode will continue if you have more than a single Ball alive on the Playfield. Otherwise the Mode will end, and you will need to repeat the above activation process to re-enter this Mode

Page 19 of 30
Power Shed Multiball *2 Ball*: Activation – Hit the Sewer Lane (8) to capture a Ball then hit the captive Ball several times to make it fall in the escape hole.
Doing so will start up the Power Shed Multiball. Mode itself - 2 Ball Multiball Begins; hit the flashing Lanes to gain Jackpots. Hitting a Jackpot Lane turns off the Lane. Hitting the Sewer Lane (8) gives a Super Jackpot and relights all Jackpot lanes. This Multiball Mode will continue if you have more than a single Ball alive on the Playfield. Otherwise the Mode will end, and you will need to repeat the above activation process to re-enter this Mode

Page 20 of 30
Evacuation Car Multiball *3 Ball*: Activation – Hit the Right Ramp (9) several times to activate the Evacuation Vehicle lock.
At the side the returning Habitrail leads through the body of an Evacuation Vehicle, with the doors at the top and the bottom open. When the locker is active the door at the bottom closes, and subsequent shots will lock the Balls inside the Evacuation Vehicle. If all 3 Balls are locked the door at the bottom opens and the Multiball begins. Mode itself - 3 Ball Multiball Begins; Jackpots can be increased by Bumper shots, and the Jackpot can be collected by sending a Ball through the Evacuation Vehicle again via the Right Ramp (9). This Multiball Mode will continue if you have more than a single Ball alive on the Playfield. Otherwise the Mode will end, and you will need to repeat the above activation process to re-enter this Mode

Page 21 of 30
MainModes Hit the 3 Stego Targets (5) under the Stegosaurus to activate the Main Mode starter magnet. Select the preferred Main Mode by switching with the Flippers and activate it by pressing the Launch Button.
Completing any 3 Main Modes will result in lighting up Extra Ball for collection.
Page 22 of 30
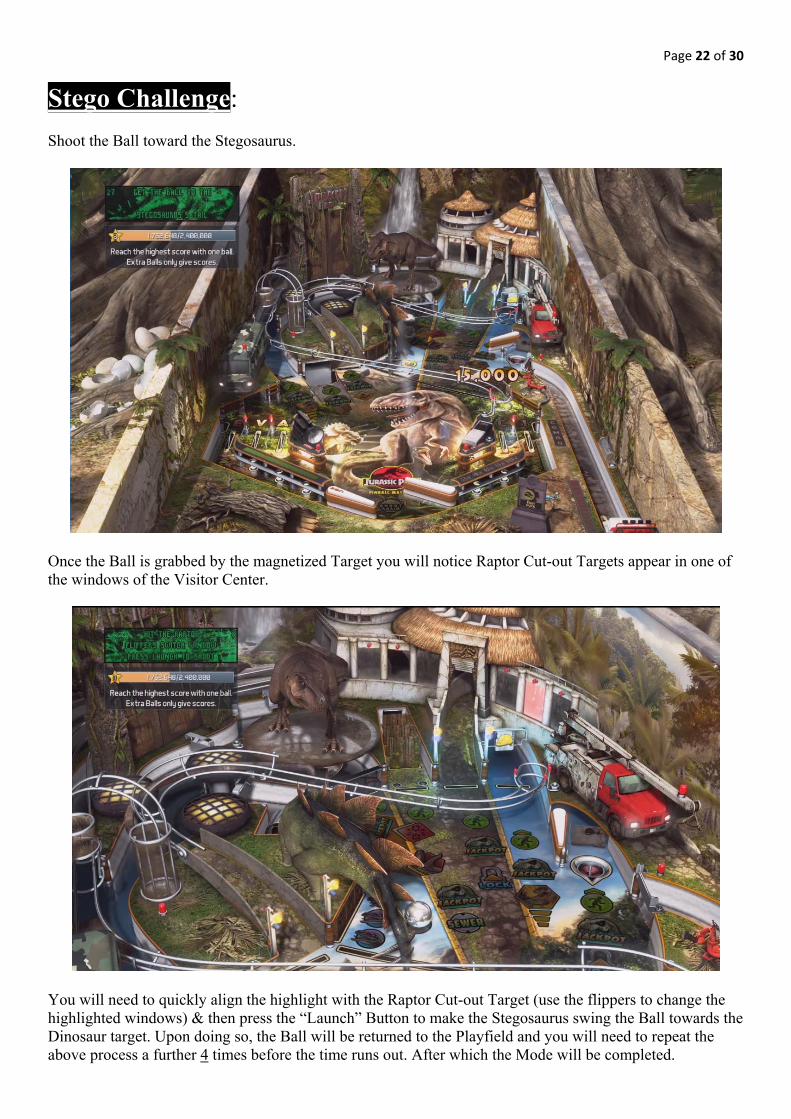
Stego Challenge: Shoot the Ball toward the Stegosaurus.
Once the Ball is grabbed by the magnetized Target you will notice Raptor Cut-out Targets appear in one of the windows of the Visitor Center.
You will need to quickly align the highlight with the Raptor Cut-out Target (use the flippers to change the highlighted windows) & then press the “Launch” Button to make the Stegosaurus swing the Ball towards the Dinosaur target. Upon doing so, the Ball will be returned to the Playfield and you will need to repeat the above process a further 4 times before the time runs out. After which the Mode will be completed.

Page 23 of 30
Regal Fury: The T-Rex starts to ram the Ramp in front of it in a fit of rage, and a gas pipe running parallel with the habitrail bursts with a steady stream of steamy gas escaping. Send the Ball towards the Bumper Area repeatedly until the Bumpers has been hit a total of 30 times.
This in-turn will cause the Ball to catch fire. Finally shoot the fiery Ball up the Left Ramp (3).
This will cause an explosion as it reaches the escaping gas, making the T-Rex retreat for good! Completing the Mode.

Page 24 of 30
Raging Fire: Rupturing the plumbing inside the Visitor Center has started a blazing inferno. As the Ball traverses through Lanes of fire the sprinkler activates and puts out the fire.
Put out the 8 blazing fires by shooting the indicated Lanes before the timer runs out. Once done, the Mode is completed.

Page 25 of 30
Triceratops Mini-Playfield: Raptors are on the loose! The Triceratops is cornered in a Mini-Playfield sunken into the Playfield. Try to repel all 10 of the incoming Raptor Balls by memorizing the attack pattern and switching positions when the Raptors are attacking. Before the Raptor Ball/s are released, a light sequence will play showing you when/where the Balls will be launched. Below is an Image showing the 3 locations that the Balls will come from.
Below is how the light will look in-game:
The above Image is showing you that the Raptor Ball will be launched from the Left side.

Page 26 of 30
So, move the Triceratops into the positions required to repeal the Raptor Balls by using the Flipper Buttons (Left Flipper – moves Left, & Right Flipper – moves Right).
The sequences are as follows –
1. 1 Raptor Ball. 2. 2 Raptor Balls. 3. 3 Raptor Balls. 4. 4 Raptor Balls
So, once you have repelled 10 Raptor Balls, the Mode will be completed.

Page 27 of 30
Demolition Scare: The T-Rex besieges the Main Entrance, slowly demolishing it. Hit the flashing Lanes to rescue the workers just before the enraged carnivore destroys the Main Entrance. Shooting a flashing Lane also turns that escape route off.
Hit the Rex Targets/Spindisc (7) to slow down the T-Rex and reopen the escape routes.
Rescue 10 workers to win the Mode.

Page 28 of 30
Diversion: Divert the t-rex towards a trap set up by shooting the ball to the opposite side of which the T-Rex must turn, indicated by the flashing Electric Fence lights above the Ramps.
As the distance shortens the T-Rex becomes more agitated, turns must be completed faster and faster.
Once 10 turns have been accomplished, the Mode will be completed.

Page 29 of 30
WizardMode–“TotalEvacuation”*5BallMultiball*
When all Main Modes are completed, hit the 3 Stego Targets (5) under the Stegosaurus to activate the Wizard Mode starter magnet. The Wizard Mode will then be automatically selected.
Wizard Mode itself: You will then be given a 5 Ball Multiball; hit the flashing Lanes to score Jackpot awards.
This Wizard Mode will continue if you have more than a single Ball alive on the Playfield. Otherwise the Mode will end, and you will need to repeat the above activation process to re-enter this Mode. The Table will also reset.

Page 30 of 30
Special Thanks to all the Zen Studios Forum Community! Members such as shogun00, Cloda, Ty-43, yoyo (without his help this guide wouldn’t have been possible!), Captain B. Z., Deep, wims, skyway73, tenorhero, DiscoKing & surf1der. I couldn’t have completed the Guide without your help either directly or indirectly - you are all awesome!!!
In closing I hope you enjoyed this Table, I certainly have and I hope by using this Guide it increases that Fun factor for you and everyone else who plays with you.
Check out the other Tables available, they are all available to download on the Xbox Live Marketplace in Add-Ons section or download it straight from the PFX2 Platform itself. Zen Pinball 2 on PlayStation Network, Zen Pinball on the Apple AppStore, Zen Pinball 3D on Nintendo 3DS and Zen Pinball THD on Android Marketplace. Thanks for viewing my Guide; any feedback would be greatly appreciated -
“Perfect! The Park has been fully evacuated.” Yours ShoryukenToTheChin