junos space virtual appliance pwp
DESCRIPTION
junos spaceTRANSCRIPT

Junos Space Virtual Appliance
Published: 2012-05-22
Copyright © 2012, Juniper Networks, Inc.

Juniper Networks, Inc.1194 North Mathilda AvenueSunnyvale, California 94089USA408-745-2000www.juniper.net
Copyright © 2012, Juniper Networks, Inc. All rights reserved.
Juniper Networks, Junos, Steel-Belted Radius, NetScreen, and ScreenOS are registered trademarks of Juniper Networks, Inc. in the UnitedStates and other countries. The Juniper Networks Logo, the Junos logo, and JunosE are trademarks of Juniper Networks, Inc. All othertrademarks, service marks, registered trademarks, or registered service marks are the property of their respective owners.
Juniper Networks assumes no responsibility for any inaccuracies in this document. Juniper Networks reserves the right to change, modify,transfer, or otherwise revise this publication without notice.
Products made or sold by Juniper Networks or components thereof might be covered by one or more of the following patents that areowned by or licensed to Juniper Networks: U.S. Patent Nos. 5,473,599, 5,905,725, 5,909,440, 6,192,051, 6,333,650, 6,359,479, 6,406,312,6,429,706, 6,459,579, 6,493,347, 6,538,518, 6,538,899, 6,552,918, 6,567,902, 6,578,186, and 6,590,785.
Junos Space Virtual ApplianceCopyright © 2012, Juniper Networks, Inc.All rights reserved.
The information in this document is current as of the date on the title page.
YEAR 2000 NOTICE
Juniper Networks hardware and software products are Year 2000 compliant. Junos OS has no known time-related limitations through theyear 2038. However, the NTP application is known to have some difficulty in the year 2036.
ENDUSER LICENSE AGREEMENT
The Juniper Networks product that is the subject of this technical documentation consists of (or is intended for use with) Juniper Networkssoftware. Use of such software is subject to the terms and conditions of the End User License Agreement (“EULA”) posted at
http://www.juniper.net/support/eula.html. By downloading, installing or using such software, you agree to the terms and conditionsof that EULA.
Copyright © 2012, Juniper Networks, Inc.ii
Table of Contents
About the Documentation . . . . . . . . . . . . . . . . . . . . . . . . . . . . . . . . . . . . . . . . . . . . vii
Documentation and Release Notes . . . . . . . . . . . . . . . . . . . . . . . . . . . . . . . . . vii
Documentation Conventions . . . . . . . . . . . . . . . . . . . . . . . . . . . . . . . . . . . . . . vii
Documentation Feedback . . . . . . . . . . . . . . . . . . . . . . . . . . . . . . . . . . . . . . . . . ix
Requesting Technical Support . . . . . . . . . . . . . . . . . . . . . . . . . . . . . . . . . . . . . . ix
Self-Help Online Tools and Resources . . . . . . . . . . . . . . . . . . . . . . . . . . . . . . . . x
Opening a Case with JTAC . . . . . . . . . . . . . . . . . . . . . . . . . . . . . . . . . . . . . . . . . x
Part 1 Overview
Chapter 1 Virtual Appliance Overview . . . . . . . . . . . . . . . . . . . . . . . . . . . . . . . . . . . . . . . . . . 3
Junos Space Virtual Appliance Overview . . . . . . . . . . . . . . . . . . . . . . . . . . . . . . . . . 3
Virtual Appliance Deployment . . . . . . . . . . . . . . . . . . . . . . . . . . . . . . . . . . . . . . 3
Recommendations for Deploying Virtual Appliances on the VMware ESX
Server . . . . . . . . . . . . . . . . . . . . . . . . . . . . . . . . . . . . . . . . . . . . . . . . . . . . . . 4
Configuring an NTP Time Source For Each Appliance . . . . . . . . . . . . . . . . . . . 4
Understanding How Nodes Are Connected in a Fabric . . . . . . . . . . . . . . . . . . . . . . . 5
Understanding How Junos Space Uses Ethernet Interfaces eth0 and eth3 . . . . . . 6
Part 2 Deploying
Chapter 2 Deploying the Junos Space Virtual Appliance . . . . . . . . . . . . . . . . . . . . . . . . . . 9
Deploying a Junos Space Virtual Appliance . . . . . . . . . . . . . . . . . . . . . . . . . . . . . . . 9
Installing the VMware ESX Server . . . . . . . . . . . . . . . . . . . . . . . . . . . . . . . . . . 10
Converting a Virtual Appliance to a Virtual Machine . . . . . . . . . . . . . . . . . . . . 10
Adding Virtual Processors (CPU) for a Junos Space Virtual Appliance . . . . . . 11
Adding Disk Resources for a Junos Space Virtual Appliance . . . . . . . . . . . . . . 12
Part 3 Configuring
Chapter 3 Configuring the Junos Space Virtual Appliance . . . . . . . . . . . . . . . . . . . . . . . . 17
Configuring Basic Settings for a Junos Space Virtual Appliance . . . . . . . . . . . . . . . 17
Configuring an Appliance that is the First Node in a Cluster or that Will Not
Be Added to an Existing Cluster . . . . . . . . . . . . . . . . . . . . . . . . . . . . . . . . . 17
Configuring an Appliance to Add to an Existing Cluster . . . . . . . . . . . . . . . . . . 21
Changing Network and System Settings for a Junos Space Virtual Appliance . . . 23
Changing the Password . . . . . . . . . . . . . . . . . . . . . . . . . . . . . . . . . . . . . . . . . . 24
Setting Routing Options . . . . . . . . . . . . . . . . . . . . . . . . . . . . . . . . . . . . . . . . . . 24
Adding DNS Servers . . . . . . . . . . . . . . . . . . . . . . . . . . . . . . . . . . . . . . . . . . . . . 25
Setting the System Time . . . . . . . . . . . . . . . . . . . . . . . . . . . . . . . . . . . . . . . . . 25
Retrieve Logs . . . . . . . . . . . . . . . . . . . . . . . . . . . . . . . . . . . . . . . . . . . . . . . . . . . 25
iiiCopyright © 2012, Juniper Networks, Inc.

Expand VM Drive Size . . . . . . . . . . . . . . . . . . . . . . . . . . . . . . . . . . . . . . . . . . . . 26
Setting Security Options . . . . . . . . . . . . . . . . . . . . . . . . . . . . . . . . . . . . . . . . . . 26
(Debug) Run Shell . . . . . . . . . . . . . . . . . . . . . . . . . . . . . . . . . . . . . . . . . . . . . . . 27
Part 4 Upgrading
Chapter 4 Upgrading The Junos Space Virtual Appliance . . . . . . . . . . . . . . . . . . . . . . . . 31
Junos Space Software Upgrade Overview . . . . . . . . . . . . . . . . . . . . . . . . . . . . . . . . 31
Upgrading Junos Space Software . . . . . . . . . . . . . . . . . . . . . . . . . . . . . . . . . . . . . . 32
Junos Space 12.1 Release Highlights . . . . . . . . . . . . . . . . . . . . . . . . . . . . . . . . . 32
Before You Begin . . . . . . . . . . . . . . . . . . . . . . . . . . . . . . . . . . . . . . . . . . . . . . . . 32
Upgrading Junos Space Release 11.3 or 11.4 to Release 12.1 . . . . . . . . . . . . . . . 33
Part 5 Index
Index . . . . . . . . . . . . . . . . . . . . . . . . . . . . . . . . . . . . . . . . . . . . . . . . . . . . . . . . . 37
Copyright © 2012, Juniper Networks, Inc.iv
Junos Space Virtual Appliance

List of Tables
About the Documentation . . . . . . . . . . . . . . . . . . . . . . . . . . . . . . . . . . . . . . . . . . vii
Table 1: Notice Icons . . . . . . . . . . . . . . . . . . . . . . . . . . . . . . . . . . . . . . . . . . . . . . . . . viii
Table 2: Text and Syntax Conventions . . . . . . . . . . . . . . . . . . . . . . . . . . . . . . . . . . . viii
Part 1 Overview
Chapter 1 Virtual Appliance Overview . . . . . . . . . . . . . . . . . . . . . . . . . . . . . . . . . . . . . . . . . . 3
Table 3: How Junos Space IP Addresses Function . . . . . . . . . . . . . . . . . . . . . . . . . . 6
vCopyright © 2012, Juniper Networks, Inc.

Copyright © 2012, Juniper Networks, Inc.vi
Junos Space Virtual Appliance
About the Documentation
• Documentation and Release Notes on page vii
• Documentation Conventions on page vii
• Documentation Feedback on page ix
• Requesting Technical Support on page ix
Documentation and Release Notes
To obtain the most current version of all Juniper Networks®
technical documentation,
see the product documentation page on the Juniper Networks website at
http://www.juniper.net/techpubs/.
If the information in the latest release notes differs from the information in the
documentation, follow the product Release Notes.
Juniper Networks Books publishes books by Juniper Networks engineers and subject
matter experts. These books go beyond the technical documentation to explore the
nuances of network architecture, deployment, and administration. The current list can
be viewed at http://www.juniper.net/books .
Documentation Conventions
Table 1 on page viii defines notice icons used in this guide.
viiCopyright © 2012, Juniper Networks, Inc.

Table 1: Notice Icons
DescriptionMeaningIcon
Indicates important features or instructions.Informational note
Indicates a situation that might result in loss of data or hardware damage.Caution
Alerts you to the risk of personal injury or death.Warning
Alerts you to the risk of personal injury from a laser.Laser warning
Table 2 on page viii defines the text and syntax conventions used in this guide.
Table 2: Text and Syntax Conventions
ExamplesDescriptionConvention
To enter configuration mode, typetheconfigure command:
user@host> configure
Represents text that you type.Bold text like this
user@host> show chassis alarms
No alarms currently active
Represents output that appears on theterminal screen.
Fixed-width text like this
• A policy term is a named structurethat defines match conditions andactions.
• JunosOSSystemBasicsConfigurationGuide
• RFC 1997,BGPCommunities Attribute
• Introduces or emphasizes importantnew terms.
• Identifies book names.
• Identifies RFC and Internet draft titles.
Italic text like this
Configure the machine’s domain name:
[edit]root@# set system domain-namedomain-name
Represents variables (options for whichyou substitute a value) in commands orconfiguration statements.
Italic text like this
• To configure a stub area, include thestub statement at the[editprotocolsospf area area-id] hierarchy level.
• The console port is labeledCONSOLE.
Represents names of configurationstatements, commands, files, anddirectories; configuration hierarchy levels;or labels on routing platformcomponents.
Text like this
stub <default-metricmetric>;Enclose optional keywords or variables.< > (angle brackets)
Copyright © 2012, Juniper Networks, Inc.viii
Junos Space Virtual Appliance
Table 2: Text and Syntax Conventions (continued)
ExamplesDescriptionConvention
broadcast | multicast
(string1 | string2 | string3)
Indicates a choice between the mutuallyexclusive keywords or variables on eitherside of the symbol. The set of choices isoften enclosed in parentheses for clarity.
| (pipe symbol)
rsvp { # Required for dynamicMPLSonly
Indicates a comment specified on thesame line as the configuration statementto which it applies.
# (pound sign)
community namemembers [community-ids ]
Enclose a variable for which you cansubstitute one or more values.
[ ] (square brackets)
[edit]routing-options {static {route default {nexthop address;retain;
}}
}
Identify a level in the configurationhierarchy.
Indention and braces ( { } )
Identifies a leaf statement at aconfiguration hierarchy level.
; (semicolon)
J-Web GUI Conventions
• In the Logical Interfaces box, selectAll Interfaces.
• To cancel the configuration, clickCancel.
Represents J-Web graphical userinterface (GUI) items you click or select.
Bold text like this
In the configuration editor hierarchy,select Protocols>Ospf.
Separates levels in a hierarchy of J-Webselections.
> (bold right angle bracket)
Documentation Feedback
We encourage you to provide feedback, comments, and suggestions so that we can
improve the documentation. You can send your comments to
[email protected], or fill out the documentation feedback form at
https://www.juniper.net/cgi-bin/docbugreport/ . If you are using e-mail, be sure to include
the following information with your comments:
• Document or topic name
• URL or page number
• Software release version (if applicable)
Requesting Technical Support
Technical product support is available through the Juniper Networks Technical Assistance
Center (JTAC). If you are a customer with an active J-Care or JNASC support contract,
ixCopyright © 2012, Juniper Networks, Inc.
About the Documentation

or are covered under warranty, and need post-sales technical support, you can access
our tools and resources online or open a case with JTAC.
• JTAC policies—For a complete understanding of our JTAC procedures and policies,
review the JTAC User Guide located at
http://www.juniper.net/us/en/local/pdf/resource-guides/7100059-en.pdf .
• Product warranties—For product warranty information, visit
http://www.juniper.net/support/warranty/ .
• JTAC hours of operation—The JTAC centers have resources available 24 hours a day,
7 days a week, 365 days a year.
Self-Help Online Tools and Resources
For quick and easy problem resolution, Juniper Networks has designed an online
self-service portal called the Customer Support Center (CSC) that provides you with the
following features:
• Find CSC offerings: http://www.juniper.net/customers/support/
• Search for known bugs: http://www2.juniper.net/kb/
• Find product documentation: http://www.juniper.net/techpubs/
• Find solutions and answer questions using our Knowledge Base: http://kb.juniper.net/
• Download the latest versions of software and review release notes:
http://www.juniper.net/customers/csc/software/
• Search technical bulletins for relevant hardware and software notifications:
https://www.juniper.net/alerts/
• Join and participate in the Juniper Networks Community Forum:
http://www.juniper.net/company/communities/
• Open a case online in the CSC Case Management tool: http://www.juniper.net/cm/
To verify service entitlement by product serial number, use our Serial Number Entitlement
(SNE) Tool: https://tools.juniper.net/SerialNumberEntitlementSearch/
Opening a Casewith JTAC
You can open a case with JTAC on the Web or by telephone.
• Use the Case Management tool in the CSC at http://www.juniper.net/cm/ .
• Call 1-888-314-JTAC (1-888-314-5822 toll-free in the USA, Canada, and Mexico).
For international or direct-dial options in countries without toll-free numbers, see
http://www.juniper.net/support/requesting-support.html .
Copyright © 2012, Juniper Networks, Inc.x
Junos Space Virtual Appliance

PART 1
Overview
• Virtual Appliance Overview on page 3
1Copyright © 2012, Juniper Networks, Inc.

Copyright © 2012, Juniper Networks, Inc.2
Junos Space Virtual Appliance

CHAPTER 1
Virtual Appliance Overview
• Junos Space Virtual Appliance Overview on page 3
• Understanding How Nodes Are Connected in a Fabric on page 5
• Understanding How Junos Space Uses Ethernet Interfaces eth0 and eth3 on page 6
Junos Space Virtual Appliance Overview
The Junos Space Virtual Appliance consists of preconfigured Junos Space software with
a built-in operating system and application stack that is easy to deploy, manage, and
maintain.
A Junos Space Virtual Appliance includes the same software and all the functionality
available in a Junos Space physical appliance. However, you must deploy the virtual
appliance on the VMware ESX or ESXi Server, which provides a CPU, hard disk, RAM, and
a network controller, but requires installation of an operating system and applications
to become fully functional.
Just as you can install additional physical appliances to create a fabric to provide
scalability and availability, you can deploy multiple virtual appliances to create a fabric
that provides the same scalability and high availability as a fabric of physical appliances.
You can create a fabric of JA1500 Junos Space appliances, Junos Space virtual appliances,
or a hybrid fabric of both physical and virtual appliances.
Virtual Appliance Deployment
The Junos Space Virtual Appliance is stored in the Open Virtualization Archive (OVA)
format and is packaged as an *.ova file, which is a single folder that contains all the files
of the Junos Space Virtual Appliance. OVA is not a bootable format, and you must deploy
each Junos Space Virtual Appliance to a hosted ESX or ESXi server before you can run
the Junos Space Virtual Appliance.
You can deploy a Junos Space Virtual Appliance on a VMware ESX server, version 3.5. or
higher, or ESXi version 4.0 or higher to convert the Junos Space Virtual Appliance to a
virtual machine. After the Junos Space Virtual Appliance is converted to a virtual machine,
you use the VMware vSphere client that is connected to the VMware ESX (or ESXi) Server
to deploy the Junos Space Virtual Appliance on the server.
3Copyright © 2012, Juniper Networks, Inc.
NOTE: Where the Junos Space Virtual Appliance documentation references“ESX server” you can use either the ESX server Version 3.5 or later, or ESXiserver, Version 4.0 or later.
Recommendations for Deploying Virtual Appliances on the VMware ESX Server
The CPU, RAM, and disk space provided by the VMware ESX server must meet or exceed
the documented CPU, RAM, and disk space requirements for deploying a Junos Space
Virtual Appliance. In addition, Juniper recommends that, for a multi-node fabric, you
deploy the first and second virtual appliance on separate VMware ESX servers to ensure
failover support.
The distributed Junos Space Virtual Appliance files are created with 16 GB of disk space,
and you add an additional 40GB of disk resources when you first deploy the virtual
appliance to a VMware ESX server. In many cases, the 45 GB of disk space will be
sufficient; however, if the percent of Junos Space disk resources utilized reaches 80%
capacity, Juniper recommends that you add another 40 GB of disk space to your virtual
appliance. You can monitor the percent of disk space utilized in the Fabric Monitor
inventory panel in the Junos Space user interface.
Configuring an NTP Time Source For Each Appliance
To ensure consistent behavior among all nodes in a multi-node fabric, each node’s time
must be synchronized with every other node in the fabric. When you configure the first
Junos Space Virtual Appliance (and JA1500 Junos Space Appliance) with an NTP server,
you ensure that, if the first node (which is used to synchronize time for all nodes in the
fabric) goes down, all other nodes in the fabric remain synchronized. Additional nodes
installed into the same fabric will automatically get their time setting from the first node
in the fabric without any additional NTP server configuration.
NOTE: By default, Junos Space translates time so that the time displayed inthe user interface corresponds to Junos Space server time, but the time ismapped to the local time zone of your client computer.
To ensure time remains synchronized across all nodes in the fabric, Juniper strongly
recommends that you add an NTP server to the first appliance (physical or virtual) during
initial set up.
NOTE: Youmust add the NTP server before you add the appliance/node tothe fabric from the Junos Space user interface.
RelatedDocumentation
Understanding How Nodes Are Connected in a Fabric on page 5•
• Fabric Management Overview
• Deploying a Junos Space Virtual Appliance on page 9
Copyright © 2012, Juniper Networks, Inc.4
Junos Space Virtual Appliance

• Configuring Basic Settings for a Junos Space Virtual Appliance on page 17
• Changing Network and System Settings for a Junos Space Virtual Appliance on page 23
• Adding a Fabric Node
• Viewing Nodes in the Fabric
Understanding HowNodes Are Connected in a Fabric
Each Junos Space appliance (physical or virtual) that you install and configure is
represented as a single node in the fabric. You can add nodes without disrupting the
services that are running on the fabric. When you install and configure the first appliance,
Junos Space automatically creates a fabric with one node. For each additional appliance
you install and configure, you must add a node to logically represent the appliance in the
fabric. You add nodes to the fabric from theAdministrationworkspace in the Junos Space
user interface. Each node that you add to the fabric increases the resource pool for the
node functions to meet the scalability and availability requirements of your network. By
default, Junos Space automatically enables node functionality across the nodes in the
fabric to distribute workload. The nodes in the fabric work together to provide a virtualized
resource pool for each of the node functions: load balancer, database, and application
logic.
In a fabric comprising two or more nodes, Junos Space provides failover when a node
functioning as the active server (load balancer server or database server) goes down. By
default, Junos Space marks a particular node down and routes failover requests to the
node that Junos Space designates as standby server. Junos Space uses a heartbeat
mechanism to check whether the nodes in the fabric are running. When a node functioning
as the active server fails (the appliance crashes or stops sending heartbeats), the node
functioning as the standby server takes over all resources that were managed by the
node functioning as active server. Because the nodes in a Junos Space fabric reply on IP
multicast messages to discover each other, you should make sure that IP multicast
packets are reachable among all nodes in the Junos Space fabric.
To add, manage, and monitor the nodes in the fabric, a Junos Space user connects to a
single Web IP address. The IP address of first (active) node and second (standby) node,
and the Web (virtual) IP address must all be in the same subnet. The Web IP needs to
work on both the first and second node in the fabric. When both nodes are in same subnet,
and the first (active) node goes down, the second (standby) node becomes the active
node and packets continue to be directed from the router, to the Junos Space Web IP,
and then to the second node, because both nodes are in same subnet. However, if the
second (standby) node is configured in a different subnet than the first (active) node,
and the first node goes down, the second node becomes the active node, but because
the Web IP now points to the different subnet of the second node, all packets originally
destined for first node won’t be received by the second node.
RelatedDocumentation
Junos Space Virtual Appliance Overview on page 3•
• Fabric Management Overview
• Adding a Fabric Node
5Copyright © 2012, Juniper Networks, Inc.
Chapter 1: Virtual Appliance Overview

• Viewing Nodes in the Fabric
Understanding How Junos Space Uses Ethernet Interfaces eth0 and eth3
Junos Space is designed to perform best using only eth0 if the managed devices are
routable, using in-bound management. Use eth3 for a device management subnet if the
managed devices are non-routable or on an out-of-band management subnet.
Table 3 on page 6 describes how Junos Space interfaces intentionally function:
Table 3: How Junos Space IP Addresses Function
Function/Interface
SSH and device management if eth3 is not configured (node IP)eth0
GUI interface with an instance of JBOSS running (GUI)eth0:0
Not supportedeth1
Not supportedeth2
Device management when managed devices are on a subnet and not reachableby way of eth0.
eth3
Junos Space uses eth0 and eth3 interfaces as follows:
• Secure Shell Daemon (sshd) is listening on all IP addresses.
• The web interface is only on the VIP, the same subnet as eth0.
• Device management, outbound (discover) and inbound (post-discovery), including
syslog and DMI, should be eth3, or eth0 if eth3 is not configured.
RelatedDocumentation
Copyright © 2012, Juniper Networks, Inc.6
Junos Space Virtual Appliance
PART 2
Deploying
• Deploying the Junos Space Virtual Appliance on page 9
7Copyright © 2012, Juniper Networks, Inc.

Copyright © 2012, Juniper Networks, Inc.8
Junos Space Virtual Appliance

CHAPTER 2
Deploying the Junos Space VirtualAppliance
• Deploying a Junos Space Virtual Appliance on page 9
Deploying a Junos Space Virtual Appliance
You can use the OVFTool to deploy one or more Junos Space virtual appliances on a
VMware ESX or ESXi host server.
The Junos Space Virtual Appliance requires a VMware ESX server, version 3.5 or later, or
VMware ESXi server, version 4.0 or later that can support a virtual machine with the
following configuration:
• 64-bit quad processor with at least 2.66 GHz
• 8 GB memory
• One RJ-45 10/100/1000 Network Interface Connector
• 56 GB hard disk (16 GB initial disk resources + 40 GB disk resources to be added)
NOTE: TheESXorESXihost servermust includeanEnterpriseedition license,whichmight not be installed onhost server by default. TheEnterprise editionlicense provides the privileges that are required for adding disk resources tothe Junos Space Virtual Appliance.
NOTE: Where the Junos Space Virtual Appliance documentation references“ESX server” you can use either the ESX server Version 3.5 or later, or ESXiserver, Version 4.0 or later.
This topic includes the following tasks:
1. Installing the VMware ESX Server on page 10
2. Converting a Virtual Appliance to a Virtual Machine on page 10
9Copyright © 2012, Juniper Networks, Inc.

3. Adding Virtual Processors (CPU) for a Junos Space Virtual Appliance on page 11
4. Adding Disk Resources for a Junos Space Virtual Appliance on page 12
Installing the VMware ESX Server
To download the installation package for the VMware ESX server, go to
http://www.vmware.com/download/vi/.
To view installation instructions for the VMware ESX server, go to
http://www.vmware.com/support/pubs/vi_pubs.html.
NOTE: You can install the VMware vSphere client when you install theVMware ESX server, Version 4.0 or later or ESXi server, Version 4.0 or later.Earlier ESX server versions support the VMware Infrastructure client.
Converting a Virtual Appliance to a Virtual Machine
To deploy a Junos Space Virtual Appliance to an ESX server, you can use the OVFTool
2.01 or the vSphere Client. You convert the Junos Space Virtual Appliance (source) to a
VMware Infrastructure virtual machine (destination) to deploy the Junos Space Virtual
Appliance on a VMware ESX Server.
To convert a Junos Space Virtual Appliance to a virtual machine using OVFTool :
1. From the OVFTool command line, you enter the following information:
• name for the virtual machine
• datastore that can accommodate all files of the source virtual machine (This step
is needed only if you store the virtual machine hard disk in the remote storage disk
instead of the local storage disk.)
• path for the *.ova file
• Host system (IP address, user, and password)
The following sample command converts a Junos Space Virtual Appliance to a virtual
machine:
/usr/bin/ovftool/ovftool --name=space1vm space-12.1R1.1.ovavi://username:[email protected]
For complete information about using OVFTool, go to
http://www.vmware.com/support/developer/ovf/.
To convert a Junos Space Virtual Appliance to a virtual machine using vSphere client:
1. Launch the vSphere client that is connected to the ESX Server where the Junos Space
Virtual Appliance is deployed.
2. Select File > Deploy OVF Template from the menu. The Deploy OVF Templateappears.
Copyright © 2012, Juniper Networks, Inc.10
Junos Space Virtual Appliance

3. Select the Deploy from file option and click Browse and upload the OVA file from
your storage location.
4. Click Next to go to the next step.
5. Verify the OVF Template details and then click Next to go to the next step.
6. Specify a name and location for the deployed template and then click Next to go to
the next step.
7. Select the networks that the deployed template should use and then click Next to go
to the next step.
8. Verify your settings and then click Finish to convert the Junos Space Virtual Appliance
to a virtual machine.
Adding Virtual Processors (CPU) for a Junos Space Virtual Appliance
The distributed Junos Space Virtual Appliance files are created with 8 GB of RAM and
one virtual processor (CPU). To support Junos Space functionality, after deploying the
Junos Space Virtual Appliance to the VMware ESX server, you must add virtual processors
for the Junos Space Virtual Appliance.
To add virtual processors for the Junos Space Virtual Appliance:
1. Launch the VMware vSphere client that is connected to the ESX Server where the
Junos Space Virtual Appliance is deployed.
2. Select the Junos Space Virtual Appliance from the inventory view.
3. If the Junos Space Virtual Appliance is powered on, you must power off the appliance
to configure RAM and increase the number of virtual processors (CPUs). To power
off the Virtual Appliance, right-click the Junos Space Virtual Appliance icon, and select
Power > Power Off.
4. Select the Summary tab to view the Junos Space virtual machine settings for CPU
and memory.
The default CPU setting is 1. The default memory setting is 8192MB.
5. Right-click the Junos Space Virtual Appliance icon, and select Edit Settings from the
drop down menu.
The Virtual Machine Properties dialog box appears.
6. Select the Hardware tab and then select CPUs.
7. Set the value for Number of virtual processors field to 4.
8. Click OK.
The number of virtual processors (CPU) for your Junos Space Virtual Appliance is
increased to 4.
11Copyright © 2012, Juniper Networks, Inc.
Chapter 2: Deploying the Junos Space Virtual Appliance
Adding Disk Resources for a Junos Space Virtual Appliance
The distributed Junos Space Virtual Appliance files are created with 16 GB of disk space.
To support Junos Space functionality, after deploying the Junos Space Virtual Appliance
to the VMware ESX server, you must add disk resources for the Junos Space Virtual
Appliance.
NOTE: Youmustaddadisk resource to increasedisk space for a JunosSpaceVirtual Appliance. You cannot resize the existing disk by assigning a newsize.
To add disk resources for the Junos Space Virtual Appliance:
1. In the VMware vSphere client, right-click the Junos Space Virtual Appliance icon, and
select Power > Power On. The Junos Space Virtual Appliance must be powered on
to add disk resources.
2. Right-click the Junos Space Virtual Appliance icon, and select Edit Settings from the
drop down menu.
The Virtual Machine Properties window is displayed.
3. Select the Hardware tab, and click Add.
The Select Device Type window is displayed.
4. Select Hard Disk.
5. Click Next.
The Select a Disk window appears.
6. Select Create a newVirtual disk.
7. Click Next.
The Create Disk window appears.
8. Set the Disk Size field to 40GB.
The Location option should remain at the default setting Store with the virtualmachine.
9. Click Next.
The Advanced Options window is displayed.
10. Leave the default settings unchanged, and click Next.
The Ready to Complete window is displayed.
11. Review your selected options, and click Finish.
The Virtual Machine Properties window displays the new virtual disk in the Hardware
list.
12. Click OK to create the new virtual disk.
A status bar shows progress at the bottom of the window.
Copyright © 2012, Juniper Networks, Inc.12
Junos Space Virtual Appliance

NOTE: After the new virtual disk is created, the Junos Space nodemustbe scanned to detect the additional disk space that you added. To startthe scan for additional disk space, you select the Expand VMDrive Sizeoption in the JunosSpaceSettingsMenu, immediately after you configurebasic settings for your Junos Space Virtual Appliance.
The next step is to configure basic settings for your deployed Junos Space Virtual
Appliance. To configure basic settings for the appliance, you access the console in the
VMware vSphere client.
To deploy another Junos Space Virtual Appliance, you complete the all the preceding
steps (and configure basic settings) for each Junos Space Virtual Appliance that you
want to create.
RelatedDocumentation
• Configuring Basic Settings for a Junos Space Virtual Appliance on page 17
• Junos Space Virtual Appliance Overview on page 3
• Understanding How Nodes Are Connected in a Fabric on page 5
• Adding a Fabric Node
• Viewing Nodes in the Fabric
13Copyright © 2012, Juniper Networks, Inc.
Chapter 2: Deploying the Junos Space Virtual Appliance

Copyright © 2012, Juniper Networks, Inc.14
Junos Space Virtual Appliance
PART 3
Configuring
• Configuring the Junos Space Virtual Appliance on page 17
15Copyright © 2012, Juniper Networks, Inc.

Copyright © 2012, Juniper Networks, Inc.16
Junos Space Virtual Appliance

CHAPTER 3
Configuring the Junos Space VirtualAppliance
• Configuring Basic Settings for a Junos Space Virtual Appliance on page 17
• Changing Network and System Settings for a Junos Space Virtual Appliance on page 23
Configuring Basic Settings for a Junos Space Virtual Appliance
After you deploy a Junos Space Virtual Appliance to a VMware ESX or ESXi server, you
must enter basic network and machine information to make your Junos Space Virtual
Appliance accessible to the network. You must also increase the virtual appliance drive
space.
To configure a deployed Junos Space Virtual Appliance, the VMware vSphere client must
be connected to the VMware ESX or ESXi server on which the virtual appliance is running.
This topic includes the following tasks:
• Configuring an Appliance that is the First Node in a Cluster or that Will Not Be Added
to an Existing Cluster on page 17
• Configuring an Appliance to Add to an Existing Cluster on page 21
Configuring an Appliance that is the First Node in a Cluster or thatWill Not Be Added to anExisting Cluster
To configure the settings of a Junos Space appliance that is the first node in a cluster or
that will not be added to an existing cluster:
1. Power on the Junos Space Virtual Appliance:
a. From the VMware vSphere client, right-click on the Junos Space Virtual Appliance
and select Power > Power On from the drop-down menu.
b. Select the Console tab.
The VMware vSphere Client console screen displays the Junos Space login prompt.
2. At the Junos Space login prompt, enter admin as your default login name and press
Enter.
3. Enter abc123 as your default password and press Enter.
17Copyright © 2012, Juniper Networks, Inc.

Junos Space prompts you to change your default password.
4. Enter the default password again.
5. Enter a new password.
Passwords should include both alpha and numeric characters and be at least 6
characters in length. All passwords are case-sensitive.
6. Reenter your new password.
7. Enter a new IP address for interface eth0.
NOTE: The first and second appliance or virtual appliance that youconfigure in a cluster (fabric) must be in the same subnet.
To understand how Junos Space uses Ethernet interfaces eth0 and eth3, see
“Understanding How Junos Space Uses Ethernet Interfaces eth0 and eth3” on page 6.
8. Enter a new subnet mask for interface eth0.
9. Enter the default gateway as a dotted decimal IP address.
10. Enter the nameserver address in dotted decimal notation for interface eth0.
11. Enter Device Management IP interface information:
If you want to configure a separate interface for device management:
• Enter y when prompted to configure a separate interface for device management.
• Enter a new IP address for interface eth3.
• Enter a new subnet mask for interface eth3.
If you do not want to configure a separate interface for device management, enter nwhen prompted.
12. Enternwhen prompted “Will this Junos Space system be added to an existing cluster?”
13. Enter the IP address for Web access.
NOTE: The IP address forWeb accessmust be in the same subnet as theIP address for interface eth0 but must be a different IP address.
14. Add an NTP server to synchronize the node with an external NTP source. For example,
you can specify ntp.juniper.net as the external NTP server.
15. Enter the display name for this node.
This is the logical node name that Junos Space displays for the first node in a Junos
Space cluster.
16. Enter a password for the cluster maintenance mode administrator.
Copyright © 2012, Juniper Networks, Inc.18
Junos Space Virtual Appliance

NOTE: This is thepasswordthatamaintenancemodeadministratormustspecify toaccessmaintenancemodeandshutdownall JunosSpacenodesin the fabric. When inmaintenancemode, an administrator cantroubleshoot the Junos Space system or perform database restoreoperations.
17. Renter the password for cluster maintenance mode.
The Settings Summary is displayed, as shown in the following example.
18. Confirm that the information in the Settings Summary is correct:
• If all summary information is correct, enter A to apply the settings.
• If any summary information is not correct, enter C to change the settings.
When you enter C, you will be prompted to reenter all the basic configuration
information that you have configured up to this point.
When you enter A to apply the settings, the Junos Space Settings Menu is displayed,
as shown in the following example.
Junos Space Settings Menu
1> Change Password2> Set Routing3> Set DNS Servers4> Change Time Options5> Retrieve Logs6>Expand VMDrive Size7>Security8> (Debug) run shell
19Copyright © 2012, Juniper Networks, Inc.
Chapter 3: Configuring the Junos Space Virtual Appliance

Q>QuitR> RedrawMenu
Choice [1-8,QR]:
19. Enter 6 to Expand VM drive size.
Junos Space displays the prompt to expand VM (virtual appliance) drive size, as shown
in the following example.
Choice [1-8,QR]: 6
This process will scan this node for additional drive space that youmay have added.During this process, performance on this nodemay be significantly slowed.Continue? [y/n]
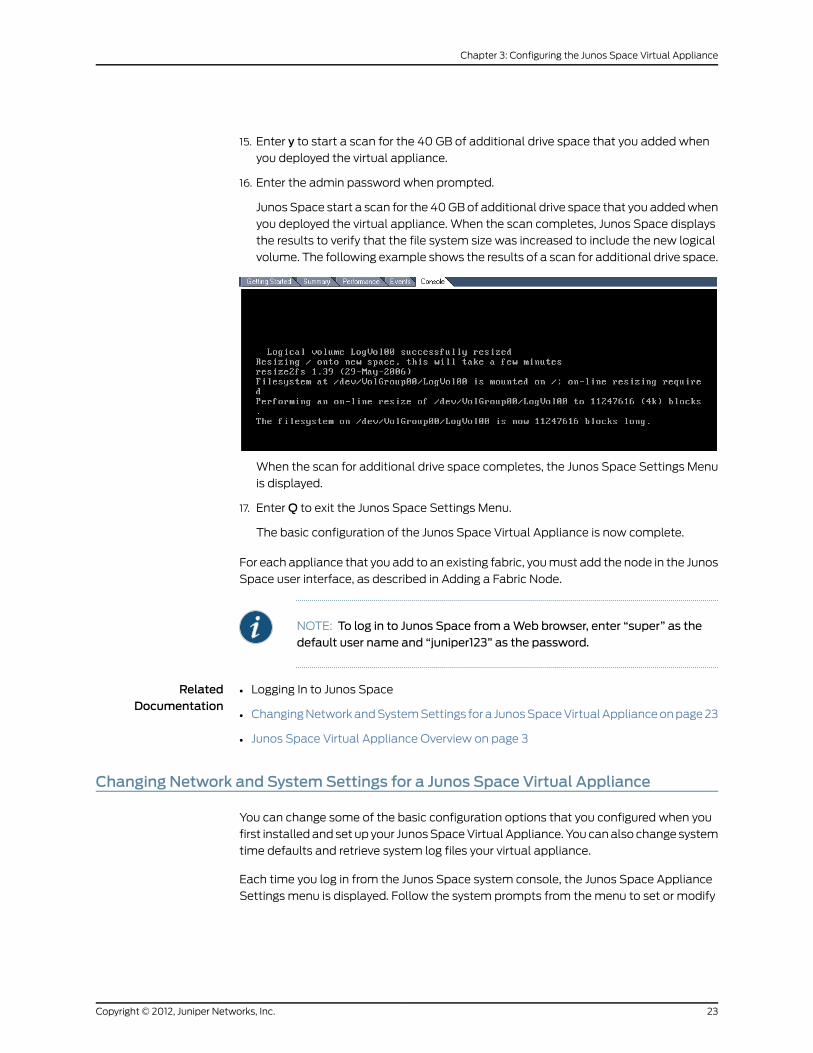
20. Enter y to start a scan for the 40 GB of additional drive space that you added when
you deployed the virtual appliance.
21. Enter the admin password when prompted.
Junos Space starts a scan for the 40 GB of additional drive space that you added
when you deployed the virtual appliance. When the scan completes, Junos Space
displays the results to verify that the file system size was increased to include the new
logical volume. The following example shows the results of a scan for additional drive
space.
The Junos Space Settings Menu is displayed.
22. Enter Q to exit the Junos Space Settings Menu.
The configuration of the Junos Space Virtual Appliance is now complete.
NOTE: To log in to Junos Space from aWeb browser, enter super as thedefault user name and juniper123 as the password.
Copyright © 2012, Juniper Networks, Inc.20
Junos Space Virtual Appliance

Configuring an Appliance to Add to an Existing Cluster
To configure the basic settings of a Junos Space appliance that will be added to an
existing cluster:
1. Power on the Junos Space virtual appliance:
a. From the VMware vSphere client, right-click on the Junos Space Virtual Appliance
and select Power > Power On from the drop-down menu.
b. Select the Console tab and then click inside the console display screen.
The VMware vSphere client console screen displays the Junos Space login prompt.
2. At the Junos Space login prompt, enter admin as your default login name and press
Enter.
3. Enter abc123 as your default password and press Enter.
Junos Space prompts you to change your default password.
4. Enter the default password again.
5. Enter a new password.
All passwords are case-sensitive.
6. Reenter your new password.
7. Enter a new IP address for interface eth0.
NOTE: The first and second appliance or virtual appliance that youconfigure in a cluster (fabric) must be in the same subnet.
8. Enter a new subnet mask for interface eth0.
9. Enter the default gateway as a dotted decimal IP address.
10. Enter the nameserver address in dotted decimal notation for interface eth0.
11. Enter Device Management IP interface information:
If you want to configure a separate interface for device management:
• Enter y when prompted to configure a separate interface for device management.
• Enter a new IP address for interface eth3.
• Enter a new subnet mask for interface eth3.
If you do not want to configure a separate interface for device management, enter nwhen prompted.
12. Enterywhen prompted “Will this Junos Space system be added to an existing cluster?”
The Settings Summary is displayed, as shown in the following example.
21Copyright © 2012, Juniper Networks, Inc.
Chapter 3: Configuring the Junos Space Virtual Appliance

13. Confirm that the information in the Settings Summary is correct:
• If all summary information is correct, enter A to apply the settings.
• If any summary information is not correct, enter C to change the settings.
When you enter C, you will be prompted to reenter all the basic configuration
information that you have configured up to this point.
When you enter A to apply the settings, the Junos Space Settings Menu is displayed,
as shown in the following example.
Junos Space Settings Menu
1> Change Password2> Set Routing3> Set DNS Servers4> Change Time Options5> Retrieve Logs6>Expand VMDrive Size7>Security8> (Debug) run shell
Q> QuitR> RedrawMenu
Choice [1-8,QR]:
14. Enter 6 to Expand VM drive size.
Junos Space displays the prompt to expand VM (virtual appliance) drive size, as shown
in the following example.
Choice [1-8,QR]: 6
This process will scan this node for additional drive space that youmay have added.During this process, performance on this nodemay be significantly slowed.Continue? [y/n]
Copyright © 2012, Juniper Networks, Inc.22
Junos Space Virtual Appliance
15. Enter y to start a scan for the 40 GB of additional drive space that you added when
you deployed the virtual appliance.
16. Enter the admin password when prompted.
Junos Space start a scan for the 40 GB of additional drive space that you added when
you deployed the virtual appliance. When the scan completes, Junos Space displays
the results to verify that the file system size was increased to include the new logical
volume. The following example shows the results of a scan for additional drive space.
When the scan for additional drive space completes, the Junos Space Settings Menu
is displayed.
17. Enter Q to exit the Junos Space Settings Menu.
The basic configuration of the Junos Space Virtual Appliance is now complete.
For each appliance that you add to an existing fabric, you must add the node in the Junos
Space user interface, as described in Adding a Fabric Node.
NOTE: To log in to Junos Space from aWeb browser, enter “super” as thedefault user name and “juniper123” as the password.
RelatedDocumentation
Logging In to Junos Space•
• Changing Network and System Settings for a Junos Space Virtual Appliance on page 23
• Junos Space Virtual Appliance Overview on page 3
Changing Network and SystemSettings for a Junos Space Virtual Appliance
You can change some of the basic configuration options that you configured when you
first installed and set up your Junos Space Virtual Appliance. You can also change system
time defaults and retrieve system log files your virtual appliance.
Each time you log in from the Junos Space system console, the Junos Space Appliance
Settings menu is displayed. Follow the system prompts from the menu to set or modify
23Copyright © 2012, Juniper Networks, Inc.
Chapter 3: Configuring the Junos Space Virtual Appliance

any menu options. Password changes take effect immediately. Any configuration changes
you make do not take effect until you apply the changes.
You can perform the following tasks from the Junos Space Appliance Settings menu:
• Changing the Password on page 24
• Setting Routing Options on page 24
• Adding DNS Servers on page 25
• Setting the System Time on page 25
• Retrieve Logs on page 25
• Expand VM Drive Size on page 26
• Setting Security Options on page 26
• (Debug) Run Shell on page 27
Changing the Password
To change your password:
1. From the Junos Space Appliance Settings menu, enter 1 at the prompt.
2. Enter y when prompted to change the password for an admin user.
3. Type the new password and press Enter.
4. Retype the new password and press Enter.
Your password is updated and the setup program returns you to the main menu.
Setting Routing Options
To modify the default gateway for the management interface (eth0) or the device
management interface (eth3). See also “Understanding How Junos Space Uses Ethernet
Interfaces eth0 and eth3” on page 6.
1. From the Junos Space Appliance Settings menu, enter 2 at the prompt.
2. Enter one of the following options:
• Enter 1 to change the default gateway for the management interface (eth0).
Follow the prompts to change the IP address of the default gateway and return to
the main menu.
• Enter 2 to change the default gateway for the device management interface (eth3).
Follow the prompts to change the IP address of the default gateway and return to
the main menu.
NOTE: Option 2 is available only when a devicemanagement interface(eth3) was specified during the initial configuration of the virtualappliance.
Copyright © 2012, Juniper Networks, Inc.24
Junos Space Virtual Appliance

Adding DNS Servers
You can add up to three DNS servers. Enter each one using dotted decimal notation (for
example, 10.157.191.252) Each addition returns you to the main menu.
To add a DNS server:
1. From the Junos Space Appliance Settings menu, enter 3 at the prompt.
2. Enter 1 to add a nameserver.
3. Enter the new nameserver in dotted decimal notation.
Repeat Step 1 through Step 3 to add another DNS server.
Setting the System Time
When you configure each Junos Space Virtual Appliance with an NTP server, you ensure
that, if the first node (which is used to synchronize time for all nodes in the fabric) goes
down, all other nodes in the fabric remain synchronized. To ensure this behavior, all nodes
in a fabric should be configured with the same external NTP source that you configured
for the first appliance.
To change time options for an appliance:
1. From the Junos Space Appliance Settings menu, enter 4 at the prompt.
2. Enter 2 to set NTP servers.
NTP servers automatically set the system clock based on external time sources.
3. Enter of the following values at the prompt:
• 1 to enable or disable NTP.
• 2 to add an NTP server.
The remaining numbered options let you remove an NTP server from the list.
4. Follow the prompts to enable, set, or delete the NTP servers and return to the main
menu.
Retrieve Logs
To retrieve system log files, you can use SecureCopy (SCP) if the network is functional,
or a USB device if the network is down.
NOTE: To save the system log file to a USB device, the devicemust beconnected to the Junos Space appliance.
To retrieve system logs:
1. From the Junos Space Appliance Settings menu, enter 5 at the prompt.
25Copyright © 2012, Juniper Networks, Inc.
Chapter 3: Configuring the Junos Space Virtual Appliance
2. Choose a method for retrieving log files from the Retrieve Logs submenu:
a. To save the log files to USB , enter 1 and follow the prompts.
Junos Space retrieves the log files on all cluster members and combines them into
a tar file. Once the file is created, you can copy the file onto a USB device.
b. To save the log files using SCP enter 2 and follow the prompts.
Junos Space retrieves the log files on all cluster members and combine them into
a tar file. Once the file is created, you can transfer the file to a remote SCP server.
Expand VMDrive Size
To increase disk space on a Junos Space Virtual Appliance, you must first add a disk
resource in the VMWare Infrastructure Client to create a new virtual disk. Then you initiate
a scan for the additional drive space that you added from the VMWare Infrastructure
Client to increase the file system size.
NOTE: The Junos Space Virtual Appliancemust be powered on to increasedisk space.
To expand the Virtual Machine drive size:
1. Enter 6 to expand the VM drive size.
2. Enter y to initiate a scan for the additional drive space you added when you deployed
the virtual appliance.
When the scan completes, Junos Space displays the results to verify that file system size
was increased to include the new logical volume.
Setting Security Options
By default, the firewall and SSH security options are enabled on the Junos Space
appliance.
NOTE: Juniper recommendsthat, inmostcases, the firewall remainsenabled.However, if you are using Service Now to send email or SNMP notificationsor using Service Now through a proxy server, youmust disable the firewall.In addition, if the Service Now application is running in amulti-node fabric(node cluster), the firewall must be disabled across each node in the fabric.
To enable or disable the firewall:
1. From the Junos Space Appliance Settings menu, enter 7 at the prompt.
2. Change the firewall setting:
• If the firewall is currently enabled, enter 1 to disable the firewall.
Copyright © 2012, Juniper Networks, Inc.26
Junos Space Virtual Appliance
• If the firewall is currently disabled, enter 1 to enable the firewall.
To enable or disable SSH:
1. From the Junos Space Appliance Settings menu, enter 7 at the prompt.
2. Change the SSH setting:
• If SSH is currently enabled, enter 2 to disable SSH.
• If SSH is currently disabled, enter 2 to enable SSH.
(Debug) Run Shell
To run shell commands to debug Junos Space:
1. From the Junos Space Appliance Settings menu, enter 8 and follow the prompts.
RelatedDocumentation
• Downloading Troubleshooting System Log Files Using the CLI
27Copyright © 2012, Juniper Networks, Inc.
Chapter 3: Configuring the Junos Space Virtual Appliance

Copyright © 2012, Juniper Networks, Inc.28
Junos Space Virtual Appliance

PART 4
Upgrading
• Upgrading The Junos Space Virtual Appliance on page 31
29Copyright © 2012, Juniper Networks, Inc.

Copyright © 2012, Juniper Networks, Inc.30
Junos Space Virtual Appliance
CHAPTER 4
Upgrading The Junos Space VirtualAppliance
• Junos Space Software Upgrade Overview on page 31
• Upgrading Junos Space Software on page 32
Junos Space Software Upgrade Overview
To upgrade software for the Junos Space Virtual Appliance, you upload the Junos Space
image file to your existing fabric and perform the software upgrade in the Junos Space
user interface. When you perform an upgrade, all appliances (nodes) in the fabric are
upgraded with the new software.
To ensure a successful upgrade of your Junos Space appliances, complete the following
tasks.
• Back up all your Junos Space data files before you begin the upgrade process.
• Download the Junos Space software image from the Juniper Networks software
download Web site.
• Complete the steps to upgrade your current Junos Space software to the latest software
version.
NOTE: To perform a Junos Space upgrade, youmust have superadministrator or system administrator access privileges.
• Validate that the software is successfully installed by logging in to the user interface.
To view the version of the installed Junos Space software, select the Help icon in the
user interface banner and clickAbout.
• Upload the License Key that was sent to you when you purchased the Junos Space
software upgrade.
RelatedDocumentation
Upgrading Junos Space Software on page 32•
31Copyright © 2012, Juniper Networks, Inc.

Upgrading Junos Space Software
To upgrade software for the Junos Space Virtual Appliance, you download the Junos
Space Upgrade image file from the Juniper Networks software download site onto the
local client file system. You upload the Junos Space image file to your local file system
using the Upgrade Platform action in the Manage Applications workspace. When you
perform an upgrade, all appliances (nodes) in the fabric are upgraded with the new
software.
CAUTION: Junos space supports upgrades from the last two versions. JunosSpace 12.1 supports upgrading from 11.3 or 11.4. Previous version upgradesmay require a two-step upgrade. Example: 11.2 to 11.3 to 12.1.
• Junos Space 12.1 Release Highlights on page 32
• Before You Begin on page 32
• Upgrading Junos Space Release 11.3 or 11.4 to Release 12.1 on page 33
Junos Space 12.1 Release Highlights
The Junos Space Upgrade Release 12.1 includes:
Junos Space Release 12.1 Contents
• Network Application Platform Release 12.1 The platform provides the operating
environment for Junos Space, therefore upgrade using the Platform > Administration
> Manage Application Upgrade Platform action.
• Service Now Release 12.1
• Service Insight Release 12.1
Available Hot-Pluggable Applications
The following applications are hot-pluggable in Junos Space. Hot-pluggable applications
mean that adding removing, and upgrading occurs while Junos Space is still running, and
without service interruption. A hot-pluggable application is packaged separately and has
an separate image file for installing and upgrading.
• Ethernet Design
• Network Activate
• QoS Design
• Virtual Control Release
Before You Begin
Before you upgrade the Junos Space Software, ensure that you are aware of the following:
Copyright © 2012, Juniper Networks, Inc.32
Junos Space Virtual Appliance

• Upgrading to Junos Space release 12.1 clears existing user preferences set using the
User Preference global action icon at the right in the title bar of Application Chooser.
• We recommend that you:
• Back up the Junos Space database before you begin the upgrade process. See also
Application Management Overview.
• Clear the Web browser cache before logging in to the upgraded Junos Space software.
• You must log in as the default super administrator or system administrator to upgrade
Junos Space.
Upgrading Junos Space Release 11.3 or 11.4 to Release 12.1
The Platform provides the running environment for all Junos Space applications, so
upgrading it causes operation interruption.
NOTE: When upgrading Junos Space from release 11.3 or 11.4 to 12.1, theNetwork Application Platform and Service Now and Service Insightapplications are upgraded only. Other Junos Space release 11.3 or 11.4applications are disabled. Youmust upgrade release 11.3 or 11.4 disabledapplications to release 12.1 (see Upgrading a Junos Space Application) oruninstall them (see Uninstalling a Junos Space Application). Do not adddisabledJunosSpaceapplicationsusingPlatform>Administration>ManageApplications > Add Application.
To upgrade Junos Space from release 11.3 or 11.4 to release 12.1, see Upgrading the Network
Application Platform.
RelatedDocumentation
• Application Management Overview
• Managing Junos Space Applications
33Copyright © 2012, Juniper Networks, Inc.
Chapter 4: Upgrading The Junos Space Virtual Appliance

Copyright © 2012, Juniper Networks, Inc.34
Junos Space Virtual Appliance

PART 5
Index
• Index on page 37
35Copyright © 2012, Juniper Networks, Inc.

Copyright © 2012, Juniper Networks, Inc.36
Junos Space Virtual Appliance

Index
Symbols#, comments in configuration statements.....................ix
( ), in syntax descriptions.......................................................ix
< >, in syntax descriptions...................................................viii
[ ], in configuration statements...........................................ix
{ }, in configuration statements..........................................ix
| (pipe), in syntax descriptions............................................ix
Bbraces, in configuration statements..................................ix
brackets
angle, in syntax descriptions......................................viii
square, in configuration statements.........................ix
Ccluster
configuring
additional nodes.....................................................21
first node....................................................................17
comments, in configuration statements.........................ix
conventions
text and syntax................................................................viii
curly braces, in configuration statements.......................ix
customer support.....................................................................ix
contacting JTAC................................................................ix
Ddebugging, system..................................................................27
documentation
comments on....................................................................ix
Ffabric
configuring
additional nodes.....................................................21
first node....................................................................17
failover support.................................................................5
firewall
default setting.................................................................26
disabling............................................................................26
font conventions.....................................................................viii
Iinstallation
overview...............................................................................3
JJunos Space software
base application.............................................................32
hot-pluggable applications........................................32
upgrade highlights.........................................................32
upgrade scenarios..........................................................32
upgrading , before you begin......................................32
Junos Space virtual appliance
configuring..........................................................................9
converting to a virtual machine using OVF
Tool..................................................................................10
disk resources, adding...................................................12
RAM, increasing.................................................................11
Virtual processor CPU, increasing..............................11
VMware ESX or ESXi server, installing....................10
Mmanuals
comments on....................................................................ix
Nnode
adding to cluster..............................................................21
configuring first node.....................................................17
nodes
active.....................................................................................5
connections........................................................................5
failover..................................................................................5
IP multicast packets........................................................5
standby.................................................................................5
Web IP...................................................................................5
NTP server
adding.................................................................................25
configuring .........................................................................4
disabling............................................................................25
enabling.............................................................................25
Pparentheses, in syntax descriptions..................................ix
password
changing on virtual appliance...................................24
37Copyright © 2012, Juniper Networks, Inc.

Rrouting
changing default gateway settings.........................24
changing static routing settings...............................24
Ssoftware, Junos Space, upgrading..............................31, 32
SSH
default setting.................................................................26
disabling............................................................................26
support, technical See technical support
syntax conventions................................................................viii
system settings
changing............................................................................23
debugging..........................................................................27
DNS servers......................................................................25
firewall................................................................................26
logs......................................................................................25
NTP server........................................................................25
password...........................................................................24
routing................................................................................24
SSH......................................................................................26
time......................................................................................25
VM drive size....................................................................26
Ttechnical support
contacting JTAC................................................................ix
Uupgrading Junos Space software...............................31, 32
Vvirtual appliance
adding disk resources....................................................12
adding DNS servers.......................................................25
changing password.......................................................24
configuration......................................................................9
configuring NTP time source........................................4
deployment
CPU...............................................................................4
disk space...................................................................4
Open Virtualization Archive (OVA)...................3
overview......................................................................3
RAM...............................................................................4
VMWare.......................................................................3
increasing RAM and CPU..............................................11
increasing VM disk space............................................26
installation overview........................................................3
installing VMware ESX or ESXi Server....................10
retrieving logs...................................................................25
Copyright © 2012, Juniper Networks, Inc.38
Junos Space Virtual Appliance