junos® os installation and upgrade guide
TRANSCRIPT

Junos®OS
Installation and Upgrade Guide
Modified: 2017-12-22
Copyright © 2018, Juniper Networks, Inc.

Juniper Networks, Inc.1133 InnovationWaySunnyvale, California 94089USA408-745-2000www.juniper.net
Juniper Networks, the Juniper Networks logo, Juniper, and Junos are registered trademarks of Juniper Networks, Inc. and/or its affiliates inthe United States and other countries. All other trademarks may be property of their respective owners.
Juniper Networks assumes no responsibility for any inaccuracies in this document. Juniper Networks reserves the right to change, modify,transfer, or otherwise revise this publication without notice.
Junos®OS Installation and Upgrade Guide
Copyright © 2018 Juniper Networks, Inc. All rights reserved.
The information in this document is current as of the date on the title page.
YEAR 2000 NOTICE
Juniper Networks hardware and software products are Year 2000 compliant. Junos OS has no known time-related limitations through theyear 2038. However, the NTP application is known to have some difficulty in the year 2036.
ENDUSER LICENSE AGREEMENT
The Juniper Networks product that is the subject of this technical documentation consists of (or is intended for use with) Juniper Networkssoftware. Use of such software is subject to the terms and conditions of the End User License Agreement (“EULA”) posted athttp://www.juniper.net/support/eula/. By downloading, installing or using such software, you agree to the terms and conditions of thatEULA.
Copyright © 2018, Juniper Networks, Inc.ii

Table of Contents
About the Documentation . . . . . . . . . . . . . . . . . . . . . . . . . . . . . . . . . . . . . . . . . . . . xxi
Documentation and Release Notes . . . . . . . . . . . . . . . . . . . . . . . . . . . . . . . . . xxi
Supported Platforms . . . . . . . . . . . . . . . . . . . . . . . . . . . . . . . . . . . . . . . . . . . . xxi
Using the Examples in This Manual . . . . . . . . . . . . . . . . . . . . . . . . . . . . . . . . xxii
Merging a Full Example . . . . . . . . . . . . . . . . . . . . . . . . . . . . . . . . . . . . . . xxii
Merging a Snippet . . . . . . . . . . . . . . . . . . . . . . . . . . . . . . . . . . . . . . . . . . xxiii
Documentation Conventions . . . . . . . . . . . . . . . . . . . . . . . . . . . . . . . . . . . . . xxiii
Documentation Feedback . . . . . . . . . . . . . . . . . . . . . . . . . . . . . . . . . . . . . . . . xxv
Requesting Technical Support . . . . . . . . . . . . . . . . . . . . . . . . . . . . . . . . . . . . xxvi
Self-Help Online Tools and Resources . . . . . . . . . . . . . . . . . . . . . . . . . . xxvi
Opening a Case with JTAC . . . . . . . . . . . . . . . . . . . . . . . . . . . . . . . . . . . . xxvi
Part 1 Junos Software and Hardware Overview
Chapter 1 Software Overview . . . . . . . . . . . . . . . . . . . . . . . . . . . . . . . . . . . . . . . . . . . . . . . . . 3
Junos OS Overview . . . . . . . . . . . . . . . . . . . . . . . . . . . . . . . . . . . . . . . . . . . . . . . . . . . 3
One Operating System . . . . . . . . . . . . . . . . . . . . . . . . . . . . . . . . . . . . . . . . . . . . 4
One Modular Software Architecture . . . . . . . . . . . . . . . . . . . . . . . . . . . . . . . . . 4
Secure Boot . . . . . . . . . . . . . . . . . . . . . . . . . . . . . . . . . . . . . . . . . . . . . . . . . . . . . 4
Junos OS Editions . . . . . . . . . . . . . . . . . . . . . . . . . . . . . . . . . . . . . . . . . . . . . . . . . . . . 5
FIPS 140-2 Security Compliance . . . . . . . . . . . . . . . . . . . . . . . . . . . . . . . . . . . . . . . . 6
Junos OS Installation Package Names . . . . . . . . . . . . . . . . . . . . . . . . . . . . . . . . . . . 7
Junos OS Installation Packages Prefixes . . . . . . . . . . . . . . . . . . . . . . . . . . . . . . 7
Junos OS Release Numbers . . . . . . . . . . . . . . . . . . . . . . . . . . . . . . . . . . . . . . . . 9
Junos OS Editions . . . . . . . . . . . . . . . . . . . . . . . . . . . . . . . . . . . . . . . . . . . . . . . 10
Software Package Information Security . . . . . . . . . . . . . . . . . . . . . . . . . . . . . . . . . . 11
Installation Modules . . . . . . . . . . . . . . . . . . . . . . . . . . . . . . . . . . . . . . . . . . . . . . . . . 12
Configuration Files . . . . . . . . . . . . . . . . . . . . . . . . . . . . . . . . . . . . . . . . . . . . . . . . . . 13
Configuration File Selection Sequence . . . . . . . . . . . . . . . . . . . . . . . . . . . . . . . 13
Remote Storage of Configuration Files . . . . . . . . . . . . . . . . . . . . . . . . . . . . . . . 14
Understanding Software Infrastructure and Processes on EX Series
Switches . . . . . . . . . . . . . . . . . . . . . . . . . . . . . . . . . . . . . . . . . . . . . . . . . . . . . . . 15
Routing Engine and Packet Forwarding Engine . . . . . . . . . . . . . . . . . . . . . . . . 15
Junos OS Processes . . . . . . . . . . . . . . . . . . . . . . . . . . . . . . . . . . . . . . . . . . . . . . 15
Junos OS with Upgraded FreeBSD . . . . . . . . . . . . . . . . . . . . . . . . . . . . . . . . . . . . . . 16
Release Information for Junos OS with Upgraded FreeBSD . . . . . . . . . . . . . . . 17
Changes in Package Names for Junos OS with Upgraded FreeBSD . . . . . . . . 18
Linux-Based Platforms Package Names . . . . . . . . . . . . . . . . . . . . . . . . . . 18
EX Series Switches Package Names . . . . . . . . . . . . . . . . . . . . . . . . . . . . . 18
MX Series Routers Package Names . . . . . . . . . . . . . . . . . . . . . . . . . . . . . 20
QFX Series and EX4600 Switches Package Names . . . . . . . . . . . . . . . . . 21
iiiCopyright © 2018, Juniper Networks, Inc.

SRX5400, SRX5600, and SRX5800 Devices Package Names . . . . . . . . 22
Changes in Commands and Statements in Junos OSwith Upgraded
FreeBSD . . . . . . . . . . . . . . . . . . . . . . . . . . . . . . . . . . . . . . . . . . . . . . . . . . . 22
Changes in Disk Volumes for Junos OS with Upgraded FreeBSD . . . . . . . . . . 24
/junos Volume . . . . . . . . . . . . . . . . . . . . . . . . . . . . . . . . . . . . . . . . . . . . . . 25
/oam Volume . . . . . . . . . . . . . . . . . . . . . . . . . . . . . . . . . . . . . . . . . . . . . . . 25
Changes in Use of Snapshots for Junos OS with Upgraded FreeBSD . . . . . . 26
Recovery Snapshots . . . . . . . . . . . . . . . . . . . . . . . . . . . . . . . . . . . . . . . . . 26
Non-Recovery Snapshots . . . . . . . . . . . . . . . . . . . . . . . . . . . . . . . . . . . . . 27
Chapter 2 Hardware Overview . . . . . . . . . . . . . . . . . . . . . . . . . . . . . . . . . . . . . . . . . . . . . . . 29
Hardware Architecture Overview . . . . . . . . . . . . . . . . . . . . . . . . . . . . . . . . . . . . . . 29
Hardware Overview (ACX Series, M Series, MX Series, T Series, and TXMatrix
Routers) . . . . . . . . . . . . . . . . . . . . . . . . . . . . . . . . . . . . . . . . . . . . . . . . . . . . . . 30
System Memory . . . . . . . . . . . . . . . . . . . . . . . . . . . . . . . . . . . . . . . . . . . . . . . . . 31
Storage Media . . . . . . . . . . . . . . . . . . . . . . . . . . . . . . . . . . . . . . . . . . . . . . . . . . 32
Hardware Overview of SRX Series Services Gateways . . . . . . . . . . . . . . . . . . . . . . 33
SRX Series Device Overview . . . . . . . . . . . . . . . . . . . . . . . . . . . . . . . . . . . . . . . 33
System Memory . . . . . . . . . . . . . . . . . . . . . . . . . . . . . . . . . . . . . . . . . . . . . . . . 34
Storage Media . . . . . . . . . . . . . . . . . . . . . . . . . . . . . . . . . . . . . . . . . . . . . . . . . . 34
Routing Engines and Storage Media Names (ACX Series, M Series, MX Series,
PTX Series, T Series, TX Matrix, TX Matrix Plus, and JCS 1200 Routers) . . . . 35
Storage Media Names for SRX Series Devices . . . . . . . . . . . . . . . . . . . . . . . . . . . . 38
Boot Sequence onM Series, MX Series, T Series, TXMatrix, TXMatrix Plus, ACX
Series, and PTX Series Devices with Routing Engines . . . . . . . . . . . . . . . . . . . 38
Boot Sequence on SRX Series Devices . . . . . . . . . . . . . . . . . . . . . . . . . . . . . . . . . . 40
Part 2 Installing Junos Software
Chapter 3 Installation Overview . . . . . . . . . . . . . . . . . . . . . . . . . . . . . . . . . . . . . . . . . . . . . . 43
Installation Type Overview . . . . . . . . . . . . . . . . . . . . . . . . . . . . . . . . . . . . . . . . . . . 43
Standard Installation . . . . . . . . . . . . . . . . . . . . . . . . . . . . . . . . . . . . . . . . . . . . 43
Category Change Installation . . . . . . . . . . . . . . . . . . . . . . . . . . . . . . . . . . . . . . 43
Recovery Installation . . . . . . . . . . . . . . . . . . . . . . . . . . . . . . . . . . . . . . . . . . . . 44
Understanding Software Installation on EX Series Switches . . . . . . . . . . . . . . . . 44
Overview of the Software Installation Process . . . . . . . . . . . . . . . . . . . . . . . . 44
Software Package Security . . . . . . . . . . . . . . . . . . . . . . . . . . . . . . . . . . . . . . . 45
Installing Software on a Virtual Chassis . . . . . . . . . . . . . . . . . . . . . . . . . . . . . 45
Installing Software on Switches with Redundant Routing Engines . . . . . . . . 45
Installing Software Using Automatic Software Download . . . . . . . . . . . . . . . 46
Autoinstalling a Configuration File on an EX2200 or EX3300 Switch from
a Disk-on-Key USBMemory Stick . . . . . . . . . . . . . . . . . . . . . . . . . . . . . . . 46
Installing Software on an EX2300 or EX3400 Switch . . . . . . . . . . . . . . . . . . 46
Configuration Image Validation on EX Series Switches . . . . . . . . . . . . . . . . . 46
Troubleshooting Software Installation . . . . . . . . . . . . . . . . . . . . . . . . . . . . . . 46
Copyright © 2018, Juniper Networks, Inc.iv
Installation and Upgrade Guide

Chapter 4 Performing a Standard or Change Category Installation . . . . . . . . . . . . . . . 49
Checking the Current Configuration and Candidate Software Compatibility . . . . 49
Determining the Junos OS Version . . . . . . . . . . . . . . . . . . . . . . . . . . . . . . . . . . . . . 50
Downloading Software . . . . . . . . . . . . . . . . . . . . . . . . . . . . . . . . . . . . . . . . . . . . . . 50
Downloading Software by Using a Browser . . . . . . . . . . . . . . . . . . . . . . . . . . . 51
Installing Software Using the Command-Line Interface . . . . . . . . . . . . . . . . . 52
Understanding Download Manager for SRX Series Devices . . . . . . . . . . . . . . . . . 54
Overview . . . . . . . . . . . . . . . . . . . . . . . . . . . . . . . . . . . . . . . . . . . . . . . . . . . . . . 54
Using Download Manager to Upgrade Junos OS . . . . . . . . . . . . . . . . . . . . . . . 54
Handling Errors . . . . . . . . . . . . . . . . . . . . . . . . . . . . . . . . . . . . . . . . . . . . . . . . . 55
Considerations . . . . . . . . . . . . . . . . . . . . . . . . . . . . . . . . . . . . . . . . . . . . . . . . . 55
Understanding the Console Port . . . . . . . . . . . . . . . . . . . . . . . . . . . . . . . . . . . . . . . 56
Backing Up the Existing Installation on Routers . . . . . . . . . . . . . . . . . . . . . . . . . . . 57
Backing Up the Current Installation on SRX Series Devices . . . . . . . . . . . . . . . . . . 59
BackingUp theCurrent Installation onSRX5800, SRX5600, andSRX5400
Devices . . . . . . . . . . . . . . . . . . . . . . . . . . . . . . . . . . . . . . . . . . . . . . . . . . . . 59
BackingUptheCurrent InstallationonSRX300,SRX320,SRX340,SRX345,
and SRX550M Devices . . . . . . . . . . . . . . . . . . . . . . . . . . . . . . . . . . . . . . . 60
Configuring External CompactFlash for SRX650 Devices . . . . . . . . . . . . . . . 60
Installing the Software Package on a Router with a Single Routing Engine . . . . . . 61
Installing the Software Package on a Router with Redundant Routing
Engines . . . . . . . . . . . . . . . . . . . . . . . . . . . . . . . . . . . . . . . . . . . . . . . . . . . . . . . 63
Preparing the Router for the Installation . . . . . . . . . . . . . . . . . . . . . . . . . . . . . 63
Installing Software on the Backup Routing Engine . . . . . . . . . . . . . . . . . . . . . 64
Installing Software on the Remaining Routing Engine . . . . . . . . . . . . . . . . . . 65
Finalizing the Installation . . . . . . . . . . . . . . . . . . . . . . . . . . . . . . . . . . . . . . . . . 67
Repartitioning Routing Engine System Storage to Increase the Swap
Partition . . . . . . . . . . . . . . . . . . . . . . . . . . . . . . . . . . . . . . . . . . . . . . . . . . . . . . 68
Registering the EX Series Switch with the J-Web Interface . . . . . . . . . . . . . . . . . . 69
Connecting and Configuring an EX Series Switch (CLI Procedure) . . . . . . . . . . . . 69
Connecting and Configuring an EX9200 Switch (CLI Procedure) . . . . . . . . . . . . . 72
Installing Junos OS on SRX Series Devices Using a USB Flash Drive . . . . . . . . . . . 75
Installing Junos OS on SRX Series Devices from the Boot Loader Using a TFTP
Server . . . . . . . . . . . . . . . . . . . . . . . . . . . . . . . . . . . . . . . . . . . . . . . . . . . . . . . . . 76
Installing Junos OS on SRX Series Devices from the Boot Loader Using a USB
Storage Device . . . . . . . . . . . . . . . . . . . . . . . . . . . . . . . . . . . . . . . . . . . . . . . . . 79
Chapter 5 Configuring Zero Touch Provisioning . . . . . . . . . . . . . . . . . . . . . . . . . . . . . . . . . 81
Understanding Zero Touch Provisioning . . . . . . . . . . . . . . . . . . . . . . . . . . . . . . . . . 81
Configuring Zero Touch Provisioning . . . . . . . . . . . . . . . . . . . . . . . . . . . . . . . . . . . . 85
Configuring Zero Touch Provisioning on SRX Series Devices . . . . . . . . . . . . . . . . . 89
Understanding Zero Touch Provisioning on SRX Series Devices . . . . . . . . . . 89
Understanding ZTP on SRX Series Devices . . . . . . . . . . . . . . . . . . . . . . . 89
Network Activator Overview . . . . . . . . . . . . . . . . . . . . . . . . . . . . . . . . . . . 90
Limitations . . . . . . . . . . . . . . . . . . . . . . . . . . . . . . . . . . . . . . . . . . . . . . . . . 93
Configuring Zero-Touch Provisioning on an SRX Series Device . . . . . . . . . . . 93
UnderstandingFactory-DefaultConfigurationonSRXSeriesDevice forZero
Touch Provisioning . . . . . . . . . . . . . . . . . . . . . . . . . . . . . . . . . . . . . . . . . . 96
vCopyright © 2018, Juniper Networks, Inc.
Table of Contents

Chapter 6 Configuring Automatic Installation of Configuration Files . . . . . . . . . . . . . . 99
Autoinstallation Overview . . . . . . . . . . . . . . . . . . . . . . . . . . . . . . . . . . . . . . . . . . . . 99
Automatic Installation of Configuration Files . . . . . . . . . . . . . . . . . . . . . . . . 100
Supported Autoinstallation Interfaces and Protocols . . . . . . . . . . . . . . . . . . 100
Typical Autoinstallation Process on a New Device . . . . . . . . . . . . . . . . . . . . . 101
Example: Configuring Autoinstallation on SRX Series Devices . . . . . . . . . . . . . . 104
Configuring Autoinstallation on JNU Satellite Devices . . . . . . . . . . . . . . . . . . . . . 107
Autoinstallation Process on Satellite Devices in a Junos Node Unifier Group . . . 109
Supported Autoinstallation Interfaces and Protocols . . . . . . . . . . . . . . . . . . 109
Typical Autoinstallation Process on a New Router . . . . . . . . . . . . . . . . . . . . . 110
Autoinstallation of Satellite Devices in a Junos Node Unifier Group . . . . . . . . . . . 111
Verifying Autoinstallation on JNU Satellite Devices . . . . . . . . . . . . . . . . . . . . . . . . 112
Chapter 7 Configuring Dual-Root Partitions for High Availability . . . . . . . . . . . . . . . . . 115
Understanding Resilient Dual-Root Partitions on Switches . . . . . . . . . . . . . . . . . 115
Resilient Dual-Root Partition Scheme (Junos OS Release 10.4R3 and
Later) . . . . . . . . . . . . . . . . . . . . . . . . . . . . . . . . . . . . . . . . . . . . . . . . . . . . . 116
Automatic Fixing of Corrupted Primary Root Partition with the Automatic
Snapshot Feature . . . . . . . . . . . . . . . . . . . . . . . . . . . . . . . . . . . . . . . . . . . 116
Earlier Partition Scheme (Junos OS Release 10.4R2 and Earlier) . . . . . . . . . . 117
Understanding Upgrading or Downgrading Between Resilient Dual-Root
Partition Releases and Earlier Releases . . . . . . . . . . . . . . . . . . . . . . . . . . 118
Dual-Root Partitioning Scheme on SRX Series Devices . . . . . . . . . . . . . . . . . . . . 118
Boot Media and Boot Partition on SRX Series Devices . . . . . . . . . . . . . . . . . . 119
Important Features of the Dual-Root Partitioning Scheme . . . . . . . . . . . . . 120
Understanding Automatic Recovery of the Primary Junos OS Image with
Dual-Root Partitioning . . . . . . . . . . . . . . . . . . . . . . . . . . . . . . . . . . . . . . . 121
UnderstandingHowthePrimary JunosOS ImagewithDual-RootPartitioning
Recovers Devices . . . . . . . . . . . . . . . . . . . . . . . . . . . . . . . . . . . . . . . . . . . 122
Understanding How Junos OS Release 10.0 or Later Upgrades with
Dual-Root Partitioning . . . . . . . . . . . . . . . . . . . . . . . . . . . . . . . . . . . . . . . 124
Example: Installing Junos OS on SRX Series Devices Using the Partition
Option . . . . . . . . . . . . . . . . . . . . . . . . . . . . . . . . . . . . . . . . . . . . . . . . . . . . . . . 124
Reinstalling the Single-Root Partition on SRX Series Devices . . . . . . . . . . . . . . . 128
Chapter 8 Upgrading Software . . . . . . . . . . . . . . . . . . . . . . . . . . . . . . . . . . . . . . . . . . . . . . . 131
Upgrading Software Packages . . . . . . . . . . . . . . . . . . . . . . . . . . . . . . . . . . . . . . . . 132
Overview of Upgrading to 64-bit Junos OS . . . . . . . . . . . . . . . . . . . . . . . . . . . . . . 135
Upgrading Redundant Routing Engines from 32-bit to 64-bit Junos OS . . . 136
Upgrading a Single Routing Engine from 32-bit to 64-bit Junos OS Using
One Slot . . . . . . . . . . . . . . . . . . . . . . . . . . . . . . . . . . . . . . . . . . . . . . . . . . 138
Copyright © 2018, Juniper Networks, Inc.vi
Installation and Upgrade Guide

Upgrading a Single Routing Engine from 32-bit to 64-bit Junos OS Using
Two Slots . . . . . . . . . . . . . . . . . . . . . . . . . . . . . . . . . . . . . . . . . . . . . . . . . 138
Upgrading Routers Using Unified ISSU . . . . . . . . . . . . . . . . . . . . . . . . . . . . . . . . . 140
Understanding Nonstop Software Upgrade on EX Series Switches . . . . . . . . . . 140
Requirements for Performing an NSSU . . . . . . . . . . . . . . . . . . . . . . . . . . . . . 142
How an NSSUWorks . . . . . . . . . . . . . . . . . . . . . . . . . . . . . . . . . . . . . . . . . . . . 143
EX3300, EX3400, EX4200, EX4300, EX4500, and Mixed Virtual
Chassis . . . . . . . . . . . . . . . . . . . . . . . . . . . . . . . . . . . . . . . . . . . . . . . . 143
EX6200 and EX8200 Switches . . . . . . . . . . . . . . . . . . . . . . . . . . . . . . . . 144
EX8200 Virtual Chassis . . . . . . . . . . . . . . . . . . . . . . . . . . . . . . . . . . . . . . 145
NSSU Limitations . . . . . . . . . . . . . . . . . . . . . . . . . . . . . . . . . . . . . . . . . . . . . . 146
NSSU and Junos OS Release Support . . . . . . . . . . . . . . . . . . . . . . . . . . . . . . 146
Overview of NSSU Configuration and Operation . . . . . . . . . . . . . . . . . . . . . . 147
Preparing the USB Flash Drive to Upgrade Junos OS on SRX Series Devices . . . 148
Upgrading the Boot Loader on SRX Series Devices . . . . . . . . . . . . . . . . . . . . . . . 150
Upgrading Software by Using Automatic Software Download . . . . . . . . . . . . . . . 151
Verifying That Automatic Software Download Is Working Correctly . . . . . . . . . . 152
Verifying Junos OS and Boot Loader Software Versions on an EX Series
Switch . . . . . . . . . . . . . . . . . . . . . . . . . . . . . . . . . . . . . . . . . . . . . . . . . . . . . . . 153
Verifying the Number of Partitions and File System Mountings . . . . . . . . . . 153
Verifying the Loader Software Version . . . . . . . . . . . . . . . . . . . . . . . . . . . . . . 154
Verifying Which Root Partition Is Active . . . . . . . . . . . . . . . . . . . . . . . . . . . . . 155
Verifying the Junos OS Version in Each Root Partition . . . . . . . . . . . . . . . . . . 155
Upgrading the Loader Software on the Line Cards in a Standalone EX8200
Switch or an EX8200 Virtual Chassis . . . . . . . . . . . . . . . . . . . . . . . . . . . . . . . 156
Upgrading Junos OS with Upgraded FreeBSD . . . . . . . . . . . . . . . . . . . . . . . . . . . 160
Determining Which Package or Packages to Install . . . . . . . . . . . . . . . . . . . . 161
Installing Junos OS with Upgraded FreeBSD Over Plain Junos OS . . . . . . . . 163
Installing Junos OSwith Upgraded FreeBSD Over Junos OSwith Upgraded
FreeBSD of a Different Release . . . . . . . . . . . . . . . . . . . . . . . . . . . . . . . . 164
To Install Junos OSwith Upgraded FreeBSD Over Junos OSwith Upgraded
FreeBSD of a Later Release . . . . . . . . . . . . . . . . . . . . . . . . . . . . . . . . . . . 165
Understanding Junos OS Upgrades for SRX Series Devices . . . . . . . . . . . . . . . . . 166
Understanding Junos OS Upgrades . . . . . . . . . . . . . . . . . . . . . . . . . . . . . . . . 166
Junos OS Upgrade Methods on the SRX Series Devices . . . . . . . . . . . . . . . . 166
Preparing Your SRX Series Device for Junos OS Upgrades . . . . . . . . . . . . . . . . . . 168
Secondary Storage Devices Available on SRX Series Devices . . . . . . . . . . . . 168
Verifying Available Disk Space on SRX Series Devices . . . . . . . . . . . . . . . . . 169
Cleaning Up the System File Storage Space . . . . . . . . . . . . . . . . . . . . . . . . . 170
Understanding Junos OS with Upgraded FreeBSD for SRX Series Devices . . . . . . 171
Understanding Junos OS with Upgraded FreeBSD 10 . . . . . . . . . . . . . . . . . . . 171
Understanding Junos OS with Upgraded FreeBSD 11 . . . . . . . . . . . . . . . . . . . 172
Understanding Changes in Operations andManagement for Junos OSwith
Upgraded FreeBSD for SRX Series devices . . . . . . . . . . . . . . . . . . . . . . . 173
Understanding Junos OS with Upgraded FreeBSD Package Names . . . . . . . 175
Upgrading Junos OS with Upgraded FreeBSD . . . . . . . . . . . . . . . . . . . . . . . . 176
Installing Junos OS with Upgraded FreeBSD Over Plain Junos OS . . . . . . . . 177
Understanding Junos OS with Upgraded FreeBSD Snapshots . . . . . . . . . . . 182
viiCopyright © 2018, Juniper Networks, Inc.
Table of Contents

Understanding Junos OSwith Upgraded FreeBSD Disk Volumes for SRX
Series Devices . . . . . . . . . . . . . . . . . . . . . . . . . . . . . . . . . . . . . . . . . . . . . . 183
Downloading Software Packages from Juniper Networks . . . . . . . . . . . . . . . . . . 184
Example: Installing Junos OS Upgrade Packages on SRX Series Devices . . . . . . 185
Installing Junos OS Upgrade Packages on SRX Series Devices from a Remote
Server . . . . . . . . . . . . . . . . . . . . . . . . . . . . . . . . . . . . . . . . . . . . . . . . . . . . . . . . 187
Understanding BIOS Upgrades on SRX Series Devices . . . . . . . . . . . . . . . . . . . . 188
Understanding Manual BIOS Upgrade Using the Junos CLI . . . . . . . . . . . . . 188
Understanding Auto BIOS Upgrade Methods on SRX Series Devices . . . . . 189
Disabling Auto BIOS Upgrade on SRX Series Devices . . . . . . . . . . . . . . . . . . . . . 190
Reverting the Junos OS Software Image Back to the Previous Version . . . . . . . . . 191
Overview of CoS Upgrade Requirements (Junos OS Release 11.1 or 11.2 to a Later
Release) . . . . . . . . . . . . . . . . . . . . . . . . . . . . . . . . . . . . . . . . . . . . . . . . . . . . . . 194
Before You Begin Installing or Upgrading the Firmware . . . . . . . . . . . . . . . . . . . . 195
Installing Firmware on the 5-Port 100-Gigabit DWDMOTN PIC
(PTX-5-100G-WDM) . . . . . . . . . . . . . . . . . . . . . . . . . . . . . . . . . . . . . . . . . . . . 197
Upgrading Firmware on the 5-Port 100-Gigabit DWDMOTN PIC
(PTX-5-100G-WDM) . . . . . . . . . . . . . . . . . . . . . . . . . . . . . . . . . . . . . . . . . . . 198
Installing Firmware on the 100-Gigabit DWDMOTNMIC
(MIC3-100G-DWDM) . . . . . . . . . . . . . . . . . . . . . . . . . . . . . . . . . . . . . . . . . . . 200
Upgrading Firmware on the 100-Gigabit DWDMOTNMIC
(MIC3-100G-DWDM) . . . . . . . . . . . . . . . . . . . . . . . . . . . . . . . . . . . . . . . . . . . 201
Upgrading Firmware on the CFP2-DCO-T-WDM-1 Transceiver . . . . . . . . . . . . . . 203
Chapter 9 Booting a Device Using a System Snapshot . . . . . . . . . . . . . . . . . . . . . . . . . 207
Understanding System Snapshot on EX Series Switches . . . . . . . . . . . . . . . . . . 207
Creating a Snapshot and Using It to Boot an EX Series Switch . . . . . . . . . . . . . . 208
Creating a Snapshot on a USB Flash Drive and Using It to Boot the
Switch . . . . . . . . . . . . . . . . . . . . . . . . . . . . . . . . . . . . . . . . . . . . . . . . . . . 208
Verifying That a System Snapshot Was Created on an EX Series Switch . . . . . . 209
Booting an EX Series Switch Using a Software Package Stored on a USB Flash
Drive . . . . . . . . . . . . . . . . . . . . . . . . . . . . . . . . . . . . . . . . . . . . . . . . . . . . . . . . . 210
Example: Creating a Snapshot and Using It to Boot an SRX Series Device . . . . . . 211
Chapter 10 Performing a Recovery Installation . . . . . . . . . . . . . . . . . . . . . . . . . . . . . . . . . 215
Creating an Emergency Boot Device . . . . . . . . . . . . . . . . . . . . . . . . . . . . . . . . . . . 215
Understanding IntegrityCheckandAutorecovery ofConfiguration, Licenses, and
Disk Information on SRX Series Devices . . . . . . . . . . . . . . . . . . . . . . . . . . . . . 217
Overview . . . . . . . . . . . . . . . . . . . . . . . . . . . . . . . . . . . . . . . . . . . . . . . . . . . . . . 217
How Autorecovery Works . . . . . . . . . . . . . . . . . . . . . . . . . . . . . . . . . . . . . . . . . 217
How to Use Autorecovery . . . . . . . . . . . . . . . . . . . . . . . . . . . . . . . . . . . . . . . . 218
Data That Is Backed Up in an Autorecovery . . . . . . . . . . . . . . . . . . . . . . . . . . 218
Troubleshooting Alarms . . . . . . . . . . . . . . . . . . . . . . . . . . . . . . . . . . . . . . . . . 218
Considerations . . . . . . . . . . . . . . . . . . . . . . . . . . . . . . . . . . . . . . . . . . . . . . . . . 219
Creating an Emergency Boot Device for Routing Engines with VM Host
Support . . . . . . . . . . . . . . . . . . . . . . . . . . . . . . . . . . . . . . . . . . . . . . . . . . . . . . 219
Performing a Recovery Installation . . . . . . . . . . . . . . . . . . . . . . . . . . . . . . . . . . . . . 221
Creating a New Configuration on a Single Routing Engine . . . . . . . . . . . . . . . . . . 222
Logging In to the Router Console . . . . . . . . . . . . . . . . . . . . . . . . . . . . . . . . . . 222
Configuring Administration User Accounts . . . . . . . . . . . . . . . . . . . . . . . . . . 223
Copyright © 2018, Juniper Networks, Inc.viii
Installation and Upgrade Guide

Adding the Management Console to the Network . . . . . . . . . . . . . . . . . . . . 223
Committing Changes . . . . . . . . . . . . . . . . . . . . . . . . . . . . . . . . . . . . . . . . . . . 225
Creating a New Configuration with Redundant Routing Engines . . . . . . . . . . . . . 227
Configuring Administration User Accounts . . . . . . . . . . . . . . . . . . . . . . . . . . 227
Setting Up Routing Engine Configuration Groups . . . . . . . . . . . . . . . . . . . . . 228
Completing the Management Console Configuration . . . . . . . . . . . . . . . . . . 230
Committing and Synchronizing Changes . . . . . . . . . . . . . . . . . . . . . . . . . . . . 230
Saving a Rescue Configuration File . . . . . . . . . . . . . . . . . . . . . . . . . . . . . . . . . . . . 232
Restoring a Saved Configuration . . . . . . . . . . . . . . . . . . . . . . . . . . . . . . . . . . . . . . 233
Copy Saved Files to the Router . . . . . . . . . . . . . . . . . . . . . . . . . . . . . . . . . . . . 233
Loading and Committing the Configuration File . . . . . . . . . . . . . . . . . . . . . . 234
Reverting to the Default Factory Configuration by Using the request system
zeroize Command . . . . . . . . . . . . . . . . . . . . . . . . . . . . . . . . . . . . . . . . . . . . . . 235
Reverting to the Rescue Configuration . . . . . . . . . . . . . . . . . . . . . . . . . . . . . . . . . 235
Accessing USB Storage on PTX1000 Routers . . . . . . . . . . . . . . . . . . . . . . . . . . . 236
Chapter 11 Reinstalling Software . . . . . . . . . . . . . . . . . . . . . . . . . . . . . . . . . . . . . . . . . . . . 239
Checklist for Reinstalling Junos OS . . . . . . . . . . . . . . . . . . . . . . . . . . . . . . . . . . . . 239
Log the Software Version Information . . . . . . . . . . . . . . . . . . . . . . . . . . . . . . . . . . 241
Log the Hardware Version Information . . . . . . . . . . . . . . . . . . . . . . . . . . . . . . . . . 242
Log the Chassis Environment Information . . . . . . . . . . . . . . . . . . . . . . . . . . . . . . 243
Log the System Boot-Message Information . . . . . . . . . . . . . . . . . . . . . . . . . . . . . 243
Log the Active Configuration . . . . . . . . . . . . . . . . . . . . . . . . . . . . . . . . . . . . . . . . . 245
Log the Interfaces on the Router . . . . . . . . . . . . . . . . . . . . . . . . . . . . . . . . . . . . . . 245
Log the BGP, IS-IS, and OSPF Adjacency Information . . . . . . . . . . . . . . . . . . . . . 246
Log the System Storage Information . . . . . . . . . . . . . . . . . . . . . . . . . . . . . . . . . . . 247
Back Up the Currently Running and Active File System . . . . . . . . . . . . . . . . . . . . 248
Reinstall Junos OS . . . . . . . . . . . . . . . . . . . . . . . . . . . . . . . . . . . . . . . . . . . . . . . . . 249
Reconfigure Junos OS . . . . . . . . . . . . . . . . . . . . . . . . . . . . . . . . . . . . . . . . . . . . . . 249
Configure Host Names, Domain Names, and IP Addresses . . . . . . . . . . . . . 249
Protecting Network Security by Configuring the Root Password . . . . . . . . . . 251
Check Network Connectivity . . . . . . . . . . . . . . . . . . . . . . . . . . . . . . . . . . . . . 253
Copy Backup Configurations to the Router . . . . . . . . . . . . . . . . . . . . . . . . . . 253
Configure Host Names, Domain Names, and IP Addresses . . . . . . . . . . . . . . . . . 253
Protecting Network Security by Configuring the Root Password . . . . . . . . . . . . . 255
Check Network Connectivity . . . . . . . . . . . . . . . . . . . . . . . . . . . . . . . . . . . . . . . . . 257
Copy Backup Configurations to the Router . . . . . . . . . . . . . . . . . . . . . . . . . . . . . . 257
After You Reinstall Junos OS . . . . . . . . . . . . . . . . . . . . . . . . . . . . . . . . . . . . . . . . . 257
Compare Information Logged Before and After the Reinstall . . . . . . . . . . . . 257
Back Up the New Software . . . . . . . . . . . . . . . . . . . . . . . . . . . . . . . . . . . . . . 258
Compare Information Logged Before and After the Reinstall . . . . . . . . . . . . . . . 258
Back Up the New Software . . . . . . . . . . . . . . . . . . . . . . . . . . . . . . . . . . . . . . . . . . 259
Chapter 12 Downgrading Software . . . . . . . . . . . . . . . . . . . . . . . . . . . . . . . . . . . . . . . . . . . 261
Downgrading Junos OS from Upgraded FreeBSD . . . . . . . . . . . . . . . . . . . . . . . . . 261
Downgrading from Junos OS with Upgraded FreeBSD to Junos OS . . . . . . . 261
Downgrading from Junos OSwith Upgraded FreeBSD Release 17.4 or Later
to an Earlier Release of Junos OS with Upgraded FreeBSD . . . . . . . . . . 262
Downgrading from JunosOSwith Upgraded FreeBSDRelease 17.3 or Earlier
to an Earlier Release of Junos OS with Upgraded FreeBSD . . . . . . . . . . 263
ixCopyright © 2018, Juniper Networks, Inc.
Table of Contents

Chapter 13 Rebooting or Halting Software Processes on a Device . . . . . . . . . . . . . . . . 265
Restarting and Halting SRX Series Devices . . . . . . . . . . . . . . . . . . . . . . . . . . . . . 265
Rebooting SRX Series Devices . . . . . . . . . . . . . . . . . . . . . . . . . . . . . . . . . . . . 265
Halting SRX Series Devices . . . . . . . . . . . . . . . . . . . . . . . . . . . . . . . . . . . . . . . 267
Bringing Chassis Components Online and Offline on SRX Series Devices . . 269
Restarting the Chassis on SRX Series Devices . . . . . . . . . . . . . . . . . . . . . . . 270
Rebooting or Halting the EX Series Switch (J-Web Procedure) . . . . . . . . . . . . . . 270
Chapter 14 Overview of Routing Engines with VM Host Support . . . . . . . . . . . . . . . . . . 273
Routing Engines with VM Host Support . . . . . . . . . . . . . . . . . . . . . . . . . . . . . . . . 273
Architecture of Routing Engines with VM Host Support . . . . . . . . . . . . . . . . . . . . 274
Salient Features of the Routing Engines with VM Host Support . . . . . . . . . . . . . 275
Platform Virtualization . . . . . . . . . . . . . . . . . . . . . . . . . . . . . . . . . . . . . . . . . . 275
Hardware Assisted Paravirtualized Guest Junos OS . . . . . . . . . . . . . . . . . . . 276
Guest Junos OS to Serve as the Administrative Framework . . . . . . . . . . . . . 276
Storage Partitioning and Redundancy . . . . . . . . . . . . . . . . . . . . . . . . . . . . . . 276
NTP and Time Zone . . . . . . . . . . . . . . . . . . . . . . . . . . . . . . . . . . . . . . . . . . . . . 277
Autorecovery . . . . . . . . . . . . . . . . . . . . . . . . . . . . . . . . . . . . . . . . . . . . . . . . . . 277
Handling Reboot and Power Off . . . . . . . . . . . . . . . . . . . . . . . . . . . . . . . . . . 278
Routers with VM Host Support-Boot Process . . . . . . . . . . . . . . . . . . . . . . . . . . . . 279
Booting for the First Time . . . . . . . . . . . . . . . . . . . . . . . . . . . . . . . . . . . . . . . . 279
Boot Sequence . . . . . . . . . . . . . . . . . . . . . . . . . . . . . . . . . . . . . . . . . . . . . . . . 279
Understanding Console Port . . . . . . . . . . . . . . . . . . . . . . . . . . . . . . . . . . . . . 279
Understanding Hostnames Synchronization . . . . . . . . . . . . . . . . . . . . . . . . 280
VM Host Installation . . . . . . . . . . . . . . . . . . . . . . . . . . . . . . . . . . . . . . . . . . . . . . . 280
VM Host Upgrade . . . . . . . . . . . . . . . . . . . . . . . . . . . . . . . . . . . . . . . . . . . . . . 281
VM Host Rollback . . . . . . . . . . . . . . . . . . . . . . . . . . . . . . . . . . . . . . . . . . . . . . 282
VM Host Snapshot . . . . . . . . . . . . . . . . . . . . . . . . . . . . . . . . . . . . . . . . . . . . . 284
Disk Recovery Using the VM Host Snapshot . . . . . . . . . . . . . . . . . . . . . 284
Copying VM Host Installation Package to the PXE Boot Server . . . . . . . . . . . . . . 285
Upgrading the SSD Firmware on Routing Engines with VM Host Support . . . . . 287
Disabling Autorecovery on Routing Engines with VM Host Support . . . . . . . . . . 289
VM Host Operations and Management . . . . . . . . . . . . . . . . . . . . . . . . . . . . . . . . 289
Part 3 Installing andManaging Software Licenses
Chapter 15 Software License Overview . . . . . . . . . . . . . . . . . . . . . . . . . . . . . . . . . . . . . . . 293
Junos OS Feature Licenses . . . . . . . . . . . . . . . . . . . . . . . . . . . . . . . . . . . . . . . . . . 293
License Enforcement . . . . . . . . . . . . . . . . . . . . . . . . . . . . . . . . . . . . . . . . . . . . . . . 294
Junos OS Feature License Keys . . . . . . . . . . . . . . . . . . . . . . . . . . . . . . . . . . . . . . . 295
Release-Tied License Keys and Upgrade Licenses on MX Series Routers . . 295
Licensable Ports on MX5, MX10, and MX40 Routers . . . . . . . . . . . . . . . . . . 296
Port Activation on MX104 Routers . . . . . . . . . . . . . . . . . . . . . . . . . . . . . . . . . 297
Software Feature Licenses . . . . . . . . . . . . . . . . . . . . . . . . . . . . . . . . . . . . . . . . . . 298
Software Features That Require Licenses on M Series, MX Series, and T
Series Routers . . . . . . . . . . . . . . . . . . . . . . . . . . . . . . . . . . . . . . . . . . . . . 299
Software Features That Require Licenses on M Series Routers Only . . . . . . 302
Software Features That Require Licenses on MX Series Routers Only . . . . . 303
Software Feature Licenses for SRX Series Devices . . . . . . . . . . . . . . . . . . . . 309
Copyright © 2018, Juniper Networks, Inc.x
Installation and Upgrade Guide

Software Features That Require Licenses on EX Series Switches . . . . . . . . . 310
Software Features That Require Licenses on the QFX Series . . . . . . . . . . . . . 311
Software Features That Require Licenses on MX Series Routers Only . . . . . . . . . 314
Understanding Software Licenses for EX Series Switches . . . . . . . . . . . . . . . . . 320
Purchasing a Software Feature License . . . . . . . . . . . . . . . . . . . . . . . . . . . . . 320
Features Requiring a License on EX2200 Switches . . . . . . . . . . . . . . . . . . . . 321
Features Requiring a License on EX2300 Switches . . . . . . . . . . . . . . . . . . . . 322
Features Requiring a License on EX3300 Switches . . . . . . . . . . . . . . . . . . . . 322
Features Requiring a License on EX3400 Switches . . . . . . . . . . . . . . . . . . . 324
Features Requiring a License on EX4300 Switches . . . . . . . . . . . . . . . . . . . 325
Features Requiring a License on EX4600 Switches . . . . . . . . . . . . . . . . . . . 326
Features Requiring a License on EX3200, EX4200, EX4500, EX4550,
EX6200, EX8200, and EX9200 Switches . . . . . . . . . . . . . . . . . . . . . . . 327
License Warning Messages . . . . . . . . . . . . . . . . . . . . . . . . . . . . . . . . . . . . . . 328
Chapter 16 Installing and Managing Licenses . . . . . . . . . . . . . . . . . . . . . . . . . . . . . . . . . . 331
Adding New Licenses (CLI Procedure) . . . . . . . . . . . . . . . . . . . . . . . . . . . . . . . . . . 331
Installing a License Using a Configuration Statement . . . . . . . . . . . . . . . . . . 331
Installing Licenses Using the CLI Directly . . . . . . . . . . . . . . . . . . . . . . . . 332
Installing Licenses Using a Configuration File . . . . . . . . . . . . . . . . . . . . . 333
Installing a License Using an Operational Command . . . . . . . . . . . . . . . . . . 335
Adding a License to a Device with a Single Routing Engine . . . . . . . . . . 335
Adding a License to a Device with Dual Routing Engines . . . . . . . . . . . . 335
Deleting License Keys (CLI) . . . . . . . . . . . . . . . . . . . . . . . . . . . . . . . . . . . . . . . . . . 336
Using the Operational Command to Delete Licenses . . . . . . . . . . . . . . . . . . 336
Using a Configuration Command to Delete Licenses . . . . . . . . . . . . . . . . . . 337
Saving License Keys (CLI) . . . . . . . . . . . . . . . . . . . . . . . . . . . . . . . . . . . . . . . . . . . 338
Verifying Junos OS License Installation (CLI) . . . . . . . . . . . . . . . . . . . . . . . . . . . . 338
Displaying Installed Licenses . . . . . . . . . . . . . . . . . . . . . . . . . . . . . . . . . . . . . 339
Displaying License Usage . . . . . . . . . . . . . . . . . . . . . . . . . . . . . . . . . . . . . . . . 340
Part 4 Troubleshooting Information
Chapter 17 Troubleshooting Software Installation . . . . . . . . . . . . . . . . . . . . . . . . . . . . . . 343
Troubleshooting Software Installation . . . . . . . . . . . . . . . . . . . . . . . . . . . . . . . . . 343
Recovering from a Failed Software Upgrade on an EX Series Switch . . . . . 343
Rebooting from the Inactive Partition . . . . . . . . . . . . . . . . . . . . . . . . . . . . . . 344
Freeing Disk Space for Software Installation . . . . . . . . . . . . . . . . . . . . . . . . . 345
Installation from the Boot Loader Generates ’cannot open package’
Error . . . . . . . . . . . . . . . . . . . . . . . . . . . . . . . . . . . . . . . . . . . . . . . . . . . . . 345
Troubleshooting a Switch That Has Booted from the Backup Junos OS
Image . . . . . . . . . . . . . . . . . . . . . . . . . . . . . . . . . . . . . . . . . . . . . . . . . . . . . . . 346
Disk Space Management for Junos OS Installation . . . . . . . . . . . . . . . . . . . . . . . 347
Verifying PIC Combinations . . . . . . . . . . . . . . . . . . . . . . . . . . . . . . . . . . . . . . . . . . 348
Part 5 Configuration Statements and Operational Commands
Chapter 18 Configuration Statements . . . . . . . . . . . . . . . . . . . . . . . . . . . . . . . . . . . . . . . . 353
auto-configuration . . . . . . . . . . . . . . . . . . . . . . . . . . . . . . . . . . . . . . . . . . . . . . . . . 354
auto-configuration (System) . . . . . . . . . . . . . . . . . . . . . . . . . . . . . . . . . . . . . . . . . 355
xiCopyright © 2018, Juniper Networks, Inc.
Table of Contents

auto-image-upgrade . . . . . . . . . . . . . . . . . . . . . . . . . . . . . . . . . . . . . . . . . . . . . . . 357
auto-snapshot . . . . . . . . . . . . . . . . . . . . . . . . . . . . . . . . . . . . . . . . . . . . . . . . . . . . 358
autoinstallation . . . . . . . . . . . . . . . . . . . . . . . . . . . . . . . . . . . . . . . . . . . . . . . . . . . 359
autoinstallation (JNU Satellite Devices) . . . . . . . . . . . . . . . . . . . . . . . . . . . . . . . . 360
bootp . . . . . . . . . . . . . . . . . . . . . . . . . . . . . . . . . . . . . . . . . . . . . . . . . . . . . . . . . . . . 361
commit . . . . . . . . . . . . . . . . . . . . . . . . . . . . . . . . . . . . . . . . . . . . . . . . . . . . . . . . . . 362
configuration-servers . . . . . . . . . . . . . . . . . . . . . . . . . . . . . . . . . . . . . . . . . . . . . . . 363
delete-after-commit (JNU Satellites) . . . . . . . . . . . . . . . . . . . . . . . . . . . . . . . . . . 364
file (App Engine Virtual Machine Management Service) . . . . . . . . . . . . . . . . . . . 365
flag (App Engine Virtual Machine Management Service) . . . . . . . . . . . . . . . . . . 367
interfaces (Autoinstallation) . . . . . . . . . . . . . . . . . . . . . . . . . . . . . . . . . . . . . . . . . 368
level (App Engine Virtual Machine Management Service) . . . . . . . . . . . . . . . . . . 369
license . . . . . . . . . . . . . . . . . . . . . . . . . . . . . . . . . . . . . . . . . . . . . . . . . . . . . . . . . . . 370
traceoptions (App Engine Virtual Machine Management Service) . . . . . . . . . . . 372
traceoptions (System License) . . . . . . . . . . . . . . . . . . . . . . . . . . . . . . . . . . . . . . . 373
usb . . . . . . . . . . . . . . . . . . . . . . . . . . . . . . . . . . . . . . . . . . . . . . . . . . . . . . . . . . . . . 374
vmhost . . . . . . . . . . . . . . . . . . . . . . . . . . . . . . . . . . . . . . . . . . . . . . . . . . . . . . . . . . 375
vmhost management-if disable . . . . . . . . . . . . . . . . . . . . . . . . . . . . . . . . . . . . . . 376
vmhost management-if link-mode . . . . . . . . . . . . . . . . . . . . . . . . . . . . . . . . . . . . 377
vmhost management-if speed . . . . . . . . . . . . . . . . . . . . . . . . . . . . . . . . . . . . . . . 378
Chapter 19 Operational Commands . . . . . . . . . . . . . . . . . . . . . . . . . . . . . . . . . . . . . . . . . . 379
clear system login lockout . . . . . . . . . . . . . . . . . . . . . . . . . . . . . . . . . . . . . . . . . . . 381
request system autorecovery state . . . . . . . . . . . . . . . . . . . . . . . . . . . . . . . . . . . . 382
request system download abort . . . . . . . . . . . . . . . . . . . . . . . . . . . . . . . . . . . . . . 384
request system download clear . . . . . . . . . . . . . . . . . . . . . . . . . . . . . . . . . . . . . . 385
request system download pause . . . . . . . . . . . . . . . . . . . . . . . . . . . . . . . . . . . . . 386
request system download resume . . . . . . . . . . . . . . . . . . . . . . . . . . . . . . . . . . . . 387
request system download start . . . . . . . . . . . . . . . . . . . . . . . . . . . . . . . . . . . . . . 388
request system firmware upgrade . . . . . . . . . . . . . . . . . . . . . . . . . . . . . . . . . . . . 390
request system halt . . . . . . . . . . . . . . . . . . . . . . . . . . . . . . . . . . . . . . . . . . . . . . . . 392
request system license add . . . . . . . . . . . . . . . . . . . . . . . . . . . . . . . . . . . . . . . . . . 394
request system license delete . . . . . . . . . . . . . . . . . . . . . . . . . . . . . . . . . . . . . . . . 396
request system license save . . . . . . . . . . . . . . . . . . . . . . . . . . . . . . . . . . . . . . . . . 397
request system license update . . . . . . . . . . . . . . . . . . . . . . . . . . . . . . . . . . . . . . . 398
request system partition compact-flash . . . . . . . . . . . . . . . . . . . . . . . . . . . . . . . 399
request system power-off . . . . . . . . . . . . . . . . . . . . . . . . . . . . . . . . . . . . . . . . . . 400
request system reboot . . . . . . . . . . . . . . . . . . . . . . . . . . . . . . . . . . . . . . . . . . . . . . 402
request system reboot (EX Series) . . . . . . . . . . . . . . . . . . . . . . . . . . . . . . . . . . . . 408
request system reboot (Junos OS with Upgraded FreeBSD) . . . . . . . . . . . . . . . . 411
request system recover . . . . . . . . . . . . . . . . . . . . . . . . . . . . . . . . . . . . . . . . . . . . . 414
request system scripts add . . . . . . . . . . . . . . . . . . . . . . . . . . . . . . . . . . . . . . . . . . 416
request system scripts delete . . . . . . . . . . . . . . . . . . . . . . . . . . . . . . . . . . . . . . . . . 417
request system scripts rollback . . . . . . . . . . . . . . . . . . . . . . . . . . . . . . . . . . . . . . . 418
request system snapshot . . . . . . . . . . . . . . . . . . . . . . . . . . . . . . . . . . . . . . . . . . . . 419
request system snapshot (Junos OS with Upgraded FreeBSD) . . . . . . . . . . . . . . 427
request system snapshot (Maintenance) . . . . . . . . . . . . . . . . . . . . . . . . . . . . . . 429
request system software abort in-service-upgrade (ICU) . . . . . . . . . . . . . . . . . . 432
request system software add . . . . . . . . . . . . . . . . . . . . . . . . . . . . . . . . . . . . . . . . 433
Copyright © 2018, Juniper Networks, Inc.xii
Installation and Upgrade Guide

request system software add (Maintenance) . . . . . . . . . . . . . . . . . . . . . . . . . . . 446
request system software configuration-backup . . . . . . . . . . . . . . . . . . . . . . . . . . 447
request system software configuration-restore . . . . . . . . . . . . . . . . . . . . . . . . . . 448
request system software delete . . . . . . . . . . . . . . . . . . . . . . . . . . . . . . . . . . . . . . 449
request system software rollback . . . . . . . . . . . . . . . . . . . . . . . . . . . . . . . . . . . . . 453
request system software rollback (SRX Series) . . . . . . . . . . . . . . . . . . . . . . . . . 458
request system software validate . . . . . . . . . . . . . . . . . . . . . . . . . . . . . . . . . . . . . 459
request system software validate on (Junos OS with Upgraded FreeBSD) . . . . 463
request system storage cleanup . . . . . . . . . . . . . . . . . . . . . . . . . . . . . . . . . . . . . . 466
request system storage cleanup (SRX Series) . . . . . . . . . . . . . . . . . . . . . . . . . . . 477
request system zeroize . . . . . . . . . . . . . . . . . . . . . . . . . . . . . . . . . . . . . . . . . . . . . 480
request vmhost halt . . . . . . . . . . . . . . . . . . . . . . . . . . . . . . . . . . . . . . . . . . . . . . . 486
request vmhost reboot . . . . . . . . . . . . . . . . . . . . . . . . . . . . . . . . . . . . . . . . . . . . . 488
show chassis usb storage . . . . . . . . . . . . . . . . . . . . . . . . . . . . . . . . . . . . . . . . . . . 490
show system autoinstallation status . . . . . . . . . . . . . . . . . . . . . . . . . . . . . . . . . . . 491
show system autorecovery state . . . . . . . . . . . . . . . . . . . . . . . . . . . . . . . . . . . . . . 493
show system boot-messages . . . . . . . . . . . . . . . . . . . . . . . . . . . . . . . . . . . . . . . . 495
show system auto-snapshot . . . . . . . . . . . . . . . . . . . . . . . . . . . . . . . . . . . . . . . . . 502
show system download . . . . . . . . . . . . . . . . . . . . . . . . . . . . . . . . . . . . . . . . . . . . 504
show system license . . . . . . . . . . . . . . . . . . . . . . . . . . . . . . . . . . . . . . . . . . . . . . . 506
show system license (View) . . . . . . . . . . . . . . . . . . . . . . . . . . . . . . . . . . . . . . . . . . 515
show system login lockout . . . . . . . . . . . . . . . . . . . . . . . . . . . . . . . . . . . . . . . . . . . 518
show system snapshot . . . . . . . . . . . . . . . . . . . . . . . . . . . . . . . . . . . . . . . . . . . . . . 519
show system snapshot (Junos OS with Upgraded FreeBSD) . . . . . . . . . . . . . . . 522
show system snapshot (Upgraded FreeBSD) . . . . . . . . . . . . . . . . . . . . . . . . . . . 524
show system snapshot media . . . . . . . . . . . . . . . . . . . . . . . . . . . . . . . . . . . . . . . . 526
show system storage partitions (EX Series Switches Only) . . . . . . . . . . . . . . . . . 527
show system storage partitions (View SRX Series) . . . . . . . . . . . . . . . . . . . . . . . 529
show version . . . . . . . . . . . . . . . . . . . . . . . . . . . . . . . . . . . . . . . . . . . . . . . . . . . . . . 531
Chapter 20 VM Host Software Administrative Commands . . . . . . . . . . . . . . . . . . . . . . . 533
request vmhost cleanup . . . . . . . . . . . . . . . . . . . . . . . . . . . . . . . . . . . . . . . . . . . . 534
request vmhost file-copy . . . . . . . . . . . . . . . . . . . . . . . . . . . . . . . . . . . . . . . . . . . . 536
request vmhost halt . . . . . . . . . . . . . . . . . . . . . . . . . . . . . . . . . . . . . . . . . . . . . . . . 537
request vmhost hard-disk-test . . . . . . . . . . . . . . . . . . . . . . . . . . . . . . . . . . . . . . . 539
request vmhost power-off . . . . . . . . . . . . . . . . . . . . . . . . . . . . . . . . . . . . . . . . . . . 541
request vmhost power-on . . . . . . . . . . . . . . . . . . . . . . . . . . . . . . . . . . . . . . . . . . . 543
request vmhost reboot . . . . . . . . . . . . . . . . . . . . . . . . . . . . . . . . . . . . . . . . . . . . . 544
request vmhost snapshot . . . . . . . . . . . . . . . . . . . . . . . . . . . . . . . . . . . . . . . . . . . 546
request vmhost software abort . . . . . . . . . . . . . . . . . . . . . . . . . . . . . . . . . . . . . . 548
request vmhost software add . . . . . . . . . . . . . . . . . . . . . . . . . . . . . . . . . . . . . . . . 549
request vmhost software in-service-upgrade . . . . . . . . . . . . . . . . . . . . . . . . . . . . 552
request vmhost software rollback . . . . . . . . . . . . . . . . . . . . . . . . . . . . . . . . . . . . 554
request vmhost zeroize . . . . . . . . . . . . . . . . . . . . . . . . . . . . . . . . . . . . . . . . . . . . . 557
Chapter 21 VM Host Software Monitoring Commands . . . . . . . . . . . . . . . . . . . . . . . . . . 561
show vmhost bridge . . . . . . . . . . . . . . . . . . . . . . . . . . . . . . . . . . . . . . . . . . . . . . . 562
show vmhost crash . . . . . . . . . . . . . . . . . . . . . . . . . . . . . . . . . . . . . . . . . . . . . . . . 564
show vmhost hard-disk-test . . . . . . . . . . . . . . . . . . . . . . . . . . . . . . . . . . . . . . . . . 565
show vmhost hardware . . . . . . . . . . . . . . . . . . . . . . . . . . . . . . . . . . . . . . . . . . . . . 567
xiiiCopyright © 2018, Juniper Networks, Inc.
Table of Contents

show vmhost information . . . . . . . . . . . . . . . . . . . . . . . . . . . . . . . . . . . . . . . . . . . 569
show vmhost logs . . . . . . . . . . . . . . . . . . . . . . . . . . . . . . . . . . . . . . . . . . . . . . . . . . 571
show vmhost management-if . . . . . . . . . . . . . . . . . . . . . . . . . . . . . . . . . . . . . . . . 573
show vmhost netstat . . . . . . . . . . . . . . . . . . . . . . . . . . . . . . . . . . . . . . . . . . . . . . . 574
show vmhost processes . . . . . . . . . . . . . . . . . . . . . . . . . . . . . . . . . . . . . . . . . . . . 576
show vmhost resource-usage . . . . . . . . . . . . . . . . . . . . . . . . . . . . . . . . . . . . . . . . 578
show vmhost snapshot . . . . . . . . . . . . . . . . . . . . . . . . . . . . . . . . . . . . . . . . . . . . . 581
show vmhost status . . . . . . . . . . . . . . . . . . . . . . . . . . . . . . . . . . . . . . . . . . . . . . . 583
show vmhost uptime . . . . . . . . . . . . . . . . . . . . . . . . . . . . . . . . . . . . . . . . . . . . . . . 585
show vmhost version . . . . . . . . . . . . . . . . . . . . . . . . . . . . . . . . . . . . . . . . . . . . . . . 587
Copyright © 2018, Juniper Networks, Inc.xiv
Installation and Upgrade Guide

List of Figures
Part 1 Junos Software and Hardware Overview
Chapter 1 Software Overview . . . . . . . . . . . . . . . . . . . . . . . . . . . . . . . . . . . . . . . . . . . . . . . . . 3
Figure 1: Configuration Selection Sequence . . . . . . . . . . . . . . . . . . . . . . . . . . . . . . . 13
Chapter 2 Hardware Overview . . . . . . . . . . . . . . . . . . . . . . . . . . . . . . . . . . . . . . . . . . . . . . . 29
Figure 2: Routing Engines . . . . . . . . . . . . . . . . . . . . . . . . . . . . . . . . . . . . . . . . . . . . . 31
Figure 3: SRX240 Device Front Panel . . . . . . . . . . . . . . . . . . . . . . . . . . . . . . . . . . . 33
Figure 4: SRX650 Device System Routing Engine . . . . . . . . . . . . . . . . . . . . . . . . . 33
Figure 5: SRX345 Device Front Panel . . . . . . . . . . . . . . . . . . . . . . . . . . . . . . . . . . . 33
Figure 6: SRX1500 Device Front Panel . . . . . . . . . . . . . . . . . . . . . . . . . . . . . . . . . . 33
Figure 7: SRX5800 Device Routing Engine . . . . . . . . . . . . . . . . . . . . . . . . . . . . . . . 34
Figure 8: SRX4200 Services Gateway Front Panel . . . . . . . . . . . . . . . . . . . . . . . . . 34
Part 2 Installing Junos Software
Chapter 4 Performing a Standard or Change Category Installation . . . . . . . . . . . . . . . 49
Figure 9: Connecting to the Console Port on a Junos OS Device . . . . . . . . . . . . . . 57
Chapter 5 Configuring Zero Touch Provisioning . . . . . . . . . . . . . . . . . . . . . . . . . . . . . . . . . 81
Figure 10: Components Involved in Initial Provisioning of Remote Device . . . . . . . 91
Figure 11: Workflow for Initial Provisioning . . . . . . . . . . . . . . . . . . . . . . . . . . . . . . . . 92
Figure 12: Entering Activation Code for ZTP . . . . . . . . . . . . . . . . . . . . . . . . . . . . . . 94
Figure 13: Initiating ZTP Process (Software Image Downloading) . . . . . . . . . . . . . 94
Figure 14: Completing ZTP Process . . . . . . . . . . . . . . . . . . . . . . . . . . . . . . . . . . . . . 95
Figure 15: Configuring System Root-Authentication Password . . . . . . . . . . . . . . . 96
Chapter 8 Upgrading Software . . . . . . . . . . . . . . . . . . . . . . . . . . . . . . . . . . . . . . . . . . . . . . . 131
Figure 16: Upgrading to 64-bit Junos OS with Redundant Routing Engines . . . . . 136
Figure 17: Upgrading a Single Routing Engine to 64-bit Junos OS Using Two
Slots . . . . . . . . . . . . . . . . . . . . . . . . . . . . . . . . . . . . . . . . . . . . . . . . . . . . . . . . . 139
Chapter 14 Overview of Routing Engines with VM Host Support . . . . . . . . . . . . . . . . . . 273
Figure 18: Architecture of RE-MX-X6, RE-MX-X8 and RE-PTX-X8 Routing
Engines . . . . . . . . . . . . . . . . . . . . . . . . . . . . . . . . . . . . . . . . . . . . . . . . . . . . . . 275
Figure 19: SSD Partitioning . . . . . . . . . . . . . . . . . . . . . . . . . . . . . . . . . . . . . . . . . . . 277
xvCopyright © 2018, Juniper Networks, Inc.

Copyright © 2018, Juniper Networks, Inc.xvi
Installation and Upgrade Guide

List of Tables
About the Documentation . . . . . . . . . . . . . . . . . . . . . . . . . . . . . . . . . . . . . . . . . xxi
Table 1: Notice Icons . . . . . . . . . . . . . . . . . . . . . . . . . . . . . . . . . . . . . . . . . . . . . . . . xxiv
Table 2: Text and Syntax Conventions . . . . . . . . . . . . . . . . . . . . . . . . . . . . . . . . . . xxiv
Part 1 Junos Software and Hardware Overview
Chapter 1 Software Overview . . . . . . . . . . . . . . . . . . . . . . . . . . . . . . . . . . . . . . . . . . . . . . . . . 3
Table 3: Installation Package Prefixes . . . . . . . . . . . . . . . . . . . . . . . . . . . . . . . . . . . . 8
Table 4: Software Release Types . . . . . . . . . . . . . . . . . . . . . . . . . . . . . . . . . . . . . . . 10
Table 5: Junos OS Processes . . . . . . . . . . . . . . . . . . . . . . . . . . . . . . . . . . . . . . . . . . 16
Table 6: New and Changed Commands and Statements for Junos OSwith
Upgraded FreeBSD . . . . . . . . . . . . . . . . . . . . . . . . . . . . . . . . . . . . . . . . . . . . . . 22
Table 7: Deprecated Commands and Statements for Junos OSwith Upgraded
FreeBSD . . . . . . . . . . . . . . . . . . . . . . . . . . . . . . . . . . . . . . . . . . . . . . . . . . . . . . . 23
Chapter 2 Hardware Overview . . . . . . . . . . . . . . . . . . . . . . . . . . . . . . . . . . . . . . . . . . . . . . . 29
Table 8: Routing Engines and Storage Media Names (ACX Series, M Series, MX
Series, T Series, TX Matrix, TX Matrix Plus, and JCS 1200 Routers) . . . . . . . . 36
Table 9: Storage Media Names . . . . . . . . . . . . . . . . . . . . . . . . . . . . . . . . . . . . . . . . 38
Part 2 Installing Junos Software
Chapter 4 Performing a Standard or Change Category Installation . . . . . . . . . . . . . . . 49
Table 10: show system download Output Fields . . . . . . . . . . . . . . . . . . . . . . . . . . 55
Table 11: Environment Variables Settings . . . . . . . . . . . . . . . . . . . . . . . . . . . . . . . . . 77
Chapter 6 Configuring Automatic Installation of Configuration Files . . . . . . . . . . . . . . 99
Table 12: Interfaces and Protocols for IP Address Acquisition During
Autoinstallation . . . . . . . . . . . . . . . . . . . . . . . . . . . . . . . . . . . . . . . . . . . . . . . . 100
Chapter 7 Configuring Dual-Root Partitions for High Availability . . . . . . . . . . . . . . . . . 115
Table 13: Resilient Dual-Root Partition Scheme . . . . . . . . . . . . . . . . . . . . . . . . . . . 116
Table 14: Earlier Partition Scheme . . . . . . . . . . . . . . . . . . . . . . . . . . . . . . . . . . . . . 118
Table 15: Storage Media on SRX Series Devices . . . . . . . . . . . . . . . . . . . . . . . . . . . 119
Chapter 8 Upgrading Software . . . . . . . . . . . . . . . . . . . . . . . . . . . . . . . . . . . . . . . . . . . . . . . 131
Table 16: Platform and Release Support for NSSU . . . . . . . . . . . . . . . . . . . . . . . . 146
Table 17: Upgrade Path to Junos OS with the Upgraded FreeBSD . . . . . . . . . . . . 162
Table 18: Secondary Storage Devices for SRX Series Devices . . . . . . . . . . . . . . . 169
Table 19: Upgraded FreeBSD Kernel Support by Hardware Platform . . . . . . . . . . 171
Table 20: Upgraded FreeBSD Kernel Support by Hardware Platform . . . . . . . . . 172
Table 21: Upgrade Path to Junos OS with the Upgraded FreeBSD . . . . . . . . . . . . 173
xviiCopyright © 2018, Juniper Networks, Inc.

Table 22: New and Changed Commands and Statements for Junos OSwith
Upgraded FreeBSD . . . . . . . . . . . . . . . . . . . . . . . . . . . . . . . . . . . . . . . . . . . . . 174
Table 23: Deprecated Commands and Statements for Junos OSwith Upgraded
FreeBSD . . . . . . . . . . . . . . . . . . . . . . . . . . . . . . . . . . . . . . . . . . . . . . . . . . . . . . 174
Table 24: Upgrade Path to Junos OS with the Upgraded FreeBSD . . . . . . . . . . . . 177
Table 25: Install Package Summary . . . . . . . . . . . . . . . . . . . . . . . . . . . . . . . . . . . 188
Table 26: CLI Commands for Manual BIOS Upgrade . . . . . . . . . . . . . . . . . . . . . . 189
Chapter 10 Performing a Recovery Installation . . . . . . . . . . . . . . . . . . . . . . . . . . . . . . . . . 215
Table 27: Autorecovery Alarms . . . . . . . . . . . . . . . . . . . . . . . . . . . . . . . . . . . . . . . . 218
Chapter 11 Reinstalling Software . . . . . . . . . . . . . . . . . . . . . . . . . . . . . . . . . . . . . . . . . . . . 239
Table 28: Checklist for Reinstalling Junos OS . . . . . . . . . . . . . . . . . . . . . . . . . . . . 239
Chapter 14 Overview of Routing Engines with VM Host Support . . . . . . . . . . . . . . . . . . 273
Table 29: Hardware Specifications of the RE-MX-X6, RE-MX-X8, RE-PTX-X8,
and RCBPTX, Routing Engines . . . . . . . . . . . . . . . . . . . . . . . . . . . . . . . . . . . . 274
Part 3 Installing andManaging Software Licenses
Chapter 15 Software License Overview . . . . . . . . . . . . . . . . . . . . . . . . . . . . . . . . . . . . . . . 293
Table 30: Upgrade Licenses for Enhancing Port Capacity . . . . . . . . . . . . . . . . . . 297
Table 31: Port Activation License Model for MX104 Routers . . . . . . . . . . . . . . . . 298
Table 32: Junos OS Feature License Model Number for M Series, MX Series, and
T Series Routers . . . . . . . . . . . . . . . . . . . . . . . . . . . . . . . . . . . . . . . . . . . . . . . 299
Table 33: Junos OS Feature License Model Number for M Series Routers . . . . . 302
Table 34: Junos OS Feature License Model Number for MX Series Routers . . . . 303
Table 35: Standard Junos OS Feature Licenses and Model Numbers for QFX
Series Devices . . . . . . . . . . . . . . . . . . . . . . . . . . . . . . . . . . . . . . . . . . . . . . . . . . 311
Table 36: Junos OS Feature License Model Number for MX Series Routers . . . . . 314
Table 37: Junos OS EFL Part Number on EX2200 Switches . . . . . . . . . . . . . . . . . 321
Table 38: Junos OS EFL Part Number on EX2300 Switches . . . . . . . . . . . . . . . . 322
Table 39: Junos OS EFL Part Number on EX3300 Switches . . . . . . . . . . . . . . . . 323
Table 40: Junos OS AFL Part Number on EX3300 Switches . . . . . . . . . . . . . . . . 324
Table 41: Junos OS EFL Part Number on EX3400 Switches . . . . . . . . . . . . . . . . . 324
Table 42: Junos OS EFL Part Number on EX4300 Switches . . . . . . . . . . . . . . . . 325
Table 43: Junos OS AFL Part Number on EX4300 Switches . . . . . . . . . . . . . . . . 326
Table 44: Junos OS AFL Part Number on EX4600 Switches . . . . . . . . . . . . . . . . 326
Table 45: Junos OS AFL Part Number on EX3200, EX4200, EX4500, EX4550,
EX6200, EX8200, and EX9200 Switches . . . . . . . . . . . . . . . . . . . . . . . . . . . 327
Part 5 Configuration Statements and Operational Commands
Chapter 19 Operational Commands . . . . . . . . . . . . . . . . . . . . . . . . . . . . . . . . . . . . . . . . . . 379
Table 46: request system storage cleanup Output Fields . . . . . . . . . . . . . . . . . . 469
Table 47: request system storage cleanup Output Fields . . . . . . . . . . . . . . . . . . . 477
Table 48: show system autoinstallation status Output Fields . . . . . . . . . . . . . . . 492
Table 49: show system autorecovery state Output Fields . . . . . . . . . . . . . . . . . . 493
Table 50: show system auto-snapshot status Output Fields . . . . . . . . . . . . . . . 502
Table 51: show system download Output Fields . . . . . . . . . . . . . . . . . . . . . . . . . 504
Table 52: show system license Output Fields . . . . . . . . . . . . . . . . . . . . . . . . . . . . 507
Copyright © 2018, Juniper Networks, Inc.xviii
Installation and Upgrade Guide

Table 53: show system license Output Fields . . . . . . . . . . . . . . . . . . . . . . . . . . . . 515
Table 54: show system login lockout . . . . . . . . . . . . . . . . . . . . . . . . . . . . . . . . . . . 518
Table 55: show system snapshot Output Fields . . . . . . . . . . . . . . . . . . . . . . . . . . 520
Table 56: show system storage partitions Output Fields . . . . . . . . . . . . . . . . . . . 527
xixCopyright © 2018, Juniper Networks, Inc.
List of Tables

Copyright © 2018, Juniper Networks, Inc.xx
Installation and Upgrade Guide

About the Documentation
• Documentation and Release Notes on page xxi
• Supported Platforms on page xxi
• Using the Examples in This Manual on page xxii
• Documentation Conventions on page xxiii
• Documentation Feedback on page xxv
• Requesting Technical Support on page xxvi
Documentation and Release Notes
To obtain the most current version of all Juniper Networks®technical documentation,
see the product documentation page on the Juniper Networks website at
http://www.juniper.net/techpubs/.
If the information in the latest release notes differs from the information in the
documentation, follow the product Release Notes.
Juniper Networks Books publishes books by Juniper Networks engineers and subject
matter experts. These books go beyond the technical documentation to explore the
nuances of network architecture, deployment, and administration. The current list can
be viewed at http://www.juniper.net/books.
Supported Platforms
For the features described in this document, the following platforms are supported:
• ACX Series
• MSeries
• MXSeries
• T Series
• EX Series
• PTX Series
• QFabric System
• QFX Series
• SRX Series
xxiCopyright © 2018, Juniper Networks, Inc.

Using the Examples in This Manual
If you want to use the examples in this manual, you can use the loadmerge or the load
merge relative command. These commands cause the software to merge the incoming
configuration into the current candidate configuration. The example does not become
active until you commit the candidate configuration.
If the example configuration contains the top level of the hierarchy (or multiple
hierarchies), the example is a full example. In this case, use the loadmerge command.
If the example configuration does not start at the top level of the hierarchy, the example
is a snippet. In this case, use the loadmerge relative command. These procedures are
described in the following sections.
Merging a Full Example
Tomerge a full example, follow these steps:
1. From the HTML or PDF version of the manual, copy a configuration example into a
text file, save the file with a name, and copy the file to a directory on your routing
platform.
For example, copy the following configuration toa file andname the file ex-script.conf.
Copy the ex-script.conf file to the /var/tmp directory on your routing platform.
system {scripts {commit {file ex-script.xsl;
}}
}interfaces {fxp0 {disable;unit 0 {family inet {address 10.0.0.1/24;
}}
}}
2. Merge the contents of the file into your routing platform configuration by issuing the
loadmerge configuration mode command:
[edit]user@host# loadmerge /var/tmp/ex-script.confload complete
Copyright © 2018, Juniper Networks, Inc.xxii
Installation and Upgrade Guide

Merging a Snippet
Tomerge a snippet, follow these steps:
1. From the HTML or PDF version of themanual, copy a configuration snippet into a text
file, save the file with a name, and copy the file to a directory on your routing platform.
For example, copy the following snippet to a file and name the file
ex-script-snippet.conf. Copy the ex-script-snippet.conf file to the /var/tmp directory
on your routing platform.
commit {file ex-script-snippet.xsl; }
2. Move to the hierarchy level that is relevant for this snippet by issuing the following
configuration mode command:
[edit]user@host# edit system scripts[edit system scripts]
3. Merge the contents of the file into your routing platform configuration by issuing the
loadmerge relative configuration mode command:
[edit system scripts]user@host# loadmerge relative /var/tmp/ex-script-snippet.confload complete
For more information about the load command, see CLI Explorer.
Documentation Conventions
Table 1 on page xxiv defines notice icons used in this guide.
xxiiiCopyright © 2018, Juniper Networks, Inc.
About the Documentation

Table 1: Notice Icons
DescriptionMeaningIcon
Indicates important features or instructions.Informational note
Indicates a situation that might result in loss of data or hardware damage.Caution
Alerts you to the risk of personal injury or death.Warning
Alerts you to the risk of personal injury from a laser.Laser warning
Indicates helpful information.Tip
Alerts you to a recommended use or implementation.Best practice
Table 2 on page xxiv defines the text and syntax conventions used in this guide.
Table 2: Text and Syntax Conventions
ExamplesDescriptionConvention
To enter configuration mode, type theconfigure command:
user@host> configure
Represents text that you type.Bold text like this
user@host> show chassis alarms
No alarms currently active
Represents output that appears on theterminal screen.
Fixed-width text like this
• A policy term is a named structurethat defines match conditions andactions.
• Junos OS CLI User Guide
• RFC 1997,BGPCommunities Attribute
• Introduces or emphasizes importantnew terms.
• Identifies guide names.
• Identifies RFC and Internet draft titles.
Italic text like this
Configure themachine’s domain name:
[edit]root@# set system domain-namedomain-name
Represents variables (options for whichyou substitute a value) in commands orconfiguration statements.
Italic text like this
Copyright © 2018, Juniper Networks, Inc.xxiv
Installation and Upgrade Guide

Table 2: Text and Syntax Conventions (continued)
ExamplesDescriptionConvention
• To configure a stub area, include thestub statement at the [edit protocolsospf area area-id] hierarchy level.
• Theconsoleport is labeledCONSOLE.
Represents names of configurationstatements, commands, files, anddirectories; configurationhierarchy levels;or labels on routing platformcomponents.
Text like this
stub <default-metricmetric>;Encloses optional keywords or variables.< > (angle brackets)
broadcast | multicast
(string1 | string2 | string3)
Indicates a choice between themutuallyexclusive keywords or variables on eitherside of the symbol. The set of choices isoften enclosed in parentheses for clarity.
| (pipe symbol)
rsvp { # Required for dynamicMPLS onlyIndicates a comment specified on thesame lineas theconfiguration statementto which it applies.
# (pound sign)
community namemembers [community-ids ]
Encloses a variable for which you cansubstitute one or more values.
[ ] (square brackets)
[edit]routing-options {static {route default {nexthop address;retain;
}}
}
Identifies a level in the configurationhierarchy.
Indention and braces ( { } )
Identifies a leaf statement at aconfiguration hierarchy level.
; (semicolon)
GUI Conventions
• In the Logical Interfaces box, selectAll Interfaces.
• To cancel the configuration, clickCancel.
Representsgraphicaluser interface(GUI)items you click or select.
Bold text like this
In the configuration editor hierarchy,select Protocols>Ospf.
Separates levels in a hierarchy of menuselections.
> (bold right angle bracket)
Documentation Feedback
We encourage you to provide feedback, comments, and suggestions so that we can
improve the documentation. You can provide feedback by using either of the following
methods:
• Online feedback rating system—On any page of the Juniper Networks TechLibrary site
athttp://www.juniper.net/techpubs/index.html, simply click the stars to rate thecontent,
and use the pop-up form to provide us with information about your experience.
Alternately, you can use the online feedback form at
http://www.juniper.net/techpubs/feedback/.
xxvCopyright © 2018, Juniper Networks, Inc.
About the Documentation
• E-mail—Sendyourcommentsto [email protected]. Includethedocument
or topic name, URL or page number, and software version (if applicable).
Requesting Technical Support
Technical product support is available through the JuniperNetworksTechnicalAssistance
Center (JTAC). If you are a customer with an active J-Care or Partner Support Service
support contract, or are covered under warranty, and need post-sales technical support,
you can access our tools and resources online or open a case with JTAC.
• JTAC policies—For a complete understanding of our JTAC procedures and policies,
review the JTAC User Guide located at
http://www.juniper.net/us/en/local/pdf/resource-guides/7100059-en.pdf.
• Product warranties—For product warranty information, visit
http://www.juniper.net/support/warranty/.
• JTAC hours of operation—The JTAC centers have resources available 24 hours a day,
7 days a week, 365 days a year.
Self-Help Online Tools and Resources
For quick and easy problem resolution, Juniper Networks has designed an online
self-service portal called the Customer Support Center (CSC) that provides youwith the
following features:
• Find CSC offerings: http://www.juniper.net/customers/support/
• Search for known bugs: https://prsearch.juniper.net/
• Find product documentation: http://www.juniper.net/documentation/
• Find solutions and answer questions using our Knowledge Base: http://kb.juniper.net/
• Download the latest versions of software and review release notes:
http://www.juniper.net/customers/csc/software/
• Search technical bulletins for relevant hardware and software notifications:
http://kb.juniper.net/InfoCenter/
• Join and participate in the Juniper Networks Community Forum:
http://www.juniper.net/company/communities/
• Open a case online in the CSC Case Management tool: http://www.juniper.net/cm/
Toverify serviceentitlementbyproduct serial number, useourSerialNumberEntitlement
(SNE) Tool: https://entitlementsearch.juniper.net/entitlementsearch/
Opening a Casewith JTAC
You can open a case with JTAC on theWeb or by telephone.
• Use the Case Management tool in the CSC at http://www.juniper.net/cm/.
• Call 1-888-314-JTAC (1-888-314-5822 toll-free in the USA, Canada, and Mexico).
Copyright © 2018, Juniper Networks, Inc.xxvi
Installation and Upgrade Guide

For international or direct-dial options in countries without toll-free numbers, see
http://www.juniper.net/support/requesting-support.html.
xxviiCopyright © 2018, Juniper Networks, Inc.
About the Documentation

Copyright © 2018, Juniper Networks, Inc.xxviii
Installation and Upgrade Guide
PART 1
Junos Software and Hardware Overview
• Software Overview on page 3
• Hardware Overview on page 29
1Copyright © 2018, Juniper Networks, Inc.

Copyright © 2018, Juniper Networks, Inc.2
Installation and Upgrade Guide
CHAPTER 1
Software Overview
• Junos OS Overview on page 3
• Junos OS Editions on page 5
• FIPS 140-2 Security Compliance on page 6
• Junos OS Installation Package Names on page 7
• Software Package Information Security on page 11
• Installation Modules on page 12
• Configuration Files on page 13
• UnderstandingSoftware InfrastructureandProcessesonEXSeriesSwitchesonpage 15
• Junos OSwith Upgraded FreeBSD on page 16
Junos OSOverview
Juniper Networks provides high-performance network devices that create a responsive
and trusted environment for accelerating the deployment of services and applications
over a single network. The Junos®operating system(JunosOS) is the foundationof these
high-performance networks.
Starting with Junos OS Release 15.1, certain hardware platforms run Junos OS based on
an upgraded FreeBSD kernel instead of older versions of FreeBSD. Basing Junos OS on
the newer kernel (referred to as Junos OSwith upgraded FreeBSD) provides Junos OS
with sophisticated processing, efficiency, and security features which do not have to be
reproduced in Junos OS.
Starting in JunosOSRelease 16.1, virtualized Routing Engines are supported that not only
provide increasedcontrol planescalability andperformancebutalsoprovidevirtualization
capabilities to the JunosOS infrastructure. These virtualizedRoutingEngines, orVMhosts
are the Routing Engines RE-MX-X6, RE-MX-X8, and RE-PTX-X8.
NOTE: VMhosts only run on a virtualized Junos OSwith Upgraded FreeBSD.
3Copyright © 2018, Juniper Networks, Inc.

Unlike other complex, monolithic software architectures, Junos OS incorporates key
designanddevelopmentaldifferences todeliver increasednetworkavailability, operational
efficiency, and flexibility. The key advantages to this approach are:
• One Operating System on page 4
• OneModular Software Architecture on page 4
• Secure Boot on page 4
OneOperating System
Unlike other network operating systems that share a common name but splinter into
many different programs, Junos OS is a single, cohesive operating system that is shared
across all network devices and product lines. This allows Juniper Networks engineers to
develop software features once and share these features across all product lines
simultaneously. Because features are common to a single source, they generally are
implemented the same way for all product lines, thus reducing the training required to
learndifferent toolsandmethods for eachproduct.Becauseall JuniperNetworksproducts
use the same code base, interoperability between products is not an issue.
OneModular Software Architecture
Although individualmodules of JunosOS communicate throughwell-defined interfaces,
eachmodule runs in its own protectedmemory space, preventing onemodule from
disrupting another. This separation enables the independent restart of eachmodule as
necessary. This is in contrast to monolithic operating systems where amalfunction in
onemodule can ripple to other modules and cause a full system crash or restart. This
modular architecture then provides for high performance, high availability, security, and
device scalability not found in other operating systems.
The Junos OS is preinstalled on your Juniper Networks device when you receive it from
the factory. Thus, when you first power on the device, all software starts automatically.
You simply need to configure the software so that the device can participate in the
network.
You can upgrade the device software as new features are added or software problems
are fixed. You normally obtain new software by downloading the software installation
packages from the JuniperNetworksSupportWebpageonto your device or onto another
system on your local network. You then install the software upgrade onto the device.
Juniper Networks routing platforms run only binaries supplied by Juniper Networks, and
currently do not support third-party binaries. Each Junos OS image includes a digitally
signedmanifest of executables that are registered with the system only if the signature
can be validated. Junos OSwill not execute any binary without a registered signature.
This feature protects the system against unauthorized software and activity that might
compromise the integrity of your device.
Secure Boot
Secure Boot is a significant system security enhancement based on the UEFI standard
(seewww.uefi.org). Itworksbysafeguarding theBIOS itself fromtamperingormodification
and thenmaintaining that protection throughout the boot process.
Copyright © 2018, Juniper Networks, Inc.4
Installation and Upgrade Guide

The Secure Boot process begins with Secure Flash, which ensures that unauthorized
changes cannot bemade to the firmware. Authorized releases of JunosOS carry a digital
signature produced by either Juniper Networks directly or one of its authorized partners.
At each point of the boot-up process, each component verifies the next link is sound by
checking the signature to ensure that the binaries have not beenmodified. The boot
process cannot continue unless the signature is correct. This "chain of trust" continues
until the operating system takes control. In this way, overall system security is enhanced,
increasing resistance to some firmware-based persistent threats.
Figure 1 shows a simplified version of this “chain of trust.”
g200
108
KernelRunLoader
StartBIOS
Core Root of Trust
BIOS checksLoader Signaturebefore handoff
Loader checksKernel Signaturesbefore handoff
SecureBoot requiresnoactionsonyourpart to implement. It is implementedonsupported
hardware by default.
For information on which Junos OS releases and hardware support Secure Boot, see
Feature Explorer and enter Secure Boot.
RelatedDocumentation
Junos OS Editions on page 5•
• Junos OS Installation Packages Prefixes on page 7
Junos OS Editions
Editions show up in the installation package name after the release number string and
before signed.
In releasesearlier than JunosOSRelease 15.1, installationpackages came in severalmajor
software package categories or editions, such as domestic, worldwide, or Federal
Information Processing Standard (FIPS). For those still using packages with names
including these terms, here is what they indicate:
• domestic—Junos OS for customers in the United States and Canada and for all other
customers with a valid encryption agreement. This edition includes high-encryption
capabilities such as IPsec and SSH for data leaving the router or switch. Later images
use a null, or empty, edition field for this category.
• limited—Junos OS for all other customers. This edition does not include any
high-encryption capabilities for data leaving the router or switch. Sometimes referred
to as the Export edition, starting in Junos OS Release 15.1R1, this category is is renamed
to the limited edition.
• fips—Junos OS that provides advanced network security for customers who need
software tools to configure a network of Juniper Networks routers and switches in a
5Copyright © 2018, Juniper Networks, Inc.
Chapter 1: Software Overview

Federal Information Processing Standards (FIPS) 140-2 environment. For more
information about Junos-FIPS, see FIPS 140-2 Security Compliance. In later images,
FIPS, instead of being a separate edition, is an option you select on installation.
Starting with Junos OS 15.1, a simplified edition schemewas started:
• Junos OSwith a null (empty) edition field is the standard image for Junos OS.
• limited—Version has no cryptographic support and is intended for countries in the
EurasianCustomsUnion (EACU). Thesecountries have import restrictionson software
containing data-plane encryption.
Other variants include the following terms:
• The term secure, indicating the image is Secure-Boot capable, is also used in the same
location in the filename as the edition.
• Sometimes secure-limitedareused together, again in the same location in the filename
as the edition.
• Another variant is flex. This descriptor appears before the release number string and
indicates the version supports enhanced automation.
FIPS 140-2 Security Compliance
For advanced network security, a special version of Junos OS, called Junos-FIPS 140-2,
is available. Junos-FIPS 140-2 provides customers with software tools to configure a
network of Juniper Networks devices in a FIPS environment. FIPS support includes:
• Upgrade package to convert Junos OS to Junos-FIPS 140-2
• Revised installation and configuration procedures
• Enforced security for remote access
• FIPS user roles (Crypto Officer, User, and Maintenance)
• FIPS-specific system logging and error messages
• IPsec configuration for Routing Engine–to–Routing Engine communication
• Enhanced password creation and encryption
Starting in Junos OS Release 15.1, Junos-FIPS is packaged in a domestic image only: a
single Junos OS image supports both domestic and FIPS features. Users that have the
FIPScredentials andpermission to login can flip betweena regular Junos imageandFIPS
image.
Copyright © 2018, Juniper Networks, Inc.6
Installation and Upgrade Guide

NOTE: Junos-FIPShasspecialpassword requirements. FIPSpasswordsmustbe between 10 and 20 characters in length. Passwordsmust use at leastthree of the five defined character sets (uppercase letters, lowercase letters,digits, punctuationmarks, and other special characters). If Junos-FIPS isinstalled on the device, you cannot configure passwords unless theymeetthis standard.
Junos OS Installation Package Names
The installation package is used to upgrade or downgrade from one release to another.
When installed, the installation package completely reinstalls the software, rebuilds the
Junos OS file system, and can erase system logs and other auxiliary information from
theprevious installation. The installationpackagedoes, however, retain theconfiguration
files from the previous installation.
Junos OS installation packages have the following general pattern:
prefix-release-edition-signed.extension
For enhanced automation variants of Junos OS, the installation package looks like this:
prefix-flex-release-edition-signed.extension
Starting in 2015, the keyword signed appears less frequently after the edition. But you
might still see it in software installation packages. Whether signed appears or not, all
Junos OS images from Junos OS Release 15.1 on are signed for validation.
Extensions are tgz, gz, img, iso, etc.
For more detail on the makeup of the installation package filename, see the following
sections:
• Junos OS Installation Packages Prefixes on page 7
• Junos OS Release Numbers on page 9
• Junos OS Editions on page 10
Junos OS Installation Packages Prefixes
The first part of the installation package filename is a combination of a standard prefix
and product designation. Table 3 on page 8 lists a variety of Junos OS package name
prefixes.
Starting in Junos OS Release 15.1, certain hardware platforms run a Junos OS based on
an upgraded FreeBSD kernel (hereafter called Junos OSwith upgraded FreeBSD).
Table 3 on page 8 also indicates the prefixes used for the different platforms running
Junos OSwith upgraded FreesBSD.
SRX Series packages use the following naming convention for package prefixes:
7Copyright © 2018, Juniper Networks, Inc.
Chapter 1: Software Overview

junos-product
Table 3 on page 8 lists several examples of installation package prefixes for the SRX
Series.
Table 3 onpage8does not list packages youdonot usewith the request systemsoftware
add command. For information on packages you load onto a USB drive to install, see
Chapter 10 of the Software Installation and Upgrade Guide.
Table 3: Installation Package Prefixes
DescriptionInstallation Package Prefix
Junos OS for M Series, MX Series, T Series, TX Matrix,and TXMatrix Plus routers.
jinstall*
64-bit Junos OS for the JCS1200 Route Reflector, TXMatrixPlus routerswith 3DSIBs, andPTXSeriesPacketTransport Routers.
jinstall64*
Junos OS for the EX Series Ethernet Switch portfolio.jinstall-ex*
JunosOSwithupgradedFreeBSDforNFX2xxplatformsthat are Linux based; this prefix indicates the imageincludes the host and Junos OS.
For details and specific examples of package namesfor Junos OSwith upgraded FreeBSD, see “Changes inPackageNames for JunosOSwithUpgraded FreeBSD”on page 18.
jinstall-host-nfx-2*
Junos OSwith upgraded FreeBSD for QFX platformsthat are Linux based; this prefix indicates the imageincludes the host and Junos OS. For example,jinstall-host-qfx-5-release.tgz is the package namefor Junos OS on the QFX5100.
For details and specific examples of package namesfor Junos OSwith upgraded FreeBSD, see “Changes inPackageNames for JunosOSwithUpgraded FreeBSD”on page 18.
jinstall-host-qfx*
OCX Series switches.jinstall-ocx-flex*
JunosOS for the ACXSeries, MX5,MX10, MX40,MX80,and MX104 routers.
jinstall-ppc*
Junos OSwith Upgraded FreeBSD for EX2300 andEX3400 switches.
For details and specific examples of package namesfor Junos OSwith upgraded FreeBSD, see “Changes inPackageNames for JunosOSwithUpgraded FreeBSD”on page 18.
junos-arm
Copyright © 2018, Juniper Networks, Inc.8
Installation and Upgrade Guide

Table 3: Installation Package Prefixes (continued)
DescriptionInstallation Package Prefix
JunosOSwithupgradedFreeBSDforEXSeries switchesand MX Series routers that support Junos OSwithupgraded FreeBSD.
For details and specific examples of package namesfor Junos OSwith upgraded FreeBSD, see “Changes inPackageNames for JunosOSwithUpgraded FreeBSD”on page 18.
junos-install*
Junos OS for SRX1400, SRX3400 and SRX3600.junos-srx1k3k*
Junos OS for SRX5400, SRX5600, and SRX5800.junos-srx5000*
Junos OS for SRX1500.junos-srxentedge*
Junos OS for SRX4100 and SRX4200.junos-srxmr*
Junos OS for SRX300, SRX320, SRX340, SRX345, andSRX550M .
junos-srxsme*
Junos OSwith upgraded FreeBSD on VMHost.junos-vmhost-install*
Junos OS for SRX4600junos-install-media-pxe-srxhe-x86*(USB)
junos-install-media-usb-srxhe-x86*(PXE
junos-srxhe-x86* (CLI)
Junos OS Release Numbers
The Junos OS release number represents a particular revision of the software that runs
on a Juniper Networks routing platform, for example, Junos OS Release 14.1, 14.2, or 15.1.
Each JunosOS releasehascertainnewfeatures that complement the softwareprocesses
that support Internet routing protocols, control the device’s interfaces and the device
chassis itself, and allow device systemmanagement. On the Juniper Networks Support
web page, you download the Junos OS installation package for a particular Junos OS
release number.
9Copyright © 2018, Juniper Networks, Inc.
Chapter 1: Software Overview

Given the format of
m.nZb.s
The software release number 17.2R1.13, for example, maps to this format as follows:
• m is the main release number of the product, for example, 17.
• n is the minor release number of the product, for example, 2.
• Z is the type of software release, for example, R for FRS or maintenance release.
For types of software releases, see Table 4 on page 10.
• b is the build number of the product, for example, 1, indicating the FRS rather than amaintenance release..
• s is the spin number of the product, for example, 13.
Table 4: Software Release Types
DescriptionReleaseType
First revenue ship (FRS) or maintenance release software. R1 is FRS. R2 onward aremaintenance releases.
R
Feature velocity release. Feature velocity releases are only in Junos OS Release 15.1.F
Beta release software.B
Internal release software. These are private software releases for verifying fixes.I
Service release software, which are released to customers to solve a specificproblem—this release will be maintained along with the life span of the underlyingrelease. The service release number is added after the R number, for example,14.2R3-S4.4. Here S4 represents the 4th service release on top of 14.2R3 and is the4th respin.
S
Special (eXception) release software. X releases follow a numbering system thatdiffers from the standard Junos OS release numbering.
Starting with Junos OS Release 12.1X44-D10, SRX Series devices follow a specialnaming convention for Junos OS releases. For more information, refer to theKnowledge Base article KB30092 athttp://kb.juniper.net/InfoCenter/index?page=home.
X
NOTE: Prior to Junos OS Release 11.4, the software release number formatfor service releases was same as other releases. For example, 10.4S4.2represented the 4th service release and 2nd respin of 10.4.
Junos OS Editions
Editions show up in the installation package name after the release number string and
before signed.
Copyright © 2018, Juniper Networks, Inc.10
Installation and Upgrade Guide

In releasesearlier than JunosOSRelease 15.1, installationpackages came in severalmajor
software package categories or editions, such as domestic, worldwide, or Federal
Information Processing Standard (FIPS). For those still using packages with names
including these terms, here is what they indicate:
• domestic—Junos OS for customers in the United States and Canada and for all other
customers with a valid encryption agreement. This edition includes high-encryption
capabilities such as IPsec and SSH for data leaving the router or switch. Later images
use a null, or empty, edition field for this category.
• limited—Junos OS for all other customers. This edition does not include any
high-encryption capabilities for data leaving the router or switch. Sometimes referred
to as the Export edition, starting in Junos OS Release 15.1R1, this category is is renamed
to the limited edition.
• fips—Junos OS that provides advanced network security for customers who need
software tools to configure a network of Juniper Networks routers and switches in a
Federal Information Processing Standards (FIPS) 140-2 environment. For more
information about Junos-FIPS, see FIPS 140-2 Security Compliance. In later images,
FIPS, instead of being a separate edition, is an option you select on installation.
Starting with Junos OS 15.1, a simplified edition schemewas started:
• Junos OSwith a null (empty) edition field is the standard image for Junos OS.
• limited—Version has no cryptographic support and is intended for countries in the
EurasianCustomsUnion (EACU). Thesecountries have import restrictionson software
containing data-plane encryption.
Other variants include the following terms:
• The term secure, indicating the image is Secure-Boot capable, is also used in the same
location in the filename as the edition.
• Sometimes secure-limitedareused together, again in the same location in the filename
as the edition.
• Another variant is flex. This descriptor appears before the release number string and
indicates the version supports enhanced automation.
RelatedDocumentation
Changes in Package Names for Junos OSwith Upgraded FreeBSD on page 18•
Software Package Information Security
JunosOS software is delivered in signed packages that contain digital signatures, Secure
HashAlgorithm(SHA-1), andMessageDigest 5 (MD5) checksums.Apackage is installed
only if the checksumwithin it matches the hash recorded in its corresponding file. Which
checksum is used depends on the software version:
• Digital signatures are used when you upgrade or downgrade between Junos OS
Release 7.0 and a later version.
11Copyright © 2018, Juniper Networks, Inc.
Chapter 1: Software Overview

• The SHA-1 checksum is used when you upgrade or downgrade between Junos OS
Release 6.4 and a later version.
• The MD5 checksum is used when you upgrade or downgrade between Junos OS
Release 6.3 or earlier and a later version.
RelatedDocumentation
Installation Type Overview on page 43•
• Software Naming Convention for SRX Series Devices
InstallationModules
Installation modules are used to upgrade individual software modules in Junos OS. For
example, you can upgrade only the Routing Engine software by installing the jroute*installation module.
NOTE: You should only use installationmodule files under the direction ofa Juniper Networks support representative.
The following installation module files are available for download:
DescriptionInstallationModule
The kernel and network tools package. Thispackage contains the basic operating systemfiles.
jkernel*
The base package for Junos OS. This packagecontains additions to the operating system.
jbase*
The Routing Engine package. This packagecontains the Routing Engine software.
jroute*
The Packet Forwarding Engine package. Thispackage contains the PFE software.
jpfe*
The documentation package. This packagecontains the documentation set for thesoftware.
jdocs*
Theencryptionpackage.Thispackagecontainsthe domestic version of the security software.
jcrypto*
The J-Web package. This package contains thegraphical user interface software for M Series,MX Series, T Series, TX Matrix, and TXMatrixPlus routers.
jweb*
Copyright © 2018, Juniper Networks, Inc.12
Installation and Upgrade Guide

NOTE: Starting with Junos OS Release 15.1, certain hardware platforms runa Junos OS based on an upgraded FreeBSD kernel (hereafter called JunosOSwith upgraded FreeBSD). Junos OSwith upgraded FreeBSD has a newnaming convention. For more information on this new naming convention,see “Changes in Package Names for Junos OSwith Upgraded FreeBSD” onpage 18.
Configuration Files
All configuration settings for the device are handled in the configuration files on the
device. These files are saved in the /config directory on the device.
Configuration File Selection Sequence
During the boot process, the device is configured based on a predefined configuration
file. The device selects the configuration file based on the sequence shown in
Figure 1 on page 13.
Figure 1: Configuration Selection Sequence
The configuration file selection process occurs in the following sequence:
1. /config/juniper.conf—Active configuration file.
2. /config/rescue.conf—Rescue configuration file. This file is created by the router or
switch administrator.
13Copyright © 2018, Juniper Networks, Inc.
Chapter 1: Software Overview

3. /config/juniper.conf.1—First rollback configuration.
4. /etc/config/factory.conf—Default factory configuration file.
The factory.conf file is the initial device configuration file shipped with the system. All
configuration settings are returned to the factory default, and access to the device is
restricted to the console. For more information about setting up your device from the
factory default configuration, see the specific hardware guide for your device.
For SRX Series Services Gateways running Junos OS Release 10.0 or later, the current
operational Junos OS configuration is stored in a file named juniper.conf and the last five
committed configurations are stored in the files juniper.conf.1 through juniper.conf.5. The
rescue configuration is stored in a file named rescue.conf. These files are located in the
/config directory available on the flash drive of the SRX Series Services Gateway.
To list the configuration files, use the file list /config operational mode command.
user@host>file list / config/config:.snap/idp-dfa-status.dbjuniper.conf+.gzjuniper.conf.1.gzjuniper.conf.2.gzjuniper.conf.3.gzjuniper.conf.4.gzjuniper.conf.5.gzjuniper.conf.gzjuniper.conf.md5*jwxd_initializedlicense/license-status.dbrescue.conf.gzusage.dbusage.db.1344499761
Remote Storage of Configuration Files
Configuration files canbestoredoff thedevice.This canbehelpful if thedeviceencounters
a software failure or other problem that forces you to restore the device’s software. Once
the software is restored, you can then reload the saved configuration file. For more
information about restoring Junos OS, see “Loading and Committing the Configuration
File” on page 234.
When the configuration file is stored off the device, you can encrypt the configuration
files using the Data Encryption Standard (DES) encryption algorithm.
RelatedDocumentation
Boot Sequence on SRX Series Devices on page 40•
Copyright © 2018, Juniper Networks, Inc.14
Installation and Upgrade Guide

Understanding Software Infrastructure and Processes on EX Series Switches
Each switch runs the Juniper Networks Junos operating system (Junos OS) for Juniper
Networks EX Series Ethernet Switches on its general-purpose processors. Junos OS
includes processes for Internet Protocol (IP) routing and for managing interfaces,
networks, and the chassis.
Junos OS runs on the Routing Engine. The Routing Engine kernel coordinates
communication among the Junos OS processes and provides a link to the Packet
Forwarding Engine.
With the J-Web interfaceand thecommand-line interface (CLI) to JunosOS, youconfigure
switching features and routing protocols and set the properties of network interfaces on
your switch. After activating a software configuration, use either the J-Web or CLI user
interface tomonitor the switch, manage operations, and diagnose protocol and network
connectivity problems.
• Routing Engine and Packet Forwarding Engine on page 15
• Junos OS Processes on page 15
Routing Engine and Packet Forwarding Engine
A switch has two primary software processing components:
• Packet Forwarding Engine—Processes packets; applies filters, routing policies, and
other features; and forwards packets to the next hop along the route to their final
destination.
• Routing Engine—Provides three main functions:
• Creates the packet forwarding switch fabric for the switch, providing route lookup,
filtering, and switching on incoming data packets, then directing outbound packets
to the appropriate interface for transmission to the network
• Maintains the routing tables used by the switch and controls the routing protocols
that run on the switch.
• Provides control andmonitoring functions for the switch, including controllingpower
andmonitoring system status.
Junos OS Processes
The Junos OS running on the Routing Engine and Packet Forwarding Engine consists of
multiple processes that are responsible for individual functions.
Theseparationof functionsprovidesoperational stability, becauseeachprocessaccesses
itsownprotectedmemory space. Inaddition, becauseeachprocess isa separate software
package, you can selectively upgrade all or part of the Junos OS, for added flexibility.
Table 5 on page 16 describes the primary Junos OS processes.
15Copyright © 2018, Juniper Networks, Inc.
Chapter 1: Software Overview

Table 5: Junos OS Processes
DescriptionNameProcess
Detects hardware on the system that is used to configure network interfaces.
Monitors the physical status of hardware components and field-replaceable units(FRUs),detectingwhenenvironmentsensors suchas temperaturesensorsare triggered.
Relays signals and interrupts—for example, when devices are taken offline, so that thesystem can close sessions and shut down gracefully.
chassisdChassis process
Handles Layer 2 switching functionality such as MAC address learning, Spanning TreeProtocol andaccessport security. Theprocess is also responsible formanagingEthernetswitching interfaces, VLANs, and VLAN interfaces.
Manages Ethernet switching interfaces, VLANs, and VLAN interfaces.
NOTE: The process is not applicable for EX2300 and EX3400 switches
eswdEthernetswitchingprocess
Defines how routing protocols operate on the switch. The overall performance of theswitch is largely determined by the effectiveness of the forwarding process.
pfemForwardingprocess
Configures andmonitors network interfaces by defining physical characteristics suchas link encapsulation, hold times, and keepalive timers.
dcdInterfaceprocess
Provides communication between the other processes and an interface to theconfiguration database.
Populates the configuration databasewith configuration information and retrieves theinformation when queried by other processes to ensure that the system operates asconfigured.
Interactswith the other processeswhen commands are issued through one of the userinterfaces on the switch.
If a process terminates or fails to startwhen called, themanagement process attemptsto restart it a limited number of times to prevent thrashing and logs any failureinformation for further investigation.
mgdManagementprocess
Defines how routing protocols such as RIP, OSPF, and BGP operate on the device,including selecting routes andmaintaining forwarding tables.
rpdRoutingprotocolprocess
RelatedDocumentation
EX Series Ethernet Switches•
Junos OSwith Upgraded FreeBSD
Junos OSwith upgraded FreeBSD provides a clean-slate implementation of Junos OS
on top of a pristine (minimally modified) and current version of FreeBSD. Basing Junos
OSon an upgraded FreeBSD kernelmakes JunosOSmore efficient and takes advantage
of the sophisticated processing and security features in the upgraded FreeBSD kernel.
Copyright © 2018, Juniper Networks, Inc.16
Installation and Upgrade Guide

Both virtualized Routing Engines (or VM hosts) and non-virtualized Routing Engines run
Junos OSwith upgraded FreeBSD. For more information on VM hosts, see “Routing
Engines with VM Host Support” on page 273 and “VM Host Installation” on page 280.
Themajor processing changes in Junos OSwith upgraded FreeBSD are as follow:
• Interactionsbetween JunosOSand theupgradedFreeBSDkernel usewell-established
interfacesbecause JunosOS isnow layeredonaminimallymodifiedandcurrent version
of FreeBSD.
• Symmetric multiprocessing (SMP) is enabled by default.
• FreeBSD provides a consistent runtime environment for all Junos OS platforms.
For other changes in Junos OSwith upgraded FreeBSD, see the following subsections:
• Release Information for Junos OSwith Upgraded FreeBSD on page 17
• Changes in Package Names for Junos OSwith Upgraded FreeBSD on page 18
• Changes inCommandsandStatements in JunosOSwithUpgradedFreeBSDonpage22
• Changes in Disk Volumes for Junos OSwith Upgraded FreeBSD on page 24
• Changes in Use of Snapshots for Junos OSwith Upgraded FreeBSD on page 26
Release Information for Junos OSwith Upgraded FreeBSD
Junos OSwith upgraded FreeBSDwas first introduced in Junos OS Release 15.1 running
on bare metal.
In Junos OS Release 16.1, with the release of virtualized Routing Engines RE-MX-X6,
RE-MX-X8,andRE-PTX-X8, JunosOSwithupgradedFreeBSDcould runasaguest virtual
machine (VM) on a Linux VM host.
NOTE: VM hosts only run virtualized Junos OSwith upgraded FreeBSD.
To find which platforms support Junos OSwith upgraded FreeBSD, see Feature Explorer
and enter one of the following:
• For non-virtualized, enter freebsd and select FreeBSD 10 kernel for Junos OS.
• For virtualized, enter virtualization and select Virtualization of the Routing Engine.
NOTE: Before upgrading to JunosOSRelease 15.1 or later on theseplatforms,see the installation and upgrade procedures in the following topics:
• Baremetal: “Upgrading Junos OSwith Upgraded FreeBSD” on page 160
• Guest VM: “VMHost Installation” on page 280
17Copyright © 2018, Juniper Networks, Inc.
Chapter 1: Software Overview

Changes in Package Names for Junos OSwith Upgraded FreeBSD
JunosOSwith upgraded FreeBSD is based on an upgraded FreeBSD kernel and has been
released on a platform-by-platform basis starting in Junos OS Release 15.1.
Package-naming conventions changed in certainwayswith the release of JunosOSwith
upgraded FreeBSD, depending on the hardware platform.
Junos OSwith upgraded FreeBSD packages use XML description files instead of scripts.
Installation package names for VM hosts begin with the junos-vmhost-install prefix.
For information on and examples of other installation package names for Junos OSwith
upgraded FreeBSD, see the following subsections:
• Linux-Based Platforms Package Names on page 18
• EX Series Switches Package Names on page 18
• MX Series Routers Package Names on page 20
• QFX Series and EX4600 Switches Package Names on page 21
• SRX5400, SRX5600, and SRX5800 Devices Package Names on page 22
Linux-Based Platforms Package Names
The followingare components of the JunosOSwith upgradedFreeBSDpackage-naming
conventions for Linux-based packages such as those for ACX Series, NFX Series, OCX
Series, and PTX Series:
• Prefix—Linux-based devices use the jinstall-host prefix for Junos OSwith upgraded
FreeBSD.
• Platform—This field indicates the major product group, such as acx, nfx, ocx, or ptx.
• Product—This field indicates the specific product.
• Architecture—This field indicates theCPUarchitecture of theplatforms. Values include
x86 for Intel and arm for Advanced RISC Machines CPUs.
• Application Binary Interface (ABI)—This field indicates the “word length” of the CPU
architecture. Values include 32 for 32-bit architectures and 64 for 64-bit architectures.
• Release—This field indicates the release number, such as 17.3R1.3.
• Edition—The edition field is null (empty) for standard (domestic) images. For
jurisdictions with limits on dataplane encryption, this field is set to limited.
Examplesof valid JunosOSwithupgradedFreeBSDpackagenames include the following:
• jinstall-host-acx5k-17.2R1.13-signed.tgz
• jinstall-host-nfx-2-flex-x86-32-17.2R1.13-secure-signed.tgz
EX Series Switches Package Names
There are multiple conventions for naming installation packages for EX Series switches.
Copyright © 2018, Juniper Networks, Inc.18
Installation and Upgrade Guide

• The EX9200 switch is based on the MX Series routers and has the same
package-namingconventionas theMXSeries routers. See “MXSeriesRoutersPackage
Names” on page 20.
• The EX4600 switch is based on the QFX5100 platform and has the same
package-naming convention as the QFX5100 platform. See “QFX Series and EX4600
Switches Package Names” on page 21.
• Thecomponentsof the JunosOSwithUpgradedFreeBSDpackage-namingconventions
for EX2300 and EX3400 switches are as follows:
• Prefix—This is junos-arm. This prefix takes theplaceof the jinstallprefix used in earlier
releases of Junos OS.
• Media keyword—Added to the prefix, a media keyword is only used when the image
is not for use with the request system software add command. Media keywordsfollow the termmedia in the package name. Values for the media keyword include
the following:
usb for images installed from a USB drive
net for images installed from the loader prompt
• Architecture—This field indicates the CPU architecture of the platforms. Values
include x86 for Intel and arm for Advanced RISC Machines CPUs.
• Application Binary Interface (ABI)—This field indicates the “word length” of the CPU
architecture.Values include32 for 32-bit architecturesand64 for64-bit architectures.
• Release—This field indicates the release number, such as 15.1R1.9.
• Edition—The edition field is null (empty) for standard (domestic) images. For
jurisdictions with limits on dataplane encryption, this field is set to limited.
As before, all images are in tarred and gzipped (.tgz) format.
NOTE: There are no longer “export” worldwide images or separate FIPSimages. The keyword “signed” no longer appears because all Junos OSimages are signed for validation.
Examples of valid Junos OS software package names include the following:
• junos-arm-32-15.1X53-D50.2.tgz—Image for an EX2300 or EX3400 platform for
jurisdictions without limits on dataplane encryption.
• junos-arm-32-15.1X53-D50.2-limited.tgz—Image for an EX2300 or EX3400 platform
for jurisdictions with limits on dataplane encryption.
19Copyright © 2018, Juniper Networks, Inc.
Chapter 1: Software Overview

• junos-install-media-usb-arm-32-15.1X53-D50.2.img—Image stored on and installed
from a USB drive for a EX2300 or EX3400 platform for jurisdictions without limits on
dataplane encryption.
• junos-install-media-net-arm-32-15.1X53-D50.2.tgz—Image stored on the tftp server
and installed from a loader prompt for a EX2300 or EX3400 platform for jurisdictions
without limits on dataplane encryption.
MXSeries Routers Package Names
The components of the JunosOSwithUpgraded FreeBSDpackage-naming conventions
for MX Series routers and EX9200 switches are as follows:
• Prefix—This is junos-install. This prefix takes theplaceof the jinstallprefix used in earlier
releases of Junos OS.
• Media keyword—Added to the prefix, a media keyword is only used when the image is
not for use with the request system software add command. Media keywords followthe termmedia in the package name. Values for the media keyword include the
following:
usb for images installed from a USB drive
net for images installed from the loader prompt
• Platform—This field indicates the major product group, such as ex92xx ormx.
• Architecture—This field indicates theCPUarchitecture of theplatforms. Values include
x86 for Intel and arm for Advanced RISC Machines CPUs.
• Application Binary Interface (ABI)—This field indicates the “word length” of the CPU
architecture. Values include 32 for 32-bit architectures and 64 for 64-bit architectures.
• Release—This field indicates the release number, such as 17.3R1.3.
• Edition—The edition field is null (empty) for standard (domestic) images. For
jurisdictions with limits on dataplane encryption, this field is set to limited.
As before, all images are in tarred and gzipped (.tgz) format.
NOTE: There are no longer “export” worldwide images or separate FIPSimages.Thekeyword“signed”no longerappearsbecauseall JunosOS imagesare signed for validation.
Examplesof valid JunosOSwithupgradedFreeBSDpackagenames include the following:
• junos-install-mx-x86-32-15.1R1.9.tgz—Image for a supported MX Series platform for
jurisdictions without limits on dataplane encryption.
• junos-install-mx-x86-32-15.1R1.9-limited.tgz—Image forasupportedMXSeriesplatform
used for jurisdictions with limits on dataplane encryption.
Copyright © 2018, Juniper Networks, Inc.20
Installation and Upgrade Guide

• junos-install-media-usb-mx-x86-32-15.1R1.9.tgz—Image stored on and installed from
a USB drive for a supported MX Series platform for jurisdictions without limits on
dataplane encryption.
• junos-install-ex92xx-x86-64-17.2R1.13-limited.tgz—Image for an EX9200 plaform for
jurisdictions with limits on dataplace encryption.
• junos-install-media-usb-ex92xx-17.2R1.13.img.gz—Image stored on and installed from
aUSB for an EX9200platform for jurisdictionswithout limits on dataplace encryption.
QFX Series and EX4600 Switches Package Names
The components of the JunosOSwith upgraded FreeBSDpackage-naming conventions
for QFX Series and EX4600 switches installation packages are as follows:
• Prefix—Linux-based devices use the jinstall-host prefix for Junos OSwith upgraded
FreeBSD.
• Platform—This field indicates the major product group, such as ex-4600 or qfx.
• Product—This field indicates the specific product, such as 5e or 10-f or 10-m
• Architecture—This field indicates theCPUarchitecture of theplatforms. Values include
x86 for Intel and arm for Advanced RISC Machines CPUs.
• Application Binary Interface (ABI)—This field indicates the “word length” of the CPU
architecture. Values include 32 for 32-bit architectures and 64 for 64-bit architectures.
• Release—This field indicates the release number, such as 17.3R1.3.
• Edition—The edition field is null (empty) for standard (domestic) images. For
jurisdictions with limits on dataplane encryption, this field is set to limited.
Examplesof valid JunosOSwithupgradedFreeBSDpackagenames include the following:
• jinstall-host-ex-4600-17.2R1.13-limited-signed.tgz
• jinstall-host-ex-4600-17.2R1.13-signed.tgz
• jinstall-host-qfx-5e-x86-64-17.2R1.13.tgz—Image for QFX5110 or QFX5200.
• jinstall-host-qfx-10-f-flex-x86-64-17.2R1.13-secure-signed.tgz—Image for QFX (???)
supporting enhanced automation and Secure Boot capable for jurisdictions without
limits on dataplane encryption.
• jinstall-host-qfx-10-m-x86-64-17.2R1.13-secure-limited-signed.tgz—ImageforQFX10008
orQFX10016,SecureBoot capable for jurisdictionswith limitsondataplaneencryption..
• jinstall-host-qfx-5-17.2R1.13-limited-signed.tgz
21Copyright © 2018, Juniper Networks, Inc.
Chapter 1: Software Overview

SRX5400, SRX5600, and SRX5800Devices Package Names
The components of the JunosOSwith upgraded FreeBSDpackage-naming conventions
for SRX5400, SRX5600, and SRX5800 are as follows:
• Prefix—This is junos-install. This prefix takes the place of the prefix junos-srx5000.
• Media keyword—Added to the prefix, a media keyword is only used when the image is
not for use with the request system software add command. Values for themediakeyword include usb for images installed from a USB drive or net for images installed
from the loader prompt; for example, the entire prefix of your packagemight be
junos-install-media-net or junos-install-media-usb.
• Architecture—This field indicates theCPUarchitecture of theplatforms. Values include
x86 for Intel and arm for Advanced RISC Machines CPUs.
• Application binary interface (ABI)—This field indicates the “word length” of the CPU
architecture. Values include 32 for 32-bit architectures and 64 for 64-bit architectures.
• Release—This field indicates the release number, such as 17.3.
• Edition—The edition field is null (empty) for the standard (domestic) images. For
jurisdictions with limits on dataplane encryption, this field is set to limited.
NOTE: There are no longer “export” worldwide images or separate FIPSimages.Thekeyword“signed”no longerappearsbecauseall JunosOS imagesare signed for validation.
Examples of valid Junos OS software package names include the following:
• junos-install-srx5000-x86-64-17.3R1.9.tgz—An image for a SRX5400, SRX5600, and
SRX5800 devices.
• junos-install-media-usb-srx5000-x86-64-17.3R1.9.img.gz—An image stored on and
installed from a USB flash drive for SRX5400, SRX5600, and SRX5800 devices.
Changes in Commands and Statements in Junos OSwith Upgraded FreeBSD
The upgraded FreeBSD kernel requires changes to several commands and statements
and their related parameters. The new and changed actions are summarized in
Table 6 on page 22. For details on the changes listed in Table 6 on page 22, see the topics
covering the specific command or statement.
ForchangedactionsforVMhosts, see“VMHostOperationsandManagement”onpage289.
Table 6: New and Changed Commands and Statements for Junos OSwith Upgraded FreeBSD
ChangeCommand or Statement
New actionrequest system snapshot delete snapshot
Copyright © 2018, Juniper Networks, Inc.22
Installation and Upgrade Guide

Table 6: New and Changed Commands and Statements for Junos OSwith Upgraded FreeBSD (continued)
ChangeCommand or Statement
New actionrequest system snapshot recovery
New actionrequest system snapshot load snapshot
Newaction: volume is either /junos-volumeor /oam-volume
request system recover volume
Changed actionrequest system snapshot
Changed actionshow system snapshot
Changed action with newmedia optionsrequest system reboot (junos | network | oam | usb}
The upgraded FreeBSD kernel also requires that several commands and statements in
JunosOSbedeprecated in JunosOSwithupgradedFreeBSD.Thedeprecatedcommands
and statements are summarized in Table 7 on page 23. The date of deprecation is the
releasedate for thatplatformsupporting JunosOSwithupgradedFreeBSD.To findwhich
platforms support Junos OSwith upgraded FreeBSD, see Feature Explorer and enter one
of the following:
• For non-virtualized, enter freebsd and select FreeBSD 10 kernel for Junos OS.
• For virtualized, enter virtualization and select Virtualization of the Routing Engine.
Table 7: Deprecated Commands and Statements for Junos OSwithUpgraded FreeBSD
Release DeprecatedDeprecated Command or Configuration Statement
Deprecated Command
23Copyright © 2018, Juniper Networks, Inc.
Chapter 1: Software Overview

Table 7: Deprecated Commands and Statements for Junos OSwithUpgraded FreeBSD (continued)
Release DeprecatedDeprecated Command or Configuration Statement
see Feature Explorer.request system partition abort
request system partition compact-flash
request system partition hard-disk
request system snapshot <config-partition>
request system snapshot <root-partition>
request system snapshot <slice>
request system software delete-backup
request system software rollback <force>
show system processes providers
show system snapshot <slice>
Deprecated Configuration Statement
see Feature Explorer.set systemmirror-flash-on-disk
See Also request system snapshot (Junos OSwith Upgraded FreeBSD) on page 427•
• show system snapshot (Junos OSwith Upgraded FreeBSD) on page 522
• request system reboot (Junos OSwith Upgraded FreeBSD) on page 411
Changes in Disk Volumes for Junos OSwith Upgraded FreeBSD
In computer data storage, a volume or logical drive is a single accessible storage area
with a single file system, typically (though not necessarily) resident on a single partition
of a hard disk.
JunosOSwith upgraded FreeBSDhas two volumes: dev/gpt/junos (/junos for short) and
a separate operations, administration, andmaintenance (OAM) volume dev/gpt/oam
(/oam for short).
• /junos Volume on page 25
• /oam Volume on page 25
Copyright © 2018, Juniper Networks, Inc.24
Installation and Upgrade Guide

/junos Volume
The /junosvolume isused for runningdevice softwareandholdsconfiguration information
and logs.
The /junosvolumecontainsadirectorynamed /packages/db thathasall thecomponents
present on the device, such as os-kernel-123, os-kernel-456, and so on. A sibling directory
named /package-sets is also present. Package sets are an important concept in Junos
OSwith upgraded FreeBSD.
The /package-sets directory contains a package listing that gathers all the components
of the running Junos OS into an XML format in the /active subdirectory. So os-kernel-123
could be a component in the /package-sets/active subdirectory, but then os-kernel-456
could not be in the same XML package. Package sets do not contain the kernel software
itself (for example), but tell the device where to find the kernel component needed for
the software package. The same kernel can be present in several package listings, but
only one package can be active and running on the device at any given time.
There are several directories on the /junos volume where a particular software package
listing can be found:
• /previous—The package set in this directory contains the list of all the components
that ran on the device before the last upgrade.
• /active—The package set in this directory contains the list of all the software
components currently running on the device.
• /pending—The package set in this directory contains the list of all the software
components on the device that will run after the next reboot.
NOTE: After a successful reboot, the package set in the /pending directory
becomes the active package set, and the package set in the /active directory
becomes the previous set.
The /junos volume also contains non-recovery snapshots taken with the request system
snapshot command. These types of snapshots are new to Junos OSwith upgraded
FreeBSD and cannot be used for recovery of a failed system. Non-recovery snapshots
are a special type of package set that includes a copy of the configuration. For more
information on non-recovery snapshots, see “Changes in Use of Snapshots for Junos OS
with Upgraded FreeBSD” on page 26.
/oamVolume
The compact flash drive is the /oam volume. In case of failure of the main drive (that is,
the /junos volume), the /oam volume canbe used to boot the system. In order to perform
this reboot, the /oam volume needs to have all of the information required to provide the
systemwitha runningconfiguration.This information isprovidedby the recovery snapshot,
created with the request system snapshot recovery command. Although it can take a
while to perform, the recovery snapshot establishes an .izo or .iso image of the running
25Copyright © 2018, Juniper Networks, Inc.
Chapter 1: Software Overview

JunosOS. Formore informationon recovery snapshots, see “Changes inUseofSnapshots
for Junos OSwith Upgraded FreeBSD” on page 26.
Changes in Use of Snapshots for Junos OSwith Upgraded FreeBSD
Junos OSwith upgraded FreeBSD has two types of snapshots: recovery snapshots and
non-recovery snapshots. Recovery snapshotsandnon-recovery snapshotshavedifferent
content, locations, and purposes, so it is important that they are created andmaintained
properly.
NOTE: Werecommendthatyougeneratebothanon-recoveryanda recoverysnapshotafter yousuccessfullyupgrade to JunosOSwithupgradedFreeBSD.These snapshots should be refreshed periodically.
• Recovery Snapshots on page 26
• Non-Recovery Snapshots on page 27
Recovery Snapshots
Themajor characteristics of recovery snapshots are as follow:
• Recovery snapshots are full copies of the packages and configuration taken at the
time the snapshot command is issued.
• Recovery snapshots reside on the OAM volume or USBmedium.
Recovery snapshots take some time to complete because of the level of detail captured.
Recovery snapshots can be used to recover the Junos OS volume. There is only ever one
recovery snapshot on the system.
A recovery snapshot is automatically taken when, for the first time, you upgrade from a
pre-FreeBSD-based Junos OS release to Junos OSwith upgraded FreeBSD. Therefore,
unless someonemanually deletes the recovery snapshot, there should always be a
recovery snapshot.
If a device does not have a recovery snapshot, then the only way to recover the device
would be to do amedia install (network or USB).
Helpful commands for recovery snapshots are:
• requestsystemsnapshot recovery—Use this commandtocreatea recovery snapshot.Youcanuseotherparameters todetermine thedetailsof the recovery snapshotcreated.
There is only ever one recovery snapshot on the system.
• show system snapshot—As of Junos OS Release 17.2, use this command to list therecovery snapshot.
• Previous to JunosOSRelease 17.2, use the following shell command to see if a recovery
snapshot exits on the device:
# oamctl list-snapshorts
Copyright © 2018, Juniper Networks, Inc.26
Installation and Upgrade Guide

Non-Recovery Snapshots
Themajor characteristics of the non-recovery snapshots are as follows:
• Non-recovery snapshots reside on the /junos volume.
• Non-recovery snapshots refer to the current running set of packages and a copy of the
configuration at the time the snapshot command is issued.
• Non-recovery snapshots do not need to copy the whole Junos OS installation and so
are very fast.
• Non-recovery snapshots can be requested as the boot image for the next reboot.
• Therecanbemanynon-recovery snapshotson thedevice, and the files canbe renamed.
Multiple non-recovery snapshots, essentially lists of software components and
configuration files, can be helpful whenmajor software or configuration changes are
occurring and establishment of a known stable system baseline is required.
Non-recovery snapshots consume little space, except for the config.tgz file.
A non-recovery snapshot is also a package set in a sense, with the addition of a copy of
the configuration at the time that the non-recovery snapshot is taken.
Packages that are no longer referenced by any package set or non-recovery snapshot
are automatically deleted. We recommend deleting any old non-recovery snapshots
after an upgrade so that old packages can be deleted and space recovered.
Some helpful commands for non-recovery snapshots are:
• request system snapshot—Use this command to create a non-recovery snapshot.
• show system snapshot—Use this command to list all the available non-recoverysnapshots.
• request system snapshot delete—Use this command to delete a non-recoverysnapshot.
See Also show system snapshot (Junos OSwith Upgraded FreeBSD) on page 522•
• request system snapshot (Junos OSwith Upgraded FreeBSD) on page 427
RelatedDocumentation
• Upgrading Junos OSwith Upgraded FreeBSD on page 160
27Copyright © 2018, Juniper Networks, Inc.
Chapter 1: Software Overview

Copyright © 2018, Juniper Networks, Inc.28
Installation and Upgrade Guide

CHAPTER 2
Hardware Overview
• Hardware Architecture Overview on page 29
• Hardware Overview (ACX Series, M Series, MX Series, T Series, and TXMatrix
Routers) on page 30
• Hardware Overview of SRX Series Services Gateways on page 33
• Routing Engines and Storage Media Names (ACX Series, M Series, MX Series, PTX
Series, T Series, TX Matrix, TX Matrix Plus, and JCS 1200 Routers) on page 35
• Storage Media Names for SRX Series Devices on page 38
• Boot Sequence onMSeries, MX Series, T Series, TXMatrix, TXMatrix Plus, ACX Series,
and PTX Series Devices with Routing Engines on page 38
• Boot Sequence on SRX Series Devices on page 40
Hardware Architecture Overview
Juniper Networks routing platforms are made up of two basic routing components:
• Routing Engine—The Routing Engine controls the routing updates and system
management.
• Packet Forwarding Engine (PFE)—The Packet Forwarding Engine performs Layer 2
and Layer 3 packet switching, route lookups, and packet forwarding.
From a system administration perspective, you install the software onto the Routing
Engine and during the installation, the appropriate software is forwarded to other
components as necessary. Most Routing Engines include a CompactFlash card that
stores Junos OS. On M Series Multiservice Edge Routers; MX240, MX480, and MX960
3DUniversal Edge Routers; T Series Core Routers; and TXMatrix routers, the systemalso
includes a hard disk or solid-state drive (SSD) that acts as a backup boot drive. PTX
Series Packet Transport Routers and the TXMatrix Plus router include a solid-state drive
as a backup boot drive.
NOTE: TheMX80router isasingle-board routerwithabuilt-inRoutingEngineand single Packet Forwarding Engine. On anMX80 router, JunosOS is storedon dual, internal NAND flash devices. These devices provide the samefunctionalityasaCompactFlashcardandharddiskor solid-statedrive (SSD).
29Copyright © 2018, Juniper Networks, Inc.
NOTE: The ACX Series router is a single board router with a built-in RoutingEngineandonePacketForwardingEngine.TheACXrouter supportsdual-rootpartitioning, whichmeans that the primary and backup JunosOS images arekept in two independently bootable root partitions. If the primary partitionbecomes corrupted, the system remains fully functional by booting from thebackup Junos OS image located in the other root partition.
On routing platforms with dual Routing Engines, each Routing Engine is independent
with regard to upgrading the software. To install new software on both Routing Engines,
you need to install the new software on each Routing Engine. On platforms with dual
RoutingEnginesconfigured for highavailability, youcanuse theunified in-service software
upgrade procedure to upgrade the software. Formore information about this procedure,
see the High Availability Feature Guide for Routing Devices.
RelatedDocumentation
Dual-Root Partitioning ACX Series Routers Overview•
HardwareOverview (ACXSeries,MSeries,MXSeries, TSeries, andTXMatrixRouters)
Figure 2 on page 31 shows examples of Routing Engines.
Copyright © 2018, Juniper Networks, Inc.30
Installation and Upgrade Guide

Figure 2: Routing Engines
The ACX Series, M Series, MX Series, PTX Series, T Series, TX Matrix, and TXMatrix Plus
routers include the following:
• SystemMemory on page 31
• Storage Media on page 32
SystemMemory
Starting with Junos OS Release 9.0, all routing platforms require a minimum of 512 MB
of systemmemory on each Routing Engine. All M7i and M10i routers delivered before
December 7, 2007, had 256MB of memory. These routers require a systemmemory
upgrade before you install Junos OS Release 9.0 or a later release. To determine the
amountofmemorycurrently installedonyour system,use the showchassis routing-engine
command in the command-line interface (CLI).
31Copyright © 2018, Juniper Networks, Inc.
Chapter 2: Hardware Overview

Formore information about upgrading yourM7i orM10i router, see theCustomer Support
Center JTAC Technical Bulletin PSN-2007-10-001:
https://www.juniper.net/alerts/viewalert.jsp?txtAlertNumber=PSN-2007-10-001&actionBtn=Search.
ACX2000 routers are shipped with 2 GB of memory and ACX1000 routers with 1 GB of
memory.
StorageMedia
Except for the ACX Series, MX80 routers, and MX104 routers, the M Series, MX Series,
PTX Series, T Series, TX Matrix, and TXMatrix Plus routers use the following media
storage devices:
• CompactFlash card—The CompactFlash card is typically the primary storage device
for most routers.
NOTE: M7iandM10i routersusingRE-400arenotdeliveredfromthefactorywith the CompactFlash card installed. In this case, the hard disk is theprimary and only boot device. The M7i andM10i routers with RE-400 canbe upgraded to include the CompactFlash card.
• Hard disk or solid -state drive—For most routers, a hard disk or solid-state drive is the
secondary boot device. When the CompactFlash card is not installed on the router,
the hard disk or the solid-state drive becomes the primary boot device. The hard disk
or solid-state drive is also used to store system log files and diagnostic dump files.
• Emergency boot device—Depending on the router, the emergency boot device can be
a PC card, a USB storage device, or an LS-120 floppy disk.
OnMX80 routers, the internal NAND flash devices (first da0, then da1) act as the primary
and secondary boot devices.
On ACX Series routers, the internal NAND flash devices (first da0s1, then da0s2) act as
the primary and secondary boot devices.
Emergency boot devices can be used to revive a routing platform that has a damaged
JunosOS.When an emergency boot device is attached to the router, the router attempts
to boot from that device before it boots from the CompactFlash card, solid-state drive
(SSD), or hard disk.
On an ACX Series router, the emergency boot device is a USB storage device.
On MX104 routers, the internal NAND flash device (da0) mounted on the internal eUSB
card acts as the primary boot and storagedevice.OnMX104 routers, the emergency boot
device is aUSB storage device that is plugged into one of theUSBports in the front plate.
When booting from an emergency boot device, the router requests a boot
acknowledgment on the console interface. If you enter yes, the emergency boot device
repartitions the primary boot device and reloads Junos OS onto the primary boot device.
After the loading is complete, the routing platform requests that you remove the
Copyright © 2018, Juniper Networks, Inc.32
Installation and Upgrade Guide

emergency boot device and reboot the system. After the reboot is complete, youmust
perform an initial configuration of the router before it can be used on your network.
NOTE: For routers with RE-MX-X6, RE-MX-X8, and RE-PTX-X8 RoutingEngines, a set of two 64-GB SSDs are available for storage and redundancy.For more information see Storage Partitioning and Redundancy topic in“Salient Features of theRouting EngineswithVMHostSupport” onpage 275section.
Hardware Overview of SRX Series Services Gateways
SRX Series Device Overview
Figure 3 on page 33 shows an example of SRX240 device.
Figure 3: SRX240 Device Front Panel
Figure 4 on page 33 shows an example of SRX650 device.
Figure 4: SRX650 Device SystemRouting Engine
g000
121
Consoleport
CompactFlash port
USBports
Auxiliaryport
Figure 5 on page 33 shows the front panel of an SRX345 device.
Figure 5: SRX345 Device Front Panel
Figure 6 on page 33 shows an example of an SRX1500 device.
Figure 6: SRX1500 Device Front Panel
Figure 7 on page 34 shows an example of an SRX5800 device Routing Engine.
33Copyright © 2018, Juniper Networks, Inc.
Chapter 2: Hardware Overview

Figure 7: SRX5800Device Routing Engine
Figure 8 on page 34 shows an example of an SRX4200 device.
Figure 8: SRX4200 Services Gateway Front Panel
g005
246
LEDs
Man agementport
USB 2.0por t s
1G/10G SFP+HA por t s
1G/10G SFP+por t s
Con sole Resetbuttonport
SystemMemory
The amount of free disk space necessary to upgrade adevicewith a newversion of Junos
OScanvary fromone release toanother for differentSRXSeriesdevices. Check the Junos
OS software version you are installing to determine the free disk space requirements.
To determine the amount of free disk space on the device, issue the showsystemstorage
detail command. The command output displays statistics about the amount of free disk
space in the device file systems.
StorageMedia
The SRX100, SRX210, SRX240, Services Gateway can boot from the following storage
media (in the order of priority):
• Internal NAND Flash (default; always present)
• USB storage key (alternate)
The SRX550 and SRX650 Services Gateway can boot from the following storagemedia
(in the order of priority):
• CompactFlash (default; always present)
• External CompactFlash card (alternate) (SRX650 only)
• USB storage key (alternate)
The SRX300, SRX320, SRX340, 345 Services Gateway can boot from the following
storagemedia (in the order of priority):
• InternalNANDflashdevicemountedon the internaleUSBcard(default; alwayspresent)
Copyright © 2018, Juniper Networks, Inc.34
Installation and Upgrade Guide

• USB storage key (alternate)
TheSRX550MServicesGatewaycanboot fromthe following storagemedia (in theorder
of priority):
• CompactFlash (default; always present)
• USB storage key (alternate)
SRX1500 device use the following media storage devices:
• Internal eSATA flash disk (default; always present)
• SSD
SRX1400,SRX3400,SRX3600,SRX5400,SRX5600,SRX5800devicesusethe following
media storage devices:
• The CompactFlash card in the Routing Engine
• The hard disk in the Routing Engine
NOTE: You can also use a JunosOS image stored on aUSB flash drive thatyou insert into the Routing Engine faceplate.
The SRX4100 and SRX4200 devices include the following storagemedia:
• Internal eSATA flash disk (default; always present)
• SSD
The SRX4600 devices include the following storagemedia:
• Internal eSATA flash disk (default; always present)
• SSD
RelatedDocumentation
Boot Sequence on SRX Series Devices on page 40•
• Verifying PIC Combinations on page 348
Routing Engines and StorageMedia Names (ACX Series, M Series, MX Series, PTXSeries, T Series, TXMatrix, TXMatrix Plus, and JCS 1200 Routers)
Table 8 on page 36 specifies the storagemedia names by Routing Engine. The storage
media device names are displayed when the router boots.
35Copyright © 2018, Juniper Networks, Inc.
Chapter 2: Hardware Overview

Table8:RoutingEnginesandStorageMediaNames(ACXSeries,MSeries,MX Series, T Series, TXMatrix, TXMatrix Plus, and JCS 1200 Routers)
RemovableMediaEmergencyBoot Device
Solid-StateDriveHard Disk
CompactFlashCardRouting Engine
ad3Noad1ad0RE-400-768 (RE5)
ad3Noad1ad0RE-600-2048 (RE3)
ad3Noad1ad0RE-850-1536(RE-850)
da0Noad2ad0RE-A-1000-2048(RE-A-1000)
da0Yes
SSD1: ad1
SSD2: ad2
Noad0RE-A-1800x2(RE-A-1800)
da0Noad2ad0RE-S-1300-2048(RE-S-1300)
da0Yes
SSD1: ad1
SSD2: ad2
Noad0RE-S-1800x2RE-S-1800x4(RE-S-1800)
da0Yes
SSD1: ad1
Noad0RE-B-1800X1-4G-S
ad3 and ad4Noad1ad0RE-1600-2048(RE4)
da0Noad2ad0RE-A-2000-4096(RE-A-2000)
da0Noad2ad0RE-S-2000-4096(RE-S-2000)
da1 and da2Noda0NoRE-MX-104
da0ad1Noad0RE-DUO-C2600-16G(RE-DUO-2600)
da0ad1Noad0RE-DUO-C1800-8G-(RE-DUO-1800)
da0ad1Noad0RE-DUO-C1800-16G
Copyright © 2018, Juniper Networks, Inc.36
Installation and Upgrade Guide

Table8:RoutingEnginesandStorageMediaNames(ACXSeries,MSeries,MX Series, T Series, TXMatrix, TXMatrix Plus, and JCS 1200Routers) (continued)
RemovableMediaEmergencyBoot Device
Solid-StateDriveHard Disk
CompactFlashCardRouting Engine
da2Noda1da0RE-JCS1200-1x2330
USBSSD1
SSD2
NoNoRE-PTX-X8-64G
USBSSD1
SSD2
NoNoRE-S-X6-64G
USBSSD1
SSD2
NoNoREMX2K-X8-64G
NOTE: OnMX80 routers, the Routing Engine is a built-in device and has nomodel number. The dual internal NAND flash devices are da0 and da1. TheUSB storage device is da2.
NOTE: On ACX Series routers, the Routing Engine is a built-in device whichdoes not have amodel number. The dual internal NAND flash devices areda0s1 and da0s2. The USB storage device is da0s2a. Use the show chassis
hardwaremodelscommand toobtain the field-replaceableunit (FRU)model
number—for example, ACX2000BASE-DC for the ACX2000 router.
To view the storagemedia currently available on your system, use the CLI show system
storage command. For more information about this command, see the CLI User Guide.
RelatedDocumentation
Supported Routing Engines by Router•
• Routing Engine Specifications
• RE-S-1300 Routing Engine Description
• RE-S-2000 Routing Engine Description
• RE-S-1800 Routing Engine Description for MX Series
• JCS1200 Routing Engine Description
37Copyright © 2018, Juniper Networks, Inc.
Chapter 2: Hardware Overview

StorageMedia Names for SRX Series Devices
Table 9 on page 38 specifies the storagemedia names used by the SRX Series devices.
The storagemedia device names are displayed as the device boots.
Table 9: StorageMedia Names
USB Storage Media DevicesInternal CompactFlash CardDevice
da1da0SRX Series device
To view the storagemedia currently available on your system, use the CLI show system
storage command.
RelatedDocumentation
Hardware Overview of SRX Series Services Gateways on page 33•
• Boot Sequence on SRX Series Devices on page 40
BootSequenceonMSeries,MXSeries, TSeries, TXMatrix, TXMatrix Plus, ACXSeries,and PTX Series Devices with Routing Engines
NOTE: For information about which Routing Engines are supported by eachdevice, see http://www.juniper.net/techpubs/en_US/release-independent/
junos/topics/reference/general/routing-engine-m-mx-t-series-support-by-chassis.html.
The M Series, MX Series (except for the MX80 routers and the MX104 routers), T Series,
and TXMatrix routers with a Routing Engine that has a hard disk attempt to boot from
the storagemedia in the following order:
1. Removable media emergency boot device, such as a PC Card (if present)
2. CompactFlash card (if present)
3. Hard disk
The M Series and MX Series with a Routing Engine that has a solid-state drive (SSD)
attempt to boot from the storagemedia in the following order:
1. USBmedia emergency boot device (if present)
2. CompactFlash card
3. Solid-state drive (SSD) in the SSD slot 1 or SSD slot 2 (if present)
MX80 routers attempt to boot from the storagemedia in the following order:
1. USBmedia emergency boot device
2. Dual, internal NAND flash device (first da0, then da1)
Copyright © 2018, Juniper Networks, Inc.38
Installation and Upgrade Guide

MX104 routers attempt to boot from the storagemedia in the following order:
1. USB storagemedia device
2. Internal NAND flash device (da0)
The T Series routers with a Routing Engine that has a solid-state drive (SSD), and TX
Matrix Plus routers attempt to boot from the storagemedia in the following order:
1. USBmedia emergency boot device
2. CompactFlash card (if present)
3. Solid-state drive (SSD) in the Disk 1 slot (if present)
NOTE: The Disk 2 slot is not currently supported.
4. Storagemedia available on the LAN
The ACX Series routers attempt to boot from the storagemedia in the following order:
1. USB storagemedia device
2. Dual, internal NAND flash device (first da0s1, then da0s2)
The PTX Series Packet Transport Routers attempt to boot from the storagemedia in the
following order:
1. USBmedia emergency boot device
2. CompactFlash card
3. Solid-state drive (SSD) in the Disk 1 slot (if present)
4. Storagemedia available on the LAN
NOTE: Do not insert an emergency boot device during normal operations.The router does not operate normally when it is booted from an emergencyboot device.
If the router boots fromanalternate boot device, JunosOSdisplays amessage indicating
this when you log in to the router. For example, the following message shows that the
software booted from the hard disk (/dev/ad1s1a):
login: usernamePassword: passwordLast login: date on terminal
--- Junos 8.0 R1 built date------ NOTICE: System is running on alternatemedia device (/dev/ad2s1a).
39Copyright © 2018, Juniper Networks, Inc.
Chapter 2: Hardware Overview

This situation results when the router detects a problemwith the primary boot
device—usually theCompactFlashcard—thatprevents it frombooting, andconsequently
boots fromthealternatebootdevice (theharddiskdrive).When thishappens, theprimary
boot device is removed from the list of candidate boot devices. The problem is usually
a serious hardware error. We recommend you contact the Juniper Networks Technical
Assistance Center (JTAC).
NOTE: OnMX104 routers, if the router boots from an alternate boot device,JunosOSdoes not display anymessage indicating thiswhen you log in to therouter.
When the router boots from the alternate boot device, the software and configuration
are only as current as the most recent request system snapshot command. However, if
themirror-flash-on-disk command was enabled, then the hard disk drive contains a
synchronized,mirror image of the compact flash drive and therefore the current software
and configuration.
RelatedDocumentation
Routing Engine Specifications•
Boot Sequence on SRX Series Devices
On SRX Series devices, the device attempts to boot from the storagemedia in the
following order:
1. Internal CompactFlash card
2. Internal eSATA flash disk (for SRX1500, SRX4100, and SRX4200 devices)
3. USB storagemedia device
RelatedDocumentation
• Hardware Overview of SRX Series Services Gateways on page 33
• Storage Media Names for SRX Series Devices on page 38
Copyright © 2018, Juniper Networks, Inc.40
Installation and Upgrade Guide

PART 2
Installing Junos Software
• Installation Overview on page 43
• Performing a Standard or Change Category Installation on page 49
• Configuring Zero Touch Provisioning on page 81
• Configuring Automatic Installation of Configuration Files on page 99
• Configuring Dual-Root Partitions for High Availability on page 115
• Upgrading Software on page 131
• Booting a Device Using a System Snapshot on page 207
• Performing a Recovery Installation on page 215
• Reinstalling Software on page 239
• Downgrading Software on page 261
• Rebooting or Halting Software Processes on a Device on page 265
41Copyright © 2018, Juniper Networks, Inc.

Copyright © 2018, Juniper Networks, Inc.42
Installation and Upgrade Guide

CHAPTER 3
Installation Overview
• Installation Type Overview on page 43
• Understanding Software Installation on EX Series Switches on page 44
Installation Type Overview
The three types of installations used to upgrade or downgrade your routing platform are
standard installation, category change, and recovery. The standard installation is the
standard method of upgrading and downgrading the software. Use a category change
installation when you are moving from one software category to another; for example,
if you are changing the device from using the standard Junos OS to the Junos-FIPS
category. Perform a recovery installation when the software on the device is damaged
or otherwise unable to accommodate a software upgrade or downgrade.
Standard Installation
A standard installation is the typical method used to upgrade or downgrade software
on the server. This method uses the installation package that matches the installation
packagealready installed on the system. For example, youmight upgradeanM120 router
running Junos OS installed using the jinstall* installation package. If you upgrade the
router from Release 9.0R2.10 to Release 9.1R1.8, you use the
jinstall-9.1R1.8–domestic-signed.tgz installationpackage. For informationon thedifferent
installation packages available, see “Junos OS Installation Packages Prefixes” on page 7.
Category Change Installation
The category change installation process is used to move from one category of Junos
OS to another on the same router; for example, moving from a Junos OS standard
installation on an M Series, MX Series, or T Series router to a Junos-FIPS installation.
Whenmoving from one installation category to another, you need to be aware of the
restrictions regarding this change.
NOTE: Juniper Networks does not support using the request systemsoftware
rollback command to restore a different installation category on the device.
When installingadifferent JunosOScategoryonadevice,oncethe installationis complete, you should execute a request system snapshot command to
delete the backup installation from the system.
43Copyright © 2018, Juniper Networks, Inc.

Recovery Installation
A recovery installation is performed to repair a device with damaged software or a
condition that prevents the upgrade, downgrade, or change in installation category of
the software.
For example, youmay need to perform a recovery installation to change a device’s
software category from Junos-FIPS to standard Junos OS.
RelatedDocumentation
Junos OS Installation Packages Prefixes on page 7•
• Software Naming Convention for SRX Series Devices
Understanding Software Installation on EX Series Switches
A Juniper Networks EX Series Ethernet Switch is delivered with the Juniper Networks
Junos operating system (Junos OS) preinstalled. As new features and software fixes
becomeavailable, youmustupgradeyour software touse them.Youcanalsodowngrade
Junos OS to a previous release.
This topic covers:
• Overview of the Software Installation Process on page 44
• Software Package Security on page 45
• Installing Software on a Virtual Chassis on page 45
• Installing Software on Switches with Redundant Routing Engines on page 45
• Installing Software Using Automatic Software Download on page 46
• AutoinstallingaConfigurationFile onanEX2200orEX3300Switch fromaDisk-on-Key
USBMemory Stick on page 46
• Installing Software on an EX2300 or EX3400 Switch on page 46
• Configuration Image Validation on EX Series Switches on page 46
• Troubleshooting Software Installation on page 46
Overview of the Software Installation Process
An EX Series switch is delivered with a domestic version of Junos OS preinstalled. When
you connect power to the switch, it starts (boots) from the installed software.
You upgrade Junos OS on an EX Series switch by copying a software package to your
switch or another system on your local network, then use either the J-Web interface or
the command-line interface (CLI) to install the new software package on the switch.
Finally, you reboot the switch; it boots from the upgraded software. After a successful
upgrade, you should back up the new current configuration to a secondary device. You
should following this procedure regardless of whether you are installing a domestic or
controlled Junos OS package.
Copyright © 2018, Juniper Networks, Inc.44
Installation and Upgrade Guide

During a successful upgrade, the upgrade package removes all files from /var/tmp and
completely reinstalls the existing software. It retains configuration files, and similar
information, such as secure shell and host keys, from the previous version. The previous
software package is preserved in a separate disk partition, and you canmanually revert
back to it if necessary. If the software installation fails for any reason, such as loss of
powerduring the installationprocess, thesystemreturns to theoriginallyactive installation
when you reboot.
Software Package Security
All Junos OS releases are delivered in signed packages that contain digital signatures to
ensure official Juniper Networks software. For more information about signed software
packages, see the Junos OS Installation and Upgrade Guide.
Installing Software on a Virtual Chassis
You can connect individual EX Series switches together to form one unit andmanage
the unit as a single device, called a Virtual Chassis. The Virtual Chassis operates as a
single network entity composed of member switches. Eachmember switch in a Virtual
Chassis must be running the same version of Junos OS.
For easeofmanagement, aVirtualChassisprovides flexiblemethods toupgradesoftware
releases. You can deploy a new software release to all member switches of a Virtual
Chassis or to only a particular member switch.
You can also upgrade the software on a Virtual Chassis using nonstop software upgrade
(NSSU). NSSU takes advantage of graceful Routing Engine switchover (GRES) and
nonstop active routing (NSR) to ensure no disruption to the control plane during the
upgrade. You canminimize disruption to network traffic by defining link aggregation
groups (LAGs) such that the member links of each LAG reside on different line cards or
on different members . During an NSSU, the line cards and Virtual Chassis members are
upgraded one at a time, so that traffic continues to flow through the other line cards or
members while that line card or member is being upgraded.
Installing Software on Switches with Redundant Routing Engines
You can install software on a switchwith redundant Routing Engines in one of twoways:
• Perform an NSSU—An NSSU upgrades both Routing Engines with a single command
and with aminimum of network disruption. An NSSU takes advantage of GRES and
NSR to ensure no disruption to the control plane. You canminimize disruption to
network traffic by defining LAGs such that the member links of each LAG reside on
different line cards. The line cards are upgraded one at a time, so that traffic continues
to flow through the other line cards while a line card is being upgraded.
You cannot use NSSU to downgrade the software running on a switch.
For more information about NSSU, see “Understanding Nonstop Software Upgrade
on EX Series Switches” on page 140.
• Upgrade each Routing Engine manually—You can perform a Junos OS installation on
each Routing Engine separately, starting with the backup Routing Engine. You can use
45Copyright © 2018, Juniper Networks, Inc.
Chapter 3: Installation Overview

this procedure to downgrade the software running on a switch. See Installing Software
on an EX Series Switch with Redundant Routing Engines (CLI Procedure).
Installing Software Using Automatic Software Download
The automatic software download feature uses the DHCPmessage exchange process
todownloadand install softwarepackages.Userscandefineapath toasoftwarepackage
on the DHCP server, and then the DHCP server communicates this path to EX Series
switches acting as DHCP clients as part of the DHCPmessage exchange process. The
DHCP clients that have been configured for automatic software download receive these
messagesand,when thesoftwarepackagename in theDHCPservermessage isdifferent
from that of the software package that booted the DHCP client switch, download and
install the software package. See “Upgrading Software by Using Automatic Software
Download” on page 151.
Autoinstalling a Configuration File on an EX2200 or EX3300 Switch from a Disk-on-Key USBMemory Stick
You can use an autoinstallation process to configure the software on an EX2200 or
EX3300switch.Youcanuseaconfiguration file that is ineither text formatorXML format.
If you want to use an XML-formatted file, you use a Junos Space platform to create the
configuration file. You place the configuration file on a Disk-on-Key USBmemory stick.
Installing Software on an EX2300 or EX3400 Switch
Before installing software on an EX2300 or EX3400 switch:
• Ensure thatat least620MBofdisk space isavailable in thesystembeforedownloading
the software installation package to the /var/tmp directory. Use the command show
system storage to get details of the available space.
• If the space available is inadequate, use the command request systemstoragecleanup.
Additionally, youcanmanuallydeleteanyother logorunwanted files fromthe /var/tmp
or /var/log directories.
You can now follow the procedure in Installing Software on an EX Series Switch with a
Single Routing Engine (CLI Procedure) to complete the software installation.
Configuration Image Validation on EX Series Switches
If you upgradeor downgrade the JunosOS imageona switch that supports configuration
image validation, the system validates that the existing configuration is compatible with
the new image before the actual upgrade or downgrade commences. See Validating the
Configuration Image Before Upgrading or Downgrading the Software for details about
using image validation. See Feature Explorer for information about which EX Series
switches support image validation.
Troubleshooting Software Installation
If JunosOS loadsbut theCLI is notworking for any reason, or if the switchhasnosoftware
installed, you can use the recovery installation procedure to install the software on the
switch. See “Troubleshooting Software Installation” on page 343.
Copyright © 2018, Juniper Networks, Inc.46
Installation and Upgrade Guide

NOTE: You can also use this procedure to load two versions of Junos OS inseparate partitions on the switch.
RelatedDocumentation
• Downloading Software Packages from Juniper Networks
• Installing Software on EX Series Switches (J-Web Procedure)
• Installing Software on an EX Series Switch with a Single Routing Engine (CLI Procedure)
• Installing Software on an EX Series Switch with Redundant Routing Engines (CLI
Procedure)
• Understanding Nonstop Software Upgrade on EX Series Switches on page 140
47Copyright © 2018, Juniper Networks, Inc.
Chapter 3: Installation Overview

Copyright © 2018, Juniper Networks, Inc.48
Installation and Upgrade Guide

CHAPTER 4
Performing a Standard or ChangeCategory Installation
• Checking theCurrent Configuration andCandidate Software Compatibility on page 49
• Determining the Junos OS Version on page 50
• Downloading Software on page 50
• Understanding Download Manager for SRX Series Devices on page 54
• Understanding the Console Port on page 56
• Backing Up the Existing Installation on Routers on page 57
• Backing Up the Current Installation on SRX Series Devices on page 59
• Installing the Software Package on a Router with a Single Routing Engine on page 61
• Installing theSoftwarePackageonaRouterwithRedundantRoutingEnginesonpage63
• RepartitioningRoutingEngineSystemStorage to Increase theSwapPartitiononpage68
• Registering the EX Series Switch with the J-Web Interface on page 69
• Connecting and Configuring an EX Series Switch (CLI Procedure) on page 69
• Connecting and Configuring an EX9200 Switch (CLI Procedure) on page 72
• Installing Junos OS on SRX Series Devices Using a USB Flash Drive on page 75
• Installing Junos OS on SRX Series Devices from the Boot Loader Using a TFTP
Server on page 76
• Installing Junos OS on SRX Series Devices from the Boot Loader Using a USB Storage
Device on page 79
Checking the Current Configuration and Candidate Software Compatibility
Whenyouupgradeordowngrade JunosOS,we recommend that you include thevalidateoption with the request system software add command to check that the candidate
software is compatiblewith thecurrent configuration.Bydefault,whenyouaddapackage
with a different release number, the validation check is done automatically.
NOTE: OnanACXSeries router, youmustensure that theprimaryandbackuppartitions are synchronized after an upgrade by issuing the request systemsnapshot command.
49Copyright © 2018, Juniper Networks, Inc.

RelatedDocumentation
Preparing Your SRX Series Device for Junos OS Upgrades on page 168•
• Downloading Software Packages from Juniper Networks on page 184
• Example: Installing Junos OS Upgrade Packages on SRX Series Devices on page 185
• Installing Junos OS Upgrade Packages on SRX Series Devices from a Remote Server
on page 187
• request system snapshot (Maintenance) on page 429
• request system software add (Maintenance) on page 446
Determining the Junos OS Version
To determine which software packages are running on the device and to get information
about these packages, use the showversion operationalmode commandat the top level
of the command-line interface (CLI).
NOTE: The show version command does not show the software category
installed, only the release number of the software.
RelatedDocumentation
Preparing Your SRX Series Device for Junos OS Upgrades on page 168•
• Downloading Software Packages from Juniper Networks on page 184
• Example: Installing Junos OS Upgrade Packages on SRX Series Devices on page 185
• Installing Junos OS Upgrade Packages on SRX Series Devices from a Remote Server
on page 187
Downloading Software
You can download the software in one of two ways:
• Downloading Software by Using a Browser on page 51
• Installing Software Using the Command-Line Interface on page 52
Copyright © 2018, Juniper Networks, Inc.50
Installation and Upgrade Guide

Downloading Software by Using a Browser
Youdownload thesoftwarepackageyouneed fromthe JuniperNetworksSupportwebsite
at http://www.juniper.net/support/.
NOTE: To access the download section, youmust have a service contractand an access account. If you need help obtaining an account, complete theregistration form at the Juniper Networks website:https://userregistration.juniper.net/entitlement/setupAccountInfo.do.
To download the software image:
1. From your browser, go to http://www.juniper.net/support/.
The Online Support (CSC) page opens.
2. Click the Download Software link.
The Download Software page appears.
3. Select the software package that you want to download. You can select software
that supports a specific platform or technology.
4. On the page that appears, click the Software tab and select the Junos OS installation
package to download.
5. Log in with your username and password.
6. On the Download Software page that appears, the following options are available:
• If you want to download the software on your local host, click the CLICK HERE link
and save the file to your system. If you want to place the file on a remote system,
youmustmake sure that the file can be accessible by the router, switch, or services
gateway by using HTTP, FTP, or SCP. Proceed with the installation. See “Installing
Software Using the Command-Line Interface” on page 52 for more details.
• If you want to download the software on your device, use the following procedure
to download and install the software on the device.
a. Click Copy to copy the generated URL to the clipboard.
NOTE: The URL string generated remains active only for 15minutes.
b. Log in to your device.
c. In operational mode, enter the file copy “URL” destination command.
In the command, paste the copied URL string (forURL) and then enter /var/tmp
(as the destination on your hard disk).
Example:
51Copyright © 2018, Juniper Networks, Inc.
Chapter 4: Performing a Standard or Change Category Installation
NOTE: Ensure that theURLstring isenclosedwithinquotationmarks.Alsoensure that there is sufficient freespaceavailableon thedevice.
The software image is downloaded on your device.
d. (Optional) Validate the software image by using the request system software
validate package-name command.
Example:
user@host> request system software validate /var/tmp/junos-install-mx-x86-32-17.3R1.10.tgz
For more details, see request system software validate.
e. Install the software by using the request system software add package-name
command.
Example:
user@host> request system software add /var/tmp/junos-install-mx-x86-32-17.3R1.10.tgz
Your software is installed on the device.
See Also Junos Platforms - Download Software•
Installing Software Using the Command-Line Interface
Download the software package you need from the Juniper Networks Support website
at http://www.juniper.net/support/, and place the package on a local system. You can
then transfer the downloaded package to the device using either the router or switch
command-line interface, or the local system command-line interface.
NOTE: To access the download section, youmust have a service contractand an access account. If you need help obtaining an account, complete theregistration form at the Juniper Networks website:https://userregistration.juniper.net/entitlement/setupAccountInfo.do.
Before you transfer the software package, ensure that the FTP service is enabled on the
device.
Enable the FTP service using the set system services ftp command:
user@host# set system services ftp
To transfer the software package using the device command-line interface:
1. From the router or switch command line, initiate an FTP sessionwith the local system
(host) where the package is located by using the ftp command:
user@host> ftp host
Copyright © 2018, Juniper Networks, Inc.52
Installation and Upgrade Guide

host is the hostname or address of the local system.
2. Log in with your customer support–supplied username and password:
User Name: username331 Password required for username.Password: password
After your credentials are validated, the FTP session opens.
3. Navigate to the software package location on the local system, and transfer the
package by using the get command:
user@host> get installation-package
Following is an example of an installation-package name:
junos-install-mx-x86-32-17.3R1.10.tgz
4. Close the FTP session by using the bye command:
user@host> byeGoodbye
To transfer the package by using the local system command-line interface:
1. From the local system command line, initiate an FTP session with the device using
the ftp command:
user@host> ftp host
host is the hostname or address of the router or switch.
2. Log in with your customer support–supplied username and password:
User Name: username331 Password required for username.Password: password
After your credentials are validated, the FTP session opens.
3. Navigate to the software package location on the local system, and transfer the
package by using the put command:
user@host> put installation-package
Following is an example of an installation-package name:
junos-install-mx-x86-32-17.3R1.10.tgz
4. Close the FTP session by using the bye command:
user@host> byeGoodbye
See Also Junos Platforms - Download Software•
53Copyright © 2018, Juniper Networks, Inc.
Chapter 4: Performing a Standard or Change Category Installation

RelatedDocumentation
Downloading Software Packages from Juniper Networks on page 184•
• Example: Installing Junos OS Upgrade Packages on SRX Series Devices on page 185
• Installing Junos OS Upgrade Packages on SRX Series Devices from a Remote Server
on page 187
Understanding DownloadManager for SRX Series Devices
This topic includes the following sections:
• Overview on page 54
• Using Download Manager to Upgrade Junos OS on page 54
• Handling Errors on page 55
• Considerations on page 55
Overview
This downloadmanager feature facilitates download of large files over low-bandwidth
links. It enables you to download large Junos OS packages over low-bandwidth/flaky
links so that the system can be upgraded. This feature allows you to downloadmultiple
files while monitoring their status and progress individually. It takes automatic action
when required and displays status information when requested.
This feature is supported on SRX300, SRX320, SRX340, and SRX345 devices.
This feature provides the following functions:
• Bandwidth-limited downloads
• Scheduled downloads
• Automatic resume on error
• Automatic resume on reboot
NOTE: This feature supports only the FTP and HTTP protocols.
Using DownloadManager to Upgrade Junos OS
Thedownloadmanager acts as a substitute for the FTPutility. You canuse thedownload
manager CLI commands for all the functions where you previously used the FTP utility.
The downloadmanager requires the following:
• FTP or HTTP server with a Junos OS image
• Server that is reachable from the device being upgraded
Copyright © 2018, Juniper Networks, Inc.54
Installation and Upgrade Guide

The downloadmanager consists of the following CLI commands:
1. To download the Junos OS image to your device, use the request system download
start command (set a bandwidth limit, if required). The file is saved to the /var/tmp
directory on your device.
You can continue to use the device while the download runs in the background.
2. Use the showsystemdownload command to verify that the file hasbeendownloaded.
The command displays the state as "completed" when the downloaded file is ready
to be installed.
3. Use the request system software add command to install the downloaded image file
from the /var/tmp directory.
Handling Errors
If you encounter any problemwith a download, use the show system download id
command to obtain details about the download.
Table 10 on page 55 lists the output fields for the show systemdownload command. Use
this information to diagnose problems. Output fields are listed in the approximate order
in which they appear.
Table 10: show system download Output Fields
DescriptionOutput Field
State of the download.Status
Time the start command was issued.Creation Time
Time the download was scheduled to start.Scheduled Time
Time the download actually started (if it has already started).Start Time
Time for next retry (if the download is in the error state).Retry Time
Number of times an error was encountered by this download.Error Count
Number of times the systemwill retry the downloadautomatically before stopping.Retries Left
Message indicating the cause of the most recent error.Most Recent Error
Considerations
• When no download limit is specified for a specific download or for all downloads, a
download uses all available network bandwidth.
• Because the download limit that you set indicates an average bandwidth limit, it is
possible that certain bursts might exceed the specified limit.
55Copyright © 2018, Juniper Networks, Inc.
Chapter 4: Performing a Standard or Change Category Installation

• When a download from an HTTP server fails, the server returns an HTML page.
Occasionally, the error page is not recognized as an error page and is downloaded in
place of the Junos image file.
• Remote server logins and passwords are stored by the downloadmanager for the
duration of a download. To encrypt these credentials provided along with the login
keyword,defineanencryptionkeywith the requestsystemset-encryption-keycommand.
Any changes to encryption settings while download is in progress can cause the
download to fail.
• Adownload command issued on a particular node in a chassis cluster takes place only
on that node and is not propagated to the other nodes in the cluster. Downloads on
different nodes are completely independent of each other. In the event of a failover, a
download continues only if the server remains reachable from the node fromwhich
the command was issued. If the server is no longer reachable on that node, the
download stops and returns an error.
RelatedDocumentation
Installation Type Overview on page 43•
Understanding the Console Port
Console ports allow root access to the Junos operating system (Junos OS) devices
through a terminal or laptop interface, regardless of the state of the Junos OS device,
unless it is completely powered off. By connecting to the console port, you can access
the root level of the JunosOSdevicewithout using thenetwork towhich thedevicemight
ormight not be connected. This creates a secondary path to the JunosOSdevicewithout
relying on the network.
Using the terminal interface provides a technician sitting in a Network Operations Center
a long distance away the ability to restore a Junos OS device or perform an initialization
configuration securely, using amodem, even if the primary network has failed. Without
a connection to the console port, a technician would have to visit the site to perform
repairs or initialization. A remote connection to the Junos OS device through amodem
requires the cable and connector (provided in the device accessory box), plus a DB-9
male to DB-25male (or similar) adapter for your modem, which youmust purchase
separately. For more information about connecting to the console port, see the
administration guide for your particular router or switch.
To configure the device initially, you must connect a terminal or laptop computer to the
device through the console port, as shown in Figure 9 on page 57.
Copyright © 2018, Juniper Networks, Inc.56
Installation and Upgrade Guide
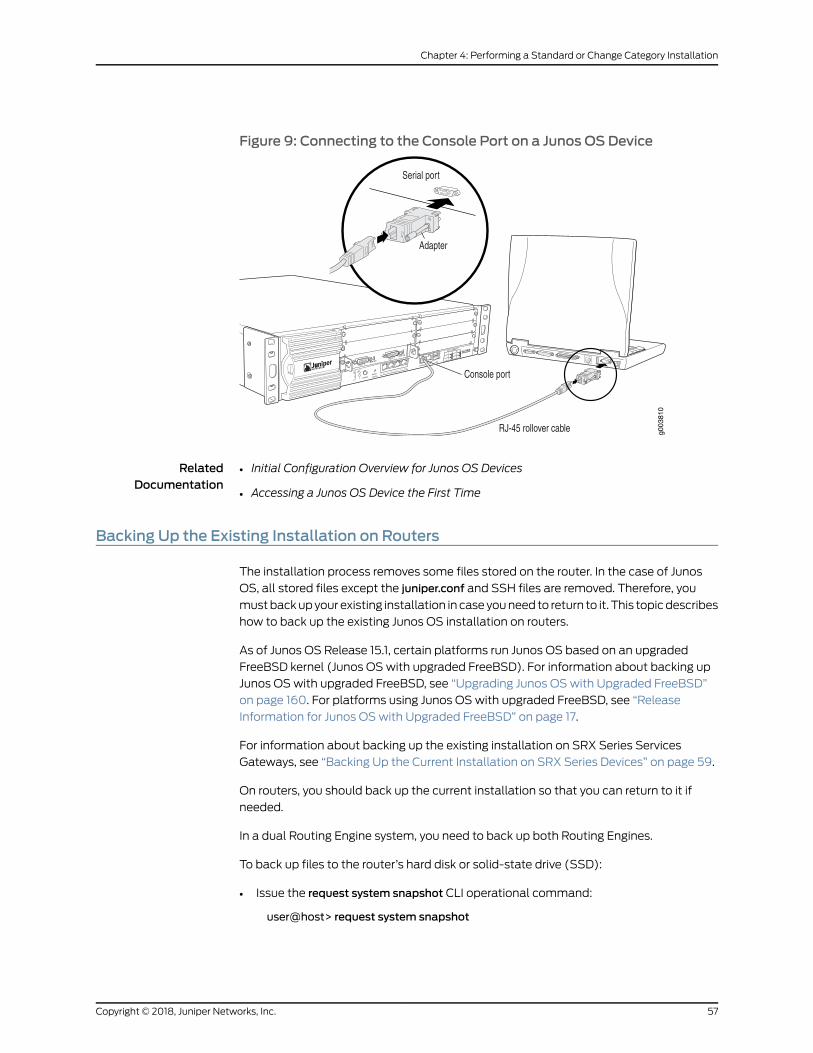
Figure 9: Connecting to the Console Port on a Junos OS Device
g003
810
RelatedDocumentation
Initial Configuration Overview for Junos OS Devices•
• Accessing a Junos OS Device the First Time
Backing Up the Existing Installation on Routers
The installation process removes some files stored on the router. In the case of Junos
OS, all stored files except the juniper.conf and SSH files are removed. Therefore, you
mustbackupyour existing installation in caseyouneed to return to it. This topicdescribes
how to back up the existing Junos OS installation on routers.
As of Junos OS Release 15.1, certain platforms run Junos OS based on an upgraded
FreeBSD kernel (Junos OSwith upgraded FreeBSD). For information about backing up
Junos OSwith upgraded FreeBSD, see “Upgrading Junos OSwith Upgraded FreeBSD”
on page 160. For platforms using Junos OSwith upgraded FreeBSD, see “Release
Information for Junos OSwith Upgraded FreeBSD” on page 17.
For information about backing up the existing installation on SRX Series Services
Gateways, see “Backing Up the Current Installation on SRX Series Devices” on page 59.
On routers, you should back up the current installation so that you can return to it if
needed.
In a dual Routing Engine system, you need to back up both Routing Engines.
To back up files to the router’s hard disk or solid-state drive (SSD):
• Issue the request system snapshot CLI operational command:
user@host> request system snapshot
57Copyright © 2018, Juniper Networks, Inc.
Chapter 4: Performing a Standard or Change Category Installation

When the request systemsnapshot command is issued, the /root file system is backed
up to /altroot, and /config is backed up to /altconfig. The /root and /config file systems
are on the router’s CompactFlash card, and the /altroot and /altconfig file systems
are on the router’s hard disk or SSD. When the backup is completed, the current and
backup software installations are identical.
NOTE: On routers without a CompactFlash card, where the hard disk is theprimarybootdevice, youcannotbackupyoursoftware installation.OnMX104routers, which do not have a CompactFlash card, you can back up yoursoftware installation on an external USB storagemedia device.
To back up files on an MX104 to a specified external storagemedia device:
• Issue the request system snapshotmedia CLI operational command. For example:
user@host > request system snapshotmedia usb1
OnMX104routers,whenyou issue the requestsystemsnapshotoperational command
tobackup thecurrent software installation, thebackup isdoneon the firstUSBstorage
media device.
To back up files from the NAND flash device to a USB storagemedia device:
• Issue the request system snapshot CLI operational command:
user@host> request system snapshot
When you issue the request system snapshot operational command to back up the
NAND flash device, the backup is done on the first USB storagemedia device.
On ACX Series routers, when you issue the request system snapshot slice alternate
command, the command backs up the files to the router’s NAND flash.
• Issue the request system snapshot slice alternate CLI operational command. For
example:
user@host > request system snapshot slice alternate
When this command is issued, the /root file system is backed up to /altroot, and
/config is backed up to /altconfig on the router’s NAND flash device.
To back up the files to an external USB storage device, you need to run the following
command:
user@host > request system snapshotmedia usb
Copyright © 2018, Juniper Networks, Inc.58
Installation and Upgrade Guide

On ACX5000 line of routers, when you issue the request system snapshot slice alternate
command, the command backs up the files to an external USB storage device.
NOTE: ACX5000 line of routers do not have a NAND flashmemory andalternate slice for Junos OS. Junos OS for ACX5000 line of routers runs as aVM on a host image.
• Issue the request system snapshot slice alternate CLI operational command. For
example:
user@host > request system snapshot slice alternate
If an externalUSB is not inserted to the router, then the commandshows the following
error:
user@host> request system snapshot slice alternatefpc0:--------------------------------------------------error: usb (/dev/da0) media missing or invalid--------------------------------------------------
RelatedDocumentation
request system snapshot on page 419•
• Routing Matrix with a TXMatrix Plus Router Solutions Page
• Upgrading Junos OSwith Upgraded FreeBSD on page 160
• Backing Up the Current Installation on SRX Series Devices on page 59
Backing Up the Current Installation on SRX Series Devices
This topic includes the following sections:
• Backing Up the Current Installation on SRX5800, SRX5600, and SRX5400
Devices on page 59
• Backing Up the Current Installation on SRX300, SRX320, SRX340, SRX345, and
SRX550M Devices on page 60
• Configuring External CompactFlash for SRX650 Devices on page 60
Backing Up the Current Installation on SRX5800, SRX5600, and SRX5400Devices
Backup thecurrent installation so that youcan return to thecurrent software installation.
The installation process using the installation package (jinstall*, for example) removes
all stored files on the device except the juniper.conf and SSH files. Therefore, you should
back up your current configuration in case you need to return to the current software
installation after running the installation program.
To back up Junos OS on the SRX Series devices, issue the request system snapshot CLI
operational command. This command saves the current software installation on the
hard disk, external USB storagemedia device, or solid-state drive (SSD).
59Copyright © 2018, Juniper Networks, Inc.
Chapter 4: Performing a Standard or Change Category Installation

When the request system snapshot command is issued, the /root file system is backed
up to /altroot, and /config is backed up to /altconfig. The /root and /config file systems
are on the devices’s CompactFlash card, and the /altroot and /altconfig file systems are
on the devices’s hard disk or or solid-state drive (SSD). When the backup is completed,
the current and backup software installations are identical.
To copy the files to the device’s hard disk or solid-state drive (SSD), use the following
command:
user@host> request system snapshotmedia
Backing Up the Current Installation on SRX300, SRX320, SRX340, SRX345, and SRX550MDevices
On SRX Series devices, you can backup the current Junos OS image and configuration
files onto amedia (such as a USB or CompactFlash) so that you can retrieve it back if
something goes wrong.
To back up the currently running and active file system partitions on the device, use the
following command:
user@host> request system snapshotmedia
Following options are supported:
• internal—Copies the snapshot to internal media.
• usb—Copies the snapshot to the USB storage device. This is the default option for
SRX300, SRX320, SRX340, SRX345, and SRX550M devices.
• external—Copies the snapshot to an external storage device. This option is available
for the compact flash on the SRX650 Services Gateway only.
Configuring External CompactFlash for SRX650 Devices
Following procedure shows how to backup current installation on an SRX650 device.
The SRX650 Services Gateway includes the following 2 GB CompactFlash (CF) storage
device:
• The Services and Routing Engine (SRE) contains a hot-pluggable external CF storage
device used to upload and download files.
• The chassis contains an internal CF used to store the operating system.
By default, only the internal CF is enabled and an option to take a snapshot of the
configuration from the internal CF to the external CF is not supported. This can be done
only by using a USB storage device.
Copyright © 2018, Juniper Networks, Inc.60
Installation and Upgrade Guide
To take a snapshot of the configuration from the external CF:
1. Takeasnapshot fromthe internalCF toaUSBstoragedeviceusing the requestsystem
snapshotmedia usb command.
2. Reboot thedevice fromtheUSBstoragedevice using the request systemrebootmedia
usb command.
3. Go to the U-boot prompt.
4. Stop at U-boot and set the following variables:
set ext.cf.pref 1 save reset
5. Once the system is booted from the USB storage device, take a snapshot from the
external CF using the request system snapshotmedia external command.
NOTE: Once the snapshot is taken on the external CF, we recommendthat you set the ext.cf.pref to 0 at the U-boot prompt.
RelatedDocumentation
Understanding Junos OS Upgrades for SRX Series Devices on page 166•
• Example: Creating a Snapshot and Using It to Boot an SRX Series Device on page 211
• Installing Junos OS on SRX Series Devices from the Boot Loader Using a TFTP Server
on page 76
• Installing Junos OS on SRX Series Devices from the Boot Loader Using a USB Storage
Device on page 79
Installing the Software Package on a Router with a Single Routing Engine
To upgrade the router or switch software:
1. Install the new software package using the request system software add command:
user@host> request system software add /var/tmp/installation-package
installation-package is the name of the installation package; for example
jinstall-9.2R1.8–domestic-signed.tgz.
For M Series, MX Series, and T Series routers running Junos OS Release 12.2 and later,
youcanuse the requestsystemsoftwareaddsetcommandto installmultiple software
packages at one time:
user@host> request system software add set /var/tmp/installation-package
61Copyright © 2018, Juniper Networks, Inc.
Chapter 4: Performing a Standard or Change Category Installation

installation-package can either be a list of installation packages, each separated by a
blank space, or the full URL to the directory or tar file containing the list of installation
packages.
WARNING: Do not include the re0 | re1 option when you install a package
using the request systemsoftware add command, if the Routing Engine on
which the package is located and the Routing Engine on which you wantto install the package are the same. In such cases, the package getsdeleted after a successful upgrade.
For more information about the request system software add command, see the CLI
Explorer.
2. Reboot thedevice tostart thenewsoftwareusing the requestsystemrebootcommand:
user@host> request system rebootReboot the system? [yes, no] (no) yes
NOTE: Youmust reboot the device to load the new installation of JunosOS on the device.
To abort the installation, do not reboot the device. Instead, finish theinstallation and then issue the request system software delete jinstall
command. This is your last chance to stop the installation.
The software is loaded when you reboot the system. Installation can take between 5
and 10minutes. The device then reboots from the boot device onwhich the software
was just installed.When the reboot is complete, the device displays the login prompt.
While the software is beingupgraded, theRoutingEngineonwhich youareperforming
the installation does not route traffic.
3. Log in and issue the show version command to verify the version of the software
installed.
4. (Optional) Add the jweb package using the request system software add command.
Before you can add this package, youmust first download the software as you did
the installation package. Formore information about downloading the jweb package,
see “Downloading Software” on page 50.
The jweb installation module adds a device management graphical user interface
that you can use to view and configure your device. For more information about the
jweb package, see “Installation Modules” on page 12.
5. After you have upgraded or downgraded the software and are satisfied that the new
software is successfully running, issue the request systemsnapshot command toback
up the new software.
Copyright © 2018, Juniper Networks, Inc.62
Installation and Upgrade Guide

RelatedDocumentation
Repartitioning Routing Engine System Storage to Increase the Swap Partition on
page 68
•
Installing the Software Package on a Router with Redundant Routing Engines
If the router has two Routing Engines, perform a Junos OS installation on each Routing
Engine separately to avoid disrupting network operation.
WARNING: If graceful Routing Engine switchover (GRES) or nonstop activerouting (NSR) is enabled when you initiate a software installation, thesoftware does not install properly. Make sure you issue the CLI delete chassis
redundancy commandwhenprompted. If GRES is enabled, itwill be removed
with the redundancycommand.Bydefault,NSR isdisabled. IfNSR isenabled,
remove the nonstop-routing statement from the [edit routing-options]hierarchy level to disable it.
Before you begin, download the software installation package you want to install and
place it on the primary Routing Engine (in slot 0) in the /var/tmp directory.
To upgrade the router software, perform the following tasks:
1. Preparing the Router for the Installation on page 63
2. Installing Software on the Backup Routing Engine on page 64
3. Installing Software on the Remaining Routing Engine on page 65
4. Finalizing the Installation on page 67
Preparing the Router for the Installation
Perform the following steps before installing the software:
1. Log in to the primary Routing Engine’s console.
Formore information about logging in to theRouting Engine through the console port,
see the specific hardware guide for your router.
2. From the router command line, enter configuration mode:
user@host#> configureEntering configuration mode
[edit]user@host#
3. Disable Routing Engine redundancy:
[edit]user@host# delete chassis redundancy
4. Disable nonstop-bridging:
[edit]user@host# delete protocols layer2-control nonstop-bridging
63Copyright © 2018, Juniper Networks, Inc.
Chapter 4: Performing a Standard or Change Category Installation

5. Save the configuration change on both Routing Engines:
[edit]user@host# commit synchronize
6. Exit the CLI configuration mode:
[edit]user@host# exit
Installing Software on the Backup Routing Engine
After the router has been prepared, you first install the new Junos OS release on the
backup Routing Engine, while keeping the currently running software version on the
primary Routing Engine. This enables the primary Routing Engine to continue operations,
minimizing disruption to your network.
1. Log in to the console port on the current primary Routing Engine in slot 0.
Formore information about logging in to theRouting Engine through the console port,
see Accessing a Junos OS Device the First Time or the specific hardware guide for your
router.
2. Install the new software package on the backup Routing Engine using the requestsystem software add command:
user@host> request system software add re1 validate /var/tmp/jinstall-9.2R1.8–domestic-signed.tgz
WARNING: Donot include the re0or re1optionwhenyou install apackage
using the request systemsoftware add command, if the Routing Engine on
which the package is located and the Routing Engine on which you wantto install the package are the same. In such cases, the package getsdeleted after a successful upgrade.
For M Series, MX Series, and T Series routers running Junos OS Release 12.2 and later,youcanuse the requestsystemsoftwareaddsetcommandto installmultiple softwarepackages at the same time:
user@host> request system software add set re1 /var/tmp/installation-package
Formore informationabout the requestsystemsoftwareaddsetcommand, see requestsystem software add or the CLI Explorer.
3. Reboot the router to start thenewsoftwareusing the requestsystemrebootcommand:
user@host> request system rebootReboot the system? [yes, no] (no) yes
Copyright © 2018, Juniper Networks, Inc.64
Installation and Upgrade Guide

NOTE: Youmust reboot the device to load the new installation of JunosOS on the router.
To abort the installation, do not reboot your device. Instead, finish theinstallation and then issue the request system software delete jinstall
command. This is your last chance to stop the installation.
All the software is loaded when you reboot the device. Installation can take between
5and 10minutes. The router then reboots from theboot device onwhich the software
was just installed. When the reboot is complete, the router displays the login prompt.
While the software is beingupgraded, theRoutingEngineonwhich youareperforming
the installation is not routing traffic.
4. Log in to the primary Routing Engine (slot 0) and issue the show version command to
verify the version of the software installed.
5. (Optional) Add the jweb package using the request system software add command.
Before you can add this package, youmust first download the software as you did
the installation package. Formore information about downloading the jweb package,
see “Downloading Software” on page 50.
The jweb installationmodule adds a routermanagement graphical user interface that
you can use to view and configure your router. For more information about the jweb
package, see “Installation Modules” on page 12.
Installing Software on the Remaining Routing Engine
Once the software is installed on the backup Routing Engine, you are ready to switch
routing control to the backup Routing Engine, and then upgrade or downgrade the
software on the remaining Routing Engine in slot 0:
1. Transfer routing control from the primary to the backup Routing Engine:
user@host> request chassis routing-engine master switch
Formore information about the request chassis routing-enginemaster command, see
the CLI Explorer.
2. Verify that the Routing Engine in slot 1 is now the primary Routing Engine:
user@host> show chassis routing-engineRouting Engine status: Slot 0: Current state Backup Election priority Master (default)Routing Engine status: Slot 1: Current state Master Election priority Backup (default)
65Copyright © 2018, Juniper Networks, Inc.
Chapter 4: Performing a Standard or Change Category Installation

3. Install the new software package on the Routing Enigne in slot 0 using the requestsystem software add command:
user@host> request system software add validate re0 /var/tmp/jinstall-9.2R1.8–domestic-signed.tgz
WARNING: Donot include the re0or re1optionwhenyou install apackage
using the request systemsoftware add command, if the Routing Engine on
which the package is located and the Routing Engine on which you wantto install the package are the same. In such cases, the package getsdeleted after a successful upgrade.
For M Series, MX Series, and T Series routers running Junos OS Release 12.2 and later,youcanuse the requestsystemsoftwareaddsetcommandto installmultiple softwarepackages at the same time:
user@host> request system software add set re0 /var/tmp/installation-package
Formore informationabout the requestsystemsoftwareaddsetcommand, see requestsystem software add or the CLI Explorer.
4. Reboot the Routing Engine using the request system reboot command:
user@host> request system rebootReboot the system? [yes, no] (no) yes
NOTE: Youmust reboot to load the new installation of Junos OS on therouter.
To abort the installation, do not reboot your system. Instead, finish theinstallation and then issue the request system software delete jinstall
command. This is your last chance to stop the installation.
The software is loaded when you reboot the system. Installation can take between 5
and 10minutes. The router then reboots from the boot device on which the software
was just installed. When the reboot is complete, the router displays the login prompt.
While the software is beingupgraded, theRoutingEngineonwhich youareperforming
the installation does not route traffic.
5. Log in to the current primary Routing Engine (slot 1) and issue the show version
command to verify the version of the software installed.
6. (Optional) Add the jweb package using the request system software add command.
Before you can add this package, youmust first download the software as you did
the installation package. Formore information about downloading the jweb package,
see “Downloading Software” on page 50.
The jweb installationmodule adds a routermanagement graphical user interface that
you can use to view and configure your router. For more information about the jweb
package, see “Installation Modules” on page 12.
Copyright © 2018, Juniper Networks, Inc.66
Installation and Upgrade Guide

7. Transfer routing control back to the original primary Routing Engine in slot 0:
user@host> request chassis routing-engine master switch
Formore information about the request chassis routing-enginemaster command, see
the CLI Explorer.
8. Verify that the Routing Engine (slot 0) is indeed the primary Routing Engine:
user@host> show chassis routing-engineRouting Engine status: Slot 0: Current state Master Election priority Master (default)outing Engine status: Slot 1: Current state Backup Election priority Backup (default)
Finalizing the Installation
Once the software is installed on both Routing Engines, you return the router back to its
original configuration and back up the new installation.
1. Restore the configuration that existed before you deleted it at the start of this
procedure:
{backup}user@host-re0> configure[edit]
user@host-re0# rollback 1
NOTE: The number on the rollback command shouldmatch the number
of commits youdid inpreparing the router for the installation. For example,if youdid a separate commit for disablingRoutingEngine redundancyanddisabling nonstop-bridging, you need to use rollback 2 in this step.
2. Save the configuration change on both Routing Engines:
[edit]user@host-re0> commit synchronize and-quit
3. After you have installed the new software and are satisfied that it is successfully
running, back up the new software on both primary and backup Routing Engines.
For backing up Junos OSwith upgraded FreeBSD, see “Changes in Use of Snapshots
for Junos OSwith Upgraded FreeBSD” on page 26.
For Junos OS, use the request system snapshot command:
{master}user@host-re0> request system snapshot{master}user@host-re0> request routing-engine login other routing-engine{backup}user@host-re1> request system snapshot
{backup}
67Copyright © 2018, Juniper Networks, Inc.
Chapter 4: Performing a Standard or Change Category Installation

The root file system is backed up to /altroot, and /config is backed up to /altconfig.
The root and /config file systems are on the router’s CompactFlash card, and the
/altroot and /altconfig file systems are on the router’s hard disk or solid-state drive
(SSD).
For more information about the request routing-engine login command, see the CLI
Explorer.
NOTE: After you issue the request systemsnapshot command, you cannot
return to the previous version of the software because the running copyand backup copy of the software are identical.
RelatedDocumentation
Repartitioning Routing Engine System Storage to Increase the Swap Partition on
page 68
•
Repartitioning Routing Engine SystemStorage to Increase the Swap Partition
You can increase the size of the swap partition by repartitioning the drive (hard disk or
solid-state drive [SSD]) on the Routing Engine. This feature is first available in Junos OS
Release 10.4R5, 11.1R3, and 11.2R1; in earlier Junos OS releases, the swap partition is not
increased by themethods described here.
This behavior applies only to Routing Engines withmore than 2 GB of RAM. The new size
of the swap partition depends on the size of the drive and the amount of Routing Engine
RAM.
• When the drive is 32 GB or less, the swap partition is limited to 8 GB.
• When the drive is larger than 32GB, the swap partitionmatches the size of the Routing
Engine RAM.
To repartition the drive, perform one of the following actions:
• During the installation of a Junos OS software package (jinstall*), issue the request
systemrebootmediadiskcommand toboot fromthedrive insteadof issuing the request
system reboot command. The drive is automatically repartitioned. The request system
rebootmedia disk command repartitions the drive only during a software upgrade.
• Manuallypartition thedriveby issuing the requestsystempartitionhard-diskcommand,
and then reboot the router when the command completes.
CAUTION: Repartitioning the drive re-creates the /config and /vardirectories
in the router file system. Although the contents of /config and /var/db are
preserved, the remaining contents of /var are lost. For this reason, we
recommend that you back up the /var directory before you repartition the
SSD on a router with this configuration.
Copyright © 2018, Juniper Networks, Inc.68
Installation and Upgrade Guide

RelatedDocumentation
Installing the Software Package on a Router with a Single Routing Engine on page 61•
• Installing the Software Package on a Router with Redundant Routing Engines on
page 63
Registering the EX Series Switch with the J-Web Interface
NOTE: This topic applies only to the J-Web Application package.
You can register your EX Series switch with the J-Web interface so that you can request
technical assistance as and when required. To register an EX Series switch:
1. In the J-Web interface, selectMaintain > Customer Support > Product Registration.
For an EX8200 Virtual Chassis configuration, select the member from the list.
Note the serial number that is displayed.
2. Click Register. Enter the serial number in the page that is displayed.
RelatedDocumentation
EX Series Switch Software Features Overview•
Connecting and Configuring an EX Series Switch (CLI Procedure)
There are twoways to connect and configure an EXSeries switch: onemethod is through
the console by using the CLI and the other is by using the J-Web interface.
NOTE: EX2200-24T-4G-DC switches do not support switch connection andconfiguration through the J-Web interface.
This topic describes the CLI procedure.
NOTE: To run the ezsetup script, the switchmust have the factory-default
configuration as the active configuration. If you have configured anything ontheswitchandwant to runezsetup, revert to the factory-default configuration.
See Reverting to the Default Factory Configuration for the EX Series Switch.
Using the CLI, set the following parameter values in the console server or PC:
• Baud rate—9600
• Flow control—None
• Data—8
• Parity—None
69Copyright © 2018, Juniper Networks, Inc.
Chapter 4: Performing a Standard or Change Category Installation

• Stop bits—1
• DCD state—Disregard
To connect and configure the switch from the console by using the CLI:
1. Connect the console port to a laptop or PC by using the RJ-45 to DB-9 serial port
adapter. An Ethernet cable that has an RJ-45 connector at either end and an RJ-45
to DB-9 serial port adapter are supplied with the switch.
For the location of the console port on different EX Series switches:
• See EX2200 Switches Hardware Overview.
• See EX2300 Switches Hardware Overview.
• See Rear Panel of an EX3200 Switch.
• See Rear Panel of an EX3300 Switch.
• See Rear Panel of an EX3400 Switch.
• See Rear Panel of an EX4200 Switch.
• See EX4300 Switches Hardware Overview
• See Front Panel of an EX4500 Switch.
• See EX4550 Switches Hardware Overview
• See Switch Fabric and Routing Engine (SRE) Module in an EX6200 Switch.
• See Switch Fabric and Routing Engine (SRE) Module in an EX8208 Switch.
• See Routing Engine (RE) Module in an EX8216 Switch.
NOTE: In EX2200-C, EX2300, EX3400, EX4300, and EX4550 switches,you can also use theMini-USBType-B console port to connect to a laptopor PC. See Connecting an EX Series Switch to a Management Console byUsing the Mini-USB Type-B Console Port.
2. At the Junos OS shell prompt root%, type ezsetup.
3. Enter the hostname. This is optional.
4. Enter the root password you want to use for the device. Reenter the root password
when prompted.
Copyright © 2018, Juniper Networks, Inc.70
Installation and Upgrade Guide

5. Enable services such as SSH and Telnet.
NOTE: Youwill not be able to log in to the switch as the root user through
Telnet. Root login is allowed only through SSH.
• The default option for SSH is yes. Select this to enable SSH.
• The default option for Telnet is no. Change this to yes to enable Telnet.
6. Use the Management Options page to select the management scenario:
NOTE: OnEX4500,EX6200,andEX8200switches,only theout-of-bandmanagement option is available.
• Configure in-bandmanagement. In in-bandmanagement, you configure a network
interface or an uplink module (expansion module) interface as the management
interface and connect it to the management device.
In this scenario, you have the following two options:
• Use the automatically createdVLAN default formanagement—Select this option
to configure all data interfaces as members of the default VLAN. Specify the
management IP address and the default gateway.
• CreateanewVLANformanagement—Select this option tocreateamanagement
VLAN. Specify the VLAN name, VLAN ID, management IP address, and default
gateway. Select the ports that must be part of this VLAN.
• Configure out-of-bandmanagement—Configure the management port. In
out-of-bandmanagement, youuseadedicatedmanagementchannel (MGMTport)
to connect to the management device. Specify the IP address and gateway of the
management interface. Use this IP address to connect to the switch.
7. Specify the SNMP read community, location, and contact to configure SNMP
parameters. These parameters are optional.
8. Specify the system date and time. Select the time zone from the list. These options
are optional.
9. The configured parameters are displayed. Enter yes to commit the configuration. Theconfiguration is committed as the active configuration for the switch.
10. (For EX4500 switches only) Enter the operational mode command request chassispic-mode intraconnect to set the PICmode to intraconnect.
You can now log inwith the CLI or the J-Web interface to continue configuring the switch.
If you use the J-Web interface to continue configuring the switch, theWeb session is
redirected to the newmanagement IP address. If the connection cannot bemade, the
J-Web interface displays instructions for starting a J-Web session.
71Copyright © 2018, Juniper Networks, Inc.
Chapter 4: Performing a Standard or Change Category Installation

RelatedDocumentation
Connecting and Configuring an EX Series Switch (J-Web Procedure)•
• Installing and Connecting an EX2200 Switch
• Installing and Connecting an EX2300 Switch
• Installing and Connecting an EX3200 Switch
• Installing and Connecting an EX3300 Switch
• Installing and Connecting an EX3400 Switch
• Installing and Connecting an EX4200 Switch
• Installing and Connecting an EX4300 Switch
• Installing and Connecting an EX4550 Switch
• Installing and Connecting an EX4500 Switch
• Installing and Connecting an EX6210 Switch
• Installing and Connecting an EX8208 Switch
• Installing and Connecting an EX8216 Switch
Connecting and Configuring an EX9200 Switch (CLI Procedure)
The EX9200 switch is shippedwith the JunosOSpreinstalled and ready to be configured
when the switch is powered on. There are three copies of the software: one on a
CompactFlash card in the Routing Engine module (REmodule), one on a rotating hard
disk in the REmodule, and one on a USB flash drive that can be inserted into the slot in
the faceplate of the REmodule.
When the switch boots, it first attempts to start the image on theUSB flash drive. If there
is no USB flash drive inserted into the REmodule or if the attempt otherwise fails, the
switch next attempts to start the software from the CompactFlash card (if installed),
and finally from the hard disk.
You configure the switch by issuing Junos OS command-line interface (CLI) commands,
either on a console device attached to the console (CONSOLE) port on themaster RE
module, or overa telnet connection toanetworkconnected to theEthernetmanagement
(<...>) port on themaster REmodule.
Gather the following information before configuring the switch:
• Name the switch will use on the network
• Domain name the switch will use
• IP address and prefix length information for the Ethernet interface
• IP address of a default switch
• IP address of a DNS server
• Password for the root user
Copyright © 2018, Juniper Networks, Inc.72
Installation and Upgrade Guide

This procedure connects the switch to the network, but does not enable it to forward
traffic. For complete information about enabling the switch to forward traffic, including
examples, see the Junos OS configuration guides.
To configure the software:
1. Verify that the switch is powered on.
2. Log in as the root user. There is no password.
3. Start the CLI.
root# cliroot@>
4. Enter configuration mode.
cli> configure[edit]root@#
5. Set the root authentication password by entering either a clear-text password, an
encrypted password, or an SSH public key string (DSA or RSA).
[edit]root@# set system root-authentication plain-text-passwordNew password: passwordRetype new password: password
or
[edit]root@# set system root-authentication encrypted-password encrypted-password
or
[edit]root@# set system root-authentication ssh-dsa public-key
or
[edit]root@# set system root-authentication ssh-rsa public-key
6. Configure the name of the switch. If the name includes spaces, enclose the name in
quotation marks (“ ”).
[edit]root@# set system host-name host-name
7. Create a user account.
[edit]root@# set system login user user-name authentication plain-text-passwordNew password: passwordRetype new password: password
73Copyright © 2018, Juniper Networks, Inc.
Chapter 4: Performing a Standard or Change Category Installation

8. Set the user account class to super-user.
[edit]root@# set system login user user-name class super-user
9. Configure the switch’s domain name.
[edit]root@# set system domain-name domain-name
10. Configure the IP address and prefix length for the switch’s Ethernet interface.
[edit]root@# set interfaces fxp0 unit 0 family inet address address/prefix-length
11. Configure the IP address of a DNS server.
[edit]root@# set system name-server address
12. (Optional) Configure the static routes to remote subnets with access to the
management port. Access to themanagement port is limited to the local subnet. For
more information about static routes, see the Junos OS Administration Library.
[edit]root@# set routing-options static route remote-subnet next-hop destination-IP retainno-readvertise
13. Configure the telnet service at the [edit system services] hierarchy level.
[edit]root@# set system services telnet
14. (Optional) Display the configuration to verify that it is correct.
[edit]root@# showsystem {host-name host-name;domain-name domain-name;root-authentication {authentication-method (password | public-key);
}name-server {address;
}}interfaces {fxp0 {unit 0 {family inet {address address/prefix-length;
}}
Copyright © 2018, Juniper Networks, Inc.74
Installation and Upgrade Guide

}}
15. Commit the configuration to activate it on the switch.
[edit]root@# commit
16. (Optional) Configure additional properties by adding the necessary configuration
statements. Then commit the changes to activate them on the switch.
[edit]root@switch# commit
17. When you have finished configuring the switch, exit configuration mode.
[edit]root@switch# exitroot@switch>
NOTE: To reinstall JunosOS, youboot the switch from the removablemedia.Do not insert the removablemedia during normal operations. The switchdoes not operate normally when it is booted from the removablemedia.
When the switch boots from the storagemedia (removable media, CompactFlash card,
or hard disk) it expands its search in the /config directory of the routing platform for the
following files in the followingorder: juniper.conf (themain configuration file), rescue.conf
(the rescue configuration file), and juniper.conf.1 (the first rollback configuration file).
When the first configuration file is found that can be loaded properly, the search ends
and the file is loaded. If none of the file can be loaded properly, the routing platform does
not functionproperly. If the switchboots fromanalternatebootdevice, JunosOSdisplays
a message indication this when you log in to the switch.
RelatedDocumentation
EX9204 Switch Hardware Overview•
• EX9208 Switch Hardware Overview
• EX9214 Switch Hardware Overview
Installing Junos OS on SRX Series Devices Using a USB Flash Drive
To install the Junos OS image on an SRX Series device using a USB flash drive:
1. Insert the USB flash drive into the USB port of the SRX Series device and wait for the
LEDs to blink amber, then steadily turn amber, indicating that the SRX Series device
detects the Junos OS image.
If the LEDs do not change to amber, press the Power button or turn the device off and
then on again and wait for the LEDs to blink amber.
75Copyright © 2018, Juniper Networks, Inc.
Chapter 4: Performing a Standard or Change Category Installation

2. Press the Reset Config button on the SRX Series device to start the installation and
wait for the LEDs to glow steadily amber.
When the LEDs glow green, the Junos OS upgrade image has been successfully
installed.
If the USB device is plugged in, the Reset Config button always performs as an image
upgrade button. Any other functionality of this button is overridden until you remove
the USB flash drive.
3. Remove the USB flash drive.
The SRX Series device restarts automatically and loads the new Junos OS version.
NOTE: On SRX300, SRX320, SRX340, SRX345, and SRX550M devices,frequent plug and play of USB keys is not supported. Youmust wait for thedevice node creation before removing the USB key.
NOTE: If an installation error occurs, the LEDs turn red, whichmight indicatethat the Junos OS image on the USB flash drive is corrupted. An installationerror can also occur if the current configuration on the SRX Series device isnot compatible with the new Junos OS version on the USB or if there is notenough space on the SRX Series device to install the image. Youmust haveconsole access to theSRXSeries device to troubleshoot an installation error.
NOTE: You can use the set system autoinstallation usb disable command to
prevent the automatic installation from the USB device. After using thiscommand, if you insert the USB device into the USB port of the SRX Seriesdevice, the installation process does not work.
RelatedDocumentation
Preparing Your SRX Series Device for Junos OS Upgrades on page 168•
• Preparing theUSBFlashDrive toUpgrade JunosOSonSRXSeriesDevices onpage 148
• Backing Up the Current Installation on SRX Series Devices on page 59
• Example: Creating a Snapshot and Using It to Boot an SRX Series Device on page 211
Installing Junos OS on SRX Series Devices from the Boot Loader Using a TFTP Server
You can install Junos OS using the Trivial File Transfer Protocol (TFTP)method. The
device is shipped with Junos OS loaded on the primary boot device. During Junos OS
installation from the loader, the device retrieves the Junos OS package from a TFTP
server. The internal media is then formatted, and the Junos OS image is installed.
Copyright © 2018, Juniper Networks, Inc.76
Installation and Upgrade Guide

From the loader installation, you can:
• Install Junos OS on the device for the first time.
• Recover the system from a file system corruption.
NOTE: Installation from a TFTP server can only be performed using thefirst onboard Ethernet interface.
Installation fromthe loader-over-TFTPmethoddoesnotwork reliablyoverslow speeds or large latency networks.
Before you begin, verify that:
• You have access to the TFTP server with the Junos OS package to be installed.
• That the TFTP server supports BOOTP or DHCP. If the TFTP server does not support
BOOTP or DHCP, youmust set the environment variables before performing the
installation from the TFTP server.
• Functional network connectivity exists between the device and the TFTP server over
the first onboard Ethernet interface.
To install the Junos OS image on the internal media of the device:
1. To access the U-boot prompt, use the console connection to connect to the device.
2. Reboot the device.
The following messages appear:
Clearing DRAM........ done BIST check passed. Net: pic init done (err = 0)octeth0 POSTPassed
After this message appears, you see the following prompt:
Press SPACE to abort autoboot in 3 seconds
3. Press the space bar to stop the autoboot process.
The => U-boot prompt appears.
4. From the U-boot prompt, configure the environment variables listed in
Table 11 on page 77.
Table 11: Environment Variables Settings
DescriptionEnvironment Variables
IP address of the gateway devicegatewayip
IP address of the SRX Series deviceipaddr
77Copyright © 2018, Juniper Networks, Inc.
Chapter 4: Performing a Standard or Change Category Installation

Table 11: Environment Variables Settings (continued)
DescriptionEnvironment Variables
network masknetmask
IP address of the TFTP serverserverip
This example shows you how to configure the environment variables:
Clearing DRAM........ doneBIST check passed.Net: pic init done (err = 0)octeth0POST PassedPress SPACE to abort autoboot in 3 seconds=>=> setenv ipaddr 10.157.70.170=> setenv netmask 255.255.255.0=> setenv gatewayip 10.157.64.1=> setenv serverip 10.157.60.1=> saveenv
5. Reboot the system using the reset command.
6. To access the loader prompt, use the console connection to connect to the device.
7. Reboot the device.
The following message appears:
Loading /boot/defaults/loader.conf
After this message appears, you see the following prompt:
Hit [Enter] to boot immediately, or space bar for command prompt.
8. Press the space bar to access the loader prompt (loader>).
The loader> prompt appears. Enter:
loader> install tftp://10.77.25.12/junos-srxsme-10.0R2-domestic.tgz
NOTE: The URL path is relative to the TFTP server’s TFTP root directory,where the URL is tftp://tftp-server-ipaddress/package.
Copyright © 2018, Juniper Networks, Inc.78
Installation and Upgrade Guide

When this command is executed:
• The Junos OS package is downloaded from the TFTP server.
• The internal media on the system is formatted.
• The Junos OS package is installed on the internal media.
NOTE: The Installation from the loader-over-TFTPmethod installs JunosOS on the internal CF on SRX100, SRX210, SRX220, and SRX240 devices,whereasonSRX650devices, thismethodcan install JunosOSonthe internalor external CF card.
After Junos OS is installed, the device boots from the internal media. Once the system
boots up with Junos OS Release 10.0 or later, you must upgrade the U-boot and boot
loader immediately.
CAUTION: When you install Junos OS using the loader-over-TFTPmethod,themedia is formatted. The process attempts to save the currentconfiguration. We recommend that you back up all important informationon the device before using this process.
RelatedDocumentation
Preparing Your SRX Series Device for Junos OS Upgrades on page 168•
• Preparing theUSBFlashDrive toUpgrade JunosOSonSRXSeriesDevices onpage 148
• Backing Up the Current Installation on SRX Series Devices on page 59
• Example: Creating a Snapshot and Using It to Boot an SRX Series Device on page 211
Installing Junos OS on SRX Series Devices from the Boot Loader Using a USB StorageDevice
To install JunosOSRelease 10.0 or later from the boot loader using aUSB storage device:
1. Format a USB storage device in MS-DOS format.
2. Copy the Junos OS image onto the USB storage device.
3. Plug the USB storage device into the SRX Series device.
4. Stop the device at the loader prompt and issue the following command:
loader> install file:///<image-path-on-usb>
An example of a command is as follows:
loader> install file:///junos-srxsme-10.0R2-domestic.tgz
79Copyright © 2018, Juniper Networks, Inc.
Chapter 4: Performing a Standard or Change Category Installation

This formats the internal media and installs the new Junos OS image on themedia
with dual-root partitioning.
5. Once the system boots up with Junos OS Release 10.0 or later, upgrade the U-boot
and boot loader immediately.
6. Remove the USB flash drive.
RelatedDocumentation
• Preparing Your SRX Series Device for Junos OS Upgrades on page 168
• Preparing theUSBFlashDrive toUpgrade JunosOSonSRXSeriesDevices onpage 148
• Backing Up the Current Installation on SRX Series Devices on page 59
• Example: Creating a Snapshot and Using It to Boot an SRX Series Device on page 211
Copyright © 2018, Juniper Networks, Inc.80
Installation and Upgrade Guide

CHAPTER 5
Configuring Zero Touch Provisioning
• Understanding Zero Touch Provisioning on page 81
• Configuring Zero Touch Provisioning on page 85
• Configuring Zero Touch Provisioning on SRX Series Devices on page 89
Understanding Zero Touch Provisioning
NOTE: To seewhich platforms support zero touch provisioning, in a browser,go to Feature Explorer. In the Explore Features section of the Feature Explorer
page, selectAll Features. In the FeaturesGroupedbyFeatureFamilybox, select
Zero Touch Provisioning. You can also type the name of the feature in theSearch for Features edit box. In previous Junos OS releases on EX Series
switches, zero touch provisioning was called EZ Touchless Provisioning.
Zero touch provisioning (ZTP) allows you to provision new Juniper Networks switches
and routers in your network automatically, without manual intervention. When you
physically connect a switch or router to the network and boot it with a default factory
configuration, it attempts toupgrade the JunosOSsoftwareautomatically andautoinstall
a configuration file from the network.
• As of Junos OS Release15.2, you can provision using a script to be executed, as well as
a configuration file to be loaded, for either switches or routers.
• As of Junos OS Release 15.1, you can provision using a script to be executed, as well as
a configuration file to be loaded, but only for switches.
• In releases earlier than JunosOSRelease 15.1, you canautomatically provision switches
only, and only by loading a configuration file.
The switchor router uses information that youconfigureonaDynamicHostConfiguration
Protocol (DHCP) server to locate the necessary software image and configuration files
on the network or to find the script to execute. If you do not configure the DHCP server
to provide this information, the device boots with the preinstalled software and default
factory configuration. Tomake sure you have the default factory configuration loaded
on the switch or router, issue the request system zeroize command on the device you
want to provision.
81Copyright © 2018, Juniper Networks, Inc.

Upon connection and booting of a new router or switch, if Junos OS detects a file on the
DHCP server, the first line of the file is examined. If Junos OS finds the characters #!
followed by an interpreter path, it treats the file as a script file and executes the script
with the interpreter mentioned. If the script returns error (that is, a nonzero value), the
ZTP state machine refetches the script and attempts to execute the script again. This
continues until the script executes successfully. The script can be, for example, a shell
script (#!/bin/sh), a slax script (#!/usr/bin/slax), or a python script (#!/usr/bin/python).
If Junos OS does not find the characters #! followed by an interpreter path, it treats the
file as a Junos OS configuration in text format and loads the file.
The zero touch provisioning process will either upgrade or downgrade the Junos OS
release.
There are two downgrade limitations for EX Series switches:
• If you downgrade to a software version earlier than Junos OS Release 12.2, in which
zero touch provisioning is not supported, the configuration file autoinstall phase of the
zero touch provisioning process does not happen.
• Todowngrade toa software version that doesnot support resilient dual-root partitions
(Junos OS Release 10.4R2 or earlier), you must perform somemanual work on the
switch. For more information, see “Understanding Resilient Dual-Root Partitions on
Switches” on page 115.
NOTE: OnQFX3500 and QFX3600 switches running the original CLI, youcannot use ZTP to upgrade from Junos OS Release 12.2 or later to Junos OSRelease 13.2X51-D15 or later.
When you boot a switch or router with the default factory configuration, the following
process happens:
1. If DHCP option 43, suboption 00 (the name of the software image file on the FTP,
HTTP, or TFTP server) is configured, the switch or router compares the version of the
provided software image to the version of the software installed on the switch or
router.
NOTE: When the DHCP server cannot use suboption 00, configure theimage file using suboption 04. If both suboption 00 and suboption 4 aredefined, suboption 04 is ignored.
2. If DHCP option 43, suboption 02 (a symbolic link to the software image file on the
FTP, HTTP, or TFTP server) is configured, the switch or router compares the version
of the provided software image to the version of the software installed on the switch
or router.
Copyright © 2018, Juniper Networks, Inc.82
Installation and Upgrade Guide

• If the Junos OS releases are different, the switch or router downloads the software
image from the FTP, HTTP, or TFTP server, installs Junos OS, and reboots using the
default factory configuration.
• If the software versions are the same, the switch or router does not upgrade the
software.
3. If DHCP option 43, suboption 01 (the name of the configuration file or the script file
on the FTP, TFTP, or HTTP server) is configured, the switch or router compares the
version of the provided configuration file to the version of the configuration file on the
switch or router.
If DHCP option 43, suboption 01 is not specified, the switch or router uses the default
factory configuration.
If the file version on the FTP, HTTP, or TFTP server is newer than the file on the switch
or router, the file is updated on the switch or router.
If both DHCP option 43, suboption 01 and suboption 2 are specified, suboption 01 is
processed before suboption 02. Junos OS is upgraded, and then the configuration or
script file is applied.
4. If DHCP option 43, suboption 03 (the transfermode setting) is configured, the switch
or router accesses the FTP, HTTP, or TFTP server using the specified transfer mode
setting, for example, FTP.
If DHCP option 43, suboption 03 is not configured, TFTP becomes the transfer mode
automatically.
5. If DHCP option 43, suboption 04 (the name of the software image file on the FTP,
HTTP, or TFTP server) is configured, the switch or router compares the version of the
provided software image to the version of the software installed on the switch or
router.
NOTE: When the DHCP server cannot use suboption 00, configure theimage file using suboption 04. If both suboption 00 and suboption 4 aredefined, suboption 04 is ignored.
6. If DHCP option 150 or option 66 is specified, the IP address of the FTP, HTTP, or TFTP
server is configured.
NOTE: Youmust configure either option 150 or option 66. If you configureboth option 150 and option 66, option 150 takes precedence and option66 is ignored. Also, make sure you specify an IP address, not a hostname,because name resolution is not supported.
7. (Optional) If DHCPoption 7 is specified, you can configure one ormore syslog servers.
83Copyright © 2018, Juniper Networks, Inc.
Chapter 5: Configuring Zero Touch Provisioning

8. (Optional) If DHCP option 42 is specified, you can configure one ormore NTP servers.
9. (Optional) IfDHCPoption 12 is specified, youcanconfigure thehostnameof the switch
or router.
RelatedDocumentation
Configuring Zero Touch Provisioning on page 85•
Copyright © 2018, Juniper Networks, Inc.84
Installation and Upgrade Guide

Configuring Zero Touch Provisioning
NOTE: To seewhich platforms support zero touch provisioning, in a browser,go to Feature Explorer. In the Explore Features section of the Feature Explorer
page, selectAll Features. In the FeaturesGroupedbyFeatureFamilybox, select
Zero Touch Provisioning. You can also type the name of the feature in theSearch for Features edit box. In previous Junos OS releases on EX Series
switches, zero touch provisioning was called EZ Touchless Provisioning.Search for that feature name if you want to know if this feature is supportedon EX Series switches.
Zero touch provisioning (ZTP) allows you to provision new switches or routers in your
network automatically, without manual intervention. You can use either management
ports or network ports on your switch to connect to the network. When you physically
connect a switch or router to the network and boot it with a default configuration, it
attempts to upgrade the Junos OS software automatically using information detected
on a Dynamic Host Control Protocol (DHCP) server. You can include this information on
the DHCP server either as a script to be executed or as a configuration file to be loaded
on the router or switch. The presence or absence of the characters !# plus a script
interpreter arewhatdetermineswhether the file is treatedasa script or asa configuration
file. If you do not configure the DHCP server to provide this information, the switch or
router boots with the preinstalled software and default configuration.
NOTE: If you have both DHCP and ZTP enabled, the switch or routerbroadcasts a DHCPDISCOVERpacket every sixminutes. If a DHCP server onthe network responds with a DHCP ACK packet with DHCP vendor optionsset with the necessary values to initiate ZTP, then ZTP proceeds.
To disable broadcasting the DHCP DISCOVER packet every six minutes,withoutperforming theZTPprocess,manuallydelete theauto-image-upgrade
statement located in the [edit chassis] hierarchy. If ZTP completes without
errors, the auto-image-upgrade statement is automatically deleted.
NOTE: For detailed information regarding theDHCPandDHCPoptions, referto RFC 2131 (http://www.ietf.org/rfc/rfc2131.txt ) and RFC 2132
(www.ietf.org/rfc/rfc2132.txt). Also, this document refers to Internet Systems
Consortium (ISC) DHCP version 4.2. For more information regarding thisversion, refer to http://www.isc.org/software/dhcp/documentation.
Before you begin:
• Ensure that the switch or router has access to the following network resources:
85Copyright © 2018, Juniper Networks, Inc.
Chapter 5: Configuring Zero Touch Provisioning

• TheDHCP server that provides the location of the software image and configuration
files on the network
Refer to your DHCP server documentation for configuration instructions.
• The File Transfer Protocol (anonymous FTP), Hypertext Transfer Protocol (HTTP),
or Trivial File Transfer Protocol (TFTP) server on which the software image and
configuration files are stored
NOTE: Although TFTP is supported, we recommend that you use FTPor HTTP instead, because these transport protocols aremore reliable.
• A Domain Name System (DNS) server to perform reverse DNS lookup
• (Optional) An NTP server to perform time synchronization on the network
• (Optional) A system log (syslog) server to manage system logmessages and alerts
• Locate and record the MAC address printed on the switch or router chassis.
CAUTION: HTTP URLs are limited to 256 characters in length.
CAUTION: You cannot commit a configuration while the switch or router isperforming the software updateprocess. If you commit a configurationwhilethe switch or router is performing the configuration file autoinstallationprocess, theprocess stops, and theconfiguration file is notdownloaded fromthe network.
To configure zero touch provisioning for a switch or router:
1. Make sure the switch or router has the default factory configuration installed.
Issue the request system zeroize command on the switch or router that you want to
provision.
2. Download the software image file and the configuration file to the FTP,HTTP, or TFTP
server fromwhich the switch or router will download these files.
You can download either one or both of these files.
3. Configure theDHCPserver toprovide thenecessary information to the switchor router.
Configure IP address assignment.
You can configure dynamic or static IP address assignment for the management
address of the switch or router. Todetermine themanagementMACaddress for static
IP addressmapping, add 1 to the last byte of the MAC address of the switch or router,
which you noted before you began this procedure.
Copyright © 2018, Juniper Networks, Inc.86
Installation and Upgrade Guide

4. Define the format of the vendor-specific information for DHCP option 43 in the
dhcpd.conf file.
The following is an example of an ISC DHCP 4.2 server dhcpd.conf file:
option space NEW_OP;option NEW_OP.config-file-name code 1 = text;option NEW_OP.image-file-name code 0 = text;option NEW_OP.image-file-type code 2 = text;option NEW_OP.transfer-mode code 3 = text;option NEW_OP.alt-image-file-name code 4= text;option NEW_OP-encapsulation code 43 = encapsulate NEW_OP;
5.
NOTE: Youmust configure either option 150 or option 66. If you configureboth option 150 and option 66, option 150 takes precedence, and option66 is ignored. Also, make sure you specify an IP address, not a hostname,because name resolution is not supported.
ConfigureDHCPoption 150 to specify the IP address of the FTP,HTTP, or TFTP server.
option option-150 code 150={ip-address};option option-150 10.100.31.71;
6. Configure DHCP option 66 to specify the IP address of the FTP, HTTP, or TFTP server.
option tftp-server-name "10.100.31.71";
7. Configure the following DHCP option 43 suboptions:
• Suboption 00: The name of the software image file to install
NOTE: When the DHCP server cannot use suboption 00, configure theimage file using suboption 04. If both suboption 00 and suboption 4are defined, suboption 04 is ignored.
option NEW_OP.image-file-name"/dist/images/jinstall-ex-4200-13.2R1.1-domestic-signed.tgz";
• Suboption 01: The name of the script or configuration file to install.
option NEW_OP.config-file-name "/dist/config/jn-switch35.config";
• Suboption 02: The symbolic link to the software image file to install.
option NEW_OP.image-file-type "symlink";
NOTE: If you do not specify suboption 2, the zero touch provisioningprocess handles the software image as a filename, not a symbolic link.
87Copyright © 2018, Juniper Networks, Inc.
Chapter 5: Configuring Zero Touch Provisioning

• Suboption 03: The transfermode that the switch or router uses to access the TFTP,
FTP, or HTTP server. If you select FTP as the transfer mode, Junos OS uses the
anonymous FTP login to download files from the FTP server.
option NEW_OP.transfer-mode "ftp";
NOTE: If suboption 03 is not configured, TFTP becomes the transfermode by default.
• Suboption 04: The name of the software image file to install.
NOTE: When the DHCP server cannot use suboption 00, configure theimage file using suboption 04. If both suboption 00 and suboption 4are defined, suboption 04 is ignored.
option NEW_OP.alt-image-file-name"/dist/images/jinstall-ex-4200-13.2R1.1-domestic-signed.tgz";
8. (Optional)ConfigureDHCPoption7 to specifyoneormoresystem log (syslog) servers.
option log-servers 10.100.31.72;
9. (Optional) Configure DHCP option 42 to specify one or more NTP servers.
option ntp-servers 10.100.31.73;
10. (Optional) Configure DHCP option 12 to specify the hostname of the switch or router.
option hostname "jn-switch35";
The following sample configuration shows the DHCP options you just configured:
host jn-switch35 {hardware ethernet ac:4b:c8:29:5d:02;fixed-address 10.100.31.36;option tftp-server-name "10.100.31.71";option host-name "jn-switch35";option log-servers 10.100.31.72;option ntp-servers 10.100.31.73;option NEW_OP.image-file-name"/dist/images/jinstall-ex-4200-13.2R1.1-domestic-signed.tgz";
option NEW_OP.transfer-mode "ftp";option NEW_OP.config-file-name "/dist/config/jn-switch35.config";
}
Based on the DHCP options you just configured, the following statements are
appended to the Junos OS configuration file (for example, jn-switch35.config):
system {host-name jn-switch35;syslog {host 10.100.31.72 {any any;
}
Copyright © 2018, Juniper Networks, Inc.88
Installation and Upgrade Guide

}ntp {server 10.100.31.73;
}}
11. Connect the switch or router to the network that includes the DHCP server and the
FTP, HTTP, or TFTP server.
12. Boot the switch or router with the default configuration.
13. Monitor the ZTP process by looking at the following log files:
• /var/log/dhcp_logfile
• /var/log/image_load_log
• /var/log/op-script.log
• /var/log/event-script.log
RelatedDocumentation
Understanding Zero Touch Provisioning on page 81•
• Understanding NTP Time Servers
• Op Script Overview
• Understanding DHCP Services for Switches
• Reverting to the Default Factory Configuration by Using the request system zeroize
Command on page 235
Configuring Zero Touch Provisioning on SRX Series Devices
• Understanding Zero Touch Provisioning on SRX Series Devices on page 89
• Configuring Zero-Touch Provisioning on an SRX Series Device on page 93
• Understanding Factory-Default Configuration on SRX Series Device for Zero Touch
Provisioning on page 96
Understanding Zero Touch Provisioning on SRX Series Devices
This topic includes following sections:
• Understanding ZTP on SRX Series Devices on page 89
• Network Activator Overview on page 90
• Limitations on page 93
Understanding ZTP on SRX Series Devices
Zero Touch Provisioning (ZTP) enables you to provision and configure devices
automatically, minimizing most of the manual intervention required for adding devices
89Copyright © 2018, Juniper Networks, Inc.
Chapter 5: Configuring Zero Touch Provisioning

to a network. ZTP is supported on SRX300, SRX320, SRX340, SRX345, SRX550M, and
SRX1500 devices.
ZTP on SRX Series devices is responsible for the initial bootup and configuration of the
device when the device is powered on. This functionality includes:
• Providing the bare-minimum bootstrapping of the device. The SRX Series device is
shippedwitha factory-default configuration.The factory-default configuration includes
the URL of the redirect server, that is used to connect to the central server by using a
secure encrypted connection.
• Automatically connecting to the server over the Internet, and downloading the
configuration and JunosOS image as specified by the customer or user from the server
when the SRX Series device boots up with the factory-default configuration. The new
image is installed first and then the initial configuration is applied and committed on
the SRX Series device.
ZTP offers the following advantages:
• Simplified and faster deployment
• Increased configuration accuracy
• Support for scaling of network without additional resources
The ZTP process uses Network Activator to initially provision SRX Series devices.
Network Activator Overview
Network Service Activator enables fast device discovery and provisioning for automated
configuration to eliminate complex device setup.
NetworkActivator initially provisionsSRXSeriesdevices (henceforth referred toas remote
devices in this documentation), which reside at end users’ sites. The remote devices
download a boot image and initial configuration files from servers hosting Network
Activator, using a process that provides full authorization and authentication for all
interactions. When initial provisioning is complete, the remote device communicates
with amanagement server, which then starts tomanage andmonitor the remote device.
Network Activator uses a distributed architecture to support remote devices. Network
Activator is installed on one central administration server (central server) andmultiple
regional administration servers (regional servers). A device communicates directly with
its assigned regional server. The distributed architecture optimizes the efficiency of the
initial provisioning process, contributing to high performance and scaling of the network.
Figure 10 onpage91 Illustrates the distributed architecture and the components involved
in the initial provisioning process.
Copyright © 2018, Juniper Networks, Inc.90
Installation and Upgrade Guide

Figure 10: Components Involved in Initial Provisioning of Remote Device
g043
412
CENTRAL ADMINISTRATIONLOCATION
Centralserver
Managementserver
(may be at centralor regional location)
REGIONAL ADMINISTRATIONLOCATION
Regionalserver
END USER’S LOCATION
Remote device
JUNIPER NETWORKSWEBSITE
Redirect Tool
The roles of the components in the initial provisioning process are as follows:
• The remote device sends requests for initial provisioning. The remote device resides
at the end user’s location.
• The Redirect Tool provides authentication and authorization for remote devices to
access their assigned regional servers through use of ITU-T X.509 private key
infrastructure (PKI) digital certificates. Redirect service is hosted on AmazonWeb
Services (AWS), operated andmaintained by Juniper Networks.
• The central server hosts Network Activator and communicates with the regional
activator servers. Administrators at a service provider or central enterprise location
interact with this server to install and set up Network Activator. The central server is
located at a central geographic location for the service provider.
• The regional server also hosts Network Activator. This server stores information about
its assigned remote devices and communicates directlywith those devices. This server
typically resides at a regional administrative location the provider designates for the
end user.
Figure 11 on page 92 illustrates the initial provisioning workflow.
91Copyright © 2018, Juniper Networks, Inc.
Chapter 5: Configuring Zero Touch Provisioning

Figure 11: Workflow for Initial Provisioning
1
4
3
7
5
2 6
ADMINISTRATOR• Installs and sets up
Network Activatoron central server.
• Adds device andcorrespondingregional serverto Redirect Tool.
Regional serverforwards notificationsabout its interactionswith the remote deviceto the managementserver.
g043
413
Central serverforwards installationand setup to regionalservers.
Remote devicecommunicateswith Redirect Toolto obtain contactinformation forregional server.
Remote deviceobtains boot imageand configurationfrom regional server.
Remote devicestarts andmanagement serverstarts managingthe device.
REDIRECTTOOL
on Juniper Networkswebsite
REGIONALSERVER
CENTRALSERVER
MANAGEMENTSERVER
End user configuresbasic connectivityand powers on device.
REMOTE DEVICE
In detail, the provisioning workflow proceeds as follows:
1. The administrator at the service provider:
• Installs and sets up Network Activator on the central server.
• Adds remote devices and regional servers in the Redirect Tool.
2. The central server forwards the installation to the regional servers.
3. The end user powers on the remote device, connects it to a computer, and enters the
authentication code in the webpage to send a request for initial provisioning.
4. The device transmits its X.509 certificate and fully qualified domain name (FQDN)
as a provisioning request to the Redirect Tool.
5. TheRedirect Tool searches its data store for the regional server that the administrator
specified for this device, and confirms that the device’s request corresponds to the
X.509 certificate specified for the server.
6. The Redirect Tool sends contact information for the regional server to the device.
Copyright © 2018, Juniper Networks, Inc.92
Installation and Upgrade Guide

7. The device sends a request to the regional server for the URL of the boot image and
the location of the initial configuration.
8. The regional server sends the information to the device.
9. The device obtains the boot image and configuration from the regional server.
10. The device uses the boot image and configuration to start and become operational.
For more details on Network Activator, see Network Activator User Guide .
Limitations
• There are no restrictions on the number of attempts for entering the correct activation
code.
• If the remote device is not able to reach the server (because the configured address
in the factory-default configuration is not correct or the server is down, and so on), the
remote device attempts to connect to an alternative server (if configured in the
factory-default configuration). If there is only one server configured, then you can
reattempt to connect. In such scenarios, we recommend that you configure the device
manually through the console.
• Captive portal redirection, required for automatically redirecting users to the
authentication webpage for entering the activation code, is not supported. Youmust
manually navigate to the activation page after connecting to the device.
Configuring Zero-Touch Provisioning on an SRX Series Device
This section provides step-by-step instructions on how to use ZTP on an SRX Series
device for initial provisioning of the device.
Before you begin:
• Unpack the device, install it, complete the necessary cabling, connect a laptop or any
other terminal device, and power on the device. See the Hardware installation Guide
for your device more information.
• For SRX300, SRX320, SRX340, SRX345, and SRX550M devices, connect the
management device and access the J-Web interface.
Formore information, seeQuickStart guidesof respectivedevicesatSRX300,SRX320,
SRX340, SRX345, and SRX550M.
You are provided with an option to use ZTP; you can use this option or skip it and
continue with J-Web wizards.
• For SRX1500 devices, before you can use J-Web to configure your device, youmust
access the CLI to configure the root authentication and themanagement interface.
For more information, see How to Set Up Your SRX1500 Services Gateway.
93Copyright © 2018, Juniper Networks, Inc.
Chapter 5: Configuring Zero Touch Provisioning

To provision an SRX Series device by using ZTP:
1. Connect amanagement device (PC or laptop) to any front panel Ethernet port (WAN
port) of the SRX Series device.
2. Launch aWeb browser from themanagement device and enter the authentication
code in the webpage as shown in Figure 12 on page 94.
Figure 12: Entering Activation Code for ZTP
After the device is successfully authenticated, it starts downloading the software
image and initial configuration from the server as shown in Figure 13 on page 94.
Figure 13: Initiating ZTP Process (Software Image Downloading)
Copyright © 2018, Juniper Networks, Inc.94
Installation and Upgrade Guide

At this step:
• The activation code is sent to the server, and if the authentication is successful, the
server pushes the initial configuration to the device. If the authentication is
unsuccessful, you are asked to provide the correct code.
• The server can optionally pushes a new software image on the SRX Series device.
In that case, the new image is installed first and then the initial configuration is
applied and committed on the device.
The new image is installed and then the initial configuration is applied and committed
on the device. When the process is complete, a confirmation message is displayed,
as shown in Figure 14 on page 95.
Figure 14: Completing ZTP Process
3. Click Logs to display details of the bootstrapping process.
After successfully installing the new software image and configuration on the system,
the client sends thebootstrap-completenotification to the server thatprovided the image
and the configuration. After the notification is sent, the configuration that includes the
names of servers is deleted from the system.When you use ZTP the next time, youmust
explicitly configure the URL of the redirect server.
NOTE: In case of failure at any stage, the procedure is started all over again.
NOTE: TheZTPprocesseitherupgradesordowngrades the JunosOSversion.During adowngradeonanSRXSeries device, if youdowngrade to a softwareversion earlier than Junos OS Release 15.1X49-D100, in which ZTP is notsupported, the autoinstallation phase of the ZTP process does not happen.
95Copyright © 2018, Juniper Networks, Inc.
Chapter 5: Configuring Zero Touch Provisioning

For SRX300, SRX320, SRX340, SRX345, and SRX550M devices, ZTP is the default
method forprovisioning thedevices.However, if youwant touse J-Web-basedprovisioning
(J-Web setupwizards supported for the SRX300 line of devices andSRX550Mdevices),
then instead of ZTP, you can use the option provided in the client portal to skip to J-Web
setup wizards for performing the initial software configuration of your device.
If you select the Skip to JWeb option, youmust configure the system root authentication
password as shown in Figure 15 on page 96.
Figure 15: Configuring SystemRoot-Authentication Password
NOTE: For SRX1500 devices, the Skip to JWeb option is not supported. To
access J-Web, the ZTP client configurationmust be deleted during the initialsetup of SRX1500 through CLI.
UnderstandingFactory-DefaultConfigurationonSRXSeriesDevice forZeroTouchProvisioning
Your services gateway is shipped with a factory-default configuration. Following is a
sample of the default configuration that includes configuration for ZTP:
system {phone-home {rfc-compliant;server https://redirect.juniper.net;
}}
Note that, in this configuration:
• server indicates the nameor IP address of the server. The factory-default configuration
on an SRX Series device might include IP addresses of more than one servers.
• rfc-compliant indicates that after an upgrade, the server enforces certain behaviors
that are compliant with RFC standards.
Copyright © 2018, Juniper Networks, Inc.96
Installation and Upgrade Guide

NOTE: By default, the system autoinstallation configuration is part of thefactory-default configurationof thedevice.So, theadministratormustensurethat the configuration file sent from the regional server to the remote device(SRX series device)must include the delete systemautoinstallation option in
the factory-default configuration.
RelatedDocumentation
• Juniper Networks Network Activator
97Copyright © 2018, Juniper Networks, Inc.
Chapter 5: Configuring Zero Touch Provisioning

Copyright © 2018, Juniper Networks, Inc.98
Installation and Upgrade Guide

CHAPTER 6
Configuring Automatic Installation ofConfiguration Files
• Autoinstallation Overview on page 99
• Example: Configuring Autoinstallation on SRX Series Devices on page 104
• Configuring Autoinstallation on JNU Satellite Devices on page 107
• AutoinstallationProcessonSatelliteDevices in a JunosNodeUnifierGrouponpage 109
• Autoinstallation of Satellite Devices in a Junos Node Unifier Group on page 111
• Verifying Autoinstallation on JNU Satellite Devices on page 112
Autoinstallation Overview
If you are setting upmany devices, autoinstallation can help automate the configuration
process by loading configuration files onto new or existing devices automatically over
the network. You can use either the J-Web configuration editor or the CLI configuration
editor to configure a device for autoinstallation.
Autoinstallation provides automatic configuration for a new device that you connect to
the network and turn on, or for a device configured for autoinstallation. The
autoinstallation process begins any time a device is powered on and cannot locate a
valid configuration file in the CompactFlash (CF) card. Typically, a configuration file is
unavailable when a device is powered on for the first time, or if the configuration file is
deleted from the CF card. The autoinstallation feature enables you to deploy multiple
devices from a central location in the network.
For the autoinstallation process to work, youmust store one or more host-specific or
default configuration files on a configuration server in the network and have a service
available—typicallyDynamicHostConfigurationProtocol (DHCP)—toassignan IPaddress
to the device.
Autoinstallation takes place automatically when you connect an Ethernet or serial port
on a new Juniper Networks device to the network and power on the device. To simplify
the process, you can explicitly enable autoinstallation on a device and specify a
configurationserver, anautoinstallation interface, andaprotocol for IPaddressacquisition.
99Copyright © 2018, Juniper Networks, Inc.

This section contains the following topics:
• Automatic Installation of Configuration Files on page 100
• Supported Autoinstallation Interfaces and Protocols on page 100
• Typical Autoinstallation Process on a New Device on page 101
Automatic Installation of Configuration Files
On SRX Series devices, you can specify a remote server where configuration files are
located. If a configuration file cannot be found on the device’s CompactFlash card, the
device automatically retrieves the configuration file from this remote server. For security
purposes, you can encrypt these remote files using the DES cipher, and once they have
been retrieved, the device decrypts them for use on the server.
To encrypt the files, we recommend the OpenSSL tool. You can get the OpenSSL tool
at http://www.openssl.org/. To encrypt the file, use the following syntax:
% openssl enc -des -k passphrase -in original-file -out encrypted-file
• passphrase—Passphrase used to encrypt the configuration file. The passphrase should
be the name of the file without the path information or file extension.
• original-file—Unencrypted configuration file.
• encrypted-file—Name of the encrypted configuration file.
For example, if you are encrypting the active configuration file juniper.conf.gz, the
passphrase is juniper.conf. The openSSL syntax used to encrypt the file is:
% openssl enc -des -k juniper.conf -in juniper.conf.gz -out juniper.conf.gz.enc
Supported Autoinstallation Interfaces and Protocols
Before autoinstallationonadevice can takeplace, thedevicemust acquire an IPaddress.
The protocol or protocols you choose for IP address acquisition determine the device
interface toconnect to thenetwork for autoinstallation. Thedevicedetects theconnected
interface and requests an IP address with a protocol appropriate for the interface.
Autoinstallation is supported over an Ethernet LAN interface or a serial LAN orWAN
interface. Table 12 on page 100 lists the protocols that the device can use on these
interfaces for IP address acquisition.
Table 12: Interfaces and Protocols for IP Address Acquisition During Autoinstallation
Protocol for AutoinstallationInterface and Encapsulation Type
DHCP, BOOTP, or Reverse Address Resolution Protocol(RARP)
Ethernet LAN interfacewithHigh-LevelDataLinkControl (HDLC)
Serial Line Address Resolution Protocol (SLARP)Serial WAN interface with HDLC
BOOTPSerial WAN interface with Frame Relay
Copyright © 2018, Juniper Networks, Inc.100
Installation and Upgrade Guide

If the server with the autoinstallation configuration file is not on the same LAN segment
as the new device, or if a specific device is required by the network, youmust configure
an intermediate device directly attached to the newdevice throughwhich the newdevice
can sendTrivial File Transfer Protocol (TFTP), BOOTP, andDomainNameSystem(DNS)
requests. In this case, you specify the IPaddressof the intermediatedeviceas the location
to receive TFTP requests for autoinstallation.
Typical Autoinstallation Process on a NewDevice
When a device is powered on for the first time, it performs the following autoinstallation
tasks:
1. Thenewdevice sendsoutDHCP,BOOTP,RARP,orSLARP requestsoneachconnected
interface simultaneously to obtain an IP address.
If a DHCP server responds, it provides the device with some or all of the following
information:
• An IP address and subnet mask for the autoinstallation interface.
• The location of the TFTP (typically), Hypertext Transfer Protocol (HTTP), or FTP
server on which the configuration file is stored.
• The name of the configuration file to be requested from the TFTP server.
• The IP address or hostname of the TFTP server.
If the DHCP server provides only the hostname, a DNS server must be available on
the network to resolve the name to an IP address.
• The IP address of an intermediate device if the configuration server is on a different
LAN segment from the new device.
2. After thenewdeviceacquiresan IPaddress, theautoinstallationprocesson thedevice
attempts to download a configuration file in the following ways:
a. If the DHCP server specifies the host-specific configuration file (boot file)
hostname.conf, the device uses that filename in the TFTP server request. (In the
filename, hostname is the hostname of the new device.) The autoinstallation
process on the new device makes three unicast TFTP requests for hostname.conf.
If these attempts fail, the device broadcasts three requests to any available TFTP
server for the file.
b. If thenewdevicecannot locatehostname.conf, theautoinstallationprocessunicasts
or broadcasts TFTP requests for a default device configuration file called
network.conf, which contains hostname-to-IP address mapping information, to
attempt to find its hostname.
c. Ifnetwork.confcontainsnohostnameentry for thenewdevice, theautoinstallation
process sends out a DNS request and attempts to resolve the new device's IP
address to a hostname.
101Copyright © 2018, Juniper Networks, Inc.
Chapter 6: Configuring Automatic Installation of Configuration Files
d. If the new device can determine its hostname, it sends a TFTP request for the
hostname.conf file.
e. If the new device is unable to map its IP address to a hostname, it sends TFTP
requests for the default configuration file router.conf.
3. After the new device locates a configuration file on a TFTP server, autoinstallation
downloads the file, installs the file on the device, and commits the configuration.
NOTE:
• If youconfigure theDHCPserver toprovideonly theTFTPserverhostname,add an IP address-to-hostnamemapping entry for the TFTP server to theDNS database file on the DNS server in the network.
• If the new device is not on the same network segment as the DHCP server(or other device providing IP address resolution), configure an existingdevice as an intermediate to receive TFTP and DNS requests and forwardthem to the TFTP server and the DNS server. Youmust configure the LANor serial interface on the intermediate device with the IP addresses of thehosts providing TFTP and DNS service. Connect this interface to the newdevice.
Copyright © 2018, Juniper Networks, Inc.102
Installation and Upgrade Guide

NOTE: Starting in Junos OS Release 15.1X49-D60 and in Junos OS Release17.3R1, on SRX300, SRX320, SRX340, SRX345, SRX550M, and SRX1500devices, some of the factory-default configurations are changed.
• The name-server statement, used to configure one or more Domain Name
System (DNS) name servers, is changed to 8.8.8.8 and 8.8.8.4. Previously,it was 208.67.222.222 and 208.67.220.220.
• A new system service, NETCONF service over SSH, is introduced at the[edit system services] hierarchy:
edit system services netconf ssh
• The following configuration setting for HTTPS (securemanagement)access using the J-Web interface is changed. Now, there is no need tospecify the interfacedetails for J-Webmanagement.With thisconfiguration,you canmanage the device from any interface through HTTPS.
edit system services web-management https interface [irb.0]
• A license autoupdate URL (https://ae1.juniper.net/junos/key_retrieval) is
now supported under the [edit system] hierarchy:
license {autoupdate {url https://ae1.juniper.net/junos/key_retrieval;
}}
• A new system log configuration is introduced to configure system logmessages to record all commands entered by users and all authenticationor authorization attempts under the [edit system] hierarchy:
syslog {archive size 100k files 3;user * {any emergency;
}file messages {any notice;authorization info;
}file interactive-commands {interactive-commands any;
}}
NOTE: Starting in Junos OS Release 17.4R1, on SRX300, SRX320, SRX340,SRX345, and SRX550M devices, telnet and xnm-clear-text are not partsystem services in factory-default configurations.
103Copyright © 2018, Juniper Networks, Inc.
Chapter 6: Configuring Automatic Installation of Configuration Files

NOTE: In Junos OS Release 15.1X49-D40 and earlier, configuringautoinstallation using USB and Layer Ethernet switching was supported onthe same interface. However, the command caused improper installation ofthe interface-related configurations.
Starting with Junos OS Release 15.1X49-D50, Layer 2 Ethernet switching isnotsupportedonthesame interface forSRX300,SRX320,SRX340,SRX345,and SRX550M devices.
The system autoinstallation interfaces <interface names> command and the
set interface <interface names> unit 0 family ethernet-switching command
cannot be configured on the same interface.
NOTE: USBauto-installation isnotsupportedonSRX1500devicesandvSRXinstances.
Release History Table DescriptionRelease
Starting in JunosOSRelease 15.1X49-D60and in JunosOSRelease 17.3R1,onSRX300,SRX320,SRX340,SRX345,SRX550M,andSRX1500devices,some of the factory-default configurations are changed.
15.1X49-D60
RelatedDocumentation
Example: Configuring Autoinstallation on SRX Series Devices on page 104•
Example: Configuring Autoinstallation on SRX Series Devices
This example shows how to configure a device for autoinstallation.
• Requirements on page 104
• Overview on page 105
• Configuration on page 105
• Verification on page 106
Requirements
Before you begin:
• Configure a DHCP server on your network tomeet your network requirements. You can
configure a device to operate as a DHCP server.
• Create one of the following configuration files, and store it on a TFTP server in the
network (see “Configuration Files” on page 13):
• A host-specific file with the name hostname.conf for each device undergoing
autoinstallation. Replace hostnamewith the name of a device. The hostname.conf
Copyright © 2018, Juniper Networks, Inc.104
Installation and Upgrade Guide
file typically contains all the configuration information necessary for the device with
this hostname.
• A default configuration file named router.confwith the minimum configuration
necessary to enable you to telnet into the new device for further configuration.
• Physically attach thedevice to thenetwork using oneormoreof the following interface
types:
• Fast Ethernet
• Gigabit Ethernet
• Serial with HDLC encapsulation
Overview
No configuration is required on a device on which you are performing autoinstallation,
because it is an automated process. However, to simplify the process, you can specify
oneormore interfaces, protocols, andconfigurationservers tobeused forautoinstallation.
The device uses these protocols to send a request for an IP address for the interface.
• BOOTP—Sends requests over all interfaces.
• RARP—Sends requests over Ethernet interfaces.
Configuration
CLI QuickConfiguration
To quickly configure this section of the example, copy the following commands, paste
them into a text file, remove any line breaks, change any details necessary tomatch your
network configuration, copy and paste the commands into the CLI at the [edit] hierarchy
level, and then enter commit from configuration mode.
set system autoinstallation configuration-servers tftp://tftpconfig.sp.comset system autoinstallation interfaces ge-0/0/0 bootp rarp
Step-by-StepProcedure
The following example requires you to navigate various levels in the configuration
hierarchy. For instructions on how to do that, see Using the CLI Editor in Configuration
Mode.
To configure a device for autoinstallation:
1. Enable autoinstallation and specify the URL address of one or more servers from
which to obtain configuration files.
[edit system]user@host# set autoinstallation configuration-servers tftp://tftpconfig.sp.com
NOTE: You can also use an FTP address, for example,ftp://user:[email protected].
105Copyright © 2018, Juniper Networks, Inc.
Chapter 6: Configuring Automatic Installation of Configuration Files

2. Configure one ormore Ethernet or serial interfaces to perform autoinstallation, and
configure one or two procurement protocols for each interface.
[edit system]user@host# set autoinstallation interfaces ge-0/0/0 bootp rarp
Results From configuration mode, confirm your configuration by entering the show system
autoinstallationstatuscommand. If theoutputdoesnotdisplay the intendedconfiguration,
repeat the configuration instructions in this example to correct it.
[edit]user@host# show system autoinstallation status
Autoinstallation status:Master state: ActiveLast committed file: NoneConfiguration server of last committed file: 10.25.100.1Interface: Name: ge-0/0/0 State: Configuration Acquisition Acquired: Address: 192.168.124.75 Hostname: host-ge-000 Hostname source: DNS Configuration filename: router-ge-000.conf Configuration filename server: 10.25.100.3 Address acquisition: Protocol: BOOTP Client Acquired address: None Protocol: RARP Client Acquired address: None
If you are done configuring the device, enter commit from configuration mode.
NOTE: When there is auser-specified configuration for aparticular interface,delete the factory default for that interface. Having two configurations forthe same devicemight lead to errors. For example, if PPP encapsulation isset on a T1 interface through user configuration while the factory defaultconfiguration configures CISCOHLDC on the same interface, then theinterfacemight not comeup and the following error is logged in themessagefile: “DCD_CONFIG_WRITE_FAILED failed.”
Verification
Confirm that the configuration is working properly.
• Verifying Autoinstallation on page 107
Copyright © 2018, Juniper Networks, Inc.106
Installation and Upgrade Guide

Verifying Autoinstallation
Purpose Verify that the device has been configured for autoinstallation.
Action From operational mode, enter the show system autoinstallation status command. The
output shows thesettingsconfigured forautoinstallation.Verify that thevaluesdisplayed
are correct for the device when it is deployed on the network.
RelatedDocumentation
Autoinstallation Overview on page 99•
Configuring Autoinstallation on JNU Satellite Devices
No configuration is required on a device on which you are performing autoinstallation
because it is an automated process. However, to simplify the process, you can specify
oneormore interfaces, protocols, andconfigurationservers tobeused forautoinstallation.
In this scenario, satellite devices, suchasEXSeriesEthernetSwitches,QFXSeriesdevices,
and ACX Series Universal Access Routers, that are managed by the controller are
considered.
To configure autoinstallation:
1. Load the JNU factory-default configuration file on the satellite device to enable the
device to function in JNUmode.
user@satellite# load override /etc/config/jnu-factory.conf
An override operation discards the current candidate configuration and loads the
configuration in the specified filename or the one that you type at the terminal.When
youuse theoverrideoptionandcommit theconfiguration, all systemprocesses reparse
the configuration.
2. Specify the URL address of one or more servers fromwhich to obtain configuration
files:
[edit system]user@host# set autoinstallation configuration-servers tftp://tftpconfig.sp.com
NOTE: You can also use an HTTP or FTP address—for example,http://user:[email protected] or
ftp://user:[email protected].
3. Configure one ormore Ethernet interfaces to perform autoinstallation and IP address
acquisitionprotocols for each interface.The router uses theprotocols to senda request
for an IP address for the interface:
[edit system]user@host# set autoinstallation interfaces ge-0/0/0 bootp
107Copyright © 2018, Juniper Networks, Inc.
Chapter 6: Configuring Automatic Installation of Configuration Files

4. Set the root password, entering a clear-text password that the systemwill encrypt,
a password that is already encrypted, or an SSH public key string.
Choose one of the following:
• To enter a clear-text password, use the following command:
[edit system]user@host# set root-authentication plain-text-passwordNew password: type password hereRetype new password: retype password here
• To enter a password that is already encrypted, use the following command:
[edit]root# set system root-authentication encrypted-password encrypted-password
• To enter an SSH public key, use the following command:
[edit]root# set system root-authentication ssh-rsa key
5. Save the Junos OS configuration changes, activate the configuration on the device,
and exit configuration mode, using the commit-and-quit command.
[edit]user@host# commit-and-quit
When the satellite device reboots, it triggers the autoinstallation mechanism to retrieve
its initial configuration and downloads the settings from the configuration file stored on
a configuration server in the network. On the controller, youmust enable the FTP service
by using the set systemservices ftp command and save the configuration on the satellite
device at the /var/jnu/ directory.
The followingconfiguration is generatedon the satellitedeviceasa result of thepreceding
procedure to configure autoinstallation:
system { autoinstallation { traceoptions { flags { all; } file autod; level all; } delete-after-commit; /* After initial config, no need to keep */ interfaces { ge-* { bootp; } xe-* { bootp; } configuration-servers { "ftp://192.168.0.1/var/jnu/sat1.conf"; } } }
Copyright © 2018, Juniper Networks, Inc.108
Installation and Upgrade Guide

root-authentication { encrypted-password "$ABC123";
}}
RelatedDocumentation
Autoinstallation of Satellite Devices in a Junos Node Unifier Group on page 111•
• AutoinstallationProcessonSatelliteDevices in a JunosNodeUnifierGrouponpage 109
• Verifying Autoinstallation on JNU Satellite Devices on page 112
• autoinstallation on page 360
• delete-after-commit (JNU Satellites) on page 364
• configuration-servers
Autoinstallation Process on Satellite Devices in a Junos Node Unifier Group
Autoinstallation provides automatic configuration for a new router that you connect to
the network and power on, or for a router configured for autoinstallation. The
autoinstallation process begins any timea router is poweredonand cannot locate a valid
configuration file in the CompactFlash card. Typically, a configuration file is unavailable
when a router is powered on for the first time, or if the configuration file is deleted from
the CompactFlash card. The autoinstallation feature enables you to deploy multiple
routers from a central location in the network.
For the autoinstallation process to work, youmust store one or more host-specific or
default configuration files on a configuration server in the network and have a service
available—typicallyDynamicHostConfigurationProtocol (DHCP)—toassignan IPaddress
to the router.
Autoinstallation takes place automatically when you connect an Ethernet interface on
a new Juniper Networks router to the network and power on the router. To simplify the
process, you can explicitly enable autoinstallation on a router and specify a configuration
server, an autoinstallation interface, and a protocol for IP address acquisition.
This topic describes:
• Supported Autoinstallation Interfaces and Protocols on page 109
• Typical Autoinstallation Process on a New Router on page 110
Supported Autoinstallation Interfaces and Protocols
Before autoinstallation on a router can take place, the router must acquire an IP address
or a USB key. The protocol or protocols you choose for IP address acquisition determine
the router interface to connect to the network for autoinstallation. The router detects
the connected interface and requests an IP address with a protocol appropriate for the
interface. Autoinstallation is supported over an Ethernet LAN interface. For IP address
109Copyright © 2018, Juniper Networks, Inc.
Chapter 6: Configuring Automatic Installation of Configuration Files

acquisition, the JNU satellite router uses DHCP, BOOTP, or Reverse Address Resolution
Protocol (RARP) on an Ethernet LAN interface.
If the server with the autoinstallation configuration file is not on the same LAN segment
as the new router, or if a specific router is required by the network, youmust configure
an intermediate router directly attached to the new router, throughwhich the new router
can send HTTP, FTP, Trivial File Transfer Protocol (TFTP), BOOTP, and Domain Name
System(DNS) requests. In this case, you specify the IPaddressof the intermediate router
as the location to receive HTTP, FTP, or TFTP requests for autoinstallation.
Typical Autoinstallation Process on a NewRouter
When a router is powered on for the first time, it performs the following autoinstallation
tasks:
1. The new router sends out DHCP, BOOTP, or RARP requests on each connected
interface simultaneously to obtain an IP address.
If a DHCP server responds, it provides the router with some or all of the following
information:
• An IP address and subnet mask for the autoinstallation interface.
• The locationof theTFTP (typically), HTTP, or FTPserver onwhich the configuration
file is stored.
• The name of the configuration file to be requested from the HTTP, FTP, or TFTP
server.
• The IP address or hostname of the HTTP, FTP, or TFTP server.
If the DHCP server provides only the hostname, a DNS server must be available on
the network to resolve the name to an IP address.
• The IP address of an intermediate router if the configuration server is on a different
LAN segment from the new router.
2. After the new router acquires an IP address, the autoinstallation process on the router
attempts to download a configuration file in the following ways:
a. If the configuration file is specified as a URL, the router fetches the configuration
file from theURLby usingHTTP, FTP, or TFTP, depending on theprotocol specified
in the URL.
b. If the DHCP server specifies the host-specific configuration file (boot file)
hostname.conf, the router uses that filename in the TFTP server request. (In the
filename,hostname is thehostnameof thenewrouter.)Theautoinstallationprocess
on the new router makes three unicast TFTP requests for hostname.conf. If these
attempts fail, the router broadcasts three requests to any available TFTP server
for the file.
c. If thenewrouter cannot locatehostname.conf, theautoinstallationprocessunicasts
or broadcasts TFTP requests for a default router configuration file called
Copyright © 2018, Juniper Networks, Inc.110
Installation and Upgrade Guide

network.conf, which contains hostname-to-IP address mapping information, to
attempt to find its hostname.
d. If network.conf contains no hostnameentry for the new router, the autoinstallation
process sends out a DNS request and attempts to resolve the new router’s IP
address to a hostname.
e. If the new router can determine its hostname, it sends a TFTP request for the
hostname.conf file.
f. If the new router is unable to map its IP address to a hostname, it sends TFTP
requests for the default configuration file router.conf.
3. After the new router locates a configuration file on a TFTP server, the autoinstallation
process downloads the file, installs the file on the router, and commits the
configuration.
RelatedDocumentation
Autoinstallation of Satellite Devices in a Junos Node Unifier Group on page 111•
• Configuring Autoinstallation on JNU Satellite Devices on page 107
• Verifying Autoinstallation on JNU Satellite Devices on page 112
• autoinstallation on page 360
• delete-after-commit (JNU Satellites) on page 364
• configuration-servers
Autoinstallation of Satellite Devices in a Junos Node Unifier Group
In a JunosNodeUnifier (JNU) group that contains anMXSeries router as a controller that
manages satellite devices, such as EX Series Ethernet Switches, QFX Series devices, and
ACX Series Universal Access Routers, the autoinstallation functionality is supported for
the satellite devices. JNU has an autoinstallation mechanism that enables a satellite
device to configure itself out-of-the-box with nomanual intervention, using the
configuration available either on the network or locally through a removable media, or
using a combination of both. This autoinstallation method is also called the zero-touch
facility.
The zero-touch configuration delivers the following benefits:
• The router can be sent from the warehouse to the deployment site without any
preconfiguration steps.
• The procedure required to deploy the device at the cell site is simplified, resulting in
reduced operational and administrative costs.
• You can roll out large numbers of these devices in a very short time.
111Copyright © 2018, Juniper Networks, Inc.
Chapter 6: Configuring Automatic Installation of Configuration Files

The factory default setting is autoinstallation-enabled. After youmake the first
configuration to the router, you can do either of the following:
• A JNU factory default file, jnu-factory.conf, is present in the /etc/config/ directory and
contains the configuration to perform autoinstallation on satellite devices. The
zero-touch configuration can be disabled by including the delete-after-commit
statement at the [edit system autoinstallation] hierarchy level and committing the
configuration. This way, the saved configuration is used the next time the system
reboots.
• Alternatively, if the routermust get theconfiguration fromtheserver each timeasystem
reboot occurs, the zero-touch configuration must not be changed (that is, you must
not include the delete-after-commit statement at the [edit system autoinstallation]
hierarchy level and commit the settings).
RelatedDocumentation
AutoinstallationProcessonSatelliteDevices in a JunosNodeUnifierGrouponpage 109•
• Configuring Autoinstallation on JNU Satellite Devices on page 107
• Verifying Autoinstallation on JNU Satellite Devices on page 112
• autoinstallation on page 360
• delete-after-commit (JNU Satellites) on page 364
• configuration-servers
Verifying Autoinstallation on JNU Satellite Devices
Purpose After you have configured autoinstallation, display the status of autoinstallation on a
satellite device, such as anACXSeries router, an EXSeries switch, or aQFXSeries device,
in a JunosNodeUnifier (JNU)group that ismanagedbyacontroller,which is anMXSeries
router.
Action From the CLI, enter the show system autoinstallation status command. The following
example displays the autoinstallation settings of an ACX Series router that operates as
a satellite in a JNU group.
Sample Output
user@host> show system autoinstallation status Autoinstallation status: Master state: Active Last committed file: None Configuration server of last committed file: 10.25.100.1 Interface: Name: ge-0/1/0 State: Configuration Acquisition Acquired: Address: 192.168.124.75 Hostname: host-ge-000 Hostname source: DNS Configuration filename: router-ge-000.conf Configuration filename server: 10.25.100.3
Copyright © 2018, Juniper Networks, Inc.112
Installation and Upgrade Guide

Address acquisition: Protocol: DHCP Client Acquired address: None Protocol: RARP Client Acquired address: None Interface: Name: ge-0/1/1 State: None Address acquisition: Protocol: DHCP Client Acquired address: None Protocol: RARP Client Acquired address: None
Meaning The output shows the settings configured for autoinstallation. Verify that the values
displayed are correct for the router when it is deployed on the network.
RelatedDocumentation
• Autoinstallation of Satellite Devices in a Junos Node Unifier Group on page 111
• AutoinstallationProcessonSatelliteDevices in a JunosNodeUnifierGrouponpage 109
• Configuring Autoinstallation on JNU Satellite Devices on page 107
• autoinstallation on page 360
• delete-after-commit (JNU Satellites) on page 364
• configuration-servers
• show system autoinstallation status on page 491
113Copyright © 2018, Juniper Networks, Inc.
Chapter 6: Configuring Automatic Installation of Configuration Files

Copyright © 2018, Juniper Networks, Inc.114
Installation and Upgrade Guide

CHAPTER 7
Configuring Dual-Root Partitions for HighAvailability
• Understanding Resilient Dual-Root Partitions on Switches on page 115
• Dual-Root Partitioning Scheme on SRX Series Devices on page 118
• Example: Installing Junos OS on SRX Series Devices Using the Partition
Option on page 124
• Reinstalling the Single-Root Partition on SRX Series Devices on page 128
Understanding Resilient Dual-Root Partitions on Switches
Resilient dual-root partitioning, introduced on Juniper Networks EX Series Ethernet
Switches in JuniperNetworks Junosoperatingsystem(JunosOS)Release 10.4R3,provides
additional resiliency to switches in the following ways:
• Allows the switch to boot transparently from the second (alternate) root partition if
the system fails to boot from the primary root partition.
• Provides separation of the root Junos OS file system from the /var file system. If
corruptionoccurs in the /var file system(ahigher probability than in the root file system
because of the greater frequency of reads and writes in /var), the root file system is
insulated from the corruption.
NOTE: For instructions on upgrading to a release that supports resilientdual-root partitions from a release that does not, see the release notes. Theprocedure for upgrading to a resilient dual-root partition release is differentfrom the normal upgrade procedure.
This topic covers:
• ResilientDual-RootPartitionScheme(JunosOSRelease 10.4R3andLater)onpage 116
• Automatic Fixing of Corrupted Primary Root Partition with the Automatic Snapshot
Feature on page 116
115Copyright © 2018, Juniper Networks, Inc.

• Earlier Partition Scheme (Junos OS Release 10.4R2 and Earlier) on page 117
• Understanding Upgrading or Downgrading Between Resilient Dual-Root Partition
Releases and Earlier Releases on page 118
Resilient Dual-Root Partition Scheme (Junos OS Release 10.4R3 and Later)
EX Series switches that ship with Junos OS Release 10.4R3 or later are configured with
a root partition scheme that is optimized for resiliency, as shown in Table 13 on page 116.
Table 13: Resilient Dual-Root Partition Scheme
Slice 4Slice 3Slice 2Slice 1
s4ds3ds3es2as1a
/config/var/tmp/var/
(root Junos OS )
/
(root Junos OS )
In the resilient dual-root partition scheme, the /var file system is contained in a separate
slice (Slice 3) from the root file systems, the /config directory is contained in its own slice
(Slice 4), and switches ship from the factory with identical Junos OS images in Slice 1
and Slice 2. The /var file system, which has a greater frequency of reads and writes than
the root file systems and is therefore more likely to have corruption issues, is isolated
from the root directories and the /config directory. If the switch fails to boot from the
active partition, the switch automatically boots from the alternate root partition and
triggers an alarm.
Automatic Fixing of Corrupted Primary Root Partition with the Automatic Snapshot Feature
Resilient dual-root partitioning also provides the automatic snapshot feature, which
allows the switch to automatically fix a corrupt JunosOS file in the primary root partition.
If the automatic snapshot feature is enabled, the switch automatically takes a snapshot
of the Junos OS root file system in the alternate root partition and copies it onto the
primary root partition, thereby repairing the corrupt file in the primary root partition. The
automatic snapshot procedure takes place whenever the system reboots from the
alternate root partition, regardless of whether the reboot is due to a command or due to
corruption of the primary root partition.
Copyright © 2018, Juniper Networks, Inc.116
Installation and Upgrade Guide

NOTE:
• EX9200 switches do not support the automatic snapshot feature.
• The automatic snapshot feature is enabled by default on the following EXSeries switches:
• EX4550 switches
• EX Series switches that ship with Junos OS Release 12.3R1 or later
• Theautomaticsnapshot feature isdisabledbydefaultonEXSeriesswitches(except the EX4550 switches) running Junos OS Release 12.2 or earlier.
• If theautomatic snapshot featurewasdisabledbydefaultbefore theswitchwas upgraded to Junos OS Release 12.3R1 or later, the feature remainsdisabled (for backward compatibility) by default after the upgrade.
• If the automatic snapshot feature is enabled in a Virtual Chassisconfiguration, the automatic snapshot procedure takes place wheneveranymemberof theVirtualChassis reboots from itsalternate rootpartition.
• You can enable the automatic snapshot feature by configuring theauto-snapshot statement at the [edit system] hierarchy level.
The automatic snapshot feature provides an additional layer of fault protection if you
maintain the same version of JunosOS in both partitions of resilient dual-root partitions.
When auto-snapshot is enabled, repair happens automatically. Therefore, the switch
does not issue an alarm to indicate that the system has rebooted from the alternate
partition. However, it does log the event. You cannot execute amanual snapshot when
an automatic snapshot procedure is in process. The login banner indicates that an
automatic snapshot operation is in progress and that banner is removed only after the
snapshot operation is complete. The next reboot happens from the primary partition.
NOTE: EX Series switches that ship with Junos OS Release 10.4R3 or laterare configured with identical Junos OS images in the primary root partition(Slice 1) and the alternate root partition (Slice 2).
However, if you do notmaintain the same version of Junos OS in bothpartitions, youmight want to disable the automatic snapshot feature. If youhave an earlier version of Junos OS in the alternate partition and the systemreboots from the alternate root partition, the automatic snapshot featurecauses the later Junos OS version to be replaced with the earlier version.
When automatic snapshot is disabled and the system reboots from thealternate root partition, it triggers an alarm indicating that the system hasrebooted from its alternate partition.
Earlier Partition Scheme (Junos OS Release 10.4R2 and Earlier)
Thepartition schemeused in JunosOS 10.4R2andearlier is shown inTable 14onpage 118.
117Copyright © 2018, Juniper Networks, Inc.
Chapter 7: Configuring Dual-Root Partitions for High Availability

Table 14: Earlier Partition Scheme
Slice 3Slice 2Slice 1
s3es3ds2fs2as1fs1a
/config/var/tmp(empty untilinitialsoftwareupgrade)
(empty untilinitialsoftwareupgrade)
/var/
(root JunosOS)
This is the partitioning scheme for a switch shipped with Release 10.4R2 or earlier (or
after you reformat the disk during a downgrade from Release 10.4R3 or later to Release
10.4R2 or earlier). In this partitioning scheme, the switch comes from the factory with
only one Junos OS image installed in the root Junos OS partition of Slice 1. The first time
that you perform a software upgrade, the new Junos OS image is installed in Slice 2. If
the switch fails to boot, youmust manually trigger it to boot from the alternate partition
(rebooting from the alternate partition does not occur automatically).
Understanding Upgrading or Downgrading Between Resilient Dual-Root Partition Releasesand Earlier Releases
Upgrading from Release 10.4R2 or earlier to Release 10.4R3 or later differs from other
upgrades in two important ways:
• Youmust install a new loader software package in addition to installing the new Junos
OS image.
• Rebooting after the upgrade reformats the disk from three partitions to four partitions.
See Table 13 on page 116.
You can perform all operations for this special software upgrade from the CLI.
CAUTION: Back up any important log files because the /var/log files are not
savedor restoredduringanupgrade fromRelease 10.4R2orearlier toa releasethat supports resilient dual-root partitions (Release 10.4R3 or later).
We recommend that you also save your /config files and any important log
files to an external medium because if there is a power interruption duringthe upgrade process, theymight be lost.
RelatedDocumentation
auto-snapshot on page 358•
Dual-Root Partitioning Scheme on SRX Series Devices
Junos OS Release 10.0 and later support dual-root partitioning on SRX Series devices.
Dual-root partitioning allows the SRX Series device to remain functional even if there is
file system corruption and to facilitate easy recovery of the file system.
Copyright © 2018, Juniper Networks, Inc.118
Installation and Upgrade Guide

NOTE: Starting in Junos OS Release 12.1X45, single root partitioning is notsupported on SRX Series devices.
SRX Series devices running Junos OS Release 9.6 or earlier support a single-root
partitioning schemewhere there is only one root partition. Because both the primary and
backup Junos OS images are located on the same root partition, the system fails to boot
if there is corruption in the root file system. The dual-root partitioning scheme guards
against this scenario by keeping the primary and backup Junos OS images in two
independently bootable root partitions. If the primary root partition becomes corrupted,
the system can still boot from the backup Junos OS image located in the other root
partition and remain fully functional.
SRX Series devices that ship with Junos OS Release 10.0 or later are formatted with
dual-root partitions from the factory. SRX Series devices that are running Junos OS
Release9.6 or earlier can be formattedwith dual-root partitionswhen they are upgraded
to Junos OS Release 10.0 or later.
NOTE: Although you can install JunosOSRelease 10.0 or later onSRXSeriesdevices with the single-root partitioning scheme, we strongly recommendthe use of the dual-root partitioning scheme.
This section contains the following topics:
• Boot Media and Boot Partition on SRX Series Devices on page 119
• Important Features of the Dual-Root Partitioning Scheme on page 120
• Understanding Automatic Recovery of the Primary Junos OS Image with Dual-Root
Partitioning on page 121
• UnderstandingHow thePrimary JunosOS ImagewithDual-RootPartitioningRecovers
Devices on page 122
• Understanding How Junos OS Release 10.0 or Later Upgrades with Dual-Root
Partitioning on page 124
Boot Media and Boot Partition on SRX Series Devices
When the SRX Series device powers on, it tries to boot the Junos OS from the default
storagemedia. If the device fails to boot from the default storagemedia, it tries to boot
from the alternate storagemedia.
Table 15 on page 119 provides information on the storagemedia available on SRX Series
devices.
Table 15: StorageMedia on SRX Series Devices
Storage MediaSRX Series Devices
• Internal NAND flash (default; always present)
• USB storage device (alternate)
SRX100, SRX210, and SRX240
119Copyright © 2018, Juniper Networks, Inc.
Chapter 7: Configuring Dual-Root Partitions for High Availability

Table 15: StorageMedia on SRX Series Devices (continued)
Storage MediaSRX Series Devices
• CompactFlash (default; always present)
• USB storage device (alternate)
SRX110, SRX220
• eUSB disk (default; always present)
• USB storage device (alternate)
SRX300, SRX320, andSRX340,and SRX345
• Internal CF (default; always present)
• USB storage device (alternate)
SRX550
• Internal CF (default; always present)
• USB storage device (alternate)
SRX550M
• Internal CF (default; always present)
• External flash card (alternate)
• USB storage device (alternate)
SRX650
With the dual-root partitioning scheme, the SRX Series device first tries to boot Junos
OS from theprimary root partition and then from thebackup root partition on thedefault
storagemedia. If both primary and backup root partitions of a media fail to boot, then
the SRX Series device tries to boot from the next available type of storagemedia. The
SRXSeries device remains fully functional even if it boots JunosOS from the backup root
partition of the storagemedia.
Important Features of the Dual-Root Partitioning Scheme
The dual-root partitioning scheme has the following important features:
• The primary and backup copies of Junos OS images reside in separate partitions. The
partition containing the backup copy is mounted only when required. With the
single-root partitioning scheme, there is one root partition that contains both the
primary and the backup Junos OS images.
• The requestsystemsoftwareaddcommand fora JunosOSpackageerases thecontents
of the other root partition. The contents of the other root partition will not be valid
unless software installation is completed successfully.
• Add-on packages, such as jais or jfirmware, can be reinstalled as required after a new
Junos OS image is installed.
• The request system software rollback command does not delete the current Junos OS
image. It is possible to switchback to the imageby issuing the rollbackcommandagain.
• The request system software delete-backup and request system software validate
commands do not take any action.
Copyright © 2018, Juniper Networks, Inc.120
Installation and Upgrade Guide

UnderstandingAutomaticRecoveryof thePrimary JunosOS ImagewithDual-RootPartitioning
The auto-snapshot feature repairs the corrupted primary root when the device reboots
from the alternate root. This is accomplished by taking a snapshot of the alternate root
onto the primary root automatically rather thanmanually from the CLI.
When this feature is enabled, and the device reboots from the alternate root (because
of a corrupted primary root or power cycle during restart), the following actions take
place:
1. A prominent message is displayed indicating a failure to boot from the primary root.
************************************************************************* **** WARNING: THIS DEVICE HAS BOOTED FROM THE BACKUP JUNOS IMAGE **** **** It is possible that the primary copy of JUNOS failed to boot up **** properly, and so this device has booted from the backup copy. **** **** Please re-install JUNOS to recover the primary copy in case **** it has been corrupted and if auto-snapshot feature is not **** enabled. **** *************************************************************************
2. A system boot frombackup root alarm is set. This is useful for devices that do not have
console access.
3. A snapshot of the alternate root onto the primary root is made.
4. Once the snapshot is complete, the system boot from backup root alarm is cleared.
During the next reboot, the system determines the good image on the primary root and
boots normally.
NOTE: Werecommendperforming thesnapshotonceall theprocessesstart.This is done to avoid any increase in the reboot time.
121Copyright © 2018, Juniper Networks, Inc.
Chapter 7: Configuring Dual-Root Partitions for High Availability

NOTE:
• Auto-snapshotfeature issupportedonSRX300,SRX320,SRX340,SRX345,and SRX550M devices.
• By default the auto-snapshot feature is disabled.
• If you do not maintain the same version of Junos OS in both partitions,ensure that the automatic snapshot feature remains disabled. Otherwise,if you have an earlier version of Junos OS in the alternate partition and thesystem reboots from the alternate root partition, the automatic snapshotfeature causes the later Junos OS version to be replaced with the earlierversion.
• When automatic snapshot is disabled and the system reboots from thealternate root partition, it triggers an alarm indicating that the system hasrebooted from its alternate partition.
Enable this feature with the set system auto-snapshot command. Once the primary root
partition is recoveredusing thismethod, thedevicewill successfully boot fromtheprimary
root partition on the next reboot.
Execute the delete system auto-snapshot command to delete all backed up data and
disable auto-snapshot, if required.
Use the show system auto-snapshot command to check the auto-snapshot status.
When auto-snapshot is in progress, you cannot run amanual snapshot command
concurrently and the following error message appears:
Snapshot already in progress. Please try after sometime.
NOTE: If you log into the device when the snapshot is in progress, thefollowing banner appears: The device has booted from the alternate partition,
auto-snapshot is in progress.
UnderstandingHowthePrimary JunosOS ImagewithDual-RootPartitioningRecoversDevices
If the SRX Series Services Gateway is unable to boot from the primary Junos OS image,
and boots up from the backup Junos OS image in the backup root partition, a message
appears on the console at the time of login indicating that the device has booted from
the backup Junos OS image.
login: user
Password:
***********************************************************************
Copyright © 2018, Juniper Networks, Inc.122
Installation and Upgrade Guide

** **
** WARNING: THIS DEVICE HAS BOOTED FROM THE BACKUP JUNOS IMAGE **
** **
** It is possible that the active copy of JUNOS failed to boot up **
** properly, and so this device has booted from the backup copy. **
** **
** Please re-install JUNOS to recover the active copy in case **
** it has been corrupted. **
** **
***********************************************************************
Because the system is left with only one functional root partition, youmust immediately
restore the primary Junos OS image using one of the following methods:
• Install a new image using the CLI or J-Web user interface. The newly installed image
will become the primary image, and the device will boot from it on the next reboot.
• Use a snapshot of the backup root partition by entering the request system snapshot
slicealternatecommand.Once theprimary rootpartition is recoveredusing thismethod,
the device will successfully boot from the primary root partition on the next reboot.
After the procedure, the primary root partition will contain the same version of Junos
OS as the backup root partition.
NOTE: You can use the CLI command request system snapshot slice
alternate to back up the currently running root file system (primary or
secondary) to the other root partition on the system along with following:
• Save an image of the primary root partition in the backup root partitionwhen system boots from the primary root partition.
• Save an image of the backup root partition in the primary root partitionwhen system boots from the backup root partition.
WARNING: The process of restoring the alternate root by using the CLIcommand request system snapshot slice alternate takes several minutes
tocomplete. If you terminate theoperationbeforecompletion, thealternateroot might not have all required contents to function properly.
123Copyright © 2018, Juniper Networks, Inc.
Chapter 7: Configuring Dual-Root Partitions for High Availability
Understanding How Junos OS Release 10.0 or Later Upgrades with Dual-Root Partitioning
NOTE: If you are upgrading to Junos OS Release 10.0 without transitioningto dual-root partitioning, use the conventional CLI and J-Web user interfaceinstallationmethods.
To format the media with dual-root partitioning while upgrading to Junos OS Release
10.0 or later, use one of the following installation methods:
• Installation from the boot loader using a TFTP server. We recommend this if console
access to the system is available and a TFTP server is available in the network. See
“Installing JunosOSonSRXSeriesDevices from theBoot LoaderUsing aTFTPServer”
on page 76
• Installation from the boot loader using a USB storage device. We recommend this
method if console access to the system is available and the system can be physically
accessed to plug in a USB storage device. See “Installing Junos OS on SRX Series
Devices from the Boot Loader Using a USB Storage Device” on page 79
• Installation from the CLI using the partition option. We recommend this method only
if console access is not available. This installation can be performed remotely.
NOTE: After upgrading to Junos OS Release 10.0 or later, the U-boot andboot loadermust be upgraded for the dual-root partitioning scheme toworkproperly.
Release History Table DescriptionRelease
Starting in Junos OS Release 12.1X45, single root partitioning is notsupported on SRX Series devices.
12.1X45-D10
RelatedDocumentation
Understanding Junos OS Upgrades for SRX Series Devices on page 166•
• Example: Installing Junos OS on SRX Series Devices Using the Partition Option on
page 124
Example: Installing Junos OS on SRX Series Devices Using the Partition Option
This example showshowto install JunosOSRelease 10.0or laterwith thepartitionoption.
• Requirements on page 125
• Overview on page 125
• Configuration on page 126
• Verification on page 127
Copyright © 2018, Juniper Networks, Inc.124
Installation and Upgrade Guide

Requirements
Before you begin, back up any important data.
Overview
This example formats the internal media and installs the new Junos OS image on the
media with dual-root partitioning. Reinstall the Release 10.0 or later image from the CLI
using the request system software add command with the partition option. This copies
the image to the device, and then reboots the device for installation. The device boots
up with the Release 10.0 or later image installed with the dual-root partitioning scheme.
When the partition option is used, the format and install process is scheduled to run on
the next reboot. Therefore, we recommend that this option be used together with the
reboot option.
NOTE: Theprocessmight take 15 to20minutes.Thesystem isnotaccessibleover the network during this time.
WARNING: Using the partition option with the request system software add
command erases the existing contents of themedia. Only the currentconfiguration is preserved. Youmust back up any important data beforestarting the process.
NOTE: Partition install is supported on the default media on SRX300,SRX320, 340, andSRX345devices (internal NAND flash) and not supportedon the alternatemedia (USB storage key).
NOTE: Partition install is supportedonthedefaultmediaonSRX100,SRX210,andSRX240devices (internalNANDflash)andonSRX650devices (internalCFcard).Partition install is not supportedon thealternatemediaonSRX100,SRX210, and SRX240 devices (USB storage key) or on SRX650 devices(external CF card or USB storage key).
In this example, add the software package junos-srxsme-10.0R2-domestic.tgz with the
following options:
• no-copy option to install the software package but do not save the copies of package
files. Youmust include this option if you do not have enough space on the internal
media to perform an upgrade that keeps a copy of the package on the device.
• no-validate option to bypass the compatibility check with the current configuration
before installation starts.
125Copyright © 2018, Juniper Networks, Inc.
Chapter 7: Configuring Dual-Root Partitions for High Availability

• partition option to format and re-partition the media before installation.
• reboot option to reboots the device after installation is completed.
Configuration
CLI QuickConfiguration
To install Junos OS Release 10.0 or later with the partition option, enter the following
command from operational mode:
user@host>request system software add junos-srxsme-10.0R2-domestic.tgz no-copyno-validate partition reboot
GUI Step-by-StepProcedure
To install Junos OS Release 10.0 or later with the partition option:
1. In the J-Web user interface, selectMaintain>Software>Install Package.
2. On the Install Package page, specify the FTP or HTTP server, file path, and software
package name. Type the full address of the software package location on the FTP or
HTTP. Example: ftp://hostname/pathname/junos-srxsme-xx.0R2-domestic.tgz or
http://hostname/pathname/junos-srxsme-xx.0R2-domestic.tgz.
NOTE: Specify the username and password, if the server requires one.
3. Select the Reboot If Required check box to set the device to reboot automatically
when the upgrade is complete.
4. Select the Do not save backup check box to bypass saving the backup copy of the
current Junos OS package.
5. Select the Format and re-partition themedia before installation check box to format
the internal media with dual-root partitioning.
6. Click Fetch and Install Package. The software is activated after the device reboots.
This formats the internal media and installs the new Junos OS image on themedia
with dual-root partitioning.
Step-by-StepProcedure
The following example requires you to navigate various levels in the configuration
hierarchy. For instructions on how to do that, see Using the CLI Editor in Configuration
Mode in the CLI User Guide.
To install Junos OS Release 10.0 or later with the partition option:
1. Upgrade the device to Junos OS Release 10.0 or later using the CLI.
Copyright © 2018, Juniper Networks, Inc.126
Installation and Upgrade Guide

2. After thedevice reboots, upgrade theboot loader to the latest version.See “Preparing
the USB Flash Drive to Upgrade Junos OS on SRX Series Devices” on page 148.
3. Reinstall the Release 10.0 or later image.
user@host>requestsystemsoftwareaddjunos-srxsme-10.0R2-domestic.tgzno-copyno-validate partition reboot
Copying package junos-srxsme-10.0R2-domestic.tgz to var/tmp/installRebooting ...
Results Fromconfigurationmode, confirmyour configurationbyentering the showsystemstorage
partitions command. If the output does not display the intended configuration, repeat
the configuration instructions in this example to correct it.
Sample output on a systemwith single root partitioning:
user@host> show system storage partitions
Boot Media: internal (da0)
Partitions Information: Partition Size Mountpoint s1a 898M / s1e 24M /config s1f 61M /var
Sample output on a systemwith dual-root partitioning:
user@host> show system storage partitions
Boot Media: internal (da0)Active Partition: da0s2aBackup Partition: da0s1aCurrently booted from: active (da0s2a)
Partitions Information: Partition Size Mountpoint s1a 293M altroot s2a 293M / s3e 24M /config s3f 342M /var s4a 30M recovery
If you are done configuring the device, enter commit from configuration mode.
Verification
Confirm that the configuration is working properly.
• Verifying the Partitioning Scheme Details on page 128
127Copyright © 2018, Juniper Networks, Inc.
Chapter 7: Configuring Dual-Root Partitions for High Availability

Verifying the Partitioning Scheme Details
Purpose Verify that the partitioning scheme details on the SRX Series device were configured.
Action From operational mode, enter the show system storage partitions command.
RelatedDocumentation
Dual-Root Partitioning Scheme on SRX Series Devices on page 118•
• Reinstalling the Single-Root Partition on SRX Series Devices on page 128
Reinstalling the Single-Root Partition on SRX Series Devices
JunosOSRelease9.6andearlier is not compatiblewith thedual-rootpartitioning scheme.
These releases can only be installed if the media is reformatted with single-root
partitioning. Any attempt to install Junos OS Release 9.6 or earlier on a device with
dual-root partitioning without reformatting the media will fail with an error. Youmust
install the JunosOSRelease9.6or earlier image from theboot loader using aTFTPserver
or USB storage device.
NOTE: Junos OS Release 12.1X45 and later do not support single rootpartitioning.
NOTE: You do not need to reinstall the earlier version of the boot loader ifyou are installing Junos OS Release 9.6.
You cannot install a Junos OS Release 9.6 or earlier package on a systemwith dual-root partitioning using the Junos OS CLI or J-Web. If this isattempted, an error will be returned.
You can install the Junos OS Release 9.6 (9.6R3 and 9.6R4 [only]) on asystemwith dual-root partitioning using request system software add
commandwith partition option.
To reinstall the single-root partition:
1. Enter the request system software add partition command to install the previous
Junos OS version (9.6R3 and 9.6R4):
user@host>request system software add partition
2. Reboot the device
user@host>request system reboot
The previous software version gets installed after rebooting the device.
Copyright © 2018, Juniper Networks, Inc.128
Installation and Upgrade Guide

NOTE: Usingthe requestsystemsoftwareaddCLIcommandwith thepartition
option to install Junos OS Release 9.6 (9.6R3 and 9.6R4) reformats themedia with single-root partitioning. This process erases the dual-rootpartitioningschemefromthesystem, so thebenefitsofdual-rootpartitioningwill no longer be available.
RelatedDocumentation
• Dual-Root Partitioning Scheme on SRX Series Devices on page 118
• Example: Installing Junos OS on SRX Series Devices Using the Partition Option on
page 124
129Copyright © 2018, Juniper Networks, Inc.
Chapter 7: Configuring Dual-Root Partitions for High Availability

Copyright © 2018, Juniper Networks, Inc.130
Installation and Upgrade Guide

CHAPTER 8
Upgrading Software
• Upgrading Software Packages on page 132
• Overview of Upgrading to 64-bit Junos OS on page 135
• Upgrading Routers Using Unified ISSU on page 140
• Understanding Nonstop Software Upgrade on EX Series Switches on page 140
• Preparing theUSBFlashDrive toUpgrade JunosOSonSRXSeriesDevices onpage 148
• Upgrading the Boot Loader on SRX Series Devices on page 150
• Upgrading Software by Using Automatic Software Download on page 151
• Verifying That Automatic Software Download Is Working Correctly on page 152
• Verifying Junos OS and Boot Loader Software Versions on an EX Series
Switch on page 153
• Upgrading the Loader Software on the Line Cards in a Standalone EX8200 Switch or
an EX8200 Virtual Chassis on page 156
• Upgrading Junos OSwith Upgraded FreeBSD on page 160
• Understanding Junos OS Upgrades for SRX Series Devices on page 166
• Preparing Your SRX Series Device for Junos OS Upgrades on page 168
• Understanding Junos OSwith Upgraded FreeBSD for SRX Series Devices on page 171
• Downloading Software Packages from Juniper Networks on page 184
• Example: Installing Junos OS Upgrade Packages on SRX Series Devices on page 185
• Installing Junos OS Upgrade Packages on SRX Series Devices from a Remote
Server on page 187
• Understanding BIOS Upgrades on SRX Series Devices on page 188
• Disabling Auto BIOS Upgrade on SRX Series Devices on page 190
• Reverting the Junos OS Software Image Back to the Previous Version on page 191
• Overview of CoS Upgrade Requirements (Junos OS Release 11.1 or 11.2 to a Later
Release) on page 194
• Before You Begin Installing or Upgrading the Firmware on page 195
• Installing Firmware on the 5-Port 100-Gigabit DWDMOTN PIC
(PTX-5-100G-WDM) on page 197
131Copyright © 2018, Juniper Networks, Inc.

• Upgrading Firmware on the 5-Port 100-Gigabit DWDMOTN PIC
(PTX-5-100G-WDM) on page 198
• Installing Firmware on the 100-Gigabit DWDMOTNMIC
(MIC3-100G-DWDM) on page 200
• Upgrading Firmware on the 100-Gigabit DWDMOTNMIC
(MIC3-100G-DWDM) on page 201
• Upgrading Firmware on the CFP2-DCO-T-WDM-1 Transceiver on page 203
Upgrading Software Packages
NOTE: When you install individual software packages, the following notesapply:
• When upgrading from Junos OSRelease 8.2 or earlier to Junos OSRelease8.5, use the system software add <image> no-validate command option.
• Only use the jinstall JunosOS imagewhen upgrading or downgrading to or
from Junos OS Release 8.5. Do not use the jbundle image.
• Before upgrading to Junos OS Release 8.5, ensure that the routingplatform’s CompactFlash card is 256MB or larger to avoid disk sizerestrictions. (M7i routers without a CompactFlash card are excluded.)
NOTE: If you are upgrading a Routing Engine on a PTX Series router to runJunos OS Release 13.2R2 and later, and thenmake that Routing Engine themasterRoutingEngine, then themasterRoutingEngine reportsamajoralarmCB 0/1 ESWPFE Port Fail even though the Control Board’s Ethernet switch
links are upand running onboth themaster and thebackupRouting Engines.This is because the backupRouting Engine is still on JunosOSRelease 13.2R1or earlier. Thealarm is clearedafter youhavecompleted theupgradeof JunosOS on the backup Routing Engine.
User@router# show chassis alarms
2 alarms currently active
Alarm time Class Description
2014-10-15 00:44:31 BSTMajor CB 0 ESWPFE Port Fail
2014-10-15 00:42:42 BSTMinor Backup RE Active
Copyright © 2018, Juniper Networks, Inc.132
Installation and Upgrade Guide

To upgrade an individual Junos OS package:
1. Download the software packages you need from the Juniper Networks Support Web
site at http://www.juniper.net/support/. For information about downloading software
packages, see “Downloading Software” on page 50.
NOTE: Werecommend that youupgradeall individual softwarepackagesusing an out-of-band connection from the console or managementEthernet interface, because in-band connections can be lost during theupgrade process.
2. Backup thecurrently runningandactive file systemso that youcan recover toaknown,
stable environment in case something goes wrong with the upgrade:
user@host> request system snapshot
The root file system is backed up to /altroot, and /config is backed up to /altconfig.
The root and /config file systems are on the router’s CompactFlash card, and the
/altroot and /altconfig file systems are on the router’s hard disk or solid-state drive
(SSD).
NOTE: After you issue the request systemsnapshotcommand, you cannot
return to the previous version of the software, because the running copyand the backup copy of the software are identical.
NOTE: SRX5000-linedevices, the root file system isbackedup to /altroot,
and /config is backed up to /altconfig. The root and /config file systems
are on the router’s CompactFlash card, and the /altroot and /altconfig file
systems are on the router’s hard disk or solid-state drive (SSD).
NOTE: This step is optional for SRX300, SRX320, SRX340, SRX345, andSRX550M; for these devices, ensure that aUSB flash drive is plugged intothe USB port of the device.
3. If youare copyingmultiple softwarepackages to the router, copy themto the /var/tmp
directory on the hard disk or solid-state drive (SSD):
user@host> file copy ftp://username :[email protected]/filename/var/tmp/filename
4. Add the new software package:
• To add an individual software package:
user@host> request system software add/var/tmp/ installation-package validate
133Copyright © 2018, Juniper Networks, Inc.
Chapter 8: Upgrading Software

installation-package is the full URL to the file.
NOTE: For SRX5800, SRX5600, andSRX5400devices, do not includethe re0 | re1 optionwhen you install a package using the request system
software add command, if the Routing Engine on which the package is
locatedandtheRoutingEngineonwhichyouwant to install thepackageis the same. In such cases, the package gets deleted after a successfulupgrade.
If you are upgradingmore than one package at the same time, add jbase first. If you
are using this procedure to upgrade all packages at once, add them in the following
order:
user@host> request system software add /var/tmp/jbase-release-signed.tgz
user@host> request system software add /var/tmp/jkernel-release-signed.tgz
user@host> request system software add /var/tmp/jpfe-release-signed.tgz
user@host> request system software add /var/tmp/jdocs-release- signed.tgz
user@host> request system software add /var/tmp/jweb-release- signed.tgz
user@host> request system software add /var/tmp/jroute-release-signed.tgz
user@host> request system software add /var/tmp/jcrypto-release-signed.tgz
• For M Series, MX Series, and T Series routers running Junos OS Release 12.2 and
later, you can addmore than one software package at the same time. To add
multiple software packages:
user@host> request system software add set /var/tmp/installation-package/var/tmp/ installation-package validate
installation-package can be any of the following:
• A list of installation packages, each separated by a blank space. For example:
user@host> request system software add set /var/tmp/jinstall-10.2R1.8–domestic-signed.tgz /var/tmp/ jtools*.tgz validate
• The full URL to the directory or tar file containing the list of installation packages.
Use the request system software add set command to retain any SDK configuration
by installing the SDK add-on packages along with the core Junos OS installation
package.
WARNING: Do not include the re0 | re1 option when you install a package
using the request systemsoftware add command, if the Routing Engine on
which the package is located and the Routing Engine on which you wantto install the package are the same. In such cases, the package getsdeleted after a successful upgrade.
The systemmight display the following message:
Copyright © 2018, Juniper Networks, Inc.134
Installation and Upgrade Guide

pkg_delete: couldn’t entirely delete package
Thismessage indicates that someonemanually deleted or changed an item that was
in a package. You do not need to take any action; the package is still properly deleted.
For more information about the request system software add command, see the CLI
Explorer.
5. Reboot the router to start the new software:
user@host> request system reboot
6. After you have upgraded or downgraded the software and are satisfied that the new
software is successfully running, issue the request systemsnapshot command toback
up the new software:
user@host> request system snapshot
NOTE: OnanACX router, youmust issue the request systemsnapshot slice
alternate command.
The root file system is backed up to /altroot, and /config is backed up to /altconfig.
The root and /config file systems are on the router’s CompactFlash card, and the
/altroot and /altconfig file systems are on the router’s hard disk or solid-state drive
(SSD).
NOTE: After you issue the request systemsnapshotcommand, you cannot
return to the previous version of the software, because the running copyand backup copy of the software are identical.
NOTE: To install the JunosOS software package and host software packageon routerswithRE-MX-X6,RE-MX-X8, andRE-PTX-X8RoutingEngines, see“VMHost Installation” on page 280
RelatedDocumentation
VMHost Installation on page 280•
Overview of Upgrading to 64-bit Junos OS
Just like any other operating system, the 64-bit version of Junos OS can address more
memory than the 32-bit version of Junos OS. In order to support larger Routing Engine
memory sizes, an upgrade from the 32-bit to the 64-bit JunosOS running on the Routing
Engine hardware is necessary.
135Copyright © 2018, Juniper Networks, Inc.
Chapter 8: Upgrading Software

The in-service softwareupgrade(ISSU)procedure isnot supportedwhileupgrading from
the 32-bit version of Junos OS to the 64-bit version of Junos OS. The upgrade process
involves some downtime, so traffic will be affected.
If you are starting with 32-bit Junos OS running on Routing Engines that are not 64-bit
capable, there are two parts of the upgrade: upgrading the hardware and upgrading the
software. This topic provides an overview of the upgrade tasks and the order in which
they must be performed. For more detailed information about replacing the Routing
Engines, see the hardware guide for your router.
The following upgrade scenarios are covered in this overview:
• Upgrading Redundant Routing Engines from 32-bit to 64-bit Junos OS on page 136
• Upgrading a Single Routing Engine from 32-bit to 64-bit Junos OS Using One
Slot on page 138
• Upgrading a Single Routing Engine from 32-bit to 64-bit Junos OS Using Two
Slots on page 138
Upgrading Redundant Routing Engines from 32-bit to 64-bit Junos OS
For a diagram ot this procedure, see Figure 16 on page 136. For the purposes of this
procedure, slot 0 has the primary Routing Engine initially.
Figure 16:Upgrading to64-bit JunosOSwithRedundantRoutingEngines
1
2
3
4
5
Both Routing Engineshave 32-bit Junos OS
RE1
RE0
32-bit Junos OS
Upgrade RE1 hardware andinstall 64-bit Junos OS on it 64-bit Junos OS
RE1
RE0
Switch mastership from RE0 to RE1
(Allow 32-bit Junos OS to runon RE0 as backup for 64-bitJunos OS on RE1)
32-bit Junos OS
RE1
RE0
Primary64-bit Junos OS
Upgrade RE0 hardware andinstall Junos OS 64-bit on it
(Both Routing Engineshave 64-bit Junos OS)
Primary64-bit Junos OS
64-bit Junos OS
RE1
RE0
Optional:Switch mastership back to RE0 64-bit Junos OS
RE1
RE0
g017
475
Primary32-bit Junos OS
Primary32-bit Junos OS
Primary64-bit Junos OS
Copyright © 2018, Juniper Networks, Inc.136
Installation and Upgrade Guide

To upgrade redundant Routing Engines from 32-bit Junos OS to 64-bit Junos OS:
1. If the backup Routing Engine in slot 1 is not 64-bit capable, replace it with a 64-bit
capable Routing Engine.
NOTE: The 64-bit version of Junos OS is not supported on every RoutingEngine. To determine whether your router and Routing Engine support a64-bit version of Junos OS, see Supported Routing Engines by Router.
For instructions on replacing a Routing Engine, see the hardware guide for your router.
2. Log in to the primary Routing Engine in slot 0, and prepare the router for software
package upgrade.
See Preparing the Router for the Installation.
3. Install 64-bit Junos OS on the backup Routing Engine in slot 1.
CAUTION: Mixing 32-bit Junos OS and 64-bit Junos OS can only be donetemporarily. It is not supported for normal operations.
See Installing Software on the Backup Routing Engine.
4. Switch mastership from slot 0 to slot 1.
user@host> request chassis routing-enginemaster switch
Now the Routing Engine in slot 1 is the primary Routing Engine.
5. If the Routing Engine in slot 0 is not 64-bit capable, replace it with a 64-bit capable
Routing Engine.
NOTE: The 64-bit version of Junos OS is not supported on every RoutingEngine. To determine whether your router and Routing Engine support a64-bit version of Junos OS, see Supported Routing Engines by Router.
For instructions on replacing a Routing Engine, see the hardware guide for your router.
6. Install 64-bit Junos OS on the Routing Engine in slot 0.
See Installing Software on the Remaining Routing Engine.
7. (Optional) Switch mastership from slot 1 to slot 0.
137Copyright © 2018, Juniper Networks, Inc.
Chapter 8: Upgrading Software

user@host> request chassis routing-enginemaster switch
8. Finalize the installation.
See Finalizing the Installation. This includes synchronization of the configuration on
the Routing Engines.
Upgrading a Single Routing Engine from 32-bit to 64-bit Junos OSUsing One Slot
To upgrade a single Routing Engine, from 32-bit to 64-bit Junos using one slot:
1. If the Routing Engine is not 64-bit capable, replace it with a 64-bit capable Routing
Engine.
NOTE: The 64-bit version of Junos OS is not supported on every RoutingEngine. To determine whether your router and Routing Engine support a64-bit version of Junos OS, see Supported Routing Engines by Router.
For instructions on replacing a Routing Engine, see the hardware guide for your router.
2. Install 64-bit Junos OS on the Routing Engine using the no-validate option.
user@host> request system software add /var/tmp/software-package no-validate
For more details on installing software on a single router, see Installing the Software
Package on a Router with a Single Routing Engine.
3. Reboot.
user@host> request system reboot
Upgrading a Single Routing Engine from 32-bit to 64-bit Junos OSUsing Two Slots
This procedure provides away to upgrade to a 64-bit JunosOSusing twoRouting Engine
slots. Using two slots reduces the amount of network downtime.
If you have only one slot, use procedure “Upgrading a Single Routing Engine from 32-bit
to 64-bit Junos OS Using One Slot” on page 138.
For adiagramof this procedure, seeFigure 17 onpage 139. In this procedure, slot 1 is initially
empty.
Copyright © 2018, Juniper Networks, Inc.138
Installation and Upgrade Guide

Figure 17: Upgrading a Single Routing Engine to 64-bit Junos OSUsing Two Slots
1
2
4
3
g017
477
Single Routing Enginehas 32-bit Junos OS
Primary32-bit Junos OS
RE1
RE0
Add RE1 hardware and install64-bit Junos OS on it
Switch mastership
(Routing Engine in RE0 is nowthe backup Routing Engine)
64-bit Junos OS
Blank
Blank
RE1
RE0
Once system is operational,remove RE0 Routing Engine Primary
64-bit Junos OS
RE1
RE0
Primary64-bit Junos OS
32-bit Junos
RE0
RE1
Primary32-bit Junos
To upgrade a single Routing Engine to 64-bit Junos OS using two Routing Engine slots:
1. Install a 64-bit capable Routing Engine in slot 1.
NOTE: The 64-bit version of Junos OS is not supported on every RoutingEngine. To determine whether your router and Routing Engine support a64-bit version of Junos OS, see Supported Routing Engines by Router.
For instructions on installing a Routing Engine, see the hardware guide for your router.
2. Install 64-bit Junos OS on the now backup Routing Engine in slot 1.
See Installing Software on the Backup Routing Engine.
CAUTION: Mixing 32-bit Junos OS and 64-bit Junos OS is not supportedfor normal operations.
You need to remove the Routing Engine from slot 0 to avoid mixing 32-bit Junos OS
and 64-bit Junos OS.
139Copyright © 2018, Juniper Networks, Inc.
Chapter 8: Upgrading Software

3. Switch the primary Routing Engine from slot 0 to slot 1.
user@host> request chassis routing-enginemaster switch
4. When the 64-bit Junos OS is configured properly, remove the Routing Engine from
slot 0 .
For instructions on removing a Routing Engine, see the hardware guide for your router.
RelatedDocumentation
Installing the Software Package on a Router with Redundant Routing Engines on
page 63
•
• Installing the Software Package on a Router with a Single Routing Engine on page 61
Upgrading Routers Using Unified ISSU
Unified in-service softwareupgrade (ISSU)enables you toupgradebetween twodifferent
Junos OS releases with no disruption on the control plane and with minimal disruption
of traffic. Unified ISSU is only supported by dual Routing Engine platforms. In addition,
graceful Routing Engine switchover (GRES) and nonstop active routing (NSR)must be
enabled.
For additional information about using unified ISSU, see the Junos OS High Availability
Library for Routing Devices.
RelatedDocumentation
Upgrading Software Packages on page 132•
Understanding Nonstop Software Upgrade on EX Series Switches
Nonstop software upgrade (NSSU) enables you to upgrade the software running on
Juniper Networks EX Series Ethernet Switches with redundant Routing Engines and all
member switches in EX Series Virtual Chassis by using a single command. During the
upgrade theremight beminimal network traffic disruption duringmastership switchover,
and the extent of disruption could be dependent on the network topology, configuration,
network traffic, and other environment factors .
NOTE: When an EX Series switch in amixed Virtual Chassis is upgraded toJunos OS Release 15.1 or later from a release earlier than Release 15.1, theremight be a drop in traffic for up to 60 seconds.
NSSU is supported on the following EX Series platforms:
• EX3300 Virtual Chassis
• EX3400 Virtual Chassis
• EX4200 Virtual Chassis
Copyright © 2018, Juniper Networks, Inc.140
Installation and Upgrade Guide

• EX4300 Virtual Chassis
• EX4500 Virtual Chassis
• EX4550 Virtual Chassis
• All mixed Virtual Chassis composed of EX4200, EX4500, and EX4550 switches
• EX6200 switches
• EX8200 switches
• EX8200 Virtual Chassis
Performing an NSSU provides these benefits:
• No disruption to the control plane—An NSSU takes advantage of graceful Routing
Engine switchover (GRES) and nonstop active routing (NSR) to ensure no disruption
to the control plane. During the upgradeprocess, interface, kernel, and routing protocol
information is preserved.
• Minimal disruption to network traffic—An NSSUminimizes network traffic disruption
by:
• Upgrading line cards one at a time in an EX6200 switch, EX8200 switch, or EX8200
Virtual Chassis, permitting traffic to continue to flow through the line cards that are
not being upgraded.
• Upgradingmemberswitchesoneata time inanEX3300,EX3400,EX4200,EX4300,
EX4500, or mixed Virtual Chassis, permitting traffic to continue to flow through the
members that are not being upgraded.
To achieve minimal disruption to traffic, you must configure link aggregation groups
(LAGs) such that themember links of each LAG reside on different line cards or Virtual
Chassis members. When onemember link of a LAG is down, the remaining links are
up, and traffic continues to flow through the LAG.
NOTE: Because NSSU upgrades the software on each line card or on eachVirtualChassismemberoneata time,anupgradeusingNSSUcantake longerthan an upgrade using the request system software add command.
In releases prior to Junos OS Release 16.1, for EX6200 switches, EX8200switches, and EX8200 Virtual Chassis, you can reduce the amount of timean upgrade takes by configuring line-card upgrade groups. The line cards inanupgradegroupareupgradedsimultaneously, reducing theamountof timeit takes to complete an upgrade. See Configuring Line-Card Upgrade Groupsfor Nonstop Software Upgrade (CLI Procedure).
This topic covers:
• Requirements for Performing an NSSU on page 142
• How an NSSUWorks on page 143
• NSSU Limitations on page 146
141Copyright © 2018, Juniper Networks, Inc.
Chapter 8: Upgrading Software

• NSSU and Junos OS Release Support on page 146
• Overview of NSSU Configuration and Operation on page 147
Requirements for Performing an NSSU
The following requirements apply to all switches and Virtual Chassis:
• All Virtual Chassis members and all Routing Engines must be running the same Junos
OS release.
• Graceful Routing Engine switchover (GRES)must be enabled.
• Nonstop active routing (NSR)must be enabled.
NOTE: Although nonstop bridging (NSB) does not have to be enabled toperform an NSSU, we recommend enabling NSB before performing anNSSU. Enabling NSB ensures that all NSB-supported Layer 2 protocolsoperate seamlessly during the Routing Engine switchover that is part oftheNSSU. In releasesprior to JunosOSRelease 16.1, seeConfiguringNonstopBridging on Switches (CLI Procedure).
• For minimal traffic disruption, youmust define link aggregation groups (LAGs) such
that the member links reside on different Virtual Chassis members or on different line
cards.
The following are requirements for EX3300, EX3400, EX4200, EX4300, EX4500, and
mixed Virtual Chassis:
• TheVirtual Chassismembersmust be connected in a ring topology so that nomember
is isolated as a result of another member being rebooted. This topology prevents the
Virtual Chassis from splitting during an NSSU.
• The Virtual Chassis master and backupmust be adjacent to each other in the ring
topology. Adjacency permits the master and backup to always be in sync, even when
the switches in linecard roles are rebooting.
• TheVirtual Chassismust be preprovisioned so that the linecard role has been explicitly
assigned to member switches acting in a linecard role. During an NSSU, the Virtual
Chassis members must maintain their roles—themaster and backupmust maintain
their master and backup roles (althoughmastership will change), and the remaining
switches must maintain their linecard roles.
• A two-member Virtual Chassis must have no-split-detection configured so that the
Virtual Chassis does not split when an NSSU upgrades amember.
Copyright © 2018, Juniper Networks, Inc.142
Installation and Upgrade Guide

NOTE: For the EX4300 Virtual Chassis, you should enable thevcp-no-hold-time statementat the [edit virtual-chassis]hierarchy level before
performing a software upgrade using NSSU. If you do not enable thevcp-no-hold-time statement, the Virtual Chassis might split during the
upgrade. A split Virtual Chassis can cause disruptions to your network, andyoumight have tomanually reconfigure your Virtual Chassis after the NSSUif the split andmerge feature was disabled. For more information about asplit Virtual Chassis, seeUnderstanding Split and Merge in a Virtual Chassis
How an NSSUWorks
This section describes what happenswhen you request an NSSU on these switches and
Virtual Chassis:
• EX3300, EX3400, EX4200, EX4300, EX4500, and Mixed Virtual Chassis on page 143
• EX6200 and EX8200 Switches on page 144
• EX8200 Virtual Chassis on page 145
EX3300, EX3400, EX4200, EX4300, EX4500, andMixed Virtual Chassis
Whenyou requestanNSSUonanEX3300,EX3400,EX4200,EX4300,EX4500,ormixed
Virtual Chassis:
1. The Virtual Chassis master verifies that:
• The backup is online and running the same software version.
• Graceful Routing Engine switchover (GRES) and nonstop active routing (NSR) are
enabled.
• The Virtual Chassis has a preprovisioned configuration.
2. Themaster installs the new software image on the backup and reboots it.
3. Themaster resynchronizes the backup.
4. Themaster installs the new software image onmember switches that are in the
linecard role and reboots them, one at a time. Themaster waits for eachmember to
become online and active before starting the software upgrade on the next member.
5. When all members that are in the linecard role have been upgraded, the master
performs a graceful Routing Engine switchover, and the upgraded backup becomes
themaster.
6. The software on the original master is upgraded and the original master is
automatically rebooted. After the originalmaster has rejoined the Virtual Chassis, you
can optionally return control to it by requesting a graceful Routing Engine switchover.
143Copyright © 2018, Juniper Networks, Inc.
Chapter 8: Upgrading Software

EX6200 and EX8200 Switches
When you request an NSSU on a standalone switch with redundant Routing Engines:
1. The switch verifies that:
• Both Routing Engines are online and running the same software version.
• Both Routing Engines have sufficient storage space for the new software image.
• Graceful Routing Engine switchover and nonstop active routing are enabled.
2. Theswitch installs thenewsoftware imageon thebackupRoutingEngineand reboots
it.
3. The switch resynchronizes the backup Routing Engine to the master Routing Engine.
4. The line cards in the first upgrade group (or the line card in slot 0, if no upgrade groups
are defined) download the new image and then restart. Traffic continues to flow
through the line cards in the other upgrade groups during this process.
5. When line cards restarted in Step 4 are online again, the line cards in the next upgrade
group download the new image and restart. This process continues until all online
line cards have restarted with the new software.
NOTE: If you have taken a line card offline with the CLI before you startthe NSSU, the line card is not restarted and remains offline.
6. The switch performs a graceful Routing Engine switchover, so that the upgraded
backup Routing Engine becomes themaster.
7. The switch installs the new software on the original master Routing Engine.
To complete the upgrade process, the original master Routing Engine must be
rebooted. You can do somanually or have the switch perform an automatic reboot
by including the reboot option when you request the NSSU. After the original master
has been rebooted, you can optionally return control to it by requesting a graceful
Routing Engine switchover.
8. (EX6200 switch only) The original master Routing Engine reboots to complete the
software upgrade.
Copyright © 2018, Juniper Networks, Inc.144
Installation and Upgrade Guide

NOTE: To complete the upgrade process on an EX8200 switch, youmustintervene to reboot the original master Routing Engine. You can rebootthe original master Routing Enginemanually or have the switch performan automatic reboot by including the reboot optionwhen you request the
NSSU.
9. (Optional) After the original master has been rebooted, you can return control to it
by requesting a graceful Routing Engine switchover.
The switch canmaintain normal operations with either Routing Engine acting as the
master Routing Engine after the software upgrade, so you only have to perform this
switchover if youwant to return Routing Engine control to the originalmaster Routing
Engine.
EX8200 Virtual Chassis
When you request an NSSU on an EX8200 Virtual Chassis:
1. Themaster external Routing Engine verifies that:
• It has a backup external Routing Engine that is online.
• All Virtual Chassis members have redundant Routing Engines and the Routing
Engines are online.
• All Routing Engines are running the same software version.
• All Routing Engines have sufficient storage space for the new software image.
• Graceful Routing Engine switchover and nonstop active routing (NSR) are enabled.
2. Themaster external Routing Engine installs the new software image on the backup
external Routing Engine and reboots it.
3. The backup external Routing Engine resynchronizes with themaster external Routing
Engine.
4. Themaster external Routing Engine installs the new software on the backup Routing
Engines in the member switches and reboots the backup Routing Engines.
5. When the reboot of the backup Routing Engines complete, the line cards in the first
upgrade group download the new image and then restart. (If no upgrade groups are
defined, the line card in slot 0 of member 0 downloads the new image and restarts.)
Traffic continues to flow through the line cards in the other upgrade groups during
this process.
6. When line cards restarted in Step 5 are online again, the line cards in the next upgrade
group (or the next sequential line card) download the new image and restart. This
process continues until all online line cards have restarted with the new software.
145Copyright © 2018, Juniper Networks, Inc.
Chapter 8: Upgrading Software

NOTE: If you have taken a line card offline with the CLI before you startthe NSSU, the line card is not restarted and remains offline.
7. The new software image is installed on themaster Routing Engines, both external
and internal.
8. Themember switches perform a graceful Routing Engine switchover, so that the
upgraded backup Routing Engines becomemasters.
9. Themaster external Routing Engine performs a graceful Routing Engine switchover
so that the backup external Routing Engine is now themaster.
To complete the upgrade process, the original master Routing Engines, both external
and internal, must be rebooted. You can do somanually by establishing a console
connection to each Routing Engine or have the reboot performed automatically by
including the rebootoptionwhenyou request theNSSU.After theoriginalmaster external
Routing Engine has been rebooted, you can optionally return control to it by requesting
a graceful Routing Engine switchover.
NSSU Limitations
You cannot use an NSSU to downgrade the software—that is, to install an earlier version
of the software than is currently running on the switch. To install an earlier software
version, use the request system software add command.
You cannot roll back to the previous software version after you performan upgrade using
NSSU. If youneed to roll back to theprevious softwareversion, youcandosoby rebooting
from the alternate root partition if you have not already copied the new software version
into the alternate root partition.
NSSU and Junos OS Release Support
A Virtual Chassis must be running a Junos OS release that supports NSSU before you
can perform an NSSU. If a Virtual Chassis is running a software version that does not
support NSSU, use the request system software add command.
Table 16 on page 146 lists the EX Series switches and Virtual Chassis that support NSSU
and the Junos OS release at which they began supporting it.
Table 16: Platform and Release Support for NSSU
Junos OS ReleasePlatform
12.2 or laterEX3300 Virtual Chassis
15.1X53-D55EX3400 Virtual Chassis
12.1 or laterEX4200 Virtual Chassis
Copyright © 2018, Juniper Networks, Inc.146
Installation and Upgrade Guide

Table 16: Platform and Release Support for NSSU (continued)
Junos OS ReleasePlatform
13.2X51-D20 or laterEX4300 Virtual Chassis
12.1 or laterEX4500 Virtual Chassis
12.2 or laterEX4550 Virtual Chassis
12.1 or laterMixed EX4200 and EX4500 Virtual Chassis
12.2 or laterMixed EX4200 and EX4550 Virtual Chassis
12.2 or laterMixed EX4200, EX4500, and EX4550 Virtual Chassis
12.2 or laterMixed EX4500 and EX4550 Virtual Chassis
12.2 or laterEX6200 switch
10.4 or laterEX8200 switch
11.1 or laterEX8200 Virtual Chassis
Overview of NSSU Configuration and Operation
Youmust ensure that the configuration of the switch or Virtual Chassis meets the
requirements described in “Requirements for Performing an NSSU” on page 142. NSSU
requires no additional configuration.
In releases prior to Junos OS Release 16.1, for EX6200 switches, EX8200 switches, and
EX8200Virtual Chassis, you can optionally configure line-card upgrade groups using the
CLI. See Example: Configuring Line-Card Upgrade Groups for Nonstop Software Upgrade
on EX Series Switches.
You perform an NSSU by executing the request system software nonstop-upgrade
command.Fordetailed instructionsonhowtoperformanNSSU, see the topics inRelated
Documentation.
Release History Table DescriptionRelease
In releases prior to Junos OS Release 16.1, for EX6200 switches, EX8200switches, and EX8200 Virtual Chassis, you can reduce the amount of time anupgrade takes by configuring line-card upgrade groups.
16.1
RelatedDocumentation
Upgrading Software Using Nonstop Software Upgrade on EX Series Virtual Chassis and
Mixed Virtual Chassis (CLI Procedure)
•
• Upgrading Software on an EX6200 or EX8200 Standalone Switch Using Nonstop
Software Upgrade (CLI Procedure)
147Copyright © 2018, Juniper Networks, Inc.
Chapter 8: Upgrading Software

• Upgrading Software on an EX8200 Virtual Chassis Using Nonstop Software Upgrade
(CLI Procedure)
• Configuring Nonstop Active Routing on Switches
• Configuring Graceful Routing Engine Switchover in a Virtual Chassis (CLI Procedure)
• Example: Configuring Line-Card Upgrade Groups for Nonstop Software Upgrade on EX
Series Switches
Preparing the USB Flash Drive to Upgrade Junos OS on SRX Series Devices
This feature simplifies the upgrading of Junos OS images in cases where there is no
console access to anSRXSeries device located at a remote site. This functionality allows
you to upgrade the JunosOS imagewithminimumconfiguration effort by simply copying
the image onto a USB flash drive, inserting it into the USB port of the SRX Series device,
and performing a few simple steps. You can also use this feature to reformat a boot
device and recover an SRX Series device after boot media corruption.
All USB flash drives used on SRX Series devices must have the following features:
• USB 2.0 or later.
• Formatted with a FAT/FAT 32 or MS-DOS file system
NOTE: For the list of recommended USB drives, see Knowledge Base articleKB31622.
NOTE: The Junos OS package on a USB device is commonly stored in theroot drive as the only file; for example,junos-srxsme-15.1X49-D30.3-domestic.tgz.
CAUTION: Any USBmemory product not listed as supported for SRX Seriesdeviceshasnotbeentestedby JuniperNetworks.TheuseofanyunsupportedUSBmemory product could expose your SRX Series device to unpredictablebehavior. Juniper Networks Technical Assistance Center (JTAC) can provideonly limited support for issues related to unsupportedhardware.We stronglyrecommend that you use only supported USB flash drives.
NOTE: This feature is not supported on chassis clusters.
Before you begin:
• Copy the Junos OS upgrade image and its autoinstall.conf file to the USB device.
Copyright © 2018, Juniper Networks, Inc.148
Installation and Upgrade Guide

• Ensure that adequate space is availableon theSRXSeriesdevice to install the software
image.
To prepare the USB flash drive and copy the Junos OS image onto the USB flash drive:
1. Insert the USB flash drive into the USB port of a PC or laptop computer running
Windows.
2. FromMy Computer, right-click the drive Devices with Removable Storage.
3. Format the drive with the FAT/FAT32 file system.
4. Copy the Junos OS image onto the USB device.
For the installation process to succeed, copy only one image onto the USB device.
Only images named junos-srxsme* are recognized by the system.
5. Check thedrivenamedetected inMyComputer for theUSBdevice.Openthecommand
prompt window and type:
echo “ “ > <drive-name>:\autoinstall.conf
For example, if the drive detected is drive F, type echo “ “ > F:\autoinstall.conf at the
command prompt. This empty file indicates to the system that the automatic
installation of the Junos OS image from the USB device is supported.
6. (Optional) Create a text file named junos-config.conf and copy the file to the USB
device. For example, the following file supports an automatic configuration update
during the installation process:
system {host-name host-1;domain-name example.net;domain-search [ abc.exmaple.net example.net device1.example.net];root-authentication {encrypted-password "$ABC123"; ## SECRET-DATA
}}...
...routing-options {static {route 0.0.0.0/0 next-hop 10.207.31.254;
}}
NOTE: The junos-config.conf file is optional, and it is not necessary forthe automatic installation of the Junos OS image from the USB device.You can use the junos-config.conf file for a backup configuration forrecovery or if the existing configuration is accidentally deleted.
149Copyright © 2018, Juniper Networks, Inc.
Chapter 8: Upgrading Software

RelatedDocumentation
Preparing Your SRX Series Device for Junos OS Upgrades on page 168•
• Downloading Software Packages from Juniper Networks on page 184
• Example: Installing Junos OS Upgrade Packages on SRX Series Devices on page 185
• Installing Junos OS Upgrade Packages on SRX Series Devices from a Remote Server
on page 187
Upgrading the Boot Loader on SRX Series Devices
To upgrade the boot loader to the latest version:
1. Upgrade to JunosOSRelease 10.0or later (withorwithoutdual-root support enabled).
The Junos OS 10.0 image contains the latest boot loader binaries in this path:
/boot/uboot, /boot/loader.
2. Enter the shell prompt using the start shell command.
3. Run the following command from the shell prompt:
bootupgrade –u /boot/uboot –l /boot/loader
NOTE: For the newversion to take effect, you should reboot the systemafterupgrading the boot loader.
To verify the boot loader version on the SRX Series device, enter the show chassis
routing-engine bios command.
user@host> show chassis routing-engine biosRouting Engine BIOS Version: 1.5
The command output displays the boot loader version.
NOTE: You can use the following commands to upgrade U-Boot or performcyclic redundancy check (CRC):
• bootupgrade -s -u – To upgrade the secondary boot loader.
• bootupgrade -c u-boot – To check CRC of the boot loader.
• bootupgrade -s -c u-boot – To check CRC for the secondary boot loader.
• bootupgrade -c loader – To check CRC for the loader on boot loader.
RelatedDocumentation
Preparing Your SRX Series Device for Junos OS Upgrades on page 168•
Copyright © 2018, Juniper Networks, Inc.150
Installation and Upgrade Guide

• Downloading Software Packages from Juniper Networks on page 184
• Example: Installing Junos OS Upgrade Packages on SRX Series Devices on page 185
• Installing Junos OS Upgrade Packages on SRX Series Devices from a Remote Server
on page 187
Upgrading Software by Using Automatic Software Download
Theautomatic softwaredownload featureuses theDynamicHostConfigurationProtocol
(DHCP)message exchange process to download and install software packages. You
configure theautomatic softwaredownload featureonswitches thatactasDHCPclients.
Youmust enable automatic softwaredownloadona switchbefore the software upgrade
can occur.
You configure a path to a software package file on the DHCP server. The server
communicates the path to the software package file through DHCP server messages.
If you enable automatic software download, the DHCP client switch compares the
software package name in the DHCP server message with the name of the software
package that booted the switch. If the software packages are different, the DHCP client
switch downloads and installs the software package specified in the DHCP server
message.
Before you upgrade software by using automatic software download, ensure that you
have configured DHCP services for the switch, including configuring a path to a boot
server and a boot file.
To configure a path to a boot server and a boot file:
1. Configure the name of the boot server advertised to DHCP clients. The client uses a
boot file located on the boot server to complete DHCP setup. This configuration is
equivalent to DHCP option 66:
[edit system services dhcp]user@switch# set boot-server (address | hostname)
2. Set the boot file advertised to DHCP clients. After the client receives an IP address
and the boot file location from theDHCP server, the client uses the boot image stored
in the boot file to complete the DHCP setup. This configuration is equivalent to DHCP
option 67:
[edit system services dhcp]user@switch# set boot-file filename
To enable automatic software download on a switch that acts as a DHCP client:
[edit chassis]user@switch# set auto-image-upgrade
151Copyright © 2018, Juniper Networks, Inc.
Chapter 8: Upgrading Software

After automatic software download is enabled on your DHCP client switch and after
DHCP services are enabled on your network, an automatic software download can occur
at any time as part of the DHCPmessage exchange process.
If an automatic software download occurs, you see the followingmessage on the switch:
Auto-image upgrade startedOn successful installation systemwill reboot automatically
The switch reboots automatically to complete the upgrade.
RelatedDocumentation
Verifying That Automatic Software Download Is Working Correctly on page 152•
• Understanding Software Installation on EX Series Switches on page 44
• Configuring a DHCP Server on Switches (CLI Procedure)
• Configuring DHCP Services (J-Web Procedure)
Verifying That Automatic Software Download IsWorking Correctly
Purpose Verify that the automatic software download feature is working correctly.
Action Use the show system services dhcp client interface-name command to verify that the
automatic software download feature has been used to install a software package.
user@switch> show system services dhcp client ge-0/0/1.0 Logical Interface Name ge-0/0/1.0 Hardware address 00:0a:12:00:12:12 Client Status bound Vendor Identifier ether Server Address 10.1.1.1 Address obtained 10.1.1.89 Lease Obtained at 2009-08-20 18:13:04 PST Lease Expires at 2009-08-22 18:13:04 PST
DHCP Options : Name: name-server, Value: [ 10.209.194.131, 203.0.113.2, 203.0.113.3 ]
Name: server-identifier, Value: 10.1.1.1 Name: router, Value: [ 10.1.1.80 ] Name: boot-image, Value: jinstall-ex-4200-9.6R1.5-domestic-signed.tgz Name: boot-image-location, Value: 10.1.1.25:/bootfiles/
Meaning The output from this command shows the name and location of the software package
under DHCP options when automatic software download was last used to install a
software package. The sample output in DHCP options shows that the last DHCP server
message to arrive on the DHCP client had a boot server address of 192.168.1.165 and a
boot file named jinstall-ex-4200-9.6R1.5-domestic-signed.tgz. If automatic software
Copyright © 2018, Juniper Networks, Inc.152
Installation and Upgrade Guide

download was enabled on this client switch during the last DHCPmessage exchange,
these values were used by the switch to upgrade the software.
RelatedDocumentation
Upgrading Software by Using Automatic Software Download on page 151•
Verifying Junos OS and Boot Loader Software Versions on an EX Series Switch
Before or after upgrading or downgrading Junos OS, youmight need to verify the Junos
OS version. Youmight also need to verify the boot loader software version if you are
upgrading to or downgrading from a release that supports resilient dual-root partitions
(Junos OS Release 10.4R3 and later).
This topic includes:
• Verifying the Number of Partitions and File SystemMountings on page 153
• Verifying the Loader Software Version on page 154
• VerifyingWhich Root Partition Is Active on page 155
• Verifying the Junos OS Version in Each Root Partition on page 155
Verifying the Number of Partitions and File SystemMountings
Purpose Between Junos OS Release 10.4R2 and Release 10.4R3, upgrades were made to further
increase resiliency of root partitions, which required reformatting the disk from three
partitions to four partitions. If your switch is running Release 10.4R2 or earlier, it has three
partitions, and if it is running Release 10.4R3 or later, it has four partitions.
Action Verify howmany partitions the disk has, as well as where each file system is mounted,
by using the following command:
user@switch> show system storagefpc0:-----------------------------------------------------------------------Filesystem Size Used Avail Capacity Mounted on/dev/da0s1a 184M 124M 45M 73% /devfs 1.0K 1.0K 0B 100% /dev/dev/md0 37M 37M 0B 100% /packages/mnt/jbase/dev/md1 18M 18M 0B 100% /packages/mnt/jcrypto-ex-10.4I20110121_0509_hbRPSRLI15184421081/dev/md2 6.1M 6.1M 0B 100% /packages/mnt/jdocs-ex-10.4I20110121_0509_hbRPSRLI15184421081/dev/md3 154M 154M 0B 100% /packages/mnt/jkernel-ex-10.4I20110121_0509_hbRPSRLI15184421081/dev/md4 23M 23M 0B 100% /packages/mnt/jpfe-ex42x-10.4I20110121_0509_hbRPSRLI15184421081/dev/md5 46M 46M 0B 100% /packages/mnt/jroute-ex-10.4I20110121_0509_hbRPSRLI15184421081/dev/md6 28M 28M 0B 100% /packages/mnt/jswitch-ex-10.4I20110121_0509_hbRPSRLI15184421081/dev/md7 22M 22M 0B 100% /packages/mnt/jweb-ex-10.4I20110121_0509_hbRPSRLI15184421081/dev/md8 126M 10.0K 116M 0% /tmp
153Copyright © 2018, Juniper Networks, Inc.
Chapter 8: Upgrading Software

/dev/da0s3e 123M 632K 112M 1% /var/dev/da0s3d 369M 20K 339M 0% /var/tmp/dev/da0s4d 62M 62K 57M 0% /config/dev/md9 118M 12M 96M 11% /var/rundbprocfs 4.0K 4.0K 0B 100% /proc/var/jail/etc 123M 632K 112M 1% /packages/mnt/jweb-ex-10.4I20110121_0509_hbRPSRLI15184421081/jail/var/etc/var/jail/run 123M 632K 112M 1% /packages/mnt/jweb-ex-10.4I20110121_0509_hbRPSRLI15184421081/jail/var/run/var/jail/tmp 123M 632K 112M 1% /packages/mnt/jweb-ex-10.4I20110121_0509_hbRPSRLI15184421081/jail/var/tmp/var/tmp 369M 20K 339M 0% /packages/mnt/jweb-ex-10.4I20110121_0509_hbRPSRLI15184421081/jail/var/tmp/uploadsdevfs 1.0K 1.0K 0B 100% /packages/mnt/jweb-ex-10.4I20110121_0509_hbRPSRLI15184421081/jail/dev
Meaning The presence of the partition name containing s4d indicates that there is a fourth slice.
If this were a three-slice partition scheme, in place of s1a, s3e, s3d, and s4d, you would
see s1a, s1f, s2a, s2f, s3d, and s3e, and you would not see s4d.
Verifying the Loader Software Version
Purpose For the special case of upgrading from Junos OS Release 10.4R2 or earlier to Release
10.4R3 or later, you must upgrade the loader software.
Action For EX Series switches except EX8200 switches:
user@switch> show chassis firmwarePart Type VersionFPC 0 uboot U-Boot 1.1.6 (Jan 3 2011 - 16:14:58) 1.0.0
loader FreeBSD/PowerPC U-Boot bootstrap loader 2.4
For EX8200 switches:
user@switch> show chassis firmwarePart Type VersionFPC 0 uboot U-Boot 1.1.6 (Jan 3 2011 - 16:14:58) 3.5.0
loader FreeBSD/PowerPC U-Boot bootstrap loader 2.4
Meaning For EX Series switches other than EX8200 switches, with Junos OS Release 10.4R3 or
later installed:
• If there is version information following the timestamp forU-Boot (1.0.0 in thepreceding
example), then the loader software does not require upgrading.
• If there is no version number following the timestamp for U-boot, then the loader
software requires upgrading.
Copyright © 2018, Juniper Networks, Inc.154
Installation and Upgrade Guide

NOTE: If the software version is Release 10.4R2 or earlier, no version numberis displayed following the timestamp for U-boot, regardless of the loader
software version installed. If you do not knowwhether you have installed thenew loader software, we recommend that you upgrade the loader softwarewhen you upgrade the software version.
For EX8200 switches, if the version number following the timestamp forU-Boot is earlier
than3.5.0, youmustupgrade the loader softwarewhenyouupgrade thesoftware version.
VerifyingWhich Root Partition Is Active
Purpose Switches running Release 10.4R3 or later have resilient dual-root partition functionality,
which includes the ability to boot transparently from the inactive partition if the system
fails to boot from the primary root partition.
You can verify which root partition is active using the following command:
Action user@switch> show system storage partitionsfpc0:--------------------------------------------------------------------------Boot Media: internal (da0)Active Partition: da0s1aBackup Partition: da0s2aCurrently booted from: active (da0s1a)Partitions information: Partition Size Mountpoint s1a 184M / s2a 184M altroot s3d 369M /var/tmp s3e 123M /var s4d 62M /config s4e unused (backup config)
Meaning The Currently booted from: field shows which root partition is active.
Verifying the Junos OS Version in Each Root Partition
Purpose Each switch contains two root partitions. We recommend that you copy the same Junos
OS version in each partition when you upgrade. In Junos OS Release 10.4R2 and earlier,
youmight choose to havedifferent JunosOS release versions in eachpartition. Youmight
have different versions during a software upgrade and before you have finished verifying
the new software installation. To enable a smooth reboot if corruption is found in the
primary root file system, ensure that the identical Junos OS images are in each root
partition. For Release 10.4R2 and earlier, you must manually reboot the switch from the
backup root partition. However, for Release 10.4R3 and later, the switch reboots
155Copyright © 2018, Juniper Networks, Inc.
Chapter 8: Upgrading Software

automatically from the backup root partition if it fails to reboot from the active root
partition.
Action Verify whether both root partitions contain the same image by using the following
command:
user@switch> show system snapshotmedia internalInformation for snapshot on internal (/dev/da0s1a) (backup)Creation date: Jan 11 03:02:59 2012JUNOS version on snapshot: jbase : ex-12.2I20120305_2240_user jcrypto-ex: 12.2I20120305_2240_user jdocs-ex: 12.2I20120305_2240_user jroute-ex: 12.2I20120305_2240_user jswitch-ex: 12.2I20120305_2240_user jweb-ex: 12.2I20120305_2240_userInformation for snapshot on internal (/dev/da0s2a) (primary)Creation date: Mar 6 02:24:08 2012JUNOS version on snapshot: jbase : ex-12.2I20120305_2240_user jcrypto-ex: 12.2I20120305_2240_user jdocs-ex: 12.2I20120305_2240_user jroute-ex: 12.2I20120305_2240_user jswitch-ex: 12.2I20120305_2240_user jweb-ex: 12.2I20120305_2240_user
Meaning The command showswhich Junos OS version is installed on eachmedia partition. Verify
that the same version is installed on both partitions.
RelatedDocumentation
Troubleshooting Software Installation on page 343•
• Troubleshooting a Switch That Has Booted from the Backup Junos OS Image on
page 346
• Understanding Resilient Dual-Root Partitions on Switches on page 115
Upgrading the Loader Software on the Line Cards in a Standalone EX8200 Switch oran EX8200 Virtual Chassis
You are almost never required to upgrade the loader software on the line cards in an
EX8200 switch.
Upgrading the loader software version for a line card is not a requirement to complete
any software upgrade. In rare cases, a line card might go offline immediately after a
softwareupgradebecause the loader softwareversionon the linecard requiresanupgrade
tobecomecompatiblewith theupgraded JunosOS.Youcanupgrade the loader software
on the line cards as a best practice to avoid this problem and other less severe issues.
The loader software on any line card in an EX8200 switch is updated using the same
loader software package that upgrades the EX8200 Routing Engine loader software.
The line card software loader contains two banks, each with a single loader software
Copyright © 2018, Juniper Networks, Inc.156
Installation and Upgrade Guide

version. This procedure is used to upgrade the loader software for both banks of a line
card in a standalone EX8200 switch or an EX8200 Virtual Chassis.
To upgrade the loader software on the line cards in a standalone EX8200 switch or an
EX8200 Virtual Chassis:
NOTE: If you are upgrading Junos OS, the Routing Engine loader software,and the line card loader software, we recommend that you upgrade in thisorder: Junos OS, line card loader software, Routing Engine loader software.
1. Determine the version of the loader software for the line cards:
user@switch> show chassis firmware
Part Type VersionFPC 6 U-Boot U-Boot 1.1.6 (Jan 13 2009 - 06:55:22) 2.3.0 loader FreeBSD/PowerPC U-Boot bootstrap loader 2.2FPC 7 U-Boot U-Boot 1.1.6 (Jan 13 2009 - 06:55:22) 2.3.0 loader FreeBSD/PowerPC U-Boot bootstrap loader 2.2Routing Engine 0 U-Boot U-Boot 1.1.6 (Mar 11 2011 - 04:29:01) 3.5.0 loader FreeBSD/PowerPC U-Boot bootstrap loader 2.4Routing Engine 1 U-Boot U-Boot 1.1.6 (Mar 11 2011 - 04:29:01) 2.3.0 loader FreeBSD/PowerPC U-Boot bootstrap loader 2.4
NOTE: OnanEX8200VirtualChassis, youcannotexecute theshowchassis
firmware command on themaster external Routing Engine. Youmust
execute this command on eachmember switch.
a. From themaster external Routing Engine, start a shell session on themember
switch, for example:
user@external-routing-engine> request sessionmember 0
b. Enter the CLI and execute the show chassis firmware command.
c. Repeat these steps for the other member switch.
The loader software version appears after the timestamp (see the Version column in
the output) for each component. For example, In the example given in this step, look
at the first FPC listed (FPC 6). Ignore the U-Boot version number (1.1.6) and find the
loader software version number (2.3.0) after the timestamp (U-Boot 1.1.6 (Jan 13
2009 - 06:55:22). The U-Boot version number has nothing to do with the loader
software version that you need to determine.
157Copyright © 2018, Juniper Networks, Inc.
Chapter 8: Upgrading Software

If the loader software version is earlier than 3.5.0 for any FPC, you should consider
upgrading the loader software for that line card.
2. Download the loader software package from the Juniper Networkswebsite and place
the software package on an internal software distribution site or in a local directory
on the switch. We recommend using /var/tmp as the local directory on the switch.
NOTE: Toobtain the loadersoftwarepackage, see theDownloadSoftwarepageat http://www.juniper.net/support/downloads/junos.html. Click on the
version, then the Software tab, and then the name of the software installpackage. In the pop-up Alert box, click the link to the PSN document.
3. DisablegracefulRoutingEngine switchover (GRES)andnonstopactive routing (NSR),
if enabled. Commit the configuration:
user@switch# deactivate chassis redundancy graceful-switchoveruser@switch# deactivate routing-options nonstop-routinguser@switch# commit synchronize
4. Install the loader package:
user@switch> request system software add package
Replace packagewith one of the following paths:
• For a software package in the /var/tmp directory on the switch or external Routing
Engine—/var/tmp/package.tgz.
• For a software package on a remote server:
• ftp://hostname/pathname/package.tgz
• http://hostname/pathname/package.tgz
In the above options, package.tgzmight be, for example,
jloader-ex-8200-11.3build-signed.tgz.
5. Upgrade the loader software.
• To upgrade the loader software for a line card on a standalone EX8200 switch:
user@switch> request system firmware upgrade fpc slot slot-numberFirmware upgrade initiated....Please wait for ~2mins for upgrade to complete....
• To upgrade the loader software for a line card on an EX8200member switch in an
EX8200 Virtual Chassis:
user@switch> request system firmware upgrade fpc slot slot-numbermembermember-idFirmware upgrade initiated....Please wait for ~2mins for upgrade to complete....
6. Confirm the loader software upgrade:
Copyright © 2018, Juniper Networks, Inc.158
Installation and Upgrade Guide

user@switch> show system firmwarePart Type Tag Current Available Status version versionFPC 6 U-Boot 0 2.3.0 UPGRADED SUCCESSFULLYFPC 7 U-Boot 0 2.3.0 OKRouting Engine 0 RE BIOS 0 3.1.1 OKRouting Engine 1 0 3.1.1 OK
The status is UPGRADED SUCCESSFULLY if the boot loader version update process
is complete.
The status is PROGRAMMING if the boot loader version update process is still in
progress.
Do not proceed to the next step until the show system firmware output confirms that
the loader software upgrade is complete.
7. Restart the line card.
• To restart a line card on a standalone EX8200 switch:
user@switch> request chassis fpc restart slot slot-number
• To restart a line card on an EX8200member switch in an EX8200 Virtual Chassis:
user@switch> request chassis fpc restart slot slot-numbermembermember-id
NOTE: You canmonitor the status of the line card restart by using theshow chassis fpc command.
8. After the line card restart has completed, confirm the loader software version update:
user@switch> show chassis firmwarePart Type Tag Current Available Status version versionFPC 6 U-Boot 0 3.5.0 OKFPC 7 U-Boot 0 2.3.0 OKRouting Engine 0 RE BIOS 0 3.1.1 OKRouting Engine 1 0 3.1.1 OK
The current version has updated to 3.5.0. You have upgraded the loader software for
one bank of the line card.
9. Repeat Steps 4 through 7 to upgrade the loader software on the other bank of the
line card.
159Copyright © 2018, Juniper Networks, Inc.
Chapter 8: Upgrading Software

NOTE: A bank switchover occurs automatically as part of the line cardrestart. Repeating Steps 3 through 6 updates the loader software on theother bank.
10. Repeat Steps 4 through 8 for all other line cards that require a line card loader version
upgrade.
RelatedDocumentation
Upgrading Software on an EX6200 or EX8200 Standalone Switch Using Nonstop
Software Upgrade (CLI Procedure)
•
• Upgrading Software on an EX8200 Virtual Chassis Using Nonstop Software Upgrade
(CLI Procedure)
• Troubleshooting an EX8200 Line Card’s Failure to Power On
Upgrading Junos OSwith Upgraded FreeBSD
NOTE: If youareupgradingor installing JunosOSonaVMhost, see “VMHostInstallation” on page 280.
Starting in Junos OS Release 15.1, certain hardware platforms run an upgraded FreeBSD
kernel instead of older versions of FreeBSD.
Direct validation of the running configuration does not work for upgrading to Junos OS
with upgraded FreeBSD from Junos OS based on older versions of the FreeBSD kernel.
Therefore, when upgrading or downgrading between Junos OS and Junos OSwith
upgraded FreeBSD, youmight have to validate on a different host. It does not matter
where that other host is, as long as you can reach it with NETCONF over SSH (see
Establishing an SSH Connection for a NETCONF Session). The target system uses the
network to contact the other host, run the validation and authentication, and return the
result.
Upgrading to Junos OSwith upgraded FreeBSD reformats the file system. Only specific
files and directories are preserved unless precautions are taken. By default, the upgrade
process only preserves the following directories:
• /config
• /etc/localtime
• /var/db
• /var/etc/master.passwd
• /var/etc/inetd.conf
• /var/etc/pam.conf
Copyright © 2018, Juniper Networks, Inc.160
Installation and Upgrade Guide

• /var/etc/resolv.conf
• /var/etc/syslog.conf
• /var/etc/localtime
• /var/etc/exports
• /var/etc/extensions.allow
• /var/preserve
• /var/tmp/baseline-config.conf
• /var/tmp/preinstall_boot_loader.conf
NOTE: On EX2300 and EX3400 switches, the following directories are notapplicable:
• /etc/localtime
• /var/etc/localtime
• /var/etc/exports
• /var/preserve
• /var/tmp/preinstall_boot_loader.conf
For specific installation procedures, see the following sections:
• DeterminingWhich Package or Packages to Install on page 161
• Installing Junos OSwith Upgraded FreeBSD Over Plain Junos OS on page 163
• Installing Junos OSwith Upgraded FreeBSD Over Junos OSwith Upgraded FreeBSD
of a Different Release on page 164
• To Install Junos OSwith Upgraded FreeBSD Over Junos OSwith Upgraded FreeBSD
of a Later Release on page 165
DeterminingWhich Package or Packages to Install
In Junos OS releases earlier than 15.1, the partition swap pages were counted as part of
the memory file system partition. Using this method leaves 4 GB of memory as the
maximum that is theoretically accessible when you are using a 32-bit image. However,
when JunosOSwithupgradedFreeBSD is run, the systemonly counts theactualpartition
size, which leaves around 3.4 GB of available physical address space, or only 3 GB of
usable RAM. Therefore, we recommend you use a 64-bit image with Junos OSwith
upgraded FreeBSD.
Before you begin:
1. Verify that the upgrade applies to your platform, as listed in “Release Information for
Junos OSwith Upgraded FreeBSD” on page 17.
2. Determine the upgrade path to follow.
161Copyright © 2018, Juniper Networks, Inc.
Chapter 8: Upgrading Software
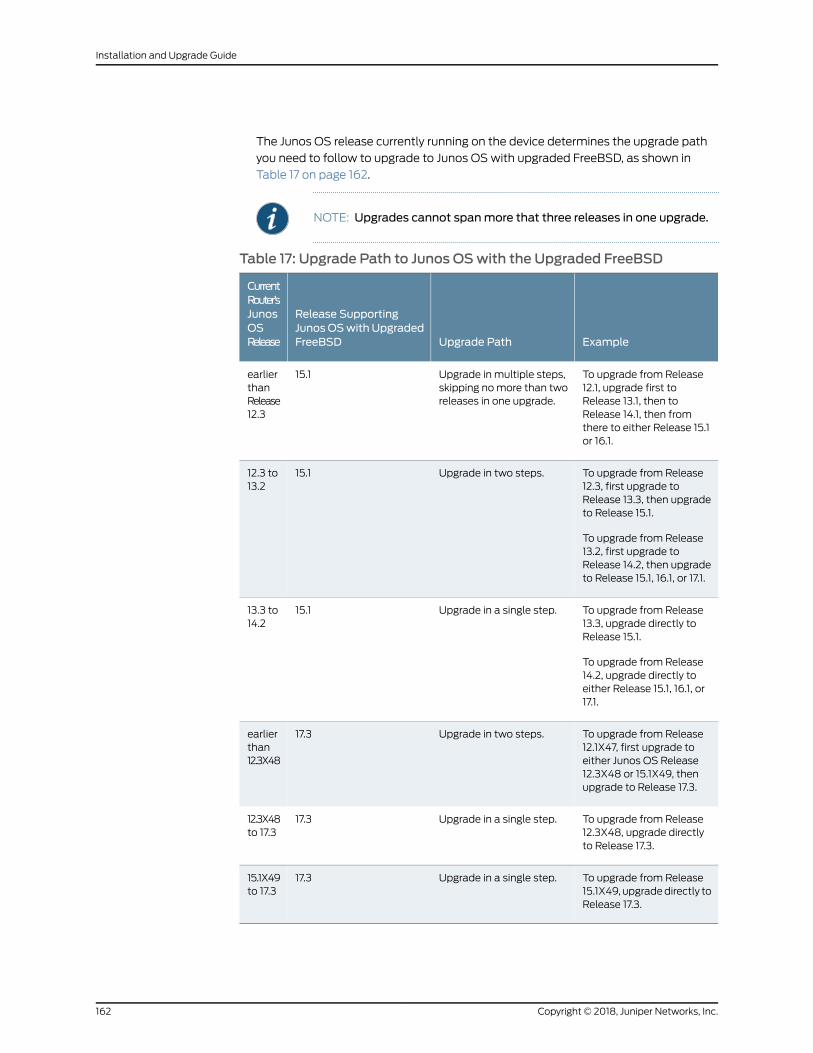
The Junos OS release currently running on the device determines the upgrade path
you need to follow to upgrade to Junos OSwith upgraded FreeBSD, as shown in
Table 17 on page 162.
NOTE: Upgrades cannot spanmore that three releases in one upgrade.
Table 17: Upgrade Path to Junos OSwith the Upgraded FreeBSD
ExampleUpgrade Path
Release SupportingJunosOSwith UpgradedFreeBSD
CurrentRouter’sJunosOSRelease
To upgrade from Release12.1, upgrade first toRelease 13.1, then toRelease 14.1, then fromthere to either Release 15.1or 16.1.
Upgrade in multiple steps,skipping nomore than tworeleases in one upgrade.
15.1earlierthanRelease12.3
To upgrade from Release12.3, first upgrade toRelease 13.3, then upgradeto Release 15.1.
To upgrade from Release13.2, first upgrade toRelease 14.2, then upgradeto Release 15.1, 16.1, or 17.1.
Upgrade in two steps.15.112.3 to13.2
To upgrade from Release13.3, upgrade directly toRelease 15.1.
To upgrade from Release14.2, upgrade directly toeither Release 15.1, 16.1, or17.1.
Upgrade in a single step.15.113.3 to14.2
To upgrade from Release12.1X47, first upgrade toeither Junos OS Release12.3X48 or 15.1X49, thenupgrade to Release 17.3.
Upgrade in two steps.17.3earlierthan12.3X48
To upgrade from Release12.3X48, upgrade directlyto Release 17.3.
Upgrade in a single step.17.312.3X48to 17.3
To upgrade from Release15.1X49, upgradedirectly toRelease 17.3.
Upgrade in a single step.17.315.1X49to 17.3
Copyright © 2018, Juniper Networks, Inc.162
Installation and Upgrade Guide

NOTE: You can also downgrade from Junos OS Release with upgradedFreeBSD to a pre-upgraded-FreeBSD release of Junos OS, as long as thepath complies with the Junos OS policy of skipping at most two earlierreleases.
3. Download the Junos OSwith upgraded FreeBSD package.
See “Changes in Package Names for Junos OSwith Upgraded FreeBSD” on page 18.
Installing Junos OSwith Upgraded FreeBSDOver Plain Junos OS
NOTE: If you have important files in other directories, copy them from therouter or switch to a secure location before upgrading the router or switch.
NOTE: The following procedure refers to routers, but it also applies toswitches.
To install Junos OSwith upgraded FreeBSD over plain Junos OS:
1. Enter the requestsystemsoftwareadd install-package-name.tgzno-validatecommand
from the operational mode in the CLI:
NOTE: The no-copy option is enabled by default.
Use the no-validate option with the request system software add command. If you
leave out the no-validate option, the command uses the validate option by default,
anddirect validationof the runningconfigurationdoesnotwork for upgrading to Junos
OSwith upgraded FreeBSD from Junos OS based on older versions of the FreeBSD
kernel.
NOTE: You can also use the reboot option along with the request system
software add command, but it is not recommended to do this in a single
step while upgrading from a FreeBSD 6.1 based Junos OS to FreeBSD 10based Junos OS.
NOTE: To validate the current configuration on an upgrade to Junos OSwith upgraded FreeBSD from JunosOS, use the request system softwarevalidate on (Junos OSwith Upgraded FreeBSD) command.
user@host>request system software add /var/tmp/install-package-name.tgzno-validate
163Copyright © 2018, Juniper Networks, Inc.
Chapter 8: Upgrading Software

The new Junos OS image is installed on the router.
2. Reboot thedevice tostart thenewsoftwareusing the requestsystemrebootcommand:
user@host> request system rebootReboot the system? [yes, no] (no) yes
NOTE: Youmust reboot the device to load the newly installed version ofJunos OS on the device.
To abort the installation, do not reboot the device. Instead, finish theinstallation and then issue the request system software delete
install-package-name.tgz command. This is your last chance to stop the
installation (not applicable on EX2300 and EX3400 platforms).
The software is loaded when you reboot the system. Installation can take between 5
and 10minutes. The device then reboots from the boot device onwhich the software
was just installed.When the reboot is complete, the device displays the login prompt.
While the software is beingupgraded, theRoutingEngineonwhich youareperforming
the installation does not route traffic.
3. Log in and issue the show version command to verify the version of the software
installed.
NOTE: The output shows the OS kernel, OS runtime, and other packagesinstalled on the router.
InstallingJunosOSwithUpgradedFreeBSDOverJunosOSwithUpgradedFreeBSDofaDifferentRelease
NOTE: If you have important files in other directories, copy them from therouter or switch to a secure location before upgrading the router or switch.
NOTE: The following procedure refers to routers, but it also applies toswitches.
To install Junos OSwith upgraded FreeBSD over Junos OSwith upgraded FreeBSD of an
earlier release:
1. Enter the request system software add package-name validate reboot command from
the operational mode in the CLI:
Copyright © 2018, Juniper Networks, Inc.164
Installation and Upgrade Guide

NOTE: The no-copy option is enabled by default.
Use the validate and reboot options with the request system software add command.
The command uses the validate option by default. We encourage users to validate
using the validate option when upgrading from Junos OS to Junos OS or from Junos
OSwith upgraded FreeBSD to Junos OSwith upgraded FreeBSD.
If you leave out the reboot option, you can take care of that in a separate reboot step.
The new Junos OS image is installed on the router.
2. Verify the installation of Junos OSwith upgraded FreeBSD.
user@host> show version
NOTE: The output shows the OS kernel, OS runtime, and other packagesinstalled on the router.
To Install Junos OSwith Upgraded FreeBSDOver Junos OSwith Upgraded FreeBSD of a LaterRelease
To install Junos OSwith upgraded FreeBSD over Junos OSwith upgraded FreeBSD of a
different release:
1. Enter the request system software add package-name validate reboot command from
the operational mode in the CLI:
NOTE: The no-copy option is enabled by default.
Use the validate and reboot options with the request system software add command.
The command uses the validate option by default. We encourage users to validate
using the validate option when upgrading from Junos OS to Junos OS, or from Junos
OSwith upgraded FreeBSD to Junos OSwith upgraded FreeBSD.
If you leave out the reboot option, you can take care of that in a separate reboot step.
The new Junos OS image is installed on the router.
2. Verify the installation of Junos OSwith upgraded FreeBSD:
user@host> show version
165Copyright © 2018, Juniper Networks, Inc.
Chapter 8: Upgrading Software

NOTE: You need to install the Junos OS software package and hostsoftware package on the routers with the RE-MX-X6, RE-MX-X8, andRE-PTX-X8Routing Engines. For upgrading the host OS and JunosOS onthese routers with VM host support, use the junos-vmhost-install-x.tgzimage and specify the name of the regular package in the request vmhost
software add command. For more information, see the “VMHost
Installation” on page 280 topic in Installation and Upgrade Guide.
NOTE: The output shows the OS kernel, OS runtime, and other packagesinstalled on the router.
RelatedDocumentation
Downgrading Junos OS from Upgraded FreeBSD on page 261•
• Release Information for Junos OSwith Upgraded FreeBSD on page 17
• request system snapshot (Junos OSwith Upgraded FreeBSD) on page 427
• request system reboot (Junos OSwith Upgraded FreeBSD) on page 411
• Establishing an SSH Connection for a NETCONF Session
Understanding Junos OSUpgrades for SRX Series Devices
SRX Series devices are delivered with Junos OS preinstalled on them.When you power
on a device, it starts (boots) up using its primary boot device. These devices also support
secondary boot devices, allowing you to back up your primary boot device and
configuration.
As new features and software fixes become available, youmust upgrade Junos OS to
use them. Before an upgrade,we recommend that you back up your primary boot device.
Understanding Junos OSUpgrades
On a services gateway, you can configure the primary or secondary boot device with a
snapshot of the current configuration, default factory configuration, or rescue
configuration. You can also replicate the configuration for use on another device.
If the SRX Series device does not have a secondary boot device configured and the
primary boot device becomes corrupted, you can reload the Junos OS package onto the
corrupted internal media from a USB flash drive or TFTP server.
Junos OSUpgradeMethods on the SRX Series Devices
SRX Series devices that ship from the factory with Junos OS Release 10.0 or later are
formatted with the dual-root partitioning scheme.
Copyright © 2018, Juniper Networks, Inc.166
Installation and Upgrade Guide

NOTE: Junos OS Release 12.1X45 and later do not support single rootpartitioning.
NOTE: SRX100, SRX110, SRX210, SRX220, and SRX240 devices with 2 GBRAMcannotbeupgradedtoany JunosOS12.1X46Releaseafter 12.1X46-D65.Attempting to upgrade to this release on devices with 2 GB RAMwill triggerthe following error: ERROR: Unsupported platform for 12.1X46 releases after
12.1X46-D65
.
Existing SRX Series devices that are running Junos OS Release 9.6 or earlier use the
single-root partitioning scheme.While upgrading these devices to JunosOSRelease 10.0
or later, you can choose to format the storagemediawith dual-root partitioning (strongly
recommended) or retain the existing single-root partitioning.
Certain JunosOSupgrademethods format the internalmediabefore installation,whereas
other methods do not. To install Junos OS Release 10.0 or later with the dual-root
partitioning scheme, youmust use an upgrademethod that formats the internal media
before installation.
NOTE: If you are upgrading to Junos OS Release 10.0 without transitioningto dual-root partitioning, use the conventional CLI and J-Web user interfaceinstallationmethods.
These upgrademethods format the internal media before installation:
• Installation from the boot loader using a TFTP server
• Installation from the boot loader using a USB storage device
• Installation from theCLI using the partition option (available in JunosOSRelease 10.0)
• Installation using the J-Web user interface
These upgrademethods retain the existing partitioning scheme:
• Installation using the CLI
• Installation using the J-Web user interface
WARNING: Upgrademethods that format the internal media beforeinstallation wipe out the existing contents of themedia. Only the currentconfiguration is preserved. Any important datamust be backed up beforestarting the process.
167Copyright © 2018, Juniper Networks, Inc.
Chapter 8: Upgrading Software

NOTE: Once themedia has been formatted with the dual-root partitioningscheme, you can use conventional CLI or J-Web user interface installationmethods, which retain the existing partitioning and contents of themedia,for subsequent upgrades.
Release History Table DescriptionRelease
SRX100, SRX110, SRX210, SRX220, and SRX240 devices with 2 GB RAMcannot be upgraded to any Junos OS 12.1X46 Release after 12.1X46-D65.Attempting to upgrade to this release on devices with 2 GB RAMwill triggerthe following error: ERROR: Unsupported platform for 12.1X46 releasesafter 12.1X46-D65
12.1X46
Junos OS Release 12.1X45 and later do not support single root partitioning12.1X45-D10
RelatedDocumentation
Software Naming Convention for SRX Series Devices•
• Example: Installing Junos OS Upgrade Packages on SRX Series Devices on page 185
• Installing Junos OS Upgrade Packages on SRX Series Devices from a Remote Server
on page 187
Preparing Your SRX Series Device for Junos OSUpgrades
Before you begin upgrading Junos OS on an SRX Series device, ensure the following:
• Obtain a Juniper NetworksWeb account and a valid support contract. Youmust have
an account to download software upgrades. To obtain an account, complete the
registration form at the Juniper Networks website:
https://www.juniper.net/registration/Register.jsp.
• Back up your primary boot device onto a secondary storage device.
Creating a backup has the following advantages:
• Thedevicecanboot frombackupandcomebackonline incaseof failureor corruption
of the primary boot device in the event of power failure during an upgrade.
• Your active configuration files and log files are retained.
• Thedevice can recover froma known, stable environment in case of an unsuccessful
upgrade.
You can use either the J-Web user interface or the CLI to back up the primary boot device
on the secondary storage device.
Secondary Storage Devices Available on SRX Series Devices
You can use either the J-Web user interface or the CLI to back up the primary boot device
on the secondary storage device.
Copyright © 2018, Juniper Networks, Inc.168
Installation and Upgrade Guide

Table 18 on page 169 lists the secondary storage devices available on an SRX Series
devices.
Table 18: Secondary Storage Devices for SRX Series Devices
MinimumStorage RequiredAvailable on ServicesGatewaysStorage Device
1 GBSRX100, SRX110, SRX210,SRX220,andSRX240ServicesGateways
USB storage device
2 GBSRX550, and SRX650Services Gateway
1 GBSRX300, SRX320, SRX340,and SRX345 ServicesGateways
2 GBSRX550M
2 GBSRX650 Services GatewayExternal CompactFlash (CF)
100 GBSRX340, SRX345, SRX550M,and SRX1500
SSD
240 GBSRX4100, SRX4200SSD
1 TBSRX4600SSD
120 GBSRX5000 line devicesRouting Engine (RE2) SSDcard
NOTE:
• During a successful upgrade, the upgrade package completely reinstallsthe existing Junos OS. It retains configuration files, log files, and similarinformation from the previous version.
• After a successful upgrade, remember to back up the new currentconfiguration to the secondary device.
Verifying Available Disk Space on SRX Series Devices
The amount of free disk space necessary to upgrade adevicewith a newversion of Junos
OS can vary from one release to another. Check the Junos OS software version you are
installing to determine the free disk space requirements.
If the amount of free disk space on a device is insufficient for installing Junos OS, you
might receive awarning similar to the followingmessages, that the /var filesystem is low
on free disk space:
169Copyright © 2018, Juniper Networks, Inc.
Chapter 8: Upgrading Software

WARNING: The /var filesystem is low on free disk space.
WARNING: This package requires 1075136k free, but there is only 666502k available.
To determine the amount of free disk space on the device, issue the showsystemstorage
detail command. The command output displays statistics about the amount of free disk
space in the device file systems.
A sample of the show system storage detail command output is shown below:
user> show system storage detail
Filesystem 1024-blocks Used Avail Capacity Mounted on/dev/da0s2a 300196 154410 121772 56% /devfs 1 1 0 100% /dev/dev/md0 409000 409000 0 100% /junos/cf 300196 154410 121772 56% /junos/cfdevfs 1 1 0 100% /junos/dev/procfs 4 4 0 100% /proc/dev/bo0s3e 25004 52 22952 0% /config/dev/bo0s3f 350628 178450 144128 55% /cf/var/dev/md1 171860 16804 141308 11% /mfs/cf/var/jail 350628 178450 144128 55% /jail/var/cf/var/log 350628 178450 144128 55% /jail/var/logdevfs 1 1 0 100% /jail/dev/dev/md2 40172 4 36956 0% /mfs/var/run/utm/dev/md3 1884 138 1596 8% /jail/mfs
Cleaning Up the System File Storage Space
When the system file storage space on the device is full, rebooting the device does not
solve the problem. The following error message is displayed during a typical operation
on the device after the file storage space is full.
user@host% cliuser@host> configure/var: write failed, filesystem is full
You can clean up the file storage on the device by deleting system files using the request
system storage cleanup command as shown in following procedure:
1. Request to delete system files on the device.
user@host> request system storage cleanup
The list of files to be deleted is displayed.
List of files to delete:
Size Date Name 11B Oct 28 23:40 /var/jail/tmp/alarmd.ts 92.4K Jan 11 17:12 /var/log/chassisd.0.gz 92.4K Jan 11 06:06 /var/log/chassisd.1.gz 92.5K Jan 10 19:00 /var/log/chassisd.2.gz 92.5K Jan 10 07:53 /var/log/chassisd.3.gz 92.2K Jan 10 15:00 /var/log/hostlogs/auth.log.1.gz 92.2K Jan 1 18:45 /var/log/hostlogs/auth.log.2.gz 92.1K Jan 4 17:30 /var/log/hostlogs/auth.log.3.gz 92.2K Jan 1 18:45 /var/log/hostlogs/auth.log.4.gz
Copyright © 2018, Juniper Networks, Inc.170
Installation and Upgrade Guide

79.0K Jan 12 01:59 /var/log/hostlogs/daemon.log.1.gz 78.8K Jan 11 23:15 /var/log/hostlogs/daemon.log.2.gz 78.7K Jan 11 20:30 /var/log/hostlogs/daemon.log.3.gz 79.1K Jan 11 17:44 /var/log/hostlogs/daemon.log.4.gz 59.1K Jan 11 21:59 /var/log/hostlogs/debug.1.gz 59.2K Jan 11 17:44 /var/log/hostlogs/debug.2.gz 59.2K Jan 11 13:29 /var/log/hostlogs/debug.3.gz 59.3K Jan 11 09:14 /var/log/hostlogs/debug.4.gz 186.6K Oct 20 16:31 /var/log/hostlogs/kern.log.1.gz 238.3K Jan 11 23:15 /var/log/hostlogs/lcmd.log.1.gz 238.4K Jan 11 17:30 /var/log/hostlogs/lcmd.log.2.gz 238.6K Jan 11 11:45 /var/log/hostlogs/lcmd.log.3.gz 238.5K Jan 11 06:00 /var/log/hostlogs/lcmd.log.4.gz 372.5K Jan 11 17:00 /var/log/hostlogs/syslog.1.gz 372.5K Jan 11 04:45 /var/log/hostlogs/syslog.2.gz 371.9K Jan 10 16:30 /var/log/hostlogs/syslog.3.gz 372.7K Jan 10 04:15 /var/log/hostlogs/syslog.4.gz 10.1K Jan 12 02:03 /var/log/messages.0.gz 55.1K Jan 6 21:25 /var/log/messages.1.gz 81.5K Dec 1 21:30 /var/log/messages.2.gz
Delete these files ? [yes,no] (no)
2. Enter the option yes to proceed with deleting of the files.
See Also Understanding Junos OS Upgrades for SRX Series Devices on page 166•
• Downloading Software Packages from Juniper Networks on page 184
• Example: Installing Junos OS Upgrade Packages on SRX Series Devices on page 185
• Installing Junos OS Upgrade Packages on SRX Series Devices from a Remote Server
on page 187
Understanding Junos OSwith Upgraded FreeBSD for SRX Series Devices
Understanding Junos OSwith Upgraded FreeBSD 10
Junos OSwith an upgraded FreeBSD kernel provides a clean-slate implementation of
Junos OS on top of a minimally modified and current version of the FreeBSD 10 OS.
SRX Series devices running Junos OSwith an upgraded FreeBSD 10 are listed in
Table 19 on page 171.
Table 19: Upgraded FreeBSD Kernel Support by Hardware Platform
Release IntroducedCPU TypePlatforms
17.3IntelSRX5400
17.3IntelSRX5600
17.3IntelSRX5800
171Copyright © 2018, Juniper Networks, Inc.
Chapter 8: Upgrading Software

Themajor processing changes are as follows:
• Interactionsbetween JunosOSand theupgradedFreeBSDkernel usewell-established
interfacesbecause JunosOS isnow layeredonaminimallymodifiedandcurrent version
of FreeBSD.
• Symmetric multiprocessing is enabled and compiled for a 64-bit kernel.
• FreeBSD provides a consistent runtime environment for platforms that run Junos OS.
• An Upgraded FreeBSD image also includes FIPSmode as a configuration mode,
eliminating the need for a separate FIPS package.
Limitations
The following limitations exist on the upgraded FreeBSD 10 for SRX5400, SRX5600,
SRX5800 devices:
• Upgraded FreeBSD is supported only on Routing Engine 1800X4 type.
• TheunderlyingFreeBSD is64bits,while thereare specific 32-bit processesandutilities.
• ISSU is not supported from an older version of FreeBSD to an upgraded FreeBSD.
However, it is supported between upgraded FreeBSDs.
There are also major changes in file structures and software packages. These changes
are as follows:
• New packages use XML description files instead of scripts.
• Multiple package sets (a collection of installed packages) are stored on the device at
the same time.Sets canbeactive (thecurrently usedset), pending (the set that should
beusedat the next reboot), or previous (a formerly active set). Nonrecovery snapshots
(but not recoverable image snapshots) are available for the package sets to preserve
package content lists.
Understanding Junos OSwith Upgraded FreeBSD 11
The SRX devices currently running Junos OSwith upgraded FreeBSD 11 are listed in
Table 19 on page 171.
Table 20: Upgraded FreeBSD Kernel Support by Hardware Platform
Release IntroducedCPU TypePlatforms
17.4IntelSRX1500
17.4IntelSRX4100
17.4IntelSRX4200
17.4IntelSRX5400
17.4IntelSRX5600
Copyright © 2018, Juniper Networks, Inc.172
Installation and Upgrade Guide

Table 20: Upgraded FreeBSD Kernel Support by HardwarePlatform (continued)
Release IntroducedCPU TypePlatforms
17.4IntelSRX5800
17.4IntelvSRX
Themajor processing changes are as follows:
• Better scaling numbers in platforms with multiple CPU cores.
• No adverse effect on the routing engine performance on platforms with no additional
virtual CPUs (VCPU).
• Storage space for JUNOS root partition is 4 G and 16 G for var and config partitions,
which is same as in the legacy JUNOS image.
Limitations
The following are the limitations of the upgraded FreeBSD 11 support on SRX1500,
SRX4100, SRX4200 devices and vSRX instances:
• ISSU from legacy to FreeBSD 11 is not supported from Junos OS Release 17.4 release
onwards.
• If you downgrade from Junos OS Release 17.4 to any previous releases, all the data in
the disk will be lost, and system boots up with default factory configuration.
Table 21: Upgrade Path to Junos OSwith the Upgraded FreeBSD
ExampleUpgrade Path
CurrentSecurityJunos OSRelease
To upgrade from Release 15.1x49-D80,upgrade directly to Release 17.4.
Upgrade in a single step.15.1x49-D80to 17.4
UnderstandingChanges inOperations andManagement for JunosOSwithUpgraded FreeBSDfor SRX Series devices
There is now a separate Operation, Administration, and Maintenance (OAM) volume
(oam) distinct from the Junos OS volume (junos).
Onemajor change between Junos OS and Junos OSwith upgraded FreeBSD is the
distinction between recovery snapshots and nonrecovery snapshots.
The upgraded FreeBSD kernel requires changes to several commands and statements
and their related parameters. The new and changed actions are summarized in
Table 6 on page 22. For details of the changes, see the topics covering the specific
command or statement.
173Copyright © 2018, Juniper Networks, Inc.
Chapter 8: Upgrading Software
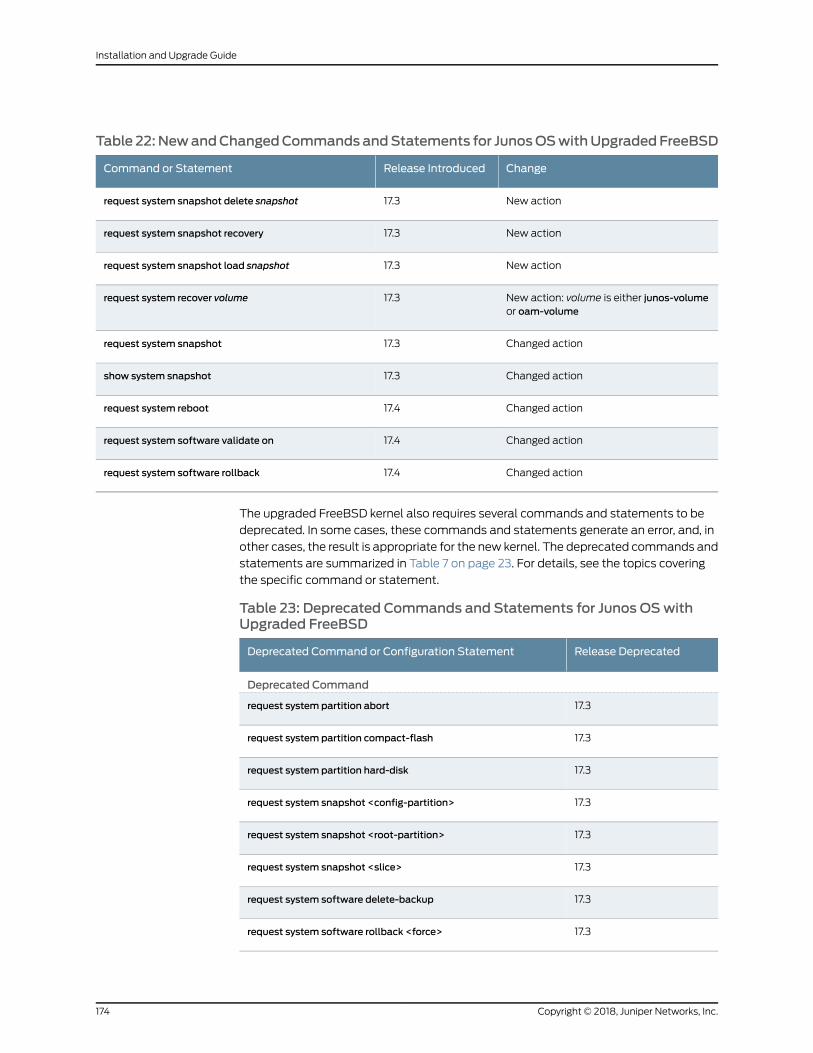
Table 22:NewandChangedCommandsandStatements for JunosOSwithUpgradedFreeBSD
ChangeRelease IntroducedCommand or Statement
New action17.3request system snapshot delete snapshot
New action17.3request system snapshot recovery
New action17.3request system snapshot load snapshot
New action: volume is either junos-volumeor oam-volume
17.3request system recover volume
Changed action17.3request system snapshot
Changed action17.3show system snapshot
Changed action17.4request system reboot
Changed action17.4request system software validate on
Changed action17.4request system software rollback
The upgraded FreeBSD kernel also requires several commands and statements to be
deprecated. In some cases, these commands and statements generate an error, and, in
other cases, the result is appropriate for the new kernel. The deprecated commands and
statements are summarized in Table 7 on page 23. For details, see the topics covering
the specific command or statement.
Table 23: Deprecated Commands and Statements for Junos OSwithUpgraded FreeBSD
Release DeprecatedDeprecated Command or Configuration Statement
Deprecated Command
17.3request system partition abort
17.3request system partition compact-flash
17.3request system partition hard-disk
17.3request system snapshot <config-partition>
17.3request system snapshot <root-partition>
17.3request system snapshot <slice>
17.3request system software delete-backup
17.3request system software rollback <force>
Copyright © 2018, Juniper Networks, Inc.174
Installation and Upgrade Guide

Table 23: Deprecated Commands and Statements for Junos OSwithUpgraded FreeBSD (continued)
Release DeprecatedDeprecated Command or Configuration Statement
17.3show system processes providers
17.3show system snapshot <slice>
Deprecated Configuration Statement
17.3set systemmirror-flash-on-disk
Understanding Junos OSwith Upgraded FreeBSD Package Names
Starting in Junos OS Release 17.3, certain hardware platforms run a Junos OS based on
an upgraded FreeBSD kernel (hereafter called Junos OSwith upgraded FreeBSD). In
releases earlier than Junos OS Release 17.3, software packages came in several major
software package categories, such as domestic, worldwide, or Federal Information
Processing Standards (FIPS). Junos OSwith upgraded FreeBSD has only one category
(FIPS is now an option you select on installation). Because of this change, there are new
naming conventions. This topic describes the simplified naming conventions for Junos
OSwith upgraded FreeBSD.
If your hardware platform is listed in the table in “Release Information for Junos OSwith
UpgradedFreeBSD”onpage 17, thenyoumustuse thenewpackagenames fordownload
and installation.
The components of the new package naming conventions are as follows:
• Prefix—This is junos-install. This prefix replaces the prefix junos-srx5000.
• Media keyword—This prefix is added to amedia keyword only when the image is not
forusewith the requestsystemsoftwareaddcommand.Values for themediakeywordinclude usb for images installed from a USB drive or net for images installed from the
loader prompt; for example, the entire prefix of your packagemight be
junos-install-media-net or junos-install-media-usb.
• Architecture—This field indicates theCPUarchitecture of theplatforms. Values include
x86 for Intel and arm for Advanced RISC Machines CPUs.
• Application binary interface (ABI)—This field indicates the word length of the CPU
architecture. Values include 32 for 32-bit architectures and 64 for 64-bit architectures.
• Release—This field indicates the release number, such as 17.3.
• Edition—The edition field is null (empty) for standard (domestic) images. For
jurisdictions with limits on dataplane encryption, this field is set to limited.
As before, all images are in .tar and .tgz(.tar and .tgz) formats.
175Copyright © 2018, Juniper Networks, Inc.
Chapter 8: Upgrading Software

NOTE: There are no longer “export” worldwide images or separate FIPSimages.Thekeyword“signed”no longerappearsbecauseall JunosOS imagesare signed for validation.
Valid Junos OS software package names include the following examples:
• junos-install-srx5000-x86-64-17.3R1.9.tgz—An image for SRX5400, SRX5600, and
SRX5800 devices.
• junos-install-media-usb-srx5000-x86-64-17.3R1.9.img.gz—An image stored on and
installed from a USB flash drive for SRX5400, SRX5600, and SRX5800 devices.
Upgrading Junos OSwith Upgraded FreeBSD
Starting in Junos OS Release 17.3, certain hardware platforms run an upgraded FreeBSD
kernel instead of an older version of FreeBSD.
Upgrading to Junos OSwith upgraded FreeBSD reformats the file system. Only specific
files and directories are preserved unless precautions are taken. By default, the upgrade
process only preserves the following directories:
• /config
• /etc/localtime
• /var/db
• /var/etc/master.passwd
• /var/etc/inetd.conf
• /var/etc/pam.conf
• /var/etc/resolv.conf
• /var/etc/syslog.conf
• /var/etc/localtime
• /var/etc/exports
• /var/etc/extensions.allow
• /var/preserve
• /var/tmp/baseline-config.conf
• /var/tmp/preinstall_boot_loader.conf
Copyright © 2018, Juniper Networks, Inc.176
Installation and Upgrade Guide

Table 24: Upgrade Path to Junos OSwith the Upgraded FreeBSD
ExampleUpgrade Path
CurrentSecurityJunos OSRelease
To upgrade from Release 12.3X48,upgrade directly to Release 17.3.
Upgrade in a single step.12.3X48 to17.3
To upgrade from Release 15.1X49,upgrade directly to Release 17.3.
Upgrade in a single step.15.1X49 to17.3
NOTE: Toupgrade fromanearlier release to JunosOSRelease 12.3X48(suchas from Release 12.1X47), first upgrade to either Junos OS Release12.3X48or Release 15.1X49 and then upgrade to Release 17.3.
Installing Junos OSwith Upgraded FreeBSDOver Plain Junos OS
To install Junos OSwith upgraded FreeBSD over plain Junos OS:
1. Enter the operational mode command request system software add package-name
no-validate from the CLI:
Use the no-validate option with the request system software add command. If you
leave out the no-validate option, the command uses the validate option by default.
Direct validation of the running configuration does not work when upgrading to Junos
OSwith upgradedFreeBSD froma JunosOSbasedonanolder versionof theFreeBSD
kernel.
NOTE: You can also use the reboot option along with the request system
software add command, but we do not recommend doing this in a single
step while upgrading from a FreeBSD 6.1-based Junos OS to a FreeBSD10-based Junos OS.
NOTE: To validate the current configuration after an upgrade to JunosOSwith FreeBSD from Junos OS, use the request system software validate on
(Junos OSwith Upgraded FreeBSD) command.
user@host>request system software add no-copy no-validatejunos-install-srx-x86-64-17.3R1.tgz rebootVerified junos-install-srx-x86-64-17.3R1 signed by PackageProductionEc_2017 method ECDSA256+SHA256Verified manifest signed by PackageProductionEc_2017 method ECDSA256+SHA256Checking PIC combinationsVerified fips-mode signed by PackageProductionEc_2017 method ECDSA256+SHA256Adding fips-mode-x86-32-20170728.153050_builder_junos_173_r1 ...Verified jail-runtime signed by PackageProductionEc_2017 method
177Copyright © 2018, Juniper Networks, Inc.
Chapter 8: Upgrading Software

ECDSA256+SHA256Adding jail-runtime-x86-32-20170725.352915_builder_stable_10 ...Verified jdocs signed by PackageProductionEc_2017 method ECDSA256+SHA256Adding jdocs-x86-32-20170728.153050_builder_junos_173_r1 ...Verified jfirmware signed by PackageProductionEc_2017 method ECDSA256+SHA256Adding jfirmware-x86-32-17.3R1 ...Verified jpfe-X signed by PackageProductionEc_2017 method ECDSA256+SHA256Adding jpfe-X-x86-32-20170728.153050_builder_junos_173_r1 ...Verified jpfe-X960 signed by PackageProductionEc_2017 method ECDSA256+SHA256Adding jpfe-X960-x86-32-20170728.153050_builder_junos_173_r1 ...Verified jpfe-common signed by PackageProductionEc_2017 method ECDSA256+SHA256Adding jpfe-common-x86-32-20170728.153050_builder_junos_173_r1 ...Verified jpfe-fips signed by PackageProductionEc_2017 method ECDSA256+SHA256Verified jpfe-wrlinux signed by PackageProductionEc_2017 method ECDSA256+SHA256Adding jpfe-wrlinux-x86-32-20170728.153050_builder_junos_173_r1 ...Verified jsd-jet-1 signed by PackageProductionEc_2017 method ECDSA256+SHA256Adding jsd-x86-32-17.3R1-jet-1 ...Verified jservices-crypto signed by PackageProductionEc_2017 method ECDSA256+SHA256Adding jservices-crypto-x86-32-17.3R1 ...Verified jservices-crypto-base signed by PackageProductionEc_2017 method ECDSA256+SHA256Adding jservices-crypto-base-x86-32-20170728.153050_builder_junos_173_r1 ...Verified jservices-ipsec signed by PackageProductionEc_2017 method ECDSA256+SHA256Adding jservices-ipsec-x86-32-20170728.153050_builder_junos_173_r1 ...Verified jservices-ssl signed by PackageProductionEc_2017 method ECDSA256+SHA256Adding jservices-ssl-x86-32-20170728.153050_builder_junos_173_r1 ...Verified jservices signed by PackageProductionEc_2017 method ECDSA256+SHA256Adding jservices-x86-32-17.3R1 ...Verified jservices-aacl signed by PackageProductionEc_2017 method ECDSA256+SHA256Adding jservices-aacl-x86-32-20170728.153050_builder_junos_173_r1 ...Verified jservices-alg signed by PackageProductionEc_2017 method ECDSA256+SHA256Adding jservices-alg-x86-32-20170728.153050_builder_junos_173_r1 ...Verified jservices-appid signed by PackageProductionEc_2017 method ECDSA256+SHA256Adding jservices-appid-x86-32-20170728.153050_builder_junos_173_r1 ...Verified jservices-cos signed by PackageProductionEc_2017 method ECDSA256+SHA256Adding jservices-cos-x86-32-20170728.153050_builder_junos_173_r1 ...Verified jservices-cpcd signed by PackageProductionEc_2017 method ECDSA256+SHA256Adding jservices-cpcd-x86-32-20170728.153050_builder_junos_173_r1 ...Verified jservices-hcm signed by PackageProductionEc_2017 method ECDSA256+SHA256Adding jservices-hcm-x86-32-20170728.153050_builder_junos_173_r1 ...Verified jservices-idp signed by PackageProductionEc_2017 method ECDSA256+SHA256Adding jservices-idp-x86-32-20170728.153050_builder_junos_173_r1 ...Verified jservices-ids signed by PackageProductionEc_2017 method ECDSA256+SHA256Adding jservices-ids-x86-32-20170728.153050_builder_junos_173_r1 ...Verified jservices-jdpi signed by PackageProductionEc_2017 method ECDSA256+SHA256Adding jservices-jdpi-x86-32-20170728.153050_builder_junos_173_r1 ...
Copyright © 2018, Juniper Networks, Inc.178
Installation and Upgrade Guide

Verified jservices-jflow signed by PackageProductionEc_2017 method ECDSA256+SHA256Adding jservices-jflow-x86-32-20170728.153050_builder_junos_173_r1 ...Verified jservices-llpdf signed by PackageProductionEc_2017 method ECDSA256+SHA256Adding jservices-llpdf-x86-32-20170728.153050_builder_junos_173_r1 ...Verified jservices-lrf signed by PackageProductionEc_2017 method ECDSA256+SHA256Adding jservices-lrf-x86-32-20170728.153050_builder_junos_173_r1 ...Verified jservices-mobile signed by PackageProductionEc_2017 method ECDSA256+SHA256Adding jservices-mobile-x86-32-20170728.153050_builder_junos_173_r1 ...Verified jservices-mss signed by PackageProductionEc_2017 method ECDSA256+SHA256Adding jservices-mss-x86-32-20170728.153050_builder_junos_173_r1 ...Verified jservices-nat signed by PackageProductionEc_2017 method ECDSA256+SHA256Adding jservices-nat-x86-32-20170728.153050_builder_junos_173_r1 ...Verified jservices-pcef signed by PackageProductionEc_2017 method ECDSA256+SHA256Adding jservices-pcef-x86-32-20170728.153050_builder_junos_173_r1 ...Verified jservices-ptsp signed by PackageProductionEc_2017 method ECDSA256+SHA256Adding jservices-ptsp-x86-32-20170728.153050_builder_junos_173_r1 ...Verified jservices-rpm signed by PackageProductionEc_2017 method ECDSA256+SHA256Adding jservices-rpm-x86-32-20170728.153050_builder_junos_173_r1 ...Verified jservices-sfw signed by PackageProductionEc_2017 method ECDSA256+SHA256Adding jservices-sfw-x86-32-20170728.153050_builder_junos_173_r1 ...Verified jservices-traffic-dird signed by PackageProductionEc_2017 method ECDSA256+SHA256Adding jservices-traffic-dird-x86-32-20170728.153050_builder_junos_173_r1 ...Verified jservices-urlf signed by PackageProductionEc_2017 method ECDSA256+SHA256Adding jservices-urlf-x86-32-20170728.153050_builder_junos_173_r1 ...Verified jsim-pfe signed by PackageProductionEc_2017 method ECDSA256+SHA256Verified junos-daemons-srx signed by PackageProductionEc_2017 method ECDSA256+SHA256Adding junos-daemons-srx-x86-64-20170728.153050_builder_junos_173_r1 ...Verified junos-daemons signed by PackageProductionEc_2017 method ECDSA256+SHA256Adding junos-daemons-x86-64-20170728.153050_builder_junos_173_r1 ...Verified junos-dp-crypto-support-srx signed by PackageProductionEc_2017 method ECDSA256+SHA256Adding junos-dp-crypto-support-srx-x86-32-20170728.153050_builder_junos_173_r1 ...Verified junos-libs-compat32-srx signed by PackageProductionEc_2017 method ECDSA256+SHA256Adding junos-libs-compat32-srx-x86-64-20170728.153050_builder_junos_173_r1 ...Verified junos-libs-compat32 signed by PackageProductionEc_2017 method ECDSA256+SHA256Adding junos-libs-compat32-x86-64-20170728.153050_builder_junos_173_r1 ...Verified junos-libs-srx signed by PackageProductionEc_2017 method ECDSA256+SHA256Adding junos-libs-srx-x86-64-20170728.153050_builder_junos_173_r1 ...Verified junos-libs signed by PackageProductionEc_2017 method ECDSA256+SHA256Adding junos-libs-x86-64-20170728.153050_builder_junos_173_r1 ...Verified junos-modules-srx signed by PackageProductionEc_2017 method
179Copyright © 2018, Juniper Networks, Inc.
Chapter 8: Upgrading Software

ECDSA256+SHA256Adding junos-modules-srx-x86-64-20170728.153050_builder_junos_173_r1 ...Verified junos-modules signed by PackageProductionEc_2017 method ECDSA256+SHA256Adding junos-modules-x86-64-20170728.153050_builder_junos_173_r1 ...Verified junos-net-prd signed by PackageProductionEc_2017 method ECDSA256+SHA256Adding junos-net-prd-x86-64-20170728.153050_builder_junos_173_r1 ...Verified junos-platform-srx signed by PackageProductionEc_2017 method ECDSA256+SHA256Adding junos-platform-srx-x86-32-20170728.153050_builder_junos_173_r1 ...Verified junos-platform signed by PackageProductionEc_2017 method ECDSA256+SHA256Adding junos-platform-x86-32-20170728.153050_builder_junos_173_r1 ...Verified junos-runtime-srx signed by PackageProductionEc_2017 method ECDSA256+SHA256Adding junos-runtime-srx-x86-32-20170728.153050_builder_junos_173_r1 ...Verified junos-runtime signed by PackageProductionEc_2017 method ECDSA256+SHA256Adding junos-runtime-x86-32-20170728.153050_builder_junos_173_r1 ...Verified junos-vmguest-mtx signed by PackageProductionEc_2017 method ECDSA256+SHA256Verified jweb-ex signed by PackageProductionEc_2017 method ECDSA256+SHA256Verified jweb-srx signed by PackageProductionEc_2017 method ECDSA256+SHA256Adding jweb-srx-x86-32-20170728.153050_builder_junos_173_r1 ...Verified jweb signed by PackageProductionEc_2017 method ECDSA256+SHA256Verified oam signed by PackageProductionEc_2017 method ECDSA256+SHA256Verified os-compat32 signed by PackageProductionEc_2017 method ECDSA256+SHA256Adding os-compat32-x86-64-20170725.352915_builder_stable_10 ...Verified os-crypto signed by PackageProductionEc_2017 method ECDSA256+SHA256Adding os-crypto-x86-64-20170725.352915_builder_stable_10 ...Verified os-kernel-prd signed by PackageProductionEc_2017 method ECDSA256+SHA256Adding os-kernel-prd-x86-64-20170725.352915_builder_stable_10 ...Verified os-libs-compat32 signed by PackageProductionEc_2017 method ECDSA256+SHA256Adding os-libs-compat32-10-x86-64-20170725.352915_builder_stable_10 ...Verified os-libs signed by PackageProductionEc_2017 method ECDSA256+SHA256Adding os-libs-10-x86-64-20170725.352915_builder_stable_10 ...Verified os-runtime signed by PackageProductionEc_2017 method ECDSA256+SHA256Adding os-runtime-x86-64-20170725.352915_builder_stable_10 ...Verified os-vmguest signed by PackageProductionEc_2017 method ECDSA256+SHA256Verified os-zoneinfo signed by PackageProductionEc_2017 method ECDSA256+SHA256Adding os-zoneinfo-x86-64-20170725.352915_builder_stable_10 ...Verified py-base signed by PackageProductionEc_2017 method ECDSA256+SHA256Adding py-base-x86-32-20170728.153050_builder_junos_173_r1 ...Verified py-extensions signed by PackageProductionEc_2017 method ECDSA256+SHA256Adding py-extensions-x86-32-20170728.153050_builder_junos_173_r1 ...Verified vrr-mx signed by PackageProductionEc_2017 method ECDSA256+SHA256NOTICE: 'pending' set will be activated at next reboot...Rebooting. PleasStopping cron.Waiting for PIDS: 19772.
The new Junos OS image is installed on the router.
2. Reboot thedevice tostart thenewsoftwareusing the requestsystemrebootcommand:
user@host> request system reboot
Copyright © 2018, Juniper Networks, Inc.180
Installation and Upgrade Guide

Reboot the system? [yes, no] (no) yes
The software is loaded when you reboot the system. Installation can take between 5
and 10minutes. The device then reboots from the boot device onwhich the software
was just installed.When the reboot is complete, the device displays the login prompt.
While the software is beingupgraded, theRoutingEngineonwhich youareperforming
the installation does not route traffic.
3. Log in and issue the show version command to verify the version of the software
installed.
user@host> show versionHostname: hostModel: srx4100Junos: 17.4-2017-10-22.0_RELEASE_174_THROTTLEJUNOS OS Kernel 64-bit [20171012.170745_fbsd-builder_stable_11]JUNOS OS libs [20171012.170745_fbsd-builder_stable_11]JUNOS OS runtime [20171012.170745_fbsd-builder_stable_11]JUNOS OS time zone information [20171012.170745_fbsd-builder_stable_11]JUNOS OS libs compat32 [20171012.170745_fbsd-builder_stable_11]JUNOS OS 32-bit compatibility [20171012.170745_fbsd-builder_stable_11]JUNOS py extensions [20171022.163229_ssd-builder_release_174_throttle]JUNOS py base [20171022.163229_ssd-builder_release_174_throttle]JUNOS OS vmguest [20171012.170745_fbsd-builder_stable_11]JUNOS OS crypto [20171012.170745_fbsd-builder_stable_11]JUNOS network stack and utilities [20171022.163229_ssd-builder_release_174_throttle]JUNOS libs [20171022.163229_ssd-builder_release_174_throttle]JUNOS libs compat32 [20171022.163229_ssd-builder_release_174_throttle]JUNOS runtime [20171022.163229_ssd-builder_release_174_throttle]JUNOS Web Management Platform Package [20171022.163229_ssd-builder_release_174_throttle]JUNOS srxtvp runtime [20171022.163229_ssd-builder_release_174_throttle]JUNOS srx libs compat32 [20171022.163229_ssd-builder_release_174_throttle]JUNOS srx runtime [20171022.163229_ssd-builder_release_174_throttle]JUNOS common platform support [20171022.163229_ssd-builder_release_174_throttle]JUNOS srx platform support [20171022.163229_ssd-builder_release_174_throttle]JUNOS mtx network modules [20171022.163229_ssd-builder_release_174_throttle]JUNOS modules [20171022.163229_ssd-builder_release_174_throttle]JUNOS srxtvp modules [20171022.163229_ssd-builder_release_174_throttle]JUNOS srxtvp libs [20171022.163229_ssd-builder_release_174_throttle]JUNOS srx libs [20171022.163229_ssd-builder_release_174_throttle]JUNOS srx Data Plane Crypto Support [20171022.163229_ssd-builder_release_174_throttle]JUNOS daemons [20171022.163229_ssd-builder_release_174_throttle]JUNOS srx daemons [20171022.163229_ssd-builder_release_174_throttle]JUNOS Online Documentation [20171022.163229_ssd-builder_release_174_throttle]JUNOS jail runtime [20171012.170745_fbsd-builder_stable_11]JUNOS FIPS mode utilities [20171022.163229_ssd-builder_release_174_throttle]
NOTE: The output shows the OS kernel, OS runtime, and other packagesinstalled on the router.
181Copyright © 2018, Juniper Networks, Inc.
Chapter 8: Upgrading Software

Understanding Junos OSwith Upgraded FreeBSD Snapshots
Onemajor change between Junos OS and Junos OSwith upgraded FreeBSD is the
distinction between recovery snapshots and nonrecovery snapshots.
Themajor characteristics of the recovery snapshots are as follows:
• They are full copies of the packages and configuration taken at the time the command
is issued.
• They reside on the OAM volume or USBmedium.
Themajor characteristics of the nonrecovery snapshots are as follows:
• They are snapshots residing on the Junos OS volume that refer to the current running
set of packages and a copy of the configuration at the time the command is issued.
• They do not need to copy the whole Junos OS installation and so are very fast.
• They can be requested as the boot image for the next reboot.
Recovery snapshots are full copies of the packages and configuration taken at the time
the command is issued. Recovery snapshots reside on theOAM volume or USBmedium.
Recovery snapshots take some time to complete because of the level of detail captured.
Recovery snapshots can be used to recover the Junos OS volume. There is only one
recovery snapshot on the system.
On theotherhand, nonrecovery snapshotsare snapshots residingon the JunosOSvolume
that refer to the current running set of packages and a copy of the configuration at the
time the snapshot command is issued. Nonrecovery snapshots do not need to copy the
whole Junos OS installation and so are very fast. They also consume little space, except
for the config.tgz file. Nonrecovery snapshots can be requested as the boot image for
the next reboot. You can rename nonrecovery snapshots and retain more than one. You
rename the nonrecovery snapshots with the same procedure used to rename any other
file on the system.
NOTE: We recommend that you generate both a nonrecovery and a recoverysnapshotafter yousuccessfullyupgrade to JunosOSwithupgradedFreeBSD.These snapshots should be refreshed periodically.
Package sets relate to nonrecovery and recovery snapshots. The /active, /pending, and
/previous sets are all package sets. A nonrecovery snapshot is also a package set in a
sense, with the addition of a copy of the configuration at the time that the nonrecovery
snapshot is taken.
Packages that are no longer referenced by any package set or nonrecovery snapshot are
automatically deleted. We recommend deleting any old nonrecovery snapshots after an
upgrade so that old packages can be deleted and space recovered.
Copyright © 2018, Juniper Networks, Inc.182
Installation and Upgrade Guide

Some helpful commands for non-recovery snapshots are:
• request system snapshot—Use this command to create a nonrecovery snapshot.
• show system snapshot—Use this command to list all the available nonrecoverysnapshots.
• requestsystemsnapshotdelete—Usethiscommandtodeleteanonrecoverysnapshot.
A helpful command for recovery snapshots is:
• requestsystemsnapshot recovery—Use this commandtocreatea recovery snapshot.Youcanuseotherparameters todetermine thedetailsof the recovery snapshotcreated.
There is only one recovery snapshot on the system.
Understanding Junos OSwith Upgraded FreeBSD Disk Volumes for SRX Series Devices
Starting in Junos OS Release 17.3, certain hardware platforms have a new disk naming
convention. These platforms run a Junos OS based on an upgraded FreeBSD kernel
instead of an older version of FreeBSD.
The hardware platforms listed in the table in “Release Information for Junos OSwith
Upgraded FreeBSD” on page 17 have two volumes. Technically, these volumes are
dev/gpt/oam and dev/gpt/junos, but the short forms (/junos and /oam) are used in this
topic. Because the /junos and /oam volumes have very different purposes, their content
is different. Essentially, the /junos volume is used for running device software and holds
configuration information and logs, whereas the /oam volume is used for backup copies
of everything needed in the event that the /junos volume fails.
The /junosvolumecontainsadirectorynamed /packages/db thathasall thecomponents
present on the device, such as os-kernel-123, os-kernel-456, and so on. A sibling directory
named /packages/sets is also present. Package sets are an important concept in Junos
OSwith upgraded FreeBSD.
The /packages/sets directory contains a package listing that gathers all the components
of the running Junos OS into an XML format in the /active subdirectory. So os-kernel-123
could be a component in the /packages/sets/active subdirectory, but then os-kernel-456
could not be in the same XML package. Package sets do not contain the kernel software
itself (for example), but tell the device where to find the kernel component needed for
the software package. The same kernel can be present in several package listings, but
only one package can be active and running on the device at any given time.
There are several directories on the /junos volume where a particular software package
listing can be found:
• /previous—The package set in this directory contains the list of all the components
that ran on the device before the last upgrade.
• /active—The package set in this directory contains the list of all the software
components currently running on the device.
• /pending—The package set in this directory contains the list of all the software
components on the device that will run after the next reboot.
183Copyright © 2018, Juniper Networks, Inc.
Chapter 8: Upgrading Software

NOTE: After a successful reboot, the package set in the /pending directory
becomes the active package set, and the package set in the /active directory
becomes the previous set.
The /junos volume also contains nonrecovery snapshots taken with the request system
snapshot command. These types of snapshots are new to Junos OSwith upgraded
FreeBSD and cannot be used for recovery of a failed system. Nonrecovery snapshots are
a special type of package set that includes a copy of the configuration. There can be
many nonrecovery snapshots on the device, and the files can be renamed. Multiple
nonrecovery snapshots, essentially lists of software components and configuration files,
can be helpful whenmajor software or configuration changes are occurring and
establishment of a known stable system baseline is required.
The compact flash drive is the /oam volume and stores recovery snapshot backup
information. In case of failure of the main drive (that is, the /junos volume), the /oam
volume can be used to boot the system. To perform this reboot, the /oam volume needs
to have all of the information required to provide the systemwith a running configuration.
This information is provided by the recovery snapshot, created with the request system
snapshot recovery command. Although it can take a while to perform, the recovery
snapshot establishes an .izo or .iso image of the running Junos OS.
In the case of a total failure of the /junos volume, the system can be booted from the
/oam volume. The recovery snapshot can then restore the repaired system.
Downloading Software Packages from Juniper Networks
To download Junos OS upgrades from Juniper Networks:
1. Using aWeb browser, go to https://www.juniper.net/support/downloads/.
NOTE: To access the download section, youmust have a service contractand an access account. If you need help obtaining an account, completethe registration form at the Juniper Networks website:https://www.juniper.net/registration/Register.jsp.
2. Select by Series or by Technology.
3. Click the Software tab and select the Junos OS Install package to download.
4. Download Junos OS to a local host or to an internal software distribution site.
RelatedDocumentation
Understanding Junos OS Upgrades for SRX Series Devices on page 166•
• Preparing Your SRX Series Device for Junos OS Upgrades on page 168
• Example: Installing Junos OS Upgrade Packages on SRX Series Devices on page 185
Copyright © 2018, Juniper Networks, Inc.184
Installation and Upgrade Guide

• Installing Junos OS Upgrade Packages on SRX Series Devices from a Remote Server
on page 187
Example: Installing Junos OSUpgrade Packages on SRX Series Devices
This example shows how to install Junos OS upgrades on SRX Series devices.
• Requirements on page 185
• Overview on page 185
• Configuration on page 185
• Verification on page 187
Requirements
Before you begin:
• Verify theavailable spaceon the internalmedia. See “PreparingYourSRXSeriesDevice
for Junos OS Upgrades” on page 168 and the Junos OS Release Notes
• Download the software package. See “Downloading Software Packages from Juniper
Networks” on page 184.
• Copy the software package to the device if you are installing the software package
from a local directory on the device. We recommend that you copy it to the /var/tmp
directory.
Overview
By default, the request system software add package-name command uses the validate
option tovalidate the softwarepackageagainst thecurrent configurationasaprerequisite
to adding the software package. This validation ensures that the device can reboot
successfully after the software package is installed. This is the default behavior when
you are adding a software package.
In this example, add the software package junos-srxsme-10.0R2-domestic.tgz (for SRX
Series devices) with the following options:
• no-copy option to install the software package but do not save the copies of package
files. Youmust include this option if you do not have enough space on the internal
media to perform an upgrade that keeps a copy of the package on the device.
• no-validate option to bypass the compatibility check with the current configuration
before installation starts.
• reboot option to reboots the device after installation is completed.
Configuration
CLI QuickConfiguration
To quickly configure this section of the example, copy the following commands, paste
them into a text file, remove any line breaks, change any details necessary tomatch your
185Copyright © 2018, Juniper Networks, Inc.
Chapter 8: Upgrading Software

network configuration, copy and paste the commands into the CLI at the [edit] hierarchy
level, and then enter commit from configuration mode.
From operational mode, enter:
user@host> request system software add /var/tmp/junos-srxsme-10.0R2-domestic.tgzno-copy no-validate reboot
GUI Step-by-StepProcedure
To install Junos OS upgrades on SRX Series devices:
1. In the J-Web user interface, selectMaintain>Software>Upload Package.
2. On the Upload Package page, specify the software package to upload. Click Browse
to navigate to the software package location and select
junos-srxsme-10.0R2-domestic.tgz.
3. Select the Reboot If Required check box to set the device to reboot automatically
when the upgrade is complete.
4. Select the Do not save backup check box to bypass saving the backup copy of the
current Junos OS package (SRX Series).
5. Click Upload Package. The software is activated after the device has rebooted.
6. ClickOK to check your configuration and save it as a candidate configuration.
7. If you are done configuring the device, click Commit Options>Commit.
Step-by-StepProcedure
The following example requires you to navigate various levels in the configuration
hierarchy. For instructions on how to do that, see Using the CLI Editor in Configuration
Mode in the CLI User Guide.
From operational mode, install the new package on the device with the no-copy and
no-validateoptions, and formatand re-partition themediabefore installation, and reboot
the device after installation is completed.
To install Junos OS upgrades on SRX Series devices:
1. From operational mode, install the new package on the device
user@host> requestsystemsoftwareadd/var/tmp/junos-srxsme-10.0R2-domestic.tgzno-copy no-validate
2. Reboot the device.
user@host> request system reboot
When the reboot is complete, the device displays the login prompt.
Copyright © 2018, Juniper Networks, Inc.186
Installation and Upgrade Guide

Results From configuration mode, confirm your configuration by entering the show system
command. If the output does not display the intended configuration, repeat the
configuration instructions in this example to correct it.
If you are done configuring the device, enter commit from configuration mode.
Verification
Confirm that the configuration is working properly.
• Verifying the Junos OS Upgrade Installation on page 187
Verifying the Junos OSUpgrade Installation
Purpose Verify that the Junos OS upgrade was installed.
Action From operational mode, enter the show system command.
RelatedDocumentation
Understanding Junos OS Upgrades for SRX Series Devices on page 166•
• Preparing theUSBFlashDrive toUpgrade JunosOSonSRXSeriesDevices onpage 148
• Preparing Your SRX Series Device for Junos OS Upgrades on page 168
• Downloading Software Packages from Juniper Networks on page 184
• Configuring Administration User Accounts on page 223
Installing Junos OSUpgrade Packages on SRX Series Devices from a Remote Server
You can use the J-Web user interface to install JunosOSpackages that are retrievedwith
FTP or HTTP from the specified location.
NOTE: This procedure applies only to upgrading from one Junos OS releaseto another.
Before installing the Junos OS upgrade:
• Verify theavailable spaceon the internalmedia. See “PreparingYourSRXSeriesDevice
for Junos OS Upgrades” on page 168 and the Junos OS Release Notes
• Download the software package. See “Downloading Software Packages from Juniper
Networks” on page 184.
To install Junos OS upgrades from a remote server:
1. In the J-Web user interface, selectMaintain>Software>Install Package.
187Copyright © 2018, Juniper Networks, Inc.
Chapter 8: Upgrading Software

2. On the Install Remote page, enter the required information in the fields described in
Table 25 on page 188.
Table 25: Install Package Summary
Your ActionFunctionField
Type the full address of the Junos OSpackage location on the FTP or HTTPserver—one of the following:
ftp://hostname/pathname/package-name
http://hostname/pathname/package-name
Specifies the FTP or HTTPserver, file path, and JunosOS package name.
Package Location(required)
Type the username.Specifies the username, ifthe server requires one.
User
Type the password.Specifies the password, ifthe server requires one.
Password
Check the box if you want the device toreboot automatically when the upgrade iscomplete.
Specifies that the device isautomatically rebootedwhen the upgrade iscomplete.
Reboot If Required
Check thebox if youwant tosave thebackupcopy of the Junos OS package.
Specifies that the backupcopyof thecurrent JunosOSpackage is not saved.
Do not savebackup (SRXSeries devices)
Check the box if you want to format theinternal media with dual-root partitioning.
Specifies that the storagemedia is formattedandnewpartitions are created.
Format andre-partition themedia beforeinstallation (SRXSeries devices)
3. Click Fetch and Install Package. Junos OS is activated after the device reboots.
RelatedDocumentation
Example: Installing Junos OS Upgrade Packages on SRX Series Devices on page 185•
• Configuring Administration User Accounts on page 223
Understanding BIOS Upgrades on SRX Series Devices
UnderstandingManual BIOS Upgrade Using the Junos CLI
For these SRX Series devices, the BIOS consists of a U-boot and the Junos loader. The
SRX240, SRX300, and SRX320, and SRX650 Service Gateways also include a U-shell
binaryaspartof theBIOS.Additionally, onSRX100,SRX110,SRX210,SRX220andSRX240,
SRX300, SRX320, SRX340, and SRX345 Service Gateways, a backup BIOS is supported
which includes a backup copy of the U-boot in addition to the active copy fromwhich
the system generally boots up.
Copyright © 2018, Juniper Networks, Inc.188
Installation and Upgrade Guide

Table 26 on page 189 Lists the CLI commands used for manual BIOS upgrade.
Table 26: CLI Commands for Manual BIOS Upgrade
Backup BIOSActive BIOS
request system firmware upgrade re bios backuprequest system firmware upgrade re bios
BIOS upgrade procedure:
1. Install the jloader-srxsme package.
1. Copy the jloader-srxsme signed package to the device.
NOTE: The version of the jloader-srxsme package you install mustmatch the version of Junos OS.
2. Install the package using the request system software add <path to jloader-srxsme
package> no-copy no-validate command.
NOTE: Installing the jloader-srxsme package places the necessaryimages under directory/boot.
2. Verify that the required images for upgradeare installed.Use the showsystemfirmware
to verify that the correct BIOS image version is available for upgrade.
3. Upgrade the BIOS (Active and backup) image.
Active BIOS:
1. Initiate the upgrade using the request system firmware upgade re bios command.
2. Monitor the upgrade status using the show system firmware command.
NOTE: The devicemust be rebooted for the upgraded active BIOS totake effect.
Backup BIOS:
1. Initiate the upgrade using the request system firmware upgade re bios backup
command.
2. Monitor the upgrade status using the show system firmware command.
Understanding Auto BIOS UpgradeMethods on SRX Series Devices
The BIOS version listed in the bios-autoupgrade.conf file is the minimum supported
version. If the current device has a BIOS version earlier than theminimum compatible
189Copyright © 2018, Juniper Networks, Inc.
Chapter 8: Upgrading Software

version, then the auto BIOS upgrade feature upgrades the BIOS automatically to the
latest version.
The BIOS upgrades automatically in the following scenarios:
• During Junos OS upgrade through either the J-Web user interface or the CLI (using the
request system software add no-copy no-validate software-image). In this case, only
the active BIOS is upgraded.
• During loader installation using TFTP or USB (using the install tftp:///software-image
command). In this case, only the active BIOS is upgraded.
• During system boot-up. In this case, both the active BIOS and the backup BIOS are
upgraded.
RelatedDocumentation
Understanding Junos OS Upgrades for SRX Series Devices on page 166•
• Installing Junos OS on SRX Series Devices Using a USB Flash Drive on page 75
• Installing Junos OS on SRX Series Devices from the Boot Loader Using a TFTP Server
on page 76
• Installing Junos OS on SRX Series Devices from the Boot Loader Using a USB Storage
Device on page 79
• Disabling Auto BIOS Upgrade on SRX Series Devices on page 190
Disabling Auto BIOS Upgrade on SRX Series Devices
The auto BIOS upgrade feature is enabled by default. You can disable the feature using
the CLI in operational mode.
To disable the automatic upgrade of the BIOS on an SRX Series device, use the chassis
routing-engine bios command as following:
user@host> set chassis routing-engine bios no-auto-upgrade
NOTE: The command disables automatic upgrade of the BIOS only duringJunos OS upgrade or system boot-up. It does not disable automatic BIOSupgrade during loader installation.
Starting in JunosOSRelease 15.1X49-D70 and in JunosOSRelease 17.3R1, the set chassis
routing-engine bios uninterrupt command is introduced on SRX300, SRX320, SRX340,
and SRX345 devices to disable user inputs at U-boot and boot loader stage.
Starting in JunosOSRelease 15.1X49-D120, the setchassis routing-enginebiosuninterrupt
command can be used on SRX300, SRX320, SRX340, and SRX345 devices to disable
user inputs at U-boot, boot loader and and Junos-Kernel boot stage.
To disable the user inputs at u-boot, boot loader and Junos Kernel boot stage, use the
chassis routing-engine bios command as following:
Copyright © 2018, Juniper Networks, Inc.190
Installation and Upgrade Guide

user@host> set chassis routing-engine bios uninterrupt
WARNING: On SRX Series devices, if both set system ports console insecure
and set chassis routing-engine bios uninterrupt options are configured, there
is no alternative recoverymethod available incase JunosOS fails to boot andthe devicemight become unusable.
Release History Table DescriptionRelease
Starting in Junos OS Release 15.1X49-D70 and in Junos OS Release 17.3R1,the set chassis routing-engine bios uninterrupt command is introducedon SRX300, SRX320, SRX340, and SRX345 devices to disable user inputsat U-boot and boot loader stage.
15.1X49-D70
Starting in Junos OS Release 15.1X49-D120, the set chassis routing-enginebios uninterrupt command canbe usedonSRX300, SRX320, SRX340, andSRX345 devices to disable user inputs at U-boot, boot loader and andJunos-Kernel boot stage.
15.1X49-D120
RelatedDocumentation
Understanding Junos OS Upgrades for SRX Series Devices on page 166•
• Understanding BIOS Upgrades on SRX Series Devices on page 188
Reverting the Junos OS Software Image Back to the Previous Version
This example shows how to downgrade Junos OS on the SRX Series devices.
• Requirements on page 191
• Overview on page 191
• Configuration on page 192
• Verification on page 193
Requirements
No special configuration beyond device initialization is required before configuring this
feature.
Overview
When you upgrade your software, the device creates a backup image of the software
that was previously installed in addition to installing the requested software upgrade.
Todowngrade thesoftware, youcan revert to theprevious imageusing thebackup image.
You can use this method to downgrade to only the software release that was installed
on the device before the current release. To downgrade to an earlier version, follow the
procedure for upgrading, using the software image labeled with the appropriate release.
This example returns software to the previous Junos OS version.
191Copyright © 2018, Juniper Networks, Inc.
Chapter 8: Upgrading Software

NOTE: This procedure applies only to downgrading from one Junos OSsoftware release toanotheror fromone JunosOSservices release toanother.
Configuration
CLI QuickConfiguration
To quickly configure this section of the example, copy the following commands, paste
them into a text file, remove any line breaks, change any details necessary tomatch your
network configuration, copy and paste the commands into the CLI at the [edit] hierarchy
level, and then enter commit from configuration mode.
From operational mode, enter:
user@host>request system software rollbackrequest system reboot
GUI Step-by-StepProcedure
To downgrade Junos OS on SRX Series devices:
1. In the J-Web user interface, selectMaintain>Software>Downgrade. The image of the
previous version (if any) appears on this page.
NOTE: After you perform this operation, you cannot undo it.
2. Select Downgrade to downgrade to the previous version of the software or Cancel to
cancel the downgrade process.
3. ClickMaintain>Reboot from the J-Web user interface to reboot the device.
NOTE: To downgrade to an earlier version, follow the procedure forupgrading, using the software image labeledwith theappropriate release.
4. ClickOK to check your configuration and save it as a candidate configuration.
5. If you are done configuring the device, click Commit Options>Commit.
Copyright © 2018, Juniper Networks, Inc.192
Installation and Upgrade Guide

Step-by-StepProcedure
The following example requires you to navigate various levels in the configuration
hierarchy. For instructions on how to do that, see Using the CLI Editor in Configuration
Mode.
To downgrade Junos OS on SRX Series devices:
1. From operational mode, return to the previous Junos OS version.
user@host> request system software rollback
2. Reboot the device.
user@host> request system reboot
The device is now running the previous version of Junos OS. To downgrade to an
earlier version, followtheprocedure for upgrading, using thesoftware image labeled
with the appropriate release.
Results From configuration mode, confirm your configuration by entering the show system
command. If the output does not display the intended configuration, repeat the
configuration instructions in this example to correct it.
If you are done configuring the device, enter commit from configuration mode.
Verification
Confirm that the configuration is working properly.
• Verifying the Junos OS Downgrade Installation on page 193
Verifying the Junos OS Downgrade Installation
Purpose Verify that the Junos OS downgrade was installed.
Action From operational mode, enter the show system command.
RelatedDocumentation
Example: Creating a Snapshot and Using It to Boot an SRX Series Device on page 211•
• Understanding Junos OS Upgrades for SRX Series Devices on page 166
• Example: Installing Junos OS Upgrade Packages on SRX Series Devices on page 185
• Restarting and Halting SRX Series Devices on page 265
193Copyright © 2018, Juniper Networks, Inc.
Chapter 8: Upgrading Software

OverviewofCoSUpgradeRequirements(JunosOSRelease11.1or 11.2 toaLaterRelease)
Before you upgrade to Junos OS Release 11.3, youmust deactivate the CoS configuration
if the CoS configuration includes any of the following features:
• excess-rate option
• strict-high or high priority queues
• Any of the Junos OS Release 11.1 or 11.2 default multidestination forwarding classes
CAUTION: If yourCoSconfigurationcontainsanyof the features listedaboveandyouattempt toupgrade fromJunosOSRelease 11.1 or 11.2 toa later versionwithout first editing the configuration, the Junos OSmight not restart.
Junos OS Release 11.3 and later for QFX Series no longer supports the excess-rate
statement, the strict priority option, or the default multidestination forwarding classes
used in Junos OS Release 11.1 and 11.2. In addition, Junos OS Release 11.3 introduces new
restrictions on how to configure and use strict-high priority queues.
This topicdoesnotdescribehowtoperformthesoftwareupgradeprocedure. It describes
how to deactivate your CoS configuration, edit your CoS configuration, and reactivate
your CoS configuration at the appropriate times.
Use the following procedure to upgrade safely from JunosOSRelease 11.1 or 11.2 to a later
release:
1. Deactivate the CoS configuration before you upgrade the software:
user@switch# deactivate class-of-service
2. Follow the upgrade procedure to Junos OS Release 11.3 or later software.
3. Make the following changes to the CoS configuration while the CoS configuration is
still deactivated:
• Remove the excess-rate statement from the CoS configuration if you have used it
at the [edit class-of-service schedulers] or [edit class-of-service
traffic-control-profiles] hierarchy level.
• Remove the strict-highand strictpriority queueconfigurations if youhaveused them
at the [edit class-of-service schedulers] hierarchy level.
• Remove the default multidestination forwarding classes (mcast-be,mcast-af,
mcast-ef, andmcast-nc) if you have used them at the [edit class-of-service
schedulers], [edit class-of-service rewrite-rules], [edit class-of-service classifiers],
[editclass-of-servicescheduler-maps], or [editclass-of-serviceforwarding-class-sets]
hierarchy level. Alternatively, you can change themapping of the multidestination
traffic to use the new default multidestination forwarding class (mcast).
Copyright © 2018, Juniper Networks, Inc.194
Installation and Upgrade Guide

4. If desired, configure strict-high priority queues in accordance with the Junos OS
Release 11.3 or later configuration rules, andmapmultidestination traffic to thedefault
multidestination forwarding class (mcast).
5. Activate the CoS configuration:
user@switch# activate class-of-service
6. Commit the CoS configuration:
user@switch# commit
NOTE: If you configured the transmit-rate option for any queues under the
[edit class-of-service schedulers] hierarchy level, if the rate is configured as
an exact rate in Mbps, we recommend that you reconfigure the transmit-rate
option as a percentage. This is because the scheduler converts exact ratesto percentages, and when the exact rate is below 1 Gbps, some granularitymaybe lost in the conversion. You canavoid this potential issueby specifyingthe transmit-rate option as a percentage.
RelatedDocumentation
Upgrading Software•
• Understanding CoS Classifiers
• Understanding CoS Output Queue Schedulers
• Understanding CoS Traffic Control Profiles
• Overview of CoS Upgrade Requirements to Junos OS Release 12.2
• Overview of CoS Upgrade Requirements to Junos OS Release 12.3 (QFX3500 and
QFX3600 Switches) or to Junos OS Release 13.1 (QFabric Systems)
• Example: Configuring Unicast Classifiers
• Example: Configuring Queue Schedulers
• Example: Configuring Traffic Control Profiles (Priority Group Scheduling)
Before You Begin Installing or Upgrading the Firmware
Before you begin installing or upgrading the firmware on the MIC or PIC, complete the
following steps:
1. Verify that a previous version of the firmware package is installed on the router by
using the show version command.
user@host> show versionHostname: mxHostModel: mx480Junos: 15.1I20160816_2117_yyin
195Copyright © 2018, Juniper Networks, Inc.
Chapter 8: Upgrading Software

JUNOS OS Kernel 64-bit (WITNESS) [20160723.102341_fbsd-builder_stable_10]JUNOS OS libs [20160723.102341_fbsd-builder_stable_10]JUNOS OS runtime [20160723.102341_fbsd-builder_stable_10]JUNOS OS time zone information [20160723.102341_fbsd-builder_stable_10]...JUNOS jfirmware [20160628.005233_builder_release_151_f_throttle]JUNOS Online Documentation [20160812.205759_yyin_release_151_f_throttle]JUNOS FIPS mode utilities [20160816.211724_yyin_release_151_f_throttle]....
user@host> show versionHostname: ptxHostModel: ptx3000Junos: 15.1F-20160720.0JUNOS Base OS boot [15.1F-20160720.0]JUNOS Base OS Software Suite [15.1F-20160720.0]JUNOS platform Software Suite [15.1F-20160720.0]JUNOS Web Management [15.1F-20160720.0]JUNOS Runtime Software Suite [15.1F-20160720.0]JUNOS Online Documentation [15.1F-20160720.0]...JUNOS jfirmware [20160628.005233_builder_release_151_f_throttle]JUNOS 64-bit Runtime Software Suite [15.1F-20160720.0]JUNOS Packet Forwarding Engine Simulation Package [15.1F-20160720.0]JUNOS Packet Forwarding Engine Support (M/T/EX Common) [15.1F-20160720.0]JUNOS Packet Forwarding Engine Support (T-Series) [15.1F-20160720.0]JUNOS Routing Software Suite [15.1F-20160720.0]
If the output of the show version command displays JUNOS jfirmware.. among the list
of packages that are installed on the router, then a previous version of the firmware
package is installed on the router. If the output of the show version command does
not display JUNOS jfirmware.. among the list of packages that are installed on the
router, the firmware package is not installed on the router.
2. If a previous version of the firmware package is installed on the router, delete the
firmware package from the router by using the request system firmware delete
command. If a previous version of the firmware package is not installed on the router,
then proceed to install the firmware package. For information about how to install
the firmware package, see “Installing Firmware on the 100-Gigabit DWDMOTNMIC
(MIC3-100G-DWDM)” on page 200or “Installing Firmware on the 5-Port 100-Gigabit
DWDMOTN PIC (PTX-5-100G-WDM)” on page 197.
user@host> request system software delete jfirmware/packages/db/jfirmware-x86-32-15.1F-20160625.0
3. To verify that the firmware package is removed from the router, use the show version
command.
user@host> show versionHostname: mxHostModel: mx240Junos: 15.1F6-S1.3JUNOS OS Kernel 64-bit [20160724.331042_builder_stable_10]JUNOS OS libs [20160724.331042_builder_stable_10]JUNOS OS runtime [20160724.331042_builder_stable_10]JUNOS OS time zone information [20160724.331042_builder_stable_10]
Copyright © 2018, Juniper Networks, Inc.196
Installation and Upgrade Guide

....JUNOS IDP Services [20160812.205945_builder_junos_151_f6_s1]....JUNOS Packet Forwarding Engine Support (M/T Common) [20160812.205945_builder_junos_151_f6_s1]JUNOS Online Documentation [20160812.205945_builder_junos_151_f6_s1]JUNOS FIPS mode utilities [20160812.205945_builder_junos_151_f6_s1]
If the firmware package is uninstalled successfully, the output of the show version
command does not display JUNOS jfirmware.. among the list of packages that are
installed on the router.
RelatedDocumentation
Configuring OTN Interfaces on MIC3-100G-DWDMMIC•
• Configuring OTN Interfaces on PTX-5-100G-WDM PIC
• Installing Firmware on the 100-Gigabit DWDMOTNMIC (MIC3-100G-DWDM) on
page 200
• Installing Firmware on the 5-Port 100-Gigabit DWDMOTN PIC (PTX-5-100G-WDM)
on page 197
• Understanding the MIC3-100G-DWDMMIC
• Understanding the PTX-5-100G-WDM PIC
• Upgrading Firmware on the 100-Gigabit DWDMOTNMIC (MIC3-100G-DWDM) on
page 201
• Upgrading Firmware on the 5-Port 100-Gigabit DWDMOTN PIC (PTX-5-100G-WDM)
on page 198
Installing Firmware on the 5-Port 100-Gigabit DWDMOTNPIC (PTX-5-100G-WDM)
Before you install the firmware package, ensure that a previous version is not installed
on the router. For more information, see “Before You Begin Installing or Upgrading the
Firmware” on page 195.
To install the firmware package, complete the following steps:
1. Upgrade Junos OS on the router to the version that supports the firmware package.
See “Installing the Software Package on a Router with Redundant Routing Engines”
on page 63 or “Installing the Software Package on a Router with a Single Routing
Engine” on page 61 for more information.
2. Download the firmwarepackage fromhttp://www.juniper.net/support/. For information
about downloading software packages, see “Downloading Software” on page 50.
NOTE: Download the firmware package specific to your router. Thefirmware package for PTX Series routers is different from the firmwarepackage for the MX Series routers.
197Copyright © 2018, Juniper Networks, Inc.
Chapter 8: Upgrading Software

3. Save the firmware package to the /var/path/package-name directory on the router.
For example, you can save the firmware package to the /var/tmp directory.
4. Install the firmware package by using the request system firmware add
path/package-name command. For example, to install the jfirmware-15.1F6.9.tgz
package:
user@host> request system firmware add jfirmware-15.1F6.9.tgz
5. Run the show version command to verify that the firmware package is installed.
user@host> show version
After the firmware package is installed successfully, the output of the show version
command displays Junos jfirmware.. among the list of packages that are installed on
the router.
RelatedDocumentation
Before You Begin Installing or Upgrading the Firmware on page 195•
• Configuring OTN Interfaces on PTX-5-100G-WDM PIC
• show system firmware
• Understanding the PTX-5-100G-WDM PIC
• Upgrading Firmware on the 5-Port 100-Gigabit DWDMOTN PIC (PTX-5-100G-WDM)
on page 198
Upgrading Firmware on the 5-Port 100-Gigabit DWDMOTNPIC (PTX-5-100G-WDM)
Before you upgrade the firmware package, ensure that a previous version is not installed
on the router. For more information, see “Before You Begin Installing or Upgrading the
Firmware” on page 195.
Copyright © 2018, Juniper Networks, Inc.198
Installation and Upgrade Guide

To upgrade the version of your firmware, complete the following steps:
1. Run the show system firmware command to view the list of components installed on
the router and the firmware version for each component.
user@host> show system firmwarePart Type Tag Current Available Status version versionFPC 0 ROM Monitor 0 0 10.4.1 OKFPC 1 ROM Monitor 0 0 10.4.1 OKFPC 2 ROM Monitor 0 0 10.4.1 OK PIC 0 CMIC LTC 2/0 1 .0 1.0 OKFPC 3 ROM Monitor 0 0 10.4.1 OKFPC 4 ROM Monitor 0 0 13.3.1 OKFPC 4 MPCS(0) 2 0.24.0 OKRouting Engine 0 RE BIOS 0 1.18 OKRouting Engine 1 0 1.18 OK
The output of the show system firmware command displays the current firmware
version of the PIC as .0 and the available firmware version as 1.0.
2. To upgrade the firmware of the PIC, use the request system firmware upgrade pic
command. For example, to upgrade the firmware version of the PIC from .0 to 1.0,
specify the FPC slot and PIC slot in the command.
user@host> request system firmware upgrade pic pic-slot 0 fpc-slot 2Part Type Tag Current Available Status version versionFPC 2 PIC 0 CMIC LTC 2/0 1 .0 1.0 OKPerform indicated firmware upgrade ? [yes,no] (no) yes
Confirm that youwant to perform the firmware upgrade by typingYes so the firmware
upgrade is initiated.
3. Tomonitor the progress of the upgrade, use the show system firmware command.
During the installation process, the status of the PIC changes to PROGRAMMING.
When the installationprocess is complete, the statusof thePICchanges toUPGRADED
SUCCESSFULLY.
NOTE: Theamount of time it takes to upgrade firmware varies dependingon the component.
user@host> request system firmwarePart Type Tag Current Available Status version versionFPC 0 ROM Monitor 0 0 10.4.1 OKFPC 1 ROM Monitor 0 0 10.4.1 OKFPC 2 ROM Monitor 0 0 10.4.1 OK PIC 0 CMIC LTC 2/0 1 1.0 1.0 UPGRADED SUCCESSFULLYFPC 3 ROM Monitor 0 0 10.4.1 OKFPC 4 ROM Monitor 0 0 13.3.1 OKFPC 4 MPCS(0) 2 0.24.0 OK
199Copyright © 2018, Juniper Networks, Inc.
Chapter 8: Upgrading Software

Routing Engine 0 RE BIOS 0 1.18 OKRouting Engine 1 0 1.18 OK
NOTE: If the installation process fails, delete the firmware package byusingthe requestsystemsoftwaredelete firmware-package-namecommand.
Reinstall the firmware package by following the procedure for installingthe firmware package and then upgrade the firmware package.
4. Restart the FPC that the PIC is installed in by using the request chassis fpc fpc-slot
restart command.
5. (Optional)After the firmwareupgrade is successfully completed,uninstall the firmware
package from the router by using the request system software delete command.
RelatedDocumentation
Before You Begin Installing or Upgrading the Firmware on page 195•
• Configuring OTN Interfaces on PTX-5-100G-WDM PIC
• Installing Firmware on the 5-Port 100-Gigabit DWDMOTN PIC (PTX-5-100G-WDM)
on page 197
• show system firmware
• Understanding the PTX-5-100G-WDM PIC
Installing Firmware on the 100-Gigabit DWDMOTNMIC (MIC3-100G-DWDM)
Before you install the firmware package, ensure that a previous version is not installed
on the router. For more information, see “Before You Begin Installing or Upgrading the
Firmware” on page 195.
To install the firmware package, complete the following steps:
1. Upgrade Junos OS on the router to the version that supports the firmware package.
See “Installing the Software Package on a Router with Redundant Routing Engines”
on page 63 or “Installing the Software Package on a Router with a Single Routing
Engine” on page 61 for more information.
2. Download the firmwarepackage fromhttp://www.juniper.net/support/. For information
about downloading software packages, see “Downloading Software” on page 50.
NOTE: Download the firmware package specific to your router. Thefirmware package for MX Series routers is different from the firmwarepackage for the PTX Series routers.
Copyright © 2018, Juniper Networks, Inc.200
Installation and Upgrade Guide

3. Save the firmware package to the /var/path/package-name directory on the router.
For example, you can save the firmware package to the /var/tmp directory.
4. Install the firmware package by using the request system firmware add
/var/path/package-name command. For example, to install the
jfirmware-x86-32-15.1F6.9.tgz package:
user@host> request system firmware add jfirmware-x86-32-15.1F6.9.tgz
5. Run the show version command to verify that the firmware package is installed.
user@host> show versionHostname: Host1Model: mx480Junos: 15.1I20160816_2117_yyinJUNOS OS Kernel 64-bit (WITNESS) [20160723.102341_fbsd-builder_stable_10]JUNOS OS libs [20160723.102341_fbsd-builder_stable_10]JUNOS OS runtime [20160723.102341_fbsd-builder_stable_10]JUNOS OS time zone information [20160723.102341_fbsd-builder_stable_10]...JUNOS jfirmware [20160628.005233_builder_release_151_f_throttle]JUNOS Online Documentation [20160812.205759_yyin_release_151_f_throttle]JUNOS FIPS mode utilities [20160816.211724_yyin_release_151_f_throttle]....
After the firmware package is installed successfully, the output of the show version
command displays JUNOS jfirmware.. among the list of packages that are installed
on the router.
RelatedDocumentation
Before You Begin Installing or Upgrading the Firmware on page 195•
• Configuring OTN Interfaces on MIC3-100G-DWDMMIC
• show system firmware
• Understanding the MIC3-100G-DWDMMIC
• Upgrading Firmware on the 100-Gigabit DWDMOTNMIC (MIC3-100G-DWDM) on
page 201
Upgrading Firmware on the 100-Gigabit DWDMOTNMIC (MIC3-100G-DWDM)
Before you upgrade the firmware package, ensure that a previous version is not installed
on the router. For more information, see “Before You Begin Installing or Upgrading the
Firmware” on page 195.
201Copyright © 2018, Juniper Networks, Inc.
Chapter 8: Upgrading Software

To upgrade the version of your firmware package, complete the following steps:
1. Run the show system firmware command to view the list of components installed on
the router and the firmware version for each component.
user@host> show system firmwarePart Type Tag Current Available Status version versionFPC 0 ROM Monitor 0 0 10.4.1 OKFPC 1 ROM Monitor 0 0 10.4.1 OKFPC 2 ROM Monitor 0 0 10.4.1 OK PIC 0 CMIC LTC 2/0 1 .0 1.0 OKFPC 3 ROM Monitor 0 0 10.4.1 OKFPC 4 ROM Monitor 0 0 13.3.1 OKFPC 4 MPCS(0) 2 0.24.0 OKRouting Engine 0 RE BIOS 0 1.18 OKRouting Engine 1 0 1.18 OK
The output of the show system firmware command displays the current firmware
version of the MIC as .0 and the available firmware version as 1.0.
2. To upgrade the firmware of the MIC, use the request system firmware upgrade pic
command. For example, to upgrade the firmware version of the MIC from .0 to 1.0,
specify the MPC slot and MIC slot in the command.
user@host> request system firmware upgrade pic pic-slot 0 fpc-slot 2Part Type Tag Current Available Status version versionFPC 2 PIC 0 CMIC LTC 2/0 1 .0 1.0 OKPerform indicated firmware upgrade ? [yes,no] (no) yes
Confirm that youwant to perform the firmware upgrade by typingYes so the firmware
upgrade is initiated.
3. Tomonitor the progress of the upgrade, use the show system firmware command.
During the installation process, the status of the MIC changes to PROGRAMMING.
When the installationprocess is complete, thestatusof theMICchanges toUPGRADED
SUCCESSFULLY.
NOTE: Theamount of time it takes to upgrade firmware varies dependingon the component.
user@host> request system firmwarePart Type Tag Current Available Status version versionFPC 0 ROM Monitor 0 0 10.4.1 OKFPC 1 ROM Monitor 0 0 10.4.1 OK FPC 2 ROM Monitor 0 0 10.4.1 OK PIC 0 CMIC LTC 2/0 1 .0 1.0 OKFPC 3 ROM Monitor 0 0 10.4.1 OKFPC 4 ROM Monitor 0 0 13.3.1 OKFPC 4 MPCS(0) 2 0.24.0 OK
Copyright © 2018, Juniper Networks, Inc.202
Installation and Upgrade Guide

Routing Engine 0 RE BIOS 0 1.18 OKRouting Engine 1 0 1.18 OK
NOTE: If the installation process fails, delete the firmware package byusingthe requestsystemsoftwaredelete firmware-package-namecommand.
Reinstall the firmware package by following the procedure for installingthe firmware package and then upgrade the firmware package.
4. Restart the MPC that the MIC is installed in by using the request chassis fpc fpc-slot
restart command.
5. (Optional)After the firmwareupgrade is successfully completed,uninstall the firmware
package from the router by using the request system software delete command.
RelatedDocumentation
Before You Begin Installing or Upgrading the Firmware on page 195•
• Installing Firmware on the 100-Gigabit DWDMOTNMIC (MIC3-100G-DWDM) on
page 200
• show system firmware
• Understanding the MIC3-100G-DWDMMIC
Upgrading Firmware on the CFP2-DCO-T-WDM-1 Transceiver
Before you upgrade the firmware package, ensure that a previous version is not installed
on the router. For more information, see “Before You Begin Installing or Upgrading the
Firmware” on page 195.
203Copyright © 2018, Juniper Networks, Inc.
Chapter 8: Upgrading Software

To upgrade the version of your firmware, complete the following steps:
1. Run the show system firmware command to view the list of components installed on
the router and the firmware version for each component.
user@host> show system firmwarePart Type Tag Current Available Status version versionFPC 0 ROM Monitor 0 0 10.4.1 OKFPC 1 ROM Monitor 0 0 10.4.1 OKFPC 2 ROM Monitor 0 0 10.4.1 OK PIC 0 CMIC LTC 2/0 1 .0 1.0 OKFPC 3 ROM Monitor 0 0 10.4.1 OKFPC 4 ROM Monitor 0 0 13.3.1 OKFPC 4 MPCS(0) 2 0.24.0 OKRouting Engine 0 RE BIOS 0 1.18 OKRouting Engine 1 0 1.18 OK
The output of the show system firmware command displays the current firmware
version of the transceiver as .0 and the available firmware version as 1.0.
2. To upgrade the firmware of the transceiver, use the request system firmware upgrade
pic command. For example, to upgrade the firmware version of the transceiver from
.0 to 1.0, specify the FPC slot (orMPC slot) andPIC slot (orMIC slot) in the command.
user@host> request system firmware upgrade pic pic-slot 1 fpc-slot 0 tag 20Part Type Tag Current Available Status version versionFPC 0 PIC 1 CMIC LTC 2/0 20 .0 1.0 OKPerform indicated firmware upgrade ? [yes,no] (no) yes
Confirm that youwant to perform the firmware upgrade by typingYes so the firmware
upgrade is initiated.
3. Tomonitor the progress of the upgrade, use the show system firmware command.
During the installation process, the status of the transceiver changes to
PROGRAMMING. When the installation process is complete, the status of the
transceiver changes to UPGRADED SUCCESSFULLY.
NOTE: Theamount of time it takes to upgrade firmware varies dependingon the component.
user@host> request system firmwarePart Type Tag Current Available Status version versionFPC 0 ROM Monitor 0 0 10.4.1 OKFPC 1 ROM Monitor 0 0 10.4.1 OKFPC 2 ROM Monitor 0 0 10.4.1 OK PIC 0 CMIC LTC 2/0 1 1.0 1.0 UPGRADED SUCCESSFULLYFPC 3 ROM Monitor 0 0 10.4.1 OKFPC 4 ROM Monitor 0 0 13.3.1 OKFPC 4 MPCS(0) 2 0.24.0 OK
Copyright © 2018, Juniper Networks, Inc.204
Installation and Upgrade Guide

Routing Engine 0 RE BIOS 0 1.18 OKRouting Engine 1 0 1.18 OK
NOTE: If the installation process fails, delete the firmware package byusingthe requestsystemsoftwaredelete firmware-package-namecommand.
Reinstall the firmware package by following the procedure for installingthe firmware package and then upgrade the firmware package.
4. Restart the FPC that the transceiver is installed in by using the request chassis fpc
fpc-slot restart command.
5. Confirm that the firmware upgradewas successful by using the showsystemfirmware
command and verifying the correct firmware version appears.
6. (Optional)After the firmwareupgrade is successfully completed,uninstall the firmware
package from the router by using the request system software delete command.
RelatedDocumentation
• Before You Begin Installing or Upgrading the Firmware on page 195
• show system firmware
205Copyright © 2018, Juniper Networks, Inc.
Chapter 8: Upgrading Software

Copyright © 2018, Juniper Networks, Inc.206
Installation and Upgrade Guide

CHAPTER 9
Booting a Device Using a SystemSnapshot
• Understanding System Snapshot on EX Series Switches on page 207
• Creating a Snapshot and Using It to Boot an EX Series Switch on page 208
• Verifying That a System SnapshotWas Created on an EX Series Switch on page 209
• Booting an EX Series Switch Using a Software Package Stored on a USB Flash
Drive on page 210
• Example: Creating a Snapshot and Using It to Boot an SRX Series Device on page 211
Understanding SystemSnapshot on EX Series Switches
You can create copies of the software running a Juniper Networks EX Series Ethernet
Switch using the system snapshot feature. The system snapshot feature takes a
“snapshot” of the files currently used to run the switch and copies them to an alternate
storage location. You can then use this snapshot to boot the switch at the next bootup
or as a backup boot option.
The switch can boot from either internal flashmedia or external (USB) flashmedia. The
contents of the snapshot vary depending on whether you create the snapshot on the
media that the switch booted from or on themedia that it did not boot from.
Snapshots are particularly useful for moving files onto USB flash drives. You cannot use
the copy command or any other file-moving technique to move files from an internal
memory source to USBmemory on the switch.
• If youcreate the snapshoton themedia that the switchdidnotboot from, the following
partitions on the boot media are included in the snapshot: root, altroot, var, var/tmp,
and config.
The root partition is the primary boot partition, and the altroot partition is the backup
boot partition.
• If you create the snapshot on themedia that the switch booted from, the root partition
that the switch booted from is copied to the alternate root partition. The var, var/tmp,
and config partitions are not copied as part of the snapshot because they already exist
on the boot media.
207Copyright © 2018, Juniper Networks, Inc.

The system snapshot feature has the following limitations:
• You cannot use snapshots to move files to any destination outside the switch other
than an installed external USB flash drive or switches that are members of the same
Virtual Chassis as the switch on which you created the snapshot.
• Snapshot commands, like all commands executed on a Virtual Chassis, are executed
on the local member switch. If different member switches request the snapshot, the
snapshot command is pushed to the Virtual Chasis member creating the snapshot
and is executed on that member, and the output is then returned to the switch that
initiated the process. For instance, if the command to create an external snapshot on
member 3 is entered onmember 1, the snapshot of internal memory onmember 3 is
taken on externalmemory onmember 3. The output of the process is seen onmember
1. No files move between the switches.
RelatedDocumentation
Understanding Software Installation on EX Series Switches on page 44•
• Creating a Snapshot and Using It to Boot an EX Series Switch on page 208
Creating a Snapshot and Using It to Boot an EX Series Switch
The system snapshot feature takes a “snapshot” of the files currently used to run the
switch and copies them to an alternate storage location. You can then use this snapshot
to boot the switch at the next bootup or as a backup boot option.
This topic includes the following tasks:
• Creating a Snapshot on aUSB FlashDrive andUsing It to Boot the Switch on page 208
Creating a Snapshot on a USB Flash Drive and Using It to Boot the Switch
You can create a snapshot on USB flash memory after a switch is booted by using files
stored in internal memory.
Ensure that you have the following tools and parts available before creating a snapshot
on a USB flash drive:
• A USB flash drive that meets the switch USB port specifications. See USB Port
Specifications for an EX Series Switch.
To create a snapshot on USB flash memory and use it to boot the switch:
1. Place the snapshot into USB flash memory:
user@switch> request system snapshot partitionmedia usb
2. (Optional) Perform this step if you want to boot the switch now using the snapshot
stored on the USB flash drive.
user@switch> request system reboot (EX Series)media usb
Copyright © 2018, Juniper Networks, Inc.208
Installation and Upgrade Guide

RelatedDocumentation
Verifying That a System SnapshotWas Created on an EX Series Switch on page 209•
• Understanding System Snapshot on EX Series Switches on page 207
Verifying That a SystemSnapshotWas Created on an EX Series Switch
Purpose Verify that a system snapshot was created with the proper files on an EX Series switch.
Action View the snapshot:
user@switch> show system snapshotmedia externalInformation for snapshot on external (/dev/da1s1a) (backup)Creation date: Mar 19 03:37:18 2012JUNOS version on snapshot: jbase : ex-12.1I20120111_0048_user jcrypto-ex: 12.1I20120111_0048_user jdocs-ex: 12.1I20120111_0048_user jroute-ex: 12.1I20120111_0048_user jswitch-ex: 12.1I20120111_0048_user jweb-ex: 12.1I20120111_0048_userInformation for snapshot on external (/dev/da1s2a) (primary)Creation date: Mar 19 03:38:25 2012JUNOS version on snapshot: jbase : ex-12.2I20120305_2240_user jcrypto-ex: 12.2I20120305_2240_user jdocs-ex: 12.2I20120305_2240_user jroute-ex: 12.2I20120305_2240_user jswitch-ex: 12.2I20120305_2240_user jweb-ex: 12.2I20120305_2240_user
Meaning The output shows the date and time when the snapshot was created and the packages
that are part of the snapshot. Check to see that the date and timematch the timewhen
you created the snapshot.
You can compare the output of this command to the output of the showsystemsoftware
command to ensure that the snapshot contains the same packages as the software
currently running the switch.
RelatedDocumentation
Creating a Snapshot and Using It to Boot an EX Series Switch on page 208•
209Copyright © 2018, Juniper Networks, Inc.
Chapter 9: Booting a Device Using a System Snapshot

Booting an EX Series Switch Using a Software Package Stored on a USB Flash Drive
There are twomethods of getting Junos OS stored on a USB flash drive before using the
software to boot the switch. You can pre-install the software onto the USB flash drive
before inserting theUSBflashdrive into theUSBport, or youcanuse thesystemsnapshot
feature to copy files from internal switch memory to the USB flash drive.
Tomove files into USB flash memory by using a system snapshot and use those files to
boot the switch, see “Creating a Snapshot and Using It to Boot an EX Series Switch” on
page 208.We recommend that you use thismethod to boot the switch fromaUSB flash
drive if your switch is running properly.
If you need to pre-install the software onto the USB flash drive, you can use themethod
described in this topic. Pre-installing Junos OS onto a USB flash drive to boot the switch
can be done at any time and is particularly useful when the switch boots to the loader
prompt because the switch cannot locate the Junos OS in internal flash memory.
Ensure that you have the following tools and parts available to boot the switch from a
USB flash drive:
• A USB flash drive that meets the EX Series switch USB port specifications. See USB
Port Specifications for an EX Series Switch.
• A computer or other device that you can use to download the software package from
the Internet and copy it to the USB flash drive.
To download a Junos OS package onto a USB flash drive before inserting the USB flash
drive:
1. Download the Junos OS package that you want to place onto the EX Series switch
from the Internet onto the USB flash drive by using your computer or other device.
See Downloading Software Packages from Juniper Networks.
2. Remove the USB flash drive from the computer or other device.
3. Insert the USB flash drive into the USB port on the switch.
4. This step can be performed only when the prompt for the loader script (loader>) is
displayed. The loader script startswhen the JunosOS loads but the CLI is notworking
for any reason or if the switch has no software installed.
Install the software package onto the switch:
loader> install source
where source represents the name and location of the Junos OS package on the USB
flash drive. The JunosOSpackage on a flash drive is commonly stored in the root drive
as the only file—for example, file://jinstall-ex-4200-9.4R1.5-domestic-signed.tgz.
Copyright © 2018, Juniper Networks, Inc.210
Installation and Upgrade Guide

RelatedDocumentation
Installing Software on an EX Series Switch with a Single Routing Engine (CLI Procedure)•
• Installing Software on EX Series Switches (J-Web Procedure)
• Understanding Software Installation on EX Series Switches on page 44
• See EX2200 Switches Hardware Overview for USB port location.
• See Rear Panel of an EX3200 Switch for USB port location.
• See Rear Panel of an EX3300 Switch for USB port location.
• See Rear Panel of an EX4200 Switch for USB port location.
• See EX4300 Switches Hardware Overview for USB port location.
• See Front Panel of an EX4500 Switch for USB port location.
• See EX4550 Switches Hardware Overview for USB port location.
• See Switch Fabric and Routing Engine (SRE) Module in an EX6200 Switch for USB port
location.
• See Switch Fabric and Routing Engine (SRE) Module in an EX8208 Switch for USB port
location.
• See Routing Engine (RE) Module in an EX8216 Switch for USB port location.
Example: Creating a Snapshot and Using It to Boot an SRX Series Device
This example shows how to configure a boot device.
• Requirements on page 211
• Overview on page 211
• Configuration on page 212
• Creating a Snapshot on a USB Flash Drive and Using It to Boot the SRX Series
Device on page 213
• Verification on page 214
Requirements
Before you begin, ensure that the backup device has a storage capacity of at least 1 GB.
See “Preparing Your SRX Series Device for Junos OS Upgrades” on page 168.
Overview
You can configure a boot device to replace the primary boot device on your SRX Series
device or to act as a backup boot device. Use either the J-Web user interface or the CLI
to take a snapshot of the configuration currently running on the device, or of the original
factory configuration and a rescue configuration, and save it to an alternate medium.
NOTE: For media redundancy, we recommend that you keep a secondarystoragemediumattached to the SRXSeries device and updated at all times.
211Copyright © 2018, Juniper Networks, Inc.
Chapter 9: Booting a Device Using a System Snapshot

If the primary storagemedium becomes corrupted and no backupmedium is in place,
you can recover the primary internal media from the TFTP installation.
You can also configure a boot device to store snapshots of software failures for use in
troubleshooting.
NOTE: You cannot copy software to the active boot device.
NOTE: After a boot device is created with the default factory configuration,it can operate only in an internal media slot.
This example configures a boot device to back up the currently running and active file
system partitions by rebooting from internalmedia and including only files shipped from
the factory.
Configuration
CLI QuickConfiguration
To quickly configure this section of the example, copy the following commands, paste
them into a text file, remove any line breaks, change any details necessary tomatch your
network configuration, copy and paste the commands into the CLI at the [edit] hierarchy
level, and then enter commit from configuration mode.
From operational mode, enter:
user@host> request system snapshot partitionmedia internal factory
GUI Step-by-StepProcedure
To configure a boot device:
1. In the J-Web user interface, selectMaintain>Snapshot.
2. On the Snapshot page, specify the boot device to copy the snapshot to. From the
Target Media list, select the internal boot device.
3. Select theFactory checkbox to copyonly default files thatwere loadedon the internal
media when it was shipped from the factory, plus the rescue configuration if one has
been set.
4. Select the Partition check box to partition the medium that you are copying the
snapshot to. This process is usually necessary for boot devices that do not already
have software installed on them.
5. Click Snapshot.
Copyright © 2018, Juniper Networks, Inc.212
Installation and Upgrade Guide
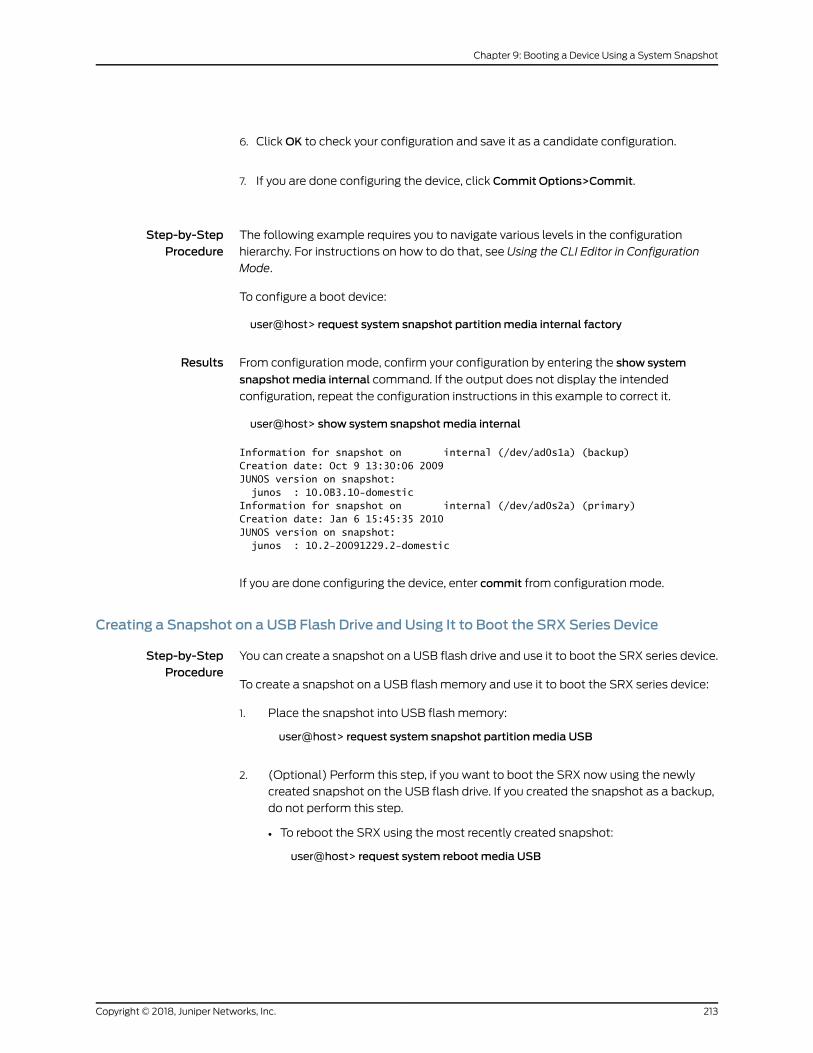
6. ClickOK to check your configuration and save it as a candidate configuration.
7. If you are done configuring the device, click Commit Options>Commit.
Step-by-StepProcedure
The following example requires you to navigate various levels in the configuration
hierarchy. For instructions on how to do that, see Using the CLI Editor in Configuration
Mode.
To configure a boot device:
user@host> request system snapshot partitionmedia internal factory
Results From configuration mode, confirm your configuration by entering the show system
snapshotmedia internal command. If the output does not display the intended
configuration, repeat the configuration instructions in this example to correct it.
user@host> show system snapshotmedia internal
Information for snapshot on internal (/dev/ad0s1a) (backup)Creation date: Oct 9 13:30:06 2009JUNOS version on snapshot: junos : 10.0B3.10-domesticInformation for snapshot on internal (/dev/ad0s2a) (primary)Creation date: Jan 6 15:45:35 2010JUNOS version on snapshot: junos : 10.2-20091229.2-domestic
If you are done configuring the device, enter commit from configuration mode.
Creating a Snapshot on a USB Flash Drive and Using It to Boot the SRX Series Device
Step-by-StepProcedure
You can create a snapshot on a USB flash drive and use it to boot the SRX series device.
To create a snapshot on a USB flash memory and use it to boot the SRX series device:
1. Place the snapshot into USB flash memory:
user@host> request system snapshot partitionmedia USB
2. (Optional) Perform this step, if you want to boot the SRX now using the newly
created snapshot on the USB flash drive. If you created the snapshot as a backup,
do not perform this step.
• To reboot the SRX using the most recently created snapshot:
user@host> request system rebootmedia USB
213Copyright © 2018, Juniper Networks, Inc.
Chapter 9: Booting a Device Using a System Snapshot

Verification
Confirm that the configuration is working properly.
• Verifying the Snapshot Information on page 214
Verifying the Snapshot Information
Purpose Verify that the snapshot information for both root partitions on SRX Series devices were
configured.
Action From operational mode, enter the show system snapshotmedia command.
The commandoutput displays the snapshot creation timeand JunosOSRelease version
on amedia for both the primary and backup roots.
NOTE: With the dual-root partitioning scheme, performing a snapshot to aUSB storage device that is less than 1 GB is not supported.
NOTE: You can use the show system snapshotmedia internal command to
determine thepartitioningschemepresenton the internalmedia. Informationforonlyone root isdisplayed for single-rootpartitioning,whereas informationfor both roots is displayed for dual-root partitioning.
NOTE: Any removablemedia that has been formatted with dual-rootpartitioningwill not be recognized correctly by the show system snapshotCLI
commandonsystemsthathavesingle-rootpartitioning. Intermixingdual-rootandsingle-root formattedmediaon thesamesystem is stronglydiscouraged.
Copyright © 2018, Juniper Networks, Inc.214
Installation and Upgrade Guide

CHAPTER 10
Performing a Recovery Installation
• Creating an Emergency Boot Device on page 215
• Understanding Integrity Check and Autorecovery of Configuration, Licenses, and Disk
Information on SRX Series Devices on page 217
• Creating an Emergency Boot Device for Routing Engines with VM Host
Support on page 219
• Performing a Recovery Installation on page 221
• Creating a New Configuration on a Single Routing Engine on page 222
• Creating a New Configuration with Redundant Routing Engines on page 227
• Saving a Rescue Configuration File on page 232
• Restoring a Saved Configuration on page 233
• Reverting to the Default Factory Configuration by Using the request system zeroize
Command on page 235
• Reverting to the Rescue Configuration on page 235
• Accessing USB Storage on PTX1000 Routers on page 236
Creating an Emergency Boot Device
If the device’s Junos OS software is damaged in some way that prevents Junos OS
software from loading completely, you can use the emergency boot device to revive the
device. The emergency boot device repartitions the primary disk and reloads a fresh
installation of Junos OS software.
The procedures outlined in this section discuss how to create an emergency boot device
for any ACX Series, M Series, MX Series, T Series, TX Matrix, and TXMatrix Plus router.
To create an emergency boot device:
1. Use FTP to copy the installation media into the router’s /var/tmp directory.
2. Insert the PC Card into the external PC Card slot or USB storage device into the USB
port.
3. In the UNIX shell, navigate to the /var/tmp directory:
215Copyright © 2018, Juniper Networks, Inc.

start shellcd /var/tmp
4. Log in as su:
su [enter]password: [enter SU password]
5. For Junos OSwith upgraded FreeBSD only, expand the image, for example:
gzip -d installMedia.img.gz
where installMedia refers to the installation media downloaded into the /var/tmp
directory. For example, for Junos OSwith upgraded FreeBSD, the filenamemight be
junos-install-media-usb-mx-x86-64-16.1R2.11.img.gz. (To determine which platforms
use Junos OSwith upgraded FreeBSD, see “Release Information for Junos OSwith
Upgraded FreeBSD” on page 17.)
6. Issue the following commands:
• For Junos OSwith upgraded FreeBSD:
dd if=/dev/zero of=/dev/externalDrive count=20dd if=installMedia.img of=/dev/externalDrive bs=256k
• For Junos OS:
dd if=/dev/zero of=/dev/externalDrive count=20dd if=installMedia of=/dev/externalDrive bs=64k
where:
• externalDrive—Refers to the removablemedia name of the emergency boot device.
For example, the removablemedianame for anemergencybootdeviceon theM120
router is da0 for both Routing Engines. For the names of the removable media, see
the table in“Routing Engines and Storage Media Names (ACX Series, M Series, MX
Series, PTX Series, T Series, TX Matrix, TX Matrix Plus, and JCS 1200 Routers)” on
page 35.
• installMedia—Refers to the installation media downloaded into the /var/tmp
directory. For example, the filenamemight be install-media-9.0R2.10–domestic for
Junos OS or, for Junos OSwith upgraded FreeBSD,
junos-install-media-usb-mx-x86-64-16.1R2.11.img (unzipped). (To determinewhich
platformsuse JunosOSwith upgradedFreeBSD, see “Release Information for Junos
OSwith Upgraded FreeBSD” on page 17.)
7. Log out as su:
exit
RelatedDocumentation
Routing Engines and Storage Media Names (ACX Series, M Series, MX Series, PTX
Series, T Series, TX Matrix, TX Matrix Plus, and JCS 1200 Routers) on page 35
•
• Release Information for Junos OSwith Upgraded FreeBSD on page 17
• Accessing USB Storage on PTX1000 Routers on page 236
Copyright © 2018, Juniper Networks, Inc.216
Installation and Upgrade Guide

Understanding Integrity Check and Autorecovery of Configuration, Licenses, and DiskInformation on SRX Series Devices
This topic includes the following sections:
• Overview on page 217
• How AutorecoveryWorks on page 217
• How to Use Autorecovery on page 218
• Data That Is Backed Up in an Autorecovery on page 218
• Troubleshooting Alarms on page 218
• Considerations on page 219
Overview
The autorecovery feature is supported on dual-partitioned SRX Series devices. With this
feature, information on disk partitioning, configuration, and licenses is recovered
automatically in the event it becomes corrupted.
Autorecovery provides the following functions:
• Detect corruption in disk partitioning during system bootup and attempt to recover
partitions automatically
• Detect corruption in the Junos OS rescue configuration during system bootup and
attempt to recover the rescue configuration automatically
• Detect corruption in Junos OS licenses during system bootup and attempt to recover
licenses automatically
HowAutorecoveryWorks
The feature works in the following ways:
• The feature provides the request system autorecovery state save command, which
backs up important data such as disk partitioning information, licenses, and JunosOS
rescue configuration.
• Once the backup copies are saved, they are used to check the integrity of the working
copies of the data on every bootup.
• The working copies are automatically recovered if any corruption is detected.
217Copyright © 2018, Juniper Networks, Inc.
Chapter 10: Performing a Recovery Installation

How to Use Autorecovery
You use autorecovery in the following ways:
• Prepare the router for deployment with the necessary licenses and configuration.
• After you finalize the state, execute the request system autorecovery state save
command to back up the state.
• After you save the state, integrity check and recovery actions (if any) occur
automatically on every bootup.
• If subsequentmaintenance activities change the state of the router by adding licenses
or updating the configuration, you need to execute the request system autorecovery
state save command again to update the saved state.
• Execute the show system autorecovery state command any time to view the status of
the saved information and the integrity check status of each saved item.
• Execute the request system autorecovery state clear command to delete all backed up
data and disable autorecovery, if required.
Data That Is Backed Up in an Autorecovery
The following data is backed up during the autorecovery process:
• Rescue configuration (regenerated from the current configuration)
• License keys
• BSD lables (disk-partitioning information)
Data is backed up only when you execute the request system autorecovery state save
command.Disk-partitioning information isbackedupautomatically fromfactorydefaults
(for new systems), on installation from the boot loader, and on snapshot creation.
Troubleshooting Alarms
Table27onpage218 lists typesofautorecoveryalarms, descriptions, and requiredactions.
Table 27: Autorecovery Alarms
Action RequiredDescriptionAlarmTypeAlarm
• Ensure that the system has allrequired licenses andconfiguration.
• Execute the request systemautorecoverystatesavecommand.
This alarm indicates:
• Unsaveddataneeds tobesaved, or saveddatacontainsproblemsandanother saveis required.
MinorAutorecovery informationneeds to be saved
• No action is required.
• Alarm is cleared on next bootup.
This alarm indicates:
• Boot time integrity check failed for certainitems; however, the items have beenrecovered successfully.
MinorAutorecoveryhas recoveredcorrupted information
Copyright © 2018, Juniper Networks, Inc.218
Installation and Upgrade Guide

Table 27: Autorecovery Alarms (continued)
Action RequiredDescriptionAlarmTypeAlarm
• Thesystemmightbeexperiencinga fatal malfunction.
This alarm indicates:
• Boot time integrity check failed for certainitems, which could not be recoveredsuccessfully.
MajorAutorecovery was unableto recover data completely
Considerations
• Devices must have dual-root partitioning for autorecovery to work.
• The request system configuration rescue save command regenerates the rescue
configuration from the current Junos OS configuration and then saves it. Therefore,
executing the save command overwrites any existing rescue configuration.
• In general, the saved contents of the rescue configuration are not updated
automatically. If you add licenses, youmust execute the request system autorecovery
state save command again.
NOTE: The rescue configuration is backed up. If /config is corrupted, the
system boots from the rescue configuration.
RelatedDocumentation
Example: Creating a Snapshot and Using It to Boot an SRX Series Device on page 211•
• Example: Installing Junos OS Upgrade Packages on SRX Series Devices on page 185
• Reverting the Junos OS Software Image Back to the Previous Version on page 191
Creating an Emergency Boot Device for Routing Engines with VMHost Support
If JunosOSonyour router isdamagedduring loading inaway thatprevents it from loading
completely, you can use the emergency boot device to revive the router. The emergency
boot device repartitions the primary disk and reloads a fresh installation of JunosOS. For
RE-MX-X6, RE-MX-X8, RE-PTX-X8, and RCBPTX Routing Engines, you can use a USB
storage device with at least 8 GB of free space to create an emergency boot device.
To create an emergency boot device on a routerwith RE-MX-X6, RE-MX-X8, RE-PTX-X8
and RCBPTX Routing Engines:
1. Copy the installation media into the router’s /var/tmp directory.
2. Insert the USB storage device into the router’s USB port.
3. In the UNIX shell, navigate to the /var/tmp directory:
start shell
219Copyright © 2018, Juniper Networks, Inc.
Chapter 10: Performing a Recovery Installation

cd /var/tmp
4. Log in as su:
su [enter]password: [enter SU password]
5. Gunzip the copied file.
For example, to convert junos-vmhost-install-usb-mx-x86-64-15.1F6.8.img.gz to
junos-vmhost-install-usb-mx-x86-64-15.1F6.8.img, , use the following command:
gunzip junos-vmhost-install-usb-mx-x86-64-15.1F6.8.img.gz
6. Issue the following command:
dd if=/path/to/downloaded.img of=/dev/devicenode bs=4M
where:
• devicenode—Refers to the name of the removable media of the emergency boot
device. Fornamesof storagemedia, see “RoutingEnginesandStorageMediaNames
(ACX Series, M Series, MX Series, PTX Series, T Series, TX Matrix, TX Matrix Plus,
and JCS 1200 Routers)” on page 35.
• downloaded.img—Refers to the installation media copied to the /var/tmp directory.
For example, junos-vmhost-install-usb-ptx-x86-64-15.1F6.8.img.
The following code example canbeused to create an emergency boot device by usinga USB storage device:
dd if=/path/to/junos-vmhost-install-usb-mx-x86-64-15.1F6.8.img of=/dev/da0 bs=4M
NOTE: In the dd command, use junos-vmhost-install-usb-mx-86 forRE-MX-X6 and RE-MX-X8 Routing Engines andjunos-vmhost-install-ptx-86 forRE-PTX-X8RoutingEngine respectively.
7. Log out as su:
exit
RelatedDocumentation
Routers with VM Host Support-Boot Process on page 279•
Copyright © 2018, Juniper Networks, Inc.220
Installation and Upgrade Guide

Performing a Recovery Installation
If the device’s software is corrupted or otherwise damaged, youmay need to perform a
recovery installation, using the emergency boot device to restore the default factory
installation. Once you have recovered the software, you will need to restore the router
or switch’s configuration. You can either create a new configuration as you did when the
device was shipped from the factory, or if you saved the device’s previous configuration,
you can simply restore that file to the system.
Depending on the situation, you should try to perform the following steps before you
perform the recovery installation:
1. Ensure you have an emergency recovery disk to use during the installation. When the
router or switch is first shipped, an emergency recovery disk is provided with it. For
instructions on creating an emergency boot device, see “Creating an Emergency Boot
Device” on page 215
2. Copy the existing configuration in the file /config/juniper.conf.gz from the device to a
remote system. For extra safety, you can also copy the backup configurations (the
files named /config/juniper.conf.n, where n is a number from 0 through 9).
WARNING: The recovery installation process completely overwrites theentire contents of the fixed storagemedia.
3. Copy any other stored files to a remote system as desired.
To reinstall Junos OS:
1. Insert the removable media emergency boot device into the device.
NOTE: You can store a configuration on installationmedia such as a PCCard or USB stick.
2. Reboot the device.
If the CLI is still active, issue the request system reboot command from command
mode to reboot the device.
If the CLI is not working, manually power off the device using the main power switch,
wait 10 seconds, and then power the device back on.
3. When the software prompts you with the following question, type y:
NOTE: Introduced in Junos OS Release 15.1, Junos OSwith upgradedFreeBSD does not display the following warning. To determine whichplatformsuseJunosOSwithupgradedFreeBSD,see“Release Informationfor Junos OSwith Upgraded FreeBSD” on page 17.
221Copyright © 2018, Juniper Networks, Inc.
Chapter 10: Performing a Recovery Installation

WARNING: The installation will erase the contents of your disk. Do you wish to continue (y/n)? y
The device copies the software from the removable media emergency boot device
onto your system, occasionally displaying statusmessages. Copying the software can
take up to 45minutes, depending on the device. When the process is complete, the
router boots into Amnesiac state and the login prompt is displayed.
4. Remove the removable media emergency boot device.
5. Log in as root on the device’s console port and issue the request system rebootcommand from commandmode to reboot the device.
The device reboots from the boot device on which the software was just installed.
When the reboot is complete, the device displays the login prompt.
6. Create a new configuration as you did when the device was shipped from the factory,
or restore a previously saved configuration file to the system. For more information,
see “Creating aNewConfiguration on a Single Routing Engine” on page 222, “Creating
a NewConfiguration with Redundant Routing Engines” on page 227, and “Restoring a
Saved Configuration” on page 233.
Creating a NewConfiguration on a Single Routing Engine
To create a new base configuration on a single Routing Engine, perform the following
tasks:
• Logging In to the Router Console on page 222
• Configuring Administration User Accounts on page 223
• Adding the Management Console to the Network on page 223
• Committing Changes on page 225
Logging In to the Router Console
To log in to the device’s console interface and open the CLI in configuration mode:
1. Verify the device is powered on.
2. Log in through the console port as root.
Amnesiac <ttyd0>
login: root
NOTE: From the factory, the root administration user account is notassociated with a password. However, youmust add a password to theroot administration account before you can successfully commit aconfiguration.
Copyright © 2018, Juniper Networks, Inc.222
Installation and Upgrade Guide

3. Start the CLI, which initially opens in operational mode. Note the command prompt
ends with > in the CLI operational mode.
root@% cliroot>
4. Enter the CLI configuration mode. Note the command prompt ends with # in the CLI
configuration mode.
root> configure[edit]root#
Configuring Administration User Accounts
Set the root administration user account password. You also need to set up one or more
administration user accounts. These administration user accounts are used to log in to
the device through themanagement console. To configure administration user accounts:
1. Add a password to the root (superuser) administration user account.
[edit]root# set system root-authentication plain-text-passwordNew password: passwordRetype new password: password
2. Create amanagement console user account.
[edit]root# set system login user user-name authentication plain-text-passwordNew Password: passwordRetype new password: password
3. Set the user account class to super-user.
[edit]root# set system login user user-name class super-user
See Also Example: Installing Junos OS Upgrade Packages on SRX Series Devices on page 185•
• Installing Junos OS Upgrade Packages on SRX Series Devices from a Remote Server
on page 187
Adding theManagement Console to the Network
To add themanagement console to the network:
1. Specify the device hostname.
223Copyright © 2018, Juniper Networks, Inc.
Chapter 10: Performing a Recovery Installation

NOTE: The hostname specified in the device configuration is not used bytheDNS server to resolve to the correct IP address. This hostname is usedto display the name of the Routing Engine in the CLI. For example, thishostname appears on the command line prompt when the user is loggedin to the CLI:
user-name@host-name>
[edit]root# set system host-name host-name
2. Configure the IP address of the DNS server.
[edit]root# set system name-server address
3. Configure the router or switch domain name.
[edit]root# set system domain-name domain-name
4. Configure the IP address and prefix length for the router or switch Ethernet interface.
• For all devices except the TXMatrix Plus router, T1600or T4000 routers in a routing
matrix, and PTX Series Packet Transport Routers:
[edit]root@# set interfaces fxp0 unit 0 family inet address address/prefix-length
• For the TXMatrix Plus router, T1600 or T4000 routers in a routing matrix only, and
PTX Series Packet Transport Routers:
[edit]root@# set interfaces em0 unit 0 family inet address address/prefix-length
Touse em0as anout-of-bandmanagement Ethernet interface, youmust configure
its logical port, em0.0, with a valid IP address.
• For a T1600 standalone router (not connected to a TXMatrix Plus router and not
in a routing matrix):
[edit]root@# set interfaces fxp0 unit 0 family inet address address/prefix-length
5. Configure the IP address of a backup router. The backup router is usedwhile the local
router is booting and if the routing process fails to start. Once the routing process
starts, the backup router address is removed from the local routing and forwarding
tables. For more information about the backup router, see the Getting Started Guide
for Routing Devices.
[edit]root# set system backup-router address
6. (Optional) Configure the static routes to remote subnets with access to the
management port. Access to the management port is limited to the local subnet. To
Copyright © 2018, Juniper Networks, Inc.224
Installation and Upgrade Guide

access the management port from a remote subnet, you need to add a static route
to that subnet within the routing table.
[edit]root# set routing-options static route remote-subnet next-hop destination-IP retain no-readvertise
7. Configure telnet service at the [edit system services] hierarchy level.
[edit]root# set system services telnet
Committing Changes
Now that you have completed your changes to the configuration file, commit the
configuration changes.
1. Beforecommitting theconfiguration, youcan reviewyourchanges to theconfiguration
with the show command.
root# show## Last changed: 2008-08-27 22:30:42 UTCversion 9.3B1.5;system { host-name tp8; domain-name subnet.device1.example.com; backup-router 192.168.71.254; root-authentication { encrypted-password "$ABC123"; ## SECRET-DATA } name-server { 192.168.5.68; 172.17.28.101; } login { user PE1 { class super-user; authentication { encrypted-password "$ABC123"; ## SECRET-DATA } } } services { telnet; } syslog { user * { any emergency; } file messages { any notice; authorization info; } file interactive-commands { interactive-commands any; } }}interfaces {
225Copyright © 2018, Juniper Networks, Inc.
Chapter 10: Performing a Recovery Installation

fxp0 { unit 0 { family inet { address 192.168.69.205/21; } } }}routing-options { static { route 172.16.0.0/12 { next-hop 192.168.71.254; retain; no-readvertise; } route 192.168.0.0/16 { next-hop 192.168.71.254; retain; no-readvertise; } }}
OnaTXMatrixPlus routerandPTXSeriesPacketTransportRouters, themanagement
Ethernet interface isem0andnot fxp0. Therefore,whenyou issue the show command
in the configuration mode, the configuration statements would be:
[edit]root@ showsystem {host-name hostname;domain-name domain.name;backup-router address ;root-authentication {(encrypted-password "password" | public-key);ssh-rsa "public-key";ssh-dsa "public-key";
}name-server {address;
}interfaces {em0 {unit 0 {family inet {address address ;
}}
}}
}
2. Commit the configuration.
[edit]root# commitcommit complete
Copyright © 2018, Juniper Networks, Inc.226
Installation and Upgrade Guide

NOTE: If you receive an error message after you issue the commit
statement, you can review the configuration using the show command to
find the errors in your configuration. You can delete incorrect entries usingthe delete command. For example, to delete a hostname from the
configuration, issue the following statement:
[edit]root# delete system host-name host-name
3. Exit configuration mode.
[edit]root# exitExiting configuration mode
root>
Creating a NewConfiguration with Redundant Routing Engines
To create a new base configuration on a router with redundant Routing Engines, perform
the following tasks:
• Configuring Administration User Accounts on page 227
• Setting Up Routing Engine Configuration Groups on page 228
• Completing the Management Console Configuration on page 230
• Committing and Synchronizing Changes on page 230
Configuring Administration User Accounts
Set the root administration user account password. You also need to set up one or more
administration user accounts. These administration user accounts are used to log in to
the device through themanagement console. To configure administration user accounts:
1. Add a password to the root (superuser) administration user account.
[edit]root# set system root-authentication plain-text-passwordNew password: passwordRetype new password: password
2. Create amanagement console user account.
[edit]root# set system login user user-name authentication plain-text-passwordNew Password: passwordRetype new password: password
3. Set the user account class to super-user.
[edit]root# set system login user user-name class super-user
227Copyright © 2018, Juniper Networks, Inc.
Chapter 10: Performing a Recovery Installation
See Also Example: Installing Junos OS Upgrade Packages on SRX Series Devices on page 185•
• Installing Junos OS Upgrade Packages on SRX Series Devices from a Remote Server
on page 187
Setting Up Routing Engine Configuration Groups
In a router with two Routing Engines, one configuration should be shared between both
Routing Engines. This ensures that both Routing Engine configurations are identical.
Within this configuration, create twoRouting Engine groups, one for eachRouting Engine.
Within these groups, you specify the Routing Engine–specific parameters.
For more information about creating configuration groups, see the CLI User Guide.
Formore informationabout the initial configuration for redundantRoutingEnginesystems
and the re0 group, see Junos OS High Availability Library for Routing Devices.
1. Create the configuration group re0. The re0 group is a special group designator thatis only used by RE0 in a redundant routing platform.
[edit]root# set groups re0
2. Navigate to the groups re0 level of the configuration hierarchy.
[edit]root# edit groups re0
3. Specify the router hostname.
[edit groups re0]root# set system host-name host-name
NOTE: The hostname specified in the router configuration is not used bytheDNS server to resolve to the correct IP address. This hostname is usedto display the name of the Routing Engine in the CLI. For example, thehostname appears at the command-line prompt when the user is loggedin to the CLI:
user-name@host-name>
4. Configure the IP address and prefix length for the router Ethernet interface.
• For all devices except the TXMatrix Plus router, T1600or T4000 routers in a routing
matrix, and PTX Series Packet Transport Routers:
[edit]root@# set interfaces fxp0 unit 0 family inet address address/prefix-length
• For the TXMatrix Plus router, T1600 or T4000 routers in a routing matrix only, and
PTX Series Packet Transport Routers:
[edit]
Copyright © 2018, Juniper Networks, Inc.228
Installation and Upgrade Guide

root@# set interfaces em0 unit 0 family inet address address/prefix-length
Touse em0as anout-of-bandmanagement Ethernet interface, youmust configure
its logical port, em0.0, with a valid IP address.
• For a T1600 standalone router (not connected to a TXMatrix Plus router and not
in a routing matrix):
[edit]root@# set interfaces fxp0 unit 0 family inet address address/prefix-length
5. Return to the top level of the hierarchy.
[edit groups re0]root# top
6. Create the configuration group re1.
[edit]root# set groups re1
7. Navigate to the groups re1 level of the configuration hierarchy.
[edit]root# edit groups re1
8. Specify the router hostname.
[edit groups re1]root# set system host-name host-name
9. Configure the IP address and prefix length for the router Ethernet interface.
• For all devices except the TXMatrix Plus router, T1600or T4000 routers in a routing
matrix, and PTX Series Packet Transport Routers:
[edit]root@# set interfaces fxp0 unit 0 family inet address address/prefix-length
• For the TXMatrix Plus router and T1600 or T4000 routers in a routing matrix only:
[edit]root@# set interfaces em0 unit 0 family inet address address/prefix-length
Touse em0as anout-of-bandmanagement Ethernet interface, youmust configure
its logical port, em0.0, with a valid IP address.
• For a T1600 standalone router (not connected to a TXMatrix Plus router, and not
in a routing matrix):
[edit]root@# set interfaces fxp0 unit 0 family inet address address/prefix-length
10. Return to the top level of the hierarchy.
[edit groups re0]root# top
229Copyright © 2018, Juniper Networks, Inc.
Chapter 10: Performing a Recovery Installation

11. Specify the group application order.
[edit]root# set apply-groups [ re0 re1 ]
Completing theManagement Console Configuration
To configure the global management console parameters:
1. Configure the IP address of the DNS server.
[edit]root# set system name-server address
2. Configure the router domain name.
[edit]root# set system domain-name domain-name
3. Configure the IP address of a backup router. The backup router is usedwhile the local
router is booting and if the routing process fails to start. Once the routing process
starts, the backup router address is removed from the local routing and forwarding
tables. For more information about the backup router, see the Getting Started Guide
for Routing Devices.
[edit]root# set system backup-router address
4. (Optional) Configure the static routes to remote subnets with access to the
management port. Access to the management port is limited to the local subnet. To
access the management port from a remote subnet, you need to add a static route
to that subnet within the routing table.
[edit]root# set routing-options static route remote-subnet next-hop destination-IP retain no-readvertise
5. Configure telnet service at the [edit system services] hierarchy level.
[edit]root# set system services telnet
Committing and Synchronizing Changes
Commit the configuration changes. When you issue the synchronize command, the
configuration is shared between both Routing Engines and committed on both Routing
Engines simultaneously.
1. Before committing the configuration, you can review the configuration entries using
the show command.
root# show## Last changed: 2008-10-17 18:32:25 UTCversion 9.1R1.8;groups {
Copyright © 2018, Juniper Networks, Inc.230
Installation and Upgrade Guide

re0 { system { host-name spice-re0; } interfaces { fxp0 { unit 0 { family inet { address 192.168.69.155/21; } } } } } re1 { system { host-name spice-re1; } interfaces { fxp0 { unit 0 { family inet { address 192.168.70.72/21; } } } } } global;}apply-groups [ re0 re1 ];system { domain-name englab.juniper.net; backup-router 192.168.71.254; root-authentication { encrypted-password "$ABC123"; ## SECRET-DATA } name-server { 192.168.1.1; } login { user user { uid 2001; class super-user; authentication { encrypted-password “$ABC123"; ## SECRET-DATA } } } services { telnet; } syslog { user * { any emergency; } file messages { any notice; authorization info; } file interactive-commands {
231Copyright © 2018, Juniper Networks, Inc.
Chapter 10: Performing a Recovery Installation

interactive-commands any; } }}routing-options { static { /* corporate office */ route 172.16.0.0/12 { next-hop 192.168.71.254; retain; no-readvertise; } }}
2. Commitandsynchronize theconfiguration.Thecommitsynchronizecommandcommits
this new configuration on both Routing Engines simultaneously.
[edit]root# commit synchronizere0:configuration check succeedsre1:commit completere0:commit complete
If you receive an error message after you issue the commit statement, you can reviewthe configuration using the show command to find the errors in your configuration.You can delete incorrect entries using the delete command. For example, to delete ahostname from the configuration, issue the following command:
[edit]root# delete system host-name host-name
3. Exit configuration mode.
[edit]root# exitExiting configuration mode
root>
Saving a Rescue Configuration File
A rescue configuration file is helpful in the event that your device’s configuration file has
beenmisconfigured. You can restore the device to this rescue configuration to bring the
device back online. If you save this file off the device, the rescue configuration can also
be used to restore your device in the event of a software failure.
To save a current device configuration as a rescue configuration file:
1. Edit the configuration file on the device to reflect the base configuration you wish to
use.
Formore informationaboutediting theconfiguration, seeOverview forRoutingDevices.
Copyright © 2018, Juniper Networks, Inc.232
Installation and Upgrade Guide

2. In the CLI operational mode, save this edited base configuration as the rescue
configuration file:
user@host> request system configuration rescue save
The rescue configuration file is automatically saved under /config directory.
3. Copy the rescue configuration to a remote server:
user@host1% cd /config/user@host1% ls -lrt rescue.conf.gz
user@host1%ftp host2Name: usernamePassword: passwordUser user logged in.ftp> cd /var/tmpftp> lcd /configftp> binftp> put rescue.conf.gzlocal: rescue.conf.gz remote: rescue.conf.gz
Transfer complete.ftp> byeGoodbye.
To roll back to the rescue configuration, use the rollback rescue command.
user@host# rollback rescue
load complete
NOTE: After rolling back to the rescue configuration, youmust commit theconfiguration to activate it:
user@host#commit
Restoring a Saved Configuration
To restore a saved configuration, perform the following tasks:
1. Copy Saved Files to the Router on page 233
2. Loading and Committing the Configuration File on page 234
Copy Saved Files to the Router
To copy the saved configuration to the router:
1. Log in to the console as root. There is no password.
Escape character is '^]'. [Enter]router (ttyd0)
login: rootPassword: [Enter]
233Copyright © 2018, Juniper Networks, Inc.
Chapter 10: Performing a Recovery Installation

Initially, access to the router is limited to the console port after a recovery installation.
Access through themanagement ports and interfaces is set in the configuration. For
informationaboutaccessing the router through theconsoleport, see theadministration
guide for your particular router.
2. Start the CLI:
# cli
3. Copy the configuration file on the remote server to the router’s /var/tmp directory:
root@host> ftp remote-serveruser: usernamepassword: passwordftp> binType set to I.ftp> get /path/fileftp> byeGoodbye.
Loading and Committing the Configuration File
Once the saved configuration file is copied to the router, you load and commit the file:
1. Start the CLI configuration mode.
user@routername> configureEntering configuration mode
[edit]user@host#
2. Load the file into the current configuration. You should override the existing file.
user@host# load override /var/tmp/filenameload complete
3. Commit the file.
user@host# commitcommit complete
4. Exit the CLI configuration mode.
user@host# exituser@host>
5. Back up Junos OS.
After you have installed the software on the router, committed the configuration, and
are satisfied that the new configuration is successfully running, issue the request
system snapshot command to back up the new software to the /altconfig file system.
If you do not issue the request system snapshot command, the configuration on the
alternate boot drive will be out of sync with the configuration on the primary boot
drive.
The request system snapshot command causes the root file system to be backed up
to /altroot, and /config to be backed up to /altconfig. The root and /config file systems
are on the router’s CompactFlash card, and the /altroot and /altconfig file systems
are on the router’s hard disk or solid-state drive (SSD).
Copyright © 2018, Juniper Networks, Inc.234
Installation and Upgrade Guide

Reverting to the Default Factory Configuration by Using the request system zeroizeCommand
The requestsystemzeroizecommand isastandard JunosOSoperationalmodecommand
that removesall configuration informationand resetsall key values. Theoperationunlinks
all user-created data files, including customized configuration and log files, from their
directories. The switch then reboots and reverts to the factory-default configuration.
To completely erase user-created data so that it is unrecoverable, use the request system
zeroizemedia command.
CAUTION: Before issuing request system zeroize, use the request system
snapshot command to back up the files currently used to run the switch to a
secondary device.
To revert to the factory-default configuration by using the request system zeroize
command:
1. user@switch> request system zeroizewarning: System will be rebooted and may not boot without configurationErase all data, including configuration and log files? [yes,no] (yes)
2. Type yes to remove configuration and log files and revert to the factory defaultconfiguration.
3. Complete the initial configuration of the switch.
RelatedDocumentation
request system zeroize on page 480•
Reverting to the Rescue Configuration
If someone inadvertently commits a configuration that denies management access to
adeviceand theconsoleport is notaccessible, youcanoverwrite the invalidconfiguration
and replace it with the rescue configuration. The rescue configuration is a previously
committed, valid configuration.
To revert the switch to the rescue configuration:
1. Enter the load override command.
[edit]user@switch# load override filename
2. Commit your changes.
[edit]
235Copyright © 2018, Juniper Networks, Inc.
Chapter 10: Performing a Recovery Installation

user@switch# commit filename
RelatedDocumentation
Reverting to the Default Factory Configuration•
Accessing USB Storage on PTX1000 Routers
On PTX1000 routers, you can only view the USB storage information from Junos OS by
using the CLI command showvmhost hardware, but cannot access it. However, you canaccess the USB storage information from the Linux host. From the Linux host, you can
also send the USB storage device information with images across different sites where
PTX1000 routers are deployed.
To access the USB storage device information on PTX1000 routers:
1. In Junos OS, ensure that the PTX1000 USB image to be copied to the USB storage
device is present on the var/tmp folder of Junos OS. To copy the image from the
/var/tmp directory of Junos OS to the /var/tmp directory of a Linux host, execute the
following command on Junos OS:
vhclient rcp /var/tmp image-name
vhclient -s
2. On the Linux host shell, execute the following command:
dd if=/var/tmp/ copied-image-name of=/dev/sdc bs=4Msyncsync
In the command above, /dev/sdc is the USB storage device detected by the Linux
host. You can determine the nameof theUSB storage device fromhost logs as shown
in the sample below:
user@host # dmesg......[645888.884431] usb 1-1.2: new high-speed USB device number 5 using ehci-pci[645889.131217] usb-storage 1-1.2:1.0: USB Mass Storage device detected[645889.131275] scsi8 : usb-storage 1-1.2:1.0[645890.134290] scsi 8:0:0:0: Direct-Access JetFlash Transcend 8GB 8.07 PQ: 0 ANSI: 2[645890.134456] sd 8:0:0:0: Attached scsi generic sg2 type 0
[645890.135908] sd 8:0:0:0: [sdc] 15687680 512-byte logical blocks: (8.03 GB/7.48 GiB)
In this example, sdc is the name of the USB storage device.
Copyright © 2018, Juniper Networks, Inc.236
Installation and Upgrade Guide

NOTE: The /var/tmp directory of a Linux host is mounted on the RAM (at
the ramfs location), which is volatile storage, and is thus lost when you
perform power cycling of or reboot the device. However, the Junos OS/var/tmpdirectory resideson thephysical (nonvolatile)harddiskand thus
exists even after rebooting or power cycling.
RelatedDocumentation
• Creating an Emergency Boot Device on page 215
• Release Information for Junos OSwith Upgraded FreeBSD on page 17
237Copyright © 2018, Juniper Networks, Inc.
Chapter 10: Performing a Recovery Installation

Copyright © 2018, Juniper Networks, Inc.238
Installation and Upgrade Guide

CHAPTER 11
Reinstalling Software
• Checklist for Reinstalling Junos OS on page 239
• Log the Software Version Information on page 241
• Log the Hardware Version Information on page 242
• Log the Chassis Environment Information on page 243
• Log the System Boot-Message Information on page 243
• Log the Active Configuration on page 245
• Log the Interfaces on the Router on page 245
• Log the BGP, IS-IS, and OSPF Adjacency Information on page 246
• Log the System Storage Information on page 247
• Back Up the Currently Running and Active File System on page 248
• Reinstall Junos OS on page 249
• Reconfigure Junos OS on page 249
• Configure Host Names, Domain Names, and IP Addresses on page 253
• Protecting Network Security by Configuring the Root Password on page 255
• Check Network Connectivity on page 257
• Copy Backup Configurations to the Router on page 257
• After You Reinstall Junos OS on page 257
• Compare Information Logged Before and After the Reinstall on page 258
• Back Up the New Software on page 259
Checklist for Reinstalling Junos OS
Table 28 on page 239 provides links and commands for reinstalling Junos OS.
Table 28: Checklist for Reinstalling Junos OS
Command or ActionTasks
Before You Reinstall Junos OS
show version | save filename1. Log the Software Version Information on page 241
239Copyright © 2018, Juniper Networks, Inc.

Table 28: Checklist for Reinstalling Junos OS (continued)
Command or ActionTasks
show chassis hardware | save filename2. Log the Hardware Version Information on page 242
show chassis environment | save filename3. Log the Chassis Environment Information on page 243
show system boot-messages | save filename4. Log theSystemBoot-Message Information on page 243
show configuration | save filename5. Log the Active Configuration on page 245
show interface terse | save filename6. Log the Interfaces on the Router on page 245
show bgp summary | save filenameshow isis adjacency brief | save filenameshow ospf neighbor brief | save filename
7. Log the BGP, IS-IS, andOSPF Adjacency Information onpage 246
show system storage | save filename8. Log the System Storage Information on page 247
request system snapshot9. Back Up the Currently Running and Active File Systemon page 248
http://www.juniper.net/support10.
Insert the floppy and reboot the system.“Reinstall Junos OS” on page 249
“Reconfigure Junos OS” on page 249
Log in as root.Start the CLI.Enter configuration mode: configureset system host-name host-nameset system domain-name domain-nameset interfaces fxp0 unit 0 family inet address address/prefix-lengthset system backup-router addressset system name-server address
1. ConfigureHostNames,DomainNames,and IPAddresseson page 249
set system root-authentication plain-text-passwordset system root-authentication encrypted-password passwordset system root-authentication ssh-rsa keycommitexit
2. Protecting Network Security by Configuring the RootPassword on page 251
ping address3. Check Network Connectivity on page 253
file copy var/tmpconfigure
[edit]loadmerge /config/filename or load replace /config/filename
[edit]commit
4. Copy Backup Configurations to the Router on page 253
Copyright © 2018, Juniper Networks, Inc.240
Installation and Upgrade Guide

Table 28: Checklist for Reinstalling Junos OS (continued)
Command or ActionTasks
“After You Reinstall Junos OS” on page 257
show version | save filenameshow chassis hardware | save filenameshow chassis environment | save filenameshow system boot-messages | save filenameshow configuration | save filenameshow interfaces terse | save filenameshow bgp summaryshow isis adjacency briefshow ospf neighbor brief | save filenameshow system storage | save filename
1. Compare Information Logged Before and After theReinstall on page 257
request system snapshot2. Back Up the New Software on page 258
Log the Software Version Information
Purpose The purpose of this action is to log the Junos OS version information.
Action Use the following Junos OS CLI operational mode command:
user@host> show version | save filename
Sample Output
user@host> show version | save testWrote 39 lines of output to ‘test’
user@host> show versionHostname: my-router.netModel: m10JUNOS Base OS boot [5.0R5]JUNOS Base OS Software Suite [5.0R5]JUNOS Kernel Software Suite [5.0R5]JUNOS Routing Software Suite [5.0R5]JUNOS Packet Forwarding Engine Support [5.0R5]JUNOS Crypto Software Suite [5.0R5]JUNOS Online Documentation [5.0R5]KERNEL 5.0R5 #0 built by builder on 2002-03-02 05:10:28 UTCMGD release 5.0R5 built by builder on 2002-03-02 04:45:32 UTCCLI release 5.0R5 built by builder on 2002-03-02 04:44:22 UTCCHASSISD release 5.0R5 built by builder on 2002-03-02 04:43:37 UTCDCD release 5.0R5 built by builder on 2002-03-02 04:42:47 UTCRPD release 5.0R5 built by builder on 2002-03-02 04:46:17 UTCSNMPD release 5.0R5 built by builder on 2002-03-02 04:52:26 UTCMIB2D release 5.0R5 built by builder on 2002-03-02 04:45:37 UTCAPSD release 5.0R5 built by builder on 2002-03-02 04:43:31 UTCVRRPD release 5.0R5 built by builder on 2002-03-02 04:52:34 UTCALARMD release 5.0R5 built by builder on 2002-03-02 04:43:24 UTCPFED release 5.0R5 built by builder on 2002-03-02 04:46:06 UTCCRAFTD release 5.0R5 built by builder on 2002-03-02 04:44:30 UTCSAMPLED release 5.0R5 built by builder on 2002-03-02 04:52:20 UTCILMID release 5.0R5 built by builder on 2002-03-02 04:45:21 UTCBPRELAYD release 5.0R5 built by builder on 2002-03-02 04:42:41 UTC
241Copyright © 2018, Juniper Networks, Inc.
Chapter 11: Reinstalling Software

RMOPD release 5.0R5 built by builder on 2002-03-02 04:46:11 UTCjkernel-dd release 5.0R5 built by builder on 2002-03-02 04:41:07 UTCjroute-dd release 5.0R5 built by builder on 2002-03-02 04:41:21 UTCjdocs-dd release 5.0R5 built by builder on 2002-03-02 04:39:11 UTC
Meaning The sample output shows the hostname, router model, and the different Junos OS
packages, processes, and documents.
RelatedDocumentation
•
Log the Hardware Version Information
Purpose You should log hardware version information in the rare event that a router cannot
successfully rebootandyoucannotobtain theRoutingEngineserial number. TheRouting
Engine serial number is necessary for Juniper Networks Technical Assistance Center
(JTAC) to issue a return to manufacturing authorization (RMA). Without the Routing
Engine serial number, an onsite technician must be dispatched to issue the RMA.
Action To log the router chassis hardware version information, use the following Junos OS CLI
operational mode command:
user@host> show chassis hardware | save filename
Sample Output The output for theM-series routers varies depending on the chassis components of each
router. All routers have a chassis, midplanes or backplanes, power supplies, and Flexible
PICConcentrators (FPCs).Refer to thehardwareguides for informationabout thedifferent
chassis components.
user@host> show chassis hardware | save testWrote 43 lines of output to ‘test’
user@host> show chassis hardwareItem Version Part number Serial number DescriptionChassis 101 M160Midplane REV 02 710-001245 S/N AB4107FPM CMB REV 01 710-001642 S/N AA2911FPM Display REV 01 710-001647 S/N AA2999CIP REV 02 710-001593 S/N AA9563PEM 0 Rev 01 740-001243 S/N KJ35769 DCPEM 1 Rev 01 740-001243 S/N KJ35765 DCPCG 0 REV 01 710-001568 S/N AA9794PCG 1 REV 01 710-001568 S/N AA9804Host 1 da000004f8d57001 teknorMCS 1 REV 03 710-001226 S/N AA9777SFM 0 SPP REV 04 710-001228 S/N AA2975SFM 0 SPR REV 02 710-001224 S/N AA9838 Internet Processor ISFM 1 SPP REV 04 710-001228 S/N AA2860SFM 1 SPR REV 01 710-001224 S/N AB0139 Internet Processor IFPC 0 REV 03 710-001255 S/N AA9806 FPC Type 1 CPU REV 02 710-001217 S/N AA9590 PIC 1 REV 05 750-000616 S/N AA1527 1x OC-12 ATM, MM
Copyright © 2018, Juniper Networks, Inc.242
Installation and Upgrade Guide

PIC 2 REV 05 750-000616 S/N AA1535 1x OC-12 ATM, MM PIC 3 REV 01 750-000616 S/N AA1519 1x OC-12 ATM, MMFPC 1 REV 02 710-001611 S/N AA9523 FPC Type 2 CPU REV 02 710-001217 S/N AA9571 PIC 0 REV 03 750-001900 S/N AA9626 1x STM-16 SDH, SMIR PIC 1 REV 01 710-002381 S/N AD3633 2x G/E, 1000 BASE-SXFPC 2 FPC Type OC192 CPU REV 03 710-001217 S/N AB3329 PIC 0 REV 01 1x OC-192 SM SR-2
Meaning The sampleoutput shows thehardware inventory for anM160 routerwith a chassis serial
number of 101. For each component, the output shows the version number, part number,
serial number, and description.
Log the Chassis Environment Information
Action To log the router chassis environment information, use the following Junos OS CLI
operational mode command:
user@host> show chassis environment | save filename
Sample Output The following example shows output from the show chassis environment command for
an M5 router:
user@m5-host> show chassis environment | save testWrote 14 lines of output to ‘test’
user@m5-host> show chassis environmentClass Item Status MeasurementPower Power Supply A OK Power Supply B OKTemp FPC Slot 0 OK 32 degrees C / 89 degrees F FEB OK 31 degrees C / 87 degrees F PS Intake OK 26 degrees C / 78 degrees F PS Exhaust OK 31 degrees C / 87 degrees FFans Left Fan 1 OK Spinning at normal speed Left Fan 2 OK Spinning at normal speed Left Fan 3 OK Spinning at normal speed Left Fan 4 OK Spinning at normal speed
Meaning The sample output shows the environmental information about the router chassis,
including the temperature and information about the fans, power supplies, and Routing
Engine.
Log the SystemBoot-Message Information
Action To log the systemboot-message information, use the following JunosOSCLI operational
mode command:
user@host> show system boot-messages | save filename
243Copyright © 2018, Juniper Networks, Inc.
Chapter 11: Reinstalling Software

Sample Output user@host> show system boot-messages | save testWrote 80 lines of output to ‘test’
user@host> show system boot-messagesCopyright (c) 1992-1998 FreeBSD Inc.Copyright (c) 1996-2000 Juniper Networks, Inc.All rights reserved.Copyright (c) 1982, 1986, 1989, 1991, 1993 The Regents of the University of California. All rights reserved.
JUNOS 4.1-20000216-Zf8469 #0: 2000-02-16 12:57:28 UTC
[email protected]:/p/build/20000216-0905/4.1/release_kernel/sys/compile/GENERICCPU: Pentium Pro (332.55-MHz 686-class CPU) Origin = "GenuineIntel" Id = 0x66a Stepping=10
Features=0x183f9ff<FPU,VME,DE,PSE,TSC,MSR,PAE,MCE,CX8,SEP,MTRR,PGE,MCA,CMOV,<b16>,<b17>,MMX,<b24>>Teknor CPU Card Recognizedreal memory = 805306368 (786432K bytes)avail memory = 786280448 (767852K bytes)Probing for devices on PCI bus 0:chip0 <generic PCI bridge (vendor=8086 device=7192 subclass=0)> rev 3 class 60000 on pci0:0:0chip1 <Intel 82371AB PCI-ISA bridge> rev 1 class 60100 on pci0:7:0chip2 <Intel 82371AB IDE interface> rev 1 class 10180 on pci0:7:1chip3 <Intel 82371AB USB interface> rev 1 class c0300 int d irq 11 on pci0:7:2smb0 <Intel 82371AB SMB controller> rev 1 class 68000 on pci0:7:3pcic0 <TI PCI-1131 PCI-CardBus Bridge> rev 1 class 60700 int a irq 15 on pci0:13:0TI1131 PCI Config Reg: [pci only][FUNC0 pci int]pcic1 <TI PCI-1131 PCI-CardBus Bridge> rev 1 class 60700 int b irq 12 on pci0:13:1TI1131 PCI Config Reg: [pci only][FUNC1 pci int]fxp0 <Intel EtherExpress Pro 10/100B Ethernet> rev 8 class 20000 int a irq 12 on pci0:16:0chip4 <generic PCI bridge (vendor=1011 device=0022 subclass=4)> rev 4 class 60400 on pci0:17:0fxp1 <Intel EtherExpress Pro 10/100B Ethernet> rev 8 class 20000 int a irq 10 on pci0:19:0Probing for devices on PCI bus 1:mcs0 <Miscellaneous Control Subsystem> rev 12 class ff0000 int a irq 12 on pci1:13:0fxp2 <Intel EtherExpress Pro 10/100B Ethernet> rev 8 class 20000 int a irq 10 on pci1:14:0Probing for devices on the ISA bus:sc0 at 0x60-0x6f irq 1 on motherboardsc0: EGA color <16 virtual consoles, flags=0x0>ed0 not found at 0x300ed1 not found at 0x280ed2 not found at 0x340psm0 not found at 0x60sio0 at 0x3f8-0x3ff irq 4 flags 0x20010 on isasio0: type 16550A, consolesio1 at 0x3e8-0x3ef irq 5 flags 0x20000 on isasio1: type 16550Asio2 at 0x2f8-0x2ff irq 3 flags 0x20000 on isasio2: type 16550Apcic0 at 0x3e0-0x3e1 on isaPC-Card ctlr(0) TI PCI-1131 [CardBus bridge mode] (5 mem & 2 I/O windows)pcic0: slot 0 controller I/O address 0x3e0npx0 flags 0x1 on motherboardnpx0: INT 16 interfacefdc0: direction bit not set
Copyright © 2018, Juniper Networks, Inc.244
Installation and Upgrade Guide

fdc0: cmd 3 failed at out byte 1 of 3fdc0 not found at 0x3f0wdc0 at 0x1f0-0x1f7 irq 14 on isawdc0: unit 0 (wd0): <SunDisk SDCFB-80>, single-sector-i/owd0: 76MB (156672 sectors), 612 cyls, 8 heads, 32 S/T, 512 B/Swdc0: unit 1 (wd1): <IBM-DCXA-210000>wd1: 8063MB (16514064 sectors), 16383 cyls, 16 heads, 63 S/T, 512 B/Swdc1 not found at 0x170wdc2 not found at 0x180ep0 not found at 0x300fxp0: Ethernet address 00:a0:a5:12:05:5afxp1: Ethernet address 00:a0:a5:12:05:59fxp2: Ethernet address 02:00:00:00:00:01swapon: adding /dev/wd1s1b as swap deviceAutomatic reboot in progress.../dev/rwd0s1a: clean, 16599 free (95 frags, 2063 blocks, 0.1% fragmentation)/dev/rwd0s1e: clean, 9233 free (9 frags, 1153 blocks, 0.1% fragmentation)/dev/rwd0s1a: clean, 16599 free (95 frags, 2063 blocks, 0.1% fragmentation)/dev/rwd1s1f: clean, 4301055 free (335 frags, 537590 blocks, 0.0% fragmentation)
Meaning The sample output shows the initial messages generated by the system kernel upon
boot. This is the content of the /var/run/dmesg.boot file.
Log the Active Configuration
Action To log the active configuration on the router, use the following Junos OS CLI operational
mode command:
user@host> show configuration | save filename
Sample Output user@host> show configuration | save testWrote 4076 lines of output to ‘test’
user@host> show configurationsystem {host-name lab8;domain-name device1.example.com;backup-router 10.1.1.254; time-zone America/Los_Angeles;default-address-selection; dump-on-panic;name-server {[...Output truncated...]
Meaning The sample output shows the configuration currently running on the router, which is the
last committed configuration.
Log the Interfaces on the Router
Action To log the interfaces on the router, use the following Junos OS CLI operational mode
command:
245Copyright © 2018, Juniper Networks, Inc.
Chapter 11: Reinstalling Software

user@host> show interface terse | save filename
Sample Output user@host> show interfaces terse | save testWrote 81 lines of output to ‘test’
user@host> show interfaces terseInterface Admin Link Proto Local Remoteat-1/3/0 up upat-1/3/0.0 up up inet 203.0.113.1 --> 203.0.113.2 isofxp0 up upfxp0.0 up up inet 10.168.5.59/24gre down upipip down uplo0 up uplo0.0 up up inet 127.0.0.1 --> 0/0 iso 47.0005.80ff.f800.0000.0108.0001.1921.6800.5059.00so-1/2/0 up downso-1/2/1 down downso-1/2/2 down downso-1/2/3 down downso-2/0/0 up upso-2/0/0.0 up up inet 192.2.3.4 --> 192.2.3.5 iso[...Output truncated...]
Meaning Thesampleoutputdisplayssummary informationabout thephysicaland logical interfaces
on the router.
Log the BGP, IS-IS, and OSPF Adjacency Information
Purpose The following commands log useful information about Border Gateway Protocol (BGP),
Intermediate System-to-Intermediate System (IS-IS), and Open Shortest Path First
(OSPF) protocols. If you have other protocols installed, such as Multiprotocol Label
Switching (MPLS), Resource Reservation Protocol (RSVP), or Protocol Independent
Multicast (PIM), you also might log summary information for them.
Action To log the protocol peer information, use the following Junos OS CLI operational mode
commands:
user@host> show bgp summary | save filenameuser@host> show isis adjacency brief | save filenameuser@host> show ospf neighbor brief | save filename
Copyright © 2018, Juniper Networks, Inc.246
Installation and Upgrade Guide

Sample Output 1 user@host> show bgp summary | save testWrote 45 lines of output to ‘test’
user@host> show bgp summaryGroups: 1 Peers: 1 Down peers: 0Table Tot Paths Act Paths Suppressed History Damp State Pendinginet.0 4 4 0 0 0 0Peer AS InPkt OutPkt OutQ Flaps Last Up/Dwn State|#Active/Received/Damped..9.9.3.1 2 2627 2628 0 0 21:50:12 4/4/0 0/0/0
Sample Output 2 user@host> show isis adjacency brief | save testWrote 7 lines of output to ‘test’
user@host> show isis adjacency briefIS-IS adjacency database:Interface System L State Hold (secs) SNPAso-1/0/0.0 1921.6800.5067 2 Up 13so-1/1/0.0 1921.6800.5067 2 Up 25so-1/2/0.0 1921.6800.5067 2 Up 20so-1/3/0.0 1921.6800.5067 2 Up 19so-2/0/0.0 1921.6800.5066 2 Up 19so-2/1/0.0 1921.6800.5066 2 Up 17so-2/2/0.0 1921.6800.5066 2 Up 20so-2/3/0.0 1921.6800.5066 2 Up 20so-5/0/0.0 ranier 2 Up 17
Sample Output 3 user@host> show ospf neighbor brief | save testWrote 10 lines of output to ‘test’
user@host> show ospf neighbor brief Address Intf State ID Pri Dead10.168.254.225 fxp3.0 2Way 10.250.240.32 128 3610.168.254.230 fxp3.0 Full 10.250.240.8 128 3810.168.254.229 fxp3.0 Full 10.250.240.35 128 3310.1.1.129 fxp2.0 Full 10.250.240.12 128 3710.1.1.131 fxp2.0 Full 10.250.240.11 128 3810.1.2.1 fxp1.0 Full 10.250.240.9 128 3210.1.2.81 fxp0.0 Full 10.250.240.10 128 33
Meaning Sample output 1 displays summary information about BGP and its neighbors. Sample
output2displays informationabout IS-ISneighbors.Sampleoutput3displays information
about all OSPF neighbors.
Log the SystemStorage Information
Action To log the system storage statistics for the amount of free disk space in the router’s file
system, use the following Junos OS CLI operational mode command:
user@host> show system storage | save filename
247Copyright © 2018, Juniper Networks, Inc.
Chapter 11: Reinstalling Software

Sample Output user@host> show system storage | save testWrote 14 lines of output to ‘test’
user@host> show system storageFilesystem 1K-blocks Used Avail Capacity Mounted on/dev/ad0s1a 65687 26700 33733 44% /devfs 16 16 0 100% /dev//dev/vn1 9310 9310 0 100% /packages/mnt/jbase/dev/vn2 8442 8442 0 100% /packages/mnt/jkernel-5.0R5.1/dev/vn3 11486 11486 0 100% /packages/mnt/jpfe-5.0R5.1/dev/vn4 5742 5742 0 100% /packages/mnt/jroute-5.0R5.1/dev/vn5 1488 1488 0 100% /packages/mnt/jcrypto-5.0R5.1/dev/vn6 792 792 0 100% /packages/mnt/jdocs-5.0R5.1mfs:2373 1015815 3 934547 0% /tmp/dev/ad0s1e 25263 11 23231 0% /configprocfs 4 4 0 100% /proc/dev/ad1s1f 9825963 1811085 7228801 20% /var
Meaning The sample output displays statistics about the amount of free disk space in the router’s
file system. Values are displayed in 1024-byte (1-KB) blocks.
Back Up the Currently Running and Active File System
Action Tobackup thecurrently runningandactive file systemso that youcan recover toaknown,
stable environment in case there is a problemduring the reinstall, use the following Junos
OS CLI operational mode command:
user@host> request system snapshot
Sample Output user@host> request system snapshotumount: /altroot: not currently mountedCopying / to /altroot.. (this may take a few minutes)umount: /altconfig: not currently mountedCopying /config to /altconfig.. (this may take a few minutes)The following filesystems were archived: / /config
Meaning The root file system is backed up to /altroot, and /config is backed up to /altconfig. The
root and /config file systems are on the router’s internal flash drive, and the /altroot and
/altconfig file systems are on the router’s hard drive.
NOTE: After you issue the request system snapshot command, you cannot
return to thepreviousversionof thesoftwarebecause the runningandbackupcopies of the software are identical.
Copyright © 2018, Juniper Networks, Inc.248
Installation and Upgrade Guide

Reinstall Junos OS
Action To reinstall Junos OS, follow these steps:
1. Insert the removable medium (boot floppy) into the router.
2. Reboot the router, either by power-cycling it or by issuing the request system reboot
command from the CLI.
3. At the following prompt, type y:
WARNING: The installation will erase the contents of your disk. Do you wish to continue (y/n)?
The router copies the software from the removable medium onto your system,
occasionally displaying status messages. This can take up to 10minutes.
4. Remove the removable mediumwhen prompted.
The router reboots from the primary boot device on which the software is installed.
When the reboot is complete, the router displays the login prompt.
Reconfigure Junos OS
After you have reinstalled the software, youmust copy the router’s configuration files
back to the router. (You also can configure the router from scratch, as described in Junos
SystemBasics Configuration Guide) However, before you can copy the configuration files,
youmust establish network connectivity.
To reconfigure the software, follow these steps:
1. Configure Host Names, Domain Names, and IP Addresses on page 249
2. Protecting Network Security by Configuring the Root Password on page 251
3. Check Network Connectivity on page 253
4. Copy Backup Configurations to the Router on page 253
Configure Host Names, Domain Names, and IP Addresses
To configure the machine name, domain name, and various addresses, follow these
steps:
1. Log in as root. There is no password.
2. Start the CLI:
root# cliroot@>
3. Enter configuration mode:
cli> configure[edit]root@#
249Copyright © 2018, Juniper Networks, Inc.
Chapter 11: Reinstalling Software

4. Configure the name of the machine. If the name includes spaces, enclose the entire
name in quotation marks (" "):
[edit]root@# set system host-name host-name
5. Configure the machine’s domain name:
[edit]root@# set system domain-name domain-name
6. Configure the IP address and prefix length for the router’s management Ethernet
interface:
[edit]root@# set interfaces fxp0 unit 0 family inet address address / prefix-length
7. Configure the IP address of a default router. This system is called the backup router
because it is used only while the routing protocol process is not running.
[edit]root@# set system backup-router address
8. Configure the IP address of a Domain Name Server (DNS) server:
[edit]root@# set system name-server address
Copyright © 2018, Juniper Networks, Inc.250
Installation and Upgrade Guide

Protecting Network Security by Configuring the Root Password
Configuring the root password on your Junos OS-enabled router helps prevent
unauthorized users frommaking changes to your network. The root user (also referred
to as superuser) has unrestricted access and full permissions within the system, so it is
crucial to protect these functions by setting a strong password when setting up a new
router.
After a new router is initially powered on, you log in as the user rootwith no password.
Junos OS requires configuration of the root password before it accepts a commit
operation.Onanewdevice, the root passwordmust alwaysbeapart of the configuration
submitted with your initial commit.
To set the root password, you have a few options as shown in Step 1 of the following
procedure.
• Enter a plain-text password that Junos OS encrypts.
• Enter a password that is already encrypted.
• Enter a secure shell (ssh) public key string.
Themost secure options of these three are using an already encrypted password or an
sshpublic key string. Pre-encrypting your passwordor usinga sshpublic key stringmeans
the plain-text version of your password will never be transferred over the internet,
protecting it from being intercepted by aman-in-the-middle attack.
BEST PRACTICE: Optionally, instead of configuring the root password at the[edit system]hierarchy level, you can use a configuration group to strengthen
security, as shown in Step 2 of this procedure. This step uses a group calledglobal as an example.
To set the root password:
251Copyright © 2018, Juniper Networks, Inc.
Chapter 11: Reinstalling Software

1. Use one of these methods to configure the root password:
• To enter a plain-text password that the system encrypts for you:
[edit groups global system]root@# set root-authentication plain-text-passwordNewPassword: type password hereRetype new password: retype password here
If you use a plain-text password, Junos OS displays the password as an encrypted
stringso thatusers viewing theconfigurationcannot see it. Asyouenter thepassword
in plain text, Junos OS encrypts it immediately. You do not have to configure Junos
OS to encrypt the password as in some other systems. Plain-text passwords are
hidden andmarked as ## SECRET-DATA in the configuration.
• To enter a password that is already encrypted:
CAUTION: Do not use the encrypted-password option unless the
password is already encrypted, and you are entering the encryptedversion of the password.
If you accidentally configure the encrypted-password option with a
plain-text password orwith blank quotationmarks (" "), youwill not beable to log in to the device as root, and you will need to complete theroot password recovery process.
[edit groups global system]root@# set root-authentication encrypted-password password
• To enter an ssh public key string:
[edit groups global system]root@# set root-authentication (ssh-dsa | ssh-ecdsa | ssh-rsa key)
2. (Optional) Strengthen security by only allowing root access from the console port.
[edit groups global system]root@# set services ssh root-login deny
3. If you used a configuration group in Step 2, apply the configuration group, substituting
globalwith the appropriate group name.
[edit]user@host# set apply-groups global
4. Commit the changes.
root@# commit
See Also Accessing a Junos OS Device the First Time•
• Understanding User Accounts
• Recovering the Root Password
Copyright © 2018, Juniper Networks, Inc.252
Installation and Upgrade Guide

Check Network Connectivity
Purpose Establish that the router has network connectivity.
Action To check that the router has network connectivity, issue a ping command to a system
on the network:
root@> ping address
If there is no response, verify that there is a route to the address using the show route
command. If the address is outside your fxp0 subnet, adda static route.Once thebackup
configuration is loaded and committed, the static route is no longer needed and should
be deleted.
Copy Backup Configurations to the Router
To copy backup configurations to the router, follow these steps:
1. Tocopy theexistingconfigurationandanybackupconfigurationsbackonto the router,
use the file copy command. Place the files in the /var/tmp directory.
user@host> file copy var/tmp/filename
2. Load and activate the desired configuration:
root@> configure[edit]root@# loadmerge/config/filename or load replace/config/filename[edit]root@# commit
Configure Host Names, Domain Names, and IP Addresses
To configure the machine name, domain name, and various addresses, follow these
steps:
1. Log in as root. There is no password.
2. Start the CLI:
root# cliroot@>
3. Enter configuration mode:
cli> configure[edit]root@#
4. Configure the name of the machine. If the name includes spaces, enclose the entire
name in quotation marks (" "):
[edit]root@# set system host-name host-name
253Copyright © 2018, Juniper Networks, Inc.
Chapter 11: Reinstalling Software

5. Configure the machine’s domain name:
[edit]root@# set system domain-name domain-name
6. Configure the IP address and prefix length for the router’s management Ethernet
interface:
[edit]root@# set interfaces fxp0 unit 0 family inet address address / prefix-length
7. Configure the IP address of a default router. This system is called the backup router
because it is used only while the routing protocol process is not running.
[edit]root@# set system backup-router address
8. Configure the IP address of a Domain Name Server (DNS) server:
[edit]root@# set system name-server address
Copyright © 2018, Juniper Networks, Inc.254
Installation and Upgrade Guide

Protecting Network Security by Configuring the Root Password
Configuring the root password on your Junos OS-enabled router helps prevent
unauthorized users frommaking changes to your network. The root user (also referred
to as superuser) has unrestricted access and full permissions within the system, so it is
crucial to protect these functions by setting a strong password when setting up a new
router.
After a new router is initially powered on, you log in as the user rootwith no password.
Junos OS requires configuration of the root password before it accepts a commit
operation.Onanewdevice, the root passwordmust alwaysbeapart of the configuration
submitted with your initial commit.
To set the root password, you have a few options as shown in Step 1 of the following
procedure.
• Enter a plain-text password that Junos OS encrypts.
• Enter a password that is already encrypted.
• Enter a secure shell (ssh) public key string.
Themost secure options of these three are using an already encrypted password or an
sshpublic key string. Pre-encrypting your passwordor usinga sshpublic key stringmeans
the plain-text version of your password will never be transferred over the internet,
protecting it from being intercepted by aman-in-the-middle attack.
BEST PRACTICE: Optionally, instead of configuring the root password at the[edit system]hierarchy level, you can use a configuration group to strengthen
security, as shown in Step 2 of this procedure. This step uses a group calledglobal as an example.
To set the root password:
255Copyright © 2018, Juniper Networks, Inc.
Chapter 11: Reinstalling Software

1. Use one of these methods to configure the root password:
• To enter a plain-text password that the system encrypts for you:
[edit groups global system]root@# set root-authentication plain-text-passwordNewPassword: type password hereRetype new password: retype password here
If you use a plain-text password, Junos OS displays the password as an encrypted
stringso thatusers viewing theconfigurationcannot see it. Asyouenter thepassword
in plain text, Junos OS encrypts it immediately. You do not have to configure Junos
OS to encrypt the password as in some other systems. Plain-text passwords are
hidden andmarked as ## SECRET-DATA in the configuration.
• To enter a password that is already encrypted:
CAUTION: Do not use the encrypted-password option unless the
password is already encrypted, and you are entering the encryptedversion of the password.
If you accidentally configure the encrypted-password option with a
plain-text password orwith blank quotationmarks (" "), youwill not beable to log in to the device as root, and you will need to complete theroot password recovery process.
[edit groups global system]root@# set root-authentication encrypted-password password
• To enter an ssh public key string:
[edit groups global system]root@# set root-authentication (ssh-dsa | ssh-ecdsa | ssh-rsa key)
2. (Optional) Strengthen security by only allowing root access from the console port.
[edit groups global system]root@# set services ssh root-login deny
3. If you used a configuration group in Step 2, apply the configuration group, substituting
globalwith the appropriate group name.
[edit]user@host# set apply-groups global
4. Commit the changes.
root@# commit
RelatedDocumentation
Accessing a Junos OS Device the First Time•
• Understanding User Accounts
• Recovering the Root Password
Copyright © 2018, Juniper Networks, Inc.256
Installation and Upgrade Guide

Check Network Connectivity
Purpose Establish that the router has network connectivity.
Action To check that the router has network connectivity, issue a ping command to a system
on the network:
root@> ping address
If there is no response, verify that there is a route to the address using the show route
command. If the address is outside your fxp0 subnet, adda static route.Once thebackup
configuration is loaded and committed, the static route is no longer needed and should
be deleted.
Copy Backup Configurations to the Router
To copy backup configurations to the router, follow these steps:
1. Tocopy theexistingconfigurationandanybackupconfigurationsbackonto the router,
use the file copy command. Place the files in the /var/tmp directory.
user@host> file copy var/tmp/filename
2. Load and activate the desired configuration:
root@> configure[edit]root@# loadmerge/config/filename or load replace/config/filename[edit]root@# commit
After You Reinstall Junos OS
To verify that the new version of the Junos OS is running as expected after the reinstall,
follow these steps:
1. Compare Information Logged Before and After the Reinstall on page 257
2. Back Up the New Software on page 258
Compare Information Logged Before and After the Reinstall
Purpose Compare the operation of the system before and after the reinstall to ensure that
everything is working as expected.
Action To obtain system information, use the following commands:
user@host> show versionuser@host> show chassis hardwareuser@host> show chassis environmentuser@host> show system boot-messages
257Copyright © 2018, Juniper Networks, Inc.
Chapter 11: Reinstalling Software

user@host> show configurationuser@host> show interface terseuser@host> show bgp summaryuser@host> show isis adjacency briefuser@host> show ospf neighbor briefuser@host> show system storage
Compare the information from these commands with the information you obtained
before the reinstall.
Back Up the New Software
Purpose After a week or so, when you are satisfied that the new software is running successfully,
we recommend that you back up the reinstalled software.
Action To back up the reinstalled software, use the following Junos OS CLI operational mode
command:
user@host> request system snapshot
The root file system is backed up to /altroot, and /config is backed up to /altconfig. The
root and /config file systems are on the router’s internal flash drive, and the /altroot and
/altconfig file systems are on the router’s hard drive.
NOTE: After you issue the request system snapshot command, you cannot
return to thepreviousversionof thesoftwarebecause the runningandbackupcopies of the software are identical.
Compare Information Logged Before and After the Reinstall
Purpose Compare the operation of the system before and after the reinstall to ensure that
everything is working as expected.
Action To obtain system information, use the following commands:
user@host> show versionuser@host> show chassis hardwareuser@host> show chassis environmentuser@host> show system boot-messagesuser@host> show configurationuser@host> show interface terseuser@host> show bgp summaryuser@host> show isis adjacency briefuser@host> show ospf neighbor briefuser@host> show system storage
Compare the information from these commands with the information you obtained
before the reinstall.
Copyright © 2018, Juniper Networks, Inc.258
Installation and Upgrade Guide

Back Up the New Software
Purpose After a week or so, when you are satisfied that the new software is running successfully,
we recommend that you back up the reinstalled software.
Action To back up the reinstalled software, use the following Junos OS CLI operational mode
command:
user@host> request system snapshot
The root file system is backed up to /altroot, and /config is backed up to /altconfig. The
root and /config file systems are on the router’s internal flash drive, and the /altroot and
/altconfig file systems are on the router’s hard drive.
NOTE: After you issue the request system snapshot command, you cannot
return to thepreviousversionof thesoftwarebecause the runningandbackupcopies of the software are identical.
259Copyright © 2018, Juniper Networks, Inc.
Chapter 11: Reinstalling Software

Copyright © 2018, Juniper Networks, Inc.260
Installation and Upgrade Guide

CHAPTER 12
Downgrading Software
• Downgrading Junos OS from Upgraded FreeBSD on page 261
Downgrading Junos OS fromUpgraded FreeBSD
Starting in Junos OS Release 15.1, certain hardware platforms run a Junos OS based on
an upgraded FreeBSD kernel instead of older versions of FreeBSD. If you have previously
upgraded to Junos OSwith upgraded FreeBSD, you can downgrade to earlier versions
versions of Junos OS, as long as the downgrade conforms to the Junos OS policy of
skipping at most two earlier releases.
Before you begin:
1. Verify that you have previously upgraded to Junos OSwith the upgraded FreeBSD
kernel, as described in “Upgrading Junos OSwith Upgraded FreeBSD” on page 160.
2. Download the Junos OS package.
Select and perform the procedure that matches your conditions:
• Downgrading from Junos OSwith Upgraded FreeBSD to Junos OS on page 261
• Downgrading from JunosOSwithUpgraded FreeBSDRelease 17.4 or Later to an Earlier
Release of Junos OSwith Upgraded FreeBSD on page 262
• Downgrading fromJunosOSwithUpgradedFreeBSDRelease 17.3or Earlier toanEarlier
Release of Junos OSwith Upgraded FreeBSD on page 263
Downgrading from Junos OSwith Upgraded FreeBSD to Junos OS
This example uses the package /var/tmp/jinstall-13.3R2.7-domestic-signed.tgz to install
Junos OSwith a pre-upgraded FreeBSD kernel on the master Routing Engine (re0).
NOTE: The following procedure refers to routers, but it also applies toswitches.
To downgrade from Junos OSwith upgraded FreeBSD to Junos OS:
1. Enter the request system software add package-name no-validate reboot command
from the operational mode in the CLI.
261Copyright © 2018, Juniper Networks, Inc.

Usetheno-validateand rebootoptionswith the requestsystemsoftwareaddcommand.
If you leave out the no-validate option, the command uses the validate option by
default, and direct validation of running configuration does not work for downgrading
to Junos OS from Junos OSwith upgraded FreeBSD.
NOTE: To validate current configuration on an downgrade to Junos OSfrom Junos OSwith upgraded FreeBSD, use the request system software
validate on (Junos OSwith Upgraded FreeBSD) command.
If you leave out the reboot option, you can take care of that in a separate reboot step.
The following example uses the re0 option:
user@host>request system software add/var/tmp/jinstall-13.3R2.7-domestic-signed.tgz re0 no-validate rebootTHIS IS A SIGNED PACKAGE Saving the config files ...NOTICE: uncommitted changes have been saved in/var/db/config/juniper.conf.pre-install Rebooting. Please wait ...shutdown: [pid 11001] Shutdown NOW! *** FINAL System shutdown messagefrom root@host *** System going down IMMEDIATELY Shutdown NOW! Systemshutdown time has arrived\x07\x07 users@host> Connection todevice1.example.com closed by remote host. Connection todevice1.example.com closed. ... user@router> show version Hostname: hostModel: mx240Junos: 13.3R2.7JUNOS Base OS boot [13.3R2.7]JUNOS Base OS Software Suite [13.3R2.7]JUNOS Kernel Software Suite [13.3R2.7]JUNOS Crypto Software Suite [13.3R2.7]JUNOS Packet Forwarding Engine Support (M/T/EX Common) [13.3R2.7]JUNOS Packet Forwarding Engine Support (MX Common) [13.3R2.7]JUNOS Online Documentation [13.3R2.7]JUNOS Services AACL Container package [13.3R2.7] ...
2. Verify the downgrade of the software package.
user@host> show version
NOTE: The output shows the OS kernel, OS runtime, and other packagesinstalled on the router.
Downgrading from JunosOSwithUpgradedFreeBSDRelease 17.4 or Later to anEarlier Releaseof Junos OSwith Upgraded FreeBSD
This procedure is applicable when downgrading from Junos OSwith Upgraded FreeBSD
Release 17.4 or later to an earlier release of Junos OSwith Upgraded FreeBSD.
NOTE: If you have important files in other directories, copy them from therouter or switch to a secure location before upgrading the router or switch.
Copyright © 2018, Juniper Networks, Inc.262
Installation and Upgrade Guide

NOTE: The following procedure refers to routers, but it also applies toswitches.
To downgrade from Junos OSwith upgraded FreeBSD Release 17.3 or earlier to an earlier
release of Junos OSwith upgraded FreeBSD:
1. Enter the request system software add package-name no-validate reboot command
from the operational mode in the CLI:
NOTE: The no-copy option is enabled by default.
Usetheno-validateand rebootoptionswith the requestsystemsoftwareaddcommand.
If you leave out the no-validate option, the command uses the validate option by
default, and direct validation of running configuration does not work for downgrading
toanearlier releaseof JunosOSwithupgradedFreeBSDfromJunosOSwithupgraded
FreeBSD Release 17.4 or later.
NOTE: To validate current configuration on an downgrade from JunosOSwith upgraded FreeBSD Release 17.4 or later to an earlier release of JunosOSwith upgraded FreeBSD, use the request system software validate on
(Junos OSwith Upgraded FreeBSD) command.
If you leave out the reboot option, you can take care of that in a separate reboot step.
The new Junos OS image is installed on the router.
2. Verify the installation of Junos OSwith upgraded FreeBSD:
user@host> show version
NOTE: The output shows the OS kernel, OS runtime, and other packagesinstalled on the router.
DowngradingfromJunosOSwithUpgradedFreeBSDRelease17.3orEarlier toanEarlierReleaseof Junos OSwith Upgraded FreeBSD
This procedure is applicable when downgrading from Junos OSwith Upgraded FreeBSD
Releases 17.3 through 15.1 to an earlier release of Junos OSwith Upgraded FreeBSD.
NOTE: If you have important files in other directories, copy them from therouter or switch to a secure location before upgrading the router or switch.
263Copyright © 2018, Juniper Networks, Inc.
Chapter 12: Downgrading Software

NOTE: The following procedure refers to routers, but it also applies toswitches.
To downgrade from Junos OSwith upgraded FreeBSD Release 17.3 or earlier to an earlier
release of Junos OSwith upgraded FreeBSD:
1. Enter the request system software add package-name validate reboot command from
the operational mode in the CLI:
NOTE: The no-copy option is enabled by default.
Use the validate and reboot options with the request system software add command.
The command uses the validate option by default. We encourage users to validate
using the validate option when upgrading from Junos OS to Junos OS, or from Junos
OSwith upgradedFreeBSDRelease 17.3 or earlier to JunosOSwith upgradedFreeBSD
Release 17.2 or earlier.
If you leave out the reboot option, you can take care of that in a separate reboot step.
The new Junos OS image is installed on the router.
2. Verify the installation of Junos OSwith upgraded FreeBSD:
user@host> show version
NOTE: The output shows the OS kernel, OS runtime, and other packagesinstalled on the router.
RelatedDocumentation
• Upgrading Junos OSwith Upgraded FreeBSD on page 160
• Release Information for Junos OSwith Upgraded FreeBSD on page 17
• request system snapshot (Junos OSwith Upgraded FreeBSD) on page 427
• request system reboot (Junos OSwith Upgraded FreeBSD) on page 411
Copyright © 2018, Juniper Networks, Inc.264
Installation and Upgrade Guide

CHAPTER 13
Rebooting or Halting Software Processeson a Device
• Restarting and Halting SRX Series Devices on page 265
• Rebooting or Halting the EX Series Switch (J-Web Procedure) on page 270
Restarting and Halting SRX Series Devices
This topic includes the following sections:
• Rebooting SRX Series Devices on page 265
• Halting SRX Series Devices on page 267
• Bringing Chassis Components Online and Offline on SRX Series Devices on page 269
• Restarting the Chassis on SRX Series Devices on page 270
Rebooting SRX Series Devices
This example shows how to reboot a SRX Series device.
• Requirements on page 265
• Overview on page 265
• Configuration on page 265
• Verification on page 267
Requirements
Before rebooting the device, save and commit any Junos OS updates.
Overview
This example shows how to reboot a device fifty minutes fromwhen you set the time
from the internalmediawhile sending a textmessage of ’stop’ to all system users before
the device reboots.
Configuration
CLI QuickConfiguration
To quickly configure this section of the example, copy the following commands, paste
them into a text file, remove any line breaks, change any details necessary tomatch your
265Copyright © 2018, Juniper Networks, Inc.

network configuration, copy and paste the commands into the CLI at the [edit] hierarchy
level, and then enter commit from configuration mode.
From operational mode, enter:
user@host> request system reboot at 5 in 50media internal message stop
GUI Step-by-StepProcedure
To reboot a device:
1. In the J-Web user interface, selectMaintain>Reboot.
2. Select Reboot in 50minutes to reboot the device fifty minutes from the current time.
3. Select the internal (for SRX Series devices) boot device from the Reboot FromMedia
list.
4. In the Message box, type stop as the message to display to any user on the devicebefore the reboot occurs.
5. ClickSchedule. The J-Webuser interface requests confirmation toperform the reboot.
6. ClickOK to confirm the operation.
• If the reboot is scheduled to occur immediately, the device reboots. You cannot
access J-Web until the device has restarted and the boot sequence is complete.
After the reboot is complete, refresh the browserwindow to display the J-Web login
page.
• If the reboot is scheduled to occur in the future, the Reboot page displays the time
until reboot. You have the option to cancel the request by clicking Cancel Reboot
on the J-Web user interface Reboot page.
7. ClickOK to check your configuration and save it as a candidate configuration.
8. If you are done configuring the device, click Commit Options>Commit.
Step-by-StepProcedure
The following example requires you to navigate various levels in the configuration
hierarchy. For instructions on how to do that, see Using the CLI Editor in Configuration
Mode in the CLI User Guide.
To reboot a device:
Fromoperationalmode, schedulea rebootof thedevice tooccur fiftyminutes fromwhen
you set the time from the internal media while sending a text message of ’stop’ to all
system users before the device reboots.
Enter:
user@host> request system reboot at 5 in 50media internal message stop
Copyright © 2018, Juniper Networks, Inc.266
Installation and Upgrade Guide

Results From configuration mode, confirm your configuration by entering the show system
command. If the output does not display the intended configuration, repeat the
configuration instructions in this example to correct it.
If you are done configuring the device, enter commit from configuration mode.
Verification
Confirm that the configuration is working properly.
• Verifying the Device Reboot on page 267
Verifying the Device Reboot
Purpose Verify that the device rebooted.
Action From operational mode, enter the show system command.
See Also Example: Creating a Snapshot and Using It to Boot an SRX Series Device on page 211•
• Example: Installing Junos OS Upgrade Packages on SRX Series Devices on page 185
• Reverting the Junos OS Software Image Back to the Previous Version on page 191
Halting SRX Series Devices
This example shows how to halt a device.
• Requirements on page 267
• Overview on page 267
• Configuration on page 268
• Verification on page 269
Requirements
Before halting the device, save and commit any Junos OS updates.
Overview
When the device is halted, all software processes stop and you can access the device
through the console port only. Reboot the device by pressing any key on the keyboard.
NOTE: If you cannot connect to the device through the console port, shutdown thedevicebypressing andholding thepower buttonon the front paneluntil thePOWERLEDturnsoff.After thedevicehasshutdown, youcanpower
on the device by pressing the power button again. The POWER LED turns on
during startup and remains steadily green when the device is operatingnormally.
267Copyright © 2018, Juniper Networks, Inc.
Chapter 13: Rebooting or Halting Software Processes on a Device

This example shows how to halt the system and stop software processes on the device
immediately.
Configuration
CLI QuickConfiguration
To quickly configure this section of the example, copy the following commands, paste
them into a text file, remove any line breaks, change any details necessary tomatch your
network configuration, copy and paste the commands into the CLI at the [edit] hierarchy
level, and then enter commit from configuration mode.
From operational mode, enter:
user@host>request system halt at now
NOTE: The request system halt command used for halting the system and
stopping software processes on the device is not supported on SRX1500,SRX4100, and SRx4200 devices.
GUI Step-by-StepProcedure
To halt a device immediately:
1. In the J-Web user interface, selectMaintain>Reboot.
2. Select Halt Immediately. After the software stops, you can access the device through
the console port only.
3. Click Schedule. The J-Web user interface requests confirmation to halt.
4. ClickOK to confirm the operation. If the device halts, all software processes stop and
youcanaccess thedevice through theconsoleport only. Reboot thedevicebypressing
any key on the keyboard.
5. ClickOK to check your configuration and save it as a candidate configuration.
6. If you are done configuring the device, click Commit Options>Commit.
Step-by-StepProcedure
The following example requires you to navigate various levels in the configuration
hierarchy. For instructions on how to do that, see Using the CLI Editor in Configuration
Mode in the CLI User Guide.
To halt a device:
From operational mode, halt the SRX Series device immediately.
user@host> request system halt at now
Copyright © 2018, Juniper Networks, Inc.268
Installation and Upgrade Guide

Results From configuration mode, confirm your configuration by entering the show system
command. If the output does not display the intended configuration, repeat the
configuration instructions in this example to correct it.
If you are done configuring the device, enter commit from configuration mode.
Verification
Confirm that the configuration is working properly.
• Verifying the Device Halt on page 269
Verifying the Device Halt
Purpose Verify that the device halted.
Action From operational mode, enter the show system command.
See Also Example: Creating a Snapshot and Using It to Boot an SRX Series Device on page 211•
• Example: Installing Junos OS Upgrade Packages on SRX Series Devices on page 185
• Reverting the Junos OS Software Image Back to the Previous Version on page 191
Bringing Chassis Components Online and Offline on SRX Series Devices
You can use the request commands to bring chassis components (except Power Entry
Modules and fans) online and offline.
To bring chassis components online and offline, enter these request chassis commands:
user@host> request chassis <fru> slot <slot#> pic <pic#> online
user@host> request chassis <fru> slot <slot#> pic <pic#> online
Where <fru> in the request chassis command can be any of the following (for SRX300,SRX320, SRX340, SRX345, and SRX550M devices):
• fpc—Changes the Flexible PIC Concentrator (FPC) status.
Where<fru> in the request chassis command canbe any of the following (for SRX5800,SRX5600, and SRX5400 devices):
• cb—Changes the control board status.
• fabric—Changes the fabric status.
• fpc—Changes the Flexible PIC Concentrator (FPC) status.
• fpm—Changes the craft interface status.
• pic—Changes the physical interface card status.
• routing-engine—Changes the routing engine status.
269Copyright © 2018, Juniper Networks, Inc.
Chapter 13: Rebooting or Halting Software Processes on a Device

NOTE: The request chassis command is not supported for bringing SPCs
online and offline.
Example:
To bring specific pic and the corresponding fpc slot online, from operational mode enter
the following request chassis command:
user@host> request chassis pic pic-slot 1 fpc-slot 1 online
See Also Example: Creating a Snapshot and Using It to Boot an SRX Series Device on page 211•
• Example: Installing Junos OS Upgrade Packages on SRX Series Devices on page 185
• Reverting the Junos OS Software Image Back to the Previous Version on page 191
Restarting the Chassis on SRX Series Devices
You can restart the chassis using the restart chassis-control commandwith the following
options:
• To restart the process gracefully:
user@host> restart chassis-control gracefully
• To restart the process immediately:
user@host> restart chassis-control immediately
• To restart the process softly:
user@host> restart chassis-control soft
See Also Example: Creating a Snapshot and Using It to Boot an SRX Series Device on page 211•
• Example: Installing Junos OS Upgrade Packages on SRX Series Devices on page 185
• Reverting the Junos OS Software Image Back to the Previous Version on page 191
Rebooting or Halting the EX Series Switch (J-Web Procedure)
You can use the J-Web interface to schedule a reboot or to halt the switching platform.
To reboot or halt the switching platform by using the J-Web interface:
1. In the J-Web interface, selectMaintain > Reboot.
2. Select one:
Copyright © 2018, Juniper Networks, Inc.270
Installation and Upgrade Guide

• Reboot Immediately—Reboots the switching platform immediately.
• Reboot in number ofminutes—Reboots the switch in the number of minutes from
now that you specify.
• Reboot when the system time is hour:minute—Reboots the switch at the absolute
time that you specify, on the current day. Youmust select a 2-digit hour in 24-hour
format and a 2-digit minute.
• Halt Immediately—Stops the switching platform software immediately. After the
switching platform software has stopped, you can access the switching platform
through the console port only.
3. (Optional) In the Message box, type amessage to be displayed to any users on the
switching platform before the reboot occurs.
4. Click Schedule. The J-Web interface requests confirmation to perform the reboot or
halt.
5. ClickOK to confirm the operation.
• If the reboot is scheduled to occur immediately, the switch reboots. You cannot
access the J-Web interface until the switch has restarted and the boot sequence
is complete. After the reboot is complete, refresh the browser window to display
the J-Web interface login page.
• If the reboot is scheduled to occur in the future, the Reboot page displays the time
until reboot. You have the option to cancel the request by clicking Cancel Reboot
on the J-Web interface Reboot page.
• If the switch is halted, all software processes stop and you can access the switching
platform through the console port only. Reboot the switch by pressing any key on
the keyboard.
RelatedDocumentation
• Starting the J-Web Interface
271Copyright © 2018, Juniper Networks, Inc.
Chapter 13: Rebooting or Halting Software Processes on a Device

Copyright © 2018, Juniper Networks, Inc.272
Installation and Upgrade Guide

CHAPTER 14
OverviewofRoutingEngineswithVMHostSupport
• Routing Engines with VM Host Support on page 273
• Architecture of Routing Engines with VM Host Support on page 274
• Salient Features of the Routing Engines with VM Host Support on page 275
• Routers with VM Host Support-Boot Process on page 279
• VMHost Installation on page 280
• Copying VM Host Installation Package to the PXE Boot Server on page 285
• Upgrading the SSD Firmware on Routing Engines with VM Host Support on page 287
• Disabling Autorecovery on Routing Engines with VM Host Support on page 289
• VMHost Operations and Management on page 289
Routing Engines with VMHost Support
The Routing Engines RE-MX-X6, RE-MX-X8, RE-PTX-X8 and RCBPTX not only provide
increased control plane scalability and performance but also provide virtualization
capabilities to the Junos OS infrastructure to support greater computing demands.
Virtualization enables multiple instances of operating systems, called guests, to run
concurrently on the host and share virtualized hardware resources. A guest is a virtual
machine (VM) that runs on a hypervisor-based host and shares its resources. A host is
avirtualizedsoftwarewhosehypervisorallowsmultipleguestVMs to runon it concurrently
andshare its resources.AVMcanbean instanceof JunosOSoranycompatible third-party
VM. EachVM runs its ownoperating system image and applications that can be different
from that of another VM running on the same host.
On the RE-MX-X6, RE-MX-X8, RE-PTX-X8, and RCBPTX Routing Engines, one instance
of Junos OS runs as a VM over a Linux-based host (VM host) and serves as the VM
operating in the administrative context. Junos OSmanages all configurations, chassis
control, communication with the host OS, and user interface command execution, thus
providing near-native Junos OS experience to the end user.
Table 29 on page 274 lists the hardware specifications of the Routing Engines.
273Copyright © 2018, Juniper Networks, Inc.

Table 29: Hardware Specifications of the RE-MX-X6, RE-MX-X8, RE-PTX-X8, and RCBPTX,Routing Engines
SpecificationsSupported on RouterModel Number
• 6-core Haswell CPU
• Wellsburg PCH-based Routing Engine with 64-GB DRAM and two64-GB solid-state drives (SSDs)
MX240, MX480, andMX960
RE-S-X6-64G
• 8-core Haswell CPU
• Wellsburg PCH-based Routing Engine with 64-GB DRAM and two64-GB SSDs
MX2020 and MX2010REMX2K-X8-64G
• 8-core Haswell CPU
• Wellsburg PCH-based Routing Engine with 64-GB DRAM and two64-GB SSDs
• New Control Board CB2-PTX
PTX5000RE-PTX-X8-64G
• Wellsburg PCH-based Routing Engine with 64-GB DRAM and two64-GB SSDs
• Multi-core Haswell CPU
RCB combines the functionality of a Routing Engine, Control Board,and Centralized Clock Generator (CCG)
PTX3000RCBPTX
NOTE: Platformsupportdependson the JunosOSrelease inyour installation.
RelatedDocumentation
Supported Routing Engines by Router•
Architecture of Routing Engines with VMHost Support
Figure 18onpage275 illustrates thearchitectureofRE-MX-X6,RE-MX-X8,andRE-PTX-X8
Routing Engines. It comprises the following components:
• The hardware layer
• The operating system and hypervisor layer.
• The host utilities and Junos VM guest layer.
The server at the hardware layer contains the physical network interface cards (NICs),
CPUs,memory, andEthernetmanagementport. TheNICssupporthardwarevirtualization
based on single root I/O virtualization (SR-IOV). With SR-IOV, the physical NICs (known
asaphysical functions)aremanagedby thehost,while the virtual functionsaremanaged
by theguestOS.Over thehardware layer, aLinux-basedOSprovides thehostenvironment
along with the kernel-based virtual machine (KVM) and Quick Emulator (QEMU). This
host OSmanages the boot complex, CPUmemory storage, and various other hardware
components such as the physical functions. Junos OS runs as guest OS, manages the
Copyright © 2018, Juniper Networks, Inc.274
Installation and Upgrade Guide

virtual functions, andservesas theadministrative framework.Additionally, it alsoprovides
the interface for managing the host and the hypervisor.
The additional applications and utilities running on the host OS assist in providing the
following functionality:
• Facilitating communication between host OS and guest OS.
• Triggering appropriate execution of the host OS based on the command and
configuration on the guest Junos OS.
• Extending theVMmanagement functionality to provide features such as autorecovery.
Figure 18: ArchitectureofRE-MX-X6,RE-MX-X8andRE-PTX-X8RoutingEngines
RelatedDocumentation
Routing Engines with VM Host Support on page 273•
Salient Features of the Routing Engines with VMHost Support
While continuing toprovide the sameend-user experience, thenewarchitectureprovides
a better performing Routing Engine.
The following are the salient features of the Routing Engines:
Platform Virtualization
Platform virtualization by the introduction of a middle layer that comprises the host OS
and the KVM (or the hypervisor).
• Enables support for multiple instances of Junos OS to be run concurrently.
275Copyright © 2018, Juniper Networks, Inc.
Chapter 14: Overview of Routing Engines with VM Host Support

• Enables support for third-party software to be run directly.
Hardware Assisted Paravirtualized Guest Junos OS
Provides the user with the benefits of platform virtualization along with the default
performance and functionality. Paravirtualization is a virtualization technique in which a
software component similar to the underlying hardware component resides in the VM
and interacts with the hypervisor to execute many operations. In contrast to full
virtualization, this technique reduces the overhead of virtualization in the VM.
Guest Junos OS to Serve as the Administrative Framework
The configurations, chassis control, communicationwith the host OS, and user interface
command execution are managed by the guest Junos OS.
Storage Partitioning and Redundancy
An Internal solid-statedrive (SSD) is usedasbootmedia for operating theRoutingEngine.
Additional options such as USB storage and network boot are available for installation
and recovery purposes. A set of two 50-GB SSDs is available for normal functioning of
the Routing Engine. The Routing Engine requires both the SSDs to be functional. Storage
partitioning is important for debugging the Routing Engine, for new installations, and for
SSD replacement.
Of the two SSDs, one SSD is the primary disk and the other SSD is the backup disk. Two
sets of software boot images are available on the primary disk. You can use one set of
images for booting and the other set of images for upgrade purposes. Until a software
upgrade or a software rollback is performed, the BIOS is programmed to boot from the
same set of images on the SSD.
Both the SSDs are partitioned to provide host boot partition, root partition, and partition
for the guest image storage. The host boot partition contains the boot loader, which is
the software responsible for booting the OS, Linux kernel, and RAM file system. The root
partition contains the root file system for the host OS.
Figure 19 on page 277 shows the partitioning of SSDs.
Copyright © 2018, Juniper Networks, Inc.276
Installation and Upgrade Guide

Figure 19: SSD Partitioning
Each SSD partition contains more than one set of fully functional host software. In case
of a boot failure on the primary SSD, the router can boot by using the snapshot available
on the alternate SSD. This snapshot can be generated by a fresh installation or by using
the request vmhost snapshot command.
RelatedDocumentation
request vmhost snapshot on page 546•
• request vmhost reboot on page 488
• request vmhost power-off on page 541
• Upgrading the SSD Firmware on Routing Engines with VM Host Support on page 287
NTP and Time Zone
The date and time zones are synchronized from the administrative guest Junos OS to
the host OS. Therefore, the timestamps in system log files of Junos OS and the host OS
are synchronized.
Autorecovery
The automatic recovery (autorecovery) feature provides the following functions:
• Detecting corruptions in disk partitioning during system startup and attempting to
recover partitions automatically
• Detecting corruptions in the Junos OS configuration during system startup and
attempting to recover the configuration automatically, thereby ensuring that the
operations andmanagement are not disrupted.
• Detecting corruptions in Junos OS licenses during system startup and attempting to
recover licenses automatically.
During the process of recovery, the host OS tries to launch the Junos VM from the image
available on the primary disk. However, if the Junos VM fails to launch, the host OS
attempts to launch the Junos VM from the snapshot of the host OS image and Junos OS
277Copyright © 2018, Juniper Networks, Inc.
Chapter 14: Overview of Routing Engines with VM Host Support

image available in the backup disk, provided request vmhost snapshotwas the last
operation performed. If the backup disk does not contain the snapshot, the host OS
attempts to launch the Junos VM from the software available in the alternate set in the
primary disk, provided request vmhost upgradewas the last operation performed.
The autorecovery feature is enabled by default on the guest OS. If you need to disable
autorecovery—for example, to examine the failure state for debugging—use the following
command:
user@host> set vmhost no-auto-recovery
RelatedDocumentation
Disabling Autorecovery on Routing Engines with VM Host Support on page 289•
Handling Reboot and Power Off
You can reboot the Routing Engine by using the request vmhost reboot command. This
command reboots the Routing Engine by rebooting both the guest Junos OS and the
host OS. However, reboot of the Routing Engine can be triggered because of various
reasons. The events or the reasons that trigger a host OS reboot are different from those
that trigger a guest OS reboot.
Guest OS reboot implies that only the Junos OS is rebooted, and that the host OS is up
and running. The following are a few of the reasons that trigger a guest OS reboot:
• Reboot due to panic
• VJUNOS reboot—Guest OS reboot after a shutdown.
• VJUNOSwatchdog from host—Guest reboot due to emulated watchdog timer expiry
Host OS reboot implies that both the host OS and the guest OS (here, Junos OS) are
rebooted. The following are a few reasons that trigger a host OS and guest OS reboot:
• Hypervisor reboot
• Power cycle or power failure
• Reboot due to exception.
• Reset-button reset—Reboot triggered by the pressing of the reset button on the front
panel.
• Thermal shutdown
• Watchdog—Reboot due to PCHwatchdog timer expiry
Youcan find the reason for the rebootbyusing the showchassis routing-enginecommand
or the show vmhost uptime command.
For example:
host@router> show chassis routing-engine 0 |match "Last reboot reason”Last reboot reason 0x4000:VJUNOS reboot
host@router> show vmhost uptime re0 |match “Vmhost last reboot reason”
Copyright © 2018, Juniper Networks, Inc.278
Installation and Upgrade Guide

Vmhost last reboot reason: 0x2000:hypervisor reboot
If the Routing Engine finishes booting and if you need to power off the router again, run
the request vmhost power-off command. If you want the Routing Engine to reboot, use
the request vmhost reboot command.
RelatedDocumentation
request vmhost snapshot on page 546•
• request vmhost reboot on page 488
• request vmhost power-off on page 541
• Disabling Autorecovery on Routing Engines with VM Host Support on page 289
Routers with VMHost Support-Boot Process
The boot process involves configuring the basic parameters through the console port
and filename synchronization.
Booting for the First Time
When you power on a router for the first time, the router initiates the boot process.
After hardwareand field-programmablegatearray (FPGA) level initialization is complete,
the Unified Extensible Firmware Interface (UEFI) selects the boot device to launch the
host OS. The host OS launches the default guest Junos OS, which is the administrative
context for the user. After the router has powered on completely, a login prompt is
displayed on the console port.
Boot Sequence
The Routing Engine boots from the storagemedia in the following sequence:
• USB
• Solid-state Drive 1 (SSD1)
• Solid-state Drive 1 (SSD2)
• Preboot Execution Environment (PXÈ)
RelatedDocumentation
Creating an Emergency Boot Device for Routing Engines with VM Host Support on
page 219
•
Understanding Console Port
To perform the initial configuration, you need to connect a terminal or laptop computer
to the router through the console port, which is a serial port on the front of the router.
The console port is the management port used by administrators to log in to Junos OS
directly—that is, without using a network connection.
279Copyright © 2018, Juniper Networks, Inc.
Chapter 14: Overview of Routing Engines with VM Host Support

Two universal asynchronous receiver/transmitter (UART) ports are connected to the
midplane to provide CTY access to line cards. At any time, two ports can be active for
the CTY application. These ports are available to the Junos VMs for configuration.
For more information about configuring the router’s basic properties, see Accessing a
Junos OS Device the First Time.
Understanding Hostnames Synchronization
A hostname provides a unique identification for a router on the network. Junos OS uses
the configured hostnameas part of the commandprompt, to prepend log files and other
accounting information, as well as in other places where knowing the device identity is
useful. Although JunosOS supports amaximumhostname length of 255 characters, the
hostOS supports hostnames that have only 64 characters or less. Therefore, hostnames
need to be synchronized between Junos OS and the host OS. Keep inmind the following
conditionswhen you synchronize the hostname configured on JunosOSwith that on the
host OS:
• If the JunosOS-configured hostname has less than or equal to 58 characters, then the
hostname supported by the host OS (Linux) has the format Junos hostname-node.
For example, if the JunosOS-configuredhostname is xx..xx, thehostname is xx..xx-node.
• If the Junos OS-configured hostname is greater than 58 characters in length, then the
synchronization process truncates characters from the 59th character onward and
replaces the truncated characters with -node.
RelatedDocumentation
vmhost on page 375•
• request vmhost reboot on page 488
• request vmhost power-off on page 541
• Creating an Emergency Boot Device for Routing Engines with VM Host Support on
page 219
VMHost Installation
You can install the JunosOS software package and host software package on the router.
The following installation options are available:
• Fresh installation—This installationmethod can be used for factory installation aswell
as for recovery after corruption. Fresh installation canbedoneusingPreboot Execution
Environment(PXE)/NetBootoraUSB installmediapackage.Thismethodof installation
installs the host OS, tools, and the Junos VMs.
A PXE boot is an environment to boot devices using a network interface independent
of available data storage devices or installed operating systems. The PXE environment
is built ona foundationof Internet protocols and services . These includeTCP/IP, DHCP,
and TFTP. This method of installation mostly used for installing the operating system
onadevice,withoutdependingon thestateof the internalmedia.The requiredsoftware
for network installation is stored on a TFTP server. PXE bootmethod supports remote
Copyright © 2018, Juniper Networks, Inc.280
Installation and Upgrade Guide
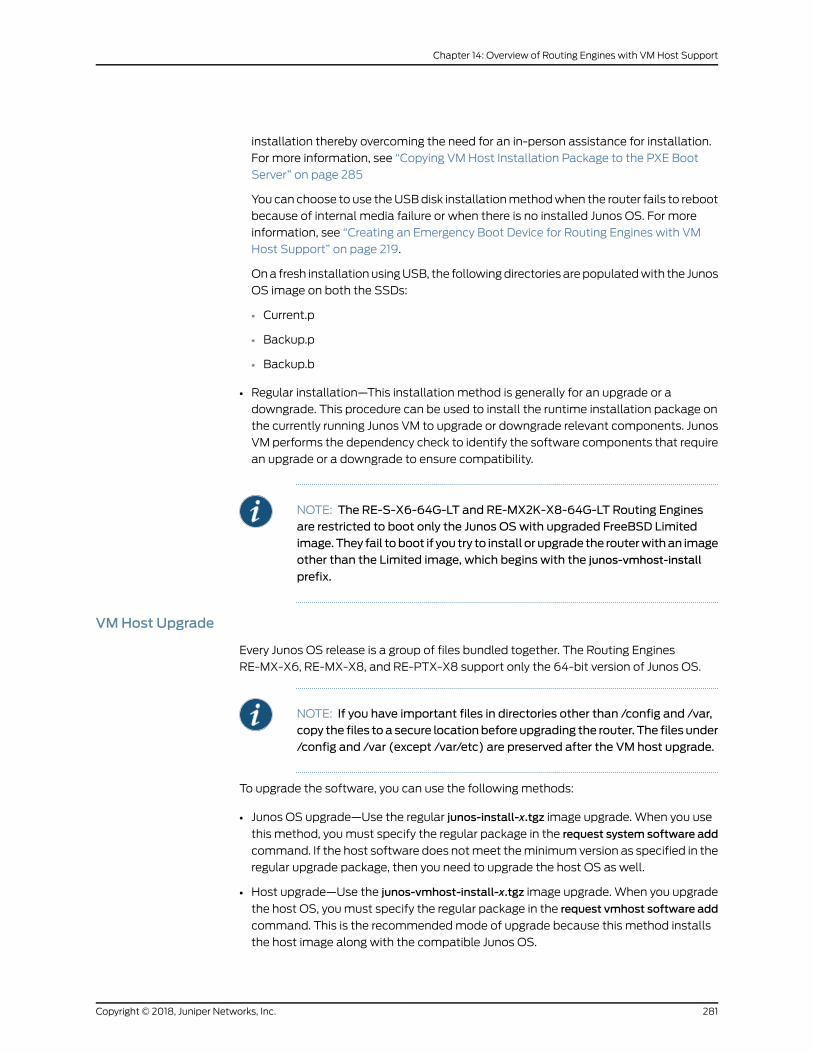
installation thereby overcoming the need for an in-person assistance for installation.
For more information, see “Copying VM Host Installation Package to the PXE Boot
Server” on page 285
You can choose to use theUSBdisk installationmethodwhen the router fails to reboot
because of internal media failure or when there is no installed Junos OS. For more
information, see “Creating an Emergency Boot Device for Routing Engines with VM
Host Support” on page 219.
Ona fresh installationusingUSB, the followingdirectories arepopulatedwith the Junos
OS image on both the SSDs:
• Current.p
• Backup.p
• Backup.b
• Regular installation—This installation method is generally for an upgrade or a
downgrade. This procedure can be used to install the runtime installation package on
the currently running Junos VM to upgrade or downgrade relevant components. Junos
VM performs the dependency check to identify the software components that require
an upgrade or a downgrade to ensure compatibility.
NOTE: The RE-S-X6-64G-LT and RE-MX2K-X8-64G-LT Routing Enginesare restricted to boot only the Junos OSwith upgraded FreeBSD Limitedimage.They fail toboot if you try to install or upgrade the routerwithan imageother than the Limited image, which begins with the junos-vmhost-install
prefix.
VMHost Upgrade
Every Junos OS release is a group of files bundled together. The Routing Engines
RE-MX-X6, RE-MX-X8, and RE-PTX-X8 support only the 64-bit version of Junos OS.
NOTE: If you have important files in directories other than /config and /var,copy the files to a secure locationbefore upgrading the router. The files under/config and /var (except /var/etc) are preserved after the VM host upgrade.
To upgrade the software, you can use the following methods:
• Junos OS upgrade—Use the regular junos-install-x.tgz image upgrade. When you use
this method, youmust specify the regular package in the request system software add
command. If the host software does notmeet theminimumversion as specified in the
regular upgrade package, then you need to upgrade the host OS as well.
• Host upgrade—Use the junos-vmhost-install-x.tgz image upgrade. When you upgrade
the host OS, youmust specify the regular package in the request vmhost software add
command. This is the recommendedmode of upgrade because this method installs
the host image along with the compatible Junos OS.
281Copyright © 2018, Juniper Networks, Inc.
Chapter 14: Overview of Routing Engines with VM Host Support

The upgrade applies to one partition of the SSD (primary). In case of a boot failure on
the primary SSD, the router can boot by using the snapshot available on the alternate
SSD.
When the upgrade happens through a VM host package, the build components are
compatible with each other. However, during a subcomponent or a package upgrade,
such as a Junos OS image upgrade, youmust check the installed base version and
ensure the compatibility. Each relevant subpackage has the logic to fetch the VM host
version and compare it with the supported version. In case of a version compatibility
mismatch, a suitable warning is displayed and the installation is aborted.
The followingexample illustrates theupgradeoperation.Youcan Installmultiple software
packages and software add-on packages at the same time.
user@host> > request vmhost software add/var/tmp/junos-vmhost-install-ptx-x86-64-15.1F5-S2.8.tgzInitializing...Verified os-libs-10-x86-64-20160616 signed by PackageProductionEc_2016Mounting os-libs-10-x86-64-20160616.329709_builder_stable_10....Transfer DoneTransfer /packages/db/pkginst.13874/junos-vmhost-install*.tgzTransfer DoneStarting upgrade ...Preparing for upgrade.../tmp/pkg-0mc/unpack/install/......
Cmos Write successfull for Boot_retry... upgrade complete.A REBOOT IS REQUIRED TO LOAD THIS SOFTWARE CORRECTLY.Use the 'request vmhost reboot' command to reboot the system
VMHost Rollback
You can revert to the software version that was loaded at the last successful request
vmhostsoftwareaddoperation.Youcan roll back to theprevioussetof softwarepackages,
including thehostOSpackages,byusing the requestvmhostsoftwarerollbackcommand.
The following example illustrates the software rollback operation. The Routing Engine
thathasbooted fromtheprimarydiskbyusing thesetphadbootedusing thesetbbefore
the upgrade.
user@host> show vmhost versionCurrent root details, Device sda, Label: jrootp_P, Partition: sda3
Current boot disk: PrimaryCurrent root set: pUEFI Version: NGRE_v00.53.00.01
Primary Disk, Upgrade Time: Wed Feb 24 17:51:53 UTC 2016
Version: set pVMHost Version: 2.951VMHost Root: vmhost-x86_64-15.1I20160210_2212_builderVMHost Core: vmhost-core-x86_64-15.1I20160210_2212_builder
Copyright © 2018, Juniper Networks, Inc.282
Installation and Upgrade Guide

kernel: 3.10.79-ovp-rt74-WR6.0.0.20_preempt-rtJunos Disk: junos-install-x86-64-15.1F5.5
Version: set bVMHost Version: 2.953VMHost Root: vmhost-x86_64-15.1F520160222_1052_builderVMHost Core: vmhost-core-x86_64-15.1F520160222_1052_builderkernel: 3.10.79-ovp-rt74-WR6.0.0.20_preempt-rtJunos Disk: junos-install-x86-64-15.1F5.6
user@host> request vmhost software rollbackCurrent root details, Device sda, Label: jrootp_P, Partition: sda3Finding alternate root for rollbackRollback to software on jrootb_P ...sh /etc/install/mk-mtre-rollback.sh jrootb_P bMounting device in preparation for rollback...Updating boot partition for rollback...Rollback complete, please reboot the node for it to take effect.Cmos Write successfullCmos Write successfull for Boot_retryCmos Write successfull for Boot_retry
user@host> show vmhost versionCurrent root details, Device sda, Label: jrootp_P, Partition: sda3Current boot disk: PrimaryCurrent root set: pUEFI Version: NGRE_v00.53.00.01
Primary Disk, Upgrade Time: Wed Feb 24 17:51:53 UTC 2016 Pending reboot.
Version: set pVMHost Version: 2.951VMHost Root: vmhost-x86_64-15.1I20160210_2212_builderVMHost Core: vmhost-core-x86_64-15.1I20160210_2212_builderkernel: 3.10.79-ovp-rt74-WR6.0.0.20_preempt-rtJunos Disk: junos-install-x86-64-15.1F5.5
Version: set bVMHost Version: 2.953VMHost Root: vmhost-x86_64-15.1F520160222_1052_builderVMHost Core: vmhost-core-x86_64-15.1F520160222_1052_builderkernel: 3.10.79-ovp-rt74-WR6.0.0.20_preempt-rtJunos Disk: junos-install-x86-64-15.1F5.6
user@host> request vmhost rebootReboot the vmhost ? [yes,no] (no) yes
warning: Rebooting re1Initiating vmhost reboot... okInitiating Junos shutdown... shutdown: [pid 9733]Shutdown NOW!okJunos shutdown is in progress...
*** FINAL System shutdown message ***
283Copyright © 2018, Juniper Networks, Inc.
Chapter 14: Overview of Routing Engines with VM Host Support

System going down IMMEDIATELY
user@host> show vmhost versionCurrent root details, Device sda, Label: jrootb_P, Partition: sda4Current boot disk: PrimaryCurrent root set: bUEFI Version: NGRE_v00.53.00.01
Primary Disk, Upgrade Time: Wed Feb 24 17:51:53 UTC 2016
Version: set pVMHost Version: 2.951VMHost Root: vmhost-x86_64-15.1I20160210_2212_builderVMHost Core: vmhost-core-x86_64-15.1I20160210_2212_builderkernel: 3.10.79-ovp-rt74-WR6.0.0.20_preempt-rtJunos Disk: junos-install-x86-64-15.1F5.5
Version: set bVMHost Version: 2.953VMHost Root: vmhost-x86_64-15.1F520160222_1052_builderVMHost Core: vmhost-core-x86_64-15.1F520160222_1052_builderkernel: 3.10.79-ovp-rt74-WR6.0.0.20_preempt-rtJunos Disk: junos-install-x86-64-15.1F5.6
VMHost Snapshot
The snapshot feature enables you to create copies of the currently running and active
file system partitions on a router.
On the router, youcanbackup thesnapshotof thehostOS imagealongwith the JunosOS
image. You can use the request vmhost snapshot command to create a VMhost recovery
snapshot on the backup disk.
Disk Recovery Using the VMHost Snapshot
If the state of the primary disk (disk1) is good and the backup disk (disk2) has to be
recovered then use the request vmhost snapshot command to recover the backup disk
assuming theRoutingEngine is booted fromtheprimarydisk. If the stateof the secondary
disk is not known or the file systems in disk are not in a consistent state, then include
partition option in the command i.e. request vmhost snapshot partition.
If the state of the backup disk (disk2) is good and the primary disk (disk1) has to be
recovered thenuse the requestvmhostsnapshot recoverycommandto recover theprimary
disk assuming the Routing Engine is booted from the backup disk. If the state of the
primarydisk is not knownor thepartition tablesare inbadcondition, then includepartition
option in the command i.e. request vmhost snapshot recovery partition.
Toboot fromdesireddisk, youcanexecute requestvmhost reboot{disk1,disk2}command.
RelatedDocumentation
request vmhost software add on page 549•
• request vmhost software rollback on page 554
• request vmhost snapshot on page 546
Copyright © 2018, Juniper Networks, Inc.284
Installation and Upgrade Guide

• show vmhost snapshot on page 581
Copying VMHost Installation Package to the PXE Boot Server
You can install the host OS, tools, and the Junos virtual machines (VMs) on the routers
with RE-MX-X6, RE-MX-X8, and RE-PTX-X8 Routing Engines by using the Preboot
Execution Environment (PXE) boot method. This is one of the methods used for a fresh
installation. A PXE boot prepares a client/server environment to boot devices by using
a network interface that is independent of available data storage devices or installed
operating systems. The image of the operating system is stored on a TFTP server.
To copy the installation packages to the PXE boot server:
1. Copy the downloaded installation media to the /var/tmp directory in the PXE boot
server.
scp /volume/build/junos/15.1/release/15.1F3.9/ship/junos-vmhost-install-net-x86-64-15.1F3.9.tgzuser@host:/var/tmp/
2. Log in to the PXE boot server and verify the installation file.
user@host> ls -lh junos-vmhost-install-net-x86-64-15.1F3.9.tgz-rw-r--r-- 1 root root 1.8G Oct 24 00:42 junos-vmhost-install-net-x86-64-15.1F3.9.tgz
3. Extract the junos-vmhost-install-net TAR file.
user@host> tar xvzf junos-vmhost-install-net-x86-64-15.1F3.9.tgz –C /var/tmpcontents/contents/junos-vmhost-install.tgzcontents/vmhost-install-net-x86_64-15.1I20151019_1021_builder.tgzmanifestmanifest.certsmanifest.ecertsmanifest.esigmanifest.sigpackage.xml
4. Remove the previously installed files, if any, from the /tftpboot directory.
user@host> rm -f/tftpboot/{vmhost-version.sh,bootpxe64.efi,vmhost-version,grub.cfg,initramfs,vmlinuz}user@host>ls -lh /tftpboot//total 45M
rw-r--r-- 1 root root 690K Sep 8 13:22 bootpxe.efi-rw-rw-r-- 1 930 930 45M Oct 20 01:51 vmhost-install-net-x86_64-15.1I20151019_1021_builder.tgz
5. Extract the network installation package.
user@host> tar xvzf/var/tmp/contents/vmhost-install-net-x86_64-15.1I20151019_1021_builder.tgz -C /tftpboot/
285Copyright © 2018, Juniper Networks, Inc.
Chapter 14: Overview of Routing Engines with VM Host Support
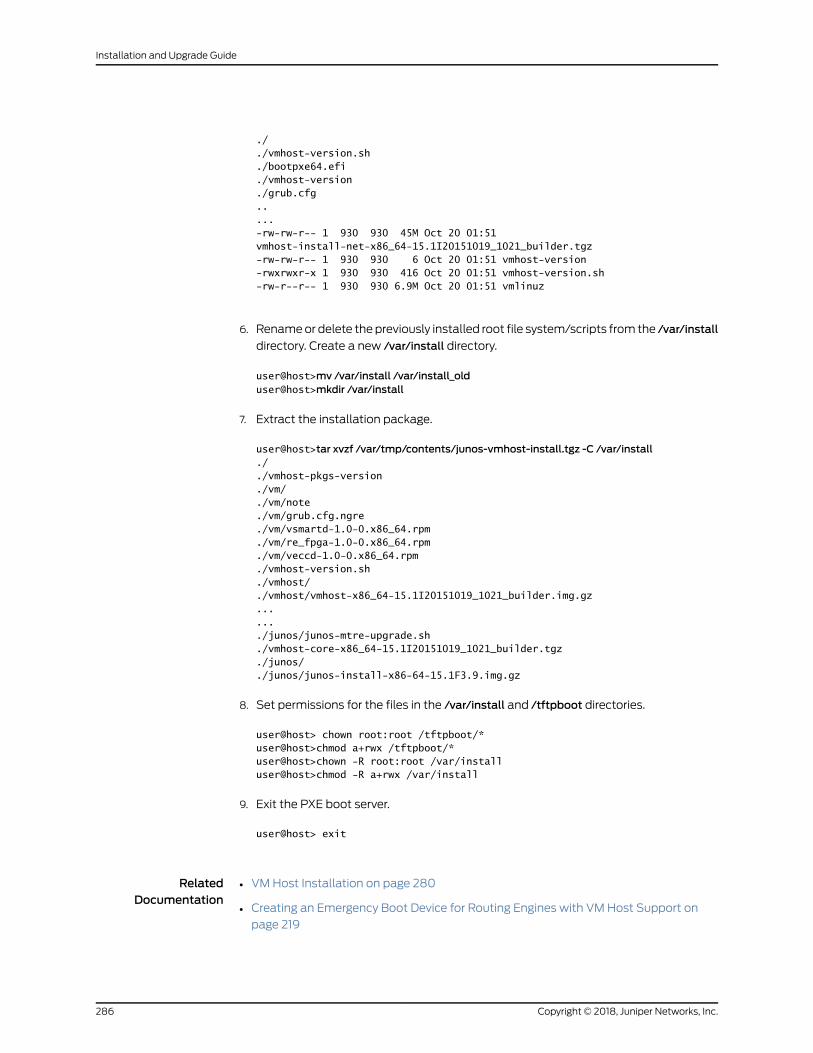
./
./vmhost-version.sh
./bootpxe64.efi
./vmhost-version
./grub.cfg
..
...-rw-rw-r-- 1 930 930 45M Oct 20 01:51 vmhost-install-net-x86_64-15.1I20151019_1021_builder.tgz-rw-rw-r-- 1 930 930 6 Oct 20 01:51 vmhost-version-rwxrwxr-x 1 930 930 416 Oct 20 01:51 vmhost-version.sh-rw-r--r-- 1 930 930 6.9M Oct 20 01:51 vmlinuz
6. Renameor delete thepreviously installed root file system/scripts from the /var/install
directory. Create a new /var/install directory.
user@host>mv /var/install /var/install_olduser@host>mkdir /var/install
7. Extract the installation package.
user@host>tar xvzf /var/tmp/contents/junos-vmhost-install.tgz -C /var/install././vmhost-pkgs-version./vm/./vm/note./vm/grub.cfg.ngre./vm/vsmartd-1.0-0.x86_64.rpm./vm/re_fpga-1.0-0.x86_64.rpm./vm/veccd-1.0-0.x86_64.rpm./vmhost-version.sh./vmhost/./vmhost/vmhost-x86_64-15.1I20151019_1021_builder.img.gz......./junos/junos-mtre-upgrade.sh./vmhost-core-x86_64-15.1I20151019_1021_builder.tgz./junos/./junos/junos-install-x86-64-15.1F3.9.img.gz
8. Set permissions for the files in the /var/install and /tftpboot directories.
user@host> chown root:root /tftpboot/*user@host>chmod a+rwx /tftpboot/*user@host>chown -R root:root /var/installuser@host>chmod -R a+rwx /var/install
9. Exit the PXE boot server.
user@host> exit
RelatedDocumentation
VMHost Installation on page 280•
• Creating an Emergency Boot Device for Routing Engines with VM Host Support on
page 219
Copyright © 2018, Juniper Networks, Inc.286
Installation and Upgrade Guide

Upgrading the SSD Firmware on Routing Engines with VMHost Support
Starting in JunosOSRelease 17.2R1, youcanupgrade the solid-statedrive (SSD) firmware
on MX Series routers with the RE-S-X6-64G and RE-MX2K-X8-64G Routing Engines. A
setof twoSSDs,disk1anddisk2 , is available for normal functioningof theRoutingEngine.
This topic shows how to perform the upgrade.
NOTE: YoushouldonlyupgradeSSDfirmwareunder thedirectionofa JuniperNetworks support representative.
Before you begin check the current firmware version of the SSD.
user@host> show system firmware Part Type Tag Current Available Status version version Routing Engine 0 RE BIOS 0 0.45 0.53 OK Routing Engine 0 RE FPGA 1 36.0.0 41.0 OK Routing Engine 0 RE SSD1 4 12028 12029 OK Routing Engine 0 RE SSD2 5 12028 12029 OK Routing Engine 1 0 1.4 OK
If the value ofCurrent version is less than the value ofAvailable version then the following
procedure can be used for the SSD firmware upgrade.
To upgrade SSD firmware:
1. Copy the jfirmware package to the device.
If the file has been obtained from JTAC, use FTP or SCP to load the firmware file on
the device. Save the file in the /var/tmp directory.
user@host> request system software add
ftp://ftp.juniper.net/private/system/jfirmware-17.1R2-signed.tgz
2. Upgrade the SSD disk1 firmware.
NOTE: You should upgrade the SSD on amaster Routing Engine only. Forupgrading firmware on the backup Routing Engine, switchmastershipusing the followingcommandandthen log in to thebackupRoutingEngine.
user@host> request chassis routing-enginemaster switch
To initiate the upgrade, use the following command:
user@host> request system firmware upgrade re ssd disk1
Part Type Tag Current Available Status version versionRouting Engine 0 RE SSD1 4 12028 12029 OK
287Copyright © 2018, Juniper Networks, Inc.
Chapter 14: Overview of Routing Engines with VM Host Support

Perform indicated firmware upgrade ? [yes,no] (no) yes
Firmware upgrade initiated, use "show system firmware" to monitor status.
Then, monitor the upgrade status using the show system firmware command.
user@host> show system firmware Part Type Tag Current Available Status version version Routing Engine 0 RE BIOS 0 0.45 0.53 OK Routing Engine 0 RE FPGA 1 36.0.0 41.0 OK Routing Engine 0 RE SSD1 4 12028 12029 OK Routing Engine 0 RE SSD2 5 12028 12029 OK Routing Engine 1 0 1.4 OK
user@host> show system firmware Part Type Tag Current Available Status version version Routing Engine 0 RE BIOS 0 0.45 0.53 OK Routing Engine 0 RE FPGA 1 36.0.0 41.0 OK Routing Engine 0 RE SSD1 4 12029 12029 UPGRADED SUCCESSFULLY
Routing Engine 0 RE SSD2 5 12028 12029 OK Routing Engine 1 0 1.4 OK
After a successful upgrade, confirm that the Current version and Available version of
the SSD firmware are identical.
3. Upgrade SSD Disk2 firmware.
To initiate the upgrade, use the following command:
user@host> request system firmware upgrade re ssd disk2
Part Type Tag Current Available Status version versionRouting Engine 0 RE SSD2 5 12028 12029 OKPerform indicated firmware upgrade ? [yes,no] (no) yes
Firmware upgrade initiated, use "show system firmware" to monitor status.
Monitor the upgrade status using the show system firmware command.
user@host> show system firmware Part Type Tag Current Available Status version version Routing Engine 0 RE BIOS 0 0.45 0.53 OK Routing Engine 0 RE FPGA 1 36.0.0 41.0 OK Routing Engine 0 RE SSD1 4 12028 12029 UPGRADED SUCCESSFULLY
Routing Engine 0 RE SSD2 5 12028 12029 PROGRAMMING Routing Engine 1 0 1.4 OK
user@host> show system firmware Part Type Tag Current Available Status version version Routing Engine 0 RE BIOS 0 0.45 0.53 OK
Copyright © 2018, Juniper Networks, Inc.288
Installation and Upgrade Guide

Routing Engine 0 RE FPGA 1 36.0.0 41.0 OK Routing Engine 0 RE SSD1 4 12029 12029 UPGRADED SUCCESSFULLY
Routing Engine 0 RE SSD2 5 12029 12029 UPGRADED SUCCESSFULLY
Routing Engine 1 0 1.4 OK
After a successful upgrade, confirm that the Current version and Available version of
the SSD firmware are identical.
Release History Table DescriptionRelease
Starting in Junos OS Release 17.2R1, you can upgrade the solid-state drive(SSD) firmware on MX Series routers with the RE-S-X6-64G andRE-MX2K-X8-64G Routing Engines.
17.2R1
Disabling Autorecovery on Routing Engines with VMHost Support
The autorecovery feature helps recover the Junos OS automatically in the event of a
corruption, therebyensuring that the JunosOS isavailable foroperationsandmanagement
always. The host Junos OS tries to launch the Junos VM from the image available on the
primary disk. However, if the guest Junos OS fails to launch, the host OS attempts to
launch the Junos VM from the snapshot of the host OS image and Junos OS image
available in the backup disk, provided request vmhost snapshotwas the last operation
performed. If the backup disk does not contain the snapshot, the host OS attempts to
launch the Junos VM from the software available in the alternate set in the primary disk,
provided request vmhost upgradewas the last operation performed.
The autorecovery feature is enabled by default on the guest Junos OS. For debugging
purposes, if you do not want the host to recover the Junos VM automatically, you can
disable the auto-recovery by the host.
To disable the guest auto-recovery, include the no-auto-recovery statement at the [edit
vmhost] hierarchy level:
[edit vmhost]no-auto-recovery
RelatedDocumentation
vmhost on page 375•
VMHost Operations andManagement
With the virtualization of the Routing Engine, Junos OS supports new request and show
commands associated with the host and hypervisor processes. The commands are
related to:
• Reboot, halt, and power management for the host.
• Software upgrade for the host.
289Copyright © 2018, Juniper Networks, Inc.
Chapter 14: Overview of Routing Engines with VM Host Support

• Disk snapshot for the host.
The following request commands are not available on the RE-MX-X6, RE-MX-X8, and
RE-PTX-X8 Routing Engines:
• request system halt
• request system partition abort
• request system power-off
• request system power on
The following commands can be used only for the guest Junos OS:
• request system reboot
• request system snapshot
• request system software add
• request system zeroize
You can use the following new request vmhost commands on the host OS:
• request vmhost cleanup
• request vmhost file-copy
• request vmhost halt
• request vmhost hard-disk-test
• request vmhost power-off
• request vmhost power-on
• request vmhost reboot
• request vmhost snapshot
• request vmhost software abort
• request vmhost software add
• request vmhost software in-service-upgrade
• request vmhost software rollback
• request vmhost zeroize
RelatedDocumentation
• Routing Engines with VM Host Support on page 273
Copyright © 2018, Juniper Networks, Inc.290
Installation and Upgrade Guide

PART 3
Installing and Managing SoftwareLicenses
• Software License Overview on page 293
• Installing and Managing Licenses on page 331
291Copyright © 2018, Juniper Networks, Inc.

Copyright © 2018, Juniper Networks, Inc.292
Installation and Upgrade Guide

CHAPTER 15
Software License Overview
• Junos OS Feature Licenses on page 293
• License Enforcement on page 294
• Junos OS Feature License Keys on page 295
• Software Feature Licenses on page 298
• Software Features That Require Licenses on MX Series Routers Only on page 314
• Understanding Software Licenses for EX Series Switches on page 320
Junos OS Feature Licenses
Some Junos OS software features require a license to activate the feature. To enable a
licensed feature, you need to purchase, install, manage, and verify a license key that
corresponds to each licensed feature. To conform to Junos OS feature licensing
requirements, youmust purchase one license per feature per device. The presence of the
appropriate software license key on your device determines whether you are eligible to
configure and use the licensed feature.
Tospeeddeploymentof licensed features, JunosOSsoftware implementsanhonor-based
licensing structure and provides youwith a 30-day grace period to use a licensed feature
without a license key installed. The grace period begins when you configure the feature
and your device uses the licensed feature for the first time, but not necessarily when you
install the license. After the grace period expires, the system generates system log
messages saying that the feature requires a license. To clear the error message and use
the licensed feature properly, youmust install and verify the required license.
Data center customers, for example thoseusing theQFXplatform, use universal licenses.
Starting in Junos OS Release 15.1, to ensure that license keys are used properly, Juniper
Networks license key generation is enhanced to specify a customer ID in the license key.
Youcansee thecustomer IDdisplayed in theoutputof the showsystemlicensecommand.
For information about how topurchase software licenses, contact your Juniper Networks
sales representative.
293Copyright © 2018, Juniper Networks, Inc.

Release History Table DescriptionRelease
Starting in JunosOSRelease 15.1, to ensure that license keys are usedproperly,Juniper Networks license key generation is enhanced to specify a customerID in the license key.
15.1
RelatedDocumentation
License Enforcement on page 294•
• Junos OS Feature License Keys on page 295
• Software Feature Licenses on page 298
• Verifying Junos OS License Installation (CLI) on page 338
• show system license on page 506
License Enforcement
For featuresor scaling levels that require a license, youmust install andproperly configure
the license to meet the requirements for using the licensable feature or scale level. The
device enables you to commit a configuration that specifies a licensable feature or scale
without a license for a 30-day grace period. The grace period is a short-term grant that
enables you to start using features in thepack or scale up to the system limits (regardless
of the license key limit) without a license key installed. The grace period beginswhen the
licensable feature or scaling level is actually used by the device (not when it is first
committed). In other words, you can commit licensable features or scaling limits to the
device configuration, but the grace period does not begin until the device uses the
licensable feature or exceeds a licensable scaling level.
NOTE: Configurationsmight includeboth licensedandnonlicensedfeatures.For these situations, the license is enforced up to the pointwhere the licensecan be clearly distinguished. For example, an authentication-orderconfiguration is sharedbybothAuthentication,Authorization,andAccounting(AAA), which is licensed, and by Layer 2 Tunneling Protocol (L2TP), whichis not licensed. When the configuration is committed, the device does notissue any licensewarnings, because it is not yet knownwhether AAAor L2TPisusing theconfiguration.However, at runtime, thedevicechecks for a licensewhenAAAauthenticatesclients,butdoesnotcheckwhenL2TPauthenticatesclients.
Thedevice reports any licensebreachasawarning logmessagewhenever a configuration
is committed that containsa featureor scale limit usage that requires a license. Following
the 30-day grace period, the device periodically reports the breach to syslog messages
until a license is installed and properly configured on the device to resolve the breach.
Copyright © 2018, Juniper Networks, Inc.294
Installation and Upgrade Guide

NOTE: Successfulcommitmentofa licensable featureorscalingconfigurationdoes not imply that the required licenses are installed or not required. If arequired license is not present, the system issues a warningmessage after itcommits the configuration.
RelatedDocumentation
Junos OS Feature License Keys•
• Software Feature Licenses on page 298
• Adding New Licenses (CLI Procedure) on page 331
• Deleting License Keys (CLI) on page 336
• Saving License Keys (CLI) on page 338
• Verifying Junos OS License Installation (CLI) on page 338
Junos OS Feature License Keys
Some Junos OS software features require a license to be activated. To enable each
licensed feature, youmust purchase, install, manage, and verify a license key that
corresponds to the licensed feature.
Release-Tied License Keys and Upgrade Licenses onMX Series Routers
The JunosOS licensing infrastructure currently associatesa license featurewithattributes
such as date, platform, and validity. In addition to these attributes, for MX Series routers
running Junos OS Release 12.2 and later, a licensed feature can be associated with a
release number at the time of generating the license key. This type of release-tied license
key is used to validate a particular licensed featurewhile attempting a software upgrade.
The upgrade process aborts if the release number in the license key is earlier than the
Junos OS release number to which the system is being upgraded.
Additionally, an upgrade license key can be generated for a release-tied licensed feature.
An upgrade license key is used for carrying forward a capacity license to the upgrade
release. Although an upgrade license might be an acceptable license on the current
release, it does not add to the existing capacity limit. The capacity added in the upgrade
license key is valid for the upgrade software release only.
The releasenumber embedded in the license key indicates themaximumreleasenumber
up to which Junos OS can be upgraded.
As an example, assume that your system is running Junos OS Release 12.2 and is using
the scale-subscriber licensed featurewitha later release-tiedupgrade licensekey installed.
If you request a software upgrade to the later release of Junos OS, the software upgrade
operation fails and the following error message is displayed:
mgd: error: No valid upgrade license found for feature 'scale-subscriber'.Aborting Software upgrade.Validation failed
295Copyright © 2018, Juniper Networks, Inc.
Chapter 15: Software License Overview

In this example, to successfully upgrade to the later release of Junos OS, the release
number included in the upgrade license key should be greater than or equal to the later
release number. Also, you can perform software upgrades up to the previous release
without any additional license keys to retain the existing scale limit.
NOTE:
When you install a release-tied license, the following apply:
• Youcanpurchaseanupgradecapacity licenseonly if abasecapacity licensefor the same scale-tier has already been generated or purchased.
• You cannot install an upgrade license if the capacity does not match anyof the existing base capacity licenses on the system.
• The license installation failswhenyou install a lower releasenumber licensekey on a higher software release number.
• A release-tied license can be installed on a Junos OS release number thatis lower than or equal to the release number included in the license key.For example, a 12.2 license key is valid on Junos OS Release 12.1.
• An upgrade license is valid only on the target release number specified inthe license key, but can be installed on an earlier Junos OS release. Forexample, a 4 K scale-tier upgrade license for Junos OSRelease 12.2 can beinstalled on an earlier release, and the installed count of licenses remainsunaltered.
• Release-tied licenses of the previous release are not deleted on upgradingJunos OS to a newer release version.
Licensable Ports onMX5, MX10, andMX40 Routers
Startingwith JunosOSRelease 12.2, licensekeysareavailable toenhance theport capacity
on MX5, MX10, and MX40 routers up to the port capacity of an MX80 router. The MX5,
MX10, and MX40 routers are derived from themodular MX80 chassis with similar slot
and port assignments, and provide all functionality available on an MX80 router, but at
a lower capacity. Restricting port capacity is achieved bymaking a set of MIC slots and
ports licensable. MICs without a license are locked, and are unlocked or made usable by
installing appropriate upgrade licenses.
The base capacity of a router is identified by the Ideeprom assembly ID (I2C ID), which
defines the board type. However, the Junos OS licensing infrastructure allows the use of
restricted ports without a license for a grace period of 30 days. After the grace period
expires, the router reverts back to the base capacity if no upgrade license is purchased
and installed for the locked ports. The I2C ID along with an upgrade license determine
the final capacity of an MX5, MX10, or MX40 router.
The MX5, MX10, MX40, and MX80 routers support the following types of MICs:
• A built-in 10-Gigabit Ethernet MIC with four 10-Gigabit Ethernet ports
• Two front-pluggable MICs
Copyright © 2018, Juniper Networks, Inc.296
Installation and Upgrade Guide

A feature ID is assigned to every license upgrade for enhancing port capacity.
Table 30 on page 297 displays the chassis types and their associated port capacity, I2C
ID, base capacity, feature ID, feature name, and the final capacity after a license upgrade.
Table 30: Upgrade Licenses for Enhancing Port Capacity
Upgrade Capacity
Feature IDandFeatureNameBase CapacityI2C ID
PortCapacity
ChassisType
Slot 1 and 2
• 1/MIC0
• 1/MIC1
f1—MX5 toMX10upgrade
Slot 1
• 1/MIC0
0x55620GMX5
Slot 2 and first 2 ports on Slot 0
• 1/MIC1
• First 2 ports on 0/MIC0
f2—MX10 toMX40upgrade
Slot 1 and 2
• 1/MIC0
• 1/MIC1
0x55540GMX10
Slot 2 and all ports on Slot 0
• 1/MIC1
• All 4 ports on 0/MIC0
f3—MX40to MX80upgrade
Slot 1, SLot 2 and first 2ports on Slot 0
• 1/MIC0
• 1/MIC1
• First 2 ports on 0/MIC0
0x55460GMX40
When installing anupgrade license for enhancingport capacity onMX5,MX10andMX40
routers, consider the following:
• To upgrade an MX5 router to MX80 router capacity, licenses for all three features (f1,
f2, f3) must be installed. All three features can be provided in a single license key.
• To upgrade an MX10 router to MX40 router capacity, installing a license key with f2
feature is sufficient.
• Non-applicable feature IDs in a license key reject the upgrade license. For example:
• An f1 feature ID on an MX10 upgrade license key rejects the license.
• Feature IDs f1 and f2 on an MX40 upgrade license key reject the entire license.
Port Activation onMX104 Routers
Starting with Junos OS Release 13.3, license keys are available to activate the ports on
the MX104 router. MX104 routers have four built-in ports. By default, in the absence of
valid licenses, all four built-in ports aredeactivated. By installing licenses, youcanactivate
any two of the four or all of the four built-in ports. For instance, you can install a license
to activate the first twobuilt-in ports (xe-2/0/0 and xe-2/0/1) or you can install a license
to activate the next two built-in ports (xe-2/0/2 and xe-2/0/3). You can also install a
license to activate all four built-in ports (xe-2/0/0, xe-2/0/1, xe-2/0/2, and xe-2/0/3).
If youhavealreadyactivated twoof thebuilt-in ports, youcan install anadditional license
to activate the other two built-in ports on the MX104 router.
297Copyright © 2018, Juniper Networks, Inc.
Chapter 15: Software License Overview

A feature ID is assigned to every license for activating the built-in ports on the MX104
router. The port license model with the feature ID is described in Table 31 on page 298.
Table 31: Port Activation LicenseModel for MX104 Routers
FunctionalityFeature NameFeature ID
Ability to activate first twobuilt-in ports (xe-2/0/0 andxe-2/0/1)
MX104 2X10G Port Activate (0 and 1)F1
Ability to activate next twobuilt-in ports (xe-2/0/2andxe-2/0/3)
MX104 2X10G Port Activate (2 and 3)F2
Both the features are also provided in a single license key for ease of use. To activate all
four ports, youmust either install the licenses for both the features listed in
Table 31 on page 298 or the single license key for both features. If you install the single
license key when feature IDs F1 and F2 are already installed, the license does not get
rejected. Also, MX104 routers do not support the graceful license expiry policy. A graceful
license expiry policy allows the use of a feature for a certain period of time (usually a
grace period of 30 days), and reverts if the license for that feature is not installed after
the grace period.
RelatedDocumentation
Junos OS Feature Licenses on page 293•
• License Enforcement on page 294
• Software Feature Licenses on page 298
• Verifying Junos OS License Installation (CLI) on page 338
• show system license on page 506
Software Feature Licenses
Each license is tied to one software feature pack, and that license is valid for only one
device.
NOTE: This is not a complete list of licenses. Contact your Juniper Networksrepresentative for license information.
For information about how topurchase software licenses, contact your Juniper Networks
sales representative at http://www.juniper.net/in/en/contact-us/.
• Software Features That Require Licenses on M Series, MX Series, and T Series
Routers on page 299
• Software Features That Require Licenses on M Series Routers Only on page 302
• Software Features That Require Licenses on MX Series Routers Only on page 303
• Software Feature Licenses for SRX Series Devices on page 309
Copyright © 2018, Juniper Networks, Inc.298
Installation and Upgrade Guide

• Software Features That Require Licenses on EX Series Switches on page 310
• Software Features That Require Licenses on the QFX Series on page 311
Software Features That Require Licenses onMSeries, MX Series, and T Series Routers
Table32onpage299 lists the licensesyoucanpurchase for eachMSeries,MXSeries, and
T Series software feature. Each license allows you to run the specified software feature
on a single device.
NOTE: The DHCP server functionality for Junos OS is part of the subscribermanagement feature. Youmust have the S-SA-FP, S-MX80-SA-FP orS-MX104-SA-FP license in order to enable the DHCP server. For serviceaccounting, youmust also have S-SSM-FP.
For informationabouthowtopurchaseasoftware license, contact your JuniperNetworks
sales representative at http://www.juniper.net/in/en/contact-us/.
Table32: JunosOSFeatureLicenseModelNumber forMSeries,MXSeries, andTSeriesRouters
Model NumberSupported DevicesLicensed Software Feature
JS-GMPLSM10i, M7i, M120, M160, M20, M320, M40e, T320,T640, and MX Series Routers
Generalized Multiprotocol Label Switching(GMPLS) Support on Junos OS
JS-IPv6M120, M160, M20, M320, M40e, T320, T640, andMX Series Routers
IPv6 Support on Junos OS
JS-LRM10i, M120, M160, M20, M320, M40e, M7i, T320,T640, and MX Series Routers
Logical Router Support for Junos OS
S-ACCTM10i, M120, M160, M20, M320, M40e, M7i, T320,M10, M5, T640, and T1600
J-Flow accounting license for AdaptiveServices (AS) PIC and Multiservices PIC
S-ATOMX104, MX240, MX480, MX960, M Series, and TSeries Routers
Chassis license for Application TrafficOptimizationservice,policyenforcementandapplication statistics. This license includesS-AI and S-LDPF fucntionality and 1-yearSignature Subscription License
S-COLLECTOR-100KM320, T640, T320, T1600SoftwareLicense forPassiveMonitoringFlowCollector Application, supporting 100 Kppsthroughput; Chassis based license forMultiservices PIC
S-CRTPM10i, M120, M160, M20, M320, M40e, M7i, T320,M10, M5, T640, and T1600
License to use Compressed Real-TimeTransport Protocol (CRTP) feature in ASPICand Multiservices PIC
S-DFC-100KM320, T640, T320, and T1600SoftwareLicense forPassiveMonitoringDFCApplication, supporting 100Kppsthroughput;Chassis based license for Multiservices PIC
299Copyright © 2018, Juniper Networks, Inc.
Chapter 15: Software License Overview

Table 32: Junos OS Feature LicenseModel Number for M Series, MX Series, and T SeriesRouters (continued)
Model NumberSupported DevicesLicensed Software Feature
S-ESM10i,M7i,M5,M120,M160,M20,M320,M40e,T320,T640, M10, and T1600
Security Services license for AS PIC andMultiservices PIC
S-IDPMX104, MX240, MX480, MX960, M Series, and TSeries Routers
Chassis license for IDP service, policyenforcement. This license includes S-AI andS-LDPF fucntionality and 1-year SignatureSubscription License
S-JUNOS-FIPSM10i, M7i, M320, M40e, T320, and T640Junos-FIPS Software License
S-LSSL-1023M5,M7i, M10,M10i, M20,M40e,M120,M320, T320,T640, T1600, MX240, MX480, and MX960
Link Services Software License—up to 1023MLbundles per Chassis forMultiservicesPICand Multiservices Dense Port Concentrator(DPC)
S-LSSL-1023-UPGM5,M7i, M10,M10i, M20,M40e,M120,M320, T320,T640, T1600, MX240, MX480, and MX960
LinkServicesSoftwareUgradeLicense—from255 to 1023 ML bundles per Chassis forMultiservices PIC and Multiservices DPC
S-LSSL-255-UPGM5,M7i, M10,M10i, M20,M40e,M120,M320, T320,T640, T1600, MX240, MX480, and MX960
LinkServicesSoftwareUgradeLicense—from64 to255MLbundlesperChassis forASPIC,Multiservices PIC, and Multiservices DPC
S-LSSL-256M10,M7i,M5,M120,M20,M320,M40e,T320,T640,M10i, T1600, MX240, MX480, and MX960
Link Services Software License—up to 255ML bundles per Chassis for AS PIC,Multiservices PIC, and Multiservices DPC
S-LSSL-4M10i, M120,M20,M320,M40e,M7i, T320,M10,M5,T640, T1600, MX240, MX480, and MX960
Link Services Software License—up to 4 MLbundlesperChassis forASPIC,MultiservicesPIC, and Multiservices DPC
S-LSSL-64M10,M7i,M5,M120,M20,M320,M40e,T320,T640,M10i, T1600, MX240, MX480, and MX960
LinkServicesSoftwareLicense—up to64MLbundles per Chassis for AS PIC, MS PIC andMS DPC
S-LSSL-64-UPGM5,M7i, M10,M10i, M20,M40e,M120,M320, T320,T640, T1600, MX240, MX480, and MX960
Link Services Software UpgradeLicense—from 4 to 64ML bundles perChassis for AS PIC, Multiservices PIC, andMultiservices DPC
S-MONITOR-1MM320, T640, T320, and T1600SoftwareLicense forPassiveMonitoringFlowMonitor Application, supporting 1M flows.Chassis based license for Multiservices PIC
S-NAT-FW-MULTIM10,M7i,M5,M120,M160,M20,M320,M40e,T320,T640, M10i, and T1600
Network Address Translation (NAT), FWlicense on AS PIC and Multiservices PIC:Multi-instance
S-NAT-FW-SINGLEM10,M7i,M5,M120,M160,M20,M320,M40e,T320,T640, M10i, and T1600
NAT, FW license onASPIC andMultiservicesPIC: Single-instance
Copyright © 2018, Juniper Networks, Inc.300
Installation and Upgrade Guide

Table 32: Junos OS Feature LicenseModel Number for M Series, MX Series, and T SeriesRouters (continued)
Model NumberSupported DevicesLicensed Software Feature
S-PTSPMX240, MX480, MX960, M120, and M320Software license forPacket trigger subscriberpolicy
S-SA-128KMX104, MX240, MX480, MX960, M120, and M320Subscriber Access Feature Pack LicenseScaling (128000)
S-SA-32KMX104, MX240, MX480, MX960, M120, and M320Subscriber Access Feature Pack LicenseScaling (32000)
S-SA-4KMX104, MX240, MX480, MX960, M120, M320, andMX80
Subscriber Access Feature Pack LicenseScaling (4000)
S-SA-64KMX104, MX240, MX480, MX960, M120, and M320Subscriber Access Feature Pack LicenseScaling (64000)
S-SA-8KMX104, MX240, MX480, MX960, M120, M320, andMX80
Subscriber Access Feature Pack LicenseScaling (8000)
S-SA-96KMX104, MX240, MX480, MX960, M120, and M320Subscriber Access Feature Pack LicenseScaling (96000)
S-SA-FPMX104, MX240, MX480, MX960, M120, and M320Subscriber Access Feature Pack license
S-SERVICES-SFOM10,M7i,M5,M120,M160,M20,M320,M40e,T320,T640, M10i, and T1600
Stateful Failover for Services on AS PIC andMultiservices PIC: Multilink PPP (MLPPP)only
S-SSM-FPMX104, MX240, MX480, MX960, M120, and M320Subscriber Service Management FeaturePacketLicense (RADIUS/SRCbasedServiceActivation and Deactivation) Per-ServiceAccounting Features for Subscribers
S-SSP-FPMX240, MX480, MX960, M120, M320, and MX80Subscriber Traffic Lawful Intercept FeaturePack License
S-TFDIRECT-APPMX240, MX480, MX960, M120, and M320Software license forapplicationaware trafficdirect feature
S-TFDIRECT-SUBMX240, MX480, MX960, M120, and M320Software license for subscriber aware trafficdirect feature
S-VIDEO-FPM120, M320, MX80, MX104, MX240, MX480, andMX960
Video Services Feature Pack license
mx5-to-mx10-upgradeMX5Port capacity enhancement Feature PackLicense for MX5 routers
mx10-to-mx40-upgradeMX10Port capacity enhancement Feature PackLicense for MX10 routers
301Copyright © 2018, Juniper Networks, Inc.
Chapter 15: Software License Overview

Table 32: Junos OS Feature LicenseModel Number for M Series, MX Series, and T SeriesRouters (continued)
Model NumberSupported DevicesLicensed Software Feature
mx40-to-mx80-upgradeMX40Port capacity enhancement Feature PackLicense for MX40 routers
See Also Junos OS Feature Licenses on page 293•
• License Enforcement on page 294
• Junos OS Feature License Keys on page 295
• Verifying Junos OS License Installation (CLI) on page 338
Software Features That Require Licenses onMSeries Routers Only
Table 33 on page 302 lists the licenses you can purchase for each M Series software
feature. Each license allows you to run the specified software feature on a single device.
For informationabouthowtopurchaseasoftware license, contact your JuniperNetworks
sales representative at http://www.juniper.net/in/en/contact-us/.
Table 33: Junos OS Feature LicenseModel Number for M Series Routers
Model NumberSupported DevicesLicensed Software Feature
S-ACCT-BBM7iJ-Flow accounting license on Integrated Adaptive Services Module(ASM) and Integrated Multiservices Module
S-ES-BBM7iSecurity Services license on ASM and Integrated MultiservicesModule
S-LNS-16KM120Layer 2 Tunneling Protocol (L2TP) L2TP Network Server (LNS)license for 16000 sessions on Multiservices PIC
S-LNS-16K-UPGM120L2TP LNS license Upgrade—from 8000 to 16000 sessions onMultiservices PIC
S-LNS-2KM7i, M10i, and M120L2TP LNS license for 2000 sessions on AS PIC or IntegratedAdaptive Services Module and Multiservices PIC
S-LNS-4KM7i, M10i, and M120L2TP LNS license for 4000 sessions on AS PIC or IntegratedAdaptive Services Module and Multiservices PIC
S-LNS-4K-UPGM7i, M10i, and M120L2TP LNS license Upgrade—from 2000 to 4000 sessions on ASPIC or Integrated Adaptive Services Module and Multiservices PIC
S-LNS-8KM7i, M10i, and M120L2TP LNS license for 8000 sessions on Multiservices PIC
S-LNS-8K-UPGM7i, M10i, and M120L2TP LNS license Upgrade—from 4000 to 8000 sessions on ASPIC and Multiservices PIC
Copyright © 2018, Juniper Networks, Inc.302
Installation and Upgrade Guide

Table 33: Junos OS Feature LicenseModel Number for M Series Routers (continued)
Model NumberSupported DevicesLicensed Software Feature
S-LSSL-BBM7iLink services software license on integrated ASM and IntegratedMulti Services Module—up to 4 ML bundles
S-NAT-FW-MULTI-BBM7iNAT, FW license on Integrated ASM and Integrated Multi ServicesModule: Multi instance
S-NAT-FW-SINGLE-BBM7iNAT, FW license on Integrated ASM and Integrated Multi ServicesModule: Single instance
S-TUNNELM7i and M10iTunnel services software license for AS PIC and Multiservices PIC(chassis license)
See Also Junos OS Feature Licenses on page 293•
• License Enforcement on page 294
• Junos OS Feature License Keys on page 295
• Verifying Junos OS License Installation (CLI) on page 338
Software Features That Require Licenses onMX Series Routers Only
Table 34 on page 303 lists the licenses you can purchase for each MX Series software
feature. Each license allows you to run the specified software feature on a single device.
NOTE: The DHCP server functionality for Junos OS is part of the subscribermanagement feature. Youmust have the S-SA-FP, S-MX80-SA-FP orS-MX104-SA-FP license in order to enable the DHCP server. For serviceaccounting, youmust also have S-SSM-FP.
NOTE: This is not a complete list of licenses. Contact your Juniper Networksrepresentative for license information.
For informationabouthowtopurchaseasoftware license, contact your JuniperNetworks
sales representative at http://www.juniper.net/in/en/contact-us/.
Table 34: Junos OS Feature LicenseModel Number for MX Series Routers
Model NumberSupported DevicesLicensed Software Feature
MX80-10G40G-UPG-ADV-BMX80Upgrade license—fromMX80-10G-ADVto MX80-40G-ADV
MX80-10G40G-UPG-BMX80Upgrade license—fromMX80-10G toMX80-40G
303Copyright © 2018, Juniper Networks, Inc.
Chapter 15: Software License Overview

Table 34: Junos OS Feature LicenseModel Number for MX Series Routers (continued)
Model NumberSupported DevicesLicensed Software Feature
MX80-40G-UPG-ADV-BMX80Upgradelicense—fromMX80-40G-ADVto full MX80
MX80-40G-UPG-BMX80Upgrade license—fromMX80-40G tofull MX80
MX80-5G10G-UPG-ADV-BMX80Upgrade license-–fromMX80-5G-ADVto MX80-10G-ADV
MX80-5G10G-UPG-BMX80Upgrade license—fromMX80-5G toMX80-10G
S-MX104-ADD-2X10GEMX104Upgrade license to activate 2x10GEP2&3
S-MX104-UPG-2X10GEMX104Upgrade license to activate 2X10GEP0&1
S-MX104-UPG-4X10GEMX104Upgrade license to activate 4X10GEfixed ports on MX104
S-MX80-QMX80License to supportperVLANqueuingonMX80
S-MX104-QMX104License to supportperVLANqueuingonMX104
S-JFLOW-CH-MX5-104MX5, MX10, M40, MX80, and MX104Chassis-based software license forinline J-Flowmonitoring on MX5, MX10,M40, MX80, and MX104 Series routers
S-JFLOW-CH-MX240MX240Chassis-based software license forinline J-Flowmonitoring on MX240routers
S-JFLOW-CH-MX480MX480Chassis-based software license forinline J-Flowmonitoring on MX480routers
S-JFLOW-CH-MX960MX960Chassis-based software license forinline J-Flowmonitoring on MX960routers
S-JFLOW-CH-MX2008MX2008Chassis-based software license forinline J-Flowmonitoring on MX2008routers
S-JFLOW-CH-MX2010MX2010Chassis-based software license forinline J-Flowmonitoring on MX2010routers
Copyright © 2018, Juniper Networks, Inc.304
Installation and Upgrade Guide

Table 34: Junos OS Feature LicenseModel Number for MX Series Routers (continued)
Model NumberSupported DevicesLicensed Software Feature
S-JFLOW-CH-MX2020MX2020Chassis-based software license forinline J-Flowmonitoring on MX2020routers
S-ACCT-JFLOW-CHASSISMX240, MX480, and MX960Flowmonitoring and accountingfeatures using J-Flow service on anyModular Port Concentrator (MPC) orMS-DPC
S-ACCT-JFLOW-INMX240, MX480, and MX960Software License for in-line J-Flowservice on Trio MPCs
S-ACCT-JFLOW-IN-10GMX80Flowmonitoring and accountingfeatures using J-Flow service on anyMPC limited to 10G of total JFLOWtraffic
S-ACCT-JFLOW-IN-10G-UPGMX80Flowmonitoring and accountingfeatures using J-Flow service on anyMPC limited to 10G of total JFLOWtraffic
S-ACCT-JFLOW-IN-5GMX80Flowmonitoring and accountingfeatures using J-Flow service on anyMPC limited to5Gof total JFLOWtraffic
S-ES-NPUMX Series routerSecurity services (IPsec, VPNandgroupVPN) license based on a single NPU forMS-MIC, MS-DPC or MS-MPC
S-ES-2KMX240, MX480, and MX9602000 IKE sessions onMS-DPC; Chassisbased, limited to 6000 per Chassis
S-ES-4KMX240, MX480, and MX9604000 IKE sessionsonMS-DPC;Chassisbased, limited to 6000 per Chassis
S-ES-4K-UPGMX240, MX480, and MX960Upgrade from 2000 IKE sessions to4000 IKE sessionsonMS-DPC;Chassisbased, limited to 6000 per Chassis
S-ES-6KMX240, MX480, and MX9606000 IKEsessionsonMS-DPC;Chassisbased, limited to 6000 per Chassis
S-ES-6K-UPGMX240, MX480, and MX960Upgrade from 4000 IKE sessions to6000 IKESessionsonMS-DPC;Chassisbased, limited to 6000 per Chassis
S-FW-NPUMX Series routersLicense to run stateful firewall on oneNPU per MS-MIC, MS-DPC or MS-MPC
305Copyright © 2018, Juniper Networks, Inc.
Chapter 15: Software License Overview

Table 34: Junos OS Feature LicenseModel Number for MX Series Routers (continued)
Model NumberSupported DevicesLicensed Software Feature
S-MIC-3D-8CHDS3MX80, MX104, MX240, MX480, andMX960
License to support DS3 Channelization(down to DS0) on each ModularInterface Card (MIC) forMIC-3D-8DS3-E3; also requires licenseS-MX80-Qwhen used on the MX80platform
S-MX80-ADV-RMX80License to support full-scale Layer 3routes and Layer 3 VPN
S-MX104-ADV-R1MX104License to support 256K routes
S-MX104-ADV-R2MX104License to support scaling Layer 3 andVPN routes to 1 million or more entrieson MX104 platforms
S-MPC-3D-16XGE-ADV-RMX240, MX480, and MX960License to support full-scale Layer 3routes and Layer 3 VPN on each slot forMPC-3D-16XGE-SFPP
S-MPC-3D-PQ-ADV-RMX240, MX480, and MX960License to support full-scale Layer 3routes and Layer 3 VPN on each slot forport queuing MPCs
S-MPC-3D-VQ-ADV-RMX240, MX480, and MX960License to support full-scale Layer 3routes and Layer 3 VPN on each slot forhierarchical quality of service (HQoS)MPCs
S-MX80-SA-FPMX80Subscriber Management Feature PackLicense for MX80
S-MX104-SA-FPMX104Subscriber Management Feature Packfor MX104 series
S-MX80-SSM-FPMX80SubscriberServiceManagementFeaturePacket License—RADIUS andSRC-based service activation anddeactivation per-service accountingfeatures
S-MX104-SSM-FPMX104SubscriberServiceManagementFeaturePacket License
S-MX-TD-UPGMX960Upgrade toTrafficDirectAdvanced (perMS-DPC)
S-NATMX240, MX480, and MX960License to run one instance of the NATsoftware on one NPU per MS-DPC
Copyright © 2018, Juniper Networks, Inc.306
Installation and Upgrade Guide

Table 34: Junos OS Feature LicenseModel Number for MX Series Routers (continued)
Model NumberSupported DevicesLicensed Software Feature
S-NAT-IN-MX5-104 (ReplacesS-NAT-IN-MX40-MX80 andS-NAT-IN-MX5-MX10)
MX5, MX10, MX40, MX80, and MX104License to support inline NAT softwareon MX5, MX10, MX40, MX80, MX104
S-NAT-NPU (ReplacesS-NAT-IN-MX40-MX80-UPG)
MX80,MX104,MX240,MA480,MX960,MX2010, and MX2020
License to run one instance of the NATsoftware on one NPU per MS-MIC,MS-DPC, or MS-MPC
S-NAT-IN-MX-CHASSISMX240, MX480, and MX960License to run NAT using any MPC in anMX Chassis
S-SA-4KMX240, MX480, MX960, M120, M320,and MX80
SubscriberAccessFeaturePackLicenseScaling (4000)
S-SA-8KMX240, MX480, MX960, M120, M320,and MX80
SubscriberAccessFeaturePackLicenseScaling (8000)
S-SA-16KMX240, MX480, MX960, and MX80SubscriberAccessFeaturePackLicenseScaling (16,000)
S-SA-32KMX240, MX480, MX960, M120, andM320
SubscriberAccessFeaturePackLicenseScaling (32,000)
S-SA-64KMX240, MX480, MX960, M120, andM320
SubscriberAccessFeaturePackLicenseScaling (64,000)
S-SA-96KMX240, MX480, MX960, M120, andM320
SubscriberAccessFeaturePackLicenseScaling (96,000)
S-SA-128KMX240, MX480, MX960, M120, andM320
SubscriberAccessFeaturePackLicenseScaling (128,000)
S-SA-256KMX240, MX480, and MX960SubscriberAccessFeaturePackLicenseScaling (256,000)
S-SA-FPMX240, MX480, MX960, M120, andM320
SubscriberAccessFeaturePackLicense
S-SFM-FLOWTAP-INMX80, MX104, MX240, MX480, andMX960
Software License for Secure FlowMirroring Service (FlowTap) (does notrequire MS-DPC)
S-SFWMX960, MX480, and MX240License to run one instance of the SFWand software on a MS-DPC
S-SSM-FPMX240, MX480, MX960, M120, andM320
SubscriberServiceManagementFeaturePacket License—RADIUS andSRC-based service activation anddeactivation per-service accountingfeatures
307Copyright © 2018, Juniper Networks, Inc.
Chapter 15: Software License Overview

Table 34: Junos OS Feature LicenseModel Number for MX Series Routers (continued)
Model NumberSupported DevicesLicensed Software Feature
S-VCRMX960, MX480, and MX240Software license for onemember of anMX Virtual Chassis
MX10-40-UPGMX10-TUpgrade license—fromMX10 toequivalent of MX40; allows additional2x10G fixed ports to be used on theMX10 router
MX10-80-UPGMX10-TUpgrade license—fromMX10 toequivalent of MX80; allows additional4x10G fixed ports to be used on theMX10 router
MX40-80-UPGMX40-TUpgrade license—fromMX40 toequivalent of MX80; allows additional2x10G fixed ports to be used on theMX40 router
MX5-10-UPGMX5-TUpgrade license—fromMX5 toequivalent of MX10; allows second MICslot to be used on the MX5 router
MX5-40-UPGMX5-TUpgrade license—fromMX5 toequivalent ofMX40; allows secondMICslot and 2x10G fixedports to be usedonthe MX5 router
MX5-80-UPGMX5-TUpgrade license—fromMX5 toequivalent ofMX80.Allows secondMICslot and4x10G fixedports tobeusedonthe MX5 router
S-SA-UP-8KMX80, MX960, MX480, and MX240Upgrade license—Subscriber AccessFeature Pack scaling license upgradefrom 4000 through 8000 subscribers
S-SA-UP-16KMX80, MX960, MX480, and MX240Upgrade license—Subscriber AccessFeature Pack scaling license upgradefrom 8000 through 16,000 subscribers
S-SA-UP-32KMX240, MX480, and MX960Upgrade license—Subscriber AccessFeature Pack scaling license upgradefrom16,000through32,000subscribers
S-SA-UP-64KMX240, MX480, and MX960Upgrade license—Subscriber AccessFeature Pack scaling license upgradefrom 32,000 through 64,000subscribers
Copyright © 2018, Juniper Networks, Inc.308
Installation and Upgrade Guide

Table 34: Junos OS Feature LicenseModel Number for MX Series Routers (continued)
Model NumberSupported DevicesLicensed Software Feature
S-SA-UP-96KMX240, MX480, and MX960Upgrade license—Subscriber AccessFeature Pack scaling license upgradefrom 64,000 through 96,000subscribers
S-SA-UP-128KMX240, MX480, and MX960Upgrade license—Subscriber AccessFeature Pack scaling license upgradefrom 96,000 through 128,000subscribers
S-SA-UP-256KMX240, MX480, and MX960Upgrade license—Subscriber AccessFeature Pack scaling license upgradefrom 128,000 through 256,000subscribers
S-MX-AD-FUSION-LICMX Series routerLicense to use MX as Controller orAggregation device for Junos Fusion.One license per MX is needed.
S-MX-SAT-EX4300EX4300License to run any supported EX4300model as a satellite device in JunosFusion mode. One license per EX4300is needed
S-MX-SAT-QFX5100QFX5100License to run any supported QFX5100model as a satellite device in JunosFusionmode. One license per QFX5100is needed
See Also Junos OS Feature Licenses on page 293•
• License Enforcement on page 294
• Junos OS Feature License Keys on page 295
• Verifying Junos OS License Installation (CLI) on page 338
Software Feature Licenses for SRX Series Devices
For informationabouthowtopurchaseasoftware license, contact your JuniperNetworks
sales representative at http://www.juniper.net/in/en/contact-us/. Platform support
depends on the Junos OS release in your installation.
Each feature license is tied to exactly one software feature, and that license is valid for
exactly one device.
NOTE: For themostup-to-date licensemodelsavailable, contactyour Juniperaccount team.
309Copyright © 2018, Juniper Networks, Inc.
Chapter 15: Software License Overview

See Also License Enforcement on page 294•
• Junos OS Feature License Keys
Software Features That Require Licenses on EX Series Switches
The following JunosOS features require anEnhancedFeature License (EFL) orAdvanced
Feature License (AFL) on EX Series devices:
• (EX2200 only) Bidirectional forwarding detection (BFD)
• (EX2200 only) Connectivity fault management (IEEE 802.lag)
• (EX2200 only) Internet GroupManagement Protocol version 1 (IGMPv1), IGMPv2, and
IGMPv3
• (EX2200 and EX3300) OSPFv1/v2 (with 4 active interfaces)
• (EX2200only)Protocol IndependentMulticast (PIM)densemode,PIMsource-specific
mode, PIM sparse mode
• (EX2200 and EX3300) Q-in-Q tunneling (IEEE 802.lad)
• (EX2200 only) Real-time performancemonitoring (RPM)
• (EX3200, EX4200, EX4500, EX6200, and EX8200) Border Gateway Protocol (BGP)
andmultiprotocol BGP (MBGP)
• (EX3200, EX4200, EX4500, EX6200, and EX8200) Intermediate
System-to-Intermediate System (IS-IS)
• (EX3200, EX4200, EX4500, EX6200, and EX8200) IPv6 protocols: OSPFv3, PIPng,
IS-IS for IPv6, IPv6 BGP
• (EX3200, EX4200, EX4500, EX6200, and EX8200) MPLS with RSVP-based
label-switched paths (LSPs) and MPLS-based circuit cross-connects (CCCs)
For more details regarding EX Series feature licenses, see “Understanding Software
Licenses for EX Series Switches” on page 320.
For informationabouthowtopurchaseasoftware license, contact your JuniperNetworks
sales representative at http://www.juniper.net/in/en/contact-us/.
See Also Understanding Software Licenses for EX Series Switches on page 320•
• Junos OS Feature Licenses on page 293
• License Enforcement on page 294
• Junos OS Feature License Keys on page 295
• Verifying Junos OS License Installation (CLI) on page 338
Copyright © 2018, Juniper Networks, Inc.310
Installation and Upgrade Guide

Software Features That Require Licenses on the QFX Series
NOTE: If you try to configure a feature that is not licensed, you will receivesyslogmessages saying that you are using a feature that is licensable andthat you do not possess a license for the feature. If you try to commitconfiguration changes for a feature that is not licensed, you will receive acommit warning saying that you have exceeded the allowed license limit forthe feature.
NOTE: Virtual Extensible Local Area Network (VXLAN) is not supported onQFX3500andQFX3600devices.Whenyou issuetheshowlicensescommand,
you will see VXLAN in the CLI output, but the feature is not enabled.
NOTE: There is no separate license for Virtual Chassis like there is for VirtualChassis Fabric.
Table 35 on page 311 lists the standard Junos OS features licenses and supported QFX
Series devices. For information on disaggregated Junos OS feature licenses on the
QFX5200-32C switch, seeDisaggregated Software Features That Require Licenses on the
QFX Series.
For informationabouthowtopurchaseasoftware license, contact your JuniperNetworks
sales representative.
Table 35: Standard Junos OS Feature Licenses andModel Numbers for QFX Series Devices
Model Number
Number ofLicensesRequiredSupported Devices
Licensed SoftwareFeature
QFX10002-36Q-PFL
QFX10002-72Q-PFL
QFX10008-PFL
QFX10016-PFL
QFX5K-C1-PFL
QFX5K-C1-PFL
One per switchQFX10002-36Q switch
QFX10002-72Q switch
QFX10008 switch
QFX10016 switch
QFX5110-48S switch
QFX5110-32Q switch
QFX Series premiumfeature license for BorderGateway Protocol (BGP),IntermediateSystem-to-IntermediateSystem(IS-IS), andVirtualExtensible Local AreaNetwork (VXLAN), andOpen vSwitch Database(OVSDB)
311Copyright © 2018, Juniper Networks, Inc.
Chapter 15: Software License Overview

Table 35: Standard Junos OS Feature Licenses andModel Numbers for QFX SeriesDevices (continued)
Model Number
Number ofLicensesRequiredSupported Devices
Licensed SoftwareFeature
QFX10002-36Q-AFL
QFX10002-72Q-AFL
QFX10008-AFL
QFX10016-AFL
QFX5K-C1-AFL
QFX5K-C1-AFL
One per switchQFX10002-36Q switch
QFX10002-72Q switch
QFX10008 switch
QFX10016 switch
QFX5110-48S switch
QFX5110-32Q switch
QFX Series advancedfeature license for BorderGateway Protocol (BGP),IntermediateSystem-to-IntermediateSystem (IS-IS),Multi-protocol LabelSwitching (MPLS), andVirtual Extensible LocalArea Network (VXLAN),and Open vSwitchDatabase (OVSDB)
QFX-JSL-EDGE-ADV1Oneper switch,two per VirtualChassis, andtwo per VirtualChassis Fabric
QFX3500, QFX3600,QFX5100-48S, andQFX5100-48T switch
QFX Series advancedfeature license for BorderGateway Protocol (BGP),IntermediateSystem-to-IntermediateSystem (IS-IS),Multi-protocol LabelSwitching (MPLS), andVirtual Extensible LocalArea Network (VXLAN),and Open vSwitchDatabase (OVSDB)
QFX5100-HDNSE-LICOneper switch,two per VirtualChassis, andtwo per VirtualChassis Fabric
QFX5100-24Q andQFX5100-96S switch
QFX Series advancedfeature license for BorderGateway Protocol (BGP),IntermediateSystem-to-IntermediateSystem (IS-IS),Multi-protocol LabelSwitching (MPLS), andVirtual Extensible LocalArea Network (VXLAN)and Open vSwitchDatabase (OVSDB)
QFX-JSL-DRCTR-ADV1One per Nodedevice in anetwork Nodegroup
QFX3100 Director deviceQFX Series advancedfeature license for BorderGateway Protocol (BGP)
QFX-JSL-EDGE-FCOne per switchon which fibrechannel portsare configured
QFX3500 switchQFX Series advancedfeature license for FibreChannel
Copyright © 2018, Juniper Networks, Inc.312
Installation and Upgrade Guide

Table 35: Standard Junos OS Feature Licenses andModel Numbers for QFX SeriesDevices (continued)
Model Number
Number ofLicensesRequiredSupported Devices
Licensed SoftwareFeature
QFX-JSL-DRCTR-FCOne perQFX3500Nodedeviceonwhichfibre channelports areconfigured
QFX3100 Director deviceQFX Series advancedfeature license for FibreChannel
QFX-JSL-DRCTR-FC-C16One for up to 16QFX3500Nodedevices onwhich fibrechannel portsare configured
QFX3100 Director deviceQFX Series advancedfeature license for FibreChannel - Capacity 16
QFX3000-JSL-EDGE-FABOne per deviceQFX3500 and QFX3600device
QFX Series feature licensefor enabling fabric mode
QFX3008-JSL-DRCTR-FABOne perQFX3000-GQFabric system
QFX3100 Director deviceQFX Series feature licensefor base software forQFX3000-G QFabricsystem
QFX3000M-JSL-DRCTR-FABOne perQFX3000-MQFabric system
QFX3100 Director deviceQFX Series feature licensefor base software forQFX3000-MQFabricsystem
EX-QFX-MACSEC-AGGOneper switch,two per VirtualChassis,
QFX switches that supportMACsec. See UnderstandingMedia Access Control Security(MACsec).
QFX and EX Series featurelicense for enabling MediaAccess Control security(MACsec)
QFX-VCF-LICTwo per VirtualChassis Fabric(VCF)
Anymemberdevice inaVirtualChassis Fabric (VCF)
Virtual Chassis Fabric(VCF) feature license
See Also Junos OS Feature Licenses on page 293•
• Junos OS Feature License Keys on page 295
• Generating License Keys
• Adding New Licenses (CLI Procedure) on page 331
• Deleting License Keys (CLI) on page 336
• Saving License Keys (CLI) on page 338
• Verifying Junos OS License Installation (CLI) on page 338
313Copyright © 2018, Juniper Networks, Inc.
Chapter 15: Software License Overview

Software Features That Require Licenses onMX Series Routers Only
Table 34 on page 303 lists the licenses you can purchase for each MX Series software
feature. Each license allows you to run the specified software feature on a single device.
NOTE: The DHCP server functionality for Junos OS is part of the subscribermanagement feature. Youmust have the S-SA-FP, S-MX80-SA-FP orS-MX104-SA-FP license in order to enable the DHCP server. For serviceaccounting, youmust also have S-SSM-FP.
NOTE: This is not a complete list of licenses. Contact your Juniper Networksrepresentative for license information.
For informationabouthowtopurchaseasoftware license, contact your JuniperNetworks
sales representative at http://www.juniper.net/in/en/contact-us/.
Table 36: Junos OS Feature LicenseModel Number for MX Series Routers
Model NumberSupported DevicesLicensed Software Feature
MX80-10G40G-UPG-ADV-BMX80Upgrade license—fromMX80-10G-ADVto MX80-40G-ADV
MX80-10G40G-UPG-BMX80Upgrade license—fromMX80-10G toMX80-40G
MX80-40G-UPG-ADV-BMX80Upgradelicense—fromMX80-40G-ADVto full MX80
MX80-40G-UPG-BMX80Upgrade license—fromMX80-40G tofull MX80
MX80-5G10G-UPG-ADV-BMX80Upgrade license-–fromMX80-5G-ADVto MX80-10G-ADV
MX80-5G10G-UPG-BMX80Upgrade license—fromMX80-5G toMX80-10G
S-MX104-ADD-2X10GEMX104Upgrade license to activate 2x10GEP2&3
S-MX104-UPG-2X10GEMX104Upgrade license to activate 2X10GEP0&1
S-MX104-UPG-4X10GEMX104Upgrade license to activate 4X10GEfixed ports on MX104
Copyright © 2018, Juniper Networks, Inc.314
Installation and Upgrade Guide

Table 36: Junos OS Feature LicenseModel Number for MX Series Routers (continued)
Model NumberSupported DevicesLicensed Software Feature
S-MX80-QMX80License to supportperVLANqueuingonMX80
S-MX104-QMX104License to supportperVLANqueuingonMX104
S-JFLOW-CH-MX5-104MX5, MX10, M40, MX80, and MX104Chassis-based software license forinline J-Flowmonitoring on MX5, MX10,M40, MX80, and MX104 Series routers
S-JFLOW-CH-MX240MX240Chassis-based software license forinline J-Flowmonitoring on MX240routers
S-JFLOW-CH-MX480MX480Chassis-based software license forinline J-Flowmonitoring on MX480routers
S-JFLOW-CH-MX960MX960Chassis-based software license forinline J-Flowmonitoring on MX960routers
S-JFLOW-CH-MX2008MX2008Chassis-based software license forinline J-Flowmonitoring on MX2008routers
S-JFLOW-CH-MX2010MX2010Chassis-based software license forinline J-Flowmonitoring on MX2010routers
S-JFLOW-CH-MX2020MX2020Chassis-based software license forinline J-Flowmonitoring on MX2020routers
S-ACCT-JFLOW-CHASSISMX240, MX480, and MX960Flowmonitoring and accountingfeatures using J-Flow service on anyModular Port Concentrator (MPC) orMS-DPC
S-ACCT-JFLOW-INMX240, MX480, and MX960Software License for in-line J-Flowservice on Trio MPCs
S-ACCT-JFLOW-IN-10GMX80Flowmonitoring and accountingfeatures using J-Flow service on anyMPC limited to 10G of total JFLOWtraffic
S-ACCT-JFLOW-IN-10G-UPGMX80Flowmonitoring and accountingfeatures using J-Flow service on anyMPC limited to 10G of total JFLOWtraffic
315Copyright © 2018, Juniper Networks, Inc.
Chapter 15: Software License Overview

Table 36: Junos OS Feature LicenseModel Number for MX Series Routers (continued)
Model NumberSupported DevicesLicensed Software Feature
S-ACCT-JFLOW-IN-5GMX80Flowmonitoring and accountingfeatures using J-Flow service on anyMPC limited to5Gof total JFLOWtraffic
S-ES-NPUMX Series routerSecurity services (IPsec, VPNandgroupVPN) license based on a single NPU forMS-MIC, MS-DPC or MS-MPC
S-ES-2KMX240, MX480, and MX9602000 IKE sessions onMS-DPC; Chassisbased, limited to 6000 per Chassis
S-ES-4KMX240, MX480, and MX9604000 IKE sessionsonMS-DPC;Chassisbased, limited to 6000 per Chassis
S-ES-4K-UPGMX240, MX480, and MX960Upgrade from 2000 IKE sessions to4000 IKE sessionsonMS-DPC;Chassisbased, limited to 6000 per Chassis
S-ES-6KMX240, MX480, and MX9606000 IKEsessionsonMS-DPC;Chassisbased, limited to 6000 per Chassis
S-ES-6K-UPGMX240, MX480, and MX960Upgrade from 4000 IKE sessions to6000 IKESessionsonMS-DPC;Chassisbased, limited to 6000 per Chassis
S-FW-NPUMX Series routersLicense to run stateful firewall on oneNPU per MS-MIC, MS-DPC or MS-MPC
S-MIC-3D-8CHDS3MX80, MX104, MX240, MX480, andMX960
License to support DS3 Channelization(down to DS0) on each ModularInterface Card (MIC) forMIC-3D-8DS3-E3; also requires licenseS-MX80-Qwhen used on the MX80platform
S-MX80-ADV-RMX80License to support full-scale Layer 3routes and Layer 3 VPN
S-MX104-ADV-R1MX104License to support 256K routes
S-MX104-ADV-R2MX104License to support scaling Layer 3 andVPN routes to 1 million or more entrieson MX104 platforms
S-MPC-3D-16XGE-ADV-RMX240, MX480, and MX960License to support full-scale Layer 3routes and Layer 3 VPN on each slot forMPC-3D-16XGE-SFPP
S-MPC-3D-PQ-ADV-RMX240, MX480, and MX960License to support full-scale Layer 3routes and Layer 3 VPN on each slot forport queuing MPCs
Copyright © 2018, Juniper Networks, Inc.316
Installation and Upgrade Guide

Table 36: Junos OS Feature LicenseModel Number for MX Series Routers (continued)
Model NumberSupported DevicesLicensed Software Feature
S-MPC-3D-VQ-ADV-RMX240, MX480, and MX960License to support full-scale Layer 3routes and Layer 3 VPN on each slot forhierarchical quality of service (HQoS)MPCs
S-MX80-SA-FPMX80Subscriber Management Feature PackLicense for MX80
S-MX104-SA-FPMX104Subscriber Management Feature Packfor MX104 series
S-MX80-SSM-FPMX80SubscriberServiceManagementFeaturePacket License—RADIUS andSRC-based service activation anddeactivation per-service accountingfeatures
S-MX104-SSM-FPMX104SubscriberServiceManagementFeaturePacket License
S-MX-TD-UPGMX960Upgrade toTrafficDirectAdvanced (perMS-DPC)
S-NATMX240, MX480, and MX960License to run one instance of the NATsoftware on one NPU per MS-DPC
S-NAT-IN-MX5-104 (ReplacesS-NAT-IN-MX40-MX80 andS-NAT-IN-MX5-MX10)
MX5, MX10, MX40, MX80, and MX104License to support inline NAT softwareon MX5, MX10, MX40, MX80, MX104
S-NAT-NPU (ReplacesS-NAT-IN-MX40-MX80-UPG)
MX80,MX104,MX240,MA480,MX960,MX2010, and MX2020
License to run one instance of the NATsoftware on one NPU per MS-MIC,MS-DPC, or MS-MPC
S-NAT-IN-MX-CHASSISMX240, MX480, and MX960License to run NAT using any MPC in anMX Chassis
S-SA-4KMX240, MX480, MX960, M120, M320,and MX80
SubscriberAccessFeaturePackLicenseScaling (4000)
S-SA-8KMX240, MX480, MX960, M120, M320,and MX80
SubscriberAccessFeaturePackLicenseScaling (8000)
S-SA-16KMX240, MX480, MX960, and MX80SubscriberAccessFeaturePackLicenseScaling (16,000)
S-SA-32KMX240, MX480, MX960, M120, andM320
SubscriberAccessFeaturePackLicenseScaling (32,000)
S-SA-64KMX240, MX480, MX960, M120, andM320
SubscriberAccessFeaturePackLicenseScaling (64,000)
317Copyright © 2018, Juniper Networks, Inc.
Chapter 15: Software License Overview

Table 36: Junos OS Feature LicenseModel Number for MX Series Routers (continued)
Model NumberSupported DevicesLicensed Software Feature
S-SA-96KMX240, MX480, MX960, M120, andM320
SubscriberAccessFeaturePackLicenseScaling (96,000)
S-SA-128KMX240, MX480, MX960, M120, andM320
SubscriberAccessFeaturePackLicenseScaling (128,000)
S-SA-256KMX240, MX480, and MX960SubscriberAccessFeaturePackLicenseScaling (256,000)
S-SA-FPMX240, MX480, MX960, M120, andM320
SubscriberAccessFeaturePackLicense
S-SFM-FLOWTAP-INMX80, MX104, MX240, MX480, andMX960
Software License for Secure FlowMirroring Service (FlowTap) (does notrequire MS-DPC)
S-SFWMX960, MX480, and MX240License to run one instance of the SFWand software on a MS-DPC
S-SSM-FPMX240, MX480, MX960, M120, andM320
SubscriberServiceManagementFeaturePacket License—RADIUS andSRC-based service activation anddeactivation per-service accountingfeatures
S-VCRMX960, MX480, and MX240Software license for onemember of anMX Virtual Chassis
MX10-40-UPGMX10-TUpgrade license—fromMX10 toequivalent of MX40; allows additional2x10G fixed ports to be used on theMX10 router
MX10-80-UPGMX10-TUpgrade license—fromMX10 toequivalent of MX80; allows additional4x10G fixed ports to be used on theMX10 router
MX40-80-UPGMX40-TUpgrade license—fromMX40 toequivalent of MX80; allows additional2x10G fixed ports to be used on theMX40 router
MX5-10-UPGMX5-TUpgrade license—fromMX5 toequivalent of MX10; allows second MICslot to be used on the MX5 router
MX5-40-UPGMX5-TUpgrade license—fromMX5 toequivalent ofMX40; allows secondMICslot and 2x10G fixedports to be usedonthe MX5 router
Copyright © 2018, Juniper Networks, Inc.318
Installation and Upgrade Guide

Table 36: Junos OS Feature LicenseModel Number for MX Series Routers (continued)
Model NumberSupported DevicesLicensed Software Feature
MX5-80-UPGMX5-TUpgrade license—fromMX5 toequivalent ofMX80.Allows secondMICslot and4x10G fixedports tobeusedonthe MX5 router
S-SA-UP-8KMX80, MX960, MX480, and MX240Upgrade license—Subscriber AccessFeature Pack scaling license upgradefrom 4000 through 8000 subscribers
S-SA-UP-16KMX80, MX960, MX480, and MX240Upgrade license—Subscriber AccessFeature Pack scaling license upgradefrom 8000 through 16,000 subscribers
S-SA-UP-32KMX240, MX480, and MX960Upgrade license—Subscriber AccessFeature Pack scaling license upgradefrom16,000through32,000subscribers
S-SA-UP-64KMX240, MX480, and MX960Upgrade license—Subscriber AccessFeature Pack scaling license upgradefrom 32,000 through 64,000subscribers
S-SA-UP-96KMX240, MX480, and MX960Upgrade license—Subscriber AccessFeature Pack scaling license upgradefrom 64,000 through 96,000subscribers
S-SA-UP-128KMX240, MX480, and MX960Upgrade license—Subscriber AccessFeature Pack scaling license upgradefrom 96,000 through 128,000subscribers
S-SA-UP-256KMX240, MX480, and MX960Upgrade license—Subscriber AccessFeature Pack scaling license upgradefrom 128,000 through 256,000subscribers
S-MX-AD-FUSION-LICMX Series routerLicense to use MX as Controller orAggregation device for Junos Fusion.One license per MX is needed.
S-MX-SAT-EX4300EX4300License to run any supported EX4300model as a satellite device in JunosFusion mode. One license per EX4300is needed
S-MX-SAT-QFX5100QFX5100License to run any supported QFX5100model as a satellite device in JunosFusionmode. One license per QFX5100is needed
319Copyright © 2018, Juniper Networks, Inc.
Chapter 15: Software License Overview

RelatedDocumentation
Junos OS Feature Licenses on page 293•
• License Enforcement on page 294
• Junos OS Feature License Keys on page 295
• Verifying Junos OS License Installation (CLI) on page 338
Understanding Software Licenses for EX Series Switches
To enable and use some of the Juniper Networks operating system (Junos OS) features,
youmust purchase, install, andmanage separate software licenses. If the switch has the
appropriate software license, you can configure and use these features.
The Junos OS feature license (that is, the purchased authorization code) is universal.
However, to conform to Junos OS feature licensing requirements, youmust install a
unique license key (a combination of the authorization code and the switch’s serial
number) on each switch.
ForaVirtualChassisdeployment, two licensekeysare recommendedfor redundancy—one
for the device in the master role and the other for the device in the backup role:
• In an EX8200 Virtual Chassis, the devices in the master and backup roles are always
XRE200 External Routing Engines.
• In all other Virtual Chassis, the devices in the master and backup roles are switches.
You do not need additional license keys for Virtual Chassis member switches that are in
the linecard role or for the redundant Routing Engine (RE) modules or the redundant
Switch Fabric and Routing Engine (SRE) modules in an EX8200member switch.
This topic describes:
• Purchasing a Software Feature License on page 320
• Features Requiring a License on EX2200 Switches on page 321
• Features Requiring a License on EX2300 Switches on page 322
• Features Requiring a License on EX3300 Switches on page 322
• Features Requiring a License on EX3400 Switches on page 324
• Features Requiring a License on EX4300 Switches on page 325
• Features Requiring a License on EX4600 Switches on page 326
• FeaturesRequiringaLicenseonEX3200,EX4200,EX4500,EX4550,EX6200,EX8200,
and EX9200 Switches on page 327
• LicenseWarning Messages on page 328
Purchasing a Software Feature License
The following sections list features that require separate licenses. Topurchaseasoftware
license, contact your Juniper Networks sales representative
(http://www.juniper.net/us/en/contact-us/sales-offices). You will be asked to supply the
Copyright © 2018, Juniper Networks, Inc.320
Installation and Upgrade Guide

chassis serial number of your switch; you can obtain the serial number by running the
show chassis hardware command.
NOTE: Youare required toprovide the 12-digit serial numberwhenpurchasinga license foranXRE200ExternalRoutingEngine inanEX8200VirtualChassis.
The serial number listed on the XRE200 External Routing Engine serial IDlabel is 16 digits long. Use the last 12 digits of the 16-digit serial number topurchase the license.
Youcanusetheshowchassishardwarecommandoutput todisplay the 12-digit
serial number of the XRE200 External Routing Engine.
Features Requiring a License on EX2200 Switches
For EX2200switches, the following features canbeadded tobasic JunosOSby installing
an enhanced feature license (EFL):
• Bidirectional Forwarding Detection (BFD)
• Connectivity fault management (IEEE 802.1ag)
• IGMP (InternetGroupManagementProtocol) version 1 (IGMPv1), IGMPv2, and IGMPv3
• OSPFv1/v2 (with four active interfaces)
• Protocol Independent Multicast (PIM) densemode, PIM source-specific mode, PIM
sparse mode
• Q-in-Q tunneling (IEEE 802.1ad)
• Real-time performancemonitoring (RPM)
• Virtual Router
• Virtual Router Redundancy Protocol (VRRP)
Table 37 on page 321 lists the EFLs that you can purchase for EX2200 switch models. If
you have the license, you can runall of the enhanced software featuresmentionedabove
on your EX2200 switch.
Table 37: Junos OS EFL Part Number on EX2200 Switches
EFL Part NumberSwitch Model
EX-12-EFLEX2200-C-12P-2GEX2200-C-12T-2G
EX-24-EFLEX2200-24T-4GEX2200-24P-4GEX2200-24T-DC-4G
EX-48-EFLEX2200-48T-4GEX2200-48P-4G
321Copyright © 2018, Juniper Networks, Inc.
Chapter 15: Software License Overview

Features Requiring a License on EX2300 Switches
EX2300 switches have enhanced feature licenses (EFLs).
To use the following features on the EX2300 switches, youmust install an EFL:
• Bidirectional Forwarding Detection (BFD)
• IGMP (InternetGroupManagementProtocol) version 1 (IGMPv1), IGMPv2, and IGMPv3
• IPv6 routingprotocols:MulticastListenerDiscoveryversion 1and2(MLDv1/v2),OSPFv3,
PIMmulticast, VRRPv6
• Multicast Source Discovery protocol (MSDP)
• OSPF v2/v3
• Protocol Independent Multicast (PIM) densemode, PIM source-specific mode, PIM
sparse mode
• Real-time performancemonitoring (RPM)
• RIPng (RIPng is for RIP IPv6)
• Virtual Router Redundancy Protocol (VRRP)
NOTE: You require a paper license to create an EX2300 Virtual Chassis. Ifyou do not have a paper license, contact Customer Support.
Table 38 on page 322 lists the EFLs that you can purchase for EX2300 switch models. If
you have the license, you can runall of the enhanced software featuresmentionedabove
on your EX2300 switch.
Table 38: Junos OS EFL Part Number on EX2300 Switches
EFL Part NumberSwitch Model
EX-24-EFLEX2300-24TEX2300-24PEX2300-C-12PEX2300-C-12T
EX-48-EFLEX2300-48TEX2300-48P
Features Requiring a License on EX3300 Switches
Two types of licenses are available on EX3300 switches: enhanced feature licenses
(EFLs) and advanced feature licenses (AFLs).
Copyright © 2018, Juniper Networks, Inc.322
Installation and Upgrade Guide

To use the following features on the EX3300 switches, youmust install an EFL:
• Bidirectional Forwarding Detection (BFD)
• IGMP (InternetGroupManagementProtocol) version 1 (IGMPv1), IGMPv2, and IGMPv3
• IPv6 routingprotocols:MulticastListenerDiscoveryversion 1and2(MLDv1/v2),OSPFv3,
PIMmulticast, VRRPv6, virtual router support for unicast and filter-based forwarding
(FBF)
• OSPFv1/v2
• Protocol Independent Multicast (PIM) densemode, PIM source-specific mode, PIM
sparse mode
• Q-in-Q tunneling (IEEE 802.1ad)
• Real-time performancemonitoring (RPM)
• Virtual Router
• Virtual Router Redundancy Protocol (VRRP)
Table 39 on page 323 lists the EFLs that you can purchase for EX3300 switch models. If
you have the license, you can runall of the enhanced software featuresmentionedabove
on your EX3300 switch.
Table 39: Junos OS EFL Part Number on EX3300 Switches
EFL Part NumberSwitch Model
EX-24-EFLEX3300-24TEX3300-24PEX3300-24T-DC
EX-48-EFLEX3300-48TEX3300-48T-BFEX3300-48P
To use the following feature on EX3300 switches, youmust install an AFL:
• Border Gateway Protocol (BGP) andmultiprotocol BGP (MBGP)
• IPv6 routing protocols: IPv6 BGP and IPv6 for MBGP
• Virtual routing and forwarding (VRF) BGP
Table 40 on page 324 lists the AFLs that you can purchase for EX3300 switch models.
For EX3300 switches, youmust purchase and install a corresponding EFL alongwith the
AFL to enable the advanced license features. If you have both these licenses, you can
run all of the advanced software features mentioned above on your EX3300 switch.
323Copyright © 2018, Juniper Networks, Inc.
Chapter 15: Software License Overview

Table 40: Junos OS AFL Part Number on EX3300 Switches
AFL Part NumberSwitch Model
EX-24-AFLEX3300-24TEX3300-24PEX3300-24T-DC
EX-48-AFLEX3300-48TEX3300-48T-BFEX3300-48P
Features Requiring a License on EX3400 Switches
EX3400 switches has an enhanced feature licenses (EFLs) and MACSec license.
To use the following features on the EX3400 switches, youmust install an EFL:
• Bidirectional Forwarding Detection (BFD)
• IGMP (InternetGroupManagementProtocol) version 1 (IGMPv1), IGMPv2, and IGMPv3
• IPv6 routing protocols: : Multicast Listener Discovery version 1 and 2 (MLD v1/v2),
OSPFv3, PIMmulticast, VRRPv6, virtual router support for unicast and filter-based
forwarding (FBF)
• Multicast Source Discovery Protocol (MSDP)
• OSPF v2/v3
• Protocol Independent Multicast (PIM) densemode, PIM source-specific mode, PIM
sparse mode
• Real-time performancemonitoring (RPM)
• RIPng (RIPng is for RIP IPv6)
• Unicast reverse-path forwarding (RPF)
• Virtual Router
• Virtual Router Redundancy Protocol (VRRP)
Table 41 on page 324 lists the EFLs that you can purchase for EX3400 switch models. If
you have the license, you can runall of the enhanced software featuresmentionedabove
on your EX3400 switch.
Table 41: Junos OS EFL Part Number on EX3400 Switches
EFL Part NumberSwitch Model
EX-24-EFLEX3400-24TEX3400-24P
EX-48-EFLEX3400-48TEX3400-48PEX3400-48T-AFI
Copyright © 2018, Juniper Networks, Inc.324
Installation and Upgrade Guide

Features Requiring a License on EX4300 Switches
Two types of licenses are available on EX4300 switches: enhanced feature licenses
(EFLs) and advanced feature licenses (AFLs).
To use the following features on the EX4300 switches, youmust install an EFL:
• Bidirectional Forwarding Detection (BFD)
• Connectivity fault management (IEEE 802.1ag)
• IGMP (InternetGroupManagementProtocol) version 1 (IGMPv1), IGMPv2, and IGMPv3
• Multicast Source Discovery Protocol (MSDP)
• OSPFv2/v3
• Protocol Independent Multicast (PIM) densemode, PIM source-specific mode, PIM
sparse mode
• Real-time perfomancemonitoring (RPM)
• RIPng (RIPng is for RIP IPv6)
• Unicast reverse-path forwarding (RPF)
• Virtual Router
• Virtual Router Redundancy Protocol (VRRP)
Table 42 on page 325 lists the EFLs that you can purchase for EX4300 switchmodels. If
you have the license, you can runall of the enhanced software featuresmentionedabove
on your EX4300 switch.
Table 42: Junos OS EFL Part Number on EX4300 Switches
EFL Part NumberSwitch Model
EX4300-24-EFLEX4300-24TEX4300-24P
EX4300-48-EFLEX4300-48PEX4300-48TEX4300-48T-AFIEX4300-48T-DCEX4300-48T-DC-AFI
EX4300-32F-EFLEX4300-32FEX4300-32F-DC
To use the following features on EX4300 switches, youmust install an AFL:
• Border Gateway Protocol (BGP) andmultiprotocol BGP (MBGP)
• Intermediate System-to-Intermediate System (IS-IS)
325Copyright © 2018, Juniper Networks, Inc.
Chapter 15: Software License Overview

Table 43 on page 326 lists the AFLs that you can purchase for EX4300 switch models.
For EX4300 switches, youmust purchase and install a corresponding EFL alongwith the
AFL to enable the advanced license features. If you have both these licenses, you can
run all of the advanced software features mentioned above on your EX4300 switch.
Table 43: Junos OS AFL Part Number on EX4300 Switches
AFL Part NumberSwitch Model
EX4300-24-AFLEX4300-24TEX4300-24P
EX4300-48-AFLEX4300-48PEX4300-48TEX4300-48T-AFIEX4300-48T-DCEX4300-48T-DC-AFI
EX4300-32F-AFLEX4300-32FEX4300-32F-DC
Youmust download a MACsec feature license to enable MACsec. The MACsec feature
license is an independent feature license; the enhanced feature licenses (EFLs) or
advanced feature licenses (AFLs) that must be purchased to enable some features on
EX Series switches cannot be purchased to enable MACsec.
To purchase a feature license for MACsec, contact your Juniper Networks sales
representative (http://www.juniper.net/us/en/contact-us/sales-offices). The Juniper sales
representative will provide you with a feature license file and a license key.
MACsec is supported on EX4300 switches.
Features Requiring a License on EX4600 Switches
To use the following features on EX4600 switches, youmust install an advanced feature
license:
• Border Gateway Protocol (BGP) andmultiprotocol BGP (MBGP)
• Intermediate System-to-Intermediate System (IS-IS)
• Multiprotocol Label Switching (MPLS)
Table 44 on page 326 lists the AFLs that you can purchase for EX4600 switch models.
Table 44: Junos OS AFL Part Number on EX4600 Switches
AFL Part NumberSwitch Model
EX4600-AFLEX4600-40F
Youmust download a MACsec feature license to enable MACsec. The MACsec feature
license is an independent feature license; the enhanced feature licenses (EFLs) or
Copyright © 2018, Juniper Networks, Inc.326
Installation and Upgrade Guide

advanced feature licenses (AFLs) that must be purchased to enable some features on
EX Series switches cannot be purchased to enable MACsec.
To purchase a feature license for MACsec, contact your Juniper Networks sales
representative (http://www.juniper.net/us/en/contact-us/sales-offices). The Juniper sales
representative will provide you with a feature license file and a license key.
MACsec is supported on EX4600 switches.
Features Requiring a License on EX3200, EX4200, EX4500, EX4550, EX6200, EX8200, andEX9200 Switches
To use the following features on EX3200, EX4200, EX4500, EX4550, EX8200, and
EX9200 switches, youmust install an advanced feature license (AFL):
• Border Gateway Protocol (BGP) andmultiprotocol BGP (MBGP)
• Ethernet VPN (available only on EX9200 switches)
• Intermediate System-to-Intermediate System (IS-IS)
• IPv6 routing protocols: IS-IS for IPv6, IPv6 BGP, IPv6 for MBGP
• Logical systems (available only on EX9200 switches)
• MPLSwith RSVP-based label-switched paths (LSPs) and MPLS-based circuit
cross-connects (CCCs) (Not supported on EX9200 switches)
• Open vSwitch Database (OVSDB) (available only on EX9200 switches)
• Virtual Extensible LAN (VXLAN) (available only on EX9200 switches)
To use the following features on Juniper Networks EX6200 Ethernet Switches, youmust
install an advanced feature license (AFL):
• Border Gateway Protocol (BGP)
• Intermediate System-to-Intermediate System (IS-IS)
• IPv6 routing protocols: IS-IS for IPv6, IPv6 BGP
Table 45onpage327 lists theAFLs that you canpurchase for EX3200, EX4200, EX4500,
EX4550, EX6200, EX8200, and EX9200 switches. If you have the license, you can run
all of the advanced software features mentioned above on your EX3200, EX4200,
EX4500, EX4550, EX6200, EX8200, or EX9200 switch. An EFL is not applicable to this
range of switches.
Table 45: Junos OS AFL Part Number on EX3200, EX4200, EX4500,EX4550, EX6200, EX8200, and EX9200 Switches
AFL Part NumberSwitch Model
EX-24-AFLEX3200-24PEX3200-24TEX4200-24FEX4200-24PEX4200-24PXEX4200-24T
327Copyright © 2018, Juniper Networks, Inc.
Chapter 15: Software License Overview

Table 45: Junos OS AFL Part Number on EX3200, EX4200, EX4500,EX4550, EX6200, EX8200, and EX9200 Switches (continued)
AFL Part NumberSwitch Model
EX-48-AFLEX3200-48PEX3200-48TEX4200-48FEX4200-48PEX4200-48PXEX4200-48T
EX-48-AFLEX4500-40F-BFEX4500-40F-BF-CEX4500-40F-FBEX4500-40F-FB-C
EX4550-AFLEX4550
EX6210-AFLEX6210
EX8208-AFLEX8208
EX8216-AFLEX8216
EX-XRE200-AFLEX-XRE200
EX9204-AFLEX9204
EX9208-AFLEX9208
EX9214-AFLEX9214
Youmust download a MACsec feature license to enable MACsec. The MACsec feature
license is an independent feature license; the enhanced feature licenses (EFLs) or
advanced feature licenses (AFLs) that must be purchased to enable some features on
EX Series switches cannot be purchased to enable MACsec.
To purchase a feature license for MACsec, contact your Juniper Networks sales
representative (http://www.juniper.net/us/en/contact-us/sales-offices). The Juniper sales
representative will provide you with a feature license file and a license key.
MACsec is supported on EX4200 and EX4550 switches.
LicenseWarningMessages
For using features that require a license, youmust install and configure a license key. To
obtain a license key, use the contact information provided in your certificate.
Copyright © 2018, Juniper Networks, Inc.328
Installation and Upgrade Guide

If you have not purchased the AFL or EFL and installed the license key, you receive
warnings when you try to commit the configuration:
[edit protocols] 'bgp' warning: requires 'bgp' licenseerror: commit failed: (statements constraint check failed)
The systemgenerates system log (syslog) alarmmessages notifying you that the feature
requires a license—for example:
Sep 3 05:59:11 craftd[806]: Minor alarm set, BGP Routing Protocol usage requires a licenseSep 3 05:59:11 alarmd[805]: Alarm set: License color=YELLOW, class=CHASSIS, reason=BGP Routing Protocol usage requires a licenseSep 3 05:59:11 alarmd[805]: LICENSE_EXPIRED: License for feature bgp(47) expired
Output of the show system alarms command displays the active alarms:
user@switch> show system alarms1 alarm currently activeAlarm time Class Description2009-09-03 06:00:11 UTC Minor BGP Routing Protocol usage requires a license
RelatedDocumentation
• Managing Licenses for the EX Series Switch (CLI Procedure)
• Managing Licenses for the EX Series Switch (J-Web Procedure)
• Monitoring Licenses for the EX Series Switch
• License Key Components for the EX Series Switch
329Copyright © 2018, Juniper Networks, Inc.
Chapter 15: Software License Overview

Copyright © 2018, Juniper Networks, Inc.330
Installation and Upgrade Guide

CHAPTER 16
Installing and Managing Licenses
• Adding New Licenses (CLI Procedure) on page 331
• Deleting License Keys (CLI) on page 336
• Saving License Keys (CLI) on page 338
• Verifying Junos OS License Installation (CLI) on page 338
Adding New Licenses (CLI Procedure)
Before adding new licenses, complete the following tasks:
• Purchase the required licenses.
• Establish basic network connectivity with the router or switch. For instructions on
establishing basic connectivity, see the Getting Started Guide orQuick Start Guide for
your device.
There are two ways to add licenses using the Junos OS CLI:
• The system license keys key configuration statement enables you to configure and
delete license keys in a Junos OS CLI configuration file.
• The request system license add operational command installs a license immediately.
NOTE: OnQFabric systems, install your licenses in the default partition ofthe QFabric system and not on the individual components (Node devicesand Interconnect devices).
To add licenses, complete one of the following procedures:
• Installing a License Using a Configuration Statement on page 331
• Installing a License Using an Operational Command on page 335
Installing a License Using a Configuration Statement
Starting with Junos OS Release 15.1, you can configure and delete license keys in a Junos
OS CLI configuration file. The system license keys key statement at the [edit] hierarchy
level installs a license by using a configuration statement.
331Copyright © 2018, Juniper Networks, Inc.

NOTE: The system license keys key configuration statement is not required
to install a license. The operational command request system license add
installs a license immediately. But because the set system license keys key
command is a configuration statement, you can use it to install a license aspart of a configuration commit, either directly or by configuration file.
The licensekeysare validatedand installedafter a successful commitof theconfiguration
file. If a license key is invalid, the commit fails and issues an error message. You can
configure individual license keys or multiple license keys by issuing Junos OS CLI
commands or by loading the license key configuration contained in a file. All installed
license keys are stored in the /config/license/ directory.
Select a procedure to install a license using configuration:
• Installing Licenses Using the CLI Directly on page 332
• Installing Licenses Using a Configuration File on page 333
Installing Licenses Using the CLI Directly
To install an individual license key using the Junos OS CLI:
1. Issue the set system license keys key name statement.
The name parameter includes the license ID and the license key. For example:
[edit]user@device# set system license keys key "JUNOS_TEST_LIC_FEAT xxxxxx xxxxxxxxxxxx xxxxxx xxxxxx xxxxxx xxxxxx xxxxxx xxxxxx xxxxxx xxxxxx xxxxxx xxxxxx"
To install multiple license keys in the Junos OS CLI, issue the set system license keys
key name statement for each license key to install. For example:
[edit]user@device# set system license keys key "key_1"set system license keys key "key_2"set system license keys key "key_2"set system license keys key "key_4"
2. Issue the commit command.
[edit]user@device# commitcommit complete
3. Verify that the license key was installed.
For example:
user@device# run show system license
License usage: Licenses Licenses Licenses Expiry Feature name used installed needed sdk-test-feat1 0 1 0 permanent
Copyright © 2018, Juniper Networks, Inc.332
Installation and Upgrade Guide

Licenses installed: License identifier: JUNOS_TEST_LIC_FEAT License version: 2 Features: sdk-test-feat1 - JUNOS SDK Test Feature 1 permanent
Alternatively, youcan issue the showsystemlicensecommand fromoperationalmode.
Installing Licenses Using a Configuration File
Before you begin, prepare the configuration file. In this example, use the Unix shell cat
command to write the license.conf file:
1. Go to the shell.
[edit]user@device# exituser@device> exit%
2. Open the new license.conf file.
% cat > license.conf
3. Type the configuration information for the license key or keys:
• For a single license, for example, type the following content:
system { license { keys { key "JUNOS_TEST_LIC_FEAT xxxxxx xxxxxx xxxxxx xxxxxx xxxxxx xxxxxx xxxxxx xxxxxx xxxxxx xxxxxx xxxxxx xxxxxx xxxxxx"; } }}
• For multiple license keys, for example, type something like this:
system { license { keys { key "key_1" key "key_2" key "key_3" ... key "key_n" } }}
4. Press Ctrl+d to save the file.
333Copyright © 2018, Juniper Networks, Inc.
Chapter 16: Installing and Managing Licenses

To install a license key configuration in a file:
1. Go to the CLI configuration mode.
% cliuser@device> configure[edit]user@device#
2. Load andmerge the license configuration file.
For example:
user@device# loadmerge license.confload complete
3. Issue the show | compare command to see the configuration.
For example:
[edit]user@device# show | compare[edit system]+ license {+ keys {+ key "JUNOS_TEST_LIC_FEAT xxxxxx xxxxxx xxxxxx xxxxxx xxxxxx xxxxxx xxxxxx xxxxxx xxxxxx xxxxxx xxxxxx xxxxxx xxxxxx";+ }+ }
4. Issue the commit command.
[edit]user@device# commit
5. To verify that the license key was installed, issue the show system license command.
For example:
root@switch> show system license
License usage: Licenses Licenses Licenses Expiry Feature name used installed needed sdk-test-feat1 0 1 0 permanent
Licenses installed: License identifier: JUNOS_TEST_LIC_FEAT License version: 2 Features: sdk-test-feat1 - JUNOS SDK Test Feature 1 permanent
Copyright © 2018, Juniper Networks, Inc.334
Installation and Upgrade Guide
Installing a License Using an Operational Command
Complete the procedure that relates to your system:
• Adding a License to a Device with a Single Routing Engine on page 335
• Adding a License to a Device with Dual Routing Engines on page 335
Adding a License to a Device with a Single Routing Engine
To add a new license key to the device using an operational command:
1. From the CLI operational mode, enter one of the following CLI commands:
• To add a license key from a file or URL, enter the following command, specifying
the filename or the URL where the key is located:
user@host> request system license add filename | url
• To add a license key from the terminal, enter the following command:
user@host> request system license add terminal
2. When prompted, enter the license key, separating multiple license keys with a blank
line.
If the license key you enter is invalid, an error appears in theCLI outputwhen youpress
Ctrl+d to exit license entry mode.
3. Go on to “Verifying Junos OS License Installation (CLI)” on page 338.
Adding a License to a Device with Dual Routing Engines
On routers that have graceful Routing Engine switchover (GRES) enabled, after
successfully adding the new license on themaster Routing Engine, the license keys are
automatically synchronizedon thebackupRoutingEngineaswell.However, in caseGRES
is not enabled, the new license is added on each Routing Engine separately. This ensures
that the license key is enabled on the backup Routing Engine during changeover of
mastership between the Routing Engines.
To add a new license key to a router with dual Routing Engines without GRES:
1. After adding thenew licensekeyon themasterRoutingEngine, use the requestchassis
routing-enginemaster switch command to have the backup Routing Engine become
themaster Routing Engine.
2. Log in to the active Routing Engine and add the new license key, repeat the same step.
335Copyright © 2018, Juniper Networks, Inc.
Chapter 16: Installing and Managing Licenses

NOTE: Addinga licensekey to the routeror switchmightbedelayed if akernelresynchronizationoperation is inprogressat that time.The followingmessageis displayed on the CLI when the license-adding operation is about to bedelayed:Akernel re-syncoperation is inprogress.Licenseupdatemaytakeseveralminutes
to complete.
RelatedDocumentation
Deleting License Keys (CLI) on page 336•
• Junos OS Feature Licenses on page 293
• Verifying Junos OS License Installation (CLI) on page 338
• request system license add on page 394
Deleting License Keys (CLI)
Before deleting a license, ensure that the features enabled by the license will not be
needed.
You can use the request system license delete operational command, or the delete or
deactivate configuration command to delete a license:
• Using the Operational Command to Delete Licenses on page 336
• Using a Configuration Command to Delete Licenses on page 337
Using the Operational Command to Delete Licenses
To delete licenses using the request system license delete command:
1. Display the licenses available to be deleted.
user@host> request system license delete license-identifier-list ?Possible completions: E00468XXX4 License key identifier JUNOS10XXX1 License key identifier JUNOS10XXX2 License key identifier JUNOS10XXX3 License key identifier JUNOS10XXX4 License key identifier [ Open a set of values
2. To delete a license key or keys from a device using the CLI operational mode, select
one of the following methods:
• Delete a single license by specifying the license ID. Using this option, you can delete
only one license at a time.
user@host> request system license delete license-identifier
• Delete all license keys from the device.
user@host> request system license delete all
Copyright © 2018, Juniper Networks, Inc.336
Installation and Upgrade Guide

• Delete multiple license keys from the device. Specify the license identifier for each
key and enclose the list of identifiers in brackets.
user@host> request system license delete license-identifier-list [JUNOS10XXX1JUNOS10XXX3 JUNOS10XXX4 ...]
Delete license(s) ? [yes,no] (no) yes
3. Verify the license was deleted by entering the show system license command.
Using a Configuration Command to Delete Licenses
Starting in Junos OS Release 16.1, to remove licenses from the configuration, you can use
either the delete or deactivate configuration command. The delete command deletes a
statement or identifier, and all subordinate statements and identifiers contained within
the specified statement path are deleted with it. The deactivate command adds the
inactive: tag to a statement, effectively commenting out the statement or identifier from
the configuration. Statements or identifiers marked as inactive do not take effect when
you issue the commit command. To remove the inactive: tag from a statement, issue the
activate command. Statements or identifiers that have been activated take effect when
you next issue the commit command.
The following procedure uses the delete command, but you could use the deactivate
command as well.
To delete one or all licenses using the delete command:
NOTE: You can use the deactivate command instead of the delete command
in this procedure.
1. Display the licenses available to be deleted.
Issue the run request system license delete license-identifier-list ? command from the
configuration mode of the CLI.
[edit]user@host# run request system license delete license-identifier-list ?
A list of licenses on the device is displayed:
Possible completions: E00468XXX4 License key identifier JUNOS10XXX1 License key identifier JUNOS10XXX2 License key identifier JUNOS10XXX3 License key identifier JUNOS10XXX4 License key identifier [ Open a set of values
2. Delete the license or licenses you want.
• To delete a single license, for example:
[edit]
337Copyright © 2018, Juniper Networks, Inc.
Chapter 16: Installing and Managing Licenses

user@host# delete system license keys key “E00468XXX4”
• To delete all licenses, for example:
[edit]user@host# delete system license keys
3. Commit the configuration by entering the commit command.
4. Verify the license was deleted by entering the show system license command.
Release History Table DescriptionRelease
Starting in Junos OS Release 16.1, to remove licenses from the configuration,you can use either the delete or deactivate configuration command.
16.1
RelatedDocumentation
Verifying Junos OS License Installation (CLI) on page 338•
• Adding New Licenses (CLI Procedure) on page 331
Saving License Keys (CLI)
To save the licenses installed on a device:
1. From operational mode, do one of the following tasks
• To save the installed license keys to a file or URL, enter the following command:
user@host> request system license save filename | url
For example, the followingcommandsaves the installed license keys toa file named
license.config:
user@host> request system license save filename | url
• To output installed license keys to the terminal, enter the following command:
user@host> request system license save terminal
RelatedDocumentation
Verifying Junos OS License Installation (CLI) on page 338•
• Adding New Licenses (CLI Procedure) on page 331
• Deleting License Keys (CLI) on page 336
Verifying Junos OS License Installation (CLI)
To verify Junos OS license management, perform the following tasks:
• Displaying Installed Licenses on page 339
• Displaying License Usage on page 340
Copyright © 2018, Juniper Networks, Inc.338
Installation and Upgrade Guide

Displaying Installed Licenses
Purpose Verify that the expected licenses are installed and active on the device.
Action From the CLI, enter the show system license command.
Sample Output
user@host> show system licenseLicense usage: Licenses Licenses Licenses Expiry Feature name used installed needed subscriber-acct 0 1 0 permanent subscriber-auth 0 1 0 permanent subscriber-addr 0 1 0 permanent subscriber-vlan 0 1 0 permanent subscriber-ip 0 1 0 permanent scale-subscriber 0 1000 0 permanent scale-l2tp 0 1000 0 permanent scale-mobile-ip 0 1000 0 permanent
Licenses installed: License identifier: E000185416 License version: 2 Features: subscriber-acct - Per Subscriber Radius Accounting permanent subscriber-auth - Per Subscriber Radius Authentication permanent subscriber-addr - Address Pool Assignment permanent subscriber-vlan - Dynamic Auto-sensed Vlan permanent subscriber-ip - Dynamic and Static IP permanent
Meaning The output shows a list of the license usage and a list of the licenses installed on the
device. Verify the following information:
• Each license is present. Licenses are listed in ascending alphanumeric order by license
ID.
• The state of each license is permanent.
NOTE: A state of invalid indicates that the license key is not a valid license
key. Either it was entered incorrectly or it is not valid for the specific device.
339Copyright © 2018, Juniper Networks, Inc.
Chapter 16: Installing and Managing Licenses

• The feature for each license is the expected feature. The features enabled are listed
by license. An all-inclusive license has all features listed.
• All configured features have the required licenses installed. The Licenses needed
columnmust show that no licenses are required.
See Also Adding New Licenses (CLI Procedure) on page 331•
Displaying License Usage
Purpose Verify that the licenses fully cover the feature configuration on the device.
Action From the CLI, enter the show system license usage command.
Sample Output
user@host> show system license usage Licenses Licenses Licenses Expiry Feature name used installed needed subscriber-addr 1 0 1 29 days scale-subscriber 0 1000 0 permanent scale-l2tp 0 1000 0 permanent scale-mobile-ip 0 1000 0 permanent
Meaning The output shows any licenses installed on the device and how they are used. Verify the
following information:
• Any configured licenses appear in the output. The output lists features in ascending
alphabetical orderby licensename.Thenumberof licensesappears in the third column.
Verify that you have installed the appropriate number of licenses.
• The number of licenses usedmatches the number of configured features. If a licensed
feature is configured, the feature is considered used. The sample output shows that
the subscriber address pooling feature is configured.
• A license is installed on the device for each configured feature. For every feature
configured that does not have a license, one license is needed.
For example, the sampleoutput shows that thesubscriber address feature is configured
but that the license for the feature has not yet been installed. The license must be
installed within the remaining grace period to be in compliance.
See Also • show system license on page 506
• Adding New Licenses (CLI Procedure) on page 331
Copyright © 2018, Juniper Networks, Inc.340
Installation and Upgrade Guide

PART 4
Troubleshooting Information
• Troubleshooting Software Installation on page 343
341Copyright © 2018, Juniper Networks, Inc.

Copyright © 2018, Juniper Networks, Inc.342
Installation and Upgrade Guide

CHAPTER 17
Troubleshooting Software Installation
• Troubleshooting Software Installation on page 343
• TroubleshootingaSwitchThatHasBootedfromtheBackupJunosOSImageonpage346
• Disk Space Management for Junos OS Installation on page 347
• Verifying PIC Combinations on page 348
Troubleshooting Software Installation
This topic describes troubleshooting issues with software installations on EX Series
switches.
• Recovering from a Failed Software Upgrade on an EX Series Switch on page 343
• Rebooting from the Inactive Partition on page 344
• Freeing Disk Space for Software Installation on page 345
• Installation from theBoot LoaderGenerates ’cannot openpackage’ Error on page 345
Recovering from a Failed Software Upgrade on an EX Series Switch
Problem Description: If Junos OS loads but the CLI is not working, or if the switch has no softwareinstalled, use this recovery installation procedure to install Junos OS.
Solution If there is already a Junos OS image on the system, you can either install the new Junos
OSpackage inaseparatepartitionandhaveboth JunosOS images remainon thesystem,
or you can wipe the disk clean before the new installation proceeds.
If there is no Junos OS image on the system, follow the instructions in “Booting an EX
Series Switch Using a Software Package Stored on aUSB Flash Drive” on page 210 to get
an image on the system and boot the switch.
To perform a recovery installation:
1. Power on the switch.
The loader script starts.
After the message Loading /boot/defaults/loader.conf displays, you are prompted
with the following:
343Copyright © 2018, Juniper Networks, Inc.

Hit [Enter] to boot immediately, or space bar for command prompt.
2. Press the space bar to enter the manual loader.
The loader> prompt displays.
3. Enter the following command:
loader> install [– –format] [– –external] source
where:
• format—Use this option towipe the installationmediabefore installing the software
package. If you do not include this option, the system installs the new Junos OS
package inadifferentpartition fromthepartitionusedby themost recently installed
Junos OS package.
• external—Use this option to install the software package on an external medium.
• source—Represents the name and location of the Junos OS package either on a
server on the network or as a file on the USB flash drive:
• Network address of the server and the path on the server; for example,
tftp://192.168.1.28/junos/jinstall-ex-4200-9.4R1.5-domestic-signed.tgz
• The Junos OS package on a USB device is commonly stored in the root drive as
the only file; for example, file:///jinstall-ex-4200-9.4R1.5-domestic-signed.tgz
The boot process proceeds as normal and ends with a login prompt.
Rebooting from the Inactive Partition
Problem Description: EX Series switches shipped with Junos OS Release 10.4R2 or earlier haveJunos OS loaded on the system disk in partition 1. The first time you upgrade, the new
software package is installed in partition 2. When you finish the installation and reboot,
partition 2 becomes the active partition. Similarly, subsequent software packages are
installed in the inactive partition, which becomes the active partition when you reboot
at the end of the installation process.
On switches shipped with Release 10.4R3 and later, the same Junos OS image is loaded
in each of the two root partitions, and you should copy the new software image to the
alternate partition each time you upgrade.
If you performed an upgrade and rebooted, the system resets the active partition. You
can use this procedure to manually boot from the inactive partition.
NOTE: If youhave completed the installationof the software imagebut havenot yet rebooted, issue the request system software rollback command to
return to the original software installation package.
Copyright © 2018, Juniper Networks, Inc.344
Installation and Upgrade Guide

Solution Reboot from the inactive partition:
user@switch> request system reboot slice alternate
NOTE: If youcannotaccess theCLI, youcan reboot fromthe inactivepartitionusing the following procedure from the loader script prompt:
1. Unload and clear the interrupted boot from the active partition:
loader> unloadloader> unset vfs.root.mountfrom
2. Select the new (inactive) partition to boot from:
loader> set currdev=diskxsy:
wherex is either0(internal)or 1 (external), and they indicates thenumberof the inactive partition, either 1 or 2.
Youmust include the colon (:) at the end of this command.
3. Boot Junos OS from the inactive partition:
loader> boot
Freeing Disk Space for Software Installation
Problem Description: The software installation process requires a certain amount of unused diskspace. If there is not enough space, youmight receive an error message such as:
fetch: /var/tmp/incoming-package.tgz: No space left on device
Solution Identify and delete unnecessary files by using the request system storage cleanup
command.
Installation from the Boot Loader Generates ’cannot open package’ Error
Problem Description:When installing a Junos OS software image from the loader prompt, a
“cannot open package error” is generated:
loader> install - -formattftp://10.204.33.248/images/Flash_corr/official/jinstall-ex-4200-10.4I2011012-domestic-signed.tgzSpeed: 1000, full duplexbootp: no replyNo response for RARP requestnet_open: RARP failedcannot open package (error 5)
345Copyright © 2018, Juniper Networks, Inc.
Chapter 17: Troubleshooting Software Installation

Solution This might be due to the IP address, gateway IP address, netmask address, or server IP
address not being properly set. You can set these values either from the shell or from the
u-boot prompt.
To set these values from the shell:
% nvram setenv ipaddr 10.204.35.235% nvram setenv netmask 255.255.240.0% nvram setenv gatewayip 10.204.47.254% nvram setenv serverip 10.204.33.248
To set these values from the u-boot prompt, log in to a console connection, reboot, and
stop at the u-boot prompt (Cntrl+c):
=> setenv ipaddr 10.204.35.235=> setenv gatewayip 10.204.47.254=> setenv serverip 10.204.33.248=> setenv netmask 255.255.240.0=> saveenv=> printenv Verify whether variables are set properly or not=> boot
RelatedDocumentation
Installing Software on an EX Series Switch with a Single Routing Engine (CLI Procedure)•
• Upgrading Software on an EX6200 or EX8200 Standalone Switch Using Nonstop
Software Upgrade (CLI Procedure)
• Installing Software on EX Series Switches (J-Web Procedure)
• Understanding Software Installation on EX Series Switches on page 44
• show system storage partitions (EX Series Switches Only) on page 527
Troubleshooting a Switch That Has Booted from the Backup Junos OS Image
Problem Description: The switch boots from the backup root file partition. It is possible that the
primary copy of JunosOS failed to boot properly, which could indicate that it is corrupted.
This event is flagged in two ways:
• Upon login through the console or management port, the following warning message
is displayed:
WARNING: THIS DEVICE HAS BOOTED FROM THE BACKUP JUNOS IMAGE
It is possible that the primary copy of JUNOS failed to boot up properly, and so this device has booted from the backup copy.
Please re-install JUNOS to recover the primary copy in case it has been corrupted.
• The following alarmmessage is generated:
user@switch> show chassis alarms
Copyright © 2018, Juniper Networks, Inc.346
Installation and Upgrade Guide

1 alarms currently activeAlarm time Class Description2011-02-17 05:48:49 PST Minor Host 0 Boot from backup root
If theswitch is inaVirtualChassis, theswitchmembernumberappears in theDescription
field, where the switch is called a host.
Solution Install a new JunosOS image on the partition that had the corruption, or take a snapshot
(use request system snapshot) of the currently active partition and use it to replace theimage in the alternate partition:
If theswitch isastandaloneswitchoraVirtualChassismaster switch, enter this command:
user@switch> request system snapshot slice alternate
If the switch is a Virtual Chassis member switch (not the master), enter this command
on the Virtual Chassis:
user@switch> request system snapshot slice alternatemembermember-id
wheremember-id is the Virtual Chassis member ID number.
RelatedDocumentation
Verifying Junos OS and Boot Loader Software Versions on an EX Series Switch on
page 153
•
• Troubleshooting Software Installation on page 343
• show system storage partitions (EX Series Switches Only) on page 527
Disk SpaceManagement for Junos OS Installation
A Junos OS installation or upgrademay fail if your router has a shortage of disk space. If
a disk space error occurs, use one or more of the following options to complete the
installation:
• Use the request system storage cleanup command to delete unnecessary files and
increase storage space on the router.
• Specify the unlink option when you use the request system software add command to
install the Junos OS:
• On the M Series, MX Series, and T Series routers, the unlink option removes the
software package after a successful upgrade.
• Download the software packages you need from the Juniper Networks Support Web
site at http://www.juniper.net/support/. The download program provides intelligent
disk spacemanagement to enable installation.
347Copyright © 2018, Juniper Networks, Inc.
Chapter 17: Troubleshooting Software Installation

RelatedDocumentation
Junos OS Configuration Using the CLI•
Verifying PIC Combinations
On Juniper Networks routing platforms, you can typically install any combination of
Physical Interface Cards (PICs) on a single Enhanced Flexible PIC Concentrator (FPC)
or in two PIC slots served by a single Layer 2/Layer 3 Packet Processing
application-specific integrated circuit (ASIC).
Newer Junos OS services for some PICs can require significant Internet Processor ASIC
memory, and some configuration rules limit certain combinations of PICs if they are
installed on some platforms.
During software installation, the configuration checker in the installation programchecks
the router’s PICs. If any configuration rules affect your PIC combinations, the installation
process stops and displays a message similar to the following:
The combination of PICS in FPC slot 3 is not supported with this release PIC slot 0 - PIC slot 1 - 1x OC-12 ATM-II IQ PIC slot 2 - 1x G/E IQ, 1000 BASE PIC slot 3 - 1x Link Service (4)If you continue the installation, one or more PICs on FPC slot 3 might appear to be online butcannot be enabled and cannot pass traffic with this release of JUNOS.See the Release Notes for more information.WARNING: This installation attempt will be aborted. If youWARNING: wish to force the installation despite these warningsWARNING: you may use the 'force' option on the command line.pkg_add: package /var/tmp/jbundle-7.6R1.x-domestic-signed.tgz fails requirements - not installed
The configuration checker has the following limitations:
• If a PIC is offline when you upgrade the router with new software, the configuration
checker cannot detect PIC combinations affected by configuration rules and cannot
warn about them.
• If you specify the force option when you upgrade the Junos OS, the configurationchecker warns about the affected PIC combination and the software installation
continues. However, after rebooting, one or more PICs might fail to initialize.
• Theconfigurationchecker looks for combinationsof threeaffectedPICs. If anEnhanced
FPC contains four affected PICs, the script generates multiple warnings.
If you install a PIC into a router already running Junos OS, you can identify the presence
of affected PIC combinations frommessages in the system logging (syslog) file:
Feb 6 17:57:40 CE1 feb BCHIP 0: uCode overflow - needs 129 inst space to load b3_atm2_LSI_decode for stream 12 Feb 6 17:57:41 CE1 chassisd[2314]: CHASSISD_IFDEV_DETACH_PIC: ifdev_detach_pic(0/3) Feb 6 17:57:41 CE1 feb BCHIP 0: binding b3_atm2_LSI_decode to stream 12 failed
Copyright © 2018, Juniper Networks, Inc.348
Installation and Upgrade Guide

Feb 6 17:57:41 CE1 feb PFE: can not bind B3 ucode prog b3_atm2_LSI_decode to FPC 0: stream 12
For more information about checking for unsupported PIC combinations, see the
correspondingPICguide for your router, the JunosOSReleaseNotes, andTechnicalSupport
Bulletin PSN-2004-12-002, PIC Combination Notes Summary on the Juniper Networks
Support Web site at http://www.juniper.net/support/.
For SRX Series Services Gateways
SRX5600 and SRX5800 devices support IOC or SPC on any given card slot, and there
is nocomplexity in equipping theservicesgatewayswith theperfectbalanceofprocessing
and I/O capacity. You can install up to 11 (on SRX5800) and 5 (SRX5600) SPCs and
IOCson thedevice.However, youmust install at least oneSPCondevice. Formoredetails,
see SRX5600 and SRX5800 Services Gateway Card Guide.
SRX3600supportsamaximumofup tosevenSPCs,threeNPCs, six IOCs, and 11NP-IOCs
per chassis.However youmust install at leastoneSPcsandNPCon thechassis. SRX3400
supportsamaximumofup to fourSPCs,twoNPCs, four IOCs, andsixNP-IOCsper chassis.
However youmust install at least one SPcs and NPC on the chassis. On SRX3400 and
SRX3600devices youmust install PICson the front slots of the chassis. Formoredetails,
see SR X1400 , SRX3400 , and SRX3600 Services GatewayModule Guide.
RelatedDocumentation
• Hardware Overview of SRX Series Services Gateways on page 33
• Storage Media Names for SRX Series Devices on page 38
349Copyright © 2018, Juniper Networks, Inc.
Chapter 17: Troubleshooting Software Installation

Copyright © 2018, Juniper Networks, Inc.350
Installation and Upgrade Guide

PART 5
Configuration Statements andOperational Commands
• Configuration Statements on page 353
• Operational Commands on page 379
• VMHost Software Administrative Commands on page 533
• VMHost Software Monitoring Commands on page 561
351Copyright © 2018, Juniper Networks, Inc.

Copyright © 2018, Juniper Networks, Inc.352
Installation and Upgrade Guide

CHAPTER 18
Configuration Statements
• auto-configuration on page 354
• auto-configuration (System) on page 355
• auto-image-upgrade on page 357
• auto-snapshot on page 358
• autoinstallation on page 359
• autoinstallation (JNU Satellite Devices) on page 360
• bootp on page 361
• commit on page 362
• configuration-servers on page 363
• delete-after-commit (JNU Satellites) on page 364
• file (App Engine Virtual Machine Management Service) on page 365
• flag (App Engine Virtual Machine Management Service) on page 367
• interfaces (Autoinstallation) on page 368
• level (App Engine Virtual Machine Management Service) on page 369
• license on page 370
• traceoptions (App Engine Virtual Machine Management Service) on page 372
• traceoptions (System License) on page 373
• usb on page 374
• vmhost on page 375
• vmhost management-if disable on page 376
• vmhost management-if link-mode on page 377
• vmhost management-if speed on page 378
353Copyright © 2018, Juniper Networks, Inc.
auto-configuration
Syntax auto-configuration {command binary-file-path;disable;
}
Hierarchy Level [edit system processes]
Release Information Statement introduced in Junos OS Release 8.5.
Description Configure the autoconfiguration process.
Options • command binary-file-path—Path to the binary process.
• disable—Disable the autoconfiguration process.
Required PrivilegeLevel
system—To view this statement in the configuration.
system-control—To add this statement to the configuration.
RelatedDocumentation
• Autoinstallation Overview on page 99
• Example: Configuring Autoinstallation on SRX Series Devices on page 104
Copyright © 2018, Juniper Networks, Inc.354
Installation and Upgrade Guide

auto-configuration (System)
Syntax auto-configuration {traceoptions {file {filename;files number;match reqular-expression;sizemaximum-file-size;(world-readable | no-world-readable);
}flag flag;level (all | error | info | notice | verbose | warning);no-remote-trace;
}}
Hierarchy Level [edit system]
Release Information Statement introduced before Junos OS Release 7.4.
Description Configure the autoconfiguration process.
Options traceoptions—Set the trace options.
• file—Configure the trace file information.
• filename—Name of the file to receive the output of the tracing operation. Enclose
the namewithin quotation marks. All files are placed in the directory /var/log. By
default, the name of the file is the name of the process being traced.
• files number—Maximum number of trace files. When a trace file named trace-file
reaches its maximum size, it is renamed to trace-file.0, then trace-file.1, and so on,
until the maximum number of trace files is reached. The oldest archived file is
overwritten.
If you specify amaximumnumber of files, you alsomust specify amaximum file size
with the size option and a filename.
Range: 2 through 1000 files
Default: 10 files
• match regular-expression—Refine the output to include lines that contain the regular
expression.
• sizemaximum-file-size—Maximumsizeof each trace file, in kilobytes (KB),megabytes
(MB), or gigabytes (GB). When a trace file named trace-file reaches this size, it is
renamed trace-file.0. When trace-file again reaches its maximum size, trace-file.0 is
renamed trace-file.1 and trace-file is renamed trace-file.0. This renaming scheme
continues until themaximumnumber of trace files is reached. Then the oldest trace
file is overwritten.
355Copyright © 2018, Juniper Networks, Inc.
Chapter 18: Configuration Statements

If you specify amaximumnumber of files, you alsomust specify amaximum file size
with the size option and a filename.
Syntax: x K to specify KB, x m to specify MB, or x g to specify GB
Range: 10 KB through 1 GB
Default: 128 KB
• world-readable | no-world-readable—By default, log files can be accessed only by
the user who configures the tracing operation. Theworld-readable option enables
any user to read the file. To explicitly set the default behavior, use the
no-world-readable option.
• flag—Specify the tracing operation to perform. To specify more than one tracing
operation, includemultiple flag statements. You can include the following flags.
• all—Trace all events.
• auth—Trace VLAN authentication.
• configuration—Trace configurations.
• interfaces—Trace interface operations.
• io—Trace I/O operations.
• rtsock—Trace routing socket operations.
• ui—Trace user interface operations.
Required PrivilegeLevel
system—To view this statement in the configuration.
system-control—To add this statement to the configuration.
RelatedDocumentation
• Autoinstallation Overview on page 99
• Example: Configuring Autoinstallation on SRX Series Devices on page 104
Copyright © 2018, Juniper Networks, Inc.356
Installation and Upgrade Guide

auto-image-upgrade
Syntax auto-image-upgrade;
Hierarchy Level [edit chassis]
Release Information Statement introduced in Junos OS Release 9.6 for EX Series switches.
Description Enable automatic software download on an EX Series switch acting as a DHCP client.
The DHCP client EX Series switch compares the software package name in the DHCP
server message to the name of the software package that booted the switch. If the
softwarepackagesaredifferent, theDHCPclientEXSeries switchdownloadsand installs
the software package specified in the DHCP server message.
Before you upgrade software using automatic software download, ensure that you have
configured DHCP services for the switch, including configuring a path to a boot server
and a boot file. See the Junos OS System Basics Configuration Guide for information about
using the CLI to configure DHCP services and settings. See Configuring DHCP Services
(J-Web Procedure) for information about using the J-Web interface to configure DHCP
services and settings.
Default Automatic software download is disabled.
Required PrivilegeLevel
interface—To view this statement in the configuration.
interface-control—To add this statement to the configuration.
RelatedDocumentation
• Upgrading Software by Using Automatic Software Download on page 151
• Understanding Software Installation on EX Series Switches on page 44
• Understanding DHCP Services for Switches
357Copyright © 2018, Juniper Networks, Inc.
Chapter 18: Configuration Statements

auto-snapshot
Syntax auto-snapshot;
Hierarchy Level [edit system]
Release Information Statement introduced in Junos OS Release 12.3 for EX Series switches.
Description Enable the automatic snapshot feature, which allows the switch to automatically fix a
corrupt Junos OS file in the primary root partition. If the automatic snapshot feature is
enabled, the switch automatically takes a snapshot of the Junos OS root file system in
the alternate root partition and copies it onto the primary root partition, thereby repairing
the corrupt file in the primary root partition. The automatic snapshot procedure takes
place whenever the system reboots from the alternate root partition, regardless of
whether the reboot is due toacommandordue tocorruptionof theprimary rootpartition.
NOTE: EX9200 switches do not support the automatic snapshot feature.
Default • The automatic snapshot feature is enabled by default on the following EX Series
switches:
• EX4550 switches
• EX Series switches that ship with Junos OS Release 12.3R1 or later
• The automatic snapshot feature is disabled by default on EX Series switches (except
the EX4550 switches) running Junos OS Release 12.2 or earlier.
• If the automatic snapshot feature was disabled by default before the switch was
upgraded to Junos OS Release 12.3R1 or later, the feature remains disabled (for
backward compatibility) by default after the upgrade.
Required PrivilegeLevel
system—To view this statement in the configuration.
system-control—To add this statement to the configuration.
RelatedDocumentation
• Understanding Resilient Dual-Root Partitions on Switches on page 115
• show system auto-snapshot on page 502
Copyright © 2018, Juniper Networks, Inc.358
Installation and Upgrade Guide

autoinstallation
Syntax autoinstallation {configuration-servers {url {password password;
}}interfaces {interface-name {bootp;rarp;
}}usb {disable;
}}
Hierarchy Level [edit system]
Release Information Statement introduced before Junos OS Release 7.4.
Description Specify the configuration for autoinstallation.
Options The remaining statements are explained separately. See CLI Explorer.
Required PrivilegeLevel
system—To view this statement in the configuration.
system-control—To add this statement to the configuration.
RelatedDocumentation
• Example: Configuring Autoinstallation on SRX Series Devices on page 104
359Copyright © 2018, Juniper Networks, Inc.
Chapter 18: Configuration Statements

autoinstallation (JNU Satellite Devices)
Syntax autoinstallation {delete-after-commit;configuration-servers {url;
}interfaces {interface-name {bootp;rarp;
}}
}
Hierarchy Level [edit system]
Release Information Statement introduced in Junos OS Release 13.3 for satellite devices in a Junos Node
Unifier (JNU) group.
Description (Satellite devices in a JNU group) Download a configuration file automatically from an
FTPorHTTPserver.Whenyoupowerona routeror switchconfigured forautoinstallation,
it requests an IP address from a Dynamic Host Configuration Protocol (DHCP) server.
When the router or switch has an address, it sends a request to a configuration server
and downloads and installs a configuration.
Options The remaining statements are explained separately. See CLI Explorer.
Required PrivilegeLevel
system—To view this statement in the configuration.
system-control—To add this statement to the configuration.
RelatedDocumentation
• Autoinstallation of Satellite Devices in a Junos Node Unifier Group on page 111
• AutoinstallationProcessonSatelliteDevices in a JunosNodeUnifierGrouponpage 109
• Configuring Autoinstallation on JNU Satellite Devices on page 107
• Verifying Autoinstallation on JNU Satellite Devices on page 112
• delete-after-commit (JNU Satellites) on page 364
• configuration-servers
Copyright © 2018, Juniper Networks, Inc.360
Installation and Upgrade Guide

bootp
Syntax bootp {command binary-file-path;disable;failover (alternate-media | other-routing-engine);
}
Hierarchy Level [edit system processes]
Release Information Statement introduced in Junos OS Release 8.5.
Description Specify the booting process.
Options • command binary-file-path—Path to the binary process.
• disable—Disable the booting process.
• failover—Configure the device to reboot if the software process fails four times within
30 seconds, and specify the software to use during the reboot.
• alternate-media—Configure the device to switch to backupmedia that contains a
version of the system if a software process fails repeatedly.
• other-routing-engine—Instruct the secondary Routing Engine to take mastership if
a softwareprocess fails. If this statement is configured for aprocess, and thatprocess
fails four times within 30 seconds, then the device reboots from the secondary
Routing Engine.
Required PrivilegeLevel
system—To view this statement in the configuration.
system-control—To add this statement to the configuration.
RelatedDocumentation
•
361Copyright © 2018, Juniper Networks, Inc.
Chapter 18: Configuration Statements

commit
Syntax commit {delta-export;peers {authentication string;user user-name;
}persist-groups-inheritance;server {commit-interval seconds;days-to-keep-error-logs days;maximum-aggregate-pool number;maximum entries number;traceoptions {file {filename;files number;microsecond-stamp;sizemaximum-file-size;(world-readable | no-world-readable);
}flag flag;no-remote-trace;
}}peers-synchronize;
}
Hierarchy Level [edit system]
Release Information Statement introduced in Junos OS Release 12.1.
Description Configure the commit operation.
Options delta-export—(Optional) Configure system commit to export only the changes made
in thecandidate configuration insteadof exporting theentire candidate configuration
to the configuration database.
peers—(Optional)Configureoptions for thepeersparticipating incommit synchronization.
persist-groups-inheritance—(Optional)Configure commit toquickly apply configurationgroups that use wildcards.
server—(Optional) Configure a default batch commit.
peers-synchronize—(Optional)Synchronize commit actionbetween thepeers. The localpeer (or requesting peer) on which you enable the peers-synchronize statement
copies and loads its configuration to the remote (or responding) peer.
The remaining statements are explained separately. See CLI Explorer.
Copyright © 2018, Juniper Networks, Inc.362
Installation and Upgrade Guide

Required PrivilegeLevel
system—To view this statement in the configuration.
system-control—To add this statement to the configuration.
RelatedDocumentation
• Controlling Execution of Commit Scripts During Commit Operations
configuration-servers
Syntax configuration-servers {url {password password;
}}
Hierarchy Level [edit system autoinstallation]
Release Information Statement introduced before Junos OS Release 7.4.
Description Configure theURLaddressofaserver fromwhich theconfiguration filesmustbeobtained.
You can download a configuration file automatically from an FTP, Hypertext Transfer
Protocol (HTTP), or Trivial FTP (TFTP) servers. Examples of URLs:
• tftp://hostname/path/filename
• ftp://username:[email protected]
• http://hostname/path/filename
• http://usenamer:[email protected]
Options • url—Specify the URL address of the server containing the configuration files.
• password—Specify the password for authentication with the configuration server.
Specifying a password in URLs and in the password option might result in commit
failure. We recommend you to use the password option for specifying the password.
Required PrivilegeLevel
system—To view this statement in the configuration.
system-control—To add this statement to the configuration.
RelatedDocumentation
• Example: Configuring Autoinstallation on SRX Series Devices on page 104
363Copyright © 2018, Juniper Networks, Inc.
Chapter 18: Configuration Statements

delete-after-commit (JNU Satellites)
Syntax delete-after-commit;
Hierarchy Level [edit system autoinstallation]
Release Information Statement introduced in Junos OS Release 13.3 for satellite devices in a Junos Node
Unifier (JNU) group.
Description Specify that during the subsequent commit operation of configuration settings (after
the autoinstallation process successfully retrieves, installs, and commits the
configuration), theautoinstallationconfigurationparametersbe removed fromthe router.
Removal of the autoinstallation parameters and statements from the committed
configuration on the router ensures that the router does not attempt to perform an
autoinstallationprocesswhen it is poweredon thenext time.Althoughyoucanoptionally
specify the interfaces to perform autoinstallation or configuration servers fromwhich
the files are to be downloaded, youmust include the delete-after-commit statement to
prevent the router from entering a recursive loop and repeatedly performing an
autoinstallation every time it is powered on.
Required PrivilegeLevel
system—To view this statement in the configuration.
system-control—To add this statement to the configuration.
RelatedDocumentation
• Autoinstallation of Satellite Devices in a Junos Node Unifier Group on page 111
• AutoinstallationProcessonSatelliteDevices in a JunosNodeUnifierGrouponpage 109
• Configuring Autoinstallation on JNU Satellite Devices on page 107
• Verifying Autoinstallation on JNU Satellite Devices on page 112
• autoinstallation on page 360
• configuration-servers
Copyright © 2018, Juniper Networks, Inc.364
Installation and Upgrade Guide

file (App Engine Virtual MachineManagement Service)
Syntax file {filename <files number> | match | no-world-readable | size size | world-readable}
Hierarchy Level [edit system processes app-engine-virtual-machine-management-service traceoptions]
Release Information Statement introduced in JunosOSRelease 15.1F3 for the PTX5000,MX240,MX480, and
MX960 routers.
Statement introduced in Junos OS Release 15.1F5 for the MX2010 and MX2020 routers.
Command introduced in Junos OS Release 16.1R4 for the PTX3000 routers.
NOTE: PTX3000 router supports the Routing and Control Board, RCBPTX.
Description Trace file information for the Virtual Machine Management Daemon ( vmmd), which
communicates with the host OS.
Options filename—Name of the file in which the trace information is stored. By default, the file iscreated in the /var/log directory.
files number—(Optional) Maximum number of trace files. When a trace file reaches the
size specified by the size option, the filename is appended with 0 and compressed.
For example,whena trace file named trace-file-log reaches size size, it is compressed
and renamed as trace-file-log.0.gz. When trace-file-log reaches size size for the
second time, trace-file-log.0.gz is renamed as trace-file-log.1.gz and trace-file-log
is compressed and renamed as trace-file-log.0.gz. This renaming sheme ensures
that the older logs have a greater index number.When number of trace files reaches
number, the oldest file is deleted.
If you specify amaximumnumber of files, you alsomust specify amaximum file size
with the size option and a filename.
Range: 2 through 1000
Default: 10
match—Refine the output to include only those lines that match the given regular
expression.
no-world-readable—Restrict file access to the user who created the trace files.
sizesize—Maximum size of each trace file . By default, the number entered is treated as
bytes. Alternatively, you can include a suffix to the number to indicate kilobytes (KB),
megabytes (MB), or gigabytes (GB). If you specify a maximum file size, you also
must specify a maximum number of trace files with the files option.
Range: 10 KB through 1 GB
Default: 128 KB
365Copyright © 2018, Juniper Networks, Inc.
Chapter 18: Configuration Statements

world-readable—Enable unrestricted file access.
Required PrivilegeLevel
system-control
RelatedDocumentation
• traceoptions (App Engine Virtual MachineManagement Service) on page 372
• level (App Engine Virtual MachineManagement Service) on page 369
• flag (App Engine Virtual MachineManagement Service) on page 367
Copyright © 2018, Juniper Networks, Inc.366
Installation and Upgrade Guide

flag (App Engine Virtual MachineManagement Service)
Syntax flag (all |ccif | configuration | heartbeat | init | miscellaneous | platform | pxe |routing-instances | snmp)
Hierarchy Level [edit system processes app-engine-virtual-machine-management-service traceoptions]
Release Information Statement introduced in JunosOSRelease 15.1F3 for the PTX5000,MX240,MX480, and
MX960 routers.
Statement introduced in Junos OS Release 15.1F5 for the MX2010 and MX2020 routers.
Command introduced in Junos OS Release 16.1R4 for the PTX3000 routers.
NOTE: PTX3000 router supports the Routing and Control Board, RCBPTX.
Description Performdifferent tracing operations. To specifymore than one tracing operation, include
multiple flag statements.
Default Tracing operations are not performed.
Options all—Trace all events.
ccif—Trace compute node interface events. This is the default option.
configuration—Trace configuration events.
heartbeat—Trace compute node heartbeat-related events.
init—Trace initialization events.
miscellaneous—Tracemiscellaneous events.
platform—Trace platform-related events.
pxe—Trace events related to Preboot Execution Environment (PXE).
routing-instances—Trace events related to routing instances.
snmp—Trace SNMP events.
Required PrivilegeLevel
system-control
RelatedDocumentation
traceoptions (App Engine Virtual MachineManagement Service) on page 372•
• file (App Engine Virtual MachineManagement Service) on page 365
367Copyright © 2018, Juniper Networks, Inc.
Chapter 18: Configuration Statements

• level (App Engine Virtual MachineManagement Service) on page 369
interfaces (Autoinstallation)
Syntax interfaces {interface-name {bootp;rarp;
}}
Hierarchy Level [edit system autoinstallation]
Release Information Statement introduced before Junos OS Release 7.4.
Description Configure the interface onwhich to perform autoinstallation. A request for an IP address
is sent from the interface. Specify the IP address procurement protocol.
NOTE: When you run the system autoinstallation command, the command
will configureunit0 logical interface forall theactivestatephysical interfaces.However, fewcommands like fabric-optionsdonotallow itsphysical interface
to be configured with a logical interface. If the system autoinstallation and
the fabric-options commandsare configured together the followingmessage
is displayed incompatible with 'system autoinstallation’.
Options • bootp—Enables BOOTP or DHCP during autoinstallation.
• rarp—Enables RARP during autoinstallation.
Required PrivilegeLevel
system—To view this statement in the configuration.
system-control—To add this statement to the configuration.
RelatedDocumentation
• Autoinstallation Overview on page 99
• Example: Configuring Autoinstallation on SRX Series Devices on page 104
Copyright © 2018, Juniper Networks, Inc.368
Installation and Upgrade Guide

level (App Engine Virtual MachineManagement Service)
Syntax level (all | error| info | notice | verbose | warning)
Hierarchy Level [edit system processes app-engine-virtual-machine-management-service traceoptions]
Release Information Statement introduced in JunosOSRelease 15.1F3 for the PTX5000,MX240,MX480, and
MX960 routers.
Statement introduced in Junos OS Release 15.1F5 for the MX2010 and MX2020 routers.
Command introduced in Junos OS Release 16.1R4 for the PTX3000 routers.
NOTE: PTX3000 router supports the Routing and Control Board, RCBPTX.
Description Set level of debugging output.
Default info
Options all—Match all levels.
error—Match error conditions.
info—Match informational messages.
notice—Match conditions that must be handled specially.
verbose—Match verbosemessages.
warning—Match warning messages.
Required PrivilegeLevel
system-control
RelatedDocumentation
• traceoptions (App Engine Virtual MachineManagement Service) on page 372
• flag (App Engine Virtual MachineManagement Service) on page 367
• file (App Engine Virtual MachineManagement Service) on page 365
369Copyright © 2018, Juniper Networks, Inc.
Chapter 18: Configuration Statements

license
Syntax license {autoupdate {url url <password password>;
}keys {key key
}renew {before-expiration number;interval interval-hours;
}traceoptions {file {filename;files number;match regular-expression;sizemaximum-file-size;(world-readable | no-world-readable);
}flag flag;no-remote-trace;
}}
Hierarchy Level [edit system]
Release Information Statement introduced in Junos OS Release 8.5 for SRX Series and vSRX.
Options keys introduced in Junos OS Release 14.1X53-D10.
Statement introduced in Junos OS Release 14.1X53-D10 for EX Series and QFX Series,
with option keys included.
Statement introduced in Junos OS Release 15.1 for M Series, MX Series, PTX Series, and
T Series, with option keys included.
Description Specify license information for the device.
Options autoupdate—Autoupdate license keys from license servers.
before-expiration number—License renewal lead time before expiration, in days.
Range: 0 through 60 days
interval interval-hours—License checking interval, in hours.
Range: 1 through 336 hours
keys key key—Configure one or more license keys. For example,
[edit]user@device# set system license keys key "key_1" user@device# set system license keys key "key_2"user@device# set system license keys key "key_3"
Copyright © 2018, Juniper Networks, Inc.370
Installation and Upgrade Guide
user@device# set system license keys key "key_4" user@device# commitcommit complete
renew—License renewal lead time and checking interval.
url—URL of a license server.
The remaining statements are explained separately. See CLI Explorer.
Required PrivilegeLevel
system—To view this statement in the configuration.
system-control—To add this statement to the configuration.
RelatedDocumentation
371Copyright © 2018, Juniper Networks, Inc.
Chapter 18: Configuration Statements

traceoptions (App Engine Virtual MachineManagement Service)
Syntax traceoptions {file (App Engine Virtual MachineManagement Service) filename <files number> | match| no-world-readable |<size size> <world-readable >;
flag(AppEngineVirtualMachineManagementService) (all |ccif | configuration |heartbeat| init | miscellaneous | platform | pxe | routing-instances | snmp);
level (AppEngineVirtualMachineManagementService) (all | error| info | notice | verbose| warning)
}
Hierarchy Level [edit system processes app-engine-virtual-machine-management-service]
Release Information Statement introduced in JunosOSRelease 15.1F3 for the PTX5000,MX240,MX480, and
MX960 routers.
Statement introduced in Junos OS Release 15.1F5 for the MX2010 and MX2020 routers.
Command introduced in Junos OS Release 16.1R4 for the PTX3000 routers.
NOTE: PTX3000 router supports the Routing and Control Board, RCBPTX.
Description Enable traceoptions for the app-engine virtual machine management service system
process.
Default Traceoptions are not enabled.
Options file—Trace file information.
flag—Perform defined tracing operation.
level—Set traceoptions level.
no-remote-trace—Disable remote tracing.
The remaining statements are explained separately. See CLI Explorer.
Required PrivilegeLevel
system-control
RelatedDocumentation
• system
• processes
• level (App Engine Virtual MachineManagement Service) on page 369
• flag (App Engine Virtual MachineManagement Service) on page 367
• file (App Engine Virtual MachineManagement Service) on page 365
Copyright © 2018, Juniper Networks, Inc.372
Installation and Upgrade Guide

traceoptions (System License)
Syntax traceoptions {file {filename;files number;match regular-expression;sizemaximum-file-size;(world-readable | no-world-readable);
}flag flag;no-remote-trace;}
Hierarchy Level [edit system license]
Release Information Statement introduced in Junos OS Release 8.5 for SRX Series and vSRX.
Statement introduced in Junos OS Release 14.1X53-D10 for EX Series and QFX Series.
Statement introduced in Junos OS Release 15.1 for M Series, MX Series, and T Series.
Description Set trace options for licenses.
Options file—Configure the trace file information.
filename—Name of the file to receive the output of the tracing operation. Enclose
the namewithin quotation marks. All files are placed in the directory /var/log.
By default, the name of the file is the name of the process being traced.
files number—Maximum number of trace files. When a trace file named trace-file
reaches its maximum size, it is renamed trace-file.0, then trace-file.1, and so on,
until the maximum number of trace files is reached. Then the oldest trace file
is overwritten.
If you specify a maximum number of files, you also must specify a maximum
file size with the size maximum file-size option.
Range: 2 through 1000 files
Default: 10 files
match regular-expression—Refine the output to include lines that contain the regular
expression.
size size—Maximum size of each trace file, in kilobytes (KB), megabytes (MB), or
gigabytes (GB). If you specify a maximum file size, you also must specify a
maximum number of trace files with the files number option.
Range: 10 KB through 1 GB
Default: 128 KB
world-readable | no-world-readable—By default, log files can be accessed only by
theuserwhoconfigures the tracingoperation.The world-readableoptionenables
373Copyright © 2018, Juniper Networks, Inc.
Chapter 18: Configuration Statements

any user to read the file. To explicitly set the default behavior, use the
no-world-readable option.
flag flag—Specify which tracing operation to perform. To specify more than one tracing
operation, includemultiple flag statements. You can include the following flags.
• all—Trace all operations.
• config—Trace license configuration processing.
• events—Trace licensing events and their processing.
no-remote-trace—Disable the remote tracing.
Required PrivilegeLevel
trace—To view this statement in the configuration.
trace-control—To add this statement to the configuration.
RelatedDocumentation
• license on page 370
usb
Syntax usb {disable;
}
Hierarchy Level [edit system autoinstallation]
Release Information Statement introduced before Junos OS Release 7.4.
Description Disable the USB autoinstallation process.
Options disable—Disable the process.
Required PrivilegeLevel
system—To view this statement in the configuration.
system-control—To add this statement to the configuration.
RelatedDocumentation
• Example: Configuring Autoinstallation on SRX Series Devices on page 104
Copyright © 2018, Juniper Networks, Inc.374
Installation and Upgrade Guide

vmhost
Syntax vmhost {management-ifno-auto-recovery
}
Hierarchy Level [edit]
Release Information Statement introduced in JunosOSRelease 15.1F3 for the PTX5000,MX240,MX480, and
MX960 routers.
Statement introduced in Junos OS Release 15.1F5 for the MX2010 and MX2020 routers.
Command introduced in Junos OS Release 16.1R4 for the PTX3000 routers
NOTE: PTX3000 router supports the Routing and Control Board, RCBPTX.
Description Configure VM host management properties. Set values in the edit vmhost hierarchy of
the configuration.
Options management-if—Configure management interface properties of the host.
no-auto-recovery—Disable the automatic guest recovery by the host.
Required PrivilegeLevel
system—To view this statement in the configuration.
system-control—To add this statement to the configuration.
RelatedDocumentation
• Routing Engines with VM Host Support on page 273
• Disabling Autorecovery on Routing Engines with VM Host Support on page 289
375Copyright © 2018, Juniper Networks, Inc.
Chapter 18: Configuration Statements

vmhostmanagement-if disable
Syntax vmhost management-if disable
Hierarchy Level [edit vmhost]
Release Information Statement introduced in Junos OS Release 15.1F6.
NOTE: Thecommand issupportedonthe routerswithRE-MX-X6,RE-MX-X8,and RE-PTX-X8 Routing Engines only.
Description Disable the host interface eth0, which serves as the management port. You can the
disable the interface if there are any issues associated with security or any hardware
failures either at the local end or the remote end of the interface. if you disable the
interface, the transmitter is turned off and the link partner experiences a link-down
condition.
Default The host interface eth0 which serves as the management port is enabled.
Required PrivilegeLevel
system—To view this statement in the configuration.
system-control—To add this statement to the configuration.
RelatedDocumentation
• vmhost on page 375
• vmhostmanagement-if speed on page 378
• vmhostmanagement-if link-mode on page 377
• show vmhostmanagement-if on page 573
Copyright © 2018, Juniper Networks, Inc.376
Installation and Upgrade Guide

vmhostmanagement-if link-mode
Syntax vmhost management-if link-mode (automatic | half-duplex | full-duplex)
Hierarchy Level [edit vmhost]
Release Information Statement introduced in Junos OS Release 15.1F6.
NOTE: Thecommand issupportedonthe routerswithRE-MX-X6,RE-MX-X8,and RE-PTX-X8 Routing Engines only.
Description Configure the link mode of the host interface eth0, which serves as the management
port as half-duplex or full-duplex. You can also manually select the link mode option as
either half-duplex or full-duplex.
Default The link partners auto-negotiate the speed and duplex link mode and select the highest
common capability.
Options automatic—Autonegotiate the link mode of the management interface. if you set thelink mode to automatic, you must also set the link speed to automatic.
half-duplex—Set the link mode of the management interface to half-duplex.
full-duplex—Set the link mode of the management interface to full-duplex.
Required PrivilegeLevel
system—To view this statement in the configuration.
system-control—To add this statement to the configuration.
RelatedDocumentation
• vmhost on page 375
• vmhostmanagement-if disable on page 376
• vmhostmanagement-if speed on page 378
• show vmhostmanagement-if on page 573
377Copyright © 2018, Juniper Networks, Inc.
Chapter 18: Configuration Statements

vmhostmanagement-if speed
Syntax vmhost management-if speed { automatic | 10m | 100m | 1g }
Hierarchy Level [edit vmhost]
Release Information Statement introduced in Junos OS Release 15.1F6.
NOTE: Thecommand issupportedonthe routerswithRE-MX-X6,RE-MX-X8,and RE-PTX-X8 Routing Engines only.
Description Configure the link speed of the host interface eth0, which serves as the management
port. If you set the link speed as 10m or 100m, autonegotiation is turned off and the link
speed is the speed that you specify.
Default The link partners auto-negotiate the speed and duplex link mode and select the highest
common capability.
Options automatic—Autonegotiate the link speed of the management interface. If you set thelink speed as automatic, speed and link mode are auto-negotiated with the link
partner.
10m—Set the link speed of the management interface to 10Mbps.
100m—Set the link speed of the management interface to 100Mbps
1g—Set the link speed of the management interface to 1Gbps. If you set link speed to1Gbps, autonegotiation is enabled. However, the interface advertises only 1Gbps
speed and full-duplex mode.
Required PrivilegeLevel
system—To view this statement in the configuration.
system-control—To add this statement to the configuration.
RelatedDocumentation
• vmhost on page 375
• vmhostmanagement-if disable on page 376
• vmhostmanagement-if link-mode on page 377
• show vmhostmanagement-if on page 573
Copyright © 2018, Juniper Networks, Inc.378
Installation and Upgrade Guide

CHAPTER 19
Operational Commands
• clear system login lockout
• request system autorecovery state
• request system download abort
• request system download clear
• request system download pause
• request system download resume
• request system download start
• request system firmware upgrade
• request system halt
• request system license add
• request system license delete
• request system license save
• request system license update
• request system partition compact-flash
• request system power-off
• request system reboot
• request system reboot (EX Series)
• request system reboot (Junos OSwith Upgraded FreeBSD)
• request system recover
• request system scripts add
• request system scripts delete
• request system scripts rollback
• request system snapshot
• request system snapshot (Junos OSwith Upgraded FreeBSD)
• request system snapshot (Maintenance)
• request system software abort in-service-upgrade (ICU)
• request system software add
• request system software add (Maintenance)
379Copyright © 2018, Juniper Networks, Inc.

• request system software configuration-backup
• request system software configuration-restore
• request system software delete
• request system software rollback
• request system software rollback (SRX Series)
• request system software validate
• request system software validate on (Junos OSwith Upgraded FreeBSD)
• request system storage cleanup
• request system storage cleanup (SRX Series)
• request system zeroize
• request vmhost halt
• request vmhost reboot
• show chassis usb storage
• show system autoinstallation status
• show system autorecovery state
• show system boot-messages
• show system auto-snapshot
• show system download
• show system license
• show system license (View)
• show system login lockout
• show system snapshot
• show system snapshot (Junos OSwith Upgraded FreeBSD)
• show system snapshot (Upgraded FreeBSD)
• show system snapshot media
• show system storage partitions (EX Series Switches Only)
• show system storage partitions (View SRX Series)
• show version
Copyright © 2018, Juniper Networks, Inc.380
Installation and Upgrade Guide

clear system login lockout
Syntax clear system login lockout<all><user username>
Release Information Command introduced in Junos OS Release 11.2.
Description Unlock the user account locked as a result of invalid login attempts.
Options all—Clear all locked user accounts.
user username—Clear the specified locked user account.
Required PrivilegeLevel
clear
RelatedDocumentation
lockout-period•
• show system login lockout on page 518
Output Fields This command produces no output.
381Copyright © 2018, Juniper Networks, Inc.
Chapter 19: Operational Commands

request system autorecovery state
Syntax request system autorecovery state (save | recover | clear)
Release Information Command introduced in Junos OS Release 11.2 for SRX300, SRX320, SRX345, and
SRX550M devices.
Description Prepare the system for autorecovery of configuration, licenses, and disk information.
Options save—Save the current state of the disk partitioning, configuration, and licenses forautorecovery.
The active Junos OS configuration is saved as the Junos rescue configuration, after
which the rescue configuration, licenses, and disk partitioning information is saved
for autorecovery. Autorecovery information must be initially saved using this
command for the autorecovery feature to verify integrity of data on every bootup.
NOTE:
• Any recovery performed at a later stage will restore the data to thesame state as it was when the save commandwas executed.
• A fresh rescue configuration is generated when the command isexecuted. Any existing rescue configuration will be overwritten.
recover—Recover the disk partitioning, configuration, and licenses.
After autorecovery data has been saved, the integrity of saved items is always
checkedautomaticallyoneverybootup.The recoverycommandallowsyou to forcibly
re-run the tests at any time if required.
clear—Clear all saved autorecovery information.
Only the autorecovery information is deleted; the original copies of the data used by
the router are not affected. Clearing the autorecovery information also disables all
autorecovery integrity checks performed during bootup.
Required PrivilegeLevel
maintenance
RelatedDocumentation
show system autorecovery state on page 493•
List of Sample Output request system autorecovery state save on page 383request system autorecovery state recover on page 383request system autorecovery state clear on page 383
Copyright © 2018, Juniper Networks, Inc.382
Installation and Upgrade Guide

Output Fields When you enter this command, you are provided feedback on the status of your request.
Sample Output
request system autorecovery state save
user@host> request system autorecovery state saveSaving config recovery information Saving license recovery information Saving bsdlabel recovery information
Sample Output
request system autorecovery state recover
user@host> request system autorecovery state recover
Configuration:File Recovery Information Integrity Check Action / Statusrescue.conf.gz Saved Passed NoneLicenses:File Recovery Information Integrity Check Action / StatusJUNOS282736.lic Saved Passed NoneJUNOS282737.lic Saved Failed RecoveredBSD Labels:Slice Recovery Information Integrity Check Action / Statuss1 Saved Passed Nones2 Saved Passed Nones3 Saved Passed Nones4 Saved Passed None
Sample Output
request system autorecovery state clear
user@host> request system autorecovery state clearClearing config recovery information Clearing license recovery information Clearing bsdlabel recovery information
383Copyright © 2018, Juniper Networks, Inc.
Chapter 19: Operational Commands

request system download abort
Syntax request system download abort <download-id>
Release Information Command introduced in Junos OS Release 11.2 for SRX300, SRX320, SRX340, SRX345,
and SRX550M devices.
Command introduced in Junos OS Release 13.2X50-D15 for EX Series switches.
Description Abort a download. The download instance is stopped and cannot be resumed. Any
partiallydownloaded file is automaticallydeleted to freedisk space. Information regarding
thedownload is retainedandcanbedisplayedwith theshowsystemdownloadcommand
until a request system download clear operation is performed.
NOTE: Onlydownloads in theactive, paused, anderror statescanbeaborted.
Options download-id—(Required) The ID number of the download to be aborted.
Required PrivilegeLevel
maintenance
RelatedDocumentation
request system download start on page 388•
• request system download pause on page 386
• request system download resume on page 387
• request system download clear on page 385
List of Sample Output request system download abort on page 384
Output Fields When you enter this command, you are provided feedback on the status of your request.
Sample Output
request system download abort
user@host> request system download abort 1Aborted download #1
Copyright © 2018, Juniper Networks, Inc.384
Installation and Upgrade Guide
request system download clear
Syntax request system download clear
Release Information Command introduced in Junos OS Release 11.2 for SRX300, SRX320, SRX340, SRX345,
and SRX550M devices.
Command introduced in Junos OS Release 13.2X50-D15 for EX Series switches.
Description Delete the history of completed and aborted downloads.
Required PrivilegeLevel
maintenance
RelatedDocumentation
request system download start on page 388•
• request system download pause on page 386
• request system download resume on page 387
• request system download abort on page 384
List of Sample Output request system download clear on page 385
Output Fields When you enter this command, you are provided feedback on the status of your request.
Sample Output
request system download clear
user@host> request system download clearCleared information on completed and aborted downloads
385Copyright © 2018, Juniper Networks, Inc.
Chapter 19: Operational Commands

request system download pause
Syntax request system download pause <download-id>
Release Information Command introduced in Junos OS Release 11.2 for SRX300, SRX320, SRX340, SRX345,
and SRX550M devices.
Command introduced in Junos OS Release 13.2X50-D15 for EX Series switches.
Description Suspend a particular download instance.
NOTE: Only downloads in the active state can be paused.
Options download-id—(Required) The ID number of the download to be paused.
Required PrivilegeLevel
maintenance
RelatedDocumentation
request system download start on page 388•
• request system download resume on page 387
• request system download abort on page 384
• request system download clear on page 385
List of Sample Output request system download pause on page 386
Output Fields When you enter this command, you are provided feedback on the status of your request.
Sample Output
request system download pause
user@host> request system download pause 1Paused download #1
Copyright © 2018, Juniper Networks, Inc.386
Installation and Upgrade Guide
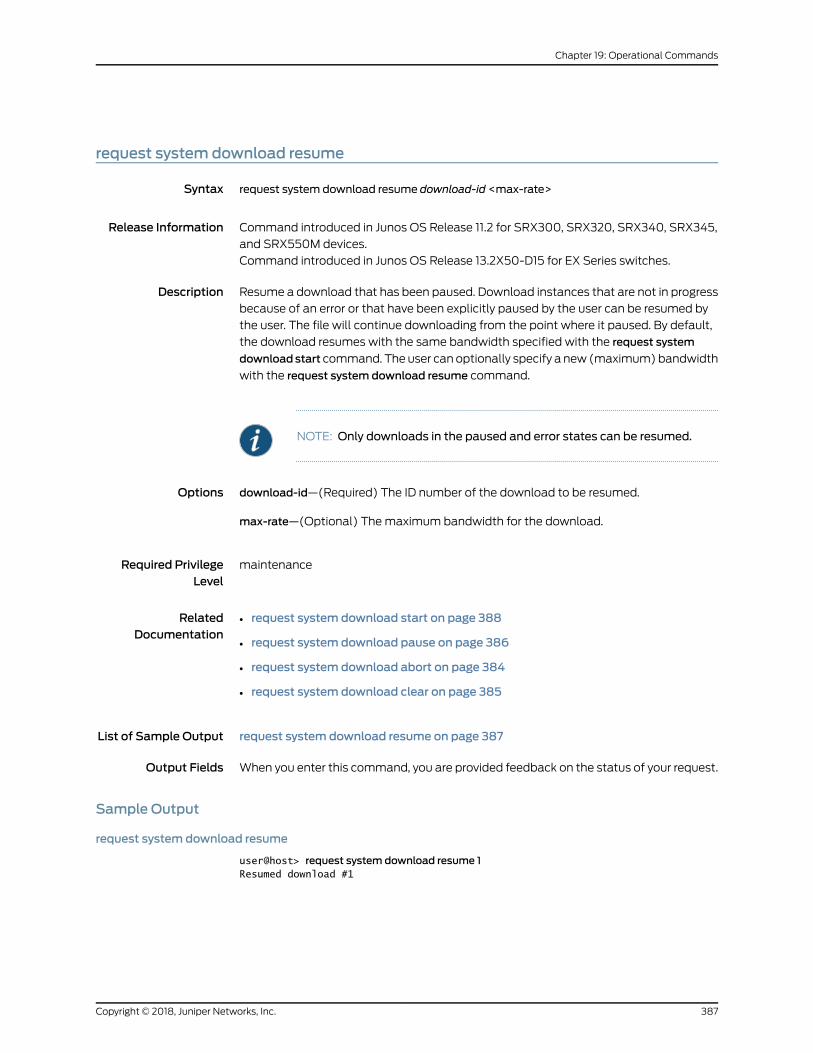
request system download resume
Syntax request system download resume download-id <max-rate>
Release Information Command introduced in Junos OS Release 11.2 for SRX300, SRX320, SRX340, SRX345,
and SRX550M devices.
Command introduced in Junos OS Release 13.2X50-D15 for EX Series switches.
Description Resume a download that has been paused. Download instances that are not in progress
because of an error or that have been explicitly paused by the user can be resumed by
the user. The file will continue downloading from the point where it paused. By default,
the download resumes with the same bandwidth specified with the request system
downloadstart command. The user can optionally specify a new (maximum)bandwidth
with the request system download resume command.
NOTE: Only downloads in the paused and error states can be resumed.
Options download-id—(Required) The ID number of the download to be resumed.
max-rate—(Optional) Themaximum bandwidth for the download.
Required PrivilegeLevel
maintenance
RelatedDocumentation
request system download start on page 388•
• request system download pause on page 386
• request system download abort on page 384
• request system download clear on page 385
List of Sample Output request system download resume on page 387
Output Fields When you enter this command, you are provided feedback on the status of your request.
Sample Output
request system download resume
user@host> request system download resume 1Resumed download #1
387Copyright © 2018, Juniper Networks, Inc.
Chapter 19: Operational Commands

request system download start
Syntax request system download start (sftp-url | delay | identity-file | login | max-rate | passphrase| save as )
Release Information Command introduced in Junos OS Release 11.2 for SRX300, SRX320, SRX340, SRX345,
and SRX550M devices.
Command introduced in Junos OS Release 13.2X50-D15 for EX Series switches.
Description Create a download instance and identify it with a unique integer called the download ID.
Options sftp-url—(Required)TheFTPorHTTPURL locationof the file tobedownloadedsecurely.
delay—(Optional) The number of hours after which the download should start (range
from 1 through 48 hours).
identity-file—(Required)Thenameof the file requestingaSecure FTP(SFTP)download.
The SFTP in smart download leverages public key authentication to authenticate a
download request. Users need to generate a private or public key pair before starting a
download, and then upload a public key to an SFTP server.
login—(Optional) The username and password for the server in the format
username:password.
max-rate—(Optional) Themaximum average bandwidth for the download. Numbers
with the suffix k or K, m or M, and g or G are interpreted as Kbps, Mbps, or Gbps,
respectively.
passphrase—(Required) The passphrase to protect the private key file stored on the file
system. This option does not allow the user to enter a weak passphrase, which ensures
stronger security.
save-as—(Optional) The filename to be used for saving the file in the /var/tmp location.
Required PrivilegeLevel
maintenance
RelatedDocumentation
request system download pause on page 386•
• request system download resume on page 387
• request system download abort on page 384
• request system download clear on page 385
List of Sample Output request system download start on page 389
Output Fields When you enter this command, you are provided feedback on the status of your request.
Copyright © 2018, Juniper Networks, Inc.388
Installation and Upgrade Guide

Sample Output
request system download start
user@host> request system download start identity-file mytestkeysftp://mysftpserver/homes/kelly/test.tgzmax-rate 200 save as newfile.tgzStarting download #8
389Copyright © 2018, Juniper Networks, Inc.
Chapter 19: Operational Commands

request system firmware upgrade
Syntax request system firmware upgrade
Release Information Command introduced in Junos OS Release 10.2.
Description Upgrade firmware on a system.
Options fpc—Upgrade FPC ROMmonitor.
pic—Upgrade PIC firmware.
re—Upgrade baseboard BIOS/FPGA. There is an active BIOS image and a backup BIOS
image.
• bios—(Optional) Upgrade BIOS.
• fpga—(Optional)Upgrade baseboard FPGA.
• ssd—(Optional)Upgrade Routing Engine solid-state drive (SSD) firmware.
disk1—Upgrade SSD disk1 firmware.
disk2—Upgrade SSD disk2 firmware.
NOTE: Starting in Junos OS Release 17.2R1, you can upgrade the SSDfirmware onMX Series routers with the RE-S-X6-64G andRE-MX2K-X8-64G Routing Engines.
vcpu—Upgrade VCPU ROMmonitor.
Required PrivilegeLevel
maintenance
RelatedDocumentation
request system license update on page 398•
List of Sample Output request system firmware upgrade on page 390
Output Fields When you enter this command, you are provided feedback on the status of your request.
Sample Output
request system firmware upgrade
user@host> request system firmware upgrade re bios
Copyright © 2018, Juniper Networks, Inc.390
Installation and Upgrade Guide

Part Type Tag Current Available Status version versionRouting Engine 0 RE BIOS 0 1.5 1.9 OKRouting Engine 0 RE BIOS Backup 1 1.7 1.9 OKPerform indicated firmware upgrade ? [yes,no] (no) yes
user@host> request system firmware upgrade re bios backupPart Type Tag Current Available Status version versionRouting Engine 0 RE BIOS 0 1.5 1.9 OKRouting Engine 0 RE BIOS Backup 1 1.7 1.9 OKPerform indicated firmware upgrade ? [yes,no] (no) yes
user@host> request system firmware upgrade re ssd disk1Part Type Tag Current Available Status version versionRouting Engine 0 RE SSD1 4 12028 12029 OKPerform indicated firmware upgrade ? [yes,no] (no) yes
Firmware upgrade initiated, use "show system firmware" to monitor status.
391Copyright © 2018, Juniper Networks, Inc.
Chapter 19: Operational Commands

request system halt
Syntax request system haltat <time>in <minutes>media (compact-flash | disk | usb)messages <message>
Release Information Command introduced in Junos OS Release 11.4.
Description Stop the system.
Options at time—Time at which to stop the system.
inminutes—Number of minutes to delay before halting the system.
media—Boot media for the next boot.
• compact-flash—Standard boot from a flash device.
• disk—Boot from a hard disk.
• usb—Boot from a USB device.
messagemessage—Message that is displayed to all system users before stopping the
system.
Required PrivilegeLevel
maintenance
RelatedDocumentation
request system power-off on page 400•
List of Sample Output request system halt on page 392
Output Fields When you enter this command, you are provided feedback on the status of your request.
Sample Output
request system halt
user@host> request system haltHalt the system ? [yes,no] (no) yes
*** FINAL System shutdown message from root@quickland ***
System going down IMMEDIATELY
Shutdown NOW!
Copyright © 2018, Juniper Networks, Inc.392
Installation and Upgrade Guide

[pid 7560]
root@quickland> Dec 8 08:57:37 Waiting (max 60 seconds) for system process `vnlru' to stop...doneWaiting (max 60 seconds) for system process `vnlru_mem' to stop...doneWaiting (max 60 seconds) for system process `bufdaemon' to stop...doneWaiting (max 60 seconds) for system process `syncer' to stop...Syncing disks, vnodes remaining...2 2 2 2 2 2 2 2 1 1 1 1 1 1 1 1 0 0 0 0 0 0 0 0 0 0 0 0 done
syncing disks... All buffers synced.Uptime: 2d16h25m9srecorded reboot as normal shutdown
The operating system has halted.Please press any key to reboot.
393Copyright © 2018, Juniper Networks, Inc.
Chapter 19: Operational Commands

request system license add
Syntax request system license add (filename | terminal)
Release Information Command introduced before Junos OS Release 7.4.
Command introduced in Junos OS Release 9.0 for EX Series switches.
Command introduced in Junos OS Release 9.5 for SRX Series devices.
Command introduced in Junos OS Release 11.1 for the QFX Series.
Added additional information section on XML RPC in Junos OS Release 17.4.
Description Add a license key.
Options filename—License key from a file or URL. Specify the filename or the URL where the key
is located.
terminal—License key from the terminal.
Additional Information Although the | display xml rpc filter returns “xml rpc equivalent of this command is not
available,” the following RPC is supported for license installation:
<rpc><request-license-add><key-data> key </key-data></request-license-add></rpc>
Where key-data is the license key data.
<rpc><request-license-add><source> key-file </source></request-license-add></rpc>
Where source is the URL of the source license key file.
Required PrivilegeLevel
maintenance
List of Sample Output request system license add on page 394
Output Fields When you enter this command, you are provided feedback on the status of your request.
Sample Output
request system license add
user@host> request system license add terminalE408408918 aeaqib qcsbja okbuqe rcmxnq vjocwf uxfsta z5ufjb kdrmt6 57bimv 2f3ddp qttcdn 627q4a
Copyright © 2018, Juniper Networks, Inc.394
Installation and Upgrade Guide

jx4s5x hiri E408408918: successfully addedadd license complete (no errors)
395Copyright © 2018, Juniper Networks, Inc.
Chapter 19: Operational Commands

request system license delete
Syntax request system license delete ( license-identifier | license-identifier-list [ licenseid001licenseid002 licenseid003 ] | all )
Release Information Command introduced before Junos OS Release 7.4.
Command introduced in Junos OS Release 9.0 for EX Series switches.
Command introduced in Junos OS Release 11.1 for the QFX Series.
Option license-identifier-list introduced in Junos OS Release 13.1.
Description Delete a license key. You can choose to delete one license at a time, all licenses at once,
or a list of license identifiers enclosed in brackets.
Options license-identifier—Text string that uniquely identifies a license key.
license-identifier-list [ licenseid001 licenseid002 licenseid003....]—Deletemultiple license
identifiers as a list enclosed in brackets.
all—Delete all licenses on the device.
Required PrivilegeLevel
maintenance
RelatedDocumentation
Copyright © 2018, Juniper Networks, Inc.396
Installation and Upgrade Guide

request system license save
Syntax request system license save (filename | terminal)
Release Information Command introduced before Junos OS Release 7.4.
Command introduced in Junos OS Release 9.0 for EX Series switches.
Command introduced in Junos OS Release 11.1 for the QFX Series.
Command introduced in Junos OS Release 9.5 for SRX Series devices.
Added additional information section on XML RPC in Junos OS Release 17.4.
Description Save installed license keys to a file or URL.
Options filename—License key from a file or URL. Specify the filename or the URL where the key
is located.
terminal—License key from the terminal.
Additional Information Although the | display xml rpc filter returns “xml rpc equivalent of this command is not
available,” the following RPC is supported for saving installed license keys to a file or
URL:
<rpc><request-license-save><destination>destination</destination></request-license-save></rpc>
Where destination is the URL of the destination license key file.
Required PrivilegeLevel
maintenance
List of Sample Output request system license save on page 397
Output Fields When you enter this command, you are provided feedback on the status of your request.
Sample Output
request system license save
user@host> request system license save ftp://user@host/license.conf
397Copyright © 2018, Juniper Networks, Inc.
Chapter 19: Operational Commands

request system license update
Syntax request system license update
Release Information Command introduced in Junos OS Release 9.5.
Description If your device supports initial install from the EMS server in Products Supporting Juniper
Agile Licensing, you can use this command to install all licenses from the EMS server.
You can also autoupdate license keys from the LMS or EMS server.
NOTE: The request system license update command always uses the default
Juniper license server:
• For Juniper Agile Licensing (JAL) keys: https://license.juniper.net/
• For non-JAL keys: https://ae1.juniper.net
Options trial—(For non-Juniper Agile Licensing keys only) Immediately updates trial license keys
from the LMS server.
Required PrivilegeLevel
maintenance
RelatedDocumentation
Example: Configuring a Proxy Server for License Updates•
List of Sample Output request system license update on page 398request system license update trial on page 398
Output Fields When you enter this command, you are provided feedback on the status of your request.
Sample Output
request system license update
user@host> request system license update
Trying to update license keys from https://ae1.juniper.net has been sent, use show system license to check status.
request system license update trial
user@host> request system license update trial
Request to automatically update trial license keys from https://ae1.juniper.net has been sent, use show system license to check status.
Copyright © 2018, Juniper Networks, Inc.398
Installation and Upgrade Guide

request system partition compact-flash
Syntax request system partition compact-flash
Release Information Command introduced in Junos OS Release 9.2.
Command deprecated for Junos OSwith Upgraded FreeBSD in Junos OS Release 15.1.
NOTE: Todeterminewhich platforms run JunosOSwithUpgraded FreeBSD,see the table listing the platforms currently running JunosOSwith upgradedFreeBSD in “Release Information for Junos OSwith Upgraded FreeBSD” onpage 17.
Description Reboots the device and repartitions the compact flash. The CompactFlash card is
repartitioned only if it is possible to restore all the data on the CompactFlash card.
Otherwise, theoperation is aborted, andamessage isdisplayed indicating that thecurrent
disk usage needs to be reduced.
Required PrivilegeLevel
maintenance
List of Sample Output request system partition compact-flash (If Yes) on page 399request system partition compact-flash (If No) on page 399
Output Fields When you enter this command, you are provided feedback on the status of your request.
Sample Output
request system partition compact-flash (If Yes)
user@host> request system partition compact-flashAre you sure you want to rebootand partition the compact-flash ? [yes,no] yesInitiating repartition operation.The operation may take several minutes to complete.System will reboot now...<System reboots><Repartition operation is performed><System reboots and starts up normally>
Sample Output
request system partition compact-flash (If No)
user@host> request system partition compact-flashAre you sure you want to rebootand partition the compact-flash ? [yes,no] no
399Copyright © 2018, Juniper Networks, Inc.
Chapter 19: Operational Commands

request system power-off
Syntax request system power-offat <time>in <minutes>media (compact-flash | disk | usb)messages <message>
Release Information Command introduced in Junos OS Release 11.4.
Description Power off the system.
Options at time—Time at which to power off the system.
inminutes—Number of minutes to delay before powering off the system.
media—Boot media for the next boot.
• compact-flash—Standard boot from a flash device.
• disk—Boot from a hard disk.
• usb—Boot from a USB device.
messagemessage—Message that is displayed to all system users before powering off
the system.
Required PrivilegeLevel
maintenance
RelatedDocumentation
request system halt on page 392•
List of Sample Output request system power-off on page 400
Output Fields When you enter this command, you are provided feedback on the status of your request.
Sample Output
request system power-off
user@host> request system power-offPower Off the system ? [yes,no] (no) yes
Shutdown NOW![pid 3300]
*** FINAL System shutdown message from root@quickland ***
System going down IMMEDIATELY
Copyright © 2018, Juniper Networks, Inc.400
Installation and Upgrade Guide
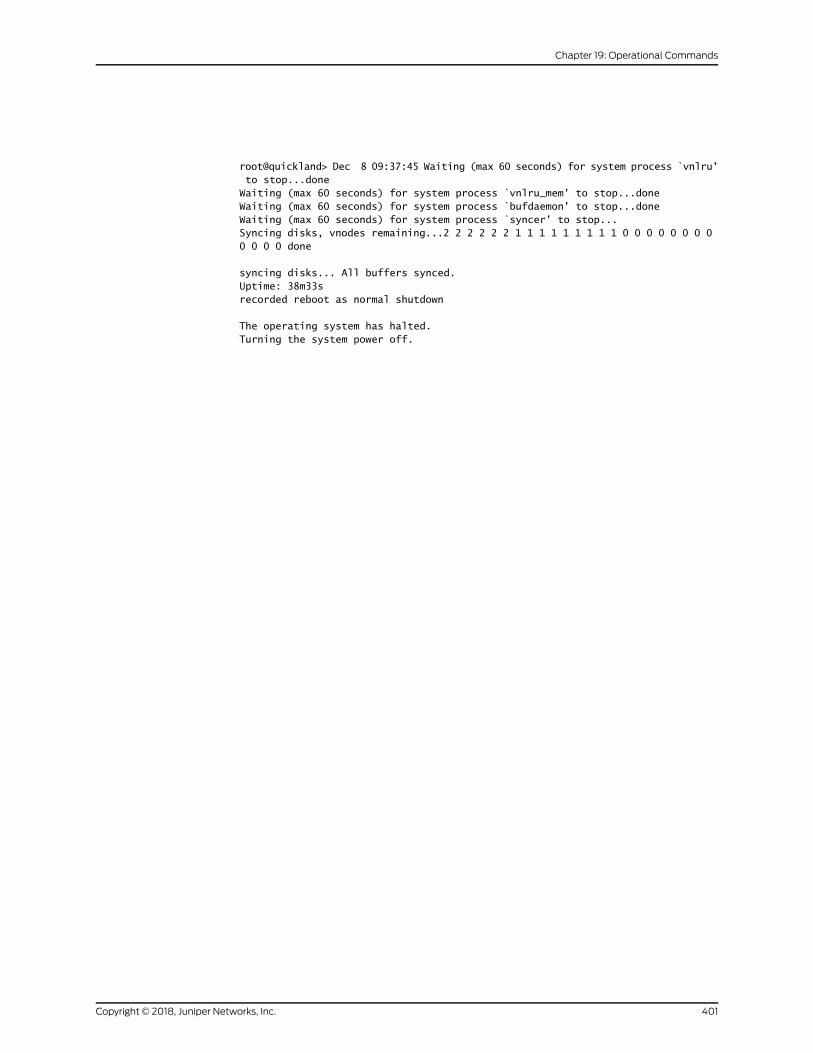
root@quickland> Dec 8 09:37:45 Waiting (max 60 seconds) for system process `vnlru' to stop...doneWaiting (max 60 seconds) for system process `vnlru_mem' to stop...doneWaiting (max 60 seconds) for system process `bufdaemon' to stop...doneWaiting (max 60 seconds) for system process `syncer' to stop...Syncing disks, vnodes remaining...2 2 2 2 2 2 1 1 1 1 1 1 1 1 1 0 0 0 0 0 0 0 0 0 0 0 0 done
syncing disks... All buffers synced.Uptime: 38m33srecorded reboot as normal shutdown
The operating system has halted.Turning the system power off.
401Copyright © 2018, Juniper Networks, Inc.
Chapter 19: Operational Commands

request system reboot
List of Syntax Syntax on page 402
Syntax (EX Series Switches) on page 402
Syntax (TXMatrix Router) on page 402
Syntax (TXMatrix Plus Router) on page 402
Syntax (MX Series Router) on page 402
Syntax request system reboot<at time><both-routing-engines><inminutes><media (compact-flash | disk | removable-compact-flash | usb)><message "text"><other-routing-engine>
Syntax (EX SeriesSwitches)
request system reboot<all-members><at time><both-routing-engines><inminutes><local><media (external | internal)><membermember-id><message "text"><other-routing-engine><slice slice>
Syntax (TXMatrixRouter)
request system reboot<all-chassis | all-lcc | lcc number | scc><at time><both-routing-engines><inminutes><media (compact-flash | disk)><message "text"><other-routing-engine>
Syntax(TXMatrixPlusRouter)
request system reboot<all-chassis | all-lcc | lcc number | sfc number><at time><both-routing-engines><inminutes><media (compact-flash | disk)><message "text"><other-routing-engine><partition (1 | 2 | alternate)>
Syntax (MX SeriesRouter)
request system reboot<all-members><at time><both-routing-engines>
Copyright © 2018, Juniper Networks, Inc.402
Installation and Upgrade Guide

<inminutes><local><media (external | internal)><membermember-id><message "text"><other-routing-engine>
Release Information Command introduced before Junos OS Release 7.4.
Option other-routing-engine introduced in Junos OS Release 8.0.
Command introduced in Junos OS Release 9.0 for EX Series switches.
Option sfc introduced for the TXMatrix Plus router in Junos OS Release 9.6.
Option both-routing-engines introduced in Junos OS Release 12.1.
Description Reboot the software.
NOTE: Starting with Junos OS Release 15.1F3, the statement request system
reboot reboots only the guest operating system on the PTX5000with
RE-PTX-X8-64G and, MX240, MX480, andMX960with RE-S-X6-64G.
Starting with Junos OS Release 15.1F5, the statement request system reboot
reboots only the guest operating system on the MX2010, andMX2020withREMX2K-X8-64G.
NOTE: Starting from Junos OS Release 17.2R1, PTX10008 routers do notsupport the requestsystemrebootcommand.Starting fromJunosOSRelease
17.4R1,PTX10016 routersdonotsupport the requestsystemrebootcommand.
Use the requestvmhost rebootcommand insteadof the requestsystemreboot
command on the PTX10008 and PTX10016 routers to reboot the Junos OSsoftware package or bundle on the router. See request vmhost reboot.
Options none—Reboot the software immediately.
all-chassis—(TXMatrix routers and TXMatrix Plus routers only) (Optional) On a TXMatrix router or TX Matrix Plus router, reboot all routers connected to the TXMatrix
or TX Matrix Plus router, respectively.
all-lcc—(TXMatrix routers andTXMatrix Plus routers only) (Optional) On a TXMatrixrouter orTXMatrixPlus router, rebootall line cardchassis connected to theTXMatrix
or TX Matrix Plus router, respectively.
all-members—(EX4200 switches and MX Series routers only) (Optional) Reboot thesoftware on all members of the Virtual Chassis configuration.
at time—(Optional)Timeatwhich to reboot thesoftware, specified inoneof the followingways:
403Copyright © 2018, Juniper Networks, Inc.
Chapter 19: Operational Commands

• now—Stop or reboot the software immediately. This is the default.
• +minutes—Number of minutes from now to reboot the software.
• yymmddhhmm—Absolute time at which to reboot the software, specified as year,
month, day, hour, andminute.
• hh:mm—Absolute time on the current day at which to stop the software, specified
in 24-hour time.
both-routing-engines—(Optional) Reboot both Routing Engines at the same time.
inminutes—(Optional)Number ofminutes fromnow to reboot the software. This option
is an alias for the at +minutes option.
lcc number——(TXMatrix routers and TXMatrix Plus routers only) (Optional) Line-cardchassis number.
Replace numberwith the following values depending on the LCC configuration:
• 0 through 3, when T640 routers are connected to a TXMatrix router in a routing
matrix.
• 0 through 3, when T1600 routers are connected to a TXMatrix Plus router in a
routing matrix.
• 0 through 7, when T1600 routers are connected to a TXMatrix Plus router with 3D
SIBs in a routing matrix.
• 0, 2, 4, or 6, when T4000 routers are connected to a TXMatrix Plus router with
3D SIBs in a routing matrix.
local—(EX4200 switches and MX Series routers only) (Optional) Reboot the softwareon the local Virtual Chassis member.
media (compact-flash | disk)—(Optional) Boot medium for next boot.
media (external | internal)—(EXSeries switches andMXSeries routers only) (Optional)Reboot the boot media:
• external—Reboot the external mass storage device.
• internal—Reboot the internal flash device.
membermember-id—(EX4200switches andMXSeries routers only) (Optional) Rebootthe software on the specified member of the Virtual Chassis configuration. For
EX4200switches, replacemember-idwithavalue from0through9. For anMXSeries
Virtual Chassis, replacemember-idwith a value of 0 or 1.
message "text"—(Optional) Message to display to all system users before stopping or
rebooting the software.
Copyright © 2018, Juniper Networks, Inc.404
Installation and Upgrade Guide

other-routing-engine—(Optional) Reboot the other Routing Engine fromwhich the
command is issued. For example, if you issue the command from themaster Routing
Engine, the backup Routing Engine is rebooted. Similarly, if you issue the command
from the backup Routing Engine, the master Routing Engine is rebooted.
partition—(TXMatrix Plus routers only) (Optional) Reboot using the specified partitionon the boot media. This option has the following suboptions:
• 1—Reboot from partition 1.
• 2—Reboot from partition 2.
• alternate—Reboot from the alternate partition.
scc—(TXMatrix routers only) (Optional) Reboot the Routing Engine on the TXMatrixswitch-card chassis. If you issue the command from re0, re0 is rebooted. If you issue
the command from re1, re1 is rebooted.
sfc number—(TXMatrix Plus routers only) (Optional) Reboot the Routing Engine on theTXMatrix Plus switch-fabric chassis. If you issue the command from re0, re0 is
rebooted. If you issue the command from re1, re1 is rebooted. Replace numberwith
0.
slice slice—(EX Series switches only) (Optional) Reboot a partition on the boot media.This option has the following suboptions:
• 1—Power off partition 1.
• 2—Power off partition 2.
• alternate—Reboot from the alternate partition.
Additional Information Reboot requests are recorded in the system log files, which you can view with the show
logcommand(see show log).Also, thenamesofany runningprocesses thatarescheduled
to be shut down are changed. You can view the process names with the show system
processes command (see show system processes).
On a TXMatrix or TXMatrix Plus router, if you issue the request system reboot command
on themaster Routing Engine, all the master Routing Engines connected to the routing
matrix are rebooted. If you issue this command on the backup Routing Engine, all the
backup Routing Engines connected to the routing matrix are rebooted.
NOTE: Before issuing the request system reboot command on a TXMatrix
Plus routerwithnooptionsor theall-chassis,all-lcc, lccnumber, or sfcoptions,
verify that master Routing Engine for all routers in the routingmatrix are inthe same slot number. If themaster Routing Engine for a line-card chassis isin a different slot number than themaster Routing Engine for a TXMatrixPlus router, the line-card chassis might become logically disconnected fromthe routingmatrix after the request system reboot command.
405Copyright © 2018, Juniper Networks, Inc.
Chapter 19: Operational Commands

NOTE: To reboot a router that has two Routing Engines, reboot the backupRouting Engine (if you have upgraded it) first, and then reboot themasterRouting Engine.
Required PrivilegeLevel
maintenance
RelatedDocumentation
clear system reboot•
• request system halt
• Routing Matrix with a TXMatrix Plus Router Solutions Page
• request vmhost reboot on page 488
List of Sample Output request system reboot on page 406request system reboot (at 2300) on page 406request system reboot (in 2 Hours) on page 406request system reboot (Immediately) on page 406request system reboot (at 1:20 AM) on page 407
Output Fields When you enter this command, you are provided feedback on the status of your request.
Sample Output
request system reboot
user@host> request system rebootReboot the system ? [yes,no] (no)
request system reboot (at 2300)
user@host> request system reboot at 2300message ?Maintenance time!?Reboot the system ? [yes,no] (no) yes
shutdown: [pid 186]*** System shutdown message from [email protected] ***System going down at 23:00
request system reboot (in 2 Hours)
The following example, which assumes that the time is 5 PM (17:00), illustrates three different ways to request the system to reboot in two hours:
user@host> request system reboot at +120user@host> request system reboot in 120user@host> request system reboot at 19:00
request system reboot (Immediately)
user@host> request system reboot at now
Copyright © 2018, Juniper Networks, Inc.406
Installation and Upgrade Guide

request system reboot (at 1:20 AM)
To reboot the system at 1:20 AM, enter the following command. Because 1:20 AM is the next day, you must specify the absolute time.
user@host> request system reboot at 06060120request system reboot at 120Reboot the system at 120? [yes,no] (no) yes
407Copyright © 2018, Juniper Networks, Inc.
Chapter 19: Operational Commands

request system reboot (EX Series)
Syntax request system reboot<all-members | local | membermember-id><at time><inminutes><media (external | internal)><message “text”><slice (1 | 2 | alternate)>
Release Information Command introduced in Junos OS Release 9.0 for EX Series switches.
Option partition changed to slice in Junos OS Release 10.0 for EX Series switches.
Description Reboot the Junos OS.
Reboot requests are recorded in the system log files, which you can view with the show
log command. You can view the process names with the show system processes
command.
Options none—Reboots the software immediately.
all-members | local |membermember-id—(Optional)Specifywhichmemberof theVirtualChassis to reboot:
• all-members—Reboots each switch that is a member of the Virtual Chassis.
• local—Reboots the local switch, meaning the switch you are logged into, only.
• membermember-id—Reboots the specifiedmember switch of theVirtual Chassis.
at time—(Optional)Timeatwhich to reboot thesoftware, specified inoneof the followingways:
• +minutes—Number of minutes from now to reboot the software.
• hh:mm—Absolute timeon thecurrentdayatwhich to reboot thesoftware, specified
in 24-hour time.
• now—Stop or reboot the software immediately. This is the default.
• yymmddhhmm—Absolute time at which to reboot the software, specified as year,
month, day, hour, andminute.
inminutes—(Optional)Number ofminutes fromnowto reboot the software. This option
is an alias for the at +minutes option.
media (external | internal)—(Optional) Boot medium for the next boot. The external
option reboots the switch using a software package stored on an external boot
source, such as a USB flash drive. The internal option reboots the switch using a
software package stored in an internal memory source.
Copyright © 2018, Juniper Networks, Inc.408
Installation and Upgrade Guide

message “text”—(Optional)Message to display to all systemusers before rebooting the
software.
slice (1 | 2 | alternate)—(Optional) Reboot using the specified partition on the bootmedia. This option has the following suboptions:
• 1—Reboot from partition 1.
• 2—Reboot from partition 2.
• alternate—Reboot from the alternate partition, which is the partition that did not
boot the switch at the last bootup.
Required PrivilegeLevel
maintenance
RelatedDocumentation
clear system reboot•
Output Fields When you enter this command, you are provided feedback on the status of your request.
Sample Output
request system reboot
user@host> request system rebootReboot the system ? [yes,no] (no)
request system reboot (at 2300)
user@host> request system reboot at 2300message ?Maintenance time!?Reboot the system ? [yes,no] (no) yes
shutdown: [pid 186]*** System shutdown message from [email protected] ***System going down at 23:00
request system reboot (in 2 Hours)
The following example, which assumes that the time is 5 PM (17:00), illustrates three
different ways to request the system to reboot in two hours:
user@host> request system reboot at +120user@host> request system reboot in 120user@host> request system reboot at 19:00
request system reboot (Immediately)
user@host> request system reboot at now
request system reboot (at 1:20 AM)
To reboot the system at 1:20 AM, enter the following command. Because 1:20 AM is the
next day, youmust specify the absolute time.
409Copyright © 2018, Juniper Networks, Inc.
Chapter 19: Operational Commands

user@host> request system reboot at 06060120request system reboot at 120Reboot the system at 120? [yes,no] (no) yes
Copyright © 2018, Juniper Networks, Inc.410
Installation and Upgrade Guide

request system reboot (Junos OSwith Upgraded FreeBSD)
Syntax request system reboot<at time><both-routing-engines><inminutes><junos><message "text"><network><oam><other-routing-engine><usb>
Release Information Command introduced in Junos OS Release 15.1 for MX240, MX480, MX960, MX2010,
and MX2020 routers and EX9200 switches.
Command introduced in Junos OS Release 15.1X53-D30 for QFX5200 switches.
Description Reboot the software.
Options none—Reboot the software immediately.
at time—(Optional)Timeatwhich to reboot the software, specified inoneof the following
ways:
• now—Stop or reboot the software immediately. This is the default.
• +minutes—Number of minutes from now to reboot the software.
• yymmddhhmm—Absolute time at which to reboot the software, specified as year,
month, day, hour, andminute. Omitting a value will default to the current date for
that value.
• hh:mm—Absolute time on the current day at which to stop the software, specified
in 24-hour time.
both-routing-engines—(Optional) Reboot both Routing Engines at the same time.
inminutes—(Optional) Number ofminutes from now to reboot the software. This option
is an alias for the at +minutes option.
junos—(Optional) Reboot from the junos volume.
message "text"—(Optional) Message to display to all system users before stopping or
rebooting the software.
network—(Optional) Reboot from the network.
oam—(Optional) Reboot from the oam volume.
other-routing-engine—(Optional) Reboot the other Routing Engine fromwhich the
command is issued. For example, if you issue the command from themaster Routing
411Copyright © 2018, Juniper Networks, Inc.
Chapter 19: Operational Commands

Engine, the backup Routing Engine is rebooted. Similarly, if you issue the command
from the backup Routing Engine, the master Routing Engine is rebooted.
usb—(Optional) Reboot from the USB device.
Additional Information Reboot requests are recorded in the system log files, which you can view with the show
logcommand(see show log).Also, thenamesofany runningprocesses thatarescheduled
to be shut down are changed. You can view the process names with the show system
processes command (see show system processes).
NOTE: To reboot a router or switch that has twoRouting Engines, reboot thebackup Routing Engine (if you have upgraded it) first, and then reboot themaster Routing Engine.
Required PrivilegeLevel
maintenance
RelatedDocumentation
request system snapshot (Junos OSwith Upgraded FreeBSD) on page 427•
• show system snapshot (Junos OSwith Upgraded FreeBSD) on page 522
• clear system reboot
• request system halt
• Release Information for Junos OSwith Upgraded FreeBSD on page 17
List of Sample Output request system reboot on page 412request system reboot (at 2300) on page 412request system reboot (in 2 Hours) on page 413request system reboot (Immediately) on page 413request system reboot (at 1:20 AM) on page 413
Output Fields When you enter this command, you are provided feedback on the status of your request.
Sample Output
request system reboot
user@host> request system rebootReboot the system ? [yes,no] (no)
request system reboot (at 2300)
user@host> request system reboot at 2300message “Maintenance time!”Reboot the system ? [yes,no] (no) yes
shutdown: [pid 186]
Copyright © 2018, Juniper Networks, Inc.412
Installation and Upgrade Guide

*** System shutdown message from [email protected] ***System going down at 23:00
request system reboot (in 2 Hours)
The following example, which assumes that the time is 5 PM (17:00), illustrates three different ways to request the system to reboot in two hours:
user@host> request system reboot at +120user@host> request system reboot in 120user@host> request system reboot at 19:00
request system reboot (Immediately)
user@host> request system reboot at now
request system reboot (at 1:20 AM)
To reboot the system at 1:20 AM, enter the following command. Because 1:20 AM is the next day, you must specify the absolute time.
user@host> request system reboot at 06060120request system reboot at 120Reboot the system at 120? [yes,no] (no) yes
413Copyright © 2018, Juniper Networks, Inc.
Chapter 19: Operational Commands

request system recover
Syntax request system recover (junos-volume | oam-volume)
Release Information Command introduced in Junos OS Release 15.1 for MX240, MX480, MX960, MX2010,
and MX2020 routers and EX9200 switches only.
Command introduced in Junos OS Release 15.1X53-D30 for QFX5200 switches.
Command introduced in Junos OS Release 15.1X53-D60 for QFX10000 switches.
Command introduced in JunosOSRelease 16.1R1 forVMhostonMX240,MX480,MX960,
MX2010, and MX2020 routers and PTX5000 routers.
Command introduced in Junos OS Release 17.3 for SRX5400, SRX5600, and SRX5800
devices.
Description Recover a specified volume of the system.
Options junos-volume—Specify the /junos volume to be recovered. The /junos volume is themain
drive and contains all the software and files needed for the day-to-day running of
the device, including configuration information and logs. The/junos volume also
contains non-recovery snapshots, which are newwith Junos OSwith upgraded
FreeBSD. Non-recovery snapshots cannot be used for recovery of a failed system.
oam-volume—Specify the /oam volume to be recovered. The compact flash drive is the
/oam volume and stores recovery snapshot backup information. In case of failure
of the /junos volume, the /oam volume can be used to boot the system. The /oam
volumehas the recovery snapshot,which is createdwith the requestsystemsnapshot
recovery command. A recovery snapshot is always replaced when a new recovery
snapshot is taken.
Additional Information If you try to recover the junos volume while you are booted on the junos volume, you will
get an error message.
To recover the junos volume, do the following:
1. Recover the oam volume.
user@host> request system recover oam
2. Reboot on the oam volume.
user@host> request system reboot oam
Required PrivilegeLevel
view
RelatedDocumentation
Release Information for Junos OSwith Upgraded FreeBSD on page 17•
• Changes in Disk Volumes for Junos OSwith Upgraded FreeBSD on page 24
• Changes in Use of Snapshots for Junos OSwith Upgraded FreeBSD on page 26
Copyright © 2018, Juniper Networks, Inc.414
Installation and Upgrade Guide

List of Sample Output requestsystemrecover junos-volume(Whilebootedonthe junosvolume)onpage415request system recover junos-volume (While bootedon the oamvolume)onpage415request system recover oam-volume on page 415
Sample Output
request system recover junos-volume (While booted on the junos volume)
user@host> request system recover junos-volumeERROR: You are currently running on the Junos volumeERROR: A recovery of the Junos volume is not possible
request system recover junos-volume (While booted on the oam volume)
user@host> request system recover junos-volumeNOTICE: Recovering the Junos volume ...ada0p3 deletedada0 createdada0p1 addedbootcode written to ada0ada0p3 addedada0p2 added/dev/gpt/junos: 20303.9MB (41582448 sectors) block size 32768, fragment size 4096
using 33 cylinder groups of 626.22MB, 20039 blks, 80256 inodes.super-block backups (for fsck_ffs -b #) at: 192, 1282688, 2565184, 3847680, 5130176, 6412672, 7695168, 8977664, 10260160, 11542656, 12825152, 14107648, 15390144, 16672640, 17955136, 19237632, 20520128, 21802624, 23085120, 24367616, 25650112, 26932608, 28215104, 29497600, 30780096, 32062592, 33345088, 34627584, 35910080, 37192576, 38475072, 39757568, 41040064NOTICE: Junos volume recovered
request system recover oam-volume
user@host> request system recover oam-volumeNOTICE: Recovering the OAM volume ...ada1p2 deletedada1 createdada1p1 addedbootcode written to ada1ada1p2 added/dev/gpt/oam: 3831.6MB (7847136 sectors) block size 32768, fragment size 4096 using 7 cylinder groups of 626.09MB, 20035 blks, 80256 inodes.super-block backups (for fsck_ffs -b #) at: 192, 1282432, 2564672, 3846912, 5129152, 6411392, 7693632Verified oam signed by PackageProductionEc_2017 method ECDSA256+SHA256Installing OAM volume contents ...The OAM volume is now installedNOTICE: Creating a recovery snapshot on the OAM volume ...Creating image ...Compressing image ...Image size is 1717MBRecovery snapshot created successfullyNOTICE: OAM volume recovered
415Copyright © 2018, Juniper Networks, Inc.
Chapter 19: Operational Commands

request system scripts add
Syntax request system scripts add <package-name><no-copy><unlink>
Release Information Command introduced before Junos OS Release 9.0.
Description CLI command to install AI-Script (jais) packages on Juniper Networks devices.
Options no-copy—Don't save a copy of the jais package file.
user@host> request system scripts add no-copy <package-name>
NOTE: If you use the no-copy option during the jais installation, the jaispackage cannot be rolled back.
unlink—Remove the package after successful installation.
user@host> request system scripts add unlink <package-name>
Required PrivilegeLevel
maintenance
RelatedDocumentation
request system scripts delete on page 417•
• request system scripts rollback on page 418
• request system scripts event-scripts
Copyright © 2018, Juniper Networks, Inc.416
Installation and Upgrade Guide

request system scripts delete
Syntax request system scripts delete <package-name>
Release Information Command introduced before Junos OS Release 9.0.
Description CLI command to delete AI-Script (jais) packages on Juniper Networks devices.
Options No options are available.
Required PrivilegeLevel
maintenance
RelatedDocumentation
request system scripts add on page 416•
• request system scripts rollback on page 418
• request system scripts event-scripts
417Copyright © 2018, Juniper Networks, Inc.
Chapter 19: Operational Commands

request system scripts rollback
Syntax request system scripts rollback
Release Information Command introduced before Junos OS Release 9.0.
Description Attempt to roll back to most recent installation of AI-Scripts (jais) package.
Options No options are available.
Required PrivilegeLevel
maintenance
RelatedDocumentation
request system scripts add on page 416•
• request system scripts delete on page 417
• request system scripts event-scripts
Copyright © 2018, Juniper Networks, Inc.418
Installation and Upgrade Guide

request system snapshot
List of Syntax Syntax on page 419
Syntax (ACX Series Routers) on page 419
Syntax (EX Series Switches) on page 419
Syntax (MX Series Routers) on page 419
Syntax (TXMatrix Routers) on page 419
Syntax (TXMatrix Plus Routers) on page 419
Syntax request system snapshot<partition>
Syntax (ACX SeriesRouters)
request system snapshot<media type><partition>
Syntax (EX SeriesSwitches)
request system snapshot<all-members | local | membermember-id><media type><partition><re0 | re1 | routing-engine routing-engine-id><slice alternate>
Syntax (MX SeriesRouters)
request system snapshot<all-members><config-partition><local><membermember-id><media usb-port-number><partition><root-partition>
Syntax (TXMatrixRouters)
request system snapshot<all-chassis | all-lcc | lcc number | scc><config-partition><partition><root-partition>
Syntax(TXMatrixPlusRouters)
request system snapshot<all-chassis | all-lcc | lcc number | sfc number><config-partition><partition><root-partition>
Release Information Command introduced before Junos OS Release 7.4.
Command introduced in Junos OS Release 10.0 for EX Series switches.
Command introduced in Junos OS Release 12.2 for ACX Series routers.
Options <config-partition> and <root-partition> introduced in Junos OS Release 13.1 for
M Series, MX Series, T Series, and TX Series routers.
419Copyright © 2018, Juniper Networks, Inc.
Chapter 19: Operational Commands

Optionmedia usb-port-number introduced in Junos OS Release 13.2 for MX104 routers.
Options <config-partition>, <root-partition>, and <slice> deprecated for Junos OSwith
Upgraded FreeBSD in Junos OS Release 15.1
NOTE: Todeterminewhich platforms run JunosOSwithUpgraded FreeBSD,see the table listing the platforms currently running JunosOSwith upgradedFreeBSD in “Release Information for Junos OSwith Upgraded FreeBSD” onpage 17.
Description On the router, back up the currently runningandactive file systempartitions to standby
partitions that are not running. Specifically, the root file system (/) is backed up to
•
/altroot, and /config is backed up to /altconfig. The root and /config file systems are
on the router's flashdrive, and the /altrootand /altconfig file systemsareon the router's
hard drive.
• On the switch, take a snapshot of the files currently used to run the switch—the
complete contents of the root (/) , /altroot, /config, /var, and /var-tmp directories,
which include the running Junos OS, the active configuration, and log files.
CAUTION: After you run the request system snapshot command, you cannot
return to thepreviousversionof thesoftware,becausethe runningandbackupcopies of the software are identical.
NOTE: Starting with Junos OS Release 15.1F3, the statement request system
snapshot creates a snapshot of the guest OS image only for the PTX5000
withRE-DUO-C2600-16G, and theMX240,MX480,andMX960 routerswithRE-S-1800X4-32G-S.
Startingwith JunosOSRelease 15.1F5, thestatement requestsystemsnapshot
creates a snapshot of the guest OS image only for theMX2010 andMX2020routers with REMX2K-1800-32G-S.
On these routers, in order to create snapshot of thehostOS imagealongwithJunos OS image, use the request vmhost snapshot command.
Options The specific options available depend upon the router or switch:
none—Back up the currently running software as follows:
• On the router, back up the currently running and active file system partitions to
standby partitions that are not running. Specifically, the root file system (/) is
Copyright © 2018, Juniper Networks, Inc.420
Installation and Upgrade Guide

backed up to /altroot, and /config is backed up to /altconfig. The root and /config
file systems are on the router's flash drive, and the /altroot and /altconfig file
systems are on the router's hard drive.
• On the switch, take a snapshot of the files currently used to run the switch and
copy them to themedia that the switch did not boot from. If the switch is booted
from internalmedia, the snapshot is copied to external (USB)media. If the switch
is booted from external (USB)media, the snapshot is copied to internal media.
• If the snapshot destination is external media but a USB flash drive is not
connected, an error message is displayed.
• If theautomatic snapshotprocedure is already inprogress, thecommand returns
the following error: Snapshot already in progress. Cannot startmanual snapshot.
For additional information about the automatic snapshot feature, see
“Understanding Resilient Dual-Root Partitions on Switches” on page 115.
all-chassis | all-lcc | lcc number—(TXMatrix and TXMatrix Plus router only) (Optional)
• all-chassis—OnaTXMatrix router, archivedataandexecutableareas for all Routing
Engines in the chassis. On a TXMatrix Plus router, archive data and executable
areas for all Routing Engines in the chassis.
• all-lcc—On a TXMatrix router, archive data and executable areas for all T640
routers (or line-card chassis) connected to a TXMatrix router. On a TXMatrix Plus
router, archive data and executable areas for all routers (or line-card chassis)
connected to a TXMatrix Plus router.
• lccnumber—OnaTXMatrix router, archive data andexecutable areas for a specific
T640 router (or line-card chassis) that is connected to a TXMatrix router. On a
TXMatrix Plus router, archive data and executable areas for a specific router
(line-card chassis) that is connected to a TXMatrix Plus router.
Replace numberwith the following values depending on the LCC configuration:
• 0 through 3, when T640 routers are connected to a TXMatrix router in a routing
matrix.
• 0 through 3, when T1600 routers are connected to a TXMatrix Plus router in a
routing matrix.
• 0 through 7, when T1600 routers are connected to a TXMatrix Plus router with
3D SIBs in a routing matrix.
• 0, 2, 4, or 6, when T4000 routers are connected to a TXMatrix Plus router with
3D SIBs in a routing matrix.
all-members | local |membermember-id—(EX Series switch Virtual Chassis and MXSeries routers only) (Optional) Specify where to place the snapshot (archive data
and executable areas) in a Virtual Chassis:
421Copyright © 2018, Juniper Networks, Inc.
Chapter 19: Operational Commands

• all-members—Create a snapshot (archive data and executable areas) for all
members of the Virtual Chassis.
• local—Create a snapshot (archive data and executable areas) on themember of
the Virtual Chassis that you are currently logged into.
• membermember-id—Create a snapshot (archive data and executable areas) for
the specified member of the Virtual Chassis.
config-partition—(M,MX,T, TXSeries routers only)Createa snapshotof the configuration
partition only and store it onto the default /altconfig on the hard disk device or an
/altconfig on aUSBdevice. Option deprecated for JunosOSwithUpgraded FreeBSD
in Junos OS Release 15.1.
NOTE: To determine which platforms run Junos OSwith UpgradedFreeBSD, see the table listing the platforms currently running Junos OSwith upgraded FreeBSD in “Release Information for Junos OSwithUpgraded FreeBSD” on page 17.
media type—(ACX Series, M320, T640, MX960 routers, and EX Series switches
only)(Optional) Specify the boot device the software is copied to:
• compact-flash—Copy software to the primary compact flash drive.
• external—(Switches only) Copy software to an externalmass storage device, such
as a USB flash drive. If a USB drive is not connected, the switch displays an error
message.
• internal—Copy software to an internal flash drive.
• removable-compact-flash—Copy software to the removable compact flash drive.
• usb—(ACX Series, M320, T640, MX960 routers only) Copy software to the device
connected to the USB port.
• usb0—(MX104 routers only) Copy software to the device connected to the USB0
port.
• usb1—(MX104 routers only) Copy software to the device connected to the USB1
port.
partition—(Optional) Repartition the flash drive before a snapshot occurs. If the partition
table on the flash drive is corrupted, the request system snapshot command fails
and reports errors. The partition option is only supported for restoring the software
image from the hard drive to the flash drive.
(Routers only) You cannot issue the request system snapshot command when you
enable flash disk mirroring. We recommend that you disable flash disk mirroring
Copyright © 2018, Juniper Networks, Inc.422
Installation and Upgrade Guide

when you upgrade or downgrade the software. For more information, see the Junos
OS Administration Library.
(EX Series switches only) If the snapshot destination is the media that the switch
did not boot from, youmust use the partition option.
re0 | re1 | routing-engine routing-engine-id—(EX6200andEX8200 switches only) Specifywhere to place the snapshot in a redundant Routing Engine configuration.
• re0—Create a snapshot on Routing Engine 0.
• re1—Create a snapshot on Routing Engine 1.
• routing-engine routing-engine-id—Create a snapshot on the specified Routing
Engine.
root-partition—(M, MX, T, TX Series routers only) Create a snapshot of the root partition
only and store it onto the default /altroot on the hard disk device or an /altroot on a
USB device. Option deprecated for Junos OSwith Upgraded FreeBSD in Junos OS
Release 15.1.
NOTE: To determine which platforms run Junos OSwith UpgradedFreeBSD, see the table listing the platforms currently running Junos OSwith upgraded FreeBSD in “Release Information for Junos OSwithUpgraded FreeBSD” on page 17.
slice alternate—(EX Series switches only) (Optional) Take a snapshot of the active root
partition and copy it to the alternate slice on the boot media.
Option deprecated for Junos OSwith Upgraded FreeBSD in Junos OS Release 15.1.
NOTE: To determine which platforms run Junos OSwith UpgradedFreeBSD, see the table listing the platforms currently running Junos OSwith upgraded FreeBSD in “Release Information for Junos OSwithUpgraded FreeBSD” on page 17.
scc—(TXMatrix router only) (Optional)Archivedataandexecutableareas for aTXMatrix
router (or switch-card chassis).
sfc number—(TXMatrix Plus router only) (Optional) Archive data and executable areas
for a TXMatrix Plus router (or switch-fabric chassis). Replace numberwith 0.
Additional Information (Routers only) Before upgrading the software on the router, when you have a known
stable system, issue the request system snapshot command to back up the software,
•
423Copyright © 2018, Juniper Networks, Inc.
Chapter 19: Operational Commands
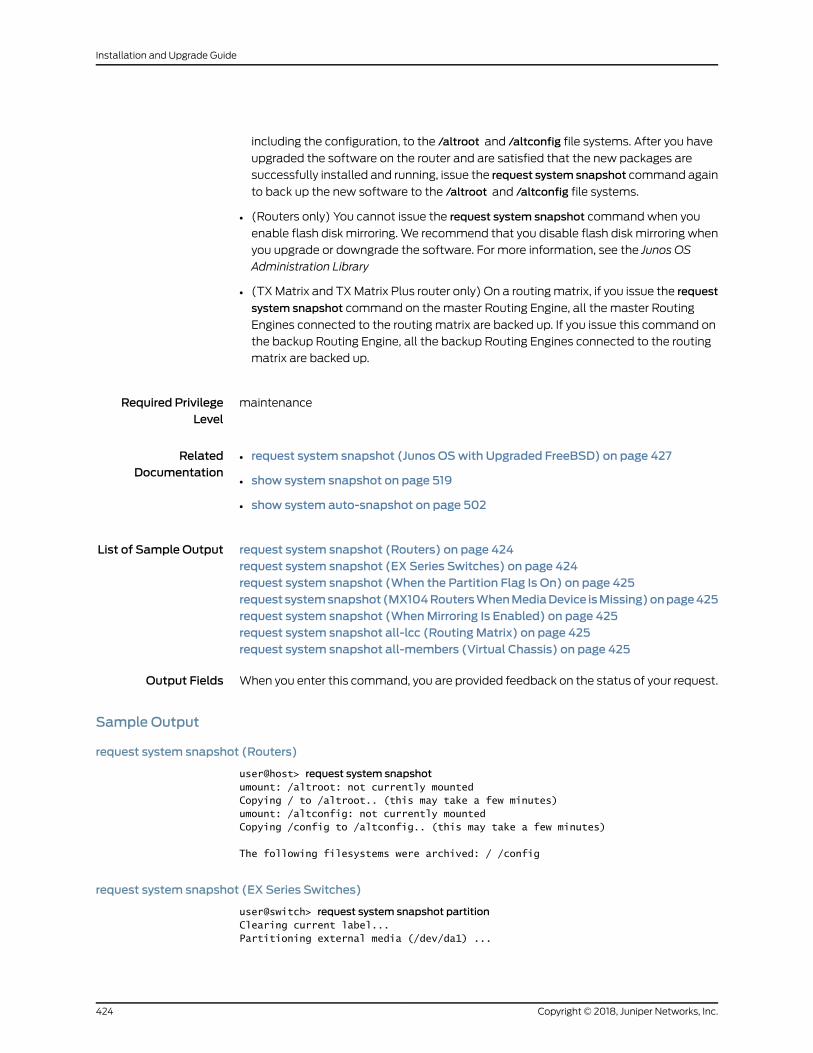
including the configuration, to the /altroot and /altconfig file systems. After you have
upgraded the software on the router and are satisfied that the new packages are
successfully installed and running, issue the request systemsnapshot command again
to back up the new software to the /altroot and /altconfig file systems.
• (Routers only) You cannot issue the request system snapshot command when you
enable flash disk mirroring. We recommend that you disable flash disk mirroring when
you upgrade or downgrade the software. For more information, see the Junos OS
Administration Library
• (TXMatrix and TXMatrix Plus router only) On a routingmatrix, if you issue the request
system snapshot command on themaster Routing Engine, all the master Routing
Engines connected to the routing matrix are backed up. If you issue this command on
the backup Routing Engine, all the backup Routing Engines connected to the routing
matrix are backed up.
Required PrivilegeLevel
maintenance
RelatedDocumentation
request system snapshot (Junos OSwith Upgraded FreeBSD) on page 427•
• show system snapshot on page 519
• show system auto-snapshot on page 502
List of Sample Output request system snapshot (Routers) on page 424request system snapshot (EX Series Switches) on page 424request system snapshot (When the Partition Flag Is On) on page 425requestsystemsnapshot(MX104RoutersWhenMediaDevice isMissing)onpage425request system snapshot (WhenMirroring Is Enabled) on page 425request system snapshot all-lcc (RoutingMatrix) on page 425request system snapshot all-members (Virtual Chassis) on page 425
Output Fields When you enter this command, you are provided feedback on the status of your request.
Sample Output
request system snapshot (Routers)
user@host> request system snapshotumount: /altroot: not currently mountedCopying / to /altroot.. (this may take a few minutes)umount: /altconfig: not currently mountedCopying /config to /altconfig.. (this may take a few minutes)
The following filesystems were archived: / /config
request system snapshot (EX Series Switches)
user@switch> request system snapshot partitionClearing current label...Partitioning external media (/dev/da1) ...
Copyright © 2018, Juniper Networks, Inc.424
Installation and Upgrade Guide

Partitions on snapshot:
Partition Mountpoint Size Snapshot argument s1a /altroot 179M none s2a / 180M none s3d /var/tmp 361M none s3e /var 121M none s4d /config 60M noneCopying '/dev/da0s1a' to '/dev/da1s1a' .. (this may take a few minutes)Copying '/dev/da0s2a' to '/dev/da1s2a' .. (this may take a few minutes)Copying '/dev/da0s3d' to '/dev/da1s3d' .. (this may take a few minutes)Copying '/dev/da0s3e' to '/dev/da1s3e' .. (this may take a few minutes)Copying '/dev/da0s4d' to '/dev/da1s4d' .. (this may take a few minutes)The following filesystems were archived: /altroot / /var/tmp /var /config
request system snapshot (When the Partition Flag Is On)
user@host> request system snapshot partitionPerforming preliminary partition checks ...Partitioning ad0 ...umount: /altroot: not currently mountedCopying / to /altroot.. (this may take a few minutes)
The following filesystems were archived: / /config
request system snapshot (MX104 RoutersWhenMedia Device is Missing)
user@host > request system snapshotmedia usb0error: usb0 media missing or invalid
request system snapshot (WhenMirroring Is Enabled)
user@host> request system snapshotSnapshot is not possible since mirror-flash-on-disk is configured.
request system snapshot all-lcc (RoutingMatrix)
user@host> request system snapshot all-lcclcc0-re0:--------------------------------------------------------------------------Copying '/' to '/altroot' .. (this may take a few minutes)Copying '/config' to '/altconfig' .. (this may take a few minutes)The following filesystems were archived: / /config
lcc2-re0:--------------------------------------------------------------------------Copying '/' to '/altroot' .. (this may take a few minutes)Copying '/config' to '/altconfig' .. (this may take a few minutes)The following filesystems were archived: / /config
request system snapshot all-members (Virtual Chassis)
user@switch> request system snapshot all-membersmedia internalfpc0:--------------------------------------------------------------------------Copying '/dev/da0s2a' to '/dev/da0s1a' .. (this may take a few minutes)The following filesystems were archived: /
fpc1:
425Copyright © 2018, Juniper Networks, Inc.
Chapter 19: Operational Commands

--------------------------------------------------------------------------Copying '/dev/da0s2a' to '/dev/da0s1a' .. (this may take a few minutes)The following filesystems were archived: /
fpc2:--------------------------------------------------------------------------Copying '/dev/da0s2a' to '/dev/da0s1a' .. (this may take a few minutes)The following filesystems were archived: /
fpc3:--------------------------------------------------------------------------Copying '/dev/da0s2a' to '/dev/da0s1a' .. (this may take a few minutes)The following filesystems were archived: /
fpc4:--------------------------------------------------------------------------Copying '/dev/da0s2a' to '/dev/da0s1a' .. (this may take a few minutes)The following filesystems were archived: /
fpc5:--------------------------------------------------------------------------Copying '/dev/da0s2a' to '/dev/da0s1a' .. (this may take a few minutes)The following filesystems were archived: /
Copyright © 2018, Juniper Networks, Inc.426
Installation and Upgrade Guide

request system snapshot (Junos OSwith Upgraded FreeBSD)
Syntax request system snapshot<delete snapshot-name><load snapshot-name><media type><recovery>
Release Information Command introduced in Junos OS Release 15.1 for MX240, MX480, MX960, MX2010,
and MX2020 routers and EX9200 switches.
Command introduced in Junos OS Release 17.3 for SRX5400, SRX5600, and SRX5800
devices.
Description On the router or switch, back up the currently running and active file system partitions
to standby partitions that are not running. Non-recovery snapshots are named
snap.date.time and stored in the /packages/sets directory.
CAUTION: After you run the request system snapshot command, you cannot
return to thepreviousversionof thesoftware,becausethe runningandbackupcopies of the software are identical.
Options none—On the router or switch, back up the currently running and active file system
partitions to standby partitions that are not running. Specifically, this creates a
non-recovery snapshotnamed snap.<date>.<time>which is stored in /packages/sets.
delete snapshot-name—(Optional) Delete a specific non-recovery snapshot from
/packages/sets. Wildcards are supported, so request system snapshot delete snap*
deletes all snapshots.
load snapshot-name—(Optional) Load a specific snapshot from /packages/sets.
media type—(Optional) Specify the boot device the software is copied to:
• usb—(MX960 routers only) Copy software to the device connected to the USB
port.
recovery—Create a recovery snapshot and store it in the /oam volume.
Additional Information Before upgrading the software on the router or switch, when you have a known stable
system, issue the request system snapshot command to back up the software, including
the configuration, to the /packages/sets file systems. After you have upgraded the
software on the router or switch andare satisfied that the newpackages are successfully
installed and running, issue the request system snapshot command again to back up the
new software to the /packages/sets file systems.
427Copyright © 2018, Juniper Networks, Inc.
Chapter 19: Operational Commands

Required PrivilegeLevel
maintenance
RelatedDocumentation
request system reboot (Junos OSwith Upgraded FreeBSD) on page 411•
• show system snapshot (Junos OSwith Upgraded FreeBSD) on page 522
• Release Information for Junos OSwith Upgraded FreeBSD on page 17
List of Sample Output request system snapshot recovery on page 428request system snapshot delete on page 428request system snapshot on page 428
Output Fields When you enter this command, you are provided feedback on the status of your request.
Sample Output
request system snapshot recovery
user@host> request system snapshot recoveryCreating image ...Compressing image . . .Image size is 777MB
Recovery snapshot created successfully
request system snapshot delete
user@host> request system snapshot delete snap.20150112.122106NOTICE: Snapshot ’snap.20150112.122106’ deleted successfully
request system snapshot
user@host> request system snapshotNOTICE: Snapshot snap.20150119.122106 created successfully
Copyright © 2018, Juniper Networks, Inc.428
Installation and Upgrade Guide

request system snapshot (Maintenance)
Syntax request system snapshot<factory><media (compact-flash | hard-disk | internal | usb)><node (all | local | node-id | primary)><partition><slice (alternate) >
Release Information Command introduced in Junos OS Release 10.2.
Description Back up the currently running and active file system partitions on the device.
Options • factory— (Optional) Specifies that only the files shipped from the factory are included
in the snapshot.
• media—(Optional) Specify the media to be included in the snapshot:
• compact-flash—Copy the snapshot to the CompactFlash card.
• hard-disk—Copy the snapshot to the hard disk.
• usb—Copy the snapshot to the USB storage device.
• internal— Copies the snapshot to internal media. This is the default.
NOTE: USB option is available on all SRX series devices; hard disk andcompact-flash options are available only on SRX5800, SRX5600, andSRX5400 devices; media internal option is available only on SRX300,SRX320, SRX340, SRX345, and SRX550M devices.
• external—Copies the snapshot to an external storage device. This option is available
for the compact flash on the SRX650 Services Gateway.
• node—(Optional) Specify the archive data and executable areas of a specific node.
• node-id—Specify for node (0, 1).
• all—Specify for all nodes.
• local—Specify for local nodes.
• primary—pecify for primary nodes.
• partition—(Default) Specify that the target media should be repartitioned before the
backup is saved to it.
429Copyright © 2018, Juniper Networks, Inc.
Chapter 19: Operational Commands

NOTE: The target media is partitioned whether or not it is specified in thecommand, because this is amandatory option.
Example: request system snapshotmedia usb partition
Example: request system snapshotmedia usb partition factory
• slice—(Optional)Takeasnapshotof the rootpartition the systemhascurrently booted
from to another slice in the samemedia.
• alternate—(Optional) Store the snapshot on the other root partition in the system.
NOTE: Thesliceoptioncannotbeusedalongwith theother requestsystem
snapshot options, because the options aremutually exclusive. If you use
the factory, media, or partition option, you cannot use the slice option; ifyou use the slice option, you cannot use any of the other options.
Required PrivilegeLevel
maintenance
RelatedDocumentation
Backing Up the Current Installation (SRX Series Devices) on page 59•
List of Sample Output request system snapshotmedia hard-disk on page 430request system snapshotmedia usb (when usb device is missing on page 430request system snapshotmedia compact-flash on page 431request system snapshot partition on page 431
Output Fields When you enter this command, you are provided feedback on the status of your request.
Sample Output
request system snapshotmedia hard-disk
user@host> request system snapshotmedia hard-diskVerifying compatibility of destination media partitions...Running newfs (880MB) on hard-disk media / partition (ad2s1a)...Running newfs (98MB) on hard-disk media /config partition (ad2s1e)...Copying '/dev/ad0s1a' to '/dev/ad2s1a' .. (this may take a few minutes)...
request system snapshotmedia usb (when usb device is missing
user@host> request system snapshotmedia usbVerifying compatibility of destination media partitions...Running newfs (254MB) on usb media / partition (da1s1a)...Running newfs (47MB) on usb media /config partition (da1s1e)...
Copyright © 2018, Juniper Networks, Inc.430
Installation and Upgrade Guide

Copying '/dev/da0s2a' to '/dev/da1s1a' .. (this may take a few minutes)Copying '/dev/da0s2e' to '/dev/da1s1e' .. (this may take a few minutes)The following filesystems were archived: / /config
request system snapshotmedia compact-flash
user@host> request system snapshotmedia compact-flasherror: cannot snapshot to current boot device
request system snapshot partition
user@host> request system snapshot partitionVerifying compatibility of destination media partitions...Running newfs (439MB) on internal media / partition (da0s1a)...Running newfs (46MB) on internal media /config partition (da0s1e)...Copying '/dev/da1s1a' to '/dev/da0s1a' .. (this may take a few minutes)Copying '/dev/da1s1e' to '/dev/da0s1e' .. (this may take a few minutes)The following filesystems were archived: / /config
431Copyright © 2018, Juniper Networks, Inc.
Chapter 19: Operational Commands

request system software abort in-service-upgrade (ICU)
Syntax request system software abort in-service-upgrade
Release Information Command introduced in Junos OS Release 11.2 for SRX300, SRX320, SRX340, SRX345,
and SRX550M devices.
Description Abort an in-band cluster upgrade (ICU). This commandmust be issued from a router
session other than the one on which you issued the request system in-service-upgrade
command that launched the ICU. If an ICU is in progress, this command aborts it. If the
node is being upgraded, this command will cancel the upgrade. The command is also
helpful in recovering the node in case of a failed ICU.
NOTE: We recommend that you use the command only when there is anissuewith the ongoing session of ISSU. Youmay need tomanually interveneto bring the system to sane state if after issuing the command the systemdoes not recover from the abort.
Options This command has no options.
Required PrivilegeLevel
view
RelatedDocumentation
request system software in-service-upgrade (Maintenance)•
List of Sample Output request system software abort in-service-upgrade on page 432
Output Fields When you enter this command, you are provided feedback on the status of your request.
Sample Output
request system software abort in-service-upgrade
user@host> request system software abort in-service-upgradeIn-Service-Upgrade aborted
Copyright © 2018, Juniper Networks, Inc.432
Installation and Upgrade Guide

request system software add
List of Syntax Syntax on page 433
Syntax (EX Series Switches) on page 433
Syntax (TXMatrix Router) on page 433
Syntax (TXMatrix Plus Router) on page 434
Syntax (MX Series Router) on page 434
Syntax (QFX Series) on page 434
Syntax (OCX Series) on page 435
Syntax request system software add package-name<best-effort-load><delay-restart><device-alias alias-name><force><no-copy><no-validate><re0 | re1><reboot><satellite slot-id><set [package-name1 package-name2]><unlink><upgrade-group [all |upgrade-group-name]><upgrade-with-config><satellite slot-id><validate><version version-string>
Syntax (EX SeriesSwitches)
request system software add package-name<best-effort-load><delay-restart><force><no-copy><no-validate><re0 | re1><reboot><set [package-name1 package-name2]><upgrade-with-config><validate><validate-on-host hostname><validate-on-routing-engine routing-engine>
Syntax (TXMatrixRouter)
request system software add package-name<best-effort-load><delay-restart><force><lcc number | scc><no-copy><no-validate><re0 | re1><reboot><set [package-name1 package-name2]>
433Copyright © 2018, Juniper Networks, Inc.
Chapter 19: Operational Commands

<unlink><upgrade-with-config><validate><validate-on-host hostname><validate-on-routing-engine routing-engine>
Syntax(TXMatrixPlusRouter)
request system software add package-name<best-effort-load><delay-restart><force><lcc number | sfc number><no-copy><no-validate><re0 | re1><reboot><set [package-name1 package-name2]><unlink><upgrade-with-config><validate><validate-on-host hostname><validate-on-routing-engine routing-engine>
Syntax (MX SeriesRouter)
request system software add package-name<best-effort-load><delay-restart><device-alias alias-name><force><membermember-id><no-copy><no-validate><re0 | re1><reboot><satellite slot-id><set [package-name1 package-name2]><upgrade-group [all |upgrade-group-name]><unlink><upgrade-with-config><validate><version version-string><validate-on-host hostname><validate-on-routing-engine routing-engine>
Syntax (QFX Series) request system software add package-name<best-effort-load><component all><delay-restart><force><force-host><no-copy><partition><reboot><unlink><upgrade-with-config>
Copyright © 2018, Juniper Networks, Inc.434
Installation and Upgrade Guide

Syntax (OCX Series) request system software add package-name<best-effort-load><delay-restart><force><force-host><no-copy><no-validate><reboot><unlink><upgrade-with-config><validate>
Release Information Command introduced before Junos OS Release 7.4.
best-effort-load and unlink options added in Junos OS Release 7.4.
Command introduced in Junos OS Release 9.0 for EX Series switches.
sfc option introduced in Junos OS Release 9.6 for the TXMatrix Plus router.
Command introduced in Junos OS Release 11.1 for the QFX Series.
set [package-name1 package-name2] option added in Junos OS Release 11.1 for EX Series
switches. Added in Junos OS Release 12.2 for M Series, MX Series, and T Series routers.
NOTE: OnEXSeriesswitches, the set[package-name1package-name2]option
allows you to install only two software packages on amixed EX4200 andEX4500VirtualChassis,whereas,onMSeries,MXSeries, andTSeries routers,the set [package-name1 package-name2 package-name3] option allows you to
install multiple software packages and software add-on packages at thesame time.
upgrade-with-config and upgrade-with-config-format format options added in Junos OS
Release 12.3 for M Series routers, MX Series routers, and T Series routers, EX Series
Ethernet switches, and QFX Series devices.
Command introduced in Junos OS Release 14.1X53-D20 for the OCX Series.
device-alias, satellite,upgrade-group, and versionoptions introduced in JunosOSRelease
14.2R3 for Junos Fusion.
validate-on-host and validate-on-routing-engine options added in Junos OS Release
15.1F3 for PTX5000 routers and MX240, MX480, and MX960 routers.
upgrade-with-config-format format option deleted in Junos OS Release 16.1 for M Series
routers, MX Series routers, and T Series routers, EX Series Ethernet switches, and QFX
Series devices.
Description NOTE: We recommend that you always download the software image to/var/tmp only. On EX Series and QFX Series switches, youmust use the
/var/tmp directory. Other directories are not supported.
Install a software package or bundle on the router or switch.
435Copyright © 2018, Juniper Networks, Inc.
Chapter 19: Operational Commands

For information on valid filename and URL formats, see Format for Specifying Filenames
and URLs in Junos OS CLI Commands.
CAUTION: Any configuration changes performed after inputting the request
system software add commandwill be lost when the system rebootswith an
upgraded version of Junos OS.
NOTE: Starting from Junos OS Release 17.2R1, PTX10008 routers do notsupport the request system software add command. Starting from Junos OS
Release 17.4R1, PTX10016 routers do not support the request systemsoftware
add command. Use the request vmhost software add command instead of
the request system software add command on the PTX10008 and PTX10016
routers to install or upgrade the JunosOS software package or bundle on therouter. See request vmhost software add.
NOTE: When graceful Routing Engine switchover (GRES) is enabled on adevice, youmust perform a unified ISSU operation to update the softwarerunning on the device. With GRES enabled, if you attempt to perform asoftware upgrade by entering the request systemsoftware addpackage-name
command, an error message is displayed stating that onlyin-service-software-upgrades are supported when GRES is configured. Insuch a case, youmust either remove the GRES configuration before youattempt the upgrade or perform a unified ISSU.
NOTE: Starting with Junos OS Release 15.1F3, the statement request system
software add installs a software package for the guest OS only for the
PTX5000 router with RE-DUO-C2600-16G, and for MX240, MX480, andMX960 routers with RE-S-1800X4-32G-S.
Startingwith JunosOSRelease 15.1F5, thestatement requestsystemsoftware
add installs a software package for the guest OS only for the MX2010 and
MX2020 routers with REMX2K-1800-32G-S.
On these routers, in order to install both Junos software and host softwarepackages, use the request vmhost software add command.
Options package-name—Location fromwhich the software package or bundle is to be installed.
For example:
Copyright © 2018, Juniper Networks, Inc.436
Installation and Upgrade Guide

• /var/tmp/package-name—For a software package or bundle that is being installed
from a local directory on the router or switch.
• protocol://hostname/pathname/package-name—Forasoftwarepackageorbundle
that is to be downloaded and installed from a remote location. Replace protocol
with one of the following:
• ftp—File Transfer Protocol.
Use ftp://hostname/pathname/package-name. To specify authentication
credentials, use
ftp://<username>:<password>@hostname/pathname/package-name. To have
the system prompt you for the password, specify prompt in place of the
password. If a password is required, and you do not specify the password or
prompt, an error message is displayed.
• http—Hypertext Transfer Protocol.
Use http://hostname/pathname/package-name. To specify authentication
credentials, use
http://<username>:<password>@hostname/pathname/package-name. If a
password is required and you omit it, you are prompted for it.
• scp—Secure copy (not available for limited editions).
Use scp://hostname/pathname/package-name. To specify authentication
credentials, use
scp://<username>:<password>@hostname/pathname/package-name.
NOTE:
• The pathname in the protocol is the relative path to the user’s home
directory on the remote system and not the root directory.
• Do not use the scp protocol in the request system software add
command to downloadand install a software package or bundle froma remote location. The previous statement does not apply to theQFabric switch. The software upgrade is handled by themanagementprocess (mgd), which does not support scp.Use the file copy command to copy the software package or bundle
from the remote location to the /var/tmp directory on the hard disk:
file copy scp://source/package-name /var/tmp
Then install the software package or bundle using the request system
software add command:
request system software add /var/tmp/package-name
best-effort-load—(Optional) Activate a partial load and treat parsing errors aswarningsinstead of errors.
component all—(QFabric systems only) (Optional) Install software package on all ofthe QFabric components.
437Copyright © 2018, Juniper Networks, Inc.
Chapter 19: Operational Commands

delay-restart—(Optional) Install a software package or bundle, but do not restartsoftware processes.
device-alias alias-name—(Junos Fusion only) (Optional) Install the satellite softwarepackage onto the specified satellite device using the satellite device’s alias name.
force—(Optional)Force theadditionof thesoftwarepackageorbundle (ignorewarnings).
force-host—(Optional) Force the addition of host software package or bundle(ignore warnings) on the QFX5100 device.
lcc number—(TXMatrix routers and TXMatrix Plus routers only) (Optional) In a routingmatrix basedon theTXMatrix router, install a softwarepackageor bundle onaT640
router that is connected to the TXMatrix router. In a routing matrix based on the TX
Matrix Plus router, install a software package or bundle on a router that is connected
to the TXMatrix Plus router.
Replace numberwith the following values depending on the LCC configuration:
• 0 through 3, when T640 routers are connected to a TXMatrix router in a routing
matrix.
• 0 through 3, when T1600 routers are connected to a TXMatrix Plus router in a
routing matrix.
• 0 through 7, when T1600 routers are connected to a TXMatrix Plus router with 3D
SIBs in a routing matrix.
• 0, 2, 4, or 6, when T4000 routers are connected to a TXMatrix Plus router with
3D SIBs in a routing matrix.
membermember-id—(MXSeries routers only) (Optional) Install a software package onthe specified Virtual Chassis member. Replacemember-idwith a value of 0 or 1.
partition—(QFX3500switchesonly) (Optional) Formatand repartition themediabeforeinstallation.
satellite slot-id—(Junos Fusion only) (Optional) Install the satellite software packageonto the specified satellite device using the satellite devices FPC slot identifier.
scc—(TXMatrix routersonly) (Optional) Install a softwarepackageorbundleonaRoutingEngine on a TXMatrix router (or switch-card chassis).
sfcnumber—(TXMatrixPlus routersonly) (Optional) Install a softwarepackageorbundleon a Routing Engine on a TXMatrix Plus router. Replace number with 0.
no-copy—(Optional) Install a software package or bundle, but do not save copies of thepackage or bundle files.
no-validate—(Optional) When loading a software package or bundle with a different
release, suppress the default behavior of the validate option.
Copyright © 2018, Juniper Networks, Inc.438
Installation and Upgrade Guide

NOTE: Softwarepackages fromunidentifiedproviderscannotbe loaded.To authorize providers, include the provider-id statement at the [edit
system extensions provider] hierarchy level.
re0 | re1—(Optional) On routers or switches that support dual or redundant RoutingEngines, load a software package or bundle on the Routing Engine in slot 0 (re0) or
the Routing Engine in slot 1 (re1).
reboot—(Optional) After adding the software package or bundle, reboot the system. Ona QFabric switch, the software installation is not complete until you reboot the
component for which you have installed the software.
set [package-name1 package-name2]—(Mixed EX4200 and EX4500 Virtual Chassis,M Series, MX Series, and T Series routers only) (Optional) Install multiple packages
at same time:
• In the case of mixed EX4200 and EX4500 Virtual Chassis, install two software
packages—a package for an EX4200 switch and the same release of the package
for an EX4500 switch—to upgrade all member switches in a mixed EX4200 and
EX4500 Virtual Chassis.
• In the case of M Series, MX Series, and T Series routers, install multiple (two or
more) software packages and software add-on packages at the same time. The
variablepackage-namecaneither bea list of installationpackages, eachseparated
by a blank space, or the full URL to the directory or tar file containing the list of
installation packages.
In each case, installation-package can either be a list of installation packages, each
separated by a blank space, or the full URL to the directory or tar file containing the
list of installation packages.
Use the request system software add set command to retain any SDK configuration
by installing the SDK add-on packages along with the core Junos OS installation
package.
unlink—(Optional) OnMSeries, T Series, andMXSeries routers, use the unlink option to
remove the software package from this directory after a successful upgrade is
completed.
upgrade-group[all |upgrade-group-name]—(JunosFusiononly) (Required to configurea Junos Fusion using autoconversion or manual conversion) Associate a satellite
software image with a satellite software upgrade group. The satellite software
package is associated with the specified satellite software upgrade group using the
upgrade-group-name, or for all satellite software upgrade groups in a Junos Fusion
when the all keyword is specified.
439Copyright © 2018, Juniper Networks, Inc.
Chapter 19: Operational Commands

A satellite software upgrade group is a group of satellite devices in a Junos Fusion
that aredesignated toupgrade to the samesatellite software versionusing the same
satellite software package. See Understanding Software in a Junos Fusion Provider
Edge, Understanding Software in a Junos Fusion Enterprise, andManaging Satellite
Software Upgrade Groups in a Junos Fusion.
upgrade-with-config—(Optional) Install one or more configuration files.
NOTE: Configuration files specified with this optionmust have theextension .text or .xml and have the extension specified. Using the
extension .txtwill not work.
validate—(Optional) Validate the software package or bundle against the currentconfiguration as a prerequisite to adding the software package or bundle. This is the
default behavior when the software package or bundle being added is a different
release.
NOTE: The validate option only works on systems that do not have
graceful-switchover (GRES) enabled. To use the validate option on a
systemwithGRES,eitherdisableGRESfor thedurationof the installation,or install using thecommand requestsystemsoftware in-service-upgrade,
which requires nonstop active routing (NSR) to be enabled when usingGRES.
validate-on-host hostname—(Optional) Validate the software package by comparingit to the running configuration on a remote Junos OS host. Specify a host, replacing
hostnamewith the remote hostname. You can optionally provide the username that
will be used to log in to the remote host by specifying the hostname in the format
user@hostname.
validate-on-routing-engine routing-engine—(Optional) Validate the software bundleorpackagebycomparing it to the runningconfigurationona JunosOSRoutingEngine
on the same chassis. Specify a Routing Engine, replacing routing-enginewith the
routing engine name.
Additional Information Before upgrading the software on the router or switch, when you have a known stable
system, issue the request system snapshot command to back up the software, including
the configuration, to the /altroot and /altconfig file systems. After you have upgraded
the software on the router or switch and are satisfied that the new package or bundle is
successfully installed and running, issue the request system snapshot command again
to back up the new software to the /altroot and /altconfig file systems.
Copyright © 2018, Juniper Networks, Inc.440
Installation and Upgrade Guide

NOTE: The request system snapshot command is currently not supported on
the QFabric system. Also, you cannot add or install multiple packages on aQFabric system.
After you run the request system snapshot command, you cannot return to the previous
version of the software because the running and backup copies of the software are
identical.
If you are upgrading more than one package at the same time, delete the operating
system package, jkernel, last. Add the operating system package, jkernel, first and the
routing software package, jroute, last. If you are upgrading all packages at once, delete
and add them in the following order:
user@host> request system software add /var/tmp/jbaseuser@host> request system software add /var/tmp/jkerneluser@host> request system software add /var/tmp/jpfeuser@host> request system software add /var/tmp/jdocsuser@host> request system software add /var/tmp/jrouteuser@host> request system software add /var/tmp/jcrypto
By default, when you issue the request system software add package-name command on
a TXMatrix master Routing Engine, all the T640master Routing Engines that are
connected to it are upgraded to the same version of software. If you issue the same
commandon theTXMatrix backupRoutingEngine, all theT640backupRoutingEngines
that are connected to it are upgraded to the same version of software.
Likewise, when you issue the request system software add package-name command on
a TXMatrix Plusmaster Routing Engine, all the T1600 or T4000master Routing Engines
that are connected to it are upgraded to the same version of software. If you issue the
same command on the TXMatrix Plus backup Routing Engine, all the T1600 or T4000
backup Routing Engines that are connected to it are upgraded to the same version of
software.
Required PrivilegeLevel
maintenance
RelatedDocumentation
Format for Specifying Filenames and URLs in Junos OS CLI Commands•
• request system software delete on page 449
• request system software rollback on page 453
• request system storage cleanup on page 466
• Upgrading Software
• Upgrading Software on a QFabric System
• Managing Satellite Software Upgrade Groups in a Junos Fusion
• request system software add (Maintenance) on page 446
441Copyright © 2018, Juniper Networks, Inc.
Chapter 19: Operational Commands

• Routing Matrix with a TXMatrix Plus Router Solutions Page
List of Sample Output request system software add validate on page 442request system software add /var/tmp/ no-validate on page 443request system software add no-copy no-validate reboot on page 443request system software add validate-on-host on page 444requestsystemsoftwareadd(MixedEX4200andEX4500VirtualChassis)onpage445request system software add component all (QFabric Systems) on page 445request system software add upgrade-group (Junos Fusion) on page 445
Output Fields When you enter this command, you are provided feedback on the status of your request.
Sample Output
request system software add validate
user@host> requestsystemsoftwareaddvalidate/var/tmp/ jinstall-7.2R1.7-domestic-signed.tgzChecking compatibility with configurationInitializing...Using jbase-7.1R2.2Using /var/tmp/jinstall-7.2R1.7-domestic-signed.tgzVerified jinstall-7.2R1.7-domestic.tgz signed by PackageProduction_7_2_0Using /var/validate/tmp/jinstall-signed/jinstall-7.2R1.7-domestic.tgzUsing /var/validate/tmp/jinstall/jbundle-7.2R1.7-domestic.tgzChecking jbundle requirements on /Using /var/validate/tmp/jbundle/jbase-7.2R1.7.tgzUsing /var/validate/tmp/jbundle/jkernel-7.2R1.7.tgzUsing /var/validate/tmp/jbundle/jcrypto-7.2R1.7.tgzUsing /var/validate/tmp/jbundle/jpfe-7.2R1.7.tgzUsing /var/validate/tmp/jbundle/jdocs-7.2R1.7.tgzUsing /var/validate/tmp/jbundle/jroute-7.2R1.7.tgzValidating against /config/juniper.conf.gzmgd: commit completeValidation succeededValidating against /config/rescue.conf.gzmgd: commit completeValidation succeededInstalling package '/var/tmp/jinstall-7.2R1.7-domestic-signed.tgz' ...Verified jinstall-7.2R1.7-domestic.tgz signed by PackageProduction_7_2_0Adding jinstall...
WARNING: This package will load JUNOS 7.2R1.7 software.WARNING: It will save JUNOS configuration files, and SSH keysWARNING: (if configured), but erase all other files and informationWARNING: stored on this machine. It will attempt to preserve dumpsWARNING: and log files, but this can not be guaranteed. This is theWARNING: pre-installation stage and all the software is loaded whenWARNING: you reboot the system.
Saving the config files ...Installing the bootstrap installer ...
WARNING: A REBOOT IS REQUIRED TO LOAD THIS SOFTWARE CORRECTLY. Use theWARNING: 'request system reboot' command when software installation isWARNING: complete. To abort the installation, do not reboot your system,WARNING: instead use the 'request system software delete jinstall'
Copyright © 2018, Juniper Networks, Inc.442
Installation and Upgrade Guide

WARNING: command as soon as this operation completes.
Saving package file in /var/sw/pkg/jinstall-7.2R1.7-domestic-signed.tgz ...Saving state for rollback ...
request system software add /var/tmp/ no-validate
user@host> request system software add no-validate/var/tmp/junos-install-mx-x86-32-15.1R1.9.tgzInstalling package '/var/tmp/junos-install-mx-x86-32-15.1R1.9.tgz' ...Verified manifest signed by PackageProductionEc_2015Verified manifest signed by PackageProductionRSA_2015Verified contents.isoVerified issu-indb.tgzVerified junos-x86-32.tgzVerified kernelVerified metatagsVerified package.xmlVerified pkgtools.tgzcamcontrol: not foundcamcontrol: not foundVerified manifest signed by PackageProductionEc_2015Saving the config files ...NOTICE: uncommitted changes have been saved in /var/db/config/juniper.conf.pre-installSaving package file in /var/sw/pkg/junos-install-x86-32-domestic-20150618.043753_builder_junos_151_r1.tgz ...Saving state for rollback ...
request system software add no-copy no-validate reboot
user@host> requestsystemsoftwareaddno-copyno-validate junos-install-srx-x86-64-17.3R1.tgzrebootVerified junos-install-srx-x86-64-17.3R1 signed by PackageProductionEc_2017 method ECDSA256+SHA256Verified manifest signed by PackageProductionEc_2017 method ECDSA256+SHA256Checking PIC combinationsVerified fips-mode signed by PackageProductionEc_2017 method ECDSA256+SHA256Adding fips-mode-x86-32-20170728.153050_builder_junos_173_r1 ...Verified jail-runtime signed by PackageProductionEc_2017 method ECDSA256+SHA256Adding jail-runtime-x86-32-20170725.352915_builder_stable_10 ...Verified jdocs signed by PackageProductionEc_2017 method ECDSA256+SHA256Adding jdocs-x86-32-20170728.153050_builder_junos_173_r1 ...Verified jfirmware signed by PackageProductionEc_2017 method ECDSA256+SHA256Adding jfirmware-x86-32-17.3R1 ...Verified jpfe-X signed by PackageProductionEc_2017 method ECDSA256+SHA256Adding jpfe-X-x86-32-20170728.153050_builder_junos_173_r1 ...Verified jpfe-X960 signed by PackageProductionEc_2017 method ECDSA256+SHA256Adding jpfe-X960-x86-32-20170728.153050_builder_junos_173_r1 ...Verified jpfe-common signed by PackageProductionEc_2017 method ECDSA256+SHA256Adding jpfe-common-x86-32-20170728.153050_builder_junos_173_r1 ...Verified jpfe-fips signed by PackageProductionEc_2017 method ECDSA256+SHA256Verified jpfe-wrlinux signed by PackageProductionEc_2017 method ECDSA256+SHA256Adding jpfe-wrlinux-x86-32-20170728.153050_builder_junos_173_r1 ...Verified jsd-jet-1 signed by PackageProductionEc_2017 method ECDSA256+SHA256Adding jsd-x86-32-17.3R1-jet-1 ...
443Copyright © 2018, Juniper Networks, Inc.
Chapter 19: Operational Commands
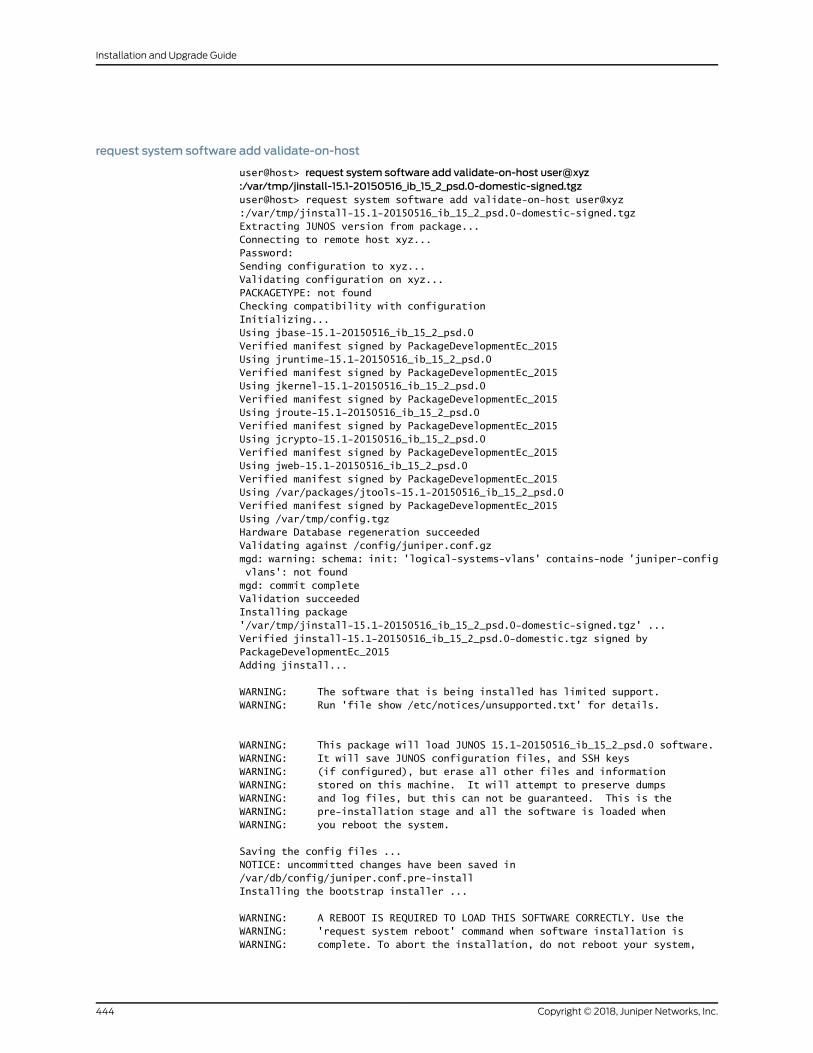
request system software add validate-on-host
user@host> request system software add validate-on-host user@xyz:/var/tmp/jinstall-15.1-20150516_ib_15_2_psd.0-domestic-signed.tgzuser@host> request system software add validate-on-host user@xyz :/var/tmp/jinstall-15.1-20150516_ib_15_2_psd.0-domestic-signed.tgzExtracting JUNOS version from package...Connecting to remote host xyz...Password:Sending configuration to xyz...Validating configuration on xyz...PACKAGETYPE: not foundChecking compatibility with configurationInitializing...Using jbase-15.1-20150516_ib_15_2_psd.0Verified manifest signed by PackageDevelopmentEc_2015Using jruntime-15.1-20150516_ib_15_2_psd.0Verified manifest signed by PackageDevelopmentEc_2015Using jkernel-15.1-20150516_ib_15_2_psd.0Verified manifest signed by PackageDevelopmentEc_2015Using jroute-15.1-20150516_ib_15_2_psd.0Verified manifest signed by PackageDevelopmentEc_2015Using jcrypto-15.1-20150516_ib_15_2_psd.0Verified manifest signed by PackageDevelopmentEc_2015Using jweb-15.1-20150516_ib_15_2_psd.0Verified manifest signed by PackageDevelopmentEc_2015Using /var/packages/jtools-15.1-20150516_ib_15_2_psd.0Verified manifest signed by PackageDevelopmentEc_2015Using /var/tmp/config.tgzHardware Database regeneration succeededValidating against /config/juniper.conf.gzmgd: warning: schema: init: 'logical-systems-vlans' contains-node 'juniper-config vlans': not foundmgd: commit completeValidation succeededInstalling package '/var/tmp/jinstall-15.1-20150516_ib_15_2_psd.0-domestic-signed.tgz' ...Verified jinstall-15.1-20150516_ib_15_2_psd.0-domestic.tgz signed by PackageDevelopmentEc_2015Adding jinstall...
WARNING: The software that is being installed has limited support.WARNING: Run 'file show /etc/notices/unsupported.txt' for details.
WARNING: This package will load JUNOS 15.1-20150516_ib_15_2_psd.0 software.WARNING: It will save JUNOS configuration files, and SSH keysWARNING: (if configured), but erase all other files and informationWARNING: stored on this machine. It will attempt to preserve dumpsWARNING: and log files, but this can not be guaranteed. This is theWARNING: pre-installation stage and all the software is loaded whenWARNING: you reboot the system.
Saving the config files ...NOTICE: uncommitted changes have been saved in /var/db/config/juniper.conf.pre-installInstalling the bootstrap installer ...
WARNING: A REBOOT IS REQUIRED TO LOAD THIS SOFTWARE CORRECTLY. Use theWARNING: 'request system reboot' command when software installation isWARNING: complete. To abort the installation, do not reboot your system,
Copyright © 2018, Juniper Networks, Inc.444
Installation and Upgrade Guide
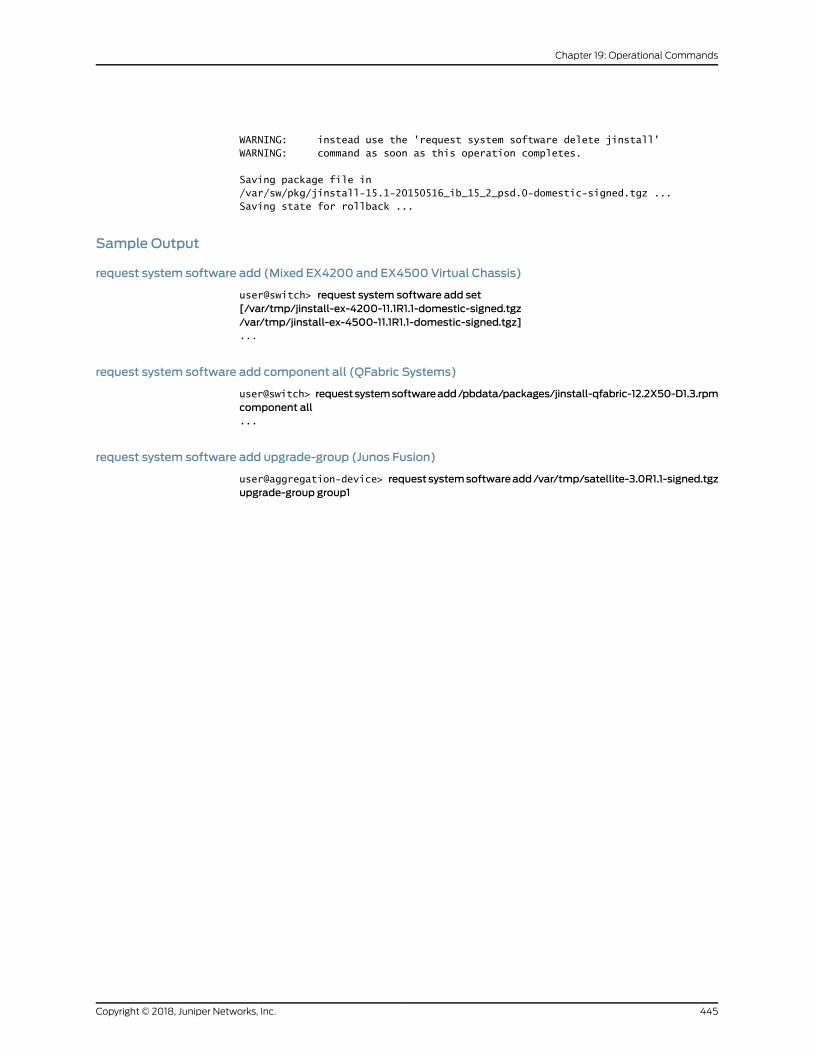
WARNING: instead use the 'request system software delete jinstall'WARNING: command as soon as this operation completes.
Saving package file in /var/sw/pkg/jinstall-15.1-20150516_ib_15_2_psd.0-domestic-signed.tgz ...Saving state for rollback ...
Sample Output
request system software add (Mixed EX4200 and EX4500 Virtual Chassis)
user@switch> request system software add set[/var/tmp/jinstall-ex-4200-11.1R1.1-domestic-signed.tgz/var/tmp/jinstall-ex-4500-11.1R1.1-domestic-signed.tgz]...
request system software add component all (QFabric Systems)
user@switch> requestsystemsoftwareadd/pbdata/packages/jinstall-qfabric-12.2X50-D1.3.rpmcomponent all...
request system software add upgrade-group (Junos Fusion)
user@aggregation-device> requestsystemsoftwareadd/var/tmp/satellite-3.0R1.1-signed.tgzupgrade-group group1
445Copyright © 2018, Juniper Networks, Inc.
Chapter 19: Operational Commands

request system software add (Maintenance)
Syntax request system software add package-name
Release Information Partition option introduced in the command in Junos OS Release 10.1.
Description Install the new software package on the device, for example: request system softwareadd junos-srxsme-10.0R2-domestic.tgz no-copy no-validate partition reboot.
Options • delay–restart—Install the software package but does not restart the software process.
• best-effort-load—Activate a partial load and treat parsing errors as warnings instead
of errors.
• no-copy—Install the software package but does not saves the copies of package files.
• no-validate—Do not check the compatibility with current configuration before
installation starts.
• partition—Format and re-partition the media before installation.
• reboot—Reboot the device after installation is completed.
• unlink—Remove the software package after successful installation.
• validate—Check the compatibility with current configuration before installation starts.
Required PrivilegeLevel
maintenance
RelatedDocumentation
request system reboot•
Copyright © 2018, Juniper Networks, Inc.446
Installation and Upgrade Guide

request system software configuration-backup
Syntax request system software configuration-backup (path)
Release Information Command introduced in Junos OS Release 11.3 for the QFX Series.
Description Save the currently active configuration and any installation-specific parameters such as
a configuration that you have entered outside of the CLI, Director group IP addresses,
and the default partition IP address.
Options path—(QFabric System) Provide the path to the location of the backup configuration
files. You can save the backup configuration files to either a URL, local directory, remote
server, or removable drive.
Required PrivilegeLevel
configure—To enter configuration mode, but other required privilege levels depend on
where the statement is located in the configuration hierarchy.
RelatedDocumentation
request system software configuration-restore on page 448•
List of Sample Output request system software configuration-backup on page 447
Output Fields When you enter this command, you are provided feedback on the status of your request.
Sample Output
request system software configuration-backup
user@switch request system software configuration-backup ftp://ftp.test.net/test % Total % Received % Xferd Average Speed Time Time Time Current Dload Upload Total Spent Left Speed100 4035 0 0 100 4035 0 138k --:--:-- --:--:-- --:--:-- 0
447Copyright © 2018, Juniper Networks, Inc.
Chapter 19: Operational Commands

request system software configuration-restore
Syntax request system software configuration-restore (path)
Release Information Command introduced in Junos OS Release 11.3 for the QFX Series.
Description Restore a previously saved configuration and any installation-specific parameters, such
as a configuration that you have entered outside of the CLI, Director group IP addresses,
and the default partition IP address.
Options path—(QFabric System) Provide the path to the location of the backup configuration
files. The path can be to a local file, a file on an external flash drive, or an SCP or FTP
destination.
Required PrivilegeLevel
configure—To enter configuration mode, but other required privilege levels depend on
where the statement is located in the configuration hierarchy.
RelatedDocumentation
request system software configuration-backup on page 447•
• Performing a QFabric System Recovery Installation on the Director Group
List of Sample Output request system software configuration-restore on page 448
Output Fields When you enter this command, you are provided feedback on the status of your request.
Sample Output
request system software configuration-restore
user@switch request system software configuration-restore ftp://ftp.test.net/test % Total % Received % Xferd Average Speed Time Time Time Current Dload Upload Total Spent Left Speed100 4035 100 4035 0 0 153k 0 --:--:-- --:--:-- --:--:-- 3803k
Copyright © 2018, Juniper Networks, Inc.448
Installation and Upgrade Guide

request system software delete
List of Syntax Syntax on page 449
Syntax (TXMatrix Router) on page 449
Syntax (TXMatrix Plus Router) on page 449
Syntax request system software delete software-package<force><reboot><set [package-name package-name]><upgrade-group [all |upgrade-group-name]><version version-string>
Syntax (TXMatrixRouter)
request system software delete software-package<force><lcc number | scc><reboot><set [package-name package-name]>
Syntax(TXMatrixPlusRouter)
request system software delete software-package<force><lcc number | sfc number><reboot><set [package-name package-name]>
Release Information Command introduced before Junos OS Release 7.4.
Command introduced in Junos OS Release 9.0 for EX Series switches.
sfc option introduced in Junos OS Release 9.6 for the TXMatrix Plus router.
Command introduced in Junos OS Release 11.1 for the QFX Series.
set [package-name package-name] option added in Junos OS Release 12.2 for M Series,
MX Series, and T Series routers.
reboot option introduced in Junos OS Release 12.3.
Command introduced in Junos OS Release 14.1X53-D20 for the OCX Series.
upgrade-group, and version options introduced in Junos OS Release 14.2R3 for Junos
Fusion.
Description Remove a software package or bundle from the router or switch.
CAUTION: Before removing a software package or bundle, make sure thatyouhavealreadyplaced thenewsoftwarepackageor bundle that you intendto load onto the router or switch.
Options software-package—Software package or bundle name. You can delete any or all of thefollowing software bundles or packages:
449Copyright © 2018, Juniper Networks, Inc.
Chapter 19: Operational Commands

• jbase—(Optional) Junos base software suite
• jcrypto—(Optional, in domestic version only) Junos security software
• jdocs—(Optional) Junos online documentation file
• jkernel—(Optional) Junos kernel software suite
• jpfe—(Optional) Junos Packet Forwarding Engine support
• jroute—(Optional) Junos routing software suite
• junos—(Optional) Junos base software
NOTE: OnEXSeries switches, some of the package names are differentthan those listed. To see the list of packages that you can delete on anEX Series switch, enter the command show system software.
force—(Optional) Ignore warnings and force removal of the software.
lcc number—(TXMatrix routers and TXMatrix Plus routers only) (Optional) In a routingmatrix, deleteasoftwarepackageorbundleonaT640router indicatedby lccnumber
that is connected to the TXMatrix router. In a routing matrix, delete a software
package or bundle on a router indicated by lcc number that is connected to the TX
Matrix Plus router.
Replace numberwith the following values depending on the LCC configuration:
• 0 through 3, when T640 routers are connected to a TXMatrix router in a routing
matrix.
• 0 through 3, when T1600 routers are connected to a TXMatrix Plus router in a
routing matrix.
• 0 through 7, when T1600 routers are connected to a TXMatrix Plus router with 3D
SIBs in a routing matrix.
• 0, 2, 4, or 6, when T4000 routers are connected to a TXMatrix Plus router with
3D SIBs in a routing matrix.
re0 | re1—(Optional) On routers or switches that support dual or redundant RoutingEngines, delete a software package or bundle on the Routing Engine in slot 0 (re0)
or the Routing Engine in slot 1 (re1).
reboot—As of Junos OS 12.3 and greater, automatically reboot upon completing therequest system software delete command.
scc—(TXMatrix routers only) (Optional) Remove an extension or upgrade package fromthe TXMatrix router (or switch-card chassis).
Copyright © 2018, Juniper Networks, Inc.450
Installation and Upgrade Guide

set [package-name package-name]—(M Series, MX Series, and T Series routers only)
(Optional) Install multiple software packages or software add-on packages at the
same time.
sfc number—(TXMatrix Plus routers only) (Optional) Remove an extension or upgradepackage from the TXMatrix Plus router. Replace number with 0.
upgrade-group [ all |upgrade-group-name]—(Junos Fusion only) Delete the satellitesoftware image association with the specified satellite software upgrade group.
A satellite software upgrade group is a group of satellite devices in the same Junos
Fusion that are designated to upgrade to the same satellite software version using
the same satellite software package.
versionversion-string—(JunosFusiononly) (Optional)Deleteasatellite softwarepackageassociationwitha satellite softwareupgradegroupbyselecting the satellite software
package’s version.
Additional Information Before upgrading the software on the router or switch, when you have a known stable
system, issue the request system snapshot command to back up the software, including
the configuration, to the /altroot and /altconfig file systems (on routers) or the /, /altroot,
/config, /var, and /var/tmp file systems (on switches). After you have upgraded the
software on the router or switch andare satisfied that the newpackages are successfully
installed and running, issue the request system snapshot command again to back up the
new software to the /altroot and /altconfig file systems (on routers) or the /, /altroot,
/config, /var, and /var/tmp file systems (on switches). After you run the request system
snapshot command, you cannot return to the previous version of the software, because
the running and backup copies of the software are identical.
Required PrivilegeLevel
maintenance
RelatedDocumentation
request system software add on page 433•
• request system software rollback on page 453
• request system software validate on page 459
• Routing Matrix with a TXMatrix Plus Router Solutions Page
List of Sample Output request system software delete jdocs on page 451
Output Fields When you enter this command, you are provided feedback on the status of your request.
Sample Output
request system software delete jdocs
The following example displays the systemsoftware packagesbefore andafter the jdocs
package is deleted through the request system software delete command:
451Copyright © 2018, Juniper Networks, Inc.
Chapter 19: Operational Commands

user@host> show system softwareInformation for jbase:
Comment:JUNOS Base OS Software Suite [7.2R1.7]
Information for jcrypto:
Comment:JUNOS Crypto Software Suite [7.2R1.7]
Information for jdocs:
Comment:JUNOS Online Documentation [7.2R1.7]
Information for jkernel:
Comment:JUNOS Kernel Software Suite [7.2R1.7]
...
user@host> request system software delete jdocsRemoving package 'jdocs' ...
user@host> show system softwareInformation for jbase:
Comment:JUNOS Base OS Software Suite [7.2R1.7]
Information for jcrypto:
Comment:JUNOS Crypto Software Suite [7.2R1.7]
Information for jkernel:
Comment:JUNOS Kernel Software Suite [7.2R1.7]
...
Copyright © 2018, Juniper Networks, Inc.452
Installation and Upgrade Guide
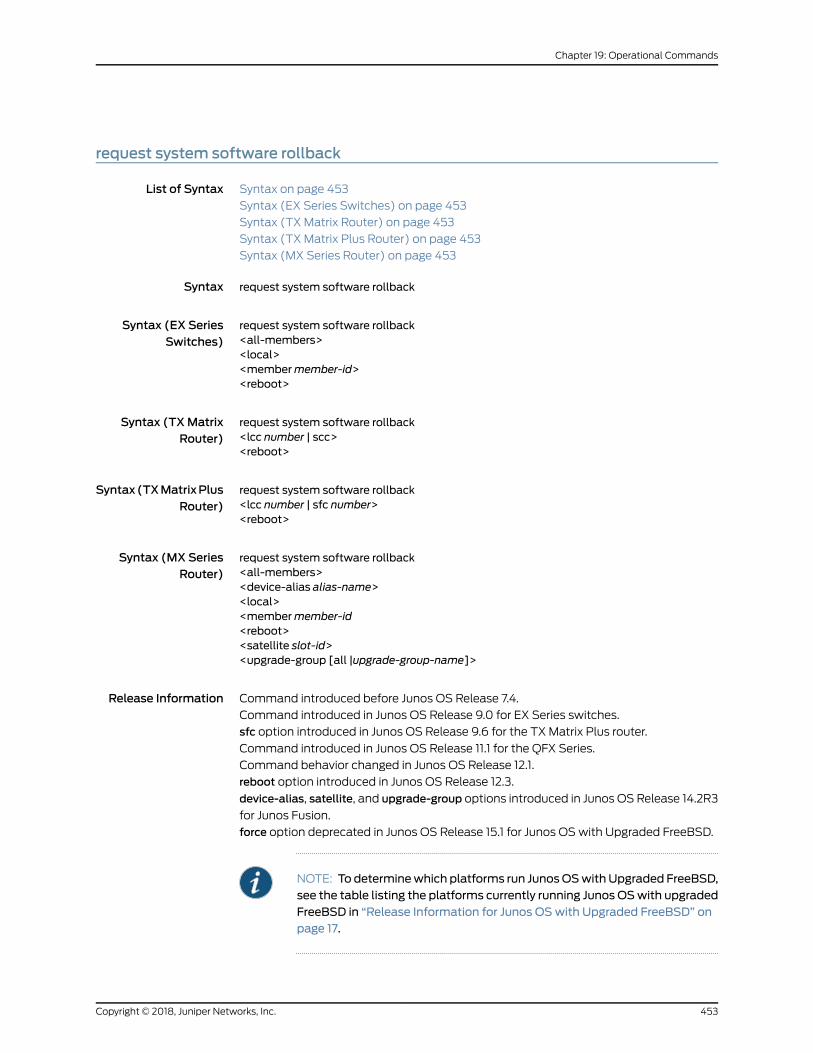
request system software rollback
List of Syntax Syntax on page 453
Syntax (EX Series Switches) on page 453
Syntax (TXMatrix Router) on page 453
Syntax (TXMatrix Plus Router) on page 453
Syntax (MX Series Router) on page 453
Syntax request system software rollback
Syntax (EX SeriesSwitches)
request system software rollback<all-members><local><membermember-id><reboot>
Syntax (TXMatrixRouter)
request system software rollback<lcc number | scc><reboot>
Syntax(TXMatrixPlusRouter)
request system software rollback<lcc number | sfc number><reboot>
Syntax (MX SeriesRouter)
request system software rollback<all-members><device-alias alias-name><local><membermember-id<reboot><satellite slot-id><upgrade-group [all |upgrade-group-name]>
Release Information Command introduced before Junos OS Release 7.4.
Command introduced in Junos OS Release 9.0 for EX Series switches.
sfc option introduced in Junos OS Release 9.6 for the TXMatrix Plus router.
Command introduced in Junos OS Release 11.1 for the QFX Series.
Command behavior changed in Junos OS Release 12.1.
reboot option introduced in Junos OS Release 12.3.
device-alias, satellite, and upgrade-group options introduced in Junos OS Release 14.2R3
for Junos Fusion.
force option deprecated in Junos OS Release 15.1 for Junos OSwith Upgraded FreeBSD.
NOTE: Todeterminewhich platforms run JunosOSwithUpgraded FreeBSD,see the table listing the platforms currently running JunosOSwith upgradedFreeBSD in “Release Information for Junos OSwith Upgraded FreeBSD” onpage 17.
453Copyright © 2018, Juniper Networks, Inc.
Chapter 19: Operational Commands

Description This command reverts to the last successfully installed package before the request
system software (add | delete) command. It uses the copy stored in the /var/sw/pkg
directory.
Additional Information
• On Junos Fusion, the request system software rollback command can be used to roll
back the version of satellite software associated with a satellite software upgrade
group.Rollingback theversionof satellite softwareassociatedwithasatellite software
upgrade group triggers a satellite software upgrade.
• OnM Series and T Series routers, if request system software add <jinstall> rebootwas
used for the previous installation, then request system software rollback has no effect.
In this case, use jinstall to reinstall the required package.
• OnM Series and T Series routers, if request system software add <sdk1>was used for
the previous installation, then request system software rollback removes the last
installed SDK package (sdk1 in this example).
• On SRX Series devices with dual root systems, when request system software rollback
is run, the system switches to the alternate root. Each root can have a different version
of Junos OS. Roll back takes each root back to the previously installed image.
• OnQFX3500andQFX3600devices inamixedVirtualChassis,when the requestsystem
software rollback command is issued, the systemdoesnot rollback to the image stored
in the alternate partition.
• OnQFX5100 switches, the reboot option has been removed. To reboot the switch after
a software rollback, issue the requestsystemrebootcommandasaseparate, secondary
command.
Options all-members—(EX4200 switches and MX Series routers only) (Optional) Attempt toroll back to the previous set of packages on all members of the Virtual Chassis
configuration.
device-aliasalias-name—(Junos Fusion only) (Optional) Rollback the satellite softwarepackage onto the specified satellite device using the satellite devices FPC slot
identifier.
lcc number—(TXMatrix routers and TXMatrix Plus routers only) (Optional) On a TXMatrix router, attempt to roll back to the previous set of packages on a T640 router
connected to the TXMatrix router. On a TXMatrix Plus router, attempt to roll back
to the previous set of packages on a connected router connected to the TXMatrix
Plus router.
Replace numberwith the following values depending on the LCC configuration:
• 0 through 3, when T640 routers are connected to a TXMatrix router in a routing
matrix.
• 0 through 3, when T1600 routers are connected to a TXMatrix Plus router in a
routing matrix.
Copyright © 2018, Juniper Networks, Inc.454
Installation and Upgrade Guide

• 0 through 7, when T1600 routers are connected to a TXMatrix Plus router with 3D
SIBs in a routing matrix.
• 0, 2, 4, or 6, when T4000 routers are connected to a TXMatrix Plus router with
3D SIBs in a routing matrix.
local—(EX4200 switches and MX Series routers only) (Optional) Attempt to roll backto the previous set of packages on the local Virtual Chassis member.
membermember-id—(EX4200switchesandMXSeries routersonly) (Optional)Attemptto roll back to the previous set of packages on the specified member of the Virtual
Chassis configuration. For EX4200 switches, replacemember-idwith a value from
0 through 9. For an MX Series Virtual Chassis, replacemember-idwith a value of 0
or 1.
none—For all versions of Junos OS up to and including Junos OS 11.4, revert to the set ofsoftware as of the last successful request system software add. As of Junos OS 12.1
and later, revert to the last known good state before themost recent request system
software (add | delete) command.
reboot—For Junos OS 12.3 and later, the system reboots automatically to complete the
rollback.
satellite slot-id—(JunosFusiononly) (Optional)Roll back the satellite softwarepackageonto the specified satellite device using the satellite devices FPC slot identifier.
scc—(TXMatrix routers only) (Optional) Attempt to roll back to the previous set ofpackages on the TXMatrix router (or switch-card chassis).
sfcnumber—(TXMatrixPlus routersonly) (Optional)Attempt to roll back to thepreviousset of packages on the TXMatrix Plus router. Replace number with 0.
upgrade-group [ all |upgrade-group-name]—(Junos Fusion only) Roll back the satellitesoftware image associated with the specified satellite software upgrade group, or
for all satellite software upgrade groups in the Junos Fusion when all is entered.
Required PrivilegeLevel
maintenance
RelatedDocumentation
request system software abort•
• request system software add on page 433
• request system software delete on page 449
• request system software validate on page 459
• request system configuration rescue delete
• request system configuration rescue save
• Routing Matrix with a TXMatrix Plus Router Solutions Page
455Copyright © 2018, Juniper Networks, Inc.
Chapter 19: Operational Commands

List of Sample Output request system software rollback on page 457
Output Fields When you enter this command, you are provided feedback on the status of your request.
Copyright © 2018, Juniper Networks, Inc.456
Installation and Upgrade Guide

Sample Output
request system software rollback
user@host> request system software rollbackVerified SHA1 checksum of ./jbase-7.2R1.7.tgzVerified SHA1 checksum of ./jdocs-7.2R1.7.tgzVerified SHA1 checksum of ./jroute-7.2R1.7.tgzInstalling package './jbase-7.2R1.7.tgz' ...Available space: 35495 require: 7335Installing package './jdocs-7.2R1.7.tgz' ...Available space: 35339 require: 3497Installing package './jroute-7.2R1.7.tgz' ...Available space: 35238 require: 6976NOTICE: uncommitted changes have been saved in /var/db/config/juniper.conf.pre-installReloading /config/juniper.conf.gz ...Activating /config/juniper.conf.gz ...mgd: commit completeRestarting mgd ...Restarting aprobed ...Restarting apsd ...Restarting cosd ...Restarting fsad ...Restarting fud ...Restarting gcdrd ...Restarting ilmid ...Restarting irsd ...Restarting l2tpd ...Restarting mib2d ...Restarting nasd ...Restarting pppoed ...Restarting rdd ...Restarting rmopd ...Restarting rtspd ...Restarting sampled ...Restarting serviced ...Restarting snmpd ...Restarting spd ...Restarting vrrpd ...
WARNING: cli has been replaced by an updated version:CLI release 7.2R1.7 built by builder on 2005-04-22 02:03:44 UTCRestart cli using the new version ? [yes,no] (yes) yes
Restarting cli ...user@host
457Copyright © 2018, Juniper Networks, Inc.
Chapter 19: Operational Commands

request system software rollback (SRX Series)
Syntax request system software rollback<node-id>
Release Information Command introduced in Junos OS Release 10.1.
Command introduced in Junos OS Release 15.1X49-D50 for SRX1500 devices.
Command introduced in Junos OS Release 17.4R1 for SRX4100, and SRX4200 devices
and vSRX intances.
Description Revert to the software that was loaded at the last successful request system software
add command. The FreeBSD 11 Junos OS image provides an option to save a recovery
image inanOperation,Administration, andMaintenance (OAM)partition, but thatoption
will saveonly the JunosOS image, not theLinux image. If a user saves the JunosOS image
and recovers it later, it might not be compatible with the Linux software loaded on the
system.
Options node-id—Identification number of the chassis cluster node. It can be 0 or 1.
Required PrivilegeLevel
maintenance
RelatedDocumentation
request system reboot•
Copyright © 2018, Juniper Networks, Inc.458
Installation and Upgrade Guide

request system software validate
List of Syntax Syntax on page 459
Syntax (TXMatrix Router) on page 459
Syntax (TXMatrix Plus Router) on page 459
Syntax (MX Series Router) on page 459
Syntax request system software validate package-name<on (host host <username username> | routing-engine routing-engine)><set [package-name package-name]><upgrade-with-config><upgrade-with-config-format format>
Syntax (TXMatrixRouter)
request system software validate package-name<lcc number | scc><on (host host <username username> | routing-engine routing-engine)><set [package-name package-name]><upgrade-with-config><upgrade-with-config-format format>
Syntax(TXMatrixPlusRouter)
request system software validate package-name<lcc number | sfc number><on (host host <username username> | routing-engine routing-engine)><set [package-name package-name]><upgrade-with-config><upgrade-with-config-format format>
Syntax (MX SeriesRouter)
request system software validate <package-name><membermember-id><on (host host <username username> | routing-engine routing-engine)><set [package-name package-name]><upgrade-with-config><upgrade-with-config-format format>
Release Information Command introduced before Junos OS Release 7.4.
sfc option introduced for the TXMatrix Plus router in Junos OS Release 9.6.
Command introduced in Junos OS Release 11.1 for the QFX Series.
set [package-name package-name] option added in Junos OS Release 12.2 for M Series,
MX Series, T Series routers.
upgrade-with-config and upgrade-with-config-format format options added in Junos OS
Release 12.3 for M Series routers, MX Series routers, and T Series routers.
Command introduced in Junos OS Release 14.1X53-D20 for the OCX Series.
on (host host<username username> | routing-engine routing-engine) option introduced in
Junos OS Release 13.3, Junos OS Release 14.1, and Junos OS Release 15.1.
Command introduced in Junos OS Release 17.4 for EX Series switches.
Description Validate candidate software against the current configuration of the router, the switch,or
a remote host.
459Copyright © 2018, Juniper Networks, Inc.
Chapter 19: Operational Commands

Options lcc number—(TXMatrix routers and TXMatrix Plus routers only) (Optional) On a TXMatrix router, validate the software bundle or package on a specific T640 router (or
line-card chassis) that is connected to the TXMatrix router. On a TXMatrix Plus
router, validate the softwarebundleor package for a specific router that is connected
to the TXMatrix Plus router.
Replace numberwith the following values depending on the LCC configuration:
• 0 through 3, when T640 routers are connected to a TXMatrix router in a routing
matrix.
• 0 through 3, when T1600 routers are connected to a TXMatrix Plus router in a
routing matrix.
• 0 through 7, when T1600 routers are connected to a TXMatrix Plus router with 3D
SIBs in a routing matrix.
• 0, 2, 4, or 6, when T4000 routers are connected to a TXMatrix Plus router with
3D SIBs in a routing matrix.
on (host host <username username> | routing-engine routing-engine)—(Optional)Validate thesoftwarebundleorpackagebycomparing it to the runningconfiguration
on a remote host or Routing Engine. Specify either a host, replacing hostwith the
remote hostname, or a Routing Engine, replacing routing-enginewith the Routing
Engine name. If you specify a remote host, you can optionally provide the username
to be used to log in to the remote host.
membermember-id—(MX Series routers only) (Optional) Validate the software bundleor package on the specifiedmember of the Virtual Chassis configuration. For an MX
Series Virtual Chassis, replacemember-idwith a value of 0 or 1.
package-name—Name of the software bundle or package to test.
scc—(TXMatrix routers only) (Optional) Validate the software bundle or package forthe TXMatrix router (or switch-card chassis).
set [package-name package-name]—(M Series, MX Series, T Series routers) (Optional)
Install multiple software packages or software add-on packages at the same time.
sfc number—(TXMatrix Plus routers only) (Optional) Validate the software bundle orpackage for the TXMatrix Plus router.
upgrade-with-config—(Optional) Install one or more configuration files.
upgrade-with-config-format format—(Optional) Specify the configuration file fomat,text or xml. The default format is text.
Copyright © 2018, Juniper Networks, Inc.460
Installation and Upgrade Guide

NOTE: Theupgrade-with-configandupgrade-with-config-formatoptions
are only available locally on the router or switch. In a routingmatrix, theconfiguration is applied only to the local router and is not propagated toother routers.
The options are validated during the validation process and applied tothe router or switch during the upgrade process. If the upgrade processis successful, the options are removed from the configuration. If theupgrade process fails, the configuration file is renamedwith the .failedsuffix.
Additional Information Bydefault,when you issue the request systemsoftwarevalidate commandonaTXMatrix
master Routing Engine, all the T640master Routing Engines that are connected to it are
validated. If you issue the same command on the TXMatrix backup Routing Engine, all
the T640 backup Routing Engines that are connected to it are upgraded to the same
version of software.
Likewise, if you issue the request system software validate command on a TXMatrix Plus
master Routing Engine, all the T1600 or T4000master Routing Engines that are
connected to it are validated. If you issue the samecommandonaTXMatrix Plus backup
Routing Engine, all the T1600 or T4000 backup Routing Engines that are connected to
it are upgraded to the same version of software.
Required PrivilegeLevel
maintenance
RelatedDocumentation
request system software abort•
• request system software add on page 433
• request system software delete on page 449
• request system software rollback on page 453
• Routing Matrix with a TXMatrix Plus Router Solutions Page
List of Sample Output request system software validate (Successful Case) on page 461request system software validate (Failure Case) on page 462
Output Fields When you enter this command, you are provided feedback on the status of your request.
Sample Output
request system software validate (Successful Case)
user@host> request system software validate /var/sw/pkg/jbundle-5.3I20020124_0520_sjg.tgz
461Copyright © 2018, Juniper Networks, Inc.
Chapter 19: Operational Commands

Checking compatibility with configurationInitializing...Using /packages/jbase-5.3I20020122_1901_sjgUsing /var/sw/pkg/jbundle-5.3I20020124_0520_sjg.tgzUsing /var/chroot/var/tmp/jbundle/jbase-5.3I20020124_0520_sjg.tgzUsing /var/chroot/var/tmp/jbundle/jkernel-5.3I20020124_0520_sjg.tgzUsing /var/chroot/var/tmp/jbundle/jcrypto-5.3I20020124_0520_sjg.tgzUsing /var/chroot/var/tmp/jbundle/jpfe-5.3I20020124_0520_sjg.tgzUsing /var/chroot/var/tmp/jbundle/jdocs-5.3I20020124_0520_sjg.tgzUsing /var/chroot/var/tmp/jbundle/jroute-5.3I20020124_0520_sjg.tgzValidating against /config/juniper.conf.gzmgd: commit complete
WARNING: cli has been replaced by an updated version:CLI release 5.3I0 built by sjg on 2002-01-24 05:23:53 UTCRestart cli using the new version ? [yes,no] (yes)
request system software validate (Failure Case)
user@host> request system software validate 6.3/Pushing bundle to lcc0-re0error: Failed to transfer package to lcc0-re0
user@host> request system software validate testPushing bundle to lcc0-re0Pushing bundle to lcc2-re0
lcc0-re0:gzip: stdin: not in gzip formattar: child returned status 1ERROR: Not a valid package: /var/tmp/test
Copyright © 2018, Juniper Networks, Inc.462
Installation and Upgrade Guide

request system software validate on (Junos OSwith Upgraded FreeBSD)
Syntax (MX240,MX480, MX960,
request system software validate on<host host-name [ username user-name ]><routing-engine (re0 | re1)>MX2010, MX2020
Routers only)
Release Information Command introduced in Junos OS Release 15.1 for MX240, MX480, MX960, MX2010,
and MX2020 routers only.
Description Direct validation of a running configuration is not possible on a device running Junos OS
with upgraded FreeBSD. Nevertheless, validation is an important step in the installation
of an upgraded operating system. This command allows validation on a device that is
not running Junos OSwith upgraded FreeBSD.
This commandvalidates the current configurationonaRoutingEngine that is not running
Junos OSwith upgraded FreeBSD or a remote host.
Options The specific options available are:
host host-name [ username user-name ]—Validate the current configuration on a remote
host. Thehost-name is resolved throughDNS.Optionally, youcansupplyausername
toemployon the remotehost. If youomit theusernameoption, thecurrently logged-in
user-name is sent to the remote host.
routing-engine (re0 | re1)—Validate the current configuration on another Routing Engine
on the same device. The other Routing Engine cannot be running Junos OSwith
upgraded FreeBSD or the validation does not succeed.
Additional Information If theauthenticityof the remotehost cannotbeestablished, youareprompted tocontinue
the validation or not. If you choose not to continue, the validation process does not take
place.
Required PrivilegeLevel
maintenance
RelatedDocumentation
request system reboot (Junos OSwith Upgraded FreeBSD) on page 411•
• show system snapshot (Junos OSwith Upgraded FreeBSD) on page 522
• Release Information for Junos OSwith Upgraded FreeBSD on page 17
List of Sample Output request system software validate on host on page 464request system software validate on routing-engine on page 464
Output Fields When you enter this command, you are provided feedback on the status of your request.
463Copyright © 2018, Juniper Networks, Inc.
Chapter 19: Operational Commands

Sample Output
request system software validate on host
user@host> request system software validate on host remote-validatorThe authenticity of host 'remote-validator (192.168.164.174)' can't be established.ECDSA key fingerprint is 73:d0:78:ce:8d:09:aa:92:4c:ce:45:52:1d:76:86:b5.Are you sure you want to continue connecting (yes/no)? yes Password: **********
Sending /var/tmp/config.tgz to remote-validator...Validating /var/tmp/config.tgz on remote-validator...Checking compatibility with configurationInitializing...Using jbase-15.1-20150416.2Verified manifest signed by PackageDevelopmentEc_2015Using jruntime-15.1-20150416.2Verified manifest signed by PackageDevelopmentEc_2015Using jkernel-15.1-20150416.2Verified manifest signed by PackageDevelopmentEc_2015Using jroute-15.1-20150416.2Verified manifest signed by PackageDevelopmentEc_2015Using jcrypto-15.1-20150416.2Verified manifest signed by PackageDevelopmentEc_2015Using jweb-15.1-20150416.2Verified manifest signed by PackageDevelopmentEc_2015Using /var/tmp/config.tgzHardware Database regeneration succeededValidating against /config/juniper.conf.gzmgd: warning: schema: init: 'logical-systems-vlans' contains-node 'juniper-config vlans': not foundmgd: commit completeValidation succeeded
request system software validate on routing-engine
user@host> request system software validate on routing-engine re1
Sending /var/tmp/config.tgz to re1...Validating /var/tmp/config.tgz on re1...Checking compatibility with configurationInitializing...Using jbase-15.1-20150416.2Verified manifest signed by PackageDevelopmentEc_2015Using jruntime-15.1-20150416.2Verified manifest signed by PackageDevelopmentEc_2015Using jkernel-15.1-20150416.2Verified manifest signed by PackageDevelopmentEc_2015Using jroute-15.1-20150416.2Verified manifest signed by PackageDevelopmentEc_2015Using jcrypto-15.1-20150416.2Verified manifest signed by PackageDevelopmentEc_2015Using jweb-15.1-20150416.2Verified manifest signed by PackageDevelopmentEc_2015Using /var/tmp/config.tgzHardware Database regeneration succeededValidating against /config/juniper.conf.gzmgd: warning: schema: init: 'logical-systems-vlans' contains-node 'juniper-config
Copyright © 2018, Juniper Networks, Inc.464
Installation and Upgrade Guide

vlans': not foundmgd: commit completeValidation succeeded
465Copyright © 2018, Juniper Networks, Inc.
Chapter 19: Operational Commands

request system storage cleanup
List of Syntax Syntax on page 466
Syntax (EX Series Switches) on page 466
Syntax (MX Series Router) on page 466
Syntax (QFX Series) on page 466
Syntax (SRX Series) on page 466
Syntax request system storage cleanup<dry-run><no-confirm><re0 | re1 | routing-engine (backup | both | local | master | other)>
Syntax (EX SeriesSwitches)
request system storage cleanup<all-members><dry-run><local><membermember-id><no-confirm><re0 | re1 | routing-engine (backup | both | local | master | other)><satellite [slot-id slot-id |device-alias alias-name]>
Syntax (MX SeriesRouter)
request system storage cleanup<all-members><dry-run><local><membermember-id><no-confirm><re0 | re1 | routing-engine (backup | both | local | master | other)><satellite [slot-id slot-id |device-alias alias-name]>
Syntax (QFX Series) request system storage cleanup<component (serial number |UUID | all)><director-group name><dry-run><infrastructure name><interconnect-device name><name-tag name-tag><no-confirm><node-group name><prune><qfabric (component name) | dry-run | name-tag | repository)><repository (core | log)><re0 | re1 | routing-engine (backup | both | local | master | other)>
Syntax (SRX Series) request system storage cleanup<dry-run><no-confirm><re0 | re1 | routing-engine (backup | both | local | master | other)>
Copyright © 2018, Juniper Networks, Inc.466
Installation and Upgrade Guide

Release Information Command introduced in Junos OS Release 7.4.
dry-run option introduced in Junos OS Release 7.6.
Command introduced in Junos OS Release 9.0 for EX Series switches.
Command introduced in Junos OS Release 9.2 for SRX Series.
Command introduced in Junos OS Release 11.1 for the QFX Series.
Command introduced in Junos OS Release 14.1X53-D20 for the OCX Series.
satellite option introduced in Junos OS Release 14.2R3.
no-confirm and (re0 |re1 | routing-engine (backup | both | local | master | other)) options
introduced in Junos OS 17.3R1.
Description Free storage space on the router or switch by rotating log files and proposing a list of files
for deletion. User input is required for file deletion. On a QFabric system, you can delete
debug files located on individual devices or on the entire QFabric system.
Options all-members—(EX4200 switches and MX Series routers only) (Optional) Delete fileson the Virtual Chassis master Routing Engine only.
NOTE: To delete files on the other members of the Virtual Chassisconfiguration, log in to each backup Routing Engine and delete the filesusing the request system storage cleanup local command.
component (UUID | serial number | all)—(QFabric systems only) (Optional) Delete fileslocated on individual QFabric system devices or on the entire QFabric system.
director-group name—(QFabric systems only) (Optional) Delete files on the Directorgroup.
dry-run—(Optional) List files proposed for deletion (without deleting them).
infrastructurename—(QFabric systemsonly) (Optional)Delete fileson the fabric controlRouting Engine and fabric manager Routing Engine.
interconnect-device name—(QFabric systems only) Optional) Delete files on theInterconnect device.
local—(EX4200switches andMXSeries routers only) (Optional)Delete files on the localVirtual Chassis member.
membermember-id—(EX4200 switches andMX Series routers only) (Optional) Deletefiles on the specified member of the Virtual Chassis configuration. For EX4200
switches, replacemember-idwith a value from0 through 9. For anMX Series Virtual
Chassis, replacemember-idwith a value of 0 or 1.
name-tag name-tag—(QFabric systems only) (Optional) Delete debug files that matcha specific regular expression.
node-group name—(QFabric systems only) (Optional) Delete files on the Node group.
467Copyright © 2018, Juniper Networks, Inc.
Chapter 19: Operational Commands

no-confirm—(Optional) Do not ask for confirmation before doing the cleanup.
prune—(QFabric systems only) (Optional) Delete debug files located in either the coreor log debug repositories of a QFabric system device.
qfabriccomponentname—(QFabric systemsonly) (Optional)Deletedebug files locatedin the debug repositories of a QFabric system device.
(re0 | re1 | routing-engine (backup | both | local |master | other))—(Optional) Requestoperation on system storage on RE0, RE1, or on specified Routing Engine by these
classifications: backup, both, local, master, or other.
When Routing Engine is specified, the belowmessage is shown before listing the
files and deleting them.
Please check the list of files to be deleted using the dry-run option. i.e. request system storage cleanup dry-run Do you want to proceed ? [yes,no] (no)
repository (core | log)—(QFabric systems only) (Optional) Specify the repository on theQFabric system device for which you want to delete debug files.
satellite [slot-id slot-id | device-alias alias-name]—(Junos Fusion only) (Optional)Specify the satellite device in the Junos Fusion by FPC ID or device alias name for
which you want to delete debug files.
Additional Information If logging is configured and being used, the dry-run option rotates the log files. In that
case, the output displays the message “Currently rotating log files, please wait.” If no
logging is currently under way, the output displays only a list of files to delete.
Required PrivilegeLevel
maintenance
List of Sample Output request system storage cleanup dry-run on page 469request system storage cleanup on page 470request system storage cleanup director-group (QFabric Systems) on page 470request system storage cleanup infrastructure device-name (QFabricSystems) on page 472request system storage cleanup interconnect-device device-name (QFabricSystems) on page 473requestsystemstoragecleanupnode-groupgroup-name(QFabricSystems)onpage474request system storage cleanup qfabric component device-name (QFabricSystems) on page 475request system storage cleanup qfabric component device-name repository core(QFabric Systems) on page 475requestsystemstoragecleanupqfabriccomponentall (QFabricSystems)onpage475
Output Fields Table 46 on page 469 describes the output fields for the request system storage cleanup
command. Output fields are listed in the approximate order in which they appear.
Copyright © 2018, Juniper Networks, Inc.468
Installation and Upgrade Guide

Table 46: request system storage cleanup Output Fields
Field DescriptionField Name
Shows list of files available for deletion.List of files to delete:
Size of the core-dump file.Size
Last core-dump file modification date and time.Date
Name of the core-dump file.Name
Shows list of directories available for deletion.Directory to delete:
Repository where core-dump files and log files are stored. Thecore-dump files are located in the core repository, and the log filesare located in the log repository. The default Repository scope isshared since both the core and log repositories are shared by all ofthe QFabric system devices.
Repository scope:
Name of the top-level repository location.Repository head:
Name of the repository: core or log.Repository name:
Shows location of files available for deletion.Creating list of debugartifacts to be removedunder:
Shows list of files available for deletion.List of debug artifacts to beremoved under:
Sample Output
request system storage cleanup dry-run
user@host> request system storage cleanup dry-runCurrently rotating log files, please wait.This operation can take up to a minute.
List of files to delete:
Size Date Name 11.4K Mar 8 15:00 /var/log/messages.1.gz 7245B Feb 5 15:00 /var/log/messages.3.gz 11.8K Feb 22 13:00 /var/log/messages.2.gz 3926B Mar 16 13:57 /var/log/messages.0.gz 3962B Feb 22 12:47 /var/log/sampled.1.gz 4146B Mar 8 12:20 /var/log/sampled.0.gz 4708B Dec 21 11:39 /var/log/sampled.2.gz 7068B Jan 16 18:00 /var/log/messages.4.gz 13.7K Dec 27 22:00 /var/log/messages.5.gz 890B Feb 22 17:22 /var/tmp/sampled.pkts 65.8M Oct 26 09:10 /var/sw/pkg/jinstall-7.4R1.7-export-signed.tgz 63.1M Oct 26 09:13 /var/sw/pkg/jbundle-7.4R1.7.tgz
469Copyright © 2018, Juniper Networks, Inc.
Chapter 19: Operational Commands

request system storage cleanup
user@host> request system storage cleanupCurrently rotating log files, please wait.This operation can take up to a minute.
List of files to delete:
Size Date Name 11.4K Mar 8 15:00 /var/log/messages.1.gz 7245B Feb 5 15:00 /var/log/messages.3.gz 11.8K Feb 22 13:00 /var/log/messages.2.gz 3926B Mar 16 13:57 /var/log/messages.0.gz 11.6K Mar 8 15:00 /var/log/messages.5.gz 7254B Feb 5 15:00 /var/log/messages.6.gz 12.9K Feb 22 13:00 /var/log/messages.8.gz 3726B Mar 16 13:57 /var/log/messages.7.gz 3962B Feb 22 12:47 /var/log/sampled.1.gz 4146B Mar 8 12:20 /var/log/sampled.0.gz 4708B Dec 21 11:39 /var/log/sampled.2.gz 7068B Jan 16 18:00 /var/log/messages.4.gz 13.7K Dec 27 22:00 /var/log/messages.5.gz 890B Feb 22 17:22 /var/tmp/sampled.pkts 65.8M Oct 26 09:10 /var/sw/pkg/jinstall-7.4R1.7-export-signed.tgz 63.1M Oct 26 09:13 /var/sw/pkg/jbundle-7.4R1.7.tgz
Delete these files ? [yes,no] (yes)
request system storage cleanup director-group (QFabric Systems)
user@switch> request system storage cleanup director-groupList of files to delete:
Size Date Name4.0K 2011-11-07 05:16:29 /tmp/2064.sfcauth4.0K 2011-11-07 05:07:34 /tmp/30804.sfcauth4.0K 2011-11-07 04:13:41 /tmp/26792.sfcauth4.0K 2011-11-07 04:13:39 /tmp/26432.sfcauth0 2011-11-07 07:45:40 /tmp/cluster_cleanup.log1.3M 2011-11-07 07:39:11 /tmp/cn_monitor.20111107-052401.log4.0K 2011-11-07 07:36:29 /tmp/clustat.28019.log4.0K 2011-11-07 07:36:29 /tmp/clustat_x.28019.log9.6M 2011-11-07 05:30:24 /tmp/sfc.2.log4.0K 2011-11-07 05:28:11 /tmp/mgd-init.1320672491.log248K 2011-11-07 05:19:24 /tmp/cn_monitor.20111107-045111.log4.0K 2011-11-07 05:17:18 /tmp/clustat.3401.log4.0K 2011-11-07 05:17:18 /tmp/clustat_x.3401.log8.0K 2011-11-07 04:58:25 /tmp/mgd-init.1320670633.log0 2011-11-07 04:54:01 /tmp/mysql_db_install_5.1.37.log4.0K 2011-11-07 04:52:08 /tmp/cn_send.log0 2011-11-07 04:52:00 /tmp/init_eth0.log4.0K 2011-11-07 04:49:35 /tmp/install_interfaces.sh.log4.0K 2011-11-07 04:48:15 /tmp/bootstrap.sh.log160K 2011-11-07 04:47:43 /tmp/bootstrap_cleanup.log38M 2011-11-07 04:42:42 /tmp/cn_monitor.20111104-110308.log4.0K 2011-11-07 04:38:47 /tmp/clustat.30913.log4.0K 2011-11-07 04:38:47 /tmp/clustat_x.30913.log4.0K 2011-11-07 04:38:03 /tmp/dcf_upgrade.sh.remove.log4.0K 2011-11-07 04:38:03 /tmp/peer_update.log4.0K 2011-11-07 04:38:02 /tmp/dcf_upgrade.log
Copyright © 2018, Juniper Networks, Inc.470
Installation and Upgrade Guide

4.0K 2011-11-07 04:38:02 /tmp/perl_mark_upgrade.log8.0K 2011-11-07 04:13:42 /tmp/install_dcf_rpm.log4.0K 2011-11-07 04:13:06 /tmp/00_cleanup.sh.1320667986.log0 2011-11-07 04:13:06 /tmp/ccif_patch_4410_4450.sh.1320667986.log4.0K 2011-11-07 04:13:06 /tmp/dcf-tools.sh.1320667986.log0 2011-11-07 04:13:06 /tmp/initial.sh.1320667986.log0 2011-11-07 04:13:06 /tmp/inventory.sh.1320667986.log4.0K 2011-11-07 04:13:06 /tmp/qf-db.sh.1320667986.log4.0K 2011-11-07 04:13:06 /tmp/sfc.sh.1320667986.log8.0K 2011-11-07 04:13:05 /tmp/jinstall-qfabric.log8.0K 2011-11-04 11:10:24 /tmp/mgd-init.1320430192.log4.0K 2011-11-04 11:07:03 /tmp/mysql_dcf_db_install.log8.0K 2011-11-04 10:55:07 /tmp/ccif_patch_4410_4450.sh.1320429307.log8.0K 2011-11-04 10:55:07 /tmp/initial.sh.1320429307.log4.0K 2011-11-04 10:55:07 /tmp/inventory.sh.1320429307.log8.0K 2011-11-04 10:55:07 /tmp/sfc.sh.1320429307.log4.0K 2011-11-04 10:54:09 /tmp/ks-script-Ax0tz5.log4.0K 2011-11-07 04:13:06 /tmp//sfc.sh.1320667986.log8.0K 2011-11-04 10:55:07 /tmp//sfc.sh.1320429307.log
Directory to delete:45M 2011-11-08 10:57:43 /tmp/sfc-captures
List of files to delete:
Size Date Name4.0K 2011-11-08 05:47:47 /tmp/5713.sfcauth4.0K 2011-11-08 05:14:32 /tmp/14494.sfcauth4.0K 2011-11-08 05:11:47 /tmp/9978.sfcauth4.0K 2011-11-08 05:09:37 /tmp/6128.sfcauth4.0K 2011-11-08 05:04:28 /tmp/29703.sfcauth4.0K 2011-11-07 11:59:10 /tmp/7811.sfcauth4.0K 2011-11-07 11:36:08 /tmp/32415.sfcauth4.0K 2011-11-07 11:30:30 /tmp/22406.sfcauth4.0K 2011-11-07 11:24:37 /tmp/12131.sfcauth4.0K 2011-11-07 10:48:42 /tmp/12687.sfcauth4.0K 2011-11-07 09:27:20 /tmp/31082.sfcauth4.0K 2011-11-07 07:33:58 /tmp/14633.sfcauth4.0K 2011-11-07 05:08:25 /tmp/15447.sfcauth4.0K 2011-11-07 04:12:29 /tmp/26874.sfcauth4.0K 2011-11-07 04:12:27 /tmp/26713.sfcauth4.0K 2011-11-07 03:49:17 /tmp/17691.sfcauth4.0K 2011-11-05 01:32:23 /tmp/5716.sfcauth4.0K 2011-11-07 08:00:17 /tmp/sfcsnmpd.log4.0K 2011-11-07 07:57:50 /tmp/cluster_cleanup.log824K 2011-11-07 07:38:37 /tmp/cn_monitor.20111107-053643.log4.0K 2011-11-07 07:36:30 /tmp/clustat.18399.log4.0K 2011-11-07 07:36:30 /tmp/clustat_x.18399.log4.0K 2011-11-07 07:35:47 /tmp/command_lock.log4.0K 2011-11-07 05:39:54 /tmp/mgd-init.1320673194.log92K 2011-11-07 05:19:25 /tmp/cn_monitor.20111107-050412.log4.0K 2011-11-07 05:17:20 /tmp/clustat.30115.log4.0K 2011-11-07 05:17:20 /tmp/clustat_x.30115.log8.0K 2011-11-07 05:08:07 /tmp/mgd-init.1320671241.log4.0K 2011-11-07 05:04:57 /tmp/cn_send.log0 2011-11-07 05:04:52 /tmp/init_eth0.log4.0K 2011-11-07 05:02:38 /tmp/install_interfaces.sh.log4.0K 2011-11-07 05:01:19 /tmp/bootstrap.sh.log160K 2011-11-07 05:00:47 /tmp/bootstrap_cleanup.log28M 2011-11-07 04:42:27 /tmp/cn_monitor.20111104-112954.log4.0K 2011-11-07 04:38:49 /tmp/clustat.6780.log
471Copyright © 2018, Juniper Networks, Inc.
Chapter 19: Operational Commands

4.0K 2011-11-07 04:38:49 /tmp/clustat_x.6780.log4.0K 2011-11-07 04:38:05 /tmp/issue_event.log4.0K 2011-11-07 04:38:05 /tmp/peer_upgrade_reboot.log12K 2011-11-07 04:38:05 /tmp/primary_update.log4.0K 2011-11-07 04:38:04 /tmp/dcf_upgrade.sh.remove.log4.0K 2011-11-07 04:38:04 /tmp/peer_rexec_upgrade.log4.0K 2011-11-07 04:13:42 /tmp/peer_install_dcf_rpm.log4.0K 2011-11-07 04:11:57 /tmp/dcf-tools.sh.1320667917.log0 2011-11-07 04:11:57 /tmp/initial.sh.1320667917.log0 2011-11-07 04:11:57 /tmp/inventory.sh.1320667917.log4.0K 2011-11-07 04:11:57 /tmp/qf-db.sh.1320667917.log4.0K 2011-11-07 04:11:57 /tmp/sfc.sh.1320667917.log4.0K 2011-11-07 04:11:56 /tmp/00_cleanup.sh.1320667916.log0 2011-11-07 04:11:56 /tmp/ccif_patch_4410_4450.sh.1320667916.log8.0K 2011-11-07 04:11:56 /tmp/jinstall-qfabric.log4.0K 2011-11-07 04:11:33 /tmp/dcf_upgrade.log8.0K 2011-11-04 11:53:12 /tmp/mgd-init.1320432782.log8.0K 2011-11-04 11:06:17 /tmp/ccif_patch_4410_4450.sh.1320429977.log8.0K 2011-11-04 11:06:17 /tmp/initial.sh.1320429977.log4.0K 2011-11-04 11:06:17 /tmp/inventory.sh.1320429977.log8.0K 2011-11-04 11:06:17 /tmp/sfc.sh.1320429977.log4.0K 2011-11-04 11:05:19 /tmp/ks-script-_tnWeb.log4.0K 2011-11-07 04:11:57 /tmp//sfc.sh.1320667917.log8.0K 2011-11-04 11:06:17 /tmp//sfc.sh.1320429977.log
Directory to delete:49M 2011-11-08 10:45:20 /tmp/sfc-captures
request system storage cleanup infrastructure device-name (QFabric Systems)
user@switch> request system storage cleanup infrastructure FCre0:--------------------------------------------------------------------------
List of files to delete:
Size Date Name 139B Nov 8 19:03 /var/log/default-log-messages.0.gz 5602B Nov 8 19:03 /var/log/messages.0.gz 28.4K Nov 8 10:15 /var/log/messages.1.gz 35.2K Nov 7 13:45 /var/log/messages.2.gz 207B Nov 7 16:02 /var/log/wtmp.0.gz 27B Nov 7 12:14 /var/log/wtmp.1.gz 184.4M Nov 7 12:16 /var/sw/pkg/jinstall-dc-re-11.3I20111104_1216_dc-builder-domestic-signed.tgz 124.0K Nov 7 15:59 /var/tmp/gres-tp/env.dat 0B Nov 7 12:57 /var/tmp/gres-tp/lock 155B Nov 7 16:02 /var/tmp/krt_gencfg_filter.txt 0B Nov 7 12:35 /var/tmp/last_ccif_update 1217B Nov 7 12:15 /var/tmp/loader.conf.preinstall 184.4M Nov 6 07:11 /var/tmp/mchassis-install.tgz 10.8M Nov 7 12:16 /var/tmp/preinstall/bootstrap-install-11.3I20111104_1216_dc-builder.tar 57.4K Nov 7 12:16 /var/tmp/preinstall/configs-11.3I20111104_1216_dc-builder.tgz
259B Nov 7 12:16 /var/tmp/preinstall/install.conf 734.3K Nov 4 13:46 /var/tmp/preinstall/jboot-dc-re-11.3I20111104_1216_dc-builder.tgz 177.8M Nov 7 12:16 /var/tmp/preinstall/jbundle-dc-re-11.3I20111104_1216_dc-builder-domestic.tgz 124B Nov 7 12:15 /var/tmp/preinstall/metatags
Copyright © 2018, Juniper Networks, Inc.472
Installation and Upgrade Guide

1217B Nov 7 12:16 /var/tmp/preinstall_boot_loader.conf 0B Nov 7 16:02 /var/tmp/rtsdb/if-rtsdb
request system storage cleanup interconnect-device device-name (QFabric Systems)
user@switch> request system storage cleanup interconnect ICre1:--------------------------------------------------------------------------
List of files to delete:
Size Date Name 11B Nov 7 15:55 /var/jail/tmp/alarmd.ts 128B Nov 8 19:06 /var/log/default-log-messages.0.gz 9965B Nov 8 19:06 /var/log/messages.0.gz 15.8K Nov 8 12:30 /var/log/messages.1.gz 15.8K Nov 8 11:00 /var/log/messages.2.gz 15.7K Nov 8 07:30 /var/log/messages.3.gz 15.8K Nov 8 04:00 /var/log/messages.4.gz 15.7K Nov 8 00:30 /var/log/messages.5.gz 18.7K Nov 7 21:00 /var/log/messages.6.gz 17.6K Nov 7 19:00 /var/log/messages.7.gz 58.3K Nov 7 16:00 /var/log/messages.8.gz 20.3K Nov 7 15:15 /var/log/messages.9.gz 90B Nov 7 15:41 /var/log/wtmp.0.gz 57B Nov 7 12:41 /var/log/wtmp.1.gz 124.0K Nov 7 15:42 /var/tmp/gres-tp/env.dat 0B Nov 7 12:40 /var/tmp/gres-tp/lock 0B Nov 7 12:41 /var/tmp/if-rtsdb/env.lck 12.0K Nov 7 15:41 /var/tmp/if-rtsdb/env.mem 132.0K Nov 7 15:55 /var/tmp/if-rtsdb/shm_usr1.mem2688.0K Nov 7 15:41 /var/tmp/if-rtsdb/shm_usr2.mem2048.0K Nov 7 15:41 /var/tmp/if-rtsdb/trace.mem 730B Nov 7 19:57 /var/tmp/juniper.conf+.gz 155B Nov 7 15:53 /var/tmp/krt_gencfg_filter.txt 0B Nov 7 15:41 /var/tmp/rtsdb/if-rtsdb
re0:--------------------------------------------------------------------------
List of files to delete:
Size Date Name 11B Nov 7 15:55 /var/jail/tmp/alarmd.ts 121B Nov 8 19:06 /var/log/default-log-messages.0.gz 16.7K Nov 8 19:06 /var/log/messages.0.gz 22.2K Nov 8 17:45 /var/log/messages.1.gz 18.4K Nov 8 17:00 /var/log/messages.2.gz 21.6K Nov 8 16:00 /var/log/messages.3.gz 17.9K Nov 8 14:30 /var/log/messages.4.gz 19.4K Nov 8 13:30 /var/log/messages.5.gz 18.2K Nov 8 12:30 /var/log/messages.6.gz 20.4K Nov 8 11:30 /var/log/messages.7.gz 21.4K Nov 8 10:15 /var/log/messages.8.gz 21.0K Nov 8 09:00 /var/log/messages.9.gz 19.9K Nov 8 08:13 /var/log/snmp-traps.0.gz 203B Nov 8 15:36 /var/log/wtmp.0.gz 57B Nov 7 12:41 /var/log/wtmp.1.gz 124.0K Nov 7 15:42 /var/tmp/gres-tp/env.dat 0B Nov 7 12:40 /var/tmp/gres-tp/lock 0B Nov 7 12:41 /var/tmp/if-rtsdb/env.lck
473Copyright © 2018, Juniper Networks, Inc.
Chapter 19: Operational Commands

12.0K Nov 7 15:41 /var/tmp/if-rtsdb/env.mem 132.0K Nov 7 15:55 /var/tmp/if-rtsdb/shm_usr1.mem2688.0K Nov 7 15:41 /var/tmp/if-rtsdb/shm_usr2.mem2048.0K Nov 7 15:41 /var/tmp/if-rtsdb/trace.mem 727B Nov 7 15:54 /var/tmp/juniper.conf+.gz 155B Nov 7 15:55 /var/tmp/krt_gencfg_filter.txt 0B Nov 7 15:41 /var/tmp/rtsdb/if-rtsdb
request system storage cleanup node-group group-name (QFabric Systems)
user@switch> request system storage cleanup node-group NW-NGBBAK0372:--------------------------------------------------------------------------
List of files to delete:
Size Date Name 126B Nov 8 19:07 /var/log/default-log-messages.0.gz 179B Nov 7 13:32 /var/log/install.0.gz 22.9K Nov 8 19:07 /var/log/messages.0.gz 26.5K Nov 8 17:30 /var/log/messages.1.gz 20.5K Nov 8 13:15 /var/log/messages.2.gz 33.2K Nov 7 17:45 /var/log/messages.3.gz 35.5K Nov 7 15:45 /var/log/messages.4.gz 339B Nov 8 17:10 /var/log/wtmp.0.gz 58B Nov 7 12:40 /var/log/wtmp.1.gz 124.0K Nov 8 17:08 /var/tmp/gres-tp/env.dat 0B Nov 7 12:39 /var/tmp/gres-tp/lock 0B Nov 7 12:59 /var/tmp/if-rtsdb/env.lck 12.0K Nov 8 17:09 /var/tmp/if-rtsdb/env.mem2688.0K Nov 8 17:09 /var/tmp/if-rtsdb/shm_usr1.mem 132.0K Nov 8 17:09 /var/tmp/if-rtsdb/shm_usr2.mem2048.0K Nov 8 17:09 /var/tmp/if-rtsdb/trace.mem 1082B Nov 8 17:09 /var/tmp/juniper.conf+.gz 155B Nov 7 17:39 /var/tmp/krt_gencfg_filter.txt 0B Nov 8 17:09 /var/tmp/rtsdb/if-rtsdb
EE3093:--------------------------------------------------------------------------
List of files to delete:
Size Date Name 11B Nov 8 17:33 /var/jail/tmp/alarmd.ts 119B Nov 8 19:08 /var/log/default-log-messages.0.gz 180B Nov 7 17:41 /var/log/install.0.gz 178B Nov 7 13:32 /var/log/install.1.gz 2739B Nov 8 19:08 /var/log/messages.0.gz 29.8K Nov 8 18:45 /var/log/messages.1.gz 31.8K Nov 8 17:15 /var/log/messages.2.gz 20.6K Nov 8 16:00 /var/log/messages.3.gz 15.4K Nov 8 10:15 /var/log/messages.4.gz 15.4K Nov 8 02:15 /var/log/messages.5.gz 25.5K Nov 7 20:45 /var/log/messages.6.gz 48.0K Nov 7 17:45 /var/log/messages.7.gz 32.8K Nov 7 13:45 /var/log/messages.8.gz 684B Nov 8 17:02 /var/log/wtmp.0.gz 58B Nov 7 12:40 /var/log/wtmp.1.gz 124.0K Nov 7 17:34 /var/tmp/gres-tp/env.dat 0B Nov 7 12:40 /var/tmp/gres-tp/lock 0B Nov 7 12:59 /var/tmp/if-rtsdb/env.lck
Copyright © 2018, Juniper Networks, Inc.474
Installation and Upgrade Guide

12.0K Nov 7 17:39 /var/tmp/if-rtsdb/env.mem2688.0K Nov 7 17:39 /var/tmp/if-rtsdb/shm_usr1.mem 132.0K Nov 7 17:40 /var/tmp/if-rtsdb/shm_usr2.mem2048.0K Nov 7 17:39 /var/tmp/if-rtsdb/trace.mem 155B Nov 7 17:40 /var/tmp/krt_gencfg_filter.txt 0B Nov 7 17:39 /var/tmp/rtsdb/if-rtsdb
request system storage cleanup qfabric component device-name (QFabric Systems)
user@switch> request system storage cleanup qfabric component TestRepository type: regularRepository head: /pbstorageCreating list of debug artifacts to be removed under: /pbstorage/rdumps/TestRemoving debug artifacts ... (press control C to abort)Removing /pbstorage/rdumps/Test/cosd.core.0.0.05162011123308.gz ... doneRemoving /pbstorage/rdumps/Test/cosd.core.1.0.05162011123614.gz ... doneRemoving /pbstorage/rdumps/Test/cosd.core.2.0.05162011123920.gz ... doneRemoving /pbstorage/rdumps/Test/livekcore.05132011163930.gz ... doneRemoving /pbstorage/rdumps/Test/tnetd.core.0.1057.05162011124500.gz ... doneRemoving /pbstorage/rdumps/Test/vmcore.05132011120528.gz ... doneRemoving /pbstorage/rdumps/Test/vmcore.kz ... doneCreating list of debug artifacts to be removed under: /pbstorage/rlogs/TestRemoving debug artifacts ... (press control C to abort)Removing /pbstorage/rlogs/Test/kdumpinfo.05132011120528 ... doneRemoving /pbstorage/rlogs/Test/kernel.tarball.0.1039.05122011234415.tgz ... doneRemoving /pbstorage/rlogs/Test/kernel.tarball.1.1039.05132011175544.tgz ... doneRemoving /pbstorage/rlogs/Test/tnetd.tarball.0.1057.05162011175453.tgz ... done
request system storage cleanup qfabric component device-name repository core (QFabric Systems)
user@switch> request system storage cleanup qfabric component Test repository coreRepository scope: sharedRepository head: /pbdata/exportRepository name: coreCreating list of debug artifacts to be removed under: /pbdata/export/rdumps/TestNOTE: core repository under /pbdata/export/rdumps/Test empty
request system storage cleanup qfabric component all (QFabric Systems)
user@switch> request system storage cleanup qfabric component allRepository scope: sharedRepository head: /pbdata/exportCreating list of debug artifacts to be removed under: /pbdata/export/rdumpsNOTE: core repository under /pbdata/export/rdumps/all emptyCreating list of debug artifacts to be removed under: /pbdata/export/rlogsList of debug artifacts to clean up ... (press control C to abort)/pbdata/export/rlogs/73747cd8-0710-11e1-b6a4-00e081c5297e/install-11072011125819.log/pbdata/export/rlogs/77116f18-0710-11e1-a2a0-00e081c5297e/install-11072011125819.log/pbdata/export/rlogs/BBAK0372/install-11072011121538.log/pbdata/export/rlogs/BBAK0394/install-11072011121532.log/pbdata/export/rlogs/EE3093/install-11072011121536.log/pbdata/export/rlogs/WS001/YN5999/install-11072011121644.log/pbdata/export/rlogs/WS001/YW3803/install-11072011122429.log/pbdata/export/rlogs/cd78871a-0710-11e1-878e-00e081c5297e/install-11072011125932.log/pbdata/export/rlogs/d0afda1e-0710-11e1-a1d0-00e081c5297e/install-11072011125930.log/pbdata/export/rlogs/d0afda1e-0710-11e1-a1d0-00e081c5297e/install-11072011133211.log/pbdata/export/rlogs/d0afda1e-0710-11e1-a1d0-00e081c5297e/install-11072011155302.log/pbdata/export/rlogs/d31ab7a6-0710-11e1-ad1b-00e081c5297e/install-11072011125931.log/pbdata/export/rlogs/d4d0f254-0710-11e1-90c3-00e081c5297e/install-11072011125932.log
475Copyright © 2018, Juniper Networks, Inc.
Chapter 19: Operational Commands

Copyright © 2018, Juniper Networks, Inc.476
Installation and Upgrade Guide

request system storage cleanup (SRX Series)
Syntax request system storage cleanup <dry-run>
Release Information Command introduced in Junos OS Release 9.2 for SRX Series.
Description Free storage space on the device by rotating log files and proposing a list of files for
deletion. User input is required for file deletion.
Options dry-run—(Optional) List files proposed for deletion (without deleting them).
Additional Information If logging is configured and being used, the dry-run option rotates the log files. In that
case, the output displays the message “Currently rotating log files, please wait.” If no
logging is currently under way, the output displays only a list of files to delete.
Required PrivilegeLevel
maintenance
RelatedDocumentation
Cleaning Up Files with the CLI•
List of Sample Output request system storage cleanup dry-run on page 477request system storage cleanup on page 479
Output Fields Table 46 on page 469 describes the output fields for the request system storage cleanup
command. Output fields are listed in the approximate order in which they appear.
Table 47: request system storage cleanup Output Fields
Field DescriptionField Name
Shows list of files available for deletion.List of files to delete:
Size of the core-dump file.Size
Last core-dump file modification date and time.Date
Name of the core-dump file.Name
Sample Output
request system storage cleanup dry-run
user@host> request system storage cleanup dry-runList of files to delete:
Size Date Name 11B Jul 14 22:51 /var/jail/tmp/alarmd.ts
477Copyright © 2018, Juniper Networks, Inc.
Chapter 19: Operational Commands

84.3K Jul 20 22:09 /var/log/chassisd.0.gz 83.0K Jul 20 04:35 /var/log/chassisd.1.gz 84.0K Jul 19 10:52 /var/log/chassisd.2.gz 90.4K Jul 18 17:16 /var/log/chassisd.3.gz 91.8K Jul 20 04:30 /var/log/hostlogs/auth.log.1.gz 93.1K Jul 17 05:45 /var/log/hostlogs/auth.log.2.gz 97.6K Jun 7 01:30 /var/log/hostlogs/auth.log.3.gz 92.0K Apr 25 15:15 /var/log/hostlogs/auth.log.4.gz 78.0K Jul 21 05:44 /var/log/hostlogs/daemon.log.1.gz 78.6K Jul 21 02:59 /var/log/hostlogs/daemon.log.2.gz 78.5K Jul 21 00:14 /var/log/hostlogs/daemon.log.3.gz 78.8K Jul 20 21:30 /var/log/hostlogs/daemon.log.4.gz 58.7K Jul 21 05:14 /var/log/hostlogs/debug.1.gz 58.5K Jul 21 00:59 /var/log/hostlogs/debug.2.gz 58.7K Jul 20 20:44 /var/log/hostlogs/debug.3.gz 58.7K Jul 20 16:29 /var/log/hostlogs/debug.4.gz 166.9K Jul 13 00:33 /var/log/hostlogs/kern.log.1.gz 166.5K Jun 1 02:32 /var/log/hostlogs/kern.log.2.gz 163.5K May 5 00:03 /var/log/hostlogs/kern.log.3.gz 152.3K Mar 2 23:23 /var/log/hostlogs/kern.log.4.gz 260.0K Apr 13 10:28 /var/log/hostlogs/lcmd.log.1.gz 257.3K Mar 7 00:38 /var/log/hostlogs/lcmd.log.2.gz 240.8K Feb 7 19:45 /var/log/hostlogs/lcmd.log.3.gz 241.1K Feb 7 14:00 /var/log/hostlogs/lcmd.log.4.gz 370.6K Jul 21 00:45 /var/log/hostlogs/syslog.1.gz 370.9K Jul 20 12:30 /var/log/hostlogs/syslog.2.gz 370.4K Jul 20 00:15 /var/log/hostlogs/syslog.3.gz 370.2K Jul 19 12:00 /var/log/hostlogs/syslog.4.gz 55.0K Jul 14 22:50 /var/log/hostlogs/vjunos0.log.1.gz 1467B Oct 28 2015 /var/log/install.0.gz 119.9K Jul 21 07:37 /var/log/messages.0.gz 147.4K May 27 01:30 /var/log/messages.1.gz 71.4K Apr 14 11:19 /var/log/messages.2.gz 90.7K Feb 28 14:15 /var/log/messages.3.gz 10.1K Jan 12 2016 /var/log/messages.4.gz 55.1K Jan 6 2016 /var/log/messages.5.gz 81.5K Dec 1 2015 /var/log/messages.6.gz 43.3K Oct 28 2015 /var/log/messages.7.gz 54.8K Oct 20 2015 /var/log/messages.8.gz 35.8K Oct 19 2015 /var/log/messages.9.gz 12.4K Jul 21 07:37 /var/log/security.0.gz 59.4K Jul 19 01:30 /var/log/security.1.gz 51.8K Apr 25 10:00 /var/log/security.2.gz 43.6K Apr 14 11:19 /var/log/security.3.gz 52.7K Apr 5 02:15 /var/log/security.4.gz 54.4K Mar 25 17:15 /var/log/security.5.gz 51.9K Mar 16 05:15 /var/log/security.6.gz 52.0K Mar 5 02:15 /var/log/security.7.gz 53.4K Feb 22 22:15 /var/log/security.8.gz 55.6K Feb 13 13:00 /var/log/security.9.gz 4063B Jul 14 22:51 /var/tmp/cleanup-pkgs.log 0B Jul 14 22:51 /var/tmp/eedebug_bin_file 50.9K Feb 8 20:33 /var/tmp/event_tags.php 34B Jul 14 22:51 /var/tmp/gksdchk.log 124.0K Apr 26 06:12 /var/tmp/gres-tp/env.dat 0B Oct 9 2015 /var/tmp/gres-tp/lock 4B Jul 14 22:52 /var/tmp/idp_license_info 46B Jul 14 22:51 /var/tmp/kmdchk.log 57B Jul 14 22:51 /var/tmp/krt_rpf_filter.txt 30B Jul 14 22:53 /var/tmp/policy_status 0B Jul 14 22:51 /var/tmp/rtsdb/if-rtsdb
Copyright © 2018, Juniper Networks, Inc.478
Installation and Upgrade Guide

349B Jul 14 22:51 /var/tmp/sd-upgrade/debug_log 0B Oct 9 2015 /var/tmp/spu_kmd_init 53B Feb 7 23:11 /var/tmp/vjunos-install.log 0B Jul 14 22:51 /var/tmp/vpn_tunnel_orig.id
request system storage cleanup
user@host> request system storage cleanupList of files to delete:
Size Date Name 11B Oct 28 23:40 /var/jail/tmp/alarmd.ts 92.4K Jan 11 17:12 /var/log/chassisd.0.gz 92.4K Jan 11 06:06 /var/log/chassisd.1.gz 92.5K Jan 10 19:00 /var/log/chassisd.2.gz 92.5K Jan 10 07:53 /var/log/chassisd.3.gz 92.2K Jan 10 15:00 /var/log/hostlogs/auth.log.1.gz 92.2K Jan 1 18:45 /var/log/hostlogs/auth.log.2.gz 92.1K Jan 4 17:30 /var/log/hostlogs/auth.log.3.gz 92.2K Jan 1 18:45 /var/log/hostlogs/auth.log.4.gz 79.0K Jan 12 01:59 /var/log/hostlogs/daemon.log.1.gz 78.8K Jan 11 23:15 /var/log/hostlogs/daemon.log.2.gz 78.7K Jan 11 20:30 /var/log/hostlogs/daemon.log.3.gz 79.1K Jan 11 17:44 /var/log/hostlogs/daemon.log.4.gz 59.1K Jan 11 21:59 /var/log/hostlogs/debug.1.gz 59.2K Jan 11 17:44 /var/log/hostlogs/debug.2.gz 59.2K Jan 11 13:29 /var/log/hostlogs/debug.3.gz 59.3K Jan 11 09:14 /var/log/hostlogs/debug.4.gz 186.6K Oct 20 16:31 /var/log/hostlogs/kern.log.1.gz 238.3K Jan 11 23:15 /var/log/hostlogs/lcmd.log.1.gz 238.4K Jan 11 17:30 /var/log/hostlogs/lcmd.log.2.gz 238.6K Jan 11 11:45 /var/log/hostlogs/lcmd.log.3.gz 238.5K Jan 11 06:00 /var/log/hostlogs/lcmd.log.4.gz 372.5K Jan 11 17:00 /var/log/hostlogs/syslog.1.gz 372.5K Jan 11 04:45 /var/log/hostlogs/syslog.2.gz 371.9K Jan 10 16:30 /var/log/hostlogs/syslog.3.gz 372.7K Jan 10 04:15 /var/log/hostlogs/syslog.4.gz 10.1K Jan 12 02:03 /var/log/messages.0.gz 55.1K Jan 6 21:25 /var/log/messages.1.gz 81.5K Dec 1 21:30 /var/log/messages.2.gz
Delete these files ? [yes,no] (no)
479Copyright © 2018, Juniper Networks, Inc.
Chapter 19: Operational Commands

request system zeroize
Syntax request system zeroize<media><local>
Release Information Command introduced before Junos OS Release 9.0.
Command introduced in Junos OS Release 11.2 for EX Series switches.
Optionmedia added in Junos OS Release 11.4 for EX Series switches.
Command introduced in Junos OS Release 12.2 for MX Series routers.
Command introduced in Junos OS Release 12.3 for the QFX Series.
Option local added in Junos OS Release 14.1.
Command introduced in Junos OS Release 14.1X53-D20 for the OCX Series.
Description Remove all configuration information on the Routing Engines and reset all key values on
the device where you run the command.
• If thedevicehasdualRoutingEngines, thecommand isbroadcast toall RoutingEngines
on the device.
• In a Virtual Chassis or Virtual Chassis Fabric (VCF) composed of EX Series switches
(except EX8200Virtual Chassis) or QFXSeries switches, this command operates only
on themember switchwhere you run the command, even if that switch is in themaster
Routing Engine role. The command is not forwarded to the backup Routing Engine
member or to member switches in the line-card role. To apply this command tomore
than onemember of an EXSeries orQFXSeries Virtual Chassis or VCF,we recommend
you remove and disconnect each of those members from the Virtual Chassis or VCF,
and then run the command on each isolated switch individually.
The command removes all data files, including customized configuration and log files,
by unlinking the files from their directories. The command removes all user-created files
from the system, including all plain-text passwords, secrets, and private keys for SSH,
local encryption, local authentication, IPsec, RADIUS, TACACS+, and SNMP.
This command reboots the device and sets it to the factory default configuration. After
the reboot, you cannot access the device through themanagement Ethernet interface.
Log in through the console as root and start the Junos OS CLI by typing cli at the prompt.
NOTE: If the configuration contains the commit synchronize statement at the
[edit system] hierarchy level, and you issue a commit in themaster Routing
Engine, themaster configuration is automatically synchronized with thebackup. If the backup Routing Engine is downwhen you issue the commit,
the Junos OS displays a warning and commits the candidate configurationin themaster Routing Engine. When the backup Routing Engine comes up,its configurationwill automatically be synchronizedwith themaster. A newlyinserted backup Routing Engine or a Routing Engine that comes up afterrunning the requestsystemzeroizecommandalsoautomatically synchronizes
its configuration with themaster Routing Engine configuration.
Copyright © 2018, Juniper Networks, Inc.480
Installation and Upgrade Guide

NOTE: Starting with Junos OS Release 15.1F3, the request system zeroize
command removes all configuration information on the guest OS for thePTX5000routerwithRE-DUO-C2600-16G,andMX240,MX480,andMX960with RE-S-1800X4-32G-S.
Starting with Junos OS Release 15.1F5, the request system zeroize command
removes all configuration information on the guest OS for the MX2010 andMX2020with REMX2K-1800-32G-S.
On these routers, in order to remove all configuration information on bothguest OS and host OS, use the request vmhost zeroize command.
To completely erase user-created data so that it is unrecoverable, use themedia option.
Options media—(Optional) Inaddition to removingall configurationand log files, causesmemoryand themedia to be scrubbed, removing all traces of any user-created files. Every
storage device attached to the system is scrubbed, including disks, flash drives,
removable USBs, and so on. The duration of the scrubbing process is dependent on
the size of the media being erased. As a result, the request system zeroizemedia
operationcan takeconsiderablymore time than the requestsystemzeroizeoperation.
However, the critical security parameters are all removed at the beginning of the
process.
NOTE: OnQFX Series platforms running Junos OS Release 14.1X53 orearlier, themediaoption isnotavailable.OnQFXSeriesplatforms running
releases later than Junos OS Release 14.1X53 that do not have theFreeBSD 10 kernel, themedia option is available, but if you use it, the
systemwill issue a warning that themedia option is not supported and
will continue with the zeroize operation. On platforms that are not QFXSeries platforms, themedia option is not available in Junos OS Release
17.2 or later with the FreeBSD 10 kernel.
local—(Optional)Removeall the configuration informationand restore all the key valueson the active Routing Engine.
NOTE: Specifying this option has no effect on switches in a VirtualChassis or VCF composedof EXSeries switches (except EX8200VirtualChassis) or QFX switches, because in these configurations, the request
system zeroize command only operates locally by default.
481Copyright © 2018, Juniper Networks, Inc.
Chapter 19: Operational Commands

Required PrivilegeLevel
maintenance
RelatedDocumentation
request system snapshot on page 419•
• Reverting to the Default Factory Configuration for the EX Series Switch
• Reverting to the Rescue Configuration for the EX Series Switch
• Reverting to the Default Factory Configuration
• Reverting to the Rescue Configuration on page 235
• Reverting to the Default Factory Configuration by Using the request system zeroize
Command on page 235
List of Sample Output request system zeroize on page 482request system zeroizemedia on page 483
Sample Output
request system zeroize
user@host> request system zeroizewarning: System will be rebooted and may not boot without configurationErase all data, including configuration and log files? [yes,no] (no) yes
0 1 1 0 0 0 done
syncing disks... All buffers synced.Uptime: 5d19h20m26srecorded reboot as normal shutdownRebooting...
U-Boot 1.1.6 (Mar 11 2011 - 04:39:06)
Board: EX4200-24T 2.11EPLD: Version 6.0 (0x85)DRAM: Initializing (1024 MB)FLASH: 8 MB
Firmware Version: --- 01.00.00 ---USB: scanning bus for devices... 2 USB Device(s) found scanning bus for storage devices... 1 Storage Device(s) found
ELF file is 32 bitConsoles: U-Boot console
FreeBSD/PowerPC U-Boot bootstrap loader, Revision 2.4([email protected], Fri Mar 11 03:03:36 UTC 2011)Memory: 1024MBbootsequencing is enabledbootsuccess is setnew boot device = disk0s1:Loading /boot/defaults/loader.conf/kernel data=0x915c84+0xa1260 syms=[0x4+0x7cbd0+0x4+0xb1c19]
Hit [Enter] to boot immediately, or space bar for command prompt.
Copyright © 2018, Juniper Networks, Inc.482
Installation and Upgrade Guide

Booting [/kernel]...Kernel entry at 0x800000e0 ...GDB: no debug ports presentKDB: debugger backends: ddbKDB: current backend: ddbCopyright (c) 1996-2011, Juniper Networks, Inc.All rights reserved.Copyright (c) 1992-2006 The FreeBSD Project.Copyright (c) 1979, 1980, 1983, 1986, 1988, 1989, 1991, 1992, 1993, 1994 The Regents of the University of California. All rights reserved.JUNOS 11.1R1.8 #0: 2011-03-09 20:14:25 UTC
[email protected]:/volume/build/junos/11.1/release/11.1R1.8/obj-powerpc/bsd/kernels/ JUNIPER-EX/kernelTimecounter "decrementer" frequency 50000000 Hz quality 0cpu0: Freescale e500v2 core revision 2.2cpu0: HID0 80004080...
request system zeroizemedia
user@host> request system zeroizemediawarning: System will be rebooted and may not boot without configurationErase all data, including configuration and log files? [yes,no] (no) yes
warning: ipsec-key-management subsystem not running - not needed by configuration.warning: zeroizing fpc0
{master:0}root> Waiting (max 60 seconds) for system process `vnlru' to stop...done. . .Syncing disks, vnodes remaining...2 4 2 4 3 2 1 1 0 0 0 done
syncing disks... All buffers synced.Uptime: 14m50srecorded reboot as normal shutdownRebooting...
U-Boot 1.1.6 (Apr 21 2011 - 13:58:42)
Board: EX4200-48PX 1.1EPLD: Version 8.0 (0x82)DRAM: Initializing (512 MB)FLASH: 8 MBNAND: No NAND device found!!!0 MiB
Firmware Version: --- 01.00.00 ---USB: scanning bus for devices... 2 USB Device(s) found scanning bus for storage devices... 1 Storage Device(s) found
ELF file is 32 bitConsoles: U-Boot console
FreeBSD/PowerPC U-Boot bootstrap loader, Revision 2.2([email protected], Fri Feb 26 17:48:51 PST 2010)Memory: 512MBLoading /boot/defaults/loader.conf /kernel data=0x9abfdc+0xb06e4 syms=[0x4+0x83b30+0x4+0xbd7c6]
Hit [Enter] to boot immediately, or space bar for command prompt.
483Copyright © 2018, Juniper Networks, Inc.
Chapter 19: Operational Commands

Booting [/kernel] in 1 second... Booting [/kernel]... Kernel entry at 0x800000e0 ...GDB: no debug ports presentKDB: debugger backends: ddbKDB: current backend: ddbCopyright (c) 1996-2011, Juniper Networks, Inc.All rights reserved.Copyright (c) 1992-2006 The FreeBSD Project.Copyright (c) 1979, 1980, 1983, 1986, 1988, 1989, 1991, 1992, 1993, 1994 The Regents of the University of California. All rights reserved.JUNOS 11.4R1.2 #0: 2011-10-27 18:05:39 UTC [email protected]:/volume/build/junos/11.4/release/11.4R1.2/obj-powerpc/bsd/kernels/JUNIPER-EX/kernelcan't re-use a leaf (all_slot_serialid)!Timecounter "decrementer" frequency 50000000 Hz quality 0cpu0: Freescale e500v2 core revision 2.2cpu0: HID0 80004080<EMCP,TBEN,EN_MAS7_UPDATE>real memory = 511705088 (488 MB)avail memory = 500260864 (477 MB)ETHERNET SOCKET BRIDGE initialisingInitializing EXSERIES platform properties .... . .Automatic reboot in progress...Media check on da0 on ex platforms** /dev/da0s2aFILE SYSTEM CLEAN; SKIPPING CHECKSclean, 20055 free (31 frags, 2503 blocks, 0.0% fragmentation)zeroizing /dev/da0s1a .... . .zeroizing /dev/da0s3d .... . .zeroizing /dev/da0s3e .... . .zeroizing /dev/da0s4d .... . .zeroizing /dev/da0s4e .... . .
syncing disks... All buffers synced.Uptime: 3m40sRebooting...
U-Boot 1.1.6 (Apr 21 2011 - 13:58:42)
Board: EX4200-48PX 1.1EPLD: Version 8.0 (0x82)DRAM: Initializing (512 MB)FLASH: 8 MBNAND: No NAND device found!!!0 MiB
Firmware Version: --- 01.00.00 ---USB: scanning bus for devices... 2 USB Device(s) found scanning bus for storage devices... 1 Storage Device(s) found
ELF file is 32 bitConsoles: U-Boot console
FreeBSD/PowerPC U-Boot bootstrap loader, Revision 2.2([email protected], Fri Feb 26 17:48:51 PST 2010)Memory: 512MB
Copyright © 2018, Juniper Networks, Inc.484
Installation and Upgrade Guide

Loading /boot/defaults/loader.conf /kernel data=0x9abfdc+0xb06e4 syms=[0x4+0x83b30+0x4+0xbd7c6]
Hit [Enter] to boot immediately, or space bar for command prompt.Booting [/kernel] in 1 second... Booting [/kernel]... Kernel entry at 0x800000e0 ...GDB: no debug ports presentKDB: debugger backends: ddbKDB: current backend: ddbCopyright (c) 1996-2011, Juniper Networks, Inc.All rights reserved.Copyright (c) 1992-2006 The FreeBSD Project.Copyright (c) 1979, 1980, 1983, 1986, 1988, 1989, 1991, 1992, 1993, 1994 The Regents of the University of California. All rights reserved.JUNOS 11.4R1.2 #0: 2011-10-27 18:05:39 UTC [email protected]:/volume/build/junos/11.4/release/11.4R1.2/obj-powerpc/bsd/kernels/JUNIPER-EX/kernelcan't re-use a leaf (all_slot_serialid)!Timecounter "decrementer" frequency 50000000 Hz quality 0cpu0: Freescale e500v2 core revision 2.2cpu0: HID0 80004080 <EMCP,TBEN,EN_MAS7_UPDATE>real memory = 511705088 (488 MB)avail memory = 500260864 (477 MB)ETHERNET SOCKET BRIDGE initialisingInitializing EXSERIES platform properties .... . .Automatic reboot in progress...Media check on da0 on ex platforms** /dev/da0s1aFILE SYSTEM CLEAN; SKIPPING CHECKSclean, 20064 free (48 frags, 2502 blocks, 0.1% fragmentation)zeroizing /dev/da0s2a .... . .Creating initial configuration...mgd: error: Cannot open configuration file: /config/juniper.confmgd: warning: activating factory configurationmgd: commit completemgd: ----------------------------------------------------------mgd: Please login as 'root'. No password is required.mgd: To start Initial Setup, type 'ezsetup' at the JUNOS prompt.mgd: To start JUNOS CLI, type 'cli' at the JUNOS prompt.mgd: ----------------------------------------------------------Setting initial options: debugger_on_panic=NO debugger_on_break=NO.Starting optional daemons: .Doing initial network setup:. . .
Amnesiac (ttyu0)
485Copyright © 2018, Juniper Networks, Inc.
Chapter 19: Operational Commands

request vmhost halt
Syntax request vmhost halt<re0 | re1><routing-engine>
Release Information Command introduced in JunosOSRelease 15.1F3 for the PTX5000,MX240,MX480, and
MX960 routers.
Command introduced in Junos OS Release 15.1F5 for the MX2010 and MX2020 routers.
Command introduced in Junos OS Release 16.1R4 for the PTX3000 routers.
NOTE: PTX3000 router supports the Routing and Control Board, RCBPTX.
Command introduced in Junos OS Release 17.1R1 for EX9200 switches.
Description Stop the host OS and Junos OS running on the router.
Options none—Stop the host OS and Junos OS on the router.
re0 | re1—(Optional) On routers that support dual or redundant Routing Engines, stopthehostOSand JunosOS runningon theRoutingEngine in slot0(re0)or theRouting
Engine in slot 1 (re1).
routing-engine—(Optional) Specify the Routing Engine onwhich the host OS and JunosOS needs to be stopped. The following options are available:
• backup—Backup Routing Engine.
• both—Master and backup Routing Engines.
• local—Routing Engine on the local Virtual Chassis member.
• master—Master Routing Engine.
• other—If you issue the command from themaster Routing Engine, the backup
Routing Engine is referred to as the other Routing Engine.
Required PrivilegeLevel
maintenance
RelatedDocumentation
request system halt•
• vmhost on page 375
List of Sample Output request vmhost halt on page 487
Copyright © 2018, Juniper Networks, Inc.486
Installation and Upgrade Guide

Sample Output
request vmhost halt
user@host> request vmhost haltHalt the system ? [yes,no] (no) yes
Initiating vmhost halt... okInitiating Junos shutdown... shutdown: [pid 9756]Shutdown NOW!okJunos shutdown is in progress...*** FINAL System shutdown message ***
System going down IMMEDIATELY
...
... Operating system halted.Please press any key to reboot.
487Copyright © 2018, Juniper Networks, Inc.
Chapter 19: Operational Commands
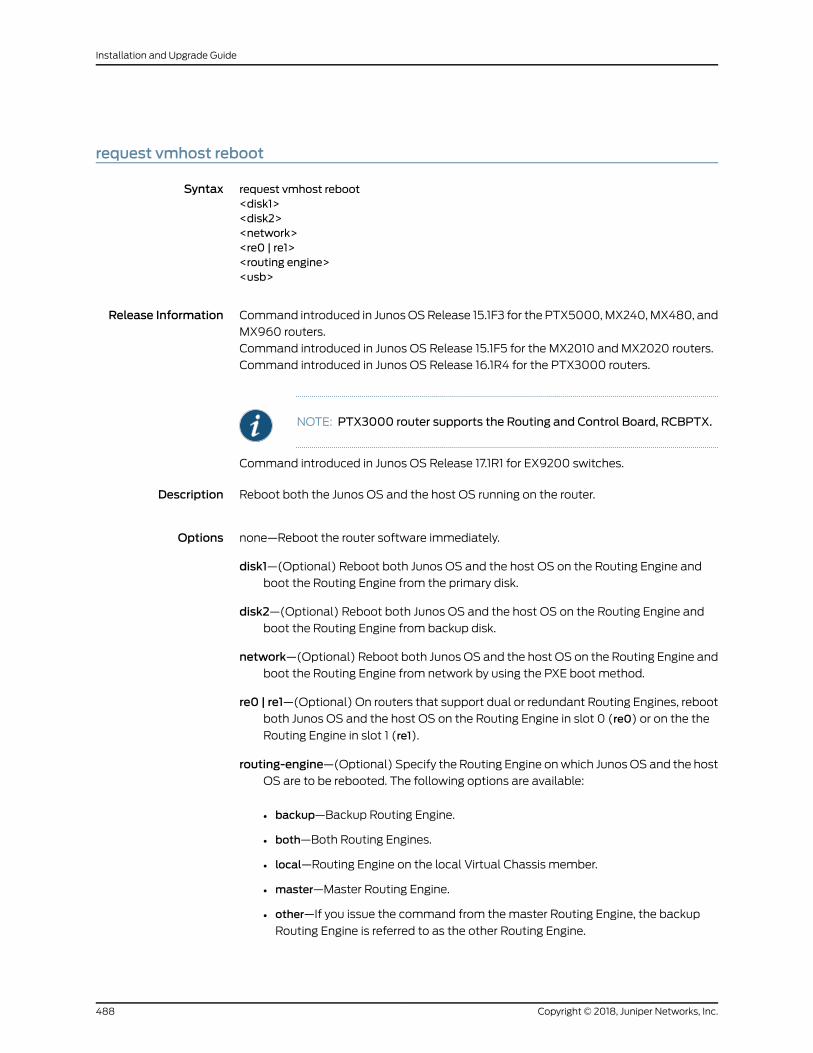
request vmhost reboot
Syntax request vmhost reboot<disk1><disk2><network><re0 | re1><routing engine><usb>
Release Information Command introduced in JunosOSRelease 15.1F3 for the PTX5000,MX240,MX480, and
MX960 routers.
Command introduced in Junos OS Release 15.1F5 for the MX2010 and MX2020 routers.
Command introduced in Junos OS Release 16.1R4 for the PTX3000 routers.
NOTE: PTX3000 router supports the Routing and Control Board, RCBPTX.
Command introduced in Junos OS Release 17.1R1 for EX9200 switches.
Description Reboot both the Junos OS and the host OS running on the router.
Options none—Reboot the router software immediately.
disk1—(Optional) Reboot both Junos OS and the host OS on the Routing Engine andboot the Routing Engine from the primary disk.
disk2—(Optional) Reboot both Junos OS and the host OS on the Routing Engine andboot the Routing Engine from backup disk.
network—(Optional) Reboot both Junos OS and the host OS on the Routing Engine andboot the Routing Engine from network by using the PXE boot method.
re0 | re1—(Optional) On routers that support dual or redundant Routing Engines, rebootboth Junos OS and the host OS on the Routing Engine in slot 0 (re0) or on the the
Routing Engine in slot 1 (re1).
routing-engine—(Optional) Specify the Routing Engine onwhich JunosOS and the hostOS are to be rebooted. The following options are available:
• backup—Backup Routing Engine.
• both—Both Routing Engines.
• local—Routing Engine on the local Virtual Chassis member.
• master—Master Routing Engine.
• other—If you issue the command from themaster Routing Engine, the backup
Routing Engine is referred to as the other Routing Engine.
Copyright © 2018, Juniper Networks, Inc.488
Installation and Upgrade Guide

usb—(Optional) Reboot both JunosOS and the host OS on the Routing Engine using theUSB installation media.
Required PrivilegeLevel
maintenance
RelatedDocumentation
request system reboot on page 402•
• request vmhost power-on on page 543
List of Sample Output request vmhost reboot on page 489
Sample Output
request vmhost reboot
user@host> request vmhost rebootwarning: Rebooting re0Initiating vmhost reboot... okInitiating Junos shutdown... shutdown: [pid 3957]Shutdown NOW!ok
*** FINAL System shutdown message ***
System going down IMMEDIATELY ......
489Copyright © 2018, Juniper Networks, Inc.
Chapter 19: Operational Commands

show chassis usb storage
Syntax show chassis usb storage
Release Information Command introduced in Junos OS Release 11.4 R2.
Description Display the current status of any USBmass storage device and whether the USB ports
are enabled or disabled.
Required PrivilegeLevel
view
RelatedDocumentation
Installing Junos OS on SRX Series Devices Using a USB Flash Drive on page 75•
List of Sample Output show chassis hardware detail on page 490show chassis usb storage on page 490
Sample Output
show chassis hardware detail
user@host> show chassis hardware detailHardware inventory:Item Version Part number Serial number DescriptionChassis BV4911AA0005 SRX240H2-POERouting Engine REV 01 750-043613 AAEC1923 RE-SRX240H2-POE usb0 (addr 1) DWC OTG root hub 0 vendor 0x0000 uhub0 usb0 (addr 2) product 0x005a 90 vendor 0x0409 uhub1 usb0 (addr 3) ST72682 High Speed Mode 64218 STMicroelectronics umass0 usb0 (addr 4) Mass Storage Device 4096 JetFlash umass1FPC 0 FPC PIC 0 16x GE Base PICPower Supply 0
show chassis usb storage
user@host> show chassis usb storageUSB Disabled
Copyright © 2018, Juniper Networks, Inc.490
Installation and Upgrade Guide

show system autoinstallation status
Syntax show system autoinstallation status
Release Information Command introduced before Junos OS Release 7.4.
Command introduced in Junos OS Release 9.0 for EX Series switches.
Command supported in Junos OS Release 12.2 for ACX Series Universal Access Routers.
Command introduced in Junos OS Release 14.1X53-D20 for the OCX Series.
Description (ACX Series routers, and EX Series switches only) Display autoinstallation status
information.
Options This command has no options.
Required PrivilegeLevel
view
RelatedDocumentation
ACX Series Autoinstallation Overview•
• Before You Begin Autoinstallation on an ACX Series Universal Access Router
• Autoinstallation Configuration of ACX Series Universal Access Routers
• USB Autoinstallation on ACX Series Routers
• Verifying Autoinstallation on ACX Series Universal Access Routers
• Verifying Autoinstallation on ACX Series Universal Access Routers
• autoinstallation
List of Sample Output show system autoinstallation status on page 492
Output Fields Table 48 on page 492 describes the output fields for the show system autoinstallation
status command. Output fields are listed in the approximate order in which they appear.
491Copyright © 2018, Juniper Networks, Inc.
Chapter 19: Operational Commands

Table 48: show system autoinstallation status Output Fields
Field DescriptionField Name
Display autoinstallation status information:
• Last committed file—File last committed for autoinstallation configuration.
• Configuration server of last committed file—IP address or URL of the server configured to retrieveconfiguration information for the last committed configuration file.
• Interface—Interface configured for autoinstallation.
• Name—Name of the interface.
• State—Interface state.
• Address acquisition—Display IP address acquired and protocol used for acquisition upon startup.
• Protocol—Protocol used for acquisition: BOOTP/DHCP or RARP.
• Acquired address—IP address acquired from the DHCP server.
Autoinstallation status
Sample Output
show system autoinstallation status
user@host> show system autoinstallation statusAutoinstallation status:Master state: ActiveLast committed file: NoneConfiguration server of last committed file: 10.0.0.0Interface: Name: ge-0/0/1 State: None Address acquisition: Protocol: DHCP Client Acquired address: None Protocol: RARP Client Acquired address: None
Copyright © 2018, Juniper Networks, Inc.492
Installation and Upgrade Guide

show system autorecovery state
Syntax show system autorecovery state
Release Information Command introduced in Junos OS Release 11.2 for SRX300, SRX320, SRX340, SRX345,
and SRX550M devices.
Description Perform checks and show status of all autorecovered items.
Required PrivilegeLevel
view
RelatedDocumentation
request system autorecovery state on page 382•
List of Sample Output show system autorecovery state on page 493
Output Fields Table 49 on page 493 lists the output fields for the show system autorecovery state
command. Output fields are listed in the approximate order in which they appear.
Table 49: show system autorecovery state Output Fields
Field DescriptionField Name
The name of the file on which autorecovery checks are performed.File
The disk partition on which autorecovery checks are performed.Slice
Indicates whether autorecovery information for the file or slice has been saved.Recovery Information
Displays the status of the file's integrity check (passed or failed).Integrity Check
Displays the status of the item, or the action required to be taken for that item.Action / Status
Sample Output
show system autorecovery state
user@host> show system autorecovery state
Configuration:File Recovery Information Integrity Check Action / Statusrescue.conf.gz Saved Passed NoneLicenses:File Recovery Information Integrity Check Action / StatusJUNOS282736.lic Saved Passed NoneJUNOS282737.lic Not Saved Not checked Requires saveBSD Labels:Slice Recovery Information Integrity Check Action / Statuss1 Saved Passed Nones2 Saved Passed None
493Copyright © 2018, Juniper Networks, Inc.
Chapter 19: Operational Commands

s3 Saved Passed Nones4 Saved Passed None
Copyright © 2018, Juniper Networks, Inc.494
Installation and Upgrade Guide

show system boot-messages
List of Syntax Syntax on page 495
Syntax (EX Series Switches) on page 495
Syntax (TXMatrix Router) on page 495
Syntax (TXMatrix Plus Router) on page 495
Syntax (MX Series Router) on page 495
Syntax (QFX Series) on page 495
Syntax show system boot-messages
Syntax (EX SeriesSwitches)
show system boot-messages<all-members><local><membermember-id>
Syntax (TXMatrixRouter)
show system boot-messages<all-chassis | all-lcc | lcc number | scc>
Syntax(TXMatrixPlusRouter)
show system boot-messages<all-chassis | all-lcc | lcc number | sfc number>
Syntax (MX SeriesRouter)
show system boot-messages<all-members><local><membermember-id>
Syntax (QFX Series) show system boot-messagesinfrastructure name | interconnect-device name | node-group name
Release Information Command introduced before Junos OS Release 7.4.
Command introduced in Junos OS Release 9.0 for EX Series switches.
sfc option introduced for the TXMatrix Plus router in Junos OS Release 9.6.
Command introduced in Junos OS Release 11.1 for the QFX Series.
Command introduced in Junos OS Release 14.1X53-D20 for the OCX Series.
Description Display initial messages generated by the system kernel upon startup. Thesemessages
are the contents of /var/run/dmesg.boot.
Options none—Display all boot timemessages.
all-chassis—(TXMatrix routers andTXMatrix Plus routers only) (Optional) Display boottimemessages for all of the chassis.
all-lcc—(TXMatrix routers and TXMatrix Plus routers only) (Optional) On a TXMatrixrouter, display boot timemessages for all T640 routers connected to a TXMatrix
495Copyright © 2018, Juniper Networks, Inc.
Chapter 19: Operational Commands

router. On a TXMatrix Plus router, display boot timemessages for all connected
T1600 or T4000 LCCs.
all-members—(EX4200 switches and MX Series routers only) (Optional) Display boottimemessages on all members of the Virtual Chassis configuration.
infrastructure name—(QFabric systems only) (Optional) Display boot timemessageson the fabric control Routing Engine or fabric manager Routing engines.
interconnect-device name—(QFabric systems only) (Optional) Display boot timemessages on the Interconnect device.
lcc number—(TXMatrix routers and TXMatrix Plus routers only) (Optional) On a TXMatrix router, display boot timemessages for a specific T640 router connected to
a TXMatrix router. On a TXMatrix Plus router, display boot timemessages for a
specific router connected to a TXMatrix Plus router.
Replace numberwith the following values depending on the LCC configuration:
• 0 through 3, when T640 routers are connected to a TXMatrix router in a routing
matrix.
• 0 through 3, when T1600 routers are connected to a TXMatrix Plus router in a
routing matrix.
• 0 through 7, when T1600 routers are connected to a TXMatrix Plus router with 3D
SIBs in a routing matrix.
• 0, 2, 4, or 6, when T4000 routers are connected to a TXMatrix Plus router with
3D SIBs in a routing matrix.
local—(EX4200 switches and MX Series routers only) (Optional) Display boot timemessages on the local Virtual Chassis member.
membermember-id—(EX4200switches andMXSeries routers only) (Optional) Displayboot timemessages on the specified member of the Virtual Chassis configuration.
For EX4200 switches, replacemember-idwith a value from 0 through 9. For an MX
Series Virtual Chassis, replacemember-idwith a value of 0 or 1.
node-group name—(QFabric systems only) (Optional) Display boot timemessages onthe Node group.
scc—(TXMatrix routers only) (Optional) Display boot timemessages for the TXMatrixrouter (or switch-card chassis).
sfc number—(TXMatrix Plus routers only) (Optional) Display boot timemessages forthe TXMatrix Plus router. Replace numberwith 0.
Additional Information By default, when you issue the show system boot-messages command on themaster
RoutingEngineofaTXMatrix router or aTXMatrixPlus router, thecommand isbroadcast
to all the master Routing Engines of the LCCs connected to it in the routing matrix.
Likewise, if you issue the same command on the backup Routing Engine of a TXMatrix
Copyright © 2018, Juniper Networks, Inc.496
Installation and Upgrade Guide

or a TXMatrix Plus router, the command is broadcast to all backup Routing Engines of
the LCCs that are connected to it in the routing matrix.
Required PrivilegeLevel
view
RelatedDocumentation
Routing Matrix with a TXMatrix Plus Router Solutions Page•
List of Sample Output show system boot-messages (TXMatrix Router) on page 497show system boot-messages lcc (TXMatrix Router) on page 498show system boot-messages (TXMatrix Plus Router) on page 499show system boot-messages (QFX3500 Switch) on page 499
Sample Output
show system boot-messages (TXMatrix Router)
user@host> show system boot-messagesCopyright (c) 1992-1998 FreeBSD Inc.Copyright (c) 1996-2000 Juniper Networks, Inc.All rights reserved.Copyright (c) 1982, 1986, 1989, 1991, 1993 The Regents of the University of California. All rights reserved.
JUNOS 4.1-20000216-Zf8469 #0: 2000-02-16 12:57:28 UTC [email protected]:/p/build/20000216-0905/4.1/release_kernel/sys/compile/GENERICCPU: Pentium Pro (332.55-MHz 686-class CPU) Origin = "GenuineIntel" Id = 0x66a Stepping=10 Features=0x183f9ff<FPU,VME,DE,PSE,TSC,MSR,PAE,MCE,CX8,SEP,MTRR,PGE,MCA,CMOV,<b16>,<b17>,MMX,<b24>>Teknor CPU Card Recognizedreal memory = 805306368 (786432K bytes)avail memory = 786280448 (767852K bytes)Probing for devices on PCI bus 0:chip0 <generic PCI bridge (vendor=8086 device=7192 subclass=0)> rev 3 class 60000 on pci0:0:0chip1 <Intel 82371AB PCI-ISA bridge> rev 1 class 60100 on pci0:7:0chip2 <Intel 82371AB IDE interface> rev 1 class 10180 on pci0:7:1chip3 <Intel 82371AB USB interface> rev 1 class c0300 int d irq 11 on pci0:7:2smb0 <Intel 82371AB SMB controller> rev 1 class 68000 on pci0:7:3pcic0 <TI PCI-1131 PCI-CardBus Bridge> rev 1 class 60700 int a irq 15 on pci0:13:0TI1131 PCI Config Reg: [pci only][FUNC0 pci int]pcic1 <TI PCI-1131 PCI-CardBus Bridge> rev 1 class 60700 int b irq 12 on pci0:13:1TI1131 PCI Config Reg: [pci only][FUNC1 pci int]fxp0 <Intel EtherExpress Pro 10/100B Ethernet> rev 8 class 20000 int a irq 12 on
pci0:16:0chip4 <generic PCI bridge (vendor=1011 device=0022 subclass=4)> rev 4 class 60400 on pci0:17:0fxp1 <Intel EtherExpress Pro 10/100B Ethernet> rev 8 class 20000 int a irq 10 on
pci0:19:0Probing for devices on PCI bus 1:
497Copyright © 2018, Juniper Networks, Inc.
Chapter 19: Operational Commands

mcs0 <Miscellaneous Control Subsystem> rev 12 class ff0000 int a irq 12 on pci1:13:0fxp2 <Intel EtherExpress Pro 10/100B Ethernet> rev 8 class 20000 int a irq 10 on
pci1:14:0Probing for devices on the ISA bus:sc0 at 0x60-0x6f irq 1 on motherboardsc0: EGA color <16 virtual consoles, flags=0x0>ed0 not found at 0x300ed1 not found at 0x280ed2 not found at 0x340psm0 not found at 0x60sio0 at 0x3f8-0x3ff irq 4 flags 0x20010 on isasio0: type 16550A, consolesio1 at 0x3e8-0x3ef irq 5 flags 0x20000 on isasio1: type 16550Asio2 at 0x2f8-0x2ff irq 3 flags 0x20000 on isasio2: type 16550Apcic0 at 0x3e0-0x3e1 on isaPC-Card ctlr(0) TI PCI-1131 [CardBus bridge mode] (5 mem & 2 I/O windows)pcic0: slot 0 controller I/O address 0x3e0npx0 flags 0x1 on motherboardnpx0: INT 16 interfacefdc0: direction bit not setfdc0: cmd 3 failed at out byte 1 of 3fdc0 not found at 0x3f0wdc0 at 0x1f0-0x1f7 irq 14 on isawdc0: unit 0 (wd0): <SunDisk SQFXB-80>, single-sector-i/owd0: 76MB (156672 sectors), 612 cyls, 8 heads, 32 S/T, 512 B/Swdc0: unit 1 (wd1): <IBM-DCXA-210000>wd1: 8063MB (16514064 sectors), 16383 cyls, 16 heads, 63 S/T, 512 B/Swdc1 not found at 0x170wdc2 not found at 0x180ep0 not found at 0x300fxp0: Ethernet address 00:a0:a5:12:05:5afxp1: Ethernet address 00:a0:a5:12:05:59fxp2: Ethernet address 02:00:00:00:00:01swapon: adding /dev/wd1s1b as swap deviceAutomatic reboot in progress.../dev/rwd0s1a: clean, 16599 free (95 frags, 2063 blocks, 0.1% fragmentation)/dev/rwd0s1e: clean, 9233 free (9 frags, 1153 blocks, 0.1% fragmentation)/dev/rwd0s1a: clean, 16599 free (95 frags, 2063 blocks, 0.1% fragmentation)/dev/rwd1s1f: clean, 4301055 free (335 frags, 537590 blocks, 0.0% fragmentation)
show system boot-messages lcc (TXMatrix Router)
user@host> show system boot-messages lcc 2lcc2-re0:--------------------------------------------------------------------------Copyright (c) 1996-2001, Juniper Networks, Inc.All rights reserved.Copyright (c) 1992-2001 The FreeBSD Project.Copyright (c) 1979, 1980, 1983, 1986, 1988, 1989, 1991, 1992, 1993, 1994 The Regents of the University of California. All rights reserved.JUNOS 7.0-20040912.0 #0: 2004-09-12 09:16:32 UTC
[email protected]:/build/benten-b/7.0/20040912.0/obj-i386/sys/compile/JUNIPERTimecounter "i8254" frequency 1193182 HzTimecounter "TSC" frequency 601368936 HzCPU: Pentium III/Pentium III Xeon/Celeron (601.37-MHz 686-class CPU) Origin = "GenuineIntel" Id = 0x68a Stepping = 10
Copyright © 2018, Juniper Networks, Inc.498
Installation and Upgrade Guide

Features=0x387f9ff<FPU,VME,DE,PSE,TSC,MSR,PAE,MCE,CX8,SEP,MTRR,PGE,MCA,CMOV,PAT,PSE36,PN,MMX,FXSR,SSE>real memory = 2147467264 (2097136K bytes)sio0: gdb debugging portavail memory = 2084040704 (2035196K bytes)Preloaded elf kernel "kernel" at 0xc06d9000.DEVFS: ready for devicesPentium Pro MTRR support enabledmd0: Malloc diskDRAM Data Integrity Mode: ECC Mode with h/w scrubbingnpx0: <math processor> on motherboardnpx0: INT 16 interfacepcib0: <ServerWorks NB6635 3.0LE host to PCI bridge> on motherboardpci0: <PCI bus> on pcib0pcic-pci0: <TI PCI-1410 PCI-CardBus Bridge> irq 15 at device 1.0 on pci0pcic-pci0: TI12XX PCI Config Reg: [pwr save][pci only]fxp0: <Intel Embedded 10/100 Ethernet> port 0x1000-0x103f mem 0xfb800000-0xfb81ffff,0xfb820000-0xfb820fff irq 9 at device 3.0 on pci0fxp1: <Intel Embedded 10/100 Ethernet> port 0x1040-0x107f mem 0xfb840000-0xfb85ffff,0xfb821000-0xfb821fff irq 11 at device 4.0 on pci0...
show system boot-messages (TXMatrix Plus Router)
user@host> show system boot-messagessfc0-re0:--------------------------------------------------------------------------Copyright (c) 1996-2009, Juniper Networks, Inc.All rights reserved.Copyright (c) 1992-2006 The FreeBSD Project.Copyright (c) 1979, 1980, 1983, 1986, 1988, 1989, 1991, 1992, 1993, 1994 The Regents of the University of California. All rights reserved.JUNOS 9.6B3.3 #0: 2009-06-17 19:52:08 UTC
[email protected]:/volume/build/junos/9.6/release/9.6B3.3/obj-i386/bsd/sys/compile/JUNIPERMPTable: Timecounter "i8254" frequency 1193182 Hz quality 0 CPU: Intel(R) Xeon(R) CPU L5238 @ 2.66GHz (2660.01-MHz 686-class CPU) Origin = "GenuineIntel" Id = 0x1067a Stepping = 10 Features=0xbfebfbff...lcc1-re0:--------------------------------------------------------------------------Copyright (c) 1996-2009, Juniper Networks, Inc.All rights reserved.Copyright (c) 1992-2006 The FreeBSD Project.Copyright (c) 1979, 1980, 1983, 1986, 1988, 1989, 1991, 1992, 1993, 1994 The Regents of the University of California. All rights reserved.JUNOS 9.6-20090617.0 #0: 2009-06-17 04:15:14 UTC
[email protected]:/volume/build/junos/9.6/production/20090617.0/obj-i386/bsd/sys/compile/JUNIPERTimecounter "i8254" frequency 1193182 Hz quality 0CPU: Intel(R) Xeon(R) CPU @ 1.86GHz (1862.01-MHz 686-class CPU)
Origin = "GenuineIntel" Id = 0x1067a Stepping = 10 Features=0xbfebfbff...
show system boot-messages (QFX3500 Switch)
user@switch> show sytem boot-messages
499Copyright © 2018, Juniper Networks, Inc.
Chapter 19: Operational Commands

getmemsize: msgbufp[size=32768] = 0x81d07fe4
System physical memory distribution:-------------------------------------------------------------------------------Total physical memory: 4160749568 (3968 MB)Physical memory used: 3472883712 (3312 MB)Physical memory allocated to kernel: 2130706432 (2032 MB)Physical memory allocated to user BTLB: 1342177280 (1280 MB)-------------------------------------------------------------------------------
Copyright (c) 1996-2010, Juniper Networks, Inc.All rights reserved.Copyright (c) 1992-2006 The FreeBSD Project.Copyright (c) 1979, 1980, 1983, 1986, 1988, 1989, 1991, 1992, 1993, 1994 The Regents of the University of California. All rights reserved.JUNOS 11.1I #0: 2010-09-17 19:18:07 UTC [email protected]:/c/ssiano/DEV_QFX_SI_BRANCH/03/20100917.399988/obj-xlr/bsd/sys/compile/JUNIPER-DCTORWARNING: debug.mpsafenet forced to 0 as ipsec requires GiantJUNOS 11.1I #0: 2010-09-17 19:18:07 UTC [email protected]:/c/ssiano/DEV_QFX_SI_BRANCH/03/20100917.399988/obj-xlr/bsd/sys/compile/JUNIPER-DCTORreal memory = 3472883712 (3312MB)avail memory = 1708171264 (1629MB)cpuid: 0, btlb_cpumap:0xfffffff8FreeBSD/SMP: Multiprocessor System Detected: 12 CPUsETHERNET SOCKET BRIDGE initialisingInitializing QFX platform properties ..cpu0 on motherboard: RMI's XLR CPU Rev. 0.3 with no FPU implemented L1 Cache: I size 32kb(32 line), D size 32kb(32 line), eight way. L2 Cache: Size 1024kb, eight waypic_lbus0: <XLR Local Bus>pic_lbus0: <XLR Local Bus> on motherboardEnter qfx control ethernet probe addr:0xc5eeec00gmac4: <XLR GMAC GE Ethernet> on pic_lbus0me0: Ethernet address 00:1d:b5:f7:68:40 Enter qfx control ethernet probe addr:0xc5eeeb40gmac5: <XLR GMAC GE Ethernet> on pic_lbus0me1: Ethernet address 00:1d:b5:f7:68:41 Enter qfx control ethernet probe addr:0xc5eeea80gmac6: <XLR GMAC GE Ethernet> on pic_lbus0me1: Ethernet address 00:1d:b5:f7:68:42 sio0 on pic_lbus0 Entering sioattach sio0: type 16550A, console xls_setup_intr: skip irq 3, xlr regs are set up somewhere else.gblmem0 on pic_lbus0 ehci0: <RMI XLS USB 2.0 controller> on pic_lbus0ehci_bus_attach: allocated resource. tag=1, base=bef24000xls_ehci_init: endian hardware swapping NOT enabled.usb0: EHCI version 1.0 usb0 on ehci0 usb0: USB revision 2.0 uhub0: vendor 0x0000 EHCI root hub, class 9/0, rev 2.00/1.00, addr 1uhub0: 2 ports with 2 removable, self poweredumass0: USB USBFlashDrive, rev 2.00/11.00, addr 2pcib0: PCIe link 0 up pcib0: PCIe link 2 up pcib0: PCIe link 3 up pcib0: <XLS PCI Host Controller> on pic_lbus0
Copyright © 2018, Juniper Networks, Inc.500
Installation and Upgrade Guide

pci0: <PCI bus> on pcib0 pcib1: <PCI-PCI bridge> at device 0.0 on pci0pci1: <PCI bus> on pcib1 pci1: <network, ethernet> at device 0.0 (no driver attached)pcib2: <PCI-PCI bridge> at device 1.0 on pci0pcib3: <PCI-PCI bridge> at device 2.0 on pci0pci2: <PCI bus> on pcib3 pci2: <network, ethernet> at device 0.0 (no driver attached)pcib4: <PCI-PCI bridge> at device 3.0 on pci0pci3: <PCI bus> on pcib4 pci3: <network, ethernet> at device 0.0 (no driver attached)cfi device address space at 0xbc000000 cfi0: <AMD/Fujitsu - 8MB> on pic_lbus0 cfi device address space at 0xbc000000 i2c0: <I2C bus controller> on pic_lbus0 i2c1: <I2C bus controller> on pic_lbus0 qfx_fmn0 on pic_lbus0 pool offset 1503776768 xlr_lbus0: <XLR Local Bus Controller> on motherboardqfx_bcpld_probe[124] qfx_bcpld_probe[138]: dev_type=0x0 qfx_bcpld_probe[124] qfx_bcpld0: QFX BCPLD probe success qfx_bcpld0qfx_bcpld_attach[174] qfx_bcpld_attach[207] : bus_space_tag=0x0, bus_space_handle=0xbd900000qfx_bcpld_probe[124] qfx_bcpld1: QFX BCPLD probe success qfx_bcpld1qfx_bcpld_attach[174] tor_bcpld_slave_attach[1245] : bus_space_tag=0x0, bus_space_handle=0xbda00000Initializing product: 96 .. bmeb: bmeb_lib_init done 0xc60a5000, addr 0x809c99a0bme0:Virtual BME driver initializing Timecounter "mips" frequency 1200000000 Hz quality 0Timecounter "xlr_pic_timer" frequency 66666666 Hz quality 1Timecounters tick every 1.000 msec Loading the NETPFE fc module IPsec: Initialized Security Association Processing.SMP: AP CPU #3 Launched! SMP: AP CPU #1 Launched! SMP: AP CPU #2 Launched! SMP: AP CPU #4 Launched! SMP: AP CPU #5 Launched! SMP: AP CPU #7 Launched! SMP: AP CPU #6 Launched! SMP: AP CPU #11 Launched! SMP: AP CPU #10 Launched! SMP: AP CPU #9 Launched! SMP: AP CPU #8 Launched! da0 at umass-sim0 bus 0 target 0 lun 0 da0: <USB USBFlashDrive 1100> Removable Direct Access SCSI-0 deviceda0: 40.000MB/s transfers da0: 3920MB (8028160 512 byte sectors: 255H 63S/T 499C)Trying to mount root from ufs:/dev/da0s1a
501Copyright © 2018, Juniper Networks, Inc.
Chapter 19: Operational Commands

show system auto-snapshot
Syntax show system auto-snapshot
Release Information Command introduced in Junos OS Release 12.3 for EX Series switches.
Command introduced in Junos OS Release 12.1X45-D10 for SRX Series devices.
Description Display automatic snapshot status information. When the automatic snapshot feature
is enabled and the system reboots from the alternate root partition, the switch
automatically takes a snapshot of the root file system in the alternate root partition and
copies it onto the primary root partition. This automatic snapshot procedure takes place
whenever the system reboots from the alternate partition, regardless of whether the
reboot from the alternate partition is due to a command or due to a corruption of the
primary partition.
Options This command has no options.
Required PrivilegeLevel
view
RelatedDocumentation
Understanding Resilient Dual-Root Partitions on Switches on page 115•
List of Sample Output show system auto-snapshot on page 503
Output Fields Table 50 on page 502 describes the output fields for the show system auto-snapshot
command. Output fields are listed in the approximate order in which they appear.
Table 50: show system auto-snapshot status Output Fields
Field DescriptionField Name
Status of the configuration:
• Enabled—If the system reboots from the alternate partition, the automatic snapshot featureautomatically takes a snapshot of the alternate partition and copies it onto the primary partition.
• Disabled—The system does not automatically take a snapshot of the alternate partition. Youmustuse the manual snapshot command, request system snapshot, to take a snapshot of one partitionand copy it onto the other.
Auto-snapshotconfiguration
Status of the automatic snapshot procedure:
• Completed—The automatic snapshot procedure has completed copying the alternate partition tothe primary partition and the alarm has been cleared.
• Disabled—The automatic snapshot procedure is inactive.
• In progress—The automatic snapshot procedure is in progress. It takes about 10 to 15 minutes tocomplete, depending upon disk size.
Auto-snapshot state
Copyright © 2018, Juniper Networks, Inc.502
Installation and Upgrade Guide

Sample Output
show system auto-snapshot
user@switch> show system auto-snapshotAuto-snapshot Configuration: EnabledAuto-snapshot State: Disabled
503Copyright © 2018, Juniper Networks, Inc.
Chapter 19: Operational Commands

show system download
Syntax show system download <download-id>
Release Information Command introduced in Junos OS Release 11.2 for SRX300, SRX320, SRX340, SRX345,
and SRX550M devices.
Description Display a brief summary of all the download instances alongwith their current state and
extent of progress. If a download-id is provided, the command displays a detailed report
of the particular download instance.
Options • download-id—(Optional) The ID number of the download instance.
Required PrivilegeLevel
view
RelatedDocumentation
request system download start on page 388•
• Understanding Download Manager for SRX Series Devices on page 54
List of Sample Output show system download on page 504show system download 1 on page 505
Output Fields Table 51 on page 504 lists the output fields for the show system download command.
Output fields are listed in the approximate order in which they appear.
Table 51: show system download Output Fields
Field DescriptionField Name
Displays the download identification number.ID
Displays the state of a particular download.Status
Displays the start time of a particular download.Start Time
Displays the percentage of a download that has been completed.Progress
Displays the URL fromwhich the file was downloaded.URL
Sample Output
show system download
user@host> show system downloadDownload Status Information:ID Status Start Time Progress URL1 Active May 4 06:28:36 5% ftp://ftp-server//tftpboot/1m_file
Copyright © 2018, Juniper Networks, Inc.504
Installation and Upgrade Guide

2 Active May 4 06:29:07 3% ftp://ftp-server//tftpboot/5m_file3 Error May 4 06:29:22 Unknown ftp://ftp-server//tftpboot/badfile4 Completed May 4 06:29:40 100% ftp://ftp-server//tftpboot/smallfile
show system download 1
user@host> show system download 1
Download ID : 1Status : ActiveProgress : 6%URL : ftp://ftp-server//tftpboot/1m_fileLocal Path : /var/tmp/1m_fileMaximum Rate : 1kCreation Time : May 4 06:28:36Scheduled Time : May 4 06:28:36Start Time : May 4 06:28:37Error Count : 0
505Copyright © 2018, Juniper Networks, Inc.
Chapter 19: Operational Commands

show system license
Syntax show system license<installed | key-content filename | keys | revoked-info | usage>
Release Information Command introduced before Junos OS Release 7.4.
Command introduced in Junos OS Release 9.0 for EX Series switches.
Command introduced in Junos OS Release 11.1 for the QFX Series.
Command introduced in JunosOSRelease 13.3 for theMX1043DUniversal EdgeRouters.
Customer ID added to output of data center users in Junos OS Release 15.1.
Corrected output for duration of license added in Junos OS Release 17.4R1.
Description Display licenses and information about how they are used.
Options none—Display all license information.
key-content filename—(Optional)Display license key contentsof the specified filename.
installed—(Optional) Display installed licenses only.
keys—(Optional) Display a list of license keys. Use this information to verify that eachexpected license key is present.
revoked-info—(Optional) Display information about revoked licenses.
usage—(Optional) Display the state of licensed features.
Required PrivilegeLevel
maintenance
RelatedDocumentation
List of Sample Output show system license (vMX Routers with Juniper Agile Licensing) on page 507show system license on page 508show system license installed on page 509show system license keys on page 509show system license usage on page 509show system license (MX104 Routers) on page 509show system license installed (MX104 Routers) on page 510show system license keys (MX104 Routers) on page 510show system license usage (MX104 Routers) on page 510show system license (MX104 Routers) on page 510show system license installed (MX104 Routers) on page 511show system license keys (MX104 Routers) on page 511show system license usage (MX104 Routers) on page 511show system license (MX104 Routers) on page 512show system license installed (MX104 Routers) on page 512
Copyright © 2018, Juniper Networks, Inc.506
Installation and Upgrade Guide

show system license keys (MX104 Routers) on page 512show system license usage (MX104 Routers) on page 513show system license (QFX Series) on page 513showsystemlicense(QFX5110SwitchwithDisaggregatedFeatureLicense)onpage513show system license key-content srx_1year_sub.lic on page 514
Output Fields Table52onpage507 lists theoutput fields for the showsystemlicensecommand.Output
fields are listed in the approximate order in which they appear.
Table 52: show system license Output Fields
Field DescriptionField Name
Name assigned to the configured feature. You use this information to verify that all the features forwhich you installed licenses are present.
Feature name
Number of licenses used by a router or switch. You use this information to verify that the number oflicenses usedmatches the number configured. If a licensed feature is configured, the feature isconsidered used.
NOTE: In Junos OS Release 10.1 and later, the Licenses used column displays the actual usage countbased on the number of active sessions or connections as reported by the corresponding featuredaemons. This is applicable for scalable license-based features such as Subscriber Access(scale-subscriber), L2TP (scale-l2tp), Mobile IP (scale-mobile-ip), and so on.
Licenses used
Information about the installed license key:
• License identifier—Identifier associated with a license key.
• State—State of the license key:valid or invalid. An invalid state indicates that the key was enteredincorrectly or is not valid for the specific device.
• License version—Version of a license. The version indicates how the license is validated, the typeof signature, and the signer of the license key.
• Customer ID—Name of the customer license is for. Feature added as of Junos OS Release 15.1 fordata center customers (for example QFX Series platform users).
• Valid for device—Device that can use a license key.
• Group defined—Groupmembership of a device.
• Features—Feature associated with a license, such as data link switching (DLSw).
Licenses installed
Number of licenses required for features being used but not yet properly licensed.Licenses needed
Amount of time left within the grace period before a license is required for a feature being used.Expiry
Sample Output
show system license (vMX Routers with Juniper Agile Licensing)
user@host> show system licenseLicense usage: Licenses Licenses Licenses Expiry Feature name used installed needed VMX-SCALE 0 1 0 permanent VMX-BANDWIDTH 0 130000 0 permanent mobile-next-DPI-base 0 1000 0 permanent mobile-next-policy-prepaid-scaling 0 1000 0 permanent
507Copyright © 2018, Juniper Networks, Inc.
Chapter 19: Operational Commands

mobile-next-http-app-scaling 0 1000 0 permanent mobile-next-scaling 0 1000 0 permanent logical-system 0 1 0 permanent ax411-wlan-ap 0 2 0 permanent dynamic-vpn 0 2 0 permanent scale-mobile-ip 0 1000 0 permanent scale-l2tp 0 1000 0 permanent scale-subscriber 0 64010 0 permanent
Licenses installed: License identifier: RMS818090001 License version: 1 Software Serial Number: AID000000001 Customer ID: LABJuniperTest License count: 1 Features: VMX-SCALE - Max scale supported by the VMX date-based, 2017-03-15 05:30:00 IST - 2017-05-14 05:30:00 IST
License identifier: RMS818020001 License version: 1 Software Serial Number: AID000000001 Customer ID: vMX-JuniperNetworks License count: 1 Features: VMX-SCALE - Max scale supported by the VMX permanent…
show system license
user@host> show system license
License usage: Licenses Licenses Licenses Expiry Feature name used installed needed subscriber-accounting 2 2 0 permanent subscriber-authentication 1 2 0 permanent subscriber-address-assignment 2 2 0 permanent subscriber-vlan 2 2 0 permanent subscriber-ip 0 2 0 permanent scale-subscriber 2 3 0 permanent scale-l2tp 4 5 0 permanent scale-mobile-ip 1 2 0 permanent
Licenses installed: License identifier: XXXXXXXXXX License version: 2 Customer ID: ACME CORPORATIOM Features: subscriber-accounting - Per Subscriber Radius Accounting permanent subscriber-authentication - Per Subscriber Radius Authentication permanent subscriber-address-assignment - Radius/SRC Address Pool Assignment permanent subscriber-vlan - Dynamic Auto-sensed Vlan permanent subscriber-ip - Dynamic and Static IP permanent
Copyright © 2018, Juniper Networks, Inc.508
Installation and Upgrade Guide

show system license installed
user@host> show system license installed License identifier: XXXXXXXXXX License version: 2 Features: subscriber-accounting - Per Subscriber Radius Accounting permanent subscriber-authentication - Per Subscriber Radius Authentication permanent subscriber-address-assignment - Radius/SRC Address Pool Assignment permanent subscriber-vlan - Dynamic Auto-sensed Vlan permanent subscriber-ip - Dynamic and Static IP permanent
show system license keys
user@host> show system license keysXXXXXXXXXX xxxxxx xxxxxx xxxxxx xxxxxx xxxxxx xxxxxx xxxxxx xxxxxx xxxxxx xxxxxx xxxxxx xxxxxx xxxxxx xxxxxx xxx
show system license usage
user@host> show system license usageLicense usage: Licenses Licenses Licenses Expiry Feature name used installed needed subscriber-accounting 2 2 0 permanent subscriber-authentication 1 2 0 permanent subscriber-address-assignment 2 2 0 permanent subscriber-vlan 2 2 0 permanent subscriber-ip 0 2 0 permanent scale-subscriber 2 3 0 permanent scale-l2tp 4 5 0 permanent scale-mobile-ip 1 2 0 permanent
show system license (MX104 Routers)
In the following output, ports 0 and 1 are activated by installing the license to activate
the first two built-in ports.
user@host> show system licenseLicense usage: Licenses Licenses Licenses Expiry Feature name used installed needed scale-subscriber 0 1000 0 permanent scale-l2tp 0 1000 0 permanent scale-mobile-ip 0 1000 0 permanent MX104-2x10Gig-port-0-1 0 1 0 permanent
Licenses installed: License identifier: XXXXXXXXXX License version: 2 Features: MX104-2x10Gig-port-0-1 - MX104 2X10Gig Builtin Port(xe-2/0/0 & xe-2/0/1)
509Copyright © 2018, Juniper Networks, Inc.
Chapter 19: Operational Commands

upgrade permanent
show system license installed (MX104 Routers)
In the following output, ports 0 and 1 are activated by installing the license to activate
the first two built-in ports.
user@host > show system license installedLicense identifier: XXXXXXXXXX License version: 2 Features: MX104-2x10Gig-port-0-1 - MX104 2X10Gig Builtin Port(xe-2/0/0 & xe-2/0/1) upgrade permanent
show system license keys (MX104 Routers)
In the following output, ports 0 and 1 are activated by installing the license to activate
the first two built-in ports.
user@host > show system license keys
XXXXXXXXXX xxxxxx xxxxxx xxxxxx xxxxxx xxxxxx xxxxxx xxxxxx xxxxxx xxxxxx xxxxxx xxxxxx xxxxxx xxxxxx xxxx
show system license usage (MX104 Routers)
In the following output, ports 0 and 1 are activated by installing the license to activate
the first two built-in ports.
user@host > show system license usage Licenses Licenses Licenses Expiry Feature name used installed needed scale-subscriber 0 1000 0 permanent scale-l2tp 0 1000 0 permanent scale-mobile-ip 0 1000 0 permanent MX104-2x10Gig-port-0-1 0 1 0 permanent
show system license (MX104 Routers)
In the following output, ports 2 and 3 are activated by installing the license to activate
the next two built-in ports after installing the license to activate the first two built-in
ports.
user@host > show system licenseLicense usage: Licenses Licenses Licenses Expiry Feature name used installed needed scale-subscriber 0 1000 0 permanent scale-l2tp 0 1000 0 permanent scale-mobile-ip 0 1000 0 permanent MX104-2x10Gig-port-0-1 0 1 0 permanent MX104-2x10Gig-port-2-3 0 1 0 permanent
Licenses installed: License identifier: XXXXXXXXXX
Copyright © 2018, Juniper Networks, Inc.510
Installation and Upgrade Guide

License version: 2 Features: MX104-2x10Gig-port-0-1 - MX104 2X10Gig Builtin Port(xe-2/0/0 & xe-2/0/1) upgrade permanent
License identifier: XXXXXXXXXX License version: 2 Features: MX104-2x10Gig-port-2-3 - MX104 2X10Gig Builtin Port(xe-2/0/2 & xe-2/0/3) upgrade permanent
show system license installed (MX104 Routers)
In the following output, ports 2 and 3 are activated by installing the license to activate
the next two built-in ports after installing the license to activate the first two built-in
ports.
user@host > show system license installedLicense identifier: XXXXXXXXXX License version: 2 Features: MX104-2x10Gig-port-0-1 - MX104 2X10Gig Builtin Port(xe-2/0/0 & xe-2/0/1) upgrade permanent
License identifier: XXXXXXXXXX License version: 2 Features: MX104-2x10Gig-port-2-3 - MX104 2X10Gig Builtin Port(xe-2/0/2 & xe-2/0/3) upgrade permanent
show system license keys (MX104 Routers)
In the following output, ports 2 and 3 are activated by installing the license to activate
the next two built-in ports after installing the license to activate the first two built-in
ports.
user@host > show system license keys
XXXXXXXXXX xxxxxx xxxxxx xxxxxx xxxxxx xxxxxx xxxxxx xxxxxx xxxxxx xxxxxx xxxxxx xxxxxx xxxxxx xxxxxx xxxx
XXXXXXXXXX xxxxxx xxxxxx xxxxxx xxxxxx xxxxxx xxxxxx xxxxxx xxxxxx xxxxxx xxxxxx xxxxxx xxxxxx xxxxxx xxxx
show system license usage (MX104 Routers)
In the following output, ports 2 and 3 are activated by installing the license to activate
the next two built-in ports after installing the license to activate the first two built-in
ports.
user@host > show system license usage
511Copyright © 2018, Juniper Networks, Inc.
Chapter 19: Operational Commands

Licenses Licenses Licenses Expiry Feature name used installed needed scale-subscriber 0 1000 0 permanent scale-l2tp 0 1000 0 permanent scale-mobile-ip 0 1000 0 permanent MX104-2x10Gig-port-0-1 0 1 0 permanent MX104-2x10Gig-port-2-3 0 1 0 permanent
show system license (MX104 Routers)
In the following output, ports 0,1,2, and 3 are activated by installing a single license key
to activate all four built-in ports.
user@host > show system licenseLicense usage: Licenses Licenses Licenses Expiry Feature name used installed needed scale-subscriber 0 1000 0 permanent scale-l2tp 0 1000 0 permanent scale-mobile-ip 0 1000 0 permanent MX104-2x10Gig-port-0-1 0 1 0 permanent MX104-2x10Gig-port-2-3 0 1 0 permanent
Licenses installed: License identifier: XXXXXXXXXX License version: 2 Features: MX104-2x10Gig-port-0-1 - MX104 2X10Gig Builtin Port(xe-2/0/0 & xe-2/0/1) upgrade permanent MX104-2x10Gig-port-2-3 - MX104 2X10Gig Builtin Port(xe-2/0/2 & xe-2/0/3) upgrade permanent
show system license installed (MX104 Routers)
In the following output, ports 0,1,2, and 3 are activated by installing a single license key
to activate all four built-in ports.
user@host > show system license installedLicense identifier: XXXXXXXXXX License version: 2 Features: MX104-2x10Gig-port-0-1 - MX104 2X10Gig Builtin Port(xe-2/0/0 & xe-2/0/1) upgrade permanent MX104-2x10Gig-port-2-3 - MX104 2X10Gig Builtin Port(xe-2/0/2 & xe-2/0/3) upgrade permanent
show system license keys (MX104 Routers)
In the following output, ports 0,1,2, and 3 are activated by installing a single license key
to activate all four built-in ports.
user@host > show system license keys
XXXXXXXXX xxxxxx xxxxxx xxxxxx xxxxxx xxxxxx
Copyright © 2018, Juniper Networks, Inc.512
Installation and Upgrade Guide

xxxxxx xxxxxx xxxxxx xxxxxx xxxxxx xxxxxx xxxxxx x
show system license usage (MX104 Routers)
In the following output, ports 0,1,2, and 3 are activated by installing a single license key
to activate all four built-in ports.
user@host > show system license usage Licenses Licenses Licenses Expiry Feature name used installed needed scale-subscriber 0 1000 0 permanent scale-l2tp 0 1000 0 permanent scale-mobile-ip 0 1000 0 permanent MX104-2x10Gig-port-0-1 0 1 0 permanent MX104-2x10Gig-port-2-3 0 1 0 permanent
show system license (QFX Series)
user@switch> show system licenseLicense usage: Licenses Licenses Licenses Expiry Feature name used installed needed qfx-edge-fab 1 1 1 permanentLicenses installed: License identifier: JUNOS417988 License version: 1 Features: qfx-edge-fab - QFX3000 Series QF/Node feature license permanent
show system license (QFX5110 Switch with Disaggregated Feature License)
user@switch> show system licenseLicense usage: Licenses Licenses Licenses Expiry Feature name used installed needed bgp 0 1 0 2017-07-05 00:00:00 UTC isis 0 1 0 2017-07-05 00:00:00 UTC vxlan 0 1 0 2017-07-05 00:00:00 UTC ovsdb 0 1 0 2017-07-05 00:00:00 UTC jbs1 0 1 0 2017-07-02 00:00:00 UTC upgrade1 0 1 0 2017-07-05 00:00:00 UTC
Licenses installed: License identifier: JUNOS797095 License version: 4 Software Serial Number: 91730A00223925 Customer ID: Juniper Features: JUNOS-BASE-SERVICES-CLASS-1 - QFX Junos Base Services license for Class 1 HW
date-based, 2016-07-01 00:00:00 UTC - 2017-07-02 00:00:00 UTC
513Copyright © 2018, Juniper Networks, Inc.
Chapter 19: Operational Commands

License identifier: JUNOS797646 License version: 4 Software Serial Number: 91730A00224207 Customer ID: Juniper Features: CLASS-1-JUNOS-BASE-ADVANCED-UPGRADE - Class 1 Junos Base to Advanced Services Upgrade date-based, 2016-07-04 00:00:00 UTC - 2017-07-05 00:00:00 UTC
{master:0}
show system license key-content srx_1year_sub.lic
License Key Content: License Id: LICENSE-1 License version: 4 Valid for device: CW2716AF0740 Features: idp-sig - IDP Signature date-based, 2016-07-03 00:00:00 GMT - 2017-07-03 00:00:00 GMT
Copyright © 2018, Juniper Networks, Inc.514
Installation and Upgrade Guide

show system license (View)
Syntax show system license<installed | keys | status | usage>
Release Information Command introduced in Junos OS Release 9.5. Logical system status option added in
Junos OS Release 11.2.
Description Display licenses and information about how licenses are used.
Options none—Display all license information.
installed—(Optional) Display installed licenses only.
keys—(Optional) Display a list of license keys. Use this information to verify that eachexpected license key is present.
status—(Optional) Display license status for a specified logical system or for all logical
systems.
usage—(Optional) Display the state of licensed features.
Required PrivilegeLevel
view
RelatedDocumentation
Adding New Licenses (CLI Procedure) on page 331•
List of Sample Output show system license on page 516show system license installed on page 516show system license keys on page 517show system license usage on page 517show system license status logical-system all on page 517
Output Fields Table53onpage515 lists theoutput fields for the showsystemlicensecommand.Output
fields are listed in the approximate order in which they appear.
Table 53: show system license Output Fields
Field DescriptionField Name
Name assigned to the configured feature. You use this information to verify that all the features forwhich you installed licenses are present.
Feature name
Number of licenses used by the device. You use this information to verify that the number of licensesusedmatches the number configured. If a licensed feature is configured, the feature is consideredused.
Licenses used
515Copyright © 2018, Juniper Networks, Inc.
Chapter 19: Operational Commands

Table 53: show system license Output Fields (continued)
Field DescriptionField Name
Information about the installed license key:
• License identifier—Identifier associated with a license key.
• License version—Version of a license. The version indicates how the license is validated, the typeof signature, and the signer of the license key.
• Valid for device—Device that can use a license key.
• Features—Feature associated with a license.
Licenses installed
Number of licenses required for features being used but not yet properly licensed.Licenses needed
Time remaining in the grace period before a license is required for a feature being used.Expiry
Displays whether a license is enabled for a logical system.Logical system licensestatus
Sample Output
show system license
user@host> show system license
License usage: Licenses Licenses Licenses Expiry Feature name used installed needed av_key_kaspersky_engine 1 1 0 2012-03-30 01:00:00 IST wf_key_surfcontrol_cpa 0 1 0 2012-03-30 01:00:00 IST dynamic-vpn 0 1 0 permanent ax411-wlan-ap 0 2 0 permanent
Licenses installed: License identifier: JUNOS301998 License version: 2 Valid for device: AG4909AA0080 Features: av_key_kaspersky_engine - Kaspersky AV date-based, 2011-03-30 01:00:00 IST - 2012-03-30 01:00:00 IST
License identifier: JUNOS302000 License version: 2 Valid for device: AG4909AA0080 Features: wf_key_surfcontrol_cpa - Web Filtering date-based, 2011-03-30 01:00:00 IST - 2012-03-30 01:00:00 IST
show system license installed
user@host> show system license installed
License identifier: JUNOS301998 License version: 2 Valid for device: AG4909AA0080
Copyright © 2018, Juniper Networks, Inc.516
Installation and Upgrade Guide

Features: av_key_kaspersky_engine - Kaspersky AV date-based, 2011-03-30 01:00:00 IST - 2012-03-30 01:00:00 IST
License identifier: JUNOS302000 License version: 2 Valid for device: AG4909AA0080 Features: wf_key_surfcontrol_cpa - Web Filtering date-based, 2011-03-30 01:00:00 IST - 2012-03-30 01:00:00 IST
show system license keys
user@host> show system license keys
XXXXXXXXXX xxxxxx xxxxxx xxxxxx xxxxxx xxxxxx xxxxxx xxxxxx xxxxxx xxxxxx xxxxxx xxxxxx xxxxxx xxxxxx xxxxxx xxx
show system license usage
user@host> show system license usage
Licenses Licenses Licenses ExpiryFeature name used installed needed av_key_kaspersky_engine 1 1 0 2012-03-30 01:00:00 IST wf_key_surfcontrol_cpa 0 1 0 2012-03-30 01:00:00 IST dynamic-vpn 0 1 0 permanent ax411-wlan-ap 0 2 0 permanent
show system license status logical-system all
user@host> show system license status logical-system allLogical system license status:
logical system name license statusroot-logical-system enabled LSYS0 enabled LSYS1 enabled LSYS2 enabled
517Copyright © 2018, Juniper Networks, Inc.
Chapter 19: Operational Commands

show system login lockout
Syntax show system login lockout
Release Information Command introduced in Junos OS Release 11.2.
Description Display the usernames locked after unsuccessful login attempts.
Required PrivilegeLevel
view and system
RelatedDocumentation
lockout-period•
• clear system login lockout on page 381
List of Sample Output show system login lockout on page 518
Output Fields Table 54 on page 518 lists the output fields for the show system login lockout command.
Output fields are listed in the approximate order in which they appear.
Table 54: show system login lockout
Level of OutputField DescriptionField Name
All levelsUsernameUser
All levelsDate and time the username was lockedLockout start
All levelsDate and time the username was unlockedLockout end
Sample Output
show system login lockout
user@host> show system login lockout
User Lockout start Lockout endroot 2011-05-11 09:11:15 UTC 2011-05-11 09:13:15 UTC
Copyright © 2018, Juniper Networks, Inc.518
Installation and Upgrade Guide
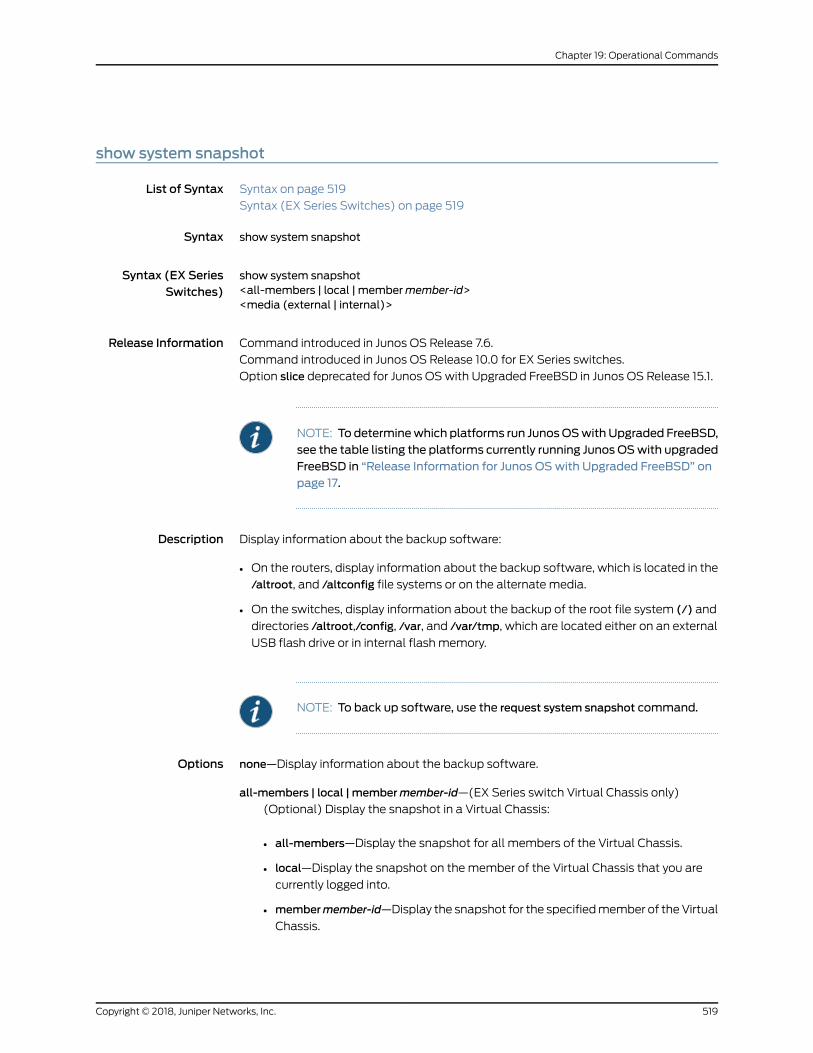
show system snapshot
List of Syntax Syntax on page 519
Syntax (EX Series Switches) on page 519
Syntax show system snapshot
Syntax (EX SeriesSwitches)
show system snapshot<all-members | local | membermember-id><media (external | internal)>
Release Information Command introduced in Junos OS Release 7.6.
Command introduced in Junos OS Release 10.0 for EX Series switches.
Option slice deprecated for Junos OSwith Upgraded FreeBSD in Junos OS Release 15.1.
NOTE: Todeterminewhich platforms run JunosOSwithUpgraded FreeBSD,see the table listing the platforms currently running JunosOSwith upgradedFreeBSD in “Release Information for Junos OSwith Upgraded FreeBSD” onpage 17.
Description Display information about the backup software:
• On the routers, display information about the backup software, which is located in the
/altroot, and /altconfig file systems or on the alternate media.
• On the switches, display information about the backup of the root file system (/) and
directories /altroot,/config, /var, and /var/tmp, which are located either on an external
USB flash drive or in internal flash memory.
NOTE: To back up software, use the request system snapshot command.
Options none—Display information about the backup software.
all-members | local | membermember-id—(EX Series switch Virtual Chassis only)
(Optional) Display the snapshot in a Virtual Chassis:
• all-members—Display the snapshot for all members of the Virtual Chassis.
• local—Display the snapshot on themember of the Virtual Chassis that you are
currently logged into.
• membermember-id—Display the snapshot for the specifiedmember of theVirtual
Chassis.
519Copyright © 2018, Juniper Networks, Inc.
Chapter 19: Operational Commands

media (external | internal)—(EX Series switch only) (Optional) Display the destination
media location for the snapshot. The external option specifies the snapshot on an
externalmass storage device, such as aUSB flash drive. The internaloption specifies
the snapshot on an internal memory source, such as internal flash memory. If no
additional options are specified, the command displays the snapshot stored in both
slices.
Required PrivilegeLevel
view
RelatedDocumentation
request system snapshot on page 419•
List of Sample Output show system snapshot (Router) on page 520show system snapshotmedia external (Switch) on page 520show system snapshotmedia internal (Switch) on page 521
Output Fields Table 55 on page 520 lists the output fields for the show system snapshot command.
Output fields are listed in the approximate order in which they appear.
Table 55: show system snapshot Output Fields
Field DescriptionField Name
Date and time of the last snapshot.Creation date
Junos OS release number of individual softwarepackages.
JUNOS version on snapshot
Sample Output
show system snapshot (Router)
user@host> show system snapshotInformation for snapshot on hard-diskCreation date: Oct 5 13:53:29 2005JUNOS version on snapshot: jbase : 7.3R2.5 jcrypto: 7.3R2.5 jdocs : 7.3R2.5 jkernel: 7.3R2.5 jpfe : M40-7.3R2.5 jroute : 7.3R2.5
show system snapshotmedia external (Switch)
user@switch> show system snapshotmedia externalInformation for snapshot on external (/dev/da1s1a) (backup)Creation date: Mar 19 03:37:18 2012JUNOS version on snapshot: jbase : ex-12.1I20120111_0048_user jcrypto-ex: 12.1I20120111_0048_user jdocs-ex: 12.1I20120111_0048_user
Copyright © 2018, Juniper Networks, Inc.520
Installation and Upgrade Guide

jroute-ex: 12.1I20120111_0048_user jswitch-ex: 12.1I20120111_0048_user jweb-ex: 12.1I20120111_0048_userInformation for snapshot on external (/dev/da1s2a) (primary)Creation date: Mar 19 03:38:25 2012JUNOS version on snapshot: jbase : ex-12.2I20120305_2240_user jcrypto-ex: 12.2I20120305_2240_user jdocs-ex: 12.2I20120305_2240_user jroute-ex: 12.2I20120305_2240_user jswitch-ex: 12.2I20120305_2240_user jweb-ex: 12.2I20120305_2240_user
show system snapshotmedia internal (Switch)
user@switch> show system snapshotmedia internalInformation for snapshot on internal (/dev/da0s1a) (backup)Creation date: Mar 14 05:01:02 2011JUNOS version on snapshot: jbase : 11.1R1.9 jcrypto-ex: 11.1R1.9 jdocs-ex: 11.1R1.9 jkernel-ex: 11.1R1.9 jroute-ex: 11.1R1.9 jswitch-ex: 11.1R1.9 jweb-ex: 11.1R1.9 jpfe-ex42x: 11.1R1.9Information for snapshot on internal (/dev/da0s2a) (primary)Creation date: Mar 30 08:46:27 2011JUNOS version on snapshot: jbase : 11.2-20110330.0 jcrypto-ex: 11.2-20110330.0 jdocs-ex: 11.2-20110330.0 jkernel-ex: 11.2-20110330.0 jroute-ex: 11.2-20110330.0 jswitch-ex: 11.2-20110330.0 jweb-ex: 11.2-20110330.0 jpfe-ex42x: 11.2-20110330.0
521Copyright © 2018, Juniper Networks, Inc.
Chapter 19: Operational Commands

show system snapshot (Junos OSwith Upgraded FreeBSD)
Syntax (MX240,MX480, MX960,
show system snapshot
MX2010, MX2020Routers and EX9200
Switches only)
Release Information Command introduced in Junos OS Release 15.1 for MX240, MX480, MX960, MX2010,
and MX2020 routers and EX9200 switches only.
Command introduced in JunosOSRelease 16.1R1 forVMhostonMX240,MX480,MX960,
MX2010, and MX2020 routers and PTX5000 routers.
Output for recovery snapshotsprovided in JunosRelease 17.2 for all platformsusing Junos
OSwith upgraded FreeBSD.
Description Display information about the non-recovery backup software, which is located in the
junos file system on the hard disk drive or solid-state drive (SSD).
Display information about recovery snapshot after the non-recovery information.
NOTE: To back up software, use the request system snapshot command.
Required PrivilegeLevel
view
RelatedDocumentation
request system snapshot (Junos OSwith Upgraded FreeBSD) on page 427•
• request system reboot (Junos OSwith Upgraded FreeBSD) on page 411
• Release Information for Junos OSwith Upgraded FreeBSD on page 17
List of Sample Output show system snapshot on page 522show system snapshot (updated as of Junos OS Release 17.2) on page 523
Output Fields When you enter this command, you are provided feedback on the status of your request.
If there are no snapshots available, the command returns null output.
Sample Output
show system snapshot
user@host> show system snapshotSnapshot snap.20141219.122106:Location: /packages/sets/snap.20141219.122106Creation date: Dec 19 12:21:06 2014Junos version: 15.1-20141216_ib_15_1_psd.0
Copyright © 2018, Juniper Networks, Inc.522
Installation and Upgrade Guide

Sample Output
show system snapshot (updated as of Junos OS Release 17.2)
user@host> show system snapshotNon-recovery snapshots:
Snapshot snap.20170112.105151:Location: /packages/sets/snap.20170112.105151Creation date: Jan 12 10:51:51 2017Junos version: 17.2I20170112_0239
Snapshot snap.20170112.112307:Location: /packages/sets/snap.20170112.112307Creation date: Jan 12 11:23:07 2017Junos version: 17.2I20170112_0239
Snapshot snap.20170112.112314:Location: /packages/sets/snap.20170112.112314Creation date: Jan 12 11:23:14 2017Junos version: 17.2I20170112_0239
Total non-recovery snapshots: 3
Recovery Snapshots:Snapshots available on the OAM volume:recovery.ufsDate created: Wed Jan 11 15:59:35 PST 2017 Junos version: 17.2I20170111_2242
Total recovery snapshots: 1
523Copyright © 2018, Juniper Networks, Inc.
Chapter 19: Operational Commands

show system snapshot (Upgraded FreeBSD)
Syntax show system snapshot
Release Information Command introduced in Junos OS Release 17.3 for SRX5400, SRX5600, and SRX5800
devices.
Description Display information about the non-recovery backup software, which is located in the
junos file system on the hard disk drive or solid-state drive (SSD).
Display information about recovery snapshot after the non-recovery information.
NOTE: To back up software, use the request system snapshot command.
Required PrivilegeLevel
view
RelatedDocumentation
request system snapshot (Junos OSwith Upgraded FreeBSD) on page 427•
• request system reboot (Junos OSwith Upgraded FreeBSD) on page 411
• Release Information for Junos OSwith Upgraded FreeBSD on page 17
List of Sample Output show system snapshot on page 524
Output Fields When you enter this command, you are provided feedback on the status of your request.
If there are no snapshots available, the command returns null output.
Sample Output
show system snapshot
user@host> show system snapshotNon-recovery snapshots:Snapshot snap.20170802.090921:Location: /packages/sets/snap.20170802.090921Creation date: Aug 2 09:09:21 2017Junos version: 17.3R1
Snapshot snap.20170802.090951:Location: /packages/sets/snap.20170802.090951Creation date: Aug 2 09:09:51 2017Junos version: 17.3R1
Total non-recovery snapshots: 2
Recovery Snapshots:Snapshots available on the OAM volume:recovery.ufs
Copyright © 2018, Juniper Networks, Inc.524
Installation and Upgrade Guide

Date created: Wed Aug 2 09:16:12 UTC 2017Junos version: 17.3R1
Total recovery snapshots: 1
525Copyright © 2018, Juniper Networks, Inc.
Chapter 19: Operational Commands

show system snapshotmedia
Syntax show system snapshot mediamedia-type
Release Information Command introduced in Junos OS Release 10.2 .
Description Display the snapshot information for both root partitions on SRX Series devices
Options internal— Show snapshot information from internal media.•
• usb— Show snapshot information from device connected to USB port.
• external— Show snapshot information from the external CompactFlash card.
Required PrivilegeLevel
View
RelatedDocumentation
Example: Creating a Snapshot and Using It to Boot an SRX Series Device on page 211•
List of Sample Output show system snapshotmedia internal on page 526show system snapshotmedia usb on page 526
Sample Output
show system snapshotmedia internal
show system snapshotmedia internalInformation for snapshot on internal (/dev/da0s1a) (primary)Creation date: Jan 15 10:43:26 2010JUNOS version on snapshot: junos : 10.1B3-domesticInformation for snapshot on internal (/dev/da0s2a) (backup)Creation date: Jan 15 10:15:32 2010JUNOS version on snapshot: junos : 10.2-20100112.0-domestic
show system snapshotmedia usb
show system snapshotmedia usbInformation for snapshot on usb (/dev/da1s1a) (primary) Creation date: Jul 24 16:16:01 2009 JUNOS version on snapshot: junos : 10.0I20090723_1017-domestic Information for snapshot on usb (/dev/da1s2a) (backup) Creation date: Jul 24 16:17:13 2009 JUNOS version on snapshot: junos : 10.0I20090724_0719-domestic
Copyright © 2018, Juniper Networks, Inc.526
Installation and Upgrade Guide

show system storage partitions (EX Series Switches Only)
Syntax show system storage partitions<all-members><local><membermember-id>
Release Information Command introduced in Junos OS Release 11.1 for EX Series switches.
Description Display information about the disk partitions on EX Series switches.
Options none—Display partition information.
all-members—(Virtual Chassis systems only) (Optional) Display partition information
for all members of the Virtual Chassis.
local—(Virtual Chassis systems only) (Optional) Display partition information for the
local Virtual Chassis member.
membermember-id—(Virtual Chassis systems only) (Optional) Display partition
information for the specified member of the Virtual Chassis configuration.
Required PrivilegeLevel
view
RelatedDocumentation
Verifying Junos OS and Boot Loader Software Versions on an EX Series Switch on
page 153
•
List of Sample Output show system storage partitions on page 528
Output Fields Table 56 on page 527 describes the output fields for the show system storage partitions
command. Output fields are listed in the approximate order in which they appear.
Table 56: show system storage partitions Output Fields
Field DescriptionField Name
Media (internal or external) fromwhich the switch was booted.Boot Media
Name of the active root partition.Active Partition
Name of the backup (alternate) root partition.Backup Partition
Partition fromwhich the switch was last booted.Currently booted from
527Copyright © 2018, Juniper Networks, Inc.
Chapter 19: Operational Commands

Table 56: show system storage partitions Output Fields (continued)
Field DescriptionField Name
Information about partitions on the boot media:
• Partition—Partition identifier.
• Size—Size of partition.
• Mountpoint—Directory on which the partition is mounted.
Partitions information
Sample Output
show system storage partitions
user@switch> show system storage partitionsfpc0:--------------------------------------------------------------------------Boot Media: internal (da0)Active Partition: da0s1aBackup Partition: da0s2aCurrently booted from: active (da0s1a)
Partitions information: Partition Size Mountpoint s1a 184M / s2a 184M altroot s3d 369M /var/tmp s3e 123M /var s4d 62M /config s4e unused (backup config)
Copyright © 2018, Juniper Networks, Inc.528
Installation and Upgrade Guide

show system storage partitions (View SRX Series)
Syntax show system storage partitions
Release Information Command introduced in Junos OS Release 10.2 .
Description Display the partitioning scheme details on SRX300, SRX320, SRX340, SRX345, and
SRX550HM devices.
Required PrivilegeLevel
View
RelatedDocumentation
Example: Installing Junos OS on SRX Series Devices Using the Partition Option on
page 124
•
List of Sample Output show system storage partitions (single root partitioning) on page 529show system storage partitions (USB) on page 529
show system storage partitions (dual root partitioning)
show system storage partitionsBoot Media: internal (da0)Active Partition: da0s2aBackup Partition: da0s1aCurrently booted from: active (da0s2a)
Partitions Information: Partition Size Mountpoint s1a 293M altroot s2a 293M / s3e 24M /config s3f 342M /var s4a 30M recovery
show system storage partitions (single root partitioning)
show system storage partitionsBoot Media: internal (da0)Partitions Information: Partition Size Mountpoint s1a 898M / s1e 24M /config s1f 61M /var
show system storage partitions (USB)
show system storage partitionsBoot Media: usb (da1)Active Partition: da1s1aBackup Partition: da1s2aCurrently booted from: active (da1s1a)
Partitions Information:
529Copyright © 2018, Juniper Networks, Inc.
Chapter 19: Operational Commands

Partition Size Mountpoint s1a 293M / s2a 293M altroot s3e 24M /config s3f 342M /var s4a 30M recovery
Copyright © 2018, Juniper Networks, Inc.530
Installation and Upgrade Guide

show version
Syntax show version<brief | detail><node node-id | local | primary>
Release Information Command introduced in Junos OS Release 10.4.
Description Display the hostnameand version information about the software running on the device.
Options none—Display standard information about the hostname and version of the softwarerunning on the device.
brief—Display brief output.
detail—Display detailed output.
node node-id—Display the software version on a specific node.
Range: 0 through 1
local—Display the software version on the local node.
primary—Display the software version on the primary node.
Required PrivilegeLevel
view
RelatedDocumentation
Determining the Junos OS Version on page 50•
List of Sample Output show version on page 531show version for MX Series Junos OSwith Upgraded FreeBSD on page 531show version for SRX Series Junos OSwith Upgraded FreeBSD on page 532
Sample Output
show version
user@host> show versionnode0:--------------------------------------------------------------------------Hostname: srx01Model: srx1400JUNOS Software Release [12.3I20141112_x_srx_12q3_x48_intgr.0-681573]JUNOS wmi Daemon [12.1I20140304_0803_tjzhang]
show version for MX Series Junos OSwith Upgraded FreeBSD
user@host> show versionHostname: hostModel: mx240Junos: 15.1R1.9
531Copyright © 2018, Juniper Networks, Inc.
Chapter 19: Operational Commands

JUNOS OS Kernel 32-bit [20150617.306001_builder_stable_10]JUNOS OS runtime [20150617.306001_builder_stable_10]JUNOS OS time zone information [20150617.306001_builder_stable_10]JUNOS py base [20150618.043753_builder_junos_151_r1]JUNOS OS crypto [20150617.306001_builder_stable_10]JUNOS network stack and utilities [20150618.043753_builder_junos_151_r1]JUNOS libs [20150618.043753_builder_junos_151_r1]JUNOS runtime [20150618.043753_builder_junos_151_r1]JUNOS platform support [20150618.043753_builder_junos_151_r1]JUNOS modules [20150618.043753_builder_junos_151_r1]JUNOS daemons [20150618.043753_builder_junos_151_r1]JUNOS Voice Services Container package [20150618.043753_builder_junos_151_r1]JUNOS Services SSL [20150618.043753_builder_junos_151_r1]
...
show version for SRX Series Junos OSwith Upgraded FreeBSD
user@host> show versionHostname: dpidev-srx5k-03Model: srx5400Junos: 17.3R1JUNOS OS Kernel 64-bit [20170725.352915_builder_stable_10]JUNOS OS libs [20170725.352915_builder_stable_10]JUNOS OS runtime [20170725.352915_builder_stable_10]JUNOS OS time zone information [20170725.352915_builder_stable_10]JUNOS OS libs compat32 [20170725.352915_builder_stable_10]JUNOS OS 32-bit compatibility [20170725.352915_builder_stable_10]JUNOS py extensions [20170728.153050_builder_junos_173_r1]JUNOS py base [20170728.153050_builder_junos_173_r1]JUNOS OS crypto [20170725.352915_builder_stable_10]JUNOS network stack and utilities [20170728.153050_builder_junos_173_r1]JUNOS modules [20170728.153050_builder_junos_173_r1]JUNOS srx modules [20170728.153050_builder_junos_173_r1]JUNOS libs [20170728.153050_builder_junos_173_r1]JUNOS libs compat32 [20170728.153050_builder_junos_173_r1]JUNOS runtime [20170728.153050_builder_junos_173_r1]
...
Copyright © 2018, Juniper Networks, Inc.532
Installation and Upgrade Guide

CHAPTER 20
VM Host Software AdministrativeCommands
• request vmhost cleanup
• request vmhost file-copy
• request vmhost halt
• request vmhost hard-disk-test
• request vmhost power-off
• request vmhost power-on
• request vmhost reboot
• request vmhost snapshot
• request vmhost software abort
• request vmhost software add
• request vmhost software in-service-upgrade
• request vmhost software rollback
• request vmhost zeroize
533Copyright © 2018, Juniper Networks, Inc.

request vmhost cleanup
Syntax request vmhost cleanup<invoke-on><re0 | re1><routing engine>
Release Information Command introduced in JunosOSRelease 15.1F3 for the PTX5000,MX240,MX480, and
MX960 routers.
Command introduced in Junos OS Release 15.1F5 for the MX2010 and MX2020 routers.
Command introduced in Junos OS Release 16.1R4 for the PTX3000 routers.
NOTE: PTX3000 router supports the Routing and Control Board, RCBPTX.
Command introduced in Junos OS Release 17.1R1 for EX9200 switches.
Description Clean up temporary files, crash generated files, and log files located in the /var/tmp,
/var/crash, and /var/log directories respectively on the host OS.
Options none—Cleanup temporary files, crashgenerated files, and log files located in the /var/tmp,
/var/crash, and /var/log directories on the host OS running on the Routing Engine on the
local Virtual Chassis member.
invoke-on—(Optional) Clean up temporary files, crash generated files, and log files onall the Routing Engines or the other Routing Engine.
Clean up files in /var/tmp, /var/crash, and /var/log on the hostOS running on a router
that has dual Routing Engines. You can use the all-routing-engine option to clean up
the files in these directories on the host OS running on all the Routing Engines or the
other-routing-engine option to clean up the files in these directories on the host OS
running on the other Routing Engine. If you issue the command from themaster
Routing Engine, thebackupRouting Engine is referred to as theother Routing Engine.
re0 | re1—(Optional) On routers that support dual or redundant Routing Engines, cleanup files in /var/tmp, /var/crash, and /var/log on the host OS running on the Routing
Engine in slot 0 (re0) or the Routing Engine in slot 1 (re1).
routing-engine—(Optional) Specify the Routing Engine for which the files in /var/tmp,/var/crash, and /var/log on the host OS are to be cleaned up. The following options
are available:
• backup—Backup Routing Engine.
• both—Master and backup Routing Engines.
• local—Routing Engine on the local Virtual Chassis member.
Copyright © 2018, Juniper Networks, Inc.534
Installation and Upgrade Guide

• master—Master Routing Engine.
• other—If you issue the command from themaster Routing Engine, the backup
Routing Engine is referred to as the other Routing Engine.
Required PrivilegeLevel
maintenance
RelatedDocumentation
request system storage cleanup on page 466•
Output Fields When you enter this command, you are provided feedback on the status of your request.
535Copyright © 2018, Juniper Networks, Inc.
Chapter 20: VM Host Software Administrative Commands

request vmhost file-copy
Syntax request vmhost file-copy (crash|log) j-node host file-name v-junos host file-name
Release Information Command introduced in JunosOSRelease 15.1F3 for the PTX5000,MX240,MX480, and
MX960 routers.
Command introduced in Junos OS Release 15.1F5 for the MX2010 and MX2020 routers.
Command introduced in Junos OS Release 16.1R4 for the PTX3000 routers.
NOTE: PTX3000 router supports the Routing and Control Board, RCBPTX.
Command introduced in Junos OS Release 17.1R1 for EX9200 switches.
Description Copy crash files or log files from the host OS to Junos OS. You can use these files for
analysis and debugging purposes.
Options crash—Files in /var/crash on the host.
from j-node filename—Name of the host file to be copied.
log—Files in /var/log on the host.
to v-junos filename—Name of the Junos OS file to which the host file is copied.
Additional Information You can use the show vmhost crash and show vmhost logs commands to list or identify
the files in the host OS to be copied to Junos OS.
Required PrivilegeLevel
maintenance
List of Sample Output request vmhost file-copy on page 536
Sample Output
request vmhost file-copy
user@host> request vmhost file-copy log from-jnode debug-20160214 to-vjunos /var/tmp//var/home/<user> # cd /var/tmp
:/var/tmp # ls -lrt debug-20160214
....root@host:/var/tmp #
Copyright © 2018, Juniper Networks, Inc.536
Installation and Upgrade Guide

request vmhost halt
Syntax request vmhost halt<re0 | re1><routing-engine>
Release Information Command introduced in JunosOSRelease 15.1F3 for the PTX5000,MX240,MX480, and
MX960 routers.
Command introduced in Junos OS Release 15.1F5 for the MX2010 and MX2020 routers.
Command introduced in Junos OS Release 16.1R4 for the PTX3000 routers.
NOTE: PTX3000 router supports the Routing and Control Board, RCBPTX.
Command introduced in Junos OS Release 17.1R1 for EX9200 switches.
Description Stop the host OS and Junos OS running on the router.
Options none—Stop the host OS and Junos OS on the router.
re0 | re1—(Optional) On routers that support dual or redundant Routing Engines, stopthehostOSand JunosOS runningon theRoutingEngine in slot0(re0)or theRouting
Engine in slot 1 (re1).
routing-engine—(Optional) Specify the Routing Engine onwhich the host OS and JunosOS needs to be stopped. The following options are available:
• backup—Backup Routing Engine.
• both—Master and backup Routing Engines.
• local—Routing Engine on the local Virtual Chassis member.
• master—Master Routing Engine.
• other—If you issue the command from themaster Routing Engine, the backup
Routing Engine is referred to as the other Routing Engine.
Required PrivilegeLevel
maintenance
RelatedDocumentation
request system halt•
• vmhost on page 375
List of Sample Output request vmhost halt on page 538
537Copyright © 2018, Juniper Networks, Inc.
Chapter 20: VM Host Software Administrative Commands

Sample Output
request vmhost halt
user@host> request vmhost haltHalt the system ? [yes,no] (no) yes
Initiating vmhost halt... okInitiating Junos shutdown... shutdown: [pid 9756]Shutdown NOW!okJunos shutdown is in progress...*** FINAL System shutdown message ***
System going down IMMEDIATELY
...
... Operating system halted.Please press any key to reboot.
Copyright © 2018, Juniper Networks, Inc.538
Installation and Upgrade Guide
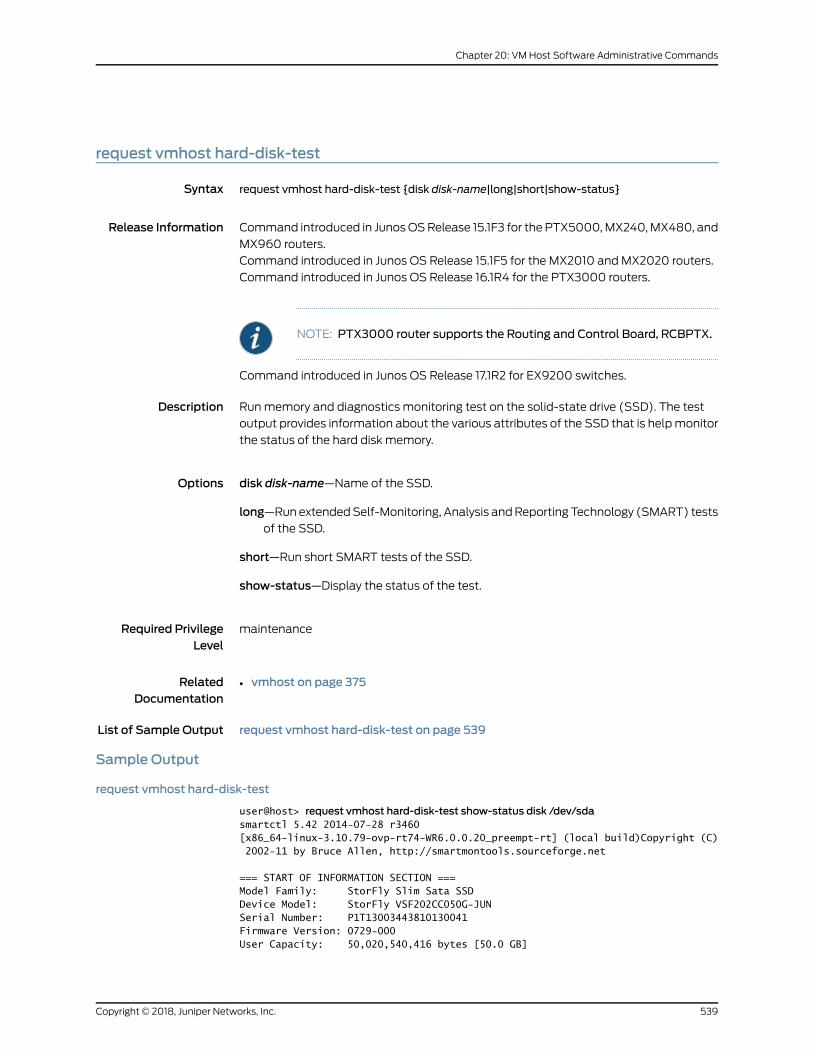
request vmhost hard-disk-test
Syntax request vmhost hard-disk-test {disk disk-name|long|short|show-status}
Release Information Command introduced in JunosOSRelease 15.1F3 for the PTX5000,MX240,MX480, and
MX960 routers.
Command introduced in Junos OS Release 15.1F5 for the MX2010 and MX2020 routers.
Command introduced in Junos OS Release 16.1R4 for the PTX3000 routers.
NOTE: PTX3000 router supports the Routing and Control Board, RCBPTX.
Command introduced in Junos OS Release 17.1R2 for EX9200 switches.
Description Runmemory and diagnostics monitoring test on the solid-state drive (SSD). The test
output provides information about the various attributes of the SSD that is helpmonitor
the status of the hard disk memory.
Options disk disk-name—Name of the SSD.
long—RunextendedSelf-Monitoring, Analysis andReporting Technology (SMART) testsof the SSD.
short—Run short SMART tests of the SSD.
show-status—Display the status of the test.
Required PrivilegeLevel
maintenance
RelatedDocumentation
vmhost on page 375•
List of Sample Output request vmhost hard-disk-test on page 539
Sample Output
request vmhost hard-disk-test
user@host> request vmhost hard-disk-test show-status disk /dev/sdasmartctl 5.42 2014-07-28 r3460 [x86_64-linux-3.10.79-ovp-rt74-WR6.0.0.20_preempt-rt] (local build)Copyright (C) 2002-11 by Bruce Allen, http://smartmontools.sourceforge.net
=== START OF INFORMATION SECTION ===Model Family: StorFly Slim Sata SSDDevice Model: StorFly VSF202CC050G-JUNSerial Number: P1T13003443810130041Firmware Version: 0729-000User Capacity: 50,020,540,416 bytes [50.0 GB]
539Copyright © 2018, Juniper Networks, Inc.
Chapter 20: VM Host Software Administrative Commands

Sector Size: 512 bytes logical/physicalDevice is: In smartctl database [for details use: -P show]ATA Version is: 8ATA Standard is: ACS-2 (revision not indicated)Local Time is: Fri Jun 17 17:30:57 2016 ISTSMART support is: Available - device has SMART capability.SMART support is: Enabled
=== START OF READ SMART DATA SECTION ===SMART overall-health self-assessment test result: PASSED
General SMART Values:Offline data collection status: (0x02) Offline data collection activity was completed without error. Auto Offline Data Collection: Disabled.Self-test execution status: ( 0) The previous self-test routine completed
without error or no self-test has ever been run.
...
...
...
Copyright © 2018, Juniper Networks, Inc.540
Installation and Upgrade Guide

request vmhost power-off
Syntax request vmhost power-off<other routing-engine>
Release Information Command introduced in JunosOSRelease 15.1F3 for the PTX5000,MX240,MX480, and
MX960 routers.
Command introduced in Junos OS Release 15.1F5 for the MX2010 and MX2020 routers.
Command introduced in Junos OS Release 16.1R4 for the PTX3000 routers.
NOTE: PTX3000 router supports the Routing and Control Board, RCBPTX.
Command introduced in Junos OS Release 17.1R1 for EX9200 switches.
Description Power off the Routing Engine on which Junos OS and the host OS are running. In a
PTX3000, the Routing and Control Board is powered off.
Options none—Power off the Routing Engine immediately.
other-routing-engine—(Optional)Poweroff theotherRoutingEngineonwhich the JunosOS and the host OS are running. For example, if you issue the command from the
master Routing Engine, the backup Routing Engine is powered off. Similarly, if you
issue the command from the backup Routing Engine, the master Routing Engine is
powered off.
Required PrivilegeLevel
maintenance
RelatedDocumentation
request system power-off•
• vmhost on page 375
List of Sample Output request vmhost power-off on page 541
Sample Output
request vmhost power-off
user@host> request vmhost power-offPower-off the vmhost ? [yes,no] (no) yes
Initiating vmhost shutdown... okInitiating Junos shutdown... shutdown: [pid 3884]Shutdown NOW!ok
*** FINAL System shutdown message from root@host ***
541Copyright © 2018, Juniper Networks, Inc.
Chapter 20: VM Host Software Administrative Commands

System going down IMMEDIATELY ......
Copyright © 2018, Juniper Networks, Inc.542
Installation and Upgrade Guide

request vmhost power-on
Syntax request vmhost power-on other-routing-engine
Release Information Command introduced in JunosOSRelease 15.1F3 for the PTX5000,MX240,MX480, and
MX960 routers.
Command introduced in Junos OS Release 15.1F5 for the MX2010 and MX2020 routers.
Command introduced in Junos OS Release 16.1R4 for the PTX3000 routers.
NOTE: PTX3000 router supports the Routing and Control Board, RCBPTX.
Command introduced in Junos OS Release 17.1R1 for EX9200 switches.
Description Power on the Routing Engine on which Junos OS and the host OS are running. In a
PTX3000, the Routing and Control Board is powered on.
Options other-routing-engine—Power on the other Routing Engine on which the Junos OS andthe host OS are running. For example, if you issue the command from themaster
Routing Engine, the backup Routing Engine is powered on. Similarly, if you issue the
command from the backup Routing Engine, the master Routing Engine is powered
on.
Required PrivilegeLevel
maintenance
RelatedDocumentation
request vmhost power-off on page 541•
• request vmhost reboot on page 488
List of Sample Output request vmhost power-on on page 543
Sample Output
request vmhost power-on
user@host> request vmhost power-on other-routing-engineRouting Engine 1 power-on initiated, use "show chassis routing-engine" to verify
543Copyright © 2018, Juniper Networks, Inc.
Chapter 20: VM Host Software Administrative Commands

request vmhost reboot
Syntax request vmhost reboot<disk1><disk2><network><re0 | re1><routing engine><usb>
Release Information Command introduced in JunosOSRelease 15.1F3 for the PTX5000,MX240,MX480, and
MX960 routers.
Command introduced in Junos OS Release 15.1F5 for the MX2010 and MX2020 routers.
Command introduced in Junos OS Release 16.1R4 for the PTX3000 routers.
NOTE: PTX3000 router supports the Routing and Control Board, RCBPTX.
Command introduced in Junos OS Release 17.1R1 for EX9200 switches.
Description Reboot both the Junos OS and the host OS running on the router.
Options none—Reboot the router software immediately.
disk1—(Optional) Reboot both Junos OS and the host OS on the Routing Engine andboot the Routing Engine from the primary disk.
disk2—(Optional) Reboot both Junos OS and the host OS on the Routing Engine andboot the Routing Engine from backup disk.
network—(Optional) Reboot both Junos OS and the host OS on the Routing Engine andboot the Routing Engine from network by using the PXE boot method.
re0 | re1—(Optional) On routers that support dual or redundant Routing Engines, rebootboth Junos OS and the host OS on the Routing Engine in slot 0 (re0) or on the the
Routing Engine in slot 1 (re1).
routing-engine—(Optional) Specify the Routing Engine onwhich JunosOS and the hostOS are to be rebooted. The following options are available:
• backup—Backup Routing Engine.
• both—Both Routing Engines.
• local—Routing Engine on the local Virtual Chassis member.
• master—Master Routing Engine.
• other—If you issue the command from themaster Routing Engine, the backup
Routing Engine is referred to as the other Routing Engine.
Copyright © 2018, Juniper Networks, Inc.544
Installation and Upgrade Guide

usb—(Optional) Reboot both JunosOS and the host OS on the Routing Engine using theUSB installation media.
Required PrivilegeLevel
maintenance
RelatedDocumentation
request system reboot on page 402•
• request vmhost power-on on page 543
List of Sample Output request vmhost reboot on page 545
Sample Output
request vmhost reboot
user@host> request vmhost rebootwarning: Rebooting re0Initiating vmhost reboot... okInitiating Junos shutdown... shutdown: [pid 3957]Shutdown NOW!ok
*** FINAL System shutdown message ***
System going down IMMEDIATELY ......
545Copyright © 2018, Juniper Networks, Inc.
Chapter 20: VM Host Software Administrative Commands

request vmhost snapshot
Syntax request vmhost snapshot<partition><re0 | re1><recovery><routing-engine>
Release Information Command introduced in JunosOSRelease 15.1F3 for the PTX5000,MX240,MX480, and
MX960 routers.
Command introduced in Junos OS Release 15.1F5 for the MX2010 and MX2020 routers.
Command introduced in Junos OS Release 16.1R4 for the PTX3000 routers.
NOTE: PTX3000 router supports the Routing and Control Board, RCBPTX.
Command introduced in Junos OS Release 17.1R1 for EX9200 switches.
Command introduced in Junos OS Release 17.2R1 for the PTX1000 routers.
Description Create a recovery snapshot of the currently running and active file system partitions on
the backup disk to recover the primary disk in case of failure.
On the router, back up the snapshot of thehostOS imagealongwith the JunosOS image.
In case of failure of the primary disk, you can boot from the image available in the backup
disk and then recover the primary disk with the snapshot created using the recovery
option.
Options none—Create a snapshot from the current disk to the target diskwithout partitioning the
target disk. Contents on target disk is lost.
partition—(Optional) Create a snapshot from the current disk to target disk and partition
the target disk. Contents on the target disk are lost
re0 | re1—(Optional) Create a snapshot from the current disk to target disk and partition
the target disk on Routing Engine in slot 0 (re0) or on the Routing Engine in slot 1
(re1). The snapshot is taken without partitioning the target disk on corresponding
Routing Engines. Contents on the target disk on the Routing Engines are lost.
For PTX1000 routers, since there is only one RE, re0|re1 is not supported.
recovery—(Optional) Recover the primary disk from the snapshot content stored in the
backup disk. This option is applicable only when the Routing engine is booted from
backup disk. Contents in the primary disk are lost.
routing-engine—(Optional) Specify the Routing Engine on which the snapshot is to becreated. The following options are available:
Copyright © 2018, Juniper Networks, Inc.546
Installation and Upgrade Guide

• backup—Backup Routing Engine.
• both—Both Routing Engines.
• local—Routing Engine on the local Virtual Chassis member.
• master—Master Routing Engine.
• other—Other Routing Engine.
Required PrivilegeLevel
maintenance
RelatedDocumentation
show vmhost snapshot on page 581•
List of Sample Output request vmhost snapshot on page 547request vmhost snapshot recovery on page 547
Sample Output
request vmhost snapshot
user@host> request vmhost snapshotwarning: Existing data on the target may be lostProceed ? [yes,no] (no) yes
warning: Proceeding with vmhost snapshotCurrent root details, Device sda, Label: jrootb_P, Partition: sda4Snapshot admin context from current boot disk to target disk ...Proceeding with snapshot on secondary diskMounting device in preparation for snapshot...Cleaning up target disk for snapshot ...Creating snapshot on target disk from current boot disk ...Snapshot created on secondary disk.Software snapshot done
request vmhost snapshot recovery
user@host> request vmhost snapshot recoverywarning: Existing data on the target may be lostProceed ? [yes,no] (no) yes
warning: Proceeding with vmhost snapshotCurrent root details, Device sdb, Label: jrootb_S, Partition: sdb4Snapshot admin context from current boot disk to target disk ...Proceeding with snapshot on primary diskMounting device in preparation for snapshot...Cleaning up target disk for snapshot ...Creating snapshot on target disk from current boot disk ...Primary disk is recovered now. Please issue "request vmhost reboot" to boot from the primary disk.Software snapshot done
547Copyright © 2018, Juniper Networks, Inc.
Chapter 20: VM Host Software Administrative Commands

request vmhost software abort
Syntax request vmhost software abort in-service-upgrade
Release Information Command introduced in JunosOSRelease 15.1F3 for the PTX5000,MX240,MX480, and
MX960 routers.
Command introduced in Junos OS Release 15.1F5 for the MX2010 and MX2020 routers.
Command introduced in Junos OS Release 16.1R4 for the PTX3000 routers.
NOTE: PTX3000 router supports the Routing and Control Board, RCBPTX.
Command introduced in Junos OS Release 17.1R1 for EX9200 switches.
Description Abort unified in-service software upgrade (unified ISSU). The unified ISSUmust be in
progress and youmust issue this command from a router session other than the one on
which you issued the request vmhost software in-service-upgrade command to launch
the unified ISSU.
Options in-service-upgrade—Abort unified ISSU.
Required PrivilegeLevel
maintenance
RelatedDocumentation
request system software abort•
• request vmhost software in-service-upgrade on page 552
Copyright © 2018, Juniper Networks, Inc.548
Installation and Upgrade Guide

request vmhost software add
List of Syntax MX Series on page 549
PTX Series on page 549
MXSeries request vmhost software add package-name<no-validate><re0 | re1><reboot><set [package-names]>
PTX Series request vmhost software add package-name<no-validate><re0 | re1><reboot>
Release Information Command introduced in JunosOSRelease 15.1F3 for the PTX5000,MX240,MX480, and
MX960 routers.
Command introduced in Junos OS Release 15.1F5 for the MX2010 and MX2020 routers.
Command introduced in Junos OS Release 16.1X65 for the PTX1000 routers.
Command introduced in Junos OS Release 16.1R4 for the PTX3000 routers.
NOTE: PTX3000 router supports the Routing and Control Board, RCBPTX.
Command introduced in Junos OS Release 17.1R1 for EX9200 switches.
Description Install Junos OS and host software packages on the router.
For installing the host software as well as Junos OS, specify the package name
junos-vmhost-install-x.tgz in the request vmhost software add command. Junos OS
installation alone can be achieved by specifying the regular package name
junos-install-x.tgz in the request system software add command. However, installation
using the vmhost package is recommended as it upgrades both the host software and
Junos OS.
Options none—Install Junos OS and host software packages on the Routing Engine on the local
Virtual Chassis member.
package-name—Location fromwhich the software package or bundle is to be installed.
For example:
• /var/tmp/package-name—For a software package or bundle that is being installed
from a local directory on the router.
• protocol://hostname/pathname/package-name—Forasoftwarepackageorbundle
that is to be downloaded and installed from a remote location. Replace protocol
with one of the following:
549Copyright © 2018, Juniper Networks, Inc.
Chapter 20: VM Host Software Administrative Commands

• ftp—File Transfer Protocol (FTP).
Use ftp://hostname/pathname/package-name. To specify authentication
credentials, use
ftp://<username>:<password>@hostname/pathname/package-name. To have
the system prompt you for the password, specify prompt in place of the
password. If a password is required, and you do not specify the password or
prompt, an error message is displayed.
• http—Hypertext Transfer Protocol (HTTP).
Use http://hostname/pathname/package-name. To specify authentication
credentials, use
http://<username>:<password>@hostname/pathname/package-name. If a
password is required and you omit it, you are prompted for it.
• scp—Secure Copy Protcol (SCP)(not available for limited editions).
Use scp://hostname/pathname/package-name. To specify authentication
credentials, use
scp://<username>:<password>@hostname/pathname/package-name.
NOTE:
• The pathname in the protocol is the relative path to the user’s home
directory on the remote system and not the root directory.
• Do not use the scp protocol in the request vmhost software add
command to downloadand install a software package or bundle fromaremote location.Thesoftwareupgrade ishandledby themgdprocessthat does not support SCP.
To install a software package or bundle from a remote location:
1. Use the file copy command to copy the software package or bundle
from the remote location to the /var/tmpdirectory on the hard disk:
file copy scp://source/package-name /var/tmp
2. Install the software package or bundle by using the request vmhost
software add command:
request vmhost software add /var/tmp/package-name
no-validate—(Optional) When loading a software package or bundle with a different
release, suppress the default behavior of the validate option.
re0 | re1—(Optional) Load a software package or bundle on the Routing Engine in slot 0(re0) or the Routing Engine in slot 1 (re1).
NOTE: Theoption re1 is not supportedon thePTX1000PacketTransport
Router.
Copyright © 2018, Juniper Networks, Inc.550
Installation and Upgrade Guide

reboot—(Optional) After adding the software package or bundle, reboot the system.
set [package-names]—(Optional)
Additional Information Before upgrading the software on the router, when you have a known stable system,
issue the request vmhost snapshot command to back up the software. After you have
upgraded the software on the router and are satisfied that the new package or bundle
is successfully installed and running, issue the request vmhost snapshot command again
to back up the new software to the backup disk.
After you run the request vmhost snapshot command, you cannot return to the previous
versionof the snapshot, because theprevious snapshot is replacedby thenewsnapshot.
Required PrivilegeLevel
maintenance
RelatedDocumentation
request system software add on page 433•
• request vmhost software rollback on page 554
List of Sample Output request vmhost software add (Multiple Packages) on page 551
Sample Output
request vmhost software add (Multiple Packages)
user@host> request vmhost software add set[/var/tmp/junos-vmhost-install-ptx-x86-64-15.1F-20160518.0.tgz/var/tmp/junos-vmhost-jdiag-15.1F-20160518.0.tgz] no-validateVerified junos-vmhost-install-ptx-x86-64-15.1F-20160518.0 signed by PackageDevelopmentEc_2016Copied the config and other data to the aux disk.Transfer junos-host-upgrade.shTransfer DoneTransfer /packages/db/pkginst.7286/junos-vmhost-install*.tgzTransfer DoneStarting upgrade ...Preparing for upgrade.../tmp/pkg-ldX/unpack/install/........
551Copyright © 2018, Juniper Networks, Inc.
Chapter 20: VM Host Software Administrative Commands

request vmhost software in-service-upgrade
Syntax request vmhost software in-service-upgrade package-name<no-old-master-upgrade><reboot>
Release Information Command introduced in JunosOSRelease 15.1F3 for the PTX5000,MX240,MX480, and
MX960 routers.
Command introduced in Junos OS Release 15.1F5 for the MX2010 and MX2020 routers.
Command introduced in Junos OS Release 16.1R4 for the PTX3000 routers.
NOTE: PTX3000 router supports the Routing and Control Board, RCBPTX.
Command introduced in Junos OS Release 17.1R1 for EX9200 switches.
Description Perform a unified in-service software upgrade (ISSU). A unified ISSU enables you to
upgrade from one Junos OS release and host OS release to another with no disruption
on the control plane and with minimal disruption of traffic. For an unified ISSU, graceful
Routing Engine switchover (GRES) and nonstop active routing (NSR)must be enabled.
Options package-name—Location fromwhich the software package or bundle is to be installed.
For example:
• /var/tmp/package-name—For a softwarepackageor bundle that is being installed
from a local directory on the router.
• protocol://hostname/pathname/package-name—Forasoftwarepackageorbundle
that is to be downloaded and installed from a remote location. Replace protocol
with one of the following:
• ftp—File Transfer Protocol (FTP).
• http—Hypertext Transfer Protocol (HTTP).
• scp—Secure Copy Protocol (SCP) (not available for limited editions).
no-old-master-upgrade—(Optional)Whentheno-old-master-upgradeoption is included,
after the backup Routing Engine is rebooted with the new software package and a
switchover occurs to make it the newmaster Routing Engine, the former master
(new backup) Routing Engine is not upgraded to the new software. In this case, you
must manually upgrade the former master (new backup) Routing Engine. If you do
not include the no-old-master-upgrade option, the system automatically upgrades
the former master Routing Engine.
reboot—(Optional) Automatically reboot the former master (new backup) Routing
Engine after the ISSU. If you don not include the reboot option in the command, you
Copyright © 2018, Juniper Networks, Inc.552
Installation and Upgrade Guide

mustmanually reboot the formermaster (newbackup) Routing Engine by using the
request vmhost reboot command.
Additional Information The following conditions apply to unified ISSU:
• Unified ISSU is not supported on every platform. For a list of supported platforms, see
Unified ISSU System Requirements.
• Unsupported PICs are restarted during a unified ISSU on certain routing devices. For
information about supportedPICs, see the JunosOSHighAvailability Library for Routing
Devices.
• During a unified ISSU, any unsupported protocols running on the device causes packet
loss. For information about supported protocols, see the Junos OS High Availability
Library for Routing Devices.
• During a unified ISSU, you cannot bring any PICs online or take them offline on certain
routing devices.
For more information, see the Junos OS High Availability Library for Routing Devices.
Required PrivilegeLevel
maintenance
RelatedDocumentation
request system software in-service-upgrade•
List of Sample Output request vmhost software in-service-upgrade on page 553
Sample Output
request vmhost software in-service-upgrade
user@host> request vmhost software in-service-upgrade/var/tmp/junos-vmhost-install-ptx-x86-64-15.1F5.6.tgz reboot Chassis ISSU Check Done[Feb 24 01:12:09]: Starting VMHOST ISSU[Feb 24 01:12:09]:ISSU: Validating ImageFPC 2 will be offlined (In-Service-Upgrade not supported)FPC 11 will be offlined (In-Service-Upgrade not supported)MIC 11/0 will be offlined (In-Service-Upgrade not supported)Do you want to continue with these actions being taken ? [yes,no] (no) yes
Junos Validation begin. Procedure will take few minutes.......
553Copyright © 2018, Juniper Networks, Inc.
Chapter 20: VM Host Software Administrative Commands

request vmhost software rollback
Syntax request vmhost software rollback<re0 | re1><routing-engine>
Release Information Command introduced in JunosOSRelease 15.1F3 for the PTX5000,MX240,MX480, and
MX960 routers.
Command introduced in Junos OS Release 15.1F5 for the MX2010 and MX2020 routers.
Command introduced in Junos OS Release 16.1R4 for the PTX3000 routers.
NOTE: PTX3000 router supports the Routing and Control Board, RCBPTX.
Command introduced in Junos OS Release 17.1R1 for EX9200 switches.
Description Roll back the Junos OS and the host OS software packages to the previous versions. You
can revert to the previous versions of software packages that were loaded at the last
successful request vmhost software add command.
Options none—Roll back the softwarepackagesof theRoutingEngineon the localVirtualChassis
member.
re0 | re1—(Optional) On routers that support dual or redundant Routing Engines, rollback the software packages in Routing Engine in slot 0 (re0) or software packages
in the Routing Engine in slot 1 (re1).
routing-engine—(Optional) Specify theRouting Engine onwhich the software packagesneeds to be rolled back to the previous set of software packages. The following
options are available:
• backup—Backup Routing Engine.
• both—Both Routing Engines.
• local—Routing Engine on the local Virtual Chassis member.
• master—Master Routing Engine.
• other—Other Routing Engine.
Required PrivilegeLevel
maintenance
RelatedDocumentation
request vmhost software add on page 549•
• request vmhost software abort on page 548
Copyright © 2018, Juniper Networks, Inc.554
Installation and Upgrade Guide

List of Sample Output request vmhost software rollback on page 555
Sample Output
request vmhost software rollback
user@host> request vmhost software rollbackCurrent root details, Device sda, Label: jrootp_P, Partition: sda3Finding alternate root for rollbackRollback to software on jrootb_P ...sh /etc/install/mk-mtre-rollback.sh jrootb_P bMounting device in preparation for rollback...Updating boot partition for rollback...Rollback complete, please reboot the node for it to take effect.Cmos Write successfullCmos Write successfull for Boot_retryCmos Write successfull for Boot_retry
user@host> show vmhost versionCurrent root details, Device sda, Label: jrootp_P, Partition: sda3Current boot disk: PrimaryCurrent root set: pUEFI Version: NGRE_v00.53.00.01
Primary Disk, Upgrade Time: Wed Feb 24 17:51:53 UTC 2016 Pending reboot.
Version: set pVMHost Version: 2.951VMHost Root: vmhost-x86_64-15.1I20160210_2212_builderVMHost Core: vmhost-core-x86_64-15.1I20160210_2212_builderkernel: 3.10.79-ovp-rt74-WR6.0.0.20_preempt-rtJunos Disk: junos-install-x86-64-15.1F5.5
Version: set bVMHost Version: 2.953VMHost Root: vmhost-x86_64-15.1F520160222_1052_builderVMHost Core: vmhost-core-x86_64-15.1F520160222_1052_builderkernel: 3.10.79-ovp-rt74-WR6.0.0.20_preempt-rtJunos Disk: junos-install-x86-64-15.1F5.6
user@host> request vmhost rebootReboot the vmhost ? [yes,no] (no) yes
warning: Rebooting re1Initiating vmhost reboot... okInitiating Junos shutdown... shutdown: [pid 9733]Shutdown NOW!okJunos shutdown is in progress...
*** FINAL System shutdown message from root@nikon1 ***
System going down IMMEDIATELY
user@host> show vmhost versionCurrent root details, Device sda, Label: jrootb_P, Partition: sda4Current boot disk: PrimaryCurrent root set: b
555Copyright © 2018, Juniper Networks, Inc.
Chapter 20: VM Host Software Administrative Commands

UEFI Version: NGRE_v00.53.00.01
Primary Disk, Upgrade Time: Wed Feb 24 17:51:53 UTC 2016
Version: set pVMHost Version: 2.951VMHost Root: vmhost-x86_64-15.1I20160210_2212_builderVMHost Core: vmhost-core-x86_64-15.1I20160210_2212_builderkernel: 3.10.79-ovp-rt74-WR6.0.0.20_preempt-rtJunos Disk: junos-install-x86-64-15.1F5.5
Version: set bVMHost Version: 2.953VMHost Root: vmhost-x86_64-15.1F520160222_1052_builderVMHost Core: vmhost-core-x86_64-15.1F520160222_1052_builderkernel: 3.10.79-ovp-rt74-WR6.0.0.20_preempt-rtJunos Disk: junos-install-x86-64-15.1F5.6
Copyright © 2018, Juniper Networks, Inc.556
Installation and Upgrade Guide

request vmhost zeroize
Syntax request vmhost zeroize<re0 | re1><routing-engine>
Release Information Command introduced in JunosOSRelease 15.1F3 for the PTX5000,MX240,MX480, and
MX960 routers.
Command introduced in Junos OS Release 15.1F5 for the MX2010 and MX2020 routers.
Command introduced in Junos OS Release 16.1R4 for the PTX3000 routers.
NOTE: PTX3000 router supports the Routing and Control Board, RCBPTX.
Command introduced in Junos OS Release 17.1R1 for EX9200 switches.
Description Remove all configuration information on the Routing Engines and reset all key values. If
the device has dual Routing Engines, the command is broadcast to both Routing Engines
on the device. The command removes all data files, including customized configuration
and log files, by unlinking the files from their directories. The command removes all
user-created files fromthesystem includingall plain-textpasswords, secrets, andprivate
keys forSSH, local encryption, local authentication, IPsec,RADIUS,TACACS+,andSNMP.
This command reboots the device and sets it to the factory-default configuration. After
the reboot, you cannot access the device through themanagement Ethernet interface.
Log in through the console as the root user and start the Junos OSCLI by typing cli at theprompt.
Options none—Remove all configuration information on all the Routing Engines and reset all key
values.
re0 | re1—(Optional) Remove all configuration information on the Routing Engine in slot0 (re0) or the Routing Engine in slot 1 (re1).
routing-engine—(Optional)Removeall configuration informationonthespecifiedRoutingEngine. The following options are available:
• backup—Backup Routing Engine.
• both—Both Routing Engines.
• local—Routing Engine on the local Virtual Chassis member.
• master—Master Routing Engine.
• other—Other Routing Engine.
557Copyright © 2018, Juniper Networks, Inc.
Chapter 20: VM Host Software Administrative Commands
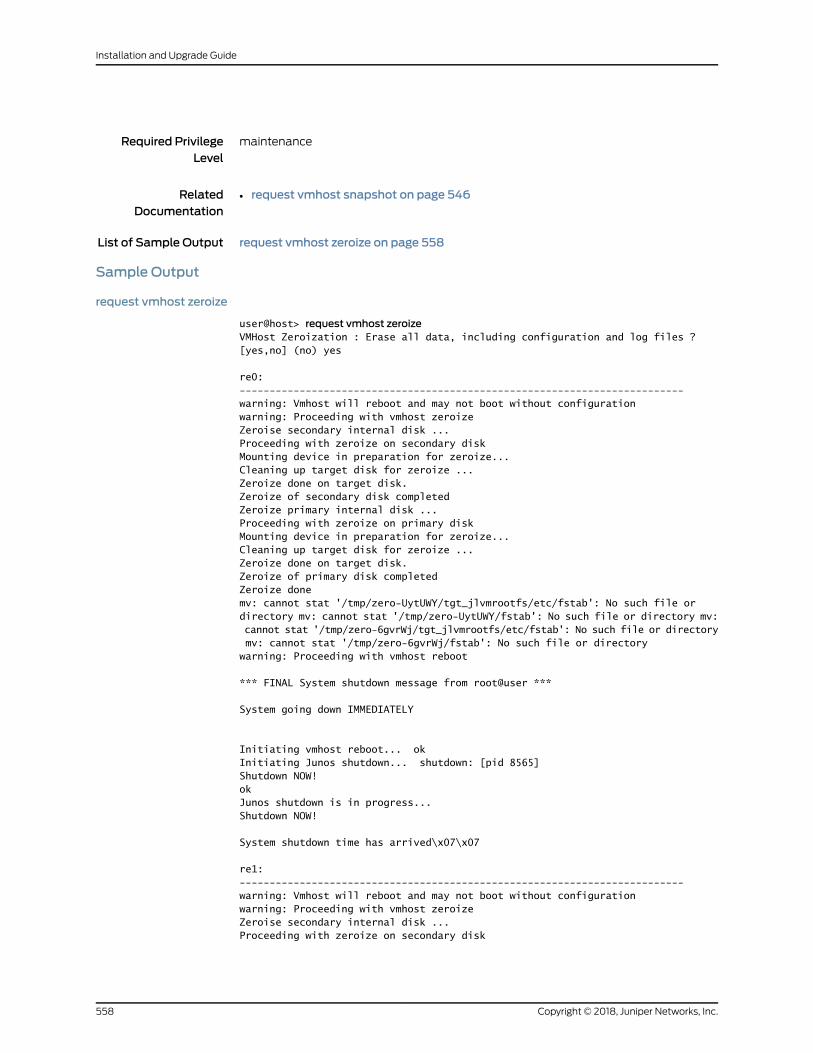
Required PrivilegeLevel
maintenance
RelatedDocumentation
request vmhost snapshot on page 546•
List of Sample Output request vmhost zeroize on page 558
Sample Output
request vmhost zeroize
user@host> request vmhost zeroizeVMHost Zeroization : Erase all data, including configuration and log files ? [yes,no] (no) yes
re0:--------------------------------------------------------------------------warning: Vmhost will reboot and may not boot without configurationwarning: Proceeding with vmhost zeroizeZeroise secondary internal disk ...Proceeding with zeroize on secondary diskMounting device in preparation for zeroize...Cleaning up target disk for zeroize ...Zeroize done on target disk.Zeroize of secondary disk completedZeroize primary internal disk ...Proceeding with zeroize on primary diskMounting device in preparation for zeroize...Cleaning up target disk for zeroize ...Zeroize done on target disk.Zeroize of primary disk completedZeroize donemv: cannot stat '/tmp/zero-UytUWY/tgt_jlvmrootfs/etc/fstab': No such file or directory mv: cannot stat '/tmp/zero-UytUWY/fstab': No such file or directory mv: cannot stat '/tmp/zero-6gvrWj/tgt_jlvmrootfs/etc/fstab': No such file or directory mv: cannot stat '/tmp/zero-6gvrWj/fstab': No such file or directorywarning: Proceeding with vmhost reboot
*** FINAL System shutdown message from root@user ***
System going down IMMEDIATELY
Initiating vmhost reboot... okInitiating Junos shutdown... shutdown: [pid 8565]Shutdown NOW!okJunos shutdown is in progress...Shutdown NOW!
System shutdown time has arrived\x07\x07
re1:--------------------------------------------------------------------------warning: Vmhost will reboot and may not boot without configurationwarning: Proceeding with vmhost zeroizeZeroise secondary internal disk ...Proceeding with zeroize on secondary disk
Copyright © 2018, Juniper Networks, Inc.558
Installation and Upgrade Guide

559Copyright © 2018, Juniper Networks, Inc.
Chapter 20: VM Host Software Administrative Commands

Copyright © 2018, Juniper Networks, Inc.560
Installation and Upgrade Guide

CHAPTER 21
VMHostSoftwareMonitoringCommands
• show vmhost bridge
• show vmhost crash
• show vmhost hard-disk-test
• show vmhost hardware
• show vmhost information
• show vmhost logs
• show vmhost management-if
• show vmhost netstat
• show vmhost processes
• show vmhost resource-usage
• show vmhost snapshot
• show vmhost status
• show vmhost uptime
• show vmhost version
561Copyright © 2018, Juniper Networks, Inc.

show vmhost bridge
Syntax show vmhost bridge<invoke-on><re0 | re1><routing engine>
Release Information Command introduced in JunosOSRelease 15.1F3 for the PTX5000,MX240,MX480, and
MX960 routers.
Command introduced in Junos OS Release 15.1F5 for the MX2010 and MX2020 routers.
Command introduced in Junos OS Release 16.1R4 for the PTX3000 routers.
NOTE: PTX3000 router supports the Routing and Control Board, RCBPTX.
Command introduced in Junos OS Release 17.1R1 for EX9200 switches.
Description Display bridge table information. The bridge table provides information about the
interfaces used for communication between host and guest operating systems.
Options invoke-on—(Optional) Display the bridge table information of Routing Engines on arouter that hasdual or redundantRoutingEngines. Youcanuse theall-routing-engine
option to display the bridge table information of all the Routing Engines or the
other-routing-engine option to display the bridge table information of the other
Routing Engine. For example, If you issue the command from themaster Routing
Engine, the backup Routing Engine is referred to as the other Routing Engine.
re0 | re1—(Optional) On routers that support dual or redundant Routing Engines, displaybridge table information about the Routing Engine in slot 0 (re0) or the Routing
Engine in slot 1 (re1).
routing-engine—(Optional) Specify the Routing Engine forwhich the bridge informationis to be displayed. The following options are available:
• backup—Backup Routing Engine.
• both—Master and the backup Routing Engines.
• local—Routing Engine on the local Virtual Chassis member.
• master—Master Routing Engine.
• other—If you issue the command from themaster Routing Engine, the backup
Routing Engine is referred to as the other Routing Engine.
Required PrivilegeLevel
view
Copyright © 2018, Juniper Networks, Inc.562
Installation and Upgrade Guide

List of Sample Output show vmhost bridge on page 563
Sample Output
show vmhost bridge
user@host> show vmhost bridgeCompute cluster: rainier-re-ccCompute node: rainier-re-cnBridge Table ============bridge name bridge id STP enabled interfaces jnpr-int-br 8000.bee5a8cfdb9a no tap1 virbr0 8000.52540051f94b yes virbr0-nic
563Copyright © 2018, Juniper Networks, Inc.
Chapter 21: VM Host Software Monitoring Commands

show vmhost crash
Syntax show vmhost crash
Release Information Command introduced in JunosOSRelease 15.1F3 for the PTX5000,MX240,MX480, and
MX960 routers.
Command introduced in Junos OS Release 15.1F5 for the MX2010 and MX2020 routers.
Command introduced in Junos OS Release 16.1R4 for the PTX3000 routers.
NOTE: PTX3000 router supports the Routing and Control Board, RCBPTX.
Command introduced in Junos OS Release 17.1R1 for EX9200 switches.
Description Display the number of times the host OS crashed. The crash dumps are available at
/var/crash.
Required PrivilegeLevel
view
RelatedDocumentation
show system core-dumps•
List of Sample Output show vmhost crash on page 564
Sample Output
show vmhost crash
user@host> show vmhost crashCompute cluster: rainier-re-cc
Compute node: rainier-re-cn
Crash Info ========== total 0
Copyright © 2018, Juniper Networks, Inc.564
Installation and Upgrade Guide

show vmhost hard-disk-test
Syntax show vmhost hard-disk -test { disk disk-name | status}
Release Information Command introduced in Junos OS Release 17.2R1 for the PTX5000, MX240, MX480,
MX960 , MX2010, and MX2020 routers.
Description Display memory and diagnostics monitoring test status on the solid-state drive (SSD).
The test output provides information about the various attributes of the SSD that help
tomonitor the status of the hard diskmemory. This command should be used only after
initiating the disk test with the request vmhost hard-disk-test command.
Options disk disk-name—Display the name of the SSD.
status—Display the status of the test.
Required PrivilegeLevel
maintenance
RelatedDocumentation
request vmhost hard-disk-test on page 539•
List of Sample Output show vmhost hard-disk-test on page 565
Sample Output
show vmhost hard-disk-test
user@host> show vmhost hard-disk-test status disk /dev/sdasmartctl 5.42 2014-07-28 r3460 [x86_64-linux-3.10.79-ovp-rt74-WR6.0.0.20_preempt-rt] (local build)Copyright (C) 2002-11 by Bruce Allen, http://smartmontools.sourceforge.net
=== START OF INFORMATION SECTION ===Model Family: UNIGEN SATA SSDDevice Model: SATA SSDSerial Number: 3AF607410C3800117282Firmware Version: S9FM01.3User Capacity: 64,023,257,088 bytes [64.0 GB]Sector Size: 512 bytes logical/physicalDevice is: In smartctl database [for details use: -P show]ATA Version is: 8ATA Standard is: ACS-3 (revision not indicated)Local Time is: Sun Jan 8 08:02:22 2017 UTCSMART support is: Available - device has SMART capability.SMART support is: Enabled
=== START OF READ SMART DATA SECTION ===SMART overall-health self-assessment test result: PASSED
General SMART Values:Offline data collection status: (0x00) Offline data collection activity was never started.
565Copyright © 2018, Juniper Networks, Inc.
Chapter 21: VM Host Software Monitoring Commands

Auto Offline Data Collection: Disabled.Self-test execution status: ( 0) The previous self-test routine completed
without error or no self-test has ever been run.Total time to complete Offlinedata collection: ( 30) seconds.Offline data collectioncapabilities: (0x1b) SMART execute Offline immediate. Auto Offline data collection on/off support. Suspend Offline collection upon new.........
Copyright © 2018, Juniper Networks, Inc.566
Installation and Upgrade Guide

show vmhost hardware
Syntax show vmhost hardware<invoke-on><re0 | re1><routing engine>
Release Information Command introduced in JunosOSRelease 15.1F3 for the PTX5000,MX240,MX480, and
MX960 routers.
Command introduced in Junos OS Release 15.1F5 for the MX2010 and MX2020 routers.
Command introduced in Junos OS Release 16.1R4 for the PTX3000 routers.
NOTE: PTX3000 router supports the Routing and Control Board, RCBPTX.
Command introduced in Junos OS Release 17.1R1 for EX9200 switches.
Description Display details of RAM and solid-state drives (SSDs) installed in the Routing Engine.
Options none—(Optional) Display information about hardware.
invoke-on—(Optional) Display the details of RAMand solid-state drives (SSDs) installed
on a router that has dual Routing Engines. You can use the all-routing-engine option
to display the hardware information of all the Routing Engines or the
other-routing-engineoption todisplay thehardware informationof theotherRouting
Engine. For example, if you issue the command from themaster Routing Engine, the
backup Routing Engine is referred to as the other Routing Engine.
re0 | re1—(Optional) On routers that support dual or redundant Routing Engines, display
hardware information about the Routing Engine in slot 0 (re0) or the Routing Engine
in slot 1 (re1).
routing-engine—(Optional)Specify theRoutingEngine forwhich thedetailsof the installed
RAM and solid-state drives (SSDs) is to be displayed. The following options are
available:
• backup—Backup Routing Engine.
• both—Master and backup Routing Engines.
• local—Routing Engine on the local Virtual Chassis member.
• master—Master Routing Engine.
• other— If you issue the command from themaster Routing Engine, the backup
Routing Engine is referred to as the other Routing Engine.
567Copyright © 2018, Juniper Networks, Inc.
Chapter 21: VM Host Software Monitoring Commands
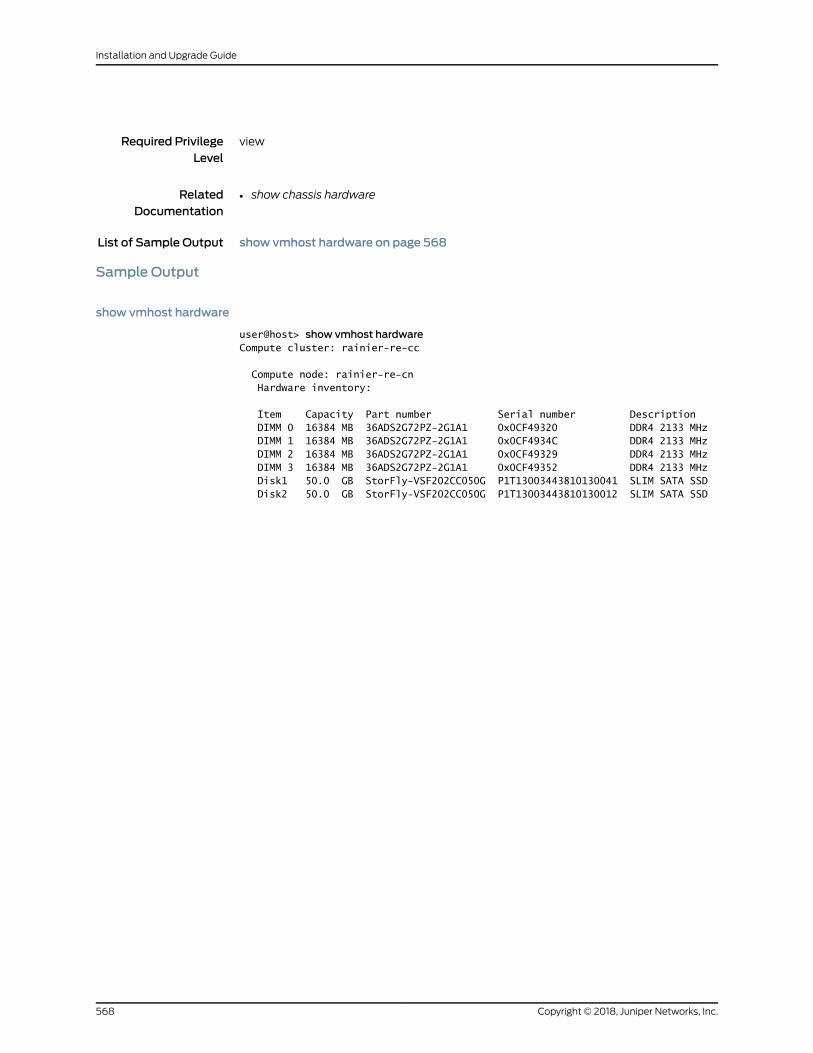
Required PrivilegeLevel
view
RelatedDocumentation
show chassis hardware•
List of Sample Output show vmhost hardware on page 568
Sample Output
show vmhost hardware
user@host> show vmhost hardwareCompute cluster: rainier-re-cc
Compute node: rainier-re-cn Hardware inventory:
Item Capacity Part number Serial number Description DIMM 0 16384 MB 36ADS2G72PZ-2G1A1 0x0CF49320 DDR4 2133 MHz DIMM 1 16384 MB 36ADS2G72PZ-2G1A1 0x0CF4934C DDR4 2133 MHz DIMM 2 16384 MB 36ADS2G72PZ-2G1A1 0x0CF49329 DDR4 2133 MHz DIMM 3 16384 MB 36ADS2G72PZ-2G1A1 0x0CF49352 DDR4 2133 MHz Disk1 50.0 GB StorFly-VSF202CC050G P1T13003443810130041 SLIM SATA SSD Disk2 50.0 GB StorFly-VSF202CC050G P1T13003443810130012 SLIM SATA SSD
Copyright © 2018, Juniper Networks, Inc.568
Installation and Upgrade Guide

show vmhost information
Syntax show vmhost information<invoke-on><re0 | re1><routing engine>
Release Information Command introduced in JunosOSRelease 15.1F3 for the PTX5000,MX240,MX480, and
MX960 routers.
Command introduced in Junos OS Release 15.1F5 for the MX2010 and MX2020 routers.
Command introduced in Junos OS Release 16.1R4 for the PTX3000 routers.
NOTE: PTX3000 router supports the Routing and Control Board, RCBPTX.
Command introduced in Junos OS Release 17.1R1 for EX9200 switches.
Description Display information about the host—such as IP address of the host Routing Engine, host
OS version, model number or name of the Routing Engine, and so on.
Options invoke-on—(Optional) Display information about the host on a router that has dualRouting Engines. You can use the all-routing-engine option to display information
about thehostof all theRoutingEnginesor theother-routing-engineoption todisplay
the informationabout thehostof theotherRoutingEngine. If you issue thecommand
from themaster Routing Engine, the backup Routing Engine is referred to as the
other Routing Engine .
re0 | re1—(Optional) On routers that support dual or redundant Routing Engines, displayinformation about the host of Routing Engine in slot 0 (re0) or the Routing Engine
in slot 1 (re1).
routing-engine—(Optional) Specify the Routing Engine for which the information aboutthe host is to be displayed. The following options are available:
• backup—Backup Routing Engine.
• both—Master and the backup Routing Engines.
• local—Routing Engine on the local Virtual Chassis member.
• master—Master Routing Engine.
• other—If you issue the command from themaster Routing Engine, the backup
Routing Engine is referred to as the other Routing Engine.
Required PrivilegeLevel
view
569Copyright © 2018, Juniper Networks, Inc.
Chapter 21: VM Host Software Monitoring Commands

List of Sample Output show vmhost information on page 570
Sample Output
show vmhost information
user@host> show vmhost informationCompute cluster: rainier-re-cc Compute node Model Kernel release Machine Management IP rainier-re-cn RAINIER 3.10.79-ovp-rt74-WR6.0.0.20_preempt-rt x86_64 192.168.1.2/24
Copyright © 2018, Juniper Networks, Inc.570
Installation and Upgrade Guide

show vmhost logs
Syntax show vmhost logs<re0 | re1><routing engine>
Release Information Command introduced in JunosOSRelease 15.1F3 for the PTX5000,MX240,MX480, and
MX960 routers.
Command introduced in Junos OS Release 15.1F5 for the MX2010 and MX2020 routers.
Command introduced in Junos OS Release 16.1R4 for the PTX3000 routers.
NOTE: PTX3000 router supports the Routing and Control Board, RCBPTX.
Command introduced in Junos OS Release 17.1R1 for EX9200 switches.
Description Display trace logs information of the host OS.
Options re0 | re1—(Optional) On routers that support dual or redundant Routing Engines, displaytrace logs information of the host os running on the Routing Engine in slot 0 (re0)
or the Routing Engine in slot 1 (re1).
routing-engine—(Optional) Specify the Routing Engine for which the trace logsinformation of the host OS is to be displayed. The following options are available:
• backup—Backup Routing Engine.
• both—Master and the backup Routing Engines.
• local—Routing Engine on the local Virtual Chassis member.
• master—Master Routing Engine.
• other—If you issue the command from themaster Routing Engine, the backup
Routing Engine is referred to as the other Routing Engine.
Required PrivilegeLevel
view
List of Sample Output show vmhost logs on page 571
Sample Output
show vmhost logs
user@host> show vmhost logsCompute cluster: rainier-re-cc
Compute node: rainier-re-cn
571Copyright © 2018, Juniper Networks, Inc.
Chapter 21: VM Host Software Monitoring Commands

Logs Info ========= total 104844 drwxr-xr-x. 2 root root 4096 Dec 10 19:56 sa -rw-r--r--. 1 root root 400 Dec 10 19:56 postinstall.log drwxr-xr-x. 2 root root 4096 Dec 10 19:56 audit drwxr-xr-x. 5 root root 4096 Dec 10 19:56 glusterfs drwxr-xr-x. 2 root root 4096 Dec 10 19:56 wdmd_disk_io drwxr-xr-x. 2 root root 4096 Dec 10 19:56 openvswitch drwxr-xr-x. 3 root root 4096 Dec 10 20:05 libvirt -rw-r-----. 1 root root 228224 Dec 11 00:00 syslog-20151211.gz -rw-r-----. 1 root root 987114 Dec 12 00:00 syslog-20151212.gz -rw-r-----. 1 root root 3100 Dec 12 20:12 mail.log-20151213 -rw-r-----. 1 root root 3100 Dec 12 20:12 mail.info-20151213 -rw-r-----. 1 root root 5730 Dec 12 20:15 user.log-20151213 -rw-r-----. 1 root root 434831 Dec 12 23:52 kern.log-20151213 -rw-r-----. 1 root root 7349109 Dec 12 23:59 debug-20151213 -rw-r-----. 1 root root 955140 Dec 13 00:00 syslog-20151213.gz -rw-r-----. 1 root root 266098 Dec 13 00:00 messages-20151213 -rw-r-----. 1 root root 10252576 Dec 13 00:00 auth.log-20151213 -rw-r--r--. 1 root root 26464360 Dec 13 04:11 daemon.log-20151213 -rw-r-----. 1 root root 242 Dec 13 04:12 mail.warn-20151213 -rw-r-----. 1 root root 242 Dec 13 04:12 mail.err-20151213 -rw-r-----. 1 root root 12373338 Dec 14 00:00 syslog-20151214 -rw-r-----. 1 root adm 1592 Dec 14 00:10 boot.4.gz -rw-r-----. 1 root adm 1570 Dec 14 00:42 boot.3.gz -rw-r-----. 1 root adm 1552 Dec 14 06:38 boot.2.gz -rw-r-----. 1 root adm 1589 Dec 14 07:54 boot.1.gz -rw-r-----. 1 root adm 5186 Dec 14 18:50 boot.0 -rw-r--r--. 1 root root 292 Dec 14 21:57 lastlog -rw-r--r--. 1 root root 1638 Dec 14 21:57 sanlock.log -rw-r-----. 1 root root 1098 Dec 14 21:57 mail.warn -rw-r-----. 1 root root 8939 Dec 14 21:57 mail.log -rw-r-----. 1 root root 8939 Dec 14 21:57 mail.info -rw-r-----. 1 root root 968 Dec 14 21:57 mail.err -rw-r-----. 1 root adm 5077 Dec 14 21:57 boot -rw-rw-r--. 1 root root 61824 Dec 14 21:57 wtmp --w-r-----. 1 root root 80275 Dec 14 21:57 resild -rw-r-----. 1 root root 31314 Dec 14 21:59 user.log -rw-r-----. 1 root root 951929 Dec 14 22:57 messages -rw-r-----. 1 root root 1577908 Dec 14 22:57 kern.log -rw-r-----. 1 root root 4810073 Dec 14 23:10 auth.log -rw-r-----. 1 root root 11130442 Dec 14 23:14 syslog -rw-r-----. 1 root root 7305132 Dec 14 23:14 debug -rw-r--r--. 1 root root 21884828 Dec 14 23:14 daemon.log
Copyright © 2018, Juniper Networks, Inc.572
Installation and Upgrade Guide

show vmhostmanagement-if
Syntax show vmhost management-if
Release Information Command introduced in Junos OS Release 15.1F6.
NOTE: Thecommand issupportedonthe routerswithRE-MX-X6,RE-MX-X8,and RE-PTX-X8 Routing Engines only.
Description Display theadministrative status, speedandoperationalmodeof thehost interfaceeth0,
which serves as amanagement interface.
Required PrivilegeLevel
view
List of Sample Output show vmhostmanagement-if on page 573
Sample Output
show vmhostmanagement-if
user@host> show vmhostmanagement-ifAdministrative status: UpLink status: UpLink speed: 1000Mb/sLink operational mode: Full
573Copyright © 2018, Juniper Networks, Inc.
Chapter 21: VM Host Software Monitoring Commands

show vmhost netstat
Syntax show vmhost netstat<invoke-on><re0 | re1><routing engine>
Release Information Command introduced in JunosOSRelease 15.1F3 for the PTX5000,MX240,MX480, and
MX960 routers.
Command introduced in Junos OS Release 15.1F5 for the MX2010 and MX2020 routers.
Command introduced in Junos OS Release 16.1R4 for the PTX3000 routers.
NOTE: PTX3000 router supports the Routing and Control Board, RCBPTX.
Command introduced in Junos OS Release 17.1R1 for EX9200 switches.
Description Displaynetwork statistics information for thehostOS.The statistics contains information
related to the interfaces used for the communication between the host and the guest,
such as the IP address of the destination, IP address of the gateway, mask, flags, and so
on.
Options invoke-on—(Optional) Display the network statistics for the host OS on a router thathas dual Routing Engines. You can use the all-routing-engine option to display the
network statistics information for the host OS running on all the Routing Engines or
the other-routing-engine option to display the network statistics information for the
hostOS runningon theotherRoutingEngine. For example, If you issue the command
from themaster Routing Engine, the backup Routing Engine is referred to as the
other Routing Engine .
re0 | re1—(Optional) On routers that support dual or redundant Routing Engines, displaythe network statistics information for the host OS running on the Routing Engine in
slot 0 (re0) or the Routing Engine in slot 1 (re1).
routing-engine—(Optional) Specify the Routing Engine for which the network statisticsinformation for the host OS is to be displayed. The following options are available:
• backup—Backup Routing Engine.
• both—Master and the backup Routing Engines.
• local—Routing Engine on the local Virtual Chassis member.
• master—Master Routing Engine.
• other—If you issue the command from themaster Routing Engine, the backup
Routing Engine is referred to as the other Routing Engine.
Copyright © 2018, Juniper Networks, Inc.574
Installation and Upgrade Guide

Required PrivilegeLevel
view
List of Sample Output show vmhost netstat on page 575
Sample Output
show vmhost netstat
user@host> show vmhost netstatCompute cluster: rainier-re-cc
Compute node: rainier-re-cn
Netstat ======= Kernel IP routing table Destination Gateway Genmask Flags MSS Window irtt Iface
0.0.0.0 10.216.63.254 0.0.0.0 UG 0 0 0 eth0
10.216.48.0 0.0.0.0 255.255.240.0 U 0 0 0 eth0
192.168.1.0 0.0.0.0 255.255.255.0 U 0 0 0 jnpr-int-br 192.168.122.0 0.0.0.0 255.255.255.0 U 0 0 0 virbr0
575Copyright © 2018, Juniper Networks, Inc.
Chapter 21: VM Host Software Monitoring Commands

show vmhost processes
Syntax show vmhost processes<invoke-on><re0 | re1><routing engine>
Release Information Command introduced in JunosOSRelease 15.1F3 for the PTX5000,MX240,MX480, and
MX960 routers.
Command introduced in Junos OS Release 15.1F5 for the MX2010 and MX2020 routers.
Command introduced in Junos OS Release 16.1R4 for the PTX3000 routers.
NOTE: PTX3000 router supports the Routing and Control Board, RCBPTX.
Description Display information about the host processes that are running on the router.
Options invoke-on—(Optional) Display information about the host processes that are runningon a router with dual Routing Engines. You can use the all-routing-engine option to
display information about the host processes running on all the Routing Engines or
the other-routing-engine option to display information about the host processes
running on the other Routing Engine. For example, If you issue the command from
themaster Routing Engine, the backup Routing Engine is referred to as the other
Routing Engine .
re0 | re1—(Optional) On routers that support dual or redundant Routing Engines, displayinformation about the host processes running on the Routing Engine in slot 0 (re0)
or on the Routing Engine in slot 1 (re1).
routing-engine—(Optional) Specify the Routing Engine for which the information aboutthe host processes is to be displayed. The following options are available:
• backup—Backup Routing Engine.
• both—Master and the backup Routing Engines.
• local—Routing Engine on the local Virtual Chassis member.
• master—Master Routing Engine.
• other—If you issue the command from themaster Routing Engine, the backup
Routing Engine is referred to as the other Routing Engine.
Required PrivilegeLevel
view
Copyright © 2018, Juniper Networks, Inc.576
Installation and Upgrade Guide

RelatedDocumentation
show system processes•
List of Sample Output show vmhost processes on page 577
Sample Output
show vmhost processes
user@host> show vmhost processesCompute cluster: rainier-re-cc
Compute node: rainier-re-cn UID PID PPID C STIME TTY TIME CMD root 1 0 0 21:56 ? 00:00:02 init [3] root 2 0 0 21:56 ? 00:00:00 [kthreadd] root 3 2 0 21:56 ? 00:00:04 [ksoftirqd/0] root 5 2 0 21:56 ? 00:00:00 [kworker/0:0H] root 7 2 0 21:56 ? 00:00:00 [posixcputmr/0] root 8 2 0 21:56 ? 00:00:00 [kclksetdelayd] root 9 2 0 21:56 ? 00:00:00 [rcub/0] root 10 2 0 21:56 ? 00:00:04 [rcu_preempt] root 11 2 0 21:56 ? 00:00:00 [rcu_sched] root 12 2 0 21:56 ? 00:00:00 [rcu_bh] root 13 2 0 21:56 ? 00:00:03 [rcuc/0] root 14 2 0 21:56 ? 00:00:00 [kcmosdelayd] root 15 2 0 21:56 ? 00:00:00 [migration/0] root 16 2 0 21:56 ? 00:00:00 [migration/1] root 17 2 0 21:56 ? 00:00:03 [rcuc/1] root 18 2 0 21:56 ? 00:00:04 [ksoftirqd/1] root 19 2 0 21:56 ? 00:00:00 [posixcputmr/1] root 20 2 0 21:56 ? 00:00:00 [kworker/1:0] root 21 2 0 21:56 ? 00:00:00 [kworker/1:0H] root 22 2 0 21:56 ? 00:00:00 [migration/2] root 23 2 0 21:56 ? 00:00:10 [rcuc/2] root 24 2 0 21:56 ? 00:00:02 [ksoftirqd/2] root 25 2 0 21:56 ? 00:00:00 [posixcputmr/2] root 26 2 0 21:56 ? 00:00:00 [kworker/2:0] root 27 2 0 21:56 ? 00:00:00 [kworker/2:0H] root 28 2 0 21:56 ? 00:00:00 [migration/3] root 29 2 0 21:56 ? 00:00:01 [rcuc/3] root 30 2 0 21:56 ? 00:00:01 [ksoftirqd/3] root 31 2 0 21:56 ? 00:00:00 [posixcputmr/3] root 32 2 0 21:56 ? 00:00:00 [kworker/3:0] root 33 2 0 21:56 ? 00:00:00 [kworker/3:0H] root 34 2 0 21:56 ? 00:00:00 [migration/4] root 35 2 0 21:56 ? 00:00:01 [rcuc/4] root 36 2 0 21:56 ? 00:00:01 [ksoftirqd/4] root 37 2 0 21:56 ? 00:00:00 [posixcputmr/4] root 38 2 0 21:56 ? 00:00:00 [kworker/4:0] root 39 2 0 21:56 ? 00:00:00 [kworker/4:0H] root 40 2 0 21:56 ? 00:00:00 [migration/5] root 41 2 0 21:56 ? 00:00:01 [rcuc/5]
577Copyright © 2018, Juniper Networks, Inc.
Chapter 21: VM Host Software Monitoring Commands

show vmhost resource-usage
Syntax show vmhost resource-usage<invoke-on><re0 | re1><routing engine>
Release Information Command introduced in JunosOSRelease 15.1F3 for the PTX5000,MX240,MX480, and
MX960 routers.
Command introduced in Junos OS Release 15.1F5 for the MX2010 and MX2020 routers.
Command introduced in Junos OS Release 16.1R4 for the PTX3000 routers.
NOTE: PTX3000 router supports the Routing and Control Board, RCBPTX.
Command introduced in Junos OS Release 17.1R1 for EX9200 switches.
Description Display the current usage of solid-state drive (SSD), RAM, andCPU resources of the host
OS.
Options invoke-on—(Optional) Display information about resources usedby the hostOS runningon a router that has dual Routing Engines. You can use the all-routing-engine option
todisplay informationabout resourcesusedby thehostOSonall theRoutingEngines
or the other-routing-engine option to display information about resources used by
the host OS on the other Routing Engine. For example, If you issue the command
from themaster Routing Engine, the backup Routing Engine is referred to as the
other Routing Engine.
re0 | re1—(Optional) On routers that support dual or redundant Routing Engines, displayinformation about resources used by the host OS on the Routing Engine in slot 0
(re0) or on the Routing Engine in slot 1 (re1).
routing-engine—(Optional) Specify the Routing Engine for which the information aboutresources usedby the hostOS is to bedisplayed. The following options are available:
• backup—Backup Routing Engine.
• both—Master and the backup Routing Engines.
• local—Routing Engine on the local Virtual Chassis member.
• master—Master Routing Engine.
• other—If you issue the command from themaster Routing Engine, the backup
Routing Engine is referred to as the other Routing Engine.
Required PrivilegeLevel
view
Copyright © 2018, Juniper Networks, Inc.578
Installation and Upgrade Guide

List of Sample Output show vmhost resource-usage on page 579
Sample Output
show vmhost resource-usage
user@host> show vmhost resource-usageCompute cluster: rainier-re-cc
Compute node: rainier-re-cn CPU Usage ========= 23:15:09 CPU %usr %nice %sys %iowait %irq %soft %steal %guest %idle 23:15:09 all 0.36 0.00 1.16 0.07 0.00 0.01 0.00 74.07 24.34 23:15:09 0 1.42 0.00 4.46 0.28 0.00 0.03 0.00 0.00 93.81 23:15:09 1 1.43 0.00 3.87 0.30 0.00 0.03 0.00 0.00 94.38 23:15:09 2 0.02 0.00 0.42 0.00 0.00 0.01 0.00 98.33 1.22 23:15:09 3 0.00 0.00 0.14 0.00 0.00 0.00 0.00 98.65 1.21 23:15:09 4 0.00 0.00 0.09 0.00 0.00 0.00 0.00 98.71 1.19 23:15:09 5 0.00 0.00 0.10 0.00 0.00 0.00 0.00 98.71 1.19 23:15:09 6 0.00 0.00 0.11 0.00 0.00 0.00 0.00 98.70 1.19 23:15:09 7 0.00 0.00 0.12 0.00 0.00 0.00 0.00 98.68 1.19
Memory Usage ============ total used free shared buffers cached Mem: 63851 51388 12462 0 35 123 Swap: 0 0 0
Disk Usage ========== Filesystem Size Used Avail Use% Mounted on rootfs 3.3G 127M 3.0G 5% / /dev/sda4 2.0G 1.7G 166M 91% /.old tmpfs 32G 1.2M 32G 1% /.old/run none 32G 4.0K 32G 1% /.old/dev tmpfs 32G 0 32G 0% /.old/tmp tmpfs 32G 0 32G 0% /.old/tdev /dev/mapper/jvg_P-jlvmrootrw 3.3G 127M 3.0G 5% /.old/tdev/.union/.s unionfs 3.3G 127M 3.0G 5% / none 32G 4.0K 32G 1% /dev tmpfs 32G 180K 32G 1% /run tmpfs 32G 8.0K 32G 1% /var/volatile /dev/mapper/jvg_P-jlvmjunos 32G 13G 18G 43% /junos /dev/mapper/jvg_P-jlvmvm 6.1G 2.7G 3.1G 47% /vm /dev/mapper/jvg_P-jlvmspare 287M 2.1M 266M 1% /spare cgroup 32G 0 32G 0% /sys/fs/cgroup unionfs 3.3G 127M 3.0G 5% /run/named-chroot/etc/bind
tmpfs 32G 180K 32G 1% /run/named-chroot/var/run/named
579Copyright © 2018, Juniper Networks, Inc.
Chapter 21: VM Host Software Monitoring Commands

tmpfs 32G 180K 32G 1% /run/named-chroot/var/run/bind unionfs 3.3G 127M 3.0G 5% /run/named-chroot/var/cache/bind unionfs 3.3G 127M 3.0G 5% /run/named-chroot/etc/localtime none 32G 4.0K 32G 1% /run/named-chroot/dev/random
none 32G 4.0K 32G 1% /run/named-chroot/dev/zero
none 32G 4.0K 32G 1% /run/named-chroot/dev/null
Copyright © 2018, Juniper Networks, Inc.580
Installation and Upgrade Guide

show vmhost snapshot
Syntax show vmhost snapshot<invoke-on><re0 | re1><routing engine>
Release Information Command introduced in JunosOSRelease 15.1F3 for the PTX5000,MX240,MX480, and
MX960 routers.
Command introduced in Junos OS Release 15.1F5 for the MX2010 and MX2020 routers.
Command introduced in Junos OS Release 16.1R4 for the PTX3000 routers.
NOTE: PTX3000 router supports the Routing and Control Board, RCBPTX.
Command introduced in Junos OS Release 17.1R1 for EX9200 switches.
Description Display snapshot details including Linux host kernel version, software version, and other
package version details for both the sets of software in the backup disk.
Options invoke-on—(Optional) Display the host snapshot information of Routing Engines on arouter that has dual Routing Engines. You can use the all-routing-engine option to
display the host snapshot information of all the Routing Engines or the
other-routing-engine option to display the host snapshot information of the other
Routing Engine. For example, If you issue the command from themaster Routing
Engine, the backup Routing Engine is referred to as the other Routing Engine.
re0 | re1—(Optional) On routers that support dual or redundant Routing Engines, displayhost snapshot information about the Routing Engine in slot 0 (re0) or the Routing
Engine in slot 1 (re1).
routing-engine—(Optional) Specify the Routing Engine for which the host snapshotdetails is to be displayed. The following options are available:
• backup—Backup Routing Engine.
• both—Master and backup Routing Engines.
• local—Routing Engine on the local Virtual Chassis member.
• master—Master Routing Engine.
• other—If you issue the command from themaster Routing Engine, the backup
Routing Engine is referred to as the other Routing Engine.
Required PrivilegeLevel
view
581Copyright © 2018, Juniper Networks, Inc.
Chapter 21: VM Host Software Monitoring Commands

RelatedDocumentation
request vmhost software rollback on page 554•
• request vmhost snapshot on page 546
List of Sample Output show vmhost snapshot on page 582
Sample Output
show vmhost snapshot
user@host> show vmhost snapshotUEFI Version: NGRE_v00.53.00.01
Secondary Disk, Snapshot Time: Tue Dec 8 19:49:09 UTC 2015
Version: set pVMHost Version: 2.897VMHost Root: vmhost-x86_64-15.1I20151203_0011_rbu-builderVMHost Core: vmhost-core-x86_64-15.1I20151203_0011_rbu-builderkernel: 3.10.79-ovp-rt74-WR6.0.0.20_preempt-rtJunos Disk: junos-install-x86-64-15.1F-20151204.0
Version: set bVMHost Version: 2.897VMHost Root: vmhost-x86_64-15.1I20151203_0011_rbu-builderVMHost Core: vmhost-core-x86_64-15.1I20151203_0011_rbu-builderkernel: 3.10.79-ovp-rt74-WR6.0.0.20_preempt-rtJunos Disk: junos-install-x86-64-15.1F-20151204.0
Copyright © 2018, Juniper Networks, Inc.582
Installation and Upgrade Guide

show vmhost status
Syntax show vmhost status<invoke-on><re0 | re1><routing engine>
Release Information Command introduced in JunosOSRelease 15.1F3 for the PTX5000,MX240,MX480, and
MX960 routers.
Command introduced in Junos OS Release 15.1F5 for the MX2010 and MX2020 routers.
Command introduced in Junos OS Release 16.1R4 for the PTX3000 routers.
NOTE: PTX3000 router supports the Routing and Control Board, RCBPTX.
Command introduced in Junos OS Release 17.1R1 for EX9200 switches.
Description Display information about the status of communication between the host OS and the
guest OS. The following status outputs are displayed:
• Online—Communication between the host OS and the guest OS is good.
• Offline—Communicationwith thehost is lost. Any stateother thanOnline is considered
asOffline.
Options invoke-on—(Optional) Display the status of communication between the host OS andthe guest OS running on a router with dual Routing Engines. You can use the
all-routing-engine option to display the status of host-to-guest communication on
all the Routing Engines or the other-routing-engine option to display the status of
host-to-guest communication on the other Routing Engine. For example, If you issue
thecommand fromthemasterRoutingEngine, thebackupRoutingEngine is referred
to as the other Routing Engine.
re0 | re1—(Optional) On routers that support dual or redundant Routing Engines, displaythe status of communication between the host OS and the guest OS on the Routing
Engine in slot 0 (re0) or on the Routing Engine in slot 1 (re1).
routing-engine—(Optional) Specify the Routing Engine for which the status ofcommunication between the host OS and the guest OS is to be displayed. The
following options are available:
• backup—Backup Routing Engine.
• both—Master and backup Routing Engines.
• local—Routing Engine on the local Virtual Chassis member.
583Copyright © 2018, Juniper Networks, Inc.
Chapter 21: VM Host Software Monitoring Commands
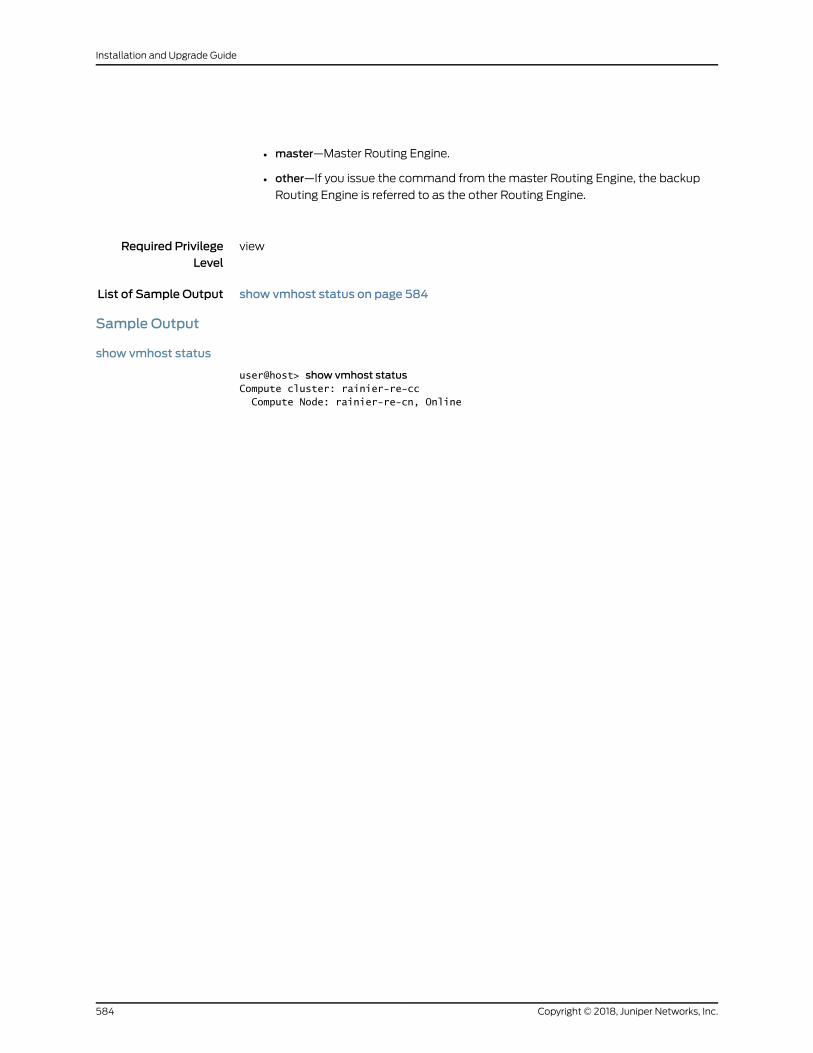
• master—Master Routing Engine.
• other—If you issue the command from themaster Routing Engine, the backup
Routing Engine is referred to as the other Routing Engine.
Required PrivilegeLevel
view
List of Sample Output show vmhost status on page 584
Sample Output
show vmhost status
user@host> show vmhost statusCompute cluster: rainier-re-cc Compute Node: rainier-re-cn, Online
Copyright © 2018, Juniper Networks, Inc.584
Installation and Upgrade Guide

show vmhost uptime
Syntax show vmhost uptime<invoke-on><re0 | re1><routing engine>
Release Information Command introduced in JunosOSRelease 15.1F3 for the PTX5000,MX240,MX480, and
MX960 routers.
Command introduced in Junos OS Release 15.1F5 for the MX2010 and MX2020 routers.
Command introduced in Junos OS Release 16.1R4 for the PTX3000 routers.
NOTE: PTX3000 router supports the Routing and Control Board, RCBPTX.
Command introduced in Junos OS Release 17.1R1 for EX9200 switches.
Description Display the current time and information such as how long the hostOShas been running,
number of users, average load, and reason for the last reboot that occurred.
Options invoke-on—(Optional) Display the uptime information about the host on a router withdualRoutingEngines.Youcanuse theall-routing-engineoption todisplay theuptime
information about the host on all the Routing Engines or the other-routing-engine
option todisplay theuptime informationabout thehost on theotherRoutingEngine.
For example, If you issue the command from themaster Routing Engine, the backup
Routing Engine is referred to as the other Routing Engine.
re0 | re1—(Optional) On routers that support dual or redundant Routing Engines, displaythe uptime information about the hoston the Routing Engine in slot 0 (re0) or on the
Routing Engine in slot 1 (re1).
routing-engine—(Optional)Specify theRoutingEngine forwhich theuptime informationabout the host is to be displayed. The following options are available:
• backup—Backup Routing Engine.
• both—Master and backup Routing Engines.
• local—Routing Engine on the local Virtual Chassis member.
• master—Master Routing Engine.
• other—If you issue the command from themaster Routing Engine, the backup
Routing Engine is referred to as the other Routing Engine.
Required PrivilegeLevel
view
585Copyright © 2018, Juniper Networks, Inc.
Chapter 21: VM Host Software Monitoring Commands

RelatedDocumentation
show chassis routing-engine•
List of Sample Output show vmhost uptime on page 586
Sample Output
show vmhost uptime
user@host> show vmhost uptimeVmhost Current time: 2015-12-14 23:16:01+00:00 Vmhost Uptime: 23:16:01 up 1:19, 0 users, load average: 6.22, 6.14, 6.07 Vmhost last reboot reason: 0x2000:hypervisor reboot
Copyright © 2018, Juniper Networks, Inc.586
Installation and Upgrade Guide

show vmhost version
Syntax show vmhost version<invoke-on><re0 | re1><routing engine>
Release Information Command introduced in JunosOSRelease 15.1F3 for the PTX5000,MX240,MX480, and
MX960 routers.
Command introduced in Junos OS Release 15.1F5 for the MX2010 and MX2020 routers.
Command introduced in Junos OS Release 16.1R4 for the PTX3000 routers.
NOTE: PTX3000 router supports the Routing and Control Board, RCBPTX.
Command introduced in Junos OS Release 17.1R1 for EX9200 switches.
Description Displayhost version information includingLinuxhost kernel version, host software version,
and other package version details for both the sets of software in the primary disk.
Options invoke-on—(Optional) Display the version information of the host running on a routerwith dual Routing Engines. You can use the all-routing-engine option to display the
version information of the host software running on all the Routing Engines or the
other-routing-engine option to display the version information of the host software
running on other Routing Engine. For example, If you issue the command from the
master Routing Engine, the backupRouting Engine is referred to as the other Routing
Engine.
re0 | re1—(Optional) On routers that support dual or redundant Routing Engines, displayversion information of the host software on the Routing Engine in slot 0 (re0) or on
the Routing Engine in slot 1 (re1).
routing-engine—(Optional)Specify theRoutingEngine forwhich the version informationof the host software is to be displayed. The following options are available:
• backup—Backup Routing Engine.
• both—Master and backup Routing Engines.
• local—Routing Engine on the local Virtual Chassis member.
• master—Master Routing Engine.
• other—If you issue the command from themaster Routing Engine, the backup
Routing Engine is referred to as the other Routing Engine.
Required PrivilegeLevel
view
587Copyright © 2018, Juniper Networks, Inc.
Chapter 21: VM Host Software Monitoring Commands

List of Sample Output show vmhost version on page 588
Sample Output
show vmhost version
user@host> show vmhost versionCurrent root details, Device sda, Label: jrootb_P, Partition: sda4Current boot disk: PrimaryCurrent root set: bUEFI Version: NGRE_v00.53.00.01
Primary Disk, Upgrade Time: Mon Dec 14 21:55:38 UTC 2015
Version: set pVMHost Version: 2.900VMHost Root: vmhost-x86_64-15.1F420151130_1049_builderVMHost Core: vmhost-core-x86_64-15.1F420151130_1049_builderkernel: 3.10.79-ovp-rt74-WR6.0.0.20_preempt-rtJunos Disk: junos-install-x86-64-15.1F4.10
Version: set bVMHost Version: 2.901VMHost Root: vmhost-x86_64-15.1I20151210_0011_rbu-builderVMHost Core: vmhost-core-x86_64-15.1I20151210_0011_rbu-builderkernel: 3.10.79-ovp-rt74-WR6.0.0.20_preempt-rtJunos Disk: junos-install-x86-64-15.1F-20151211.0
Copyright © 2018, Juniper Networks, Inc.588
Installation and Upgrade Guide