jump starter arrancadorarrancador operator’s manual / manual del usuario model / modelo: 028-43448...
TRANSCRIPT

0099001698-03
Jump StarterArrancador
OPERATOR’S MANUAL / MANUAL DEL USUARIO
Model / Modelo: 028-43448
CAUTION:Read and follow all safety rules and operating instructions before every use of this product.
SAVE THESE INSTRUCTIONS.
ATENCIÓN:Lea y siga todas
las reglas de seguridad e instrucciones de uso
antes de cada usode este producto.
GUARDE ESTAS INSTRUCCIONES.

DIEHARD LIMITED WARRANTYFOR ONE YEAR from the date of sale, this product is warranted against defects in material or workmanship when it is operated according to all supplied instructions.
WITH PROOF OF SALE, return a defective product to the retailer from which it was purchased for free replacement.
This warranty is void if this product is ever used while providing commercial services or if rented to another person.
This warranty gives you specific legal rights, and you may also have other rights which vary from state to state.
Schumacher Electric Corporation, Mount Prospect, IL 60056
FOR CUSTOMER ASSISTANCE OR REPLACEMENT PARTS, CALL 1-800-621-5485 TOLL-FREEDieHard is a registered trademark of KCD IP, LLC, in the United States, and Sears Brands, LLC in other countries, used under license.
GARANTÍA LIMITADA DIEHARDDURANTE UN AÑO desde la fecha de venta, este producto está garantizado contra defectos de materiales o mano de obra cuando se opera de acuerdo a las instrucciones provistas.
CON EL COMPROBANTE DE VENTA, devolver un producto defectuoso a la tienda donde fue comprado para el reemplazo gratuito.
Esta garantía no es válida si el producto se utiliza en cualquier momento durante la prestación de servicios comerciales o si se alquila a otra persona.
Esta garantía le otorga derechos legales específicos, así como otros derechos, que varían de estado a estado.
Schumacher Electric Corporation, Mount Prospect, IL 60056
PARA ASISTENCIA AL CLIENTE O REPUESTOS, LLAME GRATIS: 1-800-621-5485DieHard es una marca registrada de KCD IP, LLC, en los Estados Unidos de América, y Sears Brands, LLC en otros países, usada bajo licencia.

• 3 •
1. IMPORTANT SAFETY INSTRUCTIONS
SAVE THESE INSTRUCTIONS.WARNING – RISK OF EXPLOSIVE GASES.
WORKING IN THE VICINITY OF A LEAD-ACID BATTERY IS DANGEROUS. BATTERIES GENERATE EXPLOSIVE GASES DURING NORMAL OPERATION. IT IS IMPORTANT THAT YOU FOLLOW THESE INSTRUCTIONS EACH TIME YOU USE THE UNIT.
To reduce the risk of battery explosion, follow these instructions and those published by the battery manufacturer and the manufacturer of any equipment you intend to use in the vicinity of a battery. Review cautionary markings on these products and on the engine.WARNING! RISK OF ELECTRIC SHOCK OR FIRE.
1.1 Read the entire manual before using this product. Failure to do so could result in serious injury or death.
1.2 Keep out of reach of children.1.3 Do not put fingers or hands into any of the unit’s outlets.1.4 Do not expose the unit to rain or snow.1.5 Use only recommended attachments. Use of an attachment not
recommended or sold by the manufacturer of the 028-43448 may result in a risk of fire, electric shock or injury to persons or damage to property.
1.6 To reduce the risk of damage to the electric plug or cord, pull by the adaptor rather than the cord when disconnecting the unit.
1.7 Do not operate the unit with damaged cables or clamps.1.8 Do not operate the unit if it has received a sharp blow, been dropped or
otherwise damaged in any way; take it to a qualified service person.1.9 Do not disassemble the unit; take it to a qualified service person when
service or repair is required. Incorrect reassembly may result in a risk of fire or electric shock. WARNING! RISK OF EXPLOSIVE GASES.
1.10 To reduce the risk of a battery explosion, follow these instructions and those published by the battery manufacturer and the manufacturer of any equipment you intend to use in the vicinity of the battery. Review the cautionary markings on these products and on the engine.
1.11 Do not set the unit on flammable materials, such as carpeting, upholstery, paper, cardboard, etc.
1.12 Never place the unit directly above battery being jumped. 1.13 Do not use the unit to jump start a vehicle while charging the internal battery.
• 4 •
2. PERSONAL PRECAUTIONSWARNING! RISK OF EXPLOSIVE GASES. A SPARK NEAR THE BATTERY MAY CAUSE A BATTERY EXPLOSION. TO REDUCE THE RISK OF A SPARK NEAR THE BATTERY:
2.1 NEVER smoke or allow a spark or flame in the vicinity of a battery or engine.2.2 Remove personal metal items such as rings, bracelets, necklaces and
watches when working with a lead-acid battery. A lead-acid battery can produce a short-circuit current high enough to weld a ring to metal, causing a severe burn.
2.3 Be extra cautious, to reduce the risk of dropping a metal tool onto the battery. It might spark or short-circuit the battery or other electrical part that may cause an explosion.
2.4 Do not permit the internal battery of the unit to freeze. Never charge a frozen battery.
2.5 To prevent sparking, NEVER allow clamps to touch together or contact the same piece of metal.
2.6 Consider having someone nearby to come to your aid when you work near a lead-acid battery.
2.7 Have plenty of fresh water, soap and baking soda nearby for use, in case battery acid contacts your eyes, skin, or clothing.
2.8 Wear complete eye and body protection, including safety goggles and protective clothing. Avoid touching your eyes while working near the battery.
2.9 If battery acid contacts your skin or clothing, immediately wash the area with soap and water. If acid enters your eye, immediately flood the eye with cold running water for at least 10 minutes and get medical attention right away.
2.10 If battery acid is accidentally swallowed, drink milk, the whites of eggs or water. DO NOT induce vomiting. Seek medical attention immediately.
2.11 Neutralize any acid spills thoroughly with baking soda before attempting to clean up.
2.12 This product contains a lithium ion battery. In case of fire, you may use water, a foam extinguisher, Halon, CO2, ABC dry chemical, powdered graphite, copper powder or soda (sodium carbonate) to extinguish the fire. Once the fire is extinguished, douse the product with water, an aqueous-based extinguishing agent, or other nonalcoholic liquids to cool the product and prevent the battery from re-igniting. NEVER attempt to pick up or move a hot, smoking, or burning product, as you may be injured.
• 5 •
3. PREPARING TO USE THE UNITWARNING! RISK OF CONTACT WITH BATTERY ACID. BATTERY ACID IS A HIGHLY CORROSIVE SULFURIC ACID.
3.1 Make sure the area around the battery is well ventilated while the unit is in use.
3.2 Clean the battery terminals before using the jump starter. During cleaning, keep airborne corrosion from coming into contact with your eyes, nose and mouth. Use baking soda and water to neutralize the battery acid and help eliminate airborne corrosion. Do not touch your eyes, nose or mouth.
3.3 Determine the voltage of the battery by referring to the vehicle owner’s manual and make sure that the output voltage is 12V.
3.4 Make sure that the unit’s cable clamps make tight connections.
4. FOLLOW THESE STEPS WHEN CONNECTING TO A BATTERYWARNING! A SPARK NEAR THE BATTERY MAY CAUSE A BATTERY EXPLOSION. TO REDUCE THE RISK OF A SPARK NEAR THE BATTERY:
4.1 Plug the clamps into the unit, and then attach the output cables to the battery and chassis as indicated below. Never allow the output clamps to touch each other.
4.2 Position the DC cables to reduce the risk of damage by the hood, door and moving or hot engine parts. NOTE: If it is necessary to close the hood during the jump starting process, ensure that the hood does not touch the metal part of the battery clips or cut the insulation of the cables.
4.3 Stay clear of fan blades, belts, pulleys and other parts that can cause injury.4.4 Check the polarity of the battery posts. The POSITIVE (POS, P, +) battery
post usually has a larger diameter than the NEGATIVE (NEG, N, -) post.4.5 Determine which post of the battery is grounded (connected) to the
chassis. If the negative post is grounded to the chassis (as in most vehicles), see step 4.6. If the positive post is grounded to the chassis, see step 4.7.
4.6 For a negative-grounded vehicle, connect the POSITIVE (RED) clamp from the jump starter to the POSITIVE (POS, P, +) ungrounded post of the battery. Connect the NEGATIVE (BLACK) clamp to the vehicle chassis or engine block away from the battery. Do not connect the clamp to the carburetor, fuel lines or sheet-metal body parts. Connect to a heavy gauge metal part of the frame or engine block.
4.7 For a positive-grounded vehicle, connect the NEGATIVE (BLACK) clamp from the jump starter to the NEGATIVE (NEG, N, -) ungrounded post of the battery. Connect the POSITIVE (RED) clamp to the vehicle chassis or engine block away from the battery. Do not connect the clamp to the carburetor, fuel lines or sheet-metal body parts. Connect to a heavy gauge metal part of the frame or engine block.
4.8 When finished using the jump starter, remove the clamp from the vehicle chassis and then remove the clamp from the battery terminal. Disconnect the clamps from the unit.
• 6 •
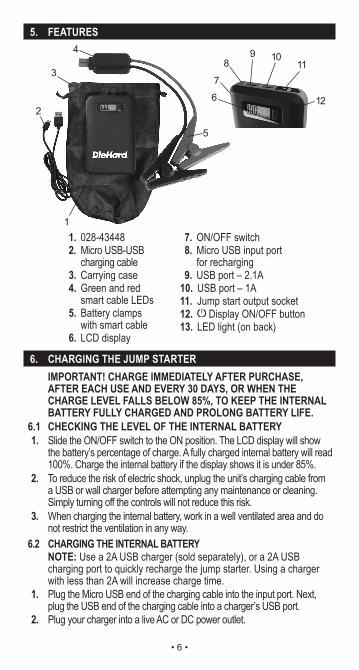
5. FEATURES
1
5
2
3
48
7
9 1011
126
1. 028-434482. Micro USB-USB
charging cable3. Carrying case4. Green and red
smart cable LEDs5. Battery clamps
with smart cable6. LCD display
7. ON/OFF switch8. Micro USB input port
for recharging9. USB port – 2.1A
10. USB port – 1A11. Jump start output socket12. Display ON/OFF button13. LED light (on back)
6. CHARGING THE JUMP STARTERIMPORTANT! CHARGE IMMEDIATELY AFTER PURCHASE, AFTER EACH USE AND EVERY 30 DAYS, OR WHEN THE CHARGE LEVEL FALLS BELOW 85%, TO KEEP THE INTERNAL BATTERY FULLY CHARGED AND PROLONG BATTERY LIFE.
6.1 CHECKING THE LEVEL OF THE INTERNAL BATTERY1. Slide the ON/OFF switch to the ON position. The LCD display will show
the battery’s percentage of charge. A fully charged internal battery will read 100%. Charge the internal battery if the display shows it is under 85%.
2. To reduce the risk of electric shock, unplug the unit’s charging cable from a USB or wall charger before attempting any maintenance or cleaning. Simply turning off the controls will not reduce this risk.
3. When charging the internal battery, work in a well ventilated area and do not restrict the ventilation in any way.
6.2 CHARGING THE INTERNAL BATTERYNOTE: Use a 2A USB charger (sold separately), or a 2A USB charging port to quickly recharge the jump starter. Using a charger with less than 2A will increase charge time.
1. Plug the Micro USB end of the charging cable into the input port. Next, plug the USB end of the charging cable into a charger’s USB port.
2. Plug your charger into a live AC or DC power outlet.
• 7 •
3. The LCD display will light, the digit begins to flash and show “IN”, indicating that charging has begun.
4. The jump starter will fully charge in 2-3 hours. When the unit is fully charged, the display will show “100%”.
5. When the battery is fully charged, disconnect your charger from the outlet, and then remove the charging cable from the charger and the unit. Slide the ON/OFF switch to the OFF position, if you are not using the unit immediately.
6. Charge the unit as soon as possible after use.7. OPERATING INSTRUCTIONS7.1 JUMP STARTING A VEHICLE ENGINE
IMPORTANT: Do not use the jump starter while charging its internal battery.IMPORTANT: Using the jump starter without a battery installed in the vehicle will damage the vehicle’s electrical system.NOTE: The internal battery must have a charge if at least 40% to jump start a vehicle.
1. Turn the ignition OFF.2. Plug the battery clamp cable into the jump starter’s output socket.3. Lay the DC cables away from any fan blades, belts, pulleys and other
moving parts. Make sure all of the vehicle’s electrical devices are turned off.4. For a negative-grounded vehicle, connect the POSITIVE (RED) clamp
from the jump starter to the POSITIVE (POS, P, +) ungrounded post of the battery. Connect the NEGATIVE (BLACK) clamp to the vehicle chassis or engine block away from the battery. Do not connect the clamp to the carburetor, fuel lines or sheet-metal body parts. Connect to a heavy gauge metal part of the frame or engine block.
5. For a positive-grounded vehicle, connect the NEGATIVE (BLACK) clamp from the jump starter to the NEGATIVE (NEG, N, -) ungrounded post of the battery. Connect the POSITIVE (RED) clamp to the vehicle chassis or engine block away from the battery. Do not connect the clamp to the carburetor, fuel lines or sheet-metal body parts. Connect to a heavy gauge metal part of the frame or engine block.
6. Slide the ON/OFF switch to the ON position. The green LED on the smart cable should light. NOTE: If the vehicle battery is extremely discharged, the initial current draw from the jump starter may activate short circuit protection in the smart cable. When the condition is corrected, the smart cable will automatically reset.
7. After a proper connection has been made, crank the engine. If the engine does not start within 5-8 seconds, stop cranking and wait at least 1 minute before attempting to start the vehicle again. NOTE: If the car does not crank a second time, check the smart cable to see if the green LED is lit. If an LED is flashing, refer to section 10, Troubleshooting, and note which error code is in effect. When the condition is corrected, the smart cable will automatically reset.NOTE: Cold weather may affect the performance of the jump starter’s lithium battery. If you hear only a click and the engine does not turn over, try the following:
• 8 •
With the jump starter connected to the car battery and the green LED illuminated on the smart cable, turn on all lights and electrical accessories for one minute. This draws current from the jump starter and warms the battery. Now try to crank the engine. If it does not turn over, repeat the procedure. Extremely cold weather may require two or three battery warmings before the engine will start.IMPORTANT: DO NOT attempt to jump start your vehicle more than three consecutive times. If the vehicle will not start after three attempts, consult a service technician.
8. After the engine starts, disconnect the black clamp (-) and the red clamp (+), in that order, and then unplug the battery clamps from the jump starter socket.
9. Recharge the unit as soon as possible after each use.7.2 CHARGING A MOBILE DEVICE, USING THE USB PORTS
The 028-43448 includes two USB ports. One provides up to 2.1A at 5V DC; the other provides up to 1A at 5V DC.
1. Consult your mobile device manufacturer for proper charging power specifications. Connect a mobile device cable to the appropriate USB port.
2. Slide the ON/OFF switch to the ON position. Charging should begin automatically. The display will show which port is in use.
3. Charging time will vary, based on the mobile device’s battery size and the charging port used.NOTE: Most devices will charge with either USB port, but may charge at a slower rate.
4. When finished using the USB port, disconnect the charging cable from your mobile device and then disconnect the charging cable from the unit. Slide the ON/OFF switch to the OFF position.
5. Recharge the unit as soon as possible after each use.NOTE: If no USB device is connected, power to the USB ports will automatically shut off after 30 seconds.
7.3 USING THE LED LIGHT1. Slide the ON/OFF switch to the ON position.2. Hold down the display button for 3 seconds.3. Once the LED light is on, press and release the display button to cycle
through the following modes:• Steady glow• Flash for an SOS signal• Flash in strobe mode
4. When finished using the LED light, press and hold the display button until the light turns off.
5. Slide the ON/OFF switch to the OFF position. 6. Recharge the unit as soon as possible after each use.
• 9 •
8. MAINTENANCE INSTRUCTIONS1. After use and before performing maintenance, unplug and disconnect
the unit.2. Use a dry cloth to wipe all battery corrosion and other dirt or oil from
the battery clamps, cords, and the outer case.3. Do not open the unit, as there are no user-serviceable parts.
9. STORAGE INSTRUCTIONS1. Charge battery to full capacity before storage.2. Store this unit at temperatures between -5°F-+140°F (-20°C-+60°C).3. Never completely discharge the battery.4. Charge after each use.5. Charge at least once every month, if not in frequent use, to prevent
over-discharge.10. TROUBLESHOOTING
Jump StarterPROBLEM SOLUTION
The jump starter’s display will not turn on.
Make sure the unit is charged.
Connect to a power source, to reset.
Make sure the ON/OFF switch is set to the ON position.
The thermometer symbol is flashing.
The unit is too hot or cold. The thermometer symbol will disappear when the condition is removed.
The jump starter will not recharge.
Make sure the power source is live.
The jump starter turns on, but won’t jump start my vehicle.
Check connections.
Verify the charge level of the jump starter is at least 40%.
Do not attempt to jump start your vehicle more than three consecutive times. If the vehicle still does not start, consult a qualified service technician.
When cable is connected only to the battery: Solid Red LED, (Green LED off); beeps once per second
The vehicle battery voltage is lower than 10.5V. User can connect to jump starter and turn key to jump start the vehicle.
When cable is correctly connected to both battery and jump starter: Green LED blinking; Red LED off; no beep.
“Fake” high battery voltage is detected, but reverse charging protection did not activate. User can turn key to jump start the vehicle.

• 10 •
Smart Cable LED and Alarm BehaviorBEHAVIOR REASON
Green LED blinking; Red LED off; no beep.
Cable is connected to battery only.
Cable is connected to jump starter only.Green LED solid; Red LED off; no beep.
Cable is connected correctly to both battery and jump starter.
Solid Red LED, Green LED off; beeps once per second
Low voltage protection
Solid Red LED, Green LED off; beeps twice per second
Reverse polarity protection
Alternating Red and Green flashing LEDs; no beep
Reverse charging protection
Solid Red LED, Green LED off; rapid beeping
Short circuit protection
Solid Red and Green LEDs; beeps once per second
Temperature protection
NOTE: When the condition is corrected, the smart cable will automatically reset.11. BEFORE RETURNING FOR REPAIRS
When an UNKNOWN OPERATING PROBLEM arises, please read the complete manual and call the customer service number for information. This will usually eliminate the need for return.
If the above solutions do not eliminate the problem, or for information about troubleshooting or replacement parts,
call toll-free from anywhere in the U.S.A. 1-800-621-5485
12. SPECIFICATIONSInternal battery type .......................................... Lithium ion polymerCapacity ............................................................8,000 mAh/29.6 Wh USB output .............................................................5V DC, 2.1A / 1A Jump start ................................................400A peak/200A crankingCharging Temperature..................................... 32°-122°F (0°-50°C)
13. REPLACEMENT PARTSBattery clamp smart cable .......................................... 3899003854Z Micro USB-USB charging cable ................................. 3899003781Z

• 11 •
1. INSTRUCCIONES IMPORTANTES DE SEGURIDAD
GUARDE ESTAS INSTRUCCIONES.ADVERTENCIA – RIESGO DE GASES EXPLOSIVOS.TRABAJAR CERCA DE UNA BATERÍA DE PLOMO-ÁCIDO ES PELIGROSO. LAS BATERÍAS GENERAN GASES EXPLOSIVOS DURANTE SU FUNCIONAMIENTO NORMAL. ES IMPORTANTE QUE SIGA LAS INSTRUCCIONES CADA VEZ QUE UTILICE LA UNIDAD.
Para disminuir el riesgo de explosión de la batería, siga estas instrucciones, al igual que las recomendaciones publicadas por el fabricante de la batería y de cualquier equipo que se utilizará cerca de la batería. Verifique las señales de advertencia que se hayan colocado en estos productos y en el motor.
ADVERTENCIA: RIESGO DE DESCARGA ELÉCTRICA O INCENDIO.1.1 Lea el manual completo antes de utilizar este producto. Cualquier falla
podría resultar en serias lesiones o podría ser mortal.1.2 Manténgase alejado de los niños.1.3 No coloque los dedos o las manos en cualquiera de salidas de la unidad.1.4 No exponga la unidad a la lluvia o la nieve.1.5 Utilice solamente accesorios recomendados. El uso de un accesorio no
recomendado o suministrado por el fabricante para el 028-43448 puede provocar riesgo de incendio, descarga eléctrica o lesiones a personas o daño a la propiedad.
1.6 Para reducir el riesgo de daños al enchufe o cable eléctrico, jale del adaptador en lugar de jalar del cable al desconectar la unidad.
1.7 No utilice la unidad si el mismo posee los cables o las pinzas dañado.1.8 No utilice la unidad si el mismo recibió un golpe fuerte, si se cayó o si
sufrió daños de cualquier otra forma; hágalo revisar por una persona capacitada que efectúe reparaciones.
1.9 No desarme la unidad; hágalo revisar por una persona capacitada que efectúe reparaciones cuando necesite servicio de mantenimiento o una reparación. Volver a ensamblar la unidad en forma incorrecta puede provocar riesgo de incendio o descarga eléctrica.ADVERTENCIA: RIESGO DE GASES EXPLOSIVOS.
1.10 Para reducir el riesgo de explosión de una batería, siga estas instrucciones y aquellas publicadas por el fabricante de la batería y por el fabricante de cualquier equipo que intente utilizar en la proximidad de la batería. Revise las pautas de precaución en estos productos y en el motor.
1.11 No coloque la unidad sobre materiales inflamables como alfombras, tapicería, papel, cartón, etc.
1.12 Nunca coloque la unidad directamente sobre la batería que se iniciará. 1.13 No use la unidad arrancar con un vehículo mientras se carga la
batería interna.

• 12 •
2. PRECAUCIONES DE SEGURIDAD PERSONALADVERTENCIA: RIESGO DE GASES EXPLOSIVOS. UNA CHISPA CERCA DE LA BATERÍA HACER QUE LA BATERÍA EXPLOTE. PARA REDUCIR EL RIESGO DE CHISPAS CERCA DE LA BATERÍA:
2.1 NUNCA fume o permita la presencia de chispas o llamas en la proximidad de una batería o motor.
2.2 No utilice elementos personales de metal tales como anillos, pulseras, collares y relojes al trabajar con una batería de plomo-ácido. Una batería de plomo-ácido puede producir una corriente de cortocircuito lo suficientemente elevada como para soldar un anillo o provocar efectos similares sobre el metal, causando una quemadura de gravedad.
2.3 Tenga especial cuidado para reducir el riesgo de dejar caer una herramienta de metal sobre la batería. Esto podría provocar chispas o un cortocircuito en la batería o en cualquier otra pieza eléctrica que podría provocar una explosión.
2.4 No deje que la batería interna se congele. Nunca cargue una batería congelada.
2.5 Para prevenir cortos, NUNCA permita que las pinzas se junten o hagan contacto por medio de un mismo metal.
2.6 Considere la idea de que alguna persona se encuentre cerca suyo para poder ayudarlo cuando trabaje en forma cercana a una batería de plomo-ácido.
2.7 Cuente con una gran cantidad de agua potable y jabón a mano en caso de que el ácido de la batería tenga contacto con su piel, ropa u ojos.
2.8 Utilice protección visual y corporal completa, incluyendo gafas de seguridad y prendas de protección. Evite tocar sus ojos mientras trabaje en forma cercana a la batería.
2.9 Si el ácido de la batería tiene contacto con su piel o su ropa, lave de inmediato el área afectada con agua y jabón. En caso de que ingrese ácido en un ojo, sumerja el mismo de inmediato bajo agua potable corriente por al menos 10 minutos y obtenga atención médica en forma inmediata.
2.10 Si el ácido de la batería es accidentalmente ingerido, se recomienda beber leche, clara de huevo o agua. NO provoque vómito. Busque ayuda médica de inmediato.
2.11 Neutralice el ácido derramado abundantemente con bicarbonato de sodio antes de intentar limpiarlo.
2.12 Este producto contiene una batería de ión-litio. En caso de incendio, puede utilizar agua, extintor de espuma, halón, CO2 polvo químico seco ABC, grafito en polvo, polvo de cobre o soda (carbonato de sodio) para extinguir el fuego. Una vez que el fuego se haya extinguido, empape el producto con agua, un agente de extinción basado en agua u otros líquidos sin alcohol para enfriar el producto y evitar que la batería se vuelva a encender. NUNCA intente levantar o mover un producto caliente, que emita humo o que esté en llamas, ya que puede resultar herido.
• 13 •
3. PREPARACIÓN PARA EL USOADVERTENCIA: RIESGO DE EXPLOSIÓN Y DE CONTACTO CON EL ÁCIDO DE LA BATERÍA. EL ÁCIDO DE LA BATERÍA ES UN ÁCIDO SULFÚRICO ALTAMENTE CORROSIVO.
3.1 Asegúrese de que el área alrededor de la batería esté bien ventilada mientras la unidad está en uso.
3.2 Limpie los terminales de la batería antes de usar el arrancador. Durante la limpieza, evite que la corrosión producida por aire tenga contacto con sus ojos, nariz y boca. Utilice bicarbonato de sodio y agua para neutralizar el ácido de la batería y ayudar a eliminar la corrosión producida por aire. No toque ojos, nariz o boca.
3.3 Determine el voltaje de la batería consultando el manual del usuario del vehículo y asegúrese de que la tensión de salida es de 12V.
3.4 Asegúrese de que las pinzas de la unidad se encuentren firmemente conectadas.
4. SIGA ESTOS PASOS CUANDO SE CONECTE A LA BATERÍAADVERTENCIA: UNA CHISPA PROVOCADA CERCA DE LA BATERÍA PUEDE CAUSAR LA EXPLOSIÓN DE LA BATERÍA. PARA REDUCIR EL RIESGO DE PROVOCAR CHISPAS CERCA DE LA BATERÍA:
4.1 Conectar las pinzas a la unidad, y luego conecte los cables de salida a la batería y al chasis según lo indicado abajo. Nunca permita que las pinzas hagan contacto una con el otra.
4.2 Ubique los cables de C.C. para reducir el riesgo de daños a la cubierta, a la puerta y a las piezas móviles o calientes del motor. NOTA: Si es necesario cerrar el cofre durante el proceso de arranca, asegúrese que el cofre no toque parte metálica de la batería o pele los cables.
4.3 Manténgase alejado de las paletas del ventilador, correas, poleas y otras piezas que podrían provocar lesiones.
4.4 Verifique la polaridad de los bornes de la batería. El borne POSITIVO (POS, P, +) de la batería generalmente posee un diámetro mayor al borne NEGATIVO (NEG, N, -).
4.5 Determine qué borne de la batería hace descarga a tierra (se encuentra conectado) con el chasis. Si el borne negativo hace descarga a tierra con el chasis (como en la mayor parte de los vehículos), ver el paso 4.5. Si el borne positivo hace descarga a tierra con el chasis, ver el paso 4.6.
4.6 En un vehículo con descarga a tierra por borne negativo, conecte el gancho POSITIVO (ROJO) desde el arrancador al borne POSITIVO (POS, P, +) sin descarga a tierra de la batería. Conecte el gancho NEGATIVO (NEGRO) al chasis del vehículo o al bloque motor alejado de la batería. No conecte el gancho al carburador, líneas de combustible o cuerpos metálicos. Conecte a una pieza metálica de calibre grueso del marco o del bloque motor.
4.7 En un vehículo con descarga a tierra por borne positivo, conecte el gancho NEGATIVO (NEGRO) desde el al borne NEGATIVO (NEG, N, -) sin descarga a tierra de la batería. Conecte el gancho POSITIVO (ROJO) al chasis del vehículo o al bloque motor alejado de la batería.

• 14 •
No conecte al carburador, líneas de combustible o cuerpos metálicos. Conecte a una pieza metálica de calibre grueso del marco o del bloque motor.
4.8 Cuando termine de usar el arrancador, retire la pinza del chasis del vehículo y quite la abrazadera de la terminal de la batería. Desconecte las pinzas desde la unidad.
5. CARACTERÍSTICAS
1
5
2
3
48
7
9 1011
126
1. 028-434482. Cable de carga micro
USB-USB3. Estuche de transporte4. LEDs de cable
inteligente verde y rojo5. Pinzas de la batería
con el cable inteligente6. Pantalla LCD
7. Interruptor ON/OFF8. Puerto de entrada Micro USB
para recargar9. Puerto USB – 2,1A
10. Puerto USB – 1A11. Toma de salida del arrancador12. Botón de pantalla ON / OFF13. Luz LED (en la parte posterior)
6. CARGAR EL ARRANCADORIMPORTANTE: CARGUE LA UNIDAD INMEDIATAMENTE DESPUES DE COMPRARLA, DESPUES DE CADA USO Y CADA 30 DÍAS, O CUANDO EL NIVEL DE CARGA CAE POR DEBAJO DEL 85%, PARA MANTENER LA BATERÍA INTERNA COMPLETAMENTE CARGADA Y PROLONGAR LA VIDA DE LA BATERÍA.
6.1 COMPROBACIÓN DEL NIVEL DE LA BATERÍA INTERNA 1. Deslice el interruptor ON / OFF a la posición ON. La pantalla LCD
mostrará el porcentaje de la carga de la batería. Una batería interna completamente cargada leerá 100%. Cargue la batería interna si la pantalla muestra que está bajo 85%.
2. Para reducir el riesgo de descarga eléctrica, desconecte el cable de carga de la unidad desde un cargador USB o de pared antes de intentar cualquier mantenimiento o limpieza. Simplemente apagar los controles no reducirá este riesgo.
3. Cuando la carga de la batería interna, trabajar en un área bien ventilada y no restringir la ventilación de ninguna manera.
• 15 •
6.2 CARGANDO LA BATERÍA INTERNA NOTA: Utilice un cargador USB de 2A (se vende por separado), o un puerto de carga USB de 2A para recargar rápidamente el arrancador. El uso de un cargador con menos de 2A aumentará el tiempo de carga.
1. Conecte el extremo Micro USB del cable de carga en el puerto de entrada. A continuación, conecte el extremo USB del cable de carga en el puerto USB de un cargador.
2. Conectar el cargador a una toma de alimentación de CA o CC en vivo.3. La pantalla LCD se iluminará, el dígito comenzará a parpadear y
mostrará “IN”, indicando que la carga ha comenzado.4. El arrancador cargará completamente en 2-3 horas. Cuando la batería
interna está completamente cargada, la pantalla mostrará “100%”.5. Cuando la batería esté completamente cargada, desconecte el
cargador de la toma de corriente y, a continuación, retire el cable de carga del cargador y de la unidad. Deslice el interruptor ON / OFF a la posición OFF, si no está utilizando la unidad inmediatamente.
6. Cargue la unidad tan pronto sea posible, después de usarse.7. INSTRUCCIONES DE OPERACIÓN7.1 ARRANCAR UN MOTOR DE VEHÍCULO
IMPORTANTE: No utilice el arrancador mientras se carga su batería interna.IMPORTANTE: Utilización de la función arranque del motor sin una batería instalada en el vehículo dañará el sistema eléctrico del vehículo.NOTA: La batería interna debe tener un cargo si al menos el 40% para iniciar un vehículo.
1. APAGUE el motor.2. Conecte el cable de las pinzas de la batería a la toma de salida del
arrancador.3. Ponga los cables de CD lejos de las aspas del ventilador, bandas, poleas
u otras partes móviles. Asegúrese de que todos los aparatos eléctricos del vehículo estén apagados.
4. En un vehículo con descarga a tierra por borne negativo, conecte el gancho POSITIVO (ROJO) desde el arrancador al borne POSITIVO (POS, P, +) sin descarga a tierra de la batería. Conecte el gancho NEGATIVO (NEGRO) al chasis del vehículo o al bloque motor alejado de la batería. No conecte el gancho al carburador, líneas de combustible o cuerpos metálicos. Conecte a una pieza metálica de calibre grueso del marco o del bloque motor.
5. En un vehículo con descarga a tierra por borne positivo, conecte el gancho NEGATIVO (NEGRO) desde el al borne NEGATIVO (NEG, N, -) sin descarga a tierra de la batería. Conecte el gancho POSITIVO (ROJO) al chasis del vehículo o al bloque motor alejado de la batería. No conecte al carburador, líneas de combustible o cuerpos metálicos. Conecte a una pieza metálica de calibre grueso del marco o del bloque motor.
6. Deslice el interruptor ON / OFF a la posición ON. El LED verde del cable inteligente debe encenderse. NOTA: Si la batería del vehículo está muy descargada, el consumo de corriente inicial del arrancador puede activar la protección de cortocircuito en el cable inteligente. Cuando se corrige la condición, el cable inteligente se reajustará automáticamente.

• 16 •
7. Después de una conexión adecuada se ha hecho, haga girar el motor. Si el motor no arranca dentro de 5-8 segundos, deje de arranque y espere al menos 1 minuto antes de intentar arrancar el vehículo nuevo.NOTA: Si el coche no arranca por segunda vez, compruebe el cable inteligente para ver si el LED verde está encendido. Si un LED parpadea, consulte la sección 10, Resolución de Problemas y tenga en cuenta que el código de error está en vigor. Cuando se corrige la condición, el cable inteligente se reajustará automáticamente.NOTA: El clima frío puede afectar el rendimiento de la batería de litio del arrancador. Si escucha a un clic y el motor no gira, pruebe lo siguiente:Con el motor de arrancador conectado a la batería del coche y el LED verde iluminado en el cable inteligente, encienda todas las luces y accesorios eléctricos durante un minuto. Esto llama la corriente desde el arrancador y se calienta la batería. Ahora trata de poner en marcha el motor. Si no se enciende otra vez, repita el procedimiento. Extremadamente frío puede requerir dos o tres calentamientos de la batería antes de que arranque el motor.IMPORTANTE: NO intente poner en marcha su vehículo más de tres veces consecutivas. Si el vehículo no arranca después de tres intentos, consulte a un técnico de servicio.
8. Después de arrancar el motor, desenchufe las pinzas de la batería desde el arrancador y luego desconecte la pinza negro (-) y la pinza roja (+), en ese orden. Deslice el interruptor ON / OFF a la posición OFF.
9. Cargue la unidad tan pronto sea posible, después de usarse.7.2 CARGA DE UN DISPOSITIVO MÓVIL, UTILIZANDO LOS PUERTOS USB
El 028-43448 incluye dos puertos USB. Uno proporciona hasta 2.1A a 5V DC, el otro proporciona hasta 1A a 5V DC.
1. Consulte con el fabricante del dispositivo móvil para las especificaciones de potencia de carga adecuados. Conecte un cable del dispositivo móvil al puerto USB adecuado.
2. Deslice el interruptor ON / OFF a la posición ON. La carga debe comenzar. La pantalla mostrará qué puerto está en uso.
3. El tiempo de carga puede variar, en función del tamaño de la batería del dispositivo móvil y el puerto de carga utilizado.NOTA: La mayoría de los dispositivos van a cobrar, ya sea con puerto USB, pero pueden cobrar a un ritmo más lento.
4. Cuando termine de usar el puerto USB, desconecte el cable de carga de su dispositivo móvil y desconecte el cable de carga de la unidad. Deslice el interruptor ON / OFF a la posición OFF.
5. Cargue la unidad tan pronto sea posible, después de usarse.NOTA: Si no está conectado un dispositivo USB, la alimentación a los puertos USB se apagará automáticamente después de 30 segundos.
7.3 UTILIZANDO LA LUZ LED1. Deslice el interruptor ON / OFF a la posición ON.2. Mantenga presionado el botón de pantalla durante 3 segundos. 3. Una vez que la luz LED está encendido, presione y suelte el botón
para cambiar entre los siguientes modos:

• 17 •
• Resplandor de constante• Parpadeará como una señal de SOS• Parpadeará como una de luz estroboscópica
4. Cuando termine de usar la luz del LED, mantenga pulsado el botón hasta que la luz se apague.
5. Deslice el interruptor ON / OFF a la posición OFF.6. Cargue la unidad tan pronto sea posible, después de usarse.
8. INSTRUCCIONES DE MANTENIMIENTO1. Después de usar la unidad y antes de hacerle mantenimiento,
desenchúfela y desconéctela.2. Use un paño seco para limpiar cualquier suciedad o grasa de las
pinzas, de los cables y del estuche.3. No abra la unidad, ya que no hay partes que el usuario; cualquier
reparación o mantenimiento debe ser realizado por personal técnico cualificado.
9. INSTRUCCIONES DE ALMACENAMIENTO1. Cargue la batería a plena capacidad antes de su almacenamiento.2. Almacene la unidad a temperaturas entre -20 °C-+60 °C (-5 °F-+140 °F).3. Nunca descargue completamente la batería.4. Cargue después de cada uso.5. Cargue al menos una vez al mes, si no en el uso frecuente, para
evitar la sobre-descarga.
10. RESOLUCIÓN DE PROBLEMASArrancador
PROBLEMA SOLUCIÓNLa pantalla del arrancador no se enciende.
Asegúrese de que la unidad está cargada.
Conectar a la fuente de alimentación, para restablecer.
Asegúrese de que el interruptor ON / OFF está en la posición ON.
El símbolo del termómetro esta parpadeando.
La unidad está demasiado caliente o fría. El símbolo del termómetro desaparecerá cuando se elimine la condición.
El arrancador no se recarga. Asegúrese de que la fuente de alimentación esté activa.
• 18 •
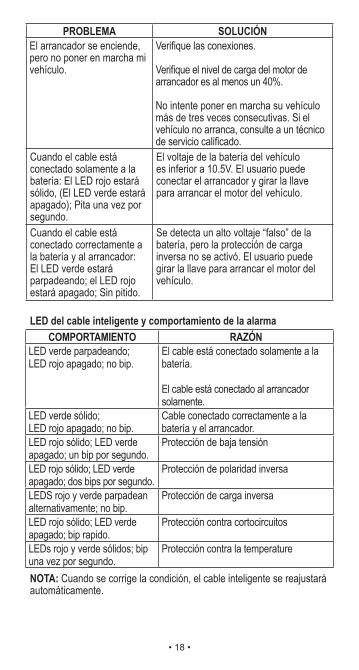
PROBLEMA SOLUCIÓNEl arrancador se enciende, pero no poner en marcha mi vehículo.
Verifique las conexiones.
Verifique el nivel de carga del motor de arrancador es al menos un 40%.
No intente poner en marcha su vehículo más de tres veces consecutivas. Si el vehículo no arranca, consulte a un técnico de servicio calificado.
Cuando el cable está conectado solamente a la batería: El LED rojo estará sólido, (El LED verde estará apagado); Pita una vez por segundo.
El voltaje de la batería del vehículo es inferior a 10.5V. El usuario puede conectar el arrancador y girar la llave para arrancar el motor del vehículo.
Cuando el cable está conectado correctamente a la batería y al arrancador: El LED verde estará parpadeando; el LED rojo estará apagado; Sin pitido.
Se detecta un alto voltaje “falso” de la batería, pero la protección de carga inversa no se activó. El usuario puede girar la llave para arrancar el motor del vehículo.
LED del cable inteligente y comportamiento de la alarmaCOMPORTAMIENTO RAZÓN
LED verde parpadeando; LED rojo apagado; no bip.
El cable está conectado solamente a la batería.
El cable está conectado al arrancador solamente.
LED verde sólido; LED rojo apagado; no bip.
Cable conectado correctamente a la batería y el arrancador.
LED rojo sólido; LED verde apagado; un bip por segundo.
Protección de baja tensión
LED rojo sólido; LED verde apagado; dos bips por segundo.
Protección de polaridad inversa
LEDS rojo y verde parpadean alternativamente; no bip.
Protección de carga inversa
LED rojo sólido; LED verde apagado; bip rapido.
Protección contra cortocircuitos
LEDs rojo y verde sólidos; bip una vez por segundo.
Protección contra la temperature
NOTA: Cuando se corrige la condición, el cable inteligente se reajustará automáticamente.

• 19 •
11. ANTES DE DEVOLVER A REPARACIONES
Cuando surja un PROBLEMA DE FUNCIONAMIENTO DESCONOCIDO, por favor lea todo el manual y comuníquese con el número de atención
al cliente para más información que no haga falta la devolución. Si estas soluciones no eliminan el problema
o si desea obtener más información sobre la solución de problemas o repuestos,
llame gratis al desde cualquier parte del U.S.A. 1-800-621-5485
12. ESPECIFICACIONES
Tipo de la batería interna ......................... Polímero de iones de litio Capacidad ........................................................8000 mAh / 29,6 Wh Salida USB .............................................................5V DC, 2,1A / 1A Arranque de motor .................................... 400A pico/200A crankingTemperatura de carga ...................................32°-122 °F (0°-50 °C)
13. REPUESTOS
Pinza cable de batería inteligente .............................. 3899003854Z Cable de carga micro USB-USB ................................ 3899003781Z