julie lundgren spring 2013
DESCRIPTION
Works from Spring 2013TRANSCRIPT

JULIE LUNDGREN •SPRING 2013 •


TABLE OF CONTENTS
INDS 2501 •stoma 6 •NICHE 42 •YOLK 70
INDS 2361 •MATERIALS 106
INDS 2340 •SPEAKERS 116 •TEA SET 120 •STOOL & TABLE 122


5
In this studio I began to dive deeper into the research aspect of Industrial Design. Very meticulous and thorough gathering, shadowing and replicating user experience was one key aspect that really drove this semester’s designs.
INDS 2501 STUDIO


7
This project was based on a simple, common electronic that needed to be innovated or improved upon. I wanted to redesign an electronic that someone wouldn’t normally think of as an everyday electronic.
I decided to look into bugzappers and what potential there was.
SIMPLE ELECTRONIC


Bug Zappers, or as they’re technically called, electronic insect-control systems, have overall been the same design since it was invented.
These objects have simply functioned as a utilitarian, industrial looking gadgets for as long as they’ve been on the market.
ZAPPERS

10
Bug Zappers work on a very basic principle. When insects are attracted to the light source, or practically anything else that lies inside, there is an electrified grid that awaits their fate.
FUNCTION


Left: Landing on their host’s skin, mosquitos are most attracted to CO2.
Right: Insects are also attracted to UV wavelengths, which helps them find flowers. Hence why bugzapper’s lights are usually purple.
BEHAVIOR

14
I began looking into different environments my design could possibly be staged in. Looking through overwhelming amounts of patio furniture and outdoor environments, there certainly was no room for the old utilitarian design of the bug zapper.
I decided that my bug zapper needed to go in the more organic, nature-like direction.
OUTDOORS


Right:: Materials that were to be explored had warmer, perceptive quality.Ceramics, glass and even wood would be an excellent choice to help stray the bug zapper from it’s previous industrial image.

ACTIONS
DURABILITY
QUALITY
HYGIENIC
Will not weather/deteriorate when placed in an outdoor setting. High quality yet inexpensive.
A material that is unexpected and of high standards. Will make the object timeless and iconic.
Easy to clean with soap and water. Will have a very smooth, preferably glossy surface.

INSPIRATION


20
My inspiration for stoma derived from organic, natural forms, so that when the bug zapper was set outside it would instantly blend and cohere with the rest of the environment.
IDEATION


22

23

24
5”
10.5”
2”
1/16”
16”
1.25”
1”
26.5”
Solar panel
Transformer
Electrical Grid
LED Light
TECHNICAL

25
5”
10.5”
2”
1/16”
16”
1.25”
1”
26.5”
Solar panel
Transformer
Electrical Grid
LED Light
26
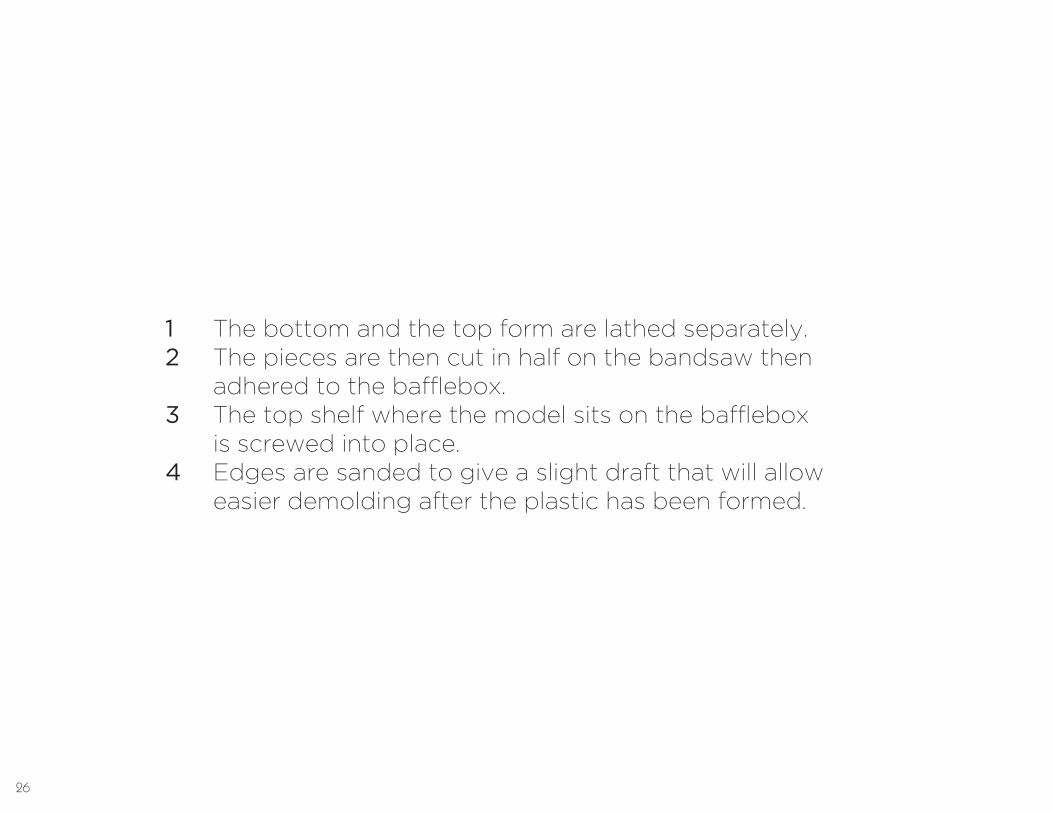
1 The bottom and the top form are lathed separately.2 The pieces are then cut in half on the bandsaw then adhered to the bafflebox.3 The top shelf where the model sits on the bafflebox is screwed into place.4 Edges are sanded to give a slight draft that will allow easier demolding after the plastic has been formed.

1 2
3 4

28
5 Holes are drill into the sides of the model to allow proper and even suction when the heated plastic is pulled through and formed..6 The bafflebox is then ready to be mounted onto the vacuumformer.7 Acrylic is started out at 30% and then gradually heated till 275º.8 Model is ready to shoot.

5 6
7 8

30
9 Once the piece has been vacuum formed, The form is cut from the sheet of acrylic using the band saw.10 The piece is then sanded to smooth out all the rough edges.11 A Dremel cutting bit is used to detail the slits that will allow bugs to travel into the inner vessel. 12 The piece in its finished form.

9 10
11 12

32
13 The acrylic piece is placed in the sandblaster to frost and diffuse the light.14 The sandblaster.15 The finished acrylic section after sandblasting.

33
13
14 15

34
16 A hole is drilled into the black acrylic piece to allow installation of the solar panel. 17 The top section of stoma is assembled in a dry run to see how all the pieces fit together.18 Durham’s Rock Hard is mixed to sculpt the lower half of stoma. The stem is created using a PVC tubing.19 Durham’s is all mixed and ready to be applied.20 Applying Durham’s to the stem of the model.

16 17
18 19 20

36
21 Filler Primer is used to cover up any imperfections and also acts as a primer surface for the final coat of paint to sit on top of.22 American Accents Gloss White is used as a base coat of paint for the translucent overglaze of pearl.23 Plastic Pearlescent paint is then applied as a third coat.24 Aerosol spray paint is used to give the bug zapper a coated finish and an appearance of brushed stainless steel.

21 22 23
24


How stoma works:Stoma attracts flying insects by an electrified trap via the solar powered UV light emitted from the petals. When insects are electrocuted, their bodies fall to the ground through the hollow stake and are essentially composted, eliminating the need for
the user to clean or interfere with the zapper.


42
This project took place on the southeast end of the Gerald D. Hines College of Architecture’s second floor niche during the spring semester of 2013. A collaborative effort between two studios was conducted by instructors Donna Kacmor and Jeff Feng’s ARCH 5500 and INDS 2501, respectively.
Before the initiation of this project, the space was commonly known as “Drink-tank”, a student build conceived five years prior, where students ideally would retrieve water from a water fountain and be able to relax on an uncomfortable, awkwardly ‘curved’ bench that mimicked the arced curve of the niche’s post modern window.
The goal was to repurpose the second floor niche into a formal pin-up space that could also function as a lounge for ideations and tête-à-tête’s.
NICHE

43
44
THE MATERIALS
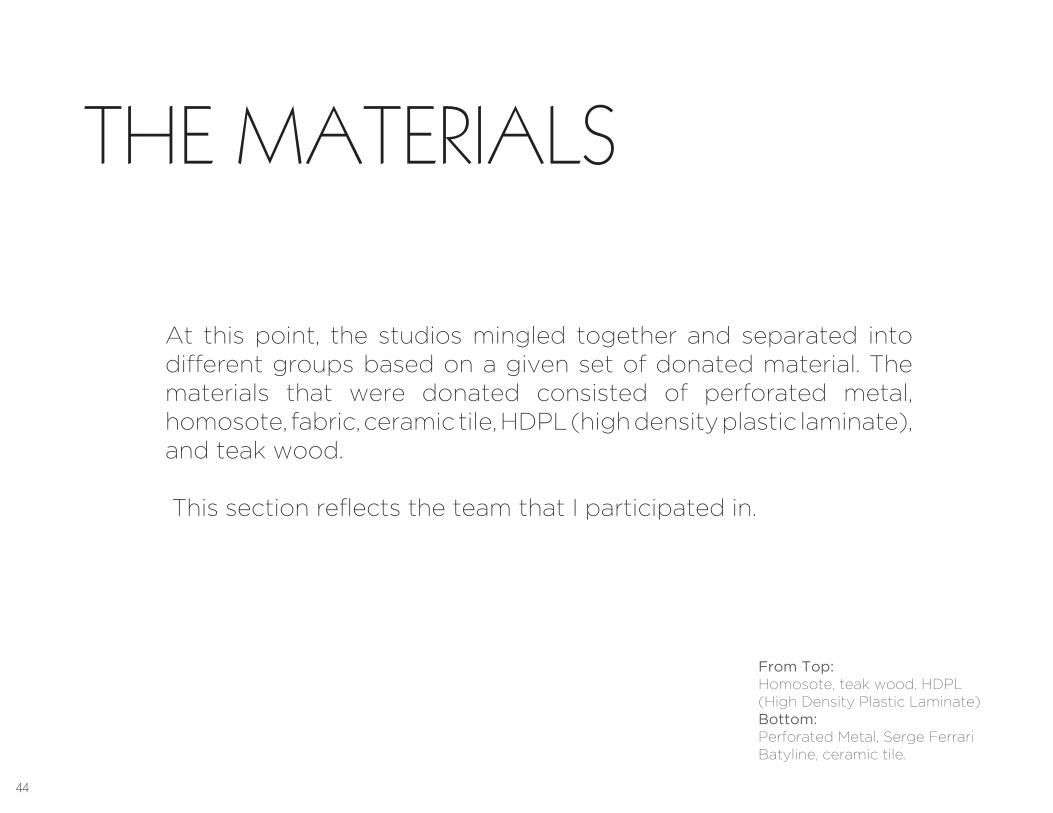
From Top:Homosote, teak wood, HDPL (High Density Plastic Laminate)Bottom:Perforated Metal, Serge Ferrari Batyline, ceramic tile.
At this point, the studios mingled together and separated into different groups based on a given set of donated material. The materials that were donated consisted of perforated metal, homosote, fabric, ceramic tile, HDPL (high density plastic laminate), and teak wood.
This section reflects the team that I participated in.

46
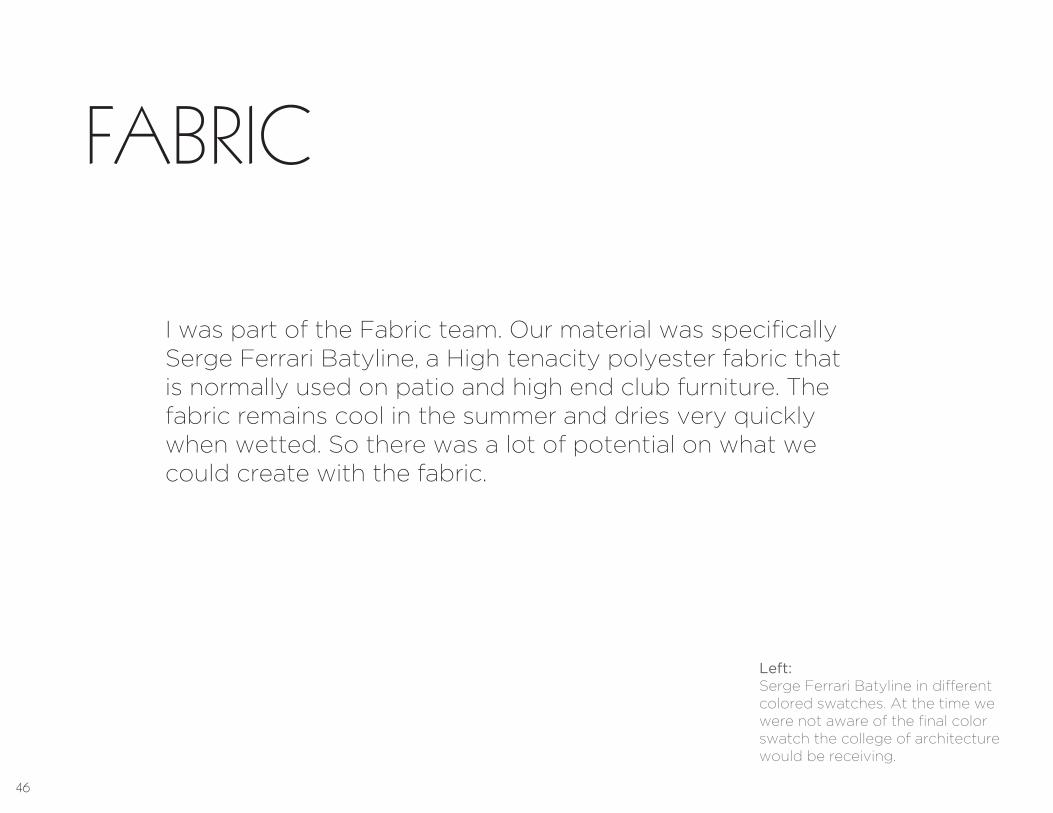
I was part of the Fabric team. Our material was specifically Serge Ferrari Batyline, a High tenacity polyester fabric that is normally used on patio and high end club furniture. The fabric remains cool in the summer and dries very quickly when wetted. So there was a lot of potential on what we could create with the fabric.
FABRIC
Left:Serge Ferrari Batyline in different colored swatches. At the time we were not aware of the final color swatch the college of architecture would be receiving.


48
From Top: Burn test, woven fabric.Bottom: Burn from further away, stain-ing the fabric with woodstain, char test.
MATERIAL TESTS


INSPIRATION

51

52
IDEATION

53

54
The materials group were then dissolved into key faces in the space: walls, ceiling, seating, floor, color and construction. The groups were in charge of key elements found within their given section.
For team wall, we were given the task of designing and refining the wallspace. Homosote and dry erase panels were to be hung in a floating fashion, and a means of attaching said panels to the walls were to be thought through.
TEAM WALL


56

57
Our group was to find out different methods of attaching homosote panels to the wall. We ideated and found that we could either attach the panels using a ‘wedging’ system, or we could use a router bit specifically made for ‘key holing’ a slot which the screw can be guided through (as pictured).
Our group found that with the key holing method that it would be very difficult to register screws drilled into the walls with the routed grooves on the panels, so we went with the wedging system instead.
ATTACHMENT
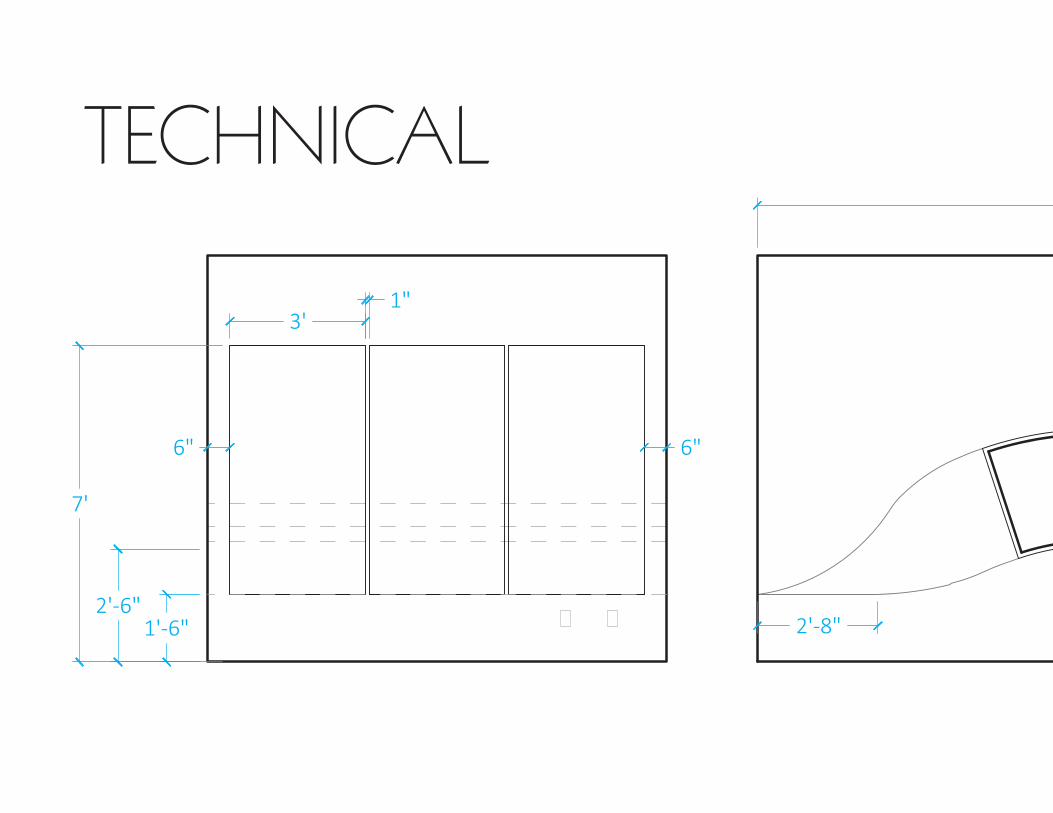
7'
3'1"
2'-6"1'-6"
6"6"
2'-8"
9'
10'-2"15'
TECHNICAL

7'
3'1"
2'-6"1'-6"
6"6"
2'-8"
9'
10'-2"15'

60
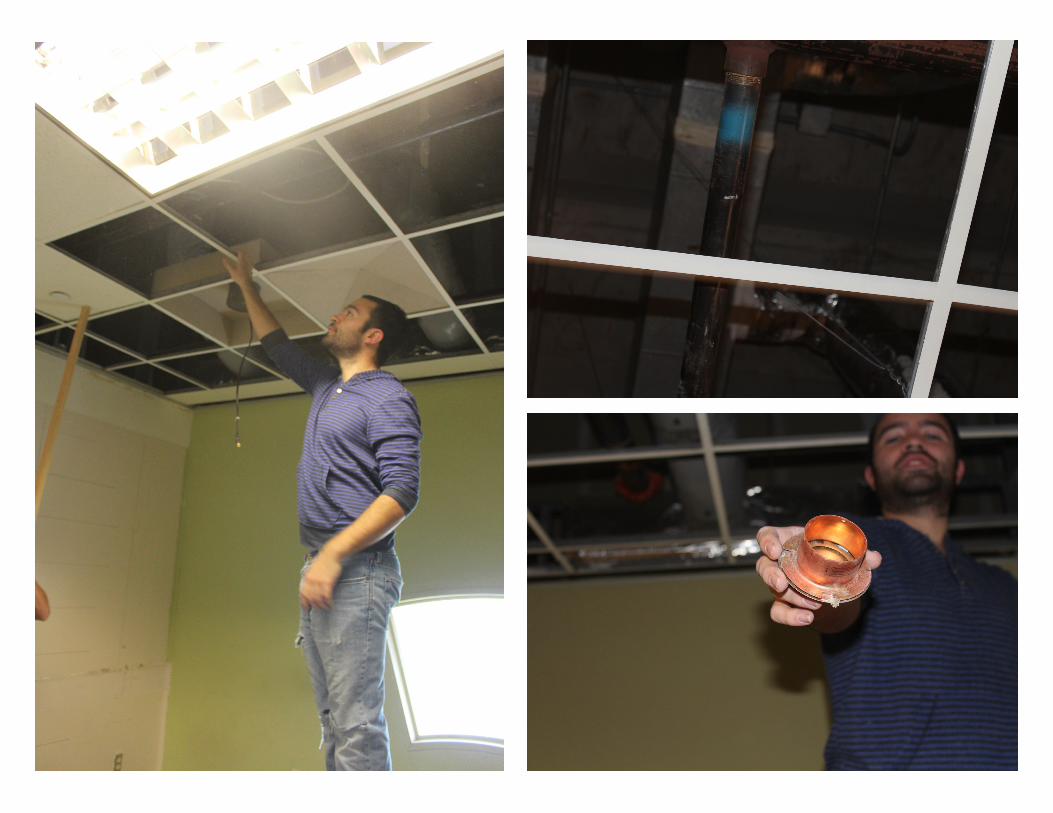
The first step to remodelling the space was to completely disassemble the previous structure that was in the niche. We took out the old carpet, painted ceiling tile, the curved bench and the old pin-up panels in efforts to really visualize the amount of space we had to work with.
DEMOLITION


62
Right:Classmate Felipe investigating the sprinkler system. Certain aspects were left alone in the niche to comply with building code. Our designs had to work around these safety measures.
UP TO CODE
In order to properly install each fixture found within the Niche, the class did some research on different building codes. We wanted to make sure that our designs would not be violating any firecodes.

64
Team Wall (Jacob Garcia, Gabriel Martinez and myself) were in charge of patching and repainting the walls to a more neutral color.
PATCH & PAINT


68

69

70
For this project we (Parker Nussbaum, Gabriel Martinez, Jesus Garate and myself) were asked to design a family of office tools that would be functional and innovative.
We chose our office family line to have a fun, contemporary edge along with its functionality.
OFFICE PRODUCT


72
RESEARCH
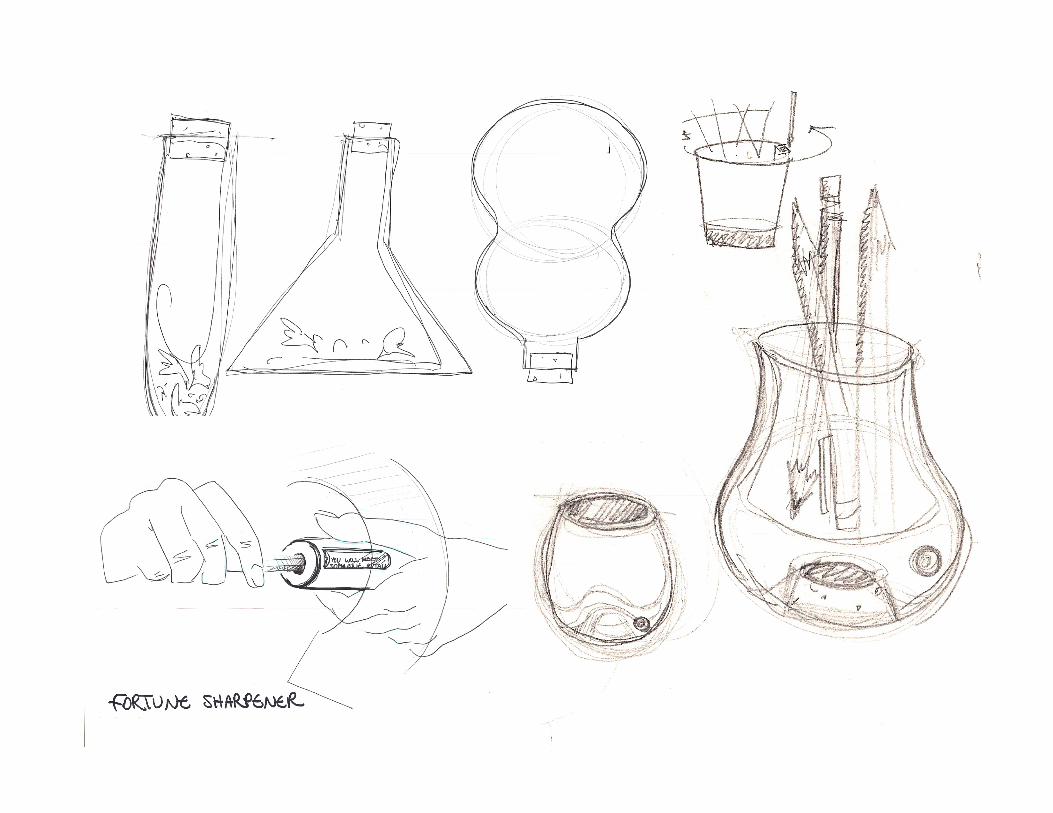
We each chose to look into a specific object that is often used in the home office work environment, I chose to work on pencil sharpeners because of the usage in the home office more as a utilitarian object. I wondered if there would be a way to make this object more playful but let it still have meaning.

73
74
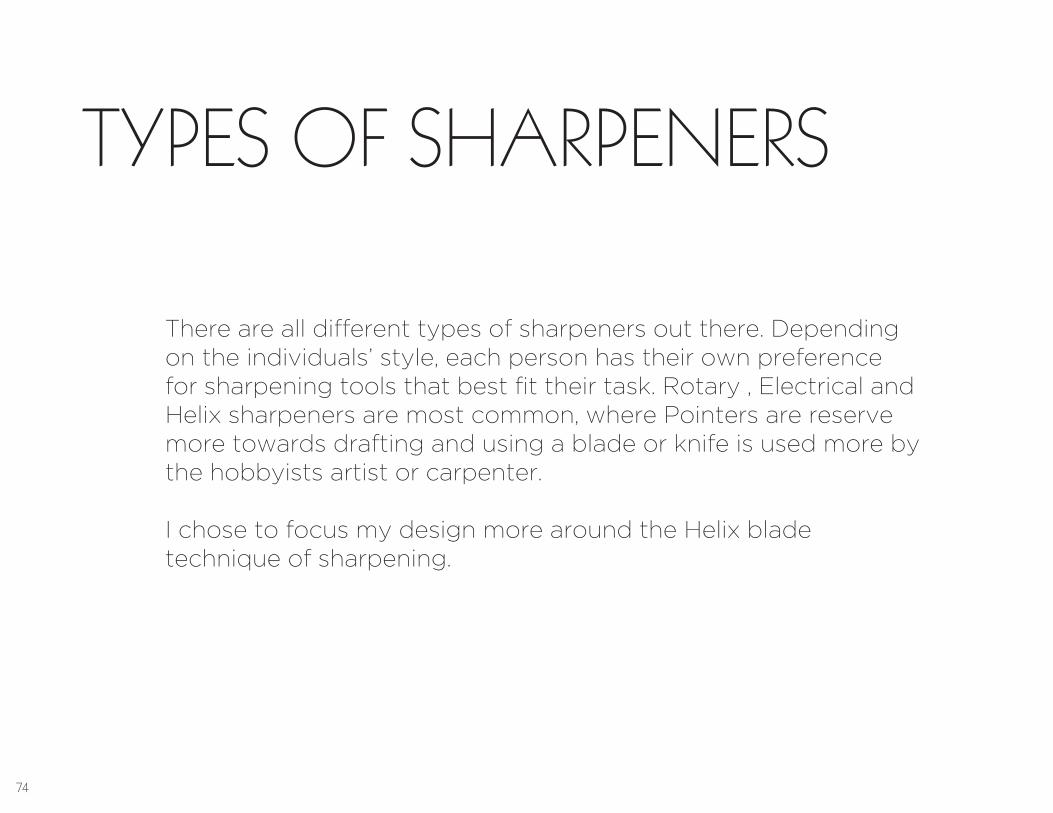
TYPES OF SHARPENERS
There are all different types of sharpeners out there. Depending on the individuals’ style, each person has their own preference for sharpening tools that best fit their task. Rotary , Electrical and Helix sharpeners are most common, where Pointers are reserve more towards drafting and using a blade or knife is used more by the hobbyists artist or carpenter.
I chose to focus my design more around the Helix blade technique of sharpening.

75
Rotary Blade
Electrical Prism
Pointers
Crayon Sharpener

76
PROBLEMS
There are many assorted problems associated with pencil sharpening. The most common - Breakage. Breakage happens when the pencil is accidentally dropped and the soft lead inside is broken into tiny little pieces. Breakage is often blamed on the pencil sharpener itself, which could very well be a factor in poor design, but it is mostly due to the pencil being broken in the first hand.
One thing I noticed about manual helix sharpeners was the hous-ing that the shaving were stored in. None were very attractive, so I saw this as an opportune design moment.

77
Messy Breakage
Sizing Mechanical Pencils

78
OPPORTUNITIES
As far as our group’s universal design language, this is what we mostly wanted to stick with. We wanted to create something that was rather unconventional, a conversation piece that could be started. A new wave of office materials would be interesting to see also, like bringing warmer, materials of a perceived higher quality would be interesting.
And most importantly ergonomics has to be at the forefront. If the office tool isn’t comfortable then it did not belong.

Unconventionality Materials
Ergonomics Tongue-in-cheek
80
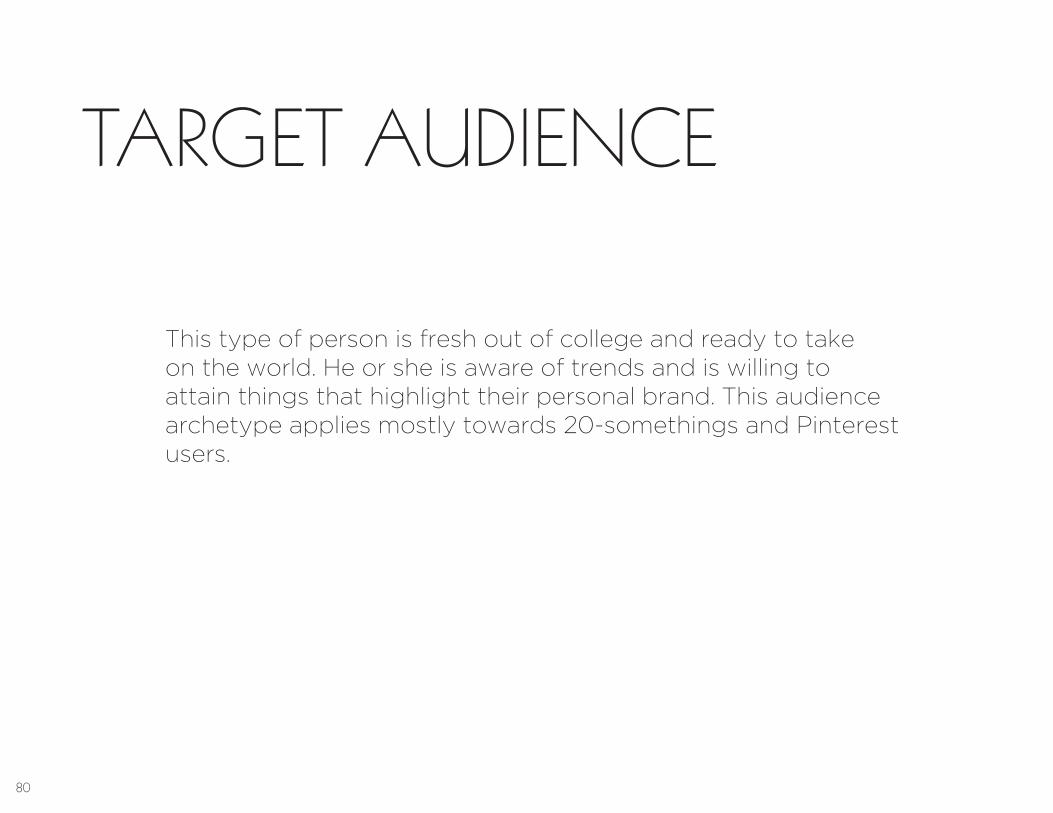
TARGET AUDIENCE
This type of person is fresh out of college and ready to take on the world. He or she is aware of trends and is willing to attain things that highlight their personal brand. This audience archetype applies mostly towards 20-somethings and Pinterest users.

82
The home and design office consists of objects that are carefully curated to reflect personal style and taste. Every object has its own place and story. If said object cannot strike a conversation, then it does not have a place in this environment.
OFFICE ENVIRONMENT


DESIGNER’S OFFICE
We went and shadowed a designer in the architecture building. We followed him through his daily routine in his office would con-sist of.
We noticed key objects in the room that definitely stood out. Pen cups, organizer, the active workspace and objects of interest all laid out on the desk. When people are working in their office, they want to show off their personal tastes and showcase objects that reflect their individuality.


INSPIRATION


IDEATION

90
REFINEMENT


92
EXECUTION
1 The form is lathed.2 The finished positive that will shape the plastic form.3 Splitting the piece in half in preparation for the bafflebox.4 Splitting the lathed positive using the bandsaw.

1 2
3 4

94
6 Cutting and mounting stilts for the pieces in order to avoid fillets and ensure a seamless parting line. 7 The model along with the stilts is mounted onto the bafflebox.8 Drilling holes into the box to properly ensure the vacuum will suck the plastic in the right places.9 The type of plastic (acrylic) that was used to vacuumform the piece.
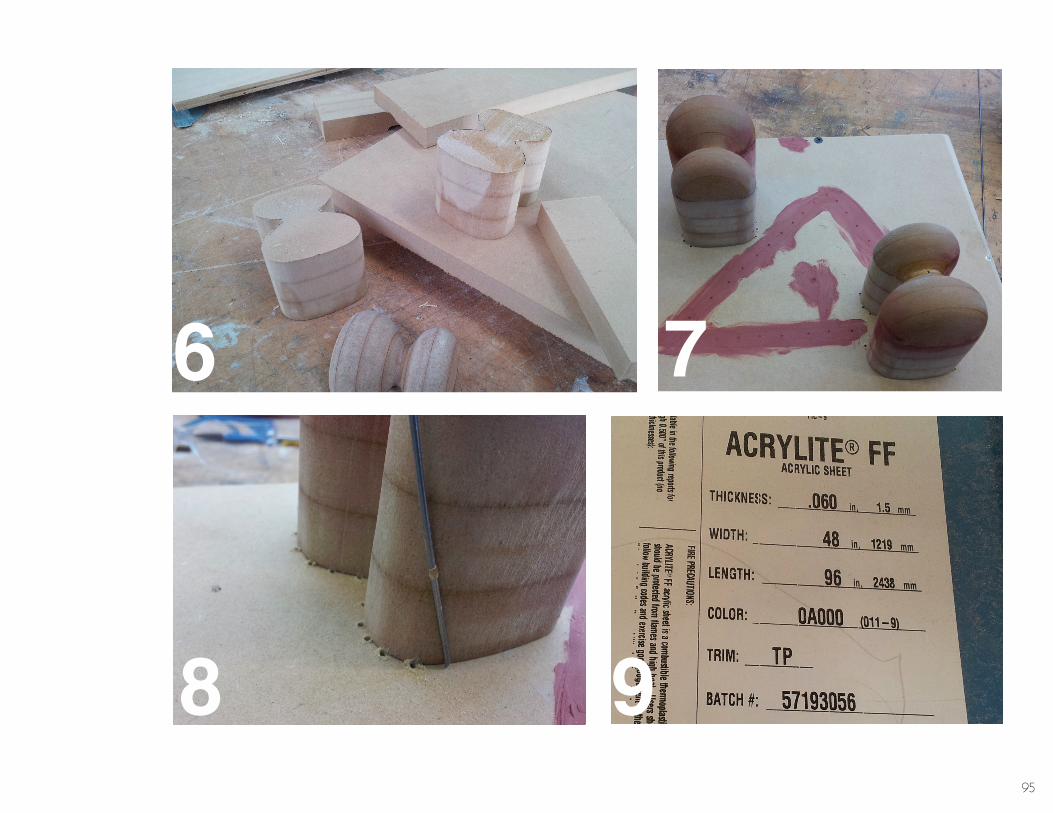
95
6 7
8 9

96
10 Vacuumformer settings for thin acrylic. Start from 20% and gradually increase temperature until the plastic is uniformly heated to 275º11 The bafflebox and model are properly mounted to ensure proper suction.12 The piece was properly formed but was stuck in the plastic. The edge helped trace the seam out. 13 Each half was carefully sanded until they both matched.

10 11
12 13

98
14 The two halves were adhered using Plastic Weld.15 Holding the two halves firmly while the MEK solution melts the two seams together16 A Dremel cuttting bit is used to open a hole up on the small end for the cap and sharpener component.

99
14 15
16

100
17 The cap’s diameter is found and traced.18 The piece is then cut out using the bandsaw.19 Sand the edges to create a very rounded form. 20 Drill the opening of the pencil sharpener using a 16/32” bit.21 The cap is sanded smooth

101
18 19 20
17 21

102
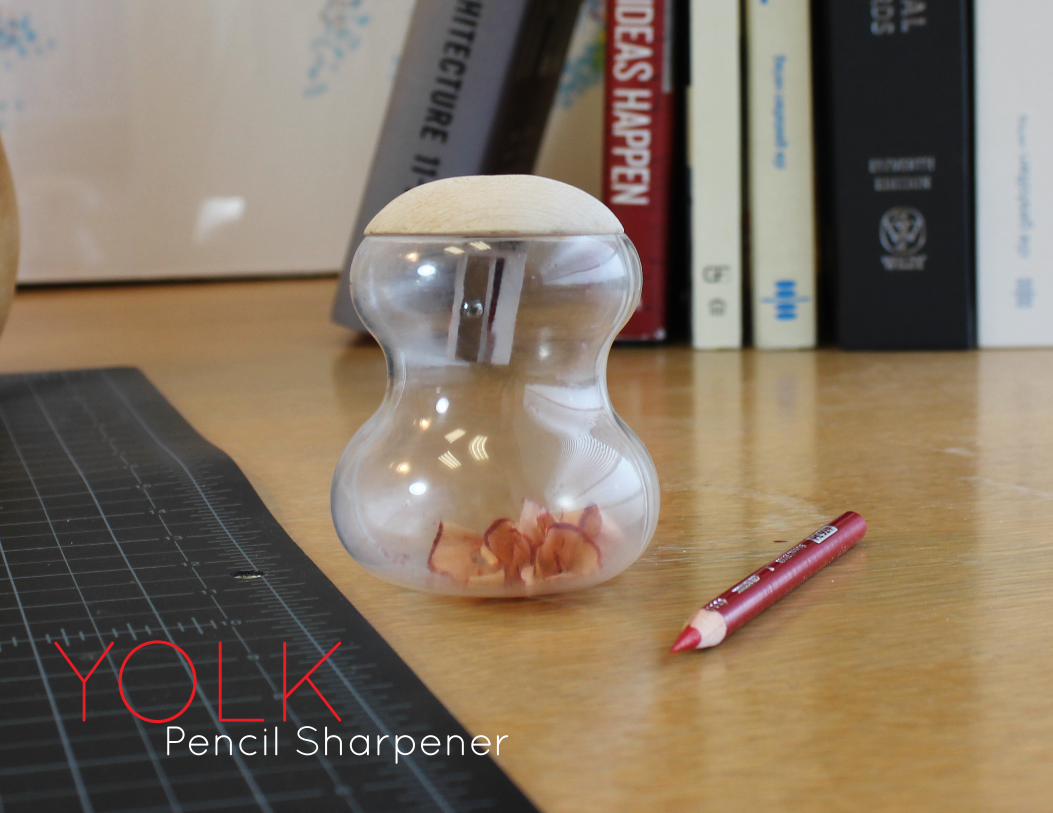
YOLKOffice Products
103
YOLKPencil Sharpener

104

105
106
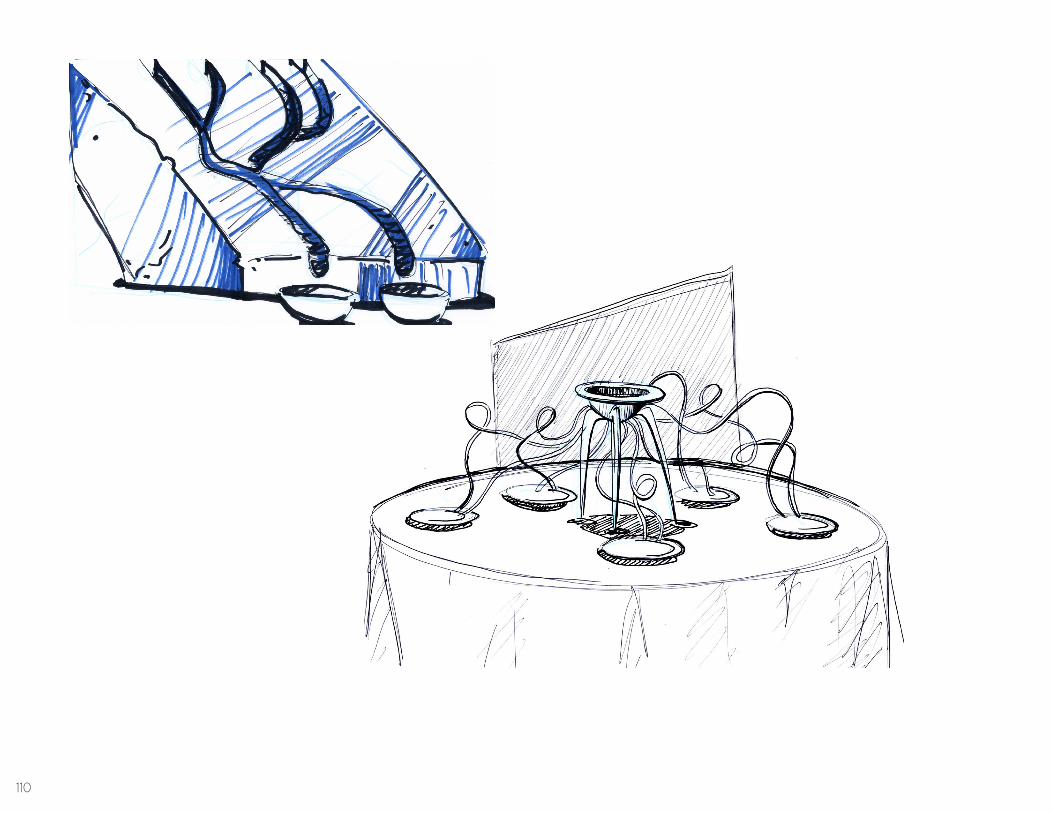
This project was part of INDS 2361 in the Spring semester with Adam Wells. We had a very well-known, high profile client, Chef Speer, of UCHI and UCHIKO in Austin, and he came to us with a proposal to create and design very unique and individual plates that have never been seen before.
There was to be an 10 course dinner where our studio was to design eight of the plates. Chef Speer requested that the plates be very rustic yet contemporary, and still have this edge of innovation and creativity.
MATERIALS
Right:A small set of ceramic jars that were glazed and capped with raw corks. These vessels intended to hold very aromatic entrees.


108
IDEATION

109
110

111

112

113

114
Bloom is a course that is presented through biomimicry, were the plate is revealed before the diner by means of blooming. The kinks are still being worked out on bloom to make it a reality.
116
The following projects were created and designed in CAID 1 with Jeff Feng.
This is an introductory course for SolidWorks. We were shown basic solid modelling techniques that included (not limited to) extruding, lofting, sweeping and revolving sketches to create very different and elegant forms.
CAID 1


118
For one of our first lessons in rendering, we were asked to design speakers that were modelled with solid bodies and then 3d rendered through the SolidWork’s 360 View Camera Add-in. We were challenged to practice lofting, sweeping, extruding and playing with the different materials in the SolidWorks material library.
I ended up creating this speaker that looks very alien and early 2000’s.
SPEAKERS


122
We were assigned to create a coffee or tea set using some of the basic modelling techniques up to this point. We were challenged to be creative with the following tools: loft, sweep, shelling and creating a part file.
MOUSE TEA SET


124
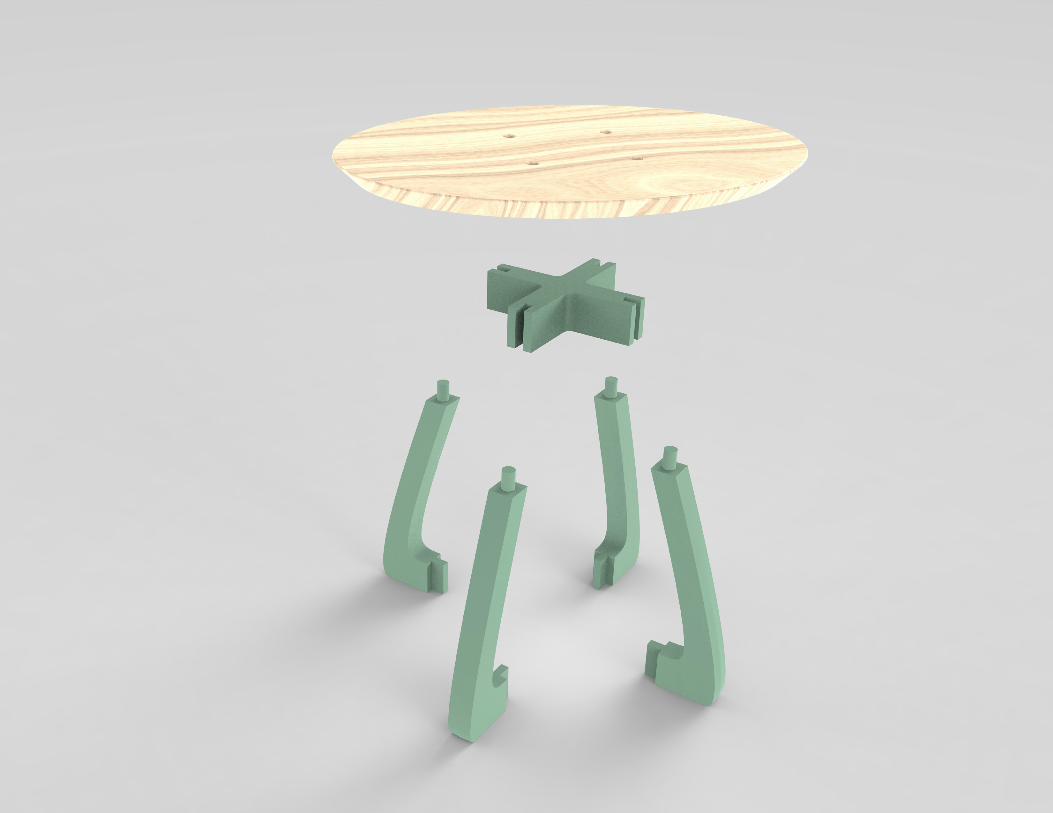
With this assignment we were asked to design furniture the complimented eachother in appearance. We were then challenged to make the furniture piece in a way so that it could be fabricated via CNC router or through the FDM (3D printing) process.
STOOL AND TABLE


The legs of the table were adjusted to prevent instability issues and the height was raised as well.


129
The Projects in the following section are renderings that I did outside the scope of the curriculum, and modelled on my own. These may be redesigns of projects shown in this packet or side projects.Enjoy!
EXTRAS

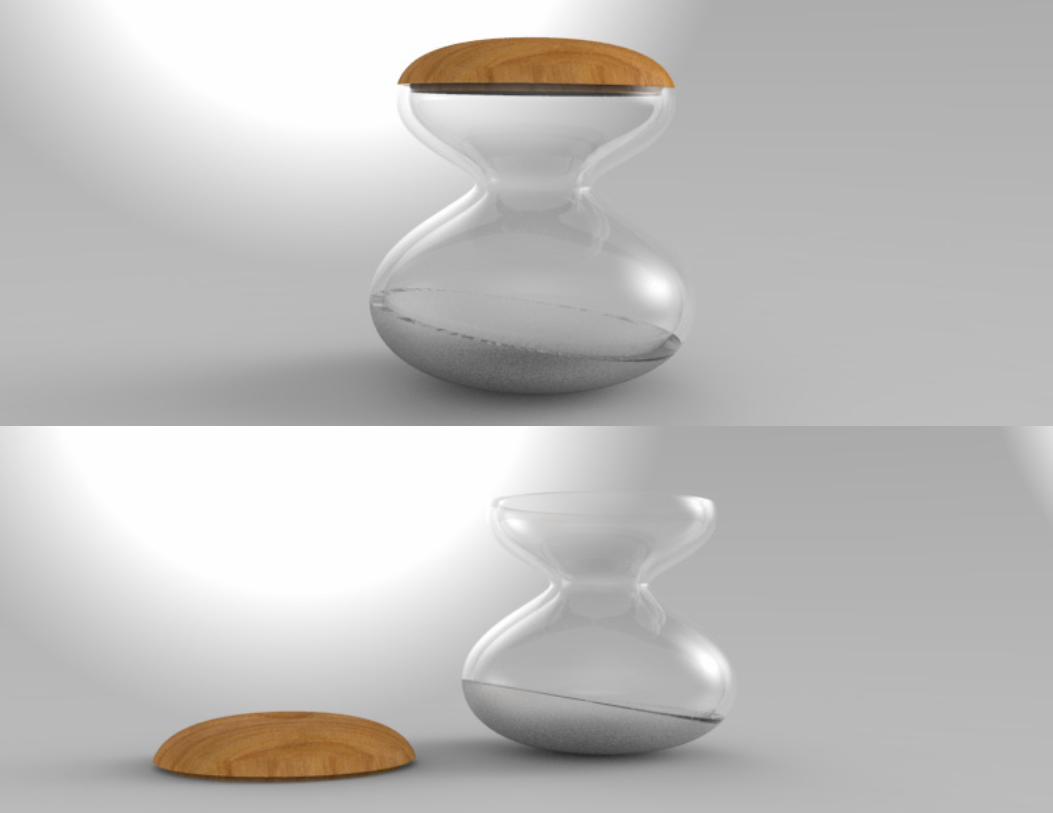
I remodelled stoma in a different form. I am planning on taking this design further as there seems to be no limit of organic forms the zapper
can take on.


The YOLK Sharpener is revisited through SolidWorks. The form was created by offsetting paths and revolving them. The rending was done through
KeyShot.
YOLKPencil Sharpener

134
Accessories as Weaponry is a side project that I decid-ed to 3D model. It is a Ring that is formed from lasercut acrylic that embodies its wearer with power.


Thank you