juki smart app instruction manual
TRANSCRIPT

JUKI Smart AppINSTRUCTION MANUAL
Date of issue : August 2020

CONTENTS
Operating environment ...................................................................................................... 1
1. Function list and sewing machine models which support the functions ................. 1
2. Setting the management ................................................................................................ 22-1. Registering the terminal ..................................................................................................... 22-2. Releasing the keylock ......................................................................................................... 3
3. Displaying/transmitting the sewing machine data ...................................................... 33-1. Displaying a sewing pattern data ....................................................................................... 4
3-1-1. Obtaining from a sewing machine ...........................................................................................43-1-2. Loading from a file .....................................................................................................................5
3-2. Transmitting the sewing pattern data to a sewing machine ............................................ 63-3. Saving the sewing pattern data in a file ............................................................................ 73-4. Displaying a memory switch data ...................................................................................... 8
3-4-1. Obtaining from a sewing machine ...........................................................................................83-4-2. Loading from a file .....................................................................................................................9
3-5. Transmitting the memory switch data to a sewing machine ......................................... 103-6. Saving the memory switch data in a file ......................................................................... 113-7. Displaying a maintenance data ........................................................................................ 12
3-7-1. Obtaining from a sewing machine .........................................................................................123-7-2. Loading from a file ...................................................................................................................13
3-8. Saving the maintenance data in a file .............................................................................. 143-9. Displaying the vector data .................................................................................... 15
3-9-1. Obtaining from a sewing machine .........................................................................................153-9-2. Loading from a file ...................................................................................................................16
3-10. Transmitting the vector data to a sewing machine ...................................................... 183-11. Saving the vector data in a file ....................................................................................... 193-12. Displaying the cycle sewing data .................................................................................. 20
3-12-1. Obtaining from a sewing machine .......................................................................................203-12-2. Loading from a file .................................................................................................................21
3-13. Transmitting the cycle sewing data to a sewing machine ........................................... 223-14. Saving the cycle sewing data in a file ........................................................................... 233-15. Displaying the continuous sewing data ........................................................................ 24
3-15-1. Obtaining from a sewing machine .......................................................................................243-15-2. Loading from a file .................................................................................................................25
3-16. Transmitting the continuous sewing data to a sewing machine ............................... 263-17. Saving the continuous sewing data in a file ................................................................. 27
i

4. Displaying the problem-solution chart ....................................................................... 284-1. Basic configuration ........................................................................................................... 28
4-1-1. Setting the working hours/holidays .......................................................................................284-1-2. Setting the sewing machine on-operation setting ................................................................294-1-3. How to set the sewing machine name ...................................................................................31
4-2. Obtaining from a sewing machine ................................................................................... 334-3. Displaying the output chart .............................................................................................. 34
4-3-1. Selecting the data to be displayed in a chart ........................................................................344-3-2. Displaying the output chart (current day) .............................................................................354-3-3. Displaying the output chart ....................................................................................................36
4-4. Displaying the operation rate chart ................................................................................. 374-4-1. Selecting the data to be displayed in a chart ........................................................................374-4-2. Displaying the operation rate chart (current day) .................................................................374-4-3. Displaying the operation rate chart ........................................................................................38
4-5. Displaying the non-operation analysis chart .................................................................. 39
5. How to use the troubleshooting chart ........................................................................ 405-1. The output chart (current day) ......................................................................................... 405-2. The output chart ................................................................................................................ 405-3. The availability chart (current day) .................................................................................. 415-4. The availability chart ......................................................................................................... 415-5. The non-operation analysis chart .................................................................................... 41
ii
– 1 –
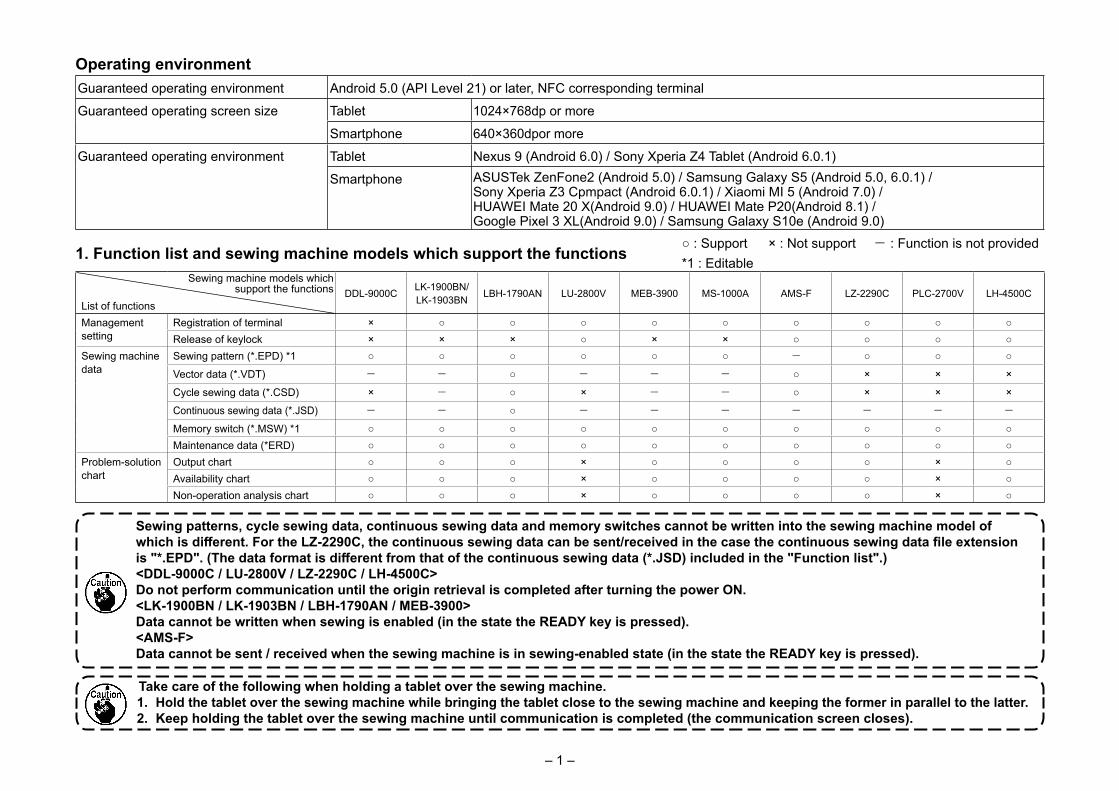
Operating environment
· Guaranteed operating environment...... Android 6.0 or later· Guaranteed operating terminal............. Nexus 9
Guaranteed operating environment Android 5.0 (API Level 21) or later, NFC corresponding terminal
Guaranteed operating screen size Tablet 1024×768dp or more
Smartphone 640×360dpor more
Guaranteed operating environment Tablet Nexus 9 (Android 6.0) / Sony Xperia Z4 Tablet (Android 6.0.1)
Smartphone ASUSTek ZenFone2 (Android 5.0) / Samsung Galaxy S5 (Android 5.0, 6.0.1) / Sony Xperia Z3 Cpmpact (Android 6.0.1) / Xiaomi MI 5 (Android 7.0) / HUAWEI Mate 20 X(Android 9.0) / HUAWEI Mate P20(Android 8.1) / Google Pixel 3 XL(Android 9.0) / Samsung Galaxy S10e (Android 9.0)
1. Function list and sewing machine models which support the functions
List of functionsDDL-9000C LK-1900BN/
LK-1903BN LBH-1790AN LU-2800V MEB-3900 MS-1000A AMS-F LZ-2290C PLC-2700V LH-4500C
Management setting
Registration of terminal × ○ ○ ○ ○ ○ ○ ○ ○ ○Release of keylock × × × ○ × × ○ ○ ○ ○
Sewing machine data
Sewing pattern (*.EPD) *1 ○ ○ ○ ○ ○ ○ - ○ ○ ○
Vector data (*.VDT) - - ○ - - - ○ × × ×
Cycle sewing data (*.CSD) × - ○ × - - ○ × × ×
Continuous sewing data (*.JSD) - - ○ - - - - - - -Memory switch (*.MSW) *1 ○ ○ ○ ○ ○ ○ ○ ○ ○ ○Maintenance data (*ERD) ○ ○ ○ ○ ○ ○ ○ ○ ○ ○
Problem-solution chart
Output chart ○ ○ ○ × ○ ○ ○ ○ × ○Availability chart ○ ○ ○ × ○ ○ ○ ○ × ○Non-operation analysis chart ○ ○ ○ × ○ ○ ○ ○ × ○
○ : Support × : Not support - : Function is not provided*1 : Editable
Sewing patterns, cycle sewing data, continuous sewing data and memory switches cannot be written into the sewing machine model of which is different. For the LZ-2290C, the continuous sewing data can be sent/received in the case the continuous sewing data file extension is "*.EPD". (The data format is different from that of the continuous sewing data (*.JSD) included in the "Function list".) <DDL-9000C / LU-2800V / LZ-2290C / LH-4500C>Do not perform communication until the origin retrieval is completed after turning the power ON. <LK-1900BN / LK-1903BN / LBH-1790AN / MEB-3900>Data cannot be written when sewing is enabled (in the state the READY key is pressed).<AMS-F>Data cannot be sent / received when the sewing machine is in sewing-enabled state (in the state the READY key is pressed).
Take care of the following when holding a tablet over the sewing machine.1. Hold the tablet over the sewing machine while bringing the tablet close to the sewing machine and keeping the former in parallel to the latter.2. Keep holding the tablet over the sewing machine until communication is completed (the communication screen closes).
Sewing machine models which support the functions

– 2 –
2. Setting the managementDisplaying the management setting screen.
1) Press "management setting" button ❶.
❶
❷
3) Approach the tablet close to the NFC mark ❷ on a panel. Once the terminal registration is successfully completed, the
massage "Terminal is successfully registered" is displayed. * When the transmission is not successful, an error message
is displayed.
2-1. Registering the terminal
1) Bring the operation panel on the sewing machine side to the terminal-registration standby state. (Refer to the Engineer's Manual for the operation panel for how to operate it.)
2) Press "terminal registration" button ❶ on the management setting screen.
❶
– 3 –
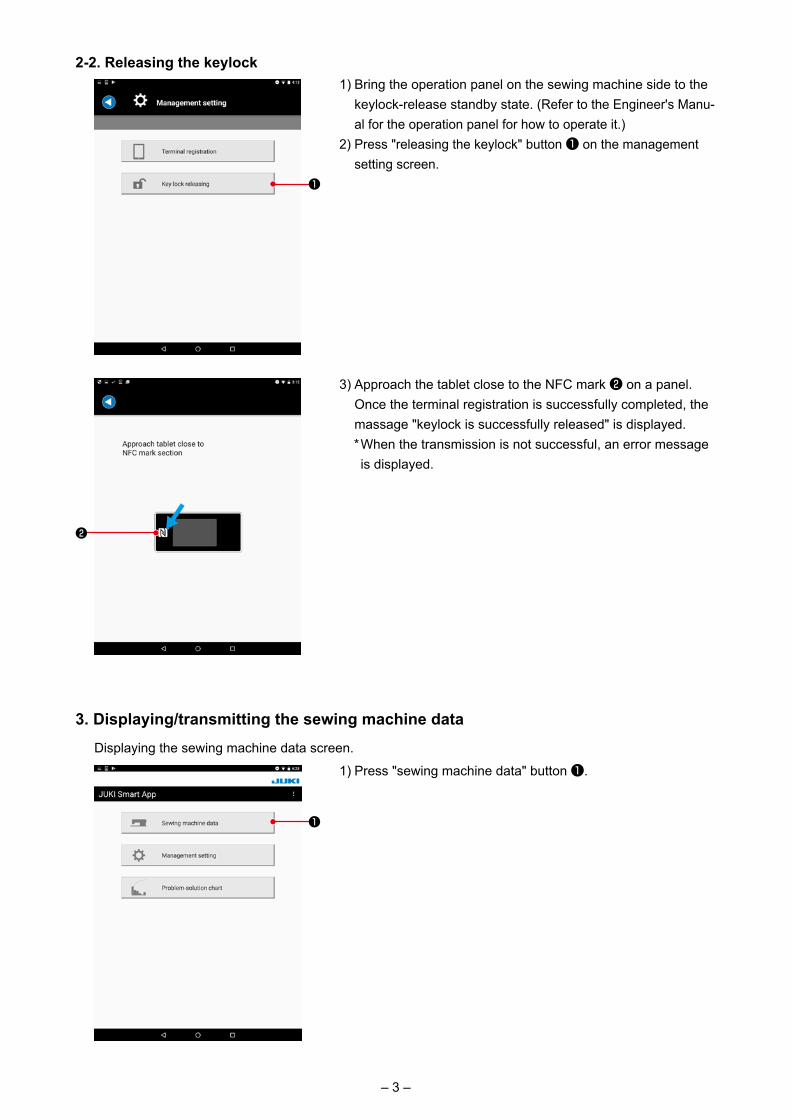
2-2. Releasing the keylock1) Bring the operation panel on the sewing machine side to the
keylock-release standby state. (Refer to the Engineer's Manu-al for the operation panel for how to operate it.)
2) Press "releasing the keylock" button ❶ on the management setting screen.
3) Approach the tablet close to the NFC mark ❷ on a panel. Once the terminal registration is successfully completed, the
massage "keylock is successfully released" is displayed. * When the transmission is not successful, an error message
is displayed.
❶
❷
3. Displaying/transmitting the sewing machine dataDisplaying the sewing machine data screen.
1) Press "sewing machine data" button ❶.
❶

– 4 –
3-1-1. Obtaining from a sewing machine
1) Press the “OBTAINED FROM SEWING MACHINE” button ❶ of Sewing pattern.
3-1. Displaying a sewing pattern data
2) Approach the tablet close to the NFC mark ❷ on a panel.
3) A sewing pattern data edit screen is displayed.
❷
❶
<LK-1900BN / LK-1903BN> Sewing patterns can be acquired only in the case the direct patterns (registered as
standard patterns only) are displayed.

– 5 –
3-1-2. Loading from a file
1) Press the “LOADED FROM FILE” button ❶ of Sewing pat-tern.
2) Select the “JUKI” - “SewingPattern” - “(Machine name)” folder ❷.
3) Select the sewing pattern data file (*.EPD) ❸.
❶
❸
❷

– 6 –
1) Press the “NFC transmission” button ❶ right above.
3-2. Transmitting the sewing pattern data to a sewing machine
2) Input a pattern No. ❷ to be written. * Check the checkbox “Overwrite” ❸ when overwriting the
existing pattern.3) Touch the NFC mark ❹ on a panel. When the transmission is successful, the screen returns to
the sewing pattern edit screen. * When the transmission is not successful, an error message
is displayed. * Only alphanumeric characters (ASCII characters) can be
entered in the "Part number", "Process" and "Comment" fields. In the case the entered characters contain any character that is not supported by the sewing machine, that character will be converted to "* (asterisk)"; or to a capital letter if the sewing machine does not support small letters.
❶
❸
❹
❷
4) A sewing pattern edit screen is displayed. * The screen displayed differs with the sewing machine model.

– 7 –
1) Press the “Save File” button ❶ right above.
3-3. Saving the sewing pattern data in a file
2) Select the “JUKI” - “SewingPattern” - “(Machine name)” fold-er ❷.
3) Input a file name and press the “Save” button ❸. * The sewing pattern data can be saved only in the “Sewing-
Pattern” - “(Machine name)” folder ❷.
* To delete a file, use the file management tool of a tablet.
❶
❸
❷

– 8 –
3-4-1. Obtaining from a sewing machine
1) Press the “OBTAINED FROM SEWING MACHINE” button ❶ of Memory switch.
3-4. Displaying a memory switch data
2) Approach the tablet close to the NFC mark ❷ on a panel.
3) A memory switch data edit screen is displayed. * The screen displayed differs with the sewing machine model.
❶
❷

– 9 –
3-4-2. Loading from a file
1) Press the “LOADED FROM FILE” button ❶ of Memory switch.
2) Select the “JUKI” - “MemorySwitch” - “(Machine name)” fold-er ❷.
3) Select the memory switch data file (*.MSW) ❸.
❶
❸
❷

– 10 –
1) Press the “NFC transmission” button ❶ right above.
3-5. Transmitting the memory switch data to a sewing machine
2) Touch the NFC mark ❷ on a panel. When the transmission is successful, the screen returns to
the memory switch group selection screen. * When the transmission is not successful, an error message
is displayed.
4) A memory switch group selection screen is displayed. * The screen displayed differs with the sewing machine model.
❶
❷

– 11 –
1) Press the “Save File” button ❶ right above.
3-6. Saving the memory switch data in a file
2) Select the “JUKI” - “MemorySwitch” - “(Machine name)” fold-er ❷.
3) Input a file name and press the “Save” button ❸. * The sewing pattern data can be saved only in the “Memory-
Switch” - “(Machine name)” folder ❷.
* To delete a file, use the file management tool of a tablet.
❸
❶
❷
– 12 –
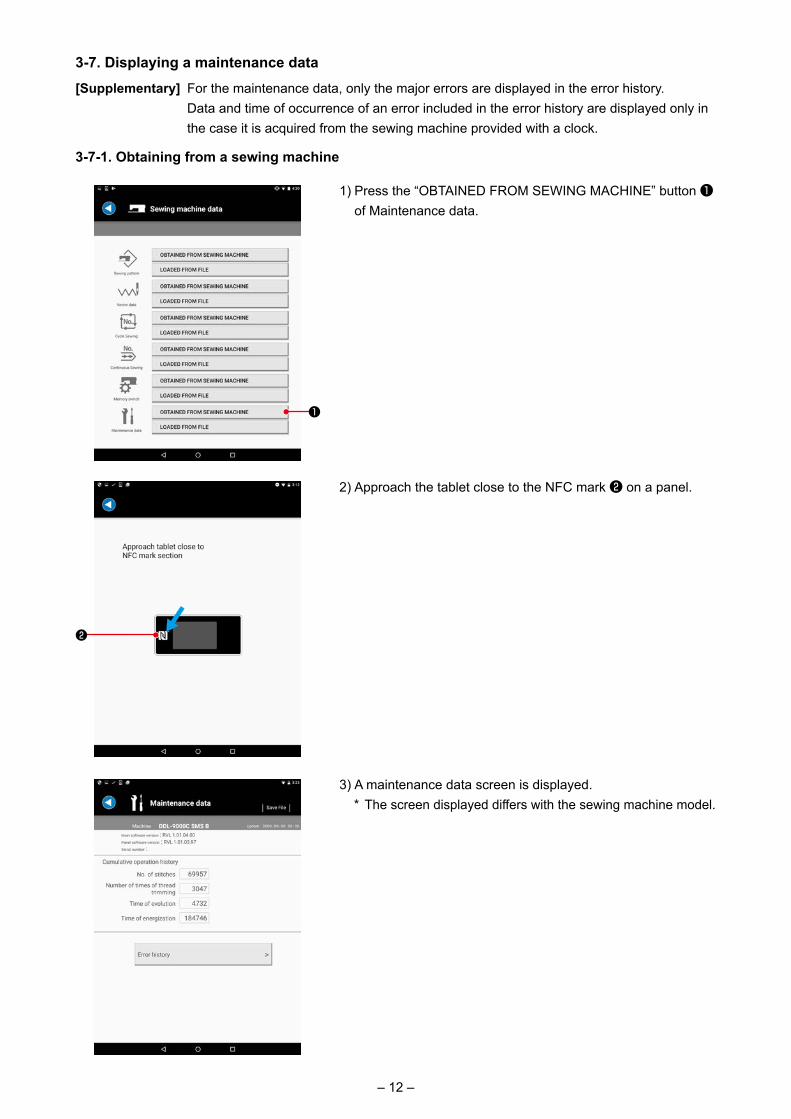
3-7-1. Obtaining from a sewing machine
1) Press the “OBTAINED FROM SEWING MACHINE” button ❶ of Maintenance data.
3-7. Displaying a maintenance data
2) Approach the tablet close to the NFC mark ❷ on a panel.
3) A maintenance data screen is displayed. * The screen displayed differs with the sewing machine model.
❷
❶
[Supplementary] For the maintenance data, only the major errors are displayed in the error history. Data and time of occurrence of an error included in the error history are displayed only in
the case it is acquired from the sewing machine provided with a clock.

– 13 –
3-7-2. Loading from a file
1) Press the “LOADED FROM FILE” button ❶ of Maintenance data.
2) Select the “JUKI” - “Maintenance” - “(Machine name)” folder ❷.
3) Select the maintenance data file (*.ERD) ❸.
❸
❶
❷

– 14 –
1) Press the “Save File” button ❶ right above.
3-8. Saving the maintenance data in a file
2) Select the “JUKI” - “Maintenance” - “(Machine name)” folder ❷.
❶
4) A maintenance data screen is displayed. * The screen displayed differs with the sewing machine model.
❷
– 15 –
❸
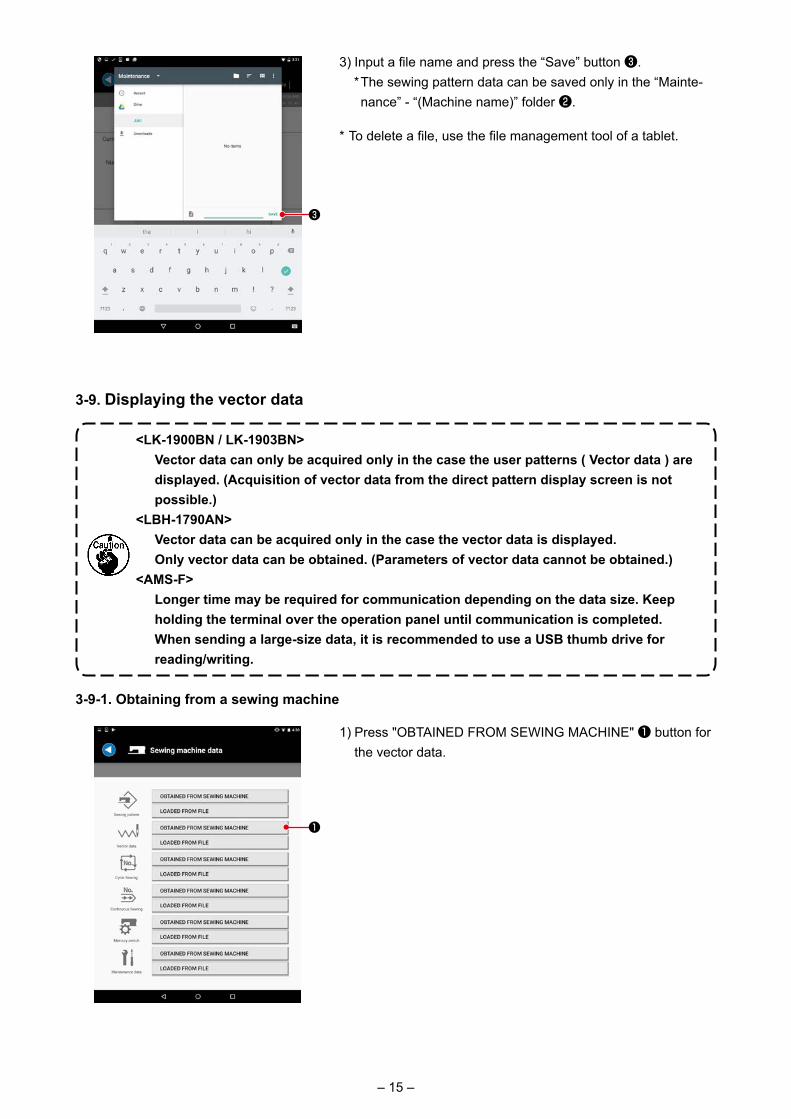
3-9-1. Obtaining from a sewing machine
1) Press "OBTAINED FROM SEWING MACHINE" ❶ button for the vector data.
3-9. Displaying the vector data
❶
3) Input a file name and press the “Save” button ❸. * The sewing pattern data can be saved only in the “Mainte-
nance” - “(Machine name)” folder ❷.
* To delete a file, use the file management tool of a tablet.
<LK-1900BN / LK-1903BN> Vector data can only be acquired only in the case the user patterns ( Vector data ) are
displayed. (Acquisition of vector data from the direct pattern display screen is not possible.)
<LBH-1790AN> Vector data can be acquired only in the case the vector data is displayed. Only vector data can be obtained. (Parameters of vector data cannot be obtained.)<AMS-F> Longer time may be required for communication depending on the data size. Keep
holding the terminal over the operation panel until communication is completed. When sending a large-size data, it is recommended to use a USB thumb drive for reading/writing.

– 16 –
3-9-2. Loading from a file
1) Press "LOADED FROM FILE" ❶ button for the vector data.
3) The vector data screen is displayed. Information displayed on this screen is the information on
vector data (VDT format).
< In the case the data is acquired from the AMS-F Series > When the data is successfully acquired, it is automatically
saved in a file.
❶
2) Approach the tablet close to the NFC mark ❷ on a panel.
❷

– 17 –
4) The vector data screen is displayed.
3) Select vector data file (*.VDT) ❸.
❸
2) Select the “JUKI” - “Vector” - “(Machine name)” folder ❷.
❷

– 18 –
1) Press the “NFC transmission” button ❶ right above.
3-10. Transmitting the vector data to a sewing machine
❶
2) Input a pattern No. ❷ to be written. * In the case of overwriting the exiting pattern or file name, put
a check to "Overwrite" ❸.
< In the case the destination is the AMS-F Series > In the case the operation panel is placed in the file manage-
ment mode, no write number applies.
3) Touch the NFC mark ❹ on a panel. Once the transmission is successfully completed, the screen
will return to the vector data screen. * When the transmission is not successful, an error message
is displayed.
❷
❸
❹

– 19 –
1) Press the “Save File” button ❶ right above.
3-11. Saving the vector data in a file
❶
2) Select the “JUKI” - “Vector” - “(Machine name)” folder ❷.
3) Input a file name and press the “Save” button ❸. * The sewing pattern data can be saved only in the “Vector” -
“(Machine name)” folder ❷.
* To delete a file, use the file management tool of a tablet.
❸
❷

– 20 –
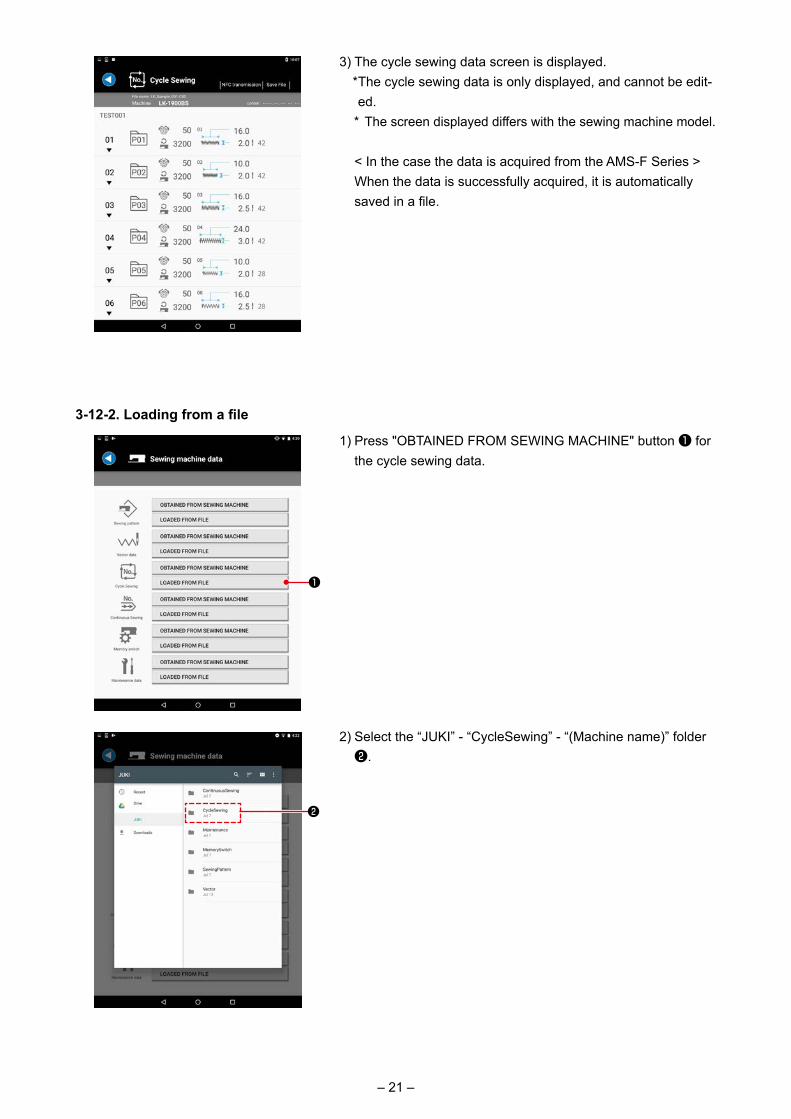
3-12. Displaying the cycle sewing data
1) Press "OBTAINED FROM SEWING MACHINE" button ❶ for the cycle sewing data.
2) Approach the tablet close to the NFC mark ❷ on a panel.
3-12-1. Obtaining from a sewing machine
❶
❷
<LK-1900BN / LK-1903BN> Cycle sewing data can be transmitted/received only in the case the cycle sewing data
(Vector data) contains only one user pattern. <LBH-1790AN / LBH-1795AN / LBH-1796AN> Cycle sewing data can be transmitted / received only in the case it contains one kind
of vector data.<AMS-F> Longer time may be required for communication depending on the data size. Keep
holding the terminal over the operation panel until communication is completed. When sending a large-size data, it is recommended to use a USB thumb drive for reading/writing.
– 21 –
3) The cycle sewing data screen is displayed. * The cycle sewing data is only displayed, and cannot be edit-
ed. * The screen displayed differs with the sewing machine model.
< In the case the data is acquired from the AMS-F Series > When the data is successfully acquired, it is automatically
saved in a file.
1) Press "OBTAINED FROM SEWING MACHINE" button ❶ for the cycle sewing data.
2) Select the “JUKI” - “CycleSewing” - “(Machine name)” folder ❷.
3-12-2. Loading from a file
❶
❷

– 22 –
3) Select cycle sewing data file (*.CSD) ❸.
❸
4) The cycle sewing data screen is displayed. * The cycle sewing data is only displayed, and cannot be
edited. * The screen displayed differs with the sewing machine model.
1) Press the “NFC transmission” button ❶ right above.
3-13. Transmitting the cycle sewing data to a sewing machine
❶

– 23 –
2) Input a pattern No. ❷ to be written. * In the case of overwriting the exiting pattern or file name, put
a check to "Overwrite" ❸.
< In the case the destination is the AMS-F Series > In the case the operation panel is placed in the file manage-
ment mode, no write number applies.
3) Touch the NFC mark ❹ on a panel. Once the transmission is successfully completed, the screen
will return to the cycle sewing data screen. * When the transmission is not successful, an error message
is displayed.
❶
❷❸
❹
1) Press the “Save File” button ❶ right above.
3-14. Saving the cycle sewing data in a file
❷
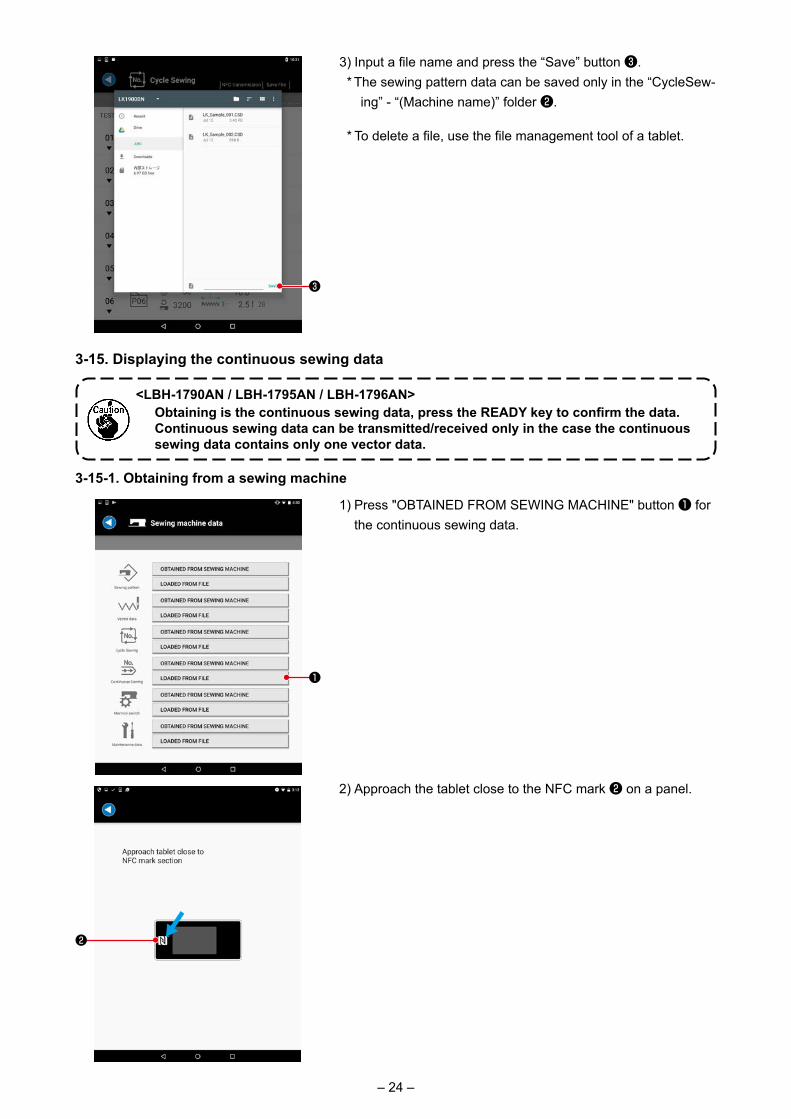
2) Select the “JUKI” - “CycleSewing” - “(Machine name)” folder ❷.
– 24 –
3) Input a file name and press the “Save” button ❸. * The sewing pattern data can be saved only in the “CycleSew-
ing” - “(Machine name)” folder ❷.
* To delete a file, use the file management tool of a tablet.
❸
3-15. Displaying the continuous sewing data
<LBH-1790AN / LBH-1795AN / LBH-1796AN> Obtaining is the continuous sewing data, press the READY key to confirm the data. Continuous sewing data can be transmitted/received only in the case the continuous
sewing data contains only one vector data.
1) Press "OBTAINED FROM SEWING MACHINE" button ❶ for the continuous sewing data.
3-15-1. Obtaining from a sewing machine
❶
2) Approach the tablet close to the NFC mark ❷ on a panel.
❷

– 25 –
3) The continuous sewing data screen is displayed. * The continuous sewing data is only displayed, and cannot
be edited.
1) Press "LOADED FROM FILE" button ❶ for the continuous sewing data.
2) Select the “JUKI” - “ContinuousSewing” - “(Machine name)” folder ❷.
3-15-2. Loading from a file
❶
❷

– 26 –
3) Select the continuous sewing data file (*.JSD) ❸.
❸
4) The continuous sewing data screen is displayed. * The continuous sewing data is only displayed, and cannot
be edited.
❶1) Press the “NFC transmission” button ❶ right above.
3-16. Transmitting the continuous sewing data to a sewing machine
– 27 –
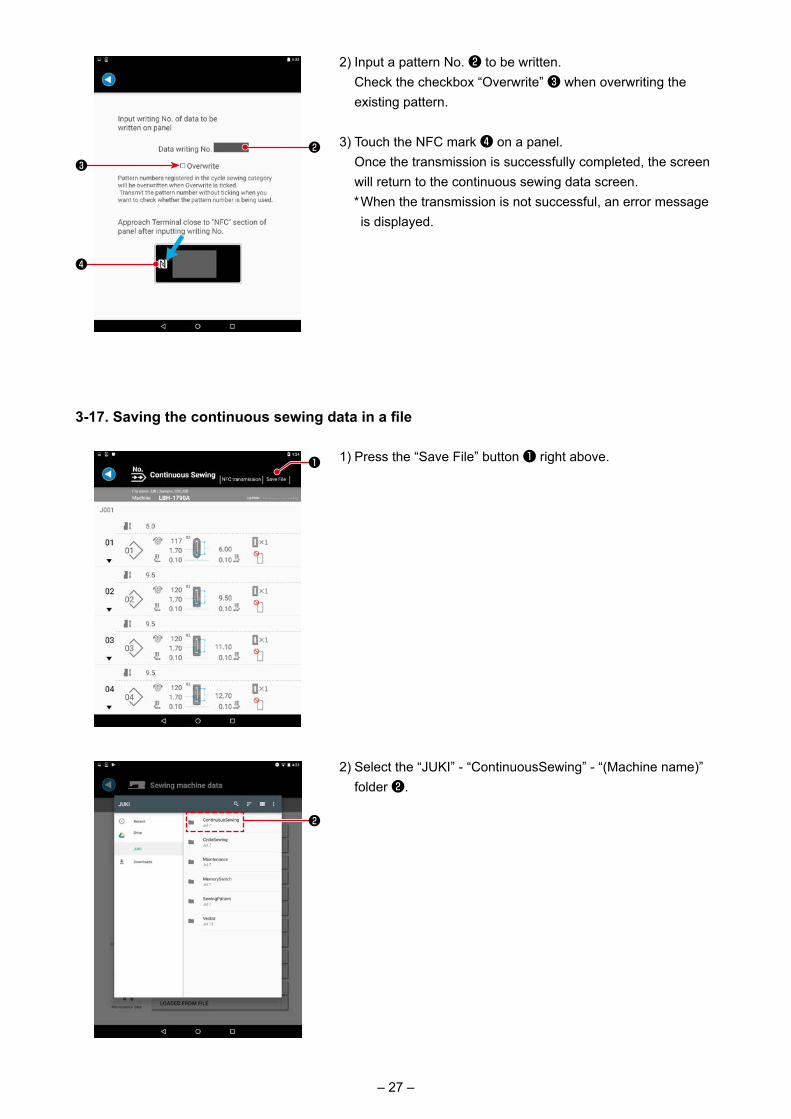
2) Input a pattern No. ❷ to be written. Check the checkbox “Overwrite” ❸ when overwriting the
existing pattern.
3) Touch the NFC mark ❹ on a panel. Once the transmission is successfully completed, the screen
will return to the continuous sewing data screen. * When the transmission is not successful, an error message
is displayed.
❶ 1) Press the “Save File” button ❶ right above.
3-17. Saving the continuous sewing data in a file
2) Select the “JUKI” - “ContinuousSewing” - “(Machine name)” folder ❷.
❷
❷❸
❹

– 28 –
3) Input a file name and press the “Save” button ❸. * The sewing pattern data can be saved only in the “Continu-
ous Sewing” - “(Machine name)” folder ❷.
* To delete a file, use the file management tool of a tablet.
❸
1) Press "problem-solution chart" button ❶.
Displaying the problem-solution chart screen.
4. Displaying the problem-solution chart
❶
4-1. Basic configuration
❶1) Select the "work hours/holiday setting" ❶ menu from the menu
displayed at the upper right section of the screen.
4-1-1. Setting the working hours/holidays
– 29 –
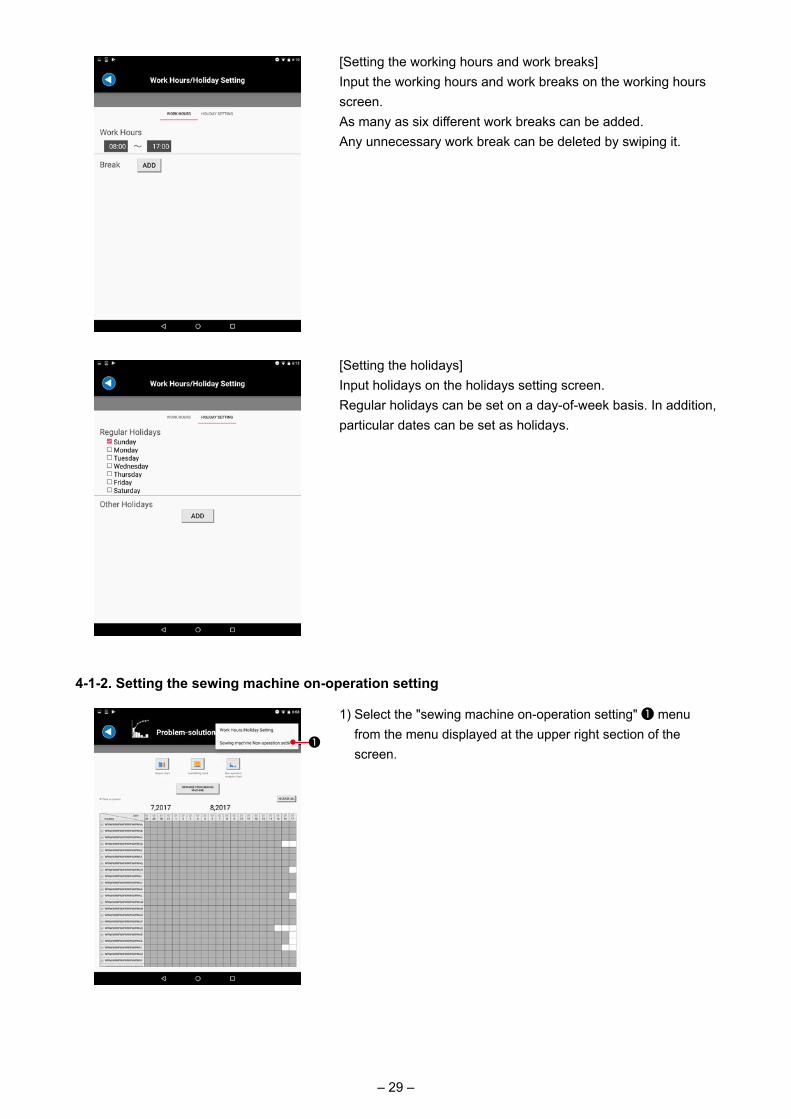
[Setting the working hours and work breaks]Input the working hours and work breaks on the working hours screen.As many as six different work breaks can be added.Any unnecessary work break can be deleted by swiping it.
[Setting the holidays]Input holidays on the holidays setting screen.Regular holidays can be set on a day-of-week basis. In addition, particular dates can be set as holidays.
1) Select the "sewing machine on-operation setting" ❶ menu from the menu displayed at the upper right section of the screen.
4-1-2. Setting the sewing machine on-operation setting
❶

– 30 –
2) Set the non-operation boundary time and the order of non-operation items on the non-operation setting screen of sewing machine.
The non-operation boundary time can be set in the range of 0 and 1800 seconds.
If it is set to "0 (zero)", the non-operation measuring function (*1) of sewing machine will be turned OFF.
*1 [Non-operation measuring function of sewing machine] This is the function of measuring the time taken to carry out a
waste work. If the downtime exceeds the non-operation boundary time,
the list of non-operation items will be displayed on the oper-ation panel. The non-operation time is measured when the operator selects one of the non-operation items. (The sewing machine will not be able to start sewing until the operator selects one of those items.)
The measured non-operation time data can be acquired with the terminal and can be viewed on the operation panel in the form of the non-operation analysis chart.
<LK-1900BN / LK-1903BN, LBH-1790AN, MEB-3900> Non-operational items can be displayed by pressing the
ready key mounted on the sewing machine side.
3) Press the “NFC transmission” button ❷ right above.❷
4) Approach the tablet close to the NFC mark ❸ on a panel. Once the NFC transmission is successfully completed, the
screen will return to the operation setting screen of the sew-ing machine.
* When the transmission is not successful, an error message is displayed.
❸

– 31 –
❶
1) Press mode key ❶ to display the mode screen.
4-1-3. How to set the sewing machine nameSet the sewing machine name in order to display the problem-solution chart with JUKI Smart App.If the sewing machine name is not set, the sewing machine name field will be left blank.
① For the LK-1900BN and LBH-1790AN
2) Press item select key ❷ to put the "version
information" in the selected state.
Press edit key ❸ to display the version
information screen A.
3) Keep edit key ❸ held pressed for one sec-ond on the version information screen. Then, the sewing machine name input screen is displayed.
❸
❷❸
❺❹❷
4) Type of characters can be selected with data
change key ❹ . Input position can be se-
lected with item select key ❷ .
The sewing machine name is confirmed by press-
ing return key ❺ . Then, the version infor-
mation screen is displayed.
A
– 32 –
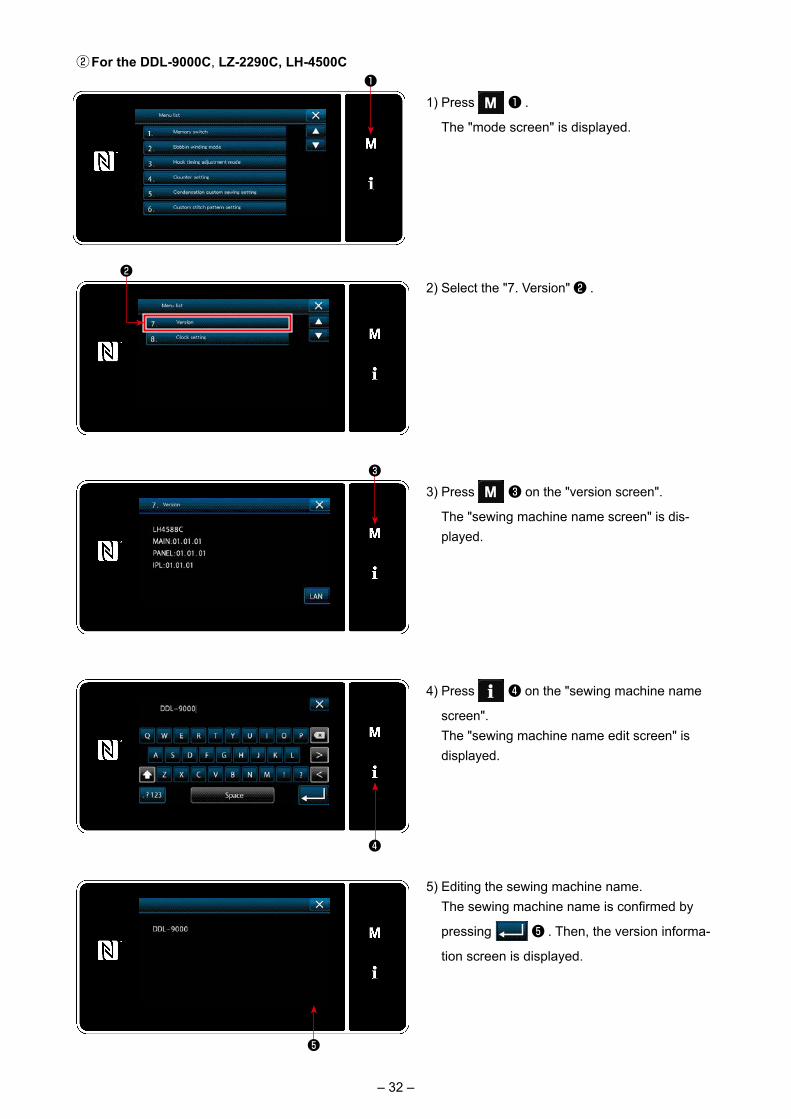
② For the DDL-9000C, LZ-2290C, LH-4500C
1) Press ❶ .
The "mode screen" is displayed.
2) Select the "7. Version" ❷ .
3) Press ❸ on the "version screen".
The "sewing machine name screen" is dis-played.
4) Press ❹ on the "sewing machine name
screen". The "sewing machine name edit screen" is
displayed.
5) Editing the sewing machine name. Thesewingmachinenameisconfirmedby
pressing ❺ . Then, the version informa-
tion screen is displayed.
❺
❹
❸
❶
❷

– 33 –
4-2. Obtaining from a sewing machine
❶
1) Press "OBTAINED FROM SEWING MACHINE" button ❶.
2) Approach the tablet close to the NFC mark ❷ on a panel. Once the data acquisition is successfully completed, the
screen will return to the problem-solution chart screen. * When the transmission is not successful, an error message
is displayed.
3) Acquired data information is reflected on the list displayed on the problem-solution chart screen.
A sewing machine line is added to the list. The color of the date on which the sewing machine data is acquired is changed to gray.
Data on the past 40 days can be held on the list. Data on 100 units of sewing machine can be acquired and
displayed on the chart at the maximum. Unnecessary sewing machine can be deleted by keeping the line on which the sewing machine is displayed held pressed.
[Data on the sewing machine which is not provided with a clock] The sewing machine which is not provided with a clock refers
to the clock time of the terminal when communicating with the terminal and adds that time to the data.
Due to the aforementioned system, the data obtained during the time between ON and OFF of the power supply to the sewing machine is not added with the clock time if the sewing machine never communicates with the terminal during the above-stated time.
(Data without confirmed clock time) Data without the confirmed clock time is displayed in the
chart after the list of data with the confirmed clock time.
On each chart, the element which contains data time of which is not accurate is displayed while attaching "*" mark on the horizontal-axis label.
❷

– 34 –
4-3. Displaying the output chart
4-3-1. Selecting the data to be displayed in a chart
1) Click acquired cell (displayed in gray) ❶ in the list.
2) ❷ is displayed at the clicked portion of the list. Data on sewing machine(s) and date(s) displayed in the cells
attached with checkmark ❷ are subject to aggregation. Cells (displayed in white) are also selectable.
Data over this period is displayed in gray.❷
❶
– 35 –
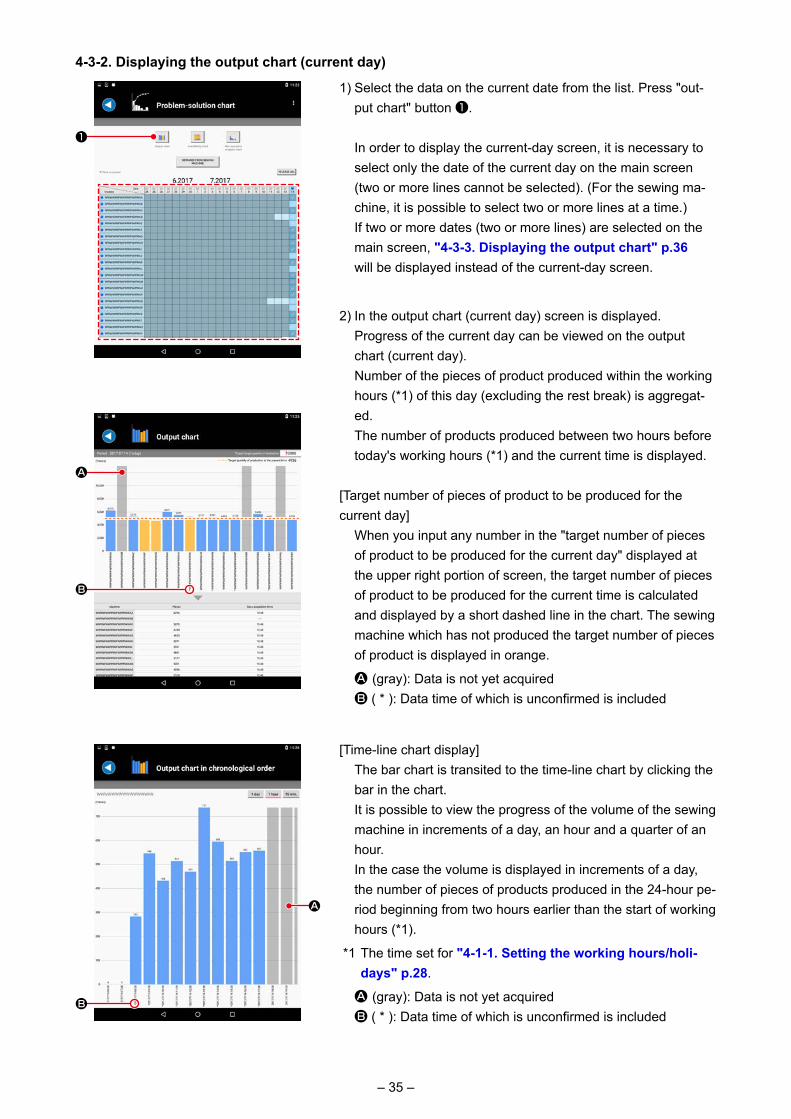
4-3-2. Displaying the output chart (current day)
1) Select the data on the current date from the list. Press "out-put chart" button ❶.
In order to display the current-day screen, it is necessary to select only the date of the current day on the main screen (two or more lines cannot be selected). (For the sewing ma-chine, it is possible to select two or more lines at a time.)
If two or more dates (two or more lines) are selected on the main screen, "4-3-3. Displaying the output chart" p.36 will be displayed instead of the current-day screen.
2) In the output chart (current day) screen is displayed. Progress of the current day can be viewed on the output
chart (current day). Number of the pieces of product produced within the working
hours (*1) of this day (excluding the rest break) is aggregat-ed.
The number of products produced between two hours before today's working hours (*1) and the current time is displayed.
[Target number of pieces of product to be produced for the current day] When you input any number in the "target number of pieces
of product to be produced for the current day" displayed at the upper right portion of screen, the target number of pieces of product to be produced for the current time is calculated and displayed by a short dashed line in the chart. The sewing machine which has not produced the target number of pieces of product is displayed in orange.
A (gray): Data is not yet acquired B ( * ): Data time of which is unconfirmed is included
[Time-line chart display] The bar chart is transited to the time-line chart by clicking the
bar in the chart. It is possible to view the progress of the volume of the sewing
machine in increments of a day, an hour and a quarter of an hour.
In the case the volume is displayed in increments of a day, the number of pieces of products produced in the 24-hour pe-riod beginning from two hours earlier than the start of working hours (*1).
*1 The time set for "4-1-1. Setting the working hours/holi-days" p.28.
A (gray): Data is not yet acquired B ( * ): Data time of which is unconfirmed is included
❶
A
B
A
B

– 36 –
4-3-3. Displaying the output chart
1) Select data on two or more dates from the list. Press "output chart" button ❶.
2) The past production results can be viewed in the output chart.
The number of pieces of product produced is aggregated taking the period from 0.00 to 23:59 as one day. (The working hours (*1) is not taken into account.)
*1 The time set for "4-1-1. Setting the working hours/holi-days" p.28.
A (gray): Data is not yet acquired B (transparent): Including the period where data is not yet
acquired. C ( * ): Data time of which is unconfirmed is included
[Time-line chart display] The bar chart is transited to the time-line chart by clicking the
bar in the chart. It is possible to view the progress of the volume of the sewing
machine in increments of a day, an hour and a quarter of an hour.
A (gray): Data is not yet acquired B (transparent): Including the period where data is not yet
acquired. C ( * ): Data time of which is unconfirmed is included
A
B
❶
C
A
B
C

– 37 –
4-4. Displaying the operation rate chart
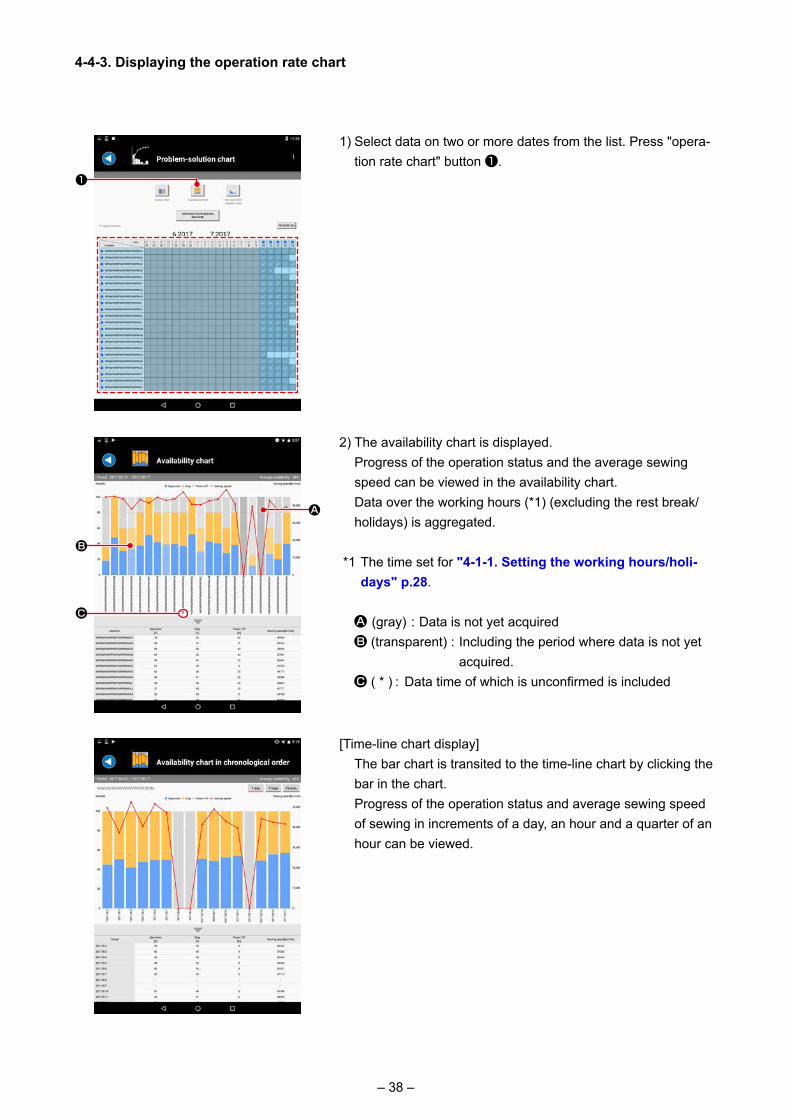
1) Select the data on the current date from the list. Press "oper-ation rate chart" button ❶.
In order to display the current-day screen, it is necessary to select only the date of the current day on the main screen (two or more lines cannot be selected). (For the sewing ma-chine, it is possible to select two or more lines at a time.)
If two or more dates (two or more lines) are selected on the main screen, "4-4-3. Displaying the operation rate chart" p.38 will be displayed instead of the current-day screen.
→ Refer to "4-3-1. Selecting the data to be displayed in a chart" p.34.
2) The availability chart (current day) is displayed. Progress of the operation status and the average sewing
speed can be viewed in the availability chart (current day). The operation rate is totalized taking the period of time to
be elapsed from the starting time of the workday (*1) to the time at which the last data of the day is acquired as 100 %. (Excluding the work break)
A (gray): Data is not yet acquired B ( * ): Data time of which is unconfirmed is included
[Time-line chart display] The bar chart is transited to the time-line chart by clicking the
bar in the chart. It is possible to view the progress of the volume of the sewing
machine in increments of a day, an hour and a quarter of an hour.
The display range in increments of "one hour / 15 minutes" covers the period from the starting time of a workday (*1) to the time at which the last data of the day is acquired.
*1 The time set for "4-1-1. Setting the working hours/holi-days" p.28.
A
C
B
❶
4-4-1. Selecting the data to be displayed in a chart
4-4-2. Displaying the operation rate chart (current day)
– 38 –
1) Select data on two or more dates from the list. Press "opera-tion rate chart" button ❶.
2) The availability chart is displayed. Progress of the operation status and the average sewing
speed can be viewed in the availability chart. Data over the working hours (*1) (excluding the rest break/
holidays) is aggregated.
*1 The time set for "4-1-1. Setting the working hours/holi-days" p.28.
A (gray) : Data is not yet acquired B (transparent) : Including the period where data is not yet
acquired. C ( * ) : Data time of which is unconfirmed is included
[Time-line chart display] The bar chart is transited to the time-line chart by clicking the
bar in the chart. Progress of the operation status and average sewing speed
of sewing in increments of a day, an hour and a quarter of an hour can be viewed.
C
B
❶
A
4-4-3. Displaying the operation rate chart

– 39 –
4-5. Displaying the non-operation analysis chart
1) Select the data to be displayed in the chart. Press "non-oper-ation analysis chart" button ❶.
Select the data to be displayed in the chart. → Refer to "4-3-1. Selecting the data to be displayed in a chart" p.34.
2) The non-operation analysis chart screen is displayed. Time taken by wasted work and the accumulation ratio of
wasted work can be viewed on the non-operation analysis chart.
Breakdown of the non-operation items is displayed in the list by clicking the bar in the chart.
To enable display of this chart, the non-operation time of sewing machine has to be measured.
→ Refer to "4-1-2. Setting the sewing machine on-opera-tion setting" p.29 for the measuring procedure.
❶
A (transparent) : Including the period where data is not yet acquired.
B ( * ) : Data time of which is unconfirmed is included
B
A

– 40 –
5. How to use the troubleshooting chart
5-1. The output chart (current day)
Output chart (for today) is used for checking the daily progress of production. The following setting is required to display the chart.
・Set the name of sewing machine. (→ Refer to "4-1-3. How to set the sewing machine name" p.31.) ・Set the working hours and work break hours. (→ Refer to "4-1-1. Setting the working hours/holidays" p.28.) ・Set the target number of pieces to be produced. (→ Refer to "4-3-2. Displaying the output chart (current day)" p.35.)
Obtain the data from the sewing machine. Select the data only for today on the troubleshooting chart screen to display the chart. → On the output chart (for today), the number of products produced from two hours before the work-
ing hours to the current time is aggregated and indicated. (The number of products produced during the work break hours is aggregated.)
→ The data to be counted on the output chart, the number of times of thread trimming for lockstitch type sewing machines, or the number of times of sewing of sewing patterns for cycle sewing ma-chines (under the cycle sewing mode, the number of times of cycle sewing is counted).
1. For the sewing machine which is not provided with a clock, be sure to carry out communication between the sewing machine and a tablet after turning on the power to the sewing machine. (Time data is transmitted to the sewing machine.)
→Refer to "4-2. [Data on the sewing machine which is not provided with a clock]" P.33.2. Approximately 60 seconds are required until the latest sewing data can be obtained
from the sewing machine. Wait for approximately 60 seconds after the completion of sewing and obtain the latest sewing data from the sewing machine.
5-2. The output chart
The output chart is used to check trends in output in the past few days.The following setting is required to display the chart.
・Set the name of sewing machine. (→ Refer to "4-1-3. How to set the sewing machine name" p.31.)
After the completion of a day's work, obtain data from the sewing machine. Select the target few days on the troubleshooting chart screen to display the chart. → On the output chart, the number of products produced during the selected period is aggregated
and displayed. (The number of products produced outside the working hours, the work break hours and the holidays is also aggregated.)
→ The data to be counted on the output chart, the number of times of thread trimming for lockstitch type sewing machines, or the number of times of sewing of sewing patterns for cycle sewing ma-chines. (Number of times of cycle sewing under the cycle mode in the case of using the production volume chart under the cycle mode)
– 41 –
5-3. The availability chart (current day)
The operation rate chart (for the current day) is used for checking the operation rate for the current day.On the sewing machine working ratio (period of time), stop ratio (period of time), power-OFF ratio (period of time) and average sewing speed can be grasped.The following setting is required to display the chart.
・Set the name of sewing machine. (→ Refer to "4-1-3. How to set the sewing machine name" p.31.) ・Set the working hours and work break hours. (→ Refer to "4-1-1. Setting the working hours/holidays" p.28.) ・Set the holidays. (→ Refer to "4-1-1. Setting the working hours/holidays [Setting the holidays]" p.29.)
After the completion of a day's work, obtain the data from the sewing machine. Select the data on the troubleshooting chart screen to display the chart. → For the operation rate (i.e., availability) chart (for the current day), the operation rate is totalized
taking the period of time to be elapsed from the start of the workday (*1) to the time at which the last data is acquired as 100 % (excluding the work break). (Even if the products are actually sewn during the work break, the production result will not be totalized.)
5-5. The non-operation analysis chart
In the case of finding a problem such that the working ration is low on the working ratio chart, the down-time analysis chart is used for investigating the cause of the problem.The following setting is required to display the chart.
・Set the name of sewing machine. (→ Refer to "4-1-3. How to set the sewing machine name" p.31.) ・Set the sewing machine down-time setting. (→ Refer to "4-1-2. Setting the sewing machine on-operation setting" p.29.)
Obtain data from the sewing machine after a certain period of sewing work. Then, select the target data on the troubleshooting chart to display it on the chart.
5-4. The availability chart
On the working ratio chart, the sewing machine working ratio (period of time), stop ratio (period of time), power-OFF ratio (period of time) and average sewing speed can be grasped.The following setting is required to display the chart.
・Set the name of sewing machine. (→ Refer to "4-1-3. How to set the sewing machine name" p.31.) ・Set the working hours and work break hours. (→ Refer to "4-1-1. Setting the working hours/holidays" p.28.) ・Set the holidays. (→ Refer to "4-1-1. Setting the working hours/holidays [Setting the holidays]" p.29.)
After the completion of a day's work, obtain the data from the sewing machine. Select the data on the troubleshooting chart screen to display the chart. → On the working ratio chart, the aggregation result of sewing machine ratio within the working hours
(excluding the work break time / holidays) is displayed. (Even if the sewing machines are actually engaged in sewing during the work break time / holidays, the corresponding sewing machine work-ing ratio is not aggregated.)