jpos programmer’s guidejpos.org/doc/proguide.pdf1.3. about iso-8583 we assume the reader is...
TRANSCRIPT

jPOS Programmer’s GuidejPOS Software SRL
Version 2.1.3, 2020-03-23
Table of ContentsCopyright notice . . . . . . . . . . . . . . . . . . . . . . . . . . . . . . . . . . . . . . . . . . . . . . . . . . . . . . . . . . . . . . . . . . . . . . . 1
Preface . . . . . . . . . . . . . . . . . . . . . . . . . . . . . . . . . . . . . . . . . . . . . . . . . . . . . . . . . . . . . . . . . . . . . . . . . . . . . . 2
1. The jPOS Project. . . . . . . . . . . . . . . . . . . . . . . . . . . . . . . . . . . . . . . . . . . . . . . . . . . . . . . . . . . . . . . . . . . . . 3
1.1. About jPOS.org . . . . . . . . . . . . . . . . . . . . . . . . . . . . . . . . . . . . . . . . . . . . . . . . . . . . . . . . . . . . . . . . . . 3
1.2. jPOS License . . . . . . . . . . . . . . . . . . . . . . . . . . . . . . . . . . . . . . . . . . . . . . . . . . . . . . . . . . . . . . . . . . . . 3
1.3. About ISO-8583. . . . . . . . . . . . . . . . . . . . . . . . . . . . . . . . . . . . . . . . . . . . . . . . . . . . . . . . . . . . . . . . . . 3
1.4. Downloading jPOS . . . . . . . . . . . . . . . . . . . . . . . . . . . . . . . . . . . . . . . . . . . . . . . . . . . . . . . . . . . . . . . 4
1.5. Directory structure . . . . . . . . . . . . . . . . . . . . . . . . . . . . . . . . . . . . . . . . . . . . . . . . . . . . . . . . . . . . . . . 4
1.6. Using jPOS. . . . . . . . . . . . . . . . . . . . . . . . . . . . . . . . . . . . . . . . . . . . . . . . . . . . . . . . . . . . . . . . . . . . . . 6
1.7. Building jPOS . . . . . . . . . . . . . . . . . . . . . . . . . . . . . . . . . . . . . . . . . . . . . . . . . . . . . . . . . . . . . . . . . . . 7
1.8. Running jPOS . . . . . . . . . . . . . . . . . . . . . . . . . . . . . . . . . . . . . . . . . . . . . . . . . . . . . . . . . . . . . . . . . . . 8
2. About ISO-8583 . . . . . . . . . . . . . . . . . . . . . . . . . . . . . . . . . . . . . . . . . . . . . . . . . . . . . . . . . . . . . . . . . . . . 10
2.1. An ISO-8583 primer . . . . . . . . . . . . . . . . . . . . . . . . . . . . . . . . . . . . . . . . . . . . . . . . . . . . . . . . . . . . . 10
2.2. jPOS approach to ISO-8583. . . . . . . . . . . . . . . . . . . . . . . . . . . . . . . . . . . . . . . . . . . . . . . . . . . . . . . . 18
2.3. IncomingListener. . . . . . . . . . . . . . . . . . . . . . . . . . . . . . . . . . . . . . . . . . . . . . . . . . . . . . . . . . . . . . . . 37
3. Support classes . . . . . . . . . . . . . . . . . . . . . . . . . . . . . . . . . . . . . . . . . . . . . . . . . . . . . . . . . . . . . . . . . . . . . 39
3.1. jPOS' Logger . . . . . . . . . . . . . . . . . . . . . . . . . . . . . . . . . . . . . . . . . . . . . . . . . . . . . . . . . . . . . . . . . . . 39
3.2. NameRegistrar. . . . . . . . . . . . . . . . . . . . . . . . . . . . . . . . . . . . . . . . . . . . . . . . . . . . . . . . . . . . . . . . . . 43
3.3. Configuration . . . . . . . . . . . . . . . . . . . . . . . . . . . . . . . . . . . . . . . . . . . . . . . . . . . . . . . . . . . . . . . . . . 45
3.4. SystemMonitor . . . . . . . . . . . . . . . . . . . . . . . . . . . . . . . . . . . . . . . . . . . . . . . . . . . . . . . . . . . . . . . . . 47
3.5. Profiler . . . . . . . . . . . . . . . . . . . . . . . . . . . . . . . . . . . . . . . . . . . . . . . . . . . . . . . . . . . . . . . . . . . . . . . 49
3.6. DirPoll . . . . . . . . . . . . . . . . . . . . . . . . . . . . . . . . . . . . . . . . . . . . . . . . . . . . . . . . . . . . . . . . . . . . . . . . 50
3.7. ThreadPool . . . . . . . . . . . . . . . . . . . . . . . . . . . . . . . . . . . . . . . . . . . . . . . . . . . . . . . . . . . . . . . . . . . . 52
4. Packagers . . . . . . . . . . . . . . . . . . . . . . . . . . . . . . . . . . . . . . . . . . . . . . . . . . . . . . . . . . . . . . . . . . . . . . . . . 54
4.1. Implementing Custom Packagers. . . . . . . . . . . . . . . . . . . . . . . . . . . . . . . . . . . . . . . . . . . . . . . . . . . . 54
4.2. GenericPackager . . . . . . . . . . . . . . . . . . . . . . . . . . . . . . . . . . . . . . . . . . . . . . . . . . . . . . . . . . . . . . . . 55
5. Channels. . . . . . . . . . . . . . . . . . . . . . . . . . . . . . . . . . . . . . . . . . . . . . . . . . . . . . . . . . . . . . . . . . . . . . . . . . 59
5.1. TCP/IP Socket-based channels . . . . . . . . . . . . . . . . . . . . . . . . . . . . . . . . . . . . . . . . . . . . . . . . . . . . . 59
5.2. SSL Channels. . . . . . . . . . . . . . . . . . . . . . . . . . . . . . . . . . . . . . . . . . . . . . . . . . . . . . . . . . . . . . . . . . . 60
5.3. LoopbackChannel . . . . . . . . . . . . . . . . . . . . . . . . . . . . . . . . . . . . . . . . . . . . . . . . . . . . . . . . . . . . . . . 62
5.4. ChannelPool . . . . . . . . . . . . . . . . . . . . . . . . . . . . . . . . . . . . . . . . . . . . . . . . . . . . . . . . . . . . . . . . . . . 64
5.5. Channel Filters . . . . . . . . . . . . . . . . . . . . . . . . . . . . . . . . . . . . . . . . . . . . . . . . . . . . . . . . . . . . . . . . . 64
6. jPOS Space . . . . . . . . . . . . . . . . . . . . . . . . . . . . . . . . . . . . . . . . . . . . . . . . . . . . . . . . . . . . . . . . . . . . . . . . 67
6.1. Space interface . . . . . . . . . . . . . . . . . . . . . . . . . . . . . . . . . . . . . . . . . . . . . . . . . . . . . . . . . . . . . . . . . 68
6.2. Local Space interface. . . . . . . . . . . . . . . . . . . . . . . . . . . . . . . . . . . . . . . . . . . . . . . . . . . . . . . . . . . . . 69
6.3. Space Factory . . . . . . . . . . . . . . . . . . . . . . . . . . . . . . . . . . . . . . . . . . . . . . . . . . . . . . . . . . . . . . . . . . 70
6.4. TSpace. . . . . . . . . . . . . . . . . . . . . . . . . . . . . . . . . . . . . . . . . . . . . . . . . . . . . . . . . . . . . . . . . . . . . . . . 71
6.5. JDBMSpace . . . . . . . . . . . . . . . . . . . . . . . . . . . . . . . . . . . . . . . . . . . . . . . . . . . . . . . . . . . . . . . . . . . . 71
6.6. JESpace . . . . . . . . . . . . . . . . . . . . . . . . . . . . . . . . . . . . . . . . . . . . . . . . . . . . . . . . . . . . . . . . . . . . . . . 72
6.7. SpaceInterceptor . . . . . . . . . . . . . . . . . . . . . . . . . . . . . . . . . . . . . . . . . . . . . . . . . . . . . . . . . . . . . . . . 72
6.8. SpaceTap. . . . . . . . . . . . . . . . . . . . . . . . . . . . . . . . . . . . . . . . . . . . . . . . . . . . . . . . . . . . . . . . . . . . . . 72
6.9. SpaceUtil . . . . . . . . . . . . . . . . . . . . . . . . . . . . . . . . . . . . . . . . . . . . . . . . . . . . . . . . . . . . . . . . . . . . . . 73

7. Q2. . . . . . . . . . . . . . . . . . . . . . . . . . . . . . . . . . . . . . . . . . . . . . . . . . . . . . . . . . . . . . . . . . . . . . . . . . . . . . . 74
7.1. Running Q2 . . . . . . . . . . . . . . . . . . . . . . . . . . . . . . . . . . . . . . . . . . . . . . . . . . . . . . . . . . . . . . . . . . . . 74
7.2. Embedding Q2. . . . . . . . . . . . . . . . . . . . . . . . . . . . . . . . . . . . . . . . . . . . . . . . . . . . . . . . . . . . . . . . . . 80
7.3. Shutting down Q2 . . . . . . . . . . . . . . . . . . . . . . . . . . . . . . . . . . . . . . . . . . . . . . . . . . . . . . . . . . . . . . . 81
7.4. Writing your first Q2 Script . . . . . . . . . . . . . . . . . . . . . . . . . . . . . . . . . . . . . . . . . . . . . . . . . . . . . . . . 82
7.5. QTest - a sample QBean . . . . . . . . . . . . . . . . . . . . . . . . . . . . . . . . . . . . . . . . . . . . . . . . . . . . . . . . . . 83
7.6. QBeanSupport . . . . . . . . . . . . . . . . . . . . . . . . . . . . . . . . . . . . . . . . . . . . . . . . . . . . . . . . . . . . . . . . . . 92
7.7. Dynamic classloading . . . . . . . . . . . . . . . . . . . . . . . . . . . . . . . . . . . . . . . . . . . . . . . . . . . . . . . . . . . . 95
8. Q2 jPOS Services . . . . . . . . . . . . . . . . . . . . . . . . . . . . . . . . . . . . . . . . . . . . . . . . . . . . . . . . . . . . . . . . . . . 98
8.1. ChannelAdaptor . . . . . . . . . . . . . . . . . . . . . . . . . . . . . . . . . . . . . . . . . . . . . . . . . . . . . . . . . . . . . . . . 98
8.2. OneShotChannelAdaptor. . . . . . . . . . . . . . . . . . . . . . . . . . . . . . . . . . . . . . . . . . . . . . . . . . . . . . . . . 103
8.3. QMUX . . . . . . . . . . . . . . . . . . . . . . . . . . . . . . . . . . . . . . . . . . . . . . . . . . . . . . . . . . . . . . . . . . . . . . . 104
8.4. QServer . . . . . . . . . . . . . . . . . . . . . . . . . . . . . . . . . . . . . . . . . . . . . . . . . . . . . . . . . . . . . . . . . . . . . . 107
9. TransactionManager. . . . . . . . . . . . . . . . . . . . . . . . . . . . . . . . . . . . . . . . . . . . . . . . . . . . . . . . . . . . . . . . 110
9.1. TransactionConstants . . . . . . . . . . . . . . . . . . . . . . . . . . . . . . . . . . . . . . . . . . . . . . . . . . . . . . . . . . . 111
9.2. Transaction Context . . . . . . . . . . . . . . . . . . . . . . . . . . . . . . . . . . . . . . . . . . . . . . . . . . . . . . . . . . . . 112
9.3. Context Recovery Interface . . . . . . . . . . . . . . . . . . . . . . . . . . . . . . . . . . . . . . . . . . . . . . . . . . . . . . . 112
9.4. Assembly Line . . . . . . . . . . . . . . . . . . . . . . . . . . . . . . . . . . . . . . . . . . . . . . . . . . . . . . . . . . . . . . . . . 113
9.5. AbortParticipant . . . . . . . . . . . . . . . . . . . . . . . . . . . . . . . . . . . . . . . . . . . . . . . . . . . . . . . . . . . . . . . 116
9.6. GroupSelector . . . . . . . . . . . . . . . . . . . . . . . . . . . . . . . . . . . . . . . . . . . . . . . . . . . . . . . . . . . . . . . . . 117
9.7. TransactionManager implementation . . . . . . . . . . . . . . . . . . . . . . . . . . . . . . . . . . . . . . . . . . . . . . . 120
9.8. Transaction Participants . . . . . . . . . . . . . . . . . . . . . . . . . . . . . . . . . . . . . . . . . . . . . . . . . . . . . . . . . 125
10. ResultCode . . . . . . . . . . . . . . . . . . . . . . . . . . . . . . . . . . . . . . . . . . . . . . . . . . . . . . . . . . . . . . . . . . . . . . 133
10.1. CMF. . . . . . . . . . . . . . . . . . . . . . . . . . . . . . . . . . . . . . . . . . . . . . . . . . . . . . . . . . . . . . . . . . . . . . . . 133
10.2. Result holder class. . . . . . . . . . . . . . . . . . . . . . . . . . . . . . . . . . . . . . . . . . . . . . . . . . . . . . . . . . . . . 135
Appendix A: Getting involved. . . . . . . . . . . . . . . . . . . . . . . . . . . . . . . . . . . . . . . . . . . . . . . . . . . . . . . . . . . 137
Appendix B: License . . . . . . . . . . . . . . . . . . . . . . . . . . . . . . . . . . . . . . . . . . . . . . . . . . . . . . . . . . . . . . . . . . 138

Copyright notice
Copyright © 1998-2019 by jPOS Software SRL, Uruguay. All rights reserved. No part of this book maybe reproduced in any form or by any electronic or mechanical means, including information storageand retrieval systems, without permission in writing from jPOS Software SRL, except by a reviewerwho may quote brief passages in a review.
1

PrefaceThis document covers jPOS 2.1.3 (and 2.1.4-SNAPSHOT).
2
Chapter 1. The jPOS Project
1.1. About jPOS.orgThe jPOS project is hosted at http://jpos.org. In order to stay up-to-date with jPOS news, you may want tovisit the project’s main page, as well as its blog at http://jpos.org/blog. For an up to date list of projectresources, you can visit the http://jpos.org/resources page. There’s also a low traffic jPOS News mailing listwhere we post important announcements, such as a the availability of new versions of this guide. You’reencouraged to register by visiting the project’s main page at http://jpos.org.
Code is hosted at http://github.com/jpos/jPOS.
You may also want to follow us on Twitter, where we keep a list of users who regularly tweet about jPOS at@apr/lists/jpos.
In addition, you may want to subscribe to our users' mailing list ([email protected]).
Commit notifications can be tracked by following @jposcommits.
We are also active on Slack. Please request an invitation via e-mail to [email protected].
If you happen to tweet about jPOS, please use the hash tag #jPOS so we can follow you.
1.2. jPOS LicensejPOS is distributed under the GNU Affero General Public License version 3.
IMPORTANT NOTICE
If you don’t plan to release your jPOS based application under a compatible license (seeAGPL 3.0 FAQ where you can find a license compatibility matrix) you need to buy acommercial license (you can contact us using the contact form).
1.3. About ISO-8583We assume the reader is familiar with the ISO-8583 standard.
For starters, you can take a look at the Wikipedia ISO_8583 page and the An ISO-8583 primer of thisdocument, but for any serious work you need to get a copy of the standard from http://www.iso.org.
This is a high level standard, and vendors have implemented it in slightly different ways. You also need theprotocol specifications for your particular interchange.
If you are starting a new payments application and you have full control over your spec, you may want toconsider using the ISO-8583 v2003 based jPOS Common Message Format described in http://jpos.org/doc/jPOS-CMF.pdf.
The jPOS-CMF is an open source project, you can get the DocBook sources in the jPOSGithub reporitory at http://github.com/jPOS/jPOS-CMF and modify it to fit your needs.This is an open spec, we expect institutions using it to get in touch with us in order toimprove it.
3
1.4. Downloading jPOSThe community edition of jPOS can be downloaded from the jPOS Download page.
A Git repository is hosted at Github. The repository has many branches and tags. Unless you are dealingwith a legacy jPOS application, you want to use the master branch.
If you are looking for older jPOS versions, you can find them in the SourceForge repository, but please noteall current development activity is taking place in the Github repository, though.
1.5. Directory structurejPOS uses Gradle with a multi-module setup.
The modules are defined in the settings.gradle file and listed below:
• jpos : this is the jPOS system
• compat_1_5_2 : compatibility with older versions
You’ll find the jPOS sources in the jpos/src directory.
4
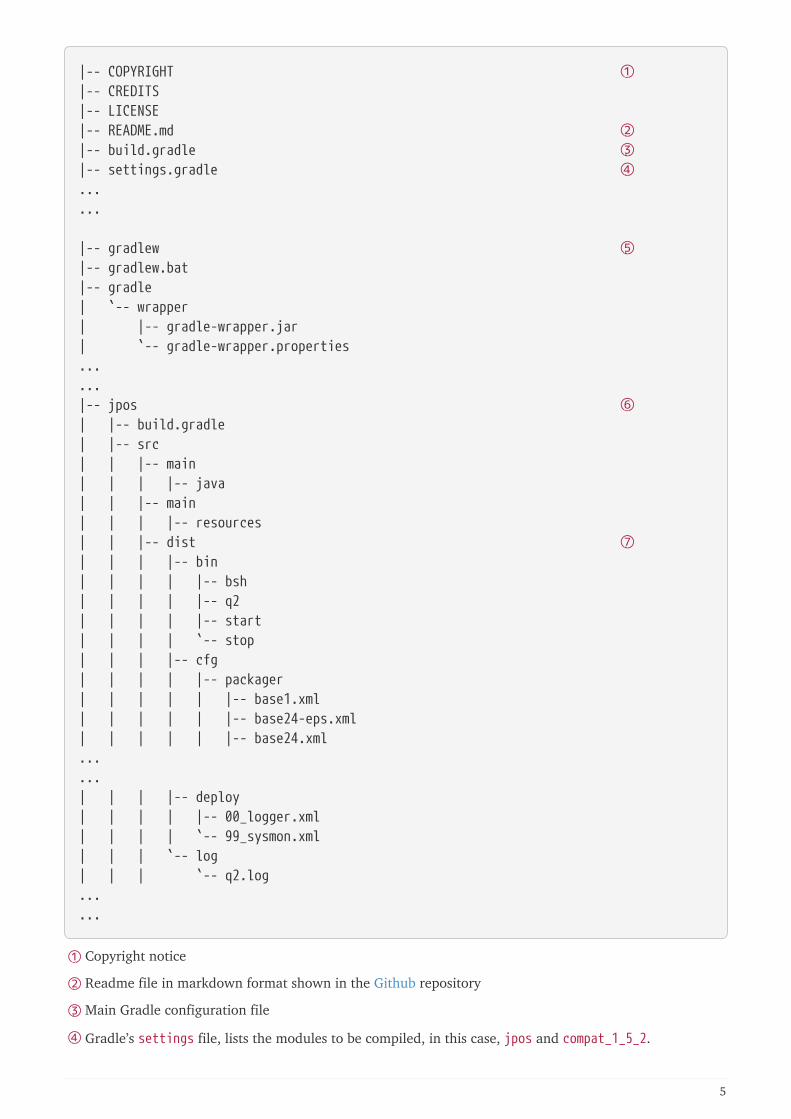
|-- COPYRIGHT ①|-- CREDITS|-- LICENSE|-- README.md ②|-- build.gradle ③|-- settings.gradle ④......
|-- gradlew ⑤|-- gradlew.bat|-- gradle| `-- wrapper| |-- gradle-wrapper.jar| `-- gradle-wrapper.properties......|-- jpos ⑥| |-- build.gradle| |-- src| | |-- main| | | |-- java| | |-- main| | | |-- resources| | |-- dist ⑦| | | |-- bin| | | | |-- bsh| | | | |-- q2| | | | |-- start| | | | `-- stop| | | |-- cfg| | | | |-- packager| | | | | |-- base1.xml| | | | | |-- base24-eps.xml| | | | | |-- base24.xml......| | | |-- deploy| | | | |-- 00_logger.xml| | | | `-- 99_sysmon.xml| | | `-- log| | | `-- q2.log......
① Copyright notice
② Readme file in markdown format shown in the Github repository
③ Main Gradle configuration file
④ Gradle’s settings file, lists the modules to be compiled, in this case, jpos and compat_1_5_2.
5
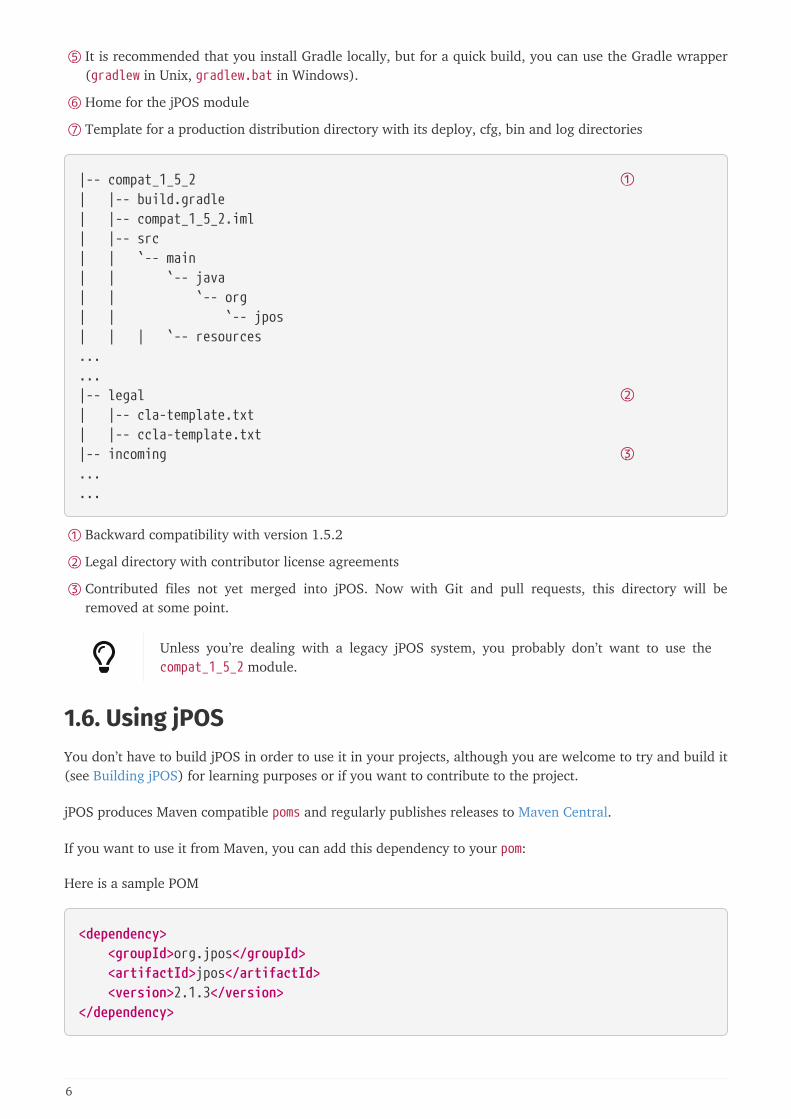
⑤ It is recommended that you install Gradle locally, but for a quick build, you can use the Gradle wrapper(gradlew in Unix, gradlew.bat in Windows).
⑥ Home for the jPOS module
⑦ Template for a production distribution directory with its deploy, cfg, bin and log directories
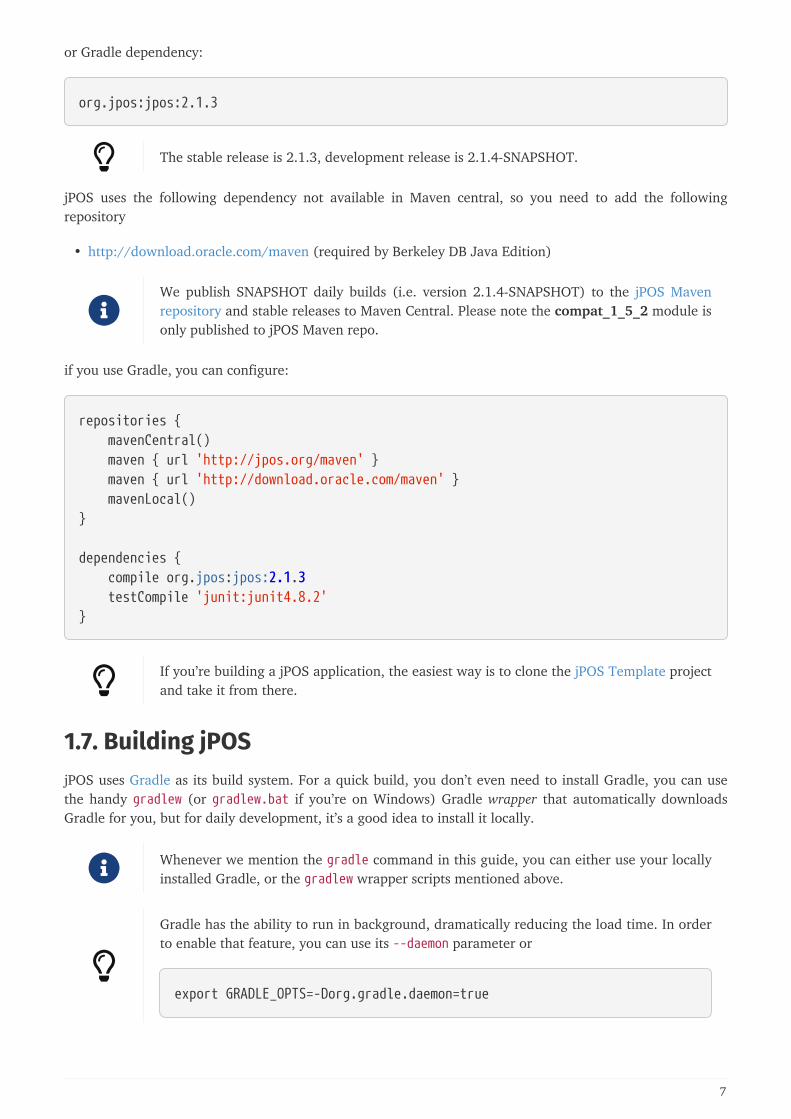
|-- compat_1_5_2 ①| |-- build.gradle| |-- compat_1_5_2.iml| |-- src| | `-- main| | `-- java| | `-- org| | `-- jpos| | | `-- resources......|-- legal ②| |-- cla-template.txt| |-- ccla-template.txt|-- incoming ③......
① Backward compatibility with version 1.5.2
② Legal directory with contributor license agreements
③ Contributed files not yet merged into jPOS. Now with Git and pull requests, this directory will beremoved at some point.
Unless you’re dealing with a legacy jPOS system, you probably don’t want to use thecompat_1_5_2 module.
1.6. Using jPOSYou don’t have to build jPOS in order to use it in your projects, although you are welcome to try and build it(see Building jPOS) for learning purposes or if you want to contribute to the project.
jPOS produces Maven compatible poms and regularly publishes releases to Maven Central.
If you want to use it from Maven, you can add this dependency to your pom:
Here is a sample POM
<dependency> <groupId>org.jpos</groupId> <artifactId>jpos</artifactId> <version>2.1.3</version></dependency>
6
or Gradle dependency:
org.jpos:jpos:2.1.3
The stable release is 2.1.3, development release is 2.1.4-SNAPSHOT.
jPOS uses the following dependency not available in Maven central, so you need to add the followingrepository
• http://download.oracle.com/maven (required by Berkeley DB Java Edition)
We publish SNAPSHOT daily builds (i.e. version 2.1.4-SNAPSHOT) to the jPOS Mavenrepository and stable releases to Maven Central. Please note the compat_1_5_2 module isonly published to jPOS Maven repo.
if you use Gradle, you can configure:
repositories { mavenCentral() maven { url 'http://jpos.org/maven' } maven { url 'http://download.oracle.com/maven' } mavenLocal()}
dependencies { compile org.jpos:jpos:2.1.3 testCompile 'junit:junit4.8.2'}
If you’re building a jPOS application, the easiest way is to clone the jPOS Template projectand take it from there.
1.7. Building jPOSjPOS uses Gradle as its build system. For a quick build, you don’t even need to install Gradle, you can usethe handy gradlew (or gradlew.bat if you’re on Windows) Gradle wrapper that automatically downloadsGradle for you, but for daily development, it’s a good idea to install it locally.
Whenever we mention the gradle command in this guide, you can either use your locallyinstalled Gradle, or the gradlew wrapper scripts mentioned above.
Gradle has the ability to run in background, dramatically reducing the load time. In orderto enable that feature, you can use its --daemon parameter or
export GRADLE_OPTS=-Dorg.gradle.daemon=true
7
1.7.1. Available tasks
Running gradle tasks provides a list of available tasks.
Most of them are standard in the Gradle build system and have self-explanatory names (i.e. jar to build thejPOS jar, javadoc to build the javadoc documentation). A few deserve further explanation, though:
• installApp is a handy task defined in the jpos module that can be used to create a runtimeenvironment inside the build/installs directory. That runtime envirnoment copies all the scriptscoming from the src/dist directory and it’s ready to execute the jPOS system using the bin/q2 (orbin\q2.bat) scripts. The installApp task is similar to running the dist task to create a tar.gz tarballand then extracting that tarball into a local directory, ready to run.
• version can be used to build jPOS and run it to query its own version.
Note about releases
jPOS stable releases (non SNAPSHOTS) are signed and published to Maven Central. If youare trying to build a stable release, you’d have to hack build.gradle to trick theisSnapshot variable to be true, otherwise the build will fail because you don’t have thePGP private keys required to sign a build.
If you’re making some changes to jPOS off a stable release, you should change the versionnumber to avoid confusion.
But remember, you don’t have to build jPOS in order to use it, just add it to your pom as adependency.
The clean task is your friend
Out of all the available tasks, there’s one that will keep you out of trouble: clean. WhileGradle is very smart when it comes to figuring out which dependencies have beenmodified and need to be rebuilt, there’s nothing like the extra confidence that a good oldclean gives. When in doubt, gradle clean.
1.8. Running jPOSFrom the jpos directory, run gradle installApp to create a working jPOS in the build/install/jposdirectory.
Change directory there and you will see a jpos-x.x.xjar (i.e jpos-1.9.9-SNAPSHOT.jar).
You can run the jar using java -jar jpos-1.9.1-SNAPSHOT.jar or use the bin/q2 or bin/q2.bat scripts.
Once started, the output should look like this:
8
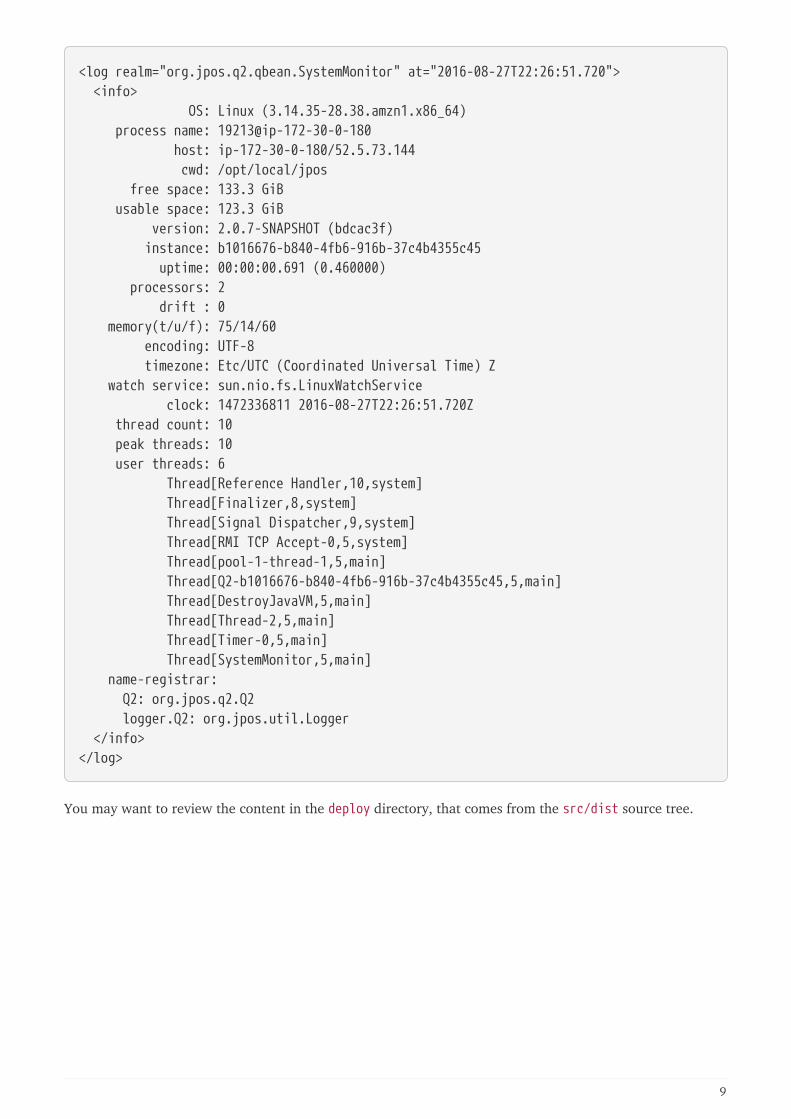
<log realm="org.jpos.q2.qbean.SystemMonitor" at="2016-08-27T22:26:51.720"> <info> OS: Linux (3.14.35-28.38.amzn1.x86_64) process name: 19213@ip-172-30-0-180 host: ip-172-30-0-180/52.5.73.144 cwd: /opt/local/jpos free space: 133.3 GiB usable space: 123.3 GiB version: 2.0.7-SNAPSHOT (bdcac3f) instance: b1016676-b840-4fb6-916b-37c4b4355c45 uptime: 00:00:00.691 (0.460000) processors: 2 drift : 0 memory(t/u/f): 75/14/60 encoding: UTF-8 timezone: Etc/UTC (Coordinated Universal Time) Z watch service: sun.nio.fs.LinuxWatchService clock: 1472336811 2016-08-27T22:26:51.720Z thread count: 10 peak threads: 10 user threads: 6 Thread[Reference Handler,10,system] Thread[Finalizer,8,system] Thread[Signal Dispatcher,9,system] Thread[RMI TCP Accept-0,5,system] Thread[pool-1-thread-1,5,main] Thread[Q2-b1016676-b840-4fb6-916b-37c4b4355c45,5,main] Thread[DestroyJavaVM,5,main] Thread[Thread-2,5,main] Thread[Timer-0,5,main] Thread[SystemMonitor,5,main] name-registrar: Q2: org.jpos.q2.Q2 logger.Q2: org.jpos.util.Logger </info></log>
You may want to review the content in the deploy directory, that comes from the src/dist source tree.
9
Chapter 2. About ISO-8583
2.1. An ISO-8583 primerThis section contains general information about the ISO-8583 International Standard.
2.1.1. International standard ISO 8583
Financial transaction card-originated messages Interchange message specifications.
You have to read it, period. And you have to read the correct one (1987/1993/2003) for your particularinterchange. And you also have to read your vendor-specific interchange specs as well.
But while you manage to gather all that information, let’s have a look at this brief introduction. Whentalking about ISO-8583, we have to be aware of the difference between:
• message format (its binary representation),
• wire protocol (how a message is transmitted over the wire), and
• message flow (e.g., send request for authorization, wait for response, retransmit, reversal, etc.).
2.1.2. Message format
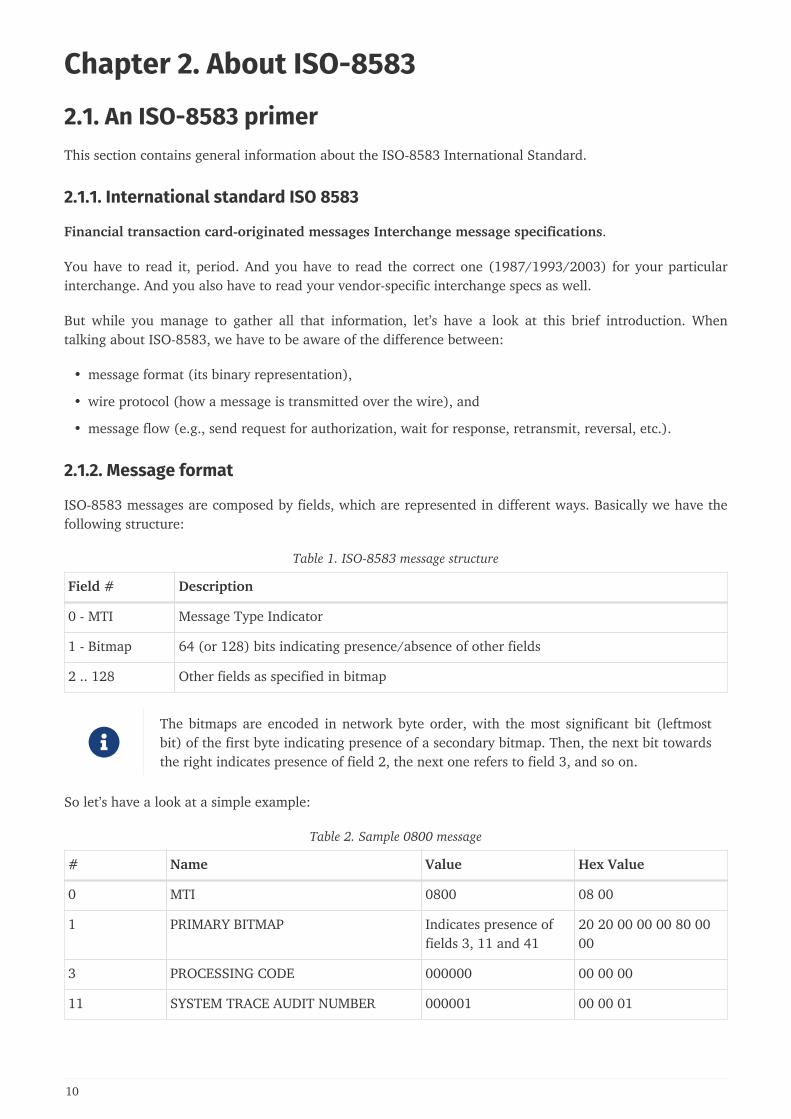
ISO-8583 messages are composed by fields, which are represented in different ways. Basically we have thefollowing structure:
Table 1. ISO-8583 message structure
Field # Description
0 - MTI Message Type Indicator
1 - Bitmap 64 (or 128) bits indicating presence/absence of other fields
2 .. 128 Other fields as specified in bitmap
The bitmaps are encoded in network byte order, with the most significant bit (leftmostbit) of the first byte indicating presence of a secondary bitmap. Then, the next bit towardsthe right indicates presence of field 2, the next one refers to field 3, and so on.
So let’s have a look at a simple example:
Table 2. Sample 0800 message
# Name Value Hex Value
0 MTI 0800 08 00
1 PRIMARY BITMAP Indicates presence offields 3, 11 and 41
20 20 00 00 00 80 0000
3 PROCESSING CODE 000000 00 00 00
11 SYSTEM TRACE AUDIT NUMBER 000001 00 00 01
10
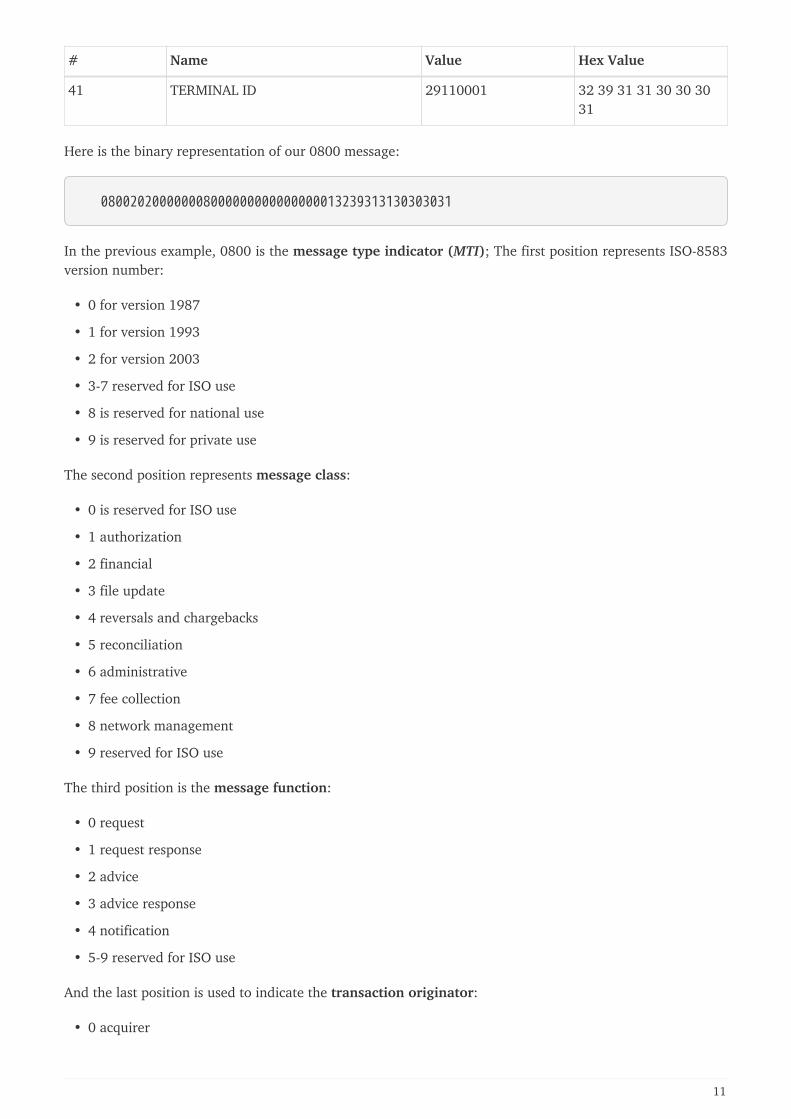
# Name Value Hex Value
41 TERMINAL ID 29110001 32 39 31 31 30 30 3031
Here is the binary representation of our 0800 message:
080020200000008000000000000000013239313130303031
In the previous example, 0800 is the message type indicator (MTI); The first position represents ISO-8583version number:
• 0 for version 1987
• 1 for version 1993
• 2 for version 2003
• 3-7 reserved for ISO use
• 8 is reserved for national use
• 9 is reserved for private use
The second position represents message class:
• 0 is reserved for ISO use
• 1 authorization
• 2 financial
• 3 file update
• 4 reversals and chargebacks
• 5 reconciliation
• 6 administrative
• 7 fee collection
• 8 network management
• 9 reserved for ISO use
The third position is the message function:
• 0 request
• 1 request response
• 2 advice
• 3 advice response
• 4 notification
• 5-9 reserved for ISO use
And the last position is used to indicate the transaction originator:
• 0 acquirer
11
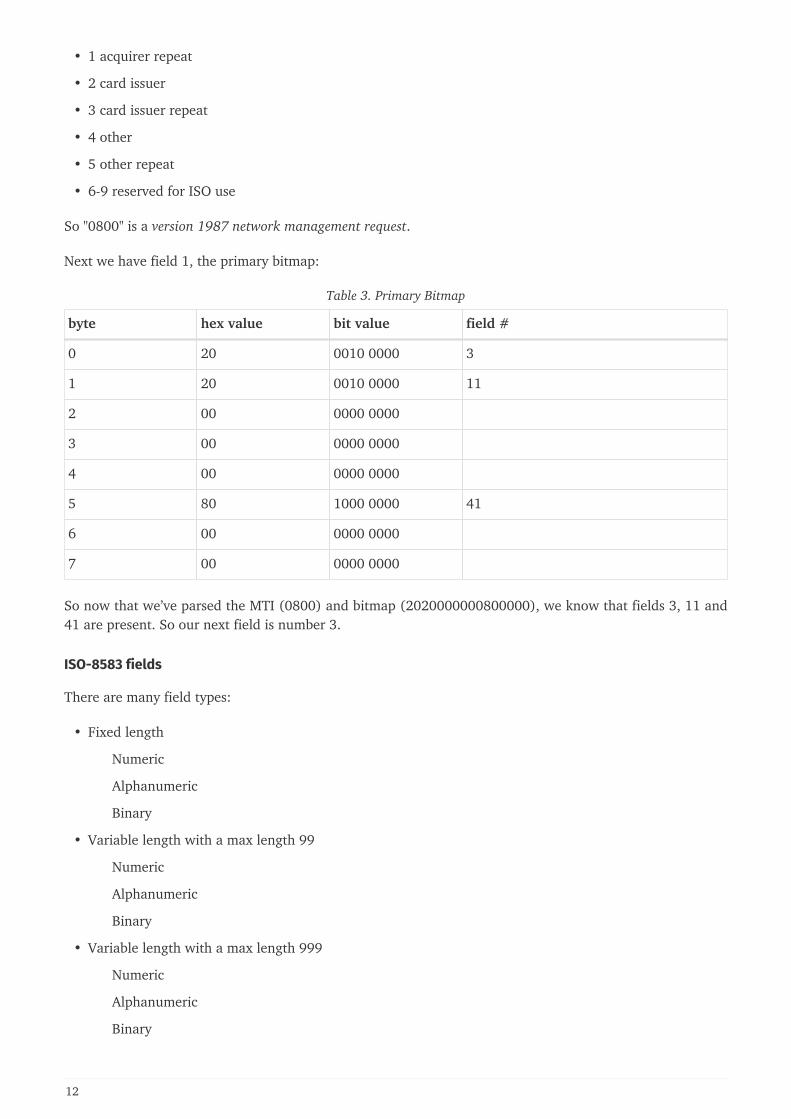
• 1 acquirer repeat
• 2 card issuer
• 3 card issuer repeat
• 4 other
• 5 other repeat
• 6-9 reserved for ISO use
So "0800" is a version 1987 network management request.
Next we have field 1, the primary bitmap:
Table 3. Primary Bitmap
byte hex value bit value field #
0 20 0010 0000 3
1 20 0010 0000 11
2 00 0000 0000
3 00 0000 0000
4 00 0000 0000
5 80 1000 0000 41
6 00 0000 0000
7 00 0000 0000
So now that we’ve parsed the MTI (0800) and bitmap (2020000000800000), we know that fields 3, 11 and41 are present. So our next field is number 3.
ISO-8583 fields
There are many field types:
• Fixed length
◦ Numeric
◦ Alphanumeric
◦ Binary
• Variable length with a max length 99
◦ Numeric
◦ Alphanumeric
◦ Binary
• Variable length with a max length 999
◦ Numeric
◦ Alphanumeric
◦ Binary
12
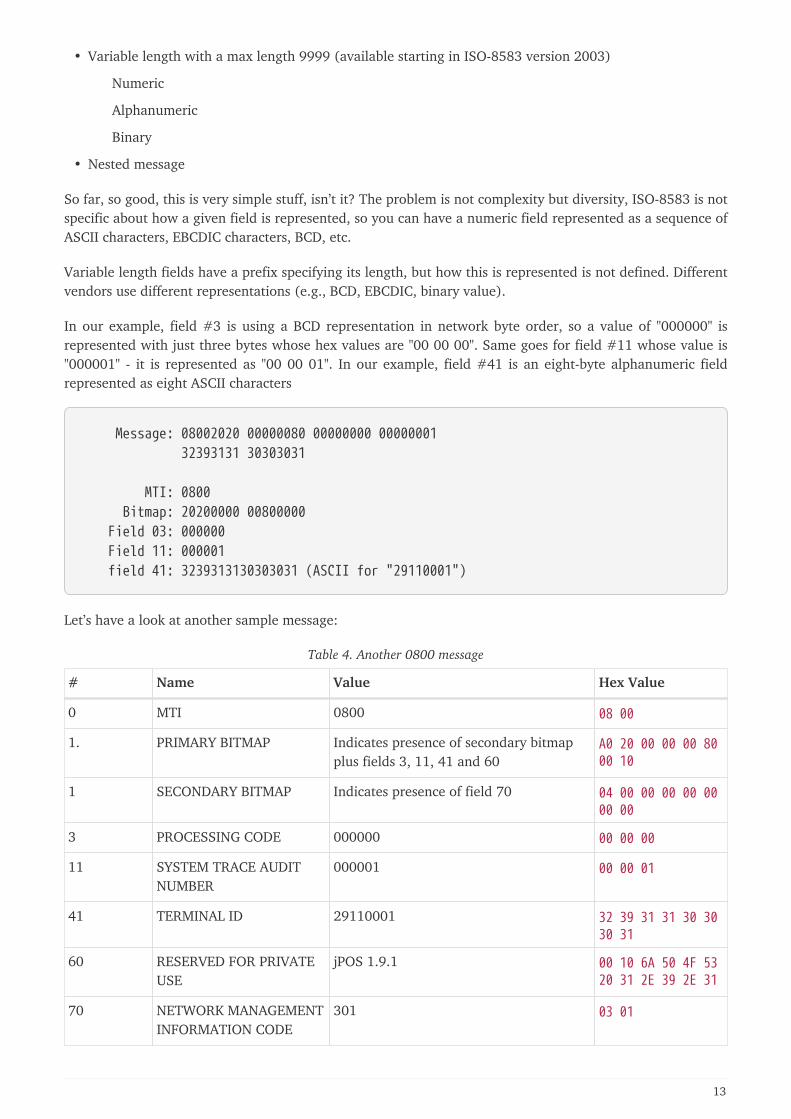
• Variable length with a max length 9999 (available starting in ISO-8583 version 2003)
◦ Numeric
◦ Alphanumeric
◦ Binary
• Nested message
So far, so good, this is very simple stuff, isn’t it? The problem is not complexity but diversity, ISO-8583 is notspecific about how a given field is represented, so you can have a numeric field represented as a sequence ofASCII characters, EBCDIC characters, BCD, etc.
Variable length fields have a prefix specifying its length, but how this is represented is not defined. Differentvendors use different representations (e.g., BCD, EBCDIC, binary value).
In our example, field #3 is using a BCD representation in network byte order, so a value of "000000" isrepresented with just three bytes whose hex values are "00 00 00". Same goes for field #11 whose value is"000001" - it is represented as "00 00 01". In our example, field #41 is an eight-byte alphanumeric fieldrepresented as eight ASCII characters
Message: 08002020 00000080 00000000 00000001 32393131 30303031
MTI: 0800 Bitmap: 20200000 00800000 Field 03: 000000 Field 11: 000001 field 41: 3239313130303031 (ASCII for "29110001")
Let’s have a look at another sample message:
Table 4. Another 0800 message
# Name Value Hex Value
0 MTI 0800 08 00
1. PRIMARY BITMAP Indicates presence of secondary bitmapplus fields 3, 11, 41 and 60
A0 20 00 00 00 8000 10
1 SECONDARY BITMAP Indicates presence of field 70 04 00 00 00 00 0000 00
3 PROCESSING CODE 000000 00 00 00
11 SYSTEM TRACE AUDITNUMBER
000001 00 00 01
41 TERMINAL ID 29110001 32 39 31 31 30 3030 31
60 RESERVED FOR PRIVATEUSE
jPOS 1.9.1 00 10 6A 50 4F 5320 31 2E 39 2E 31
70 NETWORK MANAGEMENTINFORMATION CODE
301 03 01
13
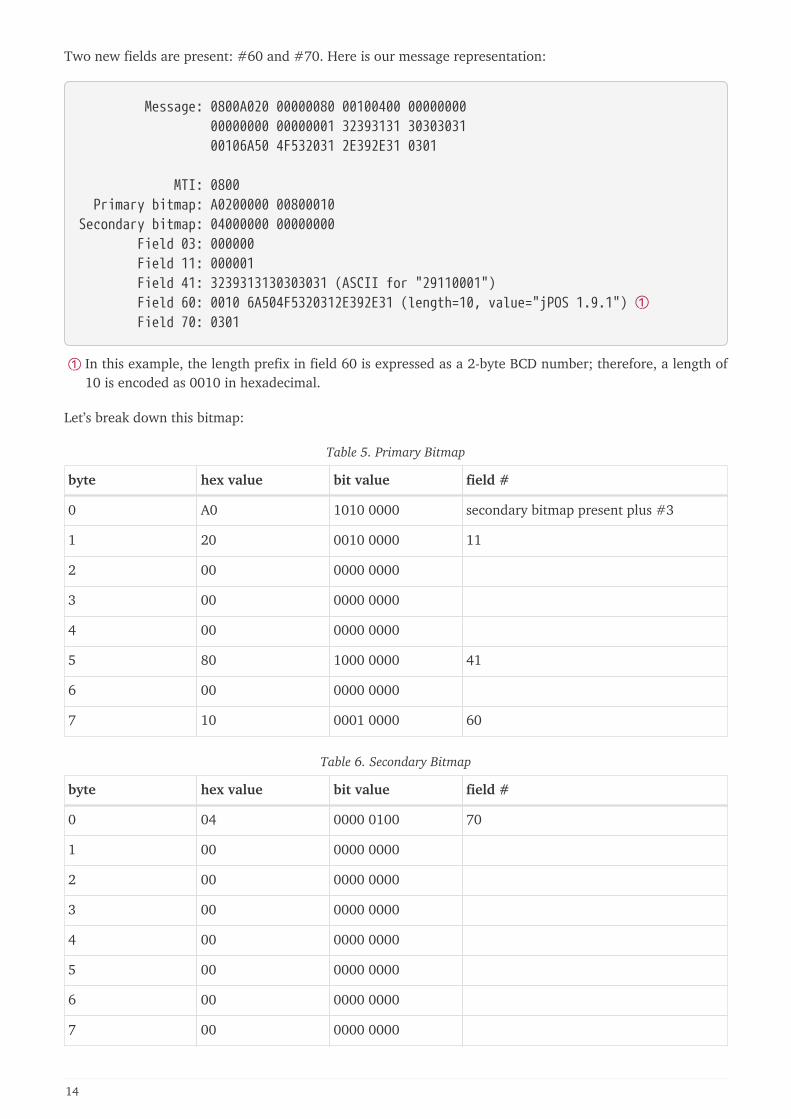
Two new fields are present: #60 and #70. Here is our message representation:
Message: 0800A020 00000080 00100400 00000000 00000000 00000001 32393131 30303031 00106A50 4F532031 2E392E31 0301
MTI: 0800 Primary bitmap: A0200000 00800010Secondary bitmap: 04000000 00000000 Field 03: 000000 Field 11: 000001 Field 41: 3239313130303031 (ASCII for "29110001") Field 60: 0010 6A504F5320312E392E31 (length=10, value="jPOS 1.9.1") ① Field 70: 0301
① In this example, the length prefix in field 60 is expressed as a 2-byte BCD number; therefore, a length of10 is encoded as 0010 in hexadecimal.
Let’s break down this bitmap:
Table 5. Primary Bitmap
byte hex value bit value field #
0 A0 1010 0000 secondary bitmap present plus #3
1 20 0010 0000 11
2 00 0000 0000
3 00 0000 0000
4 00 0000 0000
5 80 1000 0000 41
6 00 0000 0000
7 10 0001 0000 60
Table 6. Secondary Bitmap
byte hex value bit value field #
0 04 0000 0100 70
1 00 0000 0000
2 00 0000 0000
3 00 0000 0000
4 00 0000 0000
5 00 0000 0000
6 00 0000 0000
7 00 0000 0000
14

To make things more complex to developers, different vendors choose different padding styles whenhandling odd-length BCD fields. So in order to represent "003" one vendor may use two bytes with thevalues "00 03" while others may use "00 30" or even "00 3F".
Same goes for variable-length fields: field length as well as field values can be padded to the left or to theright (that’s not defined by ISO-8583, it’s just a matter of fact of different implementations).
Then we have nested fields - some implementations use "reserved for private use" fields to carry other ISO-8583 messages. These messages are usually packed as variable-length binary fields as seen by the outermessage.
You will see that jPOS handles this problem in a very simple way so you don’t have toworry about this low-level stuff.
2.1.3. Wire protocol
Once we have a binary representation of a given ISO-8583 message, we have to transmit it over the wireusing some communication protocol (e.g., TCP/IP, UDP, X.25, SDLC, SNA, ASYNC, QTP, SSL, HTTP, youname it).
That communication protocol is not part of the ISO-8583 standard, so different vendors have chosendifferent protocols.
Many implementations (especially the older ones) require support for some kind of routing information(e.g., a CICS transaction name), so they use different sorts of headers.
A few of them (especially stream-based ones) require some kind of trailers as well.
So, the wire protocol is composed by:
• An optional header / message boundary delimiter
• ISO-8583 message data
• An optional trailer (sometimes used as a message boundary delimiter)
A TCP/IP-based implementation may use a couple of bytes to indicate message length, so our 0800 exampledescribed earlier would be sent as:
00 46 08 00 A0 20 00 00 00 80 00 10 04 00 00 00 00 00 00 00 00 00 00 00 00 01 32 39 31 31 30 30 30 31 00 10 6A 50 4F 53 20 31 2E 34 2E 31 03 01
0046 being the message length expressed in network byte order.
But this is just one way of specifying message length. Other implementations may choose to send four ASCIIbytes, e.g.:
30 30 34 36 08 00 A0 20 00 00 00 80 00 10 04 00 00 00 00 00 00 00 00 00 00 00 00 01 32 39 31 31 30 30 30 31 00 10 6A 50 4F 53 20 31 2E 34 2E 31 03 01
15

30 30 34 36 being the ASCII representation of "0046".
Some implementations count the size of the message length indicator — in the previousexample the four bytes "0046" — so instead of sending "0046" they would send "0050".
A few of them perform odd things with those headers, flagging rejected messages (e.g., you send a 0100 andinstead of receiving a 0110 with a suitable response code you get back your own 0100 with someproprietary flag in the header indicating for example a temporarily failure such as destination unreachable).
It’s very important to read your interchange specification(s) as early as possible duringyour development.
jPOS deals with the wire protocol by using a set of classes called channels that implement the ISOChannelinterface that hides the wire protocol details.
2.1.4. Message flow
Message flow will vary depending on your particular interchange specification. But let’s have a look at asimple example:
Table 7. Sample authorization
Time Acquirer Issuer Description
t0 0100 --> authorization request
t1 <-- 0110 authorization response
While this is the typical case (you send a request, you get a response), sometimes there are temporaryfailures, and you don’t get a response. You have to reverse the previously transmitted transaction and theneither retry your authorization request, abort that transaction or get an authorization approval by othermeans (e.g., by phone) and send an advice.
Table 8. Authorization timeout
Time Acquirer Issuer Description
t0 0100 --> authorization request
t1 no response
t3 0400 --> reverse previous authorization
t4 <-- 0410 reverse received
t5 0120 --> authorization advice
t6 <-- 0130 advice received
Depending on your particular implementation, you may be able to send retransmissions as well (e.g., 0101after an unanswered 0100). Some implementations use private messages (e.g., 9600) to request extendedtime to process a transaction. So you can see it is very important to become familiar with your interchangespecifications and its expected message flow as early as possible.
jPOS provides tools to deal with message structure, wire protocol and message flow, but it’s theresponsibility of your higher-level application to interface the message flow with your business logic.
16

A real example may help you get the idea of what kind of information is exchanged during an authorizationrequest and response. See below:
Table 9. Sample authorization request
Fld # Description Value Comments
0 MTI 0100 Authorization request
2 Primary Account Number 4321123443211234
3 Processing Code 000000
4 Amount transaction 000000012300 i.e., 123.00
7 Transmission data/time 0304054133 MMYYHHMMSS
11 System trace auditnumber
001205
14 Expiration date 0205 YYMM
18 Merchant Type 5399
22 POS Entry Mode 022 Swiped Card
25 POS Condition Code 00
35 Track 2 4321123443211234=0205..
37 Retrieval ReferenceNumber
206305000014
41 Terminal ID 29110001
42 Merchant ID 1001001
49 Currency 840 US Dollars
Table 10. Sample authorization response
Fld # Description Value Comments
0 MTI 0110 Authorization response
2 Primary Account Number 4321123443211234
3 Processing Code 000000
4 Amount transaction 000000012300 i.e., 123.00
7 Transmission data/time 0304054133 MMYYHHMMSS
11 System trace auditnumber
001205
14 Expiration date 0205 YYMM
18 Merchant Type 5399
22 POS Entry Mode 022 Swiped Card
25 POS Condition Code 00
17
Fld # Description Value Comments
35 Track 2 4321123443211234=0205..
37 Retrieval ReferenceNumber
206305000014
38 Authorization number 010305
39 Response code 00 Approved
41 Terminal ID 29110001
42 Merchant ID 1001001
49 Currency 840 US Dollars
2.2. jPOS approach to ISO-8583This chapter describes how jPOS handles ISO-8583 messages.
2.2.1. ISOMsg & Co.
jPOS' internal representation of an ISO-8583 message is usually an ISOMsg object (or an ISOMsg’s subclass).
The ISOMsg class uses the Composite pattern (see Design Patterns, elements of Reusable Object-OrientedSoftware by Gamma, Helm, Johnson and Vlissides)
ISOMsg, ISOField, ISOBitMapField, ISOBinaryField and any custom field type that you may implement aresubclasses of ISOComponent. Let’s have a look at ISOComponent’s methods:
public abstract class ISOComponent implements Cloneable { public void set (ISOComponent c) throws ISOException; public void unset (int fldno) throws ISOException; public ISOComponent getComposite(); public Object getKey() throws ISOException; public Object getValue() throws ISOException; public byte[] getBytes() throws ISOException; public int getMaxField(); public Hashtable getChildren(); public abstract void setFieldNumber (int fieldNumber); public abstract void setValue(Object obj) throws ISOException; public abstract byte[] pack() throws ISOException; public abstract int unpack(byte[] b) throws ISOException; public abstract void dump (PrintStream p, String indent); public abstract void pack (OutputStream out) throws IOException, ISOException; public abstract void unpack (InputStream in) throws IOException, ISOException; }
This approach has proven to be really useful and maps quite well to the ISO-8583 message structure.
There are many situations where some methods are not applicable (i.e., getChildren() has no meaning in aleaf field, same goes for methods such as getMaxField()), but as a general rule, using the same super-class
18
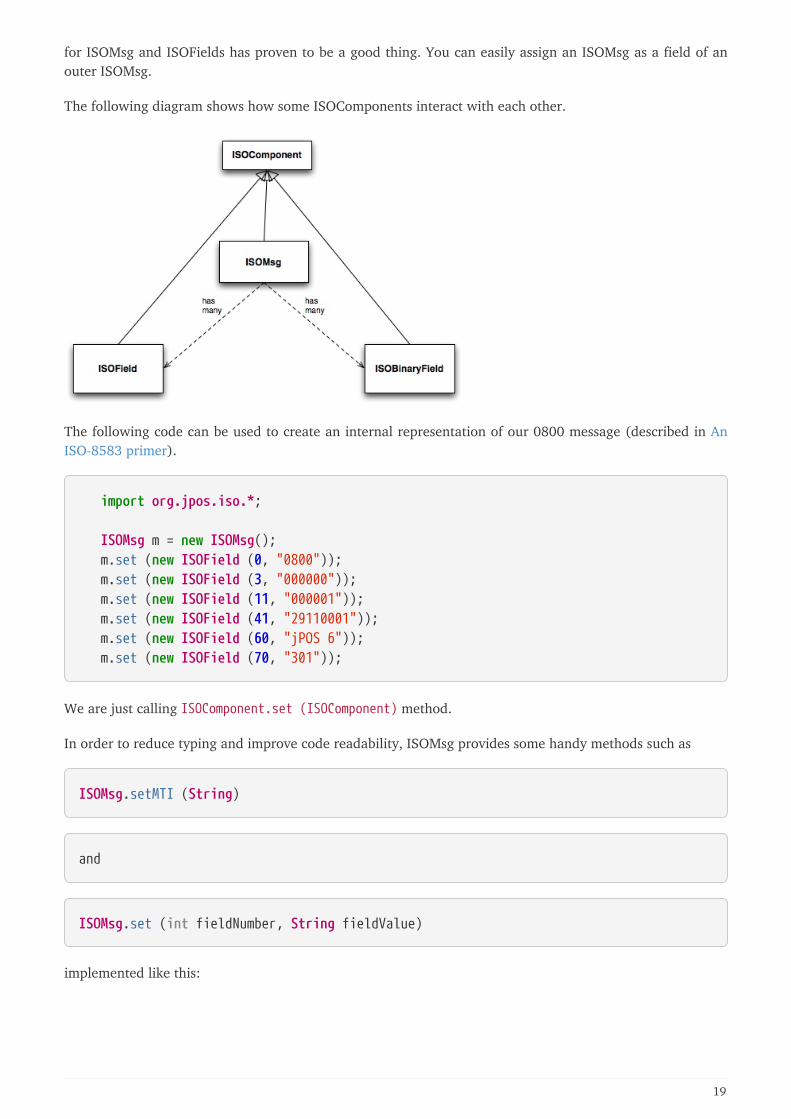
for ISOMsg and ISOFields has proven to be a good thing. You can easily assign an ISOMsg as a field of anouter ISOMsg.
The following diagram shows how some ISOComponents interact with each other.
The following code can be used to create an internal representation of our 0800 message (described in AnISO-8583 primer).
import org.jpos.iso.*;
ISOMsg m = new ISOMsg(); m.set (new ISOField (0, "0800")); m.set (new ISOField (3, "000000")); m.set (new ISOField (11, "000001")); m.set (new ISOField (41, "29110001")); m.set (new ISOField (60, "jPOS 6")); m.set (new ISOField (70, "301"));
We are just calling ISOComponent.set (ISOComponent) method.
In order to reduce typing and improve code readability, ISOMsg provides some handy methods such as
ISOMsg.setMTI (String)
and
ISOMsg.set (int fieldNumber, String fieldValue)
implemented like this:
19

public void set (int fldno, String value) throws ISOException { set (new ISOField (fldno, value)); } public void setMTI (String mti) throws ISOException { if (isInner()) throw new ISOException ("can't setMTI on inner message"); set (new ISOField (0, mti)); }
So the previous example can be written like this:
ISOMsg m = new ISOMsg(); m.setMTI ("0800"); m.set (3, "000000"); m.set (11, "000001"); m.set (41, "29110001"); m.set (60, "jPOS 6"); m.set (70, "301");
ISOMsg is one of the most used classes in typical ISO-8583-based jPOS applications.While you can subclass it, you probably won’t have to. If there’s a single class in all jPOSthat you want to study in great detail, this is it.
We recommend you to have a look at its API documentation and play with its helpermethods such as clone, merge, unset, etc.
2.2.2. Packing and unpacking
ISOComponents have two useful methods called:
public abstract byte[] pack() throws ISOException; public abstract int unpack(byte[] b) throws ISOException;
pack returns a byte[] containing the binary representation of a given component (can be just a field or thewhole ISOMsg); unpack does the opposite and also returns the number of consumed bytes.
jPOS uses a Peer pattern that allows a given ISOComponent to be packed and unpacked by a peer class,plugged at runtime.
You use
public void setPackager (ISOPackager p);
in order to assign a packager to a given ISOMsg, i.e:
20
ISOPackager customPackager = MyCustomPackager (); ISOMsg m = new ISOMsg(); m.setMTI ("0800"); m.set (3, "000000"); m.set (11, "000001"); m.set (41, "29110001"); m.set (60, "jPOS 6"); m.set (70, "301"); m.setPackager (customPackager); byte[] binaryImage = m.pack();
In order to unpack this binaryImage you may write code like this:
ISOPackager customPackager = MyCustomPackager (); ISOMsg m = new ISOMsg(); m.setPackager (customPackager); m.unpack (binaryImage);
It is very easy to create protocol converters using jPOS, e.g.:
ISOPackager packagerA = MyCustomPackagerA (); ISOPackager packagerB = MyCustomPackagerB (); ISOMsg m = new ISOMsg(); m.setPackager (packagerA); m.unpack (binaryImage); m.setPackager (packagerB); byte[] convertedBinaryImage = m.pack();
ISOMsg.pack() delegates message packing/unpacking operations to its underlying "peer" ISOPackager. Thecode looks like this:
public byte[] pack() throws ISOException { synchronized (this) { recalcBitMap(); return packager.pack(this); } }
packager.pack(ISOComponent) also delegates its packing/unpacking duties to an underlyingISOFieldPackager. There are ISOFieldPackager implementations for many different ways of representing afield. It is very easy to create your own, if required.
The following code is used by an ISOFieldPackager implementation to pack and unpack fixed-lengthalphanumeric fields:
21
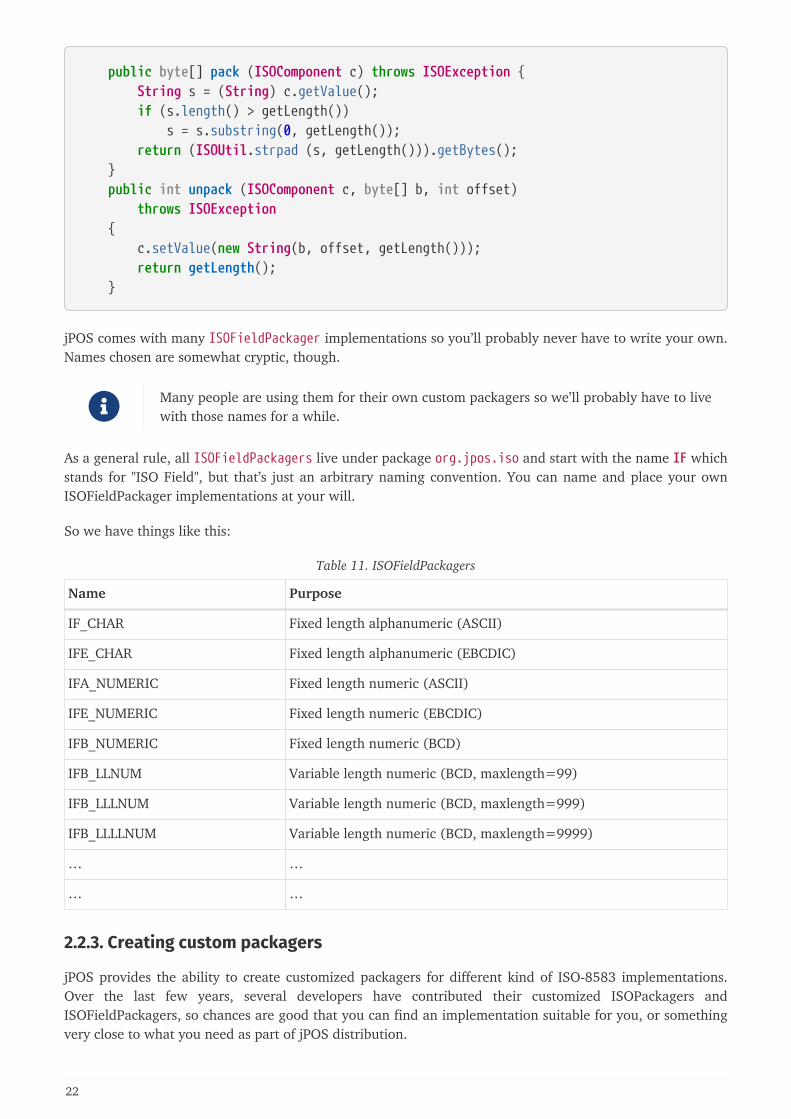
public byte[] pack (ISOComponent c) throws ISOException { String s = (String) c.getValue(); if (s.length() > getLength()) s = s.substring(0, getLength()); return (ISOUtil.strpad (s, getLength())).getBytes(); } public int unpack (ISOComponent c, byte[] b, int offset) throws ISOException { c.setValue(new String(b, offset, getLength())); return getLength(); }
jPOS comes with many ISOFieldPackager implementations so you’ll probably never have to write your own.Names chosen are somewhat cryptic, though.
Many people are using them for their own custom packagers so we’ll probably have to livewith those names for a while.
As a general rule, all ISOFieldPackagers live under package org.jpos.iso and start with the name IF whichstands for "ISO Field", but that’s just an arbitrary naming convention. You can name and place your ownISOFieldPackager implementations at your will.
So we have things like this:
Table 11. ISOFieldPackagers
Name Purpose
IF_CHAR Fixed length alphanumeric (ASCII)
IFE_CHAR Fixed length alphanumeric (EBCDIC)
IFA_NUMERIC Fixed length numeric (ASCII)
IFE_NUMERIC Fixed length numeric (EBCDIC)
IFB_NUMERIC Fixed length numeric (BCD)
IFB_LLNUM Variable length numeric (BCD, maxlength=99)
IFB_LLLNUM Variable length numeric (BCD, maxlength=999)
IFB_LLLLNUM Variable length numeric (BCD, maxlength=9999)
… …
… …
2.2.3. Creating custom packagers
jPOS provides the ability to create customized packagers for different kind of ISO-8583 implementations.Over the last few years, several developers have contributed their customized ISOPackagers andISOFieldPackagers, so chances are good that you can find an implementation suitable for you, or somethingvery close to what you need as part of jPOS distribution.
22
Before writing your own packager, have a look at the classes underjpos/src/main/java/org/jpos/iso/packager directory.
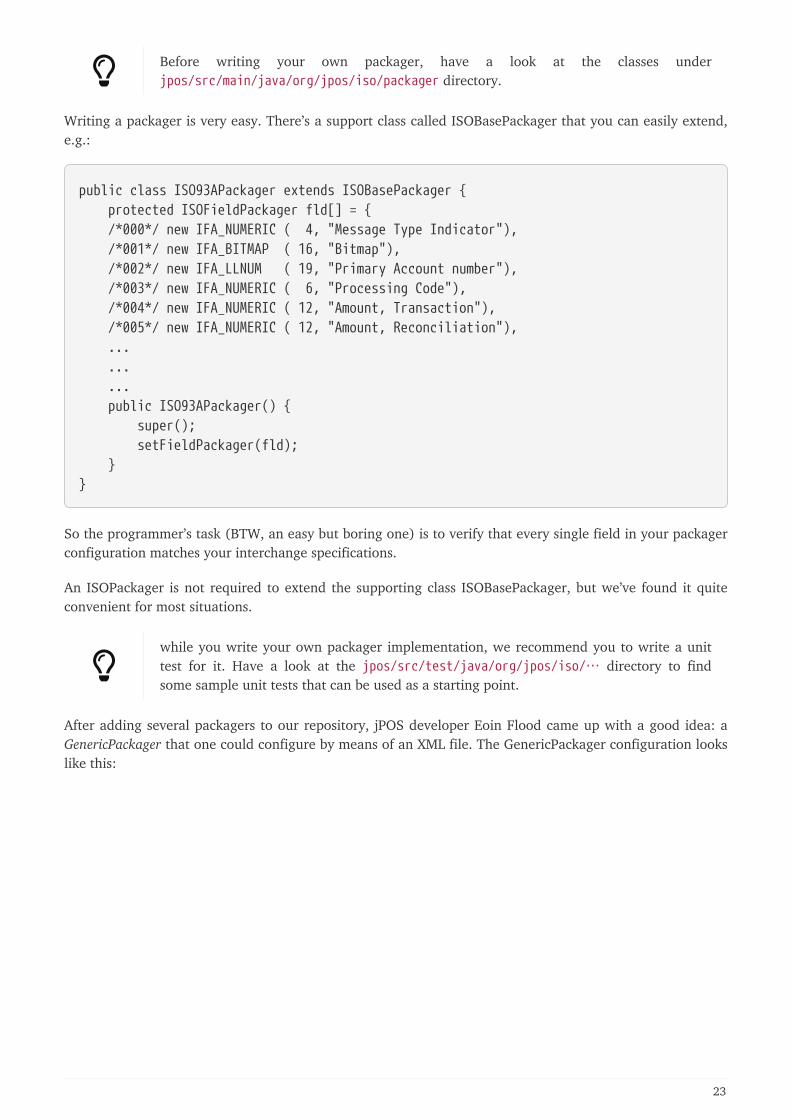
Writing a packager is very easy. There’s a support class called ISOBasePackager that you can easily extend,e.g.:
public class ISO93APackager extends ISOBasePackager { protected ISOFieldPackager fld[] = { /*000*/ new IFA_NUMERIC ( 4, "Message Type Indicator"), /*001*/ new IFA_BITMAP ( 16, "Bitmap"), /*002*/ new IFA_LLNUM ( 19, "Primary Account number"), /*003*/ new IFA_NUMERIC ( 6, "Processing Code"), /*004*/ new IFA_NUMERIC ( 12, "Amount, Transaction"), /*005*/ new IFA_NUMERIC ( 12, "Amount, Reconciliation"), ... ... ... public ISO93APackager() { super(); setFieldPackager(fld); }}
So the programmer’s task (BTW, an easy but boring one) is to verify that every single field in your packagerconfiguration matches your interchange specifications.
An ISOPackager is not required to extend the supporting class ISOBasePackager, but we’ve found it quiteconvenient for most situations.
while you write your own packager implementation, we recommend you to write a unittest for it. Have a look at the jpos/src/test/java/org/jpos/iso/… directory to findsome sample unit tests that can be used as a starting point.
After adding several packagers to our repository, jPOS developer Eoin Flood came up with a good idea: aGenericPackager that one could configure by means of an XML file. The GenericPackager configuration lookslike this:
23
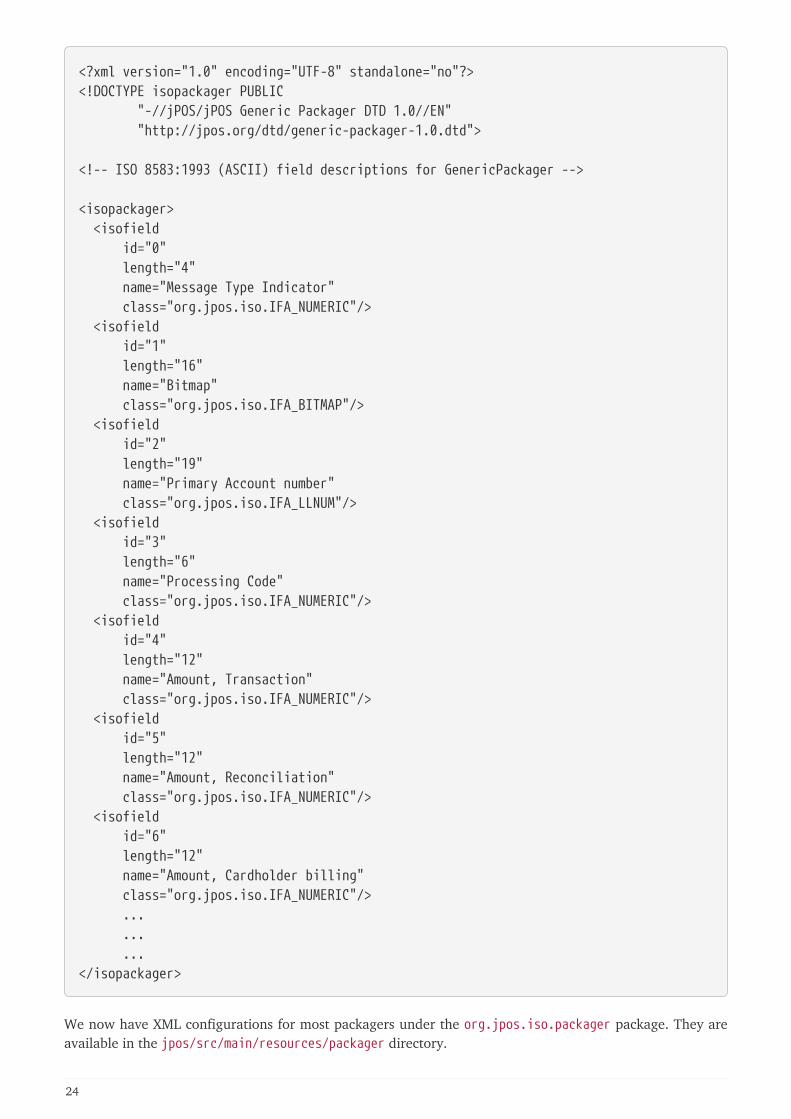
<?xml version="1.0" encoding="UTF-8" standalone="no"?><!DOCTYPE isopackager PUBLIC "-//jPOS/jPOS Generic Packager DTD 1.0//EN" "http://jpos.org/dtd/generic-packager-1.0.dtd">
<!-- ISO 8583:1993 (ASCII) field descriptions for GenericPackager -->
<isopackager> <isofield id="0" length="4" name="Message Type Indicator" class="org.jpos.iso.IFA_NUMERIC"/> <isofield id="1" length="16" name="Bitmap" class="org.jpos.iso.IFA_BITMAP"/> <isofield id="2" length="19" name="Primary Account number" class="org.jpos.iso.IFA_LLNUM"/> <isofield id="3" length="6" name="Processing Code" class="org.jpos.iso.IFA_NUMERIC"/> <isofield id="4" length="12" name="Amount, Transaction" class="org.jpos.iso.IFA_NUMERIC"/> <isofield id="5" length="12" name="Amount, Reconciliation" class="org.jpos.iso.IFA_NUMERIC"/> <isofield id="6" length="12" name="Amount, Cardholder billing" class="org.jpos.iso.IFA_NUMERIC"/> ... ... ...</isopackager>
We now have XML configurations for most packagers under the org.jpos.iso.packager package. They areavailable in the jpos/src/main/resources/packager directory.
24
If you are to develop a custom packager, we encourage you to use GenericPackager with asuitable custom configuration file instead. It will greately simplify your task.
If you’re using Q2 to configure your packagers, GenericPackager uses the "packager-config" property in order to determine its configuration file.
The XML based packager configuration can be either placed in the operating system orinside a jar within the classpath, GenericPackager has the ability to read it as a resource.
If you need support for nested messages, you may want to have a look atjpos/src/main/resources/org/jpos/iso/packager/genericpackager.dtd as well asexamples such as jpos/src/dist/cfg/packager/base1.xml (see field 127).
2.2.4. Managing the wire protocol with ISOChannel
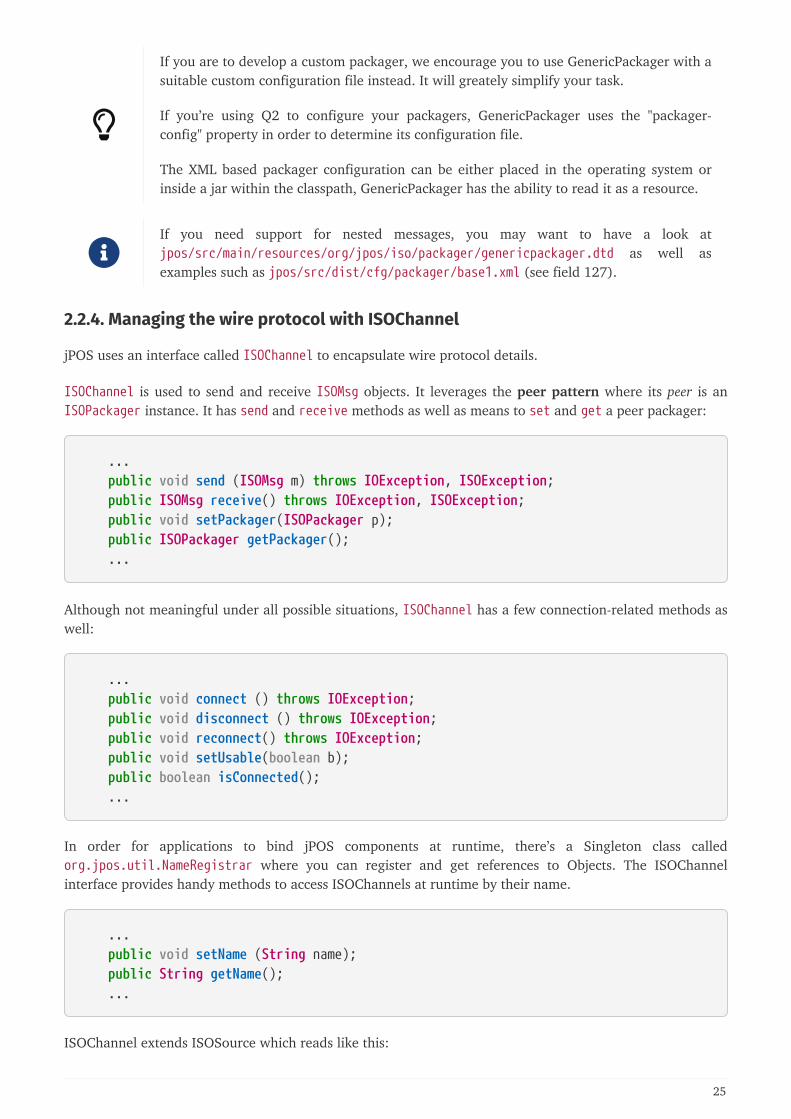
jPOS uses an interface called ISOChannel to encapsulate wire protocol details.
ISOChannel is used to send and receive ISOMsg objects. It leverages the peer pattern where its peer is anISOPackager instance. It has send and receive methods as well as means to set and get a peer packager:
... public void send (ISOMsg m) throws IOException, ISOException; public ISOMsg receive() throws IOException, ISOException; public void setPackager(ISOPackager p); public ISOPackager getPackager(); ...
Although not meaningful under all possible situations, ISOChannel has a few connection-related methods aswell:
... public void connect () throws IOException; public void disconnect () throws IOException; public void reconnect() throws IOException; public void setUsable(boolean b); public boolean isConnected(); ...
In order for applications to bind jPOS components at runtime, there’s a Singleton class calledorg.jpos.util.NameRegistrar where you can register and get references to Objects. The ISOChannelinterface provides handy methods to access ISOChannels at runtime by their name.
... public void setName (String name); public String getName(); ...
ISOChannel extends ISOSource which reads like this:
25
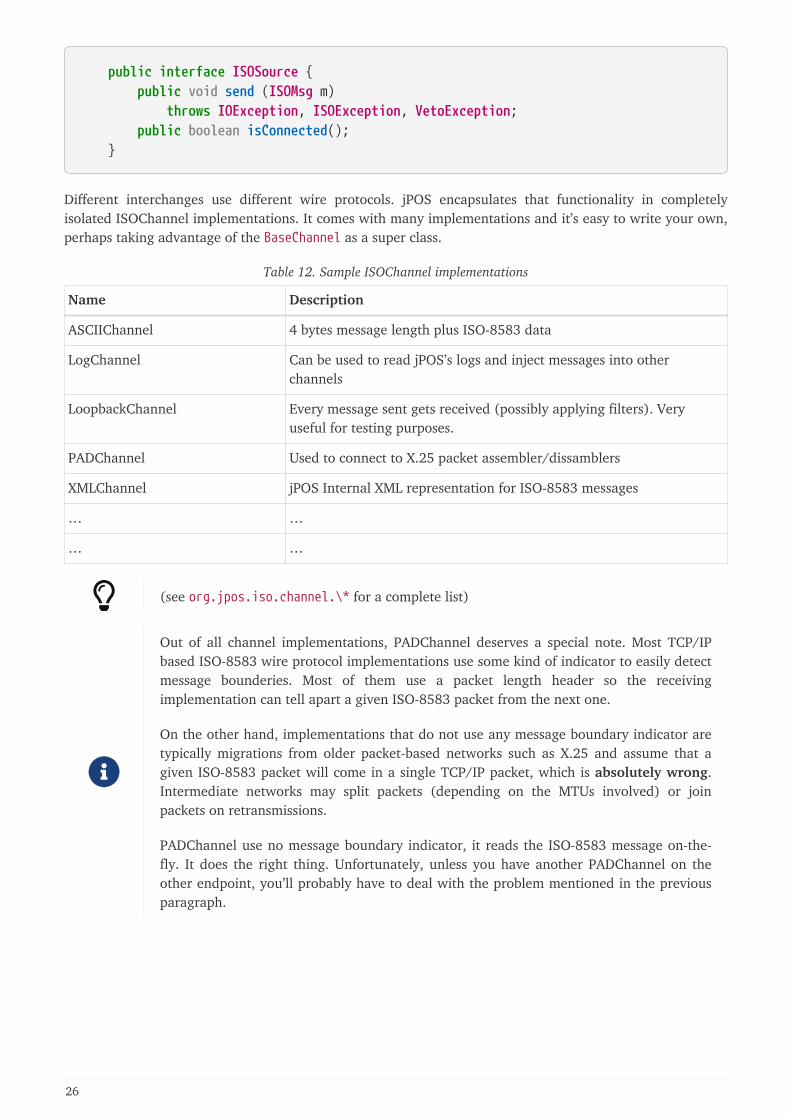
public interface ISOSource { public void send (ISOMsg m) throws IOException, ISOException, VetoException; public boolean isConnected(); }
Different interchanges use different wire protocols. jPOS encapsulates that functionality in completelyisolated ISOChannel implementations. It comes with many implementations and it’s easy to write your own,perhaps taking advantage of the BaseChannel as a super class.
Table 12. Sample ISOChannel implementations
Name Description
ASCIIChannel 4 bytes message length plus ISO-8583 data
LogChannel Can be used to read jPOS’s logs and inject messages into otherchannels
LoopbackChannel Every message sent gets received (possibly applying filters). Veryuseful for testing purposes.
PADChannel Used to connect to X.25 packet assembler/dissamblers
XMLChannel jPOS Internal XML representation for ISO-8583 messages
… …
… …
(see org.jpos.iso.channel.\* for a complete list)
Out of all channel implementations, PADChannel deserves a special note. Most TCP/IPbased ISO-8583 wire protocol implementations use some kind of indicator to easily detectmessage bounderies. Most of them use a packet length header so the receivingimplementation can tell apart a given ISO-8583 packet from the next one.
On the other hand, implementations that do not use any message boundary indicator aretypically migrations from older packet-based networks such as X.25 and assume that agiven ISO-8583 packet will come in a single TCP/IP packet, which is absolutely wrong.Intermediate networks may split packets (depending on the MTUs involved) or joinpackets on retransmissions.
PADChannel use no message boundary indicator, it reads the ISO-8583 message on-the-fly. It does the right thing. Unfortunately, unless you have another PADChannel on theother endpoint, you’ll probably have to deal with the problem mentioned in the previousparagraph.
26
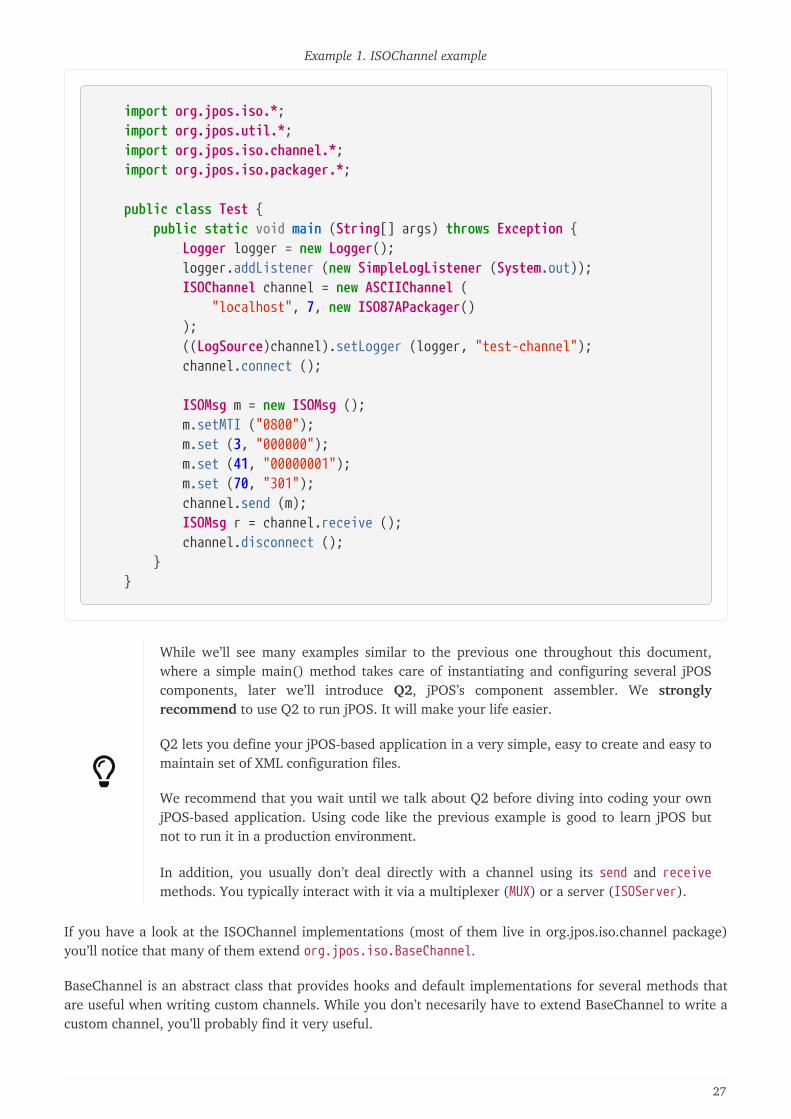
Example 1. ISOChannel example
import org.jpos.iso.*; import org.jpos.util.*; import org.jpos.iso.channel.*; import org.jpos.iso.packager.*;
public class Test { public static void main (String[] args) throws Exception { Logger logger = new Logger(); logger.addListener (new SimpleLogListener (System.out)); ISOChannel channel = new ASCIIChannel ( "localhost", 7, new ISO87APackager() ); ((LogSource)channel).setLogger (logger, "test-channel"); channel.connect ();
ISOMsg m = new ISOMsg (); m.setMTI ("0800"); m.set (3, "000000"); m.set (41, "00000001"); m.set (70, "301"); channel.send (m); ISOMsg r = channel.receive (); channel.disconnect (); } }
While we’ll see many examples similar to the previous one throughout this document,where a simple main() method takes care of instantiating and configuring several jPOScomponents, later we’ll introduce Q2, jPOS’s component assembler. We stronglyrecommend to use Q2 to run jPOS. It will make your life easier.
Q2 lets you define your jPOS-based application in a very simple, easy to create and easy tomaintain set of XML configuration files.
We recommend that you wait until we talk about Q2 before diving into coding your ownjPOS-based application. Using code like the previous example is good to learn jPOS butnot to run it in a production environment.
In addition, you usually don’t deal directly with a channel using its send and receivemethods. You typically interact with it via a multiplexer (MUX) or a server (ISOServer).
If you have a look at the ISOChannel implementations (most of them live in org.jpos.iso.channel package)you’ll notice that many of them extend org.jpos.iso.BaseChannel.
BaseChannel is an abstract class that provides hooks and default implementations for several methods thatare useful when writing custom channels. While you don’t necesarily have to extend BaseChannel to write acustom channel, you’ll probably find it very useful.
27

Depending on your wire protocol, you’ll probably only need to extend BaseChannel and just override a fewmethods, i.e:
protected void sendMessageLength(int len) throws IOException; protected int getMessageLength() throws IOException, ISOException;
(see jpos/src/main/java/org/jpos/iso/channel/CSChannel.java for an example).
You may also want to have a look at the LoopbackChannel implementation for an example of anISOChannel that doesn’t extend BaseChannel.
Filtered Channels
Many ISOChannels implement FilteredChannel which looks like this:
public interface FilteredChannel extends ISOChannel { public void addIncomingFilter (ISOFilter filter); public void addOutgoingFilter (ISOFilter filter); public void addFilter (ISOFilter filter); public void removeFilter (ISOFilter filter); public void removeIncomingFilter (ISOFilter filter); public void removeOutgoingFilter (ISOFilter filter); public Collection getIncomingFilters(); public Collection getOutgoingFilters(); public void setIncomingFilters (Collection filters); public void setOutgoingFilters (Collection filters); }
The ISOFilter interface is very simple as well:
public interface ISOFilter { public ISOMsg filter (ISOChannel channel, ISOMsg m, LogEvent evt) throws VetoException; } }
Whenever you add a filter (be it incoming, outgoing, or both) to a FilteredChannel, all messages sent orreceived by that channel are passed through that filter.
Filters give you the opportunity to stop a given message from being sent or received by that channel, bythrowing an ISOFilter.VetoException.
Let’s have a look at a very simple filter, DelayFilter:
28
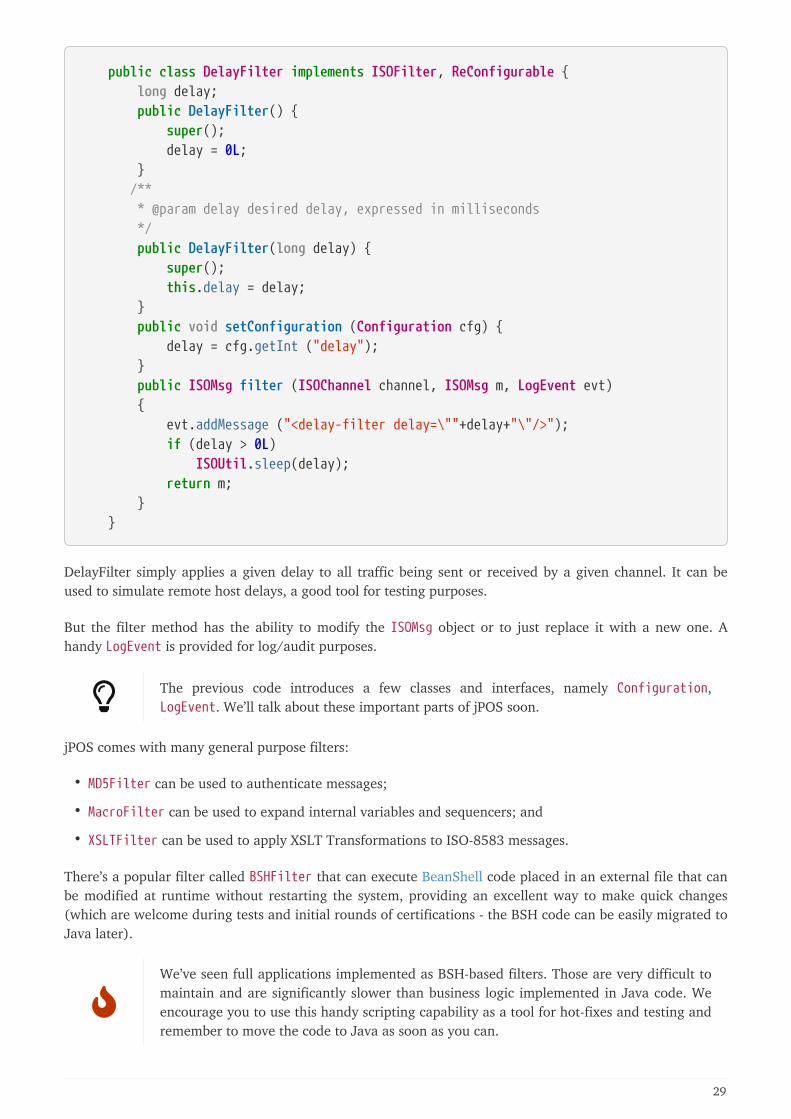
public class DelayFilter implements ISOFilter, ReConfigurable { long delay; public DelayFilter() { super(); delay = 0L; } /** * @param delay desired delay, expressed in milliseconds */ public DelayFilter(long delay) { super(); this.delay = delay; } public void setConfiguration (Configuration cfg) { delay = cfg.getInt ("delay"); } public ISOMsg filter (ISOChannel channel, ISOMsg m, LogEvent evt) { evt.addMessage ("<delay-filter delay=\""+delay+"\"/>"); if (delay > 0L) ISOUtil.sleep(delay); return m; } }
DelayFilter simply applies a given delay to all traffic being sent or received by a given channel. It can beused to simulate remote host delays, a good tool for testing purposes.
But the filter method has the ability to modify the ISOMsg object or to just replace it with a new one. Ahandy LogEvent is provided for log/audit purposes.
The previous code introduces a few classes and interfaces, namely Configuration,LogEvent. We’ll talk about these important parts of jPOS soon.
jPOS comes with many general purpose filters:
• MD5Filter can be used to authenticate messages;
• MacroFilter can be used to expand internal variables and sequencers; and
• XSLTFilter can be used to apply XSLT Transformations to ISO-8583 messages.
There’s a popular filter called BSHFilter that can execute BeanShell code placed in an external file that canbe modified at runtime without restarting the system, providing an excellent way to make quick changes(which are welcome during tests and initial rounds of certifications - the BSH code can be easily migrated toJava later).
We’ve seen full applications implemented as BSH-based filters. Those are very difficult tomaintain and are significantly slower than business logic implemented in Java code. Weencourage you to use this handy scripting capability as a tool for hot-fixes and testing andremember to move the code to Java as soon as you can.
29
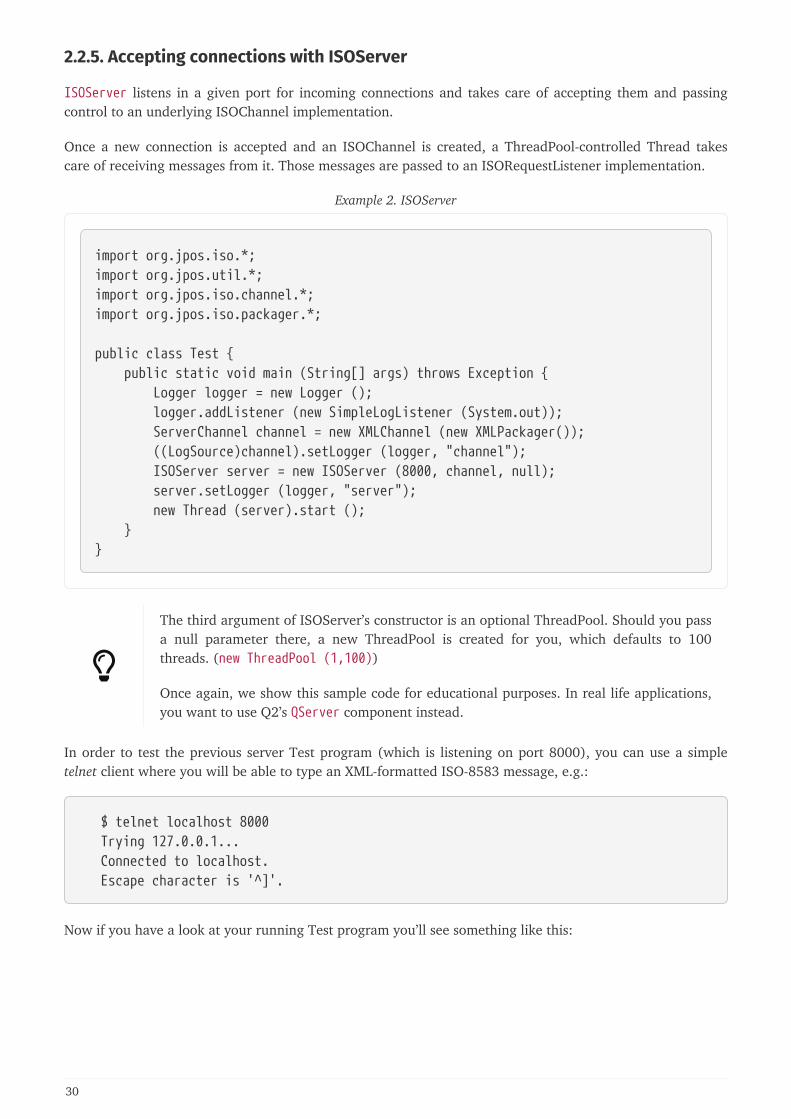
2.2.5. Accepting connections with ISOServer
ISOServer listens in a given port for incoming connections and takes care of accepting them and passingcontrol to an underlying ISOChannel implementation.
Once a new connection is accepted and an ISOChannel is created, a ThreadPool-controlled Thread takescare of receiving messages from it. Those messages are passed to an ISORequestListener implementation.
Example 2. ISOServer
import org.jpos.iso.*;import org.jpos.util.*;import org.jpos.iso.channel.*;import org.jpos.iso.packager.*;
public class Test { public static void main (String[] args) throws Exception { Logger logger = new Logger (); logger.addListener (new SimpleLogListener (System.out)); ServerChannel channel = new XMLChannel (new XMLPackager()); ((LogSource)channel).setLogger (logger, "channel"); ISOServer server = new ISOServer (8000, channel, null); server.setLogger (logger, "server"); new Thread (server).start (); }}
The third argument of ISOServer’s constructor is an optional ThreadPool. Should you passa null parameter there, a new ThreadPool is created for you, which defaults to 100threads. (new ThreadPool (1,100))
Once again, we show this sample code for educational purposes. In real life applications,you want to use Q2’s QServer component instead.
In order to test the previous server Test program (which is listening on port 8000), you can use a simpletelnet client where you will be able to type an XML-formatted ISO-8583 message, e.g.:
$ telnet localhost 8000 Trying 127.0.0.1... Connected to localhost. Escape character is '^]'.
Now if you have a look at your running Test program you’ll see something like this:
30
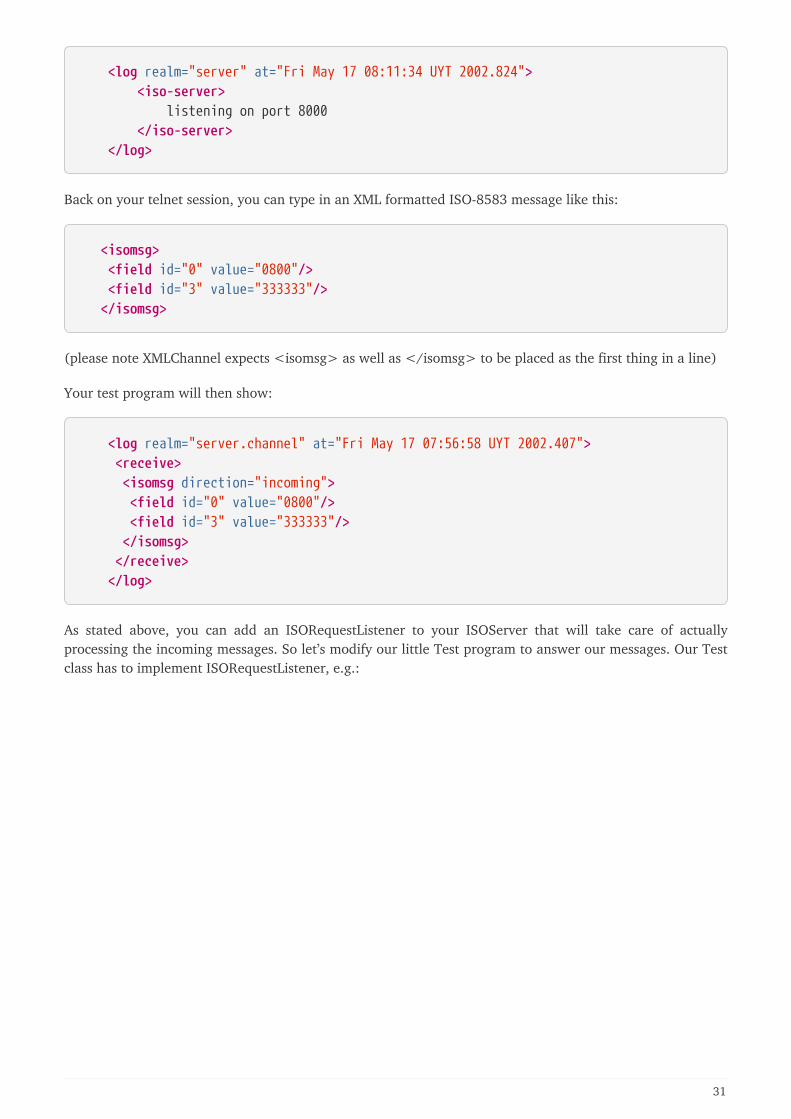
<log realm="server" at="Fri May 17 08:11:34 UYT 2002.824"> <iso-server> listening on port 8000 </iso-server> </log>
Back on your telnet session, you can type in an XML formatted ISO-8583 message like this:
<isomsg> <field id="0" value="0800"/> <field id="3" value="333333"/> </isomsg>
(please note XMLChannel expects <isomsg> as well as </isomsg> to be placed as the first thing in a line)
Your test program will then show:
<log realm="server.channel" at="Fri May 17 07:56:58 UYT 2002.407"> <receive> <isomsg direction="incoming"> <field id="0" value="0800"/> <field id="3" value="333333"/> </isomsg> </receive> </log>
As stated above, you can add an ISORequestListener to your ISOServer that will take care of actuallyprocessing the incoming messages. So let’s modify our little Test program to answer our messages. Our Testclass has to implement ISORequestListener, e.g.:
31
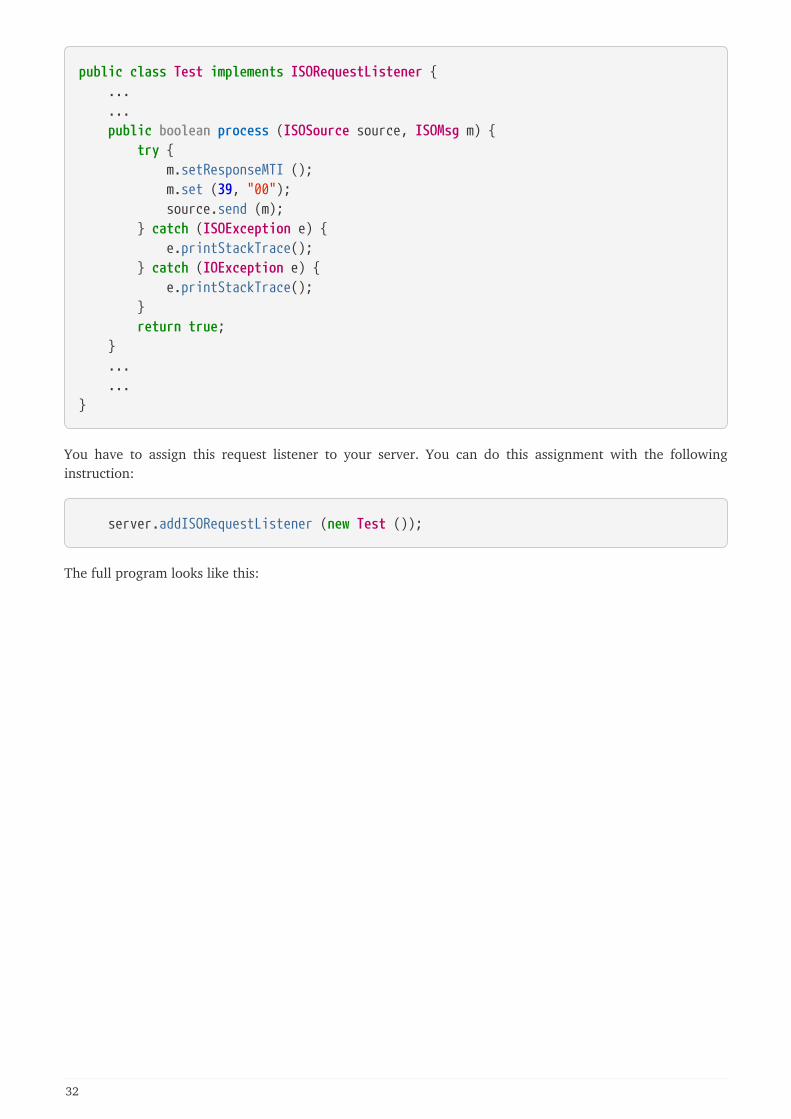
public class Test implements ISORequestListener { ... ... public boolean process (ISOSource source, ISOMsg m) { try { m.setResponseMTI (); m.set (39, "00"); source.send (m); } catch (ISOException e) { e.printStackTrace(); } catch (IOException e) { e.printStackTrace(); } return true; } ... ...}
You have to assign this request listener to your server. You can do this assignment with the followinginstruction:
server.addISORequestListener (new Test ());
The full program looks like this:
32
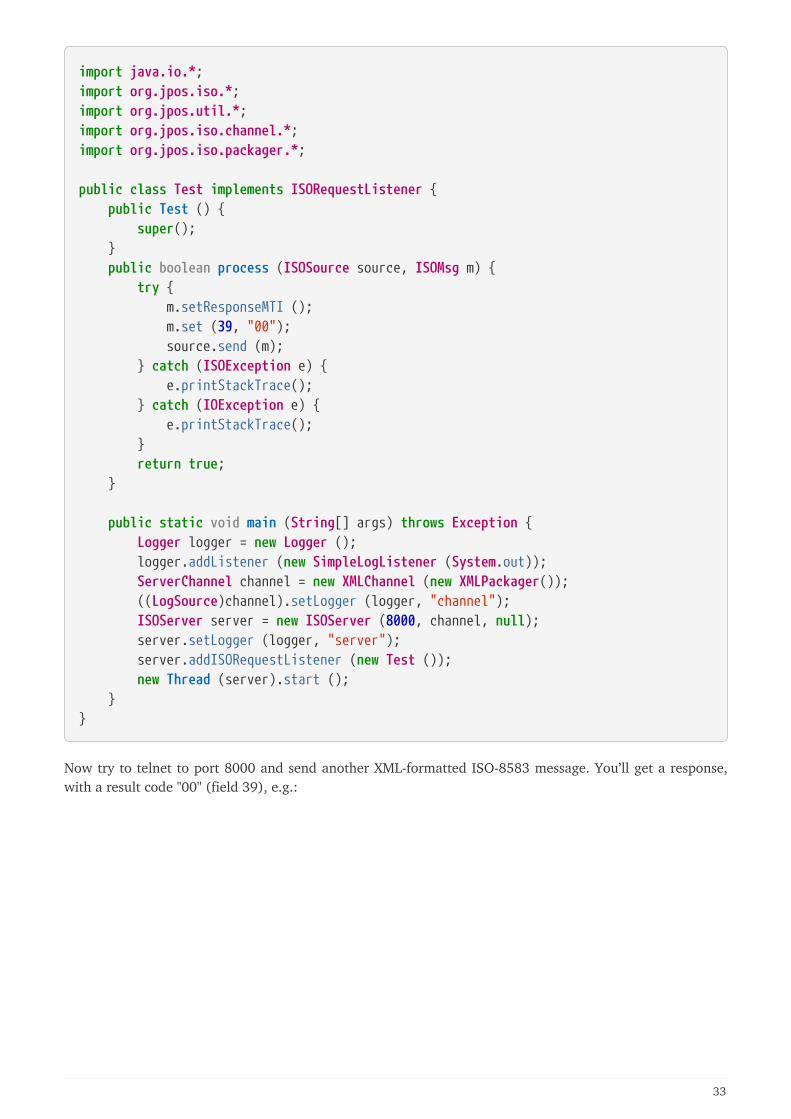
import java.io.*;import org.jpos.iso.*;import org.jpos.util.*;import org.jpos.iso.channel.*;import org.jpos.iso.packager.*;
public class Test implements ISORequestListener { public Test () { super(); } public boolean process (ISOSource source, ISOMsg m) { try { m.setResponseMTI (); m.set (39, "00"); source.send (m); } catch (ISOException e) { e.printStackTrace(); } catch (IOException e) { e.printStackTrace(); } return true; }
public static void main (String[] args) throws Exception { Logger logger = new Logger (); logger.addListener (new SimpleLogListener (System.out)); ServerChannel channel = new XMLChannel (new XMLPackager()); ((LogSource)channel).setLogger (logger, "channel"); ISOServer server = new ISOServer (8000, channel, null); server.setLogger (logger, "server"); server.addISORequestListener (new Test ()); new Thread (server).start (); }}
Now try to telnet to port 8000 and send another XML-formatted ISO-8583 message. You’ll get a response,with a result code "00" (field 39), e.g.:
33
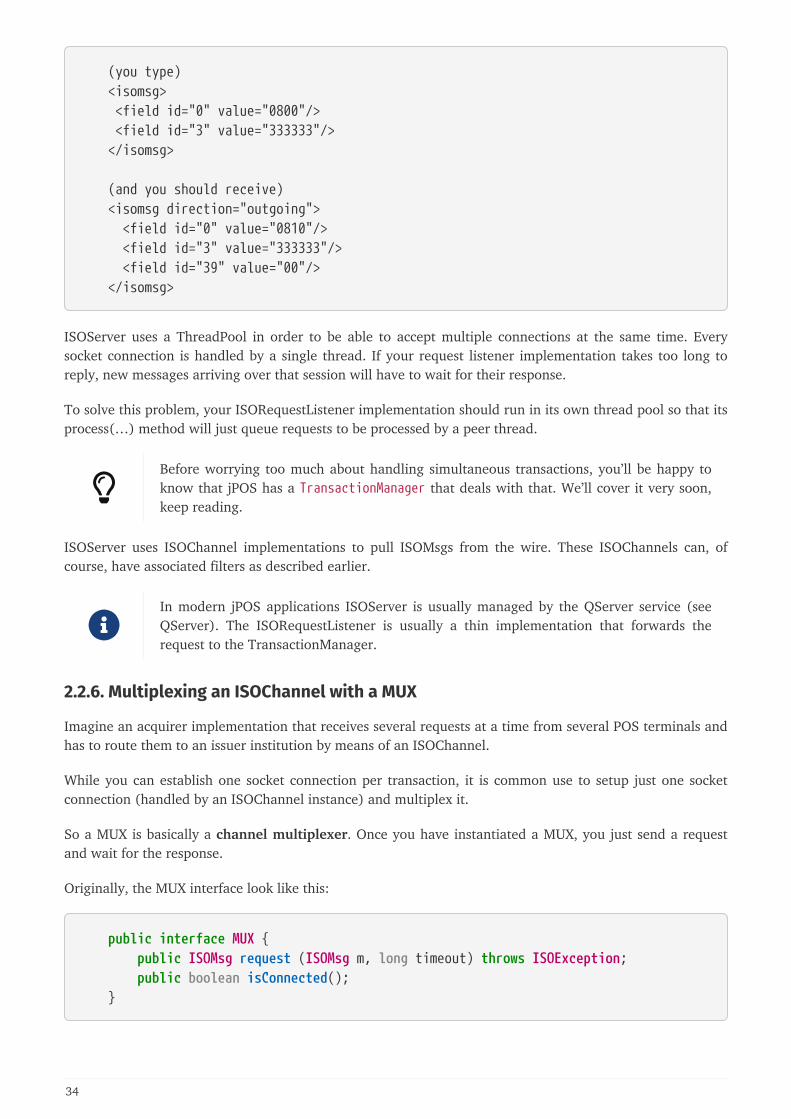
(you type) <isomsg> <field id="0" value="0800"/> <field id="3" value="333333"/> </isomsg>
(and you should receive) <isomsg direction="outgoing"> <field id="0" value="0810"/> <field id="3" value="333333"/> <field id="39" value="00"/> </isomsg>
ISOServer uses a ThreadPool in order to be able to accept multiple connections at the same time. Everysocket connection is handled by a single thread. If your request listener implementation takes too long toreply, new messages arriving over that session will have to wait for their response.
To solve this problem, your ISORequestListener implementation should run in its own thread pool so that itsprocess(…) method will just queue requests to be processed by a peer thread.
Before worrying too much about handling simultaneous transactions, you’ll be happy toknow that jPOS has a TransactionManager that deals with that. We’ll cover it very soon,keep reading.
ISOServer uses ISOChannel implementations to pull ISOMsgs from the wire. These ISOChannels can, ofcourse, have associated filters as described earlier.
In modern jPOS applications ISOServer is usually managed by the QServer service (seeQServer). The ISORequestListener is usually a thin implementation that forwards therequest to the TransactionManager.
2.2.6. Multiplexing an ISOChannel with a MUX
Imagine an acquirer implementation that receives several requests at a time from several POS terminals andhas to route them to an issuer institution by means of an ISOChannel.
While you can establish one socket connection per transaction, it is common use to setup just one socketconnection (handled by an ISOChannel instance) and multiplex it.
So a MUX is basically a channel multiplexer. Once you have instantiated a MUX, you just send a requestand wait for the response.
Originally, the MUX interface look like this:
public interface MUX { public ISOMsg request (ISOMsg m, long timeout) throws ISOException; public boolean isConnected(); }
34
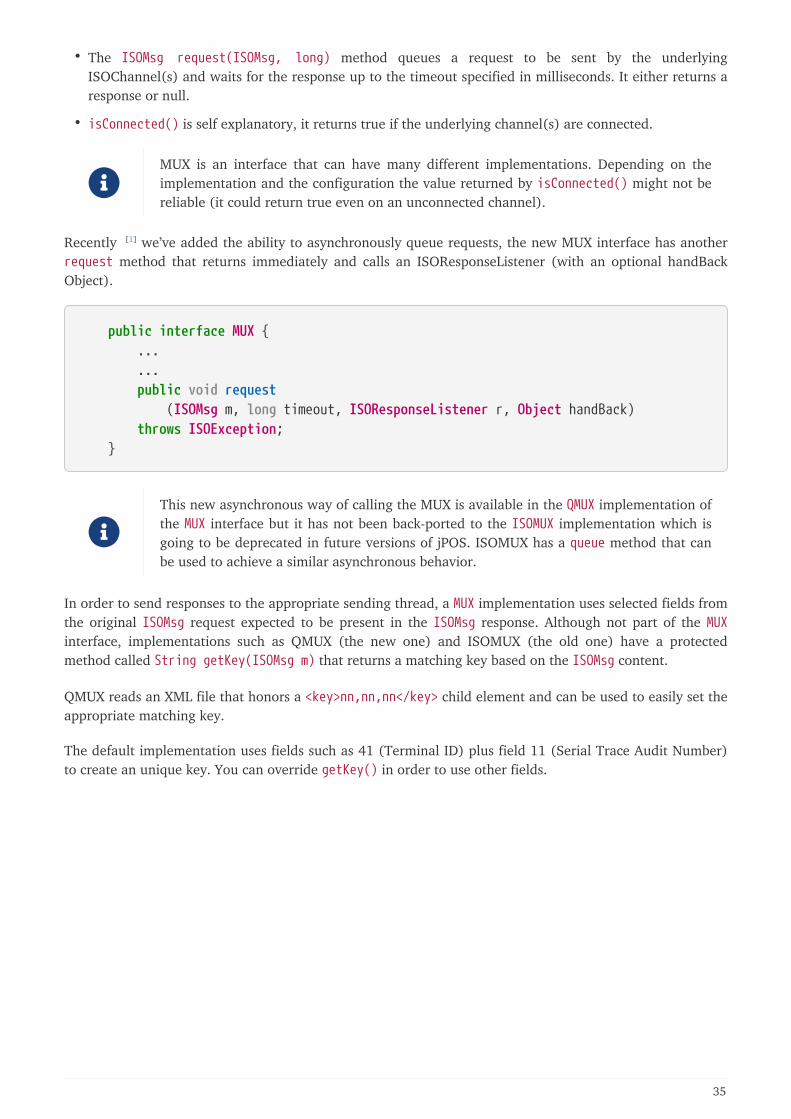
• The ISOMsg request(ISOMsg, long) method queues a request to be sent by the underlyingISOChannel(s) and waits for the response up to the timeout specified in milliseconds. It either returns aresponse or null.
• isConnected() is self explanatory, it returns true if the underlying channel(s) are connected.
MUX is an interface that can have many different implementations. Depending on theimplementation and the configuration the value returned by isConnected() might not bereliable (it could return true even on an unconnected channel).
Recently [1] we’ve added the ability to asynchronously queue requests, the new MUX interface has anotherrequest method that returns immediately and calls an ISOResponseListener (with an optional handBackObject).
public interface MUX { ... ... public void request (ISOMsg m, long timeout, ISOResponseListener r, Object handBack) throws ISOException; }
This new asynchronous way of calling the MUX is available in the QMUX implementation ofthe MUX interface but it has not been back-ported to the ISOMUX implementation which isgoing to be deprecated in future versions of jPOS. ISOMUX has a queue method that canbe used to achieve a similar asynchronous behavior.
In order to send responses to the appropriate sending thread, a MUX implementation uses selected fields fromthe original ISOMsg request expected to be present in the ISOMsg response. Although not part of the MUXinterface, implementations such as QMUX (the new one) and ISOMUX (the old one) have a protectedmethod called String getKey(ISOMsg m) that returns a matching key based on the ISOMsg content.
QMUX reads an XML file that honors a <key>nn,nn,nn</key> child element and can be used to easily set theappropriate matching key.
The default implementation uses fields such as 41 (Terminal ID) plus field 11 (Serial Trace Audit Number)to create an unique key. You can override getKey() in order to use other fields.
35
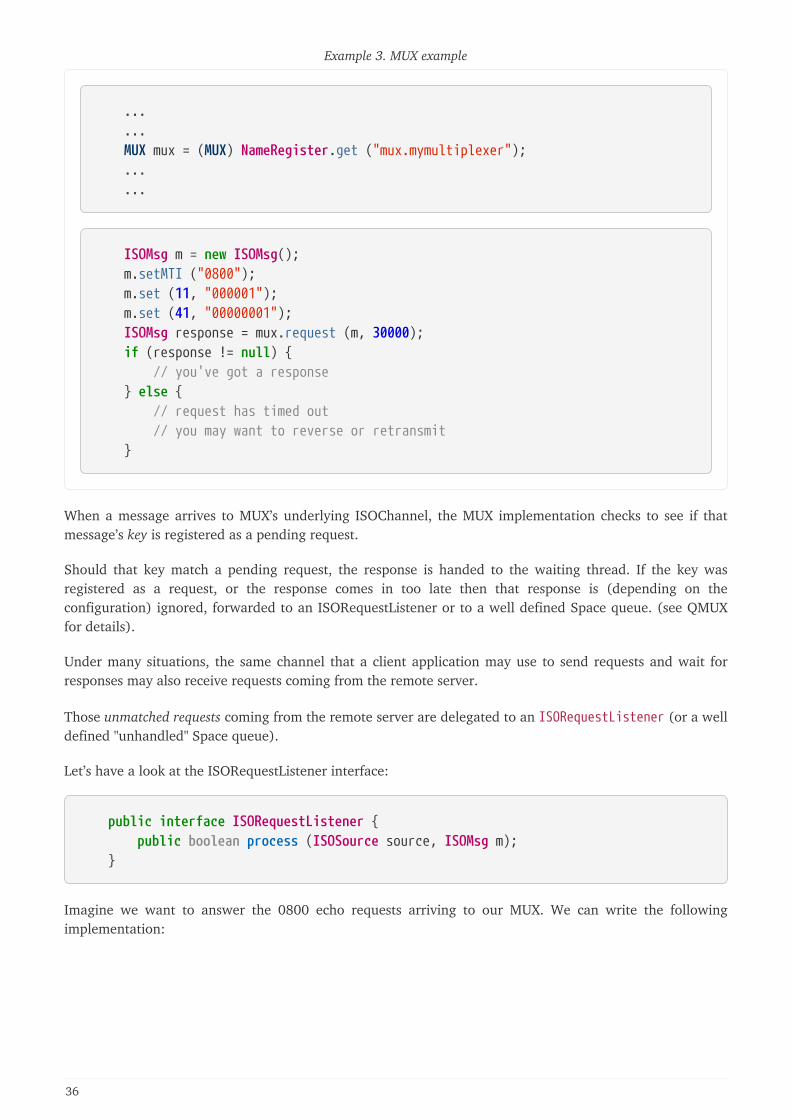
Example 3. MUX example
... ... MUX mux = (MUX) NameRegister.get ("mux.mymultiplexer"); ... ...
ISOMsg m = new ISOMsg(); m.setMTI ("0800"); m.set (11, "000001"); m.set (41, "00000001"); ISOMsg response = mux.request (m, 30000); if (response != null) { // you've got a response } else { // request has timed out // you may want to reverse or retransmit }
When a message arrives to MUX’s underlying ISOChannel, the MUX implementation checks to see if thatmessage’s key is registered as a pending request.
Should that key match a pending request, the response is handed to the waiting thread. If the key wasregistered as a request, or the response comes in too late then that response is (depending on theconfiguration) ignored, forwarded to an ISORequestListener or to a well defined Space queue. (see QMUXfor details).
Under many situations, the same channel that a client application may use to send requests and wait forresponses may also receive requests coming from the remote server.
Those unmatched requests coming from the remote server are delegated to an ISORequestListener (or a welldefined "unhandled" Space queue).
Let’s have a look at the ISORequestListener interface:
public interface ISORequestListener { public boolean process (ISOSource source, ISOMsg m); }
Imagine we want to answer the 0800 echo requests arriving to our MUX. We can write the followingimplementation:
36
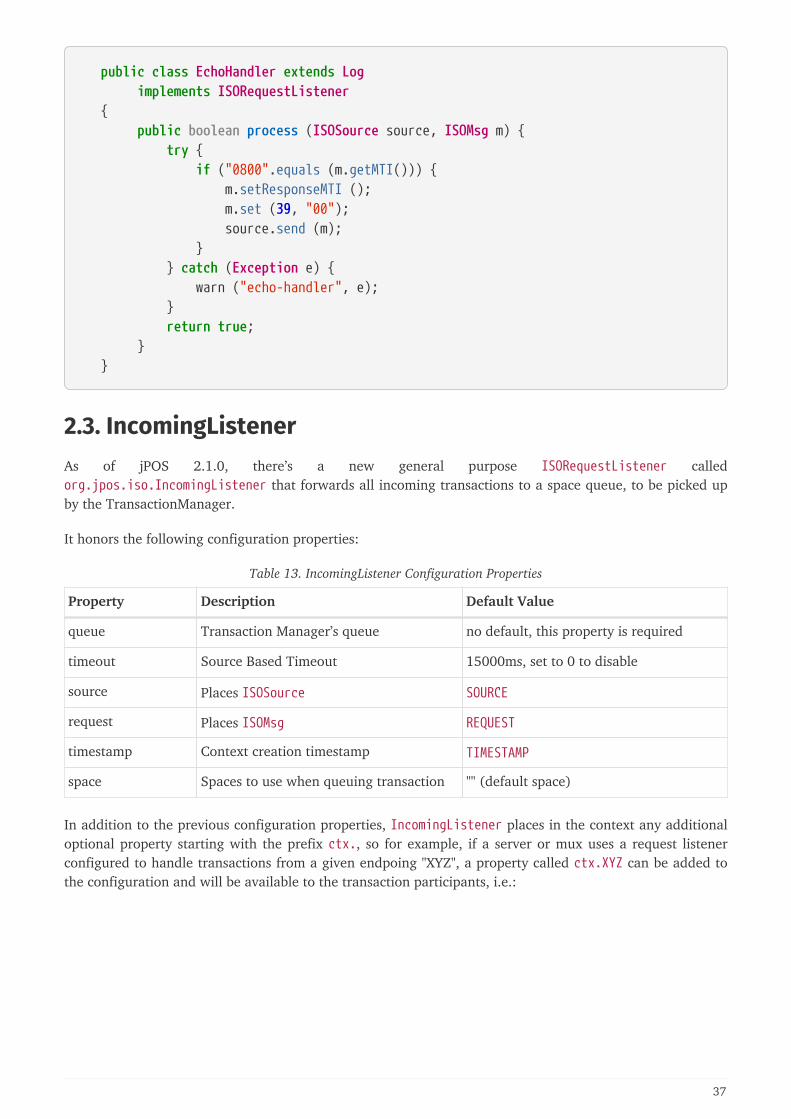
public class EchoHandler extends Log implements ISORequestListener { public boolean process (ISOSource source, ISOMsg m) { try { if ("0800".equals (m.getMTI())) { m.setResponseMTI (); m.set (39, "00"); source.send (m); } } catch (Exception e) { warn ("echo-handler", e); } return true; } }
2.3. IncomingListenerAs of jPOS 2.1.0, there’s a new general purpose ISORequestListener calledorg.jpos.iso.IncomingListener that forwards all incoming transactions to a space queue, to be picked upby the TransactionManager.
It honors the following configuration properties:
Table 13. IncomingListener Configuration Properties
Property Description Default Value
queue Transaction Manager’s queue no default, this property is required
timeout Source Based Timeout 15000ms, set to 0 to disable
source Places ISOSource SOURCE
request Places ISOMsg REQUEST
timestamp Context creation timestamp TIMESTAMP
space Spaces to use when queuing transaction "" (default space)
In addition to the previous configuration properties, IncomingListener places in the context any additionaloptional property starting with the prefix ctx., so for example, if a server or mux uses a request listenerconfigured to handle transactions from a given endpoing "XYZ", a property called ctx.XYZ can be added tothe configuration and will be available to the transaction participants, i.e.:
37
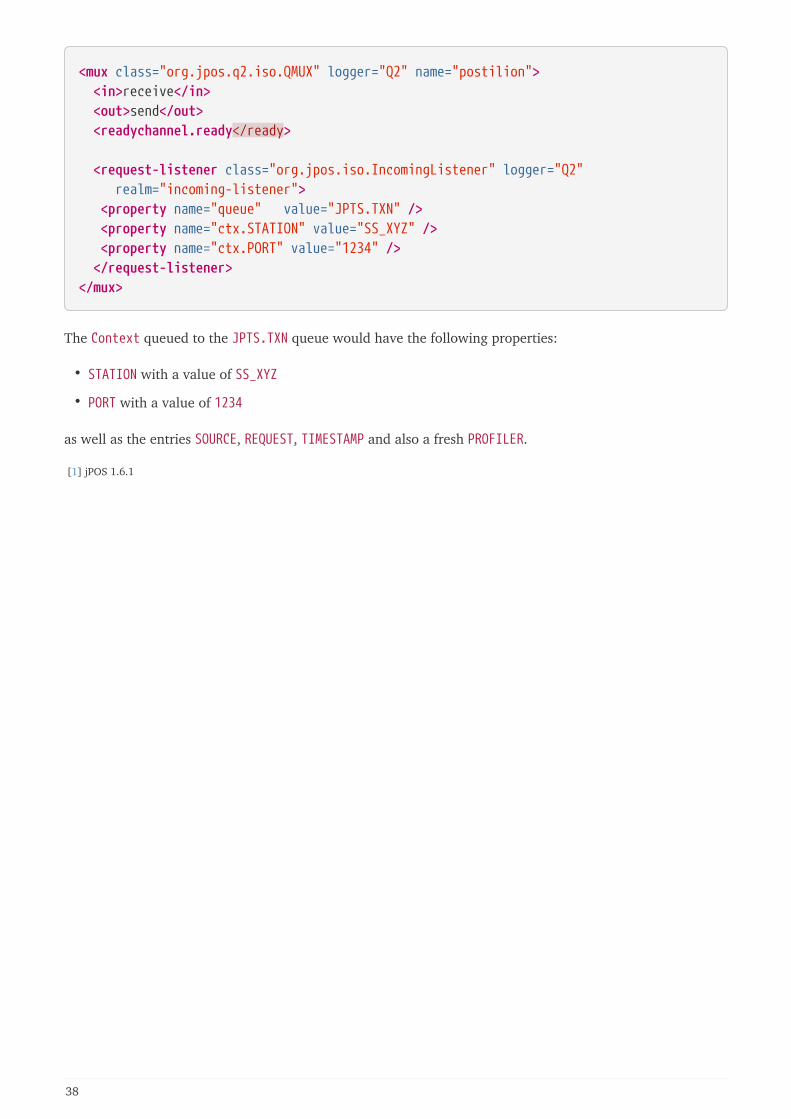
<mux class="org.jpos.q2.iso.QMUX" logger="Q2" name="postilion"> <in>receive</in> <out>send</out> <readychannel.ready</ready>
<request-listener class="org.jpos.iso.IncomingListener" logger="Q2" realm="incoming-listener"> <property name="queue" value="JPTS.TXN" /> <property name="ctx.STATION" value="SS_XYZ" /> <property name="ctx.PORT" value="1234" /> </request-listener></mux>
The Context queued to the JPTS.TXN queue would have the following properties:
• STATION with a value of SS_XYZ
• PORT with a value of 1234
as well as the entries SOURCE, REQUEST, TIMESTAMP and also a fresh PROFILER.
[1] jPOS 1.6.1
38

Chapter 3. Support classes
3.1. jPOS' LoggerYet another Logger subsystem?
You may wonder why we’ve chosen to develop our own Logger subsystem. The answer is very simple: whenwe wrote it, there were no other suitable logger subsystems available. Log4j was just a tiny library hosted inIBM alphaWorks.
You may wonder why we don’t deprecate it now that there are other options available. The main differencebetween our logger sub-system and other logger sub-systems out there is that we deal with live objects. ALogEvent holds live objects that can be handled by the LogListeners, for example to protect sensitiveinformation (PCI requirement) or to act on special conditions (i.e. e-mailing an Operator on an Exceptionwithout having to parse the serialized message).
While other logger subsystems are mostly "line oriented", jPOS' is mostly "transactionoriented". A jPOS LogEvent is likely to carry information for the whole transaction makingit very suitable for audit and debugging purposes.
In order to avoid the initial desire to get rid of the jPOS Logger and use your the loggeryou’re used to use, you may want to consider jPOS' as an Event Logger, or Audit Log. Wedon’t use it to add debug or trace statements in applications, we use it to log businessrelated data.
You can still use your preferred logger subsystem as part of your business logic.
jPOS’s logger subsystem is very easy to extend, so one can easily plug in other logger engines (such as Log4j,commons logging or the new JDK’s 1.4 logging stuff), but that has little use. One of the benefit of our loggeris the fact that it produce easy to read (very lightweight) and easy to parse XML output. The LogChannel forexample can read a jPOS log file and parse ISO-8583 messages from it. If you plug another layer of loggingon top of it, the output is likely to add per-line timestamps that will render the file difficult to parse.
Our logger is implemented by the following main classes:
Table 14. Logger’s main classes
Class Description
Logger Main logger class
LogListener Listens to log events
LogSource A log event producer has to implement LogSource
LogEvent The Log Event
The Logger class has the following important methods:
39
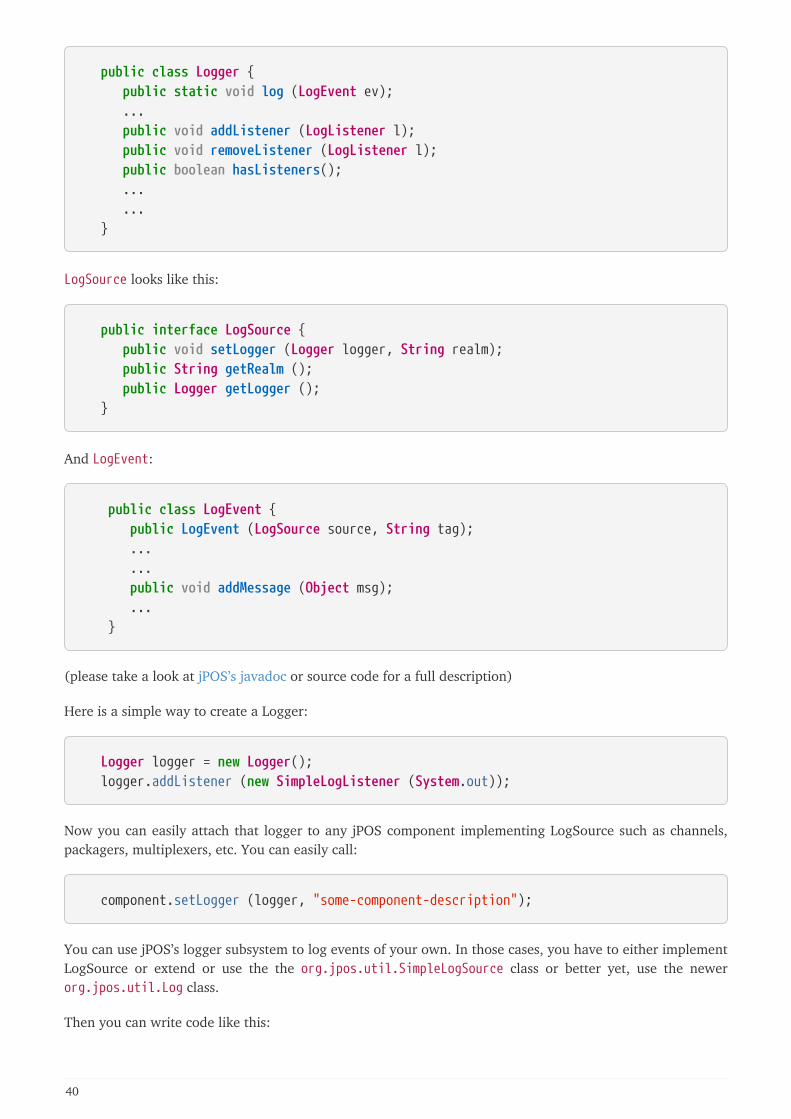
public class Logger { public static void log (LogEvent ev); ... public void addListener (LogListener l); public void removeListener (LogListener l); public boolean hasListeners(); ... ... }
LogSource looks like this:
public interface LogSource { public void setLogger (Logger logger, String realm); public String getRealm (); public Logger getLogger (); }
And LogEvent:
public class LogEvent { public LogEvent (LogSource source, String tag); ... ... public void addMessage (Object msg); ... }
(please take a look at jPOS’s javadoc or source code for a full description)
Here is a simple way to create a Logger:
Logger logger = new Logger(); logger.addListener (new SimpleLogListener (System.out));
Now you can easily attach that logger to any jPOS component implementing LogSource such as channels,packagers, multiplexers, etc. You can easily call:
component.setLogger (logger, "some-component-description");
You can use jPOS’s logger subsystem to log events of your own. In those cases, you have to either implementLogSource or extend or use the the org.jpos.util.SimpleLogSource class or better yet, use the newerorg.jpos.util.Log class.
Then you can write code like this:
40
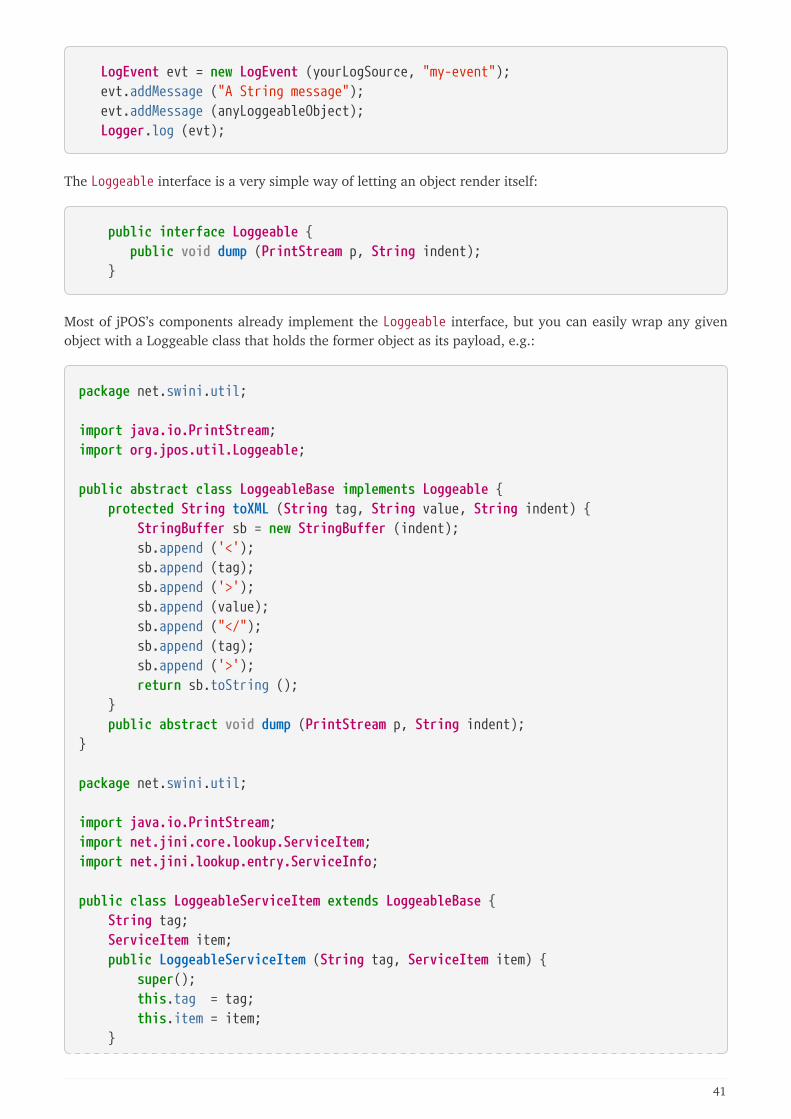
LogEvent evt = new LogEvent (yourLogSource, "my-event"); evt.addMessage ("A String message"); evt.addMessage (anyLoggeableObject); Logger.log (evt);
The Loggeable interface is a very simple way of letting an object render itself:
public interface Loggeable { public void dump (PrintStream p, String indent); }
Most of jPOS’s components already implement the Loggeable interface, but you can easily wrap any givenobject with a Loggeable class that holds the former object as its payload, e.g.:
package net.swini.util;
import java.io.PrintStream;import org.jpos.util.Loggeable;
public abstract class LoggeableBase implements Loggeable { protected String toXML (String tag, String value, String indent) { StringBuffer sb = new StringBuffer (indent); sb.append ('<'); sb.append (tag); sb.append ('>'); sb.append (value); sb.append ("</"); sb.append (tag); sb.append ('>'); return sb.toString (); } public abstract void dump (PrintStream p, String indent);}
package net.swini.util;
import java.io.PrintStream;import net.jini.core.lookup.ServiceItem;import net.jini.lookup.entry.ServiceInfo;
public class LoggeableServiceItem extends LoggeableBase { String tag; ServiceItem item; public LoggeableServiceItem (String tag, ServiceItem item) { super(); this.tag = tag; this.item = item; }
41
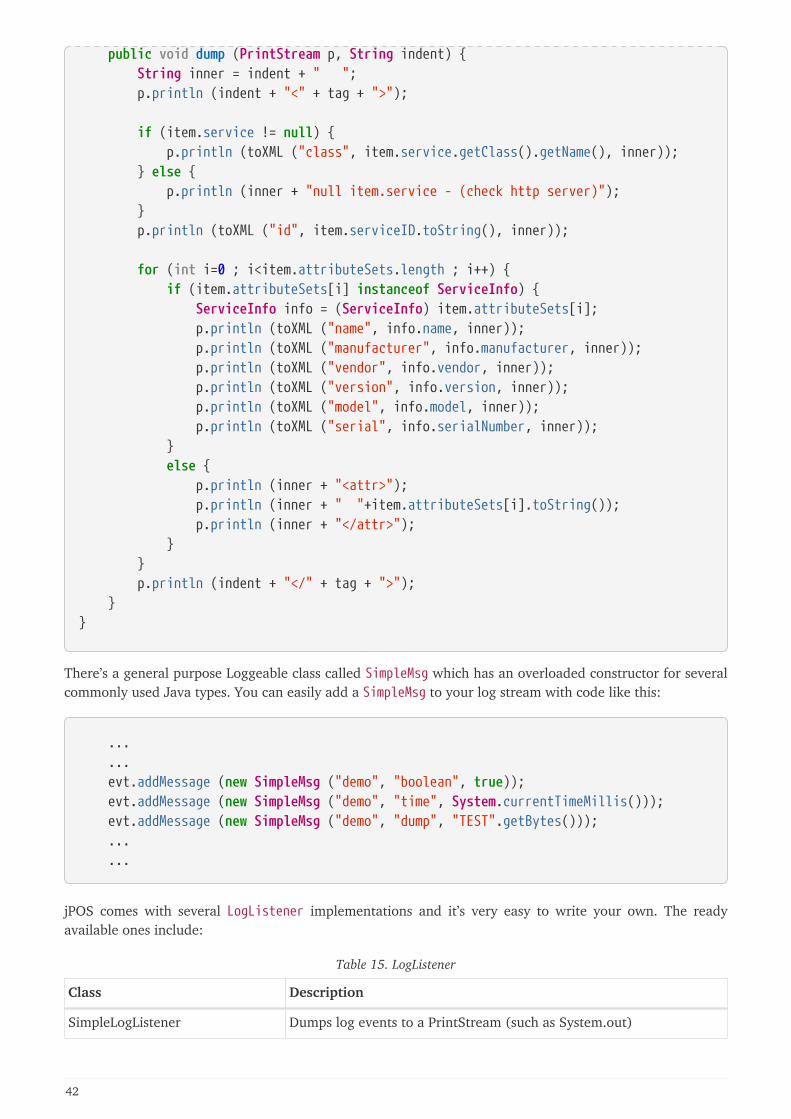
public void dump (PrintStream p, String indent) { String inner = indent + " "; p.println (indent + "<" + tag + ">");
if (item.service != null) { p.println (toXML ("class", item.service.getClass().getName(), inner)); } else { p.println (inner + "null item.service - (check http server)"); } p.println (toXML ("id", item.serviceID.toString(), inner));
for (int i=0 ; i<item.attributeSets.length ; i++) { if (item.attributeSets[i] instanceof ServiceInfo) { ServiceInfo info = (ServiceInfo) item.attributeSets[i]; p.println (toXML ("name", info.name, inner)); p.println (toXML ("manufacturer", info.manufacturer, inner)); p.println (toXML ("vendor", info.vendor, inner)); p.println (toXML ("version", info.version, inner)); p.println (toXML ("model", info.model, inner)); p.println (toXML ("serial", info.serialNumber, inner)); } else { p.println (inner + "<attr>"); p.println (inner + " "+item.attributeSets[i].toString()); p.println (inner + "</attr>"); } } p.println (indent + "</" + tag + ">"); }}
There’s a general purpose Loggeable class called SimpleMsg which has an overloaded constructor for severalcommonly used Java types. You can easily add a SimpleMsg to your log stream with code like this:
... ... evt.addMessage (new SimpleMsg ("demo", "boolean", true)); evt.addMessage (new SimpleMsg ("demo", "time", System.currentTimeMillis())); evt.addMessage (new SimpleMsg ("demo", "dump", "TEST".getBytes())); ... ...
jPOS comes with several LogListener implementations and it’s very easy to write your own. The readyavailable ones include:
Table 15. LogListener
Class Description
SimpleLogListener Dumps log events to a PrintStream (such as System.out)
42
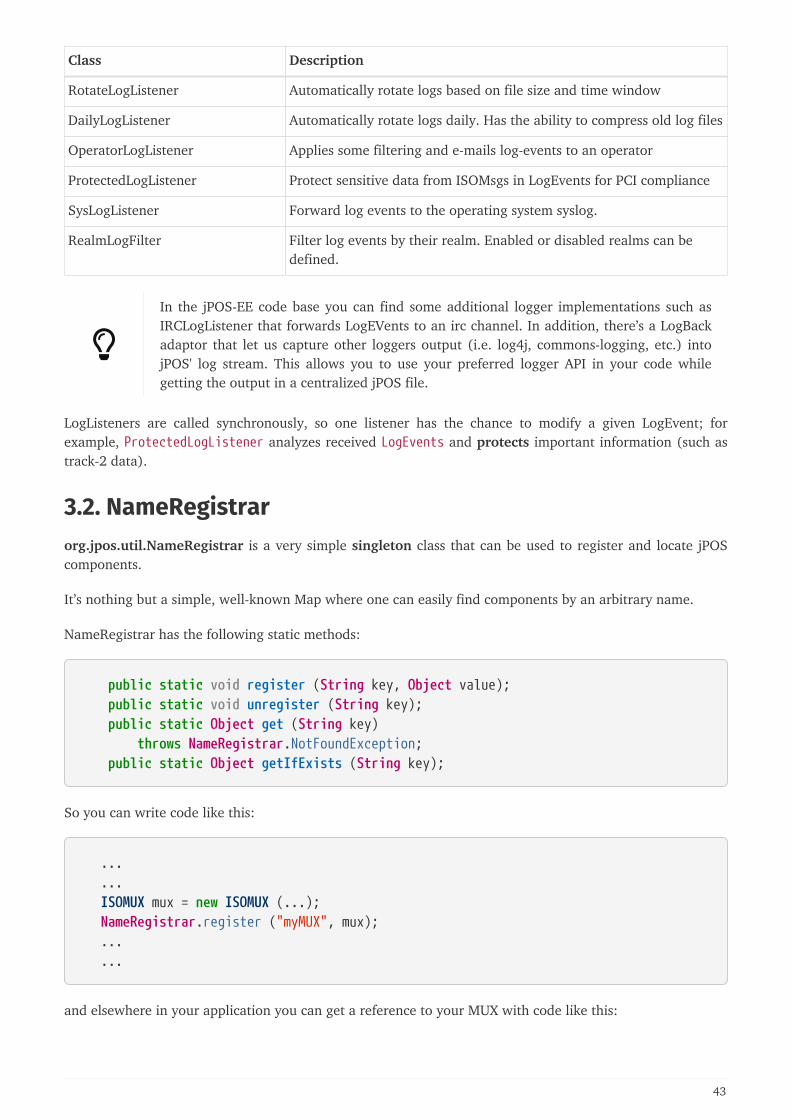
Class Description
RotateLogListener Automatically rotate logs based on file size and time window
DailyLogListener Automatically rotate logs daily. Has the ability to compress old log files
OperatorLogListener Applies some filtering and e-mails log-events to an operator
ProtectedLogListener Protect sensitive data from ISOMsgs in LogEvents for PCI compliance
SysLogListener Forward log events to the operating system syslog.
RealmLogFilter Filter log events by their realm. Enabled or disabled realms can bedefined.
In the jPOS-EE code base you can find some additional logger implementations such asIRCLogListener that forwards LogEVents to an irc channel. In addition, there’s a LogBackadaptor that let us capture other loggers output (i.e. log4j, commons-logging, etc.) intojPOS' log stream. This allows you to use your preferred logger API in your code whilegetting the output in a centralized jPOS file.
LogListeners are called synchronously, so one listener has the chance to modify a given LogEvent; forexample, ProtectedLogListener analyzes received LogEvents and protects important information (such astrack-2 data).
3.2. NameRegistrarorg.jpos.util.NameRegistrar is a very simple singleton class that can be used to register and locate jPOScomponents.
It’s nothing but a simple, well-known Map where one can easily find components by an arbitrary name.
NameRegistrar has the following static methods:
public static void register (String key, Object value); public static void unregister (String key); public static Object get (String key) throws NameRegistrar.NotFoundException; public static Object getIfExists (String key);
So you can write code like this:
... ... ISOMUX mux = new ISOMUX (...); NameRegistrar.register ("myMUX", mux); ... ...
and elsewhere in your application you can get a reference to your MUX with code like this:
43
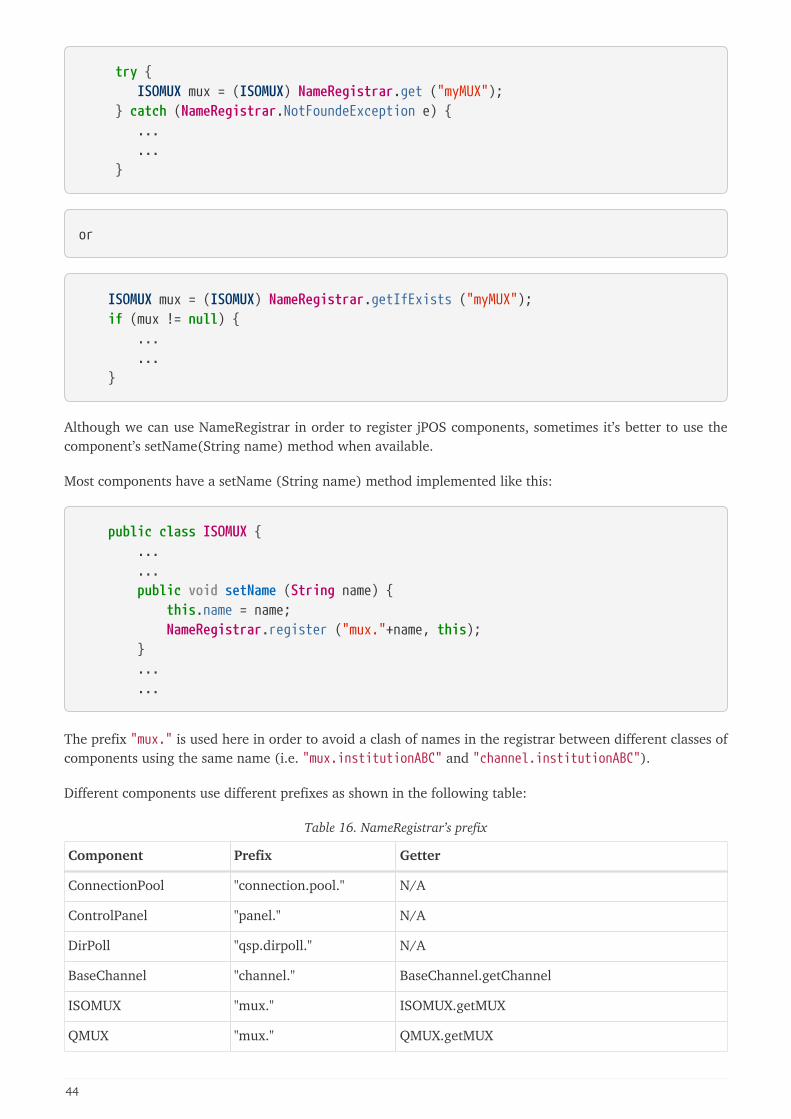
try { ISOMUX mux = (ISOMUX) NameRegistrar.get ("myMUX"); } catch (NameRegistrar.NotFoundeException e) { ... ... }
or
ISOMUX mux = (ISOMUX) NameRegistrar.getIfExists ("myMUX"); if (mux != null) { ... ... }
Although we can use NameRegistrar in order to register jPOS components, sometimes it’s better to use thecomponent’s setName(String name) method when available.
Most components have a setName (String name) method implemented like this:
public class ISOMUX { ... ... public void setName (String name) { this.name = name; NameRegistrar.register ("mux."+name, this); } ... ...
The prefix "mux." is used here in order to avoid a clash of names in the registrar between different classes ofcomponents using the same name (i.e. "mux.institutionABC" and "channel.institutionABC").
Different components use different prefixes as shown in the following table:
Table 16. NameRegistrar’s prefix
Component Prefix Getter
ConnectionPool "connection.pool." N/A
ControlPanel "panel." N/A
DirPoll "qsp.dirpoll." N/A
BaseChannel "channel." BaseChannel.getChannel
ISOMUX "mux." ISOMUX.getMUX
QMUX "mux." QMUX.getMUX
44
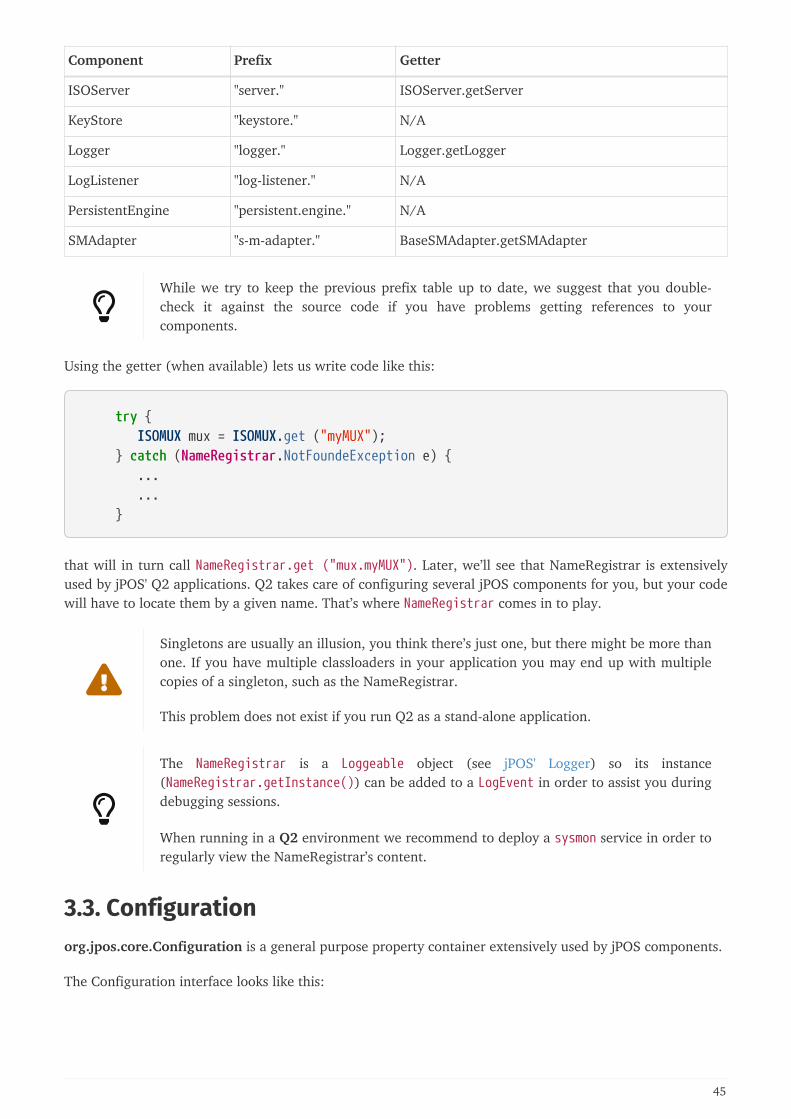
Component Prefix Getter
ISOServer "server." ISOServer.getServer
KeyStore "keystore." N/A
Logger "logger." Logger.getLogger
LogListener "log-listener." N/A
PersistentEngine "persistent.engine." N/A
SMAdapter "s-m-adapter." BaseSMAdapter.getSMAdapter
While we try to keep the previous prefix table up to date, we suggest that you double-check it against the source code if you have problems getting references to yourcomponents.
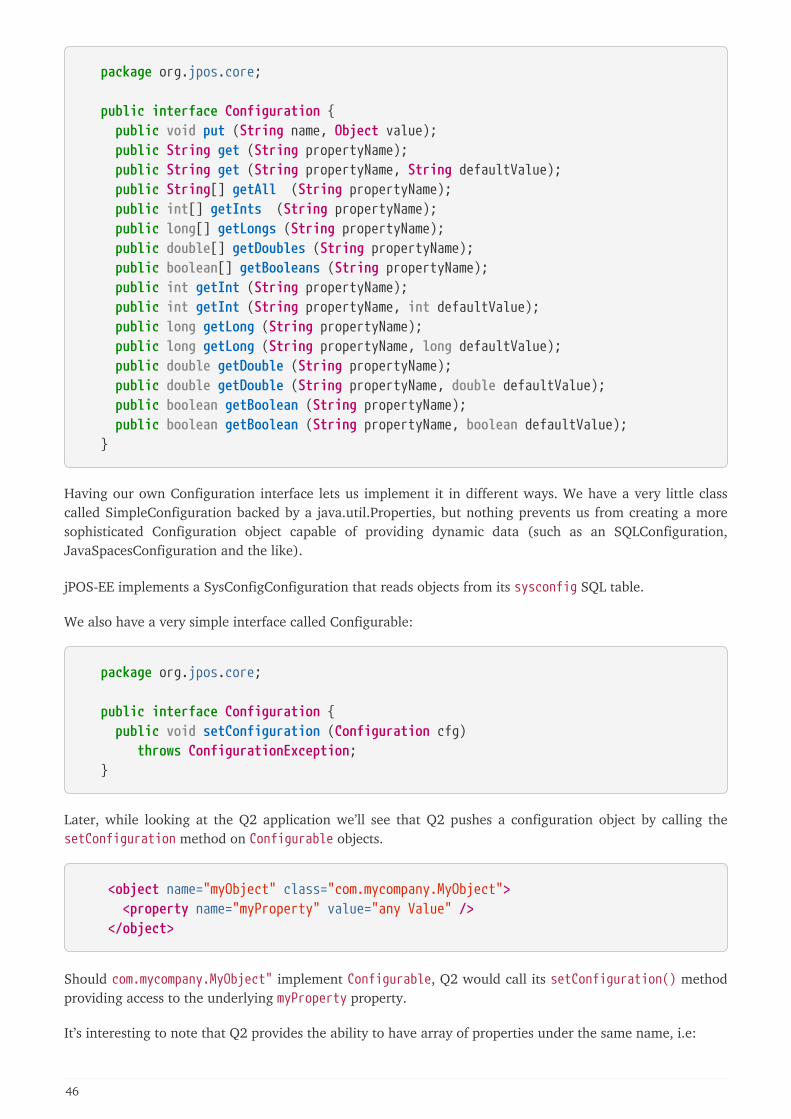
Using the getter (when available) lets us write code like this:
try { ISOMUX mux = ISOMUX.get ("myMUX"); } catch (NameRegistrar.NotFoundeException e) { ... ... }
that will in turn call NameRegistrar.get ("mux.myMUX"). Later, we’ll see that NameRegistrar is extensivelyused by jPOS' Q2 applications. Q2 takes care of configuring several jPOS components for you, but your codewill have to locate them by a given name. That’s where NameRegistrar comes in to play.
Singletons are usually an illusion, you think there’s just one, but there might be more thanone. If you have multiple classloaders in your application you may end up with multiplecopies of a singleton, such as the NameRegistrar.
This problem does not exist if you run Q2 as a stand-alone application.
The NameRegistrar is a Loggeable object (see jPOS' Logger) so its instance(NameRegistrar.getInstance()) can be added to a LogEvent in order to assist you duringdebugging sessions.
When running in a Q2 environment we recommend to deploy a sysmon service in order toregularly view the NameRegistrar’s content.
3.3. Configurationorg.jpos.core.Configuration is a general purpose property container extensively used by jPOS components.
The Configuration interface looks like this:
45
package org.jpos.core;
public interface Configuration { public void put (String name, Object value); public String get (String propertyName); public String get (String propertyName, String defaultValue); public String[] getAll (String propertyName); public int[] getInts (String propertyName); public long[] getLongs (String propertyName); public double[] getDoubles (String propertyName); public boolean[] getBooleans (String propertyName); public int getInt (String propertyName); public int getInt (String propertyName, int defaultValue); public long getLong (String propertyName); public long getLong (String propertyName, long defaultValue); public double getDouble (String propertyName); public double getDouble (String propertyName, double defaultValue); public boolean getBoolean (String propertyName); public boolean getBoolean (String propertyName, boolean defaultValue); }
Having our own Configuration interface lets us implement it in different ways. We have a very little classcalled SimpleConfiguration backed by a java.util.Properties, but nothing prevents us from creating a moresophisticated Configuration object capable of providing dynamic data (such as an SQLConfiguration,JavaSpacesConfiguration and the like).
jPOS-EE implements a SysConfigConfiguration that reads objects from its sysconfig SQL table.
We also have a very simple interface called Configurable:
package org.jpos.core;
public interface Configuration { public void setConfiguration (Configuration cfg) throws ConfigurationException; }
Later, while looking at the Q2 application we’ll see that Q2 pushes a configuration object by calling thesetConfiguration method on Configurable objects.
<object name="myObject" class="com.mycompany.MyObject"> <property name="myProperty" value="any Value" /> </object>
Should com.mycompany.MyObject" implement Configurable, Q2 would call its setConfiguration() methodproviding access to the underlying myProperty property.
It’s interesting to note that Q2 provides the ability to have array of properties under the same name, i.e:
46
<object name="myObject" class="com.mycompany.MyObject"> <property name="myProperty" value="Value A" /> <property name="myProperty" value="Value B" /> <property name="myProperty" value="Value C" /> </object>
where one can call handy methods like String\[\] getAll(String).
setConfiguration(Configuration cfg) can check the Configuration object and might throw aConfigurationException in case a required property is not present or is invalid.
SimpleConfiguration recognizes and de-reference properties with the format: ${xxx} andsearch for a system property, or operating system environment variable under the xxxname.
The format $sys{xxx} de-reference just from system properties, and $env{xxx} just fromthe operating system environment.
In the rare case where a value with the format ${...} is required, the $verb{${...}}format (verbatim) can be used.
3.4. SystemMonitororg.jpos.util.SystemMonitor is a very simple class that periodically logs useful information such as thenumber of running threads, memory usage, etc.
Its constructor looks like this:
public SystemMonitor (int sleepTime, Logger logger, String realm)
See javadocs for details.
Using SystemMonitor is very easy. You simply have to instantiate it with code like this:
... ... new SystemMonitor (60*60*1000L, yourLogger, "system-monitor"); // dumps everyhour ... ...
and it will dump info to your log every hour (60*60*1000 milliseconds). The output looks like this:
47
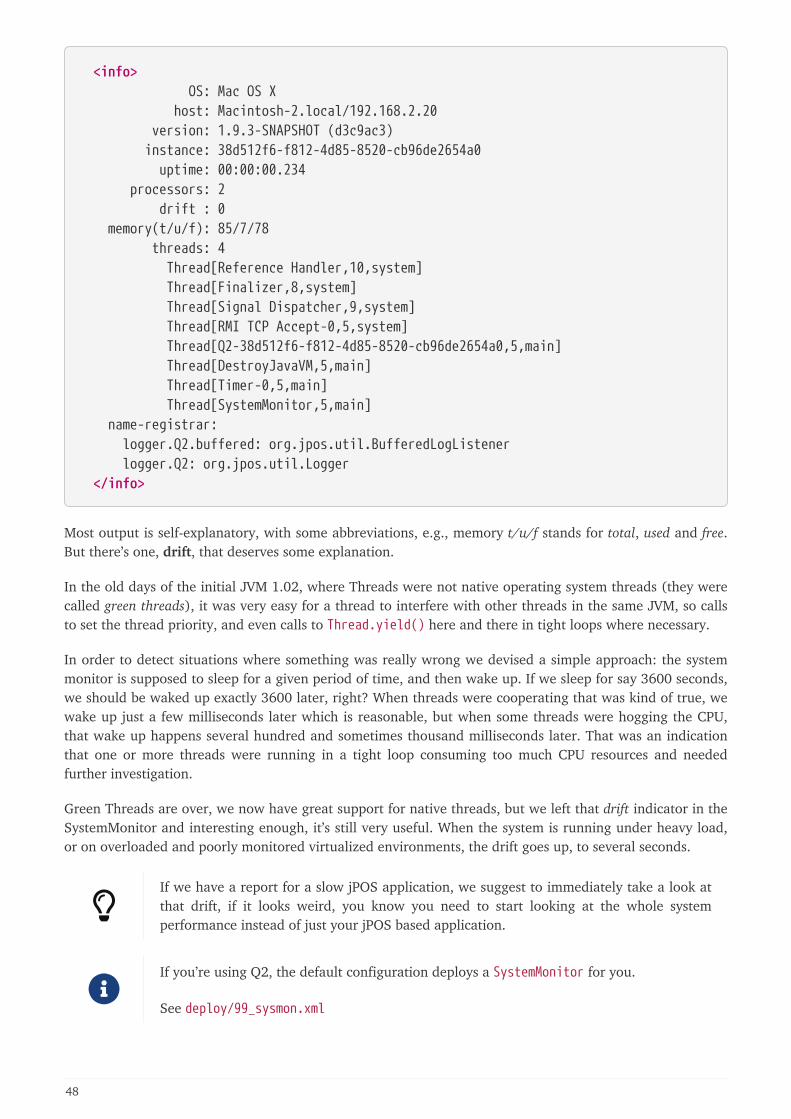
<info> OS: Mac OS X host: Macintosh-2.local/192.168.2.20 version: 1.9.3-SNAPSHOT (d3c9ac3) instance: 38d512f6-f812-4d85-8520-cb96de2654a0 uptime: 00:00:00.234 processors: 2 drift : 0 memory(t/u/f): 85/7/78 threads: 4 Thread[Reference Handler,10,system] Thread[Finalizer,8,system] Thread[Signal Dispatcher,9,system] Thread[RMI TCP Accept-0,5,system] Thread[Q2-38d512f6-f812-4d85-8520-cb96de2654a0,5,main] Thread[DestroyJavaVM,5,main] Thread[Timer-0,5,main] Thread[SystemMonitor,5,main] name-registrar: logger.Q2.buffered: org.jpos.util.BufferedLogListener logger.Q2: org.jpos.util.Logger </info>
Most output is self-explanatory, with some abbreviations, e.g., memory t/u/f stands for total, used and free.But there’s one, drift, that deserves some explanation.
In the old days of the initial JVM 1.02, where Threads were not native operating system threads (they werecalled green threads), it was very easy for a thread to interfere with other threads in the same JVM, so callsto set the thread priority, and even calls to Thread.yield() here and there in tight loops where necessary.
In order to detect situations where something was really wrong we devised a simple approach: the systemmonitor is supposed to sleep for a given period of time, and then wake up. If we sleep for say 3600 seconds,we should be waked up exactly 3600 later, right? When threads were cooperating that was kind of true, wewake up just a few milliseconds later which is reasonable, but when some threads were hogging the CPU,that wake up happens several hundred and sometimes thousand milliseconds later. That was an indicationthat one or more threads were running in a tight loop consuming too much CPU resources and neededfurther investigation.
Green Threads are over, we now have great support for native threads, but we left that drift indicator in theSystemMonitor and interesting enough, it’s still very useful. When the system is running under heavy load,or on overloaded and poorly monitored virtualized environments, the drift goes up, to several seconds.
If we have a report for a slow jPOS application, we suggest to immediately take a look atthat drift, if it looks weird, you know you need to start looking at the whole systemperformance instead of just your jPOS based application.
If you’re using Q2, the default configuration deploys a SystemMonitor for you.
See deploy/99_sysmon.xml
48
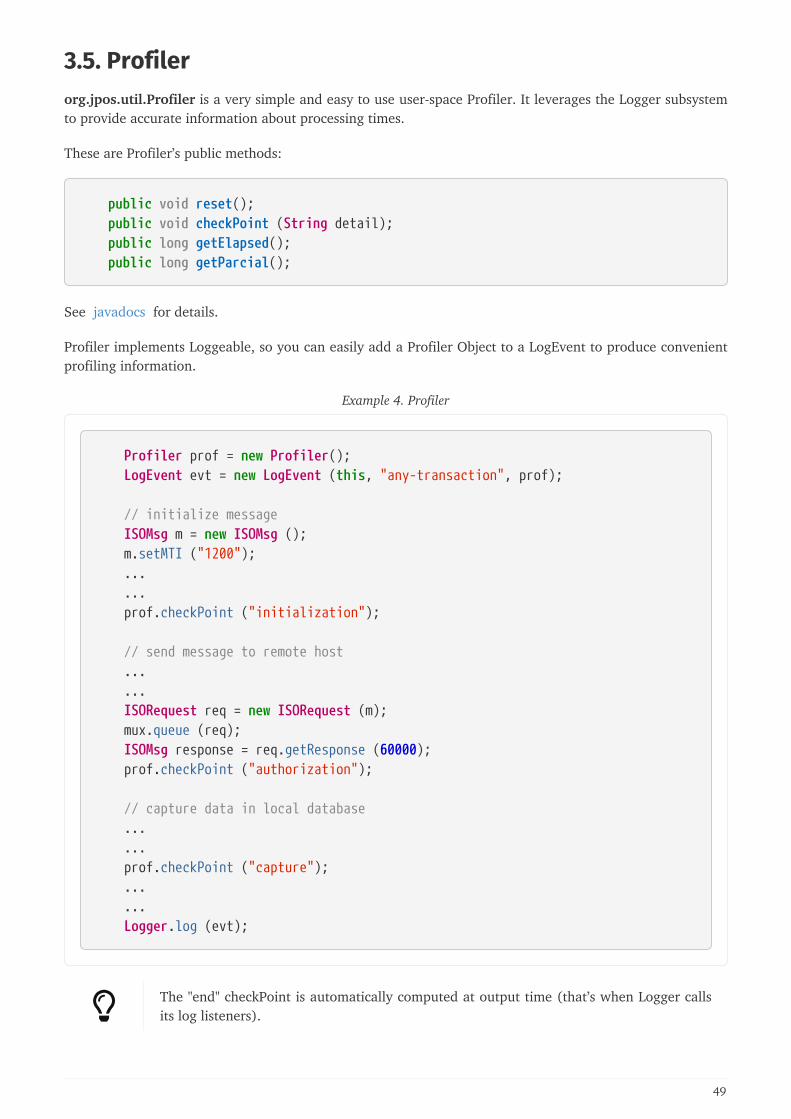
3.5. Profilerorg.jpos.util.Profiler is a very simple and easy to use user-space Profiler. It leverages the Logger subsystemto provide accurate information about processing times.
These are Profiler’s public methods:
public void reset(); public void checkPoint (String detail); public long getElapsed(); public long getParcial();
See javadocs for details.
Profiler implements Loggeable, so you can easily add a Profiler Object to a LogEvent to produce convenientprofiling information.
Example 4. Profiler
Profiler prof = new Profiler(); LogEvent evt = new LogEvent (this, "any-transaction", prof);
// initialize message ISOMsg m = new ISOMsg (); m.setMTI ("1200"); ... ... prof.checkPoint ("initialization");
// send message to remote host ... ... ISORequest req = new ISORequest (m); mux.queue (req); ISOMsg response = req.getResponse (60000); prof.checkPoint ("authorization");
// capture data in local database ... ... prof.checkPoint ("capture"); ... ... Logger.log (evt);
The "end" checkPoint is automatically computed at output time (that’s when Logger callsits log listeners).
49

The profiler output looks like this:
prepare: org.jpos.jcard.PrepareContext [0.2/0.2] ① prepare: org.jpos.jcard.CheckVersion [0.1/0.3] ② prepare: org.jpos.transaction.Open [1.0/1.3] prepare: org.jpos.jcard.Switch [0.1/1.5] prepare: org.jpos.jcard.NotSupported [0.1/1.7] prepare: org.jpos.jcard.PrepareResponse [11.2/13.0] prepare: org.jpos.transaction.Close [0.2/13.2] prepare: org.jpos.jcard.SendResponse [0.0/13.3] prepare: org.jpos.jcard.ProtectDebugInfo [0.1/13.4] prepare: org.jpos.transaction.Debug [0.0/13.5] commit: org.jpos.transaction.Close [1.8/15.4] commit: org.jpos.jcard.SendResponse [2.2/17.6] commit: org.jpos.jcard.ProtectDebugInfo [0.3/17.9] commit: org.jpos.transaction.Debug [3.9/21.9] ③ end [1.9/23.9] ④
① Partial 0.2 milliseconds, total so far, 0.2 milliseconds.
② CheckVersion took 0.1 milliseconds, so the total so far is 0.3 milliseconds.
③ Total so far, 21.9ms.
④ 1.9ms is the time between the last checkPoint and the log time.
3.6. DirPollSome jPOS-based applications have to interact with third-party legacy software (e.g., batch files comingfrom acquirers, retail applications, etc). Most of the time one can be lucky enough to deal with legacyapplications capable of sending transactions over decent protocols but sometimes you are not that lucky andthe best thing you can get is a disk-based interchange, i.e., they place a request in a given directory, youprocess that request and provide a response.
org.jpos.util.DirPoll uses the following directory structure (whose names are self explanatory):
..../archive ..../request ..../response ..../tmp ..../run ..../bad
and defines the following inner interfaces:
50
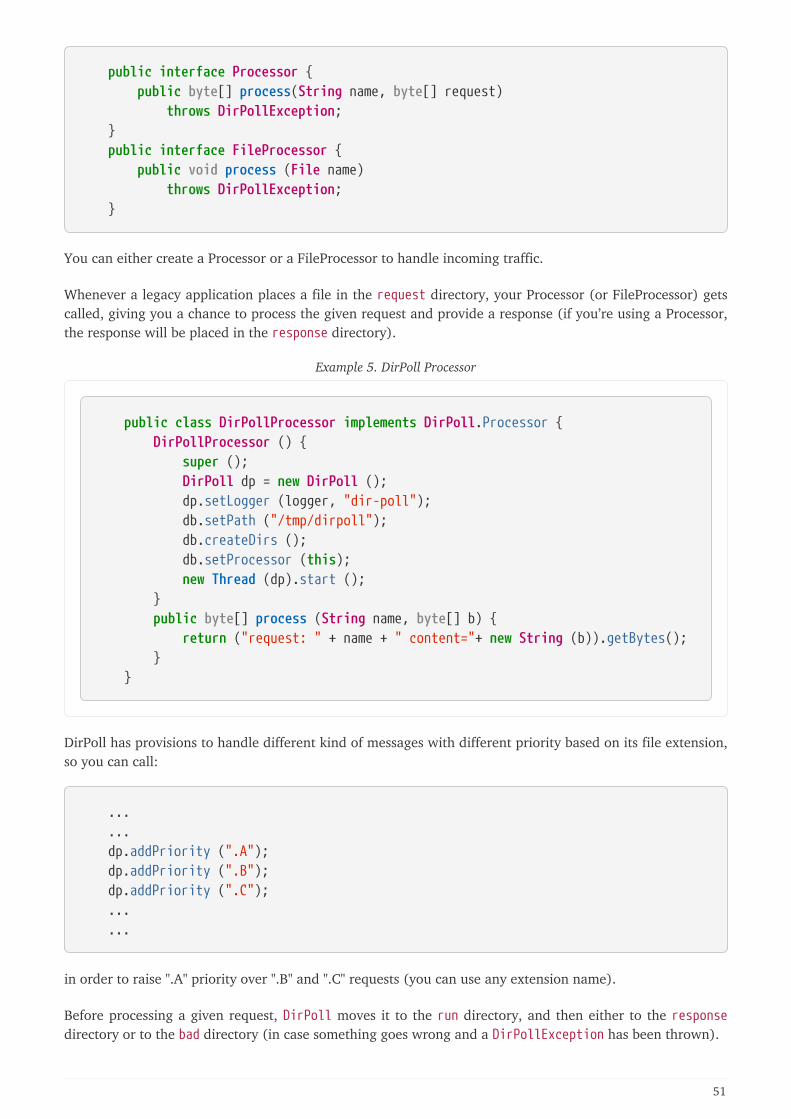
public interface Processor { public byte[] process(String name, byte[] request) throws DirPollException; } public interface FileProcessor { public void process (File name) throws DirPollException; }
You can either create a Processor or a FileProcessor to handle incoming traffic.
Whenever a legacy application places a file in the request directory, your Processor (or FileProcessor) getscalled, giving you a chance to process the given request and provide a response (if you’re using a Processor,the response will be placed in the response directory).
Example 5. DirPoll Processor
public class DirPollProcessor implements DirPoll.Processor { DirPollProcessor () { super (); DirPoll dp = new DirPoll (); dp.setLogger (logger, "dir-poll"); db.setPath ("/tmp/dirpoll"); db.createDirs (); db.setProcessor (this); new Thread (dp).start (); } public byte[] process (String name, byte[] b) { return ("request: " + name + " content="+ new String (b)).getBytes(); } }
DirPoll has provisions to handle different kind of messages with different priority based on its file extension,so you can call:
... ... dp.addPriority (".A"); dp.addPriority (".B"); dp.addPriority (".C"); ... ...
in order to raise ".A" priority over ".B" and ".C" requests (you can use any extension name).
Before processing a given request, DirPoll moves it to the run directory, and then either to the responsedirectory or to the bad directory (in case something goes wrong and a DirPollException has been thrown).
51
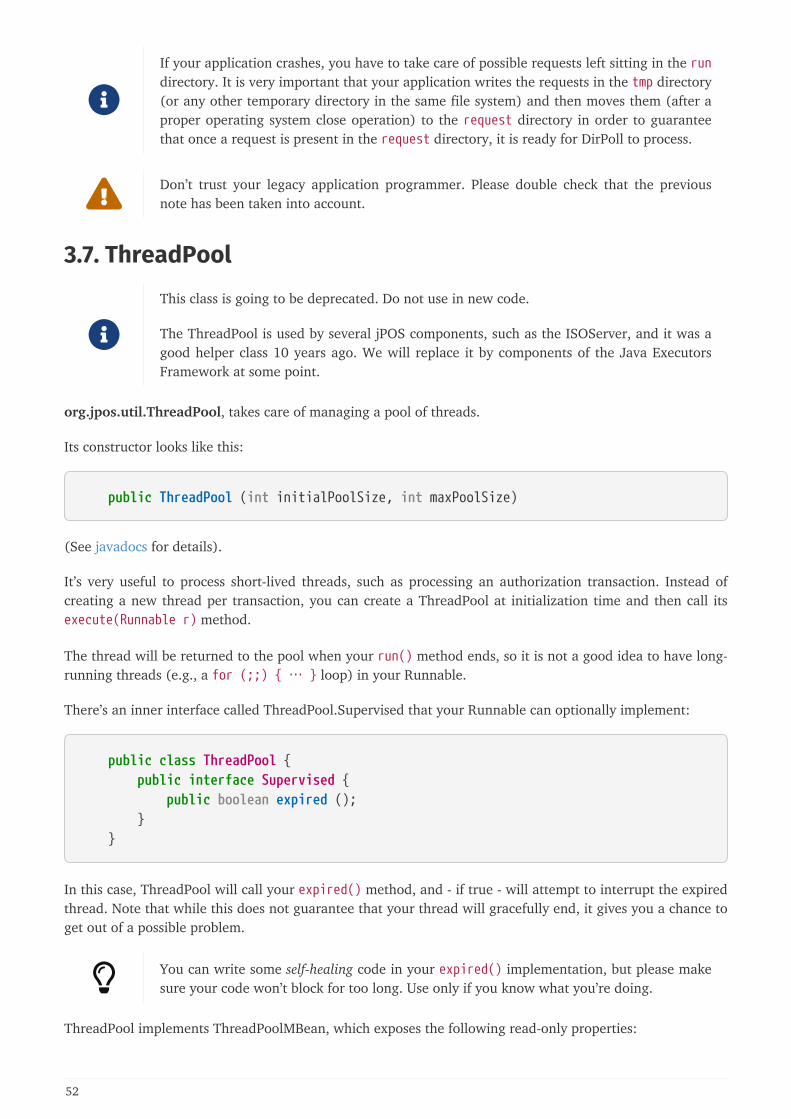
If your application crashes, you have to take care of possible requests left sitting in the rundirectory. It is very important that your application writes the requests in the tmp directory(or any other temporary directory in the same file system) and then moves them (after aproper operating system close operation) to the request directory in order to guaranteethat once a request is present in the request directory, it is ready for DirPoll to process.
Don’t trust your legacy application programmer. Please double check that the previousnote has been taken into account.
3.7. ThreadPool
This class is going to be deprecated. Do not use in new code.
The ThreadPool is used by several jPOS components, such as the ISOServer, and it was agood helper class 10 years ago. We will replace it by components of the Java ExecutorsFramework at some point.
org.jpos.util.ThreadPool, takes care of managing a pool of threads.
Its constructor looks like this:
public ThreadPool (int initialPoolSize, int maxPoolSize)
(See javadocs for details).
It’s very useful to process short-lived threads, such as processing an authorization transaction. Instead ofcreating a new thread per transaction, you can create a ThreadPool at initialization time and then call itsexecute(Runnable r) method.
The thread will be returned to the pool when your run() method ends, so it is not a good idea to have long-running threads (e.g., a for (;;) { … } loop) in your Runnable.
There’s an inner interface called ThreadPool.Supervised that your Runnable can optionally implement:
public class ThreadPool { public interface Supervised { public boolean expired (); } }
In this case, ThreadPool will call your expired() method, and - if true - will attempt to interrupt the expiredthread. Note that while this does not guarantee that your thread will gracefully end, it gives you a chance toget out of a possible problem.
You can write some self-healing code in your expired() implementation, but please makesure your code won’t block for too long. Use only if you know what you’re doing.
ThreadPool implements ThreadPoolMBean, which exposes the following read-only properties:
52
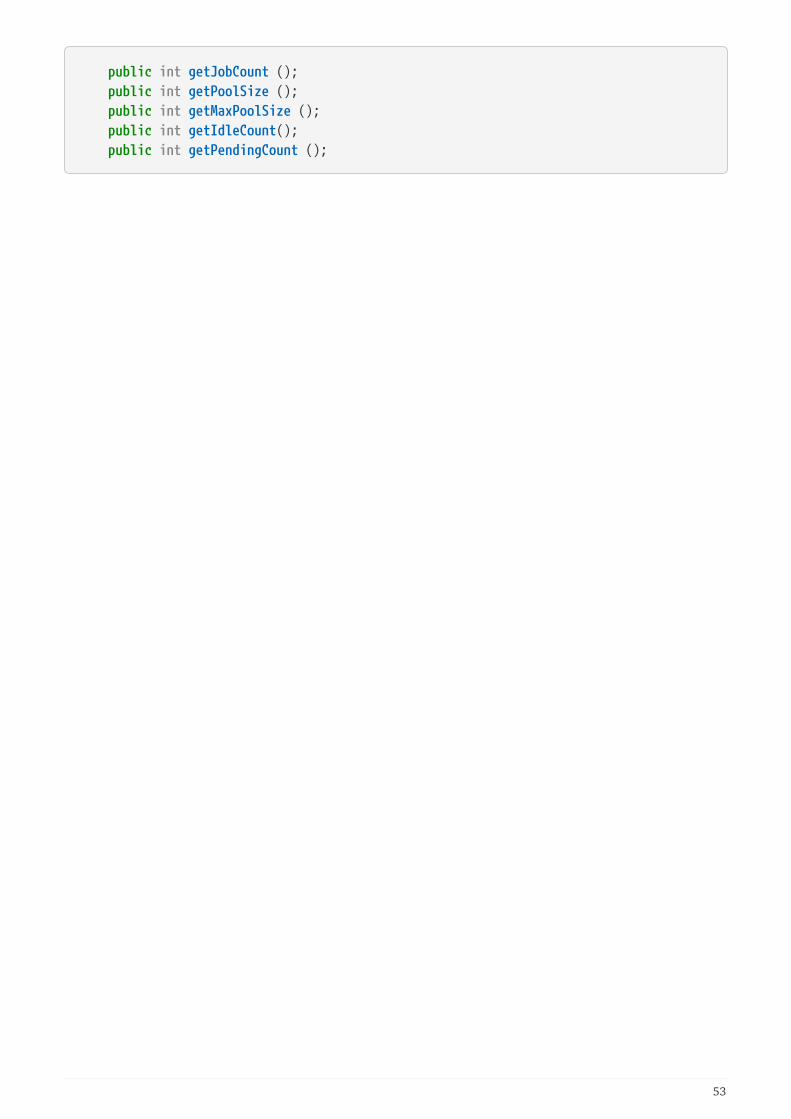
public int getJobCount (); public int getPoolSize (); public int getMaxPoolSize (); public int getIdleCount(); public int getPendingCount ();
53
Chapter 4. Packagers
4.1. Implementing Custom PackagersjPOS comes with several ISOPackager and ISOFieldPackager implementations that can be used either out-of-the-box or as a reference to encode (pack) and decode (unpack) messages that are built on the ISO-8583standard.
For a list of out-of-the-box packagers you may want to have a look at the followingdirectories:
• jpos/src/main/java/org/jpos/iso/packager (Java based packagers)
• jpos/src/main/resources/packager (GenericPackager configurations accessible as aresource)
• jpos/src/dist/cfg/packager (GenericPackager configurations accessible as externalfiles)
Although not required, most ISOPackager implementations extend the supporting class ISOBasePackager.This approach makes writing a custom packager a very simple task. It’s basically just a matter of calling itspublic void setFieldPackager (ISOFieldPackager[] fld) method with a suitable array ofISOFieldPackagers.
Let’s look at a sample implementation:
54
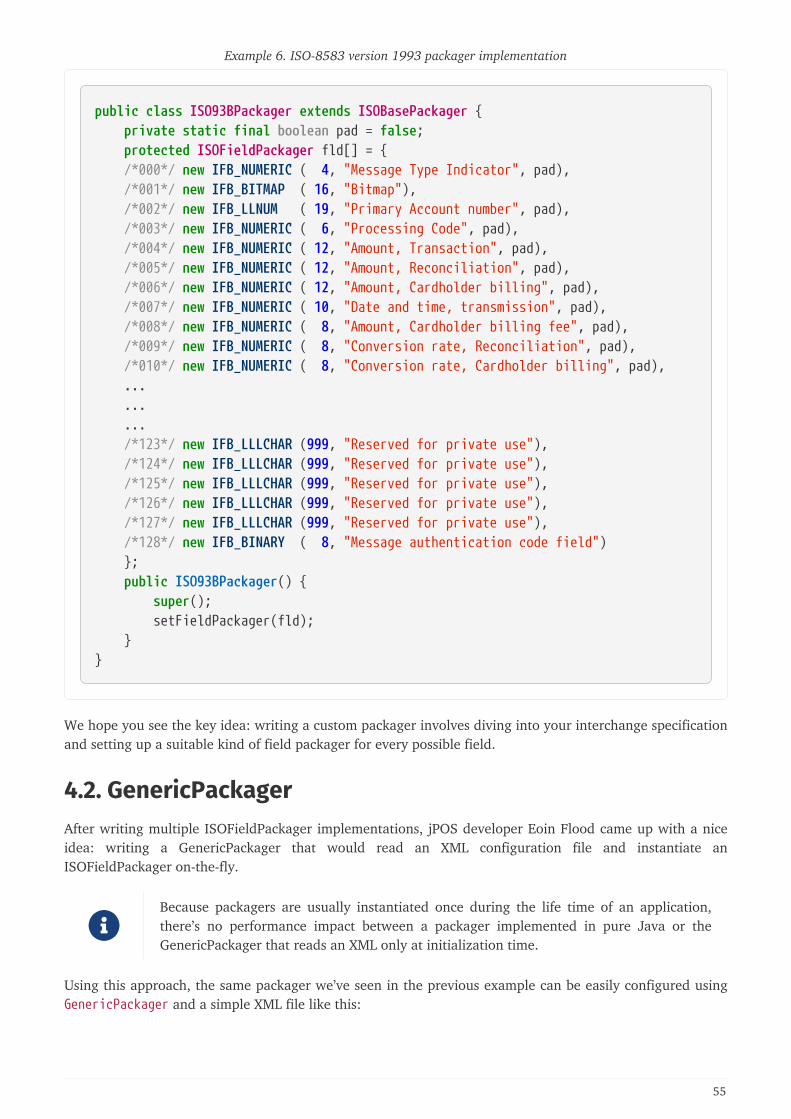
Example 6. ISO-8583 version 1993 packager implementation
public class ISO93BPackager extends ISOBasePackager { private static final boolean pad = false; protected ISOFieldPackager fld[] = { /*000*/ new IFB_NUMERIC ( 4, "Message Type Indicator", pad), /*001*/ new IFB_BITMAP ( 16, "Bitmap"), /*002*/ new IFB_LLNUM ( 19, "Primary Account number", pad), /*003*/ new IFB_NUMERIC ( 6, "Processing Code", pad), /*004*/ new IFB_NUMERIC ( 12, "Amount, Transaction", pad), /*005*/ new IFB_NUMERIC ( 12, "Amount, Reconciliation", pad), /*006*/ new IFB_NUMERIC ( 12, "Amount, Cardholder billing", pad), /*007*/ new IFB_NUMERIC ( 10, "Date and time, transmission", pad), /*008*/ new IFB_NUMERIC ( 8, "Amount, Cardholder billing fee", pad), /*009*/ new IFB_NUMERIC ( 8, "Conversion rate, Reconciliation", pad), /*010*/ new IFB_NUMERIC ( 8, "Conversion rate, Cardholder billing", pad), ... ... ... /*123*/ new IFB_LLLCHAR (999, "Reserved for private use"), /*124*/ new IFB_LLLCHAR (999, "Reserved for private use"), /*125*/ new IFB_LLLCHAR (999, "Reserved for private use"), /*126*/ new IFB_LLLCHAR (999, "Reserved for private use"), /*127*/ new IFB_LLLCHAR (999, "Reserved for private use"), /*128*/ new IFB_BINARY ( 8, "Message authentication code field") }; public ISO93BPackager() { super(); setFieldPackager(fld); }}
We hope you see the key idea: writing a custom packager involves diving into your interchange specificationand setting up a suitable kind of field packager for every possible field.
4.2. GenericPackagerAfter writing multiple ISOFieldPackager implementations, jPOS developer Eoin Flood came up with a niceidea: writing a GenericPackager that would read an XML configuration file and instantiate anISOFieldPackager on-the-fly.
Because packagers are usually instantiated once during the life time of an application,there’s no performance impact between a packager implemented in pure Java or theGenericPackager that reads an XML only at initialization time.
Using this approach, the same packager we’ve seen in the previous example can be easily configured usingGenericPackager and a simple XML file like this:
55
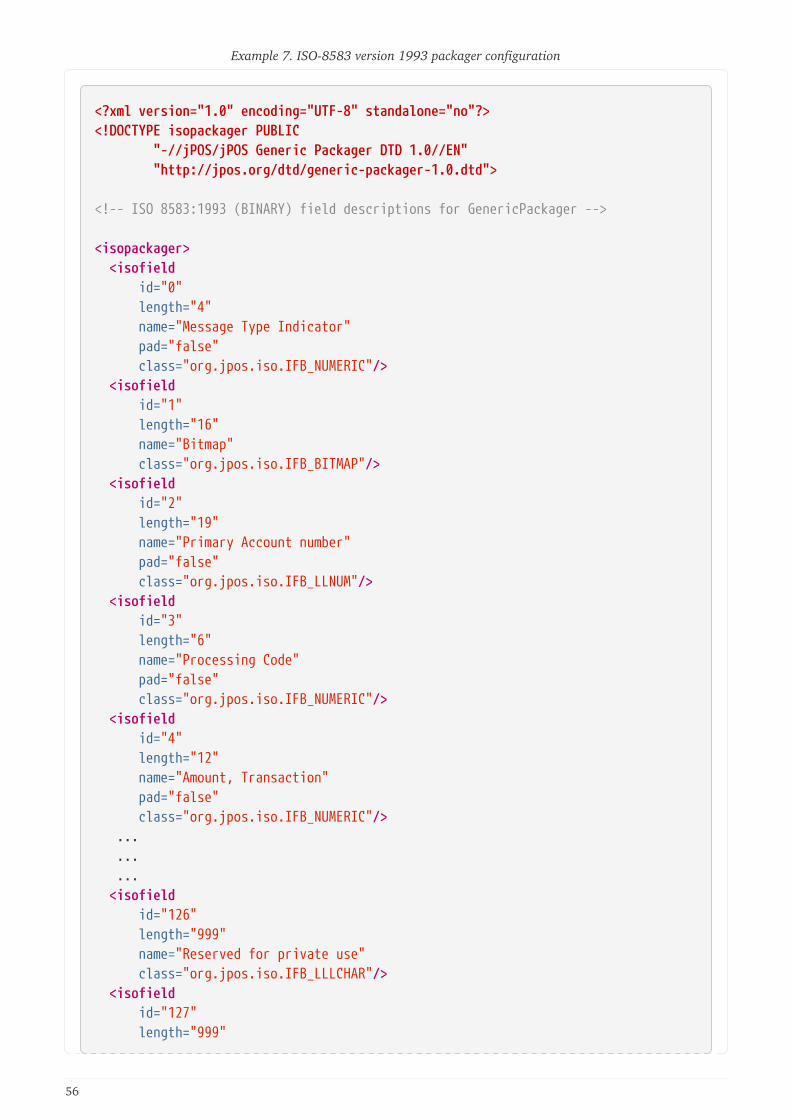
Example 7. ISO-8583 version 1993 packager configuration
<?xml version="1.0" encoding="UTF-8" standalone="no"?><!DOCTYPE isopackager PUBLIC "-//jPOS/jPOS Generic Packager DTD 1.0//EN" "http://jpos.org/dtd/generic-packager-1.0.dtd">
<!-- ISO 8583:1993 (BINARY) field descriptions for GenericPackager -->
<isopackager> <isofield id="0" length="4" name="Message Type Indicator" pad="false" class="org.jpos.iso.IFB_NUMERIC"/> <isofield id="1" length="16" name="Bitmap" class="org.jpos.iso.IFB_BITMAP"/> <isofield id="2" length="19" name="Primary Account number" pad="false" class="org.jpos.iso.IFB_LLNUM"/> <isofield id="3" length="6" name="Processing Code" pad="false" class="org.jpos.iso.IFB_NUMERIC"/> <isofield id="4" length="12" name="Amount, Transaction" pad="false" class="org.jpos.iso.IFB_NUMERIC"/> ... ... ... <isofield id="126" length="999" name="Reserved for private use" class="org.jpos.iso.IFB_LLLCHAR"/> <isofield id="127" length="999"
56
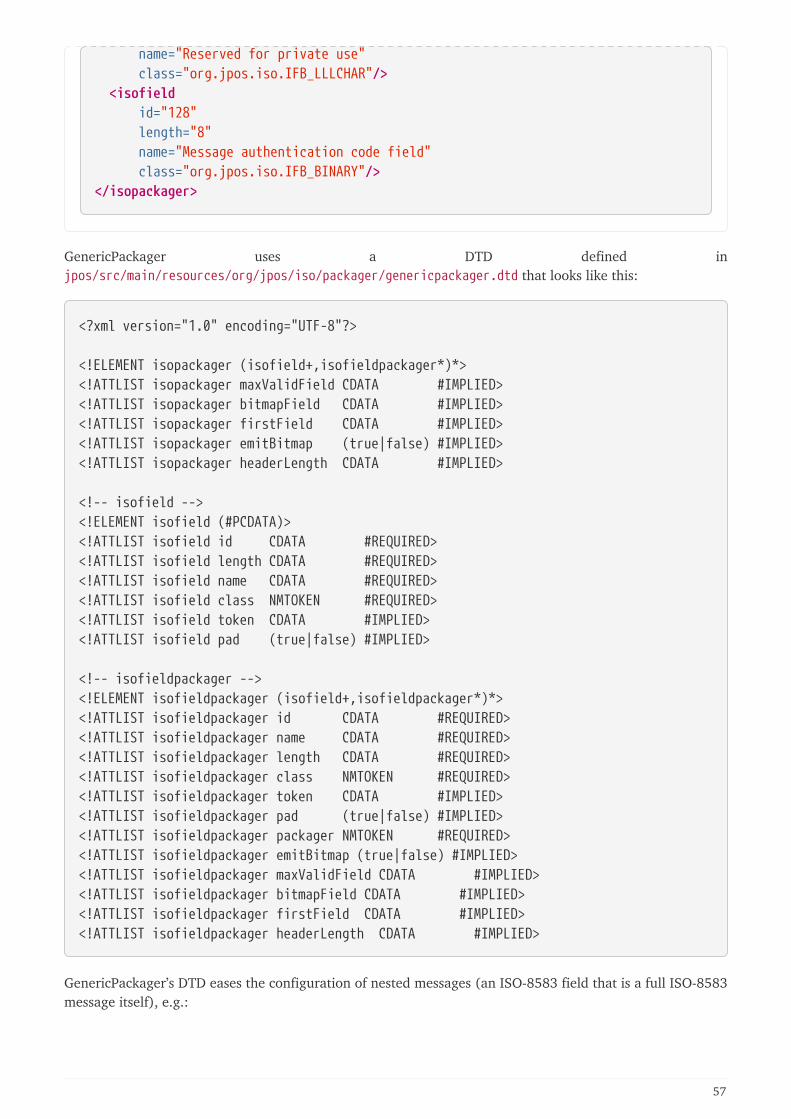
name="Reserved for private use" class="org.jpos.iso.IFB_LLLCHAR"/> <isofield id="128" length="8" name="Message authentication code field" class="org.jpos.iso.IFB_BINARY"/></isopackager>
GenericPackager uses a DTD defined injpos/src/main/resources/org/jpos/iso/packager/genericpackager.dtd that looks like this:
<?xml version="1.0" encoding="UTF-8"?>
<!ELEMENT isopackager (isofield+,isofieldpackager*)*><!ATTLIST isopackager maxValidField CDATA #IMPLIED><!ATTLIST isopackager bitmapField CDATA #IMPLIED><!ATTLIST isopackager firstField CDATA #IMPLIED><!ATTLIST isopackager emitBitmap (true|false) #IMPLIED><!ATTLIST isopackager headerLength CDATA #IMPLIED>
<!-- isofield --><!ELEMENT isofield (#PCDATA)><!ATTLIST isofield id CDATA #REQUIRED><!ATTLIST isofield length CDATA #REQUIRED><!ATTLIST isofield name CDATA #REQUIRED><!ATTLIST isofield class NMTOKEN #REQUIRED><!ATTLIST isofield token CDATA #IMPLIED><!ATTLIST isofield pad (true|false) #IMPLIED>
<!-- isofieldpackager --><!ELEMENT isofieldpackager (isofield+,isofieldpackager*)*><!ATTLIST isofieldpackager id CDATA #REQUIRED><!ATTLIST isofieldpackager name CDATA #REQUIRED><!ATTLIST isofieldpackager length CDATA #REQUIRED><!ATTLIST isofieldpackager class NMTOKEN #REQUIRED><!ATTLIST isofieldpackager token CDATA #IMPLIED><!ATTLIST isofieldpackager pad (true|false) #IMPLIED><!ATTLIST isofieldpackager packager NMTOKEN #REQUIRED><!ATTLIST isofieldpackager emitBitmap (true|false) #IMPLIED><!ATTLIST isofieldpackager maxValidField CDATA #IMPLIED><!ATTLIST isofieldpackager bitmapField CDATA #IMPLIED><!ATTLIST isofieldpackager firstField CDATA #IMPLIED><!ATTLIST isofieldpackager headerLength CDATA #IMPLIED>
GenericPackager’s DTD eases the configuration of nested messages (an ISO-8583 field that is a full ISO-8583message itself), e.g.:
57
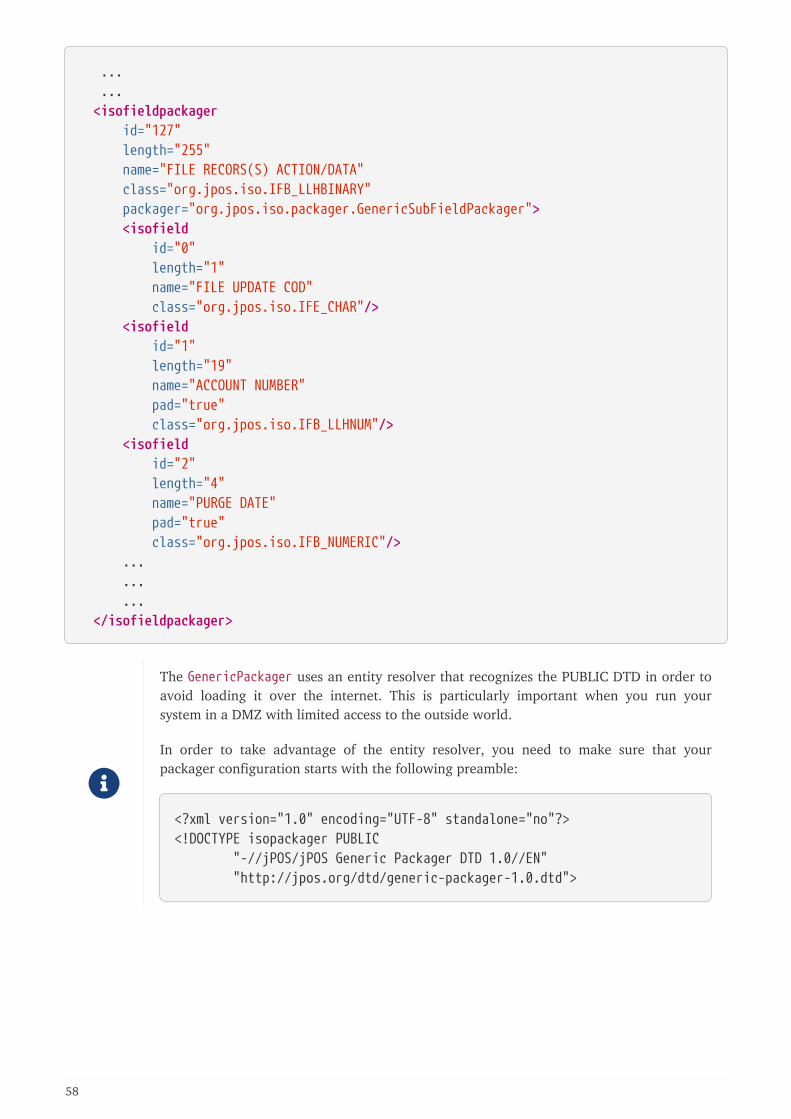
... ... <isofieldpackager id="127" length="255" name="FILE RECORS(S) ACTION/DATA" class="org.jpos.iso.IFB_LLHBINARY" packager="org.jpos.iso.packager.GenericSubFieldPackager"> <isofield id="0" length="1" name="FILE UPDATE COD" class="org.jpos.iso.IFE_CHAR"/> <isofield id="1" length="19" name="ACCOUNT NUMBER" pad="true" class="org.jpos.iso.IFB_LLHNUM"/> <isofield id="2" length="4" name="PURGE DATE" pad="true" class="org.jpos.iso.IFB_NUMERIC"/> ... ... ... </isofieldpackager>
The GenericPackager uses an entity resolver that recognizes the PUBLIC DTD in order toavoid loading it over the internet. This is particularly important when you run yoursystem in a DMZ with limited access to the outside world.
In order to take advantage of the entity resolver, you need to make sure that yourpackager configuration starts with the following preamble:
<?xml version="1.0" encoding="UTF-8" standalone="no"?><!DOCTYPE isopackager PUBLIC "-//jPOS/jPOS Generic Packager DTD 1.0//EN" "http://jpos.org/dtd/generic-packager-1.0.dtd">
58
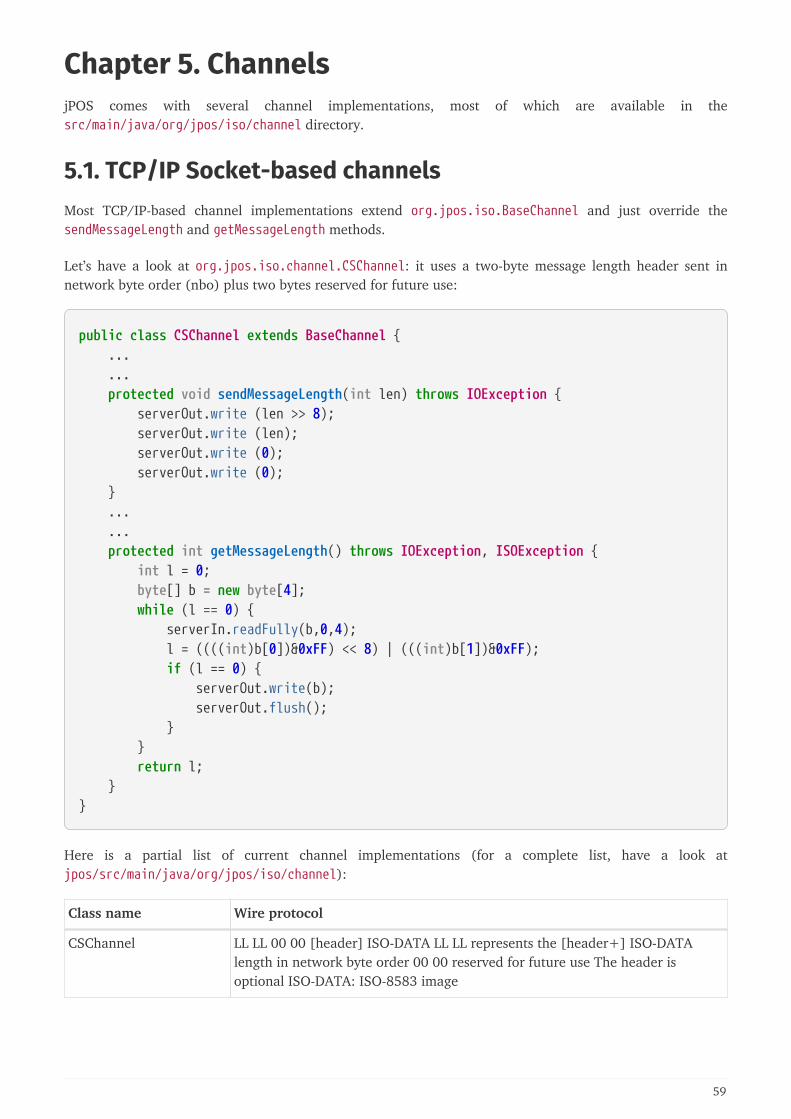
Chapter 5. ChannelsjPOS comes with several channel implementations, most of which are available in thesrc/main/java/org/jpos/iso/channel directory.
5.1. TCP/IP Socket-based channelsMost TCP/IP-based channel implementations extend org.jpos.iso.BaseChannel and just override thesendMessageLength and getMessageLength methods.
Let’s have a look at org.jpos.iso.channel.CSChannel: it uses a two-byte message length header sent innetwork byte order (nbo) plus two bytes reserved for future use:
public class CSChannel extends BaseChannel { ... ... protected void sendMessageLength(int len) throws IOException { serverOut.write (len >> 8); serverOut.write (len); serverOut.write (0); serverOut.write (0); } ... ... protected int getMessageLength() throws IOException, ISOException { int l = 0; byte[] b = new byte[4]; while (l == 0) { serverIn.readFully(b,0,4); l = ((((int)b[0])&0xFF) << 8) | (((int)b[1])&0xFF); if (l == 0) { serverOut.write(b); serverOut.flush(); } } return l; }}
Here is a partial list of current channel implementations (for a complete list, have a look atjpos/src/main/java/org/jpos/iso/channel):
Class name Wire protocol
CSChannel LL LL 00 00 [header] ISO-DATA LL LL represents the [header+] ISO-DATAlength in network byte order 00 00 reserved for future use The header isoptional ISO-DATA: ISO-8583 image
59
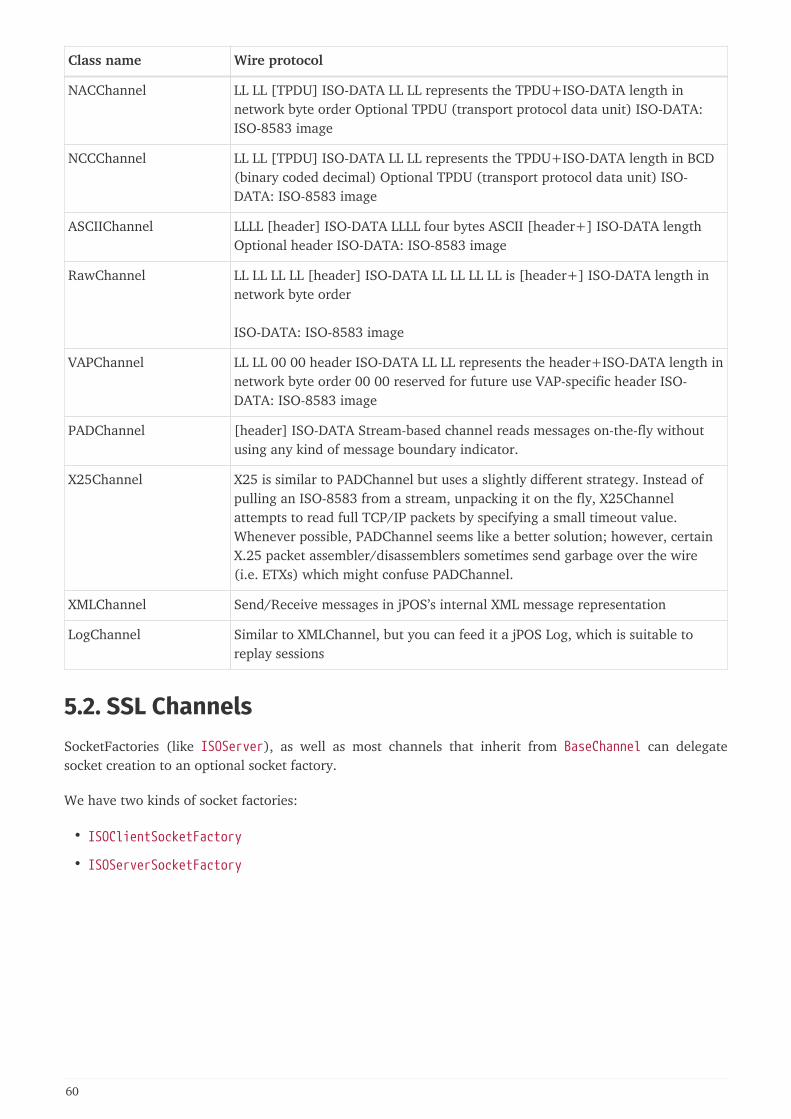
Class name Wire protocol
NACChannel LL LL [TPDU] ISO-DATA LL LL represents the TPDU+ISO-DATA length innetwork byte order Optional TPDU (transport protocol data unit) ISO-DATA:ISO-8583 image
NCCChannel LL LL [TPDU] ISO-DATA LL LL represents the TPDU+ISO-DATA length in BCD(binary coded decimal) Optional TPDU (transport protocol data unit) ISO-DATA: ISO-8583 image
ASCIIChannel LLLL [header] ISO-DATA LLLL four bytes ASCII [header+] ISO-DATA lengthOptional header ISO-DATA: ISO-8583 image
RawChannel LL LL LL LL [header] ISO-DATA LL LL LL LL is [header+] ISO-DATA length innetwork byte order
ISO-DATA: ISO-8583 image
VAPChannel LL LL 00 00 header ISO-DATA LL LL represents the header+ISO-DATA length innetwork byte order 00 00 reserved for future use VAP-specific header ISO-DATA: ISO-8583 image
PADChannel [header] ISO-DATA Stream-based channel reads messages on-the-fly withoutusing any kind of message boundary indicator.
X25Channel X25 is similar to PADChannel but uses a slightly different strategy. Instead ofpulling an ISO-8583 from a stream, unpacking it on the fly, X25Channelattempts to read full TCP/IP packets by specifying a small timeout value.Whenever possible, PADChannel seems like a better solution; however, certainX.25 packet assembler/disassemblers sometimes send garbage over the wire(i.e. ETXs) which might confuse PADChannel.
XMLChannel Send/Receive messages in jPOS’s internal XML message representation
LogChannel Similar to XMLChannel, but you can feed it a jPOS Log, which is suitable toreplay sessions
5.2. SSL ChannelsSocketFactories (like ISOServer), as well as most channels that inherit from BaseChannel can delegatesocket creation to an optional socket factory.
We have two kinds of socket factories:
• ISOClientSocketFactory
• ISOServerSocketFactory
60
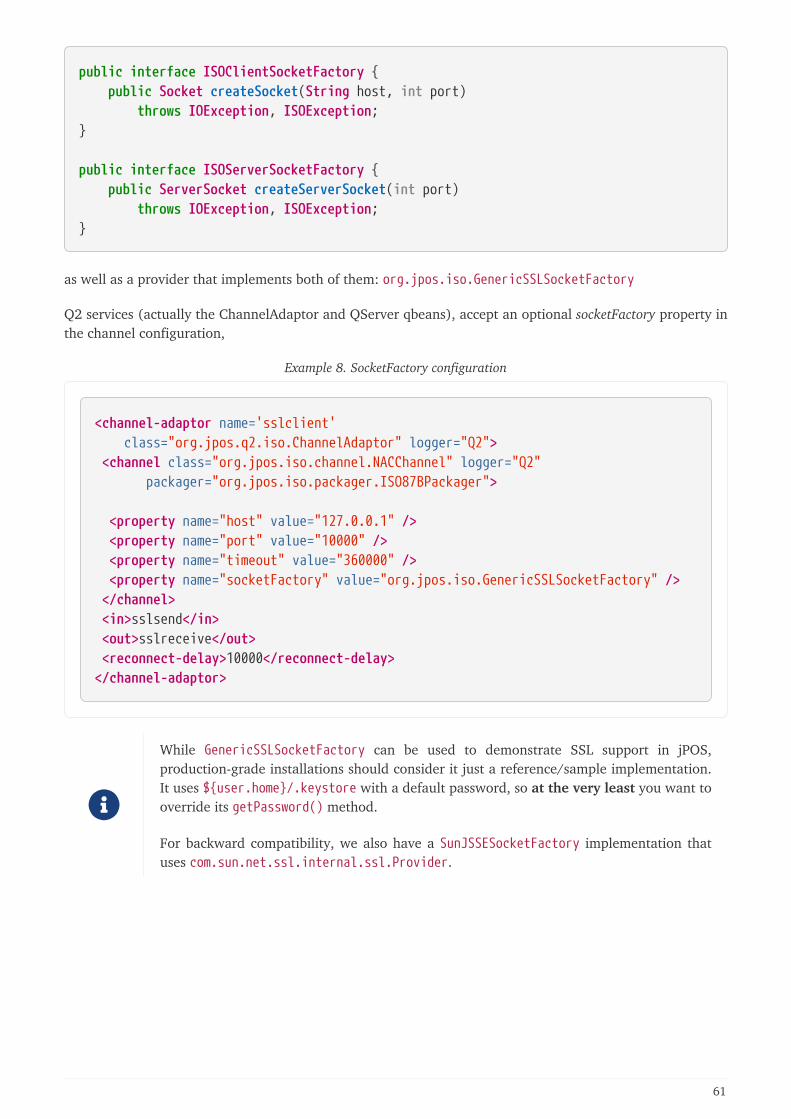
public interface ISOClientSocketFactory { public Socket createSocket(String host, int port) throws IOException, ISOException;}
public interface ISOServerSocketFactory { public ServerSocket createServerSocket(int port) throws IOException, ISOException;}
as well as a provider that implements both of them: org.jpos.iso.GenericSSLSocketFactory
Q2 services (actually the ChannelAdaptor and QServer qbeans), accept an optional socketFactory property inthe channel configuration,
Example 8. SocketFactory configuration
<channel-adaptor name='sslclient' class="org.jpos.q2.iso.ChannelAdaptor" logger="Q2"> <channel class="org.jpos.iso.channel.NACChannel" logger="Q2" packager="org.jpos.iso.packager.ISO87BPackager">
<property name="host" value="127.0.0.1" /> <property name="port" value="10000" /> <property name="timeout" value="360000" /> <property name="socketFactory" value="org.jpos.iso.GenericSSLSocketFactory" /> </channel> <in>sslsend</in> <out>sslreceive</out> <reconnect-delay>10000</reconnect-delay></channel-adaptor>
While GenericSSLSocketFactory can be used to demonstrate SSL support in jPOS,production-grade installations should consider it just a reference/sample implementation.It uses ${user.home}/.keystore with a default password, so at the very least you want tooverride its getPassword() method.
For backward compatibility, we also have a SunJSSESocketFactory implementation thatuses com.sun.net.ssl.internal.ssl.Provider.
61
GenericSSLSocketFactory honors two very important properties:
• addEnabledCipherSuite and
• addEnabledProtocol
For PCI compliance, you want to make sure which protocols and ciphersuites you want toenable. If these properties are not configured, all protocols and ciphersuites available tothe JVM will be enabled, something you probably don’t want.
5.3. LoopbackChannelLoopback channel bounces all received messages using a blocking queue. It can be used for simulationpurposes. When using in combination with a suitable ISOFilter, you can modify the outgoing or incoming(bounced) message so it can easily simulate a response.
62
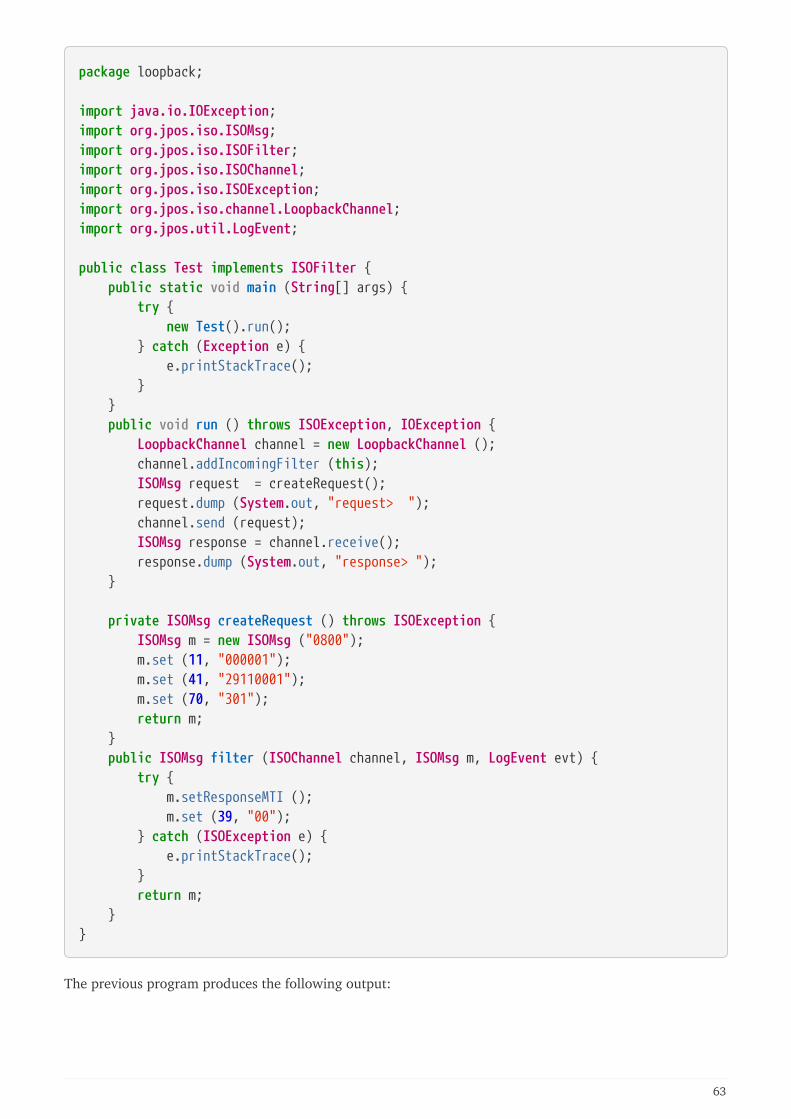
package loopback;
import java.io.IOException;import org.jpos.iso.ISOMsg;import org.jpos.iso.ISOFilter;import org.jpos.iso.ISOChannel;import org.jpos.iso.ISOException;import org.jpos.iso.channel.LoopbackChannel;import org.jpos.util.LogEvent;
public class Test implements ISOFilter { public static void main (String[] args) { try { new Test().run(); } catch (Exception e) { e.printStackTrace(); } } public void run () throws ISOException, IOException { LoopbackChannel channel = new LoopbackChannel (); channel.addIncomingFilter (this); ISOMsg request = createRequest(); request.dump (System.out, "request> "); channel.send (request); ISOMsg response = channel.receive(); response.dump (System.out, "response> "); }
private ISOMsg createRequest () throws ISOException { ISOMsg m = new ISOMsg ("0800"); m.set (11, "000001"); m.set (41, "29110001"); m.set (70, "301"); return m; } public ISOMsg filter (ISOChannel channel, ISOMsg m, LogEvent evt) { try { m.setResponseMTI (); m.set (39, "00"); } catch (ISOException e) { e.printStackTrace(); } return m; }}
The previous program produces the following output:
63
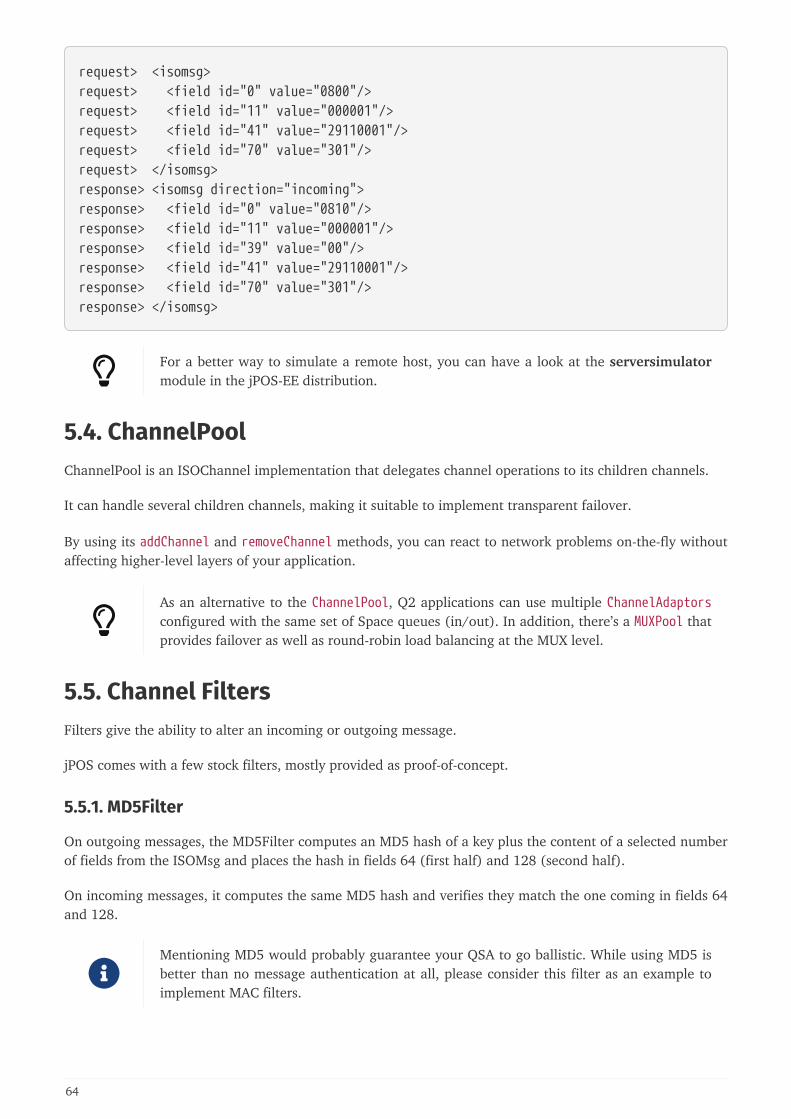
request> <isomsg>request> <field id="0" value="0800"/>request> <field id="11" value="000001"/>request> <field id="41" value="29110001"/>request> <field id="70" value="301"/>request> </isomsg>response> <isomsg direction="incoming">response> <field id="0" value="0810"/>response> <field id="11" value="000001"/>response> <field id="39" value="00"/>response> <field id="41" value="29110001"/>response> <field id="70" value="301"/>response> </isomsg>
For a better way to simulate a remote host, you can have a look at the serversimulatormodule in the jPOS-EE distribution.
5.4. ChannelPoolChannelPool is an ISOChannel implementation that delegates channel operations to its children channels.
It can handle several children channels, making it suitable to implement transparent failover.
By using its addChannel and removeChannel methods, you can react to network problems on-the-fly withoutaffecting higher-level layers of your application.
As an alternative to the ChannelPool, Q2 applications can use multiple ChannelAdaptorsconfigured with the same set of Space queues (in/out). In addition, there’s a MUXPool thatprovides failover as well as round-robin load balancing at the MUX level.
5.5. Channel FiltersFilters give the ability to alter an incoming or outgoing message.
jPOS comes with a few stock filters, mostly provided as proof-of-concept.
5.5.1. MD5Filter
On outgoing messages, the MD5Filter computes an MD5 hash of a key plus the content of a selected numberof fields from the ISOMsg and places the hash in fields 64 (first half) and 128 (second half).
On incoming messages, it computes the same MD5 hash and verifies they match the one coming in fields 64and 128.
Mentioning MD5 would probably guarantee your QSA to go ballistic. While using MD5 isbetter than no message authentication at all, please consider this filter as an example toimplement MAC filters.
64
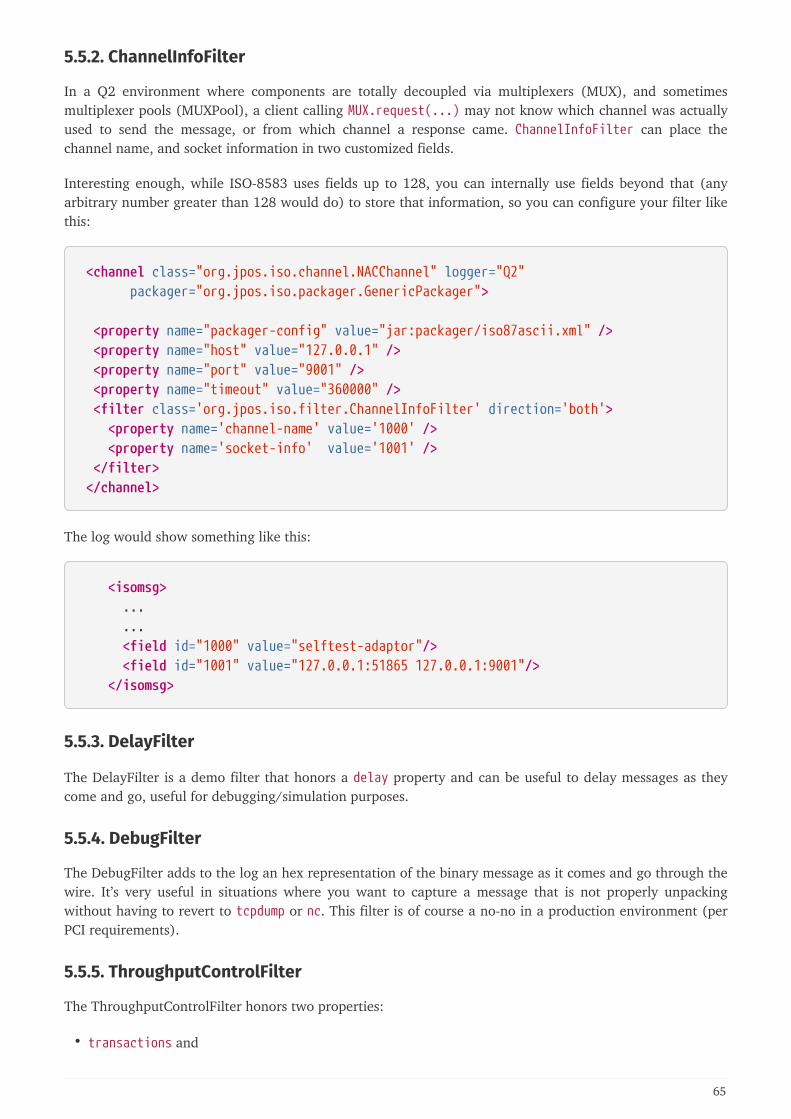
5.5.2. ChannelInfoFilter
In a Q2 environment where components are totally decoupled via multiplexers (MUX), and sometimesmultiplexer pools (MUXPool), a client calling MUX.request(...) may not know which channel was actuallyused to send the message, or from which channel a response came. ChannelInfoFilter can place thechannel name, and socket information in two customized fields.
Interesting enough, while ISO-8583 uses fields up to 128, you can internally use fields beyond that (anyarbitrary number greater than 128 would do) to store that information, so you can configure your filter likethis:
<channel class="org.jpos.iso.channel.NACChannel" logger="Q2" packager="org.jpos.iso.packager.GenericPackager">
<property name="packager-config" value="jar:packager/iso87ascii.xml" /> <property name="host" value="127.0.0.1" /> <property name="port" value="9001" /> <property name="timeout" value="360000" /> <filter class='org.jpos.iso.filter.ChannelInfoFilter' direction='both'> <property name='channel-name' value='1000' /> <property name='socket-info' value='1001' /> </filter> </channel>
The log would show something like this:
<isomsg> ... ... <field id="1000" value="selftest-adaptor"/> <field id="1001" value="127.0.0.1:51865 127.0.0.1:9001"/> </isomsg>
5.5.3. DelayFilter
The DelayFilter is a demo filter that honors a delay property and can be useful to delay messages as theycome and go, useful for debugging/simulation purposes.
5.5.4. DebugFilter
The DebugFilter adds to the log an hex representation of the binary message as it comes and go through thewire. It’s very useful in situations where you want to capture a message that is not properly unpackingwithout having to revert to tcpdump or nc. This filter is of course a no-no in a production environment (perPCI requirements).
5.5.5. ThroughputControlFilter
The ThroughputControlFilter honors two properties:
• transactions and
65
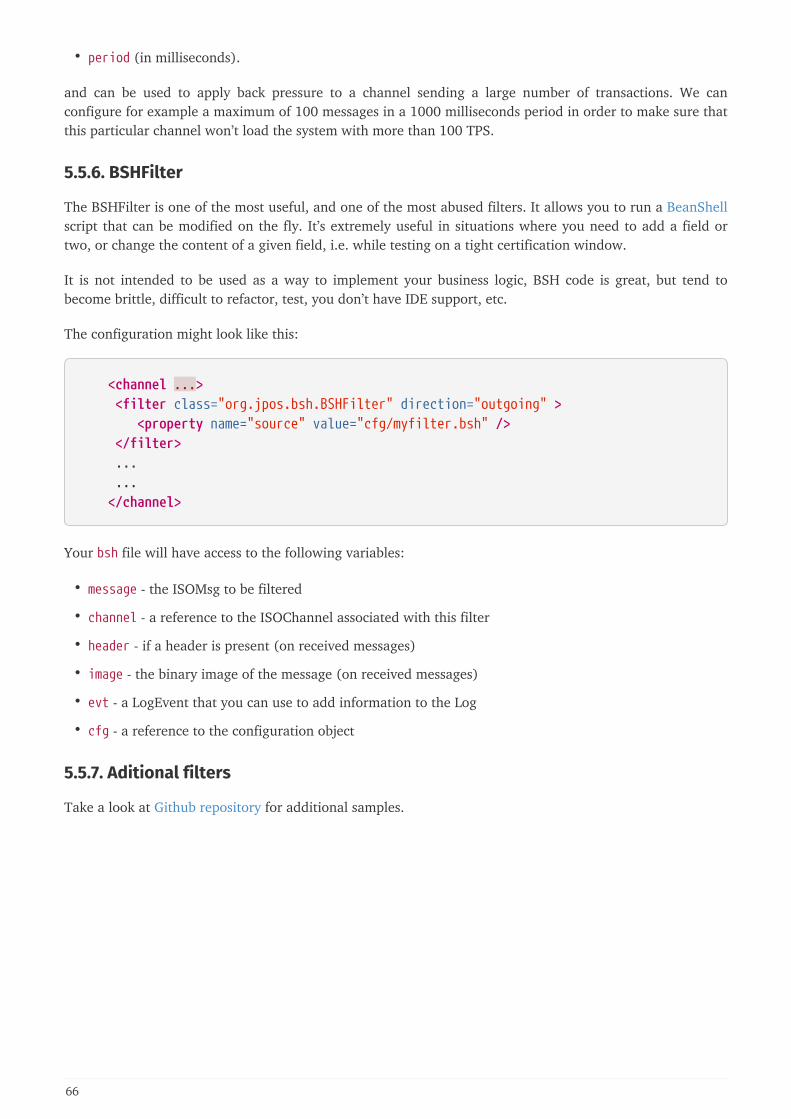
• period (in milliseconds).
and can be used to apply back pressure to a channel sending a large number of transactions. We canconfigure for example a maximum of 100 messages in a 1000 milliseconds period in order to make sure thatthis particular channel won’t load the system with more than 100 TPS.
5.5.6. BSHFilter
The BSHFilter is one of the most useful, and one of the most abused filters. It allows you to run a BeanShellscript that can be modified on the fly. It’s extremely useful in situations where you need to add a field ortwo, or change the content of a given field, i.e. while testing on a tight certification window.
It is not intended to be used as a way to implement your business logic, BSH code is great, but tend tobecome brittle, difficult to refactor, test, you don’t have IDE support, etc.
The configuration might look like this:
<channel ...> <filter class="org.jpos.bsh.BSHFilter" direction="outgoing" > <property name="source" value="cfg/myfilter.bsh" /> </filter> ... ... </channel>
Your bsh file will have access to the following variables:
• message - the ISOMsg to be filtered
• channel - a reference to the ISOChannel associated with this filter
• header - if a header is present (on received messages)
• image - the binary image of the message (on received messages)
• evt - a LogEvent that you can use to add information to the Log
• cfg - a reference to the configuration object
5.5.7. Aditional filters
Take a look at Github repository for additional samples.
66
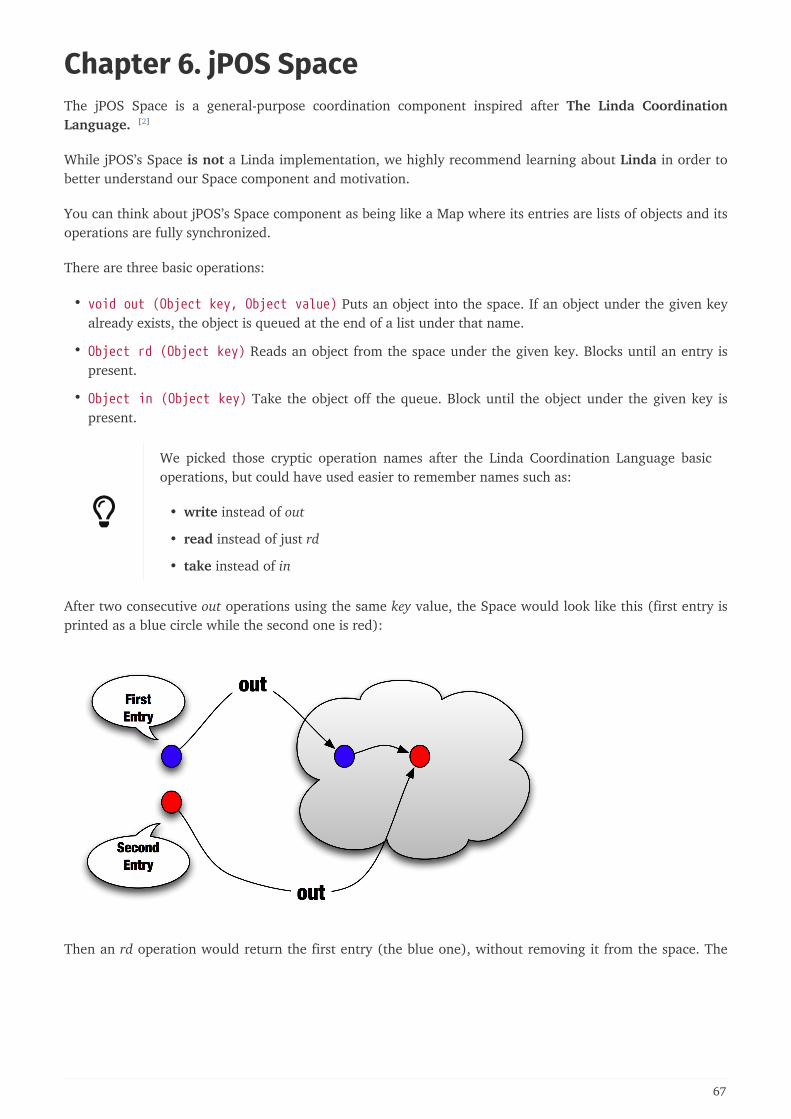
Chapter 6. jPOS SpaceThe jPOS Space is a general-purpose coordination component inspired after The Linda CoordinationLanguage. [2]
While jPOS’s Space is not a Linda implementation, we highly recommend learning about Linda in order tobetter understand our Space component and motivation.
You can think about jPOS’s Space component as being like a Map where its entries are lists of objects and itsoperations are fully synchronized.
There are three basic operations:
• void out (Object key, Object value) Puts an object into the space. If an object under the given keyalready exists, the object is queued at the end of a list under that name.
• Object rd (Object key) Reads an object from the space under the given key. Blocks until an entry ispresent.
• Object in (Object key) Take the object off the queue. Block until the object under the given key ispresent.
We picked those cryptic operation names after the Linda Coordination Language basicoperations, but could have used easier to remember names such as:
• write instead of out
• read instead of just rd
• take instead of in
After two consecutive out operations using the same key value, the Space would look like this (first entry isprinted as a blue circle while the second one is red):
Then an rd operation would return the first entry (the blue one), without removing it from the space. The
67

space remains with two entries for that particular key.
The in operation on the other hand, takes the first entry (the blue one) off the Space, leaving the red one.
At this point, a new rd operation will return the second entry (the red one) and an in operation wouldreturn the red one as well, leaving the space empty (further rd or in operations on that particular key willblock.
6.1. Space interfaceIn addition to those three basic operations, org.jpos.space.Space adds a few handy methods:
• void out (K key, V value, long timeout) Place an object into the space using an expiration timeout.The entry is automatically removed upon expiration.
• V rd (K key, long timeout) Wait a maximum of timeout milliseconds for a given entry; otherwise,return null.
• V in (K key, long timeout) Wait a maximum of timeout milliseconds for a given entry, and takes it;otherwise, return null.
• V rdp (K key) Read an entry if it exists (p for probe).
• Vinp (K key) Take an entry if it exists (again, p for probe).
• void nrd (K key) Block while key is present in the space. The operation name comes after not read.
• V nrd (K key, long timeout) Block up to timeout milliseconds while key is present in the space. Iftimeout is reached and key is still present, returns its value (as in rdp).
• void push (K key, V value) Same as out but the entry is placed at the head of the queue (like aStack’s push operation).
• void push (K key, V value, long timeout) Same as the previous push operation with a timeout inmillis.
68
• public void put (K key, V value) Like a Map.put operation, a Space.put wipes all entries that mayexist under a given key and puts just this one.
• public void put (K key, V value, long timeout) Same as previous one, but with a timeout.
See Javadoc for full details and additional helper methods (such as the handy existAny(K[] keys).
While org.jpos.space.Space supports ‘generics’, current implementations does notguarantee object type. Use with care as an unexpected ClassCastException can occurr.
The Space interface is small enough to show here:
package org.jpos.space;
public interface Space<K,V> { public void out (K key, V value); public void out (K key, V value, long timeout); public V in (Object key); public V rd (Object key); public V in (Object key, long timeout); public V rd (Object key, long timeout); public V inp (Object key); public V rdp (Object key); public void push (K key, V value); public void push (K key, V value, long timeout); public boolean existAny (K[] keys); public boolean existAny (K[] keys, long timeout); public void put (K key, V value); public void put (K key, V value, long timeout);}
6.2. Local Space interfaceThe Space implementation is designed to be easy to implement under different scenarios, such as persistentspaces, remote spaces, replicated spaces.
The LocalSpace interface enhances the Space interface in situations where the implementation runs in asingle JVM, such as the TSpace implementation.
The additional methods include:
public interface LocalSpace { public void addListener (Object key, SpaceListener listener); public void addListener (Object key, SpaceListener listener, long timeout); public void removeListener (Object key, SpaceListener listener);}
as well as some miscellaneous methods that could be expensive to transmit over the wire and were left outin the base Space implementation.
69
public Set getKeySet (); public int size (Object key);
The SpaceListener implementation looks like this:
public interface SpaceListener { public void notify (Object key, Object value);}
With the LocalSpace we can create event-driven consumers that allows us to reduce thenumber of threads. A good example is the thread-less lightweight QMUX implementation.
6.3. Space FactoryjPOS comes with several space implementations:
• TSpace : An in-memory space [3]
• JDBMSpace : a persistent JDBM based space implementation
• JESpace : a persistent Berkeley DB Java Edition based implementation
that can be instantiated using the SpaceFactory.
Although most Space implementations have either public constructors or factory methods that can be usedto create instances of their respective classes, we highly recommend using the SpaceFactory as the entrypoint for space creation or to obtain references to spaces that were previously created.
Example 9. Using the SpaceFactory
import org.jpos.space.Space; import org.jpos.space.SpaceFactory;
Space sp = SpaceFactory.getSpace();
The previous example returns a reference to the default space, which happens to be a TSpaceimplementation registered with the name default. It’s the same as calling:
Space sp = SpaceFactory.getSpace("tspace");
…which is also the same as calling:
Space sp = SpaceFactory.getSpace("tspace:default");
SpaceFactory decodes a space name based on the space implementation type, followed by an optional nameand optional parameter(s): spacetype\[:spacename\[:spaceparam}}
70
Table 17. Space Names
Type Implementation
tspace Creates or returns a reference to a previously-created instance of TSpace
jdbm Creates or returns a reference to a previously-created instance of JDBMSpace.This name accepts an optional parameter (after the Space name) which is apath to the persistent store, e.g., jdbm:myspace:/tmp/myspace.
je Creates or returns a reference to a previously-created instance of JESpace. Thisname accepts an optional parameter (after the Space name) which is a path tothe persistent store, e.g., jdbm:myspace:/tmp/myjespace.
spacelet Returns a reference to a previously-created instance of SpaceLet
Some components communicate through a default space that may change over time, so itis very important to SpaceFactory.getSpace() instead of instantiating your own. Inprevious versions, the default space was transient:default, and now is tspace:defaultbut this may change in future versions of jPOS as new Space implementations becomeavailable.
By sticking to SpaceFactory.getSpace() jPOS will give you always the default space forthe version you’re using.
6.4. TSpaceTSpace replaces the old TransientSpace as the new default in-memory Space used by jPOS components.
It’s the space you get when you call SpaceFactory.getSpace() and can be also instantiated using thetspace:xxx name (i.e. SpaceFactory.getSpace("tspace:myspace")).
TSpace implements the LocalSpace interface (see next Local Space interface).
Example 10. Sample TSpace use
import org.jpos.space.Space;import org.jpos.space.SpaceFactory;
Space sp = SpaceFactory.getSpace();sp.out("A", "The quick brown fox jumped over the lazy dog");System.out.println (sp.rdp ("A"));
6.5. JDBMSpaceJDBMSpace is a persistent space based on the popular jDBM key-value lightweight database.
It uses the SpaceFactory prefix jdbm that must be followed by a name, and an optional path, i.e.:
Space sp = SpaceFactory.getSpace("jdbm:myspace");
71

or
Space sp = SpaceFactory.getSpace("jdbm:myspace:data/myspace");
JDBMSpace is good and we’ve used it for a long time in production systems, but nowthere’s a new faster and more reliable implementation, the JESpace (see JESpace) basedon Berkeley DB Java Edition.
6.6. JESpaceJESpace is a persistent space based on Berkeley DB Java Edition.
It uses the SpaceFactory prefix je that must be followed by a name, and an optional path, i.e.:
Space sp = SpaceFactory("je:myspace");
or
Space sp = SpaceFactory("je:myspace:data/myspace");
6.7. SpaceInterceptorSpaceInterceptor implements the Space interface and can be used to intercept calls to a given Space withouthaving to extend its implementation (See Javadoc for full details).
Using a SpaceInterceptor, the developer can override specific methods in order to perform aditional tasks.
6.8. SpaceTapSpaceTap is a SpaceListener that can be used to monitor a given LocalSpace for new entries under a givenkey.
Once a SpaceTap is created, it register itself as a listener in the source LocalSpace and copies all new entriesto a destination space.
Space Tap
72

If you have a source LocalSpace ssp and a destination LocalSpace dsp and you want to monitor an entrycalled "ERRORS", we can use code like this:
SpaceTap spt = new SpaceTap (ssp, dsp, "ERRORS", "ERRORS.COPY", 5000L);
If your "source" space and "destination" space are the same, you can use the shorterconstructor:
SpaceTap (LocalSpace ssp, Object key, Object tapKey, long timeout);
The SpaceTap can be used for system monitoring purposes as it provides a non-intrusive way to "tap" anygiven space queue.
6.9. SpaceUtilIn SpaceUtil we put together general purpose helper methods that can be used with any Spaceimplementation.
• inpAll pulls all entries under a given key and return them in an array.
• wipe remove all entries under a given key
• nextLong When used in combination with a persistent Space (such as JDBMSpace or JESpace), thismethod can be used to easilyl implement sequencers, i.e:
import org.jpos.space.*;Space sp = SpaceFactory.getSpace("je:sequencers");long l = SpaceUtil.nextLong(sp, "traceno");
Regularly monitor this class, as we may add new helper methods in the future.
[2] See http://www.cs.yale.edu/Linda/linda-lang.html
[3] TSpace implements LocalSpace
73
Chapter 7. Q2In jPOS versions earlier than 1.5.0, the main for the jPOS application was a component called QSP.
The term QSP comes after the hamradio Q-signal codes and it means "Relay message forfree". Because jPOS was used to relay messages, and it is free software, in the deep nerdymind of the author, the term QSP made sense [4].
That’s one of the reasons you’ll see so many _Q_s in the code (QServer, QMUX, Q2 …).
After deploying QSP in several mission-critical applications, we found that including all the components in asingle [huge] XML configuration file was not a good idea.
• Although several QSP components supported some limited ReConfiguration, many others din’t. As aresult, major changes usually involved restarting the application (a very costly operation in a 24/7system)
• If for some reason, the changes involved went beyond just tweaking a configuration file and requiredadditional changes in a supporting jar file, the application had to be restarted (QSP didn’t supportdynamic classloading).
• Having a single big configuration file has proven to be error-prone. Although initially intended to beaccessible to system operators, changing QSP files on critical systems became an art reserved forexperienced operators.
Therefore, we’ve decided to use a simpler approach: A new container (called Q2, short for QSP version 2)with a file per component and a very simple lifecycle to ease the implementation of such components, calledQBeans (Q2 Beans).
We use the terms QBeans and Q2 service interchangeable.
QBeans are MBeans (see JMX specs) that implement the Q2’s lifecycle (init/start/stop/destroy) set ofoperations. Q2 takes care of registering them with the system’s MBeanServer.
7.1. Running Q2Running Q2 is as simple as calling java -jar jpos.jar, provided the jPOS dependencies are available in thelib directory.
The reason why this works without setting a specific CLASSPATH is because we have configured the buildsystem to produce a suitable MANIFEST.MF that contains the following relevant parts:
...
...Main-Class: org.jpos.q2.Q2Class-Path: lib/jdom-1.1.3.jar lib/jdbm-1.0.jar lib/je-4.1.10.jar lib/ commons-cli-1.2.jar lib/jline-1.0.jar lib/bsh-2.0b5.jar lib/javatuple s-1.2.jar lib/xercesImpl-2.10.0.jar lib/org.osgi.core-4.3.1.jar lib/x ml-apis-1.4.01.jar......
74
You can of course use the more convenient bin/q2 script (or bin\q2.bat in Windows), butyou don’t have to worry about setting up a classpath if the lib directory relative to yourcurrent working directory has the appropriate support files.
Q2 accepts several command line switches; for a complete list, use --help, e.g.:
bin/q2 --help
usage: Q2 -C,--config <arg> Configuration bundle -c,--command <arg> Command to execute -d,--deploydir <arg> Deployment directory -e,--encrypt <arg> Encrypt configuration bundle -h,--help Usage information -i,--cli Command Line Interface -n,--name <arg> Optional name (defaults to 'Q2') -O,--osgi Start experimental OSGi framework server -p,--pid-file <arg> Store project's pid -r,--recursive Deploy subdirectories recursively -s,--ssh Enable SSH server -sa,--ssh-authorized-keys <arg> Path to authorized key file (defaults to 'cfg/authorized_keys') -sh,--ssh-host-key-file <arg> ssh host key file, defaults to 'cfg/hostkeys.ser' -sp,--ssh-port <arg> ssh port (defaults to 2222) -su,--ssh-user <arg> ssh user (defaults to 'admin') -v,--version Q2's version
Q2 has a reasonable set of defaults so you usually don’t have to use any argument when calling it. A simplecall to bin/q2 should look like this:
<log realm="Q2.system" at="2016-10-16T20:19:41.174"> <info> Q2 started, deployDir=/Users/apr/git/jpos/jpos/build/install/jpos/deploy </info></log>
Please pay attention to the deployDir shown in the previous log message. In this case, itreads /home/jpos/git/jpos/jpos/build/install/jpos/deploy
You can override the default deploy directory using the --deploydir (or just -d) optionwhen calling Q2.
In this particular case, we are running off the build/install/jpos directory, because wecalled gradle installApp which is handy for local tests.
At start up time, Q2 scans the deploy directory looking for deployment descriptors (that we also call
75
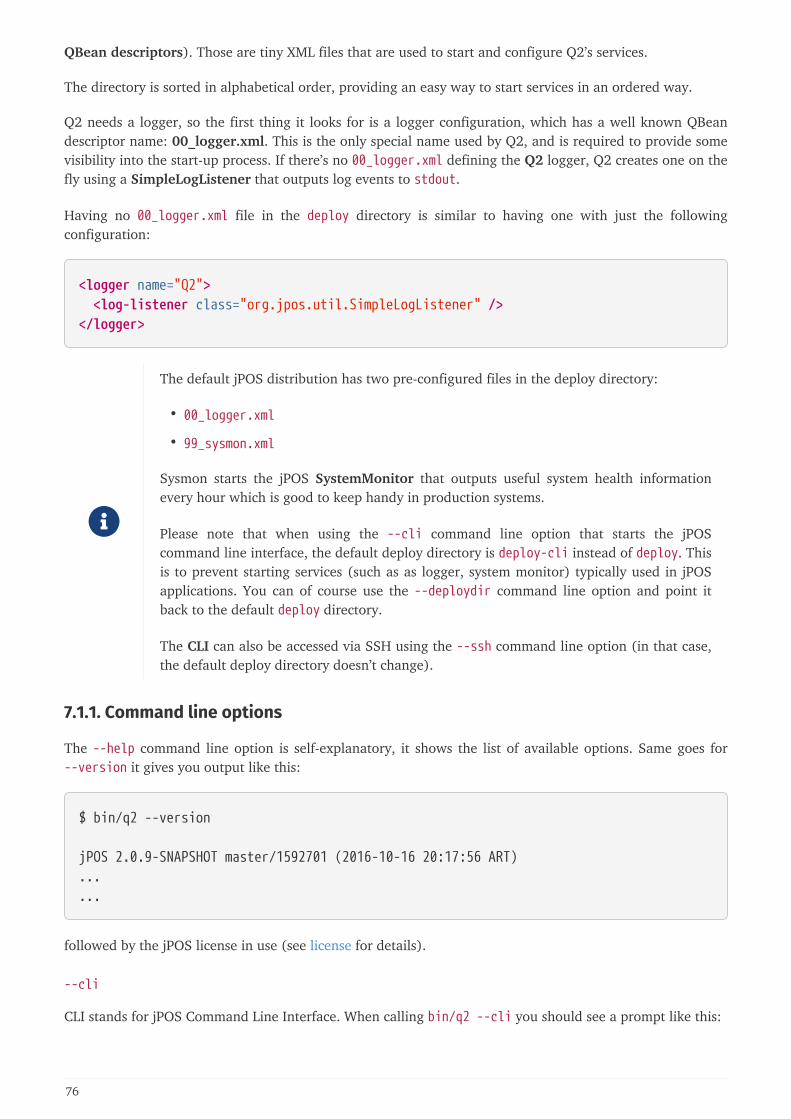
QBean descriptors). Those are tiny XML files that are used to start and configure Q2’s services.
The directory is sorted in alphabetical order, providing an easy way to start services in an ordered way.
Q2 needs a logger, so the first thing it looks for is a logger configuration, which has a well known QBeandescriptor name: 00_logger.xml. This is the only special name used by Q2, and is required to provide somevisibility into the start-up process. If there’s no 00_logger.xml defining the Q2 logger, Q2 creates one on thefly using a SimpleLogListener that outputs log events to stdout.
Having no 00_logger.xml file in the deploy directory is similar to having one with just the followingconfiguration:
<logger name="Q2"> <log-listener class="org.jpos.util.SimpleLogListener" /></logger>
The default jPOS distribution has two pre-configured files in the deploy directory:
• 00_logger.xml
• 99_sysmon.xml
Sysmon starts the jPOS SystemMonitor that outputs useful system health informationevery hour which is good to keep handy in production systems.
Please note that when using the --cli command line option that starts the jPOScommand line interface, the default deploy directory is deploy-cli instead of deploy. Thisis to prevent starting services (such as as logger, system monitor) typically used in jPOSapplications. You can of course use the --deploydir command line option and point itback to the default deploy directory.
The CLI can also be accessed via SSH using the --ssh command line option (in that case,the default deploy directory doesn’t change).
7.1.1. Command line options
The --help command line option is self-explanatory, it shows the list of available options. Same goes for--version it gives you output like this:
$ bin/q2 --version
jPOS 2.0.9-SNAPSHOT master/1592701 (2016-10-16 20:17:56 ART)......
followed by the jPOS license in use (see license for details).
--cli
CLI stands for jPOS Command Line Interface. When calling bin/q2 --cli you should see a prompt like this:
76
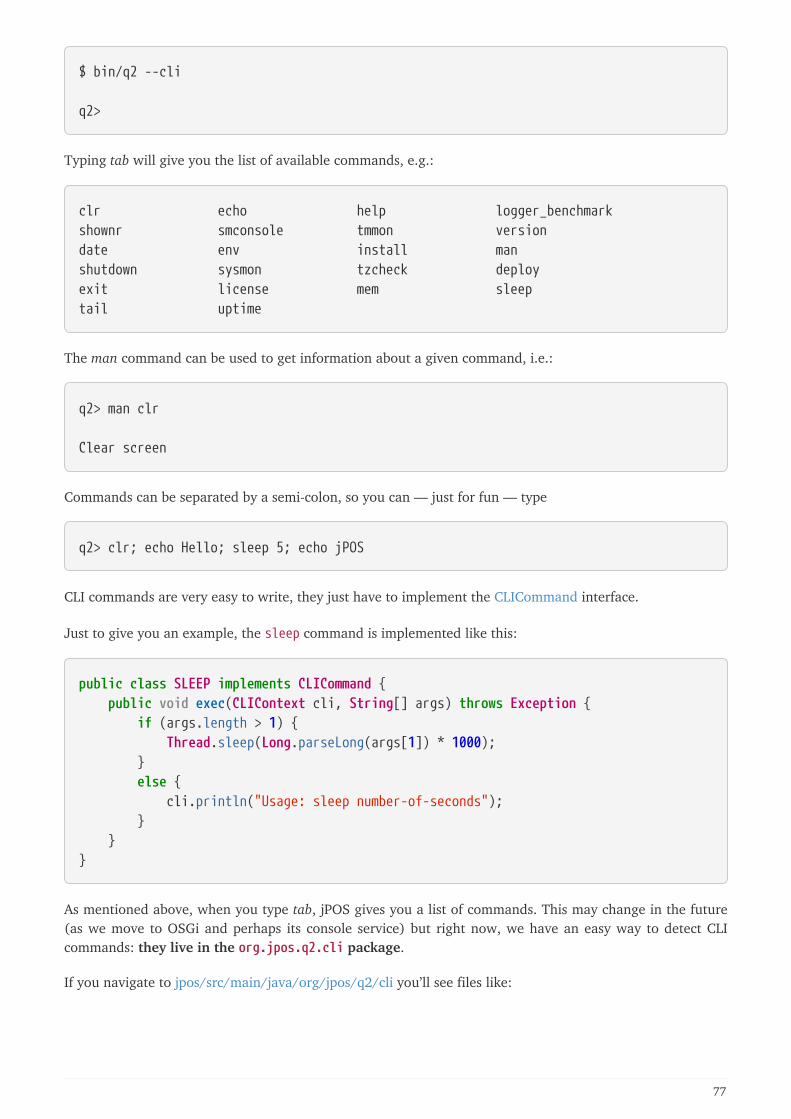
$ bin/q2 --cli
q2>
Typing tab will give you the list of available commands, e.g.:
clr echo help logger_benchmarkshownr smconsole tmmon versiondate env install manshutdown sysmon tzcheck deployexit license mem sleeptail uptime
The man command can be used to get information about a given command, i.e.:
q2> man clr
Clear screen
Commands can be separated by a semi-colon, so you can — just for fun — type
q2> clr; echo Hello; sleep 5; echo jPOS
CLI commands are very easy to write, they just have to implement the CLICommand interface.
Just to give you an example, the sleep command is implemented like this:
public class SLEEP implements CLICommand { public void exec(CLIContext cli, String[] args) throws Exception { if (args.length > 1) { Thread.sleep(Long.parseLong(args[1]) * 1000); } else { cli.println("Usage: sleep number-of-seconds"); } }}
As mentioned above, when you type tab, jPOS gives you a list of commands. This may change in the future(as we move to OSGi and perhaps its console service) but right now, we have an easy way to detect CLIcommands: they live in the org.jpos.q2.cli package.
If you navigate to jpos/src/main/java/org/jpos/q2/cli you’ll see files like:
77
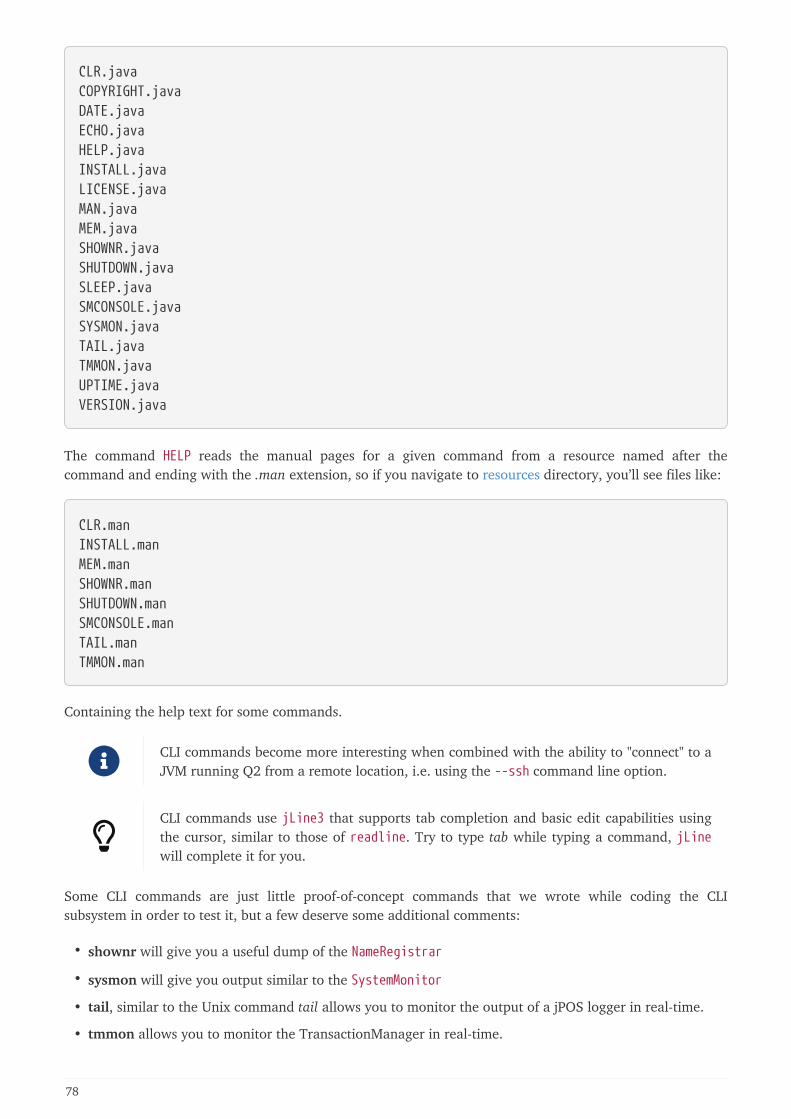
CLR.javaCOPYRIGHT.javaDATE.javaECHO.javaHELP.javaINSTALL.javaLICENSE.javaMAN.javaMEM.javaSHOWNR.javaSHUTDOWN.javaSLEEP.javaSMCONSOLE.javaSYSMON.javaTAIL.javaTMMON.javaUPTIME.javaVERSION.java
The command HELP reads the manual pages for a given command from a resource named after thecommand and ending with the .man extension, so if you navigate to resources directory, you’ll see files like:
CLR.manINSTALL.manMEM.manSHOWNR.manSHUTDOWN.manSMCONSOLE.manTAIL.manTMMON.man
Containing the help text for some commands.
CLI commands become more interesting when combined with the ability to "connect" to aJVM running Q2 from a remote location, i.e. using the --ssh command line option.
CLI commands use jLine3 that supports tab completion and basic edit capabilities usingthe cursor, similar to those of readline. Try to type tab while typing a command, jLinewill complete it for you.
Some CLI commands are just little proof-of-concept commands that we wrote while coding the CLIsubsystem in order to test it, but a few deserve some additional comments:
• shownr will give you a useful dump of the NameRegistrar
• sysmon will give you output similar to the SystemMonitor
• tail, similar to the Unix command tail allows you to monitor the output of a jPOS logger in real-time.
• tmmon allows you to monitor the TransactionManager in real-time.
78
• smconsole is a wrapper around the old jPOS security console that allows you to call it from the jPOS jarso that you don’t have to setup the full classpath.
• install extracts sample QBean descriptors from jars in the classpath and place them in the deploydirectory
The last command install deserves further comment. In jPOS-EE we build applications offmultiple little modules that are distributed via a Maven repository. Some of those requiresome configuration files that are usually placed in the META-INF/q2/installs directory.
If you look inside the jPOS jar, you’ll see that the META-INF/q2/installs directory containsample deploy/00_logger.xml and deploy/99_sysmon.xml that could be easily extractedusing the aforementioned install command.
--command <arg>
Can be used to run a CLI command from the command line, e.g.:
bin/q2 --command "install --force"
--deploydir <arg>
If you want to use a deploy directory other than the default deploy you can use this deploydir option. Thiscan be useful to run different environments (i.e. deploy_prod versus deploy_test).
--recursive
This allows you to put some order and hierarchy into your deploy directory if it becomes too big. You cancreate sub directories to group together deployment descriptors associated with different subsystems.
--config <arg>
During the migration from QSP to Q2, jPOS users were used to the monolithic QSP single XML file and whilemost users appreciated the value of the fine grained file-per-service configuration, a few others requested tokeep the ability to run off a single configuration file.
To create a single config file, you can concatenate together multiple Q2 descriptors and wrap them with anouter root XML element. The name of the outer element is not defined, you can use anything you like, i.e:<q2> or <bundle> or any other name.
Here is a sample config:
79
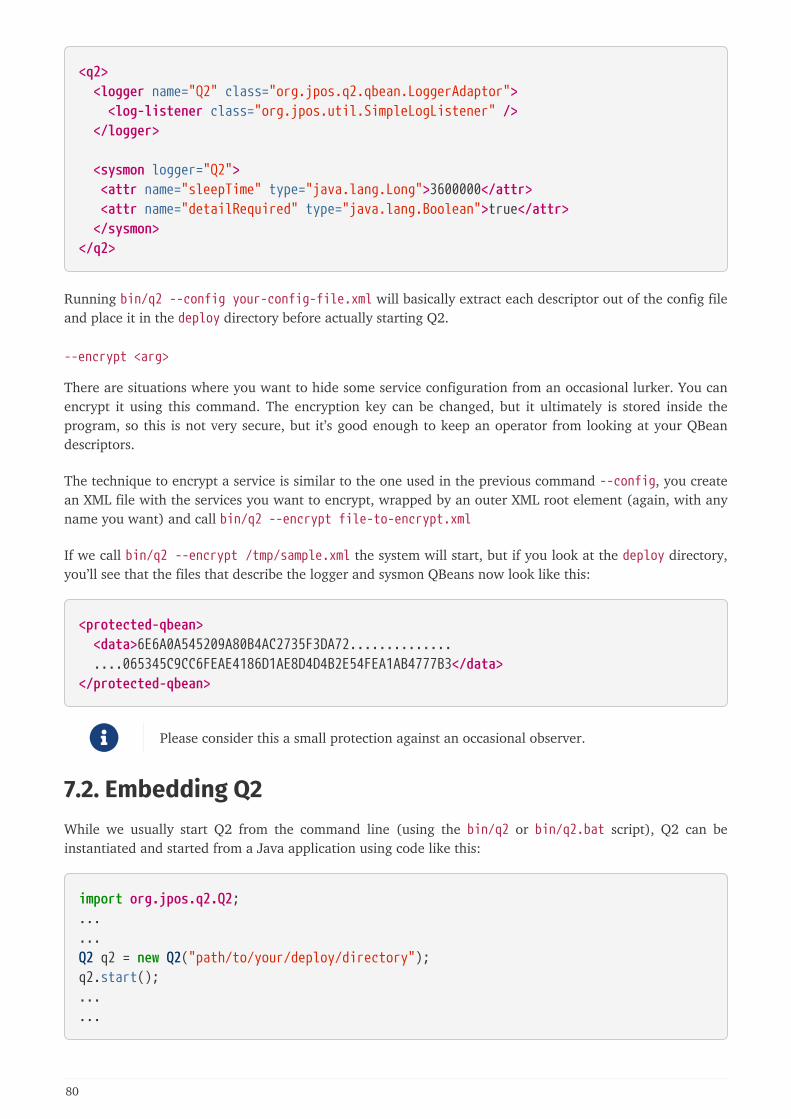
<q2> <logger name="Q2" class="org.jpos.q2.qbean.LoggerAdaptor"> <log-listener class="org.jpos.util.SimpleLogListener" /> </logger>
<sysmon logger="Q2"> <attr name="sleepTime" type="java.lang.Long">3600000</attr> <attr name="detailRequired" type="java.lang.Boolean">true</attr> </sysmon></q2>
Running bin/q2 --config your-config-file.xml will basically extract each descriptor out of the config fileand place it in the deploy directory before actually starting Q2.
--encrypt <arg>
There are situations where you want to hide some service configuration from an occasional lurker. You canencrypt it using this command. The encryption key can be changed, but it ultimately is stored inside theprogram, so this is not very secure, but it’s good enough to keep an operator from looking at your QBeandescriptors.
The technique to encrypt a service is similar to the one used in the previous command --config, you createan XML file with the services you want to encrypt, wrapped by an outer XML root element (again, with anyname you want) and call bin/q2 --encrypt file-to-encrypt.xml
If we call bin/q2 --encrypt /tmp/sample.xml the system will start, but if you look at the deploy directory,you’ll see that the files that describe the logger and sysmon QBeans now look like this:
<protected-qbean> <data>6E6A0A545209A80B4AC2735F3DA72.............. ....065345C9CC6FEAE4186D1AE8D4D4B2E54FEA1AB4777B3</data></protected-qbean>
Please consider this a small protection against an occasional observer.
7.2. Embedding Q2While we usually start Q2 from the command line (using the bin/q2 or bin/q2.bat script), Q2 can beinstantiated and started from a Java application using code like this:
import org.jpos.q2.Q2;......Q2 q2 = new Q2("path/to/your/deploy/directory");q2.start();......
80

You can stop Q2 by calling q2.stop().
7.3. Shutting down Q2If we recall Writing your first Q2 Script, we have a QFactory.properties file with some mappings, includinga shutdown mapping:
shutdown=org.jpos.q2.qbean.Shutdown
So shutting down Q2 is as easy as deploying a QBean — let’s call it shutdown.xml — with content like this:
<shutdown />
The name shutdown.xml can of course be any other name you want.
The shutdown QBean is implemented like this:
package org.jpos.q2.qbean; import org.jpos.q2.QBeanSupport; public class Shutdown extends QBeanSupport { public void startService() { getServer().shutdown (); ① } }
① This getServer() method gives us a reference to the Q2 server. It works because Shutdown extendsQBeanSupport which in turn implements the method setServer(Q2) called by Q2 via reflection asdescribed in QBeanSupport.
By deploying the shutdown QBean you have a clean way to stop a given Q2 instance without knowing itsprocess ID.
jPOS provides a bin/stop script implemented like this:
#!/bin/sh
echo Stopping Q2echo '<shutdown/>' > `dirname $0`/../deploy/shutdown.xml
bin/start which in turn calls bin/q2 removes deploy/shutdown.xml before starting. Ifyou use this shutdown technique using a shutdown name other than shutdown.xml andyour find yourself in a situation where Q2 starts and then immediately stops, check thedeploy directory for services deploying the Shutdown service.
81
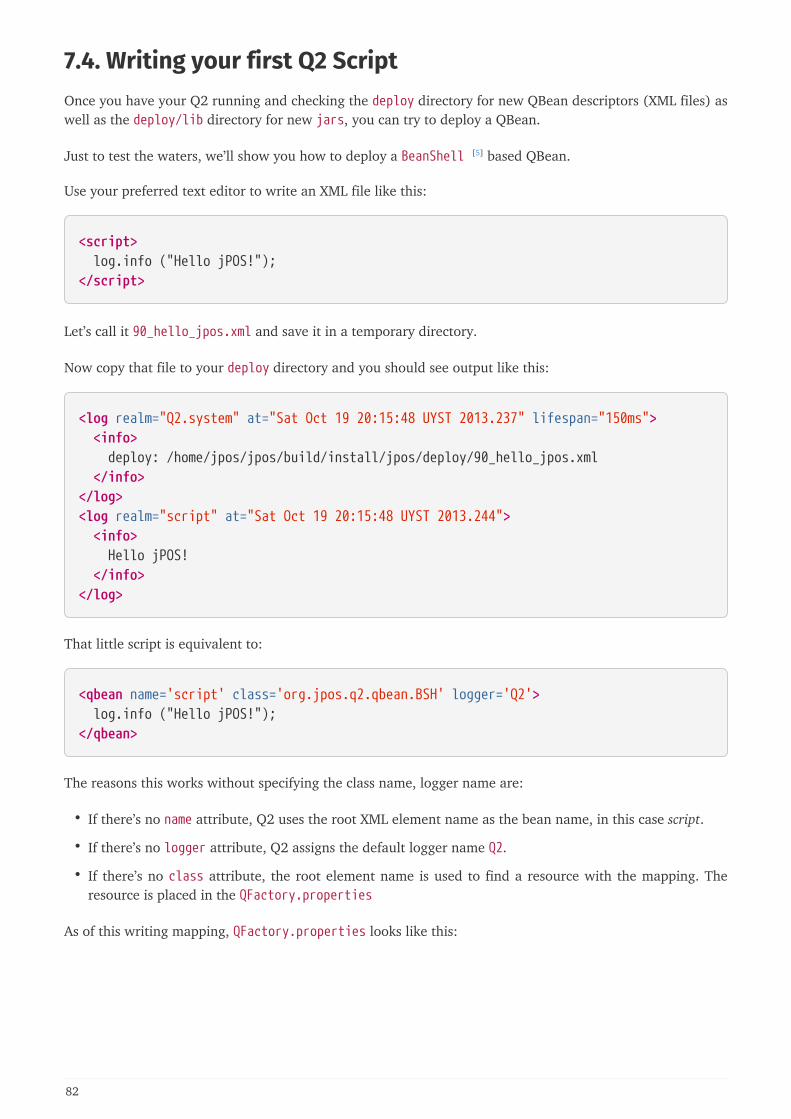
7.4. Writing your first Q2 ScriptOnce you have your Q2 running and checking the deploy directory for new QBean descriptors (XML files) aswell as the deploy/lib directory for new jars, you can try to deploy a QBean.
Just to test the waters, we’ll show you how to deploy a BeanShell [5] based QBean.
Use your preferred text editor to write an XML file like this:
<script> log.info ("Hello jPOS!");</script>
Let’s call it 90_hello_jpos.xml and save it in a temporary directory.
Now copy that file to your deploy directory and you should see output like this:
<log realm="Q2.system" at="Sat Oct 19 20:15:48 UYST 2013.237" lifespan="150ms"> <info> deploy: /home/jpos/jpos/build/install/jpos/deploy/90_hello_jpos.xml </info></log><log realm="script" at="Sat Oct 19 20:15:48 UYST 2013.244"> <info> Hello jPOS! </info></log>
That little script is equivalent to:
<qbean name='script' class='org.jpos.q2.qbean.BSH' logger='Q2'> log.info ("Hello jPOS!");</qbean>
The reasons this works without specifying the class name, logger name are:
• If there’s no name attribute, Q2 uses the root XML element name as the bean name, in this case script.
• If there’s no logger attribute, Q2 assigns the default logger name Q2.
• If there’s no class attribute, the root element name is used to find a resource with the mapping. Theresource is placed in the QFactory.properties
As of this writing mapping, QFactory.properties looks like this:
82
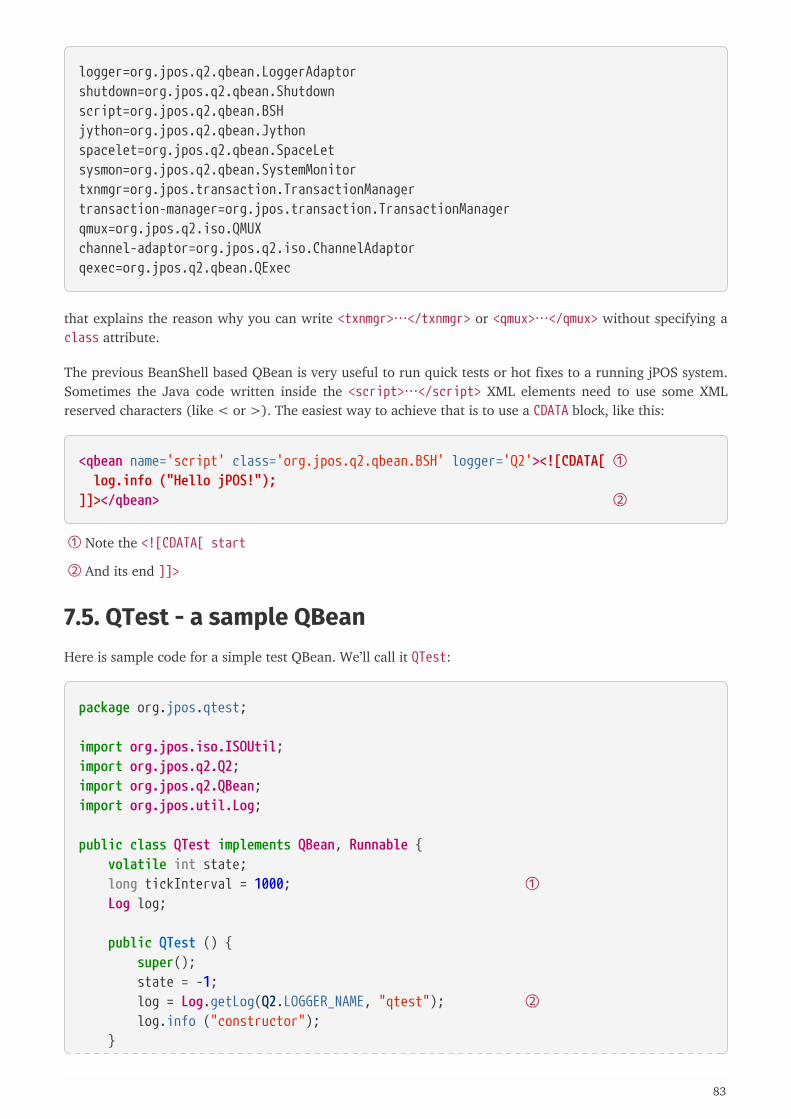
logger=org.jpos.q2.qbean.LoggerAdaptorshutdown=org.jpos.q2.qbean.Shutdownscript=org.jpos.q2.qbean.BSHjython=org.jpos.q2.qbean.Jythonspacelet=org.jpos.q2.qbean.SpaceLetsysmon=org.jpos.q2.qbean.SystemMonitortxnmgr=org.jpos.transaction.TransactionManagertransaction-manager=org.jpos.transaction.TransactionManagerqmux=org.jpos.q2.iso.QMUXchannel-adaptor=org.jpos.q2.iso.ChannelAdaptorqexec=org.jpos.q2.qbean.QExec
that explains the reason why you can write <txnmgr>…</txnmgr> or <qmux>…</qmux> without specifying aclass attribute.
The previous BeanShell based QBean is very useful to run quick tests or hot fixes to a running jPOS system.Sometimes the Java code written inside the <script>…</script> XML elements need to use some XMLreserved characters (like < or >). The easiest way to achieve that is to use a CDATA block, like this:
<qbean name='script' class='org.jpos.q2.qbean.BSH' logger='Q2'><![CDATA[ ① log.info ("Hello jPOS!");]]></qbean> ②
① Note the <![CDATA[ start
② And its end ]]>
7.5. QTest - a sample QBeanHere is sample code for a simple test QBean. We’ll call it QTest:
package org.jpos.qtest;
import org.jpos.iso.ISOUtil;import org.jpos.q2.Q2;import org.jpos.q2.QBean;import org.jpos.util.Log;
public class QTest implements QBean, Runnable { volatile int state; long tickInterval = 1000; ① Log log;
public QTest () { super(); state = -1; log = Log.getLog(Q2.LOGGER_NAME, "qtest"); ② log.info ("constructor"); }
83
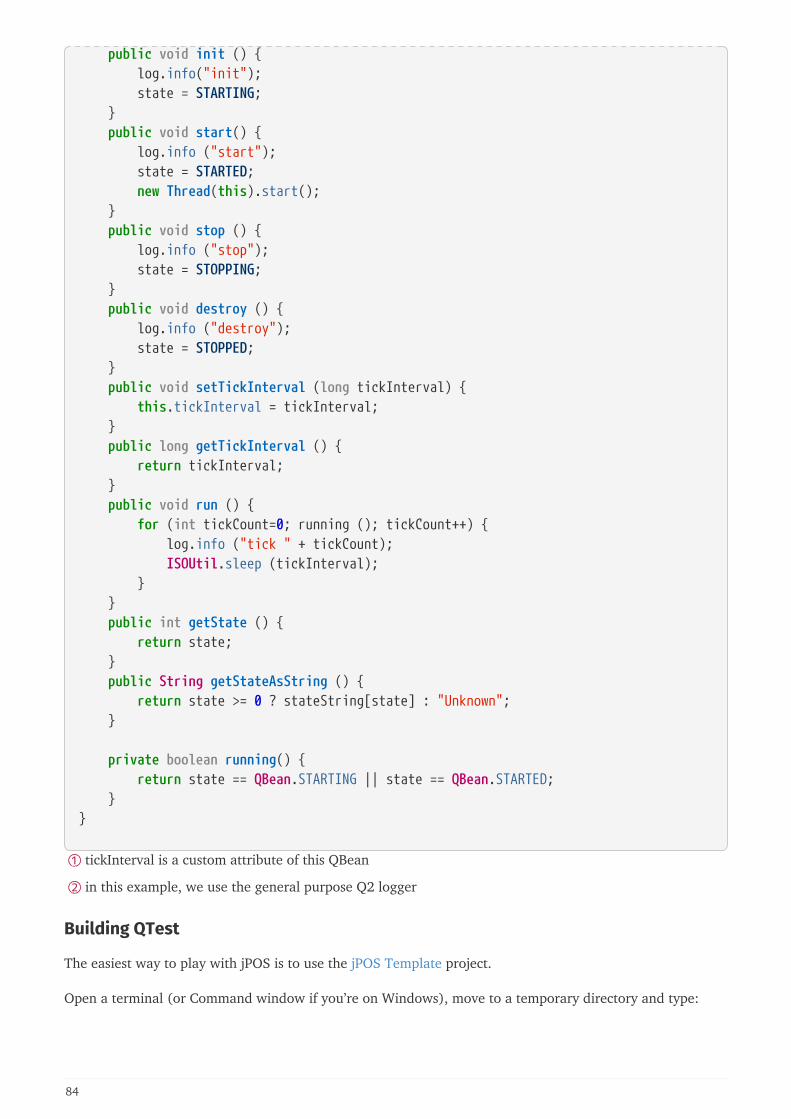
public void init () { log.info("init"); state = STARTING; } public void start() { log.info ("start"); state = STARTED; new Thread(this).start(); } public void stop () { log.info ("stop"); state = STOPPING; } public void destroy () { log.info ("destroy"); state = STOPPED; } public void setTickInterval (long tickInterval) { this.tickInterval = tickInterval; } public long getTickInterval () { return tickInterval; } public void run () { for (int tickCount=0; running (); tickCount++) { log.info ("tick " + tickCount); ISOUtil.sleep (tickInterval); } } public int getState () { return state; } public String getStateAsString () { return state >= 0 ? stateString[state] : "Unknown"; }
private boolean running() { return state == QBean.STARTING || state == QBean.STARTED; }}
① tickInterval is a custom attribute of this QBean
② in this example, we use the general purpose Q2 logger
Building QTest
The easiest way to play with jPOS is to use the jPOS Template project.
Open a terminal (or Command window if you’re on Windows), move to a temporary directory and type:
84
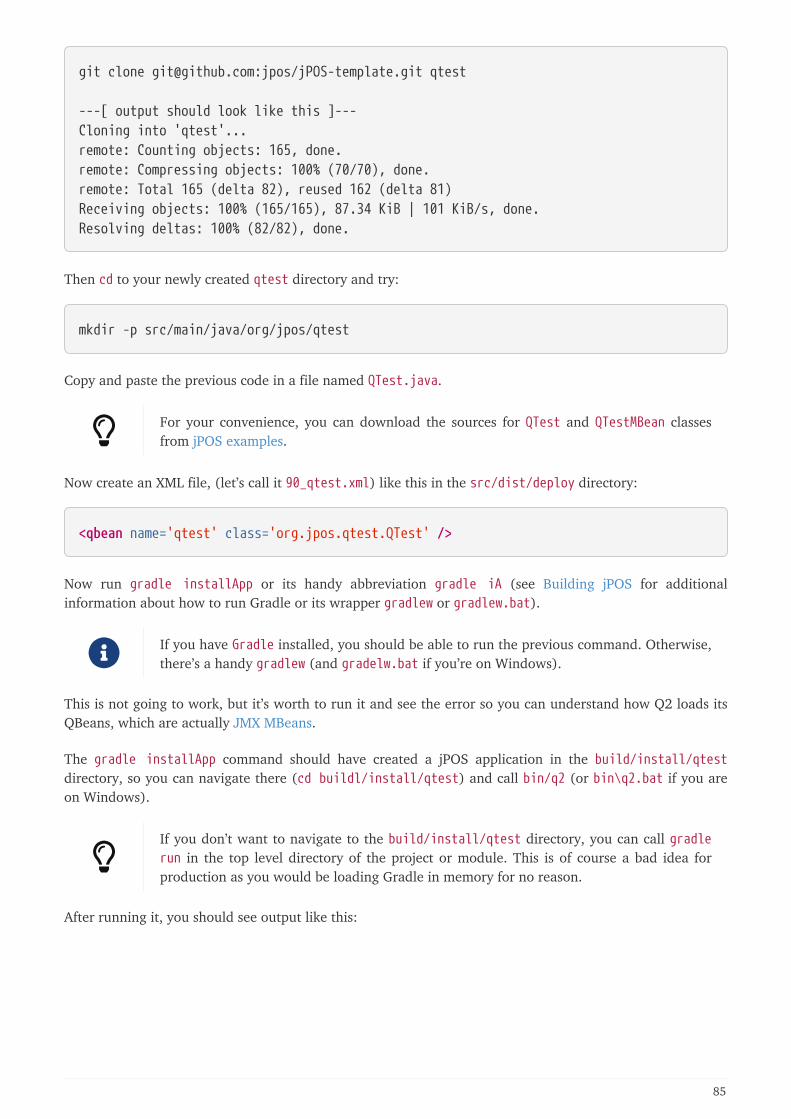
git clone [email protected]:jpos/jPOS-template.git qtest
---[ output should look like this ]---Cloning into 'qtest'...remote: Counting objects: 165, done.remote: Compressing objects: 100% (70/70), done.remote: Total 165 (delta 82), reused 162 (delta 81)Receiving objects: 100% (165/165), 87.34 KiB | 101 KiB/s, done.Resolving deltas: 100% (82/82), done.
Then cd to your newly created qtest directory and try:
mkdir -p src/main/java/org/jpos/qtest
Copy and paste the previous code in a file named QTest.java.
For your convenience, you can download the sources for QTest and QTestMBean classesfrom jPOS examples.
Now create an XML file, (let’s call it 90_qtest.xml) like this in the src/dist/deploy directory:
<qbean name='qtest' class='org.jpos.qtest.QTest' />
Now run gradle installApp or its handy abbreviation gradle iA (see Building jPOS for additionalinformation about how to run Gradle or its wrapper gradlew or gradlew.bat).
If you have Gradle installed, you should be able to run the previous command. Otherwise,there’s a handy gradlew (and gradelw.bat if you’re on Windows).
This is not going to work, but it’s worth to run it and see the error so you can understand how Q2 loads itsQBeans, which are actually JMX MBeans.
The gradle installApp command should have created a jPOS application in the build/install/qtestdirectory, so you can navigate there (cd buildl/install/qtest) and call bin/q2 (or bin\q2.bat if you areon Windows).
If you don’t want to navigate to the build/install/qtest directory, you can call gradlerun in the top level directory of the project or module. This is of course a bad idea forproduction as you would be loading Gradle in memory for no reason.
After running it, you should see output like this:
85
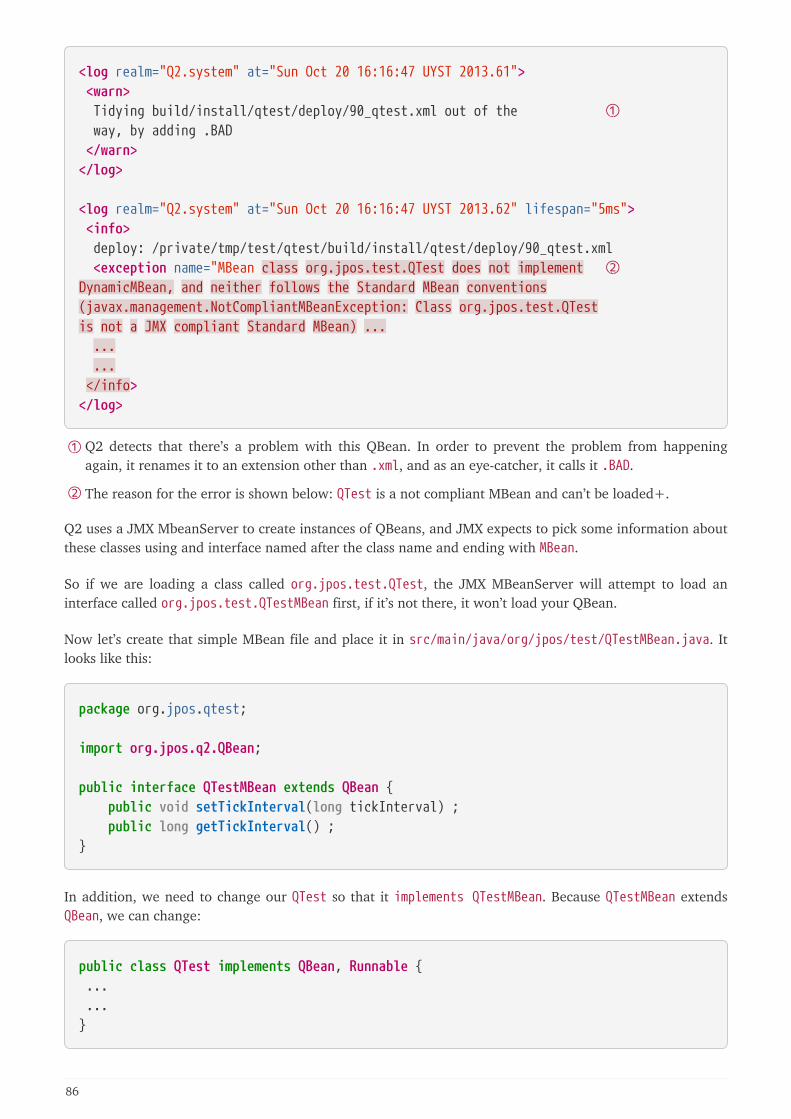
<log realm="Q2.system" at="Sun Oct 20 16:16:47 UYST 2013.61"> <warn> Tidying build/install/qtest/deploy/90_qtest.xml out of the ① way, by adding .BAD </warn></log>
<log realm="Q2.system" at="Sun Oct 20 16:16:47 UYST 2013.62" lifespan="5ms"> <info> deploy: /private/tmp/test/qtest/build/install/qtest/deploy/90_qtest.xml <exception name="MBean class org.jpos.test.QTest does not implement ②DynamicMBean, and neither follows the Standard MBean conventions(javax.management.NotCompliantMBeanException: Class org.jpos.test.QTestis not a JMX compliant Standard MBean) ... ... ... </info></log>
① Q2 detects that there’s a problem with this QBean. In order to prevent the problem from happeningagain, it renames it to an extension other than .xml, and as an eye-catcher, it calls it .BAD.
② The reason for the error is shown below: QTest is a not compliant MBean and can’t be loaded+.
Q2 uses a JMX MbeanServer to create instances of QBeans, and JMX expects to pick some information aboutthese classes using and interface named after the class name and ending with MBean.
So if we are loading a class called org.jpos.test.QTest, the JMX MBeanServer will attempt to load aninterface called org.jpos.test.QTestMBean first, if it’s not there, it won’t load your QBean.
Now let’s create that simple MBean file and place it in src/main/java/org/jpos/test/QTestMBean.java. Itlooks like this:
package org.jpos.qtest;
import org.jpos.q2.QBean;
public interface QTestMBean extends QBean { public void setTickInterval(long tickInterval) ; public long getTickInterval() ;}
In addition, we need to change our QTest so that it implements QTestMBean. Because QTestMBean extendsQBean, we can change:
public class QTest implements QBean, Runnable { ... ...}
86

so that it reads
public class QTest implements QTestMBean, Runnable { ... ...}
Now if you run build/install/qtest/bin/q2 you’ll see messages like:
<log realm="qtest" at="Sun Oct 20 16:51:27 UYST 2013.28"> <info> init </info></log><log realm="qtest" at="Sun Oct 20 16:51:27 UYST 2013.35"> <info> start </info></log><log realm="qtest" at="Sun Oct 20 16:51:27 UYST 2013.37" lifespan="1ms"> <info> tick 0 </info></log>......<log realm="qtest" at="Sun Oct 20 16:51:28 UYST 2013.38"> <info> tick 1 </info></log>......<log realm="qtest" at="Sun Oct 20 16:51:29 UYST 2013.40"> <info> tick 2 </info></log>
Approximately every second we see a tick message, issues by our little run() method:
public void run () { for (int tickCount=0; running (); tickCount++) { log.info ("tick " + tickCount); ISOUtil.sleep (tickInterval); } }
87
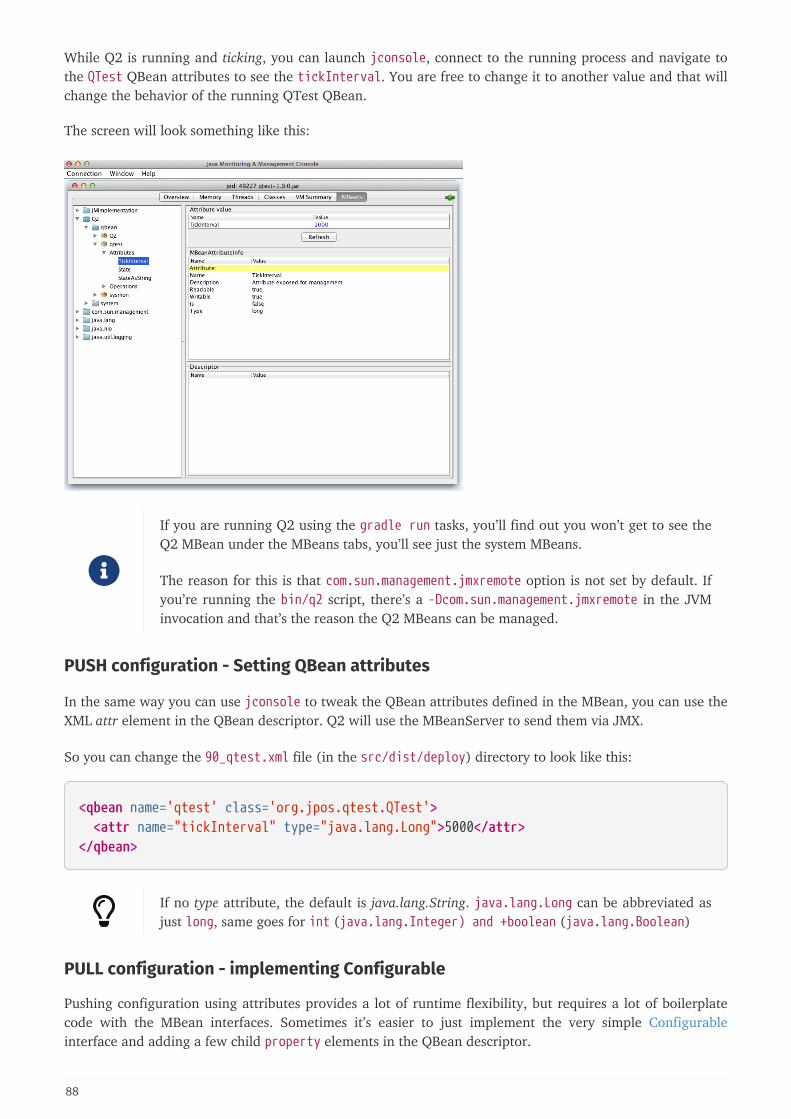
While Q2 is running and ticking, you can launch jconsole, connect to the running process and navigate tothe QTest QBean attributes to see the tickInterval. You are free to change it to another value and that willchange the behavior of the running QTest QBean.
The screen will look something like this:
If you are running Q2 using the gradle run tasks, you’ll find out you won’t get to see theQ2 MBean under the MBeans tabs, you’ll see just the system MBeans.
The reason for this is that com.sun.management.jmxremote option is not set by default. Ifyou’re running the bin/q2 script, there’s a -Dcom.sun.management.jmxremote in the JVMinvocation and that’s the reason the Q2 MBeans can be managed.
PUSH configuration - Setting QBean attributes
In the same way you can use jconsole to tweak the QBean attributes defined in the MBean, you can use theXML attr element in the QBean descriptor. Q2 will use the MBeanServer to send them via JMX.
So you can change the 90_qtest.xml file (in the src/dist/deploy) directory to look like this:
<qbean name='qtest' class='org.jpos.qtest.QTest'> <attr name="tickInterval" type="java.lang.Long">5000</attr></qbean>
If no type attribute, the default is java.lang.String. java.lang.Long can be abbreviated asjust long, same goes for int (java.lang.Integer) and +boolean (java.lang.Boolean)
PULL configuration - implementing Configurable
Pushing configuration using attributes provides a lot of runtime flexibility, but requires a lot of boilerplatecode with the MBean interfaces. Sometimes it’s easier to just implement the very simple Configurableinterface and adding a few child property elements in the QBean descriptor.
88
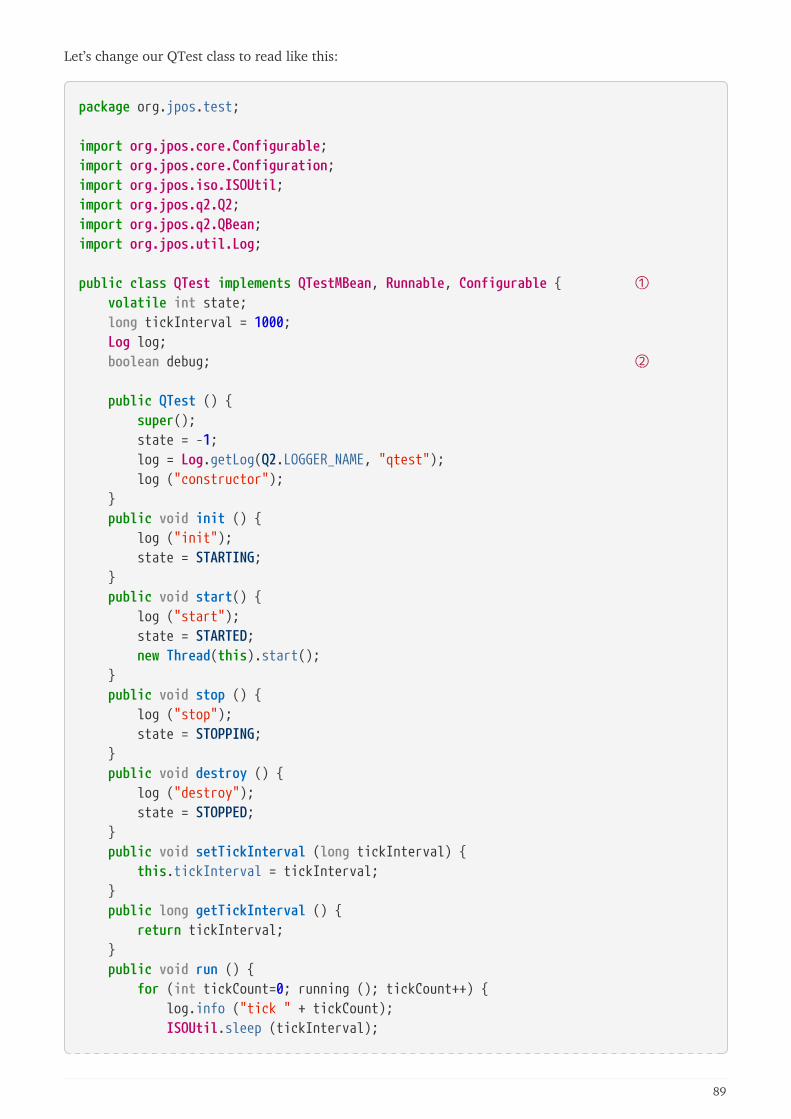
Let’s change our QTest class to read like this:
package org.jpos.test;
import org.jpos.core.Configurable;import org.jpos.core.Configuration;import org.jpos.iso.ISOUtil;import org.jpos.q2.Q2;import org.jpos.q2.QBean;import org.jpos.util.Log;
public class QTest implements QTestMBean, Runnable, Configurable { ① volatile int state; long tickInterval = 1000; Log log; boolean debug; ②
public QTest () { super(); state = -1; log = Log.getLog(Q2.LOGGER_NAME, "qtest"); log ("constructor"); } public void init () { log ("init"); state = STARTING; } public void start() { log ("start"); state = STARTED; new Thread(this).start(); } public void stop () { log ("stop"); state = STOPPING; } public void destroy () { log ("destroy"); state = STOPPED; } public void setTickInterval (long tickInterval) { this.tickInterval = tickInterval; } public long getTickInterval () { return tickInterval; } public void run () { for (int tickCount=0; running (); tickCount++) { log.info ("tick " + tickCount); ISOUtil.sleep (tickInterval);
89
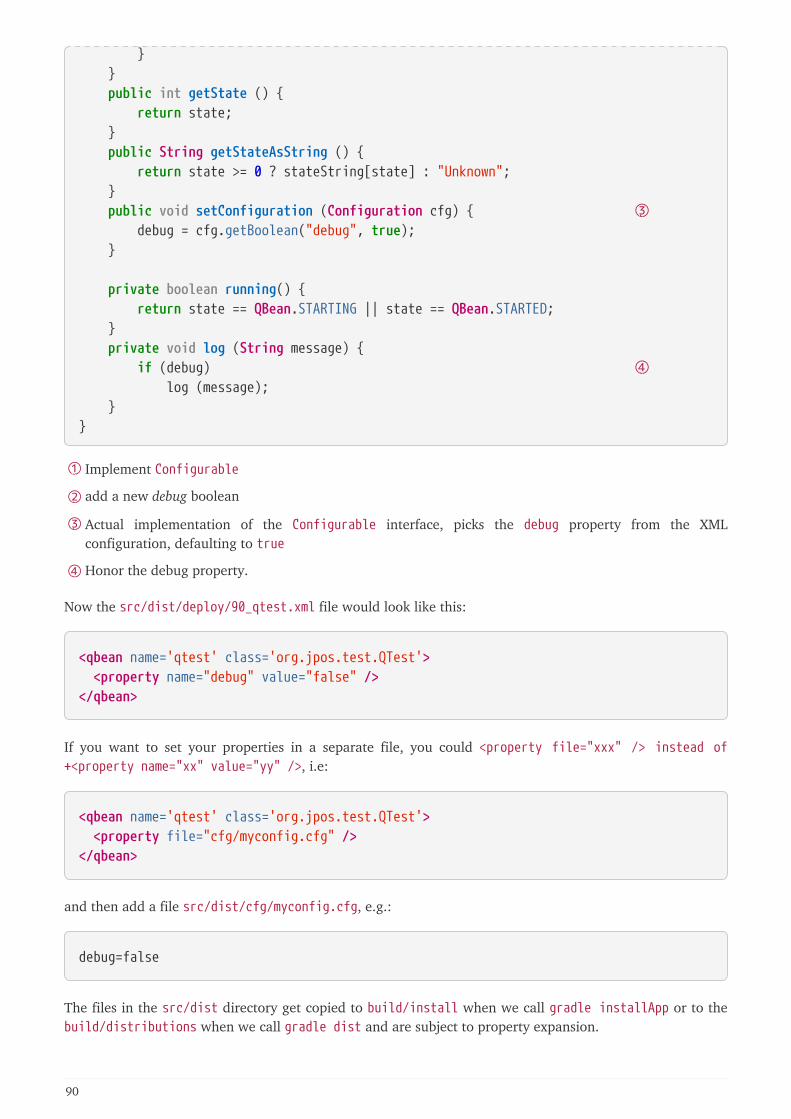
} } public int getState () { return state; } public String getStateAsString () { return state >= 0 ? stateString[state] : "Unknown"; } public void setConfiguration (Configuration cfg) { ③ debug = cfg.getBoolean("debug", true); }
private boolean running() { return state == QBean.STARTING || state == QBean.STARTED; } private void log (String message) { if (debug) ④ log (message); }}
① Implement Configurable
② add a new debug boolean
③ Actual implementation of the Configurable interface, picks the debug property from the XMLconfiguration, defaulting to true
④ Honor the debug property.
Now the src/dist/deploy/90_qtest.xml file would look like this:
<qbean name='qtest' class='org.jpos.test.QTest'> <property name="debug" value="false" /></qbean>
If you want to set your properties in a separate file, you could <property file="xxx" /> instead of+<property name="xx" value="yy" />, i.e:
<qbean name='qtest' class='org.jpos.test.QTest'> <property file="cfg/myconfig.cfg" /></qbean>
and then add a file src/dist/cfg/myconfig.cfg, e.g.:
debug=false
The files in the src/dist directory get copied to build/install when we call gradle installApp or to thebuild/distributions when we call gradle dist and are subject to property expansion.
90
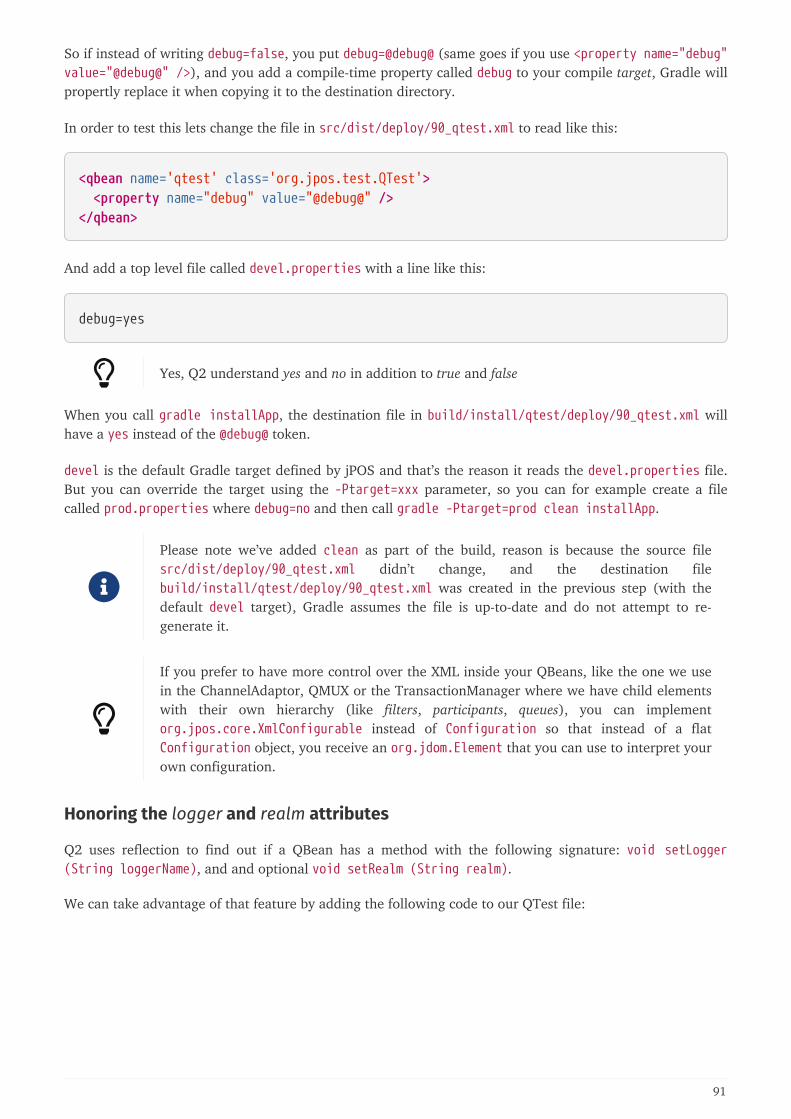
So if instead of writing debug=false, you put debug=@debug@ (same goes if you use <property name="debug"value="@debug@" />), and you add a compile-time property called debug to your compile target, Gradle willpropertly replace it when copying it to the destination directory.
In order to test this lets change the file in src/dist/deploy/90_qtest.xml to read like this:
<qbean name='qtest' class='org.jpos.test.QTest'> <property name="debug" value="@debug@" /></qbean>
And add a top level file called devel.properties with a line like this:
debug=yes
Yes, Q2 understand yes and no in addition to true and false
When you call gradle installApp, the destination file in build/install/qtest/deploy/90_qtest.xml willhave a yes instead of the @debug@ token.
devel is the default Gradle target defined by jPOS and that’s the reason it reads the devel.properties file.But you can override the target using the -Ptarget=xxx parameter, so you can for example create a filecalled prod.properties where debug=no and then call gradle -Ptarget=prod clean installApp.
Please note we’ve added clean as part of the build, reason is because the source filesrc/dist/deploy/90_qtest.xml didn’t change, and the destination filebuild/install/qtest/deploy/90_qtest.xml was created in the previous step (with thedefault devel target), Gradle assumes the file is up-to-date and do not attempt to re-generate it.
If you prefer to have more control over the XML inside your QBeans, like the one we usein the ChannelAdaptor, QMUX or the TransactionManager where we have child elementswith their own hierarchy (like filters, participants, queues), you can implementorg.jpos.core.XmlConfigurable instead of Configuration so that instead of a flatConfiguration object, you receive an org.jdom.Element that you can use to interpret yourown configuration.
Honoring the logger and realm attributes
Q2 uses reflection to find out if a QBean has a method with the following signature: void setLogger(String loggerName), and and optional void setRealm (String realm).
We can take advantage of that feature by adding the following code to our QTest file:
91
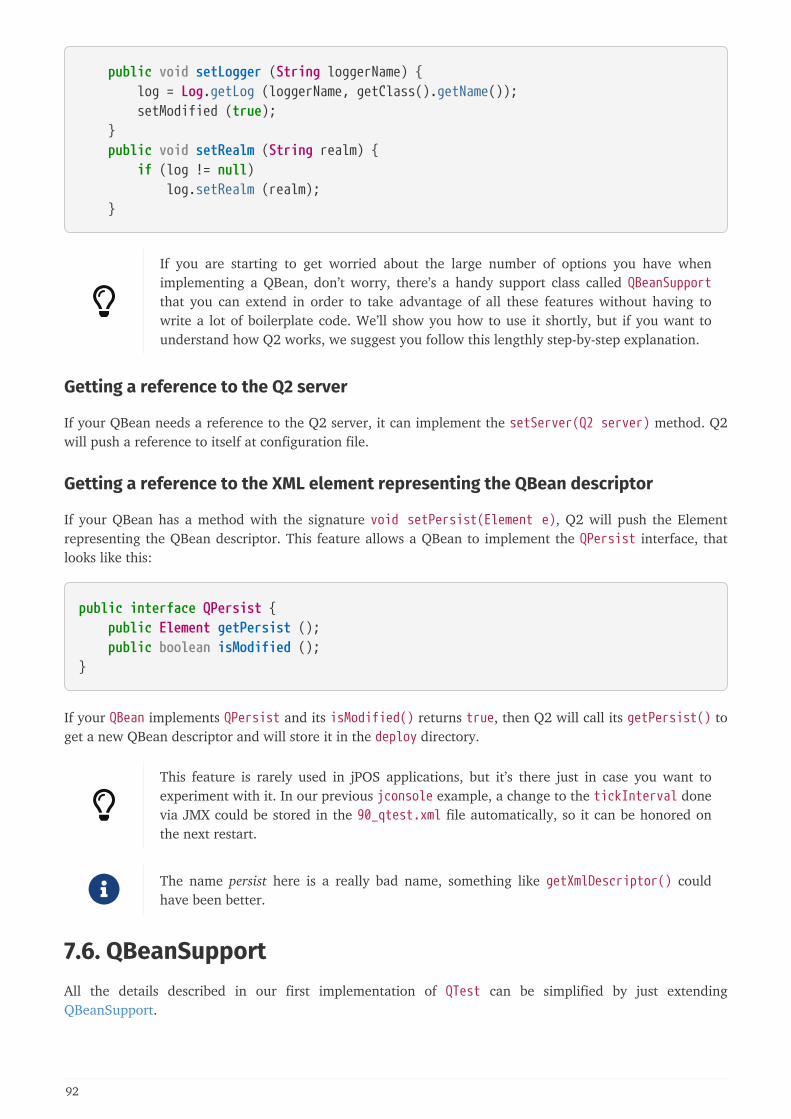
public void setLogger (String loggerName) { log = Log.getLog (loggerName, getClass().getName()); setModified (true); } public void setRealm (String realm) { if (log != null) log.setRealm (realm); }
If you are starting to get worried about the large number of options you have whenimplementing a QBean, don’t worry, there’s a handy support class called QBeanSupportthat you can extend in order to take advantage of all these features without having towrite a lot of boilerplate code. We’ll show you how to use it shortly, but if you want tounderstand how Q2 works, we suggest you follow this lengthly step-by-step explanation.
Getting a reference to the Q2 server
If your QBean needs a reference to the Q2 server, it can implement the setServer(Q2 server) method. Q2will push a reference to itself at configuration file.
Getting a reference to the XML element representing the QBean descriptor
If your QBean has a method with the signature void setPersist(Element e), Q2 will push the Elementrepresenting the QBean descriptor. This feature allows a QBean to implement the QPersist interface, thatlooks like this:
public interface QPersist { public Element getPersist (); public boolean isModified ();}
If your QBean implements QPersist and its isModified() returns true, then Q2 will call its getPersist() toget a new QBean descriptor and will store it in the deploy directory.
This feature is rarely used in jPOS applications, but it’s there just in case you want toexperiment with it. In our previous jconsole example, a change to the tickInterval donevia JMX could be stored in the 90_qtest.xml file automatically, so it can be honored onthe next restart.
The name persist here is a really bad name, something like getXmlDescriptor() couldhave been better.
7.6. QBeanSupportAll the details described in our first implementation of QTest can be simplified by just extendingQBeanSupport.
92
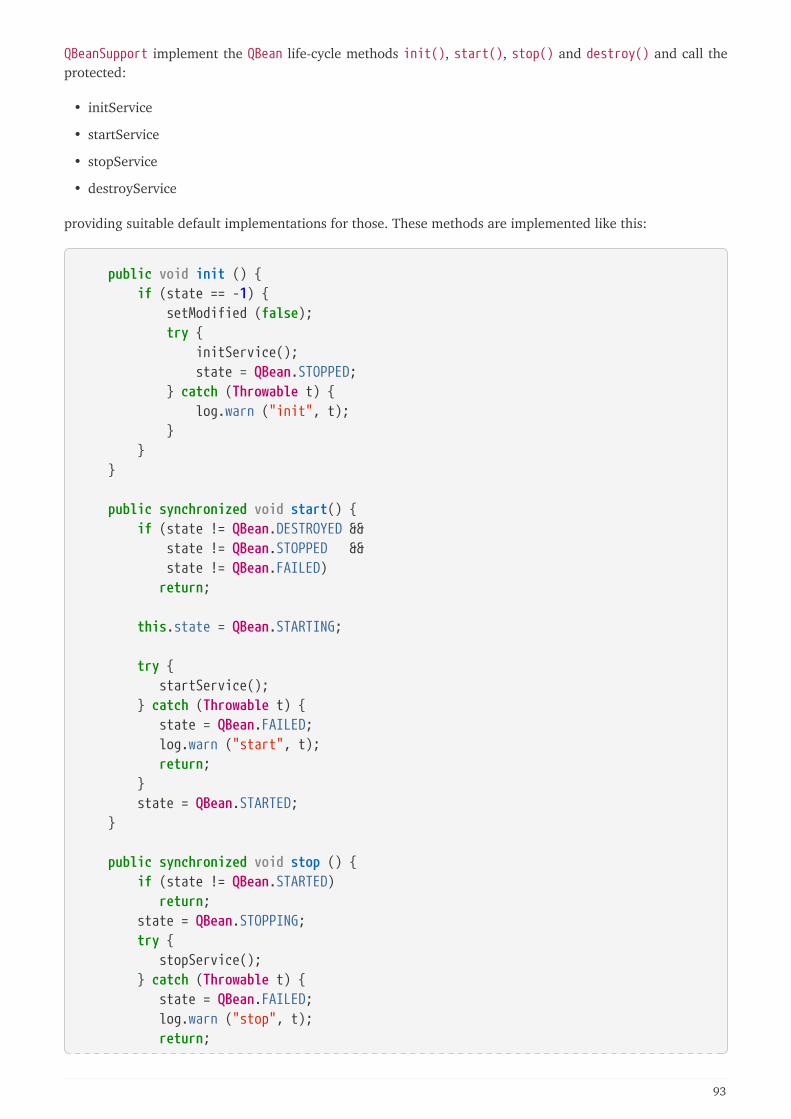
QBeanSupport implement the QBean life-cycle methods init(), start(), stop() and destroy() and call theprotected:
• initService
• startService
• stopService
• destroyService
providing suitable default implementations for those. These methods are implemented like this:
public void init () { if (state == -1) { setModified (false); try { initService(); state = QBean.STOPPED; } catch (Throwable t) { log.warn ("init", t); } } }
public synchronized void start() { if (state != QBean.DESTROYED && state != QBean.STOPPED && state != QBean.FAILED) return;
this.state = QBean.STARTING;
try { startService(); } catch (Throwable t) { state = QBean.FAILED; log.warn ("start", t); return; } state = QBean.STARTED; }
public synchronized void stop () { if (state != QBean.STARTED) return; state = QBean.STOPPING; try { stopService(); } catch (Throwable t) { state = QBean.FAILED; log.warn ("stop", t); return;
93
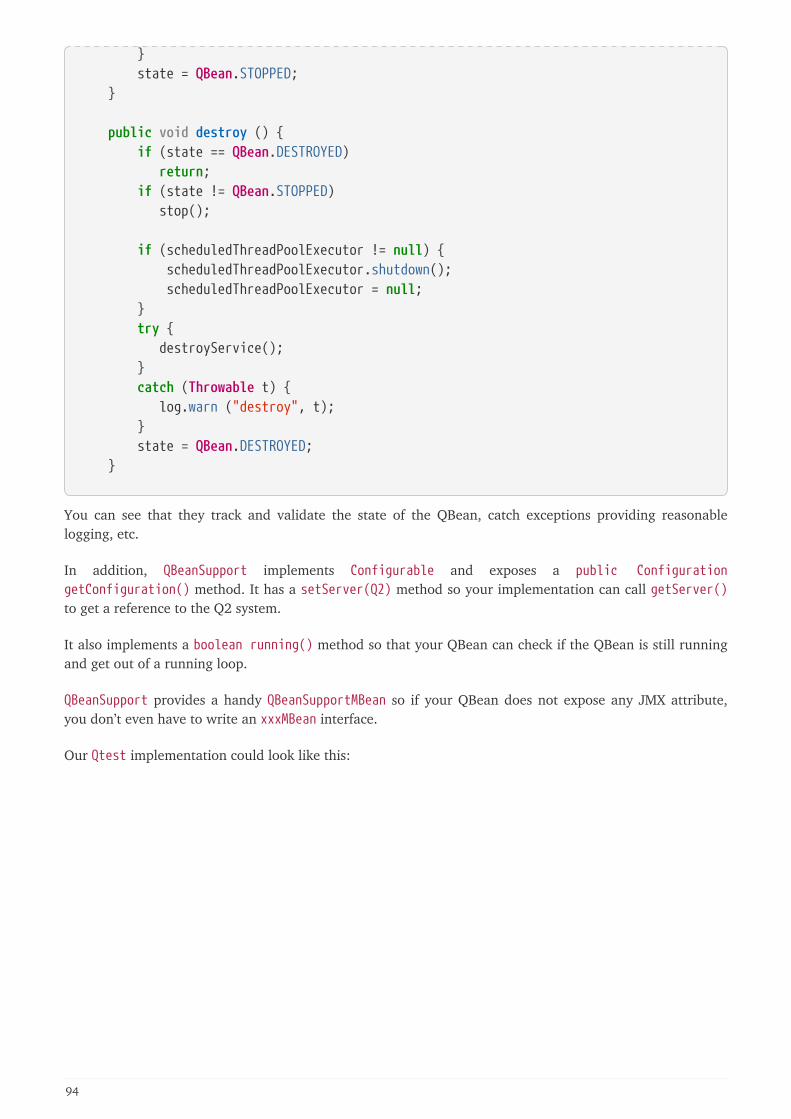
} state = QBean.STOPPED; }
public void destroy () { if (state == QBean.DESTROYED) return; if (state != QBean.STOPPED) stop();
if (scheduledThreadPoolExecutor != null) { scheduledThreadPoolExecutor.shutdown(); scheduledThreadPoolExecutor = null; } try { destroyService(); } catch (Throwable t) { log.warn ("destroy", t); } state = QBean.DESTROYED; }
You can see that they track and validate the state of the QBean, catch exceptions providing reasonablelogging, etc.
In addition, QBeanSupport implements Configurable and exposes a public ConfigurationgetConfiguration() method. It has a setServer(Q2) method so your implementation can call getServer()to get a reference to the Q2 system.
It also implements a boolean running() method so that your QBean can check if the QBean is still runningand get out of a running loop.
QBeanSupport provides a handy QBeanSupportMBean so if your QBean does not expose any JMX attribute,you don’t even have to write an xxxMBean interface.
Our Qtest implementation could look like this:
94
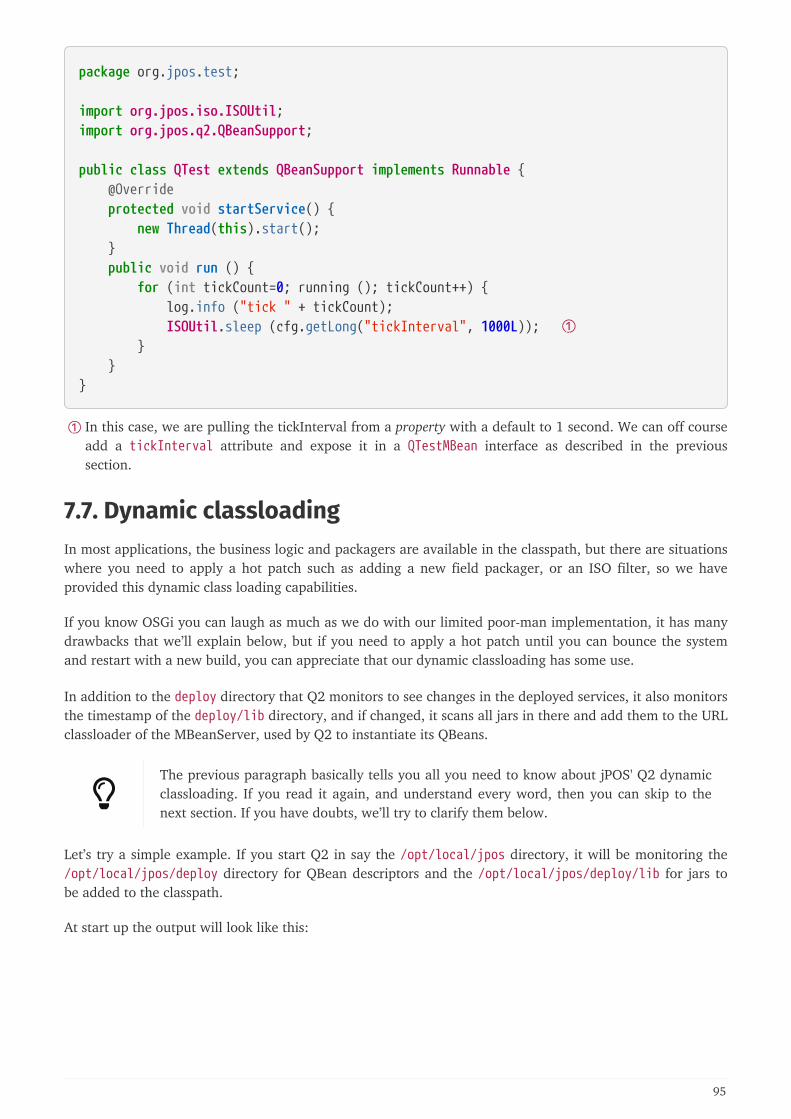
package org.jpos.test;
import org.jpos.iso.ISOUtil;import org.jpos.q2.QBeanSupport;
public class QTest extends QBeanSupport implements Runnable { @Override protected void startService() { new Thread(this).start(); } public void run () { for (int tickCount=0; running (); tickCount++) { log.info ("tick " + tickCount); ISOUtil.sleep (cfg.getLong("tickInterval", 1000L)); ① } }}
① In this case, we are pulling the tickInterval from a property with a default to 1 second. We can off courseadd a tickInterval attribute and expose it in a QTestMBean interface as described in the previoussection.
7.7. Dynamic classloadingIn most applications, the business logic and packagers are available in the classpath, but there are situationswhere you need to apply a hot patch such as adding a new field packager, or an ISO filter, so we haveprovided this dynamic class loading capabilities.
If you know OSGi you can laugh as much as we do with our limited poor-man implementation, it has manydrawbacks that we’ll explain below, but if you need to apply a hot patch until you can bounce the systemand restart with a new build, you can appreciate that our dynamic classloading has some use.
In addition to the deploy directory that Q2 monitors to see changes in the deployed services, it also monitorsthe timestamp of the deploy/lib directory, and if changed, it scans all jars in there and add them to the URLclassloader of the MBeanServer, used by Q2 to instantiate its QBeans.
The previous paragraph basically tells you all you need to know about jPOS' Q2 dynamicclassloading. If you read it again, and understand every word, then you can skip to thenext section. If you have doubts, we’ll try to clarify them below.
Let’s try a simple example. If you start Q2 in say the /opt/local/jpos directory, it will be monitoring the/opt/local/jpos/deploy directory for QBean descriptors and the /opt/local/jpos/deploy/lib for jars tobe added to the classpath.
At start up the output will look like this:
95
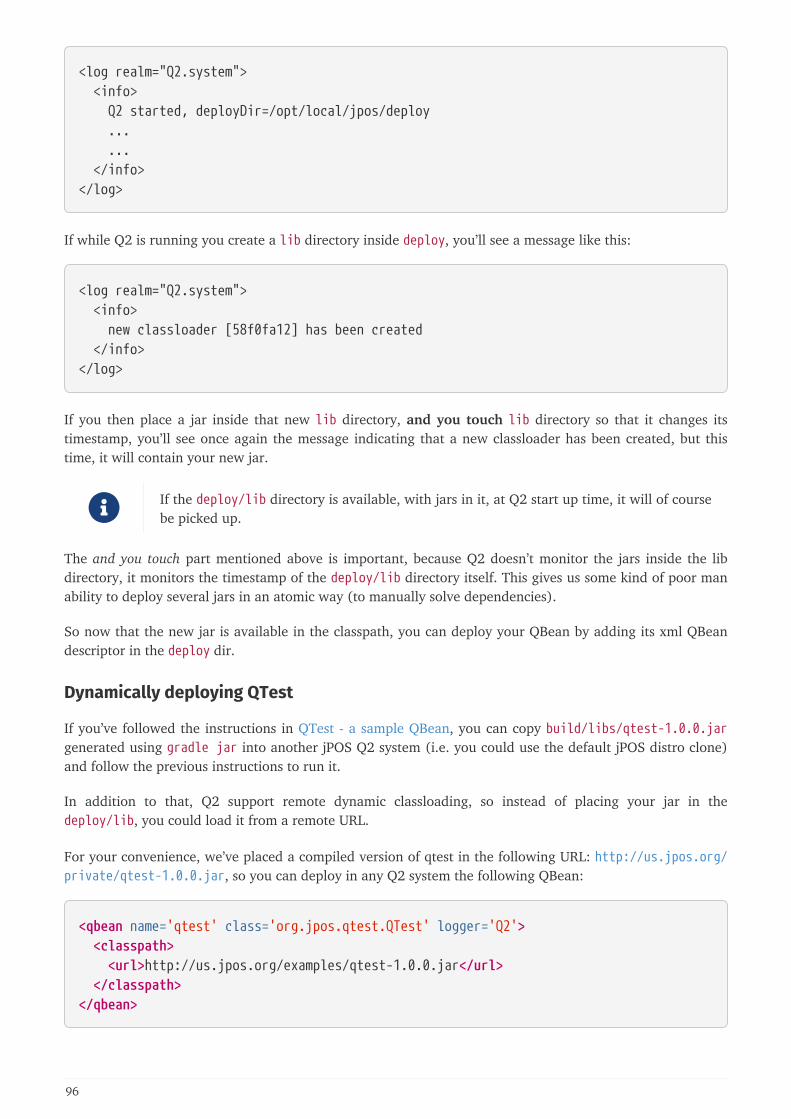
<log realm="Q2.system"> <info> Q2 started, deployDir=/opt/local/jpos/deploy ... ... </info></log>
If while Q2 is running you create a lib directory inside deploy, you’ll see a message like this:
<log realm="Q2.system"> <info> new classloader [58f0fa12] has been created </info></log>
If you then place a jar inside that new lib directory, and you touch lib directory so that it changes itstimestamp, you’ll see once again the message indicating that a new classloader has been created, but thistime, it will contain your new jar.
If the deploy/lib directory is available, with jars in it, at Q2 start up time, it will of coursebe picked up.
The and you touch part mentioned above is important, because Q2 doesn’t monitor the jars inside the libdirectory, it monitors the timestamp of the deploy/lib directory itself. This gives us some kind of poor manability to deploy several jars in an atomic way (to manually solve dependencies).
So now that the new jar is available in the classpath, you can deploy your QBean by adding its xml QBeandescriptor in the deploy dir.
Dynamically deploying QTest
If you’ve followed the instructions in QTest - a sample QBean, you can copy build/libs/qtest-1.0.0.jargenerated using gradle jar into another jPOS Q2 system (i.e. you could use the default jPOS distro clone)and follow the previous instructions to run it.
In addition to that, Q2 support remote dynamic classloading, so instead of placing your jar in thedeploy/lib, you could load it from a remote URL.
For your convenience, we’ve placed a compiled version of qtest in the following URL: http://us.jpos.org/private/qtest-1.0.0.jar, so you can deploy in any Q2 system the following QBean:
<qbean name='qtest' class='org.jpos.qtest.QTest' logger='Q2'> <classpath> <url>http://us.jpos.org/examples/qtest-1.0.0.jar</url> </classpath></qbean>
96
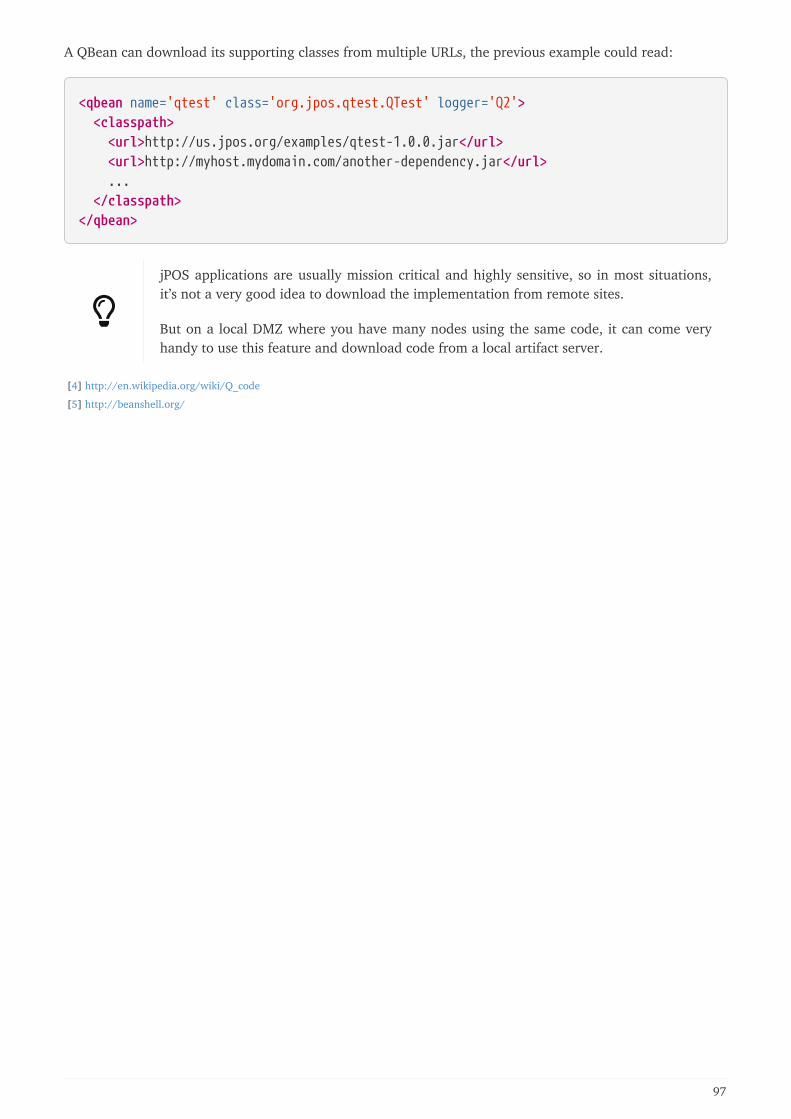
A QBean can download its supporting classes from multiple URLs, the previous example could read:
<qbean name='qtest' class='org.jpos.qtest.QTest' logger='Q2'> <classpath> <url>http://us.jpos.org/examples/qtest-1.0.0.jar</url> <url>http://myhost.mydomain.com/another-dependency.jar</url> ... </classpath></qbean>
jPOS applications are usually mission critical and highly sensitive, so in most situations,it’s not a very good idea to download the implementation from remote sites.
But on a local DMZ where you have many nodes using the same code, it can come veryhandy to use this feature and download code from a local artifact server.
[4] http://en.wikipedia.org/wiki/Q_code
[5] http://beanshell.org/
97
Chapter 8. Q2 jPOS ServicesBefore Q2, in the old QSP days, we had a limited set of services that were migrated to Q2, usually usingadaptors.
So the old QSP channel has now the corresponding channel-adaptor service, dirpoll has a dirpoll-adaptor, the security module has a SMAdaptor and KeyStoreAdaptor and so on.
We document in this chapter these adaptors, along with new services that have been implemented only inQ2.
8.1. ChannelAdaptorWhen jPOS acts as client from a TCP/IP standpoint, you’d most likely use the ChannelAdaptor service tomanage the low level socket connection.
The ChannelAdaptor uses the Space to communicate with other jPOS components, basically through twoSpace queues, one for input and the other one for output.
98
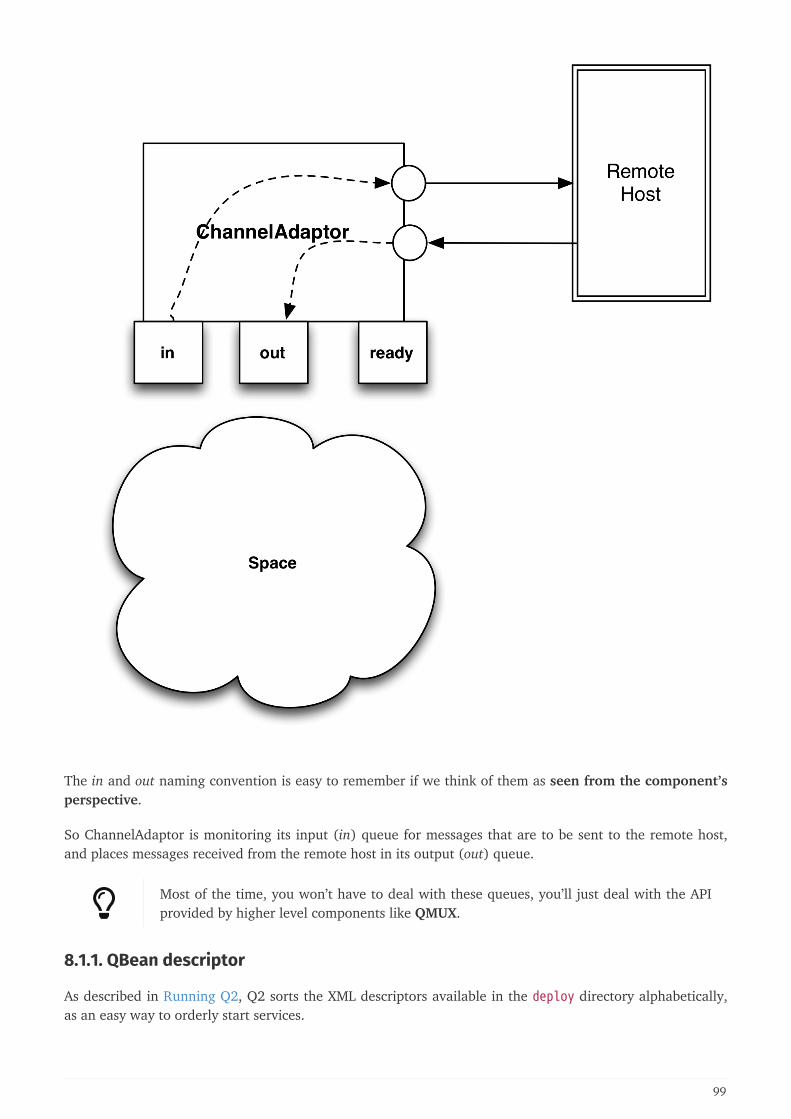
The in and out naming convention is easy to remember if we think of them as seen from the component’sperspective.
So ChannelAdaptor is monitoring its input (in) queue for messages that are to be sent to the remote host,and places messages received from the remote host in its output (out) queue.
Most of the time, you won’t have to deal with these queues, you’ll just deal with the APIprovided by higher level components like QMUX.
8.1.1. QBean descriptor
As described in Running Q2, Q2 sorts the XML descriptors available in the deploy directory alphabetically,as an easy way to orderly start services.
99
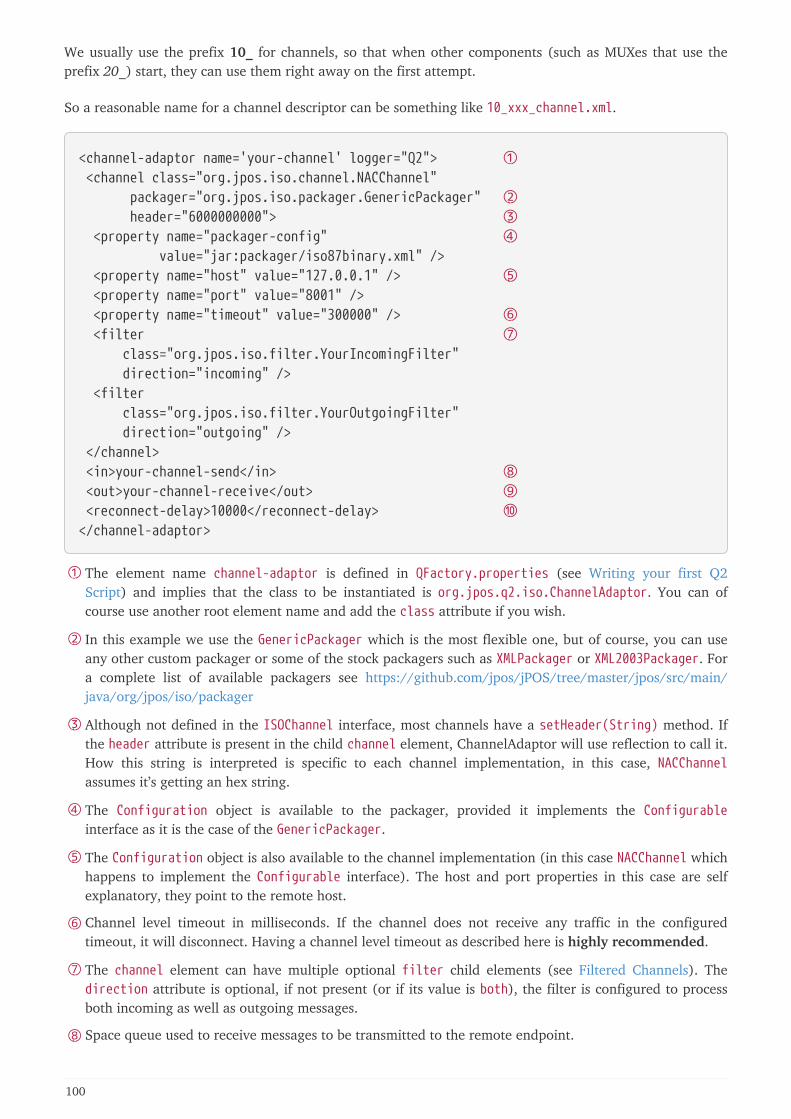
We usually use the prefix 10_ for channels, so that when other components (such as MUXes that use theprefix 20_) start, they can use them right away on the first attempt.
So a reasonable name for a channel descriptor can be something like 10_xxx_channel.xml.
<channel-adaptor name='your-channel' logger="Q2"> ① <channel class="org.jpos.iso.channel.NACChannel" packager="org.jpos.iso.packager.GenericPackager" ② header="6000000000"> ③ <property name="packager-config" ④ value="jar:packager/iso87binary.xml" /> <property name="host" value="127.0.0.1" /> ⑤ <property name="port" value="8001" /> <property name="timeout" value="300000" /> ⑥ <filter ⑦ class="org.jpos.iso.filter.YourIncomingFilter" direction="incoming" /> <filter class="org.jpos.iso.filter.YourOutgoingFilter" direction="outgoing" /> </channel> <in>your-channel-send</in> ⑧ <out>your-channel-receive</out> ⑨ <reconnect-delay>10000</reconnect-delay> ⑩</channel-adaptor>
① The element name channel-adaptor is defined in QFactory.properties (see Writing your first Q2Script) and implies that the class to be instantiated is org.jpos.q2.iso.ChannelAdaptor. You can ofcourse use another root element name and add the class attribute if you wish.
② In this example we use the GenericPackager which is the most flexible one, but of course, you can useany other custom packager or some of the stock packagers such as XMLPackager or XML2003Packager. Fora complete list of available packagers see https://github.com/jpos/jPOS/tree/master/jpos/src/main/java/org/jpos/iso/packager
③ Although not defined in the ISOChannel interface, most channels have a setHeader(String) method. Ifthe header attribute is present in the child channel element, ChannelAdaptor will use reflection to call it.How this string is interpreted is specific to each channel implementation, in this case, NACChannelassumes it’s getting an hex string.
④ The Configuration object is available to the packager, provided it implements the Configurableinterface as it is the case of the GenericPackager.
⑤ The Configuration object is also available to the channel implementation (in this case NACChannel whichhappens to implement the Configurable interface). The host and port properties in this case are selfexplanatory, they point to the remote host.
⑥ Channel level timeout in milliseconds. If the channel does not receive any traffic in the configuredtimeout, it will disconnect. Having a channel level timeout as described here is highly recommended.
⑦ The channel element can have multiple optional filter child elements (see Filtered Channels). Thedirection attribute is optional, if not present (or if its value is both), the filter is configured to processboth incoming as well as outgoing messages.
⑧ Space queue used to receive messages to be transmitted to the remote endpoint.
100
⑨ Messages received from the remote endpoint are placed in this queue.
⑩ If the connection to the remote host breaks, ChannelAdaptor will try to reconnect after a reasonabledelay, expressed in millis. If this element is not present, a default of 10 seconds (10000ms) will be used.=== SSL connections
Most channel implementations accept a socket factory, that can be configured by adding the propertiessocketFactory with additional optional configuration properties required by its implementation.
In case of the provided org.jpos.iso.SunJSSESocketFactory, the additional properties are storepassword,keypassword and keystore.
The configuration would look like this:
<property name="socketFactory" value="org.jpos.iso.SunJSSESocketFactory" /> <property name="storepassword" value="password" /> <property name="keypassword" value="password" /> <property name="keystore" value="cfg/mykeystore.ks" />
Please note that these properties are specific to the channel, so they go inside the channelelement, not the outer channel-adaptor element.
8.1.2. Handling alternate connections
This is not a feature of the ChannelAdaptor but a feature of BaseChannel, a support class inherited by mostchannel implementations (but not all of them, so please check). Channel implementations extendingBaseChannel can take advantage of the alternate-host with its companion alternate-port configurationproperty. There can be many of those, but the number of instances have to match (i.e. if you have 4alternate-host definitions, you need to have 4 alternate-port definitions).
When ChannelAdaptor calls the connect method in the underlying channel, BaseChannel will attempt aconnection to the main host/port. If that fails, it will attempt the alternate hosts list.
The configuration looks like this:
101
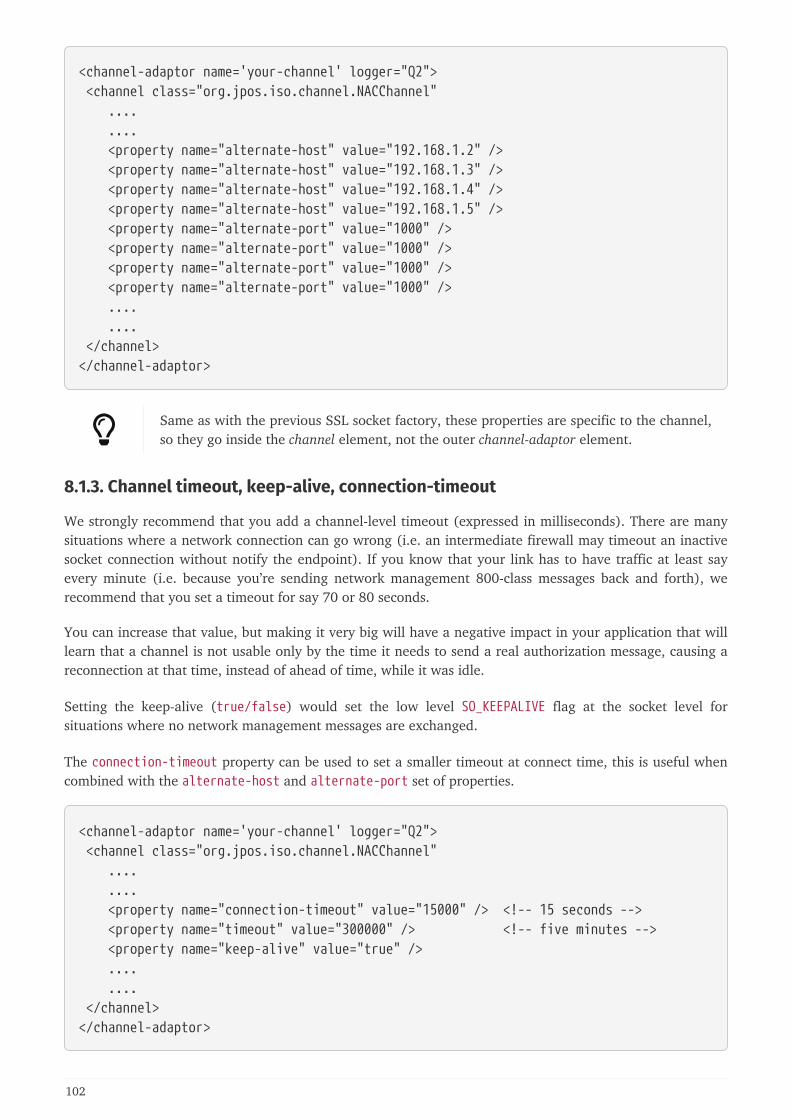
<channel-adaptor name='your-channel' logger="Q2"> <channel class="org.jpos.iso.channel.NACChannel" .... .... <property name="alternate-host" value="192.168.1.2" /> <property name="alternate-host" value="192.168.1.3" /> <property name="alternate-host" value="192.168.1.4" /> <property name="alternate-host" value="192.168.1.5" /> <property name="alternate-port" value="1000" /> <property name="alternate-port" value="1000" /> <property name="alternate-port" value="1000" /> <property name="alternate-port" value="1000" /> .... .... </channel></channel-adaptor>
Same as with the previous SSL socket factory, these properties are specific to the channel,so they go inside the channel element, not the outer channel-adaptor element.
8.1.3. Channel timeout, keep-alive, connection-timeout
We strongly recommend that you add a channel-level timeout (expressed in milliseconds). There are manysituations where a network connection can go wrong (i.e. an intermediate firewall may timeout an inactivesocket connection without notify the endpoint). If you know that your link has to have traffic at least sayevery minute (i.e. because you’re sending network management 800-class messages back and forth), werecommend that you set a timeout for say 70 or 80 seconds.
You can increase that value, but making it very big will have a negative impact in your application that willlearn that a channel is not usable only by the time it needs to send a real authorization message, causing areconnection at that time, instead of ahead of time, while it was idle.
Setting the keep-alive (true/false) would set the low level SO_KEEPALIVE flag at the socket level forsituations where no network management messages are exchanged.
The connection-timeout property can be used to set a smaller timeout at connect time, this is useful whencombined with the alternate-host and alternate-port set of properties.
<channel-adaptor name='your-channel' logger="Q2"> <channel class="org.jpos.iso.channel.NACChannel" .... .... <property name="connection-timeout" value="15000" /> <!-- 15 seconds --> <property name="timeout" value="300000" /> <!-- five minutes --> <property name="keep-alive" value="true" /> .... .... </channel></channel-adaptor>
102

8.2. OneShotChannelAdaptorMost host-to-host ISO-8583 links use persistent connections, and that’s the reason we have to multiplex themessages using a MUX, but for situations where the host expects a single transaction per socket connection,we have the OneShotChannelAdaptor.
The configuration and behavior is very similar to the ChannelAdaptor (see ChannelAdaptor), you just needto change the class name in the qbean descriptor.
It supports the following attributes:
Table 18. OneShotChannelAdaptor Attributes.
Name Attribute
in Input queue
out Output queue
space Optional space name, defaults to system’s default space
max-connections Maximum number of simultaneous connections to the remote host,defaults to 1
max-connect-attempts Maximum number of connections attempts for a single transaction,defaults to 15
8.2.1. QBean descriptor
<qbean name='your-channel' logger="Q2"> class="org.jpos.q2.iso.OneShotChannelAdaptor" ① <channel class="org.jpos.iso.channel.NACChannel" packager="org.jpos.iso.packager.GenericPackager" header="6000000000"> <property name="packager-config" value="jar:packager/iso87binary.xml" /> <property name="host" value="127.0.0.1" /> <property name="port" value="8001" /> <filter class="org.jpos.iso.filter.YourIncomingFilter" direction="incoming" /> <filter class="org.jpos.iso.filter.YourOutgoingFilter" direction="outgoing" /> </channel> <in>your-channel-send</in> ② <out>your-channel-receive</out> ③ <max-connections>5</max-connections> ④ <max-connect-attempts>3</max-connect-attempts> ⑤</qbean>
① Please note we specify a class here.
② Space queue used to receive messages to be transmitted to the remote endpoint.
103
③ Messages received from the remote endpoint are placed in this queue.
④ Overrides default max-connections (currently 1)
⑤ Overrides default max-connect-attempts (currently 15)
In addition to org.jpos.q2.iso.OneShotChannelAdaptor there’s a new experimentalorg.jpos.q2.iso.OneShotChannelAdaptorMK2 with the same functionality and a newimplementation.
8.3. QMUXQMUX is a modern and very simple, yet powerful, Q2 service that implements the MUX interface asdescribed in Multiplexing an ISOChannel with a MUX.
Users of the old ISOMUX, which is still available in the compat_1_5_2 module areencouraged to upgrade to this new service.
QMUX uses the Space in order to communicate with the underlying channels; this strategy brings into play awhole new set of deployment options, including the ability to multiplex several channels forredundancy/load-balancing. These channels doesn’t even have to run on the same machine. They could usedistributed/remote space implementations. The new space-based code doesn’t require an extra thread,something very useful in systems where a large number of MUXes are required.
8.3.1. QBean descriptor
A QMUX configuration looks like this:
<mux class="org.jpos.q2.iso.QMUX" logger="Q2" name="mymux"> <in>your-channel-receive</in> ① <out>your-channel-send</out> ② <ready>your-channel.ready</ready> ③</mux>
① The MUX <in> queue has to be named after the ChannelAdaptor’s <out> queue.
② In the same way, the MUX’s <out> queue needs to match the ChannelAdaptor’s <in> queue.
③ In order to provide a usable MUX.isConnected() method, the MUX needs to have a way to know if theunderlying channel, loosely connected through the in/out queues is actually connected. The channeladaptor sets an entry in the space named after the channel’s name with the extension .ready as truewhen connected, so the optional ready element has to match that name. If a <ready> element isn’tpresent, MUX.isConnected() will always return true.
104
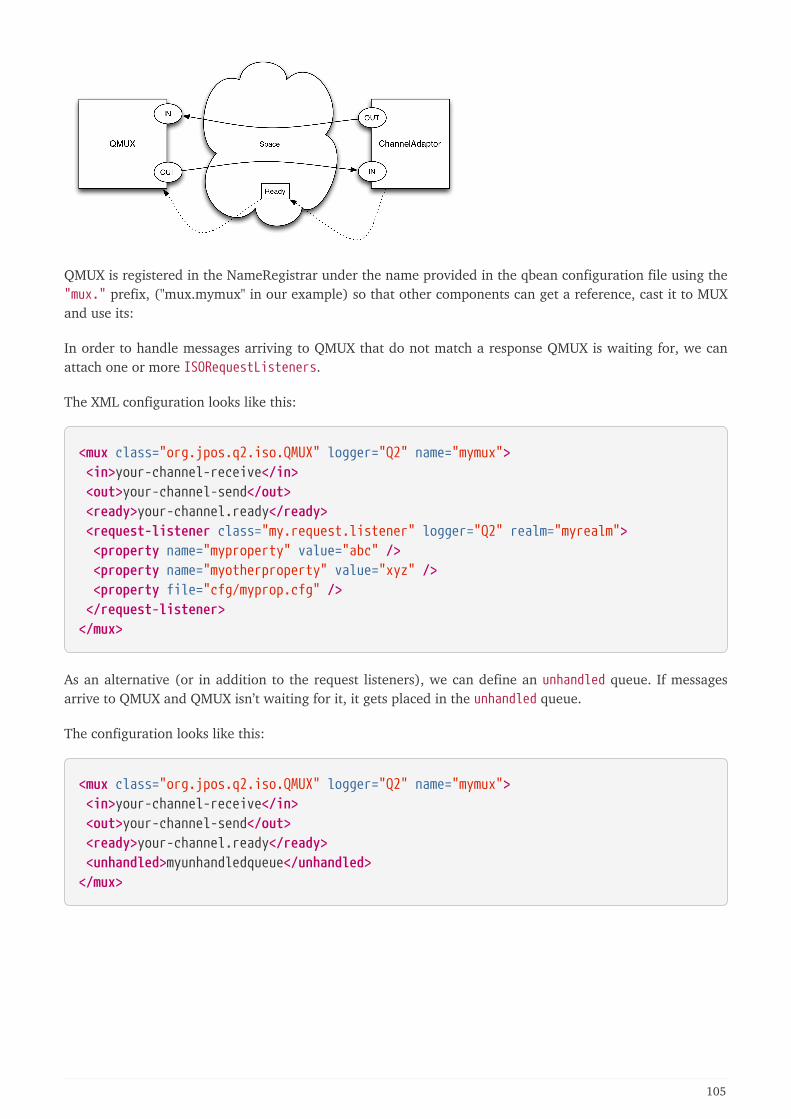
QMUX is registered in the NameRegistrar under the name provided in the qbean configuration file using the"mux." prefix, ("mux.mymux" in our example) so that other components can get a reference, cast it to MUXand use its:
In order to handle messages arriving to QMUX that do not match a response QMUX is waiting for, we canattach one or more ISORequestListeners.
The XML configuration looks like this:
<mux class="org.jpos.q2.iso.QMUX" logger="Q2" name="mymux"> <in>your-channel-receive</in> <out>your-channel-send</out> <ready>your-channel.ready</ready> <request-listener class="my.request.listener" logger="Q2" realm="myrealm"> <property name="myproperty" value="abc" /> <property name="myotherproperty" value="xyz" /> <property file="cfg/myprop.cfg" /> </request-listener></mux>
As an alternative (or in addition to the request listeners), we can define an unhandled queue. If messagesarrive to QMUX and QMUX isn’t waiting for it, it gets placed in the unhandled queue.
The configuration looks like this:
<mux class="org.jpos.q2.iso.QMUX" logger="Q2" name="mymux"> <in>your-channel-receive</in> <out>your-channel-send</out> <ready>your-channel.ready</ready> <unhandled>myunhandledqueue</unhandled></mux>
105
In order for this mechanism to work, a separate jPOS service should be waiting formessages arriving to the unhandled queue.
In order to prevent a situation where a QMUX is configured to push messages to anunhandled queue and no service is listening to those messages, a 120 seconds timeout isused. So messages will be present for just 120 seconds. This little protection is intended toavoid out of memory issues.
8.3.2. MTI mapping and default key
QMUX use the MTI as well as fields 41 and 11 as its default key.
That default can be changed using the <key>…</key> elements in the QMUX configuration, i.e.:
<mux class="org.jpos.q2.iso.QMUX" logger="Q2" name="mymux"> <key>42 41 11</key> ① <key mti="0800">41</key> ② <in>your-channel-receive</in> <out>your-channel-send</out> <ready>your-channel.ready</ready> <unhandled>myunhandledqueue</unhandled></mux>
① overrides default key.
② overrides default key for 0800 messages.
In addition to the fields defined in the <key> element, QMUX maps each digit of the MTI to use as a key partin order to avoid mixing for instance a response for a 100-class message such as a 0100 with a reversalresponse. The reason for this additional mapping is because most reversals share the same STAN (field 11)with the original authorization.
Each of the three digits of the MTI gets mapped using the following default values:
• 0123456789
• 0123456789
• 0022446789
The value 0123456789 means no special handling is required, a value of 0 in the first position of the MTI i.e.the first 0 in a 0100 message) will expect a 0 in that very same position in the response. The first positionrepresents the ISO-8583 version number (see An ISO-8583 primer), so if we send a 1987 message, weexpect a 1987 response.
Same goes for the second position, if we send a 0100 we expect a 0110, and that’s what the 0123456789mapping does, it actually takes no action.
For the third position, we use the default value 0022446789. That means that a 1 in the third position (i.e. a0110) will be considered a 0 when creating the MTI key part, so that a 0110 response will match theoriginal 0100.
These mappings can be changed using the <mtimapping> element in the QMUX configuration. The default
106
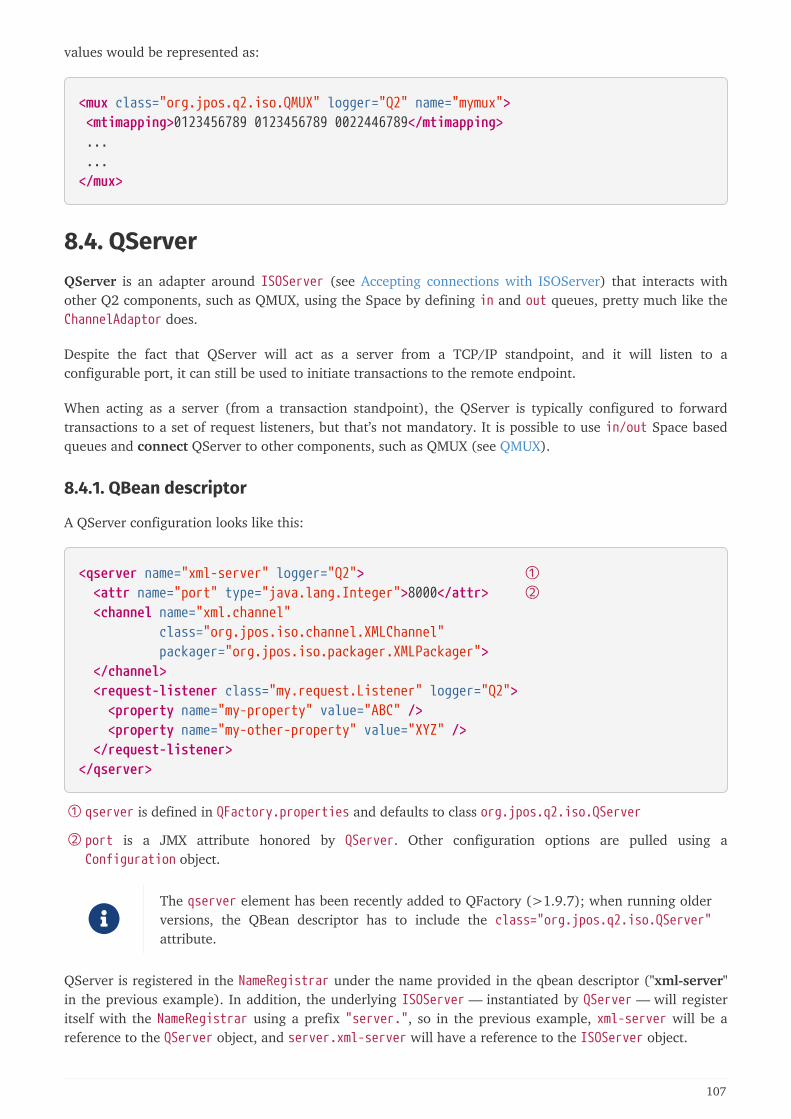
values would be represented as:
<mux class="org.jpos.q2.iso.QMUX" logger="Q2" name="mymux"> <mtimapping>0123456789 0123456789 0022446789</mtimapping> ... ...</mux>
8.4. QServerQServer is an adapter around ISOServer (see Accepting connections with ISOServer) that interacts withother Q2 components, such as QMUX, using the Space by defining in and out queues, pretty much like theChannelAdaptor does.
Despite the fact that QServer will act as a server from a TCP/IP standpoint, and it will listen to aconfigurable port, it can still be used to initiate transactions to the remote endpoint.
When acting as a server (from a transaction standpoint), the QServer is typically configured to forwardtransactions to a set of request listeners, but that’s not mandatory. It is possible to use in/out Space basedqueues and connect QServer to other components, such as QMUX (see QMUX).
8.4.1. QBean descriptor
A QServer configuration looks like this:
<qserver name="xml-server" logger="Q2"> ① <attr name="port" type="java.lang.Integer">8000</attr> ② <channel name="xml.channel" class="org.jpos.iso.channel.XMLChannel" packager="org.jpos.iso.packager.XMLPackager"> </channel> <request-listener class="my.request.Listener" logger="Q2"> <property name="my-property" value="ABC" /> <property name="my-other-property" value="XYZ" /> </request-listener></qserver>
① qserver is defined in QFactory.properties and defaults to class org.jpos.q2.iso.QServer
② port is a JMX attribute honored by QServer. Other configuration options are pulled using aConfiguration object.
The qserver element has been recently added to QFactory (>1.9.7); when running olderversions, the QBean descriptor has to include the class="org.jpos.q2.iso.QServer"attribute.
QServer is registered in the NameRegistrar under the name provided in the qbean descriptor ("xml-server"in the previous example). In addition, the underlying ISOServer — instantiated by QServer — will registeritself with the NameRegistrar using a prefix "server.", so in the previous example, xml-server will be areference to the QServer object, and server.xml-server will have a reference to the ISOServer object.
107
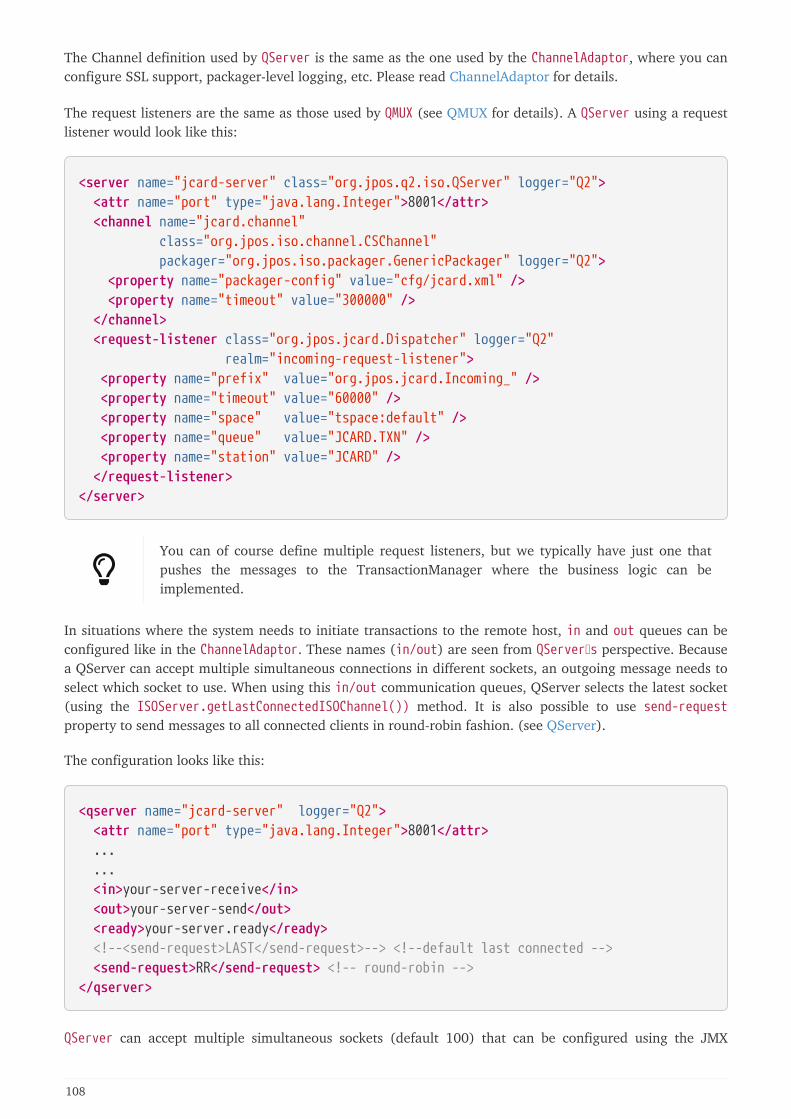
The Channel definition used by QServer is the same as the one used by the ChannelAdaptor, where you canconfigure SSL support, packager-level logging, etc. Please read ChannelAdaptor for details.
The request listeners are the same as those used by QMUX (see QMUX for details). A QServer using a requestlistener would look like this:
<server name="jcard-server" class="org.jpos.q2.iso.QServer" logger="Q2"> <attr name="port" type="java.lang.Integer">8001</attr> <channel name="jcard.channel" class="org.jpos.iso.channel.CSChannel" packager="org.jpos.iso.packager.GenericPackager" logger="Q2"> <property name="packager-config" value="cfg/jcard.xml" /> <property name="timeout" value="300000" /> </channel> <request-listener class="org.jpos.jcard.Dispatcher" logger="Q2" realm="incoming-request-listener"> <property name="prefix" value="org.jpos.jcard.Incoming_" /> <property name="timeout" value="60000" /> <property name="space" value="tspace:default" /> <property name="queue" value="JCARD.TXN" /> <property name="station" value="JCARD" /> </request-listener></server>
You can of course define multiple request listeners, but we typically have just one thatpushes the messages to the TransactionManager where the business logic can beimplemented.
In situations where the system needs to initiate transactions to the remote host, in and out queues can beconfigured like in the ChannelAdaptor. These names (in/out) are seen from QServer’s perspective. Becausea QServer can accept multiple simultaneous connections in different sockets, an outgoing message needs toselect which socket to use. When using this in/out communication queues, QServer selects the latest socket(using the ISOServer.getLastConnectedISOChannel()) method. It is also possible to use send-requestproperty to send messages to all connected clients in round-robin fashion. (see QServer).
The configuration looks like this:
<qserver name="jcard-server" logger="Q2"> <attr name="port" type="java.lang.Integer">8001</attr> ... ... <in>your-server-receive</in> <out>your-server-send</out> <ready>your-server.ready</ready> <!--<send-request>LAST</send-request>--> <!--default last connected --> <send-request>RR</send-request> <!-- round-robin --></qserver>
QServer can accept multiple simultaneous sockets (default 100) that can be configured using the JMX
108
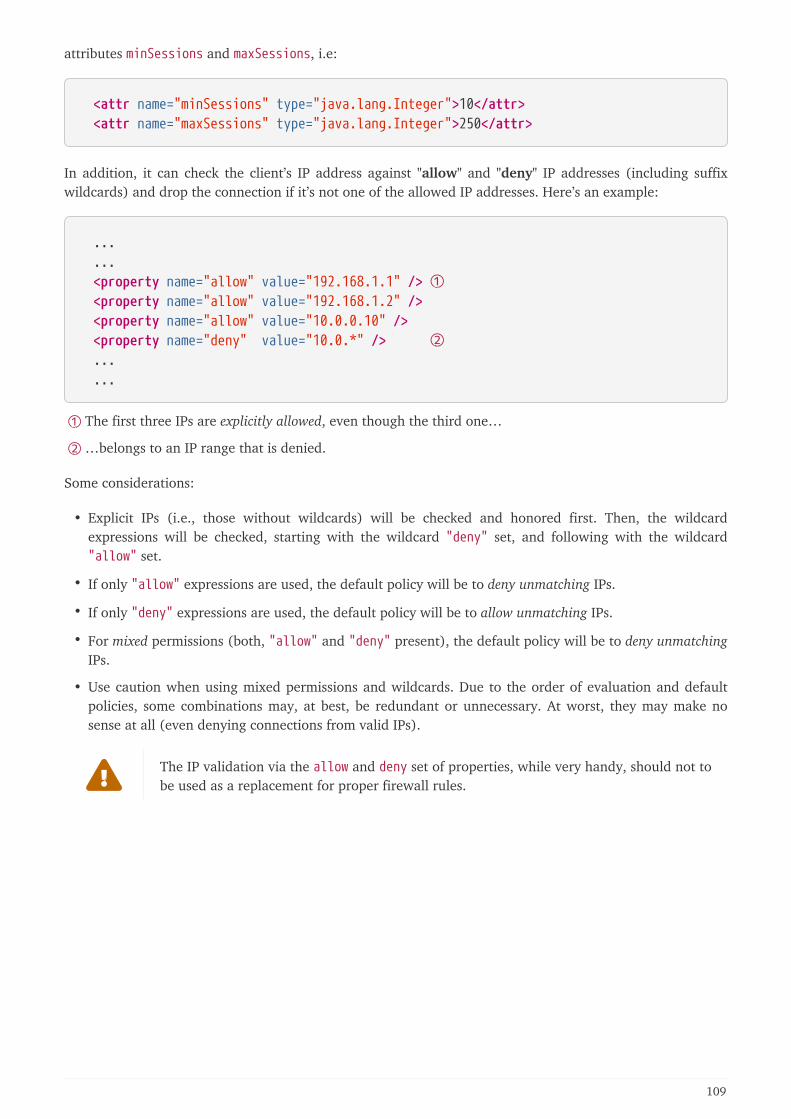
attributes minSessions and maxSessions, i.e:
<attr name="minSessions" type="java.lang.Integer">10</attr> <attr name="maxSessions" type="java.lang.Integer">250</attr>
In addition, it can check the client’s IP address against "allow" and "deny" IP addresses (including suffixwildcards) and drop the connection if it’s not one of the allowed IP addresses. Here’s an example:
... ... <property name="allow" value="192.168.1.1" /> ① <property name="allow" value="192.168.1.2" /> <property name="allow" value="10.0.0.10" /> <property name="deny" value="10.0.*" /> ② ... ...
① The first three IPs are explicitly allowed, even though the third one…
② …belongs to an IP range that is denied.
Some considerations:
• Explicit IPs (i.e., those without wildcards) will be checked and honored first. Then, the wildcardexpressions will be checked, starting with the wildcard "deny" set, and following with the wildcard"allow" set.
• If only "allow" expressions are used, the default policy will be to deny unmatching IPs.
• If only "deny" expressions are used, the default policy will be to allow unmatching IPs.
• For mixed permissions (both, "allow" and "deny" present), the default policy will be to deny unmatchingIPs.
• Use caution when using mixed permissions and wildcards. Due to the order of evaluation and defaultpolicies, some combinations may, at best, be redundant or unnecessary. At worst, they may make nosense at all (even denying connections from valid IPs).
The IP validation via the allow and deny set of properties, while very handy, should not tobe used as a replacement for proper firewall rules.
109
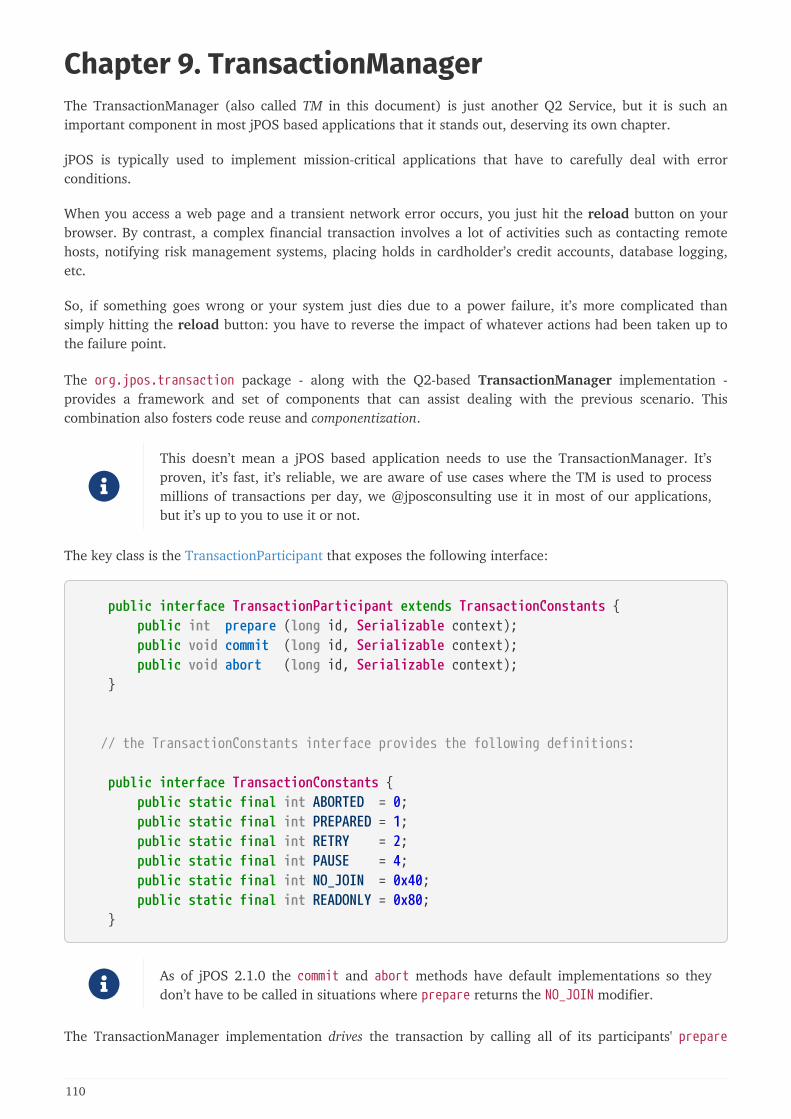
Chapter 9. TransactionManagerThe TransactionManager (also called TM in this document) is just another Q2 Service, but it is such animportant component in most jPOS based applications that it stands out, deserving its own chapter.
jPOS is typically used to implement mission-critical applications that have to carefully deal with errorconditions.
When you access a web page and a transient network error occurs, you just hit the reload button on yourbrowser. By contrast, a complex financial transaction involves a lot of activities such as contacting remotehosts, notifying risk management systems, placing holds in cardholder’s credit accounts, database logging,etc.
So, if something goes wrong or your system just dies due to a power failure, it’s more complicated thansimply hitting the reload button: you have to reverse the impact of whatever actions had been taken up tothe failure point.
The org.jpos.transaction package - along with the Q2-based TransactionManager implementation -provides a framework and set of components that can assist dealing with the previous scenario. Thiscombination also fosters code reuse and componentization.
This doesn’t mean a jPOS based application needs to use the TransactionManager. It’sproven, it’s fast, it’s reliable, we are aware of use cases where the TM is used to processmillions of transactions per day, we @jposconsulting use it in most of our applications,but it’s up to you to use it or not.
The key class is the TransactionParticipant that exposes the following interface:
public interface TransactionParticipant extends TransactionConstants { public int prepare (long id, Serializable context); public void commit (long id, Serializable context); public void abort (long id, Serializable context); }
// the TransactionConstants interface provides the following definitions:
public interface TransactionConstants { public static final int ABORTED = 0; public static final int PREPARED = 1; public static final int RETRY = 2; public static final int PAUSE = 4; public static final int NO_JOIN = 0x40; public static final int READONLY = 0x80; }
As of jPOS 2.1.0 the commit and abort methods have default implementations so theydon’t have to be called in situations where prepare returns the NO_JOIN modifier.
The TransactionManager implementation drives the transaction by calling all of its participants' prepare
110
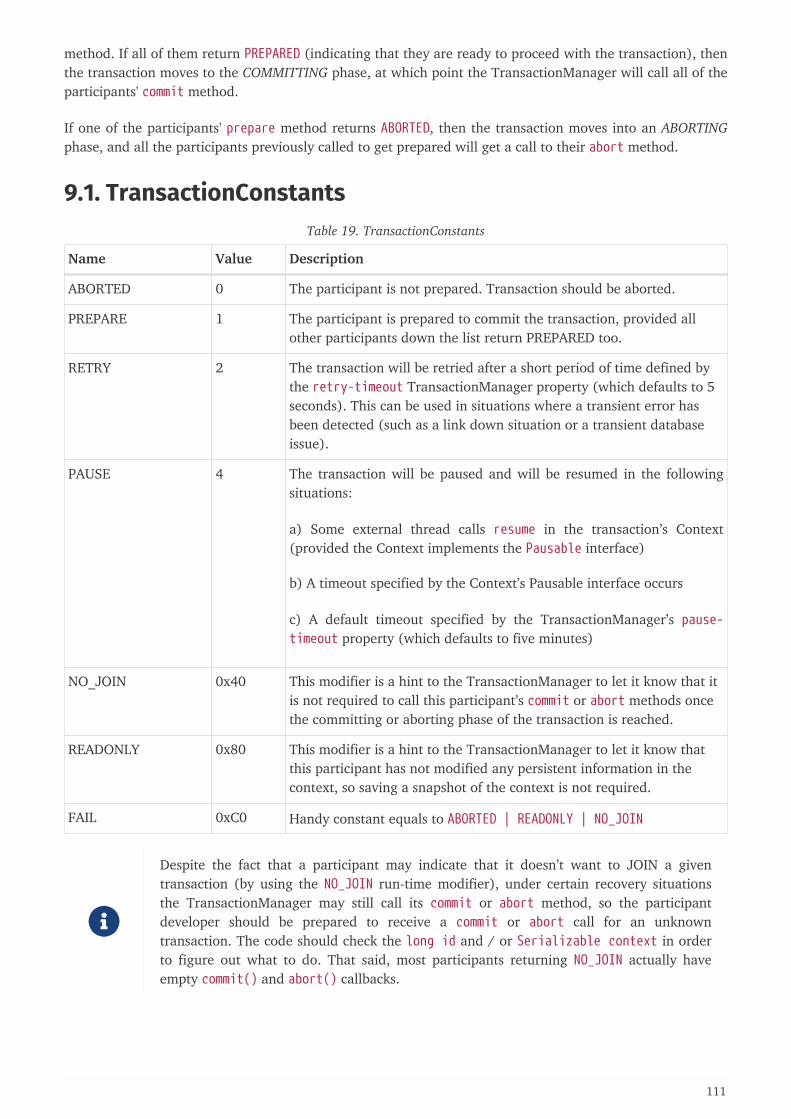
method. If all of them return PREPARED (indicating that they are ready to proceed with the transaction), thenthe transaction moves to the COMMITTING phase, at which point the TransactionManager will call all of theparticipants' commit method.
If one of the participants' prepare method returns ABORTED, then the transaction moves into an ABORTINGphase, and all the participants previously called to get prepared will get a call to their abort method.
9.1. TransactionConstantsTable 19. TransactionConstants
Name Value Description
ABORTED 0 The participant is not prepared. Transaction should be aborted.
PREPARE 1 The participant is prepared to commit the transaction, provided allother participants down the list return PREPARED too.
RETRY 2 The transaction will be retried after a short period of time defined bythe retry-timeout TransactionManager property (which defaults to 5seconds). This can be used in situations where a transient error hasbeen detected (such as a link down situation or a transient databaseissue).
PAUSE 4 The transaction will be paused and will be resumed in the followingsituations:
a) Some external thread calls resume in the transaction’s Context(provided the Context implements the Pausable interface)
b) A timeout specified by the Context’s Pausable interface occurs
c) A default timeout specified by the TransactionManager’s pause-timeout property (which defaults to five minutes)
NO_JOIN 0x40 This modifier is a hint to the TransactionManager to let it know that itis not required to call this participant’s commit or abort methods oncethe committing or aborting phase of the transaction is reached.
READONLY 0x80 This modifier is a hint to the TransactionManager to let it know thatthis participant has not modified any persistent information in thecontext, so saving a snapshot of the context is not required.
FAIL 0xC0 Handy constant equals to ABORTED | READONLY | NO_JOIN
Despite the fact that a participant may indicate that it doesn’t want to JOIN a giventransaction (by using the NO_JOIN run-time modifier), under certain recovery situationsthe TransactionManager may still call its commit or abort method, so the participantdeveloper should be prepared to receive a commit or abort call for an unknowntransaction. The code should check the long id and / or Serializable context in orderto figure out what to do. That said, most participants returning NO_JOIN actually haveempty commit() and abort() callbacks.
111

9.2. Transaction ContextThe only constraint imposed on a Context implementation is that it has to implement thejava.io.Serializable interface. That’s because the TransactionManager has to write snapshots of it atdifferent check points.
You can use any Serializable object, either a custom object such as an application-specific Bean, or ageneral-purpose object such as a java.util.Map implementation (e.g., a Hashmap).
But we found it very useful to use a general-purpose context holding two maps, a regular (persistent) mapand a transient one, so that one can store serializable data that can be automatically persisted by theTransactionManager (for recovery purposes) as well as live references (such as a TCP/IP socket or a JDBCconnection).
So there’s a general purpose Context reference implementation that in addition implements the Pausableinterface, required if you plan to use transaction continuations (PAUSE modifier).
This Context reference implementation has two kind of put operations:
public void put (Object key, Object value)
and
public void put (Object key, Object value, boolean persist)
When using the latter, if persist == true, then the object can get automatically persisted by theTransactionManager (if configured to do so, using the persistent-space property).
9.3. Context Recovery InterfaceIn the previous section, we described a Transaction Context holding two maps: a transient map and apersistent one.
In situations where the TransactionManager dies (e.g., during a power failure), a transaction could havebeen in its preparing, committing or aborting phase.
Either the commit or abort methods will be called on all participants, but before that happens, theTransactionManager gives the developer the opportunity to let the participants know that we are not dealingwith a normal commit/abort but a recovery situation.
The developer may choose to implement the ContextRecovery interface:
public interface ContextRecovery { public Serializable recover (long id, Serializable context, boolean commit); ①}
① the commit boolean parameter indicates whether the transaction is going to commit or abort.
The TransactionManager provides the opportunity to build up the transient part of the Context (e.g., re-establishing a JDBC connection, re-fetching a database record based on some persistent ID number , etc.).
112
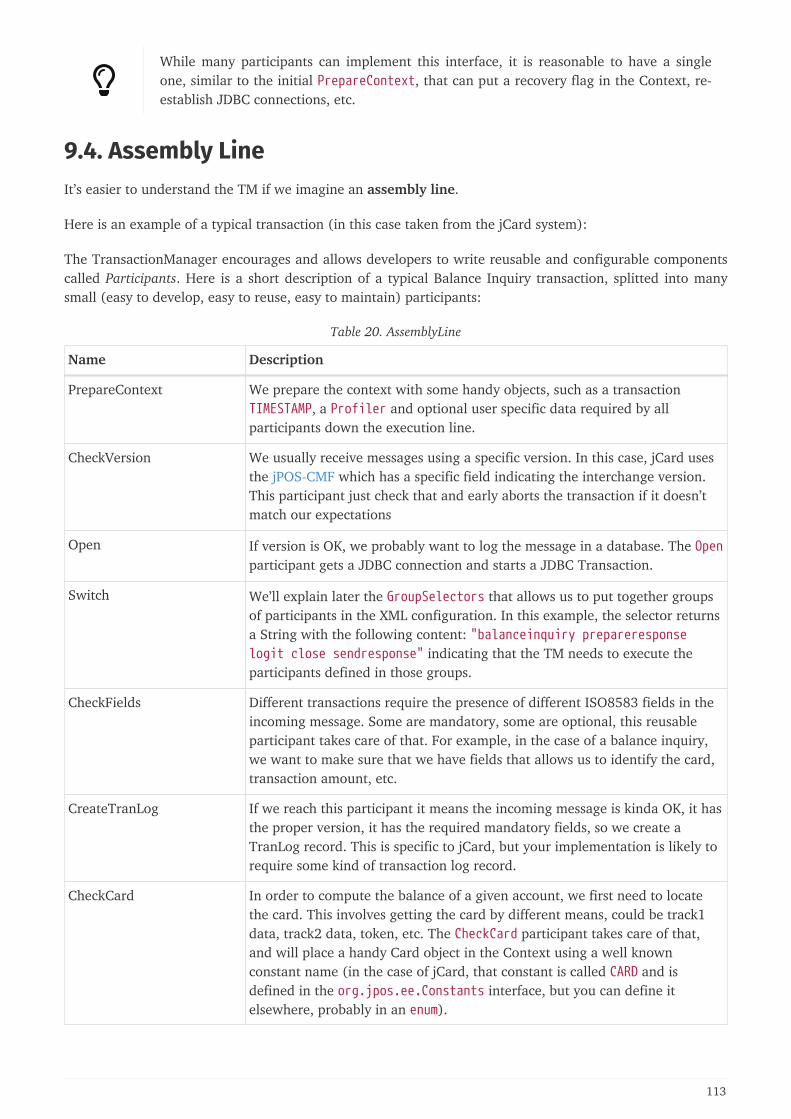
While many participants can implement this interface, it is reasonable to have a singleone, similar to the initial PrepareContext, that can put a recovery flag in the Context, re-establish JDBC connections, etc.
9.4. Assembly LineIt’s easier to understand the TM if we imagine an assembly line.
Here is an example of a typical transaction (in this case taken from the jCard system):
The TransactionManager encourages and allows developers to write reusable and configurable componentscalled Participants. Here is a short description of a typical Balance Inquiry transaction, splitted into manysmall (easy to develop, easy to reuse, easy to maintain) participants:
Table 20. AssemblyLine
Name Description
PrepareContext We prepare the context with some handy objects, such as a transactionTIMESTAMP, a Profiler and optional user specific data required by allparticipants down the execution line.
CheckVersion We usually receive messages using a specific version. In this case, jCard usesthe jPOS-CMF which has a specific field indicating the interchange version.This participant just check that and early aborts the transaction if it doesn’tmatch our expectations
Open If version is OK, we probably want to log the message in a database. The Openparticipant gets a JDBC connection and starts a JDBC Transaction.
Switch We’ll explain later the GroupSelectors that allows us to put together groupsof participants in the XML configuration. In this example, the selector returnsa String with the following content: "balanceinquiry prepareresponselogit close sendresponse" indicating that the TM needs to execute theparticipants defined in those groups.
CheckFields Different transactions require the presence of different ISO8583 fields in theincoming message. Some are mandatory, some are optional, this reusableparticipant takes care of that. For example, in the case of a balance inquiry,we want to make sure that we have fields that allows us to identify the card,transaction amount, etc.
CreateTranLog If we reach this participant it means the incoming message is kinda OK, it hasthe proper version, it has the required mandatory fields, so we create aTranLog record. This is specific to jCard, but your implementation is likely torequire some kind of transaction log record.
CheckCard In order to compute the balance of a given account, we first need to locatethe card. This involves getting the card by different means, could be track1data, track2 data, token, etc. The CheckCard participant takes care of that,and will place a handy Card object in the Context using a well knownconstant name (in the case of jCard, that constant is called CARD and isdefined in the org.jpos.ee.Constants interface, but you can define itelsewhere, probably in an enum).
113

Name Description
CheckTerminal We need to check that the client terminal is valid, active, and perhaps checkits capabilities in order to provide responses in different formats (i.e. forprinting purposes)
CheckAcquirer We need to know the acquirer, perhaps to validate fees involved in thistransaction.
SelectAccount We know the Card, so we know the CardHolder, depending on thetransaction type and processing code, we may choose a different account (i.e.checking versus saving)
ComputeBalances Now we know the account, so we compute its balances (available,accounting) and place it in the Context
PrepareResponse We have the balances in the Context in BigDecimal objects under well knowncontant keys (i.e. AVAILABLE_BALANCE, ACCOUNTING_BALANCE), but we need toplace those in the ISO8583 response, probably in field 54 (additionalamounts).
LogIt Remember we’ve created a TranLog record in the CreateTranLog participantabove, now we need to pick some of the data we have been gathering in theContext and place it there, so that it gets persisted in a database row.
Close Before we send a response, we need to commit the JDBC transaction andreturn the JDBC session to the pool.
SendResponse Now we send the response back to the network
ProtectDebugInfo The following participant (Debug) dumps the Context’s content to the jPOSlog, something very useful for debugging purposes, but there’s some sensitivedata in the Context, so this little participant take care of masking it.
Debug Dumps the Context to the jPOS log.
Here is the sample log:
114
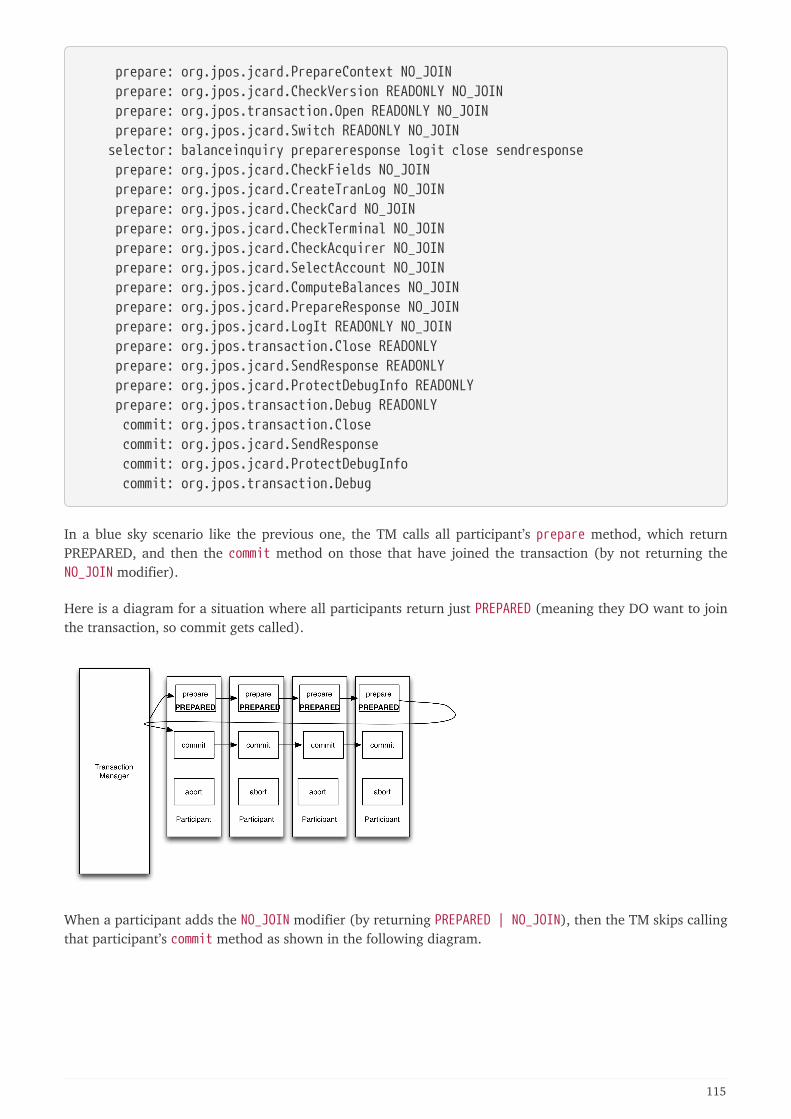
prepare: org.jpos.jcard.PrepareContext NO_JOIN prepare: org.jpos.jcard.CheckVersion READONLY NO_JOIN prepare: org.jpos.transaction.Open READONLY NO_JOIN prepare: org.jpos.jcard.Switch READONLY NO_JOIN selector: balanceinquiry prepareresponse logit close sendresponse prepare: org.jpos.jcard.CheckFields NO_JOIN prepare: org.jpos.jcard.CreateTranLog NO_JOIN prepare: org.jpos.jcard.CheckCard NO_JOIN prepare: org.jpos.jcard.CheckTerminal NO_JOIN prepare: org.jpos.jcard.CheckAcquirer NO_JOIN prepare: org.jpos.jcard.SelectAccount NO_JOIN prepare: org.jpos.jcard.ComputeBalances NO_JOIN prepare: org.jpos.jcard.PrepareResponse NO_JOIN prepare: org.jpos.jcard.LogIt READONLY NO_JOIN prepare: org.jpos.transaction.Close READONLY prepare: org.jpos.jcard.SendResponse READONLY prepare: org.jpos.jcard.ProtectDebugInfo READONLY prepare: org.jpos.transaction.Debug READONLY commit: org.jpos.transaction.Close commit: org.jpos.jcard.SendResponse commit: org.jpos.jcard.ProtectDebugInfo commit: org.jpos.transaction.Debug
In a blue sky scenario like the previous one, the TM calls all participant’s prepare method, which returnPREPARED, and then the commit method on those that have joined the transaction (by not returning theNO_JOIN modifier).
Here is a diagram for a situation where all participants return just PREPARED (meaning they DO want to jointhe transaction, so commit gets called).
When a participant adds the NO_JOIN modifier (by returning PREPARED | NO_JOIN), then the TM skips callingthat participant’s commit method as shown in the following diagram.
115
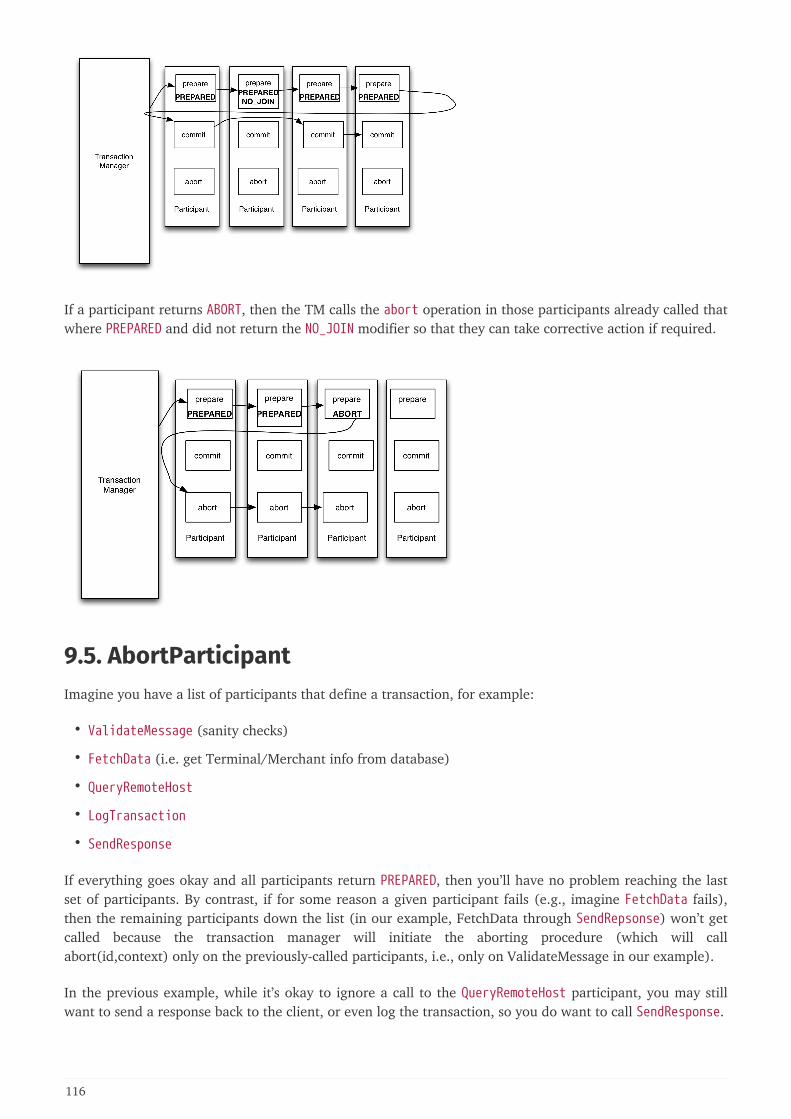
If a participant returns ABORT, then the TM calls the abort operation in those participants already called thatwhere PREPARED and did not return the NO_JOIN modifier so that they can take corrective action if required.
9.5. AbortParticipantImagine you have a list of participants that define a transaction, for example:
• ValidateMessage (sanity checks)
• FetchData (i.e. get Terminal/Merchant info from database)
• QueryRemoteHost
• LogTransaction
• SendResponse
If everything goes okay and all participants return PREPARED, then you’ll have no problem reaching the lastset of participants. By contrast, if for some reason a given participant fails (e.g., imagine FetchData fails),then the remaining participants down the list (in our example, FetchData through SendRepsonse) won’t getcalled because the transaction manager will initiate the aborting procedure (which will callabort(id,context) only on the previously-called participants, i.e., only on ValidateMessage in our example).
In the previous example, while it’s okay to ignore a call to the QueryRemoteHost participant, you may stillwant to send a response back to the client, or even log the transaction, so you do want to call SendResponse.
116
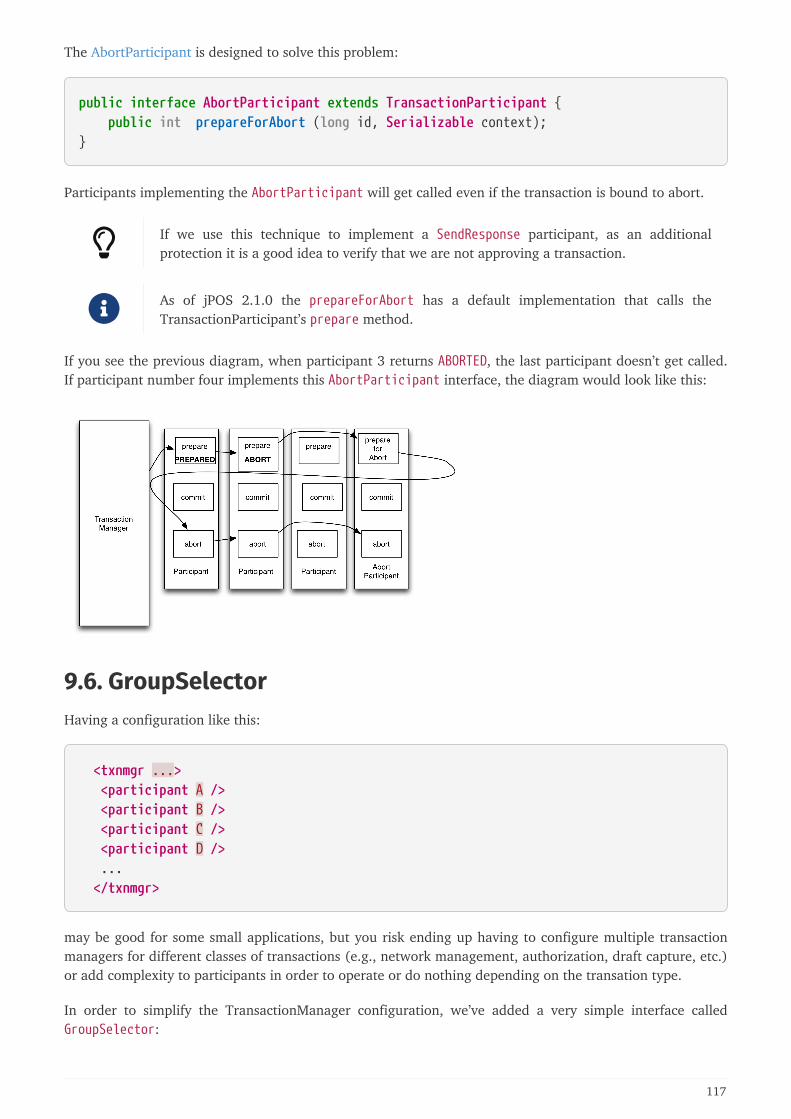
The AbortParticipant is designed to solve this problem:
public interface AbortParticipant extends TransactionParticipant { public int prepareForAbort (long id, Serializable context);}
Participants implementing the AbortParticipant will get called even if the transaction is bound to abort.
If we use this technique to implement a SendResponse participant, as an additionalprotection it is a good idea to verify that we are not approving a transaction.
As of jPOS 2.1.0 the prepareForAbort has a default implementation that calls theTransactionParticipant’s prepare method.
If you see the previous diagram, when participant 3 returns ABORTED, the last participant doesn’t get called.If participant number four implements this AbortParticipant interface, the diagram would look like this:
9.6. GroupSelectorHaving a configuration like this:
<txnmgr ...> <participant A /> <participant B /> <participant C /> <participant D /> ... </txnmgr>
may be good for some small applications, but you risk ending up having to configure multiple transactionmanagers for different classes of transactions (e.g., network management, authorization, draft capture, etc.)or add complexity to participants in order to operate or do nothing depending on the transation type.
In order to simplify the TransactionManager configuration, we’ve added a very simple interface calledGroupSelector:
117
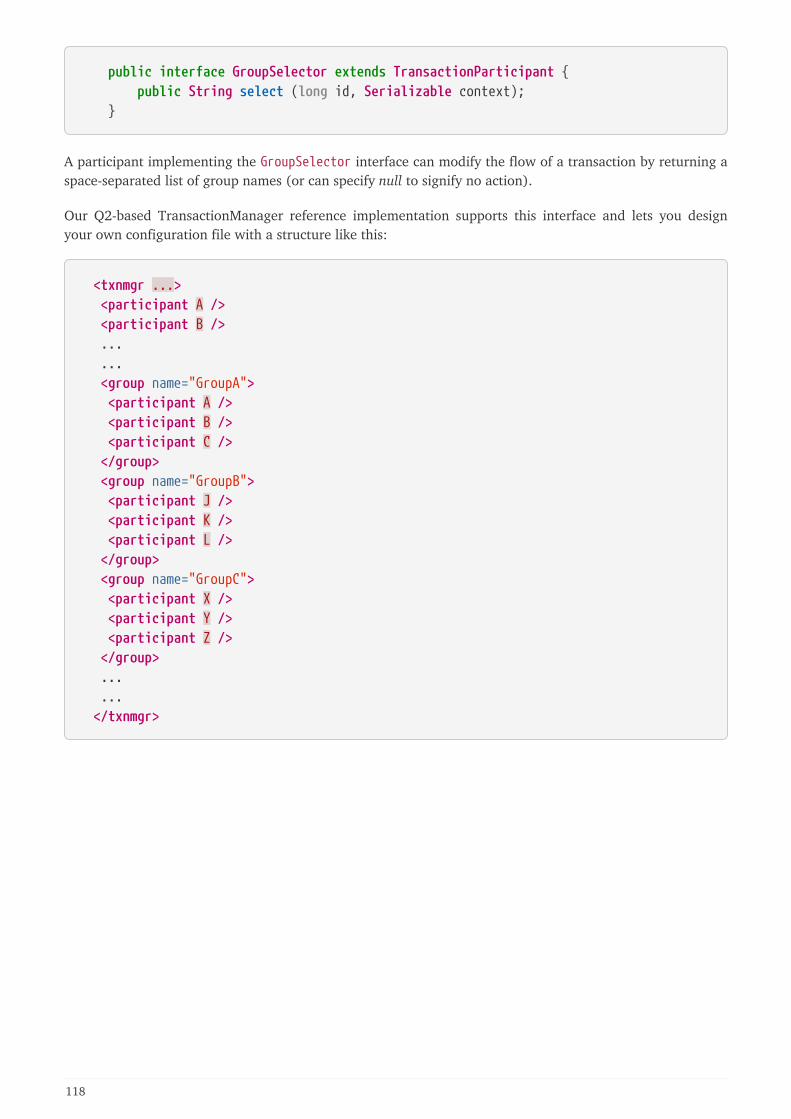
public interface GroupSelector extends TransactionParticipant { public String select (long id, Serializable context); }
A participant implementing the GroupSelector interface can modify the flow of a transaction by returning aspace-separated list of group names (or can specify null to signify no action).
Our Q2-based TransactionManager reference implementation supports this interface and lets you designyour own configuration file with a structure like this:
<txnmgr ...> <participant A /> <participant B /> ... ... <group name="GroupA"> <participant A /> <participant B /> <participant C /> </group> <group name="GroupB"> <participant J /> <participant K /> <participant L /> </group> <group name="GroupC"> <participant X /> <participant Y /> <participant Z /> </group> ... ... </txnmgr>
118
Example 11. Sample GroupSelector implementation
public class Switch implements GroupSelector { public int prepare (long id, Serializable context) { return PREPARED | READONLY | NO_JOIN; } public void commit (long id, Serializable context) { } public void abort (long id, Serializable context) { } public String select (long id, Serializable context) { try { ISOMsg m = (ISOMsg) ((Context)context).get (ISOMSG); String groups = cfg.get (m.getMTI(), null); return groups; } catch (Exception e) { warn (e); return null; } } }
By using the Switch presented in the previous example, you can write a TransactionManager configurationfile like this:
119
... ... <participant class="org.jpos.my.Switch" logger="Q2"> <property name="0100" value="Authorization Response Log" /> <property name="0200" value="Financial Response Log" /> <property name="0220" value="Notification Response Log" /> <property name="0221" value="Notification Response Log" /> <property name="0420" value="Reversal Response Log" /> <property name="0421" value="Reversal Response Log" /> <property name="0500" value="BatchManagement Response Log" /> <property name="0421" value="Reversal Response Log" /> <property name="0800" value="NetworkManagement Response Log" /> </participant> ... ... <group name="Financial"> <participant class="com.my.company.CheckRequiredFields"> <property name="fields" value="0,3,4,17,49,32,41,43,37,PAN,AMOUNT" /> </participant> <participant class="com.my.company.CheckCurrency" /> ... ... </group>
<group name="Reversal"> ... ... </group> ... ...
Using the previous approach, the application can be designed using small reusable participants. Moreover,using XML entity expansion, the resulting configuration file can be very readable.
We have found it very useful to have very small participants to perform tasks like: Debug the context;introduce Delays (during testing); Open and Close O/R mapping sessions, etc.
9.7. TransactionManager implementationThe TransactionManager is a jPOS Service that monitors a Space queue waiting for transactions to beprocessed. These transactions are expected to be any Serializable objects, but in most jPOS applicationsthose are actually org.jpos.transaction.Context objects.
The following image shows a typical scenario:
• A QServer (or a QMUX) receives a message and delegate its handling to an ISORequestListenerimplementation
• The ISORequestListener creates an instance of a Context, puts there some information relevant to thetransaction (such as a reference to the received ISOMsg and the originating ISOSource) and place it in awell known space, using a well known key. We use the space as a queue so we call it queue, but it’s just a
120
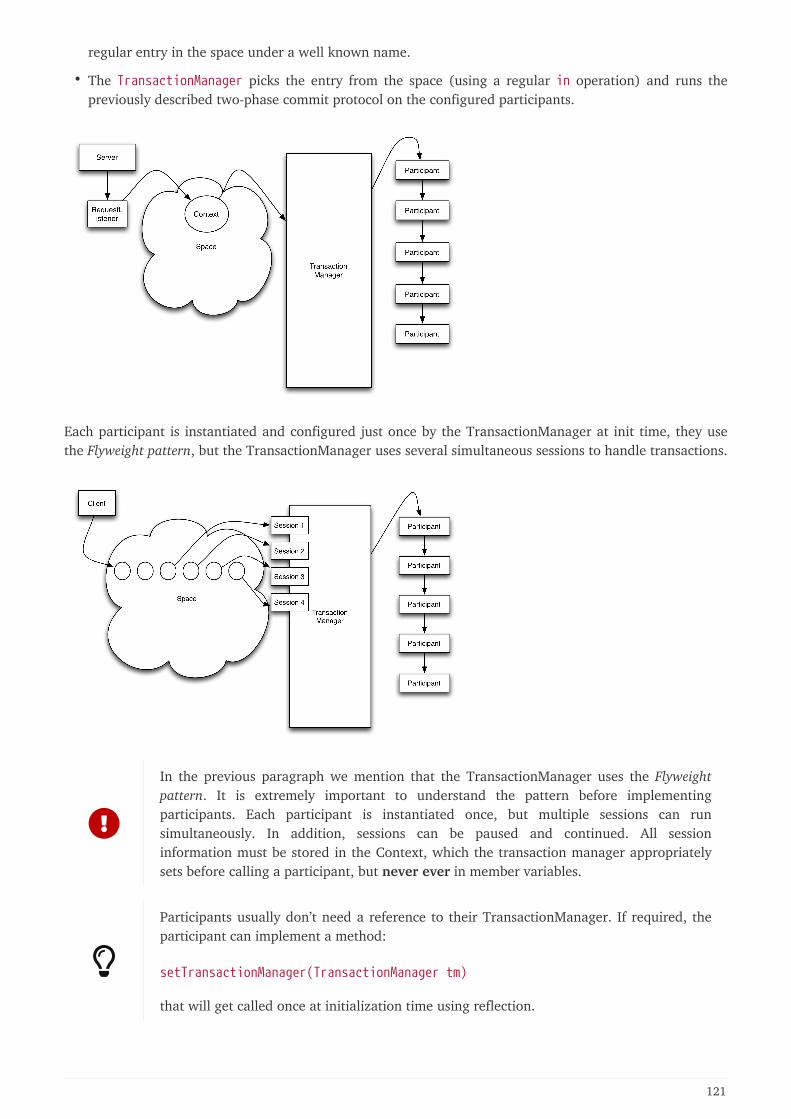
regular entry in the space under a well known name.
• The TransactionManager picks the entry from the space (using a regular in operation) and runs thepreviously described two-phase commit protocol on the configured participants.
Each participant is instantiated and configured just once by the TransactionManager at init time, they usethe Flyweight pattern, but the TransactionManager uses several simultaneous sessions to handle transactions.
In the previous paragraph we mention that the TransactionManager uses the Flyweightpattern. It is extremely important to understand the pattern before implementingparticipants. Each participant is instantiated once, but multiple sessions can runsimultaneously. In addition, sessions can be paused and continued. All sessioninformation must be stored in the Context, which the transaction manager appropriatelysets before calling a participant, but never ever in member variables.
Participants usually don’t need a reference to their TransactionManager. If required, theparticipant can implement a method:
setTransactionManager(TransactionManager tm)
that will get called once at initialization time using reflection.
121
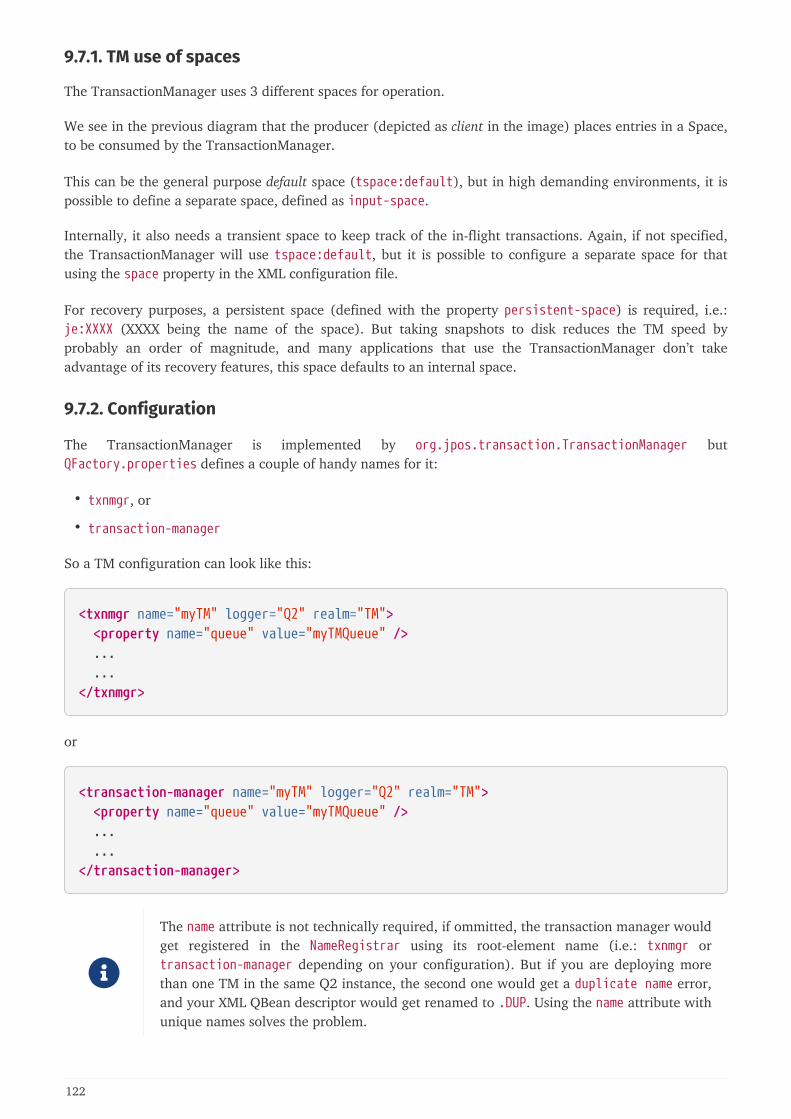
9.7.1. TM use of spaces
The TransactionManager uses 3 different spaces for operation.
We see in the previous diagram that the producer (depicted as client in the image) places entries in a Space,to be consumed by the TransactionManager.
This can be the general purpose default space (tspace:default), but in high demanding environments, it ispossible to define a separate space, defined as input-space.
Internally, it also needs a transient space to keep track of the in-flight transactions. Again, if not specified,the TransactionManager will use tspace:default, but it is possible to configure a separate space for thatusing the space property in the XML configuration file.
For recovery purposes, a persistent space (defined with the property persistent-space) is required, i.e.:je:XXXX (XXXX being the name of the space). But taking snapshots to disk reduces the TM speed byprobably an order of magnitude, and many applications that use the TransactionManager don’t takeadvantage of its recovery features, this space defaults to an internal space.
9.7.2. Configuration
The TransactionManager is implemented by org.jpos.transaction.TransactionManager butQFactory.properties defines a couple of handy names for it:
• txnmgr, or
• transaction-manager
So a TM configuration can look like this:
<txnmgr name="myTM" logger="Q2" realm="TM"> <property name="queue" value="myTMQueue" /> ... ...</txnmgr>
or
<transaction-manager name="myTM" logger="Q2" realm="TM"> <property name="queue" value="myTMQueue" /> ... ...</transaction-manager>
The name attribute is not technically required, if ommitted, the transaction manager wouldget registered in the NameRegistrar using its root-element name (i.e.: txnmgr ortransaction-manager depending on your configuration). But if you are deploying morethan one TM in the same Q2 instance, the second one would get a duplicate name error,and your XML QBean descriptor would get renamed to .DUP. Using the name attribute withunique names solves the problem.
122
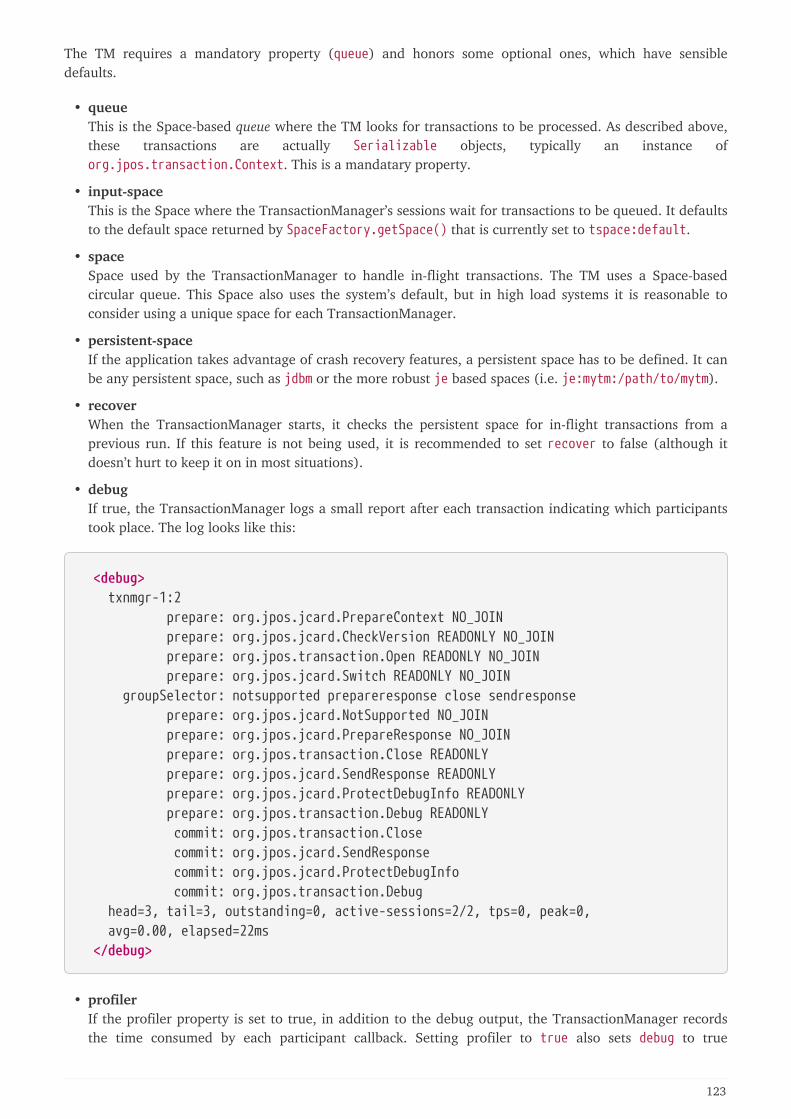
The TM requires a mandatory property (queue) and honors some optional ones, which have sensibledefaults.
• queueThis is the Space-based queue where the TM looks for transactions to be processed. As described above,these transactions are actually Serializable objects, typically an instance oforg.jpos.transaction.Context. This is a mandatary property.
• input-spaceThis is the Space where the TransactionManager’s sessions wait for transactions to be queued. It defaultsto the default space returned by SpaceFactory.getSpace() that is currently set to tspace:default.
• spaceSpace used by the TransactionManager to handle in-flight transactions. The TM uses a Space-basedcircular queue. This Space also uses the system’s default, but in high load systems it is reasonable toconsider using a unique space for each TransactionManager.
• persistent-spaceIf the application takes advantage of crash recovery features, a persistent space has to be defined. It canbe any persistent space, such as jdbm or the more robust je based spaces (i.e. je:mytm:/path/to/mytm).
• recoverWhen the TransactionManager starts, it checks the persistent space for in-flight transactions from aprevious run. If this feature is not being used, it is recommended to set recover to false (although itdoesn’t hurt to keep it on in most situations).
• debugIf true, the TransactionManager logs a small report after each transaction indicating which participantstook place. The log looks like this:
<debug> txnmgr-1:2 prepare: org.jpos.jcard.PrepareContext NO_JOIN prepare: org.jpos.jcard.CheckVersion READONLY NO_JOIN prepare: org.jpos.transaction.Open READONLY NO_JOIN prepare: org.jpos.jcard.Switch READONLY NO_JOIN groupSelector: notsupported prepareresponse close sendresponse prepare: org.jpos.jcard.NotSupported NO_JOIN prepare: org.jpos.jcard.PrepareResponse NO_JOIN prepare: org.jpos.transaction.Close READONLY prepare: org.jpos.jcard.SendResponse READONLY prepare: org.jpos.jcard.ProtectDebugInfo READONLY prepare: org.jpos.transaction.Debug READONLY commit: org.jpos.transaction.Close commit: org.jpos.jcard.SendResponse commit: org.jpos.jcard.ProtectDebugInfo commit: org.jpos.transaction.Debug head=3, tail=3, outstanding=0, active-sessions=2/2, tps=0, peak=0, avg=0.00, elapsed=22ms </debug>
• profilerIf the profiler property is set to true, in addition to the debug output, the TransactionManager recordsthe time consumed by each participant callback. Setting profiler to true also sets debug to true
123

automatically.
This adds the following information to the log
<debug> .... .... <profiler> prepare: org.jpos.jcard.PrepareContext [0.0/0.0] prepare: org.jpos.jcard.CheckVersion [0.0/0.0] prepare: org.jpos.transaction.Open [0.5/0.6] prepare: org.jpos.jcard.Switch [0.0/0.6] prepare: org.jpos.jcard.NotSupported [0.1/0.7] prepare: org.jpos.jcard.PrepareResponse [5.8/6.6] prepare: org.jpos.transaction.Close [0.0/6.6] prepare: org.jpos.jcard.SendResponse [0.0/6.6] prepare: org.jpos.jcard.ProtectDebugInfo [0.0/6.7] prepare: org.jpos.transaction.Debug [0.0/6.7] commit: org.jpos.transaction.Close [1.0/7.7] commit: org.jpos.jcard.SendResponse [4.3/12.0] commit: org.jpos.jcard.ProtectDebugInfo [0.2/12.3] commit: org.jpos.transaction.Debug [9.3/21.7] end [22.8/22.8] </profiler> </debug>
• sessionsDefines the number of simultaneous sessions (Threads) used to process transactions. Defaults to one. Itis recommended to keep the sessions property within a reasonable value commensurate the number ofCPU cores of the system. A large number here just slows down the capacity of the system.
• max-sessionsIn order to deal with occasional traffic spikes (sometimes caused by small network glitches), theTransactionManager can temporarily increase the number of sessions. This property defines thatmaximum. It defaults to the value set for sessions. For obvious reasons, max-sessions can’t be less thansessions.
• max-active-sessionsWhen using the TransactionManager continuations feature (where the prepare callback returns PAUSEmodifier), it is possible that a small number of sessions can process a large number of in-flighttransactions. Those transactions may place in the Context references to live objects such as JDBCsessions. In order to place a cap on the number of in-flight transactions to avoid exhausting resources(for example a JDBC pool), this max-active-sessions property can be set. The default is 0, which meansno limit is imposed.
If you’re pausing your transactions, please read the previous paragraph multiple times andmake sure you understand it.
• call-selector-on-abortThe transaction manager calls the prepare method, and then, if the participant implements theGroupSelector interface, it calls its select method, regardless of the result of the prepare call. While inpractice that’s a reasonable and useful behavior, it can be argued that technically, the TM shouldn’t call
124
select if the transaction is bound to abort. We have provided this configuration parameter that can beset to false in order to enable that behavior.
9.7.3. TransactionStatusListener
It is possible to monitor a TransactionManager by adding a TransactionListener
The interface is very simple:
public interface TransactionStatusListener extends EventListener { public void update (TransactionStatusEvent e);}
• see TransactionStatusListener and
• TransactionStatusEvent
A TransactionStatusListener can be either added dynamically (using theTransactionManager.addListener(TransactionStatusListener) method) or using XML configuration likethis:
<transaction-manager name="myTM" logger="Q2" realm="TM"> ... ... <status-listener class="your.transaction.Listener" /> ... ...</transaction-manager>
standard logger, realm, and properties can be used.
Calls to the transaction status listener are synchronous, the implementation is expected toreturn really fast.
The TMMON CLI command (see --cli) is an example of a TransactionStatusListener interface and so is theorg.jpos.transaction.gui.TMMonitor implementation.
9.8. Transaction ParticipantsjPOS comes with some general purpose transaction participant implementations that can be used as-is orused as a reference to write your own.
The <participant ...> element supports an optional enabled attribute that can be useddisable participants at runtime. The enabled value can either be 'yes/no/true/false` or alist of environment names (i.e.: prod, staging).
9.8.1. Switch participant
The org.jpos.transaction.participant.Switch is a general purpose GroupSelector that uses a context
125
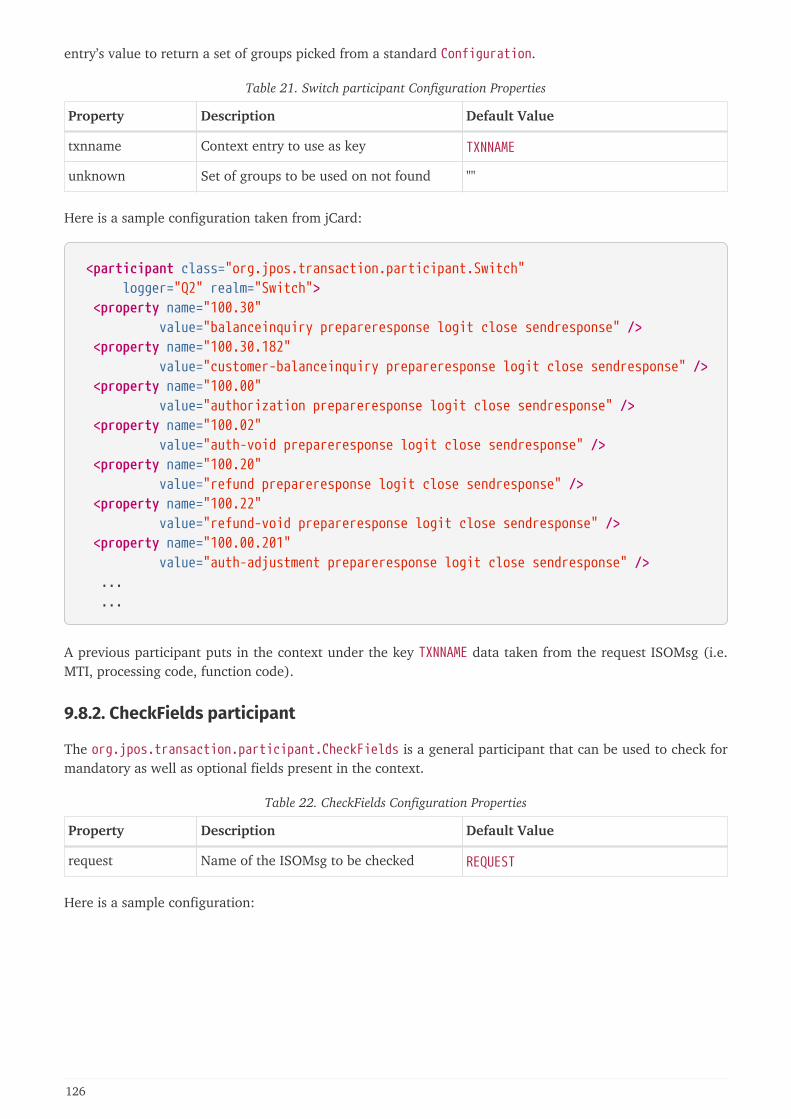
entry’s value to return a set of groups picked from a standard Configuration.
Table 21. Switch participant Configuration Properties
Property Description Default Value
txnname Context entry to use as key TXNNAME
unknown Set of groups to be used on not found ""
Here is a sample configuration taken from jCard:
<participant class="org.jpos.transaction.participant.Switch" logger="Q2" realm="Switch"> <property name="100.30" value="balanceinquiry prepareresponse logit close sendresponse" /> <property name="100.30.182" value="customer-balanceinquiry prepareresponse logit close sendresponse" /> <property name="100.00" value="authorization prepareresponse logit close sendresponse" /> <property name="100.02" value="auth-void prepareresponse logit close sendresponse" /> <property name="100.20" value="refund prepareresponse logit close sendresponse" /> <property name="100.22" value="refund-void prepareresponse logit close sendresponse" /> <property name="100.00.201" value="auth-adjustment prepareresponse logit close sendresponse" /> ... ...
A previous participant puts in the context under the key TXNNAME data taken from the request ISOMsg (i.e.MTI, processing code, function code).
9.8.2. CheckFields participant
The org.jpos.transaction.participant.CheckFields is a general participant that can be used to check formandatory as well as optional fields present in the context.
Table 22. CheckFields Configuration Properties
Property Description Default Value
request Name of the ISOMsg to be checked REQUEST
Here is a sample configuration:
126
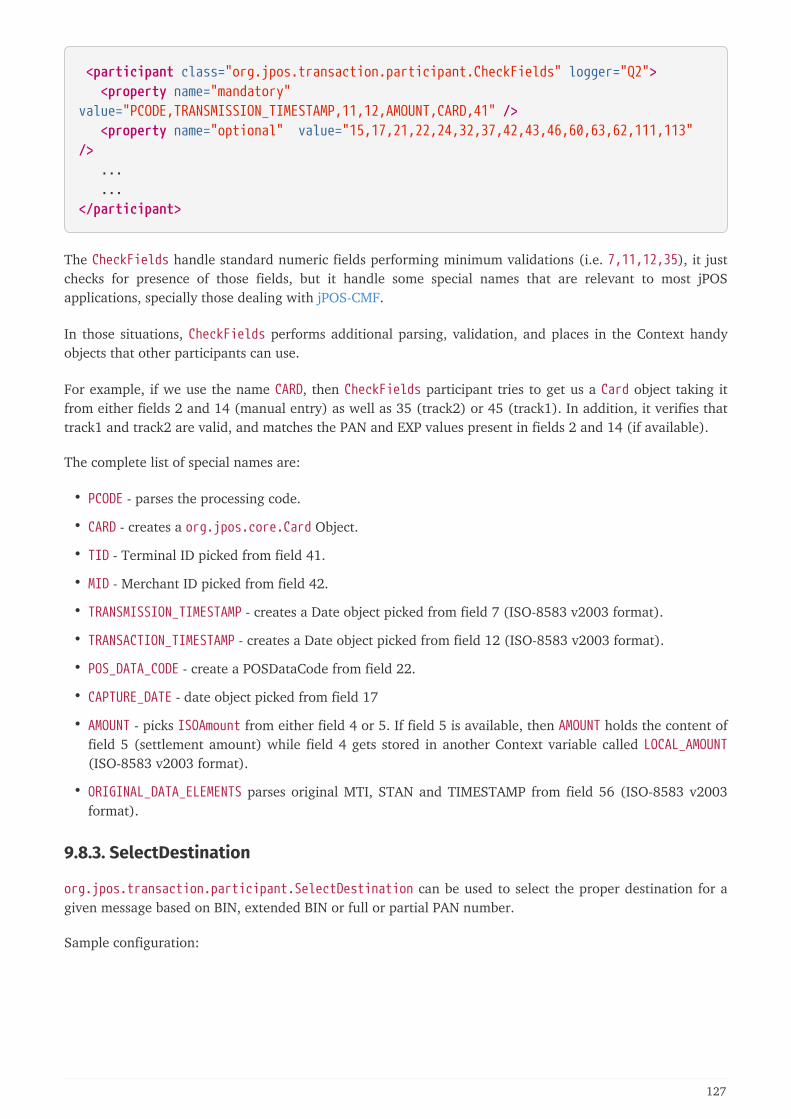
<participant class="org.jpos.transaction.participant.CheckFields" logger="Q2"> <property name="mandatory"value="PCODE,TRANSMISSION_TIMESTAMP,11,12,AMOUNT,CARD,41" /> <property name="optional" value="15,17,21,22,24,32,37,42,43,46,60,63,62,111,113"/> ... ...</participant>
The CheckFields handle standard numeric fields performing minimum validations (i.e. 7,11,12,35), it justchecks for presence of those fields, but it handle some special names that are relevant to most jPOSapplications, specially those dealing with jPOS-CMF.
In those situations, CheckFields performs additional parsing, validation, and places in the Context handyobjects that other participants can use.
For example, if we use the name CARD, then CheckFields participant tries to get us a Card object taking itfrom either fields 2 and 14 (manual entry) as well as 35 (track2) or 45 (track1). In addition, it verifies thattrack1 and track2 are valid, and matches the PAN and EXP values present in fields 2 and 14 (if available).
The complete list of special names are:
• PCODE - parses the processing code.
• CARD - creates a org.jpos.core.Card Object.
• TID - Terminal ID picked from field 41.
• MID - Merchant ID picked from field 42.
• TRANSMISSION_TIMESTAMP - creates a Date object picked from field 7 (ISO-8583 v2003 format).
• TRANSACTION_TIMESTAMP - creates a Date object picked from field 12 (ISO-8583 v2003 format).
• POS_DATA_CODE - create a POSDataCode from field 22.
• CAPTURE_DATE - date object picked from field 17
• AMOUNT - picks ISOAmount from either field 4 or 5. If field 5 is available, then AMOUNT holds the content offield 5 (settlement amount) while field 4 gets stored in another Context variable called LOCAL_AMOUNT(ISO-8583 v2003 format).
• ORIGINAL_DATA_ELEMENTS parses original MTI, STAN and TIMESTAMP from field 56 (ISO-8583 v2003format).
9.8.3. SelectDestination
org.jpos.transaction.participant.SelectDestination can be used to select the proper destination for agiven message based on BIN, extended BIN or full or partial PAN number.
Sample configuration:
127
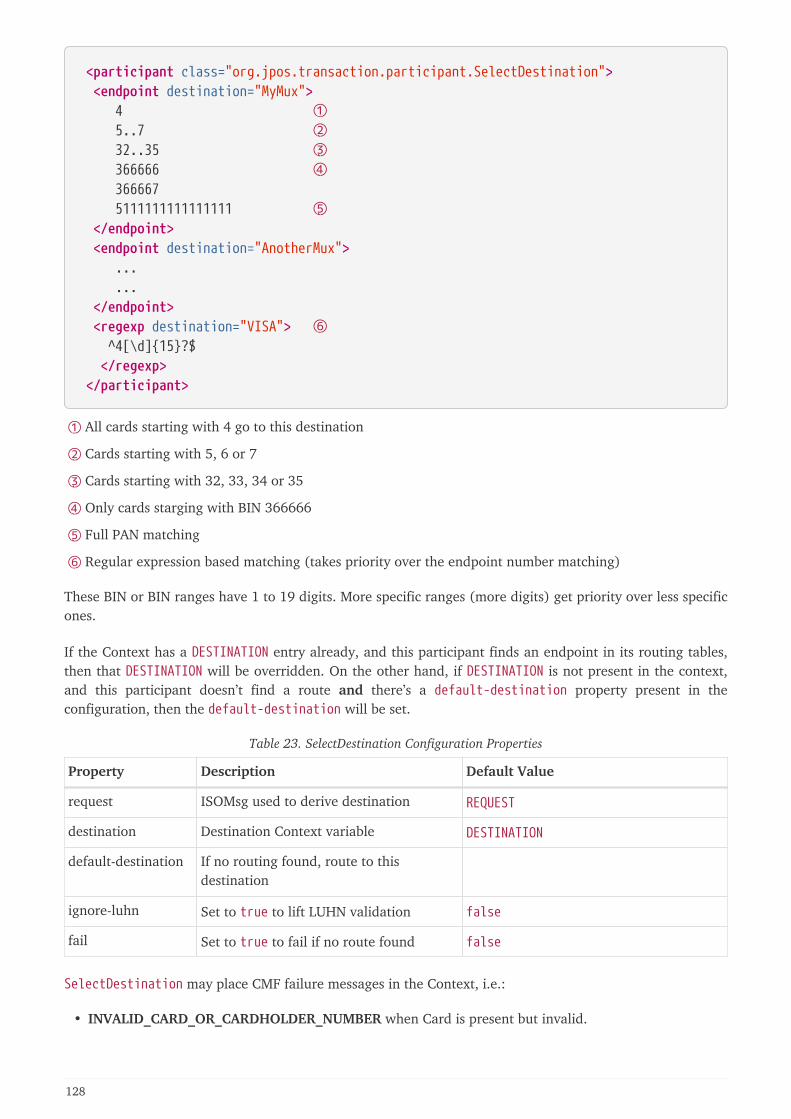
<participant class="org.jpos.transaction.participant.SelectDestination"> <endpoint destination="MyMux"> 4 ① 5..7 ② 32..35 ③ 366666 ④ 366667 5111111111111111 ⑤ </endpoint> <endpoint destination="AnotherMux"> ... ... </endpoint> <regexp destination="VISA"> ⑥ ^4[\d]{15}?$ </regexp> </participant>
① All cards starting with 4 go to this destination
② Cards starting with 5, 6 or 7
③ Cards starting with 32, 33, 34 or 35
④ Only cards starging with BIN 366666
⑤ Full PAN matching
⑥ Regular expression based matching (takes priority over the endpoint number matching)
These BIN or BIN ranges have 1 to 19 digits. More specific ranges (more digits) get priority over less specificones.
If the Context has a DESTINATION entry already, and this participant finds an endpoint in its routing tables,then that DESTINATION will be overridden. On the other hand, if DESTINATION is not present in the context,and this participant doesn’t find a route and there’s a default-destination property present in theconfiguration, then the default-destination will be set.
Table 23. SelectDestination Configuration Properties
Property Description Default Value
request ISOMsg used to derive destination REQUEST
destination Destination Context variable DESTINATION
default-destination If no routing found, route to thisdestination
ignore-luhn Set to true to lift LUHN validation false
fail Set to true to fail if no route found false
SelectDestination may place CMF failure messages in the Context, i.e.:
• INVALID_CARD_OR_CARDHOLDER_NUMBER when Card is present but invalid.
128
• ROUTING_ERROR when no route could be found.
9.8.4. QueryHost
org.jpos.transaction.participant.QueryHost can be used to send an ISOMsg to a remote host using aMUX and wait for a response.
It can operate in synchronous mode (waits a given timeout for a response to arrive) or useTransactionManager’s continuations (default) to actually PAUSE the transaction until a response arrives.
It provides sensible defaults up to the point that it can be easily configured without any property, i.e.:
<participant class="org.jpos.transaction.participant.QueryHost"/>
Table 24. QueryHost Configuration Properties
Property Description Default Value
request ISOMsg to be transmitted REQUEST
response Response object RESPONSE
destination Destination MUX DESTINATION
timeout Time to wait for response in milliseconds 30000
wait-timeout Time to wait for connection in case MUXis disconnected in milliseconds
12000
continuations Set to false in order to operate in syncmode
true
QueryHost may place CMF failure messages in the Context, i.e.:
• MISCONFIGURED_ENDPOINT when Context doesn’t have a DESTINATION object or the destination MUXis not available in the NameRegistrar
• INVALID_REQUEST if REQUEST is not in the context
• HOST_UNREACHABLE if MUX can not connect to the host or a response is not provided within thespecified timeout
• SYSTEM_ERROR on ISOException
A MUX/Server can have a request listener like this:
<request-listener class="org.jpos.iso.IncomingListener" logger="Q2"> <property name="queue" value="TXNMGR" /> <property name="ctx.DESTINATION" value="MYMUX" /> </request-listener>
Then a TransactionManager can be configured like this:
129
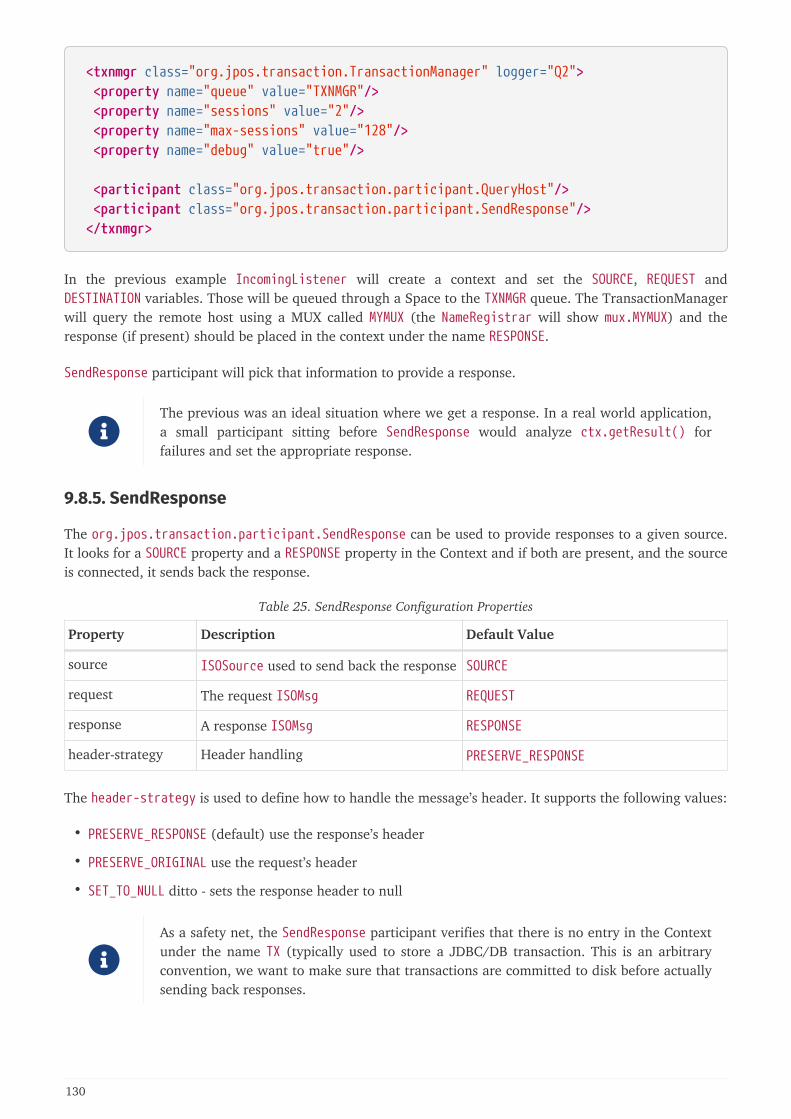
<txnmgr class="org.jpos.transaction.TransactionManager" logger="Q2"> <property name="queue" value="TXNMGR"/> <property name="sessions" value="2"/> <property name="max-sessions" value="128"/> <property name="debug" value="true"/>
<participant class="org.jpos.transaction.participant.QueryHost"/> <participant class="org.jpos.transaction.participant.SendResponse"/> </txnmgr>
In the previous example IncomingListener will create a context and set the SOURCE, REQUEST andDESTINATION variables. Those will be queued through a Space to the TXNMGR queue. The TransactionManagerwill query the remote host using a MUX called MYMUX (the NameRegistrar will show mux.MYMUX) and theresponse (if present) should be placed in the context under the name RESPONSE.
SendResponse participant will pick that information to provide a response.
The previous was an ideal situation where we get a response. In a real world application,a small participant sitting before SendResponse would analyze ctx.getResult() forfailures and set the appropriate response.
9.8.5. SendResponse
The org.jpos.transaction.participant.SendResponse can be used to provide responses to a given source.It looks for a SOURCE property and a RESPONSE property in the Context and if both are present, and the sourceis connected, it sends back the response.
Table 25. SendResponse Configuration Properties
Property Description Default Value
source ISOSource used to send back the response SOURCE
request The request ISOMsg REQUEST
response A response ISOMsg RESPONSE
header-strategy Header handling PRESERVE_RESPONSE
The header-strategy is used to define how to handle the message’s header. It supports the following values:
• PRESERVE_RESPONSE (default) use the response’s header
• PRESERVE_ORIGINAL use the request’s header
• SET_TO_NULL ditto - sets the response header to null
As a safety net, the SendResponse participant verifies that there is no entry in the Contextunder the name TX (typically used to store a JDBC/DB transaction. This is an arbitraryconvention, we want to make sure that transactions are committed to disk before actuallysending back responses.
130
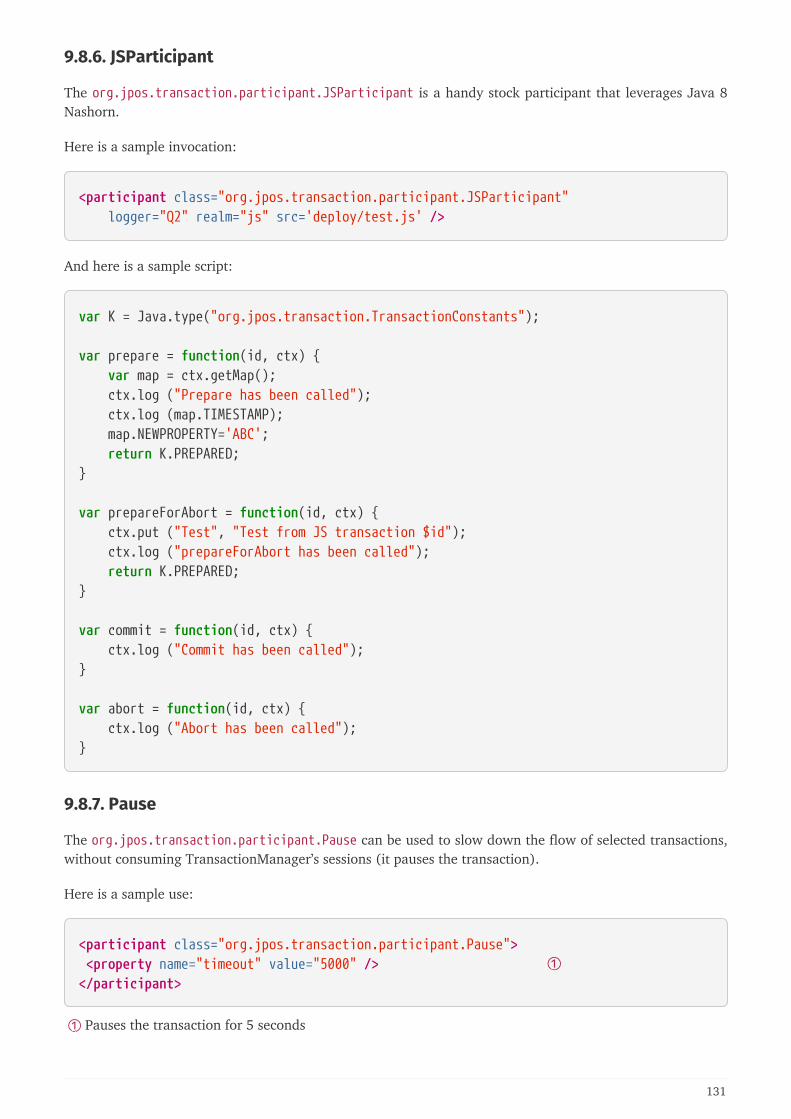
9.8.6. JSParticipant
The org.jpos.transaction.participant.JSParticipant is a handy stock participant that leverages Java 8Nashorn.
Here is a sample invocation:
<participant class="org.jpos.transaction.participant.JSParticipant" logger="Q2" realm="js" src='deploy/test.js' />
And here is a sample script:
var K = Java.type("org.jpos.transaction.TransactionConstants");
var prepare = function(id, ctx) { var map = ctx.getMap(); ctx.log ("Prepare has been called"); ctx.log (map.TIMESTAMP); map.NEWPROPERTY='ABC'; return K.PREPARED;}
var prepareForAbort = function(id, ctx) { ctx.put ("Test", "Test from JS transaction $id"); ctx.log ("prepareForAbort has been called"); return K.PREPARED;}
var commit = function(id, ctx) { ctx.log ("Commit has been called");}
var abort = function(id, ctx) { ctx.log ("Abort has been called");}
9.8.7. Pause
The org.jpos.transaction.participant.Pause can be used to slow down the flow of selected transactions,without consuming TransactionManager’s sessions (it pauses the transaction).
Here is a sample use:
<participant class="org.jpos.transaction.participant.Pause"> <property name="timeout" value="5000" /> ①</participant>
① Pauses the transaction for 5 seconds
131

This can be used to slightly delay specific transactions that may come in bursts (i.e. duringa SAF download), such as reversals.
132
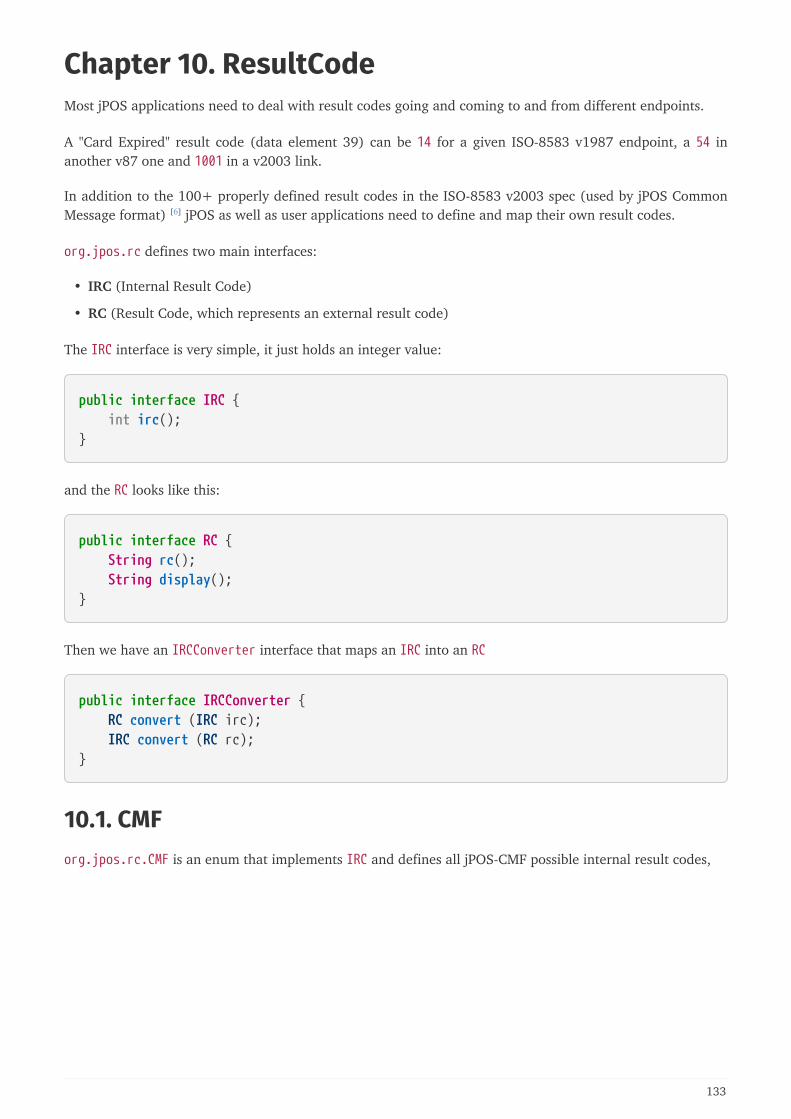
Chapter 10. ResultCodeMost jPOS applications need to deal with result codes going and coming to and from different endpoints.
A "Card Expired" result code (data element 39) can be 14 for a given ISO-8583 v1987 endpoint, a 54 inanother v87 one and 1001 in a v2003 link.
In addition to the 100+ properly defined result codes in the ISO-8583 v2003 spec (used by jPOS CommonMessage format) [6] jPOS as well as user applications need to define and map their own result codes.
org.jpos.rc defines two main interfaces:
• IRC (Internal Result Code)
• RC (Result Code, which represents an external result code)
The IRC interface is very simple, it just holds an integer value:
public interface IRC { int irc();}
and the RC looks like this:
public interface RC { String rc(); String display();}
Then we have an IRCConverter interface that maps an IRC into an RC
public interface IRCConverter { RC convert (IRC irc); IRC convert (RC rc);}
10.1. CMForg.jpos.rc.CMF is an enum that implements IRC and defines all jPOS-CMF possible internal result codes,
133
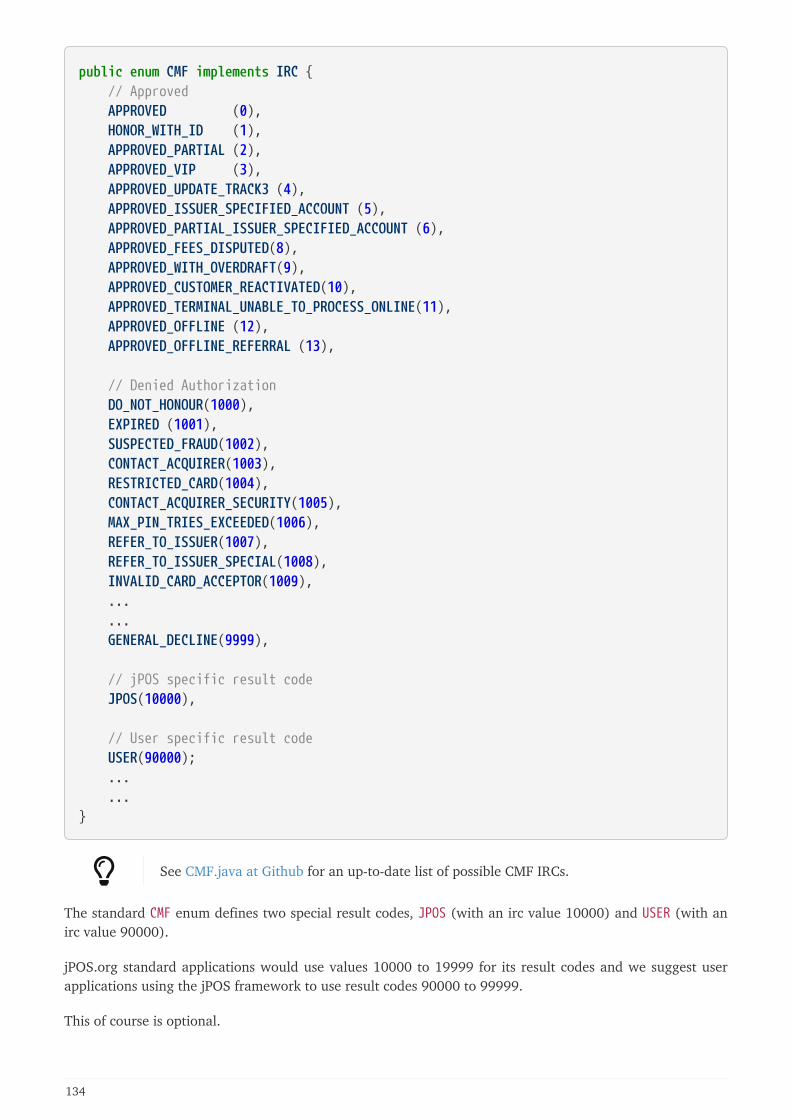
public enum CMF implements IRC { // Approved APPROVED (0), HONOR_WITH_ID (1), APPROVED_PARTIAL (2), APPROVED_VIP (3), APPROVED_UPDATE_TRACK3 (4), APPROVED_ISSUER_SPECIFIED_ACCOUNT (5), APPROVED_PARTIAL_ISSUER_SPECIFIED_ACCOUNT (6), APPROVED_FEES_DISPUTED(8), APPROVED_WITH_OVERDRAFT(9), APPROVED_CUSTOMER_REACTIVATED(10), APPROVED_TERMINAL_UNABLE_TO_PROCESS_ONLINE(11), APPROVED_OFFLINE (12), APPROVED_OFFLINE_REFERRAL (13),
// Denied Authorization DO_NOT_HONOUR(1000), EXPIRED (1001), SUSPECTED_FRAUD(1002), CONTACT_ACQUIRER(1003), RESTRICTED_CARD(1004), CONTACT_ACQUIRER_SECURITY(1005), MAX_PIN_TRIES_EXCEEDED(1006), REFER_TO_ISSUER(1007), REFER_TO_ISSUER_SPECIAL(1008), INVALID_CARD_ACCEPTOR(1009), ... ... GENERAL_DECLINE(9999),
// jPOS specific result code JPOS(10000),
// User specific result code USER(90000); ... ...}
See CMF.java at Github for an up-to-date list of possible CMF IRCs.
The standard CMF enum defines two special result codes, JPOS (with an irc value 10000) and USER (with anirc value 90000).
jPOS.org standard applications would use values 10000 to 19999 for its result codes and we suggest userapplications using the jPOS framework to use result codes 90000 to 99999.
This of course is optional.
134
We provide a general purpose converter implementation called CMFConverter that has the followingfeatures:
• It provides reasonable IRC-to-RC mapping for all result codes provided in the CMF enum
• Default values can be overridden by a result bundle provided in the classpath
• Default values can be overridden by means of a Configuration object (CMFConverter implementsConfigurable).
The CMFConverter reads optional override resource bundles in the following locations within the classpath(the second bundle overrides the first one):
• org/jpos/rc/CMF.properties
• META-INF/org/jpos/rc/CMF.properties
And then an optional Configuration object. The format for those overrides is:
IRC=RC,DISPLAY, i.e:
9999=ZZZZ,General Decline
This would return ZZZZ as the result code instead of 9999 with a display message General Decline.
10.2. Result holder classFinancial applications typically have to perform a lot of validations, a typical jPOS application for instanceusing the Transaction Manager has participants to check mandatory and optional fields, check the terminal,the merchant, the card, PIN, etc.
While certifying these kind of applications we usually detect the first error and abort. Once the error getscorrected we find there’s another error in the next test, and yet another on a third one.
So instead of early-failing, applications can "collect" result information in the Result object.
We handle three type of results:
• INFO
• WARN
• FAIL
INFO as well as WARN won’t stop a transaction from succedding, while those results with a FAIL type shouldcause the transaction to fail.
A Result object is typically placed in the Transaction’s Context which now has a handy getResult() helpermethod, so a participant can use code like this:
ctx.getResult().fail (CMF.EXPIRED, Caller.info(), "Card expired");
Caller.info() is a handy static method available in org.jpos.util.Caller class.
135

In addition to fail messages, it is possible to call warn or info. Those methods don’t require an IRCparameter.
[6] jPOS Common Message Format - http://jpos.org/doc/jPOS-CMF.pdf
136
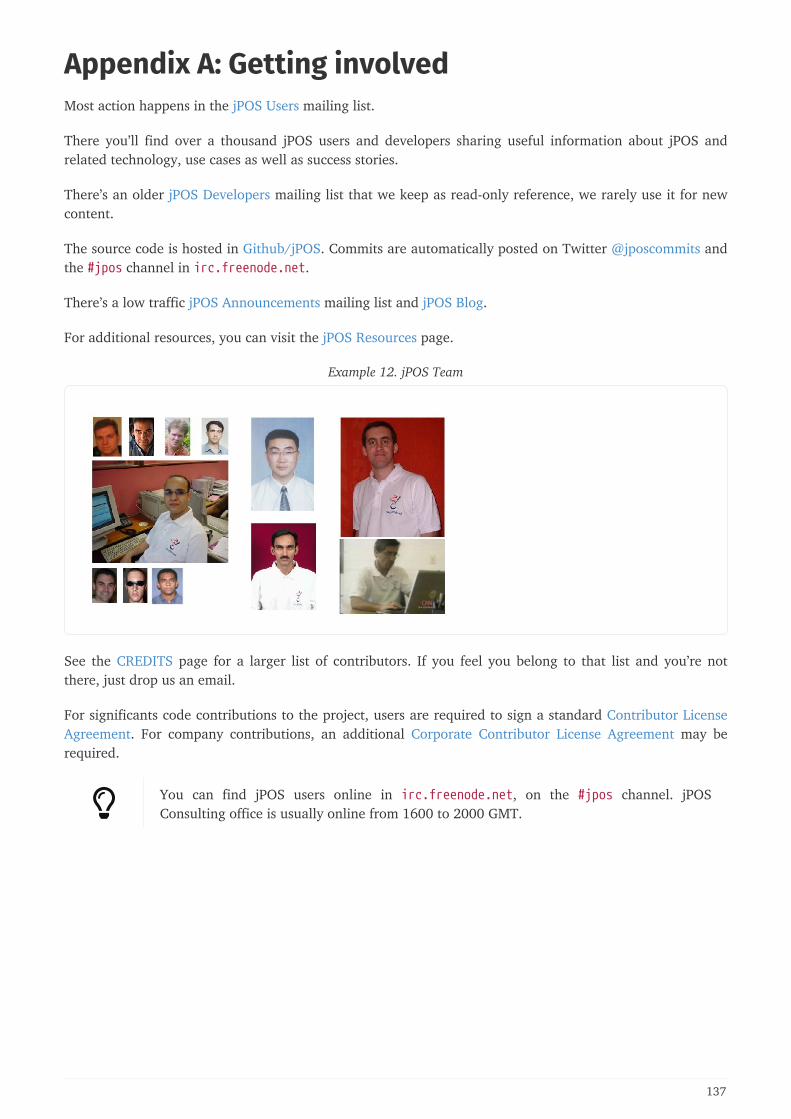
Appendix A: Getting involvedMost action happens in the jPOS Users mailing list.
There you’ll find over a thousand jPOS users and developers sharing useful information about jPOS andrelated technology, use cases as well as success stories.
There’s an older jPOS Developers mailing list that we keep as read-only reference, we rarely use it for newcontent.
The source code is hosted in Github/jPOS. Commits are automatically posted on Twitter @jposcommits andthe #jpos channel in irc.freenode.net.
There’s a low traffic jPOS Announcements mailing list and jPOS Blog.
For additional resources, you can visit the jPOS Resources page.
Example 12. jPOS Team
See the CREDITS page for a larger list of contributors. If you feel you belong to that list and you’re notthere, just drop us an email.
For significants code contributions to the project, users are required to sign a standard Contributor LicenseAgreement. For company contributions, an additional Corporate Contributor License Agreement may berequired.
You can find jPOS users online in irc.freenode.net, on the #jpos channel. jPOSConsulting office is usually online from 1600 to 2000 GMT.
137

Appendix B: License
138

GNU AFFERO GENERAL PUBLIC LICENSE
Version 3, 19 November 2007
Copyright © 2007 Free Software Foundation, Inc. <http://fsf.org/> Everyone is permitted to copy and distribute verbatim copies of this license document, but changing itis not allowed.
Preamble
The GNU Affero General Public License is a free, copyleft license for software and other kinds of works,specifically designed to ensure cooperation with the community in the case of network server software.
The licenses for most software and other practical works are designed to take away your freedom toshare and change the works. By contrast, our General Public Licenses are intended to guarantee yourfreedom to share and change all versions of a program—to make sure it remains free software for allits users.
When we speak of free software, we are referring to freedom, not price. Our General Public Licensesare designed to make sure that you have the freedom to distribute copies of free software (and chargefor them if you wish), that you receive source code or can get it if you want it, that you can change thesoftware or use pieces of it in new free programs, and that you know you can do these things.
Developers that use our General Public Licenses protect your rights with two steps: (1) assert copyrighton the software, and (2) offer you this License which gives you legal permission to copy, distributeand/or modify the software.
A secondary benefit of defending all users' freedom is that improvements made in alternate versions ofthe program, if they receive widespread use, become available for other developers to incorporate.Many developers of free software are heartened and encouraged by the resulting cooperation.However, in the case of software used on network servers, this result may fail to come about. The GNUGeneral Public License permits making a modified version and letting the public access it on a serverwithout ever releasing its source code to the public.
The GNU Affero General Public License is designed specifically to ensure that, in such cases, themodified source code becomes available to the community. It requires the operator of a network serverto provide the source code of the modified version running there to the users of that server. Therefore,public use of a modified version, on a publicly accessible server, gives the public access to the sourcecode of the modified version.
An older license, called the Affero General Public License and published by Affero, was designed toaccomplish similar goals. This is a different license, not a version of the Affero GPL, but Affero hasreleased a new version of the Affero GPL which permits relicensing under this license.
The precise terms and conditions for copying, distribution and modification follow.
TERMS AND CONDITIONS
0. Definitions.
"This License" refers to version 3 of the GNU Affero General Public License.
"Copyright" also means copyright-like laws that apply to other kinds of works, such as semiconductormasks.
139
"The Program" refers to any copyrightable work licensed under this License. Each licensee is addressedas "you". "Licensees" and "recipients" may be individuals or organizations.
To "modify" a work means to copy from or adapt all or part of the work in a fashion requiring copyrightpermission, other than the making of an exact copy. The resulting work is called a "modified version" ofthe earlier work or a work "based on" the earlier work.
A "covered work" means either the unmodified Program or a work based on the Program.
To "propagate" a work means to do anything with it that, without permission, would make you directlyor secondarily liable for infringement under applicable copyright law, except executing it on acomputer or modifying a private copy. Propagation includes copying, distribution (with or withoutmodification), making available to the public, and in some countries other activities as well.
To "convey" a work means any kind of propagation that enables other parties to make or receive copies.Mere interaction with a user through a computer network, with no transfer of a copy, is not conveying.
An interactive user interface displays "Appropriate Legal Notices" to the extent that it includes aconvenient and prominently visible feature that (1) displays an appropriate copyright notice, and (2)tells the user that there is no warranty for the work (except to the extent that warranties are provided),that licensees may convey the work under this License, and how to view a copy of this License. If theinterface presents a list of user commands or options, such as a menu, a prominent item in the listmeets this criterion.
1. Source Code.
The "source code" for a work means the preferred form of the work for making modifications to it."Object code" means any non-source form of a work.
A "Standard Interface" means an interface that either is an official standard defined by a recognizedstandards body, or, in the case of interfaces specified for a particular programming language, one thatis widely used among developers working in that language.
The "System Libraries" of an executable work include anything, other than the work as a whole, that(a) is included in the normal form of packaging a Major Component, but which is not part of thatMajor Component, and (b) serves only to enable use of the work with that Major Component, or toimplement a Standard Interface for which an implementation is available to the public in source codeform. A "Major Component", in this context, means a major essential component (kernel, windowsystem, and so on) of the specific operating system (if any) on which the executable work runs, or acompiler used to produce the work, or an object code interpreter used to run it.
The "Corresponding Source" for a work in object code form means all the source code needed togenerate, install, and (for an executable work) run the object code and to modify the work, includingscripts to control those activities. However, it does not include the work’s System Libraries, or general-purpose tools or generally available free programs which are used unmodified in performing thoseactivities but which are not part of the work. For example, Corresponding Source includes interfacedefinition files associated with source files for the work, and the source code for shared libraries anddynamically linked subprograms that the work is specifically designed to require, such as by intimatedata communication or control flow between those subprograms and other parts of the work.
The Corresponding Source need not include anything that users can regenerate automatically fromother parts of the Corresponding Source.
The Corresponding Source for a work in source code form is that same work.
140
2. Basic Permissions.
All rights granted under this License are granted for the term of copyright on the Program, and areirrevocable provided the stated conditions are met. This License explicitly affirms your unlimitedpermission to run the unmodified Program. The output from running a covered work is covered by thisLicense only if the output, given its content, constitutes a covered work. This License acknowledgesyour rights of fair use or other equivalent, as provided by copyright law.
You may make, run and propagate covered works that you do not convey, without conditions so longas your license otherwise remains in force. You may convey covered works to others for the solepurpose of having them make modifications exclusively for you, or provide you with facilities forrunning those works, provided that you comply with the terms of this License in conveying all materialfor which you do not control copyright. Those thus making or running the covered works for you mustdo so exclusively on your behalf, under your direction and control, on terms that prohibit them frommaking any copies of your copyrighted material outside their relationship with you.
Conveying under any other circumstances is permitted solely under the conditions stated below.Sublicensing is not allowed; section 10 makes it unnecessary.
3. Protecting Users' Legal Rights From Anti-Circumvention Law.
No covered work shall be deemed part of an effective technological measure under any applicable lawfulfilling obligations under article 11 of the WIPO copyright treaty adopted on 20 December 1996, orsimilar laws prohibiting or restricting circumvention of such measures.
When you convey a covered work, you waive any legal power to forbid circumvention of technologicalmeasures to the extent such circumvention is effected by exercising rights under this License withrespect to the covered work, and you disclaim any intention to limit operation or modification of thework as a means of enforcing, against the work’s users, your or third parties' legal rights to forbidcircumvention of technological measures.
4. Conveying Verbatim Copies.
You may convey verbatim copies of the Program’s source code as you receive it, in any medium,provided that you conspicuously and appropriately publish on each copy an appropriate copyrightnotice; keep intact all notices stating that this License and any non-permissive terms added in accordwith section 7 apply to the code; keep intact all notices of the absence of any warranty; and give allrecipients a copy of this License along with the Program.
You may charge any price or no price for each copy that you convey, and you may offer support orwarranty protection for a fee.
5. Conveying Modified Source Versions.
You may convey a work based on the Program, or the modifications to produce it from the Program, inthe form of source code under the terms of section 4, provided that you also meet all of theseconditions:
a. The work must carry prominent notices stating that you modified it, and giving a relevant date.
b. The work must carry prominent notices stating that it is released under this License and anyconditions added under section 7. This requirement modifies the requirement in section 4 to "keepintact all notices".
c. You must license the entire work, as a whole, under this License to anyone who comes intopossession of a copy. This License will therefore apply, along with any applicable section 7
141
additional terms, to the whole of the work, and all its parts, regardless of how they are packaged.This License gives no permission to license the work in any other way, but it does not invalidatesuch permission if you have separately received it.
d. If the work has interactive user interfaces, each must display Appropriate Legal Notices; however, ifthe Program has interactive interfaces that do not display Appropriate Legal Notices, your workneed not make them do so.
A compilation of a covered work with other separate and independent works, which are not by theirnature extensions of the covered work, and which are not combined with it such as to form a largerprogram, in or on a volume of a storage or distribution medium, is called an "aggregate" if thecompilation and its resulting copyright are not used to limit the access or legal rights of thecompilation’s users beyond what the individual works permit. Inclusion of a covered work in anaggregate does not cause this License to apply to the other parts of the aggregate.
6. Conveying Non-Source Forms.
You may convey a covered work in object code form under the terms of sections 4 and 5, provided thatyou also convey the machine-readable Corresponding Source under the terms of this License, in one ofthese ways:
a. Convey the object code in, or embodied in, a physical product (including a physical distributionmedium), accompanied by the Corresponding Source fixed on a durable physical mediumcustomarily used for software interchange.
b. Convey the object code in, or embodied in, a physical product (including a physical distributionmedium), accompanied by a written offer, valid for at least three years and valid for as long as youoffer spare parts or customer support for that product model, to give anyone who possesses theobject code either (1) a copy of the Corresponding Source for all the software in the product that iscovered by this License, on a durable physical medium customarily used for software interchange,for a price no more than your reasonable cost of physically performing this conveying of source, or(2) access to copy the Corresponding Source from a network server at no charge.
c. Convey individual copies of the object code with a copy of the written offer to provide theCorresponding Source. This alternative is allowed only occasionally and noncommercially, and onlyif you received the object code with such an offer, in accord with subsection 6b.
d. Convey the object code by offering access from a designated place (gratis or for a charge), andoffer equivalent access to the Corresponding Source in the same way through the same place at nofurther charge. You need not require recipients to copy the Corresponding Source along with theobject code. If the place to copy the object code is a network server, the Corresponding Source maybe on a different server (operated by you or a third party) that supports equivalent copyingfacilities, provided you maintain clear directions next to the object code saying where to find theCorresponding Source. Regardless of what server hosts the Corresponding Source, you remainobligated to ensure that it is available for as long as needed to satisfy these requirements.
e. Convey the object code using peer-to-peer transmission, provided you inform other peers where theobject code and Corresponding Source of the work are being offered to the general public at nocharge under subsection 6d.
A separable portion of the object code, whose source code is excluded from the Corresponding Sourceas a System Library, need not be included in conveying the object code work.
A "User Product" is either (1) a "consumer product", which means any tangible personal property whichis normally used for personal, family, or household purposes, or (2) anything designed or sold forincorporation into a dwelling. In determining whether a product is a consumer product, doubtful casesshall be resolved in favor of coverage. For a particular product received by a particular user, "normally
142
used" refers to a typical or common use of that class of product, regardless of the status of theparticular user or of the way in which the particular user actually uses, or expects or is expected to use,the product. A product is a consumer product regardless of whether the product has substantialcommercial, industrial or non-consumer uses, unless such uses represent the only significant mode ofuse of the product.
"Installation Information" for a User Product means any methods, procedures, authorization keys, orother information required to install and execute modified versions of a covered work in that UserProduct from a modified version of its Corresponding Source. The information must suffice to ensurethat the continued functioning of the modified object code is in no case prevented or interfered withsolely because modification has been made.
If you convey an object code work under this section in, or with, or specifically for use in, a UserProduct, and the conveying occurs as part of a transaction in which the right of possession and use ofthe User Product is transferred to the recipient in perpetuity or for a fixed term (regardless of how thetransaction is characterized), the Corresponding Source conveyed under this section must beaccompanied by the Installation Information. But this requirement does not apply if neither you norany third party retains the ability to install modified object code on the User Product (for example, thework has been installed in ROM).
The requirement to provide Installation Information does not include a requirement to continue toprovide support service, warranty, or updates for a work that has been modified or installed by therecipient, or for the User Product in which it has been modified or installed. Access to a network maybe denied when the modification itself materially and adversely affects the operation of the network orviolates the rules and protocols for communication across the network.
Corresponding Source conveyed, and Installation Information provided, in accord with this sectionmust be in a format that is publicly documented (and with an implementation available to the public insource code form), and must require no special password or key for unpacking, reading or copying.
7. Additional Terms.
"Additional permissions" are terms that supplement the terms of this License by making exceptionsfrom one or more of its conditions. Additional permissions that are applicable to the entire Programshall be treated as though they were included in this License, to the extent that they are valid underapplicable law. If additional permissions apply only to part of the Program, that part may be usedseparately under those permissions, but the entire Program remains governed by this License withoutregard to the additional permissions.
When you convey a copy of a covered work, you may at your option remove any additional permissionsfrom that copy, or from any part of it. (Additional permissions may be written to require their ownremoval in certain cases when you modify the work.) You may place additional permissions onmaterial, added by you to a covered work, for which you have or can give appropriate copyrightpermission.
Notwithstanding any other provision of this License, for material you add to a covered work, you may(if authorized by the copyright holders of that material) supplement the terms of this License withterms:
a. Disclaiming warranty or limiting liability differently from the terms of sections 15 and 16 of thisLicense; or
b. Requiring preservation of specified reasonable legal notices or author attributions in that materialor in the Appropriate Legal Notices displayed by works containing it; or
143
c. Prohibiting misrepresentation of the origin of that material, or requiring that modified versions ofsuch material be marked in reasonable ways as different from the original version; or
d. Limiting the use for publicity purposes of names of licensors or authors of the material; or
e. Declining to grant rights under trademark law for use of some trade names, trademarks, or servicemarks; or
f. Requiring indemnification of licensors and authors of that material by anyone who conveys thematerial (or modified versions of it) with contractual assumptions of liability to the recipient, forany liability that these contractual assumptions directly impose on those licensors and authors.
All other non-permissive additional terms are considered "further restrictions" within the meaning ofsection 10. If the Program as you received it, or any part of it, contains a notice stating that it isgoverned by this License along with a term that is a further restriction, you may remove that term. If alicense document contains a further restriction but permits relicensing or conveying under this License,you may add to a covered work material governed by the terms of that license document, provided thatthe further restriction does not survive such relicensing or conveying.
If you add terms to a covered work in accord with this section, you must place, in the relevant sourcefiles, a statement of the additional terms that apply to those files, or a notice indicating where to findthe applicable terms.
Additional terms, permissive or non-permissive, may be stated in the form of a separately writtenlicense, or stated as exceptions; the above requirements apply either way.
8. Termination.
You may not propagate or modify a covered work except as expressly provided under this License. Anyattempt otherwise to propagate or modify it is void, and will automatically terminate your rights underthis License (including any patent licenses granted under the third paragraph of section 11).
However, if you cease all violation of this License, then your license from a particular copyright holderis reinstated (a) provisionally, unless and until the copyright holder explicitly and finally terminatesyour license, and (b) permanently, if the copyright holder fails to notify you of the violation by somereasonable means prior to 60 days after the cessation.
Moreover, your license from a particular copyright holder is reinstated permanently if the copyrightholder notifies you of the violation by some reasonable means, this is the first time you have receivednotice of violation of this License (for any work) from that copyright holder, and you cure the violationprior to 30 days after your receipt of the notice.
Termination of your rights under this section does not terminate the licenses of parties who havereceived copies or rights from you under this License. If your rights have been terminated and notpermanently reinstated, you do not qualify to receive new licenses for the same material under section10.
9. Acceptance Not Required for Having Copies.
You are not required to accept this License in order to receive or run a copy of the Program. Ancillarypropagation of a covered work occurring solely as a consequence of using peer-to-peer transmission toreceive a copy likewise does not require acceptance. However, nothing other than this License grantsyou permission to propagate or modify any covered work. These actions infringe copyright if you donot accept this License. Therefore, by modifying or propagating a covered work, you indicate youracceptance of this License to do so.
144
10. Automatic Licensing of Downstream Recipients.
Each time you convey a covered work, the recipient automatically receives a license from the originallicensors, to run, modify and propagate that work, subject to this License. You are not responsible forenforcing compliance by third parties with this License.
An "entity transaction" is a transaction transferring control of an organization, or substantially all assetsof one, or subdividing an organization, or merging organizations. If propagation of a covered workresults from an entity transaction, each party to that transaction who receives a copy of the work alsoreceives whatever licenses to the work the party’s predecessor in interest had or could give under theprevious paragraph, plus a right to possession of the Corresponding Source of the work from thepredecessor in interest, if the predecessor has it or can get it with reasonable efforts.
You may not impose any further restrictions on the exercise of the rights granted or affirmed under thisLicense. For example, you may not impose a license fee, royalty, or other charge for exercise of rightsgranted under this License, and you may not initiate litigation (including a cross-claim or counterclaimin a lawsuit) alleging that any patent claim is infringed by making, using, selling, offering for sale, orimporting the Program or any portion of it.
11. Patents.
A "contributor" is a copyright holder who authorizes use under this License of the Program or a workon which the Program is based. The work thus licensed is called the contributor’s "contributor version".
A contributor’s "essential patent claims" are all patent claims owned or controlled by the contributor,whether already acquired or hereafter acquired, that would be infringed by some manner, permitted bythis License, of making, using, or selling its contributor version, but do not include claims that wouldbe infringed only as a consequence of further modification of the contributor version. For purposes ofthis definition, "control" includes the right to grant patent sublicenses in a manner consistent with therequirements of this License.
Each contributor grants you a non-exclusive, worldwide, royalty-free patent license under thecontributor’s essential patent claims, to make, use, sell, offer for sale, import and otherwise run, modifyand propagate the contents of its contributor version.
In the following three paragraphs, a "patent license" is any express agreement or commitment, howeverdenominated, not to enforce a patent (such as an express permission to practice a patent or covenantnot to sue for patent infringement). To "grant" such a patent license to a party means to make such anagreement or commitment not to enforce a patent against the party.
If you convey a covered work, knowingly relying on a patent license, and the Corresponding Source ofthe work is not available for anyone to copy, free of charge and under the terms of this License,through a publicly available network server or other readily accessible means, then you must either (1)cause the Corresponding Source to be so available, or (2) arrange to deprive yourself of the benefit ofthe patent license for this particular work, or (3) arrange, in a manner consistent with therequirements of this License, to extend the patent license to downstream recipients. "Knowinglyrelying" means you have actual knowledge that, but for the patent license, your conveying the coveredwork in a country, or your recipient’s use of the covered work in a country, would infringe one or moreidentifiable patents in that country that you have reason to believe are valid.
If, pursuant to or in connection with a single transaction or arrangement, you convey, or propagate byprocuring conveyance of, a covered work, and grant a patent license to some of the parties receivingthe covered work authorizing them to use, propagate, modify or convey a specific copy of the coveredwork, then the patent license you grant is automatically extended to all recipients of the covered work
145
and works based on it.
A patent license is "discriminatory" if it does not include within the scope of its coverage, prohibits theexercise of, or is conditioned on the non-exercise of one or more of the rights that are specificallygranted under this License. You may not convey a covered work if you are a party to an arrangementwith a third party that is in the business of distributing software, under which you make payment tothe third party based on the extent of your activity of conveying the work, and under which the thirdparty grants, to any of the parties who would receive the covered work from you, a discriminatorypatent license (a) in connection with copies of the covered work conveyed by you (or copies madefrom those copies), or (b) primarily for and in connection with specific products or compilations thatcontain the covered work, unless you entered into that arrangement, or that patent license wasgranted, prior to 28 March 2007.
Nothing in this License shall be construed as excluding or limiting any implied license or other defensesto infringement that may otherwise be available to you under applicable patent law.
12. No Surrender of Others' Freedom.
If conditions are imposed on you (whether by court order, agreement or otherwise) that contradict theconditions of this License, they do not excuse you from the conditions of this License. If you cannotconvey a covered work so as to satisfy simultaneously your obligations under this License and anyother pertinent obligations, then as a consequence you may not convey it at all. For example, if youagree to terms that obligate you to collect a royalty for further conveying from those to whom youconvey the Program, the only way you could satisfy both those terms and this License would be torefrain entirely from conveying the Program.
13. Remote Network Interaction; Use with the GNU General Public License.
Notwithstanding any other provision of this License, if you modify the Program, your modified versionmust prominently offer all users interacting with it remotely through a computer network (if yourversion supports such interaction) an opportunity to receive the Corresponding Source of your versionby providing access to the Corresponding Source from a network server at no charge, through somestandard or customary means of facilitating copying of software. This Corresponding Source shallinclude the Corresponding Source for any work covered by version 3 of the GNU General PublicLicense that is incorporated pursuant to the following paragraph.
Notwithstanding any other provision of this License, you have permission to link or combine anycovered work with a work licensed under version 3 of the GNU General Public License into a singlecombined work, and to convey the resulting work. The terms of this License will continue to apply tothe part which is the covered work, but the work with which it is combined will remain governed byversion 3 of the GNU General Public License.
14. Revised Versions of this License.
The Free Software Foundation may publish revised and/or new versions of the GNU Affero GeneralPublic License from time to time. Such new versions will be similar in spirit to the present version, butmay differ in detail to address new problems or concerns.
Each version is given a distinguishing version number. If the Program specifies that a certain numberedversion of the GNU Affero General Public License "or any later version" applies to it, you have theoption of following the terms and conditions either of that numbered version or of any later versionpublished by the Free Software Foundation. If the Program does not specify a version number of theGNU Affero General Public License, you may choose any version ever published by the Free SoftwareFoundation.
146

If the Program specifies that a proxy can decide which future versions of the GNU Affero General PublicLicense can be used, that proxy’s public statement of acceptance of a version permanently authorizesyou to choose that version for the Program.
Later license versions may give you additional or different permissions. However, no additionalobligations are imposed on any author or copyright holder as a result of your choosing to follow a laterversion.
15. Disclaimer of Warranty.
THERE IS NO WARRANTY FOR THE PROGRAM, TO THE EXTENT PERMITTED BY APPLICABLE LAW.EXCEPT WHEN OTHERWISE STATED IN WRITING THE COPYRIGHT HOLDERS AND/OR OTHERPARTIES PROVIDE THE PROGRAM "AS IS" WITHOUT WARRANTY OF ANY KIND, EITHEREXPRESSED OR IMPLIED, INCLUDING, BUT NOT LIMITED TO, THE IMPLIED WARRANTIES OFMERCHANTABILITY AND FITNESS FOR A PARTICULAR PURPOSE. THE ENTIRE RISK AS TO THEQUALITY AND PERFORMANCE OF THE PROGRAM IS WITH YOU. SHOULD THE PROGRAM PROVEDEFECTIVE, YOU ASSUME THE COST OF ALL NECESSARY SERVICING, REPAIR OR CORRECTION.
16. Limitation of Liability.
IN NO EVENT UNLESS REQUIRED BY APPLICABLE LAW OR AGREED TO IN WRITING WILL ANYCOPYRIGHT HOLDER, OR ANY OTHER PARTY WHO MODIFIES AND/OR CONVEYS THE PROGRAMAS PERMITTED ABOVE, BE LIABLE TO YOU FOR DAMAGES, INCLUDING ANY GENERAL, SPECIAL,INCIDENTAL OR CONSEQUENTIAL DAMAGES ARISING OUT OF THE USE OR INABILITY TO USETHE PROGRAM (INCLUDING BUT NOT LIMITED TO LOSS OF DATA OR DATA BEING RENDEREDINACCURATE OR LOSSES SUSTAINED BY YOU OR THIRD PARTIES OR A FAILURE OF THEPROGRAM TO OPERATE WITH ANY OTHER PROGRAMS), EVEN IF SUCH HOLDER OR OTHERPARTY HAS BEEN ADVISED OF THE POSSIBILITY OF SUCH DAMAGES.
17. Interpretation of Sections 15 and 16.
If the disclaimer of warranty and limitation of liability provided above cannot be given local legal effectaccording to their terms, reviewing courts shall apply local law that most closely approximates anabsolute waiver of all civil liability in connection with the Program, unless a warranty or assumption ofliability accompanies a copy of the Program in return for a fee.
END OF TERMS AND CONDITIONS
How to Apply These Terms to Your New Programs
If you develop a new program, and you want it to be of the greatest possible use to the public, the bestway to achieve this is to make it free software which everyone can redistribute and change under theseterms.
To do so, attach the following notices to the program. It is safest to attach them to the start of eachsource file to most effectively state the exclusion of warranty; and each file should have at least the"copyright" line and a pointer to where the full notice is found.
147
<one line to give the program's name and a brief idea of what it does.> Copyright (C) <year> <name of author>
This program is free software: you can redistribute it and/or modify it under the terms of the GNU Affero General Public License as published by the Free Software Foundation, either version 3 of the License, or (at your option) any later version.
This program is distributed in the hope that it will be useful, but WITHOUT ANY WARRANTY; without even the implied warranty of MERCHANTABILITY or FITNESS FOR A PARTICULAR PURPOSE. See the GNU Affero General Public License for more details.
You should have received a copy of the GNU Affero General Public License along with this program. If not, see <http://www.gnu.org/licenses/>.
Also add information on how to contact you by electronic and paper mail.
If your software can interact with users remotely through a computer network, you should also makesure that it provides a way for users to get its source. For example, if your program is a webapplication, its interface could display a "Source" link that leads users to an archive of the code. Thereare many ways you could offer source, and different solutions will be better for different programs; seesection 13 for the specific requirements.
You should also get your employer (if you work as a programmer) or school, if any, to sign a "copyrightdisclaimer" for the program, if necessary. For more information on this, and how to apply and followthe GNU AGPL, see <http://www.gnu.org/licenses/>.
148