joinery made simple rabbets, dadoes, and grooves
TRANSCRIPT
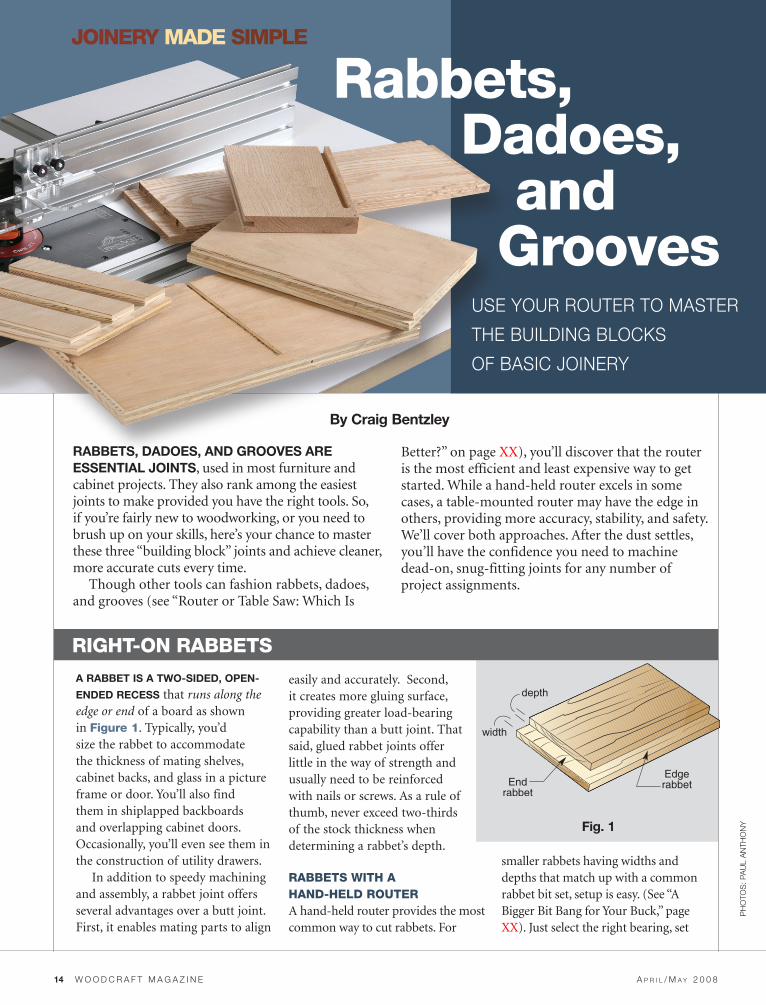
A rAbbet is A two-sided, open-
ended recess that runs along the edge or end of a board as shown in Figure 1. Typically, you’d size the rabbet to accommodate the thickness of mating shelves, cabinet backs, and glass in a picture frame or door. You’ll also find them in shiplapped backboards and overlapping cabinet doors. Occasionally, you’ll even see them in the construction of utility drawers.
In addition to speedy machining and assembly, a rabbet joint offers several advantages over a butt joint. First, it enables mating parts to align
easily and accurately. Second, it creates more gluing surface, providing greater load-bearing capability than a butt joint. That said, glued rabbet joints offer little in the way of strength and usually need to be reinforced with nails or screws. As a rule of thumb, never exceed two-thirds of the stock thickness when determining a rabbet’s depth.
Rabbets with a hand-held RouteRA hand-held router provides the most common way to cut rabbets. For
smaller rabbets having widths and depths that match up with a common rabbet bit set, setup is easy. (See “A Bigger Bit Bang for Your Buck,” page XX). Just select the right bearing, set
Right-on Rabbets
14 w o o d c r a f t m a g a z i n e A p r i l / M A y 2 0 0 8
by craig bentzley
Fig. 1
ph
oto
s: p
au
l a
nth
on
y
joineRy made simple
Rabbets, dadoes, and grooves
use your router to master
the building blocks
of basic joinery
rAbbets, dAdoes, And grooves Are essentiAl joints, used in most furniture and cabinet projects. They also rank among the easiest joints to make provided you have the right tools. So, if you’re fairly new to woodworking, or you need to brush up on your skills, here’s your chance to master these three “building block” joints and achieve cleaner, more accurate cuts every time.
Though other tools can fashion rabbets, dadoes, and grooves (see “Router or Table Saw: Which Is
Better?” on page XX), you’ll discover that the router is the most efficient and least expensive way to get started. While a hand-held router excels in some cases, a table-mounted router may have the edge in others, providing more accuracy, stability, and safety. We’ll cover both approaches. After the dust settles, you’ll have the confidence you need to machine dead-on, snug-fitting joints for any number of project assignments.

your depth of cut, and go at it. Things get trickier when making wider or deeper rabbets. Here you’ll need to use a larger straight bit and an edge guide accessory, or a straightedge clamped to your workpiece. Some manufacturers’ edge guides have large openings that can’t be adjusted (photo A). This can hamper registration with the edge of the stock at the beginning of the cut. You can close this gap by attaching wood strips to the edge of the guide. If you don’t have an edge guide, you can screw or clamp a piece of wood to your router’s subbase.
Regardless of your setup, make sure your workpiece is secured with clamps, double-faced tape, or other means, so it doesn’t move during the cut. Note, too, that the direction of feed is always left to right when doing hand-held rabbeting. Add scrap at the exiting end of the workpiece to eliminate tear-out as shown in photo b. Rout end grain before edge grain; and, for the best cut quality, don’t remove more than 1/8" of material in a pass. If you have a fixed-base router, you can place 1/8" hardboard strips under the router base and remove one after each pass until you achieve the desired depth. For rabbeting curved stock, see photo c.
rAbbets on the router tAbleAlthough you can do most rabbeting with a hand-held router, certain applications call for a table-mounted router. Some examples: small projects (like jewelry boxes), picture frames, and
when you need to make multiples. Here, with one setup, you can dispense with the large assignment in short order.
When working on the router table, remember that your feed direction
should always be from right to left, and for the best quality cuts, never remove more than 1/8" of material per pass. Follow your workpiece with sacrificial scrap as shown in photo d.
b
Clamp boards side-by-side to create a longer bearing surface for the edge guide. Scrap placed where the bit exits the wood prevents tear-out.
scrap
feed direction
w w w . w o o d c r A f t M A g A z i n e . c o M w o o d c r a f t m a g a z i n e 15
A
Make wide rabbets with a large straight bit and an edge guide.
Straight bits can cause tear-out at the edge of the cut. As an alternative to using a sacrificial piece of scrap as in Photo B, make a pass from right to left, taking 1/16" of the material off. After making this “climb-cutting” skim pass, rout from left to right to finish the rabbet.
tip
ale
Rt
c
A rabbet bit with a bearing is the best choice for cutting rabbets on curved edges.
d
When making end rabbets, a squared cutoff can provide backup and prevent tear-out at the end of the cut.
bearing
Rabbets, dadoes, and grooves
While a table saw can cut most of the joints featured here, several issues come into play. First is cost. A quality dado set is expensive (up to $300). Also, some saws do not have arbors long enough to hold a complete dado set. To cut rabbets, you need to attach an auxiliary wood face to the fence to “bury” the unneeded portion of the dado set. You’ll also need a dedicated zero-clearance insert for each setup you use whether you’re cutting rabbets or dadoes. A dedicated sled is best for dadoing large parts, and stopped dadoes made on the table saw require a lot of handwork to clean them up. Also don’t forget that dado sets take valuable shop time to set up.
If you have a lot of joints to make, setting up a table saw is probably worth the effort. One advantage: You can make wider and deeper cuts in one pass. This saves time in the long haul. Still, when you only have a few rabbets or dadoes to make, a router will get you to the finish line much faster.
Router or table saw: which is better?

A dAdo is A squAre-sided, FlAt-
bottomed recess that runs across the grain as shown in Figure 2. It’s primarily used to house the ends of shelves and cabinet floors, as well as retain drawer runners. The most common type is a through dado, which runs the full width of a workpiece. For a cleaner look, a stopped dado, shown in Figure 2, may be substituted. As the name implies, the stopped dado stops short of one, or both edges. The mating piece must then be notched
accordingly. Normally, dadoes are made no deeper than one-half of the stock thickness.
While dadoes on larger pieces are most easily and accurately made with a hand-held router, dadoes on small project parts, such as jewelry box dividers, often require a table-mounted router. You can clamp a straightedge to your workpiece as a guide, or use a shop-made “T-square jig” as shown in Figure 3 and photos e and F. The advantage to this jig is that it saves time
by showing the location of the cut, and guarantees your cuts are square to your reference edge. The only disadvantage to this jig is that you’ll need a dedicated one for each router/router bit combination. If you’re routing dadoes that are wider than your bit, attach two fences to the head of the T-square and make your dado in two or more passes.
joineRy made simple
16 w o o d c r a f t m a g a z i n e A p r i l / M A y 2 0 0 8
Cutting shaRp, Clean dadoes
Fig. 2 Fig. 3
F
Start the router in the notch and maintain the position of the router to the straightedge through the whole cut.
dadoes For plywood
As you may already know, 3/4" plywood does not typically measure 3/4" thick. The same holds true for 1/2" plywood. Although it might not seem like much, the difference can result in a sloppy fit in a case piece (photo g). To make a snug dado or groove for undersized plywood, take two passes with a smaller bit, or rout a shallow rabbet along the edge of the mating piece on the hidden face. Perhaps the best option: Use an “undersized” router bit that manufacturers created to cure this problem.
e
Align the notch in the head of the T-square jig with the layout lines, and then clamp the jig in place.
notch
The perfect dado on the left was made with a 23/32" router bit. The dado on the right was made with a standard 3/4" bit.
g

the only diFFerence between
A groove And dAdo is grAin
orientAtion. While a dado runs across the grain, a groove runs with the grain as shown in Figure 4. (This definition gets hazy when working with MDF, but “grain” generally runs along a panel’s longest dimension.) Common uses for grooves are housing drawer bottoms, door panels, and cabinet backs. You can cut grooves with a straight bit and edge guide using a hand-held router, or a straight
bit in a router table. Like dadoes, grooves can run the full length of the workpiece, or be stopped.
A plunge router works best for stopped grooves on large panels, but for smaller pieces choose a router table. It’s a lot easier to take the workpiece to the tool than clamping it in a manner that won’t interfere with the router. To make the cut, butt the stock against the right hand stopblock and slowly lower it onto the spinning bit. Then feed to the left hand stopblock, as shown in photo h. Turn off the router and lift it up when the bit comes to a stop. For deep grooves, make the cut in two or more passes.
If you need to cut narrow through grooves, consider slotting bits as shown in photo i. Because they come with a guide bearing, these bits can be used in a hand-held router. Mounted in a router table, they can be used for all sorts of grooving chores, on edges, ends, and faces.
To rout a stopped groove cut on the router table, slowly lower the workpiece onto the spinning bit. Maintain inward pressure against the fence so you won’t spoil the cut.
h
w w w . w o o d c r A f t M A g A z i n e . c o M w o o d c r a f t m a g a z i n e 17
Fig. 4
a bigger bit bang For your buck
Rabbet bit sets make for a worthwhile investment. They’re especially useful in hand-held routers. The bearings allow for accurate, repeatable cuts, and you’ll never have to fuss with an edge guide. They are also the best way to rabbet concave or convex edges (photo c). Also, the cutting edge geometry creates a smoother, cleaner cut than a straight bit. The Whiteside set shown here includes eight bearings, which allow you to make seven different rabbets (1/8",
3/16", 1/4", 5/16", 3/8", 7/16", and 1/2"). As a bonus, a full-sized bearing enables the unit to pull double duty as a flush trim bit.
conv
enie
nce-plus
buying guide WOODCRAFT # PRICe
1. pinnacle premium Router tabletop #148487 $199.99
2. pinnacle 36" Router table Fence #148488 $179.99
3. Rousseau Router table stand #148646 $119.97
4. whiteside Rabbet set (1/2" shank) #143223 $59.99
5. whiteside straight 23/32" plywood bit (1/2" sh) #24K19 $19.99
6. whiteside straight 31/64" plywood bit (1/2" sh) #24K17 $17.99
7. Cmt three-wing slot Cutter 1/4" h, 17/8" d #820305 $23.99
8. Cmt slot Cutter arbor w/bearing (1/2" sh) #820307 $10.00
Above items available at Woodcraft stores, woodcraft.com or by calling (800) 225-1153.
stopblock
FoRming snug gRooVes
Slotting bits are great for making clean, square-bottom grooves on the router table.
i

FREE YEAR!
go to woodcraftmagazine.comand click SUBSCRIBE
Complete the form below and mail in an envelope addressed to:
-or-
WOODCRAFT MAGAZINEPO BOX 7020
PARKERSBURG WV 26102-9916
2 YEARS for $29.99!
Outside of the U.S and Canada add $30 for postage. Foreign orders must be prepaid. Payment in U.S. Funds only.
By providing my e-mail address, I am indicating I’d like to receive information about my subscription and other offers from Woodcraft Magazine via e-mail.
□ Payment Enclosed □ Bill Me
Name
Address
City
State Zip
Country
Send in now to get
2 Years for $29.99!Projects, Techniques and Products
� Dovetail a case� Divide a cabinet into
compartments� Create a cornice
� 4 more projects� Famous furniture
And learn how to…
Plus…
Best-everLUMBER RACK
DECORATIVE FINISHES Done Right
Build Betterwith a CUT LIST
SPICE BOXBuild this classic
or go to woodcraftmagazine.com and click SUBSCRIBE