job management partner 1/automatic operation service
TRANSCRIPT

Job Management Partner 1/Automatic OperationService Template Developer's Guide
3021-3-363-10(E)
Job Management Partner 1 Version 10

Notices
■ Relevant program productsP-242C-E1AL Job Management Partner 1/Automatic Operation 10-50 (for Windows Server 2008 R2,Windows Server2012,Windows Server 2012 R2)The above product includes the following:• P-CC242C-EAAL Job Management Partner 1/Automatic Operation - Server 10-50 (for Windows Server 2008R2,Windows Server 2012,Windows Server 2012 R2)• P-CC242C-EBAL Job Management Partner 1/Automatic Operation - Contents 10-50 (for Windows Server 2008R2,Windows Server 2012,Windows Server 2012 R2)P-F242C-E1AL1 Job Management Partner 1/Automatic Operation Contents Set 10-50 (for Windows Server 2008R2,Windows Server 2012,Windows Server 2012 R2)
■ TrademarksActive Directory is either a registered trademark or a trademark of Microsoft Corporation in the United States and/orother countries.Adobe and Flash Player are either registered trademarks or trademarks of Adobe Systems Incorporated in the UnitedStates and/or other countries.HP-UX is a product name of Hewlett-Packard Development Company, L.P. in the U.S. and other countries.IBM, AIX are trademarks of International Business Machines Corporation, registered in many jurisdictions worldwide.Intel is a trademark of Intel Corporation in the U.S. and/or other countries.Internet Explorer is either a registered trademark or trademark of Microsoft Corporation in the United States and/orother countries.Itanium is a trademark of Intel Corporation in the United States and other countries.Kerberos is a name of network authentication protocol created by Massachusetts Institute of Technology.Linux(R) is the registered trademark of Linus Torvalds in the U.S. and other countries.Microsoft and Hyper-V are either registered trademarks or trademarks of Microsoft Corporation in the United Statesand/or other countries.Microsoft .NET is software for connecting people, information, systems, and devices.Microsoft and SQL Server are either registered trademarks or trademarks of Microsoft Corporation in the United Statesand/or other countries.Netscape is a trademark of AOL Inc.in the U.S. and other countries.The OpenStack(R) Word Mark and OpenStack Logo are either registered trademarks/service marks or trademarks/service marks of the OpenStack Foundation in the United States and other countries and are used with the OpenStackFoundation's permission. We are not affiliated with, endorsed or sponsored by the OpenStack Foundation, or theOpenStack community.Oracle and Java are registered trademarks of Oracle and/or its affiliates.Red Hat is a trademark or a registered trademark of Red Hat Inc. in the United States and other countries.RSA and BSAFE are either registered trademarks or trademarks of EMC Corporation in the United States and/or othercountries.All SPARC trademarks are used under license and are trademarks or registered trademarks of SPARC International,Inc., in the United States and other countries. Products bearing SPARC trademarks are based upon an architecturedeveloped by Sun Microsystems, Inc.
Job Management Partner 1/Automatic Operation Service Template Developer's Guide 2

UNIX is a registered trademark of The Open Group in the United States and other countries.VMware and vCenter Server are registered trademarks or trademarks of VMware, Inc. in the United States and/or otherjurisdictions.VMware and VMware vSphere ESX are registered trademarks or trademarks of VMware, Inc. in the United Statesand/or other jurisdictions.Windows is either a registered trademark or a trademark of Microsoft Corporation in the United States and/or othercountries.Windows Server is either a registered trademark or a trademark of Microsoft Corporation in the United States and/orother countries.Windows Vista is either a registered trademark or a trademark of Microsoft Corporation in the United States and/orother countries.Other company and product names mentioned in this document may be the trademarks of their respective owners.This product includes software developed by Andy Clark.This product includes software developed by the Apache Software Foundation (http://www.apache.org/).This product includes software developed by Ben Laurie for use in the Apache-SSL HTTP server project.This product includes software developed by Daisuke Okajima and Kohsuke Kawaguchi (http://relaxngcc.sf.net/).This product includes software developed by IAIK of Graz University of Technology.This product includes software developed by the Java Apache Project for use in the Apache JServ servlet engine project(http://java.apache.org/).This product includes software developed by Ralf S. Engelschall <[email protected]> for use in the mod_ssl project(http://www.modssl.org/).Portions of this software were developed at the National Center for Supercomputing Applications (NCSA) at theUniversity of Illinois at Urbana-Champaign.This product includes software developed by the University of California, Berkeley and its contributors.This software contains code derived from the RSA Data Security Inc. MD5 Message-Digest Algorithm, includingvarious modifications by Spyglass Inc., Carnegie Mellon University, and Bell Communications Research, Inc(Bellcore).Regular expression support is provided by the PCRE library package, which is open source software, written by PhilipHazel, and copyright by the University of Cambridge, England. The original software is available from ftp://ftp.csx.cam.ac.uk/pub/software/programming/pcre/
Job Management Partner 1/Automatic Operation includes RSA BSAFE(R) Cryptographic software of EMCCorporation.
Job Management Partner 1/Automatic Operation Service Template Developer's Guide 3

■ IssuedDec. 2014: 3021-3-363-10(E)
■ CopyrightAll Rights Reserved. Copyright (C) 2012, 2014, Hitachi, Ltd.
Job Management Partner 1/Automatic Operation Service Template Developer's Guide 4

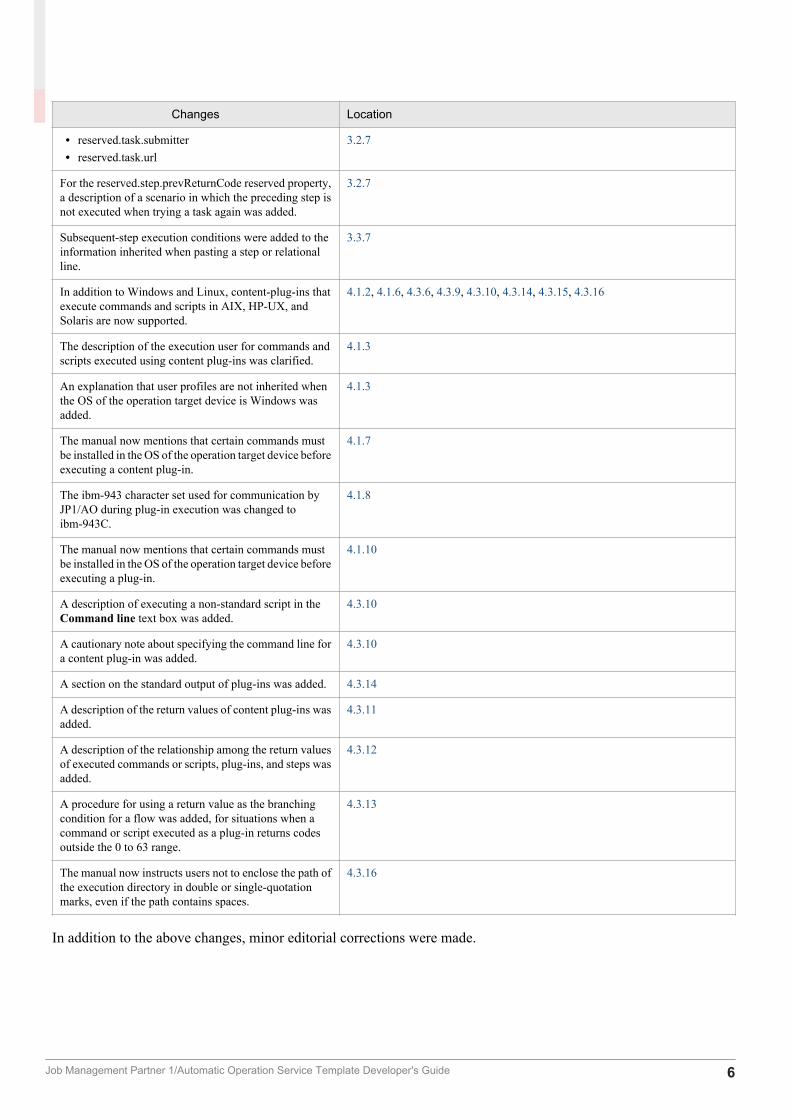
Summary of amendments
The following table lists changes in this manual (3021-3-363-10(E)) and product changes relatedto this manual.
Changes Location
For the manual issued in December 2014 or later, the titleand reference number were changed as shown below.
Before the change:Job Management Partner 1/Automatic OperationGUI and Command Reference (3021-3-315(E))
After the change:Job Management Partner 1/Automatic OperationGUI, Command, and API Reference (3021-3-366(E))
--
Windows Server 2012 R2 was added as a supportedoperating system.
--
Functionality was added that facilitates the debugging ofservice templates. Changes were made to the manualstructure to accommodate this new functionality.
1.1, 1.2, 1.3, 1.4, 1.6, 5., 6., A.1
A description was added regarding the use of the contentplug-ins provided by JP1/AO in service templatedevelopment.
1.1.1
A function was added that allows users to be promoted toroot privilege when executing a content plug-in. Thisfunction can be used when the OS of the operation targetdevice is UNIX.
4.1.3
A description was added regarding the conditions underwhich files can be transferred.
4.1.5, 4.1.6
The folder in which transferred files are stored can nowbe set in the property file (config_user.properties).
4.1.6
A description of the setting in the plugin.suPasswordreserved plug-in property when a plug-in is executedwithout promoting user permission to root was added.
4.3.6
Public key authentication was added as an authenticationmethod for operation target devices.
2.2.13, 4.3.4, 4.3.6, 4.3.11
Release plug-ins can now be deleted. 2.5.1, 4.1.4, 4.4.1
A description of reserved properties was added. Also, thefollowing reserved properties were added:• reserved.loop.index• reserved.service.category• reserved.service.name• reserved.service.resourceGroupName• reserved.step.path• reserved.step.prevReturnCode• reserved.task.description• reserved.task.id• reserved.task.name
3.2.7
Job Management Partner 1/Automatic Operation Service Template Developer's Guide 5
Changes Location
• reserved.task.submitter• reserved.task.url
3.2.7
For the reserved.step.prevReturnCode reserved property,a description of a scenario in which the preceding step isnot executed when trying a task again was added.
3.2.7
Subsequent-step execution conditions were added to theinformation inherited when pasting a step or relationalline.
3.3.7
In addition to Windows and Linux, content-plug-ins thatexecute commands and scripts in AIX, HP-UX, andSolaris are now supported.
4.1.2, 4.1.6, 4.3.6, 4.3.9, 4.3.10, 4.3.14, 4.3.15, 4.3.16
The description of the execution user for commands andscripts executed using content plug-ins was clarified.
4.1.3
An explanation that user profiles are not inherited whenthe OS of the operation target device is Windows wasadded.
4.1.3
The manual now mentions that certain commands mustbe installed in the OS of the operation target device beforeexecuting a content plug-in.
4.1.7
The ibm-943 character set used for communication byJP1/AO during plug-in execution was changed toibm-943C.
4.1.8
The manual now mentions that certain commands mustbe installed in the OS of the operation target device beforeexecuting a plug-in.
4.1.10
A description of executing a non-standard script in theCommand line text box was added.
4.3.10
A cautionary note about specifying the command line fora content plug-in was added.
4.3.10
A section on the standard output of plug-ins was added. 4.3.14
A description of the return values of content plug-ins wasadded.
4.3.11
A description of the relationship among the return valuesof executed commands or scripts, plug-ins, and steps wasadded.
4.3.12
A procedure for using a return value as the branchingcondition for a flow was added, for situations when acommand or script executed as a plug-in returns codesoutside the 0 to 63 range.
4.3.13
The manual now instructs users not to enclose the path ofthe execution directory in double or single-quotationmarks, even if the path contains spaces.
4.3.16
In addition to the above changes, minor editorial corrections were made.
Job Management Partner 1/Automatic Operation Service Template Developer's Guide 6
Preface
This manual describes how to develop the service templates and plug-ins used by Job Management Partner 1/AutomaticOperation.
In this manual, Job Management Partner 1 is abbreviated to JP1, and Job Management Partner 1/Automatic Operationis abbreviated to JP1/AO.
For reference information on JP1/AO manuals and a glossary, see the manual Job Management Partner 1/AutomaticOperation Overview and System Design Guide.
■ Intended readersThis manual is intended for the following readers:
• Users who create new service templates
• Users who edit service templates
Readers of this document are assumed to have a basic understanding of JP1/AO.
■ Microsoft product name abbreviationsThis manual uses the following abbreviations for Microsoft product names.
Abbreviation Full name or meaning
.NET Framework .NET Framework 3.5 Microsoft(R) .NET Framework 3.5
Active Directory Microsoft(R) Active Directory
Hyper-V Microsoft(R) Hyper-V(R)
Internet Explorer Microsoft Internet Explorer Microsoft(R) Internet Explorer(R)
Windows Internet Explorer Windows(R) Internet Explorer(R)
Windows Windows 7 Microsoft(R) Windows(R) 7 Enterprise
Microsoft(R) Windows(R) 7 Professional
Microsoft(R) Windows(R) 7 Ultimate
Windows Server2003#1
Windows Server 2003#1 Microsoft(R) Windows Server(R) 2003, EnterpriseEdition
Microsoft(R) Windows Server(R) 2003, StandardEdition
Windows Server 2003 (x64) Microsoft(R) Windows Server(R) 2003, Enterprisex64 Edition
Microsoft(R) Windows Server(R) 2003, Standardx64 Edition
WindowsServer 2003R2#2
Windows Server 2003R2#2
Microsoft(R) Windows Server(R) 2003 R2,Enterprise Edition
Job Management Partner 1/Automatic Operation Service Template Developer's Guide 7

Abbreviation Full name or meaning
Windows Windows Server2003#1
WindowsServer 2003R2#2
Windows Server 2003R2#2
Microsoft(R) Windows Server(R) 2003 R2,Standard Edition
Windows Server 2003R2 (x64)
Microsoft(R) Windows Server(R) 2003 R2,Enterprise x64 Edition
Microsoft(R) Windows Server(R) 2003 R2,Standard x64 Edition
Windows Server2008
WindowsServer 2008 R2
Windows Server 2008R2 Datacenter
Microsoft(R) Windows Server(R) 2008 R2Datacenter
Windows Server 2008R2 Enterprise
Microsoft(R) Windows Server(R) 2008 R2Enterprise
Windows Server 2008R2 Standard
Microsoft(R) Windows Server(R) 2008 R2 Standard
WindowsServer 2008x64
Windows Server 2008Datacenter x64
Microsoft(R) Windows Server(R) 2008 Datacenterx64
Windows Server 2008Enterprise x64
Microsoft(R) Windows Server(R) 2008 Enterprisex64
Windows Server 2008Standard x64
Microsoft(R) Windows Server(R) 2008 Standardx64
WindowsServer 2008x86
Windows Server 2008Datacenter x86
Microsoft(R) Windows Server(R) 2008 Datacenterx86
Windows Server 2008Enterprise x86
Microsoft(R) Windows Server(R) 2008 Enterprisex86
Windows Server 2008Standard x86
Microsoft(R) Windows Server(R) 2008 Standardx86
Windows Server2012
Windows Server 2012 Datacenter Microsoft(R) Windows Server(R) 2012 Datacenter
Windows Server 2012 Standard Microsoft(R) Windows Server(R) 2012 Standard
Windows Server2012 R2
Windows Server 2012 R2 Datacenter Microsoft(R) Windows Server(R) 2012 R2Datacenter
Windows Server 2012 R2 Standard Microsoft(R) Windows Server(R) 2012 R2 Standard
Windows Server Failover Cluster Microsoft(R) Windows Server(R) Failover Cluster
Windows Vista Microsoft(R) Windows Vista(R) Business
Microsoft(R) Windows Vista(R) Enterprise
Microsoft(R) Windows Vista(R) Ultimate
Windows XP Microsoft(R) Windows(R) XP ProfessionalOperating System
#1In descriptions, if Windows Server 2003 (x64) or Windows Server 2003 R2 is noted alongside Windows Server2003, the description for Windows Server 2003 does not apply to Windows Server 2003 (x64) or Windows Server2003 R2.
Job Management Partner 1/Automatic Operation Service Template Developer's Guide 8

#2In descriptions, if Windows Server 2003 R2 (x64) is noted alongside Windows Server 2003 R2, the descriptionfor Windows Server 2003 R2 does not apply to Windows Server 2003 R2 (x64).
■ Formatting conventions used in this manualThe following describes the formatting conventions used in this manual.
Text formatting Description
Character string Italic characters indicate a variable.Example: A date is specified in YYYYMMDD format.
Bold - Bold Indicates selecting menu items in succession.Example: Select File - New.This example means that you select New from the File menu.
key + key Indicates pressing keys on the keyboard at the same time.Example: Ctrl + Alt + Delete means pressing the Ctrl, Alt, and Delete keys at the same time.
Representation of JP1/AO-related installation foldersIn this manual, the default installation folders are represented as follows:
JP1/AO installation folder:system-drive\Program Files (x86)\Hitachi\JP1AO
Common Component installation folder:system-drive\Program Files (x86)\Hitachi\HiCommand\Base
Job Management Partner 1/Automatic Operation Service Template Developer's Guide 9

Contents
Notices 2
Summary of amendments 5
Preface 7
1 Flow of Service Template Development 161.1 Overview 17
1.1.1 Flow of service template development 17
1.1.2 Elements involved in service template development 19
1.1.3 Main windows used to develop service templates 22
1.2 Tasks associated with service templates 25
1.2.1 Tasks performed when creating new service templates 25
1.2.2 Tasks performed when editing service templates 26
1.2.3 Tasks performed when using existing service templates as-is 26
1.3 General procedure for creating new service templates 28
1.3.1 General procedure for creating new service templates 28
1.4 General procedure when editing an existing service template 30
1.4.1 General procedure when editing service template definition information 31
1.4.2 General procedure for editing a plug-in and applying the result to a service template 32
1.4.3 General procedure for creating new plug-ins and adding them to service templates 33
1.4.4 General procedure for changing the description displayed for a service in the user interface 35
1.4.5 General procedure for adding processing to a service template 35
1.4.6 General procedure for deleting processing from a service template 37
1.4.7 General procedure for dynamically or statically setting parameters during automated processing 38
1.4.8 General procedure for using a service resource file to set the information displayed for a service 39
1.4.9 General procedure for using a plug-in resource file to set display information for a plug-in 40
1.5 Using existing service templates provided by JP1/AO 41
1.5.1 General procedure for using an existing service template provided by JP1/AO 41
1.6 List of service template development features 42
2 Setting service template definition information 442.1 Displaying the Editor window 45
2.1.1 Procedure for displaying the Editor window 45
2.1.2 Overview of development service templates and release service templates 46
2.1.3 Available operations by service template configuration type 46
2.1.4 Behavior when an intervening action occurs in the Editor window 47
2.1.5 Version compatibility for service templates and plug-ins created in the Editor window 48
2.1.6 Compatibility with steps in service templates created in earlier versions of JP1/AO 48
Job Management Partner 1/Automatic Operation Service Template Developer's Guide 10

2.2 Creating and editing service templates 50
2.2.1 Creating blank service templates 50
2.2.2 Parameters to set when creating or copying service templates 50
2.2.3 Procedure for setting service definition information 51
2.2.4 Parameters to set in service definition information 51
2.2.5 Example of mapping parameter definition and flow of data 52
2.2.6 Procedure for setting custom files 54
2.2.7 Overview of custom files 55
2.2.8 Format of custom files 56
2.2.9 Properties defined in services (service properties) 57
2.2.10 Adding Service Share Properties 58
2.2.11 Overview of Service Share Properties 58
2.2.12 Notes on defining Service Share Properties 59
2.2.13 Overview of shared built-in service properties 60
2.2.14 Property visibility 62
2.2.15 Viewing another service template during editing 64
2.3 Displaying a list of service templates 65
2.3.1 Procedure for displaying a list of service templates 65
2.4 Copying service templates 66
2.4.1 Procedure for copying service templates 66
2.4.2 Uniqueness of service templates and plug-ins 66
2.5 Deleting service templates 68
2.5.1 Procedure for deleting development service templates 68
2.5.2 Procedure for deleting release service templates 68
2.6 Setting display information for service templates in resource files 69
2.6.1 Procedure for setting service resource files 69
2.6.2 Format of service resource file 69
2.6.3 Definitions in service resource files 70
2.6.4 Correspondence between information displayed in service templates and properties in serviceresource files 71
2.6.5 Service resource files automatically generated when a service template is created 72
2.6.6 Service resource files updated when a service template is edited 73
2.6.7 Displaying a service template in a Web browser that is set to a locale for which no serviceresource file is available 74
3 Creating and editing flows 753.1 Displaying the Flow view 76
3.1.1 Procedure for displaying the Flow view 76
3.1.2 Relationship between flow and steps 76
3.1.3 Creating flow hierarchies 77
3.2 Adding steps 78
3.2.1 Procedure for adding steps 78
Job Management Partner 1/Automatic Operation Service Template Developer's Guide 11

3.2.2 Procedure for changing step definition information 78
3.2.3 Settings in step definition information 79
3.2.4 Overview of subsequent step conditions 80
3.2.5 Procedure for setting input property mapping 81
3.2.6 Procedure for setting output property mapping 82
3.2.7 List of reserved properties 82
3.2.8 Warning icon displayed for steps 85
3.3 Connecting steps with relational lines 86
3.3.1 Procedure for connecting steps with relational lines 86
3.3.2 Procedure for deleting steps and relational lines 86
3.3.3 Procedure for copying steps and relational lines 87
3.3.4 Procedure for cutting steps and relational lines 87
3.3.5 Procedure for selecting multiple steps 88
3.3.6 Procedure for pasting steps and relational lines 88
3.3.7 Information inherited when pasting steps or relational lines 88
3.3.8 Behavior when relational lines connect to multiple steps 89
3.3.9 Scenarios where relational lines cannot be drawn 90
3.3.10 Drawing relational lines when processing branches 91
4 Creating and editing plug-ins 924.1 Displaying a list of plug-ins 93
4.1.1 Procedure for displaying a list of plug-ins 93
4.1.2 Overview of basic plug-ins, release plug-ins, and development plug-ins 93
4.1.3 Plug-in executing users 94
4.1.4 Available operations by plug-in type 96
4.1.5 Files transferred to Windows systems 96
4.1.6 Files transferred to UNIX systems 97
4.1.7 Locale set for operation target devices during plug-in execution 97
4.1.8 Character set used for communication by JP1/AO during plug-in execution 98
4.1.9 Setting a specific character set during plug-in execution 99
4.1.10 Commands required for plug-in execution 99
4.2 Creating plug-ins 100
4.2.1 Procedure for creating plug-ins 100
4.2.2 Parameters to set when creating or copying plug-ins 100
4.3 Editing plug-ins 102
4.3.1 Procedure for editing plug-in definition information 102
4.3.2 Parameters to set in plug-in definition information 102
4.3.3 Image files usable as plug-in icons 103
4.3.4 plug-in credential types 103
4.3.5 Properties defined in plug-ins (plug-in properties) 104
4.3.6 Reserved plug-in properties for specifying execution-target hosts and credential information 104
4.3.7 Procedure for mapping standard output and standard error output to output properties 106
Job Management Partner 1/Automatic Operation Service Template Developer's Guide 12

4.3.8 Specifying output filters 106
4.3.9 Procedure for setting scripts 107
4.3.10 Specifying commands in the Command line text box 109
4.3.11 Return values of content plug-ins 110
4.3.12 Relationship of command and script return values to the return values of plug-ins and steps 112
4.3.13 Procedure for using the return value of a command or script as a flow branching condition (forvalues outside the 0 to 63 range) 112
4.3.14 Information output to standard output by plug-ins 112
4.3.15 Differences between script settings methods 113
4.3.16 Specifying Execution Directory 114
4.3.17 Procedure for setting commands 115
4.4 Deleting plug-ins 116
4.4.1 Procedure for deleting plug-ins 116
4.5 Copying plug-ins 117
4.5.1 Procedure for copying plug-ins 117
4.6 Using resource files to set plug-in display information 118
4.6.1 Procedure for setting plug-in resource files 118
4.6.2 Format of plug-in resource files 118
4.6.3 Correspondence between properties in plug-in resource files and information displayed for plug-ins 119
4.6.4 Plug-in resource files automatically generated when a plug-in is created 120
4.6.5 Plug-in resource files updated when a plug-in is edited 121
4.6.6 Displaying a plug-in on a Web browser set to a locale for which no plug-in resource file is available 121
5 Validating Service Templates 1225.1 Overview of service template validation 123
5.1.1 Flow of service template validation 123
5.1.2 Overview of building 124
5.1.3 Overview of debugging 125
5.1.4 Overview of operation tests 126
5.2 Building service templates 128
5.2.1 Procedure for building a service template 128
5.3 Debugging service templates 129
5.3.1 Flow of service template debugging 129
5.3.2 Functions used during debug operations 129
5.3.3 Example of service template debugging 131
5.3.4 Procedure for starting the debug process 132
5.3.5 Settings used when beginning the debug process 134
5.3.6 Procedure for debugging a service template again without rebuilding 134
5.3.7 Flow of debug process without pausing between steps 135
5.3.8 Flow of debug process when pausing between steps 136
5.3.9 Processing of debug process when pausing between steps 137
Job Management Partner 1/Automatic Operation Service Template Developer's Guide 13

5.3.10 Plug-ins that cannot be paused during debugging 139
5.3.11 Step information that can be changed while step execution is paused 140
5.3.12 Procedure for skipping plug-in processing during the debug process 140
5.3.13 Procedure for retrying a task from a failed step during debugging 141
5.3.14 Procedure for retrying a task from the step after the failed step during debugging 141
5.3.15 Handling debug tasks that are waiting for a response (response entry) 142
5.3.16 Procedure for checking property mapping settings during debugging 142
5.3.17 Procedure for changing the value of a plug-in input property during debugging 144
5.3.18 Procedure for changing the value of a plug-in output property during debugging 145
5.3.19 Procedure for changing plug-in return values during debugging 146
5.3.20 Displaying the values of plug-in properties during debugging 146
5.3.21 Effect of changing the values of plug-in properties during debugging 147
5.3.22 When the value of a plug-in property includes surrogate pair characters or control characters 148
5.3.23 Linefeed codes in values of plug-in properties (when step execution is paused) 148
5.3.24 Displaying the flow of a debug task 149
5.3.25 Displaying the flow tree of a debug task 150
5.3.26 Displaying a repeated execution flow during debugging 151
5.3.27 Flow tree view for repeated flows during debugging 151
5.3.28 Information displayed for repeated execution plug-ins and repeated flows during debugging 152
5.4 Managing debug tasks 154
5.4.1 Procedure for checking the status of all debug tasks 154
5.4.2 Procedure for checking the progress of debug tasks from the Tasks window 154
5.4.3 Procedure for checking detailed progress of debug tasks in list format 155
5.4.4 Procedure for checking task log entries for debug tasks 155
5.4.5 Procedure for stopping debug tasks 156
5.4.6 Procedure for forcibly stopping debug tasks 157
5.4.7 Procedure for deleting debug tasks 158
5.5 Testing service templates 160
5.5.1 Procedure for testing service templates 160
6 Releasing Service Templates 1616.1 Releasing service templates 162
6.1.1 Procedure for releasing a service template 162
6.2 Overview of service template release 163
6.2.1 Overview of service template release 163
6.3 Importing service templates into the active environment (when the active and developmentenvironments are separate) 164
6.3.1 Procedure for importing service templates into the active environment (when the active anddevelopment environments are separate) 164
6.3.2 Reason for maintaining separate development and active environments 164
Job Management Partner 1/Automatic Operation Service Template Developer's Guide 14

Appendix 166A Reference Information 167
A.1 Reference information for build and release operations 167
Index 172
Job Management Partner 1/Automatic Operation Service Template Developer's Guide 15

1 Flow of Service Template Development
This chapter provides a general overview of service template development. Service templates areused to define processing that automates the operating procedures in an IT system.
Job Management Partner 1/Automatic Operation Service Template Developer's Guide 16

1.1 Overview
1.1.1 Flow of service template developmentIn JP1/AO, you can use service templates to automate operating procedures. This functionality is particularly effectivewhen applied to the automation of complex operating procedures, or those that are executed often but at random times.
You can create new service templates. You can also use the existing templates provided by JP1/AO#1 withoutmodification, or copy an existing template and edit it#2 by adding and removing steps as needed.
#1:Service templates provided by JP1/AO include the service templates provided with the JP1/AO standard packageand the JP1/AO Content Set (available separately).
#2:Before you can edit a service template provided by JP1/AO, you need to import the service template.
TipIf you want to use a content plug-in provided by JP1/AO as the basis for service template development, eitherimport the service template that contains the content plug-in or import the Utility Components service template.Importing the Utility Components service template imports every content plug-in in the JP1/AO standardpackage, making the JP1/AO Standard-package content plug-ins available for development purposes.
The following figure shows the general procedure for developing service templates.
1. Flow of Service Template Development
Job Management Partner 1/Automatic Operation Service Template Developer's Guide 17

Figure 1‒1: Flow of service template development
Related topics for creating new service templates• 1.1.2 Elements involved in service template development
• 1.1.3 Main windows used to develop service templates
• 1.2.1 Tasks performed when creating new service templates
• 1.3 General procedure for creating new service templates
Related topics for editing service templates• 1.1.2 Elements involved in service template development
• 1.1.3 Main windows used to develop service templates
• 1.2.2 Tasks performed when editing service templates
• 1.4 General procedure when editing an existing service template
1. Flow of Service Template Development
Job Management Partner 1/Automatic Operation Service Template Developer's Guide 18

Related topics for using unmodified service templates• 1.1.2 Elements involved in service template development
• 1.2.3 Tasks performed when using existing service templates as-is
• 1.5 Using existing service templates provided by JP1/AO
1.1.2 Elements involved in service template developmentService templates define the information necessary to automate operating procedures. The following figure shows theelements involved in service template development:
Figure 1‒2: Elements Involved in service template development
• Development environment
1. Flow of Service Template Development
Job Management Partner 1/Automatic Operation Service Template Developer's Guide 19

The environment in which the service template is developed. You can also conduct debugging and operation testingin this environment, to validate the operation of the service templates you develop. Although you can develop servicetemplates in an active environment, we recommend that you keep the development and active environments separate.
• Active environmentThe environment in which you can add and execute services based on service templates you have developed. Theactual automation of operating procedures takes place in this environment.
• Plug-inThe smallest unit of processing you can define when automating IT operations.
• Service templateDefines the processing that automates the operating procedures in an IT system. A service template incorporatesflows and steps.
• Development service templateA service template that is being developed by a user. Service templates created by copying a release service templateare also classified as development service templates. Development service templates are used in the developmentenvironment.
• Release service templateWhen you release a development service template, it becomes a release service template.You cannot edit a releaseservice template. The service templates provided by JP1/AO are also classified as release service templates. Releaseservice templates are used in the active environment.
• FlowDefines the flow of the operating procedure you are automating.
• StepAn element of a flow, each step executes a plug-in.
The following describes how property mapping takes place for service templates and plug-ins:
The following figure shows an example of property mapping.
1. Flow of Service Template Development
Job Management Partner 1/Automatic Operation Service Template Developer's Guide 20

Figure 1‒3: Mapping service template and plug-in component properties
• Property mappingA service template defines a generic operating procedure. For this reason, properties that store the input valuesrequired to execute the service, such as host names and resource limits, are defined when services are added froma service template. These are called service input properties. The execution results of a service are output to the JP1/AO user interface as the values of service output properties.In plug-ins, input properties that store the input values required for plug-in execution and output properties that storeexecution results are defined. You can enter values into plug-in input properties directly, or pass values to them bylinking them to a service input property or variable.By linking a service output property to a plug-in output property, you can review the execution results of a plug-inin the JP1/AO user interface. Linking properties in this way and passing values between them is called propertymapping.
• Mapping service input properties and plug-in input propertiesIn the example in Figure 1‒3: Mapping service template and plug-in component properties, Input property 1 ofthe service is mapped to Input property 1 of Plug-in A, and Input property 2 of the service is mapped to Inputproperty 2 of Plug-in B. Mapping is not configured for Input property 2 of Plug-in A.
• The value input to Input property 1 of the service is input to Input property 1 of Plug-in A.
• The value input to Input property 2 of the service is input to Input property 2 of Plug-in B.
• The unmapped Input property 2 of Plug-in A is assigned the value entered when the service template wascreated or edited.
• Mapping service output properties and plug-in output propertiesIn the example in Figure 1‒3: Mapping service template and plug-in component properties, Output property 2of Plug-in A is mapped to Output property 2 of the service, and Output property 1 of Plug-in B is mapped toOutput property 1 of the service.
• The execution results of Plug-in A (command standard output and standard error output, and outputproperties) output as Output property 2 of Plug-in A are also output to Output property 2 of the service. Theuser can then review the execution results of Plug-in A in the JP1/AO user interface.
1. Flow of Service Template Development
Job Management Partner 1/Automatic Operation Service Template Developer's Guide 21

• The execution results of Plug-in B (command standard output and standard error output, and outputproperties) output as Output property 1 of Plug-in B are also output to Output property 1 of the service. Theuser can then review the execution results of Plug-in B in the JP1/AO user interface.
• Mapping variables to plug-in propertiesIn Figure 1‒3: Mapping service template and plug-in component properties, Output property 1 of Plug-in A ismapped to Variable 1, and Variable 1 is mapped to Input property 1 of Plug-in B.Values output as Output property 1 of Plug-in A are stored in Variable 1 then input to Input property 1 of Plug-in B. This passes the execution results of Plug-in A to an input property of Plug-in B, allowing it to be used inthe processing of Plug-in B.
1.1.3 Main windows used to develop service templatesThe following describes the window in which most activity related to service template development takes place.
You can display the Editor window by clicking the Editor tab in the main window of JP1/AO.
The Editor window serves as the starting point for creating, editing, and copying service templates. After creating ablank service template or selecting a template to edit or copy, you can edit the service template by switching to servicetemplate editing view.
When you have finished the editing process, you build the service template and debug the result in the Debug view andthe service template debugging view.
1. Flow of Service Template Development
Job Management Partner 1/Automatic Operation Service Template Developer's Guide 22
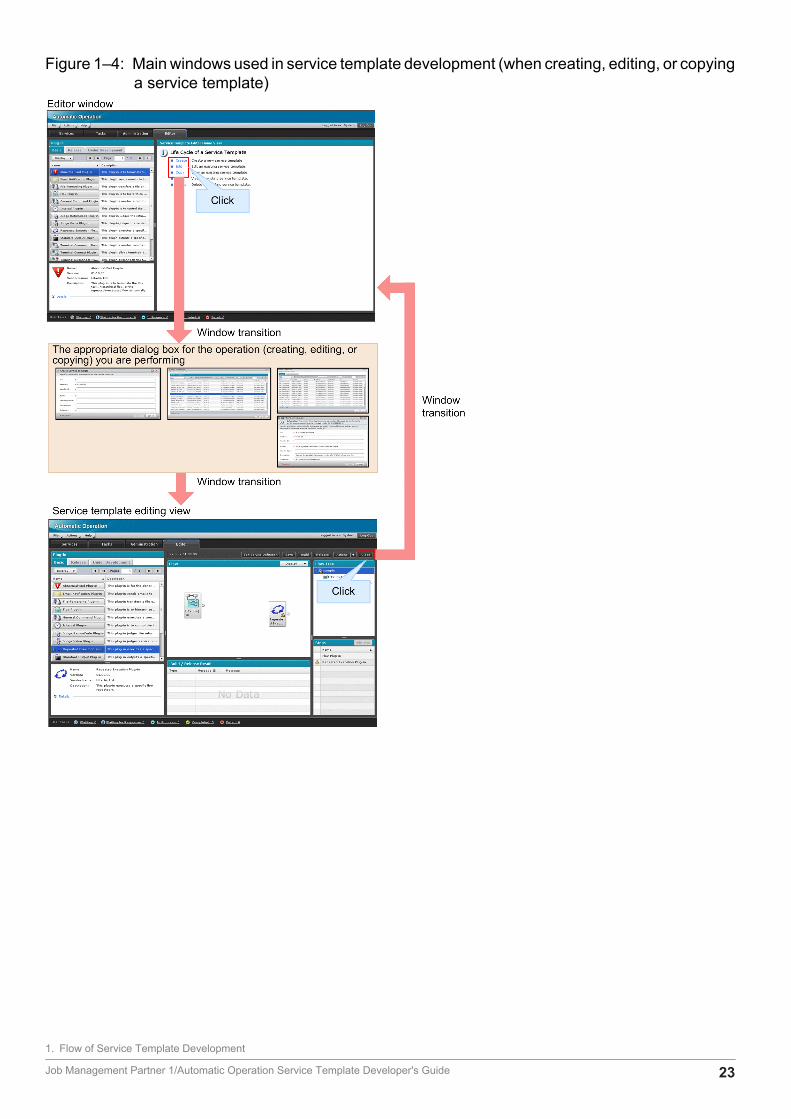
Figure 1‒4: Main windows used in service template development (when creating, editing, or copyinga service template)
1. Flow of Service Template Development
Job Management Partner 1/Automatic Operation Service Template Developer's Guide 23

Figure 1‒5: Main windows used in service template development (when debugging a servicetemplate)
For information about the window contents, input restrictions, and other details, see the manual Job Management Partner1/Automatic Operation GUI, Command, and API Reference.
1. Flow of Service Template Development
Job Management Partner 1/Automatic Operation Service Template Developer's Guide 24

1.2 Tasks associated with service templates
1.2.1 Tasks performed when creating new service templatesThe following figure shows the content and structure of the work performed when creating a new service template. Thenumbers in the figure indicate the order in which each step is performed.
Figure 1‒6: Tasks performed when creating a new service template
1. Flow of Service Template Development
Job Management Partner 1/Automatic Operation Service Template Developer's Guide 25

1.2.2 Tasks performed when editing service templatesThe following figure shows the content and structure of the work performed when editing and re-using a service template.The numbers in the figure indicate the order in which each step is performed. Only perform the tasks in the sectionenclosed by the dashed line if they are needed.
Figure 1‒7: Tasks performed when editing a service template
1.2.3 Tasks performed when using existing service templates as-isThe following figure shows the content and structure of the work performed when using an existing service templatewithout modification. The numbers in the figure indicate the order in which each step is performed.
1. Flow of Service Template Development
Job Management Partner 1/Automatic Operation Service Template Developer's Guide 26

Figure 1‒8: Tasks performed when using an existing service template as-is
1. Flow of Service Template Development
Job Management Partner 1/Automatic Operation Service Template Developer's Guide 27
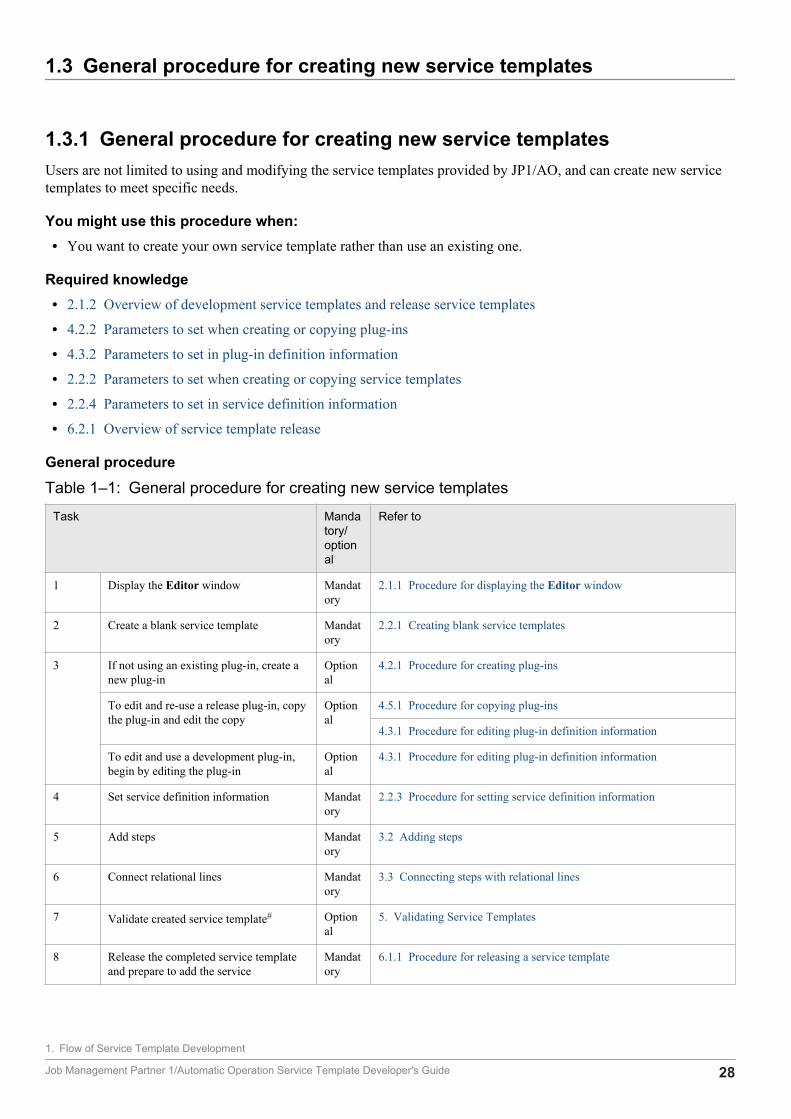
1.3 General procedure for creating new service templates
1.3.1 General procedure for creating new service templatesUsers are not limited to using and modifying the service templates provided by JP1/AO, and can create new servicetemplates to meet specific needs.
You might use this procedure when:• You want to create your own service template rather than use an existing one.
Required knowledge• 2.1.2 Overview of development service templates and release service templates
• 4.2.2 Parameters to set when creating or copying plug-ins
• 4.3.2 Parameters to set in plug-in definition information
• 2.2.2 Parameters to set when creating or copying service templates
• 2.2.4 Parameters to set in service definition information
• 6.2.1 Overview of service template release
General procedure
Table 1‒1: General procedure for creating new service templates
Task Mandatory/optional
Refer to
1 Display the Editor window Mandatory
2.1.1 Procedure for displaying the Editor window
2 Create a blank service template Mandatory
2.2.1 Creating blank service templates
3 If not using an existing plug-in, create anew plug-in
Optional
4.2.1 Procedure for creating plug-ins
To edit and re-use a release plug-in, copythe plug-in and edit the copy
Optional
4.5.1 Procedure for copying plug-ins
4.3.1 Procedure for editing plug-in definition information
To edit and use a development plug-in,begin by editing the plug-in
Optional
4.3.1 Procedure for editing plug-in definition information
4 Set service definition information Mandatory
2.2.3 Procedure for setting service definition information
5 Add steps Mandatory
3.2 Adding steps
6 Connect relational lines Mandatory
3.3 Connecting steps with relational lines
7 Validate created service template# Optional
5. Validating Service Templates
8 Release the completed service templateand prepare to add the service
Mandatory
6.1.1 Procedure for releasing a service template
1. Flow of Service Template Development
Job Management Partner 1/Automatic Operation Service Template Developer's Guide 28

Task Mandatory/optional
Refer to
9 If the development environment and activeenvironment are separate, import theservice template into the activeenvironment
Optional
6.3.1 Procedure for importing service templates into the activeenvironment (when the active and development environments areseparate)
10 Add, edit, and execute the service in theactive environment
Mandatory
The Job Management Partner 1/Automatic Operation AdministrationGuide• Adding services• Editing services• Executing services
#If the validation process finds any issues with the service template, repeat tasks 3 to 7 as needed.
1. Flow of Service Template Development
Job Management Partner 1/Automatic Operation Service Template Developer's Guide 29

1.4 General procedure when editing an existing service template
Users can create original service templates by copying and then editing the service templates provided by JP1/AO (inthe standard JP1/AO package or JP1/AO Content Set). To edit a release service template, copy the template and thenedit the copy as a new service template.
Important noteOnce edited, the service templates (standard JP1/AO package and JP1/AO Content Set) and plug-ins providedby JP1/AO are outside the scope of JP1/AO product support. However, the plug-ins provided by JP1/AO(bundled service templates or JP1/AO Content Set) that are called from such templates remain subject to productsupport.
The following table shows where to read about the tasks involved in editing a service template.
Table 1‒2: Reading material for each development stage
Task You might perform this taskwhen:
Refer to
Investigation • You are investigating whetheran existing service template orplug-in can be used withoutfurther modification.
The manual Job Management Partner 1/Automatic Operation ServiceTemplate Reference
Editing servicetemplate definitioninformation
• You want to change the name ofthe service template from "Stopvirtual server" to "Stop virtualserver and Notify by email".
• You want to add properties touse to input and output values toand from the service template.
1.4.1 General procedure when editing service template definitioninformation
Editing plug-ins • You want to change aspects ofscripts or commands defined ina plug-in.
• You want to change the icondisplayed for a plug-in in theFlow view.
1.4.2 General procedure for editing a plug-in and applying the result to aservice template
Creating new plug-ins • You want to create a new plug-in and define processing thatexecutes a command.
1.4.3 General procedure for creating new plug-ins and adding them toservice templates
Changing the contentsof the window thatdescribes the nature ofthe service
• You want to change thedescription that appears for theservice in the Service Detailswindow.
• You want to add a cautionarynote to the Service Detailswindow.
1.4.4 General procedure for changing the description displayed for a servicein the user interface
Adding plug-ins toservice templates
• You want to insert an email-sending process at the end of theprocessing automated by theservice template.
• You want to insert processingthat controls the executioninterval between processes
1.4.5 General procedure for adding processing to a service template
1. Flow of Service Template Development
Job Management Partner 1/Automatic Operation Service Template Developer's Guide 30

Task You might perform this taskwhen:
Refer to
Adding plug-ins toservice templates
automated by the servicetemplate.
1.4.5 General procedure for adding processing to a service template
Deleting plug-ins fromservice templates
• A file transfer step is no longerrequired in processing thatacquires log data for JP1/IM andJP1/Base.
• Processing that deletestemporary files is no longerrequired when mapping JP1users.
1.4.6 General procedure for deleting processing from a service template
Setting parametersdynamically orstatically duringautomated processing
• In processing that increasesavailable memory, you want tobe able to specify how muchmemory to allocate whenexecuting a service, instead ofusing a fixed value.
• In processing that increasesavailable memory, you want thememory capacity to be fixed at5 GB each time the service runs.
• When a command is executed aspart of a service, you want toextract an arbitrary characterstring from the standard outputor standard error output of thecommand and display it in theTask Details dialog box.
1.4.7 General procedure for dynamically or statically setting parametersduring automated processing
Batch modification ofdisplay informationusing a serviceresource file
• You want to use a serviceresource file to change severaldisplay items defined for aservice template in a singleoperation.
1.4.8 General procedure for using a service resource file to set theinformation displayed for a service
Batch modification ofdisplay informationusing a plug-inresource file
• You want to use a plug-inresource file to change severaldisplay items defined in a plug-in in a single operation.
1.4.9 General procedure for using a plug-in resource file to set displayinformation for a plug-in
1.4.1 General procedure when editing service template definitioninformation
Service template definition information consists of the name of the service template as it appears in the JP1/AO interface,the input and output properties of the template, and other such information.
You might use this procedure when:• You want to change the name of the service template from "Stop virtual server" to "Stop virtual server and Notify
by email".
• You want to add a property that inputs or outputs a value to or from a service template.
Required knowledge• 2.1.2 Overview of development service templates and release service templates
1. Flow of Service Template Development
Job Management Partner 1/Automatic Operation Service Template Developer's Guide 31

• 2.2.4 Parameters to set in service definition information
• 6.2.1 Overview of service template release
General procedure
Table 1‒3: General procedure when editing service template definition information
Task Mandatory/optional
Refer to
1 Display the Editor window Mandatory
2.1.1 Procedure for displaying the Editor window
2 Copy the release service template that youwant to edit
Optional
2.4.1 Procedure for copying service templates
3 Change the definition information (settingsthat relate to services, property groups,input properties, output properties, andvariables) for the service template
Mandatory
2.2.3 Procedure for setting service definition information
4 Validate an edited service template# Optional
5. Validating Service Templates
5 Release the completed service template andprepare to add the service
Mandatory
6.1.1 Procedure for releasing a service template
6 Import a service template to the activeenvironment (if the development and activeenvironments are separate)
Optional
6.3.1 Procedure for importing service templates into the active environment(when the active and development environments are separate)
7 Add, edit, and execute services in the activeenvironment
Mandatory
The Job Management Partner 1/Automatic Operation Administration Guide• Adding services• Editing services• Executing services
#If the validation process finds any issues with the service template, repeat tasks 3 and 4 as needed.
1.4.2 General procedure for editing a plug-in and applying the result to aservice template
You can edit plug-ins (except for basic plug-ins). After editing a plug-in, you can apply the result to a service template.If the plug-in is already released, copy the plug-in and edit the copy.
You might use this procedure when:• You want to change the contents of a script or command defined in a plug-in.
• You want to change the icon displayed for a plug-in in the Flow view.
Required knowledge• 4.1.2 Overview of basic plug-ins, release plug-ins, and development plug-ins
• 4.3.2 Parameters to set in plug-in definition information
• 2.1.2 Overview of development service templates and release service templates
1. Flow of Service Template Development
Job Management Partner 1/Automatic Operation Service Template Developer's Guide 32

• 2.2.4 Parameters to set in service definition information
• 6.2.1 Overview of service template release
General procedure
Table 1‒4: General procedure for editing a plug-in and applying the result to a service template
Task Mandatory/optional
Refer to
1 Display the Editor window Mandatory
2.1.1 Procedure for displaying the Editor window
2 Copy the release plug-in that you want toedit
Optional 4.5.1 Procedure for copying plug-ins
3 Select the plug-in to edit from a list ofplug-ins
Mandatory
4.1.1 Procedure for displaying a list of plug-ins
4 Edit plug-in definition information Mandatory
4.3.1 Procedure for editing plug-in definition information
5 Copy the service template (when editinga release service template)
Optional 2.4.1 Procedure for copying service templates
6 Set service definition information whenchanges made to plug-ins have made theexisting information invalid
Optional 2.2.3 Procedure for setting service definition information
7 Add or delete steps when editing a plug-in affects the flow of processing
Optional 3.2 Adding steps
8 Add and delete relational lines whenediting a plug-in affects the flow ofprocessing
Optional 3.3 Connecting steps with relational lines
9 Validate the edited service template# Optional 5. Validating Service Templates
10 Release the completed service templateand prepare to add the service
Mandatory
6.1.1 Procedure for releasing a service template
11 Import the service template to the activeenvironment (if the development andactive environments are separate)
Optional 6.3.1 Procedure for importing service templates into the active environment(when the active and development environments are separate)
12 Add, edit, and execute services in theactive environment
Mandatory
The Job Management Partner 1/Automatic Operation Administration Guide• Adding services• Editing services• Executing services
#If the validation process finds an issue with the service template, repeat tasks 6 to 9 as needed.
1.4.3 General procedure for creating new plug-ins and adding them toservice templates
Users can create custom plug-ins and add them to service templates as steps.
1. Flow of Service Template Development
Job Management Partner 1/Automatic Operation Service Template Developer's Guide 33

You might use this procedure when:• You want to create a new plug-in and define processing that executes a command.
Required knowledge• 4.1.2 Overview of basic plug-ins, release plug-ins, and development plug-ins
• 4.3.2 Parameters to set in plug-in definition information
• 2.1.2 Overview of development service templates and release service templates
• 2.2.4 Parameters to set in service definition information
• 6.2.1 Overview of service template release
General procedure
Table 1‒5: General procedure for creating new plug-ins and adding them to service templates
Task Mandatory/optional
Refer to
1 Display the Editor window Mandatory
2.1.1 Procedure for displaying the Editor window
2 Create a plug-in Mandatory
4.2.1 Procedure for creating plug-ins
3 Edit plug-in definition information Mandatory
4.3.1 Procedure for editing plug-in definition information
4 Copy the release service template that youwant to edit
Optional
2.4.1 Procedure for copying service templates
5 Set service definition information ifcreating a new plug-in has made theexisting information invalid
Optional
2.2.3 Procedure for setting service definition information
6 Add a plug-in you created as a step in aflow
Mandatory
3.2.1 Procedure for adding steps
7 Connect steps with relational lines Mandatory
3.3.1 Procedure for connecting steps with relational lines
8 Validate the edited service template# Optional
5. Validating Service Templates
9 Release a completed service template andprepare to add the service
Mandatory
6.1.1 Procedure for releasing a service template
10 Import the service template to the activeenvironment (if the development andactive environments are separate)
Optional
6.3.1 Procedure for importing service templates into the active environment(when the active and development environments are separate)
11 Add, edit, and execute services in theactive environment
Mandatory
The Job Management Partner 1/Automatic Operation Administration Guide• Adding services• Editing services• Executing services
#If the validation process finds an issue with the service template, repeat tasks 5 to 8 as needed.
1. Flow of Service Template Development
Job Management Partner 1/Automatic Operation Service Template Developer's Guide 34

1.4.4 General procedure for changing the description displayed for aservice in the user interface
When you select a service in the Services window, the Add Service dialog box, or the Edit Service dialog box andclick Show Service Details, a description of the selected service appears in a new window. You can change thedescription displayed in the Service Details window by creating or editing a custom file.
You might use this procedure when:• You want to change the description of the detailed specification displayed for a service in the Service Details
window.
• You want to add cautionary notes to the Service Details window.
Required knowledge• 2.2.7 Overview of custom files
• 2.2.4 Parameters to set in service definition information
• 6.2.1 Overview of service template release
General procedure
Table 1‒6: General procedure for changing the description displayed for a service in the userinterface
Task Mandatory/optional
Refer to
1 Display the Editor window Mandatory
2.1.1 Procedure for displaying the Editor window
2 Select a custom file that defines thecontents of the window that displaysservice descriptions
Mandatory
2.2.6 Procedure for setting custom files
3 Validate the edited service template# Optional
5. Validating Service Templates
4 Release the completed service templateand prepare to add the service
Mandatory
6.1.1 Procedure for releasing a service template
5 Import the service template to the activeenvironment (if the development andactive environments are separate)
Optional
6.3.1 Procedure for importing service templates into the active environment(when the active and development environments are separate)
6 Add, edit, and execute services in theactive environment
Mandatory
The Job Management Partner 1/Automatic Operation Administration Guide• Adding services• Editing services• Executing services
#If the validation process finds an issue with the service template, repeat tasks 2 and 3 as needed.
1.4.5 General procedure for adding processing to a service templateUsers can add processing in the form of steps to a flow in an existing service template.
1. Flow of Service Template Development
Job Management Partner 1/Automatic Operation Service Template Developer's Guide 35

You might use this procedure when:• You want to insert processing that sends an email when the processing automated by a service template has finished.
• You want to insert processing that controls the execution interval between processes automated by a service template.
Required knowledge• 2.1.2 Overview of development service templates and release service templates
• 3.1.2 Relationship between flow and steps
• 3.1.3 Creating flow hierarchies
• 2.2.4 Parameters to set in service definition information
• 6.2.1 Overview of service template release
General procedure
Table 1‒7: General procedure for adding processing to a service template
Task Mandatory/optional
Refer to
1 Display the Editor window Mandatory
2.1.1 Procedure for displaying the Editor window
2 Copy a release service template thatyou want to edit
Optional 2.4.1 Procedure for copying service templates
3 Display the Flow view in order todefine the flow of processing
Mandatory
3.1.1 Procedure for displaying the Flow view
4 Add steps Mandatory
3.2.1 Procedure for adding steps
5 Connect steps with relational lines todefine the order in which processingis executed
Mandatory
3.3.1 Procedure for connecting steps with relational lines
6 Amend service definitioninformation if the added step requireschanges to the service properties
Optional 2.2.3 Procedure for setting service definition information
7 Validate the edited service template# Optional 5. Validating Service Templates
8 Release the completed servicetemplate and prepare to add theservice
Mandatory
6.1.1 Procedure for releasing a service template
9 Import the service template to theactive environment (if thedevelopment and activeenvironments are separate)
Optional 6.3.1 Procedure for importing service templates into the active environment(when the active and development environments are separate)
10 Add, edit, and execute services in theactive environment
Mandatory
The Job Management Partner 1/Automatic Operation Administration Guide• Adding services• Editing services• Executing services
#If the validation process finds an issue with the service template, repeat tasks 3 to 7 as needed.
1. Flow of Service Template Development
Job Management Partner 1/Automatic Operation Service Template Developer's Guide 36

1.4.6 General procedure for deleting processing from a service templateYou can delete redundant steps from the flow of an existing service template.
You might use this procedure when:• A file transfer step is no longer required in processing that acquires JP1/IM and JP1/Base log files.
• Processing that deletes temporary files is no longer required in process that maps JP1 users.
Required knowledge• 2.1.2 Overview of development service templates and release service templates
• 3.1.2 Relationship between flow and steps
• 2.2.4 Parameters to set in service definition information
• 6.2.1 Overview of service template release
General procedure
Table 1‒8: General procedure for deleting processing from a service template
Task Mandatory/optional
Refer to
1 Display the Editor window Mandatory
2.1.1 Procedure for displaying the Editor window
2 Copy a release service template that youwant to edit
Optional
2.4.1 Procedure for copying service templates
3 Display the Flow view in order to define theflow of processing
Mandatory
3.1.1 Procedure for displaying the Flow view
4 Delete redundant steps Mandatory
3.3.2 Procedure for deleting steps and relational lines
5 Re-connect steps with relational lines if theexecution order of processing needs to bechanged after deleting a step
Optional
3.3 Connecting steps with relational lines
6 Change service definition information whendeleting a step results in changes needing tobe made to the definition of a service
Optional
2.2.3 Procedure for setting service definition information
7 Validate the edited service template# Optional
5. Validating Service Templates
8 Release the completed service template andprepare to add the service
Mandatory
6.1.1 Procedure for releasing a service template
9 Import the service template to the activeenvironment (if the development and activeenvironments are separate)
Optional
6.3.1 Procedure for importing service templates into the active environment(when the active and development environments are separate)
10 Add, edit, and execute services in the activeenvironment
Mandatory
The Job Management Partner 1/Automatic Operation Administration Guide• Adding services• Editing services• Executing services
#If the validation process finds an issue with the service template, repeat tasks 3 to 7 as needed.
1. Flow of Service Template Development
Job Management Partner 1/Automatic Operation Service Template Developer's Guide 37

1.4.7 General procedure for dynamically or statically setting parametersduring automated processing
By mapping service properties to the properties of a plug-in, you can execute processing that maps a value to an inputproperty. You can also assign a fixed value to an input property, or define a service template in such a manner that theoutput of a plug-in is passed to an output property of a service template or a variable.
This process is not limited to existing input properties or output properties. Users can create new properties and mapthem to plug-in properties.
You might use this procedure when:• In processing that increases available memory, you want to be able to specify how much memory to allocate when
executing a service (dynamically setting input properties), instead of using a fixed value.
• In processing that increases available memory, you want the memory capacity to be fixed at 5 GB each time theservice runs (statically setting input properties).
• When a command is executed as part of a service, you want to extract an arbitrary character string from the standardoutput or standard error output of the command and display it in the Task Details dialog box (dynamically settingoutput properties).
Required knowledge• 2.1.2 Overview of development service templates and release service templates
• 3.2.3 Settings in step definition information
• 2.2.5 Example of mapping parameter definition and flow of data
• 3.2.3 Settings in step definition information
• 6.2.1 Overview of service template release
General procedure
Table 1‒9: General procedure for dynamically or statically setting parameters during automatedprocessing
Task Mandatory/optional
Refer to
1 Display the Editor window Mandatory
2.1.1 Procedure for displaying the Editor window
2 Copy a release service template that youwant to edit
Optional
2.4.1 Procedure for copying service templates
3 Select a step and change property mappingin the definition information
Mandatory
3.2.2 Procedure for changing step definition information
4 Validate an edited service template# Optional
5. Validating Service Templates
5 Release the completed service template andprepare to add the service
Mandatory
6.1.1 Procedure for releasing a service template
6 Import the service template to the activeenvironment (if the development and activeenvironments are separate)
Optional
6.3.1 Procedure for importing service templates into the active environment(when the active and development environments are separate)
1. Flow of Service Template Development
Job Management Partner 1/Automatic Operation Service Template Developer's Guide 38

Task Mandatory/optional
Refer to
7 Add, edit, and execute services in the activeenvironment
Mandatory
The Job Management Partner 1/Automatic Operation Administration Guide• Adding services• Editing services• Executing services
#If the validation process finds an issue with the service template, repeat tasks 3 and 4 as needed.
1.4.8 General procedure for using a service resource file to set theinformation displayed for a service
You can use a service resource file to set the information displayed for a service template in the JP1/AO user interface.
You might use this procedure when:• You want to use a service resource file to change several display items defined in a service template in a single
operation.
Required knowledge• 2.1.2 Overview of development service templates and release service templates
• 2.2.4 Parameters to set in service definition information
• 2.6.4 Correspondence between information displayed in service templates and properties in service resource files
• 6.2.1 Overview of service template release
General procedure
Table 1‒10: General procedure for using a service resource file to set the information displayed fora service
Task Mandatory/optional
Refer to
1 Display the Editor window Mandatory
2.1.1 Procedure for displaying the Editor window
2 Copy a release service templatethat you want to edit
Optional 2.4.1 Procedure for copying service templates
3 Set the display information for aservice template by assigning aservice resource file
Mandatory
2.6.1 Procedure for setting service resource files
4 Validate the edited servicetemplate#
Optional 5. Validating Service Templates
5 Release the completed servicetemplate and prepare to add theservice
Mandatory
6.1.1 Procedure for releasing a service template
1. Flow of Service Template Development
Job Management Partner 1/Automatic Operation Service Template Developer's Guide 39

Task Mandatory/optional
Refer to
6 Import the service template to theactive environment (if thedevelopment and activeenvironments are separate)
Optional 6.3.1 Procedure for importing service templates into the active environment (whenthe active and development environments are separate)
7 Add, edit, and execute services inthe development environment
Mandatory
The Job Management Partner 1/Automatic Operation Administration Guide• Adding services• Editing services• Executing services
#If the validation process finds an issue with the service template, repeat tasks 3 and 4 as needed.
1.4.9 General procedure for using a plug-in resource file to set displayinformation for a plug-in
You can use a plug-in resource file to set the information displayed for a plug-in in the JP1/AO user interface.
You might use this procedure when:• You want to use a plug-in resource file to change several display items defined for a plug-in in a single operation.
Required knowledge• 2.1.2 Overview of development service templates and release service templates
• 2.2.4 Parameters to set in service definition information
• 4.6.3 Correspondence between properties in plug-in resource files and information displayed for plug-ins
• 6.2.1 Overview of service template release
General procedure
Table 1‒11: General procedure for using a plug-in resource file to set display information for a plug-in
Task Mandatory/optional
Refer to
1 Display the Editor window Mandatory 2.1.1 Procedure for displaying the Editor window
2 Copy a release service template that you want to edit Optional 2.4.1 Procedure for copying service templates
3 Configure a plug-in resource file that sets the informationdisplayed for a plug-in
Mandatory 4.6.1 Procedure for setting plug-in resource files
1. Flow of Service Template Development
Job Management Partner 1/Automatic Operation Service Template Developer's Guide 40

1.5 Using existing service templates provided by JP1/AO
1.5.1 General procedure for using an existing service template providedby JP1/AO
When appropriate, you can use the service templates provided in the standard JP1/AO package and the JP1/AO ContentSet.
You might use this procedure when:In situations like the following, a template provided by JP1/AO exactly defines the task you want to automate.
• You want to use the Add monitoring setting service template to add multiple monitored servers to JP1/Cm2/NNMior JP1/PFM
• You want to use the Add operational user service template to add OS users, JP1 users, and the associated mappinginformation.
Required knowledge• 2.1.2 Overview of development service templates and release service templates
General procedure
Table 1‒12: General procedure for using an existing service template provided by JP1/AO
Task Mandatory/optional
Refer to
1 Evaluate the service template you want to use Mandatory • Evaluating the service template to be used and thetargets of operation in the Job ManagementPartner 1/Automatic Operation Overview andSystem Design Guide
• The following sections in the Job ManagementPartner 1/Automatic Operation Service TemplateReference• List of JP1/AO Standard-package Service
Templates• List of JP1/AO Content Set Service Templates
2 Add service templates to JP1/AO Mandatory Importing service templates in the Job ManagementPartner 1/Automatic Operation Administration Guide
3 Add, edit, and execute services Mandatory The Job Management Partner 1/Automatic OperationAdministration Guide• Adding services• Editing services• Executing services
1. Flow of Service Template Development
Job Management Partner 1/Automatic Operation Service Template Developer's Guide 41

1.6 List of service template development features
The following table lists the features of JP1/AO that are used in the development of service templates.
Table 1‒13: List of service template development features
Feature Description Reference
Service templatemanagement
Creating andediting servicetemplates
Users can create new custom service templates.Users can also edit existing service templates,replacing parameters such as the service templatename, description, service properties, and custom fileto suit their needs.
2.2 Creating and editing servicetemplates
Listing servicetemplates
You can display a list of service templates. 2.3 Displaying a list of service templates
Copying servicetemplates
You can copy a service template. You can then createa new service template by editing the copy.
2.4 Copying service templates
Deleting servicetemplates
You can delete a service template. 2.5 Deleting service templates
Setting displayinformation forservice templates
You can create a service resource file that defines theinformation displayed for a service template.
2.6 Setting display information forservice templates in resource files
Flow management Adding steps You can insert processing where it is needed by addinga step to a flow. You can also edit the definitioninformation for a step.
3.2 Adding steps
Connectingrelational lines
After adding a step, you can define its place in theexecution order by connecting relational lines.
3.3 Connecting steps with relationallines
Plug-inmanagement
Listing plug-ins You can display a list of plug-ins. 4.1 Displaying a list of plug-ins
Creating plug-ins Users can create custom plug-ins to suit their needs. 4.2 Creating plug-ins
Editing plug-ins You can edit plug-ins. This might involve changingthe name, input properties, output properties, remotecommands, or other aspects of a plug-in. Note that youcannot edit the plug-ins provided in the standard JP1/AO package.
4.3 Editing plug-ins
Deleting plug-ins You can delete development plug-ins and releaseplug-ins.
4.4 Deleting plug-ins
Copying plug-ins You can copy a plug-in. You can then create a newplug-in by editing the copy.
4.5 Copying plug-ins
Setting plug-indisplayinformation
You can create a plug-in resource file that defines theinformation displayed for a plug-in, such as its nameand description.
4.6 Using resource files to set plug-indisplay information
Validation ofservice templates
Building servicetemplates
When you build a service template, the JP1/AOsystem creates a package of the service template youare developing and imports it to the JP1/AO server.Use this feature when you need to validate a servicetemplate.
5.2 Building service templates
Debuggingservice templates
You can check the operation of a service template youhave built and identify any issues. If the debug processreveals an issue in the flow or in a plug-in, you canedit the service template or plug-in from the Editorwindow.
5.3 Debugging service templates
1. Flow of Service Template Development
Job Management Partner 1/Automatic Operation Service Template Developer's Guide 42

Feature Description Reference
Validation ofservice templates
Testing servicetemplate operation
You can add and execute a service based on a servicetemplate you have built, and test the service for issues.If the test identifies an issue in the service, you canedit the service template or plug-in in the Editorwindow.
5.5 Testing service templates
Build and release Releasing servicetemplates
After validating a service template, you can release it.This creates a package from the service templatewhich is imported to the JP1/AO server. You cannotedit a service template after releasing it. If yourdevelopment environment and active environment areseparate, you will need to import the service templatemanually.
6.1 Releasing service templates
Importing servicetemplates
If your development and active environments are ondifferent servers, this feature imports releasedservices to the active environment.
6.3 Importing service templates into theactive environment (when the active anddevelopment environments are separate)
1. Flow of Service Template Development
Job Management Partner 1/Automatic Operation Service Template Developer's Guide 43

2 Setting service template definition information
This chapter describes how to set definition information when creating and editing service templates.
Job Management Partner 1/Automatic Operation Service Template Developer's Guide 44

2.1 Displaying the Editor window
2.1.1 Procedure for displaying the Editor windowUsers develop service templates in the Editor window. There are two parts to the Editor window: Plug-in view andthe Service Template Editor Home view.
Figure 2‒1: Editor window
Who can display the Editor window:Users in the Admin role or the Develop role
To display the Editor window:
1. Log in to JP1/AO and display the main window.
2. In the main window, click the Editor tab.The Editor window appears.
There are two types of service template in the Editor window: Development service templates and release servicetemplates.
For details about the service templates provided by JP1/AO, see the manual Job Management Partner 1/AutomaticOperation Service Template Reference.
Related topics• 2.1.2 Overview of development service templates and release service templates
• 2.1.5 Version compatibility for service templates and plug-ins created in the Editor window
• 2.1.4 Behavior when an intervening action occurs in the Editor window
2. Setting service template definition information
Job Management Partner 1/Automatic Operation Service Template Developer's Guide 45

2.1.2 Overview of development service templates and release servicetemplates
There are two types of service template you can edit in the Editor window:
Development service templateA service template a user is developing. Service templates created by copying a release service template are alsocategorized as development service templates. Development service templates appear in the Under Developmenttab of the Service Template List dialog box.When you build a development service template, Debug is set as the configuration type and execution of the servicecan be tested. Services added from a development service template are used in a development environment. Anyservice template that is not yet built is also categorized as a development service template.
Release service templateA service template that was imported into the JP1/AO server by releasing a development service template. Servicetemplates provided by JP1/AO are also categorized as release service templates. Release service templates are usedfor real-world applications in the active environment. Released is set as the configuration type of release servicetemplates. These templates appear in the Release tab of the Service Template List dialog box.Service templates that were imported to the JP1/AO server by executing the importservicetemplatecommand and have the configuration type release are handled as release service templates.Note that you cannot edit a service template after its release. To edit such a template, copy the release template andthen edit the copy as a development service template.
Important noteOnce edited, the service templates and plug-ins provided by JP1/AO are outside the scope of JP1/AO productsupport. However, product support is still offered for the plug-ins provided by JP1/AO (in the standard packageor the JP1/AO Content Set) that are called from such templates.
Related topics• 2.1.3 Available operations by service template configuration type
• 6. Releasing Service Templates
2.1.3 Available operations by service template configuration typeThe operations you can perform on development service templates and release service templates depend on theconfiguration type of the template.
Table 2‒1: Available operations by service template configuration type
Template Configurationtype
Operation applied to service template
Displayin list
Create Edit Copy View Delete Build Release
Development servicetemplate
Debug Y Y Y Y Y Y# Y Y
Release servicetemplate
Release Y N N Y Y N N N
2. Setting service template definition information
Job Management Partner 1/Automatic Operation Service Template Developer's Guide 46

Legend:Y: Can be performed. N: Cannot be performed.
#When you add a service from a development service template, you cannot delete the template while a task generatedfrom the service is running.
2.1.4 Behavior when an intervening action occurs in the Editor windowThis section describes what happens when another user performs an intervening action on a service template or plug-in you are in the process of editing. Although the descriptions in this section use the example of a service template, thesame applies to plug-ins.
A user who is in the process of editing the service template in the Editor window is called the original user. A user whoperforms an operation on a service template the original user is working on is called the intervening user.
• Copying a service template that is being editedThe intervening user can copy a service template that the original user is in the process of editing. In this case, thecopy of the service template does not incorporate any changes the original user has made but not saved.
Figure 2‒2: Copying a service template that is being edited
• Deleting or renaming a file while the associated service template or plug-in is being editedIf an intervening user performs any of the following operations on a service template or plug-in the original user isediting, an error message appears when the original user attempts to save, build, or release the template or plug-in.
• Deletes a plug-in icon assigned to the plug-in (excluding standard plug-in icons)
• Deletes or renames a script file assigned to a plug-in
• Deletes or renames a custom file assigned to a service template
Figure 2‒3: Renaming or deleting a file during editing
• Releasing a service template that is being edited
2. Setting service template definition information
Job Management Partner 1/Automatic Operation Service Template Developer's Guide 47

If an intervening user releases a service template an original user is editing, the service template is released normally.However, the original user is not made aware in the editing window that the template has been released. When theoriginal user attempts to save his or her changes, the save process fails and an error message appears.Before you release a service template, make sure that it is not being edited by another user.
Figure 2‒4: Releasing a service template that is being edited
2.1.5 Version compatibility for service templates and plug-ins created inthe Editor window
The following describes the version compatibility for plug-ins and service templates created in the Editor window.
Compatibility with later versionsService templates are guaranteed to remain compatible with later versions of JP1/AO. You can work with servicetemplates in the Editor window that meet the conditions below. However, a subset of displayed items and operationsmight differ between versions.
• Service template packages (*.st) created by users in earlier versions
• Service templates and plug-ins imported to the JP1/AO server from an earlier version of JP1/AO
Compatibility with earlier versionsService templates are not guaranteed to be backwards compatible. If you attempt to apply a service template youcreated in the Editor window to an earlier version of JP1/AO, an error might occur during the import process.
2.1.6 Compatibility with steps in service templates created in earlierversions of JP1/AO
Some steps in service templates created in earlier versions of JP1/AO are not compatible with version 10-10. This mightprevent you from changing the processing in the step. The icon for steps that are incompatible with the version of JP1/AO you are using is displayed in gray scale as follows:
Figure 2‒5: Icon for incompatible steps
2. Setting service template definition information
Job Management Partner 1/Automatic Operation Service Template Developer's Guide 48

• You cannot change the processing defined in a step. You can only change the step ID, name, and description.
• The default step ID is compatible.step.If there are several incompatible steps within the same hierarchy, _n is appended to the end of the step ID (wheren is a unique integer starting from 2) to give a step ID in the format step-ID_n. Step IDs are automatically allocatedby the system. The value of _n has no bearing on the position of the step in the flow.
• The description of a step is initially a blank character.
2. Setting service template definition information
Job Management Partner 1/Automatic Operation Service Template Developer's Guide 49
2.2 Creating and editing service templates
2.2.1 Creating blank service templatesThe first thing you need to do when creating a new service template is set the service template ID, service templateversion, vendor ID, and other definition information.
To create a blank service template:
1. In the Life Cycle of a Service Template area of the Service Template Editor Home view, click Create.
2. In the Create Service Template dialog box, set the definition information for the service template and then clickSave.Note that you cannot change the values in the ID, Version, or Vendor ID field after the service template has beencreated.
After creating a blank service template, you can then perform tasks like setting the service definition information andcreating and editing the flow.
Related topics• 2.2.2 Parameters to set when creating or copying service templates
• 2.2.3 Procedure for setting service definition information
• 3. Creating and editing flows
2.2.2 Parameters to set when creating or copying service templatesThe following table lists the parameters you can set in the Create Service Template dialog box and the Copy ServiceTemplate dialog box:
Table 2‒2: Parameters in the Create Service Template and the Copy Service Template dialogboxes
Parameter Description
ID#1 Specify an ID that identifies the service template.
Version#1 Specify the version number of the service template, in the format aa.bb.cc.
Vendor ID#1 Specify the ID of the vendor who created the service template.Create a unique vendor ID by specifying the domain name in reverse order from the top level asa period-separated value. For example, specify vendor IDs in the format com.xxxx orjp.co.yyyy. If you choose not to use domain names as vendor IDs, make sure that the vendorID you specify is not being used for another vendor.You cannot specify a vendor ID that starts with com.hitachi.software.dna.
Name Specify the name of the service template.
Vendor#2 Specify the name of the vendor who created the service template.
Description Specify a description of the service template.
Category Specify a category name for the service template.
2. Setting service template definition information
Job Management Partner 1/Automatic Operation Service Template Developer's Guide 50

#1You cannot change the values specified in the ID, Version, and Vendor ID fields after you create or copy the servicetemplate. These three parameters together ensure that the service template can be uniquely identified within the JP1/AO system.
#2If you omit this parameter, the value specified in Vendor ID is set as the Vendor. For a development service template,the Vendor field remains blank in the Editor window.
Related topics• 2.4.2 Uniqueness of service templates and plug-ins
2.2.3 Procedure for setting service definition informationIn the Edit Service Definition dialog box, set definition information such as the service template name and vendorname, in addition to property groups, input properties, output properties, and variables.
If the service template editing view is not displayed:
1. In the Life Cycle of a Service Template area of the Service Template Editor Home view, click Edit.
2. Select a service template in the Service Template List window, and then click Edit.
To set service template definition information:
1. In the service template editing view, click the Edit Service Definition button.
2. Set service definition information in the Edit Service Definition dialog box.
3. Click OK.
Important noteIf another user has performed an intervening action while you were editing the service template, the save processmight fail.
Related topics• 2.2.4 Parameters to set in service definition information
• 2.2.5 Example of mapping parameter definition and flow of data
• 2.1.4 Behavior when an intervening action occurs in the Editor window
2.2.4 Parameters to set in service definition informationIn the Edit Service Definition dialog box, set the service information, property group, input properties, output properties,and variables.
Use service properties (input properties and output properties) to specify the parameters the service needs to run, andto acquire the execution results of the service.
2. Setting service template definition information
Job Management Partner 1/Automatic Operation Service Template Developer's Guide 51

Table 2‒3: Parameters set in the Edit Service Definition dialog box
Parameter Description
Service information Set the service template name, vendor name, description, category name, and custom file.
Property groups You can use property groups to manage groups of properties in the Service Definitiondialog box and the Submit Service dialog box.You can define a maximum of five property groups per service template.
Input properties# Properties that store the input values required for service execution.
Output properties# Properties that store the execution results of the service
Variables# Variables that temporarily hold values to be passed between plug-ins.
#In total, you can define a maximum of 100 input properties, output properties, and variables per service template.
Related topics for service information• 2.2.2 Parameters to set when creating or copying service templates
• 2.2.6 Procedure for setting custom files
• 2.2.7 Overview of custom files
• 2.2.8 Format of custom files
Related topics for input properties, output properties, and variables• 2.2.9 Properties defined in services (service properties)
Related topics for input properties• 2.2.10 Adding Service Share Properties
• 2.2.11 Overview of Service Share Properties
• 2.2.12 Notes on defining Service Share Properties
• 2.2.13 Overview of shared built-in service properties
• 2.2.14 Property visibility
2.2.5 Example of mapping parameter definition and flow of dataThe process of defining mapping parameters links the input and output properties of a service to the input and outputproperties and variables of a plug-in. By defining mapping parameters, you can execute processing that uses a valuespecified at service execution as a value of the input property of a plug-in. You can also assign the output of a plug-into an output property of a service template or a variable when the plug-in finishes processing.
The following describes an example of mapping parameter definitions, and explains what kind of data is exchangedbetween properties.
ConditionsThe following describes an example of creating a service template that executes certain plug-ins and is defined as shownbelow.
• The properties of the plug-ins are defined as follows:
2. Setting service template definition information
Job Management Partner 1/Automatic Operation Service Template Developer's Guide 52

Table 2‒4: Definition of plug-in A
Property type Property name
Input property Capacity
Execution target server
Output property Output result of plug-in
Table 2‒5: Definition of plug-in B
Property type Property name
Input property Execution-target server
Storage folder path
• The operator specifies the value of the Execution-target server and Storage folder path properties when he or shesubmits the service for execution.
• The value of the Capacity property is fixed at 10 and does not need to be changed.
• After the service has been executed, you can check the output result of plug-in A in the Task Details dialog box.
Definition• The service is defined as follows in the Edit Service Definition dialog box:
Table 2‒6: Definition in Edit Service Definition dialog box
Property type Property name
Input property Server name
Storage folder path
Output property Service execution results
• Add plug-in A and plug-in B to the flow as steps. Then, define the steps as follows in the Edit Step dialog box:
Table 2‒7: Definition of step A
Property name Mapping parameter
Capacity 10
Execution-target server Server name property key
Plug-in output results Service execution results property key
Table 2‒8: Definition of step B
Property name Mapping parameter
Execution-target server Server name property key
Storage folder path Storage folder path property key
The properties defined in the Edit Service Definition dialog box are mapped to the execution-target server, plug-inoutput results, and storage folder path.
Flow of dataThe following figure shows the flow of data between properties:
2. Setting service template definition information
Job Management Partner 1/Automatic Operation Service Template Developer's Guide 53

Figure 2‒6: Flow of data between properties
1. The value specified for the Server name parameter in the Submit Service dialog box is stored as the value of theExecution-target server parameter for plug-in A and plug-in B.
2. The value specified for the Storage folder path parameter in the Submit Service dialog box is stored as the valueof the Storage folder path parameter for plug-in B.
3. The value of the Plug-in output results parameter of plug-in A appears for the Service execution result property inthe Task Details dialog box.
4. The value of the Execution-target server parameter of plug-in A and plug-in B appears in the Server name field ofthe Task Details dialog box.
5. The value of the Storage folder path parameter of plug-in B appears for the Storage folder path property in the TaskDetails dialog box.
2.2.6 Procedure for setting custom filesYou can define the contents of the Service Details window by selecting a custom file in the Edit Service Definitiondialog box. A custom file can consist of one file or several. For example, if you want to include images and links in thedialog box, you can archive several files or folders in zip format and register the archive. The procedure for setting acustom file differs depending on whether it consists of one file or several.
Note that you can assign a different custom file at a later stage if circumstances change.
To set a single file as a custom file:
1. In the Edit Service Definition dialog box, click the Select button in the Custom Files area.
2. Select the file you want to specify as the custom file.
To set multiple files as a custom file:
1. Place the files you created in any-folder\webroot\language-code\.As language-code, you can specify a two-character language code (ja, en, or zh) as defined in ISO-639.
2. Archive the contents of the language-code folder to a file in .zip format.
2. Setting service template definition information
Job Management Partner 1/Automatic Operation Service Template Developer's Guide 54

3. In the Edit Service Definition dialog box, click the Select button in the Custom Files area.
4. Select the file (.zip) you want to specify as the custom file.
5. In the Custom File Name for Service Details Dialog field, enter the path of the file you want to use to define thecontents of the Service Details window.Specify a relative path whose current directory is the location where the archive will be extracted. Use forwardslashes to delimit the path.
TipIf the file has the extension the .zip, it is automatically renamed to webroot.zip when you build or releasethe service template.
To change the window contents based on the Web browser locale:
1. Store the file or files you created in any-folder\webroot\language-code\.As the language code, you can specify a two-character language code as defined in ISO-639 (ja, en, or zh) in lower-case letters. You can also store a file directly under the webroot folder. This file is used when either of the followingconditions is met:
• There is no language code folder that corresponds to the locale of the Web browser.
• There are no files in the language code folder that correspond to the locale of the Web browser.
Important note• The file stored directly under the webroot folder must have the same name as the files in the language
code folders.
• Even if you do not store a file directly under the webroot folder, the files in each language code foldermust have the same name.
2. Archive the contents of the webroot folder to a file in .zip format.
3. In the Edit Service Definition dialog box, click the Select button in the Custom Files area.
4. Select the .zip file you want to specify as the custom file.
5. In the Custom File Name for Service Details field, enter the file name you want to set.
Related topics• 2.2.7 Overview of custom files
2.2.7 Overview of custom filesA custom file is a file that defines the contents of the Service Details window.You can select which information appearsin the Service Details window by assigning a custom file in the Edit Service Definition dialog box. The followingfigure shows an example of the information displayed in the Service Details dialog box:
2. Setting service template definition information
Job Management Partner 1/Automatic Operation Service Template Developer's Guide 55

Figure 2‒7: Example of Service Details window
Related topics• 2.2.6 Procedure for setting custom files
• 2.2.8 Format of custom files
2.2.8 Format of custom filesCreate custom files as static content to be executed in a Web browser.
Specifiable extensionsThe following are some of the extensions you can specify for custom files:
• .html
• .js
• .css
• .swf
• .jpeg
JP1/AO product support does not extend to dynamic content such as .jsp and .war> files that run on an applicationserver.
2. Setting service template definition information
Job Management Partner 1/Automatic Operation Service Template Developer's Guide 56

Characters specifiable in file names and pathsUse ASCII characters in the file names and paths of custom files. You cannot use the following characters:
• Multi-byte characters
• Control characters ('\u0000' to '\u001F' and '\u007F' to '\u009F')
• Question marks (?), asterisks (*), double quotation marks ("), right angle brackets (>), left angle brackets (<), verticalbars (|), and colons (:)
2.2.9 Properties defined in services (service properties)By defining properties for a service, you can specify the parameters a service needs while executing, and collect theexecution results of the service. You can define the following types of service property:
Input propertiesProperties that store the input values services need when executing. You can define a custom property or use aService Share Property. In input properties, in addition to property keys, property names, and other information ofthis nature, you can specify whether a property is visible. You can define input properties in the following dialogboxes:
• Create Input Property for Service dialog box
• Edit Input Property for Service dialog box
Output propertiesProperties that store the execution results of a service. You can define output properties in the following dialogboxes:
• Create Output Property for Service dialog box
• Edit Output Property for Service dialog box
VariablesA variable temporarily holds a value that passes between plug-ins. You can define variables in the following dialogboxes:
• Create Variable dialog box
• Edit Variable dialog box
Input properties and output properties are displayed as service properties in the following dialog boxes:
• Service Definition dialog box
• Submit Service dialog box
• Task Details dialog box
• Service Share Properties view (for Service Share Properties)
A service input property or output property can store a maximum of 1,024 characters.
Mapping input and output propertiesYou can map service properties to plug-in properties in the Specify Plug-in Input Properties for Mapping dialog boxor the Specify Plug-in Output Properties for Mapping dialog box when editing a step. This process allows you toassign a value entered by an operator to a plug-in property, or display the value of a plug-in property on screen.
2. Setting service template definition information
Job Management Partner 1/Automatic Operation Service Template Developer's Guide 57

Mapping variablesWhen editing a step, you can use the Specify Plug-in Output Properties for Mapping dialog box to map an outputproperty of a plug-in to a variable that can pass the value to another plug-in. In the Specify Plug-in Input Propertiesfor Mapping dialog box, you can map a variable to an input property of a plug-in to be executed as a later step.
Related topics• 2.2.11 Overview of Service Share Properties
• 2.2.13 Overview of shared built-in service properties
• 2.2.14 Property visibility
2.2.10 Adding Service Share PropertiesYou can share properties between services by adding a Service Share Property as a property of a service template. Youcan also use Service Share Properties defined in JP1/AO in advance (called shared built-in service properties), or addshared properties associated with service templates you have imported.
To add a new Service Share Property:
1. In the Edit Service Definition dialog box, in the Input Properties area, click Add.
2. In the Create Input Property for Service dialog box, in the Scope area, select the Service Share Property checkbox.
To add an existing Service Share Property:
1. In the Edit Service Definition dialog box, in the Input Properties area, click the Select Service Share Propertybutton.
2. In the Select Service Share Property dialog box, select the Service Share Property you want to add, and then clickOK.
Related topics• 2.2.11 Overview of Service Share Properties
• 2.2.12 Notes on defining Service Share Properties
• 2.2.13 Overview of shared built-in service properties
2.2.11 Overview of Service Share PropertiesService Share Properties are properties that are shared by more than one service, each of which can view and update itsvalue.
You can define a service property as a Service Share Property by selecting the Service Share Properties check box inthe Scope area of the Create Input Property for Service dialog box or the Edit Input Property for Service dialogbox. Any service can use the same property key to reference and update the Shared Service Property.
A Service Share Property referenced by a service or task returns a value maintained by the system.
2. Setting service template definition information
Job Management Partner 1/Automatic Operation Service Template Developer's Guide 58

Because the value of a Service Share Property is the same system-wide, you cannot assign a different value for differentresource groups. Even if you add multiple services from a service template and assign each to a different resource group,the value of the Service Share Property is shared among the resource groups.
You can assign values to properties in the Service Definition dialog box, the Submit Service dialog box, and in theService Share Properties view. Note that the value assigned to a property in the Submit Service dialog box onlyapplies to tasks generated from that service. For this reason, the value you specify in the Submit Service dialog boxdoes not affect the value of the Service Share Property as referenced by other services. Also, after a service is submittedfor execution, changing the property value in the Service Share Properties view or other dialog boxes does not affectthe property value in the running service.
The following figure shows the valid range of a Service Share Property:
Figure 2‒8: Valid range of Service Share Property
The following figure shows the valid range of an ordinary (non-shared) service property:
Figure 2‒9: Valid range of ordinary (non-shared) service property
If you do not select the Service Share Properties check box in the Scope area, the value specified for the property isonly valid in the context of that service. You can assign property values in the Service Definition dialog box and theSubmit Service dialog box.
Shared service properties that are predefined by JP1/AO are called shared built-in service properties.
Related topics• 2.2.13 Overview of shared built-in service properties
2.2.12 Notes on defining Service Share PropertiesNote the following when defining Service Share Properties:
Assigning values to Service Share Properties• The name and description you specify for properties in the Edit Service Definition dialog box appear in the Service
Definition dialog box and the Submit Service dialog box.
• Create a property key that is unique within the system by specifying the domain name in reverse order from the toplevel as a period-separated value. If you choose not to use domain names as property keys, make sure that the propertykey you specify is not being used for another property whose value you do not want shared.
2. Setting service template definition information
Job Management Partner 1/Automatic Operation Service Template Developer's Guide 59

• If you need to change a parameter of a Service Share Property other than the property name or description, use thefollowing procedure:1. Delete from JP1/AO all service templates that include the Service Share Property you want to modify.2. Add the service templates to JP1/AO with the new values specified for the Service Share Property.The value of the Service Share Property is now changed.
• The following describes what happens when a Service Share Property with the same key as an existing ServiceShare Property is assigned to a service template:
• Initially, the Service Share Property is assigned the value specified in the Default Value field for the ServiceShare Property when the service template was built, released, or imported by the importservicetemplatecommand. You can then specify a value for the property in the Service Share Properties view, the ServiceDefinition dialog box, or the Submit Service dialog box.
• The property name, description, and default value can differ from that of the existing Service Share Property.However, if a parameter other than the property name, description, or default value differs, an error occurs whenyou attempt to build, release, or import the service template.
• When a value differs from that of the existing Service Share Property, the specified value only appears in windowsand dialog boxes that display the property name or description as a property of the service template.
• Service Share Properties selected in the Select Service Share Property dialog box are added with no default valuespecified. Set the default value in the Edit Input Property for Service dialog box.
Assigning a Service Share Property to a property group• You can assign Service Share Properties to any property group when defining a service template. The same Service
Share Property can belong to a different property group in different service templates.
2.2.13 Overview of shared built-in service propertiesShared built-in service properties are properties that are defined in advance in the JP1/AO system. Unlike otherproperties, shared built-in service properties are not tied to a specific service or task. JP1/AO functions that referenceshared built-in service properties use the value assigned to the property when they execute.
You can also define a shared built-in service property as a Service Share Property of a service, and reference it fromwithin a task. Services can reference the values of these properties in the same manner as other Service Share Properties.
You can define a shared built-in service property as a Service Share Property of a service in the Edit ServiceDefinition dialog box. When you click the Select Service Share Property button in the Edit Service Definition dialogbox, a list of shared built-in service properties appears.
The following table lists the shared built-in service properties provided in JP1/AO:
Table 2‒9: List of shared built-in service properties
No. Property key Property name# Description#
1 com.hitachi.software.dna.sys.mail.notify
Email notification Enables or disables the email notification functionality. (Built-in sharedservice property)
2 com.hitachi.software.dna.sys.mail.smtp.server
SMTP serveraddress
Specifies the SMTP server address. The address can be specified as anIPv4 or IPv6 address, or as a host name. Only one of the above can bespecified. Multiple addresses cannot be specified by separating them withcommas. (Built-in shared service property)
3 com.hitachi.software.dna.sys.mail.smtp.port
SMTP server portnumber
Specifies the SMTP server port number. (Built-in shared serviceproperty)
2. Setting service template definition information
Job Management Partner 1/Automatic Operation Service Template Developer's Guide 60

No. Property key Property name# Description#
4 com.hitachi.software.dna.sys.mail.smtp.userid
SMTP server userID
Specifies the user ID of the user who logs in to the SMTP server. (Built-in shared service property)
5 com.hitachi.software.dna.sys.mail.smtp.password
SMTP serverpassword
Specifies the password of the user who logs in to the SMTP server. (Built-in shared service property)
6 com.hitachi.software.dna.sys.mail.from
Notification emailsender
Specifies the sender of notification emails. (Built-in shared serviceproperty)
7 com.hitachi.software.dna.sys.mail.to
Notification emailrecipients (To)
Specifies the "To" recipients of notification emails. Multiple emailaddresses can be specified by separating them with commas. (Built-inshared service property)
8 com.hitachi.software.dna.sys.mail.cc
Notification emailrecipients (Cc)
Specifies the "Cc" recipients of notification emails. Multiple emailaddresses can be specified by separating them with commas. (Built-inshared service property)
9 com.hitachi.software.dna.sys.mail.bcc
Notification emailrecipients (Bcc)
Specifies the "Bcc" recipients of notification emails. Multiple emailaddresses can be specified by separating them with commas. (Built-inshared service property)
10 com.hitachi.software.dna.sys.jp1.username
JP1 user name Specifies the name of the JP1 user who executes services. (Built-in sharedservice property)
11 com.hitachi.software.dna.sys.jp1.password
JP1 user password Specifies the password of the JP1 user who executes services. (Built-inshared service property)
12 com.hitachi.software.dna.sys.task.log.level
Task log outputlevel
Specifies the level of messages output to the task log. (Built-in sharedservice property)
13 com.hitachi.software.dna.sys.ssh.privatekey.passphrase
Pass phrase of theprivate key (forSSH public keyauthentication)
Specifies the pass phrase of the private key used for SSH public keyauthentication. (Built-in shared service property)
#You can change the contents of the Service Definition dialog box and the Submit Service dialog box by enteringa property name and description of your choice for the built-in shared service property. However, you cannot changethe information displayed in the Service Share Properties view from its initial state at installation.
The following table shows detailed information about each property:
Table 2‒10: Detailed information about shared built-in service properties
No. Property key Datatype
Defaultvalue
Required?
Length Specifiable characters Values inlist
Minimum
Maximum
1 com.hitachi.software.dna.sys.mail.notify
boolean
false true -- -- -- --
2 com.hitachi.software.dna.sys.mail.smtp.server
string -- false 0 255 No restrictions --
3 com.hitachi.software.dna.sys.mail.smtp.port
integer 25 false -- -- -- --
2. Setting service template definition information
Job Management Partner 1/Automatic Operation Service Template Developer's Guide 61
No. Property key Datatype
Defaultvalue
Required?
Length Specifiable characters Values inlist
Minimum
Maximum
4 com.hitachi.software.dna.sys.mail.smtp.userid
string -- false 0 255 No restrictions --
5 com.hitachi.software.dna.sys.mail.smtp.password
password
-- false 0 1,024
No restrictions --
6 com.hitachi.software.dna.sys.mail.from
string -- false 0 255 No restrictions --
7 com.hitachi.software.dna.sys.mail.to
string -- false 0 255 No restrictions --
8 com.hitachi.software.dna.sys.mail.cc
string -- false 0 255 No restrictions --
9 com.hitachi.software.dna.sys.mail.bcc
string -- false 0 255 No restrictions --
10 com.hitachi.software.dna.sys.jp1.username
string Valuespecified byuser atinstallation
true 1 31 ^[ a-z A-Z 0-9 !#\$%&\-\.@_`~]+$
--
11 com.hitachi.software.dna.sys.jp1.password
password
Valuespecified byuser atinstallation
true 6 32 ^[a-z A-Z 0-9 !#\$%&'\(\)\*\+,\-\.\/;<=>\?@\[\]\^_`\{\|\}~]+$
--
12 com.hitachi.software.dna.sys.task.log.level
list 10 true -- -- -- 0,10,20,30,40
13 com.hitachi.software.dna.sys.ssh.privatekey.passphrase
password
-- false 0 1,024
No restrictions --
Legend:--: Not applicable.
2.2.14 Property visibilityVisibility is a parameter of input service properties.
By specifying the visibility of a service property, you can control whether the property is displayed in the JP1/AOinterface. The following windows and dialog boxes display properties in JP1/AO:
• Service Definition dialog box
• Submit Service dialog box
• Task Details dialog box
• Service Share Properties view
For example, you can prevent the Submit Service dialog box from displaying properties that are not relevant to theuser.
2. Setting service template definition information
Job Management Partner 1/Automatic Operation Service Template Developer's Guide 62

You can set property visibility in the Edit Input Property for Service dialog box and the Create Input Property forthe Service dialog box. You can specify config or exec as the visibility setting.
configSpecify this setting for properties that you want to appear as input items in the Service Definition dialog box.
execSpecify this setting for properties that you want to appear as input items in the Service Definition dialog box andthe Submit Service dialog box.
You can check the property values specified at service execution in the Task Details dialog box, and set property valuesin the Service Share Properties view if the property is defined as a Service Share Property.
Which properties are displayed in each JP1/AO window and dialog box depends on the visibility setting and thepermission of the logged-in user.
Table 2‒11: Appearance in the Service Definition dialog box
Service property type Visibility Visibility by role of logged-in user
Admin role,Develop role
Modify role Submit role
Not a Service Share Property config Y Y N
exec Y Y N
Service Share Property config Y Y N
exec Y Y N
Legend:Y: Displayed. N: Not displayed.
Table 2‒12: Appearance in the Submit Service dialog box
Service property type Visibility Visibility by role of logged-in user
Admin role,Develop role
Modify role Submit role
Not a Service Share Property config N N N
exec Y Y Y
Service Share Property config N N N
exec Y Y Y
Legend:Y: Displayed. N: Not displayed.
Table 2‒13: Appearance in the Task Details dialog box
Service property type Visibility Visibility by role of logged-in user
Admin role,Develop role
Modify role Submit role
Not a Service Share Property config Y Y N
exec Y Y Y
2. Setting service template definition information
Job Management Partner 1/Automatic Operation Service Template Developer's Guide 63

Service property type Visibility Visibility by role of logged-in user
Admin role,Develop role
Modify role Submit role
Service Share Property config Y Y N
exec Y Y Y
Legend:Y: Displayed. N: Not displayed.
Table 2‒14: Appearance in the Service Share Properties view
Service property type Visibility Visibility by role of logged-in user
Admin role,Develop role
Modify role Submit role
Not a Service Share Property config N N N
exec N N N
Service Share Property config Y N N
exec Y N N
Legend:Y: Displayed. N: Not displayed.
2.2.15 Viewing another service template during editingYou can view the settings of a development service template or release service template in another window while youedit a service template. Because the reference window is opened as read-only, there is no risk of the user inadvertentlychanging the other template.
To open a service template for reference purposes from the Editor window:
1. In the Life Cycle of a Service Template area of the Service Template Editor Home view, click View.
2. In the Service Template List dialog box, select the service template you want to view, and then click View.The service template you selected appears in a new window.
To open a service template in another window during editing:
1. In the Life Cycle of a Service Template area of the Service Template Editor Home view, click Edit.
2. In the Service Template List dialog box, select the service template you want to edit, and then click Edit.
3. From the Actions pull-down menu, choose View.
4. In the Service Template List dialog box, select the service template you want to view, and then click View.The service template you selected appears in a new window.
2. Setting service template definition information
Job Management Partner 1/Automatic Operation Service Template Developer's Guide 64

2.3 Displaying a list of service templates
2.3.1 Procedure for displaying a list of service templatesWhen you edit, copy, view, or delete a service template, you can choose from a list of service templates.
To display a list of service templates:
1. In the Life Cycle of a Service Template area of the Service Template Editor Home view, click Edit, Copy,View, or Delete.The Service Template List dialog box appears.
A list of development service templates and release service templates appears in a new tab. Note that if you click Editor Delete, the window that appears only displays development service templates.
Operations you can perform in the Service Template List dialog box include specifying how many columns to display,and whether to only display service templates created with the latest version of JP1/AO.
Related topics• 2.4.2 Uniqueness of service templates and plug-ins
2. Setting service template definition information
Job Management Partner 1/Automatic Operation Service Template Developer's Guide 65

2.4 Copying service templates
2.4.1 Procedure for copying service templatesYou can copy a development service template or release service template and create a new development service templatethat retains the settings of the original. You can use this procedure when developing a new service template based onan existing service template, or when creating an upgraded version of an existing service template.
To copy a service template:
1. In the Life Cycle of a Service Template area of the Service Template Editor Home view, click Copy.
2. In the Service Template List dialog box, select the service template you want to copy, and then click Copy.
3. In the Copy Service Template dialog box, set the definition information for the service template, and then clickSave.
4. In the Information dialog box, click OK.The service template is copied, and the service template editing view appears.
You cannot copy a service template without changing at least one of the vendor ID, service template ID, and servicetemplate version. These three parameters together ensure that the service template can be uniquely identified within theJP1/AO system. You cannot specify a vendor ID that begins with com.hitachi.software.dna. This string isreserved in JP1/AO. If the vendor ID of the service template you are copying begins withcom.hitachi.software.dna, the vendor ID and vendor name are deleted when you copy the template.
Related topics• 2.2.2 Parameters to set when creating or copying service templates
• 2.4.2 Uniqueness of service templates and plug-ins
• Adding preset properties in the Job Management Partner 1/Automatic Operation Administration Guide
2.4.2 Uniqueness of service templates and plug-insThe following three parameters ensure that service templates and plug-ins can be uniquely identified within theJP1/AO system:
• Vendor ID
• Service template ID (or plug-in ID)
• Service template version (or plug-in version)
These three parameters are centrally managed with no distinction made between development service templates(development plug-ins) and release service templates (release plug-ins). For this reason, you cannot create or copy aservice template or plug-in whose vendor ID, service template ID (plug-in ID), and service template version (plug-inversion) all match those of an existing release service template (or release plug-in).
2. Setting service template definition information
Job Management Partner 1/Automatic Operation Service Template Developer's Guide 66

Figure 2‒10: Managing service template versions
2. Setting service template definition information
Job Management Partner 1/Automatic Operation Service Template Developer's Guide 67

2.5 Deleting service templates
2.5.1 Procedure for deleting development service templatesWhen you delete a development service template, the definition of the service template is deleted from the JP1/AOserver and from the list under Service Template List.
Important noteYou can delete a service template that another user is editing. Make sure that the service template is not beingedited by another user before you delete it.
To delete a development service template:
1. In the Life Cycle of a Service Template area of the Service Template Editor Home view, click Delete.
2. In the Service Template dialog box, select the service template you want to delete, and then click Delete.
3. In the confirmation dialog box, click OK.
The system does not delete the development plug-ins and release plug-ins used by the development service templateyou are deleting, regardless of whether they are used by another service template. If a development plug-in or releaseplug-in is no longer needed, you can delete it individually.
JP1/AO deletes any services that were created by building the development service template you are deleting, andarchives any tasks generated from those services. If a task is in progress, an error occurs and the deletion process fails.If any debug services or debug tasks created while debugging the development service template remain in the system,those services and tasks are deleted. If a debug task is still in progress, an error occurs and the deletion process fails.
If the development service template you are deleting has already been released by another user, an error occurs and thedeletion process fails.
Related topics• 2.5.2 Procedure for deleting release service templates
• 4.4.1 Procedure for deleting plug-ins
• 2.1.4 Behavior when an intervening action occurs in the Editor window
2.5.2 Procedure for deleting release service templatesTo delete a release service template, execute the deleteservicetemplate command.
Related topics• Deleting service templates in the Job Management Partner 1/Automatic Operation Administration Guide
2. Setting service template definition information
Job Management Partner 1/Automatic Operation Service Template Developer's Guide 68

2.6 Setting display information for service templates in resource files
2.6.1 Procedure for setting service resource filesYou can define the information displayed in a service template by assigning a service resource file. You can set displayinformation for service templates and steps.You can edit a service resource file by downloading the file and overwritingits contents.
Note that you cannot change the information displayed for a service template that has already been released unless youcopy the release service template and edit it as a development service template.
1. In the Life Cycle of a Service Template area of the Service Template Editor Home view, click Edit.
2. In the Service Template List dialog box, select a service template and click Edit.
3. From the Actions pull-down menu, choose Set Resources.
4. In the Set the Service Resources dialog box, click the link for the service resource file and download the file.
5. Edit the definitions in the service resource file you downloaded.Do not change the file name from service_language-code.properties.txt. If you change the file name, an error occurswhen you attempt to upload the file.As language-code, you can specify a two-character language code (ja, en, or zh) as defined in ISO-639.
6. Click the Refresh button, select the service resource file you edited, and upload the file.
7. In the confirmation dialog box, click OK.
Important noteWhen you upload the service resource file, the existing file is overwritten with the contents of the new file.Take care not to upload the wrong file.
Related topics• 2.4.1 Procedure for copying service templates
• 2.6.2 Format of service resource file
• 2.6.3 Definitions in service resource files
2.6.2 Format of service resource fileA service resource file defines the information displayed in the JP1/AO user interface. The format of the file is describedbelow. Note that the content of the service resource file depends on the type of display elements you are defining. Fordetails about how to define each type of display element, see 2.6.3 Definitions in service resource files.
• The file name of the service resource file is service_language-code.properties.txt.As language-code, you can specify a two-character language code (ja, en, or zh) as defined in ISO-639.
• Define the file contents in the format property-keydelimiting-charactersetting-value. As the delimiting character,you can use an equals sign =, a colon (:), tab characters (\t), or a single-byte space.
2. Setting service template definition information
Job Management Partner 1/Automatic Operation Service Template Developer's Guide 69
• Enter one property key and setting per line.
• Property keys can contain the following characters:
• Single-byte alphanumeric characters
• Single-byte hyphens (-)
• Single-byte underscores (_)
• Single-byte periods (.)
• Characters must be encoded in UTF-8.
• If you define the same property key in the file more than once, the value of the last occurrence of the property keyapplies.
• Lines that begin with a hash mark (#) are handled as comments.
• Property keys are case sensitive.
• To specify a character string that contains a forward slash (\), specify two forward slashes (\\) instead.
• Lines that consist only of single-byte spaces are ignored.
• On each line of the service resource file, the property key is the character string from the first character that is nota single-byte space to the character immediately preceding the first delimiting character.
• The setting value is the string from the first non-delimiting character after the delimiting character following theproperty key to the last character in the line.For example, the following line in the service resource file represents the property key abc with the setting value=\tc:abc\t=\tcHowever, if the character immediately following the first delimiting character is = or :, the setting value is thecharacter string from the next character that is not a single-byte space or tab character (\t), to the end of the line.For example, the following line in the service resource file represents the property key abc with the setting value=\tc.abc\t=\t=\tc
• You cannot use surrogate pair characters.
2.6.3 Definitions in service resource filesThe definitions in the service resource file depend on the type of display items you are setting. You can specify thefollowing definitions in the service resource file:
Setting items displayed in the Edit Service Definition dialog boxDefine entries in the following format to set the property names, descriptions, and other information displayed inthe Edit Service Definition dialog box.property-keydelimiting-charactersetting-valueProperty keys can be 1 to 128 characters long.As the delimiting character, you can use an equals sign =, a colon (:), a tab character (\t), or a single-byte space.For example, enter a definition in the format service.displayName=TestService.
When specifying display elements for a step on the highest hierarchical level of a flowDefine entries as follows to set the step name and comment displayed in the Step Details area of the TaskDetails dialog box.
2. Setting service template definition information
Job Management Partner 1/Automatic Operation Service Template Developer's Guide 70

Setting a step nameTo set a step name in a service template, enter a definition in the following format:dnajob.step-ID.displayNamedelimiting-charactersetting-valueFor example, enter a definition in the format dnajob.teststep.displayName=TestStep.
Setting a step descriptionTo set a description of a step, enter a definition in the following format:dnajob.step-ID.commentdelimiting-charactersetting-valueFor example. enter a definition in the format dnajob.teststep.comment=This is a test step..
When specifying display elements for a step that is not on the highest hierarchical level of a flowSpecify the step IDs from the step at the highest hierarchical level to the target step, connecting them with slashes(/).For example, to specify a resource in Step F in the figure below, connect the step ID for Step B at the highesthierarchical level to the step ID for Step F. To specify a resource in Step I, connect the step IDs of Step B, Step G,and Step I.
Figure 2‒11: Example of specifying resources in Step F and Step I
The following shows how to specify resources in Step F and Step I in a service resource file.
dnajob.StepB/StepF.displayName=Step Fdnajob.StepB/StepF.comment=Step F descriptiondnajob.StepB/StepG/StepI.displayName=Step Idnajob.StepB/StepG/StepI.comment=Step I description
Related topics• 2.6.4 Correspondence between information displayed in service templates and properties in service resource files
2.6.4 Correspondence between information displayed in servicetemplates and properties in service resource files
The display information for service templates managed in the Editor window can be set in the Editor window itself.The display information you set in the Editor window is also defined in the resource file for the service. The followingtable lists the correspondence between the information displayed for a service template and the properties in the serviceresource file.
Table 2‒15: Correspondence between information displayed for service templates and propertiesin service resource files
Information displayed for service template Property in service resource file
Vendor name service.vendorDisplayName
2. Setting service template definition information
Job Management Partner 1/Automatic Operation Service Template Developer's Guide 71

Information displayed for service template Property in service resource file
Service template name service.displayName
Service template description service.shortDescription
Property group name propertyGroup.property-group-ID.displayName
Property group description propertyGroup.property-group-ID.description
Name of input property, output property, or variable property.property-key.displayName
Description of input property, output property, or variable property.property-key.description
Step name dnajob.step-ID.displayName#
Step description dnajob.step-ID.comment#
#To set a resource for a step that is not at the highest hierarchical level of a flow, specify the step IDs from the stepat the highest hierarchical level to the target step, connecting them with slashes (/).
The step name and description both appear in the Step Details area of the Task Details dialog box. However, thisinformation is only displayed for steps in the top-level flow. It does not appear in the Step Details area of the TaskDetails dialog box for steps that are outside the top-level flow or not at the top-level in the hierarchy.
2.6.5 Service resource files automatically generated when a servicetemplate is created
When a service template is created, JP1/AO automatically generates two service resource files. One is for the samelanguage as the Web browser locale, and the other is for English.
The following table lists the values set in these automatically generated files.
Table 2‒16: Default values for display information in service resource files (at service templatecreation)
Defined display information Value set by default
Same language as Web browserlocale
Automatically generated Englishlanguage resource file#
Vendor name The value specified in the Editor window Vendor ID
Service template name Service template ID
Service template description Blank
#For the contents of the service resource file generated when the Web browser locale is English, see the "Samelanguage as the Web browser locale" column.
Examples of service resource files automatically generated when creating a service template are shown below.
Values specified in JP1/AO interface
Vendor ID: test.vendor
2. Setting service template definition information
Job Management Partner 1/Automatic Operation Service Template Developer's Guide 72

Service template ID: test.serviceService template version: 10.00.00Service template name: test.templateVendor name: test.vendorDescription: This service template is for testing purposes.
Generated service resource file (Japanese)
Generated service resource file (English)
service.vendorDisplayName=test.vendorservice.displayName=test.serviceservice.shortDescription=
2.6.6 Service resource files updated when a service template is editedWhen you edit and save a service template, JP1/AO updates the service resource file for the same language as the Webbrowser locale.
If you add or delete a definition of display information or update a property group ID, step ID, or property key,corresponding changes are made to the other service resource file for the non-Web browser locale language to ensureconsistency.
The table below shows the values added to the service resource file for locales other than the Web browser locale whenyou add a definition of a display item. When you update the definition of a display item or update a property group ID,step ID, or property key, the values in the file are automatically overwritten with the values in the table. If you want toreference the existing value, create a backup of the service resource file for locales other than the Web browser locale.
Important noteWhen the step ID of a layering step or repeated step is updated, the names and descriptions of subordinate stepsare automatically overwritten with the values in the table below. Note that the overwritten values are thosedefined in the service resource file for locales other than the Web browser locale.
Table 2‒17: Display item values set in service resource files
Defined display information Assigned value
Property group name#1 Property group ID
Property group description#1 Blank
Name of service input property, output property, or variable#2 Property key
Description of service input property, output property, or variable#2 Blank
Step name#3 Step ID
2. Setting service template definition information
Job Management Partner 1/Automatic Operation Service Template Developer's Guide 73

Defined display information Assigned value
Step description#3 Blank
#1The value of this display item is overwritten when the property group ID is updated.
#2The value of this display item is overwritten when the property key is updated.
#3The value of this display item is overwritten when the step ID is updated.
When you delete the definition of a display item, the definition is also deleted from the service resource file for languagesother than that of the Web browser locale.
To set display information for a language other than that of the Web browser locale, you need to manually create or edita service resource file and then upload the file. When manually creating a service resource file, we recommend that youdownload and use a service resource file for a locale in which display information is already defined.
2.6.7 Displaying a service template in a Web browser that is set to a localefor which no service resource file is available
When you display a service template in a Web browser that is set to a locale for which no service resource file is available,the system uses the service resource file for English language locales to display the template.
2. Setting service template definition information
Job Management Partner 1/Automatic Operation Service Template Developer's Guide 74

3 Creating and editing flows
This chapter describes how to create and edit flows. By creating and editing flows, you can changethe order in which the steps are performed in an operating procedure, or add steps to an existingprocedure.
Job Management Partner 1/Automatic Operation Service Template Developer's Guide 75

3.1 Displaying the Flow view
3.1.1 Procedure for displaying the Flow viewFlows are created and edited in the Flow view.
Creating a flow with a new service template
1. In the Life Cycle of a Service Template area of the Service Template Editor Home view, click Create.
2. In the Create Service Template dialog box, set the definition information and then click Save.When you click OK in the Information dialog box, the Flow view appears.
Editing the flow of an existing service template
1. In the Life Cycle of a Service Template area of the Service Template Editor Home view, click Edit.
2. In the Service Template List window, select the service template you want to edit and then click Edit.The Flow view appears.
Related topics• 2.2.4 Parameters to set in service definition information
3.1.2 Relationship between flow and stepsThe user creates each unit of processing in a flow by dragging plug-ins from the Plug-in view to the Flow view. Eachplug-in dropped into the Flow view is called a step. A flow is created by placing the steps required to execute a taskand connecting them with relational lines. The following figure shows the relationship between a flow and steps.
Figure 3‒1: Relationship between flow and steps
You can also use flow plug-ins and repeated-execution plug-ins to define a flow within another flow.
Related topics• 3.1.3 Creating flow hierarchies
3. Creating and editing flows
Job Management Partner 1/Automatic Operation Service Template Developer's Guide 76

3.1.3 Creating flow hierarchiesA flow hierarchy is created when you define a flow within another flow. You can define a maximum of 25 hierarchicallevels, with the top-level flow being level 1.
You can create a flow hierarchy by deploying flow plug-ins, and repeat a unit of processing that consists of several stepsby deploying repeated-execution plug-ins.
Figure 3‒2: Creating flow hierarchies
Table 3‒1: Plug-in roles and their relationship to steps
Dragged & dropped plug-in Type of step Role
Flow plug-in Hierarchical step Created a flow hierarchy.
Repeated-execution plug-in Repeated step The system repeats execution of the specified flow.However, if you want to impose a hierarchy on a flow subordinate to therepeated step, you must use a flow plug-in. You cannot place a repeated-execution plug-in in a flow that is subordinate to a repeated step. Also, ifyou attempt to impose a hierarchy on a flow you have copied and pastedthat includes a repeated step, an error occurs.
Other plug-ins Ordinary step The system executes the plug-in.
When you execute a service template that includes a hierarchical flow, only the top-level steps in the flow appear in theTask Details dialog box. Steps in subordinate flows and in flow plug-ins and repeated-execution plug-ins are notdisplayed.
TipYou can view a list of the steps in a flow in the Flow Tree view on the right side of the Editor window. In theFlow Tree view, the name of the service template appears as the first step of the flow. Lower levels arerepresented by the step name associated with the step that executes the flow plug-in or repeated-execution plug-in.
Related topics• Task log details in the Job Management Partner 1/Automatic Operation Administration Guide
3. Creating and editing flows
Job Management Partner 1/Automatic Operation Service Template Developer's Guide 77

3.2 Adding steps
3.2.1 Procedure for adding stepsYou can add processing to a flow by adding steps. A step is a plug-in that the user has dropped into a flow.
The following limits apply to the number of steps you can add:
• Maximum number of steps in one service template: 320
• Maximum number of steps at a given hierarchical level: 80
If the service template editing view is not displayed:
1. In the Life Cycle of a Service Template area of the Service Template Editor Home view, click Edit.
2. In the Service Template List window, select a service template and then click Edit.
To add a step:
1. In the Plug-in view on the left side of the service template editing view, select the plug-in you want to add as a step.You can use any type of plug-in (basic plug-ins, development plug-ins, and release plug-ins) as steps.
2. Drag the plug-in you selected to the Flow view.Create Step dialog box appears.
3. Enter the definition information for the step in the Create Step dialog box, and then click OK.You must enter values in the ID and Name fields. Other information and property mapping can be set at a laterstage.The step is added to the Flow view.
Related topics• 3.2.3 Settings in step definition information
• 4.1.2 Overview of basic plug-ins, release plug-ins, and development plug-ins
3.2.2 Procedure for changing step definition informationThe definition information users set in the Create Step dialog box when creating a step can be changed in the EditStep dialog box.
If the service template editing view is not displayed:
1. In the Life Cycle of a Service Template area of the Service Template Editor Home view, click Edit.
2. In the Service Template List window, select a service template and then click Edit.
To change step definition information:
1. In the Steps view of the service template editing view, click the step whose definition information you want tochange, and then click Edit Step.
3. Creating and editing flows
Job Management Partner 1/Automatic Operation Service Template Developer's Guide 78

2. In the Edit Step dialog box, change the definition information as needed and then click OK.
TipYou can also change the definition information for a step by right-clicking the step in the Flow view andchoosing Editfrom the right-click menu.
Related topics• 3.2.3 Settings in step definition information
3.2.3 Settings in step definition informationIn the Edit Step dialog box, you can set information for a step, such as the ID, name, input properties, and outputproperties.
Table 3‒2: Items that can be set in the Edit Step dialog box
Item Description
Step ID A value that uniquely identifies the step. As the step ID, specify a value that is unique within theflow (not including the hierarchy flow). By default, this field displays the plug-in ID.If there is more than one step with the same step ID in a given flow, _n is appended to the endof the step ID (where n is a unique integer starting from 2), which is displayed in the format step-ID_n. Note that if step-ID_n is longer than 30 characters, the excess characters are truncated atthe end of the step ID, and the shortened step ID is displayed with the _n suffix.
Name The value you specify in this field appears with the icon for the step in the Flow view, and as thename of the step in the Steps view. For the top-level flow, the step ID also appears in the TaskDetails dialog box. The default is the plug-in name. More than one step can have the same namewithin a given flow.If there is more than one step with the same name, _n is appended to the end of the step name(where n is a unique integer starting from 2), which is displayed in the format step-name_n. Notethat if step-name_n is longer than 64 characters, the excess characters are truncated at the end ofthe step name, and the shortened step name is displayed with the _n suffix.
Description For a top-level flow, the description you specify in this field is displayed as the description ofthe step in the Task Details dialog box. This field is blank by default.
Plug-in Displays information about the plug-in.As the plug-in version, the version of the plug-in dragged and dropped from the Plug-in view isdisplayed. You cannot change this information when editing a step.
Subsequent Step Conditions Set whether to execute the subsequent step according to the return value of the plug-in executedby the current step.
Input properties When you set a service property, its value is assigned as an input property of the plug-in. Youcan also enter a value directly.
Output properties You can set a service property whose value is updated by the plug-in using an output property.
Related topics• 3.2.4 Overview of subsequent step conditions
• 3.2.5 Procedure for setting input property mapping
• 3.2.6 Procedure for setting output property mapping
• List of limit values in the Job Management Partner 1/Automatic Operation GUI and Command Reference
3. Creating and editing flows
Job Management Partner 1/Automatic Operation Service Template Developer's Guide 79

3.2.4 Overview of subsequent step conditionsYou can set whether to execute a subsequent step based on the return value of the previous step.
In most situations, the return value of the step is the same as the return value of the plug-in. For details about therelationship between the return values of steps and plug-ins, see 4.3.12 Relationship of command and script returnvalues to the return values of plug-ins and steps.
Types of subsequent step conditions:
When the return value of the plug-in is equal to or less than the judgment level, execute subsequent stepsThe following shows examples of setting judgment values and warning values:
Figure 3‒3: When judgment value is 0 and no warning value is set (default)
• If the return value is equal to or less than the judgment value, the subsequent step is executed (normaltermination).
• If the return value is greater than the judgment value, the subsequent step is not executed (abnormal termination).
Figure 3‒4: When judgment value is 6 and warning value is 2
• If the return value is equal to or less than the judgment value, the subsequent step is executed (normaltermination). However, if the return value is equal to or greater than the warning value and equal to or less thanthe judgment value, the subsequent step is executed and the task terminates with a warning. In this case, the taskstatus appears as Failed (after the task has finished) or Abnormal Detection (while the task is still running) toindicate that the warning value was exceeded. In the Task Details dialog box, the step is recorded as havingterminated with a warning. When you specify a warning value, specify a value that is equal to or less than thejudgment value. You do not need to specify a warning value.
• If the return value is larger than the judgment value, the subsequent step is not executed (abnormal termination).
Always execute subsequent stepsSubsequent steps are always executed, regardless of the return value of the plug-in.
Never execute subsequent stepsThe step ends abnormally regardless of the return value of the plug-in. Subsequent steps are not executed.
Plug-ins for which subsequent step conditions cannot be setYou cannot specify subsequent step conditions for plug-ins such as flow plug-ins and test value plug-ins that control aflow.
• Flow plug-in
• Judge returncode plug-in
• test value plug-in
3. Creating and editing flows
Job Management Partner 1/Automatic Operation Service Template Developer's Guide 80

• Interval plug-in
• abnormal-end plug-in
• judge value plug-in
3.2.5 Procedure for setting input property mappingYou can set a service property and assign its value to an input property of a plug-in. For example, if you map Serviceproperty 1 to an input property, the input property stores the value of Service Property 1.
You can also enter a value directly into a plug-in property.
If the service template editing view is not displayed:
1. In the Life Cycle of a Service Template area of the Service Template Editor Home view, click Edit.
2. In the Service Template List window, select a service template and then click Edit.
To assign the value of a service property to an input property:
1. In the Steps view of the service template editing view, click the step whose definition information you want tochange.
2. Click the Edit Step button.
3. In the Input Properties area of the Edit Step dialog box, select a plug-in property and then click Edit.
4. In the Specify Plug-in Input Properties for Mapping window, select the Select a Property from ServiceProperties option for the Input Method setting.
5. Select a service property in the Service Properties list, and then click OK.The value of the selected service property can now be applied to the plug-in property.
To enter a property value directly:
1. In the Steps view of the service template editing view, click the step whose definition information you want tochange.
2. Click the Edit Step button.
3. In the Input Properties area of the Edit Step dialog box, select a plug-in property and then click Edit.
4. In the Specify Plug-in Input Properties for Mapping window, select the Direct Input option for the InputMethod setting.
5. Enter a value in the Mapping Parameter field, and then click OK.When using direct input, you can specify a value that includes linefeed characters.You can also specify a value that combines a number of reserved properties and service properties with literalcharacters. You can reference the value of a property in the format ?dna_property-key?.
Related topics• 3.2.7 List of reserved properties
3. Creating and editing flows
Job Management Partner 1/Automatic Operation Service Template Developer's Guide 81

3.2.6 Procedure for setting output property mappingYou can set an output property that assigns a value to a plug-in property. For example, if you map Service property 1to an output property of a plug-in, Service Property 1 stores the value of the output property.
If the service template editing view is not displayed:
1. In the Life Cycle of a Service Template area of the Service Template Editor Home view, click Edit.
2. In the Service Template List window, select a service template and then click Edit.
To apply the value of a plug-in property to a service property:
1. In the Steps view of the service template editing view, click the step whose definition information you want tochange.
2. Click the Edit Step button.
3. In the Edit Step dialog box, select a plug-in property in the Output Properties area, and then click Edit.
4. Select a property in the Service Properties area of the Specify Plug-in Output Properties for Mapping window.You can also add a property by clicking the Add Output Property button or Add Variable button.
5. Click OK.The value of the plug-in property can now be applied to the service property.
3.2.7 List of reserved propertiesA reserved property is a special service property whose property key has a specific definition or purpose in JP1/AO.The property key of a reserved property begins with reserved.. You can use reserved properties by mapping themto plug-in properties in the Specify Plug-in Input Properties for Mapping dialog box or the Specify Plug-in OutputProperties for Mapping dialog box. Users cannot define or assign values to reserved properties.
When you map a reserved property to an input property, the value of the reserved property is assigned to a plug-inproperty when the plug-in is executed.
To use a reserved property, select the Select a Property from Service Properties option in the Specify Plug-in InputProperties for Mapping dialog box.
Alternatively, select the Direct Input option, and in the Mapping Parameter field, specify the reserved property inthe format ?dna_reserved-property-key?. In this case, the value of the reserved property supplies part of the value ofthe plug-in properties at plug-in execution.
When you use a reserved property as an output property, the reserved property stores the value of a designated plug-inproperty. By selecting the Select a Property from Service Properties option in the Specify Plug-in Output Propertiesfor Mapping dialog box, you can specify a reserved property to which the value of the output property is passed.
Table 3‒3: List of reserved properties
Reserved property key Description
reserved.loop.index References a numerical value from 1 to 99 that indicates how many times a repeated execution plug-in has repeated.
3. Creating and editing flows
Job Management Partner 1/Automatic Operation Service Template Developer's Guide 82

Reserved property key Description
reserved.loop.index Of the comma-delimited values specified in the inputProperties property of the repeated executionplug-in, this property stores the position of the parameter to which the current execution applies. Youcan also reference this value when parallel is set as the execution method of the repeated executionplug-in. To reference this reserved property, specify the property key in the format ?dna_reserved.loop.index?. Like the reserved.loop.input property, you can use this propertyin any plug-in within the flow of the repeated execution plug-in, provided that service properties canbe mapped to the plug-in.
reserved.loop.input References the value of the inputProperties input property of a repeated execution plug-in.Of the comma-delimited values specified in the input properties of the repeated execution plug-in, thisproperty stores the value of the element that corresponds to the current iteration of the flow. Forexample, if the input property is A,B,C, the values A, B, and C are input in the order correspondingto the repetition count of the flow. The repeated execution plug-in can be executed a maximum of 99times.
reserved.loop.output Passes values to the outputProperties output property of a repeated execution plug-in.The values output to this property are assigned to the output property as a comma-separated value. Forexample, if the values of the output property of the plug-in are X, Y, and Z for successive iterations,the value X,Y,Z is assigned to the output property.
reserved.service.category
References the category assigned to the service from which a task was generated.To reference this reserved property, specify the property key in the format ?dna_reserved.service.category?. You can use this property in any plug-in to whichservice properties can be mapped.
reserved.service.name References the name of the service from which a task was generated.To reference this reserved property, specify the property key in the format ?dna_reserved.service.name?. You can use this property in any plug-in to which serviceproperties can be mapped.
reserved.service.resourceGroupName
References the resource group in which the service from which a task was generated is registered.To reference this reserved property, specify the property key in the format ?dna_reserved.service.resourceGroupName?. You can use this property in any plug-into which service properties can be mapped.
reserved.step.path References the ID of the step that is currently being executed.To reference this reserved property, specify the property key in the format ?dna_reserved.step.path?. The value of this property is the same as the step ID displayed inthe messages output to the task log when plug-in execution begins and ends. You can use this propertyin any plug-in to which service properties can be mapped.
reserved.step.prevReturnCode
Supplies the return value of the preceding step (the step that is the origin of the relational line connectedto the plug-in).To reference this reserved property, specify the property key in the format ?dna_reserved.step.prevReturnCode?. If there are multiple preceding steps, the propertyis assigned the logical sum of all the return values. If there is no preceding step, 0 is assigned. You canuse this property in any plug-in to which service properties can be mapped.If you retry a task from a step that references this reserved property without executing the precedingstep, the return value from the last time the preceding step was executed is set in this reserved propertyas the return value of the preceding step.#
reserved.task.description
Supplies the description of a task.To reference this reserved property, specify the property key in the format ?dna_reserved.task.description?. You can use this property in any plug-in to whichservice properties can be mapped.
reserved.task.dir Supplies the path of the temporary data folder created during task execution.This property provides a unique folder path at execution of each task.The folder referenced by this property is created on the JP1/AO server when the task is executed, anddeleted when the task is archived.
3. Creating and editing flows
Job Management Partner 1/Automatic Operation Service Template Developer's Guide 83

Reserved property key Description
reserved.task.dir Note that files and folders that start with task are reserved in JP1/AO, and cannot be created by theuser.
reserved.task.id Supplies the task ID.To reference this reserved property, specify the property key in the format ?dna_reserved.task.id?. You can use this property in any plug-in to which service propertiescan be mapped.
reserved.task.name Supplies the task name.To reference this reserved property, specify the property key in the format ?dna_reserved.task.name?. You can use this property in any plug-in to which serviceproperties can be mapped.
reserved.task.submitter Supplies the user ID of the user who submitted the task for execution.If the task was retried, this property references the user ID of the user who submitted the task, not theuser who retried the task.To reference this reserved property, specify the property key in the format ?dna_reserved.task.submitter?. You can use this property in any plug-in to which serviceproperties can be mapped.
reserved.task.url Supplies the URL for accessing the Task Details dialog box.To reference this reserved property, specify the property key in the format ?dna_reserved.task.url?. You can use this property in any plug-in to which service propertiescan be mapped.
reserved.terminal.account
References the user ID used by a terminal connect plug-in.This property is used by the commandLine input property of a terminal command plug-in.It stores the login name of the user account used to connect to the terminal.
reserved.terminal.password
References the password used by a terminal connect plug-in.This property is used by the commandLine input property of a terminal command plug-in.It stores the password of the user account used to connect to the terminal.
reserved.terminal.suPassword
References the administrator password used by the terminal connect plug-in.This property is used by the commandLine input property of a terminal command plug-in.It stores the password of the superuser used to connect to the terminal.
#The following shows examples of the values assigned to the reserved property when a task is retried:
The illustrated flow consists of Step 1, Step 2, and Step 3. The reserved.step.prevReturnCode property is definedfor Step 2 and Step 3. The return value of Step 1 is 0, and the return value of Step 2 is 63, indicating an error. Thetask fails with Step 3 in Not Executed status.In this scenario, if you use the Retry the Task From the Failed Step option, the value ofreserved.step.prevReturnCode (the return value of Step 1) is 0 from the perspective of Step 2. If you use the Retrythe Task From the Step After the Failed Step option, the value of reserved.step.prevReturnCode (the return valueof Step 2) is 63 from the perspective of Step 3.
3. Creating and editing flows
Job Management Partner 1/Automatic Operation Service Template Developer's Guide 84

3.2.8 Warning icon displayed for stepsIf a mandatory mapping parameter is omitted, a warning icon is displayed for the step.
Figure 3‒5: Example of steps with warning icon displayed
The icon is updated when you close the Create Step dialog box or the Edit Step dialog box and when you edit a mappingparameter.
When you copy and paste a step with a warning icon, the pasted step retains the warning icon.
3. Creating and editing flows
Job Management Partner 1/Automatic Operation Service Template Developer's Guide 85

3.3 Connecting steps with relational lines
3.3.1 Procedure for connecting steps with relational linesAfter adding steps to a flow, you can arrange the steps in the appropriate order for the task being automated by connectingthem using relational lines.
If the service template editing view is not displayed:
1. In the Life Cycle of a Service Template area of the Service Template Editor Home view, click Edit.
2. In the Service Template List window, select a service template and then click Edit.
To connect steps with relational lines:
1. In the Flow view of the service template editing view, click the circle beside the icon for the step you want to executefirst, and drag it to the icon of the step you want to execute next. Release the mouse button when the icon changescolor.The steps are connected by relational lines.
Related topics• 3.3.8 Behavior when relational lines connect to multiple steps
• 3.3.9 Scenarios where relational lines cannot be drawn
• 3.3.10 Drawing relational lines when processing branches
3.3.2 Procedure for deleting steps and relational linesYou can delete a step or a relational line. When you delete a step, the relational steps that connect that step are alsodeleted. When you delete a relational line, the steps connected by that line are disassociated.
If the service template editing view is not displayed:
1. In the Life Cycle of a Service Template area of the Service Template Editor Home view, click Edit.
2. In the Service Template List window, select a service template and then click Edit.
To delete a step or relational line:
1. In the Flow view of the service template editing view, right-click the step or relational line you want to delete, andthen click Delete.You can also delete a step or relational line by pressing the Delete key.
Related topics• 3.3.5 Procedure for selecting multiple steps
3. Creating and editing flows
Job Management Partner 1/Automatic Operation Service Template Developer's Guide 86

3.3.3 Procedure for copying steps and relational linesYou can copy steps and relational lines and paste them into the Flow view for the same service template or a differentservice template.
The system copies any steps and relational lines in the selected range. If the selected items include a hierarchical flow,the copy operation includes all subordinate flows. The clipboard only holds data from a single copy operation.
If the service template editing view is not displayed:
1. In the Life Cycle of a Service Template area of the Service Template Editor Home view, click Edit.
2. In the Service Template List window, select a service template and then click Edit.
To copy a step or relational line:
1. In the Flow view of the service template editing view, right-click the step or relational line you want to copy, andchoose Copy from the right-click menu.
Related topics• 3.3.5 Procedure for selecting multiple steps
• 3.3.7 Information inherited when pasting steps or relational lines
3.3.4 Procedure for cutting steps and relational linesYou can cut steps and relational lines and paste them into the Flow view for the same service template or a differentservice template.
Any steps and relational lines within the selection are included in the cut operation. If the selected items include ahierarchical flow, the cut operation includes all subordinate flows. The clipboard only holds data from a single copyoperation.
Any relational lines connected to steps outside the selected range disappear from the Flow view as soon as you cut theselection.
If the service template editing view is not displayed:
1. In the Life Cycle of a Service Template area of the Service Template Editor Home view, click Edit.
2. In the Service Template List window, select a service template and then click Edit.
To cut steps or relational lines:
1. In the Flow view of the service template editing view, right-click the step or relational line you want to cut, andchoose Cut from the right-click menu.
Related topics• 3.3.5 Procedure for selecting multiple steps
• 3.3.7 Information inherited when pasting steps or relational lines
3. Creating and editing flows
Job Management Partner 1/Automatic Operation Service Template Developer's Guide 87

3.3.5 Procedure for selecting multiple stepsYou can select multiple steps at once.
If the service template editing view is not displayed:
1. In the Life Cycle of a Service Template area of the Service Template Editor Home view, click Edit.
2. In the Service Template List window, select a service template and then click Edit.
To select multiple steps:
1. In the Flow view of the service template editing view, select steps by clicking and dragging with your mouse.You can also select multiple steps by clicking steps while pressing the Ctrl key.
TipYou can select all steps or relational lines by right-clicking an area in the Flow view where there are no stepsor relational lines, and choosing Select All from the right-click menu.
3.3.6 Procedure for pasting steps and relational linesAfter copying or cutting steps or relational lines, you can paste the data from the clipboard into the desired location inthe Flow view for a development service template.
The information inherited when you paste the data depends on whether a step with the same ID or name is present atthe destination of the paste operation.
If the service template editing view is not displayed:
1. In the Life Cycle of a Service Template area of the Service Template Editor Home view, click Edit.
2. In the Service Template List window, select a service template and then click Edit.
To paste steps or relational lines:
1. Right-click an empty part of the Flow view of the service template editing view, and choose Paste from the right-click menu.
Related topics• 3.3.7 Information inherited when pasting steps or relational lines
3.3.7 Information inherited when pasting steps or relational linesWhen you paste a step or relational line you have copied or cut, some information associated with the item is inheritedat the destination. After pasting a step or relational line, review the definition information for the destination developmentservice template as needed.
The following table shows the information related to steps or relational linesthat is inherited when you paste the item.
3. Creating and editing flows
Job Management Partner 1/Automatic Operation Service Template Developer's Guide 88

Table 3‒4: Information inherited when pasting steps or relational lines
Copied or cutitem
Information forcopied or cutitem
Information at paste destination
Step Step ID A step ID must be unique within the flow (not including subordinate hierarchy flows).If there is no step with the same step ID at the paste destination, the information of the copy or cutsource is inherited as-is.If there is a step with the same step ID, the step ID of the pasted step changes to step-ID_n, where nis a unique integer of 2 or higher. If step-ID_n is longer than 30 characters, the excess characters aretruncated from the end of the step ID.
Step name If there is no step with the same name at the paste destination, the information of the copy or cut sourceis inherited as-is.If there is a step with the same name, the step name of the pasted step is changed to step-name_n,where n is a unique integer of 2 or higher. If step-name_n is longer than 64 characters, the excesscharacters are truncated from the end of the step ID.
Description The information for the copy or cut source is pasted to the destination as-is.
References toplug-ininformation
Subsequent-stepexecutionconditions
Input propertymappingparameters
Output propertymappingparameters
Relational lines Direction The system copies information about the direction of relational lines. However, lines that connect tosteps outside the selected range are not copied.
3.3.8 Behavior when relational lines connect to multiple stepsA flow can contain relational lines that connect one step to several, and several steps to one. When lines are drawn inthese ways, the next step is executed only after every connected step has finished executing.
Figure 3‒6: Example of connecting multiple steps
3. Creating and editing flows
Job Management Partner 1/Automatic Operation Service Template Developer's Guide 89

3.3.9 Scenarios where relational lines cannot be drawnYou cannot connect relational lines in certain configurations. For example, you cannot draw a relational line that wouldresult in a recurring loop within a flow, or whose source and destination are the same step.
Table 3‒5: Restrictions on relational lines
Restricted relational lineconnection
Details Example
Relational lines that form aloop
You cannot use relational lines in a way that createsa loop within a flow.
Relational lines that connecta step to itself
You cannot draw a relational line if the source anddestination steps of the line are the same.
Identical relational lines You cannot create parallel relational lines with thesame source and destination step.
Multiple inputs to a judgereturncode plug-in
Because a judge returncode plug-in judges the returnvalue of the preceding step, you cannot drawrelational lines to such a plug-in from multiple steps.Only one step can serve as the preceding step of ajudge returncode plug-in.
Connecting a judgereturncode plug-in or judgevalue plug-in to a judgereturncode plug-in or judgevalue plug-in
You cannot draw a relational line that connects ajudge returncode plug-in or judge value plug-in to ajudge returncode plug-in or judge value plug-in.However, you can connect such a plug-in as asucceeding step.
Relational lines from abranch destination step of ajudge returncode plug-in orjudge value plug-in
A judge returncode plug-in or judge value plug-in canonly have one branch destination step, which cannotbe connected further by a relational line. If you needto use several steps, draw a connection line to a flowplug-in.
Relational lines to a branchdestination step of a judgereturncode plug-in or judgevalue plug-in
You cannot draw a relational lineto the branchdestination step of a judge returncode plug-in or judgevalue plug-in.
Legend: : Judge returncode plug-in or judge value plug-in : Other plug-in
Related topics• 3.3.10 Drawing relational lines when processing branches
• The description of judge returncode plug-ins in the manual Job Management Partner 1/Automatic Operation ServiceTemplate Reference
3. Creating and editing flows
Job Management Partner 1/Automatic Operation Service Template Developer's Guide 90

3.3.10 Drawing relational lines when processing branchesIf you want to execute a particular step only when judgment conditions are met, you can use a judge returncode plug-in or judge value plug-in. When using such a plug-in, draw the relational line from the circle below the icon of the plug-in.
When the conditions are met, the branch destination step is executed first, followed by the succeeding step. If theconditions are not met, the succeeding step is executed without first executing the branch destination step.
Figure 3‒7: Example of relational lines connecting a judge returncode plug-in
• The connection with the succeeding step is represented by a single-headed arrow.
• The relational line that connects a step executed only when the judgment conditions are met is represented by adouble-headed arrow. There cannot be more than one step executed when judgment conditions are met.
• If the judgment conditions are met, the steps are executed in the following order: sample1, judge returncode plug-in, sample2, and then sample3.
• If the conditions are not met, the steps are executed in the following order: sample1, judge returncode plug-in,and then sample3.
3. Creating and editing flows
Job Management Partner 1/Automatic Operation Service Template Developer's Guide 91

4 Creating and editing plug-ins
This chapter describes how to create and edit plug-ins. You can use the plug-ins provided by JP1/AO in an unmodified state, or create and edit plug-ins to define processing that meets a specificneed.
Job Management Partner 1/Automatic Operation Service Template Developer's Guide 92

4.1 Displaying a list of plug-ins
4.1.1 Procedure for displaying a list of plug-insYou can view a list of the plug-ins that have been imported into JP1/AO.
The list of plug-ins appears in the Plug-in view on the left side of the Editor window.
TipYou can display the name, version, and detailed information of a plug-in by clicking it in the list.
Related topics• 4.1.2 Overview of basic plug-ins, release plug-ins, and development plug-ins
4.1.2 Overview of basic plug-ins, release plug-ins, and development plug-ins
A plug-in defines processing that executes a task.
There are three types of plug-in in JP1/AO: basic plug-ins, release plug-ins, and development plug-ins. Each type isdisplayed in its own tab in the Plug-in view.
For the sake of expedience, plug-ins are separated into basic plug-ins and content plug-ins according to their origin. Fordetails, see Types of Service Templates and Plug-ins in the manual Job Management Partner 1/Automatic OperationService Template Reference.
Table 4‒1: Types of plug-in
Type Description
Basic plug-in • Displayed in the Basic tab.• A plug-in provided by JP1/AO. A basic plug-in defines generic
processing like email notification and flow repetition.
Content plug-ins Release plug-ins • Displayed in the Release tab.• A plug-in that was imported into JP1/AO by a user releasing a service
he or she created in theEditor window.• A plug-in in a service templates provided by JP1/AO.• A plug-in that was imported into the JP1/AO server by theimportservicetemplate command and has the releasedconfiguration type is also handled as a release plug-in.
Development plug-ins • Displayed in the Under Development tab.• A plug-in that a user created as a new plug-in, which has not yet been
released. A plug-in that is being created based on a copy of an existingplug-in is also classified as a development plug-in.
• When you build a development service template that includes adevelopment plug-in, the development plug-in is imported into the JP1/AO server and can be executed for testing purposes.
4. Creating and editing plug-ins
Job Management Partner 1/Automatic Operation Service Template Developer's Guide 93
Type Description
Content plug-ins Development plug-ins • A plug-in that was imported into the JP1/AO server by theimportservicetemplate command and has the debugconfiguration type is also handled as a development plug-in.
By using plug-ins, you can perform actions like the following:
• Sending notification emails and controlling flow repetition
• Transfer files and folders between the JP1/AO server and a remote host
• Connect to a remote host and execute commands and scripts
In JP1/AO, a user can create a custom plug-in as a content plug-in. Users can also create plug-ins that connect to aremote host and execute commands and scripts, and incorporate these plug-ins into a service template.
When JP1/AO executes a content plug-in, it uses WMI to connect to operation target devices that are running Windows,and SSH to connect to UNIX devices. For details about basic plug-ins, see the description of basic plug-ins in the manualJob Management Partner 1/Automatic Operation Service Template Reference.
Related topics• 4.1.3 Plug-in executing users
• 4.1.4 Available operations by plug-in type
• 4.1.5 Files transferred to Windows systems
• 4.1.6 Files transferred to UNIX systems
• 4.1.7 Locale set for operation target devices during plug-in execution
• 4.1.8 Character set used for communication by JP1/AO during plug-in execution
• 4.1.9 Setting a specific character set during plug-in execution
• A.1(2) Configuration types assigned to service templates and plug-ins by build and release operations
4.1.3 Plug-in executing usersThe execution user of a plug-in is as follows:
• When the OS of the operation target device is WindowsCommands and scripts are executed by the user who connects to the operation target device.When the operation target device is running Windows, user profiles are not inherited. This means a plug-in canproduce different execution results from a command or script executed on the desktop.To avoid this issue, do not reference settings in user profiles, such as user environment variables, registry entries,and Internet Explorer settings, when executing a plug-in. If a command or script references an element of a userprofile, the command or script might not behave as expected. For example, when you execute a command or scriptthat references Internet Explorer proxy settings, the command or script might fail with a communication error. Thismight occur in scenarios such as implementing a Windows Update using a script.
• When the OS of the operation target device is UNIXGenerally, the user who connects to the operation target device is the execution user of commands and scripts. JP1/AO also provides a function that allows you to elevate the execution user of a command or script to root privilege.Note that when a user connects to an operation target device as a user with root privilege, the connection of the rootprivilege user must be permitted on the operation target device side.
4. Creating and editing plug-ins
Job Management Partner 1/Automatic Operation Service Template Developer's Guide 94

The following table lists the execution users for plug-ins.
Table 4‒2: Execution users for plug-ins
Plug-in Elevation toroot privilege#1
User who connectedto operation targetdevice
Execution user ofcommand or script#2
• Basic plug-in (general command plug-in, file-forwardingplug-in, or terminal connect plug-in)
• Content plug-in
Enabled User with root privilege User with root privilege
User without rootprivilege
User with root privilege
Not enabled User with root privilege User with root privilege
User without rootprivilege
User without rootprivilege
#1The process by which the user is elevated to root privilege depends on the plug-in.
• For basic plug-ins:
• General command plug-in and file-forwarding plug-inYou can specify whether to elevate the user to root privilege in the plug-in properties.
• For the terminal connect plug-in:You cannot configure JP1/AO to elevate users of the terminal connect plug-in to root privilege. Toachieve this, you need to execute the command that elevates the user to root privilege in a terminalcommand plug-in.
For details about the elevation of users to root privilege, see the section describing basic plug-ins in themanual Job Management Partner 1/Automatic Operation Service Template Reference.
• For content plug-ins:You can specify the permissions of the execution user by using the Execute by using root privileges (forSSH connections) check box in the Create Plug-in dialog box or the Edit Plug-in dialog box. If you selectthis check box, commands and scripts are executed as a user with root privilege. If the check box is cleared,commands and scripts are executed with the permissions of the user who connected to the operation targetdevice.
TipWhen the Execute by using root privileges (for SSH connections) is selected, the way in whichyou specify the superuser password depends on the credential type selected in the Create Plug-inor Edit Plug-in dialog box.
• If Destination is selected as the credential type for the plug-inJP1/AO uses the superuser password specified in the definition of the connection destination.
• If Property is selected as the credential type for the plug-inJP1/AO uses the superuser password specified in the plugin.suPassword plug-in property.
#2
• In the case of a file-forwarding plug-in, the user who transfers the file.
• In the case of a terminal connect plug-in, the command is actually executed by a terminal command plug-in.
4. Creating and editing plug-ins
Job Management Partner 1/Automatic Operation Service Template Developer's Guide 95

4.1.4 Available operations by plug-in typeThe operations you can perform in the Editor window depend on the type of plug-in selected.
Table 4‒3: Available operations by plug-in type
Type Plug-in operation
Show in list Create Edit Delete Copy
Basic plug-in Y N N N N
Development plug-in Y Y Y Y #1 Y
Release plug-in Y N N Y #1#2 Y
Legend:Y: Can be performed. N: Cannot be performed.
#1Cannot be deleted when being used in a development service template.Cannot be deleted if a development service template has been built that incorporates the plug-in you want to delete.In this case, delete the step that uses the plug-in and build the template again. You can then delete the plug-in.
#2Cannot be deleted when being used in a release service template.
4.1.5 Files transferred to Windows systemsWhen a general command plug-in, file-forwarding plug-in, or content plug-in executes an operation on a Windowsdevice, JP1/AO transfers the following files to the device. The files are deleted when the plug-in finishes executing.
Figure 4‒1: Files transferred to Windows systems
Files are transferred when either of the following conditions are met:
• You use a file-forwarding plug-in
• A script is executed in a content plug-in
Related topics• 4.3.9 Procedure for setting scripts
4. Creating and editing plug-ins
Job Management Partner 1/Automatic Operation Service Template Developer's Guide 96

4.1.6 Files transferred to UNIX systemsWhen a file-forwarding plug-in or content plug-in executes an operation on a UNIX device, JP1/AO transfers thefollowing files to the device. The files are deleted when the plug-in finishes executing.
Figure 4‒2: Files transferred to UNIX systems
Files are transferred in the following circumstances:
• You use a file-forwarding plug-in
• A script is executed in a content plug-in
You can set working-folder in the plugin.remoteCommand.workDirectory.ssh property in the property file(config_user.properties). The default is /tmp/Hitachi_AO.
Related topics• 4.3.9 Procedure for setting scripts
• Property file (config_user.properties) in the Job Management Partner 1/Automatic Operation Configuration Guide
4.1.7 Locale set for operation target devices during plug-in executionThe locale setting that applies to a device on which an operation is performed by a plug-in depends on the operatingsystem. The following describes the locale settings applied when plug-ins are executed in each operating system.
In WindowsWhen JP1/AO executes a script or command on an operation target device, make sure that the locale and characterset of the operation target device match those of the JP1/AO server. The locale and character set are determined bythe settings in the Region and Language area of the Windows Control Panel that govern date and time formats,user-level display languages, system-level display languages, and system locale settings.For details about the character set JP1/AO uses for communication, see 4.1.8 Character set used for communicationby JP1/AO during plug-in execution.
In UNIXThe locale setting applied during plug-in execution depends on the Character Set Auto Judgment (SSH) settingin the Create Plug-in dialog box or the Edit Plug-in dialog box.
• If the Enabled check box is cleared in the Character Set Auto Judgment (SSH) area:Scripts are executed with the LC_ALL=C locale. Make sure that commands and command parameters consistonly of ASCII characters. If a command parameter, standard output, or standard error output contains non-ASCIIcharacters, the characters might become garbled and prevent the command from executing normally.
• If the Enabled check box is selected in the Character Set Auto Judgment (SSH) area:JP1/AO references the default locale of the connecting user and executes the script accordingly.When executing a script or command on an operation target device, JP1/AO sets the environment variableLC_ALL and LANG to the default locale of the connecting user. It does not change the settings of LC_XXXXXenvironment variables other than LC_ALL.The locale assigned when executing a script or command is referenced in the following order of priority:
4. Creating and editing plug-ins
Job Management Partner 1/Automatic Operation Service Template Developer's Guide 97

Table 4‒4: Priority of locale settings referenced during plug-in execution
Priority Environment variable
1 Value of LC_ALL
2 Value of LC_CTYPE
3 Value of LANG
If the script or command is encoded in a different character set from the one assigned at plug-in execution, thecharacters might become garbled. Note that the character set you can use in commands and command parametersdepends on the operating system. For details, see 4.1.8 Character set used for communication by JP1/AO duringplug-in execution.
4.1.8 Character set used for communication by JP1/AO during plug-inexecution
The character set that is assigned at plug-in execution and used by JP1/AO for communication depends on the operatingsystem of the device on which the operation is being performed.
Entries output to the task log and public log by the JP1/AO server are output in the default character set of the operatingsystem of the JP1/AO server. For this reason, characters taken from a character set that is incompatible with the operationtarget device, machine-dependent characters, and Unicode-dependent characters might become garbled when output toa log file.
The following describes the character sets assigned at plug-in execution according to the operating system of theoperation target device.
In Windows:When executing a script or command on an operation target device, make sure that the locale and character set ofthe operation target device match those of the JP1/AO server. The locale and character set are determined by thesettings in the Region and Language area of the Windows Control Panel.
In UNIX:When executing a script or command on an operation target device, the character sets the JP1/AO server can usefor communication are limited to the following character sets output by the locale charmap command. Notethat the output of the locale charmap command is not case sensitive.
• EUC-JP
• eucjp
• ibm-943C
• ISO-8859-1
• MS932
• PCK
• Shift_JIS
• UTF-8
• windows-31j
If the command returns a character set that is not one of those listed here, UTF-8 is assigned as the character set.Note that if the output of the locale charmap command is IBM-943, JP1/AO uses the ibm-943C character setfor communication when executing the plug-in.
4. Creating and editing plug-ins
Job Management Partner 1/Automatic Operation Service Template Developer's Guide 98

To find out which character set JP1/AO is using, use an SSH client or the ssh command to log in as the connectionuser, and then execute the locale charmap command. If you want to automatically change the character setwhen the connection user logs in, use a login script or other means to assign values to environment variables at login.You can change the character set at login by assigning a value to the LC_ALL or LANG environment variable.If you want to assign a specific character set, see 4.1.9 Setting a specific character set during plug-in execution.
4.1.9 Setting a specific character set during plug-in executionIf you want JP1/AO to use a specific character set for communication when performing an operation on a UNIX device,enter the appropriate setting in a character-set mapping file, or in the terminal.charset key of a connection-destination property file.
If you specify a character set in a character-set mapping file and in the terminal.charset key of a connection-destination property file, the character set is assigned in the following order of priority:
Table 4‒5: Priority of character set settings during plug-in execution
Priority Setting
1 Character set specified in the terminal.charset key of the connection-destination property file
2 Character set specified in the character-set mapping file
3 Character set returned by the locale charmap command on the operation target device
4 UTF-8
Related topics• Connection-destination property file (connection-destination.properties) and Character-set mapping file
(charsetMapping_user.properties in the Job Management Partner 1/Automatic OperationConfiguration Guide
4.1.10 Commands required for plug-in executionCertain commands must be installed in the operating system of the operation target device before you can execute plug-ins. For details, see the Release Notes.
4. Creating and editing plug-ins
Job Management Partner 1/Automatic Operation Service Template Developer's Guide 99

4.2 Creating plug-ins
4.2.1 Procedure for creating plug-insUsers can create new plug-ins to meet a specific need.
To create a plug-in:
1. In the Plug-in view of the Editor window, display the Under Development tab.
2. Click the Create button.
3. In the Create Plug-in dialog box, enter the definition information for the plug-in and then click Save.
Related topics• 4.2.2 Parameters to set when creating or copying plug-ins
• 4.3.2 Parameters to set in plug-in definition information
4.2.2 Parameters to set when creating or copying plug-insThe following table lists the parameters you can set in the Create Plug-in dialog box and the Copy Plug-in dialog box.
Table 4‒6: Parameters to set in the Create Plug-in dialog box and the Copy Plug-in dialog box
Parameter Description
ID#1 Specify an ID that identifies the plug-in.
Version#1 Specify the version number of the plug-in.Specify the version number in the format aa.bb.cc.
Vendor ID#1 Specify the ID of the vendor who created the plug-in.Create a unique vendor ID by specifying the domain name in reverse order from the top level asa period-separated value. For example, specify vendor IDs in the format com.xxxx orjp.co.yyyy. If you choose not to use domain names as vendor IDs, make sure that the vendorID you specify is not being used for another vendor.You cannot specify a vendor ID that starts with com.hitachi.software.dna.
Name Specify a name for the plug-in.
Vendor Name#2 Specify the name of the vendor who created the plug-in.
Description Specify a description of the plug-in.
Category Specify the name of the plug-in category.
#1You cannot change the values you specify in the ID, Version, and Vendor ID fields after you create or copy theplug-in.
#2If you omit this parameter, the value specified in Vendor ID is set as the Vendor Name. For a development plug-in, the Vendor Name field remains blank in the Editor window.
4. Creating and editing plug-ins
Job Management Partner 1/Automatic Operation Service Template Developer's Guide 100

In the Create Plug-in dialog box, you can also define input properties, output properties, and remote commands. Fordetails about input properties, output properties, and remote commands, see 4.3.2 Parameters to set in plug-in definitioninformation.
4. Creating and editing plug-ins
Job Management Partner 1/Automatic Operation Service Template Developer's Guide 101

4.3 Editing plug-ins
4.3.1 Procedure for editing plug-in definition informationYou can edit the definition information for plug-ins displayed in the Under Development tab.
To edit the definition information for a plug-in:
1. In the Plug-in view of the Editor window, display the Under Development tab.
2. Select the plug-in you want to edit, and then click Edit.
3. In the Edit Plug-in dialog box, set the definition information for the plug-in, and then click Save.
Important noteIf you are editing the properties of a plug-in that has been placed as a step in a flow, make sure that the mappingparameters in the step are defined appropriately. If the mapping parameters defined in the step do not matchthe properties of the plug-in, an error occurs when you build or release the service template.
Related topics• 4.3.2 Parameters to set in plug-in definition information
4.3.2 Parameters to set in plug-in definition informationIn the Create Plug-in dialog box or the Edit Plug-in dialog box, set the plug-in information, input properties, outputproperties, and remote commands.
Table 4‒7: Parameters set in the Create Plug-in or the Edit Plug-in dialog box
Parameter Description
Plug-in information You can set the plug-in name, vendor name, description, category, icon, credential type, character set auto-judgment setting (for SSH connections), and whether to execute the plug-in as root.
Input properties# Properties that store the input values the plug-in needs while executing.
Output properties# Properties that store the execution results of the plug-in.
Remote commands Commands or scripts to execute on the remote host. You can set a different set of remote commands foreach operating system.
#In total, you can define a maximum of 100 input properties and output properties per plug-in.
Related topics for plug-in information• 4.2.2 Parameters to set when creating or copying plug-ins
• 4.3.3 Image files usable as plug-in icons
• 4.3.4 plug-in credential types
4. Creating and editing plug-ins
Job Management Partner 1/Automatic Operation Service Template Developer's Guide 102

Related topics for Input properties and Output properties• 4.3.5 Properties defined in plug-ins (plug-in properties)
Related topics for Input properties• 4.3.6 Reserved plug-in properties for specifying execution-target hosts and credential information
Related topics for Remote commands• 4.3.9 Procedure for setting scripts
• 4.3.15 Differences between script settings methods
• 4.3.17 Procedure for setting commands
• 4.3.7 Procedure for mapping standard output and standard error output to output properties
4.3.3 Image files usable as plug-in iconsYou can display a custom image as the icon of a plug-in in the Plug-ins list and Flow view. Each plug-in can have adifferent icon. If you do not assign an icon, the standard icon is displayed for the plug-in.
Figure 4‒3: Standard plug-in icon
An image file used as the icon for a plug-in must meet the conditions below. If you specify a file that does not meetthese conditions, an error occurs when you attempt to register the file.
File format:PNG
Image size:48 x 48 pixels
When you register an image file as an icon, the file is renamed icon.png.
You can register another image file for a plug-in that already has an icon by selecting the new file. The existing icon isreplaced with the image in the new file.
4.3.4 plug-in credential typesThe following properties are set automatically according to the option selected for Credential Type in the Create Plug-in dialog box or the Edit Plug-in dialog box:
When Destination is selected for Credential Type
• plugin.destinationHost
When Property is selected or Credential Type
• plugin.destinationHost• plugin.account
4. Creating and editing plug-ins
Job Management Partner 1/Automatic Operation Service Template Developer's Guide 103

• plugin.password• plugin.suPassword• plugin.publicKeyAuthentication
Related topics• 4.3.6 Reserved plug-in properties for specifying execution-target hosts and credential information
4.3.5 Properties defined in plug-ins (plug-in properties)By defining properties for a plug-in, you can specify the parameters a plug-in requires during execution, and collect theexecution results of the plug-in. You can define the following plug-in property types:
Input propertiesYou can define properties that store the input values plug-ins require during execution, such as the arguments forremote commands or the target host of the operation. You can define input properties in the following dialog boxes:
• Create Input Property for Plug-in dialog box
• Edit Input Property for Plug-in dialog box
Output propertiesYou can define properties that store the execution results of the plug-in, such as the results of a remote command(standard output and standard error output). You can define output properties in the following dialog boxes:
• Create Output Property for Plug-in dialog box
• Edit Output Property for Plug-in dialog box
Plug-in properties are only valid in the context of the plug-in for which they are defined.
Input and output properties can store a maximum of 1,024 characters. If you specify a value that is longer than 1,024characters, the first 1,024 characters are stored as the property value and the remainder are discarded. If you referencethe value of a property key in the format ?dna_property-key?, the referenced value is truncated if it is longer than1,024 characters.
A plug-in property whose property key and purpose are determined in advance is called a reserved plug-in property.These properties specify credential information and the execution-target hosts of remote commands.
Related topics• 4.3.6 Reserved plug-in properties for specifying execution-target hosts and credential information
4.3.6 Reserved plug-in properties for specifying execution-target hostsand credential information
A reserved plug-in property is a plug-in property whose property key and intended use are predefined in the JP1/AOsystem.
The names of reserved plug-in properties start with plugin.. These properties are created automatically in the InputProperties area of the following dialog boxes:
• Create Plug-in dialog box
4. Creating and editing plug-ins
Job Management Partner 1/Automatic Operation Service Template Developer's Guide 104

• Edit Plug-in dialog box
Plug-in properties are only valid in the context of the plug-in for which they are defined.
Although you can edit some aspects of a reserved plug-in property, other aspects such as the property key and whethercertain parameters are mandatory cannot be changed. You cannot delete a reserved plug-in property.
Reserved plug-in property for specifying execution-target hostsThe following reserved plug-in property is automatically created to specify the execution-target host.
Table 4‒8: Reserved plug-in property for specifying execution-target hosts
Property key Description
plugin.destinationHost Specify the target of an operation by IPv4 address, IPv6 address, or host name. You must specifya target host in a network configuration in which the JP1/AO server and the command executionenvironment can communicate directly with each other.You can specify a value from 1 to 256 characters long.
Reserved plug-in property for specifying credential informationAs the credential type of the plug-in, select the Destination or the Property option in the Credential Type area of theCreate Plug-in or the Edit Plug-in dialog box.
DestinationSelect this option to use the credential information set in the Connection Destinations view. When you select thisoption, JP1/AO uses the credential information specified in the connection destination definition for WMI, SSH, orTelnet connections, depending on the IP address of the logged-in user.
PropertySelect this option to use the credential information specified in a property.
When you select Property, the following reserved plug-in property is automatically created in the Edit Input Propertyfor Plug-in dialog box.
Table 4‒9: Reserved plug-in properties for specifying credential information
Property key Description
plugin.account When the Property option is selected for Credential Type, specify the user ID for logging in to the target hostin 1 to 256 characters.
plugin.password When the Property option is selected for Credential Type, specify the password for logging in to the targethost in 1 to 256 characters.If true is specified for the plugin.publicKeyAuthentication reserved plug-in property, JP1/AO ignores the valueset for the plugin.password property.
plugin.suPassword If Property is selected for Credential Type, specify the password of the root account used to log in to a targethost in a UNIX environment, using 1 to 256 characters.The root password you specify is ignored in the following circumstances:• The target host is running Windows• The Execute by using root privileges (for SSH connections) check box was cleared in the Create Plug-
in dialog box or the Edit Plug-in dialog box.
plugin.publicKeyAuthentication
When Property is selected for Credential Type, this property specifies whether to use public keyauthentication for SSH connections to target hosts in UNIX environments. If you do not specify a value, falseapplies.• true
Specify this value to use public key authentication.
4. Creating and editing plug-ins
Job Management Partner 1/Automatic Operation Service Template Developer's Guide 105

Property key Description
plugin.publicKeyAuthentication
• falseSpecify this value to use password authentication.
4.3.7 Procedure for mapping standard output and standard error outputto output properties
You can map the standard output and standard error output of a command or script to an output property.
By default, the output filters are blank for properties in the Mapping Definition of Output Properties list. This meansthat the entire standard output and standard error output of commands and scripts is stored in output properties. Toextract values from standard output and standard error output and map them to output properties, define regularexpressions in the Edit Output Filter dialog box.
If the Create Plug-in dialog box or the Edit Plug-in dialog box is not displayed:
1. In the Plug-in view of the Editor window, display the Under Development tab.
2. To create a new plug-in, click Create.To edit an existing plug-in, select the plug-in and then click Edit.
To map standard output or standard error output to an output property:
1. In the Remote Command area of the Create Plug-in dialog box or the Edit Plug-in dialog box, click Edit.
2. Select a property in the Mapping Definition of Output Properties list, and then click Edit.Only output properties that you registered when setting the plug-in properties appear in the Mapping Definition ofOutput Properties list.
3. In the Edit Output Filter dialog box, enter a PCRE-compliant regular expression in the Output Filter area andthen click OK.
4. You can verify the output filter you entered by entering a sample of standard output and standard error output in theStandard Output / Standard Error Output: text box, and clicking Verification of the Output Filter.The value filtered by the output filter appears in the Value of the Output Property text box.
Related topics• 4.3.8 Specifying output filters
4.3.8 Specifying output filtersThis section describes how to store the standard output of a command or script in an output property.
By defining a PCRE-compliant regular expression in the Output Filter field, you can extract character strings from thestandard output and standard error output of a command or script, and store them in the output property of a plug-in.
4. Creating and editing plug-ins
Job Management Partner 1/Automatic Operation Service Template Developer's Guide 106

Important note• If you specify multiple groups in the regular expression, only values that match the first group are stored
in the output property of the plug-in.
• If the regular expression applies to multiple value ranges, only the first range of values is stored in the outputproperty of the plug-in. Multiple value ranges cannot be stored in an output property.
The following describes how to specify a regular expression that stores the standard output of a command or script inan output property.
• Property key:output01• Output filter:DATE=(.*)
When you specify an output filter in this way, the value immediately following DATE= in standard output is stored inthe output property output01.
To store the return value of a script in an output property, define the plug-in and create a script as follows:
• In the Edit Remote Command dialog box, specify the Script option for Execution Mode.
• Create a script whose standard output displays the return value of the command or script in a format that is filteredby the regular expression specified in the output filter.
4.3.9 Procedure for setting scriptsThis section describes how to set the script that executes on the operation-target host. To make sure that the plug-in iscompatible with the operating system (Windows or UNIX) on the remote host, choose an appropriate script for eachoperating system. In a script, you can define scripts and commands that are present on the operation target device andwhich the operation target device can execute.
You can configure a script by attaching an existing script, or by entering the contents of the script directly.
When defining a script that consists of multiple files, or a script that uses a specific character set or linefeed code, followthe procedure described in Attaching an existing script file. When you use the procedure described in Entering a scriptdirectly, you can define only one script file and the character set and line-feed character are fixed for the intendedoperating system.
Use ASCII characters in the script file. You cannot use the following characters:
• Control characters ('\u0000' to '\u001F' and '\u007F' to '\u009F')
• Question marks (?), asterisks (*), double quotation marks ("), right angle brackets (>), left angle brackets (<), verticalbars (|), and colons (:).
You cannot specify a file name that contains multi-byte characters.
The return values of scripts executed as plug-ins can be from 0 to 63.
Plug-ins and service templates must be designed in such a way that standard output and standard error output produceless than 100 KB of data. When the standard output or standard error output of a plug-in exceeds 100 KB, the commandis immediately killed and the plug-in terminates with an error. In this scenario, the execution results of the commandcannot be guaranteed.
4. Creating and editing plug-ins
Job Management Partner 1/Automatic Operation Service Template Developer's Guide 107

The locale setting that applies when a script is executed depends on the operating system of the target device. For detailsabout the locale assigned at the operation target device, see 4.1.7 Locale set for operation target devices during plug-in execution.
If the Create Plug-in dialog box or Edit Plug-in dialog box is not displayed:
1. In the Plug-in view of the Editor window, display the Under Development tab.
2. To create a new plug-in, click the Create button.To edit an existing plug-in, select a plug-in and then click the Edit button.
Attaching an existing script file
1. In the Remote Command area of the Create Plug-in dialog box or the Edit Plug-in dialog box, click Edit.
2. In the Edit Remote Command dialog box, specify the Script option for Execution Mode.
3. In the Command line text box, enter the command that executes the script.Although only one script file can be registered, you can register a script that consists of several files and folders ina hierarchical structure by compressing the files into an zip archive. If the script is a single file, specify the file namein the Command line text box. If the script is a zip archive containing multiple files, specify a relative path whosecurrent directory is the location where the archive will be extracted.
4. In the Setting the Scripts area, select the Attachment option.
5. In the File area, click Select and register the script.
Entering a script directly
1. In the Remote Command area of the Create Plug-in dialog box or the Edit Plug-in dialog box, click Edit.
2. In the Execution Mode area of the Edit Remote Command dialog box, select the Script option.
3. In the Command line text box, enter the command that executes the script.
4. In the Setting the Scripts area, select the Direct Input option.
5. Enter values in the File Name field and the Script text box.In the File Name field, enter the name of the file in which to store the code entered in the Script text box. In theScript text box, enter the script code.
You can later replace the file you registered on the server by selecting another file.
TipFor details about how to set return values when executing a command or script, see 4.3.11 Return values ofcontent plug-ins.
Related topics• 4.3.10 Specifying commands in the Command line text box
• 4.3.12 Relationship of command and script return values to the return values of plug-ins and steps
• 4.3.15 Differences between script settings methods
4. Creating and editing plug-ins
Job Management Partner 1/Automatic Operation Service Template Developer's Guide 108

4.3.10 Specifying commands in the Command line text boxThe information you can enter in the Command line text box depends on the option specified for Execution Mode andwhether you choose to specify the value of an input property as an argument of the command you are executing.
Note that special characters specified in the Command line text box, such as those used to indicate environmentvariables, will not be escaped. However, depending on the platform, the following characters are automatically escapedwhen the values of mapped input properties are passed to the command line:
• In Windows: %
• In UNIX: $, `, \, "
When mapping an input property as a command line argument, enclose the value of the argument in double quotationmarks (for example, "?dna_property-key-of-plug-in-property?"). When executing a PowerShell script, you can enclosethe value in double or single quotation marks.
If Platform is Windows and the value of an input property contains a double-quotation mark, an error will occur whenthe plug-in is executed.
When Script is specified for Execution Mode:Create the script to be executed on the target device, and enter the command that calls the script in the Command-line text box. If the script is a single file, specify the file name. If the script is a zip archive containing multiple files,specify a relative path whose current directory is the location where the archive will be extracted.
The script is copied to a temporary folder under the folder specified in Execution Directory.
If Platform is AIX, HP-UX, Linux, or Solaris, the command line is automatically prefixed with ./ when the commandis executed. You do not need to manually add the prefix. If you specify ./ in the command line, the script file appearsafter ././ but still works normally. Special characters, such as those used to indicate environment variables in the commandline, are not escaped.
The following shows how to enter information in the Command line text box when the Script option is specified forExecution Mode.
Example of specifying information in the Command line text boxcmd.exe /q /c "AAA.bat bbb ccc"
Example of script file (AAA.bat) contents
If the value in Platform is Windows, the command is converted to a batch file and executed on the operation targetdevice. For this reason, the results of the command might differ from those of the same command executed at thecommand prompt.
When Command is specified for Execution Mode:Enter the command to be executed on the operation target device directly in the Command line text box. You do notneed to create a script.
The following shows how to enter information in the Command line text box when the Command option is specifiedfor Execution Mode
4. Creating and editing plug-ins
Job Management Partner 1/Automatic Operation Service Template Developer's Guide 109

Example of specifying information in the Command line text boxzzz.exe aaa bbb
When specifying input property values as command argumentsTo specify the value of an input property in an argument of a command, specify ?dna_property-key-of-plugin-property? in the Command line text box.
Example of specifying information in the Command line text boxscriptA.sh -xx ?dna_input01? -yy ?dna_input02?
In this example, ?dna_input01? is replaced with the value of the plug-in property input01, and ?dna_input02? is replaced with the value of the plug-in property input02.
When specifying a non-standard scriptJP1/AO executes scripts using cmd.exe when the operation target device is running Windows, and the user's login shellwhen the device is running UNIX. If you want to run a non-standard script, you need to define the instructions requiredto run the executable file that implements the script.
The following shows an example of running a PowerShell script from the command prompt and establishing a connectionwith vCenter.
Example of specifying information in the Command line text box
powershell -executionPolicy RemoteSigned -command ".\vsphereConnectChallenge.ps1 '?dna_vCenterServerName?' '?dna_userName?' '?dna_password?' '?dna_portNumber?' '?dna_protocol?'; exit $LASTEXITCODE" 2>&1
• PowerShell cannot execute scripts by default. By specifying powershell -executionPolicyRemoteSigned in the command line, you can execute a local PowerShell script on an operation target deviceof JP1/AO.
• Here, ?dna_property-key? is a variable replaced with the value of a property. Enclose ?dna_property-key?with double or single-quotation marks.#
This allows the properties specified in the Command line text box to be passed to the shell even if the propertyhas a null value.
#If you enclose a property with double-quotation marks (") in PowerShell and that property has a null value,PowerShell skips the property. If you enclose it in single-quotation marks ('), the property is interpreted asa null value and not skipped. By avoiding double-quotation marks ("), you can ensure that the script isexecuted as originally defined in terms of the order and content of arguments.
Related topics• 4.3.11 Return values of content plug-ins
• 4.3.12 Relationship of command and script return values to the return values of plug-ins and steps
• 4.3.16 Specifying Execution Directory
4.3.11 Return values of content plug-insThe following table lists the return values of content plug-ins:
4. Creating and editing plug-ins
Job Management Partner 1/Automatic Operation Service Template Developer's Guide 110

Table 4‒10: Return values of content plug-ins
Return value Description
-1 The plug-in was forcibly terminated during execution.
0 to 63# The meaning of the return value differs between content plug-ins.
64 A command executed in the content plug-in terminated with a return value outside the 0 to 63 range.
65 The connection to the JP1/AO server failed. For example, the JP1/AO server might have stopped during plug-inexecution.
66 The following user is mapped to the JP1 user:• A user who does not belong to the Administrators group• A user with UAC enabled who is not the built-in Administrator of the Administrators group
68 The system cannot find information for the applicablejob execution ID.
69 An attempt to acquire an environment variable for the task processing engine failed.
70 The connection to the remote host failed.
71 An attempt to call a command failed.
72 The status of command execution could not be acquired.
73 File transfer failed.
74 File deletion failed.
76 The connection timed out.
77 The host name of the remote host could not be resolved.
78 Authentication with the remote host failed for one of the following reasons:• Password authentication failed.• Public key authentication has not been set up on the operation target device.• In public key authentication, the private key does not match the pass phrase.• In public key authentication, the private key does not correspond to the public key registered in the operation
target device.• In public key authentication, an invalid private key was used.
80 Task execution has stopped.
81 The plug-in was called in an invalid status.
82 The request message from the task-processing engine could not be correctly parsed.
83 The environment of the JP1/AO server is corrupted.
84 Information about the specified plug-in could not be obtained.
86 The specified property value is invalid.
127 An unspecified error has occurred.
#For plug-ins created in the Editor window, the return values are the same as for the command or script the plug-inis executing. If the plug-in is a content plug-in provided by JP1/AO, see the description of the content plug-in in theJob Management Partner 1/Automatic Operation Service Template Reference.
Related topics• 4.3.12 Relationship of command and script return values to the return values of plug-ins and steps
4. Creating and editing plug-ins
Job Management Partner 1/Automatic Operation Service Template Developer's Guide 111

4.3.12 Relationship of command and script return values to the returnvalues of plug-ins and steps
In most circumstances, the return value of a command or script serves as the return value of the plug-in. When contentplug-ins and general command plug-ins execute commands and scripts on connection destinations, the return value ofthe command or script is used as the return value of the plug-in. This does not apply to the terminal command plug-in,which does not set the return value of the command or script as the return value of the plug-in.
You can use values in the range from 0 to 63 as the return value of a command or script. If the command or script returnsa value outside this range, the plug-in returns 64, indicating that the returned value was outside the 0 to 63 range. If thecommand or script could not be executed, the plug-in returns a value of 65 or higher that indicates the cause of thefailure.
Although the return value of the plug-in is generally the return value of the step, the values might differ in certaincircumstances, such as an error occurring during plug-in execution or the task being forcibly terminated. In this case,take the appropriate action based on the return value of the step.
Related topics• 4.3.13 Procedure for using the return value of a command or script as a flow branching condition (for values outside
the 0 to 63 range)
4.3.13 Procedure for using the return value of a command or script as aflow branching condition (for values outside the 0 to 63 range)
When a command or script executed in a plug-in returns a value outside the 0 to 63 range, you can use the return valueas the branch condition for a flow by following the procedure below.
To use the return value of a command or script as the branch condition of a flow:
1. When creating or editing a plug-in, specify the Script option for Execution Mode in the Edit RemoteCommand dialog box.
2. Create a script that outputs the return value of the command it executes to standard output.
3. In the Edit Output Filter dialog box, enter a regular expression that assigns the return value of the command orscript output to standard output to an output property of the plug-in.
4. Configure output property mapping so that the value of the plug-in output property assigned in step 3 is assigned toa service property (variable).
5. Configure a judge value plug-in to judge the value of the service property (variable) assigned in step 4.
Related topics• Judge value plug-in in the manual Job Management Partner 1/Automatic Operation Service Template Reference
4.3.14 Information output to standard output by plug-insThe standard output and standard error output of the commands and scripts specified in the Command line text boxserve as the standard output of the plug-in.
4. Creating and editing plug-ins
Job Management Partner 1/Automatic Operation Service Template Developer's Guide 112

However, plug-ins and service templates must be designed so that the standard output of the plug-in does not exceed100 KB. If the standard output of a plug-in exceeds this size, the command is immediately forcibly terminated and theplug-in ends in an error. In this situation, the results of the command cannot be guaranteed.
The size of standard output includes the data added by JP1/AO. For this reason, you need to includes some leeway overand above the standard output and standard error output of the plug-in when estimating the standard output of a plug-in.
Size of plug-in standard output (when the operation target device is running UNIX)Number of linefeed codes (LF) × bytes
When the operation target device is running UNIX, the carriage return character CR(0x0d) is replaced with the linefeedcharacter LF(0x0a) in standard output and standard error output. LF(0x0a)is appended to the end of standard output andstandard output if the last character is not a linefeed character (CR/LF/CR+LF).
• LF(0x0a) is left unchanged
• CR(0x0d)is replaced with LF(0x0a)
• CR+LF(0x0d0a) is replaced with LF+LF(0x0a0a)
4.3.15 Differences between script settings methodsThere are two ways to configure a script: attaching an existing script, or entering the contents of the script directly. Thedifference between these methods is described below.
When Attachment is selectedYou can register a script composed of multiple files and folders by archiving them as a file in zip format.Archives in zip format are renamed when the plug-in is placed on the JP1/AO server. The file name is changed towindows.zip, aix.zip, hpux.zip, linux.zip, or solaris.zip depending on the operating system. Files registered withAttachment selected can be downloaded to a terminal where JP1/AO is operated through a Web browser. If youenter the script directly, you cannot download the script file.
When Direct Input is selectedIn the Edit Remote Command dialog box, enter the contents of the script to execute on the operation target devicedirectly. You can only define scripts and commands that are present and can be executed on the operation-targetdevice. You can only define one script file. The character set and linefeed code applied to the saved script file arefixed values appropriate to the operating system of the operation-target device.Therefore, if you want to register a script file that consists of multiple files, or assign a specific character set orlinefeed code, select Attachment.
The following table shows the differences between file registration methods and available character sets and linefeedcodes depending on the setting in the Setting the Scripts area.
Table 4‒11: Differences between script setting methods
Item With Attachment selected With Direct Input selected
Windows AIX, HP-UX, Linux,Solaris
Windows AIX, HP-UX, Linux,Solaris
Registering single file Can be registered Can be registered
Registering multiple files Can be registered Cannot be registered
4. Creating and editing plug-ins
Job Management Partner 1/Automatic Operation Service Template Developer's Guide 113

Item With Attachment selected With Direct Input selected
Windows AIX, HP-UX, Linux,Solaris
Windows AIX, HP-UX, Linux,Solaris
Character set of saved script Assigned character set of registered file Default character set of JP1/AOserver OS
UTF-8
Linefeed code of saved scripts Assigned linefeed code of registered file CR+LF LF
Related topics• 4.3.9 Procedure for setting scripts
• 4.3.12 Relationship of command and script return values to the return values of plug-ins and steps
4.3.16 Specifying Execution DirectoryIn the Execution Directory field, specify the absolute path of the folder in which to execute the script or command.Only use characters that are supported in command lines on the JP1/AO server and the operation target device.
Do not enclose the path of the execution directory in double or single-quotation marks, even if the path contains spaces.Plug-in execution will fail if the path is enclosed in quotation marks. The execution directory must be created in advanceon the operation target host. If you do not create the execution directory in advance, plug-in execution might fail.
The behavior of the system depends on the option selected for Execution Mode, as described below.
When Script is specified for Execution ModeJP1/AO copies the script to a uniquely-named temporary subfolder of the folder specified in Execution Directory. Thescript is executed in this temporary folder. The script and temporary folder are deleted when the script has finishedexecuting.
When Command is specified for Execution ModeYou can specify the execution directory in the Execution Directoryfield, and in the property file(config_user.properties). The execution directory is set in the following order of priority:
When the operation target host is running Windows
1. The value specified in the Execution Directory field
2. The value specified for the plugin.remoteCommand.executionDirectory.wmi property in the property file(config_user.properties)
3. The value of the %TEMP% environment variable on the operation target host
When the operation target host is running UNIX
1. The value specified in the Execution Directory field
2. The value specified for the plugin.remoteCommand.executionDirectory.ssh property in the property file(config_user.properties)
3. /tmp
4. Creating and editing plug-ins
Job Management Partner 1/Automatic Operation Service Template Developer's Guide 114

4.3.17 Procedure for setting commandsSet the command that is appropriate for the operating system on the operation target host (Windows, AIX, HP-UX,Linux, or Solaris). When creating a plug-in that is compatible with multiple operating systems, set commands for eachoperating system.
The commands you set must be scripts or commands that are present on and executable by the operation target device.
The commands executed in plug-ins can have return values in the range from 0 to 63.
Plug-ins and service templates must be designed in such a way that standard output and standard error output produceless than 100 KB of data. When the standard output or standard error output of a plug-in exceeds 100 KB, the commandis immediately killed and the plug-in terminates with an error. In this scenario, the execution results of the commandcannot be guaranteed.
If the Create Plug-in dialog box or Edit Plug-in dialog box is not displayed:
1. In the Plug-in view of the Editor window, display the Under Development tab.
2. To create a new plug-in, click Create.To edit an existing plug-in, select the plug-in and then click Edit.
To set a command:
1. In the Remote Command area of the Create Plug-in dialog box or the Edit Plug-in dialog box, click the Editbutton for the operating system of the operation target device.
2. In the Execution Mode area of the Edit Remote Command dialog box, click Command.
3. Enter the command line in Command line, and then click OK.
Related topics• 4.3.10 Specifying commands in the Command line text box
4. Creating and editing plug-ins
Job Management Partner 1/Automatic Operation Service Template Developer's Guide 115

4.4 Deleting plug-ins
4.4.1 Procedure for deleting plug-insYou can delete plug-ins that appear in the Under Development tab and the Release tab. When you delete a plug-in,the definition of the plug-in is deleted from the JP1/AO server, and the plug-in disappears from the UnderDevelopment and Release tabs.
However, you cannot delete a plug-in that is being used by a development service template or a release service template.Nor can you delete a plug-in if a development service template has been built that uses that plug-in as a step. In thisscenario, delete the step from the development service template, and build the service template again. You will then beable to delete the plug-in.
To delete a plug-in:
1. In the Plug-in view of the Editor window, display the Release tab or the Under Development tab.
2. Select the plug-in you want to delete, and from the Actions pull-down menu, choose Delete.
3. In the confirmation dialog box, click OK.The plug-in is deleted.
4. Creating and editing plug-ins
Job Management Partner 1/Automatic Operation Service Template Developer's Guide 116

4.5 Copying plug-ins
4.5.1 Procedure for copying plug-insYou can copy a development plug-in or release plug-in to create a new development plug-in that retains the settings ofthe original. Use this procedure when you want to develop a new plug-in based on an existing plug-in, or to create amodified version of an existing plug-in.
To copy a plug-in:
1. In the Plug-in view of the Editor window, click the Release tab or the Under Development tab.
2. Select the plug-in you want to copy, and from the Actions pull-down menu, choose Copy.
3. In the Copy Plug-in dialog box, change at least one of the plug-in ID, plug-in version, and vendor ID, and then clickSave.You cannot specify a vendor ID that begins with com.hitachi.software.dna because such IDs are reservedby JP1/AO. If the vendor ID of the original plug-in begins with com.hitachi.software.dna, the vendorname and vendor ID are removed when the plug-in is copied.After copying a plug-in, you can then set the definition information for the plug-in.
Related topics• 4.2.2 Parameters to set when creating or copying plug-ins
• 4.3.1 Procedure for editing plug-in definition information
4. Creating and editing plug-ins
Job Management Partner 1/Automatic Operation Service Template Developer's Guide 117

4.6 Using resource files to set plug-in display information
4.6.1 Procedure for setting plug-in resource filesYou can set the information displayed for a plug-in by entering settings in a plug-in resource file. You can edit the plug-in resource file directly by downloading the file and overwriting it.
You cannot set display information for plug-ins in released service templates.
To set a plug-in resource file:
1. Select a plug-in in the Plug-in view of the Editor window.
2. From the Actions pull-down menu, choose Set Resources.
3. In the Set the Plug-in Resources dialog box, download the plug-in resource file by clicking the link.
4. Edit the plug-in resource file you downloaded.
5. Click the Refresh button, select the plug-in resource file you edited, and upload the file.If the plug-in resource file you uploaded is not named plugin_language-code.properties.txt, an error occurs.
6. In the conformation dialog box, click OK.
Important noteWhen you upload the plug-in resource file, the existing file is overwritten with the contents of the new file.Take care not to upload the wrong file.
The file name of the uploaded file must be plugin_language-code.properties.txt, or an erroroccurs.
language-code is a two-character language code (ja, en, or zh) as defined in ISO-639.
Related topics• 4.6.2 Format of plug-in resource files
• 4.6.3 Correspondence between properties in plug-in resource files and information displayed for plug-ins
4.6.2 Format of plug-in resource filesA plug-in resource file defines the information displayed in the JP1/AO user interface. The file has the following format:
• The file name of the plug-in resource file is plugin_language-code.properties.txt.language-code is a two-character language code (ja, en, or zh) as defined in ISO-639.
• Define the file contents in the format property-keydelimiting-charactersetting-value. As the delimiting character,you can use an equals sign (=), a colon (:), a tab character (\t), or a single-byte space.For example, enter a definition in the format plugin.displayName=TestPlugin.
• Enter one property key and setting per line.
4. Creating and editing plug-ins
Job Management Partner 1/Automatic Operation Service Template Developer's Guide 118

• Property keys can be 1 to 128 characters long, and can contain the following characters:
• Single-byte alphanumeric characters
• Single-byte hyphens (-)
• Single-byte underscores (_)
• Single-byte periods (.)
• Characters must be encoded in UTF-8.
• If you define the same property key in the file more than once, the value of the last occurrence of the property keyapplies.
• Lines that begin with a hash mark (#) are handled as comments.
• Property keys are case sensitive.
• To specify a character string that contains a forward slash (\), specify two forward slashes (\\) instead.
• Lines that consist only of single-byte spaces are ignored.
• On each line of the plug-in resource file, the property key is the character string from the first character that is nota single-byte space to the character immediately preceding the first delimiting character.
• The setting value is the string from the first non-delimiting character after the delimiting character following theproperty key to the last character of the line.For example, the following line represents the property key abc with the setting value =\tc:abc\t=\tcHowever, if the character immediately following the first delimiting character is = or :, the setting value is thecharacter string from the next character that is not a single-byte space or \t to the end of the line.For example, the following line in the service resource file represents the property key abc with the setting value=\tc.abc\t=\t=\tc
• Surrogate pair characters are ignored.
4.6.3 Correspondence between properties in plug-in resource files andinformation displayed for plug-ins
You can set the display information for plug-ins managed in the Editor window from the user interface. The followingtable lists the correspondence between the display information of the plug-in and the properties in the plug-in resourcefile.
Table 4‒12: Correspondence between properties in plug-in resource file and display information
Plug-in display information Property in plug-in resource file
Plug-in name plugin.displayName
Vendor name plugin.vendorDisplayName
Description plugin.shortDescription
Input property name/Output property name property.property-key.displayName
Input property description/Output propertydescription
property.property-key.description
4. Creating and editing plug-ins
Job Management Partner 1/Automatic Operation Service Template Developer's Guide 119

4.6.4 Plug-in resource files automatically generated when a plug-in iscreated
When a plug-in is created, two different plug-in resource files are automatically generated. One is for the same languageas the Web browser locale, and the other is for English.
The following values are set in the generated plug-in resource files.
Table 4‒13: Display information values set by default for plug-in resource files (when a plug-in iscreated)
Defined display information Values set by default
Same language as the Web browser locale Automatically generated resourcefile for English#
Vendor name Values specified in the Editor window Vendor ID
Plug-in name Plug-in ID
Plug-in description Blank
Plug-in input property name or output propertyname
Property key
Plug-in input property description or outputproperty description
Blank
#For the contents of the plug-in resource file generated when the Web browser locale is English, see the "Samelanguage as the Web browser locale" column.
Examples of plug-in resource files that are automatically generated when a plug-in is created are shown below.
Values specified in the window
Generated plug-in resource file (Japanese)
Generated plug-in resource file (English)
plugin.vendorDisplayName=test.vendorplugin.displayName=test.pluginplugin.shortDescription=
4. Creating and editing plug-ins
Job Management Partner 1/Automatic Operation Service Template Developer's Guide 120

4.6.5 Plug-in resource files updated when a plug-in is editedWhen a plug-in is edited and saved, the plug-in resource file for the same language as the Web browser locale is updated.
If a display information definition is added or deleted or if the property key is updated, the update is also reflected inthe other plug-in resource file for the non-Web browser locale language, for consistency.
The table below describes the values that will be added to the plug-in resource files for locales other than the Webbrowser's locale when the definition of a display item is added. If the definition of a display item is updated, the valuesin this table will automatically overwrite the existing values in those files. Note, however, that overwriting of valuestakes place only when the property key is updated.
If you might need to reference the values that existed before being overwritten, back up the plug-in resource files forlocales other than the Web browser's locale.
Table 4‒14: Values of the display items that will be set in plug-in resource files
Defined display information Value that will be set
Plug-in input property name or output property name Property key
Plug-in input property description or output property description Blank
If a display information definition is deleted, the definition is also deleted from the plug-in resource file for the non-Web browser locale language.
To specify display information for a non-Web browser locale language, the plug-in resource file must be created oredited manually before uploading. To manually create a plug-in resource file, we recommend that you download anduse the appropriate plug-in resource file for a locale for which display information is defined.
4.6.6 Displaying a plug-in on a Web browser set to a locale for which noplug-in resource file is available
If a plug-in is displayed on a Web browser set to a locale for which no plug-in resource file is available, the plug-inresource file for English will be loaded to display the plug-in.
4. Creating and editing plug-ins
Job Management Partner 1/Automatic Operation Service Template Developer's Guide 121

5 Validating Service Templates
After creating a service template, you can perform a validation process to make sure that it willoperate as intended in the active environment.
Job Management Partner 1/Automatic Operation Service Template Developer's Guide 122

5.1 Overview of service template validation
5.1.1 Flow of service template validationAfter creating or editing a flow, you can check for issues in the flow transitions and plug-in processing by building anddebugging a development service template. If the debug process reveals an issue, you can edit the affected servicetemplate or plug-in, build the development service template again, and repeat the debug process. When all the issueshave been resolved, you then test the operation of the service by executing it in the development environment.
The following figure shows the flow of service template validation:
Figure 5‒1: Flow of service template validation
Build
1. After creating or editing a flow, prepare it for testing by building a service template.
Debug
1. If the build process is successful, debug the service template to identify issues in its flow or plug-ins. The debugprocess creates a debug service and debug task.
5. Validating Service Templates
Job Management Partner 1/Automatic Operation Service Template Developer's Guide 123

2. Review the execution results of the debug task, and resolve any issues by amending the service template. Then,build the amended service template again and repeat the debug process.Repeat the process of amending, building, and debugging the service template until all problems are resolved.
Operation test
1. After all issues have been resolved, conduct an operation test by adding and executing the service in the developmentenvironment.Check the execution results of the task. If any issues are identified, amend the affected service template or plug-inand repeat the debug process.
When there are no further issues, release the service template.
Note that debugging and operation testing can be performed on an as-needed basis.
Related topics for building service templates• 5.1.2 Overview of building
• 5.2 Building service templates
Related topics for debugging service templates• 5.1.3 Overview of debugging
• 5.3 Debugging service templates
• 5.4 Managing debug tasks
Related topics for testing service template operation• 5.1.4 Overview of operation tests
• 5.5 Testing service templates
5.1.2 Overview of buildingBuilding is the process of preparing a service template you created or edited in the Editor window for testing. Whensuccessful, a build operation creates a package of the service template which you can then use to debug the servicetemplate or add a service to the server.
ObjectivePerform a build operation to prepare a development service template for validation. The service template you build ispackaged as a debug configuration service template and imported to the JP1/AO server.
Number of executionsYou can build a service template any number of times. If the debug process or an operation test reveals an issue withthe service template, the user repeats the series of operations from amending the development service template ordevelopment plug-in to checking its operation until all issues are resolved.
When you edit and rebuild a service template that has already been through a debug process, JP1/AO deletes the debugservice and debug task generated the last time the service template was built. When you rebuild a service template aftertesting its operation, JP1/AO deletes the services added from the service template and archives tasks. For details aboutthe services and tasks archived and deleted during build operations, see A.1(5) Deletion and archiving of servicetemplates, services, and tasks during build and release operations.
5. Validating Service Templates
Job Management Partner 1/Automatic Operation Service Template Developer's Guide 124

Assigned configuration typeAfter building, a service template is assigned the Debug configuration type. Only users assigned the Admin or Developrole can view and work with Debug configuration type service templates and the associated services and tasks.
Output destinations of service templatesWhen you build a service template, a service template package is created in the following folder with the name vendor-ID_name_version_d.st:
In a non-cluster systemJP1/AO-installation-folder\develop\output
In a cluster systemshared-folder-name\develop\output
Related topics• 2.1.2 Overview of development service templates and release service templates
• 5.1.1 Flow of service template validation
• 5.2.1 Procedure for building a service template
• A.1 Reference information for build and release operations
5.1.3 Overview of debuggingDebugging is the process of using the Debug view and the service template debugging view to check the operation ofa service template you have built, and identify issues in its flow or plug-ins. When you debug a service template,JP1/AO creates a debug service and debug task. The debug process involves executing this debug task.
If the debug process reveals an issue, the user stops debugging and edits the affected service template or plug-in.
ObjectivePerform a debug operation to make sure the flow and plug-ins of a service template are working as intended. For example,you can confirm that property mapping is set correctly and that the conditions for executing subsequent steps branchthe flow in the intended way. In the Debug view and the service template debugging view, you can:
• Execute debug tasks while checking the flow transitions at all hierarchical levels (including hierarchy flows andrepeated flows) and the results of plug-in processing.
• Execute debug tasks while making sure that property values are assigned correctly by the property mappingconfigured for the service template.
• If you detect an issue with a plug-in, you can assign an arbitrary property value or return value to the plug-in andexecute it again. This allows you to see the effect a given property value or return value has on the plug-in processingand flow transitions.
Number of executionsYou can debug a service template any number of times. If the debug process reveals an issue with the service template,the user can repeat the series of operations from amending the development service template or development plug-into building and debugging until all issues are resolved.
5. Validating Service Templates
Job Management Partner 1/Automatic Operation Service Template Developer's Guide 125

Debug servicesA debug service is a service generated and executed when debugging a service template. One debug service is generatedper service template. When you debug a service template that has already been through a debug process, JP1/AO deletesthe existing debug service and creates a new one.
Note that debug services appear in the Service Name column in the Debug-Tasks view, but do not appear in the Serviceswindow.
Debug tasksA debug task is a task generated for a debug service when debugging a service template. When you debug a servicetemplate that has already been through a debug process, JP1/AO deletes the existing debug task and creates a new one.
Debug tasks appear in the service template debugging view and Debug-Tasks view. Only users assigned the Admin orDevelop role can view and work with debug tasks.
Note that debug tasks do not appear in the task summary.
Related topics• 2.1.2 Overview of development service templates and release service templates
• 5.1.1 Flow of service template validation
• 5.3.1 Flow of service template debugging
• 5.3.2 Functions used during debug operations
• 5.3.3 Example of service template debugging
5.1.4 Overview of operation testsAn operation test is the process of adding a service from a service template you have built, and executing it in thedevelopment environment. This provides final confirmation that the service template is ready for real-world use.
If the operation test reveals a problem, the user can edit the service template or plug-in in the Editor window.
ObjectivesPerform an operation test by executing a service generated from the service template to confirm that it will work correctlyin the active environment. The user can also test the usability of the service template by adding and executing servicesfrom the Services window in a way that reflects real-world use. For example, the user can specify a schedule for theservice, check whether it operates as intended, and make sure that the appropriate properties are visible in the userinterface.
Number of executionsYou can conduct any number of operation tests for a given service template. If the operation test reveals an issue withthe service template, the user repeats the series of operations from amending the development service template ordevelopment plug-in to building, debugging, editing, and testing it until all issues are resolved.
Related topics• 2.1.2 Overview of development service templates and release service templates
• 5.1.1 Flow of service template validation
• 5.5.1 Procedure for testing service templates
5. Validating Service Templates
Job Management Partner 1/Automatic Operation Service Template Developer's Guide 126

• Managing services in the Job Management Partner 1/Automatic Operation Administration Guide
• Executing Services in the Job Management Partner 1/Automatic Operation Administration Guide
• Managing Tasks in the Job Management Partner 1/Automatic Operation Administration Guide
5. Validating Service Templates
Job Management Partner 1/Automatic Operation Service Template Developer's Guide 127

5.2 Building service templates
5.2.1 Procedure for building a service templateWhen you select and build a service template, a service template package is created and imported to the JP1/AO server.You can then debug and test the service template.
Important noteAfter you edit the definition of a plug-in that is positioned as a step in a flow, the mapping parameters definedfor the step might no longer match the properties of the edited plug-in. In this scenario, an error occurs whenyou build the service template. You can resolve the mismatch by reviewing the property settings and plug-inplacement.
If the service template editing view is not displayed:
1. In the Life Cycle of a Service Template area of the Service Template Editor Home view, click Edit.
2. In the Service Template List window, select a service template, and then click Edit.
To build a service template:
1. In the service template editing view, click Build/Debug.
2. In the confirmation window, click OK.The results of the build process appear in the Build / Release Result dialog box.
3. If you want to then debug the service template, click Perform Debugging. For details about how to start the debugprocess, see 5.3.4 Procedure for starting the debug process.If you do not want to debug the service template, click End Debug.
If an error occurs during the build process, a message is displayed that describes the cause of the error and instructs theuser to fix the flow. The error message remains on screen until the user closes the service template editing view.
If the service template you are working with has already been released or deleted by another user, an error occurs andthe build process fails.
Related topics• 2.1.4 Behavior when an intervening action occurs in the Editor window
• 2.1.2 Overview of development service templates and release service templates
• 5.1.1 Flow of service template validation
• 5.1.2 Overview of building
• A.1 Reference information for build and release operations
5. Validating Service Templates
Job Management Partner 1/Automatic Operation Service Template Developer's Guide 128

5.3 Debugging service templates
5.3.1 Flow of service template debuggingThe following describes the general procedure for debugging a service template:
1. If you do not expect any issues when executing the plug-ins in the service template, the first step of the debug processis to execute the debug task without pausing between steps.In the Debug view or the service template debugging view, make sure that there are no issues with the flow transitionsor the processing of the plug-ins.If the service template contains plug-ins that you would prefer not to execute at this time, skip this step and startfrom step 2 instead.
2. If you identify an issue with a flow transition or the processing of a plug-in, execute the steps in the debug taskindividually to identify the precise location and nature of the problem. You can also test the behavior of the plug-ins by assigning unexpected values to input and output properties. You can debug the service template any numberof times by clicking Perform Debugging in the service template debugging view.
3. Amend the service template in the service template editing view.
4. Build and debug the service template again, repeating steps 1 to 4 until all issues are resolved.
5. Make sure that all issues have been resolved, and finish the debug process.
TipAfter executing a debug task, you do not need to perform the build operation again if you repeat the debugprocess without amending the service template.
Related topics• 5.1.1 Flow of service template validation
• 5.1.2 Overview of building
• 5.1.3 Overview of debugging
• 5.3.2 Functions used during debug operations
• 5.3.3 Example of service template debugging
5.3.2 Functions used during debug operationsThe table below lists the functions used when debugging service templates. When debugging service templates, use thefunctions that are appropriate for what you want to achieve.
Table 5‒1: Functions used during debug operations
Function Description Reference
Interruptionsettings for
There are two ways to execute a debug task:• Do not break after each step
5.3.4 Procedure for starting thedebug process, 5.3.7 Flow of debugprocess without pausing between
5. Validating Service Templates
Job Management Partner 1/Automatic Operation Service Template Developer's Guide 129

Function Description Reference
debugoperations
Like execution of a normal task, processing of the debug task proceeds withoutpausing between steps. You can check the execution results of the debug taskand identify steps where issues occur.
• Break after each stepExecution of the debug task pauses between each step. This allows you to checkthe values of plug-in properties and return values step by step.
steps, 5.3.8 Flow of debug processwhen pausing between steps
Displaying flowinformation
There are two ways to display the flow of a debug task:• Flow view
In the service template debugging view and Tasks window, you can view thestatus of steps and the flow transitions at each hierarchical level.
• Flow Tree viewIn the service template debugging view, you can view flow hierarchies in treeformat. You can also identify paused steps in each flow hierarchy.You can also view flow hierarchies in tree format from the Tasks window.
5.3.24 Displaying the flow of adebug task, 5.3.25 Displaying theflow tree of a debug task, 5.4 Managing debug tasks
Displaying tasklogs
The contents of the task log appear in the Task Log tab of the service templatedebugging view. You can configure JP1/AO to automatically refresh the contentsof the task log.
5.4.4 Procedure for checking tasklog entries for debug tasks
Checkingpropertymapping
You can display the values of plug-in properties and the property mapping settingsin the Debug view. By viewing this information together with the service propertyvalues displayed in the Properties tab of the service template debugging view, youcan check whether property mapping is set up correctly.
5.3.16 Procedure for checkingproperty mapping settings duringdebugging
Changinginformation in astep#
You can change a property value or return value of a plug-in to any value.• You can pause a step before its plug-in processing is executed and change the
value of input properties.• You can pause a step after its plug-in processing is executed and change the
value of output properties or the return value of the plug-in.
5.3.17 Procedure for changing thevalue of a plug-in input propertyduring debugging, 5.3.18 Procedure for changing the value ofa plug-in output property duringdebugging, 5.3.19 Procedure forchanging plug-in return valuesduring debugging
Skipping plug-inprocessing#
You can skip plug-in processing and continue processing as if execution of the stephad completed.
5.3.12 Procedure for skippingplug-in processing during the debugprocess
Retrying tasks There are two approaches to retrying a failed debug task:• Retry the task from the failed step
You can resume task execution from the failed step.• Retry the task from the step after the failed step
You can resume task execution from the next step, as if the failed step hadfinished normally.
5.3.13 Procedure for retrying a taskfrom a failed step duringdebugging, 5.3.14 Procedure forretrying a task from the step after thefailed step during debugging
Managing debugtasks
You can perform the following operations in relation to debug tasks:• Display a list of all debug tasks• Stop execution of a debug task• Forcibly stop a debug task• Delete a debug task
5.4 Managing debug tasks
#This function is available when Interrupt After Each Step is selected as the break setting for the debug process.
Related topics• 5.3.1 Flow of service template debugging
• 5.3.3 Example of service template debugging
5. Validating Service Templates
Job Management Partner 1/Automatic Operation Service Template Developer's Guide 130

5.3.3 Example of service template debuggingWhen debugging a service template, users need to adjust various settings according to the aspects of the service templatethey want to check.
An example of the operations a user performs when debugging a service template is shown below.
This example describes the procedure for debugging a service template in the following scenario:
Issues with service template being debugged
Issue 1:There is an issue with the mapping between a service property and an input property of Step A.
User objectives
Objective 1:To check the execution results of other steps before amending the service template.
Objective 2:To check the processing of Plug-in A.
Objective 3:To prevent the processing of Plug-in B from being executed.
Objective 4:To check the results of Plug-in C.
Figure 5‒2: Example of debugging service templates
1. As indicated by Objective 3, there is a plug-in within the flow that the user does not want to execute. Therefore, theuser needs execution of the debug task to pause between steps. To achieve this, select Interrupt After Each Stepfrom the Interruption Settings list box in the Perform Debugging dialog box.
2. Specify the definition information for the service, and click Run.The Debug view and the service template debugging view appear.
3. In the Debug view, check the value of Input property A in Step A. Make sure that the value of Input service property1 has been mapped correctly in the Properties tab.Through this process, you can identify the problem with the input property mapping of Step A (Issue 1).
5. Validating Service Templates
Job Management Partner 1/Automatic Operation Service Template Developer's Guide 131

4. To check the processing of Plug-in A when the value of the input property is set correctly (Objective 2), change thevalue of input property A in the Debug view.
5. In the Debug view, click Rerun to execute the processing of Plug-in A.
6. Check the results of Step A in the Debug view, Flow view, and Task Log tab.
7. To check the execution results of the other steps (Objective 1), you need to advance the processing of the debugtask. In the Flow view, select Step B.
8. To skip the processing of Plug-in B (to meet Objective 3), from the Execution Settings list box in the Debug view,select Do not execute the plug-in processing.
9. In the Debug view, click Rerun to execute Step B.The processing of Plug-in B is skipped and Step B finishes executing.
10. In the Flow view, make sure that Step C has begun executing according to the subsequent-step execution conditionof Step B.
11. In the Debug view, click Rerun to execute the processing of Plug-in C.The debug tasks ends normally.
12. To meet Objective 4, check the execution results of Step C in the Debug view, Flow view, and Task Log tab.
13. In the service template debugging view, click End Debug.The service template editing view appears.
14. Amend the property mapping settings of Step A.
15. After saving the service template, build the service template again and begin the debug process.
Related topics• 5.1.1 Flow of service template validation
• 5.1.2 Overview of building
• 5.1.3 Overview of debugging
• 5.3.1 Flow of service template debugging
• 5.3.2 Functions used during debug operations
5.3.4 Procedure for starting the debug processWhen JP1/AO has successfully built the service template, you can begin the debug process. This involves selecting thebreak setting for debug service execution and setting the definition information for the debug service and debug task.
Note that schedule information is ignored during debug operations. All plug-ins are executed immediately.
To start the debug process:
1. From the Interruption Settings list box in the Perform Debugging dialog box, select the execution method for thedebug task.To pause after each step as you execute the debug task, select Interrupt After Each Step. To execute the debugtask without pausing between steps, select Do Not Break.
5. Validating Service Templates
Job Management Partner 1/Automatic Operation Service Template Developer's Guide 132

2. Set the definition information for the debug service. For details about the parameters you can set in the PerformDebugging dialog box, see 5.3.5 Settings used when beginning the debug process.
3. Click the Run button.The Debug view and the service template debugging view appear in the Editor window, and the debug task isexecuted.
4. If you select Interrupt After Each Step as the break setting, execution of the debug task pauses after each step.You can resume execution of the task by clicking Rerun in the Debug view.
Important note• The break setting governs whether execution of the debug task pauses between steps. If you want to check
the execution results of each step as you go, or the task contains plug-ins you do not want to execute at thattime, select Interrupt After Each Step as the break setting.
• The Perform Debugging dialog box shows the service template as it was configured when last built by thecurrent user. If another user edits and builds the same service template after the debugging user, the changesdo not apply to the contents of the service template shown in the Perform Debugging dialog box.
• A debug task is forcibly terminated in the following circumstances:
• The JP1/AO server stops.
• Failover to another node in a cluster system occurs.
• The user logs out of JP1/AO.
• Closing your Web browser during the debug process does not stop the debug task. If you close your Webbrowser, processing of the debug task continues until reaching a point where it would normally stop. If youhave configured JP1/AO to break between each step of the debug task, processing of the debug task remainspaused indefinitely at the current or succeeding step. If this occurs, the user needs to log in again and stopthe debug task from the Debug-Tasks view of the Tasks window. The Debug view and the service templatedebugging view do not re-appear. To execute the debug task again, you need to rebuild the service templateand restart the debug process.
• If another user builds the same service template in the period of time after you build the service templatebut before you begin the debug process, an error occurs after you click Run in the Perform Debuggingdialog box.
• A single JP1/AO system can execute a maximum of 10 plug-ins concurrently in a debug task. For detailsabout the maximum number of plug-ins that can be executed at one time and what happens when the numberexceeds this limit, see Maximum number of plug-ins contained in a task that can be executed concurrentlyin the Job Management Partner 1/Automatic Operation Administration Guide.
• The status of debug tasks is subject to JP1 event reporting and email notification.
Related topics• 5.3.2 Functions used during debug operations
• 1.1.3 Main windows used to develop service templates
• 5.2.1 Procedure for building a service template
• 5.3.1 Flow of service template debugging
• 5.3.7 Flow of debug process without pausing between steps
• 5.3.8 Flow of debug process when pausing between steps
5. Validating Service Templates
Job Management Partner 1/Automatic Operation Service Template Developer's Guide 133

5.3.5 Settings used when beginning the debug processIn the Perform Debugging dialog box, you can enter the break setting, service name, category, task name, taskdescription, resource group, task log output level, and property values.
Table 5‒2: Items set in Perform Debugging dialog box
Item Description
Interruption Settings As the break setting for the debug task, select one of the following:• Do Not Break
The debug task is executed without pausing between steps.• Interrupt After Each Step
Execution of the debug task pauses between each step.
Service Name Enter the name of the debug service. The default is [DEBUG]name-of-executed-service-template.
Category Enter the category of the debug service. The default is category-of-executed-service-template.
Task Name Enter the name of the debug task. The default is [DEBUG]name-of-executed-service-template_current-time. The format of current-time is YYYYMMDDhhmmss.
Task Description Enter a description of the debug task. This field is empty by default.
Resource Group Select the resource group in which to register the debug service. The default is All Resources.
Task Log Level Select the level of messages output to the task log. The default is 40.The log level you select applies only to the debug task. It has no effect on the existing shared built-in serviceproperty com.hitachi.software.dna.sys.task.log.level.
Property Set the values of the input properties of the service. Default values are assigned according to the serviceproperty definitions set when creating the service template.The property values set in this area are specific to the debug task, and do not affect service share propertieselsewhere in the system. Therefore, the values you set will not affect other services that reference the serviceshare properties.
5.3.6 Procedure for debugging a service template again withoutrebuilding
After executing a debug task, you can debug the same service template again by running the debug task from the servicetemplate debugging view that is already displayed. In this case, you do not need to build the service template again.
When you initiate another debug process, JP1/AO deletes the debug service and debug task generated during the lastdebug process, and generates a new debug service and debug task.
To execute a new debug task without building the service template again:
1. If the debug task is in completed or failed status, click Perform Debugging in the service template debugging view.If the debug task is still in progress, forcibly stop it.
2. In the Perform Debugging dialog box, enter the interruption settings and definition information for the debugservice.
3. Click Run.The debug task is executed.
5. Validating Service Templates
Job Management Partner 1/Automatic Operation Service Template Developer's Guide 134

Important note• The Perform Debugging dialog box shows the service template as it was configured when last built by the
current user. If another user edits and builds the same service template in the meantime, the changes do notapply to the contents of the service template shown in the Perform Debugging dialog box.
• You can only debug a service template again without building it again if the service template debuggingview is still displayed. If you close the service template debugging view by clicking the End Debug buttonor logging out of JP1/AO, you need to rebuild the service template before debugging it.
Related topics• 5.3.1 Flow of service template debugging
• 5.3.5 Settings used when beginning the debug process
• 5.4.6 Procedure for forcibly stopping debug tasks
5.3.7 Flow of debug process without pausing between stepsLike a normal task, processing of the debug task proceeds without pausing between steps. You cannot change the valuesof plug-in properties or the return value of the plug-in.
You might use this approach when you want to make sure a task still ends normally after you edit the service templateor plug-in, or you want to identify problems with the flow transitions.
Debugging without pausing between steps:
1. In the Perform Debugging dialog box, select Do Not Break in the Interruption Settings list box.
2. Specify the definition information for the debug service.
3. Click Run.The Debug view and the service template debugging view appear, and the debug task is executed.
4. Check the execution results in the Debug view and the service template debugging view.
5. After the debug task has finished, edit the service template or plug-ins as needed.
Related topics• 5.3.4 Procedure for starting the debug process
• 5.3.5 Settings used when beginning the debug process
• 5.3.16 Procedure for checking property mapping settings during debugging
• 5.3.24 Displaying the flow of a debug task
• 5.4.4 Procedure for checking task log entries for debug tasks
5. Validating Service Templates
Job Management Partner 1/Automatic Operation Service Template Developer's Guide 135

5.3.8 Flow of debug process when pausing between stepsYou can configure JP1/AO to pause after each step as it executes the debug task. This gives the user the opportunity toperform the actions below. If a flow includes multiple steps executed in parallel, you can perform these actions for eachstep.
• Check the flow transitions and plug-in processing at the level of individual steps
• Select whether to execute the processing of a particular plug-in
• Change the values of plug-in properties and the return values of plug-ins
You might use this approach when you have a general idea of where a problem is located in the flow, and want to keepa close eye on the task as it executes. You could also use this procedure to see how the task behaves with unexpectedproperty values.
Important noteIf a plug-in returns a value of 65 or higher, the processing of the debug task will not pause after the plug-in,even if configured to do so in the interruption settings. This could occur when the value of an input property isspecified incorrectly, or JP1/AO is unable to connect to the OS of the operation target device.
Debugging with pauses between steps:
1. In the Perform Debugging dialog box, select Interrupt After Each Step in the Interruption Settings list box.
2. Specify the definition information for the debug service.
3. Click Run.The Debug view and the service template debugging view appear, and the debug task is executed.JP1/AO executes the debug task from the first step in the flow, which immediately pauses before executing its plug-in processing. For details about the flow of tasks in this scenario, see 5.3.9 Processing of debug process whenpausing between steps.
4. In the Debug view and the Properties tab, check the mapping of the input properties, and change the input propertiesto arbitrary values as needed.
5. Select whether to execute plug-in processing. If you choose not to execute the processing of a particular plug-in,specify the output properties and return value of the plug-in. If you want to change the output properties and returnvalue of a plug-in after executing its processing, configure JP1/AO to pause after processing the plug-in.
6. Click Rerun to resume step execution. If the plug-in requires a response, provide the response now.Plug-in processing is executed and execution of the step finishes.
7. If you configured JP1/AO to pause after executing the plug-in processing in step 5, change the output propertiesand return values as needed, and then click Rerun.
8. JP1/AO executes the subsequent step according to the subsequent-step execution condition, but pauses beforeexecuting the plug-in processing.
9. To execute the subsequent step, repeat steps 4 to 7.
10. After the debug task has finished, edit the service template or plug-ins as needed.
5. Validating Service Templates
Job Management Partner 1/Automatic Operation Service Template Developer's Guide 136

Related topics• 5.3.4 Procedure for starting the debug process
• 5.3.10 Plug-ins that cannot be paused during debugging
• 5.3.11 Step information that can be changed while step execution is paused
• 5.3.15 Handling debug tasks that are waiting for a response (response entry)
• 5.3.16 Procedure for checking property mapping settings during debugging
• 5.3.17 Procedure for changing the value of a plug-in input property during debugging
• 5.3.18 Procedure for changing the value of a plug-in output property during debugging
• 5.3.19 Procedure for changing plug-in return values during debugging
5.3.9 Processing of debug process when pausing between stepsIf you execute a debug task with Interrupt After Each Step specified as the break setting, the steps in the flow arepaused before their plug-in processing is executed. The flow of processing when the step is resumed and the timing withwhich execution is paused depends on the debugging setting of the plug-in. This section describes the processing forthe following scenarios:
• When executing a step
• When skipping plug-in processing
• When changing the output properties and return value of a plug-in
Processing when executing a stepThe following describes the processing of the debug task when a step is executed with Interrupt After Each Stepspecified as the break setting.
Figure 5‒3: Flow of processing when executing a step
1. When you execute the debug task, JP1/AO begins executing Step A.
2. The value of the input property Input A of Plug-in A is generated, and Step A pauses before executing the processingof Plug-in A.
3. When you resume execution of Step A, JP1/AO executes the processing of Plug-in A.
4. JP1/AO begins executing Step B according to the subsequent-step execution condition.
5. Validating Service Templates
Job Management Partner 1/Automatic Operation Service Template Developer's Guide 137

The value of the input property Input B of Plug-in B is generated, and Step B is paused before executing theprocessing of Plug-in B.
Flow of processing when skipping plug-in processingThe following describes the processing of the debug task when a step is executed with Interrupt After Each Stepspecified as the break setting, and Do not execute the plug-in processing is specified as the debugging setting.
Figure 5‒4: Flow of processing when skipping plug-in processing
1. With Step A paused before executing the processing of Plug-in A, you select Do not execute the plug-inprocessing as the debugging setting for Plug-in A. You are then able to specify the values of output properties andthe return value of the plug-in.
2. When you resume Step A, JP1/AO skips the execution of Plug-in A.
3. Step B begins executing, subject to the output properties and return value you specified.The value of the input property Input B of Plug-in B is generated. Step B is paused before executing the processingof Plug-in B.
Flow of processing when changing output properties and return valuesThe following describes the processing of the debug task when Interrupt After Each Step is specified as the breaksetting, and Interrupt after the plug-in processing is specified as the debugging setting.
Figure 5‒5: Flow of processing when changing output properties and return values
1. With Step A paused before executing the processing of Plug-in A, if you select Interrupt after the plug-inprocessing as the debugging setting for Plug-in A and resume Step A, JP1/AO executes the processing of Plug-inA.After processing Plug-in A, the execution of Step A pauses before the step finishes, allowing you to change outputproperties and return values.
5. Validating Service Templates
Job Management Partner 1/Automatic Operation Service Template Developer's Guide 138

2. When you resume Step A, Step B starts executing subject to the output property values and return value you specified.The value of the input property Input B of Plug-in B is generated. Step B is paused before executing the processingof Plug-in B.
Related topics• 5.3.8 Flow of debug process when pausing between steps
• 5.3.11 Step information that can be changed while step execution is paused
• 5.3.12 Procedure for skipping plug-in processing during the debug process
• 5.3.17 Procedure for changing the value of a plug-in input property during debugging
• 5.3.18 Procedure for changing the value of a plug-in output property during debugging
• 5.3.19 Procedure for changing plug-in return values during debugging
5.3.10 Plug-ins that cannot be paused during debuggingSome plug-ins cannot be paused when executing a step, even if Interrupt After Each Step is selected as the breaksetting for the debug task. When one of these plug-ins is encountered in the debug process, the flow automaticallyadvances to the succeeding step.
Table 5‒3: Ability to pause plug-ins
No. Plug-in name Can be paused
1 Basic plug-ins General command plug-in Y
2 File-forwarding plug-in Y
3 Repeated execution plug-in Y
4 Email notification plug-in Y
5 User-response wait plug-in Y
6 Standard output plug-in Y
7 Terminal connect plug-in Y
8 Terminal command plug-in Y
9 Terminal disconnect plug-in Y
10 Flow plug-in N
11 Interval plug-in N
12 Judge returncode plug-in N
13 Test value plug-in Y
14 Abnormal-end plug-in N
15 Judge value plug-in N
16 Content plug-ins Y
17 Incompatible steps in service templates created in versions of JP1/AO earlier than 10-10 N
Legend:Y: Can be paused. N: Cannot be paused.
5. Validating Service Templates
Job Management Partner 1/Automatic Operation Service Template Developer's Guide 139

5.3.11 Step information that can be changed while step execution ispaused
You can change the information of a step in a debug task while execution of the step is paused during the debug process.When there is an issue with a plug-in, this allows you to change the values of input properties and output properties andsee how it affects plug-in processing.
The information you can change depends on when the step was paused.
Table 5‒4: Step information that can be changed while a step is paused
Item If the step was paused before executing plug-in processing If the step was pausedafter executing plug-inprocessingWhen not skipping plug-in
processingWhen skipping plug-inprocessing
Values of plug-in input properties Y N N
Values of plug-in output properties N Y Y
Return value of plug-in N Y Y
Legend:Y: Can be changed. N: Cannot be changed.
5.3.12 Procedure for skipping plug-in processing during the debugprocess
If there are plug-ins whose processing you do not want to execute during the debug process, you can skip the processingof those plug-ins. You can specify the values of output properties and the return value of these plug-ins so that it appearsto the next step as if the plug-in has executed. This allows you to assess the effect the subsequent-step executionconditions have on the status transitions of steps and tasks, flow transitions, and the processing of subsequent steps.
For details on plug-ins whose processing cannot be skipped, see 5.3.10 Plug-ins that cannot be paused during debugging.
Note that you can only skip plug-in processing when Interrupt After Each Step is selected as the break setting for thedebug process.
To skip plug-in processing:
1. With the step whose plug-in you do not want to execute paused, select Do not execute the plug-in processing fromthe Execution Settings list box in the Debug view.
2. In the Return Value text box, specify the value you want to use as the return value of the plug-in.The return value you specify determines the status transitions of steps and tasks and the flow transitions, subject tothe subsequent-step execution conditions.
3. Specify values for output properties as needed.
TipIf you have configured output property mapping, the value you specify for an output property is passed tothe service property (output property or variable) to which it is mapped. If you do not specify a value, theservice property (output property or variable) to which the output property is mapped will have a null value.
5. Validating Service Templates
Job Management Partner 1/Automatic Operation Service Template Developer's Guide 140

4. Click Rerun.
Related topics• 5.3.4 Procedure for starting the debug process
• 5.3.9 Processing of debug process when pausing between steps
• 5.3.18 Procedure for changing the value of a plug-in output property during debugging
• 5.3.19 Procedure for changing plug-in return values during debugging
• 3.2.4 Overview of subsequent step conditions
5.3.13 Procedure for retrying a task from a failed step during debuggingWhen a debug task fails partway through, you can retry the task from the failed step.
By retrying from a failed step, you can resume the debug task with the same task ID and the original property values.You can use this approach when the cause of the failure has been resolved. For example, a step that fails due to atemporary problem with the network can be retried when the network connection is available again.
For details about retrying tasks, see Retrying tasks in the Job Management Partner 1/Automatic OperationAdministration Guide. This describes situations in which property values are not inherited, whether tasks in a particularstatus can be retried, and other considerations.
To retry a task from a failed step during debugging:
1. With the debug task in Failed status, from the Retry list box in the Debug view, select Retry the Task From theFailed Step.A dialog box appears in which you can confirm that you want to retry the task from the failed step.
2. Click the OK button.
Related topics• 5.3.14 Procedure for retrying a task from the step after the failed step during debugging
• Retrying tasks in the Job Management Partner 1/Automatic Operation Administration Guide
5.3.14 Procedure for retrying a task from the step after the failed stepduring debugging
When a debug task fails partway through, you can retry the task from the step after the failed step.
By retrying from the step after the failed step, you can resume the debug task with the same task ID and the originalproperty values. This approach is appropriate in situations where there is no need to execute the failed step. When youretry a task from the step after the failed step, processing of the task continues as if the failed step had ended normally.You can use this approach when you encounter an issue in a step, but want to continue executing the debug task anddeal with the issue later.
For details about retrying tasks, see Retrying tasks in the Job Management Partner 1/Automatic OperationAdministration Guide. This describes situations in which property values are not inherited, whether tasks in a particularstatus can be retried, and other aspects of retrying tasks.
5. Validating Service Templates
Job Management Partner 1/Automatic Operation Service Template Developer's Guide 141

To retry a task from the step after a failed step during debugging:
1. With the debug task in Failed status, from the Retry list box in the Debug view, select Retry the Task From theStep After the Failed Step.A dialog box appears in which you can confirm that you want to retry the task from the step after the failed step.
2. Click the OK button.
Related topics• 5.3.13 Procedure for retrying a task from a failed step during debugging
• Retrying tasks in the Job Management Partner 1/Automatic Operation Administration Guide
5.3.15 Handling debug tasks that are waiting for a response (responseentry)
If a debug task requires a user response during execution, you can provide the response in the Debug view.
To respond to a debug task that is waiting for a user response:
1. With the debug task in Waiting for Response status, click Enter Response in the Debug view.
2. Read the message in the Respond dialog box, and click the button associated with the action you want to perform.
3. In the Information dialog box, click the OK button.Depending on the response you entered, the plug-in processing of the step resumes or stops.
5.3.16 Procedure for checking property mapping settings duringdebugging
The following describes how to check whether the values of service properties and plug-in properties are mapped asintended during the debug process.
By viewing the Properties tab of the Debug view and the service template debugging view, you can make sure that thesame value is assigned to plug-in properties and the service properties to which they are mapped.
Use the following timing to check the mapping settings during debugging:
• For mapping between plug-in input properties and service input properties or variablesWhile the step is paused before executing the plug-in processing.
• For mapping between plug-in output properties and service output properties or variables
• If skipping plug-in processing, when the step is resumed after you specify the plug-in output properties andreturn value.
• After resuming a step that was paused after executing plug-in processing.
5. Validating Service Templates
Job Management Partner 1/Automatic Operation Service Template Developer's Guide 142

Figure 5‒6: Window for checking property mapping
To check the property mapping of a plug-in:
1. In the Flow view, select the step whose plug-in property values you want to check.The Debug view displays the input properties and output properties of the step you selected.
2. Click the Properties tab at the bottom of the service template debugging view.The values of the service properties are displayed.
3. In the Debug view, review the contents of the Mapping Parameters column for the plug-in property you want tocheck, and identify the service property to which it is mapped.
4. In the Property Key column of the Properties tab, find the service property you identified in step 3.
5. In the Debug view and the Property List view, make sure that the same value appears in the Property Value columnsfor the plug-in property and the mapped service property.If a service property is not mapped to the intended plug-in property or the values of the plug-in property and theservice property differ, fix the problem in the service template editing view.You can also change the values of the plug-in properties. By doing so, you can test the plug-in processing whenproperty mapping is configured correctly, and see how the processing of subsequent steps and the flow transitionschange with an assortment of values.
TipProperty types are represented by the following icons in the Debug view and the Properties tab:
icon
Indicates an input property.
5. Validating Service Templates
Job Management Partner 1/Automatic Operation Service Template Developer's Guide 143

icon
Indicates an output property.
icon
Indicates a variable.
Important noteWhen parallel is specified for the foreachMode property of a repeated execution plug-in, values assignedto service properties in a repeated flow executed in parallel do not appear in the Properties tab.
Related topics• 5.3.9 Processing of debug process when pausing between steps
• 5.3.17 Procedure for changing the value of a plug-in input property during debugging
• 5.3.18 Procedure for changing the value of a plug-in output property during debugging
5.3.17 Procedure for changing the value of a plug-in input property duringdebugging
You can change the value of plug-in input properties during debugging. By changing the input property to an arbitraryvalue before executing a plug-in, you can see how different property values affect the processing of the plug-in.
Note that you can only change the values of input properties if Interrupt After Each Step is selected as the breaksetting.
To change the value of an input property during debugging:
1. In the Flow view, select a step that is in Interrupted status.
2. In the Debug view, select Execute the plug-in processing from the Execution Settings list box.
3. In the Debug view, specify the desired values for the input properties.
4. Click Rerun.
Related topics• 5.3.4 Procedure for starting the debug process
• 5.3.8 Flow of debug process when pausing between steps
• 5.3.9 Processing of debug process when pausing between steps
• 5.3.16 Procedure for checking property mapping settings during debugging
• 5.3.21 Effect of changing the values of plug-in properties during debugging
• 5.3.22 When the value of a plug-in property includes surrogate pair characters or control characters
• 5.3.23 Linefeed codes in values of plug-in properties (when step execution is paused)
5. Validating Service Templates
Job Management Partner 1/Automatic Operation Service Template Developer's Guide 144
5.3.18 Procedure for changing the value of a plug-in output propertyduring debugging
You can change the values of plug-in output properties during debugging. By changing an output property to an arbitraryvalue after executing or skipping a plug-in, you can see how different property values affect the processing of subsequentsteps and the flow transitions.
Note that you can only change the values of output properties if Interrupt After Each Step is selected as the breaksetting.
The method of changing the output property value differs according to whether a step skips or executes plug-inprocessing.
To change the value of an output property during debugging (when executing plug-in processing):
1. In the Flow view, select a step that is in Interrupted status.
2. In the Debug view, select Execute the plug-in processing from the Execution Settings list box.
3. Select the Interrupt after the plug-in processing check box.
4. Click Rerun.The step is paused after the plug-in processing is executed.
5. In the Debug view, specify the desired values for the output properties.
6. Click Rerun.
To change the value of an output property during debugging (when skipping plug-in processing):
1. In the Flow view, select a step that is in Interrupted status.
2. In the Debug view, select Do not execute the plug-in processing from the Execution Settings list box.
3. In the Debug view, specify the desired values for the output properties.
4. Click Rerun.
Related topics• 5.3.4 Procedure for starting the debug process
• 5.3.8 Flow of debug process when pausing between steps
• 5.3.9 Processing of debug process when pausing between steps
• 5.3.12 Procedure for skipping plug-in processing during the debug process
• 5.3.16 Procedure for checking property mapping settings during debugging
• 5.3.21 Effect of changing the values of plug-in properties during debugging
• 5.3.22 When the value of a plug-in property includes surrogate pair characters or control characters
• 5.3.23 Linefeed codes in values of plug-in properties (when step execution is paused)
5. Validating Service Templates
Job Management Partner 1/Automatic Operation Service Template Developer's Guide 145

5.3.19 Procedure for changing plug-in return values during debuggingYou can change the return value of a plug-in during debugging. By changing the return value to an arbitrary value afterexecuting or skipping plug-in processing, you can see how different return values affect aspects of the task. This includesthe status transitions of steps and tasks, processing of subsequent steps, and flow transitions influenced by thesubsequent-step execution condition.
Note that you can only change return values if Interrupt After Each Step is selected as the break setting.
The method of changing the return value differs according to whether plug-in processing is executed or skipped.
To change the return value during debugging (when executing plug-in processing):
1. In the Flow view, select a step that is in Interrupted status.
2. In the Debug view, select Execute the plug-in processing from the Execution Settings list box.
3. Select the Interrupt after the plug-in processing check box.
4. Click Rerun.The step is paused after the plug-in processing is executed.
5. In the Debug view, specify the desired return value in the Return Value text box.
6. Click Rerun.
To change the return value during debugging (when skipping plug-in processing):
1. In the Flow view, select a step that is in Interrupted status.
2. In the Debug view, select Do not execute the plug-in processing from the Execution Settings list box.
3. In the Debug view, specify the desired return value in the Return Value text box.
4. Click Rerun.
Related topics• 5.3.4 Procedure for starting the debug process
• 5.3.8 Flow of debug process when pausing between steps
• 5.3.9 Processing of debug process when pausing between steps
• 5.3.12 Procedure for skipping plug-in processing during the debug process
• 3.2.4 Overview of subsequent step conditions
5.3.20 Displaying the values of plug-in properties during debuggingThe following describes the conditions under which the values of plug-in input and output properties appear in the userinterface, and the location where these values appear.
5. Validating Service Templates
Job Management Partner 1/Automatic Operation Service Template Developer's Guide 146

Table 5‒5: Conditions for displaying plug-in properties and their location
Type of plug-inproperty
Displayed plug-ins Display timing Display location
Input property Plug-ins that can be paused, and judgevalue plug-ins
Timing with which plug-inexecution begins
Property Value column inDebug view
Output property Plug-ins that can be paused# Timing with which plug-inprocessing ends
Property Value column inDebug view
#If a plug-in returns a value of 65 or higher, the processing of the debug task will not pause after the plug-in, even ifconfigured to do so in the interruption settings. This might occur when the value of an input property is specifiedincorrectly, or JP1/AO is unable to connect to the OS of the operation target device.
TipFor plug-ins that cannot be paused (except judge value plug-ins), the values of input properties are thosespecified directly in the input property mapping settings when editing the step. Therefore, the input propertyvalues of these plug-ins appear in the Mapping Parameters column in the Debug view.
Related topics• 5.3.10 Plug-ins that cannot be paused during debugging
5.3.21 Effect of changing the values of plug-in properties duringdebugging
During the debug process, the information you can change in relation to a step are the values of plug-in properties andthe return values of plug-ins. Changing the value of a plug-in property does not automatically change the values of theservice properties to which it is mapped. However, changing an output property of a plug-in can indirectly change thevalue of a service property (output property or variable) depending on how output property mapping is configured.
The following shows an example of how changing the values of input and output properties of a plug-in while executinga step affects the behavior of a service template. This example assumes a service template with the following definition:
Figure 5‒7: Example of service template configuration
5. Validating Service Templates
Job Management Partner 1/Automatic Operation Service Template Developer's Guide 147

Property mapping definition
Step A
• The input property Input 1 of the service is mapped to the input property Input A1 of Plug-in A
• The output property Output A1 of Plug-in A is mapped to the variable Variable 1 of the service.
Step B
• The variable Variable 1 of the service is mapped to the input property Input B1 of Plug-in B.
• The input property Input 1 of the service is mapped to the input property Input B2 of Plug-in B.
• The output property Output B1 of Plug-in B is mapped to the output property Output 1 of the service.
Behavior when a property value is changed
Behavior when changing an input property of a plug-inIf you change the value of the input property Input A1 of Plug-in A before executing the plug-in, Plug-in A uses thenew value when it runs. This does not change the value of the service input property Input 1 to which the plug-ininput property Input A1 is mapped. Therefore, the input property Input B2 of the plug-in is assigned the originalvalue specified for the input property of the service.
Behavior when changing an output property of a plug-inIf you change the value of the output property Output A1 after executing the plug-in, the new value is assigned tothe service variable Variable 1 to which Output A1 is mapped. The input property Input B1 of the plug-in also takesthe new value.
5.3.22 When the value of a plug-in property includes surrogate paircharacters or control characters
If the value of a plug-in property contains surrogate pair characters or control characters (excluding line breaks and tabcharacters) at the point when a step is paused during debugging, these characters do not appear on screen. When youresume the step, a value with the surrogate pair characters and control characters (excluding line breaks and tabcharacters) omitted is set as the value of the plug-in property.
When the break setting of the debug task is Do Not Break, the surrogate pair characters and control characters (excludingline breaks and tab characters) in property values do not appear on screen. However, the value of the plug-in propertyretains these characters.
5.3.23 Linefeed codes in values of plug-in properties (when stepexecution is paused)
When a step is paused during debugging, you can change the linefeed code used in the values of the plug-in propertiesfor that step. Specify the linefeed code used in the operating system of the connection destination device of the plug-in.
Service and plug-in properties handle CR+LF as two characters. As such, changing the linefeed code might cause theoutput of the plug-in to exceed the maximum number of characters (1,024 characters), altering the value that is ultimatelyassigned to the property. In this scenario, you can prevent the property value from changing by specifying the samelinefeed code as the environment on the operation target device.
5. Validating Service Templates
Job Management Partner 1/Automatic Operation Service Template Developer's Guide 148

In the Debug view, you can select CR, LF, or CRLF as the linefeed code. When you resume the step, the linefeed codesin all plug-in properties in the step change to the linefeed code you selected. The default is the linefeed code in theexisting property values. If the property values contain more than one linefeed code, the default is the first linefeed codespecified when defining the plug-in properties. If the values of plug-in properties do not contain linefeed codes, thedefault is CRLF.
Note that you do not need to specify a linefeed code if no property values contain line feeds.
5.3.24 Displaying the flow of a debug taskYou can display a flow that represents the debug task you are executing.
The steps in the debug task appear in the Flow view of the service template debugging view, in the order in which theyare executed. The icon of the step indicates the status of the step.
When you rest your mouse pointer on the step icon, the step name, the status icon, and the status of the step are displayed.
TipFor details about step statuses, see Step statuses in the Job Management Partner 1/Automatic OperationAdministration Guide.
Figure 5‒8: Displaying the flow of a debug task
In the Flow view, the border around the icon of a paused step is highlighted as follows:
5. Validating Service Templates
Job Management Partner 1/Automatic Operation Service Template Developer's Guide 149

Figure 5‒9: Icon of paused step (example)
Steps with plug-ins that cannot be paused have an icon with a darker background in the Flow view, as shown below.The icons of steps in a subordinate flow of a repeated execution plug-in also have a darker background until the repeatedexecution plug-in is executed.
Figure 5‒10: Icon (example) of steps with unpausable plug-ins and steps in subordinate flows ofrepeated execution plug-ins (before execution)
Related topics• 5.3.26 Displaying a repeated execution flow during debugging
• 5.3.28 Information displayed for repeated execution plug-ins and repeated flows during debugging
• Step statuse icons in the Job Management Partner 1/Automatic Operation GUI, Command, and API Reference
5.3.25 Displaying the flow tree of a debug taskThe name of the service template appears at the top level of the flow tree. Lower levels are represented by the name ofthe step that executes the flow plug-in or repeated execution plug-in.
During debugging, a pause icon is displayed for levels whose steps are paused (in a status requiring user intervention).
Figure 5‒11: Example of pause icon (when a step in Flow plug-in 2 is paused)
You can find paused steps during debugging by looking for hierarchical levels with pause icons in the flow tree. Byselecting a level with a pause icon, you can identify the paused step from the flow that appears.
The pause icon is not displayed for levels that are above the level containing the paused step in the hierarchy. The statusof the step that represents the flow plug-in or repeated execution plug-in itself and the status of the repeated executionflow are not represented in the flow tree.
Related topics• 5.3.27 Flow tree view for repeated flows during debugging
5. Validating Service Templates
Job Management Partner 1/Automatic Operation Service Template Developer's Guide 150

• 5.3.28 Information displayed for repeated execution plug-ins and repeated flows during debugging
5.3.26 Displaying a repeated execution flow during debuggingDuring debugging, for steps that execute a repeated execution plug-in, the user interface displays each iteration of theflow in the levels below the repeated execution plug-in. This is called a repeated flow. A repeated flow appears as soonas a repeated execution plug-in is executed (during and after execution of the plug-in).
The following shows an example of a repeated execution plug-in executed with hostA,hostB,hostC specified in the InputProperties (inputProperties).
Figure 5‒12: Flow displayed for repeated execution flow
The name of a repeated flow is displayed under the icon in the format iteration-number_input-value-(reserved.loop.input). Repeated flow names that are 65 characters or longer are truncated after the 64th character. If theInput Properties value contains control characters, names are truncated after the 64th character after removing the controlcharacters. Note that iteration-number is a two-digit number. In the example in the figure above, the repeated flownames will be 01_hostA, 02_hostB, and 03_hostC.
Related topics• 5.3.26 Displaying a repeated execution flow during debugging
• 5.3.28 Information displayed for repeated execution plug-ins and repeated flows during debugging
5.3.27 Flow tree view for repeated flows during debuggingThe flow tree of the debug task you are debugging appears in the Flow Tree view of the service template debuggingview. A repeated flow appears as soon as a repeated execution plug-in is executed (and remains after plug-in execution).
5. Validating Service Templates
Job Management Partner 1/Automatic Operation Service Template Developer's Guide 151

Repeated flow names appear in the format iteration-number_input-value-(reserved.loop.input). Repeated flow namesthat are 65 characters or longer are truncated after the 64th character. If the Input Properties value contains controlcharacters, names are truncated after the 64th character after removing the control characters. Note that iteration-number is a two-digit number.
The following shows an example of the window contents when executing a repeated execution plug-in withhostA,hostB,hostC specified in the Input Properties (inputProperties).
Figure 5‒13: Flow tree of repeated flow
Note that all iterations of the repeated flow appear in the window regardless of whether parallel or serial is specifiedfor the foreachMode property.
If you log out during the debug process, information about iterations of the flow that are in Waiting to Repeat statusmight not appear in the flow tree.
Related topics• 5.3.25 Displaying the flow tree of a debug task
• 5.3.28 Information displayed for repeated execution plug-ins and repeated flows during debugging
5.3.28 Information displayed for repeated execution plug-ins andrepeated flows during debugging
The table below describes the information displayed for repeated execution plug-ins and repeated flows when a stepthat includes a repeated execution plug-in is executed during a debug process. This information does not appear untilthe step has started executing.
Table 5‒6: Information displayed for repeated flows
Item Description
Execution method (parallel or serial) The value of the foreachMode property of the repeated execution plug-in is displayed.
Iteration number (reserved.loop.index) Combines with the applicable Input Properties value to give the name of the repeatedflow.This information indicates which of the parameters in the comma-separated dataspecified in the inputProperties property of the plug-in applies to this instance of theflow.
Input Properties (reserved.loop.input) Combines with the iteration number to give the name of the repeated flow.#
This value is the comma-separated value in the inputProperties property of the repeatedflow plug-in that corresponds to the particular iteration of the flow.
Repeated execution result (true or false) This information appears as the value of the outputResult property of the repeatedexecution plug-in.
Output value (reserved.loop.output) This information appears as the outputProperties output property of the repeatedexecution plug-in.
5. Validating Service Templates
Job Management Partner 1/Automatic Operation Service Template Developer's Guide 152

Item Description
Output value (reserved.loop.output) Its value is the value of a plug-in property mapped to reserved.loop.output by outputproperty mapping, output during execution of the particular iteration of the repeatedflow.
#Repeated flow names that are 65 characters or longer are truncated after the 64th character. If the Input Propertiesvalue contains control characters, names are truncated after the 64th character after removing the control characters.
Related topics• 5.3.22 When the value of a plug-in property includes surrogate pair characters or control characters
5. Validating Service Templates
Job Management Partner 1/Automatic Operation Service Template Developer's Guide 153

5.4 Managing debug tasks
5.4.1 Procedure for checking the status of all debug tasksIn the Tasks window, you can view the status of all debug tasks in a list. This feature is useful when you want to viewthe status of several debug tasks, or check the status of a debug task that was executed by another user.
To view the status of all debug tasks:
1. In the left pane of the Tasks window, click the Debug Executed Tasks menu command.
2. In the right pane (Debug-Tasks view) of the Tasks window, view the statuses of the debug tasks.
TipYou can view detailed information about a task in the Debug-Tasks view by clicking the link in the Taskcolumn.
Important noteJP1/AO automatically deletes debug tasks (and archives tasks) whose retention period has expired and tasksexceeding the total number of tasks (including normal tasks) that can be retained. This takes place daily and isperformed at the same time as the automatic archiving of normal tasks. Tasks are deleted or archived in orderfrom the task with the oldest end date. You can change the retention period for debug tasks, the total numberof tasks that can be retained, and the timing of automatic deletion in the property file (config_user.properties).For details about the automatic archiving of tasks, see Archiving tasks and removing histories automatically inthe Job Management Partner 1/Automatic Operation Administration Guide.
Related topics• Property file (config_user.properties) in the Job Management Partner 1/Automatic Operation Configuration Guide
5.4.2 Procedure for checking the progress of debug tasks from the Taskswindow
From the Tasks window, you can view the progress of debug tasks as a flow. You might use this approach when youwant to check the status of steps in a debug task after closing the Debug view and the service template debugging view.You could also use this procedure to check the status of a step in a debug task executed by another user.
To view the status of steps in a debug task from the Tasks window:
1. In the left pane of the Tasks window, click the Debug Executed Tasks menu command.
2. In the right pane (Debug-Tasks view) of the Tasks window, select the task whose step status you want to check.
3. In the Task Monitor view, check the progress of the task. The progress of a task is indicated by an icon superimposedon the step icon.
5. Validating Service Templates
Job Management Partner 1/Automatic Operation Service Template Developer's Guide 154

Related topics• 5.3.25 Displaying the flow tree of a debug task
• 5.3.26 Displaying a repeated execution flow during debugging
• Checking the progress of tasks in flow format in the Job Management Partner 1/Automatic Operation AdministrationGuide
• Step statuses in the Job Management Partner 1/Automatic Operation Administration Guide
• Step status icons in the Job Management Partner 1/Automatic Operation GUI, Command, and API Reference
5.4.3 Procedure for checking detailed progress of debug tasks in listformat
The following describes how to view detailed information about the progress of a debug task. You can view the progressof a debug task from a general perspective, or check the progress of individual steps. Note that only the steps definedat the highest level of the flow appear in the list. Steps in flows at lower hierarchical levels and steps in flow plug-insand repeated execution plug-ins do not appear.
To display detailed progress information for debug tasks in list format:
1. In the left pane of the Tasks window, click the Debug Executed Tasks menu command.
2. In the right pane (Tasks List view) of the Tasks window, click the task-name.
TipYou can achieve the same result by selecting the debug task whose status you want to check in the table,and then clicking Show Task Details.
3. Click Step Details at the bottom of the Task Details dialog box.
4. View the overall progress of the debug task in Step Information.
5. View the progress of individual steps in the Steps area.
5.4.4 Procedure for checking task log entries for debug tasksThe following describes how to view the information output to the task log by a debug task. You cannot view the tasklog for a debug task that is in Waiting status. You can also download the task log to a folder of your choice, under anyfile name.
You can view the task log for a running debug task from the Editor window.
To view the task log for a finished debug task or a debug task that was executed by another user, use the Tasks window.
For details about the information output to the task log, see Task log details in the Job Management Partner 1/AutomaticOperation Administration Guide.
To view the task log for a debug task from the Editor window:
1. In the service template debugging view, click the Task Log tab.
5. Validating Service Templates
Job Management Partner 1/Automatic Operation Service Template Developer's Guide 155

The Task Log tab shows the contents of the task log of the debug task you are debugging.
In the Task Log tab, you can perform actions such as setting the timing with which the contents of the task log arerefreshed, and downloading the task log information to a file. The following describes how to perform these actions.
• To automatically update the task log at regular intervals:Select the Update automatically check box.When you select this check box, the task log is automatically updated each time the status of a step or task changeswhile the debug task is running.
• To manually update the task log:Click Update.
• To download the task log:Click Download Log File.
Tip• When you debug a debug task that has already undergone a debug process, the Update automatically check
box is selected automatically and the task log is refreshed. This also happens when you retry a debut task.
• When you select the Update automatically check box, regardless of the task status, the task log is refreshedand the scroll box in the Task Log tab scrolls to the bottom of the table.
To view the task log for a debug task from the Tasks window:
1. In the left pane of the Tasks window, click the Debug Executed Tasks menu command.
2. View the task log in the right pane (Debug-Tasks view) of the Tasks window.For details about how to view the task log from the Tasks window, see Displaying task logs in the Job ManagementPartner 1/Automatic Operation Administration Guide.
Important note• The task log size specified (in KB) in the property file (config_user.properties) determines the amount of
information displayed in the Task Log dialog box and in the Task Log tab of the service template debuggingview. This amount of information is taken from the end of the task log data. The dialog boxes do not displaythe entire contents of the task log.
• You can set the maximum log file size for debug tasks (in KB) in the property file (config_user.properties).When the maximum file size is exceeded, JP1/AO begins overwriting the oldest information in the task log.
Related topics• Property file (config_user.properties) in the Job Management Partner 1/Automatic Operation Configuration Guide
5.4.5 Procedure for stopping debug tasksThe following describes how to stop a debug task that is still in progress. You can stop a debug task that is in In Progress,Waiting for Response, or Abnormal Detection status. Stopped tasks enter Failed status, unless the final step was alreadyin progress in which case the debug task enters Completed status if the final step ends normally.
5. Validating Service Templates
Job Management Partner 1/Automatic Operation Service Template Developer's Guide 156

If the debug task contains a paused step, the step is automatically resumed and the task ends when the step finishesexecuting.
TipFor details about the difference between stopping and forcibly stopping tasks, see Managing Tasks in theJobManagement Partner 1/Automatic Operation Administration Guide.
To stop a debug task:
1. In the left pane of the Tasks window, click the Debug Executed Tasks menu command.
2. In the right pane (Debug-Tasks view) of the Tasks window, select the debug tasks that you want to stop.You can select multiple debug tasks by holding the Ctrl key as you click. To select all the debug tasks in the list,click Select All.
Important noteClicking a task-name link displays the Task Details dialog box for that task. To prevent this from happening,select each debug task by clicking the empty space in the row for the task.
3. In the More Actions menu, click Stop Tasks.
4. In the Stop Tasks dialog box, review the debug task or tasks you are stopping, and then click OK.
5. In the Information dialog box, click OK.
The selected debug task or tasks enter Failed status.
5.4.6 Procedure for forcibly stopping debug tasksThe following describes how to forcibly stop a debug task that is still in progress. You can forcibly stop a debug taskthat is in In Progress, Waiting for Response, Abnormal Detection, or Terminated status.
When you want to stop a running debug task and perform the debug process again, you can forcibly terminate the debugtask from the Editor window.
You can forcibly stop a task from the Tasks window. Situations in which you might need to forcibly stop a task includeinadvertently closing the Web browser from which you are using JP1/AO while a debug task is in progress, or stoppinga debug task executed by another user.
Forcibly stopped debug tasks enter Failed status.
If the debug task contains a paused step, the debug task stops after the step is automatically resumed, without executingthe plug-in processing.
TipFor details about the difference between stopping and forcibly stopping tasks, see Managing Tasks in theJobManagement Partner 1/Automatic Operation Administration Guide.
5. Validating Service Templates
Job Management Partner 1/Automatic Operation Service Template Developer's Guide 157

To forcibly stop debug tasks from the Editor window:
1. In the Debug view of the Editor window, click Forcibly Stop Tasks.
2. In the Forcibly Stop Tasks dialog box, review the debug task you are forcibly stopping, and then click OK.
3. In the Information dialog box, click OK.
The debug task enters Failed status.
To forcibly stop debug tasks from the Tasks window:
1. In the left pane of the Tasks window, click the Debug Executed Tasks menu command.
2. In the right pane (Debug-Tasks view) of the Tasks window, select the debug tasks you want to forcibly stop.You can select multiple debug tasks by holding the Ctrl key as you click. To select all the debug tasks in the list,click Select All.
Important noteClicking a task-name link displays the Task Details dialog box for that task. To prevent this from happening,select each debug task by clicking the empty space in the row for the task.
3. In the More Actions menu, click Forcibly Stop Tasks.
4. In the Forcibly Stop Tasks dialog box, review the debug tasks you are forcibly stopping, and then click OK.
5. In the Information dialog box, click OK.
The selected debug tasks enter Failed status.
5.4.7 Procedure for deleting debug tasksThe following describes how to manually delete debug tasks that are no longer required. You can delete debug tasksthat are in Completed or Failed status.
If you want to delete debug tasks automatically, set a retention period for finished debug tasks in the property file(config_user.properties).
To manually delete debug tasks:
1. In the left pane of the Tasks window, click the Debug Executed Tasks menu command.
2. In the right pane (Debug-Tasks view) of the Tasks window, select the debug tasks you want to delete.You can select multiple debug tasks by holding the Ctrl key as you click. To select all the debug tasks in the list,click Select All.
Important noteClicking a task-name link displays the Task Details dialog box for that task. To prevent this from happening,select each debug task by clicking the empty space in the row for the task.
3. In the More Actions menu, click Delete Tasks.
5. Validating Service Templates
Job Management Partner 1/Automatic Operation Service Template Developer's Guide 158

4. In the Delete Tasks dialog box, review the debug tasks you are deleting and then click OK.
5. In the Information dialog box, click OK.
The debug tasks you selected are removed from the Debug-Tasks view.
Related topics• Property file (config_user.properties) in the Job Management Partner 1/Automatic Operation Configuration Guide
5. Validating Service Templates
Job Management Partner 1/Automatic Operation Service Template Developer's Guide 159

5.5 Testing service templates
5.5.1 Procedure for testing service templatesWhen you have finished debugging the service template and are sure that no issues remain, you can perform an operationtest in the development environment.
To test the operation of a service template:
1. Build the service template and then add it as a service.For details about how to add a service, see Adding services in the Job Management Partner 1/Automatic OperationAdministration Guide.
2. Execute the service.For details about how to execute a service, see Submitting services for execution in the Job Management Partner1/Automatic Operation Administration Guide.
3. Check the execution results in the Tasks window.For details about how to check the execution results, see Managing Tasks in the Job Management Partner 1/Automatic Operation Administration Guide.
4. If the results of the operation test reveal an issue with the service template, edit the affected service template or plug-in.
Related topics• 5.1.1 Flow of service template validation
• 5.1.2 Overview of building
• 5.1.4 Overview of operation tests
• 5.2.1 Procedure for building a service template
5. Validating Service Templates
Job Management Partner 1/Automatic Operation Service Template Developer's Guide 160

6 Releasing Service Templates
This chapter describes how to release service templates. Releasing an edited service templatecreates a package that is imported to the JP1/AO server.
Job Management Partner 1/Automatic Operation Service Template Developer's Guide 161

6.1 Releasing service templates
6.1.1 Procedure for releasing a service templateWhen you select and release a service template, a package is created based on the service template and imported to theJP1/AO server. If the development environment is the same as the active environment, you are then able to add theservice.
Important noteOnce a service template is released, it cannot be re-edited. If you want to edit a Release service template, copyit so that it can be edited.
If the service template editing view is not displayed:
1. In the Life Cycle of a Service Template area of the Service Template Editor Home view, click Edit.
2. In the Service Template List window, select a service template and then click Edit.
To release a service template:
1. In the service template editing view, click Release.You can also release a service template by clicking the Release button in the service template debugging view.
2. In the confirmation window, click OK.
3. Check the results in the Build / Release Result dialog box, and then click Close.
4. In the Information dialog box, click OK.
If the service template has been deleted or released by another user, an error occurs and the release process fails.
If an error occurs during the release process, a message is displayed to the operator that describes the cause of the errorand instructs the operator to fix the flow. The error message remains on screen until the operator closes the servicetemplate editing view.
Important noteWhen you release a service template from the service template debugging view, the content of the releasedservice template is that of the last build you performed as part of the debug process. If another user edits andbuilds the service template in the meantime, the changes made by this user do not apply to this release.
Related topics• 6.2.1 Overview of service template release
• A.1(5) Deletion and archiving of service templates, services, and tasks during build and release operations
6. Releasing Service Templates
Job Management Partner 1/Automatic Operation Service Template Developer's Guide 162

6.2 Overview of service template release
6.2.1 Overview of service template releaseRelease is the process of making a service template available to other users after it has undergone the validation process.When successfully released, a service template is packaged and can be added as a service.
Note that you cannot edit a service template or its plug-ins after the service template has been released. To edit a releasedservice template or its plug-ins, you need to copy the service template or plug-in and edit the copy.
ObjectivePerform a release operation when you want to use a service template in the active environment. A released servicetemplate is packaged as a service template of the Release configuration type, and imported to the JP1/AO server.
Number of releasesYou can release a service template only once. When you release a service template, the pre-release development servicetemplate is deleted. Any services that were added from the development service template prior to release are deleted,and associated tasks are archived. Debug services and debug tasks are deleted.
For details about the specific service templates, services, tasks, debug services, and debug tasks that are deleted andarchived during a release operation, see A.1(5) Deletion and archiving of service templates, services, and tasks duringbuild and release operations.
Assigned configuration typeAfter its release, a service template is assigned the Release configuration type. In addition to users in the Admin andDevelop roles, users in the Modify and Submit roles can configure and execute release service templates and theassociated services and tasks. Note that you cannot edit a service template or its plug-ins after the service template hasbeen released. To edit a released service template or its plug-ins, you need to copy the service template or plug-in andedit the copy. For details about the configuration types assigned to service templates and plug-ins by the release process,see A.1(2) Configuration types assigned to service templates and plug-ins by build and release operations.
Output destinations of service templatesWhen you release a service template, a service template package is created in the following folder with the name vendor-ID_name_version.st:
In a non-cluster systemJP1/AO-installation-folder\develop\output
In a cluster systemshared-folder-name\develop\output
Related topics• 2.1.2 Overview of development service templates and release service templates
• 2.4.1 Procedure for copying service templates
• A.1(1) Structure of build and release processes and how they differ
• A.1(2) Configuration types assigned to service templates and plug-ins by build and release operations
• A.1(5) Deletion and archiving of service templates, services, and tasks during build and release operations
6. Releasing Service Templates
Job Management Partner 1/Automatic Operation Service Template Developer's Guide 163

6.3 Importing service templates into the active environment (when theactive and development environments are separate)
6.3.1 Procedure for importing service templates into the activeenvironment (when the active and development environments areseparate)
If your JP1/AO system maintains separate development and active environments, service templates created in thedevelopment environment must be imported into the active environment.
When the development and active environments are separate, we recommend that you check the operation of the servicetemplate in the development environment before proceeding. After checking operation in the development environment,apply the service template to the active environment. The following describes how to bring a service template from thedevelopment environment to the active environment.
To bring a service template from the development environment to the active environment:
1. Copy the service template package from the JP1/AO server in the development environment to the local disk of theJP1/AO server in the active environment.
2. On the JP1/AO server in the active environment, execute the importservicetemplate command to importthe service template package.
3. Create the service on the JP1/AO server in the active environment.
TipYou can import several service template packages in a single operation by archiving the packages as a zip fileand using the importservicetemplate command to import the file.
Related topics• 6.3.2 Reason for maintaining separate development and active environments
6.3.2 Reason for maintaining separate development and activeenvironments
When you develop a service template in a separate environment from the active environment, each environment has itsown set of service share properties.
When the development and active environments are the sameA given service share property has one value within the JP1/AO system. When you change the value of a serviceshare property in the service template editor, the change affects release service templates in addition to developmentservice templates.
When the development and active environments are differentThe values of service share properties are managed separately in the active and development environments. Whenyou change the value of a service share property in the service template editor, the change only applies to the service
6. Releasing Service Templates
Job Management Partner 1/Automatic Operation Service Template Developer's Guide 164

share property associated with the development service template. It does not affect the service share propertyassociated with the release service template.
Therefore, we recommend that you keep the development and active environments of the service template separate.This allows you to prevent changes made during development from affecting the service share properties of the servicetemplate after release.
6. Releasing Service Templates
Job Management Partner 1/Automatic Operation Service Template Developer's Guide 165

Appendix
Job Management Partner 1/Automatic Operation Service Template Developer's Guide 166

A. Reference Information
This appendix provides reference information for users of JP1/AO.
A.1 Reference information for build and release operations
(1) Structure of build and release processes and how they differThe build and release processes create a package of a service template. Perform a build operation when you want tovalidate a service template, and a release operation when you want to make the service template available in the activeenvironment.
The following figure shows the structure of the build and release processes.
A. Reference Information
Job Management Partner 1/Automatic Operation Service Template Developer's Guide 167

Figure A‒1: Structure of build and release processes
The following table lists the differences between build and release processes.
Table A‒1: Differences between build and release
Operation Objective Number ofexecutions
Configuration typeassigned to servicetemplate package
File name of servicetemplate package
Can developmentservice templatebe edited afteroperation?
Build To validate a servicetemplate
Any number oftimes
Debug configuration vendor-ID_name_version_d.st
Yes
Release To make a servicetemplate available inthe active environment
Once Release configuration vendor-ID_name_version.st No
A. Reference Information
Job Management Partner 1/Automatic Operation Service Template Developer's Guide 168

Legend:Yes: Can be edited. No: Cannot be edited.
Related topics• A.1(2) Configuration types assigned to service templates and plug-ins by build and release operations
• A.1(4) Ability to display window items by service template configuration type and user role
• A.1(5) Deletion and archiving of service templates, services, and tasks during build and release operations
(2) Configuration types assigned to service templates and plug-ins bybuild and release operations
JP1/AO assigns a configuration type to the service templates and plug-ins in a service template package (*.st) accordingto its stage in the development process (build or release). The following table lists the configuration types assigned toservice templates and plug-ins.
Table A‒2: Configuration types assigned by build and release operations
Service template or plug-in Assigned configuration type
When built When released
Development service template Debug configuration Release configuration
Plug-in# Basic plug-in or release plug-in (releaseconfiguration)
Release configuration Release configuration
Development plug-in (debug configuration) Debug configuration Release configuration
#You cannot build or release individual plug-ins. A development plug-in becomes a release plug-in when you releasea service template that contains that plug-in. A development plug-in remains as such when you build a servicetemplate that contains the plug-in.
Related topics• A.1(4) Ability to display window items by service template configuration type and user role
(3) Behavior when multiple build or release operations apply to the sameservice template or plug-in
If you repeatedly build a service template during its development, or you build then later release a service template, thesame service template or plug-ins might have already been imported. The behavior of the build or release operation inthis scenario depends on the configuration type of the service template or plug-in.
Here, the same service template (or same plug-in) means a service template or plug-in with the same vendor ID, servicetemplate ID (plug-in ID), and service template version (plug-in version). The plug-ins referred to below are those usedby the service template being built or released.
When building a service template• The service template is overwritten.
• Development plug-ins in the service template you are building are overwritten.
• Release plug-ins in the service template you are building are not overwritten.
A. Reference Information
Job Management Partner 1/Automatic Operation Service Template Developer's Guide 169

When releasing a service template• The service template is overwritten and becomes a release service template.
• Development plug-ins in the released service template become release plug-ins.
• Release plug-ins in the released service template are not overwritten.
(4) Ability to display window items by service template configuration typeand user role
The configuration type of the service template and the role of the user determine whether service templates and elementscreated from service templates (services, tasks, and task histories) appear in the Services window and the Tasks window.The following table describes whether these items appear in the user interface for each combination of configurationtype and user role.
Table A‒3: Ability to display elements by service template configuration type and user role
Service template configurationtype
Managed element Displayed in the Services window and Tasks window
AdminDevelop
Modify Submit
Debug configuration Service template Y N N
Service Y N N
Task Y N N
History Y N N
Release configuration Service template Y Y N
Service Y Y Y
Task Y Y Y
History Y Y VO
Legend:Y: Can be viewed and manipulated. VO: Can only be viewed. N: Cannot be viewed or manipulated.
(5) Deletion and archiving of service templates, services, and tasks duringbuild and release operations
When you build or release a development service template, JP1/AO automatically deletes service templates and servicesand archives tasks. Debug services and debug tasks are automatically deleted.
Note that service templates and services are deleted and tasks archived even if the build or release process fails. Debugservices and debug tasks are also deleted.
A. Reference Information
Job Management Partner 1/Automatic Operation Service Template Developer's Guide 170

Figure A‒2: Deletion and archiving of elements during build and release operations
A. Reference Information
Job Management Partner 1/Automatic Operation Service Template Developer's Guide 171

Index
Aability to display elements by service templateconfiguration type and user role 170active environments
reason for maintaining separate from developmentenvironment 164
Bbasic plug-in 93basic plug-ins 93building service templates 128build or release operations performed on multipleinstances of same service template or plug-in 169
Ccautionary notes
Service Share Properties 59character set
setting specific character set at plug-in execution 99used during plug-in execution 98
commandsrequired for plug-in execution 99setting procedure 115specifying in Command-line text box 109
compatibility with stepscreated in earlier versions 48
configuration types assigned to service templates andplug-ins by build and release operations 169connecting steps
relational lines 86content plug-ins 93copying
service templates 66creating
flow hierarchy 77credential types
plug-in 103custom file
format 56setting 54
custom filesoverview 55
Ddebugging service templates 129debugging service templates again without rebuilding
134debugging without pausing between steps 135debugging with pausing between steps 136definitions
service resource files 70deleting
service template 68deletion and archiving of service templates, tasks, andservices during build and release operations 170development environments
reason for maintaining separate from activeenvironment 164
development plug-ins 93development service template 20, 46development service templates
overview 46displaying
Editor window 45displaying a plug-in on a Web browser set to a localefor which no plug-in resource file is available 121displaying debug task flow 149displaying flow tree of debug task 150displaying list
plug-ins 93service templates 65
displaying repeated execution flow during debugging151
displaying values of plug-in properties duringdebugging 146display procedure
Editor window 45Flow view 76
Eediting existing service template 30editing plug-ins to apply to service templates
general procedure 32Editor window
behavior when intervening actions occur 47displaying 45display procedure 45
Job Management Partner 1/Automatic Operation Service Template Developer's Guide 172

version compatibility for service templates and plug-ins 48
effect of changing values of plug-in properties duringdebugging 147example of service template debugging 131executing users
plug-in 94Execution Directory
specifying 114
Ffile transfer
files transferred to UNIX systems 97files transferred to Windows systems 96
flow 20creating 75editing 75relationship to steps 76
flow hierarchy 77flow of service template debugging 129flow of service template development 17flow of service template validation 123flow tree view for repeated flows during debugging 151Flow view
displaying 76display procedure 76
formatservice resource file 69
functions used during debug operations 129
Ggeneral procedure
creating new service templates 28
Hhandling debug tasks that are waiting for response(response entry) 142
Iimporting into active environment
service templates 164information displayed for repeated execution plug-insand repeated flows during debugging 152input property mapping
setting procedure 81
Llinefeed codes in values of plug-in properties (whenstep execution is paused) 148
Mmanaging debug tasks 154mapping parameter
definition example 52flow of data 52
Ooutput property mapping
setting procedure 82overview
service template development 17subsequent step conditions 80
overview of building 124overview of debugging 125overview of operation tests 126overview of service template validation 123
Pparameters
setting dynamically or statically 38parameters to set
plug-in definition information 102plug-in
available operations by plug-in type 96credential types 103executing users 94image files usable as icons 103setting display information 118using plug-in resource files to set display information
40plug-in definition information
parameters to set 102plug-in execution
locale settings for operation target devices 97plug-in properties 104plug-in resource file
correspondence between properties and displayedinformation 119
plug-in resource filesformat 118procedure for setting 118
Job Management Partner 1/Automatic Operation Service Template Developer's Guide 173

plug-in resource files automatically generated when aplug-in is created 120plug-in resource files updated when a plug-in is edited
121plug-ins
copying 117copying procedure 117creating 92, 100creating and adding to service templates 33creation procedure 100deleting 116deletion procedure 116displaying list 93editing 92, 102parameters to set when creating or copying 100procedure for editing definition information 102procedure for listing 93uniqueness 66
plug-ins definition informationprocedure for editing 102
Plug-ins that cannot be paused during debugging 139procedure
copying plug-ins 117deletion plug-ins 116setting commands 115setting plug-in resource files 118
procedure for building service template 128procedure for changing plug-in return values duringdebugging 146procedure for changing value of plug-in input propertyduring debugging 144procedure for changing value of plug-in output propertyduring debugging 145procedure for checking detailed progress of debugtasks in list format 155procedure for checking progress of debug tasks fromTasks window 154procedure for checking property mapping settingsduring debugging 142procedure for checking status of all debug tasks 154procedure for checking task log entries for debug tasks
155procedure for deleting debug tasks 158procedure for forcibly stopping debug tasks 157procedure for retrying from failed step duringdebugging 141procedure for retrying task from step after failed stepduring debugging 141
procedure for skipping plug-in processing duringdebugging 140procedure for starting debug 132procedure for stopping debug tasks 156procedure for testing service templates 160processing of debug process when pausing betweensteps 137properties
defined in plug-ins 104defined in services 57
propertyvisibility 62
Rreference information 167reference information for build and release 167relational line
procedure for deleting 86relational lines
behavior when connected to multiple steps 89connecting steps 86information inherited when pasting 88plug-ins when processing branches 91procedure for connecting steps 86procedure for copying 87procedure for cutting 87procedure for pasting 88restrictions 90
relationship of command and script return values toreturn codes of plug-ins and steps 112release
overview 163release plug-ins 93release service template 20, 46release service templates
deleting procedure 68overview 46
releasingservice templates 162
reserved plug-in propertiescredential information 104specifying execution-target hosts 104
reserved propertylist 82
resource filessetting service template display information 69
return values of content plug-ins 110
Job Management Partner 1/Automatic Operation Service Template Developer's Guide 174

Sscript
differences between setting methods 113scripts
setting procedure 107selecting multiple steps
procedure 88service definition information
parameters to set 51setting procedure 51
service properties 57service resource file
format 69setting displayed information 39
service resource filesautomatically generated at service template creation
72correspondence between properties and displayedinformation 71definitions 70displaying service template in Web browser whoselocale has no service resource file 74setting procedure 69updated when service template is edited 73
serviceschanging description 35
Service Share Propertiescautionary notes 59overview 58
Service Share Propertyadding 58
service template 20active environment 20adding processing 35available operations by configuration type 46compatibility with steps created in earlier versions 48creating blank template 50deleting 68deleting processing 37development environment 19elements involved in development 19flow of development 16list of development features 42plug-in 20procedure for releasing 162setting definition information 44viewing another service template during editing 64
service template definition informationediting 31
service template developmentoverview 17
service templatescopying 66creating 50creating new 28deleting procedure 68displaying list 65editing 50importing into active environment 164parameters to set when creating or copying 50procedure for copying 66procedure for displaying list 65procedure for importing into active environment 164releasing 162tasks 25tasks when creating new service templates 25tasks when editing 26tasks when using existing service templates as-is 26uniqueness 66using existing templates 41windows used for development 22
setting definition informationservice template 44
setting procedureinput property mapping 81output property mapping 82service definition information 51
settingsstep definition information 79
settings used when beginning debug process 134shared built-in service properties
overview 60specifying
Execution Directory 114standard error output
mapping to output properties 106standard output
mapping to output properties 106standard output of plug-ins 112step 20
definition information 79procedure for changing definition information 78
step information changeable while step execution ispaused 140
Job Management Partner 1/Automatic Operation Service Template Developer's Guide 175

stepsadding 78adding procedure 78information inherited when pasting 88procedure for copying 87procedure for cutting 87procedure for deleting 86procedure for pasting 88relationship to flow 76selecting multiple 88warning icon 85
structure and differences of build and releaseprocesses 167subsequent step conditions
overview 80surrogate pair characters and control characters invalues of plug-in properties 148
Ttesting service templates 160
Uusing command or script return values as flowbranching conditions (for values outside 0 to 63 range)
112
Vvalidating service templates 122visibility
property 62
Wwarning icon
steps 85
Job Management Partner 1/Automatic Operation Service Template Developer's Guide 176