job corps academic standards implementation...
TRANSCRIPT

Chapter 4: Effective Teaching Strategies for Standards-Based Instruction
Evaluating Effectiveness
Chapter 3 focused on processes or structure. It presented methods to ensure that student learning was maximized through:
Explicit instruction Guided practice Many opportunities for additional practice
Chapter 4 focuses on an equally important question: Which strategies are most effective in explicit instruction, guided practice, and additional practice? Fortunately, in the 21st century, a large body of evidence exists attesting to teaching practices that work best to help students learn and retain important concepts and skills. Researchers have conducted thousands of studies about effective instruction, and others have examined these studies in a “meta-analysis” to determine the approaches that effectively and consistently produce the greatest achievement.
Probably the best known of these meta-analyses was done by researchers at Mid-continent Research for Education and Learning (McREL) Laboratory in preparation for a book by Robert Marzano, with Jana S. Marzano and Debra J. Pickering. The book, entitled Classroom Instruction That Works, was published in 20011. The McREL researchers analyzed and categorized over one thousand educational research studies to develop a list of the most effective teaching strategies, as indicated by the research. These strategies are summarized in the chart below.
Before reading the chart, definitions of “average effect size” and “percentile” are provided for this context. An “effect size” is the increase (or decrease) in achievement shown by students whose teacher used the specific strategy, as compared to students whose teacher did not use the strategy. The number is shown in standard deviations, and Marzano et al. provide a straightforward description.2 Another researcher, Jacob Cohen, uses the following rule of thumb: .20 effect size is small, .50 effect size is medium, and .80 effect size is large.
1 Marzano, R. J., Pickering, Debra, Pollock, Jane E. (2001) Classroom Instruction that Works: research-based strategies for increasing student achievement. Pearson Education, Inc., Upper Saddle River, New Jersey2 Op.Cit., pp. 7-10.
Guide to Standards-based Instruction Chapter 4: Effective Teaching Strategies Page 1 of 37 Workgroup Draft (5.9.11)

Dark blue is less than one standard deviation from the mean. For the normal distribution, this accounts for about 68% of the set, while two standard deviations from the mean (medium and dark blue) account for about 95%, and three standard deviations (light, medium, and dark blue) account for about 99.7%.
Because it is expressed in standard deviations, effect size can be translated accurately into percentile or point differences on a standard bell curve test. Let’s look at two groups of students:
Both groups are taught the same clearly defined content; One group is taught this content using the instructional strategy; The other group is taught the same content not using the strategy; and The two groups are given the exact same test on the content.
The “percentile difference” is the difference between the mean scores of the two groups.
Let’s look at the last item in the chart below which is “Questions, Cues, and Advance Organizers.” This strategy has a rating of .59 average effect size and 22 percentile points. What does this mean? Students whose teacher used this teaching strategy took the same test on the same content as students whose teacher taught the same content but did not use questions, cues, and advance organizers. When the test scores were analyzed, the students whose teacher used questions, cues, and advance organizers scored an average of 22% higher on the test than the students whose teachers did not use the strategy. If, for example, the students taught using the strategy scored an average of 85% on the test, this means that students taught without questions, cues, and advance organizers scored an average of 63% on the test. This is an amazing difference!
So, what are the magic instructional strategies that can make such a huge difference in student achievement? Below are the findings of the McREL researchers:
Strategy AverageEffect Size
Percentile Difference
Identifying Similarities & Differences 1.61 45Summarizing & Note Taking 1.00 34Reinforcing Effort & Providing Recognition .80 29Homework & Practice .77 28Nonlinguistic Representation .75 27
Guide to Standards-based Instruction Chapter 4: Effective Teaching Strategies Page 2 of 37 Workgroup Draft (5.9.11)
Robert J. Marzano is a Senior Scholar at Mid-Continent Research for Education and Learning. He has developed programs and practices that translate current research and theory in cognition into instructional methods. Marzano has authored 21 books and more than 150 articles and chapters on topics such as reading and writing instruction, thinking skills, school effectiveness, restructuring, assessment, cognition and standards implementation.
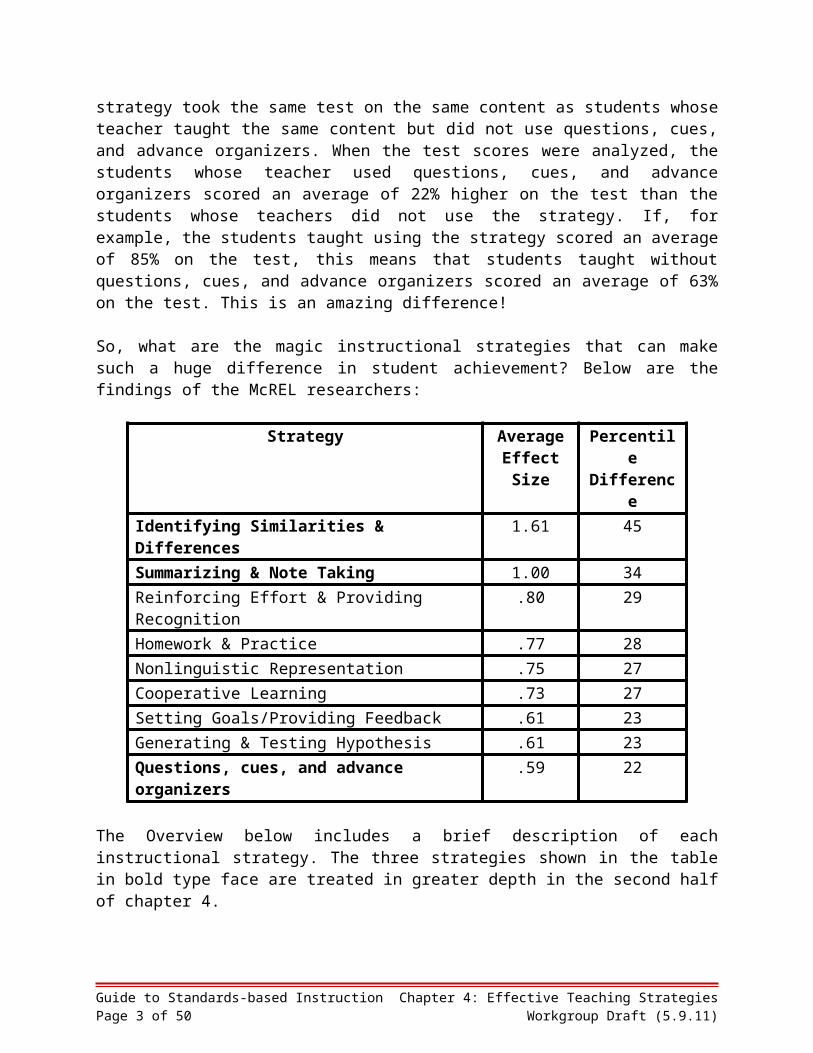
Cooperative Learning .73 27Setting Goals/Providing Feedback .61 23Generating & Testing Hypothesis .61 23Questions, cues, and advance organizers
.59 22
The Overview below includes a brief description of each instructional strategy. The three strategies shown in the table in bold type face are treated in greater depth in the second half of chapter 4.
Guide to Standards-based Instruction Chapter 4: Effective Teaching Strategies Page 3 of 37 Workgroup Draft (5.9.11)
An Overview of Instructional Strategies
1. Identifying Similarities & Differences. Comparing items to find their similarities and differences is an extremely powerful way for students to learn, for several reasons:
It allows them to build on their existing knowledge if they are comparing something they know well, like traffic rules, to new information, like the function of the circulatory system.
It allows them to practice previous learning while building the new knowledge if they are comparing something they have already learned, like the causes of World War I, to new knowledge, like the causes of World War II.
It allows them to “picture” the differences and similarities, especially if graphic organizers are used.
Using this strategy on a regular basis for purposes like those above will dramatically improve student achievement!
2. Summarizing & Note Taking. These two strategies are key to helping students make sense out of information they see, read or hear. They also serve as great study aids for increased practice of skills and concepts. Summarizing requires students to focus on the most important information and find patterns in the input, so what might appear to be a simple task is actually fairly complex. Note taking skills are essential to organizing the information input, building later learning upon early foundations, and remembering information over time. They can be invaluable when studying for certification exams.
3. Reinforcing Effort & Providing Recognition. This is an area in which Job Corps teachers usually excel, but we can improve our practice in this area by understanding just a few facts:
Talk to students about effort. Research shows that American students believe success is the result of luck, ability, or other people (e.g., Your teacher was better than mine, so I did not pass.) But only effort will always pay off with greater achievement. Even the very bright students who sail through most course content will find a time when only effort alone will achieve real understanding. Students can learn about effort, but hearing frequently about the benefits of working hard is essential.
Giving students rewards does not necessarily keep them from developing intrinsic self-motivation, but rewards should always be tied to reaching a certain standard of performance, not solely participating. With this approach, all students can earn the reward when their performance reaches the teacher’s standard.
Abstract rewards, like verbal praise, are more effective than other types of rewards such as candy or points. Some students like to be recognized in front of a group while others prefer private praise.
Guide to Standards-based Instruction Chapter 4: Effective Teaching Strategies Page 4 of 37 Workgroup Draft (5.9.11)

4. Homework & Practice: The concept of practice (in class or out of class) is so important to success in Job Corps academic and career technical courses that this guide has major sections of chapter 4, all of chapter 5, and sections of appendix A devoted to it. Here are two tricks of the trade useful for additional practice.
Trick of the Trade #1: Reciprocal Teaching. Reciprocal teaching is a dynamite learning tool that delivers effective practice using several of Marzano’s top 9 strategies: cooperative learning; setting objectives and providing feedback; reinforcing effort/providing recognition; and cues, questions, and advance organizers. Students find this approach fun, and it has been proven to increase academic intensity3, increase academic gains and develop more positive attitudes toward the content4, increase time on task5, and improve social interactions6.
For reciprocal teaching, students work in pairs to go over new material, solve problems, or read complex text. This is a partnership for learning, and both students are committed to helping each other succeed.
Here’s how it works. There are two roles: the coach and the player. For the first round, student A is the coach and student B the player. Then they switch roles. The player’s job is to answer his own questions that appear on his worksheet while thinking out loud. In other words, he explains aloud why he is solving the problem in a certain way or choosing a certain answer. The coach’s job is to watch the player at work, listen to the reasoning, and provide hints, give feedback, and offer praise to help the player be successful.
Each student in the pair has a worksheet with
Questions they will answer or problems they will solve, Answers to her partner’s questions and Coaching hints for her partner, if the questions are difficult.
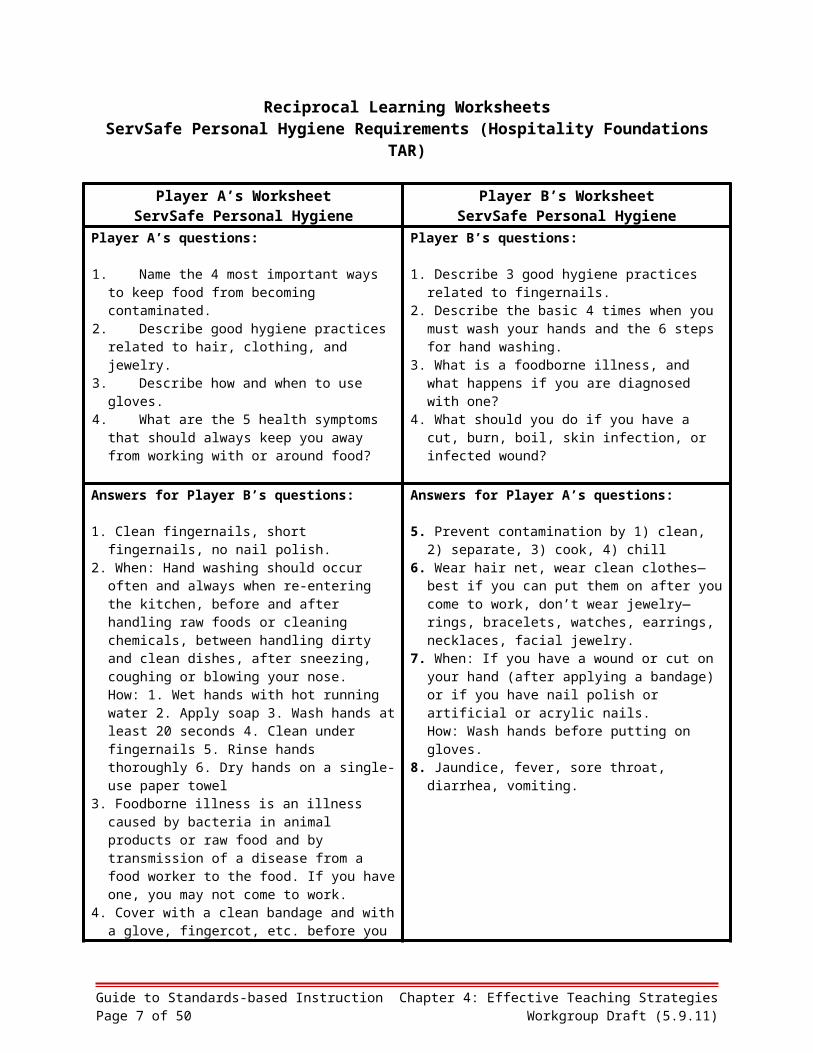
Here is a sample of two reciprocal learning worksheets designed for review of ServSafe Personal Hygiene requirements in the Hospitality Foundations TAR. The tasks include:
1. Describe how food handlers can contaminate food2. Describe good hygiene practices 3. Describe when and how to wash hands4. Describe how and when to use gloves
Guide to Standards-based Instruction Chapter 4: Effective Teaching Strategies Page 5 of 37 Workgroup Draft (5.9.11)

Reciprocal Learning WorksheetsServSafe Personal Hygiene Requirements (Hospitality Foundations
TAR)
Player A’s WorksheetServSafe Personal Hygiene
Player B’s WorksheetServSafe Personal Hygiene
Player A’s questions:
1. Name the 4 most important ways to keep food from becoming contaminated.
2. Describe good hygiene practices related to hair, clothing, and jewelry.
3. Describe how and when to use gloves.4. What are the 5 health symptoms that
should always keep you away from working with or around food?
Player B’s questions:
1. Describe 3 good hygiene practices related to fingernails.
2. Describe the basic 4 times when you must wash your hands and the 6 steps for hand washing.
3. What is a foodborne illness, and what happens if you are diagnosed with one?
4. What should you do if you have a cut, burn, boil, skin infection, or infected wound?
Answers for Player B’s questions:
1. Clean fingernails, short fingernails, no nail polish.
2. When: Hand washing should occur often and always when re-entering the kitchen, before and after handling raw foods or cleaning chemicals, between handling dirty and clean dishes, after sneezing, coughing or blowing your nose.How: 1. Wet hands with hot running water 2. Apply soap 3. Wash hands at least 20 seconds 4. Clean under fingernails 5. Rinse hands thoroughly 6. Dry hands on a single-use paper towel
3. Foodborne illness is an illness caused by bacteria in animal products or raw food and by transmission of a disease from a food worker to the food. If you have one, you may not come to work.
4. Cover with a clean bandage and with a glove, fingercot, etc. before you start work.
Answers for Player A’s questions:
5. Prevent contamination by 1) clean, 2) separate, 3) cook, 4) chill
6. Wear hair net, wear clean clothes—best if you can put them on after you come to work, don’t wear jewelry—rings, bracelets, watches, earrings, necklaces, facial jewelry.
7. When: If you have a wound or cut on your hand (after applying a bandage) or if you have nail polish or artificial or acrylic nails.How: Wash hands before putting on gloves.
8. Jaundice, fever, sore throat, diarrhea, vomiting.
Cooperative question (and summary): What are the 3 most important things an employer should do to make sure that ServSafe Personal Hygiene requirements are followed?
Part of the dialog you might hear between players A and B could sound like this:
Player A: My first question is to name the 4 most important ways to keep food from becoming contaminated. Hmm. Well, I remember that there
Guide to Standards-based Instruction Chapter 4: Effective Teaching Strategies Page 6 of 37 Workgroup Draft (5.9.11)
were 4, so that’s a good start! I know 3 for sure because they all start with “C”—clean, cook, and chill. Right?
Player B: Absolutely. Great so far.
Player A: But the fourth…I’m just not remembering. Can you give me a hint?
Player B: Well, I can give you another question that might help: What’s the most important thing to do with raw chicken and cooked chicken?
Player A: I know now! Separate. That’s it, right?
Player B: Right on. And I just thought of a way we can remember this better: non-contamination = 3CS—chill, clean, cook, and separate.
Player A: Makes sense to me 3CS. I’ll get that one right next time.
To set up reciprocal teaching:
Step 1: Choose the topic, the purpose (review, reading comprehension, or problem-solving), and the questions. Provide hints for the coach to give the player if the questions are hard. For example, “remember the top hat organizer we did last week?” Add a cooperative question that the pair can work on if they have time. It should be a higher-order thinking question, rather than just recall, and can summarize the learning.
Step 2: Create the reciprocal teaching worksheets. One with questions for Player A and hints and answers for Player B’s questions (when A is the coach) and the other with questions for Player B and hints/answers for Player A’s question (when B is the coach). Try to balance the difficulty and the type of questions for each player.
Step 3: Assign partners and have them sit side-by-side. Assigning partners means that no one is left out or not chosen. Having them sit side-by-side makes the process more collegial (and lowers the decibel level.)
Of course you noticed that by having each student play both roles, reciprocal teaching counts for two practices and doubles the learning!
Reciprocal Teaching with Reading. There are slightly different steps when using reciprocal teaching to help students improve understanding of difficult texts. Many manuals, government documents, and manufacturer’s instructions are written at a level requiring excellent reading and vocabulary skills. Job Corps students often lack this high level of reading comprehension and yet they must be able to access this information.
Reciprocal teaching can greatly increase student understanding of difficult text. Difficult text includes any reading with a lot of details that make it hard to separate the important material
Guide to Standards-based Instruction Chapter 4: Effective Teaching Strategies Page 7 of 37 Workgroup Draft (5.9.11)

from the rest of the information. Researchers have found that students are more willing to read difficult text and have a greater retention and grasp of content when they read reciprocally, as opposed to reading alone.7 When using reciprocal teaching for reading:
1) Break the reading into short sections, no longer than one page. For example, select a Collision Repair manual for outer body repairs and adjustments that has important information on paint preparation. When looking at the content, there are 6 clear sections in the 4 pages the students will read.
2) Create one or two key questions for each section; mark the even questions ‘A’ and the odd questions ‘B’, so player ‘A’ gets the questions for sections 1, 3, and 5, while player ‘B’ gets the questions for 2, 4, and 6. No one gets the answers.
3) Have both players review the section 1 questions in advance and then read the first section silently, making notes. When done, Player ‘A’ states the answers and her thinking for the section 1 questions, while ‘B’ coaches from his understanding of the section. Then they both read section 2, after which Player ‘B’ answers the questions and explains his rationale while ‘A’ coaches. They continue to switch back and forth until the reading is completed.
4) Ask the team to create the summary together.
Trick of the Trade #2: Competitions and Games. A second excellent learning tool to use for practice is competition. Competition in teams actually requires a great deal of cooperation. For example, think of a basketball game. We can create the same kind of excitement about content mastery by using games.
Before the game, announce the topics that will be covered and create a study worksheet. Tell students that 2 points will be added to their test score (or some other incentive) to members of the winning team. Group students with various achievement levels in study teams of 4 to review key content and fill their black holes of knowledge before they go into competition against another team. If the class has only a few students, divide into just 2 teams (maybe with 3 students per team). In larger groups, there may be 4 or 6 teams.
During the game, individual students earn points for their team in two ways: by answering questions correctly and by correctly challenging the answer given by a member of the other team.
After the game, pass out the rewards to members of the winning team (or remind them about the 2 extra points). When you give the individual assessment/test of the content, you’ll be amazed at how well students have learned and retained the information. It’s just another example of peer power and play as learning.
Here is one way to play the game. You can easily make up your own rules or let the students make them up.
Write one game question on each of a stack of cards—24 questions for each 2 teams you have. Every question should reflect important information related to items on the study worksheet.
Guide to Standards-based Instruction Chapter 4: Effective Teaching Strategies Page 8 of 37 Workgroup Draft (5.9.11)

Arrange each team’s players by name in an achievement order such as this: middle achiever, low achiever, high achiever, middle achiever; that will allow each person to compete against a peer of about the same achievement level.
Choose the first 2 teams and line up the students in each team in the achievement order you’ve determined.
Give the answer sheet to a student in the audience (or you can play the judge role.) Ask (or have a student in the audience ask) the top card question of the first student in
Team A; when the player answers, the first student in Team B then has the right to challenge the answer. If there is a challenge, and the challenger is correct, Team B earns a point; if the challenger is wrong, Team B loses a point.
If there is no challenge or if the challenger is wrong, announce the correct answer and give Team A a point if the player was right or no point if she/he was wrong.
Direct the question on the second card to the first student for Team B. After the answer, ask if there’s a challenge. Proceed as above.
Tally the points on the board as you go. Direct the question on the third card to the player who is second in line for Team A and
continue the process. Continue through 3 questions for each team member (24 questions total for the 2 teams)
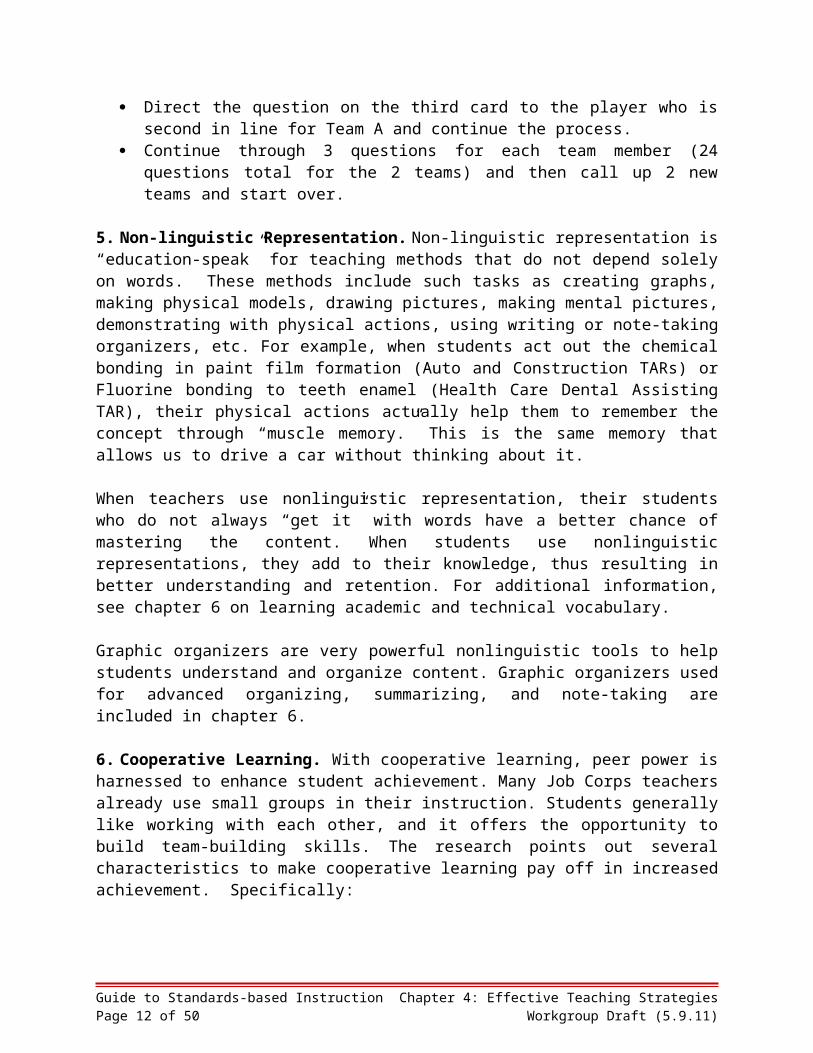
and then call up 2 new teams and start over. 5. Non-linguistic Representation. Non-linguistic representation is “education-speak” for teaching methods that do not depend solely on words. These methods include such tasks as creating graphs, making physical models, drawing pictures, making mental pictures, demonstrating with physical actions, using writing or note-taking organizers, etc. For example, when students act out the chemical bonding in paint film formation (Auto and Construction TARs) or Fluorine bonding to teeth enamel (Health Care Dental Assisting TAR), their physical actions actually help them to remember the concept through “muscle memory.” This is the same memory that allows us to drive a car without thinking about it.
When teachers use nonlinguistic representation, their students who do not always “get it” with words have a better chance of mastering the content. When students use nonlinguistic representations, they add to their knowledge, thus resulting in better understanding and retention. For additional information, see chapter 6 on learning academic and technical vocabulary.
Graphic organizers are very powerful nonlinguistic tools to help students understand and organize content. Graphic organizers used for advanced organizing, summarizing, and note-taking are included in chapter 6.
6. Cooperative Learning. With cooperative learning, peer power is harnessed to enhance student achievement. Many Job Corps teachers already use small groups in their instruction. Students generally like working with each other, and it offers the opportunity to build team-building skills. The research points out several characteristics to make cooperative learning pay off in increased achievement. Specifically:
Keep the groups small. 3-5 students is best. Keep membership stable unless there is a specific reason to change (e.g., one student is being consistently left out, a student
Guide to Standards-based Instruction Chapter 4: Effective Teaching Strategies Page 9 of 37 Workgroup Draft (5.9.11)

leaves the class, etc.) Use cooperative groups consistently and systematically, at least once a
week for best results. Mix achievement levels in each group for maximum achievement gains. Students
who are low achievers and students who are high achievers both show higher achievement gains when they are in mixed groups than when they are grouped with others at their achievement level.
7. Setting Goals/Providing Feedback: Setting learning goals for students helps them to narrow their focus and avoid being overwhelmed. Students can initially accept the teacher’s goals and then adapt these goals to their personal needs/interests as they become used to the process. For most of us, having a learning goal when we set out helps us keep on track: we are going to master keyboarding at the level of 50 words per minute with 95% accuracy; we will locate and interpret vehicle and major component identification numbers within 2 minutes with 100% accuracy; we will identify and describe the 5 major methods of disease transmission with 100% accuracy; etc.
One important element in providing feedback is to gradually wean students from dependence on your corrections, making them more responsible for finding, identifying, and correcting their own errors. For example, if you are teaching medical report writing, you begin by circling or underlining the errors and marking a correction symbol above the circle, such as circling a misspelled medical term or using ^ for insert. As student writing improves, you begin to take away some of the support or scaffolding, as some researchers call it, by:
First, just highlight the error but do not write the symbol; Then, write the symbol to the left of the line in which the error occurs, but do not circle
the error; and Finally, put a check mark to the left of the line, but do not use the symbol or circle the
error.
A second important element is to always give accurate feedback. Be sure to correct misinformation or incorrect responses. This feedback should not be harsh or negative. In fact, find something in the student’s response that you can accept or provide some positive response to before pointing out the error. Using an assessment guide, or rubric, with a point scale to describe levels of performance quality makes this task even easier.
Finally, use peer feedback by asking students to evaluate each other’s work and explain what is correct/incorrect about the product/performance, as well as their scoring on the assessment guide. Peer feedback is an extremely powerful tool both in practice and in assessment. Indeed, some research has shown that peer feedback is more effective than teacher feedback because students may feel less self-conscious8.
Peers never grade papers. Instead, they:
• compare each other’s work to the standard required in the assessment guide and tell each other where they think more effort is needed;
Guide to Standards-based Instruction Chapter 4: Effective Teaching Strategies Page 10 of 37 Workgroup Draft (5.9.11)

• provide commentary for each other about how to improve an item;• compare answers to questions and find evidence for the correct response; and• explain to each other the reason for the correct answer when one gets an item correct and
the other does not.
Peer feedback can be one-on-one or between small groups. When used before the teacher grades the product or performance, it helps the student to understand what her/his level of achievement appears to be in the eyes of an outside observer. The peer input helps the student more clearly analyze how his performance or product matches up with the standard and then improve the performance/product before the teacher assessment.
The use of assessment guides to provide feedback is detailed in chapter 5.
8. Generating & Testing Hypotheses. This strategy is used for in-depth learning, usually targeting only the most important concepts. Here the student gains a level of basic knowledge, makes an educated guess or hypothesis about an important concept, and then tests the hypothesis to see if it is true. For example, a Culinary Arts student might hypothesize that dry heat is more effective in cooking a certain cut of meat than moist heat. Then she tests it and reports the results, explaining the conclusions. This process gives students a deep understanding of the concept because they have proved it themselves.
9. Questions, Cues, and Advance Organizers. These strategies help students to remember what they already know and anticipate new knowledge/skills. Since the brain learns best when it can attach new information to existing knowledge, students show achievement gains when these techniques are used. The advance organizers also help keep students on track when the new knowledge is presented in a way that is not well organized. More detailed information on these strategies is directly below.
Guide to Standards-based Instruction Chapter 4: Effective Teaching Strategies Page 11 of 37 Workgroup Draft (5.9.11)
An In-Depth View of Instructional StrategiesKey Strategy #1: Questions, Cues & Advance
Organizers
The descriptions above are only an overview of these “magic strategies.” This section takes a deeper look at three of these techniques that fit perfectly with Job Corps and can dramatically increase student achievement. We will begin with the Questions, Cues, and Advance Organizers to give our students a 22% advantage in achievement, and conclude with the blue ribbon, silver bullet strategy Identifying Similarities and Differences, for a 45% achievement boost.
Questions
Most Job Corps teachers already use questions as an instructional strategy. Here are some tips from experts about the types of questions to ask and how to ask them.
What kinds of questions should you ask? Researchers have found that you can maximize learning through questions if you:
• Ask the simple recall questions first as a warm-up. For example, you might ask LVN students, “What are the steps for irrigating an indwelling catheter?” or “What is passive range of motion?” These questions usually have fairly simple right or wrong answers.
• Ask questions that make students think. Here’s where you get more learning “bang for your buck.” For example, covering the same content at a higher level, you might ask, “When you are irrigating an indwelling catheter using sterile technique, what might go wrong as you go through the steps?” (hypothesis) or “What are the differences between passive and active range of motion?” (similarities/differences). Other kinds of thinking questions include:
o Supporting a statement with evidenceo Prioritizing response items by importanceo Determining which of several options a student prefers and whyo Asking “what if….”o Creating a metaphor (“How are sterilization procedures like waxing your car?”)o Creating an analogy (“Thermometer is to temperature like what is to blood
pressure?”)
• Ask questions that connect new understanding to previous learning. For example, in mathematics, “How is figuring the area of a triangle similar to determining the area of a rectangle?”
Guide to Standards-based Instruction Chapter 4: Effective Teaching Strategies Page 12 of 37 Workgroup Draft (5.9.11)

• Ask questions that are at the right level for the particular student. This plays out in several ways in Job Corps. If a student just entered your class two days ago, a question that connects new understanding to previous learning probably is not appropriate. If a student is clearly an English Language Learner, use relatively simple phrasing for your question and do not expect linguistically elaborate responses. And if a student has an exceptionally hard time putting thoughts into words, ask for a drawing or chart on the board that he could then explain. It is important not to ask less of these students but to ask differently.
• Finally, be sure to focus the questions on what is most important. There is not unlimited time to cover the content, so be sure to make every question count. This works best by writing down in advance the questions to be asked. This way you’ll get good warm-ups and tightly focused, high level questions on important topics!
How should you ask the questions? One major reason for asking questions is to provide more opportunities to get in those 24 repetitions needed for fluency in performance! Remember that fluency is the level where a student can perform adequately and automatically, almost “without thinking about it.”
So, when asking a question, try to follow the Q-SPACE guidelines9 to maximize effectiveness:
QuestionSilence and wait timeProbingAcceptanceClarifying and correctingElaborating
Question. Pose a clear question. Just one. For example, ask, “When you inspect the brake lines, flexible hoses, and fittings, what kinds of problems are you looking for?” rather than “What problems can occur in the brake lines, how might you fix the problems, and what parts might you have to fabricate?”
Silence and wait time. Wait for a count of 5 before calling on any student to give every student enough time to figure out the question’s meaning and to think of a good answer10. Students will provide much more in-depth and thoughtful answers, and every student will have the mental practice of thinking of a good answer. (Some teachers have students work in pairs at this point to jot down some possible responses.) Be sure to call on a particular student by name, not students who raise their hand or volunteer to speak. This way, all students have a chance to answer a question, students who need more repetitions get more questions, and questions can be tailored to a student’s special needs.
Guide to Standards-based Instruction Chapter 4: Effective Teaching Strategies Page 13 of 37 Workgroup Draft (5.9.11)

Probing. After a direct answer, ask students to support their response or provide some proof or ask a follow-up question about one part of the answer. Probing can be done with the same student or someone else that is called on by name. This increases the challenge and keeps students alert and thinking. Never accept a non-answer. Clarify the question, come back after the students have had time to think, let them “phone a friend,” have them consult their partner. All of these methods will ensure that the student you called on actually responds with some kind of answer.
Acceptance. Acceptance is simply finding some way to be positive or to say, “You’re on the right track,” even when students give a wrong answer. For example, if you ask the best way to initially respond to an angry customer and the student says, “Call the manager,” you might say, “Well, the manager is a good resource, but she may expect you to try to handle the situation first. What do you think you might be able to say to the customer?” Acceptance rather than rejection of student responses makes students more willing to try, increasing both the quantity and diversity of answers.
Clarifying and correcting. Correct any wrong answer or misinformation right away, but try to get the correction from the students, rather than just giving the right answer. This can be done by:
clarifying the question and then asking the student, “Does that make a difference in your answer?”
calling on another student for a “second opinion” polling the class or small group members asking a student to review the part of the reading/video/lecture notes that the question
relates to
Elaborating. When appropriate, ask students to expand or elaborate on their answer by:
asking a specific follow-up question saying, “Tell me a little more about that” encouraging a comparison with a previous discussion item asking for a generalization of the material
Cues
Cues are easy to use and work well when introducing a new topic. We remember that new information is easier to learn when it is attached to existing knowledge. Thus, with cues, you begin with existing knowledge by just asking students: What do you already know about…
The digestive system (Clinical Medical Assistant, F.5.b.); The oil pump and converter (Automatic Transmission and Transaxle E.2); or
Guide to Standards-based Instruction Chapter 4: Effective Teaching Strategies Page 14 of 37 Workgroup Draft (5.9.11)

Construction techniques and moisture control (Bricklaying P).
Correct the wrong information verbally and write the correct information on the board or overhead. Then explain what the unit will teach and how students’ prior knowledge relates to what they will learn. Cues like these are fast, simple, and effective in setting the stage for student learning.
Advance Organizers
Advance organizers use graphic organizers (see full description below under “Note Taking” but they supply all or some of the information in advance. In other words, advance organizers tell the students what they are going to hear, see, or read before they get the information.
The teacher can fill out the advance organizer completely or partially, with the students completing it as they get the information. For example, let’s say that you are working on Infection Control in the Dental Assistant TAR and focusing on the following task:
Maintain infection control procedures in the dental laboratory:
a. Rag wheelb. Bench handpiecec. Lathed. Model trimmere. Impressionsf. Air ventilationg. Laboratory casesh. Vacuum former
You plan to introduce the topic and show a short video that covers the “how to” for four of the items and then describe how to control infection with the other four items. You want the students to get the big idea of infection control and have good notes so you can discuss similarities and differences in the procedures afterwards. You also know that some of your newer students have not had a lot of practice in taking good notes. So you might give them an advance organizer that fills in most of the information from the video, like the one below, and ask them to fill in the other parts from the video and from your presentation.
Guide to Standards-based Instruction Chapter 4: Effective Teaching Strategies Page 15 of 37 Workgroup Draft (5.9.11)

Advance Organizer: Infection Control
Location Problem Infection Control Procedures
Rag wheels Risk of contamination from pumice
Clean and disinfect rag wheels daily, preferably using heat sterilization
Bench handpieceLathe Risk of contamination from
pumiceMix pumice with water, diluted 1:10 bleach, or other disinfectant; change pumice daily; clean and disinfect machine daily
Model TrimmerImpressions Risk of contamination from
impressions to dental casts; lab personnel, patients at risk
Rinse with water; clean with effective antibacterial disinfectant; rinse with water; use disposable gloves during process; wash hands before and after using gloves.
Air ventilationLaboratory cases Risk of contamination from
case to case by surface contact, burs, dust/mist, unwashed hands, etc.
Wash with water, clean with effective antibacterial disinfectant, rinse with water, use utility gloves during sanitation process
Vacuum former
Key Strategy #2: Summarizing & Note Taking
Note taking is a very important skill both for success in Job Corps and in job retention. It can also serve as the basis for summarizing. Together, the two strategies organize information so it makes sense for students and helps them retain and build on what they have learned. How can we teach students to take good notes?
First, we must simply require students to take notes on what they hear, see, and read. We will give them the support and training they need on note-taking, but if we do not require it, they probably will not do it. And we’re talking about a big pay-off for something that takes only a few minutes beyond the time you would spend anyway on a presentation or video: 34 percentage points higher achievement for students who take notes and summarize compared to those who do not!
Guide to Standards-based Instruction Chapter 4: Effective Teaching Strategies Page 16 of 37 Workgroup Draft (5.9.11)

Second, we must plan our input (teacher presentation, reading, video, student/guest presentation) so it will make sense for the students taking notes. And the easiest way to do this is to design demonstrations, plan presentations or mini-lectures, preview videos, and pre-read student textbooks/written information actually using the organizer or template you’ll ask the students to use. That is, plan your input (reading, teacher or student presentation, video) to align with your advance organizer or note-taking system.
Third, we must teach Job Corps students to use graphic organizers or note-taking templates. As discussed above, you can do this with advance organizers where, at first, you fill in part of the template to model how good notes look and help them keep on track. In the learning phase, you can also stop the video, reading, or presentation and ask what they have written in their notes, make suggestions, and move on.
So, what kind of organizers or templates should you use? One tried-and-true note-taking template that students can adapt to just about any type of information provided by just about any source is called Cornell Notes. Students make the template for Cornell Notes by drawing lines to divide their paper as follows, with the Key questions/Notes/Pictures section taking up most of the page.
One great advantage of Cornell Notes is that they include the questions and the summary that are extremely helpful for later review before an assessment or reminders of basic information to build on.
Date Course InputTopic or Big Idea:Key questions
Notes Pictures
Summary/Major Questions
Let’s say that you are a Carpentry instructor introducing information in the construction textbook related to Section C, Introduction to Hand Tools, which includes these TAR items:
1. Identify the basic hand tools used in the construction trade.2. Demonstrate how to use hand tools safely.
Guide to Standards-based Instruction Chapter 4: Effective Teaching Strategies Page 17 of 37 Workgroup Draft (5.9.11)

3. Describe the basic procedures for taking care of hand tools.
Student Cornell Notes from your review might look like this:
Date: 12/4/11 Course: Carpentry—hand tools Input: Text, teacher
Topic or Big Idea: Hand tool use, safety, and careKey questions:Identify use of: 1) 3 measuring, marking tools2) 3 leveling, layout tools3) 2 boring, cutting tools4) 3 fastening, dismantling tools.
Identify 3 safety issues with hand tools.
Name 3 rules of care for hand tools.
Notes: Names and functions1) Measuring and marking tools: a. tape measure: measures the
dimensions for cuts of lumber and other materials
b. chalk line: marks straight lines over long distances
c. metal ruler: marks accurate straight lines over short distances
2) Leveling and layout tools: a. levels: determines horizontal and
vertical positioningb. squares: verify right angles and other
anglesc. plumb bob: determines straight lines
for vertical positioning; matches vertical line to mark
3) Boring and cutting tools: a. drill/bits: make holes of defined
diameter and measurable depth in various materials
b. saws: cut materials to desired dimensions or shapes
4) Fastening and dismantling tools: a. hammers: drive or remove nails,
brads, staples, etc.b. pry bars: lift, move, or separate itemsc. catspaws: remove undesired
fastenersd. screwdrivers: install and remove
screws5) General safety: a) keep hand tools clean and in good repair; b) use only for the intended purpose; c) don’t leave tools overhead or underfoot.6) General care: a) inspect tools regularly; b: keep hand tools clean and dry; c) sharpen cutting surfaces, as needed; d) replace bent or broken tools.
Pictures
Guide to Standards-based Instruction Chapter 4: Effective Teaching Strategies Page 18 of 37 Workgroup Draft (5.9.11)

Summary: 1) Hand tools are used for 4 purposes: measuring/marking (ex: tape measure, pencil, metal ruler), leveling/layout (ex: level, square, plumb bob), boring/cutting (ex: drill, saws), and fastening/dismantling (ex: hammer, pry bar, screwdriver).2) Safety: Hand tools should be clean, repaired, used as intended, and put away after use.3) Care: Tools should be inspected, left clean/dry, sharpened, and replaced when broken.
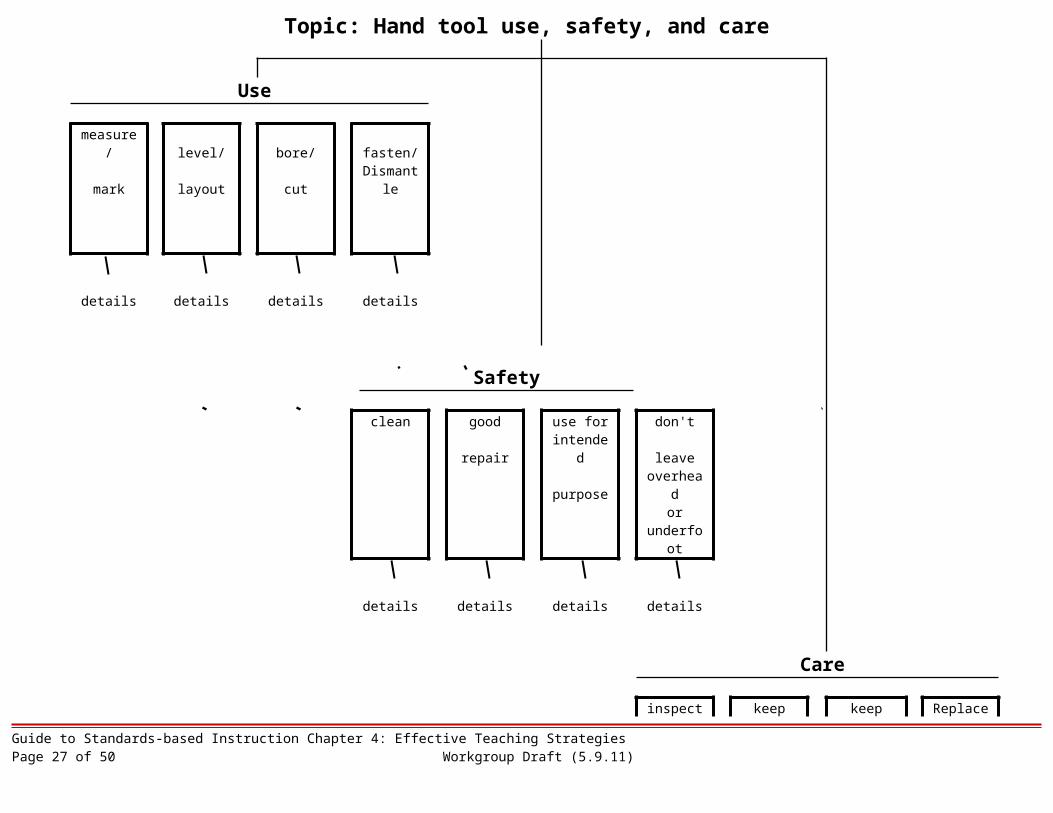
One great advantage of Cornell Notes is that they include the questions and the summary that are extremely helpful for later review before an assessment or reminders of basic information to build on. But they do depend on words, and many Job Corps students are more visual learners, so we might want to try a different organizer like the one shown below called a topic organizer.
Guide to Standards-based Instruction Chapter 4: Effective Teaching Strategies Page 19 of 37 Workgroup Draft (5.9.11)
Topic: Hand tool use, safety, and care
Use
measure
/ level/ bore/ fasten/
mark layout cutDismantl
e
details details details details
Safety
clean good use for don't repair intended leave
purposeoverhea
d or
underfoo
t
details details details details
Care
inspect keep keep Replace
regularly cleansharpene
d bent or & dry Broken Tools
Guide to Standards-based Instruction Chapter 4: Effective Teaching Strategies Page 20 of 37 Workgroup Draft (5.9.11)
details details details Details
Guide to Standards-based Instruction Chapter 4: Effective Teaching Strategies Page 21 of 37 Workgroup Draft (5.9.11)

In addition to the organizer/template styles above and the ones described under “similarities and differences” below, there are many other organizers that students use for note-taking, depending on the type of information the source is providing. Take a look at the following, all of which work well in Job Corps courses:
Cycle organizer. In many Job Corps classrooms and trade areas, students encounter cycles that are essential to understanding the key topics. One simple example, absolutely basic to the Renewable Resources and Energy, Forestry Conservation and Firefighting TAR, is the forest fire cycle. In the example below, the teacher has given the students the basic elements of the cycle, and they will fill in the characteristics as they listen to a student presentation.
Guide to Standards-based Instruction Chapter 4: Effective Teaching Strategies Page 22 of 37
Diagram organizer. Whether it is to understand the flow of blood through the circulatory system of the flow of air through an air-cooled engine, Job Corps students must master hundreds of terms and parts. Blank diagrams give students the opportunity to practice identifying the parts of the item they must master. For example, students in Health Occupations, Dental Assistant trade must be able to identify the parts of a tooth. To practice this learning until it is fluent or automatic, a blank diagram can help.
Acronym organizer. This method of memorizing a list of items or the steps in a process can be a useful tool, especially so the information is at hand until it becomes part of the fluid memory. Say, for example, that you are teaching the safety unit in IT, Computer Networking. The TAR calls upon students to master the following safety items:
No watches or jewelry when working on equipment. Wear goggles when soldering. No food or drink around computers. Do not remove components when power supply is connected and
turned on. Maintain a clean and organized work space. Demonstrate awareness of hazardous substances associated with
computer repair, especially lead, mercury, and silica. Demonstrate awareness of ergonomic issues associated with the work
environment. Demonstrate knowledge of common injuries sustained from computer
services, e.g., cuts and scrapes from sharp edges and components.
Because safety on the job is so important, you want students to memorize these items until they become second nature. So you tell them that the list means SAFETY 1ST, with the acronym described as follows (with a little humor thrown in):
Guide to Standards-based Instruction Chapter 4: Effective Teaching Strategies Page 23 of 37

S pace—clean and well-organizedA bandon jewelryF ood and drink—no-noE rgonomic issuesT oxic substances—lead, mercury, silicaY ou use grounding procedures
1 great networking specialist, that will be me!S oldering requires gogglesT urn off/disconnect power supply before removing components
Then have students develop their own acronyms. Most students think this is fun, and they will come up with lists that are personally meaningful and, therefore, much more memorable.
Phrase organizer. The phrase organizer is a lot like the acronym in that it uses the first letters of words to help students remember lists. The most famous of phrase organizers is probably the one used for order of operations in mathematics: Please Excuse My Dear Aunt Sally (parentheses, exponents, multiplication, division, addition, subtraction). The first letter of each word of the phrase is the clue to the step in the process. You can use the phrase organizer, like the acronym organizer, for lists or steps in a process.
Below is a phrase organizer you might use for Construction, Facilities Maintenance TAR item related to plumbing repair:
Phrase: To Fix Running Issues, Change The Flapper Action.
Letter
Process Step
T Turn the water offF Flush the toiletR Remove the old flapper and chainI Install the new flapperC Connect the new chain at approximately the right lengthT Turn on the waterF Flush the toiletA Adjust chain length, if needed
The next section on identifying similarities and differences also contains a variety of organizers.
Guide to Standards-based Instruction Chapter 4: Effective Teaching Strategies Page 24 of 37

Organizers to increase reading comprehension. Using organizers specifically for reading assignments can make the difference between students “getting it” and being left in the dark. Many Job Corps students arrive on center with low reading skills, and a lot of the industry materials are written at high reading levels. To help address this gap, shop and classroom teachers can use a special reading organizer.
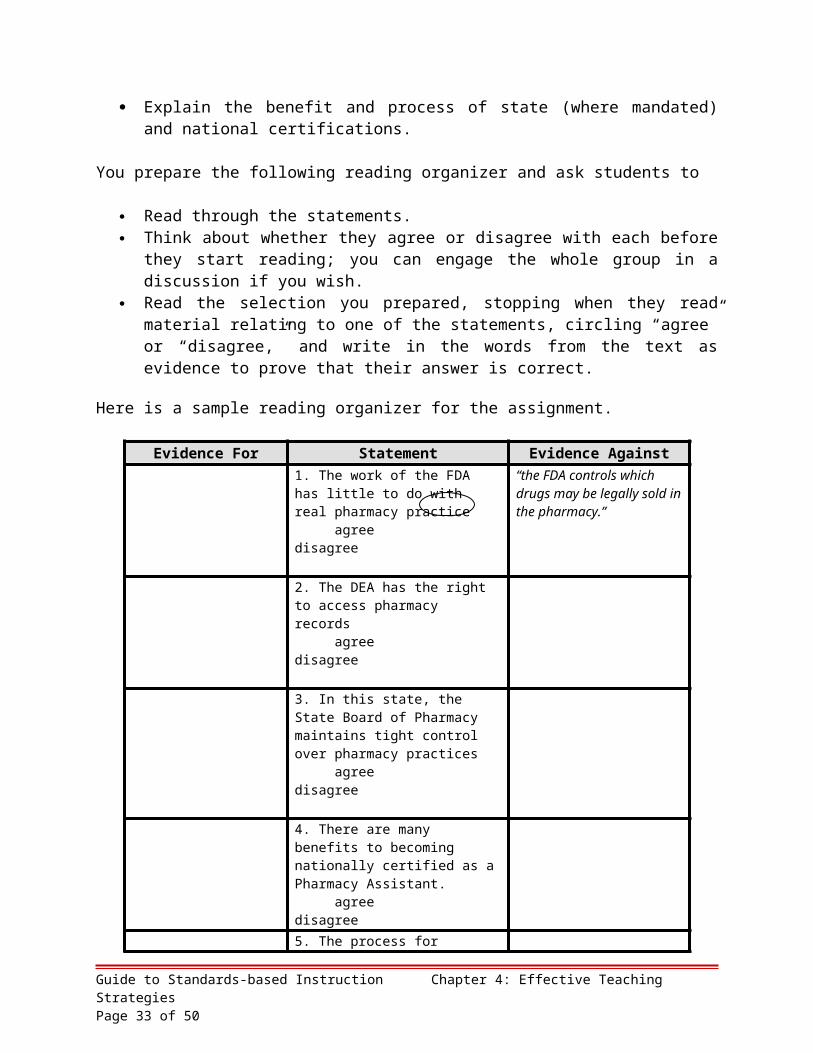
Let’s say that you are the instructor for Health Occupations, Pharmacy Technician and you begin by introducing the industry. You have a 2-page reading to give students the information for the following TAR items:
Demonstrate knowledge of the governing boards that oversee the practice of pharmacy (FDA, DEA, state board of pharmacy).
Explain the benefit and process of state (where mandated) and national certifications.
You prepare the following reading organizer and ask students to
Read through the statements. Think about whether they agree or disagree with each before they start reading; you can
engage the whole group in a discussion if you wish. Read the selection you prepared, stopping when they read material relating to one of the
statements, circling “agree” or “disagree,” and write in the words from the text as evidence to prove that their answer is correct.
Here is a sample reading organizer for the assignment.
Evidence For Statement Evidence Against1. The work of the FDA has little to do with real pharmacy practice agree disagree
“the FDA controls which drugs may be legally sold in the pharmacy.”
2. The DEA has the right to access pharmacy records agree disagree
3. In this state, the State Board of Pharmacy maintains tight control over pharmacy practices agree disagree
4. There are many benefits to becoming nationally certified as a Pharmacy Assistant. agree
Guide to Standards-based Instruction Chapter 4: Effective Teaching Strategies Page 25 of 37

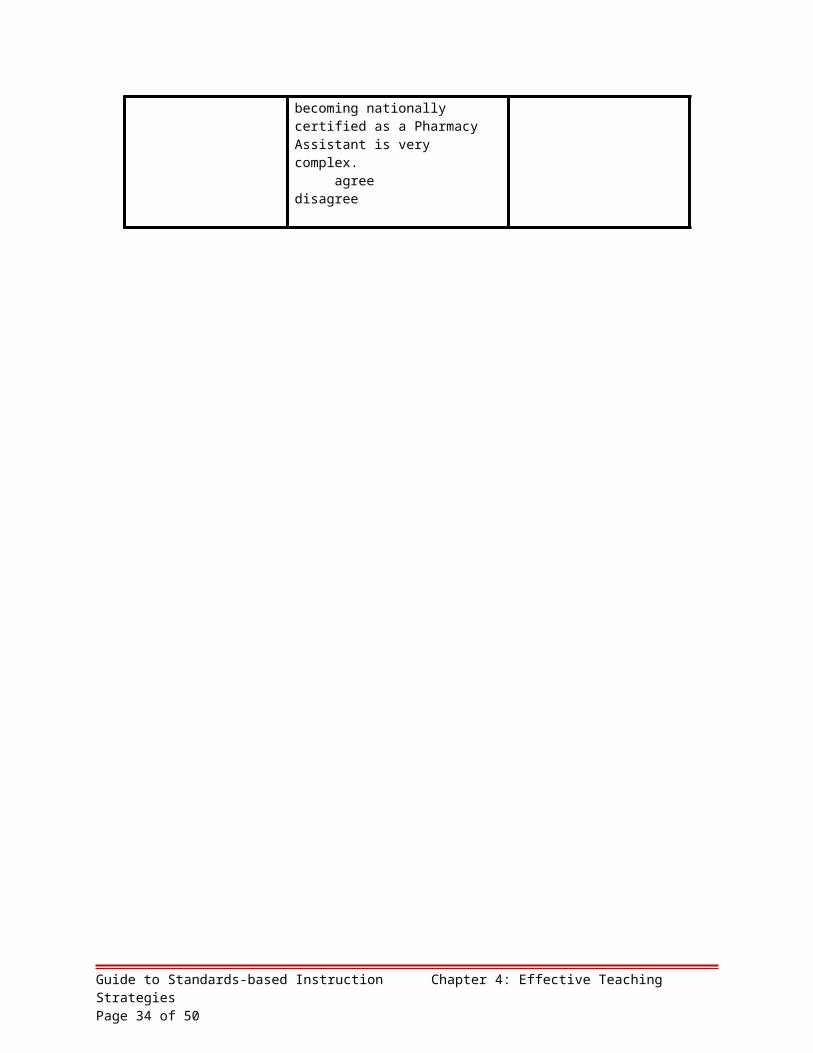
disagree5. The process for becoming nationally certified as a Pharmacy Assistant is very complex. agree disagree
Guide to Standards-based Instruction Chapter 4: Effective Teaching Strategies Page 26 of 37
Key Strategy #3: Identifying Similarities & Differences
As discussed earlier, comparing items to find their similarities and differences is an extremely powerful way for students to learn.
Identifying similarities and differences is simply the most effective teaching tool in the entire toolbox of strategies. If you use this strategy on a regular basis you will see a huge gain in student understanding: 45 percentage points higher achievement for students whose teachers used similarities/differences compared to those whose teachers did not!
How do you actually use this strategy in a shop or classroom context? There are four basic ways to work with similarities and differences: compare and contrast, classifying, creating metaphors, and creating analogies.
Compare & Contrast
Let’s start with the steps for a basic compare and contrast activity.
Step 1: Choose the items to be compared and the criteria for comparison . Some items are obvious. For example, task B.4 in the Computer Networking/Routing, Switching, and Networking TAR asks students to “Describe the difference between standard and extended IP Access Control Lists.” Other comparisons, not quite so straightforward, are also easy to put together. Let’s say you are the instructor for Computer Networking/IT Essentials, and your students are addressing the tasks in C. 2 which are as follows:
a. Gather information from the customer about use.b. Describe a home computer.c. Describe an entertainment/gaming computer.d. Describe a work computer.e. Describe an advanced work computer.f. Describe a server.g. Determine the type of computer based on customer needs.
You might choose items b through f to have students compare using the following criteria: typical use, typical hardware, typical software, typical peripherals, and cost range.
Any items can be compared on a wide range of criteria. Some criteria are relatively unimportant, such as the color of the computer, while others are key to understanding. When you begin using this strategy, you will choose the criteria for comparison. As students become more skilled, you can begin to remove some of the scaffolding, giving them some criteria and having them choose the others and defend the importance of their choices.
Guide to Standards-based Instruction Chapter 4: Effective Teaching Strategies Page 27 of 37

Step 2: Have students describe each item to be compared. Part of the power in this strategy comes from students analyzing written material, their notes, videos, web sites, and other input to identify and describe the characteristics of each item. You may help them in this process by providing additional information or telling them where to look for the needed data. Again, as they become better at compare/contrast, let them investigate on their own.
Step 3: Provide a visual organizer for students to identify similarities and differences. Visual organizers are a perfect way to capture the similarities and differences. Below are four types of organizers used by Job Corps instructors:
Venn Diagram. This example is comparing the characteristics of arteries to veins from Health Care. Following a lecture or reading on arteries and veins, Health Care students complete a Venn diagram to compare the two and deepen their understanding of a blood vessel.
Guide to Standards-based Instruction Chapter 4: Effective Teaching Strategies Page 28 of 37

Top Hat organizer. The example is comparing Fahrenheit to Celsius temperature gradients from the Automotive Technician TAR.
Side-by-Side Chart. The example is comparing dry cooking, dry cooking using fat, moist cooking, and combination cooking techniques in relation to meat/poultry/fish outcomes from Hospitality, Culinary Arts.
Technique Meat Poultry FishDry cooking Cuts/varieties Heat sourceDry cooking with fat Cuts/varieties Heat sourceMoist cooking Cuts/varieties Heat sourceCombination Cuts/varieties Heat sourceSimilarities
Differences
Step 4: Lead students in a discussion of the similarities and differences in the
Guide to Standards-based Instruction Chapter 4: Effective Teaching Strategies Page 29 of 37

items. This is an important step in helping students create conclusions about their findings. You can have them write the word “Conclusions” at the bottom of the page and fill in with their notes during your discussion.
What kinds of questions should you use to help students find the most important conclusions? The answer depends mostly on the focus of the content. For example, in the Culinary Arts chart above, you probably want students to focus primarily on how to choose the right cooking technique for the kind of meat, fish, or poultry they will be dealing with, so your questions might include:
What is similar in the kinds of cuts or varieties most appropriate for moist cooking? Dry cooking? Dry cooking with fat? Combination? How can you use this information when you’re choosing a cooking technique?
There are also some general questions you can ask to help students focus in on the important conclusions:
What is most important about the similarities? What is most important about the differences? What are the primary causes of the differences and similarities? What are the primary effects of the differences and similarities? Why is it important to know the differences?
Step 5: Have students apply their understanding. In most classrooms and trade areas, applying knowledge is simply the next logical step. But not all TAR items are completely hands-on, so application will sometimes take different approaches, such as role playing, writing a plan, playing a game, etc. For example, in Construction/Transportation, Heavy Equipment Operation, students could practice the identification of various types of equipment (B.7) by comparing their functions and operations in a team competition. Also, some types of concepts and areas of knowledge may require theoretical applications, such as applying a tourniquet to a severely injured arm.
Classifying
In addition to compare/contrast, a second way to identify similarities and differences is by classifying items. In just about every aspect of life, human beings sort and classify information to make it more understandable and to identify similarities and differences. Basic classification is also the foundation for inductive learning. Inductive learning entails taking a number of different items and making sense out of them by grouping according to categories, naming and then testing out the classification through further research.
The steps in classification are similar to compare and contrast:
Step 1: Choose the items to be classified. If you are the instructor for Renewable
Guide to Standards-based Instruction Chapter 4: Effective Teaching Strategies Page 30 of 37

Resources and Energy, Exterior Landscaping, you will be teaching about the various types of equipment used in the industry. As an introduction to the equipment, you might give the students a list of the following items from the TAR, Section C:
1. hand seeder2. gas powered blower3. gas powered vacuum4. 21" rotary mower5. line trimmer6. compact tractor7. power auger8. sod cutter9. jack hammer10. rotary tiller11. rotary spreader12. hand sprayer13. backpack sprayer14. tank trailer sprayer15. backhoe16. skid-steer tractor17. electric or gas utility cart18. reel-type mower19. riding front deck mower20. power shears
Step 2: Have students describe the items. Because every piece of equipment must be a part of the Landscape student’s fluent memory, you might want to have them create equipment 4 x 6 cards that they can later use for recall practice. The front of the card could have a student-drawn picture of the equipment with the name, safety information, and description of care; on the back could be a description of the characteristics of the equipment, its use, and basic operation information. Students could work in teams of 4, with each person on the team being responsible for the research and card development for 5 items. Then they would share information, with each team member explaining his pieces of equipment, while the others created cards for those 6 items. You can review the basics for each piece with the whole class to make sure the information is correct.
Step 3: Have students fill in graphic organizer for classification. Here’s the really interesting part. Students now look at the characteristics they have identified for one piece of equipment they think is quite important. Let’s say they chose the rotary tiller. They described it as a hand-operated, gas driven tool with a small engine that is used to break up the soil prior to planting. This suggests 3 possible ways to classify the equipment: by size (hand-operated vs. large), by power source (manual vs. gas/electric), or by general use area (soil, grass, shrubs/trees, etc.)
Here’s a sample of the combined graphic organizer:
Guide to Standards-based Instruction Chapter 4: Effective Teaching Strategies Page 31 of 37

Topic: Landscape Equipment
Manual Gas/electric Large Hand-operatedHand seeder Gas-powered blower Compact tractor Hand seeder
Gas-powered vacuum
Gas-powered blower
21” rotary mower Gas-powered vacuum
Line trimmer 21” rotary mowerCompact tractor Line trimmer
And so on…
And here’s an example of classification by the kind of landscape component:
Topic: Landscape Equipment
Soil Grass Shrubs/trees OtherHand seeder Hand seeder Line trimmer Gas-powered
blowerCompact tractor 21” rotary mower Gas-powered
vacuumPower auger Sod cutter Jack hammerRotary tiller Rotary spreaderAnd so on…
Step 4: Help students reach conclusions. In classification, reaching conclusions is relatively easy. First, check for accuracy. If students disagree, let them defend their position. It is possible, for example, to justify putting a rotary spreader under “soil” instead of “grass.” Then have students determine which kind of classification is most useful for them in their learning and which they feel might be most helpful in their actual work.
Guide to Standards-based Instruction Chapter 4: Effective Teaching Strategies Page 32 of 37
Creating Metaphors & Analogies
Don’t worry. You don’t have to be a Shakespearean scholar to create metaphors and analogies. In fact, you use them every day in normal speech! Metaphors are simply a short-hand way to compare two outwardly different items to each other (Ex. “war is hell.”) Metaphors work because the characteristics or process of the two items are actually similar. For example, the metaphor, “My mother-in-law is an angel” may not be frequently used, but the comparison is clear and could even be charted like this:
My mother-in-law Cultural concept of an angel
Accepts me as one of her own
Accepts all human beings
Listens to my problems and tries to help me solve them
Watches over people
Keeps me focused on what is important and right
Serves as a conscience
If we look again at the TAR’s, the following is an example from Health Care: An aneurysm is like the bulge you can get in a garden hose. The bigger the bulge, the weaker the wall and the more likely it will burst. You can find more medical analogies at http://www.altoonafp.org/analogies.htm.
However, this similarities/differences activity uses higher order thinking skills that students will need to be taught. We will approach our use of metaphor from the perspective of making the strange familiar. Meaning, using something that everyone knows about to explain new information. And there are specific steps for making the new familiar.
Step 1: Choose the item for the metaphor focus and comparison. Since a fair amount of time will be spent on this activity, be sure to choose something important. For example, in the Health, Licensed Vocational Nurse TAR, students must have a good understanding of the digestive system. Therefore, we use this information in the metaphor. When choosing the other half of the metaphor, we will rule out anything that is too similar, like the circulatory system. Similar items are great for compare and contrast, but not for metaphor.
A metaphor will use something that is both quite different in its literal sense and quite similar in its patterns. For example, we could say that the digestive system is like a mining operation because, in both cases, the raw material is unusable and must be processed. The processing requires the breaking down of the raw material into smaller pieces with the assistance of liquids, and the material that is not usable is disposed of. Or we can say that the digestive system is like learning a new concept on the Internet and let the students elaborate on the metaphor. At first, give the full analogy to the students but over time, let the students think of their own
Guide to Standards-based Instruction Chapter 4: Effective Teaching Strategies Page 33 of 37
comparisons. They will only be able to do this after finishing step 2.
Step 2: Describe the new information briefly for the students. We assume that “learning” is something all students understand and that “the digestive system” is the new information. So you might provide students with a diagram of the digestive system and a one page description about how it works, beginning with the food entering the mouth. Or you could show a video, make a short presentation, or have a student make a presentation while the other students take notes.
Step 3: Have students fill in a graphic organizer for the metaphor. Start with the new information. Below is a sample of what a student product might look like for the analogy, “The digestive system is like learning from the Internet”:
Analogy: The digestive system is like learning from the InternetDigestive system (DS) literal characteristics
Similarities Learning from Internet literal characteristics
1) The DS is made up of a series of components: mouth (entry), esophagus, stomach, small intestine, large intestine/colon, rectum, and anus
Series of related pieces working together for a single purpose
1) The Internet is made up of trillions of pieces of information which are made accessible for learning about a topic by search engines.
2) The mouth serves as entry point for a variety of food.
There is an entry point 2) The search engine provides the entry point for a variety of information relative to your topic.
3) The mouth, stomach, small/large intestines use digestive juices to break down the food into pieces small enough (small molecules) to be absorbed by the blood stream.
Raw material is broken down into usable pieces
3) The key words you use in the search engine determine how finely the information is sorted for you. Then you use your brain to break down the information into pieces usable (and understandable) for you.
4) The stomach stores the food initially and then mixes it with digestive juices and sends it to the small intestine
The usable pieces are stored in the system
4) Your computer stores the information in the form of highlighted notes
5) In the small intestine, nutrients, vitamins, water, salt, fat, and sugars are absorbed into the body.
The usable pieces are retrieved in the system and put to work
5) Then you select what information you need to know from what you’ve collected and you learn that information to mastery.
6) Indigestible fiber and any foreign elements are eliminated through the colon, rectum, and anus
The parts that aren’t used are eliminated
6) The rest of the information goes into the computer trash.
Guide to Standards-based Instruction Chapter 4: Effective Teaching Strategies Page 34 of 37

7) The DS is a long series of convoluted, twisted tubes running through our bodies.
The systems are complex 7) The Internet operates as a complex system offering information from world-wide sources.
Guide to Standards-based Instruction Chapter 4: Effective Teaching Strategies Page 35 of 37

Step 4: Help students reach conclusions. Through discussion, you can review the best characteristics and similarities, demonstrate the range of thinking, and help students reach conclusions about the new information. The important point is that the student brains have created the dendrite links between the “strange” information and the “familiar” understanding they already have, making it much easier to remember and use the new information.
Chapter Summary
Below is a review of the strategies discussed in this chapter and the purposes for each.
Strategy Purpose or UseAdvance organizers Make sense of information input
Create future guide for study Provide repetitions of correct
informationClassifying Organize/categorize information
Make sense of information inputCompare and contrast organizers
Top Hat Organizer Venn Diagram Side-by-Side Chart
Compare two or more items and create synthesis
Attach new information to existing knowledge, review, strengthen connections
Provide repetitions of correct information
Make sense of information inputCompetitions and games Help students master contentCooperative learning Many different usesCues Attach new information to existing
knowledge, review, strengthen connections
Generating and testing hypotheses Method for in-depth learningMetaphor and analogy Help students master content
Provide deeper understanding Attach new information to existing
knowledge, review, strengthen connections
Non-linguistic representation Make sense of information inputNotetaking Cornell notes Topic cycle diagram acronym phrase reading organizers
Make sense of information input Create future guide for study Provide repetitions of correct
information
Peer feedback Provide repetitions of correct information
Questions Make sense of information input Help students master content
Reciprocal teaching Help students understand and master
Guide to Standards-based Instruction Chapter 4: Effective Teaching Strategies Page 36 of 37

content Provide repetitions of correct
informationReinforcing effort & providing recognition
Help students understand that effort brings success
Make students feel they can be effective learners
Create better student-teacher relationships
Setting goals/providing feedback Create learning incentive Provide repetitions of correct
informationSummarizing Finding the most important information
Creating future guide for study Provide repetitions of correct
information
3 Fuchs, D., Fuchs, L.S., Mathes, P..G., & Simmons, D.C. (1997). Peer-assisted learning strategies: Making classrooms more responsive to academic diversity. American Education Research Journal, 34(1), 174-206.4 Kings-Sears, M.E., & Bradley, D.F. (1995). Classwide peer tutoring: Heterogeneous instruction in general education classrooms. Preventing School Failure 40(1), 29-35.5 Ibid.6 Butler, F.M. (1999). Reading partners: Students can help each other learn to read! Education and Treatment of Children, 22(4), 415-426.7 Hashey, J.M. & Connors, D.J. (2003). Learn from our journey: Reciprocal teaching and action research. The Reading Teacher, 57(3), 174-206.8 Fathman, A.K., Quinn, M.E., & Kessler, C. (1992) Teaching science to English learners, grades 4-8. NCELA Program Information Guide Series (No. 11), 1-27. 9 Strong, R.W., Hanson, J.R., & Silver, H.F. (1995). Questioning styles and strategies (3rd ed.). Woodbridge, NJ: Thoughtful Education Press.10 Stahl, R.J. (1994). Using “think time” and “wait time” skillfully in the classroom. Bloomington, IN: ERIC Clearinghouse for Social Studies/Social Science Education.
Guide to Standards-based Instruction Chapter 4: Effective Teaching Strategies Page 37 of 37