jinx! - led matrix control - live-leds.de · jinx! – led matrix control page 2 audio based...
TRANSCRIPT
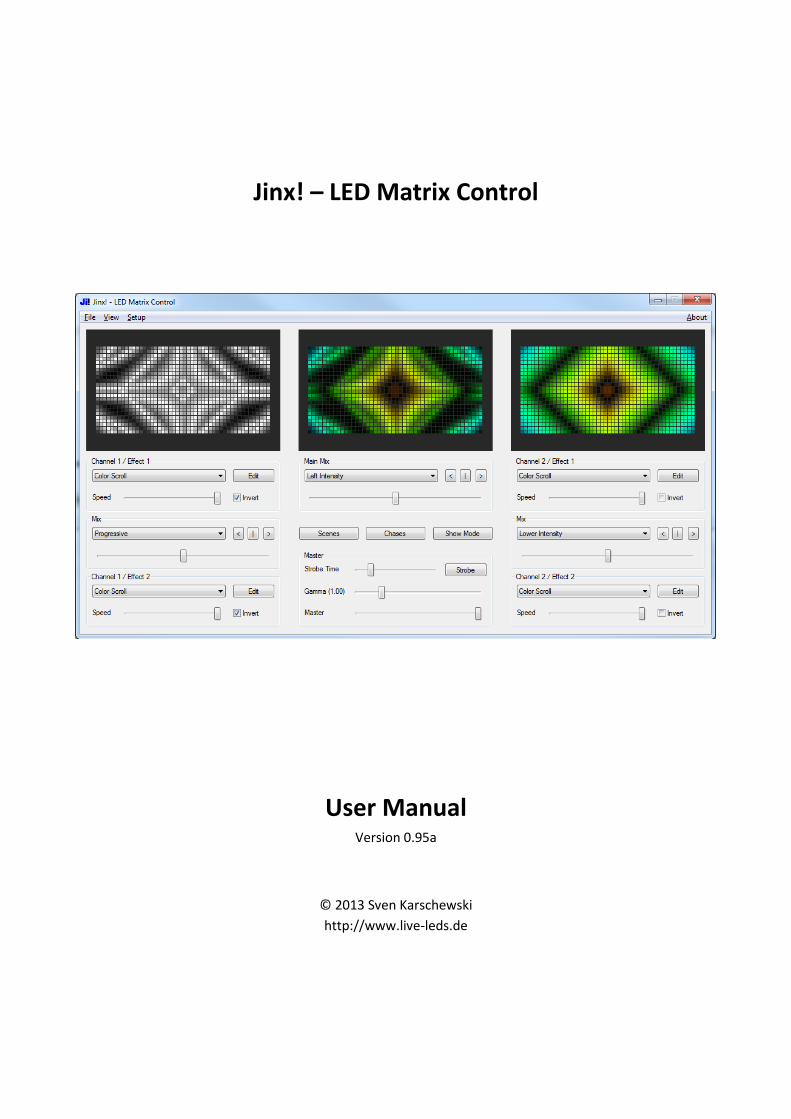
Jinx! – LED Matrix Control
User Manual Version 0.95a
© 2013 Sven Karschewski
http://www.live-leds.de
Jinx! – LED Matrix Control
Page 1
Table of Contents
Features ............................................................................................................................................................. 3
Quick start ......................................................................................................................................................... 4
Matrix Size ..................................................................................................................................................... 4
Output Devices .............................................................................................................................................. 4
Patch Matrix .................................................................................................................................................. 5
Start Output ................................................................................................................................................... 6
Main Window .................................................................................................................................................... 7
Effect Generators .......................................................................................................................................... 7
Copy and Paste Effects .................................................................................................................................. 8
Mixing Effects ................................................................................................................................................ 8
Channel Preview ............................................................................................................................................ 9
Mixing Channels ............................................................................................................................................ 9
Controlling Master Output ............................................................................................................................ 9
Main Window Buttons ................................................................................................................................. 10
Working with Scenes ....................................................................................................................................... 10
Manage and Playing Scenes ........................................................................................................................ 11
Scene Fade ................................................................................................................................................... 11
Working with Chases ....................................................................................................................................... 12
Creating a new Chase .................................................................................................................................. 13
Starting and Stopping a Chase ..................................................................................................................... 14
Manage Chases ............................................................................................................................................ 14
The Show Mode ............................................................................................................................................... 15
Setup Matrix Size and Options ........................................................................................................................ 16
Configure Output Devices ............................................................................................................................... 17
Add and Edit Output Devices ....................................................................................................................... 17
Patch Matrix .................................................................................................................................................... 19
Fast Patch .................................................................................................................................................... 20
Starting Output ................................................................................................................................................ 20
Remote Control ............................................................................................................................................... 21
Jinx! – LED Matrix Control
Page 2
Audio based Effects ......................................................................................................................................... 22
Auto Gain Control ........................................................................................................................................ 22
Audio Trigger Setup ..................................................................................................................................... 23
Saving and Loading your Show ........................................................................................................................ 24
Importing a Show ........................................................................................................................................ 24
Auto save and load ...................................................................................................................................... 24
Loading Files over the Command line ......................................................................................................... 24
The Jinx! Effect Engines ................................................................................................................................... 25
Simple Color ................................................................................................................................................. 25
Color Scroll ................................................................................................................................................... 25
Plasma ......................................................................................................................................................... 25
Fire ............................................................................................................................................................... 25
Metaballs ..................................................................................................................................................... 26
Expanding Shapes ........................................................................................................................................ 26
Falling Rain ................................................................................................................................................... 26
Radar/Scan Lines ......................................................................................................................................... 27
Scrolling Text ............................................................................................................................................... 27
Animated Gif ................................................................................................................................................ 27
Starfield ....................................................................................................................................................... 27
Sine Lines ..................................................................................................................................................... 28
Strobe .......................................................................................................................................................... 28
Spectrum Analyzer....................................................................................................................................... 29
Capture Screen ............................................................................................................................................ 29

Jinx! – LED Matrix Control
Page 3
Features
Jinx! is a standalone controlling software for led matrices, it has a powerful set of features to get the most
out of your matrix.
simple and intuitive user interface
2 effect channels with 2 independent generators each
16 effect generators with lots of variations and sub effects including audio based effects like strobe
and spectrum analyzer
switchable auto gain control for audio capturing
generators can be merged with a lot of different modes
both effect channels can be merged and crossfaded
simple master control for main brightness and gamma
additional master strobe effect
scene store to quickly save and access a composed effect
powerful chase engine to build your own chases with stored scenes
touchscreen friendly show mode for playing scenes and chases
matrix preview panels switchable to single generators
copy and paste single generators to another channel or scene
various and flexible output options, supporting Art-Net, tpm2.net, tpm2, Glediator protocol and
MiniDMX
multiple output devices can be handled to drive a serial matrix with more than one port
flexible pixel to output device patching
remote control support via Art-Net, tpm2.net and tpm2 to control scene and chase changes, master
brightness and master strobe remotely over a hardware or software based light desk
complete ArtPoll support for Art-Net input and output
small, fast and native windows application, doesn’t need any additional runtimes
Jinx! – LED Matrix Control
Page 4
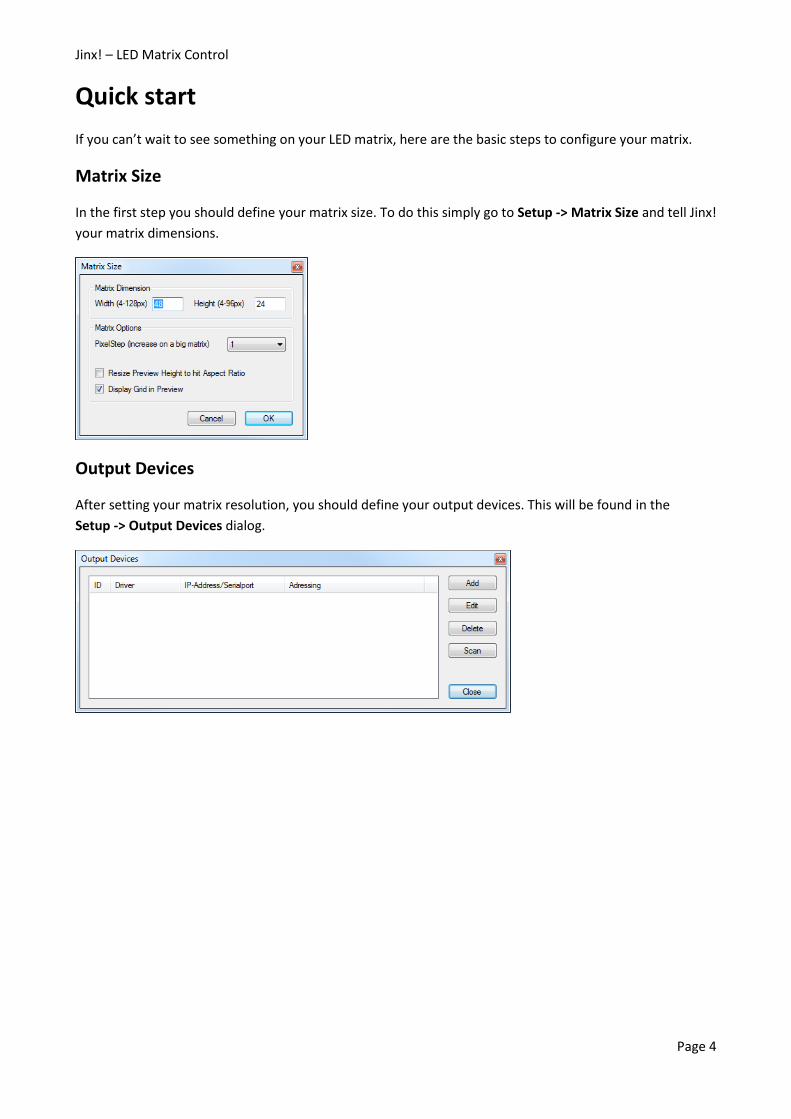
Quick start
If you can’t wait to see something on your LED matrix, here are the basic steps to configure your matrix.
Matrix Size
In the first step you should define your matrix size. To do this simply go to Setup -> Matrix Size and tell Jinx!
your matrix dimensions.
Output Devices
After setting your matrix resolution, you should define your output devices. This will be found in the
Setup -> Output Devices dialog.

Jinx! – LED Matrix Control
Page 5
Here you can manage your devices and even scan for Art-Net devices inside your network. Simply add one
or multiple devices and give it the correct parameters.
Patch Matrix
When you successfully defined your devices, you should patch the matrix pixels to your corresponding
output devices. This will be done in the Setup -> Output Patch dialog.
In this window you can see every single pixel of your matrix. Unpatched pixels are indicated red, patched
pixels will appear in green. You can click on a single pixel and patch it to the corresponding device and
channels on the right side.

Jinx! – LED Matrix Control
Page 6
To complete this job quickly, you can use the Fast Patch dialog.
The Fast Patch starts with the actually marked pixel. Now you have to set the dimension of the block you
want to patch, choose the correct output device, the pixel order and the first device channel. To do the
patch you simply have to click the OK button.
Start Output
After patching your matrix you can start the output by activating Setup -> Start Output. If everything went
well and you choose any effect it should be displayed on your matrix.

Jinx! – LED Matrix Control
Page 7
Main Window
The Main Window is divided into 3 sections. There are 2 effect channels, channel one is placed at the left
side and channel two at the ride side. In between these effect channels resides the master section, where
you can control the output.
Every effect channel is divided into 2 identical effect generators and a crossfade/mix section in between
where you can mix the animations that are generated by the independent generators.
The master section has another crossfade/mix section which is responsible to mix the two effect channels
together. The lower control group in the master section will control the main brightness (Master), the
global gamma correction (Gamma) and the master strobe, which can be used as additional effect after
mixing all channels together.
Effect Generators
Every single effect generator has 4 controls to choose and control the animation.
The most important control is the dropdown list on the top left side, here you can choose the effect that
will be generated. On the left bottom you can change the generator speed, to fit your needs.
The Edit button on the right top will invoke the effect configure window, where you can change a lot of
parameters for your chosen effect. The small checkbox underneath will invert the colors of the whole
generated picture/animation.
Jinx! – LED Matrix Control
Page 8
Copy and Paste Effects
You can copy an already configured effect generator into the internal clipboard by right clicking your mouse
over the Edit button. You can paste it back to any effect generator by using the right click menu over the
Edit button again.
Mixing Effects
If you activated both effect generators in one channel, these animations will be mixed together. The way
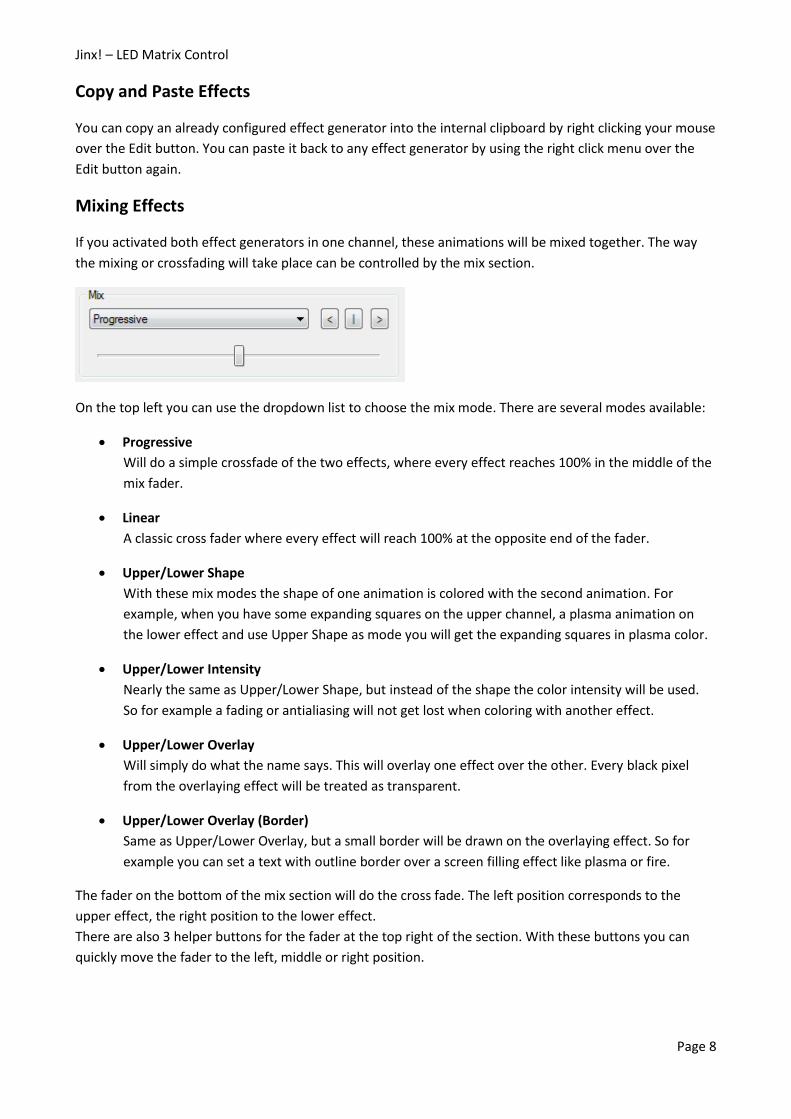
the mixing or crossfading will take place can be controlled by the mix section.
On the top left you can use the dropdown list to choose the mix mode. There are several modes available:
Progressive
Will do a simple crossfade of the two effects, where every effect reaches 100% in the middle of the
mix fader.
Linear
A classic cross fader where every effect will reach 100% at the opposite end of the fader.
Upper/Lower Shape
With these mix modes the shape of one animation is colored with the second animation. For
example, when you have some expanding squares on the upper channel, a plasma animation on
the lower effect and use Upper Shape as mode you will get the expanding squares in plasma color.
Upper/Lower Intensity
Nearly the same as Upper/Lower Shape, but instead of the shape the color intensity will be used.
So for example a fading or antialiasing will not get lost when coloring with another effect.
Upper/Lower Overlay
Will simply do what the name says. This will overlay one effect over the other. Every black pixel
from the overlaying effect will be treated as transparent.
Upper/Lower Overlay (Border)
Same as Upper/Lower Overlay, but a small border will be drawn on the overlaying effect. So for
example you can set a text with outline border over a screen filling effect like plasma or fire.
The fader on the bottom of the mix section will do the cross fade. The left position corresponds to the
upper effect, the right position to the lower effect.
There are also 3 helper buttons for the fader at the top right of the section. With these buttons you can
quickly move the fader to the left, middle or right position.
Jinx! – LED Matrix Control
Page 9
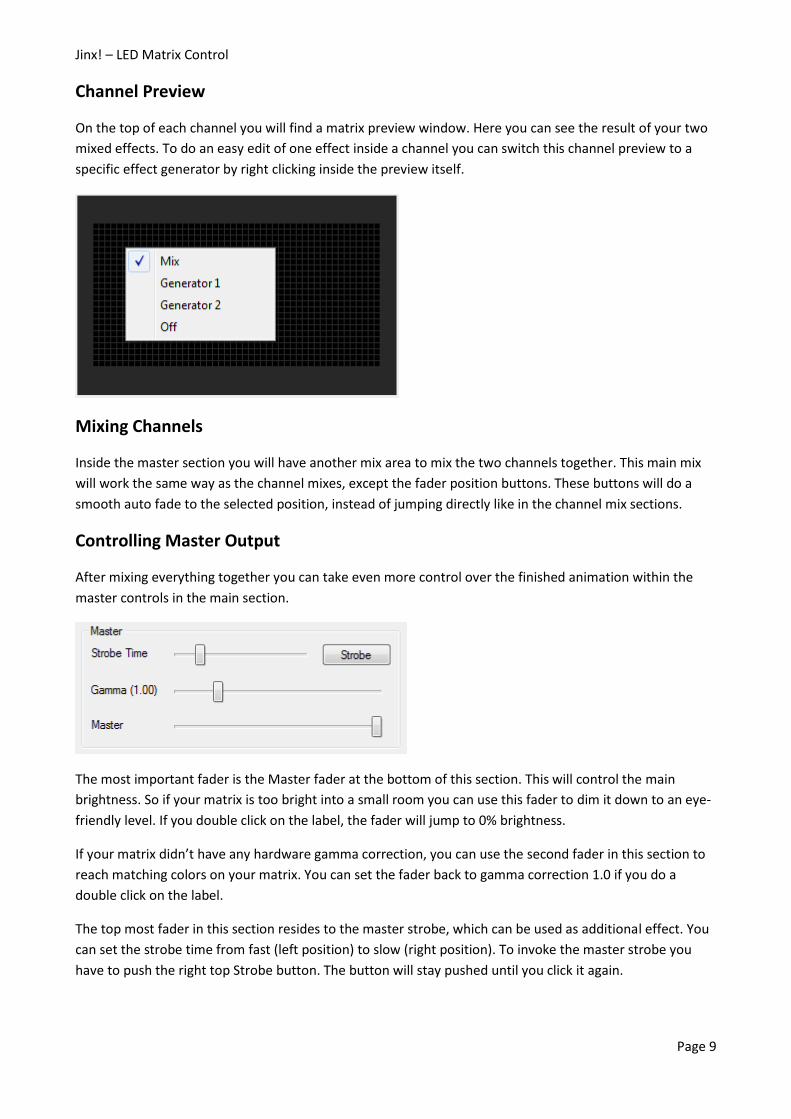
Channel Preview
On the top of each channel you will find a matrix preview window. Here you can see the result of your two
mixed effects. To do an easy edit of one effect inside a channel you can switch this channel preview to a
specific effect generator by right clicking inside the preview itself.
Mixing Channels
Inside the master section you will have another mix area to mix the two channels together. This main mix
will work the same way as the channel mixes, except the fader position buttons. These buttons will do a
smooth auto fade to the selected position, instead of jumping directly like in the channel mix sections.
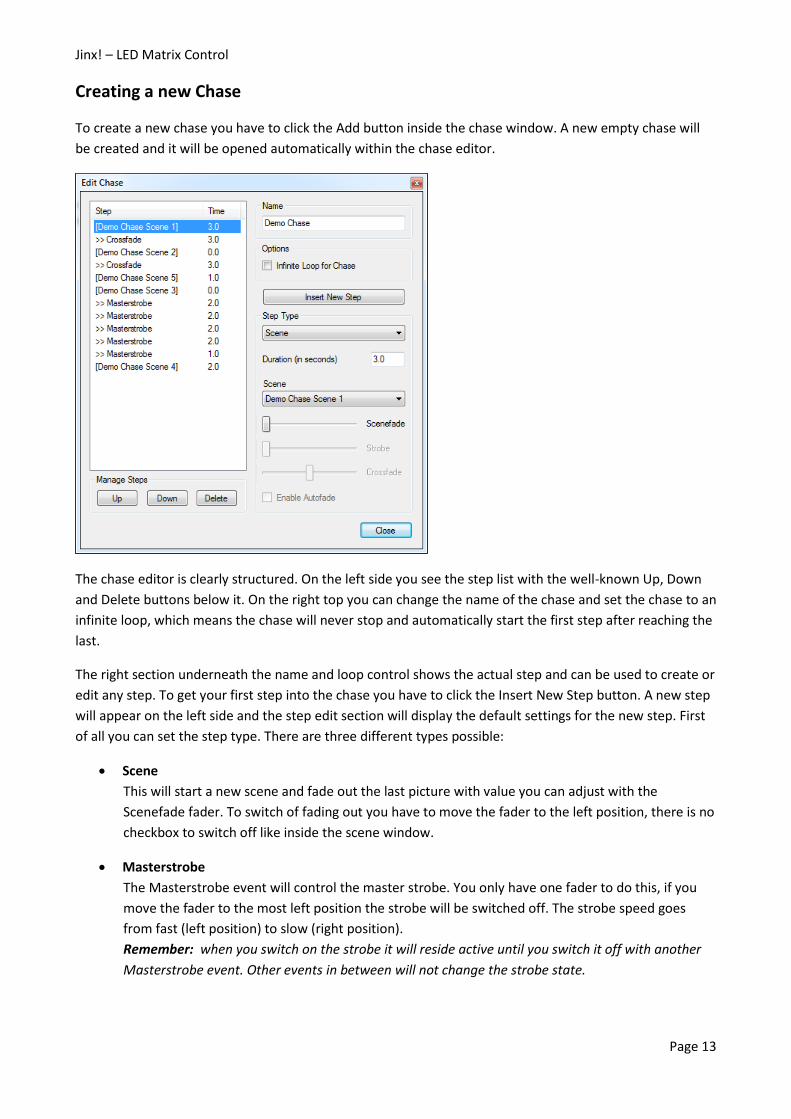
Controlling Master Output
After mixing everything together you can take even more control over the finished animation within the
master controls in the main section.
The most important fader is the Master fader at the bottom of this section. This will control the main
brightness. So if your matrix is too bright into a small room you can use this fader to dim it down to an eye-
friendly level. If you double click on the label, the fader will jump to 0% brightness.
If your matrix didn’t have any hardware gamma correction, you can use the second fader in this section to
reach matching colors on your matrix. You can set the fader back to gamma correction 1.0 if you do a
double click on the label.
The top most fader in this section resides to the master strobe, which can be used as additional effect. You
can set the strobe time from fast (left position) to slow (right position). To invoke the master strobe you
have to push the right top Strobe button. The button will stay pushed until you click it again.

Jinx! – LED Matrix Control
Page 10
Main Window Buttons
In the middle of the main window there are three more buttons.
With the Scenes button you will open the scenes window where you can store and manage your scenes,
the second button will open the chase window where you can manage your chases. To switch Jinx! into the
show mode, you have to press the third button.
More information about scenes, chases and the show mode will be found within the next chapters.
Working with Scenes
Because it is not very comfortable to design every animation mix manually
when you need it, it is possible to store a complete animation setup into a
scene.
The following things get stored inside a scene:
all 4 effect generators with all effect specific options
the 2 effect mixes
the channel main mix
The master controls (Master, Gamma, Master Strobe) will not be saved and
will operate independently from any scene. So you can adjust the main
brightness and gamma to your setup or room and don’t have to adjust it
every time a new scene will be activated.
The amount of scenes which can be stored is not limited. To save, activate
and manage scenes you have to go to the scene window. This can be opened
over the Scenes button in the master section of the main screen or you can
use the main menu. Choose View -> Scenelist to activate the window over
the menu.
The scene window is divided into 3 sections. The first and top most section is the scene list, it will display all
stored scenes. The second area is called Control and will let you enable and adjust the scene fade when you
activate another stored scene. The Manage Scene section will let you add, replace/rename, move and
delete your scenes.

Jinx! – LED Matrix Control
Page 11
Manage and Playing Scenes
When you successfully created your first animation you can store it into your scene memory with two easy
steps.
First of all you have to give the scene a name. Just write it into the text field which will be found in between
the buttons in the Manage Scenes section. To store into the scene list you simply have to click the Add
button afterwards and the scene will immediately appear inside the scene list. Now you can setup another
animation and store it with another name. To recall the stored scene you simply have to click on the list
entry in the first section of the scene window.
Tip: Create always a Blackout scene with no active effect generators, so you can switch off any animation or
matrix output quickly by recalling this scene.
If you want to edit a scene and change some parameters you can restore the scene by clicking it in the list,
change your parameters and click the Replace button. The active scene will be overwritten with the new
settings. Furthermore you can use the Replace button to rename a scene. After activating the scene you
can type in a new name in the text field and scene will be overwritten with the active settings and the new
name by clicking the replace button.
To copy scenes you have to activate it and use the add button after a new name was typed into the text
field.
The Up, Down and Delete buttons will exactly do what you expect. With Up/Down the activated scene will
move inside the scene list and Delete will remove the scene from the store. Be carefully, the scene will be
deleted without any confirmation.
Scene Fade
Inside the Control section you can activate and adjust the scene fading on changing scenes. If you activate
the Fade Out checkbox the last picture from the previously running scene will be faded out while a new
selected scene is already running. So you can create smooth scene changes instead of hardly switched
effects. The duration of the fade out can be adjusted with the fader control beneath the checkbox from fast
(left position) to slow (right position).
Tip: The scene window can be docked to the main window, you can activate it inside the main menu with
View -> Dock Scenewindow. It will be undocked automatically if you move the scene window directly.

Jinx! – LED Matrix Control
Page 12
Working with Chases
In addition to the scene store, Jinx! has also a powerful chase engine
integrated to get even more flexibility.
A chase is a well-known feature within common lightning desks and it is able
to playback scenes automatically. This means you can program complete
shows and generate extended animations with a few easy steps.
A chase in Jinx! can use the following features:
scene changes with adjustable scene fade for every step
control main mix cross fader with smooth auto fade or a direct jump
to the wanted position
control master strobe on/off and speed
adjustable duration/time for every step
unlimited amount of steps inside a chase
the chase can be set to an endless loop
The amount of storable chases is not limited as well. The chase window can
be opened over the Chases button in the main window or by choosing
View -> Chaselist in the main menu.
The window looks roughly like the scene window. We have the chase list at the top, a control section to
start and stop chases as well as the Manage Chases section to add, edit, move and delete a single chase.
Jinx! – LED Matrix Control
Page 13
Creating a new Chase
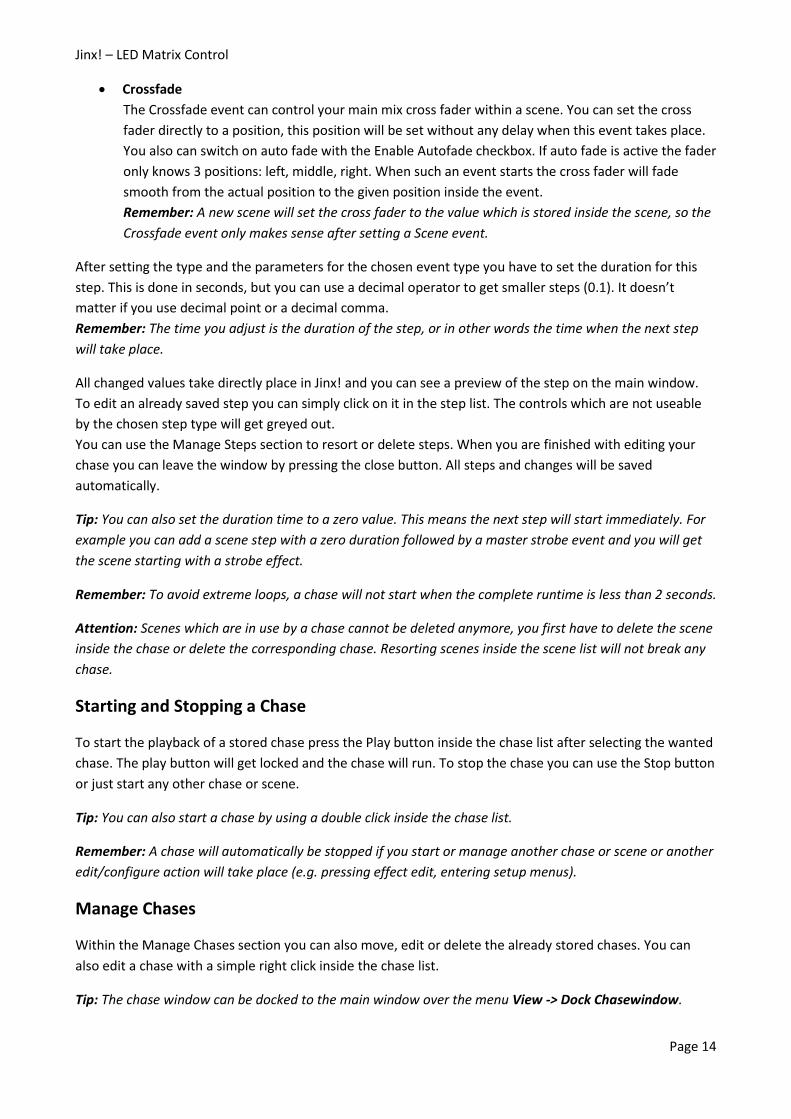
To create a new chase you have to click the Add button inside the chase window. A new empty chase will
be created and it will be opened automatically within the chase editor.
The chase editor is clearly structured. On the left side you see the step list with the well-known Up, Down
and Delete buttons below it. On the right top you can change the name of the chase and set the chase to an
infinite loop, which means the chase will never stop and automatically start the first step after reaching the
last.
The right section underneath the name and loop control shows the actual step and can be used to create or
edit any step. To get your first step into the chase you have to click the Insert New Step button. A new step
will appear on the left side and the step edit section will display the default settings for the new step. First
of all you can set the step type. There are three different types possible:
Scene
This will start a new scene and fade out the last picture with value you can adjust with the
Scenefade fader. To switch of fading out you have to move the fader to the left position, there is no
checkbox to switch off like inside the scene window.
Masterstrobe
The Masterstrobe event will control the master strobe. You only have one fader to do this, if you
move the fader to the most left position the strobe will be switched off. The strobe speed goes
from fast (left position) to slow (right position).
Remember: when you switch on the strobe it will reside active until you switch it off with another
Masterstrobe event. Other events in between will not change the strobe state.
Jinx! – LED Matrix Control
Page 14
Crossfade
The Crossfade event can control your main mix cross fader within a scene. You can set the cross
fader directly to a position, this position will be set without any delay when this event takes place.
You also can switch on auto fade with the Enable Autofade checkbox. If auto fade is active the fader
only knows 3 positions: left, middle, right. When such an event starts the cross fader will fade
smooth from the actual position to the given position inside the event.
Remember: A new scene will set the cross fader to the value which is stored inside the scene, so the
Crossfade event only makes sense after setting a Scene event.
After setting the type and the parameters for the chosen event type you have to set the duration for this
step. This is done in seconds, but you can use a decimal operator to get smaller steps (0.1). It doesn’t
matter if you use decimal point or a decimal comma.
Remember: The time you adjust is the duration of the step, or in other words the time when the next step
will take place.
All changed values take directly place in Jinx! and you can see a preview of the step on the main window.
To edit an already saved step you can simply click on it in the step list. The controls which are not useable
by the chosen step type will get greyed out.
You can use the Manage Steps section to resort or delete steps. When you are finished with editing your
chase you can leave the window by pressing the close button. All steps and changes will be saved
automatically.
Tip: You can also set the duration time to a zero value. This means the next step will start immediately. For
example you can add a scene step with a zero duration followed by a master strobe event and you will get
the scene starting with a strobe effect.
Remember: To avoid extreme loops, a chase will not start when the complete runtime is less than 2 seconds.
Attention: Scenes which are in use by a chase cannot be deleted anymore, you first have to delete the scene
inside the chase or delete the corresponding chase. Resorting scenes inside the scene list will not break any
chase.
Starting and Stopping a Chase
To start the playback of a stored chase press the Play button inside the chase list after selecting the wanted
chase. The play button will get locked and the chase will run. To stop the chase you can use the Stop button
or just start any other chase or scene.
Tip: You can also start a chase by using a double click inside the chase list.
Remember: A chase will automatically be stopped if you start or manage another chase or scene or another
edit/configure action will take place (e.g. pressing effect edit, entering setup menus).
Manage Chases
Within the Manage Chases section you can also move, edit or delete the already stored chases. You can
also edit a chase with a simple right click inside the chase list.
Tip: The chase window can be docked to the main window over the menu View -> Dock Chasewindow.
Jinx! – LED Matrix Control
Page 15
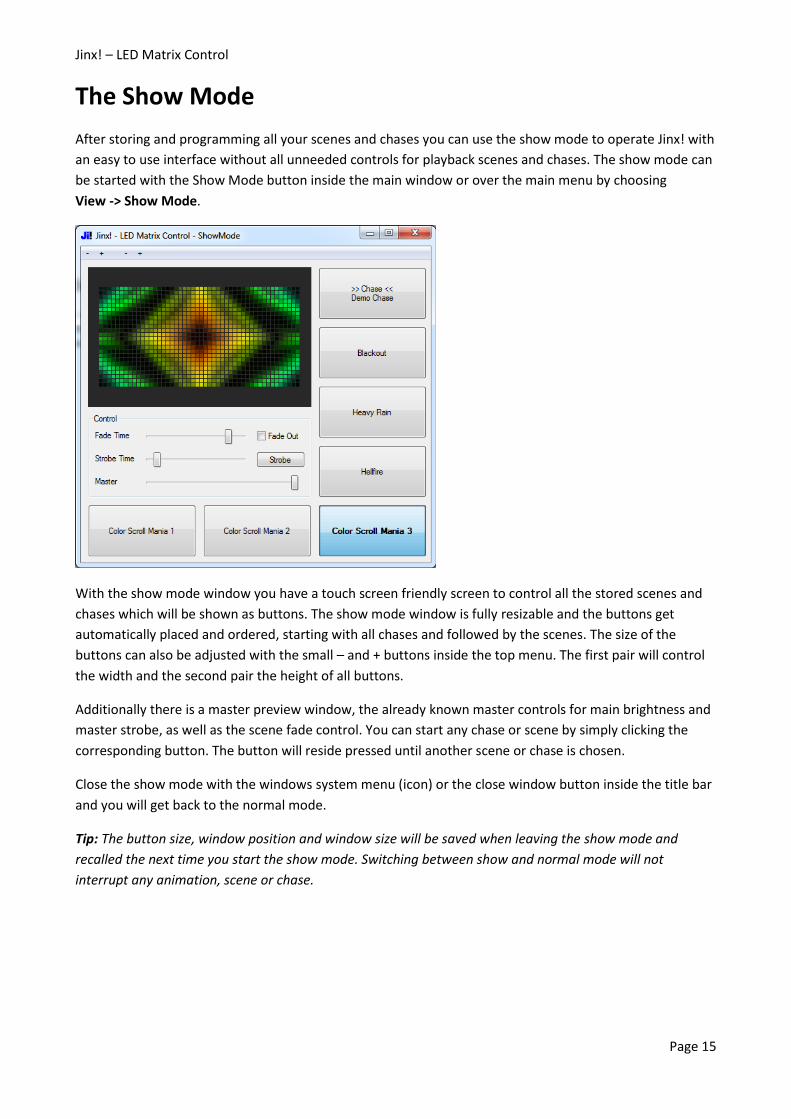
The Show Mode
After storing and programming all your scenes and chases you can use the show mode to operate Jinx! with
an easy to use interface without all unneeded controls for playback scenes and chases. The show mode can
be started with the Show Mode button inside the main window or over the main menu by choosing
View -> Show Mode.
With the show mode window you have a touch screen friendly screen to control all the stored scenes and
chases which will be shown as buttons. The show mode window is fully resizable and the buttons get
automatically placed and ordered, starting with all chases and followed by the scenes. The size of the
buttons can also be adjusted with the small – and + buttons inside the top menu. The first pair will control
the width and the second pair the height of all buttons.
Additionally there is a master preview window, the already known master controls for main brightness and
master strobe, as well as the scene fade control. You can start any chase or scene by simply clicking the
corresponding button. The button will reside pressed until another scene or chase is chosen.
Close the show mode with the windows system menu (icon) or the close window button inside the title bar
and you will get back to the normal mode.
Tip: The button size, window position and window size will be saved when leaving the show mode and
recalled the next time you start the show mode. Switching between show and normal mode will not
interrupt any animation, scene or chase.

Jinx! – LED Matrix Control
Page 16
Setup Matrix Size and Options
The first step to configure Jinx! for your matrix would be to set the resolution your matrix has. This would
be done in the Matrix Size dialog. You can access it over the main menu with Setup -> Matrix Size.
In the first section you can set the width and height of your matrix in pixel. At the moment Jinx! supports
any matrix dimension between 4x4 pixels and 128x96 pixels.
In the lower section there are additional options to set. Because many of the effect generators are on a
pixel based speed, they can get very slow if you drive big matrixes with Jinx!. To speed up those effects, you
can rise the pixel step to 2 or 3 pixel changes per frame.
The next two options adjusting the matrix previews in the user interface. You can choose if you want to see
a grid in the preview or not and you can resize the preview height to your matrix aspect ratio to reduce
unused border space inside the preview panes on certain aspect ratios.
Jinx! – LED Matrix Control
Page 17
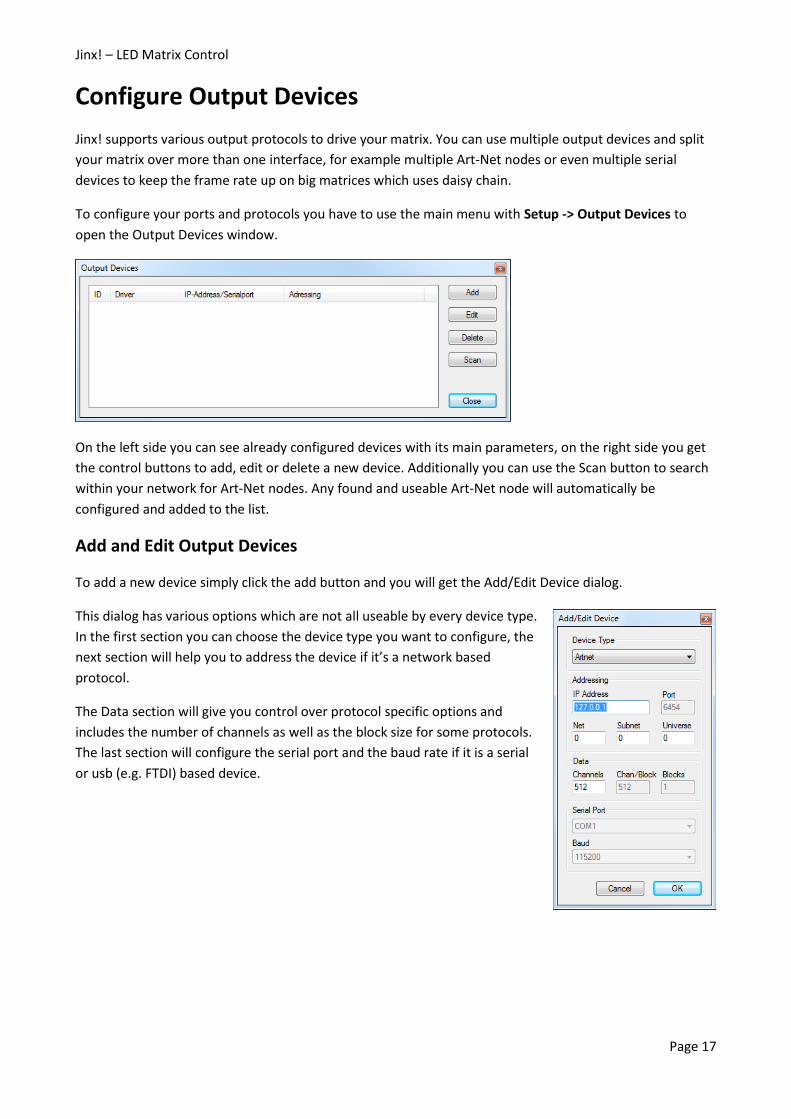
Configure Output Devices
Jinx! supports various output protocols to drive your matrix. You can use multiple output devices and split
your matrix over more than one interface, for example multiple Art-Net nodes or even multiple serial
devices to keep the frame rate up on big matrices which uses daisy chain.
To configure your ports and protocols you have to use the main menu with Setup -> Output Devices to
open the Output Devices window.
On the left side you can see already configured devices with its main parameters, on the right side you get
the control buttons to add, edit or delete a new device. Additionally you can use the Scan button to search
within your network for Art-Net nodes. Any found and useable Art-Net node will automatically be
configured and added to the list.
Add and Edit Output Devices
To add a new device simply click the add button and you will get the Add/Edit Device dialog.
This dialog has various options which are not all useable by every device type.
In the first section you can choose the device type you want to configure, the
next section will help you to address the device if it’s a network based
protocol.
The Data section will give you control over protocol specific options and
includes the number of channels as well as the block size for some protocols.
The last section will configure the serial port and the baud rate if it is a serial
or usb (e.g. FTDI) based device.

Jinx! – LED Matrix Control
Page 18
Firstly you have to choose the correct type of your device to see and set the needed parameters. The
following protocols are supported by Jinx!
Art-Net
Art-Net is a network based protocol, so first of all you have to set the IP address of the Art-Net
node, the udp port is fixed and displayed as read only. Art-Net also needs a direct addressing inside
the Art-Net network. Jinx! supports Art-Net 3, which means Net, Subnet and Universe as address
parameters. If your node only supports Art-Net 2 you should use 0 as the Net address and only give
the correct Subnet and Universe values.
You also can set the amount of channels to be transmitted. Art-Net, as DMX based protocol,
supports maximal 512 channels per node. If you set the Channels value greater than 512 it will be
corrected to 512 on saving. The Art-Net specification allows sending less than 512 channels, so you
can choose lower values. The channel count must be dividable by 2.
Remember: If your Art-Net node supports ArtPoll, you can simply use the Art-Net scan in the Output
Device dialog to find and add the nodes automatically instead of adding and configuring manually.
tpm2.net
tpm2.net is a network based protocol designed and specified by the ledstyles.de community. It’s a
simple and clear structured protocol with variable frame size and based on tpm2 which will get
used on serial lines.
As its network based, you have to set the receivers IP address, the udp port is fixed and displayed
read only. As tpm2.net support a variable frame size you can set the channel size freely to the size
your device needs. Additionally a tpm2.net frame can be split into multiple blocks, so if your device
needs a special block size you should set the Chan/Block value. The amount of blocks will be
calculated automatically.
Glediator
The Glediator protocol was invented and introduced by Solderlab (http://www.solderlab.de). It’s a
very simple serial based protocol which will be used by the Solderlab Matrix Controller Board. Some
other devices use this protocol as well.
You have to set the amount of channels you want to transmit over the serial line. You also have to
choose the corresponding serial port and set the baud rate to fit the settings of your device.
tpm2
The serial based version of the tpm2.net protocol with a smaller header size. As it’s a serial based
protocol you only have to set the frame size and the correct serial port and baud rate.
MiniDMX
The serial based MiniDMX protocol is widely used and supported by many devices. You will have to
set the channel count to 96, 256, 512, 768, 1536 or 3072. If you choose any other channel count, it
will get corrected automatically. As its serial based, you will also have to set the serial port and the
needed baud rate.
Tip: Jinx! support broadcasting for the Art-Net protocol. So if you have a small network and your Art-Net
nodes are configured well, you can set the IP address to 255.255.255.255 and don’t have to take care about
any IP parameters.

Jinx! – LED Matrix Control
Page 19
Patch Matrix
When you added and configured your output devices, it is time to patch the single pixels to the
corresponding devices and channels. Jinx! give you control over every single pixel and you can patch it to
any defined output device.
The patching takes place in the Output Patch window, which can be opened through the main menu over
Setup -> Output Patch.
Inside this window you can see and scroll through every single pixel of your defined matrix. Every pixel will
show you its actual state. If it’s marked red its unpatched, means no output device and channel is assigned,
if it’s already patched it will be marked green.
You can see and edit the actual pixel assignment on the right side of the window. If you click on any pixel
you will see the position in coordinates as well as the assigned output device and channels for the three
colors red, green and blue.
After activating a pixel, you can edit the device and channel assignment and it will be stored immediately.
To get this work done more comfortably, than editing every single pixel, you can invoke the Fast Patch
window.

Jinx! – LED Matrix Control
Page 20
Fast Patch
The fast patch dialog will help you to patch your matrix in a very short time. To open the dialog, use the
Fast Patch button on the right side.
The fast patch will assign ascending channel numbers within a device to the next pixel, corresponding to
your matrix controller and setup you can patch the whole matrix at once or single areas.
On the top of the fast patch window you will see your starting point, this will be chosen by the activated
pixel in the output patch window. You also have to tell Jinx! the size of the area you want to patch. For
example the complete matrix size, or if your matrix is assembled with single boards the size of a single
board.
The section Patch Mode will define how your pixels are latched together, you can choose all common
modes with the drop down list. You also have to set your color order inside a single pixel and the starting
channel on the corresponding output device as well as the output device itself.
As soon as you press the OK button, Jinx! will enumerate your pixels to the output device and channels in
the selected order and will return you to the output patch window.
If everything is done you can use the Close button to leave the output patch window.
Attention: If you change your output devices, the patch will be corrected if necessary. So if you need to edit
your output devices after patching, take a look at your patch again to be sure that everything is assigned
correctly.
Starting Output
After configuring the complete output section, you will have to start the output devices to get the
animations transferred to your matrix. You can simply start the output with the main menu entry
Setup -> Start Output.
Attention: Jinx! will always produce 25fps. So be sure that your output device is able to handle it (e.g. serial
line with a too small baud rate), otherwise a frame skip will appear.

Jinx! – LED Matrix Control
Page 21
Remote Control
Jinx! can be controlled remotely by various protocols, so you can seamlessly integrate it into any lightning
installation. The remote control feature can be enabled and configured over the main menu with
Setup -> Remote Control.
The remote control supports four different controls and will receive and
interpret 8 bit values on every channel. The following controls are available:
Scene Select
Jinx! will map every received number to the corresponding scene in
the scene list. The value 0 will be ignored. For example, if the received
value is 1 the first scene would be activated. You can choose any
scene between 1 and 255.
Additionally you can limit the scenes to 32. In that case the values 1-7
will activate the first scene, 8-15 the second scene and so on. The
value 0 gets ignored in that mode as well.
Chase Select
The chase select will operate the same way as the scene select. You
can choose and start any chase between 1 and 255. The 0 values will
get ignored as well. If you activated the scene limit to 32 scenes, the
chase selection will also get limited to 32 chases.
Master Brightness
With the master brightness control you can set the main brightness. Accepted values are from 0 to
255, where 0 means 0% and 255 will get out 100% brightness of your matrix.
Master Strobe
This control also takes values between 0 and 255. The value 0 switches the master strobe off, 1-255
will activate the strobe. Smaller values will give you a faster strobe.
In the first section of the remote control dialog you can enable or disable the remote control feature by
setting the first checkbox. You can also activate the scene / chase limit in this dialog section.
The second area will display the 4 controls and tell you the actual channel they are using. The channels will
always be ascending and the control order is fixed. The start channel can be set inside the protocol
addressing area.
Attention: Jinx! will always start any channel count at zero. DMX normally starts counting in human order,
means 1 is the first channel. So if you converting any DMX data to remotely control Jinx! you should take
care about that and know that DMX channel 1 will get Channel 0 inside Jinx!.

Jinx! – LED Matrix Control
Page 22
You can configure the wanted remote control protocol with the device type drop down list. The following
protocols are available:
tpm2
For the serial based tpm2 protocol (see Configure Output Devices for details) you need to set the
incoming serial port and the corresponding baud rate as well as the start channel. Jinx! will receive
every tpm2 frame with a minimum of 4 and maximum of 512 channels and will use the given start
channel for the first control.
tpm2.net
As tpm2.net is a network based protocol you only need to set the starting channel inside the
received frames to map the control functions. Only frames between 4 and 512 channels will be
accepted.
Art-Net
The network based Art-Net is also accepted to get remote commands. You will need to assign the
Art-Net addressing with Net, Subnet and Universe. The start channel must be assigned as well. Jinx!
interpret every addressed Art-Net frame, with sizes between 4 and 512 channels. The Art-Net
implementation also supports ArtPoll, this means any lightning desk or software which is able to do
ArtPoll can find and configure the Jinx! remote automatically.
Tip: To control Jinx! with your DMX lightning desk, you can use any DMX2Art-Net node or use a small SEDU
based solution, which will do a DMX2tpm conversion (http://www.sedu-board.de).
Audio based Effects
Jinx! also offers some audio based effect generators, which will be driven by a Fourier analysis to get
frequency controlled triggers. The audio capturing will be done automatically and always uses your default
windows capture/recording device. The selection and configuration of this device depends on your
windows version and your audio hardware. You will find information inside your audio device manual.
Tip: If you playback your music with the same computer that runs Jinx! you should configure your audio
device to capture the main output. If your soundcard doesn’t offer this feature, you can use the free
available VB-Audio Cable driver.
Auto Gain Control
The audio engine inside Jinx! has a built-in auto gain control. This means the engine will try to normalize the
captured audio to a common level. If you activate this feature you are able to get the same effect results,
even if your audio volume changes. You can enable and disable the auto gain control within the main menu
over Setup -> Audio AutoGainControl.

Jinx! – LED Matrix Control
Page 23
Audio Trigger Setup
The multi-frequency based effects like spectrum analyzer get configured automatically and the only audio
control available is a gain fader. For other effects, for example strobe or expanding objects, an audio trigger
has to be configured. The trigger setup will be invoked when you press the corresponding trigger setup
button inside the effect configuration.
Every audio trigger can be configured to a frequency range within it will analyze the audio data. You can
adjust the low and hi shelf frequencies with the 2 faders at the bottom. On the right side you see two level
bars. The first level bar will show you the actual audio level within the given frequencies. You can influence
this level with the gain fader to get a good level. The second smaller bar shows the actual threshold of your
trigger. It is adjustable with the thresh fader. Adjust your threshold to get the audio based effect work. The
threshold bar will change its color from green to red when it gets triggered, which means the audio level is
above your chosen threshold.
Jinx! – LED Matrix Control
Page 24
Saving and Loading your Show
Jinx! will manage and save all your settings, scenes and chases in one single file, so you can load your show
with one single step. The following things will be stored inside the .jnx files:
complete setup with Matrix size, output devices, patch, remote control
all single menu options like auto gain control, windows docking
all main section settings like strobe time, master brightness and gamma
show mode window size and position as well as button sizes
all stored scenes including actual scene fade setting
all chases stored in the chase list
input/output states, if the output or remote control is enabled while saving it will be automatically
started, if possible, after loading that file again
You can simply load and save files over the main menu entries File -> Open and File -> Save.
Importing a Show
If you already configured or loaded a complete setup and will only import scenes and chases from another
show, you can use the File -> Import menu entry. Jinx! will only import scenes and chases with this function
and add it to the actual scene and chase list, no other settings will be loaded and no already stored scenes
or chases in the lists will get overwritten.
Tip: Save a complete setup with some basic scenes for every matrix or matrix setup you have. So you can do
a quick start to match your hardware and are able to import additional scenes and chases from a global file.
Auto save and load
There is also an auto load feature integrated. Whenever you exit Jinx! it will save the actual state to an
autosave.dat file to your Jinx! directory. The next time you start the software, this file will automatically be
loaded and you can start with your last state. You can delete the autosave.dat at any time to get a clean
startup.
Loading Files over the Command line
Additionally Jinx! can load your show over the command line, so you can make different startup links to
start with different shows or you can assign all .jnx files within windows to start your show file with a
simple double click. To start Jinx! with a specific file, simply give the file name with path on the command
line. For example: “jinx.exe c:\shows\show.jnx”

Jinx! – LED Matrix Control
Page 25
The Jinx! Effect Engines
Jinx! will give you various effect engines to create your animations. Every engine comes with a lot of
parameters and some effects will give you sub-effects as well. Take a look at the demo scenes to get a
feeling what can be done by adjusting and combining these effects.
Simple Color
This most basic effect will give you a simply colored matrix. It is useful for
coloring other shape based effects or to coloring simple black & white gif
animations.
Within the configuration dialog you can adjust and mix the color with the
three base color faders: red, green and blue.
Additionally you can activate the Autocolor function which will fade the color
through the whole rgb color space starting at a random value.
The Autocolor Sync option will synchronize the auto color to other effects, which has the same option
enabled.
Remember: The color controls including auto color will be seen at many other effects and always will work
the same way.
Color Scroll
The Color Scroll engine is a very powerful effect. You can produce various
color moves and additionally use it as a shape generator with the black/white
color palette. You will find some examples inside the demo scenes.
You can choose different styles like horizontal, vertical and diagonal color
fading as well as a shape based fading like a circle or diamond.
Additionally you can control zoom and speed of the color scroll and reverse
the scroll direction.
Plasma
The Plasma effect is a classical effect, which has been used in computer
graphics for a very long time. You can adjust the effect by setting the plasma type, the color palette as well
as the zoom level.
Fire
This is another basic effect which will give you a great background or standalone wall of flames. You can
adjust the size and amount of the hotspots which will drive your fire.
Jinx! – LED Matrix Control
Page 26
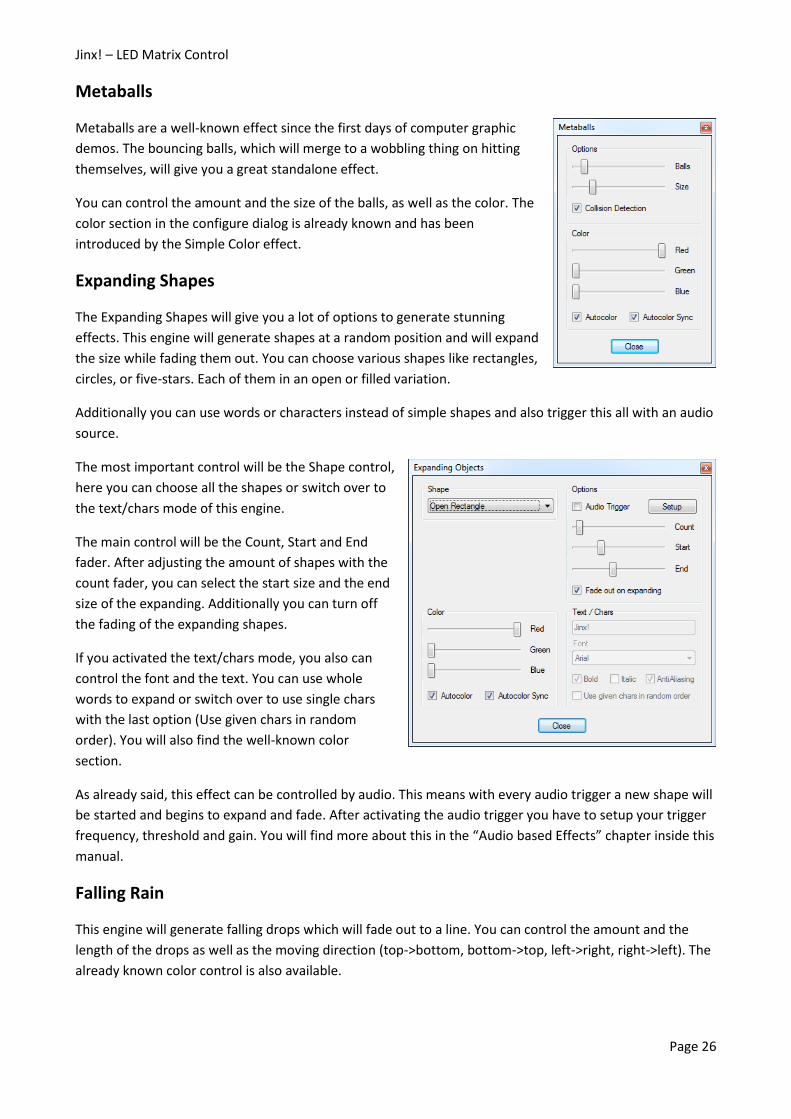
Metaballs
Metaballs are a well-known effect since the first days of computer graphic
demos. The bouncing balls, which will merge to a wobbling thing on hitting
themselves, will give you a great standalone effect.
You can control the amount and the size of the balls, as well as the color. The
color section in the configure dialog is already known and has been
introduced by the Simple Color effect.
Expanding Shapes
The Expanding Shapes will give you a lot of options to generate stunning
effects. This engine will generate shapes at a random position and will expand
the size while fading them out. You can choose various shapes like rectangles,
circles, or five-stars. Each of them in an open or filled variation.
Additionally you can use words or characters instead of simple shapes and also trigger this all with an audio
source.
The most important control will be the Shape control,
here you can choose all the shapes or switch over to
the text/chars mode of this engine.
The main control will be the Count, Start and End
fader. After adjusting the amount of shapes with the
count fader, you can select the start size and the end
size of the expanding. Additionally you can turn off
the fading of the expanding shapes.
If you activated the text/chars mode, you also can
control the font and the text. You can use whole
words to expand or switch over to use single chars
with the last option (Use given chars in random
order). You will also find the well-known color
section.
As already said, this effect can be controlled by audio. This means with every audio trigger a new shape will
be started and begins to expand and fade. After activating the audio trigger you have to setup your trigger
frequency, threshold and gain. You will find more about this in the “Audio based Effects” chapter inside this
manual.
Falling Rain
This engine will generate falling drops which will fade out to a line. You can control the amount and the
length of the drops as well as the moving direction (top->bottom, bottom->top, left->right, right->left). The
already known color control is also available.
Jinx! – LED Matrix Control
Page 27
Radar/Scan Lines
Another simple line based effect which will produce a moving line, which looks like the knight rider effect or
a radar scan line. You can choose the width and direction of the line as well as a fade out/tracing effect. The
color control section is also available.
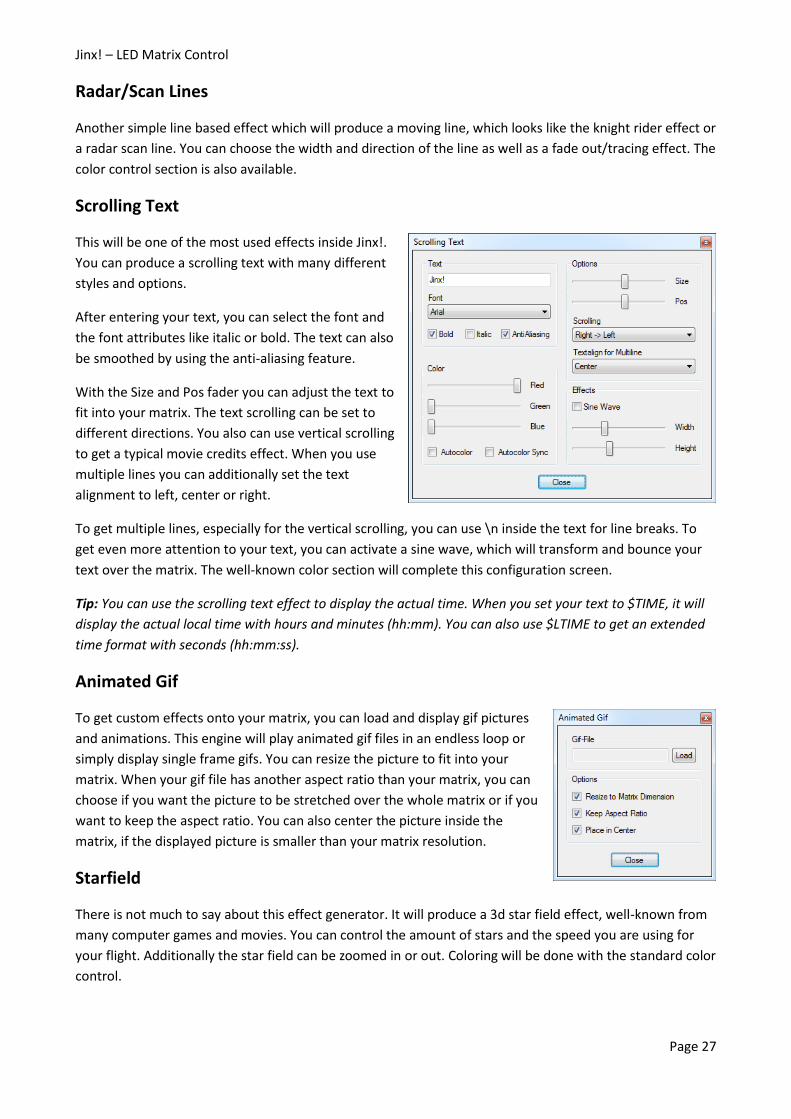
Scrolling Text
This will be one of the most used effects inside Jinx!.
You can produce a scrolling text with many different
styles and options.
After entering your text, you can select the font and
the font attributes like italic or bold. The text can also
be smoothed by using the anti-aliasing feature.
With the Size and Pos fader you can adjust the text to
fit into your matrix. The text scrolling can be set to
different directions. You also can use vertical scrolling
to get a typical movie credits effect. When you use
multiple lines you can additionally set the text
alignment to left, center or right.
To get multiple lines, especially for the vertical scrolling, you can use \n inside the text for line breaks. To
get even more attention to your text, you can activate a sine wave, which will transform and bounce your
text over the matrix. The well-known color section will complete this configuration screen.
Tip: You can use the scrolling text effect to display the actual time. When you set your text to $TIME, it will
display the actual local time with hours and minutes (hh:mm). You can also use $LTIME to get an extended
time format with seconds (hh:mm:ss).
Animated Gif
To get custom effects onto your matrix, you can load and display gif pictures
and animations. This engine will play animated gif files in an endless loop or
simply display single frame gifs. You can resize the picture to fit into your
matrix. When your gif file has another aspect ratio than your matrix, you can
choose if you want the picture to be stretched over the whole matrix or if you
want to keep the aspect ratio. You can also center the picture inside the
matrix, if the displayed picture is smaller than your matrix resolution.
Starfield
There is not much to say about this effect generator. It will produce a 3d star field effect, well-known from
many computer games and movies. You can control the amount of stars and the speed you are using for
your flight. Additionally the star field can be zoomed in or out. Coloring will be done with the standard color
control.

Jinx! – LED Matrix Control
Page 28
Simple Lines
The Simple Lines module produces line based effects. There are some sub
effects available with various options. The line drawing sub effects Cross and
Rectangular don’t need any specific options.
For the Dancing Lines and the Dancing Snake effects, the amount of lines or
snakes can be chosen with the corresponding roll down list.
The Spotlight effect will be controlled by the Beam and Phase values. With the
beam fader you can adjust the width of the spotlight beam and the phase
fader will give you the possibility to get a phase drifting on multiple spotlights.
You can additionally activate multiple spots placed in the corners of your
matrix with the checkboxes inside the Spotlights section.
For all sub effects a fade control is available which will fade out the last
position and gives you a motion blur like, smooth moving effect.
The standard color control is also available.
Sine Lines
This effect will produce moving sine waves on your screen. You can choose the amount of lines (1-3) as well
as the width of your sine wave. Every sine line has its own color control and can be set independently.
In addition to the standard mode, this effect can also be used as a 3-band audio analyzer. After activating
the audio trigger checkbox, every enabled sine wave will response to a specific audio frequency. You can
adjust the audio response of the sine wave amplitudes with the audio gain control.
Strobe
The Strobe effect will flash your matrix so it can be used as an audience blinder. It is also helpful to strobe
other effects with the various effect merge options. The strobe can be controlled by two time faders. The
first one will adjust the time of the flash, the second one adjusts the blackout time of the strobe.
Additionally the strobe can be triggered with an audio signal. After activating the audio trigger checkbox,
you have to setup the trigger. You will find more information about the audio trigger in the “Audio based
Effects” chapter inside this manual.
The strobe can directly be colored with the already known color section.

Jinx! – LED Matrix Control
Page 29
Spectrum Analyzer
This engine will display a classic spectrum analyzer on
your matrix. The amount of frequency bands can be
adjusted to anything between 4 and the pixel width
of your matrix. The available frequency bands get
limited to 64, if your matrix width is greater than 64
pixels.
The frequency for every band/bar will automatically
be calculated over a logarithmic scale.
Every frequency bar is displayed in 3 colors. You can
adjust these colors independently as well as their
beginning with color transition pos faders.
The height of the bars can be adjusted with the audio
gain control.
There are multiple options available for the spectrum analyzer. You can get a clear picture by activating
gaps between the bars and even can enable or disable a peak hold feature.
If you don’t want Jinx! to display frequency bars you can enable the line mode. Here you will get a single
horizontal line which responses to the audio bands as well. You can also fill the area underneath the line to
get a more matrix filling effect. Enabling peek hold will give you a second line in this mode.
Tip: Use less frequency bands than pixels when using line mode and the line will be drawn more smoothly. A
good starting point will be half the amount of your matrix width.
Capture Screen
The Screen Capture engine will give you the possibility to show everything on your matrix you want. It will
capture a defined region within your screen, so you can capture and display for example a media player
driven audio visualizer, flash animations or simply a movie.
The screen capture will start immediately. To define the screen area you will get a small resizable window
when you invoke the effect configure. Place and resize this window to fit exactly on the screen area you
want to capture. After closing the dialog you should see the result on your matrix. The aspect ratio will be
defined by your matrix resolution.
The screen capturing is limited to one effect generator, so you can only choose and active this engine once.
Tip: Screen capturing within windows can be cpu intensive. Windows has to synchronize the screen and all
graphical effects within the desktop to capture the screen. So if you are working a lot with screen capturing
you should disable all windows effects, especially aero, to get less cpu load and a smooth screen capturing.