java programming 3: java programming...
TRANSCRIPT
Java Programming 3: Java Programming FoundationsLesson 1: SoftwareDesignUsingJava.lab
Quiz 1 Pro ject 1 Lesson 2: T he User Experience
User Friendly CodingUser Input: Command LineOverloading the ConstructorA Closer Look at MainEntering Command Line Arguments
Code Flexibility RevisitedFooling the UserFinding the MaxDon't Let the User Foo l You
What's in store?
Lesson 3: PackagesYou Have Great Potential
Why Packages?Organization
Inside Packages
Your Own Java PackagePackage CreationDeclaring a Package
Package AccessAccessing Packages Using importThe ClassloaderWhen to ImportNaming ConflictsNaming a SubpackageConventions: Case Usage for Package and Class NamesConventions: Duplicate Member NamesConventions: Company Names
Packages Highlights
Coming Attractions
Lesson 4: So f t ware Design: Inherit anceOrigins and Organization
Classification
InheritingInheritance: ShadowingInheritance: Overriding
Working with ConstructorsChainingChain o f CommandIn a Nutshell

Java's DesignThe API
Making Our Own: Early Design
Lesson 5: So f t ware Design: Abst ract ClassesThe Power o f Abstraction
Syntax: Abstract ClassesThe API and abstract
Making Your Own Figures and ShapesDesign Considerations for a Graphics Too l
Lesson 6 : Int erf aces: List eners and Adapt ersInterfaces in Java
Model-View-Contro ller ArchitectureAn Example: Drop-Down Lists (Choice Components)Creating the Shape Drawing Pro jectInterfaces and Listeners
Building a Program
Lesson 7: Int erf aces: List eners and Adapt ers (co nt inued)Building the Shapes
AdaptersButton PanelContro ls PanelMain Panel
Phew!
Lesson 8 : Nest ed ClassesManeuvering Around Classes
Nested Classes
Nested Top-Level Classes
Inner ClassesLocal ClassesAnonymous Inner Classes
Deciding When to Use Nested Classes
Lesson 9 : Int erf aces and Inherit anceInterfaces and Classes
Shared Features o f Classes and InterfacesDifferences Between Classes and Interfaces
Interfaces and Multiple InheritanceInheritance Design Conclusions
CastingInterfaces as TypesCasting BackCasting: instanceofListeners

Extending Interfaces
Generics
Lesson 10: GenericsThe Dot Operator
Code Reuse and FlexibilityChecking Type
Generic ExampleVectorsVectors Using Generics
Generals on Generics
Lesson 11: T he Co llect io n Framewo rkCollections
Empowered by Collections
ArrayList
LinkedList
Co llections: Things Java Has Already Written for UsComparator
Wrapping Up the Collections Framework
Lesson 12: Enumerat io n and enumEnumeration
ConstantsEnum Types
Enum ExampleAccessing Members o f the Enumeration
More about Enum
Enum Inside o f Classes
Static Initialization Blocks
A Bit More About Enum
Lesson 13: Image Mapping and HandlingTying It All Together
Getting Images
Mapping with a Hashtable
Moving Images: Mouse Listener
Now Make It an AppletDouble BufferGraphics Pro ject Examples
Lesson 14: Deplo ying Applet s and Applicat io ns Using EclipseJava JAR Files
Deploying Applets in a JAR File
Deploying Applications in a Jar FileCreating an Application for DeploymentDeploying the Application in an Executable Jar File

Deploying the Application in an Executable Jar FileRunning an Executable Jar File
Lesson 15: Wo rking Wit h FilesWorking With Files
The File Class
Writers and ReadersWriting to A FileReading a File
You Are a Genius!
Copyright © 1998-2014 O'Reilly Media, Inc.
This work is licensed under a Creative Commons Attribution-ShareAlike 3.0 Unported License.See http://creativecommons.org/licenses/by-sa/3.0/legalcode for more information.

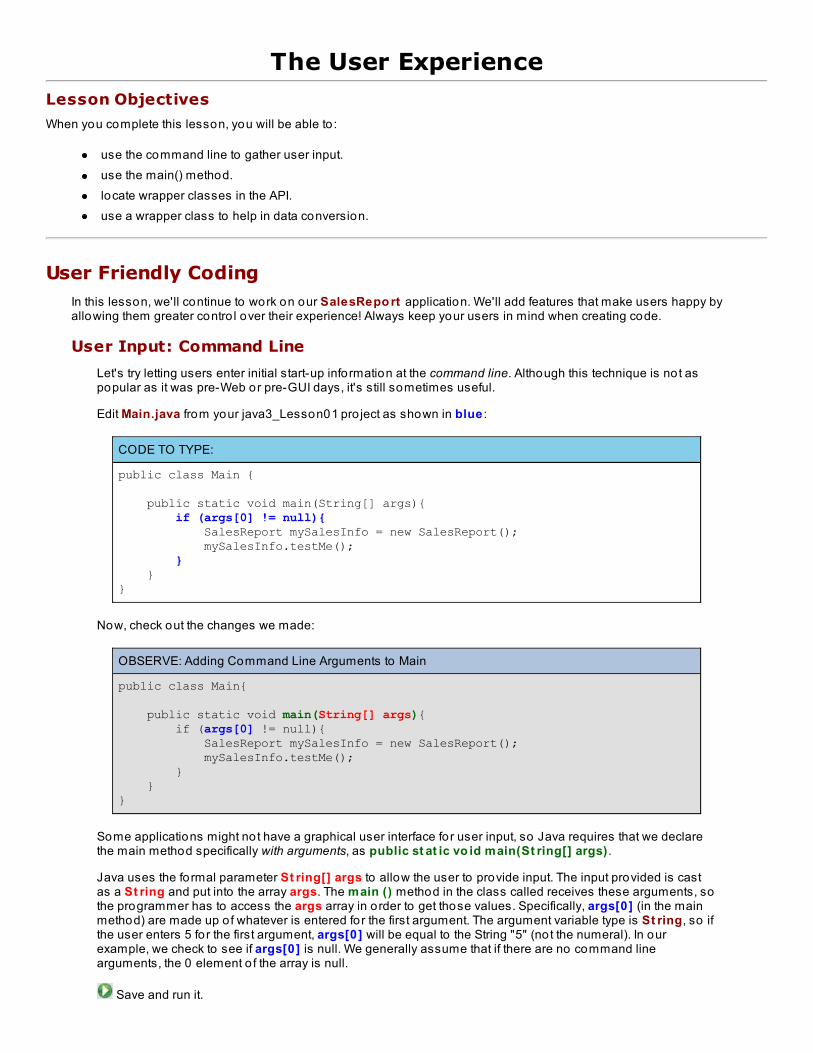
The User ExperienceLesson Objectives
When you complete this lesson, you will be able to :
use the command line to gather user input.use the main() method.locate wrapper classes in the API.use a wrapper class to help in data conversion.
User Friendly CodingIn this lesson, we'll continue to work on our SalesRepo rt application. We'll add features that make users happy byallowing them greater contro l over their experience! Always keep your users in mind when creating code.
User Input: Command Line
Let's try letting users enter initial start-up information at the command line. Although this technique is not aspopular as it was pre-Web or pre-GUI days, it's still sometimes useful.
Edit Main.java from your java3_Lesson01 pro ject as shown in blue :
CODE TO TYPE:
public class Main {
public static void main(String[] args){ if (args[0] != null){ SalesReport mySalesInfo = new SalesReport(); mySalesInfo.testMe(); } }}
Now, check out the changes we made:
OBSERVE: Adding Command Line Arguments to Main
public class Main{
public static void main(String[] args){ if (args[0] != null){ SalesReport mySalesInfo = new SalesReport(); mySalesInfo.testMe(); } }}
Some applications might not have a graphical user interface for user input, so Java requires that we declarethe main method specifically with arguments, as public st at ic vo id main(St ring[] args) .
Java uses the formal parameter St ring[] args to allow the user to provide input. The input provided is castas a St ring and put into the array args. The main () method in the class called receives these arguments, sothe programmer has to access the args array in order to get those values. Specifically, args[0] (in the mainmethod) are made up o f whatever is entered for the first argument. The argument variable type is St ring, so ifthe user enters 5 for the first argument, args[0] will be equal to the String "5" (not the numeral). In ourexample, we check to see if args[0] is null. We generally assume that if there are no command linearguments, the 0 element o f the array is null.
Save and run it.
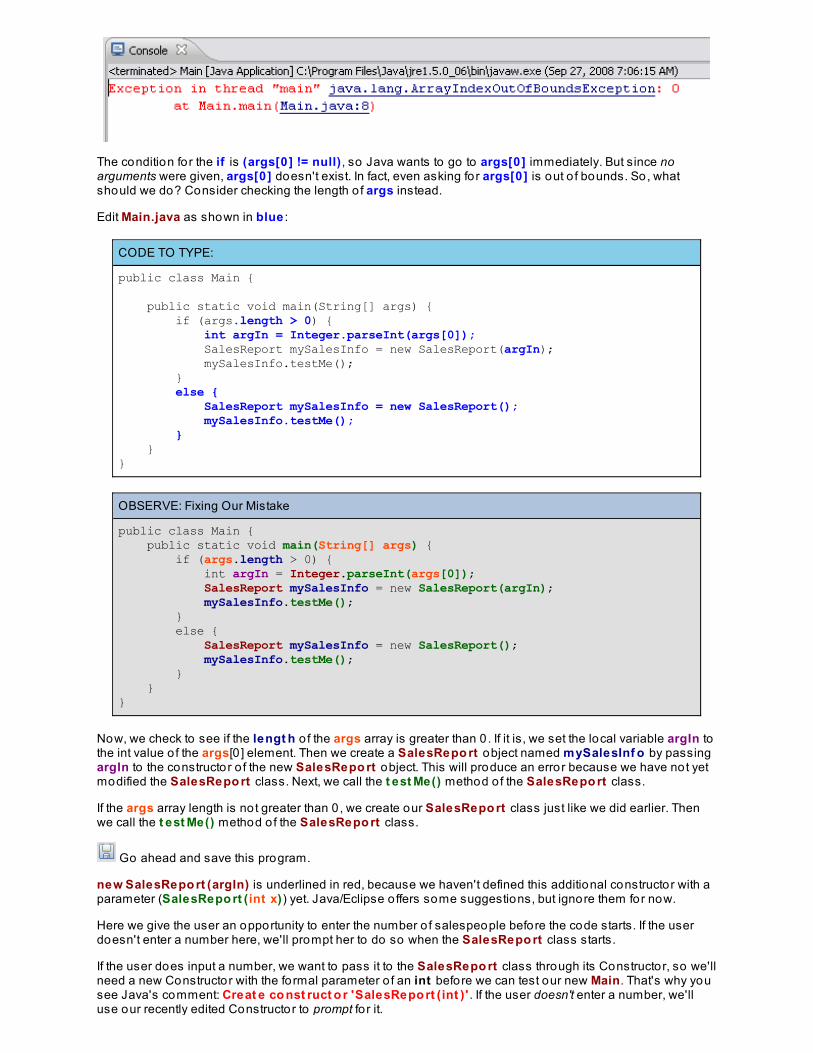
The condition for the if is (args[0] != null) , so Java wants to go to args[0] immediately. But since noarguments were given, args[0] doesn't exist. In fact, even asking for args[0] is out o f bounds. So, whatshould we do? Consider checking the length o f args instead.
Edit Main.java as shown in blue :
CODE TO TYPE:
public class Main {
public static void main(String[] args) { if (args.length > 0) { int argIn = Integer.parseInt(args[0]); SalesReport mySalesInfo = new SalesReport(argIn); mySalesInfo.testMe(); } else { SalesReport mySalesInfo = new SalesReport(); mySalesInfo.testMe(); } }}
OBSERVE: Fixing Our Mistake
public class Main { public static void main(String[] args) { if (args.length > 0) { int argIn = Integer.parseInt(args[0]); SalesReport mySalesInfo = new SalesReport(argIn); mySalesInfo.testMe(); } else { SalesReport mySalesInfo = new SalesReport(); mySalesInfo.testMe(); } }}
Now, we check to see if the lengt h o f the args array is greater than 0 . If it is, we set the local variable argIn tothe int value o f the args[0 ] element. Then we create a SalesRepo rt object named mySalesInf o by passingargIn to the constructor o f the new SalesRepo rt object. This will produce an error because we have not yetmodified the SalesRepo rt class. Next, we call the t est Me() method o f the SalesRepo rt class.
If the args array length is not greater than 0 , we create our SalesRepo rt class just like we did earlier. Thenwe call the t est Me() method o f the SalesRepo rt class.
Go ahead and save this program.
new SalesRepo rt (argIn) is underlined in red, because we haven't defined this additional constructor with aparameter (SalesRepo rt (int x)) yet. Java/Eclipse o ffers some suggestions, but ignore them for now.
Here we give the user an opportunity to enter the number o f salespeople before the code starts. If the userdoesn't enter a number here, we'll prompt her to do so when the SalesRepo rt class starts.
If the user does input a number, we want to pass it to the SalesRepo rt class through its Constructor, so we'llneed a new Constructor with the formal parameter o f an int before we can test our new Main. That's why yousee Java's comment: Creat e co nst ruct o r 'SalesRepo rt (int )' . If the user doesn't enter a number, we'lluse our recently edited Constructor to prompt fo r it.
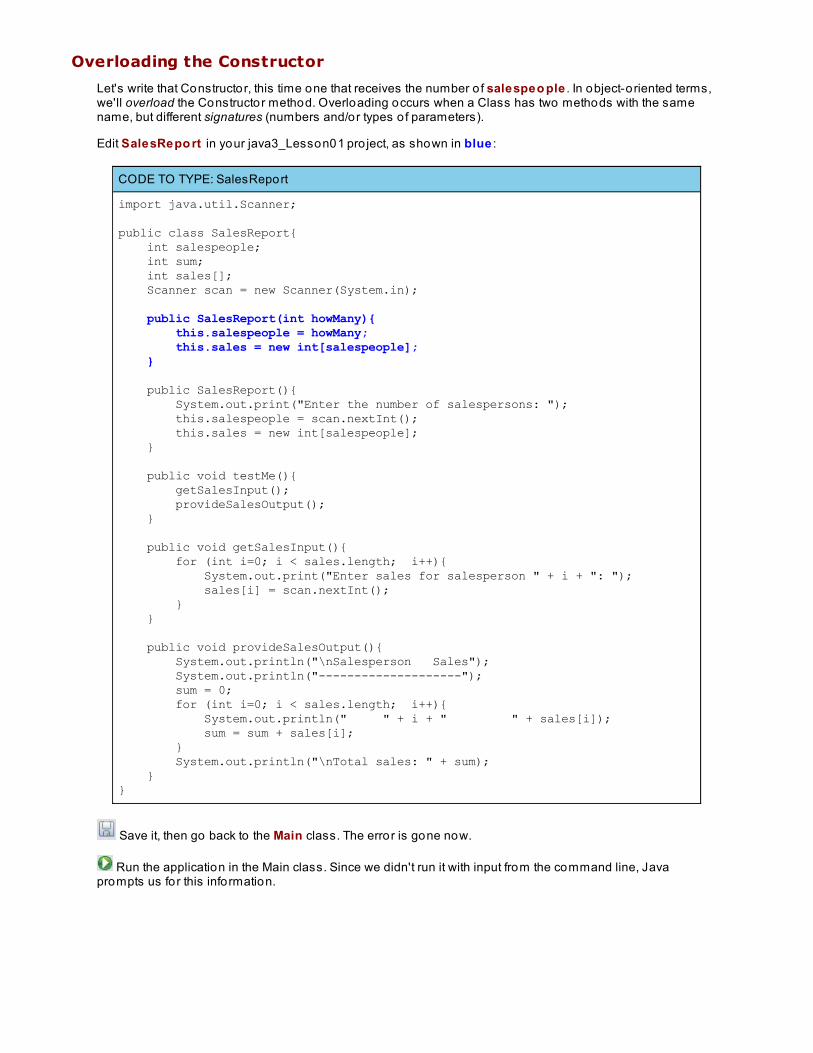
Overloading the Constructor
Let's write that Constructor, this time one that receives the number o f salespeo ple . In object-oriented terms,we'll overload the Constructor method. Overloading occurs when a Class has two methods with the samename, but different signatures (numbers and/or types o f parameters).
Edit SalesRepo rt in your java3_Lesson01 pro ject, as shown in blue :
CODE TO TYPE: SalesReport
import java.util.Scanner; public class SalesReport{ int salespeople; int sum; int sales[]; Scanner scan = new Scanner(System.in); public SalesReport(int howMany){ this.salespeople = howMany; this.sales = new int[salespeople]; }
public SalesReport(){ System.out.print("Enter the number of salespersons: "); this.salespeople = scan.nextInt(); this.sales = new int[salespeople]; } public void testMe(){ getSalesInput(); provideSalesOutput(); } public void getSalesInput(){ for (int i=0; i < sales.length; i++){ System.out.print("Enter sales for salesperson " + i + ": "); sales[i] = scan.nextInt(); } } public void provideSalesOutput(){ System.out.println("\nSalesperson Sales"); System.out.println("--------------------"); sum = 0; for (int i=0; i < sales.length; i++){ System.out.println(" " + i + " " + sales[i]); sum = sum + sales[i]; } System.out.println("\nTotal sales: " + sum); }}
Save it, then go back to the Main class. The error is gone now.
Run the application in the Main class. Since we didn't run it with input from the command line, Javaprompts us for this information.
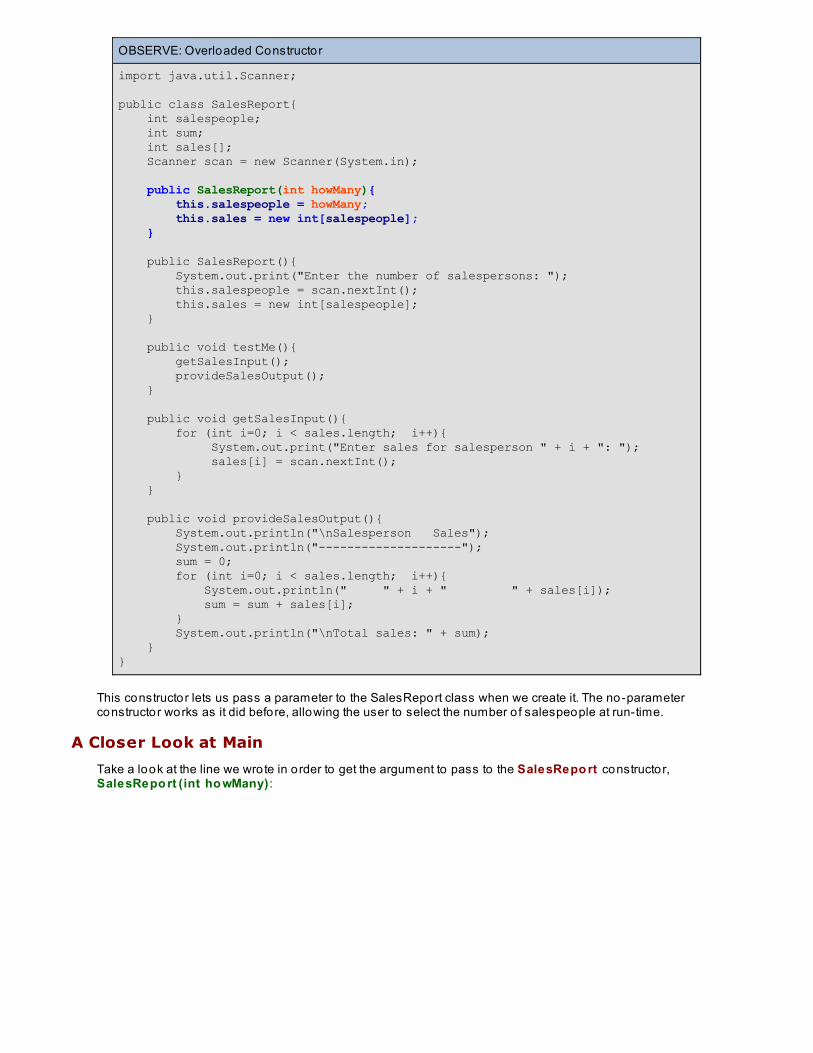
OBSERVE: Overloaded Constructor
import java.util.Scanner; public class SalesReport{ int salespeople; int sum; int sales[]; Scanner scan = new Scanner(System.in); public SalesReport(int howMany){ this.salespeople = howMany; this.sales = new int[salespeople]; }
public SalesReport(){ System.out.print("Enter the number of salespersons: "); this.salespeople = scan.nextInt(); this.sales = new int[salespeople]; } public void testMe(){ getSalesInput(); provideSalesOutput(); } public void getSalesInput(){ for (int i=0; i < sales.length; i++){ System.out.print("Enter sales for salesperson " + i + ": "); sales[i] = scan.nextInt(); } } public void provideSalesOutput(){ System.out.println("\nSalesperson Sales"); System.out.println("--------------------"); sum = 0; for (int i=0; i < sales.length; i++){ System.out.println(" " + i + " " + sales[i]); sum = sum + sales[i]; } System.out.println("\nTotal sales: " + sum); }}
This constructor lets us pass a parameter to the SalesReport class when we create it. The no-parameterconstructor works as it did before, allowing the user to select the number o f salespeople at run-time.
A Closer Look at Main
Take a look at the line we wrote in order to get the argument to pass to the SalesRepo rt constructor,SalesRepo rt (int ho wMany) :
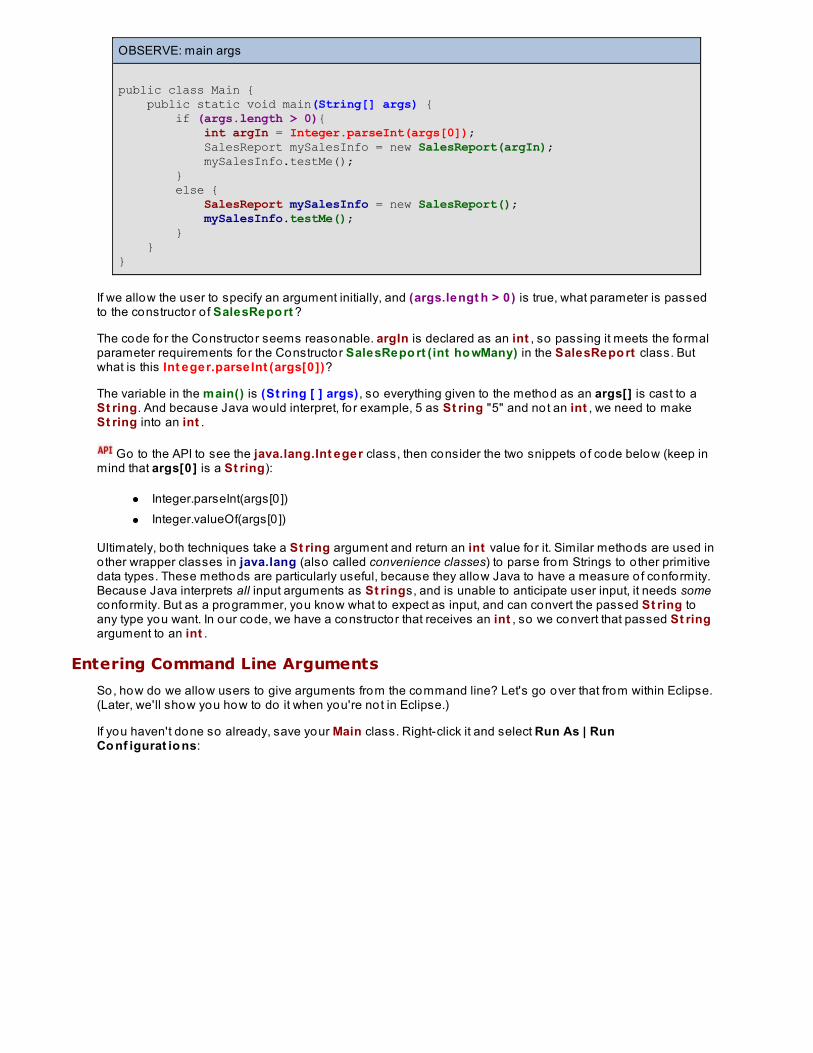
OBSERVE: main args
public class Main { public static void main(String[] args) { if (args.length > 0){ int argIn = Integer.parseInt(args[0]); SalesReport mySalesInfo = new SalesReport(argIn); mySalesInfo.testMe(); } else { SalesReport mySalesInfo = new SalesReport(); mySalesInfo.testMe(); } }}
If we allow the user to specify an argument initially, and (args.lengt h > 0) is true, what parameter is passedto the constructor o f SalesRepo rt ?
The code for the Constructor seems reasonable. argIn is declared as an int , so passing it meets the formalparameter requirements for the Constructor SalesRepo rt (int ho wMany) in the SalesRepo rt class. Butwhat is this Int eger.parseInt (args[0])?
The variable in the main() is (St ring [ ] args) , so everything given to the method as an args[] is cast to aSt ring. And because Java would interpret, fo r example, 5 as St ring "5" and not an int , we need to makeSt ring into an int .
Go to the API to see the java.lang.Int eger class, then consider the two snippets o f code below (keep inmind that args[0] is a St ring):
Integer.parseInt(args[0 ])Integer.valueOf(args[0 ])
Ultimately, both techniques take a St ring argument and return an int value for it. Similar methods are used inother wrapper classes in java.lang (also called convenience classes) to parse from Strings to o ther primitivedata types. These methods are particularly useful, because they allow Java to have a measure o f conformity.Because Java interprets all input arguments as St rings, and is unable to anticipate user input, it needs someconformity. But as a programmer, you know what to expect as input, and can convert the passed St ring toany type you want. In our code, we have a constructor that receives an int , so we convert that passed St ringargument to an int .
Entering Command Line Arguments
So, how do we allow users to give arguments from the command line? Let's go over that from within Eclipse.(Later, we'll show you how to do it when you're not in Eclipse.)
If you haven't done so already, save your Main class. Right-click it and select Run As | RunCo nf igurat io ns:
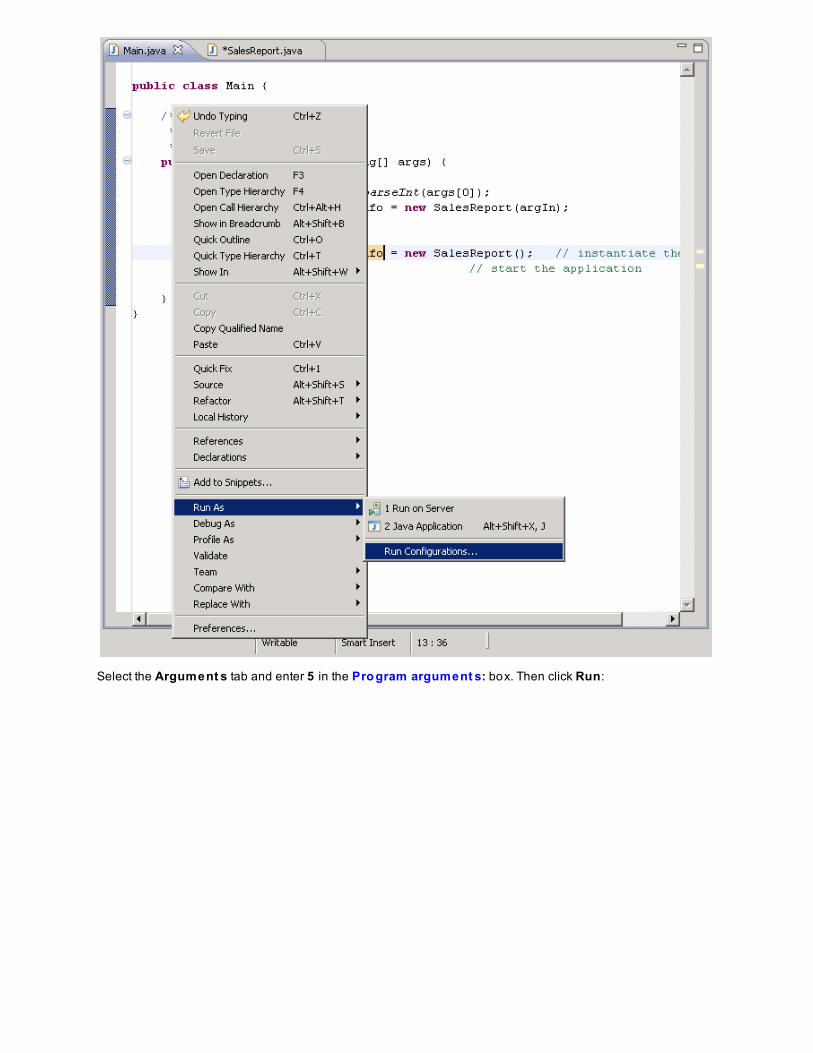
Select the Argument s tab and enter 5 in the Pro gram argument s: box. Then click Run:
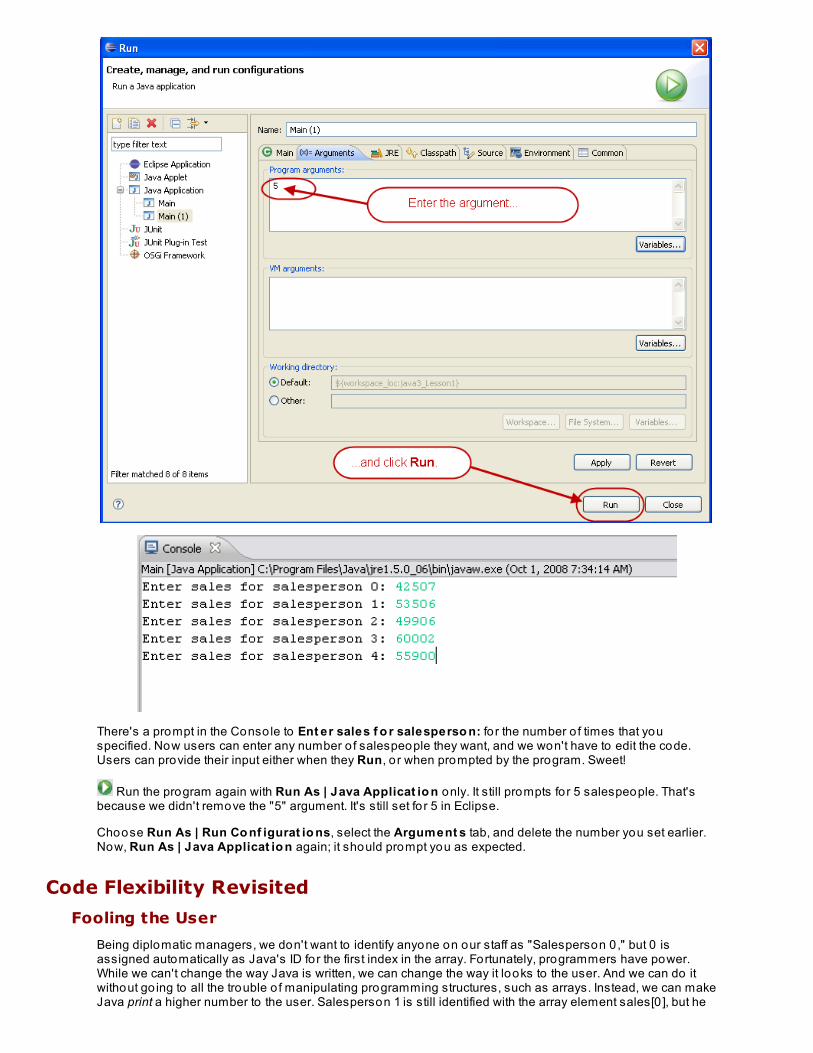
There's a prompt in the Conso le to Ent er sales f o r salesperso n: fo r the number o f times that youspecified. Now users can enter any number o f salespeople they want, and we won't have to edit the code.Users can provide their input either when they Run, o r when prompted by the program. Sweet!
Run the program again with Run As | Java Applicat io n only. It still prompts for 5 salespeople. That'sbecause we didn't remove the "5" argument. It's still set fo r 5 in Eclipse.
Choose Run As | Run Co nf igurat io ns, select the Argument s tab, and delete the number you set earlier.Now, Run As | Java Applicat io n again; it should prompt you as expected.
Code Flexibility Revisited
Fooling the User
Being diplomatic managers, we don't want to identify anyone on our staff as "Salesperson 0 ," but 0 isassigned automatically as Java's ID for the first index in the array. Fortunately, programmers have power.While we can't change the way Java is written, we can change the way it looks to the user. And we can do itwithout go ing to all the trouble o f manipulating programming structures, such as arrays. Instead, we can makeJava print a higher number to the user. Salesperson 1 is still identified with the array element sales[0 ], but he
doesn't need to know that!
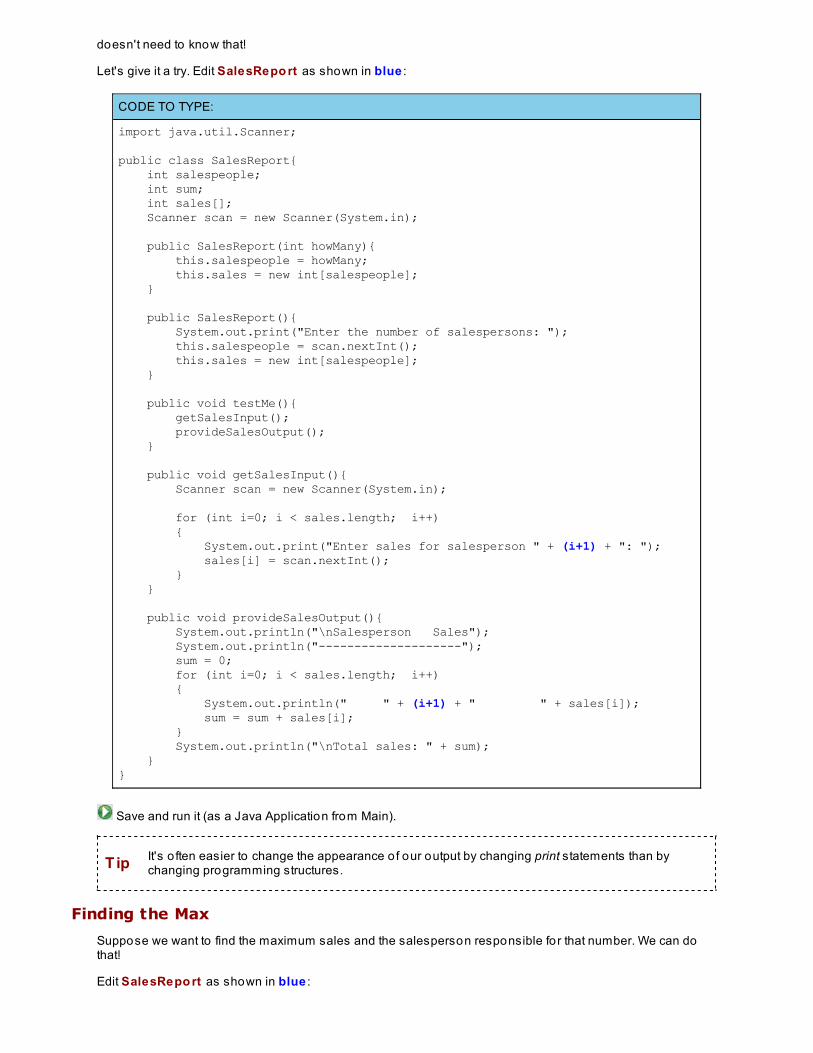
Let's give it a try. Edit SalesRepo rt as shown in blue :
CODE TO TYPE:
import java.util.Scanner; public class SalesReport{ int salespeople; int sum; int sales[]; Scanner scan = new Scanner(System.in); public SalesReport(int howMany){ this.salespeople = howMany; this.sales = new int[salespeople]; }
public SalesReport(){ System.out.print("Enter the number of salespersons: "); this.salespeople = scan.nextInt(); this.sales = new int[salespeople]; } public void testMe(){ getSalesInput(); provideSalesOutput(); } public void getSalesInput(){ Scanner scan = new Scanner(System.in); for (int i=0; i < sales.length; i++) { System.out.print("Enter sales for salesperson " + (i+1) + ": "); sales[i] = scan.nextInt(); } } public void provideSalesOutput(){ System.out.println("\nSalesperson Sales"); System.out.println("--------------------"); sum = 0; for (int i=0; i < sales.length; i++) { System.out.println(" " + (i+1) + " " + sales[i]); sum = sum + sales[i]; } System.out.println("\nTotal sales: " + sum); }}
Save and run it (as a Java Application from Main).
Tip It's o ften easier to change the appearance o f our output by changing print statements than bychanging programming structures.
Finding the Max
Suppose we want to find the maximum sales and the salesperson responsible for that number. We can dothat!
Edit SalesRepo rt as shown in blue :
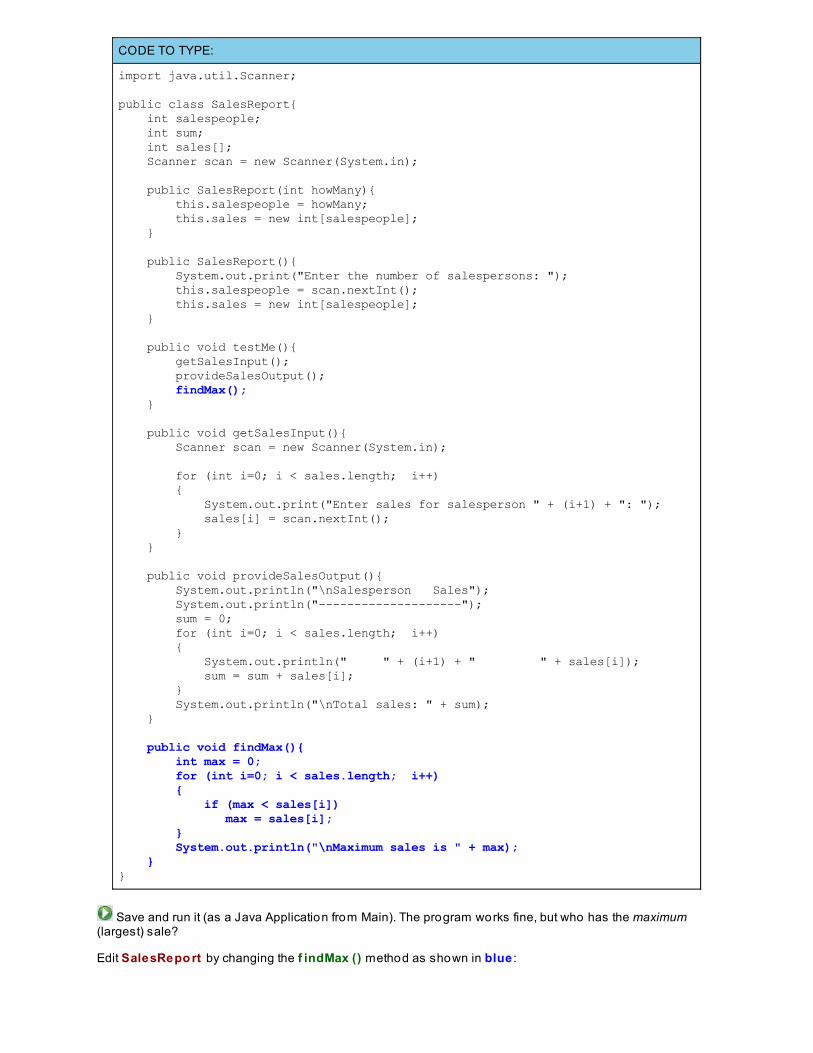
CODE TO TYPE:
import java.util.Scanner; public class SalesReport{ int salespeople; int sum; int sales[]; Scanner scan = new Scanner(System.in); public SalesReport(int howMany){ this.salespeople = howMany; this.sales = new int[salespeople]; }
public SalesReport(){ System.out.print("Enter the number of salespersons: "); this.salespeople = scan.nextInt(); this.sales = new int[salespeople]; } public void testMe(){ getSalesInput(); provideSalesOutput(); findMax(); } public void getSalesInput(){ Scanner scan = new Scanner(System.in); for (int i=0; i < sales.length; i++) { System.out.print("Enter sales for salesperson " + (i+1) + ": "); sales[i] = scan.nextInt(); } } public void provideSalesOutput(){ System.out.println("\nSalesperson Sales"); System.out.println("--------------------"); sum = 0; for (int i=0; i < sales.length; i++) { System.out.println(" " + (i+1) + " " + sales[i]); sum = sum + sales[i]; } System.out.println("\nTotal sales: " + sum); }
public void findMax(){ int max = 0; for (int i=0; i < sales.length; i++) { if (max < sales[i]) max = sales[i]; } System.out.println("\nMaximum sales is " + max); }}
Save and run it (as a Java Application from Main). The program works fine, but who has the maximum(largest) sale?
Edit SalesRepo rt by changing the f indMax () method as shown in blue :
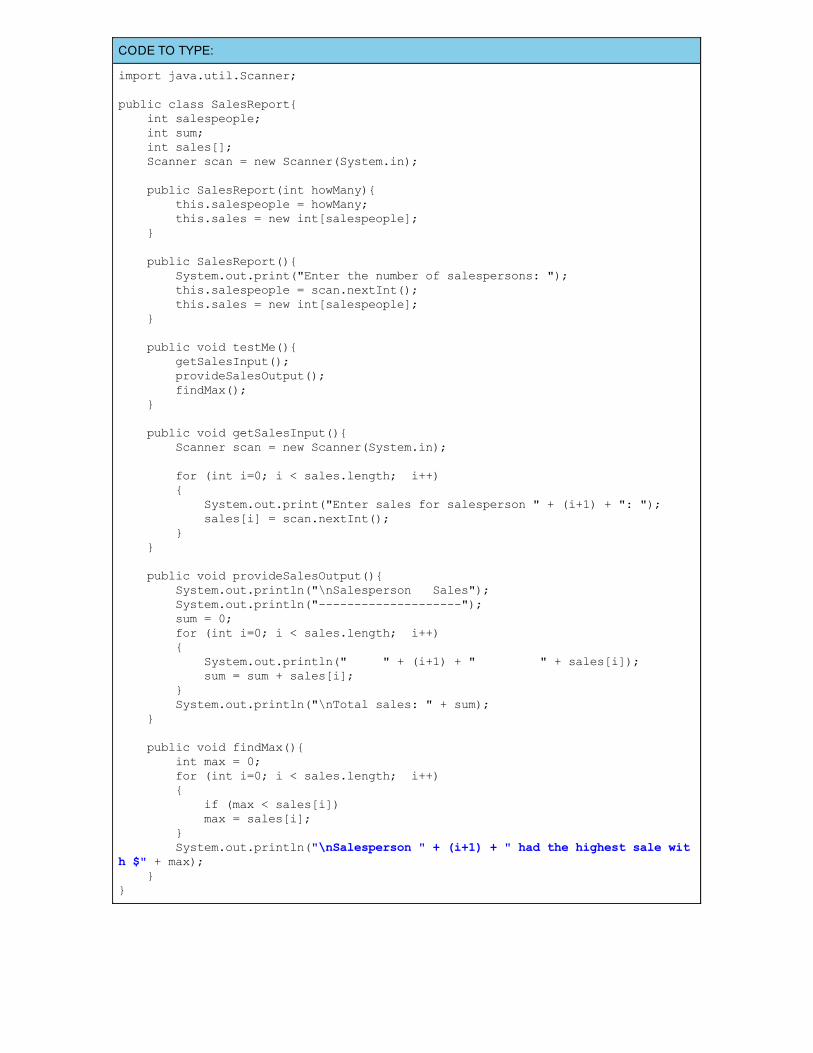
CODE TO TYPE:
import java.util.Scanner; public class SalesReport{ int salespeople; int sum; int sales[]; Scanner scan = new Scanner(System.in); public SalesReport(int howMany){ this.salespeople = howMany; this.sales = new int[salespeople]; } public SalesReport(){ System.out.print("Enter the number of salespersons: "); this.salespeople = scan.nextInt(); this.sales = new int[salespeople]; } public void testMe(){ getSalesInput(); provideSalesOutput(); findMax(); } public void getSalesInput(){ Scanner scan = new Scanner(System.in); for (int i=0; i < sales.length; i++) { System.out.print("Enter sales for salesperson " + (i+1) + ": "); sales[i] = scan.nextInt(); } } public void provideSalesOutput(){ System.out.println("\nSalesperson Sales"); System.out.println("--------------------"); sum = 0; for (int i=0; i < sales.length; i++) { System.out.println(" " + (i+1) + " " + sales[i]); sum = sum + sales[i]; } System.out.println("\nTotal sales: " + sum); } public void findMax(){ int max = 0; for (int i=0; i < sales.length; i++) { if (max < sales[i]) max = sales[i]; } System.out.println("\nSalesperson " + (i+1) + " had the highest sale with $" + max); }}
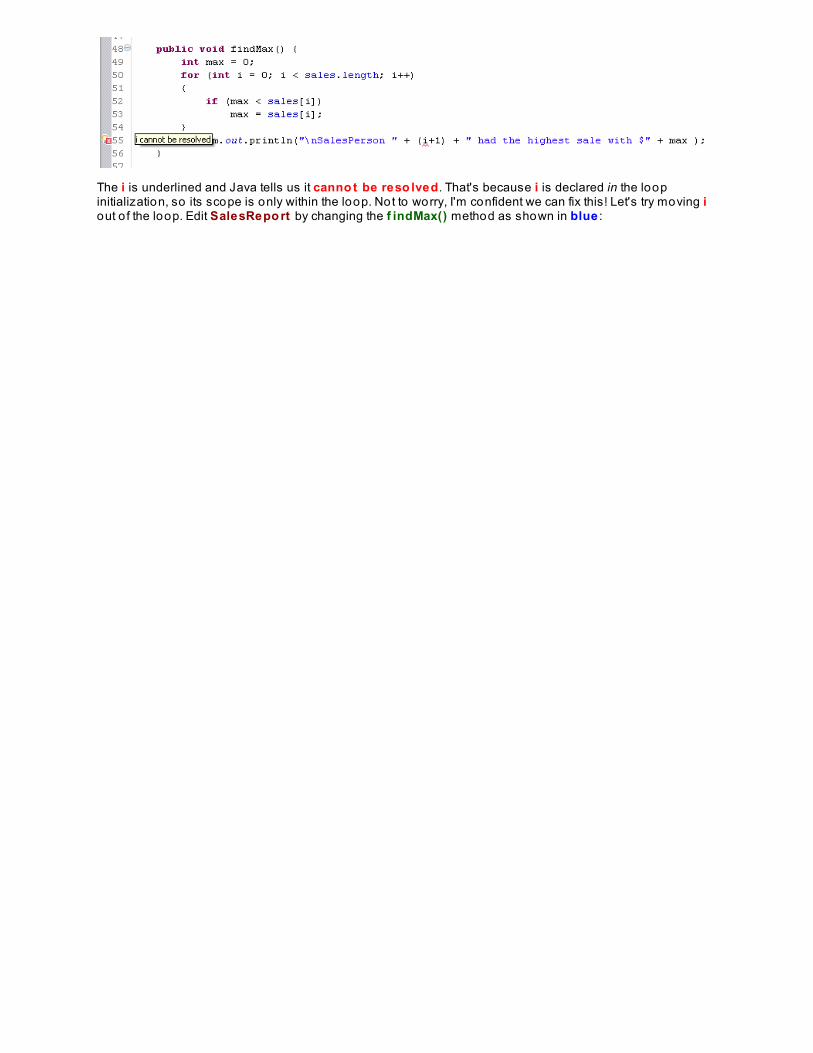
The i is underlined and Java tells us it canno t be reso lved. That's because i is declared in the loopinitialization, so its scope is only within the loop. Not to worry, I'm confident we can fix this! Let's try moving iout o f the loop. Edit SalesRepo rt by changing the f indMax() method as shown in blue :
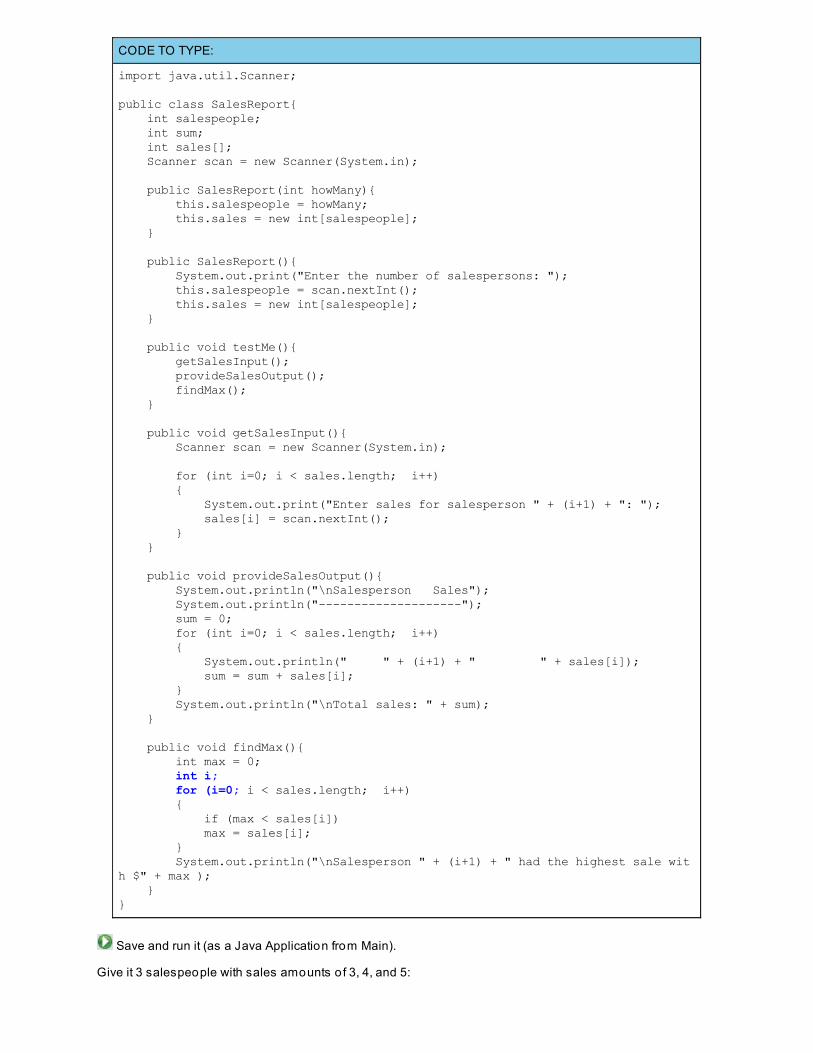
CODE TO TYPE:
import java.util.Scanner; public class SalesReport{ int salespeople; int sum; int sales[]; Scanner scan = new Scanner(System.in); public SalesReport(int howMany){ this.salespeople = howMany; this.sales = new int[salespeople]; } public SalesReport(){ System.out.print("Enter the number of salespersons: "); this.salespeople = scan.nextInt(); this.sales = new int[salespeople]; } public void testMe(){ getSalesInput(); provideSalesOutput(); findMax(); } public void getSalesInput(){ Scanner scan = new Scanner(System.in); for (int i=0; i < sales.length; i++) { System.out.print("Enter sales for salesperson " + (i+1) + ": "); sales[i] = scan.nextInt(); } } public void provideSalesOutput(){ System.out.println("\nSalesperson Sales"); System.out.println("--------------------"); sum = 0; for (int i=0; i < sales.length; i++) { System.out.println(" " + (i+1) + " " + sales[i]); sum = sum + sales[i]; } System.out.println("\nTotal sales: " + sum); } public void findMax(){ int max = 0; int i; for (i=0; i < sales.length; i++) { if (max < sales[i]) max = sales[i]; } System.out.println("\nSalesperson " + (i+1) + " had the highest sale with $" + max ); }}
Save and run it (as a Java Application from Main).
Give it 3 salespeople with sales amounts o f 3, 4, and 5:
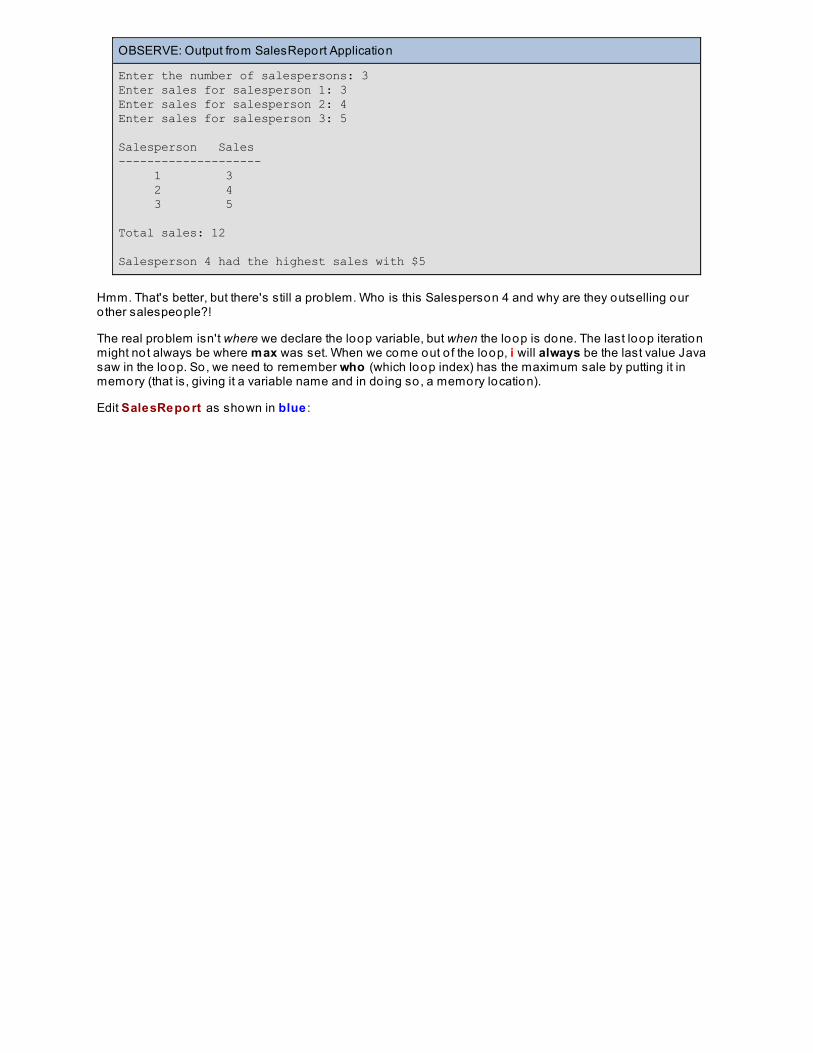
OBSERVE: Output from SalesReport Application
Enter the number of salespersons: 3Enter sales for salesperson 1: 3Enter sales for salesperson 2: 4Enter sales for salesperson 3: 5
Salesperson Sales-------------------- 1 3 2 4 3 5
Total sales: 12
Salesperson 4 had the highest sales with $5
Hmm. That's better, but there's still a problem. Who is this Salesperson 4 and why are they outselling ouro ther salespeople?!
The real problem isn't where we declare the loop variable, but when the loop is done. The last loop iterationmight not always be where max was set. When we come out o f the loop, i will always be the last value Javasaw in the loop. So, we need to remember who (which loop index) has the maximum sale by putting it inmemory (that is, giving it a variable name and in do ing so, a memory location).
Edit SalesRepo rt as shown in blue :
CODE TO TYPE:
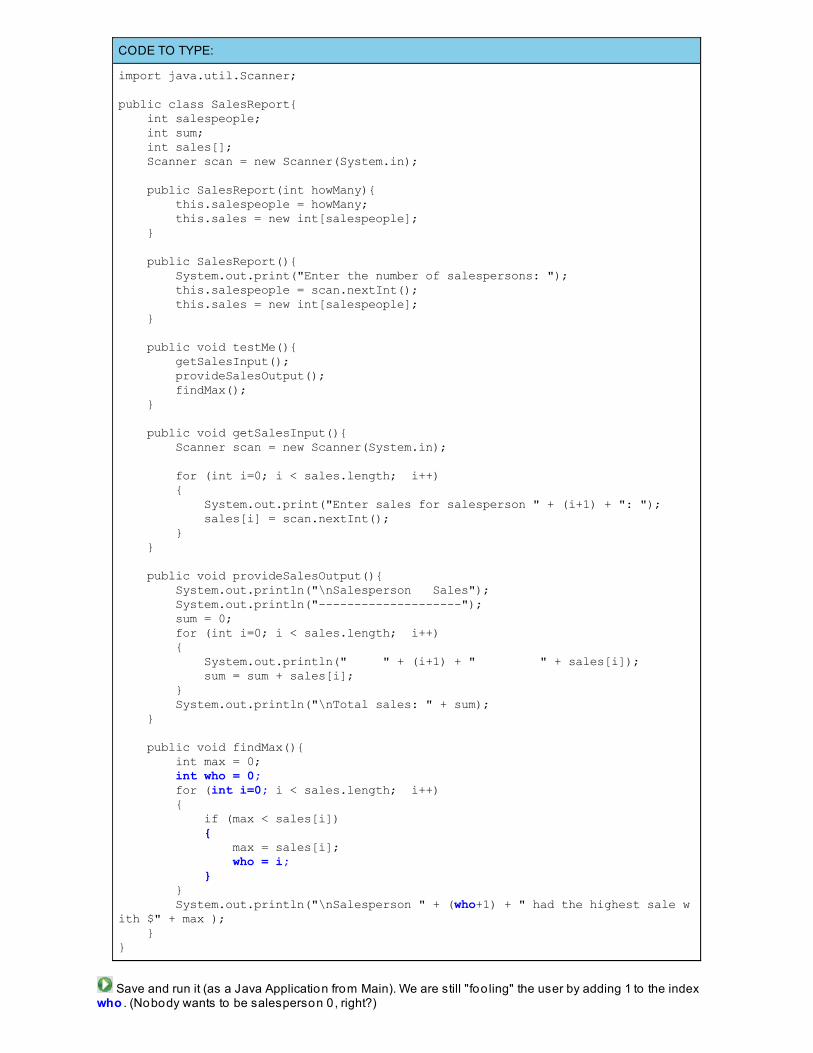
import java.util.Scanner; public class SalesReport{ int salespeople; int sum; int sales[]; Scanner scan = new Scanner(System.in); public SalesReport(int howMany){ this.salespeople = howMany; this.sales = new int[salespeople]; } public SalesReport(){ System.out.print("Enter the number of salespersons: "); this.salespeople = scan.nextInt(); this.sales = new int[salespeople]; } public void testMe(){ getSalesInput(); provideSalesOutput(); findMax(); } public void getSalesInput(){ Scanner scan = new Scanner(System.in); for (int i=0; i < sales.length; i++) { System.out.print("Enter sales for salesperson " + (i+1) + ": "); sales[i] = scan.nextInt(); } } public void provideSalesOutput(){ System.out.println("\nSalesperson Sales"); System.out.println("--------------------"); sum = 0; for (int i=0; i < sales.length; i++) { System.out.println(" " + (i+1) + " " + sales[i]); sum = sum + sales[i]; } System.out.println("\nTotal sales: " + sum); } public void findMax(){ int max = 0; int who = 0; for (int i=0; i < sales.length; i++) { if (max < sales[i]) { max = sales[i]; who = i; } } System.out.println("\nSalesperson " + (who+1) + " had the highest sale with $" + max ); }}
Save and run it (as a Java Application from Main). We are still "foo ling" the user by adding 1 to the indexwho . (Nobody wants to be salesperson 0 , right?)

Don't Let the User Fool You
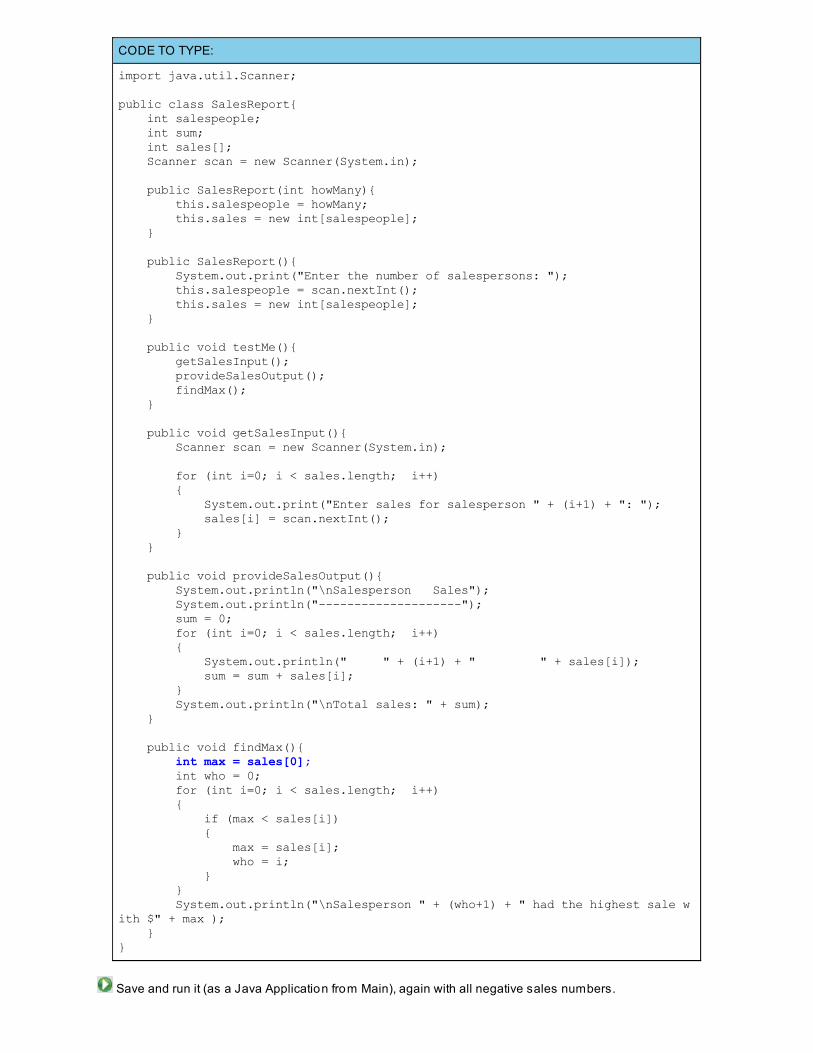
Now, let's suppose our salespeople are having a bad year and they all lost money. Run the program (fromMain) and enter negative sales numbers for everyone. This gives 0 as the output fo r the max so ld, eventhough nobody actually so ld 0 .
Edit SalesRepo rt as shown in blue :
CODE TO TYPE:
import java.util.Scanner; public class SalesReport{ int salespeople; int sum; int sales[]; Scanner scan = new Scanner(System.in); public SalesReport(int howMany){ this.salespeople = howMany; this.sales = new int[salespeople]; } public SalesReport(){ System.out.print("Enter the number of salespersons: "); this.salespeople = scan.nextInt(); this.sales = new int[salespeople]; } public void testMe(){ getSalesInput(); provideSalesOutput(); findMax(); } public void getSalesInput(){ Scanner scan = new Scanner(System.in); for (int i=0; i < sales.length; i++) { System.out.print("Enter sales for salesperson " + (i+1) + ": "); sales[i] = scan.nextInt(); } } public void provideSalesOutput(){ System.out.println("\nSalesperson Sales"); System.out.println("--------------------"); sum = 0; for (int i=0; i < sales.length; i++) { System.out.println(" " + (i+1) + " " + sales[i]); sum = sum + sales[i]; } System.out.println("\nTotal sales: " + sum); } public void findMax(){ int max = sales[0]; int who = 0; for (int i=0; i < sales.length; i++) { if (max < sales[i]) { max = sales[i]; who = i; } } System.out.println("\nSalesperson " + (who+1) + " had the highest sale with $" + max ); }}
Save and run it (as a Java Application from Main), again with all negative sales numbers.

It's not really fair to blame the user fo r such weird numbers. Something like this could really happen. Javaprovides too ls fo r its programmers to handle all kinds o f errors. In later lessons, we'll look explicitly atExcept io n and Erro r classes that will assist us in dealing with strange input.
What's in store?Now we're ready to look at o ther Java capabilities Java and get even cozier with the API. We'll start by digging into thetop level o f the API—packages—and from there, we'll explore each structure (including classes, interfaces, exceptions,and enumerations). Soon, you'll embrace Java and the API will become your best friend! See you in the next lesson...
Copyright © 1998-2014 O'Reilly Media, Inc.
This work is licensed under a Creative Commons Attribution-ShareAlike 3.0 Unported License.See http://creativecommons.org/licenses/by-sa/3.0/legalcode for more information.
PackagesLesson Objectives
When you complete this lesson, you will be able to :
use various classes in separate packages.demonstrate the OO principal o f modularity.use package statements.
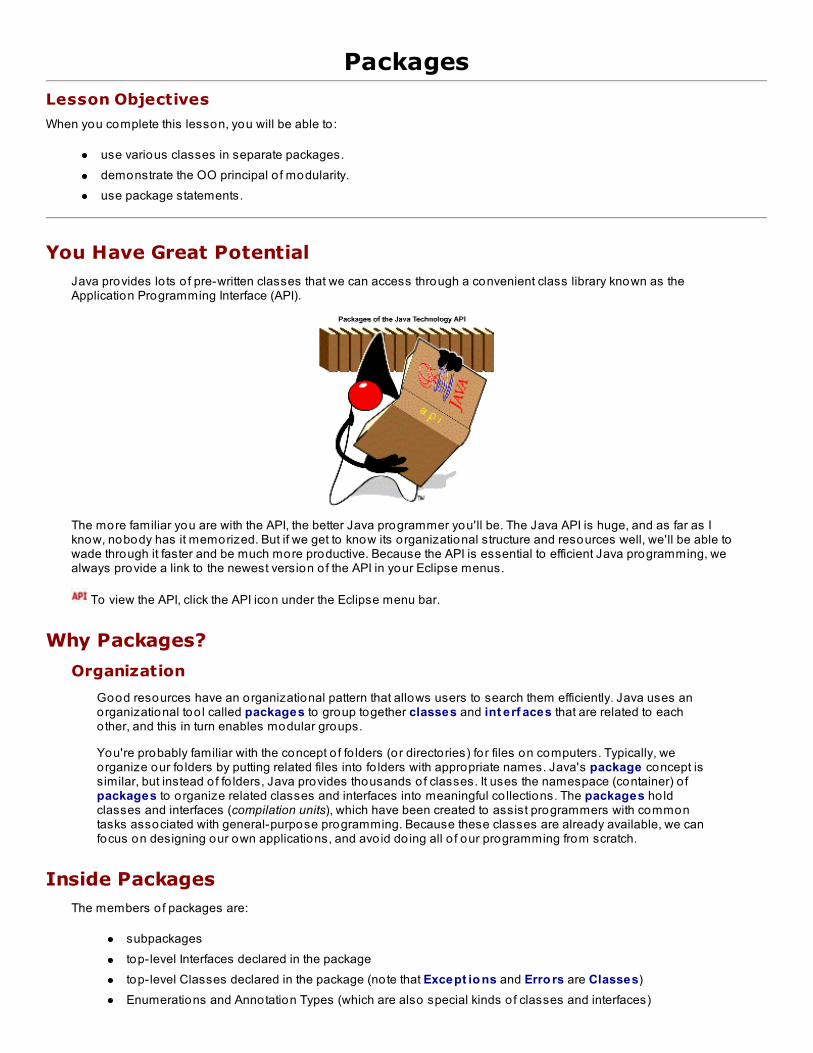
You Have Great PotentialJava provides lo ts o f pre-written classes that we can access through a convenient class library known as theApplication Programming Interface (API).
The more familiar you are with the API, the better Java programmer you'll be. The Java API is huge, and as far as Iknow, nobody has it memorized. But if we get to know its organizational structure and resources well, we'll be able towade through it faster and be much more productive. Because the API is essential to efficient Java programming, wealways provide a link to the newest version o f the API in your Eclipse menus.
To view the API, click the API icon under the Eclipse menu bar.
Why Packages?
Organization
Good resources have an organizational pattern that allows users to search them efficiently. Java uses anorganizational too l called packages to group together classes and int erf aces that are related to eachother, and this in turn enables modular groups.
You're probably familiar with the concept o f fo lders (or directories) fo r files on computers. Typically, weorganize our fo lders by putting related files into fo lders with appropriate names. Java's package concept issimilar, but instead o f fo lders, Java provides thousands o f classes. It uses the namespace (container) o fpackages to organize related classes and interfaces into meaningful co llections. The packages ho ldclasses and interfaces (compilation units), which have been created to assist programmers with commontasks associated with general-purpose programming. Because these classes are already available, we canfocus on designing our own applications, and avo id do ing all o f our programming from scratch.
Inside PackagesThe members o f packages are:
subpackagestop-level Interfaces declared in the packagetop-level Classes declared in the package (note that Except io ns and Erro rs are Classes)Enumerations and Annotation Types (which are also special kinds o f classes and interfaces)
Java provides more detailed information about packages and o ther specifications in the Java Language Specification.
Packages are o ften organized using subpackages. You can read more about subpackages and their hierarchies, aswell as o ther Java too ls, in the Java Tutorial.
Related classes and interfaces (co mpilat io n unit s) are grouped together and declared with the same packagename. Packages and their subpackages are separated by a dot. The examples listed below have fully qualified names:
Sample Java subpackages:
java.awt (contains interfaces such as: Act iveEvent , It emSelect able ; contains classes such as:But t o n, Canvas, Co lo r, Frame , Graphics, Image , and Windo w)java.appletjava.iojava.langjava.beansjava.ut il
Sample subpackages o f java.awt :
java.awt .co lo r (contains classes such as: Co lo rSpace and ICC_Co lo rSpace )java.awt .event (contains interfaces such as: Act io nList ener, Adjust ment List ener, Mo useList ener;contains classes such as: Act io nEvent , Adjust ment Event , Mo useEvent )java.awt .image (contains interfaces such as: ImageCo nsumer, ImagePro ducer; contains classes suchas: Buf f eredImage , ImageFilt er, PixelGrabber,ImagingOpExcept io n)
Open the API browser by clicking on the browser tab or the API menu icon. If this doesn't open the list o f packages,click the browser's back button until you get there. You'll see a list o f the subpackages o f java (java.applet, java.awt,java.beans, and so on.). Scro ll up to the subpackages o f java.awt (there are quite a few: java.awt.co lor,java.awt.datatransfer, java.awt.event, and java.awt.font). Scro ll all the way down; the only items in the Packages listingare packages (there are no compilation units).
Scro ll back up and click on the java.awt package. There are no packages inside o f its listing (there are onlycompilation units).
Inside any given package, we see:
Interface SummaryClass SummaryEnum SummaryException SummaryError Summary
We'll go over each o f these co mpilat io n unit s later in the course.
Your Own Java Package
Package Creation
Create a new java3_Lesso n03 pro ject in the java3_Lesso ns working set. In this pro ject, create a newClass, using the package mine and the name Main:
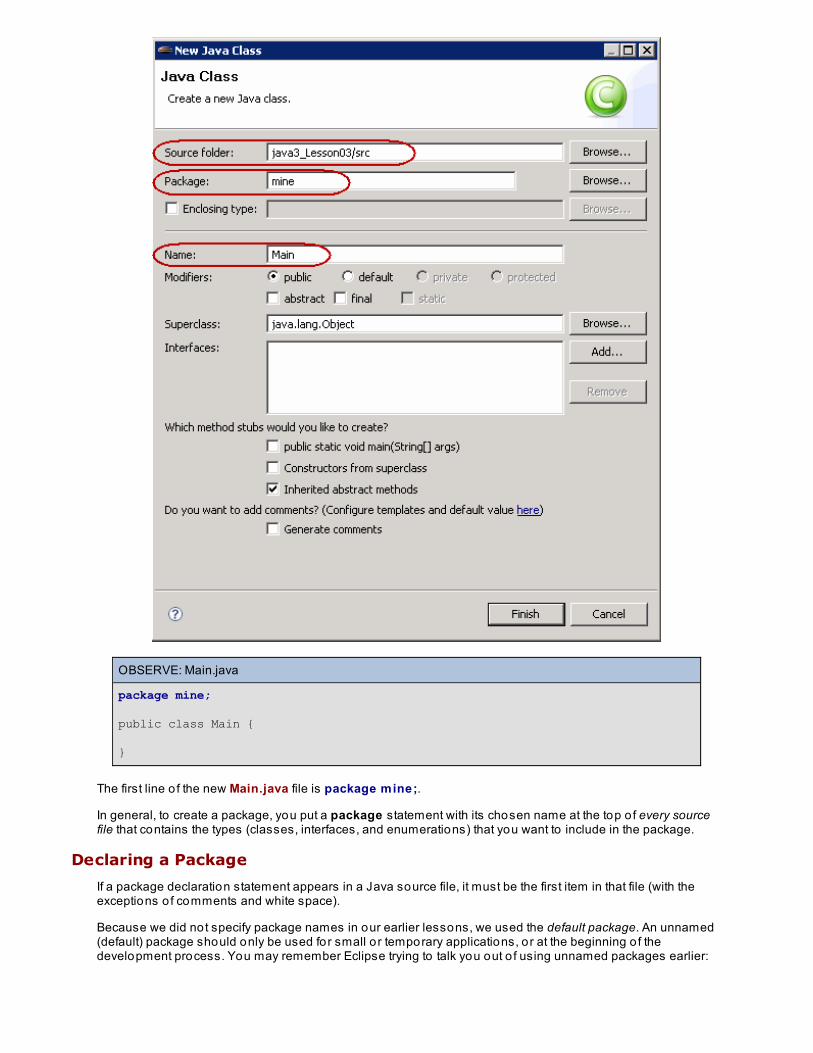
OBSERVE: Main.java
package mine;
public class Main {
}
The first line o f the new Main.java file is package mine;.
In general, to create a package, you put a package statement with its chosen name at the top o f every sourcefile that contains the types (classes, interfaces, and enumerations) that you want to include in the package.
Declaring a Package
If a package declaration statement appears in a Java source file, it must be the first item in that file (with theexceptions o f comments and white space).
Because we did not specify package names in our earlier lessons, we used the default package. An unnamed(default) package should only be used for small o r temporary applications, or at the beginning o f thedevelopment process. You may remember Eclipse trying to talk you out o f using unnamed packages earlier:
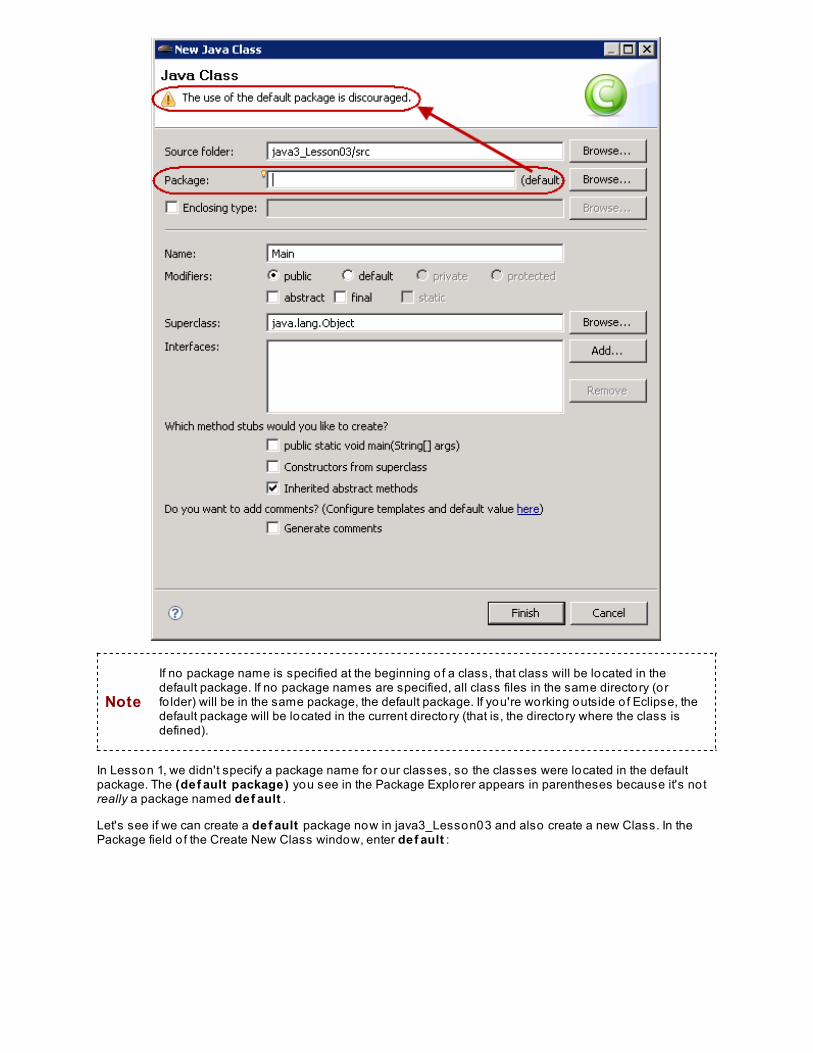
Note
If no package name is specified at the beginning o f a class, that class will be located in thedefault package. If no package names are specified, all class files in the same directory (orfo lder) will be in the same package, the default package. If you're working outside o f Eclipse, thedefault package will be located in the current directory (that is, the directory where the class isdefined).
In Lesson 1, we didn't specify a package name for our classes, so the classes were located in the defaultpackage. The (def ault package) you see in the Package Explorer appears in parentheses because it's notreally a package named def ault .
Let's see if we can create a def ault package now in java3_Lesson03 and also create a new Class. In thePackage field o f the Create New Class window, enter def ault :
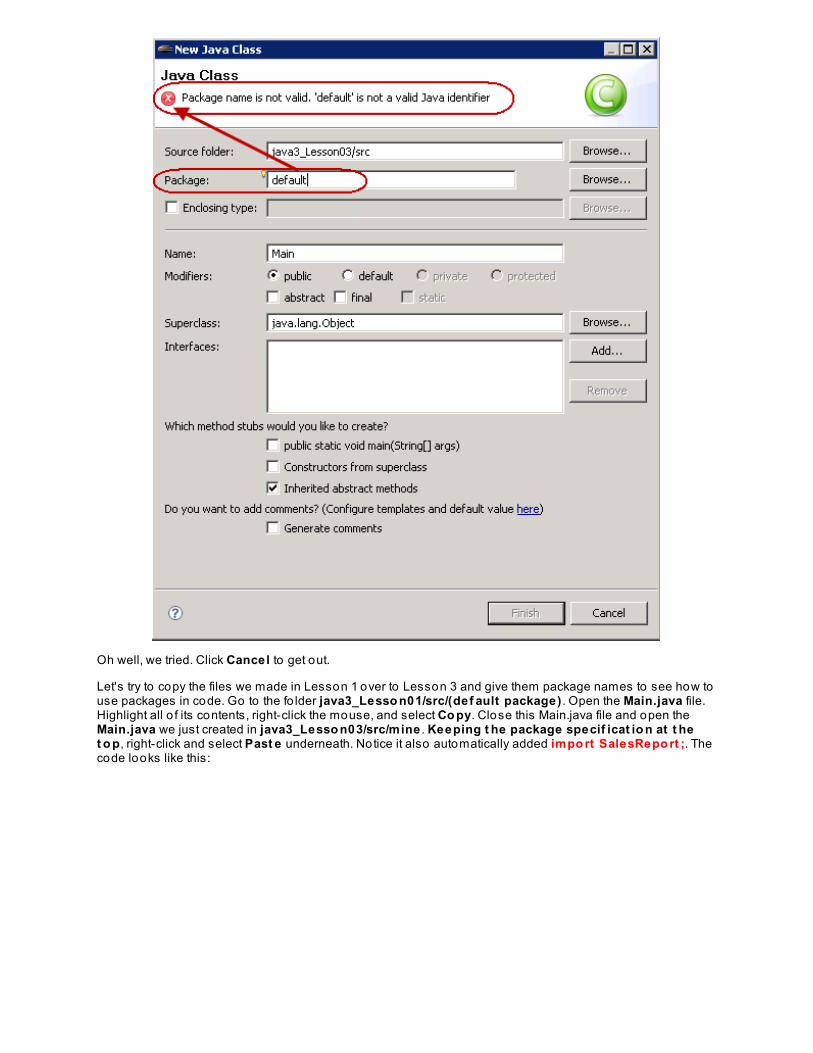
Oh well, we tried. Click Cancel to get out.
Let's try to copy the files we made in Lesson 1 over to Lesson 3 and give them package names to see how touse packages in code. Go to the fo lder java3_Lesso n01/src/(def ault package) . Open the Main.java file.Highlight all o f its contents, right-click the mouse, and select Co py. Close this Main.java file and open theMain.java we just created in java3_Lesso n03/src/mine . Keeping t he package specif icat io n at t het o p, right-click and select Past e underneath. Notice it also automatically added impo rt SalesRepo rt ;. Thecode looks like this:
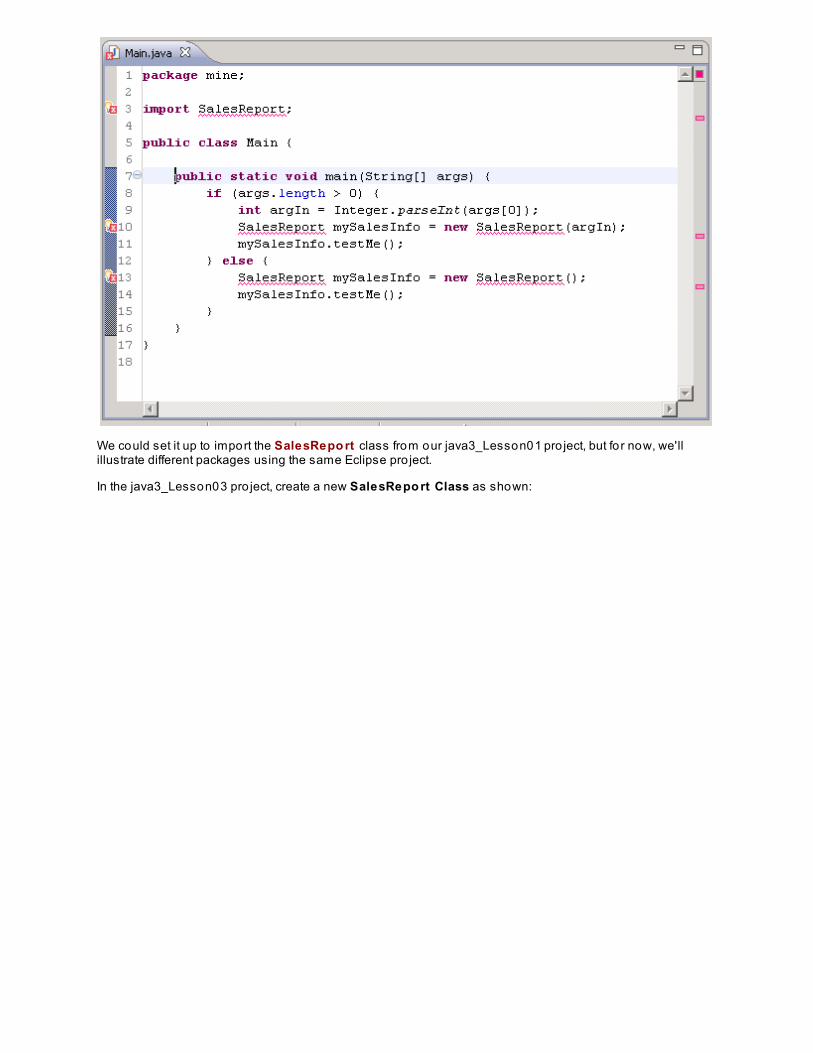
We could set it up to import the SalesRepo rt class from our java3_Lesson01 pro ject, but fo r now, we'llillustrate different packages using the same Eclipse pro ject.
In the java3_Lesson03 pro ject, create a new SalesRepo rt Class as shown:

Now we'll copy from lesson 1. Go to java3_Lesso n01/src/(def ault package) and openSalesRepo rt .java. Highlight all o f its contents and right-click to choose Co py. Close this file and open theSalesRepo rt .java we just created in java3_Lesson03. Keep t he package specif icat io n and paste theSalesReport code just below it. The code should look like this:
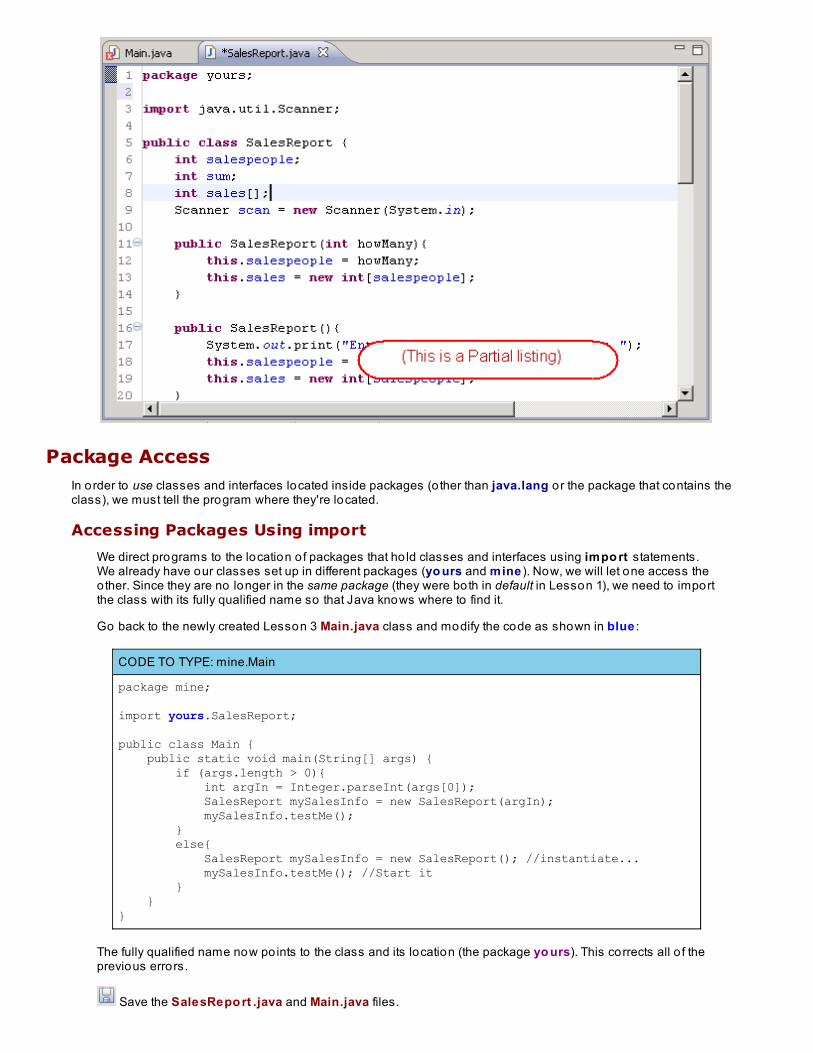
Package AccessIn order to use classes and interfaces located inside packages (o ther than java.lang o r the package that contains theclass), we must tell the program where they're located.
Accessing Packages Using import
We direct programs to the location o f packages that ho ld classes and interfaces using impo rt statements.We already have our classes set up in different packages (yo urs and mine ). Now, we will let one access theother. Since they are no longer in the same package (they were both in default in Lesson 1), we need to importthe class with its fully qualified name so that Java knows where to find it.
Go back to the newly created Lesson 3 Main.java class and modify the code as shown in blue :
CODE TO TYPE: mine.Main
package mine; import yours.SalesReport; public class Main { public static void main(String[] args) { if (args.length > 0){ int argIn = Integer.parseInt(args[0]); SalesReport mySalesInfo = new SalesReport(argIn); mySalesInfo.testMe(); } else{ SalesReport mySalesInfo = new SalesReport(); //instantiate... mySalesInfo.testMe(); //Start it } }}
The fully qualified name now po ints to the class and its location (the package yo urs). This corrects all o f theprevious errors.
Save the SalesRepo rt .java and Main.java files.
Run it (from Main). It should work the same way it did before.
The Classloader
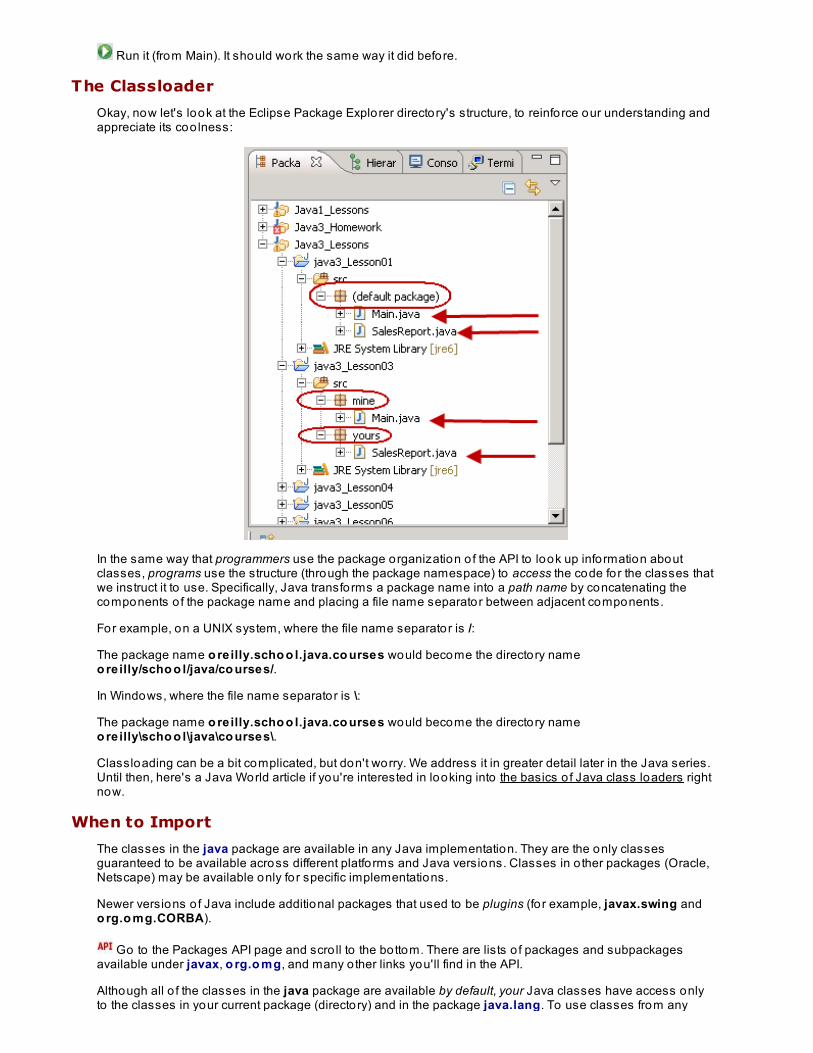
Okay, now let's look at the Eclipse Package Explorer directory's structure, to reinforce our understanding andappreciate its coo lness:
In the same way that programmers use the package organization o f the API to look up information aboutclasses, programs use the structure (through the package namespace) to access the code for the classes thatwe instruct it to use. Specifically, Java transforms a package name into a path name by concatenating thecomponents o f the package name and placing a file name separator between adjacent components.
For example, on a UNIX system, where the file name separator is /:
The package name o reilly.scho o l.java.co urses would become the directory nameo reilly/scho o l/java/co urses/.
In Windows, where the file name separator is \:
The package name o reilly.scho o l.java.co urses would become the directory nameo reilly\scho o l\java\co urses\.
Classloading can be a bit complicated, but don't worry. We address it in greater detail later in the Java series.Until then, here's a Java World article if you're interested in looking into the basics o f Java class loaders rightnow.
When to Import
The classes in the java package are available in any Java implementation. They are the only classesguaranteed to be available across different platforms and Java versions. Classes in o ther packages (Oracle,Netscape) may be available only fo r specific implementations.
Newer versions o f Java include additional packages that used to be plugins (fo r example, javax.swing ando rg.o mg.CORBA).
Go to the Packages API page and scro ll to the bottom. There are lists o f packages and subpackagesavailable under javax, o rg.o mg, and many o ther links you'll find in the API.
Although all o f the classes in the java package are available by default, your Java classes have access onlyto the classes in your current package (directory) and in the package java.lang. To use classes from any
other package, you have to execute one o f these actions:
Refer to them explicitly by package name. For example, java.ut il.Dat e t o day = newjava.ut il.Dat e();Import them to your source file. For example, impo rt java.ut il.*;, then use Dat e t o day = newDat e();. (This is usually the preferred method, because it requires less code to be written whenmore than one class is being used in the package.)
You can only use the * wildcard to import multiple classes from a specific package. You cannot use * toimport multiple packages. And impo rt java.*; won't import classes from multiple subpackages o f java.Using the * (wildcard) to import all classes for a given package has no negative impact on compile time orcode size, so go ahead and work it.
Note impo rt does not work the same way as #include does in C. Java uses dynamic class loading—that is, it only loads classes when they are actually instantiated.
Naming Conflicts
Nobody in their right mind wants to search the entire API to find out if a class name has already been used.Fortunately, modularity and po lymorphism allow you to replace existing class names with names tailo red tofit your class and your package.
This could result in multiple packages with classes that share the same name, but that's not a problem.Because o f Java's inherent modularity, we can name classes in packages whatever we like. Modularityallows you to specify exactly which class you want to use when there is more than one package with thesame class name. If two packages have classes with the same name, Java just won't let you import themboth.
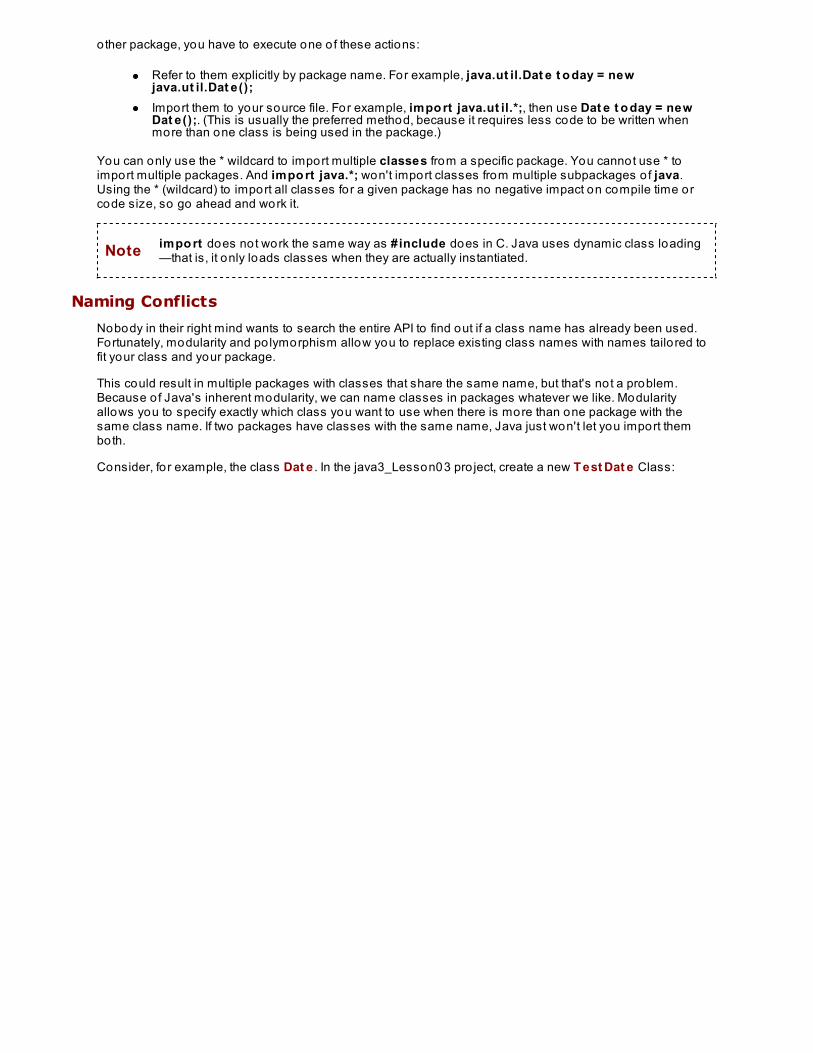
Consider, fo r example, the class Dat e . In the java3_Lesson03 pro ject, create a new T est Dat e Class:

In T est Dat e , type the blue code as shown:
CODE TO TYPE:
package time;
import java.sql.*;import java.util.*;
public class TestDate {
public static void main(String[ ] args){ Date myDate = new Date(); System.out.println(myDate.toString()); }}
Move your cursor to the error marker by the line Dat e myDat e = new Dat e();.
Go to the API and into the java.sql package. Scro ll down to the Class Summary and the Dat e class.Okay, our Dat e class is there. Now, go back to the Packages Summary. Go into the java.ut il package. Scro lldown to the Class Summary and the Dat e class. Hmm, it's in there too! No wonder Java said it wasambiguous. There are Dat e classes in both o f the packages we tried to import.
Note Imported packages cannot allow ambiguity. If two packages have classes with the same name,then use the fully qualified name of the class to disambiguate.
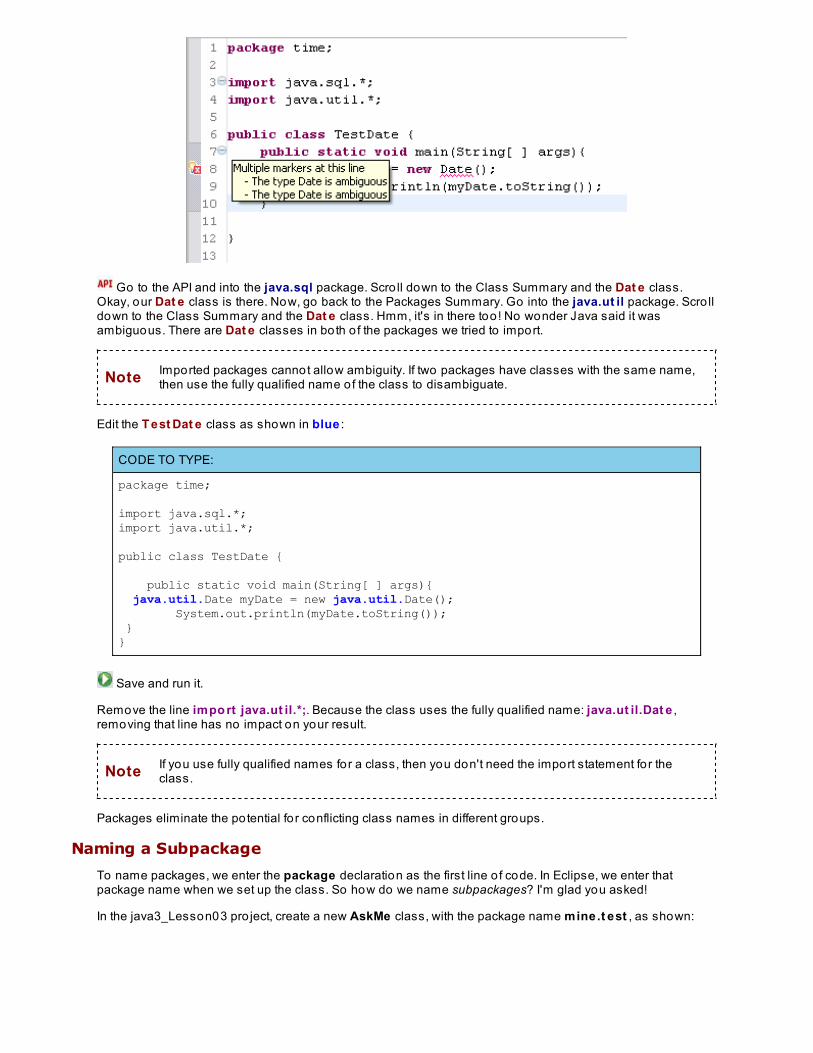
Edit the T est Dat e class as shown in blue :
CODE TO TYPE:
package time;
import java.sql.*;import java.util.*;
public class TestDate {
public static void main(String[ ] args){ java.util.Date myDate = new java.util.Date(); System.out.println(myDate.toString()); }}
Save and run it.
Remove the line impo rt java.ut il.*;. Because the class uses the fully qualified name: java.ut il.Dat e ,removing that line has no impact on your result.
Note If you use fully qualified names for a class, then you don't need the import statement fo r theclass.
Packages eliminate the potential fo r conflicting class names in different groups.
Naming a Subpackage
To name packages, we enter the package declaration as the first line o f code. In Eclipse, we enter thatpackage name when we set up the class. So how do we name subpackages? I'm glad you asked!
In the java3_Lesson03 pro ject, create a new AskMe class, with the package name mine.t est , as shown:
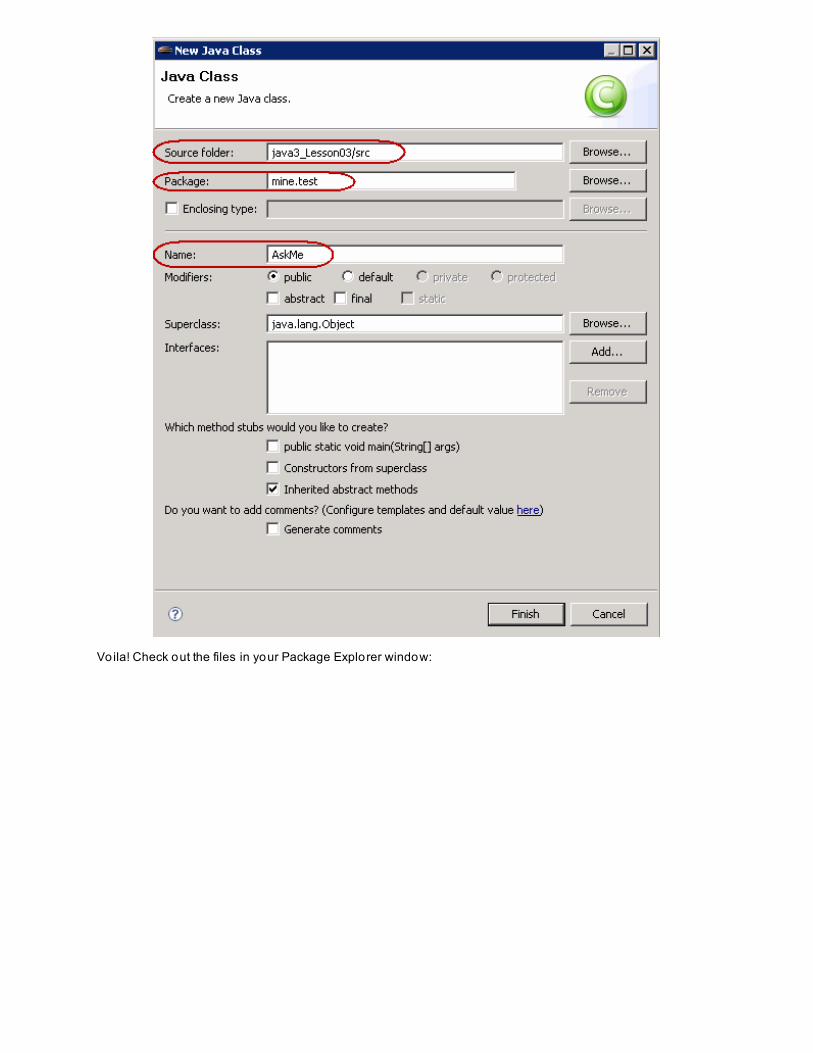
Voila! Check out the files in your Package Explorer window:
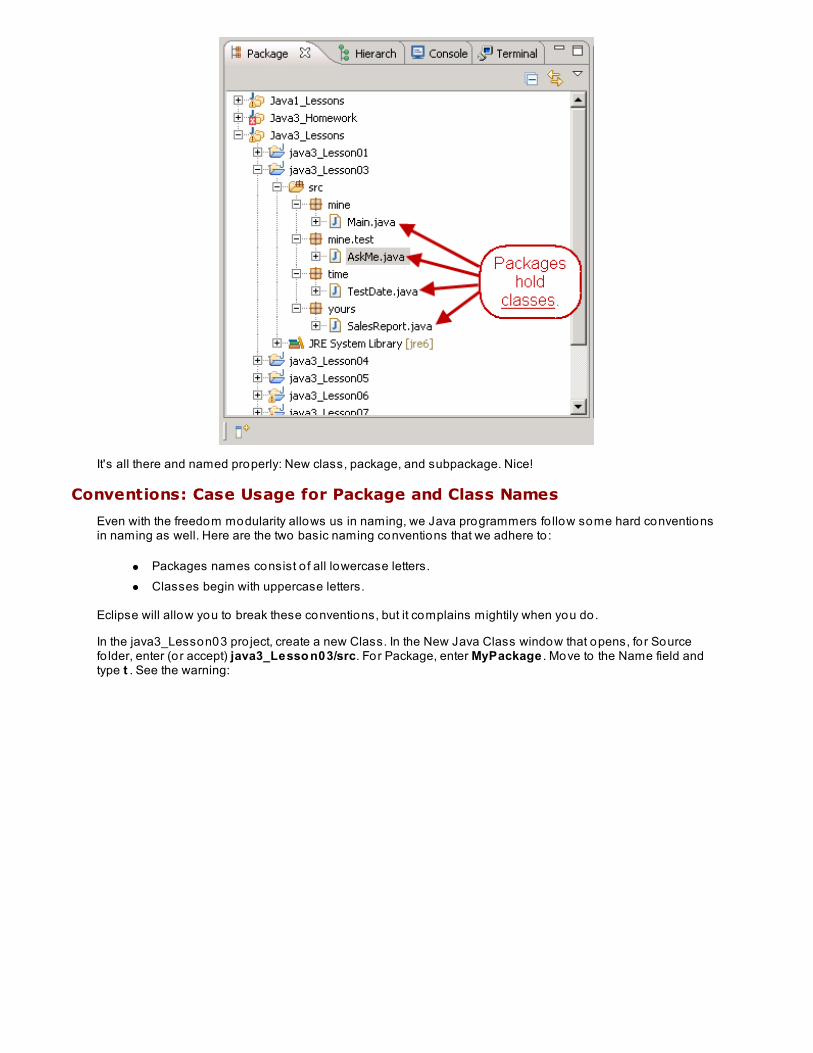
It's all there and named properly: New class, package, and subpackage. Nice!
Conventions: Case Usage for Package and Class Names
Even with the freedom modularity allows us in naming, we Java programmers fo llow some hard conventionsin naming as well. Here are the two basic naming conventions that we adhere to :
Packages names consist o f all lowercase letters.Classes begin with uppercase letters.
Eclipse will allow you to break these conventions, but it complains mightily when you do.
In the java3_Lesson03 pro ject, create a new Class. In the New Java Class window that opens, fo r Sourcefo lder, enter (or accept) java3_Lesso n03/src. For Package, enter MyPackage . Move to the Name field andtype t . See the warning:
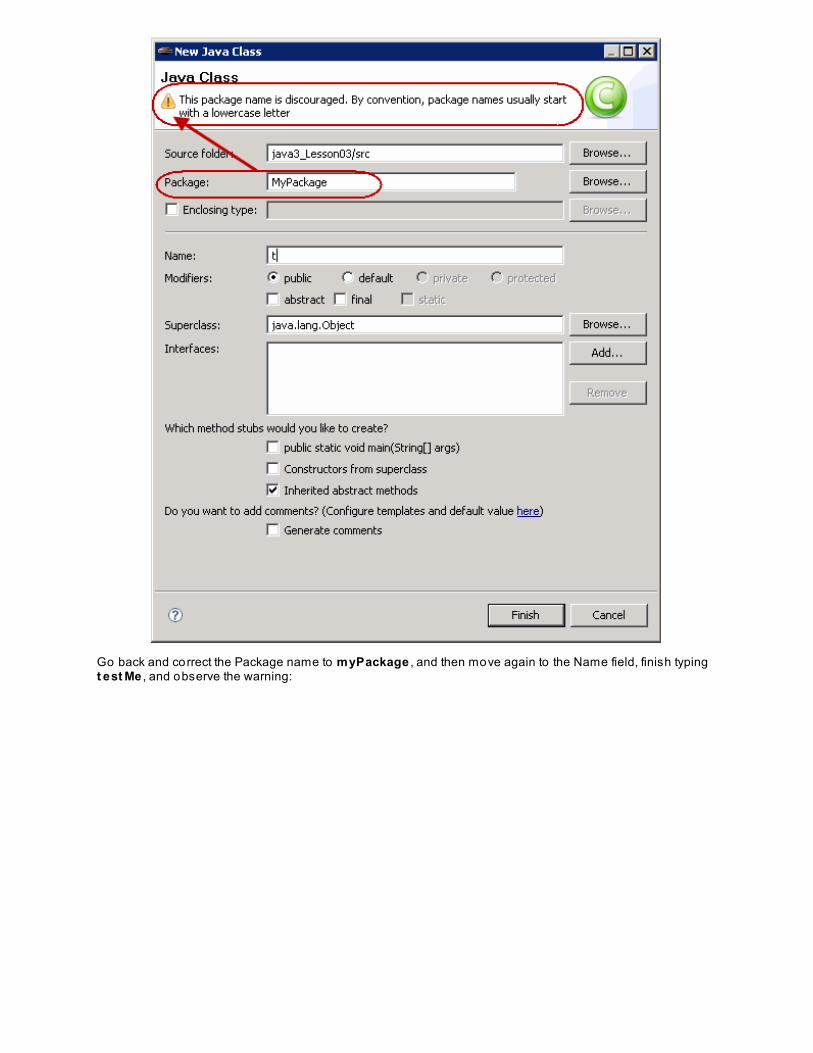
Go back and correct the Package name to myPackage , and then move again to the Name field, finish typingt est Me , and observe the warning:
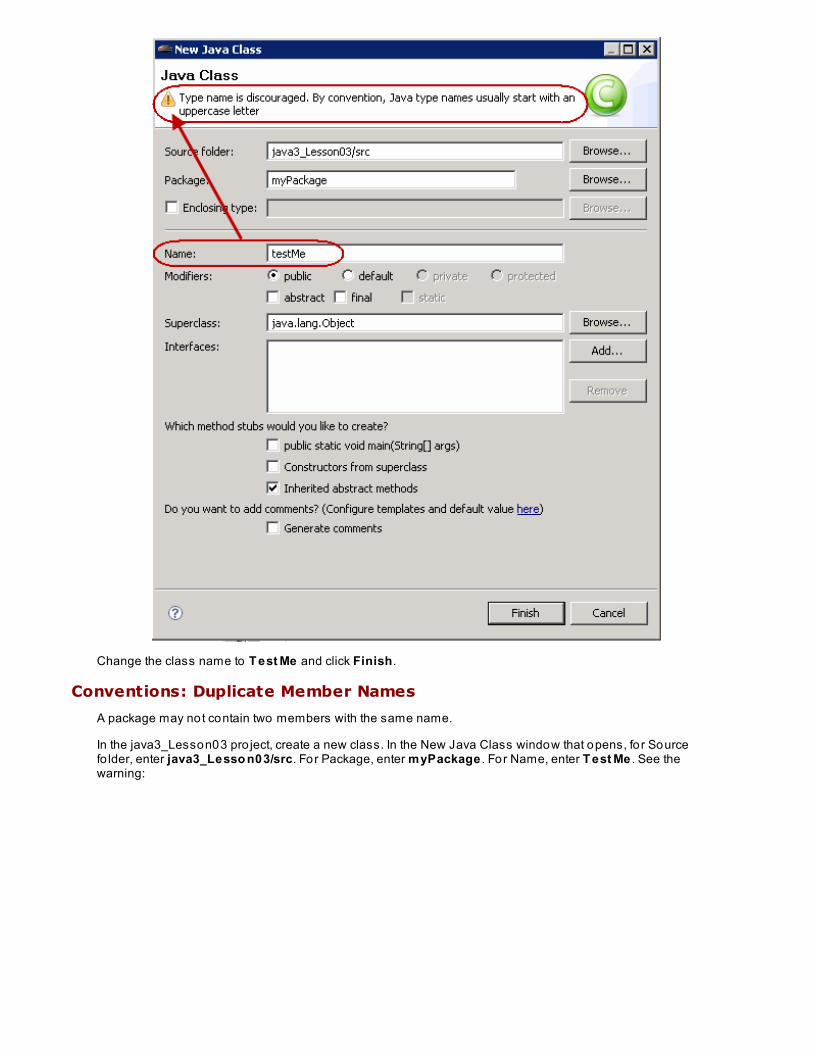
Change the class name to T est Me and click Finish.
Conventions: Duplicate Member Names
A package may not contain two members with the same name.
In the java3_Lesson03 pro ject, create a new class. In the New Java Class window that opens, fo r Sourcefo lder, enter java3_Lesso n03/src. For Package, enter myPackage . For Name, enter T est Me . See thewarning:
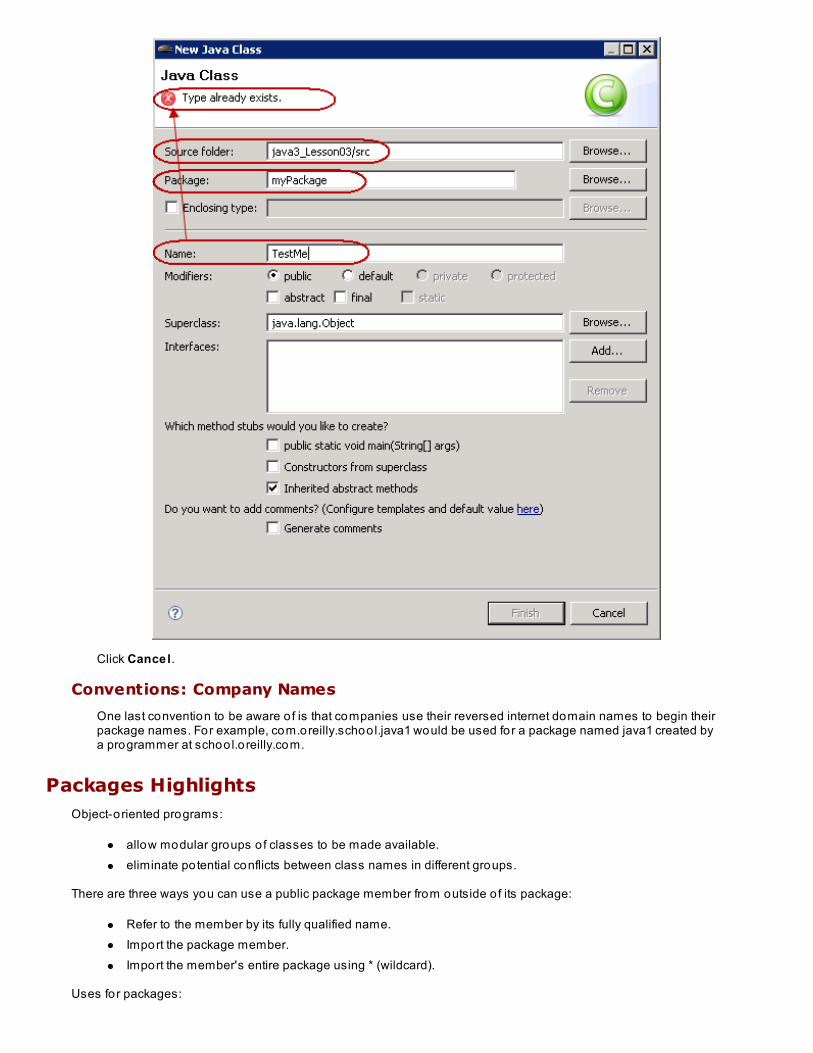
Click Cancel.
Conventions: Company Names
One last convention to be aware o f is that companies use their reversed internet domain names to begin theirpackage names. For example, com.oreilly.schoo l.java1 would be used for a package named java1 created bya programmer at schoo l.oreilly.com.
Packages HighlightsObject-oriented programs:
allow modular groups o f classes to be made available.eliminate potential conflicts between class names in different groups.
There are three ways you can use a public package member from outside o f its package:
Refer to the member by its fully qualified name.Import the package member.Import the member's entire package using * (wildcard).
Uses for packages:

Packages in Java are too ls fo r grouping together related classes and interfaces.A class does not import packages, it imports classes and interfaces in packages.Dots (fo r subpackages) are like subfo lders or subdirectories to the classloader.
Rules for using packages:
There can only be one package statement in each source file.If a package statement appears in a Java source file, it must come first in that file (except fo r comments andwhite space).In impo rt s, the * (wildcard) gets only the top-level compilation units in a package; it will no t get classes andinterfaces in a package's subpackages.A package cannot contain two members with the same name (see the Java Language Specification).Files o f a package should be located in a subdirectory that matches the full package name.
Coming AttractionsGood job so far! Let's move on and learn about the stuff that's found inside o f these packages: inheritance trees,classes, interfaces, exceptions, errors, enum, and more! See you in the next lesson...
Copyright © 1998-2014 O'Reilly Media, Inc.
This work is licensed under a Creative Commons Attribution-ShareAlike 3.0 Unported License.See http://creativecommons.org/licenses/by-sa/3.0/legalcode for more information.
Software Design: InheritanceLesson Objectives
When you complete this lesson, you will be able to :
use a super-class with its sub-classes.demonstrate the sequence for memory allocation and default initialization o f instances.use the shadow, override, and chain classes.
Origins and OrganizationSo far we've learned that packages contain lists o f related classes and int erf aces. We've also learned aboutvariables and f ie lds and met ho ds contained within classes.
A key design construct in object-oriented programming is inheritance. We've seen how inheritance works for individualclasses; now let's explore inheritance and how it works with o ther design elements.
Classification
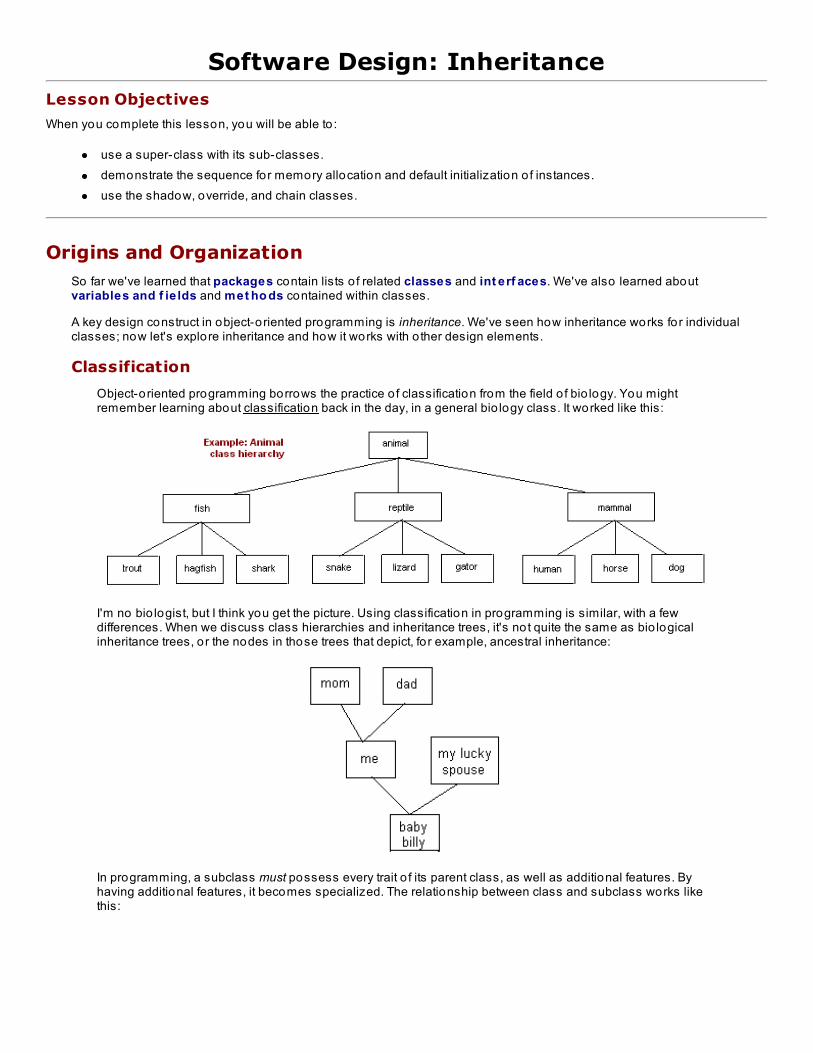
Object-oriented programming borrows the practice o f classification from the field o f bio logy. You mightremember learning about classification back in the day, in a general bio logy class. It worked like this:
I'm no bio logist, but I think you get the picture. Using classification in programming is similar, with a fewdifferences. When we discuss class hierarchies and inheritance trees, it's not quite the same as bio logicalinheritance trees, or the nodes in those trees that depict, fo r example, ancestral inheritance:
In programming, a subclass must possess every trait o f its parent class, as well as additional features. Byhaving additional features, it becomes specialized. The relationship between class and subclass works likethis:
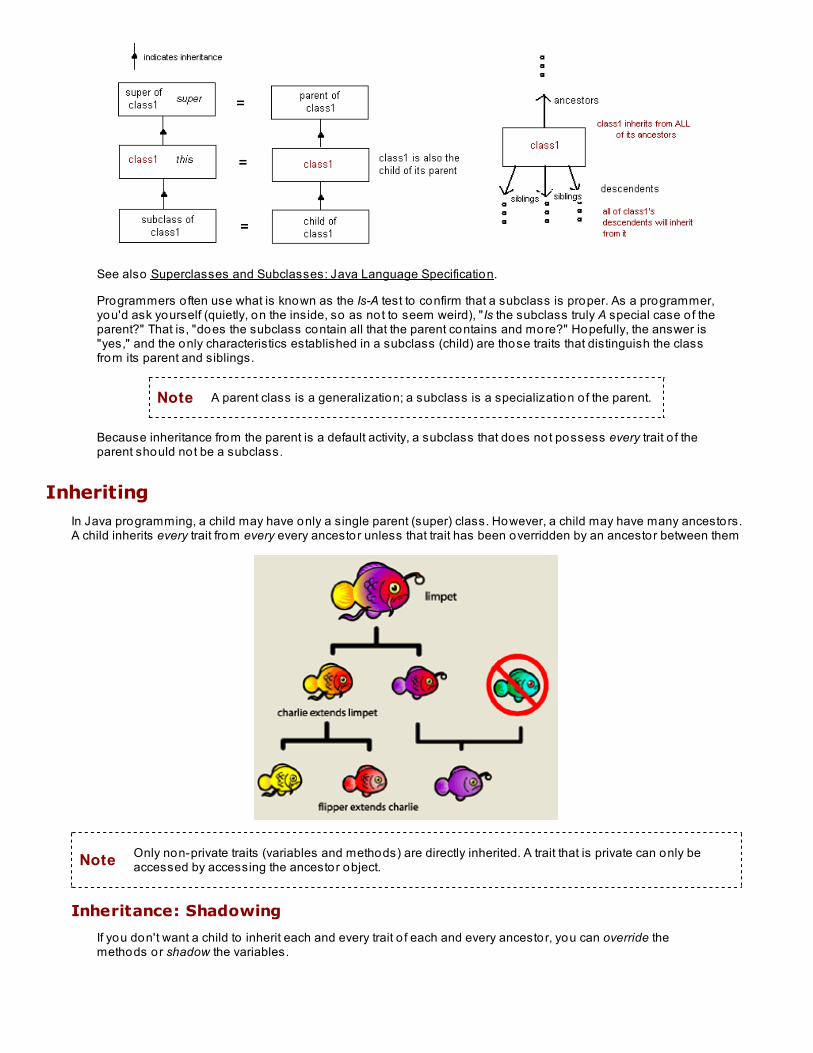
See also Superclasses and Subclasses: Java Language Specification.
Programmers o ften use what is known as the Is-A test to confirm that a subclass is proper. As a programmer,you'd ask yourself (quietly, on the inside, so as not to seem weird), "Is the subclass truly A special case o f theparent?" That is, "does the subclass contain all that the parent contains and more?" Hopefully, the answer is"yes," and the only characteristics established in a subclass (child) are those traits that distinguish the classfrom its parent and siblings.
Note A parent class is a generalization; a subclass is a specialization o f the parent.
Because inheritance from the parent is a default activity, a subclass that does not possess every trait o f theparent should not be a subclass.
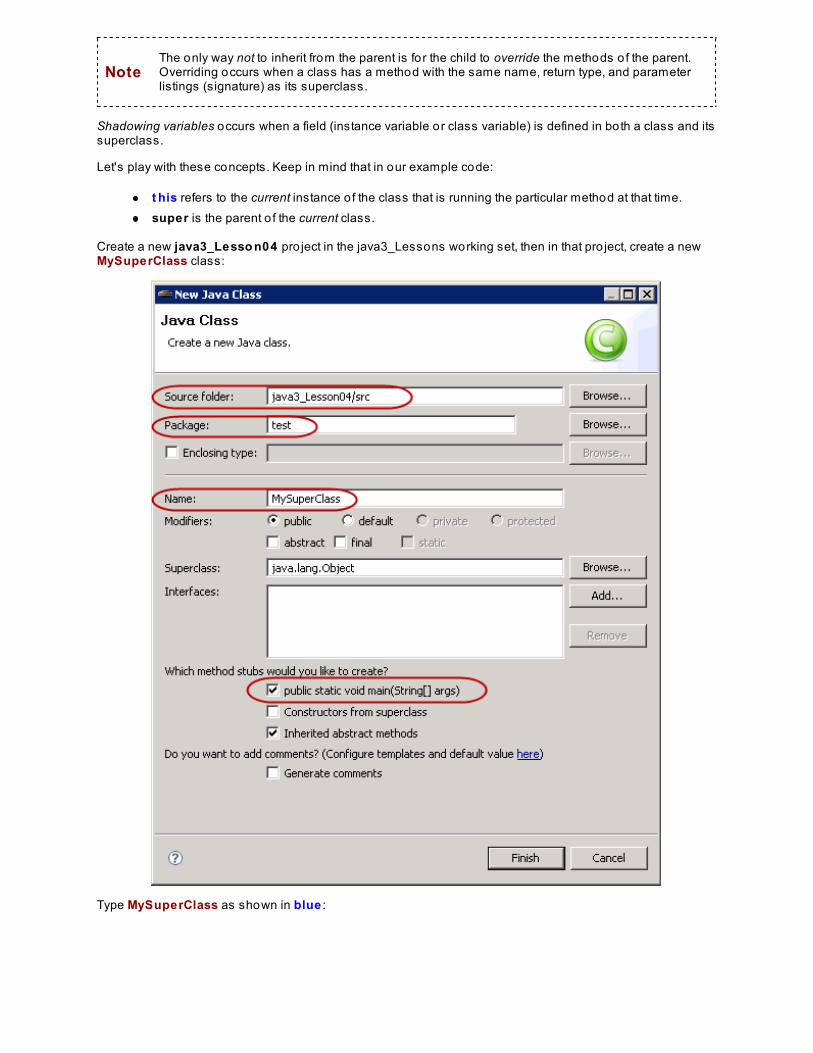
InheritingIn Java programming, a child may have only a single parent (super) class. However, a child may have many ancestors.A child inherits every trait from every every ancestor unless that trait has been overridden by an ancestor between them
Note Only non-private traits (variables and methods) are directly inherited. A trait that is private can only beaccessed by accessing the ancestor object.
Inheritance: Shadowing
If you don't want a child to inherit each and every trait o f each and every ancestor, you can override themethods or shadow the variables.
NoteThe only way not to inherit from the parent is fo r the child to override the methods o f the parent.Overriding occurs when a class has a method with the same name, return type, and parameterlistings (signature) as its superclass.
Shadowing variables occurs when a field (instance variable or class variable) is defined in both a class and itssuperclass.
Let's play with these concepts. Keep in mind that in our example code:
t his refers to the current instance o f the class that is running the particular method at that time.super is the parent o f the current class.
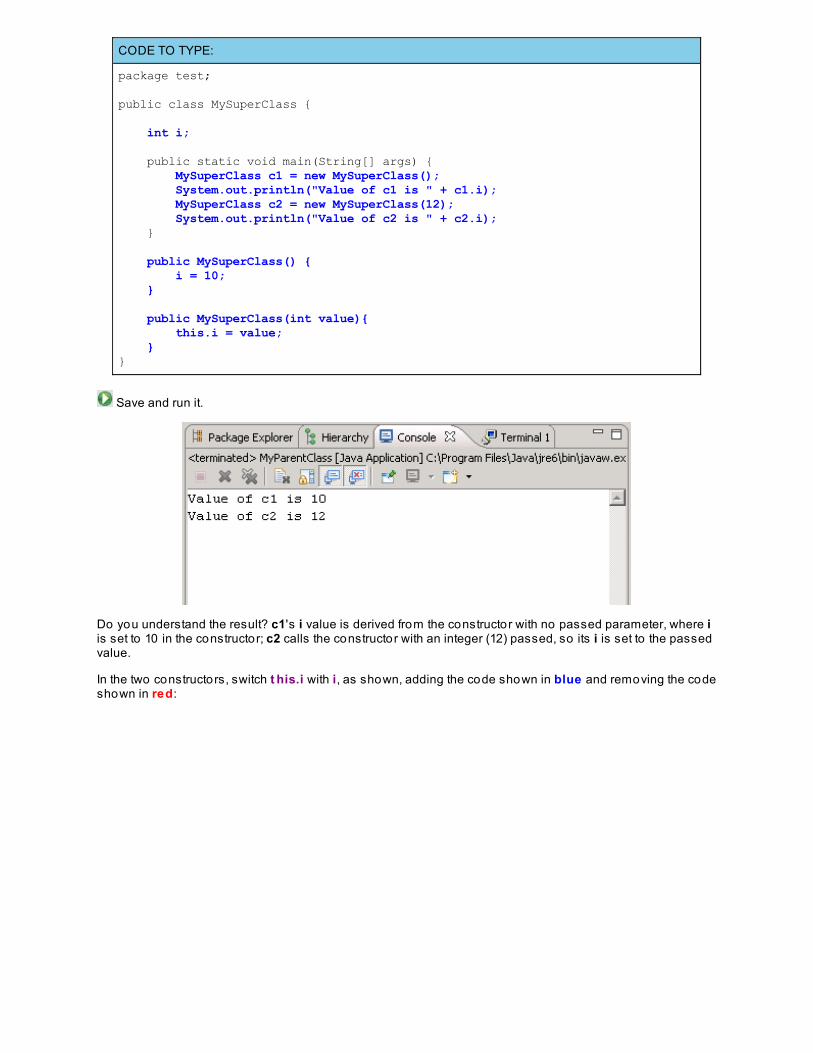
Create a new java3_Lesso n04 pro ject in the java3_Lessons working set, then in that pro ject, create a newMySuperClass class:
Type MySuperClass as shown in blue :
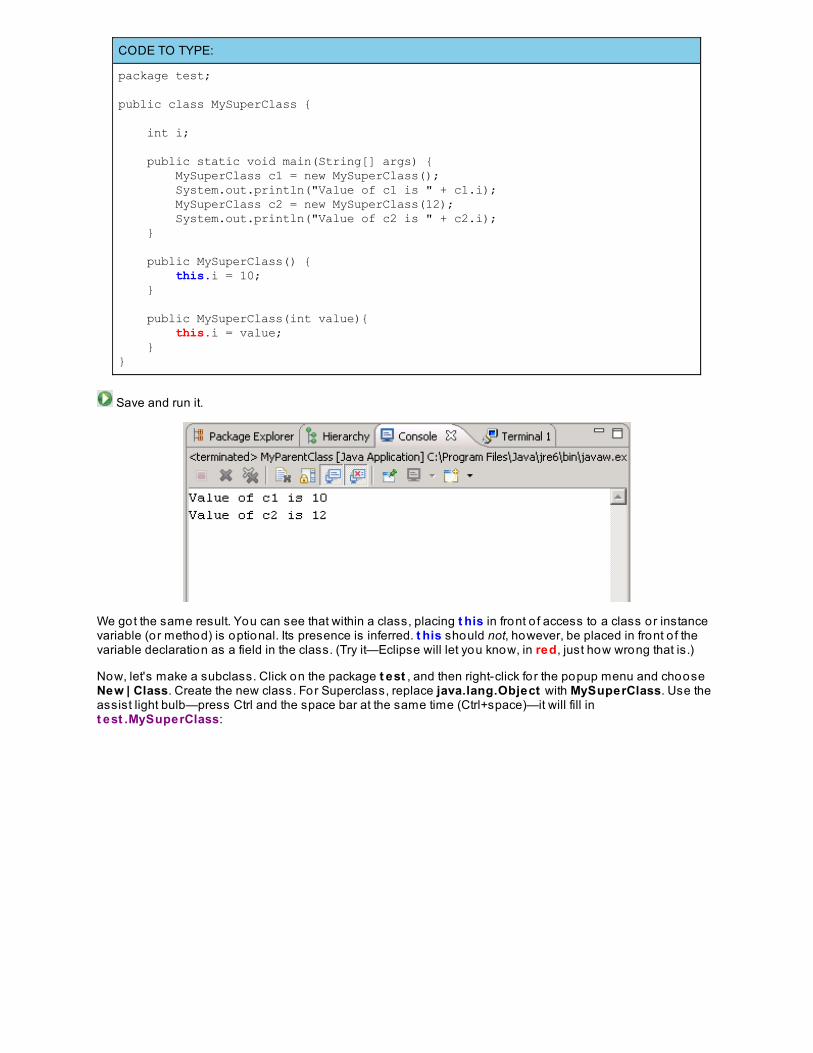
CODE TO TYPE:
package test;
public class MySuperClass {
int i; public static void main(String[] args) { MySuperClass c1 = new MySuperClass(); System.out.println("Value of c1 is " + c1.i); MySuperClass c2 = new MySuperClass(12); System.out.println("Value of c2 is " + c2.i); } public MySuperClass() { i = 10; } public MySuperClass(int value){ this.i = value; }}
Save and run it.
Do you understand the result? c1's i value is derived from the constructor with no passed parameter, where iis set to 10 in the constructor; c2 calls the constructor with an integer (12) passed, so its i is set to the passedvalue.
In the two constructors, switch t his.i with i, as shown, adding the code shown in blue and removing the codeshown in red:
CODE TO TYPE:
package test;
public class MySuperClass {
int i; public static void main(String[] args) { MySuperClass c1 = new MySuperClass(); System.out.println("Value of c1 is " + c1.i); MySuperClass c2 = new MySuperClass(12); System.out.println("Value of c2 is " + c2.i); } public MySuperClass() { this.i = 10; } public MySuperClass(int value){ this.i = value; }}
Save and run it.
We got the same result. You can see that within a class, placing t his in front o f access to a class or instancevariable (or method) is optional. Its presence is inferred. t his should not, however, be placed in front o f thevariable declaration as a field in the class. (Try it—Eclipse will let you know, in red, just how wrong that is.)
Now, let's make a subclass. Click on the package t est , and then right-click for the popup menu and chooseNew | Class. Create the new class. For Superclass, replace java.lang.Object with MySuperClass. Use theassist light bulb—press Ctrl and the space bar at the same time (Ctrl+space)—it will fill int est .MySuperClass:
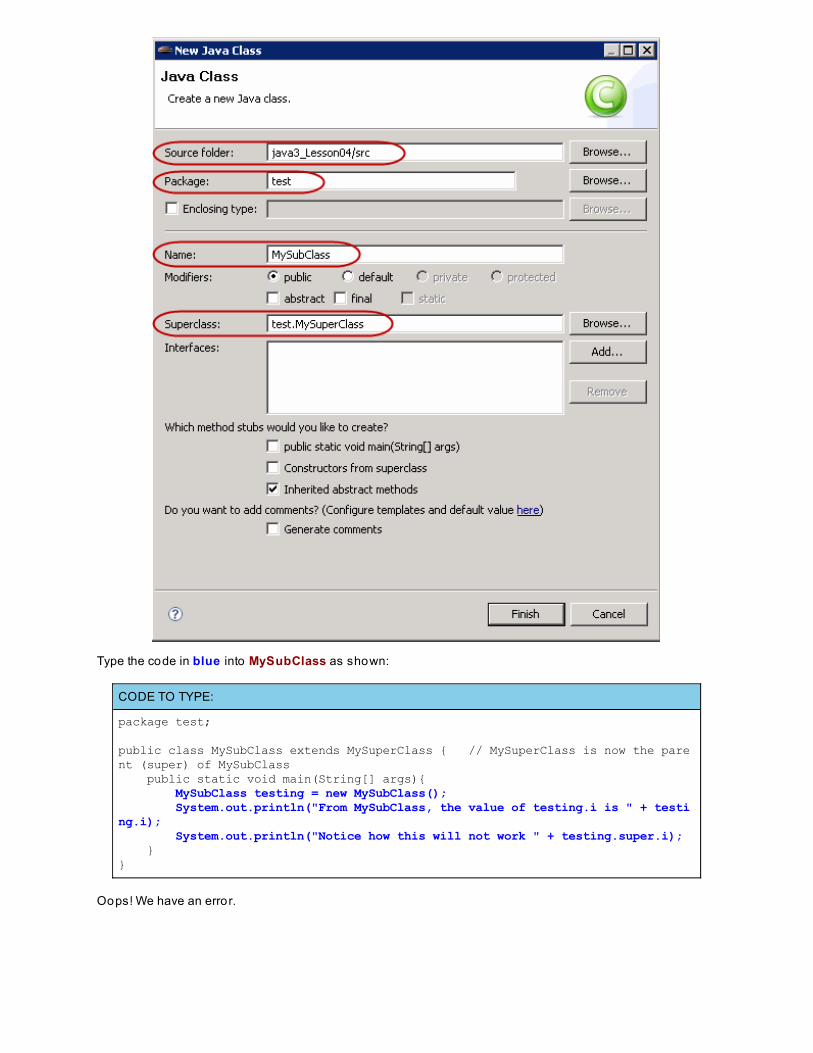
Type the code in blue into MySubClass as shown:
CODE TO TYPE:
package test;
public class MySubClass extends MySuperClass { // MySuperClass is now the parent (super) of MySubClass public static void main(String[] args){ MySubClass testing = new MySubClass(); System.out.println("From MySubClass, the value of testing.i is " + testing.i); System.out.println("Notice how this will not work " + testing.super.i); }}
Oops! We have an error.
OBSERVE:
package test;
public class MySubClass extends MySuperClass { public static void main(String[] args){ MySubClass testing = new MySubClass(); System.out.println("From MySubClass, the value of testing.i is " + testing.i); System.out.println("Notice how this will not work " + testing.super.i); }}
We did not define an instance variable i in MySubClass. Actually, MySubClass doesn't have any o f its ownmethods or variables; it only has the main() method to get it started. The main() method is not considered amethod o f MySubClass. MySubClass will need to inherit everything from its parent, MySuperClass.
In order to reference itself and its super, t his and super must be contained within the code o f a class. Javadoesn't like the inclusion o f t est ing.super.i in your code. t his and super do not po int to anything, exceptwhen they are within a specific class's methods.
super.super.i wouldn't be able to access a superclass o f a superclass either. super.super.i isn't legalsyntax.
Remove the line shown in red from your code:
CODE TO EDIT:
package test; public class MySubClass extends MySuperClass { public static void main(String[] args){ MySubClass testing = new MySubClass(); System.out.println("From MySubClass, the value of testing.i is " + testing.i); System.out.println("Notice how this will not work " + testing.super.i); }}
Save and Run it.
Even though MySubClass did not have a variable defined for i, it was able to get a value for t est ing.i. So asexpected, the instance t est ing o f class MySubClass inherited the variable i from its parent MySuperClass.
That's all well and good, but a little boring. Let's spice things up—let's give the subclass a variable i too . EditMySubClass, adding the code shown in blue and removing the code shown in red:
CODE TO TYPE:
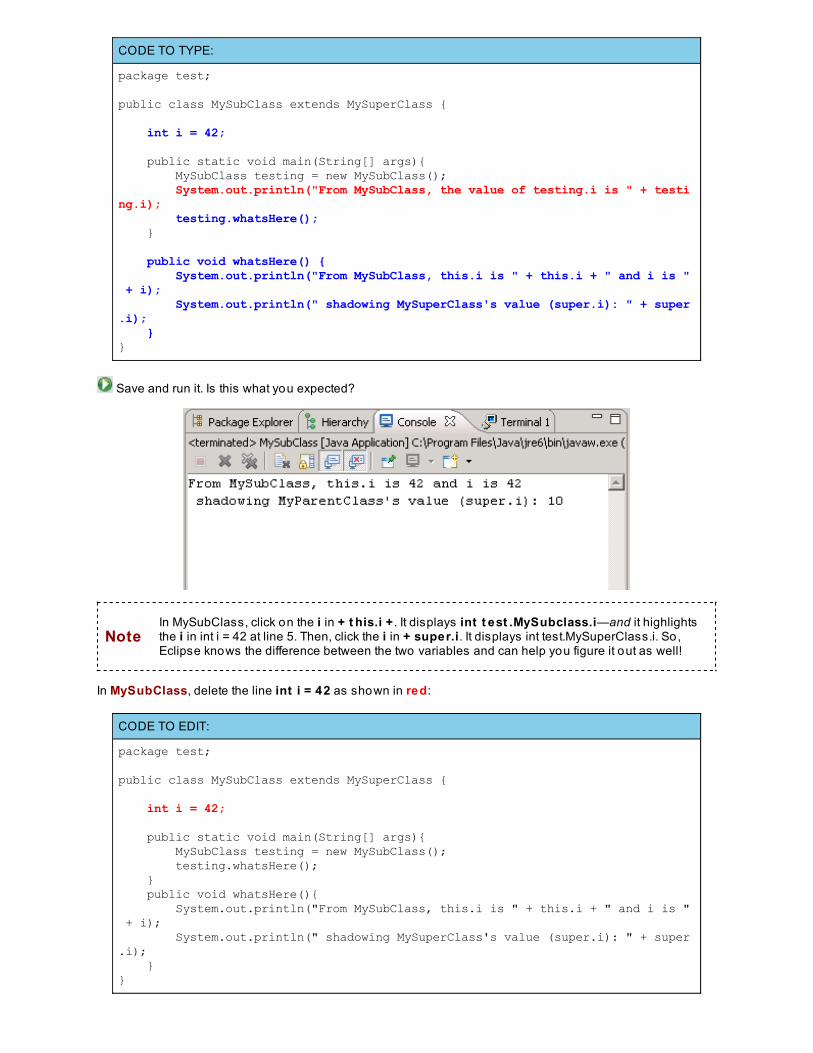
package test;
public class MySubClass extends MySuperClass { int i = 42; public static void main(String[] args){ MySubClass testing = new MySubClass(); System.out.println("From MySubClass, the value of testing.i is " + testing.i); testing.whatsHere(); } public void whatsHere() { System.out.println("From MySubClass, this.i is " + this.i + " and i is " + i); System.out.println(" shadowing MySuperClass's value (super.i): " + super.i); }}
Save and run it. Is this what you expected?
NoteIn MySubClass, click on the i in + t his.i + . It displays int t est .MySubclass.i—and it highlightsthe i in int i = 42 at line 5. Then, click the i in + super.i. It displays int test.MySuperClass.i. So,Eclipse knows the difference between the two variables and can help you figure it out as well!
In MySubClass, delete the line int i = 42 as shown in red:
CODE TO EDIT:
package test;
public class MySubClass extends MySuperClass { int i = 42; public static void main(String[] args){ MySubClass testing = new MySubClass(); testing.whatsHere(); } public void whatsHere(){ System.out.println("From MySubClass, this.i is " + this.i + " and i is " + i); System.out.println(" shadowing MySuperClass's value (super.i): " + super.i); }}

Save and run it. Interesting, yes?
All is as it should be, because MySubClass inherits by default.
Tip
We could also shadow (or mask) a variable in a superclass by having a variable in the subclasswith the same name, but o f a different type. For example, i could be declared in the super as int iand it could also be declared in the subclass as do uble i. Use o f i in the subclass would accessthe do uble . If you wanted to access the int , you could do it via super.i Be aware that these aretwo distinct i variables.
Inheritance: Overriding
Now that we have some understanding o f shadowing variables, let's look at o verriding. We'll give bothclasses a method with the same signature. Edit MySuperClass, adding the code shown in blue andremoving the main() method as shown in red:
CODE TO TYPE:
package test;
public class MySuperClass {
int i; public static void main(String[] args) { MySuperClass c1 = new MySuperClass(); System.out.println("Value of c1 is " + c1.i); MySuperClass c2 = new MySuperClass(12); System.out.println("Value of c2 is " + c2.i); } public MySuperClass() { this.i = 10; } public MySuperClass(int value){ i = value; } public void addToI (int j) { i = i + j; System.out.println("After MySuperClass addToI, i is " + i); }}
Save it.
Edit MySubClass, adding the code shown in blue and removing the what sHere() code as shown in red:
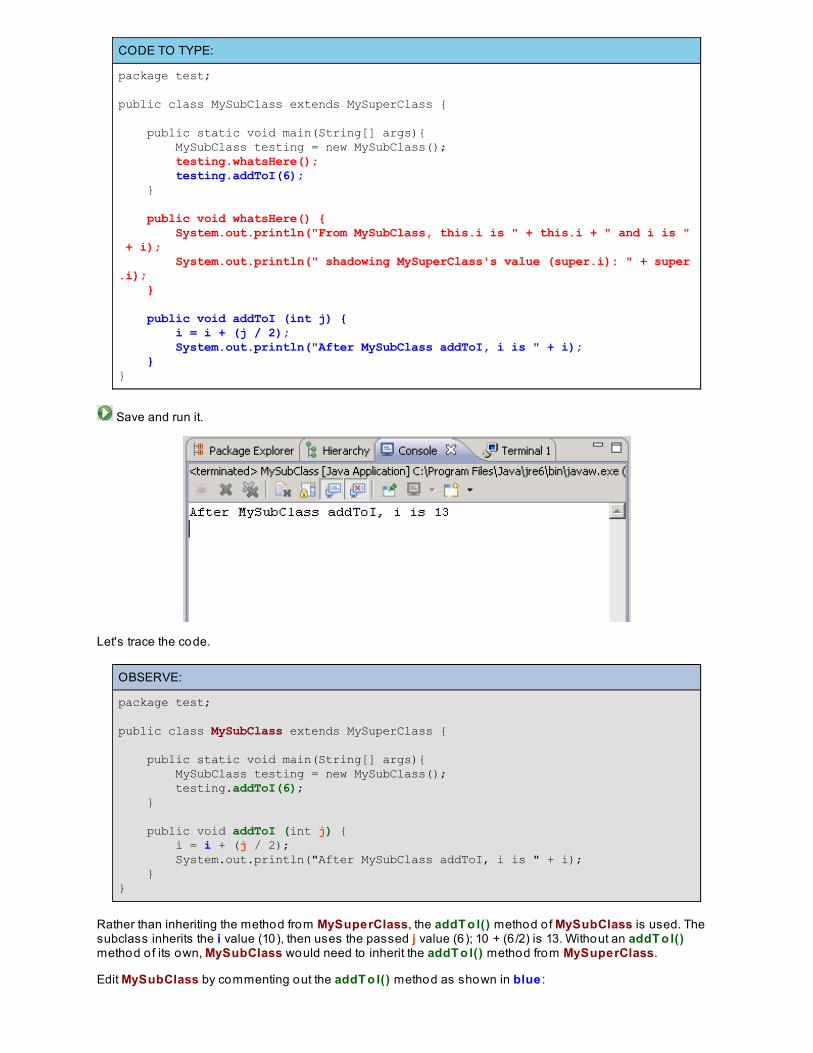
CODE TO TYPE:
package test;
public class MySubClass extends MySuperClass { public static void main(String[] args){ MySubClass testing = new MySubClass(); testing.whatsHere(); testing.addToI(6); } public void whatsHere() { System.out.println("From MySubClass, this.i is " + this.i + " and i is " + i); System.out.println(" shadowing MySuperClass's value (super.i): " + super.i); } public void addToI (int j) { i = i + (j / 2); System.out.println("After MySubClass addToI, i is " + i); }}
Save and run it.
Let's trace the code.
OBSERVE:
package test;
public class MySubClass extends MySuperClass {
public static void main(String[] args){ MySubClass testing = new MySubClass(); testing.addToI(6); } public void addToI (int j) { i = i + (j / 2); System.out.println("After MySubClass addToI, i is " + i); }}
Rather than inheriting the method from MySuperClass, the addT o I() method o f MySubClass is used. Thesubclass inherits the i value (10), then uses the passed j value (6); 10 + (6 /2) is 13. Without an addT o I()method o f its own, MySubClass would need to inherit the addT o I() method from MySuperClass.
Edit MySubClass by commenting out the addT o I() method as shown in blue :
CODE TO TYPE:
package test;
public class MySubClass extends MySuperClass {
public static void main(String[] args){ MySubClass testing = new MySubClass(); testing.addToI(6); } /* public void addToI (int j) { i = i + (j / 2); System.out.println("After MySubClass addToI, i is " + i); }*/ }
Save and run it.
OBSERVE:
package test;
public class MySuperClass { int i;
public MySuperClass() { this.i = 10; }
public MySuperClass (int value){ i = value; }
public void addToI (int j) { i = i + j; System.out.println("after MySuperClass addToI, i is " + i); }}
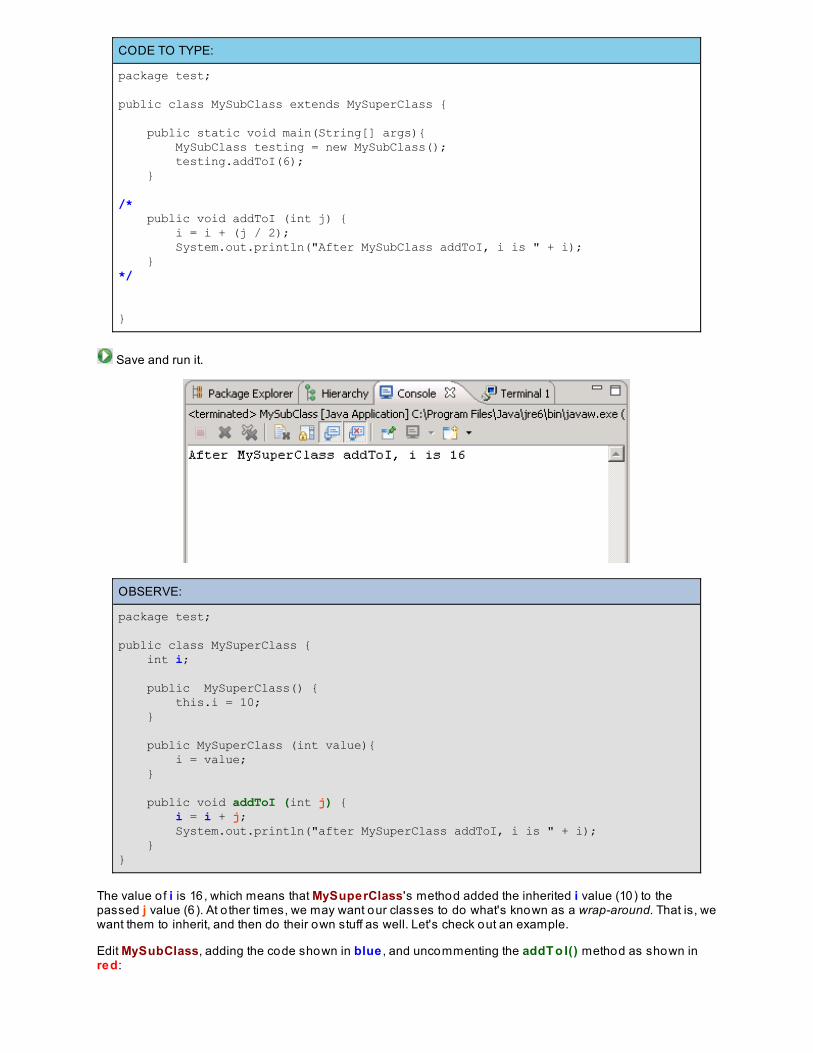
The value o f i is 16, which means that MySuperClass's method added the inherited i value (10) to thepassed j value (6). At o ther times, we may want our classes to do what's known as a wrap-around. That is, wewant them to inherit, and then do their own stuff as well. Let's check out an example.
Edit MySubClass, adding the code shown in blue , and uncommenting the addT o I() method as shown inred:
CODE TO TYPE:
package test;
public class MySubClass extends MySuperClass {
public static void main(String[] args){ MySubClass testing = new MySubClass(); testing.addToI(6); } /* public void addToI (int j) { super.addToI (j); i = i + (j / 2); System.out.println("After MySubClass addToI, i is " + i); }*/}
Save and run it.
In MySubClass, we inherit the i value (10). We use j 's passed value (6), and pass this within super's call.This produces i as a value o f 16. Then we return to the local method in MySubClass, which adds i 's currentvalue (16) to the 6 /2 and we get a new i value o f 19. Great!
NoteIf the method that you want to wrap-around is a constructor, use this syntax: super(); If you wantto pass from one constructor to another within a class, use this syntax: t his(values to bepassed); When the call is within a constructor itself, do not add the name of the constructor.
Working with Constructors
Chaining
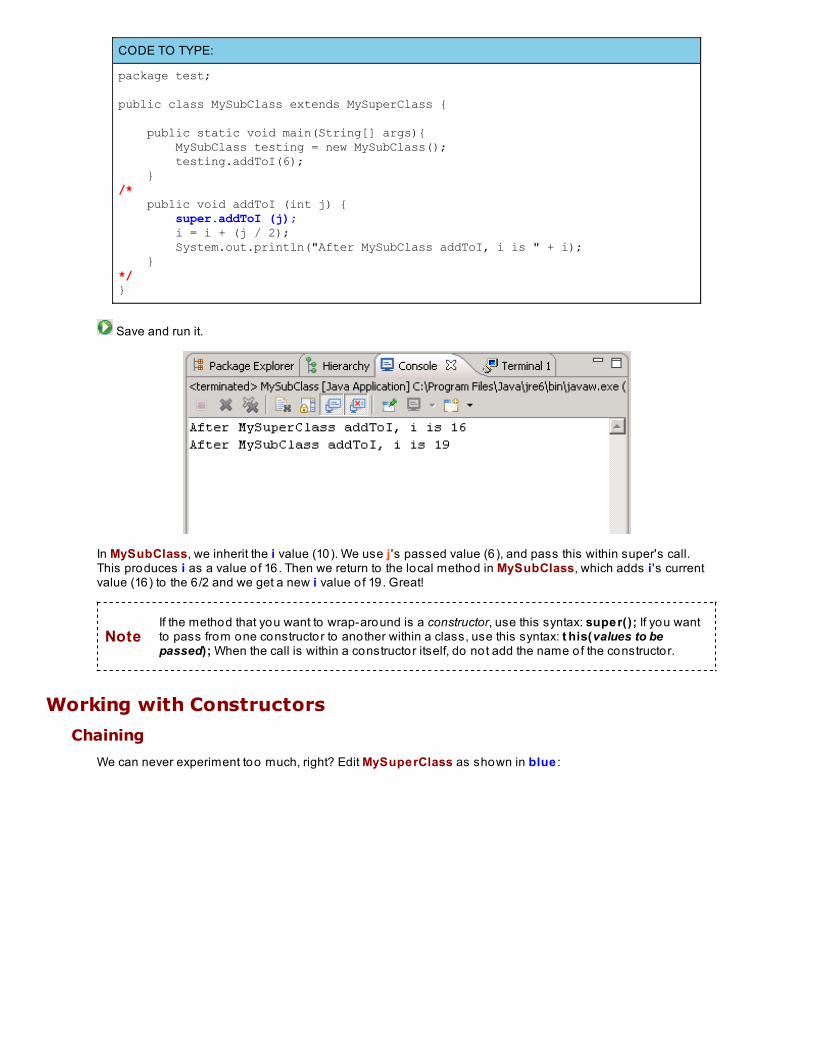
We can never experiment too much, right? Edit MySuperClass as shown in blue :
CODE TO TYPE:
package test; public class MySuperClass { int i; public MySuperClass() { this(10); } public MySuperClass (int value){ this.i = value; }
public void addToI (int j) { i = i + j; System.out.println("after MySuperClass addToI, i is " + i); }}
Save it. Go to MySubClass and run it.
Nothing changed—perfect!
OBSERVE:
package test; public class MySuperClass { int i; public MySuperClass() { this(10); } public MySuperClass (int value){ this.i = value; }
public void addToI (int j) { i = i + j; System.out.println("after MySuperClass addToI, i is " + i); }}
We changed the MySuperClass() constructor to pass a default value o f 10 to the o ther MySuperClass( intvalue) constructor, which sets the instance variable i to that value.
This is called constructor chaining, and it allows us to build up a chain o f constructors to account fo r various
ways o f constructing an object when it is instantiated. When we call t his(10) , we are chaining theMySuperClass() constructor to the MySuperClass( int value) constructor.
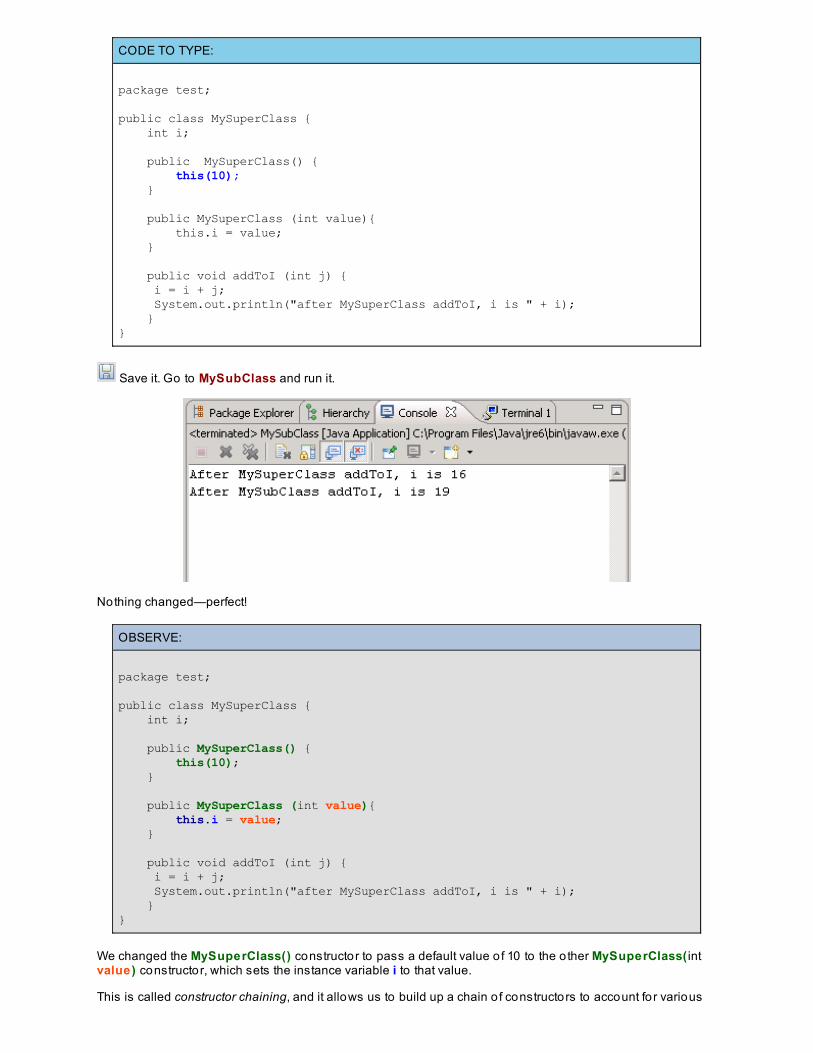
Now we know the syntax used in order to "chain" constructors that are within the same class. So, what's thecorrect syntax to use to call a parent's constructor? Edit the code in MySubClass as shown:
CODE TO TYPE:
package test;
public class MySubClass extends MySuperClass { public MySubClass(int x){ super(x); // passes the desired value to the super. }
public static void main(String[] args){ MySubClass testing = new MySubClass(); testing.addToI(6); } public void addToI (int j) { super.addToI (j); i = i + (j / 2); System.out.println("after MySubClass addToI, i is " + i); }}
Java doesn't seem to like the line where we instantiated MySubClass:
So, why didn't Java complain about that before? Because, when there are no constructors defined, Javaprovides an empty default constructor, a constructor containing no arguments. But, if there is a definedconstructor in your class, the default constructor will no t be supplied, and the MySubClass() constructor doesnot exist.
We'll add an empty default constructor to our code. We'll also test a restriction placed on the order in whichsuper's constructors are called. When a constructor calls another constructor, the call must be located withinthe first line o f the constructor code. Check out what happens if it isn't. Edit MySubClass as shown:

CODE TO TYPE:
package test;public class MySubClass extends MySuperClass { public MySubClass(){ } public MySubClass(int x){ System.out.println("Here I am passing " + x + " to my super for a value of i"); super(x); // passes the desired value to the super. }
public static void main(String[] args){ MySubClass testing = new MySubClass(); testing.addToI(6); }
public void addToI (int j) { super.addToI (j); i = i + (j / 2); System.out.println("after MySubClass addToI, i is " + i); }}
Progress! Now we have a new error message:
If we call a super() constructor, it must be the first statement in the constructor. Switch the order o f thestatements in the second constructor as shown in blue :
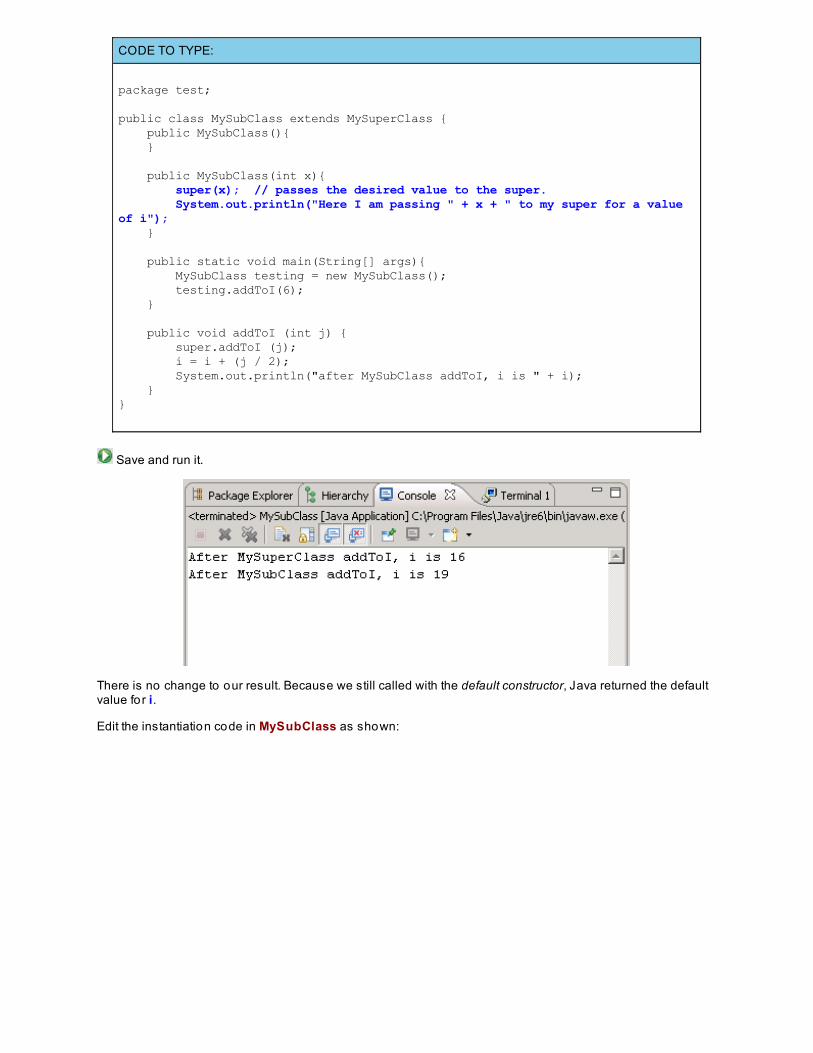
CODE TO TYPE:
package test;
public class MySubClass extends MySuperClass { public MySubClass(){ } public MySubClass(int x){ super(x); // passes the desired value to the super. System.out.println("Here I am passing " + x + " to my super for a value of i"); }
public static void main(String[] args){ MySubClass testing = new MySubClass(); testing.addToI(6); } public void addToI (int j) { super.addToI (j); i = i + (j / 2); System.out.println("after MySubClass addToI, i is " + i); }}
Save and run it.
There is no change to our result. Because we still called with the default constructor, Java returned the defaultvalue for i.
Edit the instantiation code in MySubClass as shown:
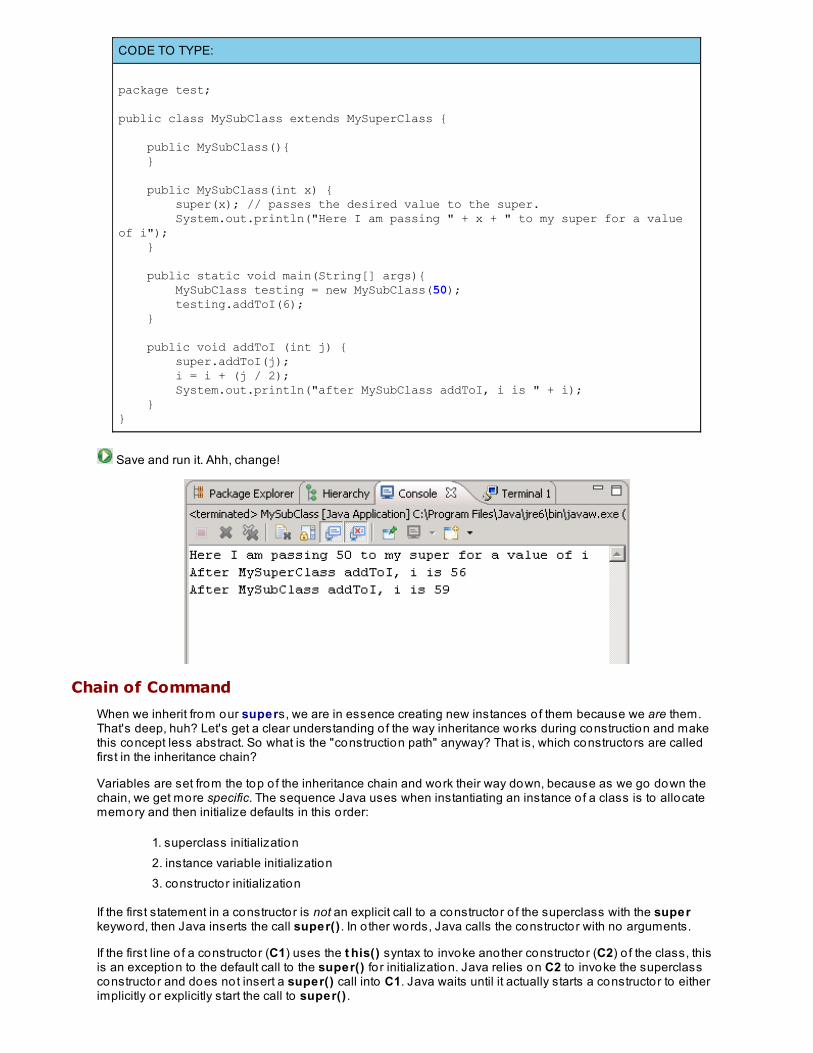
CODE TO TYPE:
package test; public class MySubClass extends MySuperClass { public MySubClass(){ } public MySubClass(int x) { super(x); // passes the desired value to the super. System.out.println("Here I am passing " + x + " to my super for a value of i"); } public static void main(String[] args){ MySubClass testing = new MySubClass(50); testing.addToI(6); } public void addToI (int j) { super.addToI(j); i = i + (j / 2); System.out.println("after MySubClass addToI, i is " + i); }}
Save and run it. Ahh, change!
Chain of Command
When we inherit from our supers, we are in essence creating new instances o f them because we are them.That's deep, huh? Let's get a clear understanding o f the way inheritance works during construction and makethis concept less abstract. So what is the "construction path" anyway? That is, which constructors are calledfirst in the inheritance chain?
Variables are set from the top o f the inheritance chain and work their way down, because as we go down thechain, we get more specific. The sequence Java uses when instantiating an instance o f a class is to allocatememory and then initialize defaults in this order:
1. superclass initialization2. instance variable initialization3. constructor initialization
If the first statement in a constructor is not an explicit call to a constructor o f the superclass with the superkeyword, then Java inserts the call super() . In o ther words, Java calls the constructor with no arguments.
If the first line o f a constructor (C1) uses the t his() syntax to invoke another constructor (C2) o f the class, thisis an exception to the default call to the super() fo r initialization. Java relies on C2 to invoke the superclassconstructor and does not insert a super() call into C1. Java waits until it actually starts a constructor to eitherimplicitly or explicitly start the call to super() .
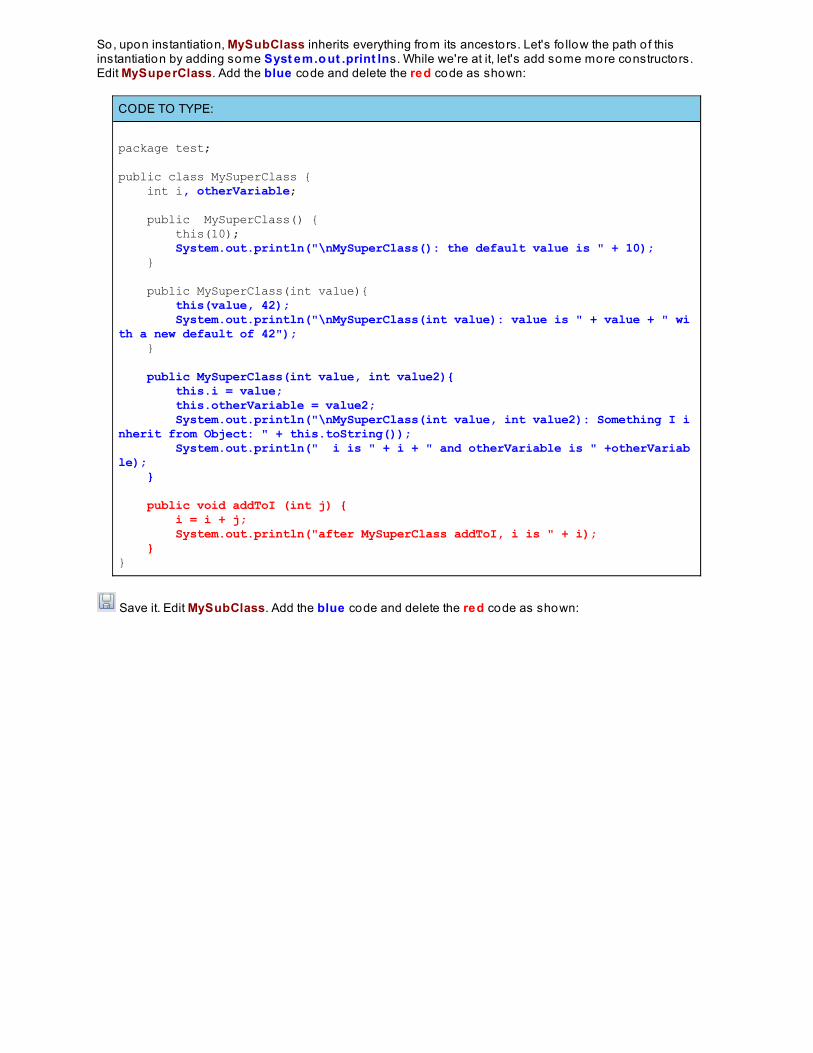
So, upon instantiation, MySubClass inherits everything from its ancestors. Let's fo llow the path o f thisinstantiation by adding some Syst em.o ut .print lns. While we're at it, let's add some more constructors.Edit MySuperClass. Add the blue code and delete the red code as shown:
CODE TO TYPE:
package test;
public class MySuperClass { int i, otherVariable; public MySuperClass() { this(10); System.out.println("\nMySuperClass(): the default value is " + 10); } public MySuperClass(int value){ this(value, 42); System.out.println("\nMySuperClass(int value): value is " + value + " with a new default of 42"); }
public MySuperClass(int value, int value2){ this.i = value; this.otherVariable = value2; System.out.println("\nMySuperClass(int value, int value2): Something I inherit from Object: " + this.toString()); System.out.println(" i is " + i + " and otherVariable is " +otherVariable); }
public void addToI (int j) { i = i + j; System.out.println("after MySuperClass addToI, i is " + i); }}
Save it. Edit MySubClass. Add the blue code and delete the red code as shown:
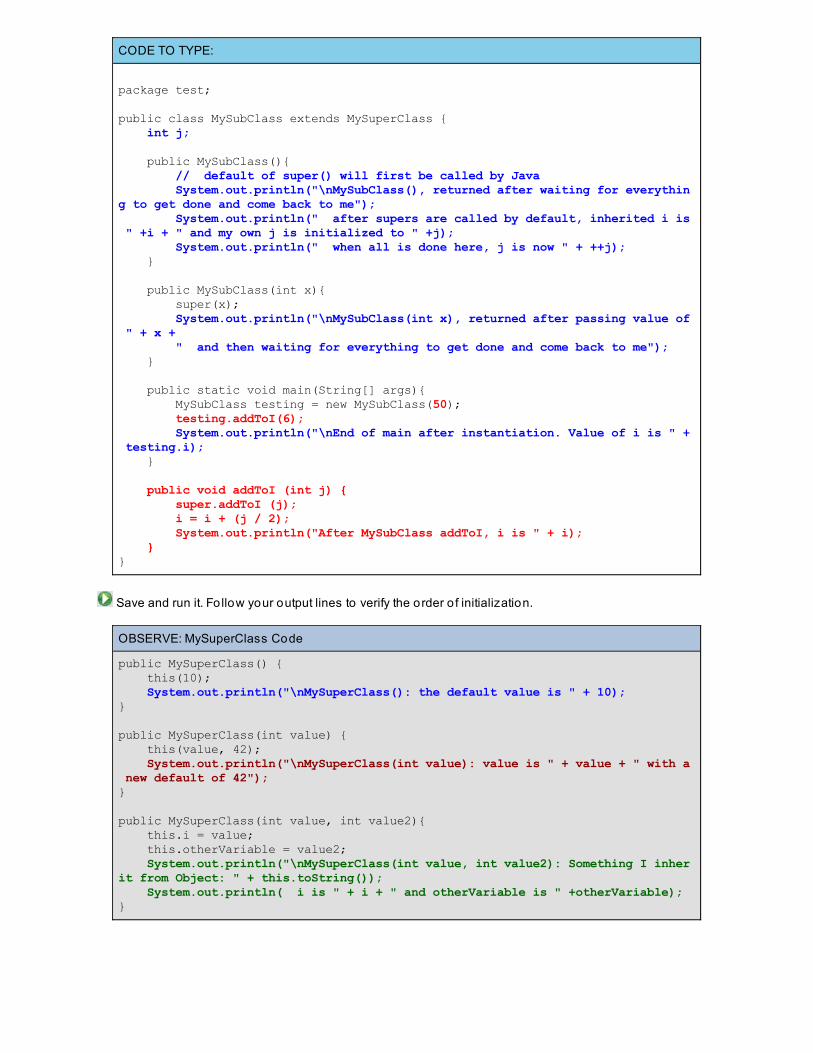
CODE TO TYPE:
package test;
public class MySubClass extends MySuperClass { int j;
public MySubClass(){ // default of super() will first be called by Java System.out.println("\nMySubClass(), returned after waiting for everything to get done and come back to me"); System.out.println(" after supers are called by default, inherited i is " +i + " and my own j is initialized to " +j); System.out.println(" when all is done here, j is now " + ++j); } public MySubClass(int x){ super(x); System.out.println("\nMySubClass(int x), returned after passing value of " + x + " and then waiting for everything to get done and come back to me"); } public static void main(String[] args){ MySubClass testing = new MySubClass(50); testing.addToI(6); System.out.println("\nEnd of main after instantiation. Value of i is " + testing.i); } public void addToI (int j) { super.addToI (j); i = i + (j / 2); System.out.println("After MySubClass addToI, i is " + i); }}
Save and run it. Fo llow your output lines to verify the order o f initialization.
OBSERVE: MySuperClass Code
public MySuperClass() { this(10); System.out.println("\nMySuperClass(): the default value is " + 10);} public MySuperClass(int value) { this(value, 42); System.out.println("\nMySuperClass(int value): value is " + value + " with a new default of 42");} public MySuperClass(int value, int value2){ this.i = value; this.otherVariable = value2; System.out.println("\nMySuperClass(int value, int value2): Something I inherit from Object: " + this.toString()); System.out.println( i is " + i + " and otherVariable is " +otherVariable);}
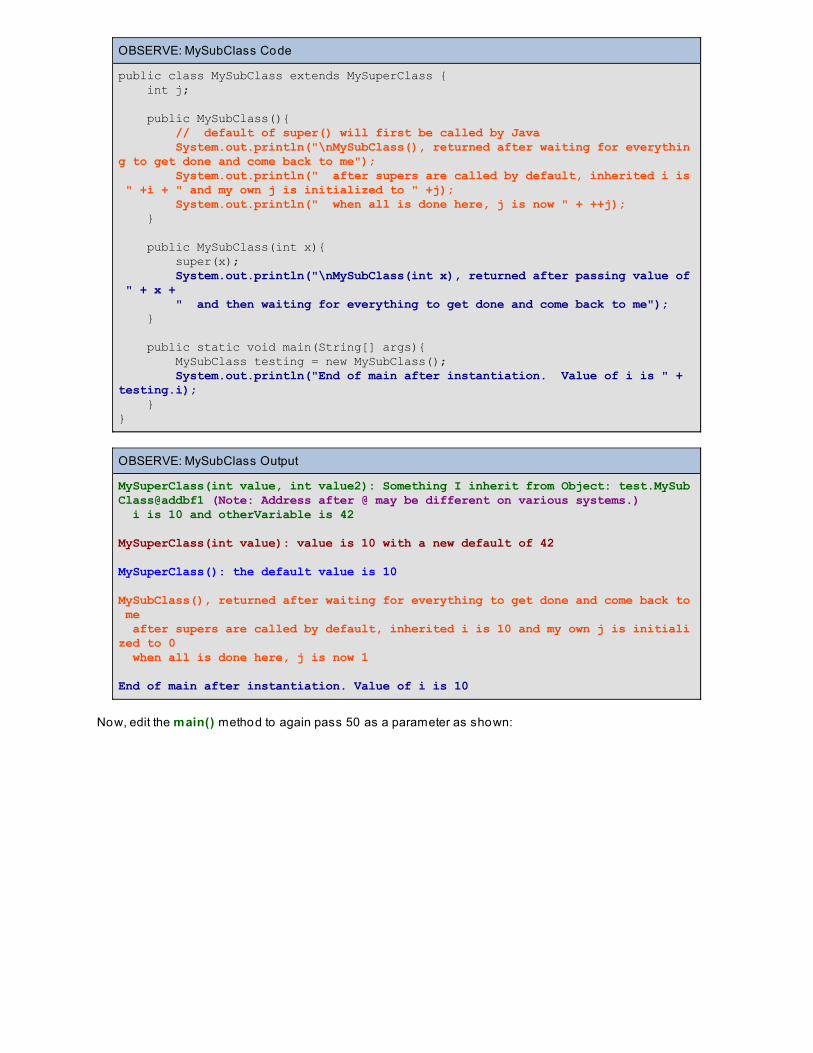
OBSERVE: MySubClass Code
public class MySubClass extends MySuperClass { int j; public MySubClass(){ // default of super() will first be called by Java System.out.println("\nMySubClass(), returned after waiting for everything to get done and come back to me"); System.out.println(" after supers are called by default, inherited i is " +i + " and my own j is initialized to " +j); System.out.println(" when all is done here, j is now " + ++j); } public MySubClass(int x){ super(x); System.out.println("\nMySubClass(int x), returned after passing value of " + x + " and then waiting for everything to get done and come back to me"); } public static void main(String[] args){ MySubClass testing = new MySubClass(); System.out.println("End of main after instantiation. Value of i is " + testing.i); }}
OBSERVE: MySubClass Output
MySuperClass(int value, int value2): Something I inherit from Object: test.MySubClass@addbf1 (Note: Address after @ may be different on various systems.) i is 10 and otherVariable is 42
MySuperClass(int value): value is 10 with a new default of 42
MySuperClass(): the default value is 10
MySubClass(), returned after waiting for everything to get done and come back to me after supers are called by default, inherited i is 10 and my own j is initialized to 0 when all is done here, j is now 1
End of main after instantiation. Value of i is 10
Now, edit the main() method to again pass 50 as a parameter as shown:
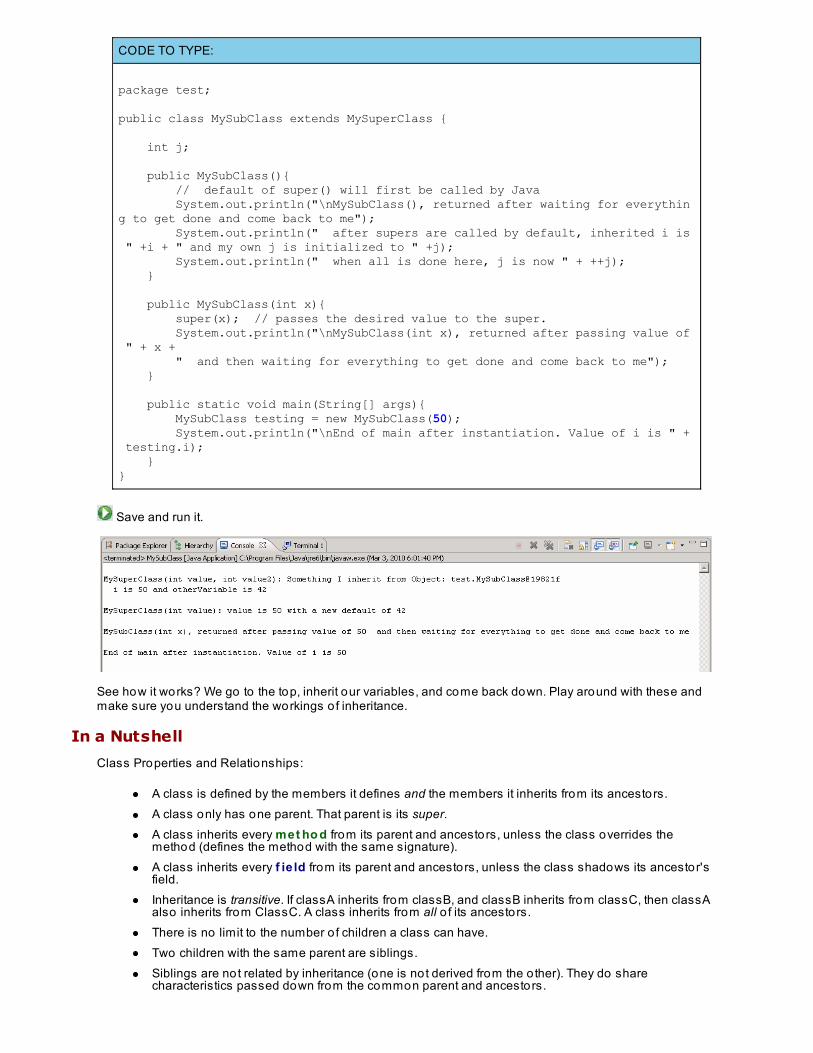
CODE TO TYPE:
package test;
public class MySubClass extends MySuperClass { int j; public MySubClass(){ // default of super() will first be called by Java System.out.println("\nMySubClass(), returned after waiting for everything to get done and come back to me"); System.out.println(" after supers are called by default, inherited i is " +i + " and my own j is initialized to " +j); System.out.println(" when all is done here, j is now " + ++j); } public MySubClass(int x){ super(x); // passes the desired value to the super. System.out.println("\nMySubClass(int x), returned after passing value of " + x + " and then waiting for everything to get done and come back to me"); }
public static void main(String[] args){ MySubClass testing = new MySubClass(50); System.out.println("\nEnd of main after instantiation. Value of i is " + testing.i); }}
Save and run it.
See how it works? We go to the top, inherit our variables, and come back down. Play around with these andmake sure you understand the workings o f inheritance.
In a Nutshell
Class Properties and Relationships:
A class is defined by the members it defines and the members it inherits from its ancestors.A class only has one parent. That parent is its super.A class inherits every met ho d from its parent and ancestors, unless the class overrides themethod (defines the method with the same signature).A class inherits every f ie ld from its parent and ancestors, unless the class shadows its ancestor'sfield.Inheritance is transitive. If classA inherits from classB, and classB inherits from classC, then classAalso inherits from ClassC. A class inherits from all o f its ancestors.There is no limit to the number o f children a class can have.Two children with the same parent are siblings.Siblings are not related by inheritance (one is not derived from the o ther). They do sharecharacteristics passed down from the common parent and ancestors.
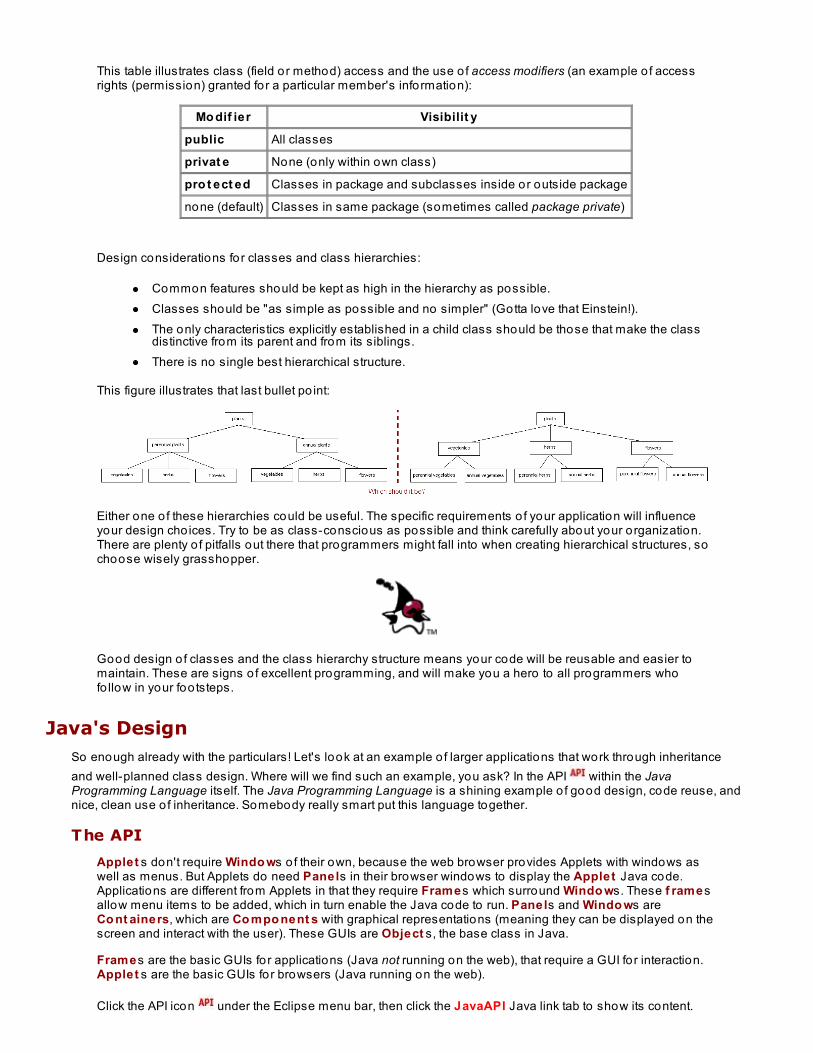
This table illustrates class (field or method) access and the use o f access modifiers (an example o f accessrights (permission) granted for a particular member's information):
Mo dif ier Visibilit y
public All classes
privat e None (only within own class)
pro t ect ed Classes in package and subclasses inside or outside package
none (default) Classes in same package (sometimes called package private)
Design considerations for classes and class hierarchies:
Common features should be kept as high in the hierarchy as possible.Classes should be "as simple as possible and no simpler" (Gotta love that Einstein!).The only characteristics explicitly established in a child class should be those that make the classdistinctive from its parent and from its siblings.There is no single best hierarchical structure.
This figure illustrates that last bullet po int:
Either one o f these hierarchies could be useful. The specific requirements o f your application will influenceyour design cho ices. Try to be as class-conscious as possible and think carefully about your organization.There are plenty o f pitfalls out there that programmers might fall into when creating hierarchical structures, sochoose wisely grasshopper.
Good design o f classes and the class hierarchy structure means your code will be reusable and easier tomaintain. These are signs o f excellent programming, and will make you a hero to all programmers whofo llow in your footsteps.
Java's DesignSo enough already with the particulars! Let's look at an example o f larger applications that work through inheritanceand well-planned class design. Where will we find such an example, you ask? In the API within the JavaProgramming Language itself. The Java Programming Language is a shining example o f good design, code reuse, andnice, clean use o f inheritance. Somebody really smart put this language together.
The API
Applet s don't require Windo ws o f their own, because the web browser provides Applets with windows aswell as menus. But Applets do need Panels in their browser windows to display the Applet Java code.Applications are different from Applets in that they require Frames which surround Windo ws. These f ramesallow menu items to be added, which in turn enable the Java code to run. Panels and Windo ws areCo nt ainers, which are Co mpo nent s with graphical representations (meaning they can be displayed on thescreen and interact with the user). These GUIs are Object s, the base class in Java.
Frames are the basic GUIs for applications (Java not running on the web), that require a GUI for interaction.Applet s are the basic GUIs for browsers (Java running on the web).
Click the API icon under the Eclipse menu bar, then click the JavaAPI Java link tab to show its content.
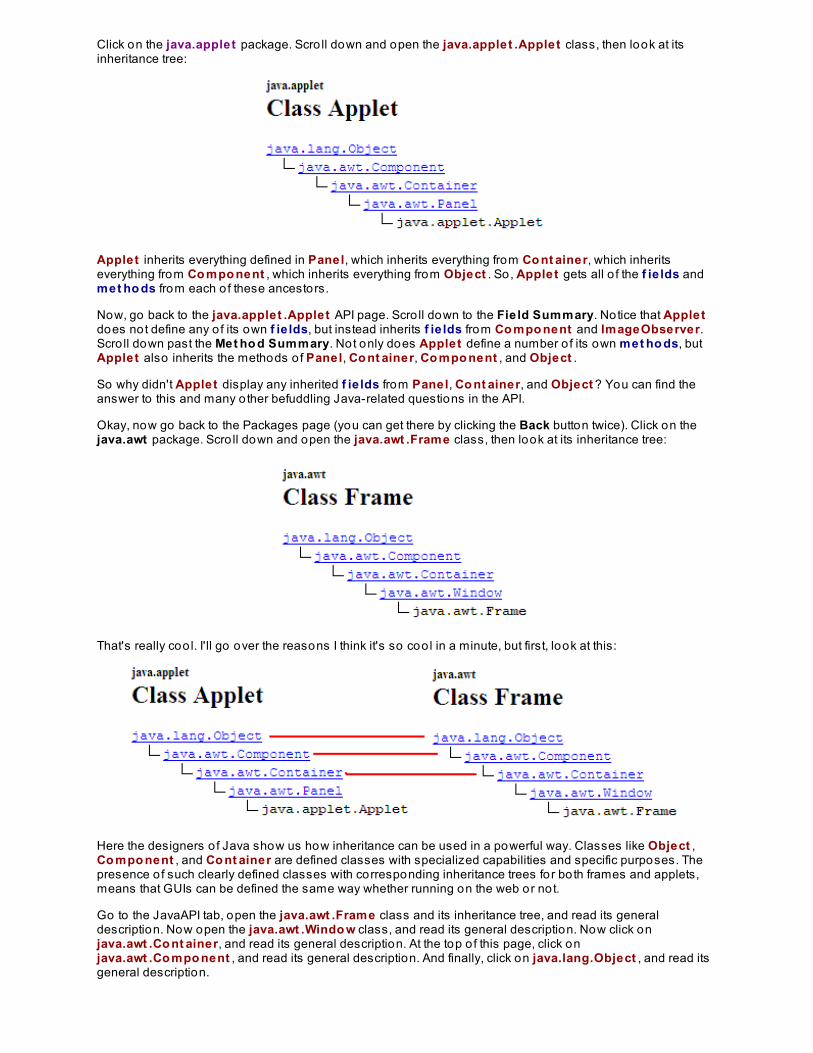
Click on the java.applet package. Scro ll down and open the java.applet .Applet class, then look at itsinheritance tree:
Applet inherits everything defined in Panel, which inherits everything from Co nt ainer, which inheritseverything from Co mpo nent , which inherits everything from Object . So, Applet gets all o f the f ie lds andmet ho ds from each o f these ancestors.
Now, go back to the java.applet .Applet API page. Scro ll down to the Field Summary. Notice that Appletdoes not define any o f its own f ie lds, but instead inherits f ie lds from Co mpo nent and ImageObserver.Scro ll down past the Met ho d Summary. Not only does Applet define a number o f its own met ho ds, butApplet also inherits the methods o f Panel, Co nt ainer, Co mpo nent , and Object .
So why didn't Applet display any inherited f ie lds from Panel, Co nt ainer, and Object ? You can find theanswer to this and many o ther befuddling Java-related questions in the API.
Okay, now go back to the Packages page (you can get there by clicking the Back button twice). Click on thejava.awt package. Scro ll down and open the java.awt .Frame class, then look at its inheritance tree:
That's really coo l. I'll go over the reasons I think it's so coo l in a minute, but first, look at this:
Here the designers o f Java show us how inheritance can be used in a powerful way. Classes like Object ,Co mpo nent , and Co nt ainer are defined classes with specialized capabilities and specific purposes. Thepresence o f such clearly defined classes with corresponding inheritance trees for both frames and applets,means that GUIs can be defined the same way whether running on the web or not.
Go to the JavaAPI tab, open the java.awt .Frame class and its inheritance tree, and read its generaldescription. Now open the java.awt .Windo w class, and read its general description. Now click onjava.awt .Co nt ainer, and read its general description. At the top o f this page, click onjava.awt .Co mpo nent , and read its general description. And finally, click on java.lang.Object , and read itsgeneral description.

Note The "windowing" elements are in java.awt , while the ever-present Object class is withinjava.lang (which is conveniently available without impo rt ing). Now that's good packaging!
The API is a warehouse o f good Java program design. As we observed:
It defines classes cleanly and succinctly so their use and potentials are clear and specific.Its classes are reusable for multiple related purposes.Because o f early good design, its classes are easier to maintain.This low-maintenance style o f design allows changes we make to a parent to be reflectedautomatically in the descendants.In addition, because classes are succinct, it's clear where changes should be made.
When classes are made with clear and specific specifications and capabilities, it's easier to build applicationswith them. The API is a Java launch pad for programmers. It provides ready-made classes that can beinherited and then extended right away for programmers' specific application requirements.
Making Our Own: Early DesignIn our upcoming labs, we'll develop a too l fo r drawing graphical objects (squares, circles, ellipses, triangles, andsuch). But we're not just go ing to draw the figures and leave it at that; we're go ing to move them around, resize them,and manipulate them in all sorts o f ways. Each figure will be an Object , which will enable us to manipulate themindividually. Specifically, each figure drawn must be an inst ance o f a class.
Click on this example (allow blocked content if necessary) to get a feel fo r the pro ject we'll be working to create. Goahead and play around with it. You'll see in the example that:
The appropriate action button must be chosen.There are only two graphical objects present.If you draw a figure, you can specify which figure to move with your mouse.Each drawing is an individual inst ance .
In the next lesson, Abst ract Classes, we'll continue with this example and start implementing code.
There's a lo t to digest here. Hang in there. You're do ing great so far, keep it up! See you in the next lesson...
Copyright © 1998-2014 O'Reilly Media, Inc.
This work is licensed under a Creative Commons Attribution-ShareAlike 3.0 Unported License.See http://creativecommons.org/licenses/by-sa/3.0/legalcode for more information.
Software Design: Abstract ClassesLesson Objectives
When you complete this lesson, you will be able to :
use the 'abstract' keyword by making the super-class and draw method abstract.use abstract classes and methods.
The Power of Abstraction"There is nothing so pro lific in utilities as abstractions."- Michael Faraday
Picture a mammal in your mind. Now, picture a dog. Did you imagine this particular mammal, o r this particular dog?Probably not. There are, o f course, many different types o f mammals, and many different types o f dogs. And while alldogs are mammals, not all mammals are dogs.
These familiar creatures will help us understand the concept o f abstraction within hierarchies in Java. Mammals anddogs are classes o f objects. Often, some classes within a class hierarchy are more "abstract" than o thers. Each stepup in a hierarchy is broader and more abstract, than the one below. Using our example, "poodle" is more specific than"dog," and "dog" is more specific than "mammal."
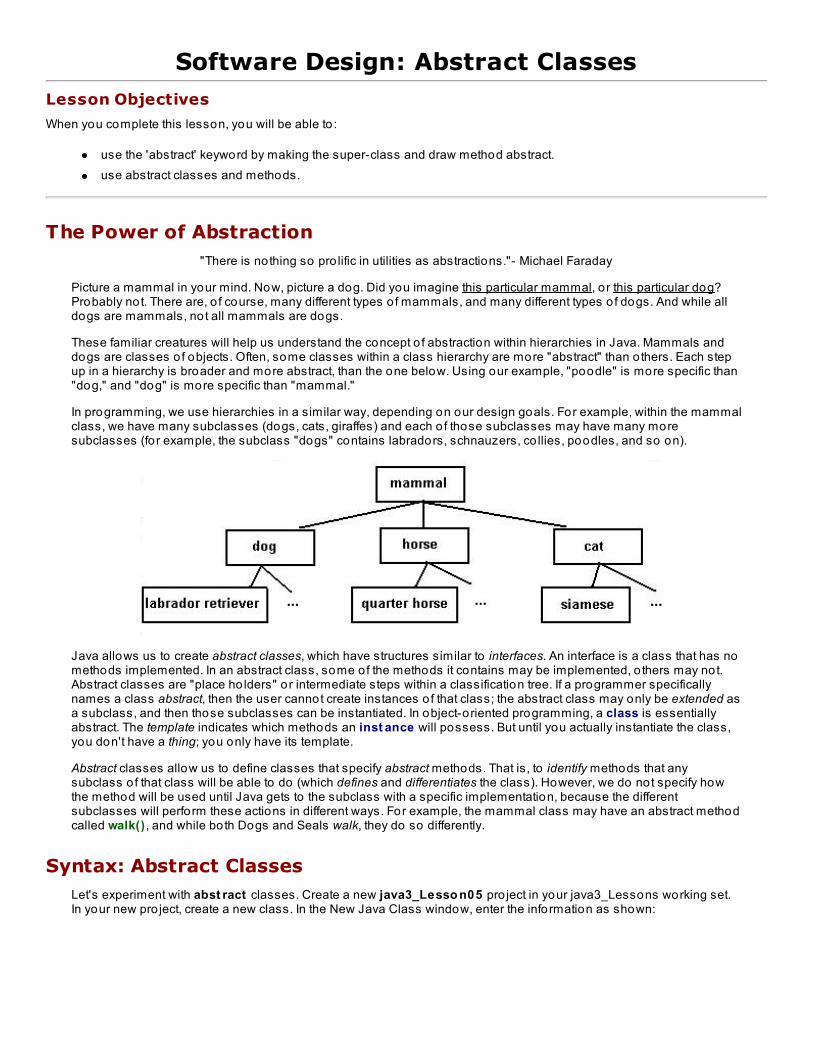
In programming, we use hierarchies in a similar way, depending on our design goals. For example, within the mammalclass, we have many subclasses (dogs, cats, giraffes) and each o f those subclasses may have many moresubclasses (for example, the subclass "dogs" contains labradors, schnauzers, co llies, poodles, and so on).
Java allows us to create abstract classes, which have structures similar to interfaces. An interface is a class that has nomethods implemented. In an abstract class, some of the methods it contains may be implemented, o thers may not.Abstract classes are "place ho lders" or intermediate steps within a classification tree. If a programmer specificallynames a class abstract, then the user cannot create instances o f that class; the abstract class may only be extended asa subclass, and then those subclasses can be instantiated. In object-oriented programming, a class is essentiallyabstract. The template indicates which methods an inst ance will possess. But until you actually instantiate the class,you don't have a thing; you only have its template.
Abstract classes allow us to define classes that specify abstract methods. That is, to identify methods that anysubclass o f that class will be able to do (which defines and differentiates the class). However, we do not specify howthe method will be used until Java gets to the subclass with a specific implementation, because the differentsubclasses will perform these actions in different ways. For example, the mammal class may have an abstract methodcalled walk() , and while both Dogs and Seals walk, they do so differently.
Syntax: Abstract ClassesLet's experiment with abst ract classes. Create a new java3_Lesso n05 pro ject in your java3_Lessons working set.In your new pro ject, create a new class. In the New Java Class window, enter the information as shown:
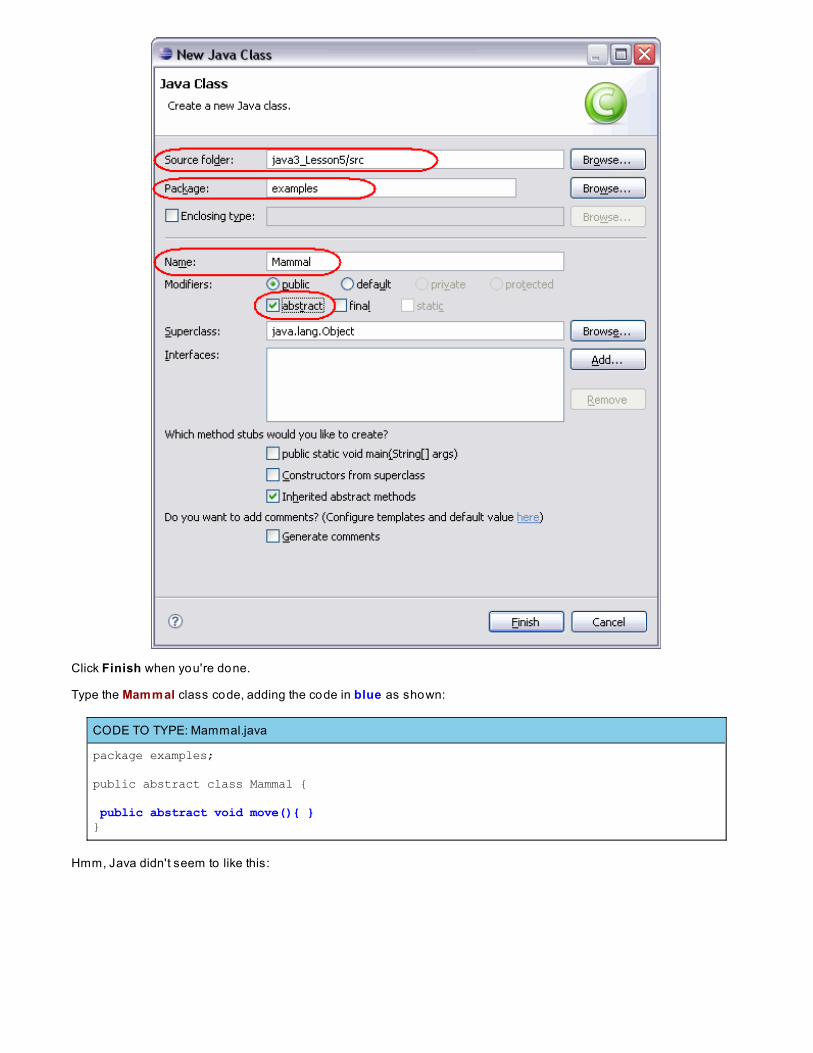
Click Finish when you're done.
Type the Mammal class code, adding the code in blue as shown:
CODE TO TYPE: Mammal.java
package examples;
public abstract class Mammal { public abstract void move(){ }}
Hmm, Java didn't seem to like this:
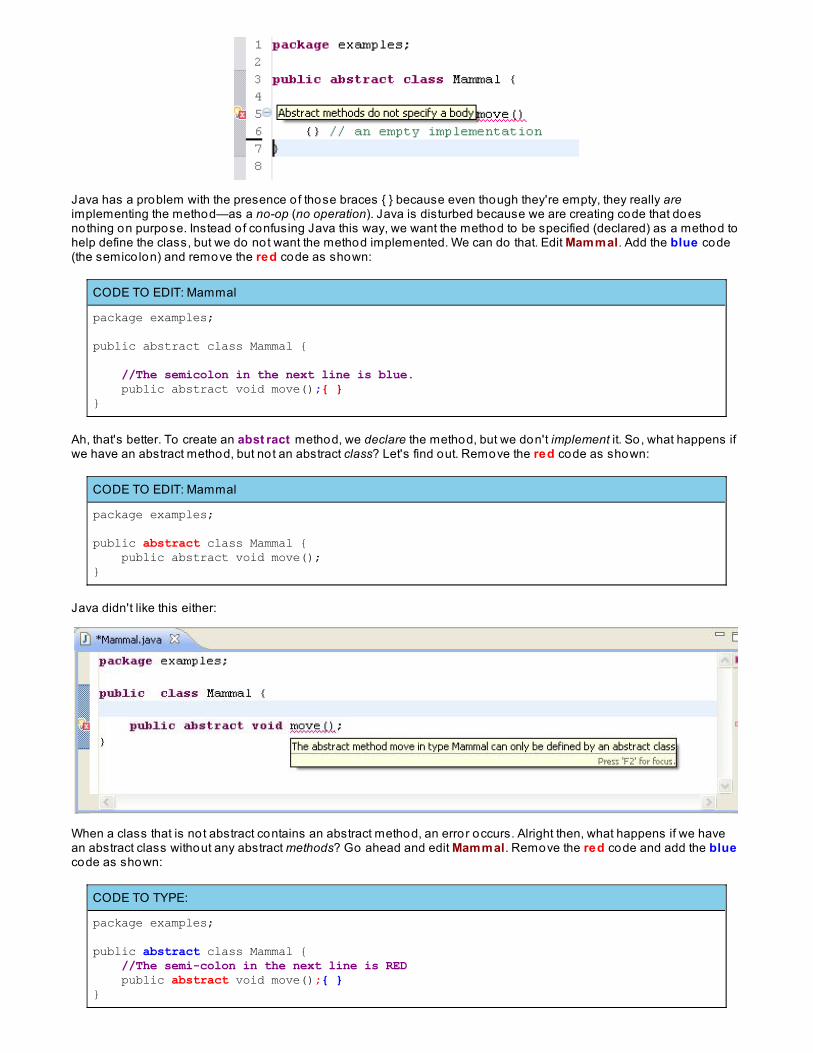
Java has a problem with the presence o f those braces { } because even though they're empty, they really areimplementing the method—as a no-op (no operation). Java is disturbed because we are creating code that doesnothing on purpose. Instead o f confusing Java this way, we want the method to be specified (declared) as a method tohelp define the class, but we do not want the method implemented. We can do that. Edit Mammal. Add the blue code(the semico lon) and remove the red code as shown:
CODE TO EDIT: Mammal
package examples;
public abstract class Mammal {
//The semicolon in the next line is blue. public abstract void move();{ }}
Ah, that's better. To create an abst ract method, we declare the method, but we don't implement it. So, what happens ifwe have an abstract method, but not an abstract class? Let's find out. Remove the red code as shown:
CODE TO EDIT: Mammal
package examples;
public abstract class Mammal { public abstract void move();}
Java didn't like this either:
When a class that is not abstract contains an abstract method, an error occurs. Alright then, what happens if we havean abstract class without any abstract methods? Go ahead and edit Mammal. Remove the red code and add the bluecode as shown:
CODE TO TYPE:
package examples;
public abstract class Mammal { //The semi-colon in the next line is RED public abstract void move();{ }}
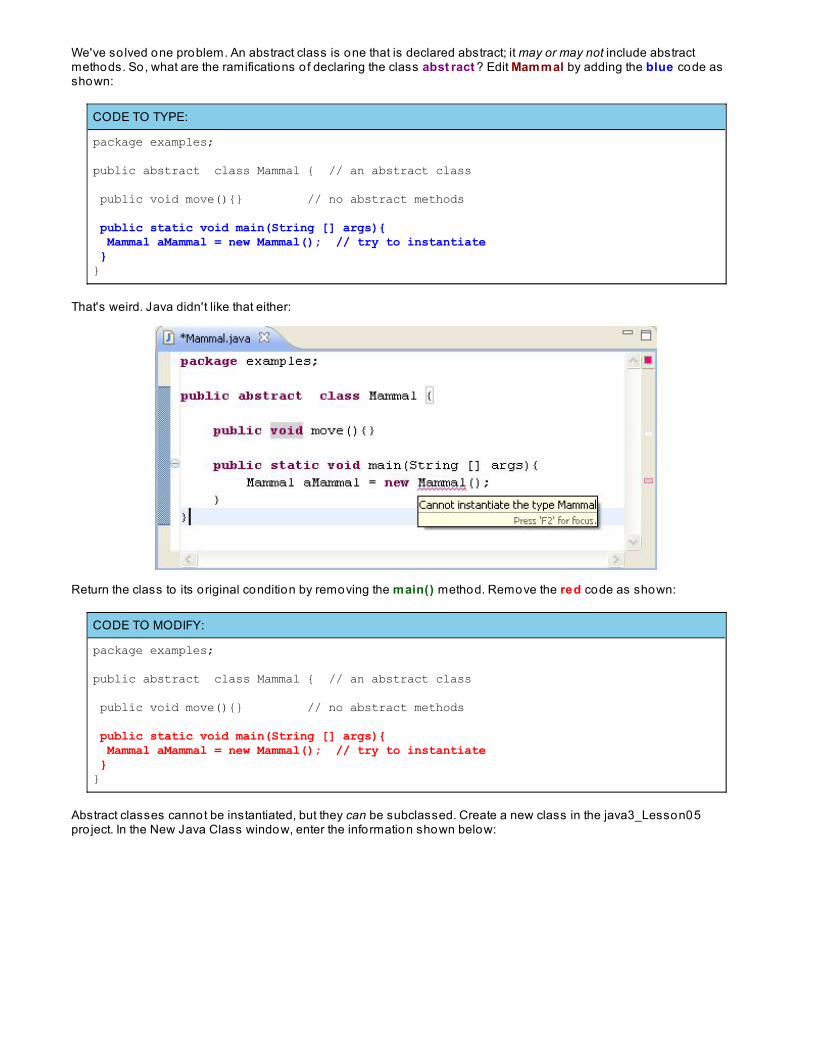
We've so lved one problem. An abstract class is one that is declared abstract; it may or may not include abstractmethods. So, what are the ramifications o f declaring the class abst ract ? Edit Mammal by adding the blue code asshown:
CODE TO TYPE:
package examples;
public abstract class Mammal { // an abstract class
public void move(){} // no abstract methods public static void main(String [] args){ Mammal aMammal = new Mammal(); // try to instantiate } }
That's weird. Java didn't like that either:
Return the class to its original condition by removing the main() method. Remove the red code as shown:
CODE TO MODIFY:
package examples;
public abstract class Mammal { // an abstract class
public void move(){} // no abstract methods
public static void main(String [] args){ Mammal aMammal = new Mammal(); // try to instantiate } }
Abstract classes cannot be instantiated, but they can be subclassed. Create a new class in the java3_Lesson05pro ject. In the New Java Class window, enter the information shown below:

Now click Finish.
The Dog.java class that opens looks fine, but let's play around with it a little more. (We live to experiment!) Edit Do g byadding the blue code as shown:
CODE TO TYPE:
package examples;
public class Dog extends Mammal { public abstract void move();}
Java didn't like this:
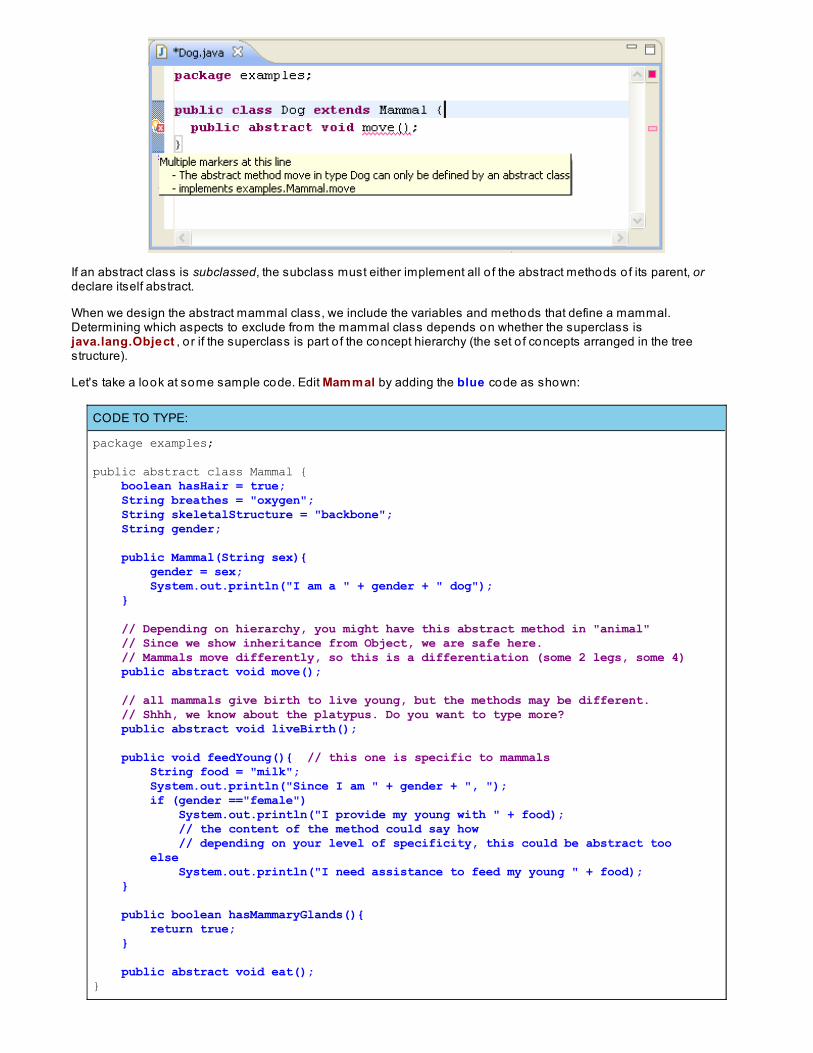
If an abstract class is subclassed, the subclass must either implement all o f the abstract methods o f its parent, ordeclare itself abstract.
When we design the abstract mammal class, we include the variables and methods that define a mammal.Determining which aspects to exclude from the mammal class depends on whether the superclass isjava.lang.Object , o r if the superclass is part o f the concept hierarchy (the set o f concepts arranged in the treestructure).
Let's take a look at some sample code. Edit Mammal by adding the blue code as shown:
CODE TO TYPE:
package examples;
public abstract class Mammal { boolean hasHair = true; String breathes = "oxygen"; String skeletalStructure = "backbone"; String gender;
public Mammal(String sex){ gender = sex; System.out.println("I am a " + gender + " dog"); }
// Depending on hierarchy, you might have this abstract method in "animal" // Since we show inheritance from Object, we are safe here. // Mammals move differently, so this is a differentiation (some 2 legs, some 4) public abstract void move();
// all mammals give birth to live young, but the methods may be different. // Shhh, we know about the platypus. Do you want to type more? public abstract void liveBirth();
public void feedYoung(){ // this one is specific to mammals String food = "milk"; System.out.println("Since I am " + gender + ", "); if (gender =="female") System.out.println("I provide my young with " + food); // the content of the method could say how // depending on your level of specificity, this could be abstract too else System.out.println("I need assistance to feed my young " + food); }
public boolean hasMammaryGlands(){ return true; }
public abstract void eat();}
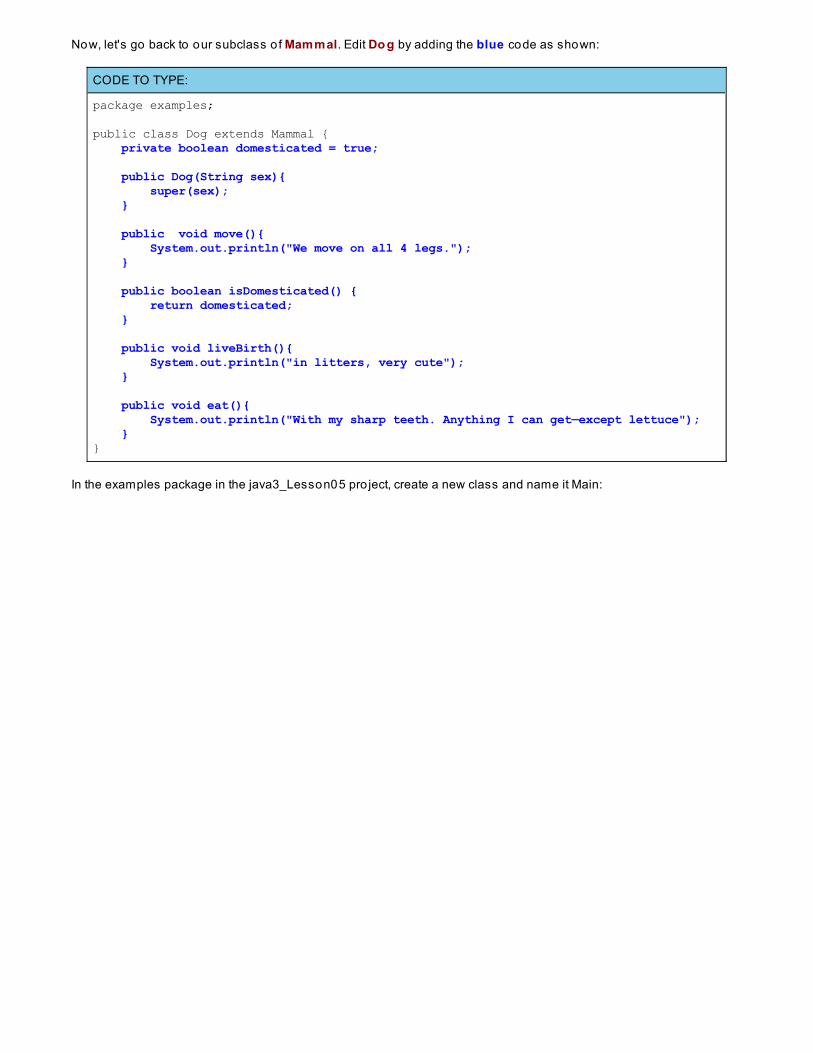
Now, let's go back to our subclass o f Mammal. Edit Do g by adding the blue code as shown:
CODE TO TYPE:
package examples;
public class Dog extends Mammal { private boolean domesticated = true;
public Dog(String sex){ super(sex); }
public void move(){ System.out.println("We move on all 4 legs."); } public boolean isDomesticated() { return domesticated; } public void liveBirth(){ System.out.println("in litters, very cute"); } public void eat(){ System.out.println("With my sharp teeth. Anything I can get—except lettuce"); } }
In the examples package in the java3_Lesson05 pro ject, create a new class and name it Main:
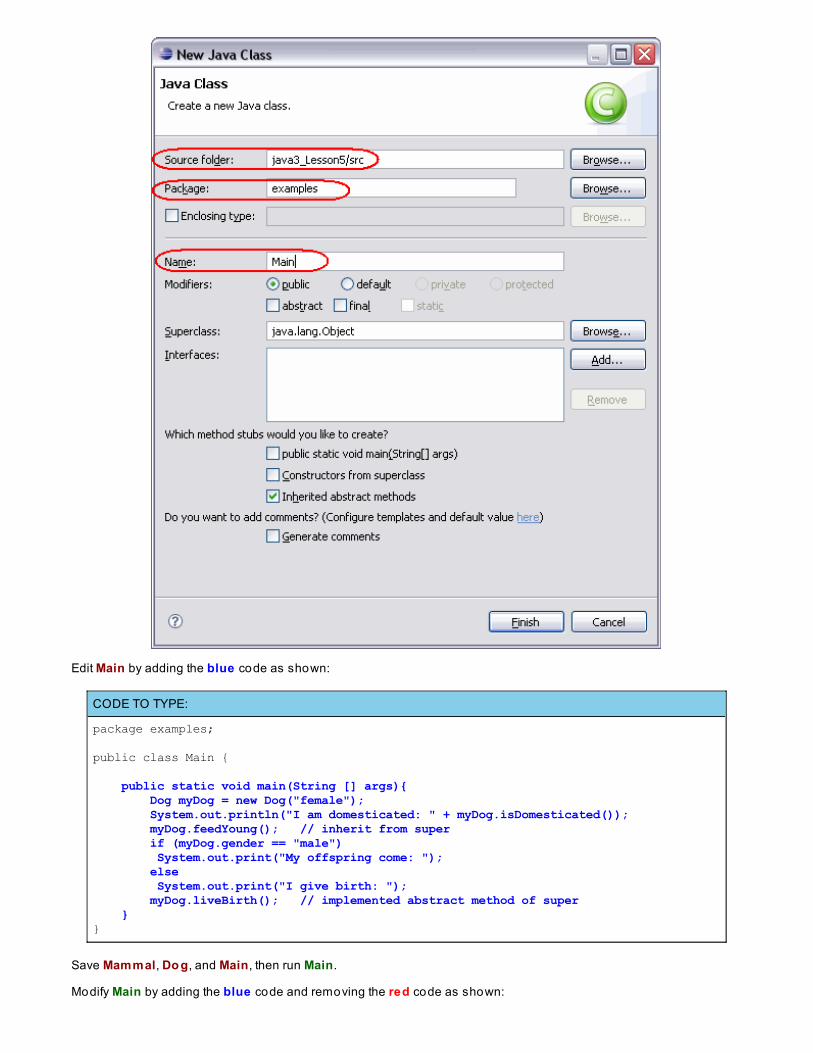
Edit Main by adding the blue code as shown:
CODE TO TYPE:
package examples;
public class Main { public static void main(String [] args){ Dog myDog = new Dog("female"); System.out.println("I am domesticated: " + myDog.isDomesticated()); myDog.feedYoung(); // inherit from super if (myDog.gender == "male") System.out.print("My offspring come: "); else System.out.print("I give birth: "); myDog.liveBirth(); // implemented abstract method of super } }
Save Mammal, Do g, and Main, then run Main.
Modify Main by adding the blue code and removing the red code as shown:
CODE TO TYPE:
package examples; public class Main { public static void main(String [] args){ Dog myDog = new Dog("male female"); System.out.println("I am domesticated: " + myDog.isDomesticated()); myDog.feedYoung(); // inherit from super if (myDog.gender == "male") System.out.print("My offspring come: "); else System.out.print("I give birth: "); myDog.liveBirth(); // implemented abstract method of super } }
Save and run it again. Your output should change accordingly.
The API and abstract
Click the API icon under the Eclipse menu bar, go to the java.awt package, and scro ll down to theGraphics class. The first line looks like this:
public abst ract class Graphics ext ends Object
Read through the description o f the Graphics class. Now scro ll down to its Method Summary. The left panelbeside the method signatures indicates that the methods are almost all abst ract . Graphics methods areimplemented depending on context. And, as the API's Co nst ruct o r Summary says, "Since Graphics is anabstract class, applications cannot call this constructor directly. Graphics contexts are obtained from othergraphics contexts or are created by calling get Graphics on a component."
Abstract classes provide programmers with conceptual power and contro l over subclasses. Classes may havemultiple uses (through subclasses), but stipulations in the abst ract class definition provide core aspects o f theobjects. These stipulations:
make inheritance stronger.enhance each subclass o f a super.allow designers to focus on conceptual aspects o f a class.
Making Your Own Figures and ShapesOkay, we're getting dangerously close to working on the pro ject that you'll hand in to your instructor fo r this lesson.Here's an example o f the pro ject you're about to create.
Familiarize yourself with the various action buttons here. This particular example has only two graphical objects. You'lladd more to your pro ject later. Draw a figure and then move that figure around with your mouse. Each drawing is anindividual inst ance .
In the previous lesson's pro ject, we asked you to create a Shape class and some other classes that descended fromit. As you make decisions about shapes you want to create, consider these questions: How would you draw a genericShape object? What is a Shape object? Can we actually define a Shape without knowing which kind o f Shape it is?
We have a few ideas to share with you about a Shape class that we envision. But we won't put them into a listing now.You'll decide later whether you want to use our design or keep your own. You might even decide to blend the two.
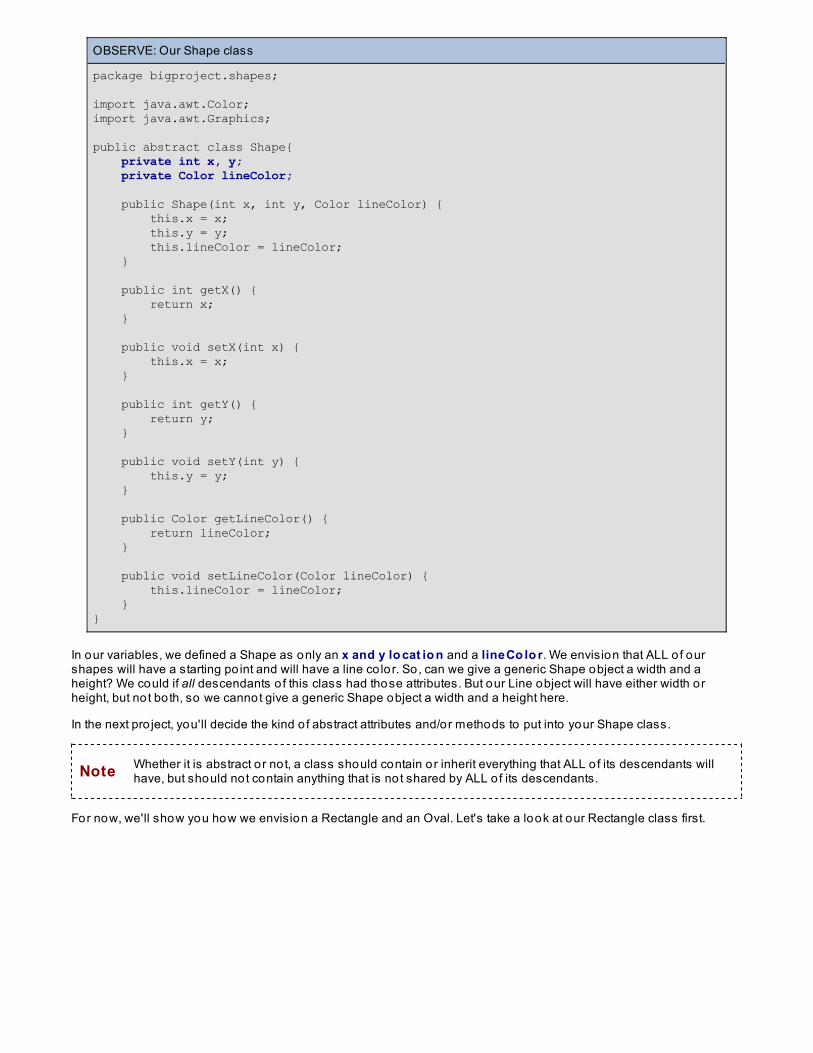
OBSERVE: Our Shape class
package bigproject.shapes;
import java.awt.Color;import java.awt.Graphics;
public abstract class Shape{ private int x, y; private Color lineColor; public Shape(int x, int y, Color lineColor) { this.x = x; this.y = y; this.lineColor = lineColor; } public int getX() { return x; } public void setX(int x) { this.x = x; } public int getY() { return y; } public void setY(int y) { this.y = y; } public Color getLineColor() { return lineColor; } public void setLineColor(Color lineColor) { this.lineColor = lineColor; }}
In our variables, we defined a Shape as only an x and y lo cat io n and a lineCo lo r. We envision that ALL o f ourshapes will have a starting po int and will have a line co lor. So, can we give a generic Shape object a width and aheight? We could if all descendants o f this class had those attributes. But our Line object will have either width orheight, but not both, so we cannot give a generic Shape object a width and a height here.
In the next pro ject, you'll decide the kind o f abstract attributes and/or methods to put into your Shape class.
Note Whether it is abstract or not, a class should contain or inherit everything that ALL o f its descendants willhave, but should not contain anything that is not shared by ALL o f its descendants.
For now, we'll show you how we envision a Rectangle and an Oval. Let's take a look at our Rectangle class first.
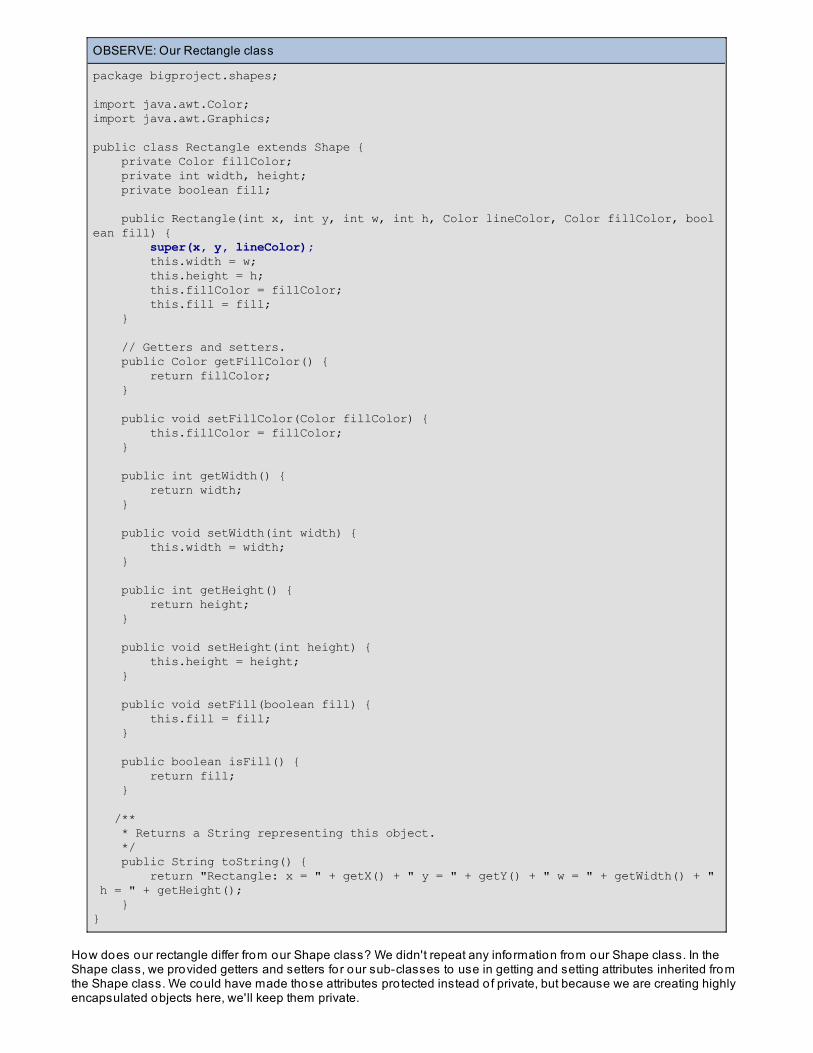
OBSERVE: Our Rectangle class
package bigproject.shapes;
import java.awt.Color;import java.awt.Graphics;
public class Rectangle extends Shape { private Color fillColor; private int width, height; private boolean fill; public Rectangle(int x, int y, int w, int h, Color lineColor, Color fillColor, boolean fill) { super(x, y, lineColor); this.width = w; this.height = h; this.fillColor = fillColor; this.fill = fill; } // Getters and setters. public Color getFillColor() { return fillColor; } public void setFillColor(Color fillColor) { this.fillColor = fillColor; } public int getWidth() { return width; } public void setWidth(int width) { this.width = width; } public int getHeight() { return height; } public void setHeight(int height) { this.height = height; } public void setFill(boolean fill) { this.fill = fill; } public boolean isFill() { return fill; } /** * Returns a String representing this object. */ public String toString() { return "Rectangle: x = " + getX() + " y = " + getY() + " w = " + getWidth() + " h = " + getHeight(); }}
How does our rectangle differ from our Shape class? We didn't repeat any information from our Shape class. In theShape class, we provided getters and setters for our sub-classes to use in getting and setting attributes inherited fromthe Shape class. We could have made those attributes pro tected instead o f private, but because we are creating highlyencapsulated objects here, we'll keep them private.
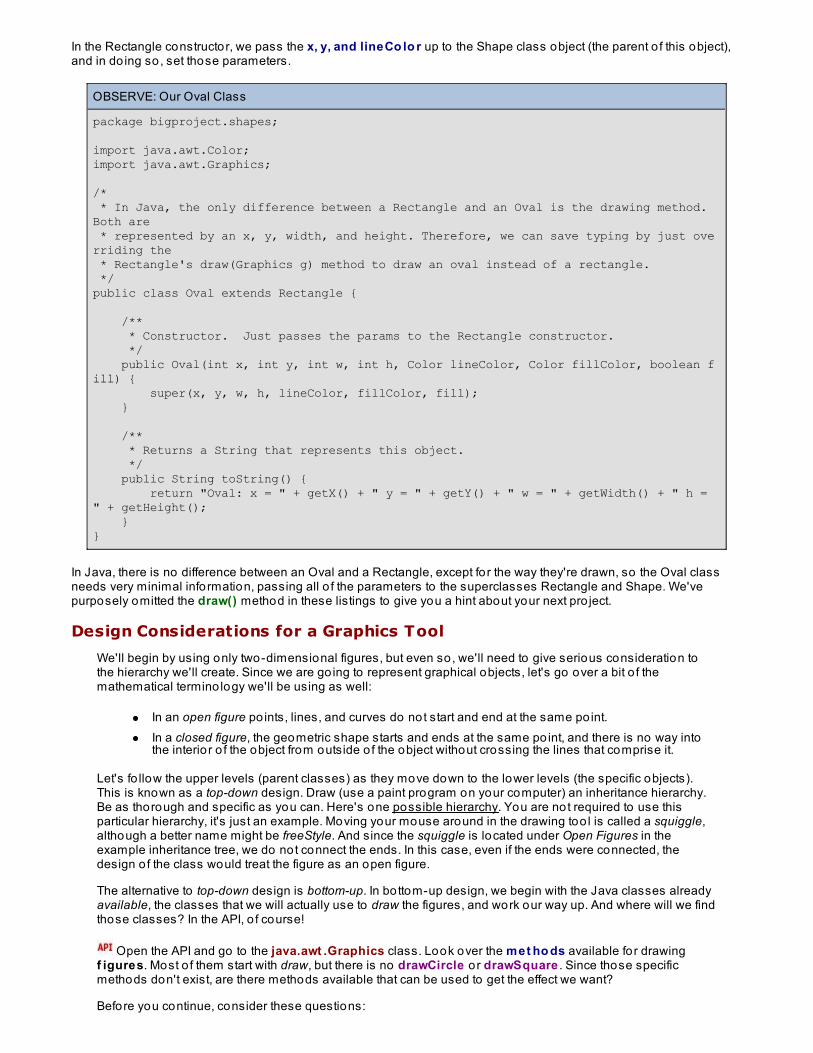
In the Rectangle constructor, we pass the x, y, and lineCo lo r up to the Shape class object (the parent o f this object),and in do ing so, set those parameters.
OBSERVE: Our Oval Class
package bigproject.shapes;
import java.awt.Color;import java.awt.Graphics;
/* * In Java, the only difference between a Rectangle and an Oval is the drawing method. Both are * represented by an x, y, width, and height. Therefore, we can save typing by just overriding the * Rectangle's draw(Graphics g) method to draw an oval instead of a rectangle. */public class Oval extends Rectangle { /** * Constructor. Just passes the params to the Rectangle constructor. */ public Oval(int x, int y, int w, int h, Color lineColor, Color fillColor, boolean fill) { super(x, y, w, h, lineColor, fillColor, fill); } /** * Returns a String that represents this object. */ public String toString() { return "Oval: x = " + getX() + " y = " + getY() + " w = " + getWidth() + " h = " + getHeight(); }}
In Java, there is no difference between an Oval and a Rectangle, except fo r the way they're drawn, so the Oval classneeds very minimal information, passing all o f the parameters to the superclasses Rectangle and Shape. We'vepurposely omitted the draw() method in these listings to give you a hint about your next pro ject.
Design Considerations for a Graphics Tool
We'll begin by using only two-dimensional figures, but even so, we'll need to give serious consideration tothe hierarchy we'll create. Since we are go ing to represent graphical objects, let's go over a bit o f themathematical termino logy we'll be using as well:
In an open figure po ints, lines, and curves do not start and end at the same po int.In a closed figure, the geometric shape starts and ends at the same po int, and there is no way intothe interio r o f the object from outside o f the object without crossing the lines that comprise it.
Let's fo llow the upper levels (parent classes) as they move down to the lower levels (the specific objects).This is known as a top-down design. Draw (use a paint program on your computer) an inheritance hierarchy.Be as thorough and specific as you can. Here's one possible hierarchy. You are not required to use thisparticular hierarchy, it's just an example. Moving your mouse around in the drawing too l is called a squiggle,although a better name might be freeStyle. And since the squiggle is located under Open Figures in theexample inheritance tree, we do not connect the ends. In this case, even if the ends were connected, thedesign o f the class would treat the figure as an open figure.
The alternative to top-down design is bottom-up. In bottom-up design, we begin with the Java classes alreadyavailable, the classes that we will actually use to draw the figures, and work our way up. And where will we findthose classes? In the API, o f course!
Open the API and go to the java.awt .Graphics class. Look over the met ho ds available for drawingf igures. Most o f them start with draw, but there is no drawCircle o r drawSquare . Since those specificmethods don't exist, are there methods available that can be used to get the effect we want?
Before you continue, consider these questions:
Do we have a candidate or candidates for an abstract class?What aspects would be shared by all subclasses and so should be located within the abstractclass(es)?What kinds of shapes (subclasses) do we want to create?Where would methods such as getArea() and getCircumference() go?
Keep these questions in mind as you work through the pro ject fo r this lesson. I'm looking forward to seeingwhat you come up with for your pro ject. Keep up the good work and see you in the next lesson!
Copyright © 1998-2014 O'Reilly Media, Inc.
This work is licensed under a Creative Commons Attribution-ShareAlike 3.0 Unported License.See http://creativecommons.org/licenses/by-sa/3.0/legalcode for more information.
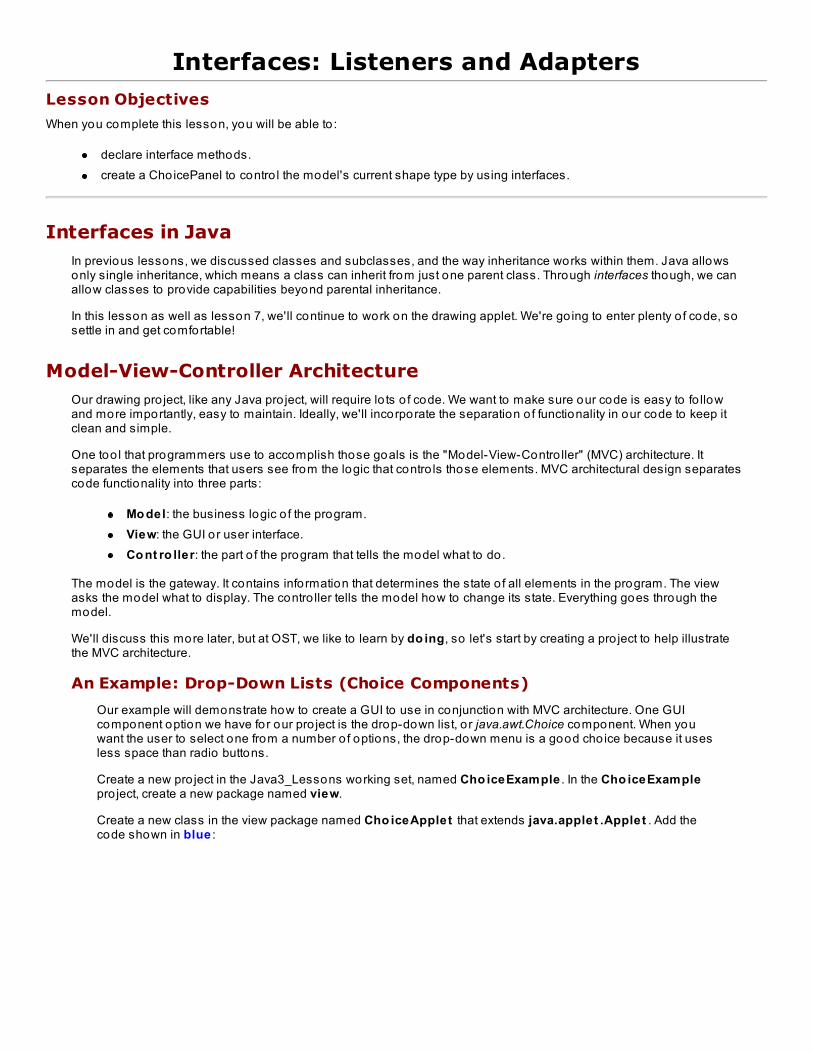
Interfaces: Listeners and AdaptersLesson Objectives
When you complete this lesson, you will be able to :
declare interface methods.create a ChoicePanel to contro l the model's current shape type by using interfaces.
Interfaces in JavaIn previous lessons, we discussed classes and subclasses, and the way inheritance works within them. Java allowsonly single inheritance, which means a class can inherit from just one parent class. Through interfaces though, we canallow classes to provide capabilities beyond parental inheritance.
In this lesson as well as lesson 7, we'll continue to work on the drawing applet. We're go ing to enter plenty o f code, sosettle in and get comfortable!
Model-View-Controller ArchitectureOur drawing pro ject, like any Java pro ject, will require lo ts o f code. We want to make sure our code is easy to fo llowand more importantly, easy to maintain. Ideally, we'll incorporate the separation o f functionality in our code to keep itclean and simple.
One too l that programmers use to accomplish those goals is the "Model-View-Contro ller" (MVC) architecture. Itseparates the elements that users see from the logic that contro ls those elements. MVC architectural design separatescode functionality into three parts:
Mo del: the business logic o f the program.View: the GUI or user interface.Co nt ro ller: the part o f the program that tells the model what to do.
The model is the gateway. It contains information that determines the state o f all elements in the program. The viewasks the model what to display. The contro ller tells the model how to change its state. Everything goes through themodel.
We'll discuss this more later, but at OST, we like to learn by do ing, so let's start by creating a pro ject to help illustratethe MVC architecture.
An Example: Drop-Down Lists (Choice Components)
Our example will demonstrate how to create a GUI to use in conjunction with MVC architecture. One GUIcomponent option we have for our pro ject is the drop-down list, o r java.awt.Choice component. When youwant the user to select one from a number o f options, the drop-down menu is a good cho ice because it usesless space than radio buttons.
Create a new pro ject in the Java3_Lessons working set, named Cho iceExample . In the Cho iceExamplepro ject, create a new package named view.
Create a new class in the view package named Cho iceApplet that extends java.applet .Applet . Add thecode shown in blue :
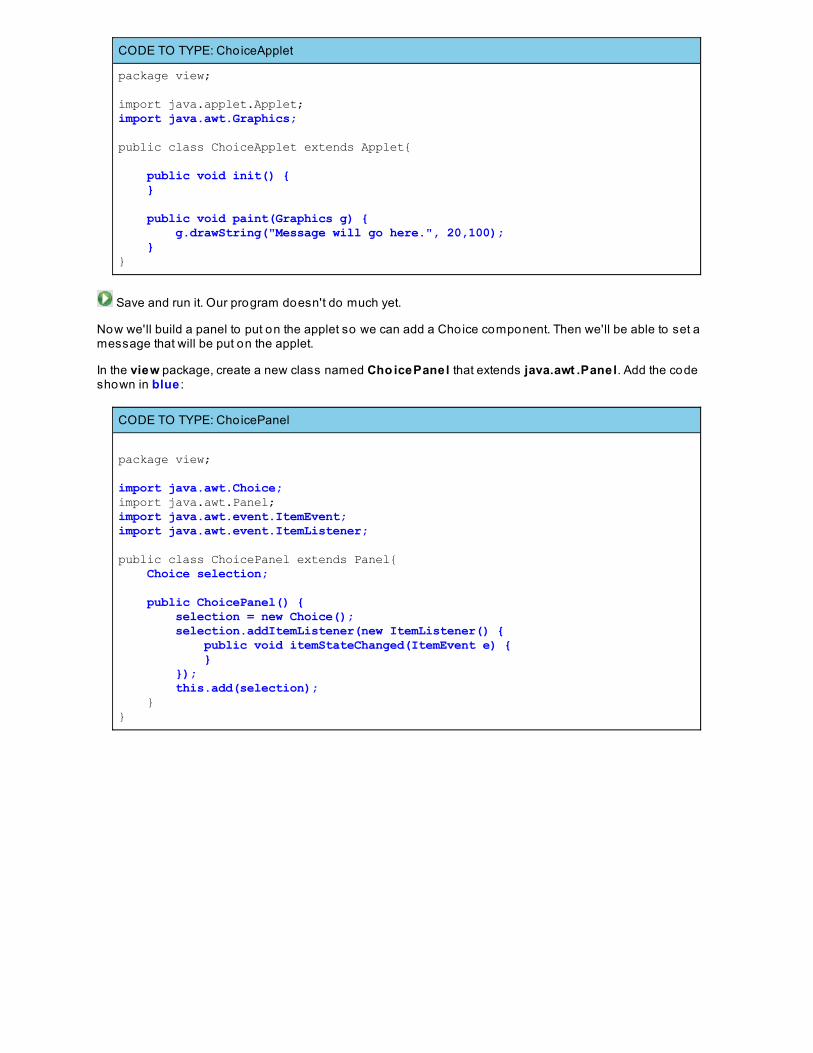
CODE TO TYPE: ChoiceApplet
package view;
import java.applet.Applet;import java.awt.Graphics;
public class ChoiceApplet extends Applet{ public void init() { } public void paint(Graphics g) { g.drawString("Message will go here.", 20,100); }}
Save and run it. Our program doesn't do much yet.
Now we'll build a panel to put on the applet so we can add a Choice component. Then we'll be able to set amessage that will be put on the applet.
In the view package, create a new class named Cho icePanel that extends java.awt .Panel. Add the codeshown in blue :
CODE TO TYPE: ChoicePanel
package view;
import java.awt.Choice;import java.awt.Panel;import java.awt.event.ItemEvent;import java.awt.event.ItemListener;
public class ChoicePanel extends Panel{ Choice selection; public ChoicePanel() { selection = new Choice(); selection.addItemListener(new ItemListener() { public void itemStateChanged(ItemEvent e) { } }); this.add(selection); }}
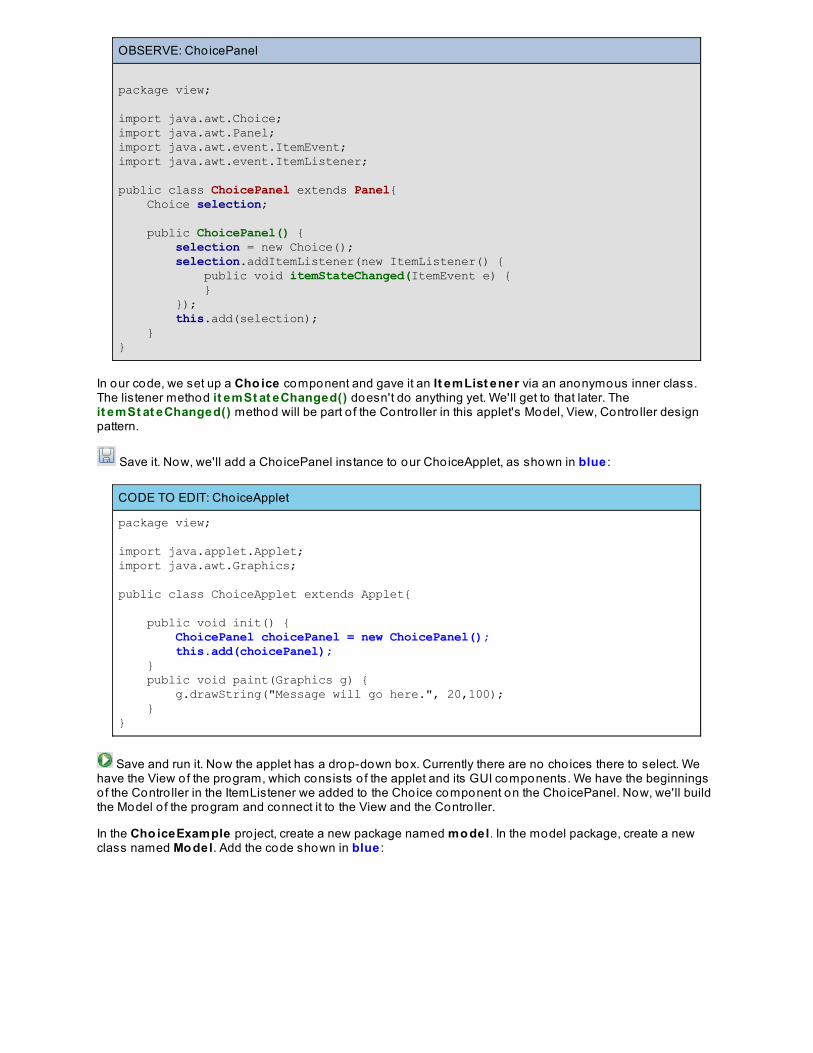
OBSERVE: ChoicePanel
package view;
import java.awt.Choice;import java.awt.Panel;import java.awt.event.ItemEvent;import java.awt.event.ItemListener;
public class ChoicePanel extends Panel{ Choice selection; public ChoicePanel() { selection = new Choice(); selection.addItemListener(new ItemListener() { public void itemStateChanged(ItemEvent e) { } }); this.add(selection); }}
In our code, we set up a Cho ice component and gave it an It emList ener via an anonymous inner class.The listener method it emSt at eChanged() doesn't do anything yet. We'll get to that later. Theit emSt at eChanged() method will be part o f the Contro ller in this applet's Model, View, Contro ller designpattern.
Save it. Now, we'll add a ChoicePanel instance to our ChoiceApplet, as shown in blue :
CODE TO EDIT: ChoiceApplet
package view;
import java.applet.Applet;import java.awt.Graphics;
public class ChoiceApplet extends Applet{ public void init() { ChoicePanel choicePanel = new ChoicePanel(); this.add(choicePanel); } public void paint(Graphics g) { g.drawString("Message will go here.", 20,100); }}
Save and run it. Now the applet has a drop-down box. Currently there are no cho ices there to select. Wehave the View of the program, which consists o f the applet and its GUI components. We have the beginningsof the Contro ller in the ItemListener we added to the Choice component on the ChoicePanel. Now, we'll buildthe Model o f the program and connect it to the View and the Contro ller.
In the Cho iceExample pro ject, create a new package named mo del. In the model package, create a newclass named Mo del. Add the code shown in blue :
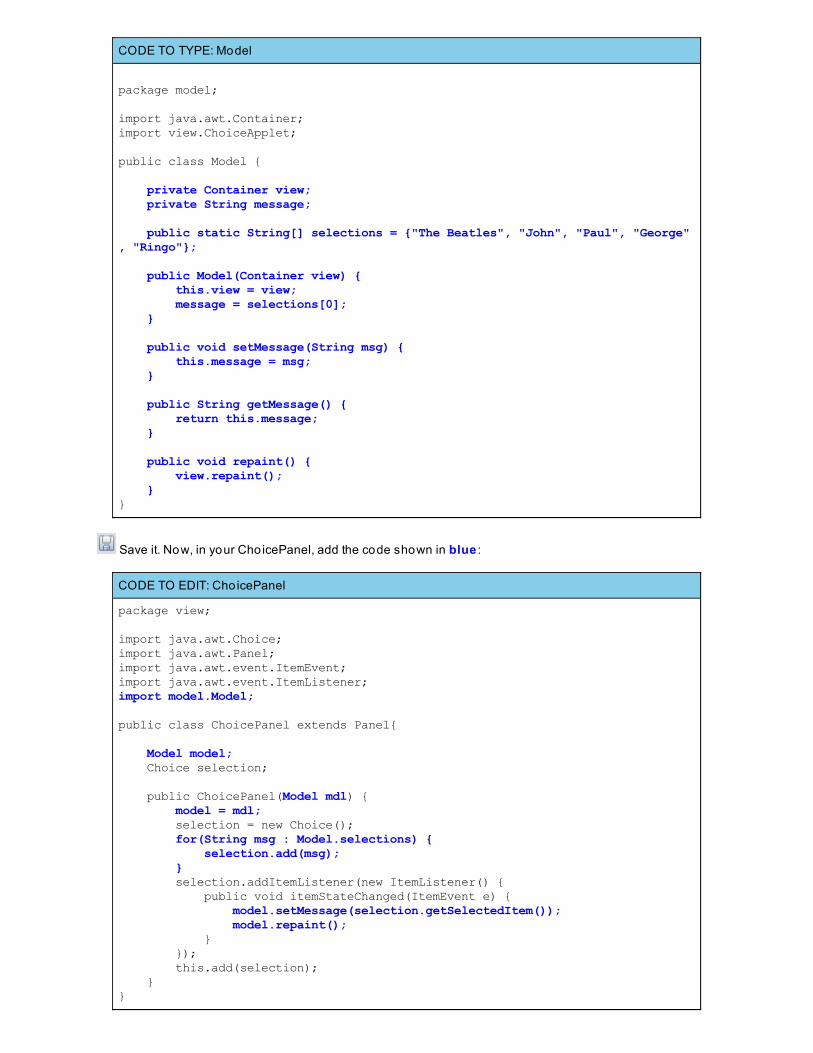
CODE TO TYPE: Model
package model;
import java.awt.Container;import view.ChoiceApplet;
public class Model { private Container view; private String message; public static String[] selections = {"The Beatles", "John", "Paul", "George", "Ringo"}; public Model(Container view) { this.view = view; message = selections[0]; } public void setMessage(String msg) { this.message = msg; } public String getMessage() { return this.message; } public void repaint() { view.repaint(); }}
Save it. Now, in your ChoicePanel, add the code shown in blue :
CODE TO EDIT: ChoicePanel
package view;
import java.awt.Choice;import java.awt.Panel;import java.awt.event.ItemEvent;import java.awt.event.ItemListener;import model.Model;
public class ChoicePanel extends Panel{
Model model; Choice selection; public ChoicePanel(Model mdl) { model = mdl; selection = new Choice(); for(String msg : Model.selections) { selection.add(msg); } selection.addItemListener(new ItemListener() { public void itemStateChanged(ItemEvent e) { model.setMessage(selection.getSelectedItem()); model.repaint(); } }); this.add(selection); }}
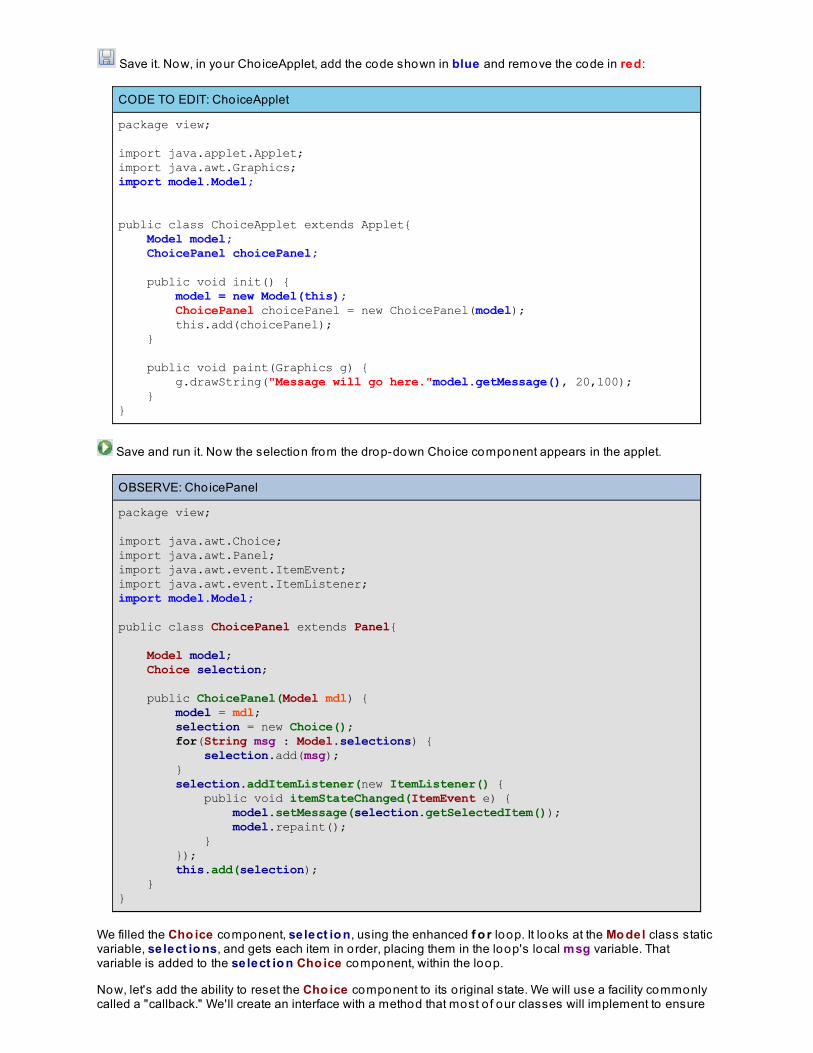
Save it. Now, in your ChoiceApplet, add the code shown in blue and remove the code in red:
CODE TO EDIT: ChoiceApplet
package view;
import java.applet.Applet;import java.awt.Graphics;import model.Model;
public class ChoiceApplet extends Applet{ Model model; ChoicePanel choicePanel; public void init() { model = new Model(this); ChoicePanel choicePanel = new ChoicePanel(model); this.add(choicePanel); } public void paint(Graphics g) { g.drawString("Message will go here."model.getMessage(), 20,100); }}
Save and run it. Now the selection from the drop-down Choice component appears in the applet.
OBSERVE: ChoicePanel
package view;
import java.awt.Choice;import java.awt.Panel;import java.awt.event.ItemEvent;import java.awt.event.ItemListener;import model.Model;
public class ChoicePanel extends Panel{
Model model; Choice selection; public ChoicePanel(Model mdl) { model = mdl; selection = new Choice(); for(String msg : Model.selections) { selection.add(msg); } selection.addItemListener(new ItemListener() { public void itemStateChanged(ItemEvent e) { model.setMessage(selection.getSelectedItem()); model.repaint(); } }); this.add(selection); }}
We filled the Cho ice component, select io n, using the enhanced f o r loop. It looks at the Mo del class staticvariable, select io ns, and gets each item in order, placing them in the loop's local msg variable. Thatvariable is added to the select io n Cho ice component, within the loop.
Now, let's add the ability to reset the Cho ice component to its original state. We will use a facility commonlycalled a "callback." We'll create an interface with a method that most o f our classes will implement to ensure
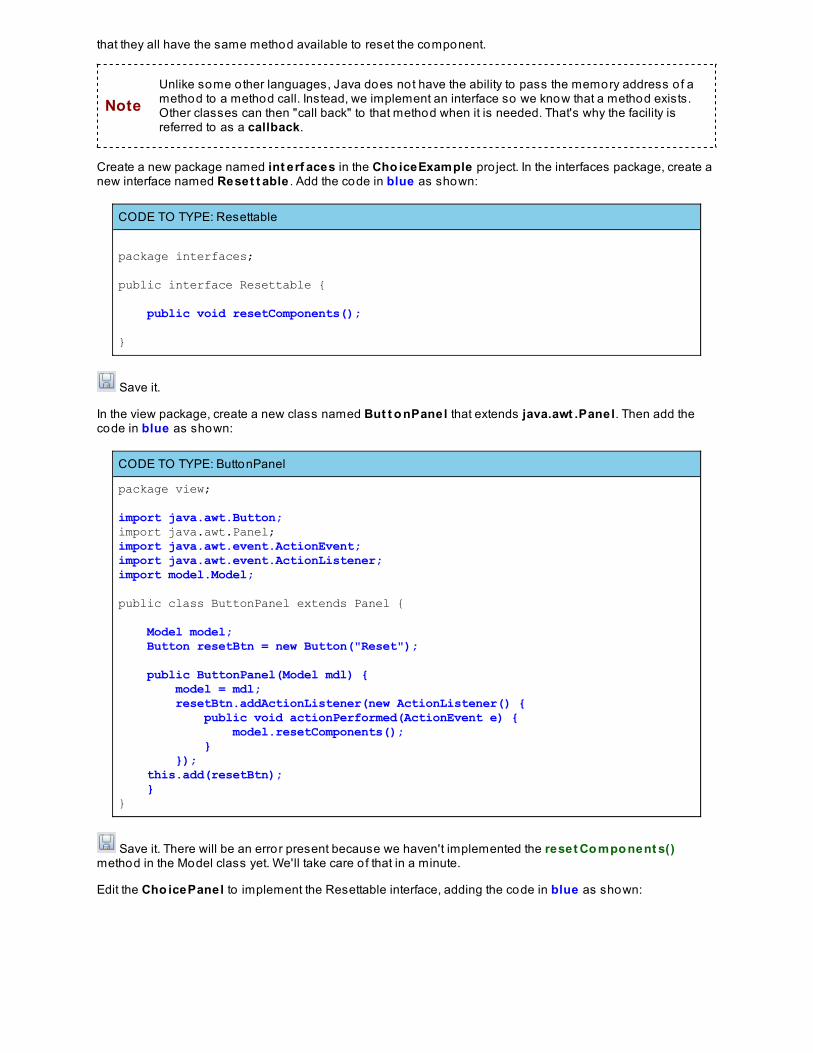
that they all have the same method available to reset the component.
NoteUnlike some other languages, Java does not have the ability to pass the memory address o f amethod to a method call. Instead, we implement an interface so we know that a method exists.Other classes can then "call back" to that method when it is needed. That's why the facility isreferred to as a callback.
Create a new package named int erf aces in the Cho iceExample pro ject. In the interfaces package, create anew interface named Reset t able . Add the code in blue as shown:
CODE TO TYPE: Resettable
package interfaces;
public interface Resettable { public void resetComponents();
}
Save it.
In the view package, create a new class named But t o nPanel that extends java.awt .Panel. Then add thecode in blue as shown:
CODE TO TYPE: ButtonPanel
package view;
import java.awt.Button;import java.awt.Panel;import java.awt.event.ActionEvent;import java.awt.event.ActionListener;import model.Model;
public class ButtonPanel extends Panel { Model model; Button resetBtn = new Button("Reset"); public ButtonPanel(Model mdl) { model = mdl; resetBtn.addActionListener(new ActionListener() { public void actionPerformed(ActionEvent e) { model.resetComponents(); } }); this.add(resetBtn); }}
Save it. There will be an error present because we haven't implemented the reset Co mpo nent s()method in the Model class yet. We'll take care o f that in a minute.
Edit the Cho icePanel to implement the Resettable interface, adding the code in blue as shown:
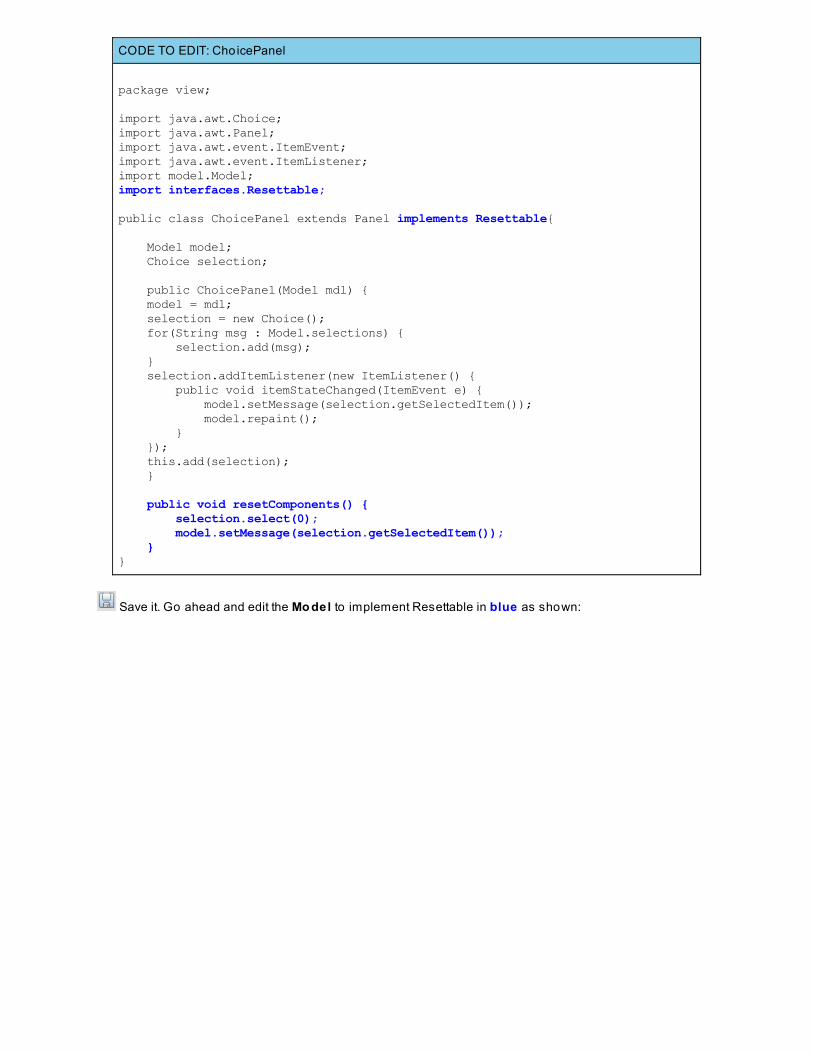
CODE TO EDIT: ChoicePanel
package view;
import java.awt.Choice;import java.awt.Panel;import java.awt.event.ItemEvent;import java.awt.event.ItemListener;import model.Model;import interfaces.Resettable;
public class ChoicePanel extends Panel implements Resettable{
Model model; Choice selection; public ChoicePanel(Model mdl) { model = mdl; selection = new Choice(); for(String msg : Model.selections) { selection.add(msg); } selection.addItemListener(new ItemListener() { public void itemStateChanged(ItemEvent e) { model.setMessage(selection.getSelectedItem()); model.repaint(); } }); this.add(selection); } public void resetComponents() { selection.select(0); model.setMessage(selection.getSelectedItem()); }}
Save it. Go ahead and edit the Mo del to implement Resettable in blue as shown:
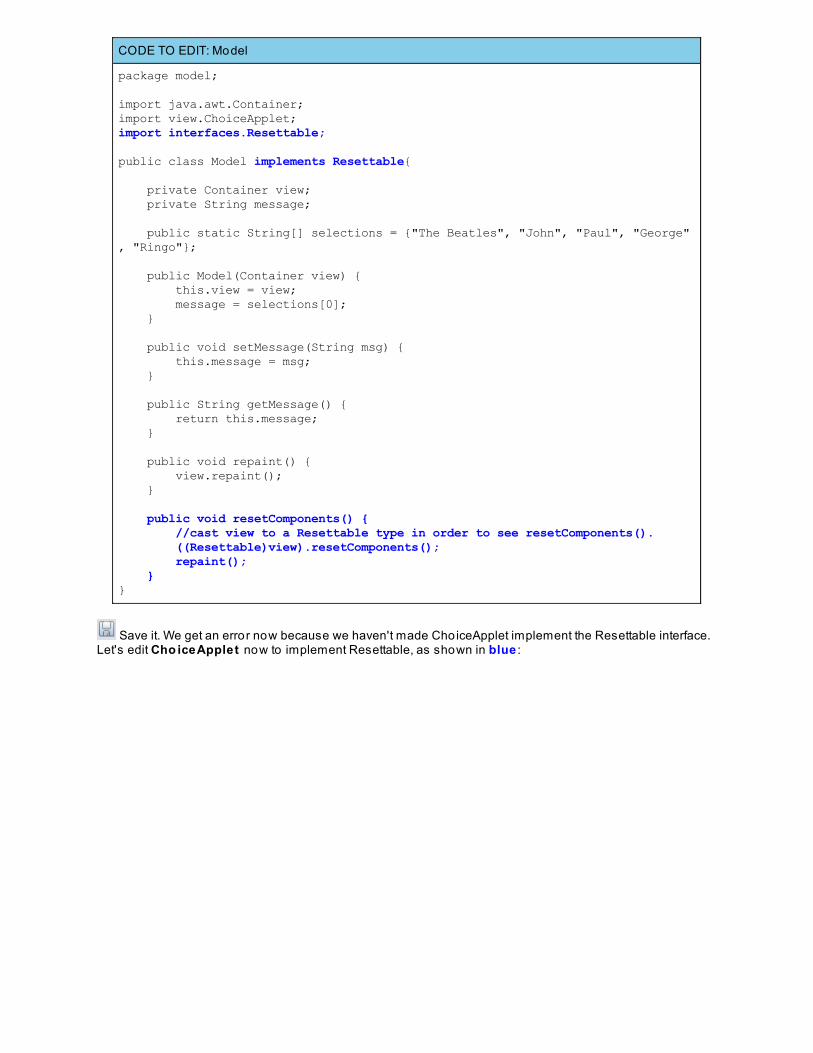
CODE TO EDIT: Model
package model;
import java.awt.Container;import view.ChoiceApplet;import interfaces.Resettable;
public class Model implements Resettable{ private Container view; private String message; public static String[] selections = {"The Beatles", "John", "Paul", "George", "Ringo"}; public Model(Container view) { this.view = view; message = selections[0]; } public void setMessage(String msg) { this.message = msg; } public String getMessage() { return this.message; } public void repaint() { view.repaint(); } public void resetComponents() { //cast view to a Resettable type in order to see resetComponents(). ((Resettable)view).resetComponents(); repaint(); }}
Save it. We get an error now because we haven't made ChoiceApplet implement the Resettable interface.Let's edit Cho iceApplet now to implement Resettable, as shown in blue :
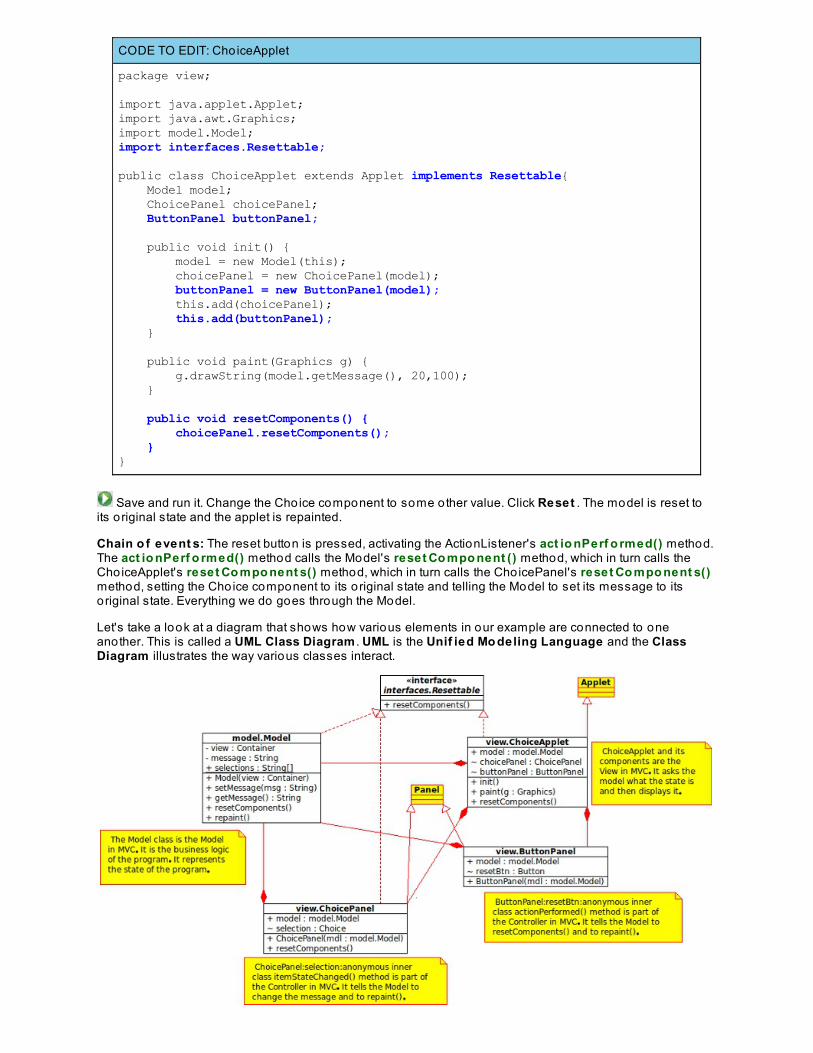
CODE TO EDIT: ChoiceApplet
package view;
import java.applet.Applet;import java.awt.Graphics;import model.Model;import interfaces.Resettable;
public class ChoiceApplet extends Applet implements Resettable{ Model model; ChoicePanel choicePanel; ButtonPanel buttonPanel; public void init() { model = new Model(this); choicePanel = new ChoicePanel(model); buttonPanel = new ButtonPanel(model); this.add(choicePanel); this.add(buttonPanel); } public void paint(Graphics g) { g.drawString(model.getMessage(), 20,100); } public void resetComponents() { choicePanel.resetComponents(); }}
Save and run it. Change the Choice component to some other value. Click Reset . The model is reset toits original state and the applet is repainted.
Chain o f event s: The reset button is pressed, activating the ActionListener's act io nPerf o rmed() method.The act io nPerf o rmed() method calls the Model's reset Co mpo nent () method, which in turn calls theChoiceApplet's reset Co mpo nent s() method, which in turn calls the ChoicePanel's reset Co mpo nent s()method, setting the Choice component to its original state and telling the Model to set its message to itsoriginal state. Everything we do goes through the Model.
Let's take a look at a diagram that shows how various elements in our example are connected to oneanother. This is called a UML Class Diagram . UML is the Unif ied Mo deling Language and the ClassDiagram illustrates the way various classes interact.
Let's break down our diagram. First, the + symbol inside the class boxes means that the method or attributeis public. The ~ symbol means that the attribute or method is private.
The red lines in the diagram have specific meanings as well. A so lid line with an arrow at the end o f it represents inheritance. The arrow po ints to a super class.
A dotted line with an arrow at the end o f it indicates implementation o f an interface. The arrow po ints tothe interface being implemented.
Finally, the so lid line with a diamond at the end o f it indicates association, or "uses." Thediamond is on the end o f the line closest to the class that is using the o ther class.
So, our diagram shows us that ChoiceApplet inherits from Applet, implements Resettable, and uses Model,ChoicePanel, and ButtonPanel.
All o f the View components, Cho iceApplet, ButtonPanel, and ChoicePanel, use the Model. They either getinformation from the Model to display it, o r the Contro ller portion o f those components tell the Model how tochange its state.
Creating the Shape Drawing Project
In the Java3_Lesso ns working set, create a new Java pro ject named java3_Lesso n06 . Add the fo llowingpackages to the pro ject:
eventinterfacesmodelshapesui.appletui.panels
We'll need these packages to modularize our code and make it easy to maintain. We'll talk about this ingreater detail later, but let's build something right now!
In the ui.applet package o f your java3_Lesso n06 pro ject, create a new class named GUIDemo. Thesuperclass should be java.applet .Applet .
Edit GUIDemo in blue as shown :
CODE TO TYPE: GUIDemo
package ui.applet;import java.applet.Applet;import java.awt.*;
public class GUIDemo extends Applet {
private final String DRAW = "Draw"; public void init(){ Checkbox draw = new Checkbox(DRAW); add(draw); }}
Save and run it (as a Java Applet). This sweet little applet opens:
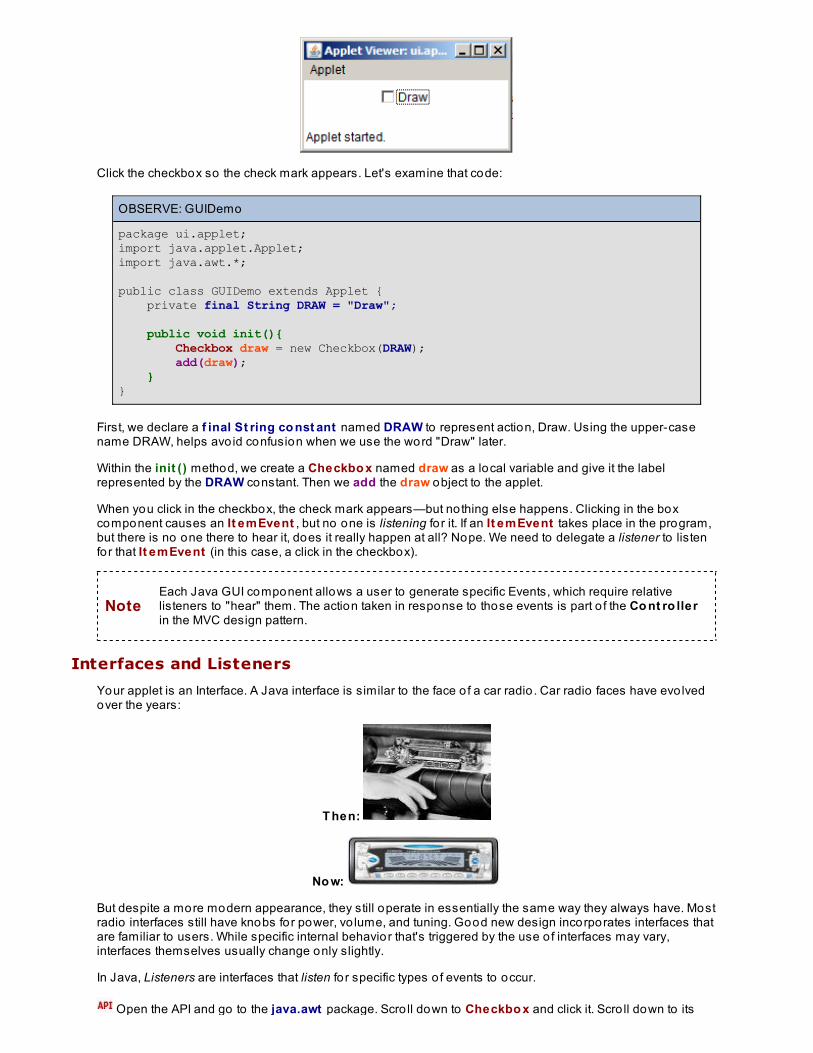
Click the checkbox so the check mark appears. Let's examine that code:
OBSERVE: GUIDemo
package ui.applet;import java.applet.Applet;import java.awt.*;
public class GUIDemo extends Applet { private final String DRAW = "Draw"; public void init(){ Checkbox draw = new Checkbox(DRAW); add(draw); }}
First, we declare a f inal St ring co nst ant named DRAW to represent action, Draw. Using the upper-casename DRAW, helps avo id confusion when we use the word "Draw" later.
Within the init () method, we create a Checkbo x named draw as a local variable and give it the labelrepresented by the DRAW constant. Then we add the draw object to the applet.
When you click in the checkbox, the check mark appears—but nothing else happens. Clicking in the boxcomponent causes an It emEvent , but no one is listening fo r it. If an It emEvent takes place in the program,but there is no one there to hear it, does it really happen at all? Nope. We need to delegate a listener to listenfor that It emEvent (in this case, a click in the checkbox).
NoteEach Java GUI component allows a user to generate specific Events, which require relativelisteners to "hear" them. The action taken in response to those events is part o f the Co nt ro llerin the MVC design pattern.
Interfaces and Listeners
Your applet is an Interface. A Java interface is similar to the face o f a car radio . Car radio faces have evo lvedover the years:
T hen:
No w:
But despite a more modern appearance, they still operate in essentially the same way they always have. Mostradio interfaces still have knobs for power, vo lume, and tuning. Good new design incorporates interfaces thatare familiar to users. While specific internal behavior that's triggered by the use o f interfaces may vary,interfaces themselves usually change only slightly.
In Java, Listeners are interfaces that listen fo r specific types o f events to occur.
Open the API and go to the java.awt package. Scro ll down to Checkbo x and click it. Scro ll down to its
methods and you'll see addIt emList ener(It emList ener l) . Conveniently, in order to add a listener, wealways use the command addxxx() , where xxx is the name of the listener. So, if we need anAct io nList ener, we would use the addActionListener() method.
Let's get that List ener into our code! Edit GUIDemo as shown in blue :
CODE TO TYPE: GUIDemo
package ui.applet;
import java.applet.Applet;import java.awt.*;import java.awt.event.*;
public class GUIDemo extends Applet implements ItemListener { private final String DRAW = "Draw"; Checkbox draw; public void init(){ draw = new Checkbox(DRAW); add(draw); draw.addItemListener(this); } public void itemStateChanged(ItemEvent e){ System.out.println("I see you now!"); if (e.getSource() == draw) System.out.println("I know you clicked " + e.getItem().toString()); }}
Save and run it. Now, when you click the box you see output in the conso le. How did we do that? Let's takea look at the code:
OBSERVE:
package ui.applet;
import java.applet.Applet;import java.awt.*;import java.awt.event.*;
public class GUIDemo extends Applet implements ItemListener{ private final String DRAW = "Draw"; Checkbox draw; public void init(){ draw = new Checkbox(DRAW); add(draw); draw.addItemListener(this); }
public void itemStateChanged(ItemEvent e){ System.out.println("I see you now!"); if (e.getSource() == draw) System.out.println("I know you clicked " + e.getItem().toString()); }}
We make draw an instance variable so we can use it throughout the class rather than just in the init ()method.
In the init () method, we add t his instance o f the GUIDemo class to the draw object withaddIt emList ener() .
When the user changes the state o f the draw Checkbo x, the it emSt at eChanged() method is invoked,because t his instance o f GUIDemo is the It emList ener fo r the draw Checkbo x.
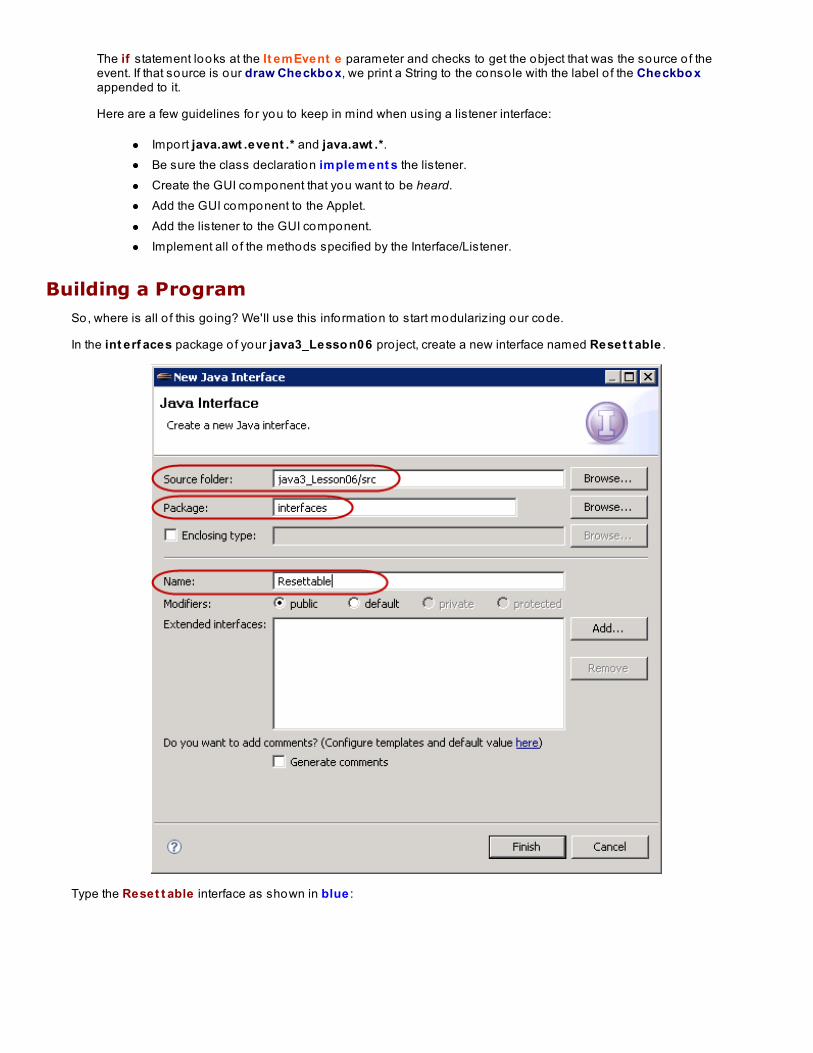
because t his instance o f GUIDemo is the It emList ener fo r the draw Checkbo x.
The if statement looks at the It emEvent e parameter and checks to get the object that was the source o f theevent. If that source is our draw Checkbo x, we print a String to the conso le with the label o f the Checkbo xappended to it.
Here are a few guidelines for you to keep in mind when using a listener interface:
Import java.awt .event .* and java.awt .*.Be sure the class declaration implement s the listener.Create the GUI component that you want to be heard.Add the GUI component to the Applet.Add the listener to the GUI component.Implement all o f the methods specified by the Interface/Listener.
Building a ProgramSo, where is all o f this go ing? We'll use this information to start modularizing our code.
In the int erf aces package o f your java3_Lesso n06 pro ject, create a new interface named Reset t able .
Type the Reset t able interface as shown in blue :
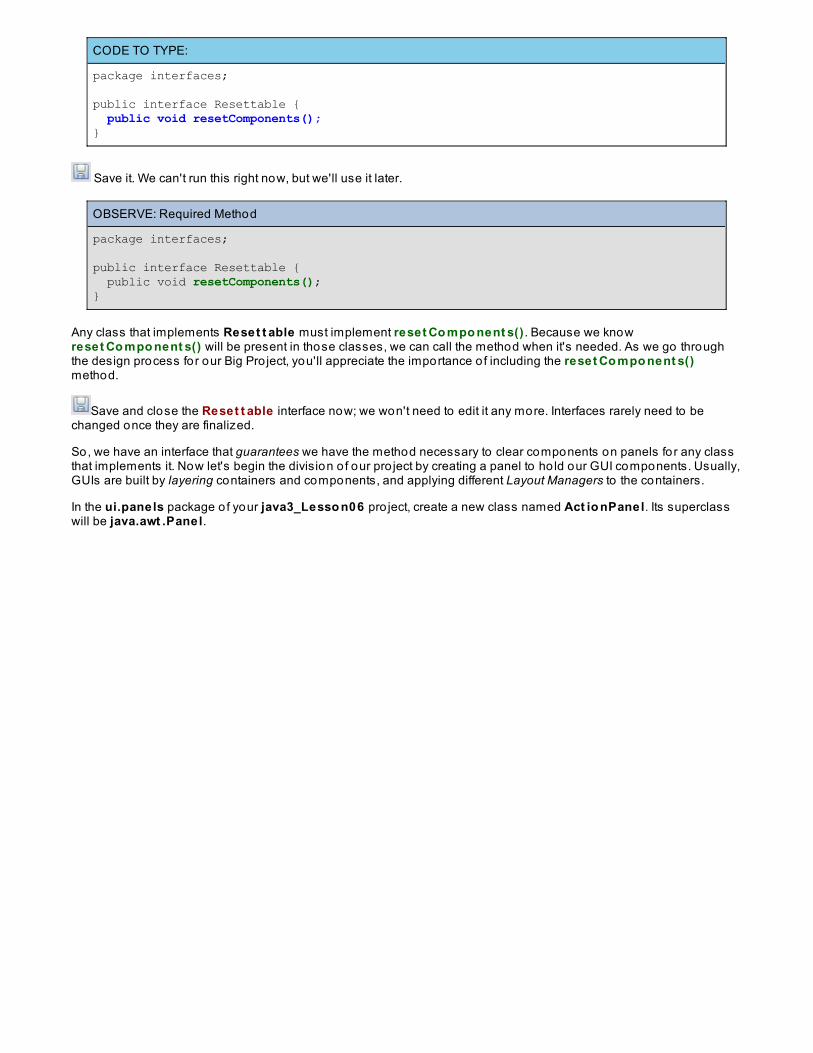
CODE TO TYPE:
package interfaces;
public interface Resettable { public void resetComponents();}
Save it. We can't run this right now, but we'll use it later.
OBSERVE: Required Method
package interfaces;
public interface Resettable { public void resetComponents();}
Any class that implements Reset t able must implement reset Co mpo nent s() . Because we knowreset Co mpo nent s() will be present in those classes, we can call the method when it's needed. As we go throughthe design process for our Big Pro ject, you'll appreciate the importance o f including the reset Co mpo nent s()method.
Save and close the Reset t able interface now; we won't need to edit it any more. Interfaces rarely need to bechanged once they are finalized.
So, we have an interface that guarantees we have the method necessary to clear components on panels fo r any classthat implements it. Now let's begin the division o f our pro ject by creating a panel to ho ld our GUI components. Usually,GUIs are built by layering containers and components, and applying different Layout Managers to the containers.
In the ui.panels package o f your java3_Lesso n06 pro ject, create a new class named Act io nPanel. Its superclasswill be java.awt .Panel.
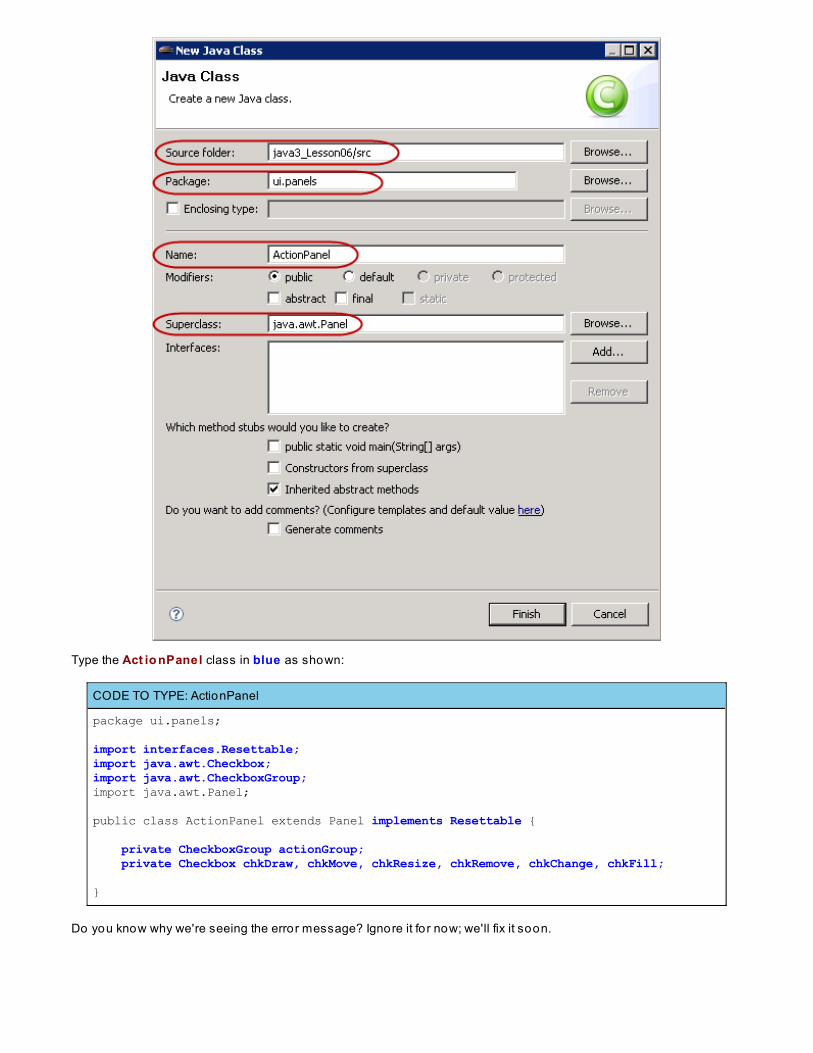
Type the Act io nPanel class in blue as shown:
CODE TO TYPE: ActionPanel
package ui.panels;
import interfaces.Resettable;import java.awt.Checkbox;import java.awt.CheckboxGroup;import java.awt.Panel;
public class ActionPanel extends Panel implements Resettable {
private CheckboxGroup actionGroup; private Checkbox chkDraw, chkMove, chkResize, chkRemove, chkChange, chkFill; }
Do you know why we're seeing the error message? Ignore it fo r now; we'll fix it soon.
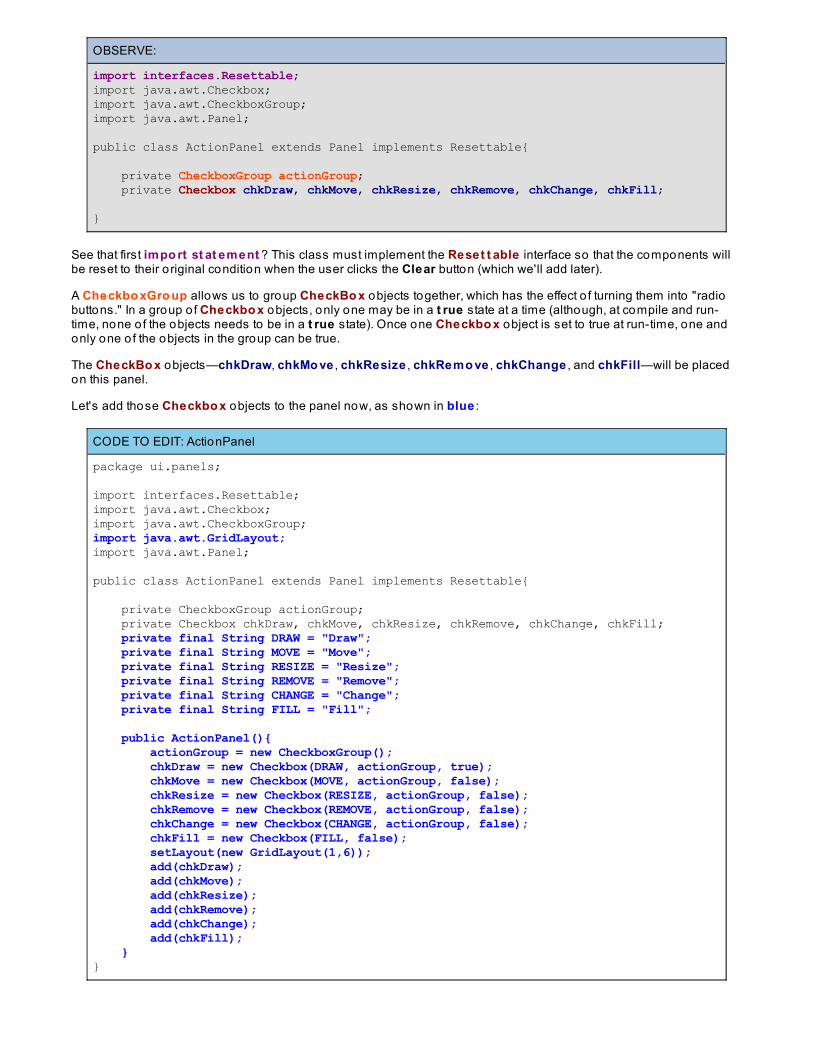
OBSERVE:
import interfaces.Resettable;import java.awt.Checkbox;import java.awt.CheckboxGroup;import java.awt.Panel;
public class ActionPanel extends Panel implements Resettable{
private CheckboxGroup actionGroup; private Checkbox chkDraw, chkMove, chkResize, chkRemove, chkChange, chkFill;
}
See that first impo rt st at ement ? This class must implement the Reset t able interface so that the components willbe reset to their o riginal condition when the user clicks the Clear button (which we'll add later).
A Checkbo xGro up allows us to group CheckBo x objects together, which has the effect o f turning them into "radiobuttons." In a group o f Checkbo x objects, only one may be in a t rue state at a time (although, at compile and run-time, none o f the objects needs to be in a t rue state). Once one Checkbo x object is set to true at run-time, one andonly one o f the objects in the group can be true.
The CheckBo x objects—chkDraw, chkMo ve , chkResize , chkRemo ve , chkChange , and chkFill—will be placedon this panel.
Let's add those Checkbo x objects to the panel now, as shown in blue :
CODE TO EDIT: ActionPanel
package ui.panels;
import interfaces.Resettable;import java.awt.Checkbox;import java.awt.CheckboxGroup;import java.awt.GridLayout;import java.awt.Panel;
public class ActionPanel extends Panel implements Resettable{
private CheckboxGroup actionGroup; private Checkbox chkDraw, chkMove, chkResize, chkRemove, chkChange, chkFill; private final String DRAW = "Draw"; private final String MOVE = "Move"; private final String RESIZE = "Resize"; private final String REMOVE = "Remove"; private final String CHANGE = "Change"; private final String FILL = "Fill"; public ActionPanel(){ actionGroup = new CheckboxGroup(); chkDraw = new Checkbox(DRAW, actionGroup, true); chkMove = new Checkbox(MOVE, actionGroup, false); chkResize = new Checkbox(RESIZE, actionGroup, false); chkRemove = new Checkbox(REMOVE, actionGroup, false); chkChange = new Checkbox(CHANGE, actionGroup, false); chkFill = new Checkbox(FILL, false); setLayout(new GridLayout(1,6)); add(chkDraw); add(chkMove); add(chkResize); add(chkRemove); add(chkChange); add(chkFill); }}
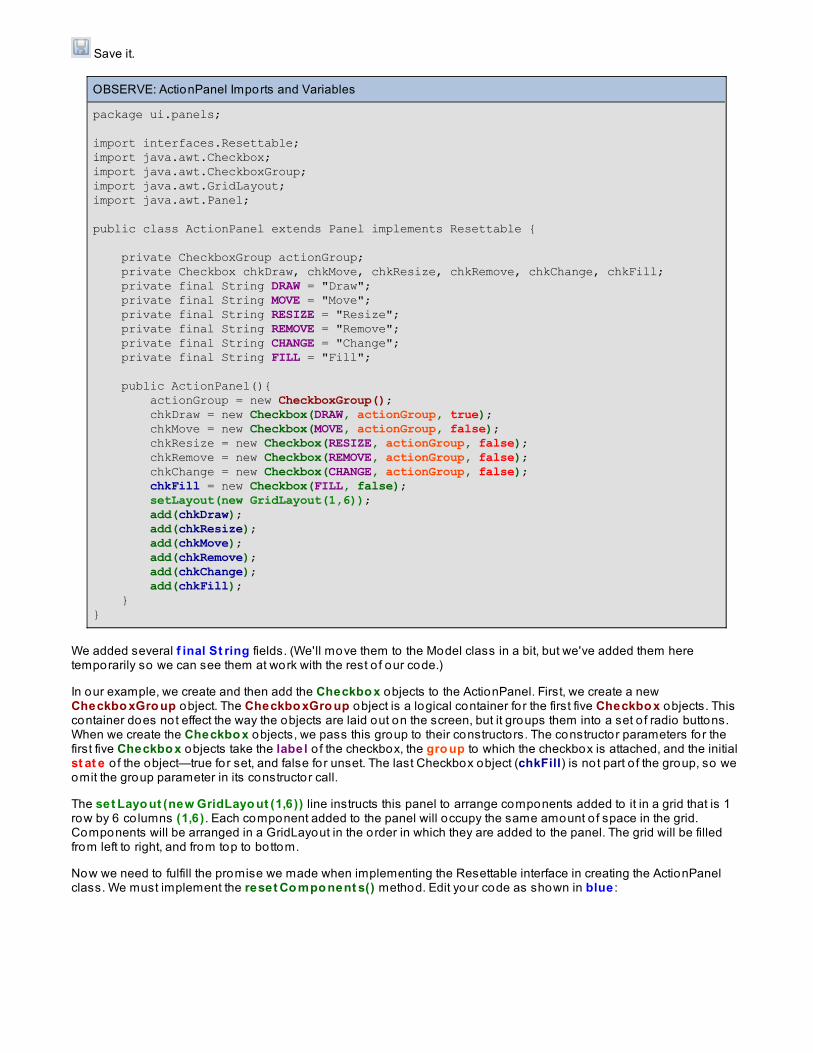
Save it.
OBSERVE: ActionPanel Imports and Variables
package ui.panels;
import interfaces.Resettable;import java.awt.Checkbox;import java.awt.CheckboxGroup;import java.awt.GridLayout;import java.awt.Panel;
public class ActionPanel extends Panel implements Resettable {
private CheckboxGroup actionGroup; private Checkbox chkDraw, chkMove, chkResize, chkRemove, chkChange, chkFill; private final String DRAW = "Draw"; private final String MOVE = "Move"; private final String RESIZE = "Resize"; private final String REMOVE = "Remove"; private final String CHANGE = "Change"; private final String FILL = "Fill"; public ActionPanel(){ actionGroup = new CheckboxGroup(); chkDraw = new Checkbox(DRAW, actionGroup, true); chkMove = new Checkbox(MOVE, actionGroup, false); chkResize = new Checkbox(RESIZE, actionGroup, false); chkRemove = new Checkbox(REMOVE, actionGroup, false); chkChange = new Checkbox(CHANGE, actionGroup, false); chkFill = new Checkbox(FILL, false); setLayout(new GridLayout(1,6)); add(chkDraw); add(chkResize); add(chkMove); add(chkRemove); add(chkChange); add(chkFill); }}
We added several f inal St ring fields. (We'll move them to the Model class in a bit, but we've added them heretemporarily so we can see them at work with the rest o f our code.)
In our example, we create and then add the Checkbo x objects to the ActionPanel. First, we create a newCheckbo xGro up object. The Checkbo xGro up object is a logical container fo r the first five Checkbo x objects. Thiscontainer does not effect the way the objects are laid out on the screen, but it groups them into a set o f radio buttons.When we create the Checkbo x objects, we pass this group to their constructors. The constructor parameters for thefirst five Checkbo x objects take the label o f the checkbox, the gro up to which the checkbox is attached, and the initialst at e o f the object—true for set, and false for unset. The last Checkbox object (chkFill) is not part o f the group, so weomit the group parameter in its constructor call.
The set Layo ut (new GridLayo ut (1,6)) line instructs this panel to arrange components added to it in a grid that is 1row by 6 co lumns (1,6) . Each component added to the panel will occupy the same amount o f space in the grid.Components will be arranged in a GridLayout in the order in which they are added to the panel. The grid will be filledfrom left to right, and from top to bottom.
Now we need to fulfill the promise we made when implementing the Resettable interface in creating the ActionPanelclass. We must implement the reset Co mpo nent s() method. Edit your code as shown in blue :
CODE TO EDIT: ActionPanel
package ui.panels;
import interfaces.Resettable;import java.awt.Checkbox;import java.awt.CheckboxGroup;import java.awt.GridLayout;import java.awt.Panel;
public class ActionPanel extends Panel implements Resettable{
private CheckboxGroup actionGroup; private Checkbox chkDraw, chkMove, chkResize, chkRemove, chkChange, chkFill; private final String DRAW = "Draw"; private final String MOVE = "Move"; private final String RESIZE = "Resize"; private final String REMOVE = "Remove"; private final String CHANGE = "Change"; private final String FILL = "Fill"; public ActionPanel(){ actionGroup = new CheckboxGroup(); chkDraw = new Checkbox(DRAW, actionGroup, true); chkMove = new Checkbox(MOVE, actionGroup, false); chkResize = new Checkbox(RESIZE, actionGroup, false); chkRemove = new Checkbox(REMOVE, actionGroup, false); chkChange = new Checkbox(CHANGE, actionGroup, false); chkFill = new Checkbox(FILL, false); setLayout(new GridLayout(1,6)); add(chkDraw); add(chkMove); add(chkResize); add(chkRemove); add(chkChange); add(chkFill); } public void resetComponents() { // For each component, set the state. Only one of the first five can be true. chkDraw.setState(true); chkMove.setState(false); chkResize.setState(false); chkRemove.setState(false); chkChange.setState(false); chkFill.setState(false); }}
Save it.
This method sets appropriate default states for all o f the co mpo nent s on the panel. We're getting close to being ableto run our program. But first, we need to modify our GUIDemo applet so it can use this class. We have a lo t more to dostill, but this will allow us to see results as we go. Edit GUIDemo, adding the code shown in blue and removing thecode shown in red:
CODE TO EDIT: GUIDemo
package ui.applet;
import java.applet.Applet;import java.awt.*;import java.awt.event.*;import ui.panels.ActionPanel;
public class GUIDemo extends Applet implements ItemListener{ private final String DRAW = "Draw"; Checkbox draw; ActionPanel actionPanel; public void init(){ Checkbox draw = new Checkbox(DRAW); add(draw); draw.addItemListener(this); resize(600,400); actionPanel = new ActionPanel(); add(actionPanel); } public void itemStateChanged(ItemEvent e){ System.out.println("I see you now!"); if (e.getSource() == draw) System.out.println("I know you clicked " + e.getItem().toString()); } }
OBSERVE: GUIDemo
package ui.applet;
import java.applet.Applet;import ui.panels.ActionPanel;
public class GUIDemo extends Applet { ActionPanel actionPanel; public void init() { resize(600,400); actionPanel = new ActionPanel(); add(actionPanel); }}
Now our GUIDemo applet will look like the listing above. We created a new Act io nPanel object, added it to the applet,and named it act io nPanel.
Save all o f your files and run the applet:
You can click on any o f the first five checkboxes (which are configured as radio buttons), but only one o f them will beselected at a time. The last checkbox (Fill) can be set and unset regardless o f the o ther checkbox states, because wedidn't add it to the Checkbo xGro up object.
We'll incorporate a bit more modularization now, to keep as much o f the actual program operation as we can, out o fthe applet code. Let's create a MainPanel panel to ho ld the ActionPanel and any o ther panels we want to place.Afterward, we can add this MainPanel to our applet and all o f the o ther panels will be added automatically. Create anew class named MainPanel in the ui.panels package . It should extend java.awt .Panel and implement theReset t able interface, as shown:
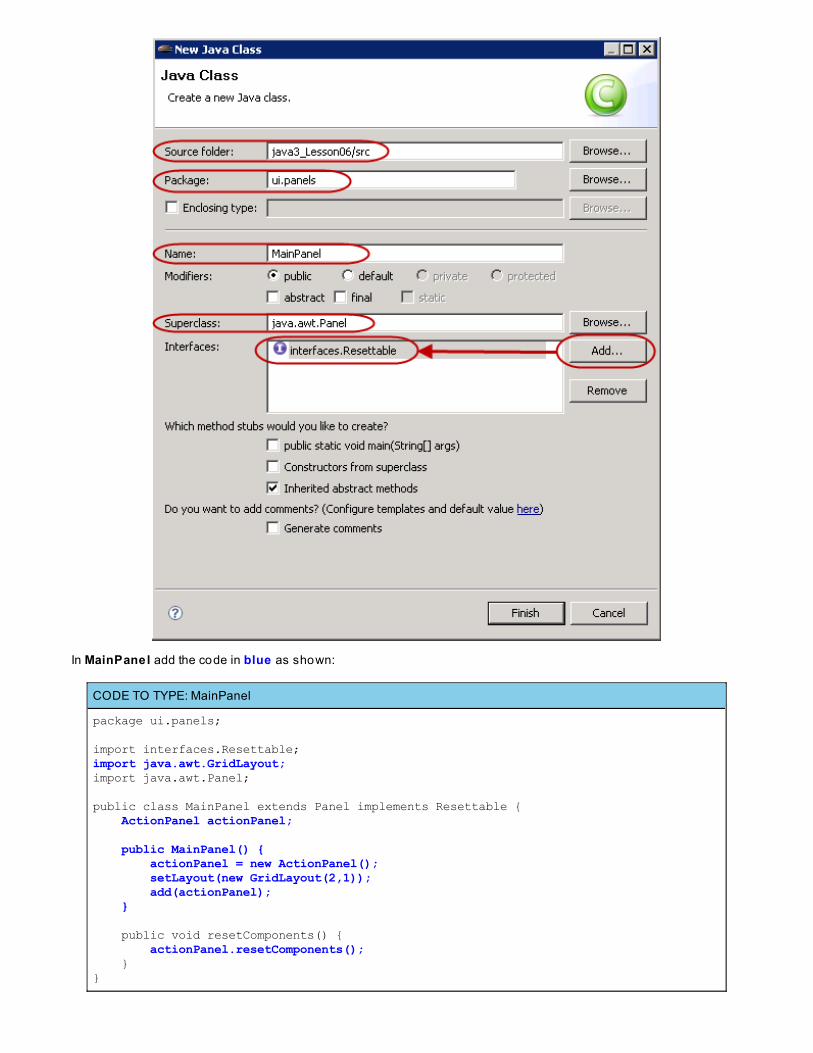
In MainPanel add the code in blue as shown:
CODE TO TYPE: MainPanel
package ui.panels;
import interfaces.Resettable;import java.awt.GridLayout;import java.awt.Panel;
public class MainPanel extends Panel implements Resettable { ActionPanel actionPanel; public MainPanel() { actionPanel = new ActionPanel(); setLayout(new GridLayout(2,1)); add(actionPanel); } public void resetComponents() { actionPanel.resetComponents(); }}
OBSERVE: MainPanel
package ui.panels;
import interfaces.Resettable;import java.awt.GridLayout;import java.awt.Panel;
public class MainPanel extends Panel implements Resettable { ActionPanel actionPanel; public MainPanel() { actionPanel = new ActionPanel(); setLayout(new GridLayout(2,1)); add(actionPanel); } public void resetComponents() { actionPanel.resetComponents(); }}
Here we create a new Act io nPanel object named act io nPanel and add it to this panel. We use a GridLayo ut thatsets our MainPanel to two rows by one co lumn (2,1) in each row. This leaves room to add another panel later.
The reset Co mpo nent s() method is a pass-through method that passes the message along to the ActionPanelobject. When this method is called, it in turn calls the ActionPanel's reset Co mpo nent s() method.
Save the MainPanel class and then modify the GUIDemo class, adding the blue code and removing the redcode as shown:
CODE TO EDIT: GUIDemo
package ui.applet;
import interfaces.Resettable;import java.applet.Applet;import ui.panels.ActionPanel;import ui.panels.MainPanel;
public class GUIDemo extends Applet implements Resettable{ ActionPanel actionPanel; MainPanel mainPanel; public void init() { resize(600,400); actionPanel = new ActionPanel(); add(actionPanel); mainPanel = new MainPanel(); add(mainPanel); } public void resetComponents(){ mainPanel.resetComponents(); }}
Save it.
OBSERVE: GUIDemo
package ui.applet;
import interfaces.Resettable;import java.applet.Applet;import ui.panels.MainPanel;
public class GUIDemo extends Applet implements Resettable{ MainPanel mainPanel; public void init() { resize(600, 400); mainPanel = new MainPanel(); add(mainPanel); } public void resetComponents() { mainPanel.resetComponents(); }}
We replace ActionPanel with MainPanel and actionPanel with mainPanel. We implement the Resettable interface andits required method, reset Co mpo nent s() . This gives us the ability to tell the GUIDemo applet to have themainPanel reset its components whenever this method is called.
Save all o f your files and run the GUIDemo applet. The applet looks the same, but our structural changes make itmore modular and easier to maintain in the future.
Now let's create the Model class for this applet and start making the applet work for us!
In the mo del package, create a new class named Mo del. This class should implement the Resettable interface asshown:
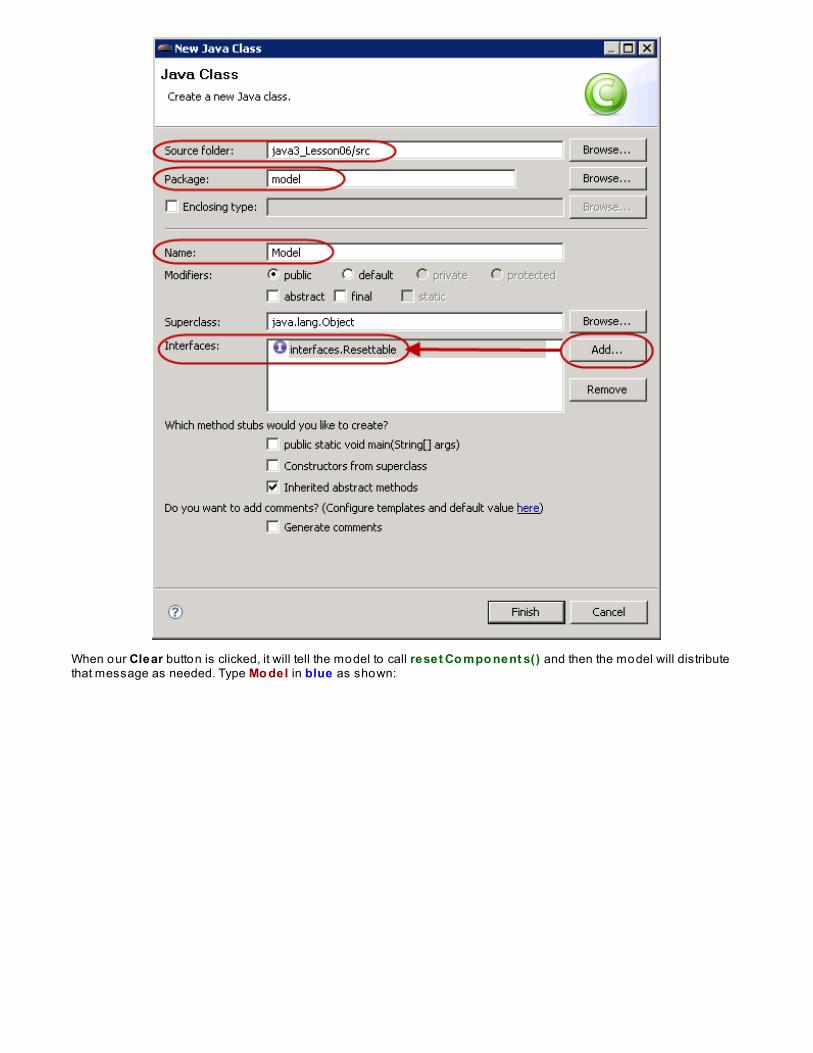
When our Clear button is clicked, it will tell the model to call reset Co mpo nent s() and then the model will distributethat message as needed. Type Mo del in blue as shown:
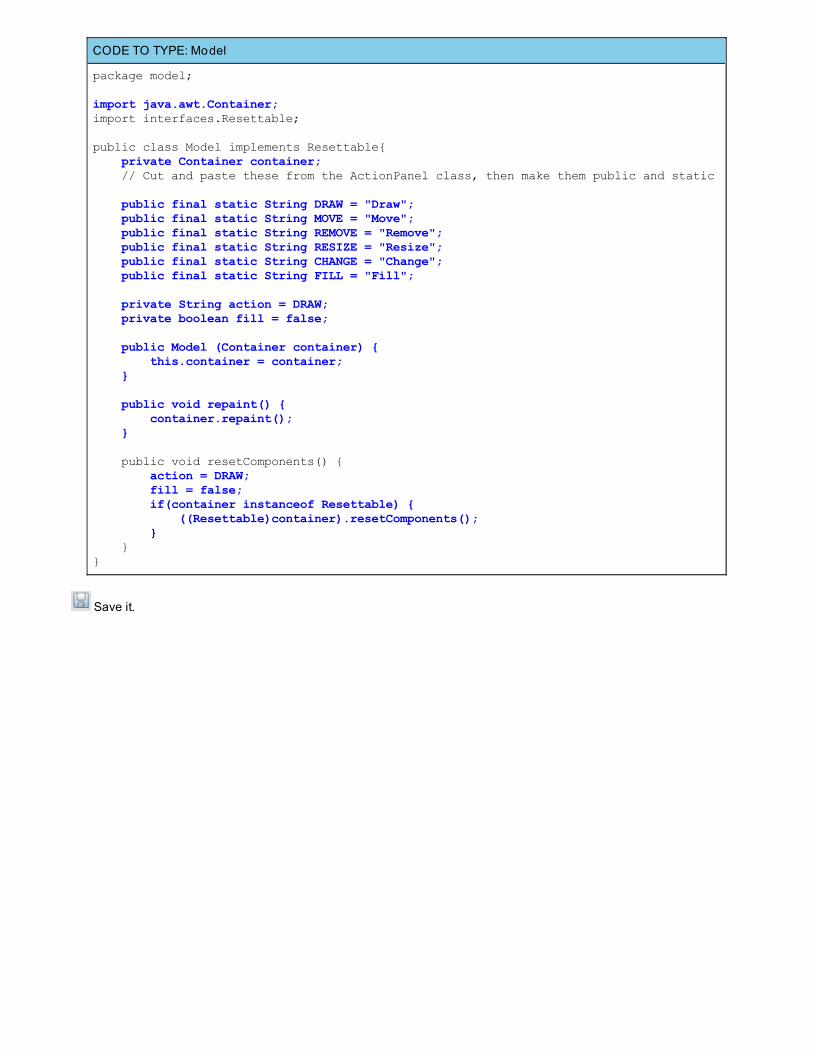
CODE TO TYPE: Model
package model;
import java.awt.Container; import interfaces.Resettable;
public class Model implements Resettable{ private Container container; // Cut and paste these from the ActionPanel class, then make them public and static public final static String DRAW = "Draw"; public final static String MOVE = "Move"; public final static String REMOVE = "Remove"; public final static String RESIZE = "Resize"; public final static String CHANGE = "Change"; public final static String FILL = "Fill"; private String action = DRAW; private boolean fill = false; public Model (Container container) { this.container = container; } public void repaint() { container.repaint(); } public void resetComponents() { action = DRAW; fill = false; if(container instanceof Resettable) { ((Resettable)container).resetComponents(); } }}
Save it.
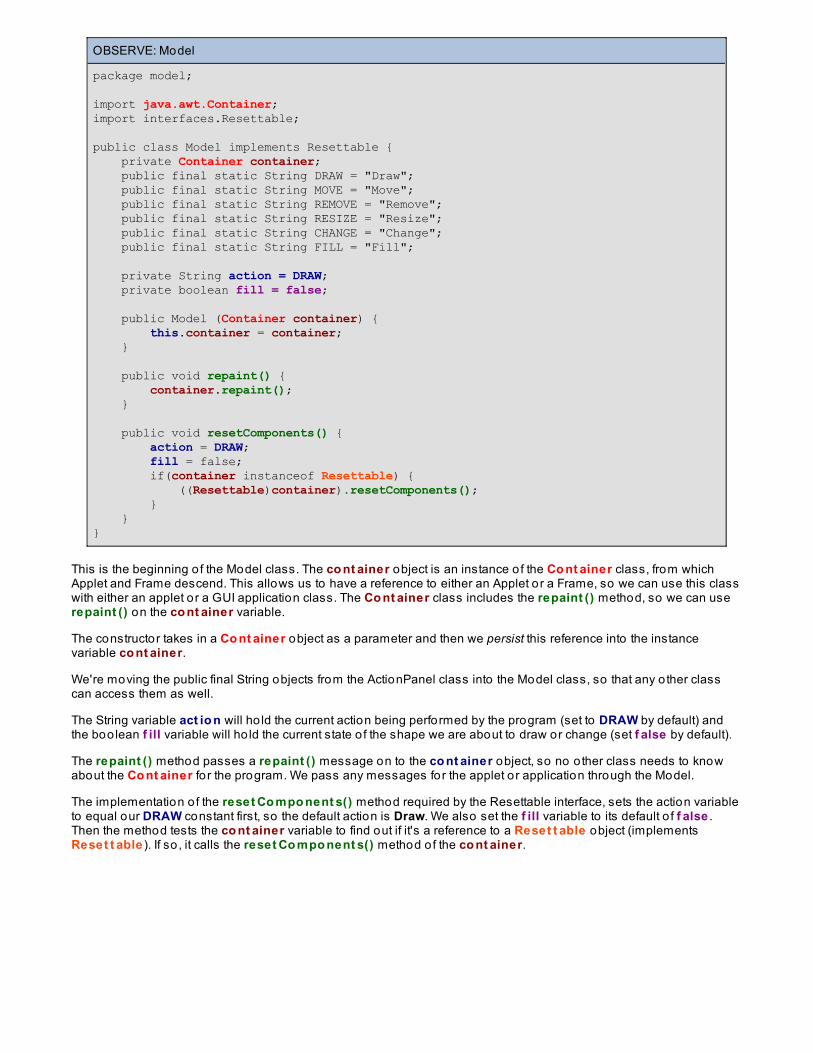
OBSERVE: Model
package model;
import java.awt.Container; import interfaces.Resettable;
public class Model implements Resettable { private Container container; public final static String DRAW = "Draw"; public final static String MOVE = "Move"; public final static String REMOVE = "Remove"; public final static String RESIZE = "Resize"; public final static String CHANGE = "Change"; public final static String FILL = "Fill";
private String action = DRAW; private boolean fill = false; public Model (Container container) { this.container = container; } public void repaint() { container.repaint(); } public void resetComponents() { action = DRAW; fill = false; if(container instanceof Resettable) { ((Resettable)container).resetComponents(); } }}
This is the beginning o f the Model class. The co nt ainer object is an instance o f the Co nt ainer class, from whichApplet and Frame descend. This allows us to have a reference to either an Applet or a Frame, so we can use this classwith either an applet or a GUI application class. The Co nt ainer class includes the repaint () method, so we can userepaint () on the co nt ainer variable.
The constructor takes in a Co nt ainer object as a parameter and then we persist this reference into the instancevariable co nt ainer.
We're moving the public final String objects from the ActionPanel class into the Model class, so that any o ther classcan access them as well.
The String variable act io n will ho ld the current action being performed by the program (set to DRAW by default) andthe boo lean f ill variable will ho ld the current state o f the shape we are about to draw or change (set f alse by default).
The repaint () method passes a repaint () message on to the co nt ainer object, so no o ther class needs to knowabout the Co nt ainer fo r the program. We pass any messages for the applet or application through the Model.
The implementation o f the reset Co mpo nent s() method required by the Resettable interface, sets the action variableto equal our DRAW constant first, so the default action is Draw. We also set the f ill variable to its default o f f alse .Then the method tests the co nt ainer variable to find out if it's a reference to a Reset t able object (implementsReset t able ). If so , it calls the reset Co mpo nent s() method o f the co nt ainer.

Note
((Reset t able )co nt ainer).reset Co mpo nent s() ; casts the co nt ainer to a Reset t able object, so thatwe can call its reset Co mpo nent s() method. A Co nt ainer object does not have areset Co mpo nent s() method, but a Co nt ainer subclass that implements Reset t able does. Payattention to the position o f the parentheses. We are casting the co nt ainer object to a Reset t ableobject, which allows us to access the co nt ainer object's Reset t able methods for this statement in ourcode. Then we call the reset Co mpo nent s() method on that object. If we did not have the outside set o fparentheses, we would be trying to cast the returned value o f the reset Co mpo nent s() method and wewould get an error message at compile-time because reset Co mpo nent s() returns vo id. Try removingthe parentheses and see what happens.
We aren't quite finished working with this class. Let's add the set t ers and get t ers, and a t o St ring() method to helpwith debugging. Edit the code in Mo del as shown in blue :
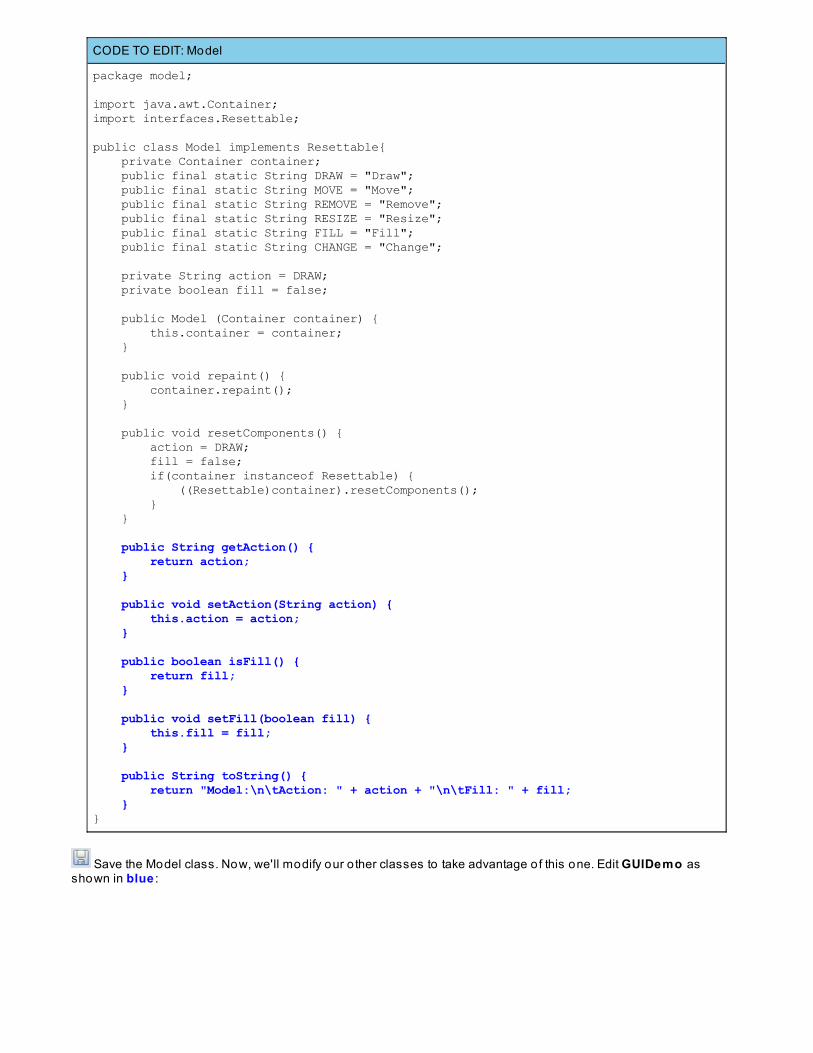
CODE TO EDIT: Model
package model;
import java.awt.Container; import interfaces.Resettable;
public class Model implements Resettable{ private Container container; public final static String DRAW = "Draw"; public final static String MOVE = "Move"; public final static String REMOVE = "Remove"; public final static String RESIZE = "Resize"; public final static String FILL = "Fill"; public final static String CHANGE = "Change"; private String action = DRAW; private boolean fill = false; public Model (Container container) { this.container = container; } public void repaint() { container.repaint(); } public void resetComponents() { action = DRAW; fill = false; if(container instanceof Resettable) { ((Resettable)container).resetComponents(); } } public String getAction() { return action; } public void setAction(String action) { this.action = action; } public boolean isFill() { return fill; } public void setFill(boolean fill) { this.fill = fill; } public String toString() { return "Model:\n\tAction: " + action + "\n\tFill: " + fill; }}
Save the Model class. Now, we'll modify our o ther classes to take advantage o f this one. Edit GUIDemo asshown in blue :
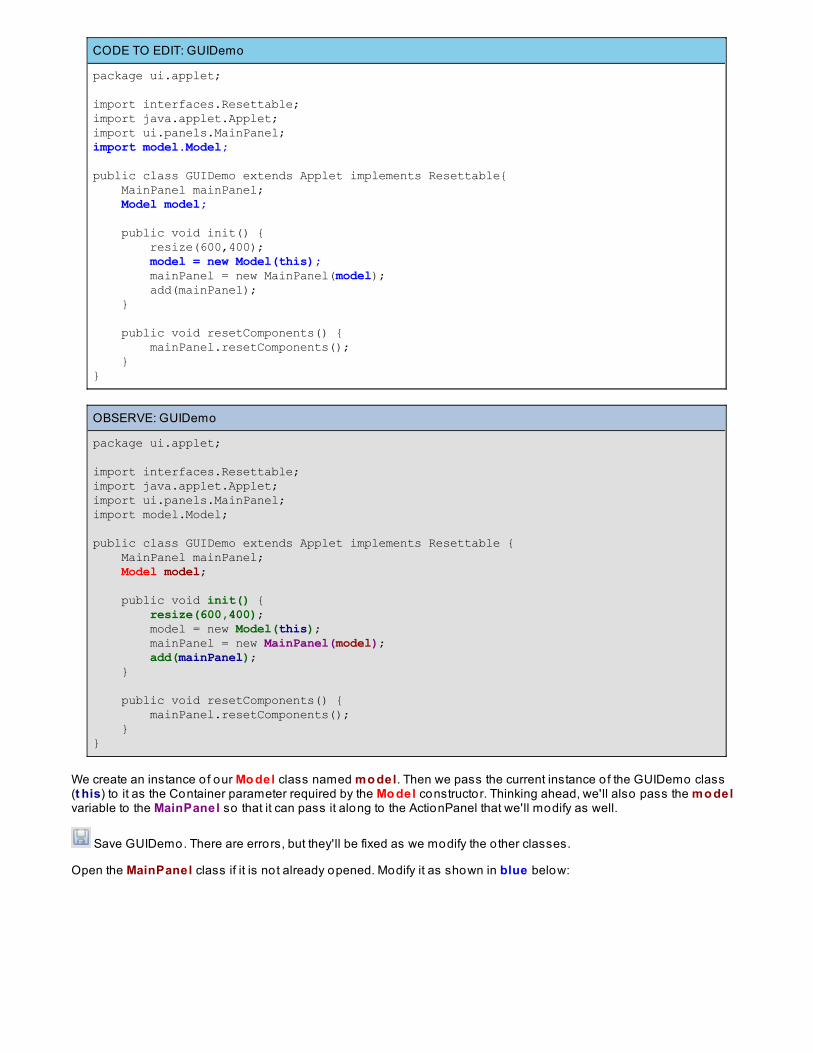
CODE TO EDIT: GUIDemo
package ui.applet;
import interfaces.Resettable;import java.applet.Applet;import ui.panels.MainPanel;import model.Model;
public class GUIDemo extends Applet implements Resettable{ MainPanel mainPanel; Model model; public void init() { resize(600,400); model = new Model(this); mainPanel = new MainPanel(model); add(mainPanel); } public void resetComponents() { mainPanel.resetComponents(); }}
OBSERVE: GUIDemo
package ui.applet;
import interfaces.Resettable;import java.applet.Applet;import ui.panels.MainPanel;import model.Model;
public class GUIDemo extends Applet implements Resettable { MainPanel mainPanel; Model model; public void init() { resize(600,400); model = new Model(this); mainPanel = new MainPanel(model); add(mainPanel); } public void resetComponents() { mainPanel.resetComponents(); }}
We create an instance o f our Mo del class named mo del. Then we pass the current instance o f the GUIDemo class(t his) to it as the Container parameter required by the Mo del constructor. Thinking ahead, we'll also pass the mo delvariable to the MainPanel so that it can pass it along to the ActionPanel that we'll modify as well.
Save GUIDemo. There are errors, but they'll be fixed as we modify the o ther classes.
Open the MainPanel class if it is not already opened. Modify it as shown in blue below:
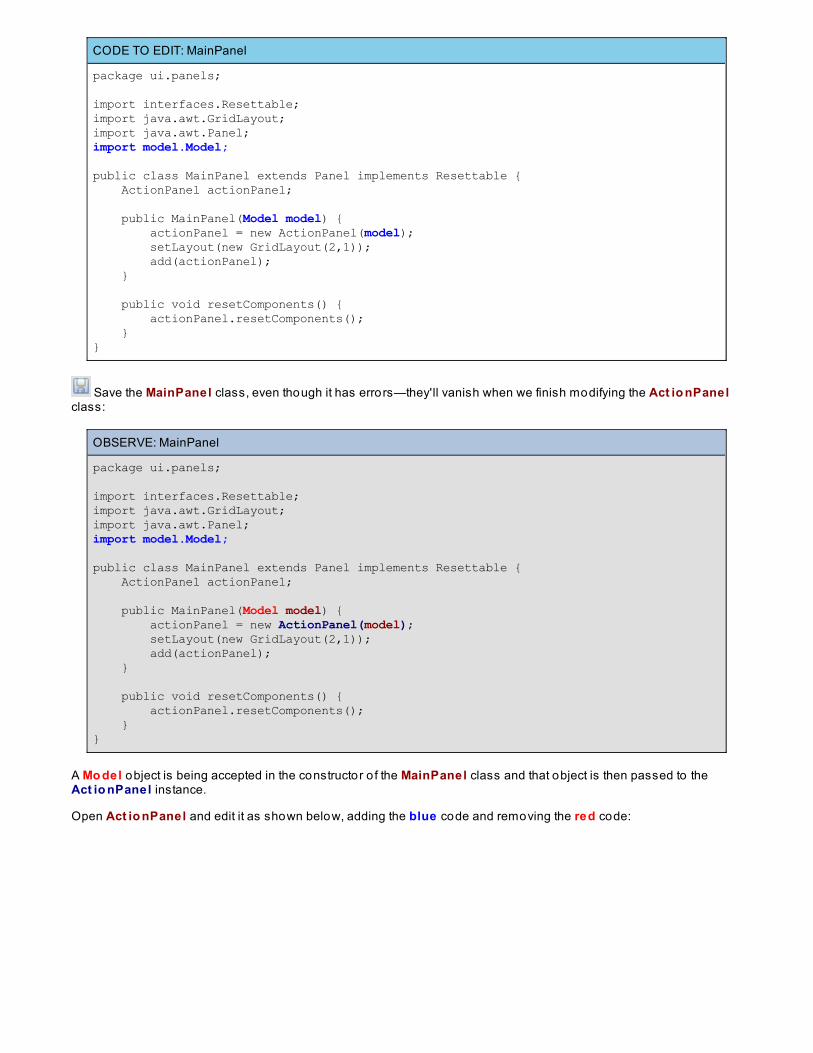
CODE TO EDIT: MainPanel
package ui.panels;
import interfaces.Resettable;import java.awt.GridLayout;import java.awt.Panel;import model.Model;
public class MainPanel extends Panel implements Resettable { ActionPanel actionPanel; public MainPanel(Model model) { actionPanel = new ActionPanel(model); setLayout(new GridLayout(2,1)); add(actionPanel); } public void resetComponents() { actionPanel.resetComponents(); }}
Save the MainPanel class, even though it has errors—they'll vanish when we finish modifying the Act io nPanelclass:
OBSERVE: MainPanel
package ui.panels;
import interfaces.Resettable;import java.awt.GridLayout;import java.awt.Panel;import model.Model;
public class MainPanel extends Panel implements Resettable { ActionPanel actionPanel; public MainPanel(Model model) { actionPanel = new ActionPanel(model); setLayout(new GridLayout(2,1)); add(actionPanel); } public void resetComponents() { actionPanel.resetComponents(); }}
A Mo del object is being accepted in the constructor o f the MainPanel class and that object is then passed to theAct io nPanel instance.
Open Act io nPanel and edit it as shown below, adding the blue code and removing the red code:
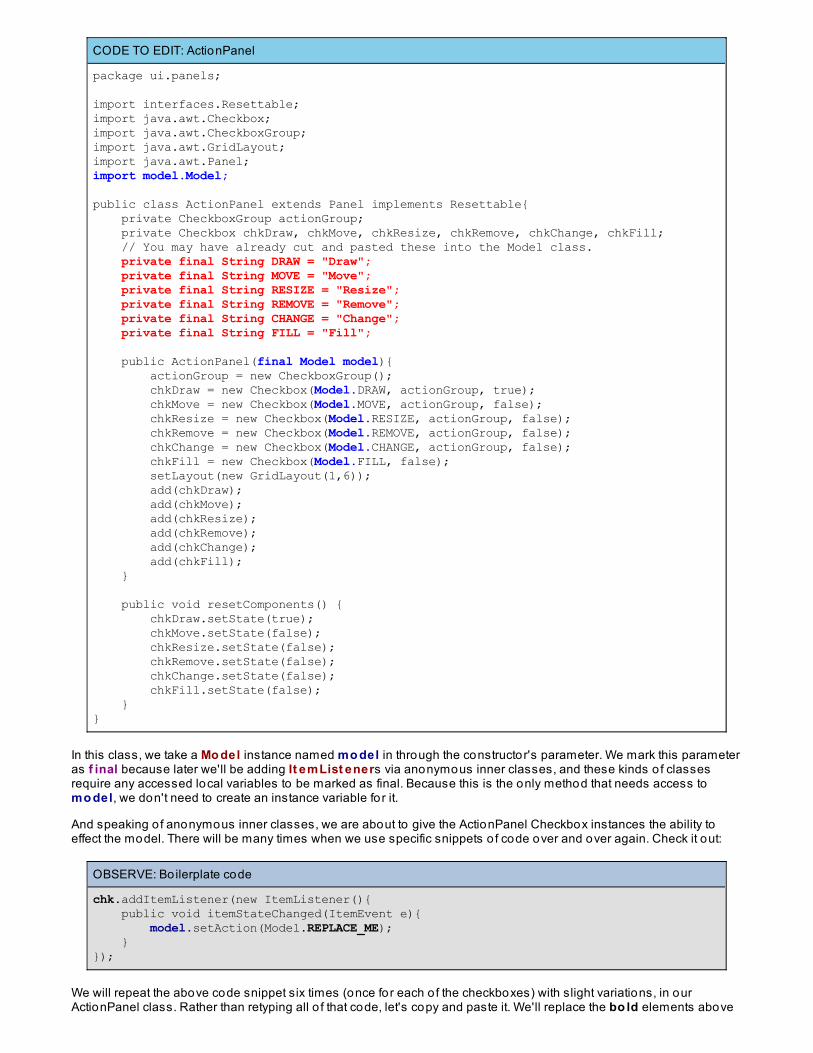
CODE TO EDIT: ActionPanel
package ui.panels;
import interfaces.Resettable;import java.awt.Checkbox;import java.awt.CheckboxGroup;import java.awt.GridLayout;import java.awt.Panel;import model.Model;
public class ActionPanel extends Panel implements Resettable{ private CheckboxGroup actionGroup; private Checkbox chkDraw, chkMove, chkResize, chkRemove, chkChange, chkFill; // You may have already cut and pasted these into the Model class. private final String DRAW = "Draw"; private final String MOVE = "Move"; private final String RESIZE = "Resize"; private final String REMOVE = "Remove"; private final String CHANGE = "Change"; private final String FILL = "Fill"; public ActionPanel(final Model model){ actionGroup = new CheckboxGroup(); chkDraw = new Checkbox(Model.DRAW, actionGroup, true); chkMove = new Checkbox(Model.MOVE, actionGroup, false); chkResize = new Checkbox(Model.RESIZE, actionGroup, false); chkRemove = new Checkbox(Model.REMOVE, actionGroup, false); chkChange = new Checkbox(Model.CHANGE, actionGroup, false); chkFill = new Checkbox(Model.FILL, false); setLayout(new GridLayout(1,6)); add(chkDraw); add(chkMove); add(chkResize); add(chkRemove); add(chkChange); add(chkFill); } public void resetComponents() { chkDraw.setState(true); chkMove.setState(false); chkResize.setState(false); chkRemove.setState(false); chkChange.setState(false); chkFill.setState(false); }}
In this class, we take a Mo del instance named mo del in through the constructor's parameter. We mark this parameteras f inal because later we'll be adding It emList eners via anonymous inner classes, and these kinds o f classesrequire any accessed local variables to be marked as final. Because this is the only method that needs access tomo del, we don't need to create an instance variable for it.
And speaking o f anonymous inner classes, we are about to give the ActionPanel Checkbox instances the ability toeffect the model. There will be many times when we use specific snippets o f code over and over again. Check it out:
OBSERVE: Bo ilerplate code
chk.addItemListener(new ItemListener(){ public void itemStateChanged(ItemEvent e){ model.setAction(Model.REPLACE_ME); }});
We will repeat the above code snippet six times (once for each o f the checkboxes) with slight variations, in ourActionPanel class. Rather than retyping all o f that code, let's copy and paste it. We'll replace the bo ld elements above
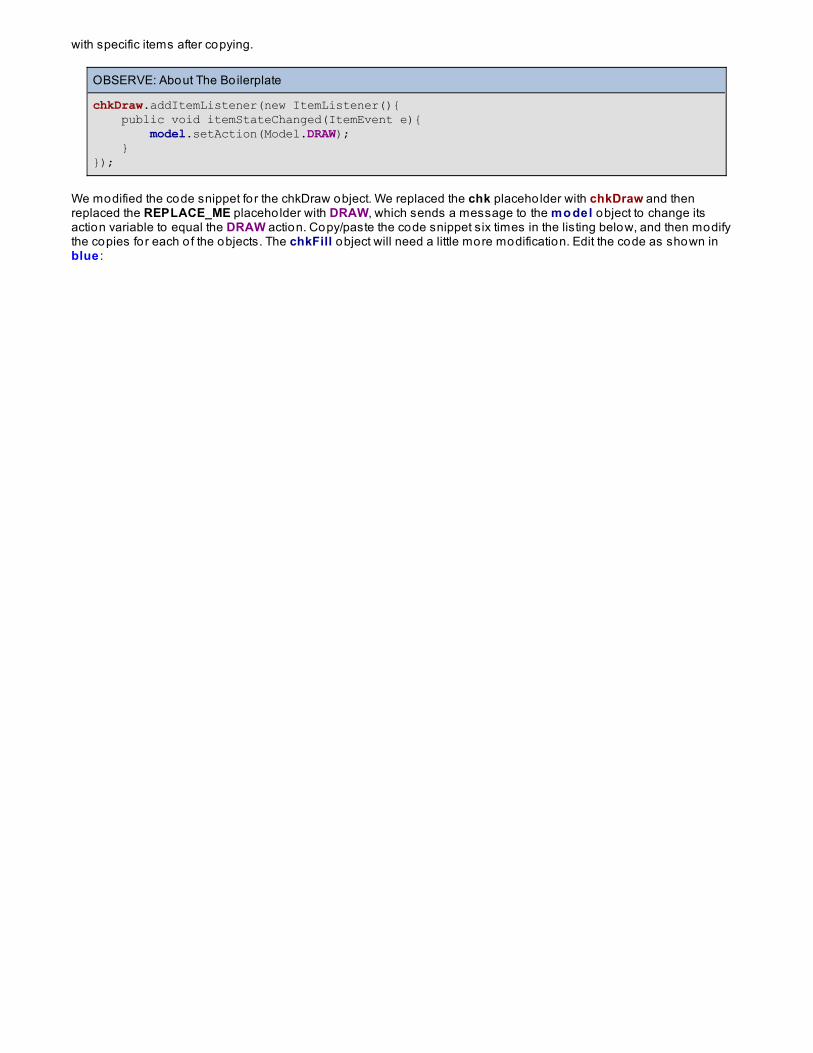
with specific items after copying.
OBSERVE: About The Bo ilerplate
chkDraw.addItemListener(new ItemListener(){ public void itemStateChanged(ItemEvent e){ model.setAction(Model.DRAW); }});
We modified the code snippet fo r the chkDraw object. We replaced the chk placeho lder with chkDraw and thenreplaced the REPLACE_ME placeho lder with DRAW, which sends a message to the mo del object to change itsaction variable to equal the DRAW action. Copy/paste the code snippet six times in the listing below, and then modifythe copies for each o f the objects. The chkFill object will need a little more modification. Edit the code as shown inblue :
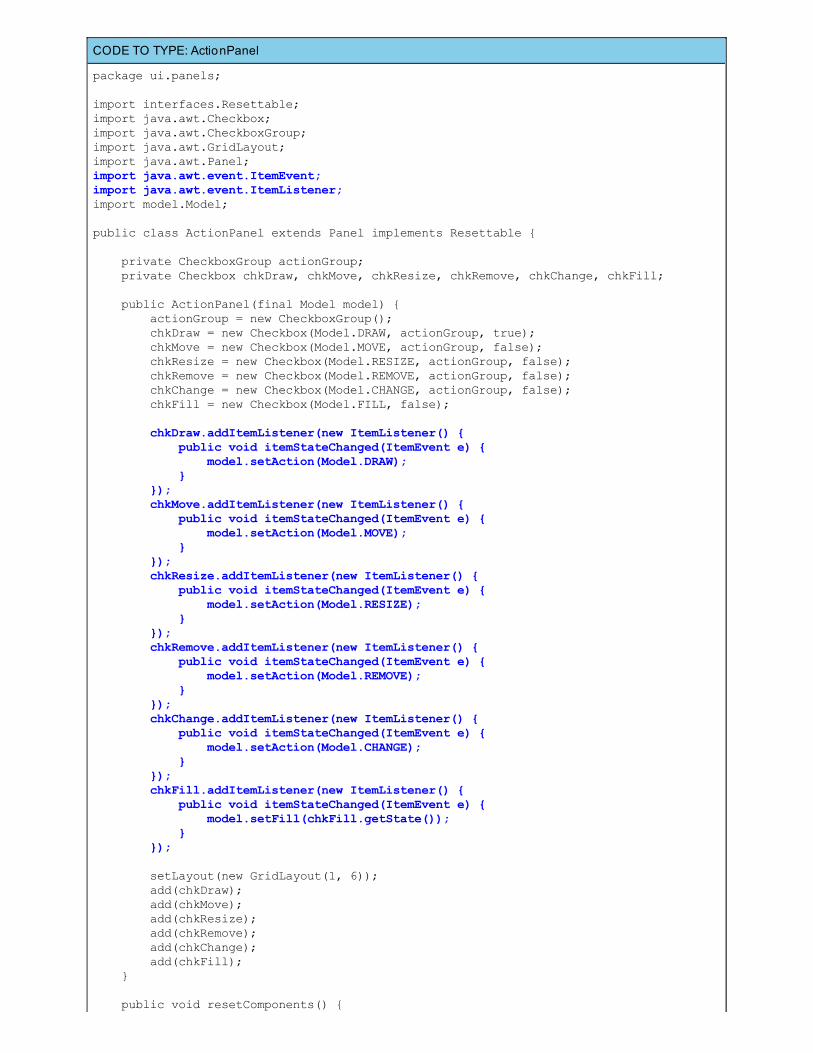
CODE TO TYPE: ActionPanel
package ui.panels;
import interfaces.Resettable;import java.awt.Checkbox;import java.awt.CheckboxGroup;import java.awt.GridLayout;import java.awt.Panel;import java.awt.event.ItemEvent;import java.awt.event.ItemListener;import model.Model;
public class ActionPanel extends Panel implements Resettable {
private CheckboxGroup actionGroup; private Checkbox chkDraw, chkMove, chkResize, chkRemove, chkChange, chkFill; public ActionPanel(final Model model) { actionGroup = new CheckboxGroup(); chkDraw = new Checkbox(Model.DRAW, actionGroup, true); chkMove = new Checkbox(Model.MOVE, actionGroup, false); chkResize = new Checkbox(Model.RESIZE, actionGroup, false); chkRemove = new Checkbox(Model.REMOVE, actionGroup, false); chkChange = new Checkbox(Model.CHANGE, actionGroup, false); chkFill = new Checkbox(Model.FILL, false); chkDraw.addItemListener(new ItemListener() { public void itemStateChanged(ItemEvent e) { model.setAction(Model.DRAW); } }); chkMove.addItemListener(new ItemListener() { public void itemStateChanged(ItemEvent e) { model.setAction(Model.MOVE); } }); chkResize.addItemListener(new ItemListener() { public void itemStateChanged(ItemEvent e) { model.setAction(Model.RESIZE); } }); chkRemove.addItemListener(new ItemListener() { public void itemStateChanged(ItemEvent e) { model.setAction(Model.REMOVE); } }); chkChange.addItemListener(new ItemListener() { public void itemStateChanged(ItemEvent e) { model.setAction(Model.CHANGE); } }); chkFill.addItemListener(new ItemListener() { public void itemStateChanged(ItemEvent e) { model.setFill(chkFill.getState()); } }); setLayout(new GridLayout(1, 6)); add(chkDraw); add(chkMove); add(chkResize); add(chkRemove); add(chkChange); add(chkFill); } public void resetComponents() {

chkDraw.setState(true); chkMove.setState(false); chkResize.setState(false); chkRemove.setState(false); chkChange.setState(false); chkFill.setState(false); }}
The chkFill instance also needs an It emList ener, but it is changing the f ill variable in the mo del object. We set thisvariable to equal the state o f the chkFill instance. So, if the chkFill instance is checked, then the f ill variable o f themo del instance will be true.
Save the Act io nPanel class and edit the GUIDemo class as shown in blue :
CODE TO EDIT: GUIDemo
package ui.applet;
import interfaces.Resettable;import java.applet.Applet;import ui.panels.MainPanel;import model.Model;import java.awt.Graphics;
public class GUIDemo extends Applet implements Resettable{ MainPanel mainPanel; Model model; public void init() { resize(600,400); model = new Model(this); mainPanel = new MainPanel(model); add(mainPanel); } public void paint(Graphics g){ System.out.println(model); } public void resetComponents() { mainPanel.resetComponents(); }}
Save and run it. Change some of the checkboxes manually, then resize the applet. You can see in the conso le thatthe model has changed states. Also, dragging the appletviewer window border to manually resize the applet fo rces arepaint () .
This has been a long and lesson, so for now, just take a look at how the pieces are tied together in the UML ClassDiagram for this part o f the lesson:
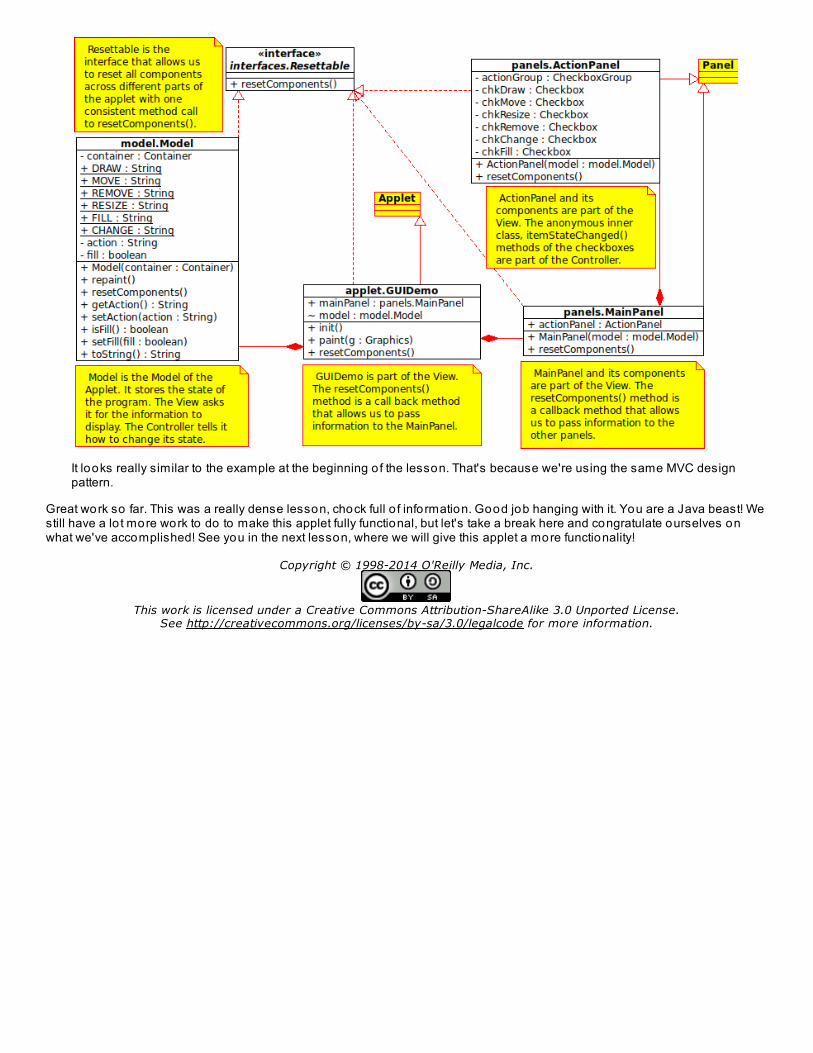
It looks really similar to the example at the beginning o f the lesson. That's because we're using the same MVC designpattern.
Great work so far. This was a really dense lesson, chock full o f information. Good job hanging with it. You are a Java beast! Westill have a lo t more work to do to make this applet fully functional, but let's take a break here and congratulate ourselves onwhat we've accomplished! See you in the next lesson, where we will give this applet a more functionality!
Copyright © 1998-2014 O'Reilly Media, Inc.
This work is licensed under a Creative Commons Attribution-ShareAlike 3.0 Unported License.See http://creativecommons.org/licenses/by-sa/3.0/legalcode for more information.
Interfaces: Listeners and Adapters (continued)Lesson Objectives
When you complete this lesson, you will be able to :
use the MVC pattern and interfaces.demonstrate the similarities between Oval and Rectangle classes.implement inheritance.demonstrate the advantages o f using an Adapter class instead o f a Listener interface.
Building the ShapesIn this section, we'll look again at our pro ject from the previous lesson and trace the way our Java classes aredeveloping. In the last homework assignment, we asked you to think about abstract classes and abstract methods foryour Shape class, and then make adjustments to your classes based on what you had learned.
Take work with the Shape class that we modified earlier. It's now abstract. Again, you're not required to use our designfor this next pro ject, but you can if you like. If you do use your own design, make sure it includes all o f the samefunctionality that is present in ours. This might be a bit tough, but, hey, you like a challenge, right? We encourage criticalthinking, experimentation, and exploration. If you get lost along the way, you can always come back to this design.
Let's start by creating a new pro ject named Java3_Lesso n07 . Copy the src fo lder from your Java3_Lesso n06pro ject into this new pro ject.
Note Be sure to incorporate the changes you made in your last homework pro ject.
Create or modify a Shape class in the shapes package. It will look something like this:
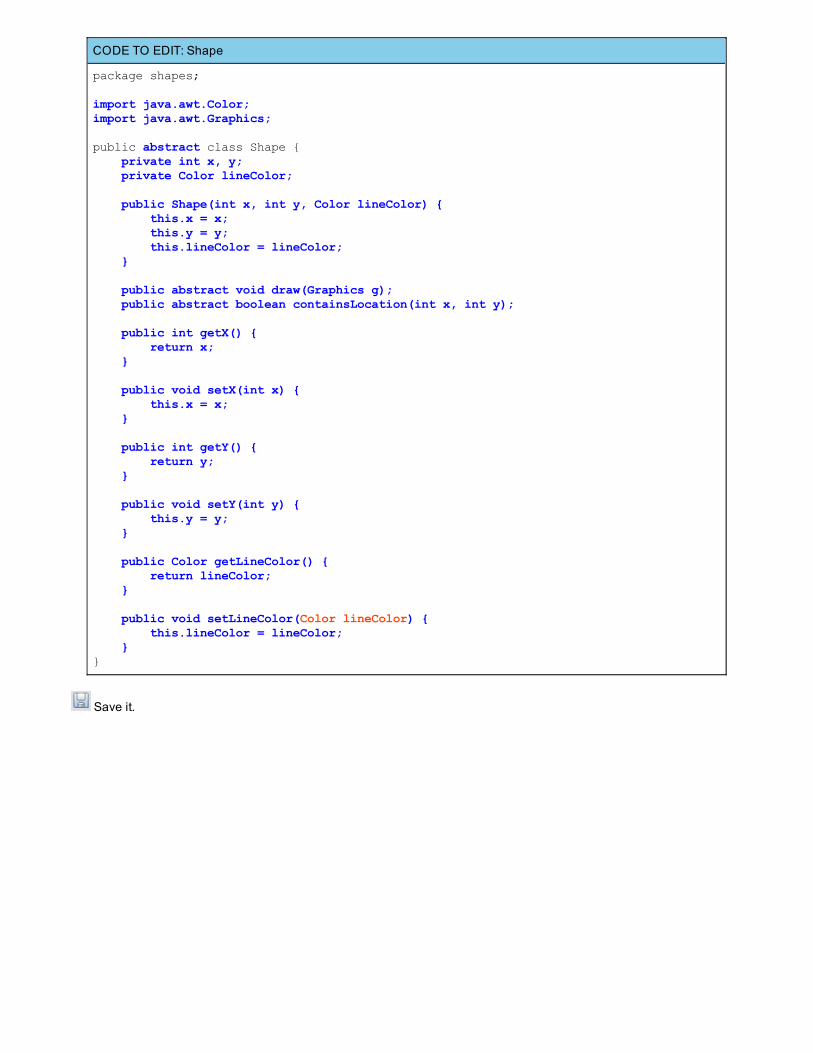
CODE TO EDIT: Shape
package shapes;
import java.awt.Color;import java.awt.Graphics;
public abstract class Shape { private int x, y; private Color lineColor; public Shape(int x, int y, Color lineColor) { this.x = x; this.y = y; this.lineColor = lineColor; } public abstract void draw(Graphics g); public abstract boolean containsLocation(int x, int y); public int getX() { return x; } public void setX(int x) { this.x = x; } public int getY() { return y; } public void setY(int y) { this.y = y; } public Color getLineColor() { return lineColor; } public void setLineColor(Color lineColor) { this.lineColor = lineColor; }}
Save it.
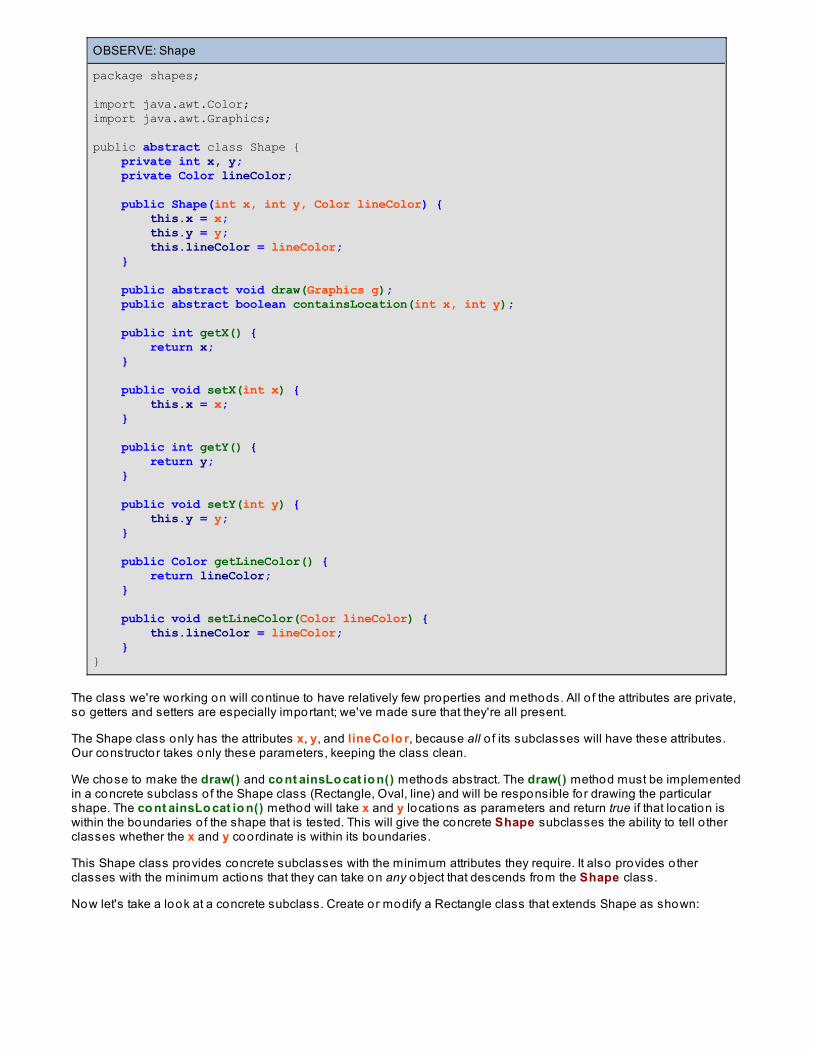
OBSERVE: Shape
package shapes;
import java.awt.Color;import java.awt.Graphics;
public abstract class Shape { private int x, y; private Color lineColor; public Shape(int x, int y, Color lineColor) { this.x = x; this.y = y; this.lineColor = lineColor; } public abstract void draw(Graphics g); public abstract boolean containsLocation(int x, int y); public int getX() { return x; } public void setX(int x) { this.x = x; } public int getY() { return y; } public void setY(int y) { this.y = y; } public Color getLineColor() { return lineColor; } public void setLineColor(Color lineColor) { this.lineColor = lineColor; }}
The class we're working on will continue to have relatively few properties and methods. All o f the attributes are private,so getters and setters are especially important; we've made sure that they're all present.
The Shape class only has the attributes x, y, and lineCo lo r, because all o f its subclasses will have these attributes.Our constructor takes only these parameters, keeping the class clean.
We chose to make the draw() and co nt ainsLo cat io n() methods abstract. The draw() method must be implementedin a concrete subclass o f the Shape class (Rectangle, Oval, line) and will be responsible for drawing the particularshape. The co nt ainsLo cat io n() method will take x and y locations as parameters and return true if that location iswithin the boundaries o f the shape that is tested. This will give the concrete Shape subclasses the ability to tell o therclasses whether the x and y coordinate is within its boundaries.
This Shape class provides concrete subclasses with the minimum attributes they require. It also provides o therclasses with the minimum actions that they can take on any object that descends from the Shape class.
Now let's take a look at a concrete subclass. Create or modify a Rectangle class that extends Shape as shown:
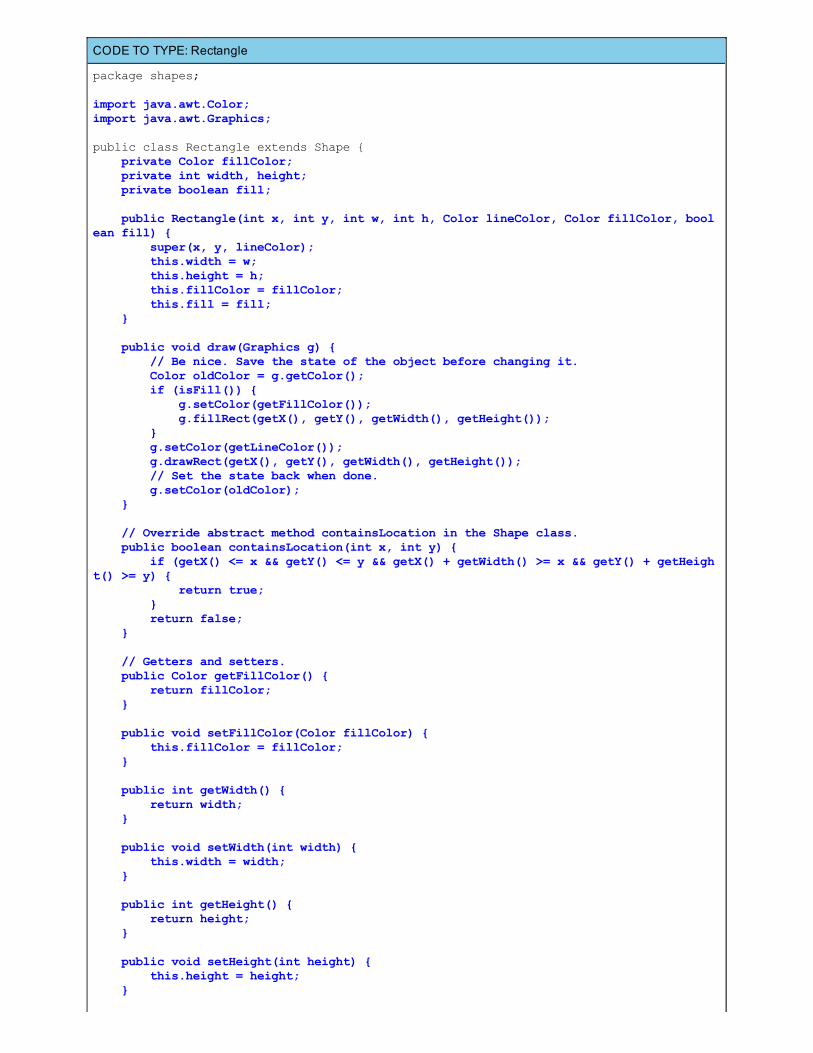
CODE TO TYPE: Rectangle
package shapes;
import java.awt.Color;import java.awt.Graphics;
public class Rectangle extends Shape { private Color fillColor; private int width, height; private boolean fill; public Rectangle(int x, int y, int w, int h, Color lineColor, Color fillColor, boolean fill) { super(x, y, lineColor); this.width = w; this.height = h; this.fillColor = fillColor; this.fill = fill; } public void draw(Graphics g) { // Be nice. Save the state of the object before changing it. Color oldColor = g.getColor(); if (isFill()) { g.setColor(getFillColor()); g.fillRect(getX(), getY(), getWidth(), getHeight()); } g.setColor(getLineColor()); g.drawRect(getX(), getY(), getWidth(), getHeight()); // Set the state back when done. g.setColor(oldColor); } // Override abstract method containsLocation in the Shape class. public boolean containsLocation(int x, int y) { if (getX() <= x && getY() <= y && getX() + getWidth() >= x && getY() + getHeight() >= y) { return true; } return false; } // Getters and setters. public Color getFillColor() { return fillColor; } public void setFillColor(Color fillColor) { this.fillColor = fillColor; } public int getWidth() { return width; } public void setWidth(int width) { this.width = width; } public int getHeight() { return height; } public void setHeight(int height) { this.height = height; }
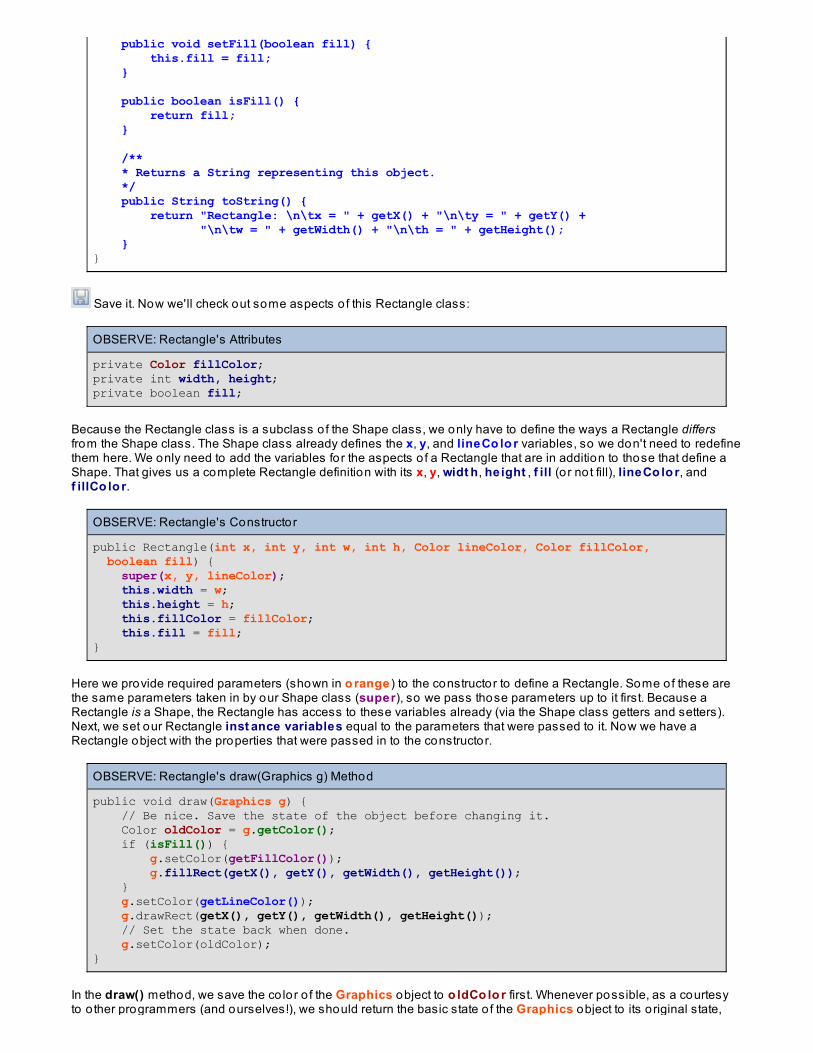
public void setFill(boolean fill) { this.fill = fill; } public boolean isFill() { return fill; } /** * Returns a String representing this object. */ public String toString() { return "Rectangle: \n\tx = " + getX() + "\n\ty = " + getY() + "\n\tw = " + getWidth() + "\n\th = " + getHeight(); }}
Save it. Now we'll check out some aspects o f this Rectangle class:
OBSERVE: Rectangle's Attributes
private Color fillColor;private int width, height;private boolean fill;
Because the Rectangle class is a subclass o f the Shape class, we only have to define the ways a Rectangle differsfrom the Shape class. The Shape class already defines the x, y, and lineCo lo r variables, so we don't need to redefinethem here. We only need to add the variables for the aspects o f a Rectangle that are in addition to those that define aShape. That gives us a complete Rectangle definition with its x, y, widt h, height , f ill (o r not fill), lineCo lo r, andf illCo lo r.
OBSERVE: Rectangle's Constructor
public Rectangle(int x, int y, int w, int h, Color lineColor, Color fillColor, boolean fill) { super(x, y, lineColor); this.width = w; this.height = h; this.fillColor = fillColor; this.fill = fill;}
Here we provide required parameters (shown in o range ) to the constructor to define a Rectangle. Some of these arethe same parameters taken in by our Shape class (super), so we pass those parameters up to it first. Because aRectangle is a Shape, the Rectangle has access to these variables already (via the Shape class getters and setters).Next, we set our Rectangle inst ance variables equal to the parameters that were passed to it. Now we have aRectangle object with the properties that were passed in to the constructor.
OBSERVE: Rectangle's draw(Graphics g) Method
public void draw(Graphics g) { // Be nice. Save the state of the object before changing it. Color oldColor = g.getColor(); if (isFill()) { g.setColor(getFillColor()); g.fillRect(getX(), getY(), getWidth(), getHeight()); } g.setColor(getLineColor()); g.drawRect(getX(), getY(), getWidth(), getHeight()); // Set the state back when done. g.setColor(oldColor);}
In the draw() method, we save the co lor o f the Graphics object to o ldCo lo r first. Whenever possible, as a courtesyto o ther programmers (and ourselves!), we should return the basic state o f the Graphics object to its original state,
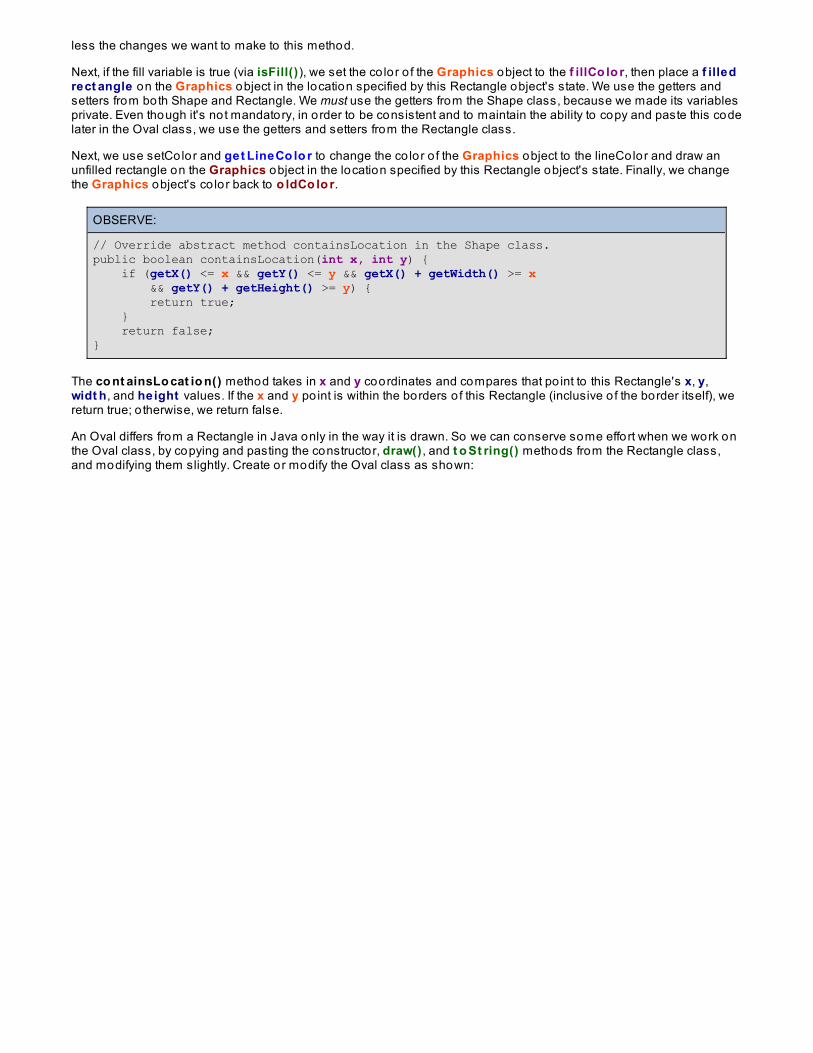
less the changes we want to make to this method.
Next, if the fill variable is true (via isFill()), we set the co lor o f the Graphics object to the f illCo lo r, then place a f illedrect angle on the Graphics object in the location specified by this Rectangle object's state. We use the getters andsetters from both Shape and Rectangle. We must use the getters from the Shape class, because we made its variablesprivate. Even though it's not mandatory, in order to be consistent and to maintain the ability to copy and paste this codelater in the Oval class, we use the getters and setters from the Rectangle class.
Next, we use setColor and get LineCo lo r to change the co lor o f the Graphics object to the lineColor and draw anunfilled rectangle on the Graphics object in the location specified by this Rectangle object's state. Finally, we changethe Graphics object's co lor back to o ldCo lo r.
OBSERVE:
// Override abstract method containsLocation in the Shape class.public boolean containsLocation(int x, int y) { if (getX() <= x && getY() <= y && getX() + getWidth() >= x && getY() + getHeight() >= y) { return true; } return false;}
The co nt ainsLo cat io n() method takes in x and y coordinates and compares that po int to this Rectangle's x, y,widt h, and height values. If the x and y po int is within the borders o f this Rectangle (inclusive o f the border itself), wereturn true; o therwise, we return false.
An Oval differs from a Rectangle in Java only in the way it is drawn. So we can conserve some effort when we work onthe Oval class, by copying and pasting the constructor, draw() , and t o St ring() methods from the Rectangle class,and modifying them slightly. Create or modify the Oval class as shown:
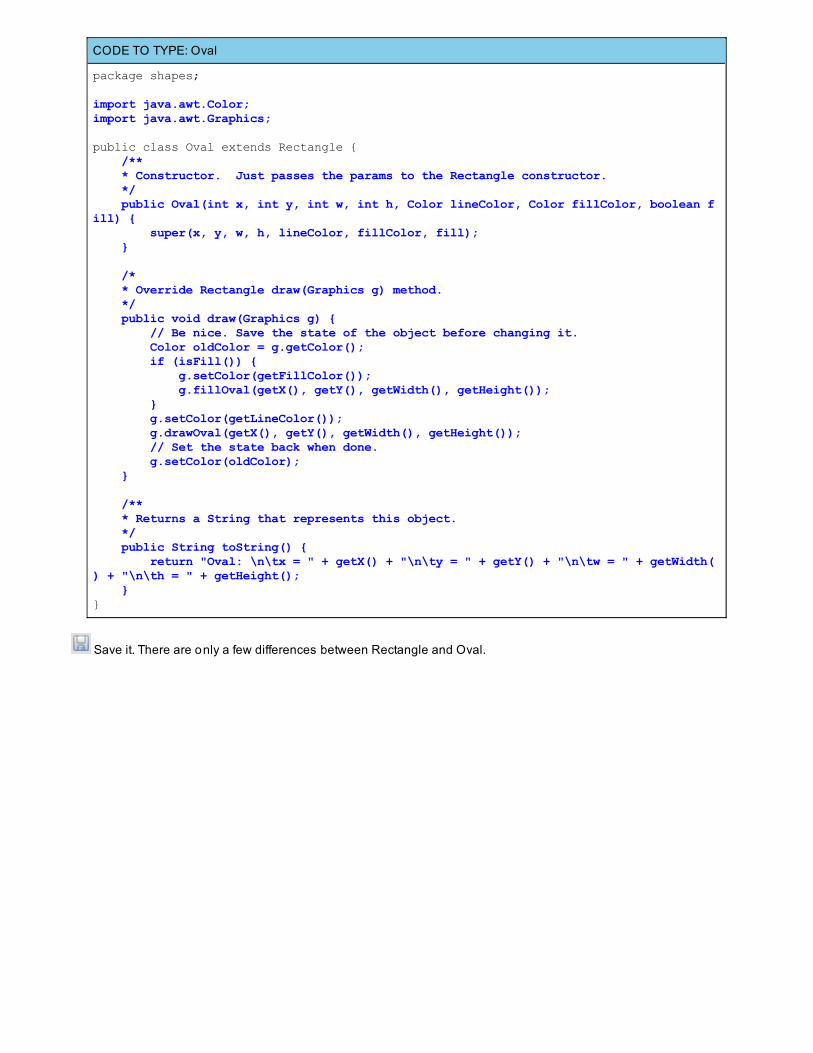
CODE TO TYPE: Oval
package shapes;
import java.awt.Color;import java.awt.Graphics;
public class Oval extends Rectangle { /** * Constructor. Just passes the params to the Rectangle constructor. */ public Oval(int x, int y, int w, int h, Color lineColor, Color fillColor, boolean fill) { super(x, y, w, h, lineColor, fillColor, fill); } /* * Override Rectangle draw(Graphics g) method. */ public void draw(Graphics g) { // Be nice. Save the state of the object before changing it. Color oldColor = g.getColor(); if (isFill()) { g.setColor(getFillColor()); g.fillOval(getX(), getY(), getWidth(), getHeight()); } g.setColor(getLineColor()); g.drawOval(getX(), getY(), getWidth(), getHeight()); // Set the state back when done. g.setColor(oldColor); } /** * Returns a String that represents this object. */ public String toString() { return "Oval: \n\tx = " + getX() + "\n\ty = " + getY() + "\n\tw = " + getWidth() + "\n\th = " + getHeight(); }}
Save it. There are only a few differences between Rectangle and Oval.
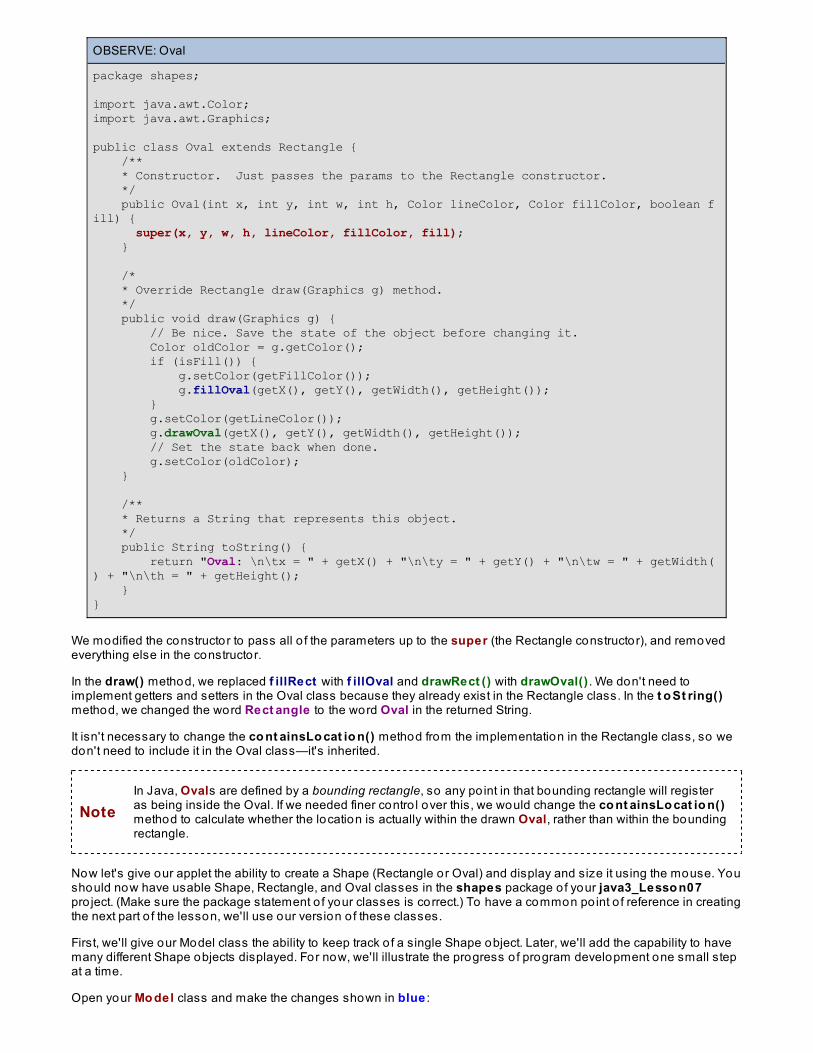
OBSERVE: Oval
package shapes;
import java.awt.Color;import java.awt.Graphics;
public class Oval extends Rectangle { /** * Constructor. Just passes the params to the Rectangle constructor. */ public Oval(int x, int y, int w, int h, Color lineColor, Color fillColor, boolean fill) { super(x, y, w, h, lineColor, fillColor, fill); } /* * Override Rectangle draw(Graphics g) method. */ public void draw(Graphics g) { // Be nice. Save the state of the object before changing it. Color oldColor = g.getColor(); if (isFill()) { g.setColor(getFillColor()); g.fillOval(getX(), getY(), getWidth(), getHeight()); } g.setColor(getLineColor()); g.drawOval(getX(), getY(), getWidth(), getHeight()); // Set the state back when done. g.setColor(oldColor); } /** * Returns a String that represents this object. */ public String toString() { return "Oval: \n\tx = " + getX() + "\n\ty = " + getY() + "\n\tw = " + getWidth() + "\n\th = " + getHeight(); }}
We modified the constructor to pass all o f the parameters up to the super (the Rectangle constructor), and removedeverything else in the constructor.
In the draw() method, we replaced f illRect with f illOval and drawRect () with drawOval() . We don't need toimplement getters and setters in the Oval class because they already exist in the Rectangle class. In the t o St ring()method, we changed the word Rect angle to the word Oval in the returned String.
It isn't necessary to change the co nt ainsLo cat io n() method from the implementation in the Rectangle class, so wedon't need to include it in the Oval class—it's inherited.
NoteIn Java, Ovals are defined by a bounding rectangle, so any po int in that bounding rectangle will registeras being inside the Oval. If we needed finer contro l over this, we would change the co nt ainsLo cat io n()method to calculate whether the location is actually within the drawn Oval, rather than within the boundingrectangle.
Now let's give our applet the ability to create a Shape (Rectangle or Oval) and display and size it using the mouse. Youshould now have usable Shape, Rectangle, and Oval classes in the shapes package o f your java3_Lesso n07pro ject. (Make sure the package statement o f your classes is correct.) To have a common po int o f reference in creatingthe next part o f the lesson, we'll use our version o f these classes.
First, we'll give our Model class the ability to keep track o f a single Shape object. Later, we'll add the capability to havemany different Shape objects displayed. For now, we'll illustrate the progress o f program development one small stepat a time.
Open your Mo del class and make the changes shown in blue :

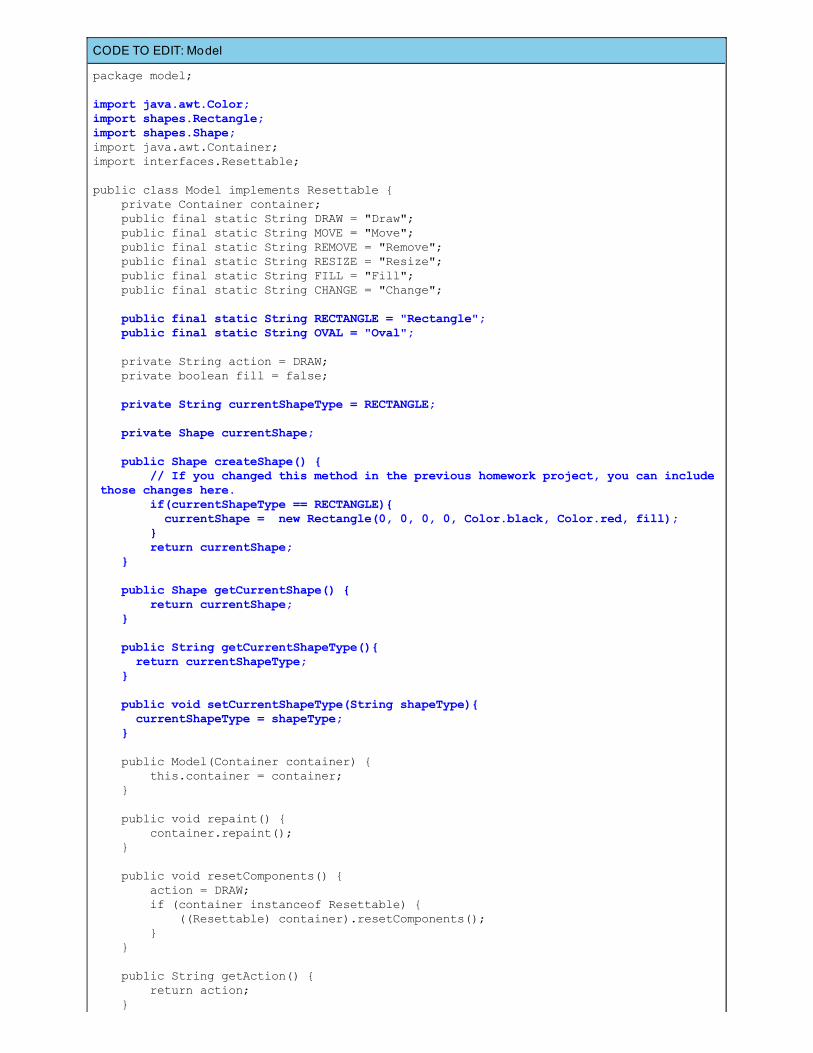
CODE TO EDIT: Model
package model;
import java.awt.Color;import shapes.Rectangle;import shapes.Shape;import java.awt.Container;import interfaces.Resettable;
public class Model implements Resettable { private Container container; public final static String DRAW = "Draw"; public final static String MOVE = "Move"; public final static String REMOVE = "Remove"; public final static String RESIZE = "Resize"; public final static String FILL = "Fill"; public final static String CHANGE = "Change"; public final static String RECTANGLE = "Rectangle"; public final static String OVAL = "Oval"; private String action = DRAW; private boolean fill = false; private String currentShapeType = RECTANGLE; private Shape currentShape; public Shape createShape() { // If you changed this method in the previous homework project, you can include those changes here. if(currentShapeType == RECTANGLE){ currentShape = new Rectangle(0, 0, 0, 0, Color.black, Color.red, fill); } return currentShape; } public Shape getCurrentShape() { return currentShape; } public String getCurrentShapeType(){ return currentShapeType; } public void setCurrentShapeType(String shapeType){ currentShapeType = shapeType; } public Model(Container container) { this.container = container; } public void repaint() { container.repaint(); } public void resetComponents() { action = DRAW; if (container instanceof Resettable) { ((Resettable) container).resetComponents(); } } public String getAction() { return action; }
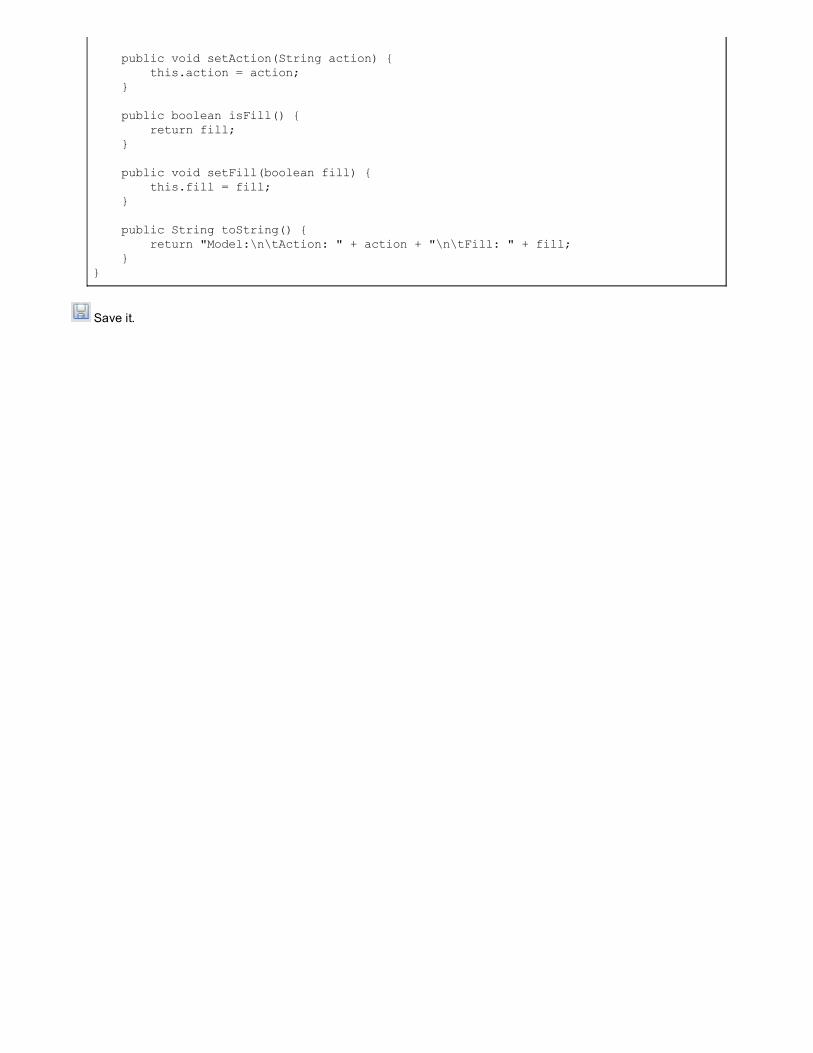
public void setAction(String action) { this.action = action; } public boolean isFill() { return fill; } public void setFill(boolean fill) { this.fill = fill; } public String toString() { return "Model:\n\tAction: " + action + "\n\tFill: " + fill; }}
Save it.
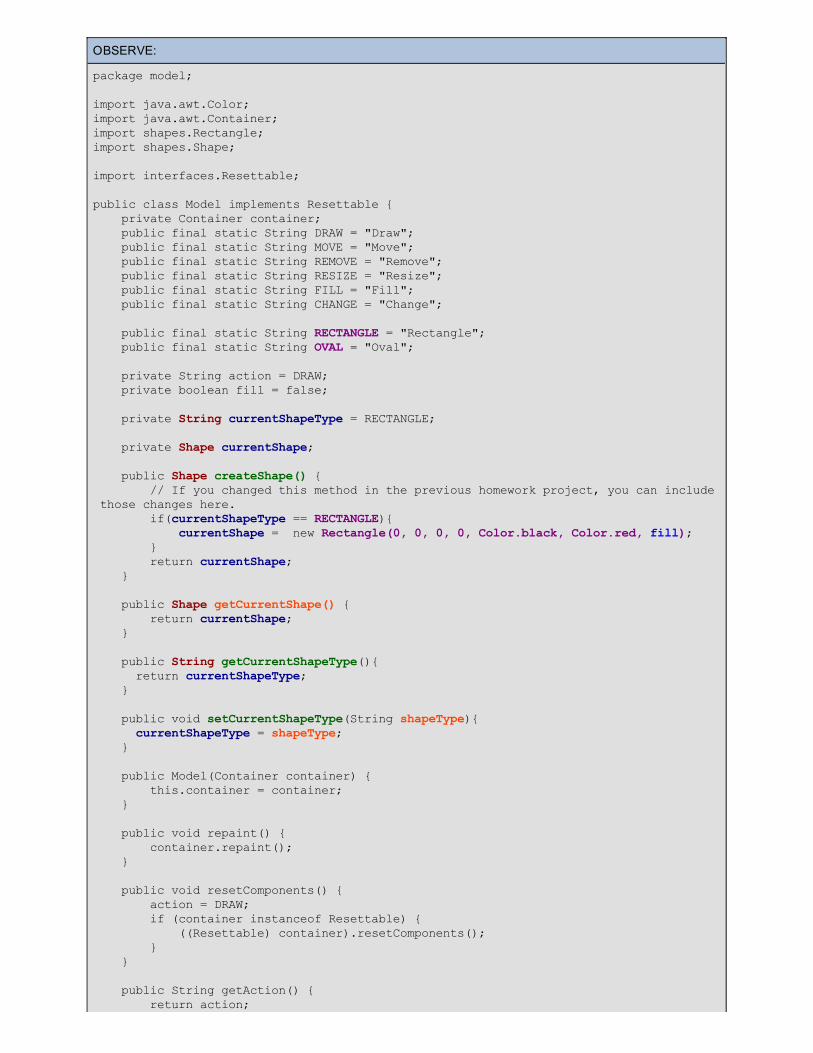
OBSERVE:
package model;
import java.awt.Color;import java.awt.Container;import shapes.Rectangle;import shapes.Shape;
import interfaces.Resettable;
public class Model implements Resettable { private Container container; public final static String DRAW = "Draw"; public final static String MOVE = "Move"; public final static String REMOVE = "Remove"; public final static String RESIZE = "Resize"; public final static String FILL = "Fill"; public final static String CHANGE = "Change"; public final static String RECTANGLE = "Rectangle"; public final static String OVAL = "Oval"; private String action = DRAW; private boolean fill = false; private String currentShapeType = RECTANGLE; private Shape currentShape; public Shape createShape() { // If you changed this method in the previous homework project, you can include those changes here. if(currentShapeType == RECTANGLE){ currentShape = new Rectangle(0, 0, 0, 0, Color.black, Color.red, fill); } return currentShape; } public Shape getCurrentShape() { return currentShape; } public String getCurrentShapeType(){ return currentShapeType; } public void setCurrentShapeType(String shapeType){ currentShapeType = shapeType; } public Model(Container container) { this.container = container; } public void repaint() { container.repaint(); } public void resetComponents() { action = DRAW; if (container instanceof Resettable) { ((Resettable) container).resetComponents(); } } public String getAction() { return action;
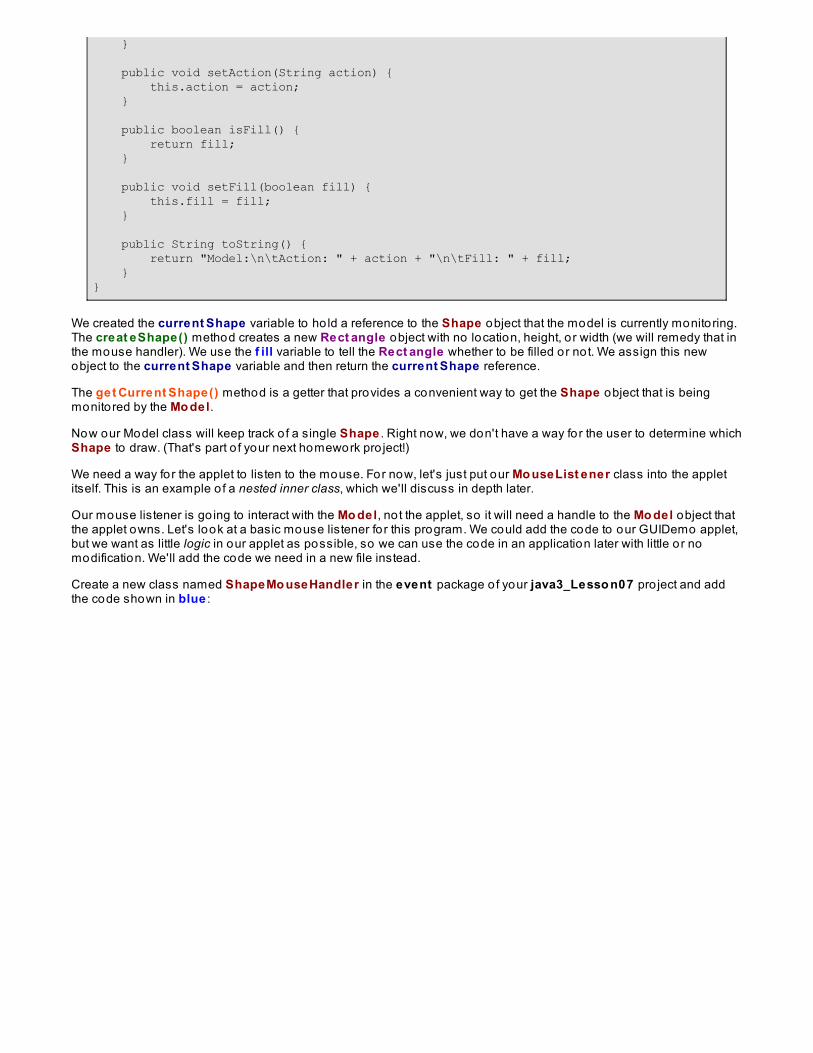
} public void setAction(String action) { this.action = action; } public boolean isFill() { return fill; } public void setFill(boolean fill) { this.fill = fill; } public String toString() { return "Model:\n\tAction: " + action + "\n\tFill: " + fill; }}
We created the current Shape variable to ho ld a reference to the Shape object that the model is currently monitoring.The creat eShape() method creates a new Rect angle object with no location, height, o r width (we will remedy that inthe mouse handler). We use the f ill variable to tell the Rect angle whether to be filled or not. We assign this newobject to the current Shape variable and then return the current Shape reference.
The get Current Shape() method is a getter that provides a convenient way to get the Shape object that is beingmonitored by the Mo del.
Now our Model class will keep track o f a single Shape . Right now, we don't have a way for the user to determine whichShape to draw. (That's part o f your next homework pro ject!)
We need a way for the applet to listen to the mouse. For now, let's just put our Mo useList ener class into the appletitself. This is an example o f a nested inner class, which we'll discuss in depth later.
Our mouse listener is go ing to interact with the Mo del, no t the applet, so it will need a handle to the Mo del object thatthe applet owns. Let's look at a basic mouse listener fo r this program. We could add the code to our GUIDemo applet,but we want as little logic in our applet as possible, so we can use the code in an application later with little or nomodification. We'll add the code we need in a new file instead.
Create a new class named ShapeMo useHandler in the event package o f your java3_Lesso n07 pro ject and addthe code shown in blue :
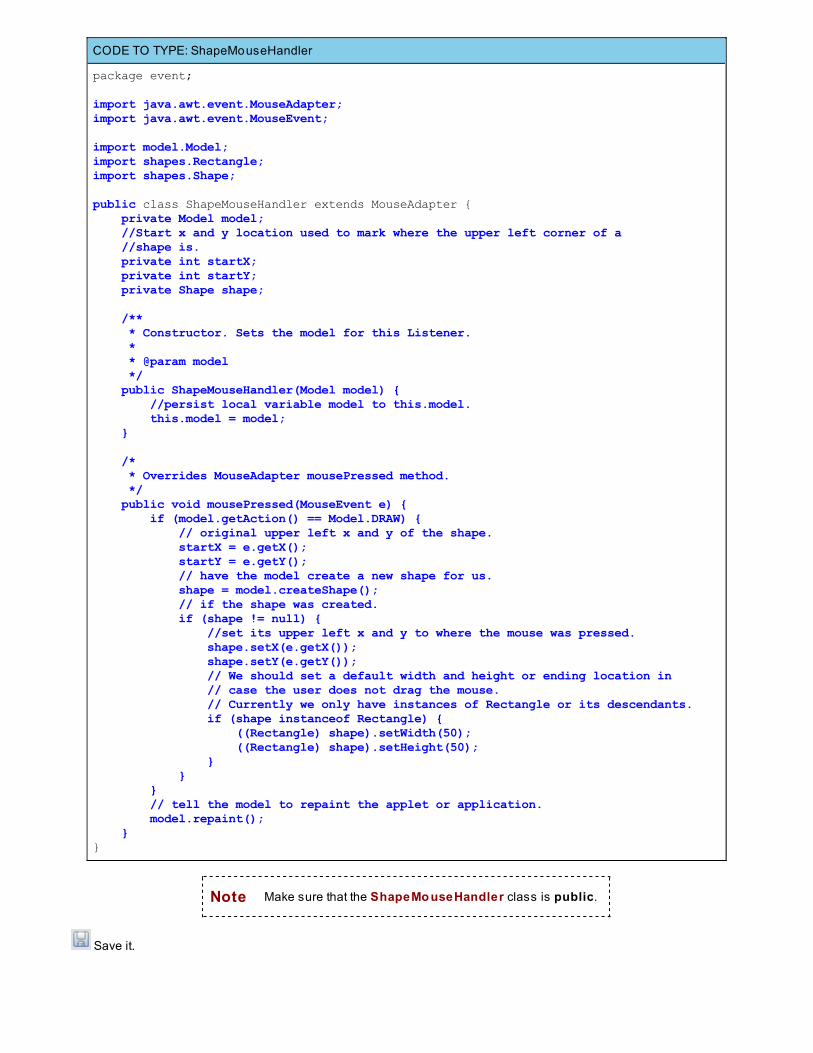
CODE TO TYPE: ShapeMouseHandler
package event;
import java.awt.event.MouseAdapter;import java.awt.event.MouseEvent;
import model.Model;import shapes.Rectangle;import shapes.Shape;
public class ShapeMouseHandler extends MouseAdapter { private Model model; //Start x and y location used to mark where the upper left corner of a //shape is. private int startX; private int startY; private Shape shape; /** * Constructor. Sets the model for this Listener. * * @param model */ public ShapeMouseHandler(Model model) { //persist local variable model to this.model. this.model = model; } /* * Overrides MouseAdapter mousePressed method. */ public void mousePressed(MouseEvent e) { if (model.getAction() == Model.DRAW) { // original upper left x and y of the shape. startX = e.getX(); startY = e.getY(); // have the model create a new shape for us. shape = model.createShape(); // if the shape was created. if (shape != null) { //set its upper left x and y to where the mouse was pressed. shape.setX(e.getX()); shape.setY(e.getY()); // We should set a default width and height or ending location in // case the user does not drag the mouse. // Currently we only have instances of Rectangle or its descendants. if (shape instanceof Rectangle) { ((Rectangle) shape).setWidth(50); ((Rectangle) shape).setHeight(50); } } } // tell the model to repaint the applet or application. model.repaint(); }}
Note Make sure that the ShapeMo useHandler class is public.
Save it.

OBSERVE: ShapeMouseHandler
package event;
import java.awt.event.MouseAdapter;import java.awt.event.MouseEvent;
import model.Model;import shapes.Rectangle;import shapes.Shape;
public class ShapeMouseHandler extends MouseAdapter { private Model model; // Start x and y location used to mark where the upper left corner of a shape is. private int startX; private int startY; private Shape shape; /** * Constructor. Sets the model for this Listener. * * @param model */ public ShapeMouseHandler(Model model) { //persist local variable model to this.model. this.model = model; }
/* * Overrides MouseAdapter mousePressed method. */ public void mousePressed(MouseEvent e) { if (model.getAction() == Model.DRAW) { // original upper left x and y of the shape. startX = e.getX(); startY = e.getY(); // have the model create a new shape for us. shape = model.createShape(); // if the shape was created. if (shape != null) { //set its upper left x and y to where the mouse was pressed. shape.setX(e.getX()); shape.setY(e.getY()); // We should set a default width and height or ending location in // case the user does not drag the mouse. // Currently we only have instances of Rectangle or its descendants. if (shape instanceof Rectangle) { ((Rectangle) shape).setWidth(50); ((Rectangle) shape).setHeight(50); } } } // tell the model to repaint the applet or application. model.repaint(); }}
The mo usePressed() method runs when the mouse is clicked on the applet. First, we test to see if we are in theDRAW mode in the mo del. If we are, then we get the x and y location o f the mouse and set our st art X and st art Yvariables to this location. We'll need that location later in the mo useDragged() method.
Then we have the mo del create a shape . The model will track which shape to create. Right now, it will give us a newRectangle object. If the mo del gives us a good shape (not null), then we set the shape's x and y location to thelocation where the mouse was clicked.
In case the user just clicks and does not drag the mouse, we still want the shape to appear, so we give it default widt hand height values (once we add the mo useDragged() method, these will be overwritten when they drag the mouse).To make sure that the object being referenced has a width and height (a Line would not) we test to see if the shape
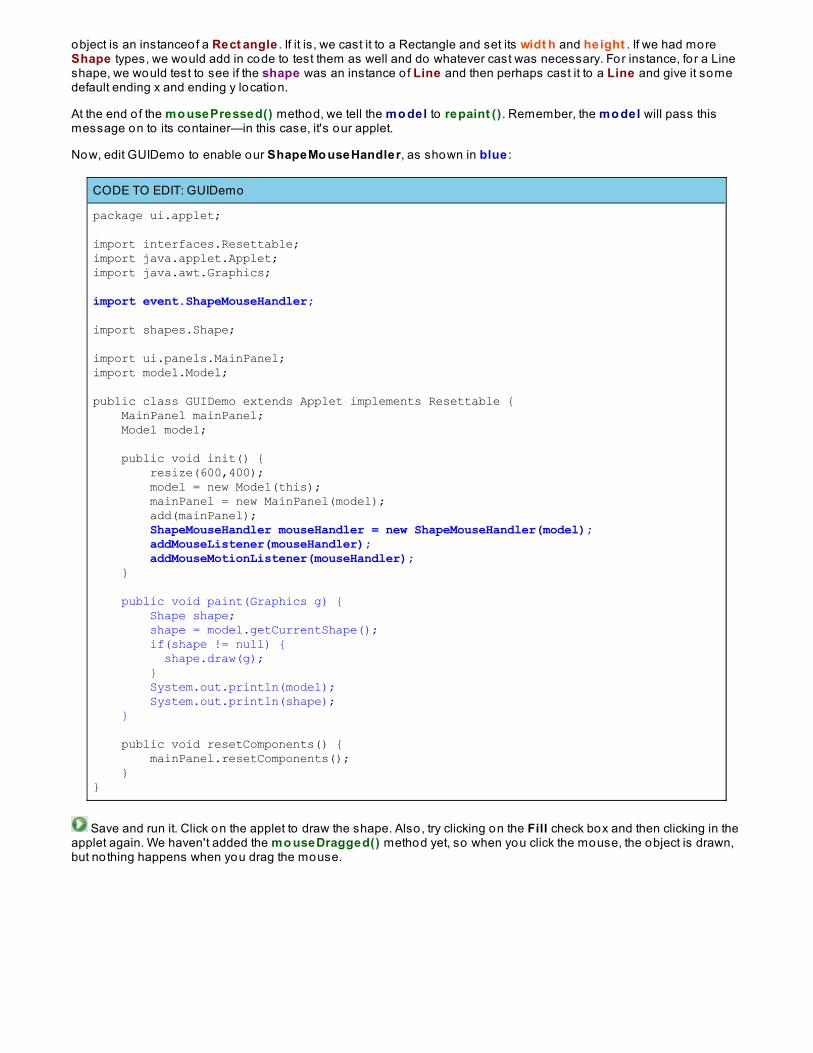
object is an instanceof a Rect angle . If it is, we cast it to a Rectangle and set its widt h and height . If we had moreShape types, we would add in code to test them as well and do whatever cast was necessary. For instance, fo r a Lineshape, we would test to see if the shape was an instance o f Line and then perhaps cast it to a Line and give it somedefault ending x and ending y location.
At the end o f the mo usePressed() method, we tell the mo del to repaint () . Remember, the mo del will pass thismessage on to its container—in this case, it's our applet.
Now, edit GUIDemo to enable our ShapeMo useHandler, as shown in blue :
CODE TO EDIT: GUIDemo
package ui.applet;
import interfaces.Resettable;import java.applet.Applet;import java.awt.Graphics;
import event.ShapeMouseHandler;
import shapes.Shape;
import ui.panels.MainPanel;import model.Model;
public class GUIDemo extends Applet implements Resettable { MainPanel mainPanel; Model model; public void init() { resize(600,400); model = new Model(this); mainPanel = new MainPanel(model); add(mainPanel); ShapeMouseHandler mouseHandler = new ShapeMouseHandler(model); addMouseListener(mouseHandler); addMouseMotionListener(mouseHandler); } public void paint(Graphics g) { Shape shape; shape = model.getCurrentShape(); if(shape != null) { shape.draw(g); } System.out.println(model); System.out.println(shape); } public void resetComponents() { mainPanel.resetComponents(); }}
Save and run it. Click on the applet to draw the shape. Also, try clicking on the Fill check box and then clicking in theapplet again. We haven't added the mo useDragged() method yet, so when you click the mouse, the object is drawn,but nothing happens when you drag the mouse.
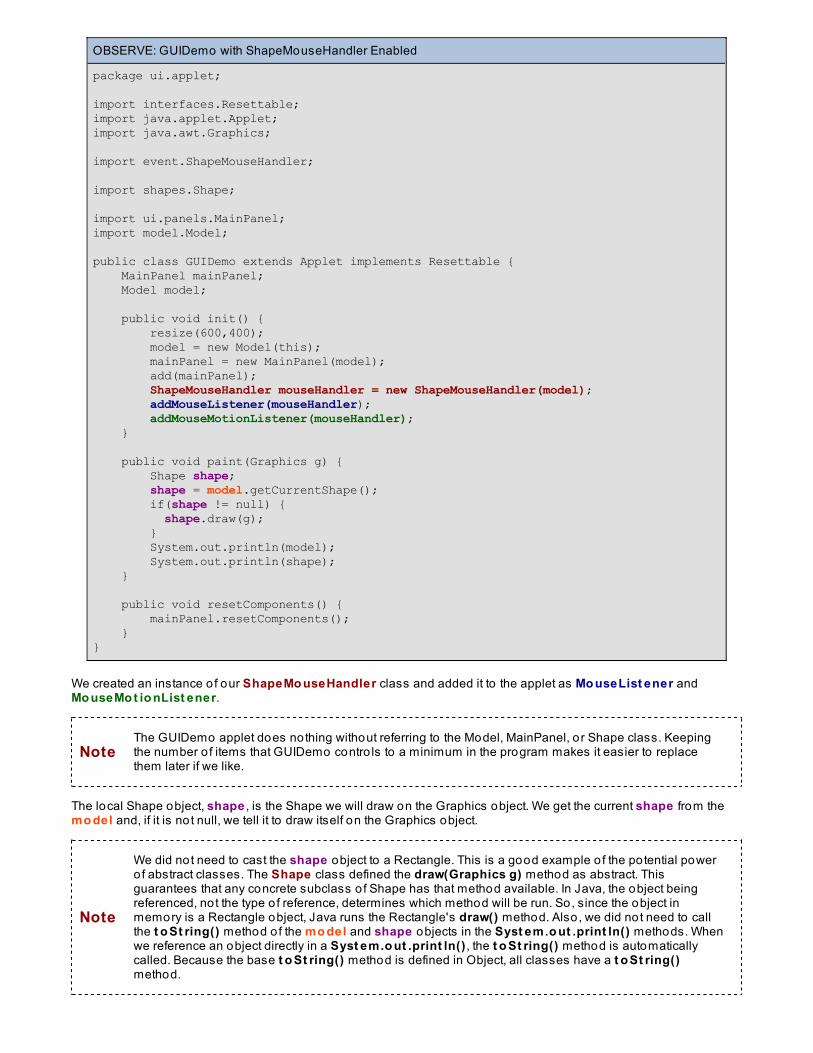
OBSERVE: GUIDemo with ShapeMouseHandler Enabled
package ui.applet;
import interfaces.Resettable;import java.applet.Applet;import java.awt.Graphics;
import event.ShapeMouseHandler;
import shapes.Shape;
import ui.panels.MainPanel;import model.Model;
public class GUIDemo extends Applet implements Resettable { MainPanel mainPanel; Model model; public void init() { resize(600,400); model = new Model(this); mainPanel = new MainPanel(model); add(mainPanel); ShapeMouseHandler mouseHandler = new ShapeMouseHandler(model); addMouseListener(mouseHandler); addMouseMotionListener(mouseHandler); } public void paint(Graphics g) { Shape shape; shape = model.getCurrentShape(); if(shape != null) { shape.draw(g); } System.out.println(model); System.out.println(shape); } public void resetComponents() { mainPanel.resetComponents(); }}
We created an instance o f our ShapeMo useHandler class and added it to the applet as Mo useList ener andMo useMo t io nList ener.
NoteThe GUIDemo applet does nothing without referring to the Model, MainPanel, o r Shape class. Keepingthe number o f items that GUIDemo contro ls to a minimum in the program makes it easier to replacethem later if we like.
The local Shape object, shape , is the Shape we will draw on the Graphics object. We get the current shape from themo del and, if it is not null, we tell it to draw itself on the Graphics object.
Note
We did not need to cast the shape object to a Rectangle. This is a good example o f the potential powerof abstract classes. The Shape class defined the draw(Graphics g) method as abstract. Thisguarantees that any concrete subclass o f Shape has that method available. In Java, the object beingreferenced, not the type o f reference, determines which method will be run. So, since the object inmemory is a Rectangle object, Java runs the Rectangle's draw() method. Also, we did not need to callthe t o St ring() method o f the mo del and shape objects in the Syst em.o ut .print ln() methods. Whenwe reference an object directly in a Syst em.o ut .print ln() , the t o St ring() method is automaticallycalled. Because the base t o St ring() method is defined in Object, all classes have a t o St ring()method.

Let's add that mo useDragged() method now. Add the blue code to ShapeMo useHandler as shown:
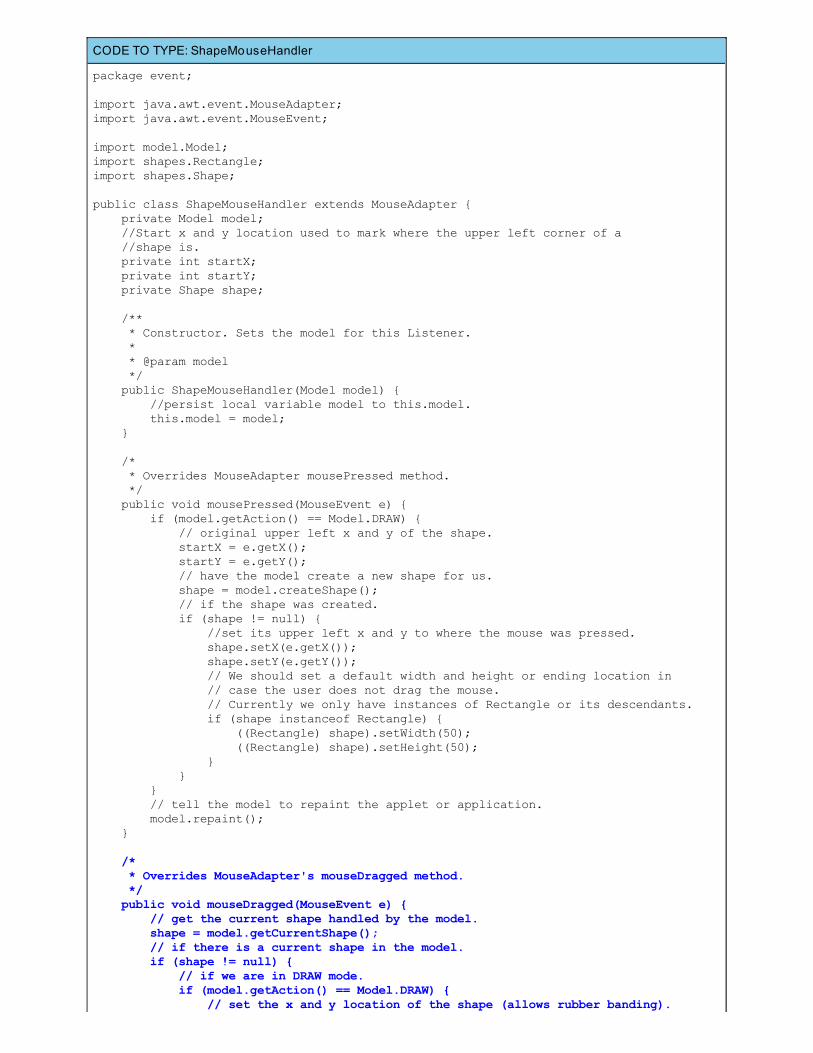
CODE TO TYPE: ShapeMouseHandler
package event;
import java.awt.event.MouseAdapter;import java.awt.event.MouseEvent;
import model.Model;import shapes.Rectangle;import shapes.Shape;
public class ShapeMouseHandler extends MouseAdapter { private Model model; //Start x and y location used to mark where the upper left corner of a //shape is. private int startX; private int startY; private Shape shape; /** * Constructor. Sets the model for this Listener. * * @param model */ public ShapeMouseHandler(Model model) { //persist local variable model to this.model. this.model = model; } /* * Overrides MouseAdapter mousePressed method. */ public void mousePressed(MouseEvent e) { if (model.getAction() == Model.DRAW) { // original upper left x and y of the shape. startX = e.getX(); startY = e.getY(); // have the model create a new shape for us. shape = model.createShape(); // if the shape was created. if (shape != null) { //set its upper left x and y to where the mouse was pressed. shape.setX(e.getX()); shape.setY(e.getY()); // We should set a default width and height or ending location in // case the user does not drag the mouse. // Currently we only have instances of Rectangle or its descendants. if (shape instanceof Rectangle) { ((Rectangle) shape).setWidth(50); ((Rectangle) shape).setHeight(50); } } } // tell the model to repaint the applet or application. model.repaint(); } /* * Overrides MouseAdapter's mouseDragged method. */ public void mouseDragged(MouseEvent e) { // get the current shape handled by the model. shape = model.getCurrentShape(); // if there is a current shape in the model. if (shape != null) { // if we are in DRAW mode. if (model.getAction() == Model.DRAW) { // set the x and y location of the shape (allows rubber banding).
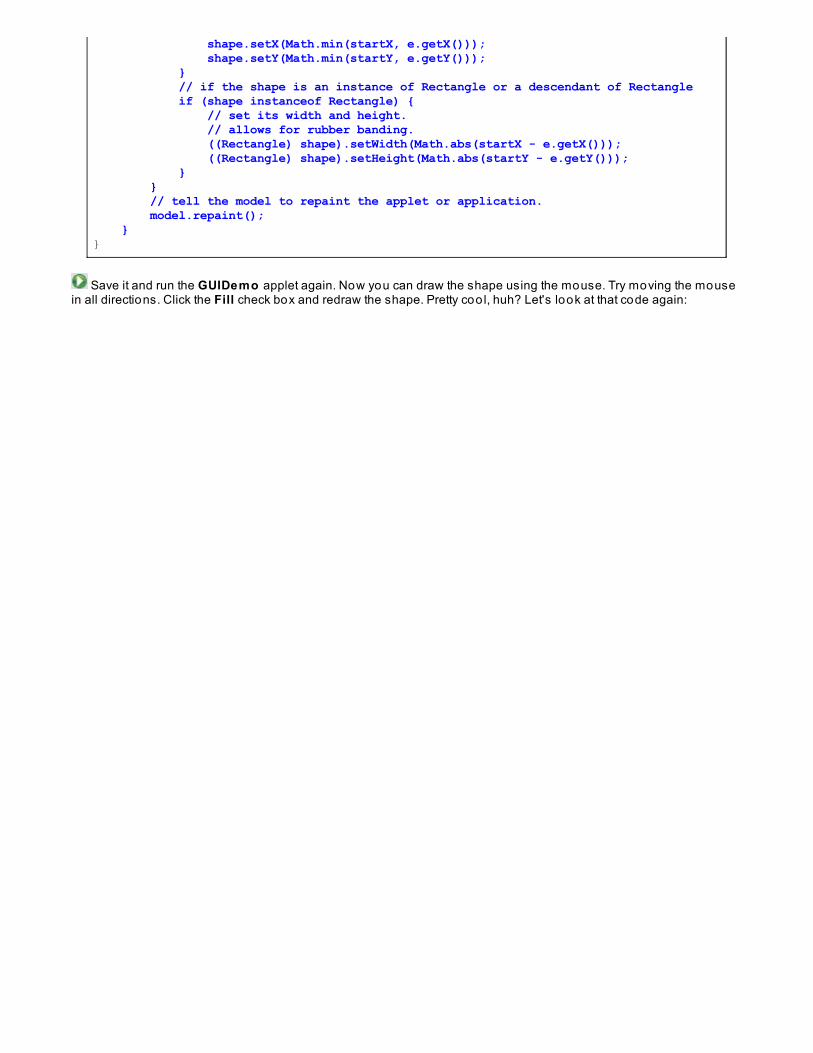
shape.setX(Math.min(startX, e.getX())); shape.setY(Math.min(startY, e.getY())); } // if the shape is an instance of Rectangle or a descendant of Rectangle if (shape instanceof Rectangle) { // set its width and height. // allows for rubber banding. ((Rectangle) shape).setWidth(Math.abs(startX - e.getX())); ((Rectangle) shape).setHeight(Math.abs(startY - e.getY())); } } // tell the model to repaint the applet or application. model.repaint(); }}
Save it and run the GUIDemo applet again. Now you can draw the shape using the mouse. Try moving the mousein all directions. Click the Fill check box and redraw the shape. Pretty coo l, huh? Let's look at that code again:
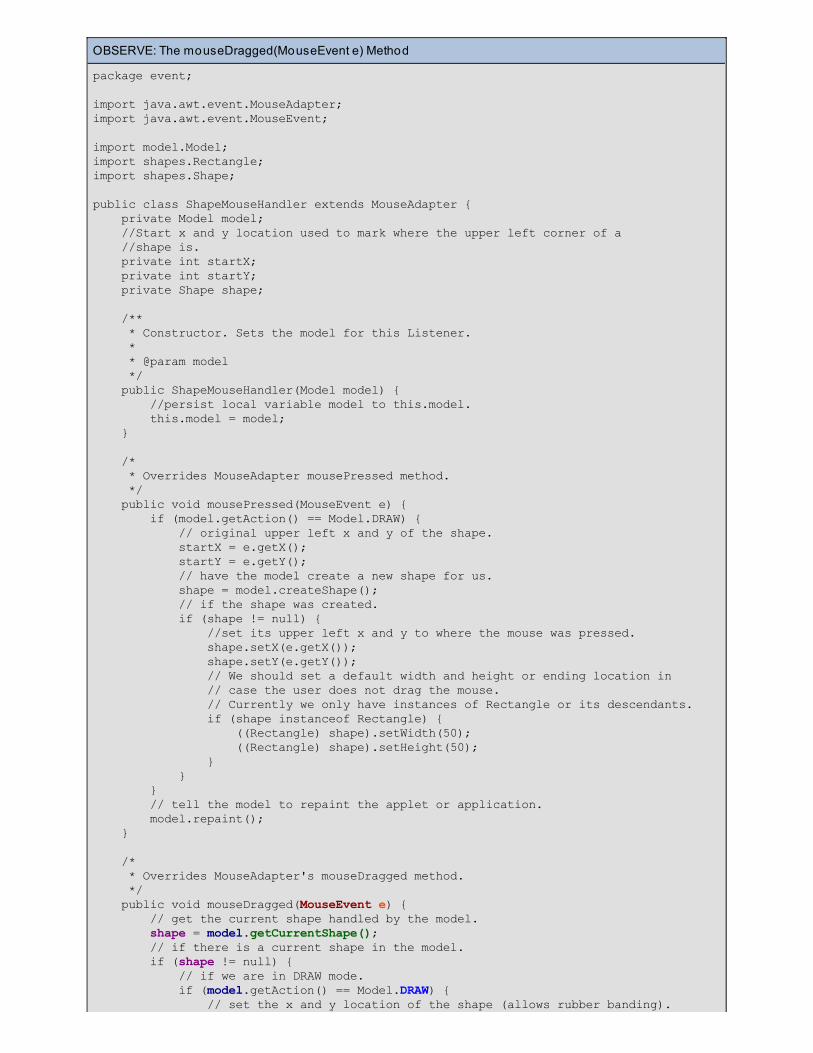
OBSERVE: The mouseDragged(MouseEvent e) Method
package event;
import java.awt.event.MouseAdapter;import java.awt.event.MouseEvent;
import model.Model;import shapes.Rectangle;import shapes.Shape;
public class ShapeMouseHandler extends MouseAdapter { private Model model; //Start x and y location used to mark where the upper left corner of a //shape is. private int startX; private int startY; private Shape shape; /** * Constructor. Sets the model for this Listener. * * @param model */ public ShapeMouseHandler(Model model) { //persist local variable model to this.model. this.model = model; } /* * Overrides MouseAdapter mousePressed method. */ public void mousePressed(MouseEvent e) { if (model.getAction() == Model.DRAW) { // original upper left x and y of the shape. startX = e.getX(); startY = e.getY(); // have the model create a new shape for us. shape = model.createShape(); // if the shape was created. if (shape != null) { //set its upper left x and y to where the mouse was pressed. shape.setX(e.getX()); shape.setY(e.getY()); // We should set a default width and height or ending location in // case the user does not drag the mouse. // Currently we only have instances of Rectangle or its descendants. if (shape instanceof Rectangle) { ((Rectangle) shape).setWidth(50); ((Rectangle) shape).setHeight(50); } } } // tell the model to repaint the applet or application. model.repaint(); } /* * Overrides MouseAdapter's mouseDragged method. */ public void mouseDragged(MouseEvent e) { // get the current shape handled by the model. shape = model.getCurrentShape(); // if there is a current shape in the model. if (shape != null) { // if we are in DRAW mode. if (model.getAction() == Model.DRAW) { // set the x and y location of the shape (allows rubber banding).

shape.setX(Math.min(startX, e.getX())); shape.setY(Math.min(startY, e.getY())); } // if the shape is an instance of Rectangle or a descendant of Rectangle if (shape instanceof Rectangle) { // set its width and height. // allows for rubber banding. ((Rectangle) shape).setWidth(Math.abs(startX - e.getX())); ((Rectangle) shape).setHeight(Math.abs(startY - e.getY())); } } // tell the model to repaint the applet or application. model.repaint(); }}
The mo useDragged() method runs when the user drags the mouse on the applet. Our program retrieves the currentshape being tracked by the mo del. Then, it tests to make sure shape is not null. If it is a valid shape, the program testto see if we are in the DRAW action o f the mo del object. If so , it does a little math to set the x and y location o f theshape . Then we can draw the shape moving left, right, up, or down using the mouse (this is known as "rubber-banding" in Java). Now determine the smallest value between the shape 's st art X and the Mo useEvent 's X locationand set the shape 's x location to that. Do the same with the st art Y and Mo useEvent 's Y location.
Next, we perform an instance o f test similar to the one we did in the mo usePressed() method, to make sure we'reworking with a Rectangle or Rectangle subclass. If we are, we cast the shape object to a Rectangle and set its widt hto the abso lute value o f the st art X, minus the Mo useEvent 's X location. Then we do the same with the height ,using st art Y and the Mo useEvent 's Y location. Finally, we tell the mo del to repaint () , which passes that messagealong to the applet.
Adapters
Some list eners have several methods, but we don't always need them all. When we implement an interfacethough, we are also promising to implement all o f its methods. Java provides a few options for getting thisdone.
A listener in Java with more than one method to be implemented always has a corresponding adapter class.Adapter classes can be subclassed and they implement all o f their corresponding listeners' requiredmethods. For instance, the Mo useAdapt er class implements all o f the methods required by theMo useList ener and Mo useMo t io nList ener interfaces. The Mo useAdapt er implements these methodsas no-op o r empty methods. They don't do anything.
The advantage in this is that we only have to implement the methods we need, rather than all o f the listeners'methods.
The ShapeMo useHandler class extends Mo useAdapt er:
OBSERVE: ShapeMouseAdapter
public class ShapeMouseHandler extends MouseAdapter {
This allows us to implement only the mo usePressed() and mo useDragged() methods, because those are the onlymethods we actually need.
Button Panel
We still have one more task to take care o f in this lesson. We need to create that Clear Button.
Create a new class named But t o nPanel in the ui.panels package o f your java3_Lesso n07 pro ject. Thisclass should extend java.awt .Panel. Add the blue code as shown:
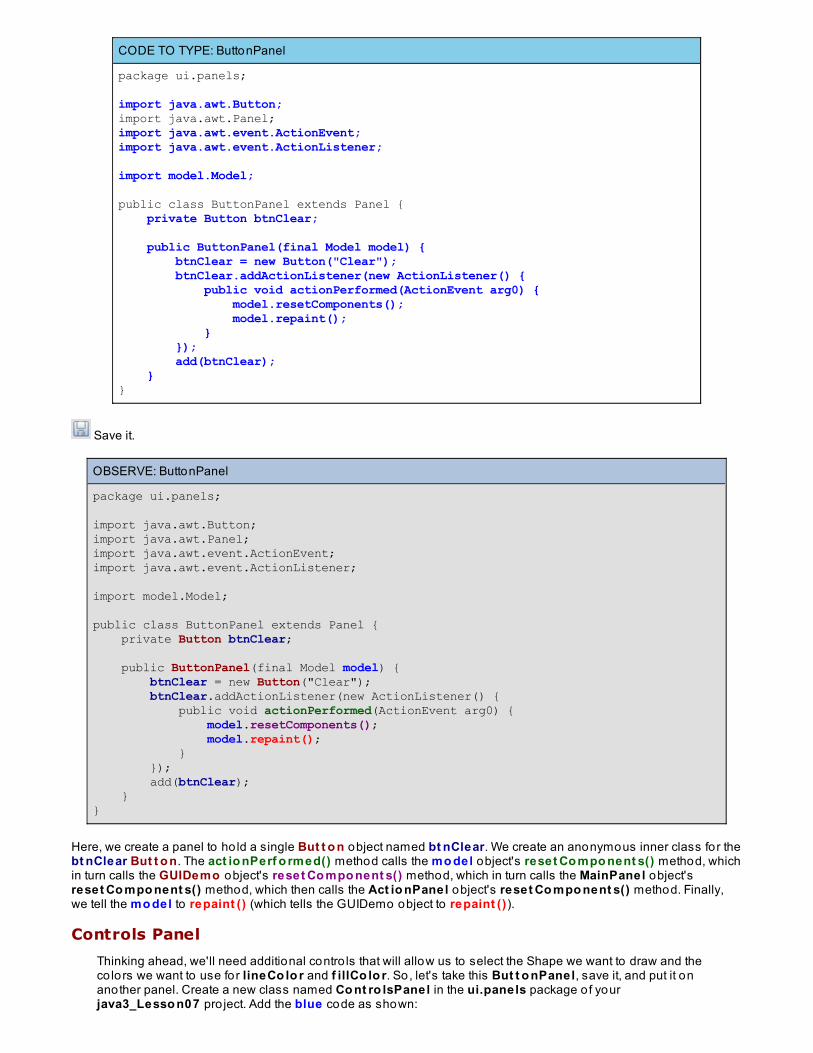
CODE TO TYPE: ButtonPanel
package ui.panels;
import java.awt.Button;import java.awt.Panel;import java.awt.event.ActionEvent;import java.awt.event.ActionListener;
import model.Model;
public class ButtonPanel extends Panel { private Button btnClear;
public ButtonPanel(final Model model) { btnClear = new Button("Clear"); btnClear.addActionListener(new ActionListener() { public void actionPerformed(ActionEvent arg0) { model.resetComponents(); model.repaint(); } }); add(btnClear); }}
Save it.
OBSERVE: ButtonPanel
package ui.panels;
import java.awt.Button;import java.awt.Panel;import java.awt.event.ActionEvent;import java.awt.event.ActionListener;
import model.Model;
public class ButtonPanel extends Panel { private Button btnClear; public ButtonPanel(final Model model) { btnClear = new Button("Clear"); btnClear.addActionListener(new ActionListener() { public void actionPerformed(ActionEvent arg0) { model.resetComponents(); model.repaint(); } }); add(btnClear); }}
Here, we create a panel to ho ld a single But t o n object named bt nClear. We create an anonymous inner class for thebt nClear But t o n. The act io nPerf o rmed() method calls the mo del object's reset Co mpo nent s() method, whichin turn calls the GUIDemo object's reset Co mpo nent s() method, which in turn calls the MainPanel object'sreset Co mpo nent s() method, which then calls the Act io nPanel object's reset Co mpo nent s() method. Finally,we tell the mo del to repaint () (which tells the GUIDemo object to repaint ()).
Controls Panel
Thinking ahead, we'll need additional contro ls that will allow us to select the Shape we want to draw and theco lors we want to use for lineCo lo r and f illCo lo r. So, let's take this But t o nPanel, save it, and put it onanother panel. Create a new class named Co nt ro lsPanel in the ui.panels package o f yourjava3_Lesso n07 pro ject. Add the blue code as shown:
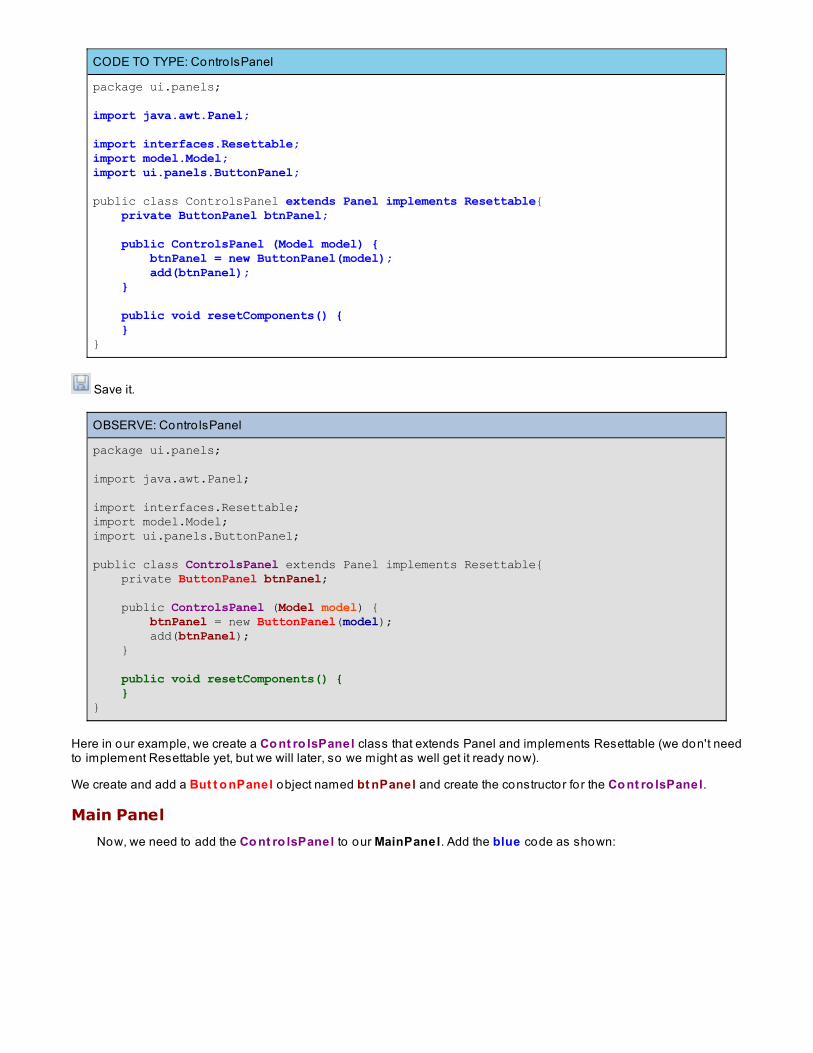
CODE TO TYPE: Contro lsPanel
package ui.panels;
import java.awt.Panel;
import interfaces.Resettable;import model.Model;import ui.panels.ButtonPanel;
public class ControlsPanel extends Panel implements Resettable{ private ButtonPanel btnPanel; public ControlsPanel (Model model) { btnPanel = new ButtonPanel(model); add(btnPanel); } public void resetComponents() { }}
Save it.
OBSERVE: Contro lsPanel
package ui.panels;
import java.awt.Panel;
import interfaces.Resettable;import model.Model;import ui.panels.ButtonPanel;
public class ControlsPanel extends Panel implements Resettable{ private ButtonPanel btnPanel; public ControlsPanel (Model model) { btnPanel = new ButtonPanel(model); add(btnPanel); } public void resetComponents() { }}
Here in our example, we create a Co nt ro lsPanel class that extends Panel and implements Resettable (we don't needto implement Resettable yet, but we will later, so we might as well get it ready now).
We create and add a But t o nPanel object named bt nPanel and create the constructor fo r the Co nt ro lsPanel.
Main Panel
Now, we need to add the Co nt ro lsPanel to our MainPanel. Add the blue code as shown:
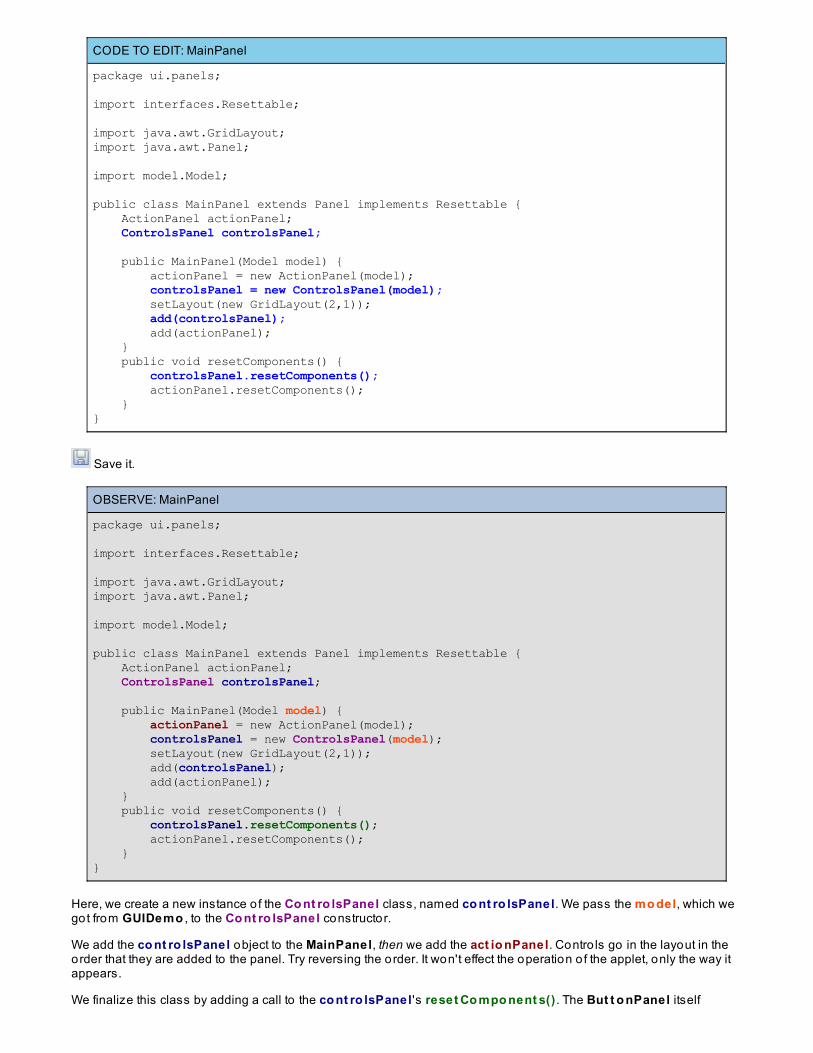
CODE TO EDIT: MainPanel
package ui.panels;
import interfaces.Resettable;
import java.awt.GridLayout;import java.awt.Panel;
import model.Model;
public class MainPanel extends Panel implements Resettable { ActionPanel actionPanel; ControlsPanel controlsPanel; public MainPanel(Model model) { actionPanel = new ActionPanel(model); controlsPanel = new ControlsPanel(model); setLayout(new GridLayout(2,1)); add(controlsPanel); add(actionPanel); } public void resetComponents() { controlsPanel.resetComponents(); actionPanel.resetComponents(); }}
Save it.
OBSERVE: MainPanel
package ui.panels;
import interfaces.Resettable;
import java.awt.GridLayout;import java.awt.Panel;
import model.Model;
public class MainPanel extends Panel implements Resettable { ActionPanel actionPanel; ControlsPanel controlsPanel; public MainPanel(Model model) { actionPanel = new ActionPanel(model); controlsPanel = new ControlsPanel(model); setLayout(new GridLayout(2,1)); add(controlsPanel); add(actionPanel); } public void resetComponents() { controlsPanel.resetComponents(); actionPanel.resetComponents(); }}
Here, we create a new instance o f the Co nt ro lsPanel class, named co nt ro lsPanel. We pass the mo del, which wegot from GUIDemo , to the Co nt ro lsPanel constructor.
We add the co nt ro lsPanel object to the MainPanel, then we add the act io nPanel. Contro ls go in the layout in theorder that they are added to the panel. Try reversing the order. It won't effect the operation o f the applet, only the way itappears.
We finalize this class by adding a call to the co nt ro lsPanel 's reset Co mpo nent s() . The But t o nPanel itself
doesn't need a call to the co nt ro lsPanel 's reset Co mpo nent s() , but we will be adding o ther panels to theCo nt ro lsPanel that will.
Finally, we need to add the reset value for current Shape to the Mo del class. Open your Mo del class. Modify thereset Co mpo nent s() method as shown in blue :
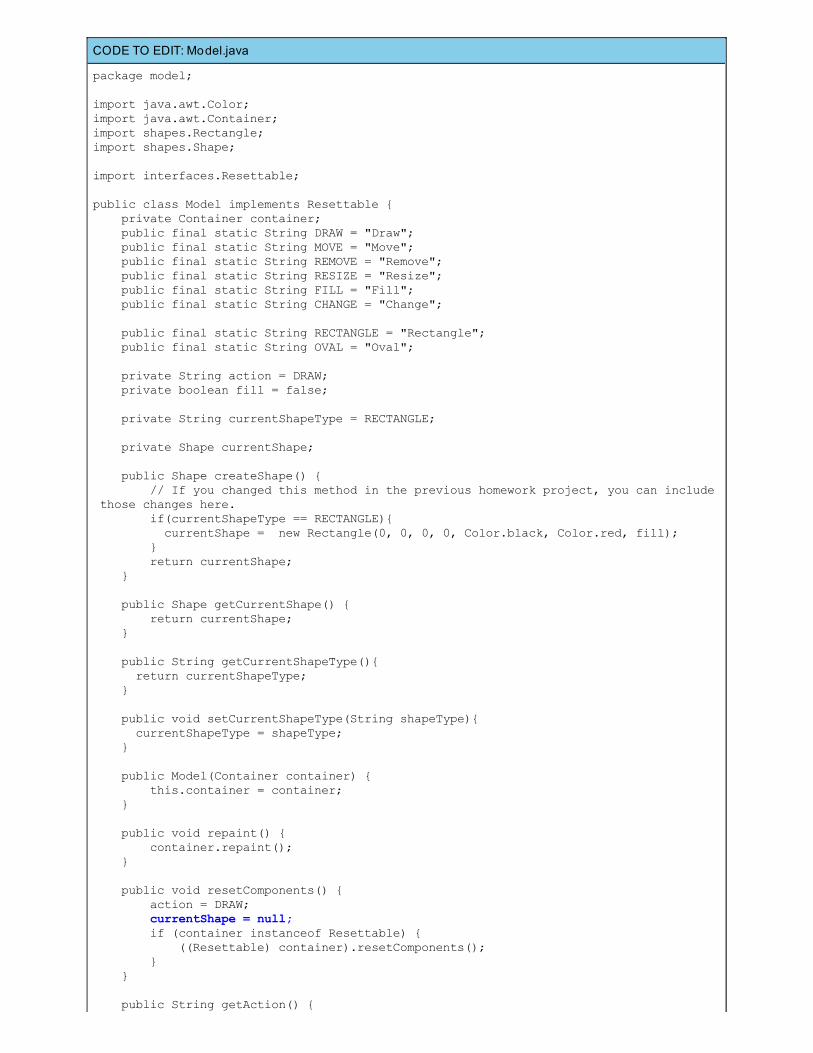
CODE TO EDIT: Model.java
package model;
import java.awt.Color;import java.awt.Container;import shapes.Rectangle;import shapes.Shape;
import interfaces.Resettable;
public class Model implements Resettable { private Container container; public final static String DRAW = "Draw"; public final static String MOVE = "Move"; public final static String REMOVE = "Remove"; public final static String RESIZE = "Resize"; public final static String FILL = "Fill"; public final static String CHANGE = "Change"; public final static String RECTANGLE = "Rectangle"; public final static String OVAL = "Oval"; private String action = DRAW; private boolean fill = false; private String currentShapeType = RECTANGLE; private Shape currentShape; public Shape createShape() { // If you changed this method in the previous homework project, you can include those changes here. if(currentShapeType == RECTANGLE){ currentShape = new Rectangle(0, 0, 0, 0, Color.black, Color.red, fill); } return currentShape; } public Shape getCurrentShape() { return currentShape; } public String getCurrentShapeType(){ return currentShapeType; } public void setCurrentShapeType(String shapeType){ currentShapeType = shapeType; } public Model(Container container) { this.container = container; } public void repaint() { container.repaint(); } public void resetComponents() { action = DRAW; currentShape = null; if (container instanceof Resettable) { ((Resettable) container).resetComponents(); } } public String getAction() {
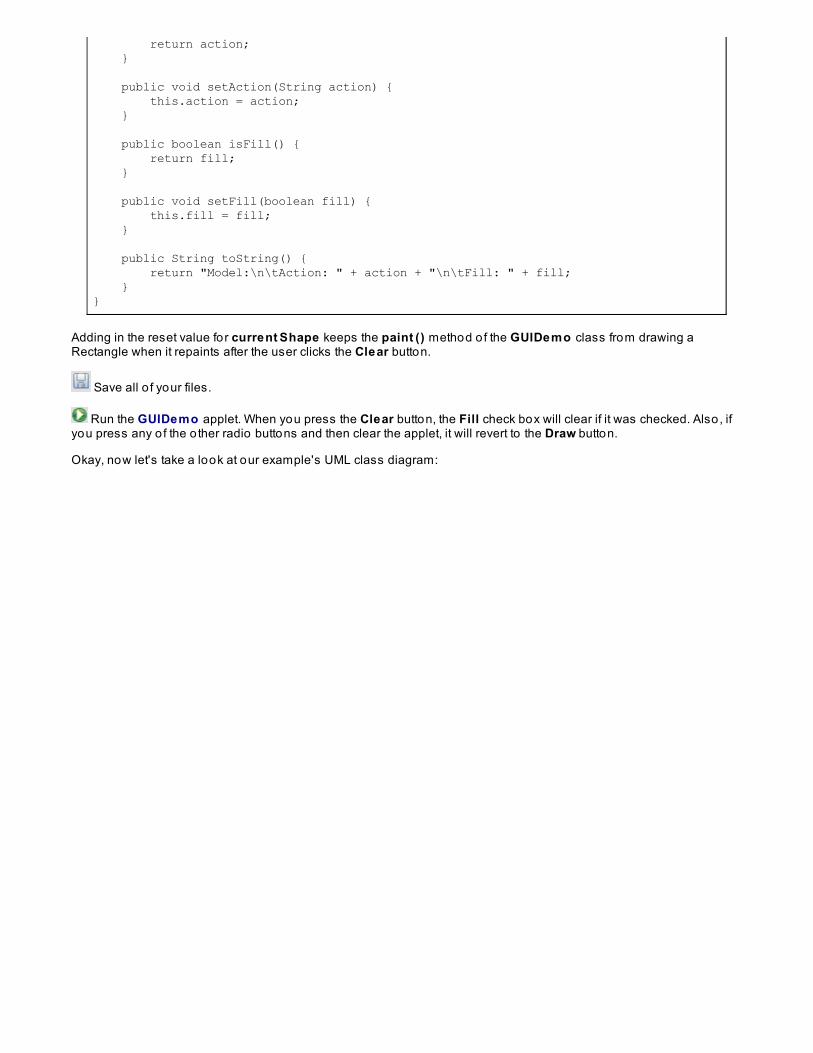
return action; } public void setAction(String action) { this.action = action; } public boolean isFill() { return fill; } public void setFill(boolean fill) { this.fill = fill; } public String toString() { return "Model:\n\tAction: " + action + "\n\tFill: " + fill; }}
Adding in the reset value for current Shape keeps the paint () method o f the GUIDemo class from drawing aRectangle when it repaints after the user clicks the Clear button.
Save all o f your files.
Run the GUIDemo applet. When you press the Clear button, the Fill check box will clear if it was checked. Also, ifyou press any o f the o ther radio buttons and then clear the applet, it will revert to the Draw button.
Okay, now let's take a look at our example's UML class diagram:
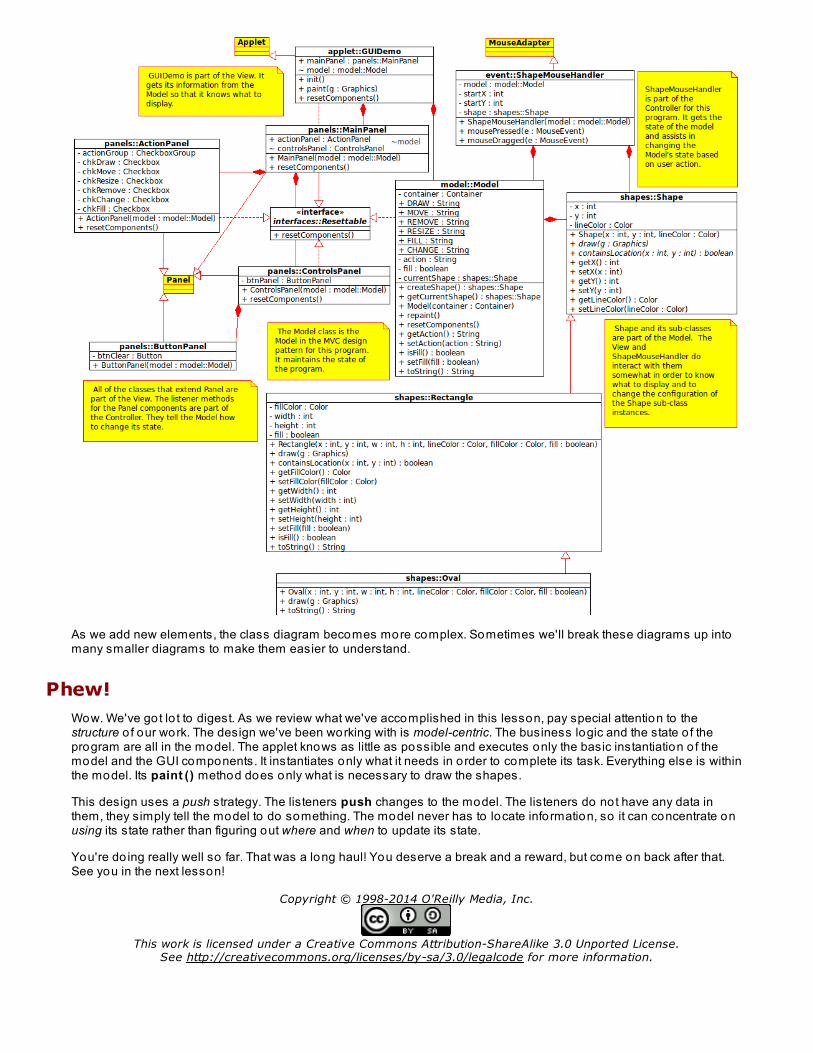
As we add new elements, the class diagram becomes more complex. Sometimes we'll break these diagrams up intomany smaller diagrams to make them easier to understand.
Phew!Wow. We've got lo t to digest. As we review what we've accomplished in this lesson, pay special attention to thestructure o f our work. The design we've been working with is model-centric. The business logic and the state o f theprogram are all in the model. The applet knows as little as possible and executes only the basic instantiation o f themodel and the GUI components. It instantiates only what it needs in order to complete its task. Everything else is withinthe model. Its paint () method does only what is necessary to draw the shapes.
This design uses a push strategy. The listeners push changes to the model. The listeners do not have any data inthem, they simply tell the model to do something. The model never has to locate information, so it can concentrate onusing its state rather than figuring out where and when to update its state.
You're do ing really well so far. That was a long haul! You deserve a break and a reward, but come on back after that.See you in the next lesson!
Copyright © 1998-2014 O'Reilly Media, Inc.
This work is licensed under a Creative Commons Attribution-ShareAlike 3.0 Unported License.See http://creativecommons.org/licenses/by-sa/3.0/legalcode for more information.
Nested ClassesLesson Objectives
When you complete this lesson, you will be able to :
use nested classes and the three types o f inner classes.
Maneuvering Around ClassesIn the last lesson we used a MouseAdapter, which enabled us to exclude some of the mouse methods in theMo useList ener. We created our own class, ShapeMo useHandler, to extend Mo useAdapt er, override one o f themethods, and then access only the methods we needed. Then we took the ShapeMo useHandler out o f our applet.
An alternative way to designate which classes to use is to define a nested class, a class inside our Applet subclass.Specific types o f nested classes are also called inner classes. We've seen the anonymous inner class before, but inthis lesson we'll explore it thoroughly.
Nested ClassesNested classes are classes that are contained within another class or interface. Sometimes we want one class to betightly associated with another class. A particular class might only be used by one o ther specific class, so we want tokeep them connected. Or we may want a particular class to be accessible only through one o ther specific class. Ineach o f these circumstances, using nesting classes is a good option.
NoteIn most cases, we want classes to be lo o sely co upled, meaning as little connection between classesas possible, to make reuse easier. But, in some cases, classes are so t ight ly co upled, that we usenested classes to keep the classes physically together to make maintenance easier. This is especiallytrue with anonymous inner classes.
We have learned that classes can be defined to have two members: fields/variables and methods. But a class thatcontains one or more nested classes will have the nested classes as members as well.
Nested classes can be static or non-static:
If a nested class is declared static, it's logically called a static nested class. Static nested classes are top-level classes.If a nested class is declared non-static, it's called an inner class. There are three types o f inner classes:
1. Member classes2. Local classes3. Anonymous classes
Nested Top-Level ClassesNested classes aren't nearly as common as o ther constructs, so we don't see them in most classes within the API.
Go to the java.applet .Applet class. Scro ll down a bit. The first summary you'll see is the Nest ed ClassSummary, fo llowed by Field Summary, Co nst ruct o r Summary, and Met ho d Summary.
A nested top-level class (also known as a static nested class) is a class (or interface) defined as a static member o fanother class. Outer classes (like those we have already seen) may be declared only public o r package privat e .Package privat e means there is no modifier present that provides access within the same package. Nested classescan be declared privat e , public, pro t ect ed, o r package privat e . The syntax for such nested classes looks likethis:
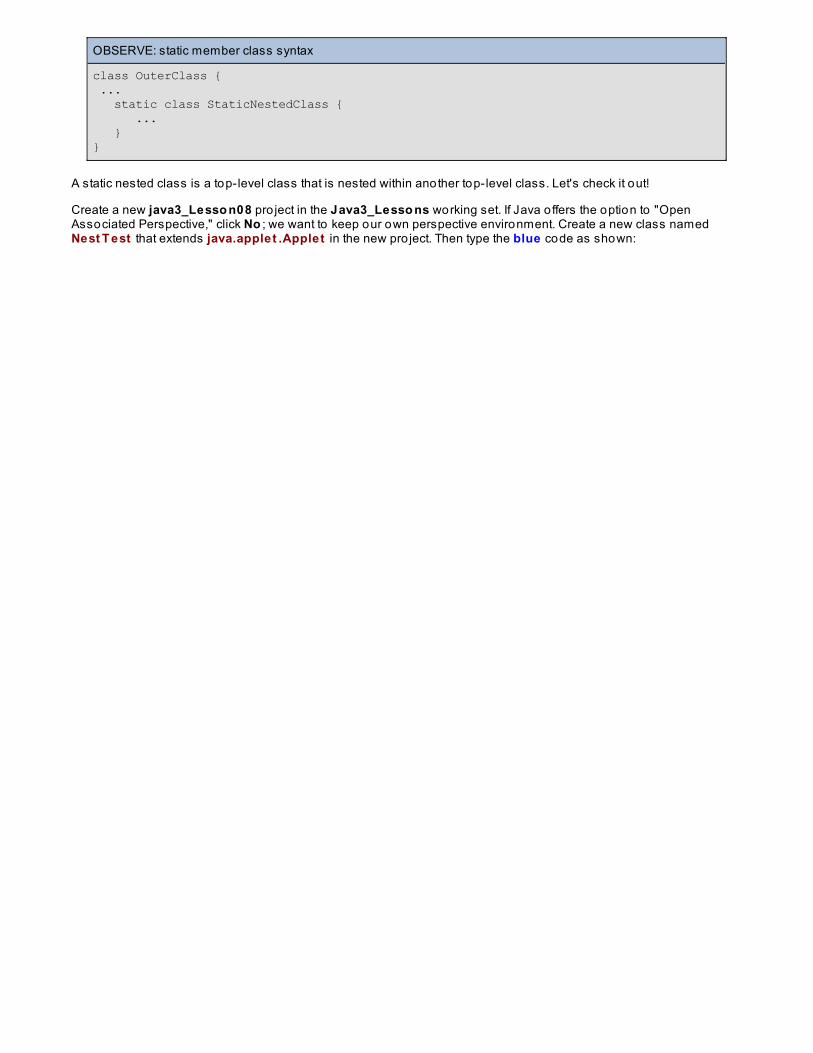
OBSERVE: static member class syntax
class OuterClass { ... static class StaticNestedClass { ... }}
A static nested class is a top-level class that is nested within another top-level class. Let's check it out!
Create a new java3_Lesso n08 pro ject in the Java3_Lesso ns working set. If Java o ffers the option to "OpenAssociated Perspective," click No ; we want to keep our own perspective environment. Create a new class namedNest T est that extends java.applet .Applet in the new pro ject. Then type the blue code as shown:
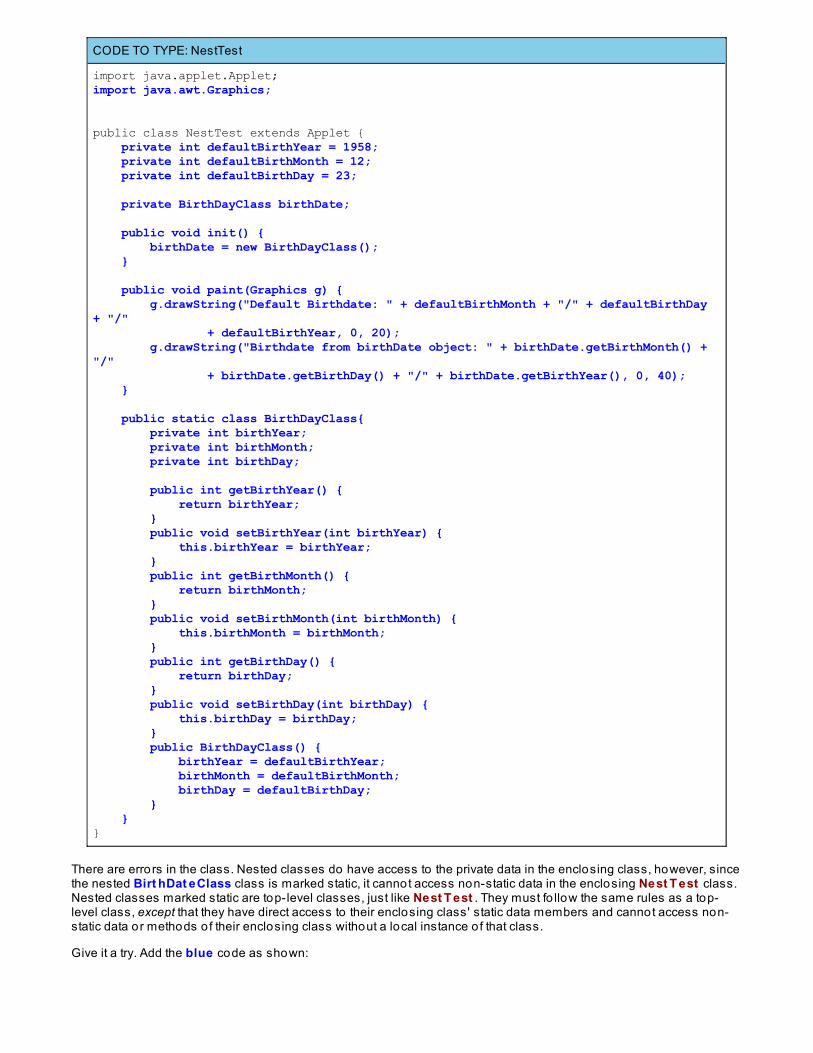
CODE TO TYPE: NestTest
import java.applet.Applet;import java.awt.Graphics;
public class NestTest extends Applet { private int defaultBirthYear = 1958; private int defaultBirthMonth = 12; private int defaultBirthDay = 23; private BirthDayClass birthDate; public void init() { birthDate = new BirthDayClass(); } public void paint(Graphics g) { g.drawString("Default Birthdate: " + defaultBirthMonth + "/" + defaultBirthDay + "/" + defaultBirthYear, 0, 20); g.drawString("Birthdate from birthDate object: " + birthDate.getBirthMonth() + "/" + birthDate.getBirthDay() + "/" + birthDate.getBirthYear(), 0, 40); } public static class BirthDayClass{ private int birthYear; private int birthMonth; private int birthDay; public int getBirthYear() { return birthYear; } public void setBirthYear(int birthYear) { this.birthYear = birthYear; } public int getBirthMonth() { return birthMonth; } public void setBirthMonth(int birthMonth) { this.birthMonth = birthMonth; } public int getBirthDay() { return birthDay; } public void setBirthDay(int birthDay) { this.birthDay = birthDay; } public BirthDayClass() { birthYear = defaultBirthYear; birthMonth = defaultBirthMonth; birthDay = defaultBirthDay; } }}
There are errors in the class. Nested classes do have access to the private data in the enclosing class, however, sincethe nested Birt hDat eClass class is marked static, it cannot access non-static data in the enclosing Nest T est class.Nested classes marked static are top-level classes, just like Nest T est . They must fo llow the same rules as a top-level class, except that they have direct access to their enclosing class' static data members and cannot access non-static data or methods o f their enclosing class without a local instance o f that class.
Give it a try. Add the blue code as shown:
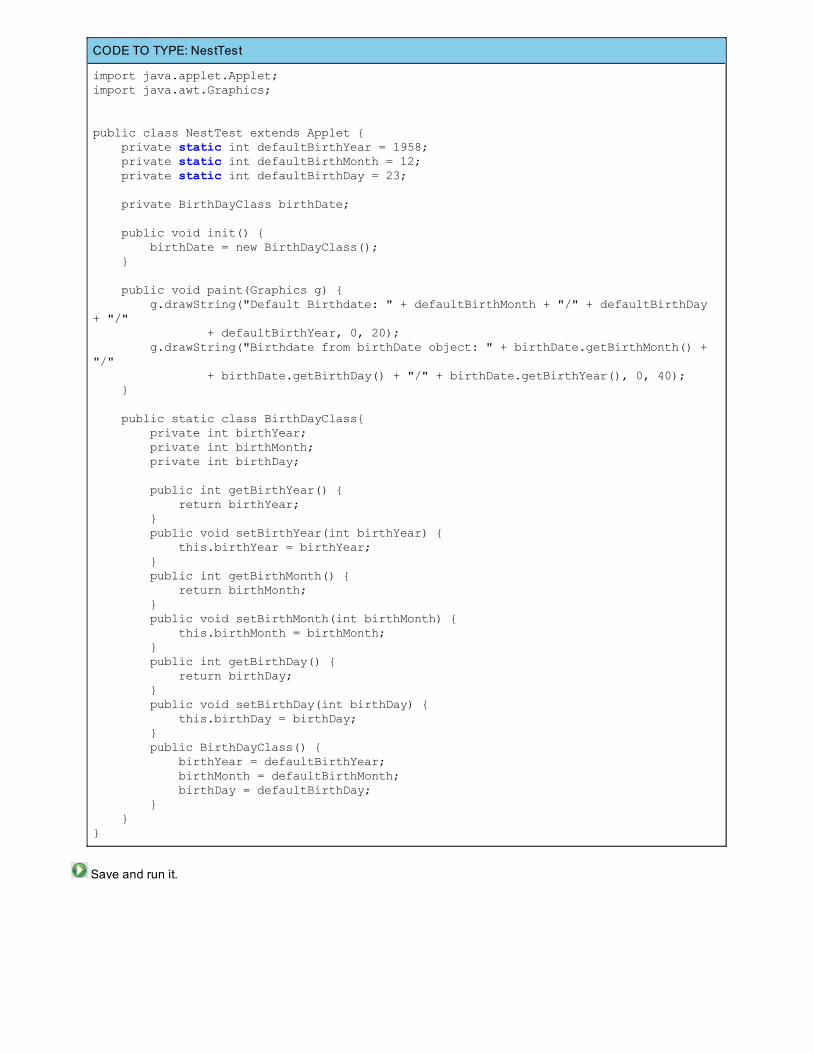
CODE TO TYPE: NestTest
import java.applet.Applet;import java.awt.Graphics;
public class NestTest extends Applet { private static int defaultBirthYear = 1958; private static int defaultBirthMonth = 12; private static int defaultBirthDay = 23; private BirthDayClass birthDate; public void init() { birthDate = new BirthDayClass(); } public void paint(Graphics g) { g.drawString("Default Birthdate: " + defaultBirthMonth + "/" + defaultBirthDay + "/" + defaultBirthYear, 0, 20); g.drawString("Birthdate from birthDate object: " + birthDate.getBirthMonth() + "/" + birthDate.getBirthDay() + "/" + birthDate.getBirthYear(), 0, 40); } public static class BirthDayClass{ private int birthYear; private int birthMonth; private int birthDay; public int getBirthYear() { return birthYear; } public void setBirthYear(int birthYear) { this.birthYear = birthYear; } public int getBirthMonth() { return birthMonth; } public void setBirthMonth(int birthMonth) { this.birthMonth = birthMonth; } public int getBirthDay() { return birthDay; } public void setBirthDay(int birthDay) { this.birthDay = birthDay; } public BirthDayClass() { birthYear = defaultBirthYear; birthMonth = defaultBirthMonth; birthDay = defaultBirthDay; } }}
Save and run it.
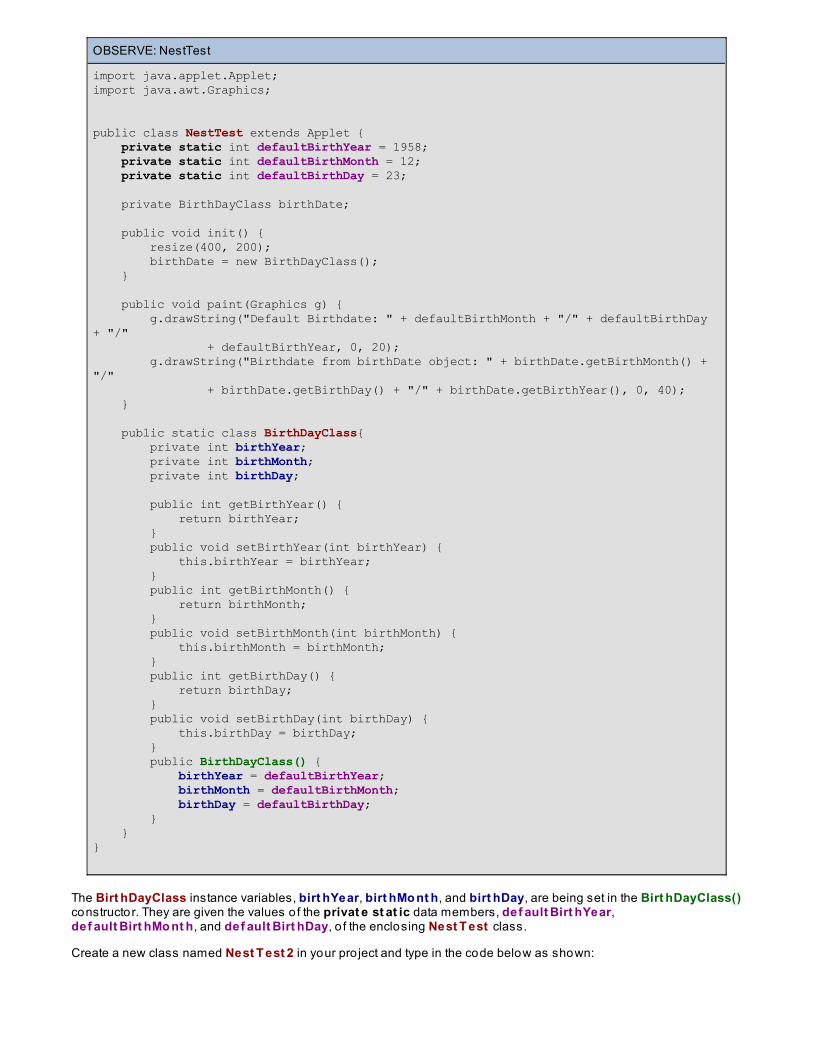
OBSERVE: NestTest
import java.applet.Applet;import java.awt.Graphics;
public class NestTest extends Applet { private static int defaultBirthYear = 1958; private static int defaultBirthMonth = 12; private static int defaultBirthDay = 23; private BirthDayClass birthDate; public void init() { resize(400, 200); birthDate = new BirthDayClass(); } public void paint(Graphics g) { g.drawString("Default Birthdate: " + defaultBirthMonth + "/" + defaultBirthDay + "/" + defaultBirthYear, 0, 20); g.drawString("Birthdate from birthDate object: " + birthDate.getBirthMonth() + "/" + birthDate.getBirthDay() + "/" + birthDate.getBirthYear(), 0, 40); } public static class BirthDayClass{ private int birthYear; private int birthMonth; private int birthDay; public int getBirthYear() { return birthYear; } public void setBirthYear(int birthYear) { this.birthYear = birthYear; } public int getBirthMonth() { return birthMonth; } public void setBirthMonth(int birthMonth) { this.birthMonth = birthMonth; } public int getBirthDay() { return birthDay; } public void setBirthDay(int birthDay) { this.birthDay = birthDay; } public BirthDayClass() { birthYear = defaultBirthYear; birthMonth = defaultBirthMonth; birthDay = defaultBirthDay; } } }
The Birt hDayClass instance variables, birt hYear, birt hMo nt h, and birt hDay, are being set in the Birt hDayClass()constructor. They are given the values o f the privat e st at ic data members, def ault Birt hYear,def ault Birt hMo nt h, and def ault Birt hDay, o f the enclosing Nest T est class.
Create a new class named Nest T est 2 in your pro ject and type in the code below as shown:
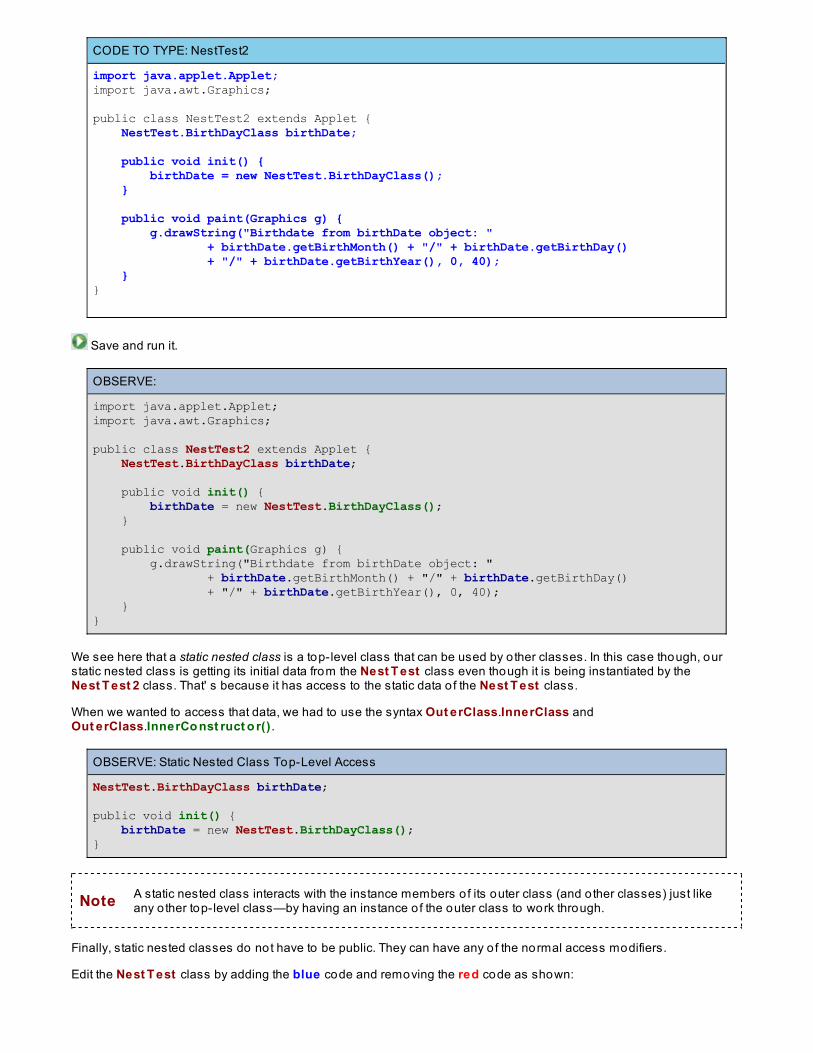
CODE TO TYPE: NestTest2
import java.applet.Applet;import java.awt.Graphics;
public class NestTest2 extends Applet { NestTest.BirthDayClass birthDate;
public void init() { birthDate = new NestTest.BirthDayClass(); }
public void paint(Graphics g) { g.drawString("Birthdate from birthDate object: " + birthDate.getBirthMonth() + "/" + birthDate.getBirthDay() + "/" + birthDate.getBirthYear(), 0, 40); }}
Save and run it.
OBSERVE:
import java.applet.Applet;import java.awt.Graphics;
public class NestTest2 extends Applet { NestTest.BirthDayClass birthDate;
public void init() { birthDate = new NestTest.BirthDayClass(); }
public void paint(Graphics g) { g.drawString("Birthdate from birthDate object: " + birthDate.getBirthMonth() + "/" + birthDate.getBirthDay() + "/" + birthDate.getBirthYear(), 0, 40); }}
We see here that a static nested class is a top-level class that can be used by o ther classes. In this case though, ourstatic nested class is getting its initial data from the Nest T est class even though it is being instantiated by theNest T est 2 class. That' s because it has access to the static data o f the Nest T est class.
When we wanted to access that data, we had to use the syntax Out erClass.InnerClass andOut erClass.InnerCo nst ruct o r() .
OBSERVE: Static Nested Class Top-Level Access
NestTest.BirthDayClass birthDate; public void init() { birthDate = new NestTest.BirthDayClass();}
Note A static nested class interacts with the instance members o f its outer class (and o ther classes) just likeany o ther top-level class—by having an instance o f the outer class to work through.
Finally, static nested classes do not have to be public. They can have any o f the normal access modifiers.
Edit the Nest T est class by adding the blue code and removing the red code as shown:
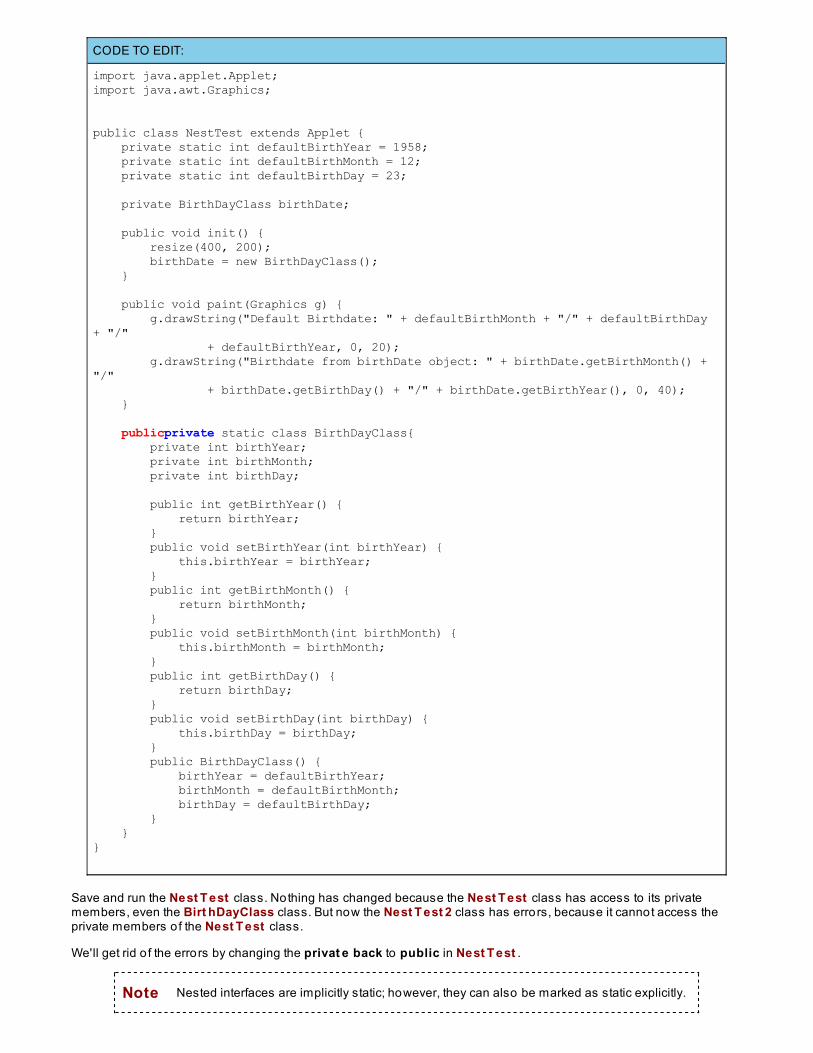
CODE TO EDIT:
import java.applet.Applet;import java.awt.Graphics;
public class NestTest extends Applet { private static int defaultBirthYear = 1958; private static int defaultBirthMonth = 12; private static int defaultBirthDay = 23; private BirthDayClass birthDate; public void init() { resize(400, 200); birthDate = new BirthDayClass(); } public void paint(Graphics g) { g.drawString("Default Birthdate: " + defaultBirthMonth + "/" + defaultBirthDay + "/" + defaultBirthYear, 0, 20); g.drawString("Birthdate from birthDate object: " + birthDate.getBirthMonth() + "/" + birthDate.getBirthDay() + "/" + birthDate.getBirthYear(), 0, 40); } publicprivate static class BirthDayClass{ private int birthYear; private int birthMonth; private int birthDay; public int getBirthYear() { return birthYear; } public void setBirthYear(int birthYear) { this.birthYear = birthYear; } public int getBirthMonth() { return birthMonth; } public void setBirthMonth(int birthMonth) { this.birthMonth = birthMonth; } public int getBirthDay() { return birthDay; } public void setBirthDay(int birthDay) { this.birthDay = birthDay; } public BirthDayClass() { birthYear = defaultBirthYear; birthMonth = defaultBirthMonth; birthDay = defaultBirthDay; } } }
Save and run the Nest T est class. Nothing has changed because the Nest T est class has access to its privatemembers, even the Birt hDayClass class. But now the Nest T est 2 class has errors, because it cannot access theprivate members o f the Nest T est class.
We'll get rid o f the errors by changing the privat e back to public in Nest T est .
Note Nested interfaces are implicitly static; however, they can also be marked as static explicitly.
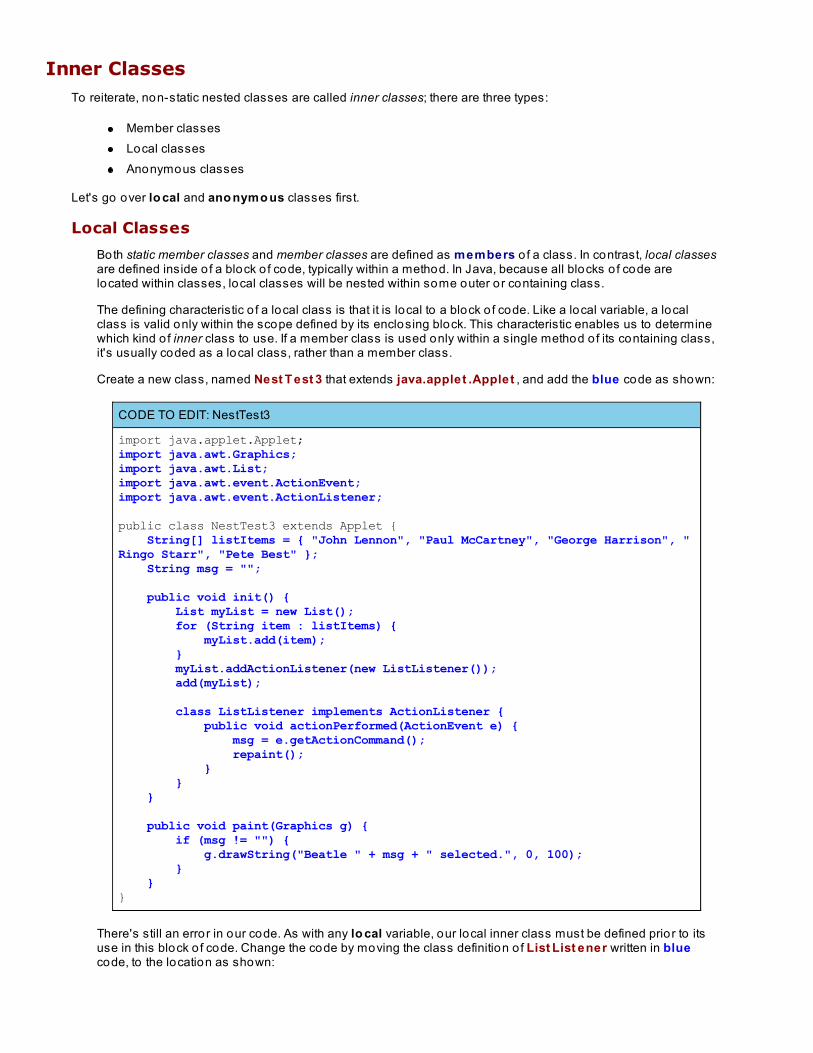
Inner ClassesTo reiterate, non-static nested classes are called inner classes; there are three types:
Member classesLocal classesAnonymous classes
Let's go over lo cal and ano nymo us classes first.
Local Classes
Both static member classes and member classes are defined as members o f a class. In contrast, local classesare defined inside o f a block o f code, typically within a method. In Java, because all blocks o f code arelocated within classes, local classes will be nested within some outer or containing class.
The defining characteristic o f a local class is that it is local to a block o f code. Like a local variable, a localclass is valid only within the scope defined by its enclosing block. This characteristic enables us to determinewhich kind o f inner class to use. If a member class is used only within a single method o f its containing class,it's usually coded as a local class, rather than a member class.
Create a new class, named Nest T est 3 that extends java.applet .Applet , and add the blue code as shown:
CODE TO EDIT: NestTest3
import java.applet.Applet;import java.awt.Graphics;import java.awt.List;import java.awt.event.ActionEvent;import java.awt.event.ActionListener;
public class NestTest3 extends Applet { String[] listItems = { "John Lennon", "Paul McCartney", "George Harrison", "Ringo Starr", "Pete Best" }; String msg = "";
public void init() { List myList = new List(); for (String item : listItems) { myList.add(item); } myList.addActionListener(new ListListener()); add(myList);
class ListListener implements ActionListener { public void actionPerformed(ActionEvent e) { msg = e.getActionCommand(); repaint(); } } }
public void paint(Graphics g) { if (msg != "") { g.drawString("Beatle " + msg + " selected.", 0, 100); } }}
There's still an error in our code. As with any lo cal variable, our local inner class must be defined prio r to itsuse in this block o f code. Change the code by moving the class definition o f List List ener written in bluecode, to the location as shown:
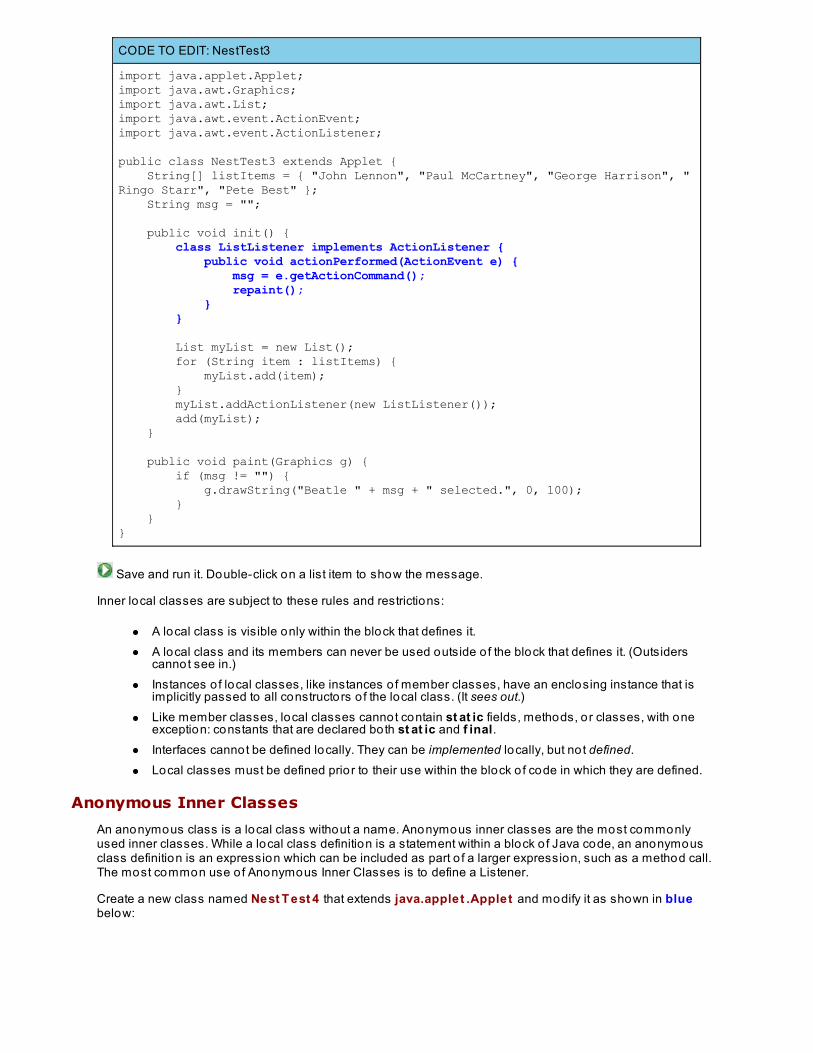
CODE TO EDIT: NestTest3
import java.applet.Applet;import java.awt.Graphics;import java.awt.List;import java.awt.event.ActionEvent;import java.awt.event.ActionListener;
public class NestTest3 extends Applet { String[] listItems = { "John Lennon", "Paul McCartney", "George Harrison", "Ringo Starr", "Pete Best" }; String msg = "";
public void init() { class ListListener implements ActionListener { public void actionPerformed(ActionEvent e) { msg = e.getActionCommand(); repaint(); } }
List myList = new List(); for (String item : listItems) { myList.add(item); } myList.addActionListener(new ListListener()); add(myList); }
public void paint(Graphics g) { if (msg != "") { g.drawString("Beatle " + msg + " selected.", 0, 100); } }}
Save and run it. Double-click on a list item to show the message.
Inner local classes are subject to these rules and restrictions:
A local class is visible only within the block that defines it.A local class and its members can never be used outside o f the block that defines it. (Outsiderscannot see in.)Instances o f local classes, like instances o f member classes, have an enclosing instance that isimplicitly passed to all constructors o f the local class. (It sees out.)Like member classes, local classes cannot contain st at ic fields, methods, or classes, with oneexception: constants that are declared both st at ic and f inal.Interfaces cannot be defined locally. They can be implemented locally, but not defined.Local classes must be defined prio r to their use within the block o f code in which they are defined.
Anonymous Inner Classes
An anonymous class is a local class without a name. Anonymous inner classes are the most commonlyused inner classes. While a local class definition is a statement within a block o f Java code, an anonymousclass definition is an expression which can be included as part o f a larger expression, such as a method call.The most common use o f Anonymous Inner Classes is to define a Listener.
Create a new class named Nest T est 4 that extends java.applet .Applet and modify it as shown in bluebelow:
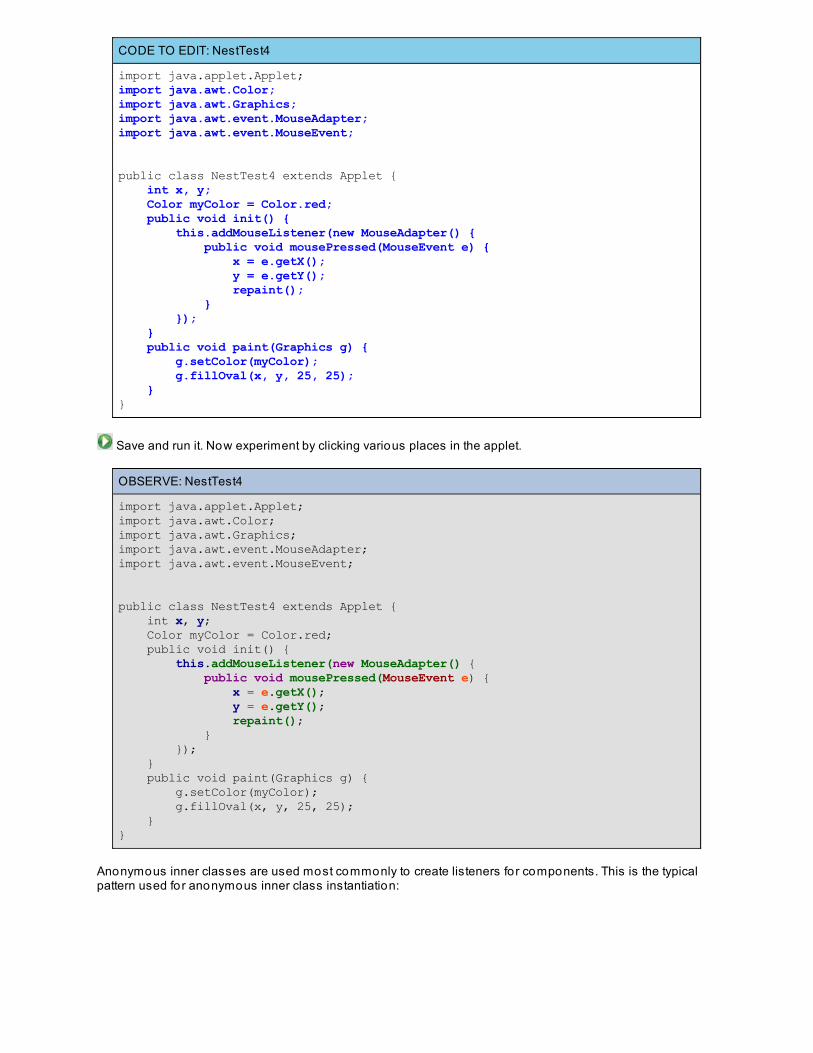
CODE TO EDIT: NestTest4
import java.applet.Applet;import java.awt.Color;import java.awt.Graphics;import java.awt.event.MouseAdapter;import java.awt.event.MouseEvent;
public class NestTest4 extends Applet { int x, y; Color myColor = Color.red; public void init() { this.addMouseListener(new MouseAdapter() { public void mousePressed(MouseEvent e) { x = e.getX(); y = e.getY(); repaint(); } }); } public void paint(Graphics g) { g.setColor(myColor); g.fillOval(x, y, 25, 25); }}
Save and run it. Now experiment by clicking various places in the applet.
OBSERVE: NestTest4
import java.applet.Applet;import java.awt.Color;import java.awt.Graphics;import java.awt.event.MouseAdapter;import java.awt.event.MouseEvent;
public class NestTest4 extends Applet { int x, y; Color myColor = Color.red; public void init() { this.addMouseListener(new MouseAdapter() { public void mousePressed(MouseEvent e) { x = e.getX(); y = e.getY(); repaint(); } }); } public void paint(Graphics g) { g.setColor(myColor); g.fillOval(x, y, 25, 25); }}
Anonymous inner classes are used most commonly to create listeners for components. This is the typicalpattern used for anonymous inner class instantiation:
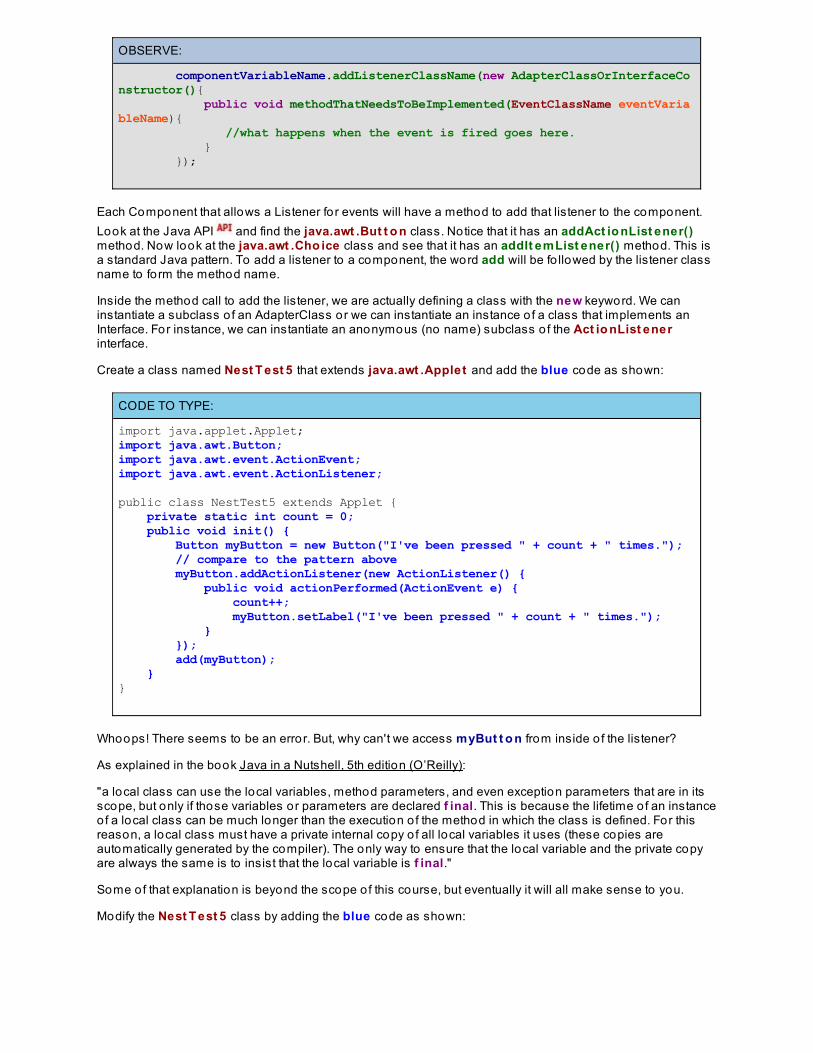
OBSERVE:
componentVariableName.addListenerClassName(new AdapterClassOrInterfaceConstructor(){ public void methodThatNeedsToBeImplemented(EventClassName eventVariableName){ //what happens when the event is fired goes here. } });
Each Component that allows a Listener fo r events will have a method to add that listener to the component.Look at the Java API and find the java.awt .But t o n class. Notice that it has an addAct io nList ener()method. Now look at the java.awt .Cho ice class and see that it has an addIt emList ener() method. This isa standard Java pattern. To add a listener to a component, the word add will be fo llowed by the listener classname to form the method name.
Inside the method call to add the listener, we are actually defining a class with the new keyword. We caninstantiate a subclass o f an AdapterClass or we can instantiate an instance o f a class that implements anInterface. For instance, we can instantiate an anonymous (no name) subclass o f the Act io nList enerinterface.
Create a class named Nest T est 5 that extends java.awt .Applet and add the blue code as shown:
CODE TO TYPE:
import java.applet.Applet;import java.awt.Button;import java.awt.event.ActionEvent;import java.awt.event.ActionListener;
public class NestTest5 extends Applet { private static int count = 0; public void init() { Button myButton = new Button("I've been pressed " + count + " times."); // compare to the pattern above myButton.addActionListener(new ActionListener() { public void actionPerformed(ActionEvent e) { count++; myButton.setLabel("I've been pressed " + count + " times."); } }); add(myButton); }}
Whoops! There seems to be an error. But, why can't we access myBut t o n from inside o f the listener?
As explained in the book Java in a Nutshell, 5th edition (O’Reilly):
"a local class can use the local variables, method parameters, and even exception parameters that are in itsscope, but only if those variables or parameters are declared f inal. This is because the lifetime o f an instanceof a local class can be much longer than the execution o f the method in which the class is defined. For thisreason, a local class must have a private internal copy o f all local variables it uses (these copies areautomatically generated by the compiler). The only way to ensure that the local variable and the private copyare always the same is to insist that the local variable is f inal."
Some of that explanation is beyond the scope o f this course, but eventually it will all make sense to you.
Modify the Nest T est 5 class by adding the blue code as shown:

CODE TO TYPE:
import java.applet.Applet;import java.awt.Button;import java.awt.event.ActionEvent;import java.awt.event.ActionListener;
public class NestTest5 extends Applet { private static int count = 0; public void init() { final Button myButton = new Button("I've been pressed " + count + " times."); // compare to the pattern above myButton.addActionListener(new ActionListener() { public void actionPerformed(ActionEvent e) { count++; myButton.setLabel("I've been pressed " + count + " times."); } }); add(myButton); }}
Save and run it. Click on the button.
OBSERVE: NestTest5
import java.applet.Applet;import java.awt.Button;import java.awt.event.ActionEvent;import java.awt.event.ActionListener;
public class NestTest5 extends Applet { private static int count = 0; public void init() { final Button myButton = new Button("I've been pressed " + count + " times."); // compare to the pattern above myButton.addActionListener(new ActionListener() { public void actionPerformed(ActionEvent e) { count++; myButton.setLabel("I've been pressed " + count + " times."); } }); add(myButton); }}
In our new Act io nList ener() , it seems like we are trying to instantiate an interface with a constructor. This isnot the case. The compiler knows that we are creating an anonymous inner class by instantiating a new classthat implements the interface Act io nList ener.
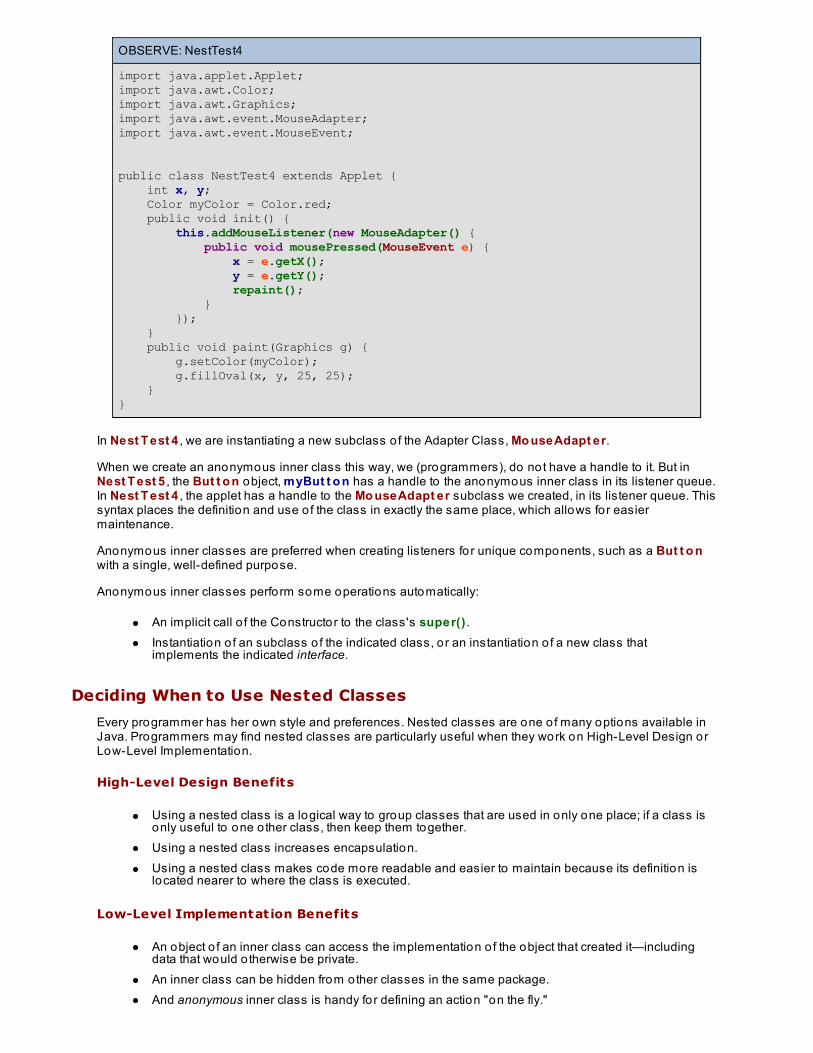
OBSERVE: NestTest4
import java.applet.Applet;import java.awt.Color;import java.awt.Graphics;import java.awt.event.MouseAdapter;import java.awt.event.MouseEvent;
public class NestTest4 extends Applet { int x, y; Color myColor = Color.red; public void init() { this.addMouseListener(new MouseAdapter() { public void mousePressed(MouseEvent e) { x = e.getX(); y = e.getY(); repaint(); } }); } public void paint(Graphics g) { g.setColor(myColor); g.fillOval(x, y, 25, 25); }}
In Nest T est 4 , we are instantiating a new subclass o f the Adapter Class, Mo useAdapt er.
When we create an anonymous inner class this way, we (programmers), do not have a handle to it. But inNest T est 5 , the But t o n object, myBut t o n has a handle to the anonymous inner class in its listener queue.In Nest T est 4 , the applet has a handle to the Mo useAdapt er subclass we created, in its listener queue. Thissyntax places the definition and use o f the class in exactly the same place, which allows for easiermaintenance.
Anonymous inner classes are preferred when creating listeners for unique components, such as a But t o nwith a single, well-defined purpose.
Anonymous inner classes perform some operations automatically:
An implicit call o f the Constructor to the class's super() .Instantiation o f an subclass o f the indicated class, or an instantiation o f a new class thatimplements the indicated interface.
Deciding When to Use Nested Classes
Every programmer has her own style and preferences. Nested classes are one o f many options available inJava. Programmers may find nested classes are particularly useful when they work on High-Level Design orLow-Level Implementation.
High-Level Design Benefits
Using a nested class is a logical way to group classes that are used in only one place; if a class isonly useful to one o ther class, then keep them together.Using a nested class increases encapsulation.Using a nested class makes code more readable and easier to maintain because its definition islocated nearer to where the class is executed.
Low-Level Implementation Benefits
An object o f an inner class can access the implementation o f the object that created it—includingdata that would o therwise be private.An inner class can be hidden from other classes in the same package.And anonymous inner class is handy for defining an action "on the fly."

Inner classes are convenient fo r writing event-driven programs.
As with most programming cho ices, there are also some disadvant ages to using nested classes:
Anonymous classes may make code difficult to read.Separation o f Model-View-Contro ller becomes invalidated.Classes contain a mixture o f purposes and are therefore no longer specific and easily understood.Inner classes may cause security concerns.
In the end it will be up to you to decide which features you need for your programs and how to achieve your goals.Now that you have a grasp on nested classes, let's return to int erf aces and see how the two impact one another.See you in the next lesson!
Copyright © 1998-2014 O'Reilly Media, Inc.
This work is licensed under a Creative Commons Attribution-ShareAlike 3.0 Unported License.See http://creativecommons.org/licenses/by-sa/3.0/legalcode for more information.
Interfaces and InheritanceLesson Objectives
When you complete this lesson, you will be able to :
use interfaces as well as instanceof properly.demonstrate the Class/Interface relationship.
Interfaces and ClassesIn earlier lessons, we explored too ls such as inheritance, abstract classes, interfaces, and nested classes, used todesign large applications. In this lesson, we'll investigate interfaces. While interfaces aren't part o f a class hierarchy,they do work in combination with classes.
Interfaces are used o ften by Java programmers to :
act as listeners for graphical user interfaces.provide a type o f multiple inheritance in Java.allow "callbacks."
So far we've used interfaces as listeners. Interfaces and classes are a similar. Like classes, when you define a newinterface, you're defining a new data type. You can use interface names anywhere you can use data type names. Aninterface is like a class but with no implementation. So if you define a reference variable with a type that's an interface,any object you assign to it must be an instance o f a class that implements that interface.
Java only allows single inheritance; a class can extend only one o ther class. But a class in Java can implement anunlimited number o f interfaces. If a class implements more than one interface, it must implement every method o fevery interface it implements (or else the class must be declared abstract). We saw this in previous examples when weimplemented a listener fo r the Buttons and the mouse.
Classes and interfaces share many o f the same qualities, but they also differ significantly.
Shared Features of Classes and Interfaces
Classes and interfaces are both types.Classes have fields (instance and class variables); interfaces can have fields, but o nly when theyare static and final (constants without instance variables), and every field declaration in the body o fan interface is implicitly public, static, and final.Classes have methods; interfaces make method declarations. (All method declarations in the bodyof an interface are implicitly public and abstract.)Classes can have subclasses; interfaces can have subinterfaces. A subinterface inherits all o f theabstract methods and constants o f its superinterface, and can define new abstract methods andconstants.
Differences Between Classes and Interfaces
Interfaces contain no implementation. For all interface methods, we use a semi-co lon, but nomethod body.All methods o f an interface are public. Anyone can implement the interface.Interfaces cannot be instantiated, so they cannot have constructors.Methods o f an interface cannot be declared static (because static methods cannot be abstract). Allo f the methods o f an interface must be instance methods.Interfaces can extend o ther interfaces. An interface can have an extends clause that lists more thanone superinterface. All o f the methods specified in the given interface and all o f its superinterfacesmust be implemented.A variable with an interface that is a declared type may have as its value a reference to any instanceof a class that implements the specified interface. In these instances, the potential fo r "multipleinheritance" arises.
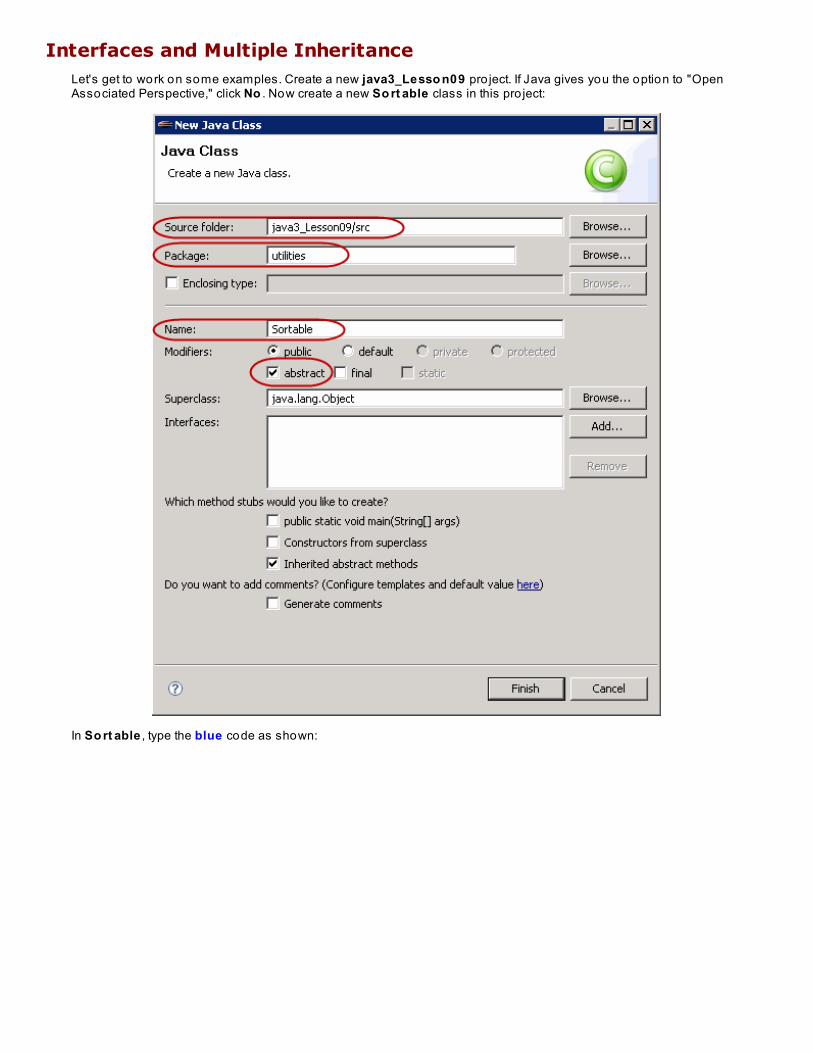
Interfaces and Multiple InheritanceLet's get to work on some examples. Create a new java3_Lesso n09 pro ject. If Java gives you the option to "OpenAssociated Perspective," click No . Now create a new So rt able class in this pro ject:
In So rt able , type the blue code as shown:
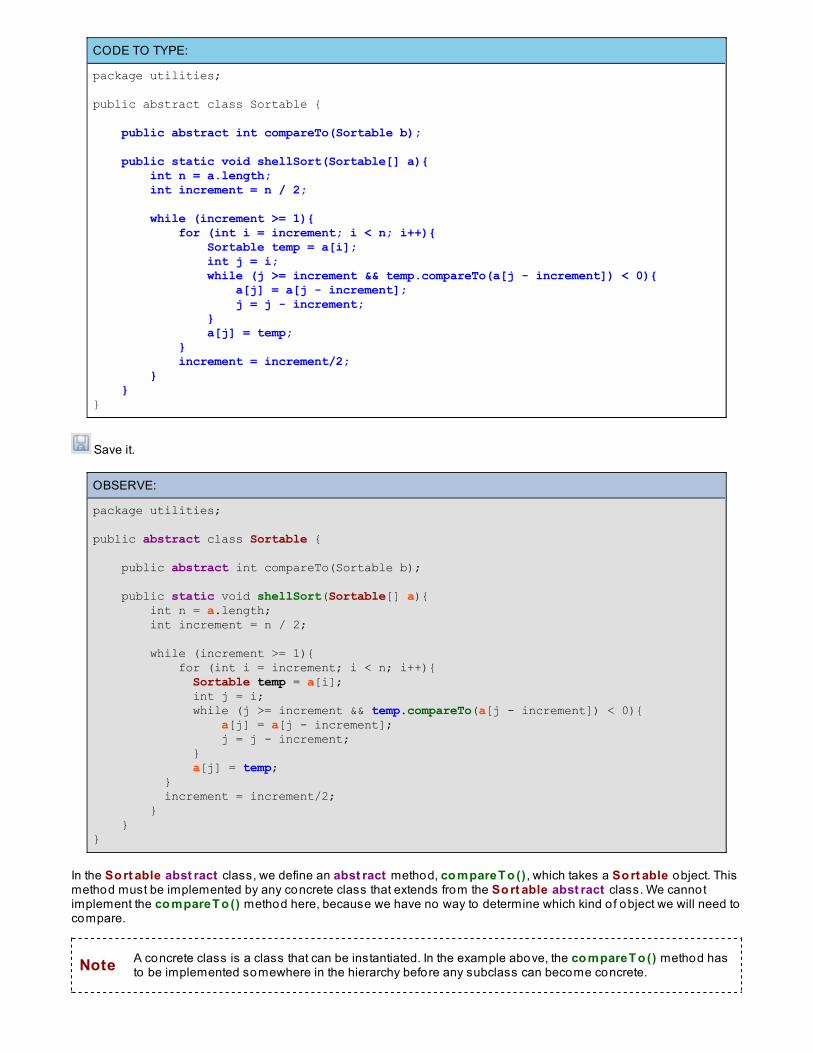
CODE TO TYPE:
package utilities;
public abstract class Sortable {
public abstract int compareTo(Sortable b); public static void shellSort(Sortable[] a){ int n = a.length; int increment = n / 2; while (increment >= 1){ for (int i = increment; i < n; i++){ Sortable temp = a[i]; int j = i; while (j >= increment && temp.compareTo(a[j - increment]) < 0){ a[j] = a[j - increment]; j = j - increment; } a[j] = temp; } increment = increment/2; } }}
Save it.
OBSERVE:
package utilities;
public abstract class Sortable {
public abstract int compareTo(Sortable b); public static void shellSort(Sortable[] a){ int n = a.length; int increment = n / 2; while (increment >= 1){ for (int i = increment; i < n; i++){ Sortable temp = a[i]; int j = i; while (j >= increment && temp.compareTo(a[j - increment]) < 0){ a[j] = a[j - increment]; j = j - increment; } a[j] = temp; } increment = increment/2; } }}
In the So rt able abst ract class, we define an abst ract method, co mpareT o () , which takes a So rt able object. Thismethod must be implemented by any concrete class that extends from the So rt able abst ract class. We cannotimplement the co mpareT o () method here, because we have no way to determine which kind o f object we will need tocompare.
Note A concrete class is a class that can be instantiated. In the example above, the co mpareT o () method hasto be implemented somewhere in the hierarchy before any subclass can become concrete.
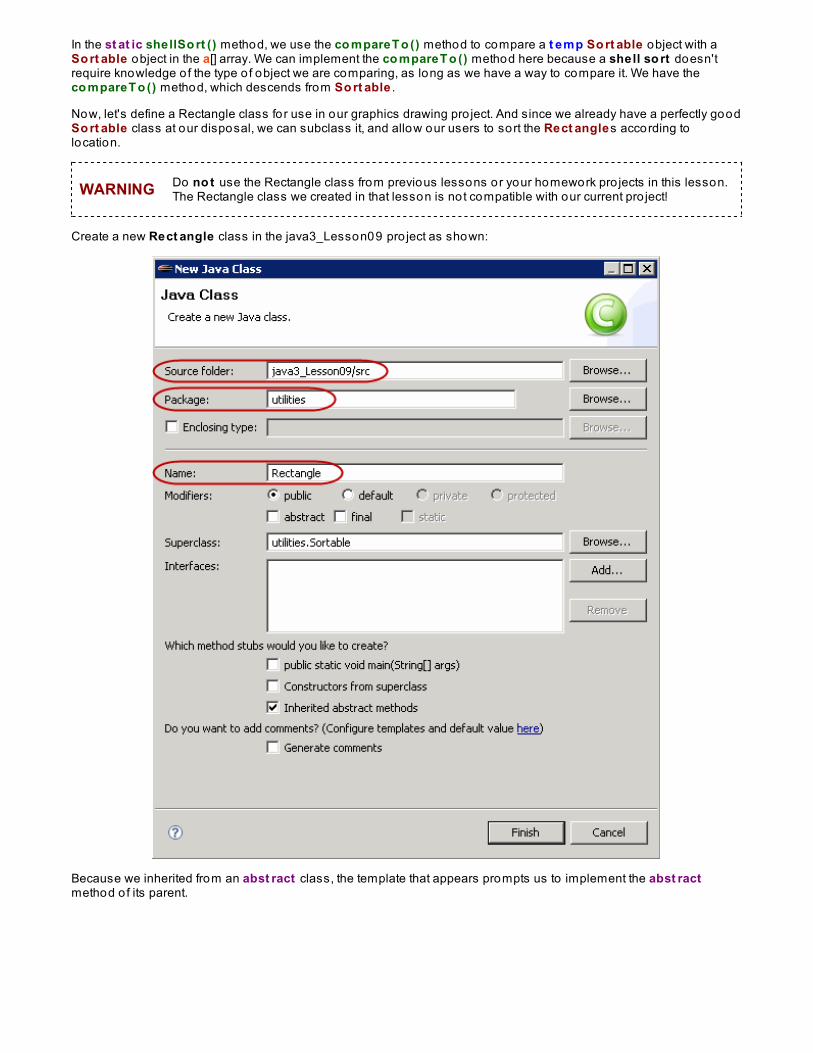
In the st at ic shellSo rt () method, we use the co mpareT o () method to compare a t emp So rt able object with aSo rt able object in the a[] array. We can implement the co mpareT o () method here because a shell so rt doesn'trequire knowledge o f the type o f object we are comparing, as long as we have a way to compare it. We have theco mpareT o () method, which descends from So rt able .
Now, let's define a Rectangle class for use in our graphics drawing pro ject. And since we already have a perfectly goodSo rt able class at our disposal, we can subclass it, and allow our users to sort the Rect angles according tolocation.
WARNING Do no t use the Rectangle class from previous lessons or your homework pro jects in this lesson.The Rectangle class we created in that lesson is not compatible with our current pro ject!
Create a new Rect angle class in the java3_Lesson09 pro ject as shown:
Because we inherited from an abst ract class, the template that appears prompts us to implement the abst ractmethod o f its parent.
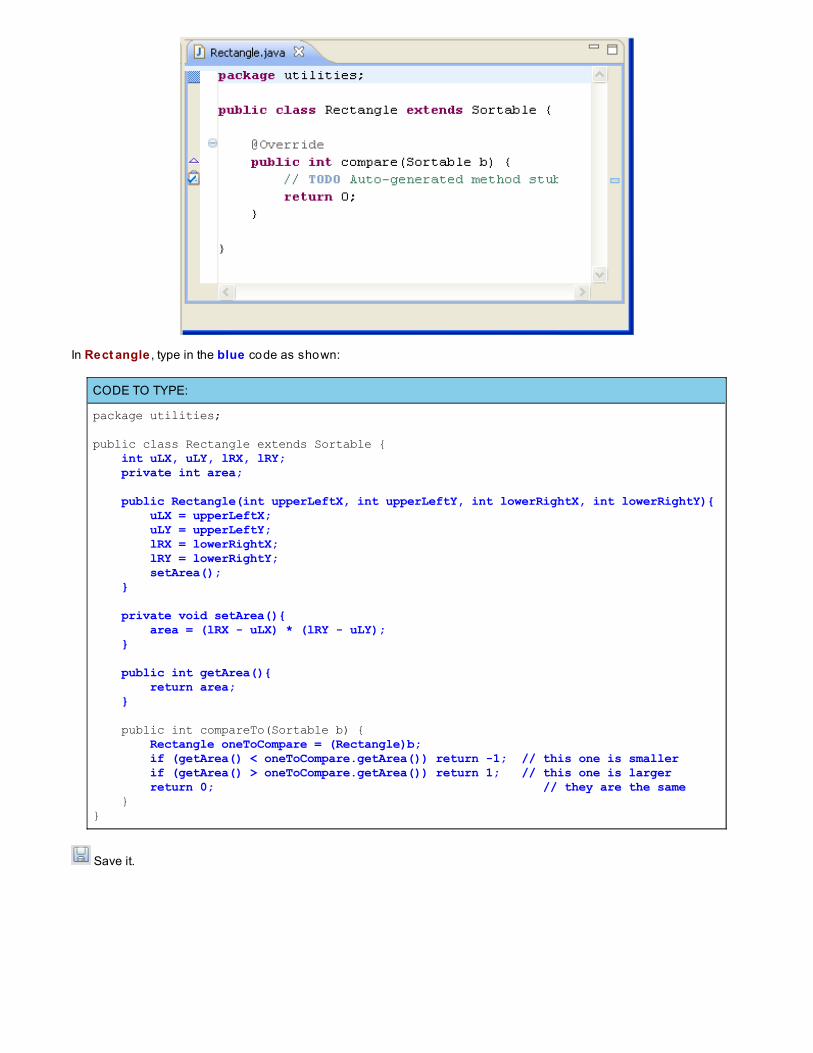
In Rect angle , type in the blue code as shown:
CODE TO TYPE:
package utilities;
public class Rectangle extends Sortable { int uLX, uLY, lRX, lRY; private int area; public Rectangle(int upperLeftX, int upperLeftY, int lowerRightX, int lowerRightY){ uLX = upperLeftX; uLY = upperLeftY; lRX = lowerRightX; lRY = lowerRightY; setArea(); } private void setArea(){ area = (lRX - uLX) * (lRY - uLY); } public int getArea(){ return area; } public int compareTo(Sortable b) { Rectangle oneToCompare = (Rectangle)b; if (getArea() < oneToCompare.getArea()) return -1; // this one is smaller if (getArea() > oneToCompare.getArea()) return 1; // this one is larger return 0; // they are the same }}
Save it.
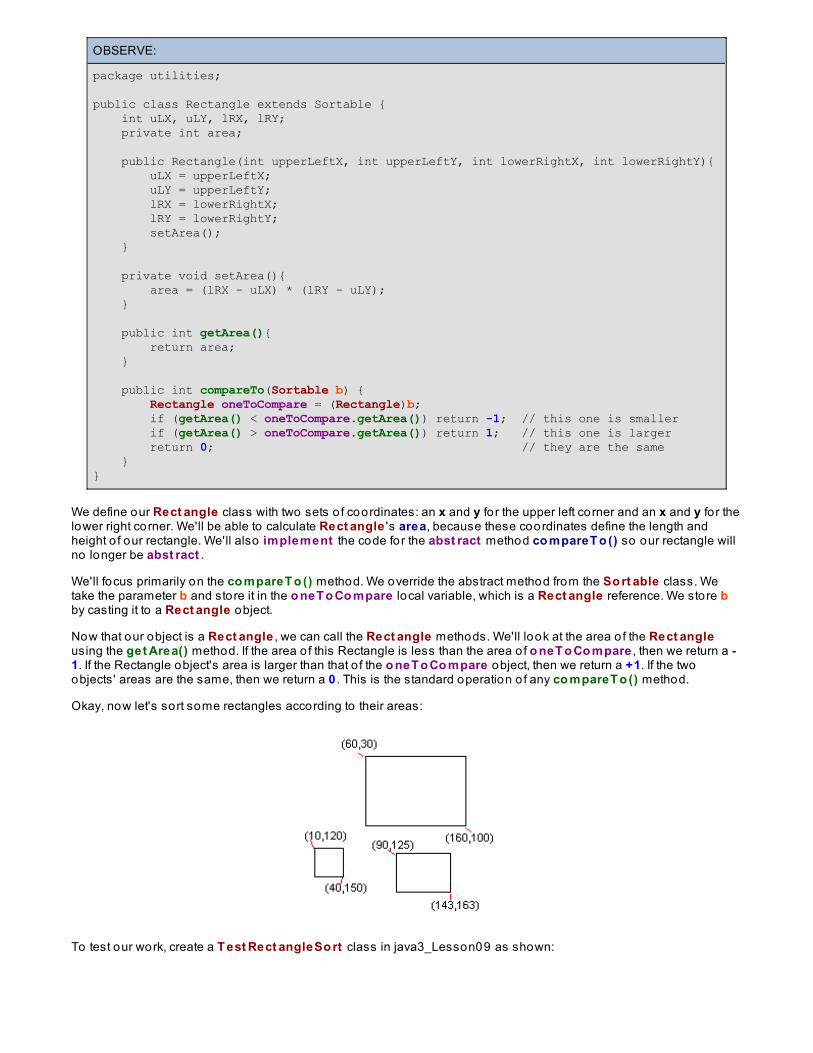
OBSERVE:
package utilities;
public class Rectangle extends Sortable { int uLX, uLY, lRX, lRY; private int area; public Rectangle(int upperLeftX, int upperLeftY, int lowerRightX, int lowerRightY){ uLX = upperLeftX; uLY = upperLeftY; lRX = lowerRightX; lRY = lowerRightY; setArea(); } private void setArea(){ area = (lRX - uLX) * (lRY - uLY); } public int getArea(){ return area; } public int compareTo(Sortable b) { Rectangle oneToCompare = (Rectangle)b; if (getArea() < oneToCompare.getArea()) return -1; // this one is smaller if (getArea() > oneToCompare.getArea()) return 1; // this one is larger return 0; // they are the same }}
We define our Rect angle class with two sets o f coordinates: an x and y fo r the upper left corner and an x and y fo r thelower right corner. We'll be able to calculate Rect angle 's area, because these coordinates define the length andheight o f our rectangle. We'll also implement the code for the abst ract method co mpareT o () so our rectangle willno longer be abst ract .
We'll focus primarily on the co mpareT o () method. We override the abstract method from the So rt able class. Wetake the parameter b and store it in the o neT o Co mpare local variable, which is a Rect angle reference. We store bby casting it to a Rect angle object.
Now that our object is a Rect angle , we can call the Rect angle methods. We'll look at the area o f the Rect angleusing the get Area() method. If the area o f this Rectangle is less than the area o f o neT o Co mpare , then we return a -1. If the Rectangle object's area is larger than that o f the o neT o Co mpare object, then we return a +1. If the twoobjects' areas are the same, then we return a 0 . This is the standard operation o f any co mpareT o () method.
Okay, now let's sort some rectangles according to their areas:
To test our work, create a T est Rect angleSo rt class in java3_Lesson09 as shown:
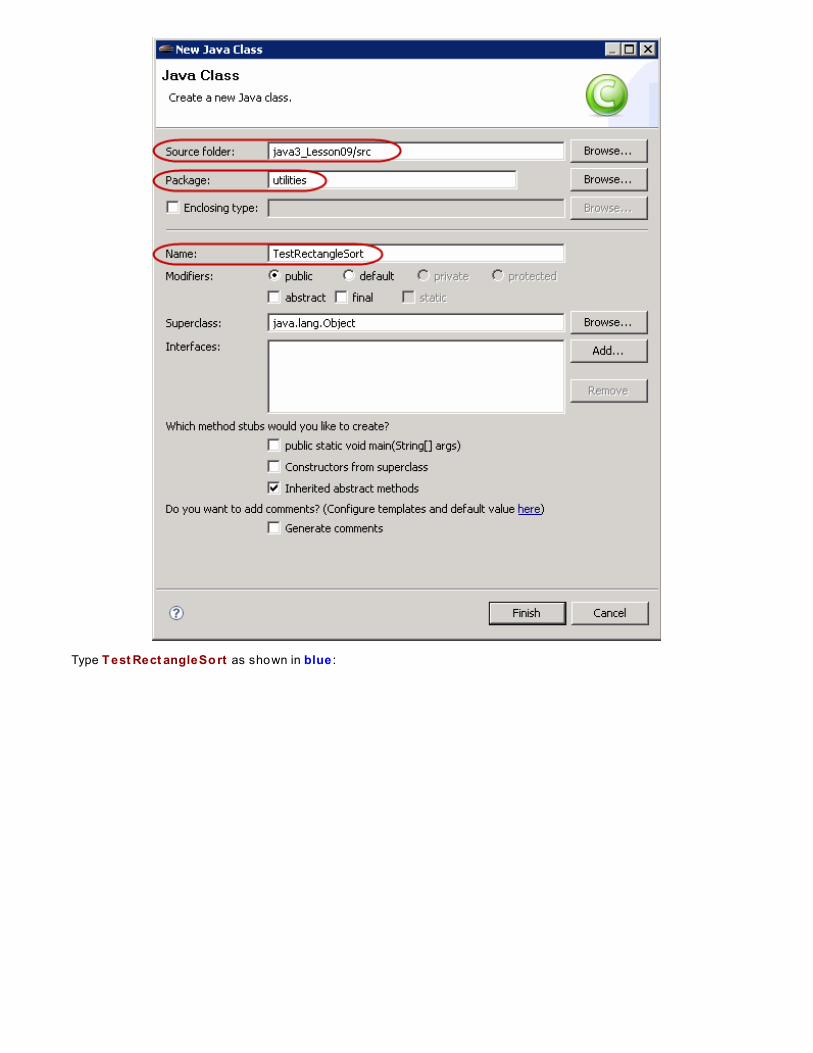
Type T est Rect angleSo rt as shown in blue :

CODE TO TYPE:
package utilities;
public class TestRectangleSort {
public static void main(String[] args){ TestRectangleSort newExample = new TestRectangleSort(); newExample.sortRectangles(); } public void sortRectangles(){ Rectangle[] figures = new Rectangle[3]; figures[0] = new Rectangle(60,30,160,100); figures[1] = new Rectangle(10,120,40,150); figures[2] = new Rectangle(90,125,143,163); System.out.println("Before shellSort:"); for (int i = 0; i < figures.length; i++) System.out.println("Area is " + figures[i].getArea()); Sortable.shellSort(figures); System.out.println("\nAfter shellSort:"); for (int i = 0; i < figures.length; i++) System.out.println("Area is " + figures[i].getArea()); }}
Save and run it. Your output will look like this:
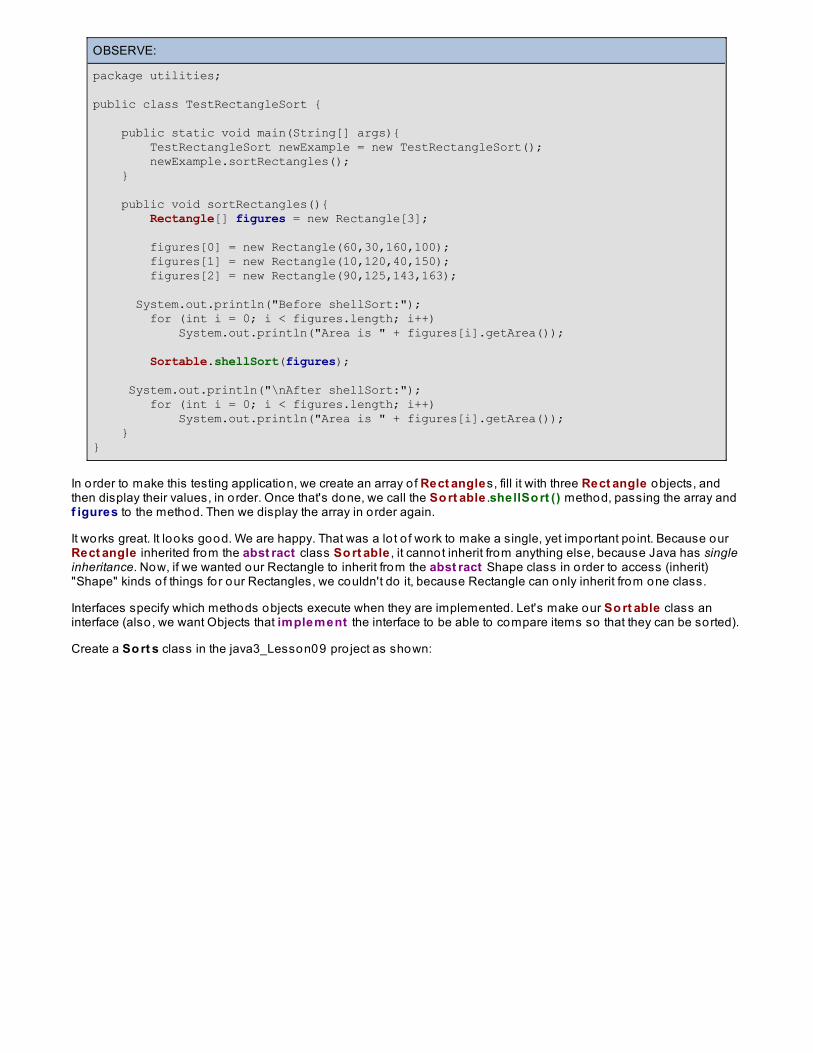
OBSERVE:
package utilities;
public class TestRectangleSort {
public static void main(String[] args){ TestRectangleSort newExample = new TestRectangleSort(); newExample.sortRectangles(); } public void sortRectangles(){ Rectangle[] figures = new Rectangle[3]; figures[0] = new Rectangle(60,30,160,100); figures[1] = new Rectangle(10,120,40,150); figures[2] = new Rectangle(90,125,143,163); System.out.println("Before shellSort:"); for (int i = 0; i < figures.length; i++) System.out.println("Area is " + figures[i].getArea()); Sortable.shellSort(figures); System.out.println("\nAfter shellSort:"); for (int i = 0; i < figures.length; i++) System.out.println("Area is " + figures[i].getArea()); }}
In order to make this testing application, we create an array o f Rect angles, fill it with three Rect angle objects, andthen display their values, in order. Once that's done, we call the So rt able .shellSo rt () method, passing the array andf igures to the method. Then we display the array in order again.
It works great. It looks good. We are happy. That was a lo t o f work to make a single, yet important po int. Because ourRect angle inherited from the abst ract class So rt able , it cannot inherit from anything else, because Java has singleinheritance. Now, if we wanted our Rectangle to inherit from the abst ract Shape class in order to access (inherit)"Shape" kinds o f things for our Rectangles, we couldn't do it, because Rectangle can only inherit from one class.
Interfaces specify which methods objects execute when they are implemented. Let's make our So rt able class aninterface (also , we want Objects that implement the interface to be able to compare items so that they can be sorted).
Create a So rt s class in the java3_Lesson09 pro ject as shown:
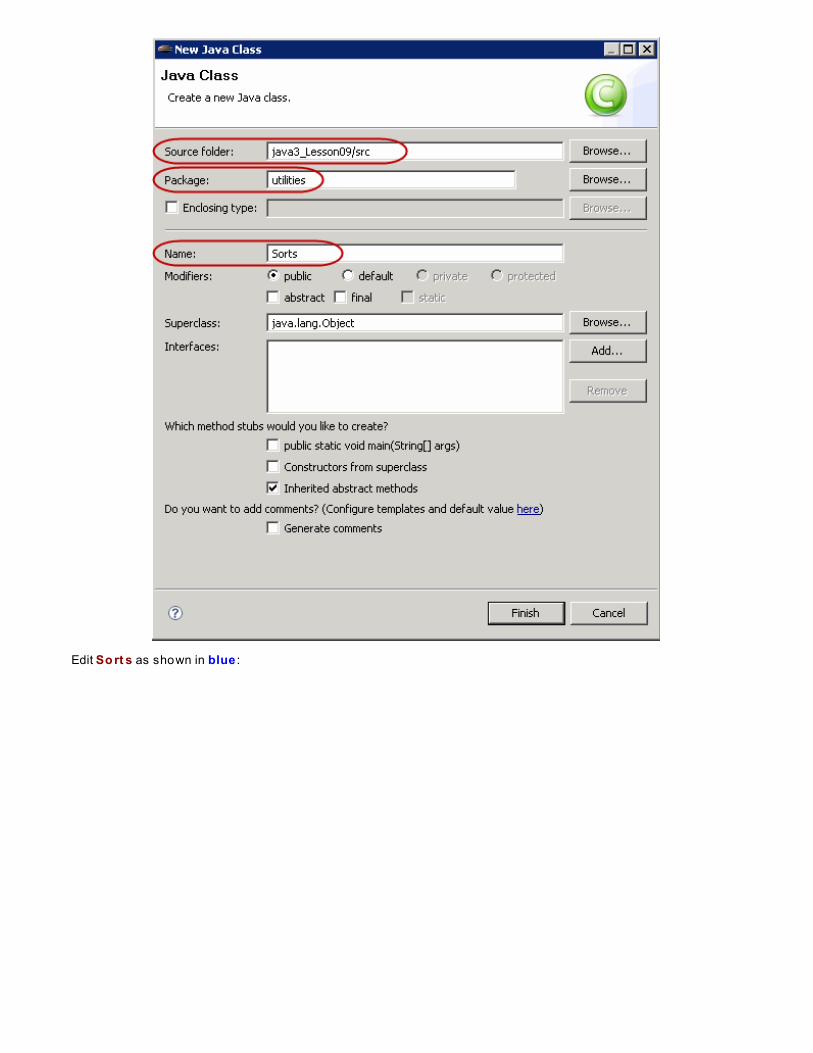
Edit So rt s as shown in blue :
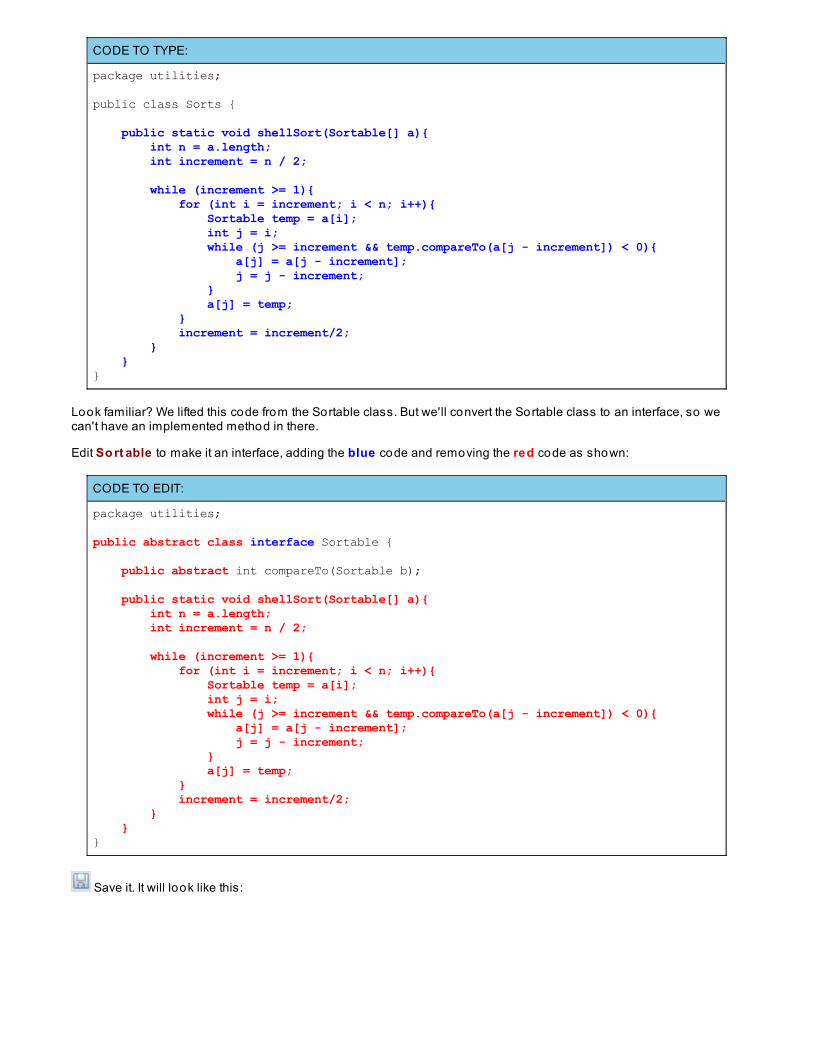
CODE TO TYPE:
package utilities;
public class Sorts { public static void shellSort(Sortable[] a){ int n = a.length; int increment = n / 2; while (increment >= 1){ for (int i = increment; i < n; i++){ Sortable temp = a[i]; int j = i; while (j >= increment && temp.compareTo(a[j - increment]) < 0){ a[j] = a[j - increment]; j = j - increment; } a[j] = temp; } increment = increment/2; } }}
Look familiar? We lifted this code from the Sortable class. But we'll convert the Sortable class to an interface, so wecan't have an implemented method in there.
Edit So rt able to make it an interface, adding the blue code and removing the red code as shown:
CODE TO EDIT:
package utilities;
public abstract class interface Sortable {
public abstract int compareTo(Sortable b); public static void shellSort(Sortable[] a){ int n = a.length; int increment = n / 2; while (increment >= 1){ for (int i = increment; i < n; i++){ Sortable temp = a[i]; int j = i; while (j >= increment && temp.compareTo(a[j - increment]) < 0){ a[j] = a[j - increment]; j = j - increment; } a[j] = temp; } increment = increment/2; } }}
Save it. It will look like this:
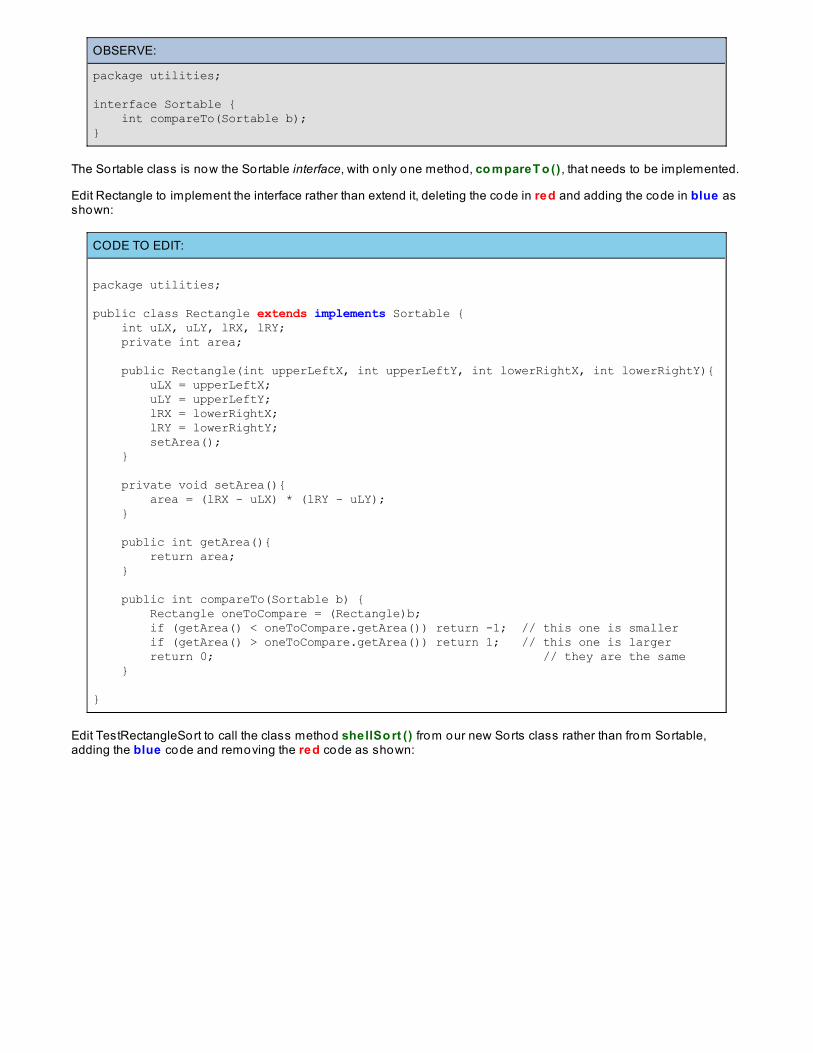
OBSERVE:
package utilities;
interface Sortable { int compareTo(Sortable b);}
The Sortable class is now the Sortable interface, with only one method, co mpareT o () , that needs to be implemented.
Edit Rectangle to implement the interface rather than extend it, deleting the code in red and adding the code in blue asshown:
CODE TO EDIT:
package utilities; public class Rectangle extends implements Sortable { int uLX, uLY, lRX, lRY; private int area; public Rectangle(int upperLeftX, int upperLeftY, int lowerRightX, int lowerRightY){ uLX = upperLeftX; uLY = upperLeftY; lRX = lowerRightX; lRY = lowerRightY; setArea(); } private void setArea(){ area = (lRX - uLX) * (lRY - uLY); } public int getArea(){ return area; } public int compareTo(Sortable b) { Rectangle oneToCompare = (Rectangle)b; if (getArea() < oneToCompare.getArea()) return -1; // this one is smaller if (getArea() > oneToCompare.getArea()) return 1; // this one is larger return 0; // they are the same } }
Edit TestRectangleSort to call the class method shellSo rt () from our new Sorts class rather than from Sortable,adding the blue code and removing the red code as shown:
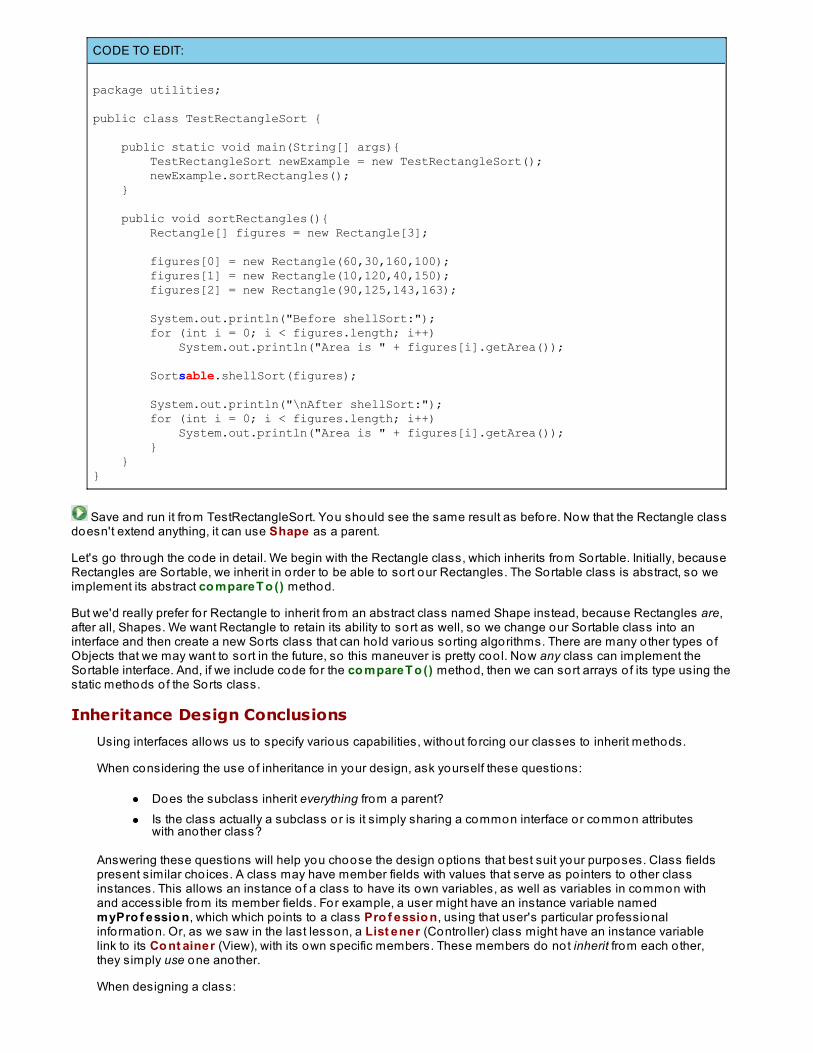
CODE TO EDIT:
package utilities; public class TestRectangleSort { public static void main(String[] args){ TestRectangleSort newExample = new TestRectangleSort(); newExample.sortRectangles(); } public void sortRectangles(){ Rectangle[] figures = new Rectangle[3]; figures[0] = new Rectangle(60,30,160,100); figures[1] = new Rectangle(10,120,40,150); figures[2] = new Rectangle(90,125,143,163); System.out.println("Before shellSort:"); for (int i = 0; i < figures.length; i++) System.out.println("Area is " + figures[i].getArea()); Sortsable.shellSort(figures); System.out.println("\nAfter shellSort:"); for (int i = 0; i < figures.length; i++) System.out.println("Area is " + figures[i].getArea()); } }}
Save and run it from TestRectangleSort. You should see the same result as before. Now that the Rectangle classdoesn't extend anything, it can use Shape as a parent.
Let's go through the code in detail. We begin with the Rectangle class, which inherits from Sortable. Initially, becauseRectangles are Sortable, we inherit in order to be able to sort our Rectangles. The Sortable class is abstract, so weimplement its abstract co mpareT o () method.
But we'd really prefer fo r Rectangle to inherit from an abstract class named Shape instead, because Rectangles are,after all, Shapes. We want Rectangle to retain its ability to sort as well, so we change our Sortable class into aninterface and then create a new Sorts class that can ho ld various sorting algorithms. There are many o ther types o fObjects that we may want to sort in the future, so this maneuver is pretty coo l. Now any class can implement theSortable interface. And, if we include code for the co mpareT o () method, then we can sort arrays o f its type using thestatic methods o f the Sorts class.
Inheritance Design Conclusions
Using interfaces allows us to specify various capabilities, without fo rcing our classes to inherit methods.
When considering the use o f inheritance in your design, ask yourself these questions:
Does the subclass inherit everything from a parent?Is the class actually a subclass or is it simply sharing a common interface or common attributeswith another class?
Answering these questions will help you choose the design options that best suit your purposes. Class fieldspresent similar cho ices. A class may have member fields with values that serve as po inters to o ther classinstances. This allows an instance o f a class to have its own variables, as well as variables in common withand accessible from its member fields. For example, a user might have an instance variable namedmyPro f essio n, which which po ints to a class Pro f essio n, using that user's particular pro fessionalinformation. Or, as we saw in the last lesson, a List ener (Contro ller) class might have an instance variablelink to its Co nt ainer (View), with its own specific members. These members do not inherit from each o ther,they simply use one another.
When designing a class:
The class's member fields should be o f a class type that ho lds additional information about somespecific aspect o f the class.When a class has capabilities (methods) that are not actions inherited from a parent, but arecommon types o f actions for o ther types o f classes, the class should implement an interface.
NoteInterfaces provide a specification for a set o f established action types. Each class thatimplements the interface writes its own code for the action. Classes can implement multipleinterfaces.
An interfaces is o ften written to be used by multiple classes—many different types o f classes will implementthat interface. Java cannot anticipate every possible use o f an interface, so the amount o f information theinterface gets is limited to that which the interface defines. The next section will illustrate this further.
Casting
Interfaces as Types
A variable with an interface type as its declared type may have as its value, a reference to any instance o f aclass that implements the specified interface. When using multiple inheritance, an Object can be declared asan instance o f a class type or something that implemented an interface type. The difference is that a declaredinterface type will only know about the interface methods. Let's experiment.
In the java3_Lesson09 pro ject, create a new class named T est , as shown:

In T est , type the blue code as shown:
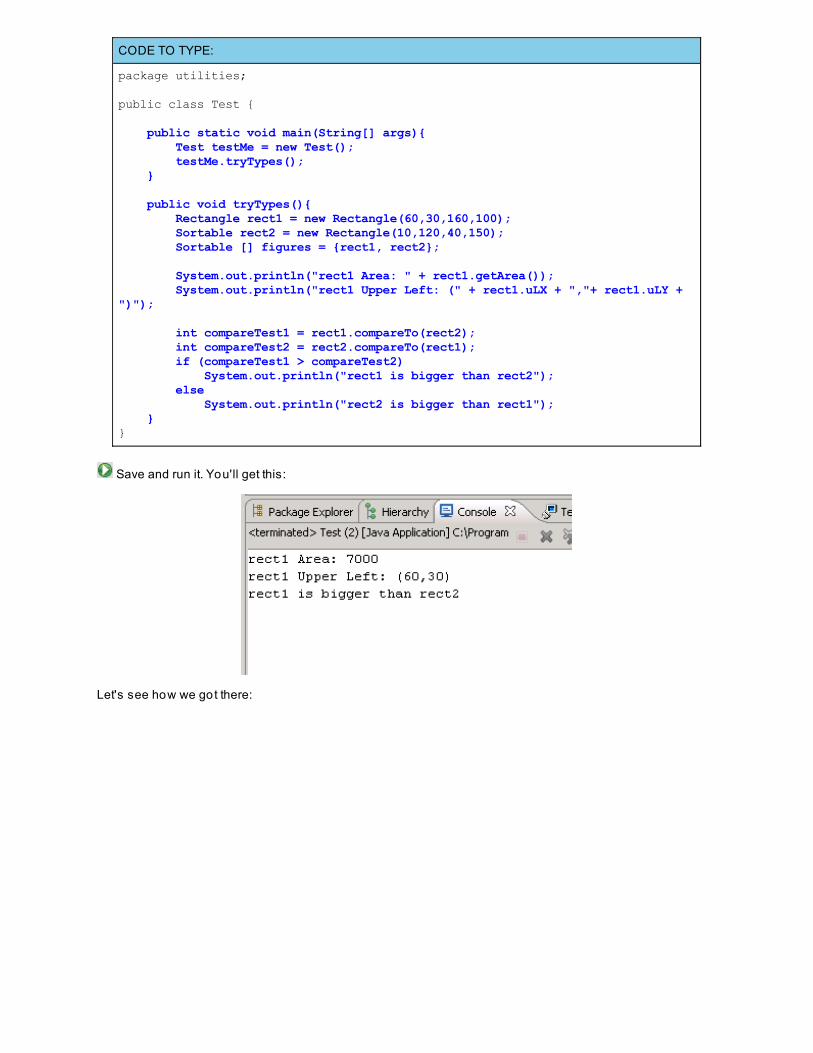
CODE TO TYPE:
package utilities;
public class Test {
public static void main(String[] args){ Test testMe = new Test(); testMe.tryTypes(); } public void tryTypes(){ Rectangle rect1 = new Rectangle(60,30,160,100); Sortable rect2 = new Rectangle(10,120,40,150); Sortable [] figures = {rect1, rect2}; System.out.println("rect1 Area: " + rect1.getArea()); System.out.println("rect1 Upper Left: (" + rect1.uLX + ","+ rect1.uLY + ")"); int compareTest1 = rect1.compareTo(rect2); int compareTest2 = rect2.compareTo(rect1); if (compareTest1 > compareTest2) System.out.println("rect1 is bigger than rect2"); else System.out.println("rect2 is bigger than rect1"); }}
Save and run it. You'll get this:
Let's see how we got there:
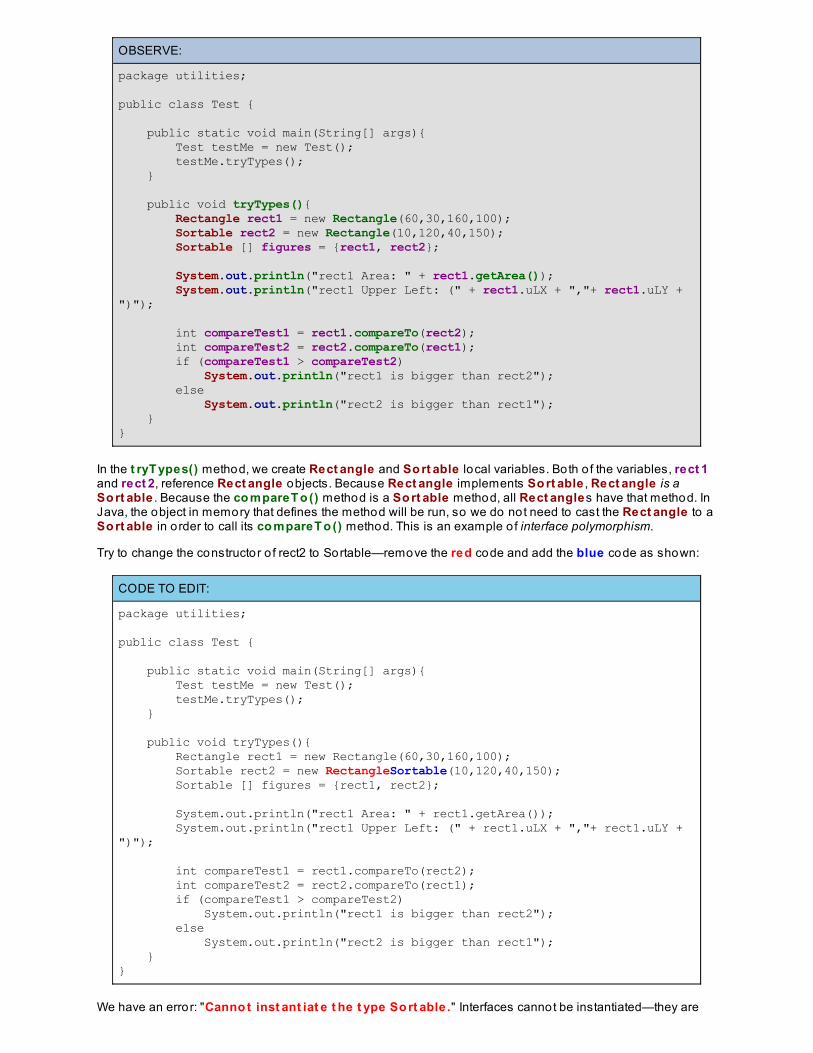
OBSERVE:
package utilities;
public class Test {
public static void main(String[] args){ Test testMe = new Test(); testMe.tryTypes(); } public void tryTypes(){ Rectangle rect1 = new Rectangle(60,30,160,100); Sortable rect2 = new Rectangle(10,120,40,150); Sortable [] figures = {rect1, rect2}; System.out.println("rect1 Area: " + rect1.getArea()); System.out.println("rect1 Upper Left: (" + rect1.uLX + ","+ rect1.uLY + ")"); int compareTest1 = rect1.compareTo(rect2); int compareTest2 = rect2.compareTo(rect1); if (compareTest1 > compareTest2) System.out.println("rect1 is bigger than rect2"); else System.out.println("rect2 is bigger than rect1"); }}
In the t ryT ypes() method, we create Rect angle and So rt able local variables. Both o f the variables, rect 1and rect 2, reference Rect angle objects. Because Rect angle implements So rt able , Rect angle is aSo rt able . Because the co mpareT o () method is a So rt able method, all Rect angles have that method. InJava, the object in memory that defines the method will be run, so we do not need to cast the Rect angle to aSo rt able in order to call its co mpareT o () method. This is an example o f interface polymorphism.
Try to change the constructor o f rect2 to Sortable—remove the red code and add the blue code as shown:
CODE TO EDIT:
package utilities; public class Test { public static void main(String[] args){ Test testMe = new Test(); testMe.tryTypes(); } public void tryTypes(){ Rectangle rect1 = new Rectangle(60,30,160,100); Sortable rect2 = new RectangleSortable(10,120,40,150); Sortable [] figures = {rect1, rect2}; System.out.println("rect1 Area: " + rect1.getArea()); System.out.println("rect1 Upper Left: (" + rect1.uLX + ","+ rect1.uLY + ")"); int compareTest1 = rect1.compareTo(rect2); int compareTest2 = rect2.compareTo(rect1); if (compareTest1 > compareTest2) System.out.println("rect1 is bigger than rect2"); else System.out.println("rect2 is bigger than rect1"); }}
We have an error: "Canno t inst ant iat e t he t ype So rt able ." Interfaces cannot be instantiated—they are
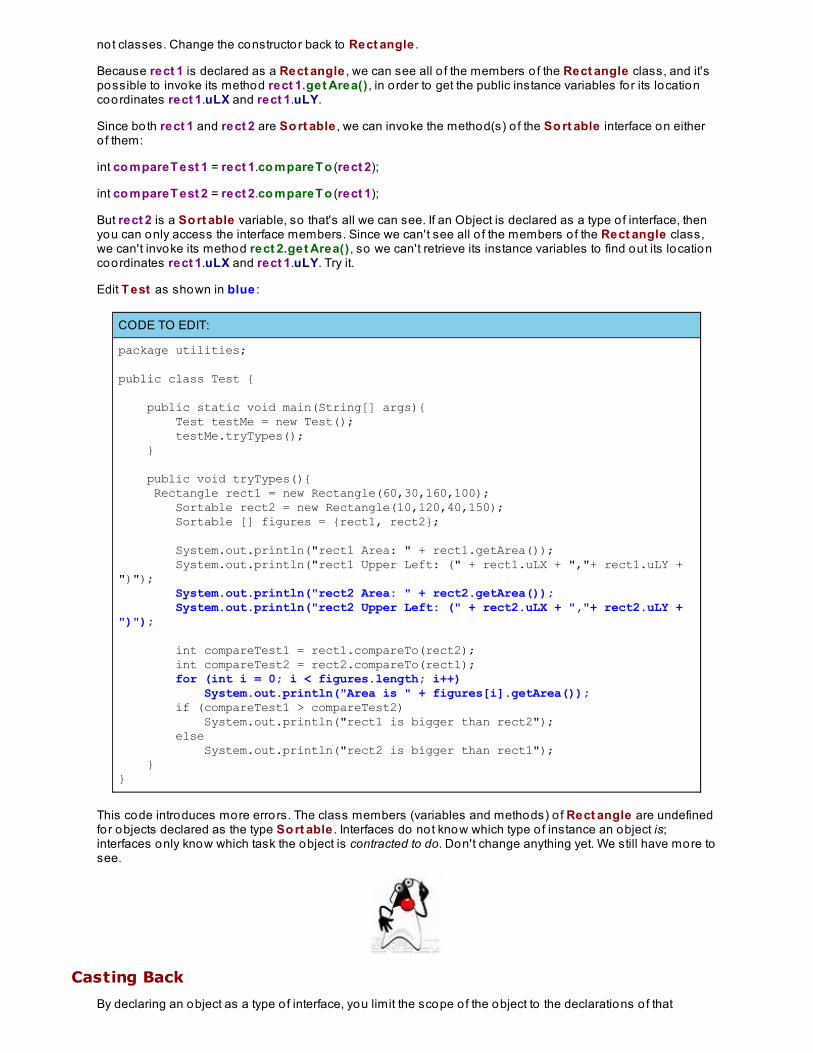
not classes. Change the constructor back to Rect angle .
Because rect 1 is declared as a Rect angle , we can see all o f the members o f the Rect angle class, and it'spossible to invoke its method rect 1.get Area() , in order to get the public instance variables for its locationcoordinates rect 1.uLX and rect 1.uLY.
Since both rect 1 and rect 2 are So rt able , we can invoke the method(s) o f the So rt able interface on eithero f them:
int co mpareT est 1 = rect 1.co mpareT o (rect 2);
int co mpareT est 2 = rect 2.co mpareT o (rect 1);
But rect 2 is a So rt able variable, so that's all we can see. If an Object is declared as a type o f interface, thenyou can only access the interface members. Since we can't see all o f the members o f the Rect angle class,we can't invoke its method rect 2.get Area() , so we can't retrieve its instance variables to find out its locationcoordinates rect 1.uLX and rect 1.uLY. Try it.
Edit T est as shown in blue :
CODE TO EDIT:
package utilities;
public class Test {
public static void main(String[] args){ Test testMe = new Test(); testMe.tryTypes(); } public void tryTypes(){ Rectangle rect1 = new Rectangle(60,30,160,100); Sortable rect2 = new Rectangle(10,120,40,150); Sortable [] figures = {rect1, rect2}; System.out.println("rect1 Area: " + rect1.getArea()); System.out.println("rect1 Upper Left: (" + rect1.uLX + ","+ rect1.uLY + ")"); System.out.println("rect2 Area: " + rect2.getArea()); System.out.println("rect2 Upper Left: (" + rect2.uLX + ","+ rect2.uLY + ")"); int compareTest1 = rect1.compareTo(rect2); int compareTest2 = rect2.compareTo(rect1); for (int i = 0; i < figures.length; i++) System.out.println("Area is " + figures[i].getArea()); if (compareTest1 > compareTest2) System.out.println("rect1 is bigger than rect2"); else System.out.println("rect2 is bigger than rect1"); }}
This code introduces more errors. The class members (variables and methods) o f Rect angle are undefinedfor objects declared as the type So rt able . Interfaces do not know which type o f instance an object is;interfaces only know which task the object is contracted to do. Don't change anything yet. We still have more tosee.
Casting Back
By declaring an object as a type o f interface, you limit the scope o f the object to the declarations o f that
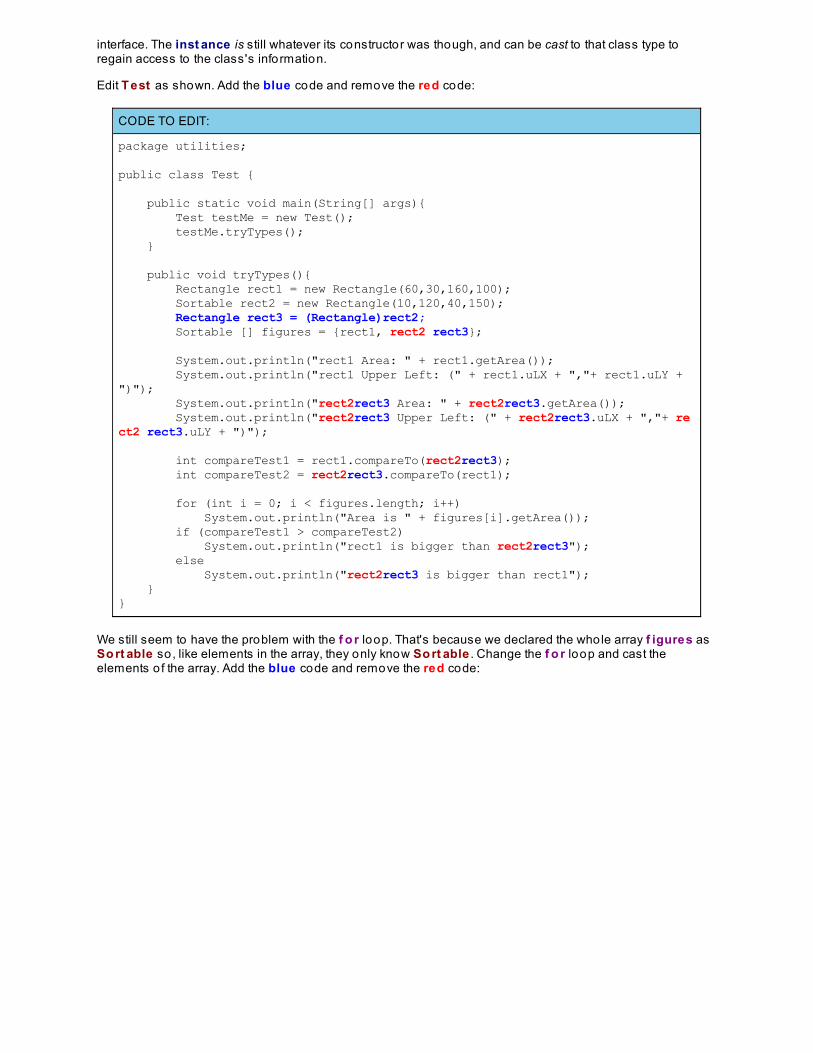
interface. The inst ance is still whatever its constructor was though, and can be cast to that class type toregain access to the class's information.
Edit T est as shown. Add the blue code and remove the red code:
CODE TO EDIT:
package utilities;
public class Test {
public static void main(String[] args){ Test testMe = new Test(); testMe.tryTypes(); } public void tryTypes(){ Rectangle rect1 = new Rectangle(60,30,160,100); Sortable rect2 = new Rectangle(10,120,40,150); Rectangle rect3 = (Rectangle)rect2; Sortable [] figures = {rect1, rect2 rect3}; System.out.println("rect1 Area: " + rect1.getArea()); System.out.println("rect1 Upper Left: (" + rect1.uLX + ","+ rect1.uLY + ")"); System.out.println("rect2rect3 Area: " + rect2rect3.getArea()); System.out.println("rect2rect3 Upper Left: (" + rect2rect3.uLX + ","+ rect2 rect3.uLY + ")"); int compareTest1 = rect1.compareTo(rect2rect3); int compareTest2 = rect2rect3.compareTo(rect1); for (int i = 0; i < figures.length; i++) System.out.println("Area is " + figures[i].getArea()); if (compareTest1 > compareTest2) System.out.println("rect1 is bigger than rect2rect3"); else System.out.println("rect2rect3 is bigger than rect1"); }}
We still seem to have the problem with the f o r loop. That's because we declared the whole array f igures asSo rt able so , like elements in the array, they only know So rt able . Change the f o r loop and cast theelements o f the array. Add the blue code and remove the red code:
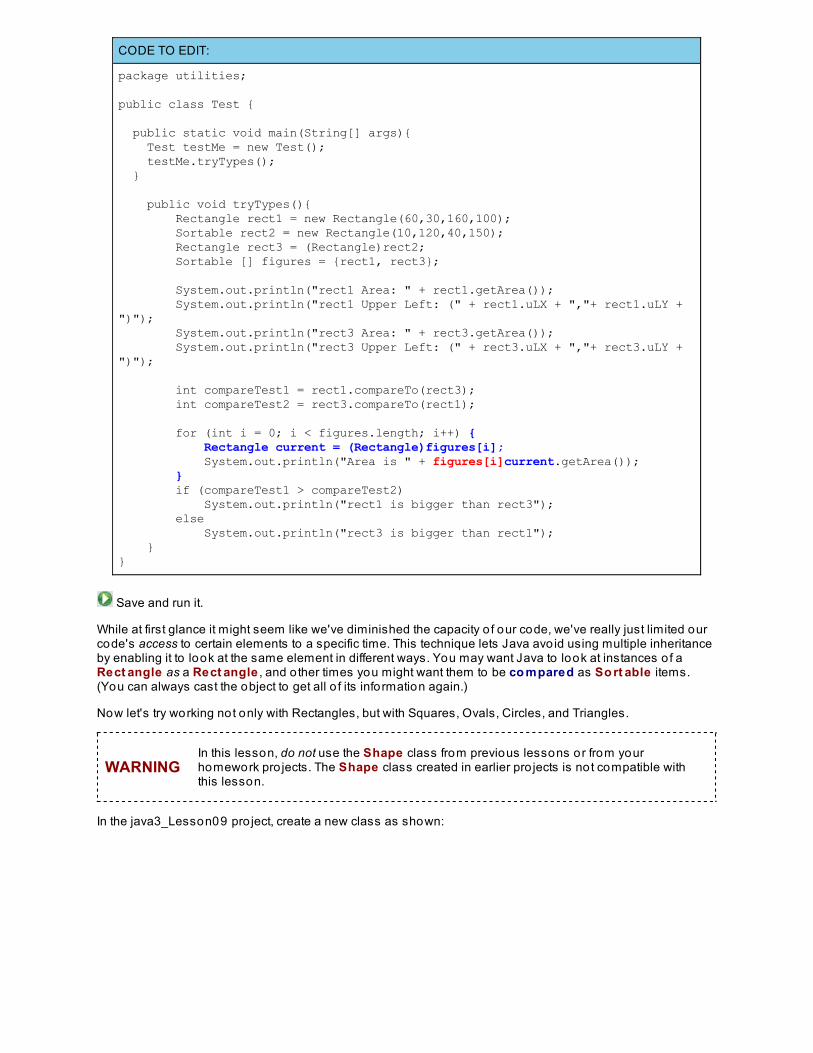
CODE TO EDIT:
package utilities; public class Test { public static void main(String[] args){ Test testMe = new Test(); testMe.tryTypes(); }
public void tryTypes(){ Rectangle rect1 = new Rectangle(60,30,160,100); Sortable rect2 = new Rectangle(10,120,40,150); Rectangle rect3 = (Rectangle)rect2; Sortable [] figures = {rect1, rect3}; System.out.println("rect1 Area: " + rect1.getArea()); System.out.println("rect1 Upper Left: (" + rect1.uLX + ","+ rect1.uLY + ")"); System.out.println("rect3 Area: " + rect3.getArea()); System.out.println("rect3 Upper Left: (" + rect3.uLX + ","+ rect3.uLY + ")"); int compareTest1 = rect1.compareTo(rect3); int compareTest2 = rect3.compareTo(rect1); for (int i = 0; i < figures.length; i++) { Rectangle current = (Rectangle)figures[i]; System.out.println("Area is " + figures[i]current.getArea()); } if (compareTest1 > compareTest2) System.out.println("rect1 is bigger than rect3"); else System.out.println("rect3 is bigger than rect1"); }}
Save and run it.
While at first glance it might seem like we've diminished the capacity o f our code, we've really just limited ourcode's access to certain elements to a specific time. This technique lets Java avo id using multiple inheritanceby enabling it to look at the same element in different ways. You may want Java to look at instances o f aRect angle as a Rect angle , and o ther times you might want them to be co mpared as So rt able items.(You can always cast the object to get all o f its information again.)
Now let's try working not only with Rectangles, but with Squares, Ovals, Circles, and Triangles.
WARNINGIn this lesson, do not use the Shape class from previous lessons or from yourhomework pro jects. The Shape class created in earlier pro jects is not compatible withthis lesson.
In the java3_Lesson09 pro ject, create a new class as shown:
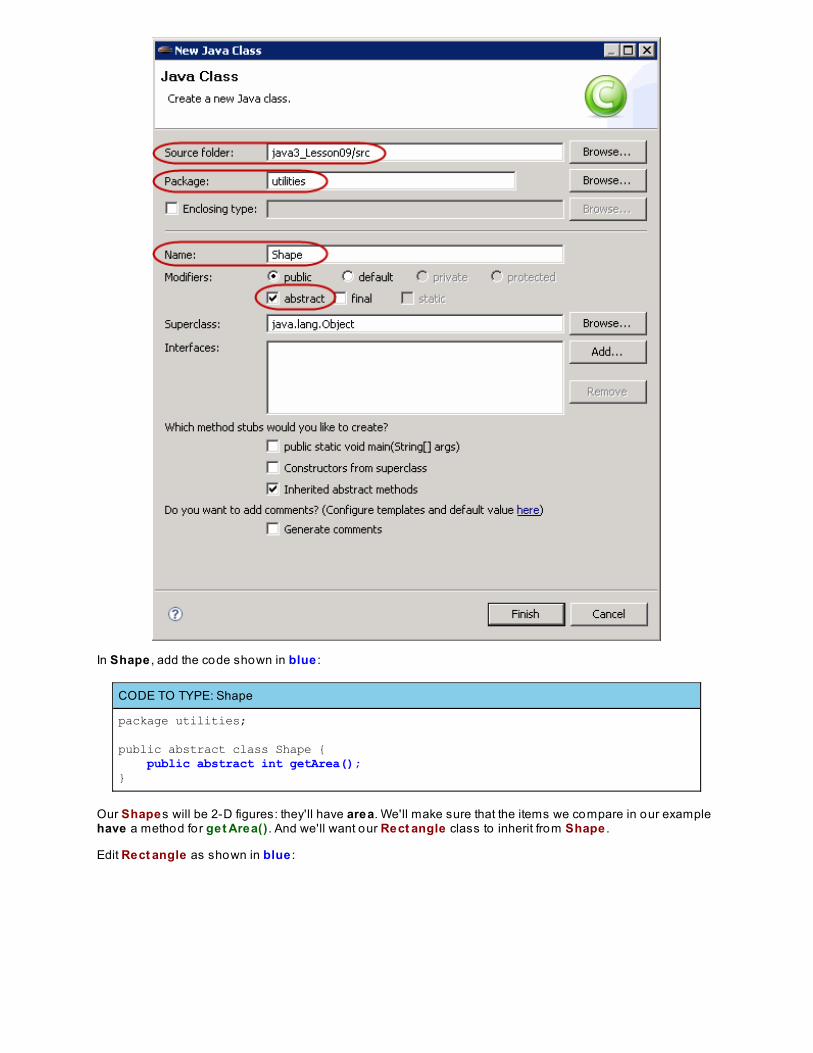
In Shape , add the code shown in blue :
CODE TO TYPE: Shape
package utilities;
public abstract class Shape { public abstract int getArea();}
Our Shapes will be 2-D figures: they'll have area. We'll make sure that the items we compare in our examplehave a method for get Area() . And we'll want our Rect angle class to inherit from Shape .
Edit Rect angle as shown in blue :
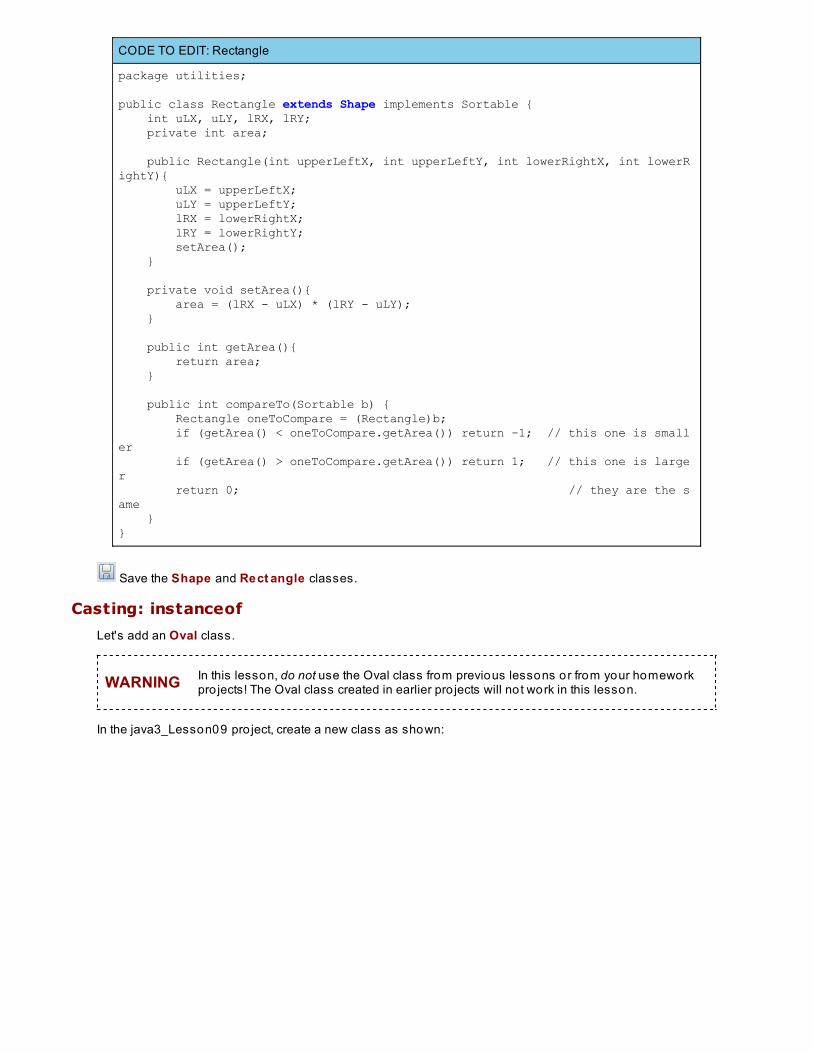
CODE TO EDIT: Rectangle
package utilities; public class Rectangle extends Shape implements Sortable { int uLX, uLY, lRX, lRY; private int area; public Rectangle(int upperLeftX, int upperLeftY, int lowerRightX, int lowerRightY){ uLX = upperLeftX; uLY = upperLeftY; lRX = lowerRightX; lRY = lowerRightY; setArea(); } private void setArea(){ area = (lRX - uLX) * (lRY - uLY); } public int getArea(){ return area; } public int compareTo(Sortable b) { Rectangle oneToCompare = (Rectangle)b; if (getArea() < oneToCompare.getArea()) return -1; // this one is smaller if (getArea() > oneToCompare.getArea()) return 1; // this one is larger return 0; // they are the same }}
Save the Shape and Rect angle classes.
Casting: instanceof
Let's add an Oval class.
WARNING In this lesson, do not use the Oval class from previous lessons or from your homeworkpro jects! The Oval class created in earlier pro jects will no t work in this lesson.
In the java3_Lesson09 pro ject, create a new class as shown:
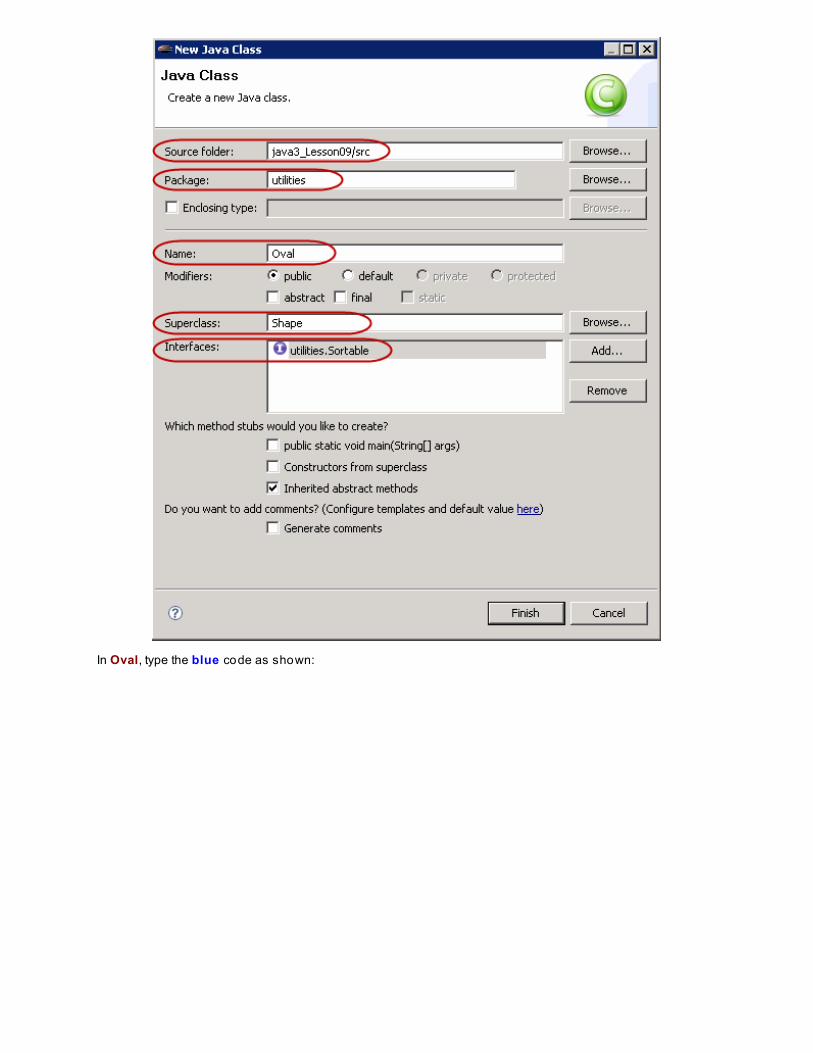
In Oval, type the blue code as shown:
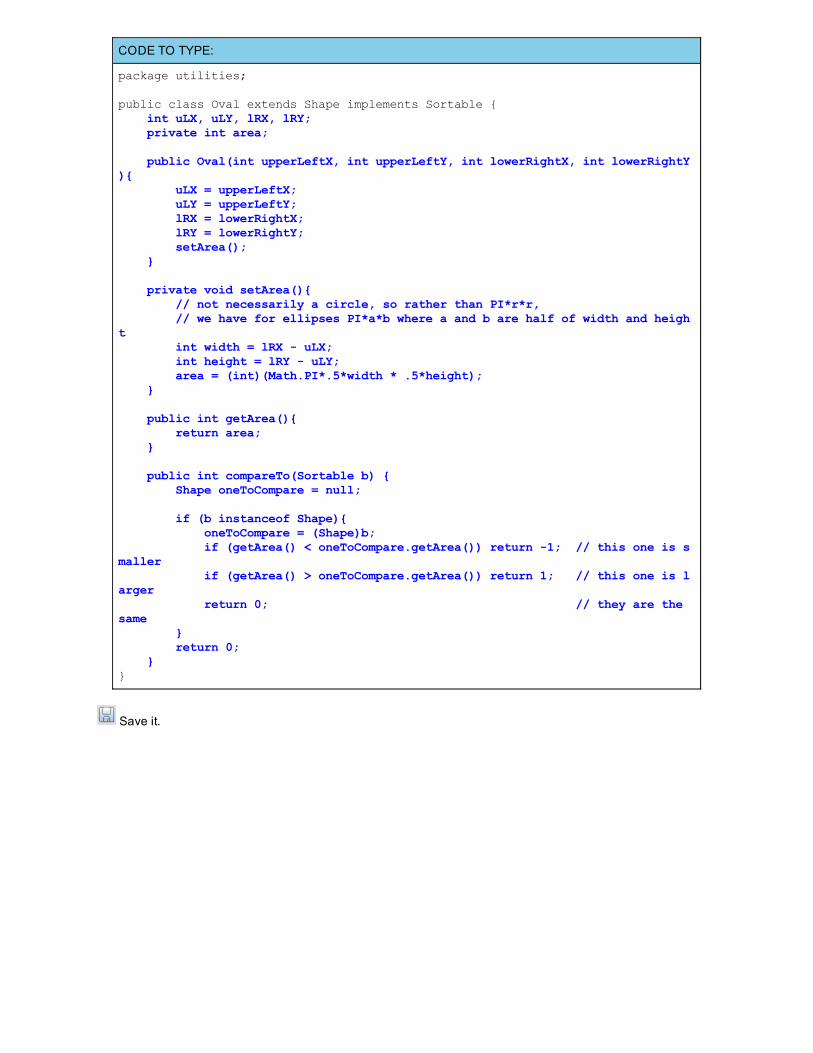
CODE TO TYPE:
package utilities;
public class Oval extends Shape implements Sortable { int uLX, uLY, lRX, lRY; private int area; public Oval(int upperLeftX, int upperLeftY, int lowerRightX, int lowerRightY){ uLX = upperLeftX; uLY = upperLeftY; lRX = lowerRightX; lRY = lowerRightY; setArea(); } private void setArea(){ // not necessarily a circle, so rather than PI*r*r, // we have for ellipses PI*a*b where a and b are half of width and height int width = lRX - uLX; int height = lRY - uLY; area = (int)(Math.PI*.5*width * .5*height); } public int getArea(){ return area; } public int compareTo(Sortable b) { Shape oneToCompare = null; if (b instanceof Shape){ oneToCompare = (Shape)b; if (getArea() < oneToCompare.getArea()) return -1; // this one is smaller if (getArea() > oneToCompare.getArea()) return 1; // this one is larger return 0; // they are the same } return 0; }}
Save it.
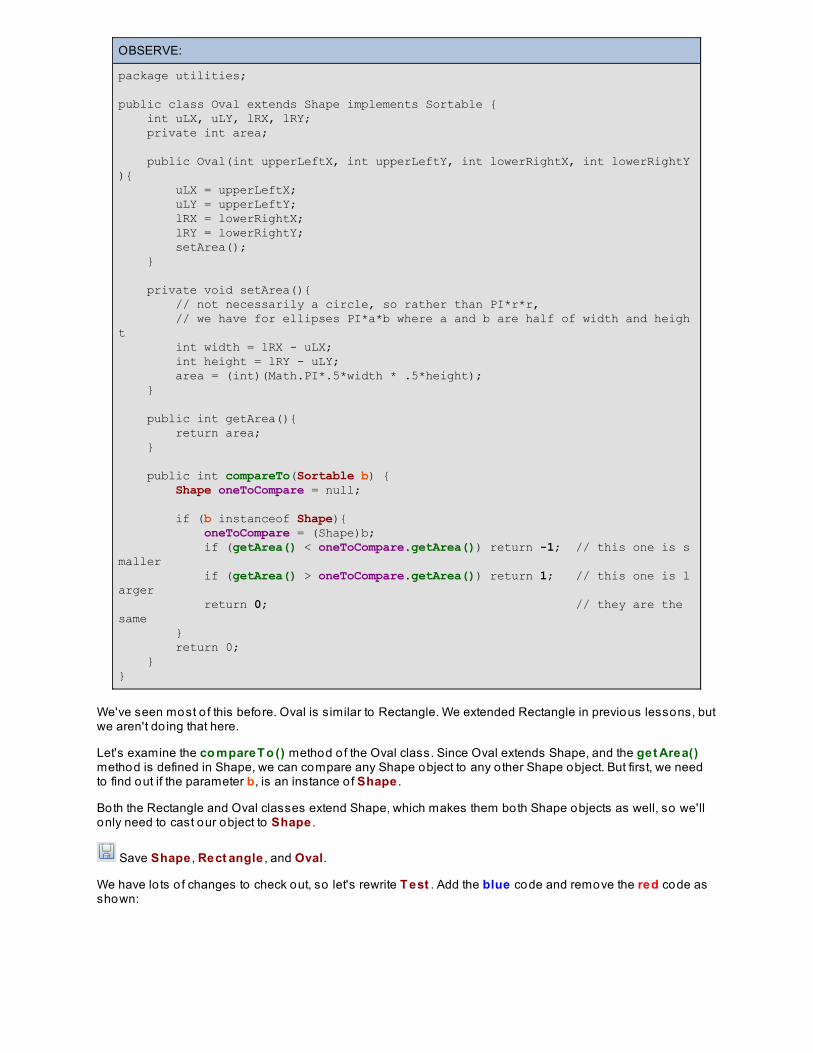
OBSERVE:
package utilities;
public class Oval extends Shape implements Sortable { int uLX, uLY, lRX, lRY; private int area; public Oval(int upperLeftX, int upperLeftY, int lowerRightX, int lowerRightY){ uLX = upperLeftX; uLY = upperLeftY; lRX = lowerRightX; lRY = lowerRightY; setArea(); } private void setArea(){ // not necessarily a circle, so rather than PI*r*r, // we have for ellipses PI*a*b where a and b are half of width and height int width = lRX - uLX; int height = lRY - uLY; area = (int)(Math.PI*.5*width * .5*height); } public int getArea(){ return area; } public int compareTo(Sortable b) { Shape oneToCompare = null; if (b instanceof Shape){ oneToCompare = (Shape)b; if (getArea() < oneToCompare.getArea()) return -1; // this one is smaller if (getArea() > oneToCompare.getArea()) return 1; // this one is larger return 0; // they are the same } return 0; }}
We've seen most o f this before. Oval is similar to Rectangle. We extended Rectangle in previous lessons, butwe aren't do ing that here.
Let's examine the co mpareT o () method o f the Oval class. Since Oval extends Shape, and the get Area()method is defined in Shape, we can compare any Shape object to any o ther Shape object. But first, we needto find out if the parameter b, is an instance o f Shape .
Both the Rectangle and Oval classes extend Shape, which makes them both Shape objects as well, so we'llonly need to cast our object to Shape .
Save Shape , Rect angle , and Oval.
We have lo ts o f changes to check out, so let's rewrite T est . Add the blue code and remove the red code asshown:
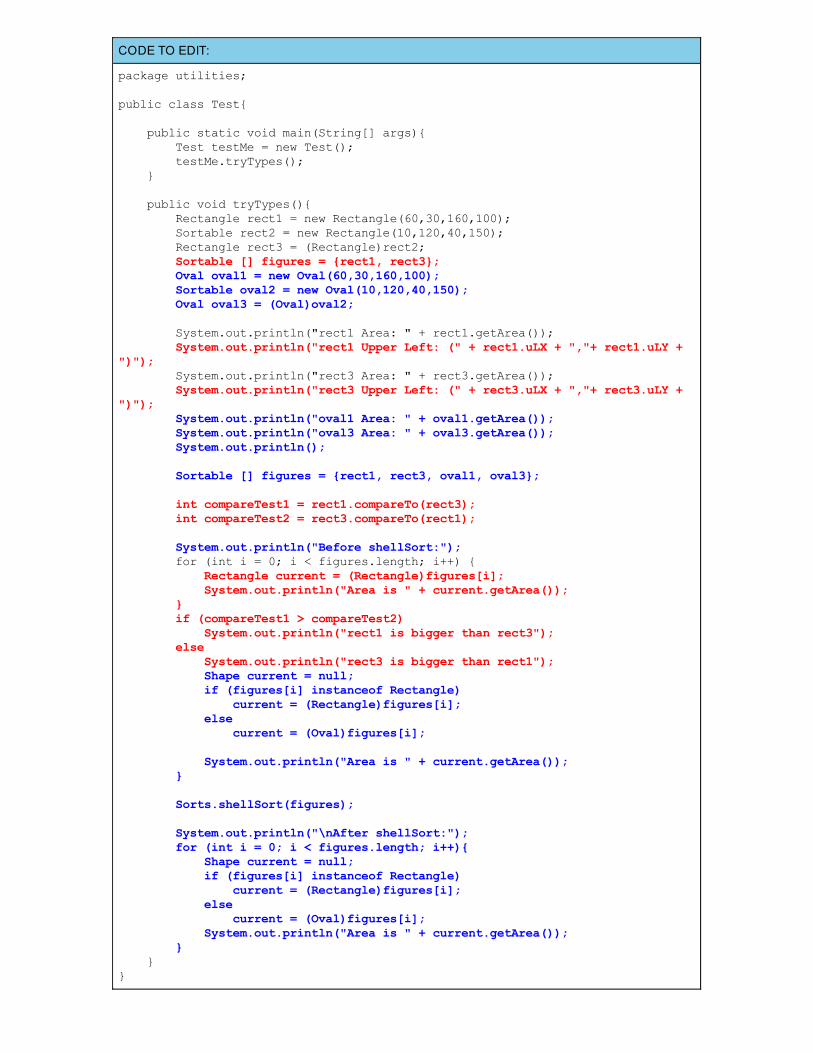
CODE TO EDIT:
package utilities;
public class Test{
public static void main(String[] args){ Test testMe = new Test(); testMe.tryTypes(); }
public void tryTypes(){ Rectangle rect1 = new Rectangle(60,30,160,100); Sortable rect2 = new Rectangle(10,120,40,150); Rectangle rect3 = (Rectangle)rect2; Sortable [] figures = {rect1, rect3}; Oval oval1 = new Oval(60,30,160,100); Sortable oval2 = new Oval(10,120,40,150); Oval oval3 = (Oval)oval2; System.out.println("rect1 Area: " + rect1.getArea()); System.out.println("rect1 Upper Left: (" + rect1.uLX + ","+ rect1.uLY + ")"); System.out.println("rect3 Area: " + rect3.getArea()); System.out.println("rect3 Upper Left: (" + rect3.uLX + ","+ rect3.uLY + ")"); System.out.println("oval1 Area: " + oval1.getArea()); System.out.println("oval3 Area: " + oval3.getArea()); System.out.println(); Sortable [] figures = {rect1, rect3, oval1, oval3}; int compareTest1 = rect1.compareTo(rect3); int compareTest2 = rect3.compareTo(rect1); System.out.println("Before shellSort:"); for (int i = 0; i < figures.length; i++) { Rectangle current = (Rectangle)figures[i]; System.out.println("Area is " + current.getArea()); } if (compareTest1 > compareTest2) System.out.println("rect1 is bigger than rect3"); else System.out.println("rect3 is bigger than rect1"); Shape current = null; if (figures[i] instanceof Rectangle) current = (Rectangle)figures[i]; else current = (Oval)figures[i]; System.out.println("Area is " + current.getArea()); } Sorts.shellSort(figures);
System.out.println("\nAfter shellSort:"); for (int i = 0; i < figures.length; i++){ Shape current = null; if (figures[i] instanceof Rectangle) current = (Rectangle)figures[i]; else current = (Oval)figures[i]; System.out.println("Area is " + current.getArea()); } }}
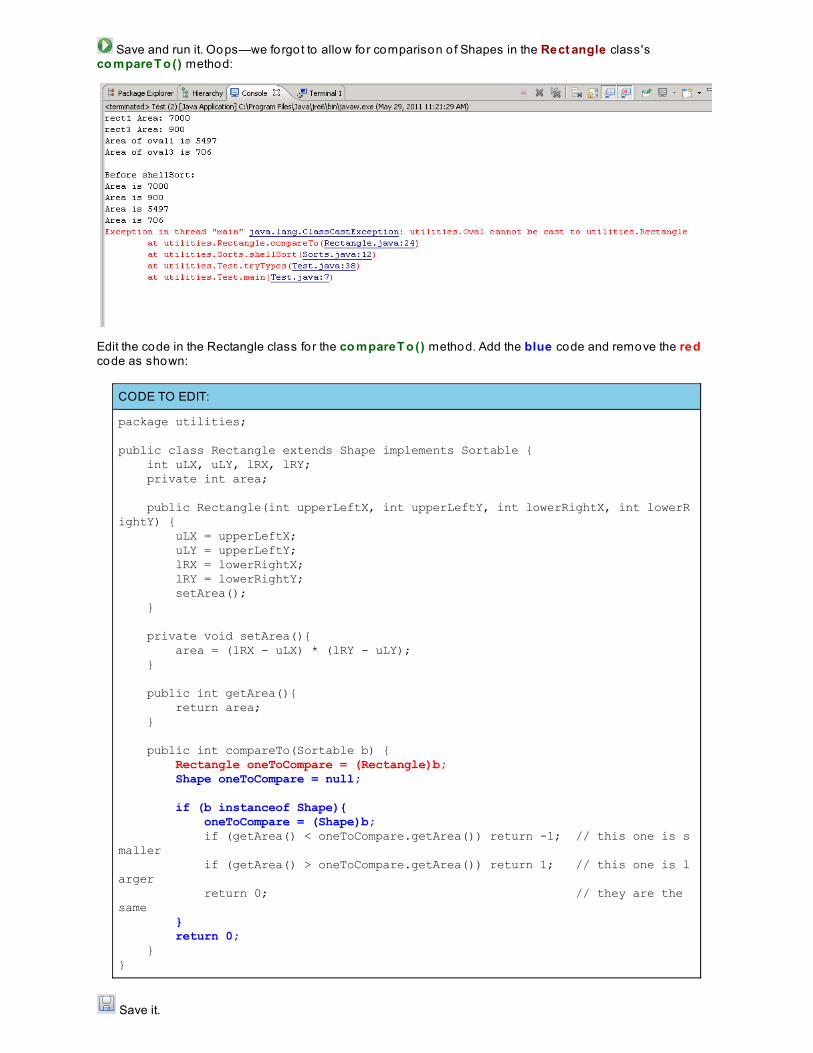
Save and run it. Oops—we forgot to allow for comparison o f Shapes in the Rect angle class'sco mpareT o () method:
Edit the code in the Rectangle class for the co mpareT o () method. Add the blue code and remove the redcode as shown:
CODE TO EDIT:
package utilities; public class Rectangle extends Shape implements Sortable { int uLX, uLY, lRX, lRY; private int area; public Rectangle(int upperLeftX, int upperLeftY, int lowerRightX, int lowerRightY) { uLX = upperLeftX; uLY = upperLeftY; lRX = lowerRightX; lRY = lowerRightY; setArea(); } private void setArea(){ area = (lRX - uLX) * (lRY - uLY); } public int getArea(){ return area; } public int compareTo(Sortable b) { Rectangle oneToCompare = (Rectangle)b; Shape oneToCompare = null; if (b instanceof Shape){ oneToCompare = (Shape)b; if (getArea() < oneToCompare.getArea()) return -1; // this one is smaller if (getArea() > oneToCompare.getArea()) return 1; // this one is larger return 0; // they are the same } return 0; }}
Save it.
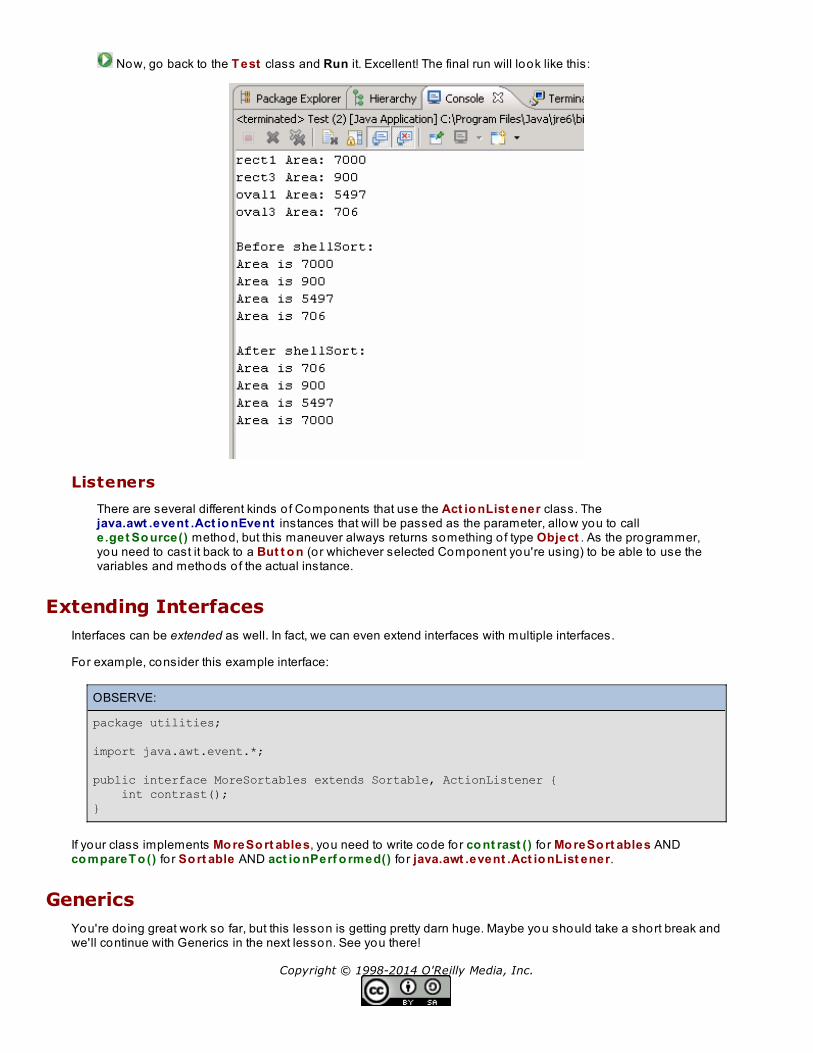
Save it.
Now, go back to the T est class and Run it. Excellent! The final run will look like this:
Listeners
There are several different kinds o f Components that use the Act io nList ener class. Thejava.awt .event .Act io nEvent instances that will be passed as the parameter, allow you to calle.get So urce() method, but this maneuver always returns something o f type Object . As the programmer,you need to cast it back to a But t o n (o r whichever selected Component you're using) to be able to use thevariables and methods o f the actual instance.
Extending InterfacesInterfaces can be extended as well. In fact, we can even extend interfaces with multiple interfaces.
For example, consider this example interface:
OBSERVE:
package utilities;
import java.awt.event.*;
public interface MoreSortables extends Sortable, ActionListener { int contrast();}
If your class implements Mo reSo rt ables, you need to write code for co nt rast () fo r Mo reSo rt ables ANDco mpareT o () fo r So rt able AND act io nPerf o rmed() fo r java.awt .event .Act io nList ener.
GenericsYou're do ing great work so far, but this lesson is getting pretty darn huge. Maybe you should take a short break andwe'll continue with Generics in the next lesson. See you there!
Copyright © 1998-2014 O'Reilly Media, Inc.

This work is licensed under a Creative Commons Attribution-ShareAlike 3.0 Unported License.See http://creativecommons.org/licenses/by-sa/3.0/legalcode for more information.
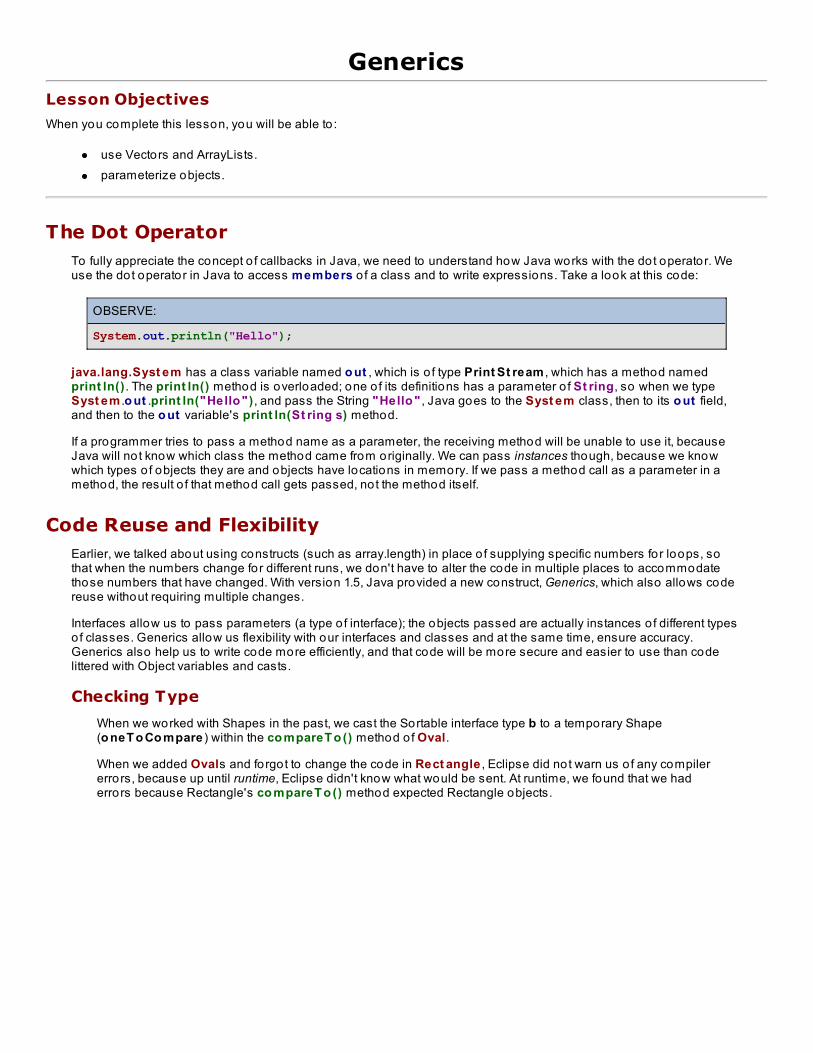
GenericsLesson Objectives
When you complete this lesson, you will be able to :
use Vectors and ArrayLists.parameterize objects.
The Dot OperatorTo fully appreciate the concept o f callbacks in Java, we need to understand how Java works with the dot operator. Weuse the dot operator in Java to access members o f a class and to write expressions. Take a look at this code:
OBSERVE:
System.out.println("Hello");
java.lang.Syst em has a class variable named o ut , which is o f type Print St ream , which has a method namedprint ln() . The print ln() method is overloaded; one o f its definitions has a parameter o f St ring, so when we typeSyst em .o ut .print ln("Hello ") , and pass the String "Hello " , Java goes to the Syst em class, then to its o ut field,and then to the o ut variable's print ln(St ring s) method.
If a programmer tries to pass a method name as a parameter, the receiving method will be unable to use it, becauseJava will no t know which class the method came from originally. We can pass instances though, because we knowwhich types o f objects they are and objects have locations in memory. If we pass a method call as a parameter in amethod, the result o f that method call gets passed, not the method itself.
Code Reuse and FlexibilityEarlier, we talked about using constructs (such as array.length) in place o f supplying specific numbers for loops, sothat when the numbers change for different runs, we don't have to alter the code in multiple places to accommodatethose numbers that have changed. With version 1.5, Java provided a new construct, Generics, which also allows codereuse without requiring multiple changes.
Interfaces allow us to pass parameters (a type o f interface); the objects passed are actually instances o f different typesof classes. Generics allow us flexibility with our interfaces and classes and at the same time, ensure accuracy.Generics also help us to write code more efficiently, and that code will be more secure and easier to use than codelittered with Object variables and casts.
Checking Type
When we worked with Shapes in the past, we cast the Sortable interface type b to a temporary Shape(o neT o Co mpare ) within the co mpareT o () method o f Oval.
When we added Ovals and forgot to change the code in Rect angle , Eclipse did not warn us o f any compilererrors, because up until runtime, Eclipse didn't know what would be sent. At runtime, we found that we haderrors because Rectangle's co mpareT o () method expected Rectangle objects.
Generic Example
Vectors
We don't want our applications to give runtime errors. Runtime bugs can be particularly tough to catchbecause they aren't always readily visible near their source.
Generics provide stability to your code by making runtime bugs visible sooner—at compile time. Let's take alook at generics using a common alternative to arrays, the class Vect o r.
Often we need our code to ho ld multiple objects. In mathematics, we would create a set to ho ld those objects.In Java, the only mechanism we have learned for this task so far, is the array. Arrays have two basiclimitations:
1. They must be declared with a specified size.2. All o f their elements must be o f the same type.
We made the array for our f igures o f type So rt able , because we wanted to call the shellSo rt () method inthe So rt s class, and shellSo rt () had a parameter o f type So rt able .
For our graphics drawing pro ject, we want to allow different types o f Shapes (and icon Images), but we don'tknow the number o f figures the user will draw or add to the screen, so we can't specify a size for an array.One way to address these issues is to use a Vect o r. Vect o rs differ from arrays in that:
They can grow dynamically.They can ho ld different types. That is, Java allows you to put different types into a Vect o r, but thenit casts them all as Object .Primitive data types are not allowed unless wrapped into their wrapper classes (for example, int iswrapped into java.lang.Int eger).
In the API, you can find out if Java will wrap these data types automatically. While you're there, go topackage java.ut il and read the description o f the class Vect o r.
There's some information and termino logy in that description that we haven't covered yet, but this part maymake sense: "the size o f a Vector can grow or shrink as needed to accommodate adding and removingitems after the Vector has been created." We'll explain the <E>s on this page later. But first, let's find out whatcan go wrong when we can put multiple types in a co llection like a Vector. We'll use the classes we created injava3_Lesso n9 fo r our example.
Create a new java3_Lesso n10 pro ject, and in that new pro ject, create a ut ilit ies package. Copy all o f theclasses from java3_Lesso n9 and put them into the new utilities fo lder. Go to java3_Lesso n9/src/ut ilit ies,select all o f the classes there, right-click for the popup menu, and select Co py. Then, go tojava3_Lesso n10/src/ut ilit ies fo lder, right-click, and select Past e .
In the java3_Lesso n10 pro ject, create a new class as shown:
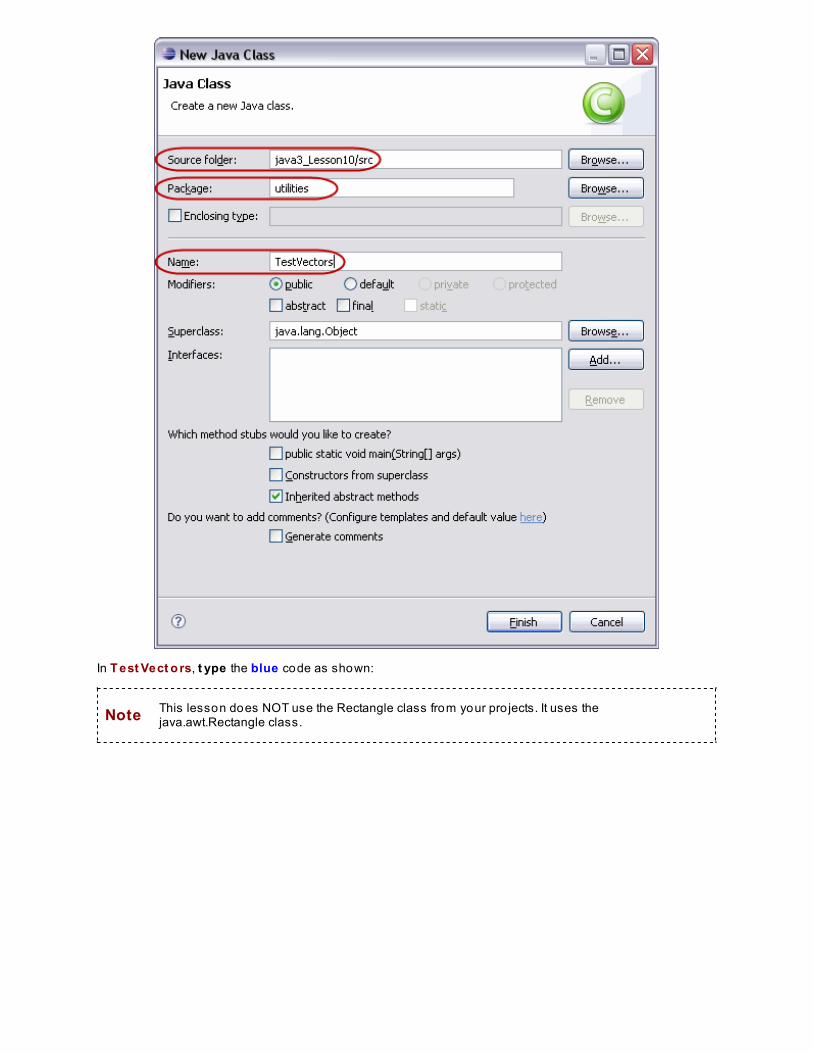
In T est Vect o rs, t ype the blue code as shown:
Note This lesson does NOT use the Rectangle class from your pro jects. It uses thejava.awt.Rectangle class.
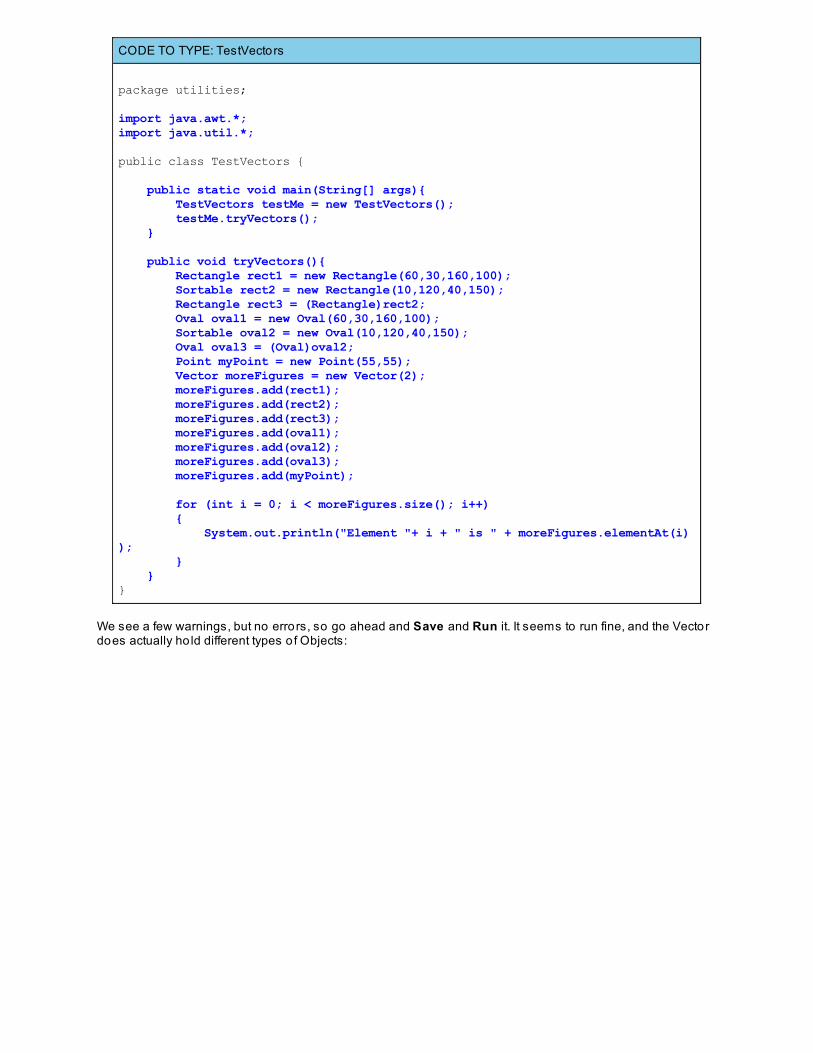
CODE TO TYPE: TestVectors
package utilities;
import java.awt.*;import java.util.*;
public class TestVectors { public static void main(String[] args){ TestVectors testMe = new TestVectors(); testMe.tryVectors(); }
public void tryVectors(){ Rectangle rect1 = new Rectangle(60,30,160,100); Sortable rect2 = new Rectangle(10,120,40,150); Rectangle rect3 = (Rectangle)rect2; Oval oval1 = new Oval(60,30,160,100); Sortable oval2 = new Oval(10,120,40,150); Oval oval3 = (Oval)oval2; Point myPoint = new Point(55,55); Vector moreFigures = new Vector(2); moreFigures.add(rect1); moreFigures.add(rect2); moreFigures.add(rect3); moreFigures.add(oval1); moreFigures.add(oval2); moreFigures.add(oval3); moreFigures.add(myPoint); for (int i = 0; i < moreFigures.size(); i++) { System.out.println("Element "+ i + " is " + moreFigures.elementAt(i)); } }}
We see a few warnings, but no errors, so go ahead and Save and Run it. It seems to run fine, and the Vectordoes actually ho ld different types o f Objects:
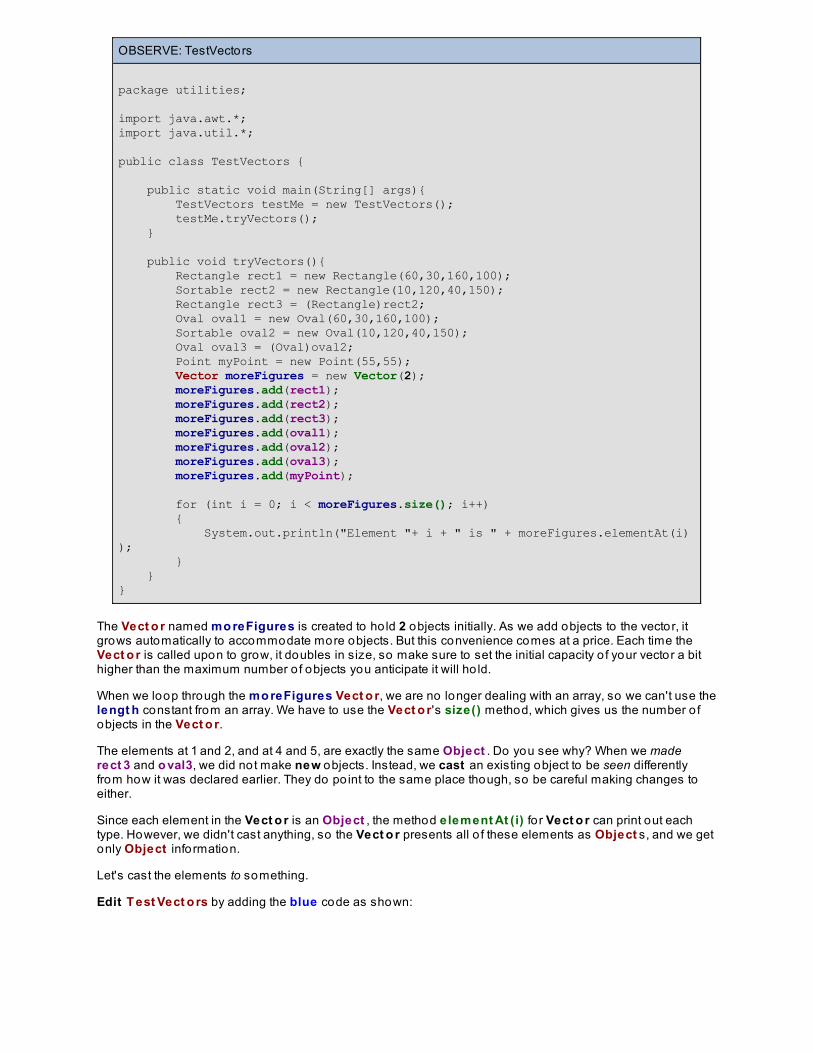
OBSERVE: TestVectors
package utilities;
import java.awt.*;import java.util.*;
public class TestVectors { public static void main(String[] args){ TestVectors testMe = new TestVectors(); testMe.tryVectors(); }
public void tryVectors(){ Rectangle rect1 = new Rectangle(60,30,160,100); Sortable rect2 = new Rectangle(10,120,40,150); Rectangle rect3 = (Rectangle)rect2; Oval oval1 = new Oval(60,30,160,100); Sortable oval2 = new Oval(10,120,40,150); Oval oval3 = (Oval)oval2; Point myPoint = new Point(55,55); Vector moreFigures = new Vector(2); moreFigures.add(rect1); moreFigures.add(rect2); moreFigures.add(rect3); moreFigures.add(oval1); moreFigures.add(oval2); moreFigures.add(oval3); moreFigures.add(myPoint); for (int i = 0; i < moreFigures.size(); i++) { System.out.println("Element "+ i + " is " + moreFigures.elementAt(i)); } }}
The Vect o r named mo reFigures is created to ho ld 2 objects initially. As we add objects to the vector, itgrows automatically to accommodate more objects. But this convenience comes at a price. Each time theVect o r is called upon to grow, it doubles in size, so make sure to set the initial capacity o f your vector a bithigher than the maximum number o f objects you anticipate it will ho ld.
When we loop through the mo reFigures Vect o r, we are no longer dealing with an array, so we can't use thelengt h constant from an array. We have to use the Vect o r's size() method, which gives us the number o fobjects in the Vect o r.
The elements at 1 and 2, and at 4 and 5, are exactly the same Object . Do you see why? When we maderect 3 and o val3, we did not make new objects. Instead, we cast an existing object to be seen differentlyfrom how it was declared earlier. They do po int to the same place though, so be careful making changes toeither.
Since each element in the Vect o r is an Object , the method element At (i) fo r Vect o r can print out eachtype. However, we didn't cast anything, so the Vect o r presents all o f these elements as Object s, and we getonly Object information.
Let's cast the elements to something.
Edit T est Vect o rs by adding the blue code as shown:
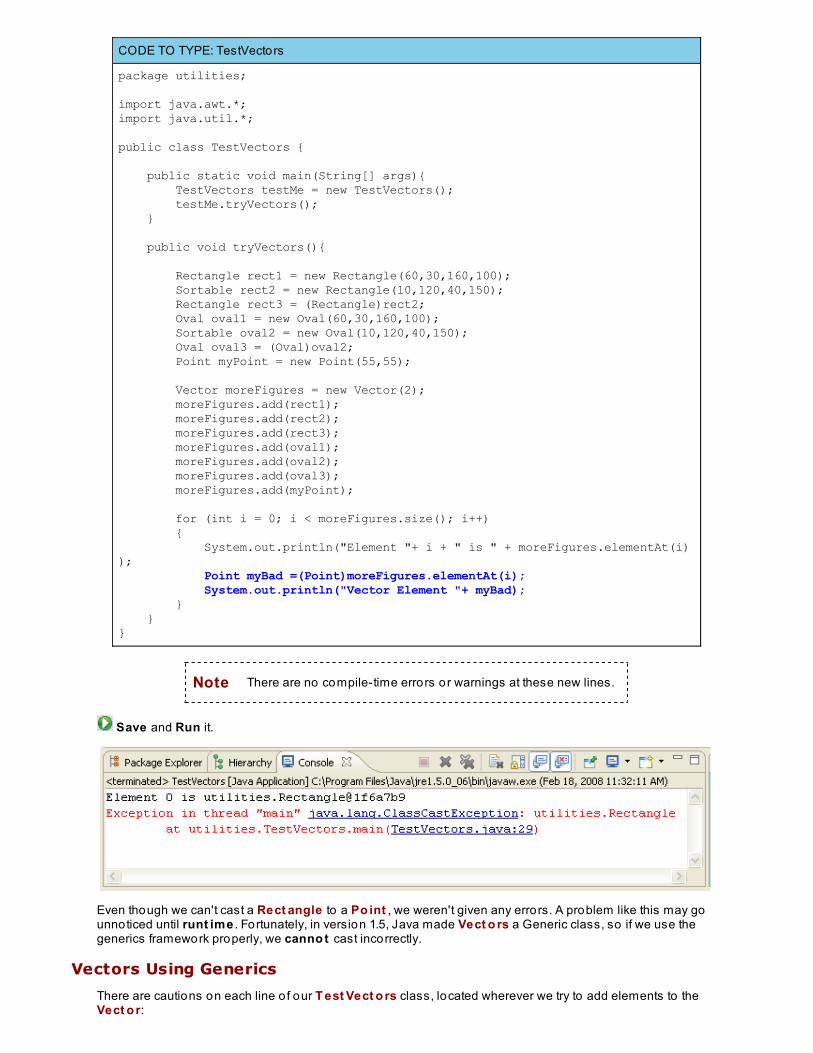
CODE TO TYPE: TestVectors
package utilities;
import java.awt.*;import java.util.*;
public class TestVectors { public static void main(String[] args){ TestVectors testMe = new TestVectors(); testMe.tryVectors(); }
public void tryVectors(){ Rectangle rect1 = new Rectangle(60,30,160,100); Sortable rect2 = new Rectangle(10,120,40,150); Rectangle rect3 = (Rectangle)rect2; Oval oval1 = new Oval(60,30,160,100); Sortable oval2 = new Oval(10,120,40,150); Oval oval3 = (Oval)oval2; Point myPoint = new Point(55,55);
Vector moreFigures = new Vector(2); moreFigures.add(rect1); moreFigures.add(rect2); moreFigures.add(rect3); moreFigures.add(oval1); moreFigures.add(oval2); moreFigures.add(oval3); moreFigures.add(myPoint); for (int i = 0; i < moreFigures.size(); i++) { System.out.println("Element "+ i + " is " + moreFigures.elementAt(i)); Point myBad =(Point)moreFigures.elementAt(i); System.out.println("Vector Element "+ myBad); } }}
Note There are no compile-time errors or warnings at these new lines.
Save and Run it.
Even though we can't cast a Rect angle to a Po int , we weren't given any errors. A problem like this may gounnoticed until runt ime . Fortunately, in version 1.5, Java made Vect o rs a Generic class, so if we use thegenerics framework properly, we canno t cast incorrectly.
Vectors Using Generics
There are cautions on each line o f our T est Vect o rs class, located wherever we try to add elements to theVect o r:
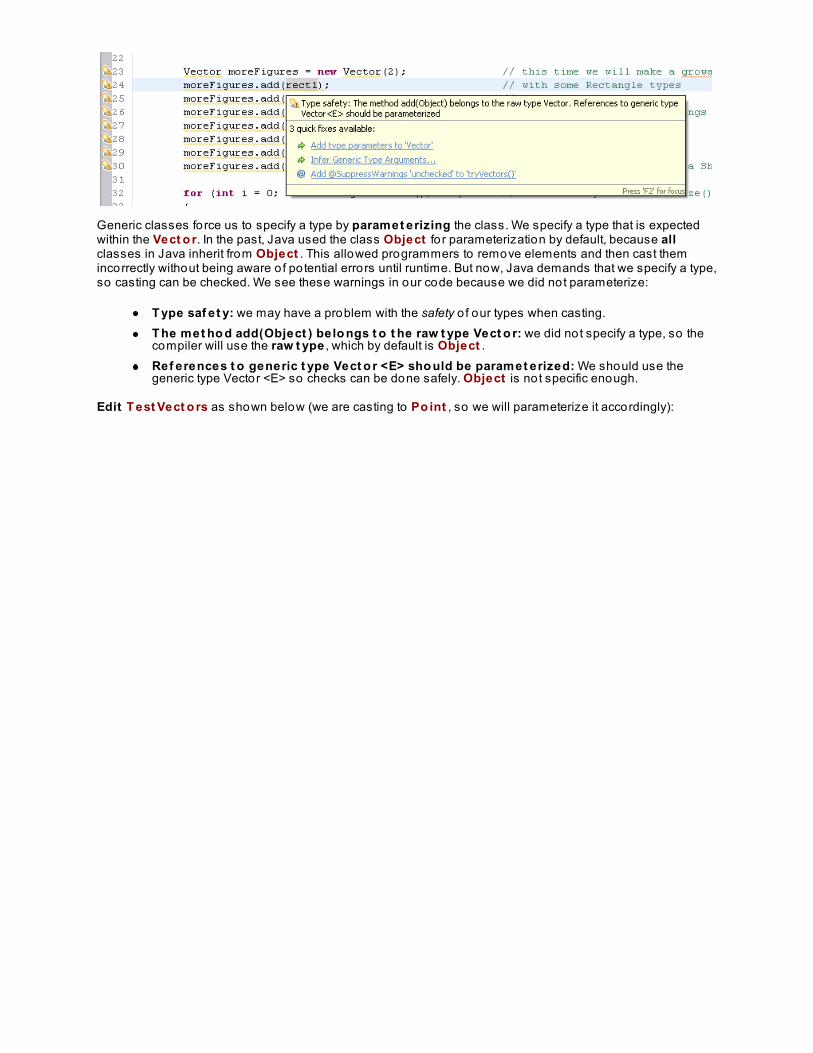
Vect o r:
Generic classes force us to specify a type by paramet erizing the class. We specify a type that is expectedwithin the Vect o r. In the past, Java used the class Object fo r parameterization by default, because allclasses in Java inherit from Object . This allowed programmers to remove elements and then cast themincorrectly without being aware o f potential errors until runtime. But now, Java demands that we specify a type,so casting can be checked. We see these warnings in our code because we did not parameterize:
T ype saf et y: we may have a problem with the safety o f our types when casting.T he met ho d add(Object ) belo ngs t o t he raw t ype Vect o r: we did not specify a type, so thecompiler will use the raw t ype , which by default is Object .Ref erences t o generic t ype Vect o r <E> sho uld be paramet erized: We should use thegeneric type Vector <E> so checks can be done safely. Object is not specific enough.
Edit T est Vect o rs as shown below (we are casting to Po int , so we will parameterize it accordingly):
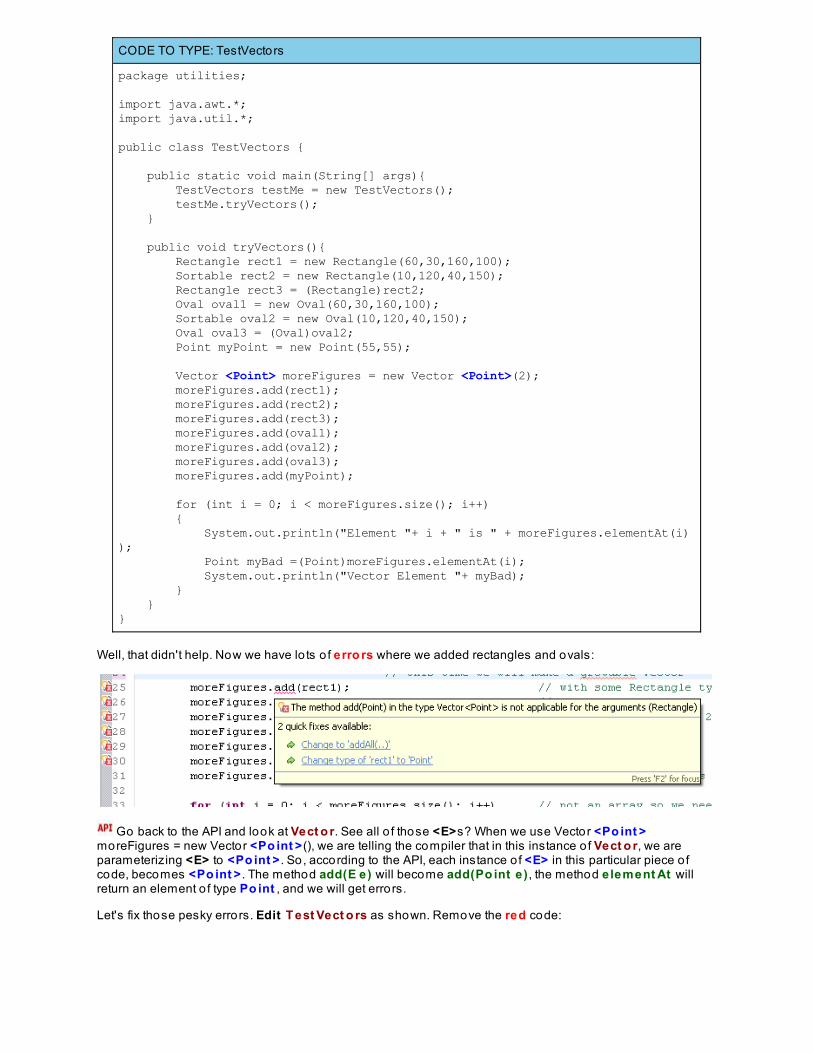
CODE TO TYPE: TestVectors
package utilities;
import java.awt.*;import java.util.*;
public class TestVectors {
public static void main(String[] args){ TestVectors testMe = new TestVectors(); testMe.tryVectors(); }
public void tryVectors(){ Rectangle rect1 = new Rectangle(60,30,160,100); Sortable rect2 = new Rectangle(10,120,40,150); Rectangle rect3 = (Rectangle)rect2; Oval oval1 = new Oval(60,30,160,100); Sortable oval2 = new Oval(10,120,40,150); Oval oval3 = (Oval)oval2; Point myPoint = new Point(55,55);
Vector <Point> moreFigures = new Vector <Point>(2); moreFigures.add(rect1); moreFigures.add(rect2); moreFigures.add(rect3); moreFigures.add(oval1); moreFigures.add(oval2); moreFigures.add(oval3); moreFigures.add(myPoint);
for (int i = 0; i < moreFigures.size(); i++) { System.out.println("Element "+ i + " is " + moreFigures.elementAt(i)); Point myBad =(Point)moreFigures.elementAt(i); System.out.println("Vector Element "+ myBad); } }}
Well, that didn't help. Now we have lo ts o f erro rs where we added rectangles and ovals:
Go back to the API and look at Vect o r. See all o f those <E>s? When we use Vector <Po int >moreFigures = new Vector <Po int >(), we are telling the compiler that in this instance o f Vect o r, we areparameterizing <E> to <Po int > . So, according to the API, each instance o f <E> in this particular piece o fcode, becomes <Po int > . The method add(E e) will become add(Po int e) , the method element At willreturn an element o f type Po int , and we will get errors.
Let's fix those pesky errors. Edit T est Vect o rs as shown. Remove the red code:
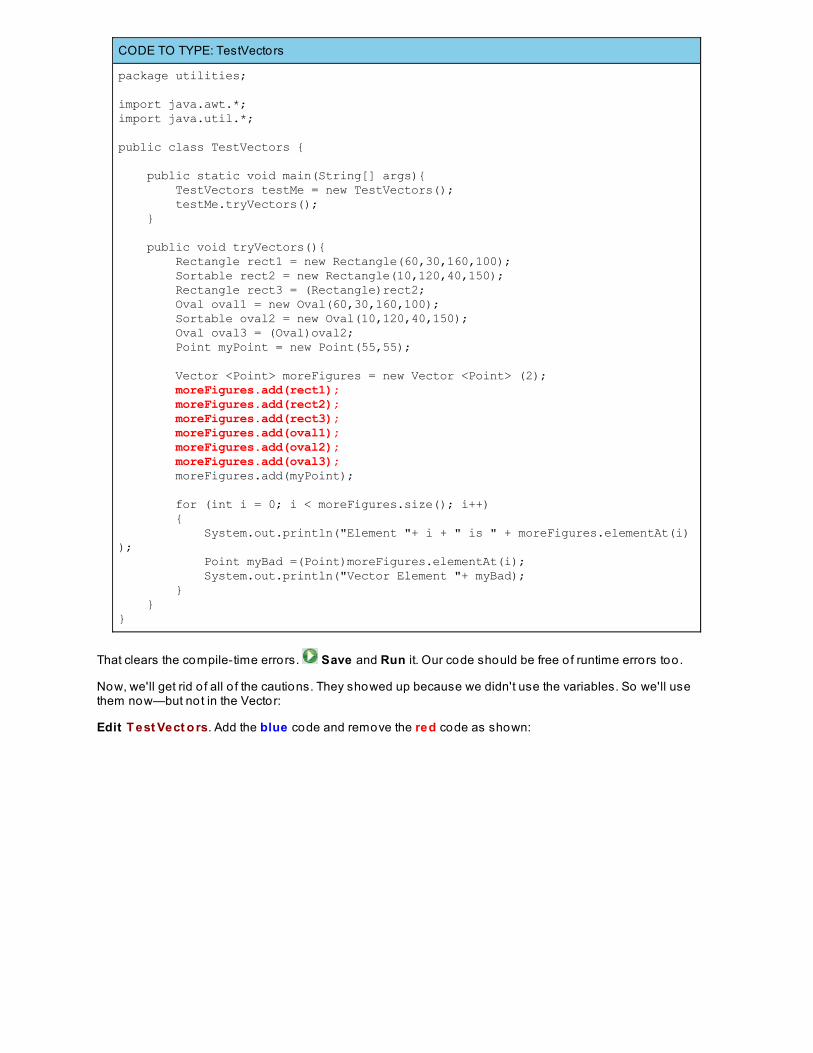
CODE TO TYPE: TestVectors
package utilities;
import java.awt.*;import java.util.*;
public class TestVectors { public static void main(String[] args){ TestVectors testMe = new TestVectors(); testMe.tryVectors(); }
public void tryVectors(){ Rectangle rect1 = new Rectangle(60,30,160,100); Sortable rect2 = new Rectangle(10,120,40,150); Rectangle rect3 = (Rectangle)rect2; Oval oval1 = new Oval(60,30,160,100); Sortable oval2 = new Oval(10,120,40,150); Oval oval3 = (Oval)oval2; Point myPoint = new Point(55,55);
Vector <Point> moreFigures = new Vector <Point> (2); moreFigures.add(rect1); moreFigures.add(rect2); moreFigures.add(rect3); moreFigures.add(oval1); moreFigures.add(oval2); moreFigures.add(oval3); moreFigures.add(myPoint); for (int i = 0; i < moreFigures.size(); i++) { System.out.println("Element "+ i + " is " + moreFigures.elementAt(i)); Point myBad =(Point)moreFigures.elementAt(i); System.out.println("Vector Element "+ myBad); } }}
That clears the compile-time errors. Save and Run it. Our code should be free o f runtime errors too.
Now, we'll get rid o f all o f the cautions. They showed up because we didn't use the variables. So we'll usethem now—but not in the Vector:
Edit T est Vect o rs. Add the blue code and remove the red code as shown:
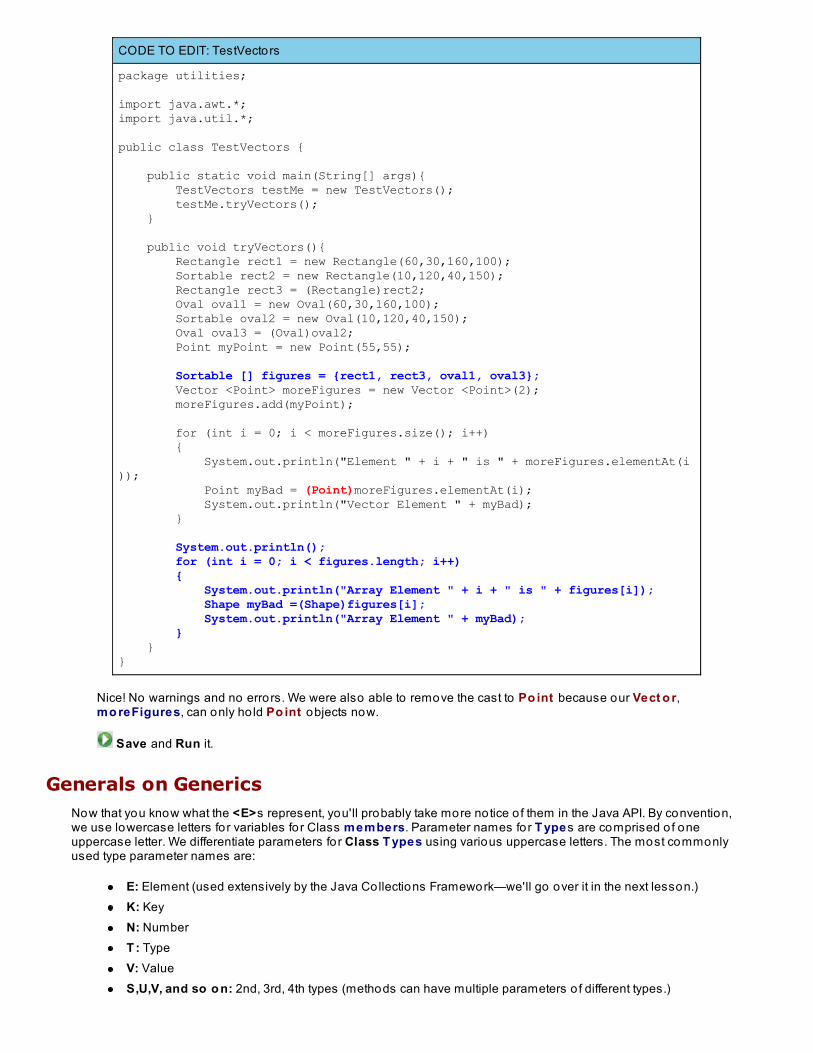
CODE TO EDIT: TestVectors
package utilities;
import java.awt.*;import java.util.*;
public class TestVectors { public static void main(String[] args){ TestVectors testMe = new TestVectors(); testMe.tryVectors(); }
public void tryVectors(){ Rectangle rect1 = new Rectangle(60,30,160,100); Sortable rect2 = new Rectangle(10,120,40,150); Rectangle rect3 = (Rectangle)rect2; Oval oval1 = new Oval(60,30,160,100); Sortable oval2 = new Oval(10,120,40,150); Oval oval3 = (Oval)oval2; Point myPoint = new Point(55,55);
Sortable [] figures = {rect1, rect3, oval1, oval3}; Vector <Point> moreFigures = new Vector <Point>(2); moreFigures.add(myPoint); for (int i = 0; i < moreFigures.size(); i++) { System.out.println("Element " + i + " is " + moreFigures.elementAt(i)); Point myBad = (Point)moreFigures.elementAt(i); System.out.println("Vector Element " + myBad); } System.out.println(); for (int i = 0; i < figures.length; i++) { System.out.println("Array Element " + i + " is " + figures[i]); Shape myBad =(Shape)figures[i]; System.out.println("Array Element " + myBad); } }}
Nice! No warnings and no errors. We were also able to remove the cast to Po int because our Vect o r,mo reFigures, can only ho ld Po int objects now.
Save and Run it.
Generals on GenericsNow that you know what the <E>s represent, you'll probably take more notice o f them in the Java API. By convention,we use lowercase letters fo r variables for Class members. Parameter names for T ypes are comprised o f oneuppercase letter. We differentiate parameters for Class T ypes using various uppercase letters. The most commonlyused type parameter names are:
E: Element (used extensively by the Java Collections Framework—we'll go over it in the next lesson.)K: KeyN: NumberT : TypeV: ValueS,U,V, and so o n: 2nd, 3rd, 4th types (methods can have multiple parameters o f different types.)

Because the API always illustrates the most general usage, we commonly see parameters o f <T > fo r T ype and <E>fo r Element . And there are additional parameter type limitations in generics including:
bounds (for example, <T extends Shape >)wildcards (fo r example, <? extends Shape >)
There's still a lo t more to the Generic Framework, but much o f it is beyond the scope o f this class. Our focus is onusing the classes that Java provides, so we won't be writing our own generic classes, or experience their full po tentialjust yet. Although in the next lesson, we will look at the Collection Framework which is probably the most extensiveapplied use o f generics. Here are some links to more information on generics:
Oracle's generics page with a link to the Generics guide (as a pdf), also available as html.Learning t he Java Language , the Generics Tutorial.
Don't wrestle with this too much now. Like most new skills, the generics too l is best learned through many examplesand lo ts o f practice over time.
Copyright © 1998-2014 O'Reilly Media, Inc.
This work is licensed under a Creative Commons Attribution-ShareAlike 3.0 Unported License.See http://creativecommons.org/licenses/by-sa/3.0/legalcode for more information.

The Collection FrameworkLesson Objectives
When you complete this lesson, you will be able to :
use the ShapeMouseHandler's in the MVC pattern.use the addLast(), add(), pop(), push(), and removeFirst() methods.implement the logic fo r performing all actions for every specific shape possibilities.
CollectionsComputers ho ld and sort through co llections o f information continually, looking for specific items. We need efficientways to program and manipulate those co llections. Java provides a Co llect io n Framewo rk that contains numeroustypes to ho ld, access, and manipulate our co llections. This Co llection Framework saves programmers lo ts o f timeand effort because it allows them to avo id writing and rewriting code for tasks the Collection Framework alreadymanages. Co llections are also a part o f the Generic Framework. Since we usually think o f things in co llections aselement s, the common parameter variable used to specify our elements' types is <E> .
So far, we have seen two constructs that ho ld co llections: arrays (which are no t classes) and Vect o rs. In this lesson,we'll look at some additional constructs. We'll check out the similarities that cause a class to be included within theframework, as well as some of the "concrete co llections" that have been sitting in the API just waiting for us to findthem.
Empowered by Collections
Using co llections, we can:
determine whether anything is in the co llection.count the items in the co llection.search for specific items.order (sort) the items.store elements.retrieve elements.empty (clear) the co llection.
Int erf aces specify which tasks a co llection is able to perform. Java provides multiple core co llectioninterfaces:
Co llect io n: the root o f the co llection hierarchy. It represents a group o f objects we call elements.Set : a co llection that cannot contain duplicate elements.List : an ordered co llection. Lists may contain duplicates.Queue : a co llection that ho lds multiple elements awaiting processing (like a line at a bank).Queues typically operate in a FIFO (First In First Out) order.Map: an object that maps keys to values (for example, common keys for the IRS would be socialsecurity numbers). A Map cannot contain duplicate keys and each key can map at most, to onevalue.
Classes in the co llections framework implement one or more o f those int erf aces. In addition, Co llectionsare also a part o f the Generic Framework, and since we usually think o f things in co llections as element s,the common parameter variable used to specify our elements' types is <E> .
ArrayListThe ArrayList class is similar to our Vect o r class. ArrayList allows the co llection to grow dynamically, in the sameway that the Vect o r class does. You must specify a length for your arrays, and they must be large in order to avo id"array out o f bounds" errors. Empty array locations take up lo ts o f space as well.
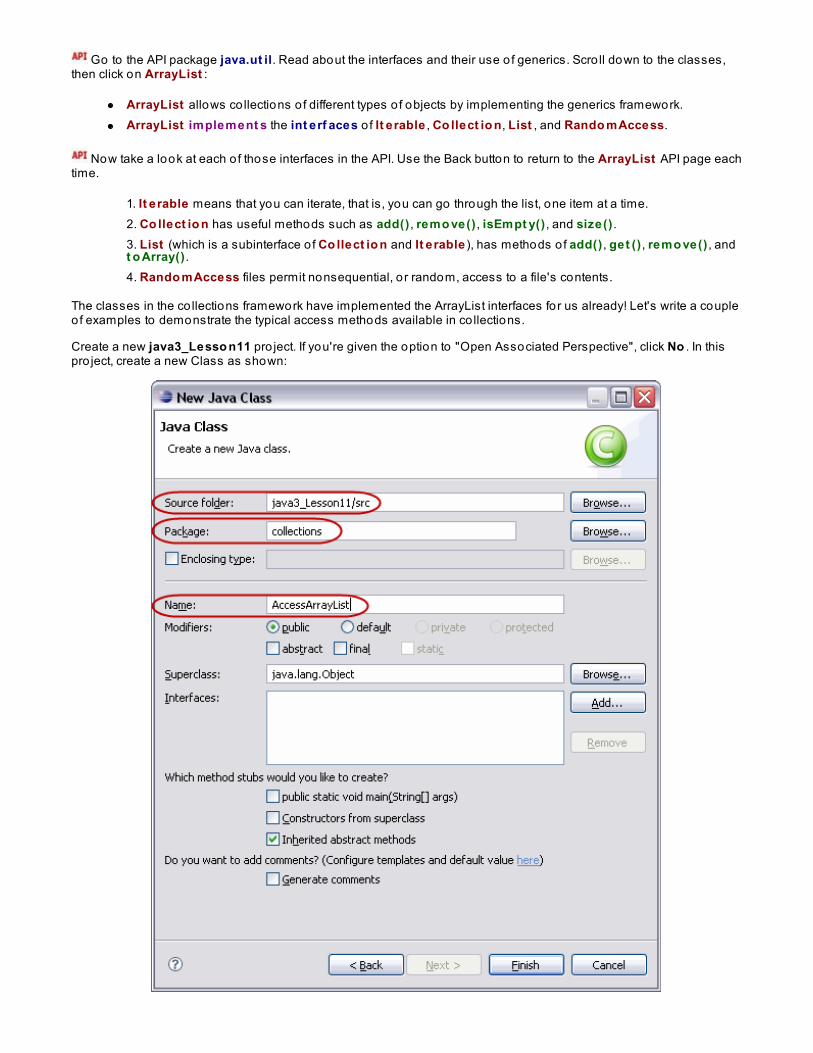
Go to the API package java.ut il. Read about the interfaces and their use o f generics. Scro ll down to the classes,then click on ArrayList :
ArrayList allows co llections o f different types o f objects by implementing the generics framework.ArrayList implement s the int erf aces o f It erable , Co llect io n, List , and Rando mAccess.
Now take a look at each o f those interfaces in the API. Use the Back button to return to the ArrayList API page eachtime.
1. It erable means that you can iterate, that is, you can go through the list, one item at a time.2. Co llect io n has useful methods such as add() , remo ve() , isEmpt y() , and size() .3. List (which is a subinterface o f Co llect io n and It erable ), has methods o f add() , get () , remo ve() , andt o Array() .4. Rando mAccess files permit nonsequential, o r random, access to a file's contents.
The classes in the co llections framework have implemented the ArrayList interfaces for us already! Let's write a coupleof examples to demonstrate the typical access methods available in co llections.
Create a new java3_Lesso n11 pro ject. If you're given the option to "Open Associated Perspective", click No . In thispro ject, create a new Class as shown:
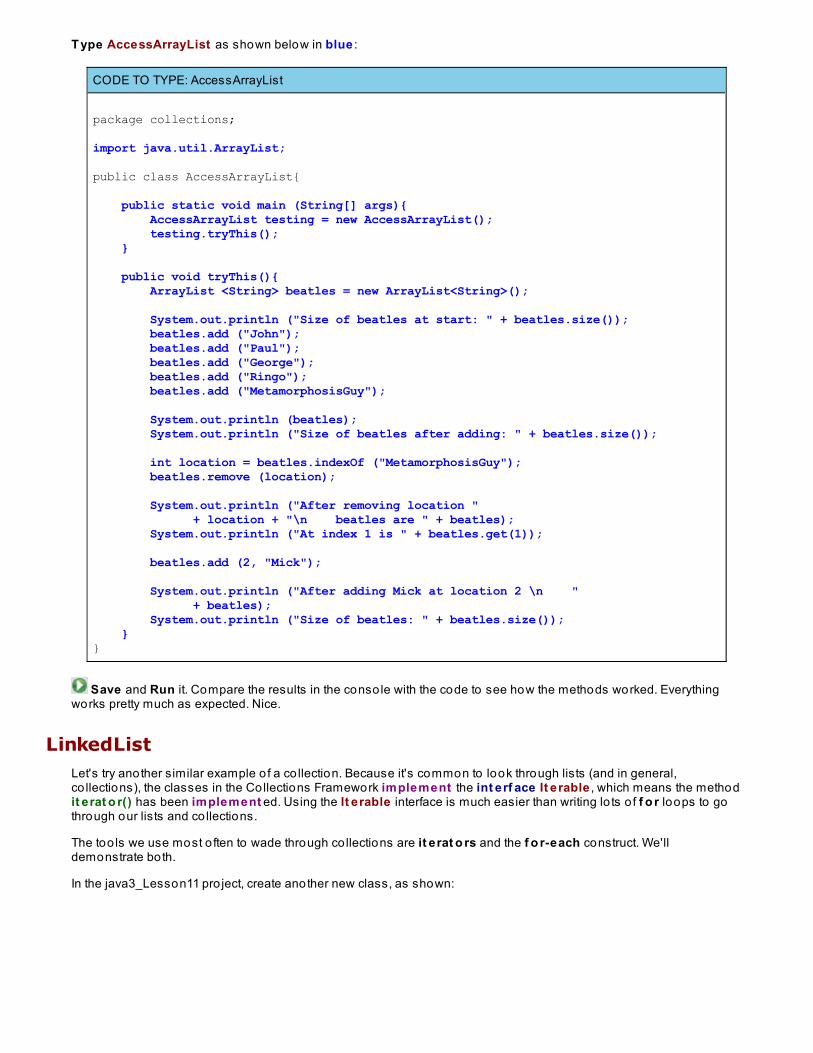
T ype AccessArrayList as shown below in blue :
CODE TO TYPE: AccessArrayList
package collections;
import java.util.ArrayList;
public class AccessArrayList{
public static void main (String[] args){ AccessArrayList testing = new AccessArrayList(); testing.tryThis(); }
public void tryThis(){ ArrayList <String> beatles = new ArrayList<String>(); System.out.println ("Size of beatles at start: " + beatles.size()); beatles.add ("John"); beatles.add ("Paul"); beatles.add ("George"); beatles.add ("Ringo"); beatles.add ("MetamorphosisGuy");
System.out.println (beatles); System.out.println ("Size of beatles after adding: " + beatles.size());
int location = beatles.indexOf ("MetamorphosisGuy"); beatles.remove (location);
System.out.println ("After removing location " + location + "\n beatles are " + beatles); System.out.println ("At index 1 is " + beatles.get(1));
beatles.add (2, "Mick");
System.out.println ("After adding Mick at location 2 \n " + beatles); System.out.println ("Size of beatles: " + beatles.size()); }}
Save and Run it. Compare the results in the conso le with the code to see how the methods worked. Everythingworks pretty much as expected. Nice.
LinkedListLet's try another similar example o f a co llection. Because it's common to look through lists (and in general,co llections), the classes in the Collections Framework implement the int erf ace It erable , which means the methodit erat o r() has been implement ed. Using the It erable interface is much easier than writing lo ts o f f o r loops to gothrough our lists and co llections.
The too ls we use most o ften to wade through co llections are it erat o rs and the f o r-each construct. We'lldemonstrate both.
In the java3_Lesson11 pro ject, create another new class, as shown:
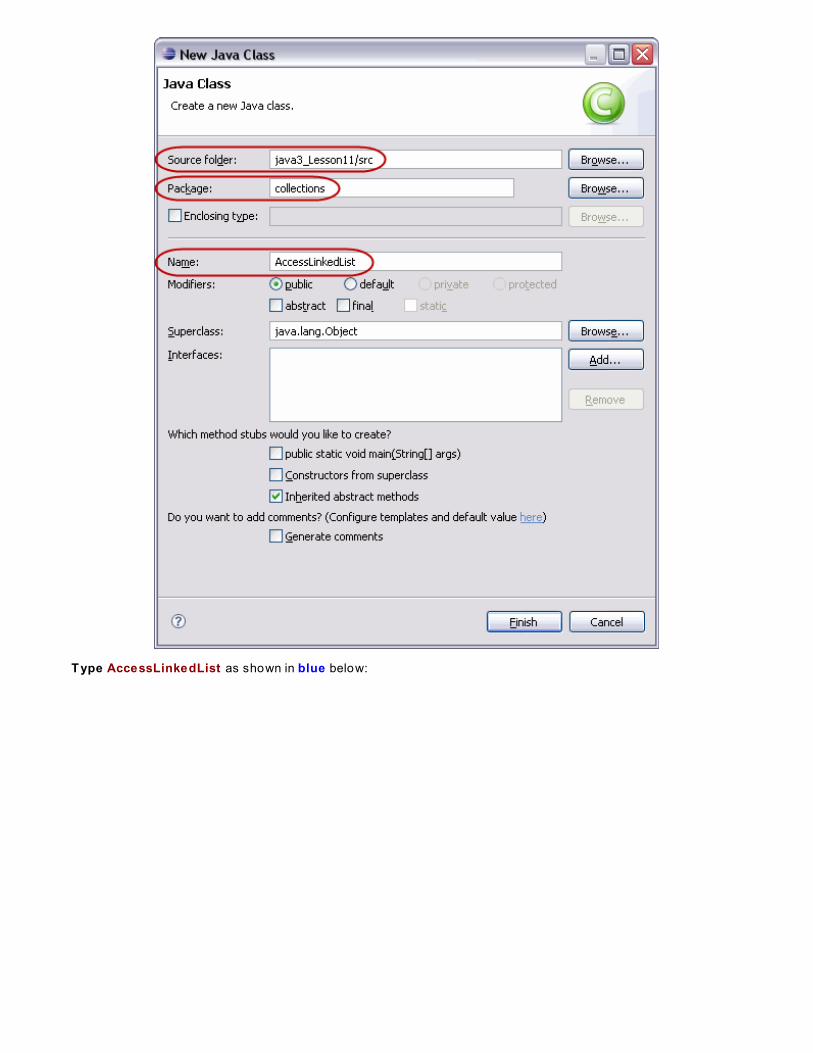
T ype AccessLinkedList as shown in blue below:
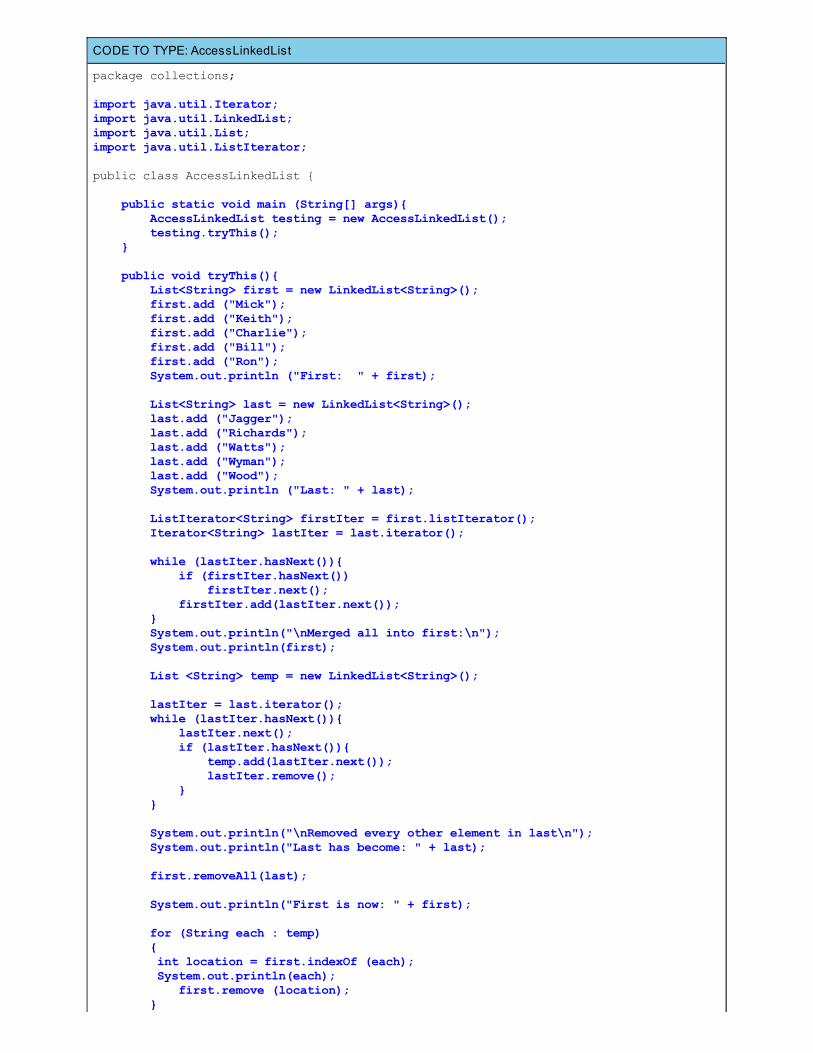
CODE TO TYPE: AccessLinkedList
package collections;
import java.util.Iterator;import java.util.LinkedList;import java.util.List;import java.util.ListIterator;
public class AccessLinkedList {
public static void main (String[] args){ AccessLinkedList testing = new AccessLinkedList(); testing.tryThis(); }
public void tryThis(){ List<String> first = new LinkedList<String>(); first.add ("Mick"); first.add ("Keith"); first.add ("Charlie"); first.add ("Bill"); first.add ("Ron"); System.out.println ("First: " + first);
List<String> last = new LinkedList<String>(); last.add ("Jagger"); last.add ("Richards"); last.add ("Watts"); last.add ("Wyman"); last.add ("Wood"); System.out.println ("Last: " + last);
ListIterator<String> firstIter = first.listIterator(); Iterator<String> lastIter = last.iterator();
while (lastIter.hasNext()){ if (firstIter.hasNext()) firstIter.next(); firstIter.add(lastIter.next()); } System.out.println("\nMerged all into first:\n"); System.out.println(first);
List <String> temp = new LinkedList<String>();
lastIter = last.iterator(); while (lastIter.hasNext()){ lastIter.next(); if (lastIter.hasNext()){ temp.add(lastIter.next()); lastIter.remove(); } }
System.out.println("\nRemoved every other element in last\n"); System.out.println("Last has become: " + last);
first.removeAll(last);
System.out.println("First is now: " + first); for (String each : temp) { int location = first.indexOf (each); System.out.println(each); first.remove (location); }
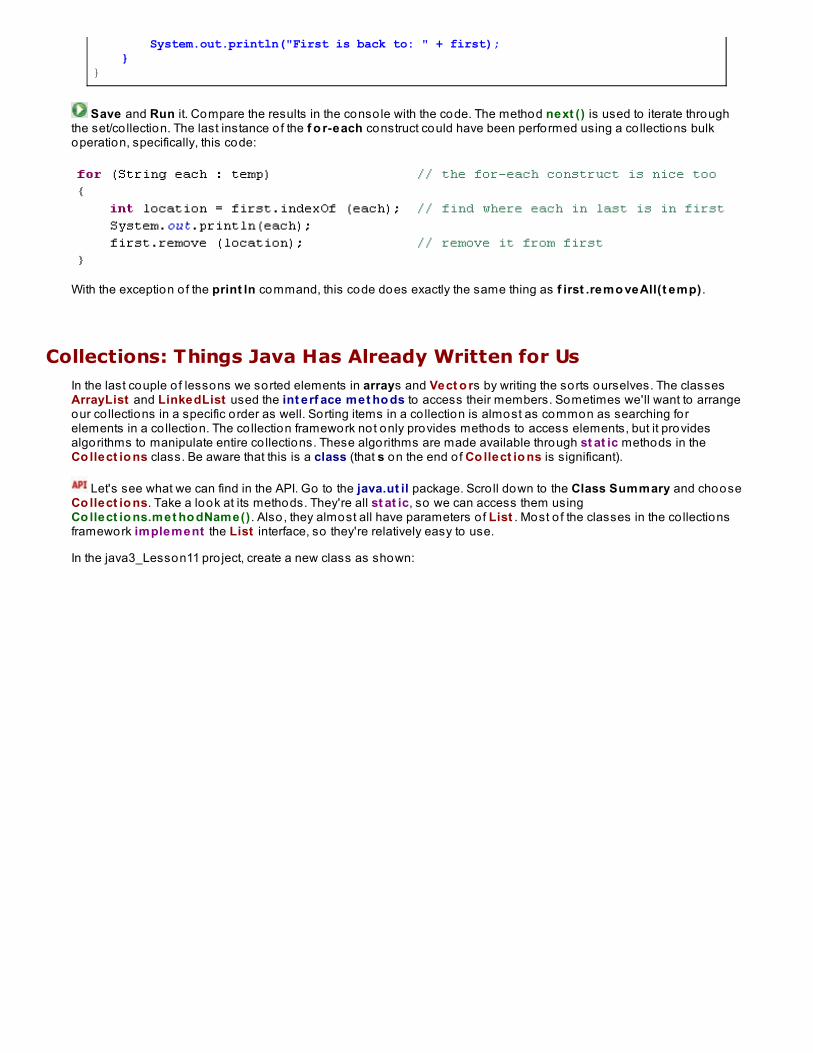
System.out.println("First is back to: " + first); }}
Save and Run it. Compare the results in the conso le with the code. The method next () is used to iterate throughthe set/co llection. The last instance o f the f o r-each construct could have been performed using a co llections bulkoperation, specifically, this code:
With the exception o f the print ln command, this code does exactly the same thing as f irst .remo veAll(t emp) .
Collections: Things Java Has Already Written for UsIn the last couple o f lessons we sorted elements in arrays and Vect o rs by writing the sorts ourselves. The classesArrayList and LinkedList used the int erf ace met ho ds to access their members. Sometimes we'll want to arrangeour co llections in a specific order as well. Sorting items in a co llection is almost as common as searching forelements in a co llection. The co llection framework not only provides methods to access elements, but it providesalgorithms to manipulate entire co llections. These algorithms are made available through st at ic methods in theCo llect io ns class. Be aware that this is a class (that s on the end o f Co llect io ns is significant).
Let's see what we can find in the API. Go to the java.ut il package. Scro ll down to the Class Summary and chooseCo llect io ns. Take a look at its methods. They're all st at ic, so we can access them usingCo llect io ns.met ho dName() . Also , they almost all have parameters o f List . Most o f the classes in the co llectionsframework implement the List interface, so they're relatively easy to use.
In the java3_Lesson11 pro ject, create a new class as shown:
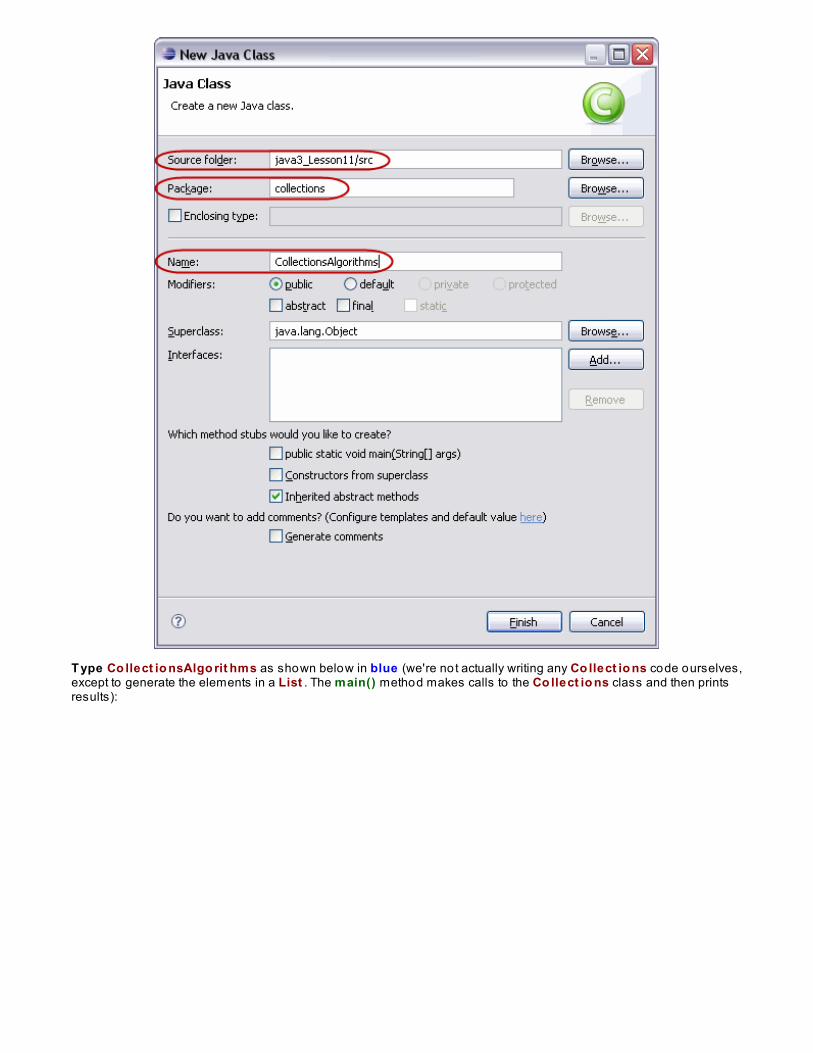
T ype Co llect io nsAlgo rit hms as shown below in blue (we're not actually writing any Co llect io ns code ourselves,except to generate the elements in a List . The main() method makes calls to the Co llect io ns class and then printsresults):
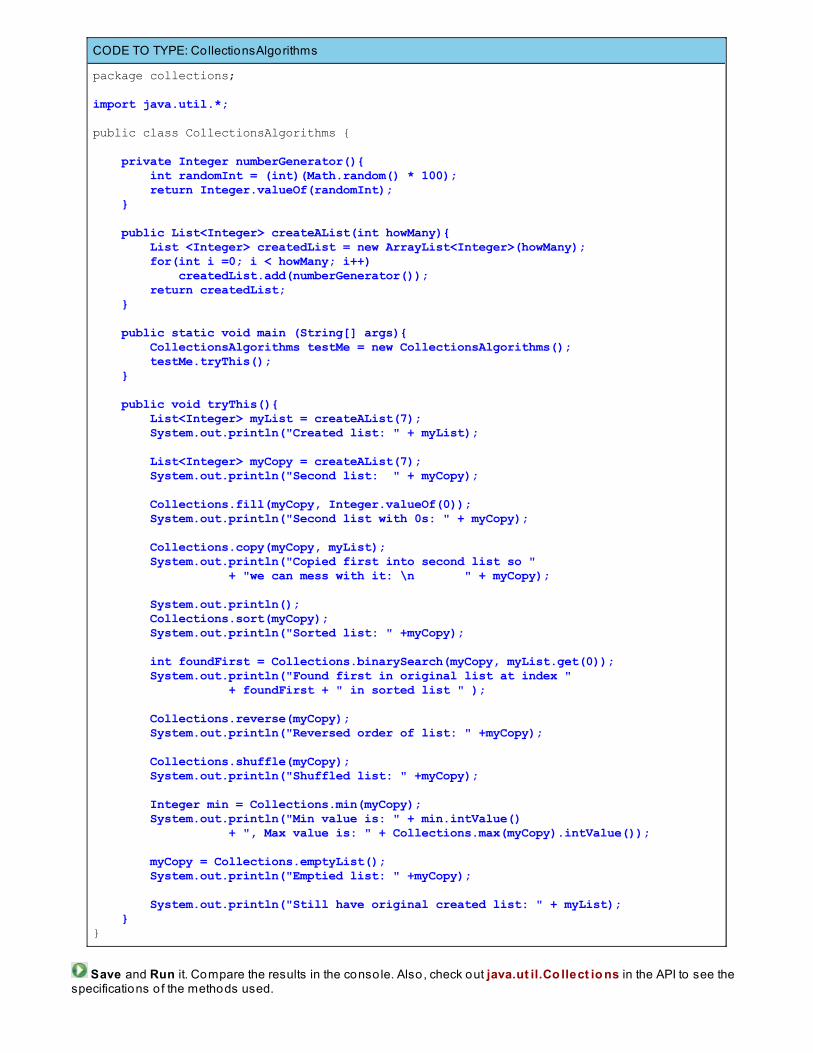
CODE TO TYPE: CollectionsAlgorithms
package collections;
import java.util.*;
public class CollectionsAlgorithms { private Integer numberGenerator(){ int randomInt = (int)(Math.random() * 100); return Integer.valueOf(randomInt); }
public List<Integer> createAList(int howMany){ List <Integer> createdList = new ArrayList<Integer>(howMany); for(int i =0; i < howMany; i++) createdList.add(numberGenerator()); return createdList; }
public static void main (String[] args){ CollectionsAlgorithms testMe = new CollectionsAlgorithms(); testMe.tryThis(); } public void tryThis(){ List<Integer> myList = createAList(7); System.out.println("Created list: " + myList);
List<Integer> myCopy = createAList(7); System.out.println("Second list: " + myCopy);
Collections.fill(myCopy, Integer.valueOf(0)); System.out.println("Second list with 0s: " + myCopy);
Collections.copy(myCopy, myList); System.out.println("Copied first into second list so " + "we can mess with it: \n " + myCopy);
System.out.println(); Collections.sort(myCopy); System.out.println("Sorted list: " +myCopy);
int foundFirst = Collections.binarySearch(myCopy, myList.get(0)); System.out.println("Found first in original list at index " + foundFirst + " in sorted list " );
Collections.reverse(myCopy); System.out.println("Reversed order of list: " +myCopy);
Collections.shuffle(myCopy); System.out.println("Shuffled list: " +myCopy);
Integer min = Collections.min(myCopy); System.out.println("Min value is: " + min.intValue() + ", Max value is: " + Collections.max(myCopy).intValue());
myCopy = Collections.emptyList(); System.out.println("Emptied list: " +myCopy);
System.out.println("Still have original created list: " + myList); }}
Save and Run it. Compare the results in the conso le. Also, check out java.ut il.Co llect io ns in the API to see thespecifications o f the methods used.
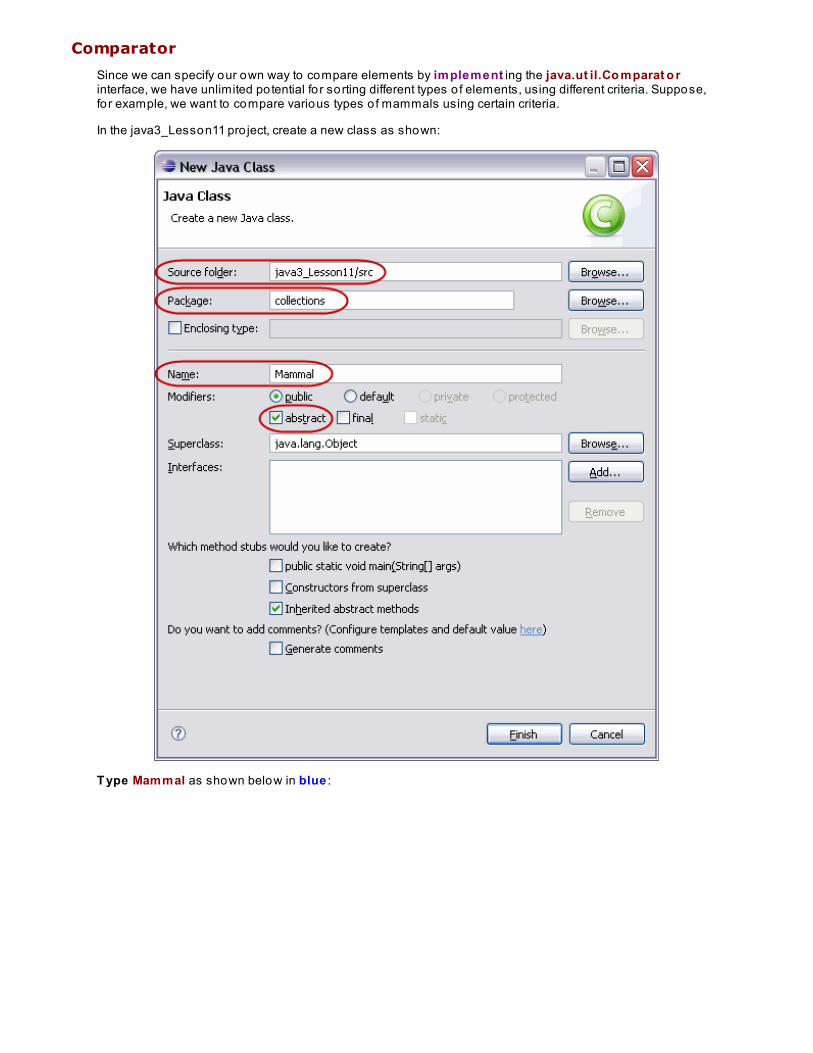
Comparator
Since we can specify our own way to compare elements by implement ing the java.ut il.Co mparat o rinterface, we have unlimited potential fo r sorting different types o f elements, using different criteria. Suppose,for example, we want to compare various types o f mammals using certain criteria.
In the java3_Lesson11 pro ject, create a new class as shown:
T ype Mammal as shown below in blue :
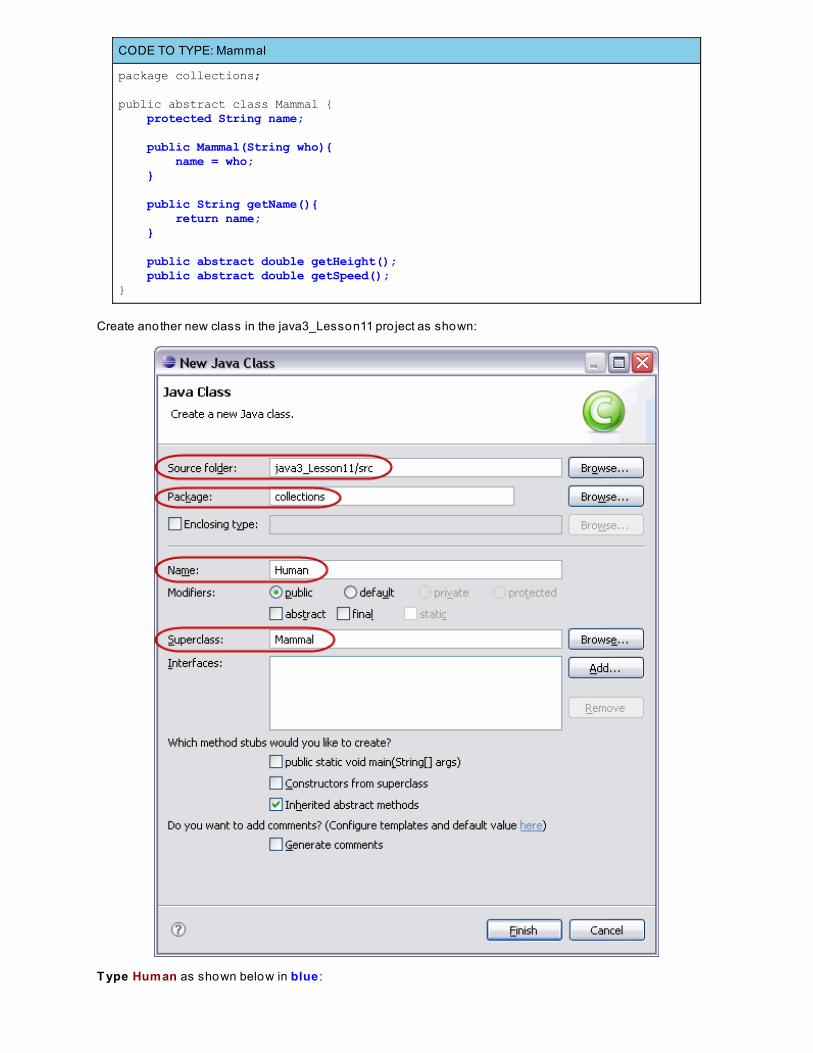
CODE TO TYPE: Mammal
package collections;
public abstract class Mammal { protected String name;
public Mammal(String who){ name = who; }
public String getName(){ return name; }
public abstract double getHeight(); public abstract double getSpeed(); }
Create another new class in the java3_Lesson11 pro ject as shown:
T ype Human as shown below in blue :
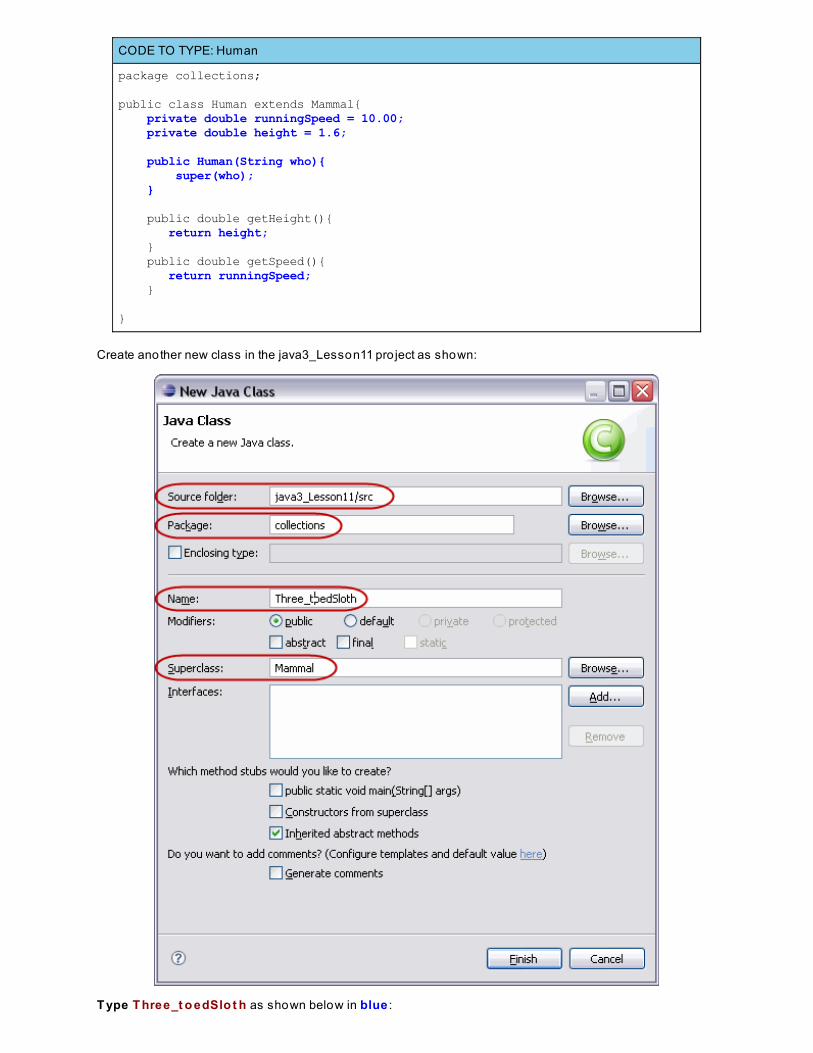
CODE TO TYPE: Human
package collections;
public class Human extends Mammal{ private double runningSpeed = 10.00; private double height = 1.6;
public Human(String who){ super(who); } public double getHeight(){ return height; } public double getSpeed(){ return runningSpeed; } }
Create another new class in the java3_Lesson11 pro ject as shown:
T ype T hree_t o edSlo t h as shown below in blue :
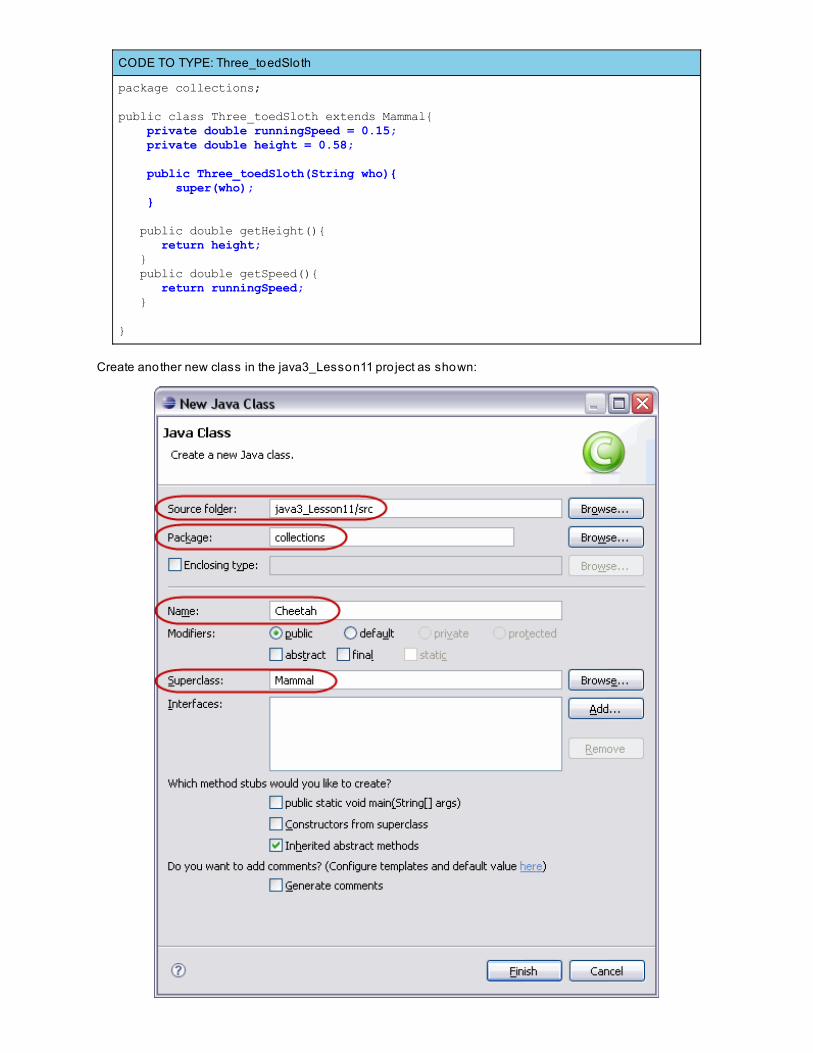
CODE TO TYPE: Three_toedSlo th
package collections;
public class Three_toedSloth extends Mammal{ private double runningSpeed = 0.15; private double height = 0.58;
public Three_toedSloth(String who){ super(who); } public double getHeight(){ return height; } public double getSpeed(){ return runningSpeed; } }
Create another new class in the java3_Lesson11 pro ject as shown:
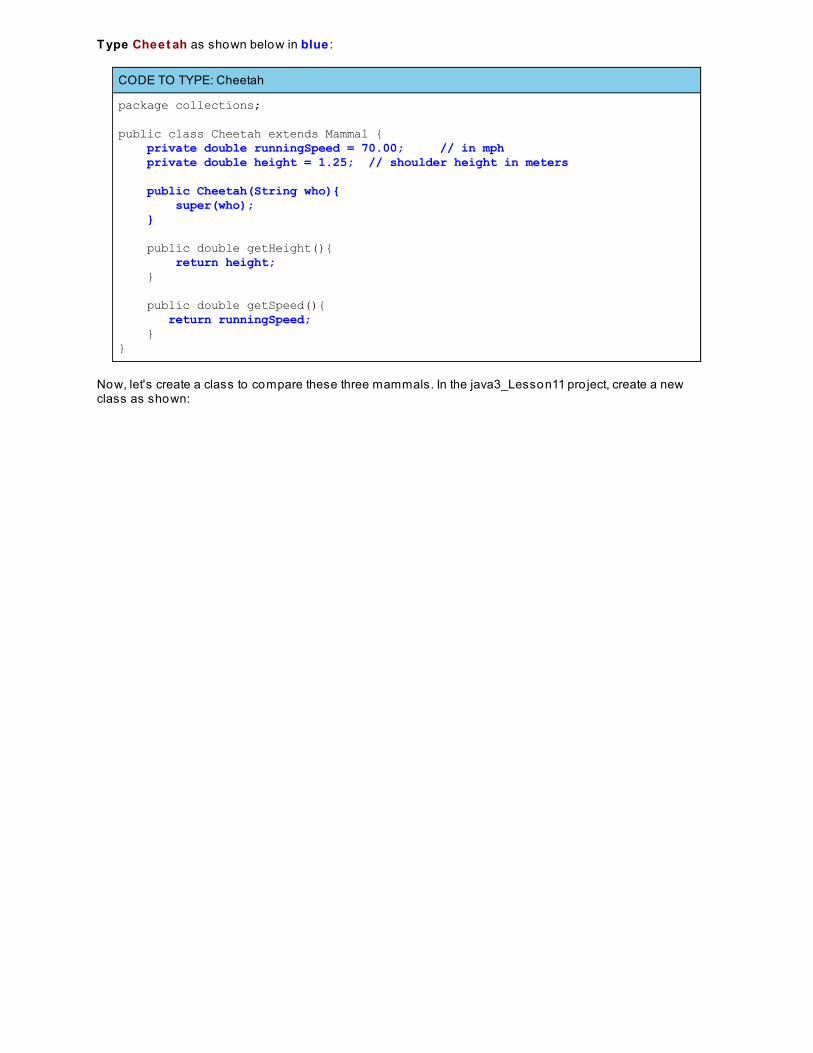
T ype Cheet ah as shown below in blue :
CODE TO TYPE: Cheetah
package collections;
public class Cheetah extends Mammal { private double runningSpeed = 70.00; // in mph private double height = 1.25; // shoulder height in meters
public Cheetah(String who){ super(who); } public double getHeight(){ return height; }
public double getSpeed(){ return runningSpeed; }}
Now, let's create a class to compare these three mammals. In the java3_Lesson11 pro ject, create a newclass as shown:

T ype MammalRace as shown below in blue :
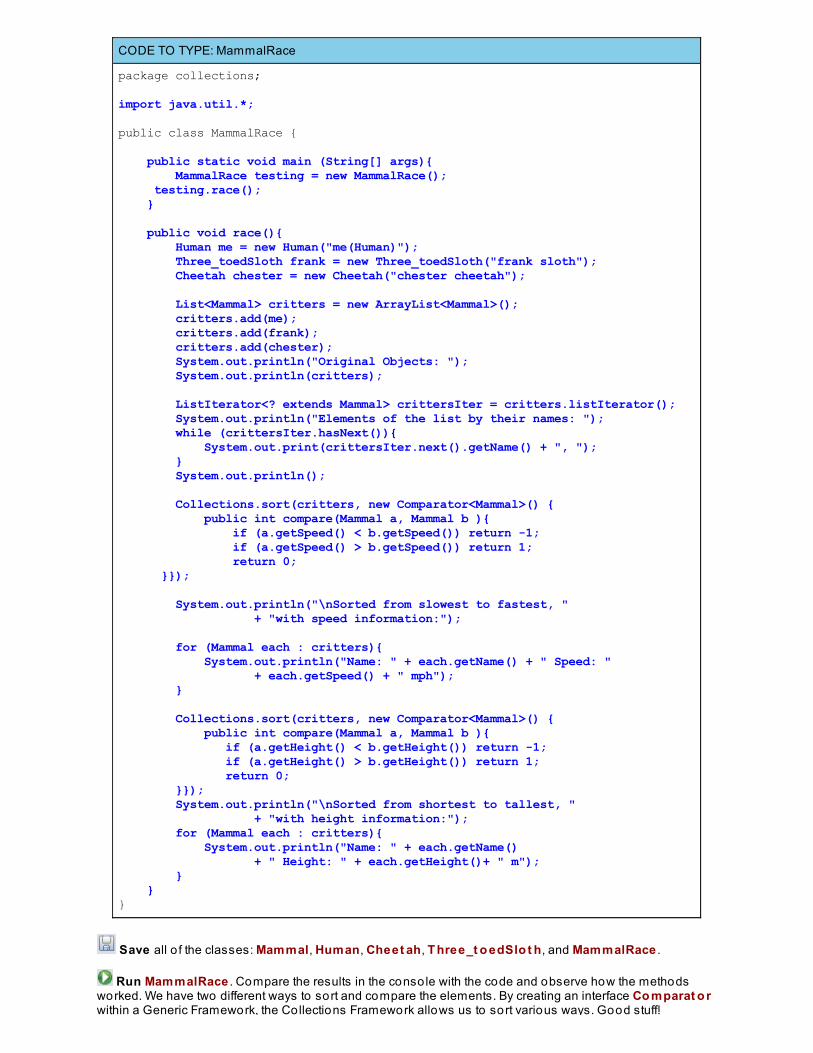
CODE TO TYPE: MammalRace
package collections;
import java.util.*;
public class MammalRace { public static void main (String[] args){ MammalRace testing = new MammalRace(); testing.race(); } public void race(){ Human me = new Human("me(Human)"); Three_toedSloth frank = new Three_toedSloth("frank sloth"); Cheetah chester = new Cheetah("chester cheetah"); List<Mammal> critters = new ArrayList<Mammal>(); critters.add(me); critters.add(frank); critters.add(chester); System.out.println("Original Objects: "); System.out.println(critters);
ListIterator<? extends Mammal> crittersIter = critters.listIterator(); System.out.println("Elements of the list by their names: "); while (crittersIter.hasNext()){ System.out.print(crittersIter.next().getName() + ", "); } System.out.println(); Collections.sort(critters, new Comparator<Mammal>() { public int compare(Mammal a, Mammal b ){ if (a.getSpeed() < b.getSpeed()) return -1; if (a.getSpeed() > b.getSpeed()) return 1; return 0; }});
System.out.println("\nSorted from slowest to fastest, " + "with speed information:");
for (Mammal each : critters){ System.out.println("Name: " + each.getName() + " Speed: " + each.getSpeed() + " mph"); } Collections.sort(critters, new Comparator<Mammal>() { public int compare(Mammal a, Mammal b ){ if (a.getHeight() < b.getHeight()) return -1; if (a.getHeight() > b.getHeight()) return 1; return 0; }}); System.out.println("\nSorted from shortest to tallest, " + "with height information:"); for (Mammal each : critters){ System.out.println("Name: " + each.getName() + " Height: " + each.getHeight()+ " m"); } }}
Save all o f the classes: Mammal, Human, Cheet ah, T hree_t o edSlo t h, and MammalRace .
Run MammalRace . Compare the results in the conso le with the code and observe how the methodsworked. We have two different ways to sort and compare the elements. By creating an interface Co mparat o rwithin a Generic Framework, the Collections Framework allows us to sort various ways. Good stuff!

within a Generic Framework, the Collections Framework allows us to sort various ways. Good stuff!
Wrapping Up the Collections FrameworkUsing the Collections Framework can save you a lo t o f time. It may well be worthwhile fo r you to look at Java's tutorialand become familiar with all o f the capabilities these interfaces and classes provide. Why reinvent the wheel, right?
Here are just some of the benefits provided by the Java Collections Framework, as described in that tutorial we justmentioned:
Reduces pro gramming ef f o rt : By providing useful data structures and algorithms, the CollectionsFramework allows you to concentrate on the important aspects o f your own program, rather than reinventingthings that have already been written (by experts). Two major contributions these co llections have made inthe ongo ing quest to simplify the writing o f code can be seen in:
1. Enhanced f o r loops2. Autoboxing
Increases pro gram speed and qualit y: The Collections Framework provides high-performance, high-quality implementations o f useful constructs and algorithms. The various implementations o f each interfaceare interchangeable, so programs can be tuned easily by switching co llection implementations, dependingon your needs.Allo ws int ero perabilit y amo ng unrelat ed APIs: The co llection interfaces define how to passco llections back and forth. If one individual's code furnishes a co llection o f node names and another'stoo lkit expects a co llection o f certain co lumn headings, the Collection APIs will interoperate seamlessly,even though they were written independently.Reduces ef f o rt t o learn and t o use new APIs: Many APIs naturally take co llections as input and furnishthem as output. With a set o f standard co llection interfaces, co llection use is uniform.Reduces ef f o rt t o design new APIs: Designers and implementers don't have to reinvent the wheel eachtime they create an API that relies on co llections; instead, they can use standard co llection interfaces.Fo st ers so f t ware reuse: If you use standard types and conform to the framework, o thers can use yourcode without major changes. They will love you for this.
All in all, Java provides some really handy too ls!
Copyright © 1998-2014 O'Reilly Media, Inc.
This work is licensed under a Creative Commons Attribution-ShareAlike 3.0 Unported License.See http://creativecommons.org/licenses/by-sa/3.0/legalcode for more information.

Enumeration and enumLesson Objectives
When you complete this lesson, you will be able to :
declare and use enumerated data.implement object instantiation and class initialization.use enum.apply default modifiers to fields o f type enum.
EnumerationEnumerat e : To count o ff o r name one by one; list. This is the definition one finds in the American Heritage Dictionary.Java's new reserved word enum comes from the use o f enumeration.
Earlier in this series o f courses, we learned that Java has two main t ypes—primit ive dat a t ypes and classes. Inour current course, we learned that int erf aces are a t ypes as well. Programming languages evo lve all the time.Since version 1.5, Java has provided a new t ypes o f object, the Enum . It's actually pretty coo l that you're invo lvedright now, during this evo lution o f a programming language! If you go into the API from Java Version 1.4 in java.lang,you won't find the new Enum class.
Click on that link to the API from Java Version 1.4 and scro ll down. Look at the Class Summary between Do uble andFlo at . There's nothing that starts with an E.
Now, click our link to the newest API version and go to java.lang. Enum<E> ext ends Enum <E> .
All the enums that you define, by default, will inherit from java.lang.Enum . Let's take a closer look at this new t ype .
Constants
In object-oriented programming, everyt hing is in a class. There are pieces o f information that should bereadily accessible to everyone, such as:
PI ( )Ethe speed o f light (c in E = mc2)Avogadro 's constant
In Java, we make these pieces o f information co nst ant s by declaring them with public st at ic f inal:
public makes them accessible to everyone.st at ic makes them accessible by using the class name (for example, Mat h.PI).f inal makes sure that no one can change them.
Go to the java.lang package. Scro ll down to the Mat h class. Scro ll to the Field Summary and click on E.
The convention in Java is to name constants with all capital letters; that's why you see PI and E.
Enum Types
An enumerated type is a special kind o f class. An enum t ype is a t ype with variables (fields) that consist o fa fixed set o f constants. Common examples include: days o f the week, months o f the year, seasons o f theyear (values o f WINTER, SUMMER, FALL, and SPRING), compass directions (NORTH, SOUTH, EAST, andWEST), and static Co lor or Action cho ices on a menu. Because they are constants, the names enum types'fields conventionally use uppercase letters as well.
The values o f the enumerated type are a fixed set o f constants (by default) and are objects. The values are, infact, instances o f their own enumeration type.
In our upcoming example, CHEET AH is an object/instance o f the MammalEnum class. Specifically, theenum declaration defines a class (called an enum type). The enum class body can include methods and

other fields. Interestingly, they have a static values() method that returns an array containing all o f the valuesof the enum in the order that they are declared—so you can iterate through the enumeration.
Enum ExampleThe animal o f type Mammal and the subclasses we used in the last lesson's example are usually classes o f theirown. But we'll make them of the class enum here, in order to demonstrate the use o f enum .
Create a new java3_Lesso n12 pro ject. If you're given the option to "Open Associated Perspective," click No . Click onjava3_Lesson12 and then right-click for the popup menu. Select New | Enum (if no Enum option appears in thispopup, select New | Ot her | Java | Enum ). Enum should appear in the popup from then on.
In the New Enum T ype window that opens, enter the circled information:
Hey, what's go ing on here? Why can't you click Finish? Sorry about that—I wanted to demonstrate that enum is areserved word. Change the name of the package to enumerable :

Create the MammalEnum class as shown in blue :
CODE TO TYPE: MammalEnum
package enumerable;
public enum MammalEnum { CHEETAH, HUMAN, THREETOED_SLOTH;
public static void main(String[] args){ for (MammalEnum each : MammalEnum.values()) System.out.println(each); }}
OBSERVE: MammalEnum
package enumerable;
public enum MammalEnum { CHEETAH, HUMAN, THREETOED_SLOTH;
public static void main(String[] args){ for (MammalEnum each : MammalEnum.values()) System.out.println(each); }}
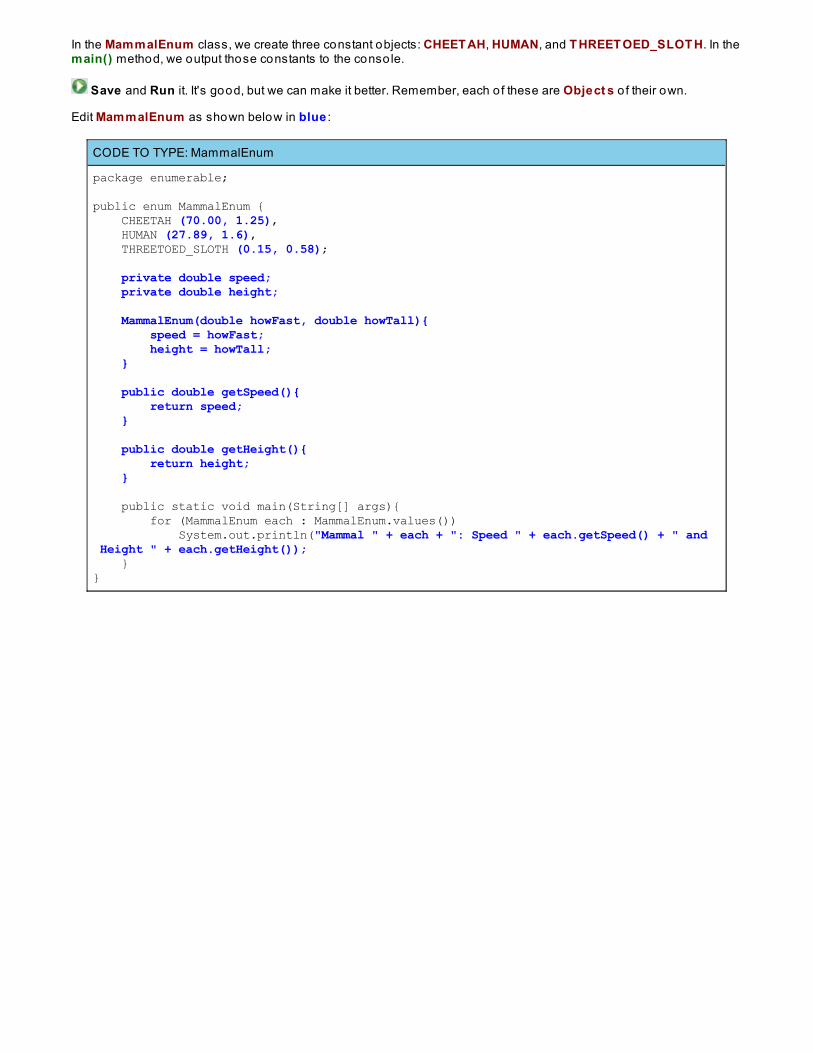
In the MammalEnum class, we create three constant objects: CHEET AH, HUMAN, and T HREET OED_SLOT H. In themain() method, we output those constants to the conso le.
Save and Run it. It's good, but we can make it better. Remember, each o f these are Object s o f their own.
Edit MammalEnum as shown below in blue :
CODE TO TYPE: MammalEnum
package enumerable;
public enum MammalEnum { CHEETAH (70.00, 1.25), HUMAN (27.89, 1.6), THREETOED_SLOTH (0.15, 0.58);
private double speed; private double height; MammalEnum(double howFast, double howTall){ speed = howFast; height = howTall; } public double getSpeed(){ return speed; } public double getHeight(){ return height; }
public static void main(String[] args){ for (MammalEnum each : MammalEnum.values()) System.out.println("Mammal " + each + ": Speed " + each.getSpeed() + " and Height " + each.getHeight()); }}
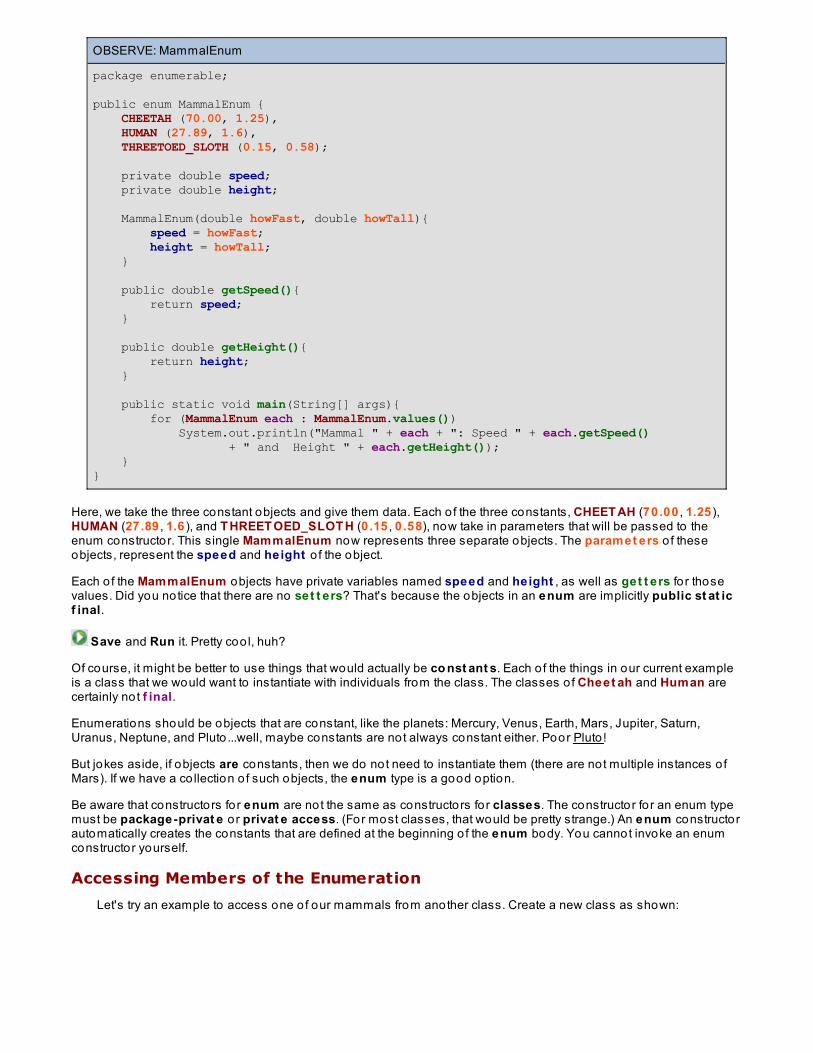
OBSERVE: MammalEnum
package enumerable;
public enum MammalEnum { CHEETAH (70.00, 1.25), HUMAN (27.89, 1.6), THREETOED_SLOTH (0.15, 0.58);
private double speed; private double height; MammalEnum(double howFast, double howTall){ speed = howFast; height = howTall; } public double getSpeed(){ return speed; } public double getHeight(){ return height; }
public static void main(String[] args){ for (MammalEnum each : MammalEnum.values()) System.out.println("Mammal " + each + ": Speed " + each.getSpeed() + " and Height " + each.getHeight()); }}
Here, we take the three constant objects and give them data. Each o f the three constants, CHEET AH (70.00 , 1.25 ),HUMAN (27.89 , 1.6 ), and T HREET OED_SLOT H (0.15 , 0.58), now take in parameters that will be passed to theenum constructor. This single MammalEnum now represents three separate objects. The paramet ers o f theseobjects, represent the speed and height o f the object.
Each o f the MammalEnum objects have private variables named speed and height , as well as get t ers fo r thosevalues. Did you notice that there are no set t ers? That's because the objects in an enum are implicitly public st at icf inal.
Save and Run it. Pretty coo l, huh?
Of course, it might be better to use things that would actually be co nst ant s. Each o f the things in our current exampleis a class that we would want to instantiate with individuals from the class. The classes o f Cheet ah and Human arecertainly not f inal.
Enumerations should be objects that are constant, like the planets: Mercury, Venus, Earth, Mars, Jupiter, Saturn,Uranus, Neptune, and Pluto ...well, maybe constants are not always constant either. Poor Pluto !
But jokes aside, if objects are constants, then we do not need to instantiate them (there are not multiple instances o fMars). If we have a co llection o f such objects, the enum type is a good option.
Be aware that constructors for enum are not the same as constructors for classes. The constructor fo r an enum typemust be package-privat e o r privat e access. (For most classes, that would be pretty strange.) An enum constructorautomatically creates the constants that are defined at the beginning o f the enum body. You cannot invoke an enumconstructor yourself.
Accessing Members of the Enumeration
Let's try an example to access one o f our mammals from another class. Create a new class as shown:
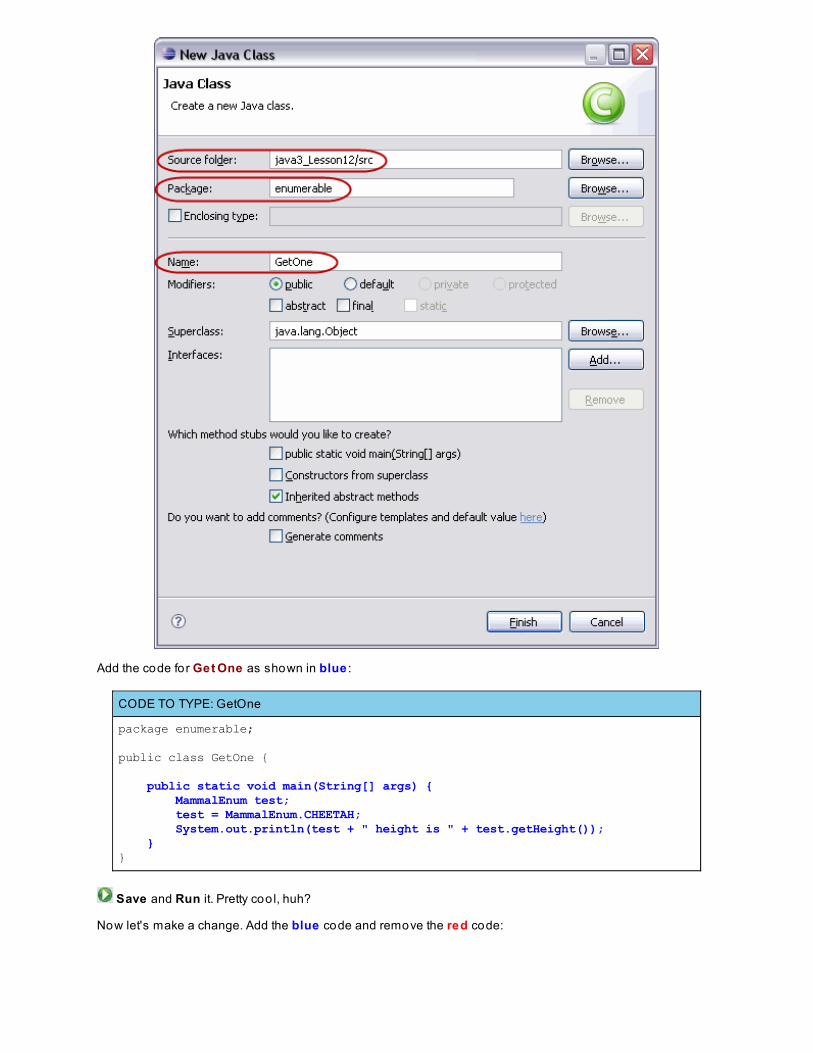
Add the code for Get One as shown in blue :
CODE TO TYPE: GetOne
package enumerable;
public class GetOne { public static void main(String[] args) { MammalEnum test; test = MammalEnum.CHEETAH; System.out.println(test + " height is " + test.getHeight()); }}
Save and Run it. Pretty coo l, huh?
Now let's make a change. Add the blue code and remove the red code:
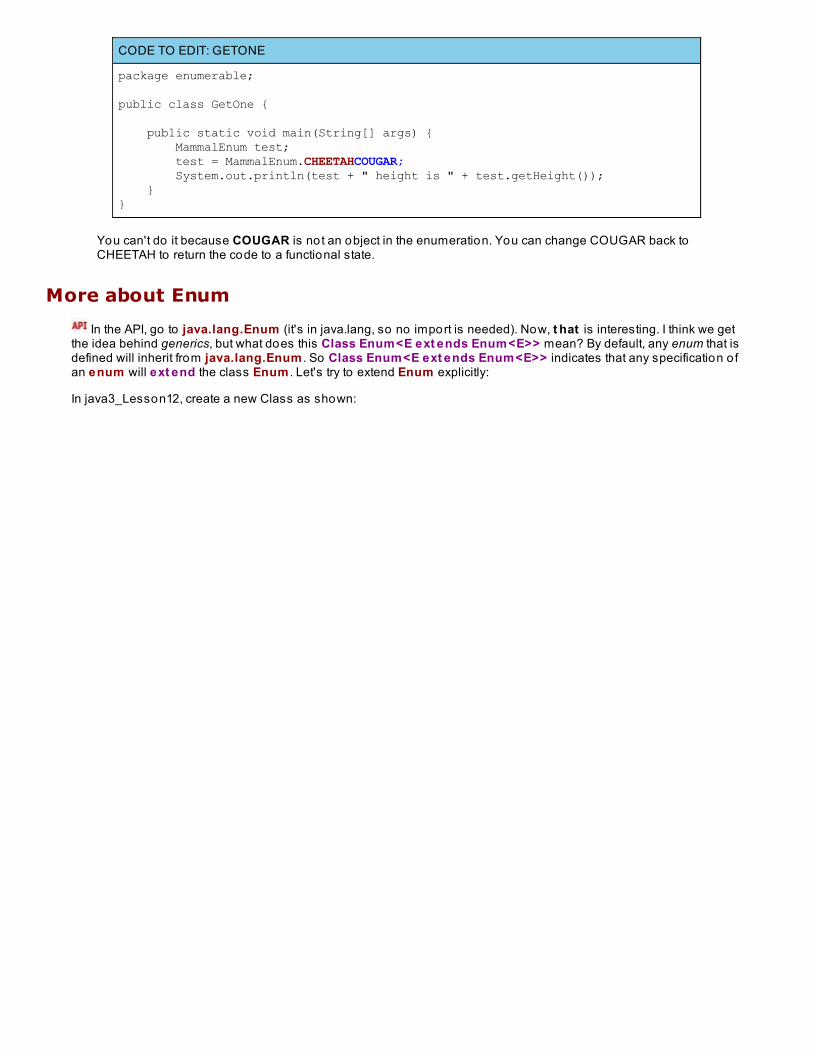
CODE TO EDIT: GETONE
package enumerable; public class GetOne { public static void main(String[] args) { MammalEnum test; test = MammalEnum.CHEETAHCOUGAR; System.out.println(test + " height is " + test.getHeight()); }}
You can't do it because COUGAR is not an object in the enumeration. You can change COUGAR back toCHEETAH to return the code to a functional state.
More about Enum
In the API, go to java.lang.Enum (it's in java.lang, so no import is needed). Now, t hat is interesting. I think we getthe idea behind generics, but what does this Class Enum<E ext ends Enum<E>> mean? By default, any enum that isdefined will inherit from java.lang.Enum . So Class Enum<E ext ends Enum<E>> indicates that any specification o fan enum will ext end the class Enum . Let's try to extend Enum explicitly:
In java3_Lesson12, create a new Class as shown:
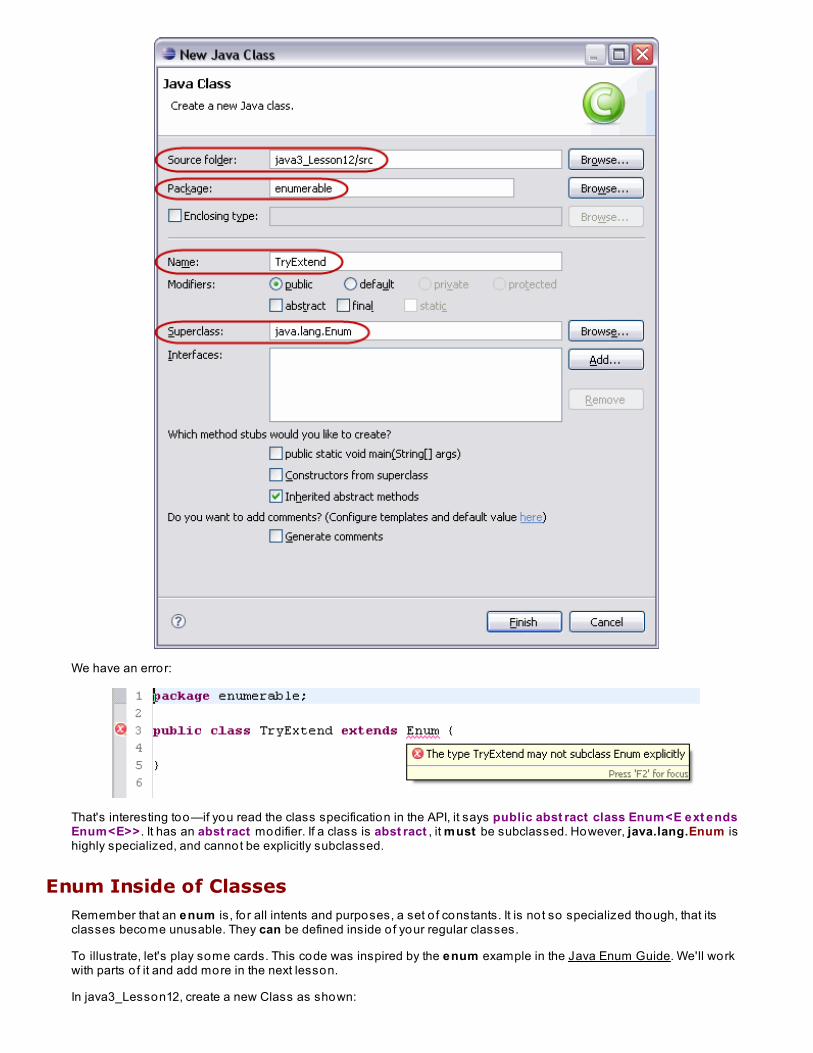
We have an error:
That's interesting too—if you read the class specification in the API, it says public abst ract class Enum<E ext endsEnum<E>> . It has an abst ract modifier. If a class is abst ract , it must be subclassed. However, java.lang.Enum ishighly specialized, and cannot be explicitly subclassed.
Enum Inside of ClassesRemember that an enum is, fo r all intents and purposes, a set o f constants. It is not so specialized though, that itsclasses become unusable. They can be defined inside o f your regular classes.
To illustrate, let's play some cards. This code was inspired by the enum example in the Java Enum Guide. We'll workwith parts o f it and add more in the next lesson.
In java3_Lesson12, create a new Class as shown:
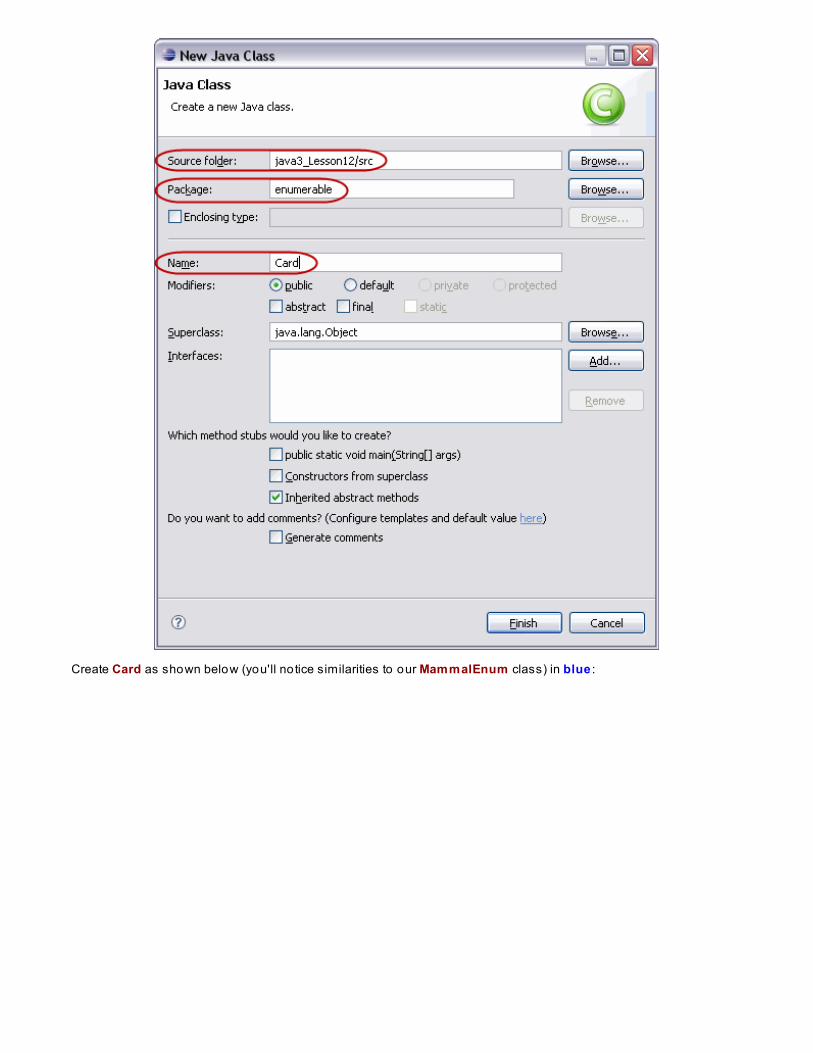
Create Card as shown below (you'll no tice similarities to our MammalEnum class) in blue :
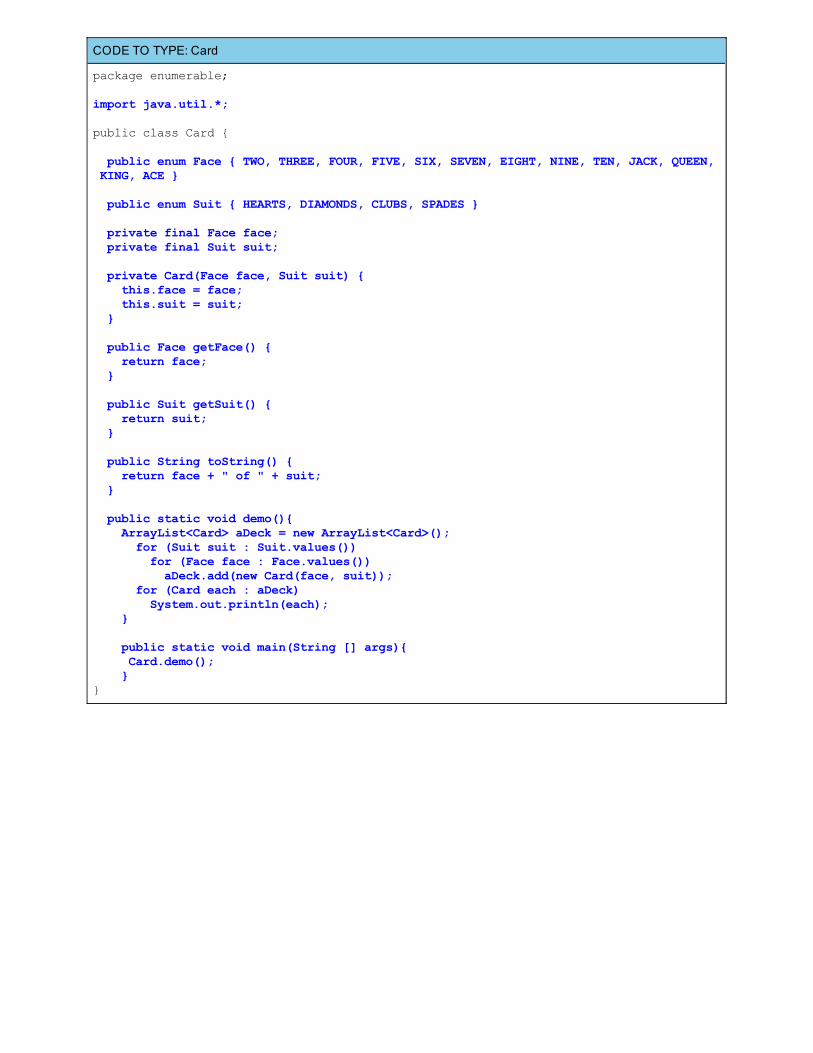
CODE TO TYPE: Card
package enumerable;
import java.util.*;
public class Card {
public enum Face { TWO, THREE, FOUR, FIVE, SIX, SEVEN, EIGHT, NINE, TEN, JACK, QUEEN, KING, ACE }
public enum Suit { HEARTS, DIAMONDS, CLUBS, SPADES }
private final Face face; private final Suit suit;
private Card(Face face, Suit suit) { this.face = face; this.suit = suit; }
public Face getFace() { return face; }
public Suit getSuit() { return suit; }
public String toString() { return face + " of " + suit; }
public static void demo(){ ArrayList<Card> aDeck = new ArrayList<Card>(); for (Suit suit : Suit.values()) for (Face face : Face.values()) aDeck.add(new Card(face, suit)); for (Card each : aDeck) System.out.println(each); }
public static void main(String [] args){ Card.demo(); }}
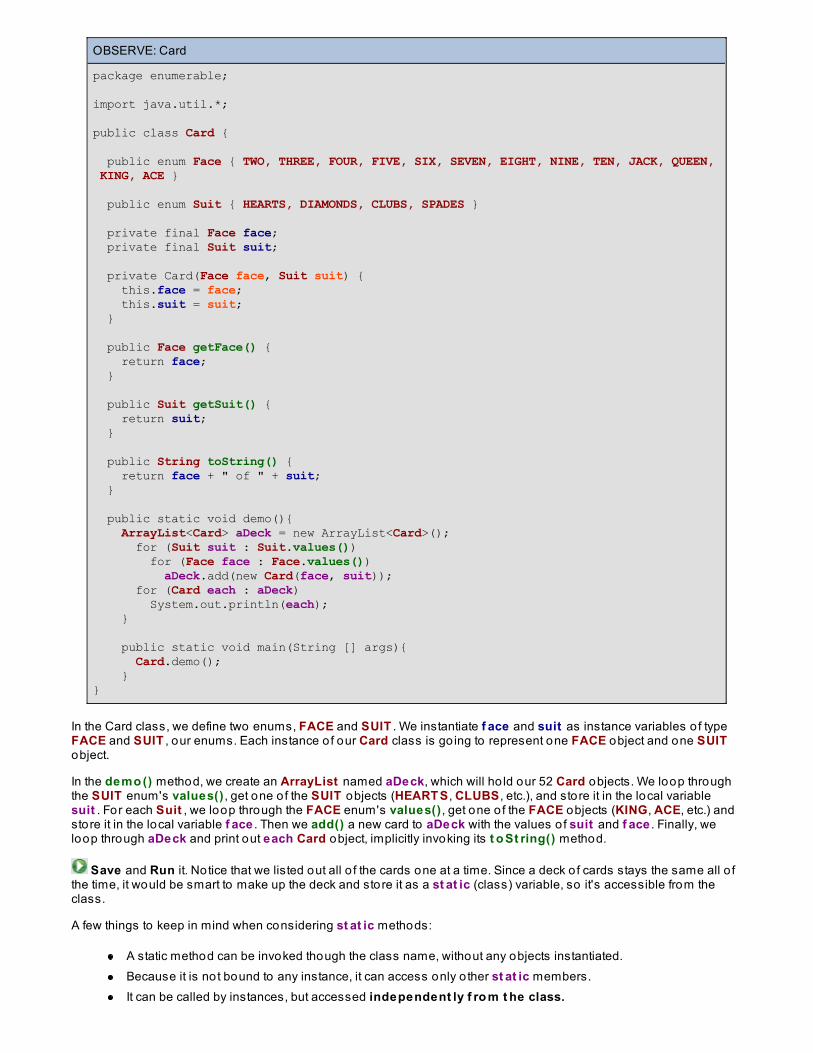
OBSERVE: Card
package enumerable;
import java.util.*;
public class Card {
public enum Face { TWO, THREE, FOUR, FIVE, SIX, SEVEN, EIGHT, NINE, TEN, JACK, QUEEN, KING, ACE }
public enum Suit { HEARTS, DIAMONDS, CLUBS, SPADES }
private final Face face; private final Suit suit;
private Card(Face face, Suit suit) { this.face = face; this.suit = suit; }
public Face getFace() { return face; }
public Suit getSuit() { return suit; }
public String toString() { return face + " of " + suit; }
public static void demo(){ ArrayList<Card> aDeck = new ArrayList<Card>(); for (Suit suit : Suit.values()) for (Face face : Face.values()) aDeck.add(new Card(face, suit)); for (Card each : aDeck) System.out.println(each); }
public static void main(String [] args){ Card.demo(); }}
In the Card class, we define two enums, FACE and SUIT . We instantiate f ace and suit as instance variables o f typeFACE and SUIT , our enums. Each instance o f our Card class is go ing to represent one FACE object and one SUITobject.
In the demo () method, we create an ArrayList named aDeck, which will ho ld our 52 Card objects. We loop throughthe SUIT enum's values() , get one o f the SUIT objects (HEART S , CLUBS , etc.), and store it in the local variablesuit . For each Suit , we loop through the FACE enum's values() , get one o f the FACE objects (KING, ACE, etc.) andstore it in the local variable f ace . Then we add() a new card to aDeck with the values o f suit and f ace . Finally, weloop through aDeck and print out each Card object, implicitly invoking its t o St ring() method.
Save and Run it. Notice that we listed out all o f the cards one at a time. Since a deck o f cards stays the same all o fthe time, it would be smart to make up the deck and store it as a st at ic (class) variable, so it's accessible from theclass.
A few things to keep in mind when considering st at ic methods:
A static method can be invoked though the class name, without any objects instantiated.Because it is not bound to any instance, it can access only o ther st at ic members.It can be called by instances, but accessed independent ly f ro m t he class.
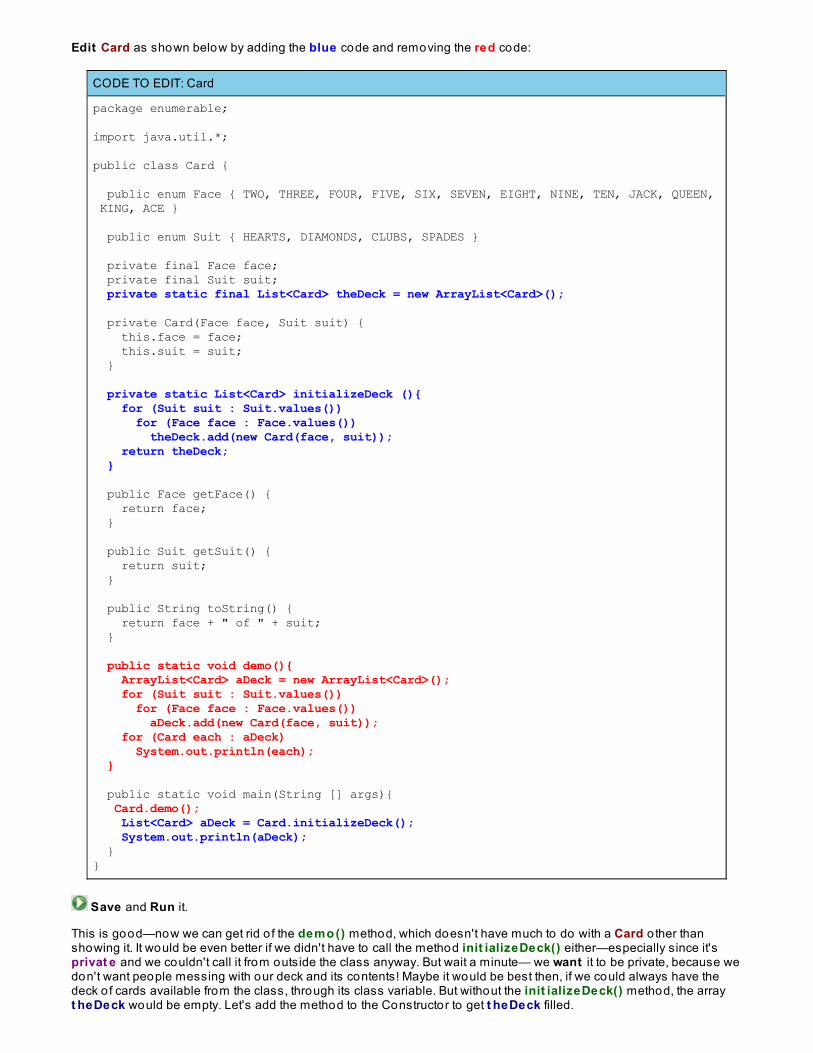
Edit Card as shown below by adding the blue code and removing the red code:
CODE TO EDIT: Card
package enumerable;
import java.util.*;
public class Card {
public enum Face { TWO, THREE, FOUR, FIVE, SIX, SEVEN, EIGHT, NINE, TEN, JACK, QUEEN, KING, ACE }
public enum Suit { HEARTS, DIAMONDS, CLUBS, SPADES }
private final Face face; private final Suit suit; private static final List<Card> theDeck = new ArrayList<Card>();
private Card(Face face, Suit suit) { this.face = face; this.suit = suit; }
private static List<Card> initializeDeck (){ for (Suit suit : Suit.values()) for (Face face : Face.values()) theDeck.add(new Card(face, suit)); return theDeck; }
public Face getFace() { return face; }
public Suit getSuit() { return suit; }
public String toString() { return face + " of " + suit; }
public static void demo(){ ArrayList<Card> aDeck = new ArrayList<Card>(); for (Suit suit : Suit.values()) for (Face face : Face.values()) aDeck.add(new Card(face, suit)); for (Card each : aDeck) System.out.println(each); }
public static void main(String [] args){ Card.demo(); List<Card> aDeck = Card.initializeDeck(); System.out.println(aDeck); }}
Save and Run it.
This is good—now we can get rid o f the demo () method, which doesn't have much to do with a Card o ther thanshowing it. It would be even better if we didn't have to call the method init ializeDeck() either—especially since it'sprivat e and we couldn't call it from outside the class anyway. But wait a minute— we want it to be private, because wedon't want people messing with our deck and its contents! Maybe it would be best then, if we could always have thedeck o f cards available from the class, through its class variable. But without the init ializeDeck() method, the arrayt heDeck would be empty. Let's add the method to the Constructor to get t heDeck filled.
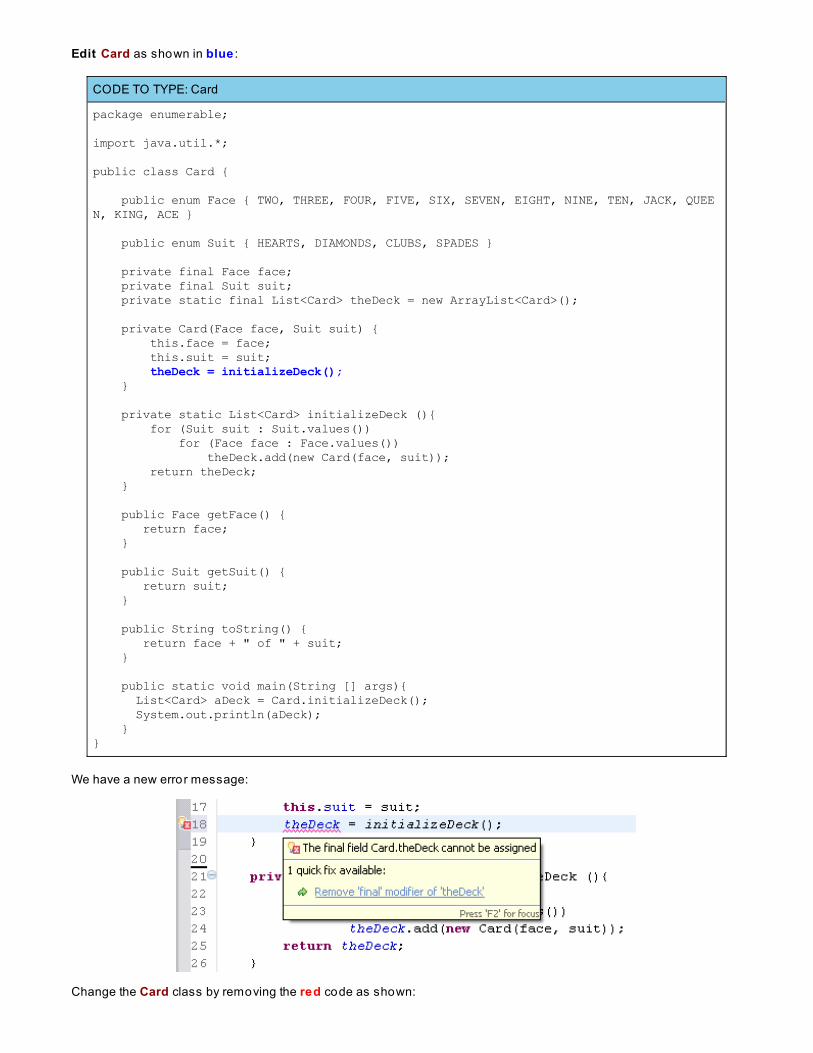
Edit Card as shown in blue :
CODE TO TYPE: Card
package enumerable;
import java.util.*;
public class Card {
public enum Face { TWO, THREE, FOUR, FIVE, SIX, SEVEN, EIGHT, NINE, TEN, JACK, QUEEN, KING, ACE }
public enum Suit { HEARTS, DIAMONDS, CLUBS, SPADES }
private final Face face; private final Suit suit; private static final List<Card> theDeck = new ArrayList<Card>();
private Card(Face face, Suit suit) { this.face = face; this.suit = suit; theDeck = initializeDeck(); }
private static List<Card> initializeDeck (){ for (Suit suit : Suit.values()) for (Face face : Face.values()) theDeck.add(new Card(face, suit)); return theDeck; }
public Face getFace() { return face; }
public Suit getSuit() { return suit; }
public String toString() { return face + " of " + suit; }
public static void main(String [] args){ List<Card> aDeck = Card.initializeDeck(); System.out.println(aDeck); }}
We have a new error message:
Change the Card class by removing the red code as shown:
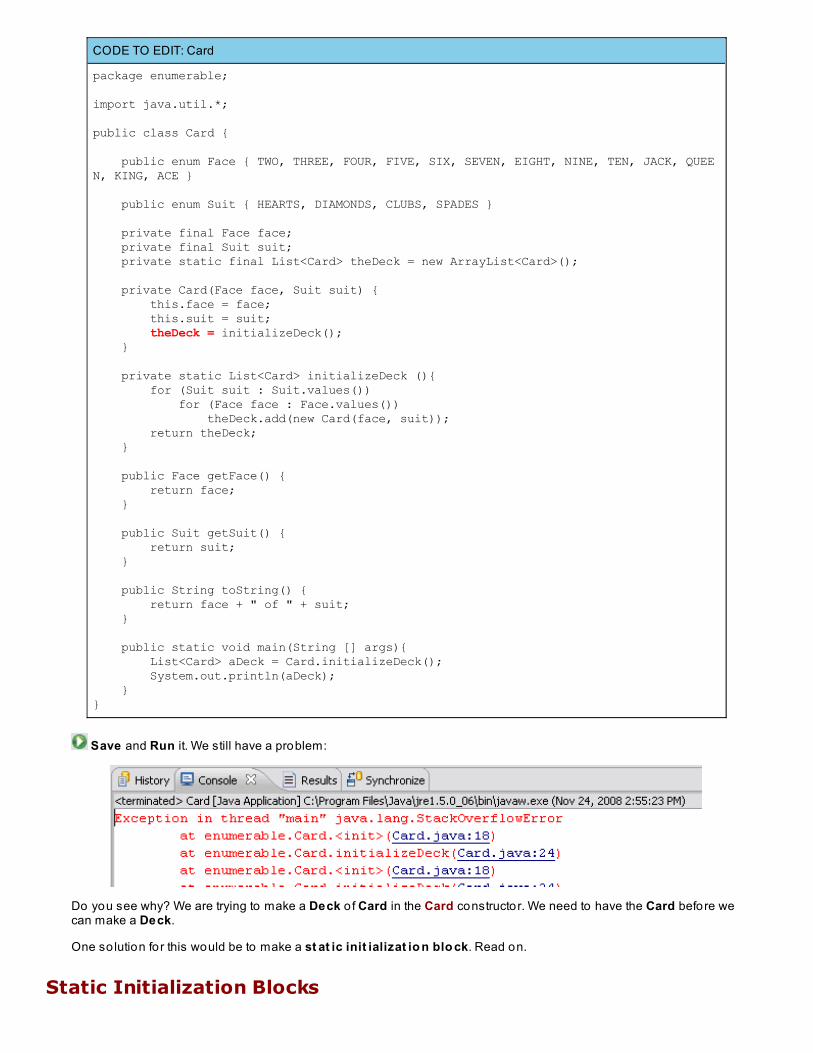
CODE TO EDIT: Card
package enumerable; import java.util.*; public class Card { public enum Face { TWO, THREE, FOUR, FIVE, SIX, SEVEN, EIGHT, NINE, TEN, JACK, QUEEN, KING, ACE } public enum Suit { HEARTS, DIAMONDS, CLUBS, SPADES } private final Face face; private final Suit suit; private static final List<Card> theDeck = new ArrayList<Card>(); private Card(Face face, Suit suit) { this.face = face; this.suit = suit; theDeck = initializeDeck(); }
private static List<Card> initializeDeck (){ for (Suit suit : Suit.values()) for (Face face : Face.values()) theDeck.add(new Card(face, suit)); return theDeck; }
public Face getFace() { return face; }
public Suit getSuit() { return suit; }
public String toString() { return face + " of " + suit; }
public static void main(String [] args){ List<Card> aDeck = Card.initializeDeck(); System.out.println(aDeck); }}
Save and Run it. We still have a problem:
Do you see why? We are trying to make a Deck o f Card in the Card constructor. We need to have the Card before wecan make a Deck.
One so lution for this would be to make a st at ic init ializat io n blo ck. Read on.
Static Initialization Blocks

A static initialization block is a normal block o f code enclosed in Curly brackets {} and preceded by the st at ickeyword. It's not a method, it's an init ializer. Its basic purpose is to perform initialization o f static variables that can'tbe accomplished in a variable declaration.
It is not "called" when an object o f the class is instantiated; it is executed the first time the class itself is referenced,similar to static variable declarations. Here's an example:
Key characteristics o f static initialization blocks:
A class can have any number o f static initialization blocks.They can appear anywhere in the class body.The runtime system guarantees that static initialization blocks are called in the order that they appear in thesource code. This is important because variables in one might rely on the o ther having been instantiated.
NoteInitializing the class is not the same as instantiating an object. Initializing the class happens only once perclass per classloader. So static initializers are run once per class, when the class is loaded, whichoccurs the first time your code references it.
Edit Card as shown. Add the code in blue and remove the code in red:
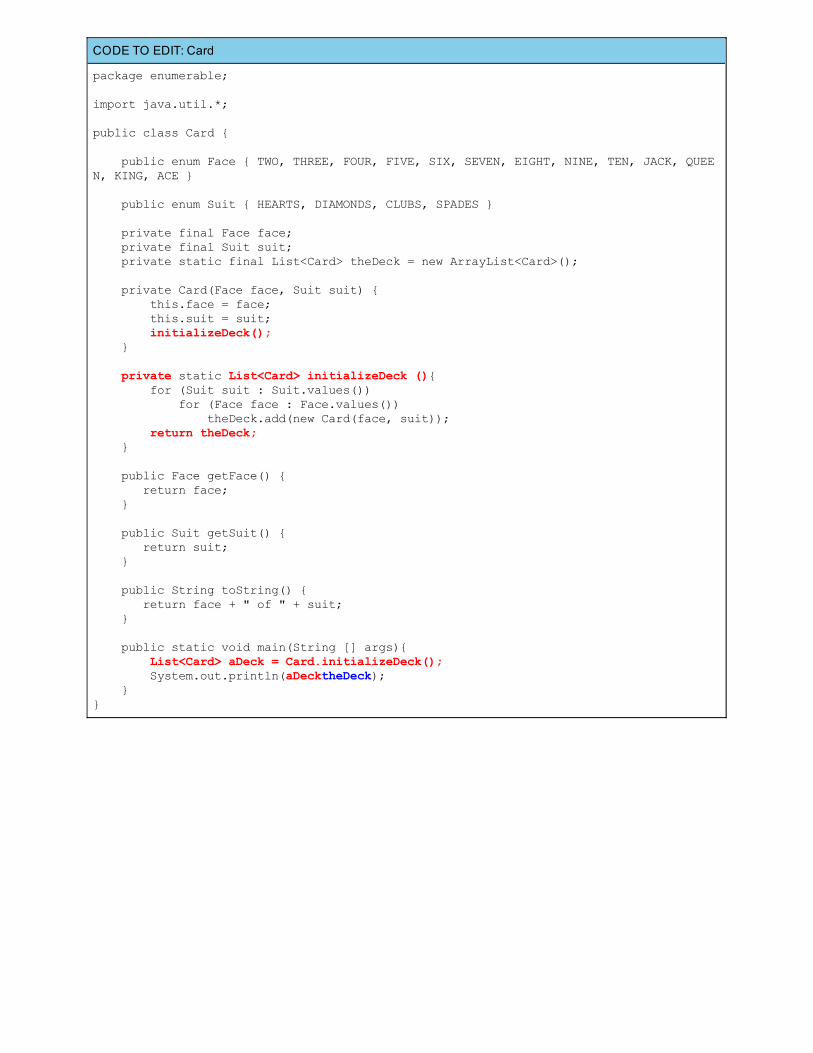
CODE TO EDIT: Card
package enumerable;
import java.util.*;
public class Card {
public enum Face { TWO, THREE, FOUR, FIVE, SIX, SEVEN, EIGHT, NINE, TEN, JACK, QUEEN, KING, ACE }
public enum Suit { HEARTS, DIAMONDS, CLUBS, SPADES }
private final Face face; private final Suit suit; private static final List<Card> theDeck = new ArrayList<Card>();
private Card(Face face, Suit suit) { this.face = face; this.suit = suit; initializeDeck(); } private static List<Card> initializeDeck (){ for (Suit suit : Suit.values()) for (Face face : Face.values()) theDeck.add(new Card(face, suit)); return theDeck; }
public Face getFace() { return face; }
public Suit getSuit() { return suit; }
public String toString() { return face + " of " + suit; }
public static void main(String [] args){ List<Card> aDeck = Card.initializeDeck(); System.out.println(aDecktheDeck); }}
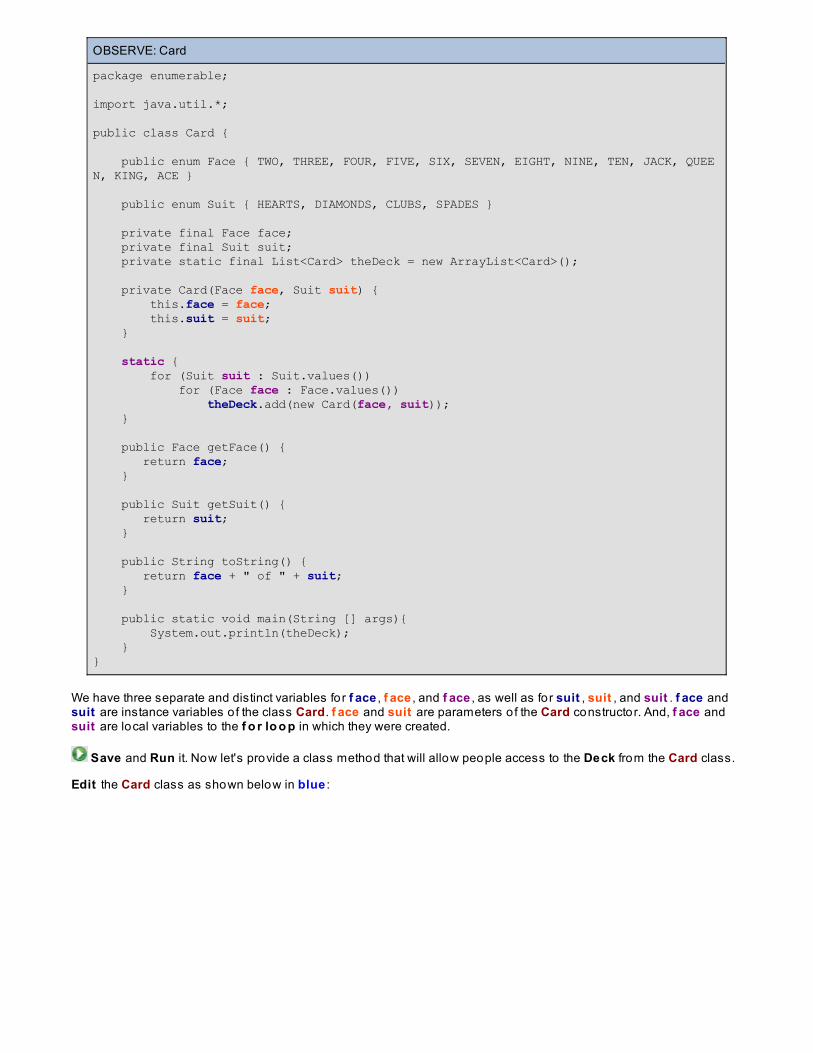
OBSERVE: Card
package enumerable;
import java.util.*;
public class Card {
public enum Face { TWO, THREE, FOUR, FIVE, SIX, SEVEN, EIGHT, NINE, TEN, JACK, QUEEN, KING, ACE }
public enum Suit { HEARTS, DIAMONDS, CLUBS, SPADES }
private final Face face; private final Suit suit; private static final List<Card> theDeck = new ArrayList<Card>();
private Card(Face face, Suit suit) { this.face = face; this.suit = suit; } static { for (Suit suit : Suit.values()) for (Face face : Face.values()) theDeck.add(new Card(face, suit)); }
public Face getFace() { return face; }
public Suit getSuit() { return suit; }
public String toString() { return face + " of " + suit; }
public static void main(String [] args){ System.out.println(theDeck); }}
We have three separate and distinct variables for f ace , f ace , and f ace , as well as for suit , suit , and suit . f ace andsuit are instance variables o f the class Card. f ace and suit are parameters o f the Card constructor. And, f ace andsuit are local variables to the f o r lo o p in which they were created.
Save and Run it. Now let's provide a class method that will allow people access to the Deck from the Card class.
Edit the Card class as shown below in blue :
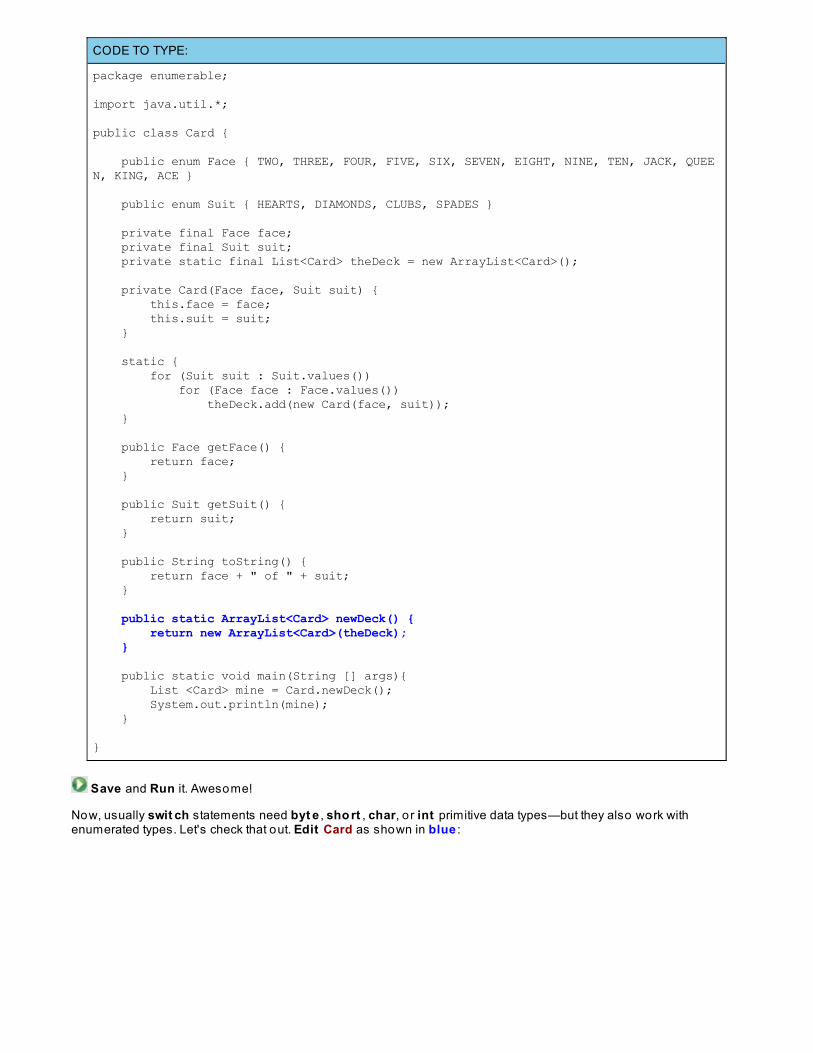
CODE TO TYPE:
package enumerable; import java.util.*; public class Card { public enum Face { TWO, THREE, FOUR, FIVE, SIX, SEVEN, EIGHT, NINE, TEN, JACK, QUEEN, KING, ACE } public enum Suit { HEARTS, DIAMONDS, CLUBS, SPADES } private final Face face; private final Suit suit; private static final List<Card> theDeck = new ArrayList<Card>(); private Card(Face face, Suit suit) { this.face = face; this.suit = suit; } static { for (Suit suit : Suit.values()) for (Face face : Face.values()) theDeck.add(new Card(face, suit)); } public Face getFace() { return face; } public Suit getSuit() { return suit; } public String toString() { return face + " of " + suit; } public static ArrayList<Card> newDeck() { return new ArrayList<Card>(theDeck); } public static void main(String [] args){ List <Card> mine = Card.newDeck(); System.out.println(mine); } }
Save and Run it. Awesome!
Now, usually swit ch statements need byt e , sho rt , char, o r int primitive data types—but they also work withenumerated types. Let's check that out. Edit Card as shown in blue :
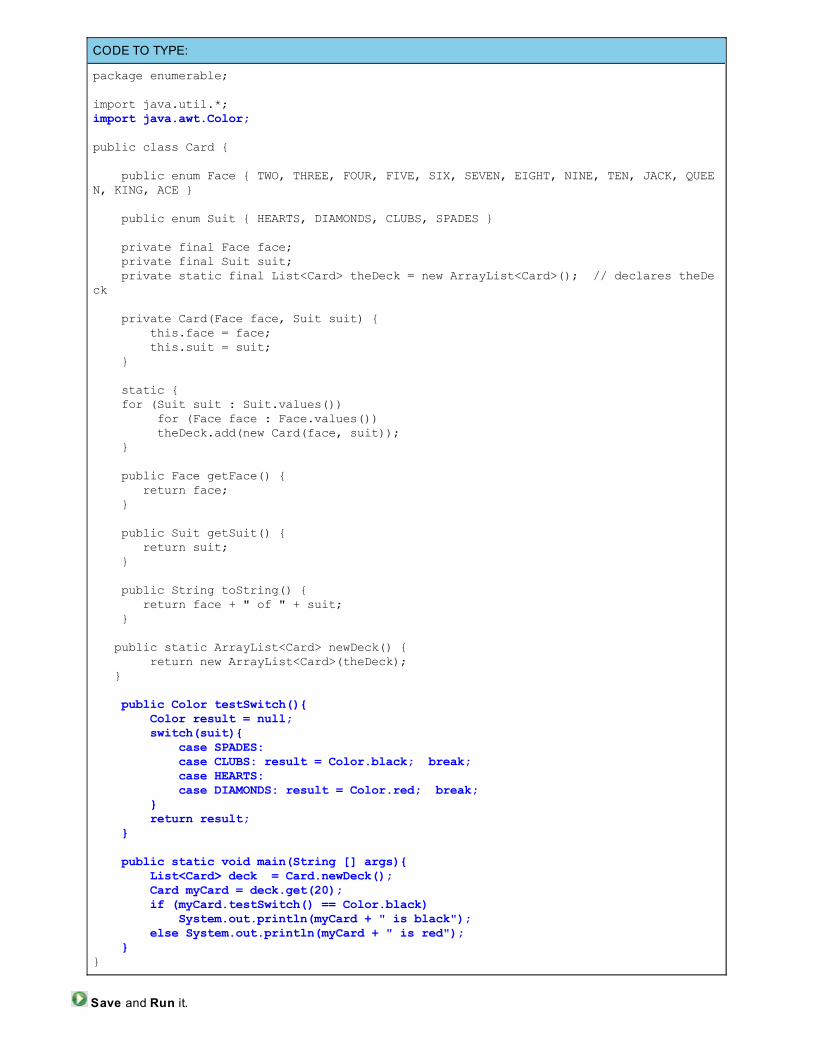
CODE TO TYPE:
package enumerable;
import java.util.*;import java.awt.Color;
public class Card {
public enum Face { TWO, THREE, FOUR, FIVE, SIX, SEVEN, EIGHT, NINE, TEN, JACK, QUEEN, KING, ACE }
public enum Suit { HEARTS, DIAMONDS, CLUBS, SPADES }
private final Face face; private final Suit suit; private static final List<Card> theDeck = new ArrayList<Card>(); // declares theDeck
private Card(Face face, Suit suit) { this.face = face; this.suit = suit; }
static { for (Suit suit : Suit.values()) for (Face face : Face.values()) theDeck.add(new Card(face, suit)); }
public Face getFace() { return face; }
public Suit getSuit() { return suit; }
public String toString() { return face + " of " + suit; }
public static ArrayList<Card> newDeck() { return new ArrayList<Card>(theDeck); }
public Color testSwitch(){ Color result = null; switch(suit){ case SPADES: case CLUBS: result = Color.black; break; case HEARTS: case DIAMONDS: result = Color.red; break; } return result; }
public static void main(String [] args){ List<Card> deck = Card.newDeck(); Card myCard = deck.get(20); if (myCard.testSwitch() == Color.black) System.out.println(myCard + " is black"); else System.out.println(myCard + " is red"); }}
Save and Run it.

You may wonder why we had the t est Swit ch() method return a Co lo r, rather than a St ring, which would haveenabled us to say "NINE of DIAMONDS is red" and thereby avo id using the if statement. You'll understand the reasonbehind that cho ice when you get busy with the pro ject fo r this lesson.
A Bit More About EnumEnumerations can be declared as their own class (enum ), but they can also be declared within classes and interfacesas well (as we saw with the Cards). In this way, they behave like inner classes.
The enum object type is limited to the explicit set o f values. That means that you can't call the constructor to create newelements for the enum. The values have an established order, defined by the order in which they are declared in thecode. The values correspond to a string name, which is the same as their declared name in the source code.
We'll apply more o f this information in the next lesson. We'll refine our skills and the capabilities o f Cards, associatingour Card class with specific card icons. See you there!
Copyright © 1998-2014 O'Reilly Media, Inc.
This work is licensed under a Creative Commons Attribution-ShareAlike 3.0 Unported License.See http://creativecommons.org/licenses/by-sa/3.0/legalcode for more information.
Image Mapping and HandlingLesson Objectives
When you complete this lesson, you will be able to :
implement double buffering.select an object to Move or Resize, then set it back to its original state.
Tying It All TogetherIn the Java first course, we provided a file to download that created your first pro ject. We'll do that again for this lessonto create your final pro ject, java3_Lesso n13. You'll find some images in the new file that you'll need to complete thelesson.
Click here to get java3_Lesson13 and the image files. It contains an src directory with a games package and agames.images fo lder to use for your work with cards. It should be listed with your o ther pro jects in the PackageExplorer view.
Open the src fo lder to see the games.images fo lder and make sure the images are there. Take a look at the Cardsclass in the src fo lder and games package. Open it in the Editor and Run it. It's the same package we had in the lastlesson. We're go ing to create additional classes and then extend their functionality.
Our main objectives for this lesson are to :
Give the Cards added functionality and view.Use Cards examples to add images, and then identify and move shapes and images within our graphicspro ject.
To reach those goals, we'll work on some examples and eventually complete our graphics drawing pro ject. So far, we have:
determined a class hierarchy for inheritance.created the abst ract class Shape .created a panel fo r user cho ices.used interfaces as listeners:
using adapter classes.using anonymous inner classes.
incorporated a Collection Framework class to ho ld different Shapes.used enum to specify Co lo r cho ices.
To complete our graphics drawing pro ject, our plan is to :
load Images.determine which Shape has been selected.use a mouse listener to move the Shapes.put all o f our pieces together.
We'll use the Cards class from the previous lesson and add images to demonstrate those last few tasks.
Getting ImagesIn this lesson we will use the initial Card class with the embedded enums from the example in Oracle's Java EnumGuide. We'll add actual images in order to see the cards. It's most convenient that someone has already created thecard images and put them on the web with permissions for us to use them!
We found some code we can use for our task in the section on moving images here (thanks, Fred Swartz). To allowyou to fo llow the use terms, we included the open source initiative notice for the MIT license. The images are GPL(GNU General Public License).
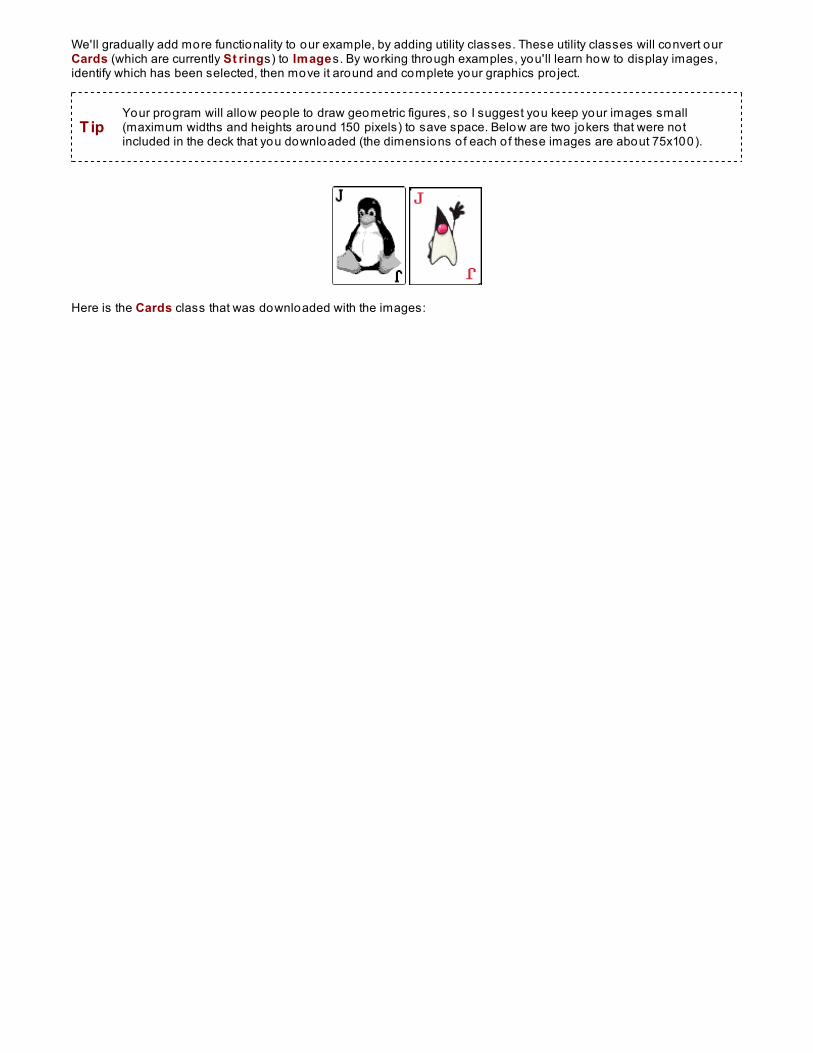
We'll gradually add more functionality to our example, by adding utility classes. These utility classes will convert ourCards (which are currently St rings) to Images. By working through examples, you'll learn how to display images,identify which has been selected, then move it around and complete your graphics pro ject.
TipYour program will allow people to draw geometric figures, so I suggest you keep your images small(maximum widths and heights around 150 pixels) to save space. Below are two jokers that were notincluded in the deck that you downloaded (the dimensions o f each o f these images are about 75x100).
Here is the Cards class that was downloaded with the images:
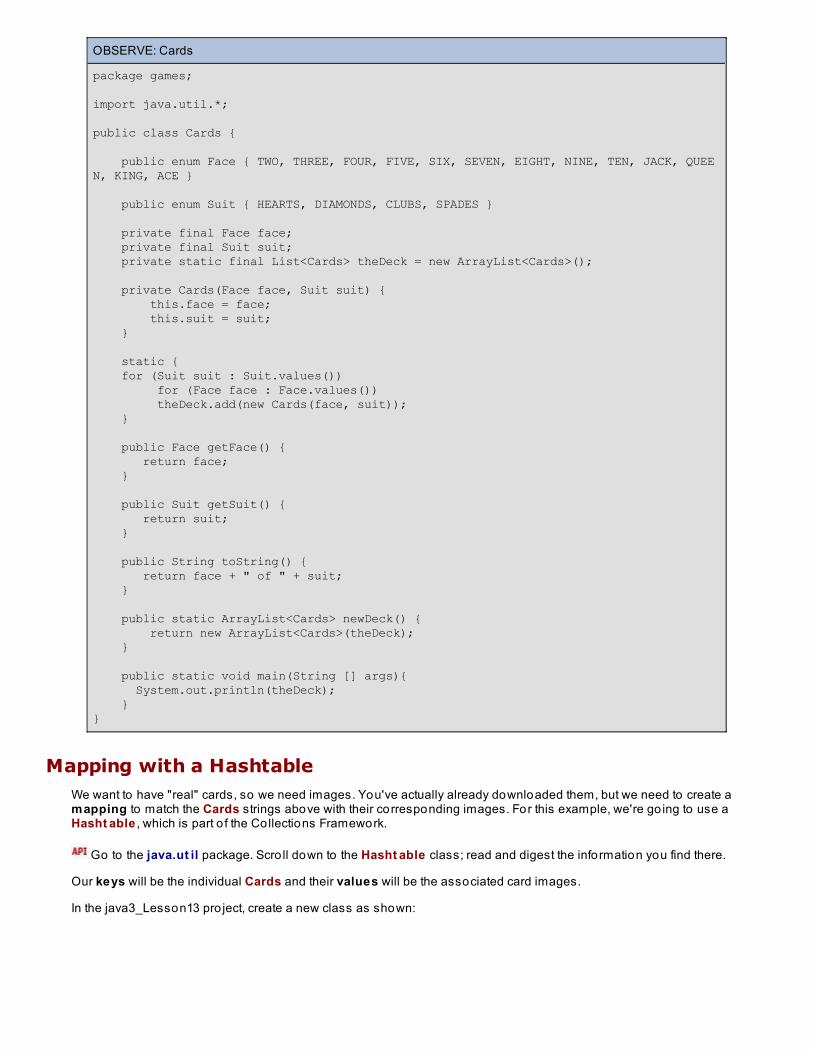
OBSERVE: Cards
package games;
import java.util.*;
public class Cards {
public enum Face { TWO, THREE, FOUR, FIVE, SIX, SEVEN, EIGHT, NINE, TEN, JACK, QUEEN, KING, ACE }
public enum Suit { HEARTS, DIAMONDS, CLUBS, SPADES }
private final Face face; private final Suit suit; private static final List<Cards> theDeck = new ArrayList<Cards>();
private Cards(Face face, Suit suit) { this.face = face; this.suit = suit; }
static { for (Suit suit : Suit.values()) for (Face face : Face.values()) theDeck.add(new Cards(face, suit)); }
public Face getFace() { return face; }
public Suit getSuit() { return suit; }
public String toString() { return face + " of " + suit; }
public static ArrayList<Cards> newDeck() { return new ArrayList<Cards>(theDeck); }
public static void main(String [] args){ System.out.println(theDeck); }}
Mapping with a HashtableWe want to have "real" cards, so we need images. You've actually already downloaded them, but we need to create amapping to match the Cards strings above with their corresponding images. For this example, we're go ing to use aHasht able , which is part o f the Collections Framework.
Go to the java.ut il package. Scro ll down to the Hasht able class; read and digest the information you find there.
Our keys will be the individual Cards and their values will be the associated card images.
In the java3_Lesson13 pro ject, create a new class as shown:
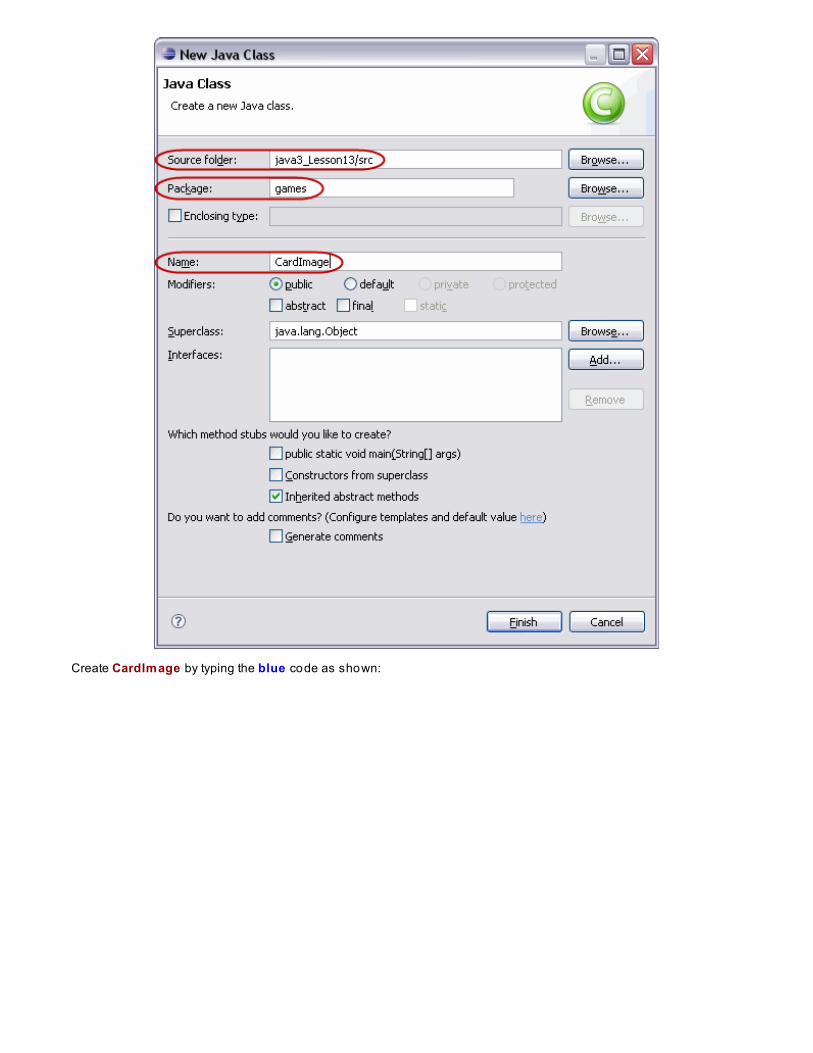
Create CardImage by typing the blue code as shown:
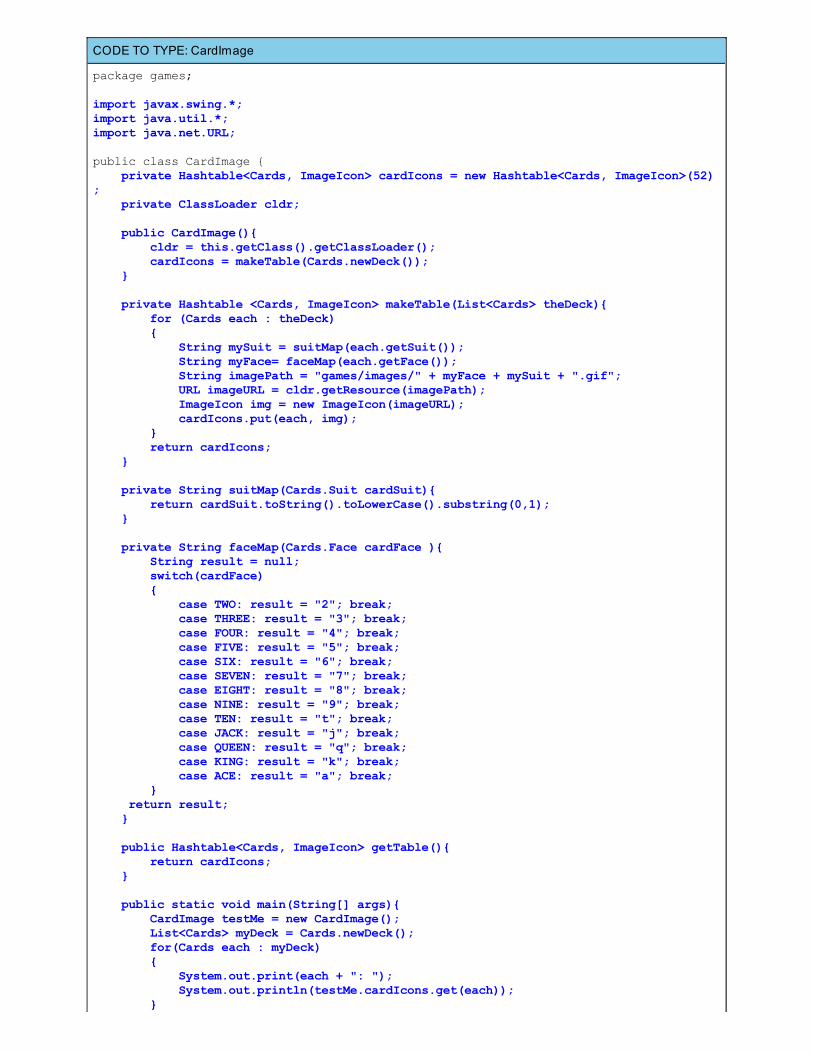
CODE TO TYPE: CardImage
package games;
import javax.swing.*;import java.util.*;import java.net.URL;
public class CardImage { private Hashtable<Cards, ImageIcon> cardIcons = new Hashtable<Cards, ImageIcon>(52); private ClassLoader cldr;
public CardImage(){ cldr = this.getClass().getClassLoader(); cardIcons = makeTable(Cards.newDeck()); }
private Hashtable <Cards, ImageIcon> makeTable(List<Cards> theDeck){ for (Cards each : theDeck) { String mySuit = suitMap(each.getSuit()); String myFace= faceMap(each.getFace()); String imagePath = "games/images/" + myFace + mySuit + ".gif"; URL imageURL = cldr.getResource(imagePath); ImageIcon img = new ImageIcon(imageURL); cardIcons.put(each, img); } return cardIcons; } private String suitMap(Cards.Suit cardSuit){ return cardSuit.toString().toLowerCase().substring(0,1); } private String faceMap(Cards.Face cardFace ){ String result = null; switch(cardFace) { case TWO: result = "2"; break; case THREE: result = "3"; break; case FOUR: result = "4"; break; case FIVE: result = "5"; break; case SIX: result = "6"; break; case SEVEN: result = "7"; break; case EIGHT: result = "8"; break; case NINE: result = "9"; break; case TEN: result = "t"; break; case JACK: result = "j"; break; case QUEEN: result = "q"; break; case KING: result = "k"; break; case ACE: result = "a"; break; } return result; }
public Hashtable<Cards, ImageIcon> getTable(){ return cardIcons; } public static void main(String[] args){ CardImage testMe = new CardImage(); List<Cards> myDeck = Cards.newDeck(); for(Cards each : myDeck) { System.out.print(each + ": "); System.out.println(testMe.cardIcons.get(each)); }
}}
Whew! That was a lo t to type. Let's break it down. (By the way, you aren't foo ling anyone, we know you're using copyand paste! Try to resist.)
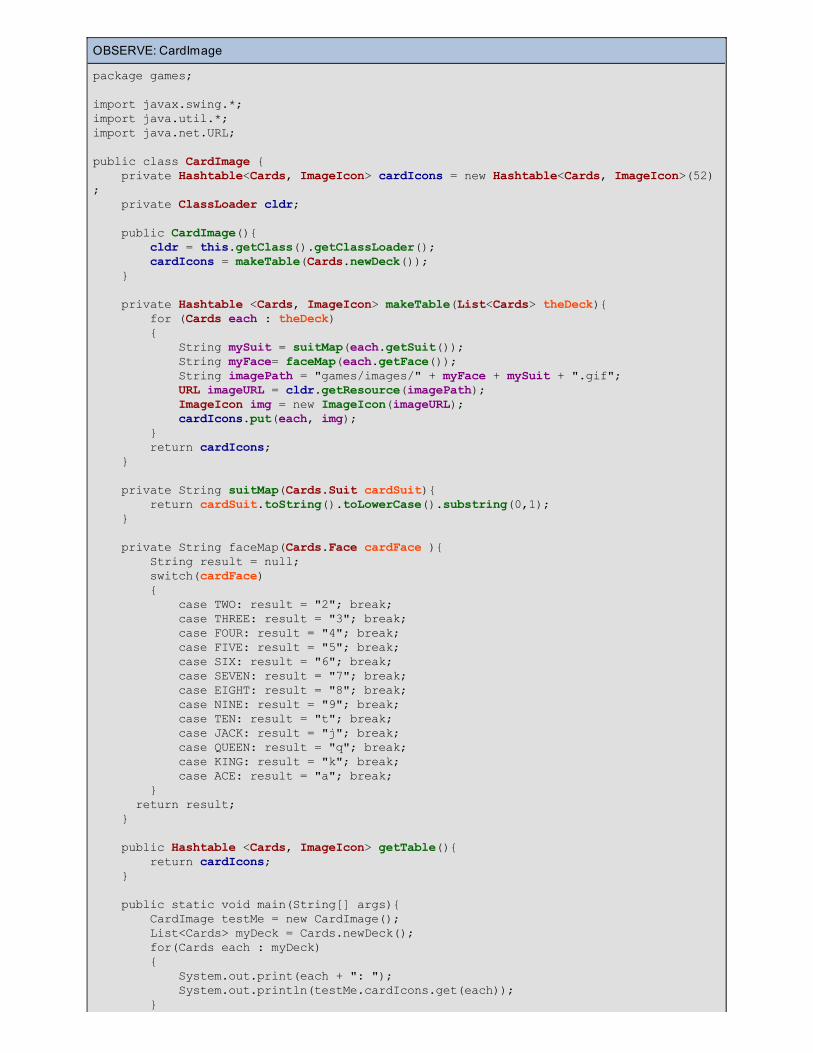
OBSERVE: CardImage
package games;
import javax.swing.*;import java.util.*;import java.net.URL;
public class CardImage { private Hashtable<Cards, ImageIcon> cardIcons = new Hashtable<Cards, ImageIcon>(52); private ClassLoader cldr;
public CardImage(){ cldr = this.getClass().getClassLoader(); cardIcons = makeTable(Cards.newDeck()); }
private Hashtable <Cards, ImageIcon> makeTable(List<Cards> theDeck){ for (Cards each : theDeck) { String mySuit = suitMap(each.getSuit()); String myFace= faceMap(each.getFace()); String imagePath = "games/images/" + myFace + mySuit + ".gif"; URL imageURL = cldr.getResource(imagePath); ImageIcon img = new ImageIcon(imageURL); cardIcons.put(each, img); } return cardIcons; } private String suitMap(Cards.Suit cardSuit){ return cardSuit.toString().toLowerCase().substring(0,1); } private String faceMap(Cards.Face cardFace ){ String result = null; switch(cardFace) { case TWO: result = "2"; break; case THREE: result = "3"; break; case FOUR: result = "4"; break; case FIVE: result = "5"; break; case SIX: result = "6"; break; case SEVEN: result = "7"; break; case EIGHT: result = "8"; break; case NINE: result = "9"; break; case TEN: result = "t"; break; case JACK: result = "j"; break; case QUEEN: result = "q"; break; case KING: result = "k"; break; case ACE: result = "a"; break; } return result; }
public Hashtable <Cards, ImageIcon> getTable(){ return cardIcons; } public static void main(String[] args){ CardImage testMe = new CardImage(); List<Cards> myDeck = Cards.newDeck(); for(Cards each : myDeck) { System.out.print(each + ": "); System.out.println(testMe.cardIcons.get(each)); }

}}
This class is represented by two instance variables. The first is cardIco ns, a Hasht able that maps Cards toImageIco ns. The second is cldr, a Classlo ader that makes it easier to load the images from the disk.
Most o f the work for this CardImage class is done in the makeT able() method, which takes a List o f Cards as aparameter. We loop through the Cards objects in the List , using the local variable each. For each Cards, we get thefirst character o f its suit (mySuit ) by calling suit Map() , and we get a one character representation o f its face (myFace )by calling f aceMap() . We use mySuit and myFace to build a path to an image file which we load into an ImageIco nnamed img. Then we add each Cards object and its associated img ImageIco n, into the cardsIco ns Hasht able .
Save it. We've included a main method so you can Run it. Check out the mapping in the conso le output. Eachcard has its proper image file.
We co uld have used generics to create a deck o f Cards o r ImageIco n cards, but instead we made sure that theCards deck always has a corresponding matching ImageIco n "deck." Now we want to create a class for Deck thatallows us to do the stuff we like to do with Decks, like shuffle and deal hands.
In java3_Lesson13, create a new class as shown:
Create Deck by typing the blue code as shown:
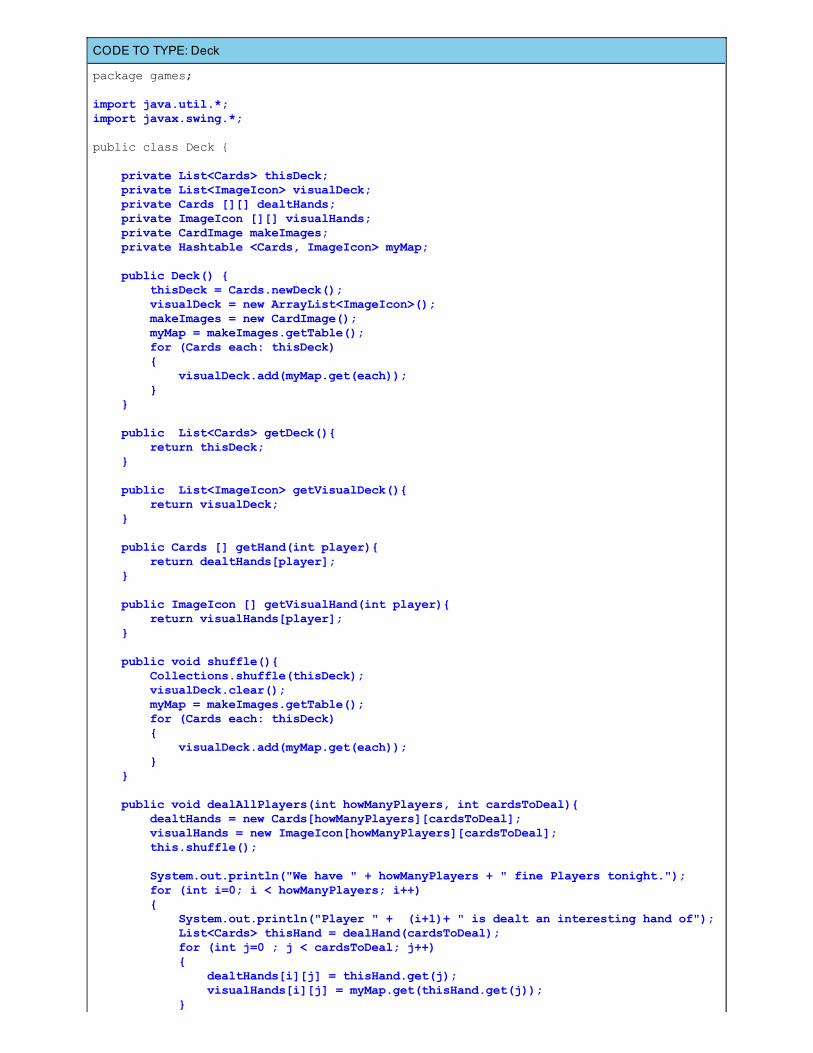
CODE TO TYPE: Deck
package games;
import java.util.*;import javax.swing.*;
public class Deck {
private List<Cards> thisDeck; private List<ImageIcon> visualDeck; private Cards [][] dealtHands; private ImageIcon [][] visualHands; private CardImage makeImages; private Hashtable <Cards, ImageIcon> myMap; public Deck() { thisDeck = Cards.newDeck(); visualDeck = new ArrayList<ImageIcon>(); makeImages = new CardImage(); myMap = makeImages.getTable(); for (Cards each: thisDeck) { visualDeck.add(myMap.get(each)); } }
public List<Cards> getDeck(){ return thisDeck; }
public List<ImageIcon> getVisualDeck(){ return visualDeck; }
public Cards [] getHand(int player){ return dealtHands[player]; }
public ImageIcon [] getVisualHand(int player){ return visualHands[player]; }
public void shuffle(){ Collections.shuffle(thisDeck); visualDeck.clear(); myMap = makeImages.getTable(); for (Cards each: thisDeck) { visualDeck.add(myMap.get(each)); } } public void dealAllPlayers(int howManyPlayers, int cardsToDeal){ dealtHands = new Cards[howManyPlayers][cardsToDeal]; visualHands = new ImageIcon[howManyPlayers][cardsToDeal]; this.shuffle();
System.out.println("We have " + howManyPlayers + " fine Players tonight."); for (int i=0; i < howManyPlayers; i++) { System.out.println("Player " + (i+1)+ " is dealt an interesting hand of"); List<Cards> thisHand = dealHand(cardsToDeal); for (int j=0 ; j < cardsToDeal; j++) { dealtHands[i][j] = thisHand.get(j); visualHands[i][j] = myMap.get(thisHand.get(j)); }
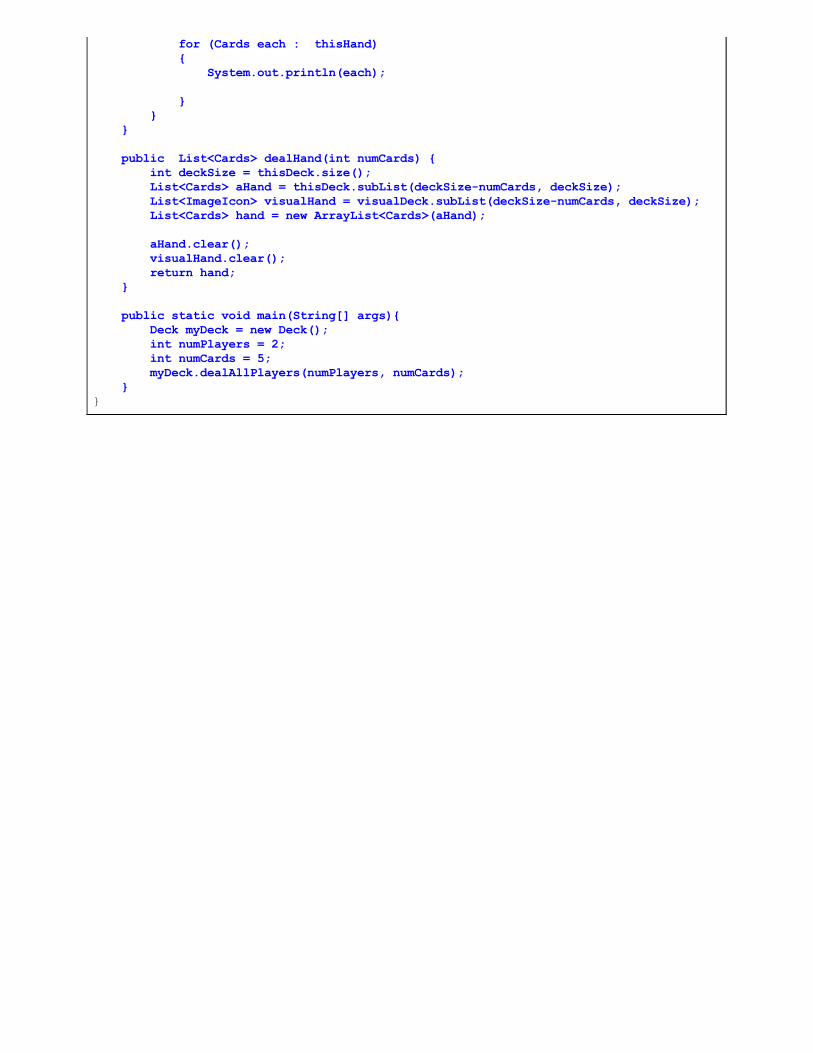
for (Cards each : thisHand) { System.out.println(each);
} } }
public List<Cards> dealHand(int numCards) { int deckSize = thisDeck.size(); List<Cards> aHand = thisDeck.subList(deckSize-numCards, deckSize); List<ImageIcon> visualHand = visualDeck.subList(deckSize-numCards, deckSize); List<Cards> hand = new ArrayList<Cards>(aHand);
aHand.clear(); visualHand.clear(); return hand; } public static void main(String[] args){ Deck myDeck = new Deck(); int numPlayers = 2; int numCards = 5; myDeck.dealAllPlayers(numPlayers, numCards); } }

OBSERVE: Deck
package games;
import java.util.*;import javax.swing.*;
public class Deck {
private List<Cards> thisDeck; private List<ImageIcon> visualDeck; private Cards [][] dealtHands; private ImageIcon [][] visualHands; private CardImage makeImages; private Hashtable <Cards, ImageIcon> myMap; public Deck() { thisDeck = Cards.newDeck(); visualDeck = new ArrayList<ImageIcon>(); makeImages = new CardImage(); myMap = makeImages.getTable(); for (Cards each: thisDeck) { visualDeck.add(myMap.get(each)); } }
public List<Cards> getDeck(){ return thisDeck; }
public List<ImageIcon> getVisualDeck(){ return visualDeck; }
public Cards [] getHand(int player){ return dealtHands[player]; }
public ImageIcon [] getVisualHand(int player){ return visualHands[player]; }
public void shuffle(){ Collections.shuffle(thisDeck); visualDeck.clear(); myMap = makeImages.getTable(); for (Cards each: thisDeck) { visualDeck.add(myMap.get(each)); } } public void dealAllPlayers(int howManyPlayers, int cardsToDeal){ dealtHands = new Cards[howManyPlayers][cardsToDeal]; visualHands = new ImageIcon[howManyPlayers][cardsToDeal]; this.shuffle();
System.out.println("We have " + howManyPlayers + " fine Players tonight."); for (int i=0; i < howManyPlayers; i++) { System.out.println("Player " + (i+1)+ " is dealt an interesting hand of"); List<Cards> thisHand = dealHand(cardsToDeal); for (int j=0 ; j < cardsToDeal; j++) { dealtHands[i][j] = thisHand.get(j); visualHands[i][j] = myMap.get(thisHand.get(j)); }
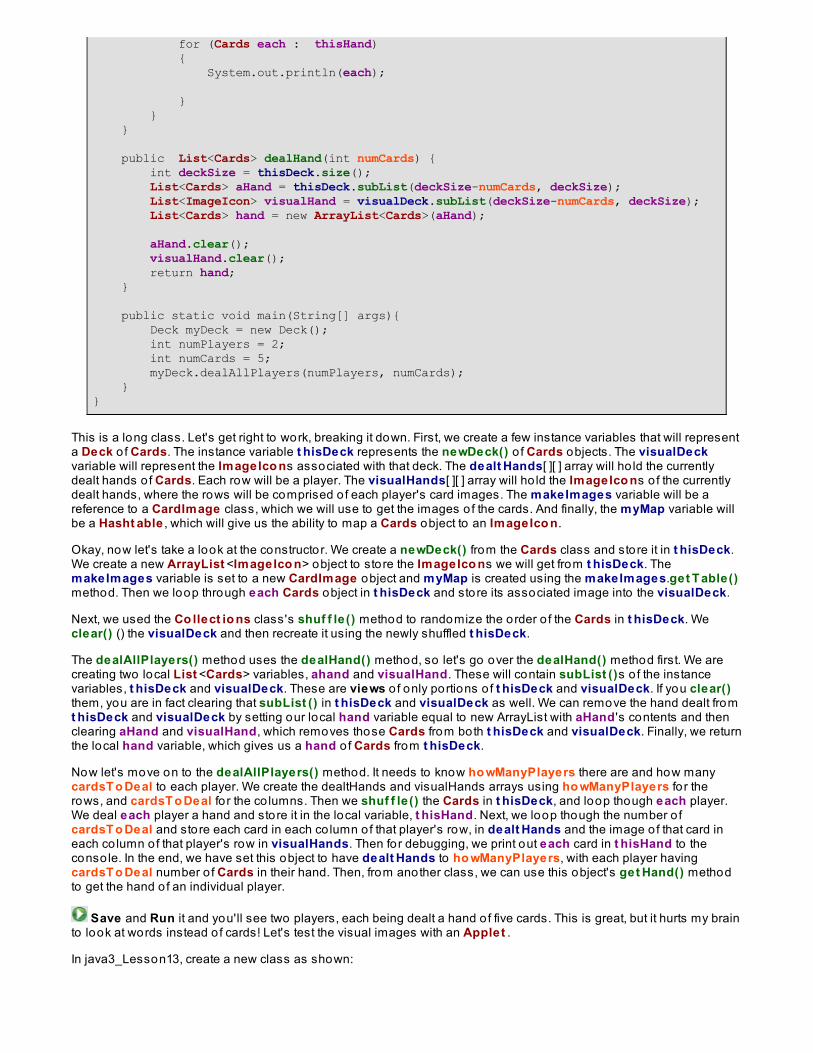
for (Cards each : thisHand) { System.out.println(each);
} } }
public List<Cards> dealHand(int numCards) { int deckSize = thisDeck.size(); List<Cards> aHand = thisDeck.subList(deckSize-numCards, deckSize); List<ImageIcon> visualHand = visualDeck.subList(deckSize-numCards, deckSize); List<Cards> hand = new ArrayList<Cards>(aHand);
aHand.clear(); visualHand.clear(); return hand; } public static void main(String[] args){ Deck myDeck = new Deck(); int numPlayers = 2; int numCards = 5; myDeck.dealAllPlayers(numPlayers, numCards); } }
This is a long class. Let's get right to work, breaking it down. First, we create a few instance variables that will representa Deck o f Cards. The instance variable t hisDeck represents the newDeck() o f Cards objects. The visualDeckvariable will represent the ImageIco ns associated with that deck. The dealt Hands[ ][ ] array will ho ld the currentlydealt hands o f Cards. Each row will be a player. The visualHands[ ][ ] array will ho ld the ImageIco ns o f the currentlydealt hands, where the rows will be comprised o f each player's card images. The makeImages variable will be areference to a CardImage class, which we will use to get the images o f the cards. And finally, the myMap variable willbe a Hasht able , which will give us the ability to map a Cards object to an ImageIco n.
Okay, now let's take a look at the constructor. We create a newDeck() from the Cards class and store it in t hisDeck.We create a new ArrayList <ImageIco n> object to store the ImageIco ns we will get from t hisDeck. ThemakeImages variable is set to a new CardImage object and myMap is created using the makeImages.get T able()method. Then we loop through each Cards object in t hisDeck and store its associated image into the visualDeck.
Next, we used the Co llect io ns class's shuf f le() method to randomize the order o f the Cards in t hisDeck. Weclear() () the visualDeck and then recreate it using the newly shuffled t hisDeck.
The dealAllPlayers() method uses the dealHand() method, so let's go over the dealHand() method first. We arecreating two local List <Cards> variables, ahand and visualHand. These will contain subList ()s o f the instancevariables, t hisDeck and visualDeck. These are views o f only portions o f t hisDeck and visualDeck. If you clear()them, you are in fact clearing that subList () in t hisDeck and visualDeck as well. We can remove the hand dealt fromt hisDeck and visualDeck by setting our local hand variable equal to new ArrayList with aHand 's contents and thenclearing aHand and visualHand, which removes those Cards from both t hisDeck and visualDeck. Finally, we returnthe local hand variable, which gives us a hand o f Cards from t hisDeck.
Now let's move on to the dealAllPlayers() method. It needs to know ho wManyPlayers there are and how manycardsT o Deal to each player. We create the dealtHands and visualHands arrays using ho wManyPlayers fo r therows, and cardsT o Deal fo r the co lumns. Then we shuf f le() the Cards in t hisDeck, and loop though each player.We deal each player a hand and store it in the local variable, t hisHand. Next, we loop though the number o fcardsT o Deal and store each card in each co lumn of that player's row, in dealt Hands and the image o f that card ineach co lumn of that player's row in visualHands. Then for debugging, we print out each card in t hisHand to theconso le. In the end, we have set this object to have dealt Hands to ho wManyPlayers, with each player havingcardsT o Deal number o f Cards in their hand. Then, from another class, we can use this object's get Hand() methodto get the hand o f an individual player.
Save and Run it and you'll see two players, each being dealt a hand o f five cards. This is great, but it hurts my brainto look at words instead o f cards! Let's test the visual images with an Applet .
In java3_Lesson13, create a new class as shown:
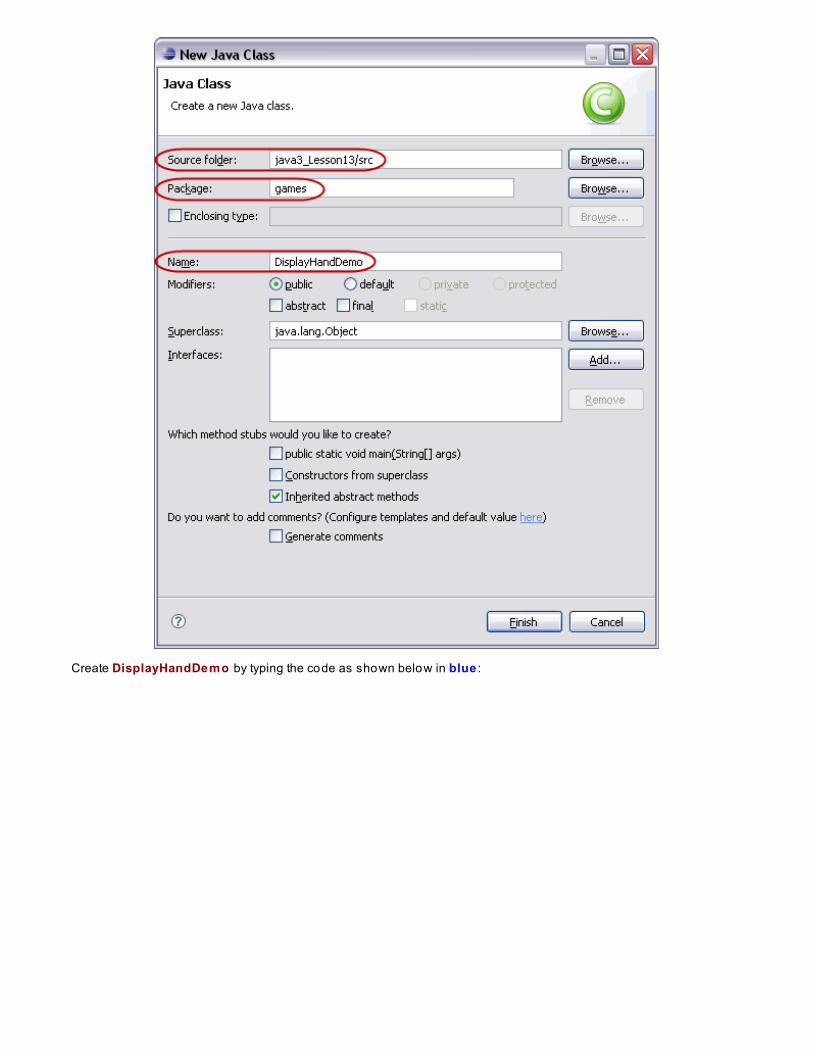
Create DisplayHandDemo by typing the code as shown below in blue :
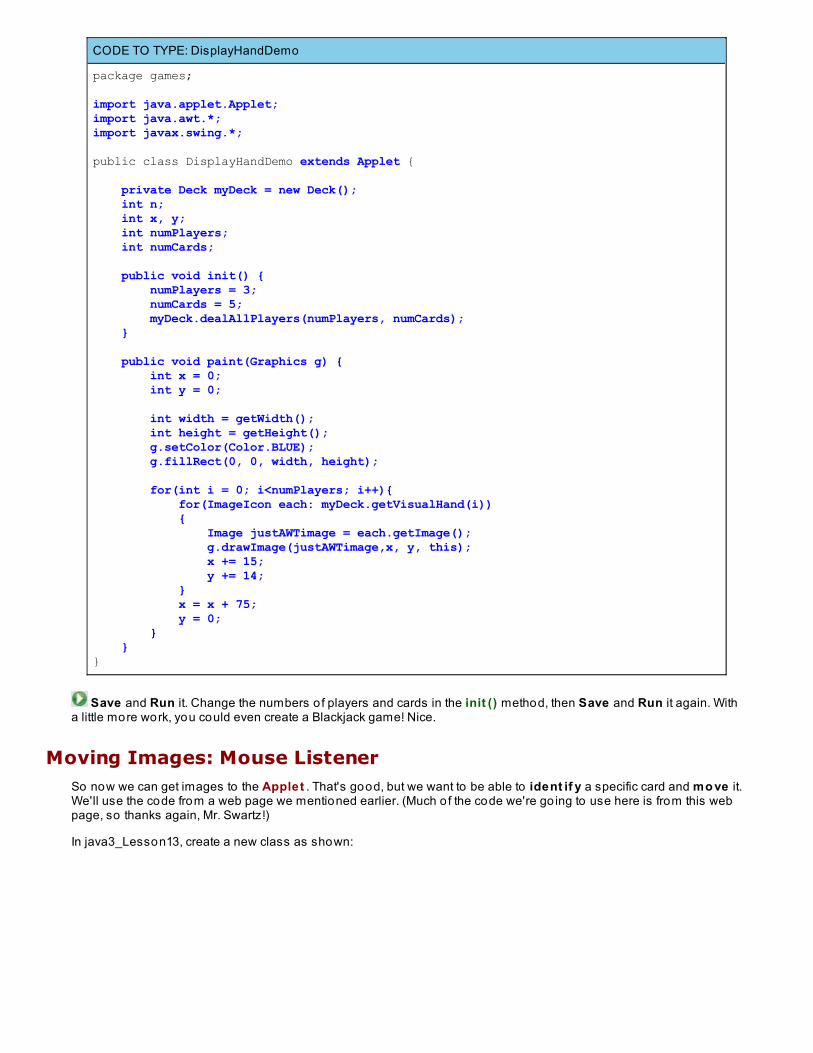
CODE TO TYPE: DisplayHandDemo
package games;
import java.applet.Applet;import java.awt.*;import javax.swing.*;
public class DisplayHandDemo extends Applet { private Deck myDeck = new Deck(); int n; int x, y; int numPlayers; int numCards;
public void init() { numPlayers = 3; numCards = 5; myDeck.dealAllPlayers(numPlayers, numCards); } public void paint(Graphics g) { int x = 0; int y = 0;
int width = getWidth(); int height = getHeight(); g.setColor(Color.BLUE); g.fillRect(0, 0, width, height);
for(int i = 0; i<numPlayers; i++){ for(ImageIcon each: myDeck.getVisualHand(i)) { Image justAWTimage = each.getImage(); g.drawImage(justAWTimage,x, y, this); x += 15; y += 14; } x = x + 75; y = 0; } }}
Save and Run it. Change the numbers o f players and cards in the init () method, then Save and Run it again. Witha little more work, you could even create a Blackjack game! Nice.
Moving Images: Mouse ListenerSo now we can get images to the Applet . That's good, but we want to be able to ident if y a specific card and mo ve it.We'll use the code from a web page we mentioned earlier. (Much o f the code we're go ing to use here is from this webpage, so thanks again, Mr. Swartz!)
In java3_Lesson13, create a new class as shown:
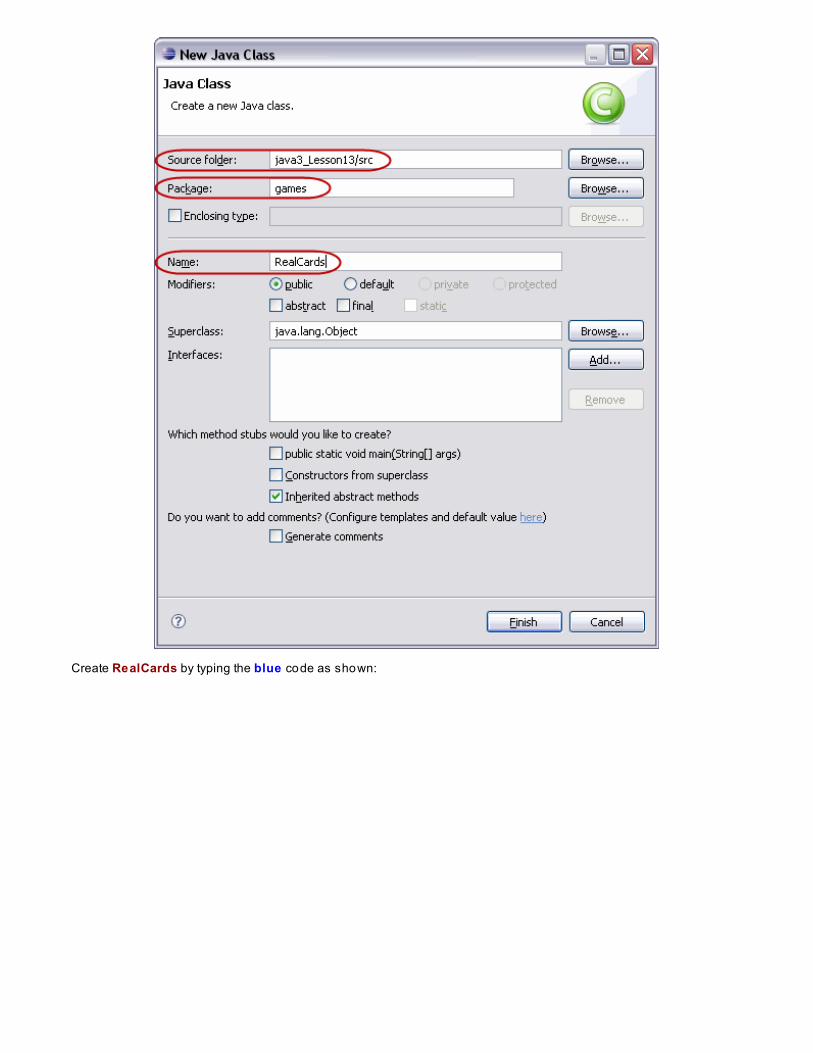
Create RealCards by typing the blue code as shown:
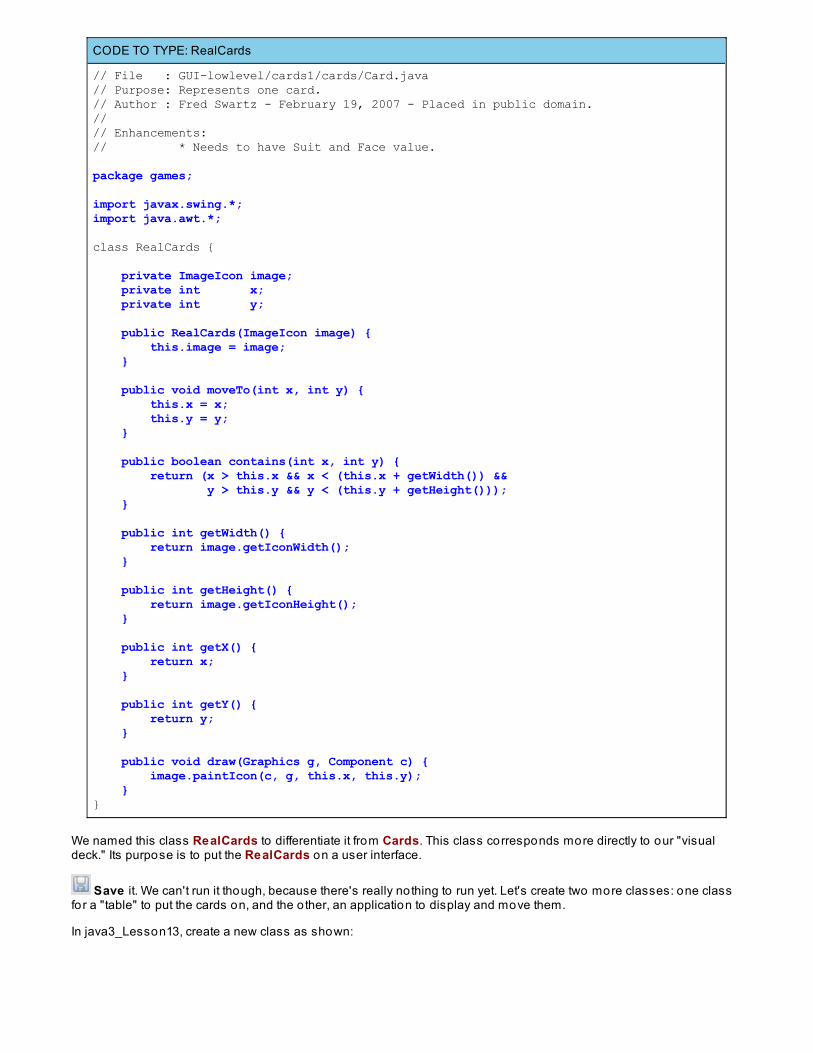
CODE TO TYPE: RealCards
// File : GUI-lowlevel/cards1/cards/Card.java// Purpose: Represents one card.// Author : Fred Swartz - February 19, 2007 - Placed in public domain.//// Enhancements:// * Needs to have Suit and Face value.
package games;
import javax.swing.*;import java.awt.*;
class RealCards {
private ImageIcon image; private int x; private int y; public RealCards(ImageIcon image) { this.image = image; } public void moveTo(int x, int y) { this.x = x; this.y = y; } public boolean contains(int x, int y) { return (x > this.x && x < (this.x + getWidth()) && y > this.y && y < (this.y + getHeight())); } public int getWidth() { return image.getIconWidth(); } public int getHeight() { return image.getIconHeight(); } public int getX() { return x; } public int getY() { return y; } public void draw(Graphics g, Component c) { image.paintIcon(c, g, this.x, this.y); }}
We named this class RealCards to differentiate it from Cards. This class corresponds more directly to our "visualdeck." Its purpose is to put the RealCards on a user interface.
Save it. We can't run it though, because there's really nothing to run yet. Let's create two more classes: one classfor a "table" to put the cards on, and the o ther, an application to display and move them.
In java3_Lesson13, create a new class as shown:
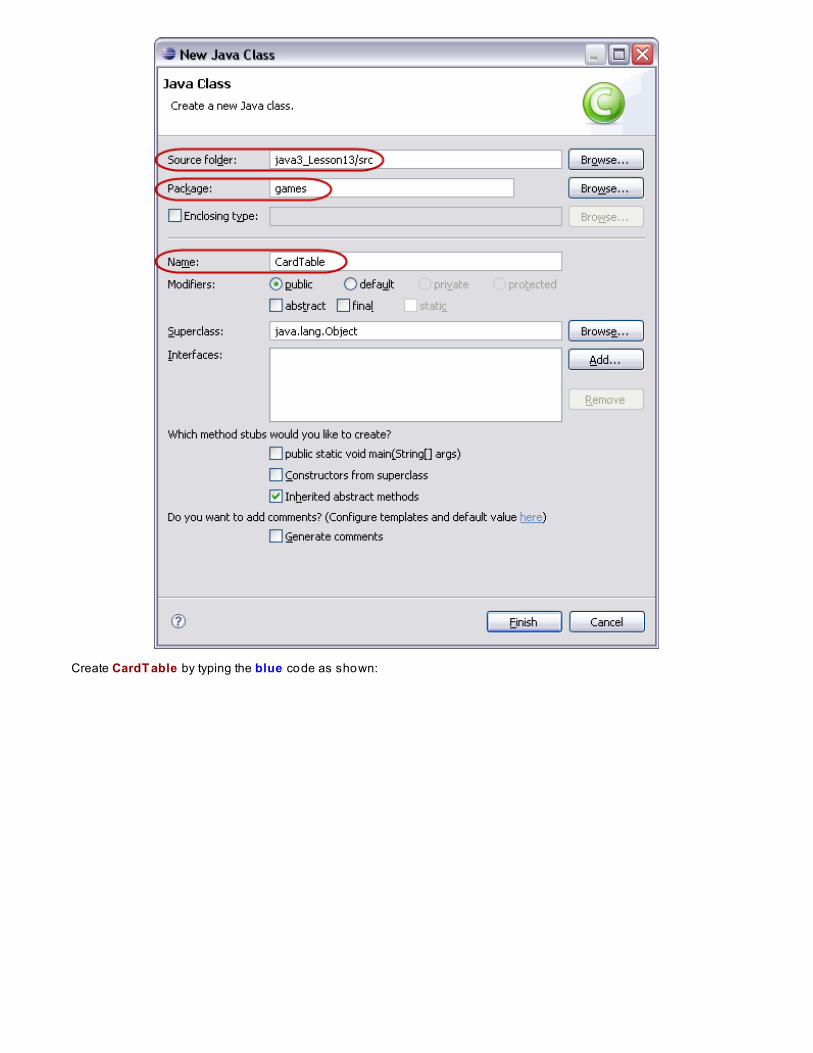
Create CardT able by typing the blue code as shown:
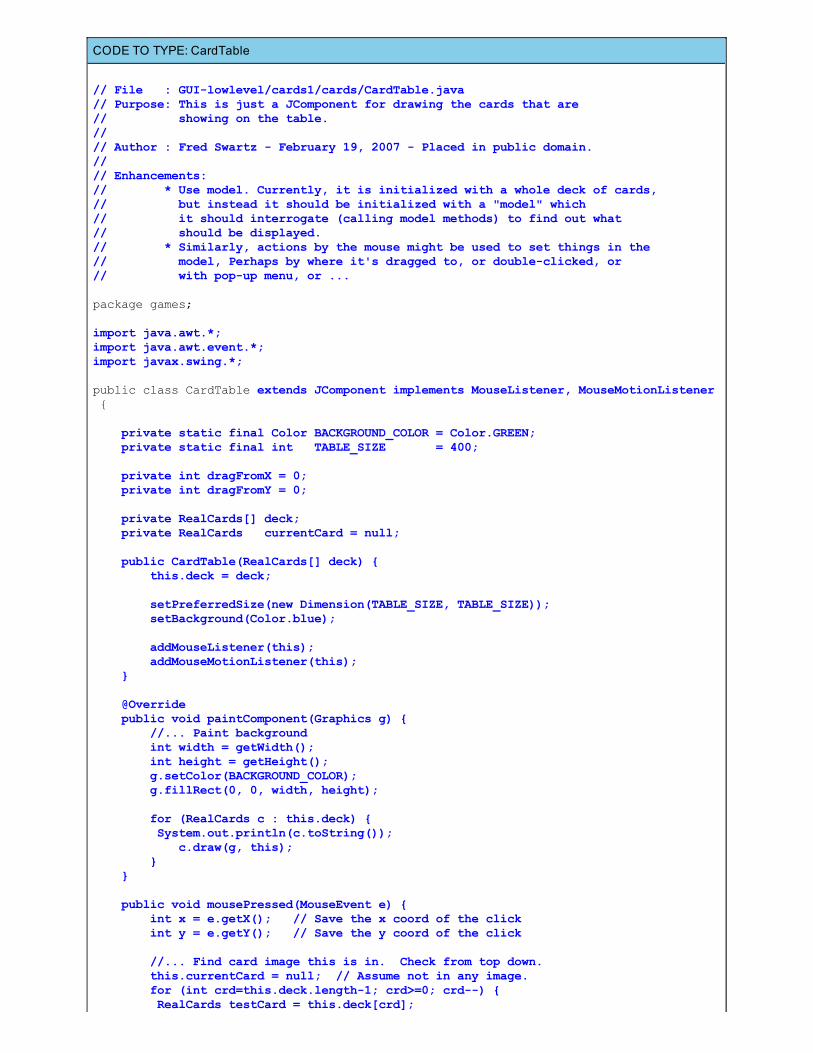
CODE TO TYPE: CardTable
// File : GUI-lowlevel/cards1/cards/CardTable.java// Purpose: This is just a JComponent for drawing the cards that are// showing on the table.//// Author : Fred Swartz - February 19, 2007 - Placed in public domain.//// Enhancements:// * Use model. Currently, it is initialized with a whole deck of cards,// but instead it should be initialized with a "model" which// it should interrogate (calling model methods) to find out what// should be displayed.// * Similarly, actions by the mouse might be used to set things in the// model, Perhaps by where it's dragged to, or double-clicked, or// with pop-up menu, or ...
package games;
import java.awt.*;import java.awt.event.*;import javax.swing.*;
public class CardTable extends JComponent implements MouseListener, MouseMotionListener { private static final Color BACKGROUND_COLOR = Color.GREEN; private static final int TABLE_SIZE = 400;
private int dragFromX = 0; private int dragFromY = 0; private RealCards[] deck; private RealCards currentCard = null; public CardTable(RealCards[] deck) { this.deck = deck; setPreferredSize(new Dimension(TABLE_SIZE, TABLE_SIZE)); setBackground(Color.blue); addMouseListener(this); addMouseMotionListener(this); } @Override public void paintComponent(Graphics g) { //... Paint background int width = getWidth(); int height = getHeight(); g.setColor(BACKGROUND_COLOR); g.fillRect(0, 0, width, height); for (RealCards c : this.deck) { System.out.println(c.toString()); c.draw(g, this); } } public void mousePressed(MouseEvent e) { int x = e.getX(); // Save the x coord of the click int y = e.getY(); // Save the y coord of the click //... Find card image this is in. Check from top down. this.currentCard = null; // Assume not in any image. for (int crd=this.deck.length-1; crd>=0; crd--) { RealCards testCard = this.deck[crd];
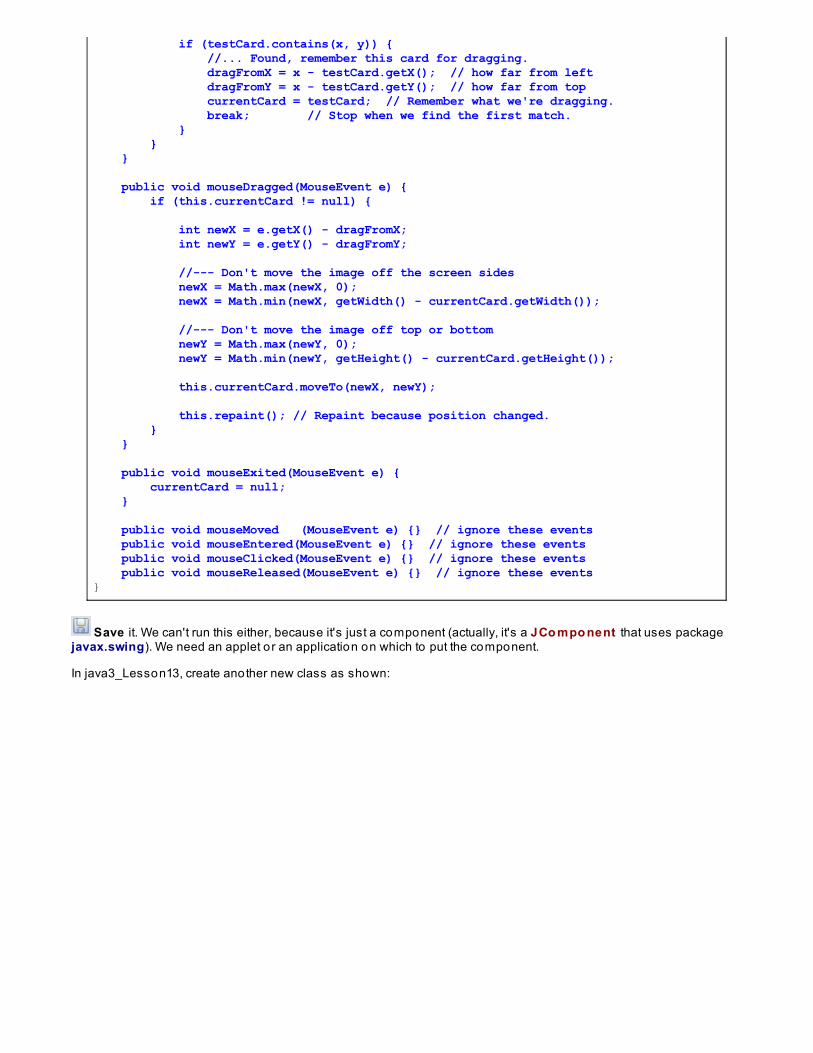
if (testCard.contains(x, y)) { //... Found, remember this card for dragging. dragFromX = x - testCard.getX(); // how far from left dragFromY = x - testCard.getY(); // how far from top currentCard = testCard; // Remember what we're dragging. break; // Stop when we find the first match. } } } public void mouseDragged(MouseEvent e) { if (this.currentCard != null) { int newX = e.getX() - dragFromX; int newY = e.getY() - dragFromY; //--- Don't move the image off the screen sides newX = Math.max(newX, 0); newX = Math.min(newX, getWidth() - currentCard.getWidth()); //--- Don't move the image off top or bottom newY = Math.max(newY, 0); newY = Math.min(newY, getHeight() - currentCard.getHeight()); this.currentCard.moveTo(newX, newY); this.repaint(); // Repaint because position changed. } } public void mouseExited(MouseEvent e) { currentCard = null; } public void mouseMoved (MouseEvent e) {} // ignore these events public void mouseEntered(MouseEvent e) {} // ignore these events public void mouseClicked(MouseEvent e) {} // ignore these events public void mouseReleased(MouseEvent e) {} // ignore these events}
Save it. We can't run this either, because it's just a component (actually, it's a JCo mpo nent that uses packagejavax.swing). We need an applet or an application on which to put the component.
In java3_Lesson13, create another new class as shown:
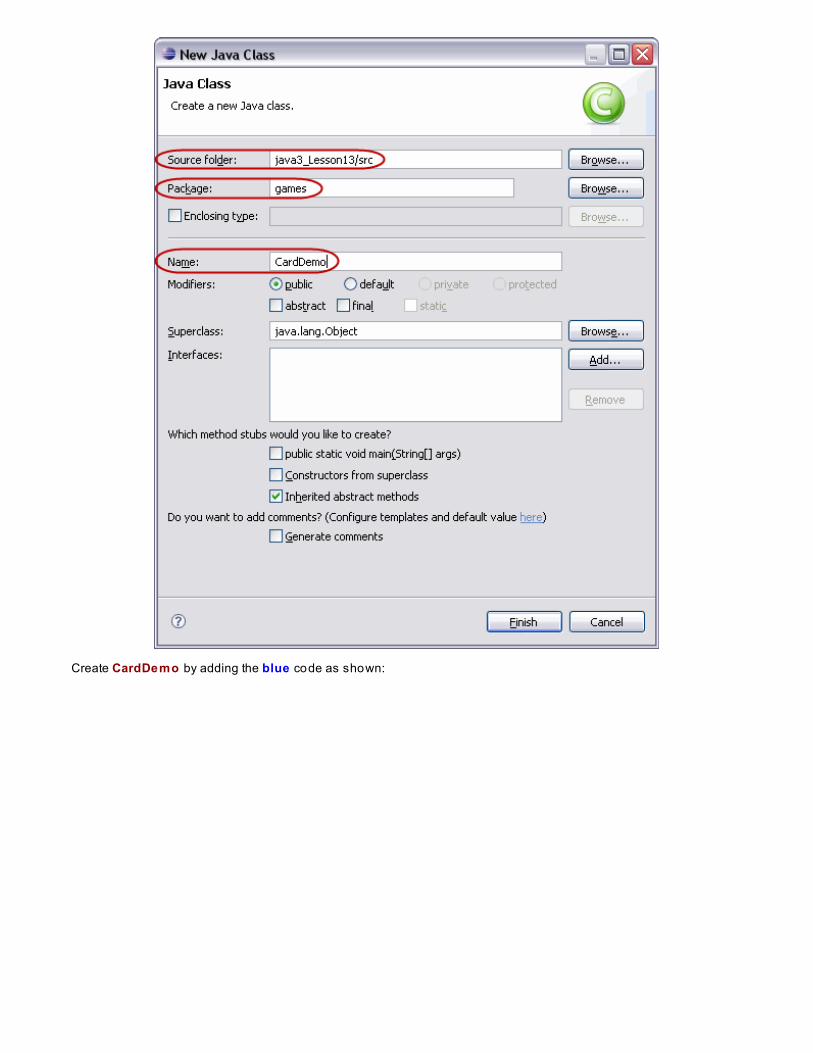
Create CardDemo by adding the blue code as shown:
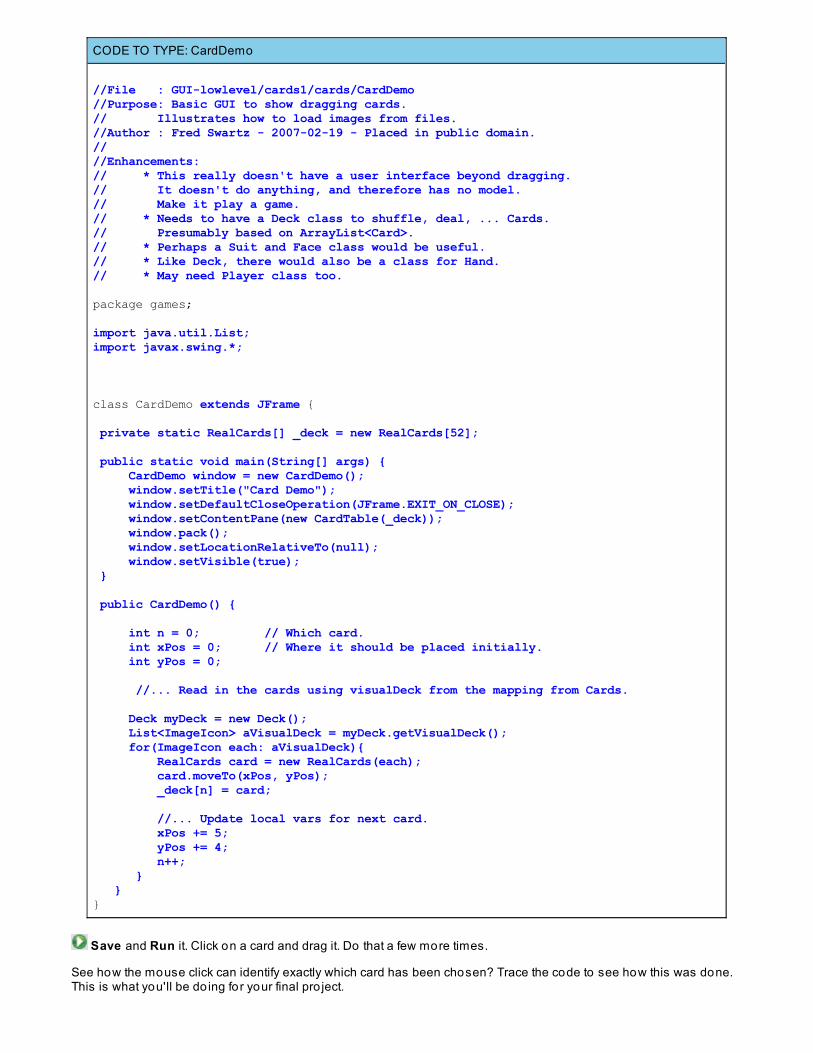
CODE TO TYPE: CardDemo
//File : GUI-lowlevel/cards1/cards/CardDemo//Purpose: Basic GUI to show dragging cards.// Illustrates how to load images from files.//Author : Fred Swartz - 2007-02-19 - Placed in public domain.////Enhancements:// * This really doesn't have a user interface beyond dragging.// It doesn't do anything, and therefore has no model.// Make it play a game.// * Needs to have a Deck class to shuffle, deal, ... Cards.// Presumably based on ArrayList<Card>.// * Perhaps a Suit and Face class would be useful.// * Like Deck, there would also be a class for Hand.// * May need Player class too.
package games;
import java.util.List;import javax.swing.*;
class CardDemo extends JFrame { private static RealCards[] _deck = new RealCards[52]; public static void main(String[] args) { CardDemo window = new CardDemo(); window.setTitle("Card Demo"); window.setDefaultCloseOperation(JFrame.EXIT_ON_CLOSE); window.setContentPane(new CardTable(_deck)); window.pack(); window.setLocationRelativeTo(null); window.setVisible(true); } public CardDemo() { int n = 0; // Which card. int xPos = 0; // Where it should be placed initially. int yPos = 0; //... Read in the cards using visualDeck from the mapping from Cards.
Deck myDeck = new Deck(); List<ImageIcon> aVisualDeck = myDeck.getVisualDeck(); for(ImageIcon each: aVisualDeck){ RealCards card = new RealCards(each); card.moveTo(xPos, yPos); _deck[n] = card; //... Update local vars for next card. xPos += 5; yPos += 4; n++; } }}
Save and Run it. Click on a card and drag it. Do that a few more times.
See how the mouse click can identify exactly which card has been chosen? Trace the code to see how this was done.This is what you'll be do ing for your final pro ject.
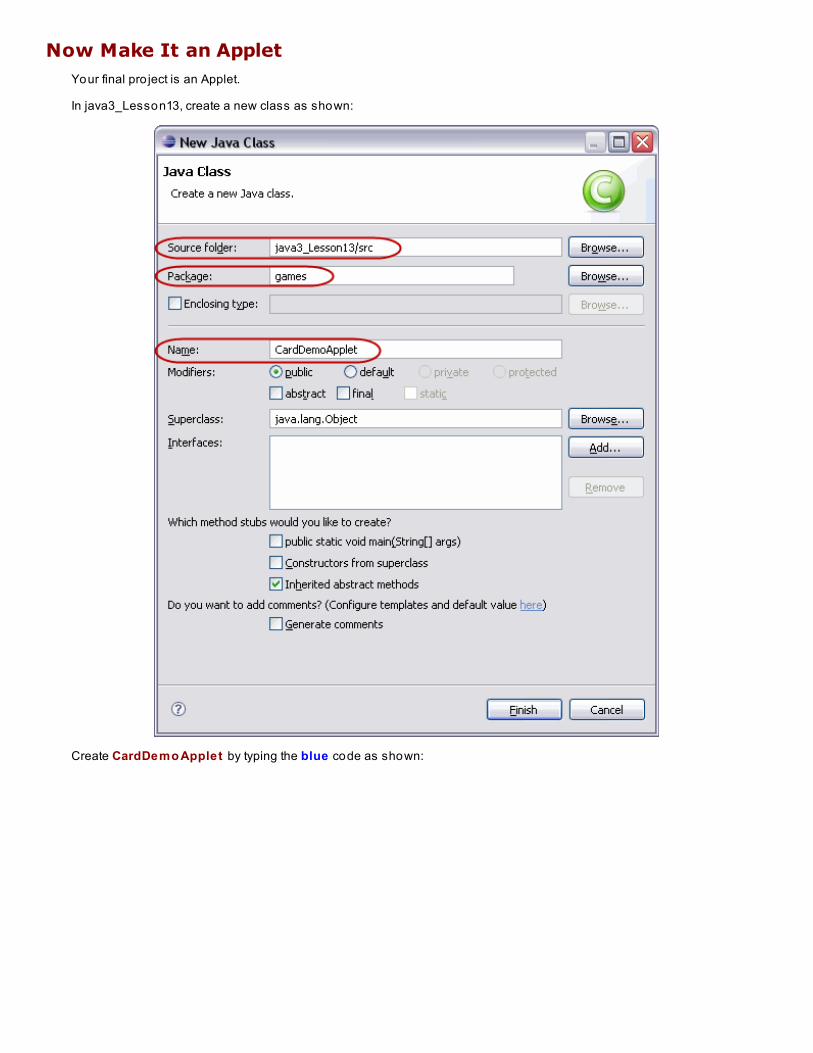
Now Make It an AppletYour final pro ject is an Applet.
In java3_Lesson13, create a new class as shown:
Create CardDemo Applet by typing the blue code as shown:
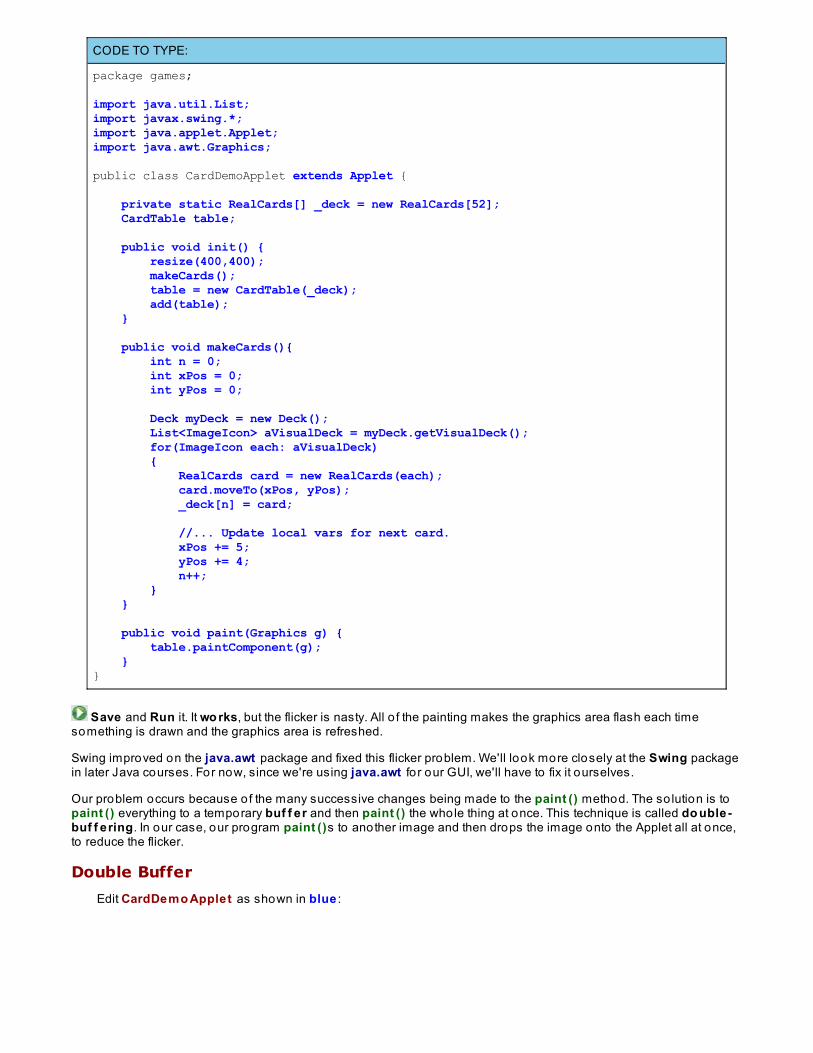
CODE TO TYPE:
package games;
import java.util.List;import javax.swing.*;import java.applet.Applet;import java.awt.Graphics;
public class CardDemoApplet extends Applet { private static RealCards[] _deck = new RealCards[52]; CardTable table;
public void init() { resize(400,400); makeCards(); table = new CardTable(_deck); add(table); } public void makeCards(){ int n = 0; int xPos = 0; int yPos = 0;
Deck myDeck = new Deck(); List<ImageIcon> aVisualDeck = myDeck.getVisualDeck(); for(ImageIcon each: aVisualDeck) { RealCards card = new RealCards(each); card.moveTo(xPos, yPos); _deck[n] = card;
//... Update local vars for next card. xPos += 5; yPos += 4; n++; } }
public void paint(Graphics g) { table.paintComponent(g); }}
Save and Run it. It wo rks, but the flicker is nasty. All o f the painting makes the graphics area flash each timesomething is drawn and the graphics area is refreshed.
Swing improved on the java.awt package and fixed this flicker problem. We'll look more closely at the Swing packagein later Java courses. For now, since we're using java.awt fo r our GUI, we'll have to fix it ourselves.
Our problem occurs because o f the many successive changes being made to the paint () method. The so lution is topaint () everything to a temporary buf f er and then paint () the whole thing at once. This technique is called do uble-buf f ering. In our case, our program paint ()s to another image and then drops the image onto the Applet all at once,to reduce the flicker.
Double Buffer
Edit CardDemo Applet as shown in blue :
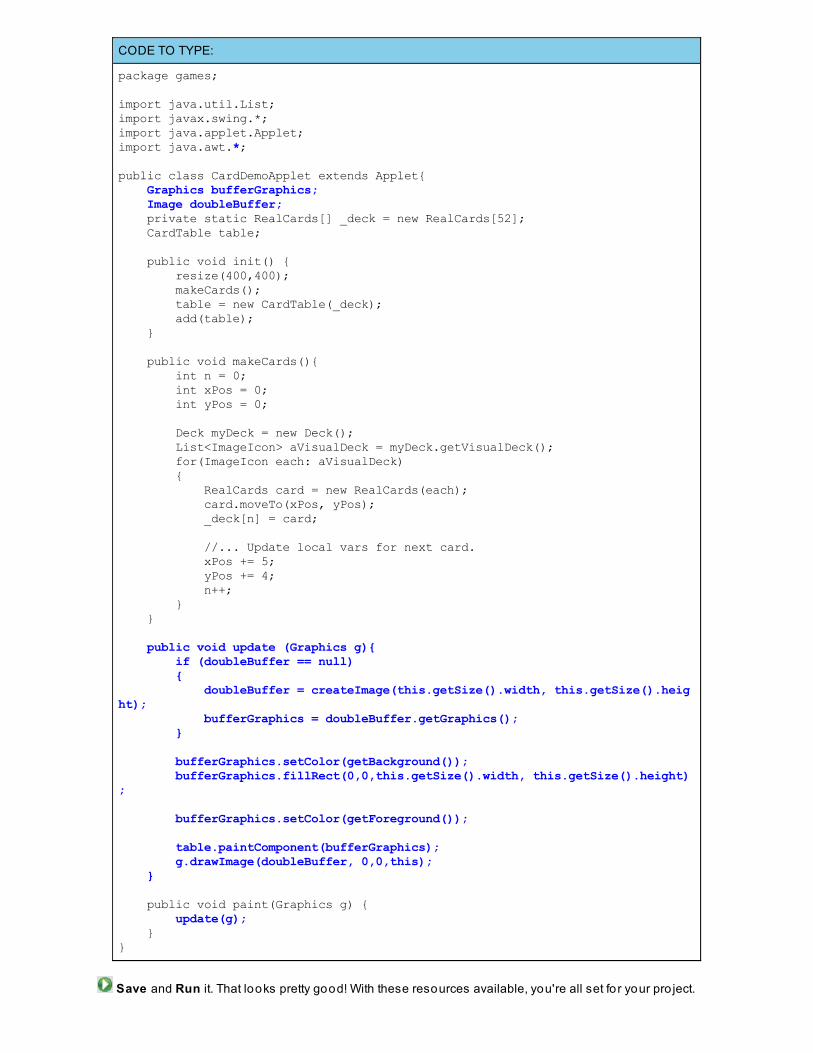
CODE TO TYPE:
package games;
import java.util.List;import javax.swing.*;import java.applet.Applet;import java.awt.*;
public class CardDemoApplet extends Applet{ Graphics bufferGraphics; Image doubleBuffer; private static RealCards[] _deck = new RealCards[52]; CardTable table;
public void init() { resize(400,400); makeCards(); table = new CardTable(_deck); add(table); } public void makeCards(){ int n = 0; int xPos = 0; int yPos = 0;
Deck myDeck = new Deck(); List<ImageIcon> aVisualDeck = myDeck.getVisualDeck(); for(ImageIcon each: aVisualDeck) { RealCards card = new RealCards(each); card.moveTo(xPos, yPos); _deck[n] = card; //... Update local vars for next card. xPos += 5; yPos += 4; n++; } }
public void update (Graphics g){ if (doubleBuffer == null) { doubleBuffer = createImage(this.getSize().width, this.getSize().height); bufferGraphics = doubleBuffer.getGraphics(); }
bufferGraphics.setColor(getBackground()); bufferGraphics.fillRect(0,0,this.getSize().width, this.getSize().height);
bufferGraphics.setColor(getForeground());
table.paintComponent(bufferGraphics); g.drawImage(doubleBuffer, 0,0,this); } public void paint(Graphics g) { update(g); }}
Save and Run it. That looks pretty good! With these resources available, you're all set fo r your pro ject.

Graphics Project Examples
Here are a few last examples for you to check out that will help you with your own pro ject. Open thisdemonstration. Read the Readme to learn how it works. Run it to observe o ther interesting possibilities forthe program.
For your pro ject, you are only required to meet the stated specifications, but feel free to include whateveradditional elements you like.
Copyright © 1998-2014 O'Reilly Media, Inc.
This work is licensed under a Creative Commons Attribution-ShareAlike 3.0 Unported License.See http://creativecommons.org/licenses/by-sa/3.0/legalcode for more information.
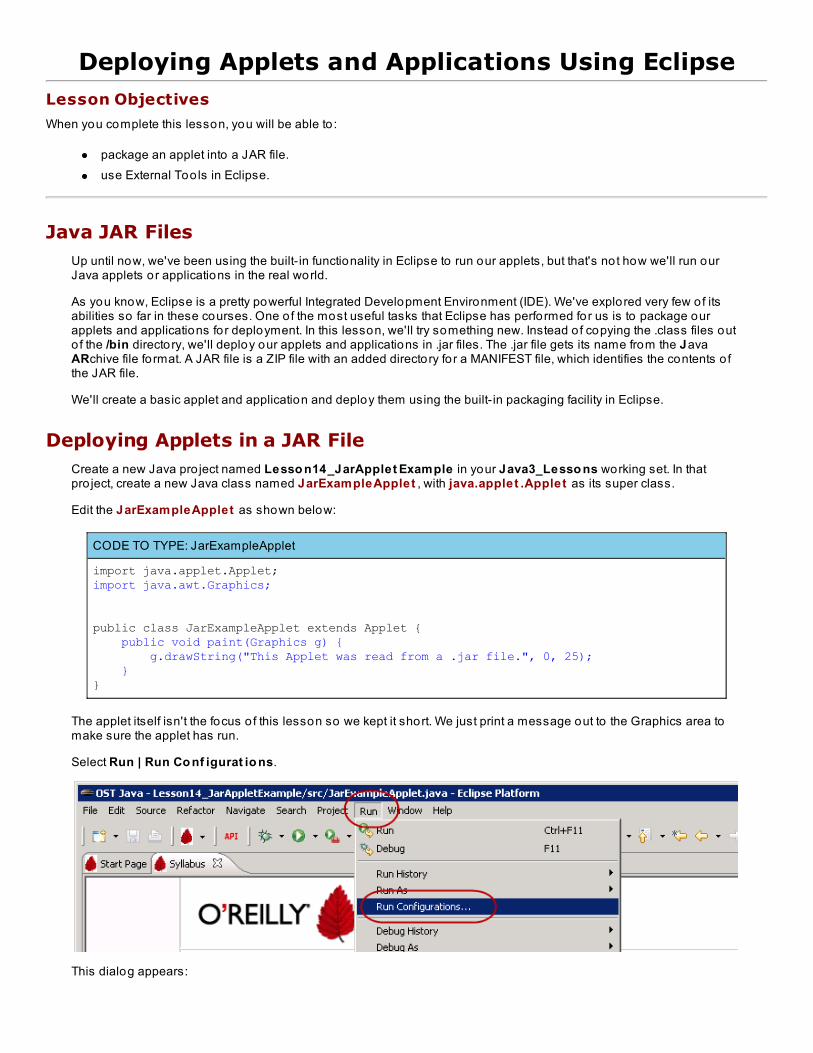
Deploying Applets and Applications Using EclipseLesson Objectives
When you complete this lesson, you will be able to :
package an applet into a JAR file.use External Too ls in Eclipse.
Java JAR FilesUp until now, we've been using the built- in functionality in Eclipse to run our applets, but that's not how we'll run ourJava applets or applications in the real world.
As you know, Eclipse is a pretty powerful Integrated Development Environment (IDE). We've explored very few of itsabilities so far in these courses. One o f the most useful tasks that Eclipse has performed for us is to package ourapplets and applications for deployment. In this lesson, we'll try something new. Instead o f copying the .class files outo f the /bin directory, we'll deploy our applets and applications in .jar files. The .jar file gets its name from the JavaARchive file fo rmat. A JAR file is a ZIP file with an added directory for a MANIFEST file, which identifies the contents o fthe JAR file.
We'll create a basic applet and application and deploy them using the built- in packaging facility in Eclipse.
Deploying Applets in a JAR FileCreate a new Java pro ject named Lesso n14_JarApplet Example in your Java3_Lesso ns working set. In thatpro ject, create a new Java class named JarExampleApplet , with java.applet .Applet as its super class.
Edit the JarExampleApplet as shown below:
CODE TO TYPE: JarExampleApplet
import java.applet.Applet;import java.awt.Graphics;
public class JarExampleApplet extends Applet { public void paint(Graphics g) { g.drawString("This Applet was read from a .jar file.", 0, 25); }}
The applet itself isn't the focus o f this lesson so we kept it short. We just print a message out to the Graphics area tomake sure the applet has run.
Select Run | Run Co nf igurat io ns.
This dialog appears:
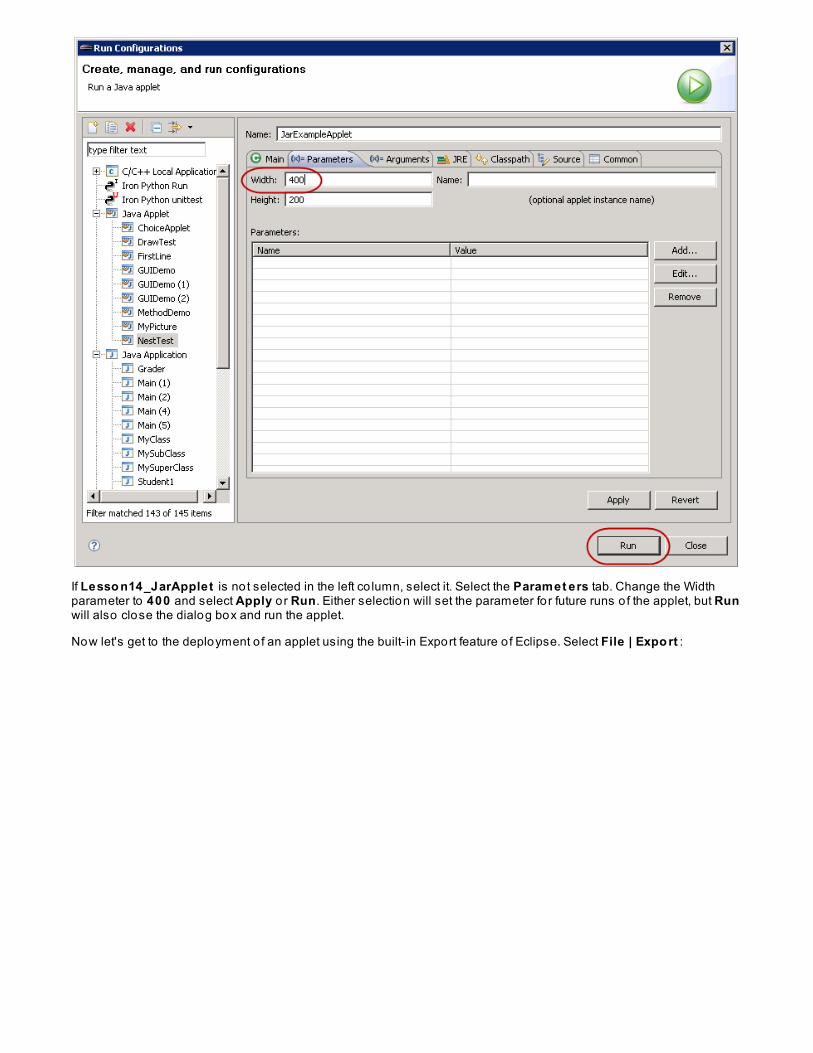
If Lesso n14_JarApplet is not selected in the left co lumn, select it. Select the Paramet ers tab. Change the Widthparameter to 400 and select Apply o r Run. Either selection will set the parameter fo r future runs o f the applet, but Runwill also close the dialog box and run the applet.
Now let's get to the deployment o f an applet using the built- in Export feature o f Eclipse. Select File | Expo rt :
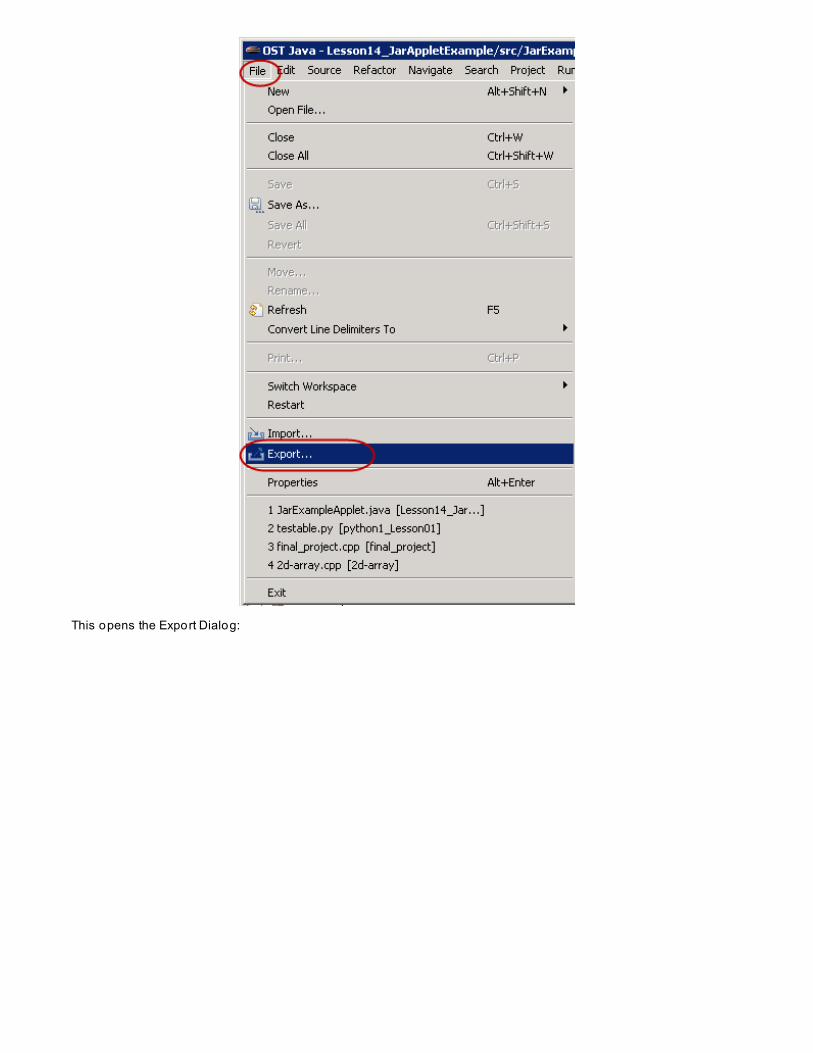
This opens the Export Dialog:
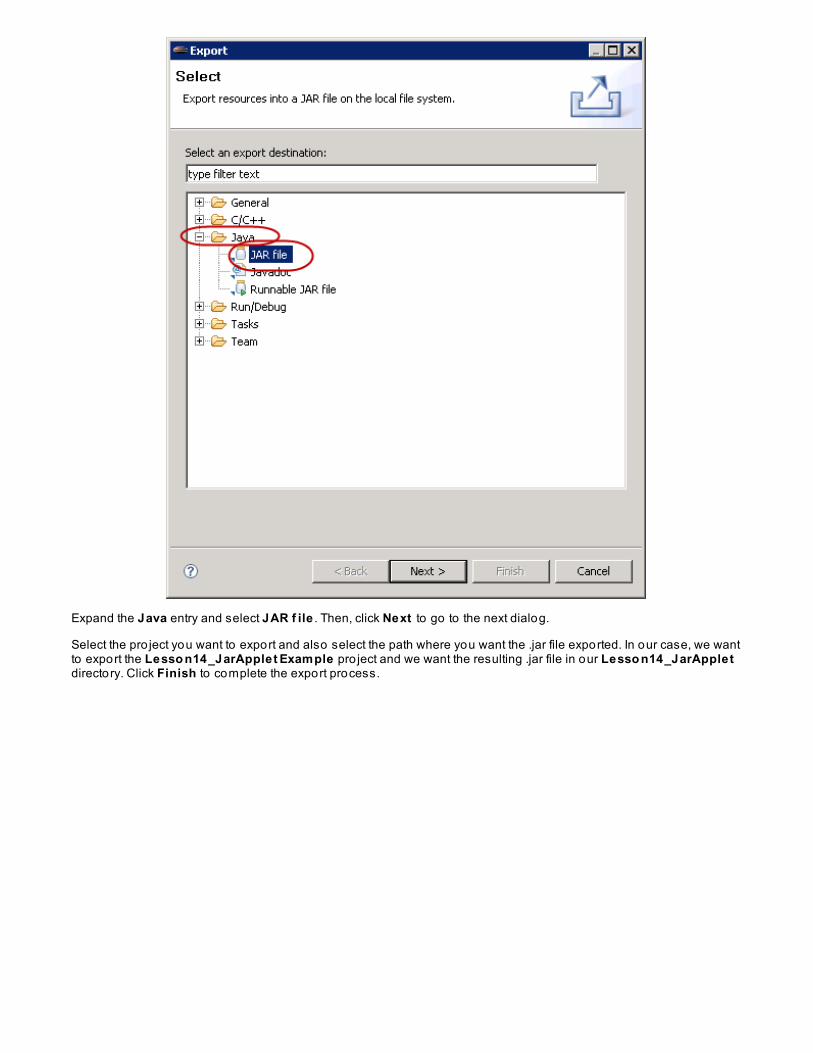
Expand the Java entry and select JAR f ile . Then, click Next to go to the next dialog.
Select the pro ject you want to export and also select the path where you want the .jar file exported. In our case, we wantto export the Lesso n14_JarApplet Example pro ject and we want the resulting .jar file in our Lesso n14_JarAppletdirectory. Click Finish to complete the export process.
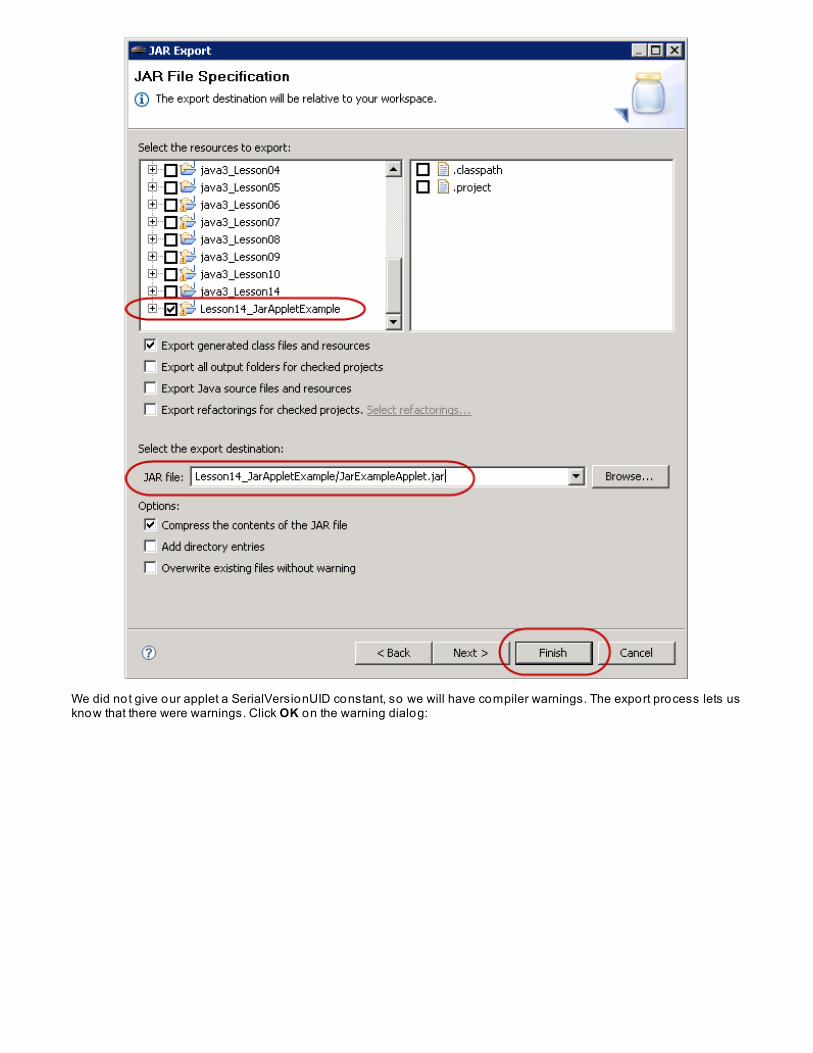
We did not give our applet a SerialVersionUID constant, so we will have compiler warnings. The export process lets usknow that there were warnings. Click OK on the warning dialog:
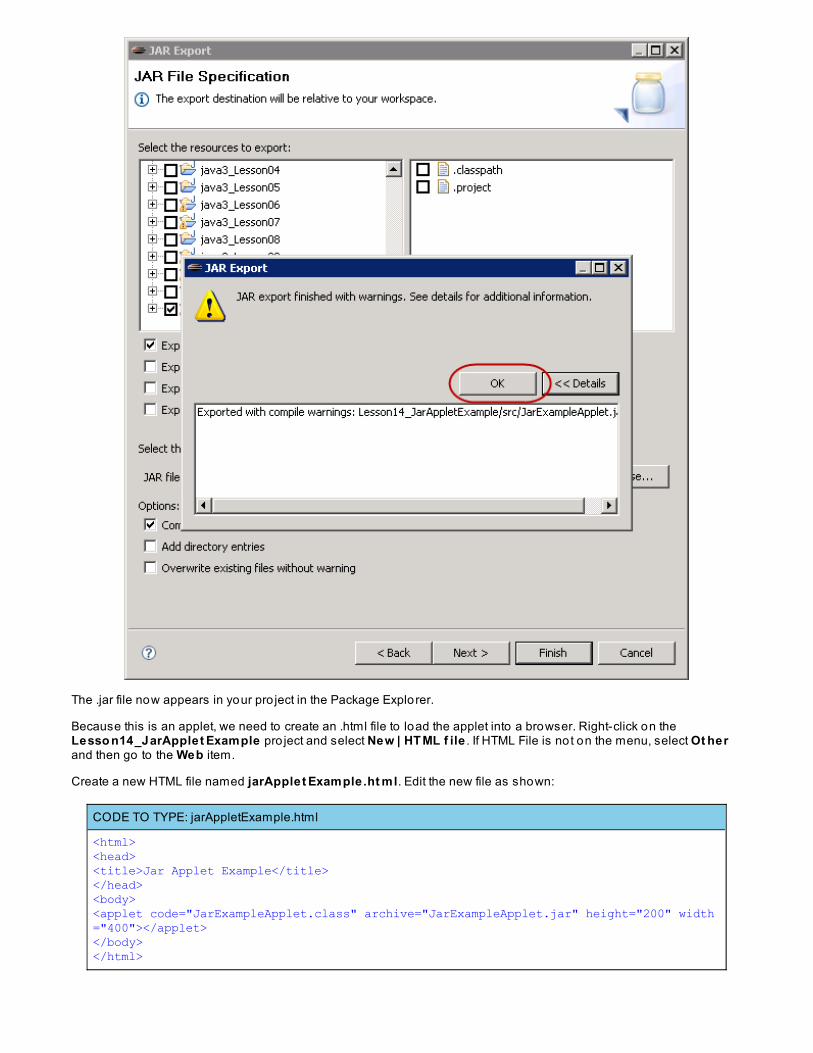
The .jar file now appears in your pro ject in the Package Explorer.
Because this is an applet, we need to create an .html file to load the applet into a browser. Right-click on theLesso n14_JarApplet Example pro ject and select New | HT ML f ile . If HTML File is not on the menu, select Ot herand then go to the Web item.
Create a new HTML file named jarApplet Example.ht ml. Edit the new file as shown:
CODE TO TYPE: jarAppletExample.html
<html><head><title>Jar Applet Example</title></head><body><applet code="JarExampleApplet.class" archive="JarExampleApplet.jar" height="200" width="400"></applet></body></html>
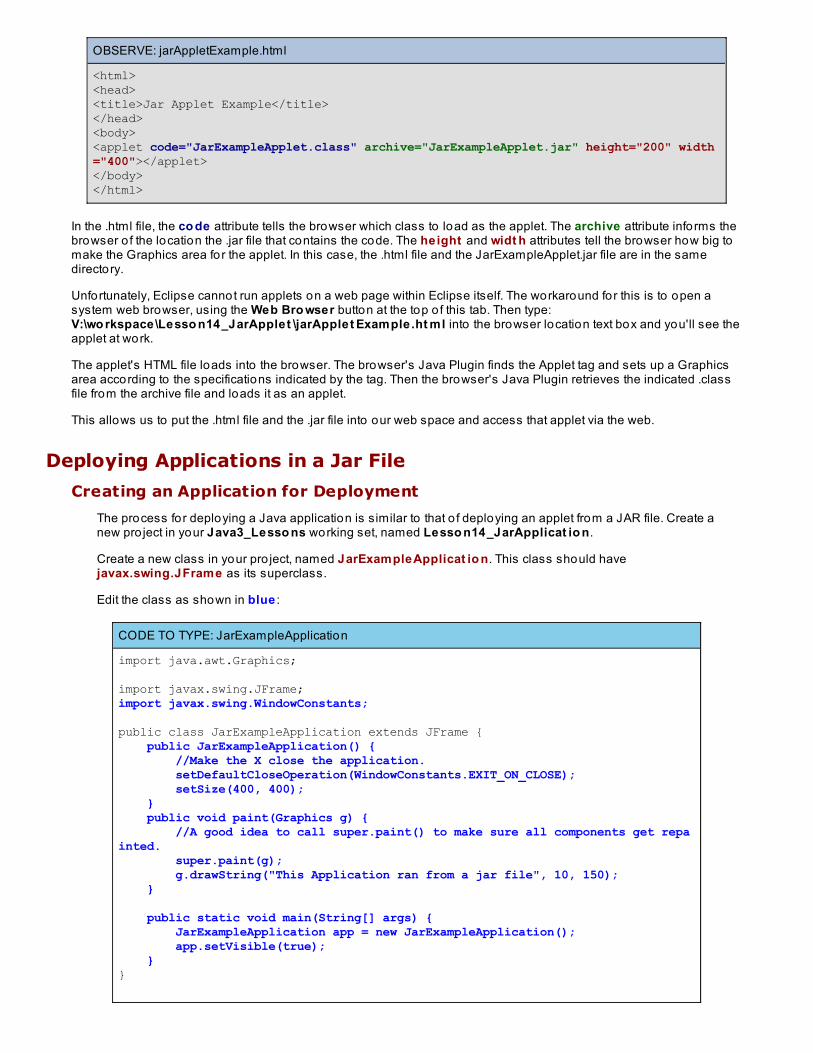
OBSERVE: jarAppletExample.html
<html><head><title>Jar Applet Example</title></head><body><applet code="JarExampleApplet.class" archive="JarExampleApplet.jar" height="200" width="400"></applet></body></html>
In the .html file, the co de attribute tells the browser which class to load as the applet. The archive attribute informs thebrowser o f the location the .jar file that contains the code. The height and widt h attributes tell the browser how big tomake the Graphics area for the applet. In this case, the .html file and the JarExampleApplet.jar file are in the samedirectory.
Unfortunately, Eclipse cannot run applets on a web page within Eclipse itself. The workaround for this is to open asystem web browser, using the Web Bro wser button at the top o f this tab. Then type:V:\wo rkspace\Lesso n14_JarApplet \jarApplet Example.ht ml into the browser location text box and you'll see theapplet at work.
The applet's HTML file loads into the browser. The browser's Java Plugin finds the Applet tag and sets up a Graphicsarea according to the specifications indicated by the tag. Then the browser's Java Plugin retrieves the indicated .classfile from the archive file and loads it as an applet.
This allows us to put the .html file and the .jar file into our web space and access that applet via the web.
Deploying Applications in a Jar File
Creating an Application for Deployment
The process for deploying a Java application is similar to that o f deploying an applet from a JAR file. Create anew pro ject in your Java3_Lesso ns working set, named Lesso n14_JarApplicat io n.
Create a new class in your pro ject, named JarExampleApplicat io n. This class should havejavax.swing.JFrame as its superclass.
Edit the class as shown in blue :
CODE TO TYPE: JarExampleApplication
import java.awt.Graphics;
import javax.swing.JFrame;import javax.swing.WindowConstants;
public class JarExampleApplication extends JFrame { public JarExampleApplication() { //Make the X close the application. setDefaultCloseOperation(WindowConstants.EXIT_ON_CLOSE); setSize(400, 400); } public void paint(Graphics g) { //A good idea to call super.paint() to make sure all components get repainted. super.paint(g); g.drawString("This Application ran from a jar file", 10, 150); } public static void main(String[] args) { JarExampleApplication app = new JarExampleApplication(); app.setVisible(true); }}
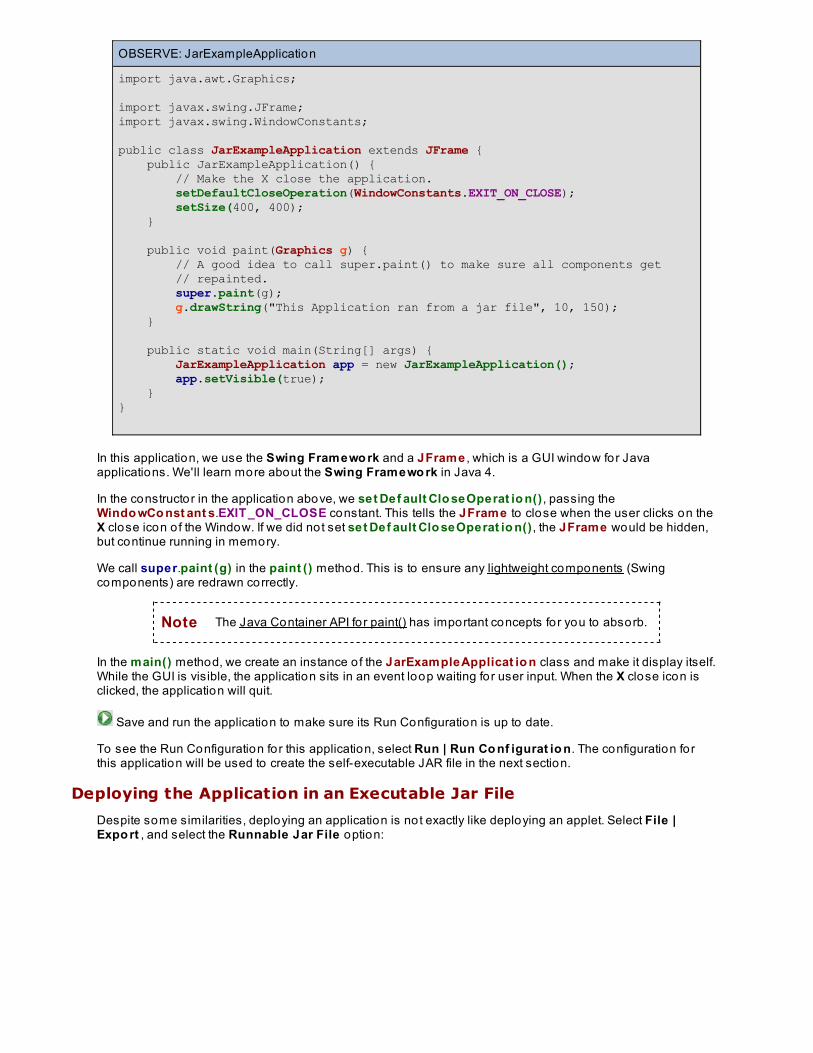
OBSERVE: JarExampleApplication
import java.awt.Graphics;
import javax.swing.JFrame;import javax.swing.WindowConstants;
public class JarExampleApplication extends JFrame { public JarExampleApplication() { // Make the X close the application. setDefaultCloseOperation(WindowConstants.EXIT_ON_CLOSE); setSize(400, 400); }
public void paint(Graphics g) { // A good idea to call super.paint() to make sure all components get // repainted. super.paint(g); g.drawString("This Application ran from a jar file", 10, 150); }
public static void main(String[] args) { JarExampleApplication app = new JarExampleApplication(); app.setVisible(true); }}
In this application, we use the Swing Framewo rk and a JFrame , which is a GUI window for Javaapplications. We'll learn more about the Swing Framewo rk in Java 4.
In the constructor in the application above, we set Def ault Clo seOperat io n() , passing theWindo wCo nst ant s.EXIT _ON_CLOSE constant. This tells the JFrame to close when the user clicks on theX close icon o f the Window. If we did not set set Def ault Clo seOperat io n() , the JFrame would be hidden,but continue running in memory.
We call super.paint (g) in the paint () method. This is to ensure any lightweight components (Swingcomponents) are redrawn correctly.
Note The Java Container API fo r paint() has important concepts for you to absorb.
In the main() method, we create an instance o f the JarExampleApplicat io n class and make it display itself.While the GUI is visible, the application sits in an event loop waiting for user input. When the X close icon isclicked, the application will quit.
Save and run the application to make sure its Run Configuration is up to date.
To see the Run Configuration for this application, select Run | Run Co nf igurat io n. The configuration forthis application will be used to create the self-executable JAR file in the next section.
Deploying the Application in an Executable Jar File
Despite some similarities, deploying an application is not exactly like deploying an applet. Select File |Expo rt , and select the Runnable Jar File option:
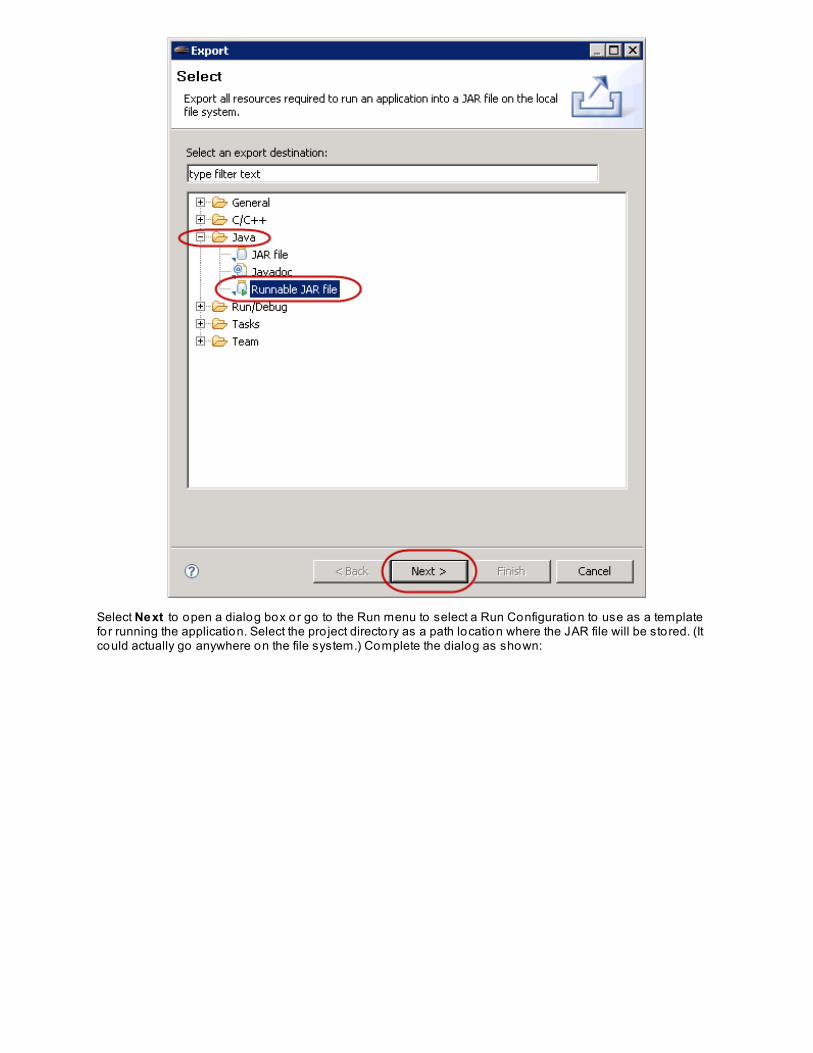
Select Next to open a dialog box or go to the Run menu to select a Run Configuration to use as a templatefor running the application. Select the pro ject directory as a path location where the JAR file will be stored. (Itcould actually go anywhere on the file system.) Complete the dialog as shown:
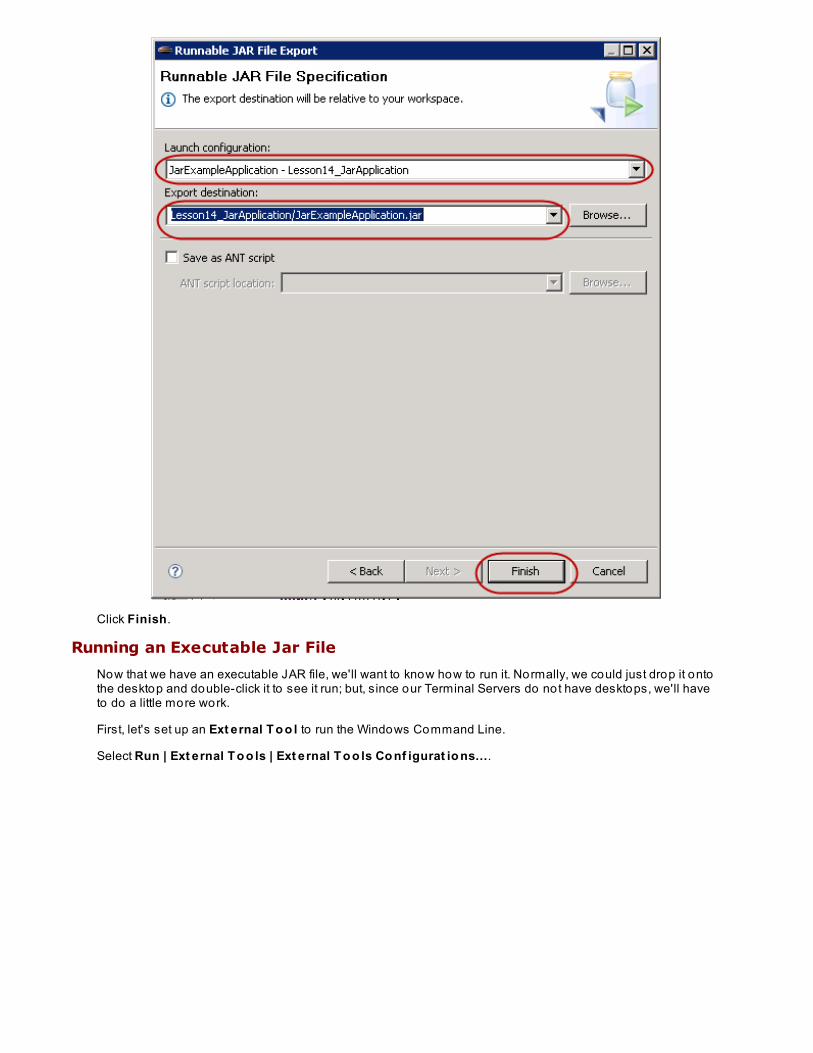
Click Finish.
Running an Executable Jar File
Now that we have an executable JAR file, we'll want to know how to run it. Normally, we could just drop it ontothe desktop and double-click it to see it run; but, since our Terminal Servers do not have desktops, we'll haveto do a little more work.
First, let's set up an Ext ernal T o o l to run the Windows Command Line.
Select Run | Ext ernal T o o ls | Ext ernal T o o ls Co nf igurat io ns....
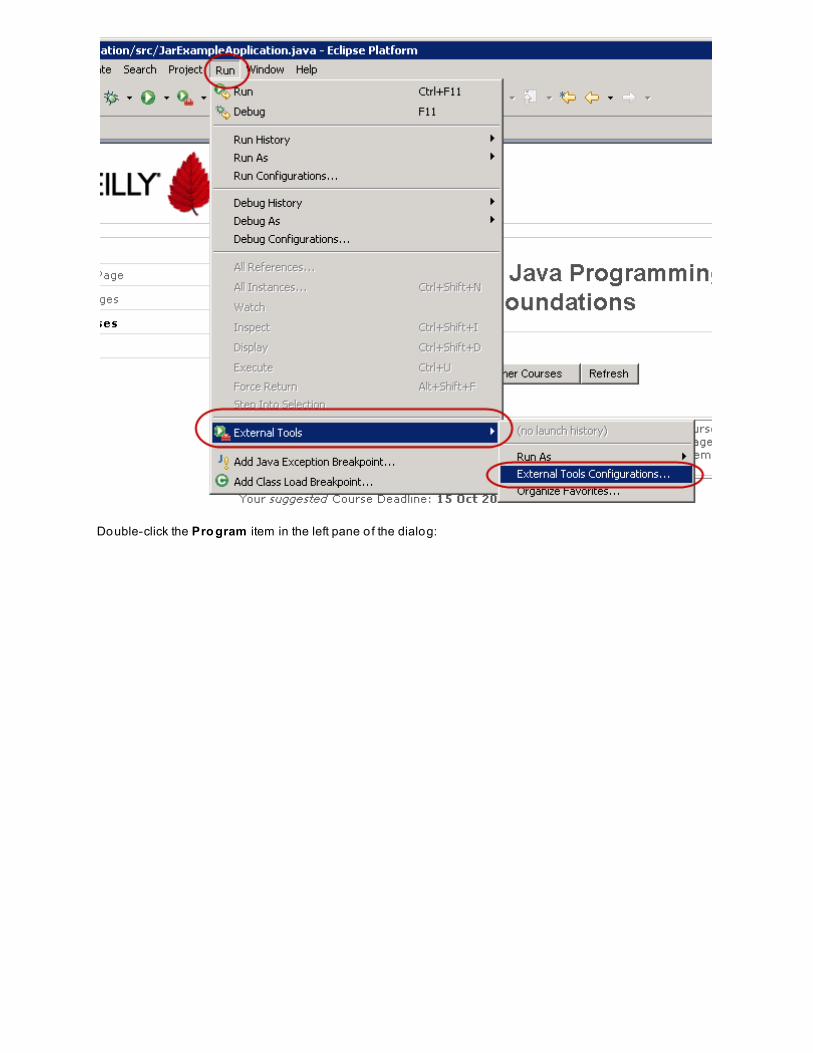
Double-click the Pro gram item in the left pane o f the dialog:
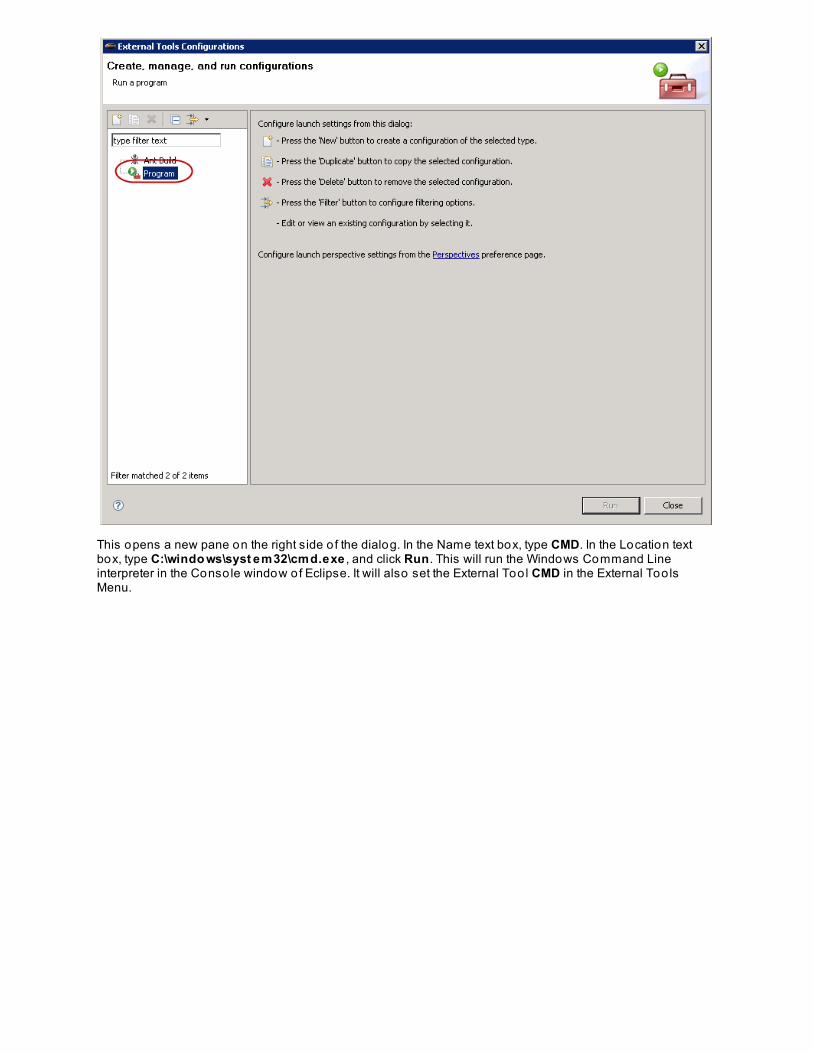
This opens a new pane on the right side o f the dialog. In the Name text box, type CMD. In the Location textbox, type C:\windo ws\syst em32\cmd.exe , and click Run. This will run the Windows Command Lineinterpreter in the Conso le window of Eclipse. It will also set the External Too l CMD in the External Too lsMenu.

Click in the Conso le view of Eclipse, type V:, and press Ent er. This will switch us over to the V: drive.
Type cd \wo rkspace\Lesso n14_JarApplicat io n to switch to the directory where JarExampleApplication.jarfile is located.
Type st art JarExampleApplicat io n.jar to start the application. This will automatically run Java and load upthe application. You can see the application running in the image here (your input from above is seen in lightgreen):
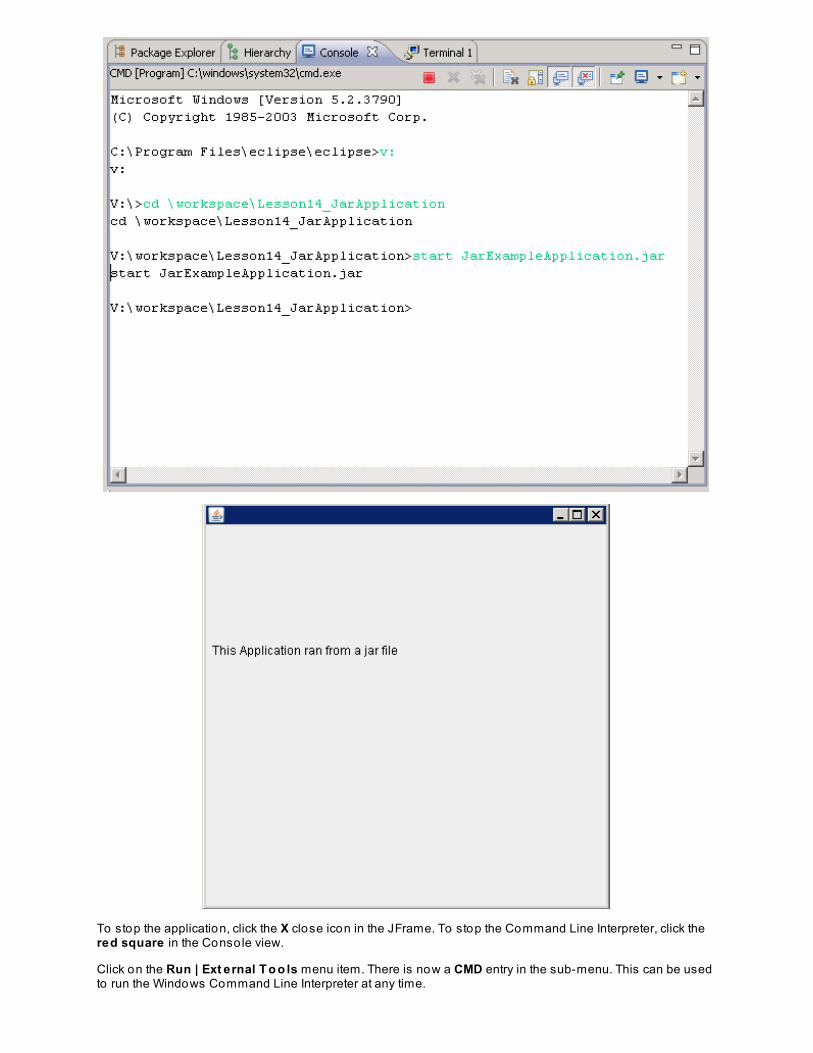
To stop the application, click the X close icon in the JFrame. To stop the Command Line Interpreter, click thered square in the Conso le view.
Click on the Run | Ext ernal T o o ls menu item. There is now a CMD entry in the sub-menu. This can be usedto run the Windows Command Line Interpreter at any time.
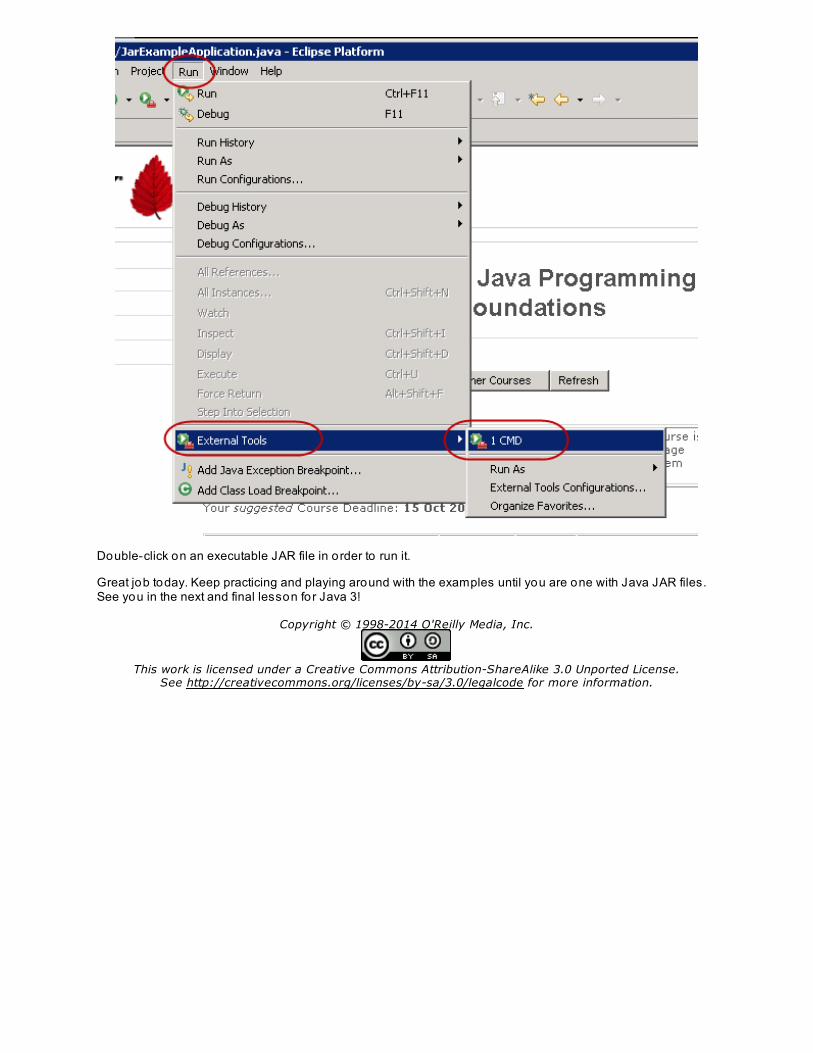
Double-click on an executable JAR file in order to run it.
Great job today. Keep practicing and playing around with the examples until you are one with Java JAR files.See you in the next and final lesson for Java 3!
Copyright © 1998-2014 O'Reilly Media, Inc.
This work is licensed under a Creative Commons Attribution-ShareAlike 3.0 Unported License.See http://creativecommons.org/licenses/by-sa/3.0/legalcode for more information.
Working With FilesLesson Objectives
When you complete this lesson, you will be able to :
write a program that saves user input to a file.read a text file and display its contents to the user.use the PrintWriter, File, and FileWriter class.take advantage o f the benefits o f the BufferedReader.use exit code.
Working With FilesThere are lo ts o f ways to manage files in Java. In this lesson, we'll go over options we have when working with textfiles.
The File ClassThe File class lets us create files and directories to use when we work with the various file streams, readers, andwriters, provided by the Java API.
Create a new Java pro ject named Java3_File IO. In that pro ject, create a new class named File IO. Edit the File IOclass by adding the blue code as shown:
CODE TO TYPE: FileIO.java
import java.io.File;import java.io.IOException; public class FileIO { File myFile; public FileIO(String path) { myFile = new File(path); try { myFile.createNewFile(); } catch (IOException e) { e.printStackTrace(); //exit with an exit code. Exit code 0 indicates normal exit. System.exit(1); } } public static void main(String [] args) { FileIO fileTest = new FileIO("filetest.txt"); }}
Save and run it. Right-click on the Package Explorer and select Refresh from the pop-up menu. Now thef ile t est .t xt file is in your pro ject. If we use a file name as the path, the current directory will be used to create the file:
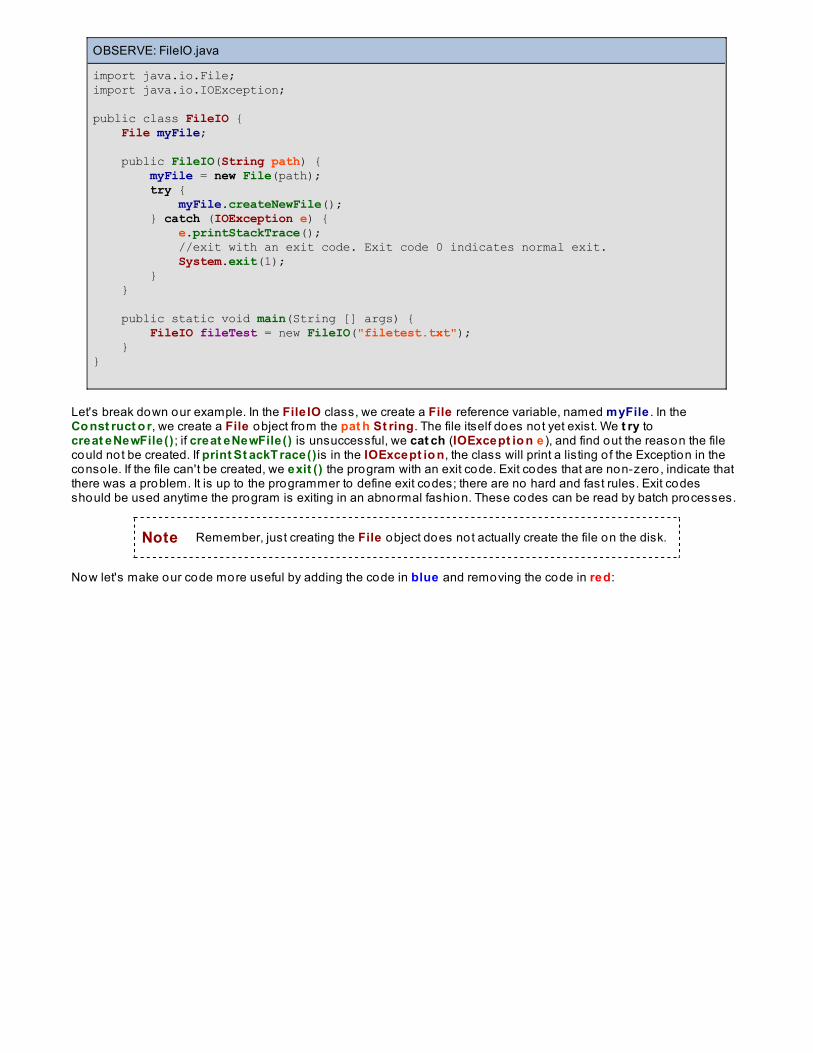
OBSERVE: FileIO.java
import java.io.File;import java.io.IOException;
public class FileIO { File myFile; public FileIO(String path) { myFile = new File(path); try { myFile.createNewFile(); } catch (IOException e) { e.printStackTrace(); //exit with an exit code. Exit code 0 indicates normal exit. System.exit(1); } } public static void main(String [] args) { FileIO fileTest = new FileIO("filetest.txt"); }}
Let's break down our example. In the File IO class, we create a File reference variable, named myFile . In theCo nst ruct o r, we create a File object from the pat h St ring. The file itself does not yet exist. We t ry tocreat eNewFile() ; if creat eNewFile() is unsuccessful, we cat ch (IOExcept io n e ), and find out the reason the filecould not be created. If print St ackT race() is in the IOExcept io n, the class will print a listing o f the Exception in theconso le. If the file can't be created, we exit () the program with an exit code. Exit codes that are non-zero , indicate thatthere was a problem. It is up to the programmer to define exit codes; there are no hard and fast rules. Exit codesshould be used anytime the program is exiting in an abnormal fashion. These codes can be read by batch processes.
Note Remember, just creating the File object does not actually create the file on the disk.
Now let's make our code more useful by adding the code in blue and removing the code in red:
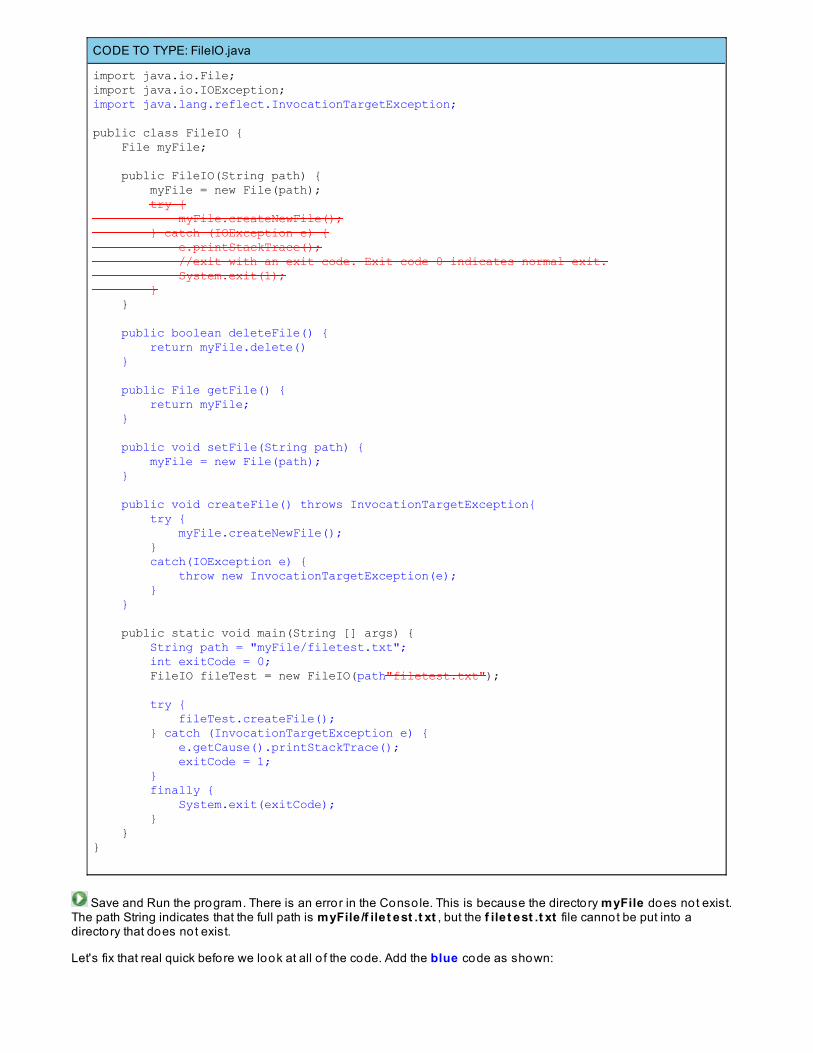
CODE TO TYPE: FileIO.java
import java.io.File;import java.io.IOException;import java.lang.reflect.InvocationTargetException;
public class FileIO { File myFile; public FileIO(String path) { myFile = new File(path); try { myFile.createNewFile(); } catch (IOException e) { e.printStackTrace(); //exit with an exit code. Exit code 0 indicates normal exit. System.exit(1); } } public boolean deleteFile() { return myFile.delete() } public File getFile() { return myFile; } public void setFile(String path) { myFile = new File(path); } public void createFile() throws InvocationTargetException{ try { myFile.createNewFile(); } catch(IOException e) { throw new InvocationTargetException(e); } } public static void main(String [] args) { String path = "myFile/filetest.txt"; int exitCode = 0; FileIO fileTest = new FileIO(path"filetest.txt"); try { fileTest.createFile(); } catch (InvocationTargetException e) { e.getCause().printStackTrace(); exitCode = 1; } finally { System.exit(exitCode); } }}
Save and Run the program. There is an error in the Conso le. This is because the directory myFile does not exist.The path String indicates that the full path is myFile /f ile t est .t xt , but the f ile t est .t xt file cannot be put into adirectory that does not exist.
Let's fix that real quick before we look at all o f the code. Add the blue code as shown:
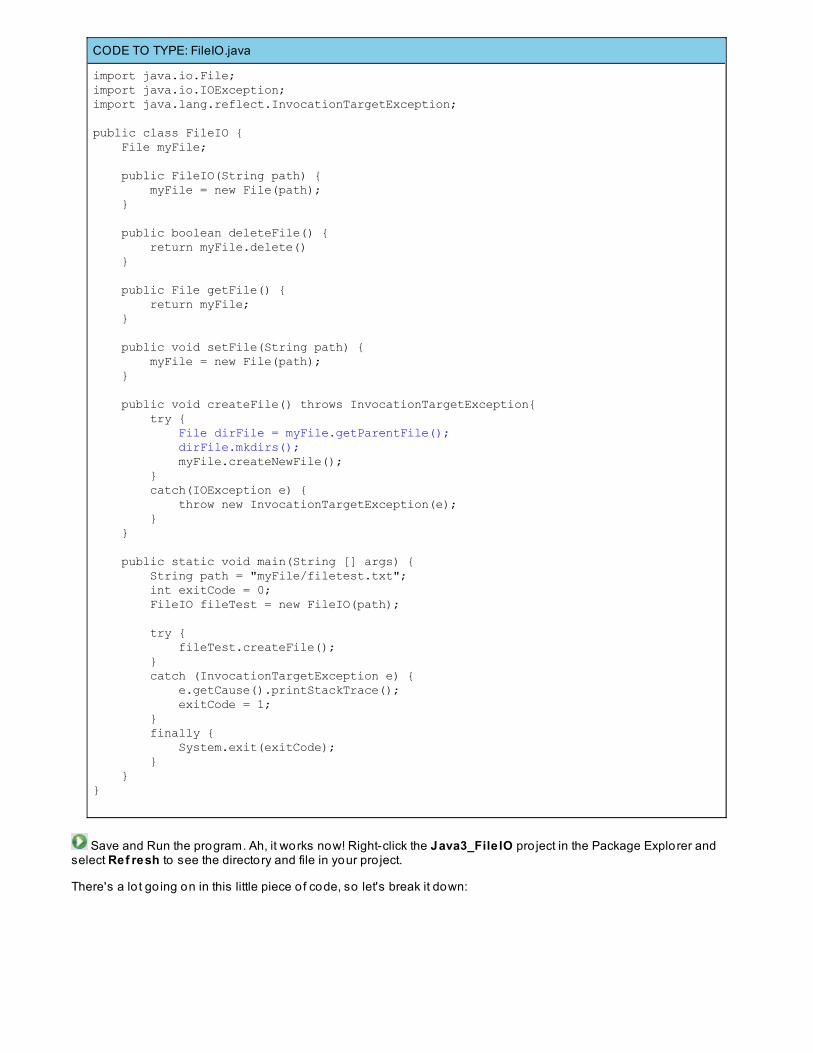
CODE TO TYPE: FileIO.java
import java.io.File;import java.io.IOException;import java.lang.reflect.InvocationTargetException;
public class FileIO { File myFile; public FileIO(String path) { myFile = new File(path); } public boolean deleteFile() { return myFile.delete() } public File getFile() { return myFile; } public void setFile(String path) { myFile = new File(path); } public void createFile() throws InvocationTargetException{ try { File dirFile = myFile.getParentFile(); dirFile.mkdirs(); myFile.createNewFile(); } catch(IOException e) { throw new InvocationTargetException(e); } } public static void main(String [] args) { String path = "myFile/filetest.txt"; int exitCode = 0; FileIO fileTest = new FileIO(path); try { fileTest.createFile(); } catch (InvocationTargetException e) { e.getCause().printStackTrace(); exitCode = 1; } finally { System.exit(exitCode); } }}
Save and Run the program. Ah, it works now! Right-click the Java3_File IO pro ject in the Package Explorer andselect Ref resh to see the directory and file in your pro ject.
There's a lo t go ing on in this little piece o f code, so let's break it down:

OBSERVE: FileIO.java
import java.io.File;import java.io.IOException;import java.lang.reflect.InvocationTargetException;
public class FileIO { File myFile; public FileIO(String path) { myFile = new File(path); } public void deleteFile() { myFile.delete(); } public File getFile() { return myFile; } public void setFile(String path) { myFile = new File(path); } public void createFile() throws InvocationTargetException{ try { File dirFile = myFile.getParentFile(); dirFile.mkdirs(); myFile.createNewFile(); } catch(IOException e) { throw new InvocationTargetException(e); } } public static void main(String [] args) { String path = "myFile/filetest.txt"; int exitCode = 0; FileIO fileTest = new FileIO(path); try { fileTest.createFile(); } catch (InvocationTargetException e) { e.getCause().printStackTrace(); exitCode = 1; } finally { System.exit(exitCode); } }}
First, we removed the file creation from the constructor. That's so we can separate the actions this program can take.We make sure that myFile is not null, that way we can act on it in o ther methods later, without having to check to makesure it is null then.
We've added the methods, delet eFile() , set File() , get File() , and creat eFile() to the program so that we canperform those actions on the myFile object.
We are adding something new to the creat eFile() method: the t hro ws clause at the end o f the method header. It letsus know that this method can throw an Exception. To be specific, it can throw the Invo cat io nT arget Except io n. TheInvo cat io nT arget Except io n is a checked exception that allows us to pass an exception along to another method.We surround everything we are do ing in the creat eFile() method within a t ry{} block, and cat ch() anyIOExcept io ns that occur. The t ry{} block gets the prefix o f the path in the myFile object, as a File object nameddirFile using the get Parent File() method o f the File class (myFile object).
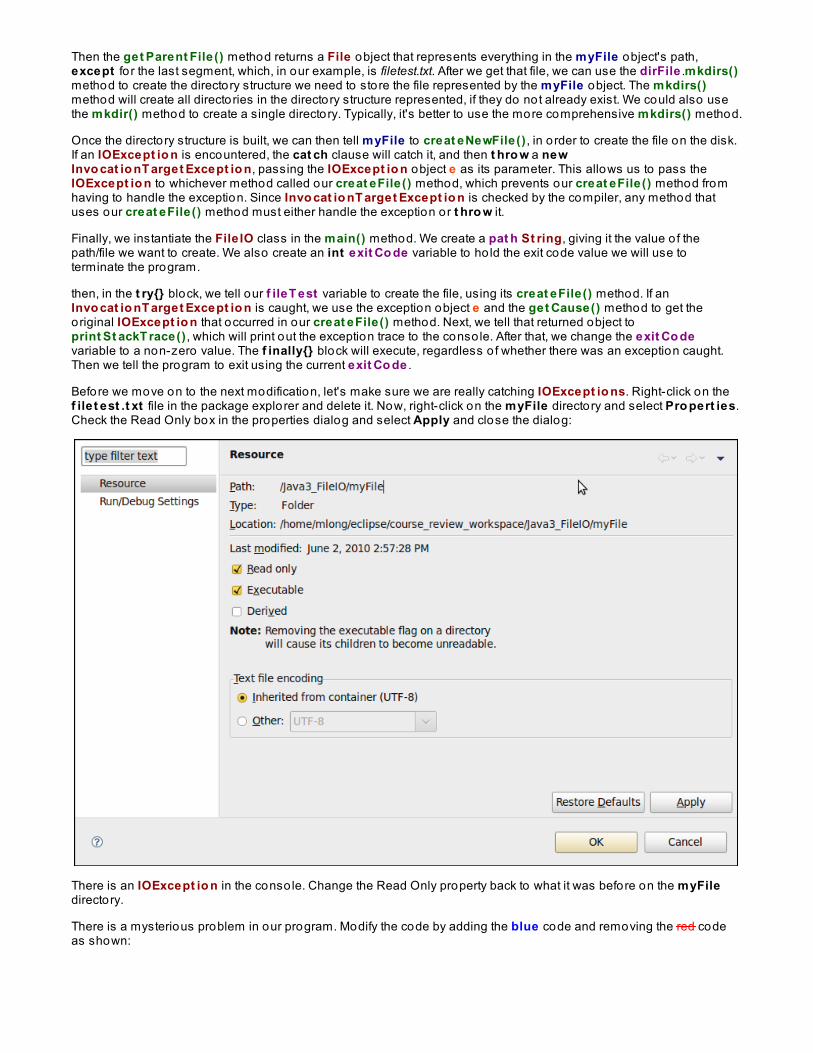
Then the get Parent File() method returns a File object that represents everything in the myFile object's path,except fo r the last segment, which, in our example, is filetest.txt. After we get that file, we can use the dirFile .mkdirs()method to create the directory structure we need to store the file represented by the myFile object. The mkdirs()method will create all directories in the directory structure represented, if they do not already exist. We could also usethe mkdir() method to create a single directory. Typically, it's better to use the more comprehensive mkdirs() method.
Once the directory structure is built, we can then tell myFile to creat eNewFile() , in order to create the file on the disk.If an IOExcept io n is encountered, the cat ch clause will catch it, and then t hro w a newInvo cat io nT arget Except io n, passing the IOExcept io n object e as its parameter. This allows us to pass theIOExcept io n to whichever method called our creat eFile() method, which prevents our creat eFile() method fromhaving to handle the exception. Since Invo cat io nT arget Except io n is checked by the compiler, any method thatuses our creat eFile() method must either handle the exception or t hro w it.
Finally, we instantiate the File IO class in the main() method. We create a pat h St ring, giving it the value o f thepath/file we want to create. We also create an int exit Co de variable to ho ld the exit code value we will use toterminate the program.
then, in the t ry{} block, we tell our f ileT est variable to create the file, using its creat eFile() method. If anInvo cat io nT arget Except io n is caught, we use the exception object e and the get Cause() method to get theoriginal IOExcept io n that occurred in our creat eFile() method. Next, we tell that returned object toprint St ackT race() , which will print out the exception trace to the conso le. After that, we change the exit Co devariable to a non-zero value. The f inally{} block will execute, regardless o f whether there was an exception caught.Then we tell the program to exit using the current exit Co de .
Before we move on to the next modification, let's make sure we are really catching IOExcept io ns. Right-click on thef ile t est .t xt file in the package explorer and delete it. Now, right-click on the myFile directory and select Pro pert ies.Check the Read Only box in the properties dialog and select Apply and close the dialog:
There is an IOExcept io n in the conso le. Change the Read Only property back to what it was before on the myFiledirectory.
There is a mysterious problem in our program. Modify the code by adding the blue code and removing the red codeas shown:
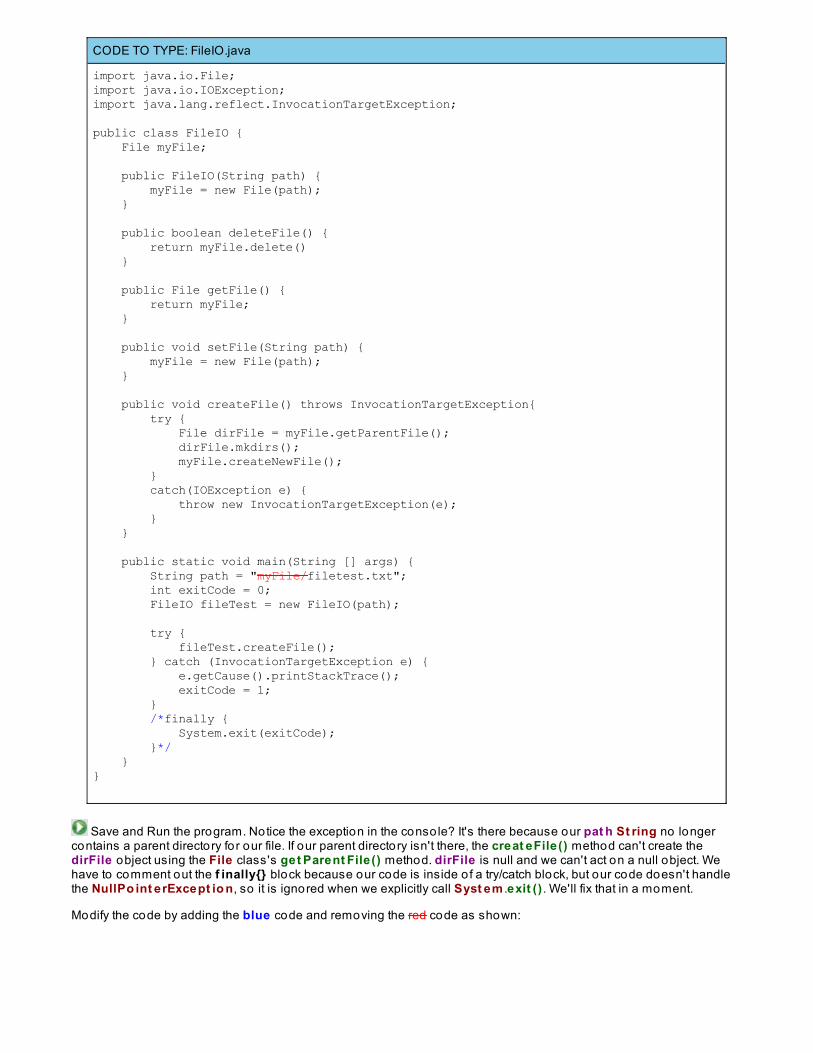
CODE TO TYPE: FileIO.java
import java.io.File;import java.io.IOException;import java.lang.reflect.InvocationTargetException;
public class FileIO { File myFile; public FileIO(String path) { myFile = new File(path); } public boolean deleteFile() { return myFile.delete() } public File getFile() { return myFile; } public void setFile(String path) { myFile = new File(path); } public void createFile() throws InvocationTargetException{ try { File dirFile = myFile.getParentFile(); dirFile.mkdirs(); myFile.createNewFile(); } catch(IOException e) { throw new InvocationTargetException(e); } } public static void main(String [] args) { String path = "myFile/filetest.txt"; int exitCode = 0; FileIO fileTest = new FileIO(path); try { fileTest.createFile(); } catch (InvocationTargetException e) { e.getCause().printStackTrace(); exitCode = 1; } /*finally { System.exit(exitCode); }*/ }}
Save and Run the program. Notice the exception in the conso le? It's there because our pat h St ring no longercontains a parent directory for our file. If our parent directory isn't there, the creat eFile() method can't create thedirFile object using the File class's get Parent File() method. dirFile is null and we can't act on a null object. Wehave to comment out the f inally{} block because our code is inside o f a try/catch block, but our code doesn't handlethe NullPo int erExcept io n, so it is ignored when we explicitly call Syst em .exit () . We'll fix that in a moment.
Modify the code by adding the blue code and removing the red code as shown:
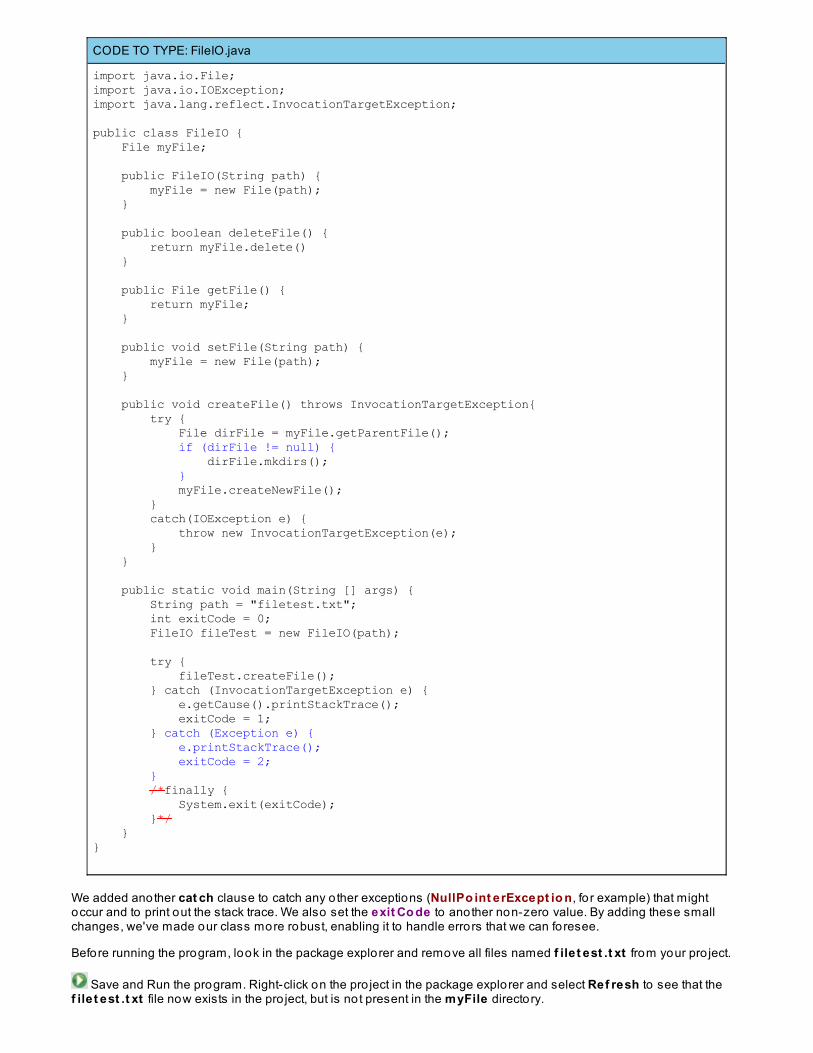
CODE TO TYPE: FileIO.java
import java.io.File;import java.io.IOException;import java.lang.reflect.InvocationTargetException;
public class FileIO { File myFile; public FileIO(String path) { myFile = new File(path); } public boolean deleteFile() { return myFile.delete() } public File getFile() { return myFile; } public void setFile(String path) { myFile = new File(path); } public void createFile() throws InvocationTargetException{ try { File dirFile = myFile.getParentFile(); if (dirFile != null) { dirFile.mkdirs(); } myFile.createNewFile(); } catch(IOException e) { throw new InvocationTargetException(e); } } public static void main(String [] args) { String path = "filetest.txt"; int exitCode = 0; FileIO fileTest = new FileIO(path); try { fileTest.createFile(); } catch (InvocationTargetException e) { e.getCause().printStackTrace(); exitCode = 1; } catch (Exception e) { e.printStackTrace(); exitCode = 2; } /*finally { System.exit(exitCode); }*/ }}
We added another cat ch clause to catch any o ther exceptions (NullPo int erExcept io n, fo r example) that mightoccur and to print out the stack trace. We also set the exit Co de to another non-zero value. By adding these smallchanges, we've made our class more robust, enabling it to handle errors that we can foresee.
Before running the program, look in the package explorer and remove all files named f ile t est .t xt from your pro ject.
Save and Run the program. Right-click on the pro ject in the package explorer and select Ref resh to see that thef ile t est .t xt file now exists in the pro ject, but is not present in the myFile directory.
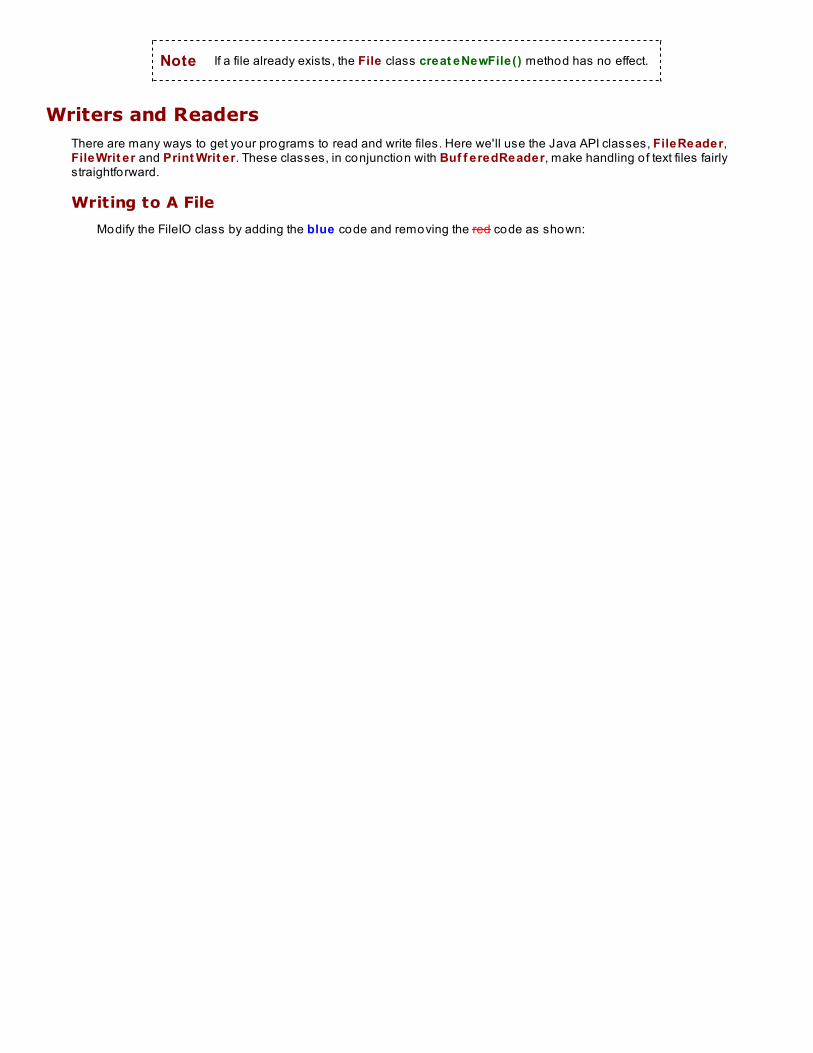
Note If a file already exists, the File class creat eNewFile() method has no effect.
Writers and ReadersThere are many ways to get your programs to read and write files. Here we'll use the Java API classes, FileReader,FileWrit er and Print Writ er. These classes, in conjunction with Buf f eredReader, make handling o f text files fairlystraightforward.
Writing to A File
Modify the FileIO class by adding the blue code and removing the red code as shown:
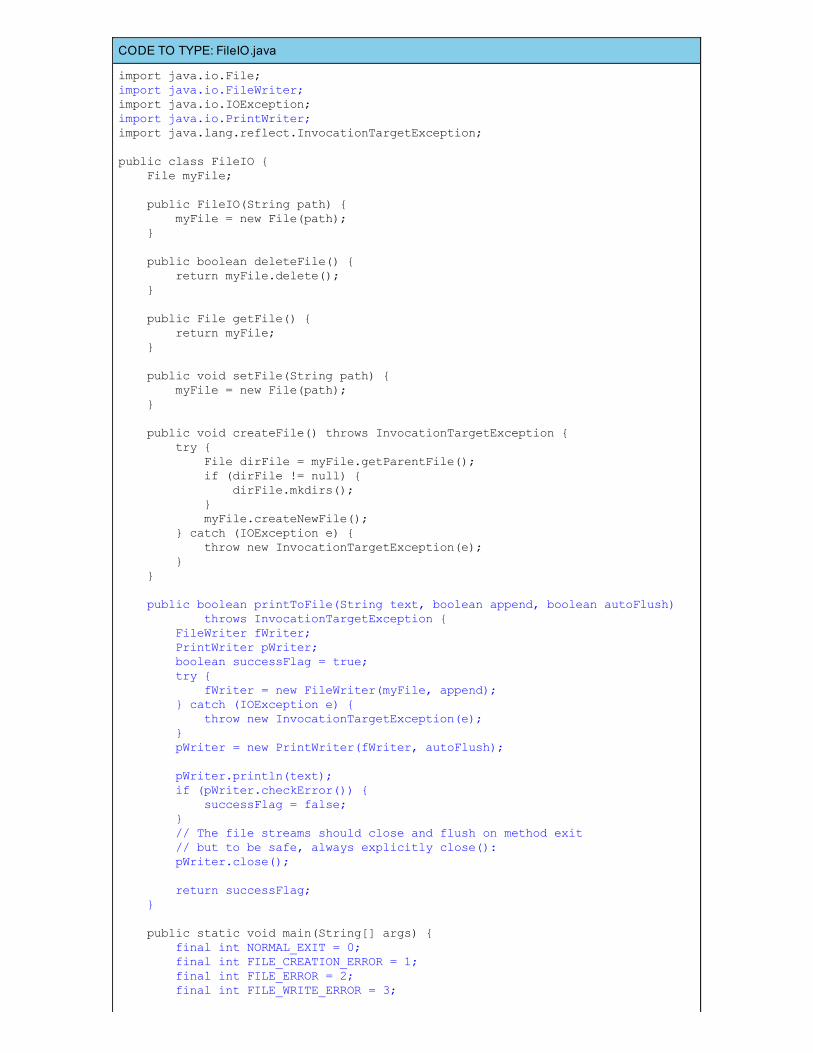
CODE TO TYPE: FileIO.java
import java.io.File;import java.io.FileWriter;import java.io.IOException;import java.io.PrintWriter;import java.lang.reflect.InvocationTargetException;
public class FileIO { File myFile;
public FileIO(String path) { myFile = new File(path); }
public boolean deleteFile() { return myFile.delete(); }
public File getFile() { return myFile; }
public void setFile(String path) { myFile = new File(path); }
public void createFile() throws InvocationTargetException { try { File dirFile = myFile.getParentFile(); if (dirFile != null) { dirFile.mkdirs(); } myFile.createNewFile(); } catch (IOException e) { throw new InvocationTargetException(e); } }
public boolean printToFile(String text, boolean append, boolean autoFlush) throws InvocationTargetException { FileWriter fWriter; PrintWriter pWriter; boolean successFlag = true; try { fWriter = new FileWriter(myFile, append); } catch (IOException e) { throw new InvocationTargetException(e); } pWriter = new PrintWriter(fWriter, autoFlush);
pWriter.println(text); if (pWriter.checkError()) { successFlag = false; } // The file streams should close and flush on method exit // but to be safe, always explicitly close(): pWriter.close();
return successFlag; }
public static void main(String[] args) { final int NORMAL_EXIT = 0; final int FILE_CREATION_ERROR = 1; final int FILE_ERROR = 2; final int FILE_WRITE_ERROR = 3;
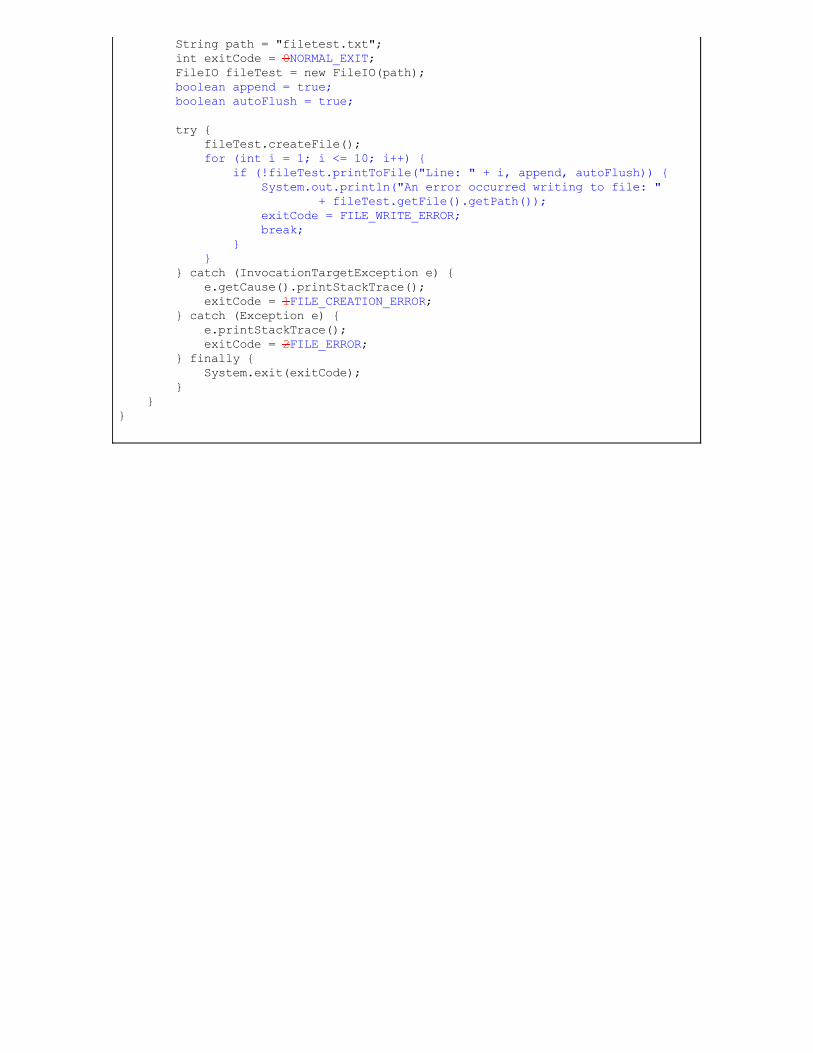
String path = "filetest.txt"; int exitCode = 0NORMAL_EXIT; FileIO fileTest = new FileIO(path); boolean append = true; boolean autoFlush = true;
try { fileTest.createFile(); for (int i = 1; i <= 10; i++) { if (!fileTest.printToFile("Line: " + i, append, autoFlush)) { System.out.println("An error occurred writing to file: " + fileTest.getFile().getPath()); exitCode = FILE_WRITE_ERROR; break; } } } catch (InvocationTargetException e) { e.getCause().printStackTrace(); exitCode = 1FILE_CREATION_ERROR; } catch (Exception e) { e.printStackTrace(); exitCode = 2FILE_ERROR; } finally { System.exit(exitCode); } }}
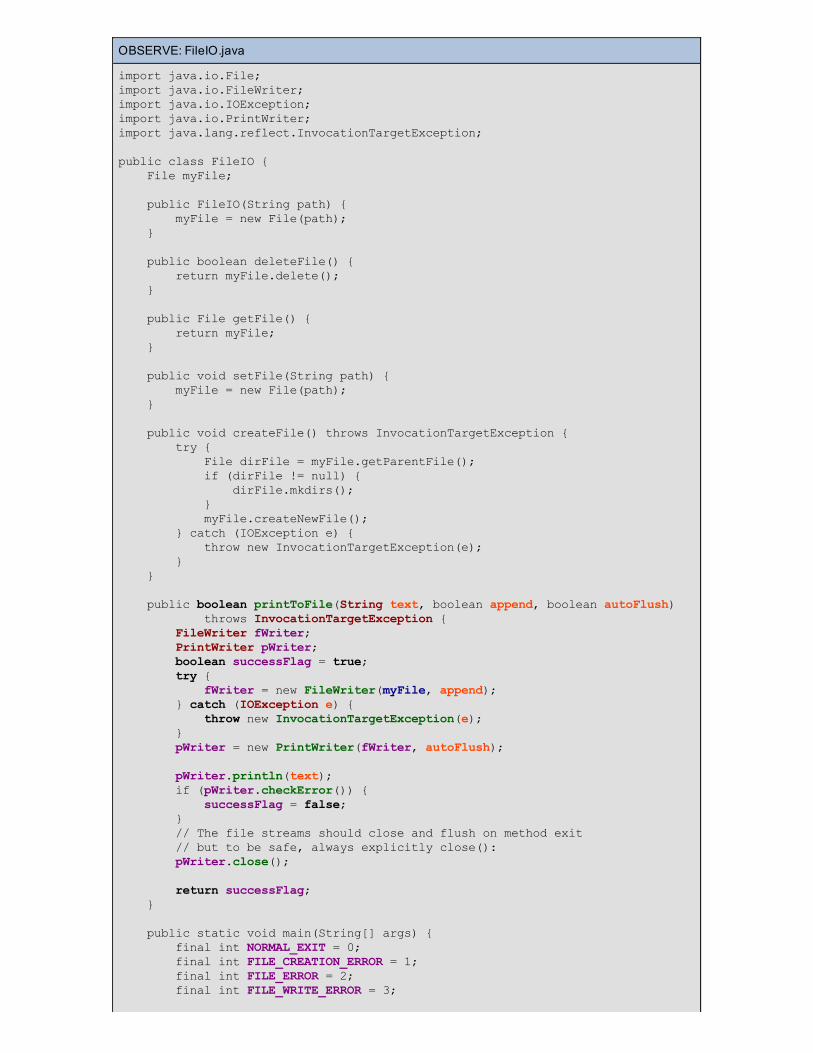
OBSERVE: FileIO.java
import java.io.File;import java.io.FileWriter;import java.io.IOException;import java.io.PrintWriter;import java.lang.reflect.InvocationTargetException;
public class FileIO { File myFile;
public FileIO(String path) { myFile = new File(path); }
public boolean deleteFile() { return myFile.delete(); }
public File getFile() { return myFile; }
public void setFile(String path) { myFile = new File(path); }
public void createFile() throws InvocationTargetException { try { File dirFile = myFile.getParentFile(); if (dirFile != null) { dirFile.mkdirs(); } myFile.createNewFile(); } catch (IOException e) { throw new InvocationTargetException(e); } }
public boolean printToFile(String text, boolean append, boolean autoFlush) throws InvocationTargetException { FileWriter fWriter; PrintWriter pWriter; boolean successFlag = true; try { fWriter = new FileWriter(myFile, append); } catch (IOException e) { throw new InvocationTargetException(e); } pWriter = new PrintWriter(fWriter, autoFlush);
pWriter.println(text); if (pWriter.checkError()) { successFlag = false; } // The file streams should close and flush on method exit // but to be safe, always explicitly close(): pWriter.close();
return successFlag; }
public static void main(String[] args) { final int NORMAL_EXIT = 0; final int FILE_CREATION_ERROR = 1; final int FILE_ERROR = 2; final int FILE_WRITE_ERROR = 3;
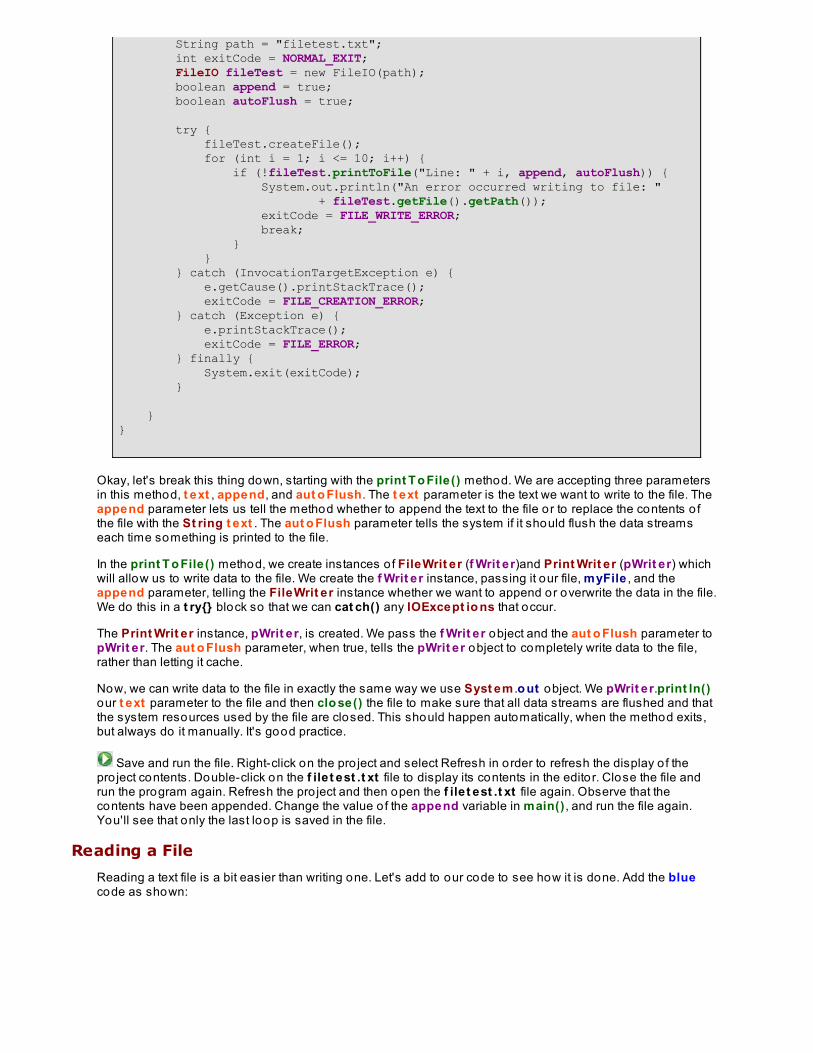
String path = "filetest.txt"; int exitCode = NORMAL_EXIT; FileIO fileTest = new FileIO(path); boolean append = true; boolean autoFlush = true;
try { fileTest.createFile(); for (int i = 1; i <= 10; i++) { if (!fileTest.printToFile("Line: " + i, append, autoFlush)) { System.out.println("An error occurred writing to file: " + fileTest.getFile().getPath()); exitCode = FILE_WRITE_ERROR; break; } } } catch (InvocationTargetException e) { e.getCause().printStackTrace(); exitCode = FILE_CREATION_ERROR; } catch (Exception e) { e.printStackTrace(); exitCode = FILE_ERROR; } finally { System.exit(exitCode); }
}}
Okay, let's break this thing down, starting with the print T o File() method. We are accepting three parametersin this method, t ext , append, and aut o Flush. The t ext parameter is the text we want to write to the file. Theappend parameter lets us tell the method whether to append the text to the file or to replace the contents o fthe file with the St ring t ext . The aut o Flush parameter tells the system if it should flush the data streamseach time something is printed to the file.
In the print T o File() method, we create instances o f FileWrit er (f Writ er)and Print Writ er (pWrit er) whichwill allow us to write data to the file. We create the f Writ er instance, passing it our file, myFile , and theappend parameter, telling the FileWrit er instance whether we want to append or overwrite the data in the file.We do this in a t ry{} block so that we can cat ch() any IOExcept io ns that occur.
The Print Writ er instance, pWrit er, is created. We pass the f Writ er object and the aut o Flush parameter topWrit er. The aut o Flush parameter, when true, tells the pWrit er object to completely write data to the file,rather than letting it cache.
Now, we can write data to the file in exactly the same way we use Syst em .o ut object. We pWrit er.print ln()our t ext parameter to the file and then clo se() the file to make sure that all data streams are flushed and thatthe system resources used by the file are closed. This should happen automatically, when the method exits,but always do it manually. It's good practice.
Save and run the file. Right-click on the pro ject and select Refresh in order to refresh the display o f thepro ject contents. Double-click on the f ile t est .t xt file to display its contents in the editor. Close the file andrun the program again. Refresh the pro ject and then open the f ile t est .t xt file again. Observe that thecontents have been appended. Change the value o f the append variable in main() , and run the file again.You'll see that only the last loop is saved in the file.
Reading a File
Reading a text file is a bit easier than writing one. Let's add to our code to see how it is done. Add the bluecode as shown:
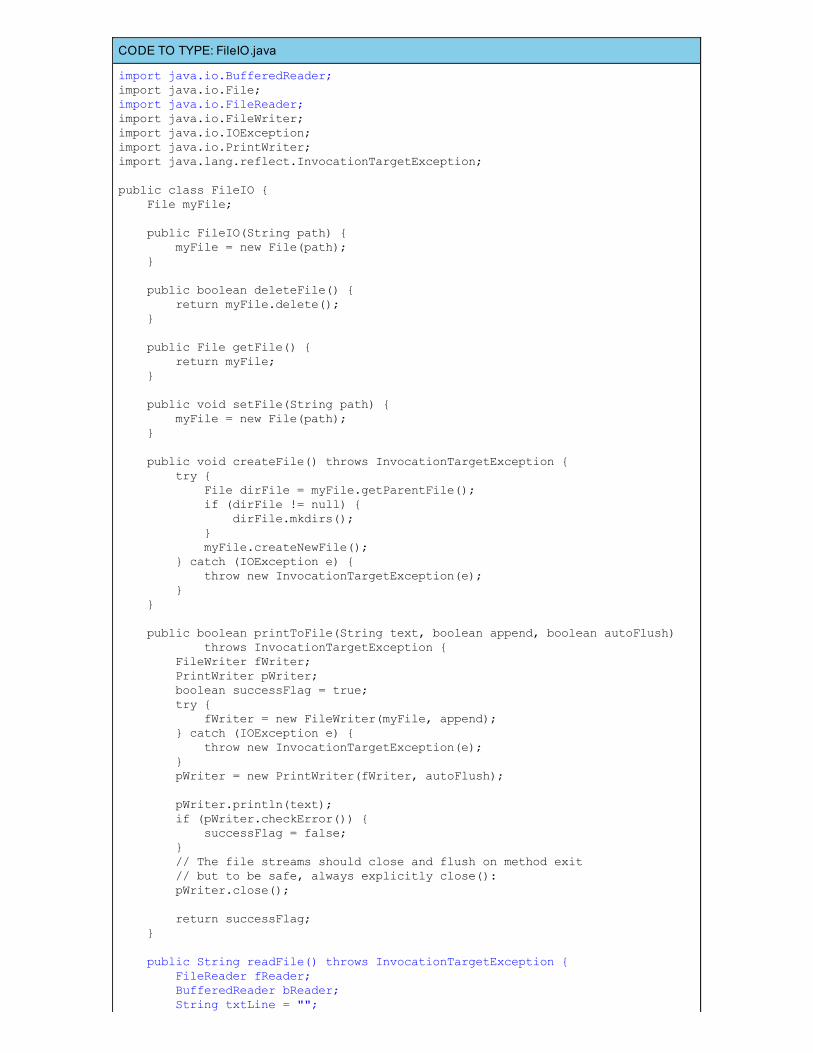
CODE TO TYPE: FileIO.java
import java.io.BufferedReader;import java.io.File;import java.io.FileReader;import java.io.FileWriter;import java.io.IOException;import java.io.PrintWriter;import java.lang.reflect.InvocationTargetException;
public class FileIO { File myFile;
public FileIO(String path) { myFile = new File(path); }
public boolean deleteFile() { return myFile.delete(); }
public File getFile() { return myFile; }
public void setFile(String path) { myFile = new File(path); }
public void createFile() throws InvocationTargetException { try { File dirFile = myFile.getParentFile(); if (dirFile != null) { dirFile.mkdirs(); } myFile.createNewFile(); } catch (IOException e) { throw new InvocationTargetException(e); } }
public boolean printToFile(String text, boolean append, boolean autoFlush) throws InvocationTargetException { FileWriter fWriter; PrintWriter pWriter; boolean successFlag = true; try { fWriter = new FileWriter(myFile, append); } catch (IOException e) { throw new InvocationTargetException(e); } pWriter = new PrintWriter(fWriter, autoFlush);
pWriter.println(text); if (pWriter.checkError()) { successFlag = false; } // The file streams should close and flush on method exit // but to be safe, always explicitly close(): pWriter.close();
return successFlag; }
public String readFile() throws InvocationTargetException { FileReader fReader; BufferedReader bReader; String txtLine = "";
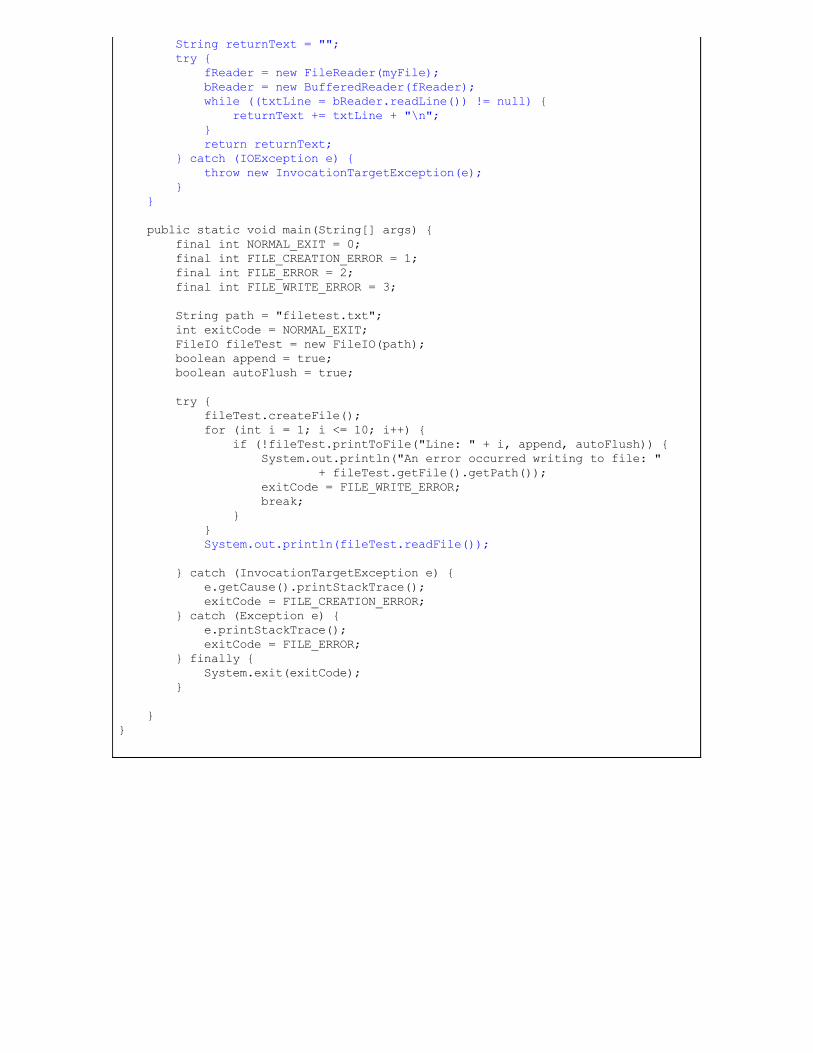
String returnText = ""; try { fReader = new FileReader(myFile); bReader = new BufferedReader(fReader); while ((txtLine = bReader.readLine()) != null) { returnText += txtLine + "\n"; } return returnText; } catch (IOException e) { throw new InvocationTargetException(e); } }
public static void main(String[] args) { final int NORMAL_EXIT = 0; final int FILE_CREATION_ERROR = 1; final int FILE_ERROR = 2; final int FILE_WRITE_ERROR = 3;
String path = "filetest.txt"; int exitCode = NORMAL_EXIT; FileIO fileTest = new FileIO(path); boolean append = true; boolean autoFlush = true;
try { fileTest.createFile(); for (int i = 1; i <= 10; i++) { if (!fileTest.printToFile("Line: " + i, append, autoFlush)) { System.out.println("An error occurred writing to file: " + fileTest.getFile().getPath()); exitCode = FILE_WRITE_ERROR; break; } } System.out.println(fileTest.readFile());
} catch (InvocationTargetException e) { e.getCause().printStackTrace(); exitCode = FILE_CREATION_ERROR; } catch (Exception e) { e.printStackTrace(); exitCode = FILE_ERROR; } finally { System.exit(exitCode); }
}}
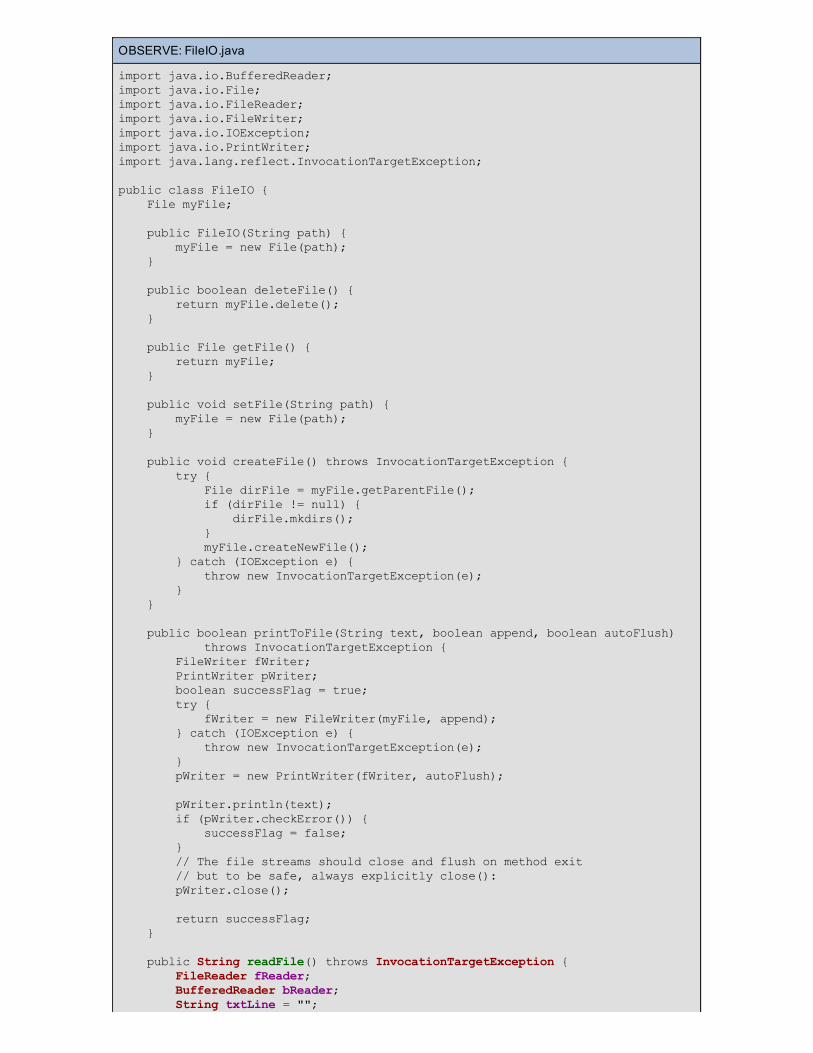
OBSERVE: FileIO.java
import java.io.BufferedReader;import java.io.File;import java.io.FileReader;import java.io.FileWriter;import java.io.IOException;import java.io.PrintWriter;import java.lang.reflect.InvocationTargetException;
public class FileIO { File myFile;
public FileIO(String path) { myFile = new File(path); }
public boolean deleteFile() { return myFile.delete(); }
public File getFile() { return myFile; }
public void setFile(String path) { myFile = new File(path); }
public void createFile() throws InvocationTargetException { try { File dirFile = myFile.getParentFile(); if (dirFile != null) { dirFile.mkdirs(); } myFile.createNewFile(); } catch (IOException e) { throw new InvocationTargetException(e); } }
public boolean printToFile(String text, boolean append, boolean autoFlush) throws InvocationTargetException { FileWriter fWriter; PrintWriter pWriter; boolean successFlag = true; try { fWriter = new FileWriter(myFile, append); } catch (IOException e) { throw new InvocationTargetException(e); } pWriter = new PrintWriter(fWriter, autoFlush);
pWriter.println(text); if (pWriter.checkError()) { successFlag = false; } // The file streams should close and flush on method exit // but to be safe, always explicitly close(): pWriter.close();
return successFlag; }
public String readFile() throws InvocationTargetException { FileReader fReader; BufferedReader bReader; String txtLine = "";
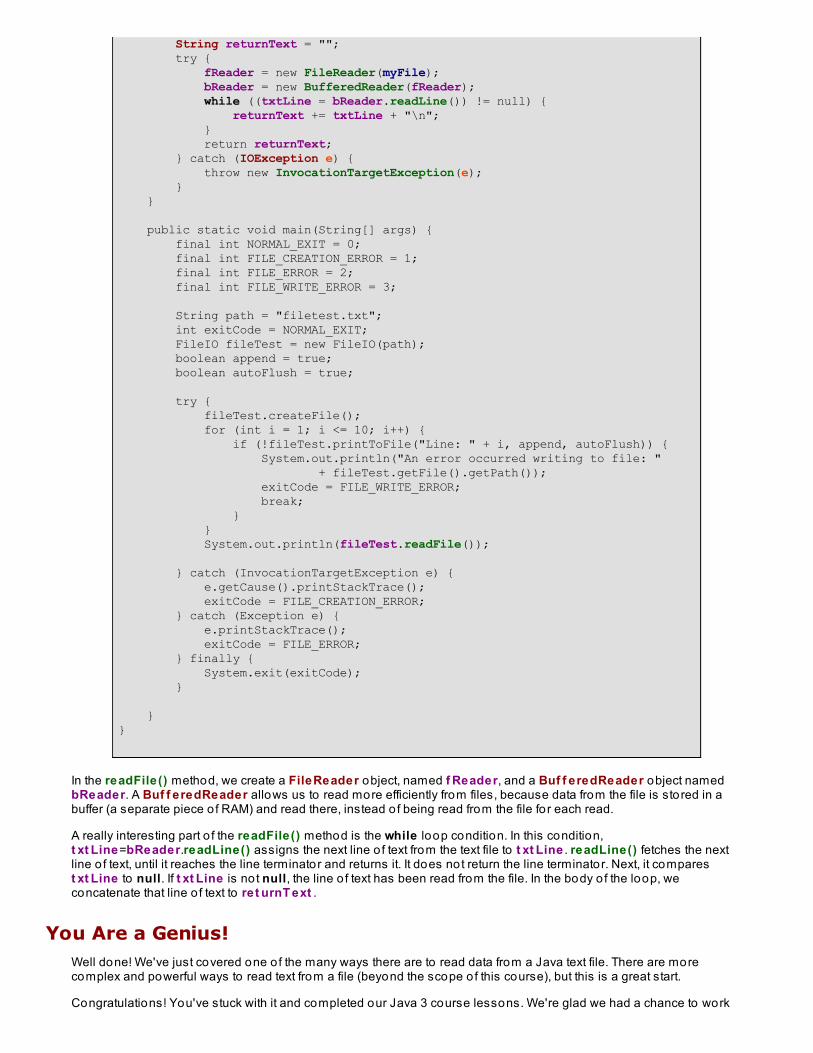
String returnText = ""; try { fReader = new FileReader(myFile); bReader = new BufferedReader(fReader); while ((txtLine = bReader.readLine()) != null) { returnText += txtLine + "\n"; } return returnText; } catch (IOException e) { throw new InvocationTargetException(e); } }
public static void main(String[] args) { final int NORMAL_EXIT = 0; final int FILE_CREATION_ERROR = 1; final int FILE_ERROR = 2; final int FILE_WRITE_ERROR = 3;
String path = "filetest.txt"; int exitCode = NORMAL_EXIT; FileIO fileTest = new FileIO(path); boolean append = true; boolean autoFlush = true;
try { fileTest.createFile(); for (int i = 1; i <= 10; i++) { if (!fileTest.printToFile("Line: " + i, append, autoFlush)) { System.out.println("An error occurred writing to file: " + fileTest.getFile().getPath()); exitCode = FILE_WRITE_ERROR; break; } } System.out.println(fileTest.readFile());
} catch (InvocationTargetException e) { e.getCause().printStackTrace(); exitCode = FILE_CREATION_ERROR; } catch (Exception e) { e.printStackTrace(); exitCode = FILE_ERROR; } finally { System.exit(exitCode); }
}}
In the readFile() method, we create a FileReader object, named f Reader, and a Buf f eredReader object namedbReader. A Buf f eredReader allows us to read more efficiently from files, because data from the file is stored in abuffer (a separate piece o f RAM) and read there, instead o f being read from the file fo r each read.
A really interesting part o f the readFile() method is the while loop condition. In this condition,t xt Line=bReader.readLine() assigns the next line o f text from the text file to t xt Line . readLine() fetches the nextline o f text, until it reaches the line terminator and returns it. It does not return the line terminator. Next, it comparest xt Line to null. If t xt Line is not null, the line o f text has been read from the file. In the body o f the loop, weconcatenate that line o f text to ret urnT ext .
You Are a Genius!Well done! We've just covered one o f the many ways there are to read data from a Java text file. There are morecomplex and powerful ways to read text from a file (beyond the scope o f this course), but this is a great start.
Congratulations! You've stuck with it and completed our Java 3 course lessons. We're glad we had a chance to work

with you in the course, and to help you to achieve your Java goals. Java 4 continues with more useful andempowering Java topics, including Swing GUI Building, Databases, and Multi-Threaded Programs. We hope to seeyou there.
Copyright © 1998-2014 O'Reilly Media, Inc.
This work is licensed under a Creative Commons Attribution-ShareAlike 3.0 Unported License.See http://creativecommons.org/licenses/by-sa/3.0/legalcode for more information.