java jazz up
TRANSCRIPT

Jan-08 Java Jazz Up 1

2 Java Jazz Up Jan-08

Jan-08 Java Jazz Up 3
January 2008 Volume I Issue VII
“Learning new technologies demandsindividuals to work together to
construct shared understandings andknowledge.”
Published by
RoseIndia
JavaJazzUp Team
Editor-in-Chief
Deepak Kumar
Editor-Technical
Ravi Kant
Sr. Graphics Designer
Suman Saurabh
Graphics Designer
Santosh KumarAmardeep Patel
Editorial
Register with JavaJazzUp
and grab your monthly issue
“Free”
Dear Readers,
We are back here with the Christmas cum New Year(Jan’ 2008) issue of Java Jazz-up. The current editionis specially designed for the sprouting technocrats. Thisissue highlights the interesting Java technologiesespecially for the beginners.
Though it was a hard job to simplify the complexities ofthe technologies like JBoss AS, Hibernate 3.0, Ant tool,struts 2, JSF and Design Patterns. Still our team hasdone a marvelous work in making it easy and simpler forthe new programmers regime. This issue reflects ourconsistent attempts to avail the quality technologicalupdates that enforce the readers to appreciate it a lotand be a part of its Readers Community.
Java News and Updates section provides the latestupdates of the things happening around the globemaking the readers aware of the java technologicaladvancement. In this section, you will know the newfeatures introduced in the existing tools, utilities,application servers, IDEs, along with the Java APIupdates.
The set of articles conferring technologies like Designpatterns, JSF, Hibernate 3.0, Integrating varioustechnologies like JSF, Spring, Hibernate together etc.are provided in such a manner that even a novicelearns and implements the concepts in a very easymanner.
We are providing it in a PDF format so that you canview and even download it as a whole and get its hardcopy.
Please send us your feedback about this issue andparticipate in the Reader’s Forum with your problems,issues concerned with the topics you want us toinclude in our next issues.
Editor-in-ChiefDeepak KumarJava Jazz up

4 Java Jazz Up Jan-08
05 Java News | Apple launched a stack of patches recently fixing at least 18 securityvulnerabilities in its implementation of Java for Mac users. This Java update targets to Macsystems running OS X 10.4 (Tiger) and earlier versions.Apple claims that none of thevulnerabilities patched in the Java roll-up are there now in OS X 10.5 (Leopard).
07 Java Developers Desk: Annotations| Sun Microsystem added the features likeannotation to make the development easier and more efficient in jdk 5. The mainobjective to develop the annotations is to make the development easier
13 JBoss Application Server| JBoss is a free, open source application server under the LGPLlicense that is widely used for developing and deploying enterprise Java applications (J2EE),Web applications, and Portals.
15 EJB 3.0 | Enterprise beans are the Java EE server side components that run inside the ejbcontainer and encapsulate the business logic of an enterprise application. Enterprise applicationsare the software applications developed intended to use at large scale.
23 XML and JAXP | “XML is a cross-platform, software and hardware independent tool fortransmittingin formation”
36 Hibernate with Annotation |The Java 5 version has introduced a powerful way to providethe metadata to the JVM. The mechanism is known as Annotations.
39 Introduction to Ant |Ant is a platform-independent build tool that specially supports for theJava programming language.
42 Struts2 Data Tags | Apache Struts is an open-source framework used to develop Java webapplications. We started introducing struts generic tags in the November issue. In this section,we will continue further with the data tags (generic tags) provided with struts 2 frameworkand the rest will be included in the subsequent issues of the magazine.
51 Integrating JSF, Spring and Hibernate | This article explains integrating JSF (MyFaces),Spring and Hibernate to build real world User Login and Registration Application usingMySQL as database. This application lets the new user create an account and existing useraccess the application by user name and password.
77 Facelet| Facelet is a view technology for Java Server Faces (JSF) that allows building compositeviews more quickly and easily than with JSP which is the default view technology for JSF. JSPpages are compiled into servlets but it’s not the case with Facelets because Facelet pages areXML compliant and its framework uses a fast SAXbased compiler to build views
90 Design Patterns | Behavioral Patterns Behavioral patterns are those patterns, which arespecifically concerned with communication (interaction) between the objects. The interactionsbetween the objects should be such that they are talking to each other and are still looselycoupled.
96 Tips & Tricks| Copy content from one file to another This example explains how to copycontents from one file to another file. Copy file is one of the good use of io package of Java.The logic of program is explained below:
104 Advertise with Us | We are the top most providers of technology stuffs to the java community.
105 Valued JavaJazzup Readers Community | We invite you to post Java-technologyoriented stuff. It would be our pleasure to give space to your posts in JavaJazzup.
Content

Jan-08 Java Jazz Up 5
Java News and ReleasesI. Apple Patches Java, OS X and Safari 3Flaws
Apple launched a stack of patches recentlyfixing at least 18 security vulnerabilities in itsimplementation of Java for Mac users. ThisJava update targets to Mac systems runningOS X 10.4 (Tiger) and earlier versions.Apple claims that none of the vulnerabilitiespatched in the Java roll-up are there now in OSX 10.5 (Leopard). However, a fair number ofthe fixes in the patch batch for OS X also applyto Leopard.
II. Secunia aims to be leadingvulnerability intelligence provider
It is Secunia’s ambition to be the leadingvulnerability intelligence provider and distributorin the world - second to none.
They have detected few of the vulnerability inthe Sun Java System Web Proxy Server, Thesevulnerabilities can be exploited by maliciouspeople to conduct cross-site scripting attacks.
A such kind of vulnerability is reported in 4.xversions prior to 4.0.6. It is being illustratedthrough an example: Input passed viaunspecified parameters within the View ErrorLog functionality is not properly sanitized beforebeing returned to the user. This can beexploited to execute arbitrary HTML and scriptcode in a user’s browser session in context ofan affected site.
Solution is just to update Sun Java SystemWeb Proxy Server 4.x to version 4.0.6.
Another vulnerability is reported in 4.x versionsprior to 4.0.6 and 3.x versions prior to 3.6SP11. It is illustrated with an example:Input passed via unspecified parameters withinthe View URL Database functionality is notproperly sanitised before being returned to theuser. This can be exploited to execute arbitraryHTML and script code in a user’s browsersession in context of an affected site.
Solution is just to update Sun Java SystemWeb Proxy Server 3.x to version 3.6 ServicePack 11.
III. JetBrains added Ruby, Groovy toJava IDE
Now the plug-ins for dynamic languages areavailable. Recently JetBrains has unveiled theplug-ins that allows the users of its IntelliJ IdeaIDE to accommodate Groovy and Rubyprogramming.
The IDE highly supports java development, ison the way of expansion to accommodate newlypopular dynamic languages. To meet thepurpose, JetBrains is offering its JetGroovyPlugin 1.0 for Groovy and Grails frameworkdevelopers. It is also available for Rubydevelopment as the Ruby Plugin 1.0.
IV. Spring Integration: a central service andmessage busRecently, SpringSource announced the creationof Spring Integration, a project aimed to providea central service and message bus inside theSpring Framework. This is built on the Spring’salready-impressive capabilities for providingsimple models for using services. SpringIntegration is a logical next step for Spring, as

6 Java Jazz Up Jan-08
Java news and releases
it already provides services for JMS, remoting,scheduling, email, lifecycle management,transaction management, event publication andsubscription, and transaction management.
The benefit is that a Spring configuration canmanage all of the communication protocol, suchthat the service barely has to know it’s a servicefor an ESB at all.
V. Major update to WebSphere XD DataGridshipped
Recently IBM WebSphere XD DataGrid hasshipped a major update to the ObjectGridfunction known as iFix 3. It includes theObjectGrid data grid middleware. ObjectGridprovides an embeddable distributed memoryplatform for implementing complex eventprocessing, network attached memory, HTTPSession management, next generation scalableOLTP databases or XTP style applications. Itprovides Map based APIs or an EntityManagerstyle API as well as a stored procedure like API.It’s very lightweight and scales from a pair ofJVMs to thousands distributed across multipledata centers.
VI. Trace Modeler v1.0 released
Trace Modeler v1.0 has been released. It is aneasy-to-use and smart UML sequence diagrameditor that provides immediate and automaticlayout of UML sequence diagrams and simpledrag and drop interface. It’s cross-platform i.e.runs on any platform. Its main benefit is that itcan save much amount of time. It instantlyupdates a diagram’s layout whenever it changes,
freeing you to focus on the actual content.Furthermore, its layout engine ensures thatevery diagram is visually pleasing andstructurally correct. Trace Modeler also offersa couple of unique features like inlining messagecalls, splitting activations, smart flow-basedcomment connectors, right-to-left diagramlayout and full bidi-text support for non-Western scripts, control flow highlighting,automatic object lifetimes.
VII. Apache ActiveMQ 5.0 released
Apache, powerful and flexible httpd server,comes with an unrestrictive license. ApacheActiveMQ is the most powerful open sourceMessage Broker and Enterprise IntegrationPatterns provider. It has recently releasedActiveMQ 5.0 with lot of new features like AMQmessage store, message cursors, blobmessages, a command agent, enterpriseintegration patterns, logging a warning,message transformation and mirrored queues.
VIII. JSFUnit 1.0 Beta 1 released
JSFUnit 1.0, JSF Testing Tool, has been releasedrecently by Jboss. This Beta release allowstesting JSF applications based on cactus andJunit. It allows complete integration testing andunit testing of JSF applications. This versionwill use three different testing tools In-containerTesting Framework, Framework for JSF StaticAnalysis Testing, JSFTimer for PerformanceTesting of the JSF Lifecycle. JSFUnit allowstesting of a running JSF application and evenlooking at the HTML output of each clientrequest.

Jan-08 Java Jazz Up 7
Java Developers Desk: AnnotationsAn Introduction to Annotations
Sun Microsystem added the features likeannotation to make the development easier andmore efficient in jdk 5. The main objective todevelop the annotations is to make thedevelopment easier. Annotations behaves likethe meta. The literal meaning of meta data isdata about data. Java also signifies thismeaning. Annotations are like meta data, meansyou are free to add your code and can alsoapply them to variables, parameters, fields typedeclarations, methods and constructors.Metadata is also used to create thedocumentation to perform rudimentary compiletime checking and even for tracking down thedependencies in code. XDoclet contains all thesefeatures and is widely used. Annotations providea means of indicating about methods, classes,dependencies, incompleteness and also aboutthe references on other methods and classesrespectively. Quoting from Sun’s official site,“It (annotation-based development) lets usavoid writing boilerplate code under manycircumstances by enabling tools to generate itfrom annotations in the source code. This leadsto a declarative programming style where theprogrammer says what should be done andtools emit the code to do it.”
Annotation is the way of associating theprogram elements with the meta tags so thatthe compiler can extract program behavior tosupport the annotated elements to generateinterdependent code when necessary.
Fundamentals of annotations
While going through the annotations youshould consider two things. The first one isthe “annotation” itself and second one is the“annotations types”. An annotation is themeta tag, used to give some life to the codeyou are using. While annotation type is usedto define annotations so that you can use themwhile creating your own custom annotations.
An annotation type definition appends an “at”@ sign at the start of the interface keywordwith the annotation name. On the other hand,an annotation includes the “at” @ sign followedby the annotation type. You can also add the
data within the parenthesis after the annotationname. Lets illustrate the concept more clearlyby using some examples.
Defining an annotation (Annotation type)public @interface Example {String showSomething();}
Annotating the code (Annotation)Example (showSomething=”Hi! How r you”)public void anymethod() {....}
Annotation Types:
Three types of annotations types are there injava.
I. Marker:
Like the marker interface, marker annotationsdoes not contain any elements except the nameitself. The example given below clarifies theconcept of marker interface.
Example:
public @interface Example{ } Usage:
@Examplepublic void anymethod() {
——————}
II. Single-value:
This type of elements provide only single value.It means that these can be represented withthe data and value pair or we can use theshortcut syntax (just by using the value onlywithin the parenthesis).
Example:
public @interface Example{ String showSomething(); }

8 Java Jazz Up Jan-08
Usage: @Example (“Hi ! How r you”) public void anymethod(){ ———— }
Multi-value or Full-value
These types of annotations can have multipledata members. Therefore use full valueannotations to pass the values to all the datamembers.
Example:
public @interface Example{ String showSomething(); int num; String name; }
Usage:
@Example (showSomething = “Hi! How ryou”, num=5, name=”amit” ) public void anymethod{ // code here }
Rules defining the Annotation type:
Here are some rules that one should followwhile defining and using annotations types
• Start the annotation declaration startingwith the symbol “at” @ following theinterface keyword that should follow theannotation name.
• Method declaration should not throwany exception.
• Method declaration should not containany parameter.
• Method using annotations should returna value, one of the types given below:
• String• primitive• enum• Class• array of the above types
Categorizing Annotations:JDK 5 contains two categories ofannotations:
Simple annotations:These types of annotations are used toannotate the code only. We can not usethese types of annotations for creating thecustom annotation type.
Meta annotations:Also known as annotations of annotationsare used to annotate the annotation-typedeclaration.
I. Simple annotations:JDK 5 includes three types of simpleannotations.
• Override• Depricated• Suppresswarning
JDK 5 does not include many built-inannotations but it facilitates to core java tosupport annotation features. Now will discussin brief each of the above simple annotationtypes along with examples.
1) Override annotation:
The override annotation ensures that theannotated method is used to override themethod in the super class. If the methodcontaining this type of annotation does notoverride the method in the super class thenthe compiler will generate a compile time error.
Lets take an example and demonstrate whatwill happen if the annotated method does notoverride the method in the super class.
Example 1:
public class Override_method{@Overridepublic String toString(){return super.toString() + “Will generate an compile time error.”;}}
Java Developers Desk: Annotations

Jan-08 Java Jazz Up 9
Suppose there is spell mistake in the methodname such as the name is changed fromtoString to toStrimg. Then on compiling thecode will generate the message like this:Compiling 1 source file to D:tempNew Folder(2)TestJavaApplication1buildclassesD:tempNew Folder(2)TestJavaApplication1srctestmyannotationTest_Override.java:24: methoddoes not override a method from itssuperclass@Override1 errorBUILD FAILED (total time: 0 seconds)
2) Deprecated annotation:These types of annotations ensure that thecompiler warns you when you use thedeprecated element of the program. Theexample given below illustrates this concept.
Example: Lets first create the class containingthe deprecated method.
public class Deprecated_method{@Deprecatedpublic void showSomething() {System.out.println(“Method has beendepricated’”);}}
Now lets try to invoke this method from insidethe other class:
public class Test_Deprication {public static void main(String arg[]) throwsException {new Test_Deprication();}public Test_Deprication() {Deprecated_method d = newDeprecated_method();d.showSomething();}
The method showSomething() in the aboveexample is declared as the deprecatedmethod. That means we can’t further use this
method any more. On compiling the classDepricated_method does not generate anyerror. While compiling the classTest_Deprication generates the message likethis:Compiling 1 source file to D:tempNew Folder(2)TestJavaApplication1buildclassesD:tempNew Folder(2)TestJavaApplication1srctestmyannotationTest_Deprication.java:27:warning: [deprecation] showSomething() intest.myannotation.Deprecated_method hasbeen deprecatedd.showSomething();1 warning
3) Suppresswarning annotation:
These types of annotations ensure that thecompiler will shield the warning message in theannotated elements and also in all of its sub-elements. Lets take an example:
Suppose you annotate a class to suppress awarning and one of its method to suppressanother warning, then both the warning will besuppressed at the method level only. Letsdemonstrate it by an example:
public class Test_Depricated {public static void main(String arg[]) throwsException {new TestDepricated().showSomething();}@SuppressWarnings({“deprecation”})public void showSomething() {Deprecation_method d = newDeprecation_method();d.showSomething();}}
This example is suppressing the deprecationwarnings that means we can’t see the warningsany more.
Note: Applying annotation at most deeplynested elements is a good idea. It is better toapply annotations at the method level ratherthan the class to annotate a particular method.
Java Developers Desk: Annotations

10 Java Jazz Up Jan-08
II. Meta-Annotations (AnnotationTypes):
There are four types of Meta annotations (orannotations of annotations) defined by theJDK 5. These are as follows:
• Target• Retention• Documented• Inherited
1) Target annotation:
Target annotation specifies the elements of aclass to which annotation is to be applied. Hereis the listing of the elements of the enumeratedtypes as its value:
• @Target(ElementType.TYPE)— applicableto any element of a class.
• @Target(ElementType.FIELD)—applicableto field or property.
• @Target(ElementType.PARAMETER)—applicable to the parameters of amethod.
•@Target(ElementType.LOCAL_VARIABLE)—applicable to local variables.
• @Target(ElementType.METHOD)—applicable to method level annotation.
• @Target(ElementType.CONSTRUCTOR)—aplicable to constructors.
•@Target(ElementType.ANNOTATION_TYPE)—specifies that the declared type itself isan annotation type.
Here is an example that demonstrates thetarget annotation:
Example:
@Target(ElementType.METHOD)public @interface Test_Element {public String doTestElement();}
Now lets create a class that use theTest_Element annotation:
public class Test_Annotations {public static void main(String arg[]) {new Test_Annotations().doTestElement();}@Test_Target(doTestElement=”Hi ! How ryou”)public void doTestElement() {System.out.printf(“Testing Target Elementannotation”);}}
The @Target(ElementType.METHOD)specifies that this type of annotation can beapplied only at method level. Compiling andrunning the above program will work properly.Lets try to apply this type of annotation toannotate an element:
public class Test_Annotations {@Test_Target(doTestElement=”Hi! How ryou”)private String str;public static void main(String arg[]) {new Test_Annotations().doTestElement();}public void doTestElement() {System.out.printf(“Testing Target Elementannotation”);}}
Here we are trying to apply
@Target(ElementType.METHOD) at thefield level by declaring the element privateString str; after the@Test_Target(doTestElement=”Hi ! How ryou”) statement.On compiling this code will generate an errorlike this:
“Test_Annotations.java”:D:R_AND_DTest_AnnotationsrctestmyannotationTest_Annotations.java:16:annotation type not applicable to this kind ofdeclaration at line16, column 0
Java Developers Desk: Annotations

Jan-08 Java Jazz Up 11
@Test_Target(doTestElement=”Hi ! How ryou”)^Error in javac compilation
2) Retention annotation:
These types of annotation specify where andhow long annotation with this types are to beretained. There are three type of Retentionannotations are of three types.
• RetentionPolicy.SOURCE: This type ofannotation will be retained only atsource level and the compiler will ignorethem.
• RetentionPolicy.CLASS: This type ofannotation will be retained at thecompile time the virtual machine (VM) willignore them.
• RetentionPolicy.RUNTIME: Virtualmachine will retained the annotation ofthis type and they can be read only atrun-time.
• Lets demonstrate that how this type ofannotations are applied by taking anexample using RetentionPolicy.RUNTIME.
Example:
@Retention(RetentionPolicy.RUNTIME)public @interface Retention_Demo {String doRetentionDemo();}
This example uses the annotation type@Retention(RetentionPolicy.RUNTIME) thatindicates the VM will retained yourRetention_Demo annotation so that it can beread effectively at run-time.
3) Documented annotation:
This type of annotation should be documentedby the javadoc tool. javadoc does not includethe annotation by default. Include the
annotation type information by using@Documented in the generated document. Inthis type of annotation all the processing is doneby javadoc-like tool.
The given example demonstrates the use ofthe @Documented annotations.
Example:
@Documentedpublic @interface Documented_Demo {String doTestDocumentedDemo();}
Next, make changes in Test_Annotations classas follows:public class Test_Annotations {public static void main(String arg[]) {newTest_Annotations().doTestRetentionDemo();newTest_Annotations().doTestDocumentedDemo();}@Retention_Demo(doTestRetentionDemo=”Hello retentionannotation”)public void doTestRetentionDemo() {System.out.printf(“Testing ‘Retention’annotation”);}@Documented_Demo(doTestDocumentedDemo=”Hello Testdocumentation”)public void doTestDocumentedDemo() {System.out.printf(“Testing ‘Documented’annotation”);}}
4) Inherited Annotation:
This annotation is little bit complex. It inheritsthe annotated class automatically. If you specify@Inherited tag before defining a class thenapply the annotation at your class and finallyextend the class then the child class inheritsthe properties of the parent class automatically.Lets demonstrate the benefits of using the
Java Developers Desk: Annotations

12 Java Jazz Up Jan-08
@Inherited tag by an example:
Example:Lets first, define the annotation:
@Inheritedpublic @interface ParentObjectDemo {boolean isInherited() default true;String showSomething() default “Showanything?”;}
Now, annotate the class with ourannotation:
@ParentObjectDemopublic Class ChildObjectDemo {}The above example shows that you do notneed to define the interface methods insidethe implemented class. The @Inherited tagautomatically inherits the methods for you.Suppose you define the implementing class inthe old-fashioned-java-style then let us seethe effect of doing this:
public class ChildObjectDemo implementsParentObjectDemo {public boolean isInherited() {return false;}public String showSomething() {return “”;}public boolean equals(Object obj) {return false;}public int hashCode() {return 0;}public String toString() {return “”;}public Class annotationType() {return null;}}
Have you seen the difference? You have toimplement all the methods of the parentinterface. You will have to implement theequals(), toString(), and the hashCode()methods of the Object class and also theannotation type method of thejava.lang.annotation.Annotation class. You willalso have to include all these methods in yourclass regardless of whether you areimplementing all these methods or not
Java Developers Desk: Annotations
Jan-08 Java Jazz Up 13
Introduction to JBoss Application Server
JBoss is a free, open source application serverunder the LGPL license that is widely used fordeveloping and deploying enterprise Javaapplications (J2EE), Web applications, andPortals. It provides the full features of J2EE1.4 such as EJB container as well as extendedenterprise services (EJB) including such asdatabase access (JDBC), transactions (JTA),messaging (JTS), naming (JNDI) andmanagement support (JMX). It also providesenterprise-class security, and resourcemanagement.
JBoss is a cross-platform Java-based AS, dueto this reason it is usable on any operatingsystem that Java supports.
Features of JBoss AS:
JBoss is advanced middleware with a full J2EEbased personality.
I. Open Standards and Open Source:JBoss is an open source J2EE 1.4 certified AShaving business friendly license that allows thedevelopers to free download, use, embed, anddistribute the JBoss AS.
II. Simplicity:JBoss AS supports full features of J2EE 1.4including EJB, JCA, JSP, JMX, HTTP etc. Itprovides a bridge for the enterprise Javaprogramming model, and enables developersto get started quickly and easily with theseapplications.
III. Clustering and High Availability:JBoss AS provides the clustering of any javaobjects (EJB, HTTP, POJO), load balancing, anddistributed deployment features that arerequired for deploying large scalable enterpriseapplications.
IV. 100% Pure Java:JBoss is pure Java-based AS. Due to thisreason, it is interoperable with most operatingsystems that are capable of running a JavaVirtual Machine (JVM). These OS includes RedHat Enterprise Linux, SUSE Linux, MicrosoftWindows, Sun Solaris, HP-UX, and others.
V. Supporting for Breed Technologies:JBoss AS integrates JAAS, Hibernate, ApacheTomcat, EJB 3.0, Aspect Oriented Programming(AOP) and JBoss Cache into its microkernelfoundation approach that is based on JavaManagement eXtensions (JMX).
JBoss AS Versions:
JBoss Application Server has been released inseveral versions with their sub-versions listedbelow.
• JBoss Application Server was started asan open source EJB container in 1999.
• JBoss 2.x was a full J2EE 1.2 basedserver.· JBoss 3.x was a J2EE 1.3 basedserver.
• JBoss 4.x is our current J2EE 1.4production version.
• JBoss 5.x as beta version is a Java EE 5certified based server.
• JBoss AS 4.2.x versions support forEJB3.
JBoss 3.x was released to provide fullframework for building such applications thatare based on a Java microkernel (JMX) andservice oriented architecture (SOA). WhileJBoss 4.x explores aspect oriented middleware(AOM) and Java based middleware independentof J2EE.
JBoss AS 5.x Beta versions include thefollowing core technologies such as POJO basedmicrocontainer, EJB 3.0, Hibernate 3.2 - JPAcertified, JBoss Messaging, JBoss WebServices2.0 (JAX-WS), JBoss Seam 1.1, etc.JBoss AS Architecuture:
JBoss Application Server

14 Java Jazz Up Jan-08
Working Process of JBoss AS:
The JBoss creates an MBean server instancein one of the first steps when it starts up. Then,it plugs the manageable MBean components byregistering with the MBean server that is aregistry for Mbeans.
JBoss implements the classloading M-Let servicedynamically, which treats as an agent service.This service allows registering of the MBeans(specified in a text based configuration files) tothe MBean server.
The functionality is provided by MBeans actuallyinstead of the JMX MBean server. The MBeanserver is only the sense of a microkernelaggregator component that interconnects theMbeans.
In the architecture of Jboss we can also seethe EJB Container as the core implementationof JBoss server that supports its Plugins,InstancePool, EntityPersistenceManager,StatefulSessionPersistenceManager, to provideEJB services to a particular EJB.
Getting familiar with JBoss AS 4.2.1.GA
JBoss AS 4.2.1.GA is the first bug fixingrelease version of the JBoss Application Serverv4.2 series. Its aim is to fix the most importantbugs against JBossAS v4.2.0.GA that arereported by the community. There are a fewminor components are upgraded (Hibernate,JacORB, JBoss TS, JBoss Remoting and SunJSF) in this released version.
In this tutorial of JBoss AS, we have used JBossAS 4.2.1.GA version in which you will learn,how to deploy and run an EJB-based application.
I. Downloading and Installing JBoss AS4.2.1.GA
The JBoss application server 4.2.1.GA isavailable as a free download from the JBosswebsite. You can download this version fromhttp://labs.jboss.com/jbossas/downloads/URL by clicking the Download button or clickhere to extract files to save in your disk.JBoss 4.2.1.GA Platform is easy to install. Itonly requires at least a Java 1.4 or Java 1.5JVM. Apart from this, also make sure for theJAVA_HOME environment variable that is to beset to point the JDK installation.
Once you have installed JBoss 4.2.1.GA, thenext step is to learn that how to start the JBossserver.
II. Starting the Server
After installing JBoss AS, you will find a bindirectory inside the main JBoss directory, whichcontains various scripts. Click on the run.batfile to start the server on Windows, and thensee the log messages from all the JBosscomponents as they are deployed and startedup. The last message (obviously with differentvalues for the time and start-up speed) shouldlook like the following.
This message verifies that the JBoss as a webserver is running on port 8080 (Make sure youdon’t have anything else already on yourmachine using that port).
III. Stopping the Server
To stop the server, you can either press Ctrl+Con the console or you can run the shutdownscript shutdown.bat from the bin directory.Alternatively, you can use the managementconsole. Look for type=Server under thejboss.system domain and invoke the shutdownoperation.
JBoss Application Server
Jan-08 Java Jazz Up 15
EJB 3.0Introduction To Enterprise Java Bean 3.0(EJB 3.0)
Enterprise beans are the Java EE server sidecomponents that run inside the ejb containerand encapsulate the business logic of anenterprise application. Enterprise applicationsare the software applications developedintended to use at large scale. Theseapplications involve large number of dataaccessing concurrently by many users.Enterprise beans are used to perform varioustypes of task like interacting with the client,maintaining session for the clients retrieving andholding data from the database andcommunicating with the server.
The Enterprise JavaBeans specification definesan architecture for a transactional, distributedobject system based on server-sidecomponents. These server-side componentsare called enterprise beans or distributed objectsthat are hosted in Enterprise JavaBeancontainers where it provide remote services forclients distributed throughout the network.
The EJB Container
An EJB container is nothing but the programthat runs on the server and implements theEJB specifications. EJB container provides specialtype of the environment suitable for runningthe enterprise components. The EJB containermanages remote access to the bean, security,persistence, transactions, concurrency, andaccess to and pooling of resources. It hosts anenterprise bean in the same manner that theJava Web Server hosts a servlet or an HTML.An enterprise bean can’t perform functionsoutside of an EJB container.
Migration from EJB2 to EJB3
Migrating to EJB 3.0 is a big step towardssimplifying the process of developing EJBs,which reduces lots of complexities, time andcost. In spite of being rich featured, developersfeel complex working with previous versions ofEJB.
Migration from EJB 2.1 to EJB 3.0
Lets go through some points justifying reasonsto adopt EJB 3.0 instead of EJB 2.1:
1. In EJB 2.1, home interface extends thejavax.ejb.EJBHome interface and localhome interface extends thejavax.ejb.EJBLocalHome interface. TheEJB 2.1 remote interface extends thejavax.ejb.EJBObject interface and localinterface extends thejavax.ejb.EJBLocalObject interface. In EJB3.0, home and component interfaces arereplaced with POJI business interfaces.
2. EJB 2.1 needs the developer to implementa variety of callback methods in the beanclass, like ejbActivate(), ejbPassivate(),ejbLoad(), and ejbStore(), most of whichwere never used. EJB 3.0 doesn’t forceto implement any of these methods andinstead can designate any arbitrarymethod as a callback method to receivenotifications for life cycle events.
3. In EJB 2.1, session bean implements theSessionBean interface and entity beanimplements the EntityBean interface. InEJB 3.0, session and entity bean classesare POJOs and do not implement theSessionBean and EntityBean interfaces.
4. The deployment descriptor, which specifiesthe EJB name, the bean class name, theinterfaces, the finder methods etc.is notrequired because they are replaced bymetadata annotations in the bean classes.Annotations are available in JDK 5.0 soyou need JDK 5.0 to develop EJB 3.0 EJBs.
5. In EJB 2.1, client application finds areference to entity and session beanobjects using JNDI name but in EJB 3.0,client finds them using dependencyannotations like @Resource, @Inject, and@EJB.
6. In EJB 2.1, developers used their own wayto perform database specific operations

16 Java Jazz Up Jan-08
like primary key generation while EJB 3.0provides support for several database-specific operations. The O/R mappingmodel has intrinsic support for native SQL.The O/R mapping is specified usingannotations.
7. Runtime services like transaction andsecurity are often implemented as theinterceptor methods managed by thecontainer. However, in EJB 3.0 developerscan write custom interceptor. Sodevelopers have control for the actionslike committing transaction, security check,etc.
What is new in EJB 3.0?
Now, have a look over the new features of EJB3.0 that achieved some simplicity over theprevious EJB APIs in various ways:
1. EJBs are now Plain Old Java Objects(POJOs)
2. No need of home and object interface.
3. No need of any component interface.
4. Unnecessary artifacts and lifecyclemethods are optional
5. Use of java annotations instead of usingXML descriptors
6. Use of dependency injection to simplifyclient view
7. Simplify APIs to make flexible for bean’senvironment
8. Defaults are assumed whenever possible
Types of EJB
There are three different types of EJB that aresuited to different purposes:
• Session EJB—A Session EJB is usefulfor mapping business process flow (orequivalent application concepts). Session
EJBs commonly represent “pure”functionality that is created, as it isneeded.
• Entity EJB—An Entity EJB maps acombination of data (or equivalentapplication concept) and associatedfunctionality. Entity EJBs are usuallybased on an underlying data store andwill be created based on that data withinit.
• Message-driven EJB—A Message-driven EJB is very similar in concept to aSession EJB, but is only activated whenan asynchronous message arrives.
Session Bean on EJB Container
Session beans are divided into two parts.
• Stateless: A session bean is theenterprise bean that directly interactswith the user and contains the businesslogic of the enterprise application. Asession bean represents a single clientaccessing the enterprise applicationdeployed on the server by invoking itsmethod. An application may containmultiple sessions depending upon thenumber of users accessing to theapplication.
• Stateful: These types of beans use theinstance variables that allow the datapersistent across method invocationbecause the instance variables allowpersistence of data across method
EJB 3.0

Jan-08 Java Jazz Up 17
invocation. The client sets the data tothese variables, which he wants topersist. Stateful session beans have theextra overhead for the server tomaintain the state than the statelesssession bean.
• In this tutorial, you will learn how astateless EJB application is developedusing an Application Server Jboss 4.2.0.So lets first see the life cycle of aStateless Session Bean.
Life Cycle of a Stateless Session Bean:
Since the Stateless session bean does notpassivates across method calls therefore astateless session bean includes only twostages. Whether it does not exist or ready formethod invocation. A stateless session beanstarts its life cycle when the client first obtainsthe reference of the session bean. For this,the container performs the dependencyinjection before invoking the annotated@PreConstruct method if any exists. Afterinvoking the annotated @PreConstructmethod the bean will be ready to invoke itsmethod by the client.
The above figure demonstrates how theStateless Session Beans are created anddestroyed.
The container calls the annotated @PreDestroymethod while ending the life cycle of the sessionbean. After this, the bean is ready for garbagecollection.
In this tutorial, we are going to develop aStateless Session Bean Application namedexample. The purpose of example is toperform the mathematical operations such asAddition, Subtraction, Multiplication, andDivision.
The example application consists of anenterprise bean, which performs thecalculations, and a web client.
There are following steps that you have to followto develop a calculator JEE application.
1. Create the enterprise bean:CalculatorBean
2. Create web clients: index.jsp,form.jsp, WebClient.jsp
3. Deploy example onto the server.4. Using a browser, run the web client.
1.Creating the enterprise bean:The enterprise bean in our example is a statelesssession bean called CalculatorBean. Thesource code for CalculatorBean is in“com.javajazz/examples/ejb3/stateless”directory.
Creating CalculatorBean requires these steps:
1) Coding the bean’s Remote businessinterface and Enterprise bean class.
2) Compiling the source code with the Anttool.
(i) Coding the Business Interface
The business interface defines the businessmethods that a client can call remotely. Thebusiness methods are implemented in theenterprise bean class. The source code for theCalculatorRemote business interface is givenbelow.
packagecom.javajazzup.examples.ejb3.stateless;import java.math.*;import javax.ejb.Remote;import java.lang.annotation.*;@Remotepublic interface CalculatorRemote {public float add(float x, float y);public float subtract(float x, float y);public float multiply(float x, float y);public float division(float x, float y);}
EJB 3.0

18 Java Jazz Up Jan-08
Note that, the @Remote annotation decoratingthe interface definition. This lets the containerknow that remote clients will accessCalculatorBean.
(ii) Coding the Enterprise Bean ClassThe enterprise bean class for this example iscalled CalculatorBean. This class implementsthe four business methods (add, subtract,multiply, division) that are defined in theCalculatorRemote business interface. Thesource code for the CalculatorBean class isgiven below.
packagecom.javajazzup.examples.ejb3.stateless;import java.math.*;import javax.ejb.Stateless;import javax.ejb.Remote;@Stateless(name=”CalculatorBean”)@Remote(CalculatorRemote.class)public class CalculatorBean implementsCalculatorRemote{
public float add(float x, float y){return x + y;
} public float subtract(float x, float y){ return x - y; } public float multiply(float x, float y){ return x * y; } public float division(float x, float y){
return x / y; }}
Note that, the @Stateless annotation decoratingthe enterprise bean class. This lets the containerknow that CalculatorBean is a stateless sessionbean.
2. Creating a Web Client
The web client is divided into two pages. Firstis “form.jsp” where a request form is sent tothe client; second is “WebClient.jsp” which iscalled from the “form.jsp” page.
A JSP page is a text-based document thatcontains JSP elements, which construct dynamiccontent, and static template data, expressed
in any text-based format such as HTML, WML,and XML.
The source code for the “form.jsp” is givenbelow.
<html> <head> <title>Calculator</title> </head> <body bgcolor=”pink”> <h1>Calculator</h1> <hr>
<form action=”WebClient.jsp”method=”POST”>
<p>Enter first value: <input type=”text” name=”num1"size=”25"></p> <br>
<p>Enter second value: <input type=”text” name=”num2"size=”25"></p> <br>
<b>Seclect your choice:</b><br> <input type=”radio” name=”group1" value=”add”>Addition<br> <input type=”radio” name=”group1" value=”sub”>Subtraction<br> <input type=”radio” name=”group1" value=”multi”>Multiplication<br> <input type=”radio” name=”group1" value=”div”>Division<br> <p> <input type=”submit”value=”Submit”> <input type=”reset”value=”Reset”></p> </form> </body></html>
The following statements given below in“WebClient.jsp” are used for locating thebusiness interface, creating an enterprise beaninstance, and invoking a business method.
InitialContext ic = new InitialContext();CalculatorRemote calculator =(CalculatorRemote)ic.lookup(“example/CalculatorBean/remote”);
EJB 3.0

Jan-08 Java Jazz Up 19
The classes needed by the client are declaredusing a JSP page directive (enclosed within the<%@ %> characters). Because locating thebusiness interface and creating the enterprisebean are performed only once, this code appearsin a JSP declaration (enclosed within the <%!%> characters) that contains the initializationmethod, jspInit, of the JSP page. A scriptlet(enclosed within the <% %> characters)retrieves the parameters from the request andconverts it to a Float object. Finally, a JSPscriptlet invokes the enterprise bean’s businessmethods, and JSP expressions (enclosed withinthe <%= %> characters) insert the resultsinto the stream of data returned to the client.
The full source code for the WebClient.jsp isgiven below.<%@ page contentType=”text/html;charset=UTF-8" %><%@ pageimport=”com.javajazzup.examples.ejb3.stateless.*,javax.naming.*”%> <%! private CalculatorRemote calculator = null;
float result=0; public void jspInit() { try { InitialContext ic = newInitialContext(); calculator = (CalculatorRemote)ic.lookup(“example/CalculatorBean/remote”);
System.out.println(“Loaded CalculatorBean”); } catch (Exception ex) { System.out.println(“Error:”+ex.getMessage()); } } public void jspDestroy() { calculator = null; }%> <%
try { String s1 =request.getParameter(“num1”);
String s2 = request.getParameter(“num2”);String s3 =
request.getParameter(“group1”); if ( s1 != null && s2 != null ) { Float num1 = new Float(s1);
Float num2 = new Float(s2);if(s3.equals(“add”))result=calculator.add(num1.floatValue(),
num2.floatValue());else if(s3.equals(“sub”))result=calculator.subtract(num1.floatValue(),num2.floatValue());else if(s3.equals(“multi”))result=calculator.multiply(num1.floatValue(),num2.floatValue());elseresult=calculator.division(num1.floatValue(),num2.floatValue()); %> <p> <b>The result is:</b> <%= result %> <p> <%}}// end of try catch (Exception e) { e.printStackTrace (); } %>
The source code for the “index.jsp” is givenbelow that will actual call the client-design form.
<%@page language=”java” %><html><head><title>Ejb3 Stateless Tutorial</title></head><body bgcolor=”#FFFFCC”><p align=”center”><font size=”6"color=”#800000"><b>Welcome to <br>Ejb3-Jboss 4.2.0 Tutorial</b></font>Click <a href=”ejb3/form.jsp”>CalculatorExample</a> to execute Calculator<br></p></body></html>
3. Deploy calculator application on theApplication Server
To deploy the created example application weare going to use Jboss 4.2.0 Application Serverabout which you have read in the previous
EJB 3.0
20 Java Jazz Up Jan-08
section of this Javajazzup issue. So you firstneed to download the following tools to deploythis application.
· JDK 1.5 or Higher· apache-ant-1.7.0· JBoss 4.2.1
Do the following steps to deploy the calculatorapplication:
(i) Make a directory structure. You can Clickhere to extract the readymade directorystructure according to this tutorial.
(ii)Create the essential deployment descriptor.xml files.
build.xml
<?xml version=”1.0"?><project name=”Jboss Tutorials” default=”all”basedir=”.”> <target name=”init”>
<!— Define —> <property name=”dirs.base”value=”${basedir}”/> <property name=”classdir”value=”${dirs.base}/build/classes”/><property name=”src” value=”${dirs.base}/src”/> <property name=”web”value=”${dirs.base}/web”/> <propertyname=”deploymentdescription”value=”${dirs.base}/deploymentdescriptors”/> <property name=”warFile”value=”example.war”/> <property name=”earFile”value=”example.ear”/> <property name=”jarFile”value=”example.jar”/> <property name=”earDir”value=”${dirs.base}/build/ear”/><property name=”warDir”value=”${dirs.base}/build/war”/> <property name=”jarDir”value=”${dirs.base}/build/jar”/>
<!— classpath for Project —><path id=”library.classpath”>
<pathelement path =”libext/servlet-
api.jar”/><pathelement path =”libext/ejb3-
persistence.jar”/><pathelement path =”libext/javaee.jar”/
><pathelement path =”${classpath}”/>
</path> <!— Create Web-inf and classesdirectories —> <mkdir dir=”${warDir}/WEB-INF”/> <mkdir dir=”${warDir}/WEB-INF/classes”/> <!— Create Meta-inf and classesdirectories —> <mkdir dir=”${earDir}/META-INF”/> <mkdir dir=”${jarDir}/META-INF”/> <mkdir dir=”${classdir}”/> </target> <!— Main target —> <target name=”all”depends=”init,build,buildWar,buildJar,buildEar”/> <!— Compile Java Files and store in /build/src directory —><target name=”build” > <javac srcdir=”${src}”destdir=”${classdir}” debug=”true”includes=”**/*.java” >
<classpath refid=”library.classpath”/> </javac>
</target> <!— Create the web archive File —> <target name=”buildWar” depends=”init”> <copy todir=”${warDir}/WEB-INF/classes”> <fileset dir=”${classdir}”includes=”**/*.class” /> </copy> <copy todir=”${warDir}/WEB-INF”> <filesetdir=”${deploymentdescription}/web/”includes=”web.xml” /> </copy> <copy todir=”${warDir}”> <fileset dir=”${web}” includes=”**/*.*” /> </copy>
<!— Create war file and place in eardirectory —> <jar jarfile=”${earDir}/${warFile}” basedir=”${warDir}” /> </target>
EJB 3.0

Jan-08 Java Jazz Up 21
<!— Create the jar File —> <target name=”buildJar” depends=”init”> <copy todir=”${jarDir}”> <fileset dir=”${classdir}”includes=”**/*.class” /> </copy> <copy todir=”${jarDir}/META-INF”> <filesetdir=”${deploymentdescription}/jar/”includes=”ejb-jar.xml,weblogic-cmp-rdbms-jar.xml,weblogic-ejb-jar.xml” /> </copy> <!— Create jar file and place in eardirectory —> <jar jarfile=”${earDir}/${jarFile}”basedir=”${jarDir}” /> </target><!— Create the ear File —> <target name=”buildEar” depends=”init”> <copy todir=”${earDir}/META-INF”> <filesetdir=”${deploymentdescription}/ear”includes=”application.xml” /> </copy> <!— Create ear file and place in eardirectory —> <jar jarfile=”../${earFile}”basedir=”${earDir}” /> <copy todir=”C:/jboss-4.2.0.GA/server/default/deploy/”> <fileset dir=”../”includes=”${earFile}” /> </copy> </target></project>
Put this file in the base (stateless\code)directory.
application.xml
<?xml version=”1.0" encoding=”UTF-8"?><application xmlns=”http://java.sun.com/xml/ns/javaee” xmlns:xsi=”http://www.w3.org/2001/XMLSchema-instance” version=”5"xsi:schemaLocation=”http://java.sun.com/xml/ns/javaee http://java.sun.com/xml/ns/javaee/application_5.xsd”>
<display-name>Stateless Session BeanExample</display-name>
<module><web>
<web-uri>example.war</web-uri><context-root>/example</context-root>
</web></module><module>
<ejb>example.jar</ejb></module>
</application>
Put this file in theStateless\code\deploymentdescriptors\eardirectory.
web.xml<?xml version=”1.0" encoding=”UTF-8"?><!DOCTYPE web-app PUBLIC “-//SunMicrosystems, Inc.//DTD Web Application 2.3//EN” “http://java.sun.com/dtd/web-app_2_3.dtd”><web-app ></web-app>
Put this file in theStateless\code\deploymentdescriptors\webdirectory.
Put all .jsp files in the Stateless\code\webdirectory.
Put all .java files in the Stateless\code\srcdirectory.
(iii)Start command prompt, and go to theStateless\code directory. Then type thecommand as:
C:\Stateless\code>ant build.xmlThe Ant tool will deploy the example.ear fileto the jboss-4.2.0.GA\server\default\deploy directory.4. Running the example application WebClient
Open the web browser and type the followingURL to run the application:
EJB 3.0

22 Java Jazz Up Jan-08
http://localhost:8080/example
Click at the given link as Calculator Example:
Give values to the textbox and choose the desireoption button as Addition then clicks theSubmit button to get the result.
Download the full source code
EJB 3.0

Jan-08 Java Jazz Up 23
XML and JAXPIntroduction to XML
About XML
“XML is a cross-platform, software andhardware independent tool for transmittinginformation”
XML is a W3C Recommendations. It stands forExtensible Markup Language. It is a markuplanguage much like HTML used to describe data.In XML, tags are not predefined. A user defineshis own tags and XML document structure likeDocument Type Definition (DTD), XML Schemato describe the data. Hence it is self-descriptivetoo. There is nothing special about XML It isjust plain text with the addition of some XMLtags enclosed in angle brackets. In a simpletext editor, the XML document is easily visible.
Reasons of using XML
There are number of reasons that contributesto the XML’s increasing acceptance, few of themare:
1. Plain Text
In XML it is easy to create and edit files withanything from a standard text editor to a visualdevelopment environment. XML also providesscalability for anything from small configurationfiles to a company-wide data repository.
2. Data Identification
The markup tags in XML documents identifiythe information and break up the data into partsfor example.. a search program can look formessages sent to particular people from therest of the message. Different parts of theinformation are identified and further they canbe used in different ways by differentapplications.
3. Stylability
When display matters, the style sheetstandard, XSL (an advance feature of XML),lets you dictate over the convectional designs(like using HTML) to portray the data. XML beingstyle-free, uses different style sheets to produce
output in postscript, TEX, PDF, or some newformat that hasn’t even been invented yet. Auser can use a simple XML document to displaydata in diverse formats like
• A plain text file• An XHTML file• A WML (Wireless Markup Language)
document suitable for display on a PDA• An Adobe PDF document suitable for
hard copy• A VML (Voice Markup Language) dialog
for a voicemail information system• An SVG (Scalable Vector Graphic)
document that draws pictures ofthermometers and water containers
4. Universally Processed
Apart from being valid, restrictions are imposedon an xml file to abide by a DTD or a Schemato make it well formed. Otherwise, the XMLparser won’t be able to read the data. XML is avendor-neutral standard, so a user can chooseamong several XML parsers to process XMLdata.
5. Hierarchical Approach
XML documents get benefited from theirhierarchical structure. Hierarchical documentstructures are, faster to access. They are alsoeasier to rearrange, because each piece isdelimited. This makes xml files easy to modifyand maintain.
6. Inline Reusability
XML documents can be composed of separateentities. XML entities can be included “in line” ina XML document. And this included sectionslook like a normal part of the document .A usercan single-source a section so that an edit to itis reflected everywhere the section is used, andyet a document composed looks like a one-piece document.

24 Java Jazz Up Jan-08
Applications using XML
Although there are countless applications thatuse XML, here are a few examples of theapplications that are making use of thistechnology.
Refined search results - With XML-specifictags, search engines can give users morerefined search results. A search engine seeksthe term in the tags, rather than the entiredocument, giving the user more precise results.
EDI Transactions - XML has made electronicdata interchange (EDI) transactions accessibleto a broader set of users. XML allows data tobe exchanged, regardless of the computingsystems or accounting applications being used.
Cell Phones - XML data is sent to some cellphones, which is then formatted by thespecification of the cell phone software designerto display text, images and even play sounds!
File Converters - Many applications have beenwritten to convert existing documents into theXML standard. An example is a PDF to XMLconverter.
VoiceXML - Converts XML documents into anaudio format so that a user can listen to anXML document.
History of XML
In the 1970’s, Charles Goldfarb, Ed Mosher andRay Lorie invented GML at IBM. GML was usedto describe a way of marking up technicaldocuments with structural tags. The initialsstood for Goldfarb, Mosher and Lorie.
Goldfarb invented the term “mark-up language”to make better use of the initials and it becamethe Standard Generalised Markup Language.
In 1986, SGML was adopted by the ISO.
SGML is just a specification for defining markuplanguages.
SGML (Standardized Generalized MarkupLanguage) is the mother of all markup
languages like HTML, XML, XHTML, WML etc...
In 1986, SGML became an internationalstandard for defining the markup languages. Itwas used to create other languages, includingHTML, which is very popular for its use on theweb. HTML was made by Tim Berners Lee in1991.
While on one hand SGML is very effective butcomplex, on the other, HTML is very easy, butlimited to a fixed set of tags. This situationraised the need for a language that was aseffective as SGML and at the same time assimple as HTML. This gap has now been filledby XML.
The development of XML started in 1996 atSun Microsystems. Jon Bosak with his teambegan work on a project for remoulding SGML.They took the best of SGML and producedsomething to be powerful, but much simpler touse.
The World Wide Web Consortium alsocontributes to the creation and developmentof the standard for XML. The specifications forXML were laid down in just 26 pages, comparedto the 500+ page specification that define SGML.
Difference between HTML and XML
1. XML is designed to carry data.
XML describes and focuses on the data whileHTML only displays and focuses on how datalooks. HTML is all about displaying informationbut XML is all about describing information. Incurrent scenario XML is the most common toolfor data manipulation and data transmission.
XML is used to store data in files and for sharingdata between diverse applications. Unlike HTMLdocument where data and display logic areavailable in the same file, XML hold only data.Different presentation logics could be appliedto display the xml data in the required format.XML is the best way to exchange information.
2. XML is Free and Extensible.
3. XML tags are not predefined. User
XML and JAXP
Jan-08 Java Jazz Up 25
must “invent” his tags.
The tags used to mark up HTML documentsand the structure of HTML documents ispredefined. The author of HTML documentscan only use tags that are defined in theHTML standard (like <p>, <h1>, etc.).
XML allows the user to define his own tagsand document structure.
4. XML Tags are Case Sensitive
Unlike HTML, XML tags are case sensitive. InHTML the following will work:
<Message>This is incorrect</message>
In XML opening and closing tags musttherefore be written with the same case:
<message>This is correct</message>
5. XML Elements Must be Properly Nested
Improper nesting of tags makes no sense toXML.
In HTML some elements can be improperlynested within each other like this:
<b><i>This text is bold and italic</b></i>
In XML all elements must be properly nestedwithin each other like this:
<b><i>This text is bold and italic</i></b>
6. XML is a Complement to HTML, not areplacement for HTML.
It is important to understand that XML is nota replacement for HTML. In Web developmentit is most likely that XML will be used todescribe the data, while HTML will be used toformat and display the same data.Syntax Rules for XML
The syntax rules for XML are very simple and
strict. These are easy to learn and use.Because of this, creating software that canread and manipulate XML is very easy. Xmlenables a user to create his own tags.
Note - XML documents use a self-describingand simple syntax
Let’s develop a simple XML document:
<?xml version=”1.0" encoding=”ISO-8859-1"?><E-mail><To>Rohan</To><From>Amit</From><Subject>Surprise....</Subject><Body>Be ready for a cruise...i will catch utonight</Body></E-mail>
The XML declaration:
The XML declaration should always beincluded in the first line of the xml document.It defines the XML version and the characterencoding used in the document. In this casethe document conforms to the 1.0specification of XML and uses the ISO-8859-1 (Latin-1/West European) character set.
<?xml version=”1.0" encoding=”ISO-8859-1"?>
Root Element:
The next line defines the first element of thedocument. It is called as the root element
<E-mail>
Child Elements:
Next 4 lines describe the four child elementsof the root (To, From, Subject and Body).
<To>Rohan</To><From>Amit</From><Subject>Surprise....</Subject><Body>Be ready for a cruise...i will catch utonight</Body>
XML and JAXP
26 Java Jazz Up Jan-08
And finally the last line defines the end of theroot element.
</E-mail>
You may feel from this example that the XMLdocument contains an E-mail To Rohan FromAmit. Don’t you agree that XML is quite self-descriptive?
Now let’s discuss its syntax-rules which arevery simple to learn.All XML elements must have a closing tag
In XML all the elements must have a closingtag like this:
<To>Rohan</To><From>Amit</From>
XML tags are case sensitive
XML tags are case sensitive. The tag <To> isdifferent from the tag <to>. Hence theopening and closing tags must be written withthe same case:
<To>Rohan</To><to>Rohan</to>
XML Elements Must be Properly Nested
Improper nesting of tags makes no sense toXML. In XML all elements must be properlynested within each other like this in a logicalorder:
<b><i>Hi , how are you.....</i></b>
XML Documents Must Have a RootElement
All XML documents must contain a single tagpair to define a root element. All otherelements must be written within this rootelement. All elements can have sub elementscalled as child elements. Sub elements mustbe correctly nested within their parentelement:
<root> <child> <subchild>.....</subchild> </child></root>
Always Quote the XML Attribute Values
In XML the attribute value must always bequoted. XML elements can have attributes inname/value pairs just like in HTML. Just lookthe two XML documents below.The error in the first document is that thedate and version attributes are not quoted .
<?xml version=1.0 encoding=”ISO-8859-1"?><E-mail date=12/11/2002/>
The second document is correct:
<?xml version=”1.0" encoding=”ISO-8859-1"?><E-mail date=”12/11/2002"/>
With XML, White Space is preserved
With XML, the white space in a document ispreserved.
So a sentence likes this: Hello Howare you, will be displayed like this:
Hello How are you,
Comments in XML
The syntax for writing comments in XML issimilar to that of HTML.
<!— This is a comment —>
XML Elements
XML Elements are extensible. They have
XML and JAXP

Jan-08 Java Jazz Up 27
relationships. They have simple naming rules.
XML Elements are ExtensibleXML documents can be extended to carrymore information.
Look at the following XML example:
<?xml version=”1.0" encoding=”ISO-8859-1"?><E-mail><To>Rohan</To><From>Amit</From><Body>Be ready for a cruise...i will catch utonight</Body></E-mail>
Let’s suppose that we create an application tofetch data from the above XML documentand produce this output:
To: RohanFrom: Amit
Be ready for a cruise...i will catch u tonight
Now, the author wants to add a new feature(let it be a subject line). He can easily achieveit by adding one more tag ie..<Subject>in thexml document. So the new modified xmldocument will look like this:
<?xml version=”1.0" encoding=”ISO-8859-1"?><E-mail><To>Rohan</To><From>Amit</From><Subject>Surprise....</Subject><Body>Be ready for a cruise...i will catch utonight</Body></E-mail>Now the new generated output will look likethis:
To: RohanFrom: Amit
Subject: Surprise....
Be ready for a cruise...i will catch u tonight
XML Elements have Relationships
Elements in a xml document are related asparents and children.
Imagine that this xml document is a descriptionof e-mail:
<?xml version=”1.0" encoding=”ISO-8859-1"?><E-mail><To>Rohan</To><From>Amit</From><Subject>Surprise....</Subject><Body>Be ready for a cruise...i will catch utonight</Body></E-mail>
Here, E-mail is the root element while To, From,Subject and Body are the child elements of theE-mail. Here, E-mail is the parent element ofTo, From, Subject and Body. To, From, Subjectand Body are siblings (or sister elements)because they have the same parentage. Hence,all the XML Elements have Relationships.
XML Element Naming conventions:
XML elements must follow these namingconventions:
Names must not start with a number orpunctuation character but it can contain letters,numbers, and other characters without spaces.
Names must not start with the letters xml (orXML, or Xml, etc).
XML Attributes
XML elements can have attributes in the starttag, just like HTML. Attributes are used toprovide additional information about elements.Attributes often provide information thatis not a part of the data. In the example below,the file type is irrelevant to the data, but
XML and JAXP

28 Java Jazz Up Jan-08
important to the software that wants tomanipulate the element:
<file type=”gif”>roseindia.gif</file>
Use the quote styles: “red” or ‘red’
Attribute values must always be enclosed inquotes. Use either single or double quoteseg..
<color=”red”>
or like this:
<color=’red’>
Note: If the attribute value itself containsdouble quotes it is necessary to use singlequotes, like in this example:
<name=’Rose “India” Net’>
Note: If the attribute value itself containssingle quotes it is necessary to use doublequotes, like in this example:
<name=”Rose ‘India’ Net”>
Use of Elements vs. Attributes
If you start using attributes as containers forXML data, you might end up with thedocuments that are both difficult to maintainand manipulate. So the user should useelements to describe the data. Use attributesonly to provide data that is not relevant tothe reader. Only metadata (data about data)should be stored as attributes, and that dataitself should be stored as elements.
This is not the way to use attributes eg..
<?xml version=”1.0" encoding=”ISO-8859-1"?><E-mail To=”Rohan” From=”Amit”Subject=”Surprise....”<Body>Be ready for a cruise...i will catch utonight</Body></E-mail>
Try to avoid using attributes in few of thesituations.
Lot of problems occur with using attributesvalues. They are not easily expandable andcannot contain multiple values. They are noteasy to test against a Document Type Definitionand are also unable to describe their structure.Becomes more irritating, because of its difficultlyto get manipulated by program code.
Here is an example, demonstrating howelements can be used instead of attributes. Thefollowing three XML documents contain exactlythe same information. A date attribute is usedin the first, a date element is used in the second,and an expanded date element is used in thethird:
<?xml version=”1.0" encoding=”ISO-8859-1"?><E-mail date=”15/05/07"><To>Rohan</To><From>Amit</From><Subject>Surprise....</Subject><Body>Be ready for a cruise...i will catch utonight</Body></E-mail>
First xml document contains date as a attributewhich can not be further extended. But dateused a element in second document makes itmore flexible.
<?xml version=”1.0" encoding=”ISO-8859-1"?><E-mail ><date=”15/05/07"><To>Rohan</To><From>Amit</From><Subject>Surprise....</Subject><Body>Be ready for a cruise...i will catch utonight</Body></E-mail>
Second xml document can be furtherextended as.
XML and JAXP

Jan-08 Java Jazz Up 29
<?xml version=”1.0" encoding=”ISO-8859-1"?><E-mail ><date> <day>12</day> <month>11</month> <year>99</year></date><To>Rohan</To><From>Amit</From><Subject>Surprise....</Subject><Body>Be ready for a cruise...i will catch utonight</Body></E-mail>
XML Validation
XML with correct syntax is Well Formed XML.XML validated against a DTD or a Schema is aValid XML.
Well Formed XML Documents
A “Well Formed” XML document has correctXML syntax. A “Well Formed” XML documentis a document that conforms to the XMLsyntax rules which were described previously.
• XML documents must have a root element• XML elements must have a closing tag• XML tags are case sensitive• XML elements must be properly nested• XML attribute values must always be quoted
<?xml version=”1.0" encoding=”ISO-8859-1"?><E-mail><To>Rohan</To><From>Amit</From><Subject>Surprise....</Subject><Body>Be ready for a cruise...i will catch utonight</Body></E-mail>
Valid XML Documents:
A “Valid” XML document is a “Well Formed” XMLdocument, which also conforms to the rules ofa Document Type Definition (DTD) or a XML
Schema.
The following xml document is validated againsta DTD , notice the highlighted text.
<?xml version=”1.0" encoding=”ISO-8859-1"?><!DOCTYPE e-mail SYSTEM “InternalE-mail.dtd”><E-mail><To>Rohan</To><From>Amit</From><Subject>Surprise....</Subject><Body>Be ready for a cruise...i will catch utonight</Body></E-mail>
XML DTD
A DTD defines the legal elements of an XMLdocument. The purpose of a DTD is to definethe legal building blocks of an XML document.It defines the document structure with a list oflegal elements.
XML Schema
XML Schema is an XML based alternative to DTD.W3C supports an alternative to DTD called XMLSchema.
Designing XML DTD
1. Introduction to DTD2. DTD - XML Constituent Components3. DTD Elements4. DTD Attributes5. DTD Entities
1. Introduction to DTD:
A Document Type Definition (DTD) defines thelegal building blocks of an XML document. Itdefines the document structure with a list oflegal elements and attributes.
A DTD can be defined inside a XML document,or a external reference can be declared.
Internal DTD
If the DTD is defined inside the XML
XML and JAXP

30 Java Jazz Up Jan-08
document, it should be wrapped in aDOCTYPE definition with the following syntax:
<!DOCTYPE root-element [element-declarations]>
Example of a XML document with an internalDTD: E-mail.xml
<?xml version=”1.0"?><!DOCTYPE E-mail[ <!ELEMENT E-mail (To,From,subject,Body)> <!ELEMENT To (#PCDATA)> <!ELEMENT From (#PCDATA)> <!ELEMENT Subject (#PCDATA)> <!ELEMENT Body (#PCDATA)>]><E-mail><To>Rohan</To><From>Amit</From><Subject>Surprise....</Subject><Body>Be ready for a cruise...i will catch utonight</Body></E-mail>
Open the file E-mail.xml in a web-browser.
External DTD
If the DTD is defined in an external file, itshould be wrapped in a DOCTYPE definitionwith the following syntax:
<!DOCTYPE root-element SYSTEM“filename”>
This is the same XML document asabove,(but with an external DTD ) : E-mail.xml
<?xml version=”1.0"?><!DOCTYPE E-mail SYSTEM “E-mail.dtd”><E-mail><To>Rohan</To><From>Amit</From><Subject>Surprise....</Subject><Body>Be ready for a cruise...i will catch utonight</Body></E-mail>And this is the file “E-mail.dtd” which containsthe following DTD:
<!ELEMENT E-mail (To,From,subject,Body)><!ELEMENT To (#PCDATA)><!ELEMENT From (#PCDATA)><!ELEMENT Subject (#PCDATA)><!ELEMENT Body (#PCDATA)>
Open the file E-mail.xml in a web-browser.
Importance of a DTD:
1. With a DTD, a XML file carries adescription of its own format.
2. With a DTD, independent groups ofpeople can agree to use a standard DTDfor interchanging data.
3. User application can use a standard DTDto verify that the data he receives fromthe outside world is valid.
4. User can also use a DTD to verify hisown data.
XML and JAXP

Jan-08 Java Jazz Up 31
2. DTD - XML Constituent
DTDs are made up by the followingintegrants:
· Elements· Attributes· Entities· PCDATA· CDATA
Elements
Elements are the main constituent componentsof both XML documents.
Elements can contain text, other elements, orbe empty.
<To>Rohan</To><From>Amit</From>
AttributesAttributes provide extra information aboutelements. Attributes are always placed insidethe opening tag of an element. Attributesalways come in name/value pairs. Thefollowing “img” element has additionalinformation about a source file:
<img src=”computer.gif” />
The name of the element is “img”. The name ofthe attribute is “src”. The value of the attributeis “computer.gif”. Since the element itself isempty it is closed by a “ /”.
Entities:
Entities are expanded when a document isparsed by a XML parser. Some characters havea special meaning in XML, like the less thansign (<) that defines the start of an XML tag,the greater than sign (>) that defines the endof a XML tag.
The following entities are predefined inXML:
Entity References Character< <> >& &" “' ‘
PCDATA:
PCDATA means parsed character data. It canbe thought as the character data (text) foundbetween the start tag and the end tag of aXML element. PCDATA is a text to be parsed bya parser. The text is checked by the parser forentities and markup.
Tags inside the text will be treated as markupand entities will be expanded. However, parsedcharacter data should not contain any &, <, or> characters. These should be represented bythe &, <, and > entities, respectively.
CDATA:
CDATA is character data that will NOT be parsedby a parser. Tags inside the text will NOT betreated as markup and entities will not beexpanded.
3. DTD-Elements
In a DTD, elements are declared with anELEMENT declaration.
Declaring Elements: syntax
In a DTD, XML elements are declared with thefollowing syntax:
<!ELEMENT element-name category>or<!ELEMENT element-name (element-content)>
Empty ElementsEmpty elements are declared with thekeyword EMPTY inside the parentheses.
<!ELEMENT element-name EMPTY>
XML and JAXP

32 Java Jazz Up Jan-08
DTD Example: <!ELEMENT br EMPTY>
In XML document:
<br />
Elements with Parsed Character DataElements with only parsed character data aredeclared with #PCDATA inside theparentheses:
<!ELEMENT element-name (#PCDATA)>
DTD Example:
<!ELEMENT To (#PCDATA)><!ELEMENT From (#PCDATA)>
Elements with DataElements declared with the keyword ANY, cancontain any combination of parsable data:
<!ELEMENT element-name ANY>
DTD Example:
<!ELEMENT E-mail (To,From,Subject,Body)><!ELEMENT To (#PCDATA)><!ELEMENT From (#PCDATA)>
Elements with Children (sequences)Elements with one or more children aredeclared with the name of the childrenelements inside the parentheses as:
<!ELEMENT element-name (child1)>or<!ELEMENT element-name (child1,child2,...)>
DTD Example:
<!ELEMENT E-mail (To,From,Subject,Body)>
When children are declared in a sequenceseparated by commas, the children mustappear in the same sequence in thedocument. In a full declaration, the childrenmust also be declared.Children can have
children. The full declaration of the “E-mail”element is:
<!ELEMENT E-mail (To,From,Subject,Body)><!ELEMENT To (#PCDATA)><!ELEMENT From (#PCDATA)><!ELEMENT Subject (#PCDATA)><!ELEMENT Body (#PCDATA)>
Declaring Only One Occurrence of an Element
<!ELEMENT element-name (child-name)>
DTD Example:
<!ELEMENT color (Fill-Red)>
The example above declares that the childelement “Fill-Red” must occur once, and onlyonce inside the “color” element.
Declaring Minimum One Occurrence of anElement
<!ELEMENT element-name (child-name+)>
DTD Example:
<!ELEMENT color (Fill-Red+)>
The ‘+’ sign in the example above declaresthat the child element “Fill-Red” must occurone or more times inside the “color” element.
Declaring Zero or More Occurrences of anElement
<!ELEMENT element-name (child-name*)>
DTD Example:
<!ELEMENT color (Fill-Red*)>
The ‘*’ sign in the example above declaresthat the child element “Fill-Red” can occurzero or more times inside the “color” element.
XML and JAXP

Jan-08 Java Jazz Up 33
Declaring Zero or One Occurrence of anElement
<!ELEMENT element-name (child-name?)>
DTD Example:
<!ELEMENT color (Fill-Red?)>
The ‘?’ sign in the example above declaresthat the child element “Fill-Red” can occurzero or one time inside the “color” element.
Declaring either/or ContentDTD Example:
<!ELEMENT E-mail(To,From,Subject,(Message|Body))>
The example above declares that the “E-mail”element must contain a “To” element, a“From” element, a “Subject” element, andeither a “Message” or a “Body” element.
Declaring Mixed Content
DTD Example:
<!ELEMENT E-mail(#PCDATA|To|From|Subject|Body)*>
The example above declares that the “E-mail”element can contain zero or more occurrencesof a parsed character data, “To”, “From”,“Subject”, or “Body” elements.
4. DTD-Attributes
In a DTD, attributes are declared with anATTLIST declaration.
Declaring Attributes
The ATTLIST declaration defines the elementhaving a attribute with attribute name , attributetype , and attribute default value. An attributedeclaration has the following syntax:
<!ATTLIST element-name attribute-nameattribute-type default-value>
DTD example:
<!ATTLIST reciept type CDATA “check”>
XML example:
<reciept type=”check” />
Attribute-type
The attribute-type can be one of thefollowing:
Type Description
CDATA The value is character data(en1|en2|..) The value must be one from anenumerated listID The value is a unique idIDREFThe value is the id of another elementIDREFS The value is a list of other idsNMTOKEN The value is a valid XML nameNMTOKENS The value is a list of valid XMLnamesENTITY The value is an entityENTITIESThe value is a list of entitiesNOTATION The value is a name of a notationxml The value is a predefined xml value
Default-valueThe default-value can be one of the following:Value Explanationvalue The default value of the attribute#REQUIRED The attribute is required#IMPLIED The attribute is not required#FIXED value The attribute value is fixed
A Default Attribute Value
DTD Example:
<!ELEMENT Scale EMPTY><!ATTLIST Scale length CDATA “0”>
In the example above, the DTD defines a
XML and JAXP

34 Java Jazz Up Jan-08
“Scale” element to be empty with a “length “attribute of type CDATA . If no length isspecified, it has a default value of 0.
Valid XML:
<Scale length =”100" />
REQUIRED Syntax
<!ATTLIST element-name attribute_nameattribute-type #REQUIRED>
DTD Example
<!ATTLIST person number CDATA#REQUIRED>
Valid XML:
<person id=”5677" />
Invalid XML:
<person />
Use the #REQUIRED keyword if you don’thave an option for a default value, but stillwant to force the attribute to be present.
IMPLIED Syntax
<!ATTLIST element-name attribute-nameattribute-type #IMPLIED>
DTD Example
<!ATTLIST emergency no. CDATA #IMPLIED>
Valid XML:
<emergency no.=”555-667788" />
Valid XML:
<emergency/>
Use the #IMPLIED keyword if you don’t wantto force the author to include an attribute,and you don’t have an option for a defaultvalue.
FIXED Syntax
<!ATTLIST element-name attribute-nameattribute-type #FIXED “value”>
DTD Example
<!ATTLIST Client CDATA #FIXED“RoseIndia”>
Valid XML:
<Client =”RoseIndia” />
Invalid XML:
<Client=”LotusIndia” />
Use the #FIXED keyword when you want anattribute to have a fixed value withoutallowing the author to change it. If an authorincludes another value, the XML parser willreturn an error.
Enumerated Attribute Values
Syntax
<!ATTLIST element-name attribute-name(en1|en2|..) default-value>
XML and JAXP

Jan-08 Java Jazz Up 35
DTD Example
<!ATTLIST reciept type (check|cash) “cash”>
XML example:
<reciept type=”check” />or<reciept type=”cash” />
Use enumerated attribute values when youwant the attribute value to be one of a fixedset of legal values.
5. DTD-Entities
Entities are variables used to define shortcutsto standard text or special characters. Entityreferences are references to entities Entitiescan be declared internally or externally.
Internal Entity DeclarationSyntax
<!ENTITY entity-name “entity-value”>
DTD Example:
<!ENTITY name “Amit”><!ENTITY company “RoseIndia”>
XML example:
<Profile>&name;&company;</Profile>
Note: An entity has three parts: anampersand (&), an entity name, and asemicolon (;).
An External Entity DeclarationSyntax
XML and JAXP
<!ENTITY entity-name SYSTEM “URI/URL”>
DTD Example:
<!ENTITY name SYSTEM “http://www.roseindia.net/entities.dtd”><!ENTITY company SYSTEM “http://www.roseindia.net/entities.dtd”>
XML example:
<Profile>&name;&company;</Profile>
36 Java Jazz Up Jan-08
Hibernate with AnnotationIn the Dec 2007 issue of Java Jazz Up
magazine, we have discussed a lot ofdetails about the Hibernate. In the current issuewe are taking you further in the same directionbut this time we are talking about theannotations with the hibernate.
Hibernate needs a metadata to govern thetransformation of data from POJO to databasetables and vice versa. Most commonly XML fileis used to write the metadata information inHibernate
Annotations : A Brief Overview
The Java 5 version has introduced a powerfulway to provide the metadata to the JVM. Themechanism is known as Annotations.Annotation is the java class which is readthrough reflection mechanism during theruntime by JVM and does the processingaccordingly. The Hibernate Annotations is thepowerful way to provide the metadata for theObject and Relational Table mapping. All themetadata is clubbed into the POJO java file alongwith the code this helps the user to understandthe table structure and POJO simultaneouslyduring the development. This also reduces themanagement of different files for the metadataand java code.
Prerequisites for setting up a project :
1. Make sure to have Java 5.0 or a higherversion.
2. Hibernate Core 3.2.0GA and above.
3. Download and add the Hibernate-Annotations jar file in the projectworkspace.
Let’s start with developing an Application :
Let us assume we have a table Employee whichhas only two columns i.e ID and Name. Inhibernate core to achieve the mapping for theabove employee table the user should createthe following files
1. Utility file for configuring and building thesession factory.
2. Hibernate.cfg.xml or any otherDatasource metadata file
3. Employee POJO object.4. Real application file which has the actual
logic manipulate the POJO
Note:- Annotations are only the step to removethe hbm.xml file so all the steps remain sameonly some modifications in some part andadding the annotation data for the POJO.
Please note that coming example will use theEmployee table from the database. The SQLquery to create the employee table is asfollows :-
Create table Employee( ID int2 PRIMARYKEY, NAME n varchar(30) );
Step 1:- Creating A simple Utility Class
The following is the code given for the utilityclass for sessionFactory
package net.roseindia;
import org.hibernate.SessionFactory;importorg.hibernate.cfg.AnnotationConfiguration;
public class HibernateUtil { private static final SessionFactorysessionFactory; static { try { // Create the SessionFactory fromhibernate.cfg.xml sessionFactory = newAnnotationConfiguration().configure().buildSessionFactory(); }
catch (Throwable ex) { // Make sure you log the exception, as itmight be swallowed System.err.println(“Initial SessionFactorycreation failed.” + ex);
throw newExceptionInInitializerError(ex); } }

Jan-08 Java Jazz Up 37
public static SessionFactorygetSessionFactory() { return sessionFactory; }}
If you see the only change in the file for theannotations is that we simply useAnnotationConfiguration() class instead of theConfiguration() class to build thesessionFactory for the hibernate.
Step 2: Creating the Hibernate.cfg.xml
The Hibernate.cfg.xml is the configuration filefor the datasource in the Hibernate world. Thefollowing is the example for the configurationfile.
<?xml version=’1.0' encoding=’utf-8'?><!DOCTYPE hibernate-configuration PUBLIC”-//Hibernate/Hibernate Configuration DTD3.0//EN””http://hibernate.sourceforge.net/hibernate-configuration-3.0.dtd”><hibernate-configuration><session-factory><!— Database connection settings —><propertyname=”connection.driver_class”>com.mysql.jdbc.Driver</property><propertyname=”connection.url”>jdbc:mysql://localhost:3306/test</property><propertyname=”connection.username”>root</property><propertyname=”connection.password”>root</property><!— JDBC connection pool (use the built-in)—><property name=”connection.pool_size”>1</property><!— SQL dialect —><property name=”dialect”>org.hibernate.dialect.MySQLDialect</property><!— Enable Hibernate’s automatic sessioncontext management —>
<propertyname=”current_session_context_class”>thread</property><!— Disable the second-level cache —><property name=”cache.provider_class”>org.hibernate.cache.NoCacheProvider</property><!— Echo all executed SQL to stdout —><property name=”show_sql”>true</property><!— Drop and re-create the databaseschema on startup —><property name=”hbm2ddl.auto”>none</property>
<mapping class=”com.roseindia.Employee”/>
</session-factory></hibernate-configuration>
The only change is that, we are just tellingthe compiler that instead of any resource getthe metadata for the mapping from the POJOclass itself like in this case it isnet.roseindia.Employee.
Note: Using annotations does not mean thatyou cannot give the hbm.xml file mappng. Youcan mix annotations and hbm.xml files mappingfor different Pojo but you cannot mix themappings for the same POJO in both ways.
Step 3: Developing a simple POJO
The major changes occurred only in the POJOfiles if you want to use the annotations as thisis the file which will now contain the mapping ofthe properties with the database.
The following is the code for the EmployeePOJO.
package net.roseindia;
import java.io.Serializable;
import javax.persistence.Column;import javax.persistence.Entity;import javax.persistence.Id;import javax.persistence.Table;
@Entity
Hibernate with Annotation

38 Java Jazz Up Jan-08
@Table(name = “employee”)public class Employee implementsSerializable { public Employee() {
} @Id @Column(name = “id”) Integer id;
@Column(name = “name”) String name;
public Integer getId() { return id; }
public void setId(Integer id) { this.id = id; }
public String getName() { return name; }
public void setName(String name) { this.name = name; }
}
In the EJB word the entities represent thepersistence object. This can be achieved by@Entity at the class level. @Table(name =“employee”) annotation tells the entity ismapped with the table employee in thedatabase. Mapped classes must declare theprimary key column of the database table. Mostclasses will also have a Java-Beans-styleproperty holding the unique identifier of aninstance. The @Id element defines the mappingfrom that property to the primary key column.@Column is used to map the entities with thecolumn in the database.
Step 4: Real application file which has theactual logic manipulate the POJO
The following code demonstrates how to storean entity in the database. The code is identicalas you have used in the Hibernate applications.
package net.roseindia;
import org.hibernate.Session;import org.hibernate.SessionFactory;import org.hibernate.Transaction;
public class Example1 {
/** * @param args */ public static void main(String[] args)throws Exception { /** Getting the Session Factory andsession */ SessionFactory session =HibernateUtil.getSessionFactory(); Session sess =session.getCurrentSession(); /** Starting the Transaction */ Transaction tx = sess.beginTransaction(); /** Creating POJO */ Employee pojo = new Employee(); pojo.setId(new Integer(5)); pojo.setName(“XYZ”); /** Saving POJO */ sess.save(pojo); /** Commiting the changes */ tx.commit(); System.out.println(“Record Inserted”); /** Closing Session */ session.close(); }
}
Output:
Record
Inserted.
This article tried to show the basic configurationsfor the Hibernate annotations. The aboveexample will only add one record in theDatabase using the hibernate annotations.
Hibernate with Annotation

Jan-08 Java Jazz Up 39
Ant is a platform-independent build tool thatspecially supports for the Java programminglanguage. It is written purely in Java. Ant is apowerful technique that helps the developersto convert their developmental structures indeployment structures.
It allows the developer to automate therepeated process involved in the developmentof J2EE application. Developers can easily writethe script to automate the build process likecompilation, archiving and deployment.A build process is an essential part of anydevelopment cycle because it removes the gapbetween the development, integration, and testenvironments. It also helps to remove otherissues while deploying such as compilation,classpath, or properties that cost manyprojects time and money. Ant is a free toolunder the GNU License and is freely availableat http://jakarta.apache.org/ant/.
There are some useful commands described inthe table. These commands are built in the Antdistribution.
Command Description
Ant Used to execute another antprocess from within thecurrent one.
Copydir Used to copy an entiredirectory.
Copyfile Used to copy a single file.
Delete Deletes either a single file or allfiles in a specified directory andits sub-directories.
Deltree Deletes a directory with all itsfiles and subdirectories.
Get Gets a file from an URL.
Jar Jars a set of files.
Java Executes a Java class withinthe running (Ant) VM or forksanother VM if specified.
Javac Compiles a source tree withinthe running (Ant) VM.
Mkdir Makes a directory.
Property Sets a property (by name andvalue), or set of properties(from file or resource) in theproject.
Rmic Runs the rmic compiler for acertain class.
Exec Executes a system command.When the os attribute isspecified, then the commandisonly executed when Ant isrun on one of the specifiedoperating systems.
Ant Data Types
There are some data types used by the anttasks. These are described in a table givenbelow:
Data Types Description
Argument It passes command-linearguments to programs thatyou invoke from an Antbuildfile.
Environment It specifies environmentvariables to pass to anexternal command orprogram that you executefrom an Ant buildfile.
Filelist It defines a named list of filesthat do not necessarily needto actually exist.
Fileset It defines a named list of filesthat must actually exist.
Patternset It groups a set of patternstogether.
Filterset It groups a set of filterstogether.
Introduction to Ant

40 Java Jazz Up Jan-08
Path It specifies paths (such as aclasspath) in a way that is portablebetween operating systems.
Let’s develop a Build.xml :
In Ant, all the command line tasks used fordeploying an application are represented bysimple XML elements. It accepts instructions inthe form of XML documents thus it is extensibleand easy to maintain. The Ant installationcomes with a JAXP-Compliant XML parser, thatmeans the installation of an external XMLparser is not necessary.
In this section, a simple Ant example is shownbelow which is followed by a set of instructionsthat indicates how to use Ant.
Simple build process with Ant(build.xml):
<?xml version=”1.0"?><project name=”antCompile”default=”deploy” basedir=”.”><target name=”init”> <property name=”sourceDir”value=”src”/ > <property name=” classDir “value=”build” /> <property name=”deployJSP” value=”/web/deploy/jsp” /> </target>
<target name=”clean” depends=”init”> <deltree dir=”${ classDir }” /> </target> <target name=”prepare” depends=”clean”> <mkdir dir=”${ classDir }” /> </target>
<target name=”compile”depends=”prepare”> <javac srcdir=”${sourceDir}” destdir=”${classDir }” /> </target>
<target name=”deploy”depends=”compile,init”>
<copydir src=”${jsp}”dest=”${deployJSP}”/> </target></project>
Now, let’s understand one by one each tag ofthis XML file.
1. <?xml version=”1.0"?>
Since Ant build files are XML files so thedocument begins with an XML declaration thatspecifies which version of XML is in use.
2. <project name=”antCompile”default=”deploy” basedir=”.”>
The root element of an Ant build file is theproject element that contains information aboutthe overall project that is to be built. It hasthree attributes.
• name: It defines the name of the projectthat can be any combination ofalphanumeric characters that constitutevalid XML.
• default: It references the default targetthat is to be executed, and when no targetis specified. Out of these three attributesdefault is the only required attribute.
• basedir: It is treated as the base directoryfrom which the relative referencescontained in the build file are retrieved.Each project can have only one basedirattribute.
3. <target name=”init”> or<target name=”clean” depends=”init”>
The target element is used as a wrapper forsequences of actions. It contains fourattributes: name, if, unless, and depends. Antrequires the name attribute, but the other threeattributes are optional.
name: The name of the target is used toreference it from elsewhere, so that it can be
Introduction to Ant
Jan-08 Java Jazz Up 41
referenced from elsewhere, either externallyfrom the command line, or internally via thedepends keyword, or through a direct call.
depends: depends contains the list of thetargets that must be executed prior toexecuting this target. For example in the secondline, the clean task will not start until the inittask has completed.
if: This is a useful attribute which allows one toadd a conditional attribute to a target basedon the value of a property. The if will executewhen the property value is set.
unless: This is the converse of if. The targets’contents will be executed if the value is not set(to any value).
The init target from the simple example containsthree lines of property commands as shownhere:
<property name=”sourceDir” value=”src”/ ><property name=” classDir “ value=”build” /><property name=”deployJSP” value=”/web/deploy/jsp” />
The property element allows the declarationof commonly used directories or files that arelike user-definable variables available for usewithin an Ant build file. The name attributespecifies the name of the directory or file as alogically and the value attribute specifies thedesired value of the property.
For example, in the markup shown above“sourceDir” has been assigned the value “src”.
4. Then, you can have the reference of thesespecified variables later in the Ant file toobtain the value for these tags using ${dirname}.For example two other commands present inthe above buildfile are:
<deltree dir=”${ classDir }” /> <mkdir dir=”${ classDir }” />
The first command removes the entire treecontained under the classDir. The secondcommand makes a directory again using the
mkdir element.
5. <target name=”compile”depends=”prepare”><javac srcdir=”${sourceDir}” destdir=”${classDir }”/></target>
This section of a build file covers the compilationprocess. The javac element, as used above isa command. It requires a source directory (theinput location of the .java files) and a destinationdirectory (the output location of the .classesfile). It is important to note that all directoriesmust either exist to run the ant command orbe created using the mkdir command. Theexample above will compile all the .java files inthe directory specified by the src property andplacing the resultant .class files in the directoryspecified by the build property.
6. <target name=”deploy”depends=”compile,init”><copydir src=”${jsp}” dest=”${deployJSP}”/></target>
Once the compile task has been complete, atlast the deploy task will perform the copyoperation to copy all JSP files from the sourcedirectory to a deployment directory using thecopydir command.
Introduction to Ant
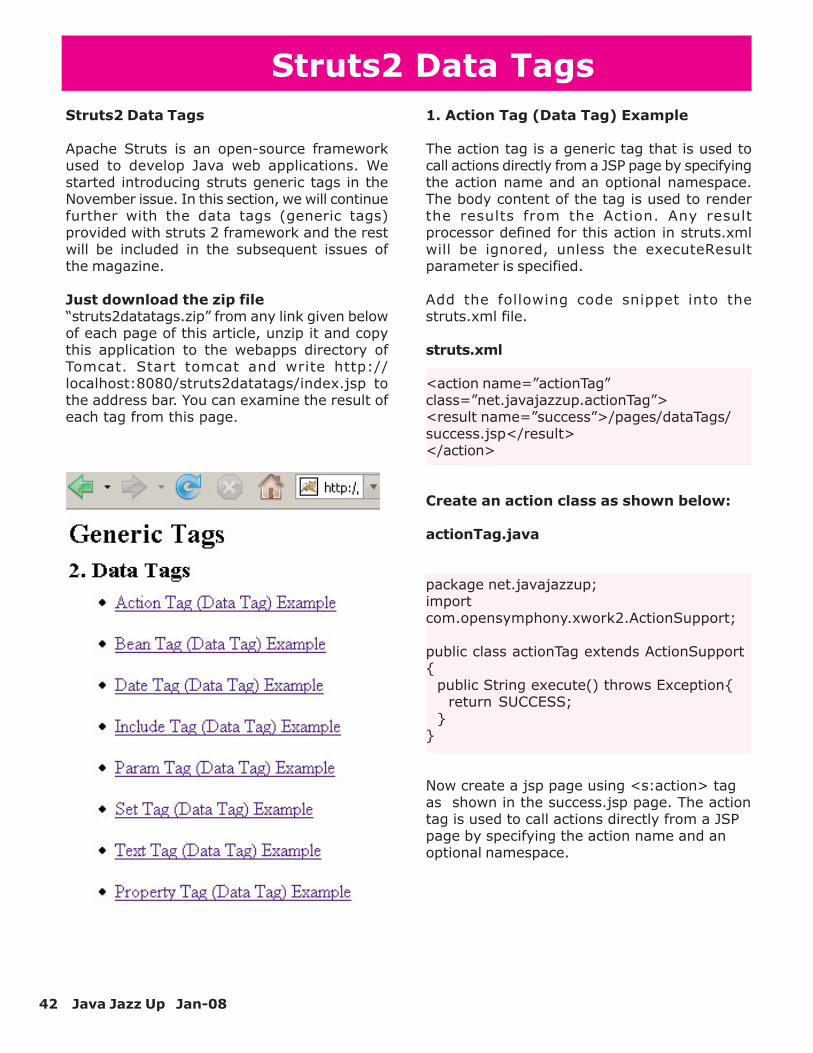
42 Java Jazz Up Jan-08
Struts2 Data Tags
Apache Struts is an open-source frameworkused to develop Java web applications. Westarted introducing struts generic tags in theNovember issue. In this section, we will continuefurther with the data tags (generic tags)provided with struts 2 framework and the restwill be included in the subsequent issues ofthe magazine.
Just download the zip file“struts2datatags.zip” from any link given belowof each page of this article, unzip it and copythis application to the webapps directory ofTomcat. Start tomcat and write http://localhost:8080/struts2datatags/index.jsp tothe address bar. You can examine the result ofeach tag from this page.
1. Action Tag (Data Tag) Example
The action tag is a generic tag that is used tocall actions directly from a JSP page by specifyingthe action name and an optional namespace.The body content of the tag is used to renderthe results from the Action. Any resultprocessor defined for this action in struts.xmlwill be ignored, unless the executeResultparameter is specified.
Add the following code snippet into thestruts.xml file.
struts.xml
<action name=”actionTag”class=”net.javajazzup.actionTag”><result name=”success”>/pages/dataTags/success.jsp</result></action>
Create an action class as shown below:
actionTag.java
package net.javajazzup;importcom.opensymphony.xwork2.ActionSupport;
public class actionTag extends ActionSupport{
public String execute() throws Exception{return SUCCESS;
}}
Now create a jsp page using <s:action> tagas shown in the success.jsp page. The actiontag is used to call actions directly from a JSPpage by specifying the action name and anoptional namespace.
Struts2 Data Tags

Jan-08 Java Jazz Up 43
success.jsp
<%@ taglib prefix=”s” uri=”/struts-tags” %>
<html><head>
<title>Action Tag Example</title></head><body>
<h2>Action Tag Example</h2><s:action name=”success”>
<b><i>The action tag will execute the result andinclude it in this page.</i></b></div>
</s:action></body>
</html>
Output of the success.jsp
2. Bean Tag (Data Tag) Example
The Bean tag is a generic tag that is used toinstantiate a class that confirms to theJavaBeans specification. This tag has a body,which can contain a number of Param elementsto set any mutator methods on that class. Ifthe id attribute is set on the BeanTag, it willplace the instantiated bean into the stack’sContext.
Add the following code snippet into thestruts.xml file.
struts.xml
<action name=”beanTag”class=”net.javajazzup.beanTag”>
<result name=”success”>/pages/dataTags/beanTag.jsp</result></action>
Create an action class as shown below:
beanTag.javapackage net.javajazzup;importcom.opensymphony.xwork2.ActionSupport;
public class beanTag extends ActionSupport {public String execute() throws Exception{
return SUCCESS;}
}
Create a simple java bean as shown:
companyName.java
package net.javajazzup;
public class companyName {private String name;
public void setName(String name){this.name =name ;
}
public String getName(){return name;
}}
Now create a jsp page using <s:bean> and<s:param> tags as shown in the beanTag.jsppage. The bean tag instantiates the“net.roseindia.companyName” class, it confirmsto the JavaBeans specification. The id attributeis set on the BeanTag, it places the instantiatedbean into the stack’s Context. The body of<s:bean> tag contains a param element<s:param name=”name”>RoseIndia</s:param> which is used to set the value forthe setName() method of the “companyName”class and <s:property value=”%{name}” />retrieves that value by calling the getName()method.
Struts2 Data Tags

44 Java Jazz Up Jan-08
beanTag.jsp
<%@ taglib prefix=”s” uri=”/struts-tags” %>
<html><head>
<title>Bean Tag Example</title></head>
<body>
Output of the beanTag.jsp
3. Date Tag (Data Tag) Example
The date tag allows formatting a Date in a quickand easy way. User can specify a custom format(eg. “dd/MM/yyyy hh:mm”), can generate easyreadable notations (like “in hours, 14 minutes”),or can just fall back on a predefined formatwith key ‘struts.date.format’ in the propertiesfile. If that key is not defined, it will finally fallback to the default DateFormat.MEDIUMformatting.
Note: If the requested Date object isn’t foundon the stack, a blank will be returned.
Configurable attributes are:
1. name 2. nice 3. format
Add the following code snippet into the“struts.xml” file.
struts.xml
<action name=”dateTag”class=”net.javajazzup.dateTag”><result>/pages/dataTags/dateTag.jsp</result></action>
Create an action class as shown below:
dateTag.java
package net.javajazzup;importcom.opensymphony.xwork2.ActionSupport;import java.util.*;
public class dateTag extends ActionSupport {private Date currentDate;public String execute() throws Exception{
setCurrentDate(new Date());return SUCCESS;
}public void setCurrentDate(Date date){
this.currentDate = date;}public Date getCurrentDate(){
return currentDate;}
}
Now create a jsp page using <s:date> tag asshown in the success.jsp page.
The <s:date name=”currentDate” format=”dd/MM/yyyy” /> date tag formats a Date in a quickand easy way. Here the “format” parameterspecifies a custom format (eg. “dd/MM/yyyyhh:mm”) to follow.
The nice parameter is of Boolean type, whichdecides whether to print out the date nicely ornot. By Default it is kept false which prints outdate nicely i.e. <s:date name=”currentDate”nice=”false” /> tag formats a date and similarly<s:date name=”currentDate” nice=”true” />does not format a date, it is illustrated in ourcurrent jsp page.
Struts2 Data Tags

Jan-08 Java Jazz Up 45
dateTag.jsp
<%@ taglib prefix=”s” uri=”/struts-tags” %>
<html><head>
<title>Date Tag Example</title></head><body>
<h2>Current Date Format</h2><table border=”1" width=”35%”>
<tr><td><b>Date Format</b></td><td><b>Date</b></td>
</tr><tr>
<td>Day/Month/Year</td><td><s:date name=”currentDate”
format=”dd/MM/yyyy” /></td></tr><tr>
<td>Month/Day/Year</td><td><s:date name=”currentDate”
format=”MM/dd/yyyy” /></td></tr><tr>
<td>Month/Day/Year</td><td><s:date name=”currentDate”
format=”MM/dd/yy” /></td></tr><tr>
<td>Month/Day/Year Hour<B>:</B>Minute</td>
<td><s:date name=”currentDate”format=”MM/dd/yy hh:mm” /></td>
</tr><tr>
<td>Month/Day/Year Hour<B>:</B>Minute<B>:</B>Second</td>
<td><s:date name=”currentDate”format=”MM/dd/yy hh:mm:ss” /></td>
</tr><tr>
<td>Nice Date (Current Date &Time)</td>
<td><s:date name=”currentDate”nice=”false” /></td>
</tr><tr>
<td>Nice Date</td><td><s:date name=”currentDate”
nice=”true” /></td>
</tr></table>
</body></html>
Output of the dateTag.jsp :
4. Include Tag (Data Tag) Example
The include tag is a generic tag that is used toinclude a servlet’s output (result of servlet or aJSP page) to the current page.
Add the following code snippet into thestruts.xml file.
struts.xml
<action name=”includeTag”class=”net.javajazzup.includeTag”><result>/pages/dataTags/includeTag.jsp</result></action>
Struts2 Data Tags

46 Java Jazz Up Jan-08
Create an action class as shown below:includeTag.java
package net.javajazzup;importcom.opensymphony.xwork2.ActionSupport;import java.util.*;
public class includeTag extends ActionSupport{private Date myBirthday;public String execute() throws Exception{setMyBirthday(new Date(“Jan 12, 198411:21:30 AM”));
return SUCCESS;}public void setMyBirthday(Date date){
this.myBirthday = date;}public Date getMyBirthday(){
return myBirthday;}
}
Create a simple jsp (myBirthday.jsp) that wewant to include in our main jsp page ie.includeTag.jsp.
myBirthday.jsp
<%@ taglib prefix=”s” uri=”/struts-tags” %>
<html><head>
<title>Include Tag Example</title></head><body>
<b>My Birth Day (Date Format)</b><table border=”1" width=”35%”>
<tr><td><b>Date Format</b></td><td><b>Date</b></td>
</tr><tr>
<td>Day/Month/Year</td><td><s:date name=”myBirthday”format=”dd/MM/yyyy” /></td>
</tr><tr>
<td>Month/Day/Year</td>
<td><s:date name=”myBirthday”format=”MM/dd/yyyy” /></td>
</tr><tr>
<td>Month/Day/Year</td><td><s:date name=”myBirthday”
format=”MM/dd/yy” /></td></tr><tr>
<td>Month/Day/Year Hour<B>:</B>Minute</td>
<td><s:date name=”myBirthday”format=”MM/dd/yy hh:mm” /></td>
</tr><tr>
<td>Month/Day/Year Hour<B>:</B>Minute<B>:</B>Second</td>
<td><s:date name=”myBirthday”format=”MM/dd/yy hh:mm:ss” /></td>
</tr><tr>
<td>Nice Date (Current Date &Time)</td>
<td><s:date name=”myBirthday”nice=”false” /></td>
</tr></table>
</body></html>
Now create a jsp page using <s:include> tagas shown in the includeTag.jsp page. The<s:include value=”myBirthday.jsp” /> tagincludes another jsp using the valueparameter.
includeTag.jsp
<%@ taglib prefix=”s” uri=”/struts-tags” %>
<html><head>
<title>Include Tag Example</title></head><body>
<h2>Include Tag Example</h2><s:include value=”myBirthday.jsp” />
</body></html>
Struts2 Data Tags

Jan-08 Java Jazz Up 47
Output of the includeTag.jsp:
5. Param Tag (Data Tag) Example
The param tag is a generic tag that is used toparameterize other tags. For example theinclude tag and bean tag. The parameters canbe added with or without a name as a key.
The param tag has the following twoparameters.
1. name (String) - the name of theparameter
2. value (Object) - the value of theparameter
Note: When you declare the param tag, thevalue can be defined in either a value attributeor as text between the start and end tag.Struts behave a bit different according to thesetwo situations.
Case 1. <param name=”empname”>Amit</param> Here the value would be evaluatedto the stack as a java.lang.String object.
Case 2. <param name=”empname”value=”Vinod”/> Here the value would beevaluated to the stack as a java.lang.Objectobject.
Add the following code snippet into thestruts.xml file.
struts.xml
<action name=”paramTag”><result>/pages/dataTags/paramTag.jsp</result></action>
Now create a jsp page to see the workingof the param tags.
paramTag.jsp
<%@ taglib prefix=”s” uri=”/struts-tags” %>
<html><head>
<title>Param Tag Example</title></head><body>
<h2>Param Tag Example</h2><ui:component>
<ui:param name=”empname”>Emp1</ui:param><br>
<ui:param name=”empname”>Emp2</ui:param><br>
<ui:param name=”empname”>Emp3</ui:param>
</ui:component></body>
</html>
Struts2 Data Tags

48 Java Jazz Up Jan-08
Output of paramTag.jsp:
6. Set Tag (Data Tag) Example
The set tag is a generic tag that is used toassign a value to a variable in a specified scope.It is useful when you wish to assign a variableto a complex expression and then simplyreference that variable each time rather thanthe complex expression.
Add the following code snippet into thestruts.xml file.
struts.xml
<action name=”setTag”><result>/pages/dataTags/setTag.jsp</result></action>
Now create a jsp page using <s:set> tag asshown in the setTag.jsp page. The set tag isused to assign a value to a variable in aspecified scope. The parameters name andvalue in the tag<s:set name=”technologyName”value=”%{‘Java’}”/>acts as the name-value pair. Here we set theparameters as name=”technologyName”value=”Java”.
setTag.jsp
<%@ taglib prefix=”s” uri=”/struts-tags” %>
<html><head>
<title>Set Tag Example</title></head><body>
<h2>Set Tag Example</h2><s:set name=”technologyName”
value=”%{‘Java’}”/>Technology Name: <s:property
value=”#technologyName”/></body>
</html>
Output of the setTag.jsp:
7. Text Tag (Data Tag) Example
The text tag is a generic tag that is used torender a I18n text message. Follow one of thethree steps:
1. Keep the message to be displayed in aresource bundle with the same name asthe action that it is associated with ie.Create a properties file in the samepackage as your Java class with the samename as your class, but with. propertiesextension.
2. If the property file does-not work or themessage is not found in the resource
Struts2 Data Tags

Jan-08 Java Jazz Up 49
bundle, then the body of the tag will beused as default message.
3. If there is no body, then the name of themessage will be used.
Add the following code snippet into thestruts.xml file.
struts.xml
<action name=”textTag”class=”net.javajazzup.textTag”>
<result>/pages/dataTags/textTag.jsp</result></action>
Create an action class as shown below:textTag.java
package net.javajazzup;importcom.opensymphony.xwork2.ActionSupport;
public class textTag extends ActionSupport {
public String execute() throws Exception{ return SUCCESS; }}
Create a property file in the same packagewhere your Java program file (textTag.java) issaved with the name aspackage.properties.package.properties
webname1 = http://www.javajazzup.comwebname2 = http://www.roseindia.netwebname3 = http://www.newstrackindia.com
Now create a jsp page to see the working ofthe text tags.
The first three tags <s:textname=”webname1">,<s:textname=”webname2"> and <s:textname=”webname3"> uses thepackage.properties file to display the textmessage.
Struts2 Data Tags
The next tag<s:text name=”empname”>Vinod, Amit,Sushil, .......</s:text> uses the body of thetag as a default message.
The last tag <s:text name=”empname”></s:text> does not have access to thepackage.properties files nor does it have abody so it uses name of the message todisplay.
textTag.jsp
<%@ taglib prefix=”s” uri=”/struts-tags” %>
<html><head>
<title>Text Tag Example</title></head><body>
<h2>Text Tag Example</h2>
<s:text name=”webname1"></s:text><br><s:text name=”webname2"></s:text><br><s:text name=”webname3"></s:text><br><s:text name=”empname”>Emp1,Emp2....</s:text><br><s:text name=”empname”></s:text></body></html>
Output of the textTag.jsp:

50 Java Jazz Up Jan-08
8. Property Tag (Data Tag) Example
The property tag is a generic tag that is usedto get the property of a value, which will defaultto the top of the stack if none is specified.
Add the following code snippet into thestruts.xml file.
struts.xml
<action name=”propertyTag”class=”net.javajazzup.propertyTag”><result>/pages/dataTags/propertyTag.jsp</result></action>
Create an action class as shown:
propertyTag.java
package net.javajazzup;importcom.opensymphony.xwork2.ActionSupport;
public class propertyTag extendsActionSupport { public String execute() throws Exception{ return SUCCESS; }}
Create a bean class “companyName” asshown:
companyName.java
package net.javajazzup;
public class companyName {private String name;
public void setName(String name){this.name =name ;
}
public String getName(){return name;
}}
Create a jsp using the tags.
<s:property value=”%{name}” /> it printsthe result of myBean’s getMyBeanProperty()method.
<s:property value=”name” default=”DefaultValue” /> it prints the result ofcompanyName’s getName() method and if itis null, print ‘a default value’ instead.
propertyTag.jsp
<%@ taglib prefix=”s” uri=”/struts-tags” %>
<html><head><title>Property Tag Example</title></head><body><h2>Property Tag Example</h2><!— Example to pick the value through beanclass —><s:beanname=”net.javajazzup.companyName”id=”uid”><s:param name=”name”>JavaJazzUp</s:param><s:property value=”%{name}” /><br>
</s:bean><!— Default value —>
<s:property value=”name”default=”Default Value” />
</body></html>
Output of the propertyTag.jsp:
Struts2 Data Tags

Jan-08 Java Jazz Up 51
Integrating JSF, Spring and Hibernate
Integrating JSF, Spring and Hibernate
This article explains integrating JSF (MyFaces),Spring and Hibernate to build real world UserLogin and Registration Application usingMySQL as database. This application lets thenew user create an account and existing useraccess the application by user name andpassword. These three frameworks can beused for different purposes according to theusefulness and power of individualframeworks. Like,
1 JSF can be used to implementpresentation layer because it fits intothe MVC design pattern.
2 Spring Framework can be used in thebusiness logic tier to manage businessobjects, resource management.
3 Hibernate can be powerful inside theintegration tier. Spring integratesHibernate very well.
Let’s see how these have been utilized todevelop our User Login and RegistrationApplication. Development of this applicationhas been divided in various steps tounderstand it clearly.
1. About the Application2. Application Architecture3. Downloading MyFaces and creating web
application4. Adding Spring and Hibernate Capabilities5. Setting up MySql database and creating
tablesDeveloping Presentation Layer
6. Developing Login and Registration formand backing beans
Developing Business Layer
7. Writing Business Objects
Integration Tier of the Application8. Implementing Integration tier withHibernate
Wiring up everything
9. Integrating JSF, Spring and Hibernate10. Integrating presentation layer11. Integrating Business Logic/IntegrationTier12. Downloading the full code of thisapplication
1. About the Application
a) User Login ModuleIn this module, the user is asked to fill its userID and password to proceed further in theapplication.
If the user fills correct user name and passwordthen it welcomes the user and displays the pagelike the following.

52 Java Jazz Up Jan-08
If user doesn’t fill it correctly then it shows amessage indicating wrong entry.
If the user is not registered yet then there isa link “New User?” to register such users.
b) User Registration Module:In this module, the user is asked to fill therequired information like User Name, Password,Email Address and Physical Address. User isasked to reenter the password to confirm it. Inthis form, all the fields have individual validationchecks so that the user should enter correctentries. So for this we have taken care of somepoints:
1. Make the fields required to fill. 2. Confirm password field. 3. Check for matching the passwords. 4. Email address validation to check the
correct format of email address. 5. Individual Messages for every field if
there is any mismatch in the passed information.
The registration page can be seen below.
If the user fills any incorrect entry thenrelated message is shown for that particularfield, like below:
Integrating JSF, Spring and Hibernate

Jan-08 Java Jazz Up 53
If the registration process completessuccessfully then the screen below appears:
If the user is already registered with the sitethen a message flashes as in the figure
below:
2. Application ArchitectureLogin and Registration application consists of3 different layers (tiers):
1. Presentation Layer 2. Business Layer 3. Data Access Layer
In this application the presentation layer,business layer and data access layer arephysically located on the same JEE server.Different layers of the application are isolatedfrom each other and connected through well-defined interfaces.
Three tier architecture of the application:
Integrating JSF, Spring and Hibernate

54 Java Jazz Up Jan-08
Presentation Layer
JSF is used to build the presentation layer ofthe application. JFS allows us to create richGUI for web application. It resolves thetechnical challenges of creating rich GUI webapplication. In this layer we have JSP pagesconsists of JSF components. All the requeststo the web server pass through FacesServlet.Business Layer
The POJO classes and classes to process thebusiness logic are used to create the BusinessLayer. The POJO classes, with the help of springframework, create an ideal solution to implementthe Business Layer.
Data Access Layer
The data access layer handles all the logic tosave and retrieve the data from database.Hibernate O/R mapping tools is an ideal solutionfor enterprise application of any size. Hibernatehandles all the logic to store and retrieve POJOobjects. It also handles resource managementand transaction management activities.
3. Downloading MyFaces and creating webapplication
Downloading MyFaces
MyFaces can be configured using libraries andconfiguration files which come with theexample applications. The latest version ofMyFaces can be downloaded from http://myfaces.apache.org/download.html. We havedownloaded tomahawk-examples-1.1.6-bin.zip from http://www.apache.org/dyn/closer.cgi/myfaces/binaries/tomahawk-examples-1.1.6-bin.zip for this exampletutorial. The downloaded file will be a zip filenamed tomahawk-examples-1.1.6-bin.zip.Extract the zip file and you will get 4 war files.Copy myfaces-example-simple-1.1.6.war filein the webapps directory of Tomcat whichwill automatically be expanded in the directoryof same name. Now we will use the librariesand configuration files from the explodedapplication to create our web application.
Creating web application
Web application follows the start directorystructure as defined in the JEE (J2EE)specification. Here we are creating the applicationin the exploded format, you can also createarchive (war, ear) and then deploy on theapplication server.
Following image shows the directory structureof our web application.
Integrating JSF, Spring and Hibernate
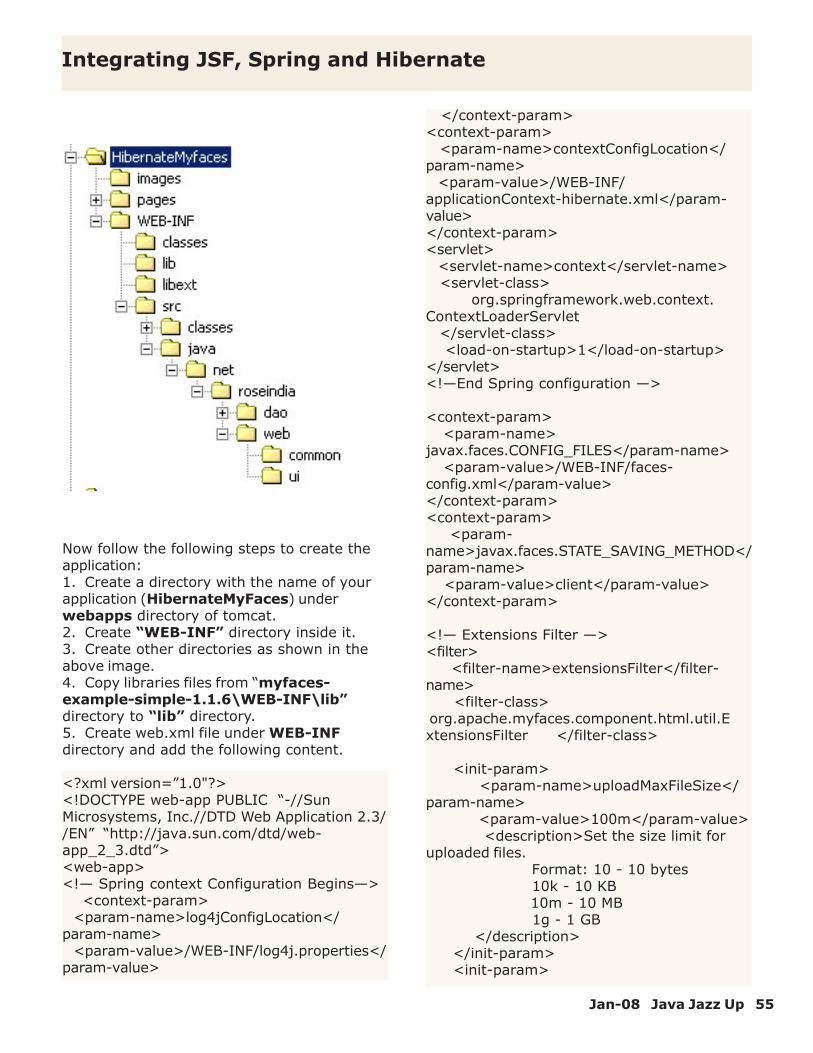
Jan-08 Java Jazz Up 55
Now follow the following steps to create theapplication:1. Create a directory with the name of yourapplication (HibernateMyFaces) underwebapps directory of tomcat.2. Create “WEB-INF” directory inside it.3. Create other directories as shown in theabove image.4. Copy libraries files from “myfaces-example-simple-1.1.6\WEB-INF\lib”directory to “lib” directory.5. Create web.xml file under WEB-INFdirectory and add the following content.
<?xml version=”1.0"?><!DOCTYPE web-app PUBLIC “-//SunMicrosystems, Inc.//DTD Web Application 2.3//EN” “http://java.sun.com/dtd/web-app_2_3.dtd”><web-app><!— Spring context Configuration Begins—> <context-param>
<param-name>log4jConfigLocation</param-name>
<param-value>/WEB-INF/log4j.properties</param-value>
</context-param><context-param> <param-name>contextConfigLocation</param-name> <param-value>/WEB-INF/applicationContext-hibernate.xml</param-value></context-param><servlet> <servlet-name>context</servlet-name> <servlet-class> org.springframework.web.context.ContextLoaderServlet </servlet-class> <load-on-startup>1</load-on-startup></servlet><!—End Spring configuration —>
<context-param> <param-name>javax.faces.CONFIG_FILES</param-name> <param-value>/WEB-INF/faces-config.xml</param-value></context-param><context-param> <param-name>javax.faces.STATE_SAVING_METHOD</param-name> <param-value>client</param-value></context-param>
<!— Extensions Filter —><filter> <filter-name>extensionsFilter</filter-name> <filter-class> org.apache.myfaces.component.html.util.ExtensionsFilter </filter-class>
<init-param> <param-name>uploadMaxFileSize</param-name> <param-value>100m</param-value> <description>Set the size limit foruploaded files. Format: 10 - 10 bytes 10k - 10 KB 10m - 10 MB 1g - 1 GB </description> </init-param> <init-param>
Integrating JSF, Spring and Hibernate

56 Java Jazz Up Jan-08
<param-name>uploadThresholdSize</param-name> <param-value>100k</param-value> <description>Set the threshold size –files below this limit are stored in memory,files above this limit are stored on disk. Format: 10 - 10 bytes 10k - 10 KB 10m - 10 MB 1g - 1 GB </description> </init-param></filter>
<filter-mapping> <filter-name>extensionsFilter</filter-name> <url-pattern>*.jsf</url-pattern></filter-mapping><filter-mapping> <filter-name>extensionsFilter</filter-name> <url-pattern>/faces/*</url-pattern></filter-mapping><servlet> <servlet-name>Faces Servlet</servlet-name> <servlet-class>javax.faces.webapp.FacesServlet</servlet-class> <load-on-startup>1</load-on-startup></servlet><servlet-mapping> <servlet-name>Faces Servlet</servlet-name> <url-pattern>*.jsf</url-pattern></servlet-mapping><welcome-file-list> <welcome-file>index.jsp</welcome-file></welcome-file-list></web-app>
6. Now create faces-config.xml and addthe following code.
<?xml version=”1.0"?><!DOCTYPE faces-config PUBLIC “-//SunMicrosystems, Inc.//DTD JavaServer FacesConfig 1.0//EN” “http://java.sun.com/dtd/web-facesconfig_1_0.dtd” >
<faces-config> <application> <locale-config> <default-locale>en</default-locale> </locale-config> <message-bundle>net.roseindia.web.ui.messages</message-bundle> </application>
<managed-bean> <managed-bean-name>Bean</managed-bean-name> <managed-bean-class>net.roseindia.web.ui.Bean</managed-bean-class> <managed-bean-scope>session</managed-bean-scope> </managed-bean>
<managed-bean> <managed-bean-name>CheckValidUser</managed-bean-name> <managed-bean-class> net.roseindia.web.ui.CheckValidUser </managed-bean-class> <managed-bean-scope>session</managed-bean-scope> </managed-bean>
<navigation-rule> <from-view-id>/pages/login.jsp</from-view-id> <navigation-case> <from-outcome>reg</from-outcome> <to-view-id>/pages/registration.jsp</to-view-id> </navigation-case> <navigation-case><from-outcome>success</from-outcome> <to-view-id>/pages/successLogin.jsp</to-view-id> </navigation-case> <navigation-case><from-outcome>failure</from-outcome><to-view-id>/pages/login.jsp</to-view-id> </navigation-case></navigation-rule>
<navigation-rule>
Integrating JSF, Spring and Hibernate

Jan-08 Java Jazz Up 57
<from-view-id>/pages/registration.jsp</from-view-id> <navigation-case><from-outcome>success</from-outcome><to-view-id>/pages/welcome.jsp</to-view-id></navigation-case><navigation-case> <from-outcome>failure</from-outcome> <to-view-id>/pages/registration.jsp</to-view-id> </navigation-case></navigation-rule></faces-config>
Note: In the next sections we will add theconfiguration into web.xml and faces-config.xml files, so the content will change.We advice you to download the full code fromour site and then take the files from there.
7. Create “src” directory parallel to the “lib”directory.
8. Create two directories “classes”, “java”and “build.xml” file within “src” folder. Copythe following content into build.xml file:
<project name=”MyFaces, Hibernate andSpring Integration” basedir=”../”default=”all”><!— Project settings —> <property name=”project.title”value=”RoseIndia MyFaces, Hibernate andSpring Integration Tutorial”/> <property name=”project.jar.file”value=”roseindia.jar”/>
<path id=”class.path”> <fileset dir=”lib”> <include name=”**/*.jar”/> </fileset> <fileset dir=”libext”> <include name=”**/*.jar”/> </fileset> </path>
<!— Classpath for Project —> <path id=”compile.classpath”> <pathelement path =”lib/myfaces-api-1.1.5.jar”/> <pathelement path =”lib/myfaces-impl-
1.1.5.jar”/> <pathelement path =”lib/jstl-1.1.0.jar”/> <pathelement path =”lib/tomahawk-1.1.6.jar”/> <pathelement path =”libext/servlet-api.jar”/> <pathelement path =”classes”/> <pathelement path =”${classpath}”/> </path>
<!— Check timestamp on files —> <target name=”prepare”> <tstamp/> </target>
<!— Copy any resource or configurationfiles —> <target name=”resources”>
<copy todir=”src/classes”includeEmptyDirs=”no”> <fileset dir=”src/java”> <patternset> <include name=”**/*.conf”/> <include name=”**/*.properties”/> <include name=”**/*.xml”/>
</patternset> </fileset> </copy> </target> <!— Normal build of application —> <target name=”compile”depends=”prepare,resources”> <javac srcdir=”src” destdir=”src/classes” debug=”true” debuglevel=”lines,vars,source”> <classpath refid=”class.path”/> </javac> <jar jarfile=”lib/${project.jar.file}”basedir=”src/classes”/> </target>
<!— Remove classes directory for cleanbuild —> <target name=”clean”description=”Prepare for clean build”> <delete dir=”classes”/> <mkdir dir=”classes”/> </target>
<!— Build Javadoc documentation —> <target name=”javadoc”
Integrating JSF, Spring and Hibernate

58 Java Jazz Up Jan-08
description=”Generate JavaDoc API docs”> <delete dir=”./doc/api”/>
<mkdir dir=”./doc/api”/><javadoc sourcepath=”./src/java” destdir=”./doc/api” classpath=”${servlet.jar}:${jdbc20ext.jar}”packagenames=”*”author=”true” private=”true” version=”true” windowtitle=”${project.title} APIDocumentation”doctitle=”<h1>${project.title} Documentation (Version${project.version})</h1>” bottom=”Copyright ©2002"> <classpathrefid=”compile.classpath”/> </javadoc> </target>
<!— Build entire project —> <target name=”project”depends=”clean,prepare,compile”/> <!— Build project and createdistribution—> <target name=”all” depends=”project”/></project>
We will use ant tool to build the application,so make sure ant tool is installed on yourdevelopment machine.9. Create directory with name “net” in“java” directory and directory of name“roseindia” within “net” directory.
10. Create “classes” directory within“WEB-INF” directory for the class file to beused in the application.
4. Adding Spring and HibernateCapabilities
In this section, we will add Spring and Hibernatecapabilities to our web application. So for this,we will have to add the spring and hibernate
libraries and configuration files to the webapplication.
Steps to integrate:
Adding Servlets LibrarySince we are using ant build tool to compile theapplication, it is necessary to make servletsapi library available to ant build tool for compilingthe java code. We are adding Servlets libraryto the project. 1. Create a directory named libext underWEB-INF directory of your application.
2. Copy servlet-api.jar from common\libdirectory of your Tomcat into libextdirectory.
Adding Hibernate LibrariesNow we will download hibernate libraries andadd it to the project.
1. Download hibernate-3.2.4.sp1.zip orlatest version from http://www.hibernate.org/6.html. We havedownloaded hibernate-3.2.4.sp1.zip for thistutorial.
2. Unzip the file.
3. Copy all the jar files from hibernate-3.2.4.sp1\hibernate-3.2\lib into libdirectory of your application. (The directorieshibernate-3.2.4.sp1\hibernate-3.2 may bedifferent in your case depending on thedownloaded version).
4. Copy hibernate3.jar from hibernate-3.2.4.sp1\hibernate-3.2 into lib directory ofyour application.
Adding Spring LibrariesOur application uses spring to manage thebeans, so we have to add the springcapabilities to the application.
1. Download spring-framework-2.0.5-with-dependencies.zip from http://www.springframework.org/download.
2. Extract the file.
Integrating JSF, Spring and Hibernate

Jan-08 Java Jazz Up 59
3. Copy spring.jar from spring-framework-2.0.5-with-dependencies\spring-framework-2.0.5\dist directory into lib directory of yourapplication.
Now all the libraries are available with us inour application, we will now create databaseand tables in MySQL to use in our application.5. Setup MySQL Database
In this section, we will create database and tableinto MySQL database. Table created here willbe used in sample application.
Downloading and Installing MySQL
You can download MySQL from mysql.org.
Creating Database:You can create mysql database by issuing thefollowing command:
Mysql>create database jsf_hibenate;
Creating Table:To create table in this database you would haveto first select the database by use statement.
Mysql>use jsf_hibenate
Now, you can create table using the followingcommand:
mysql>create table users (userId int(11) NOT NULL auto_increment,userName varchar(20) default NULL,userPassword varchar(11) default NULL,userEmail varchar(30) default NULL,userAddress varchar(30) default NULL,PRIMARY KEY (userId)) ;
6. User Login and Registration application
Creation of Pages:This is the first page that appears to the user.In this page user is asked to fill the user nameand password to login itself in the site. Boththe fields are required to fill. If the user leavesit blank then the message indicating that these
can’t be left empty is shown.Login Page:
login.jsp : The code for above page is givenbelow. For this page CheckValidUserbacking bean has been used. On thesubmission of the page checkUser() methodof the bean is called to check the existence ofthe user. If the user is registered then user iswelcomed to the next page otherwise amessage that either user name or passwordis incorrect.
<%@ taglib uri=”http://java.sun.com/jsf/html” prefix=”h”%><%@ taglib uri=”http://java.sun.com/jsf/core” prefix=”f”%><%@ taglib uri=”http://myfaces.apache.org/tomahawk” prefix=”t”%>
<f:view><html><meta http-equiv=”Content-Type”content=”text/html; charset=iso-8859-1"><head><title>User Login</title><link href=”pages/mycss.css”rel=”stylesheet” type=”text/css”/></head><body ><center>
<h:panelGrid width=”100%” columns=”1"
Integrating JSF, Spring and Hibernate

60 Java Jazz Up Jan-08
border=”0" style=”padding-left:10px; padding-top:10px; “ styleClass=”top_bg”> <h:dataTable id=”dt1" border=”0"cellpadding=”0" cellspacing=”0" var=”ab”> <h:column> <f:facet name=”header”> <h:outputTextvalue=”RoseIndia” styleClass=”style4"/> </f:facet> </h:column> </h:dataTable></h:panelGrid>
<h:panelGrid width=”175px” columns=”3"border=”0" cellspacing=”0" cellpadding=”0"> <h:outputText value=” “/> <h:graphicImage id=”gi3"value=”images/verticle_line.gif” width=”4" height=”18"></h:graphicImage> <h:panelGroup> <h:dataTable id=”dt2" border=”0"cellpadding=”0" cellspacing=”0"width=”250" var=”gh”> <h:column> <f:facet name=”header”> <h:outputTextvalue=”User Login” styleClass=”style1"/> </f:facet> </h:column> </h:dataTable> </h:panelGroup>
<h:graphicImage id=”gi4"value=”images/horizontal_line.gif”width=”25" height=”4" ></h:graphicImage> <h:graphicImage id=”gi8"value=”images/horizontal_line.gif” width=”5" height=”4" ></h:graphicImage> <h:graphicImage id=”gi6"value=”images/horizontal_line.gif” width=”260" height=”4" ></h:graphicImage> <h:outputText value=” “/> <h:graphicImage id=”gi7"value=”images/verticle_line.gif”width=”5" height=”100%” ></h:graphicImage> <h:panelGroup> <h:form>
<h:panelGrid width=”75px” columns=”2"border=”0"><f:facet name=”header”> <h:outputText value=”User Name orPassword is incorrect”style=”color:red; font-weight: bold;”rendered=”#{CheckValidUser.exist}”/> </f:facet> <h:panelGroup> <h:outputText value=” “/> <h:outputText value=”User Name”styleClass=”style2"/> </h:panelGroup> <h:panelGroup> <h:inputText id=”UserName”value=”#{CheckValidUser.userName}”size=”27" required=”true”/> <f:verbatim><br/></f:verbatim> <h:message for=”UserName”styleClass=”errors”/></h:panelGroup> <h:panelGroup> <h:outputText value=”Password”styleClass=”style2"/> </h:panelGroup> <h:panelGroup> <h:inputSecret id=”Password”value=”#{CheckValidUser.pwd}” size=”27" required=”true”/><f:verbatim><br/></f:verbatim> <h:message for=”Password”styleClass=”errors”/> </h:panelGroup> <h:outputText value=” “/> <h:panelGroup><h:commandButton image=”images/submit_button.gif”action=”#{CheckValidUser.checkUser}”/></h:panelGroup> </h:panelGrid> </h:form> <h:form> <h:commandLink value=”New User?”action=”reg” styleClass=”style3"/> </h:form> </h:panelGroup></h:panelGrid></center></body></html></f:view>
Integrating JSF, Spring and Hibernate

Jan-08 Java Jazz Up 61
Login Successful Page:If the user enters correct information thenthe user is presented with the next page asin the figure below:
successLogin.jsp: This is the code forabove page. This is simple page in which onlywelcome string is shown to the user.
<%@ taglib uri=”http://java.sun.com/jsf/html” prefix=”h”%><%@ taglib uri=”http://java.sun.com/jsf/core” prefix=”f”%><%@ taglib uri=”http://myfaces.apache.org/tomahawk” prefix=”t”%><f:view><html><meta http-equiv=”Content-Type”content=”text/html; charset=iso-8859-1"><head><title>Welcome</title><link href=”mycss.css” rel=”stylesheet”type=”text/css”/></head><body ><center><h:form><h:panelGrid width=”100%” columns=”1"border=”0" style=”padding-left:10px; padding-top:10px; “ styleClass=”top_bg”> <h:dataTable id=”dt1" border=”0"
cellpadding=”0" cellspacing=”0" var=”ab”> <h:column><f:facet name=”header”><h:outputText value=”RoseIndia”styleClass=”style4"/></f:facet> </h:column></h:dataTable> </h:panelGrid> <h:panelGrid width=”100%” columns=”1"border=”0" > <f:verbatim> </f:verbatim><h:outputText value=” “/><h:outputTextvalue=” “/><h:outputText value=” “/></h:panelGrid><h:outputText value=”Welcome .....”style=”color:green; font-weight:bold”/></h:form></center></body></html></f:view>
Registration Page:This page comes to the user if the user is notregistered with the site. The user clicks thelink named “New User?” and so registrationpage is opened. The figure below isregistration page:
Integrating JSF, Spring and Hibernate

62 Java Jazz Up Jan-08
registration.jsp : This is the code for abovepage. The backing bean used for this page is“Bean”. When the page is submitted thenregister() method is called which checks theuser name entered by the user. If the name isalready registered then user is informed thatthe user with name is already registeredotherwise a new user object is created and allthe fields related with the user is added inthat object i.e. user name, password, email,address. Before checking the user existencevalidateData() method is called to check allthe fields. If anything doesn’t match with therequirement then the same page is againpresented to the user with the validationmessages. The messages can be customizedcreating the MessageFactory class in whichmessages from the resource bundle for thespecific locale are picked and shown in thepage. You can see the code for bean below inthe tutorial.
<%@ taglib uri=”http://java.sun.com/jsf/html” prefix=”h”%><%@ taglib uri=”http://java.sun.com/jsf/core” prefix=”f”%><%@ taglib uri=”http://myfaces.apache.org/tomahawk” prefix=”t”%><f:loadBundlebasename=”net.roseindia.web.ui.messages”var=”message”/><f:view><html><meta http-equiv=”Content-Type”content=”text/html; charset=iso-8859-1">
<head><title>Registration</title><link href=”mycss.css” rel=”stylesheet”type=”text/css”/></head><body ><center>
<h:form id=”registerForm”> <h:panelGrid width=”100%” columns=”1"border=”0" style=”padding-left:10px; padding-top:10px; “styleClass=”top_bg”> <h:dataTable id=”dt1" border=”0"cellpadding=”0" cellspacing=”0" var=”ab”> <h:column> <f:facet name=”header”>
<h:outputText value=”RoseIndia”styleClass=”style4"/> </f:facet> </h:column> </h:dataTable> </h:panelGrid> <h:panelGrid width=”175px”columns=”3" border=”0" cellspacing=”0"cellpadding=”0"> <h:outputText value=” “/> <h:graphicImage id=”gi3"value=”images/verticle_line.gif”width=”4" height=”18"></h:graphicImage><h:panelGroup><h:dataTable id=”dt2" border=”0"cellpadding=”0" cellspacing=”0" width=”250"var=”gh”> <h:column> <f:facet name=”header”> <h:outputText value=”User Registration “styleClass=”style1"/> </f:facet> </h:column> </h:dataTable> </h:panelGroup><h:graphicImage id=”gi4" value=”images/horizontal_line.gif” width=”25" height=”4" ></h:graphicImage> <h:graphicImage id=”gi8" value=”images/horizontal_line.gif” width=”5" height=”4" ></h:graphicImage><h:graphicImage id=”gi6" value=”images/horizontal_line.gif” width=”260" height=”4" ></h:graphicImage><h:outputText value=” “/><h:graphicImage id=”gi7" value=”images/verticle_line.gif” width=”5" height=”100%” ></h:graphicImage> <h:panelGroup><h:dataTable id=”dt3" border=”0"cellpadding=”0" cellspacing=”0" width=”250"var=”gh”> <h:column><f:facet name=”header”><h:outputTextvalue=”#{message.already_registered_msg}” style=”color:red; font-weight: bold;” rendered=”#{Bean.exist}”/> </f:facet> </h:column> </h:dataTable><h:panelGrid width=”100px” columns=”2"
Integrating JSF, Spring and Hibernate

Jan-08 Java Jazz Up 63
border=”0" cellspacing=”2" cellpadding=”0"> <h:outputText value=”User Name”styleClass=”style2"/> <h:panelGroup><h:inputText id=”userName”value=”#{Bean.userName}” required=”true” size=”27" /> <f:verbatim><br/></f:verbatim> <h:message for=”userName”styleClass=”errors”/></h:panelGroup><h:outputText value=”Password”styleClass=”style2"/><h:panelGroup> <h:inputSecret id=”Password”value=”#{Bean.pwd}” size=”27" redisplay=”true” required=”true”/> <f:verbatim><br/></f:verbatim> <h:message for=”Password”styleClass=”errors” /></h:panelGroup><h:outputText value=”Confirm Password”styleClass=”style2"/><h:panelGroup> <h:inputSecret id=”confirmPassword”value=”#{Bean.confPwd}” size=”27" redisplay=”true” required=”true”/> <f:verbatim><br/></f:verbatim> <h:message for=”confirmPassword”styleClass=”errors” /> </h:panelGroup> <h:outputText value=”Email”styleClass=”style2"/> <h:panelGroup> <h:inputText id=”email”value=”#{Bean.email}” size=”27" required=”true”/> <f:verbatim><br/></f:verbatim> <h:messagefor=”email” styleClass=”errors” /> </h:panelGroup> <h:outputTextvalue=”Address” styleClass=”style2"/> <h:panelGroup> <h:inputTextid=”address” value=”#{Bean.address}” size=”27"required=”true”/> <f:verbatim><br/></f:verbatim> <h:messagefor=”address” styleClass=”errors” />
</h:panelGroup><h:outputText value=” “/> <h:commandButtonvalue=”sub” image=”images/submit_button.gif” action=”#{Bean.register}”/> </h:panelGrid> </h:panelGroup> </h:panelGrid>
</h:form></center></body></html></f:view>
Welcome page:If the user enters the correct information in allthe fields then user is informed for thesuccessful registration in the next page.
welcome.jsp :This is the code for the above page. This isalso a simple page in which only string forsuccessful registration has been shown.
<%@ taglib uri=”http://java.sun.com/jsf/html” prefix=”h”%><%@ taglib uri=”http://java.sun.com/jsf/core” prefix=”f”%><%@ taglib uri=”http://myfaces.apache.org/tomahawk” prefix=”t”%><f:view><html><meta http-equiv=”Content-Type”content=”text/html; charset=iso-8859-1">
<head><title>Welcome</title>
Integrating JSF, Spring and Hibernate

64 Java Jazz Up Jan-08
<link href=”mycss.css” rel=”stylesheet”type=”text/css”/></head><body ><center>
<h:form> <h:panelGrid width=”100%” columns=”1"border=”0" style=”padding-left:10px; padding-top:10px; “styleClass=”top_bg”> <h:dataTable id=”dt1" border=”0"cellpadding=”0" cellspacing=”0" var=”ab”> <h:column> <f:facet name=”header”> <h:outputTextvalue=”RoseIndia” styleClass=”style4"/> </f:facet> </h:column> </h:dataTable> </h:panelGrid> <h:panelGrid width=”100%” columns=”1"border=”0" > <f:verbatim> </f:verbatim> <h:outputText value=” “/><h:outputText value=” “/><h:outputTextvalue=” “/> </h:panelGrid> <h:outputText value=”Registration issuccessful.” style=”color:green; font-weight:bold”/></h:form></center></body></html></f:view>
Configuration Files :
Information about message bundle, backingbean, navigation rules are to be specified inthe faces-config.xml file. This file has beenmodified like below:
faces-config.xml :
<?xml version=”1.0"?>
<!DOCTYPE faces-config PUBLIC“-//Sun Microsystems, Inc.//DTD JavaServerFaces Config 1.0//EN”“http://java.sun.com/dtd/web-facesconfig_1_0.dtd” >
<faces-config>
<application> <locale-config> <default-locale>en</default-locale> </locale-config> <message-bundle>net.roseindia.web.ui.messages</message-bundle></application>
<managed-bean> <managed-bean-name>Bean</managed-bean-name> <managed-bean-class>net.roseindia.web.ui.Bean</managed-bean-class> <managed-bean-scope>session</managed-bean-scope></managed-bean>
<managed-bean> <managed-bean-name>CheckValidUser</managed-bean-name> <managed-bean-class>net.roseindia.web.ui.CheckValidUser</managed-bean-class> <managed-bean-scope>session</managed-bean-scope></managed-bean>
<navigation-rule> <from-view-id>/pages/login.jsp</from-view-id> <navigation-case> <from-outcome>reg</from-outcome> <to-view-id>/pages/registration.jsp</to-view-id> </navigation-case> <navigation-case> <from-outcome>success</from-outcome> <to-view-id>/pages/successLogin.jsp</to-view-id> </navigation-case> <navigation-case> <from-outcome>failure</from-outcome> <to-view-id>/pages/login.jsp</to-view-id>
Integrating JSF, Spring and Hibernate
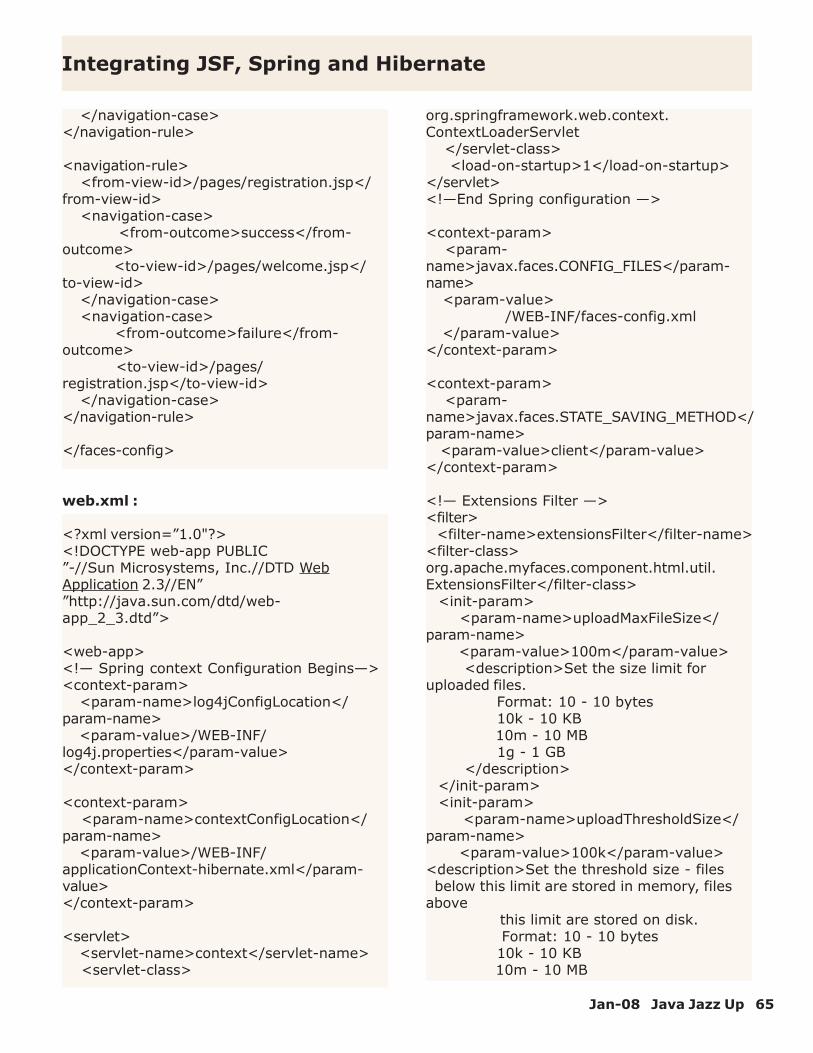
Jan-08 Java Jazz Up 65
</navigation-case></navigation-rule>
<navigation-rule> <from-view-id>/pages/registration.jsp</from-view-id> <navigation-case> <from-outcome>success</from-outcome> <to-view-id>/pages/welcome.jsp</to-view-id> </navigation-case> <navigation-case> <from-outcome>failure</from-outcome> <to-view-id>/pages/registration.jsp</to-view-id> </navigation-case></navigation-rule>
</faces-config>
web.xml :
<?xml version=”1.0"?><!DOCTYPE web-app PUBLIC”-//Sun Microsystems, Inc.//DTD WebApplication 2.3//EN””http://java.sun.com/dtd/web-app_2_3.dtd”>
<web-app><!— Spring context Configuration Begins—><context-param> <param-name>log4jConfigLocation</param-name> <param-value>/WEB-INF/log4j.properties</param-value></context-param>
<context-param> <param-name>contextConfigLocation</param-name> <param-value>/WEB-INF/applicationContext-hibernate.xml</param-value></context-param>
<servlet> <servlet-name>context</servlet-name> <servlet-class>
org.springframework.web.context.ContextLoaderServlet </servlet-class> <load-on-startup>1</load-on-startup></servlet><!—End Spring configuration —>
<context-param> <param-name>javax.faces.CONFIG_FILES</param-name> <param-value> /WEB-INF/faces-config.xml </param-value></context-param>
<context-param> <param-name>javax.faces.STATE_SAVING_METHOD</param-name> <param-value>client</param-value></context-param>
<!— Extensions Filter —><filter> <filter-name>extensionsFilter</filter-name><filter-class>org.apache.myfaces.component.html.util.ExtensionsFilter</filter-class> <init-param> <param-name>uploadMaxFileSize</param-name> <param-value>100m</param-value> <description>Set the size limit foruploaded files. Format: 10 - 10 bytes 10k - 10 KB 10m - 10 MB 1g - 1 GB </description> </init-param> <init-param> <param-name>uploadThresholdSize</param-name> <param-value>100k</param-value><description>Set the threshold size - files below this limit are stored in memory, filesabove this limit are stored on disk. Format: 10 - 10 bytes 10k - 10 KB 10m - 10 MB
Integrating JSF, Spring and Hibernate

66 Java Jazz Up Jan-08
1g - 1 GB </description> </init-param></filter>
<filter-mapping> <filter-name>extensionsFilter</filter-name> <url-pattern>*.jsf</url-pattern></filter-mapping><filter-mapping> <filter-name>extensionsFilter</filter-name> <url-pattern>/faces/*</url-pattern></filter-mapping>
<servlet> <servlet-name>Faces Servlet</servlet-name> <servlet-class>javax.faces.webapp.FacesServlet</servlet-class> <load-on-startup>1</load-on-startup></servlet>
<servlet-mapping> <servlet-name>Faces Servlet</servlet-name> <url-pattern>*.jsf</url-pattern></servlet-mapping><welcome-file-list> <welcome-file>index.jsp</welcome-file></welcome-file-list>
</web-app>
Creation of Beans :
Bean.java : This bean has been used forregistration page. This bean has propertiesrelated to all the fields in the page and setterand getter method corresponding to all theproperties. exist property has been used toset true or false value to the “rendered” attributeof the outputText tag responsible for presentingthe string “User is already registered”. If theusername is already present then the value forexist property is set to “true”. dao object ofHibernateSpringDAO class is used to work withthe database.
package net.roseindia.web.ui;
import net.roseindia.web.common.*;
import net.roseindia.dao.*;
CheckValidUser.javaThis bean has been used in the login page. Allthe properties of the bean are related to thefields of the login page. When the page issubmitted then checkUser() method is calledwhich checks the username and password. Ifboth are correct then the user is sent to thenext page which welcomes the user otherwisemessage is displayed to the user in the samelogin page. In this bean there is one existproperty which is set to true if username orpassword doesn’t match with the database. Sothis value is set to the “rendered” property ofthe tag responsible for displaying the string“User name or password is incorrect”.
package net.roseindia.web.ui;import net.roseindia.web.common.*;
import net.roseindia.dao.*;
import javax.faces.application.FacesMessage;import javax.faces.context.FacesContext;
public class CheckValidUser{ String userName; String pwd; boolean exist; public void setUserName(StringuserName){ this.userName=userName; } public void setPwd(String pwd){ this.pwd=pwd; } public void setExist(boolean exist){ this.exist=exist; }
public String getUserName(){ return userName; } public String getPwd(){ return pwd; }
Integrating JSF, Spring and Hibernate

Jan-08 Java Jazz Up 67
public boolean getExist(){ return exist; }public String checkUser() throws Exception{ String status = “failure”; HibernateSpringDAO dao =(HibernateSpringDAO)ServiceFinder.findBean(“SpringHibernateDao”);
if(dao.validateUser(getUserName(),getPwd())!=null){ exist=false; status = “success”; } exist=true; return status; }}
MessageFactory.java :This java code is used to get the messagefrom message bundle of specific locale. Thisclass has been used in the Bean class to setthe appropriate message for different fieldswhen the defined condition doesn’t meet.
package net.roseindia.web.ui;import net.roseindia.web.common.*;
import java.util.*;import javax.faces.application.FacesMessage;import javax.faces.context.FacesContext;
public class MessageFactory { ResourceBundle bundle; Locale locale; public MessageFactory() { locale =FacesContext.getCurrentInstance().getViewRoot().getLocale(); bundle = ResourceBundle.getBundle(“net.roseindia.web.ui.messages”, locale); } public String getMessage(String key) { return bundle.getString(key); }
}
Creation of Properties File :
This is the file containing the messages stringsthat are to be shown in different pages.
# Registration PageerrorPasswordConfirm=Passwords are notsame.errorUserId=User ID can not be less than 4characters.errorUserName=User Name can not be lessthan 4 characters.errorPasswordLength=Password can not beless than 6 characters.errorEmail=Invalid Email Address.already_registered_msg=User is alreadyregistered.
# Messages.properties file of JSFjavax.faces.component.UIInput.REQUIRED=Cannotbe blankCreating CSS :
body{background-color:#fff2f2;margin-left:0;margin-right:0;margin-top:0;margin-bottom:0;}
.top_bg{background-image:url(../images/TOP_BG.gif);background-repeat:repeat-x;}
.style1 {font-family: Verdana, Arial, Helvetica, sans-serif;font-weight: bold;font-size: 12px;}.style2 {font-family: Verdana, Arial, Helvetica, sans-serif;font-size: 10px;font-weight: bold;}
Integrating JSF, Spring and Hibernate

68 Java Jazz Up Jan-08
.style3 {font-size: 13px; font-family:Verdana, Arial, Helvetica, sans-serif;}.style4 {font-family: Verdana, Arial, Helvetica, sans-serif;font-weight:bold;color: #FF0000;}.errors {font-style: italic;color: green;}
7. Business Objects of Business Logic tierIn this section we will develop the objects ofbusiness logic tier. Business logic tier refers tothe mid tier of 3-tier web application architecture.
Business Objects
Business logic tier communicates both with userinterface tier and the database tier. In thebusiness logic tier all the logic are encapsulated.The business objects and business services inthe application resides in the Business logic tier.The business objects contain the data and logicassociated with the data. In our application thereis only one business object the User.
Here is the code of User.java businessobject:
package net.roseindia.dao.hibernate;
import java.io.Serializable;
/** @author Hibernate CodeGenerator */public class User implements Serializable {
/** identifier field */ private Integer userId;
/** nullable persistent field */ private String userName;
/** nullable persistent field */ private String userPassword;
/** nullable persistent field */ private String userEmail;
/** nullable persistent field */ private String userAddress;
/** full constructor */ public User(Integer userId, StringuserName, String userPassword, StringuserEmail, String userAddress) { this.userId = userId; this.userName = userName; this.userPassword = userPassword; this.userEmail = userEmail; this.userAddress = userAddress; }
/** default constructor */ public User() { }
/** minimal constructor */ public User(Integer userId) { this.userId = userId; }
public Integer getUserId() { return this.userId; }
public void setUserId(Integer userId) { this.userId = userId; }
public String getUserName() { return this.userName; }
public void setUserName(StringuserName) { this.userName = userName; }
public String getUserPassword() { return this.userPassword; }
public void setUserPassword(StringuserPassword) { this.userPassword = userPassword; }
Integrating JSF, Spring and Hibernate

Jan-08 Java Jazz Up 69
public String getUserEmail() { return this.userEmail; }
public void setUserEmail(String userEmail){ this.userEmail = userEmail; }
public String getUserAddress() { return this.userAddress; }
public void setUserAddress(StringuserAddress) { this.userAddress = userAddress; }
}
Since we are using Hibernate for persistence,the User business object provides getter andsetter methods for all fields.Business Services
Business Services contains the code to interactwith the data tier. In this application we havedeveloped a formal service layer, client can usethese services interface. There is only oneservice in this application the ServiceFinder.The ServiceFinder service is used to get theSpring managed beans fromWebApplicationContext.
In the next section we will learn aboutIntegration tier of our application. Integrationtier is also known as data access tier.
8. Implementing Data Access Layer withHibernate
In this application we are using Hibernate toimplement data access layer. Hibernate is anopen source O/R mapping framework thathandles all the persistence logic.
Hibernate supports all major database availablein the market. The Hibernate Query Languageis an object-oriented extension to SQL, whichcan be extensively used to save and retrieve
the data in the form of Java objects fromdatabase. Hibernate also supports association,inheritance, polymorphism, composition and alsothe Java Collection framework.
Data Access Object (DAO)In this application we have used the DAOpattern. The DAO pattern abstracts andencapsulates all access to the data source. Ourapplication has one DAO interface:HibernateSpringDAO. The implementationclasses of it is HibernateSpringDAOImpl thatcontains Hibernate-specific logic to manage andpersist data.
Here is the code ofHibernateSpringDAO.java file:
importorg.springframework.dao.DataAccessException;import net.roseindia.dao.hibernate.*;
public interface HibernateSpringDAO {
/** * Retrieve all <code>true</code>/<code>false</code> from the datastore. * @return a <code>true</code> or<code>fasel</code>. */ public User checkUser(String strUserName)throwsDataAccessException,java.sql.SQLException;
/** * Retrieve all <code>true</code>/<code>false</code> from the datastore. * @return a <code>true</code> or<code>fasel</code>. */ public User validateUser(StringstrUserName,String password) throws DataAccessException,java.sql.SQLException;
/** * Saves User object to the datastore. * */ public voidaddUser(net.roseindia.dao.hibernate.Userobj) throws DataAccessException;
Integrating JSF, Spring and Hibernate

70 Java Jazz Up Jan-08
}
Here is the code ofHibernateSpringDAOImpl.java file thatactually implements the logic:
package net.roseindia.dao;
import java.util.*;importorg.springframework.dao.DataAccessException;importorg.springframework.orm.hibernate3.support.HibernateDaoSupport;import org.hibernate.criterion.*;//Java Importsimport java.sql.*;import javax.servlet.http.HttpSession;//Project Importsimport net.roseindia.dao.hibernate.*;
public class HibernateSpringDAOImplextends HibernateDaoSupport implements HibernateSpringDAO {
public User checkUser(String strUserName) throws DataAccessException,java.sql.SQLException { User obj = null; DetachedCriteria criteria =DetachedCriteria.forClass(User.class); criteria.add(Expression.eq(“userName”,strUserName));
List objs =getHibernateTemplate().findByCriteria(criteria); if ((objs != null) && (objs.size() > 0)) { obj = (User) objs.get(0); } return obj; }
public User validateUser(StringstrUserName,String password) throws DataAccessException,java.sql.SQLException { User obj = null; DetachedCriteria criteria =DetachedCriteria.forClass(User.class); criteria.add(Expression.eq(“userName”,strUserName));
criteria.add(Expression.eq(“userPassword”,password)); List objs =getHibernateTemplate().findByCriteria(criteria); if ((objs != null) && (objs.size() > 0)) { obj = (User) objs.get(0); } return obj; }
public voidaddUser(net.roseindia.dao.hibernate.Userobj) throws DataAccessException { getHibernateTemplate().save(obj); }};
Database DesignOur application contains only one table whosestructure is as follows:
In the next section we will integrate all thecomponents.
9. Integrating JSF, Spring and HibernateIn this section we will explain you the processof Integrating Spring with JSF technology. Thissection gives you a brief description aboutSpring container (a WebApplicationContext),which contains all the ‘business beans’ presentin the application.
Configuring Springcontext(WebApplicationContext)
What is WebApplicationContext?
The WebApplicationContext is an interfacethat extends the ApplicationContext interfacein the Spring framework. This interface is usedto provide the configuration for a web application.The WebApplicationContext is ready onlywhile application is running, it can even bereloaded in runtime if the implementation
Integrating JSF, Spring and Hibernate

Jan-08 Java Jazz Up 71
supports this.
Configuring WebApplicationContext
First of all it is necessary to configure theWebApplicationContext as aContextListener in the web.xml file of theweb application. Following code shows theconfiguration:
<listener><listener-class>org.springframework.web.context.ContextLoaderListener</listener-class></listener>
In case you are using an older version of theServlet API (<2.3), you have to use Spring’sContextLoaderServlet in order to configureWebApplicationContext. You can use thefollowing code in the web.xml file:
<servlet> <servlet-name>context</servlet-name> <servlet-class> org.springframework.web.context.ContextLoaderServlet </servlet-class> <load-on-startup>1</load-on-startup></servlet>
The ContextLoaderListener uses theconfiguration defined in applicationContext-hibernate.xml file and creates the object ofWebApplicationContext for the application. Thepath of applicationContext-hibernate.xml ispassed as <context-param>..</context-param> property. Following code can be usedfor this purpose:
<context-param> <param-name>contextConfigLocation</param-name> <param-value>/WEB-INF/applicationContext-hibernate.xml</param-value></context-param>
When the application is started,
ContextLoaderListener loads the configurationparameters from applicationContext-hibernate.xml file and creates an object ofWebApplicationContext and stores it theServletContext of the web application.
Now our application can use theWebApplicationContext to find the beanspresent in it.
Getting the reference of Application context:
ApplicationContext appContext =WebApplicationContextUtils.getWebApplicationContext(servletContext);
Getting the bean from the ApplicationContext
Object o =appContext.getBean(beanName);
Developing Service Finder
In our application we will use Service Finderclass to find the beans managed by Springframework. Here is the code of the Servicefinder utility (ServiceFinder.java):
package net.roseindia.web.common; import javax.faces.context.FacesContext;import javax.faces.context.ExternalContext;
import javax.servlet.ServletContext;
importorg.springframework.context.ApplicationContext; importorg.springframework.web.context.support.WebApplicationContextUtils; import java.util.Map; import javax.servlet.ServletRequest; importjavax.servlet.http.HttpServletRequest; public class ServiceFinder {
Integrating JSF, Spring and Hibernate

72 Java Jazz Up Jan-08
public static Object findBean(StringbeanName){ FacesContext context=FacesContext.getCurrentInstance();
ServletContext servletContext = (ServletContext)context.getExternalContext().getContext(); ApplicationContext appContext = WebApplicationContextUtils.getWebApplicationContext(servletContext);Object o =appContext.getBean(beanName); return o; } }
The findBean() method of ServiceFinder classis used to get the reference of in the backingbeans of JSF.
10. JSF, Integrating Presentation LayerIn this section we will learn about configuringthe presentation layer.
The presentation tier integration actuallyinvolves the following steps:
1. Creating JSP pagesThe JSP pages used in this application arelogin.jsp, registration.jsp, successLogin.jsp andwelcome.jsp. These pages are already describedin the previous section Developing Login andRegistration form and backing beans.
2. Defining the page navigation rulesFollowing code present in the faces-config.xmlfile defines the page navigation rule.
<navigation-rule> <from-view-id>/pages/login.jsp</from-view-id> <navigation-case> <from-outcome>reg</from-outcome> <to-view-id>/pages/registration.jsp</to-view-id> </navigation-case> <navigation-case> <from-outcome>success</from-outcome> <to-view-id>/pages/
successLogin.jsp</to-view-id> </navigation-case> <navigation-case> <from-outcome>failure</from-outcome> <to-view-id>/pages/login.jsp</to-view-id> </navigation-case></navigation-rule><navigation-rule> <from-view-id>/pages/registration.jsp</from-view-id> <navigation-case> <from-outcome>success</from-outcome> <to-view-id>/pages/welcome.jsp</to-view-id> </navigation-case> <navigation-case> <from-outcome>failure</from-outcome> <to-view-id>/pages/registration.jsp</to-view-id> </navigation-case></navigation-rule>
3. Developing and configuring backingbeans
In our application there are two backing beansBean and CheckValidUser.Following code in the faces-config.xml filedeclares the backing beans:
<application> <locale-config> <default-locale>en</default-locale> </locale-config> <message-bundle>net.roseindia.web.ui.messages</message-bundle></application>
<managed-bean> <managed-bean-name>Bean</managed-bean-name> <managed-bean-class>net.roseindia.web.ui.Bean</managed-bean-class> <managed-bean-scope>session</managed-bean-scope></managed-bean>
Integrating JSF, Spring and Hibernate

Jan-08 Java Jazz Up 73
<managed-bean> <managed-bean-name>CheckValidUser</managed-bean-name> <managed-bean-class>net.roseindia.web.ui.CheckValidUser</managed-bean-class> <managed-bean-scope>session</managed-bean-scope></managed-bean>
4. Integrating JSF with business logic tier
We are using ServiceFinder class to get theSpring managed bean.
FacesContext context=FacesContext.getCurrentInstance();
ServletContext servletContext =(ServletContext)context.getExternalContext().getContext();ApplicationContext appContext =WebApplicationContextUtils.getWebApplicationContext(servletContext);
11. Integrating Business Logic Tier andIntegration Tier ComponentsIn the business logic tier web have createdbusiness objects, business services and nowwe are going to integrate them using Springframework.
Business Objects
In this example we have only one businessobject the User.
Integration tier components
Hibernate maps the business objects todatabase using XML configuration file. Followingfile (User.hbm.xml) is used to map User objectwith the database.
<?xml version=”1.0" encoding=”UTF-8"?><!DOCTYPE hibernate-mapping PUBLIC “-//Hibernate/Hibernate Mapping DTD//EN””http://hibernate.sourceforge.net/hibernate-mapping-3.0.dtd”>
<hibernate-mapping auto-import=”true”default-lazy=”false”>
<classname=”net.roseindia.dao.hibernate.User”table=”users”>
<idname=”userId”type=”java.lang.Integer”column=”userId”><generator class=”increment” /></id>
<propertyname=”userName”type=”java.lang.String”column=”userName”length=”20"/>
<propertyname=”userPassword”type=”java.lang.String”column=”userPassword”length=”11"/>
<propertyname=”userEmail”type=”java.lang.String”column=”userEmail”length=”30" />
<propertyname=”userAddress”type=”java.lang.String”column=”userAddress”length=”30"/>
<!— Associations —></class></hibernate-mapping>
The HibernateSpringDAO is wired withHibernateTemplate by Spring:
<bean id=”HibernateSpringDaoTarget”class=”net.roseindia.dao.HibernateSpringDAOImpl”><property name=”sessionFactory”><reflocal=”sessionFactory”/></property></bean>
Integrating JSF, Spring and Hibernate

74 Java Jazz Up Jan-08
Here is the full code of applicationContext-hibernate.xml file
<?xml version=”1.0" encoding=”UTF-8"?><!DOCTYPE beans PUBLIC “-//SPRING//DTDBEAN//EN” “http://www.springframework.org/dtd/spring-beans.dtd”>
<!—- Application context definition for MyFaces,Hibernate and Spring Integration application.—><beans>
<!— =========================RESOURCE DEFINITIONS========================= —>
<!— Configurer that replaces ${...}placeholders with values from a properties file—><!— (in this case, JDBC-related settings forthe dataSource definition below) —><bean id=”propertyConfigurer”class=”org.springframework.beans.factory.config.PropertyPlaceholderConfigurer”><property name=”location”><value>/WEB-INF/jdbc.properties</value></property></bean>
<!— Local DataSource that works in anyenvironment —><!— Note that DriverManagerDataSourcedoes not pool; it is not intended forproduction —>
<bean id=”dataSource”class=”org.springframework.jdbc.datasource.DriverManagerDataSource”><property name=”driverClassName”><value>${jdbc.driverClassName}</value></property><property name=”url”><value>${jdbc.url}</value></property><propertyname=”username”><value>${jdbc.username}</value></property><propertyname=”password”><value>${jdbc.password}</value></property>
</bean>
<!— JNDI DataSource for J2EE environments—><!—<bean id=”dataSource”class=”org.springframework.jndi.JndiObjectFactoryBean”><propertyname=”jndiName”><value>java:comp/env/jdbc/roseindiaDB_local</value></property></bean>—><!— Hibernate SessionFactory —><bean id=”sessionFactory”class=”org.springframework.orm.hibernate3.LocalSessionFactoryBean”><property name=”dataSource”><ref local=”dataSource”/></property><property name=”mappingResources”><list><value>/net/roseindia/dao/hibernate/User.hbm.xml</value></list></property><property name=”hibernateProperties”><props><prop key=”hibernate.dialect”>${hibernate.dialect}</prop><prop key=”hibernate.show_sql”>true</prop></props></property></bean>
<!— Transaction manager for a singleHibernate SessionFactory (alternative to JTA)—><bean id=”transactionManager”class=”org.springframework.orm.hibernate3.HibernateTransactionManager”><property name=”sessionFactory”><reflocal=”sessionFactory”/></property></bean>
<!— =========================BUSINESS OBJECT DEFINITIONS========================= —>
<!—Data access object: Hibernate
Integrating JSF, Spring and Hibernate

Jan-08 Java Jazz Up 75
implementation.—>
<bean id=”HibernateSpringDaoTarget”class=”net.roseindia.dao.HibernateSpringDAOImpl”><property name=”sessionFactory”><reflocal=”sessionFactory”/></property></bean>
<!—- Transactional proxy for Application’s centraldata access object.-- Defines specific transaction attributes with“readOnly” markers,- which is an optimization that is particularlyvaluable with Hibernate(to suppressunnecessary flush attempts for read-onlyoperations).-Note that in a real-life app with multipletransaction proxies,-you will probably want to use parent andchild bean definitionsas described in themanual, to reduce duplication.—>
<bean id=”SpringHibernateDao”class=”org.springframework.transaction.interceptor.TransactionProxyFactoryBean”><property name=”transactionManager”><ref local=”transactionManager”/></property><property name=”target”><reflocal=”HibernateSpringDaoTarget”/></property><property name=”transactionAttributes”><props><propkey=”get*”>PROPAGATION_REQUIRED,readOnly</prop><prop key=”find*”>PROPAGATION_REQUIRED,readOnly</prop><prop key=”load*”>PROPAGATION_REQUIRED,readOnly</prop><prop key=”store*”>PROPAGATION_REQUIRED</prop><prop key=”add*”>PROPAGATION_REQUIRED</prop>
</props></property></bean>
</beans>
This application is supported with full free code.In the next section we will show you how youcan download and install it on your computer.
12. Download full code of JSF, Spring andHibernate based Registration program
From this page you can download the sourcecode of the application.
Downloading code
Download the code of the application.
Extracting and Installing the code on TomcatExtract the downloaded file and copyHibernateMyfaces directory to tomcatwebapps directory. This will install applicationon tomcat server.
Creating databaseFollow the steps given in the previous sectionand create database for testing the application.
Changing the database login informationGo to HibernateMyfaces\WEB-INF directoryand edit jdbc.properties to point to yourdatabase.
Compile the application
To compile the program ant tool must beinstalled on your system. Open console and goto HibernateMyfaces\WEB-INF\src directoryand type ant command. This will compile yourprogram.
Running and testing the program
Start tomcat and type http://localhost:8080/HibernateMyfaces/ . Youbrowser will display the login page as shownbelow.
Integrating JSF, Spring and Hibernate

76 Java Jazz Up Jan-08
Now you can test the application.
Congratulations you have successfullydeveloped application using JSF, Hibernate andSpring frameworks.
Integrating JSF, Spring and Hibernate

Jan-08 Java Jazz Up 77
Facelet is a view technology for Java ServerFaces (JSF) that allows building composite viewsmore quickly and easily than with JSP which isthe default view technology for JSF. JSP pagesare compiled into servlets but it’s not the casewith Facelets because Facelet pages are XMLcompliant and its framework uses a fast SAX-based compiler to build views. Facelets can makechanges to pages immediately so developingJSF applications with Facelets is simply faster.This section explains all facelet tags. Downloadzip file from the link given below of the pageand run it. You will get the page given belowand can see the output of each tag clicking therelated link.
1.Facelet component tag
This tag is used to add a new component intothe JSF component tree as children of UIcomponent instance. This tag shows itsbehavior like composition tag. The difference isthat the component tag inserts a newUIcomponent instance in the component treeand this instance is the root of all its childcomponents or fragments. The content outsideof the tag is ignored as it happens withcomposition tag.
comptemplate.xhtml :
<!DOCTYPE html PUBLIC “-//W3C//DTDXHTML 1.0 Transitional//EN” “http://www.w3.org/TR/xhtml1/DTD/xhtml1-transitional.dtd”><html xmlns=”http://www.w3.org/1999/xhtml” xmlns:ui=”http://java.sun.com/jsf/facelets”> <head>
<title>Facelet component tag </title> </head> <body>
Content above component tag will not berendered. <ui:component >
<h2>Welcome........</h2> </ui:component >
Content below component tag will not berendered. </body></html>
Rendered Output:
Facelet

78 Java Jazz Up Jan-08
2. Facelet composition tag
This is a templating tag and is used for thewrapping the content that can be included inany other facelet. This tag provides some usefulfeatures. Any content outside of this tag is leftbe rendered. You can include normal htmlcontent in your page but Facelet will render onlycontent that is within this tag i.e. compositiontag. This tag takes one attribute named“template”. This attribute is set to the path ofthe template where the content of this tag willbe included.
In the code below we have taken templateattribute, which indicates the template to whichthe content inside this composition tag will berendered. Content outside of the compositiontag will not be rendered. In thecomptemplate.xhtml we have used insert tagto include the content inside the compositiontag to the comptemplate.xhtml page.
composition.xhtml:
<!DOCTYPE html PUBLIC “-//W3C//DTDXHTML 1.0 Transitional//EN” “http://www.w3.org/TR/xhtml1/DTD/xhtml1-transitional.dtd”><html xmlns=”http://www.w3.org/1999/xhtml”xmlns:ui=”http://java.sun.com/jsf/facelets”> <body>
Content above composition tag will not berendered. <ui:composition template=”/pages/composition/comptemplate.xhtml”>
<h2>Content to be included in thecomptemplate.xhtml page.</h2> </ui:composition>
Content below composition tag will not berendered. </body></html>
comptemplate.xhtml :
<!DOCTYPE html PUBLIC “-//W3C//DTDXHTML 1.0 Transitional//EN” “http://www.w3.org/TR/xhtml1/DTD/xhtml1-transitional.dtd”><html xmlns=”http://www.w3.org/1999/
xhtml” xmlns:ui=”http://java.sun.com/jsf/facelets”> <head>
<title>Facelet composition tag example</title>
<link href=”../../style/CSS.css”rel=”stylesheet” type=”text/css”/> </head> <body>
<ui:insert /> </body></html>
Rendered Output:
3. Facelet debug tag
This tag is useful in displaying the componenttree and scoped variables. This information willbe displayed in a popup window of browserwhen we press Ctrl+Shift+(a key). This keywill be specified in hotkey attribute. For example,in the code below in “debugtemplate.xhtml”,this has been specified “p”. So when pagecomes to the user then if Ctrl+Shift+p ispressed, debug window is open which displaysthe component tree and scoped variables.
debug.xhtml :
<!DOCTYPE html PUBLIC “-//W3C//DTDXHTML 1.0 Transitional//EN” “http://www.w3.org/TR/xhtml1/DTD/xhtml1-transitional.dtd”><html xmlns=”http://www.w3.org/1999/
Facelet

Jan-08 Java Jazz Up 79
xhtml”xmlns:ui=”http://java.sun.com/jsf/facelets”xmlns:h=”http://java.sun.com/jsf/html”> <body>
Content above composition tag will not berendered. <ui:composition template=”/pages/debug/debugtemplate.xhtml”>
<ui:define name=”face1"><h2>Java Jazz Up</h2><h3>Facelet Examples</h3>
</ui:define><ui:define name=”face2">Enter UserID
:<br/><h:inputText id=”it” /><br/><br/>
</ui:define><ui:define name=”face3">Enter Password
:<br/><h:inputSecret id=”is” /><br/><br/>
</ui:define><ui:define name=”face4">
<h:commandButton id=”cb”value=”Submit” />
</ui:define> </ui:composition>
Content below composition tag will not berendered. </body></html>
debugtemplate.xhtml :
<!DOCTYPE html PUBLIC “-//W3C//DTDXHTML 1.0 Transitional//EN” “http://www.w3.org/TR/xhtml1/DTD/xhtml1-transitional.dtd”><html xmlns=”http://www.w3.org/1999/xhtml” xmlns:ui=”http://java.sun.com/jsf/facelets”> <head>
<title>Facelet debug tag example</title><link href=”../../style/CSS.css”
rel=”stylesheet” type=”text/css”/> </head> <body>
<ui:insert name=”face1"></ui:insert><ui:insert name=”face2"> </ui:insert><ui:insert name=”face3"> </ui:insert><ui:insert name=”face4"> </ui:insert><ui:debug hotkey=”p” rendered=”true”/>
</body></html>
Rendered Output: This is the page that isdisplayed to the user first. Now if we pressCtrl+Shift+p then debug window is openedthat is shown in the second figure below:
Facelet

80 Java Jazz Up Jan-08
Debug window:
4. Facelet decorate tagThis tag is like composition tag. Differencebetween those is that the content outside ofthe decorate tag is rendered while it is reversefor composition tag i.e. it is not rendered whenwe use composition tag. This tag is useful whenwe want content with some decoration text inthe document.
decorate.xhtml:
<!DOCTYPE html PUBLIC “-//W3C//DTDXHTML 1.0 Transitional//EN” “http://www.w3.org/TR/xhtml1/DTD/xhtml1-transitional.dtd”><html xmlns=”http://www.w3.org/1999/xhtml”xmlns:ui=”http://java.sun.com/jsf/facelets”xmlns:h=”http://java.sun.com/jsf/html”> <body>
<h2>Java Jazz Up</h2><h3>Facelet Examples</h3><hr/>
<ui:decorate template=”/pages/decorate/decoratetemplate.xhtml”>
<ui:define name=”face1"><table border=”1"><tr><th>User</th><th>Email</th></tr><tr><td>ABC</td>
<td>[email protected]</td></tr><tr><td>XYZ</td><td>[email protected]</td></tr></table><hr/>
</ui:define> </ui:decorate>
<h3>Content below decorate tag.</h3> </body></html>
decoratetemplate.xhtml :
<!DOCTYPE html PUBLIC “-//W3C//DTDXHTML 1.0 Transitional//EN” “http://www.w3.org/TR/xhtml1/DTD/xhtml1-transitional.dtd”><html xmlns=”http://www.w3.org/1999/xhtml” xmlns:ui=”http://java.sun.com/jsf/facelets”> <head>
<title>Facelet decorate tag example</title><link href=”../../style/CSS.css”
rel=”stylesheet” type=”text/css”/> </head> <body>
<ui:insert name=”face1"></ui:insert> </body></html>
Facelet

Jan-08 Java Jazz Up 81
Rendered Output:
5. Facelet define tagThis tag is used to define the name of thecontent. This named content can be includedwithin a template. This tag is used within thosetags that allows templating like composition anddecorate tags. This tag takes one attributenamed “name” that is required to be includedwhen using this define tag. This name attributeis required to be same as name attribute ofinsert tag in the target template to include thecontent specified in define tag with the samename. For example, in the first define tag nameattribute is set to “face1”. Now look at thecode below in “definetemplate.xhtml” where wehave used insert tag with name attribute. Thisname attribute is given value “face1”. So thecontent within define tag, whose name attributevalue matches with the name attribute of theinsert tag i.e.”face1", will be included in the“definetemplate.xhtml”.
define.xhtml :
<!DOCTYPE html PUBLIC “-//W3C//DTDXHTML 1.0 Transitional//EN” “http://www.w3.org/TR/xhtml1/DTD/xhtml1-transitional.dtd”><html xmlns=”http://www.w3.org/1999/xhtml”xmlns:ui=”http://java.sun.com/jsf/facelets”xmlns:h=”http://java.sun.com/jsf/html”> <body>
Content above composition tag will not berendered. <ui:composition template=”/pages/define/definetemplate.xhtml”>
<ui:define name=”face1"><h2>Java Jazz Up</h2><h3>Facelet Examples</h3>
</ui:define><ui:define name=”face2">Enter UserID
:<br/><h:inputText id=”it” /><br/><br/>
</ui:define><ui:define name=”face3">Enter Password
:<br/><h:inputSecret id=”is” /><br/><br/>
</ui:define><ui:define name=”face4">
<h:commandButton id=”cb”value=”Submit” />
</ui:define> </ui:composition>
Content below composition tag will not berendered. </body></html>
definetemplate.xhtml :
<!DOCTYPE html PUBLIC “-//W3C//DTDXHTML 1.0 Transitional//EN” “http://www.w3.org/TR/xhtml1/DTD/xhtml1-transitional.dtd”><html xmlns=”http://www.w3.org/1999/xhtml” xmlns:ui=”http://java.sun.com/jsf/facelets”> <head>
<title>Facelet define tag example</title><link href=”../../style/CSS.css”
rel=”stylesheet” type=”text/css”/>
Facelet

82 Java Jazz Up Jan-08
</head> <body>
<ui:insert name=”face1"> </ui:insert><ui:insert name=”face2"> </ui:insert><ui:insert name=”face3"> </ui:insert><ui:insert name=”face4"> </ui:insert>
</body></html>
Rendered Output:
6. Facelet fragment tagThis tag is used to insert the newUIcomponent to the component tree and thecontent outside of the tag is included to thetree. So this tag is same with component tagas decorate tag is with composition tag i.e. asdecorate tag behaves same as compositiontag except including content outside the tag,in the same way fragment tag behaves sameas component tag except including content
outside the tag. In this example, the contentwithin fragment tag in included in componenttree and the code above fragment tag is alsorendered. So “Content above fragment tagwill be rendered.” and “Content belowfragment tag will be rendered.” is rendered.
fragmenttemplate.xhtml
<!DOCTYPE html PUBLIC “-//W3C//DTDXHTML 1.0 Transitional//EN” “http://www.w3.org/TR/xhtml1/DTD/xhtml1-transitional.dtd”><html xmlns=”http://www.w3.org/1999/xhtml” xmlns:ui=”http://java.sun.com/jsf/facelets”> <head>
<title>Facelet fragment tag example</title> </head> <body>
<h3>Content above fragment tag will berendered.</h3> <ui:fragment >
<h4>This is the content to be included inthe page.</h4> </ui:fragment >
<h3>Content below fragment tag will berendered.</h3> </body></html>
Rendered Output:
Facelet

Jan-08 Java Jazz Up 83
7. Facelet include tagThis tag is used to include the content of apage. This page name is specified by srcattribute of include tag. The page that hasbeen included should use composition tag orcomponent tag. It may contain xhtml or xmlto be included. In the program below, wehave used include tag and src attribute is setto “includepage.xhtml”. So the content of thispage will be included in the “include.xhtml”page and rendered in “includetemplate.xhtml”because insert tag with name attribute set toface5 is used in “includetemplate.xhtml”.
include.xhtml:
<!DOCTYPE html PUBLIC “-//W3C//DTDXHTML 1.0 Transitional//EN” “http://www.w3.org/TR/xhtml1/DTD/xhtml1-transitional.dtd”>
<html xmlns=”http://www.w3.org/1999/xhtml”xmlns:ui=”http://java.sun.com/jsf/facelets”xmlns:h=”http://java.sun.com/jsf/html”> <body>
Content above composition tag will not berendered. <ui:composition template=”/pages/include/includetemplate.xhtml”>
<ui:define name=”face1"><h2>Java Jazz Up</h2><h3>Facelet Examples</h3>
</ui:define><ui:define name=”face2">Enter UserID
:<br/><h:inputText id=”it” /><br/><br/>
</ui:define><ui:define name=”face3">Enter Password
:<br/><h:inputSecret id=”is” /><br/><br/>
</ui:define><ui:define name=”face4">
<h:commandButton id=”cb”value=”Submit” />
</ui:define><ui:define name=”face5">
<ui:include src=”includepage.xhtml”/></ui:define>
</ui:composition>Content below composition tag will not be
rendered. </body></html>
includetemplate.xhtml :
<!DOCTYPE html PUBLIC “-//W3C//DTDXHTML 1.0 Transitional//EN” “http://www.w3.org/TR/xhtml1/DTD/xhtml1-transitional.dtd”><html xmlns=”http://www.w3.org/1999/xhtml” xmlns:ui=”http://java.sun.com/jsf/facelets”> <head>
<title>Facelet include tag example</title><link href=”../../style/CSS.css”
rel=”stylesheet” type=”text/css”/> </head> <body>
<ui:insert name=”face1"></ui:insert>
Facelet

84 Java Jazz Up Jan-08
<ui:insert name=”face2"> </ui:insert><ui:insert name=”face3"> </ui:insert><ui:insert name=”face4"> </ui:insert><ui:insert name=”face5"></ui:insert>
</body></html>
includepage.xhtml :The content in this page will be included in the“includetemplate.xhtml”.
<!DOCTYPE html PUBLIC “-//W3C//DTDXHTML 1.0 Transitional//EN” “http://www.w3.org/TR/xhtml1/DTD/xhtml1-transitional.dtd”><html xmlns=”http://www.w3.org/1999/xhtml” xmlns:ui=”http://java.sun.com/jsf/facelets”>
<ui:composition><br/><br/>This is the content of
<b>”includepage.xhtml”</b> </ui:composition>
</html>
Rendered Output:
8. Facelet insert tagThis tag is used to replace the content definedin another facelet to the template. This tag takesone attribute that is not a required attributeand is used in conjunction with define tag. Ifyou set this attribute same as defined in definetag then that content within define tag will beincluded. If it doesn’t match then the contentspecified within opening and closing tag of thisinsert tag will be displayed. For example, in thecode below in “insert.xhtml” there is not anydefine tag whose name attribute value is “face5”and this value is used in the second file“inserttemplate.xhtml”. So the content (“Thisis the default text rendered”) specified withinopening and closing tag of insert tag isdisplayed. While there is one insert tag whosevalue of name attribute (“face1”) matches withthat of define tag, so the content “ Java JazzUp “ and “ Facelet Examples” will be replaced tothe insert tag.
insert.xhtml:
<!DOCTYPE html PUBLIC “-//W3C//DTDXHTML 1.0 Transitional//EN” “http://www.w3.org/TR/xhtml1/DTD/xhtml1-transitional.dtd”><html xmlns=”http://www.w3.org/1999/xhtml”xmlns:ui=”http://java.sun.com/jsf/facelets”xmlns:h=”http://java.sun.com/jsf/html”> <body>
Content above composition tag will not berendered. <ui:composition template=”/pages/insert/inserttemplate.xhtml”>
<ui:define name=”face1"><h2>Java Jazz Up</h2><h3>Facelet Examples</h3>
</ui:define><ui:define name=”face2">Enter UserID
:<br/><h:inputText id=”it” /><br/><br/>
</ui:define><ui:define name=”face3">Enter Password
:<br/><h:inputSecret id=”is” /><br/><br/>
</ui:define><ui:define name=”face4">
<h:commandButton id=”cb”value=”Submit” />
Facelet

Jan-08 Java Jazz Up 85
</ui:define> </ui:composition>
Content below composition tag will not berendered. </body></html>
inserttemplate.xhtml :
<!DOCTYPE html PUBLIC “-//W3C//DTDXHTML 1.0 Transitional//EN” “http://www.w3.org/TR/xhtml1/DTD/xhtml1-transitional.dtd”><html xmlns=”http://www.w3.org/1999/xhtml” xmlns:ui=”http://java.sun.com/jsf/facelets”> <head>
<title>Facelet insert tag example</title><link href=”../../style/CSS.css”
rel=”stylesheet” type=”text/css”/> </head> <body>
<ui:insert name=”face1"></ui:insert><ui:insert name=”face2"> </ui:insert><ui:insert name=”face3"> </ui:insert><ui:insert name=”face4"> </ui:insert><ui:insert name=”face5"><h3>This is the
default text rendered</h3> </ui:insert> </body></html>
Rendered Output:
9. Facelet param tagThis tag is used to pass objects as variablesbetween facelets. This tag has two requiredattributes name and value. name attribute isthe name of the variable and the value attributeis to set the value of this variable. You can usethis tag where a define tag is used withincomposition or decorate tag. We can also usethis tag within include tag. In this example, wehave taken two variables user and pwd withininclude tag in param.xhtml and values are setthrough bean’s properties userid and password.These variable are passed to the“includeparampage.xhtml” where we can usethese variables in this line of code “Your #{user}and #{pwd} will not be disclosed”.
Facelet

86 Java Jazz Up Jan-08
param.xhtml:
<!DOCTYPE html PUBLIC “-//W3C//DTDXHTML 1.0 Transitional//EN” “http://www.w3.org/TR/xhtml1/DTD/xhtml1-transitional.dtd”><html xmlns=”http://www.w3.org/1999/xhtml”xmlns:ui=”http://java.sun.com/jsf/facelets”xmlns:h=”http://java.sun.com/jsf/html”> <body>
Content above composition tag will not berendered. <ui:composition template=”/pages/param/paramtemplate.xhtml”>
<ui:define name=”face1"><h2>Java Jazz Up</h2><h3>Facelet Examples</h3>
</ui:define><ui:define name=”face2">Enter UserID
:<br/><h:inputText id=”it” /><br/><br/>
</ui:define><ui:define name=”face3">Enter Password
:<br/><h:inputSecret id=”is” /><br/><br/>
</ui:define><ui:define name=”face4">
<h:commandButton id=”cb”value=”Submit” />
</ui:define><ui:define name=”face5">
<ui:includesrc=”includeparampage.xhtml”>
<ui:param name=”user”value=”#{MessageBean.userid}”/>
<ui:param name=”pwd”value=”#{MessageBean.password}”/>
</ui:include>
</ui:define> </ui:composition>
Content below composition tag will not berendered. </body></html>
paramtemplate.xhtml :
<!DOCTYPE html PUBLIC “-//W3C//DTDXHTML 1.0 Transitional//EN” “http://www.w3.org/TR/xhtml1/DTD/xhtml1-transitional.dtd”><html xmlns=”http://www.w3.org/1999/xhtml” xmlns:ui=”http://java.sun.com/jsf/facelets”> <head>
<title>Facelet param tag example</title><link href=”../../style/CSS.css”
rel=”stylesheet” type=”text/css”/> </head> <body>
<ui:insert name=”face1"></ui:insert><ui:insert name=”face2"> </ui:insert><ui:insert name=”face3"> </ui:insert><ui:insert name=”face4"> </ui:insert><ui:insert name=”face5"></ui:insert>
</body></html>
includeparampage.xhtml :
<!DOCTYPE html PUBLIC “-//W3C//DTDXHTML 1.0 Transitional//EN” “http://www.w3.org/TR/xhtml1/DTD/xhtml1-transitional.dtd”><html xmlns=”http://www.w3.org/1999/xhtml” xmlns:ui=”http://java.sun.com/jsf/facelets”>
<ui:composition><br/><br/><h3>Your #{user} and
#{pwd} will not be disclosed.</h3> </ui:composition>
</html>
Facelet
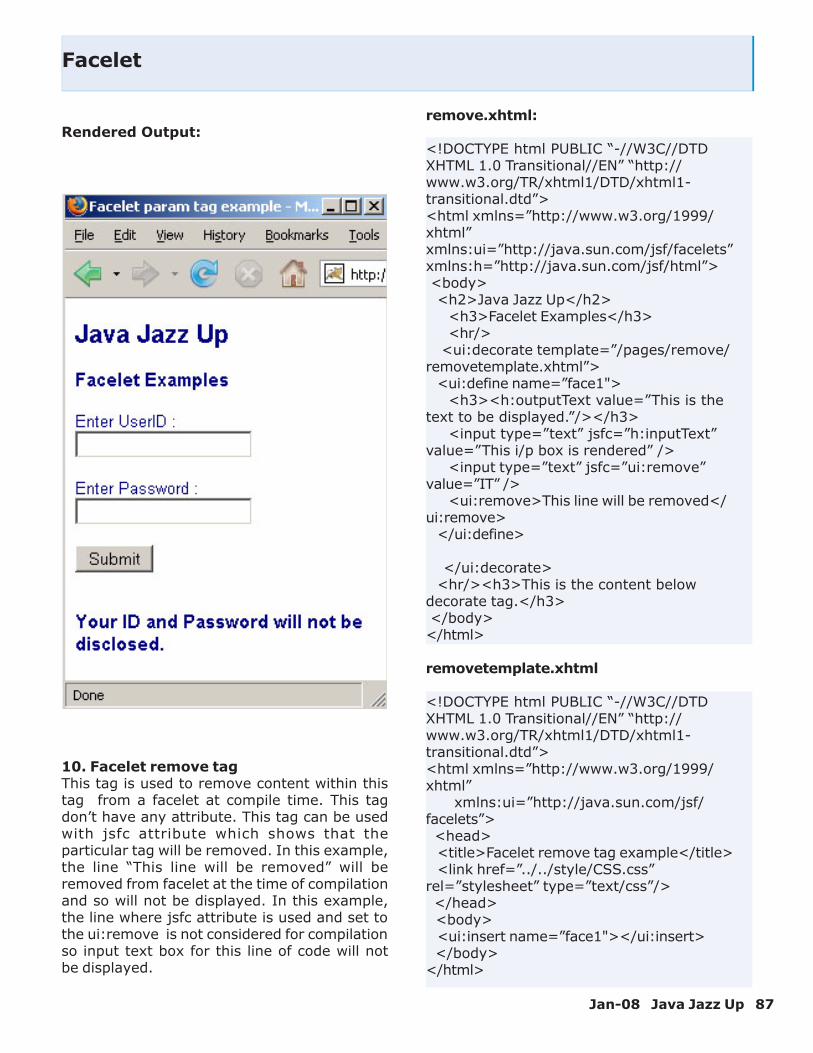
Jan-08 Java Jazz Up 87
Rendered Output:
10. Facelet remove tagThis tag is used to remove content within thistag from a facelet at compile time. This tagdon’t have any attribute. This tag can be usedwith jsfc attribute which shows that theparticular tag will be removed. In this example,the line “This line will be removed” will beremoved from facelet at the time of compilationand so will not be displayed. In this example,the line where jsfc attribute is used and set tothe ui:remove is not considered for compilationso input text box for this line of code will notbe displayed.
remove.xhtml:
<!DOCTYPE html PUBLIC “-//W3C//DTDXHTML 1.0 Transitional//EN” “http://www.w3.org/TR/xhtml1/DTD/xhtml1-transitional.dtd”><html xmlns=”http://www.w3.org/1999/xhtml”xmlns:ui=”http://java.sun.com/jsf/facelets”xmlns:h=”http://java.sun.com/jsf/html”> <body>
<h2>Java Jazz Up</h2><h3>Facelet Examples</h3><hr/>
<ui:decorate template=”/pages/remove/removetemplate.xhtml”>
<ui:define name=”face1"><h3><h:outputText value=”This is the
text to be displayed.”/></h3><input type=”text” jsfc=”h:inputText”
value=”This i/p box is rendered” /><input type=”text” jsfc=”ui:remove”
value=”IT” /><ui:remove>This line will be removed</
ui:remove></ui:define>
</ui:decorate><hr/><h3>This is the content below
decorate tag.</h3> </body></html>
removetemplate.xhtml
<!DOCTYPE html PUBLIC “-//W3C//DTDXHTML 1.0 Transitional//EN” “http://www.w3.org/TR/xhtml1/DTD/xhtml1-transitional.dtd”><html xmlns=”http://www.w3.org/1999/xhtml” xmlns:ui=”http://java.sun.com/jsf/facelets”> <head>
<title>Facelet remove tag example</title><link href=”../../style/CSS.css”
rel=”stylesheet” type=”text/css”/> </head> <body>
<ui:insert name=”face1"></ui:insert> </body></html>
Facelet

88 Java Jazz Up Jan-08
Rendered Output:
11. Facelet repeat tag:
This tag is used to iterate over the list of items.The name of list of items is specified by the ELexpression in the value attribute of this tag.This tag contains two attributes “value” “name”.The literal name specified in the name attributeis used to iterate over the items. In this example,we have used a bean named “TableBean” andinfo name is given to be used further. For ex.,info.id, info.name used in value attribute ofinputText JSF tag where id and name areattributes specified in bean. so here all id andnames will be displayed.
repeat.xhtml:
<!DOCTYPE html PUBLIC “-//W3C//DTDXHTML 1.0 Transitional//EN” “http://www.w3.org/TR/xhtml1/DTD/xhtml1-transitional.dtd”>
<html xmlns=”http://www.w3.org/1999/xhtml”xmlns:ui=”http://java.sun.com/jsf/facelets”xmlns:h=”http://java.sun.com/jsf/html”> <body>
<h2>Java Jazz Up</h2><h3>Facelet Examples</h3><hr/>
<ui:decorate template=”/pages/repeat/repeattemplate.xhtml”>
<ui:define name=”face1"><h3><h:outputText value=”This is the list
of ID and Names.”/></h3><ui:repeat
value=”#{TableBean.perInfoAll}” var=”info”> <li>
<h:inputText value=”#{info.id}” /><h:inputText value=”#{info.name}” />
</li></ui:repeat>
</ui:define> </ui:decorate> </body></html>
repeattemplate.xhtml :
<!DOCTYPE html PUBLIC “-//W3C//DTDXHTML 1.0 Transitional//EN” “http://www.w3.org/TR/xhtml1/DTD/xhtml1-transitional.dtd”><html xmlns=”http://www.w3.org/1999/xhtml” xmlns:ui=”http://java.sun.com/jsf/facelets”> <head>
<title>Facelet repeat tag example</title><link href=”../../style/CSS.css”
rel=”stylesheet” type=”text/css”/> </head> <body>
<ui:insert name=”face1"></ui:insert> </body></html>
TableBean.java :(Java Bean used for collectionof items)
package javajazzup;public class TableBean { private perInfo[] perInfoAll = newperInfo[]{
Facelet

Jan-08 Java Jazz Up 89
new perInfo(101, “Emp1”,“9891444444”, “aaa”, 11111), new perInfo(102, “Emp2”,“9911666666”, “bbb” ,22222), new perInfo(103, “Emp3”,“9313888888”, “ccc”, 33333) }; public perInfo[] getperInfoAll() { return perInfoAll; }
public class perInfo { int id;
String name;String phone;String city;int pin;
public perInfo(int id, String name, Stringphone, String city, int pin) { this.id = id; this.name = name; this.phone = phone; this.city = city; this.pin= pin; } public int getid() { return id; } public String getname() { return name; } public String getphone() { return phone; } public String getcity() { return city; } public int getpin() { return pin; } }}
Rendered Output:
Facelet

90 Java Jazz Up Jan-08
Behavioral Patterns Behavioral patterns arethose patterns, which are specifically concernedwith communication (interaction) between theobjects. The interactions between the objectsshould be such that they are talking to eachother and are still loosely coupled. The loosecoupling is the key to n-tier architectures. Inthis, the implementations and the client shouldbe loosely coupled in order to avoid hard codingand dependencies. The behavioral patterns are:
1. Chain of Responsibility Pattern2. Command Pattern3. Interpreter Pattern4. Iterator Pattern5. Mediator Pattern6. Momento Pattern7. Observer Pattern8. State Pattern9. Strategy Pattern10. Template Pattern11. Visitor Pattern
In this Issue, we are going to discuss only theIterator, Mediator, and the Memento designpatterns.
Iterator Pattern
Iterator pattern is the mechanism of accessingall the objects in a collection. To sequentiallyaccess the objects of a collection, the iteratorpattern defines an interface containing themethods that access the objects of a collectionor the aggregate objects without havingknowledge about its internal representation. Itprovides uniform interface to traverse collectionsof all kinds.
Aggregate objects are the objects containingthe group of objects as a unit. We can alsoreferred them as container or collection. Hashtable and linked list are the examples ofaggregate objects.
Example: Lets take an example of employeesof a software company and their section, thenwe add some enumeration capabilities to theEmployee class. This class is the collection ofemployees having their names; employee id andtheir department and these employees are
stored in a Vector.
Now we simply the enumeration of the Vectoritself just to obtain the enumeration of all theemployees of the collection.
Filtered Enumeration: Suppose we want theemployees of the development section. Thisrequires a special enumeration class that accessthe employees belong only to the developmentdepartment. The element() method we havedefined provides filtered access. NowEnumeration that only returns employeesrelated to the development section is required.
Person.java
import java.util.*;interface Person {public abstract double income();}
Teacher.java
class Teacher implements Person {private double MonthlyIncome;private String name;public Teacher(String name, double i) {this.name = name;setMonthlyIncome(i);}
void setMonthlyIncome(double i) {if (i > 0) {MonthlyIncome = i;} elseMonthlyIncome = 0;}
public double income() {return MonthlyIncome;}public String getName() {return name;}public String toString() {return “Teacher: “ + getName();}}
Design Patterns

Jan-08 Java Jazz Up 91
Doctor.java
class Doctor implements Person {private double feeperPatient;private int NoOfPatient;private String name;public Doctor(String name, double f, int n) {this.name = name;setFeeperPatient(f);setNoOfPatient(n);}
void setFeeperPatient(double f) {if (f > 0)feeperPatient = f;elsefeeperPatient = 0;}
void setNoOfPatient(int n) {if ( n > 0)NoOfPatient = n;elseNoOfPatient = 0;}public String getName() {return name;}public double income() {return NoOfPatient * feeperPatient;}
public String toString() {return “Doctor : “ + getName();}}
PersonTest.java
import java.util.Iterator;import java.util.ArrayList;import java.util.List;
class PersonTest {public static void main(String[] args) {List list = new ArrayList();list.add(new Teacher(“Bill”, 800.00));list.add(new Doctor(“Al”, 2.5, 200));list.add(new Teacher(“Peter”, 1200.00));list.add(new Doctor(“Mark”, 4.5, 333));
System.out.println(“Use built-in iterator:”);Iterator iterator = list.iterator();while(iterator.hasNext()) {Person pr = (Person)iterator.next();if (pr instanceof Teacher) {System.out.print(“Teacher has “ + pr + “income $”);System.out.println(pr.income());
}}}}
The above example also shows a dynamicbinding feature, which is popular in Object-Oriented realm.
If you want to pick up a specific object fromthe aggregated list, you may use the followingcode.
II. Mediator Pattern
Mediator pattern takes an object that puts thelogic to manages state changes of other objectsrather than distributing the logic among thevarious objects that results in decreasing thecoupling between the other objects.
Define an object that encapsulates how a setof objects interacts. Mediator promotes loosecoupling by keeping objects from referring toeach other explicitly, and lets you vary theirinteraction independently.
Lets try to under stand more clearly, When westarts developing an application that have fewclasses and these classes interact with eachother just to produce a result. As soon as theapplication becomes large then the logicbecomes more complex and functionalityincreases. In such condition it is difficult tomaintain this code then Mediator pattern solvesthe problem by maintaining the code. It loose-couples to the classes so that only one class(Mediator) has the information about rest ofthe classes, rest of the classes only interactswith the Mediator.
Design Patterns

92 Java Jazz Up Jan-08
Mediator.java
import java.io.*;
abstract class Mediator{public abstract void pilotChanged(PilottheChangedPilot);
public static void main(String args[]){
ConcreteMediator aConcreteMediator = newConcreteMediator();aConcreteMediator.createConcreteMediator();(aConcreteMediator.getOnePilot()).Show();(aConcreteMediator.getNextPilot()).Show();OnePilot newPilot = newOnePilot(aConcreteMediator, “OnePilot”);aConcreteMediator.pilotChanged((OnePilot)newPilot );(aConcreteMediator.getOnePilot()).Show();(aConcreteMediator.getNextPilot()).Show();}}
Pilot.java
abstract class Pilot{
private Mediator mediator;
public Pilot(Mediator m){mediator = m;}
public void changed(){mediator.pilotChanged(this);}
public Mediator getMediator(){return(mediator);}public abstract void Show();}
ConcreteMediator.java
class ConcreteMediator extends Mediator{
private OnePilot aOnePilot;private NextPilot aNextPilot;
public void pilotChanged( Pilot
theChangedPilot ){
if (((OnePilot)theChangedPilot).getSelection().equals(aOnePilot.getSelection() ) ){aNextPilot.setText( aOnePilot.getSelection() );}}
public void createConcreteMediator(){aOnePilot = new OnePilot(this, “OnePilot”);aNextPilot = new NextPilot(this, “NextPilot”);}
public OnePilot getOnePilot(){return(aOnePilot);}
public NextPilot getNextPilot(){return(aNextPilot);}}
OnePilot.java
class OnePilot extends Pilot{
private String text;public OnePilot(Mediator m, String s){
super( m );text = s;}
public void setText(String txt){text = txt;}
public String getSelection(){return(text);}
public void Show(){System.out.println(“OnePilot = “ + text);}}
NextPilot.java
Design Patterns

Jan-08 Java Jazz Up 93
class NextPilot extends Pilot{
private String text;public NextPilot(Mediator m, String s){
super( m );text = s;}
public void setText(String txt){text = txt;}
public String getSelection(){return( text );}
public void Show(){System.out.println(“NextPilot = “ + text);}}
III. Memento
The memento design pattern is that pattern inwhich one object stores the previous state(undo via rollback) of another object. Thispattern operates on a single object.
The objects originator and the caretaker usethis design pattern. The object originatormaintains the original state while the objectcaretaker assist to the originator. First thecaretaker object asked to the originator for thememento object then it does the operation (orsequence of operations) it is going to do. Itreturns the memento object to the originatorto roll back the state before the operations. Becareful while using this pattern, as the originatormay change other objects or resources.
To develop a memento featured program weneed to combine the design patterns likeIterator, Mediator or Command.
Here we are taking an example that uses theMediator design pattern.
To demonstrate the concept of Memento designpattern we are taking an example of dice that
records the dice numbers.
Command.java
import java.awt.*;import java.util.*;import javax.swing.*;import java.awt.event.*;import javax.swing.border.*;import java.awt.FontMetrics;
interface Command {void execute();}
Memento.java
class Memento {int number;Memento(int num) {number = num;}int getNumber() {return number;}}
ButtonDice.java
import java.awt.*;import java.util.*;import javax.swing.*;import java.awt.event.*;import javax.swing.border.*;import java.awt.FontMetrics;
class ButtonDice extends JButton implementsCommand {Mediator mediator;ButtonDice(ActionListener al, Mediator med) {super(“Throw Dice”);addActionListener(al);mediator = med;mediator.registerDice(this);}public void execute() {mediator.throwit();}}
ButtonClear.java
Design Patterns

94 Java Jazz Up Jan-08
import java.awt.*;import java.util.*;import javax.swing.*;import java.awt.event.*;import javax.swing.border.*;import java.awt.FontMetrics;
class ButtonClear extends JButtonimplements Command {Mediator mediator;ButtonClear(ActionListener al, Mediator med){super(“Clear”);addActionListener(al);mediator = med;mediator.registerClear(this);}public void execute() {mediator.clear();}}
ButtonPrevious.java
import java.awt.*;import java.util.*;import javax.swing.*;import java.awt.event.*;import javax.swing.border.*;import java.awt.FontMetrics;
class ButtonPrevious extends JButtonimplements Command {Mediator mediator;ButtonPrevious(ActionListener al, Mediatormed) {super(“Previous”);addActionListener(al);mediator = med;mediator.registerPrevious(this);}public void execute() {mediator.previous();}}
Display.java
import java.awt.*;import java.util.*;import javax.swing.*;import java.awt.event.*;import javax.swing.border.*;import java.awt.FontMetrics;
class Display extends JLabel{Mediator mediator;Display (Mediator med) {super(“0”,JLabel.CENTER);mediator = med;mediator.registerDisplay(this);setBackground(Color.white);setBorder(new EtchedBorder(Color.blue,Color.green));Font font = new Font(“Arial”,Font.BOLD,40);setFont(font);}}
Mediator.java
import java.awt.*;import java.util.*;import javax.swing.*;import java.awt.event.*;import javax.swing.border.*;import java.awt.FontMetrics;
class Mediator {ButtonDice btnDc;ButtonPrevious btnPrvs;ButtonClear btnClr;Display display;java.util.List list, undo;boolean restart = true;int counter = 0, ct = 0;//....Mediator() {list = new ArrayList();undo = new ArrayList();}void registerDice(ButtonDice bd) {btnDc = bd;}void registerClear(ButtonClear bc) {btnClr = bc;}void registerPrevious(ButtonPrevious bp) {btnPrvs = bp;
Design Patterns

Jan-08 Java Jazz Up 95
}void registerDisplay(Display disp) {display = disp;}void throwit() {display.setForeground(Color.black);int num = (int)(Math.random()*6 +1);int i = counter++;list.add(i, new Integer(num));undo.add(i, new Memento(num));display.setText(“”+num);}
void previous() {display.setForeground(Color.red);btnDc.setEnabled(false);if (undo.size() > 0) {ct = undo.size()-1;Memento num = (Memento)undo.get(ct);display.setText(“”+num.getNumber());undo.remove(ct);}if (undo.size() == 0)display.setText(“0”);}void clear() {list = new ArrayList();undo = new ArrayList();counter = 0;display.setText(“0”);btnDc.setEnabled(true);}}
MementoDemoDp.java
import java.awt.*;import java.util.*;import javax.swing.*;import java.awt.event.*;import javax.swing.border.*;import java.awt.FontMetrics;
class MementoDemoDp extends JFrameimplements ActionListener {Mediator mediator = new Mediator();MementoDemoDp() {JPanel panel = new JPanel();panel.add(new ButtonDice(this,mediator));panel.add(newButtonPrevious(this,mediator));panel.add(new ButtonClear(this,mediator));
JPanel dice = new JPanel();Display disp = new Display(mediator);dice.add(disp);getContentPane().add(dice, “Center”);getContentPane().add(panel, “South”);setTitle(“Memento pattern example”);setDefaultCloseOperation(EXIT_ON_CLOSE);setSize(400,200);setVisible(true);}public void actionPerformed(ActionEvent ae) {Command cmd = (Command)ae.getSource();cmd.execute();}public static void main(String[] args) {new MementoDemoDp();}}
Design Patterns
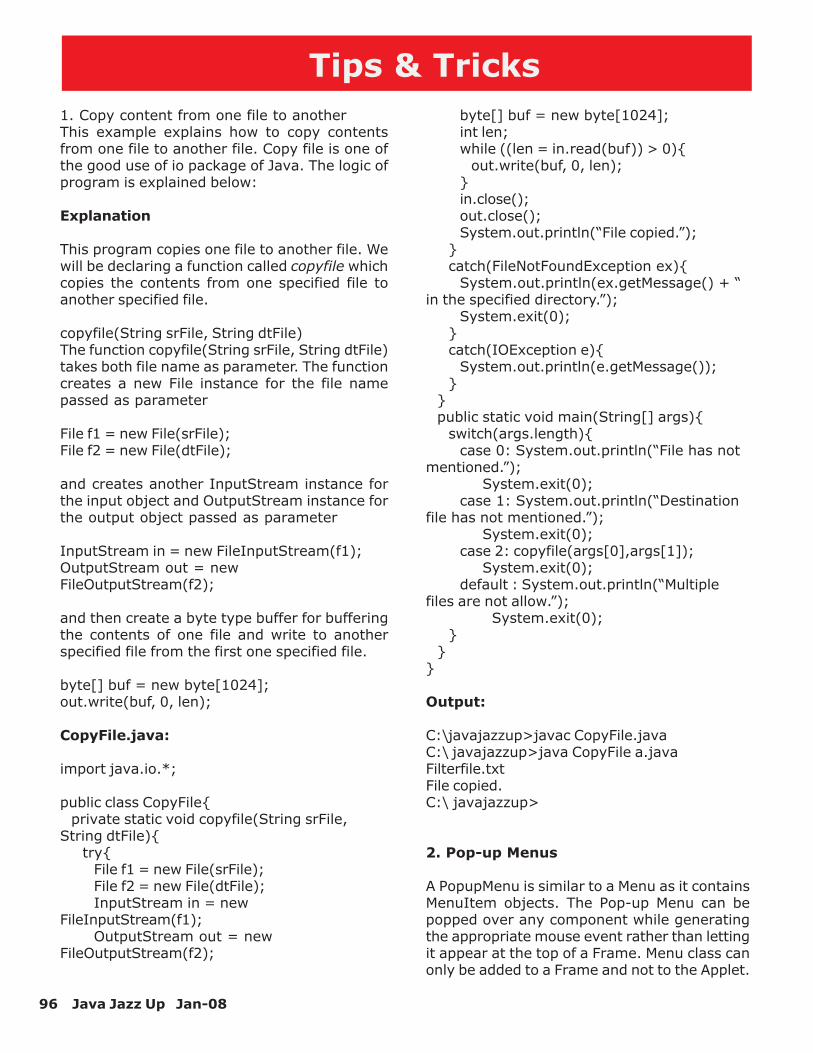
96 Java Jazz Up Jan-08
1. Copy content from one file to anotherThis example explains how to copy contentsfrom one file to another file. Copy file is one ofthe good use of io package of Java. The logic ofprogram is explained below:
Explanation
This program copies one file to another file. Wewill be declaring a function called copyfile whichcopies the contents from one specified file toanother specified file.
copyfile(String srFile, String dtFile)The function copyfile(String srFile, String dtFile)takes both file name as parameter. The functioncreates a new File instance for the file namepassed as parameter
File f1 = new File(srFile);File f2 = new File(dtFile);
and creates another InputStream instance forthe input object and OutputStream instance forthe output object passed as parameter
InputStream in = new FileInputStream(f1);OutputStream out = newFileOutputStream(f2);
and then create a byte type buffer for bufferingthe contents of one file and write to anotherspecified file from the first one specified file.
byte[] buf = new byte[1024];out.write(buf, 0, len);
CopyFile.java:
import java.io.*;
public class CopyFile{private static void copyfile(String srFile,
String dtFile){try{
File f1 = new File(srFile);File f2 = new File(dtFile);InputStream in = new
FileInputStream(f1);OutputStream out = new
FileOutputStream(f2);
byte[] buf = new byte[1024];int len;while ((len = in.read(buf)) > 0){
out.write(buf, 0, len);}in.close();out.close();System.out.println(“File copied.”);
}catch(FileNotFoundException ex){
System.out.println(ex.getMessage() + “in the specified directory.”);
System.exit(0);}catch(IOException e){
System.out.println(e.getMessage());}
}public static void main(String[] args){
switch(args.length){case 0: System.out.println(“File has not
mentioned.”);System.exit(0);
case 1: System.out.println(“Destinationfile has not mentioned.”);
System.exit(0);case 2: copyfile(args[0],args[1]);
System.exit(0);default : System.out.println(“Multiple
files are not allow.”); System.exit(0);
}}
}
Output:
C:\javajazzup>javac CopyFile.javaC:\ javajazzup>java CopyFile a.javaFilterfile.txtFile copied.C:\ javajazzup>
2. Pop-up Menus
A PopupMenu is similar to a Menu as it containsMenuItem objects. The Pop-up Menu can bepopped over any component while generatingthe appropriate mouse event rather than lettingit appear at the top of a Frame. Menu class canonly be added to a Frame and not to the Applet.
Tips & Tricks

Jan-08 Java Jazz Up 97
To add it to the Applet you need to use theSwing component set.
In the program code given below, we have usedMouseEvent.isPopupTrigger() method to triggerthe MouseEvent that pops up the menu. Theexample below shows the triggering of a pop-up menu and its activation through a commandbutton.
Code of Program: PopupMenuDemo.java import java.awt.*;import java.awt.event.*;import java.applet.Applet;
public class PopupMenuDemo extends Applet{ Button b; TextField msg; PopupAppMenu m; public PopupMenuDemo(){ setSize(200, 200); b = new Button(“Pop-up Menu”); add(b, BorderLayout.NORTH); msg = new TextField(); msg.setEditable(false); add(msg, BorderLayout.SOUTH); m = new PopupAppMenu(this); add(m); b.addActionListener(newActionListener(){public void actionPerformed(ActionEvent e){ m.show(b, 20, 20); } }); addMouseListener(new MouseAdapter(){ public void mousePressed(MouseEvent e){ if (e.isPopupTrigger()) m.show(e.getComponent(), e.getX(),e.getY()); }public void mouseReleased(MouseEvent e){ if (e.isPopupTrigger())m.show(e.getComponent(), e.getX(),e.getY()); } }); }public static void main(String[] args){popupMenuDemo app = newPopupMenuDemo();app.setVisible(true);
} }
class PopupAppMenu extends PopupMenuimplements ActionListener{PopupMenuDemo ref;public PopupAppMenu(PopupMenuDemo ref){ super(“File”); this.ref = ref; MenuItem mi; add(mi = new MenuItem(“Copy”)); mi.addActionListener(this); add(mi = new MenuItem(“Open”)); mi.addActionListener(this); add(mi = new MenuItem(“Cut”)); mi.addActionListener(this); add(mi = new MenuItem(“Paste”)); mi.addActionListener(this); }public void actionPerformed(ActionEvent e){String item = e.getActionCommand();ref.msg.setText(“Option Selected: “ + item); } }
PopupMenuDemo.html
<HTML><HEAD></HEAD><BODY><APPLET ALIGN=”CENTER”CODE=”PopupMenuDemo.class”WIDTH=”800" HEIGHT=”500"></APPLET></BODY></HTML>
Run the program:
C:\newprgrm>javac PopupMenuDemo.javaC:\newprgrm>appletviewerPopupMenuDemo.html
Tips & Tricks

98 Java Jazz Up Jan-08
Output of the program:
3. JSlider Component of Java Swing
A Slider is a Swing tool that lets the userselect a value within a bounded range bymoving a knob. In this program, events onthe JSlider component have also been shown.If you increase or decrease the slider byselecting then the actual position of the sliderwill be displayed on a label. Some methodsand APIs have been used to create a JSlidercomponent and perform various tasks relatedto the slider. Methods and APIs are as follows:
JSlider :This class creates the slider for the swingapplication.
ChangeListener:This is the interface of which is used to callstateChanged() method which receives theevent generated by the slider usingaddChangeListener() method of the JSliderclass.
ChangeEvent:This is the class that handles the eventgenerated by the JSlider component on changethe state.
addChangeListener(object):This is the method of the JSlider class which isused to handle event on change the selectedstate of the JSlider component.
Code of Program: SliderExample.java
import javax.swing.*;import javax.swing.event.*;import java.awt.*;import java.awt.event.*;
public class SliderExample{ JSlider slider; JLabel label; public static void main(String[] args){ SliderExample cs = new SliderExample(); }
public SliderExample(){ JFrame frame = new JFrame(“Slider”); slider = new JSlider(); slider.setValue(50); slider.addChangeListener(newMyChangeAction()); label = new JLabel(“JavaJazzUp”); JPanel panel = new JPanel(); panel.add(slider); panel.add(label); frame.add(panel, BorderLayout.CENTER); frame.setSize(400, 100); frame.setVisible(true); frame.setDefaultCloseOperation(JFrame.EXIT_ON_CLOSE); }
public class MyChangeAction implementsChangeListener{ public void stateChanged(ChangeEventce){ int value = slider.getValue(); String str = Integer.toString(value); label.setText(str); } }}
Output:
Tips & Tricks

Jan-08 Java Jazz Up 99
You can slide the knob at any desired positionas shown below:
4. Dialog Box In Swing Application
In non-swing application we were usingSystem.in class for input or output some textor numeric values but now in the swingapplication we can use JOptionPane class toshow the output or show the message. Thisway of inputting or outputting works veryefficiently in the Swing Applications. The windowfor showing message for input or output makesyour application very innovative.
JOptionPane class is available in thejavax.swing package. This class providesvarious types of message dialog box as follows:
1. A simple message dialog box that has onlyone button i.e. “Ok”. This type of messagedialog box is used only for showing theappropriate message and user can finish themessage dialog box by clicking the “Ok”button.
2. A message dialog box that has two orthree buttons. You can set several values forviewing several message dialog box as
follows:
1.) “Yes” and “No”2.) “Yes”, “No” and “Cancel”3.) “Ok”, and “Cancel”
3. An input dialog box that contains twobuttons “Ok” and “Cancel”.
The JOptionPane class has three methods asfollows:
showMessageDialog(): First is theshowMessageDialog() method which isused to display a simple message.
showInputDialog(): Second is theshowInputDialog() method which is usedto display a prompt for inputting. Thismethod returns a String value which isentered by you.
showConfirmDialog(): And the last or thirdmethod is the showConfirmDialog() whichasks the user for confirmation (Yes/No) bydisplaying message. This method returns anumeric value either 0 or 1. If you click on the“Yes” button then the method returns 1otherwise 0.
I. Show dialog box.
Message dialog box is used to displayinformative messages to the user. In theexample program, we will use JOptionPane classto display the message Dialog box. Our programdisplay “Show Message” button on the windowand when user clicks on it program displaysMessage box with “OK” button and message“JavaJazzUp”.
Description:
showMessageDialog():
This method is used to show a message dialogbox which contains some text messages. Thisis being used with two arguments in the programwhere the first argument is the parent objectin which the dialog box opens and another isthe message which has to be shown.
Tips & Tricks

100 Java Jazz Up Jan-08
Code of Program: ShowDialogBox.java
import javax.swing.*;import java.awt.event.*;public class ShowDialogBox{
JFrame frame;public static void main(String[] args){ShowDialogBox db = new ShowDialogBox(); }public ShowDialogBox(){frame = new JFrame(“Show Message Dialog”);JButton button = new JButton(“ShowMessage”);button.addActionListener(new MyAction());frame.add(button);frame.setSize(300, 300);frame.setVisible(true);frame.setDefaultCloseOperation(JFrame.EXIT_ON_CLOSE); }public class MyAction implementsActionListener{public void actionPerformed(ActionEvent e){JOptionPane.showMessageDialog(frame,”JavaJazzUp”); } }}
Output:
When you run the program, following windowwill be displayed:
When you click on “Show Message” button,following Message is displayed:
II. Show message and confirm dialogbox
There are three types of message dialog boxthat you can use in your swing applications.In this section, we will display several types ofmessage boxes. When you run the program,it will display a frame with three buttons.
Description:
1. showMessageDialog(): Above methodshows a simple message dialog box, which holdsonly one button i.e. “Ok” button. This methodtakes four arguments in which, first is theparent object name, second is the message asstring, third is the title of the message dialogbox as string and the last is the type of themessage dialog box.
2. showConfirmDialog(): Above methodasks from the user by displaying a messagedialog box, which contains more than onebutton. Depending on the parameter passedit can be “Ok” and “Cancel” or “Yes”, “No”and “Cancel”. This method returns the integervalue.
Code of Program:ShowMessageDialog.java
import javax.swing.*;import java.awt.*;import java.awt.event.*;
public class ShowMessageDialog{ JButton button; public static void main(String[] args){ ShowMessageDialog md = new
Tips & Tricks

Jan-08 Java Jazz Up 101
ShowMessageDialog(); }
public ShowMessageDialog(){ JFrame frame = new JFrame(“MessageDialog Box”); button = new JButton(“Simple messagedialog box”); button.addActionListener(new MyAction()); JPanel panel = new JPanel(); panel.add(button); button = new JButton(“\”Ok/Cancel\”message dialog box”); button.addActionListener(new MyAction()); panel.add(button); button = new JButton(“\”Yes/No/Cancel\”dialog box”); button.addActionListener(new MyAction()); panel.add(button); frame.add(panel); frame.setSize(400, 200); frame.setVisible(true); frame.setDefaultCloseOperation(JFrame.EXIT_ON_CLOSE); }
public class MyAction implementsActionListener{ public void actionPerformed(ActionEventae){ String str = ae.getActionCommand(); if(str.equals(“Simple message dialogbox”)){ JOptionPane.showMessageDialog(null,“Simple message dialog box.”, “javajazzup”,1); } else if(str.equals(“\”Ok/Cancel\” messagedialog box”)){ if(JOptionPane.showConfirmDialog(null,“\”Ok/Cancel\” message dialog box.”,“javajazzup”,JOptionPane.OK_CANCEL_OPTION) == 0) JOptionPane.showMessageDialog(null,“You clicked on \”Ok\” button”, “javajazzup”,1); else JOptionPane.showMessageDialog(null,“You clicked on \”Cancel\” button”,“javajazzup”, 1); } else if(str.equals(“\”Yes/No/Cancel\”
dialog box”)){ JOptionPane.showConfirmDialog(null,“\”Yes/No/Cancel\” message dialog box.”); } } }}
Output
If you click on the first button then the simplemessage box will open which holds only “Ok”button as shown below:
If you click on the second button then theconfirm dialog box will open which asks for “Ok”and “Cancel”.
Tips & Tricks

102 Java Jazz Up Jan-08
If you click on the third button from the mainwindow or frame then a confirm message dialogbox will open with three button i.e. the “Yes”,“No” and “Cancel” like the following image:
III. Show input dialog box
Java Swing provides the way to input any textor numeric value in a normal window (InputDialog Box). It contains two buttons “Ok” and“Cancel”. The program given below shows abutton labeled by “Show Input Dialog Box to
enter name” on the frame. Clicking the buttonopens an input dialog box. If you click on the“Ok” button then a message dialog box appearscontaining message “Welcome: entered_text”otherwise it displays a message dialog boxcontaining message “You pressed cancelbutton.”.
Code of Program: ShowInputDialog.java
import javax.swing.*;import java.awt.event.*;
public class ShowInputDialog{ public static void main(String[] args){ JFrame frame = new JFrame(“Input DialogBox Frame”); JButton button = new JButton(“ShowInput Dialog Box to enter name”); button.addActionListener(newActionListener(){ public void actionPerformed(ActionEventae){ String str =JOptionPane.showInputDialog(null, “Enteryour name: “,“JavaJazzUp”, 1); if(str != null) JOptionPane.showMessageDialog(null,“Welcome: “ + str,“JavaJazzUp”, 1); else JOptionPane.showMessageDialog(null,“You pressed cancel button.”,“JavaJazzUp”, 1); } }); JPanel panel = new JPanel(); panel.add(button); frame.add(panel); frame.setSize(300, 300); frame.setDefaultCloseOperation(JFrame.EXIT_ON_CLOSE); frame.setVisible(true); }}
Tips & Tricks

Jan-08 Java Jazz Up 103
Output:
Clicking “Show Input Dialog Box to enter name”button creates Input Dialog Box as shownbelow:
If “User” is entered as name in the input boxthen it welcomes the user with its name asshown below:
Tips & Tricks
104 Java Jazz Up Jan-08
Advertise with JavaJazzUpWe are the top most providers of technologystuffs to the java community. Our technologyportal network is providing standard tutorials,articles, news and reviews on the Javatechnologies to the industrial technocrats. Ournetwork is getting around 3 million hits permonth and its increasing with a great pace.
For a long time we have endeavored to providequality information to our readers. Furthermore,we have succeeded in the dissemination of theinformation on technical and scientific facets ofIT community providing an added value andreturns to the readers.We have serious folks that depend on our sitefor real solutions to development problems.
JavaJazzUp Network comprises of :
http://www.roseindia.nethttp://www.newstrackindia.comhttp://www.javajazzup.comhttp://www.allcooljobs.com
Advertisement Options:
Banner Size Page Views MonthlyTop Banner 470*80 5,00,000 USD 2,000Box Banner 125 * 125 5,00,000 USD 800Banner 460x60 5,00,000 USD 1,200Pay Links Un Limited USD 1,000Pop Up Banners Un Limited USD 4,000
The http://www.roseindia.net network is the“real deal” for technical Java professionals.Contact me today to discuss yourcustomized sponsorship program. You mayalso ask about advertising on otherTechnology Network.
Deepak [email protected]

Jan-08 Java Jazz Up 105
Valued JavaJazzup Readers Community
We invite you to post Java-technologyoriented stuff. It would be our pleasureto give space to your posts inJavaJazzup.
Contribute to Readers Forum
If theres something youre curious about, wereconfident that your curiosity, combined with theknowledge of other participants, will be enoughto generate a useful and exciting ReadersForum. If theres a topic you feel needs to bediscussed at JavaJazzup, its up to you to get itdiscussed.
Convene a discussion on a specific subject
If you have a topic youd like to talk about .Whether its something you think lots of peoplewill be interested in, or a narrow topic only afew people may care about, your article willattract people interested in talking about it atthe Readers Forum. If you like, you can preparea really a good article to explain what youreinterested to tell java technocrates about.
Sharing Expertise on Java Technologies
If youre a great expert on a subject in java,the years you spent developing that expertiseand want to share it with others. If theressomething youre an expert on that you thinkother technocrates might like to know about,wed love to set you up in the Readers Forumand let people ask you questions.
Show your innovation
We invite people to demonstrate innovativeideas and projects. These can be online ortechnology-related innovations that would bringyou a great appreciations and recognitionamong the java technocrates around the globe.
Hands-on technology demonstrations
Some people are Internet experts. Some arebarely familiar with the web. If you’d like to showothers aroud some familiar sites and tools, thatwould be great. It would be our pleasure togive you a chance to provide yourdemonstrations on such issues : How to set
up a blog, how to get your images onto Flickr,How to get your videos onto YouTube,demonstrations of P2P software, a tour ofMySpace, a tour of Second Life (or let us knowif there are other tools or technologies youthink people should know about...).
Present a question, problem, or puzzle
Were inviting people from lots of differentworlds. We do not expect everybody at ReadersForum to be an expert in some areas. Yourexpertise is a real resource you may contributeto the Java Jazzup. We want your curiosity tobe a resource, too. You can also present aquestion, problem, or puzzle that revolvesaround java technologies along with theirsolution that you think would get reallyappreciated by the java readers around theglobe.
Post resourceful URLs
If you think you know such URL links whichcan really help the readers to explore their javaskills. Even you can post general URLs thatyou think would be really appreciated by thereaders community.
Anything else
If you have another idea for something youdlike to do, talk to us. If you want to dosomething that we havent thought of, have acrazy idea, wed really love to hear about it.Were open to all sorts of suggestions, especiallyif they promote readers participation.

106 Java Jazz Up Jan-08

Jan-08 Java Jazz Up 107