java is an object oriented objects - grahamhall.orggrahamhall.org/java netbeans/chapter 10 object...
TRANSCRIPT

250 Java Programming for A-level Computer Science
10 Object oriented programming
Java is an object oriented programming language. The use of objects has a number of
important advantages, particularly when developing large and complex software
projects.
You have already been using objects in each Java NetBeans program you have written, although
you may not have realised this. Each component is an object - for example: buttons, spinners,
tables, text field boxes, and forms themselves.
An easy way to understand object oriented programming is to make an analogy with electronics:
Electronic circuits are made up of Programs are made up of
components: components:
Electronic components are assembled Program components are assembled
together to produce complete devices: together to produce software applications:
Chapter 10: Object oriented programming 251
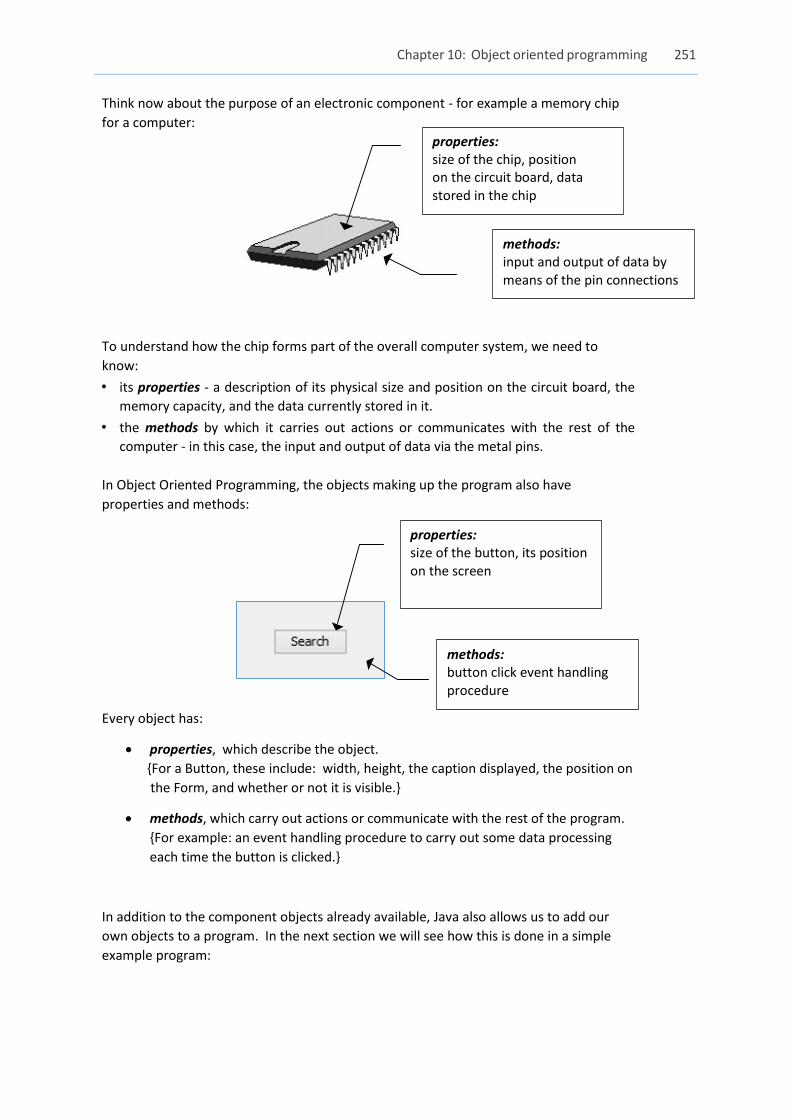
Think now about the purpose of an electronic component - for example a memory chip
for a computer:
To understand how the chip forms part of the overall computer system, we need to
know:
• its properties - a description of its physical size and position on the circuit board, the
memory capacity, and the data currently stored in it.
• the methods by which it carries out actions or communicates with the rest of the
computer - in this case, the input and output of data via the metal pins.
In Object Oriented Programming, the objects making up the program also have
properties and methods:
Every object has:
properties, which describe the object.
{For a Button, these include: width, height, the caption displayed, the position on
the Form, and whether or not it is visible.}
methods, which carry out actions or communicate with the rest of the program.
{For example: an event handling procedure to carry out some data processing
each time the button is clicked.}
In addition to the component objects already available, Java also allows us to add our
own objects to a program. In the next section we will see how this is done in a simple
example program:
properties: size of the chip, position on the circuit board, data stored in the chip
methods: input and output of data by means of the pin connections
properties: size of the button, its position on the screen
methods: button click event handling procedure
252 Java Programming for A-level Computer Science
A computer studies lecturer has a collection of 8 reference books which can be
borrowed by students. The lecturer requires a computer program to record the
names of the borrowers when the books are out on loan.
Begin the project in the standard way. Close all previous projects, then set up a New Project. Give
this the name library, and ensure that the Create Main Class option is not selected.
Return to the NetBeans editing page. Right-click on the library project, and select New / JFrame
Form. Give the Class Name as library, and the Package as libraryPackage:
Return to the NetBeans editing screen.
Right-click on the form, and select Set layout / Absolute layout.
Go to the Properties window on the bottom right of the screen and click the Code tab.
Select the option: Form Size Policy / Generate pack() / Generate Resize code.
Click the Source tab above the design window to open the program code. Locate the main
method. Use the + icon to open the program lines and change the parameter “Nimbus” to
“Windows”.
Run the program and accept the main class which is offered. Check that a blank window appears
and has the correct size and colour scheme. Close the program and return to the editing screen.
Click the Design tab to move to the form layout view.
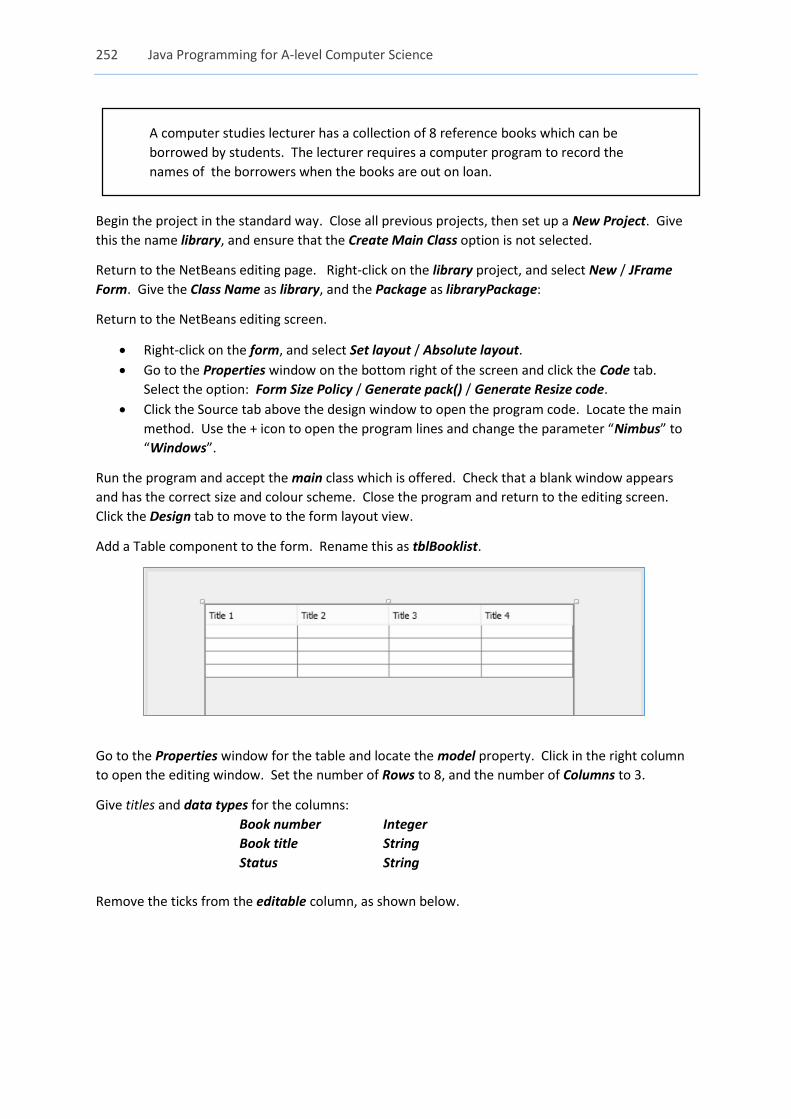
Add a Table component to the form. Rename this as tblBooklist.
Go to the Properties window for the table and locate the model property. Click in the right column
to open the editing window. Set the number of Rows to 8, and the number of Columns to 3.
Give titles and data types for the columns:
Book number Integer
Book title String
Status String
Remove the ticks from the editable column, as shown below.
Chapter 10: Object oriented programming 253
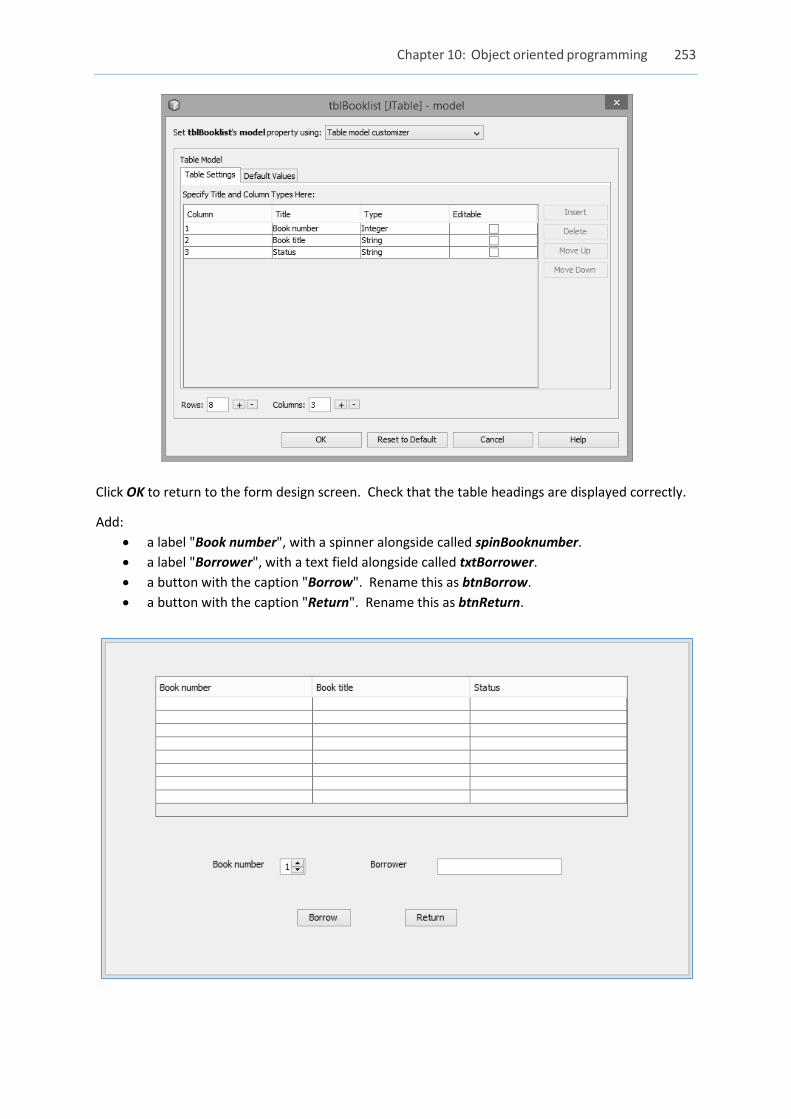
Click OK to return to the form design screen. Check that the table headings are displayed correctly.
Add:
a label "Book number", with a spinner alongside called spinBooknumber.
a label "Borrower", with a text field alongside called txtBorrower.
a button with the caption "Borrow". Rename this as btnBorrow.
a button with the caption "Return". Rename this as btnReturn.
254 Java Programming for A-level Computer Science
We will use an object oriented approach for this program. The objects used can be any
kind of building blocks which help towards a solution of the programming problem, so in
this case we will choose to set up 'book' objects.
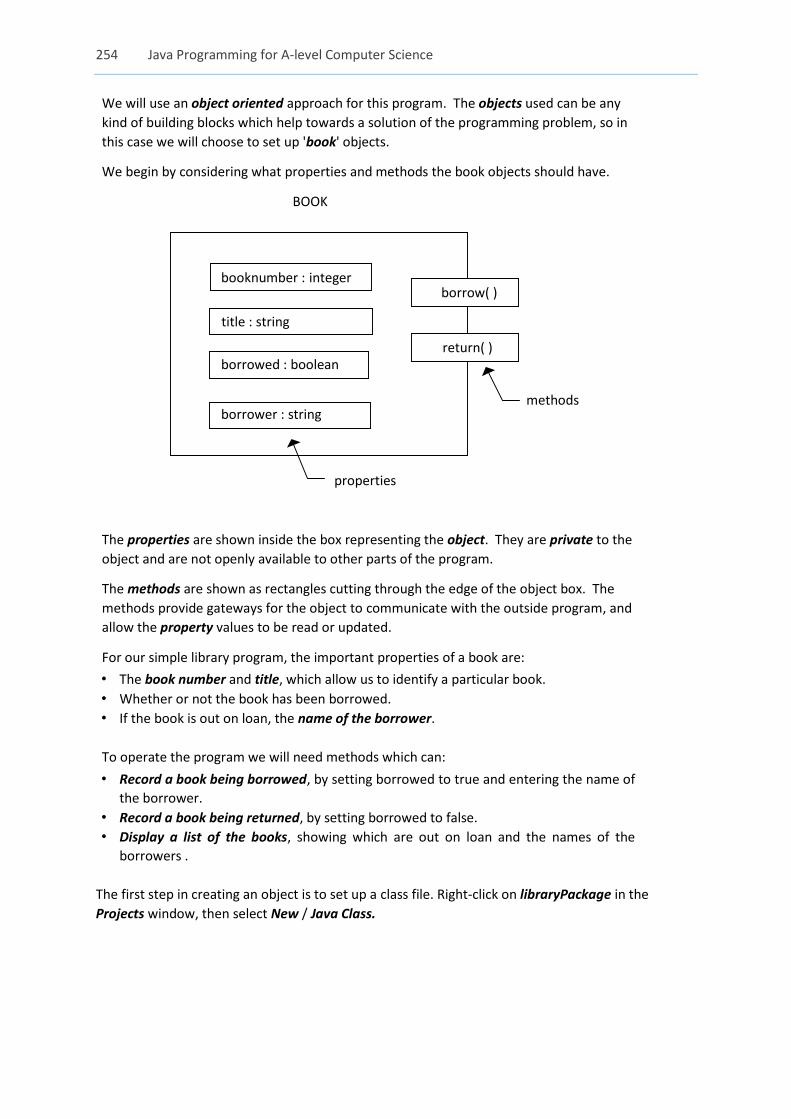
We begin by considering what properties and methods the book objects should have.
BOOK
The properties are shown inside the box representing the object. They are private to the
object and are not openly available to other parts of the program.
The methods are shown as rectangles cutting through the edge of the object box. The
methods provide gateways for the object to communicate with the outside program, and
allow the property values to be read or updated.
For our simple library program, the important properties of a book are:
• The book number and title, which allow us to identify a particular book.
• Whether or not the book has been borrowed.
• If the book is out on loan, the name of the borrower.
To operate the program we will need methods which can:
• Record a book being borrowed, by setting borrowed to true and entering the name of
the borrower.
• Record a book being returned, by setting borrowed to false.
• Display a list of the books, showing which are out on loan and the names of the
borrowers .
The first step in creating an object is to set up a class file. Right-click on libraryPackage in the
Projects window, then select New / Java Class.
booknumber : integer
borrowed : boolean
borrower : string
title : string
borrow( )
return( )
properties
methods
Chapter 10: Object oriented programming 255
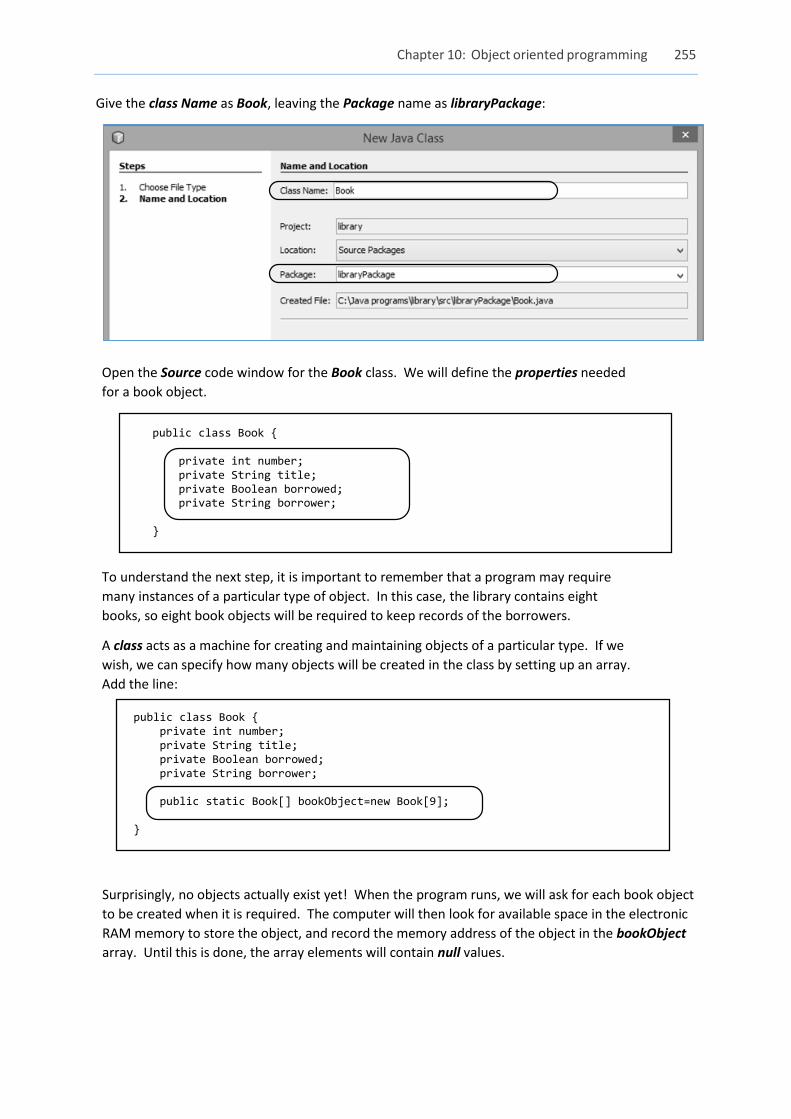
Give the class Name as Book, leaving the Package name as libraryPackage:
Open the Source code window for the Book class. We will define the properties needed
for a book object.
public class Book { private int number; private String title; private Boolean borrowed; private String borrower; }
To understand the next step, it is important to remember that a program may require
many instances of a particular type of object. In this case, the library contains eight
books, so eight book objects will be required to keep records of the borrowers.
A class acts as a machine for creating and maintaining objects of a particular type. If we
wish, we can specify how many objects will be created in the class by setting up an array.
Add the line:
public class Book { private int number; private String title; private Boolean borrowed; private String borrower; public static Book[] bookObject=new Book[9]; }
Surprisingly, no objects actually exist yet! When the program runs, we will ask for each book object
to be created when it is required. The computer will then look for available space in the electronic
RAM memory to store the object, and record the memory address of the object in the bookObject
array. Until this is done, the array elements will contain null values.

256 Java Programming for A-level Computer Science
bookObject array …provides pointers to … the book objects created in the RAM memory
Notice that there may be many book objects. These are referred to as dynamic data structures.
Objects do not exist before the program runs, but are created when required whilst the program is
running.
Notice also that there is only one bookObject array. This is a static data structure, as it is set up
permanently before the program runs.
Java assumes that properties and methods belong to individual objects, so are dynamic. If, we
wish to set up static variables, with only one copy applying to the whole class, we must include the
keyword 'static' in the definition:
public static Book[ ] bookObject=new Book[9];
We now need a way to produce the individual book objects. This is done by a 'constructor' method
which is always given the same name as the overall class, in this case 'Book( )'. When the
constructor method is called, a book object is set up in the RAM memory, a pointer is added to the
bookObject array, and values can be assigned to the private properties inside the book object.
0 null
1 pointer
2 pointer
3 pointer
4 null
5 null
6 null
7 null
8 null
book object 1
book object 2
book object 3
book object
bookObject[ ] pointer array STATIC
DYNAMIC
BOOK CLASS
created before
the program runs
created while the
program is running
Chapter 10: Object oriented programming 257
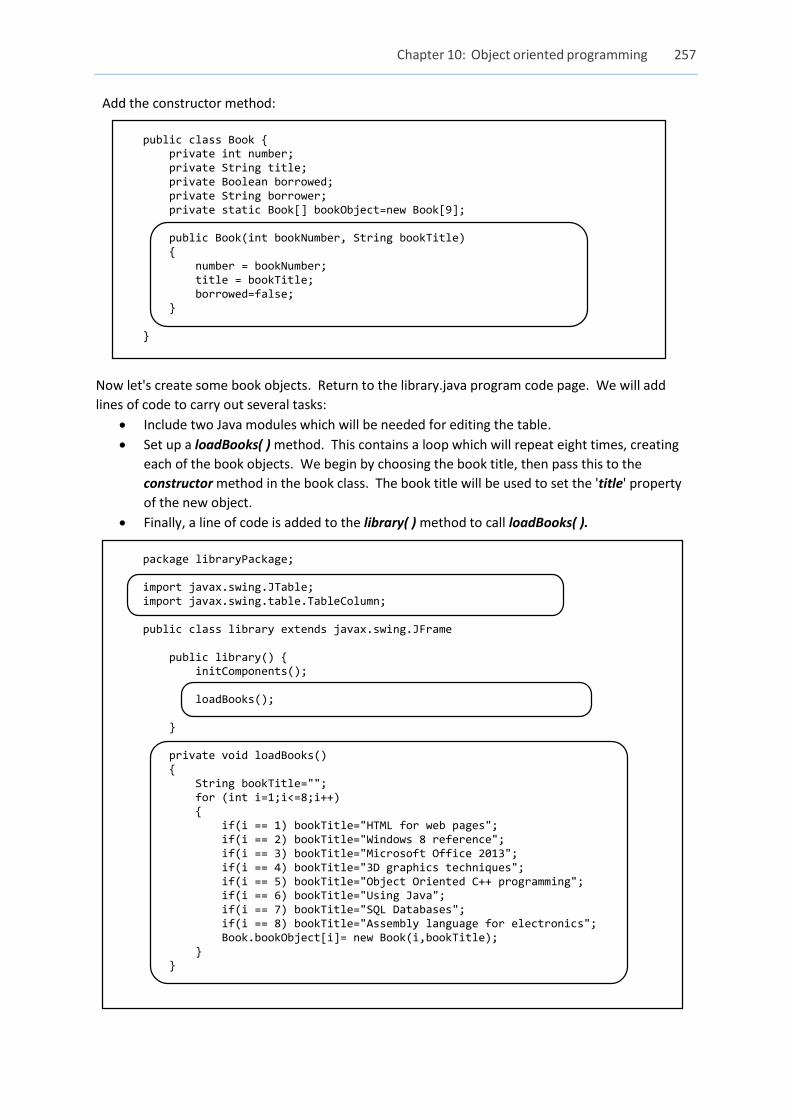
Add the constructor method:
public class Book { private int number; private String title; private Boolean borrowed; private String borrower; private static Book[] bookObject=new Book[9]; public Book(int bookNumber, String bookTitle) { number = bookNumber; title = bookTitle; borrowed=false; } }
Now let's create some book objects. Return to the library.java program code page. We will add
lines of code to carry out several tasks:
Include two Java modules which will be needed for editing the table.
Set up a loadBooks( ) method. This contains a loop which will repeat eight times, creating
each of the book objects. We begin by choosing the book title, then pass this to the
constructor method in the book class. The book title will be used to set the 'title' property
of the new object.
Finally, a line of code is added to the library( ) method to call loadBooks( ).
package libraryPackage; import javax.swing.JTable; import javax.swing.table.TableColumn; public class library extends javax.swing.JFrame public library() { initComponents(); loadBooks(); } private void loadBooks() { String bookTitle=""; for (int i=1;i<=8;i++) { if(i == 1) bookTitle="HTML for web pages"; if(i == 2) bookTitle="Windows 8 reference"; if(i == 3) bookTitle="Microsoft Office 2013"; if(i == 4) bookTitle="3D graphics techniques"; if(i == 5) bookTitle="Object Oriented C++ programming"; if(i == 6) bookTitle="Using Java"; if(i == 7) bookTitle="SQL Databases"; if(i == 8) bookTitle="Assembly language for electronics"; Book.bookObject[i]= new Book(i,bookTitle); } }
258 Java Programming for A-level Computer Science
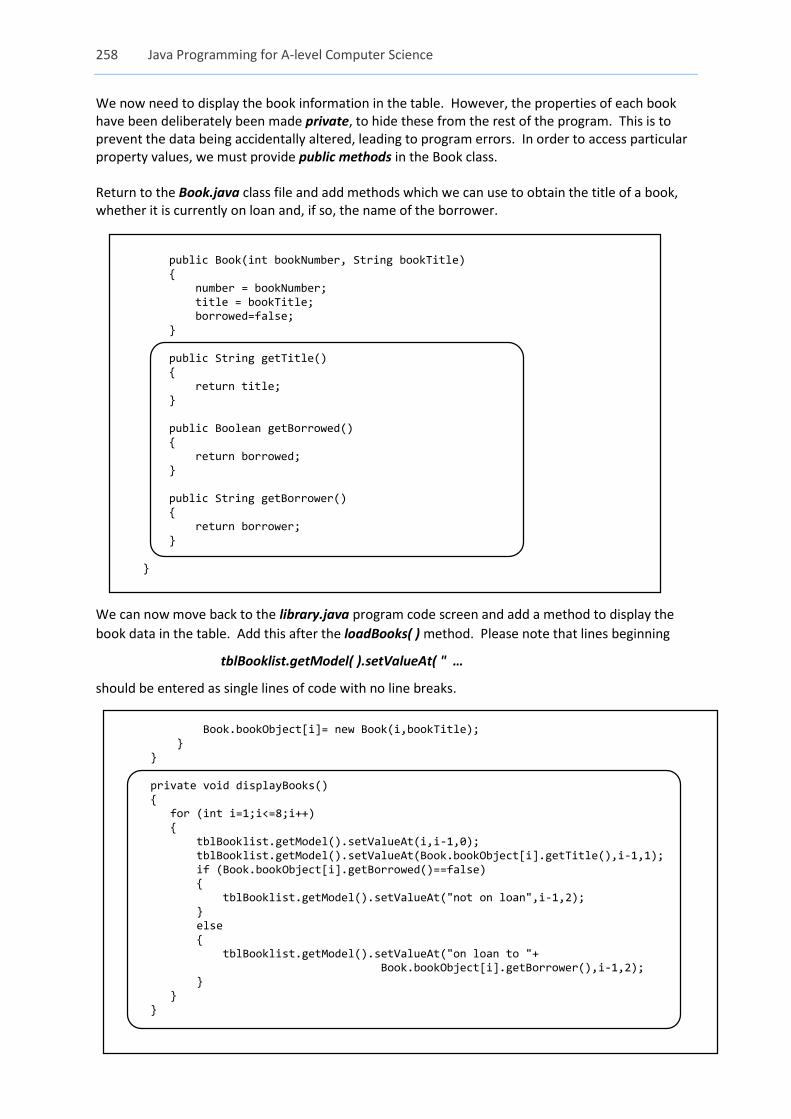
We now need to display the book information in the table. However, the properties of each book have been deliberately been made private, to hide these from the rest of the program. This is to prevent the data being accidentally altered, leading to program errors. In order to access particular property values, we must provide public methods in the Book class. Return to the Book.java class file and add methods which we can use to obtain the title of a book, whether it is currently on loan and, if so, the name of the borrower.
public Book(int bookNumber, String bookTitle) { number = bookNumber; title = bookTitle; borrowed=false; } public String getTitle() { return title; } public Boolean getBorrowed() { return borrowed; } public String getBorrower() { return borrower; } }
We can now move back to the library.java program code screen and add a method to display the
book data in the table. Add this after the loadBooks( ) method. Please note that lines beginning
tblBooklist.getModel( ).setValueAt( " …
should be entered as single lines of code with no line breaks.
Book.bookObject[i]= new Book(i,bookTitle); } } private void displayBooks() { for (int i=1;i<=8;i++) { tblBooklist.getModel().setValueAt(i,i-1,0); tblBooklist.getModel().setValueAt(Book.bookObject[i].getTitle(),i-1,1); if (Book.bookObject[i].getBorrowed()==false) { tblBooklist.getModel().setValueAt("not on loan",i-1,2); } else { tblBooklist.getModel().setValueAt("on loan to "+ Book.bookObject[i].getBorrower(),i-1,2); } } }
Chapter 10: Object oriented programming 259
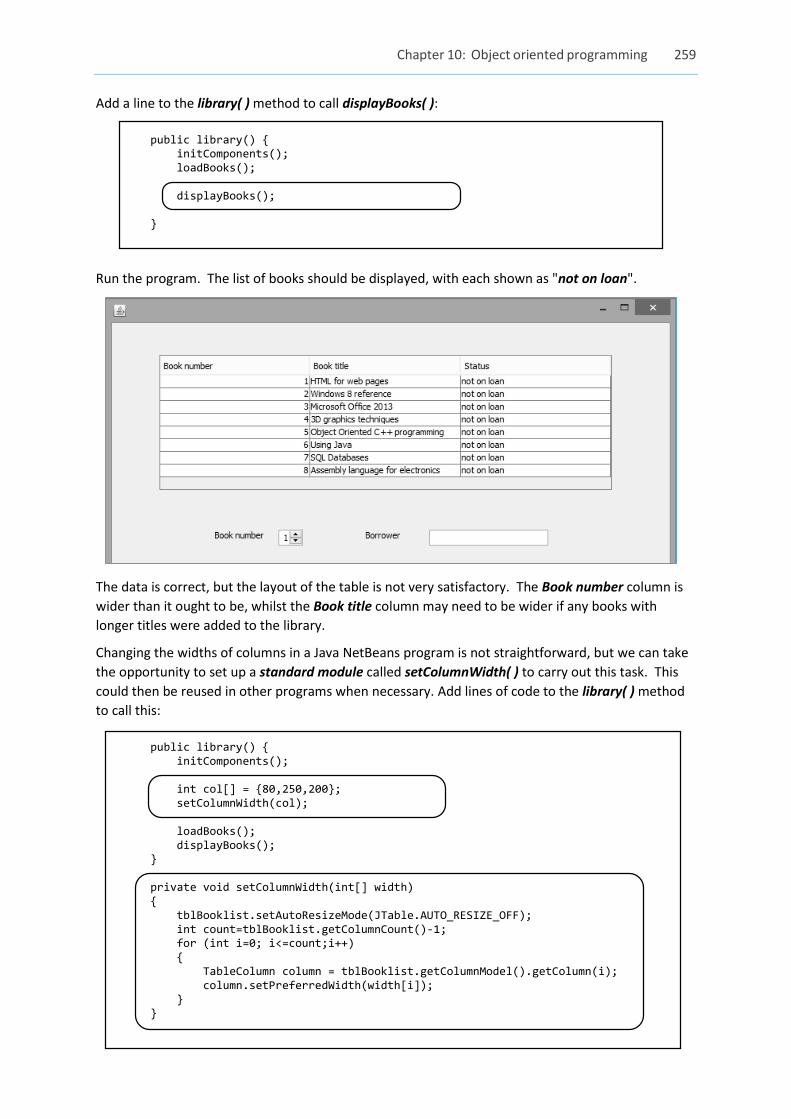
Add a line to the library( ) method to call displayBooks( ):
public library() { initComponents(); loadBooks(); displayBooks(); }
Run the program. The list of books should be displayed, with each shown as "not on loan".
The data is correct, but the layout of the table is not very satisfactory. The Book number column is
wider than it ought to be, whilst the Book title column may need to be wider if any books with
longer titles were added to the library.
Changing the widths of columns in a Java NetBeans program is not straightforward, but we can take
the opportunity to set up a standard module called setColumnWidth( ) to carry out this task. This
could then be reused in other programs when necessary. Add lines of code to the library( ) method
to call this:
public library() { initComponents(); int col[] = {80,250,200}; setColumnWidth(col); loadBooks(); displayBooks(); } private void setColumnWidth(int[] width) { tblBooklist.setAutoResizeMode(JTable.AUTO_RESIZE_OFF); int count=tblBooklist.getColumnCount()-1; for (int i=0; i<=count;i++) { TableColumn column = tblBooklist.getColumnModel().getColumn(i); column.setPreferredWidth(width[i]); } }
260 Java Programming for A-level Computer Science
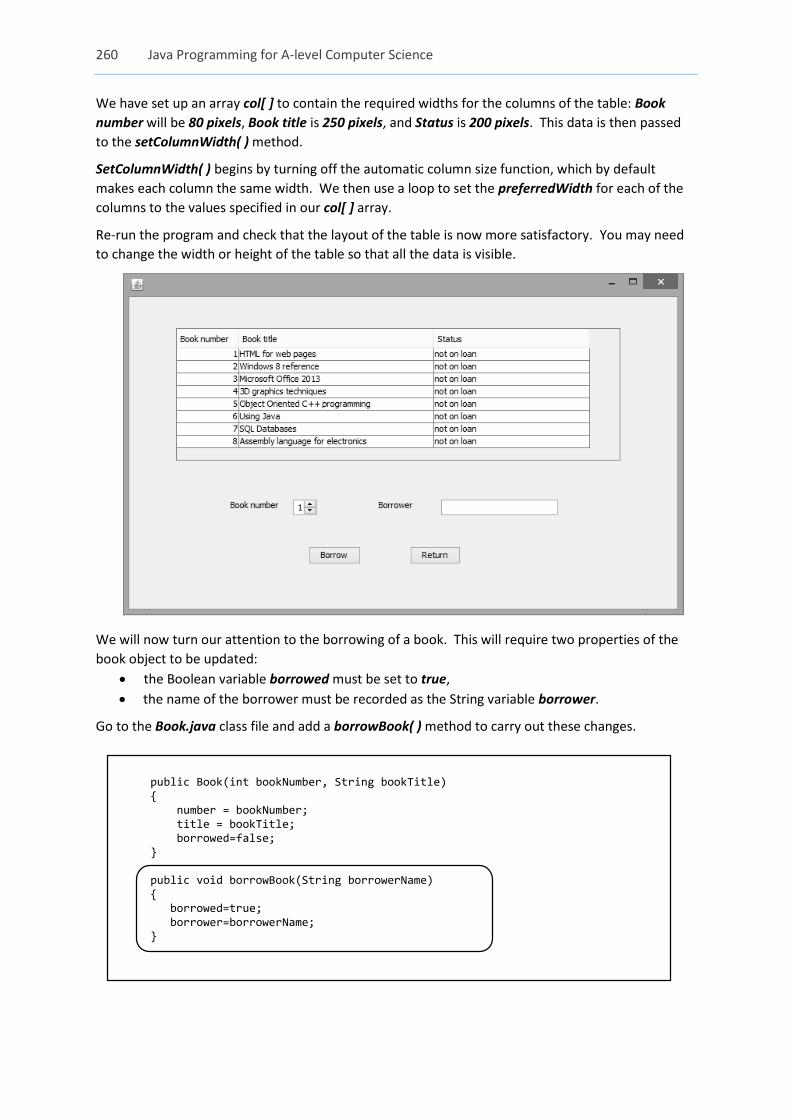
We have set up an array col[ ] to contain the required widths for the columns of the table: Book
number will be 80 pixels, Book title is 250 pixels, and Status is 200 pixels. This data is then passed
to the setColumnWidth( ) method.
SetColumnWidth( ) begins by turning off the automatic column size function, which by default
makes each column the same width. We then use a loop to set the preferredWidth for each of the
columns to the values specified in our col[ ] array.
Re-run the program and check that the layout of the table is now more satisfactory. You may need
to change the width or height of the table so that all the data is visible.
We will now turn our attention to the borrowing of a book. This will require two properties of the
book object to be updated:
the Boolean variable borrowed must be set to true,
the name of the borrower must be recorded as the String variable borrower.
Go to the Book.java class file and add a borrowBook( ) method to carry out these changes.
public Book(int bookNumber, String bookTitle) { number = bookNumber; title = bookTitle; borrowed=false; } public void borrowBook(String borrowerName) { borrowed=true; borrower=borrowerName; }
Chapter 10: Object oriented programming 261
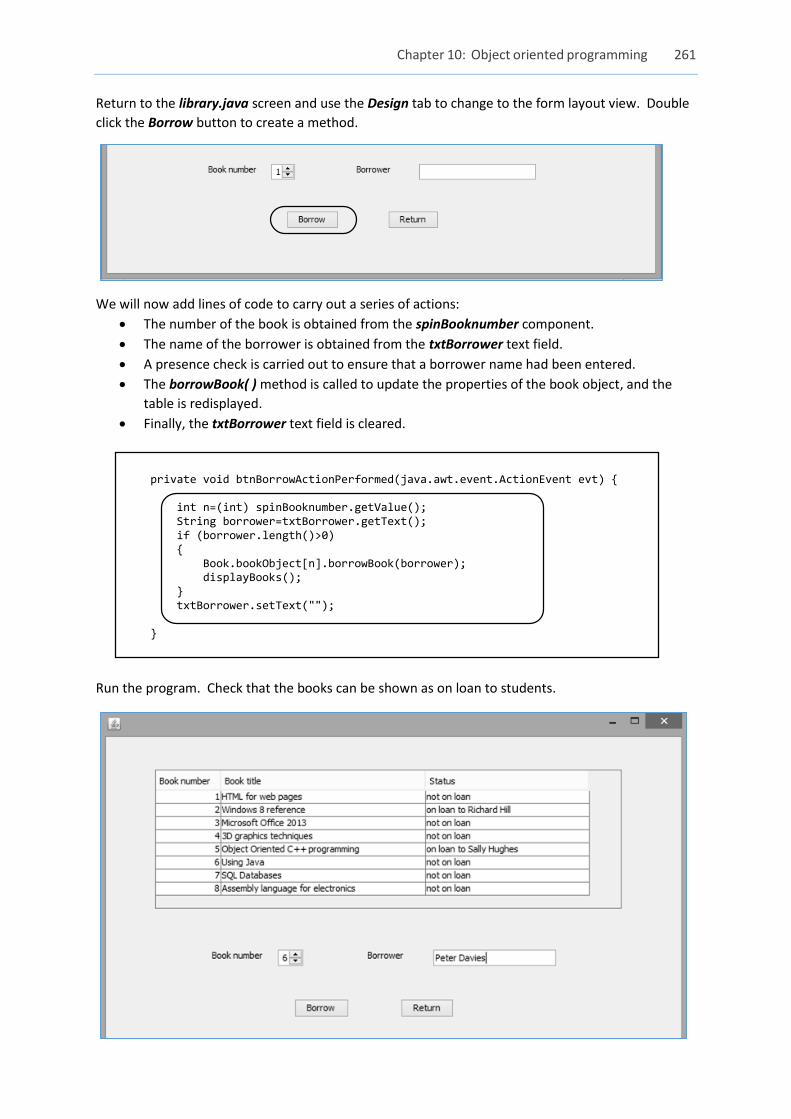
Return to the library.java screen and use the Design tab to change to the form layout view. Double
click the Borrow button to create a method.
We will now add lines of code to carry out a series of actions:
The number of the book is obtained from the spinBooknumber component.
The name of the borrower is obtained from the txtBorrower text field.
A presence check is carried out to ensure that a borrower name had been entered.
The borrowBook( ) method is called to update the properties of the book object, and the
table is redisplayed.
Finally, the txtBorrower text field is cleared.
private void btnBorrowActionPerformed(java.awt.event.ActionEvent evt) { int n=(int) spinBooknumber.getValue(); String borrower=txtBorrower.getText(); if (borrower.length()>0) { Book.bookObject[n].borrowBook(borrower); displayBooks(); } txtBorrower.setText(""); }
Run the program. Check that the books can be shown as on loan to students.
262 Java Programming for A-level Computer Science
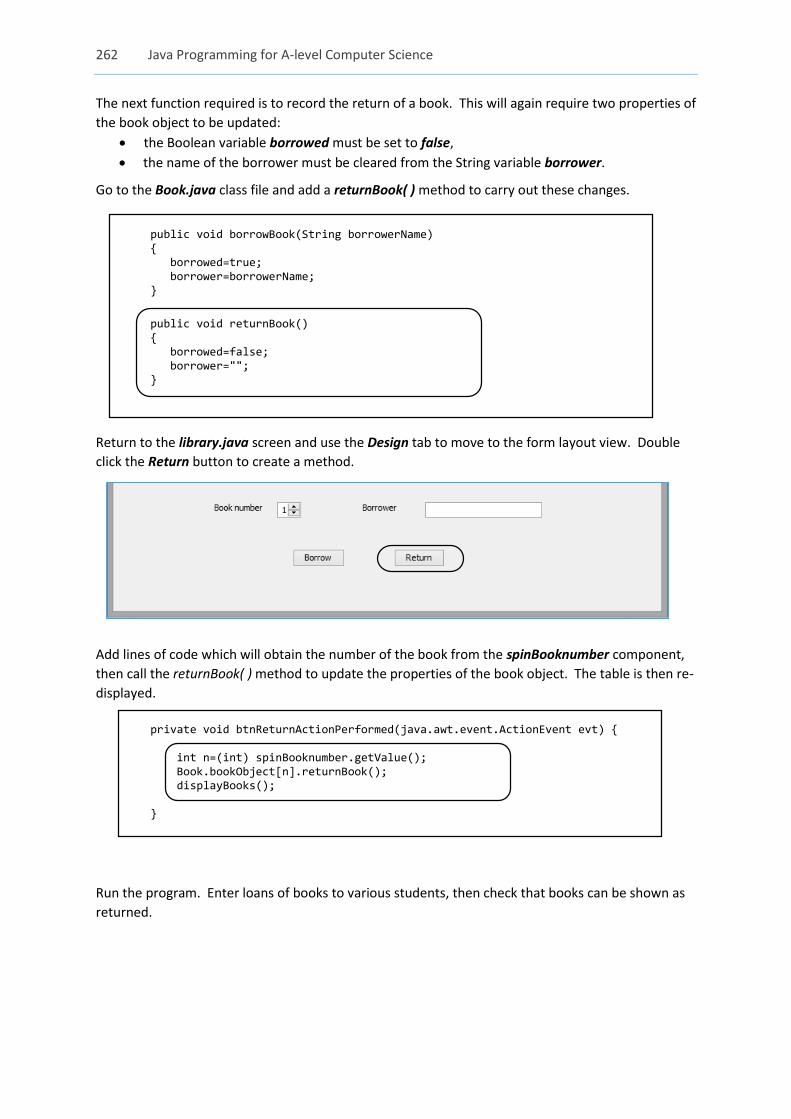
The next function required is to record the return of a book. This will again require two properties of
the book object to be updated:
the Boolean variable borrowed must be set to false,
the name of the borrower must be cleared from the String variable borrower.
Go to the Book.java class file and add a returnBook( ) method to carry out these changes.
public void borrowBook(String borrowerName) { borrowed=true; borrower=borrowerName; }
public void returnBook() { borrowed=false; borrower=""; }
Return to the library.java screen and use the Design tab to move to the form layout view. Double
click the Return button to create a method.
Add lines of code which will obtain the number of the book from the spinBooknumber component,
then call the returnBook( ) method to update the properties of the book object. The table is then re-
displayed.
private void btnReturnActionPerformed(java.awt.event.ActionEvent evt) { int n=(int) spinBooknumber.getValue(); Book.bookObject[n].returnBook(); displayBooks(); }
Run the program. Enter loans of books to various students, then check that books can be shown as
returned.
Chapter 10: Object oriented programming 263
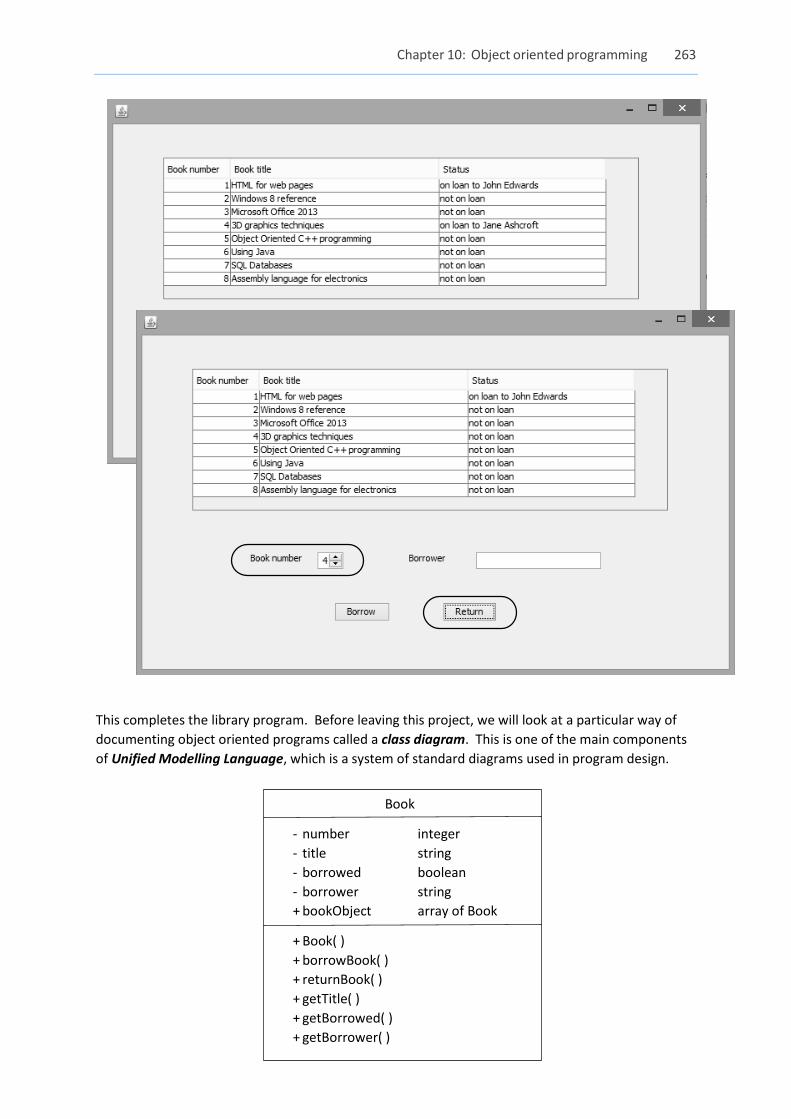
This completes the library program. Before leaving this project, we will look at a particular way of
documenting object oriented programs called a class diagram. This is one of the main components
of Unified Modelling Language, which is a system of standard diagrams used in program design.
Book
- number integer
- title string
- borrowed boolean
- borrower string
+ bookObject array of Book
+ Book( )
+ borrowBook( )
+ returnBook( )
+ getTitle( )
+ getBorrowed( )
+ getBorrower( )
264 Java Programming for A-level Computer Science
The class diagram is a box divided into three sections. The top section contains the class name.
Below this is a section which lists the properties of the class. The final section lists the methods.
Minus (-) symbols indicate private properties, unavailable except through public methods. Plus (+)
symbols indicate the public methods, and also the bookObject array which is used to locate a
particular instance of a book object in the computer memory.
As we have seen, the bookObject array and the public methods are used together when carrying out
operations with the book objects. For example, calling
Book.bookObject[5].returnBook( )
would locate book object 5 and use the returnBook( ) method to update the private properties to
record that the book has been returned.
For our second program using object oriented methods, we will develop a program
involving graphics:
A theatre requires a computer program to record the seat bookings for a play. The
program should produce a graphical seating plan of the theatre, with seats shown
in green if available or red if booked. The theatre has 8 rows each containing 12
seats. Initially, all the seats are un-booked.
It should be possible to enter the number of the row and the quantity of seats
required, and the computer will make the booking if sufficient seats are available.
(To keep the program as simple as possible, we will not worry about cancellation of
bookings.)
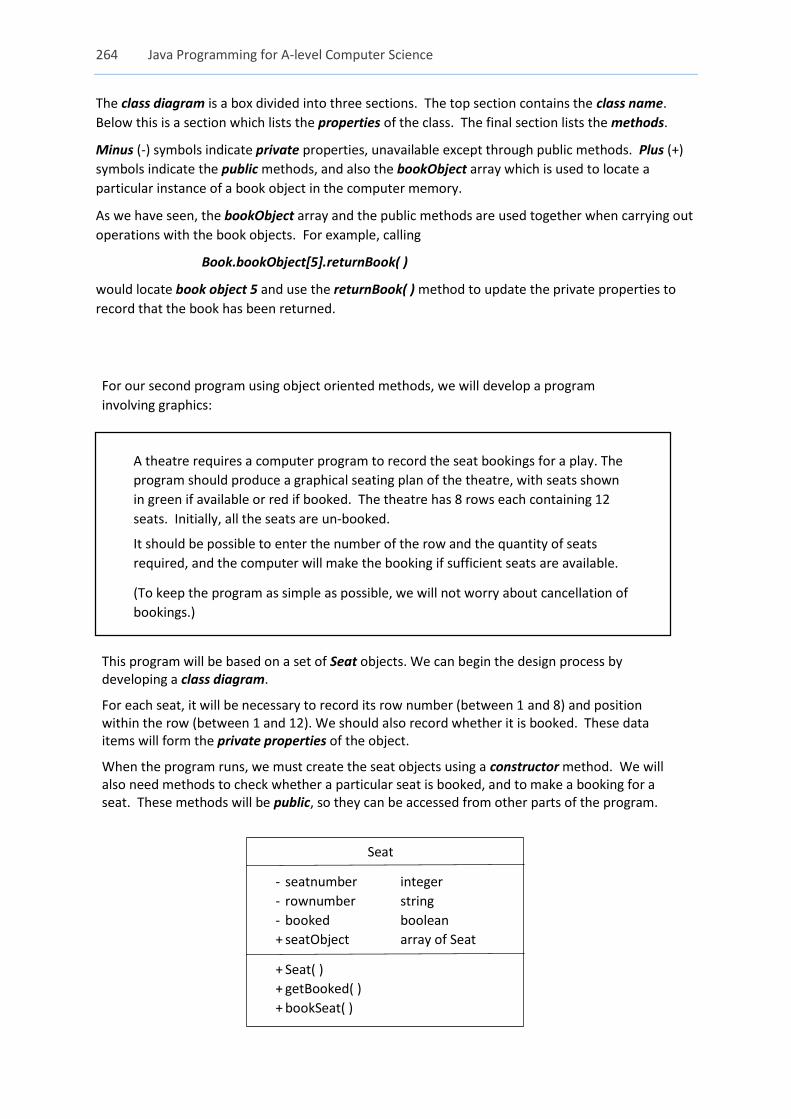
This program will be based on a set of Seat objects. We can begin the design process by developing a class diagram.
For each seat, it will be necessary to record its row number (between 1 and 8) and position within the row (between 1 and 12). We should also record whether it is booked. These data items will form the private properties of the object.
When the program runs, we must create the seat objects using a constructor method. We will also need methods to check whether a particular seat is booked, and to make a booking for a seat. These methods will be public, so they can be accessed from other parts of the program.
Seat
- seatnumber integer
- rownumber string
- booked boolean
+ seatObject array of Seat
+ Seat( )
+ getBooked( )
+ bookSeat( )
Chapter 10: Object oriented programming 265
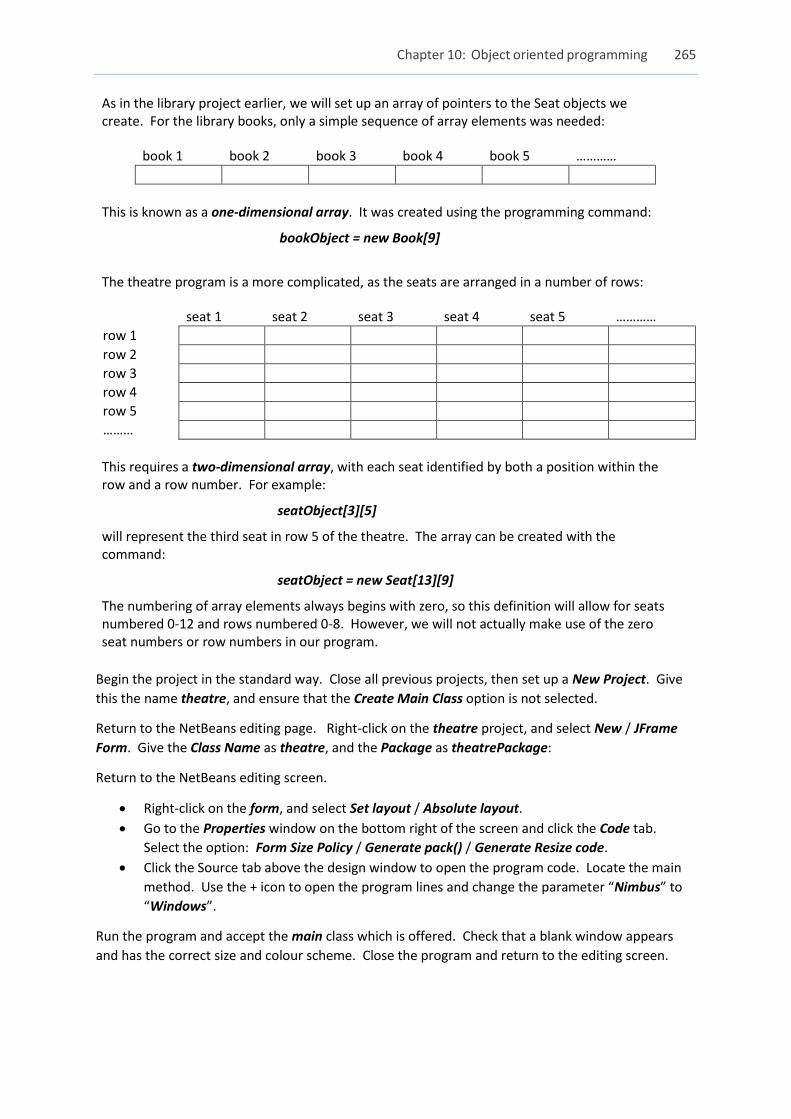
As in the library project earlier, we will set up an array of pointers to the Seat objects we create. For the library books, only a simple sequence of array elements was needed: This is known as a one-dimensional array. It was created using the programming command:
bookObject = new Book[9]
The theatre program is a more complicated, as the seats are arranged in a number of rows:
This requires a two-dimensional array, with each seat identified by both a position within the row and a row number. For example:
seatObject[3][5]
will represent the third seat in row 5 of the theatre. The array can be created with the command:
seatObject = new Seat[13][9]
The numbering of array elements always begins with zero, so this definition will allow for seats numbered 0-12 and rows numbered 0-8. However, we will not actually make use of the zero seat numbers or row numbers in our program.
Begin the project in the standard way. Close all previous projects, then set up a New Project. Give
this the name theatre, and ensure that the Create Main Class option is not selected.
Return to the NetBeans editing page. Right-click on the theatre project, and select New / JFrame
Form. Give the Class Name as theatre, and the Package as theatrePackage:
Return to the NetBeans editing screen.
Right-click on the form, and select Set layout / Absolute layout.
Go to the Properties window on the bottom right of the screen and click the Code tab.
Select the option: Form Size Policy / Generate pack() / Generate Resize code.
Click the Source tab above the design window to open the program code. Locate the main
method. Use the + icon to open the program lines and change the parameter “Nimbus” to
“Windows”.
Run the program and accept the main class which is offered. Check that a blank window appears
and has the correct size and colour scheme. Close the program and return to the editing screen.
book 1 book 2 book 3 book 4 book 5 …………
seat 1 seat 2 seat 3 seat 4 seat 5 …………
row 1
row 2
row 3
row 4
row 5
………
266 Java Programming for A-level Computer Science
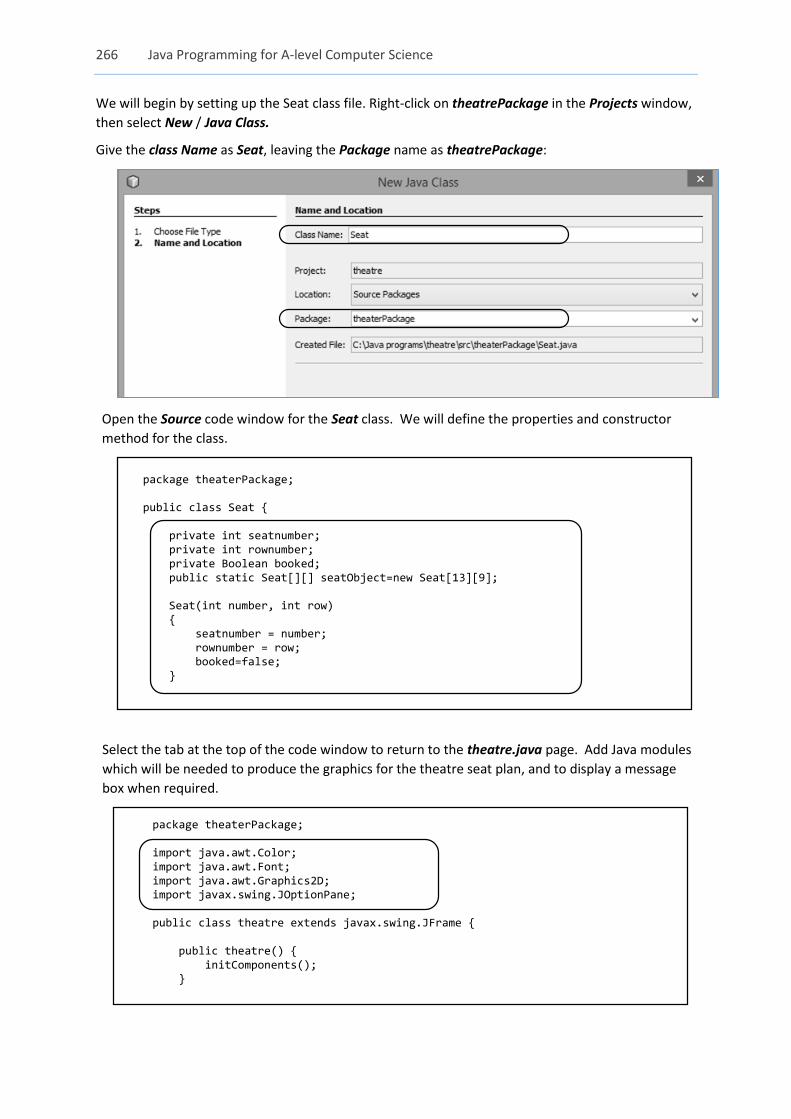
We will begin by setting up the Seat class file. Right-click on theatrePackage in the Projects window,
then select New / Java Class.
Give the class Name as Seat, leaving the Package name as theatrePackage:
Open the Source code window for the Seat class. We will define the properties and constructor
method for the class.
package theaterPackage; public class Seat { private int seatnumber; private int rownumber; private Boolean booked; public static Seat[][] seatObject=new Seat[13][9]; Seat(int number, int row) { seatnumber = number; rownumber = row; booked=false; }
Select the tab at the top of the code window to return to the theatre.java page. Add Java modules
which will be needed to produce the graphics for the theatre seat plan, and to display a message
box when required.
package theaterPackage; import java.awt.Color; import java.awt.Font; import java.awt.Graphics2D; import javax.swing.JOptionPane; public class theatre extends javax.swing.JFrame { public theatre() { initComponents(); }
Chapter 10: Object oriented programming 267
We will now produce a loadSeats( ) method to create the eight rows of twelve seats for the theatre. Add a line of code to call loadSeats( ) from the theatre( ) method, which is the first to run when the program begins.
public class theatre extends javax.swing.JFrame { public theatre() { initComponents(); loadSeats(); } private void loadSeats() { for (int rownumber=1; rownumber<=8; rownumber++) { for (int i=1; i<=12; i++) { Seat.seatObject[i][rownumber]= new Seat(i,rownumber); } } }
We can now turn our attention to the user interface. Use the Design tab to move to the form
layout view.
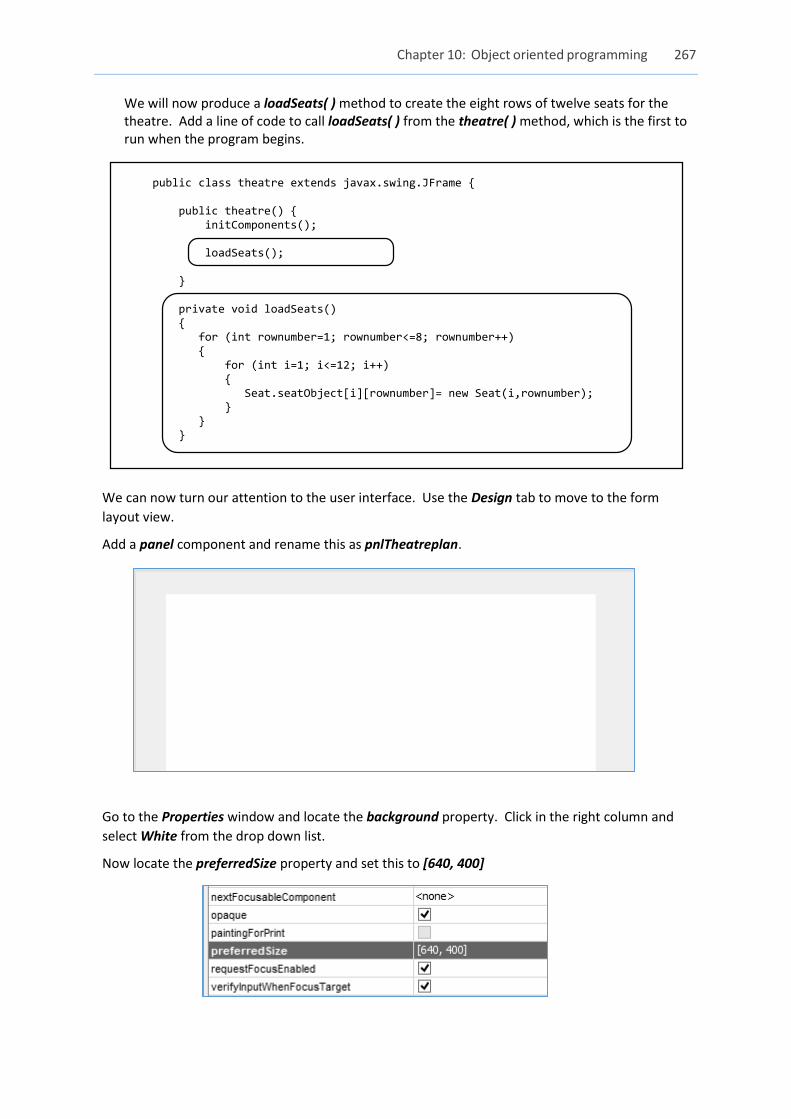
Add a panel component and rename this as pnlTheatreplan.
Go to the Properties window and locate the background property. Click in the right column and
select White from the drop down list.
Now locate the preferredSize property and set this to [640, 400]
268 Java Programming for A-level Computer Science
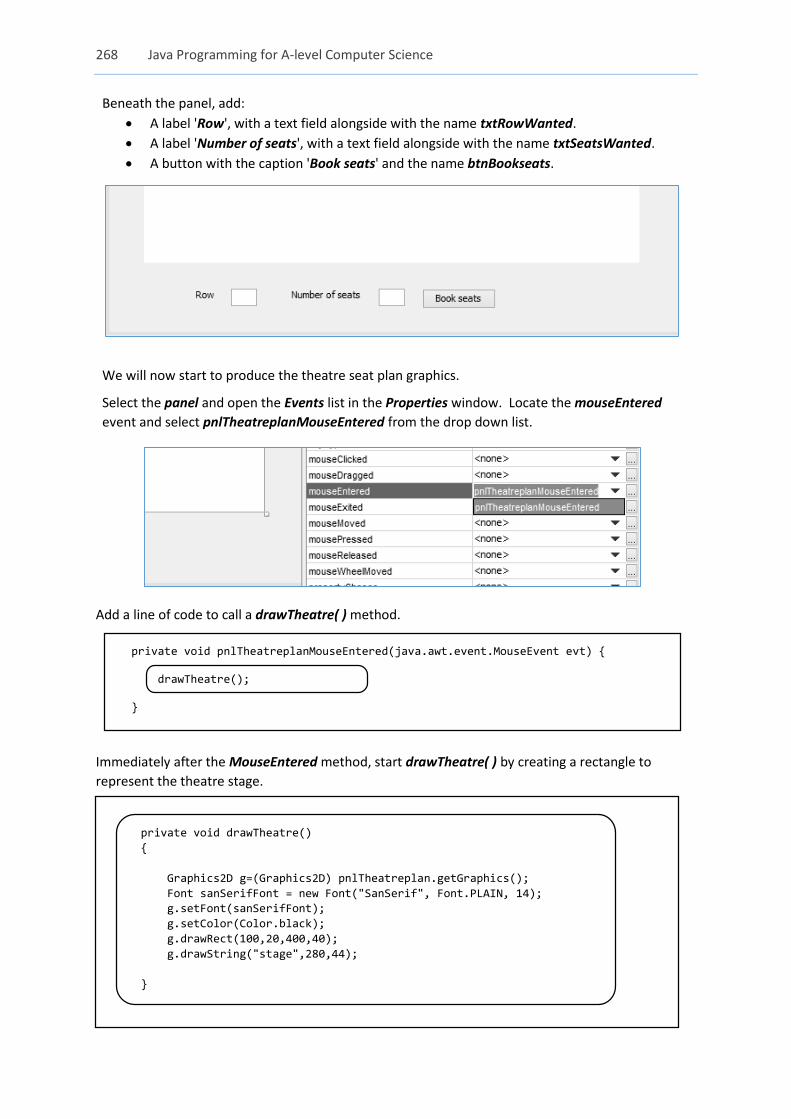
Beneath the panel, add:
A label 'Row', with a text field alongside with the name txtRowWanted.
A label 'Number of seats', with a text field alongside with the name txtSeatsWanted.
A button with the caption 'Book seats' and the name btnBookseats.
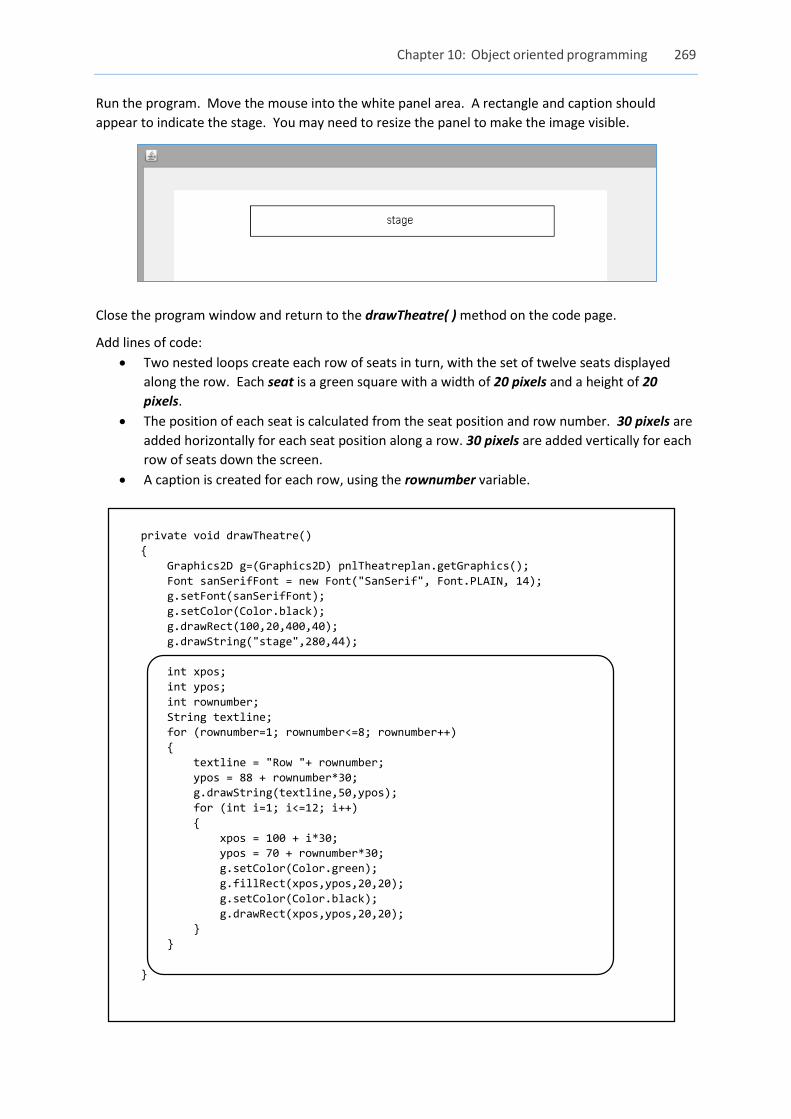
We will now start to produce the theatre seat plan graphics.
Select the panel and open the Events list in the Properties window. Locate the mouseEntered
event and select pnlTheatreplanMouseEntered from the drop down list.
Add a line of code to call a drawTheatre( ) method.
private void pnlTheatreplanMouseEntered(java.awt.event.MouseEvent evt) { drawTheatre(); }
Immediately after the MouseEntered method, start drawTheatre( ) by creating a rectangle to
represent the theatre stage.
private void drawTheatre()
{
Graphics2D g=(Graphics2D) pnlTheatreplan.getGraphics();
Font sanSerifFont = new Font("SanSerif", Font.PLAIN, 14);
g.setFont(sanSerifFont);
g.setColor(Color.black);
g.drawRect(100,20,400,40);
g.drawString("stage",280,44);
}
Chapter 10: Object oriented programming 269
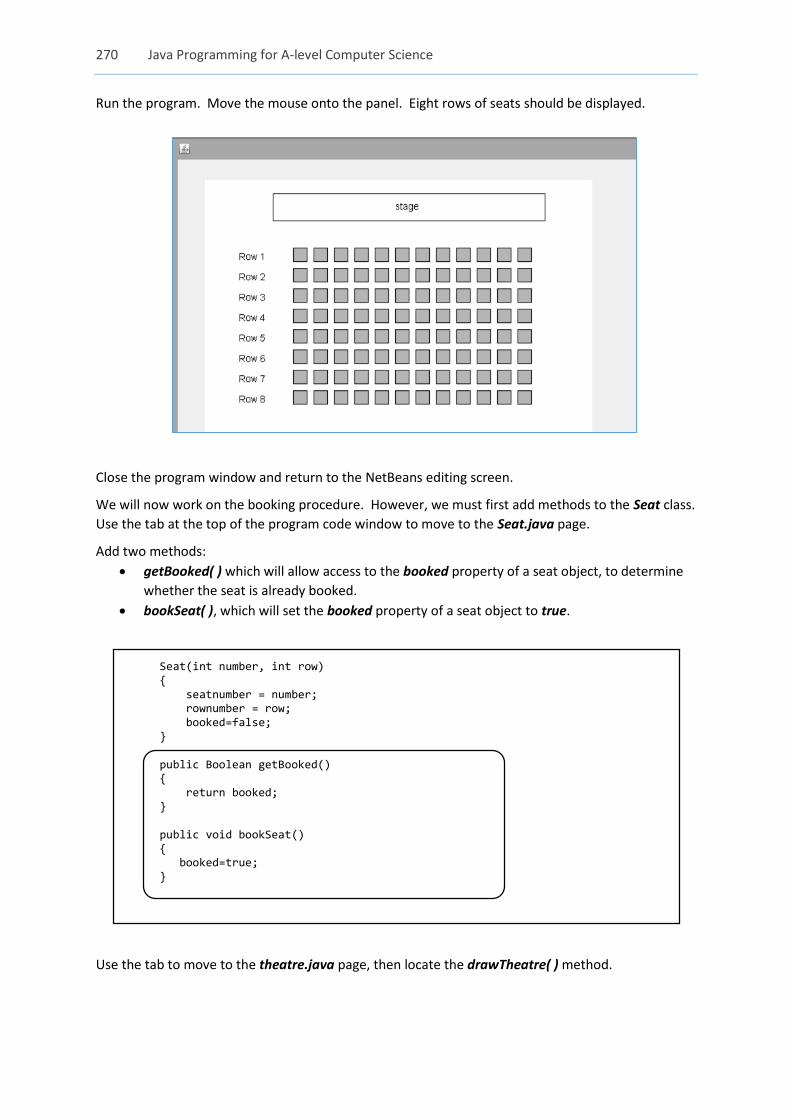
Run the program. Move the mouse into the white panel area. A rectangle and caption should
appear to indicate the stage. You may need to resize the panel to make the image visible.
Close the program window and return to the drawTheatre( ) method on the code page.
Add lines of code:
Two nested loops create each row of seats in turn, with the set of twelve seats displayed
along the row. Each seat is a green square with a width of 20 pixels and a height of 20
pixels.
The position of each seat is calculated from the seat position and row number. 30 pixels are
added horizontally for each seat position along a row. 30 pixels are added vertically for each
row of seats down the screen.
A caption is created for each row, using the rownumber variable.
private void drawTheatre()
{
Graphics2D g=(Graphics2D) pnlTheatreplan.getGraphics();
Font sanSerifFont = new Font("SanSerif", Font.PLAIN, 14);
g.setFont(sanSerifFont);
g.setColor(Color.black);
g.drawRect(100,20,400,40);
g.drawString("stage",280,44);
int xpos;
int ypos;
int rownumber;
String textline;
for (rownumber=1; rownumber<=8; rownumber++)
{
textline = "Row "+ rownumber;
ypos = 88 + rownumber*30;
g.drawString(textline,50,ypos);
for (int i=1; i<=12; i++)
{
xpos = 100 + i*30;
ypos = 70 + rownumber*30;
g.setColor(Color.green);
g.fillRect(xpos,ypos,20,20);
g.setColor(Color.black);
g.drawRect(xpos,ypos,20,20);
}
}
}
270 Java Programming for A-level Computer Science
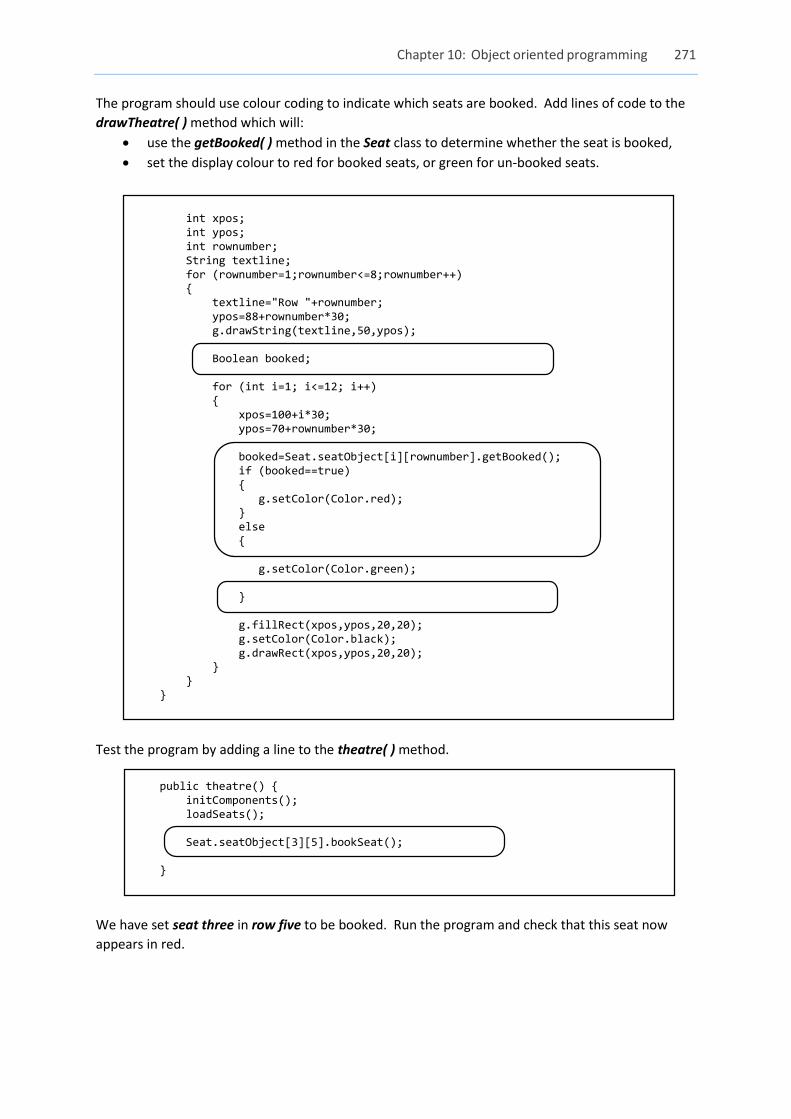
Run the program. Move the mouse onto the panel. Eight rows of seats should be displayed.
Close the program window and return to the NetBeans editing screen.
We will now work on the booking procedure. However, we must first add methods to the Seat class.
Use the tab at the top of the program code window to move to the Seat.java page.
Add two methods:
getBooked( ) which will allow access to the booked property of a seat object, to determine
whether the seat is already booked.
bookSeat( ), which will set the booked property of a seat object to true.
Seat(int number, int row) { seatnumber = number; rownumber = row; booked=false; } public Boolean getBooked() { return booked; } public void bookSeat() { booked=true; }
Use the tab to move to the theatre.java page, then locate the drawTheatre( ) method.
Chapter 10: Object oriented programming 271
The program should use colour coding to indicate which seats are booked. Add lines of code to the
drawTheatre( ) method which will:
use the getBooked( ) method in the Seat class to determine whether the seat is booked,
set the display colour to red for booked seats, or green for un-booked seats.
int xpos; int ypos; int rownumber; String textline; for (rownumber=1;rownumber<=8;rownumber++) { textline="Row "+rownumber; ypos=88+rownumber*30; g.drawString(textline,50,ypos); Boolean booked; for (int i=1; i<=12; i++) { xpos=100+i*30; ypos=70+rownumber*30; booked=Seat.seatObject[i][rownumber].getBooked(); if (booked==true) { g.setColor(Color.red); } else { g.setColor(Color.green); } g.fillRect(xpos,ypos,20,20); g.setColor(Color.black); g.drawRect(xpos,ypos,20,20); } } }
Test the program by adding a line to the theatre( ) method.
public theatre() { initComponents(); loadSeats(); Seat.seatObject[3][5].bookSeat(); }
We have set seat three in row five to be booked. Run the program and check that this seat now
appears in red.
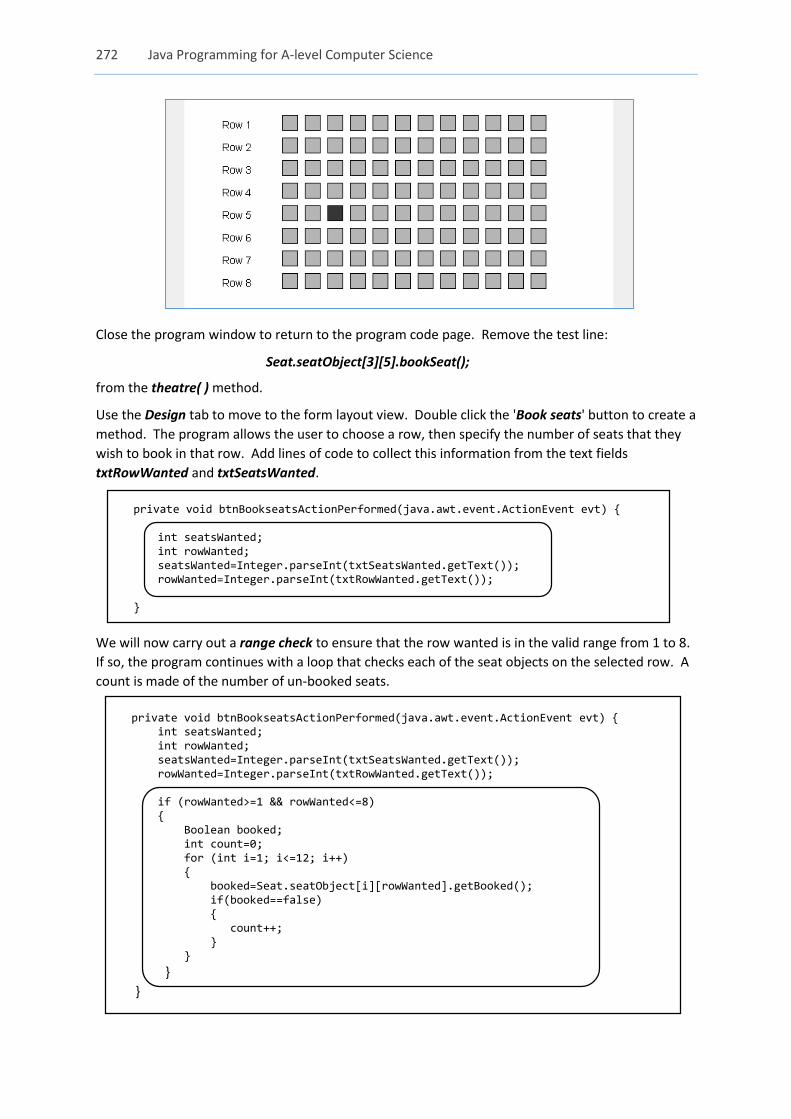
272 Java Programming for A-level Computer Science
Close the program window to return to the program code page. Remove the test line:
Seat.seatObject[3][5].bookSeat();
from the theatre( ) method.
Use the Design tab to move to the form layout view. Double click the 'Book seats' button to create a
method. The program allows the user to choose a row, then specify the number of seats that they
wish to book in that row. Add lines of code to collect this information from the text fields
txtRowWanted and txtSeatsWanted.
private void btnBookseatsActionPerformed(java.awt.event.ActionEvent evt) {
int seatsWanted; int rowWanted; seatsWanted=Integer.parseInt(txtSeatsWanted.getText()); rowWanted=Integer.parseInt(txtRowWanted.getText());
}
We will now carry out a range check to ensure that the row wanted is in the valid range from 1 to 8.
If so, the program continues with a loop that checks each of the seat objects on the selected row. A
count is made of the number of un-booked seats.
private void btnBookseatsActionPerformed(java.awt.event.ActionEvent evt) { int seatsWanted; int rowWanted; seatsWanted=Integer.parseInt(txtSeatsWanted.getText()); rowWanted=Integer.parseInt(txtRowWanted.getText()); if (rowWanted>=1 && rowWanted<=8) { Boolean booked; int count=0; for (int i=1; i<=12; i++) { booked=Seat.seatObject[i][rowWanted].getBooked(); if(booked==false) { count++; } }
}
}
Chapter 10: Object oriented programming 273
We now know the row in which the user wishes to book seats, and the number of available seats on
that row. The next step is to check whether the number of available seats is sufficient for the
booking. If so, the required number of seats can be booked; if not, then a warning message will be
displayed.
To book seats, a loop checks each seat object in turn along the row. If the seat is available, it will be
booked and the count increased by one. The loop continues until the required number of seats have
been booked.
Add lines of code to the 'Book seats' button click method. Please note that the
showMessageDialog(….) instruction should be entered as a single line of code without a line break.
for (int i=1; i<=12; i++)
{
booked=Seat.seatObject[i][rowWanted].getBooked();
if(booked==false)
{
count++;
}
}
if (count>=seatsWanted)
{
int i=0;
count=0;
while(count<seatsWanted)
{
i++;
if(Seat.seatObject[i][rowWanted].getBooked()==false)
{
Seat.seatObject[i][rowWanted].bookSeat();
count++;
}
}
}
else
{
JOptionPane.showMessageDialog(theatre.this,
"Sorry, not enough seats available");
}
}
}
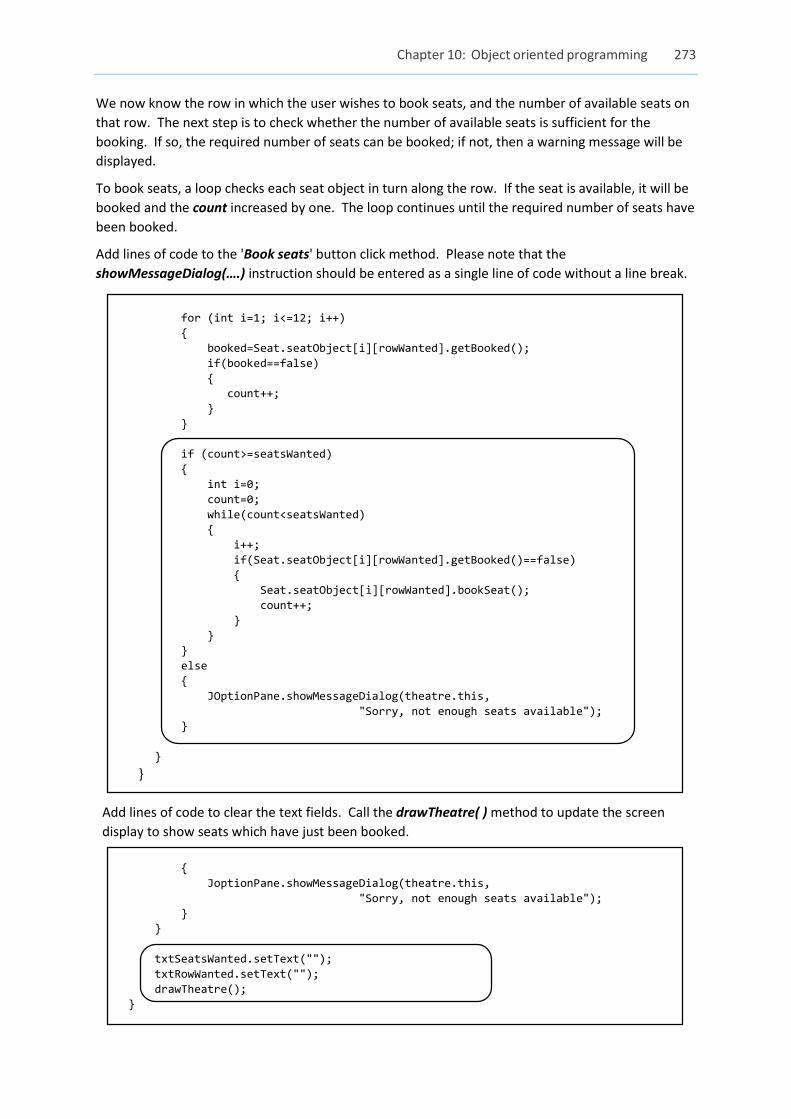
Add lines of code to clear the text fields. Call the drawTheatre( ) method to update the screen
display to show seats which have just been booked.
{
JoptionPane.showMessageDialog(theatre.this,
"Sorry, not enough seats available");
}
}
txtSeatsWanted.setText("");
txtRowWanted.setText("");
drawTheatre();
}
274 Java Programming for A-level Computer Science
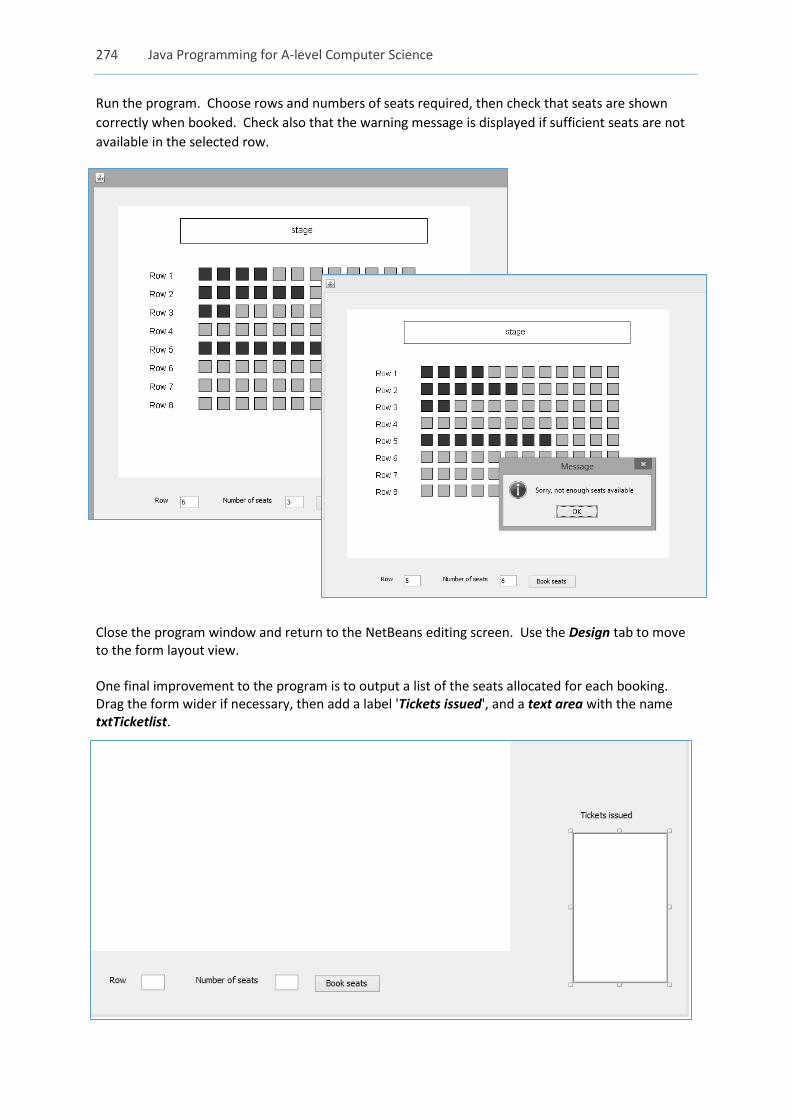
Run the program. Choose rows and numbers of seats required, then check that seats are shown
correctly when booked. Check also that the warning message is displayed if sufficient seats are not
available in the selected row.
Close the program window and return to the NetBeans editing screen. Use the Design tab to move to the form layout view. One final improvement to the program is to output a list of the seats allocated for each booking. Drag the form wider if necessary, then add a label 'Tickets issued', and a text area with the name txtTicketlist.
Chapter 10: Object oriented programming 275
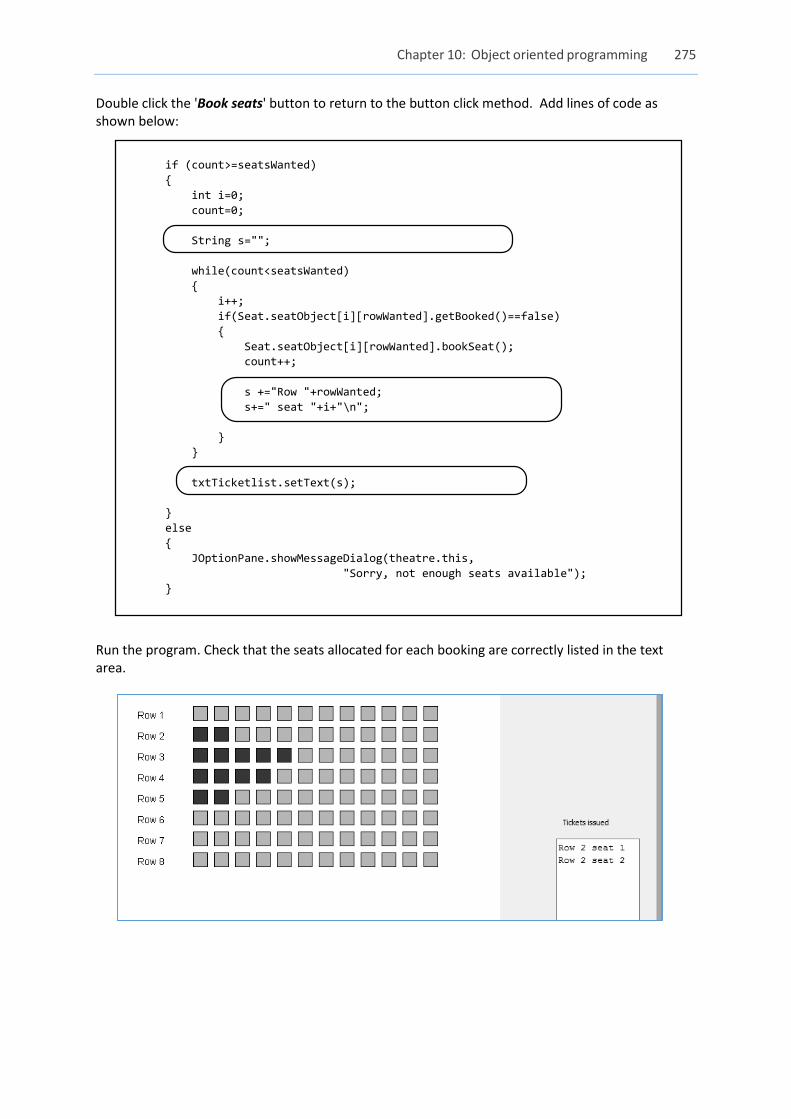
Double click the 'Book seats' button to return to the button click method. Add lines of code as shown below:
if (count>=seatsWanted)
{
int i=0;
count=0;
String s="";
while(count<seatsWanted)
{
i++;
if(Seat.seatObject[i][rowWanted].getBooked()==false)
{
Seat.seatObject[i][rowWanted].bookSeat();
count++;
s +="Row "+rowWanted;
s+=" seat "+i+"\n";
}
}
txtTicketlist.setText(s);
}
else
{
JOptionPane.showMessageDialog(theatre.this,
"Sorry, not enough seats available");
}
Run the program. Check that the seats allocated for each booking are correctly listed in the text area.