jagannath institute of management sciences lajpat nagar · · 2016-01-30features of java...
TRANSCRIPT
Jagannath Institute of Management Sciences
Lajpat Nagar
BCA Sem V
JAVA
UNIT – I (8 Lectures)
The Genesis of Java: Why Java? Flavors of Java. Java Designing Goal. Role of Java
Programmer in Industry.
Features of Java Language.JVM –The heart of Java, Java’s Magic Byte code,
using blocks of code, the Java libraries.
Java Programming: Data types (Primitive and Reference), Control structured (Decision making, looping, branching statements), Arrays (One and two dimensional), Introducing classes and objects.
About Java
Java is a programming language and a platform.
Java is a high level, robust, secured and object-oriented programming language.
Platform: Any hardware or software environment in which a program runs, is known
as a platform. Since Java has its own runtime environment (JRE) and API, it is called
platform.
Where it is used?
According to Sun, 3 billion devices run java. There are many devices where java
is currently used. Some of them are as follows:
1. Desktop Applications such as acrobat reader, media player, antivirus etc. 2. Web Applications such as irctc.co.in, javatpoint.com etc. 3. Enterprise Applications such as banking applications. 4. Mobile 5. Embedded System 6. Smart Card 7. Robotics 8. Games etc.
Types of Java Applications

There are mainly 4 type of applications that can be created using java programming:
1) Standalone Application It is also known as desktop application or window-based application. An application that
we need to install on every machine such as media player, antivirus etc. AWT and
Swing are used in java for creating standalone applications.
2) Web Application An application that runs on the server side and creates dynamic page, is called web
application. Currently, servlet, jsp, struts, jsf etc. technologies are used for creating
web applications in java.
3) Enterprise Application An application that is distributed in nature, such as banking applications etc. It has
the advantage of high level security, load balancing and clustering. In java, EJB is
used for creating enterprise applications.
4) Mobile Application An application that is created for mobile devices. Currently Android and Java ME are
used for creating mobile applications.
History of Java Java history is interesting to know. The history of java starts from Green Team. Java
team members (also known as Green Team), initiated a revolutionary task to develop a
language for digital devices such as set-top boxes, televisions etc.
For the green team members, it was an advance concept at that time. But, it was
suited for internet programming. Later, Java technology as incorporated by Netscape. Currently, Java is used in internet programming, mobile devices, games, e-business
solutions etc. There are given the major points that describes the history of java.
1) James Gosling, Mike Sheridan, and Patrick Naughton initiated the Java
language project in June 1991. The small team of sun engineers called Green Team.

2) Originally designed for small, embedded systems in electronic appliances like set-
top boxes.
3) Firstly, it was called "Greentalk" by James Gosling and file extension was .gt.
4) After that, it was called Oak and was developed as a part of the Green project.
Why Oak name for java language? 5) Why Oak? Oak is a symbol of strength and choosen as a national tree of
many countries like U.S.A., France, Germany, Romania etc.
6) In 1995, Oak was renamed as "Java" because it was already a trademark by Oak
Technologies.
Why Java name for java language? 7) Why they choosed java name for java language? The team gathered to choose
a new name. The suggested words were "dynamic", "revolutionary", "Silk", "jolt", "DNA"
etc. They wanted something that reflected the essence of the technology: revolutionary,
dynamic, lively, cool, unique, and easy to spell and fun to say.
According to James Gosling "Java was one of the top choices along with Silk". Since java
was so unique, most of the team members preferred java.
8) Java is an island of Indonesia where first coffee was produced (called java coffee).
9) Notice that Java is just a name not an acronym.
10) Originally developed by James Gosling at Sun Microsystems (which is now
a subsidiary of Oracle Corporation) and released in 1995.
11) In 1995, Time magazine called Java one of the Ten Best Products of 1995.
12) JDK 1.0 released in(January 23, 1996).
Java Version History
There are many java versions that has been released. Current stable release of Java is Java SE 8.
1. JDK Alpha and Beta (1995) 2. JDK 1.0 (23rd Jan, 1996) 3. JDK 1.1 (19th Feb, 1997) 4. J2SE 1.2 (8th Dec, 1998) 5. J2SE 1.3 (8th May, 2000) 6. J2SE 1.4 (6th Feb, 2002) 7. J2SE 5.0 (30th Sep, 2004) 8. Java SE 6 (11th Dec, 2006) 9. Java SE 7 (28th July, 2011) 10. Java SE 8 (18th March, 2014)
Features of Java
There is given many features of java. They are also known as java buzzwords. The Java Features given below are simple and easy to understand.
1. Simple 2. Object-Oriented 3. Platform independent 4. Secured 5. Robust 6. Architecture neutral 7. Portable 8. Dynamic 9. Interpreted 10. High Performance 11. Multithreaded 12. Distributed
Simple
According to Sun, Java language is simple because:
1. syntax is based on C++ (so easier for programmers to learn it after C++).
2. removed many confusing and/or rarely-used features e.g., explicit
pointers, operator overloading etc.
3. No need to remove unreferenced objects because there is Automatic Garbage

Collection in java.
Object-oriented
Object-oriented means we organize our software as a combination of different
types of objects that incorporates both data and behavior.
Object-oriented programming (OOPs) is a methodology that simplifies
software development and maintenance by providing some rules.
Basic concepts of OOPs are:
1. Object 2. Class 3. Inheritance 4. Polymorphism 5. Abstraction 6. Encapsulation
Platform Independent
A platform is the hardware or software environment in which a program runs. There
are two types of platforms software-based and hardware-based. Java provides
software-based platform. The Java platform differs from most other platforms in the
sense that it's a software-based platform that runs on top of other hardware-based
platforms. It has two components:
1. Runtime Environment 2. API(Application Programming Interface)
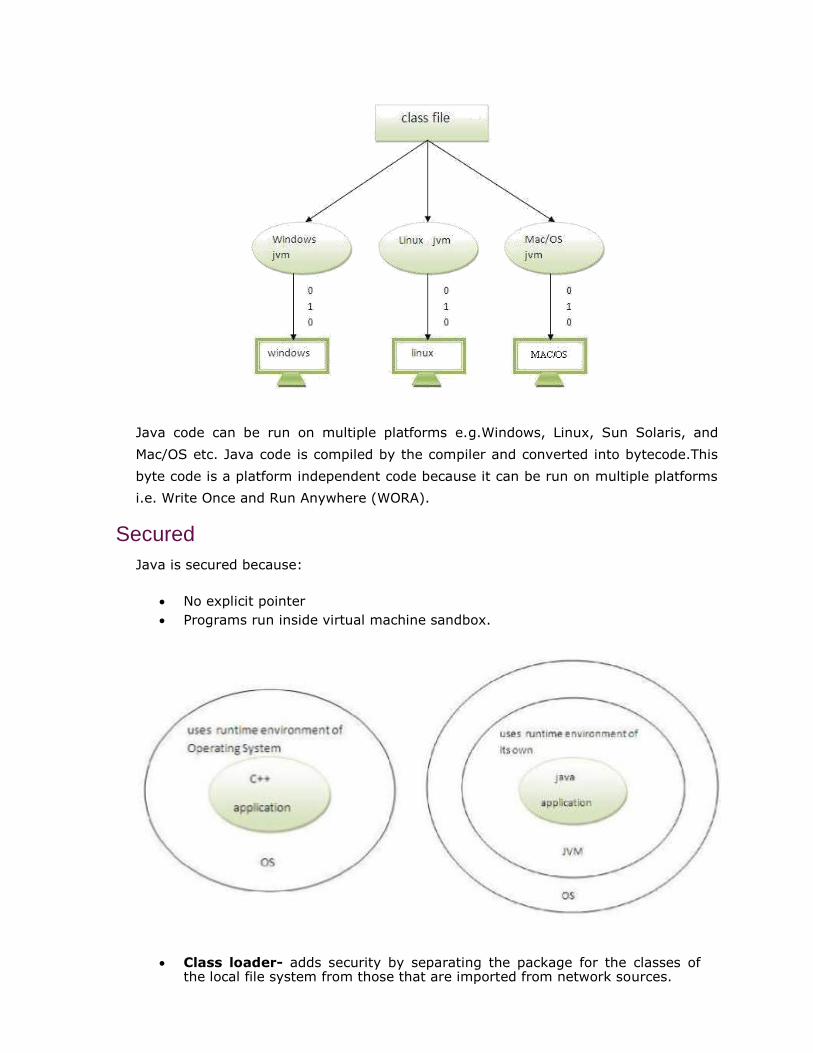
Java code can be run on multiple platforms e.g.Windows, Linux, Sun Solaris, and
Mac/OS etc. Java code is compiled by the compiler and converted into bytecode.This
byte code is a platform independent code because it can be run on multiple platforms
i.e. Write Once and Run Anywhere (WORA).
Secured
Java is secured because:
No explicit pointer Programs run inside virtual machine sandbox.
Class loader- adds security by separating the package for the classes of
the local file system from those that are imported from network sources.
Byte code Verifier- checks the code fragments for illegal code that can
violate access right to objects.
Security Manager- determines what resources a class can access such as reading and writing to the local disk.
These securities are provided by java language. Some security can also be
provided by application developer through SSL,JAAS,cryptography etc.
Robust
Robust simply means strong. Java uses strong memory management. There is lack of
pointers that avoids security problem. There is automatic garbage collection in java.
There is exception handling and type checking mechanism in java. All these points
make java robust.
Architecture-neutral There are no implementation dependent features e.g. size of primitive types is set. Java
compiler generates an architecture-neutral object file format which makes the compiled
code to be executable on many processors, with the presence of Java runtime system.
Portable We may carry the java bytecode to any platform. Being architectural-neutral and having no
implementation dependent aspects of the specification makes Java portable. Compiler in Java
is written in ANSI C with a clean portability boundary which is a POSIX subset.
High-performance Java is faster than traditional interpretation since byte code is "close" to native code
still somewhat slower than a compiled language (e.g., C++)
Distributed We can create distributed applications in java. RMI and EJB are used for creating
distributed applications. We may access files by calling the methods from any machine
on the internet.
Multi-threaded

A thread is like a separate program, executing concurrently. We can write Java programs
that deal with many tasks at once by defining multiple threads. The main advantage of
multi-threading is that it shares the same memory. Threads are important for multi-
media, Web applications etc.
Interpreted
Java byte code is translated on the fly to native machine instructions and is not stored
anywhere. The development process is more rapid and analytical since the linking is an
incremental and light weight process.
Dynamic
Java is considered to be more dynamic than C or C++ since it is designed to adapt to an
evolving environment. Java programs can carry extensive amount of run-time
information that can be used to verify and resolve accesses to objects on run-time.
Simple Program of Java
1. class Simple 2. { 3. public static void main(String args[]) 4. { 5. System.out.println("Hello Java"); 6. } 7. }
Save this file as Simple.java
To compile: javac Simple.java
To execute: java Simple
Output:Hello Java
Understanding first java program

The meaning of class, public, static, void, main, String[], System.out.println().
class keyword is used to declare a class in java.
public keyword is an access modifier which represents visibility, it means it is visible to all.
static is a keyword, if we declare any method as static, it is known as static
method. The core advantage of static method is that there is no need to create object to invoke the static method. The main method is executed by the JVM, so it doesn't require to create object to invoke the main method. So it saves memory.
void is the return type of the method, it means it doesn't return any value. main represents startup of the program. String[] args is used for command line argument. We will learn it later.
System.out.println() is used print statement.
To write the simple program, open notepad by start menu -> All Programs -
> Accessories -> notepad and write simple program as displayed below:
As displayed in the above diagram, write the simple program of java in notepad and saved
it as Simple.java. To compile and run this program, you need to open command prompt
by start menu -> All Programs -> Accessories -> command prompt.

To compile and run the above program, go to your current directory first; my
current directory is c:\new . Write here:
To compile: javac Simple.java
To execute: java Simple
Different Ways to write a java program There are many ways to write a java program. The modifications that can be done in a java
program are given below:
1) By changing sequence of the modifiers, method prototype is not changed.
Let's see the simple code of main method. 1. static public void main(String args[])
2) subscript notation in java array can be used after type, before variable or
after variable.
Let's see the different codes to write the main method.
1. public static void main(String[] args) 2. public static void main(String []args) 3. public static void main(String args[])
3) You can provide var-args support to main method by passing 3 ellipses (dots)
Let's see the simple code of using var-args in main method. We will learn about var-args
later in Java New Features chapter.
1. public static void main(String... args)
4) Having semicolon at the end of class in java is optional.
Let's see the simple code. 1. class A{ 2. static public void main(String... args){ 3. System.out.println("hello java4"); 4. }
5. };
Valid java main method signature
1. public static void main(String[] args) 2. public static void main(String []args) 3. public static void main(String args[])
4. public static void main(String... args)
5. static public void main(String[] args) 6. public static final void main(String[] args) 7. final public static void main(String[] args)
8. final strictfp public static void main(String[] args)
Invalid java main method signature

1. public void main(String[] args) 2. static void main(String[] args) 3. public void static main(String[] args) 4. abstract public static void main(String[] args)
Resolving an error "javac is not recognized as an internal or external command" ?
Since DOS doesn't know javac or java, we need to set path. Path is not required in
such a case if you save your program inside the jdk/bin folder. But its good approach
to set path. Click here for How to set path in java.

How to set path in Java 1. How to set path of JDK in Windows OS 1. Setting Temporary Path of JDK
2. Setting Permanent Path of JDK 2. How to set path of JDK in Linux OS
The path is required to be set for using tools such as javac, java etc. If you are saving the java source file inside the jdk/bin directory, path is not
required to be set because all the tools will be available in the current directory.
But If you are having your java file outside the jdk/bin folder, it is necessary to
set path of JDK.
There are 2 ways to set java path:
1. temporary 2. permanent
1) How to set Temporary Path of JDK in Windows
To set the temporary path of JDK, you need to follow following steps:
Open command prompt copy the path of jdk/bin directory write in command prompt: set path=copied_path
For Example: set path=C:\Program Files\Java\jdk1.6.0_23\bin
Let's see it in the figure given below:

2) How to set Permanent Path of JDK in Windows
For setting the permanent path of JDK, you need to follow these steps:
Go to MyComputer properties -> advanced tab -> environment variables -
> new tab of user variable -> write path in variable name -> write path of bin folder in variable value -> ok -> ok -> ok
For Example:
1)Go to MyComputer properties
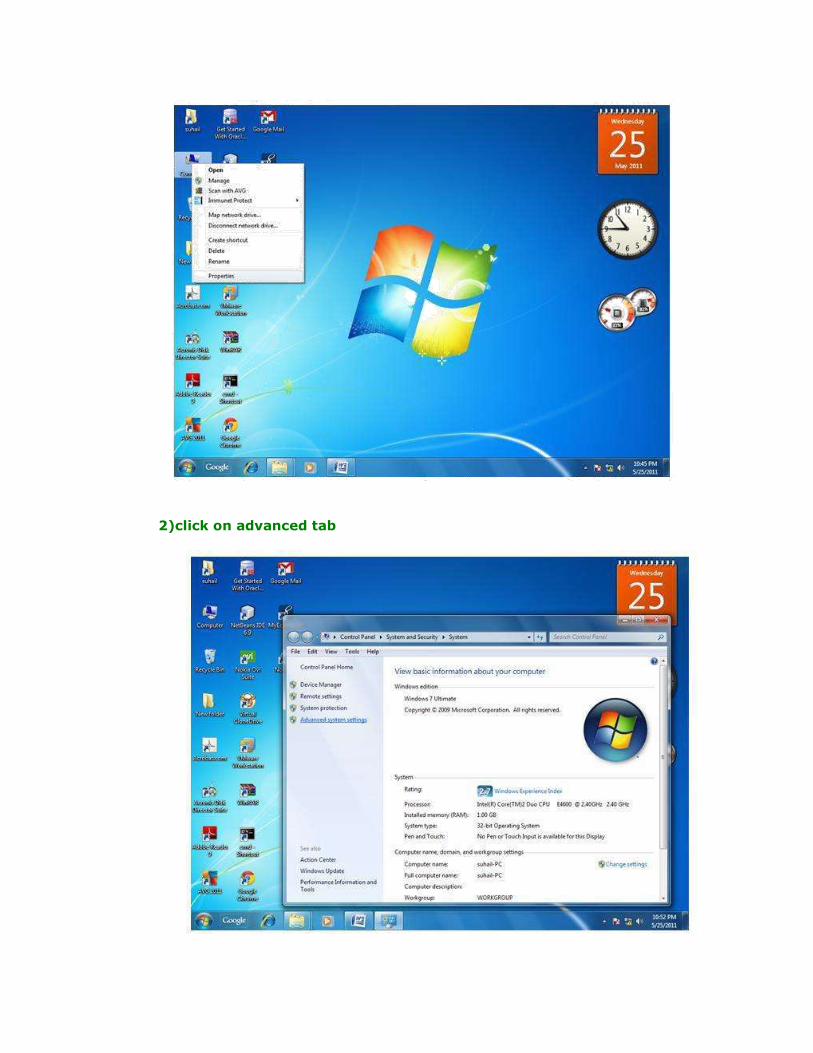
2)click on advanced tab

3)click on environment variables
4)click on new tab of user variables
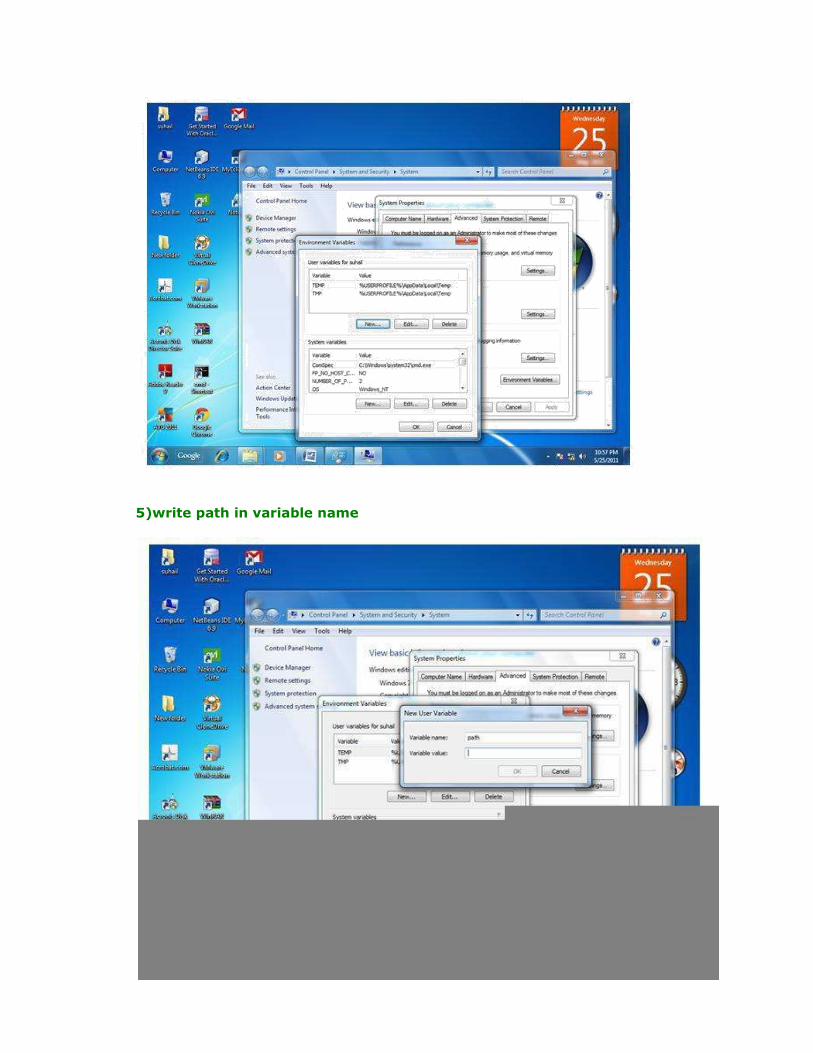
5)write path in variable name
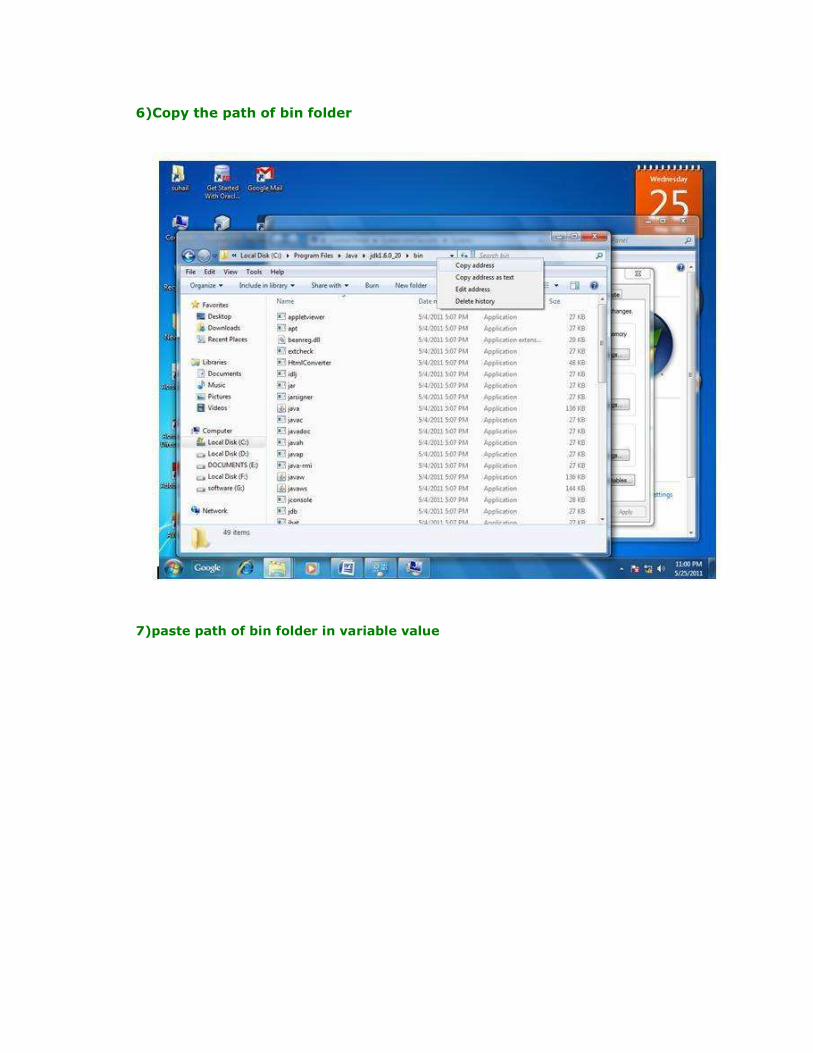
6)Copy the path of bin folder
7)paste path of bin folder in variable value
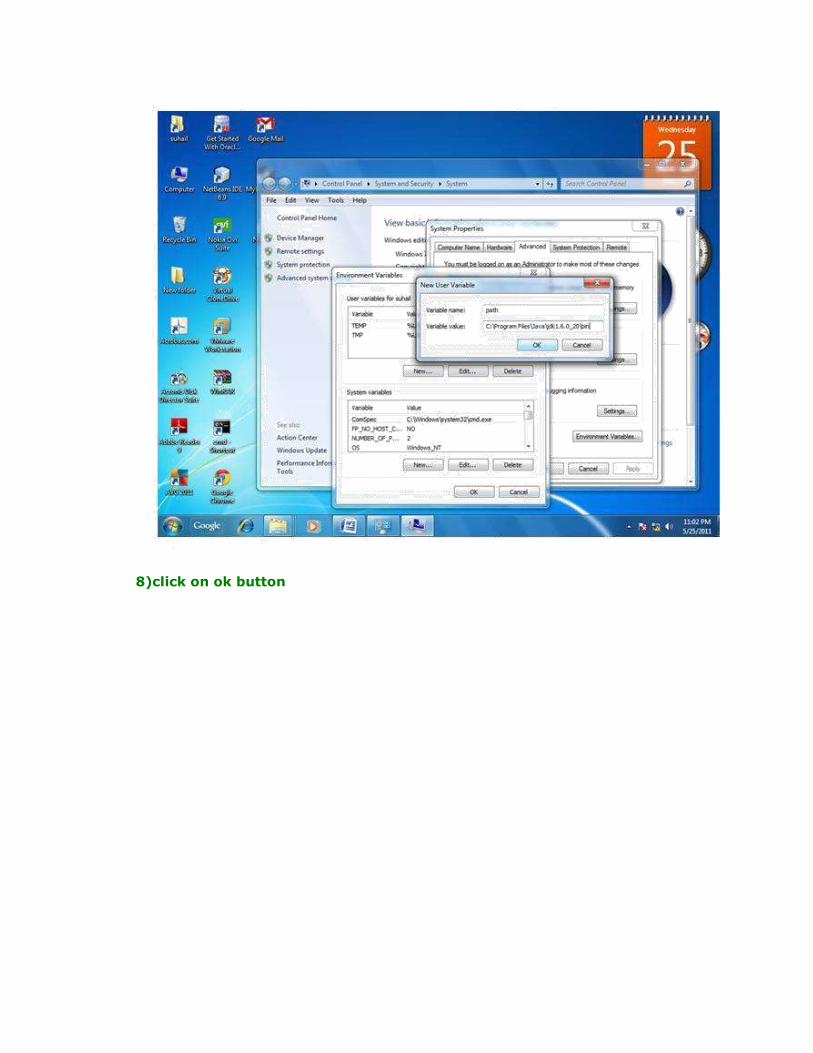
8)click on ok button

9)click on ok button
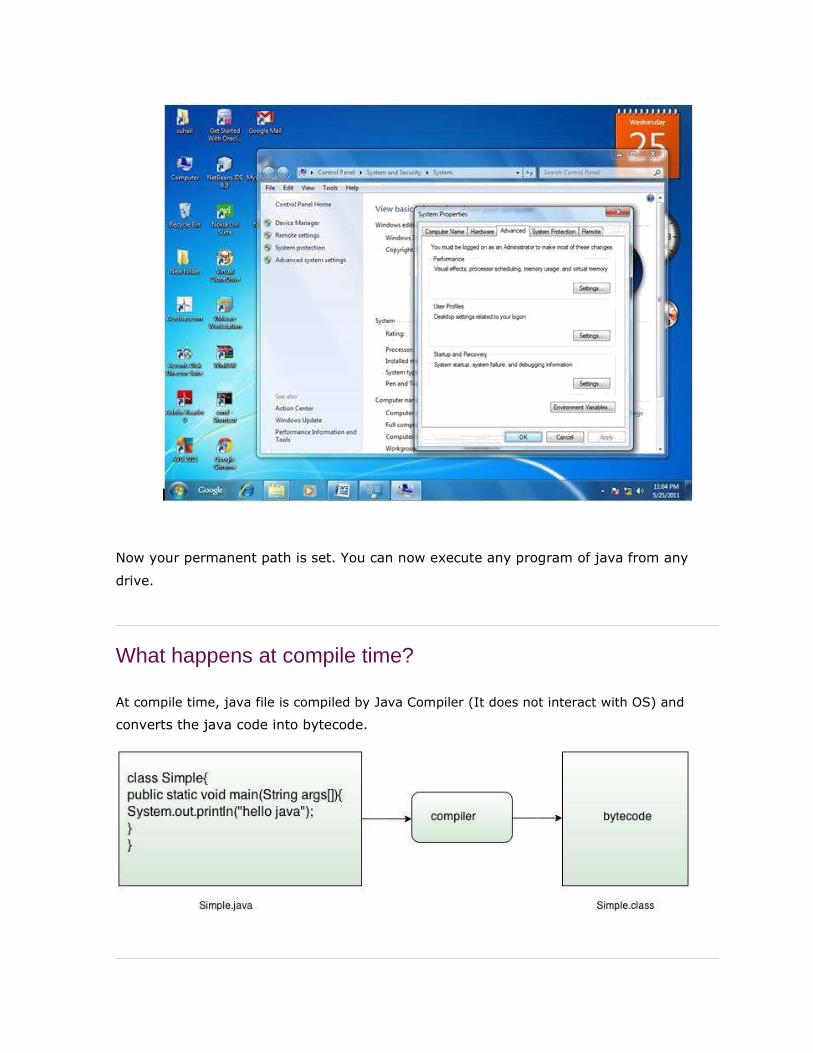
Now your permanent path is set. You can now execute any program of java from any drive.
What happens at compile time?
At compile time, java file is compiled by Java Compiler (It does not interact with OS) and converts the java code into bytecode.
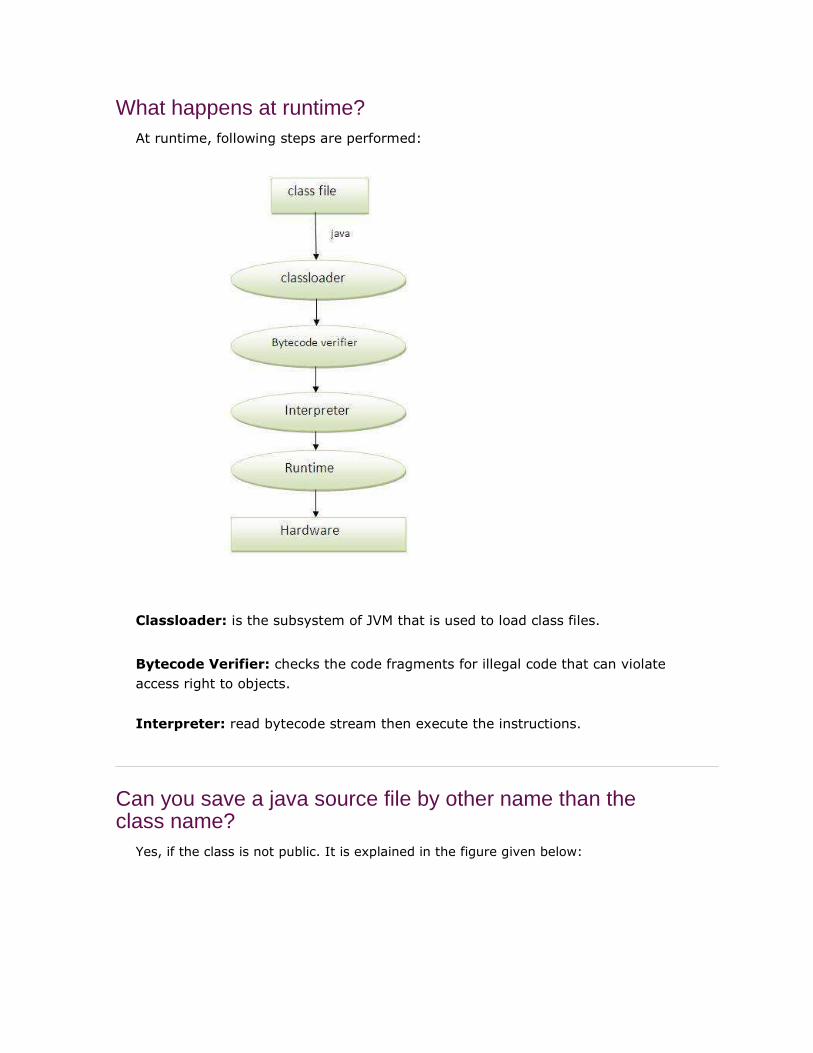
What happens at runtime?
At runtime, following steps are performed:
Classloader: is the subsystem of JVM that is used to load class files.
Bytecode Verifier: checks the code fragments for illegal code that can violate
access right to objects.
Interpreter: read bytecode stream then execute the instructions.
Can you save a java source file by other name than the class name?
Yes, if the class is not public. It is explained in the figure given below:

To compile: javac Hard.java
To execute: java Simple
Can you have multiple classes in a java source file? Yes, like the figure given below illustrates:

Difference between JDK, JRE and JVM Understanding the difference between JDK, JRE and JVM is important in Java. We are
having brief overview of JVM here.
If you want to get the detailed knowledge of Java Virtural Machine, move to the
next page. Firstly, let's see the basic differences between the JDK, JRE and JVM.
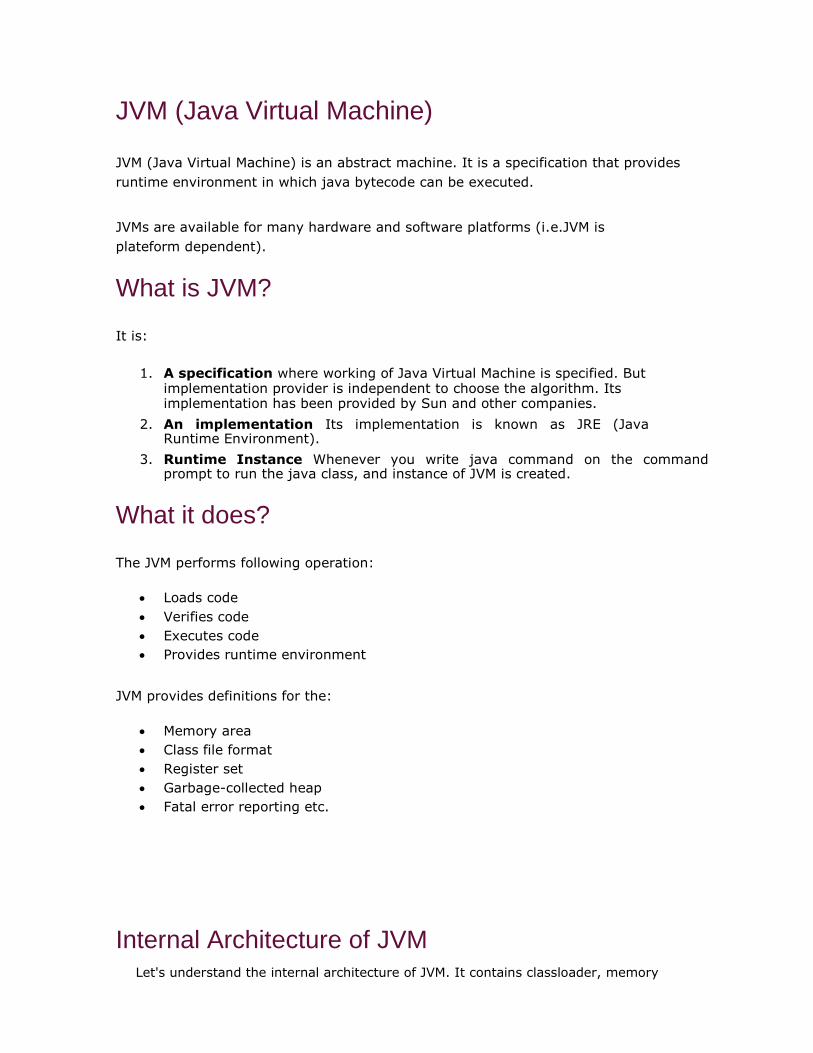
JVM
JVM (Java Virtual Machine) is an abstract machine. It is a specification that
provides runtime environment in which java bytecode can be executed.
JVMs are available for many hardware and software platforms. JVM, JRE and JDK
are platform dependent because configuration of each OS differs. But, Java is
platform independent.
The JVM performs following main tasks:
Loads code Verifies code Executes code Provides runtime environment
JRE
JRE is an acronym for Java Runtime Environment.It is used to provide runtime
environment.It is the implementation of JVM.It physically exists.It contains set
of libraries + other files that JVM uses at runtime.
Implementation of JVMs are also actively released by other companies besides
Sun Micro Systems.
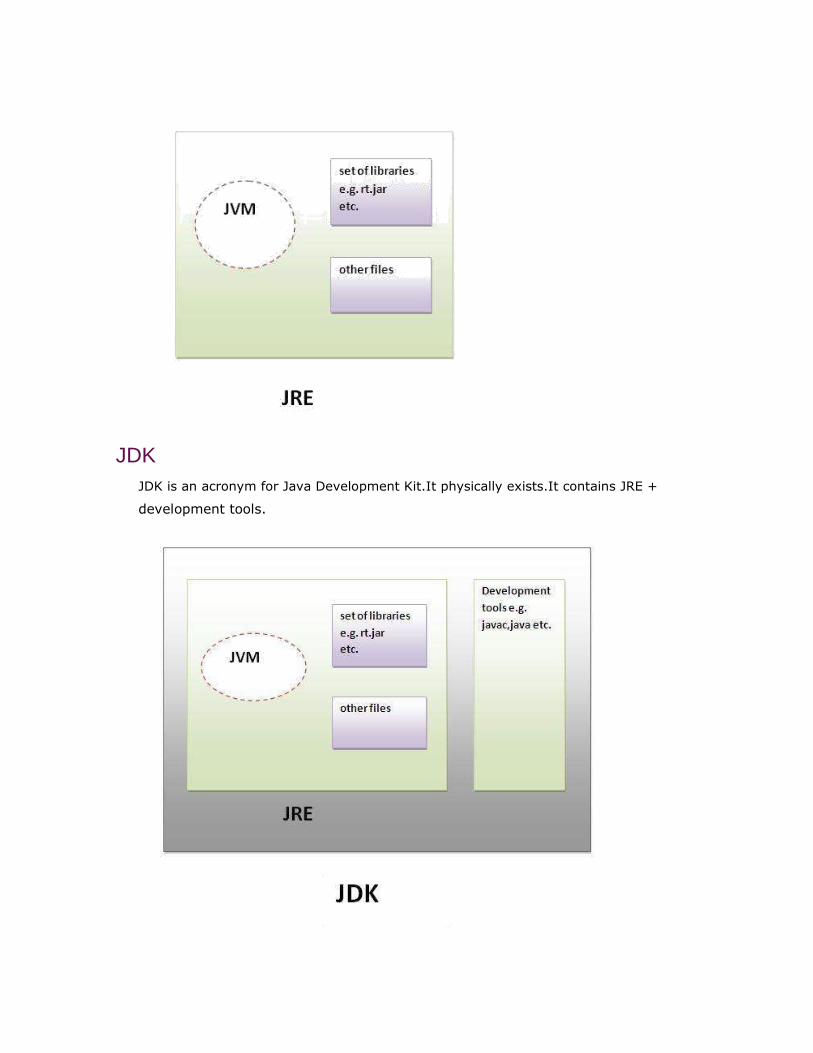
JDK
JDK is an acronym for Java Development Kit.It physically exists.It contains JRE +
development tools.
JVM (Java Virtual Machine) JVM (Java Virtual Machine) is an abstract machine. It is a specification that provides
runtime environment in which java bytecode can be executed.
JVMs are available for many hardware and software platforms (i.e.JVM is
plateform dependent).
What is JVM?
It is:
1. A specification where working of Java Virtual Machine is specified. But
implementation provider is independent to choose the algorithm. Its implementation has been provided by Sun and other companies.
2. An implementation Its implementation is known as JRE (Java
Runtime Environment).
3. Runtime Instance Whenever you write java command on the command prompt to run the java class, and instance of JVM is created.
What it does?
The JVM performs following operation:
Loads code Verifies code Executes code Provides runtime environment
JVM provides definitions for the:
Memory area Class file format Register set Garbage-collected heap Fatal error reporting etc.
Internal Architecture of JVM Let's understand the internal architecture of JVM. It contains classloader, memory

area, execution engine etc.
1) Classloader:
Classloader is a subsystem of JVM that is used to load class files.
2) Class(Method) Area: Class(Method) Area stores per-class structures such as the runtime constant pool,
field and method data, the code for methods.
3) Heap:
It is the runtime data area in which objects are allocated.

4) Stack:
Java Stack stores frames.It holds local variables and partial results, and plays a
part in method invocation and return.
Each thread has a private JVM stack, created at the same time as thread.
A new frame is created each time a method is invoked. A frame is destroyed when
its method invocation completes.
5) Program Counter Register:
PC (program counter) register. It contains the address of the Java virtual
machine instruction currently being executed.
6) Native Method Stack:
It contains all the native methods used in the application.
7) Execution Engine:
It contains:
1) A virtual processor
2) Interpreter:Read bytecode stream then execute the instructions.
3) Just-In-Time(JIT) compiler:It is used to improve the performance.JIT compiles
parts of the byte code that have similar functionality at the same time, and hence
reduces the amount of time needed for compilation.Here the term ?compiler? refers
to a translator from the instruction set of a Java virtual machine (JVM) to the
instruction set of a specific CPU.
Java - Basic Syntax
When we consider a Java program it can be defined as a collection of objects that communicate via invoking each other's methods.

Object - Objects have states and behaviors. Example: A dog has states - color, name,
breed as well as behaviors -wagging, barking, eating. An object is an instance of a class.
Class - A class can be defined as a template/ blue print that describes the behaviors/states
that object of its type support.
Methods - A method is basically a behavior. A class can contain many methods. It is in
methods where the logics are written, data is manipulated and all the actions are executed.
Instance Variables - Each object has its unique set of instance variables. An object's state
is created by the values assigned to these instance variables.
Basic Syntax: About Java programs, it is very important to keep in mind the following points.
Case Sensitivity - Java is case sensitive, which means identifierHello and hello would
have different meaning in Java.
Class Names - For all class names the first letter should be in Upper Case.
If several words are used to form a name of the class, each inner word's first letter should
be in Upper Case.
Example class MyFirstJavaClass
Method Names - All method names should start with a Lower Case letter.
If several words are used to form the name of the method, then each inner word's first letter
should be in Upper Case.
Example public void myMethodName()
Program File Name - Name of the program file should exactly match the class name.
When saving the file, you should save it using the class name (Remember Java is case
sensitive) and append '.java' to the end of the name (if the file name and the class name do
not match your program will not compile).

Example : Assume 'MyFirstJavaProgram' is the class name. Then the file should be saved
as 'MyFirstJavaProgram.java'
public static void main(String args[]) - Java program processing starts from the main()
method which is a mandatory part of every Java program..
Java Identifiers: All Java components require names. Names used for classes, variables and methods are called identifiers.
In Java, there are several points to remember about identifiers. They are as follows:
All identifiers should begin with a letter (A to Z or a to z), currency character ($) or an
underscore (_).
After the first character identifiers can have any combination of characters.
A key word cannot be used as an identifier.
Most importantly identifiers are case sensitive.
Examples of legal identifiers: age, $salary, _value, __1_value
Examples of illegal identifiers: 123abc, -salary
Java Modifiers: Like other languages, it is possible to modify classes, methods, etc., by using modifiers. There are
two categories of modifiers:
Access Modifiers: default, public , protected, private
Non-access Modifiers: final, abstract, strictfp
Java Keywords: The following list shows the reserved words in Java. These reserved words may not be used as
constant or variable or any other identifier names.
abstract assert boolean break

byte case catch char
class const continue default
do double else enum
extends final finally float
for goto if implements
import instanceof int interface
long native new package
private protected public return
short static strictfp super
switch synchronized this throw
throws transient try void
volatile while
Comments in Java
Java supports single-line and multi-line comments very similar to c and c++. All characters available
inside any comment are ignored by Java compiler.
public class MyFirstJavaProgram{
/* This is my first java program.
* This will print 'Hello World' as the output

* This is an example of multi-line comments.
*/
public static void main(String []args){
// This is an example of single line comment
/* This is also an example of single line comment.
*/ System.out.println("Hello World");
} }
Using Blank Lines: A line containing only whitespace, possibly with a comment, is known as a blank line, and Java totally ignores it.
Java Naming conventions Java naming convention is a rule to follow as you decide what to name your
identifiers such as class, package, variable, constant, method etc.
But, it is not forced to follow. So, it is known as convention not rule. All the classes, interfaces, packages, methods and fields of java programming language
are given according to java naming convention.
Advantage of naming conventions in java By using standard Java naming conventions, you make your code easier to read for
yourself and for other programmers. Readability of Java program is very important. It
indicates that less time is spent to figure out what the code does.
Name Convention
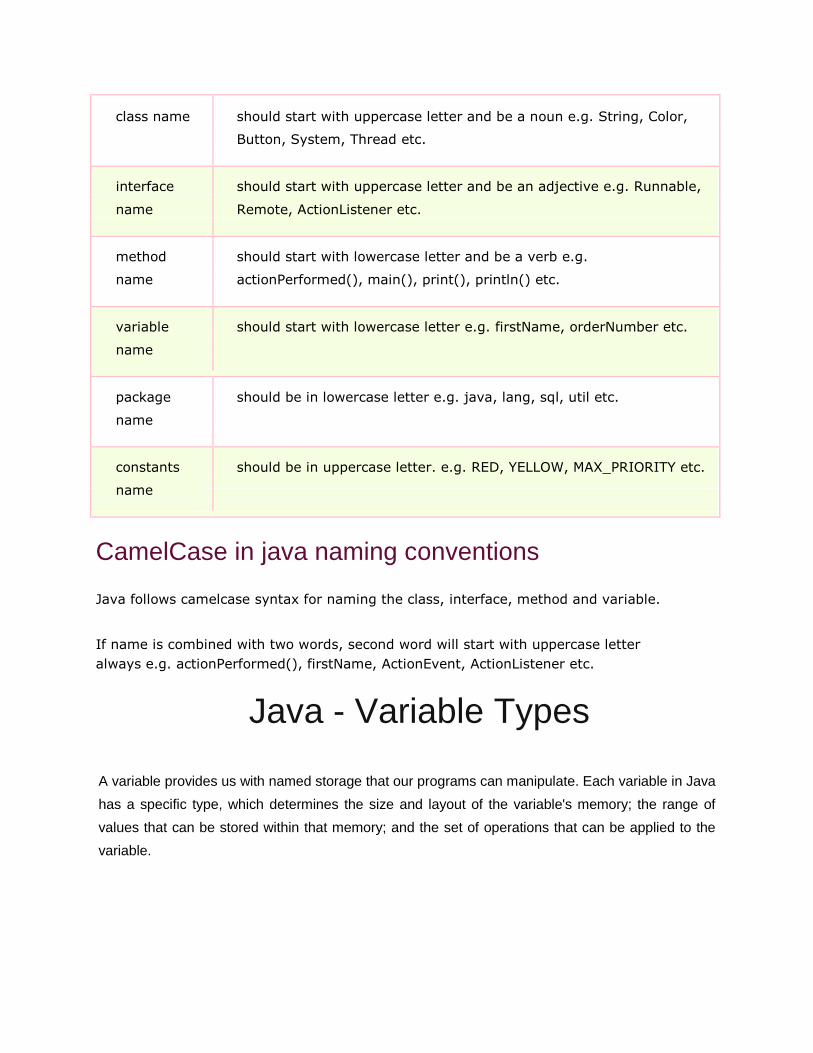
class name should start with uppercase letter and be a noun e.g. String, Color,
Button, System, Thread etc.
interface should start with uppercase letter and be an adjective e.g. Runnable,
name Remote, ActionListener etc.
method should start with lowercase letter and be a verb e.g.
name actionPerformed(), main(), print(), println() etc.
variable should start with lowercase letter e.g. firstName, orderNumber etc.
name
package should be in lowercase letter e.g. java, lang, sql, util etc.
name
constants should be in uppercase letter. e.g. RED, YELLOW, MAX_PRIORITY etc.
name
CamelCase in java naming conventions
Java follows camelcase syntax for naming the class, interface, method and variable. If name is combined with two words, second word will start with uppercase letter
always e.g. actionPerformed(), firstName, ActionEvent, ActionListener etc.
Java - Variable Types
A variable provides us with named storage that our programs can manipulate. Each variable in Java
has a specific type, which determines the size and layout of the variable's memory; the range of
values that can be stored within that memory; and the set of operations that can be applied to the
variable.
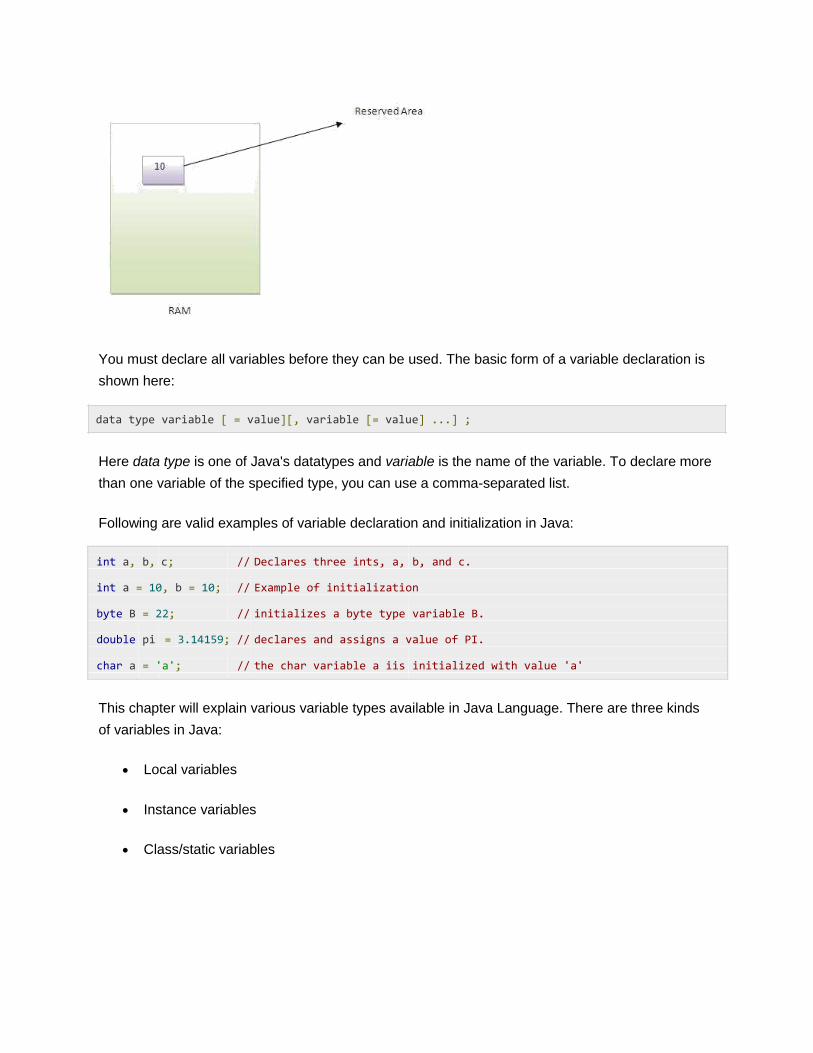
You must declare all variables before they can be used. The basic form of a variable declaration is
shown here:
data type variable [ = value][, variable [= value] ...] ;
Here data type is one of Java's datatypes and variable is the name of the variable. To declare more
than one variable of the specified type, you can use a comma-separated list.
Following are valid examples of variable declaration and initialization in Java:
int a, b, c; // Declares three ints, a, b, and c.
int a = 10, b = 10; // Example of initialization
byte B = 22; // initializes a byte type variable B.
double pi = 3.14159; // declares and assigns a value of PI.
char a = 'a'; // the char variable a iis initialized with value 'a'
This chapter will explain various variable types available in Java Language. There are three kinds
of variables in Java:
Local variables
Instance variables
Class/static variables

Local variables:
Local variables are declared in methods, constructors, or blocks.
Local variables are created when the method, constructor or block is entered and the
variable will be destroyed once it exits the method, constructor or block.
Access modifiers cannot be used for local variables.
Local variables are visible only within the declared method, constructor or block.
Local variables are implemented at stack level internally.
There is no default value for local variables so local variables should be declared and an
initial value should be assigned before the first use.
Example: Here, age is a local variable. This is defined inside pupAge() method and its scope is limited to this method only.
public class Test{
public void pupAge(){
int age = 0;
age = age + 7;
System.out.println("Puppy age is : " + age);
}
public static void main(String
args[]){ Test test = new Test();
test.pupAge();
} }
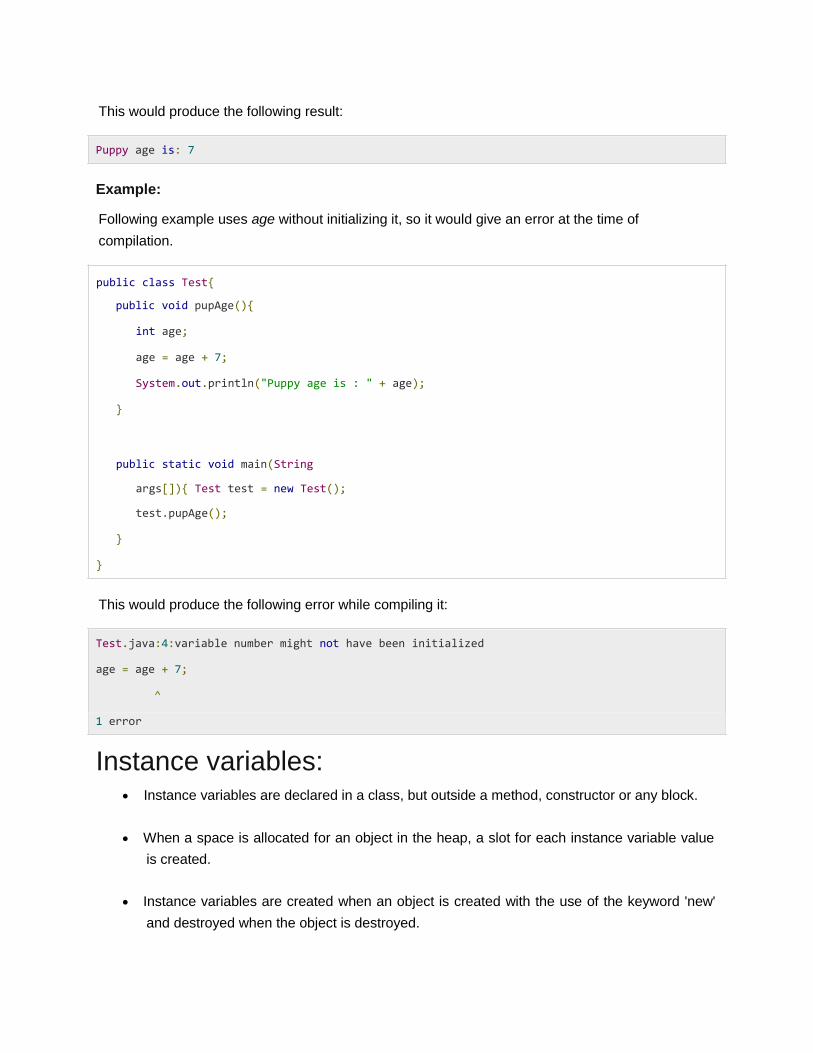
This would produce the following result:
Puppy age is: 7
Example: Following example uses age without initializing it, so it would give an error at the time of
compilation.
public class Test{
public void pupAge(){
int age;
age = age + 7;
System.out.println("Puppy age is : " + age);
}
public static void main(String
args[]){ Test test = new Test();
test.pupAge();
} }
This would produce the following error while compiling it:
Test.java:4:variable number might not have been initialized age = age + 7;
^ 1 error
Instance variables:
Instance variables are declared in a class, but outside a method, constructor or any block.
When a space is allocated for an object in the heap, a slot for each instance variable value
is created.
Instance variables are created when an object is created with the use of the keyword 'new'
and destroyed when the object is destroyed.
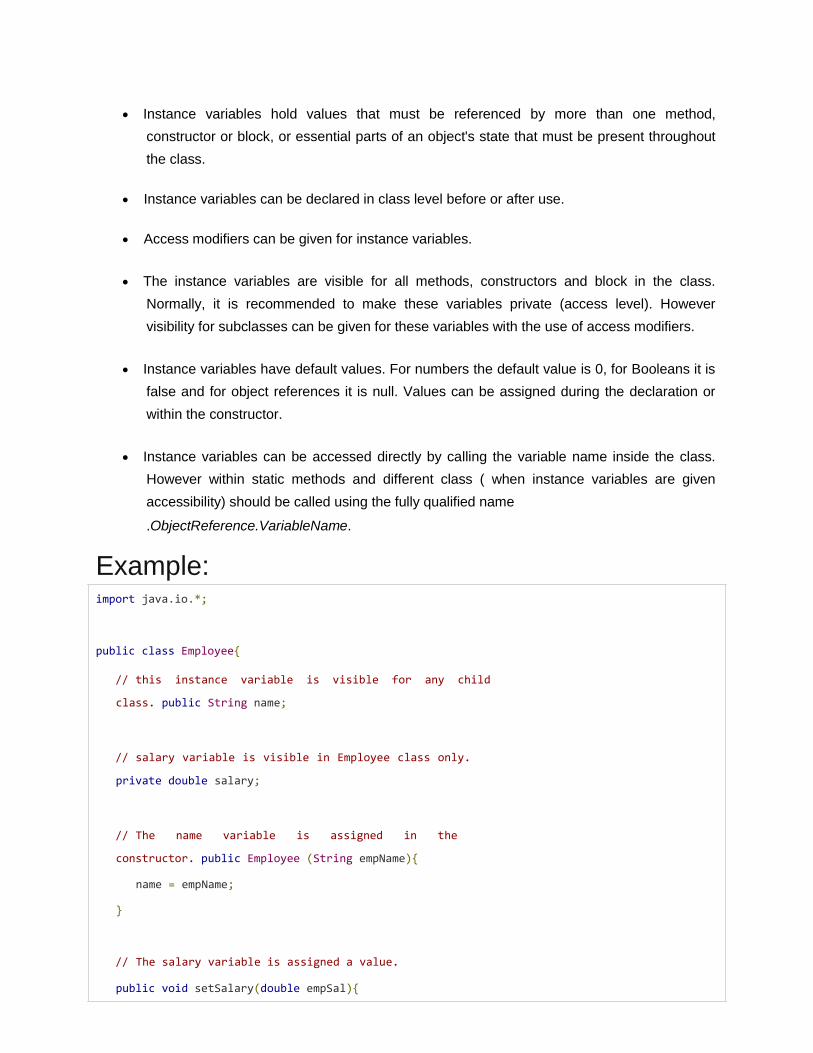
Instance variables hold values that must be referenced by more than one method,
constructor or block, or essential parts of an object's state that must be present throughout
the class.
Instance variables can be declared in class level before or after use.
Access modifiers can be given for instance variables.
The instance variables are visible for all methods, constructors and block in the class.
Normally, it is recommended to make these variables private (access level). However
visibility for subclasses can be given for these variables with the use of access modifiers.
Instance variables have default values. For numbers the default value is 0, for Booleans it is
false and for object references it is null. Values can be assigned during the declaration or
within the constructor.
Instance variables can be accessed directly by calling the variable name inside the class.
However within static methods and different class ( when instance variables are given
accessibility) should be called using the fully qualified name
.ObjectReference.VariableName.
Example: import java.io.*;
public class Employee{
// this instance variable is visible for any child
class. public String name;
// salary variable is visible in Employee class only.
private double salary;
// The name variable is assigned in the
constructor. public Employee (String empName){
name = empName;
}
// The salary variable is assigned a value.
public void setSalary(double empSal){
salary = empSal;
}
// This method prints the employee details.
public void printEmp(){
System.out.println("name : " + name );
System.out.println("salary :" + salary);
}
public static void main(String args[]){
Employee empOne = new Employee("Ransika");
empOne.setSalary(1000);
empOne.printEmp();
} }
This would produce the following result:
name : Ransika salary :1000.0
Class/static variables:
Class variables also known as static variables are declared with thestatic keyword in a class,
but outside a method, constructor or a block.
There would only be one copy of each class variable per class, regardless of how many
objects are created from it.
Static variables are rarely used other than being declared as constants. Constants are
variables that are declared as public/private, final and static. Constant variables never
change from their initial value.
Static variables are stored in static memory. It is rare to use static variables other than
declared final and used as either public or private constants.
Static variables are created when the program starts and destroyed when the program
stops.

Visibility is similar to instance variables. However, most static variables are declared public
since they must be available for users of the class.
Default values are same as instance variables. For numbers, the default value is 0; for
Booleans, it is false; and for object references, it is null. Values can be assigned during the
declaration or within the constructor. Additionally values can be assigned in special static
initializer blocks.
Static variables can be accessed by calling with the class name .ClassName.VariableName.
When declaring class variables as public static final, then variables names (constants) are
all in upper case. If the static variables are not public and final the naming syntax is the
same as instance and local variables.
Example: import java.io.*;
public class Employee{
// salary variable is a private static variable
private static double salary;
// DEPARTMENT is a constant
public static final String DEPARTMENT = "Development ";
public static void main(String
args[]){ salary = 1000;
System.out.println(DEPARTMENT+"average salary:"+salary);
} }
This would produce the following result:
Development average salary:1000
Note: If the variables are access from an outside class the constant should be accessed as Employee.DEPARTMENT
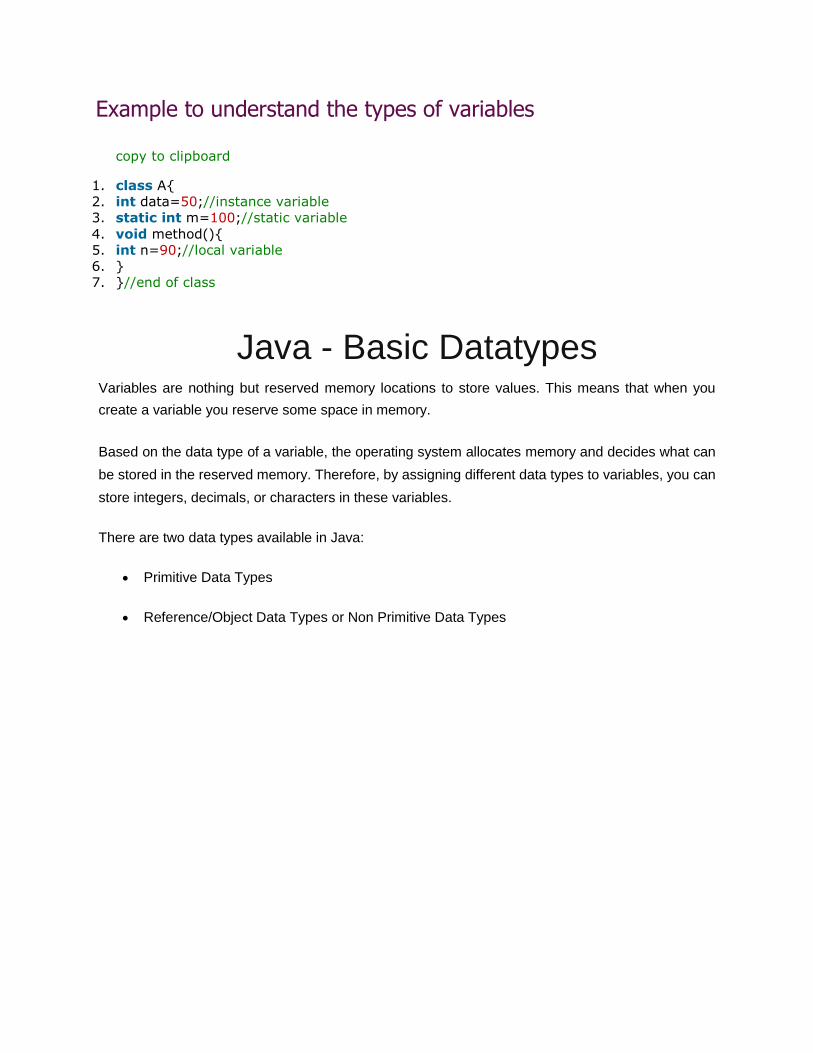
Example to understand the types of variables
copy to clipboard 1. class A{ 2. int data=50;//instance variable
3. static int m=100;//static variable 4. void method(){ 5. int n=90;//local variable
6. }
7. }//end of class
Java - Basic Datatypes
Variables are nothing but reserved memory locations to store values. This means that when you
create a variable you reserve some space in memory.
Based on the data type of a variable, the operating system allocates memory and decides what can
be stored in the reserved memory. Therefore, by assigning different data types to variables, you can
store integers, decimals, or characters in these variables.
There are two data types available in Java:
Primitive Data Types
Reference/Object Data Types or Non Primitive Data Types
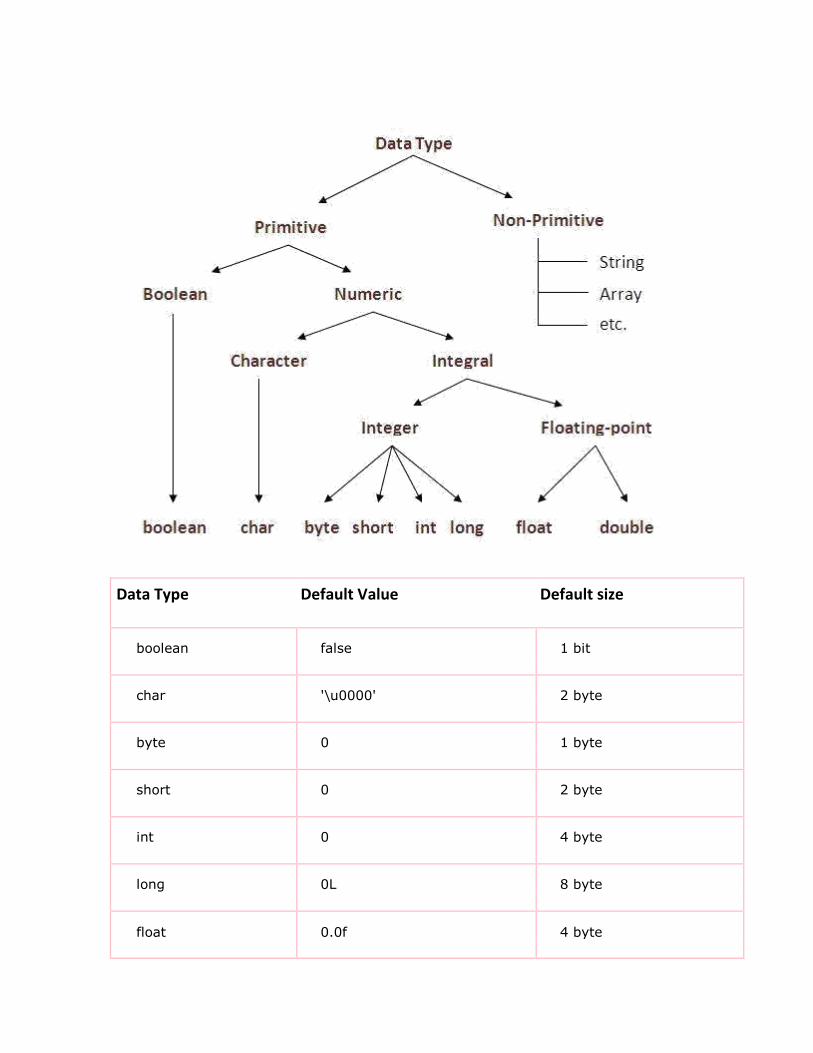
Data Type Default Value Default size
boolean false 1 bit
char '\u0000' 2 byte
byte 0 1 byte
short 0 2 byte
int 0 4 byte
long 0L 8 byte
float 0.0f 4 byte

double 0.0d 8 byte
Primitive Data Types: There are eight primitive data types supported by Java. Primitive data types are predefined by the
language and named by a keyword. Let us now look into detail about the eight primitive data types.
byte:
Byte data type is an 8-bit signed two's complement integer.
Minimum value is -128 (-2^7)
Maximum value is 127 (inclusive)(2^7 -1)
Default value is 0
Byte data type is used to save space in large arrays, mainly in place of integers, since a byte
is four times smaller than an int.
Example: byte a = 100 , byte b = -50
short:
Short data type is a 16-bit signed two's complement integer.
Minimum value is -32,768 (-2^15)
Maximum value is 32,767 (inclusive) (2^15 -1)
Short data type can also be used to save memory as byte data type. A short is 2 times
smaller than an int
Default value is 0.
Example: short s = 10000, short r = -20000
int:
Int data type is a 32-bit signed two's complement integer.
Minimum value is - 2,147,483,648.(-2^31)

Maximum value is 2,147,483,647(inclusive).(2^31 -1)
Int is generally used as the default data type for integral values unless there is a concern
about memory.
The default value is 0.
Example: int a = 100000, int b = -200000
long:
Long data type is a 64-bit signed two's complement integer.
Minimum value is -9,223,372,036,854,775,808.(-2^63)
Maximum value is 9,223,372,036,854,775,807 (inclusive). (2^63 -1)
This type is used when a wider range than int is needed.
Default value is 0L.
Example: long a = 100000L, int b = -200000L
float:
Float data type is a single-precision 32-bit IEEE 754 floating point.
Float is mainly used to save memory in large arrays of floating point numbers.
Default value is 0.0f.
Float data type is never used for precise values such as currency.
Example: float f1 = 234.5f
double:
double data type is a double-precision 64-bit IEEE 754 floating point.
This data type is generally used as the default data type for decimal values, generally the
default choice.
Double data type should never be used for precise values such as currency.
Default value is 0.0d.
Example: double d1 = 123.4
boolean:
boolean data type represents one bit of information.
There are only two possible values: true and false.
This data type is used for simple flags that track true/false conditions.
Default value is false.
Example: boolean one = true
char:
char data type is a single 16-bit Unicode character.
Minimum value is '\u0000' (or 0).
Maximum value is '\uffff' (or 65,535 inclusive).
Char data type is used to store any character.
Example: char letterA ='A'
Reference Data Types:
Reference variables are created using defined constructors of the classes. They are used to
access objects. These variables are declared to be of a specific type that cannot be
changed. For example, Employee, Puppy etc.
Class objects, and various type of array variables come under reference data type.
Default value of any reference variable is null.
A reference variable can be used to refer to any object of the declared type or any
compatible type.
Example: Animal animal = new Animal("giraffe");
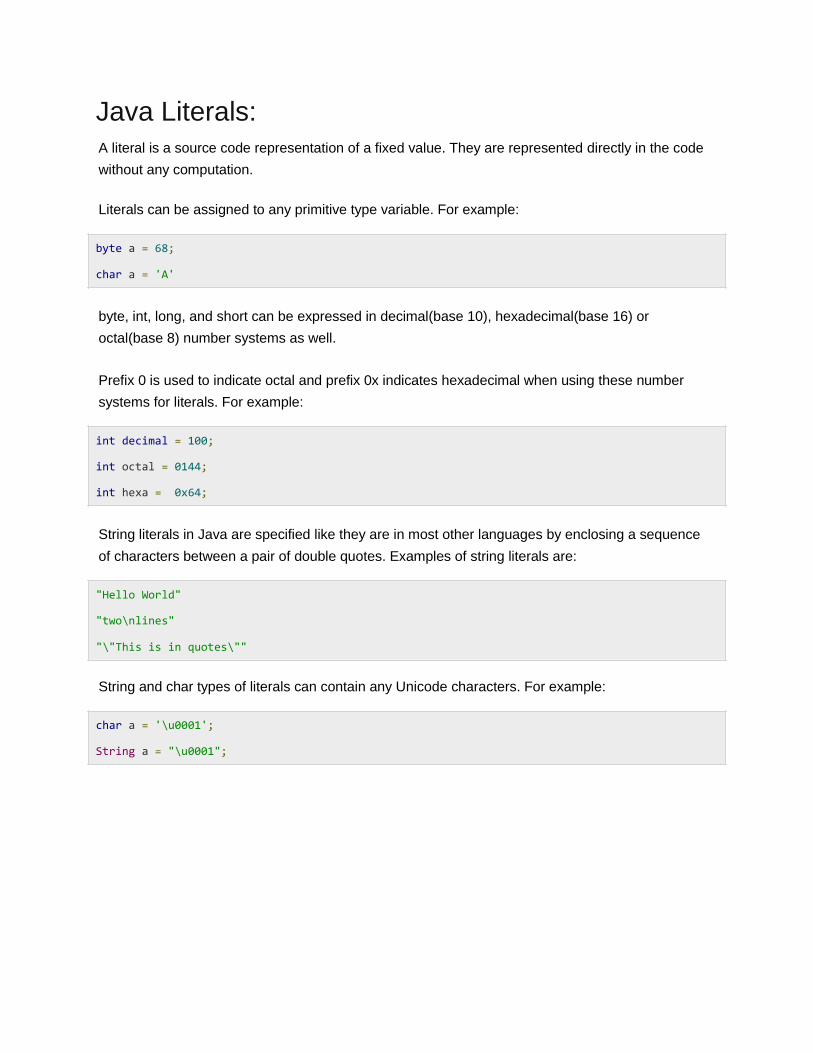
Java Literals: A literal is a source code representation of a fixed value. They are represented directly in the code
without any computation.
Literals can be assigned to any primitive type variable. For example:
byte a = 68; char a = 'A' byte, int, long, and short can be expressed in decimal(base 10), hexadecimal(base 16) or
octal(base 8) number systems as well.
Prefix 0 is used to indicate octal and prefix 0x indicates hexadecimal when using these number
systems for literals. For example:
int decimal = 100; int octal = 0144; int hexa = 0x64; String literals in Java are specified like they are in most other languages by enclosing a sequence
of characters between a pair of double quotes. Examples of string literals are:
"Hello World" "two\nlines" "\"This is in quotes\""
String and char types of literals can contain any Unicode characters. For example:
char a = '\u0001'; String a = "\u0001";
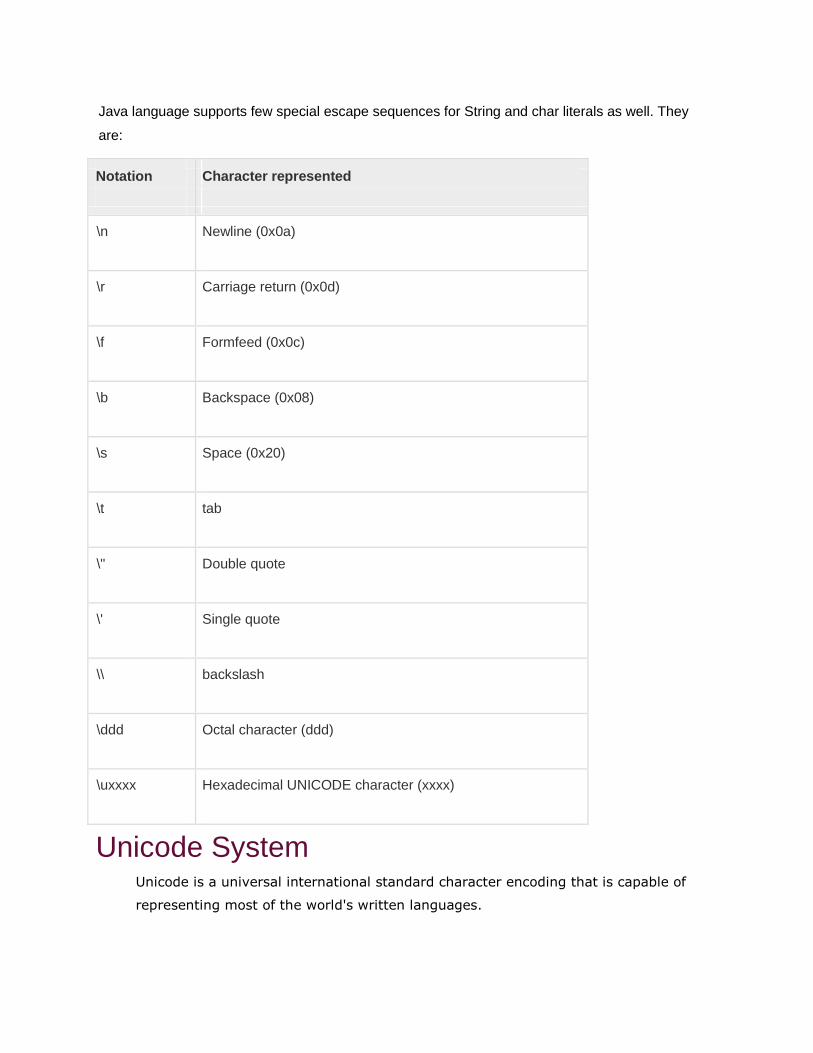
Java language supports few special escape sequences for String and char literals as well. They
are:
Notation
Character represented
\n Newline (0x0a)
\r Carriage return (0x0d)
\f Formfeed (0x0c)
\b Backspace (0x08)
\s Space (0x20)
\t tab
\" Double quote
\' Single quote
\\ backslash
\ddd Octal character (ddd)
\uxxxx Hexadecimal UNICODE character (xxxx)
Unicode System
Unicode is a universal international standard character encoding that is capable of
representing most of the world's written languages.
Why java uses Unicode System?
Before Unicode, there were many language standards:
ASCII (American Standard Code for Information Interchange) for the
United States. ISO 8859-1 for Western European Language. KOI-8 for Russian. GB18030 and BIG-5 for chinese, and so on.
This caused two problems:
1. A particular code value corresponds to different letters in the various language standards.
2. The encodings for languages with large character sets have variable length.
Some common characters are encoded as single bytes, other require two or more byte.
To solve these problems, a new language standard was developed i.e. Unicode
System.
In unicode, character holds 2 byte, so java also uses 2 byte for characters.
Java - Basic Operators
Java provides a rich set of operators to manipulate variables. We can divide all the Java operators
into the following groups:
Arithmetic Operators
Relational Operators
Bitwise Operators
Logical Operators
Assignment Operators
Misc Operators

The Arithmetic Operators:
Arithmetic operators are used in mathematical expressions in the same way that they are used in
algebra. The following table lists the arithmetic operators:
Assume integer variable A holds 10 and variable B holds 20, then:
Show Examples
Operator
Description
Example
+ Addition - Adds values on either side of the operator A + B will give 30
- Subtraction - Subtracts right hand operand from left hand A - B will give -10
operand
* Multiplication - Multiplies values on either side of the operator A * B will give 200
/ Division - Divides left hand operand by right hand operand B / A will give 2
% Modulus - Divides left hand operand by right hand operand B % A will give 0
and returns remainder
++ Increment - Increases the value of operand by 1 B++ gives 21
-- Decrement - Decreases the value of operand by 1 B-- gives 19

The Relational Operators:
There are following relational operators supported by Java language
Assume variable A holds 10 and variable B holds 20, then:
Operator
Description
Example
== Checks if the values of two operands are equal or (A == B) is not true.
not, if yes then condition becomes true.
!= Checks if the values of two operands are equal or (A != B) is true.
not, if values are not equal then condition becomes
true.
> Checks if the value of left operand is greater than the (A > B) is not true.
value of right operand, if yes then condition becomes
true.
< Checks if the value of left operand is less than the (A < B) is true.
value of right operand, if yes then condition becomes
true.
>= Checks if the value of left operand is greater than or (A >= B) is not true.
equal to the value of right operand, if yes then
condition becomes true.
<= Checks if the value of left operand is less than or (A <= B) is true.
equal to the value of right operand, if yes then
condition becomes true.

The Bitwise Operators:
Java defines several bitwise operators, which can be applied to the integer types, long, int, short,
char, and byte.
Bitwise operator works on bits and performs bit-by-bit operation. Assume if a = 60; and b = 13; now
in binary format they will be as follows:
a = 0011 1100
b = 0000 1101
-----------------
a&b = 0000 1100
a|b = 0011 1101
a^b = 0011 0001
~a = 1100 0011
The following table lists the bitwise operators:
Assume integer variable A holds 60 and variable B holds 13 then:
Operator Description Example
& Binary AND (A & B) will give 12 which is 0000 1100 Operator
copies a bit
to the result
if it exists in
both
operands.
| Binary OR (A | B) will give 61 which is 0011 1101 Operator
copies a bit

if it exists in
either
operand.
^ Binary XOR (A ^ B) will give 49 which is 0011 0001
Operator
copies the
bit if it is set
in one
operand but
not both.
~ Binary Ones (~A ) will give -61 which is 1100 0011 in 2's complement form due Complement to a signed binary number. Operator is
unary and
has the
effect of
'flipping' bits.
<< Binary Left A << 2 will give 240 which is 1111 0000 Shift
Operator.
The left
operands
value is
moved left
by the
number of
bits
specified by
the right
operan
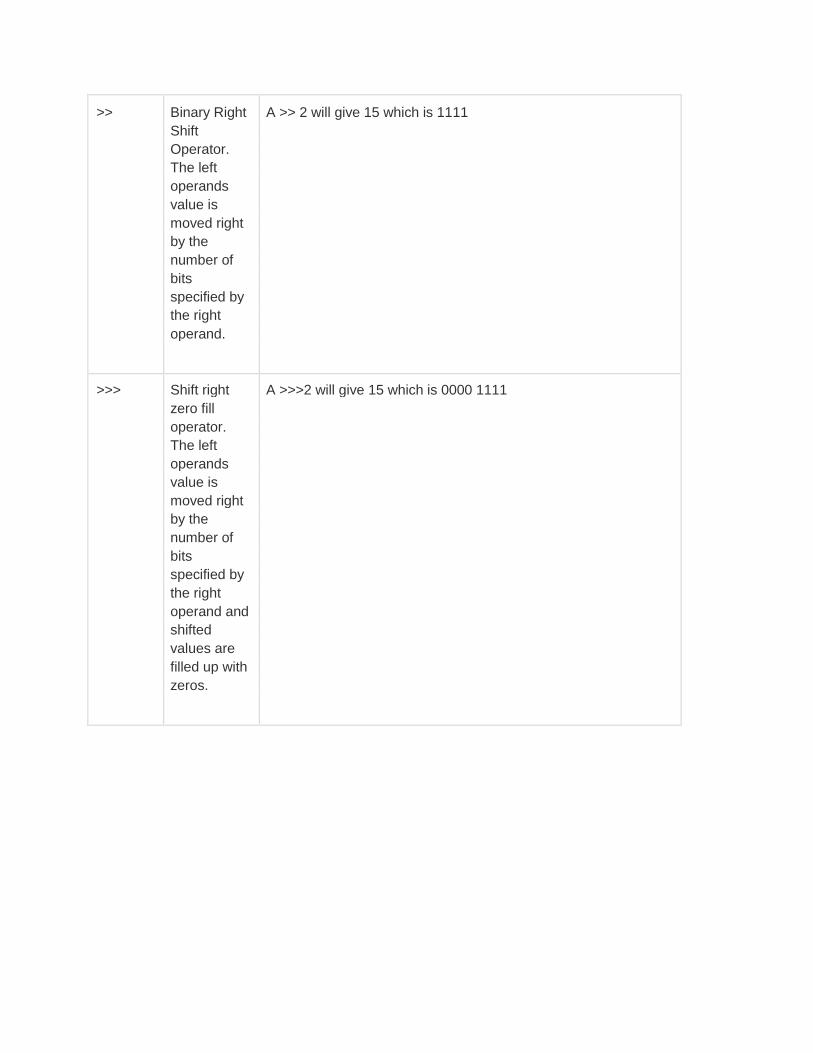
>> Binary Right A >> 2 will give 15 which is 1111 Shift
Operator.
The left
operands
value is
moved right
by the
number of
bits
specified by
the right
operand.
>>> Shift right A >>>2 will give 15 which is 0000 1111 zero fill
operator.
The left
operands
value is
moved right
by the
number of
bits
specified by
the right
operand and
shifted
values are
filled up with
zeros.
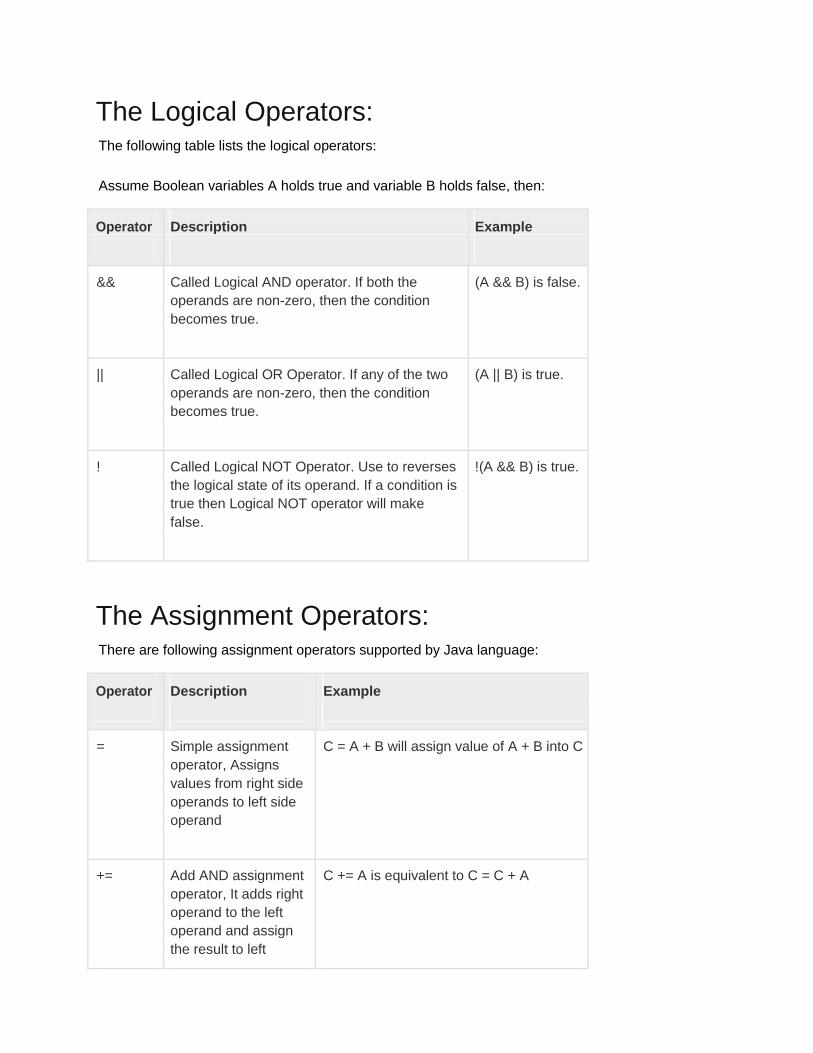
The Logical Operators:
The following table lists the logical operators:
Assume Boolean variables A holds true and variable B holds false, then:
Operator
Description
Example
&& Called Logical AND operator. If both the (A && B) is false.
operands are non-zero, then the condition
becomes true.
|| Called Logical OR Operator. If any of the two (A || B) is true.
operands are non-zero, then the condition
becomes true.
! Called Logical NOT Operator. Use to reverses !(A && B) is true.
the logical state of its operand. If a condition is
true then Logical NOT operator will make
false.
The Assignment Operators:
There are following assignment operators supported by Java language:
Operator
Description
Example
= Simple assignment C = A + B will assign value of A + B into C
operator, Assigns
values from right side
operands to left side
operand
+= Add AND assignment C += A is equivalent to C = C + A
operator, It adds right
operand to the left
operand and assign
the result to left

operand
-= Subtract AND C -= A is equivalent to C = C - A assignment operator,
It subtracts right
operand from the left
operand and assign
the result to left
operand
*= Multiply AND C *= A is equivalent to C = C * A assignment operator,
It multiplies right
operand with the left
operand and assign
the result to left
operand
/= Divide AND C /= A is equivalent to C = C / A assignment operator,
It divides left operand
with the right operand
and assign the result
to left operand
%= Modulus AND C %= A is equivalent to C = C % A assignment operator,
It takes modulus
using two operands
and assign the result
to left operand
<<= Left shift AND C <<= 2 is same as C = C << 2 assignment operator
>>= Right shift AND C >>= 2 is same as C = C >> 2 assignment operator
&= Bitwise AND C &= 2 is same as C = C & 2
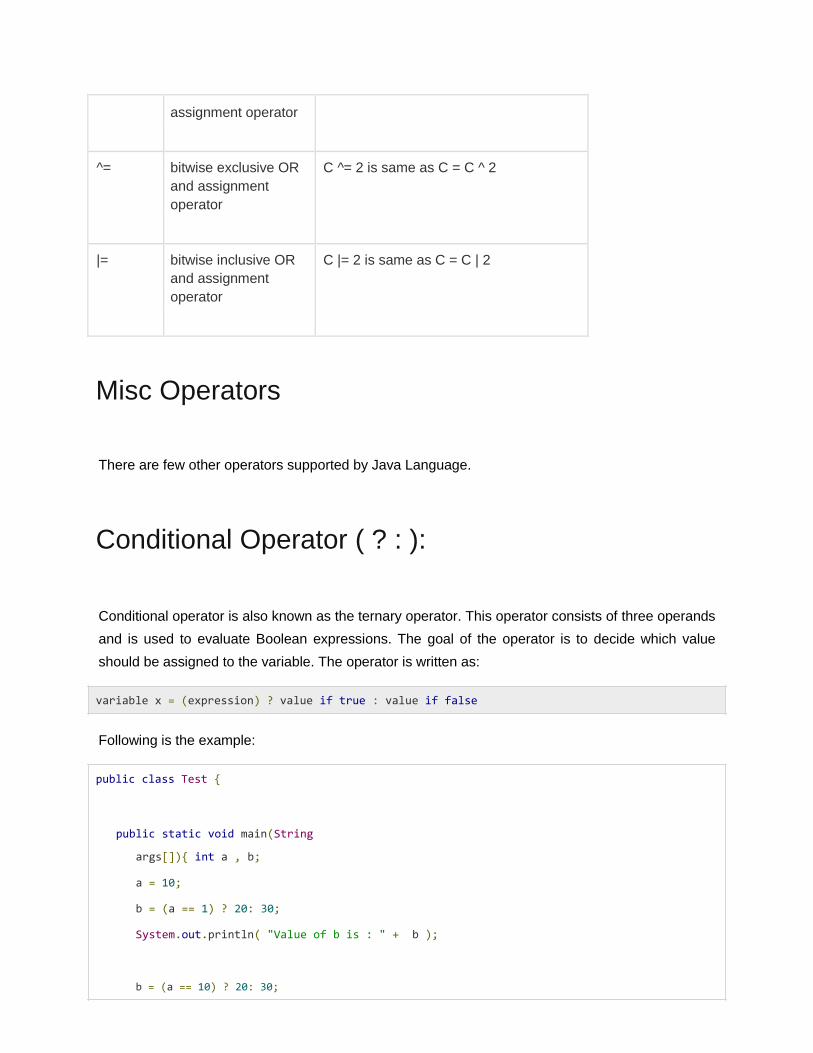
assignment operator
^= bitwise exclusive OR C ^= 2 is same as C = C ^ 2 and assignment
operator
|= bitwise inclusive OR C |= 2 is same as C = C | 2 and assignment
operator
Misc Operators
There are few other operators supported by Java Language.
Conditional Operator ( ? : ):
Conditional operator is also known as the ternary operator. This operator consists of three operands
and is used to evaluate Boolean expressions. The goal of the operator is to decide which value
should be assigned to the variable. The operator is written as:
variable x = (expression) ? value if true : value if false
Following is the example:
public class Test {
public static void main(String
args[]){ int a , b;
a = 10;
b = (a == 1) ? 20: 30;
System.out.println( "Value of b is : " + b );
b = (a == 10) ? 20: 30;
System.out.println( "Value of b is : " + b );
}
}
This would produce the following result:
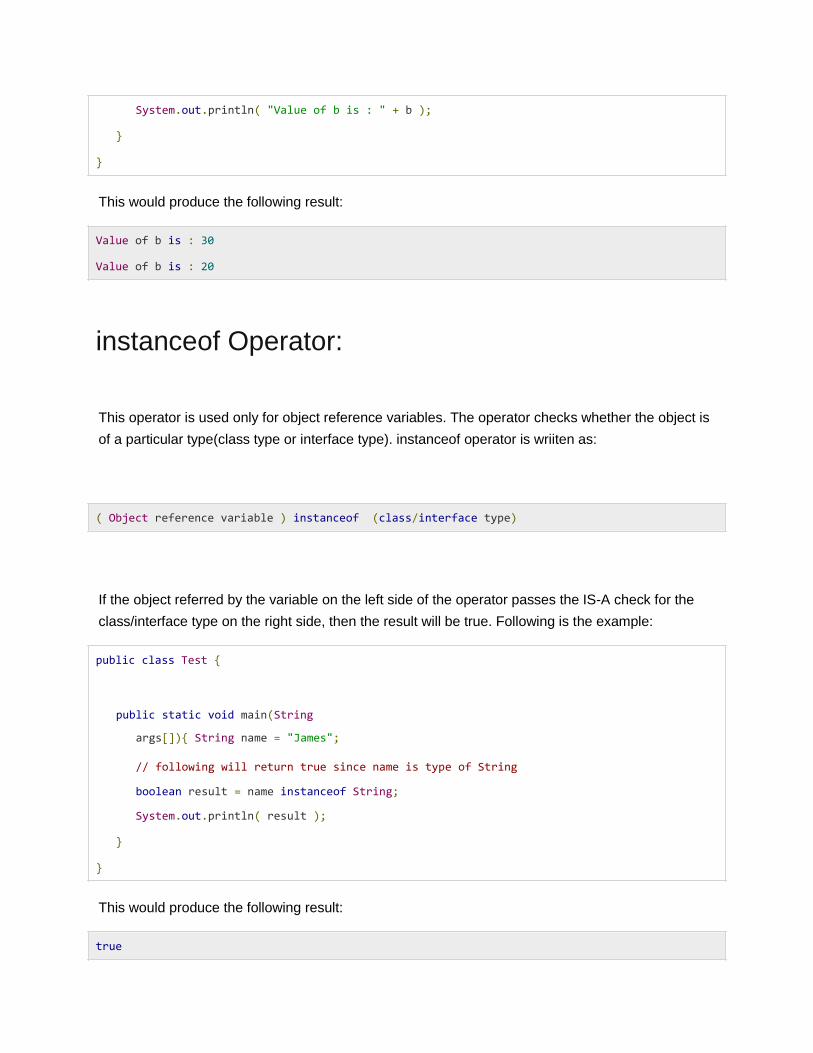
Value of b is : 30 Value of b is : 20
instanceof Operator: This operator is used only for object reference variables. The operator checks whether the object is
of a particular type(class type or interface type). instanceof operator is wriiten as:
( Object reference variable ) instanceof (class/interface type) If the object referred by the variable on the left side of the operator passes the IS-A check for the
class/interface type on the right side, then the result will be true. Following is the example:
public class Test {
public static void main(String
args[]){ String name = "James";
// following will return true since name is type of String
boolean result = name instanceof String;
System.out.println( result );
} }
This would produce the following result:
true

This operator will still return true if the object being compared is the assignment compatible with the
type on the right. Following is one more example:
class Vehicle {}
public class Car extends Vehicle {
public static void main(String
args[]){ Vehicle a = new Car();
boolean result = a instanceof Car;
System.out.println( result );
} }
This would produce the following result:
true
Precedence of Java Operators:
Operator precedence determines the grouping of terms in an expression. This affects how an
expression is evaluated. Certain operators have higher precedence than others; for example, the
multiplication operator has higher precedence than the addition operator:
For example, x = 7 + 3 * 2; here x is assigned 13, not 20 because operator * has higher precedence
than +, so it first gets multiplied with 3*2 and then adds into 7.
Here, operators with the highest precedence appear at the top of the table, those with the lowest
appear at the bottom. Within an expression, higher precedence operators will be evaluated first.
Category
Operator
Associativity
Postfix () [] . (dot operator) Left toright

Unary ++ - - ! ~ Right to left
Multiplicative * / % Left to right
Additive + - Left to right
Shift >> >>> << Left to right
Relational > >= < <= Left to right
Equality == != Left to right
Bitwise AND & Left to right
Bitwise XOR ^ Left to right
Bitwise OR | Left to right
Logical AND && Left to right
Logical OR || Left to right
Conditional ?: Right to left
Assignment = += -= *= /= %= >>= <<= &= ^= |= Right to left
Comma , Left to right
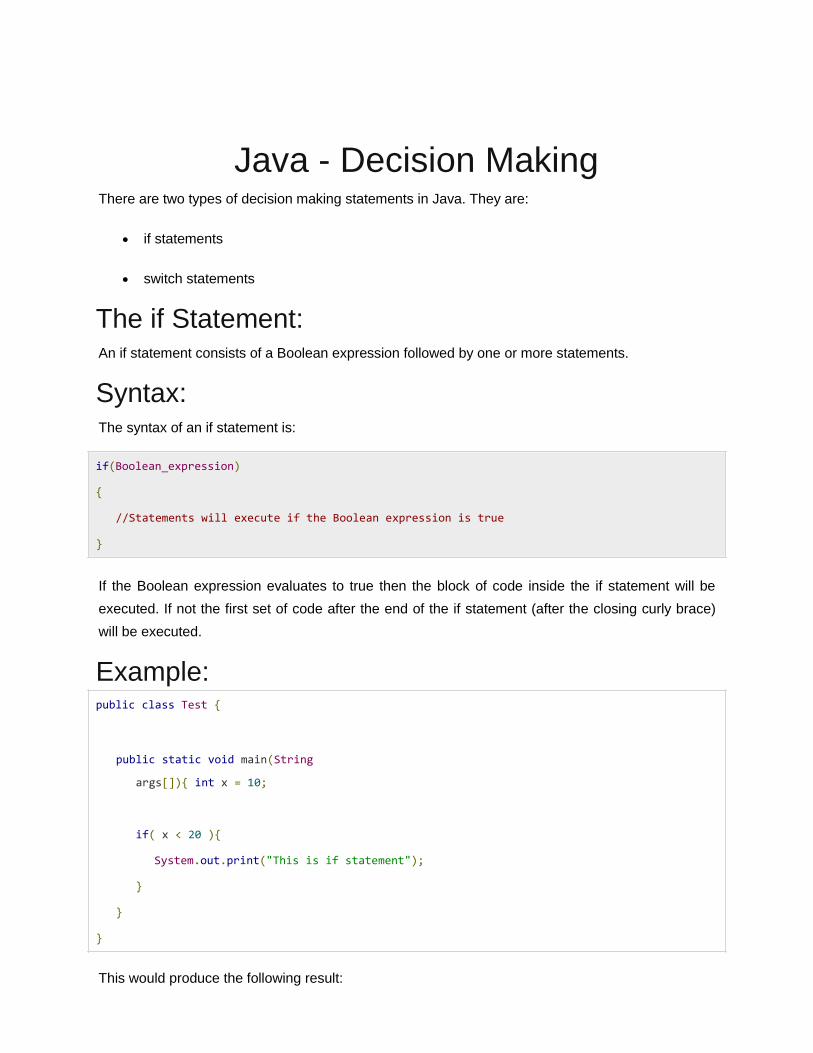
Java - Decision Making There are two types of decision making statements in Java. They are:
if statements
switch statements
The if Statement: An if statement consists of a Boolean expression followed by one or more statements.
Syntax: The syntax of an if statement is:
if(Boolean_expression) {
//Statements will execute if the Boolean expression is true } If the Boolean expression evaluates to true then the block of code inside the if statement will be
executed. If not the first set of code after the end of the if statement (after the closing curly brace)
will be executed.
Example: public class Test {
public static void main(String
args[]){ int x = 10;
if( x < 20 ){
System.out.print("This is if statement");
}
} }
This would produce the following result:
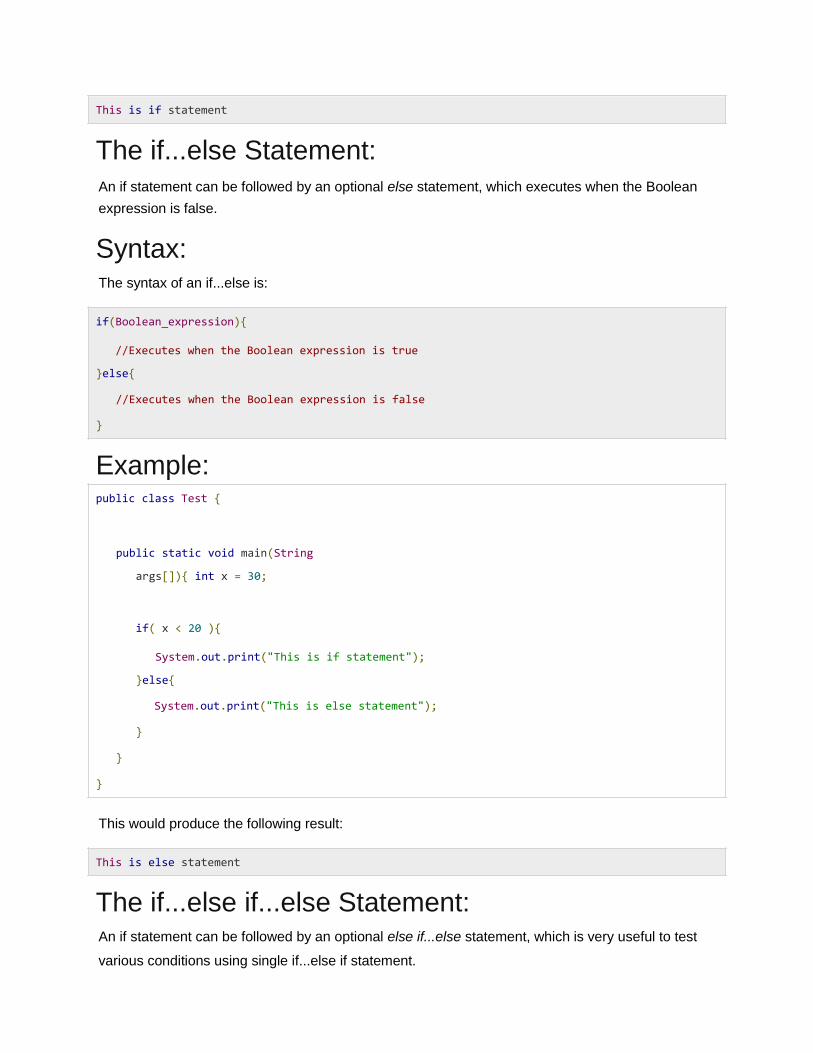
This is if statement
The if...else Statement: An if statement can be followed by an optional else statement, which executes when the Boolean
expression is false.
Syntax: The syntax of an if...else is:
if(Boolean_expression){
//Executes when the Boolean expression is true
}else{
//Executes when the Boolean expression is false }
Example: public class Test {
public static void main(String
args[]){ int x = 30;
if( x < 20 ){
System.out.print("This is if statement");
}else{
System.out.print("This is else statement");
}
} }
This would produce the following result:
This is else statement
The if...else if...else Statement: An if statement can be followed by an optional else if...else statement, which is very useful to test various conditions using single if...else if statement.
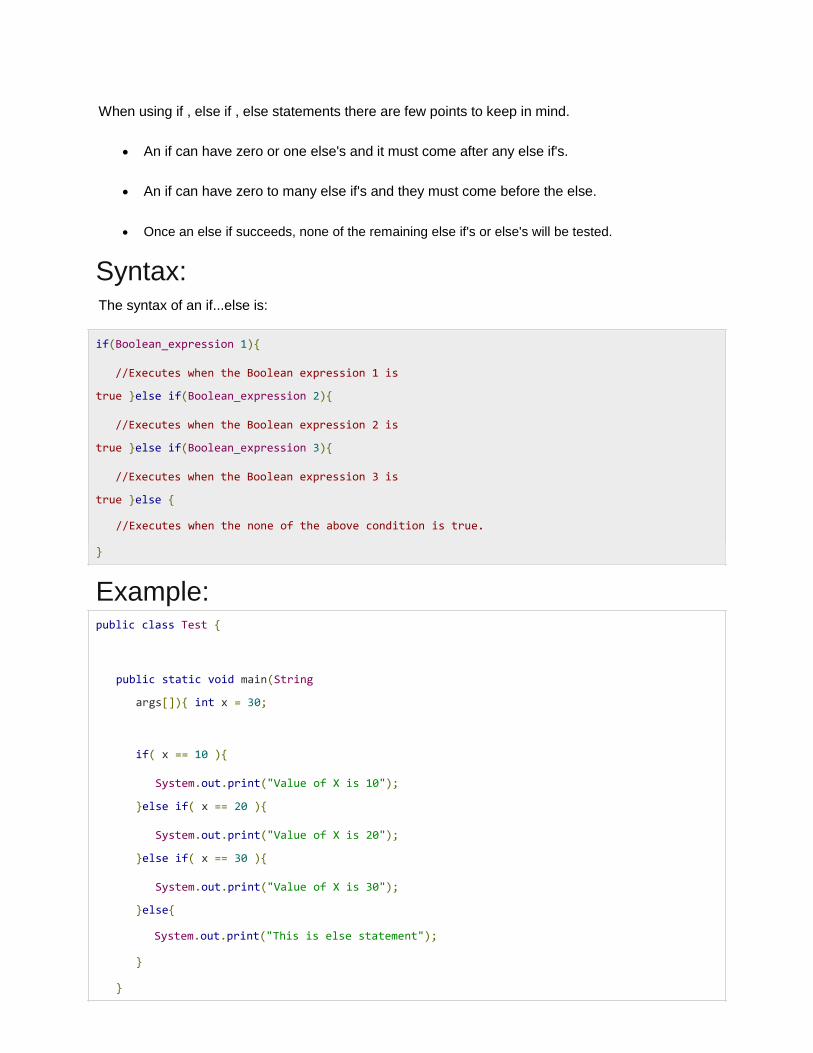
When using if , else if , else statements there are few points to keep in mind.
An if can have zero or one else's and it must come after any else if's.
An if can have zero to many else if's and they must come before the else.
Once an else if succeeds, none of the remaining else if's or else's will be tested.
Syntax: The syntax of an if...else is:
if(Boolean_expression 1){
//Executes when the Boolean expression 1 is
true }else if(Boolean_expression 2){
//Executes when the Boolean expression 2 is
true }else if(Boolean_expression 3){
//Executes when the Boolean expression 3 is
true }else {
//Executes when the none of the above condition is true. }
Example: public class Test {
public static void main(String
args[]){ int x = 30;
if( x == 10 ){
System.out.print("Value of X is 10");
}else if( x == 20 ){
System.out.print("Value of X is 20");
}else if( x == 30 ){
System.out.print("Value of X is 30");
}else{
System.out.print("This is else statement");
}
}

}
This would produce the following result:
Value of X is 30
Nested if...else Statement: It is always legal to nest if-else statements which means you can use one if or else if statement
inside another if or else if statement.
Syntax: The syntax for a nested if...else is as follows:
if(Boolean_expression 1){
//Executes when the Boolean expression 1 is
true if(Boolean_expression 2){
//Executes when the Boolean expression 2 is true
} }
You can nest else if...else in the similar way as we have nested if statement.
Example: public class Test {
public static void main(String
args[]){ int x = 30;
int y = 10;
if( x == 30 ){
if( y == 10 ){
System.out.print("X = 30 and Y = 10");
}
}
} }
This would produce the following result:
X = 30 and Y = 10
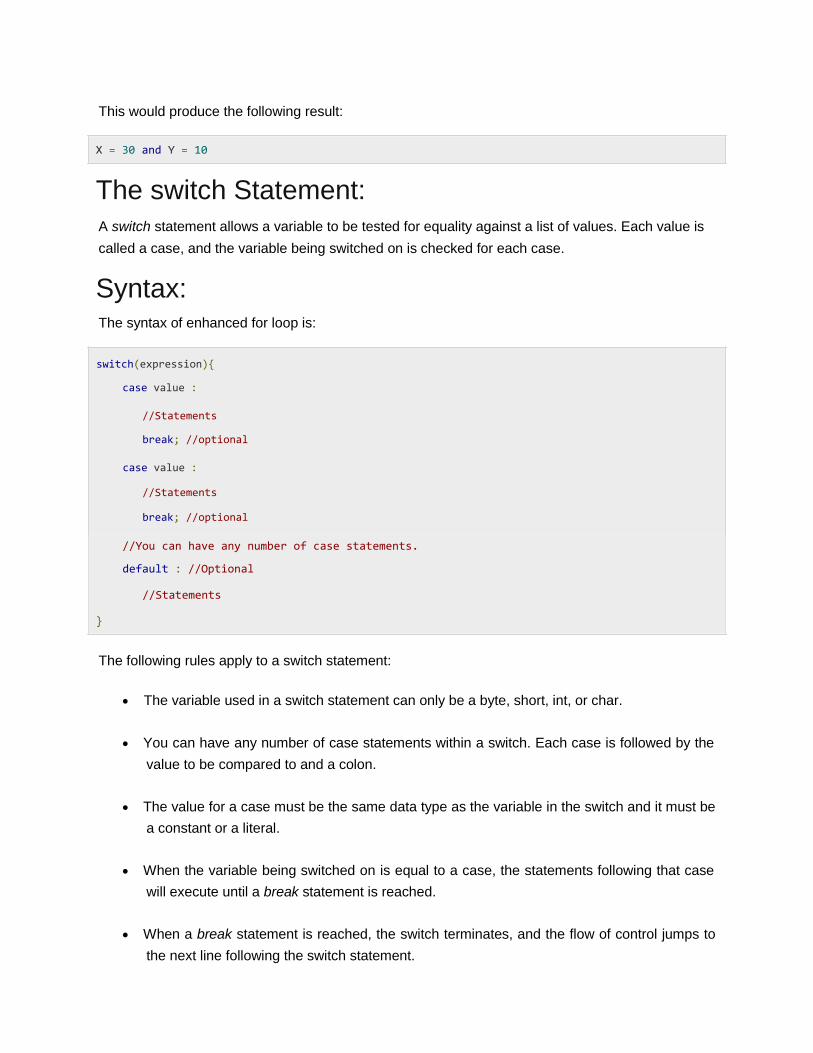
The switch Statement: A switch statement allows a variable to be tested for equality against a list of values. Each value is
called a case, and the variable being switched on is checked for each case.
Syntax: The syntax of enhanced for loop is:
switch(expression){
case value :
//Statements
break; //optional
case value :
//Statements
break; //optional
//You can have any number of case statements.
default : //Optional
//Statements }
The following rules apply to a switch statement:
The variable used in a switch statement can only be a byte, short, int, or char.
You can have any number of case statements within a switch. Each case is followed by the
value to be compared to and a colon.
The value for a case must be the same data type as the variable in the switch and it must be
a constant or a literal.
When the variable being switched on is equal to a case, the statements following that case
will execute until a break statement is reached.
When a break statement is reached, the switch terminates, and the flow of control jumps to
the next line following the switch statement.

Not every case needs to contain a break. If no break appears, the flow of control will fall
through to subsequent cases until a break is reached.
A switch statement can have an optional default case, which must appear at the end of the
switch. The default case can be used for performing a task when none of the cases is true.
No break is needed in the default case.
Example: public class Test {
public static void main(String args[]){
//char grade = args[0].charAt(0); char
grade = 'C';
switch(grade)
{
case 'A' :
System.out.println("Excellent!");
break;
case 'B' :
case 'C' :
System.out.println("Well done");
break;
case 'D' :
System.out.println("You passed");
case 'F' :
System.out.println("Better try again");
break;
default :
System.out.println("Invalid grade");
}
System.out.println("Your grade is " + grade);
} }

Compile and run above program using various command line arguments. This would produce the
following result:
$ java Test Well done Your grade is a C $
Java - Loop Control
There may be a situation when we need to execute a block of code several number of times, and is
often referred to as a loop.
Java has very flexible three looping mechanisms. You can use one of the following three loops:
while Loop
do...while Loop
for Loop
As of Java 5, the enhanced for loop was introduced. This is mainly used for Arrays.
The while Loop: A while loop is a control structure that allows you to repeat a task a certain number of times.
Syntax: The syntax of a while loop is:
while(Boolean_expression) {
//Statements } When executing, if the boolean_expression result is true, then the actions inside the loop will be
executed. This will continue as long as the expression result is true.
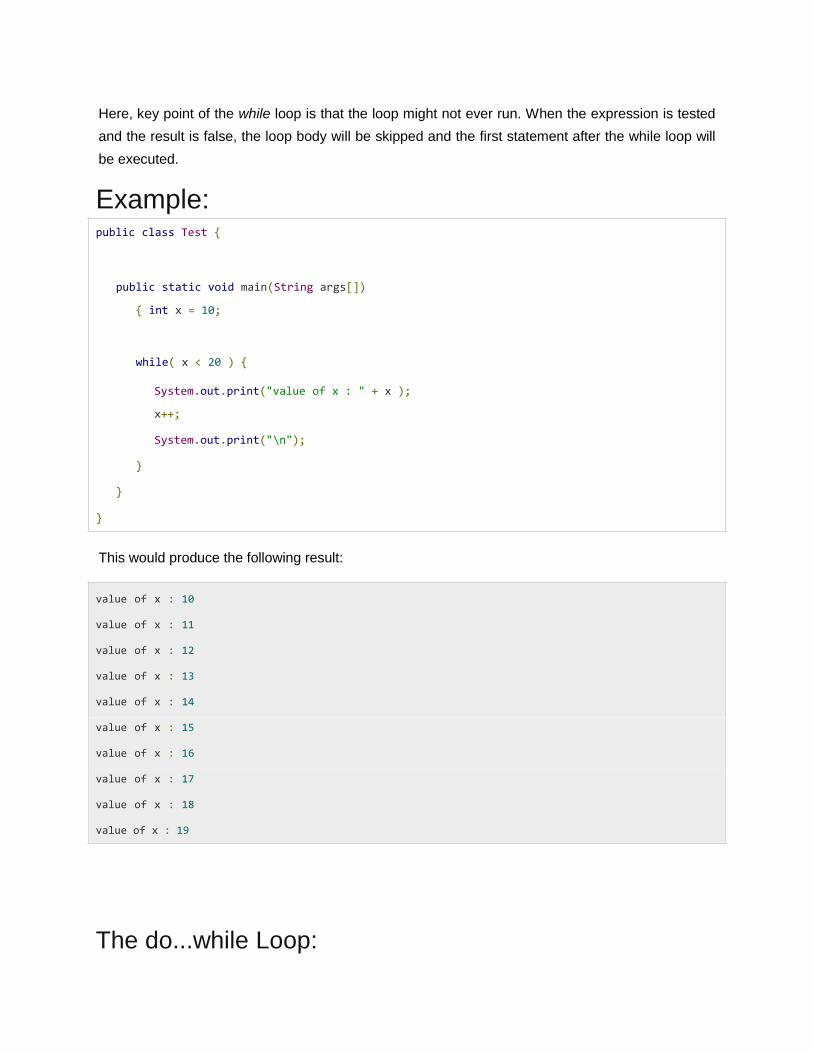
Here, key point of the while loop is that the loop might not ever run. When the expression is tested
and the result is false, the loop body will be skipped and the first statement after the while loop will
be executed.
Example: public class Test {
public static void main(String args[])
{ int x = 10;
while( x < 20 ) {
System.out.print("value of x : " + x );
x++;
System.out.print("\n");
}
} }
This would produce the following result:
value of x : 10
value of x : 11
value of x : 12
value of x : 13
value of x : 14
value of x : 15
value of x : 16
value of x : 17
value of x : 18
value of x : 19
The do...while Loop:
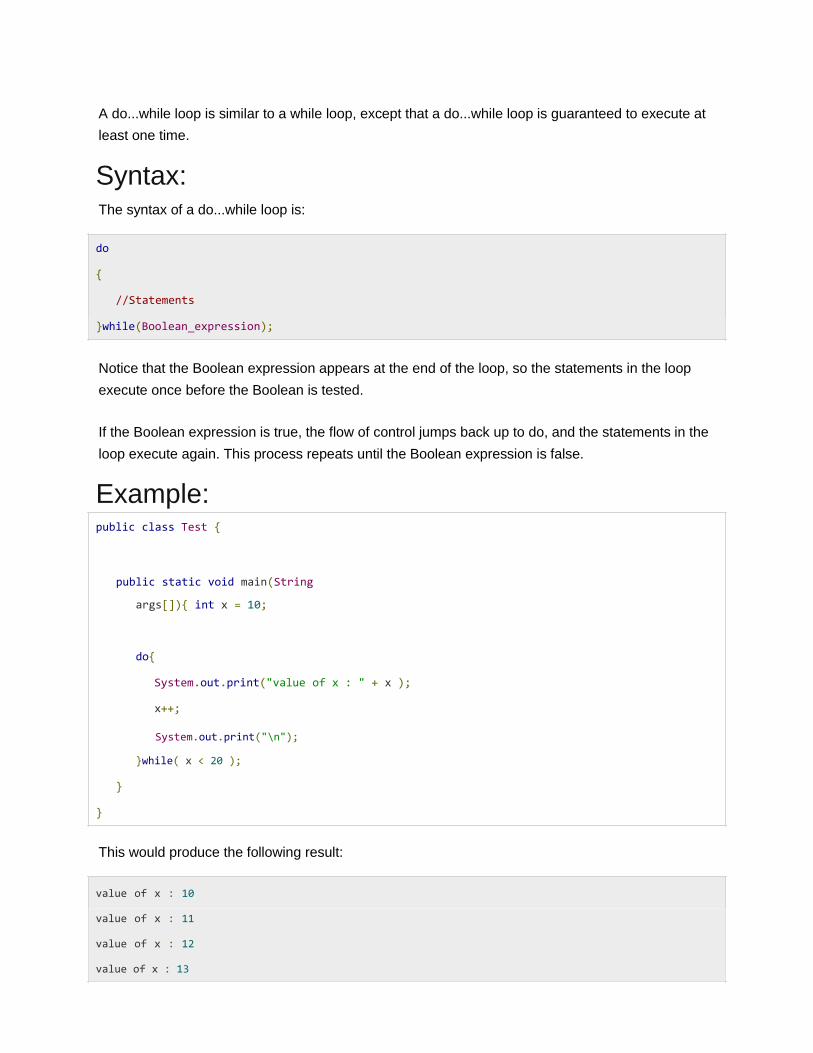
A do...while loop is similar to a while loop, except that a do...while loop is guaranteed to execute at
least one time.
Syntax: The syntax of a do...while loop is:
do {
//Statements }while(Boolean_expression); Notice that the Boolean expression appears at the end of the loop, so the statements in the loop
execute once before the Boolean is tested.
If the Boolean expression is true, the flow of control jumps back up to do, and the statements in the
loop execute again. This process repeats until the Boolean expression is false.
Example: public class Test {
public static void main(String
args[]){ int x = 10;
do{
System.out.print("value of x : " + x );
x++;
System.out.print("\n");
}while( x < 20 );
} }
This would produce the following result:
value of x : 10
value of x : 11
value of x : 12
value of x : 13
value of x : 14
value of x : 15
value of x : 16
value of x : 17
value of x : 18
value of x : 19
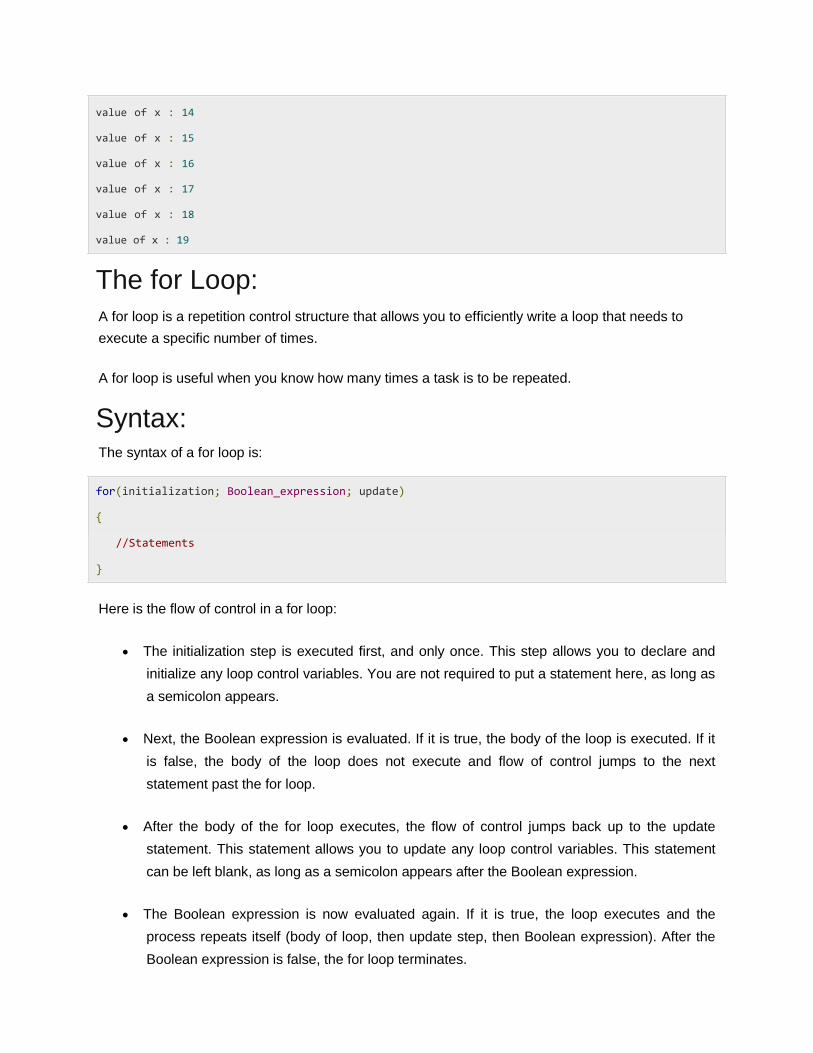
The for Loop: A for loop is a repetition control structure that allows you to efficiently write a loop that needs to
execute a specific number of times.
A for loop is useful when you know how many times a task is to be repeated.
Syntax: The syntax of a for loop is:
for(initialization; Boolean_expression; update) {
//Statements }
Here is the flow of control in a for loop:
The initialization step is executed first, and only once. This step allows you to declare and
initialize any loop control variables. You are not required to put a statement here, as long as
a semicolon appears.
Next, the Boolean expression is evaluated. If it is true, the body of the loop is executed. If it
is false, the body of the loop does not execute and flow of control jumps to the next
statement past the for loop.
After the body of the for loop executes, the flow of control jumps back up to the update
statement. This statement allows you to update any loop control variables. This statement
can be left blank, as long as a semicolon appears after the Boolean expression.
The Boolean expression is now evaluated again. If it is true, the loop executes and the
process repeats itself (body of loop, then update step, then Boolean expression). After the
Boolean expression is false, the for loop terminates.

Example: public class Test {
public static void main(String args[]) {
for(int x = 10; x < 20; x = x+1) {
System.out.print("value of x : " + x );
System.out.print("\n");
}
} }
This would produce the following result:
value of x : 10
value of x : 11
value of x : 12
value of x : 13
value of x : 14
value of x : 15
value of x : 16
value of x : 17
value of x : 18
value of x : 19
Enhanced for loop in Java: As of Java 5, the enhanced for loop was introduced. This is mainly used for Arrays.
Syntax:
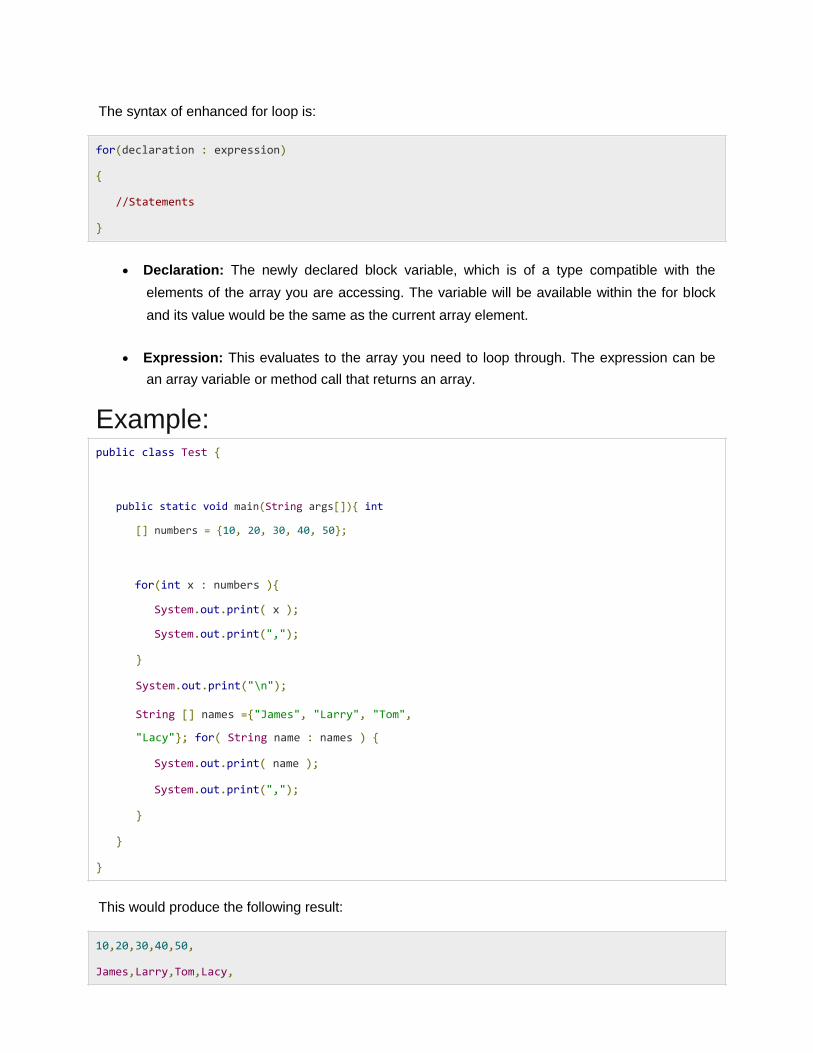
The syntax of enhanced for loop is:
for(declaration : expression) {
//Statements }
Declaration: The newly declared block variable, which is of a type compatible with the
elements of the array you are accessing. The variable will be available within the for block
and its value would be the same as the current array element.
Expression: This evaluates to the array you need to loop through. The expression can be
an array variable or method call that returns an array.
Example: public class Test {
public static void main(String args[]){ int
[] numbers = {10, 20, 30, 40, 50};
for(int x : numbers ){
System.out.print( x );
System.out.print(",");
}
System.out.print("\n");
String [] names ={"James", "Larry", "Tom",
"Lacy"}; for( String name : names ) {
System.out.print( name );
System.out.print(",");
}
} }
This would produce the following result:
10,20,30,40,50, James,Larry,Tom,Lacy,

The break Keyword: The break keyword is used to stop the entire loop. The break keyword must be used inside any loop
or a switch statement.
The break keyword will stop the execution of the innermost loop and start executing the next line of
code after the block.
Syntax: The syntax of a break is a single statement inside any loop:
break;
Example: public class Test {
public static void main(String args[]) {
int [] numbers = {10, 20, 30, 40, 50};
for(int x : numbers )
{ if( x == 30 ) {
break;
}
System.out.print( x );
System.out.print("\n");
}
} }
This would produce the following result:
10 20

The continue Keyword: The continue keyword can be used in any of the loop control structures. It causes the loop to immediately jump to the next iteration of the loop.
In a for loop, the continue keyword causes flow of control to immediately jump to the update
statement.
In a while loop or do/while loop, flow of control immediately jumps to the Boolean
expression.
Syntax: The syntax of a continue is a single statement inside any loop:
continue;
Example: public class Test {
public static void main(String args[]) {
int [] numbers = {10, 20, 30, 40, 50};
for(int x : numbers )
{ if( x == 30 ) {
continue;
}
System.out.print( x );
System.out.print("\n");
}
} }
This would produce the following result:
10 20 40 50
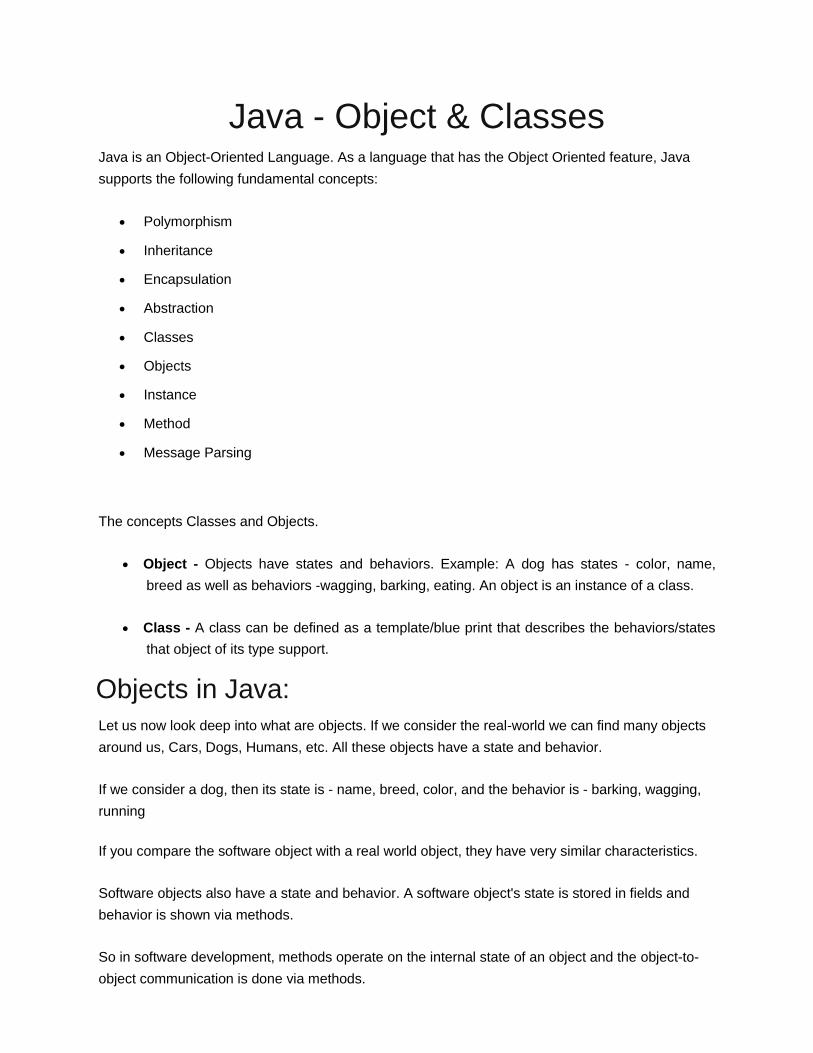
Java - Object & Classes
Java is an Object-Oriented Language. As a language that has the Object Oriented feature, Java
supports the following fundamental concepts:
Polymorphism
Inheritance
Encapsulation
Abstraction
Classes
Objects
Instance
Method
Message Parsing
The concepts Classes and Objects.
Object - Objects have states and behaviors. Example: A dog has states - color, name,
breed as well as behaviors -wagging, barking, eating. An object is an instance of a class.
Class - A class can be defined as a template/blue print that describes the behaviors/states
that object of its type support.
Objects in Java: Let us now look deep into what are objects. If we consider the real-world we can find many objects
around us, Cars, Dogs, Humans, etc. All these objects have a state and behavior.
If we consider a dog, then its state is - name, breed, color, and the behavior is - barking, wagging,
running
If you compare the software object with a real world object, they have very similar characteristics.
Software objects also have a state and behavior. A software object's state is stored in fields and
behavior is shown via methods.
So in software development, methods operate on the internal state of an object and the object-to-
object communication is done via methods.

Classes in Java: A class is a blue print from which individual objects are created.
A sample of a class is given below:
public class Dog{
String breed;
int age;
String color;
void barking(){
}
void hungry(){
}
void sleeping(){
} }
A class can contain any of the following variable types.
Local variables: Variables defined inside methods, constructors or blocks are called local
variables. The variable will be declared and initialized within the method and the variable
will be destroyed when the method has completed.
Instance variables: Instance variables are variables within a class but outside any method.
These variables are instantiated when the class is loaded. Instance variables can be
accessed from inside any method, constructor or blocks of that particular class.
Class variables: Class variables are variables declared with in a class, outside any method,
with the static keyword.
A class can have any number of methods to access the value of various kinds of methods. In the
above example, barking(), hungry() and sleeping() are methods.
Below mentioned are some of the important topics that need to be discussed when looking into
classes of the Java Language.

Java - Numbers Class
Normally, when we work with Numbers, we use primitive data types such as byte, int, long, double,
etc.
Example: int i = 5000; float gpa = 13.65; byte mask = 0xaf; However, in development, we come across situations where we need to use objects instead of
primitive data types. In-order to achieve this Java provides wrapper classes for each primitive data
type.
All the wrapper classes (Integer, Long, Byte, Double, Float, Short) are subclasses of the abstract
class Number.
This wrapping is taken care of by the compiler, the process is called boxing. So when a primitive is
used when an object is required, the compiler boxes the primitive type in its wrapper class.
Similarly, the compiler unboxes the object to a primitive as well. The Number is part of the java.lang
package.
Here is an example of boxing and unboxing:
public class Test{
public static void main(String args[]){
Integer x = 5; // boxes int to an Integer
object x = x + 10; // unboxes the Integer to a
int System.out.println(x);
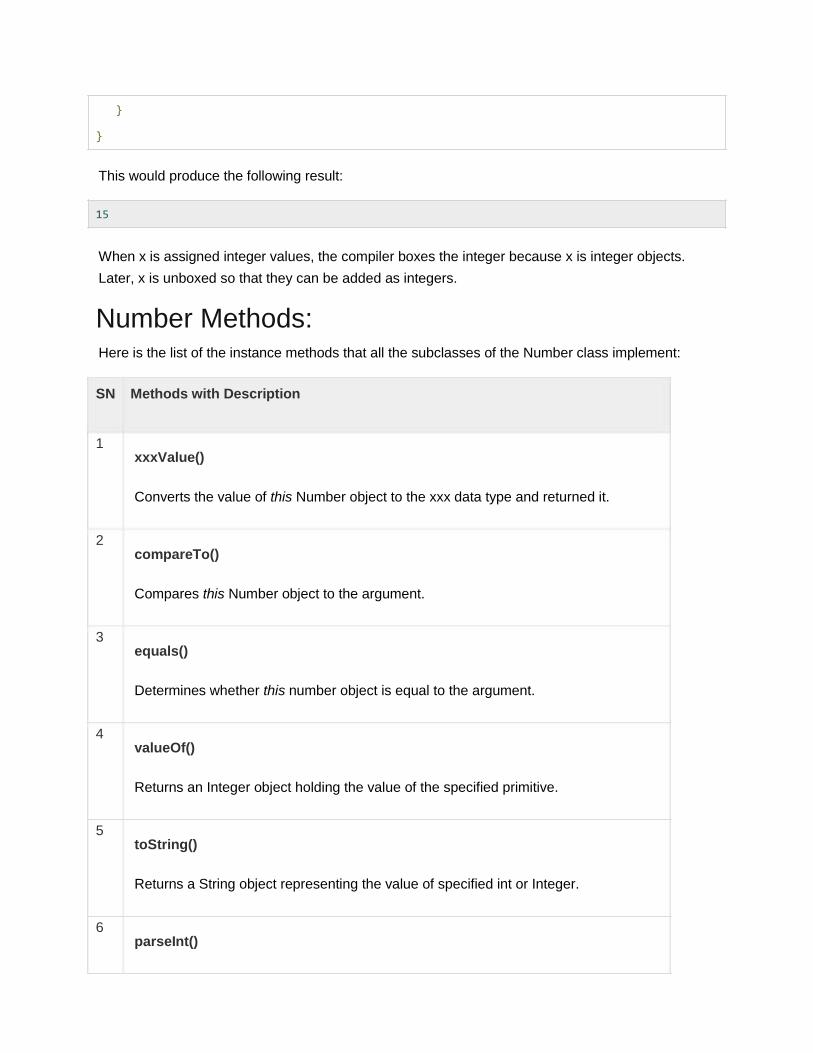
}
}
This would produce the following result:
15 When x is assigned integer values, the compiler boxes the integer because x is integer objects.
Later, x is unboxed so that they can be added as integers.
Number Methods: Here is the list of the instance methods that all the subclasses of the Number class implement:
SN Methods with Description
1
xxxValue()
Converts the value of this Number object to the xxx data type and returned it.
2
compareTo()
Compares this Number object to the argument.
3
equals()
Determines whether this number object is equal to the argument.
4
valueOf()
Returns an Integer object holding the value of the specified primitive.
5
toString()
Returns a String object representing the value of specified int or Integer.
6
parseInt()

This method is used to get the primitive data type of a certain String.
7
abs()
Returns the absolute value of the argument.
8
ceil()
Returns the smallest integer that is greater than or equal to the argument. Returned
as a double.
9
floor()
Returns the largest integer that is less than or equal to the argument. Returned as a
double.
10
rint()
Returns the integer that is closest in value to the argument. Returned as a double.
11
round()
Returns the closest long or int, as indicated by the method's return type, to the
argument.
12
min()
Returns the smaller of the two arguments.
13
max()
Returns the larger of the two arguments.
14
exp()
Returns the base of the natural logarithms, e, to the power of the argument.
15
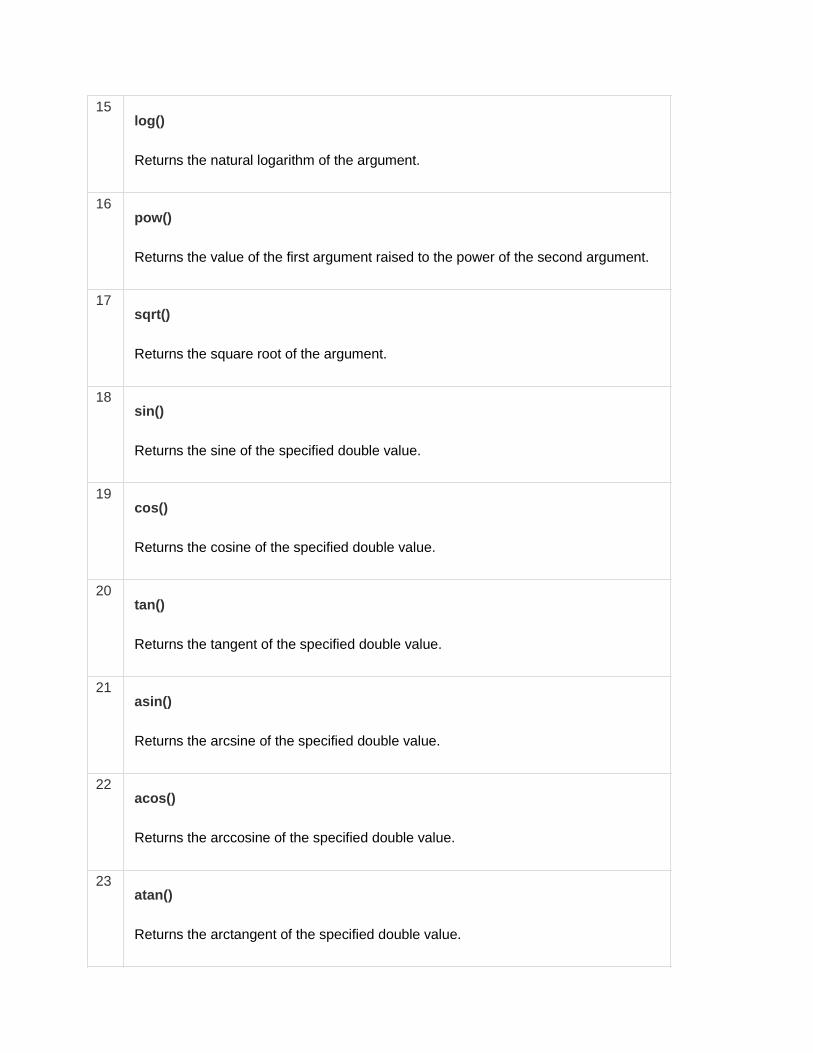
log()
Returns the natural logarithm of the argument.
16
pow()
Returns the value of the first argument raised to the power of the second argument.
17
sqrt()
Returns the square root of the argument.
18
sin()
Returns the sine of the specified double value.
19
cos()
Returns the cosine of the specified double value.
20
tan()
Returns the tangent of the specified double value.
21
asin()
Returns the arcsine of the specified double value.
22
acos()
Returns the arccosine of the specified double value.
23
atan()
Returns the arctangent of the specified double value.
24
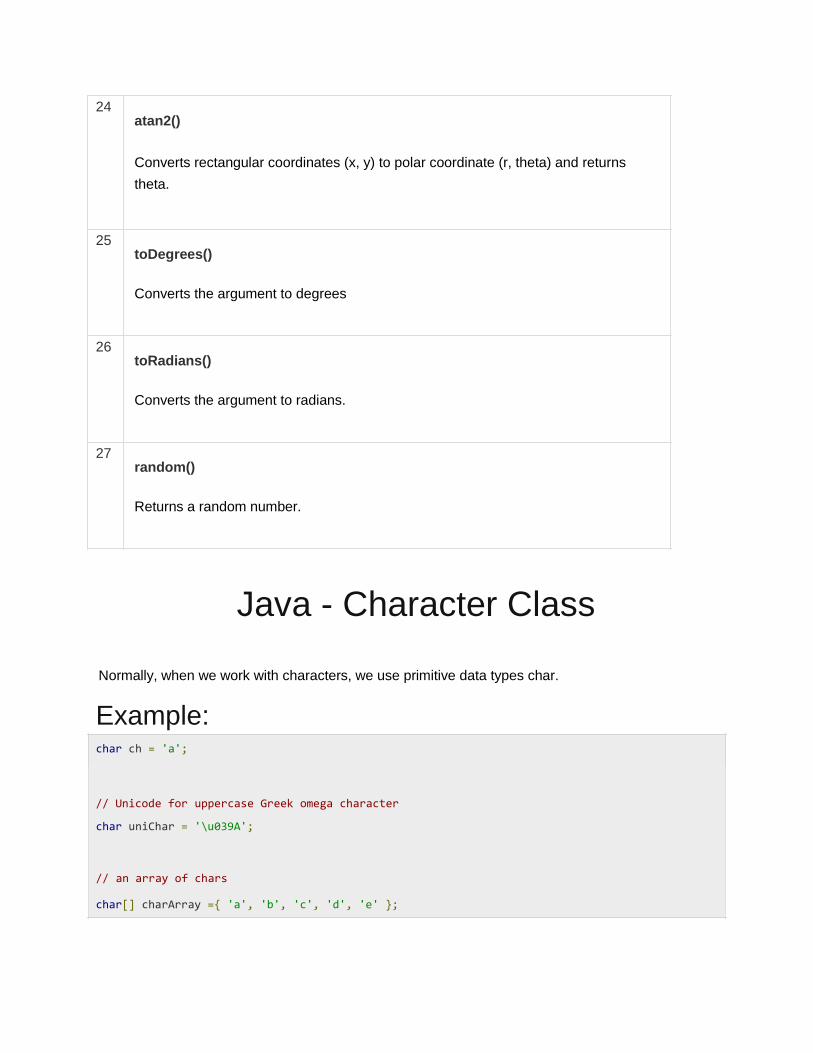
atan2()
Converts rectangular coordinates (x, y) to polar coordinate (r, theta) and returns
theta.
25
toDegrees()
Converts the argument to degrees
26
toRadians()
Converts the argument to radians.
27
random()
Returns a random number.
Java - Character Class
Normally, when we work with characters, we use primitive data types char.
Example: char ch = 'a'; // Unicode for uppercase Greek omega character
char uniChar = '\u039A';
// an array of chars char[] charArray ={ 'a', 'b', 'c', 'd', 'e' };
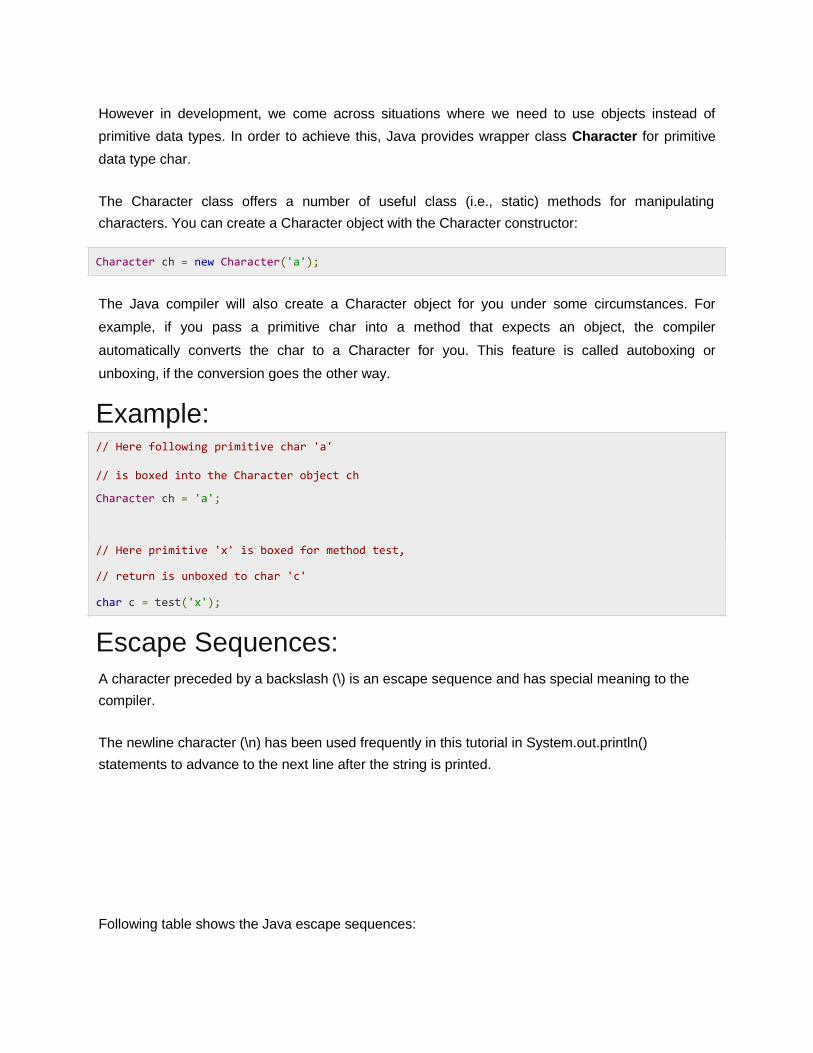
However in development, we come across situations where we need to use objects instead of
primitive data types. In order to achieve this, Java provides wrapper class Character for primitive
data type char.
The Character class offers a number of useful class (i.e., static) methods for manipulating
characters. You can create a Character object with the Character constructor:
Character ch = new Character('a'); The Java compiler will also create a Character object for you under some circumstances. For
example, if you pass a primitive char into a method that expects an object, the compiler
automatically converts the char to a Character for you. This feature is called autoboxing or
unboxing, if the conversion goes the other way.
Example: // Here following primitive char 'a'
// is boxed into the Character object ch
Character ch = 'a';
// Here primitive 'x' is boxed for method test, // return is unboxed to char 'c' char c = test('x');
Escape Sequences: A character preceded by a backslash (\) is an escape sequence and has special meaning to the
compiler.
The newline character (\n) has been used frequently in this tutorial in System.out.println()
statements to advance to the next line after the string is printed.
Following table shows the Java escape sequences:
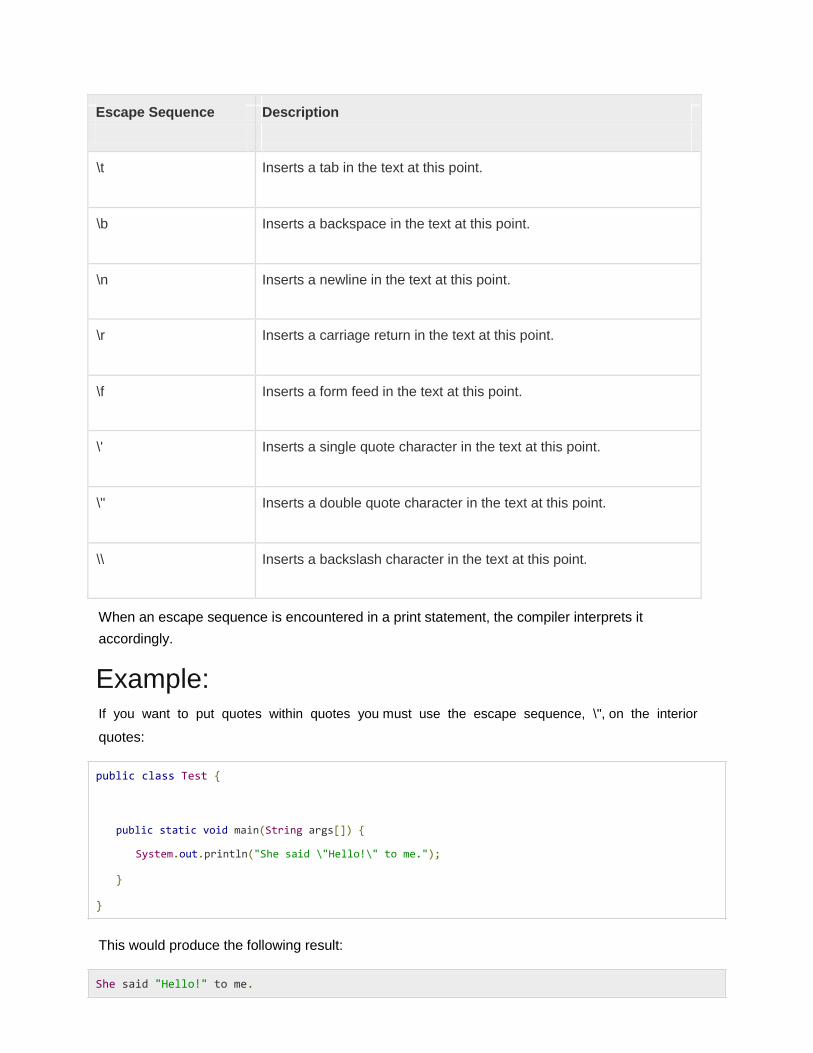
Escape Sequence
Description
\t Inserts a tab in the text at this point.
\b Inserts a backspace in the text at this point.
\n Inserts a newline in the text at this point.
\r Inserts a carriage return in the text at this point.
\f Inserts a form feed in the text at this point.
\' Inserts a single quote character in the text at this point.
\" Inserts a double quote character in the text at this point.
\\ Inserts a backslash character in the text at this point.
When an escape sequence is encountered in a print statement, the compiler interprets it
accordingly.
Example:
If you want to put quotes within quotes you must use the escape sequence, \", on the interior
quotes:
public class Test {
public static void main(String args[]) {
System.out.println("She said \"Hello!\" to me.");
} }
This would produce the following result:
She said "Hello!" to me.

Character Methods: Here is the list of the important instance methods that all the subclasses of the Character class
implement:
SN Methods with Description
1
isLetter()
Determines whether the specified char value is a letter.
2
isDigit()
Determines whether the specified char value is a digit.
3
isWhitespace()
Determines whether the specified char value is white space.
4
isUpperCase()
Determines whether the specified char value is uppercase.
5
isLowerCase()
Determines whether the specified char value is lowercase.
6
toUpperCase()
Returns the uppercase form of the specified char value.
7
toLowerCase()
Returns the lowercase form of the specified char value.
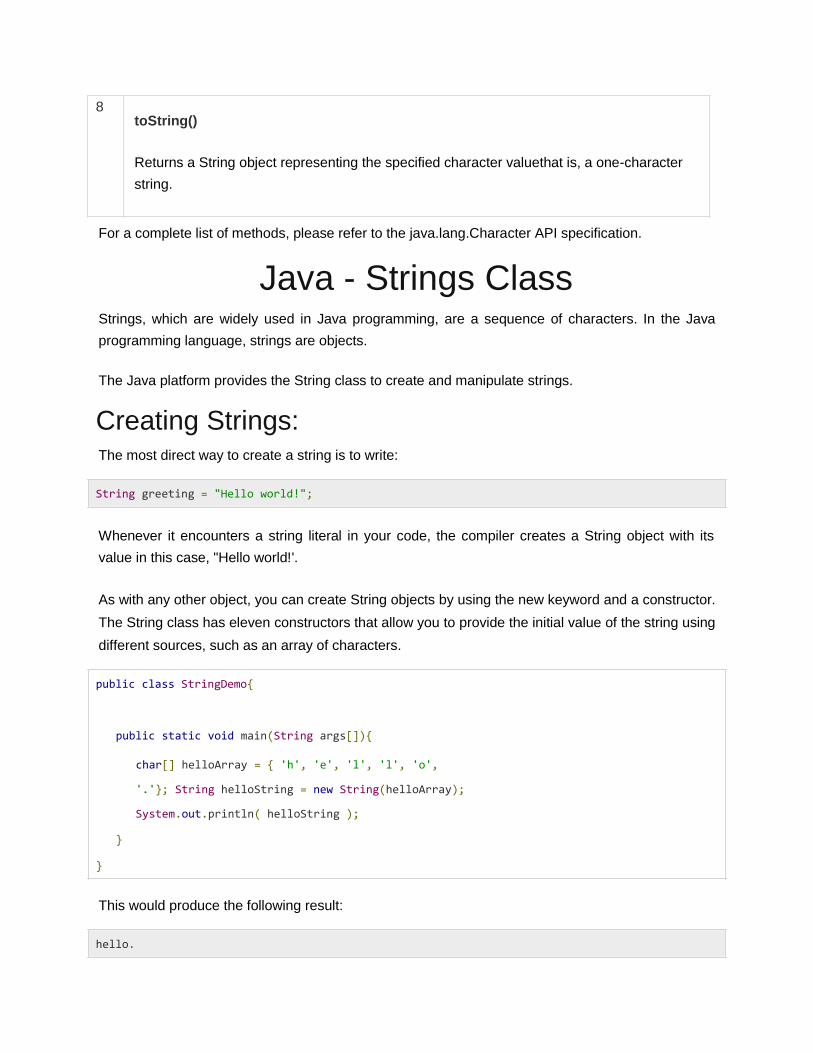
8
toString()
Returns a String object representing the specified character valuethat is, a one-character
string.
For a complete list of methods, please refer to the java.lang.Character API specification.
Java - Strings Class
Strings, which are widely used in Java programming, are a sequence of characters. In the Java
programming language, strings are objects.
The Java platform provides the String class to create and manipulate strings.
Creating Strings: The most direct way to create a string is to write:
String greeting = "Hello world!"; Whenever it encounters a string literal in your code, the compiler creates a String object with its
value in this case, "Hello world!'.
As with any other object, you can create String objects by using the new keyword and a constructor.
The String class has eleven constructors that allow you to provide the initial value of the string using
different sources, such as an array of characters.
public class StringDemo{
public static void main(String args[]){
char[] helloArray = { 'h', 'e', 'l', 'l', 'o',
'.'}; String helloString = new String(helloArray);
System.out.println( helloString );
} }
This would produce the following result:
hello.

Note: The String class is immutable, so that once it is created a String object cannot be changed. If
there is a necessity to make a lot of modifications to Strings of characters, then you should use
String Buffer & String Builder Classes.
String Length: Methods used to obtain information about an object are known as accessor methods. One accessor
method that you can use with strings is the length() method, which returns the number of characters
contained in the string object.
After the following two lines of code have been executed, len equals 17:
public class StringDemo {
public static void main(String args[]) {
String palindrome = "Dot saw I was Tod";
int len = palindrome.length();
System.out.println( "String Length is : " + len );
} }
This would produce the following result:
String Length is : 17
Concatenating Strings: The String class includes a method for concatenating two strings:
string1.concat(string2); This returns a new string that is string1 with string2 added to it at the end. You can also use the
concat() method with string literals, as in:
"My name is ".concat("Zara");
Strings are more commonly concatenated with the + operator, as in:
"Hello," + " world" + "!"
which results in:
"Hello, world!"
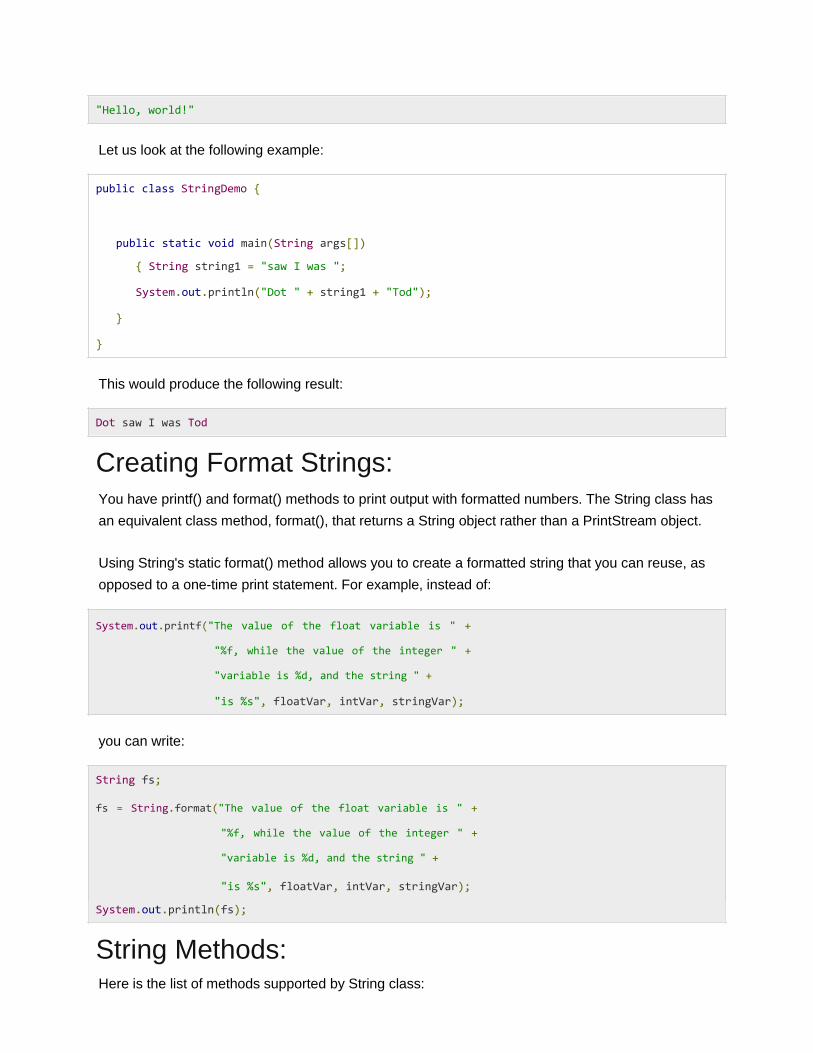
Let us look at the following example:
public class StringDemo {
public static void main(String args[])
{ String string1 = "saw I was ";
System.out.println("Dot " + string1 + "Tod");
} }
This would produce the following result:
Dot saw I was Tod
Creating Format Strings: You have printf() and format() methods to print output with formatted numbers. The String class has
an equivalent class method, format(), that returns a String object rather than a PrintStream object.
Using String's static format() method allows you to create a formatted string that you can reuse, as
opposed to a one-time print statement. For example, instead of:
System.out.printf("The value of the float variable is " +
"%f, while the value of the integer " +
"variable is %d, and the string " +
"is %s", floatVar, intVar, stringVar);
you can write:
String fs; fs = String.format("The value of the float variable is " +
"%f, while the value of the integer " +
"variable is %d, and the string " +
"is %s", floatVar, intVar, stringVar);
System.out.println(fs);
String Methods: Here is the list of methods supported by String class:

SN Methods with Description
1
char charAt(int index)
Returns the character at the specified index.
2
int compareTo(Object o)
Compares this String to another Object.
3
int compareTo(String anotherString)
Compares two strings lexicographically.
4
int compareToIgnoreCase(String str)
Compares two strings lexicographically, ignoring case differences.
5
String concat(String str)
Concatenates the specified string to the end of this string.
6
boolean contentEquals(StringBuffer sb)
Returns true if and only if this String represents the same sequence of characters as
the specified StringBuffer.
7
static String copyValueOf(char[] data)
Returns a String that represents the character sequence in the array specified.
8
static String copyValueOf(char[] data, int offset, int count)
Returns a String that represents the character sequence in the array specified.
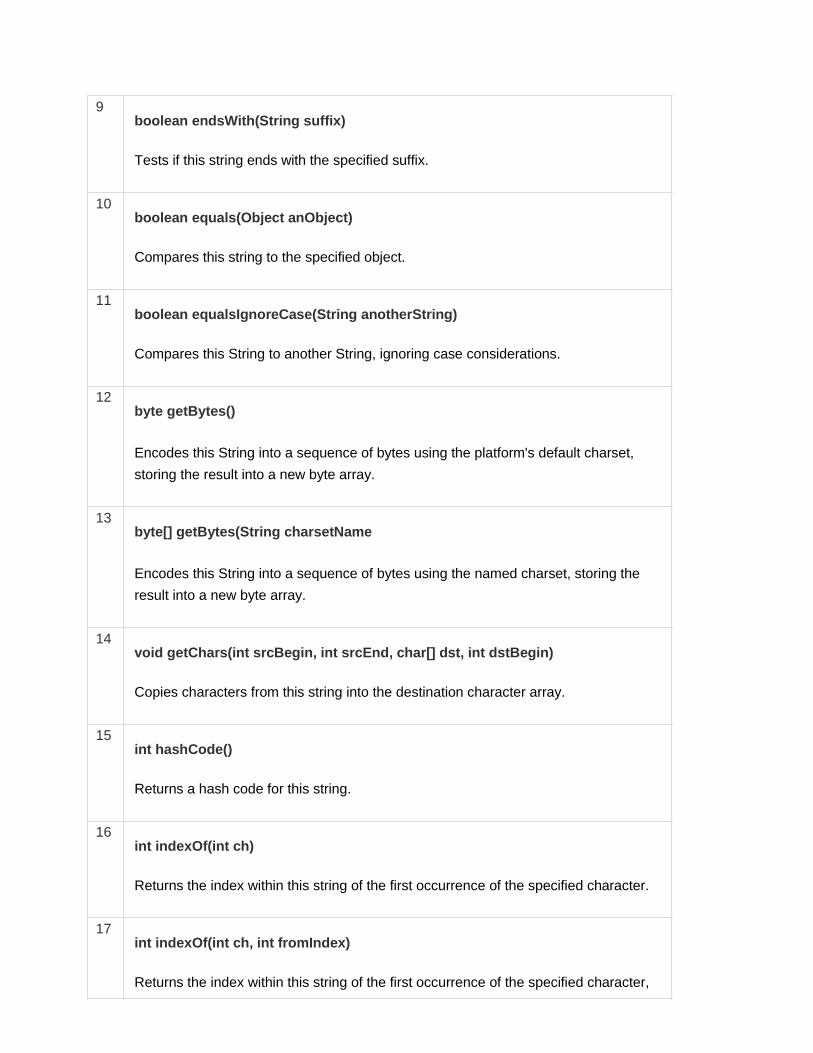
9
boolean endsWith(String suffix)
Tests if this string ends with the specified suffix.
10
boolean equals(Object anObject)
Compares this string to the specified object.
11
boolean equalsIgnoreCase(String anotherString)
Compares this String to another String, ignoring case considerations.
12
byte getBytes()
Encodes this String into a sequence of bytes using the platform's default charset,
storing the result into a new byte array.
13
byte[] getBytes(String charsetName
Encodes this String into a sequence of bytes using the named charset, storing the
result into a new byte array.
14
void getChars(int srcBegin, int srcEnd, char[] dst, int dstBegin)
Copies characters from this string into the destination character array.
15
int hashCode()
Returns a hash code for this string.
16
int indexOf(int ch)
Returns the index within this string of the first occurrence of the specified character.
17
int indexOf(int ch, int fromIndex)
Returns the index within this string of the first occurrence of the specified character,

starting the search at the specified index.
18 int indexOf(String str)
Returns the index within this string of the first occurrence of the specified substring.
19 int indexOf(String str, int fromIndex)
Returns the index within this string of the first occurrence of the specified substring,
starting at the specified index
20 String intern()
Returns a canonical representation for the string object.
21 int lastIndexOf(int ch)
Returns the index within this string of the last occurrence of the specified character.
22 int lastIndexOf(int ch, int fromIndex)
Returns the index within this string of the last occurrence of the specified character,
searching backward starting at the specified index.
23 int lastIndexOf(String str)
Returns the index within this string of the rightmost occurrence of the specified
substring.
24 int lastIndexOf(String str, int fromIndex)
Returns the index within this string of the last occurrence of the specified substring,
searching backward starting at the specified index.
25 int length()

Returns the length of this string.
26
boolean matches(String regex)
Tells whether or not this string matches the given regular expression.
27
boolean regionMatches(boolean ignoreCase, int toffset, String other, int
ooffset, int len)
Tests if two string regions are equal.
28
boolean regionMatches(int toffset, String other, int ooffset, int len)
Tests if two string regions are equal
29
String replace(char oldChar, char newChar)
Returns a new string resulting from replacing all occurrences of oldChar in this string
with newChar.
30
String replaceAll(String regex, String replacement
Replaces each substring of this string that matches the given regular expression with
the given replacement.
31
String replaceFirst(String regex, String replacement)
Replaces the first substring of this string that matches the given regular expression
with the given replacement.
32
String[] split(String regex)
Splits this string around matches of the given regular expression.
33
String[] split(String regex, int limit)
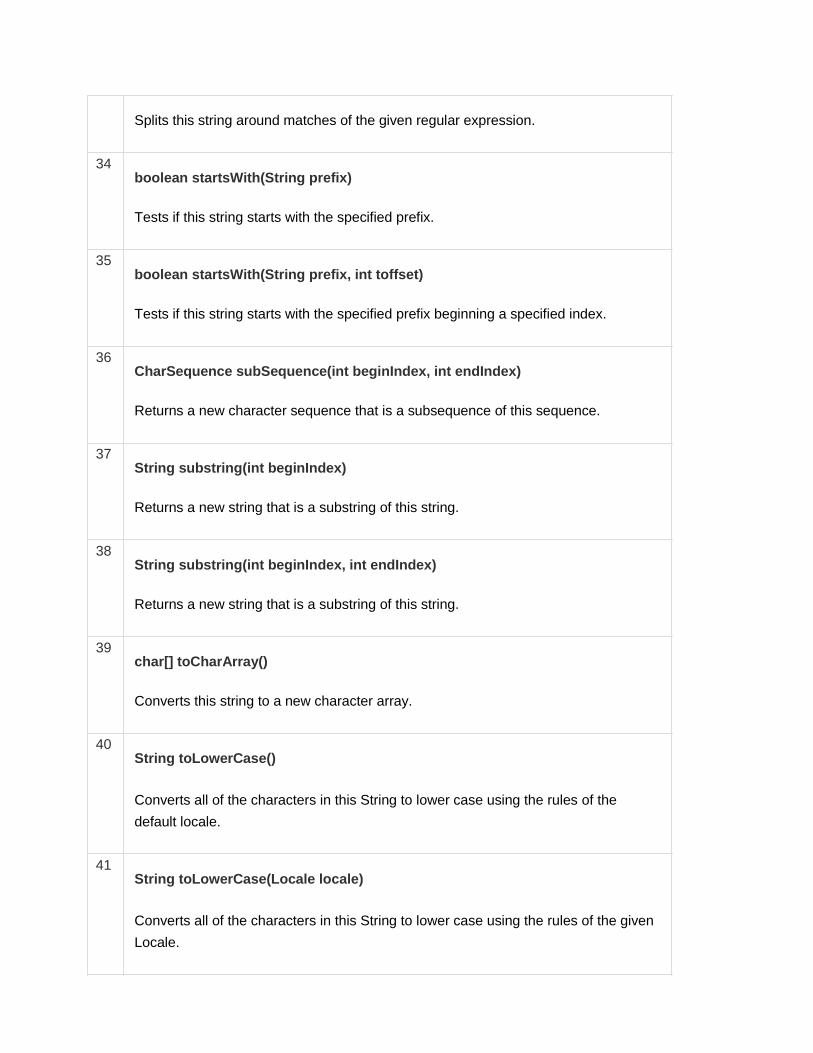
Splits this string around matches of the given regular expression.
34
boolean startsWith(String prefix)
Tests if this string starts with the specified prefix.
35
boolean startsWith(String prefix, int toffset)
Tests if this string starts with the specified prefix beginning a specified index.
36
CharSequence subSequence(int beginIndex, int endIndex)
Returns a new character sequence that is a subsequence of this sequence.
37
String substring(int beginIndex)
Returns a new string that is a substring of this string.
38
String substring(int beginIndex, int endIndex)
Returns a new string that is a substring of this string.
39
char[] toCharArray()
Converts this string to a new character array.
40
String toLowerCase()
Converts all of the characters in this String to lower case using the rules of the
default locale.
41
String toLowerCase(Locale locale)
Converts all of the characters in this String to lower case using the rules of the given
Locale.

42
String toString()
This object (which is already a string!) is itself returned.
43
String toUpperCase()
Converts all of the characters in this String to upper case using the rules of the
default locale.
44
String toUpperCase(Locale locale)
Converts all of the characters in this String to upper case using the rules of the given
Locale.
45
String trim()
Returns a copy of the string, with leading and trailing whitespace omitted.
46
static String valueOf(primitive data type x)
Returns the string representation of the passed data type argument.
Java - Arrays
Java provides a data structure, the array, which stores a fixed-size sequential collection of
elements of the same type. An array is used to store a collection of data, but it is often more useful
to think of an array as a collection of variables of the same type.
Instead of declaring individual variables, such as number0, number1, ..., and number99, you
declare one array variable such as numbers and use numbers[0], numbers[1], and ..., numbers[99]
to represent individual variables.

This tutorial introduces how to declare array variables, create arrays, and process arrays using
indexed variables.
Declaring Array Variables:
To use an array in a program, you must declare a variable to reference the array, and you must
specify the type of array the variable can reference. Here is the syntax for declaring an array
variable:
dataType[] arrayRefVar; // preferred way.
or
dataType arrayRefVar[]; // works but not preferred way.
Note: The style dataType[] arrayRefVar is preferred. The style dataType arrayRefVar[] comes
from the C/C++ language and was adopted in Java to accommodate C/C++ programmers.
Example:
The following code snippets are examples of this syntax:
double[] myList; // preferred way.
or
double myList[]; // works but not preferred way.
Creating Arrays:
You can create an array by using the new operator with the following syntax:
arrayRefVar = new dataType[arraySize];
The above statement does two things:
It creates an array using new dataType[arraySize];
It assigns the reference of the newly created array to the variable arrayRefVar.
Declaring an array variable, creating an array, and assigning the reference of the array to the
variable can be combined in one statement, as shown below:

dataType[] arrayRefVar = new dataType[arraySize];
Alternatively you can create arrays as follows:
dataType[] arrayRefVar = {value0, value1, ..., valuek}; The array elements are accessed through the index. Array indices are 0-based; that is, they start
from 0 to arrayRefVar.length-1.
Example: Following statement declares an array variable, myList, creates an array of 10 elements of double
type and assigns its reference to myList:
double[] myList = new double[10]; Following picture represents array myList. Here, myList holds ten double values and the indices are
from 0 to 9.
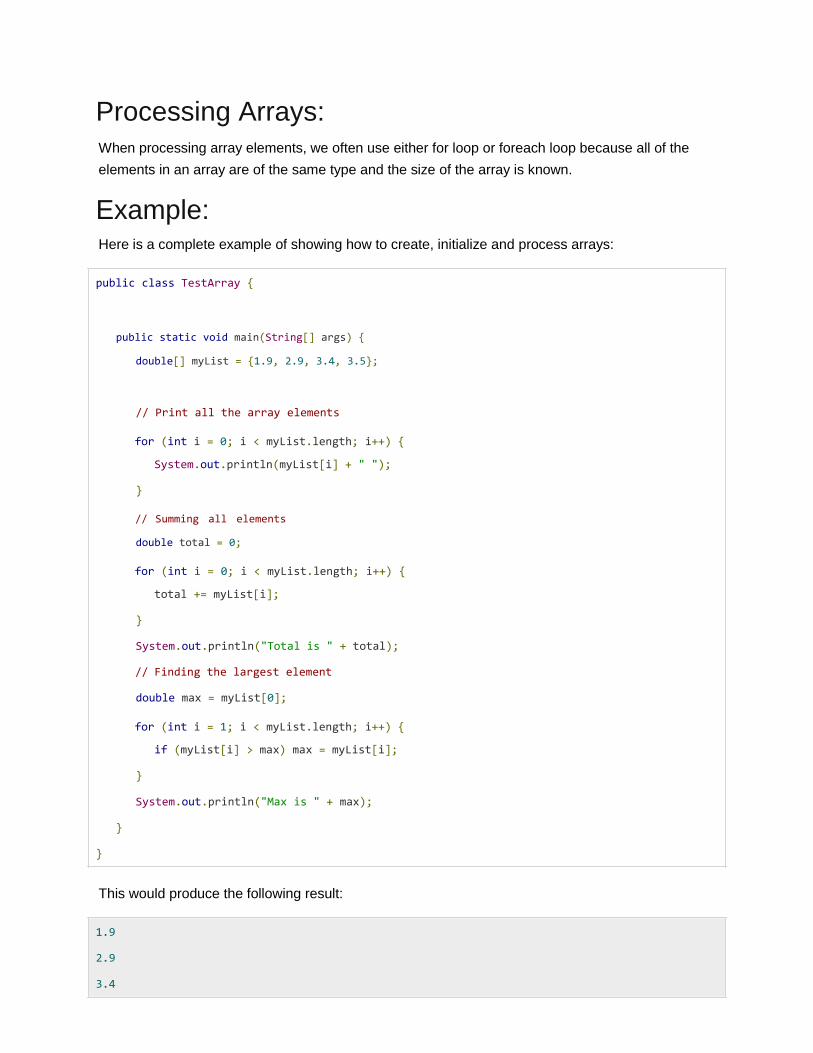
Processing Arrays: When processing array elements, we often use either for loop or foreach loop because all of the
elements in an array are of the same type and the size of the array is known.
Example: Here is a complete example of showing how to create, initialize and process arrays:
public class TestArray {
public static void main(String[] args) {
double[] myList = {1.9, 2.9, 3.4, 3.5};
// Print all the array elements
for (int i = 0; i < myList.length; i++) {
System.out.println(myList[i] + " ");
}
// Summing all elements
double total = 0;
for (int i = 0; i < myList.length; i++) {
total += myList[i];
}
System.out.println("Total is " + total);
// Finding the largest element
double max = myList[0];
for (int i = 1; i < myList.length; i++) {
if (myList[i] > max) max = myList[i];
}
System.out.println("Max is " + max);
} }
This would produce the following result:
1.9 2.9 3.4

3.5 Total is 11.7 Max is 3.5
The foreach Loops: JDK 1.5 introduced a new for loop known as foreach loop or enhanced for loop, which enables you
to traverse the complete array sequentially without using an index variable.
Example: The following code displays all the elements in the array myList:
public class TestArray {
public static void main(String[] args) {
double[] myList = {1.9, 2.9, 3.4, 3.5};
// Print all the array elements
for (double element: myList) {
System.out.println(element);
}
} }
This would produce the following result:
1.9 2.9 3.4 3.5
Passing Arrays to Methods: Just as you can pass primitive type values to methods, you can also pass arrays to methods. For
example, the following method displays the elements in an int array:
public static void printArray(int[] array) {
for (int i = 0; i < array.length; i++) {
System.out.print(array[i] + " ");
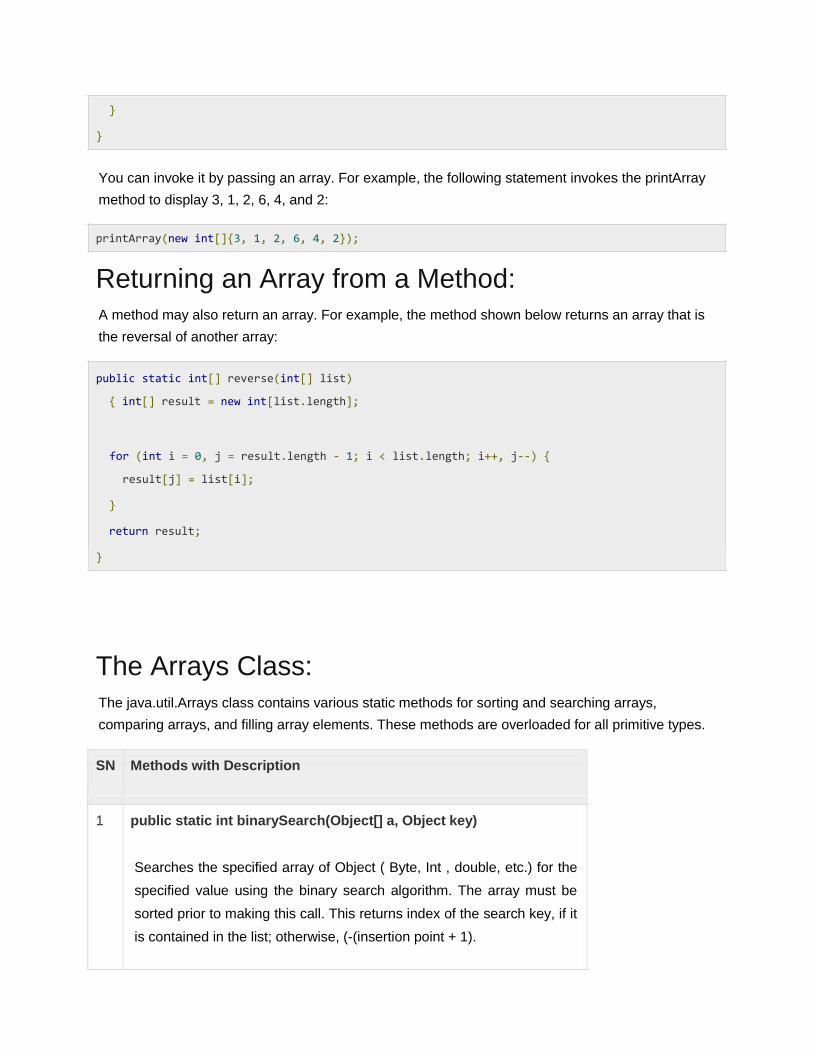
}
} You can invoke it by passing an array. For example, the following statement invokes the printArray
method to display 3, 1, 2, 6, 4, and 2:
printArray(new int[]{3, 1, 2, 6, 4, 2});
Returning an Array from a Method: A method may also return an array. For example, the method shown below returns an array that is
the reversal of another array:
public static int[] reverse(int[] list)
{ int[] result = new int[list.length];
for (int i = 0, j = result.length - 1; i < list.length; i++, j--) {
result[j] = list[i];
}
return result; }
The Arrays Class: The java.util.Arrays class contains various static methods for sorting and searching arrays,
comparing arrays, and filling array elements. These methods are overloaded for all primitive types.
SN Methods with Description
1 public static int binarySearch(Object[] a, Object key)
Searches the specified array of Object ( Byte, Int , double, etc.) for the
specified value using the binary search algorithm. The array must be
sorted prior to making this call. This returns index of the search key, if it
is contained in the list; otherwise, (-(insertion point + 1).

2 public static boolean equals(long[] a, long[] a2)
Returns true if the two specified arrays of longs are equal to one
another. Two arrays are considered equal if both arrays contain the
same number of elements, and all corresponding pairs of elements in
the two arrays are equal. This returns true if the two arrays are equal.
Same method could be used by all other primitive data types (Byte,
short, Int, etc.)
3 public static void fill(int[] a, int val)
Assigns the specified int value to each element of the specified array of
ints. Same method could be used by all other primitive data types
(Byte, short, Int etc.)
4 public static void sort(Object[] a)
Sorts the specified array of objects into ascending order, according to
the natural ordering of its elements. Same method could be used by all
other primitive data types ( Byte, short, Int, etc.)
Java - Date & Time
Java provides the Date class available in java.util package, this class encapsulates the current
date and time.
The Date class supports two constructors. The first constructor initializes the object with the current
date and time.
Date( ) The following constructor accepts one argument that equals the number of milliseconds that have
elapsed since midnight, January 1, 1970
Date(long millisec) Once you have a Date object available, you can call any of the following support methods to play
with dates:

SN
Methods with Description
1 boolean after(Date date)
Returns true if the invoking Date object contains a date that is later than the one
specified by date, otherwise, it returns false.
2 boolean before(Date date)
Returns true if the invoking Date object contains a date that is earlier than the one
specified by date, otherwise, it returns false.
3 Object clone( )
Duplicates the invoking Date object.
4 int compareTo(Date date)
Compares the value of the invoking object with that of date. Returns 0 if the values
are equal. Returns a negative value if the invoking object is earlier than date.
Returns a positive value if the invoking object is later than date.
5 int compareTo(Object obj)
Operates identically to compareTo(Date) if obj is of class Date. Otherwise, it throws
a ClassCastException.
6 boolean equals(Object date)
Returns true if the invoking Date object contains the same time and date as the one
specified by date, otherwise, it returns false.
7 long getTime( )
Returns the number of milliseconds that have elapsed since January 1, 1970.

8 int hashCode( )
Returns a hash code for the invoking object.
9 void setTime(long time)
Sets the time and date as specified by time, which represents an elapsed time in
milliseconds from midnight, January 1, 1970
10 String toString( )
Converts the invoking Date object into a string and returns the result.
Getting Current Date & Time This is very easy to get current date and time in Java. You can use a simple Date object with
toString() method to print current date and time as follows:
import java.util.Date;
public class DateDemo {
public static void main(String args[]) {
// Instantiate a Date object
Date date = new Date();
// display time and date using toString()
System.out.println(date.toString());
} }
This would produce the following result:
Mon May 04 09:51:52 CDT 2009
Date Comparison:

There are following three ways to compare two dates:
You can use getTime( ) to obtain the number of milliseconds that have elapsed since
midnight, January 1, 1970, for both objects and then compare these two values.
You can use the methods before( ), after( ), and equals( ). Because the 12th of the month
comes before the 18th, for example, new Date(99, 2, 12).before(new Date (99, 2, 18))
returns true.
You can use the compareTo( ) method, which is defined by the Comparable interface and
implemented by Date.
Date Formatting using SimpleDateFormat: SimpleDateFormat is a concrete class for formatting and parsing dates in a locale-sensitive manner.
SimpleDateFormat allows you to start by choosing any user-defined patterns for date-time
formatting. For example:
import java.util.*;
import java.text.*;
public class DateDemo {
public static void main(String args[]) {
Date dNow = new Date( );
SimpleDateFormat ft =
new SimpleDateFormat ("E yyyy.MM.dd 'at' hh:mm:ss a zzz");
System.out.println("Current Date: " + ft.format(dNow));
}
}
This would produce the following result:

Current Date: Sun 2004.07.18 at 04:14:09 PM PDT
Simple DateFormat format codes:
To specify the time format, use a time pattern string. In this pattern, all ASCII letters are reserved as
pattern letters, which are defined as the following:
Character
Description
Example
G Era designator AD
y Year in four digits 2001
M Month in year July or 07
d Day in month 10
h Hour in A.M./P.M. (1~12) 12
H Hour in day (0~23) 22
m Minute in hour 30
s Second in minute 55
S Millisecond 234
E Day in week Tuesday
D Day in year 360
F Day of week in month 2 (second Wed. in July)
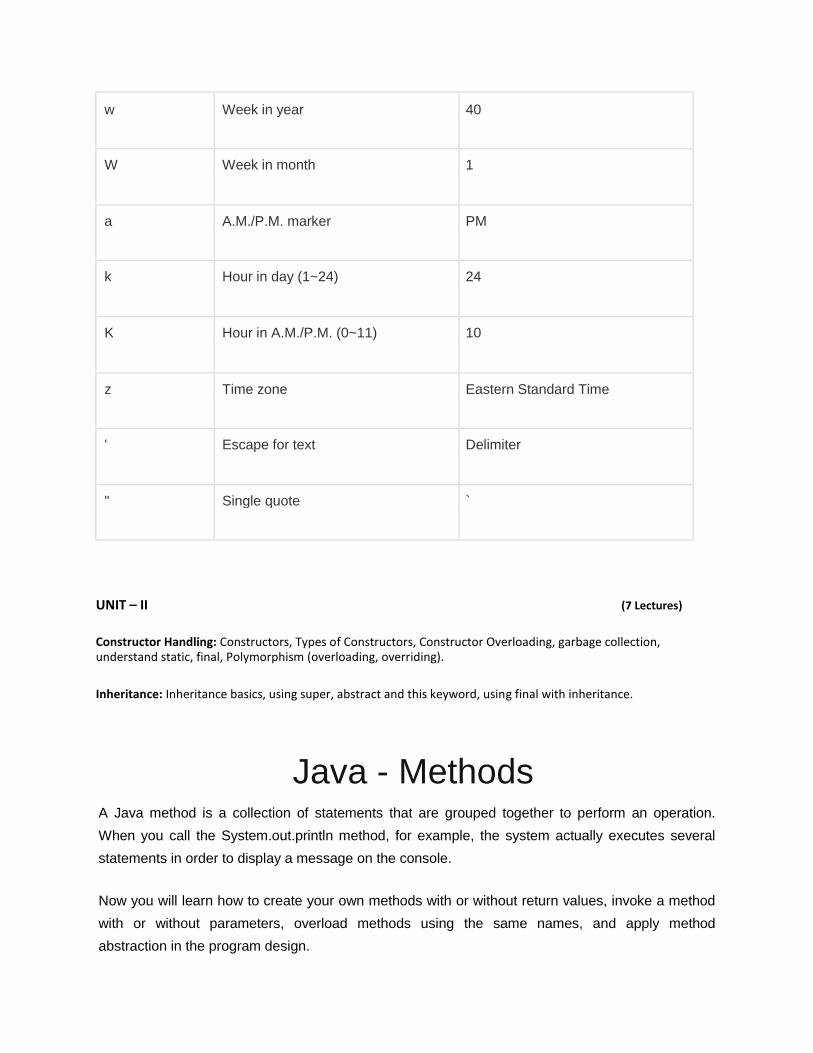
w Week in year 40
W Week in month 1
a A.M./P.M. marker PM
k Hour in day (1~24) 24
K Hour in A.M./P.M. (0~11) 10
z Time zone Eastern Standard Time
' Escape for text Delimiter
" Single quote `
UNIT – II (7 Lectures)
Constructor Handling: Constructors, Types of Constructors, Constructor Overloading, garbage collection, understand static, final, Polymorphism (overloading, overriding).
Inheritance: Inheritance basics, using super, abstract and this keyword, using final with inheritance.
Java - Methods
A Java method is a collection of statements that are grouped together to perform an operation.
When you call the System.out.println method, for example, the system actually executes several
statements in order to display a message on the console.
Now you will learn how to create your own methods with or without return values, invoke a method
with or without parameters, overload methods using the same names, and apply method
abstraction in the program design.
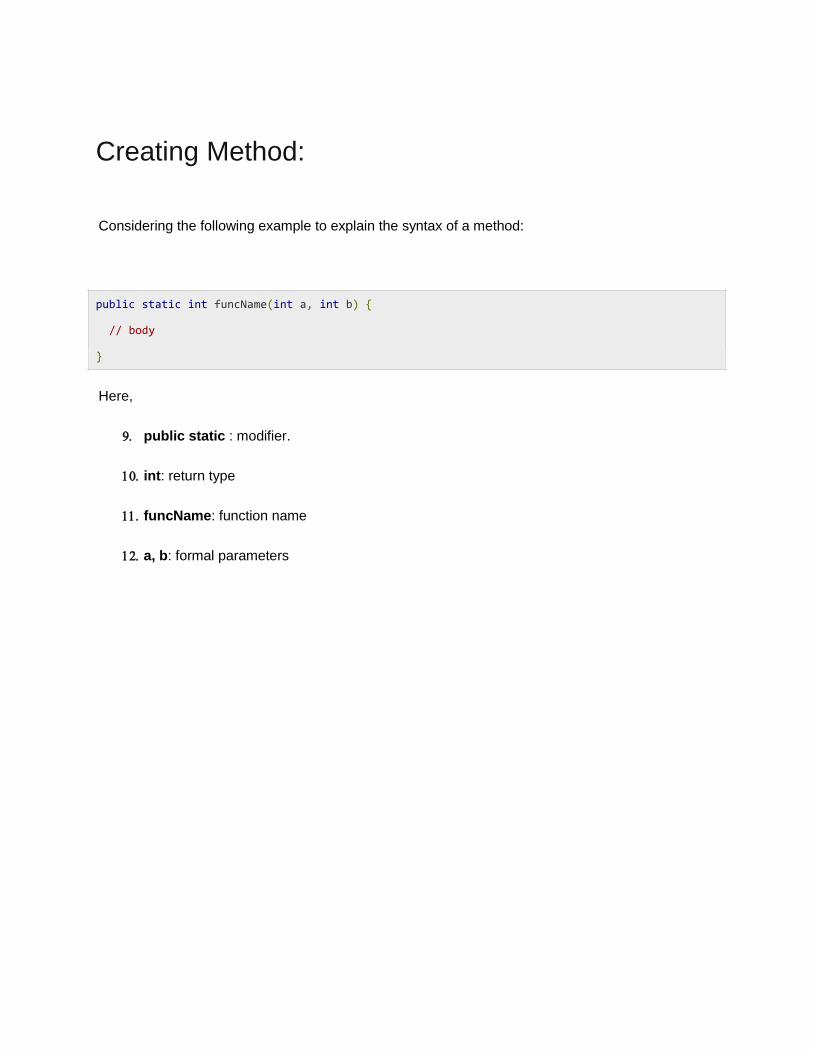
Creating Method:
Considering the following example to explain the syntax of a method:
public static int funcName(int a, int b) {
// body }
Here,
public static : modifier.
int: return type
funcName: function name
a, b: formal parameters

int a, int b: list of parameters
Methods are also known as Procedures or Functions:
Procedures: They don't return any value.
Functions: They return value.
Method definition consists of a method header and a method body. The same is shown below:
modifier returnType nameOfMethod (Parameter List) { // method body
}
The syntax shown above includes:
modifier: It defines the access type of the method and it is optional to use.
returnType: Method may return a value.
nameOfMethod: This is the method name. The method signature consists of the method
name and the parameter list.
Parameter List: The list of parameters, it is the type, order, and number of parameters of a
method. These are optional, method may contain zero parameters.
method body: The method body defines what the method does with statements.
Example: Here is the source code of the above defined method called max(). This method takes two
parameters num1 and num2 and returns the maximum between the two:
/** the snippet returns the minimum between two numbers */
public static int minFunction(int n1, int n2) {
int min;
if (n1 > n2)
min = n2;
else
min = n1;

return min;
}
Method Calling: For using a method, it should be called. There are two ways in which a method is called i.e. method
returns a value or returning nothing (no return value).
The process of method calling is simple. When a program invokes a method, the program control
gets transferred to the called method. This called method then returns control to the caller in two
conditions, when:
return statement is executed.
reaches the method ending closing brace.
The methods returning void is considered as call to a statement. Lets consider an example:
System.out.println("This is tutorialspoint.com!");
The method returning value can be understood by the following example:
int result = sum(6, 9);
Example: Following is the example to demonstrate how to define a method and how to call it:
public class ExampleMinNumber{
public static void main(String[] args) {
int a = 11;
int b = 6;
int c = minFunction(a, b);
System.out.println("Minimum Value = " + c);

}
/** returns the minimum of two numbers */
public static int minFunction(int n1, int n2) {
int min;
if (n1 > n2)
min = n2;
else
min = n1;
return min;
}
}
This would produce the following result:
Minimum value = 6
The void Keyword: The void keyword allows us to create methods which do not return a value. Here, in the following
example we're considering a void methodMETHODRANKPOINTS. This method is a void method which
does not return any value. Call to a void method must be a statement i.e.METHODRANKPOINTS(255.7);.
It is a Java statement which ends with a semicolon as shown below.
Example: public class ExampleVoid {
public static void main(String[] args)
{ methodRankPoints(255.7);
}
public static void methodRankPoints(double points)
{ if (points >= 202.5) {
System.out.println("Rank:A1");
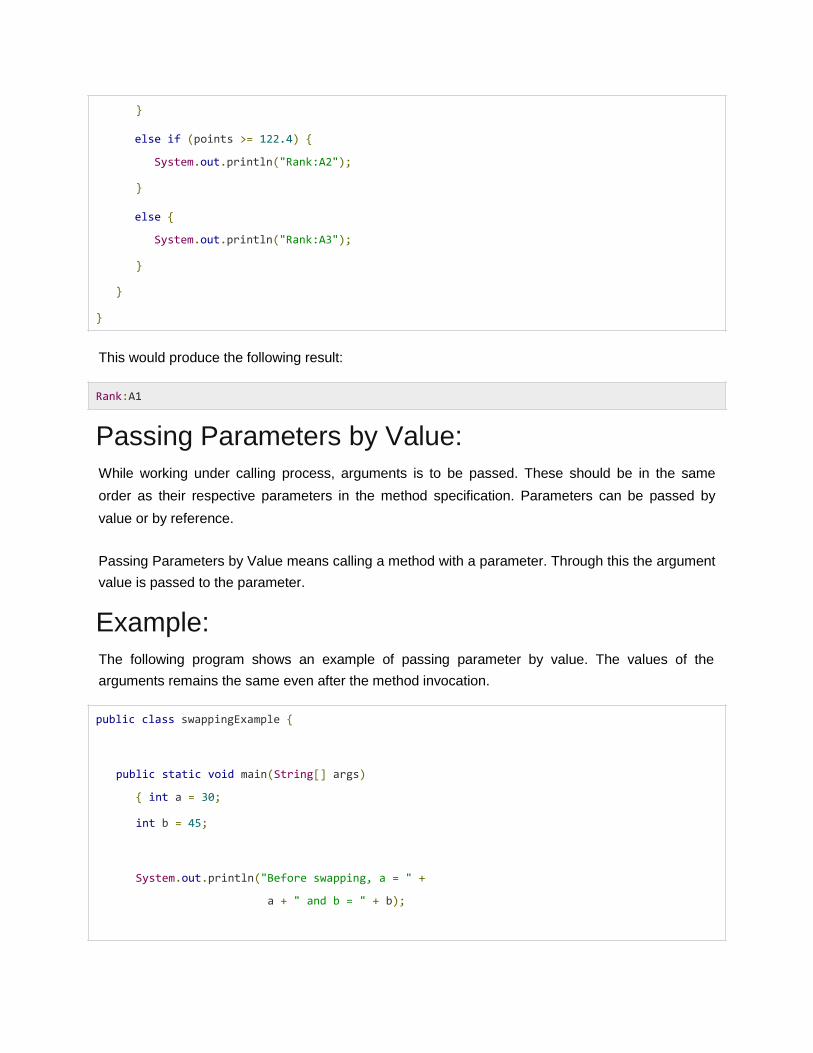
}
else if (points >= 122.4) {
System.out.println("Rank:A2");
}
else {
System.out.println("Rank:A3");
}
} }
This would produce the following result:
Rank:A1
Passing Parameters by Value: While working under calling process, arguments is to be passed. These should be in the same
order as their respective parameters in the method specification. Parameters can be passed by
value or by reference.
Passing Parameters by Value means calling a method with a parameter. Through this the argument
value is passed to the parameter.
Example: The following program shows an example of passing parameter by value. The values of the
arguments remains the same even after the method invocation.
public class swappingExample {
public static void main(String[] args)
{ int a = 30;
int b = 45;
System.out.println("Before swapping, a = " +
a + " and b = " + b);
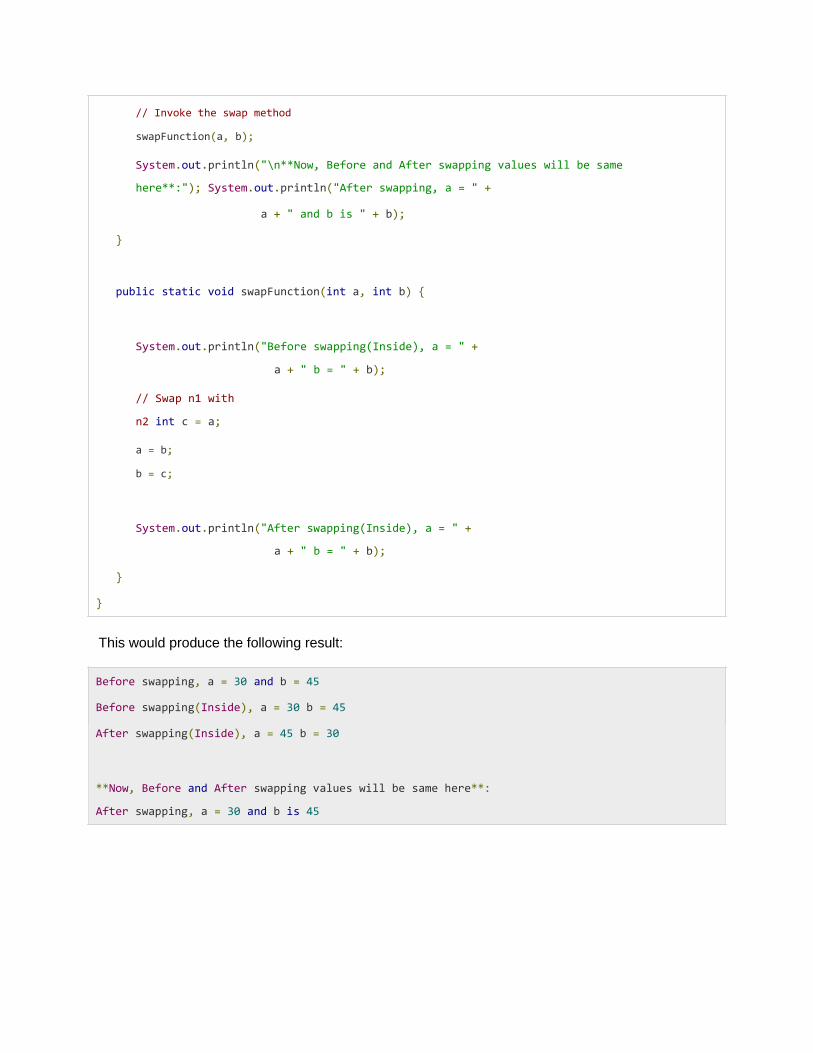
// Invoke the swap method
swapFunction(a, b);
System.out.println("\n**Now, Before and After swapping values will be same
here**:"); System.out.println("After swapping, a = " +
a + " and b is " + b);
}
public static void swapFunction(int a, int b) {
System.out.println("Before swapping(Inside), a = " +
a + " b = " + b);
// Swap n1 with
n2 int c = a;
a = b;
b = c;
System.out.println("After swapping(Inside), a = " +
a + " b = " + b);
} }
This would produce the following result:
Before swapping, a = 30 and b = 45 Before swapping(Inside), a = 30 b = 45 After swapping(Inside), a = 45 b = 30 **Now, Before and After swapping values will be same here**:
After swapping, a = 30 and b is 45

Java - Polymorphism
Polymorphism is the ability of an object to take on many forms. The most common use of
polymorphism in OOP occurs when a parent class reference is used to refer to a child class object.
Any Java object that can pass more than one IS-A test is considered to be polymorphic. In Java, all
Java objects are polymorphic since any object will pass the IS-A test for their own type and for the
class Object.
It is important to know that the only possible way to access an object is through a reference
variable. A reference variable can be of only one type. Once declared, the type of a reference
variable cannot be changed.
The reference variable can be reassigned to other objects provided that it is not declared final. The
type of the reference variable would determine the methods that it can invoke on the object.
A reference variable can refer to any object of its declared type or any subtype of its declared type.
A reference variable can be declared as a class or interface type.
Example: Let us look at an example.
public interface Vegetarian{} public class Animal{} public class Deer extends Animal implements Vegetarian{} Now, the Deer class is considered to be polymorphic since this has multiple inheritance. Following
are true for the above example:
A Deer IS-A Animal
A Deer IS-A Vegetarian
A Deer IS-A Deer
A Deer IS-A Object
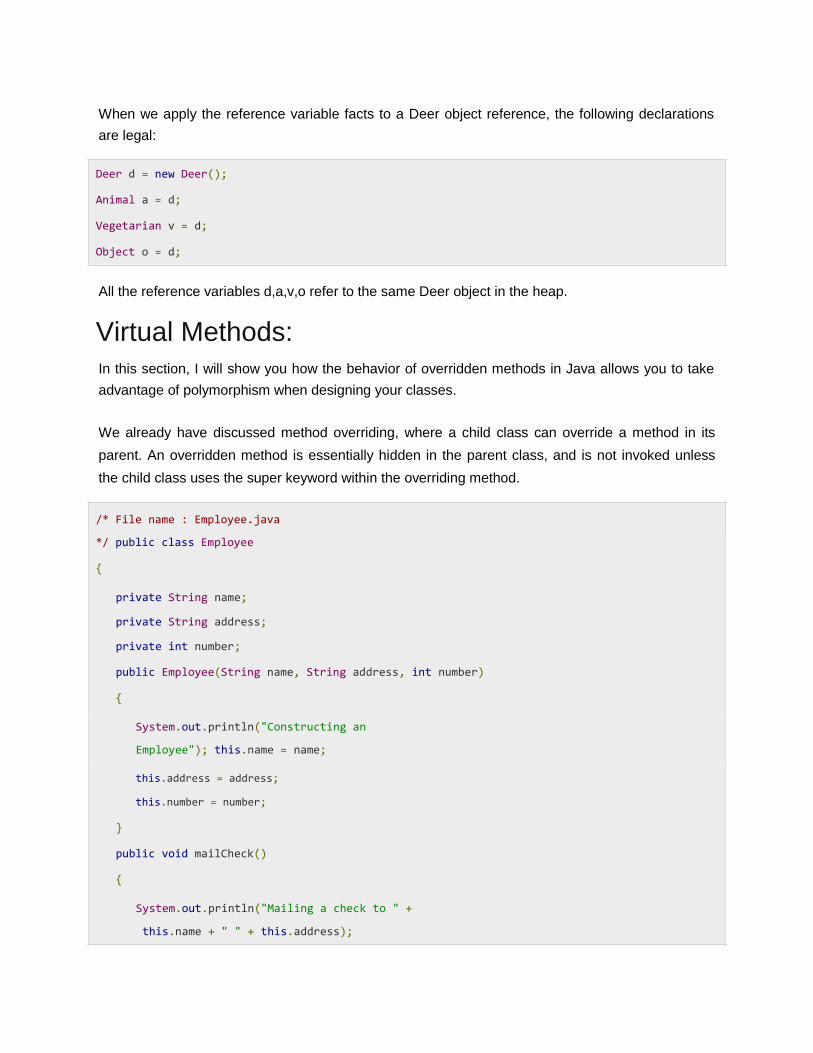
When we apply the reference variable facts to a Deer object reference, the following declarations
are legal:
Deer d = new Deer(); Animal a = d; Vegetarian v = d; Object o = d;
All the reference variables d,a,v,o refer to the same Deer object in the heap.
Virtual Methods: In this section, I will show you how the behavior of overridden methods in Java allows you to take
advantage of polymorphism when designing your classes.
We already have discussed method overriding, where a child class can override a method in its
parent. An overridden method is essentially hidden in the parent class, and is not invoked unless
the child class uses the super keyword within the overriding method.
/* File name : Employee.java
*/ public class Employee {
private String name;
private String address;
private int number;
public Employee(String name, String address, int number)
{
System.out.println("Constructing an
Employee"); this.name = name;
this.address = address;
this.number = number;
}
public void mailCheck()
{
System.out.println("Mailing a check to " +
this.name + " " + this.address);

}
public String toString()
{
return name + " " + address + " " + number;
}
public String getName()
{
return name;
}
public String getAddress()
{
return address;
}
public void setAddress(String newAddress)
{
address = newAddress;
}
public int getNumber()
{
return number;
}
}
Now suppose we extend Employee class as follows:
/* File name : Salary.java */ public class Salary extends Employee {
private double salary; //Annual salary
public Salary(String name, String address, int number, double
salary)
{
super(name, address,
number); setSalary(salary);

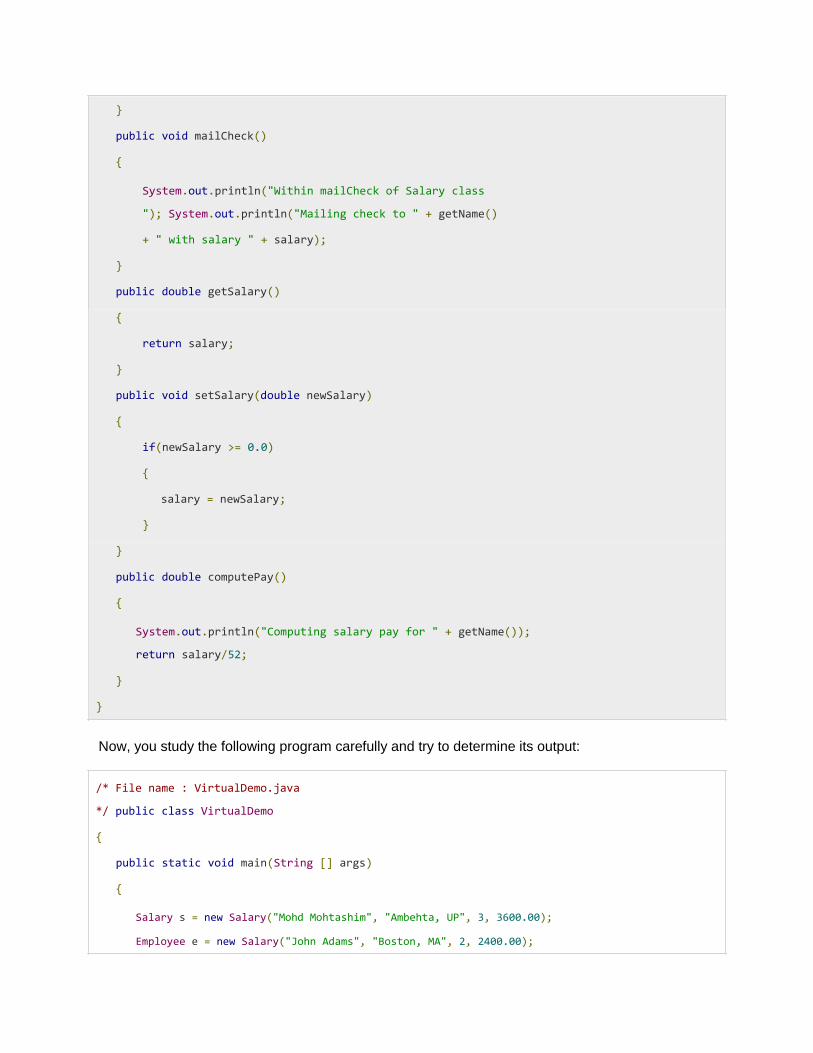
}
public void mailCheck()
{
System.out.println("Within mailCheck of Salary class
"); System.out.println("Mailing check to " + getName()
+ " with salary " + salary);
}
public double getSalary()
{
return salary;
}
public void setSalary(double newSalary)
{
if(newSalary >= 0.0)
{
salary = newSalary;
}
}
public double computePay()
{
System.out.println("Computing salary pay for " + getName());
return salary/52;
} }
Now, you study the following program carefully and try to determine its output: /* File name : VirtualDemo.java
*/ public class VirtualDemo {
public static void main(String [] args)
{
Salary s = new Salary("Mohd Mohtashim", "Ambehta, UP", 3, 3600.00);
Employee e = new Salary("John Adams", "Boston, MA", 2, 2400.00);
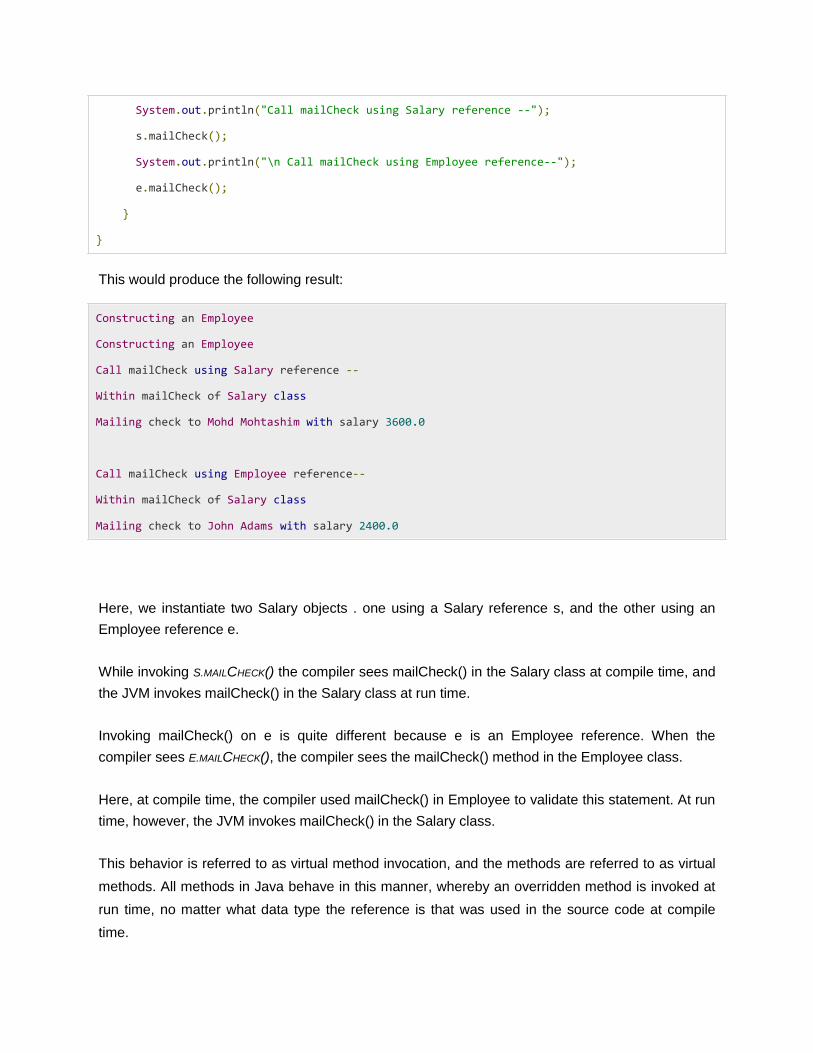
System.out.println("Call mailCheck using Salary reference --");
s.mailCheck();
System.out.println("\n Call mailCheck using Employee reference--");
e.mailCheck();
}
}
This would produce the following result:
Constructing an Employee Constructing an Employee Call mailCheck using Salary reference -- Within mailCheck of Salary class Mailing check to Mohd Mohtashim with salary 3600.0
Call mailCheck using Employee reference-- Within mailCheck of Salary class Mailing check to John Adams with salary 2400.0 Here, we instantiate two Salary objects . one using a Salary reference s, and the other using an
Employee reference e.
While invoking S.MAILCHECK() the compiler sees mailCheck() in the Salary class at compile time, and
the JVM invokes mailCheck() in the Salary class at run time.
Invoking mailCheck() on e is quite different because e is an Employee reference. When the
compiler sees E.MAILCHECK(), the compiler sees the mailCheck() method in the Employee class.
Here, at compile time, the compiler used mailCheck() in Employee to validate this statement. At run
time, however, the JVM invokes mailCheck() in the Salary class.
This behavior is referred to as virtual method invocation, and the methods are referred to as virtual
methods. All methods in Java behave in this manner, whereby an overridden method is invoked at
run time, no matter what data type the reference is that was used in the source code at compile
time.
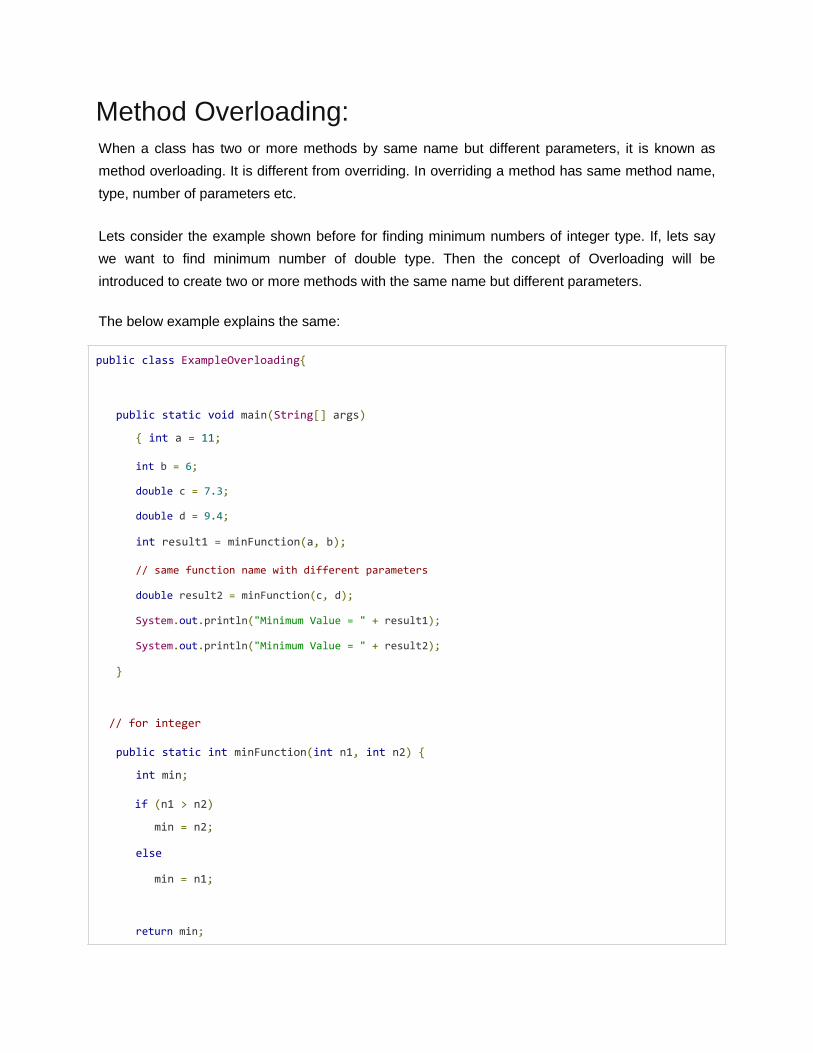
Method Overloading: When a class has two or more methods by same name but different parameters, it is known as
method overloading. It is different from overriding. In overriding a method has same method name,
type, number of parameters etc.
Lets consider the example shown before for finding minimum numbers of integer type. If, lets say
we want to find minimum number of double type. Then the concept of Overloading will be
introduced to create two or more methods with the same name but different parameters.
The below example explains the same:
public class ExampleOverloading{
public static void main(String[] args)
{ int a = 11;
int b = 6;
double c = 7.3;
double d = 9.4;
int result1 = minFunction(a, b);
// same function name with different parameters
double result2 = minFunction(c, d);
System.out.println("Minimum Value = " + result1);
System.out.println("Minimum Value = " + result2);
}
// for integer
public static int minFunction(int n1, int n2) {
int min;
if (n1 > n2)
min = n2;
else
min = n1;
return min;
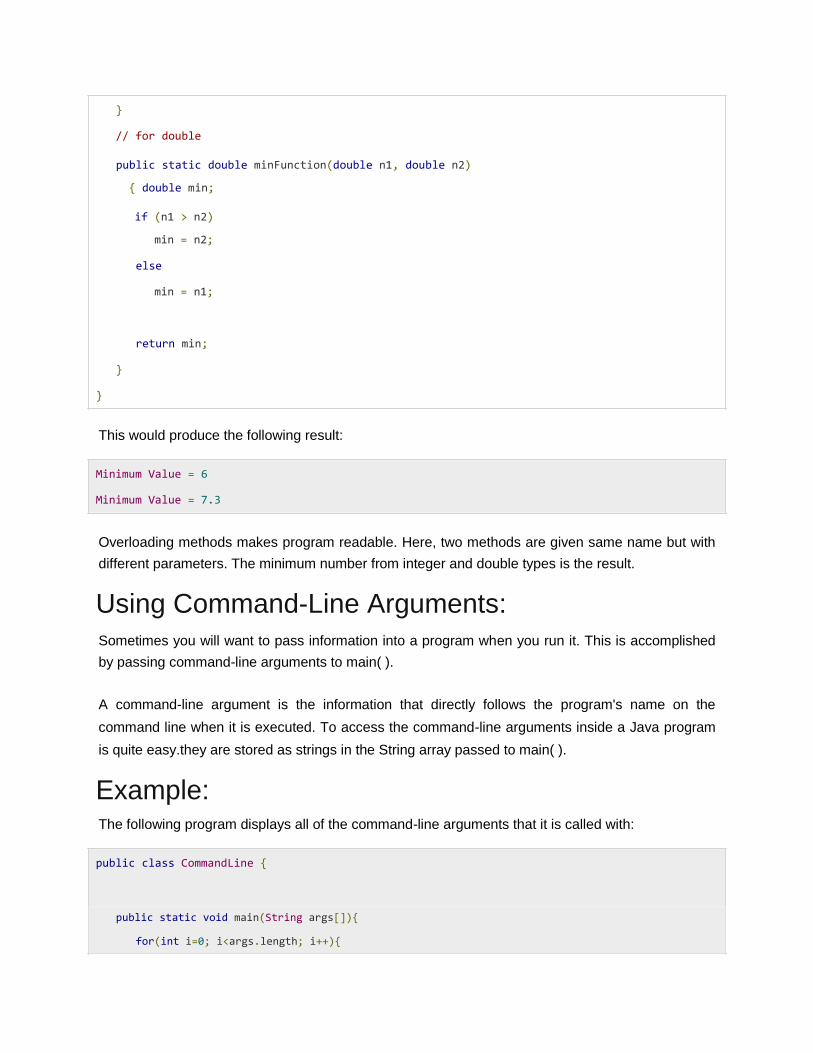
}
// for double
public static double minFunction(double n1, double n2)
{ double min;
if (n1 > n2)
min = n2;
else
min = n1;
return min;
}
}
This would produce the following result:
Minimum Value = 6 Minimum Value = 7.3 Overloading methods makes program readable. Here, two methods are given same name but with
different parameters. The minimum number from integer and double types is the result.
Using Command-Line Arguments: Sometimes you will want to pass information into a program when you run it. This is accomplished
by passing command-line arguments to main( ).
A command-line argument is the information that directly follows the program's name on the
command line when it is executed. To access the command-line arguments inside a Java program
is quite easy.they are stored as strings in the String array passed to main( ).
Example: The following program displays all of the command-line arguments that it is called with:
public class CommandLine {
public static void main(String args[]){
for(int i=0; i<args.length; i++){
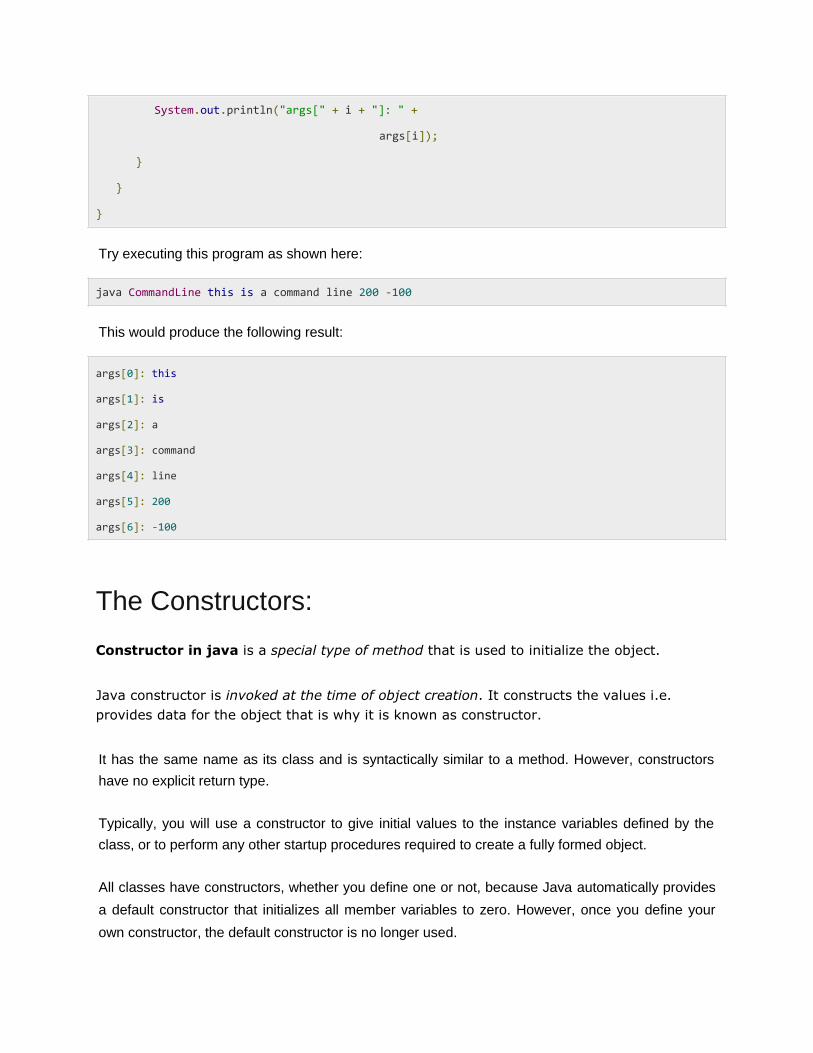
System.out.println("args[" + i + "]: " +
args[i]);
}
}
}
Try executing this program as shown here:
java CommandLine this is a command line 200 -100
This would produce the following result:
args[0]: this
args[1]: is
args[2]: a
args[3]: command
args[4]: line
args[5]: 200
args[6]: -100
The Constructors:
Constructor in java is a special type of method that is used to initialize the object. Java constructor is invoked at the time of object creation. It constructs the values i.e.
provides data for the object that is why it is known as constructor.
It has the same name as its class and is syntactically similar to a method. However, constructors
have no explicit return type.
Typically, you will use a constructor to give initial values to the instance variables defined by the
class, or to perform any other startup procedures required to create a fully formed object.
All classes have constructors, whether you define one or not, because Java automatically provides
a default constructor that initializes all member variables to zero. However, once you define your
own constructor, the default constructor is no longer used.
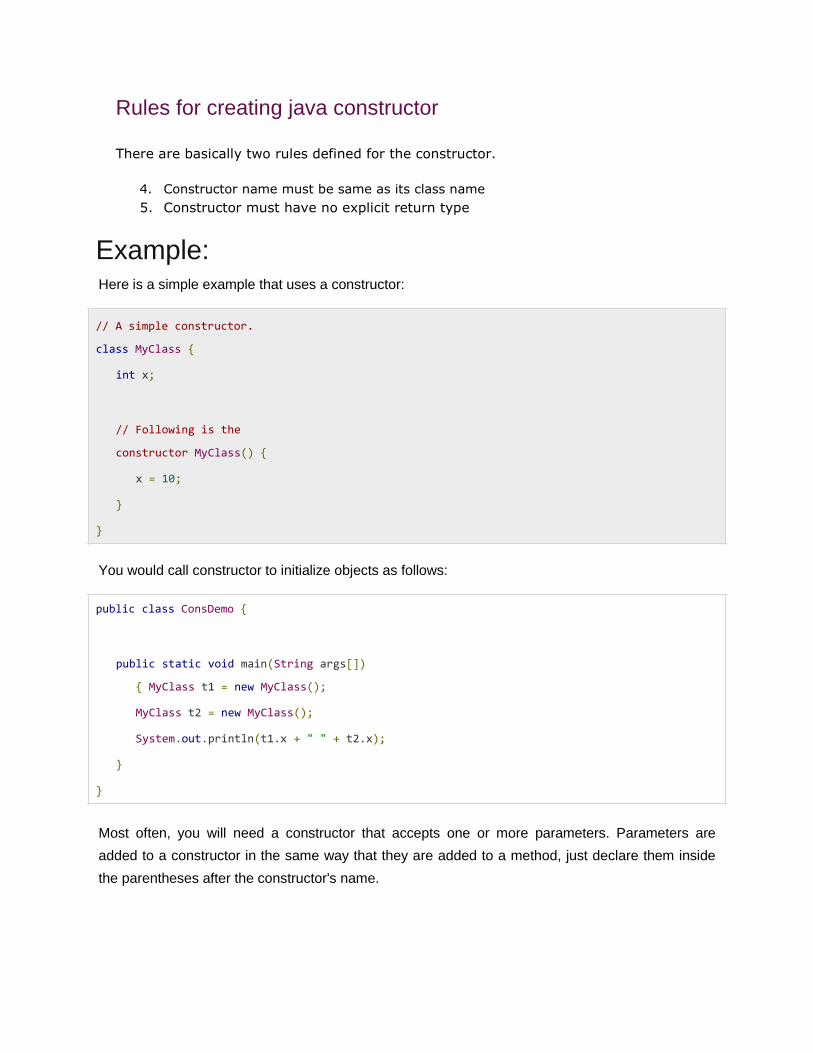
Rules for creating java constructor
There are basically two rules defined for the constructor.
4. Constructor name must be same as its class name 5. Constructor must have no explicit return type
Example: Here is a simple example that uses a constructor:
// A simple constructor.
class MyClass {
int x;
// Following is the
constructor MyClass() {
x = 10;
} }
You would call constructor to initialize objects as follows:
public class ConsDemo {
public static void main(String args[])
{ MyClass t1 = new MyClass();
MyClass t2 = new MyClass();
System.out.println(t1.x + " " + t2.x);
} } Most often, you will need a constructor that accepts one or more parameters. Parameters are
added to a constructor in the same way that they are added to a method, just declare them inside
the parentheses after the constructor's name.
Example: Here is a simple example that uses a constructor:
// A simple constructor.
class MyClass {
int x;
// Following is the
constructor MyClass(int i ) {
x = i;
} }
You would call constructor to initialize objects as follows:
public class ConsDemo {
public static void main(String args[]) {
MyClass t1 = new MyClass( 10 ); MyClass
t2 = new MyClass( 20 );
System.out.println(t1.x + " " + t2.x);
} }
This would produce the following result:
10 20
Types of java constructors
There are two types of constructors:
7. Default constructor (no-arg constructor) 8. Parameterized constructor
Java Default Constructor
Constructors that have no parameter is known as default constructor.
Syntax of default constructor:
<class_name>(){}
Example of default constructor
In this example, we are creating the no-arg constructor in the Bike class. It will be invoked
at the time of object creation.
3. class Bike1 4. { 5. Bike1() 6. { 7. System.out.println("Bike is created");
8. }
9. public static void main(String args[]) 10. { 11. Bike1 b=new Bike1(); 12. } 13. }
Test it Now
Output:
Bike is created
Rule: If there is no constructor in a class, compiler automatically creates a default constructor.
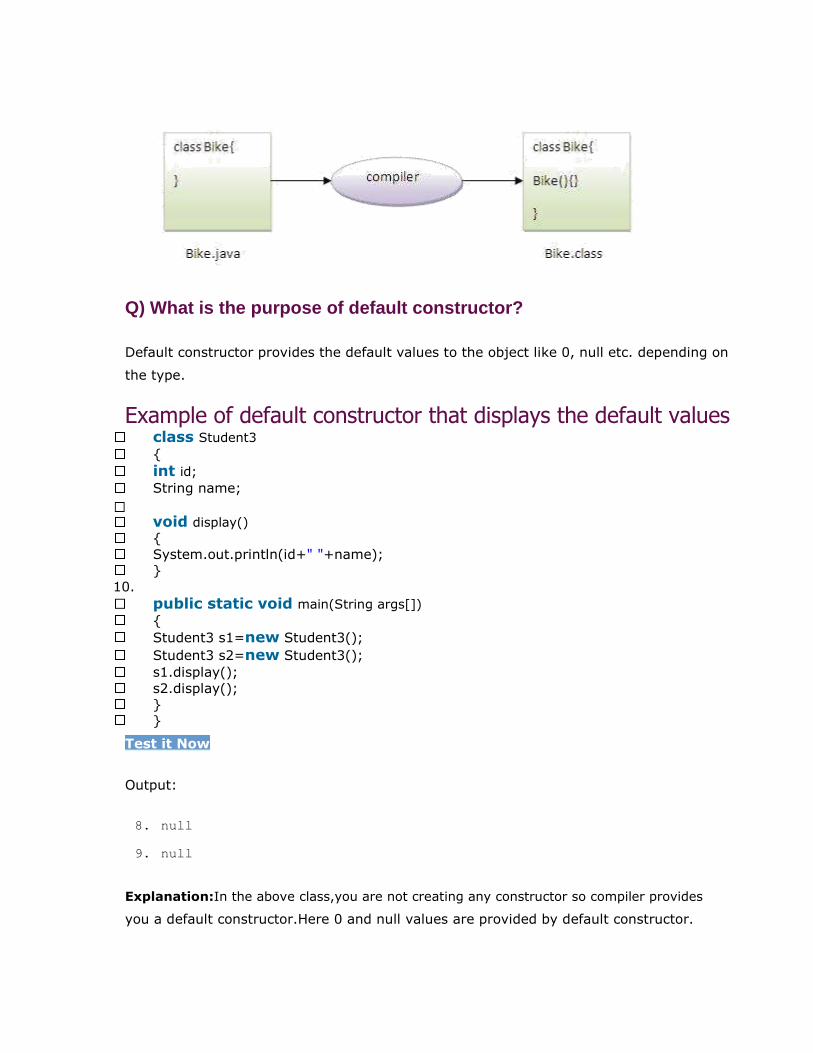
Q) What is the purpose of default constructor?
Default constructor provides the default values to the object like 0, null etc. depending on
the type.
Example of default constructor that displays the default values class Student3 { int id; String name; void display() { System.out.println(id+" "+name);
} 10.
public static void main(String args[]) { Student3 s1=new Student3(); Student3 s2=new Student3(); s1.display(); s2.display(); }
}
Test it Now
Output:
8. null
9. null
Explanation:In the above class,you are not creating any constructor so compiler provides
you a default constructor.Here 0 and null values are provided by default constructor.

Java parameterized constructor
A constructor that have parameters is known as parameterized constructor.
Why use parameterized constructor?
Parameterized constructor is used to provide different values to the distinct objects.
Example of parameterized constructor
In this example, we have created the constructor of Student class that have two
parameters. We can have any number of parameters in the constructor.
class Student4 { int id; String name;
6. Student4(int i,String n) 7. { 8. id = i; 9. name = n; 10. }
11. void display(){System.out.println(id+" "+name);} 12. 13. public static void main(String args[]){ 14. Student4 s1 = new Student4(111,"Karan"); 15. Student4 s2 = new Student4(222,"Aryan"); 16. s1.display(); 17. s2.display(); 18. } 19. }
Test it Now
Output:
111 Karan
222 Aryan
Constructor Overloading in Java
Constructor overloading is a technique in Java in which a class can have any number of
constructors that differ in parameter lists.The compiler differentiates these constructors by

taking into account the number of parameters in the list and their type.
Example of Constructor Overloading
1. class Student5 2. { 3. int id; 4. String name; 5. int age; 6. Student5(int i,String n) 7. { 8. id = i; 9. name = n;
10. }
11. Student5(int i,String n,int a) 12. {
13. id = i; 14. name = n; 15. age=a;
16. }
17. void display(){System.out.println(id+" "+name+" "+age);} 18. 19. public static void main(String args[]){ 20. Student5 s1 = new Student5(111,"Karan"); 21. Student5 s2 = new Student5(222,"Aryan",25); 22. s1.display(); 23. s2.display(); 24. } 25. }
Test it Now
Output:
111 Karan 0
222 Aryan 25
Difference between constructor and method in java
There are many differences between constructors and methods. They are given below.
Java Constructor
Java Method
Constructor is used to initialize the state of an Method is used to expose

object. behaviour of an object.
Constructor must not have return type.
Method must have return type.
Constructor is invoked implicitly. Method is invoked explicitly.
The java compiler provides a default constructor if Method is not provided by
you don't have any constructor. compiler in any case.
Constructor name must be same as the class Method name may or may not be
name. same as class name.
Java Copy Constructor
There is no copy constructor in java. But, we can copy the values of one object to another
like copy constructor in C++.
There are many ways to copy the values of one object into another in java. They are:
By constructor By assigning the values of one object into another By clone() method of Object class
In this example, we are going to copy the values of one object into another using java
constructor. 1. class Student6{ 2. int id; 3. String name; 4. Student6(int i,String n){ 5. id = i; 6. name = n; 7. } 8. 9. Student6(Student6 s){ 10. id = s.id; 11. name =s.name;
12. }
13. void display(){System.out.println(id+" "+name);} 14.

15. public static void main(String args[]){ 16. Student6 s1 = new Student6(111,"Karan"); 17. Student6 s2 = new Student6(s1); 18. s1.display(); 19. s2.display(); 20. } 21. }
Test it Now
Output:
111 Karan
111 Karan
Copying values without constructor
We can copy the values of one object into another by assigning the objects values
to another object. In this case, there is no need to create the constructor.
class Student7{ int id; String name; Student7(int i,String n){ id = i; name = n; }
Student7(){}
void display(){System.out.println(id+" "+name);} public static void main(String args[]){ Student7 s1 = new Student7(111,"Karan"); Student7 s2 = new Student7(); s2.id=s1.id; s2.name=s1.name; s1.display();
s2.display();
} }
Test it Now
Output:
111 Karan
111 Karan
Q) Does constructor return any value?
Ans:yes, that is current class instance (You cannot use return type yet it returns a value).
Can constructor perform other tasks instead of initialization?
Yes, like object creation, starting a thread, calling method etc. You can perform
any operation in the constructor as you perform in the method.
Variable Arguments(var-args): JDK 1.5 enables you to pass a variable number of arguments of the same type to a method. The
parameter in the method is declared as follows:
typeName... parameterName In the method declaration, you specify the type followed by an ellipsis (...) Only one variable-length
parameter may be specified in a method, and this parameter must be the last parameter. Any
regular parameters must precede it.
Example: public class VarargsDemo {
public static void main(String args[])
{ // Call method with variable args
printMax(34, 3, 3, 2, 56.5);
printMax(new double[]{1, 2, 3});
}
public static void printMax( double... numbers)
{ if (numbers.length == 0) {
System.out.println("No argument passed");
return;
}
double result = numbers[0];

for (int i = 1; i < numbers.length; i++)
if (numbers[i] > result)
result = numbers[i];
System.out.println("The max value is " + result);
} }
This would produce the following result:
The max value is 56.5 The max value is 3.0
The finalize( ) Method: It is possible to define a method that will be called just before an object's final destruction by the
garbage collector. This method is called finalize( ), and it can be used to ensure that an object
terminates cleanly.
For example, you might use finalize( ) to make sure that an open file owned by that object is closed.
To add a finalizer to a class, you simply define the finalize( ) method. The Java runtime calls that
method whenever it is about to recycle an object of that class.
Inside the finalize( ) method, you will specify those actions that must be performed before an object
is destroyed.
The finalize( ) method has this general form:
protected void finalize( ) {
// finalization code here } Here, the keyword protected is a specifier that prevents access to finalize( ) by code defined
outside its class.
This means that you cannot know when or even if finalize( ) will be executed. For example, if your
program ends before garbage collection occurs, finalize( ) will not execute.

Method Overloading in Java
If a class have multiple methods by same name but different parameters, it is
known as Method Overloading.
If we have to perform only one operation, having same name of the methods increases
the readability of the program.
Suppose you have to perform addition of the given numbers but there can be any number
of arguments, if you write the method such as a(int,int) for two parameters, and
b(int,int,int) for three parameters then it may be difficult for you as well as other
programmers to understand the behaviour of the method because its name differs. So,
we perform method overloading to figure out the program quickly.
Advantage of method overloading?
Method overloading increases the readability of the program.
Different ways to overload the method
There are two ways to overload the method in java
By changing number of arguments By changing the data type
In java, Methood Overloading is not possible by changing the return type of the method.
1)Example of Method Overloading by changing the no. of arguments
In this example, we have created two overloaded methods, first sum method performs
addition of two numbers and second sum method performs addition of three numbers. 4. class Calculation{ 5. void sum(int a,int b){System.out.println(a+b);}
6. void sum(int a,int b,int c){System.out.println(a+b+c);} 7.
public static void main(String args[]){

Calculation obj=new Calculation(); obj.sum(10,10,10); obj.sum(20,20);
9. 4) } 5) }
Test it Now
Output:30
40
2)Example of Method Overloading by changing data type of argument
In this example, we have created two overloaded methods that differs in data type. The
first sum method receives two integer arguments and second sum method receives two
double arguments.
class Calculation2{ void sum(int a,int b){System.out.println(a+b);}
void sum(double a,double b){System.out.println(a+b);}
5. public static void main(String args[]){ 6. Calculation2 obj=new Calculation2();
7. obj.sum(10.5,10.5); 8. obj.sum(20,20); 9. 10. } 11. }
Test it Now
Output:21.0
40
Que) Why Method Overloaing is not possible by changing the return type of method?
In java, method overloading is not possible by changing the return type of the
method because there may occur ambiguity. Let's see how ambiguity may occur:
because there was problem:

1. class Calculation3{ 2. int sum(int a,int b){System.out.println(a+b);} 3. double sum(int a,int b){System.out.println(a+b);} 4. 5. public static void main(String args[]){ 6. Calculation3 obj=new Calculation3();
7. int result=obj.sum(20,20); //Compile Time Error 8. 9. } 10. }
Test it Now
int result=obj.sum(20,20); //Here how can java determine which sum() method should
be called
Can we overload main() method?
Yes, by method overloading. You can have any number of main methods in a class by
method overloading. Let's see the simple example: 1. class Overloading1{ 2. public static void main(int a){ 3. System.out.println(a);
4. }
5. 6. public static void main(String args[]){ 7. System.out.println("main() method invoked");
8. main(10); 9. } 10. }
Test it Now
Output:main() method invoked
10
Method Overloading and TypePromotion
One type is promoted to another implicitly if no matching datatype is found. Let's
understand the concept by the figure given below:

As displayed in the above diagram, byte can be promoted to short, int, long, float or
double. The short datatype can be promoted to int,long,float or double. The char datatype
can be promoted to int,long,float or double and so on.
Example of Method Overloading with TypePromotion 1. class OverloadingCalculation1{ 2. void sum(int a,long b){System.out.println(a+b);}
3. void sum(int a,int b,int c){System.out.println(a+b+c);} 4. 5. public static void main(String args[]){ 6. OverloadingCalculation1 obj=new OverloadingCalculation1();
7. obj.sum(20,20);//now second int literal will be promoted to long 8. obj.sum(20,20,20); 9. 10. } 11. }
Test it Now
Output:40

60
Example of Method Overloading with TypePromotion if matching found
If there are matching type arguments in the method, type promotion is not performed. 1. class OverloadingCalculation2{ 2. void sum(int a,int b){System.out.println("int arg method invoked");}
3. void sum(long a,long b){System.out.println("long arg method invoked");} 4. 5. public static void main(String args[]){ 6. OverloadingCalculation2 obj=new OverloadingCalculation2();
7. obj.sum(20,20);//now int arg sum() method gets invoked 8. } 9. }
Test it Now
Output:int arg method invoked
Example of Method Overloading with TypePromotion in case ambiguity
If there are no matching type arguments in the method, and each method promotes similar
number of arguments, there will be ambiguity.
1. class OverloadingCalculation3{ 2. void sum(int a,long b){System.out.println("a method invoked");} 3. void sum(long a,int b){System.out.println("b method invoked");} 4. 5. public static void main(String args[]){ 6. OverloadingCalculation3 obj=new OverloadingCalculation3();
7. obj.sum(20,20);//now ambiguity 8. } 9. }
Test it Now
Output:Compile Time Error

One type is not de-promoted implicitly for example double cannot be depromoted to
any type implicitely.
Java static keyword
1. Static variable
2. Program of counter without static variable
3. Program of counter with static variable
4. Static method
5. Restrictions for static method
6. Why main method is static ?
7. Static block
8. Can we execute a program without main method ?
The static keyword in java is used for memory management mainly. We can apply java
static keyword with variables, methods, blocks and nested class. The static keyword
belongs to the class than instance of the class.
The static can be:
1. variable (also known as class variable) 2. method (also known as class method) 3. block 4. nested class
Java static variable
If you declare any variable as static, it is known static variable.
The static variable can be used to refer the common property of all objects (that
is not unique for each object) e.g. company name of employees,college name of students etc.
The static variable gets memory only once in class area at the time of class loading.
Advantage of static variable
It makes your program memory efficient (i.e it saves memory).
Understanding problem without static variable
1. class Student{

2. int rollno; 3. String name; 4. String college="ITS"; 5. }
Suppose there are 500 students in my college, now all instance data members will get
memory each time when object is created.All student have its unique rollno and name so
instance data member is good.Here, college refers to the common property of all objects.If
we make it static,this field will get memory only once.
Java static property is shared to all objects.
Example of static variable 1. //Program of static variable 2. 3. class Student8{ 4. int rollno; 5. String name; 6. static String college ="ITS"; 7. 8. Student8(int r,String n){ 9. rollno = r; 10. name = n; 11. } 12. void display (){System.out.println(rollno+" "+name+" "+college);} 13.
14. public static void main(String args[]){ 15. Student8 s1 = new Student8(111,"Karan"); 16. Student8 s2 = new Student8(222,"Aryan"); 17. 18. s1.display();
19. s2.display(); 20. } 21. }
Test it Now
Output:111 Karan ITS
222 Aryan ITS

Program of counter without static variable
In this example, we have created an instance variable named count which is incremented
in the constructor. Since instance variable gets the memory at the time of object creation,
each object will have the copy of the instance variable, if it is incremented, it won't reflect
to other objects. So each objects will have the value 1 in the count variable.
1. class Counter{ 2. int count=0;//will get memory when instance is created 3.
4. Counter(){ 5. count++;
6. System.out.println(count);
7. } 8.
9. public static void main(String args[]){ 10. 11. Counter c1=new Counter();
12. Counter c2=new Counter();
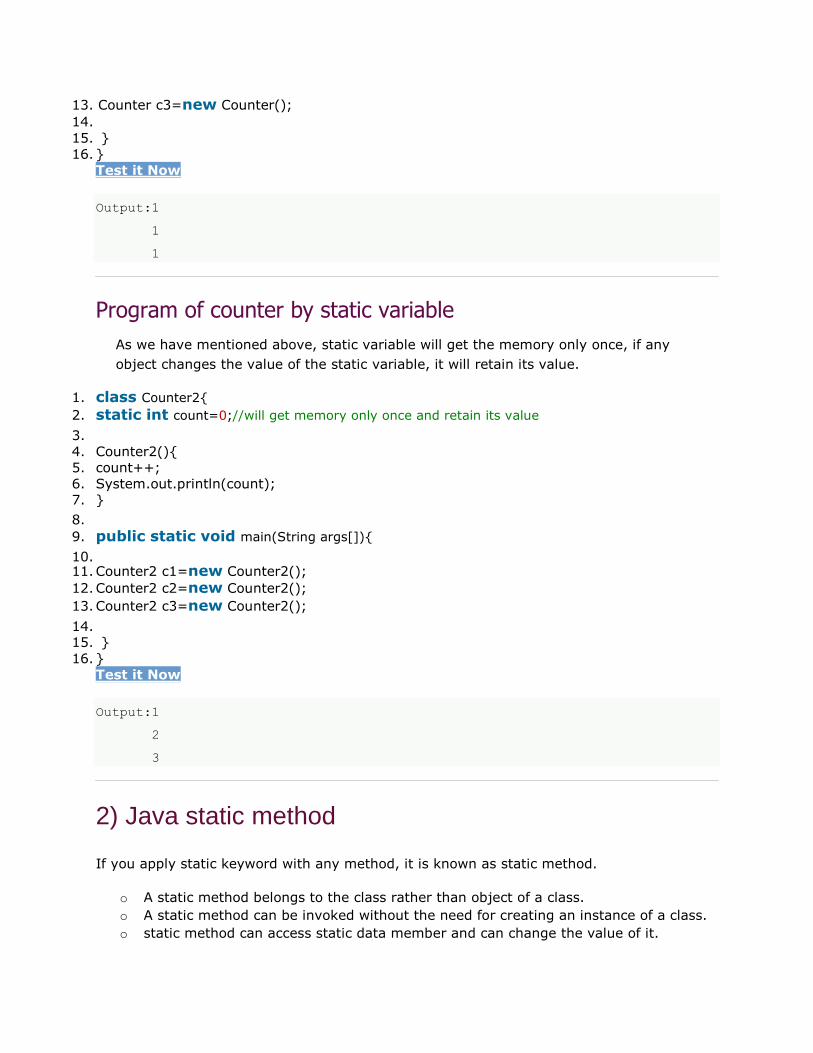
13. Counter c3=new Counter(); 14. 15. } 16. }
Test it Now
Output:1
1
1
Program of counter by static variable
As we have mentioned above, static variable will get the memory only once, if any
object changes the value of the static variable, it will retain its value. 1. class Counter2{ 2. static int count=0;//will get memory only once and retain its value 3.
4. Counter2(){ 5. count++;
6. System.out.println(count); 7. } 8.
9. public static void main(String args[]){ 10. 11. Counter2 c1=new Counter2();
12. Counter2 c2=new Counter2(); 13. Counter2 c3=new Counter2(); 14. 15. } 16. }
Test it Now
Output:1
2
3
2) Java static method
If you apply static keyword with any method, it is known as static method.
o A static method belongs to the class rather than object of a class.
o A static method can be invoked without the need for creating an instance of a class.
o static method can access static data member and can change the value of it.
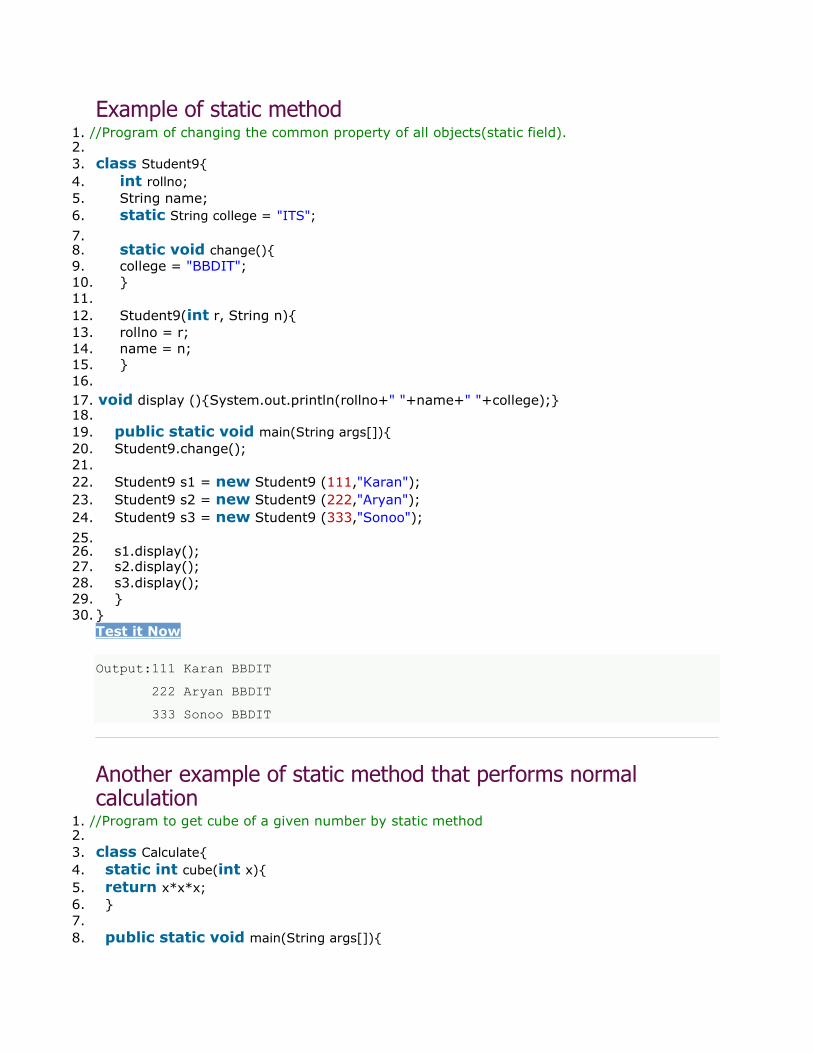
Example of static method 1. //Program of changing the common property of all objects(static field). 2. 3. class Student9{ 4. int rollno; 5. String name; 6. static String college = "ITS"; 7. 8. static void change(){ 9. college = "BBDIT"; 10. }
11. 12. Student9(int r, String n){ 13. rollno = r; 14. name = n; 15. } 16. 17. void display (){System.out.println(rollno+" "+name+" "+college);} 18. 19. public static void main(String args[]){ 20. Student9.change();
21. 22. Student9 s1 = new Student9 (111,"Karan");
23. Student9 s2 = new Student9 (222,"Aryan"); 24. Student9 s3 = new Student9 (333,"Sonoo"); 25. 26. s1.display(); 27. s2.display(); 28. s3.display(); 29. }
30. } Test it Now
Output:111 Karan BBDIT
222 Aryan BBDIT
333 Sonoo BBDIT
Another example of static method that performs normal calculation
1. //Program to get cube of a given number by static method 2. 3. class Calculate{ 4. static int cube(int x){ 5. return x*x*x; 6. } 7. 8. public static void main(String args[]){

9. int result=Calculate.cube(5); 10. System.out.println(result); 11. } 12. }
Test it Now
Output:125 Restrictions for static method
There are two main restrictions for the static method. They are:
1. The static method can not use non static data member or call non-static
method directly. 2. this and super cannot be used in static context.
1. class A{ 2. int a=40;//non static 3.
public static void main(String args[]){ System.out.println(a); } }
Test it Now
Output:Compile Time Error
Q) why java main method is static?
Ans) because object is not required to call static method if it were non-static method,
jvm create object first then call main() method that will lead the problem of extra
memory allocation.
3) Java static block // Is used to initialize the static data member.
// It is executed before main method at the time of classloading.
Example of static block
// class A2{ // static{System.out.println("static block is invoked");} // public static void main(String args[]){ // System.out.println("Hello main"); // }
// }
Test it Now
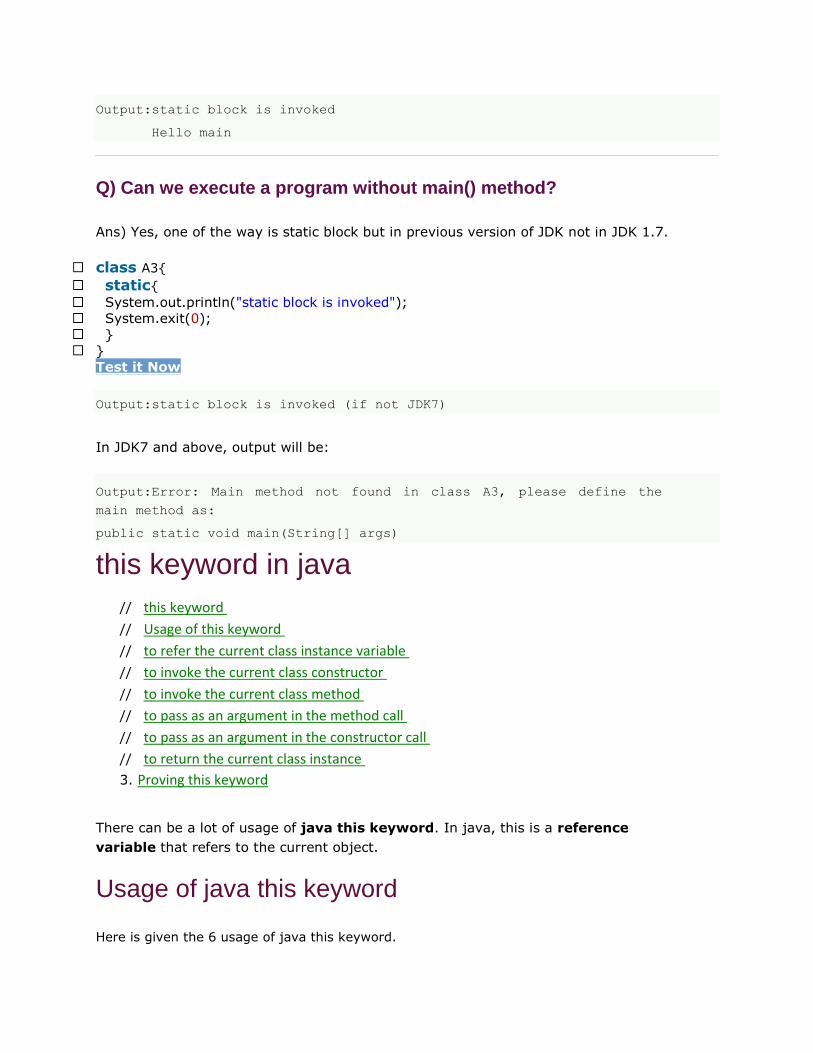
Output:static block is invoked
Hello main
Q) Can we execute a program without main() method?
Ans) Yes, one of the way is static block but in previous version of JDK not in JDK 1.7.
class A3{ static{ System.out.println("static block is invoked"); System.exit(0); } }
Test it Now
Output:static block is invoked (if not JDK7)
In JDK7 and above, output will be:
Output:Error: Main method not found in class A3, please define the
main method as:
public static void main(String[] args)
this keyword in java
// this keyword
// Usage of this keyword // to refer the current class instance variable
// to invoke the current class constructor
// to invoke the current class method
// to pass as an argument in the method call
// to pass as an argument in the constructor call
// to return the current class instance 3. Proving this keyword
There can be a lot of usage of java this keyword. In java, this is a reference
variable that refers to the current object.
Usage of java this keyword
Here is given the 6 usage of java this keyword.

this keyword can be used to refer current class instance variable. this() can be used to invoke current class constructor. this keyword can be used to invoke current class method (implicitly) this can be passed as an argument in the method call. this can be passed as argument in the constructor call. this keyword can also be used to return the current class instance.
Suggestion: If you are beginner to java, lookup only two usage of this keyword.
1) The this keyword can be used to refer current class instance variable.
If there is ambiguity between the instance variable and parameter, this keyword resolves
the problem of ambiguity.
Understanding the problem without this keyword
Let's understand the problem if we don't use this keyword by the example given below: 1. class Student10{ 2. int id; 3. String name; 4. 5. Student10(int id,String name){ 6. id = id; 7. name = name; 8. }
9. void display(){System.out.println(id+" "+name);} 10. 11. public static void main(String args[]){ 12. Student10 s1 = new Student10(111,"Karan"); 13. Student10 s2 = new Student10(321,"Aryan"); 14. s1.display();
15. s2.display();
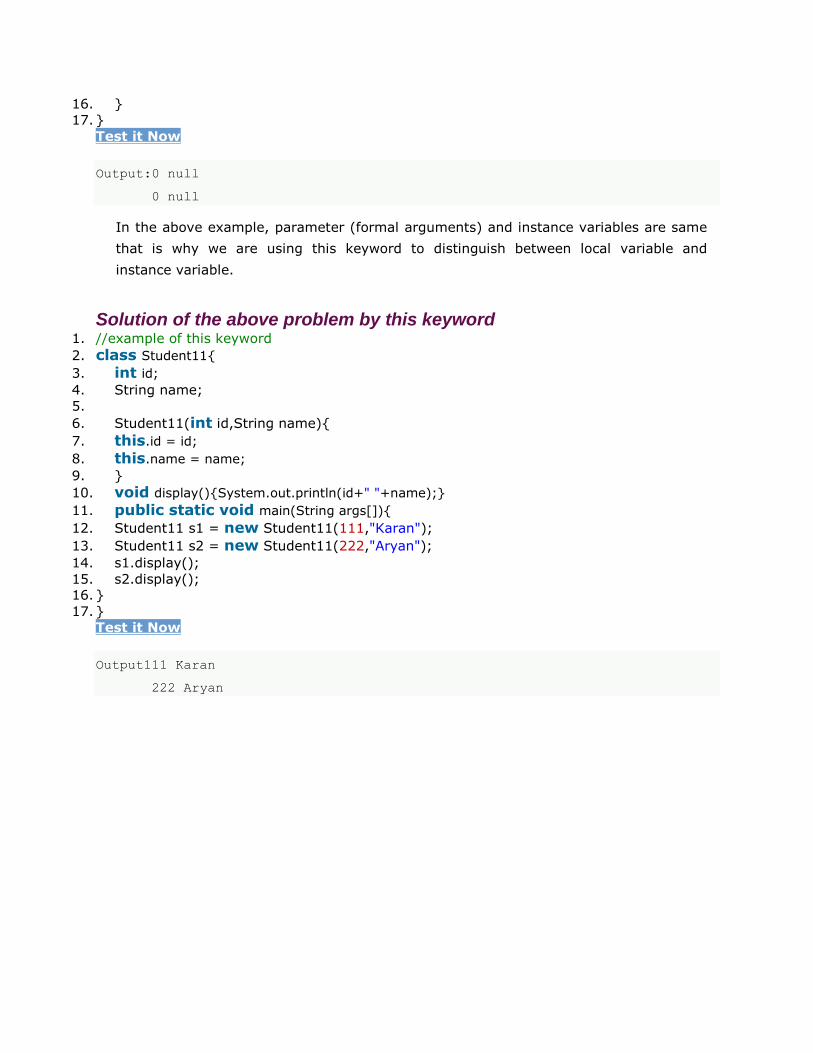
16. } 17. }
Test it Now
Output:0 null
0 null
In the above example, parameter (formal arguments) and instance variables are same
that is why we are using this keyword to distinguish between local variable and
instance variable.
Solution of the above problem by this keyword 1. //example of this keyword 2. class Student11{ 3. int id; 4. String name;
5. 6. Student11(int id,String name){
7. this.id = id; 8. this.name = name; 9. } 10. void display(){System.out.println(id+" "+name);} 11. public static void main(String args[]){ 12. Student11 s1 = new Student11(111,"Karan");
13. Student11 s2 = new Student11(222,"Aryan"); 14. s1.display(); 15. s2.display(); 16. } 17. }
Test it Now
Output111 Karan
222 Aryan

If local variables(formal arguments) and instance variables are different, there is no need
to use this keyword like in the following program:
Program where this keyword is not required 1. class Student12{ 2. int id; 3. String name; 4. 5. Student12(int i,String n){ 6. id = i; 7. name = n; 8. }
9. void display(){System.out.println(id+" "+name);} 10. public static void main(String args[]){ 11. Student12 e1 = new Student12(111,"karan");
12. Student12 e2 = new Student12(222,"Aryan"); 13. e1.display(); 14. e2.display();
15. } 16. }
Test it Now
Output:111 Karan

222 Aryan
2) this() can be used to invoked current class constructor.
The this() constructor call can be used to invoke the current class constructor
(constructor chaining). This approach is better if you have many constructors in the class
and want to reuse that constructor.
1. //Program of this() constructor call (constructor chaining) 2. 3. class Student13{ 4. int id; 5. String name; 6. Student13(){System.out.println("default constructor is invoked");} 7. 8. Student13(int id,String name){ 9. this ();//it is used to invoked current class constructor. 10. this.id = id; 11. this.name = name; 12. } 13. void display(){System.out.println(id+" "+name);} 14. 15. public static void main(String args[]){ 16. Student13 e1 = new Student13(111,"karan"); 17. Student13 e2 = new Student13(222,"Aryan"); 18. e1.display(); 19. e2.display();
20. } 21. }
Test it Now
Output:
default constructor is invoked
default constructor is invoked
111 Karan
222 Aryan
Where to use this() constructor call?
The this() constructor call should be used to reuse the constructor in the constructor. It
maintains the chain between the constructors i.e. it is used for constructor chaining.
Let's see the example given below that displays the actual use of this keyword. 1. class Student14{ 2. int id; 3. String name;
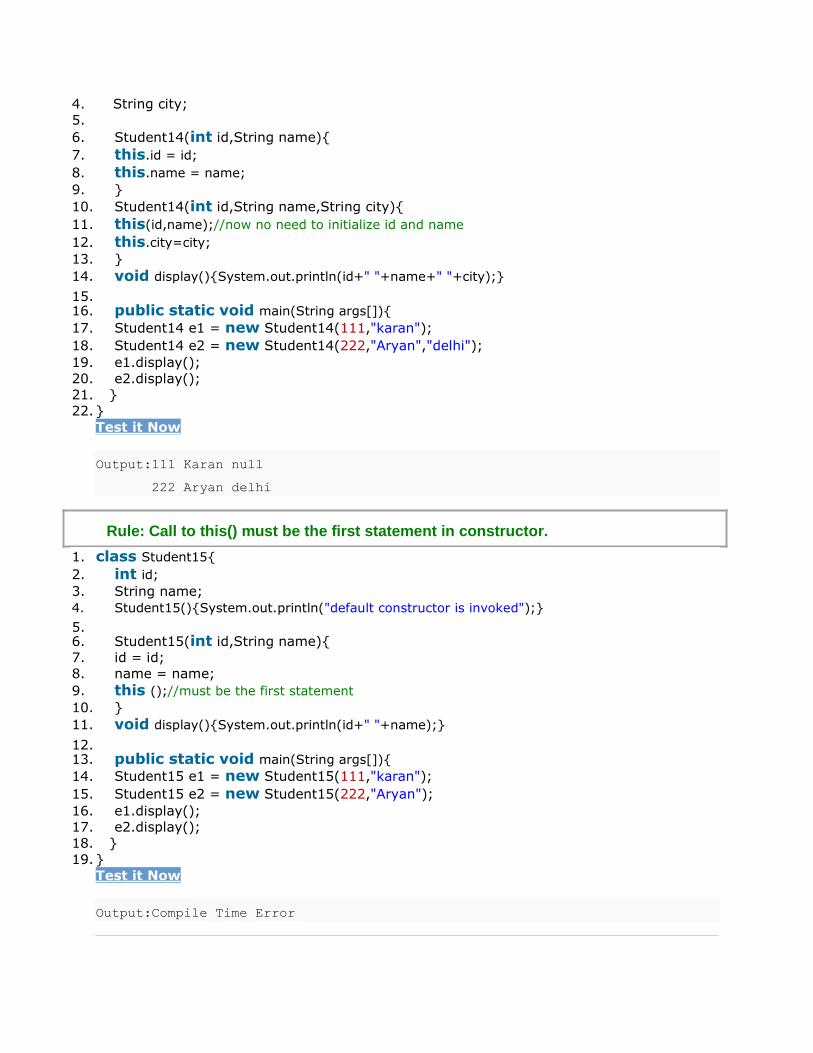
4. String city; 5. 6. Student14(int id,String name){
7. this.id = id; 8. this.name = name; 9. } 10. Student14(int id,String name,String city){
11. this(id,name);//now no need to initialize id and name 12. this.city=city; 13. } 14. void display(){System.out.println(id+" "+name+" "+city);} 15. 16. public static void main(String args[]){ 17. Student14 e1 = new Student14(111,"karan");
18. Student14 e2 = new Student14(222,"Aryan","delhi"); 19. e1.display(); 20. e2.display(); 21. }
22. } Test it Now
Output:111 Karan null
222 Aryan delhi
Rule: Call to this() must be the first statement in constructor. 1. class Student15{ 2. int id; 3. String name; 4. Student15(){System.out.println("default constructor is invoked");} 5. 6. Student15(int id,String name){ 7. id = id; 8. name = name;
9. this ();//must be the first statement 10. } 11. void display(){System.out.println(id+" "+name);} 12. 13. public static void main(String args[]){ 14. Student15 e1 = new Student15(111,"karan");
15. Student15 e2 = new Student15(222,"Aryan"); 16. e1.display(); 17. e2.display();
18. } 19. }
Test it Now
Output:Compile Time Error
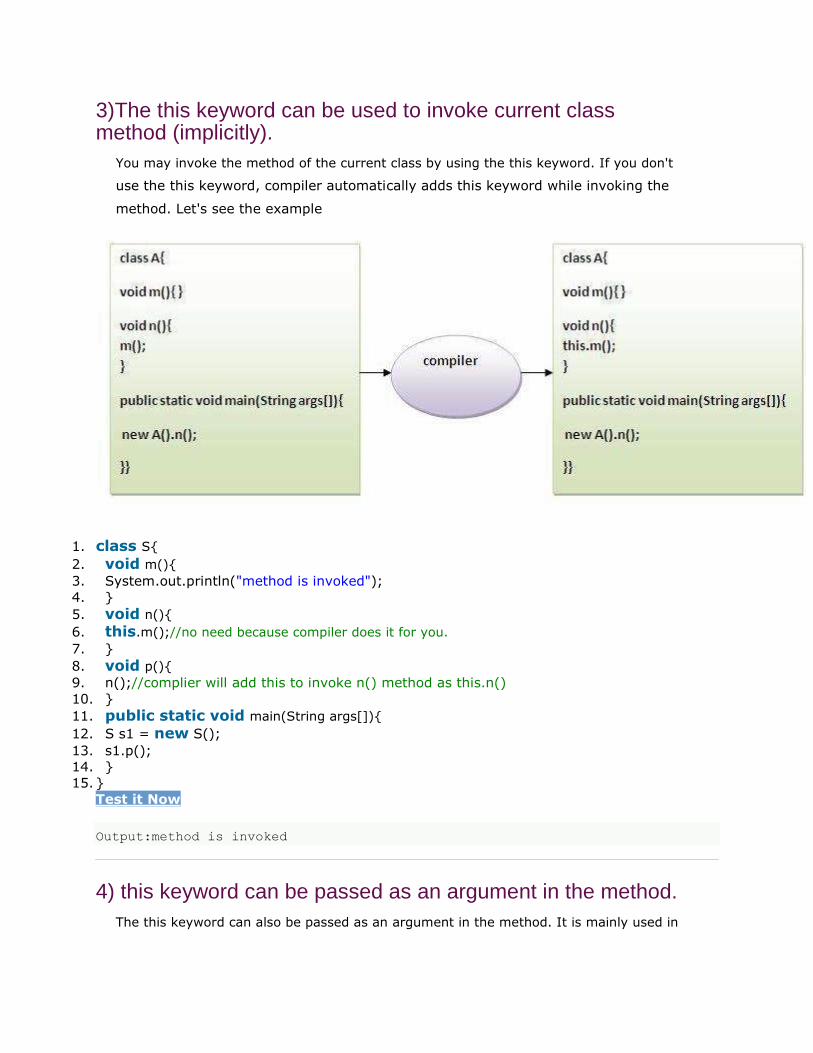
3)The this keyword can be used to invoke current class method (implicitly).
You may invoke the method of the current class by using the this keyword. If you don't
use the this keyword, compiler automatically adds this keyword while invoking the
method. Let's see the example
1. class S{ 2. void m(){ 3. System.out.println("method is invoked"); 4. } 5. void n(){ 6. this.m();//no need because compiler does it for you. 7. } 8. void p(){ 9. n();//complier will add this to invoke n() method as this.n() 10. } 11. public static void main(String args[]){ 12. S s1 = new S(); 13. s1.p(); 14. }
15. } Test it Now
Output:method is invoked
4) this keyword can be passed as an argument in the method. The this keyword can also be passed as an argument in the method. It is mainly used in
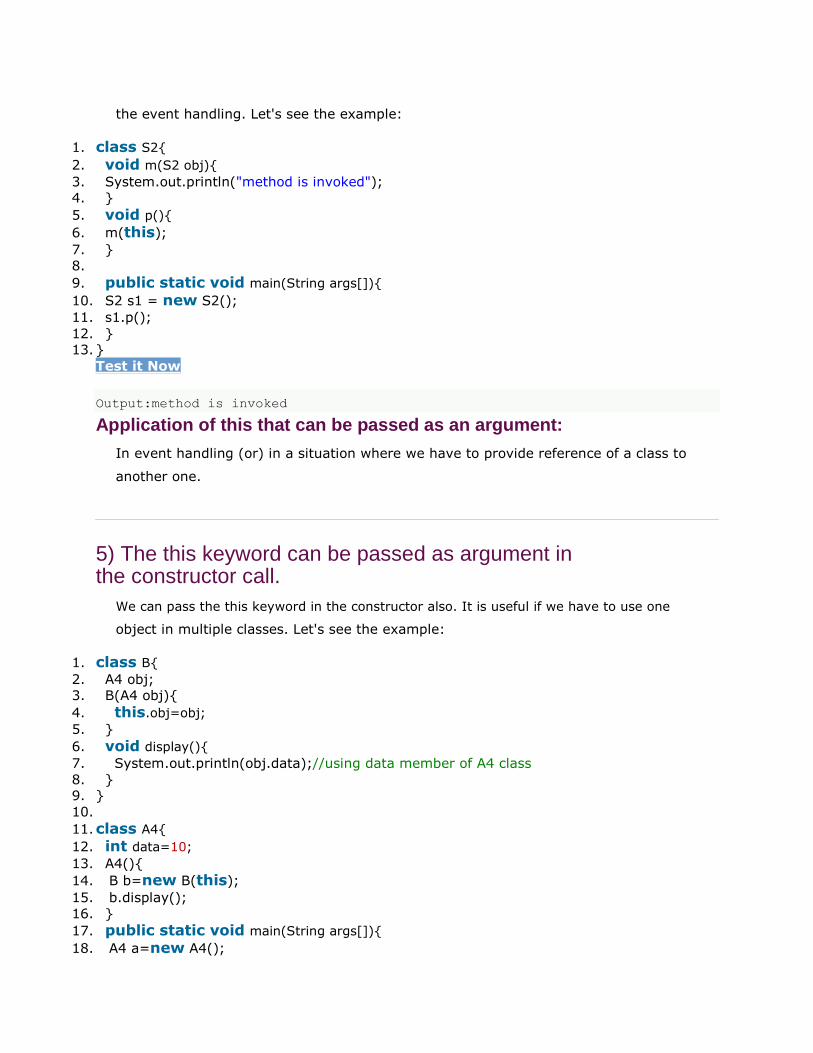
the event handling. Let's see the example:
1. class S2{ 2. void m(S2 obj){ 3. System.out.println("method is invoked"); 4. } 5. void p(){ 6. m(this); 7. }
8. 9. public static void main(String args[]){ 10. S2 s1 = new S2(); 11. s1.p(); 12. } 13. }
Test it Now
Output:method is invoked Application of this that can be passed as an argument:
In event handling (or) in a situation where we have to provide reference of a class to
another one.
5) The this keyword can be passed as argument in the constructor call.
We can pass the this keyword in the constructor also. It is useful if we have to use one
object in multiple classes. Let's see the example:
1. class B{ 2. A4 obj; 3. B(A4 obj){
4. this.obj=obj; 5. } 6. void display(){ 7. System.out.println(obj.data);//using data member of A4 class 8. } 9. } 10. 11. class A4{ 12. int data=10; 13. A4(){ 14. B b=new B(this); 15. b.display(); 16. }
17. public static void main(String args[]){ 18. A4 a=new A4();

19. } 20. }
Test it Now
Output:10
6) The this keyword can be used to return current class instance.
We can return the this keyword as an statement from the method. In such case, return
type of the method must be the class type (non-primitive). Let's see the example:
Syntax of this that can be returned as a statement 1. return_type method_name(){ 2. return this; 3. }
Example of this keyword that you return as a statement from the method
1. class A{ 2. A getA(){ 3. return this; 4. } 5. void msg(){System.out.println("Hello java");} 6. }
7. 8. class Test1{ 9. public static void main(String args[]){ 10. new A().getA().msg(); 11. } 12. }
Test it Now
Output:Hello java
Proving this keyword
Let's prove that this keyword refers to the current class instance variable. In this
program, we are printing the reference variable and this, output of both variables
are same. 1. class A5{ 2. void m(){ 3. System.out.println(this);//prints same reference ID 4. }
5. 6. public static void main(String args[]){
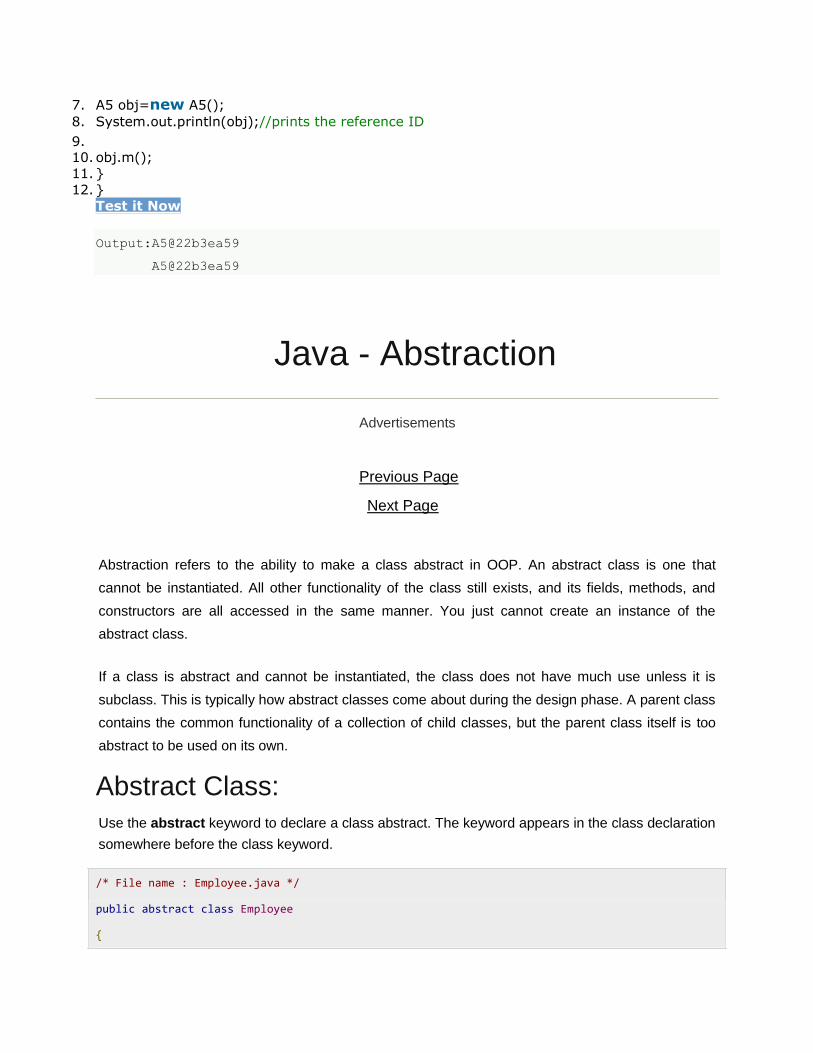
7. A5 obj=new A5(); 8. System.out.println(obj);//prints the reference ID 9. 10. obj.m();
11. } 12. }
Test it Now
Output:A5@22b3ea59
A5@22b3ea59
Java - Abstraction
Advertisements
Previous Page
Next Page
Abstraction refers to the ability to make a class abstract in OOP. An abstract class is one that
cannot be instantiated. All other functionality of the class still exists, and its fields, methods, and
constructors are all accessed in the same manner. You just cannot create an instance of the
abstract class.
If a class is abstract and cannot be instantiated, the class does not have much use unless it is
subclass. This is typically how abstract classes come about during the design phase. A parent class
contains the common functionality of a collection of child classes, but the parent class itself is too
abstract to be used on its own.
Abstract Class:
Use the abstract keyword to declare a class abstract. The keyword appears in the class declaration
somewhere before the class keyword.
/* File name : Employee.java */
public abstract class Employee
{
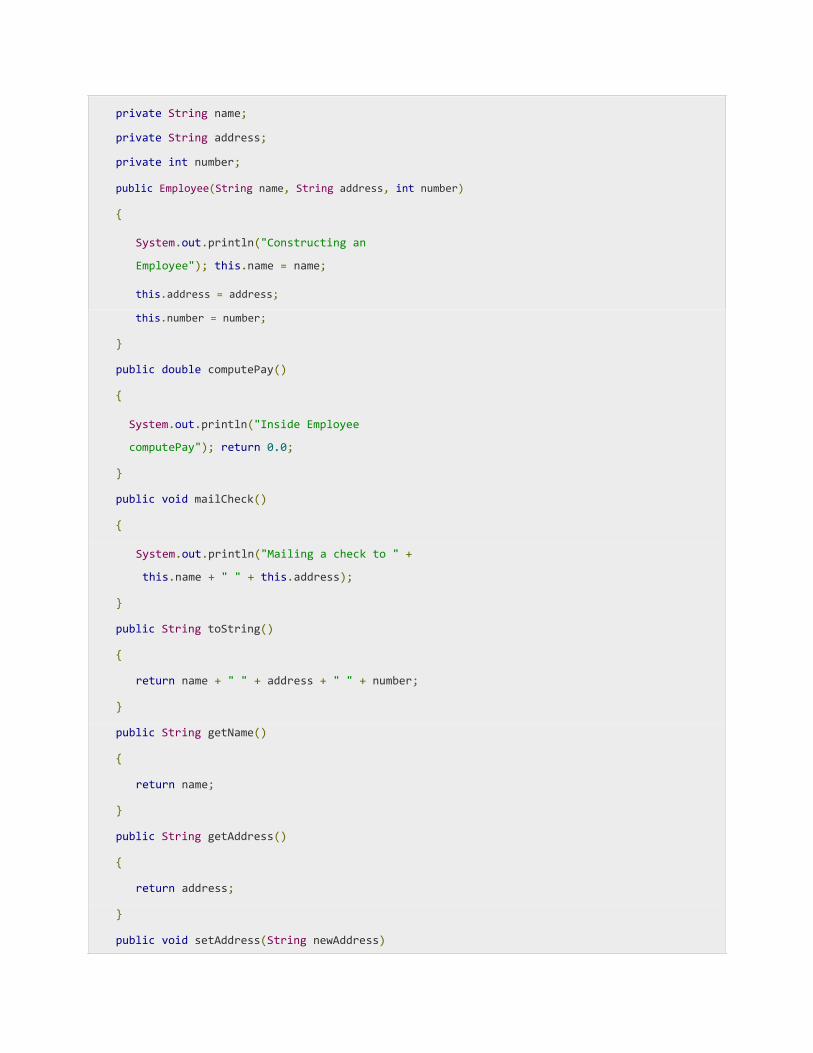
private String name;
private String address;
private int number; public Employee(String name, String address, int number) {
System.out.println("Constructing an
Employee"); this.name = name;
this.address = address;
this.number = number; } public double computePay() {
System.out.println("Inside Employee
computePay"); return 0.0; } public void mailCheck() {
System.out.println("Mailing a check to " +
this.name + " " + this.address); } public String toString() {
return name + " " + address + " " + number; } public String getName() {
return name; } public String getAddress() {
return address; } public void setAddress(String newAddress)

{
address = newAddress;
}
public int getNumber()
{
return number;
}
} Notice that nothing is different in this Employee class. The class is now abstract, but it still has three
fields, seven methods, and one constructor.
Now if you would try as follows:
/* File name : AbstractDemo.java
*/ public class AbstractDemo {
public static void main(String [] args)
{
/* Following is not allowed and would raise error */ Employee
e = new Employee("George W.", "Houston, TX", 43);
System.out.println("\n Call mailCheck using Employee reference--
"); e.mailCheck();
} }
When you would compile above class then you would get the following error:
Employee.java:46: Employee is abstract; cannot be instantiated
Employee e = new Employee("George W.", "Houston, TX", 43);
^ 1 error
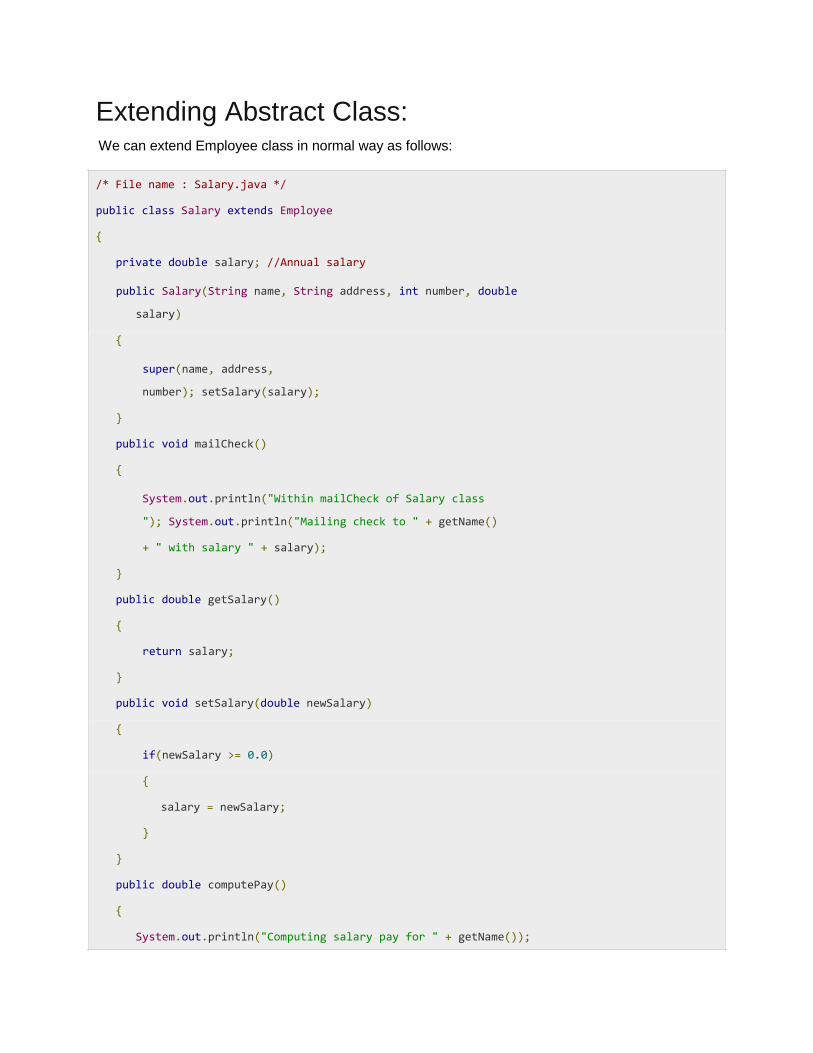
Extending Abstract Class: We can extend Employee class in normal way as follows:
/* File name : Salary.java */ public class Salary extends Employee {
private double salary; //Annual salary
public Salary(String name, String address, int number, double
salary)
{
super(name, address,
number); setSalary(salary);
}
public void mailCheck()
{
System.out.println("Within mailCheck of Salary class
"); System.out.println("Mailing check to " + getName()
+ " with salary " + salary);
}
public double getSalary()
{
return salary;
}
public void setSalary(double newSalary)
{
if(newSalary >= 0.0)
{
salary = newSalary;
}
}
public double computePay()
{
System.out.println("Computing salary pay for " + getName());

return salary/52;
}
}
Here, we cannot instantiate a new Employee, but if we instantiate a new Salary object, the Salary object will inherit the three fields and seven methods from Employee.
/* File name : AbstractDemo.java
*/ public class AbstractDemo {
public static void main(String [] args)
{
Salary s = new Salary("Mohd Mohtashim", "Ambehta, UP", 3, 3600.00);
Employee e = new Salary("John Adams", "Boston, MA", 2, 2400.00);
System.out.println("Call mailCheck using Salary reference --");
s.mailCheck();
System.out.println("\n Call mailCheck using Employee reference--
"); e.mailCheck();
} }
This would produce the following result:
Constructing an Employee Constructing an Employee Call mailCheck using Salary reference -- Within mailCheck of Salary class Mailing check to Mohd Mohtashim with salary 3600.0
Call mailCheck using Employee reference-- Within mailCheck of Salary class Mailing check to John Adams with salary 2400.
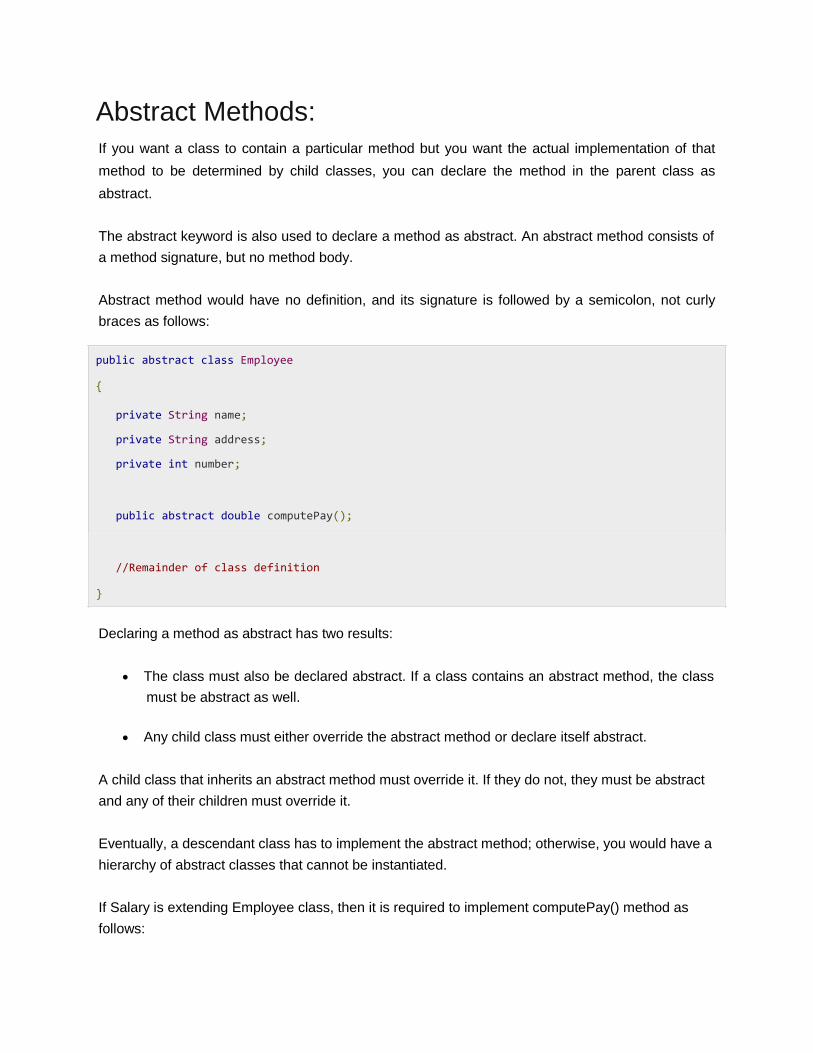
Abstract Methods: If you want a class to contain a particular method but you want the actual implementation of that
method to be determined by child classes, you can declare the method in the parent class as
abstract.
The abstract keyword is also used to declare a method as abstract. An abstract method consists of
a method signature, but no method body.
Abstract method would have no definition, and its signature is followed by a semicolon, not curly
braces as follows:
public abstract class Employee {
private String name;
private String address;
private int number;
public abstract double computePay();
//Remainder of class definition
}
Declaring a method as abstract has two results:
The class must also be declared abstract. If a class contains an abstract method, the class
must be abstract as well.
Any child class must either override the abstract method or declare itself abstract.
A child class that inherits an abstract method must override it. If they do not, they must be abstract
and any of their children must override it.
Eventually, a descendant class has to implement the abstract method; otherwise, you would have a
hierarchy of abstract classes that cannot be instantiated.
If Salary is extending Employee class, then it is required to implement computePay() method as
follows:

/* File name : Salary.java */ public class Salary extends Employee {
private double salary; // Annual salary
public double computePay()
{
System.out.println("Computing salary pay for " + getName());
return salary/52;
}
//Remainder of class definition
}
Java - Encapsulation
Advertisements
Previous Page
Next Page Encapsulation is one of the four fundamental OOP concepts. The other three are inheritance,
polymorphism, and abstraction.
Encapsulation is the technique of making the fields in a class private and providing access to the
fields via public methods. If a field is declared private, it cannot be accessed by anyone outside the
class, thereby hiding the fields within the class. For this reason, encapsulation is also referred to as
data hiding.
Encapsulation can be described as a protective barrier that prevents the code and data being
randomly accessed by other code defined outside the class. Access to the data and code is tightly
controlled by an interface.
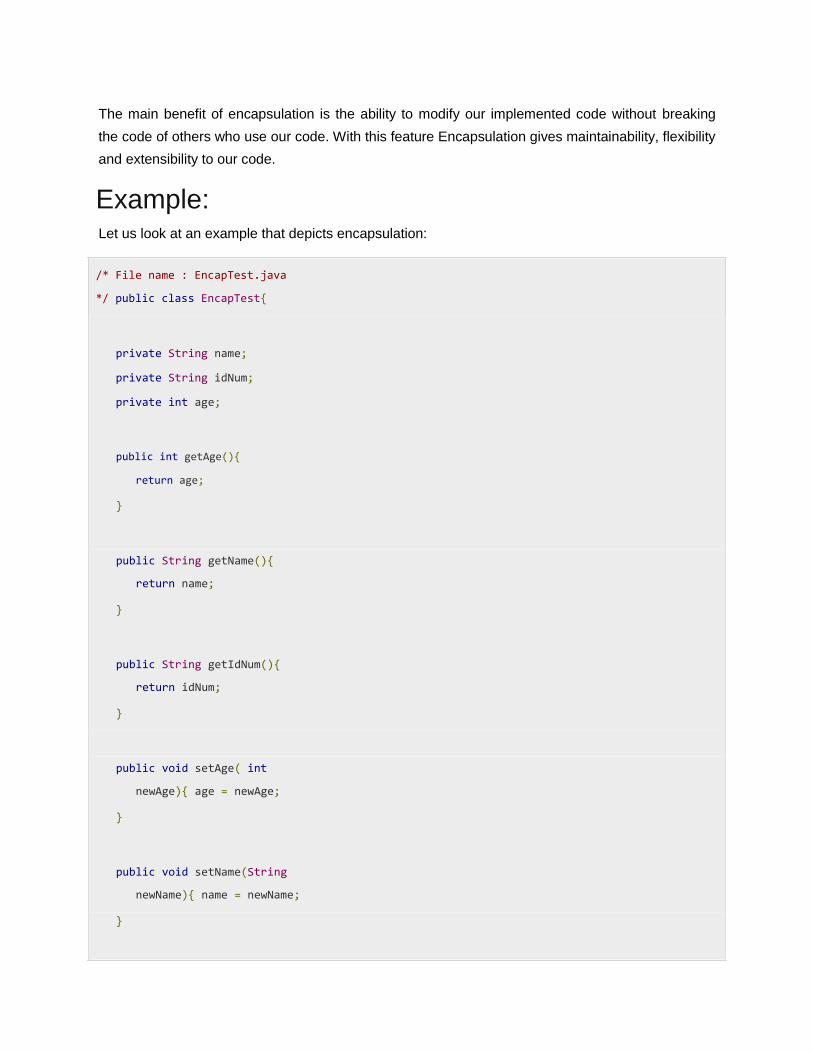
The main benefit of encapsulation is the ability to modify our implemented code without breaking
the code of others who use our code. With this feature Encapsulation gives maintainability, flexibility
and extensibility to our code.
Example: Let us look at an example that depicts encapsulation:
/* File name : EncapTest.java
*/ public class EncapTest{
private String name;
private String idNum;
private int age;
public int getAge(){
return age;
}
public String getName(){
return name;
}
public String getIdNum(){
return idNum;
}
public void setAge( int
newAge){ age = newAge;
}
public void setName(String
newName){ name = newName;
}

public void setIdNum( String newId){
idNum = newId;
}
} The public methods are the access points to this class' fields from the outside java world. Normally,
these methods are referred as getters and setters. Therefore any class that wants to access the
variables should access them through these getters and setters.
The variables of the EncapTest class can be access as below::
/* File name : RunEncap.java
*/ public class RunEncap{
public static void main(String args[]){
EncapTest encap = new EncapTest();
encap.setName("James");
encap.setAge(20);
encap.setIdNum("12343ms");
System.out.print("Name : " + encap.getName()+
" Age : "+ encap.getAge());
}
}
This would produce the following result:
Name : James Age : 20
Benefits of Encapsulation:
The fields of a class can be made read-only or write-only.
A class can have total control over what is stored in its fields.
The users of a class do not know how the class stores its data. A class can change the data
type of a field and users of the class do not need to change any of their code.

Inheritance in Java Inheritance in java is a mechanism in which one object acquires all the properties and behaviors of parent object The idea behind inheritance in java is that you can create new classes that are built upon
existing classes. When you inherit from an existing class, you can reuse methods and
fields of parent class, and you can add new methods and fields also.
When we talk about inheritance, the most commonly used keyword would be extends and implements.
Inheritance represents the IS-A relationship, also known as parent-child relationship.
IS-A Relationship: IS-A is a way of saying : This object is a type of that object. Let us see how theextends keyword is
used to achieve inheritance.
public class Animal{ }
public class Mammal extends Animal{ }
public class Reptile extends Animal{ }
public class Dog extends Mammal{ }
Now, based on the above example, In Object Oriented terms, the following are true:
Animal is the superclass of Mammal class.
Animal is the superclass of Reptile class.
Mammal and Reptile are subclasses of Animal class.

Dog is the subclass of both Mammal and Animal classes.
Now, if we consider the IS-A relationship, we can say:
Mammal IS-A Animal
Reptile IS-A Animal
Dog IS-A Mammal
Hence : Dog IS-A Animal as well
With use of the extends keyword the subclasses will be able to inherit all the properties of the
superclass except for the private properties of the superclass.
We can assure that Mammal is actually an Animal with the use of the instance operator.
Example: public class Dog extends Mammal{
public static void main(String args[]){
Animal a = new Animal();
Mammal m = new Mammal();
Dog d = new Dog();
System.out.println(m instanceof Animal);
System.out.println(d instanceof Mammal);
System.out.println(d instanceof Animal);
}
}
This would produce the following result:
true true true

Since we have a good understanding of the extends keyword let us look into how the implements
keyword is used to get the IS-A relationship.
The implements keyword is used by classes by inherit from interfaces. Interfaces can never be
extended by the classes.
Example: public interface Animal {}
public class Mammal implements Animal{ }
public class Dog extends Mammal{ }
The instanceof Keyword: Let us use the instanceof operator to check determine whether Mammal is actually an Animal, and dog is actually an Animal
interface Animal{}
class Mammal implements Animal{}
public class Dog extends Mammal{
public static void main(String args[]){
Mammal m = new Mammal();
Dog d = new Dog();
System.out.println(m instanceof Animal);
System.out.println(d instanceof Mammal);
System.out.println(d instanceof Animal);
}
}

This would produce the following result:
true true true
HAS-A relationship: These relationships are mainly based on the usage. This determines whether a certain class HAS-
A certain thing. This relationship helps to reduce duplication of code as well as bugs.
Lets us look into an example:
public class Vehicle{}
public class Speed{} public class Van extends Vehicle{
private Speed sp; } This shows that class Van HAS-A Speed. By having a separate class for Speed, we do not have to
put the entire code that belongs to speed inside the Van class., which makes it possible to reuse
the Speed class in multiple applications.
In Object-Oriented feature, the users do not need to bother about which object is doing the real
work. To achieve this, the Van class hides the implementation details from the users of the Van
class. So basically what happens is the users would ask the Van class to do a certain action and
the Van class will either do the work by itself or ask another class to perform the action.
A very important fact to remember is that Java only supports only single inheritance. This means
that a class cannot extend more than one class. Therefore following is illegal:
public class extends Animal, Mammal{} However, a class can implement one or more interfaces. This has made Java get rid of the
impossibility of multiple inheritance.
Why use inheritance in java
For Method Overriding (so runtime polymorphism can be achieved). For Code Reusability.

Syntax of Java Inheritance 1. class Subclass-name extends Superclass-name 2. { 3. //methods and fields 4. }
The extends keyword indicates that you are making a new class that derives from an
existing class.
In the terminology of Java, a class that is inherited is called a super class. The new class is
called a subclass.
Understanding the simple example of inheritance
As displayed in the above figure, Programmer is the subclass and Employee is the
superclass. Relationship between two classes is Programmer IS-A Employee.It means
that Programmer is a type of Employee. 1. class Employee{ 2. float salary=40000; 3. }
4. class Programmer extends Employee{ 5. int bonus=10000;
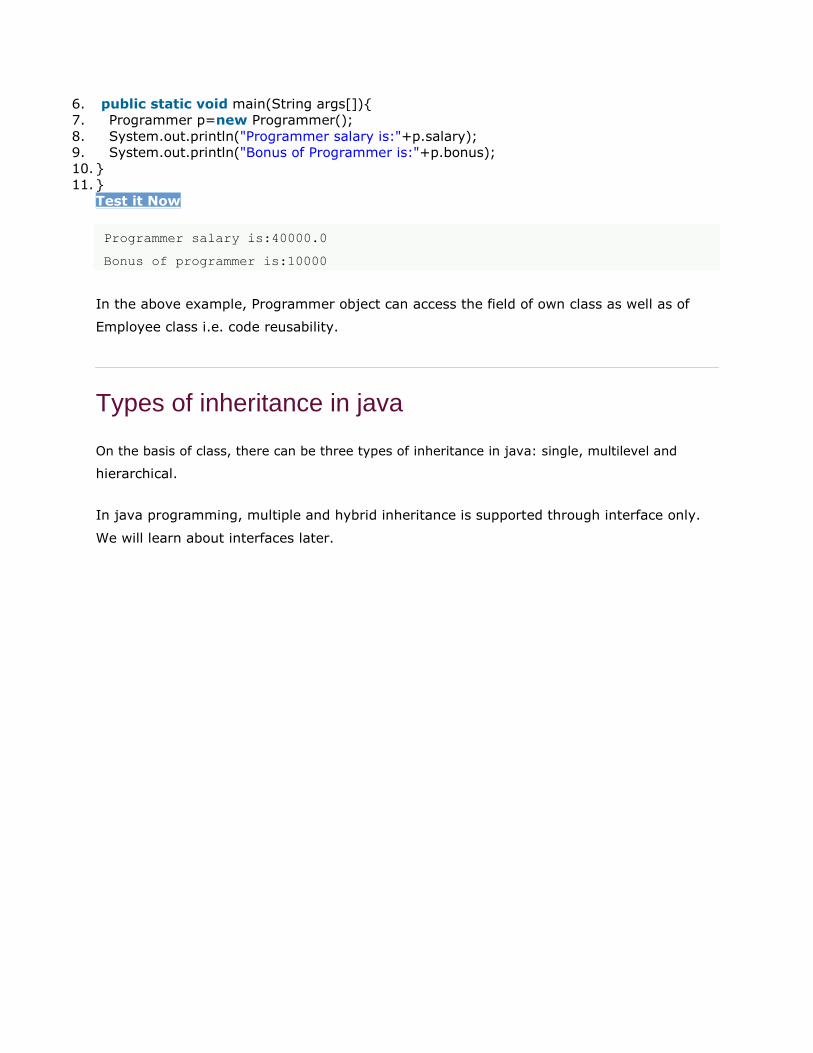
6. public static void main(String args[]){ 7. Programmer p=new Programmer(); 8. System.out.println("Programmer salary is:"+p.salary); 9. System.out.println("Bonus of Programmer is:"+p.bonus);
10. }
11. } Test it Now
Programmer salary is:40000.0
Bonus of programmer is:10000
In the above example, Programmer object can access the field of own class as well as of
Employee class i.e. code reusability.
Types of inheritance in java
On the basis of class, there can be three types of inheritance in java: single, multilevel and
hierarchical.
In java programming, multiple and hybrid inheritance is supported through interface only.
We will learn about interfaces later.
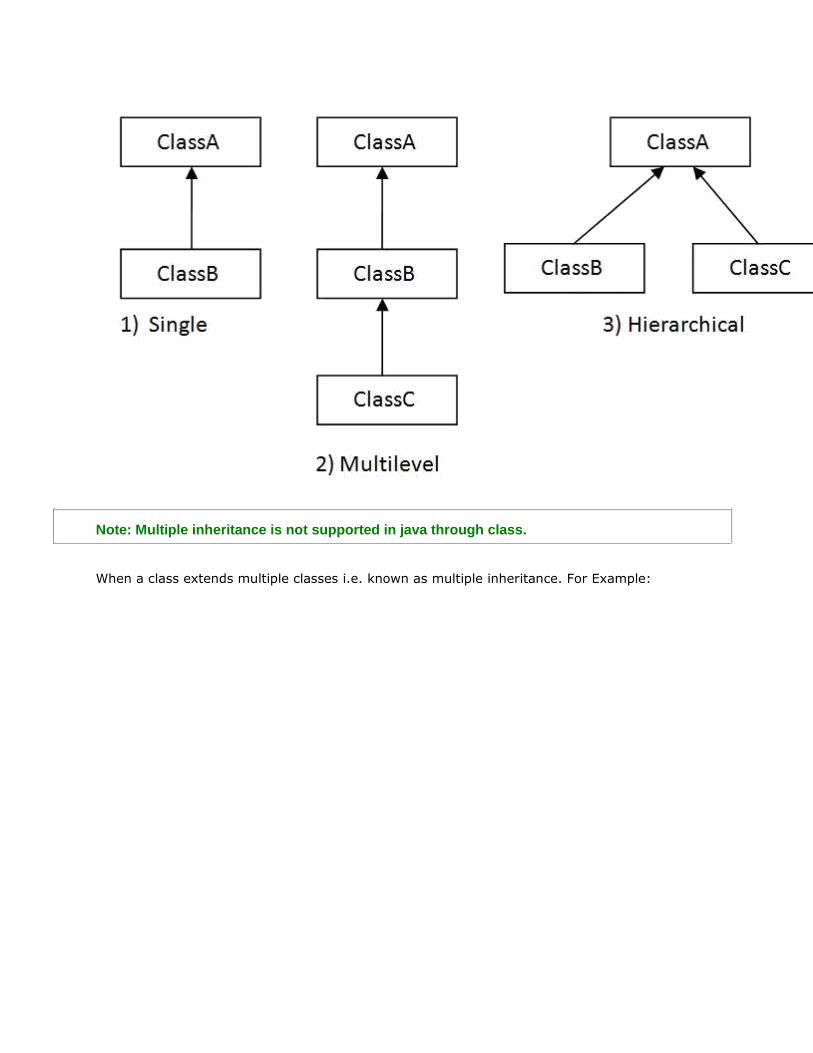
Note: Multiple inheritance is not supported in java through class.
When a class extends multiple classes i.e. known as multiple inheritance. For Example:
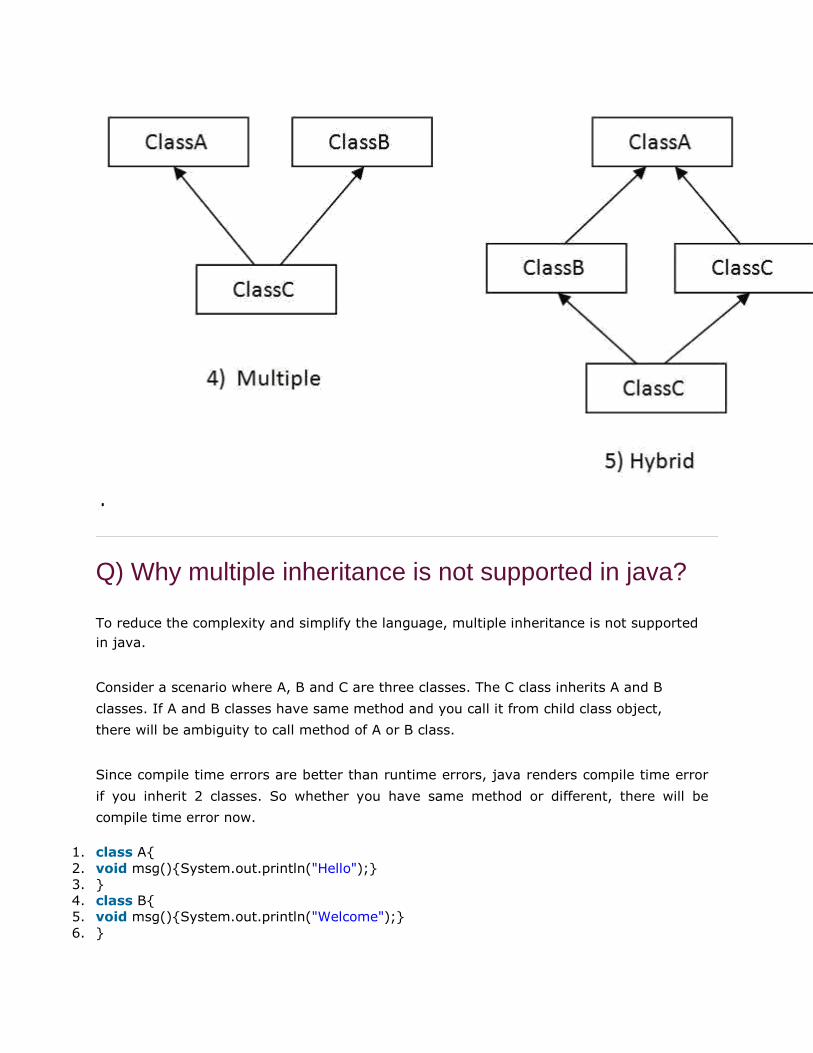
Q) Why multiple inheritance is not supported in java?
To reduce the complexity and simplify the language, multiple inheritance is not supported
in java.
Consider a scenario where A, B and C are three classes. The C class inherits A and B
classes. If A and B classes have same method and you call it from child class object,
there will be ambiguity to call method of A or B class.
Since compile time errors are better than runtime errors, java renders compile time error
if you inherit 2 classes. So whether you have same method or different, there will be
compile time error now.
1. class A{ 2. void msg(){System.out.println("Hello");} 3. }
4. class B{
5. void msg(){System.out.println("Welcome");} 6. }

7. class C extends A,B{//suppose if it were 8. 9. Public Static void main(String args[]){ 10. C obj=new C();
11. obj.msg();//Now which msg() method would be invoked? 12. } 13. }
Test it Now
Compile Time Error
Aggregation in Java
If a class have an entity reference, it is known as Aggregation. Aggregation represents HAS-
A relationship.
Consider a situation, Employee object contains many informations such as id, name, emailId
etc. It contains one more object named address, which contains its own informations such
as city, state, country, zipcode etc. as given below.
1. class Employee{ 2. int id; 3. String name;
4. Address address;//Address is a class 5. ... 6. }
In such case, Employee has an entity reference address, so relationship is Employee HAS-A
address.
Why use Aggregation? For Code Reusability.
Simple Example of Aggregation
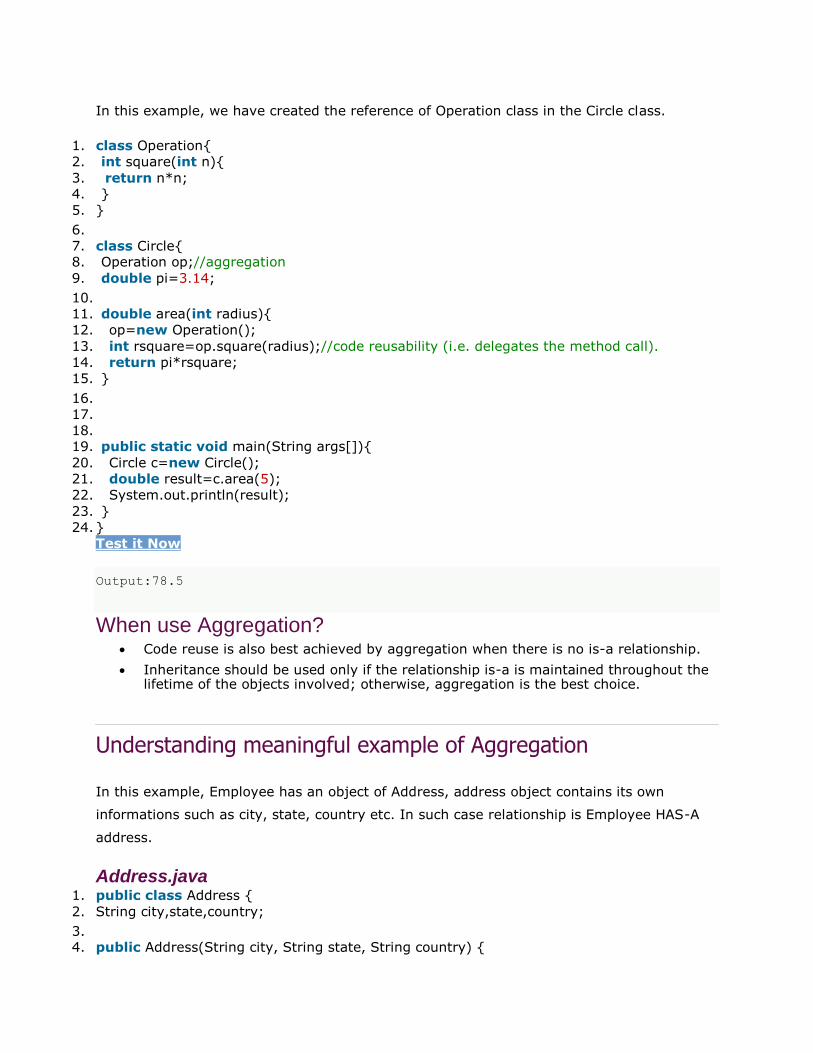
In this example, we have created the reference of Operation class in the Circle class.
1. class Operation{ 2. int square(int n){ 3. return n*n; 4. } 5. } 6.
7. class Circle{ 8. Operation op;//aggregation 9. double pi=3.14; 10. 11. double area(int radius){
12. op=new Operation(); 13. int rsquare=op.square(radius);//code reusability (i.e. delegates the method call). 14. return pi*rsquare;
15. } 16.
17.
18. 19. public static void main(String args[]){ 20. Circle c=new Circle(); 21. double result=c.area(5);
22. System.out.println(result); 23. } 24. }
Test it Now
Output:78.5
When use Aggregation?
Code reuse is also best achieved by aggregation when there is no is-a relationship.
Inheritance should be used only if the relationship is-a is maintained throughout the lifetime of the objects involved; otherwise, aggregation is the best choice.
Understanding meaningful example of Aggregation
In this example, Employee has an object of Address, address object contains its own
informations such as city, state, country etc. In such case relationship is Employee HAS-A
address.
Address.java 1. public class Address { 2. String city,state,country; 3. 4. public Address(String city, String state, String country) {

5. this.city = city; 6. this.state = state; 7. this.country = country; 8. }
9. 10. }
Emp.java 1. public class Emp { 2. int id;
3. String name; 4. Address address; 5.
6. public Emp(int id, String name,Address address) { 7. this.id = id; 8. this.name = name; 9. this.address=address;
10. } 11. 12. void display(){ 13. System.out.println(id+" "+name);
14. System.out.println(address.city+" "+address.state+" "+address.country); 15. } 16. 17. public static void main(String[] args) { 18. Address address1=new Address("gzb","UP","india"); 19. Address address2=new Address("gno","UP","india"); 20.
21. Emp e=new Emp(111,"varun",address1); 22. Emp e2=new Emp(112,"arun",address2); 23.
24. e.display();
25. e2.display(); 26. 27. }
28. } Test it Now
Output:111 varun
gzb UP india
112 arun
gno UP india
download this example
Method Overriding in Java
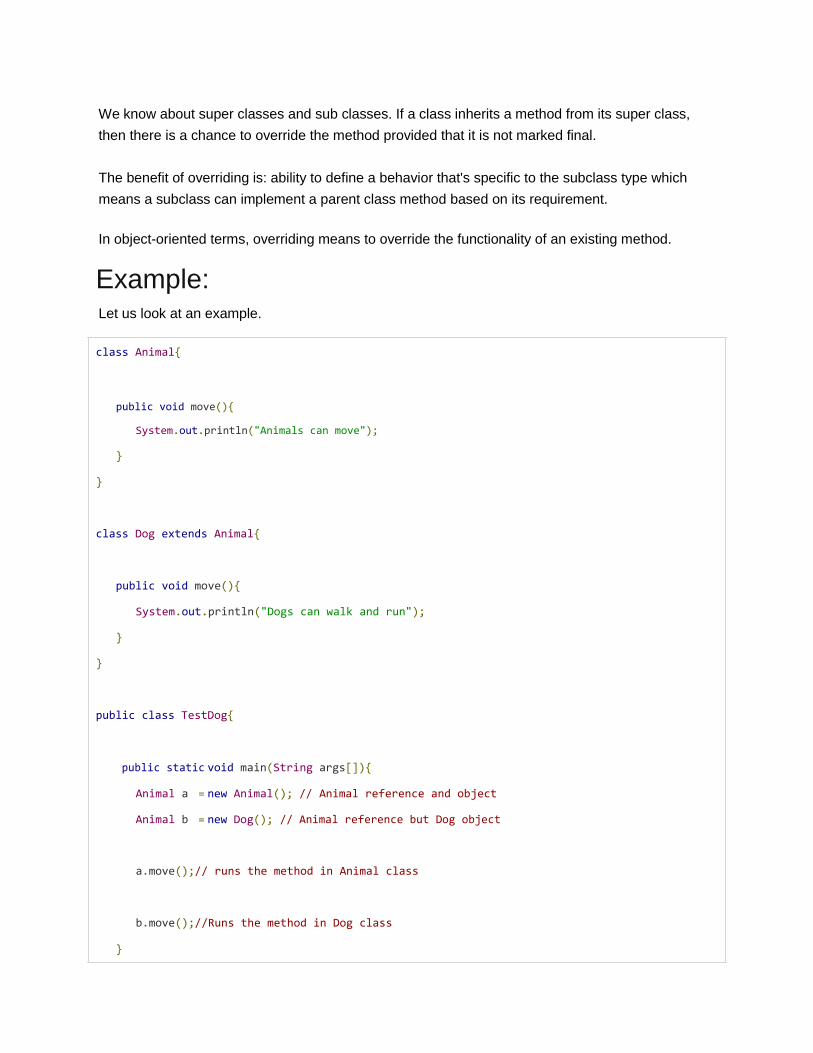
We know about super classes and sub classes. If a class inherits a method from its super class,
then there is a chance to override the method provided that it is not marked final.
The benefit of overriding is: ability to define a behavior that's specific to the subclass type which
means a subclass can implement a parent class method based on its requirement.
In object-oriented terms, overriding means to override the functionality of an existing method.
Example: Let us look at an example.
class Animal{
public void move(){
System.out.println("Animals can move");
} }
class Dog extends Animal{
public void move(){
System.out.println("Dogs can walk and run");
}
}
public class TestDog{
public static void main(String args[]){
Animal a = new Animal(); // Animal reference and object
Animal b = new Dog(); // Animal reference but Dog object
a.move();// runs the method in Animal class
b.move();//Runs the method in Dog class
}

}
This would produce the following result:
Animals can move Dogs can walk and run In the above example, you can see that the even though b is a type of Animal it runs the move
method in the Dog class. The reason for this is: In compile time, the check is made on the reference
type. However, in the runtime, JVM figures out the object type and would run the method that
belongs to that particular object.
Therefore, in the above example, the program will compile properly since Animal class has the
method move. Then, at the runtime, it runs the method specific for that object.
Consider the following example :
class Animal{
public void move(){
System.out.println("Animals can move");
} }
class Dog extends Animal{
public void move(){
System.out.println("Dogs can walk and run");
}
public void bark(){
System.out.println("Dogs can bark");
} }
public class TestDog{
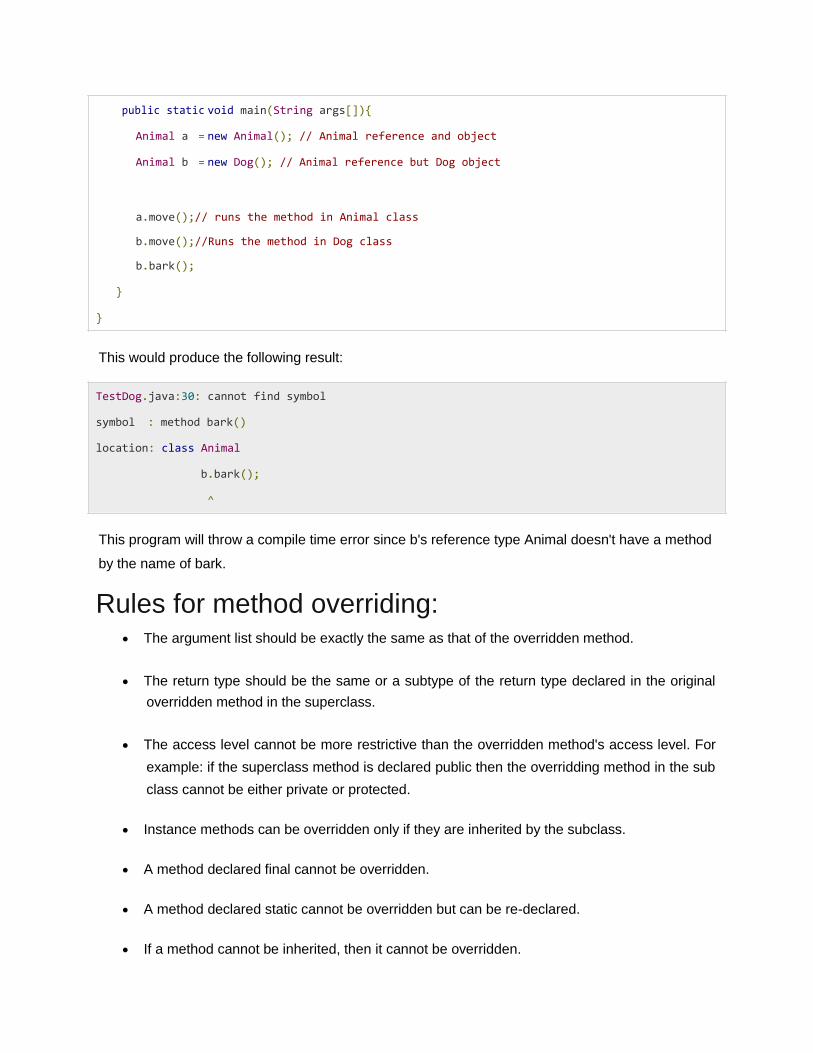
public static void main(String args[]){
Animal a = new Animal(); // Animal reference and object
Animal b = new Dog(); // Animal reference but Dog object
a.move();// runs the method in Animal class
b.move();//Runs the method in Dog class
b.bark();
} }
This would produce the following result:
TestDog.java:30: cannot find symbol symbol : method bark() location: class Animal
b.bark();
^
This program will throw a compile time error since b's reference type Animal doesn't have a method by the name of bark.
Rules for method overriding:
The argument list should be exactly the same as that of the overridden method.
The return type should be the same or a subtype of the return type declared in the original
overridden method in the superclass.
The access level cannot be more restrictive than the overridden method's access level. For
example: if the superclass method is declared public then the overridding method in the sub
class cannot be either private or protected.
Instance methods can be overridden only if they are inherited by the subclass.
A method declared final cannot be overridden.
A method declared static cannot be overridden but can be re-declared.
If a method cannot be inherited, then it cannot be overridden.

A subclass within the same package as the instance's superclass can override any
superclass method that is not declared private or final.
A subclass in a different package can only override the non-final methods declared public or
protected.
An overriding method can throw any uncheck exceptions, regardless of whether the
overridden method throws exceptions or not. However the overriding method should not
throw checked exceptions that are new or broader than the ones declared by the overridden
method. The overriding method can throw narrower or fewer exceptions than the overridden
method.
Constructors cannot be overridden.
Using the super keyword: When invoking a superclass version of an overridden method the superkeyword is used.
class Animal{
public void move(){
System.out.println("Animals can move");
} }
class Dog extends Animal{
public void move(){
super.move(); // invokes the super class method
System.out.println("Dogs can walk and run");
} }
public class TestDog{
public static void main(String args[]){
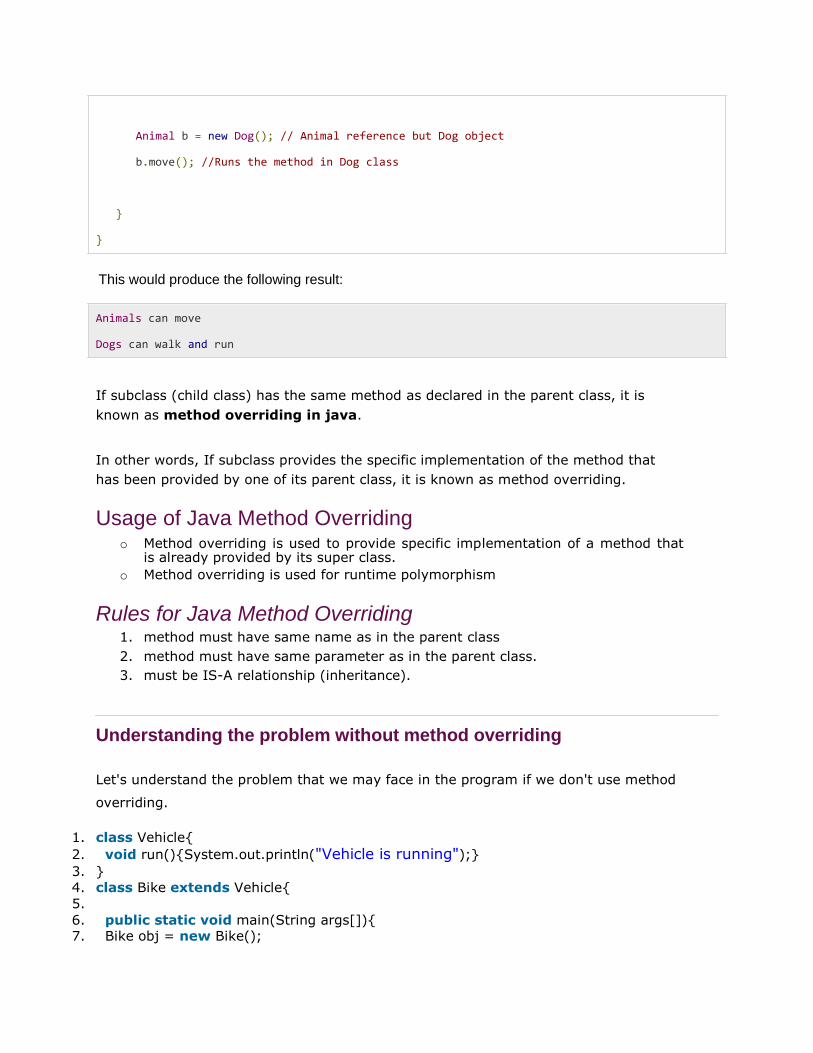
Animal b = new Dog(); // Animal reference but Dog object
b.move(); //Runs the method in Dog class
}
}
This would produce the following result:
Animals can move
Dogs can walk and run
If subclass (child class) has the same method as declared in the parent class, it is
known as method overriding in java.
In other words, If subclass provides the specific implementation of the method that
has been provided by one of its parent class, it is known as method overriding.
Usage of Java Method Overriding
o Method overriding is used to provide specific implementation of a method that is already provided by its super class.
o Method overriding is used for runtime polymorphism
Rules for Java Method Overriding 1. method must have same name as in the parent class 2. method must have same parameter as in the parent class. 3. must be IS-A relationship (inheritance).
Understanding the problem without method overriding
Let's understand the problem that we may face in the program if we don't use method
overriding. 1. class Vehicle{ 2. void run(){System.out.println("Vehicle is running");} 3. } 4. class Bike extends Vehicle{
5. 6. public static void main(String args[]){ 7. Bike obj = new Bike();

8. obj.run(); 9. } 10. }
Test it Now
Output:Vehicle is running
Problem is that I have to provide a specific implementation of run() method in subclass
that is why we use method overriding.
Example of method overriding
In this example, we have defined the run method in the subclass as defined in the parent
class but it has some specific implementation. The name and parameter of the method is
same and there is IS-A relationship between the classes, so there is method overriding.
1. class Vehicle{ 2. void run(){System.out.println("Vehicle is running");} 3. } 4. class Bike2 extends Vehicle{
5. void run(){System.out.println("Bike is running safely");} 6.
7. public static void main(String args[]){ 8. Bike2 obj = new Bike2(); 9. obj.run(); 10. }
Test it Now
Output:Bike is running safely
Real example of Java Method Overriding
Consider a scenario, Bank is a class that provides functionality to get rate of interest.
But, rate of interest varies according to banks. For example, SBI, ICICI and AXIS banks
could provide 8%, 7% and 9% rate of interest.

1. class Bank{ 2. int getRateOfInterest(){return 0;} 3. }
4. 5. class SBI extends Bank{ 6. int getRateOfInterest(){return 8;} 7. }
8. 9. class ICICI extends Bank{ 10. int getRateOfInterest(){return 7;}
11. }
12. class AXIS extends Bank{ 13. int getRateOfInterest(){return 9;} 14. }
15. 16. class Test2{ 17. public static void main(String args[]){ 18. SBI s=new SBI(); 19. ICICI i=new ICICI(); 20. AXIS a=new AXIS(); 21. System.out.println("SBI Rate of Interest: "+s.getRateOfInterest());
22. System.out.println("ICICI Rate of Interest: "+i.getRateOfInterest()); 23. System.out.println("AXIS Rate of Interest: "+a.getRateOfInterest()); 24. } 25. }
Test it Now
Output:
SBI Rate of Interest: 8
ICICI Rate of Interest: 7
AXIS Rate of Interest: 9
Can we override static method?

No, static method cannot be overridden. It can be proved by runtime polymorphism, so
we will learn it later.
Why we cannot override static method? because static method is bound with class whereas instance method is bound with
object. Static belongs to class area and instance belongs to heap area.
Can we override java main method?
No, because main is a static method.
Difference between method overloading and method overriding in java
There are many differences between method overloading and method overriding in java. A
list of differences between method overloading and method overriding are given below:
No. Method Overloading Method Overriding
1) Method overloading is used to increase the Method overriding is used to
readability of the program. provide the specific
implementation of the method
that is already provided by its
super class.
2) Method overloading is performed within Method overriding occurs in two
class. classes that have IS-A
(inheritance) relationship.
3) In case of method overloading, parameter In case of method overriding,
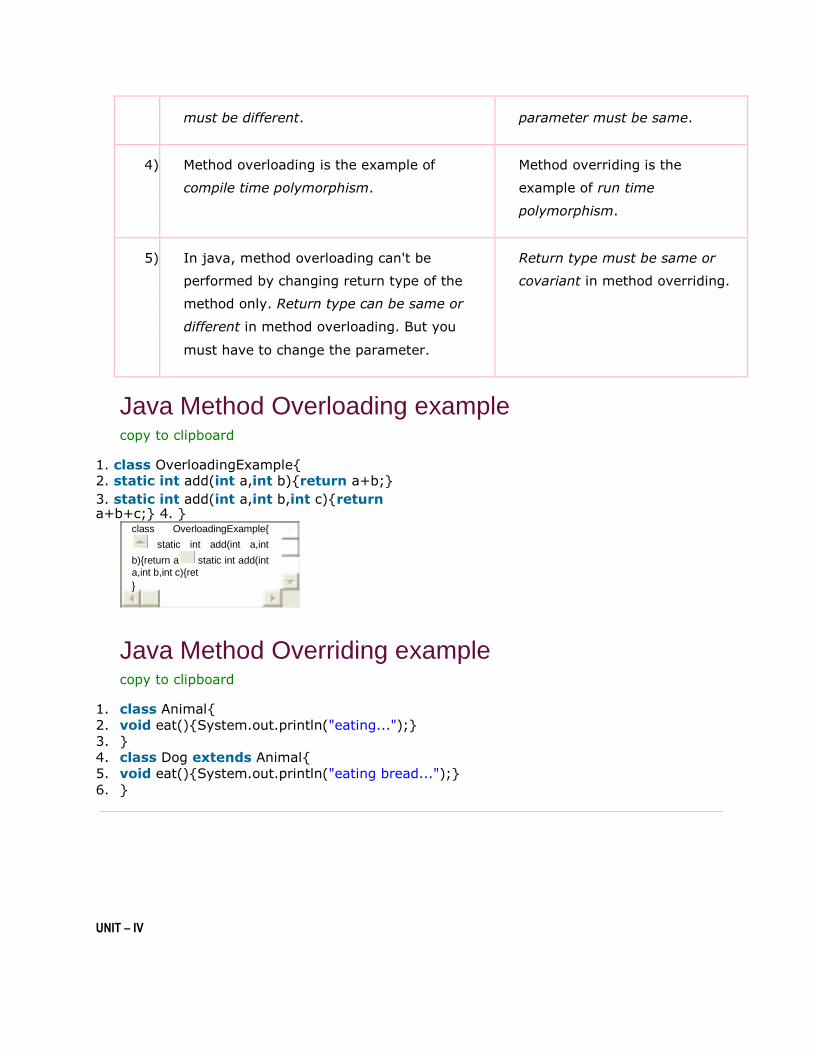
must be different. parameter must be same.
4) Method overloading is the example of Method overriding is the
compile time polymorphism. example of run time
polymorphism.
5) In java, method overloading can't be Return type must be same or
performed by changing return type of the covariant in method overriding.
method only. Return type can be same or
different in method overloading. But you
must have to change the parameter.
Java Method Overloading example
copy to clipboard 1. class OverloadingExample{ 2. static int add(int a,int b){return a+b;} 3. static int add(int a,int b,int c){return a+b+c;} 4. }
class OverloadingExample{
static int add(int a,int
b){return a static int add(int
a,int b,int c){ret }
Java Method Overriding example
copy to clipboard 1. class Animal{ 2. void eat(){System.out.println("eating...");}
3. }
4. class Dog extends Animal{ 5. void eat(){System.out.println("eating bread...");} 6. }
UNIT – IV
Threading & Networking
(5 Lectures) Multithreaded programming- Multithreaded Programming: The Java thread model, the main thread, creating multiple threads, using Alive () and join (), thread priorities, synchronization, suspending, resuming, and stopping threads, using multithreading. Networking (datagram socket and TCP/IP based server socket),
Multithreading in Java
Multithreading in java is a process of executing multiple threads simultaneously. Thread is basically a lightweight sub-process, a smallest unit of processing.
Multiprocessing and multithreading, both are used to achieve multitasking.
But we use multithreading than multiprocessing because threads share a common memory
area. They don't allocate separate memory area so saves memory, and context-switching
between the threads takes less time than process.
Java Multithreading is mostly used in games, animation etc. Java is a multithreaded programming language which means we can develop multithreaded
program using Java. A multithreaded program contains two or more parts that can run concurrently
and each part can handle different task at the same time making optimal use of the available
resources especially when your computer has multiple CPUs.
By definition multitasking is when multiple processes share common processing resources such as
a CPU. Multithreading extends the idea of multitasking into applications where you can subdivide
specific operations within a single application into individual threads. Each of the threads can run in
parallel. The OS divides processing time not only among different applications, but also among
each thread within an application.
Multithreading enables you to write in a way where multiple activities can proceed concurrently in
the same program.
Advantage of Java Multithreading 13. It doesn't block the user because threads are independent and you can
perform multiple operations at same time.
14. You can perform many operations together so it saves time.
15. Threads are independent so it doesn't affect other threads if exception occur in a
single thread.
Multitasking Multitasking is a process of executing multiple tasks simultaneously. We use multitasking to
utilize the CPU. Multitasking can be achieved by two ways:
Process-based Multitasking(Multiprocessing)
o Thread-based Multitasking(Multithreading)
1) Process-based Multitasking (Multiprocessing)
o Each process have its own address in memory i.e. each process allocates separate memory area.
o Process is heavyweight. o Cost of communication between the process is high.
Switching from one process to another require some time for saving and
loading registers, memory maps, updating lists etc.
2) Thread-based Multitasking (Multithreading) o Threads share the same address space. o Thread is lightweight. o Cost of communication between the thread is low.
Note: At least one process is required for each thread.
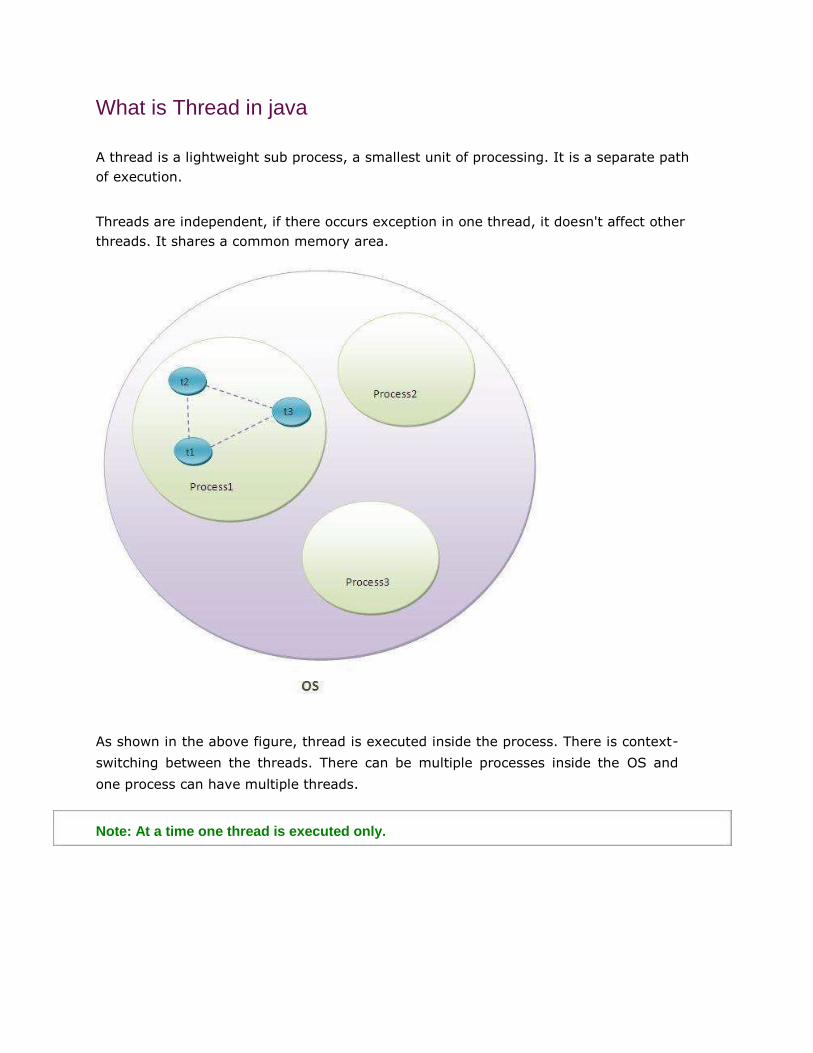
What is Thread in java A thread is a lightweight sub process, a smallest unit of processing. It is a separate path
of execution.
Threads are independent, if there occurs exception in one thread, it doesn't affect other
threads. It shares a common memory area. As shown in the above figure, thread is executed inside the process. There is context-
switching between the threads. There can be multiple processes inside the OS and
one process can have multiple threads.
Note: At a time one thread is executed only.

Life cycle of a Thread (Thread States)
A thread can be in one of the five states. According to sun, there is only 4 states in thread life cycle in java new, runnable, non-runnable and terminated. There is
no running state.
But for better understanding the threads, we are explaining it in the 5 states. The life cycle of the thread in java is controlled by JVM. The java thread states are
as follows:
1. New 2. Runnable 3. Running 4. Non-Runnable (Blocked) 5. Terminated
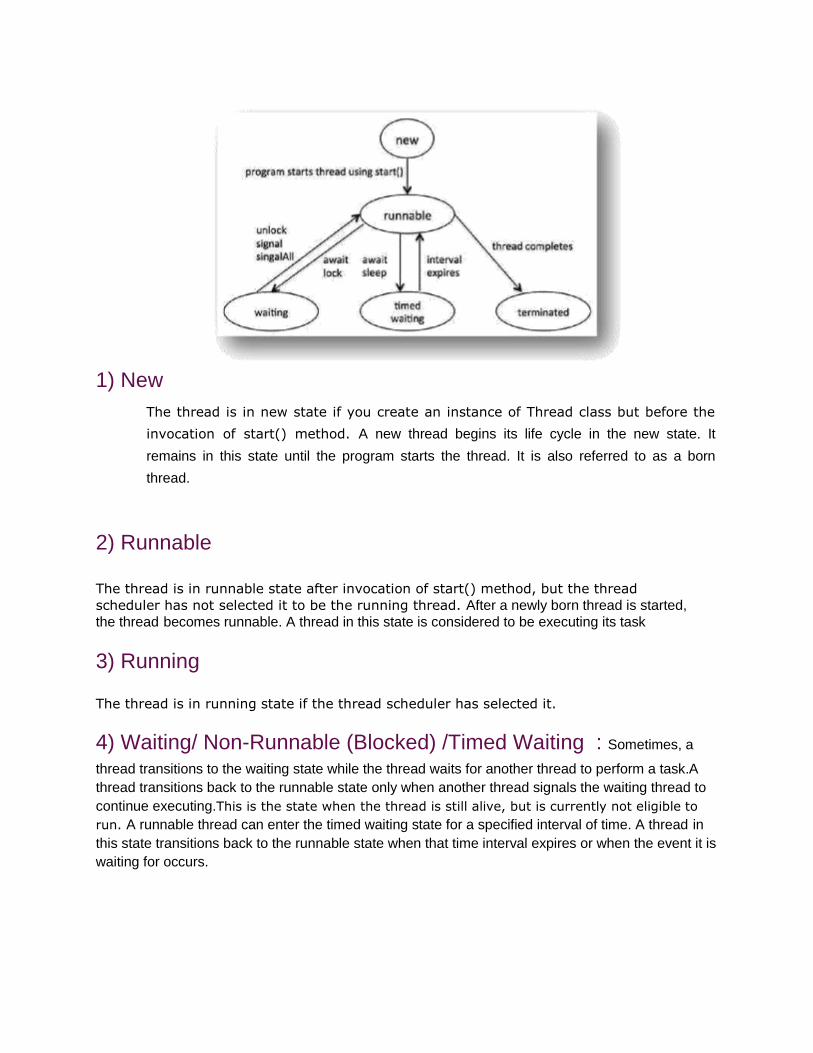
1) New
The thread is in new state if you create an instance of Thread class but before the
invocation of start() method. A new thread begins its life cycle in the new state. It
remains in this state until the program starts the thread. It is also referred to as a born
thread.
2) Runnable
The thread is in runnable state after invocation of start() method, but the thread
scheduler has not selected it to be the running thread. After a newly born thread is started,
the thread becomes runnable. A thread in this state is considered to be executing its task
3) Running
The thread is in running state if the thread scheduler has selected it.
4) Waiting/ Non-Runnable (Blocked) /Timed Waiting : Sometimes, a thread transitions to the waiting state while the thread waits for another thread to perform a task.A
thread transitions back to the runnable state only when another thread signals the waiting thread to
continue executing.This is the state when the thread is still alive, but is currently not eligible to
run. A runnable thread can enter the timed waiting state for a specified interval of time. A thread in
this state transitions back to the runnable state when that time interval expires or when the event it is
waiting for occurs.
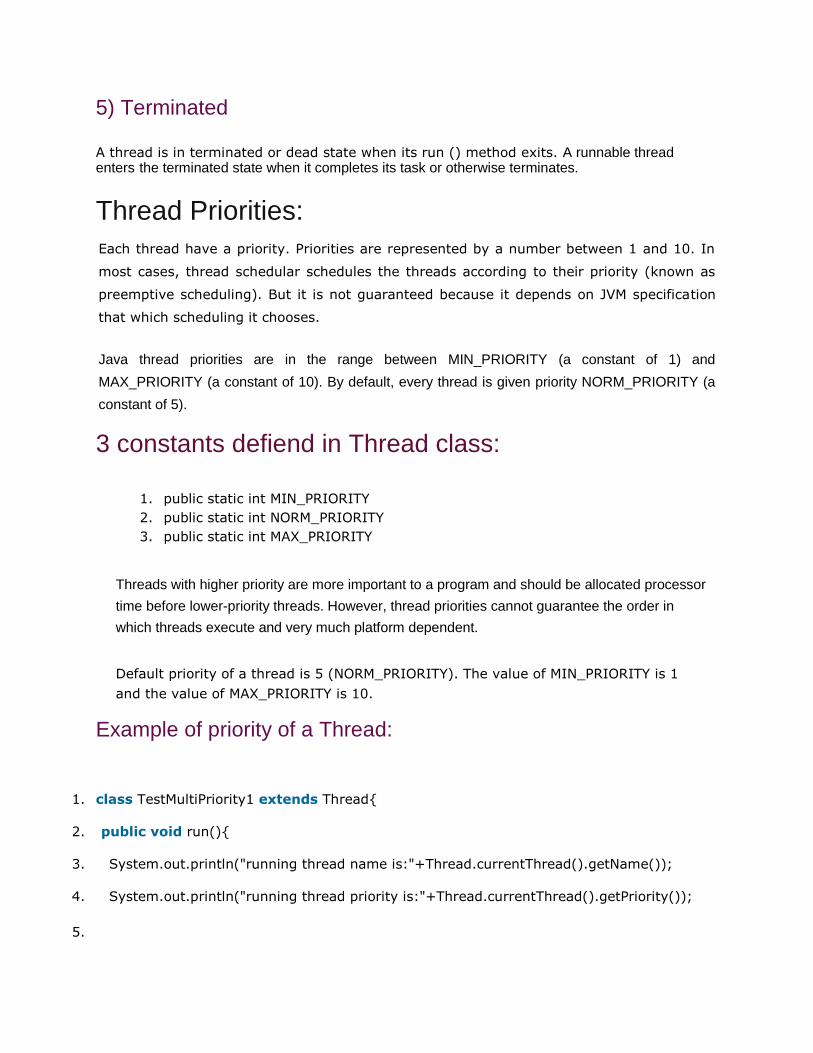
5) Terminated
A thread is in terminated or dead state when its run () method exits. A runnable thread enters the terminated state when it completes its task or otherwise terminates.
Thread Priorities:
Each thread have a priority. Priorities are represented by a number between 1 and 10. In
most cases, thread schedular schedules the threads according to their priority (known as
preemptive scheduling). But it is not guaranteed because it depends on JVM specification
that which scheduling it chooses.
Java thread priorities are in the range between MIN_PRIORITY (a constant of 1) and
MAX_PRIORITY (a constant of 10). By default, every thread is given priority NORM_PRIORITY (a
constant of 5).
3 constants defiend in Thread class:
1. public static int MIN_PRIORITY 2. public static int NORM_PRIORITY 3. public static int MAX_PRIORITY
Threads with higher priority are more important to a program and should be allocated processor
time before lower-priority threads. However, thread priorities cannot guarantee the order in
which threads execute and very much platform dependent.
Default priority of a thread is 5 (NORM_PRIORITY). The value of MIN_PRIORITY is 1
and the value of MAX_PRIORITY is 10.
Example of priority of a Thread:
1. class TestMultiPriority1 extends Thread{
2. public void run(){
3. System.out.println("running thread name is:"+Thread.currentThread().getName());
4. System.out.println("running thread priority is:"+Thread.currentThread().getPriority());
5.

6. }
7. public static void main(String args[]){
8. TestMultiPriority1 m1=new TestMultiPriority1();
9. TestMultiPriority1 m2=new TestMultiPriority1();
10. m1.setPriority(Thread.MIN_PRIORITY);
11. m2.setPriority(Thread.MAX_PRIORITY);
12. m1.start();
13. m2.start(); 14. 15. }
16. }
Test it Now
Output:running thread name is:Thread-0
running thread priority is:10
running thread name is:Thread-1
running thread priority is:1
Example that creates a new thread and starts it running:
class RunnableDemo implements Runnable
{ private Thread t;
private String threadName;
RunnableDemo( String name){
threadName = name;
System.out.println("Creating " + threadName );
}
public void run() {
System.out.println("Running " + threadName );
try {
for(int i = 4; i > 0; i--) {
System.out.println("Thread: " + threadName + ", " + i);
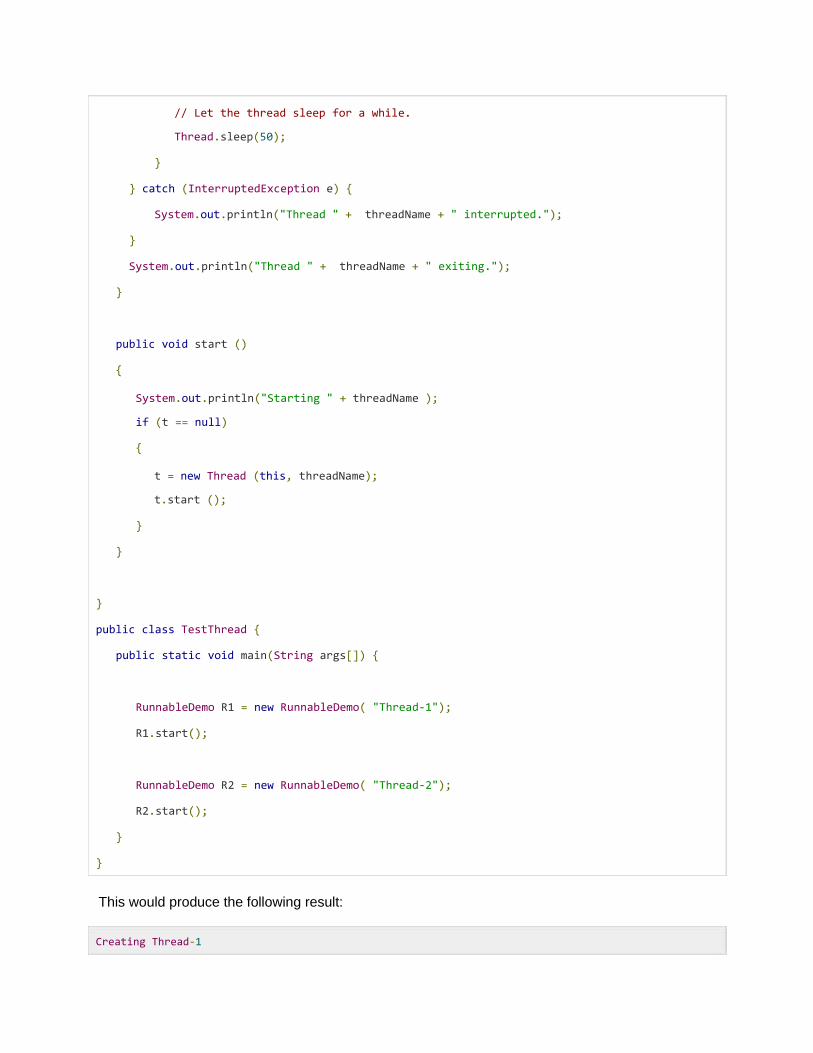
// Let the thread sleep for a while.
Thread.sleep(50);
}
} catch (InterruptedException e) {
System.out.println("Thread " + threadName + " interrupted.");
}
System.out.println("Thread " + threadName + " exiting.");
}
public void start ()
{
System.out.println("Starting " + threadName );
if (t == null)
{
t = new Thread (this, threadName);
t.start ();
}
}
} public class TestThread {
public static void main(String args[]) {
RunnableDemo R1 = new RunnableDemo( "Thread-1");
R1.start();
RunnableDemo R2 = new RunnableDemo( "Thread-2");
R2.start();
}
}
This would produce the following result:
Creating Thread-1
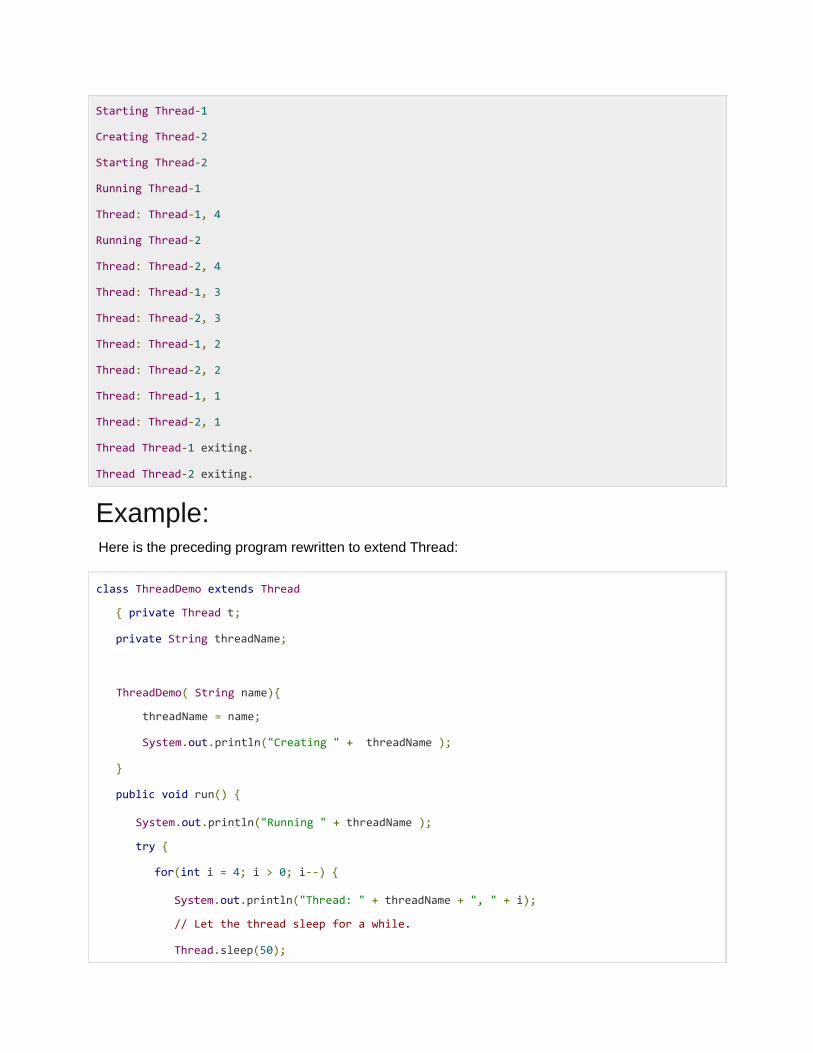
Starting Thread-1 Creating Thread-2 Starting Thread-2 Running Thread-1 Thread: Thread-1, 4 Running Thread-2 Thread: Thread-2, 4 Thread: Thread-1, 3 Thread: Thread-2, 3 Thread: Thread-1, 2 Thread: Thread-2, 2 Thread: Thread-1, 1 Thread: Thread-2, 1 Thread Thread-1 exiting. Thread Thread-2 exiting.
Example: Here is the preceding program rewritten to extend Thread:
class ThreadDemo extends Thread
{ private Thread t;
private String threadName;
ThreadDemo( String name){
threadName = name;
System.out.println("Creating " + threadName );
}
public void run() {
System.out.println("Running " + threadName );
try {
for(int i = 4; i > 0; i--) {
System.out.println("Thread: " + threadName + ", " + i);
// Let the thread sleep for a while.
Thread.sleep(50);

}
} catch (InterruptedException e) {
System.out.println("Thread " + threadName + " interrupted.");
}
System.out.println("Thread " + threadName + " exiting.");
}
public void start ()
{
System.out.println("Starting " + threadName );
if (t == null)
{
t = new Thread (this, threadName);
t.start ();
}
}
}
public class TestThread {
public static void main(String args[]) {
ThreadDemo T1 = new ThreadDemo( "Thread-1");
T1.start();
ThreadDemo T2 = new ThreadDemo( "Thread-2");
T2.start();
}
}
This would produce the following result:
Creating Thread-1 Starting Thread-1
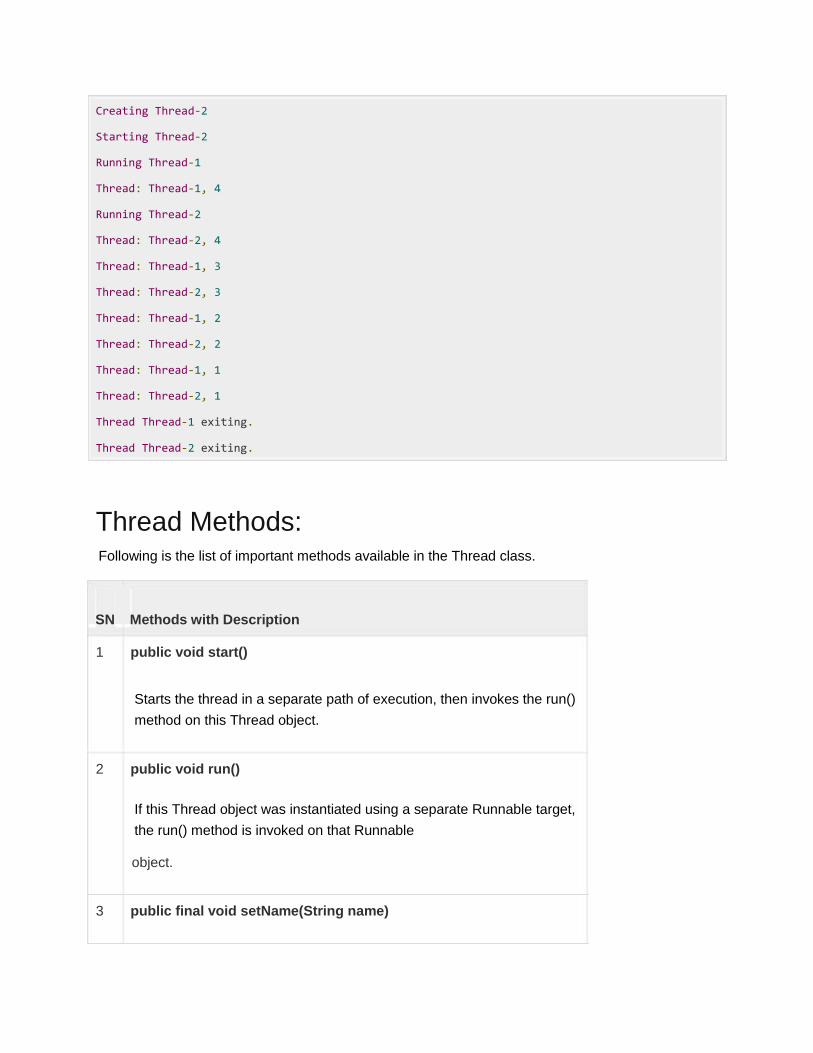
Creating Thread-2
Starting Thread-2
Running Thread-1
Thread: Thread-1, 4
Running Thread-2
Thread: Thread-2, 4
Thread: Thread-1, 3
Thread: Thread-2, 3
Thread: Thread-1, 2
Thread: Thread-2, 2
Thread: Thread-1, 1
Thread: Thread-2, 1
Thread Thread-1 exiting.
Thread Thread-2 exiting.
Thread Methods:
Following is the list of important methods available in the Thread class.
SN Methods with Description
1 public void start()
Starts the thread in a separate path of execution, then invokes the run()
method on this Thread object.
2 public void run()
If this Thread object was instantiated using a separate Runnable target,
the run() method is invoked on that Runnable
object.
3 public final void setName(String name)
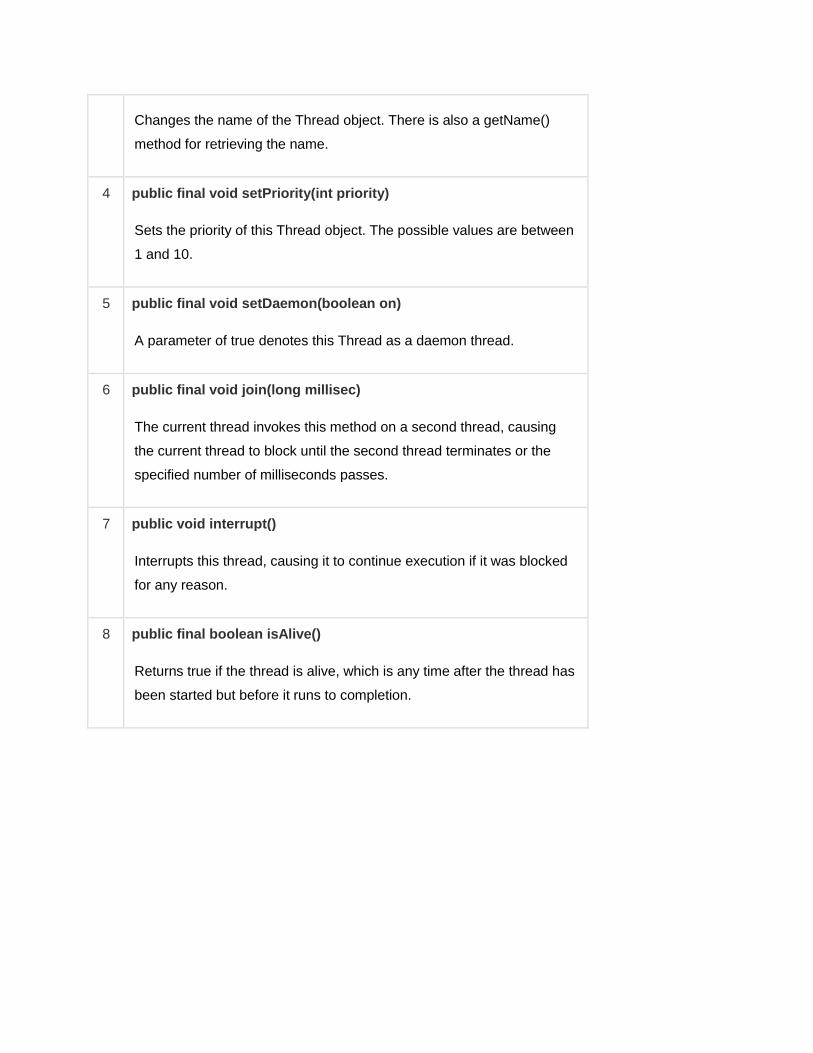
Changes the name of the Thread object. There is also a getName()
method for retrieving the name.
4 public final void setPriority(int priority)
Sets the priority of this Thread object. The possible values are between
1 and 10.
5 public final void setDaemon(boolean on)
A parameter of true denotes this Thread as a daemon thread.
6 public final void join(long millisec)
The current thread invokes this method on a second thread, causing
the current thread to block until the second thread terminates or the
specified number of milliseconds passes.
7 public void interrupt()
Interrupts this thread, causing it to continue execution if it was blocked
for any reason.
8 public final boolean isAlive()
Returns true if the thread is alive, which is any time after the thread has
been started but before it runs to completion.

The previous methods are invoked on a particular Thread object. The following methods in the
Thread class are static. Invoking one of the static methods performs the operation on the currently
running thread.
SN
Methods with Description
1 public static void yield()
Causes the currently running thread to yield to any other threads of the
same priority that are waiting to be scheduled.
2 public static void sleep(long millisec)
Causes the currently running thread to block for at least the specified
number of milliseconds.
3 public static boolean holdsLock(Object x)
Returns true if the current thread holds the lock on the given Object.
4 public static Thread currentThread()
Returns a reference to the currently running thread, which is the thread
that invokes this method.
5 public static void dumpStack()
Prints the stack trace for the currently running thread, which is useful
when debugging a multithreaded application.

How to create thread
There are two ways to create a thread:
1. By extending Thread class 2. By implementing Runnable interface.
13. Create Thread by Extending Thread Class: The second way to create a thread is to create a new class that extendsThread class using the
following two simple steps. This approach provides more flexibility in handling multiple threads
created using available methods in Thread class.
Step 1 You will need to override run( ) method available in Thread class. This method provides entry point
for the thread and you will put you complete business logic inside this method. Following is simple
syntax of run() method:
public void run( )
Step 2 Once Thread object is created, you can start it by calling start( ) method, which executes a call to
run( ) method. Following is simple syntax of start() method:
void start( );
Following is another class which extends Thread class:
6. File Name : GuessANumber.java 7. Create a thread to extentd Thread
public class GuessANumber extends Thread {
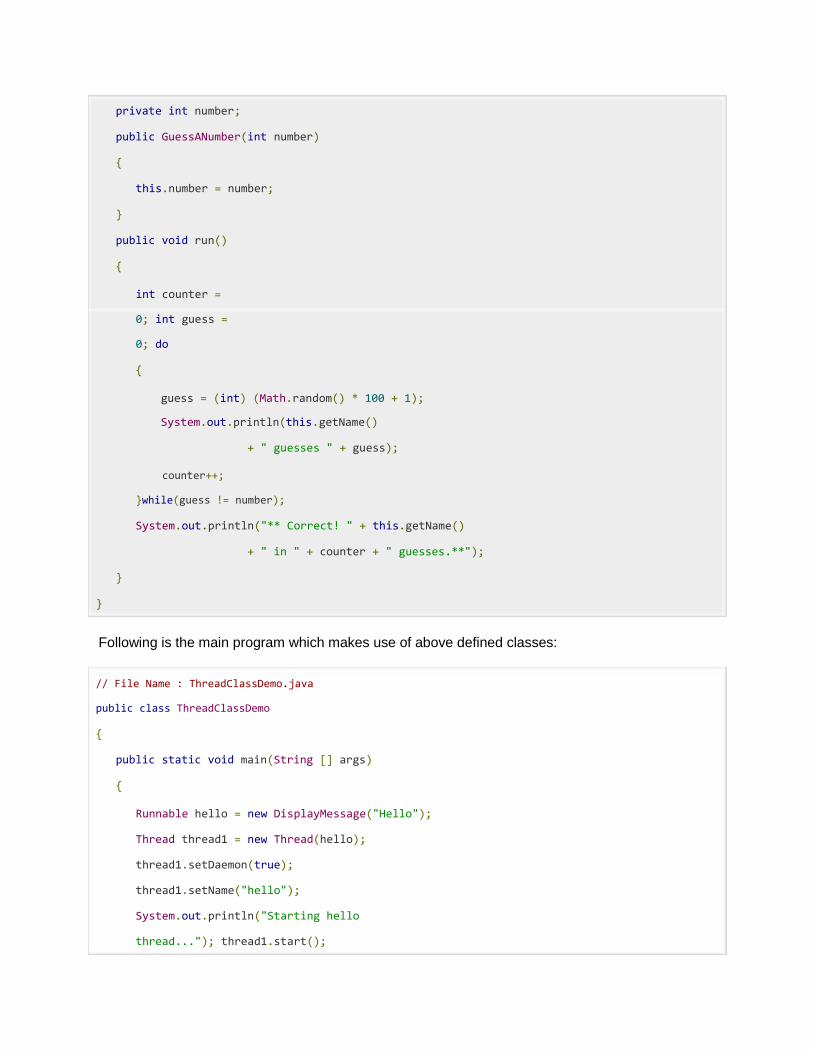
private int number;
public GuessANumber(int number)
{
this.number = number;
}
public void run()
{
int counter =
0; int guess =
0; do
{
guess = (int) (Math.random() * 100 + 1);
System.out.println(this.getName()
+ " guesses " + guess);
counter++;
}while(guess != number);
System.out.println("** Correct! " + this.getName()
+ " in " + counter + " guesses.**");
} }
Following is the main program which makes use of above defined classes:
// File Name : ThreadClassDemo.java
public class ThreadClassDemo {
public static void main(String [] args)
{
Runnable hello = new DisplayMessage("Hello");
Thread thread1 = new Thread(hello);
thread1.setDaemon(true);
thread1.setName("hello");
System.out.println("Starting hello
thread..."); thread1.start();
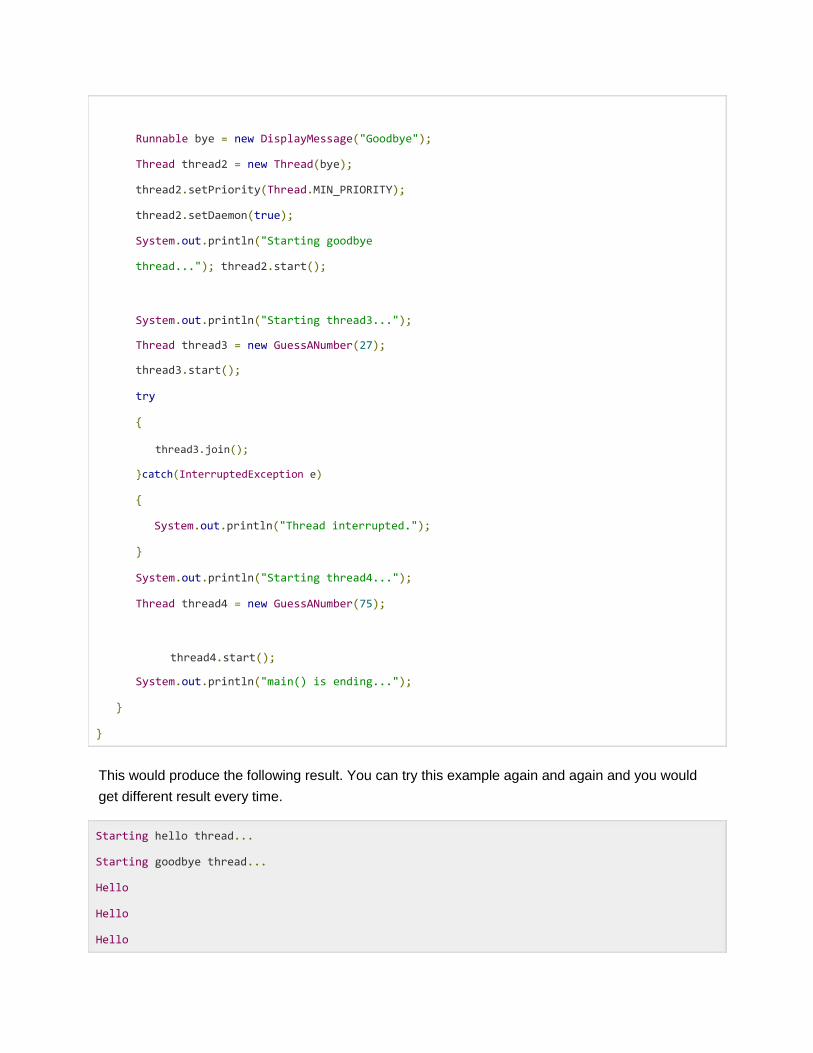
Runnable bye = new DisplayMessage("Goodbye");
Thread thread2 = new Thread(bye);
thread2.setPriority(Thread.MIN_PRIORITY);
thread2.setDaemon(true);
System.out.println("Starting goodbye
thread..."); thread2.start();
System.out.println("Starting thread3...");
Thread thread3 = new GuessANumber(27);
thread3.start();
try
{
thread3.join();
}catch(InterruptedException e)
{
System.out.println("Thread interrupted.");
}
System.out.println("Starting thread4...");
Thread thread4 = new GuessANumber(75);
thread4.start();
System.out.println("main() is ending...");
} } This would produce the following result. You can try this example again and again and you would
get different result every time.
Starting hello thread... Starting goodbye thread... Hello Hello Hello
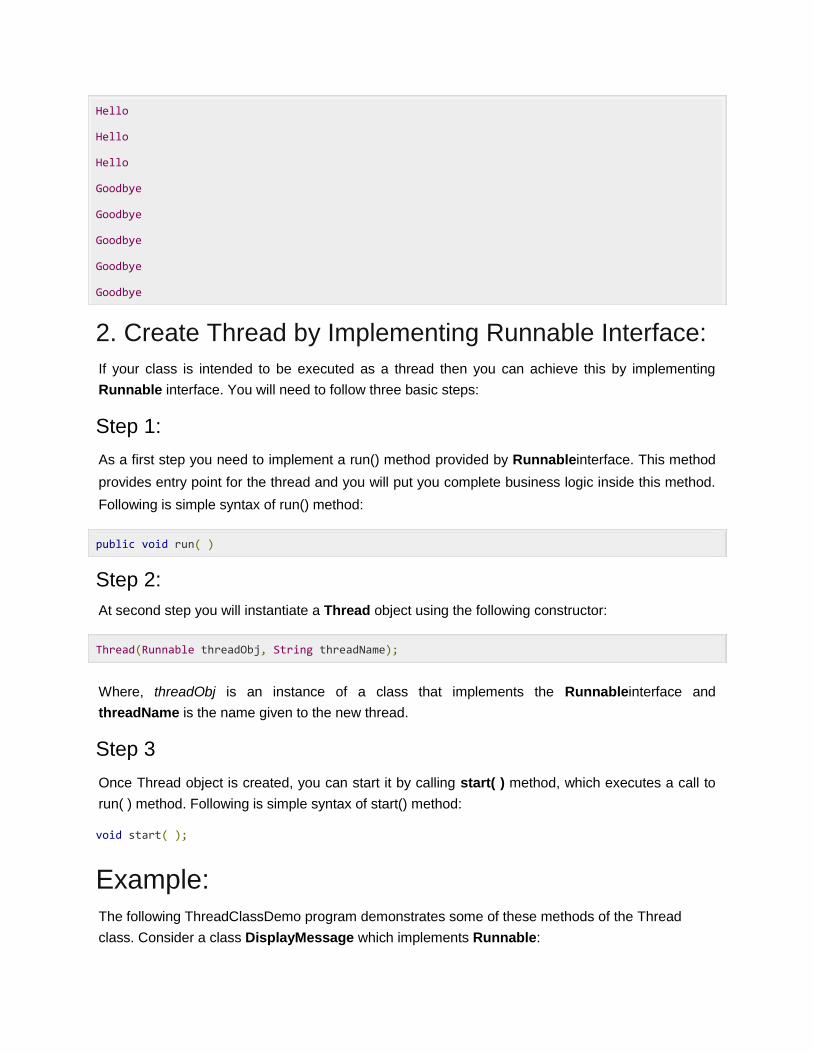
Hello Hello Hello Goodbye Goodbye Goodbye Goodbye Goodbye
2. Create Thread by Implementing Runnable Interface: If your class is intended to be executed as a thread then you can achieve this by implementing
Runnable interface. You will need to follow three basic steps:
Step 1: As a first step you need to implement a run() method provided by Runnableinterface. This method
provides entry point for the thread and you will put you complete business logic inside this method.
Following is simple syntax of run() method:
public void run( )
Step 2: At second step you will instantiate a Thread object using the following constructor:
Thread(Runnable threadObj, String threadName); Where, threadObj is an instance of a class that implements the Runnableinterface and
threadName is the name given to the new thread.
Step 3 Once Thread object is created, you can start it by calling start( ) method, which executes a call to
run( ) method. Following is simple syntax of start() method: void start( );
Example: The following ThreadClassDemo program demonstrates some of these methods of the Thread
class. Consider a class DisplayMessage which implements Runnable:
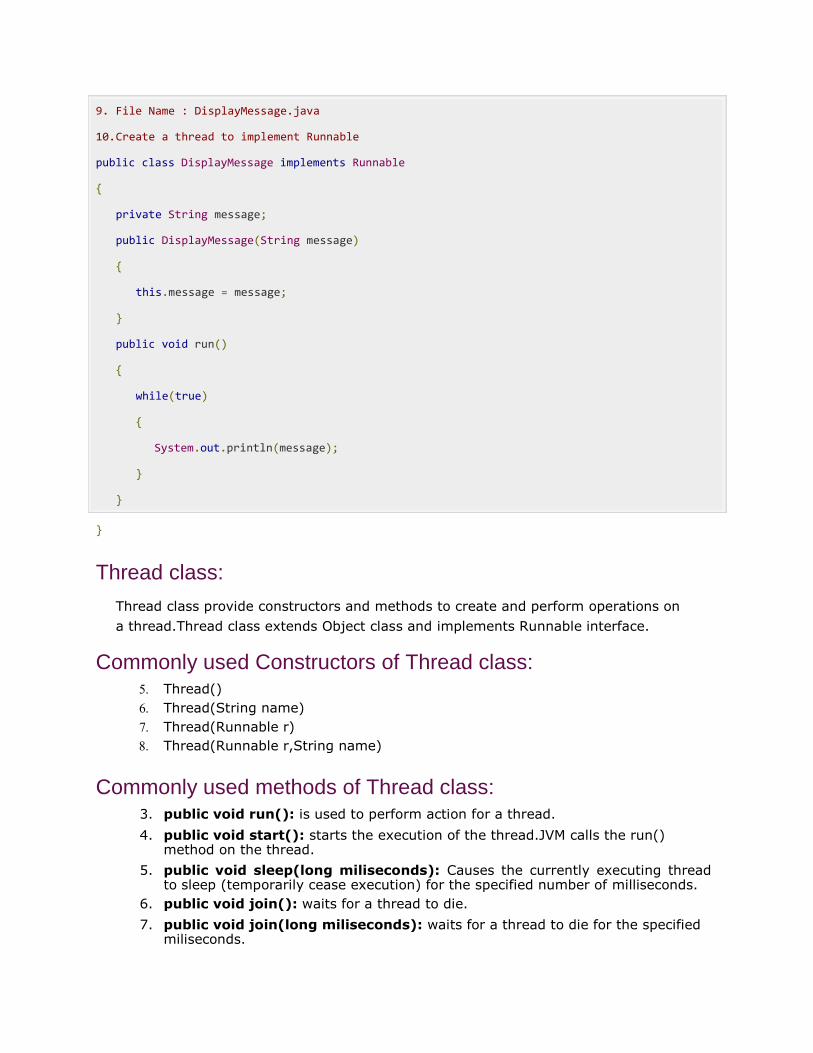
9. File Name : DisplayMessage.java 10. Create a thread to implement Runnable public class DisplayMessage implements Runnable {
private String message;
public DisplayMessage(String message)
{
this.message = message;
}
public void run()
{
while(true)
{
System.out.println(message);
}
} }
Thread class:
Thread class provide constructors and methods to create and perform operations on
a thread.Thread class extends Object class and implements Runnable interface.
Commonly used Constructors of Thread class:
Thread() Thread(String name) Thread(Runnable r) Thread(Runnable r,String name)
Commonly used methods of Thread class:
3. public void run(): is used to perform action for a thread.
4. public void start(): starts the execution of the thread.JVM calls the run() method on the thread.
5. public void sleep(long miliseconds): Causes the currently executing thread
to sleep (temporarily cease execution) for the specified number of milliseconds. 6. public void join(): waits for a thread to die.
7. public void join(long miliseconds): waits for a thread to die for the specified
miliseconds.
2 public int getPriority(): returns the priority of the thread. 3 public int setPriority(int priority): changes the priority of the thread. 4 public String getName(): returns the name of the thread. 5 public void setName(String name): changes the name of the thread.
6 public Thread currentThread(): returns the reference of currently
executing thread. 7 public int getId(): returns the id of the thread. 8 public Thread.State getState(): returns the state of the thread. 9 public boolean isAlive(): tests if the thread is alive.
10 public void yield(): causes the currently executing thread object to
temporarily pause and allow other threads to execute. 11 public void suspend(): is used to suspend the thread(depricated). 12 public void resume(): is used to resume the suspended thread(depricated). 13 public void stop(): is used to stop the thread(depricated). 14 public boolean isDaemon(): tests if the thread is a daemon thread.
15 public void setDaemon(boolean b): marks the thread as daemon or user
thread. 16 public void interrupt(): interrupts the thread. 17 public boolean isInterrupted(): tests if the thread has been interrupted.
18 public static boolean interrupted(): tests if the current thread has been
interrupted.
Runnable interface:
The Runnable interface should be implemented by any class whose instances are
intended to be executed by a thread. Runnable interface have only one method
named run().
1. public void run(): is used to perform action for a thread.
Starting a thread:
start() method of Thread class is used to start a newly created thread. It performs
following tasks:
A new thread starts(with new callstack). The thread moves from New state to the Runnable state. When the thread gets a chance to execute, its target run() method will run.
1)By extending Thread class:

1. class Multi extends Thread{
2. public void run(){
3. System.out.println("thread is running...");
4. }
5. public static void main(String args[]){
6. Multi t1=new Multi();
7. t1.start();
8. }
9. }
Output:thread is running...
Who makes your class object as thread object?
Thread class constructor allocates a new thread object.When you create object of
Multi class,your class constructor is invoked(provided by Compiler) fromwhere Thread
class constructor is invoked(by super() as first statement).So your Multi class object
is thread object now.
2)By implementing the Runnable interface: 1. class Multi3 implements Runnable{
2. public void run(){
3. System.out.println("thread is running...");
4. } 5. 6. public static void main(String args[]){
7. Multi3 m1=new Multi3();
8. Thread t1 =new Thread(m1);
9. t1.start();

10. }
11. }
Output:thread is running...
If you are not extending the Thread class,your class object would not be treated as a
thread object.So you need to explicitely create Thread class object.We are passing
the object of your class that implements Runnable so that your class run() method
may execute.
Thread Scheduler in Java
Thread scheduler in java is the part of the JVM that decides which thread should run.
There is no guarantee that which runnable thread will be chosen to run by the
thread scheduler.
Only one thread at a time can run in a single process.
The thread scheduler mainly uses preemptive or time slicing scheduling to schedule
the threads.
Difference between preemptive scheduling and time slicing
Under preemptive scheduling, the highest priority task executes until it enters the waiting
or dead states or a higher priority task comes into existence. Under time slicing, a task
executes for a predefined slice of time and then reenters the pool of ready tasks. The
scheduler then determines which task should execute next, based on priority and other
factors.
Sleep method in java The sleep() method of Thread class is used to sleep a thread for the specified amount
of time.

Syntax of sleep() method in java
The Thread class provides two methods for sleeping a thread:
o public static void sleep(long miliseconds)throws InterruptedException o public static void sleep(long miliseconds, int nanos)throws InterruptedException
Example of sleep method in java 1. class TestSleepMethod1 extends Thread{
2. public void run(){
3. for(int i=1;i<5;i++){
4. try{Thread.sleep(500);}
5. catch(InterruptedException e){System.out.println(e);}
6. System.out.println(i);
7. }
8. }
9. public static void main(String args[]){
10. TestSleepMethod1 t1=new TestSleepMethod1();
11. TestSleepMethod1 t2=new TestSleepMethod1(); 12. 13. t1.start();
14. t2.start();
15. }
16. }
Output:
1
1
2 2
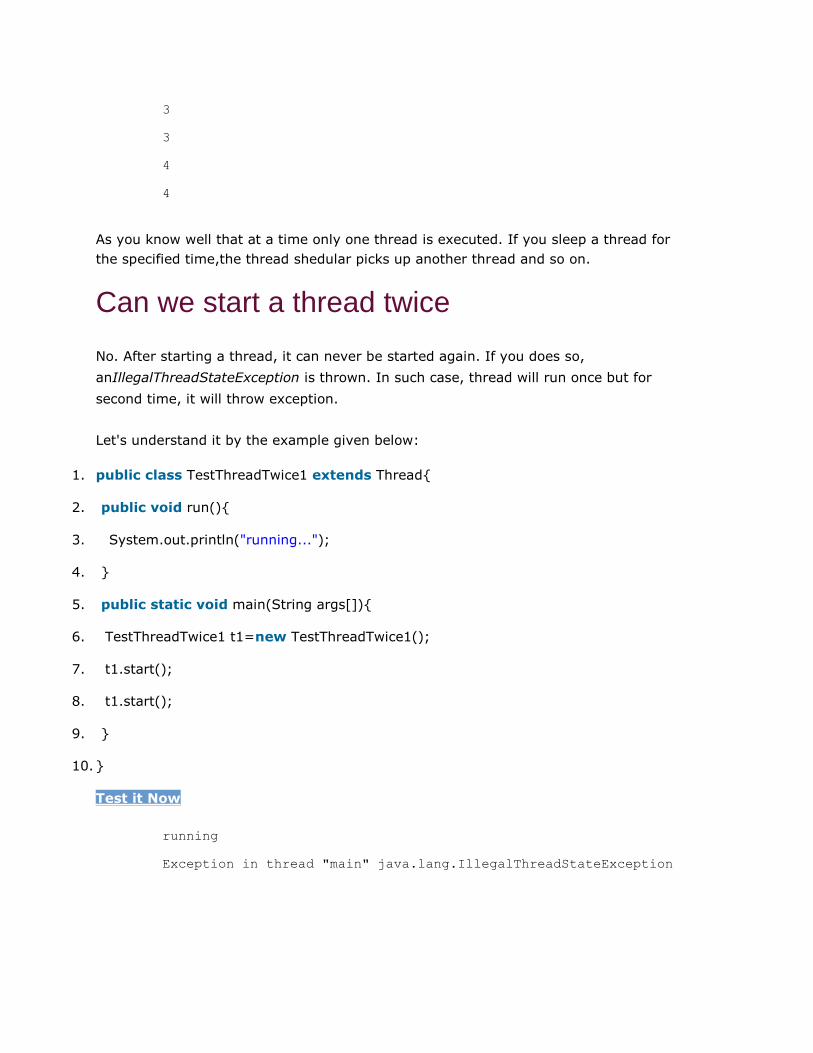
3
3
4
4
As you know well that at a time only one thread is executed. If you sleep a thread for
the specified time,the thread shedular picks up another thread and so on.
Can we start a thread twice
No. After starting a thread, it can never be started again. If you does so,
anIllegalThreadStateException is thrown. In such case, thread will run once but for
second time, it will throw exception.
Let's understand it by the example given below:
1. public class TestThreadTwice1 extends Thread{
2. public void run(){
3. System.out.println("running...");
4. }
5. public static void main(String args[]){
6. TestThreadTwice1 t1=new TestThreadTwice1();
7. t1.start();
8. t1.start();
9. }
10. }
Test it Now
running
Exception in thread "main" java.lang.IllegalThreadStateException
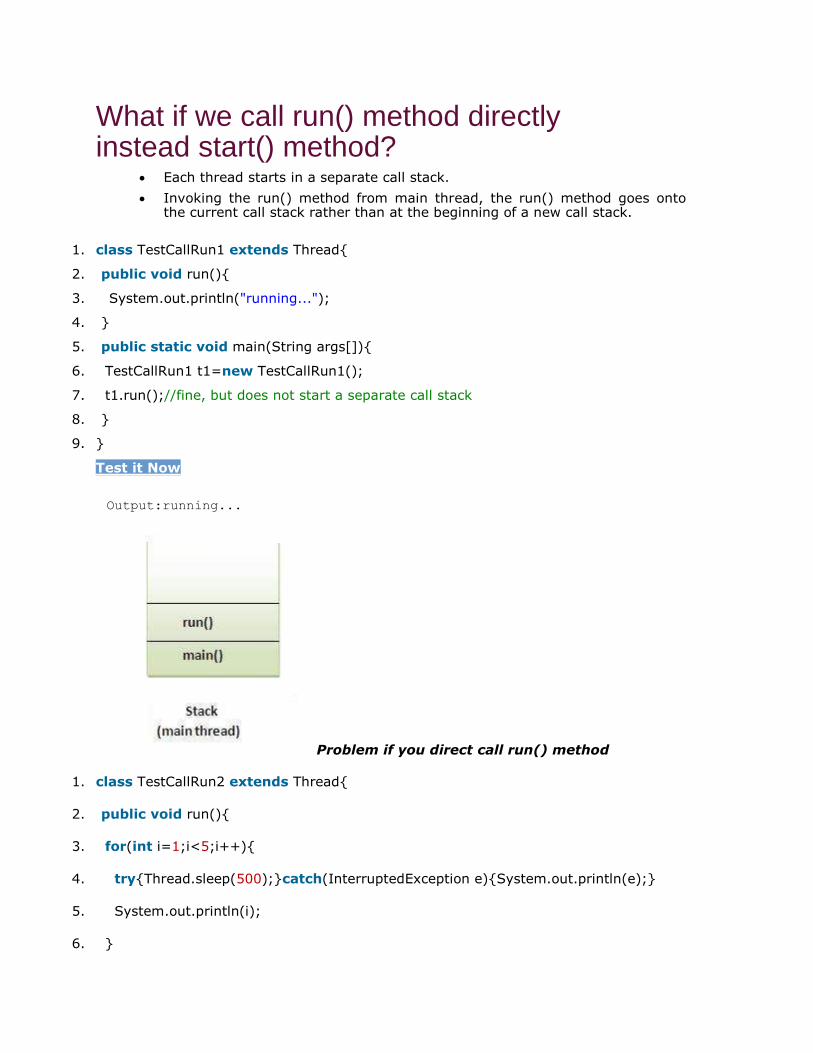
What if we call run() method directly instead start() method?
Each thread starts in a separate call stack.
Invoking the run() method from main thread, the run() method goes onto
the current call stack rather than at the beginning of a new call stack.
1. class TestCallRun1 extends Thread{ 2. public void run(){ 3. System.out.println("running..."); 4. } 5. public static void main(String args[]){ 6. TestCallRun1 t1=new TestCallRun1(); 7. t1.run();//fine, but does not start a separate call stack 8. } 9. }
Test it Now
Output:running...
Problem if you direct call run() method 1. class TestCallRun2 extends Thread{
2. public void run(){
3. for(int i=1;i<5;i++){
4. try{Thread.sleep(500);}catch(InterruptedException e){System.out.println(e);}
5. System.out.println(i);
6. }

7. }
8. public static void main(String args[]){
9. TestCallRun2 t1=new TestCallRun2();
10. TestCallRun2 t2=new TestCallRun2();
11. 12. t1.run();
13. t2.run();
14. }
15. }
Test it Now
Output:1
2
3
4
5
1
2
3
4
5
As you can see in the above program that there is no context-switching because here
t1 and t2 will be treated as normal object not thread object.
The join() method:
The join() method waits for a thread to die. In other words, it causes the currently
running threads to stop executing until the thread it joins with completes its task.
Syntax: public void join()throws InterruptedException
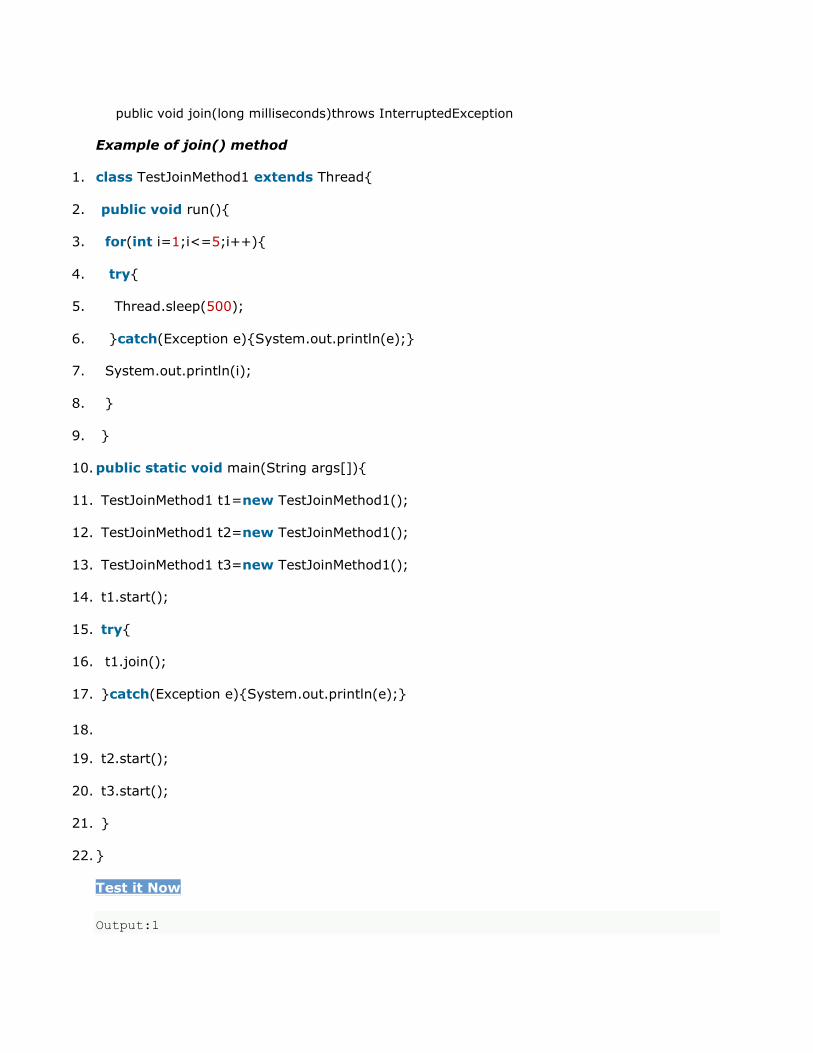
public void join(long milliseconds)throws InterruptedException
Example of join() method
1. class TestJoinMethod1 extends Thread{
2. public void run(){
3. for(int i=1;i<=5;i++){
4. try{
5. Thread.sleep(500);
6. }catch(Exception e){System.out.println(e);}
7. System.out.println(i);
8. }
9. }
10. public static void main(String args[]){
11. TestJoinMethod1 t1=new TestJoinMethod1();
12. TestJoinMethod1 t2=new TestJoinMethod1();
13. TestJoinMethod1 t3=new TestJoinMethod1();
14. t1.start();
15. try{
16. t1.join();
17. }catch(Exception e){System.out.println(e);}
18. 19. t2.start();
20. t3.start();
21. } 22. }
Test it Now
Output:1
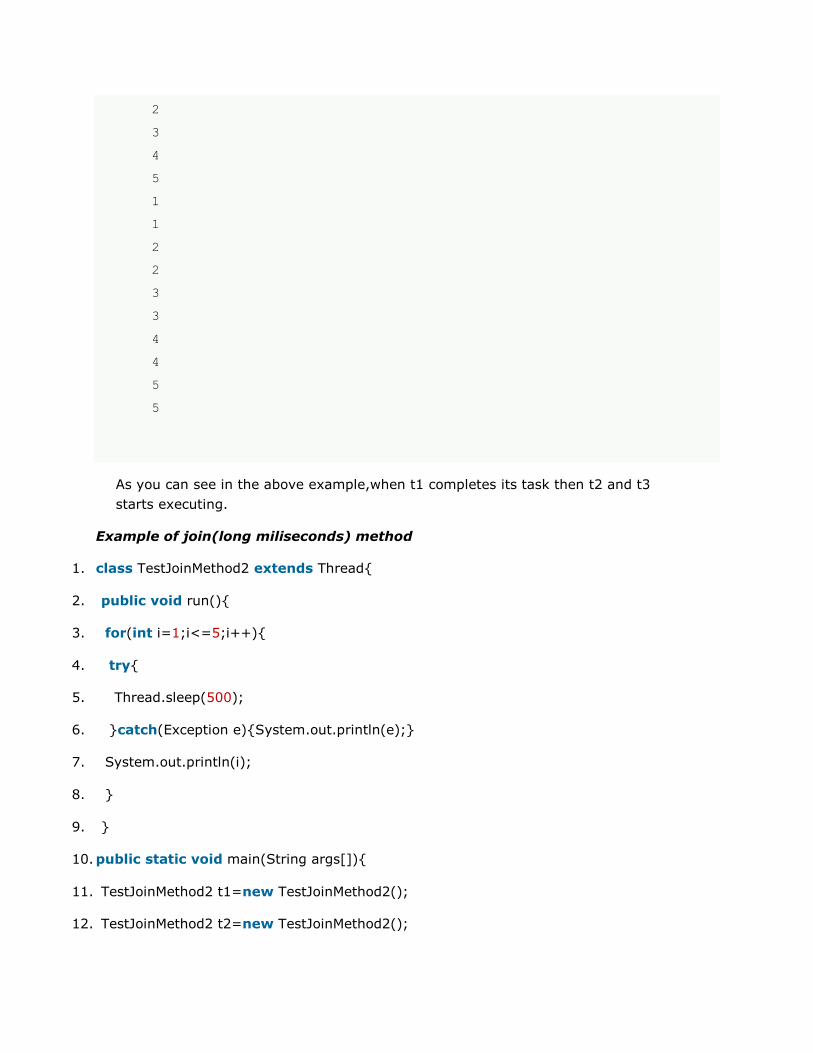
2
3
4
5
1
1
2
2
3
3
4
4
5
5
As you can see in the above example,when t1 completes its task then t2 and t3
starts executing.
Example of join(long miliseconds) method 1. class TestJoinMethod2 extends Thread{
2. public void run(){
3. for(int i=1;i<=5;i++){
4. try{
5. Thread.sleep(500);
6. }catch(Exception e){System.out.println(e);}
7. System.out.println(i);
8. }
9. }
10. public static void main(String args[]){
11. TestJoinMethod2 t1=new TestJoinMethod2();
12. TestJoinMethod2 t2=new TestJoinMethod2();
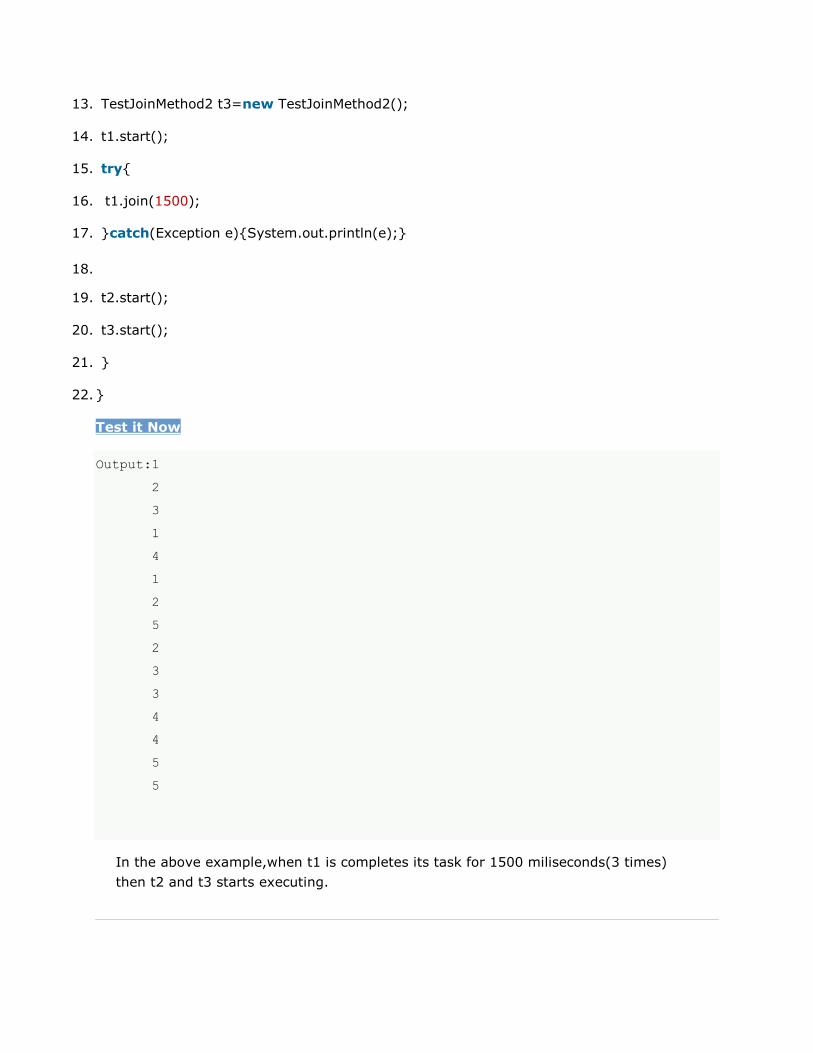
13. TestJoinMethod2 t3=new TestJoinMethod2();
14. t1.start();
15. try{
16. t1.join(1500);
17. }catch(Exception e){System.out.println(e);}
18. 19. t2.start();
20. t3.start();
21. }
22. }
Test it Now
Output:1
2
3
1
4
1
2
5
2
3
3
4
4
5
5
In the above example,when t1 is completes its task for 1500 miliseconds(3 times)
then t2 and t3 starts executing.

getName(),setName(String) and getId() method:
public String getName()
public void setName(String name)
public long getId() 1. class TestJoinMethod3 extends Thread{
2. public void run(){
3. System.out.println("running...");
4. }
5. public static void main(String args[]){
6. TestJoinMethod3 t1=new TestJoinMethod3();
7. TestJoinMethod3 t2=new TestJoinMethod3();
8. System.out.println("Name of t1:"+t1.getName());
9. System.out.println("Name of t2:"+t2.getName());
10. System.out.println("id of t1:"+t1.getId()); 11. 12. t1.start();
13. t2.start();
14. 15. t1.setName("Sonoo Jaiswal");
16. System.out.println("After changing name of t1:"+t1.getName());
17. }
18. }
Test it Now
Output:Name of t1:Thread-
0 Name of
t2:Thread-1 id of
t1:8 running...

After changling name of t1:Sonoo Jaiswal
running...
The currentThread() method:
The currentThread() method returns a reference to the currently executing thread object.
Syntax:
public static Thread currentThread()
Example of currentThread() method 1. class TestJoinMethod4 extends Thread{
2. public void run(){
3. System.out.println(Thread.currentThread().getName());
4. }
5. }
6. public static void main(String args[]){
7. TestJoinMethod4 t1=new TestJoinMethod4();
8. TestJoinMethod4 t2=new TestJoinMethod4(); 9. 10. t1.start();
11. t2.start();
12. }
13. }
Test it Now
Output:Thread-0
Thread-1
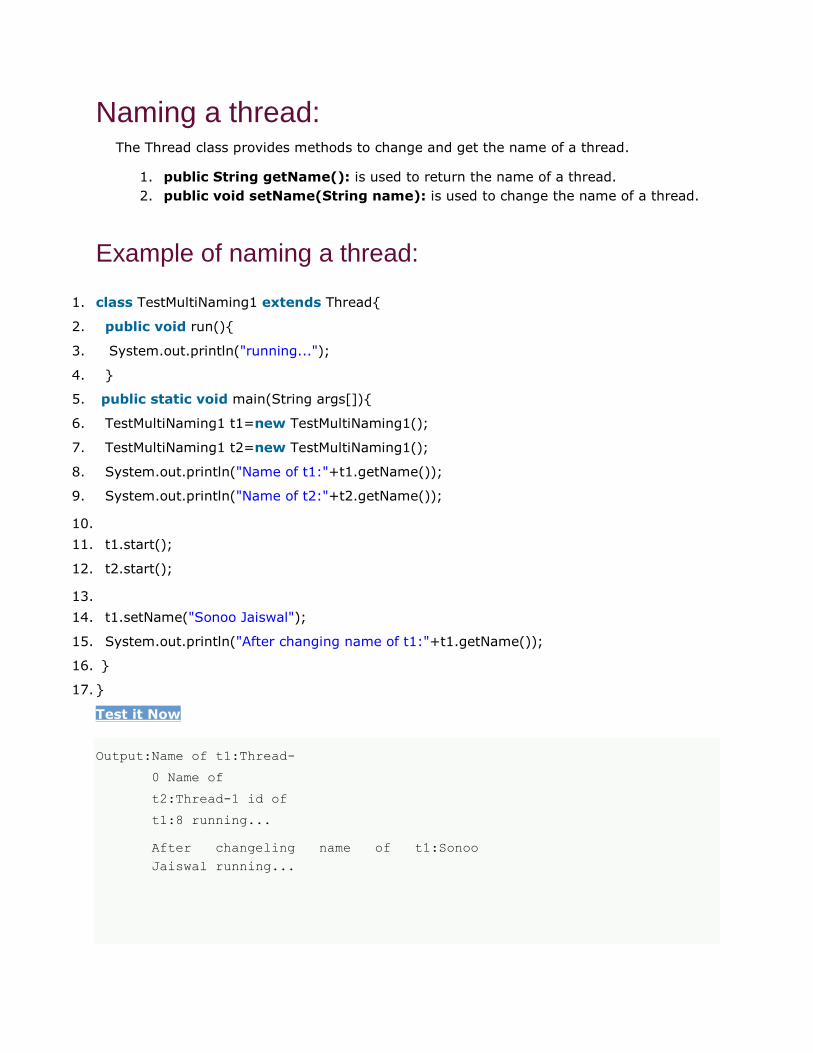
Naming a thread:
The Thread class provides methods to change and get the name of a thread.
1. public String getName(): is used to return the name of a thread. 2. public void setName(String name): is used to change the name of a thread.
Example of naming a thread:
1. class TestMultiNaming1 extends Thread{ 2. public void run(){ 3. System.out.println("running..."); 4. } 5. public static void main(String args[]){ 6. TestMultiNaming1 t1=new TestMultiNaming1(); 7. TestMultiNaming1 t2=new TestMultiNaming1(); 8. System.out.println("Name of t1:"+t1.getName()); 9. System.out.println("Name of t2:"+t2.getName()); 10. 11. t1.start(); 12. t2.start(); 13. 14. t1.setName("Sonoo Jaiswal"); 15. System.out.println("After changing name of t1:"+t1.getName()); 16. } 17. }
Test it Now
Output:Name of t1:Thread-
0 Name of
t2:Thread-1 id of
t1:8 running...
After changeling name of t1:Sonoo
Jaiswal running...
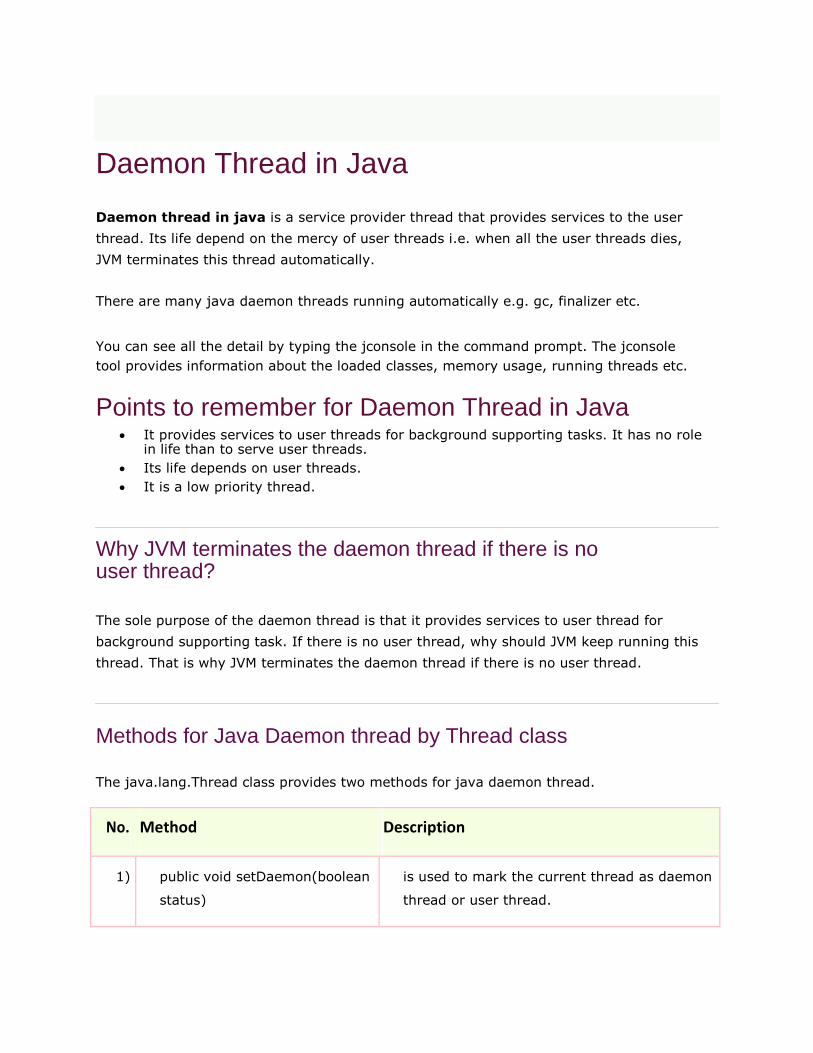
Daemon Thread in Java Daemon thread in java is a service provider thread that provides services to the user
thread. Its life depend on the mercy of user threads i.e. when all the user threads dies,
JVM terminates this thread automatically.
There are many java daemon threads running automatically e.g. gc, finalizer etc.
You can see all the detail by typing the jconsole in the command prompt. The jconsole
tool provides information about the loaded classes, memory usage, running threads etc.
Points to remember for Daemon Thread in Java
It provides services to user threads for background supporting tasks. It has no role in life than to serve user threads.
Its life depends on user threads. It is a low priority thread.
Why JVM terminates the daemon thread if there is no user thread?
The sole purpose of the daemon thread is that it provides services to user thread for
background supporting task. If there is no user thread, why should JVM keep running this
thread. That is why JVM terminates the daemon thread if there is no user thread.
Methods for Java Daemon thread by Thread class
The java.lang.Thread class provides two methods for java daemon thread.
No.
Method
Description
1) public void setDaemon(boolean is used to mark the current thread as daemon
status) thread or user thread.
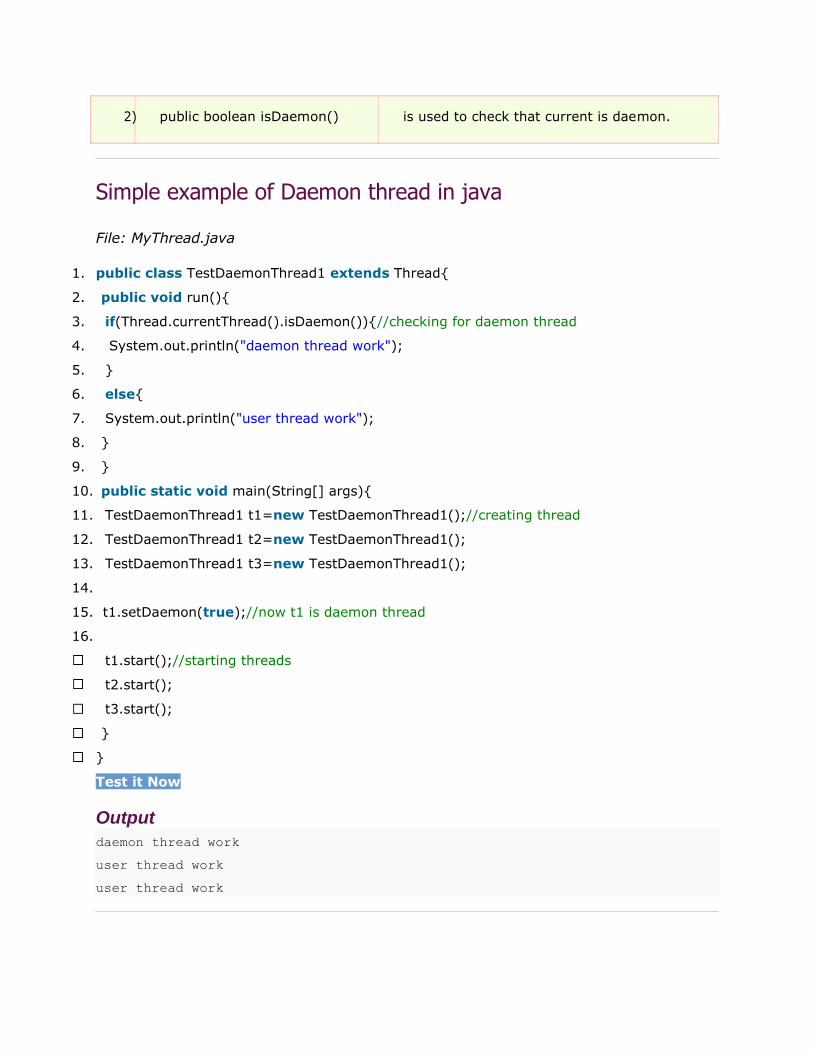
2) public boolean isDaemon() is used to check that current is daemon.
Simple example of Daemon thread in java
File: MyThread.java 1. public class TestDaemonThread1 extends Thread{ 2. public void run(){ 3. if(Thread.currentThread().isDaemon()){//checking for daemon thread 4. System.out.println("daemon thread work"); 5. } 6. else{ 7. System.out.println("user thread work"); 8. } 9. } 10. public static void main(String[] args){ 11. TestDaemonThread1 t1=new TestDaemonThread1();//creating thread 12. TestDaemonThread1 t2=new TestDaemonThread1(); 13. TestDaemonThread1 t3=new TestDaemonThread1(); 14. 15. t1.setDaemon(true);//now t1 is daemon thread 16.
t1.start();//starting threads
t2.start();
t3.start();
}
}
Test it Now
Output
daemon thread work
user thread work
user thread work
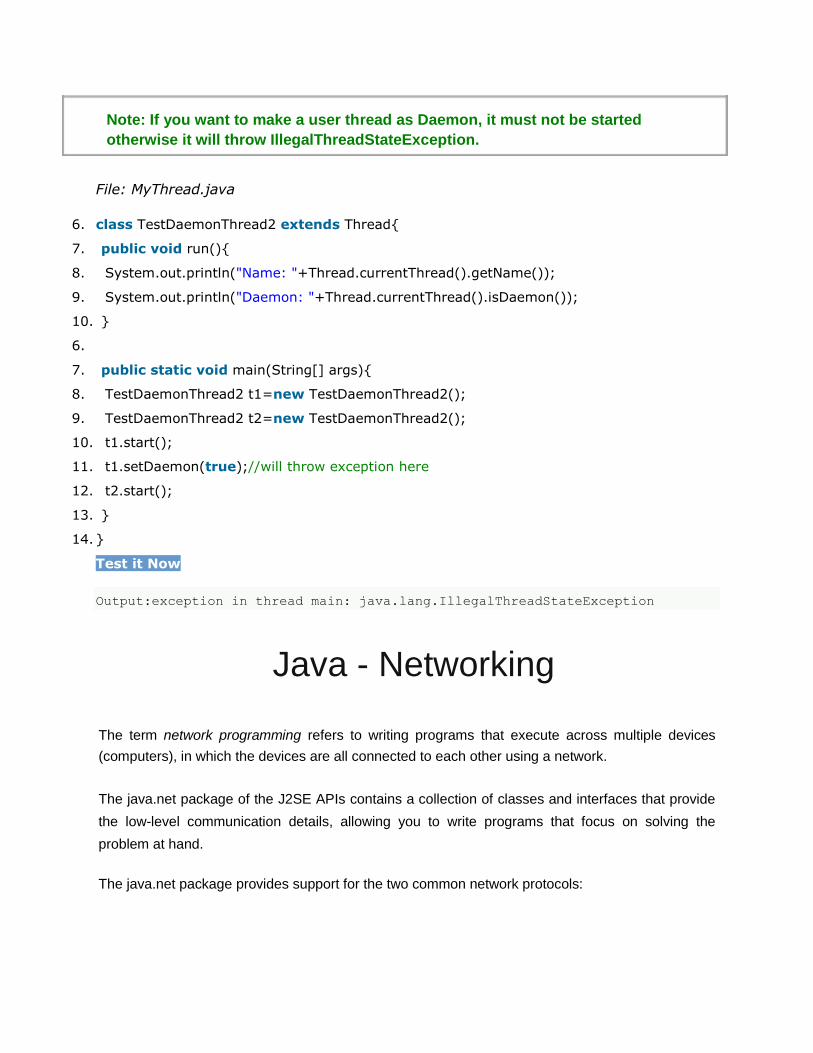
Note: If you want to make a user thread as Daemon, it must not be started
otherwise it will throw IllegalThreadStateException.
File: MyThread.java 6. class TestDaemonThread2 extends Thread{ 7. public void run(){ 8. System.out.println("Name: "+Thread.currentThread().getName()); 9. System.out.println("Daemon: "+Thread.currentThread().isDaemon()); 10. } 6. 7. public static void main(String[] args){ 8. TestDaemonThread2 t1=new TestDaemonThread2(); 9. TestDaemonThread2 t2=new TestDaemonThread2(); 10. t1.start(); 11. t1.setDaemon(true);//will throw exception here 12. t2.start(); 13. } 14. }
Test it Now
Output:exception in thread main: java.lang.IllegalThreadStateException
Java - Networking
The term network programming refers to writing programs that execute across multiple devices
(computers), in which the devices are all connected to each other using a network.
The java.net package of the J2SE APIs contains a collection of classes and interfaces that provide
the low-level communication details, allowing you to write programs that focus on solving the
problem at hand.
The java.net package provides support for the two common network protocols:

TCP: TCP stands for Transmission Control Protocol, which allows for reliable
communication between two applications. TCP is typically used over the Internet Protocol,
which is referred to as TCP/IP.
UDP: UDP stands for User Datagram Protocol, a connection-less protocol that allows for
packets of data to be transmitted between applications.
This tutorial gives good understanding on the following two subjects:
Socket Programming: This is most widely used concept in Networking and it has been
explained in very detail.
URL Processing: This would be covered separately. Click here to learn about URL
Processing in Java language.
Socket Programming: Sockets provide the communication mechanism between two computers using TCP. A client
program creates a socket on its end of the communication and attempts to connect that socket to a
server.
When the connection is made, the server creates a socket object on its end of the communication.
The client and server can now communicate by writing to and reading from the socket.
The java.net.Socket class represents a socket, and the java.net.ServerSocket class provides a
mechanism for the server program to listen for clients and establish connections with them.
The following steps occur when establishing a TCP connection between two computers using
sockets:
The server instantiates a ServerSocket object, denoting which port number communication
is to occur on.
The server invokes the accept() method of the ServerSocket class. This method waits until a
client connects to the server on the given port.
After the server is waiting, a client instantiates a Socket object, specifying the server name
and port number to connect to.

The constructor of the Socket class attempts to connect the client to the specified server and
port number. If communication is established, the client now has a Socket object capable of
communicating with the server.
On the server side, the accept() method returns a reference to a new socket on the server
that is connected to the client's socket.
After the connections are established, communication can occur using I/O streams. Each socket
has both an OutputStream and an InputStream. The client's OutputStream is connected to the
server's InputStream, and the client's InputStream is connected to the server's OutputStream.
TCP is a twoway communication protocol, so data can be sent across both streams at the same
time. There are following usefull classes providing complete set of methods to implement sockets.
ServerSocket Class Methods:
The java.net.ServerSocket class is used by server applications to obtain a port and listen for client
requests
The ServerSocket class has four constructors:
SN Methods with Description
1 public ServerSocket(int port) throws IOException
Attempts to create a server socket bound to the specified port. An
exception occurs if the port is already bound by another application.
2 public ServerSocket(int port, int backlog) throws IOException
Similar to the previous constructor, the backlog parameter specifies
how many incoming clients to store in a wait queue.
17. public ServerSocket(int port, int backlog, InetAddress address) throws IOException
Similar to the previous constructor, the InetAddress parameter
specifies the local IP address to bind to. The InetAddress is used for
servers that may have multiple IP addresses, allowing the server to

specify which of its IP addresses to accept client requests on
4 public ServerSocket() throws IOException
Creates an unbound server socket. When using this constructor, use
the bind() method when you are ready to bind the server socket
If the ServerSocket constructor does not throw an exception, it means that your application has
successfully bound to the specified port and is ready for client requests.
Here are some of the common methods of the ServerSocket class:
SN Methods with Description
1 public int getLocalPort()
Returns the port that the server socket is listening on. This method is
useful if you passed in 0 as the port number in a constructor and let the
server find a port for you.
2 public Socket accept() throws IOException
Waits for an incoming client. This method blocks until either a client
connects to the server on the specified port or the socket times out,
assuming that the time-out value has been set using the
setSoTimeout() method. Otherwise, this method blocks indefinitely
3 public void setSoTimeout(int timeout)
Sets the time-out value for how long the server socket waits for a client
during the accept().
4 public void bind(SocketAddress host, int backlog)
Binds the socket to the specified server and port in the SocketAddress
object. Use this method if you instantiated the ServerSocket using the

no-argument constructor.
When the ServerSocket invokes accept(), the method does not return until a client connects. After a
client does connect, the ServerSocket creates a new Socket on an unspecified port and returns a
reference to this new Socket. A TCP connection now exists between the client and server, and
communication can begin.
Socket Class Methods:
The java.net.Socket class represents the socket that both the client and server use to
communicate with each other. The client obtains a Socket object by instantiating one, whereas the
server obtains a Socket object from the return value of the accept() method.
The Socket class has five constructors that a client uses to connect to a server:
SN
Methods with Description
1 public Socket(String host, int port) throws UnknownHostException,
IOException.
This method attempts to connect to the specified server at the specified
port. If this constructor does not throw an exception, the connection is
successful and the client is connected to the server.
2 public Socket(InetAddress host, int port) throws IOException
This method is identical to the previous constructor, except that the
host is denoted by an InetAddress object.
3 public Socket(String host, int port, InetAddress localAddress, int
localPort) throws IOException.
Connects to the specified host and port, creating a socket on the local
host at the specified address and port.
4 public Socket(InetAddress host, int port, InetAddress
localAddress, int localPort) throws IOException.
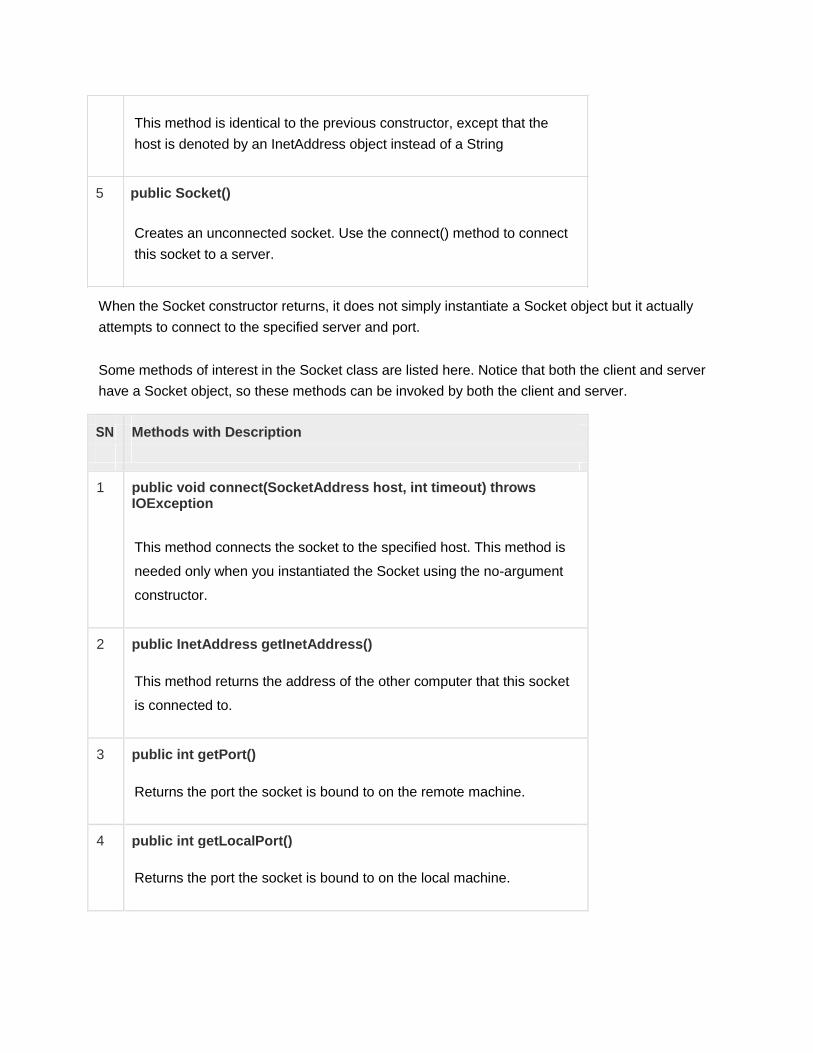
This method is identical to the previous constructor, except that the
host is denoted by an InetAddress object instead of a String
5 public Socket()
Creates an unconnected socket. Use the connect() method to connect
this socket to a server.
When the Socket constructor returns, it does not simply instantiate a Socket object but it actually
attempts to connect to the specified server and port.
Some methods of interest in the Socket class are listed here. Notice that both the client and server
have a Socket object, so these methods can be invoked by both the client and server.
SN
Methods with Description
1 public void connect(SocketAddress host, int timeout) throws
IOException
This method connects the socket to the specified host. This method is
needed only when you instantiated the Socket using the no-argument
constructor.
2 public InetAddress getInetAddress()
This method returns the address of the other computer that this socket
is connected to.
3 public int getPort()
Returns the port the socket is bound to on the remote machine.
4 public int getLocalPort()
Returns the port the socket is bound to on the local machine.

5 public SocketAddress getRemoteSocketAddress()
Returns the address of the remote socket.
6 public InputStream getInputStream() throws IOException
Returns the input stream of the socket. The input stream is connected
to the output stream of the remote socket.
7 public OutputStream getOutputStream() throws IOException
Returns the output stream of the socket. The output stream is
connected to the input stream of the remote socket
8 public void close() throws IOException
Closes the socket, which makes this Socket object no longer capable
of connecting again to any server
InetAddress Class Methods:
This class represents an Internet Protocol (IP) address. Here are following usefull methods which
you would need while doing socket programming:
SN
Methods with Description
1 static InetAddress getByAddress(byte[] addr)
Returns an InetAddress object given the raw IP address .
2 static InetAddress getByAddress(String host, byte[] addr)
Create an InetAddress based on the provided host name and IP
address.
3 static InetAddress getByName(String host)
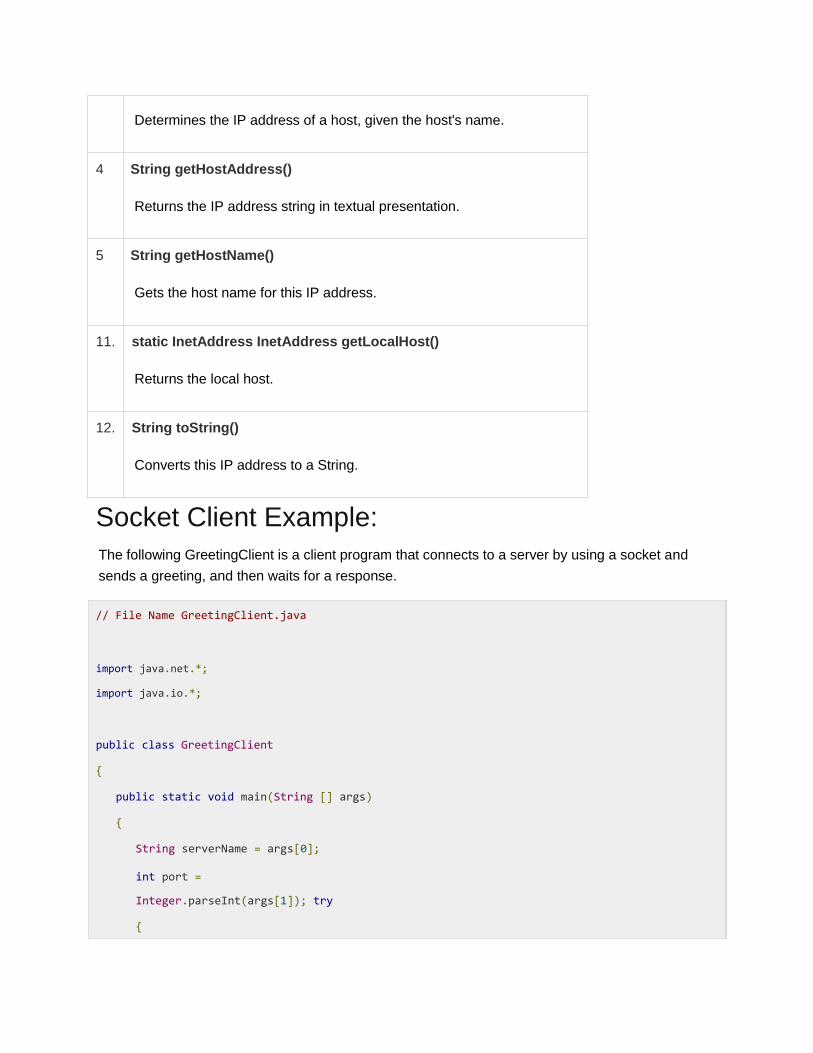
Determines the IP address of a host, given the host's name.
4 String getHostAddress()
Returns the IP address string in textual presentation.
5 String getHostName()
Gets the host name for this IP address.
11. static InetAddress InetAddress getLocalHost()
Returns the local host.
12. String toString()
Converts this IP address to a String.
Socket Client Example: The following GreetingClient is a client program that connects to a server by using a socket and
sends a greeting, and then waits for a response.
// File Name GreetingClient.java
import java.net.*;
import java.io.*;
public class GreetingClient {
public static void main(String [] args)
{
String serverName = args[0];
int port =
Integer.parseInt(args[1]); try
{

System.out.println("Connecting to " + serverName
+ " on port " + port);
Socket client = new Socket(serverName, port);
System.out.println("Just connected to "
+ client.getRemoteSocketAddress());
OutputStream outToServer = client.getOutputStream();
DataOutputStream out =
new DataOutputStream(outToServer);
out.writeUTF("Hello from "
+ client.getLocalSocketAddress());
InputStream inFromServer = client.getInputStream();
DataInputStream in =
new DataInputStream(inFromServer);
System.out.println("Server says " + in.readUTF());
client.close();
}catch(IOException e)
{
e.printStackTrace();
}
} }
Socket Server Example: The following GreetingServer program is an example of a server application that uses the Socket
class to listen for clients on a port number specified by a command-line argument:
// File Name GreetingServer.java
import java.net.*;
import java.io.*;
public class GreetingServer extends Thread {
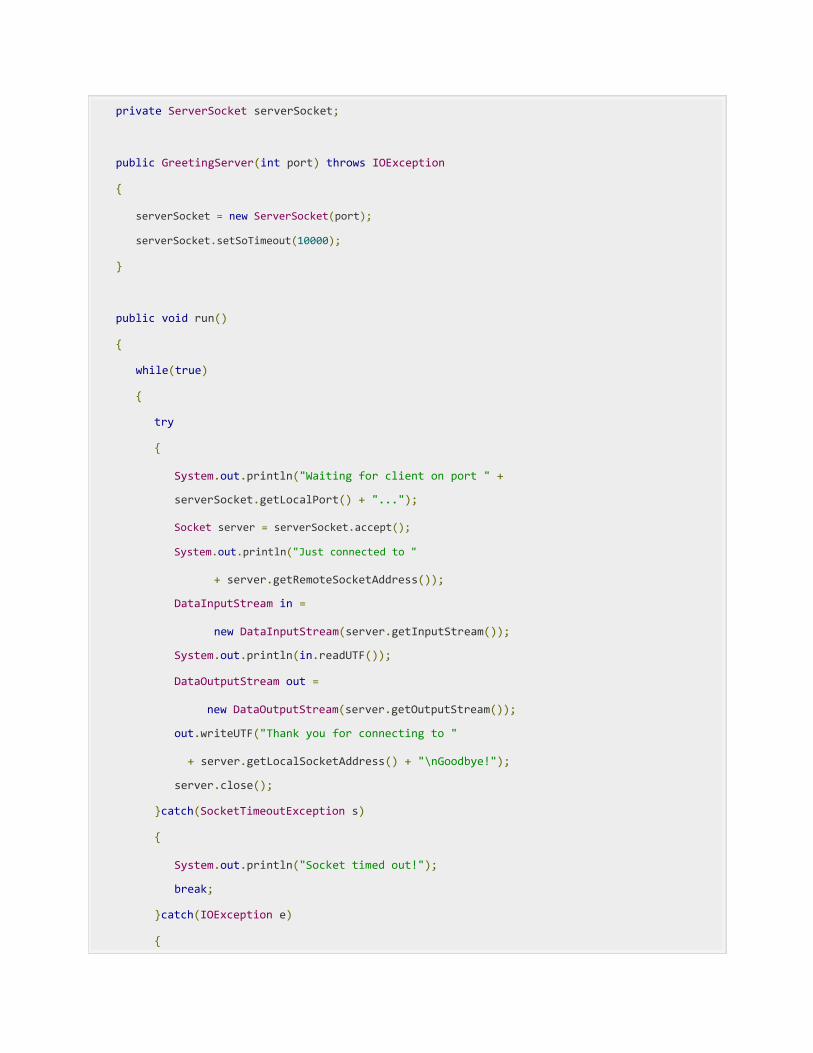
private ServerSocket serverSocket;
public GreetingServer(int port) throws IOException {
serverSocket = new ServerSocket(port);
serverSocket.setSoTimeout(10000); }
public void run() {
while(true)
{
try
{
System.out.println("Waiting for client on port " +
serverSocket.getLocalPort() + "...");
Socket server = serverSocket.accept();
System.out.println("Just connected to "
+ server.getRemoteSocketAddress());
DataInputStream in =
new DataInputStream(server.getInputStream());
System.out.println(in.readUTF());
DataOutputStream out =
new DataOutputStream(server.getOutputStream());
out.writeUTF("Thank you for connecting to "
+ server.getLocalSocketAddress() + "\nGoodbye!");
server.close();
}catch(SocketTimeoutException s)
{
System.out.println("Socket timed out!");
break;
}catch(IOException e)
{
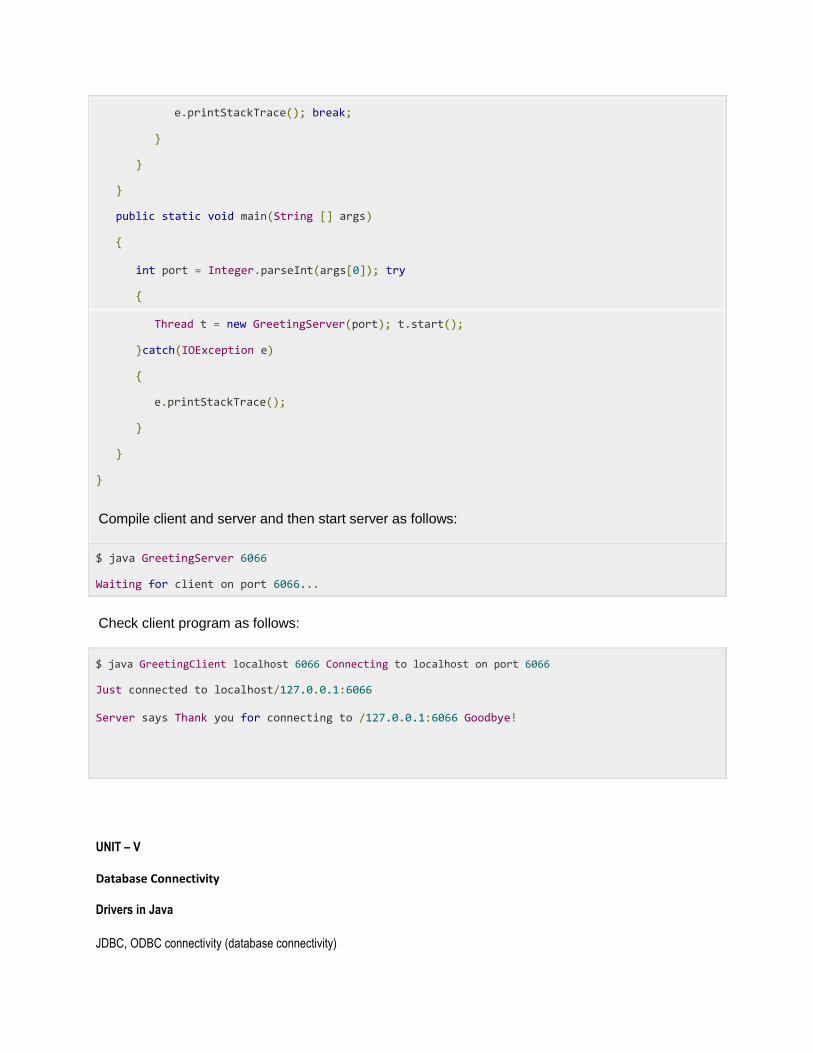
e.printStackTrace(); break;
}
}
}
public static void main(String [] args)
{
int port = Integer.parseInt(args[0]); try
{
Thread t = new GreetingServer(port); t.start();
}catch(IOException e)
{
e.printStackTrace();
}
}
}
Compile client and server and then start server as follows:
$ java GreetingServer 6066 Waiting for client on port 6066...
Check client program as follows:
$ java GreetingClient localhost 6066 Connecting to localhost on port 6066 Just connected to localhost/127.0.0.1:6066 Server says Thank you for connecting to /127.0.0.1:6066 Goodbye!
UNIT – V Database Connectivity Drivers in Java JDBC, ODBC connectivity (database connectivity)

Java JDBC Tutorial Java JDBC is a java API to connect and execute query with the database. JDBC API
uses jdbc drivers to connect with the database.
Why use JDBC Before JDBC, ODBC API was the database API to connect and execute query with the
database. But, ODBC API uses ODBC driver which is written in C language (i.e. platform
dependent and unsecured). That is why Java has defined its own API (JDBC API) that uses
JDBC drivers (written in Java language).
Do You Know
o How to connect Java application with Oracle and Mysql database using JDBC?
o What is the difference between Statement and PreparedStatement interface?
o How to print total numbers of tables and views of a database using JDBC ?
o How to store and retrieve images from Oracle database using JDBC?
o How to store and retrieve files from Oracle database using JDBC?
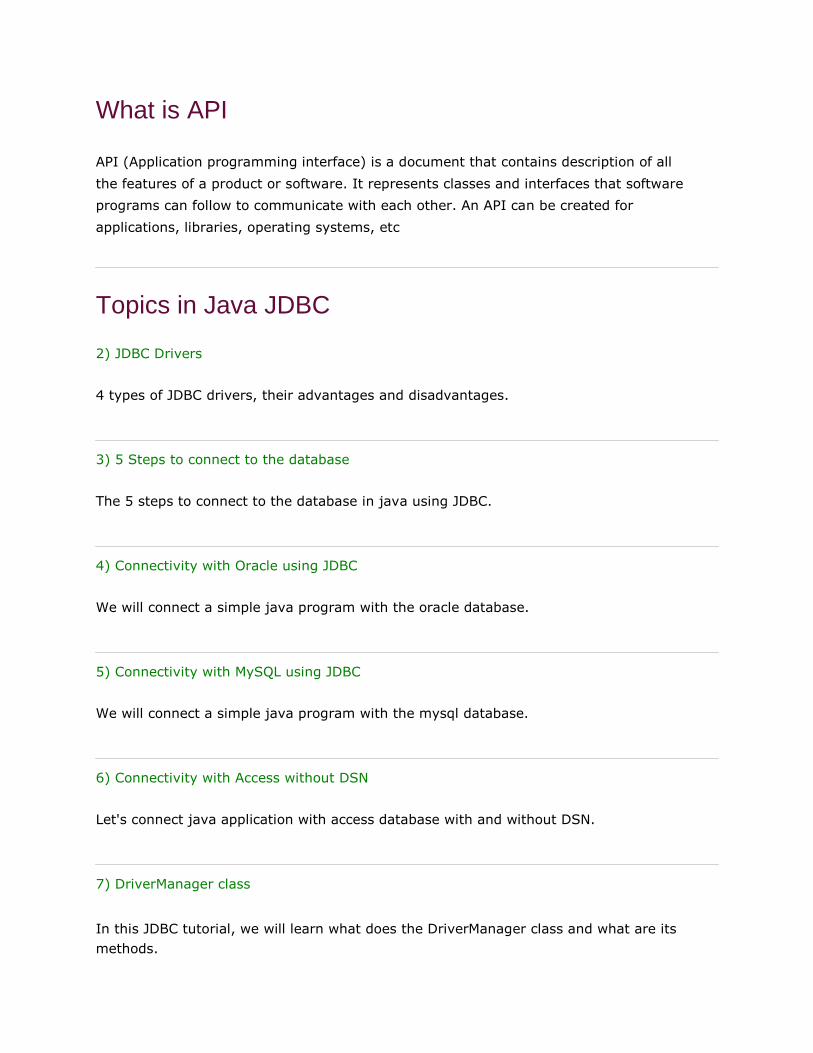
What is API API (Application programming interface) is a document that contains description of all
the features of a product or software. It represents classes and interfaces that software
programs can follow to communicate with each other. An API can be created for
applications, libraries, operating systems, etc
Topics in Java JDBC
2) JDBC Drivers
4 types of JDBC drivers, their advantages and disadvantages.
3) 5 Steps to connect to the database
The 5 steps to connect to the database in java using JDBC.
4) Connectivity with Oracle using JDBC
We will connect a simple java program with the oracle database.
5) Connectivity with MySQL using JDBC
We will connect a simple java program with the mysql database.
6) Connectivity with Access without DSN
Let's connect java application with access database with and without DSN.
7) DriverManager class In this JDBC tutorial, we will learn what does the DriverManager class and what are its
methods.

8) Connection interface
We will learn what is Connection interface and what are its methods.
9) Statement interface
We will learn what is Statement interface and what are its methods.
10) ResultSet interface We will learn what is ResultSet interface and what are its methods. Moreover, we will
learn how we can make the ResultSet scrollable. 11) PreparedStatement Interface We will learn what is benefit of PreparedStatement over Statement interface. We will
see examples to insert, update or delete records using the PreparedStatement interface. 12) ResultSetMetaData interface
We will learn how we can get the metadata of a table.
13) DatabaseMetaData interface
We will learn how we can get the metadata of a database.
14) Storing image in Oracle
How to store image in the oracle database using JDBC.
15) Retrieving image from Oracle

To retrieve image from the oracle database using JDBC.
16) Storing file in Oracle
To store file in the oracle database using JDBC.
17) Retrieving file from Oracle
To retrieve file from the oracle database using JDBC.
18) CallableStatement
To call stored procedures and functions using CallableStatement.
19) Transaction Management using JDBC
To use transaction management using JDBC.
16. Batch Statement using JDBC
The code to execute batch of queries.
17. JDBC RowSet
The working of new JDBC RowSet interface.
JDBC Driver
JDBC Driver is a software component that enables java application to interact with
the database.There are 4 types of JDBC drivers:
6) JDBC-ODBC bridge driver 7) Native-API driver (partially java driver) 8) Network Protocol driver (fully java driver)

Thin driver (fully java driver)
1) JDBC-ODBC bridge driver
The JDBC-ODBC bridge driver uses ODBC driver to connect to the database. The JDBC-
ODBC bridge driver converts JDBC method calls into the ODBC function calls. This is
now discouraged because of thin driver.
Advantages: easy to use. can be easily connected to any database.
Disadvantages:
Performance degraded because JDBC method call is converted into the ODBC function calls.
The ODBC driver needs to be installed on the client machine.
2) Native-API driver The Native API driver uses the client-side libraries of the database. The driver converts
JDBC method calls into native calls of the database API. It is not written entirely in java.
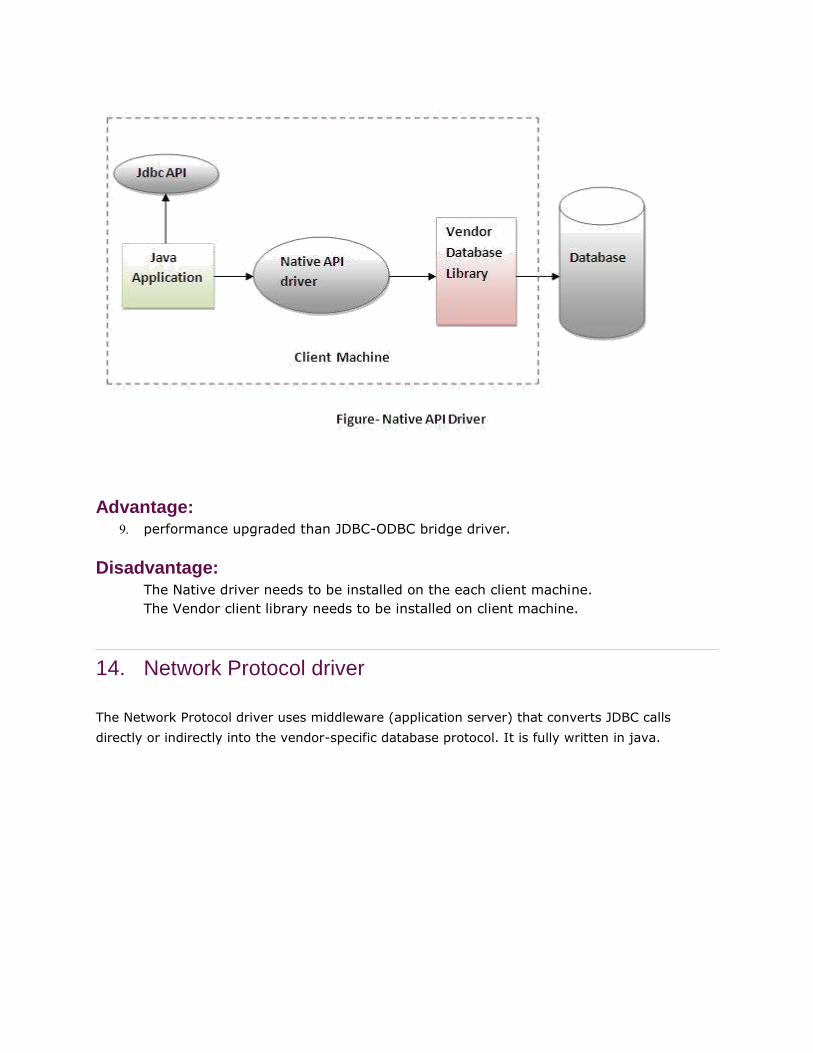
Advantage: performance upgraded than JDBC-ODBC bridge driver.
Disadvantage: The Native driver needs to be installed on the each client machine. The Vendor client library needs to be installed on client machine.
14. Network Protocol driver The Network Protocol driver uses middleware (application server) that converts JDBC calls
directly or indirectly into the vendor-specific database protocol. It is fully written in java.

Advantage:
No client side library is required because of application server that can perform many tasks like auditing, load balancing, logging etc.
Disadvantages: Network support is required on client machine. Requires database-specific coding to be done in the middle tier.
Maintenance of Network Protocol driver becomes costly because it requires database-
specific coding to be done in the middle tier.
4) Thin driver
The thin driver converts JDBC calls directly into the vendor-specific database
protocol. That is why it is known as thin driver. It is fully written in Java language.
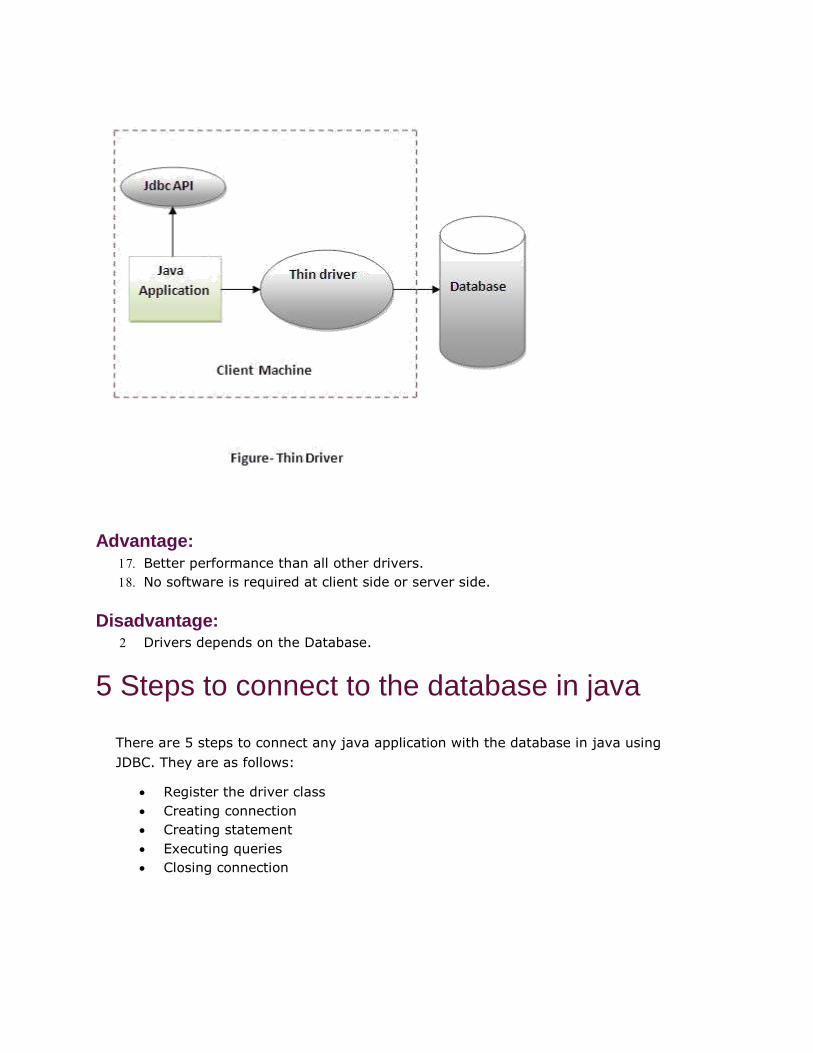
Advantage: Better performance than all other drivers. No software is required at client side or server side.
Disadvantage: Drivers depends on the Database.
5 Steps to connect to the database in java
There are 5 steps to connect any java application with the database in java using
JDBC. They are as follows:
Register the driver class Creating connection Creating statement Executing queries Closing connection
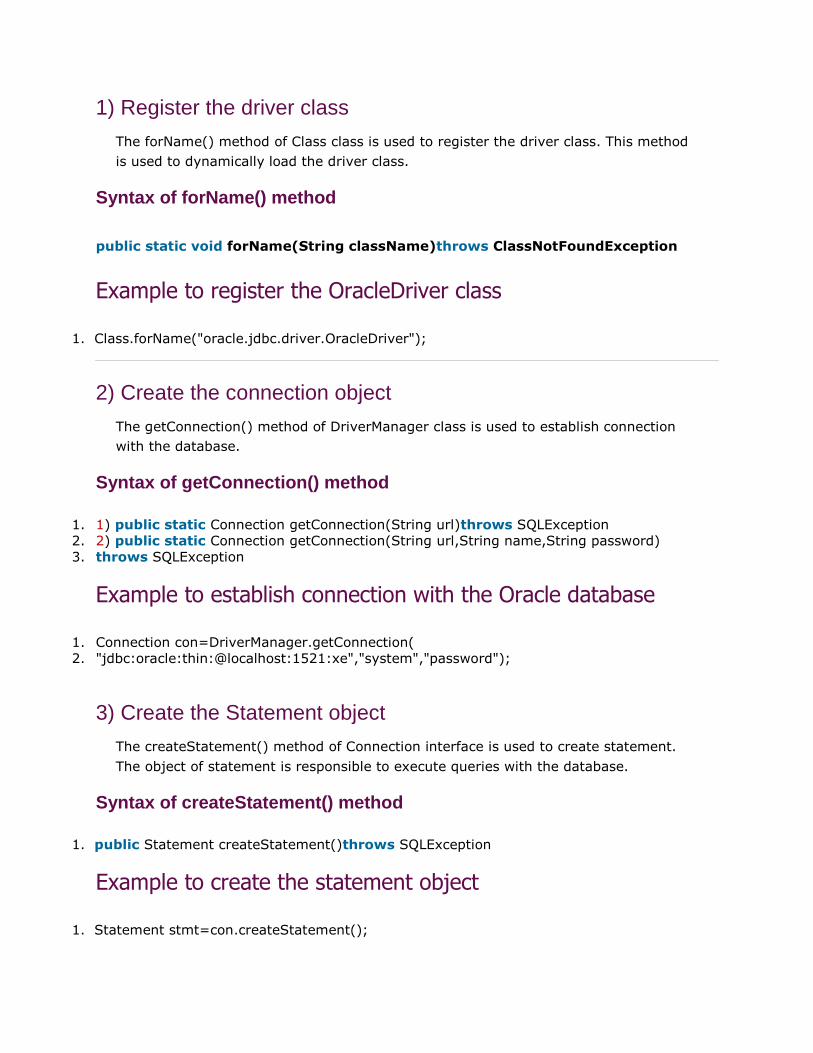
1) Register the driver class
The forName() method of Class class is used to register the driver class. This method
is used to dynamically load the driver class.
Syntax of forName() method
public static void forName(String className)throws ClassNotFoundException
Example to register the OracleDriver class 1. Class.forName("oracle.jdbc.driver.OracleDriver");
2) Create the connection object
The getConnection() method of DriverManager class is used to establish connection
with the database.
Syntax of getConnection() method
1. 1) public static Connection getConnection(String url)throws SQLException 2. 2) public static Connection getConnection(String url,String name,String password)
3. throws SQLException
Example to establish connection with the Oracle database 1. Connection con=DriverManager.getConnection( 2. "jdbc:oracle:thin:@localhost:1521:xe","system","password");
3) Create the Statement object
The createStatement() method of Connection interface is used to create statement.
The object of statement is responsible to execute queries with the database.
Syntax of createStatement() method
1. public Statement createStatement()throws SQLException
Example to create the statement object 1. Statement stmt=con.createStatement();

4) Execute the query
The executeQuery() method of Statement interface is used to execute queries to the
database. This method returns the object of ResultSet that can be used to get all
the records of a table.
Syntax of executeQuery() method
public ResultSet executeQuery(String sql)throws SQLException
Example to execute query 1. ResultSet rs=stmt.executeQuery("select * from emp"); 2. 3. while(rs.next()){ 4. System.out.println(rs.getInt(1)+" "+rs.getString(2)); 5. }
5) Close the connection object
By closing connection object statement and ResultSet will be closed automatically.
The close() method of Connection interface is used to close the connection.
Syntax of close() method
1. public void close()throws SQLException
Example to close connection 1. con.close();
Example to connect to the Oracle database
For connecting java application with the oracle database, you need to follow 5 steps to
perform database connectivity. In this example we are using Oracle10g as the
database. So we need to know following informations for the oracle database:
1. Driver class: The driver class for the oracle database is oracle.jdbc.driver.OracleDriver.
2. Connection URL: The connection URL for the oracle10G database is
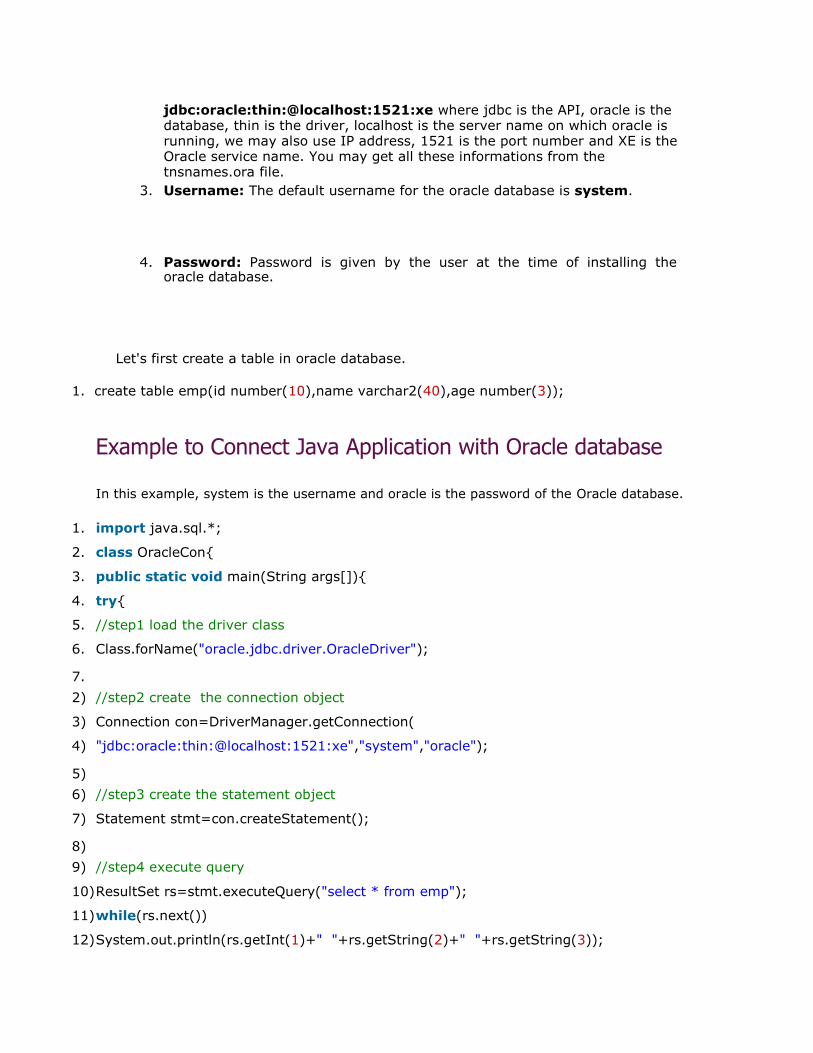
jdbc:oracle:thin:@localhost:1521:xe where jdbc is the API, oracle is the database, thin is the driver, localhost is the server name on which oracle is running, we may also use IP address, 1521 is the port number and XE is the Oracle service name. You may get all these informations from the tnsnames.ora file.
3. Username: The default username for the oracle database is system.
4. Password: Password is given by the user at the time of installing the
oracle database.
Let's first create a table in oracle database. 1. create table emp(id number(10),name varchar2(40),age number(3));
Example to Connect Java Application with Oracle database
In this example, system is the username and oracle is the password of the Oracle database.
1. import java.sql.*; 2. class OracleCon{ 3. public static void main(String args[]){ 4. try{ 5. //step1 load the driver class 6. Class.forName("oracle.jdbc.driver.OracleDriver"); 7. 2) //step2 create the connection object 3) Connection con=DriverManager.getConnection( 4) "jdbc:oracle:thin:@localhost:1521:xe","system","oracle"); 5) 6) //step3 create the statement object 7) Statement stmt=con.createStatement(); 8) 9) //step4 execute query 10) ResultSet rs=stmt.executeQuery("select * from emp"); 11) while(rs.next()) 12) System.out.println(rs.getInt(1)+" "+rs.getString(2)+" "+rs.getString(3));
19. 20. //step5 close the connection object 21. con.close(); 22. 23. }catch(Exception e){ System.out.println(e);} 24. 25. } 26. }
The above example will fetch all the records of emp table.
To connect java application with the Oracle database ojdbc14.jar file is required to
be loaded.
Two ways to load the jar file:
1. paste the ojdbc14.jar file in jre/lib/ext folder 2. set classpath
8. paste the ojdbc14.jar file in JRE/lib/ext folder:
Firstly, search the ojdbc14.jar file then go to JRE/lib/ext folder and paste the jar file here.
2) set classpath:
There are two ways to set the classpath:
temporary permanent
How to set the temporary classpath:
Firstly, search the ojdbc14.jar file then open command prompt and write: 1. C:>set classpath=c:\folder\ojdbc14.jar;.;
How to set the permanent classpath:
Go to environment variable then click on new tab. In variable name write classpath
and in variable value paste the path to ojdbc14.jar by appending ojdbc14.jar;.; as
C:\oraclexe\app\oracle\product\10.2.0\server\jdbc\lib\ojdbc14.jar;.;
To see the slides of seting parmanent path click here
Example to connect to the mysql database
For connecting java application with the mysql database, you need to follow 5 steps to
perform database connectivity.
In this example we are using MySql as the database. So we need to know following
informations for the mysql database:
11. Driver class: The driver class for the mysql database is com.mysql.jdbc.Driver.
12. Connection URL: The connection URL for the mysql database
isjdbc:mysql://localhost:3306/sonoo where jdbc is the API, mysql is the database,
localhost is the server name on which mysql is running, we may also use IP address,
3306 is the port number and sonoo is the database name. We may use any database, in
such case, you need to replace the sonoo with your database name. 13. Username: The default username for the mysql database is root.
14. Password: Password is given by the user at the time of installing the
mysql database. In this example, we are going to use root as the password.
Let's first create a table in the mysql database, but before creating table, we need to
create database first.
10. create database sonoo; 11. use sonoo; 12. create table emp(id int(10),name varchar(40),age int(3));
Example to Connect Java Application with mysql database
In this example, sonoo is the database name, root is the username and password. 1. import java.sql.*; 2. class MysqlCon{
3. public static void main(String args[]){ 4. try{ 5. Class.forName("com.mysql.jdbc.Driver"); 6.
Connection con=DriverManager.getConnection( "jdbc:mysql://localhost:3306/sonoo","root","root"); //here sonoo is database name, root is username and password Statement stmt=con.createStatement(); ResultSet rs=stmt.executeQuery("select * from emp"); while(rs.next())
System.out.println(rs.getInt(1)+" "+rs.getString(2)+" "+rs.getString(3));

18. 19. con.close(); 20. 21. }catch(Exception e){ System.out.println(e);} 22.
} }
The above example will fetch all the records of emp table.
To connect java application with the mysql database mysqlconnector.jar file is required
to be loaded.
Two ways to load the jar file:
paste the mysqlconnector.jar file in jre/lib/ext folder set classpath
23. paste the mysqlconnector.jar file in JRE/lib/ext folder:
Download the mysqlconnector.jar file. Go to jre/lib/ext folder and paste the jar file here.
2) set classpath:
There are two ways to set the classpath:
temporary permament
How to set the temporary classpath
open comman prompt and write:
1. C:>set classpath=c:\folder\mysql-connector-java-5.0.8-bin.jar;.;
How to set the permanent classpath
Go to environment variable then click on new tab. In variable name write classpath and in
variable value paste the path to the mysqlconnector.jar file by appending
mysqlconnector.jar;.; as C:\folder\mysql-connector-java-5.0.8-bin.jar;.;
Connectivity with Access without DSN
There are two ways to connect java application with the access database.
11. Without DSN (Data Source Name) 12. With DSN
Java is mostly used with Oracle, mysql, or DB2 database. So you can learn this topic
only for knowledge.
Example to Connect Java Application with access without DSN
In this example, we are going to connect the java program with the access database. In
such case, we have created the login table in the access database. There is only one
column in the table named name. Let's get all the name of the login table.
5. import java.sql.*; 6. class Test{ 7. public static void main(String ar[]){ 8. try{ 9. String database="student.mdb";//Here database exists in the current directory 10. 9. String url="jdbc:odbc:Driver={Microsoft Access Driver (*.mdb)}; 8. DBQ=" + database + ";DriverID=22;READONLY=true"; 9. 12. Class.forName("sun.jdbc.odbc.JdbcOdbcDriver"); 13. Connection c=DriverManager.getConnection(url);
14. Statement st=c.createStatement(); 15. ResultSet rs=st.executeQuery("select * from login"); 16. 5. while(rs.next()){ 6. System.out.println(rs.getString(1)); 7. } 18. 19. }catch(Exception ee){System.out.println(ee);} 20. 21. }}
Example to Connect Java Application with access with DSN Connectivity with type1 driver is not considered good. To connect java application
with type1 driver, create DSN first, here we are assuming your dsn name is mydsn.

10. import java.sql.*; 11. class Test{ 12. public static void main(String ar[]){ 13. try{ 14. String url="jdbc:odbc:mydsn"; 15. Class.forName("sun.jdbc.odbc.JdbcOdbcDriver"); 16. Connection c=DriverManager.getConnection(url); 17. Statement st=c.createStatement(); 18. ResultSet rs=st.executeQuery("select * from login"); 19. 5. while(rs.next()){ 6. System.out.println(rs.getString(1)); 7. } 14. 15. }catch(Exception ee){System.out.println(ee);} 16. 17. }}
DriverManager class:
The DriverManager class acts as an interface between user and drivers. It keeps track of
the drivers that are available and handles establishing a connection between a database
and the appropriate driver. The DriverManager class maintains a list of Driver classes that
have registered themselves by calling the method DriverManager.registerDriver().
Commonly used methods of DriverManager class: 10. public static void
registerDriver(Driver driver):
11. public static void
deregisterDriver(Driver driver):
is used to register the given driver with
DriverManager. is used to deregister the given driver
(drop the driver from the list) with
DriverManager.
3) public static Connection is used to establish the connection with
getConnection(String url): the specified url.
4) public static Connection is used to establish the connection with
getConnection(String url,String the specified url, username and
userName,String password): password.
Connection interface: A Connection is the session between java application and database. The Connection
interface is a factory of Statement, PreparedStatement, and DatabaseMetaData i.e.
object of Connection can be used to get the object of Statement and DatabaseMetaData.
The Connection interface provide many methods for transaction management like
commit(),rollback() etc.
By default, connection commits the changes after executing queries.
Commonly used methods of Connection interface:
9. public Statement createStatement(): creates a statement object that can be used
to execute SQL queries.
10. public Statement createStatement(int resultSetType,int
resultSetConcurrency): Creates a Statement object that will generate
ResultSet objects with the given type and concurrency.
11. public void setAutoCommit(boolean status): is used to set the commit
status.By default it is true.
12. public void commit(): saves the changes made since the previous
commit/rollback permanent.
13. public void rollback(): Drops all changes made since the previous
commit/rollback.
14. public void close(): closes the connection and Releases a JDBC
resources immediately.

Statement interface
The Statement interface provides methods to execute queries with the database. The
statement interface is a factory of ResultSet i.e. it provides factory method to get the
object of ResultSet.
Commonly used methods of Statement interface:
The important methods of Statement interface are as follows:
2 public ResultSet executeQuery(String sql): is used to execute SELECT query.
It returns the object of ResultSet.
3 public int executeUpdate(String sql): is used to execute specified query, it may
be create, drop, insert, update, delete etc.
4 public boolean execute(String sql): is used to execute queries that may return
multiple results.
5 public int[] executeBatch(): is used to execute batch of commands.
Example of Statement interface
Let’s see the simple example of Statement interface to insert, update and delete the record. 1. import java.sql.*; 2. class FetchRecord{ 3. public static void main(String args[])throws Exception{ 4. 5. Class.forName("oracle.jdbc.driver.OracleDriver"); 6. Connection con=DriverManager.getConnection("jdbc:oracle:thin:@localhost:1521:xe","syste
m","oracle"); 7. Statement stmt=con.createStatement(); 8. 9. //stmt.executeUpdate("insert into emp765 values(33,'Irfan',50000)"); 10. //int result=stmt.executeUpdate("update emp765 set name='Vimal',salary=10000 where
id =33"); 11. int result=stmt.executeUpdate("delete from emp765 where id=33");

12. 13. System.out.println(result+" records affected"); 14. con.close(); 15. }}
ResultSet interface
The object of ResultSet maintains a cursor pointing to a particular row of data.
Initially, cursor points to before the first row.
By default, ResultSet object can be moved forward only and it is not updatable.
But we can make this object to move forward and backward direction by passing
either TYPE_SCROLL_INSENSITIVE or TYPE_SCROLL_SENSITIVE in
createStatement(int,int) method as well as we can make this object as updatable by:
1. Statement stmt = con.createStatement(ResultSet.TYPE_SCROLL_INSENSITIVE, 2. ResultSet.CONCUR_UPDATABLE);
Commonly used methods of ResultSet interface
1) public boolean next():
is used to move the cursor to the one row next from
the current position.
2) public boolean previous(): is used to move the cursor to the one row previous
from the current position.
is used to move the cursor to the first row in result
3) public boolean first():
set object.
4) public boolean last(): is used to move the cursor to the last row in result
set object.
5) public boolean absolute(int
is used to move the cursor to the specified row
row): number in the ResultSet object.
6) public boolean relative(int is used to move the cursor to the relative row
number in the ResultSet object, it may be positive or
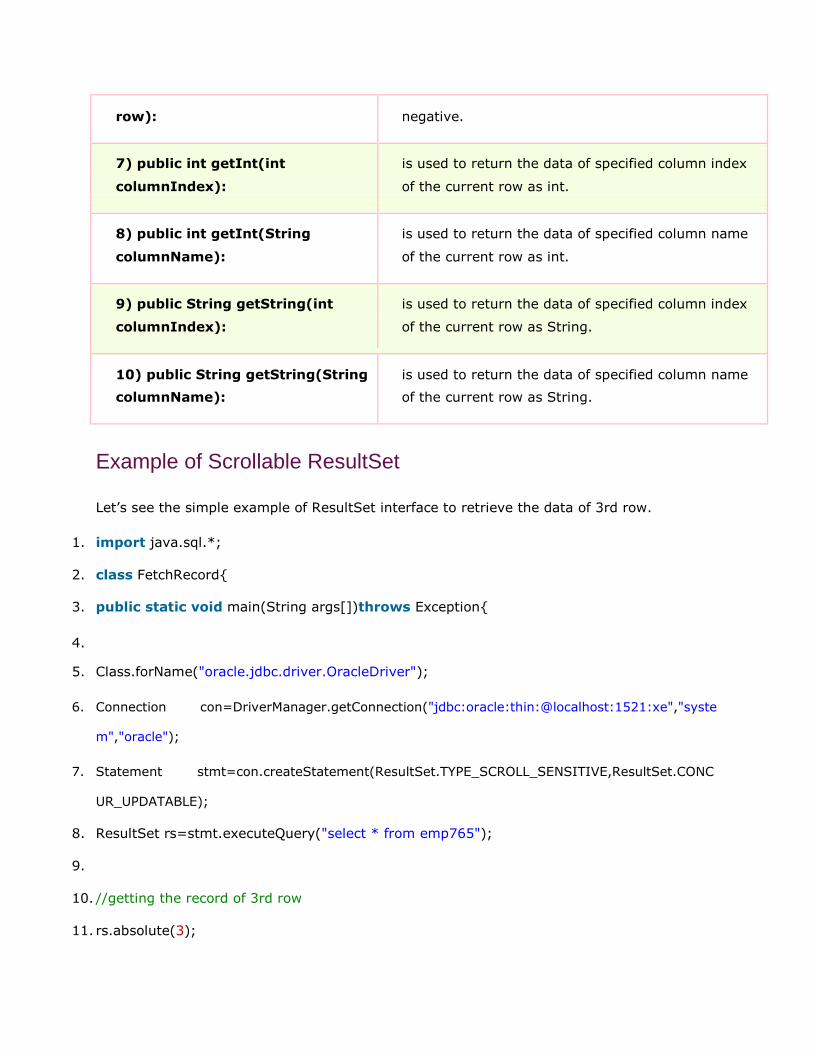
row): negative.
7) public int getInt(int
is used to return the data of specified column index
columnIndex): of the current row as int.
8) public int getInt(String is used to return the data of specified column name
columnName): of the current row as int.
9) public String getString(int is used to return the data of specified column index
columnIndex): of the current row as String.
10) public String getString(String is used to return the data of specified column name
columnName): of the current row as String.
Example of Scrollable ResultSet
Let’s see the simple example of ResultSet interface to retrieve the data of 3rd row. 1. import java.sql.*;
2. class FetchRecord{
3. public static void main(String args[])throws Exception{
4. 5. Class.forName("oracle.jdbc.driver.OracleDriver");
6. Connection con=DriverManager.getConnection("jdbc:oracle:thin:@localhost:1521:xe","syste
m","oracle");
7. Statement stmt=con.createStatement(ResultSet.TYPE_SCROLL_SENSITIVE,ResultSet.CONC
UR_UPDATABLE);
8. ResultSet rs=stmt.executeQuery("select * from emp765"); 9. 10. //getting the record of 3rd row
11. rs.absolute(3);

12. System.out.println(rs.getString(1)+" "+rs.getString(2)+" "+rs.getString(3)); 13. 14. con.close();
15. }}
PreparedStatement interface
The PreparedStatement interface is a subinterface of Statement. It is used to
execute parameterized query.
Let's see the example of parameterized query:
1. String sql="insert into emp values(?,?,?)";
As you can see, we are passing parameter (?) for the values. Its value will be set by
calling the setter methods of PreparedStatement.
Why use PreparedStatement?
Improves performance: The performance of the application will be faster if you use
PreparedStatement interface because query is compiled only once.
How to get the instance of PreparedStatement?
The prepareStatement() method of Connection interface is used to return the object
of PreparedStatement. Syntax:
1. public PreparedStatement prepareStatement(String query)throws SQLException{}

Methods of PreparedStatement interface
The important methods of PreparedStatement interface are given below:
Method Description
public void setInt(int paramIndex, int sets the integer value to the given
value) parameter index.
public void setString(int paramIndex, sets the String value to the given
String value) parameter index.
public void setFloat(int paramIndex, float sets the float value to the given parameter
value) index.
public void setDouble(int paramIndex, sets the double value to the given
double value) parameter index.
public int executeUpdate() executes the query. It is used for create,
drop, insert, update, delete etc.
public ResultSet executeQuery() executes the select query. It returns an
instance of ResultSet.
Example of PreparedStatement interface that inserts the record
First of all create table as given below: 1. create table emp(id number(10),name varchar2(50));
Now insert records in this table by the code given below: 1. import java.sql.*; 2. class InsertPrepared{ 3. public static void main(String args[]){ 4. try{ 5. Class.forName("oracle.jdbc.driver.OracleDriver");

6. 7. Connection con=DriverManager.getConnection("jdbc:oracle:thin:@localhost:1521:xe","syste
m","oracle"); 8. 9. PreparedStatement stmt=con.prepareStatement("insert into Emp values(?,?)"); 10. stmt.setInt(1,101);//1 specifies the first parameter in the query 11. stmt.setString(2,"Ratan"); 12. 13. int i=stmt.executeUpdate(); 14. System.out.println(i+" records inserted"); 15. 16. con.close(); 17. 18. }catch(Exception e){ System.out.println(e);} 19. 20. } 21. }
Example of PreparedStatement interface that updates the record
1. PreparedStatement stmt=con.prepareStatement("update emp set name=? where id=?"); 2. stmt.setString(1,"Sonoo");//1 specifies the first parameter in the query i.e. name 3. stmt.setInt(2,101); 4. 5. int i=stmt.executeUpdate(); 6. System.out.println(i+" records updated");
Example of PreparedStatement interface that deletes the record
1. PreparedStatement stmt=con.prepareStatement("delete from emp where id=?"); 2. stmt.setInt(1,101); 3. 4. int i=stmt.executeUpdate(); 5. System.out.println(i+" records deleted");
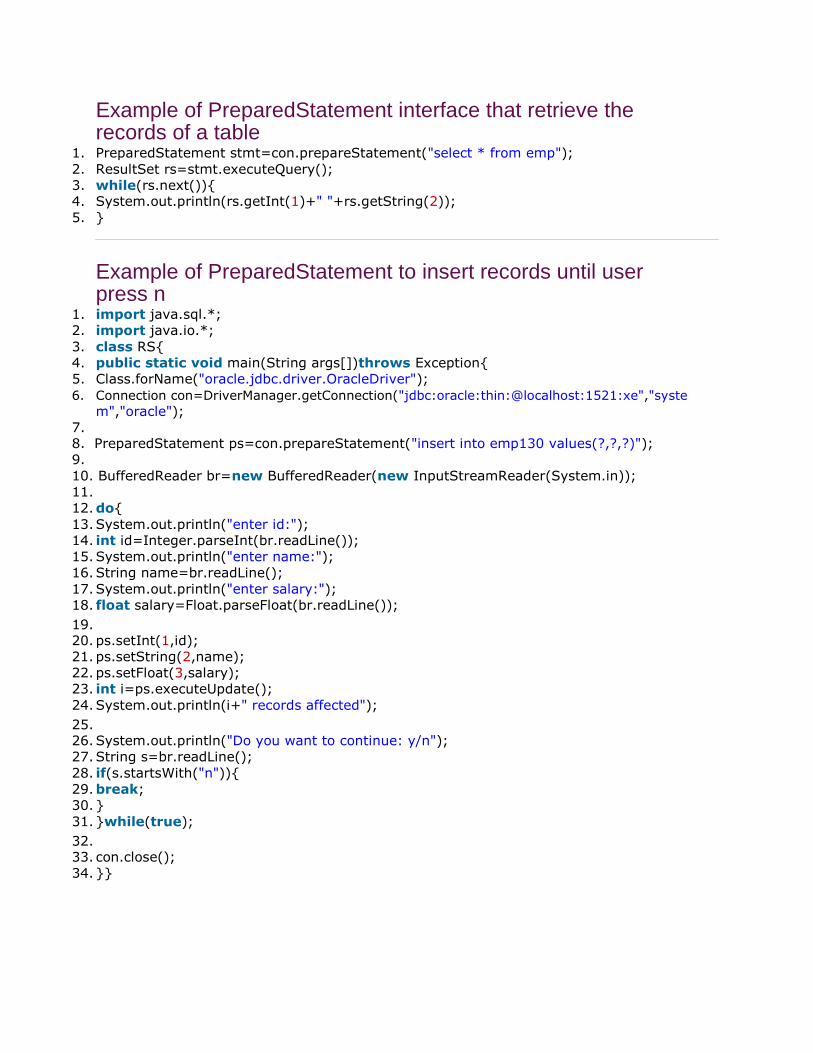
Example of PreparedStatement interface that retrieve the records of a table
1. PreparedStatement stmt=con.prepareStatement("select * from emp"); 2. ResultSet rs=stmt.executeQuery();
3. while(rs.next()){ 4. System.out.println(rs.getInt(1)+" "+rs.getString(2)); 5. }
Example of PreparedStatement to insert records until user press n
1. import java.sql.*; 2. import java.io.*; 3. class RS{ 4. public static void main(String args[])throws Exception{
5. Class.forName("oracle.jdbc.driver.OracleDriver"); 6. Connection con=DriverManager.getConnection("jdbc:oracle:thin:@localhost:1521:xe","syste
m","oracle"); 7. 8. PreparedStatement ps=con.prepareStatement("insert into emp130 values(?,?,?)"); 9. 10. BufferedReader br=new BufferedReader(new InputStreamReader(System.in)); 11. 12. do{ 13. System.out.println("enter id:"); 14. int id=Integer.parseInt(br.readLine());
15. System.out.println("enter name:");
16. String name=br.readLine(); 17. System.out.println("enter salary:"); 18. float salary=Float.parseFloat(br.readLine()); 19. 20. ps.setInt(1,id); 21. ps.setString(2,name);
22. ps.setFloat(3,salary);
23. int i=ps.executeUpdate(); 24. System.out.println(i+" records affected"); 25. 26. System.out.println("Do you want to continue: y/n");
27. String s=br.readLine(); 28. if(s.startsWith("n")){ 29. break;
30. } 31. }while(true); 32. 33. con.close();
34. }}

ResultSetMetaData Interface
The metadata means data about data i.e. we can get further information from the data.
If you have to get metadata of a table like total number of column, column name, column
type etc. , ResultSetMetaData interface is useful because it provides methods to get
metadata from the ResultSet object.
Commonly used methods of ResultSetMetaData interface
Method Description
public int getColumnCount()throws it returns the total number of
SQLException columns in the ResultSet object.
public String getColumnName(int it returns the column name of the
index)throws SQLException specified column index.
public String getColumnTypeName(int it returns the column type name for
index)throws SQLException the specified index.
public String getTableName(int index)throws it returns the table name for the
SQLException specified column index.
How to get the object of ResultSetMetaData:
The getMetaData() method of ResultSet interface returns the object of
ResultSetMetaData. Syntax: 1. public ResultSetMetaData getMetaData()throws SQLException
Example of ResultSetMetaData interface : 1. import java.sql.*; 2. class Rsmd{ 3. public static void main(String args[]){
4. try{ 5. Class.forName("oracle.jdbc.driver.OracleDriver"); 6. 7. Connection con=DriverManager.getConnection(

8. "jdbc:oracle:thin:@localhost:1521:xe","system","oracle"); 9. 10. PreparedStatement ps=con.prepareStatement("select * from emp"); 11. ResultSet rs=ps.executeQuery();
12. 13. ResultSetMetaData rsmd=rs.getMetaData(); 14. 15. System.out.println("Total columns: "+rsmd.getColumnCount()); 16. System.out.println("Column Name of 1st column: "+rsmd.getColumnName(1));
17. System.out.println("Column Type Name of 1st column: "+rsmd.getColumnTypeName(1)); 18.
19. con.close(); 20.
21. }catch(Exception e){ System.out.println(e);} 22. 23. }
24. }
Output:Total columns: 2
Column Name of 1st column: ID
Column Type Name of 1st column: NUMBER
DatabaseMetaData interface:
DatabaseMetaData interface provides methods to get meta data of a database such as
database product name, database product version, driver name, name of total number
of tables, name of total number of views etc.
Commonly used methods of DatabaseMetaData interface
public String getDriverName()throws SQLException: it returns the name of the JDBC driver.
public String getDriverVersion()throws SQLException: it returns the
version number of the JDBC driver.
public String getUserName()throws SQLException: it returns the username of the database.
public String getDatabaseProductName()throws SQLException: it
returns the product name of the database.
public String getDatabaseProductVersion()throws SQLException: it returns the product version of the database.
public ResultSet getTables(String catalog, String schemaPattern, String
tableNamePattern, String[] types)throws SQLException: it returns the description of the tables of the specified catalog. The table type can be TABLE, VIEW, ALIAS, SYSTEM TABLE, SYNONYM etc.

How to get the object of DatabaseMetaData:
The getMetaData() method of Connection interface returns the object of
DatabaseMetaData. Syntax:
1. public DatabaseMetaData getMetaData()throws SQLException
Simple Example of DatabaseMetaData interface : 1. import java.sql.*; 2. class Dbmd{ 3. public static void main(String args[]){
4. try{
5. Class.forName("oracle.jdbc.driver.OracleDriver"); 6. 3. Connection con=DriverManager.getConnection( 4. "jdbc:oracle:thin:@localhost:1521:xe","system","oracle"); 5. 6. DatabaseMetaData dbmd=con.getMetaData(); 7. 8. System.out.println("Driver Name: "+dbmd.getDriverName()); 9. System.out.println("Driver Version: "+dbmd.getDriverVersion()); 10. System.out.println("UserName: "+dbmd.getUserName());
11. System.out.println("Database Product Name: "+dbmd.getDatabaseProductName());
12. System.out.println("Database Product Version: "+dbmd.getDatabaseProductVersion()); 13. 14. con.close(); 15. 16. }catch(Exception e){ System.out.println(e);} 17. 18. }
19. }
Output:Driver Name: Oracle JDBC Driver
Driver Version: 10.2.0.1.0XE
Database Product Name: Oracle
Database Product Version: Oracle Database 10g Express Edition
Release 10.2.0.1.0 -Production
Example of DatabaseMetaData interface that prints total number of tables :
1. import java.sql.*; 2. class Dbmd2{
3. public static void main(String args[]){
4. try{ 5. Class.forName("oracle.jdbc.driver.OracleDriver");

6. 7. Connection con=DriverManager.getConnection( 8. "jdbc:oracle:thin:@localhost:1521:xe","system","oracle"); 9.
10. DatabaseMetaData dbmd=con.getMetaData();
11. String table[]={"TABLE"}; 12. ResultSet rs=dbmd.getTables(null,null,null,table); 13. 14. while(rs.next()){
15. System.out.println(rs.getString(3)); 16. } 17. 18. con.close(); 19. 20. }catch(Exception e){ System.out.println(e);} 21. 22. } 23. }
Example of DatabaseMetaData interface that prints total number of views :
1. import java.sql.*; 2. class Dbmd3{ 3. public static void main(String args[]){ 4. try{
5. Class.forName("oracle.jdbc.driver.OracleDriver"); 6. 7. Connection con=DriverManager.getConnection( 8. "jdbc:oracle:thin:@localhost:1521:xe","system","oracle"); 9. 10. DatabaseMetaData dbmd=con.getMetaData(); 11. String table[]={"VIEW"}; 12. ResultSet rs=dbmd.getTables(null,null,null,table); 13. 14. while(rs.next()){ 15. System.out.println(rs.getString(3));
16. } 17. 18. con.close(); 19. 20. }catch(Exception e){ System.out.println(e);} 21. 22. }
23. }

Example to retrieve image from Oracle database
By the help of PreparedStatement we can retrieve and store the image in the database.
The getBlob() method of PreparedStatement is used to get Binary information, it
returns the instance of Blob. After calling the getBytes() method on the blob object, we
can get the array of binary information that can be written into the image file.
Signature of getBlob() method of PreparedStatement 1. public Blob getBlob()throws SQLException
Signature of getBytes() method of Blob interface 1. public byte[] getBytes(long pos, int length)throws SQLException
We are assuming that image is stored in the imgtable.
1. CREATE TABLE "IMGTABLE" 2. ( "NAME" VARCHAR2(4000),
3. "PHOTO" BLOB 4. ) 5. /
Now let's write the code to retrieve the image from the database and write it into
the directory so that it can be displayed.
In AWT, it can be displayed by the Toolkit class. In servlet, jsp, or html it can be
displayed by the img tag.
1. import java.sql.*; 2. import java.io.*; 3. public class RetrieveImage { 4. public static void main(String[] args) {
5. try{ 6. Class.forName("oracle.jdbc.driver.OracleDriver"); 7. Connection con=DriverManager.getConnection(
8. "jdbc:oracle:thin:@localhost:1521:xe","system","oracle"); 9.
10. PreparedStatement ps=con.prepareStatement("select * from imgtable"); 11. ResultSet rs=ps.executeQuery();
12. if(rs.next()){//now on 1st row 13.
14. Blob b=rs.getBlob(2);//2 means 2nd column data 15. byte barr[]=b.getBytes(1,(int)b.length());//1 means first image 16.

17. FileOutputStream fout=new FileOutputStream("d:\\sonoo.jpg");
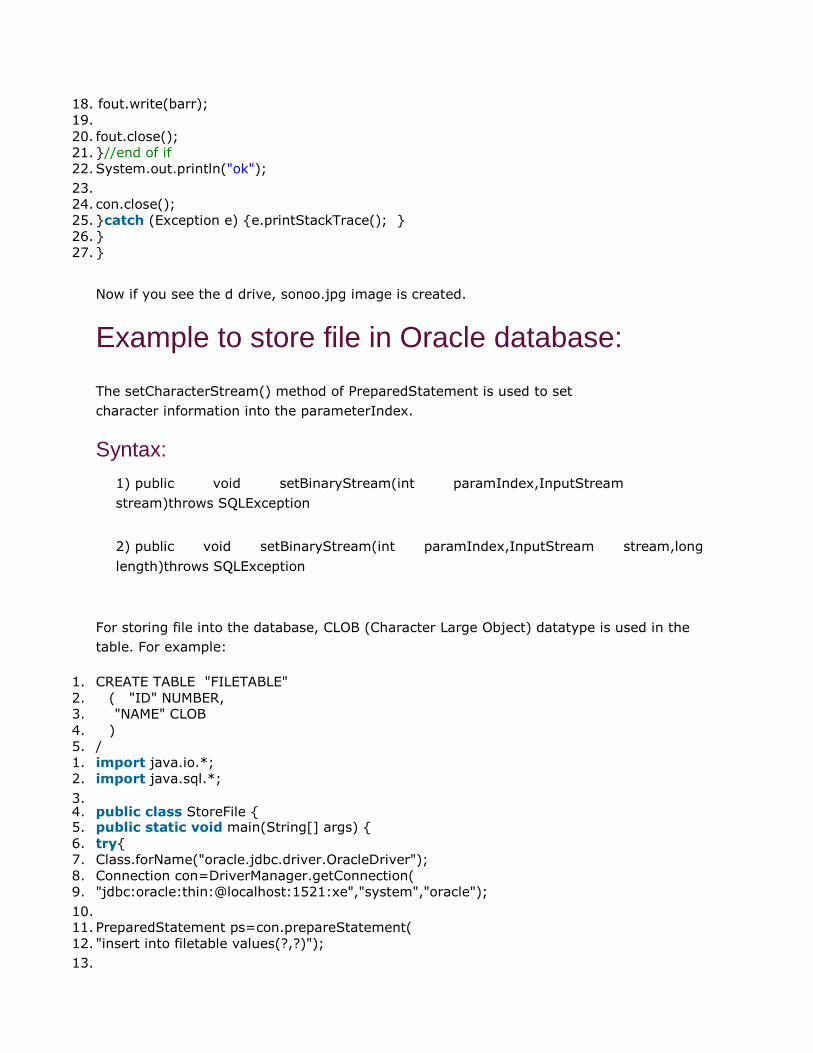
18. fout.write(barr); 19. 20. fout.close(); 21. }//end of if
22. System.out.println("ok"); 23. 24. con.close(); 25. }catch (Exception e) {e.printStackTrace(); }
26. }
27. }
Now if you see the d drive, sonoo.jpg image is created.
Example to store file in Oracle database:
The setCharacterStream() method of PreparedStatement is used to set
character information into the parameterIndex.
Syntax:
1) public void setBinaryStream(int paramIndex,InputStream
stream)throws SQLException
2) public void setBinaryStream(int paramIndex,InputStream stream,long
length)throws SQLException
For storing file into the database, CLOB (Character Large Object) datatype is used in the
table. For example:
1. CREATE TABLE "FILETABLE" 2. ( "ID" NUMBER, 3. "NAME" CLOB 4. ) 5. /
1. import java.io.*;
2. import java.sql.*; 3. 4. public class StoreFile { 5. public static void main(String[] args) { 6. try{ 7. Class.forName("oracle.jdbc.driver.OracleDriver");
8. Connection con=DriverManager.getConnection(
9. "jdbc:oracle:thin:@localhost:1521:xe","system","oracle"); 10. 11. PreparedStatement ps=con.prepareStatement(
12. "insert into filetable values(?,?)"); 13.

14. File f=new File("d:\\myfile.txt"); 15. FileReader fr=new FileReader(f); 16. 17. ps.setInt(1,101);
18. ps.setCharacterStream(2,fr,(int)f.length());
19. int i=ps.executeUpdate(); 20. System.out.println(i+" records affected"); 21. 22. con.close(); 23. 24. }catch (Exception e) {e.printStackTrace();} 25. }
26. }
Example to retrieve file from Oracle database:
The getClob() method of PreparedStatement is used to get file information from
the database.
Syntax of getClob method
1. public Clob getClob(int columnIndex){}
Let's see the table structure of this example to retrieve the file. 1. CREATE TABLE "FILETABLE" 2. ( "ID" NUMBER, 3. "NAME" CLOB 4. )
5. /
The example to retrieve the file from the Oracle database is given below. 1. import java.io.*; 2. import java.sql.*; 3. 4. public class RetrieveFile { 5. public static void main(String[] args) {
6. try{
7. Class.forName("oracle.jdbc.driver.OracleDriver"); 8. Connection con=DriverManager.getConnection( 9. "jdbc:oracle:thin:@localhost:1521:xe","system","oracle"); 10. 11. PreparedStatement ps=con.prepareStatement("select * from filetable");

12. ResultSet rs=ps.executeQuery();
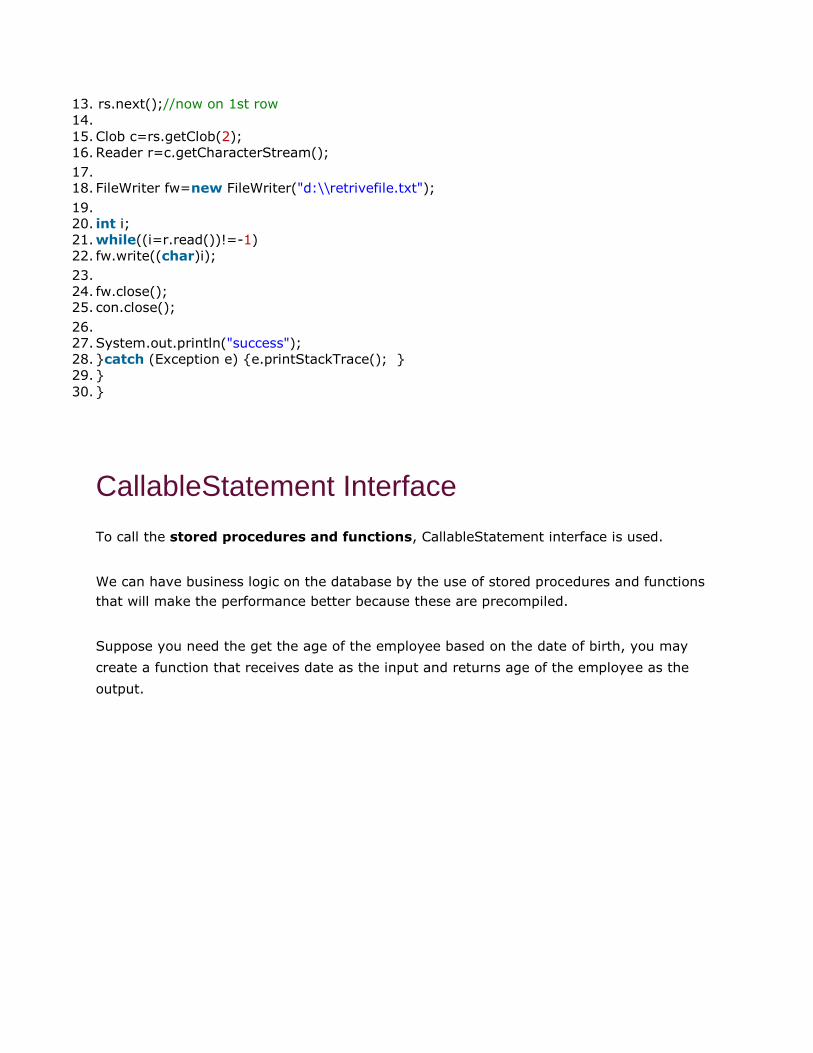
13. rs.next();//now on 1st row 14. 15. Clob c=rs.getClob(2); 16. Reader r=c.getCharacterStream(); 17. 18. FileWriter fw=new FileWriter("d:\\retrivefile.txt"); 19. 20. int i;
21. while((i=r.read())!=-1)
22. fw.write((char)i); 23.
24. fw.close(); 25. con.close(); 26. 27. System.out.println("success");
28. }catch (Exception e) {e.printStackTrace(); }
29. } 30. }
CallableStatement Interface
To call the stored procedures and functions, CallableStatement interface is used.
We can have business logic on the database by the use of stored procedures and functions
that will make the performance better because these are precompiled.
Suppose you need the get the age of the employee based on the date of birth, you may
create a function that receives date as the input and returns age of the employee as the
output.

What is the difference between stored procedures and functions.
The differences between stored procedures and functions are given below:
Stored Procedure Function
is used to perform business logic. is used to perform calculation.
must not have the return type. must have the return type.
may return 0 or more values. may return only one values.
We can call functions from the procedure. Procedure cannot be called from function.
Procedure supports input and output Function supports only input parameter.
parameters.
Exception handling using try/catch block Exception handling using try/catch can't
can be used in stored procedures. be used in user defined functions.
How to get the instance of CallableStatement?
The prepareCall() method of Connection interface returns the instance of
CallableStatement. Syntax is given below:
1. public CallableStatement prepareCall("{ call procedurename(?,?...?)}");
The example to get the instance of CallableStatement is given below:
8. CallableStatement stmt=con.prepareCall("{call myprocedure(?,?)}");
It calls the procedure myprocedure that receives 2 arguments.
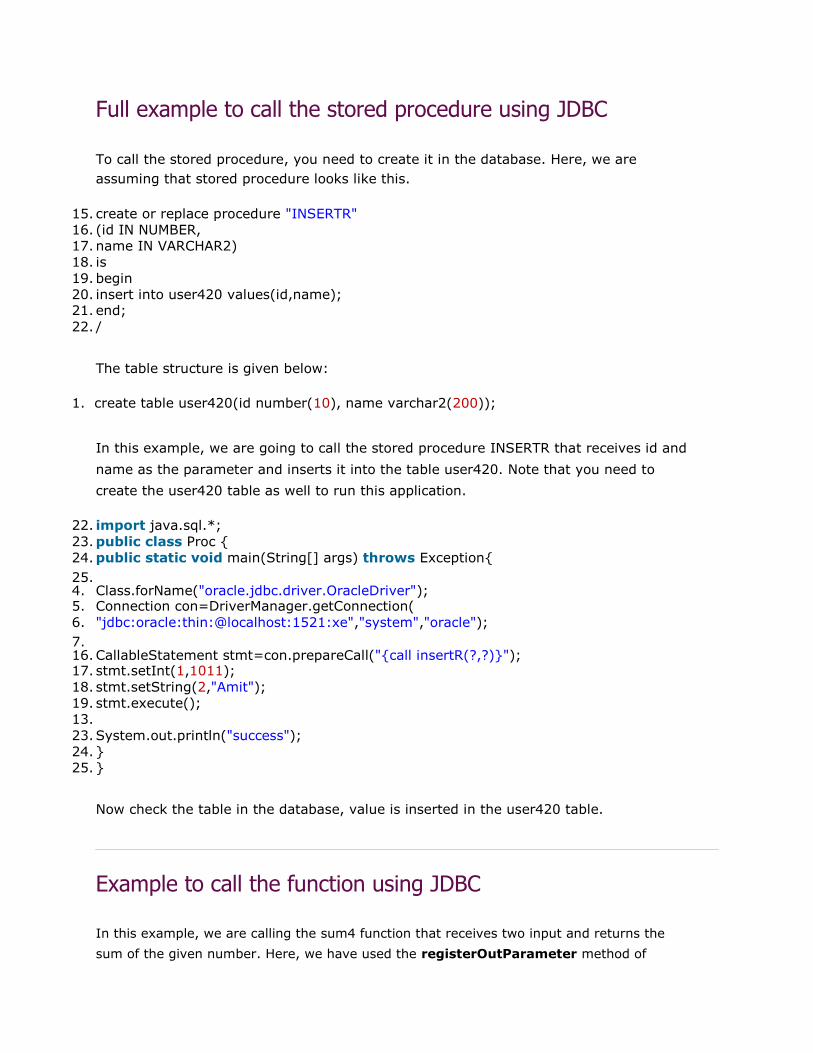
Full example to call the stored procedure using JDBC
To call the stored procedure, you need to create it in the database. Here, we are
assuming that stored procedure looks like this.
15. create or replace procedure "INSERTR" 16. (id IN NUMBER,
17. name IN VARCHAR2) 18. is 19. begin
20. insert into user420 values(id,name); 21. end; 22. /
The table structure is given below: 1. create table user420(id number(10), name varchar2(200));
In this example, we are going to call the stored procedure INSERTR that receives id and
name as the parameter and inserts it into the table user420. Note that you need to
create the user420 table as well to run this application.
22. import java.sql.*; 23. public class Proc { 24. public static void main(String[] args) throws Exception{ 25. 4. Class.forName("oracle.jdbc.driver.OracleDriver"); 5. Connection con=DriverManager.getConnection( 6. "jdbc:oracle:thin:@localhost:1521:xe","system","oracle"); 7. 16. CallableStatement stmt=con.prepareCall("{call insertR(?,?)}"); 17. stmt.setInt(1,1011); 18. stmt.setString(2,"Amit"); 19. stmt.execute();
13. 23. System.out.println("success"); 24. }
25. }
Now check the table in the database, value is inserted in the user420 table.
Example to call the function using JDBC
In this example, we are calling the sum4 function that receives two input and returns the
sum of the given number. Here, we have used the registerOutParameter method of

CallableStatement interface, that registers the output parameter with its corresponding
type. It provides information to the CallableStatement about the type of result being
displayed.
The Types class defines many constants such as INTEGER, VARCHAR, FLOAT,
DOUBLE, BLOB, CLOB etc.
Let's create the simple function in the database first.
6. create or replace function sum4 7. (n1 in number,n2 in number)
8. return number
9. is 10. temp number(8); 11. begin
12. temp :=n1+n2; 13. return temp; 14. end; 15. /
Now, let's write the simple program to call the function. 1. import java.sql.*; 2. 13. public class FuncSum { 14. public static void main(String[] args) throws Exception{ 15. 20. Class.forName("oracle.jdbc.driver.OracleDriver"); 21. Connection con=DriverManager.getConnection(
22. "jdbc:oracle:thin:@localhost:1521:xe","system","oracle"); 23.
24. CallableStatement stmt=con.prepareCall("{?= call sum4(?,?)}"); 25. stmt.setInt(2,10);
26. stmt.setInt(3,43); 27. stmt.registerOutParameter(1,Types.INTEGER); 28. stmt.execute(); 29. 30. System.out.println(stmt.getInt(1)); 31. 32. }
33. }
Output: 53
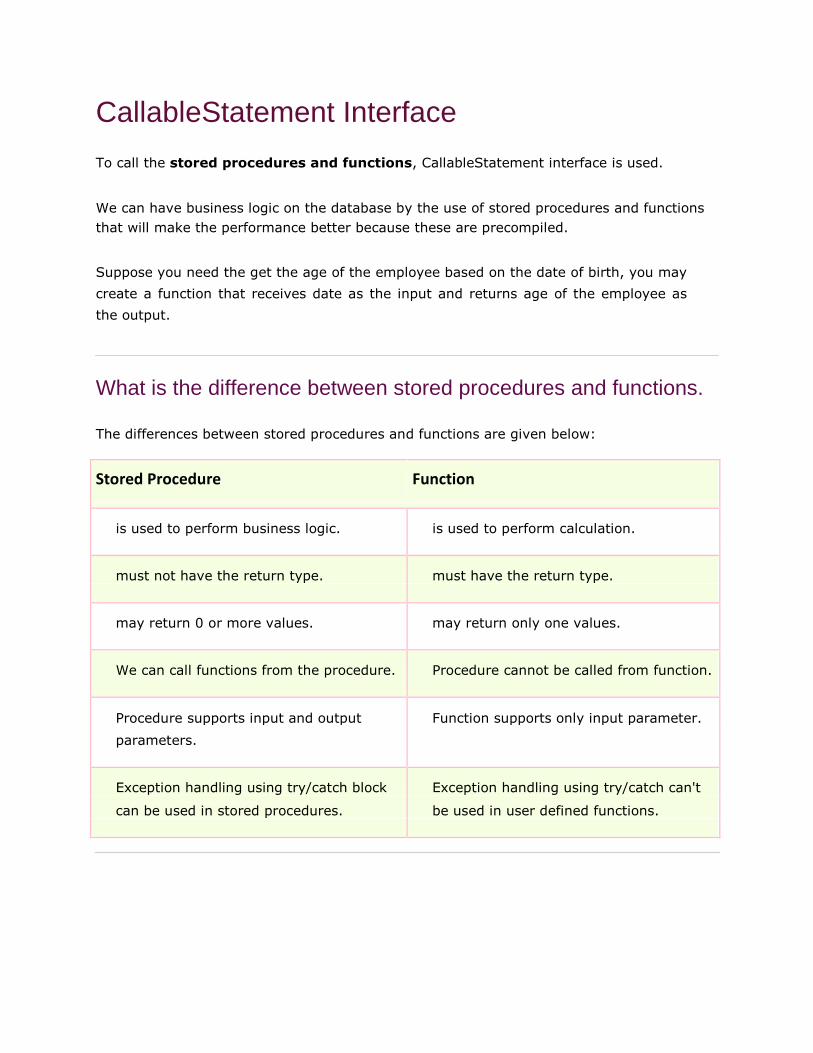
CallableStatement Interface
To call the stored procedures and functions, CallableStatement interface is used. We can have business logic on the database by the use of stored procedures and functions
that will make the performance better because these are precompiled.
Suppose you need the get the age of the employee based on the date of birth, you may
create a function that receives date as the input and returns age of the employee as
the output.
What is the difference between stored procedures and functions.
The differences between stored procedures and functions are given below:
Stored Procedure Function
is used to perform business logic. is used to perform calculation.
must not have the return type. must have the return type.
may return 0 or more values. may return only one values.
We can call functions from the procedure. Procedure cannot be called from function.
Procedure supports input and output Function supports only input parameter.
parameters.
Exception handling using try/catch block Exception handling using try/catch can't
can be used in stored procedures. be used in user defined functions.
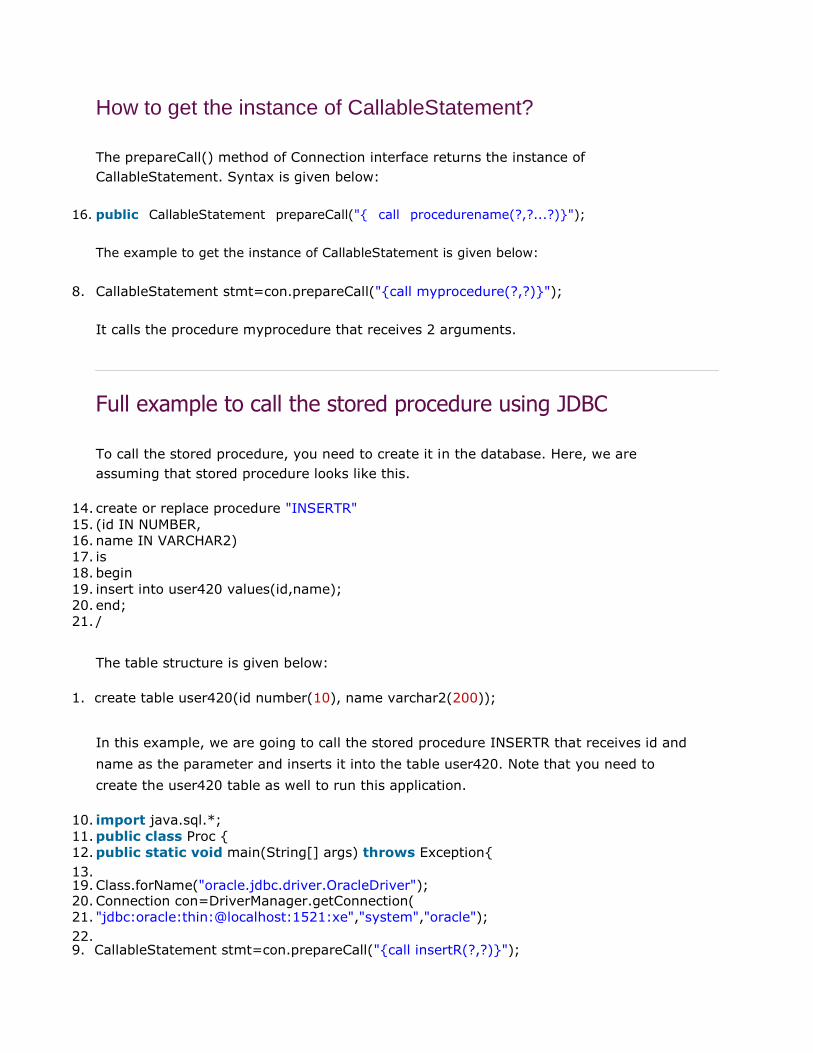
How to get the instance of CallableStatement?
The prepareCall() method of Connection interface returns the instance of
CallableStatement. Syntax is given below:
16. public CallableStatement prepareCall("{ call procedurename(?,?...?)}");
The example to get the instance of CallableStatement is given below:
8. CallableStatement stmt=con.prepareCall("{call myprocedure(?,?)}");
It calls the procedure myprocedure that receives 2 arguments.
Full example to call the stored procedure using JDBC
To call the stored procedure, you need to create it in the database. Here, we are
assuming that stored procedure looks like this.
14. create or replace procedure "INSERTR" 15. (id IN NUMBER, 16. name IN VARCHAR2)
17. is
18. begin 19. insert into user420 values(id,name); 20. end;
21. /
The table structure is given below: 1. create table user420(id number(10), name varchar2(200));
In this example, we are going to call the stored procedure INSERTR that receives id and
name as the parameter and inserts it into the table user420. Note that you need to
create the user420 table as well to run this application.
10. import java.sql.*; 11. public class Proc { 12. public static void main(String[] args) throws Exception{ 13. 19. Class.forName("oracle.jdbc.driver.OracleDriver"); 20. Connection con=DriverManager.getConnection(
21. "jdbc:oracle:thin:@localhost:1521:xe","system","oracle"); 22. 9. CallableStatement stmt=con.prepareCall("{call insertR(?,?)}");

21. stmt.setInt(1,1011); 22. stmt.setString(2,"Amit"); 23. stmt.execute();
13. 4. System.out.println("success"); 5. } 6. }
Now check the table in the database, value is inserted in the user420 table.
Example to call the function using JDBC
In this example, we are calling the sum4 function that receives two input and returns
the sum of the given number. Here, we have used the registerOutParameter method
of CallableStatement interface, that registers the output parameter with its
corresponding type. It provides information to the CallableStatement about the type of
result being displayed.
The Types class defines many constants such as INTEGER, VARCHAR, FLOAT,
DOUBLE, BLOB, CLOB etc.
Let's create the simple function in the database first.
7. create or replace function sum4 8. (n1 in number,n2 in number) 9. return number
10. is
11. temp number(8); 12. begin 13. temp :=n1+n2; 14. return temp;
15. end; 16. /
Now, let's write the simple program to call the function. 1. import java.sql.*; 2. 13. public class FuncSum { 14. public static void main(String[] args) throws Exception{ 15. 5. Class.forName("oracle.jdbc.driver.OracleDriver"); 6. Connection con=DriverManager.getConnection( 7. "jdbc:oracle:thin:@localhost:1521:xe","system","oracle"); 8.

13. CallableStatement stmt=con.prepareCall("{?= call sum4(?,?)}"); 14. stmt.setInt(2,10); 15. stmt.setInt(3,43); 16. stmt.registerOutParameter(1,Types.INTEGER);
17. stmt.execute();
15. 16. System.out.println(stmt.getInt(1)); 17.
} }
Output: 53
Batch Processing in JDBC
Instead of executing a single query, we can execute a batch (group) of queries. It
makes the performance fast.
The java.sql.Statement and java.sql.PreparedStatement interfaces provide methods
for batch processing.
Advantage of Batch Processing
Fast Performance
Methods of Statement interface
The required methods for batch processing are given below:
Method Description
void addBatch(String query) It adds query into batch.
int[] executeBatch() It executes the batch of queries.
Example of batch processing in jdbc
Let's see the simple example of batch processing in jdbc. It follows following steps:

Load the driver class Create Connection Create Statement Add query in the batch Execute Batch Close Connection
import java.sql.*; class FetchRecords{ public static void main(String args[])throws Exception{ Class.forName("oracle.jdbc.driver.OracleDriver"); Connection con=DriverManager.getConnection("jdbc:oracle:thin:@localhost:1521:xe","syste
m","oracle"); con.setAutoCommit(false);
7. 8. Statement stmt=con.createStatement(); 9. stmt.addBatch("insert into user420 values(190,'abhi',40000)"); 10. stmt.addBatch("insert into user420 values(191,'umesh',50000)"); 11. 12. stmt.executeBatch();//executing the batch 13. 14. con.commit();
15. con.close(); 16. }}
If you see the table user420, two records has been added.
Example of batch processing using PreparedStatement 1. import java.sql.*; 2. import java.io.*;
3. class BP{ 4. public static void main(String args[]){ 5. try{
6. 7. Class.forName("oracle.jdbc.driver.OracleDriver"); 8. Connection con=DriverManager.getConnection("jdbc:oracle:thin:@localhost:1521:xe","syste
m","oracle"); 9. 10. PreparedStatement ps=con.prepareStatement("insert into user420 values(?,?,?)"); 11. 7. BufferedReader br=new BufferedReader(new InputStreamReader(System.in)); 8. while(true){ 14. 15. System.out.println("enter id"); 16. String s1=br.readLine(); 17. int id=Integer.parseInt(s1); 18. 19. System.out.println("enter name");

20. String name=br.readLine();
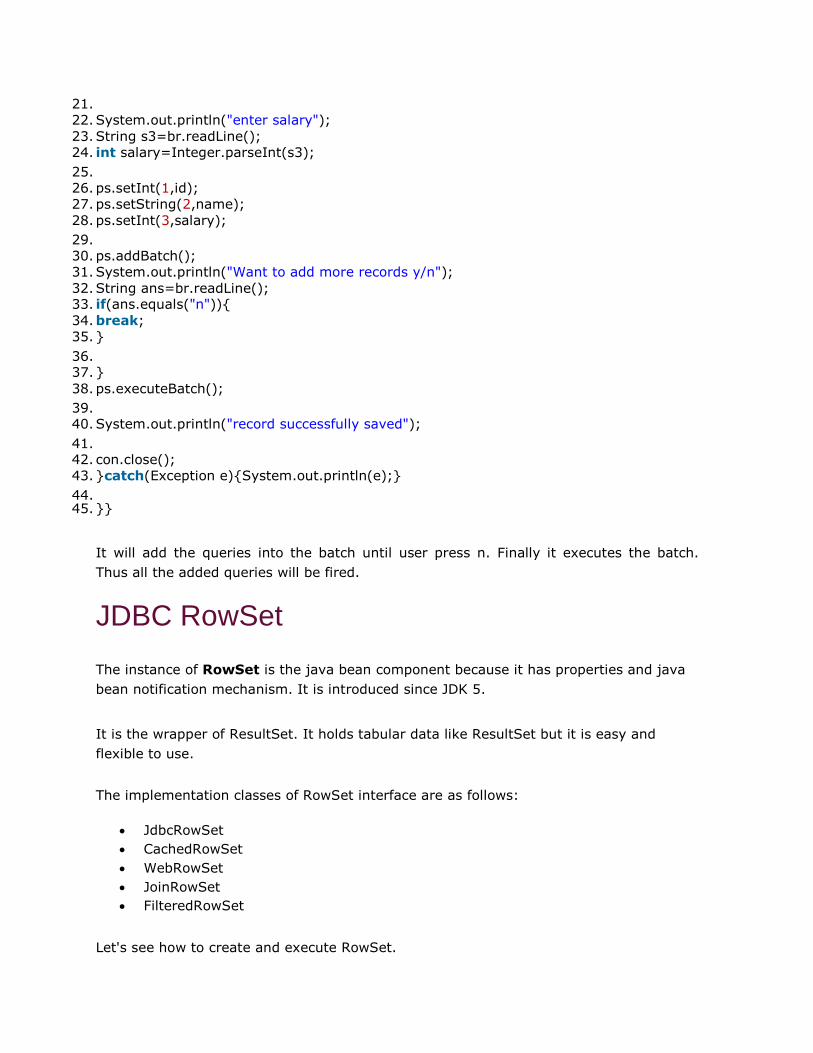
21. 22. System.out.println("enter salary"); 23. String s3=br.readLine(); 24. int salary=Integer.parseInt(s3); 25.
26. ps.setInt(1,id); 27. ps.setString(2,name); 28. ps.setInt(3,salary); 29.
30. ps.addBatch(); 31. System.out.println("Want to add more records y/n"); 32. String ans=br.readLine(); 33. if(ans.equals("n")){ 34. break; 35. } 36. 37. } 38. ps.executeBatch(); 39. 40. System.out.println("record successfully saved"); 41. 42. con.close();
43. }catch(Exception e){System.out.println(e);} 44. 45. }}
It will add the queries into the batch until user press n. Finally it executes the batch.
Thus all the added queries will be fired.
JDBC RowSet
The instance of RowSet is the java bean component because it has properties and java
bean notification mechanism. It is introduced since JDK 5.
It is the wrapper of ResultSet. It holds tabular data like ResultSet but it is easy and
flexible to use.
The implementation classes of RowSet interface are as follows:
JdbcRowSet CachedRowSet WebRowSet JoinRowSet FilteredRowSet
Let's see how to create and execute RowSet.
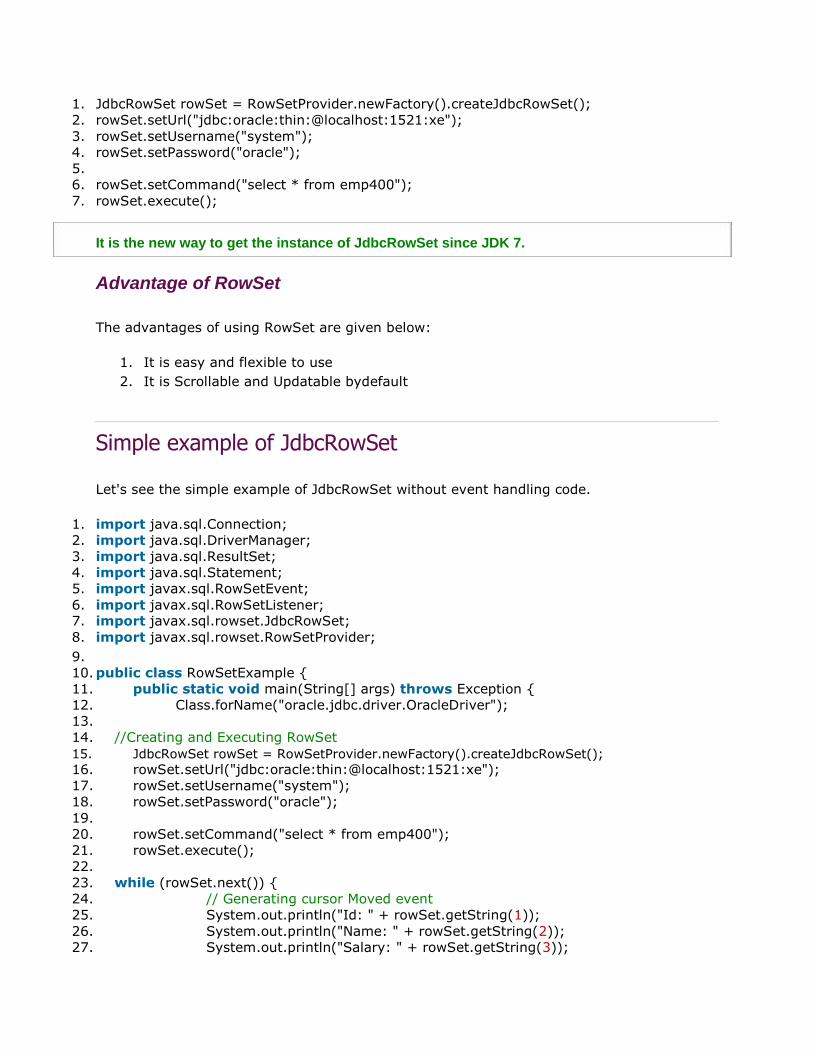
1. JdbcRowSet rowSet = RowSetProvider.newFactory().createJdbcRowSet(); 2. rowSet.setUrl("jdbc:oracle:thin:@localhost:1521:xe"); 3. rowSet.setUsername("system"); 4. rowSet.setPassword("oracle");
5. 6. rowSet.setCommand("select * from emp400"); 7. rowSet.execute();
It is the new way to get the instance of JdbcRowSet since JDK 7.
Advantage of RowSet
The advantages of using RowSet are given below:
1. It is easy and flexible to use 2. It is Scrollable and Updatable bydefault
Simple example of JdbcRowSet
Let's see the simple example of JdbcRowSet without event handling code. 1. import java.sql.Connection; 2. import java.sql.DriverManager;
3. import java.sql.ResultSet;
4. import java.sql.Statement; 5. import javax.sql.RowSetEvent; 6. import javax.sql.RowSetListener; 7. import javax.sql.rowset.JdbcRowSet; 8. import javax.sql.rowset.RowSetProvider; 9.
10. public class RowSetExample {
11. public static void main(String[] args) throws Exception { 12. Class.forName("oracle.jdbc.driver.OracleDriver");
13. 14. //Creating and Executing RowSet 15. JdbcRowSet rowSet = RowSetProvider.newFactory().createJdbcRowSet();
16. rowSet.setUrl("jdbc:oracle:thin:@localhost:1521:xe");
17. rowSet.setUsername("system");
18. rowSet.setPassword("oracle"); 19. 20. rowSet.setCommand("select * from emp400"); 21. rowSet.execute();
22. 23. while (rowSet.next()) {
24. // Generating cursor Moved event 25. System.out.println("Id: " + rowSet.getString(1)); 26. System.out.println("Name: " + rowSet.getString(2)); 27. System.out.println("Salary: " + rowSet.getString(3));

28. } 29.
30. } 31. }
The output is given below:
Id: 55
Name: Om Bhim
Salary: 70000
Id: 190
Name: abhi
Salary: 40000
Id: 191
Name: umesh
Salary: 50000
Full example of Jdbc RowSet with event handling
To perform event handling with JdbcRowSet, you need to add the instance
ofRowSetListener in the addRowSetListener method of JdbcRowSet.
The RowSetListener interface provides 3 method that must be implemented. They are
as follows:
1) public void cursorMoved(RowSetEvent event);
2) public void rowChanged(RowSetEvent event);
3) public void rowSetChanged(RowSetEvent event);
Let's write the code to retrieve the data and perform some additional tasks while cursor is
moved, cursor is changed or rowset is changed. The event handling operation can't be
performed using ResultSet so it is preferred now.
1. import java.sql.Connection; 2. import java.sql.DriverManager;
3. import java.sql.ResultSet; 4. import java.sql.Statement; 5. import javax.sql.RowSetEvent;
6. import javax.sql.RowSetListener; 7. import javax.sql.rowset.JdbcRowSet; 8. import javax.sql.rowset.RowSetProvider;
9. 10. public class RowSetExample { 11. public static void main(String[] args) throws Exception { 12. Class.forName("oracle.jdbc.driver.OracleDriver");
13. 14. //Creating and Executing RowSet 15. JdbcRowSet rowSet = RowSetProvider.newFactory().createJdbcRowSet();
16. rowSet.setUrl("jdbc:oracle:thin:@localhost:1521:xe");
17. rowSet.setUsername("system");
18. rowSet.setPassword("oracle"); 19. 20. rowSet.setCommand("select * from emp400"); 21. rowSet.execute(); 22. 23. //Adding Listener and moving RowSet 24. rowSet.addRowSetListener(new MyListener()); 25. 26. while (rowSet.next()) { 27. // Generating cursor Moved event 28. System.out.println("Id: " + rowSet.getString(1)); 29. System.out.println("Name: " + rowSet.getString(2)); 30. System.out.println("Salary: " + rowSet.getString(3)); 31. } 32.
33. } 34. }
35. 36. class MyListener implements RowSetListener { 37. public void cursorMoved(RowSetEvent event) { 38. System.out.println("Cursor Moved...");
39. } 40. public void rowChanged(RowSetEvent event) { 41. System.out.println("Cursor Changed...");
42. }
43. public void rowSetChanged(RowSetEvent event) { 44. System.out.println("RowSet changed..."); 45. }
46. }
The output is as follows:
Cursor Moved...
Id: 55
Name: Om Bhim
Salary: 70000
Cursor Moved...
Id: 190
Name: abhi
Salary: 40000
Cursor Moved... Id: 191 Name: umesh Salary: 50000 Cursor Moved...
Jdbc New Features The latest version of JDBC is 4.0 currently. Java has updated jdbc api to ease and
simplify the coding to database interactivity.
Here, we are going to see the features included in Jdbc 3.0 and Jdbc 4.0.
Jdbc 3.0 Features
The important features of JDBC API 3.0 are as follows:
Jdbc RowSet We have done the great discussion on JdbcRowSet in the
previous page.
Savepoint in transaction management Now you are able to create, rollback and release the savepoint by Connection.setSavepoint(), Connection.rollback(Savepoint svpt) and Connection.releaseSavepoint(Savepoint svpt) methods.
Statement and ResultSet Caching for Connection Pooling Now you are able to
reuse the statement and result set because jdbc 3 provides you the facility of statement caching and result set caching.
Switching between Global and Local Transactions
Retrieval of auto generated keys Now you are able to get the auto generated keys by the method getGeneratedKeys().
Jdbc 4.0 Features
The important features of JDBC API 4.0 are given below:
Automatic Loading of Driver class You don't need to write Class.forName() now
because it is loaded bydefault since jdbc4.
Subclasses of SQLException Jdbc 4 provides new subclasses of SQLException class for better readability and handling.

New methods There are many new methods introduced in Connection,
PreparedStatement, CallableStatement, ResultSet etc. Improved DataSource Now data source implementation is improved.
Event Handling support in Statement for Connection Pooling Now Connection
Pooling can listen statement error and statement closing events.
New Features in Java There are many new features that have been added in java. There are major enhancement
made in Java5, Java6 and Java7 like auto-boxing, generics, var-args, java
annotations,enum, premain method etc.
RMI (Remote Method Invocation) The RMI (Remote Method Invocation) is an API that provides a mechanism to create
distributed application in java. The RMI allows an object to invoke methods on an
object running in another JVM.
The RMI provides remote communication between the applications using two
objects stub and skeleton.
Understanding stub and skeleton
RMI uses stub and skeleton object for communication with the remote object. A remote object is an object whose method can be invoked from another JVM.
Let's understand the stub and skeleton objects:
stub The stub is an object, acts as a gateway for the client side. All the outgoing requests are
routed through it. It resides at the client side and represents the remote object. When
the caller invokes method on the stub object, it does the following tasks:
1. It initiates a connection with remote Virtual Machine (JVM),
2. It writes and transmits (marshals) the parameters to the remote Virtual
Machine (JVM), 3. It waits for the result 4. It reads (unmarshals) the return value or exception, and
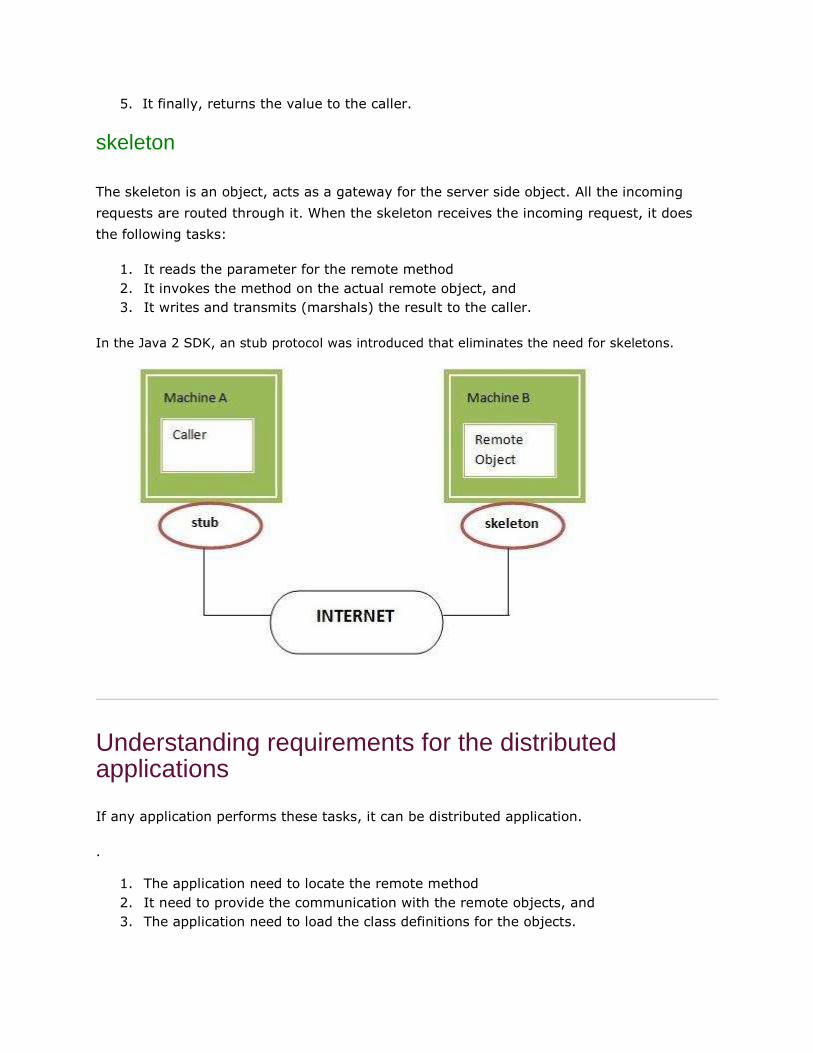
5. It finally, returns the value to the caller.
skeleton The skeleton is an object, acts as a gateway for the server side object. All the incoming
requests are routed through it. When the skeleton receives the incoming request, it does
the following tasks:
1. It reads the parameter for the remote method 2. It invokes the method on the actual remote object, and 3. It writes and transmits (marshals) the result to the caller.
In the Java 2 SDK, an stub protocol was introduced that eliminates the need for skeletons.
Understanding requirements for the distributed applications
If any application performs these tasks, it can be distributed application. .
1. The application need to locate the remote method 2. It need to provide the communication with the remote objects, and 3. The application need to load the class definitions for the objects.
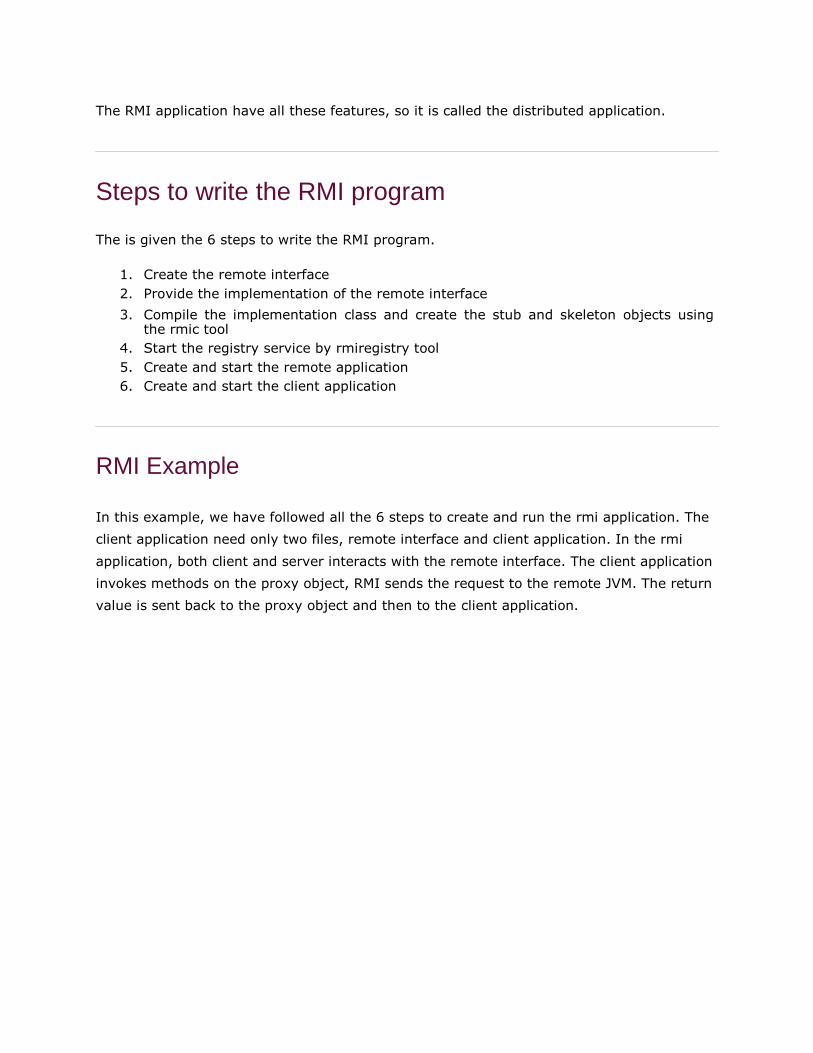
The RMI application have all these features, so it is called the distributed application.
Steps to write the RMI program
The is given the 6 steps to write the RMI program.
1. Create the remote interface 2. Provide the implementation of the remote interface
3. Compile the implementation class and create the stub and skeleton objects using
the rmic tool 4. Start the registry service by rmiregistry tool 5. Create and start the remote application 6. Create and start the client application
RMI Example In this example, we have followed all the 6 steps to create and run the rmi application. The
client application need only two files, remote interface and client application. In the rmi
application, both client and server interacts with the remote interface. The client application
invokes methods on the proxy object, RMI sends the request to the remote JVM. The return
value is sent back to the proxy object and then to the client application.
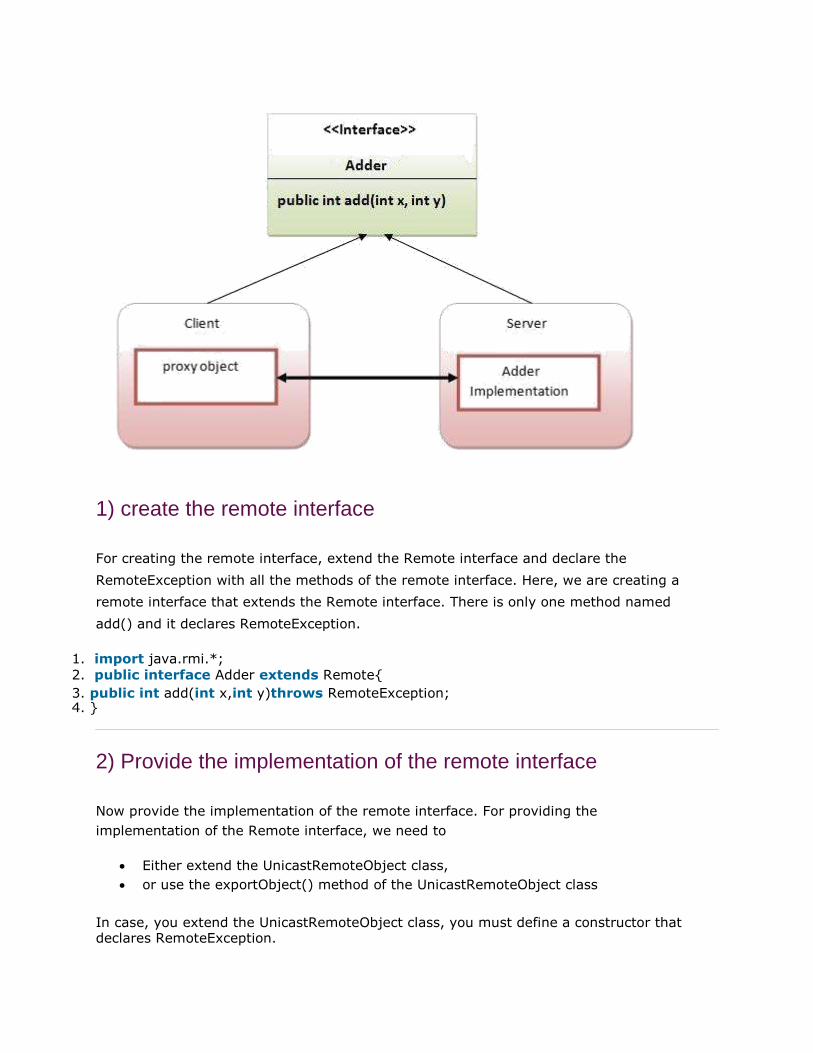
1) create the remote interface
For creating the remote interface, extend the Remote interface and declare the
RemoteException with all the methods of the remote interface. Here, we are creating a
remote interface that extends the Remote interface. There is only one method named
add() and it declares RemoteException.
1. import java.rmi.*; 2. public interface Adder extends Remote{ 3. public int add(int x,int y)throws RemoteException; 4. }
2) Provide the implementation of the remote interface
Now provide the implementation of the remote interface. For providing the
implementation of the Remote interface, we need to
Either extend the UnicastRemoteObject class, or use the exportObject() method of the UnicastRemoteObject class
In case, you extend the UnicastRemoteObject class, you must define a constructor that declares RemoteException.

1. import java.rmi.*; 2. import java.rmi.server.*; 3. public class AdderRemote extends UnicastRemoteObject implements Adder{ 4. AdderRemote()throws RemoteException{
5. super();
6. } 7. public int add(int x,int y){return x+y;} 8. }
3) create the stub and skeleton objects using the rmic tool.
Next step is to create stub and skeleton objects using the rmi compiler. The rmic
tool invokes the RMI compiler and creates stub and skeleton objects.
1. rmic AdderRemote
4) Start the registry service by the rmiregistry tool
Now start the registry service by using the rmiregistry tool. If you don't specify the
port number, it uses a default port number. In this example, we are using the port
number 5000.
1. rmiregistry 5000
5) Create and run the server application
Now rmi services need to be hosted in a server process. The Naming class provides methods
to get and store the remote object. The Naming class provides 5 methods.
1. public static java.rmi.Remote lookup(java.lang.String) throws
java.rmi.NotBoundException, java.net.MalformedURLException, java.rmi.RemoteException; it returns the reference of the remote object.
2. public static void bind(java.lang.String, java.rmi.Remote) throws
java.rmi.AlreadyBoundException, java.net.MalformedURLException, java.rmi.RemoteException; it binds the remote object with the given name.
3. public static void unbind(java.lang.String) throws
java.rmi.RemoteException, java.rmi.NotBoundException, java.net.MalformedURLException; it destroys the remote object which is bound with the given name.
4. public static void rebind(java.lang.String, java.rmi.Remote) throws
java.rmi.RemoteException, java.net.MalformedURLException; it binds the remote object to the new name.
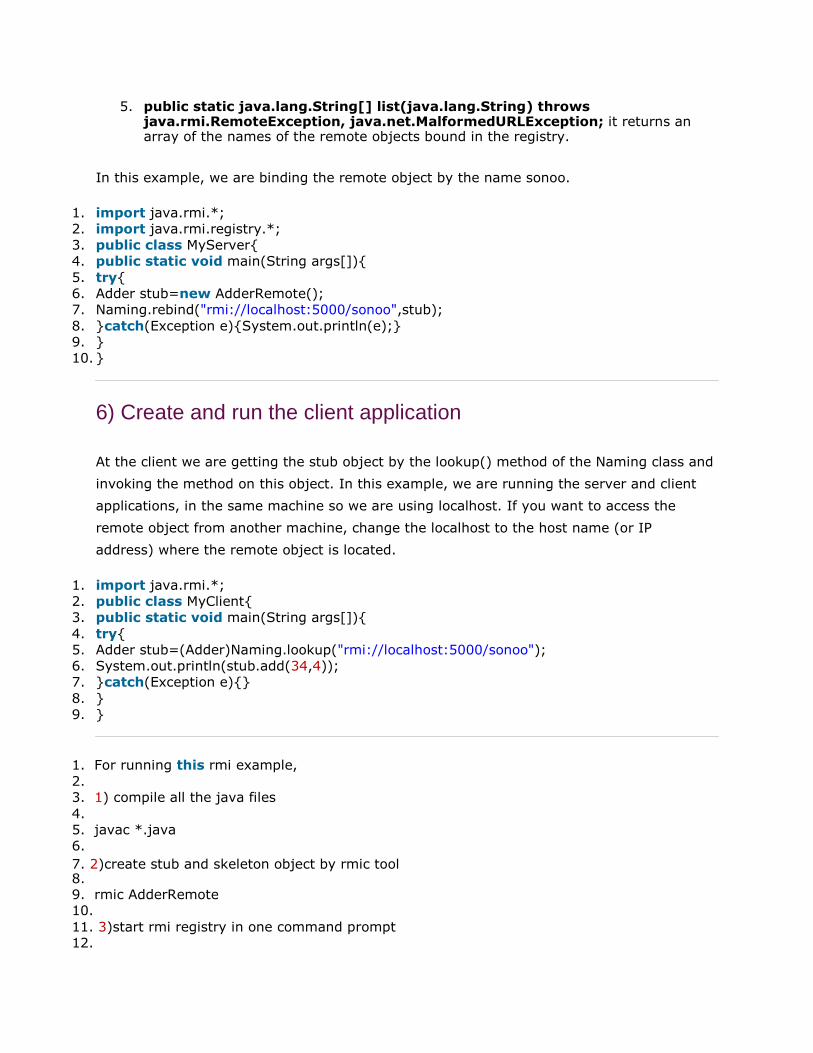
5. public static java.lang.String[] list(java.lang.String) throws
java.rmi.RemoteException, java.net.MalformedURLException; it returns an array of the names of the remote objects bound in the registry.
In this example, we are binding the remote object by the name sonoo. 1. import java.rmi.*; 2. import java.rmi.registry.*;
3. public class MyServer{ 4. public static void main(String args[]){ 5. try{
6. Adder stub=new AdderRemote(); 7. Naming.rebind("rmi://localhost:5000/sonoo",stub); 8. }catch(Exception e){System.out.println(e);} 9. }
10. }
6) Create and run the client application
At the client we are getting the stub object by the lookup() method of the Naming class and
invoking the method on this object. In this example, we are running the server and client
applications, in the same machine so we are using localhost. If you want to access the
remote object from another machine, change the localhost to the host name (or IP
address) where the remote object is located.
1. import java.rmi.*; 2. public class MyClient{
3. public static void main(String args[]){ 4. try{ 5. Adder stub=(Adder)Naming.lookup("rmi://localhost:5000/sonoo");
6. System.out.println(stub.add(34,4));
7. }catch(Exception e){} 8. } 9. }
1. For running this rmi example, 2. 3. 1) compile all the java files 4. 5. javac *.java 6. 7. 2)create stub and skeleton object by rmic tool 8. 9. rmic AdderRemote 10. 11. 3)start rmi registry in one command prompt 12.

13. rmiregistry 5000 14. 15. 4)start the server in another command prompt 16. 17. java MyServer 18. 19. 5)start the client application in another command prompt 20. 21. java MyClient
Output of this RMI example

Meaningful example of RMI application with database Consider a scenario, there are two applications running in different machines. Let's
say MachineA and MachineB, machineA is located in United States and MachineB in
India. MachineB want to get list of all the customers of MachineA application.
Let's develop the RMI application by following the steps.
1) Create the table First of all, we need to create the table in the database. Here, we are using Oracle10
database.
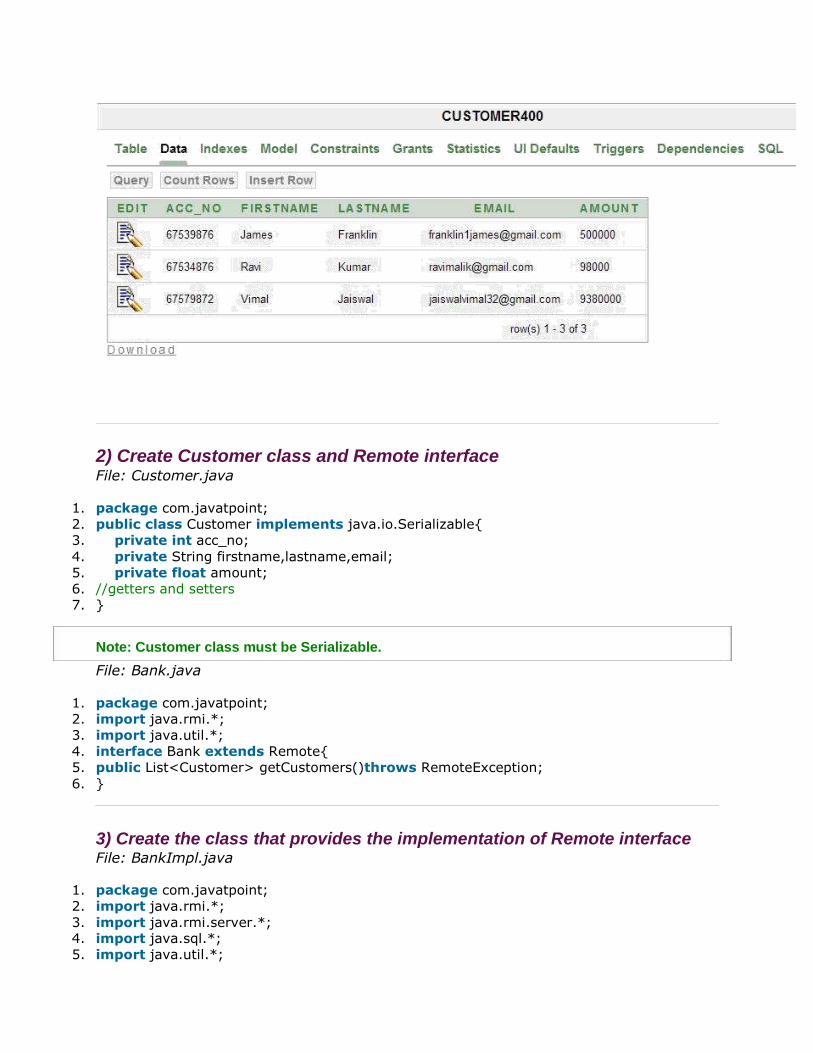
2) Create Customer class and Remote interface File: Customer.java
1. package com.javatpoint; 2. public class Customer implements java.io.Serializable{
3. private int acc_no; 4. private String firstname,lastname,email; 5. private float amount;
6. //getters and setters
7. }
Note: Customer class must be Serializable.
File: Bank.java
1. package com.javatpoint; 2. import java.rmi.*;
3. import java.util.*;
4. interface Bank extends Remote{ 5. public List<Customer> getCustomers()throws RemoteException; 6. }
3) Create the class that provides the implementation of Remote interface File: BankImpl.java
1. package com.javatpoint; 2. import java.rmi.*; 3. import java.rmi.server.*; 4. import java.sql.*;
5. import java.util.*;

6. class BankImpl extends UnicastRemoteObject implements Bank{ 7. BankImpl()throws RemoteException{} 8. 9. public List<Customer> getCustomers(){ 10. List<Customer> list=new ArrayList<Customer>();
11. try{ 12. Class.forName("oracle.jdbc.driver.OracleDriver"); 13. Connection con=DriverManager.getConnection("jdbc:oracle:thin:@localhost:1521:xe","syste
m","oracle"); 14. PreparedStatement ps=con.prepareStatement("select * from customer400"); 15. ResultSet rs=ps.executeQuery();
16. 17. while(rs.next()){ 18. Customer c=new Customer(); 19. c.setAcc_no(rs.getInt(1));
20. c.setFirstname(rs.getString(2));
21. c.setLastname(rs.getString(3)); 22. c.setEmail(rs.getString(4));
23. c.setAmount(rs.getFloat(5));
24. list.add(c); 25. }
26. 27. con.close(); 28. }catch(Exception e){System.out.println(e);} 29. return list; 30. }//end of getCustomers()
31. }
4) Compile the class rmic tool and start the registry service by rmiregistry tool

5) Create and run the Server File: MyServer.java
1. package com.javatpoint; 2. import java.rmi.*; 3. public class MyServer{
4. public static void main(String args[])throws Exception{
5. Remote r=new BankImpl(); 6. Naming.rebind("rmi://localhost:6666/javatpoint",r); 7. }}
6) Create and run the Client File: MyClient.java
1. package com.javatpoint; 2. import java.util.*;
3. import java.rmi.*; 4. public class MyClient{ 5. public static void main(String args[])throws Exception{ 6. Bank b=(Bank)Naming.lookup("rmi://localhost:6666/javatpoint"); 7. 8. List<Customer> list=b.getCustomers(); 9. for(Customer c:list){ 10. System.out.println(c.getAcc_no()+" "+c.getFirstname()+" "+c.getLastname() 11. +" "+c.getEmail()+" "+c.getAmount()); 12. }
13. 14. }}
