ix4-300d_en
DESCRIPTION
ix4-300d_enTRANSCRIPT

Iomega StorCenter ix4-300d User Guide
D31621100

iii
Table of Contents
Setting up Your Device ................................................................................................... 1
Setup Overview ......................................................................................................... 1
Set up My Iomega StorCenter If It's Not Discovered .............................................................. 2
Discovering with Iomega Storage Manager ...................................................................... 2
Discovering the Iomega device without the Internet .......................................................... 2
Setup Page ............................................................................................................... 3
Network Connection.................................................................................................... 4
Connecting the Iomega StorCenter ix4-300d Network Storage to Your Network ......................... 4
Network Settings ..................................................................................................... 6
Manually Configuring the Network ................................................................................ 7
Bonding NICs .......................................................................................................... 8
VLAN Settings ......................................................................................................... 9
Naming Your Iomega StorCenter ix4-300d Network Storage .................................................. 10
Configuring Your Iomega StorCenter ix4-300d Network Storage to Use Active Directory ............... 11
Enabling Active Directory Trusted Domains ................................................................... 11
Obtaining Alerts About Your Iomega StorCenter ix4-300d Network Storage ............................... 13
Using Your Iomega StorCenter ix4-300d Network Storage in Various Time Zones ......................... 14
Setting the Display Language for Your Iomega StorCenter ix4-300d Network Storage ................... 15
Printing Documents................................................................................................... 16
Setting up Personal Cloud, Security, and File Sharing ......................................................... 17
Sharing Files .............................................................................................................. 19
Sharing Overview ..................................................................................................... 19
Interfaces for Sharing ............................................................................................. 19
Shares ................................................................................................................... 20
What are Shares and How Do I Organize Content with Them? ............................................. 20
Adding Shares ....................................................................................................... 21

Iomega StorCenter ix4-300d User Guide
iv
Managing Shares .................................................................................................... 22
Deleting Shares ..................................................................................................... 24
Using Protocols to Share Files ...................................................................................... 25
What Are Protocols and How Do I Use Them to Share Files? ............................................... 25
AFP File Sharing for Macs ......................................................................................... 26
Bluetooth File Sharing ............................................................................................ 27
FTP File Sharing .................................................................................................... 28
NFS File Sharing .................................................................................................... 29
rsync: Synchronizing Files with Another Storage Device or Other Computers .......................... 30
TFTP .................................................................................................................. 31
Monitoring Your Device with an SNMP Management Tool ................................................... 32
WebDAV: Managing Files Using HTTP or HTTPS ............................................................... 33
Windows DFS: Creating a Distributed Windows File System ................................................ 34
Windows File Sharing .............................................................................................. 35
Sharing Content through the Home Page ......................................................................... 36
Sharing Your Content with the World .......................................................................... 36
Adding a Custom Home Page .................................................................................... 37
Automatically Sending Content to Multiple People at Once .................................................. 38
How to Set Up an Email Distribution Active Folder .......................................................... 38
Sharing Content Using Social Media: Overview .................................................................. 39
Managing Your Content .............................................................................................. 40
Transferring Content to and from Your Iomega StorCenter ix4-300d Network Storage with Copy Jobs41
Copy Jobs Limitations ............................................................................................. 41
Getting Content from a USB External Storage Device .......................................................... 42
Safely removing external storage ............................................................................... 42
One-touch Transferring of Content from a USB Device ........................................................ 43
Setting QuikTransfer .............................................................................................. 43

Table of Contents
v
iSCSI: Creating IP-Based Storage Area Networks (SAN) ........................................................... 45
iSCSI Overview ........................................................................................................ 45
Adding iSCSI Drives ................................................................................................... 46
Enabling iSCSI Drives .............................................................................................. 46
Connecting to iSCSI Drives ....................................................................................... 46
Managing iSCSI Drives ................................................................................................ 48
Changing Access Permissions .................................................................................... 48
Deleting iSCSI Drives ................................................................................................. 49
Storage Pool Management ............................................................................................. 51
Managing Drives ....................................................................................................... 51
Adding New Drives to Your Iomega StorCenter ix4-300d Network Storage ................................. 52
Drive Management ...................................................................................................... 53
Managing Drives ....................................................................................................... 53
Backing up and Restoring Your Content ............................................................................. 55
Backup and Restore Overview ...................................................................................... 55
Backup of Data through RAID Protection ...................................................................... 55
Backing up to and Restoring from Your Device .................................................................. 56
Backing up Macs with Time Machine ........................................................................... 56
Copy Jobs Overview ............................................................................................... 57
Backing up Your Device .............................................................................................. 58
Copy Jobs ............................................................................................................ 58
Backing up with Mozy Backup.................................................................................... 66
Restoring Files with Mozy Backup ............................................................................... 67
Backing up with Amazon S3 ...................................................................................... 68
Restoring Files with Amazon S3 ................................................................................. 69
Backing up with Iomega Personal Cloud ....................................................................... 70
Restoring Files with Personal Cloud ............................................................................ 71

Iomega StorCenter ix4-300d User Guide
vi
Securing Your Device and Contents .................................................................................. 73
What Is Security and Do I Need It? ................................................................................. 73
Enabling Security and Creating an Administrator User ......................................................... 74
Disabling Security .................................................................................................. 74
Limiting Access to Your Content by Creating Users ............................................................ 76
Users .................................................................................................................... 77
Users Overview ..................................................................................................... 77
Adding Users ........................................................................................................ 78
Managing Users ..................................................................................................... 79
Deleting Users ...................................................................................................... 81
Groups .................................................................................................................. 82
Groups Overview ................................................................................................... 82
Adding Groups ...................................................................................................... 83
Managing Groups ................................................................................................... 84
Deleting Groups .................................................................................................... 85
Using Active Directory Domain to Manage Users and Groups ................................................. 86
Active Directory Users and Groups Overview ................................................................. 86
Managing Users and Groups with Active Directory ........................................................... 87
Deleting Active Directory Users and Groups .................................................................. 89
Personal Cloud: Accessing Your Device From Anywhere in the World ......................................... 91
What Is an Iomega Personal Cloud ? ............................................................................... 91
Iomega Personal Cloud Key Terms .............................................................................. 91
Is My Content Secure? ................................................................................................ 93
Iomega Personal Cloud Setup Overview .......................................................................... 94
Creating an Iomega Personal Cloud ............................................................................... 95
Configuring Router Port Forwarding for Personal Cloud ....................................................... 96
Router Port Forwarding ........................................................................................... 96
Table of Contents
vii
Configuring Your Iomega Personal Cloud ......................................................................... 98
Enabling Internet Access to the ix4-300d Network Storage ................................................ 98
Changing Personal Cloud Settings ............................................................................... 98
Inviting People onto Your Iomega Personal Cloud ............................................................. 100
Joining a Trusted Device to an Iomega Personal Cloud ....................................................... 101
Managing Trusted Devices on a Personal Cloud ................................................................ 102
Disconnecting Trusted Devices ................................................................................. 102
Deleting Trusted Devices ........................................................................................ 102
Using Copy Jobs with an Iomega Personal Cloud ............................................................... 103
Disabling or Deleting Your Iomega Personal Cloud ............................................................ 104
Accessing Content Using Your Iomega Personal Cloud ........................................................ 105
Informing Users What to Do with Iomega Personal Cloud .................................................... 106
Sharing Content Using Social Media ................................................................................. 107
Sharing Content Using Social Media: Overview ................................................................. 107
Facebook .............................................................................................................. 108
Flickr ................................................................................................................... 109
YouTube ............................................................................................................... 110
Share Content through Iomega Personal Cloud ................................................................. 111
Media Management ..................................................................................................... 113
Media Management Overview ..................................................................................... 113
Scanning for media content ..................................................................................... 113
Media Services Capabilities and Limitations .................................................................... 114
Sharing Media Content over the Internet ........................................................................ 115
Enabling Internet Access from the Media Server Page ..................................................... 115
Media Aggregation ................................................................................................... 116
Enabling Media Aggregation ..................................................................................... 116
Social Media Sharing ................................................................................................ 117

Iomega StorCenter ix4-300d User Guide
viii
Streaming Music, Movies, and Pictures .......................................................................... 118
Example: Setting up iTunes ..................................................................................... 118
Example: Setting up Xbox 360 .................................................................................. 118
Photos ................................................................................................................. 119
Photos Overview .................................................................................................. 119
Streaming Pictures ................................................................................................ 120
Creating a Slideshow on the Device Home Page ............................................................ 121
Automatically Resizing Your Photos ........................................................................... 122
Getting Pictures from Your Camera ........................................................................... 123
Music ................................................................................................................... 124
Music Overview .................................................................................................... 124
Streaming Music ................................................................................................... 125
Torrents ............................................................................................................... 126
Torrent Overview ................................................................................................. 126
Enabling Torrent Downloads .................................................................................... 127
Deleting torrent jobs ............................................................................................. 128
Configuring Your Router for Torrent Downloads ............................................................ 129
Torrent Active Folders ........................................................................................... 130
Videos .................................................................................................................. 132
Video Capabilities Overview .................................................................................... 132
Streaming Movies ................................................................................................. 133
Adding Applications to Your Device ................................................................................. 135
Application Overview ............................................................................................... 135
Application Manager ................................................................................................ 136
Starting or stopping an application ............................................................................ 136
Adding applications ............................................................................................... 136
Removing applications ........................................................................................... 136

Table of Contents
ix
Upgrading Your Device ................................................................................................ 137
Software Updates .................................................................................................... 137
Manual update process: installing a device software update ............................................. 137
Recovering Your Device Configuration .............................................................................. 139
Copying Your Iomega StorCenter ix4-300d Network Storage Settings to Other Devices ................ 139
Backing up Device Configuration ............................................................................... 139
Restoring a Configuration Backup .............................................................................. 139
Hardware Management ................................................................................................ 141
About the Iomega StorCenter ix4-300d Network Storage Components .................................... 141
Front Panel ......................................................................................................... 141
Drive Bay Access .................................................................................................. 142
Rear Panel .......................................................................................................... 142
Energy Saving ......................................................................................................... 144
Power Down Drives ............................................................................................... 144
Brightness .......................................................................................................... 144
Wake On LAN ...................................................................................................... 144
Creating A Power Schedule ..................................................................................... 144
Factory Reset ......................................................................................................... 145
UPS Management .................................................................................................... 146
Adding New Drives to Your Iomega StorCenter ix4-300d Network Storage ................................ 147
Troubleshooting Routers ........................................................................................... 148
Enabling the DMZ .................................................................................................... 148
Configuring Port Forwarding on Double NAT Networks ....................................................... 149
Bridging the Secondary Router .................................................................................... 149
Bridging the Primary Router ....................................................................................... 149
Additional Support ..................................................................................................... 151
How to Get Help ..................................................................................................... 151

Iomega StorCenter ix4-300d User Guide
x
Support ................................................................................................................ 152
Legal ...................................................................................................................... 153
ix4-300d Network Storage Trademark Page ..................................................................... 153
Regulatory Information ............................................................................................. 154
FCC (United States) ............................................................................................... 154
Canadian Verification ............................................................................................ 154
CE (European Community) ...................................................................................... 154
Manufacturer/Responsible Party ............................................................................... 154
EU Representative ................................................................................................ 154
Safety Information ................................................................................................... 156
Limited Warranty .................................................................................................... 157
Drives and Media .................................................................................................. 157
Coverage ........................................................................................................... 157
Excluded Products and Problems............................................................................... 157
Remedies ........................................................................................................... 157
Obtaining Warranty Service ..................................................................................... 158
Limitations ......................................................................................................... 158
Open Source .......................................................................................................... 159
1
Setting up Your Device
Setup Overview
Setup with your Iomega StorCenter ix4-300d Network Storage is easy. Remove it from the box, connect it to your network or computer, and power it up. Then, launch a web browser, and enter the setup URL identified in the Quick Install Guide. Iomega Setup launches and displays a message that your ix4-300d Network Storage is online and ready to use.
You then can install client software that includes:
Iomega Storage Manager
Twonky Media Server for media aggregation
Iomega QuikProtect for backups
Iomega Storage Manager is a management tool that helps you discover your ix4-300d Network Storage on your network to simplify access to content on your ix4-300d Network Storage from your computer. It also allows you to add your computer as a trusted device to an Iomega Personal Cloud. Refer to Iomega Storage Manager online help for additional information. Twonky Media Server consolidates all media files on devices on your network and presents them in a unified view. Iomega QuikProtect offers file backup of your computer to an Iomega storage device.
From Iomega Setup, you can optionally create a Personal Cloud or begin using your ix4-300d Network Storage by clicking Manage My Device.
How do I ...
set up my ix4-300d Network Storage if it's not discovered
create an Iomega Personal Cloud
set up media aggregation

Iomega StorCenter ix4-300d User Guide
2
Set up My Iomega StorCenter If It's Not Discovered
If, after you enter the setup URL identified in the Quick Install Guide, your Iomega device is not discovered, you have two ways of discovering it.
Discovering with Iomega Storage Manager
You can install Iomega Storage Manager from Iomega Setup, which helps you discover your Iomega device on your network.
Discovering the Iomega device without the Internet
You can access your Iomega device device without internet access as described by these methods for Windows pcs or Macs:
Windows 7 and Vista — Click Start, Computer, Network. Under Other Devices, you should see your Iomega device listed. For example, if you have an Iomega device, you can double-click the device labeled Iomega device, and you will see the Iomega StorCenter Console for the Iomega device.
Windows XP — If you have not enabled UPnP Discovery, click Start, Help and Support. In the Help and Support browser, search for UPnP, and follow the steps from “Install the UPnP framework”. After UPnP is enabled, open Windows Explorer and in the Folders view, expand My Network Places. You should see your Iomega device listed. For example, if you have an EZ Media device, you can double-click the device labeled IomegaEZ, and you will see the Iomega StorCenter Console for the Iomega device.
Mac — Browse to your Iomega device through Finder, Shared, All and use Go, Connect to Server to connect to Shares on your Iomega device.
How do I ...
set up my Iomega device
install Iomega Storage Manager
Setting up Your Device
3
Setup Page
The Setup page opens when you first access the Iomega StorCenter ix4-300d Network Storage from the Home Page or the Iomega Storage Manager. On this page, you can configure some basic device features by clicking the appropriate link. The current setting of the feature displays above the link. You can also configure all features shown on the Setup page by accessing the specific features directly.

Iomega StorCenter ix4-300d User Guide
4
Network Connection
Connecting the Iomega StorCenter ix4-300d Network Storage to Your Network
First, check the package contents.
Verify that the box contains the following items:
1. ix4-300d Network Storage (models may vary)
2. Power Adapter and Cord
3. Quick Start Guide
4. Ethernet Cable

Setting up Your Device
5
Connecting the ix4-300d Network Storage
If you have purchased more than one ix4-300d Network Storage, complete all steps on one device before setting up additional devices.
1. Use the included network cable to connect the ix4-300d Network Storage to your network router, switch or directly to a computer.
2. Connect the included power adapter to the back of the ix4-300d Network Storage and a power socket or Uninterruptible Power Supply (UPS).
3. Your ix4-300d Network Storage should power on automatically.
4. From a computer on your network, open a web browser and go to www.iomegasetup.com to set up your ix4-300d Network Storage on your network. For best results, use a computer that is connected to the same subnet or network segment as the ix4-300d Network Storage.
NOTE: You can access the Iomega StorCenter ix4 Console directly by entering the IP address or model name of your ix4-300d Network Storage in your computer’s web browser. To use the model name on a Mac, add .local after the name in the browser (for example, ix4-300d
Network Storage.local).
5. OPTIONAL: if desired, install the Iomega Storage Manager, QuikProtect, and Media Aggregation software.
If you install Iomega Storage Manager, its icon will appear in the System Tray (Windows) or Menu Bar (Mac). The Iomega Storage Manager will automatically scan your network and connect to available Shares.
If you receive a message from your operating system's firewall alerting you of network activity, be sure to unblock communications.
Mac Users: Shares on the ix4-300d Network Storage will mount and appear on the Mac Desktop.
PC Users: Shares on the ix4-300d Network Storage will automatically be assigned a drive letter and will be available in the Network Drives section under My Computer.
How do I ...
view information about my device components

Iomega StorCenter ix4-300d User Guide
6
Network Settings
The Network page of your ix4-300d Network Storage is where you make changes to set up network connectivity. The Network page displays your current network settings and enables those settings to be modified. On this page, you can identify your DNS servers and WINS servers and how your system's IP address is determined. Most system IP addresses and other network settings can normally be configured automatically.
Manually Configuring Your Network
If you are comfortable with network technology and want to configure the network, refer to Manually Configuring the Network.
Bonding NICs
If your ix4-300d Network Storage has multiple network interface cards (NICs), you can bond those NICs. Refer to Bonding NICs.
Enabling Jumbo Frames for Each NIC
You can enable jumbo frames for each NIC in your ix4-300d Network Storage by expanding the Information section for a NIC and selecting a jumbo frame size from the Jumbo Frame drop-down menu. Valid jumbo frame sizes are 4,000 or 9,000 bytes. If you do not want jumbo frame support, select None from the Jumbo Frame drop-down menu. Jumbo frame support is useful for transferring large files, such as multimedia files, over a network. Jumbo frame support increases transfer speed by placing large files in fewer data packets. It also reduces the demand on the device hardware by having the CPU process more data in fewer data packets.
Jumbo frame support should only be enabled if you are sure your network is jumbo-frame compatible and all network devices have been configured to support jumbo frames. It is recommended that you confirm all network interface cards (NICs) are configured to support jumbo frames before enabling this feature.
VLAN Settings
Each NIC in your ix4-300d Network Storage can be added to up to four Virtual LANs (VLAN). For more information on adding a NIC to a VLAN, refer to VLAN Settings.
Setting up Your Device
7
Manually Configuring the Network
There are various settings in the network setup that you can manually configure.
1. Click Modify network settings.
2. Uncheck Automatically configure DNS, WINS, and all IP addresses (DHCP).
3. DNS Servers — enter the IP addresses of the DNS (Domain Name System) servers. DNS is used for translating the domain name to IP addresses.
4. WINS Servers — enter the IP addresses of the WINS server.
5. From the Bonding Mode drop-down menu, choose one of the following:
Transmission Load Balance — increases bandwidth by distributing the load across multiple NICs.
Link Aggregation — increases bandwidth by distributing the load across multiple ports in a switch.
Failover — provides recovery from a failure, so if one NIC should fail, your system still has network connectivity with the other NIC.
6. Click Apply to save your settings.
If a DHCP server is unavailable for a network interface card (NIC), the device could auto-assign an IP address, or you can uncheck the Automatically acquire network address (DHCP) checkbox found in the Information section of a NIC.
7. You can change the following settings in the Information section:
IP Address — the static IP address of the ix4-300d Network Storage. Use an available IP address in the range used by the LAN.
Subnet Mask — the subnet that the IP address belongs to. The default value is 255.255.255.0.
Gateway — enter the gateway IP address in this field.
8. Click Apply to save your settings.
VLAN Settings
Each NIC in your ix4-300d Network Storage can be added to up to four Virtual LANs (VLAN). For more information on adding a NIC to a VLAN, refer to VLAN Settings.
Bonding NICs
If your ix4-300d Network Storage has multiple network interface cards (NICs), you can bond those NICs. Refer to Bonding NICs.

Iomega StorCenter ix4-300d User Guide
8
Bonding NICs
Bonding network interface cards (NICs) is a way to provide redundancy for your ix4-300d Network Storage on the network. If one NIC should fail, your ix4-300d Network Storage will remain accessible on the network if that NIC is bonded to others. You can bond two or more network interface cards (NICs) in your ix4-300d Network Storage by selecting the NICs and clicking Apply.
Use the following procedure to bond NICs.
1. On the Network page, expand the NIC number and then expand the Bond Network Interface section.
2. Check the checkboxes next to the NICs that you want to bond to the selected NIC. For example, if you selected NIC 1, and your configuration includes four NICs, you could bond NIC 1 to NIC 2, 3, and/or 4.
3. Click Apply to save your settings.
The section updates and displays the NICs that are bonded to the selected NIC.
Unbonding NICs
1. To unbond a NIC, uncheck the box next to the bonded NIC.
2. Click Apply to save your settings.
Setting up Your Device
9
VLAN Settings
A VLAN (Virtual Local Area Network) is a network of devices that are joined into one broadcast domain, even if the devices are not physically connected to each other. VLANs are useful for creating smaller networks within a larger LAN; for example, a legal department in a company might be on its own VLAN because it has sensitive documents that only certain personnel should have access to. The smaller networks that VLANs create do not require any additional physical resources, such as additional cabling. Your Iomega StorCenter ix4-300d Network Storage can be configured to support VLANs.
VLAN is configured for each NIC, but it is not supported on bonded NICs. If a NIC is bonded, you must unbind it first to configure it for a VLAN.
Adding a VLAN
1. To add a VLAN, expand the VLAN Settings section of a NIC.
2. Click Add VLAN.
3. Enter a VLAN ID value between 2 and 4094. You can enter up to 4 VLAN IDs for each NIC. A VLAN can obtain its network settings from DHCP, or you can uncheck DHCP and enter the IP address, subnet mask, and gateway manually.
4. Refer to Network Settings Overview for information about jumbo frames.
5. Click Apply to save your changes.
Deleting a VLAN
In the VLAN Settings section click Delete to delete the VLAN.
Iomega StorCenter ix4-300d User Guide
10
Naming Your Iomega StorCenter ix4-300d Network Storage
You can provide a meaningful name for your ix4-300d Network Storage using the Device Identification page. This page in the Iomega StorCenter ix4 Console enables you to change the Storage Device Name, the Storage Device Descriptive Name, and the Workgroup Name.
Change any of these by editing the text fields. Click Apply to save your changes.
Device Name
Enter a name for the Iomega device. Use a name that will help you identify it on your network.
Device Descriptive Name
Enter a descriptive name for the Iomega device device. This name can provide additional detail that identifies the device.
Workgroup Name
Enter a workgroup name for the Iomega device if you need to change the default name. The workgroup name identifies a group of computers that share information with each other. Change the workgroup name only if you explicitly define a workgroup on your network. Most users won't need to change the workgroup name, unless they have explicitly defined a different workgroup on their other computers.
How do I...
enable security

Setting up Your Device
11
Configuring Your Iomega StorCenter ix4-300d Network Storage to Use Active Directory
If you have an existing Active Directory user organization, you can incorporate it into the Iomega StorCenter ix4 Console.
Note: When you configure Active Directory, you enable security on your ix4-300d Network Storage.
1. To configure Active Directory, manually add the ix4-300d Network Storage to your DNS server. Set the ix4-300d Network Storage DNS setting to point to your DNS server. On the Network page, uncheck Automatically configure all network settings, type the IP address of your DNS Server in the text box, and click Apply to save your settings.
2. Configure the ix4-300d Network Storage to join the Active Directory domain. Active Directory — select Active Directory mode if you already have an existing user organization, such as Active Directory, that you want to incorporate into the ix4-300d Network Storage.
3. Provide the following connectivity information:
Domain Name — the actual name of your Active Directory domain, for example, sohoad.com.
Domain Controller — the actual name or IP address of your Active Directory Server, for example, ad-server.sohoad.com or 10.14.50.12.
Organizational Unit — an optional predefined subset of directory objects within an Active Directory domain.
Administrator Username — the Active Directory username with domain administrator privilege.
Administrator Password — the Active Directory password for the specified Active Directory username.
Users/Groups Refresh Interval — how often the ix4-300d Network Storage should refresh the list of available users and groups from the Active Directory server.
Enable Trusted Domains — enables your ix4-300d Network Storage to allow access to other domains.
4. Click Apply to save your settings.
Enabling Active Directory Trusted Domains
By enabling Active Directory trusted domains on your ix4-300d Network Storage, you enable the importing of users and groups from other trusted domains to your ix4-300d Network Storage device. Those users and groups from other domains will then have access to features on your ix4-300d Network Storage, including accessing folders and documents in Shares, and joining any Personal Cloud of which the device is a member.
Now that you have enabled access to all trusted domains, you can add users and groups from those trusted domains to your ix4-300d Network Storage. For more information, refer to Manage Users and Groups with Active Directory.
How do I ...

Iomega StorCenter ix4-300d User Guide
12
enable security
Setting up Your Device
13
Obtaining Alerts About Your Iomega StorCenter ix4-300d Network Storage
You can configure your ix4-300d Network Storage to send email alerts when problems are detected. This is done through the email notification feature. Email notification provides a destination for emails sent by the ix4-300d Network Storage when problems are detected. To provide a destination email address, enter the following information:
Destination Email Addresses — enter a valid email address or addresses. This email address provides a destination for messages sent by the ix4-300d Network Storage when problems are detected by the system. You can add multiple email addresses by separating them with commas, spaces or semicolons.
Check Send a test email message to confirm that email notification is working properly.
Check Configure custom SMTP settings only if your network blocks SMTP traffic, requiring additional credentials, such as a corporate firewall. Most users will not need to check this option. If checked, enter the following additional information to identify your SMTP server:
Email Server (SMTP) — enter the address of your SMTP server.
Sender Email Address — enter an email address for the ix4-300d Network Storage to use as the From address when it creates messages.
Email Login — enter the username used to log into the email account you entered above.
Email Password — enter the password for the email account.
Confirm Password — confirm the password for the email account. It must match the password provided above.
Note: If your email application uses a SPAM blocker, it is recommended that you add a sender email address to your safe list. If you do not define additional credentials, the default sender email is: [email protected]
Click Apply to save your changes.
Iomega StorCenter ix4-300d User Guide
14
Using Your Iomega StorCenter ix4-300d Network Storage in Various Time Zones
You can set the date and time used on your ix4-300d Network Storage , so that it can appear to be in one time zone, when it actually may be in a different one. This can help your users have the correct date and time if they live and work in a location different from your ix4-300d Network Storage . You can set the date, time, and time zone through the Date and Time feature.
Note: When an Active Directory Domain is in use, the storage device synchronizes time with the domain controller.
in a different one. This can help your users have the correct date and time if they live and work
in a location different from your ix4-300d Network Storage. You can set the date, time, and time
zone through the Date and Time feature.
Note: When an Active Directory Domain is in use, the storage device synchronizes time with the domain controller.
1. To change time zones, select a Time Zone from the drop-down menu, and then select how time will be set for the ix4-300d Network Storage:
Internet Time Server
By default, Automatically synchronize with an internet time server and Use the default time server are selected. To specify a time server, select Specify the time server and type the URL of the internet time server you wish to use in the text box that displays.
Manual
Select Manually set date and time. To set the current date and time, click the appropriate icon for calendar and clock settings.
2. Click Apply to save your changes.

Setting up Your Device
15
Setting the Display Language for Your Iomega StorCenter ix4-300d Network Storage
You can set the display language for your ix4-300d Network Storage through the Languages page.
The Languages page allows you to change the language used in email notification messages and on the display screen.
The language used by the Iomega StorCenter ix4 Console is based on the preferences configured in your browser. You can change the language used in this program by modifying your browser's preferred language settings.
Click Apply to save your changes.
Iomega StorCenter ix4-300d User Guide
16
Printing Documents
Printing documents from your Iomega StorCenter ix4-300d Network Storage is simple after you have attached a compatible printer to the ix4-300d Network Storage. The Printers page displays a table of printers that are attached to the ix4-300d Network Storage. The table contains for each printer the name, model, status, and number of documents waiting.
To attach a printer, simply plug a supported printer's USB cable to a USB port on the ix4-300d Network Storage. Once attached, the printer will appear in the table. When the cable is unplugged, the printer will be removed from the table.
Setting up Your Device
17
Setting up Personal Cloud, Security, and File Sharing
After you have configured some basic features of your Iomega StorCenter, you may also want to set up an Iomega Personal Cloud, security, or file sharing.
You can set up a Personal Cloud to allow invited users access to content on your Iomega StorCenter. This content can be in private Shares that are exclusive to the users who join the Personal Cloud, which adds an additional layer of security to your content. In addition, you may want to join other trusted devices to the Personal Cloud so that content on those devices can be made available to Personal Cloud users. For more information about Personal Clouds, refer to the Personal Cloud overview.
You can enable security so you can secure Shares, create users, and allow selected features to be enabled. When you create users, you limit access to your Iomega StorCenter to those specific people, and when you secure Shares, you limit data access to those specific users. For more information on security, refer to What Is Security and Do I Need It?
It is recommended to set up file sharing so that content can be added to your Iomega StorCenter, and that content can be made available in a wide variety of ways, including users of your Iomega StorCenter and content features such as Active Folders and media sharing. For more information, refer to the Sharing Overview.
How do I ...
create an Iomega Personal Cloud
set up security
set up file sharing

19
Sharing Files
Sharing Overview
Your Iomega StorCenter is set up for storing, retrieving, and accessing files among users, client computers, and applications.
Note: File sharing is accomplished by creating Shares; setting up security, which includes creating users; setting up media services; and configuring Active Folders.
Interfaces for Sharing
Your Iomega device has three separate interfaces for file sharing:
Iomega StorCenter Console
You manage the creation of Shares through the Iomega StorCenter Console.
Iomega Storage Manager
Optionally installed on your local computer, Iomega Storage Manager discovers any Iomega storage devices on your subnet, maps device Shares to computers, and provides local access to your content. It provides access to Shares through your computer's file management program, such as Windows Explorer or Mac Finder, allowing you to drag and drop many files between your computer and the Iomega device. Installing Iomega Storage Manager is optional.
Home Page
Serves as a web-accessible interface to your Iomega device. The Home page content is configured using the Iomega StorCenter Console. The Home Page displays any public Shares. It can also display secured Shares accessible only to users who log in to the Iomega device. You can access the Home page of your Iomega device by entering the device name or IP address directly in your browser. If security is enabled and you are an administrator user, you can access the Iomega StorCenter Console
from the Home page by clicking .
How do I ...
create Shares
enable security
create users
Iomega StorCenter ix4-300d User Guide
20
Shares
What are Shares and How Do I Organize Content with Them?
Shares are folders that contain all types of content, including documents, pictures, and music files. Shares can be public, meaning anyone accessing your ix4-300d Network Storage can access the content in the Shares. Shares can also be secured, which means access to content in them is limited to a select group of users.
All Shares on an ix4-300d Network Storage are displayed on the Shares page. The Shares page displays a table that contains folders, connected drives, and any cloud storage to which your Iomega StorCenter ix4 Console is connected. The Properties column displays the features that are enabled for each Share.
Share Information
The Information section displays the Share name, graphically displays the space usage of the Share, and allows you to view the content using the web-based content viewer.
To view the content of a Share, click View Content to open the Content Viewer.
To learn how to modify your Share information, refer to Managing Shares.
Access Permissions
The Access Permissions section contains a list of users who currently have access to that Share. Access Permissions displays when the ix4-300d Network Storage is secured, otherwise the section is not included in the Share. If "Everyone" has access to Shares that means your content can be viewed by anyone with access to your network without that person needing a username or password.
To learn how to modify Access Permissions on a Share, refer to Managing Shares.
Active Folders
Follow the link to the Active Folder options for information on configuring each:
Email Distribution
Flickr
Photo Resize
Torrents
YouTube
How do I...
add a Share
manage a Share
delete a Share

Sharing Files
21
Adding Shares
1. From the Iomega StorCenter Console, click Shares.
2. To add a new Share, click Add a Share. Type a name for the Share. All Shares must have a name. Names cannot exceed 32 characters. The following are not valid Share names: global, homes, printers.
3. Click Create. To modify an existing Share, click the Share row to expand the Share.
How do I ...
manage Shares
delete Shares

Iomega StorCenter ix4-300d User Guide
22
Managing Shares
You can change Share information, change access permissions, make a Share an Active Folder, use Share volumes, and modify a Share volume.
If available, you can also enable NFS secured access.
Changing Share Information
1. Modify the existing name for the Share.
2. Choose whether to enable media sharing. When Media sharing is enabled, the media server scans this Share for any media content and makes it available to anyone with access to your network, even if this Share is secured. If you do not want media content made available to
anyone, do not check this option. When Media sharing search is enabled, displays in the Properties for that Share.
3. To view the content of a Share, click the View Content link to open the Content Viewer.
4. Click Apply to save your changes.
Changing Access Permissions
Note: You should enable security on your Iomega StorCenter before changing access permissions.
1. Expand Access Permissions to change user permissions to this Share. A security icon displays in Properties indicating a secure Share. When a secure Share is first created, Everyone has read and write access to that Share by default, which means that everyone on your network can read, write, and delete files to and from that Share. When user Everyone has Read and Write permissions to a Share, the Share is not secure and is open to all users.
2. Check Allow users to change file level security to allow file and folder permissions to be set through other programs, such as Windows Explorer, independent of the Iomega device. Setting this option allows users to put additional access restrictions on individual files and folders.
3. To limit access to this Share to a specific set of users, click Add access permissions and choose one or more users from the pop-up window. If you have created groups, you can also limit access for them in this way.
4. In the Access Permissions section, check Read, Write, or both to set access to this Share for each user. To remove a user, leave both Read and Write unchecked for that user. If you grant Read and Write permissions to Everyone, the list of users is also cleared since all users (Everyone) has access to this Share. If you have created groups, you can also limit access for them in this way.
5. Click Apply to save your changes.
Enabling NFS Secured Access
1. To enable NFS, first click the switch on from the Protocols page.
2. On the Shares page, select a secure Share and expand the NFS section. You cannot apply a rule to a public Share.
3. Click Add an NFS rule to add a Host Name for the rule. Rules are added to specify the hosts that are allowed to access Shares using NFS. Use this table to add NFS rules to specify access for hosts. For example, *.cs.foo.com matches all hosts in the domain cs.foo.com. To export a Share to all hosts on an IP address or local network simultaneously, specify an IP

Sharing Files
23
address and netmask pair as address/netmask where the netmask can be in dotted-decimal format, or as a contiguous mask length. For example, either /255.255.252.0 or /22 will result in identical local networks.
4. When the rule is added, read access is automatically set to the Share. Select Write to allow
users to write to that Share. Use and to modify the rule priority for NFS access.
5. Click Apply to save your changes.
Making a Share an Active Folder
1. You can optionally enable Active Folders on a Share to allow you to associate this Share with a specific feature that will happen automatically when files are copied to the Share. For example, you can enable a Share as a social media active folder to upload a file to a social media site. Refer to Sharing Content with Social Media Overview. You can only set one Active Folder option per Share.
2. Expand the Active Folder section and check Enable. Select one of the following Active Folder options and follow the link for details on configuring each:
Email Distribution
Flickr
Photo Resize
Torrents
YouTube
3. Click Apply to save your changes.
How do I ...
add a Share
delete a Share
share content with social media

Iomega StorCenter ix4-300d User Guide
24
Deleting Shares
To delete a Share:
1. From the Iomega StorCenter ix4 Console, click Shares.
2. To delete an existing Share, click to expand the Share.
3. In the Information section, click Delete to delete the Share.
4. In the Delete Share confirmation pop-up window, click Yes.
5. If you do not wish to delete the Share, click Cancel to return to the Shares page.
How do I ...
add a Share
manage a Share

Sharing Files
25
Using Protocols to Share Files
What Are Protocols and How Do I Use Them to Share Files?
Your Iomega StorCenter ix4-300d Network Storage uses communication protocols to mount file systems and allow files to be transferred between client computers and the Iomega StorCenter.
The ix4-300d Network Storage includes the following protocols for file sharing:
AFP
Bluetooth
FTP
TFTP
NFS
rsync
SNMP
WebDAV
Windows DFS
Windows File Sharing
Iomega StorCenter ix4-300d User Guide
26
AFP File Sharing for Macs
The Apple Filing Protocol (AFP) enables Apple file sharing, which is the preferred method for Mac users to access Shares. AFP is on by default.
To enable AFP, click the switch on.
Sharing Files
27
Bluetooth File Sharing
Once a Bluetooth adapter is detected, files can be uploaded to a configurable destination Share on the ix4-300d Network Storage from a Bluetooth device.
Configuring Bluetooth settings
1. To enable Bluetooth, click the switch on.
2. Once Bluetooth Transfer is enabled, check the Enable security checkbox to require Bluetooth users to supply a unique PIN that they have defined before allowing them to transfer files to the destination Share on the ix4-300d Network Storage. If you have enabled security, you must define a unique PIN number, which will be supplied by devices attempting to upload data using Bluetooth.
3. To set the destination Share, click .
4. Click Apply to save your settings.
Note: To change any Bluetooth settings, click .
Iomega StorCenter ix4-300d User Guide
28
FTP File Sharing
On the Protocols page, click the switch to turn on FTP (File Transfer Protocol) and allow access to your Iomega StorCenter ix4-300d Network Storage.
Click to select either FTP or secure FTP (SFTP) or both. You must enable security to apply SFTP. If you select and enable SFTP, you cannot have the secure Rsync protocol enabled.
When you turn on FTP, you can send files to your ix4-300d Network Storage.

Sharing Files
29
NFS File Sharing
On the Protocols page, click the switch to turn on NFS (Network File System) to allow remote hosts to mount file systems over a network and interact with them as though they were mounted locally to your Iomega StorCenter ix4-300d Network Storage.
Note: Select an option to choose how users on client computers are mapped to the ix4-300d Network Storage:
To have all users, including root, map as guest, select Treat client users as guest (all_squash). All files are owned by user guest, and all users accessing the ix4-300d Network Storage have the same access rights. If you have enabled Active Directory on your ix4-300d Network Storage, only this option is available for mapping client computers.
To have all users map as themselves but root maps as guest, select Allow full access for client users other than root (root_squash).
To have all users map as themselves, including root, select Allow all client users full access.
Once enabled, add NFS access rules for each secure Share from the Managing Shares page. NFS provides another protocol for sharing storage data with Linux hosts. When NFS is enabled, you can configure rules for host-based access to secure Shares.
Rules can be added to secure Shares to specify the hosts that are allowed to access Shares using NFS. For example, *.cs.foo.com matches all hosts in the domain cs.foo.com. To export a Share to all hosts on an IP address or local network simultaneously, specify an IP address and netmask pair as address/netmask where the netmask can be in dotted-decimal format, or as a contiguous mask length. For example, either /255.255.252.0 or /22 will result in identical local networks.
To change any NFS settings, click .
Iomega StorCenter ix4-300d User Guide
30
rsync: Synchronizing Files with Another Storage Device or Other Computers
When you turn on this protocol, you can enable the Iomega StorCenter ix4-300d Network Storage as an rsync server. When the ix4-300d Network Storage is an rsync server, it can be used as a source and/or destination device for rsync Copy Jobs. Because of the fast and efficient nature of rsync, an rsync Copy Job can be faster than a Windows File Sharing Copy Job. For more information on Copy Jobs, refer to Copy Jobs.
If you enable the ix4-300d Network Storage as an rsync server, you can optionally set up a user account on the ix4-300d Network Storage for secure rsync Copy Jobs.
Configuring rsync server settings
1. To enable rsync server, click the switch on.
2. To create a secure user account, check Configure secure rsync credentials.
3. The username is preset as rsync. You can change this to a more meaningful user account name. Enter a password and confirm it for the rsync user account name. When you create a secure rsync user account on the ix4-300d Network Storage, you allow other devices to securely copy to or from it.
4. By default, rsync uses TCP port 873 for accepting requests. You can change this value to a different port number, if desired.
5. Click Apply to save your settings.
Note: To change any rsync server settings, click . You cannot enable rsync server if you have already enabled SFTP.
Sharing Files
31
TFTP
On the Protocols page, click the switch to turn on TFTP (Trivial File Transfer Protocol) and allow access to your Iomega StorCenter. When you turn TFTP on, you can send files to your Iomega device using FTP.
Iomega StorCenter ix4-300d User Guide
32
Monitoring Your Device with an SNMP Management Tool
SNMP (Simple Network Management Protocol) provides information about the state of the Iomega StorCenter ix4-300d Network Storage to various management tools.
SNMP should be disabled unless you are specifically providing information to a management system that requires this information.
Configuring SNMP settings
1. To enable SNMP, click the switch on.
2. Enter a unique username and password to define the community.
3. Confirm your password.
4. Enter the IP address of the host in the Trap Receivers text box. To grant access to multiple receivers, list all of them in the text box, separating each entry with a space.
5. Click Apply to save your settings.
To change any SNMP settings, click .

Sharing Files
33
WebDAV: Managing Files Using HTTP or HTTPS
WebDAV (Web-based Distributed Authoring and Versioning) is a protocol that provides web-based access to Shares on the Iomega StorCenter ix4-300d Network Storage. With WebDAV enabled on the ix4-300d Network Storage, you can view, add, or delete files through your WebDAV client using either HTTP for unencrypted access or HTTPS for encrypted access. HTTP offers faster performance, but is not secured. Access Shares using a URL such as http://devicename/WebDAV/Foldername. Refer to your operating system's documentation to learn how to access files through WebDAV.
Note: If your ix4-300d Network Storage has a remote access password, you must enter that password and the username webdav to access your device. Your ix4-300d Network Storage has a remote access
password only if the device is not secured and a Personal Cloud was created on it.
Configuring WebDAV settings
1. To enable WebDAV, click the switch on.
2. To enable WebDAV for HTTP, check Enable WebDAV Over HTTP.
3. To enable WebDAV for HTTPS, check Enable WebDAV Over HTTPS.
4. Click Apply to save your settings.
Iomega StorCenter ix4-300d User Guide
34
Windows DFS: Creating a Distributed Windows File System
Windows DFS (Distributed File System) organizes Shares and files on a network, such that they appear to be all in one directory tree on a single ix4-300d Network Storage, even if the Shares reside on many devices.
Windows DFS terms
There are several terms to understand with Windows DFS.
Namespace
A virtual Share containing other folders that are located on different devices throughout a network.
DFS root
An object that consolidates all the folders in your network and makes them available through a single entry point. An example of a DFS root is \\ DeviceName\DFSRootName.
DFS link
A folder under the DFS root.
Configuring Windows DFS settings
1. To enable Windows DFS, click the switch on.
2. Enter a DFS root name. The DFS root name is the starting point of a DFS namespace.
After entering a DFS root name, you add DFS links, which map to folders on other devices.
3. Click Click to add a DFS link target to begin adding DFS links.
4. Enter the DFS link name, which includes the name of the host and Share to which you are linking.
5. Click Apply to save your settings, or click Cancel to discard your changes.

Sharing Files
35
Windows File Sharing
Windows File Sharing allows you to work in Workgroup mode, using Iomega StorCenter ix4 Console to create users and manage access. To enable Windows File Sharing, click the switch on.

Iomega StorCenter ix4-300d User Guide
36
Sharing Content through the Home Page
Sharing Your Content with the World
When you set up the Home Page of your Iomega StorCenter ix4-300d Network Storage, you are presenting public content to anyone who accesses your ix4-300d Network Storage. That public content includes a slideshow and public Shares.
You can manage the look of the Home Page by using the Home Page Settings page. This page allows you to display the slideshow, display public Shares, name the Home Page, and turn the Home Page on or off.
1. From the Iomega StorCenter ix4 Console, click Home Page Settings.
2. Click the slider switch to On to enable the Home Page on your ix4-300d Network Storage.
3. Enter a title for the Home Page. This title displays in the top banner of the Home Page when users access the ix4-300d Network Storage.
4. Check Display Shares to display public Shares. When you select to display Shares, the user sees all public Shares on the ix4-300d Network Storage.
5. Check Display slideshows to display picture slideshows that are in folders on the ix4-300d Network Storage. Click Manage slideshows to configure any slideshows you want to display. The slideshow location can be any folder attached to the ix4-300d Network Storage, including a USB drive or DFS location.
6. Click Apply to save your changes, or click Cancel to discard your changes.
Deleting a Slideshow
To delete a slideshow from the list of available slideshows, click . After you delete a slideshow, you can configure a different one.
How do I...
create Shares
add custom home page content
Sharing Files
37
Adding a Custom Home Page
You can customize the look of the home page of your Iomega StorCenter ix4-300d Network Storage to include html pages and client-side scripting, such as Javascript. This customized home page replaces the default home page on the ix4-300d Network Storage. In addition, there are applications available on www.lifelineapps.com that can enhance your home page content.
You add your custom html content to a Share on your ix4-300d Network Storage and then specify its location on the Home Page Settings page.
Applying the Customized Home Page
1. Click the Home Page Settings feature from the Iomega StorCenter ix4 Console.
2. On the Home Page Settings page, select Customized home page settings.
3. In the Home Page Name field, enter the name of the start page of your custom home page. By default, the name is index.html.
4. Specify the destination Share where the start page and your html content exists on your ix4-
300d Network Storage by clicking and navigating to the Share.
Note: You cannnot access the destination Share through the WebDAV interface. Access through WebDAV is permanently disabled.
5. Select the Share name and click Apply.
6. Click Apply to save your settings.

Iomega StorCenter ix4-300d User Guide
38
Automatically Sending Content to Multiple People at Once
You can send content to multiple people at once using an email distribution active folder. You can configure a Share as an Email Active Folder so that when you add files to that Share, they are automatically sent to the recipients on the email distribution list. To configure a Share as an Email Active Folder, access Shares from the Iomega StorCenter ix4 Console, select or create a Share, and expand the Active Folders section to enable and configure email distribution.
How to Set Up an Email Distribution Active Folder
Note: Email Distribution lets you email your files to friends and family right from your Iomega StorCenter ix4 Console. Use Email Distribution to share files with an email list.
Note: To prevent email distribution list spamming, the ix4-300d Network Storage allows lists of 250
or fewer email recipients and sends a maximum of six emails in a 24-hour period.
Refer to Managing Shares for more information on managing Shares and Active Folders.
Configuring an Email Distribution Active Folder
1. From the Iomega StorCenter ix4 Console, click Shares.
2. Select a Share to use as an Email Distribution Active Folder, and click to expand the Active Folder section.
3. Check Enable.
4. Select Email Distribution from the drop-down menu.
5. Include an email address in the Sender Email Address text box. Distribution is sent from this email address.
6. You can add multiple email addresses in the Email To: text box by separating them with commas, spaces, or semicolons.
7. Add a subject and email message for your recipients.
8. Check Send the file as an attachment, Send a link to the file, or both.
9. Click Apply to save your changes.
10. Once configured, all files in this Share are sent by email to your recipients. Click View Transfer History to see the transfer activity from this Share to your account.
How do I...
manage a Share

Sharing Files
39
Sharing Content Using Social Media: Overview
If you have an account with social media services such as Facebook, Flickr, or YouTube, you can share content on your Iomega StorCenter ix4-300d Network Storage with your friends and family using one or more of these social media sites. To share your content using social media sites, create Shares called Active Folders, and connect each Active Folder with a social media account. Refer to the help topic links below for more information on these procedures. When you add photos and movies to an Active Folder, those files are automatically uploaded to the social media site associated with that Active Folder. If you have photos or movies you want to share with others, this is a great way to make your content available to people who may not have access to your ix4-300d Network Storage.
If you have configured a Personal Cloud on your ix4-300d Network Storage, you can grant Personal Cloud users access to Shares and Active Folders. This is useful if you want to allow users to add files to your social media sites. For example, if your ix4-300d Network Storage has a Flickr Active Folder, you can grant Personal Cloud users access to that Active Folder. In this manner, when photos are added to the Flickr Active Folder, either by you or by Personal Cloud users, those photos are uploaded automatically to your Flickr account.
Note that an Active Folder can only be associated with one social media account. For example, if you want Active Folders for your Facebook and YouTube accounts, create two Active Folders, and assign one Active Folder to Facebook, and one to YouTube. Using this example, any photos you add to your Facebook Active Folder are automatically uploaded to your Facebook page, and any movies you add to your YouTube Active Folder are automatically uploaded to your YouTube page. Not only is this a fast and easy way to share content, but uploading content to your social media sites provides an additional backup of your content, as the content is stored both on your ix4-300d Network Storage and at your social media accounts.
How do I...
make a Share an Active Folder
upload to Facebook
upload to Flickr
upload to YouTube

Iomega StorCenter ix4-300d User Guide
40
Managing Your Content
You manage content on your Iomega StorCenter ix4-300d Network Storage using the Content Viewer. The Content Viewer is a graphical file browser that lets you view and manage content in the Shares on your ix4-300d Network Storage.
The Content Viewer is divided into two panes. The left pane lists the Shares on the ix4-300d Network Storage and allows you to delete or add a Share. If you select a Share that contains pictures, you can start a slideshow of the pictures in that Share. The right pane lists the files and folders in a Share and allows you to delete content or upload a file to the Share.
To delete multiple files simultaneously, hold the Ctrl key on your keyboard and select each file, or drag your mouse over the filenames. Share content can be sorted, and you can switch between a list view and a thumbnail view of the files. When you are looking at content in a list view and you hover your mouse over an image, a thumbnail view of the image displays next to your mouse. If all the content cannot fit on one page, there are pagination controls that allow you to continue browsing the content.

Sharing Files
41
Transferring Content to and from Your Iomega StorCenter ix4-300d Network Storage with Copy Jobs
You can transfer content to and from your ix4-300d Network Storage using the Copy Jobs feature. Copy Jobs copies files from one storage device to another, either by a set schedule or immediately by the user. An example of a Copy Job scenario is if you keep pictures from your digital camera on a separate USB drive, but you also want to maintain a backup of these pictures on your ix4-300d Network Storage. Using Copy Jobs, you can create a task that copies your photos on the USB drive to a Share on your ix4-300d Network Storage, and you can set that task to a schedule so the images automatically copy at a specific time. This ensures that your photos are always safely backed up to your ix4-300d Network Storage in the event your USB device ever fails or is lost.
Note: While a Copy Job copies all data from one NAS device to another, it does not copy permissions or access rights from one NAS device to another.
All saved Copy Jobs display on the Copy Jobs page. From there, you can manually start and stop a Copy Job, view Copy Job information, modify a Copy Job, check its last run status, and, if applicable, view when the Copy Job is next scheduled to run.
When defining a Copy Job, you can copy data from or to any of the following:
Any NAS device automatically discovered on the same subnet as your ix4-300d Network Storage
Any NAS device that you manually add to the subnet using the Iomega Storage Manager
Any external storage device, such as a USB device, connected to your ix4-300d Network Storage
A Windows computer that is automatically discovered on the same subnet as your ix4-300d Network Storage
When selecting what data to copy on the source storage device, you can choose a specific folder or all folders. You can also copy from a folder on an external storage device mounted to your ix4-300d Network Storage.
When selecting the destination device, you can copy files to the top-level folder on the destination device (the default option), or to an existing folder on this device, which adds the copied files into folders.
You can manually start or stop a Copy Job by clicking start or stop buttons on the Copy Jobs page. You can schedule a Copy Job to run automatically at a set day and time.
Copy Jobs Limitations
Copy Jobs does not establish a continuous replication or mirroring relationship between the source and destination devices. You should not set up Copy Jobs for disaster recovery.
Copy Jobs does not support transferring content from iSCSI drives.
Iomega StorCenter ix4-300d User Guide
42
Getting Content from a USB External Storage Device
You can transfer content to your Iomega StorCenter ix4-300d Network Storage from external USB storage devices. The External Storage page displays a list of externally connected storage devices. You can connect supported external storage to your ix4-300d Network Storage using one of the provided USB ports. When you connect external storage to your ix4-300d Network Storage, that device content is accessible from the Shares page.
Safely removing external storage
Click to safely remove the external storage. A confirmation dialog will display. Click Yes to remove the external storage. When the external storage has been removed from the External Storage table, it is safe to remove, and you may unplug it from the ix4-300d Network Storage. When the external storage is safely removed, its associated Share is removed as well.
Sharing Files
43
One-touch Transferring of Content from a USB Device
One touch transfer of content is created on the QuikTransfer page. On the QuikTransfer page, you can set the default destination Share for any automatically created QuikTransfer Copy Jobs.
QuikTransfer automatically copies all files from any USB external storage device plugged into your Iomega StorCenter ix4-300d Network Storage to the destination Share when the QuikTransfer button is pressed.
Setting QuikTransfer
1. Select a destination folder for the default QuikTransfer Copy Job by clicking and selecting a folder in the file browser. The file browser provides a way to select a Share and all its folders, or just some of the folders under a Share.
2. Click Apply to save your setting.

45
iSCSI: Creating IP-Based Storage Area Networks (SAN)
iSCSI Overview
The iSCSI page allows you to create iSCSI drives on your Iomega StorCenter ix4-300d Network Storage and allows the Iomega Storage Manager to communicate with those drives over a network. An iSCSI drive provides a single place for all your storage, which you can divide as needed to support all computers in your enterprise business. iSCSI is useful for transmitting large blocks of data over a network at a high speed.
Only one client computer can connect to an iSCSI drive at a time, so iSCSI drives are not for shared data. If your business is clustering clients, then a cluster can access iSCSI drives.
How do I ...
add an iSCSI drive
manage an iSCSI drive
delete an iSCSI drive

Iomega StorCenter ix4-300d User Guide
46
Adding iSCSI Drives
To add an iSCSI drive:
1. From the Iomega StorCenter Console , click iSCSI.
2. When the iSCSI page opens, click Add an iSCSI drive.
3. Enter a name for the iSCSI drive. How you name your iSCSI drive will depend on your Iomega StorCenter meeting one of the following conditions:
If the Name field displays by itself, enter a name for the iSCSI drive. This field displays when your Iomega device is new or being upgraded and has only one volume.
If the options Create a volume and Use an existing volume display, select:
Create a volume to create a new volume for your iSCSI drive. This option displays when your Iomega device is new, or if you are upgrading your Iomega device and it has available space in its Storage Pools.
Use an existing volume to use an existing empty or shared volume. This option displays when you are upgrading your Iomega device, have available space in your Storage Pools, and have already created multiple volumes. To use an existing empty volume, select iSCSI/Volume Name and enter a name for the iSCSI drive and volume. To use an existing shared volume, select Shared Volume, select the existing volume, and enter a name for the iSCSI drive.
4. Enter a size for the iSCSI drive. The size must be smaller than the free space available on your Iomega device.
5. Click Create to create the iSCSI drive.
Enabling iSCSI Drives
1. Click Settings to begin configuring an iSCSI drive.
2. To set the discovery of the iSCSI drive using iSNS, check Enable discovery with iSNS.
3. Choose one of the following options:
Use local iSNS server — the device acts as an iSNS server for the iSCSI drives.
Use external iSNS server — you supply the IP address or host name of the external iSNS server for the iSCSI drives.
4. To enable the Challenge Handshake Authentication Protocol (CHAP), check Enable two-way authentication (Mutual CHAP). With Mutual CHAP enabled, the client performs an additional check to confirm that it is using the correct device.
5. Enter a device secret (password) for Device Secret and then enter it again in the confirm box.
6. Click Apply to save your changes.
Connecting to iSCSI Drives
You can connect iSCSI drives on your Iomega StorCenter to your computer using Iomega Storage Manager or the Microsoft software initiator. If you are using another type of software or hardware initiator, you must use the native tools provided with your initiator to connect your iSCSI drives.
Caution: Attempting to connect two clients (iSCSI initiators) to the same iSCSI drive at the same time may result in data corruption or drive damage. The Iomega StorCenter Console prevents you from connecting two clients (iSCSI initiators) to the same iSCSI drive at the same time, but if you
iSCSI: Creating IP-Based Storage Area Networks (SAN)
47
connect to an iSCSI drive using native tools, you may encounter this issue. You can use the Connected Clients section to view a list of client computers connected to your Iomega StorCenter that are running iSCSI initiator software. On the iSCSI page, expand an iSCSI drive, then expand the Connected Clients section. If the iSCSI drive is in use, you will see a list of connected client
computers running initiator software.
How do I ...
manage iSCSI drives
delete iSCSI drives

Iomega StorCenter ix4-300d User Guide
48
Managing iSCSI Drives
The page describes how to:
Change Access Permissions
Changing Access Permissions
1. Expand Access Permissions to change user permissions on an iSCSI drive. When an iSCSI drive is first created, the user Everyone has read and write access to that iSCSI drive by default, which means that everyone on your network can read, write, and delete files to and from that iSCSI drive.
2. To limit access to this iSCSI drive to a specific set of users, click the and choose one or more users from the pop-up window.
3. In the Access Permissions section, check Read, Write, or both to set access to the iSCSI drive for each user. If you create groups, you can also set access for groups in this way. To remove a user, leave both Read and Write unchecked for that user. If you grant read and write permissions to Everyone, the list of users is automatically cleared because all users (Everyone) have access to this iSCSI drive.
4. Click Apply to save your changes.
How do I...
add an iSCSI drive
delete an iSCSI Drive

iSCSI: Creating IP-Based Storage Area Networks (SAN)
49
Deleting iSCSI Drives
To delete an iSCSI drive:
1. From the Iomega StorCenter ix4 Console, click iSCSI.
2. Click the iSCSI name to expand the iSCSI drive.
3. In the iSCSI Information section, click Delete to delete the iSCSI drive.
4. Click Yes in the confirmation pop-up window.
5. If you do not wish to delete the iSCSI drive, click Cancel to return to the iSCSI page.


51
Storage Pool Management
Managing Drives
The Drive Management page provides settings for managing storage and lets you apply global settings for drives on your Iomega StorCenter ix4-300d Network Storage .
Using a UPS (Uninterrupted Power Supply) can mitigate the risk associated with write caching, which is why it is recommended to only enable this feature when a UPS is connected.
Iomega StorCenter ix4-300d User Guide
52
Adding New Drives to Your Iomega StorCenter ix4-300d Network Storage
To replace a drive on a ix4-300d Network Storage, you must power it down first.
1. Before installing a new hard drive in your ix4-300d Network Storage, check the hard drive compatibility list online at www.iomega.com/support for approved and supported hard drive brands and models.
2. Mount the drive carrier containing the new drive in an available slot.
3. A confirmation dialog box displays as soon as the ix4-300d Network Storage detects the new hard drive. Click Yes to proceed.
Note: All data on the drive is deleted.
4. You are re-directed to the Iomega StorCenter ix4 Console.
5. Access the Drive Management page.
Your ix4-300d Network Storage displays the new hard drives in the bays they are mounted in.
6. To create a RAID Array, you must install a minimum of two hard drives. The same confirmation dialog box displays. Click Yes to proceed.
Note: You can create a Storage Pool using one hard drive if desired. You will not have any RAID protection options and can only select None from the RAID dropdown list while
configuring your Storage Pool.
7. When all new drives are detected, click Add a Storage Pool.
8. Complete the Storage Pool configuration options and select the desired drives on which to build the Storage Pool by checking the boxes next to them. All drives in a Storage Pool must be the same model, manufacturer, and capacity.
9. Allow a few minutes for the RAID array and Storage Pool to build. When complete, the Storage Pool status displays on the Drive Management page.

53
Drive Management
Managing Drives
The Drive Management page provides settings for managing storage and lets you apply global settings for drives on your Iomega StorCenter ix4-300d Network Storage .
Using a UPS (Uninterrupted Power Supply) can mitigate the risk associated with write caching, which is why it is recommended to only enable this feature when a UPS is connected.


55
Backing up and Restoring Your Content
Backup and Restore Overview
Your Iomega StorCenter provides many ways to back up and restore content.
To back up content to and from your Iomega device, such as:
Time Machine
QuikProtect
Copy Jobs
To back up and restore your Iomega device, there are:
Copy Jobs
Mozy Backup
Amazon S3
Iomega Personal Cloud features
Backup of Data through RAID Protection
The drives in your Iomega device are protected using a built-in, pre-configured technology that redundantly stores data across the drives. This technology, known as RAID (Redundant Array of Independent Disks), enables a series of drives to act together as a single storage system. For more information, refer to Understanding How Your Content Is Stored.
How do I ...
back up Macs with Time Machine
back up with Copy Jobs
back up with Mozy Backup
back up with Amazon S3
back up with Iomega Personal Cloud

Iomega StorCenter ix4-300d User Guide
56
Backing up to and Restoring from Your Device
Backing up Macs with Time Machine
You can back up your Iomega StorCenter ix4-300d Network Storage to Time Machine.
To set up Time Machine backups on an Iomega StorCenter ix4-300d Network Storage, run the Time Machine setup from the Mac you want to back up and follow these instructions:
1. Connect your Mac to your ix4-300d Network Storage using Apple File Protocol. You can do this using Iomega Storage Manager for Mac or Bonjour.
2. Mount the Backup Share from the Iomega network device.
Note: If you want to create a new Share for Time Machine backups, you can do so using the Iomega StorCenter ix4 Console.
3. Select System Preferences... from the Apple Menu.
4. Select Time Machine (listed under System).
5. Click ON to enable Time Machine.
6. From the list of available drives, choose the desired Share on your ix4-300d Network Storage, then click Use for Backup.
Note: Time Machine uses a single destination drive for backups. If you have previously set up another drive for Time Machine backups and want to change to use the Iomega network device, click Select Disk, then choose the desired Share on your ix4-300d Network Storage.
Note: Older Iomega Storage devices include a Time Machine feature. In more recent devices, the Time Machine feature is not included because it is no longer necessary to pre-configure a sparse bundle on the device. The sparsebundle image is created automatically when you
complete Time Machine setup following the instructions above.

Backing up and Restoring Your Content
57
Copy Jobs Overview
You can back up content to and from your Iomega StorCenter using the Copy Jobs feature. Copy Jobs copies files from one storage device to another, either by a set schedule or immediately by the user. An example of a Copy Job scenario is if you keep pictures from your digital camera on a separate USB drive, but you also want to maintain a backup of these pictures on your Iomega device. Using Copy Jobs, you can create a task that copies your photos on the USB drive to a Share on your Iomega device, and you can set that task to a schedule so the images automatically copy at a specific time. This ensures that your photos are always safely backed up to your Iomega device in the event your USB device ever fails or is lost.
For more information, refer to Transferring Content to and from Your Iomega device.
How do I ...
add a Copy Job
manage a Copy Job
modify a Copy Job
delete a Copy Job
restore files with Copy Jobs
Iomega StorCenter ix4-300d User Guide
58
Backing up Your Device
Copy Jobs
Transferring Content to and from Your Iomega StorCenter ix4-300d Network Storage with Copy Jobs
You can transfer content to and from your ix4-300d Network Storage using the Copy Jobs feature. Copy Jobs copies files from one storage device to another, either by a set schedule or immediately by the user. An example of a Copy Job scenario is if you keep pictures from your digital camera on a separate USB drive, but you also want to maintain a backup of these pictures on your ix4-300d Network Storage. Using Copy Jobs, you can create a task that copies your photos on the USB drive to a Share on your ix4-300d Network Storage, and you can set that task to a schedule so the images automatically copy at a specific time. This ensures that your photos are always safely backed up to your ix4-300d Network Storage in the event your USB device ever fails or is lost.
Note: While a Copy Job copies all data from one NAS device to another, it does not copy permissions or access rights from one NAS device to another.
All saved Copy Jobs display on the Copy Jobs page. From there, you can manually start and stop a Copy Job, view Copy Job information, modify a Copy Job, check its last run status, and, if applicable, view when the Copy Job is next scheduled to run.
When defining a Copy Job, you can copy data from or to any of the following:
Any NAS device automatically discovered on the same subnet as your ix4-300d Network Storage
Any NAS device that you manually add to the subnet using the Iomega Storage Manager
Any external storage device, such as a USB device, connected to your ix4-300d Network Storage
A Windows computer that is automatically discovered on the same subnet as your ix4-300d Network Storage
When selecting what data to copy on the source storage device, you can choose a specific folder or all folders. You can also copy from a folder on an external storage device mounted to your ix4-300d Network Storage.
When selecting the destination device, you can copy files to the top-level folder on the destination device (the default option), or to an existing folder on this device, which adds the copied files into folders.
You can manually start or stop a Copy Job by clicking start or stop buttons on the Copy Jobs page. You can schedule a Copy Job to run automatically at a set day and time.
Copy Jobs Limitations
Copy Jobs does not establish a continuous replication or mirroring relationship between the source and destination devices. You should not set up Copy Jobs for disaster recovery.
Copy Jobs does not support transferring content from iSCSI drives.

Backing up and Restoring Your Content
59
Adding Copy Jobs
The page describes how to:
Add Copy Jobs
Set From Information
Set To Information
Set a Schedule
Adding Copy Jobs
1. On the Copy Jobs page, click . A Copy Job is added to the top of the list and the Information section displays.
2. Enter a name for the Copy Job.
3. The Overwrite Setting determines what happens to files in the destination location if they have the same name as those in the source location. Select one of the following values from the Overwrite Setting drop-down menu:
Overwrite and don't delete — Files in the destination location are overwritten with files from the source location. Any files in the destination location that are not in the source location are preserved.
Overwrite and delete — Files in the destination location are overwritten with files from the source location. Any files in the destination location that are not in the source location are deleted. The destination location becomes an exact copy of the source location.
Don't overwrite — Only files in the source location that are not in the destination location are copied. No files are overwritten in the destination location.
From: Settings
1. In the From: section, click to select a source location. This is the location of the files you want to copy. In the dialog, enter the Device Name or IP address in the text box, or select a device from the list. If a connected device is not listed, click the Refresh button.
2. Click OK to save your selection or click Cancel.
3. The Protocol drop-down menu displays if the source device is different from the device you are currently accessing; for example, it could be a separate NAS device on your network. From the Protocol drop-down menu, choose one of the following:
Windows File Sharing — The default value in the menu is Windows File Sharing and in most cases you should accept the default value. For more information, refer to Windows File Sharing.
rsync — The rsync protocol can provide faster copying, but may not be available on all devices. If you are able to select the rsync protocol, and you want the rsync Copy Job to be secure, select the Use secure rsync (SSH) option. Enter the rsync username and password for the rsync server to or from which you are copying. The rsync username and password is set up on a different device than the device on which you are creating the Copy Job. For more information on creating an rsync user, refer to rsync Server Settings.
Iomega StorCenter ix4-300d User Guide
60
4. Enter a valid username and password, if applicable, for the device to provide access to its folders.
5. To select a specific folder, click to select a source location for the What to copy: section. In the Copy dialog box, select all Shares or a folder, and select one of the following options for the Copy Job from the drop-down menu:
The selected folder and its contents — copies the selected folder and its contents. If the destination is a folder, a new folder will be created for each source folder. If the destination is Top Level, a new top-level folder is created on the destination device for each source folder.
Only the contents of the selected folder — copies the contents of the selected folder; not the folder itself. If the destination is a folder, the files and folders in the selected folder are copied directly to it (the source folder name is not copied). If the destination is Top Level, a new top-level folder is created on the destination device for each folder in the source folder.
6. By selecting Shares, you choose to copy All Shares, in which all files on the ix4-300d Network Storage are copied. Any files not contained in a folder are not copied. If the destination is a folder, a new folder will be created for each source folder. If the destination is Top Level, a new top-level folder is created on the destination device for each source folder.
7. Click OK to save your selection or click Cancel.
8. Click Apply to save your changes.
To: Settings
1. In the To: section, click to select a destination location. This is the location where you want your files copied. In the dialog, enter the Device Name or IP address in the text box. Or, from the drop-down menu, select a device in the list. If a connected device is not listed, click the Refresh button.
2. Click OK to save your selection or click Cancel.
3. The Protocol drop-down menu displays if the source device is different from the device you are currently accessing; for example, it could be a separate NAS device on your network. From the Protocol drop-down menu, choose one of the following:
Windows File Sharing — The default value in the menu is Windows File Sharing and in most cases you should accept the default value. For more information, refer to Windows File Sharing.
rsync — The rsync protocol can provide faster copying but, may not be available on all devices. If you are able to select the rsync protocol, and you want the rsync Copy Job to be secure, select the Use secure rsync (SSH) option. Enter the rsync username and password for the rsync server you are copying from or to. The rsync username and password is set up on a different device than the device on which you are creating the Copy Job. For more information on creating an rsync user, refer to rsync Server Settings.
4. Enter a valid username and password, if applicable, for the device to provide access to its folders.

Backing up and Restoring Your Content
61
5. To select a specific folder, click to select a destination location for the Copy to here: section. In the Copy to here dialog, select a Share or a folder from a Share to copy your files.
6. Click OK to save your selection or click Cancel.
7. Click Apply to save your changes.
Setting a Schedule
1. To set a schedule, expand the Schedule section.
2. In the Schedule section, select Enable Schedule for Copy Job.
3. Select the days you want the Copy Job to run, or select All Days to run the Copy Job every day.
4. Click to select a start time. Click Done to save your time selection.
5. Click Apply to save your changes. The new Copy Job displays on the Copy Jobs page.
How do I ...
manage a Copy Job
modify a Copy Job
delete a Copy Job
restore files with Copy Jobs

Iomega StorCenter ix4-300d User Guide
62
Managing Copy Jobs
From the Copy Jobs page, you can add, start, stop, delete, or monitor Copy Jobs.
After you have added Copy Jobs, the Copy Jobs page displays a list of Copy Jobs. The information section includes the name of each Copy Job, date and time it last ran, and its next scheduled time.
From the Copy Jobs list, you can perform the following actions:
1 Click to start a Copy Job.
2 Click to stop a Copy Job.
3 Click to delete a Copy Job.
4 Expand the Copy Job Information section to modify the Copy Job settings.
5 Click the Schedule section to view the Copy Jobs schedule.
How do I ...
add a Copy Job
modify a Copy Job
delete a Copy Job
restore files with Copy Jobs
Backing up and Restoring Your Content
63
Modifying Copy Jobs
1. In the list on the Copy Jobs page, find the Copy Job you want to modify, and click it to expand the Information section.
2. Refer to Adding a Copy Job for information about revising the Copy Job fields.
How do I ...
add a Copy Job
manage a Copy Job
delete a Copy Job
restore files with Copy Jobs
Iomega StorCenter ix4-300d User Guide
64
Deleting Copy Jobs
1. In the list on the Copy Jobs page, find the Copy Job you want to delete.
2. Click from the Actions column of the table to delete the Copy Job.
The Delete Copy Job pop-up window opens.
3. If you are sure that you want to delete the Copy Job, click Yes.
Note: If you do not wish to delete the Copy Job, click Cancel to return to the Copy Jobs page.
How do I ...
add a Copy Job
manage a Copy Job
modify a Copy Job
restore files with Copy Jobs

Backing up and Restoring Your Content
65
Restoring Files with Copy Jobs
To restore files with Copy Jobs, create a new Copy Job that reverses the back-up Copy Job. Modify the From and To settings to copy files from the backup location to the original source location, specify what to restore, set overwrite settings, and choose the protocol for the Copy Job.
Refer to Add A Copy Job for detailed information on Copy Job settings.
How do I ...
add a Copy Job
manage a Copy Job
modify a Copy Job
delete a Copy Job

Iomega StorCenter ix4-300d User Guide
66
Backing up with Mozy Backup
The Mozy online backup service allows you to create a Mozy account, connect your Iomega StorCenter ix4-300d Network Storage to the account, and back up Shares and folders to the Mozy cloud service.
Enabling Mozy Account Information
1. On the Mozy Backup page, click the switch on.
Note: If you do not have a Mozy account, click the link to open an account.
2. Enter a valid email address, password, license key, and country for your Mozy account.
3. To upgrade your Mozy account, click the link.
4. Click Apply to save your changes.
Selecting Folders to Back Up
1. Expand the Backup section and select the Shares and folders to back up in the tree. The tree provides a way to select a Share and all its folders, or just some of the folders under a Share.
2. Click Apply to save your changes.
3. To create a scheduled backup, click Backup schedule settings.
4. In the Mozy Backup Settings dialog box, select one of the following:
Automatic Backup — to generate an automatic backup anytime you add a new file or change an existing file to your selected Shares or folders.
Scheduled Backup — to set up a scheduled backup.
5. If you are creating a scheduled backup, select the days you want the backup to run.
6. Enter the start or stop times for the backup, or click to select the times.
7. To prevent performance degradation on your ix4-300d Network Storage, select a speed limit for the backup.
8. To schedule the time that the backup will run at the selected speed, enter start and stop times.
9. Click Apply to save your changes.
10. Click Apply to save the selected Shares and folders to back up.
After a backup has completed, click View log to see which files have been successfully backed up by Mozy.
How do I ...
restore files with Mozy

Backing up and Restoring Your Content
67
Restoring Files with Mozy Backup
To restore folders and files with Mozy Backup:
1. Click the link to restore any files and folders you back up to your Mozy account.
2. Select the desired backup from the Backup Date: drop-down menu, either the latest backup or a previous one.
The file browser provides a way to select a Share and all its folders, or just some of the folders under a Share.
3. Click Apply to save your changes.
The Restore section displays a table with the status of a restore, either one in progress or
one that has failed. To delete the restore task, click and confirm the deletion. When the restore finishes, the table status clears.
How do I ...
back up files with Mozy Backup

Iomega StorCenter ix4-300d User Guide
68
Backing up with Amazon S3
The Amazon S3 online storage service allows you to back up your Iomega StorCenter ix4-300d Network Storage to the cloud.
Enabling the Amazon S3 Feature
1. On the Amazon S3 page, click the switch on.
Note: If you do not have an Amazon S3 account, click the link to create an account.
2. Enter a valid access key, secret key, and bucket name from your Amazon S3 account information. You can create a bucket at account setup, or you can enter a new bucket for your ix4-300d Network Storage. Your content lives in this bucket on your Amazon S3 account.
3. Select an existing Share on your ix4-300d Network Storage in which to copy files that are then backed up to Amazon S3.
4. Click Apply to save your changes.
Backing up Files to the Amazon S3 Cloud
After you copy files to the selected Share on your ix4-300d Network Storage, the files are automatically backed up to the Amazon S3 cloud service. File uploads are limited to 5 GB in size. If you delete files from the selected Share on your ix4-300d Network Storage, they are not automatically deleted from the cloud service. You can manually delete those files from the cloud service by clicking a command on the Amazon S3 page.
How do I ...
restore files with Amazon S3

Backing up and Restoring Your Content
69
Restoring Files with Amazon S3
When you want to restore files from the Amazon S3 cloud service to your Iomega StorCenter ix4-300d Network Storage, you can choose to restore all files or select individual files to restore.
How do I ...
back up files with Amazon S3

Iomega StorCenter ix4-300d User Guide
70
Backing up with Iomega Personal Cloud
You can back up content on your Iomega StorCenter by creating a Copy Job from the Iomega Personal Cloud on it to another Iomega device that is a member of the cloud.
Refer to Iomega Personal Cloud help for additional information.
How do I ...
create an Iomega Personal Cloud
create Copy Jobs with Iomega Personal Cloud
Backing up and Restoring Your Content
71
Restoring Files with Personal Cloud
You can restore content on your Iomega device by creating a Copy Job from the Iomega Personal Cloud on it to another Iomega device that is a member of the Personal Cloud.
Refer to Iomega Personal Cloud help for additional information.
How do I ...
create an Iomega Personal Cloud
create Copy Jobs with Iomega Personal Cloud


73
Securing Your Device and Contents
What Is Security and Do I Need It?
Security is an optional feature you can enable on your Iomega StorCenter ix4-300d Network Storage to secure Shares, create users, and allow some features to be enabled. When you create users, you limit access to your ix4-300d Network Storage to specific people, and when you secure Shares, you limit data access to specific users. Security adds an extra layer of protection to your ix4-300d Network Storage beyond whatever form of security you have on your local network. Without security, all data on your ix4-300d Network Storage can be accessed by anyone on your local network.
To secure your ix4-300d Network Storage:
First enable security and create an administrator user.
Create users. Create groups.
Secure any existing or new Shares.
Secure any existing or new iSCSI drives.
How do I...
enable security
add users
add groups
secure Shares

Iomega StorCenter ix4-300d User Guide
74
Enabling Security and Creating an Administrator User
With security turned on, only administrator users can view or change settings on the ix4-300d Network Storage, including creating or deleting users and Shares. When you create users, you limit access to your ix4-300d Network Storage to specific people, and when you secure Shares, you limit data access to specific users.
1. On the Security page, click the switch on.
2. When you turn security on, you will be asked to create an administrator user. Provide a username and password, and then confirm your password.
3. Encryption is always available when you access your ix4-300d Network Storage using https. By setting local encryption, you enforce encryption on your local network. By setting remote encryption, you enforce encryption outside your local network, such as through the internet. Choices for both encryption types are Not required, Passwords only (passwords are encrypted through https), and Always (encryption is always enforced). Always encrypting communication is safest, but can impact performance.
Note: When security is turned on, browser communications with the ix4-300d Network Storage are encrypted. Therefore, each computer that attempts to access the ix4-300d Network Storage may encounter a security warning, which can be safely ignored. In addition, you may be asked to accept a signed certificate for the ix4-300d Network Storage, which you should accept. If you change the device name at a later date, these warnings may appear
again.
ix4-300d Network Storage administrators do not have access to all Shares by default. Access rights to Shares must be granted explicitly to administrators, as with other users.
4. If you have your own security certificate, you can load it by selecting Use an imported certificate and browsing to the certificate to load it.
5. Click Apply to save your changes.
6. Click here to learn how to create users.
7. Click here to learn how to secure any existing or new Shares.
Disabling Security
Disabling security will cause all defined users to be deleted.
Note: If you are using other features on your ix4-300d Network Storage that require security, you cannot disable security until those features are also disabled.
1. On the Security page, click the switch off.
2. Disabling security will cause all defined users and groups to be deleted. Check the box to disable security.
3. Click Apply to save your changes.
Security is disabled.
How do I...
create secured Shares

Securing Your Device and Contents
75
add users
Iomega StorCenter ix4-300d User Guide
76
Limiting Access to Your Content by Creating Users
When you create users, you are selecting the specific people that have access to your Iomega StorCenter. You can secure Shares and specify which users can read and write to the secured Shares. You can also create additional administrator users who can manage the Iomega device through the Iomega StorCenter Console. Administrator users can change various settings on the Iomega device, including adding and deleting Shares. If you create groups, you can also limit access to your Iomega device by group so you don’t have to specify access for each individual user.
How do I ...
add users
add groups
Securing Your Device and Contents
77
Users
Users Overview
When security is enabled, the Users page displays all users on the Iomega StorCenter ix4-300d Network Storage and enables administrators to add and modify users.
Non-administrator users can be added to limit access to Share content. Additional administrator users can be added allow specific users to configure the ix4-300d Network Storage. The table displays the Usernames and Descriptive Name of each user. Click in a row of the table to view or modify details about a user.
How do I...
add users
manage users
delete users
create Shares for users
Iomega StorCenter ix4-300d User Guide
78
Adding Users
To add a user:
1. Navigate to the Users page.
2. Before you can create or modify users, you must have security enabled on your Iomega StorCenter Iomega device. If security is already enabled, you are ready to add users. If not, a pop-up window appears for enabling security and create an administrator user to manage your secured Iomega device.
3. To add a new user, click Add a user.
4. Enter the following information:
Username — enter the username of the user to be created. This is the username for logging into the Iomega device. There is a maximum of 32 characters, and spaces are not allowed. The following are not valid usernames: root, daemon, bin, sys, sync, mail, proxy, www-data, backup, operator, sshd, postfix, nobody, unuser, guest, and rsync.
Descriptive Name — add a descriptive name to identify the user. For example, if you created a user with a Username of jsmith, you may want to add the Descriptive Name Joe Smith.
Password — create a password for the user. The password should be between 8 and 12 characters, and spaces are not allowed.
Confirm Password — confirm the password. If the text in this field does not match the text in the Password field, an error will be returned.
Quota Size — set a quota size by entering a value in gigabytes. This limits the amount of storage space this user can have. To have no quota, leave this field blank.
Administrator — check this box to allow this user to manage the Iomega device.
Note: An administrator does not have default access to all Shares. Access to Shares
must be granted explicitly to all users, including administrators.
Add a secured Share for this user — check this box to create a secured Share for this user. This Share will have the new user's name, and allows access only to that user.
Send a Personal Cloud invitation — click this link to invite a user to join your Personal Cloud on the Iomega device. This opens the Send a Personal Cloud Invitation dialog box where you create an invitation by entering a user's email address along with any additional comments. A user then receives the invitation, which contains the Personal Cloud name and username and password. A user enters that information from Iomega Storage Manager. For more information on this, refer to the online help with Iomega Storage Manager. You see this option only if a Personal Cloud has been created on the Iomega device.
Allow this user to add trusted devices to my Personal Cloud — check this box to allow a user to join a trusted device to a Personal Cloud. A trusted device is a machine, either a computer or another Iomega device, that belongs to an added user. Only trusted devices that belong to users that have been added to the Iomega device can join the Iomega Personal Cloud. This option displays only if a Personal Cloud has been created on the Iomega device.
5. Click Create.
Securing Your Device and Contents
79
Managing Users
The page describes how to:
Change User Information
Change Access Permissions
Set Quotas
Changing User Information
1. Modify the following information:
Username — enter the username of the user to be created. This will be the username provided when logging into the Iomega StorCenter ix4-300d Network Storage. There is a maximum of 32 characters, and spaces are not allowed. The following are not valid usernames: root, daemon, bin, sys, sync, mail, proxy, www-data, backup, operator, sshd, postfix, nobody, unuser, guest, and rsync.
Descriptive Name — add a descriptive name to identify the user. For example, if you created a user with a Username of jsmith, you may want to add the Descriptive Name Joe Smith.
Password — create a password for the user. The password should be between 8 and 12 characters, and spaces are not allowed.
Confirm Password — confirm the password. If the text in this field does not match the text in the Password field, an error will be returned.
Send a Personal Cloud invitation — click this link to invite a user to join your Personal Cloud on the ix4-300d Network Storage. This opens the Send a Personal Cloud Invitation dialog box where you create an invitation by entering a user's email address along with any additional comments. A user then receives the invitation, which contains the Personal Cloud name and username and password. A user enters that information from Iomega Storage Manager. For more information on this, refer to the online help with Iomega Storage Manager. You see this option only if a Personal Cloud has been created on the ix4-300d Network Storage.
Allow this user to add trusted devices to my Personal Cloud — check this box to allow a user to join a trusted device to a Personal Cloud. A trusted device is a machine, either a computer or another ix4-300d Network Storage, that belongs to an added user. Only trusted devices that belong to users that have been added to the ix4-300d Network Storage can join the Iomega Personal Cloud. You see this option only if a Personal Cloud has been created on the ix4-300d Network Storage.
Quota Size — set a quota size by entering a value in gigabytes. To have no quota, leave this field blank.
Administrator — check this box if you would like to allow this user to manage the ix4-300d Network Storage.
Note: An administrator does not inherently have access to all Shares. Access to
Shares must be granted explicitly to administrators, as with other users.
2. Click Apply.
Changing Access Permissions
1. Expand Access Permissions to change Share access permissions for the selected user.

Iomega StorCenter ix4-300d User Guide
80
2. To give this user access to a specific set of Shares, click Add access permissions.
3. In the Add Access Permissions pop-up window, select which Shares this user can access, and click Apply.
4. Uncheck Read or both Read and Write to limit or deny access permission to each Share for this user.
5. Click Apply to save your changes. When both Read and Write are unchecked, the Share is removed from the list.
Setting Quotas
You can limit the amount of space allocated to one or more users by applying quotas.
1. Click Quota Settings to enable quotas, and set a default quota for each user.
2. In the Quota Settings pop-up window, check Enable quotas to turn on quotas for each user.
3. If desired, enter a Default Quota. This quota applies to new users only.
4. Check Set default quota for all users to apply the default quota to all users.
5. Click Apply to save your changes.
6. To set individual user quotas, expand the Information section for a user and enter a value in Quota size. If you leave the box blank, there is no quota for that user.
7. Click Apply to save your changes.

Securing Your Device and Contents
81
Deleting Users
To delete a user:
1. From the Iomega StorCenter ix4 Console, click Users.
2. To delete an existing user, click the username to expand the user.
3. In the User Information section, click Delete.
4. In the Delete User pop-up window, click Yes.
5. The user is removed from the user list.

Iomega StorCenter ix4-300d User Guide
82
Groups
Groups Overview
Groups consist of one or more users, and administrators can grant each group rights to Shares on the Iomega StorCenter ix4-300d Network Storage. Users can belong to more than one group. The Groups page enables administrators to create one or more groups, and grant each group rights to Shares on the ix4-300d Network Storage. Security must be enabled before you can create groups.
Note: Refer to the Security page to enable security permissions and create an administrator account, if you have not done so already.
By default, there are no groups defined. Once an administrator defines one or more groups, the Groups functionality is dynamically available when creating, modifying, and viewing users, Shares, and groups.
How Access Rights Are Granted Using Groups in Workgroup Mode
When groups are defined in Workgroup mode, a user's access rights are the most rights granted to the user and all groups to which the user belongs. For example, assume 3 Shares exist (SF1, SF2, and SF3), two users (UserA and UserB), and three groups (Group1, Group2, Group3). When created, UserA was not granted access rights to any Share, and UserB was granted Read rights to SF3. Group1 has Read/Write rights to SF1, Group2 has Read/Write rights to SF2, and Group3 has Read/Write rights to SF3. If UserA is added to Group1, UserB is added to Group2, and Group1 is added to Group3, the table below shows the resulting access rights for each user and group defined:
Name Member of Group Access Rights
UserA Group1, Group3 SF1 - Read/Write SF3 - Read/Write
UserB Group2 SF2 - Read/Write SF3 - Read
Group1 Group3 SF1 - Read/Write SF3 - Read/Write
Group2 none SF2 - Read/Write
Group3 none SF3 - Read/Write
How do I...
add new groups add users delete users

Securing Your Device and Contents
83
Adding Groups
1. On the Groups page, click Add a group. The Information section opens.
2. From the Information section, give the new group a name.
3. To add users to the group, click Add users. Select a user or users to include in the group. Select the checkbox in the title bar to add all listed users.
4. Click Apply to save your changes.

Iomega StorCenter ix4-300d User Guide
84
Managing Groups
The page describes how to:
Remove a User from a Group
Change Access Permissions
Removing a User from the Group
1. Open a group to display users belonging to it.
2. To remove a user from the group, click the next to that user. When the Remove user pop-up window appears, click Yes to remove the user.
Changing Access Permissions
1. To refresh the list of users, click above the table.
2. Expand Access Permissions to change group permissions to a secured Share. If iSCSI is enabled, you can also change group permissions to secured iSCSI drives.
3. To add permissions to a Share, click Add access permissions.
4. From the Add Access Permissions pop-up window, select a Share or Shares for the group to access. If iSCSI is enabled, select iSCSI drives for the group to access. Select the checkbox in the title bar to select all the Shares listed. If iSCSI is enabled, select the checkbox in the title bar to also select all the iSCSI drives listed.
5. Click Apply to save your changes.
6. In the table listing the Shares, check Read or Write for each Share. If iSCSI is enabled, check Read or Write for each iSCSI drive. The group can have full access by checking both Read and Write. To grant only read access, check only Read.
Note: A group must have read access at a minimum. A group cannot have only write access.
7. Uncheck Read to remove all access to a Share and remove the Share from the table. If iSCSI is enabled, uncheck Read to remove all access to an iSCSI drive and remove the iSCSI drive from the table.
8. Click Apply to save your changes.
9. If NFS is enabled, the GID field is visible. The GID value must be the same on both the Linux client and the Iomega StorCenter ix4-300d Network Storage for the client to access files. To modify the GID, type a new GID value.
Securing Your Device and Contents
85
Deleting Groups
To delete a group:
1. From the Iomega StorCenter ix4 Console, click Groups.
2. To delete an existing group, click to expand the group.
3. In the Information section, click Delete to delete the group.
4. In the Delete Group confirmation pop-up window, click Yes.
5. If you do not wish to delete the group, click Cancel to return to the Groups page.

Iomega StorCenter ix4-300d User Guide
86
Using Active Directory Domain to Manage Users and Groups
Active Directory Users and Groups Overview
On the Users and Groups page, administrator users can import users and groups from an Active Directory server and grant them access rights to Shares on the Iomega StorCenter ix4-300d Network Storage. The Users and Groups page is visible when you enable Active Directory on the ix4-300d Network Storage. For more information on enabling Active Directory on the ix4-300d Network Storage, refer to Configuring Your ix4-300d Network Storage to Use AD Domain. For information on creating an administrator user, refer to Enabling Security and Creating an Administrator User.
How do I...
enable security
change Active Directory settings
manage Active Directory users and groups
delete users and groups from Active Directory

Securing Your Device and Contents
87
Managing Users and Groups with Active Directory
The page describes how to:
Import Users and Groups from Active Directory
Synchronize with the Active Directory Controller
Change Access Permissions
Set Quotas
Importing Users and Groups from Active Directory
1. Click Import Users and Groups from Active Directory.
2. The pop-up window for Import Users and Groups from Active Directory is searchable, and you can sort by name, descriptive name, or type. You can filter the list of users and groups by selecting a specific user or group from the domain tree.
3. Select the checkbox next to a user or group to import that user or group to your Iomega StorCenter ix4-300d Network Storage from your Active Directory domain. Select the checkbox in the title bar to select all the users and groups in your Active Directory domain.
4. Click Apply to save your changes.
Synchronizing with the Active Directory Controller
You can poll the Active Directory controller at any time to check for new users and groups on the controller, so you can add them to your ix4-300d Network Storage. This keeps your ix4-300d Network Storage up to date with any group changes on the controller and indicates if any users on the controller were deleted or promoted.
Click Synchronize with the Active Directory Controller.
Changing Access Permissions
1. Expand Access Permissions to change user or group permissions to a secured Share. If iSCSI is enabled, you can also change user and group permissions to secured iSCSI drives.
2. To add permissions to a Share, click Add access permissions.
3. From the Add Access Permissions pop-up window, select a Share or Shares for the user or group to access. If iSCSI is enabled, select iSCSI drives for the user or group to access. Select the checkbox in the title bar to select all the Shares listed. If iSCSI is enabled, select the checkbox in the title bar to also select all the iSCSI drives listed.
4. Click Apply to save your changes.
5. In the table listing the Shares, check Read or Write for each Share. If iSCSI is enabled, check Read or Write for each iSCSI drive. A user or group can have full access by checking both Read and Write. To grant only read access, check only Read.
Note: A user or group must have read access at a minimum. A user or group cannot have only write access.
Iomega StorCenter ix4-300d User Guide
88
6. Uncheck Read to remove all access to a Share and remove the Share from the table. If iSCSI is enabled, uncheck Read to remove all access to an iSCSI drive and remove the iSCSI drive from the table.
7. Click Apply to save your changes.
8. If NFS is enabled, the GID field is visible. The GID value must be the same on both the Linux client and the ix4-300d Network Storage for the client to access files. To modify the GID, type a new GID value.
Setting Quotas
1. Click Quota settings to enable quotas and set a default quota. Quotas are only set for individual users, and not groups.
2. In the Quota Settings dialog, click Enable quotas to turn on quotas for each user. Quotas can be set for each user individually or set as a default value.
3. Enter a Default Quota in gigabytes. When you set a default quota, this becomes the quota size for all new users.
4. Check Set default quota for all users to globally set the same quota size to all users. You may overwrite this default value for individual users by setting their quota size separately in the user's Information section.
5. Click Apply to save your changes.

Securing Your Device and Contents
89
Deleting Active Directory Users and Groups
To delete a user or a group:
1. From the Iomega StorCenter ix4 Console, click Users and Groups.
2. To delete an existing user or group, click to expand that user or group.
3. In the Information section, click Delete. Deleting a user or group does not delete any Shares to which the user or group has access. Click the checkbox if you want to Delete all Shares that only this user can access.
4. In the confirmation pop-up window, click Yes.
5. If you do not wish to delete a user or group, click No to return to the Groups page.

91
Personal Cloud: Accessing Your Device From Anywhere in the World
What Is an Iomega Personal Cloud ?
An Iomega Personal Cloud turns an Iomega StorCenter ix4-300d Network Storage into a hub for sharing files and backing up data among computers anywhere in the world. A Personal Cloud can exist on your Iomega StorCenter ix4-300d Network Storage, or on another Iomega network device. When you create a Personal Cloud, you gain access to your ix4-300d Network Storage from anywhere on the internet. You can also share with friends and family by inviting users to join your Personal Cloud. You manage Personal Cloud users the same way you manage other users on your ix4-300d Network Storage, so you control the storage and content they can access through the Personal Cloud. Trusted devices can be added to your Personal Cloud to connect them through the internet as if they are on a common home network with your ix4-300d Network Storage. People who join your Personal Cloud can access data, perform Copy Job operations, use your ix4-300d Network Storage as a QuikProtect remote target, stream media from your ix4-300d Network Storage over the internet, and use remote desktop to access computers on the local network for your ix4-300d Network Storage. If you allow a user to join their trusted devices to the Cloud, those devices become part of the Cloud and can be accessed by other users on the Cloud.
Iomega Personal Cloud Key Terms
The following are a few key terms to help get you started with a Personal Cloud:
Iomega Personal Cloud — This is a setting configured on your Iomega StorCenter ix4 Console that allows you to securely share storage and media capabilities with computers around the world.
Web Access — You can use Personal Cloud information to access your ix4-300d Network Storage from the web. Enter myCloudName.Myiomegacloud.com in a web browser, and when prompted, enter a valid username and password for your ix4-300d Network Storage. You can also use the Iomega Link, which is an application that runs on mobile devices, by entering the Personal Cloud name and then a valid username and password. For more information on the Iomega Link, refer to its documentation.
My Personal Cloud — When you are the administrator of an ix4-300d Network Storage, you can create a Personal Cloud through the Iomega StorCenter ix4 Console and then invite people to join it. You create and manage the Personal Cloud on your Iomega StorCenter ix4 Console through the My Personal Cloud configuration option. The Personal Cloud that you administer is called My Personal Cloud.
Other Personal Cloud — If you want to have your ix4-300d Network Storage join that Personal Cloud instead of administering your own, select the option for Other Personal Cloud. Enter the Personal Cloud name, username and password you received when you were invited to join your ix4-300d Network Storage as a Trusted Device on the other Personal Cloud.
Joining an Iomega Personal Cloud as a Trusted Device — To connect your computer or your ix4-300d Network Storage as a trusted device to a Personal Cloud, you use the username and password given to you for that Personal Cloud. The person managing the Personal Cloud has to create you as a user on the device hosting the Personal Cloud and give you permission to add trusted devices. You can connect your ix4-300d Network Storage to only one Personal Cloud at any given time, so you must select between either My Personal Cloud or Other Personal Cloud.
An administrator should complete the following tasks to set up or join a Personal Cloud:
create a Personal Cloud

Iomega StorCenter ix4-300d User Guide
92
invite people to a Personal Cloud
join a trusted device to a Personal Cloud
Personal Cloud: Accessing Your Device From Anywhere in the World
93
Is My Content Secure?
Your content is always secure using an Iomega Personal Cloud. If you create a Personal Cloud with security disabled, you are required to enter a password when accessing your Iomega device remotely. Enabling security allows you to share your Iomega device with the people you choose. For example, you have photos of your new baby you want to share with your sister, your brother, and your sister-in-law. To share your baby photos with these family members, create a Personal Cloud, and then invite your sister, your brother, and your sister-in-law to join your Personal Cloud. Your Iomega StorCenter provides an easy way to send email invitations and instructions to the people you select as Personal Cloud users. In this way, your content is never exposed to the public, and remains private. It is visible only to the individuals you invite to be Personal Cloud users. Content of the Personal Cloud is determined by you as the Personal Cloud owner. Refer to the help topic links below for more information on Personal Cloud.
Note that people added to your Personal Cloud as users are not required to own or have access to an Iomega device. The process of adding someone as a Personal Cloud user grants them access to your Personal Cloud from any computer.
How do I ...
create an Iomega Personal Cloud
configure a router for port forwarding
create a Personal Cloud
invite people to a Personal Cloud
join a trusted device to a Personal Cloud
enable security on Iomega device

Iomega StorCenter ix4-300d User Guide
94
Iomega Personal Cloud Setup Overview
You can create an Iomega Personal Cloud in one of two ways:
Follow the Iomega Personal Cloud setup through Iomega Setup
Create the Iomega Personal Cloud through the Iomega StorCenter Console
Creating an Iomega Personal Cloud starts with providing a name for your Personal Cloud and an email address associated with it. After creating the Personal Cloud, you can use the Personal Cloud Quick Setup wizard to perform common tasks associated with the Iomega Personal Cloud: adding Shares, inviting people to join the Personal Cloud, and setting up Copy Jobs through the Personal Cloud.
How do I ...
enable security on my Iomega device
create an Iomega Personal Cloud
configure a Personal Cloud
invite people onto your Personal Cloud
join a trusted device to a Personal Cloud
use Copy Jobs with a Personal Cloud

Personal Cloud: Accessing Your Device From Anywhere in the World
95
Creating an Iomega Personal Cloud
Before you can work with your Iomega Personal Cloud, you first create a Personal Cloud and configure the settings.
After your Personal Cloud is ready and connected to the internet as indicated by the status images, you can invite people to join your Personal Cloud. When you invite people to join your Personal Cloud, you add them as users on your Iomega StorCenter. The invited users receive an email invitation that includes the username and password they must provide when connecting to the Personal Cloud from the Iomega Storage Manager on their computer.
If you have content on your Iomega device that you do not want to share with members of your Personal Cloud, you should put that content in secured Shares that are not accessible to anyone invited to your Personal Cloud.
Note: This procedure assumes you did not create a Personal Cloud using the initial Iomega Setup portal. If you have already created a Personal Cloud, you do not have to follow this procedure.
1. On the Iomega Personal Cloud page, expand the Configure section.
2. Click the My Personal Cloud button to open the portal that lets you create your Personal Cloud.
After you click the My Personal Cloud button, a new website containing the portal opens. You create a Personal Cloud on this website. After you create the Personal Cloud, you return to the Iomega StorCenter Console.
3. If your Iomega device is not secured, you are prompted to create a remote access password. This is a password that anyone not on your local network must enter to access your device.
After completing these steps, the Personal Cloud Quick Setup Wizard opens, so you can create Shares, invite users, or configure Copy Jobs. You can use the Quick Setup Wizard or close it and begin using your Personal Cloud.
How do I...
invite people to a Personal Cloud
join a trusted device to a Personal Cloud
enable security on Iomega device

Iomega StorCenter ix4-300d User Guide
96
Configuring Router Port Forwarding for Personal Cloud
In most cases, your Iomega StorCenter attempts to automatically configure your router. However, if it cannot, a message displays that your router is not configured for port forwarding, and you must manually configure your router to forward a specific port to your Iomega device. Most routers refer to this as port forwarding, application access, or virtual server. It is recommended that you refer to your router's documentation for setting these values. When you set up port forwarding, you are allowing data to travel through your Personal Cloud between your Iomega device and trusted devices.
When you have selected a port value to forward for Personal Cloud, click Settings on the Personal Cloud page, and enter your selected port number in the Personal Cloud settings dialog box. If you have more than one Personal Cloud, you can enter a range of port values for your Personal Clouds. The range of port values is 50500-50599. You must also port forward port 443 to enable https access to your Iomega device.
Router Port Forwarding
Some routers have a UPnP option. If you have a UPnP router, enabling this option allows the Iomega device software to automatically configure the correct forwarding ports. Otherwise, you must perform additional steps by manually enabling port forwarding on your home network router. Port forwarding allows invited users to connect remote computers or other Iomega device devices outside of your local area network (LAN) as trusted devices to the Personal Cloud on your network.
Note: Port forwarding must be configured for both the network router on which the Personal Cloud is configured, and any remote network from which trusted devices are accessing the Personal Cloud.
The following steps are generic router settings. If you have never logged into your router before, you must consult the manufacturer’s documentation to find specific details such as default IP address, default administrator account, and password.
1. Log in to your router by entering its IP address in the browser’s URL field from your computer. If prompted, enter administrator account name and password.
2. Navigate to the Port Forwarding configuration page. This is often related to Port Mapping, Application, Virtual Server, or Gaming configuration options.
3. Type in the desired application or service name. This is typically a blank or drop-down field where you can type or choose a user-specified application or service name for the port you are forwarding. Create a new entry with a value like “Iomega Personal Cloud ” in this field.
4. Enter a port number for the Personal Cloud service in the range 50500-50599 in both the port start and port end fields. Port number 50500 is the default. It should not be necessary to change this value, but if you do, choose the next available port; for example, 50501. If you decide to choose a port in the higher range, note that the Media Server uses the same range of ports, numbering backwards from 50599.
5. Repeat the previous step, using port 443 to enable https communication with your Iomega device.
6. Enter the IP address of your Iomega device which contains the Personal Cloud. The IP address displays on the System Status page when you log into the device's web interface.
7. Save the changed settings.
8. Reboot the router if required.

Personal Cloud: Accessing Your Device From Anywhere in the World
97
How do I ...
create an Iomega Personal Cloud

Iomega StorCenter ix4-300d User Guide
98
Configuring Your Iomega Personal Cloud
As an Iomega Personal Cloud administrator, you can manage various settings on your Personal Cloud to ensure that it functions as efficiently as possible. Settings include specifying an email address when sending invitations. When data is traveling through the Personal Cloud, you can control the security of that information by specifying a Secure Communication level. Note that data stored on your ix4-300d Network Storage through the Personal Cloud is not encrypted, and using encryption can slow down communications.
Enabling Internet Access to the ix4-300d Network Storage
You can grant internet users, including Iomega Link users, secure access to the web interface and unrestricted access to media content on your ix4-300d Network Storage. Iomega Link is an application that runs on mobile devices, and allows access to content on your ix4-300d Network Storage. Before enabling secure access, you must first enable security on your ix4-300d Network Storage and create users. After enabling secure access, any internet users can access your ix4-300d Network Storage, and view any public content. Secure content is restricted to internet users who have valid usernames and passwords for the ix4-300d Network Storage. When you enable unrestricted media content access, your media files become available to all internet users.
Changing Personal Cloud Settings
1. In the Configure section of the Personal Cloud page, click Settings.
2. In the Personal Cloud Settings dialog box, configure the following:
Administration Email Address — This is the sender email address used on the email invitations.
Port Number — Your router forwards this specific port for your Personal Cloud. This value is automatically filled in, and you do not have to change it, unless you have more than one Personal Cloud on your network. Refer to Configuring Router Port Forwarding for Personal Cloud for more information.
Secure Communication — This setting controls the security of information traveling through the Personal Cloud.
Note: You can also specify a Secure Communication level setting with Iomega Storage Manager. The Secure Communication setting for the Iomega StorCenter ix4 Console sets the minimum value. You cannot specify a setting lower than this value using Iomega Storage Manager. For information on using Iomega Storage Manager,
refer to its online help.
Enable unrestricted access to media content — This setting makes all media files in media-enabled Shares available to anyone on the internet accessing your ix4-300d Network Storage, even if those media files are in secured Shares. For mor information on making a Share media-enabled, refer to changing Share information.
3. Click Apply to save your changes.
How do I...
create a Personal Cloud
configure a router for port forwarding
invite people onto your Personal Cloud
join a trusted device to a Personal Cloud

Personal Cloud: Accessing Your Device From Anywhere in the World
99
manage trusted devices on a Personal Cloud
disable or delete my Personal Cloud
enable security on ix4-300d Network Storage
enable the Home Page

Iomega StorCenter ix4-300d User Guide
100
Inviting People onto Your Iomega Personal Cloud
When you invite people to join your Iomega Personal Cloud, you are actually selecting from existing users on your Iomega device, or adding people as users on your Iomega device. In addition, you are optionally allowing them to add their computers or Iomega storage devices as trusted devices on your Personal Cloud. Computers are added as trusted devices through Iomega Storage Manager. Refer to its online help for more information.
1. From either the Personal Cloud Quick Setup dialog box or the Iomega Personal Cloud page, click Invite Users.
Note: You can also send an invitation to join a Personal Cloud when you are adding users. Refer to Adding Users for more information.
2. In the Invite Users dialog box, select the name of an existing user or click Create New User to add a new user. If security has not been enabled, you are prompted to enable security and create an administrator user.
3. If the email address field is not already completed, enter an email address for the user.
4. Click Apply to send the invitation.
How do I ...
create an Iomega Personal Cloud
add users to my Iomega device

Personal Cloud: Accessing Your Device From Anywhere in the World
101
Joining a Trusted Device to an Iomega Personal Cloud
You can join your Iomega StorCenter ix4-300d Network Storage to the Personal Cloud as a trusted device if you have been given permission by the person administering the Personal Cloud.
Note: You cannot join your trusted device to a Personal Cloud if you have not been added as a user on the Personal Cloud.
1. On the Personal Cloud page, select the Other Personal Cloud command to join another Iomega Personal Cloud.
2. In the Add Trusted Device to Personal Cloud dialog box, enter the Personal Cloud name, username, and password you received in the email invitation.
3. Enter a descriptive name for your trusted device in the Description field.
4. Click Apply.
After applying this information, you are automatically connected to the Personal Cloud.
How do I ...
enable security on my ix4-300d Network Storage
create an Iomega Personal Cloud
configure a Personal Cloud
invite people onto your Personal Cloud
use Copy Jobs with a Personal Cloud
delete a trusted device

Iomega StorCenter ix4-300d User Guide
102
Managing Trusted Devices on a Personal Cloud
As an Iomega Personal Cloud administrator, you can manage trusted devices on your Personal Cloud. Trusted devices can be disconnected, or you can completely delete a trusted device from the Personal Cloud.
Disconnecting Trusted Devices
Click My Personal Cloud, and expand the trusted device section of the page.
To disconnect a trusted device from the Personal Cloud, disable the trusted device by clicking the switch to Disabled, and click Yes in the confirmation pop-up window. The trusted device is not deleted and can be reenabled at a later time.
Deleting Trusted Devices
To delete a trusted device from the Personal Cloud, click next to the device's name. The trusted device is deleted and can only be added again by a user with trusted device privileges.
1. On the Personal Cloud page, expand the Trusted Devices section.
2. Click next to the trusted device you want to remove from the Personal Cloud.
3. Confirm the deletion.
How do I ...
join a trusted device
enable security on my ix4-300d Network Storage
create an Iomega Personal Cloud
configure a Personal Cloud
invite people onto your Personal Cloud
use Copy Jobs with a Personal Cloud

Personal Cloud: Accessing Your Device From Anywhere in the World
103
Using Copy Jobs with an Iomega Personal Cloud
You can create Copy Jobs that can transfer data from one trusted device to another through the Personal Cloud. When you add a trusted device to your Personal Cloud, a Copy Jobs icon displays next to that device in the trusted device table. Clicking the Copy Jobs button opens the Copy Jobs page to help you configure a Copy Job between the Iomega StorCenter ix4-300d Network Storage that is hosting the Personal Cloud and a trusted device. For more information on setting up Copy Jobs, refer to Adding Copy Jobs.
How do I...
create a Personal Cloud
join a trusted device to a Personal Cloud
add a Copy Job
enable security on ix4-300d Network Storage

Iomega StorCenter ix4-300d User Guide
104
Disabling or Deleting Your Iomega Personal Cloud
When you disable your Personal Cloud, you are eliminating access to your Personal Cloud without deleting the account information you created when you set up the Personal Cloud. Later, if you want to reenable your Personal Cloud, you can without reentering all the account information. To completely stop the Personal Cloud and eliminate any account information with it, delete it. If you delete your Personal Cloud and later decide you want to recreate it, you must start the creation process again and re-invite all users. When you delete a Personal Cloud, you lose your ownership of its name.
To disable a Personal Cloud, click Disable.
To delete a Personal Cloud, click Settings and then click Delete in the Personal Cloud Settings dialog box.
How do I...
create a Personal Cloud
invite people onto your Personal Cloud
join a trusted device to a Personal Cloud
configure my Personal Cloud
enable security on ix4-300d Network Storage

Personal Cloud: Accessing Your Device From Anywhere in the World
105
Accessing Content Using Your Iomega Personal Cloud
You can share content by inviting users to your Personal Cloud. The data in Shares can be made accessible to all users of the Cloud, or access can be restricted to a specific set of users by setting access permissions to Shares. Access permissions control whether users are only allowed to read files in Shares, or if they can also write (upload) files to Shares.
How do I ...
create an Iomega Personal Cloud
add users
create Shares
set access permission for Shares
Iomega StorCenter ix4-300d User Guide
106
Informing Users What to Do with Iomega Personal Cloud
Personal Cloud enables users to access your Iomega device from the web. They can enter myCloudName.Myiomegacloud.com in a web browser, and when prompted, enter a valid username and password for your Iomega device. After they access your Iomega StorCenter, they can view Shares, upload and download content, and stream content. Optionally, they can install Iomega Storage Manager on their computers, and then join their computers as trusted devices to the Personal Cloud. When users join their computer as a trusted device to the Personal Cloud, they are making their machine and its files available to other users of the Personal Cloud. A large virtual network is created.
How do I ...
create an Iomega Personal Cloud
add users
invite people to a Personal Cloud
join a trusted device to a Personal Cloud
enable security on Iomega device

107
Sharing Content Using Social Media
Sharing Content Using Social Media: Overview
If you have an account with social media services such as Facebook, Flickr, or YouTube, you can share content on your Iomega StorCenter ix4-300d Network Storage with your friends and family using one or more of these social media sites. To share your content using social media sites, create Shares called Active Folders, and connect each Active Folder with a social media account. Refer to the help topic links below for more information on these procedures. When you add photos and movies to an Active Folder, those files are automatically uploaded to the social media site associated with that Active Folder. If you have photos or movies you want to share with others, this is a great way to make your content available to people who may not have access to your ix4-300d Network Storage.
If you have configured a Personal Cloud on your ix4-300d Network Storage, you can grant Personal Cloud users access to Shares and Active Folders. This is useful if you want to allow users to add files to your social media sites. For example, if your ix4-300d Network Storage has a Flickr Active Folder, you can grant Personal Cloud users access to that Active Folder. In this manner, when photos are added to the Flickr Active Folder, either by you or by Personal Cloud users, those photos are uploaded automatically to your Flickr account.
Note that an Active Folder can only be associated with one social media account. For example, if you want Active Folders for your Facebook and YouTube accounts, create two Active Folders, and assign one Active Folder to Facebook, and one to YouTube. Using this example, any photos you add to your Facebook Active Folder are automatically uploaded to your Facebook page, and any movies you add to your YouTube Active Folder are automatically uploaded to your YouTube page. Not only is this a fast and easy way to share content, but uploading content to your social media sites provides an additional backup of your content, as the content is stored both on your ix4-300d Network Storage and at your social media accounts.
How do I...
make a Share an Active Folder
upload to Facebook
upload to Flickr
upload to YouTube
Iomega StorCenter ix4-300d User Guide
108
Facebook is a social network to connect with friends and family. You can configure a Share as a Facebook Active Folder so that photos and movies added to that Share are automatically uploaded to your Facebook account.
Refer to Managing Shares for more information on managing Shares and Active Folders.
Note: If you do not have a Facebook account, go to the Facebook website to open an account.
Configuring a Facebook Active Folder
1. From the Iomega StorCenter ix4 Console, click Shares.
2. Select a Share to use as a Facebook Active Folder, and click to expand the Active Folder section.
3. Check Enable.
4. Select Facebook from the drop-down menu.
5. Click Configure Facebook account access to configure your Facebook account. You will be taken to a Facebook page to configure your account. Follow the instructions provided by Facebook.
6. Check Delete files after upload to delete images or movies from the Share once they are transferred to your Facebook account.
7. Images can also be resized prior to upload. Check 800x600, 1024x768, or enter a custom resolution for resizing images.
8. Click Apply to save your changes.
Once configured, all your images in this Active Folder will upload to your Facebook account.
9. Click View Transfer History to see the transfer activity from this Share to your account.
How do I...
add a Share
make a Share an Active Folder
Sharing Content Using Social Media
109
Flickr
Flickr is a photo sharing network for sharing photos with friends and family. You can configure a Share as a Flickr Active Folder so that images and albums added to that Share are automatically uploaded to your Flickr account.
Refer to Managing Shares for more information on managing Shares and Active Folders.
Note: If you do not have a Flickr account, go to the Flickr website to open an account.
Configuring a Flickr Active Folder
1. From the Iomega StorCenter ix4 Console, click Shares.
2. Select a Share to use as a Flickr Active Folder, and click to expand the Active Folder section.
3. Check Enable.
4. Select Flickr from the drop-down menu.
5. Click Configure Flickr account access to configure your Flickr account. You are taken to a Flickr page to configure your account. Follow the instructions provided by Flickr.
6. Check Delete files after upload to delete images from the Share once they are transferred to your Flickr account.
7. Click Apply to save your changes.
8. Once configured, all images added to this Active Folder are uploaded to your Flickr account. Click View Transfer History to see the transfer activity from this Share to your account.
How do I...
add a Share
make a Share an Active Folder
Iomega StorCenter ix4-300d User Guide
110
YouTube
YouTube is a social media site to share video content. You can configure a Share as a YouTube Active Folder so that videos added to that Share are automatically uploaded to your YouTube account.
Refer to Managing Shares for more information on managing Shares and Active Folders.
Note: If you do not have a YouTube account, go to the YouTube website to open an account.
Configuring a YouTube Active Folder
1. From the Iomega StorCenter ix4 Console, click Shares.
2. Select a Share to use as a YouTube Active Folder, and click to expand the Active Folder section.
3. Check Enable.
4. Select YouTube from the drop-down menu.
5. Check Delete files after upload to delete videos from the Share once they are transferred to your YouTube account.
6. Click Apply to save your changes.
Once configured, all videos added to this Active Folder automatically upload to your YouTube account.
7. Click View Transfer History to see the transfer activity from this Share to your account.
How do I...
add a Share
make a Share an Active Folder
Sharing Content Using Social Media
111
Share Content through Iomega Personal Cloud
You can share your multimedia content with friends and family through an Iomega Personal Cloud. Refer to the Iomega Personal Cloud section for more information.
How do I ...
create an Iomega Personal Cloud
know my Personal Cloud content is secure

113
Media Management
Media Management Overview
The ix4-300d Network Storage has a built-in media server that, when turned on, scans for media content in specific Shares that have media sharing enabled. Any media content contained in these specific Shares are accessible to any user on your network with a media player, even if the Share is secured. For information on enabling a folder as a media folder, refer to Managing Shares.
Scanning for media content
The Media Server automatically scans for media content on a regular basis. However, you can click Scan now at any time to force the media server to perform an immediate scan for media content. This is especially useful after you have created new folders with media sharing enabled and copied a large amount of media content to them.
How do I...
share media content over the internet
enable media aggregation
stream music, movies, and pictures
share media through social media
Iomega StorCenter ix4-300d User Guide
114
Media Services Capabilities and Limitations
One important consideration when using the media server is that it can share media content on your ix4-300d Network Storage with anyone on the internet. When media sharing is enabled, internet users, including those users on mobile devices running the Iomega Link, can access media content on your ix4-300d Network Storage.
Note: When you enable internet access to your media content, all media content is available to any user on the internet, regardless of any security you may have applied to a media file. All your pictures, movies, and music are available to anyone accessing your ix4-300d Network Storage. You
should be sure you want to make all your media content this accessible.

Media Management
115
Sharing Media Content over the Internet
There are two methods for sharing media content on your Iomega device with anyone on the internet. You can enable internet access on the Media Server page. Alternatively, you can enable internet access by configuring your Iomega Personal Cloud.
Enabling Internet Access from the Media Server Page
Note: You can only enable internet access from the Media Server page if you have already created and configured a Personal Cloud. If a Personal Cloud is not set up, you do not see the Enable internet access option.
1. On the Media Server page, click Settings.
2. In the dialog box, check Enable internet access.
3. Click Apply to save your changes.
4. In the confirmation dialog box, check Check this box to continue.
5. Click OK to save your selection or click Cancel.
To access media content, internet users enter a non-secure IP address in their browser along with the port number 9000 used to access the media server, for example, http://72.xx.xxx.104:9000, where "x" is the IP value for your network. When a user enters this IP address, the Twonky Server page on the Iomega device displays. Refer to the Support section of the Twonky Server page for information on using the server. Iomega Link users can access media content directly from the Iomega device. Refer to your Iomega Link documentation for details.
For additional information on enabling internet access, refer to Media Services Capabilities and Limitations.
How do I...
scan for media content
enable media aggregation
stream music, movies, and pictures

Iomega StorCenter ix4-300d User Guide
116
Media Aggregation
If you have multiple Digital Living Network Alliance (DLNA) servers in your network that have media content, you can combine all media content into one view by enabling aggregation on your Iomega device. When you enable aggregation, all media content on DLNA servers is available for playback using a DLNA player, such as Playstation®3, Windows Media Player®, or Xbox 360®. In addition, you can optionally copy all media content from your network servers to your Iomega device.
Enabling Media Aggregation
1. On the Media Server page, click Settings.
2. Check Enable media aggregation.
This enables aggregation for media servers already discovered in your network.
3. Choose the default aggregation setting.
The default aggregation setting sets the default value for media servers as they are added to your network.
The default aggregation settings are as follows:
None — Media aggregation is off.
Show Common View — This enables media aggregation and allows all media content from computers on the network to be played back by a DLNA player. All your movies, music, and pictures are linked from various computers and can be played back from one view. All aggregated media files remain on their original device, and can only be played while that device is powered on and connected to the network.
Copy Files — This enables media aggregation and automatically copies all media content from computers, both networked and local, to your Iomega device. All your movies, music, and pictures from various computers can be played back from one view, and they are copied into Shares on your Iomega device. Because all media files are copied to the Iomega device, they can be played even if the original device they were on is powered off or not connected to the network.
Copy on Request — This enables media aggregation but does not automatically copy all media content from computers, both networked and local, to your Iomega device. Computers on the network will have to enable media aggregation individually and then media files are copied to the Iomega device. If a computer is running the Iomega Storage Manager, media aggregation is automatically enabled.
Note: When you enable media aggregation, the media server restarts, and any media you are currently streaming stops playing. You can begin streaming your media after the media server has
restarted.
Media Management
117
Social Media Sharing
You can share media content, such as movies and pictures, using social media sites like Facebook, Flickr, or YouTube. Refer to the Sharing Content Using Social Media section for more information.
How do I ...
share content through Facebook
share content through Flickr
share content through YouTube
Iomega StorCenter ix4-300d User Guide
118
Streaming Music, Movies, and Pictures
The Media Server supports playback of videos, music and pictures from any UPnP AV (Universal Plug and Play Audio Visual) network media players, such as Playstation3, Windows Media Player, or Xbox 360.
You can play back all your media files from your individual home computers by enabling media aggregation on your Iomega device. You can also connect USB mass storage devices (such as your iPod, mp3 player, or USB drive) to your Iomega device and directly stream files through the device, or access media files through a networked media player. Below are two examples of how to set up the following media players:
iTunes
Xbox 360
Note: The procedures shown below are intended as examples. Your media player or version may operate differently. It is recommended that you refer to your media player documentation for
instructions on how to add a network device.
Example: Setting up iTunes
1. Locate the source directory of your iTunes media content.
2. Drag, or copy, your existing media content to a Share that has media sharing enabled.
3. When you open the iTunes Library, iTunes will display all of the media content from the Iomega device.
Example: Setting up Xbox 360
1. Connect your Xbox 360 to your TV and to the same local network as your Iomega device.
2. Navigate to the Media Tab in Xbox 360 and select a media-enabled Share.
3. Select Computer from the options menu.
4. Click Yes, Continue when asked if you have downloaded and installed media sharing software on your computer, since the Iomega device device comes preconfigured with this software.
5. Select Iomega device from the list of names. You should now see all the public media content on your device.
How do I ...
enable media aggregation
learn more about social media sharing
Media Management
119
Photos
Photos Overview
Your Iomega device has multiple ways to manage your pictures.
Your Iomega device can:
Stream pictures that are in Shares with media sharing enabled
Display pictures on the Home Page in a slideshow
Automatically resize pictures
Transfer pictures from your digital camera
Upload pictures to social media sites like Flickr or Facebook
How do I ...
stream pictures
display pictures in a slideshow
automatically resize pictures
transfer pictures from a digital camera
upload pictures to Facebook
upload pictures to Flickr

Iomega StorCenter ix4-300d User Guide
120
Streaming Pictures
The Iomega StorCenter has a built-in media server that, when turned on, can scan for pictures in specific folders that have media sharing enabled. Any pictures contained in these specific folders will then be accessible to any user on your network with a media player. For information on enabling a folder as a media folder, refer to Managing Shares.
Scanning for Pictures
The Media Server automatically scans for media content on a regular basis. However, you can click Scan now at any time to force the media server to perform an immediate scan for pictures. This is especially useful after you have created new folders with media sharing enabled and copied a large amount of media content to them.
How do I ...
display pictures in a slideshow
automatically resize pictures
transfer pictures from a digital camera
Media Management
121
Creating a Slideshow on the Device Home Page
Your ix4-300d Network Storage can display a slideshow on its home page.
On the Home Page Settings feature page, check Display slideshows to display picture slideshows from folders on the ix4-300d Network Storage. Click Manage slideshows to configure any slideshows you want to display. The slideshow location can be any folder attached to the ix4-300d Network Storage, including a USB drive or DFS location.
Iomega StorCenter ix4-300d User Guide
122
Automatically Resizing Your Photos
A Photo Resize Active Folder automatically changes the size of photos in that Share to a set size. You can choose to keep the original photos added to this Share, while a resized copy is created. The resized photos are saved to a folder on the Share named by the photo size you choose, such as 800x600. To configure a Share as a Photo Resize Active Folder, access Shares from the Iomega StorCenter ix4 Console, select a Share, and expand the Active Folders section to enable and configure it.
Refer to Managing Shares for more information on managing Shares and Active Folders.
Configuring a Photo Resize Active Folder
1. From the Iomega StorCenter ix4 Console, click Shares.
2. Select a Share to use as a Photo Resize Active Folder, and click to expand the Active Folder section.
3. Check Enable.
4. Select Photo Resize from the drop-down menu.
5. You can set a size for your pictures. Select 640x480, 800x600, 1024x768, or enter a Custom Resolution for resizing images. The resized photos are saved to a folder on the Share named by the photo size you choose, such as 800x600.
6. You can keep a copy of the original by selecting Keep the original files after resizing.
7. To add a watermark to your photo, select Add a watermark to the photos. Click the Watermark file icon to apply a watermark image to your file.
8. Click Apply to save your changes.
9. Once configured, all photos added to this Active Folder are resized to your settings. Click View Content to see the files in this Share.
How do I...
manage a Share

Media Management
123
Getting Pictures from Your Camera
The Picture Transfer Protocol (PTP) allows pictures to be automatically copied from a USB camera connected directly to the ix4-300d Network Storage. When Picture Transfer is turned on, and your camera is connected to your ix4-300d Network Storage, the pictures are copied to the configured destination folder.
1. Open the Picture Transfer page, click the switch on.
2. Optionally, if you want to automatically delete the pictures from your camera once they have been safely copied to your Iomega StorCenter, check Remove Copied Pictures From Camera to automatically delete the pictures from your camera once they have been safely copied to your ix4-300d Network Storage.
3. Click to open the Select Folder pop-up window, and select a Share as the destination for your pictures.
Iomega StorCenter ix4-300d User Guide
124
Music
Music Overview
If you have music files in media-sharing enabled folders on your Iomega device, those music files can be streamed by a DLNA player running on a computer on the network.
How do I ...
stream music

Media Management
125
Streaming Music
The Iomega StorCenter has a built-in media server that, when turned on, scans for music in specific folders that have media sharing enabled. Any music contained in these specific folders is then accessible to any user on your network with a media player. For information on enabling a folder as a media folder, refer to Managing Shares.
Scanning for Music
The Media Server automatically scans for media content on a regular basis. However, you can click Scan now at any time to force the media server to perform an immediate scan for media content. This is especially useful after you have created new folders with media sharing enabled and copied a large amount of media content to them.
Iomega StorCenter ix4-300d User Guide
126
Torrents
Torrent Overview
Torrent downloads allow you to share files using a peer-to-peer file sharing protocol. With torrent download enabled, you can download files using the torrent protocol to your Iomega StorCenter and then those files can be uploaded by other torrent users.
After you have added torrent jobs to your torrent share, the torrent download page displays a table of torrent jobs, showing both downloads and files available for upload. Multiple torrent files can download simultaneously. The table information includes the name of the file, its size, download or upload status, and amount of time remaining for the torrent job to complete.
How do I ...
enable torrent downloads
configure a router for torrent downloads
delete torrent jobs
share torrent downloads with other peers
add torrent files to your Iomega StorCenter

Media Management
127
Enabling Torrent Downloads
1. On the Torrent Download page, click the switch on.
2. Click Settings to modify the torrent download and upload settings.
3. In the Torrent Download Settings dialog box, enter a value for Maximum Download Speed. This sets the rate at which files are downloaded to your device. The maximum download speed you can enter is 2 MB/s.
4. Enter a value for Maximum Upload Speed. This sets the speed at which other users can upload a file unprompted from your device. The upload speed can affect device performance, so it is recommended that you choose a value that does not strain the performance of your device and impact other work on it. The maximum upload speed you can enter is 1GB/s.
5. Set a Port value used by torrent peers to upload files from your ix4-300d Network Storage. The port value should be a number between 6881 and 6999, and your router must be configured to allow port forwarding on the same port. Refer to Configuring your router for torrent downloads for more information on how to do this.
6. Click Apply to save your changes.

Iomega StorCenter ix4-300d User Guide
128
Deleting torrent jobs
1. On the Torrent Download page, select a torrent you want to delete.
2. Click the under the Action column to delete the torrent.
3. Click Yes to delete the torrent.

Media Management
129
Configuring Your Router for Torrent Downloads
You must manually configure your router to forward a specific port to your ix4-300d Network Storage. Most routers refer to this as port forwarding or application access, and it is recommended that you refer to your router's documentation to learn how to set these values.
Port Information Used to Configure Your Router
The following information may be required to manually configure your router:
Forward the port to your ix4-300d Network Storage IP address identified in the table:
Device IP Address
192.168.1.1
Port name
HTTP
Port number
Set to the same port value set on the Torrent Download page.
Protocol
TCP
Iomega StorCenter ix4-300d User Guide
130
Torrent Active Folders
Sharing Torrent Downloads with Other Peers
Torrent downloads allow you to share files using a peer-to-peer file sharing protocol. With Torrent Download, you can download files using the torrent protocol to your ix4-300d Network Storage and then those files can be uploaded by other torrent users.
Refer to Managing Shares for more information on managing Shares and Active Folders.
Configuring a Torrent Active Folder
1. From the Iomega StorCenter ix4 Console, click Shares.
2. Select a Share to use as a Torrent Active Folder, and click to expand the Active Folder section.
3. Check Enable.
4. Select Torrent from the drop-down menu.
5. Click General torrent settings to set up Torrent settings. Refer to Torrent Downloads for more information on configuring your Torrent downloads.
6. Click Apply to save your changes.
7. Click View Content to see the files in this Share.
How do I...
manage a Share
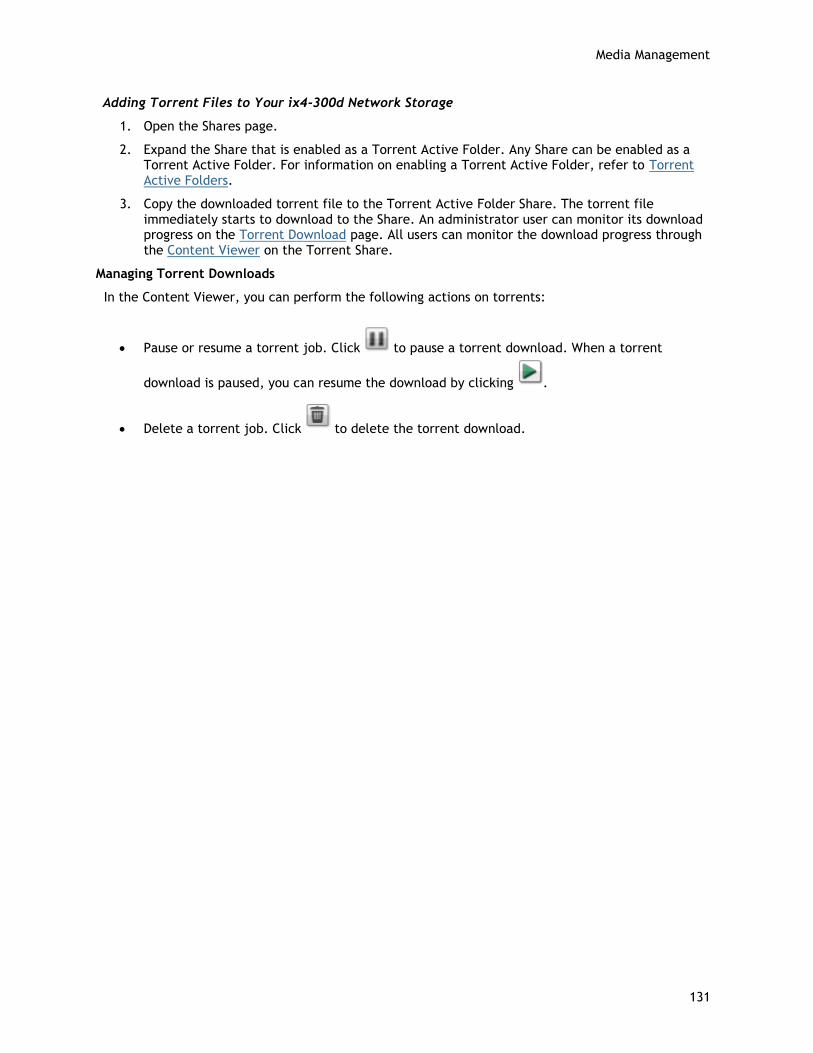
Media Management
131
Adding Torrent Files to Your ix4-300d Network Storage
1. Open the Shares page.
2. Expand the Share that is enabled as a Torrent Active Folder. Any Share can be enabled as a Torrent Active Folder. For information on enabling a Torrent Active Folder, refer to Torrent Active Folders.
3. Copy the downloaded torrent file to the Torrent Active Folder Share. The torrent file immediately starts to download to the Share. An administrator user can monitor its download progress on the Torrent Download page. All users can monitor the download progress through the Content Viewer on the Torrent Share.
Managing Torrent Downloads
In the Content Viewer, you can perform the following actions on torrents:
Pause or resume a torrent job. Click to pause a torrent download. When a torrent
download is paused, you can resume the download by clicking .
Delete a torrent job. Click to delete the torrent download.

Iomega StorCenter ix4-300d User Guide
132
Videos
Video Capabilities Overview
Your Iomega StorCenter has multiple ways to manage your videos.
Your Iomega device can:
Stream movies that are in Shares with media sharing enabled
Upload videos that are added to Shares associated with social media sites
How do I ...
stream movies
share movies through social media

Media Management
133
Streaming Movies
The Iomega StorCenter has a built-in media server that, when turned on, scans for movies in specific folders that have media sharing enabled. Any movies contained in these specific folders are accessible to any user on your network with a media player. For information on enabling a folder as a media folder, refer to Managing Shares.
Scanning for Movies
The Media Server automatically scans for media content on a regular basis. However, you can click Scan now at any time to force the media server to perform an immediate scan for movies. This is especially useful after you have created new folders with media sharing enabled and copied a large amount of media content to them.

135
Adding Applications to Your Device
Application Overview
You can install supported applications on your ix4-300d Network Storage using the Application Manager page. For each application installed you may have the option to uninstall, start, and stop the application.
How do I...
install an application
Iomega StorCenter ix4-300d User Guide
136
Application Manager
The Application Manager page allows you to add applications to your ix4-300d Network Storage from an installation file located on your computer. For each application installed you may have the option to uninstall, start, and stop the application. This page shows the applications which came preinstalled with your ix4-300d Network Storage, as well as applications that you have manually installed.
Note: Only valid applications built using the Iomega StorCenter SDK can be installed on your ix4-300d Network Storage.
Starting or stopping an application
When available, click in the Action column to stop an application. Click to start it again.
Adding applications
1. Click the Add application link. The Add application window displays.
2. Enter the path and name of the application file, or click Browse, and select the application file located on your computer.
3. Click Upload to install the application.
Removing applications
When available, click in the Action column to uninstall an application.
How do I...
enable security
137
Upgrading Your Device
Software Updates
The Software Updates page identifies the ix4-300d Network Storage software status and provides the ability to update the software for the ix4-300d Network Storage.
This software is protected by RSA BSAFE technology.
1. In the table listing the current software installed on your ix4-300d Network Storage, click in the Action column to check for updates.
2. The Status column will state whether the software is up to date or if an update is available.
To copy an update file to your ix4-300d Network Storage, click . The software update file is downloaded directly to your ix4-300d Network Storage.
3. If multiple updates are ready, you may install all the updates at the same time. Click Apply all pending updates to install the available updates. The software updates are applied to your ix4-300d Network Storage.
4. Once the software is installed, the ix4-300d Network Storage will reboot. If you are applying multiple updates, you only need to reboot once. Do not power down the ix4-300d Network Storage during this time.
5. If you want to remove the update without applying changes, click in the Action column.
Caution: Do not shut down the ix4-300d Network Storage during the update process as this can damage the ix4-300d Network Storage. The ix4-300d Network Storage will be temporarily inaccessible during the software update. Be sure no critical files are being
accessed.
during this time.
Manual update process: installing a device software update
1. In the table listing the current software installed on your ix4-300d Network Storage, click
in the Action column to check for updates.
2. If an update is available, the Status column will state that a software update is available with a link. Download the update file to your local computer.
3. To retrieve the update, click Add Software.
4. In the Add Software pop-up window, if an update is available, there will be a link to download the appropriate update for your ix4-300d Network Storage. Click the link, follow the instructions on the download site page, and download the software update to your local computer.
5. Once downloaded, click Browse to select the update, and then click Upload to continue.

Iomega StorCenter ix4-300d User Guide
138
When the update is uploaded to the ix4-300d Network Storage, the Status column will say Ready to apply.
6. Click Apply all pending updates to apply the update or updates. The software updates will be applied to your ix4-300d Network Storage. If you want to remove the update without
applying changes, click in the Action column.
The ix4-300d Network Storage restarts once the software is installed. You should not power down the ix4-300d Network Storage during the installation process as this can damage the ix4-300d Network Storage. If multiple updates are ready, all of them will be applied, requiring only one reboot.
Caution: The ix4-300d Network Storage will be temporarily inaccessible during the software update. Be sure no critical files are being accessed.

139
Recovering Your Device Configuration
Copying Your Iomega StorCenter ix4-300d Network Storage Settings to Other Devices
The Configuration Backup and Restore page allows you to back up and restore system configuration information. Backing up a configuration saves various system properties, including users, groups, device identification, and Share names and permissions. Configuration information is saved to a file, and you can save as many versions of the file as you want. After backing up the configuration, you can restore it to your ix4-300d Network Storage at any time. You can also apply the configuration backup to other Iomega StorCenter devices of the same model, effectively using the configuration as a template.
Note: Configuration Backup and Restore does not back up or restore any data files on your ix4-300d Network Storage.
Backing up Device Configuration
1. On the Configuration Backup and Restore page, click Back up configuration to select a name and location for your configuration backup.
2. Save the configuration file to an external device, such as your computer or a USB drive. You can save as many configuration backups as you want.
Restoring a Configuration Backup
1. On the Configuration Backup and Restore page, click Restore configuration to select a saved configuration backup.
2. In the Restore Configuration dialog box, click Browse to locate a previously saved configuration backup stored on your computer or USB device.
3. Select one of the following options:
Restore settings — overwrites any existing settings, such as device identification and Share names. When you select this option, existing data on the ix4-300d Network Storage is not deleted, and the configuration restore operation starts automatically after you click Apply in the Restore Configuration dialog box.
Restore settings and drive configuration — deletes all data, users, and settings from the target ix4-300d Network Storage. If you select this option, a confirmation dialog box displays and informs you that restoring the configuration will delete all data and overwrite any existing users or settings on the target ix4-300d Network Storage. Check Check this box to continue to confirm this dialog box or click Cancel to stop the configuration restore process.
4. Click Apply to save your changes. After you click Apply, the restore process starts.
5. If your source ix4-300d Network Storage had Active Directory enabled, you are prompted to enter the administrator name and password of an account that has the rights to join the domain.
6. Click OK.

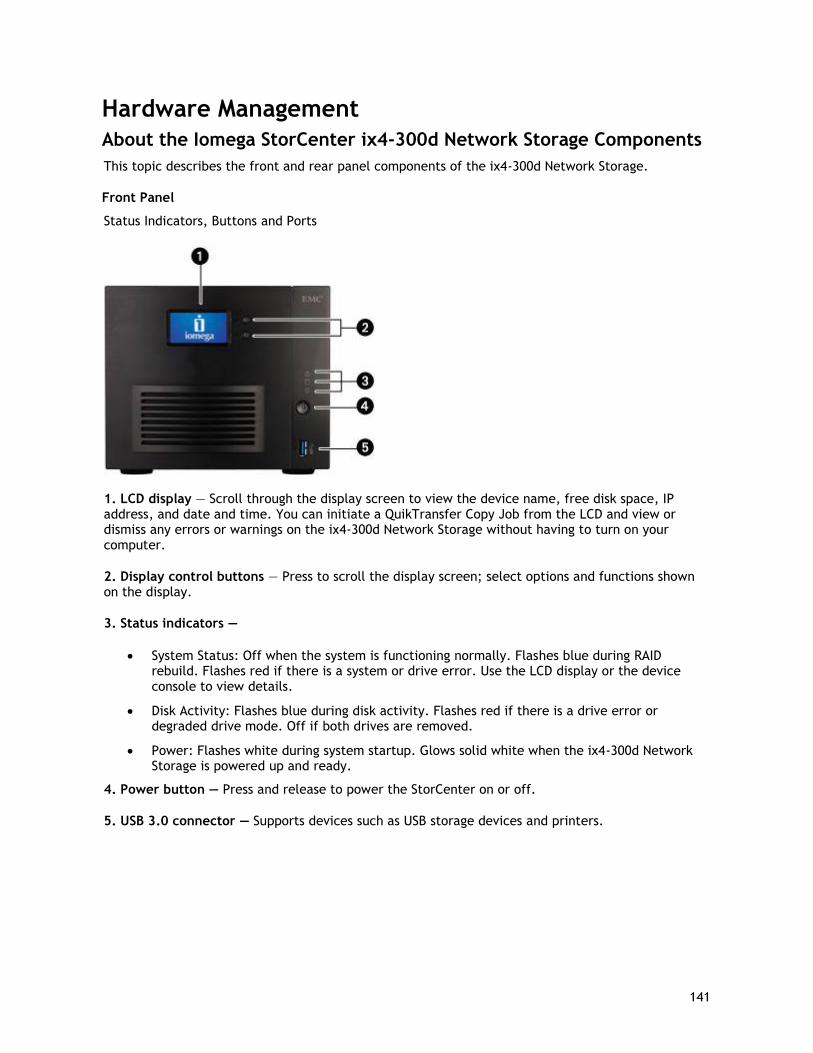
141
Hardware Management
About the Iomega StorCenter ix4-300d Network Storage Components
This topic describes the front and rear panel components of the ix4-300d Network Storage.
Front Panel
Status Indicators, Buttons and Ports
1. LCD display — Scroll through the display screen to view the device name, free disk space, IP address, and date and time. You can initiate a QuikTransfer Copy Job from the LCD and view or dismiss any errors or warnings on the ix4-300d Network Storage without having to turn on your computer.
2. Display control buttons — Press to scroll the display screen; select options and functions shown on the display.
3. Status indicators —
System Status: Off when the system is functioning normally. Flashes blue during RAID rebuild. Flashes red if there is a system or drive error. Use the LCD display or the device console to view details.
Disk Activity: Flashes blue during disk activity. Flashes red if there is a drive error or degraded drive mode. Off if both drives are removed.
Power: Flashes white during system startup. Glows solid white when the ix4-300d Network Storage is powered up and ready.
4. Power button — Press and release to power the StorCenter on or off.
5. USB 3.0 connector — Supports devices such as USB storage devices and printers.
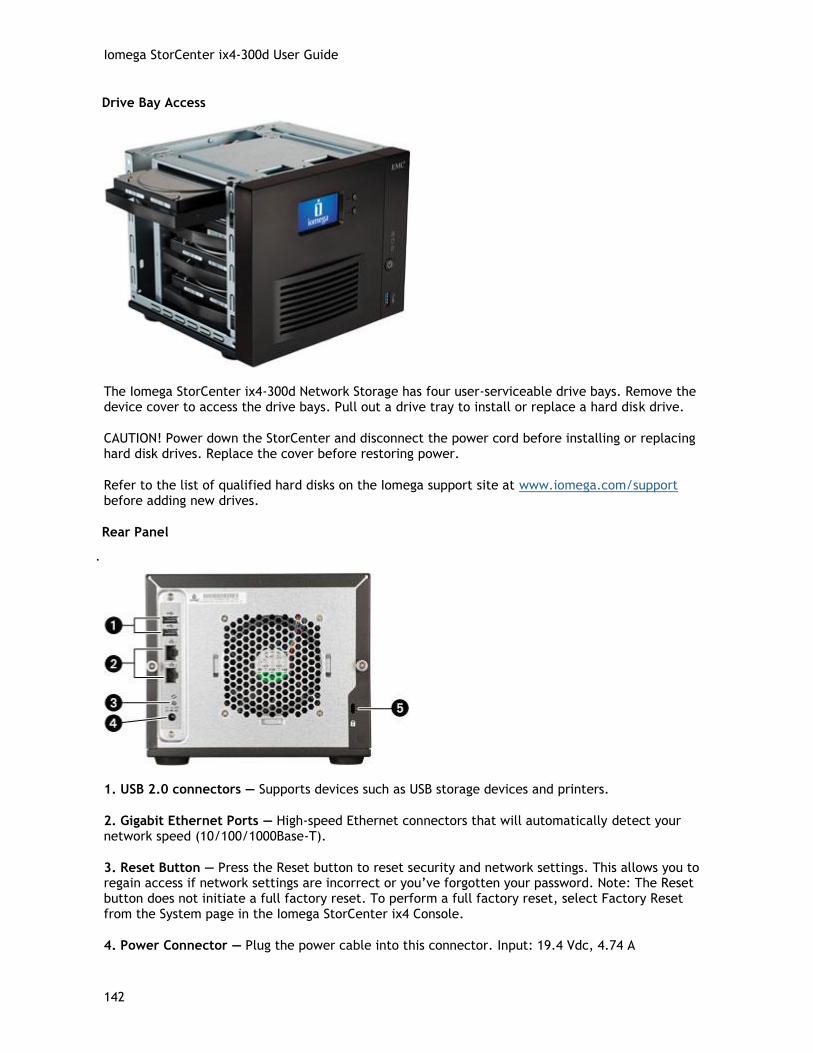
Iomega StorCenter ix4-300d User Guide
142
Drive Bay Access
The Iomega StorCenter ix4-300d Network Storage has four user-serviceable drive bays. Remove the device cover to access the drive bays. Pull out a drive tray to install or replace a hard disk drive.
CAUTION! Power down the StorCenter and disconnect the power cord before installing or replacing hard disk drives. Replace the cover before restoring power.
Refer to the list of qualified hard disks on the Iomega support site at www.iomega.com/support before adding new drives.
Rear Panel
.
1. USB 2.0 connectors — Supports devices such as USB storage devices and printers.
2. Gigabit Ethernet Ports — High-speed Ethernet connectors that will automatically detect your network speed (10/100/1000Base-T).
3. Reset Button — Press the Reset button to reset security and network settings. This allows you to regain access if network settings are incorrect or you’ve forgotten your password. Note: The Reset button does not initiate a full factory reset. To perform a full factory reset, select Factory Reset from the System page in the Iomega StorCenter ix4 Console.
4. Power Connector — Plug the power cable into this connector. Input: 19.4 Vdc, 4.74 A

Hardware Management
143
5. Security Lock — Connect security cable to protect your ix4-300d Network Storage from theft.
Default Settings:
IP Address — If not DHCP server is found on your network, the Iomega StorCenter ix4-300d Network Storage will get a self-assigned IP address in the 169.254.x.x range.
Device Name — The default name for your Iomega StorCenter ix4-300d is ix4-300d-XXXXXX (where XXXXXX is a unique string of letters and numbers).
Default Shares — Backups, Documents, Movies, Music, Pictures

Iomega StorCenter ix4-300d User Guide
144
Energy Saving
The Energy Saving page provides power settings for the ix4-300d Network Storage.
Power Down Drives
Click the Power Down Drives drop-down menu to select how much idle time should be allowed to elapse before the ix4-300d Network Storage powers down the drives. Drives automatically power back up when the ix4-300d Network Storage accesses them. You may notice a slight delay when the drives are accessed.
Brightness
To adjust the brightness of the lights on the ix4-300d Network Storage, set the Indicator Brightness to High, Medium, or Low.
Wake On LAN
Wake On LAN powers on your ix4-300d Network Storage when a specific signal is sent over the network. Additional software may be required to send the Wake On LAN signal to your device.
1. Check the Wake On LAN checkbox to enable Wake On LAN.
2. Click Apply to save your changes.
Creating A Power Schedule
You can create a power schedule to turn your ix4-300d Network Storage on and off. Power off and Power on functions can be scheduled as one-time events, or recurring events. When you create a power schedule, you can set the day and time to power down the device. In addition, you can optionally set power on times.
1. Check the Enable device power schedule checkbox.
2. Select the days for your ix4-300d Network Storage to power on or off.
3. Set the power schedule time in both hours and minutes (HH:MM), and specify AM or PM.
4. Click Apply to save your changes.

Hardware Management
145
Factory Reset
Factory Reset returns the ix4-300d Network Storage to its original state. This feature is useful if you give your ix4-300d Network Storage to someone else.
Factory Reset provides two options for returning your ix4-300d Network Storage to its original state:
Quickly delete all data — permanently deletes all record of existing or deleted data, users, and passwords.
Securely delete all data — this option takes significantly longer, but provides an added security benefit by permanently erasing all data on the drives to prevent recovery of existing or deleted data, users, and passwords. The secure delete operation renders all data irrecoverable.
Note: You can use the factory reset feature only to erase the drives internal to the ix4-300d Network Storage. You cannot use this feature to reset any external storage devices that may be connected.
1. Choose one of the following options:
Quickly delete all data
Securely delete all data
2. From the After Reset drop-down menu, choose to Restart or Power off the ix4-300d Network Storage after the factory reset completes.
3. Click Apply.
4. In the pop-up confirmation, click Yes to perform the factory reset. After the factory reset completes, the ix4-300d Network Storage powers down or restarts depending on your selection.
Warning: When you quickly delete or securely delete all data on your Iomega StorCenter, any installed applications, as listed on the Application Manager page, are also deleted. Go to www.lifelineapps.com to download and reinstall your applications. In addition, you should visit the Iomega support web site for specific information on reinstalling applications that
came preloaded with your ix4-300d Network Storage.

Iomega StorCenter ix4-300d User Guide
146
UPS Management
The Iomega StorCenter UPS Management page allows you to monitor the status of an attached Uninterruptible Power Supply.
If your ix4-300d Network Storage is connected to a UPS battery backup unit, it is listed on this page. The battery status of the backup unit is also indicated, displaying how much of a charge is left in the battery. To monitor the battery status of your UPS unit, connect your ix4-300d Network Storage to it with a USB cable.
If the ix4-300d Network Storage is running from the UPS battery, it automatically shuts down to preserve data as the battery charge gets low.
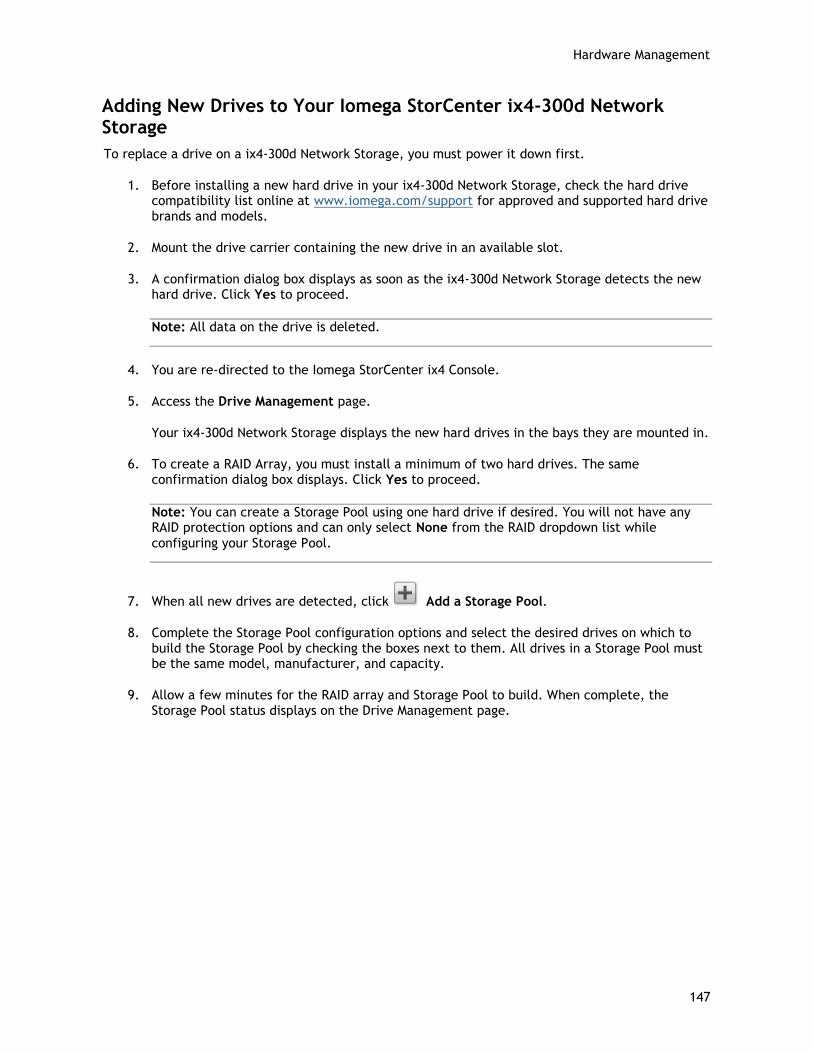
Hardware Management
147
Adding New Drives to Your Iomega StorCenter ix4-300d Network Storage
To replace a drive on a ix4-300d Network Storage, you must power it down first.
1. Before installing a new hard drive in your ix4-300d Network Storage, check the hard drive compatibility list online at www.iomega.com/support for approved and supported hard drive brands and models.
2. Mount the drive carrier containing the new drive in an available slot.
3. A confirmation dialog box displays as soon as the ix4-300d Network Storage detects the new hard drive. Click Yes to proceed.
Note: All data on the drive is deleted.
4. You are re-directed to the Iomega StorCenter ix4 Console.
5. Access the Drive Management page.
Your ix4-300d Network Storage displays the new hard drives in the bays they are mounted in.
6. To create a RAID Array, you must install a minimum of two hard drives. The same confirmation dialog box displays. Click Yes to proceed.
Note: You can create a Storage Pool using one hard drive if desired. You will not have any RAID protection options and can only select None from the RAID dropdown list while
configuring your Storage Pool.
7. When all new drives are detected, click Add a Storage Pool.
8. Complete the Storage Pool configuration options and select the desired drives on which to build the Storage Pool by checking the boxes next to them. All drives in a Storage Pool must be the same model, manufacturer, and capacity.
9. Allow a few minutes for the RAID array and Storage Pool to build. When complete, the Storage Pool status displays on the Drive Management page.

Iomega StorCenter ix4-300d User Guide
148
Troubleshooting Routers
If you encounter a problem while connecting or using your ix4-300d Network Storage, check the topics listed below for possible solutions.
If you have properly set port forwarding on your router and remote access still does not work, you may have multiple routers on your network. In this situation, you will most likely have two NAT (Network Address Translation) this situation you will most likely have two NAT (Network Address Translation) firewalls.
1. One of the easiest ways to identify this issue is to log in to the router to which the ix4-300d Network Storage is connected.
2. Once you have logged in, go to the page that shows the router's WAN IP address, usually Status or Network Info.
3. If the WAN IP address begins with 192.168, 10, or 172, you may have a NAT Firewall between the router and internet connection.
There are several options for resolving double NAT situations. The sections below explore the pros and cons of each resolution:
These instructions will refer to the router that is connected directly to the internet
as the Primary Router. The cascaded router or router to which your ix4-300d
Network Storage is connected is referred to as the Secondary Router.
Use the primary router's DMZ
Port forward the primary router to the secondary router
Put the secondary router in bridging mode
Put the primary router in bridging mode
Enabling the DMZ
Most routers have a feature called DMZ or Default Server. DMZ stands for Demilitarized Zone, Data Management Zone, Demarcation Done, or Perimeter Network. The DMZ allows you to enter an IP address that will exist outside the router's NAT Firewall.
This is the easiest way to configure your network to handle double NAT situations; however, it is dependent upon DMZ functionality within your primary router.
To enable the DMZ:
1. Log in to the primary router.
2. Navigate to the settings page for DMZ or Default Server. Refer to the documentation that came with your router for information on where this feature is found.
3. Enter the secondary router's IP address.
4. Save your settings.
Your secondary router is no longer behind your primary router's firewall. If port forwarding is correctly configured, remote access should now be working properly. Moving your secondary router into the DMZ should not have any effect on the security of the network, since it is still protected by the secondary router's firewall.
Hardware Management
149
Configuring Port Forwarding on Double NAT Networks
If for some reason the network configuration cannot be changed and your setup requires the double NAT, you must perform the port forwarding steps twice. On the primary router, set the port forwarding to the cascaded router's external IP address. On the cascaded router, set the port forwarding to the ix4-300d Network Storage's IP address.
Bridging the Secondary Router
Bridging the Primary Router
If none of the above options are available, you must enable transparent bridging on your primary router. This may require contacting your ISP (Internet Service Provider) to configure the DSL or Cable Modem/NAT into bridge mode, which then disables the first NAT/Firewall. After this first firewall in the modem is disabled, the secondary router handles all the network traffic, Port Forwarding, and allows Remote Access to work.
You should not attempt bridging without help from the ISP. If bridge mode is attempted by the customer and not configured properly, it can render the customer's internet connection inoperable. Primary router bridging may also require special configuration information and settings on the secondary router.
If you configured your ix4-300d Network Storage using DHCP, you may not be able to reconnect to it via Remote Access after a reboot. DHCP automatically receives an IP address from the server whenever the ix4-300d Network Storage restarts. This is a very simple way to configure the ix4-300d Network Storage but can cause problems with your router's port forwarding settings. The router does not dynamically update port forwarding settings and cannot port forward to your ix4-300d Network Storage if its IP address changes.
To resolve this problem, try one of the following processes:
Increase the length of the DHCP lease: Your router attempts to remember all DHCP clients and assigns them the same IP address every time they request an IP address; however, the router forgets clients if they do not request an IP address for a certain amount of time. Your router has a setting for the duration of the validity of the DHCP lease. If your network requires DHCP, this may be a good solution; however, it is not always guaranteed to work. Occasionally updating your router's port forwarding settings may be required.
Use Static DHCP: Some routers allow you to assign Static IP addresses through the DHCP system based on the MAC address of the device. This ensures that the ix4-300d Network Storage always gets the same IP address, and your port forwarding settings are always correct. Static DHCP allows you to leave your ix4-300d Network Storage in DHCP mode. Refer to your router's documentation for more information on configuring DHCP settings.
Use a Manual IP Address: Changing the Manual IP address reduces the reliance of your ix4-300d Network Storage on the DHCP server; however, you must perform additional configuration for it to work properly.
1. Log in to your router and write down the DHCP range it is using.
2. Refer to your router's documentation for more information on configuring DHCP settings.
3. Navigate to the IP address settings interface page on your ix4-300d Network Storage . For more information, check the Network Settings section of this manual.
4. Enter a new IP address that is outside of your router's DHCP range. For example, if your router is distributing IP addresses in the range of 192.168.14.2 through 192.168.14.50,

Iomega StorCenter ix4-300d User Guide
150
you must assign the ix4-300d Network Storage a number between 192.168.14.51 and 192.168.14.255. Make sure you are assigning the ix4-300d Network Storage an IP address that is not in use by another device.
5. Enter a subnet mask. The subnet mask describes the size of your network. For most networks this is 255.255.255.0 which allows for 256 network devices. If you are on a larger network or are using the self-assigned APIPA range (169.254.x.x), you must use a 255.255.0.0 or larger subnet mask.
6. For best results, enter the IP address(es) for your DNS Server(s).
7. If necessary, enter the IP address(es) for your WINS server(s).
8. Enter a gateway address. In most cases, this is the IP address of your router.
9. If necessary, update your router's port forwarding information with the new static DHCP IP address.
151
Additional Support
How to Get Help
Iomega is committed to providing excellent customer support. To meet this goal, Iomega offers a variety of support options designed to meet the needs of a wide range of users. For complete information on the support options available for your Iomega product, visit the Iomega website. Please select your region carefully.
Here's just some of what is available on Iomega's award-winning web support site 24 hours a day, 7 days a week:
Answers to frequently asked questions (FAQs)
Online help pages with troubleshooting or basic how to information
Up-to-date Iomega software and drivers
Advanced online support options, such as 1-on-1 live chat and email
Electronic copies of Iomega product manuals
Information on telephone support options
Information on advanced technical service options, such as data recovery
Warranty information and product return instructions
Support options available may vary depending on your region and language of choice. Iomega's specific customer support policies (including fees for services) and procedures change as technology and market conditions dictate. To obtain information about Iomega's current policies, please visit our website at:
www.iomega.com/supportpolicy.html
or write to:
Iomega Customer Service 4059 South 1900 West Roy, UT 84067, USA

Iomega StorCenter ix4-300d User Guide
152
Support
The Support feature opens the Iomega web site where you can get more information about your Iomega StorCenter ix4-300d Network Storage. The Support page provides access to content for learning more about using and supporting your ix4-300d Network Storage.
Refer to the Iomega Support site for more information.
153
Legal
ix4-300d Network Storage Trademark Page
Iomega, the stylized logo, and StorCenter are either registered trademarks or trademarks of Iomega Corporation in the United States and other countries. Microsoft and Windows are either registered trademarks or trademarks of Microsoft Corporation in the United States and/or other countries. Mac, Macintosh, and AppleTalk are registered trademarks or trademarks of Apple Computer Inc. in the United States and/or other countries. Certain other product names, brand names, and company names may be trademarks or designations of their respective owners.
© 2012 Iomega Corporation. All rights reserved.
Iomega StorCenter ix4-300d User Guide
154
Regulatory Information
This topic provides regulatory information for various countries.
FCC (United States)
The computer equipment described in this manual generates and uses radio frequency (RF) energy. If the equipment is not installed and operated in strict accordance with the manufacturer's instructions, interference to radio and television reception might result.
This equipment complies with Part 15 of the FCC Rules. Operation is subject to the following conditions: (1) This device may not cause harmful interference, and (2) this device must accept any interference received, including interference that may cause undesired operation.
Note: This equipment has been tested and found to comply with the limits for a Class B digital device, pursuant to part 15 of the FCC Rules. These limits are designed to provide reasonable protection against harmful interference in a residential installation. This equipment generates, uses and can radiate radio frequency energy and, if not installed and used in accordance with the instructions, may cause harmful interference to radio communications. However, there is no guarantee that interference will not occur in a particular installation. If this equipment does cause harmful interference to radio or television reception, which can be determined by turning the equipment off and on, the user is encouraged to try to correct the interference by one or more of the following measures:
Reorient or relocate the receiving antenna.
Increase the separation between the equipment and receiver.
Connect the equipment into an outlet on a circuit different from that to which the receiver is connected.
Consult the dealer or an experienced radio/TV technician for help.
Canadian Verification
This Class B digital apparatus meets all requirements of the Canadian Interference-Causing Equipment Regulations (ICES-003, Class B).
CE (European Community)
Iomega declares that this Iomega product conforms to all applicable European Directives and Standards, including by way of example, 2004/108/ EC, 2009/125/ EC, and 2006/95/ EC. The Declaration of Conformity can be obtained by contacting Iomega or is available at www.iomega.com/support/ce.
Manufacturer/Responsible Party
Iomega Customer Service, 4059 South 1900 West, Roy, UT 84067
EU Representative
Iomega International SA H/O Iomega Netherlands

Legal
155
3821 BM Amersfoort NL - The Netherlands
Waste Electrical and Electronic Equipment (WEEE)
In accordance with European Directive 2002/96/EC on Waste Electrical and Electronic Equipment (WEEE), the presence of the above symbol on the product or on its packaging indicates that this item must not be disposed of in the normal unsorted municipal waste stream. Instead, it is the user's responsibility to dispose of this product by returning it to a collection point designated for the recycling of electrical and electronic equipment waste. Separate collection of this waste helps to optimize the recovery and recycling of any reclaimable materials and also reduces the impact on human health and the environment.
For more information concerning the correct disposal of this product, please contact your local authority or the retailer where this product was purchased.

Iomega StorCenter ix4-300d User Guide
156
Safety Information
Observe the following guidelines when using your Iomega StorCenter ix4-300d Network Storage:
1. Follow all instructions marked on the ix4-300d Network Storage and in the documentation.
2. Use only the power supply provided with the ix4-300d Network Storage.
3. Unplug the ix4-300d Network Storage before cleaning. Do not use liquid or aerosol cleaners. Use a damp cloth for cleaning.
4. Do not use the ix4-300d Network Storage near water. Do not spill liquid on or into the ix4-300d Network Storage.
5. Do not place the ix4-300d Network Storage on an unstable surface.
6. Do not place the ix4-300d Network Storage near or on a radiator or heat register.
7. Openings in the ix4-300d Network Storage are provided for fans and air ventilation and should not be blocked or covered. Make sure the ix4-300d Network Storage has ample ventilation (at least 6 inches or 127 mm) in front and behind the unit.
8. Do not walk on the power cord or allow anything to rest on it.
9. Power down the StorCenter and disconnect the power cord before installing or replacing hard disk drives. Replace the cover before restoring power.
10. There is a danger of explosion if the battery is incorrectly replaced. Replace only with the same or equivalent type recommended by the equipment manufacturer. Dispose of used batteries according to local, state, regional, and federal regulations.
Under any of the following conditions, unplug the ix4-300d Network Storage from the wall outlet and contact technical support:
The power cord or plug is damaged.
Liquid has been spilled into the device.
The device does not function properly when the operating instructions are followed.
The device was dropped or the exterior enclosure is damaged.

Legal
157
Limited Warranty
Drives and Media
Coverage
Excluded Products and Problems
Remedies
Obtaining Warranty Service
Limitations
Coverage
Iomega warrants this hardware product to be free from defects in materials and workmanship for the warranty period. This non-transferable, limited warranty applies only to you, the first end-user purchaser. The warranty begins on the date of purchase and lasts for a period of one (1) year for products purchased in the Americas, the Asia-Pacific region, or non-European Union nations in Europe, the Middle East, or Africa; ninety (90) days for Iomega reconditioned products purchased in these regions; or, two (2) years for products purchased by an end-user in member nations of the European Union. Customers who register their new products at www.iomegareg.com within 90 days of purchase will receive a warranty extension so that their total warranty shall be a period of three (3) years in all regions. Reconditioned products are not eligible for a warranty extension.
Excluded Products and Problems
This warranty does not apply to: (a) software of Iomega or any affiliates; (b) expendable components such as fuses or bulbs; or (c) third party products, hardware or software, distributed by Iomega. Iomega makes no warranty of any kind on such products which, if included, are provided “AS IS.” This warranty also excludes damage caused by accident, misuse, abuse, use of non-Iomega approved media or replaceable components, exposure of media to excessive magnetic fields, or external environmental causes, or damage arising from any cause or causes for which Iomega is not responsible such as exposure to abnormal temperatures, shock, power surges, power outages, improper power supply, or damage caused while the product is being shipped from you to Iomega.
Your Iomega product may contain certain replaceable components such as hard drives or power supplies. Refer to your product documentation or contact Iomega to determine whether specific components are replaceable. Any alteration, change, modification, or repair (other than replacement of a replaceable component) made to the product by a party other than Iomega or Iomega’s authorized service provider will void this warranty.
All Iomega products are manufactured solely to standard commercial grade levels of reliability and are not intended for use in any systems that require Iomega products to conform to the higher grades of reliability, such as critical safety systems, life-support systems, medical devices, nuclear facilities, military devices, satellites, or aviation equipment. Iomega shall not be liable for any damages incurred if Iomega products are used in such capacities, and no warranty shall apply.
Remedies
Your sole and exclusive remedy for a covered defect is repair or replacement of the defective product, at Iomega's sole option and expense (shipping may be charged), and Iomega may use new or refurbished parts or products to do so. If Iomega is unable to repair or replace a defective product, your alternate exclusive remedy shall be a refund of the original purchase price.
The above is Iomega 's entire obligation to you under this warranty. IN NO EVENT SHALL IOMEGA BE LIABLE FOR INDIRECT, INCIDENTAL, CONSEQUENTIAL OR SPECIAL DAMAGES OR LOSSES, INCLUDING
Iomega StorCenter ix4-300d User Guide
158
LOSS OF DATA, USE, OR PROFITS EVEN IF IOMEGA HAS BEEN ADVISED OF THE POSSIBILITY OF SUCH DAMAGES. In no event shall Iomega 's liability exceed the original purchase price of the drive or the media disk. Some jurisdictions do not allow the exclusion or limitation of incidental or consequential damages, so the above limitation or exclusion may not apply to you.
Obtaining Warranty Service
You must notify Iomega within the warranty period to receive warranty service. Just as technology and market conditions vary, Iomega's specific customer support policies (including fees for services) and procedures change over time. To obtain information about Iomega's current policies or warranty service, please visit our website at www.iomega.com/supportpolicy.html or write to:
Iomega Customer Service, 4059 South 1900 West, Roy, UT 84067
Contact information for Iomega Customer Service can be obtained on our support website at:
Americas www.iomega.com/support
Europe www.iomega.com/europe/support
Asia www.iomega.com/ap/support
If your product is eligible for warranty service, you will be required to return it to Iomega, along with proper identification, a return authorization number obtained from the Iomega website or provided by the Iomega representative, and proof of purchase. Iomega will not protect, recover, or return data during warranty service, so you should duplicate your data before shipment.
Limitations
THE ABOVE WARRANTY IS EXCLUSIVE AND IN LIEU OF ALL OTHER WARRANTIES, EXPRESS OR IMPLIED. To the extent permitted by applicable law, IOMEGA SPECIFICALLY DISCLAIMS ANY IMPLIED WARRANTIES, INCLUDING ANY IMPLIED WARRANTY OF MERCHANTABILITY OR FITNESS FOR A PARTICULAR PURPOSE. Any implied warranty required by applicable law shall be limited in duration to the express warranty term. Some jurisdictions do not allow disclaimers of implied warranties or limitations on how long an implied warranty lasts, so the above limitation may not apply to you.
This warranty gives you specific legal rights, and you may also have other rights that vary from jurisdiction to jurisdiction. Any suit for breach of any warranty on your product must be filed within one (1) year of the first date the suit could have been brought.
Legal
159
Open Source
The software included in this product contains copyrighted software that is licensed under open source agreements. Components of this software covered under GPL or other open source licenses are fully documented as to license and redistribution requirements in the ReadMe file available with the source code. The corresponding source code package is available for download from Iomega’s Support and Download site at www.iomega.com/support. To locate the download page for open source code, select your Iomega product and your operating system. Scroll down the page to the search field and enter “open source”. In addition, you can also obtain a copy of the applicable open source code on CD by sending a money order or check for $10 (USD) to:
Iomega Corporation • ATTN: Source Code • 4059 South 1900 West • Roy, UT 84067 USA
Please include the model name for your Iomega product with the request.