iwd rapid iphone web app development framework...
TRANSCRIPT
iWD
Rapid iPhone Web App Development Framework
TutorialBuild 805
Background
iWD is a set of extensions to Enterprise Web Developer (EWD) that provides a framework for extremely rapid development of Caché-based iPhone Web Applications that look and behave almost identically to Native iPhone Apps.
The difference is that whereas Native iPhone Apps take months of complex Mac-based Objective C development and weeks of waiting for approval by Apple to gain entry to their App Store, you can build iWD apps in a matter of just minutes or hours using a simple text editor and a copy of Caché!
This document provides a tutorial to help you learn how to build iPhone Apps using iWD.
Pre-requisites
Before you begin this tutorial, you should install the latest build of EWD that is available from our web site (http://www.mgateway.com). Click the Enterprise Web Developer tab, then click the tabs Download EWD followed by EWD for Caché. Complete the registration form and you’ll be able to download the latest copy of EWD for free. iWD is included with EWD.
The zip file that you'll download contains two critical parts:
- zewd.xml - the object code file that you install into your %SYS namespace using $system.OBJ.Load. Let this overwrite any existing copy of ^%zewd* routines if you already have EWD on your Caché system
-
- an entire directory path named /iwd. This contains all the CSS and Javascript files needed for running your iWD-generated iPhone apps. Copy this entire directory directly under your web server's root directory. For example, if you're running IIS, you should end up with \inetpub\wwwroot\iwd, or if you're using Apache on a Ubuntu server, you'll end up with /var/www/iwd
-iWD can generate both CSP and WebLink versions of iPhone applications from the same iWD source code. If you're already using EWD, then you can immediately start developing iWD applications.
iWD : Tutorial. Build 805: 27 April 2010. Copyright 2010, M/Gateway Developments Ltd. All Rights Reserved
1
If you're new to EWD, then you'll need to configure EWD for either WebLink or CSP, depending on which technology you use. There are configuration instructions on our web site, but here's a quick way of configuring both, based on certain assumptions - just change the references according to your exact Caché/WebLink/CSP configuration.
CSP
Assumptions:
- you'll be running your iWD/EWD-generated CSP applications in your USER namespace
- you're using IIS as your web server and its root path is c:\inetpub\wwwroot
- your source iWD/EWD applications will reside under the path c:/ ewdapps
- the CSP application directories and files generated by iWD/EWD will be saved under c:\InterSystems\Cache\CSP\ewd
Create a global named ^zewd as follows (adjust as necessary):
^zewd("config","RootURL","csp")="/csp/ewd" ^zewd("config","applicationRootPath")="c:\ewdapps" ^zewd("config","backEndTechnology")="cache" ^zewd("config","frontEndTechnology")="csp" ^zewd("config","sessionDatabase")="cache" ^zewd("config","defaultFormat")="pretty" ^zewd("config","outputRootPath","csp")="c:\InterSystems\Cache\CSP\ewd" ^zewd("config","jsScriptPath","csp","mode")="fixed" ^zewd("config","jsScriptPath","csp","path")="/" ^zewd("config","jsScriptPath","csp","outputPath")="c:\Inetpub\wwwroot"
Next, create a CSP Application named "/csp/ewd" that points to the outputRootPath above and directs you to the required namespace (USER).
WebLink
Assumptions:
- you'll be running your iWD/EWD applications in your USER namespace
- you're using IIS as your web server and its root path is c:\inetpub\wwwroot
- your source iWD/EWD applications will reside under the path c:/ ewdapps -
iWD : Tutorial. Build 805: 27 April 2010. Copyright 2010, M/Gateway Developments Ltd. All Rights Reserved
2

- you'll be using the WebLink Server (MGWLPN) USER which, by default, connects incoming requests to the USER namespace
Create a global named ^zewd in the USER namespace as follows (adjust as necessary):
^zewd("config","RootURL","wl")="/scripts/mgwms32.dll" ^zewd("config","applicationRootPath")="/usr/ewdApps" ^zewd("config","backEndTechnology")="cache" ^zewd("config","defaultFormat")="pretty" ^zewd("config","defaultTechnology")="wl" ^zewd("config","frontEndTechnology")="wl" ^zewd("config","jsScriptPath","wl")="fixed" ^zewd("config","jsScriptPath","wl","mode")="fixed" ^zewd("config","jsScriptPath","wl","outputPath")="c:\Inetpub\wwwroot" ^zewd("config","jsScriptPath","wl","path")="/" ^zewd("config","sessionDatabase")="cache"
You also must create the global (again in USER):
^MGWAPP("ewdwl")="runPage^%zewdWLD"
This latter global creates the WebLink dispatcher to EWD's WebLink run-time engine.
Creating iWD Pages
This tutorial will guide you through the process, but here’s a quick summary of the process involved, based on the configuration settings shown above.
Having configured your EWD/iWD environment, you should now be ready to start developing. Create your new iWD application source pages in subdirectories of the Application Root Path, eg:
- c:\ewdapps\myApp\index.ewd - c:\ewdapps\myApp\login.ewd
You can use any text editor to create and edit these files.
To create the executable web application from these pages, you must compile them. This is most easily done using the command-line APIs that you invoke from within Caché Terminal.
To compile an entire application (eg one named myApp):
iWD : Tutorial. Build 805: 27 April 2010. Copyright 2010, M/Gateway Developments Ltd. All Rights Reserved
3
CSP:
USER> d compileAll^%zewdAPI("myApp",,"csp")
WebLink:
USER> d compileAll^%zewdAPI("myApp",,"wl")
To compile one page (eg myPage.ewd) in an application (eg myApp):
CSP:
USER> d compilePage^%zewdAPI("myApp","myPage",,"csp")
WebLink:
USER> d compilePage^%zewdAPI("myApp","myPage",,"wl")
Running iWD Applications
You’ll now have a runnable iPhone Web Application. You start it using Safari in your iPhone. The structure of the URL you’ll use depends on whether you’re using WebLink or CSP:
CSP
For CSP iWD applications, the structure of the URL you’ll use is:
- http://127.0.0.1/csp/ewd/[applicationName]/[pageName].csp
where applicationName is the name of your iWD application pageName is the name of the first page of your iWD application
for example:
- http://127.0.0.1/csp/ewd/myApp/index.csp
WebLink
For WebLink iWD applications, the structure of the URL you’ll use is:
- http://127.0.0.1/scripts/mgwms32.dll?MGWLPN=LOCAL&MGWAPP=ewdwl&app=[applicationName]&page=[pageName]
iWD : Tutorial. Build 805: 27 April 2010. Copyright 2010, M/Gateway Developments Ltd. All Rights Reserved
4

where applicationName is the name of your iWD application pageName is the name of the first page of your iWD application
for example:
- http://127.0.0.1/scripts/mgwms32.dll?MGWLPN=LOCAL&MGWAPP=ewdwl&app=myApp&page=index
If you’re using Apache, you’ll typically replace /scripts/mgwms32.dll with cgi-bin/nph-mgwcgi
Of course if you’re using a WebLink Server other than LOCAL, you’ll also need to change the value of the MGWLPN name/value pair.
OK, we’re ready to begin the tutorial.
iWD : Tutorial. Build 805: 27 April 2010. Copyright 2010, M/Gateway Developments Ltd. All Rights Reserved
5

Lesson 1 : Hello World
In time-honoured fashion, let’s start this tutorial by creating a simple “Hello World” application that will run as an iPhone application. We’ll analyse in detail how this application works and what all the XML means in the next section, but for now just try the following steps and see how little is involved in developing iPhone applications with iWD.
We’re going to name this demo application iwddemo, so you’ll be creating and editing files in the directory c:\ewdapps\iwddemo
You can use any text or HTML editor to create and edit your iWD source pages. In this tutorial we’ll assume that you are using Notepad.
Create a text file named index.ewd (ie c:\ewdapps\iwddemo\index.ewd) that contains the following:
<ewd:config isFirstPage="true" cachePage="false">
<iwd:main title="iWD Demo" contentPage="helloWorld" touchIcon="/iwd/pics/homescreen.gif" startupImage="/iwd/pics/iwd-Splash.png" />
Note: the file should have a blank line at the end, and the <iwd:main> tag should not be split across separate lines.
Next, create a second text file name helloWorld.ewd (ie c:\ewdapps\iwddemo\helloWorld.ewd) that contains the following:
<ewd:config isFirstPage="false" pageType="ajax"><iwd:pageItem> <iwd:header text="Hello World" /> <p> iWD is the fastest and coolest framework available for iPhone Apps! </p></iwd:pageItem>
OK, let’s compile and run this application. Start up a Caché Terminal session, change to the USER namespace and type the following (depending on whether you’re using CSP or WebLink):
CSP: d compileAll^%zewdAPI(“iwddemo”,,”csp”)WebLink: d compileAll^%zewdAPI(“iwddemo”,,”wl”)
Note the two commas!!
iWD : Tutorial. Build 805: 27 April 2010. Copyright 2010, M/Gateway Developments Ltd. All Rights Reserved
6
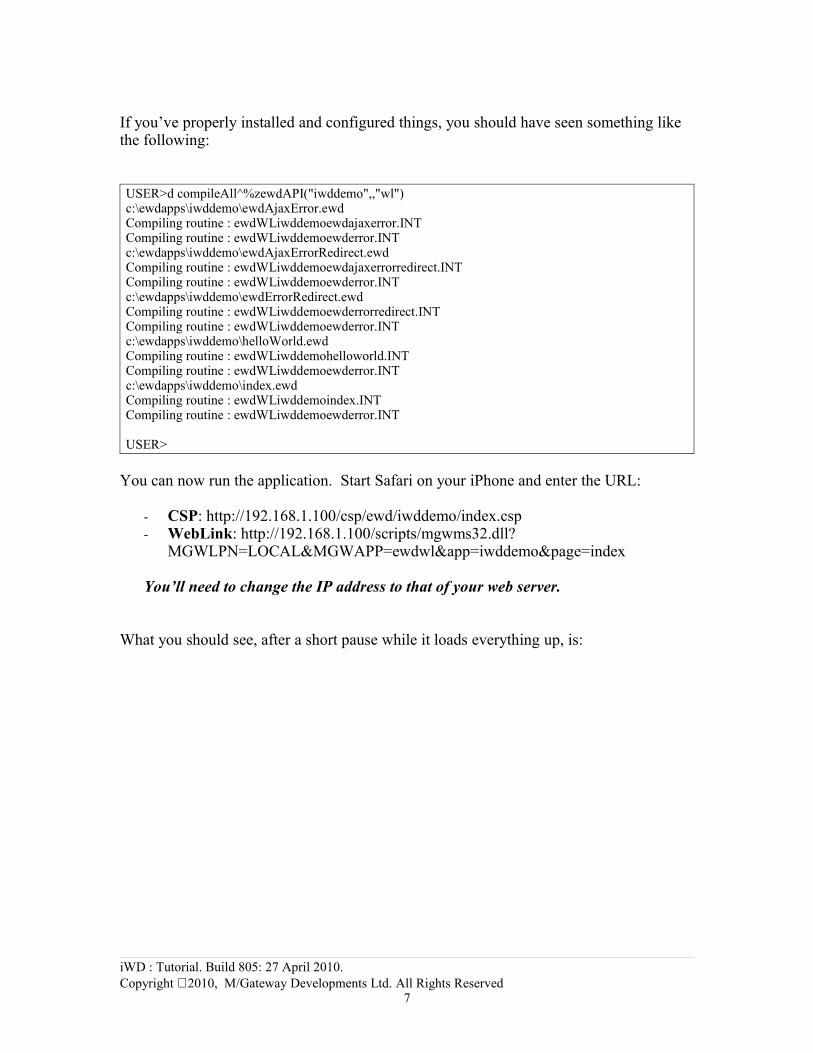
If you’ve properly installed and configured things, you should have seen something like the following:
USER>d compileAll^%zewdAPI("iwddemo",,"wl")c:\ewdapps\iwddemo\ewdAjaxError.ewdCompiling routine : ewdWLiwddemoewdajaxerror.INTCompiling routine : ewdWLiwddemoewderror.INTc:\ewdapps\iwddemo\ewdAjaxErrorRedirect.ewdCompiling routine : ewdWLiwddemoewdajaxerrorredirect.INTCompiling routine : ewdWLiwddemoewderror.INTc:\ewdapps\iwddemo\ewdErrorRedirect.ewdCompiling routine : ewdWLiwddemoewderrorredirect.INTCompiling routine : ewdWLiwddemoewderror.INTc:\ewdapps\iwddemo\helloWorld.ewdCompiling routine : ewdWLiwddemohelloworld.INTCompiling routine : ewdWLiwddemoewderror.INTc:\ewdapps\iwddemo\index.ewdCompiling routine : ewdWLiwddemoindex.INTCompiling routine : ewdWLiwddemoewderror.INT USER>
You can now run the application. Start Safari on your iPhone and enter the URL:
- CSP: http://192.168.1.100/csp/ewd/iwddemo/index.csp- WebLink: http://192.168.1.100/scripts/mgwms32.dll?
MGWLPN=LOCAL&MGWAPP=ewdwl&app=iwddemo&page=index
You’ll need to change the IP address to that of your web server.
What you should see, after a short pause while it loads everything up, is:
iWD : Tutorial. Build 805: 27 April 2010. Copyright 2010, M/Gateway Developments Ltd. All Rights Reserved
7

:
You’ll notice that the application is running full screen without Safari’s URL Location window being visible. However, Safari’s toolbar is still visible at the bottom, and if you wanted to restart the application, you’d need to relaunch Safari and tediously re-enter that lengthy URL.
However, there’s a further trick. Click that + sign in the middle of the bottom toolbar and up will pop the following:
iWD : Tutorial. Build 805: 27 April 2010. Copyright 2010, M/Gateway Developments Ltd. All Rights Reserved
8

Click the “Add to Home Screen” button and you’ll see:
iWD : Tutorial. Build 805: 27 April 2010. Copyright 2010, M/Gateway Developments Ltd. All Rights Reserved
9

Click the blue Add button in the top right corner, and the Touch-Icon that we’d specified in the index.ewd page’s <iwd:main> tag will be added to your iPhone’s Home Screen
Now you can start our Demo application by touching the icon, just as if it was a Native iPhone App. What’s more, when you start it up this way, you’ll see the startup splash screen, and when the application is fully loaded and ready for use, you’ll no longer see any trace of Safari’s chrome:
iWD : Tutorial. Build 805: 27 April 2010. Copyright 2010, M/Gateway Developments Ltd. All Rights Reserved
10
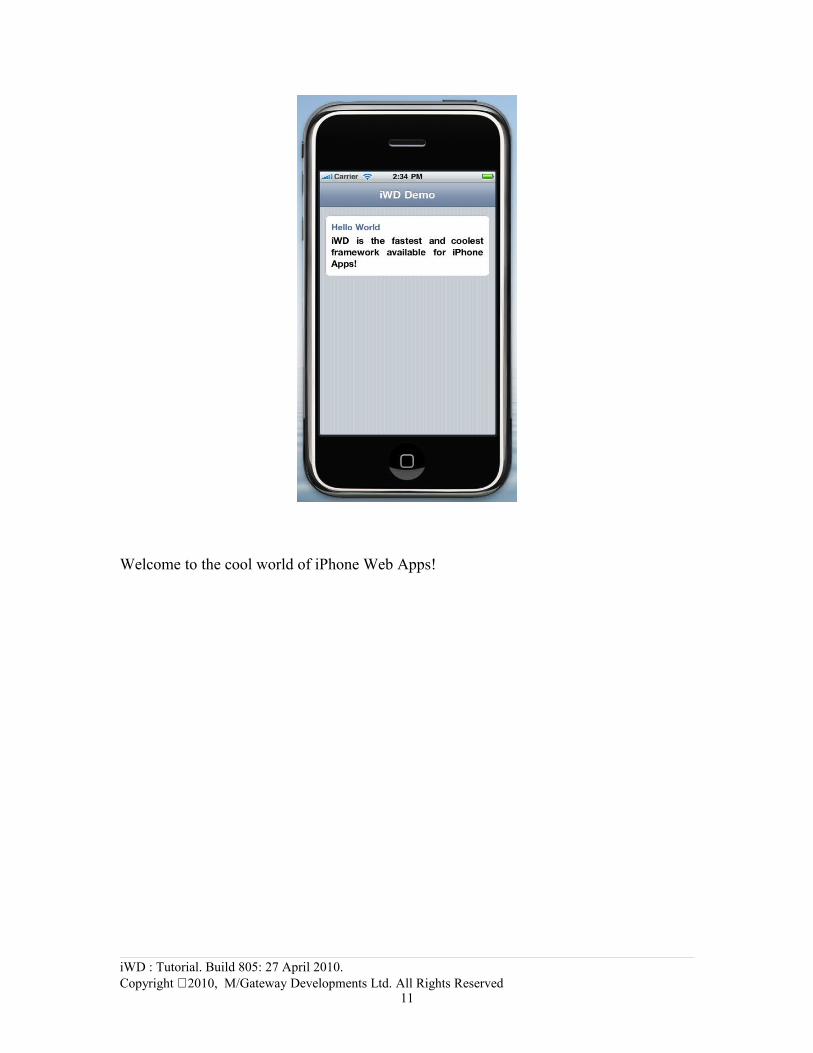
Welcome to the cool world of iPhone Web Apps!
iWD : Tutorial. Build 805: 27 April 2010. Copyright 2010, M/Gateway Developments Ltd. All Rights Reserved
11
Lesson 2 : HelloWorld Analysed
Hopefully you’ll agree that there wasn’t much involved in getting a simple iWD application up and running. Now let’s take a more detailed look at what we did and why we did it.
Every iWD Application requires what is known as the Container Page or First Page. This is basically an empty HTML page that acts as a container for all the subsequent content that will be sent to Safari by iWD. iWD applications use Ajax techniques for injecting chunks of markup into the container page. As far as Safari is concerned, an iWD application is actually a single page of HTML that never leaves the browser. iWD will handle all that Ajax stuff for you automatically.
The Container Page can be named anything you like (avoid punctuation marks in names). However, by convention, we usually name this page index.ewd. iWD pages must have a file extension of .ewd.
So, our iWD Container page was the file named index.ewd. The reason we created it in the path c:\ewdapps is because, at the start of this tutorial, that path was configured as what’s know as the Application Root Path. The Application Root Path is the directory under which EWD’s compiler will search for iWD applications. The name of each application is the same as the name you assign to each subdirectory under the Application Root Path. We named our application iwddemo, so that’s why we created the files in the directory c:\ewdapps\iwddemo.
Now let’s take a close look at the contents of index.ewd. You’ll notice that the iWD files we created just consist of XML (or XML-like) tags. In fact, as we’ll see later, an iWD file can also contain HTML tags and Javascript. Those of you who are familiar with technologies such as PHP or Java Server Pages will therefore realize that iWD is essentially what’s generally known as a “server pages” technology. However, since most of the iWD pages are just fragments of markup that are injected into the Container Page, we refer to iWD as a “server fragments” technology. iWD differs significantly from other server pages technologies in many ways. In particular, the level of abstraction – the degree to which iWD describes what your application should do rather that how it should do it – is very much higher than anything else in the web application development framework marketplace. That means your type less and your iWD files are a very succinct description of what each fragment is going to be doing.
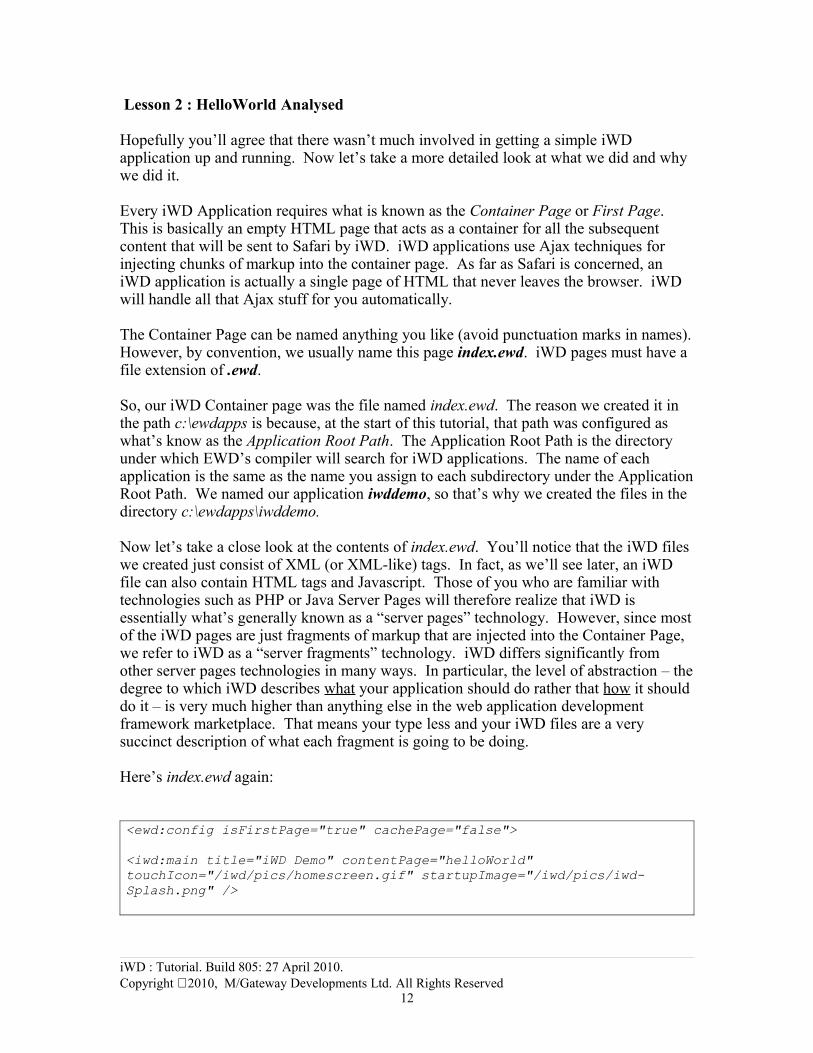
Here’s index.ewd again:
<ewd:config isFirstPage="true" cachePage="false">
<iwd:main title="iWD Demo" contentPage="helloWorld" touchIcon="/iwd/pics/homescreen.gif" startupImage="/iwd/pics/iwd-Splash.png" />
iWD : Tutorial. Build 805: 27 April 2010. Copyright 2010, M/Gateway Developments Ltd. All Rights Reserved
12

The two tags in this file are known as Custom Tags.
The first one (<ewd:config>) is a generic EWD one which all EWD or iWD pages must start with. The attribute isFirstPage=”true” tells EWD that this is the first page and can therefore be invoked using a simple “static” URL. The attribute cachePage=”false” tells EWD to add a variety of HTTP response headers that will prevent Safari from caching the page, so you get a fresh copy loaded every time you invoke it.
The second Custom Tag (<iwd:main>) will generate all the HTML for the Container Page. You simply need to specify a few attributes for your specific application:
- title: the HTML title and also the text to be used by default in the toolbar that you’ll see at the top of the page in your iPhone. It’s also used as the default text for the touch (startup) icon.
- contentPage: the name of the iWD page (fragment) that will be automatically loaded into the empty container page. Note that you don’t add the .ewd file extension.
- touchIcon: the path of the icon image file that a user can add to their iPhone’s Home Screen. This image file should be 57 X 57 pixels in size and without rounded corners or gloss (iWD can add these automatically). You’ll find the example file we’re referencing was included in the /iwd directory in the EWD download zip file.
- startupImage: the path of the startup splash screen that will appear while the first page is loading. This image file should be 320 X 460 pixels in size. You’ll find the example file we’re referencing was included in the /iwd directory in the EWD download zip file.
Now let’s look in more detail at helloWorld.ewd. Here’s what it contained:
<ewd:config isFirstPage="false" pageType="ajax"><iwd:pageItem> <iwd:header text="Hello World" /> <p> iWD is the fastest and coolest framework available for iPhone Apps! </p></iwd:pageItem>
The first thing to notice is the <ewd:config> tag. Unlike the Container page, the attribute isFirstPage=”false” specifies that this is not a first page, so can only be accessed via tokens that EWD automatically tokenizes with randomly-generated name/value pairs. What this means is that even if a user was aware that your application included a
iWD : Tutorial. Build 805: 27 April 2010. Copyright 2010, M/Gateway Developments Ltd. All Rights Reserved
13

fragment named helloWorld.ewd, they would be unable to access that fragment arbitrarily via its associated URL – it can only be accessed if the URL includes the name/value pairs that EWD is expecting to also be attached to the URL. iWD applications are highly secure as a result of this feature.
Notice also the pageType=”ajax” attribute. helloWorld.ewd is known as a fragment because it does not contain a complete page of HTML: it is simply a fragment of markup that will be injected, using Ajax techniques, into the main container page. You don’t need to worry about how that happens: EWD will look after it for you. All your iWD fragments should use the same <ewd:config> tag as we’ve used for helloWorld.ewd.
iWD applies a set of stylesheets that present the contents of your pages with a look and feel that emulates the standard Apple iPhone App styling as closely as possible. Rather than worrying too much about the stylesheets, iWD provides you with a set of iWD-specific Custom Tags that apply that styling automatically for you. If you use the iWD Custom Tags, your application will conform closely to Apple’s iPhone Style Guide without you having to do very much work at all!
The stylesheets used in iWD are based on two iPhone Web Application frameworks: iWebKit and jQTouch, adapted for use within the iWD framework.
We can see one of these Custom Tags at work in our helloWorld fragment: the contents of the page are wrappered in an <iwd:pageItem> tag. This tag generates a white panel with rounded corners. Anything inside this tag is put inside the panel.
The <iwd:header> tag styles the text defined in the text attribute as a blue/grey title. The standard HTML <p> tag is used to define the rest of the text as a paragraph.
You’ll notice that a toolbar was automatically added to the top of the page, with the words “iWD Demo” centered in it. This was generated automatically and by default as a result of the title attribute in the <iwd:main> tag in the index.ewd page:
<iwd:main title=”iWD Demo” …/>
So that’s our iWD Hello World application: created using 5 Custom tags and 1 HTML tag!
iWD : Tutorial. Build 805: 27 April 2010. Copyright 2010, M/Gateway Developments Ltd. All Rights Reserved
14

Lesson 3: Some Simple Changes to Hello World
In this lesson we’re going to make some simple modifications to our Hello World application.
Let’s first change the toolbar.
We can change the toolbar by using the <iwd:toolbar> tag which can be added to any fragment. Let’s try it. Edit the fragment helloWorld.ewd so it now looks like:
<ewd:config isFirstPage="false" pageType="ajax"><iwd:toolbar title="Hello iWD" /><iwd:pageItem> <iwd:header text="Hello World" /> <p> iWD is the fastest and coolest framework available for iPhone Apps! </p></iwd:pageItem>
Re-compile this fragment file using:
CSP: d compilePage^%zewdAPI(“iwddemo”,”helloWorld”,,”csp”)WebLink: d compilePage^%zewdAPI(“iwddemo”,”helloWorld”,,”wl”)
Note those two commas again! The compilePage command just recompiled the helloWorld fragment, leaving everything else unchanged.
Now try re-running the application by clicking on the iWD touch icon again. This time you should see that the text in the toolbar has been changed to “Hello iWD”.
Next, let’s add a footer to the page.
We can add an automatically styled footer by using the <iwd:footer> tag. You specify any text you like within the <iwd:footer> and the closing </iwd:footer> tags. Try it by editing your helloWorld.ewd page as follows:
iWD : Tutorial. Build 805: 27 April 2010. Copyright 2010, M/Gateway Developments Ltd. All Rights Reserved
15

<ewd:config isFirstPage="false" pageType="ajax"><iwd:toolbar title="Hello iWD" /><iwd:pageItem> <iwd:header text="Hello World" /> <p> iWD is the fastest and coolest framework available for iPhone Apps! </p></iwd:pageItem>
<iwd:footer> Powered by iWD<br/> From M/Gateway Developments Ltd</iwd:footer>
Recompile and re-run by clicking the iWD icon and you should see:
iWD : Tutorial. Build 805: 27 April 2010. Copyright 2010, M/Gateway Developments Ltd. All Rights Reserved
16

iWD : Tutorial. Build 805: 27 April 2010. Copyright 2010, M/Gateway Developments Ltd. All Rights Reserved
17

Lesson 4 : Adding a Menu Page
So far we have an application that just presents you with a simple Hello World page. Let’s now enhance the application so that what you first see is a menu of options, the first of which will take you to our helloworld fragment. iWD makes this very simple:
First bring up your Container/First page (index.ewd) and change the contentPage attribute to point to the menu fragment that we’re going to create, ie:
<ewd:config isFirstPage="true" cachePage="false">
<iwd:main title="iWD Demo" contentPage="mainMenu" touchIcon="/iwd/pics/homescreen.gif" startupImage="/iwd/pics/iwd-Splash.png" />
Now create a new page in the directory c:\ewdapps\iwddemo named mainMenu.ewd containing the following:
<ewd:config isFirstPage="false" pageType="ajax"><div> <iwd:menuPanel> <iwd:menuItem text="Hello World" nextpage="helloWorld" /> <iwd:menuItem text="About iWD" nextpage="aboutiWD" /> </iwd:menuPanel></div>
That’s all there is to it! Now recompile your iwddemo application and run it again in your iPhone. After you login you should now see this menu page:
Try clicking the Hello World menu option and you should be taken to our original Hello World fragment. That happened because of the nextpage attribute in the first <iwd:menuItem> tag:
iWD : Tutorial. Build 805: 27 April 2010. Copyright 2010, M/Gateway Developments Ltd. All Rights Reserved
18
<iwd:menuItem text="Hello World" nextpage="helloWorld" />
Hopefully you’re beginning to agree that the level of abstraction in iWD is really high – your fragments describe, in very succinct XML terms, what they do: in the case of mainMenu.ewd, you have two menu items with associated text and links to the fragments you’ll be taken to when you click them. You don’t have to worry at all about how or why they work – they just do! EWD’s run-time engine looks after all that how stuff for you and EWD’s compiler ensures that they’re styled correctly for the iPhone.
Adding Back Buttons
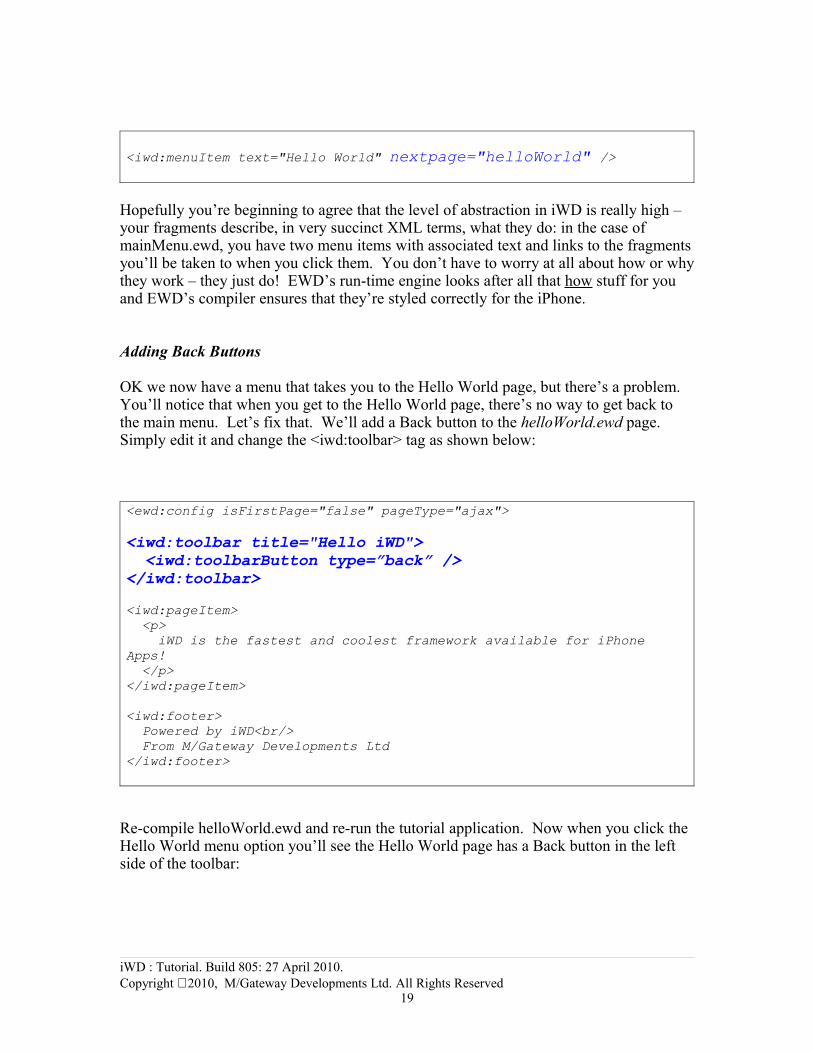
OK we now have a menu that takes you to the Hello World page, but there’s a problem. You’ll notice that when you get to the Hello World page, there’s no way to get back to the main menu. Let’s fix that. We’ll add a Back button to the helloWorld.ewd page. Simply edit it and change the <iwd:toolbar> tag as shown below:
<ewd:config isFirstPage="false" pageType="ajax">
<iwd:toolbar title="Hello iWD"> <iwd:toolbarButton type=”back” /></iwd:toolbar>
<iwd:pageItem> <p> iWD is the fastest and coolest framework available for iPhone Apps! </p></iwd:pageItem>
<iwd:footer> Powered by iWD<br/> From M/Gateway Developments Ltd</iwd:footer>
Re-compile helloWorld.ewd and re-run the tutorial application. Now when you click the Hello World menu option you’ll see the Hello World page has a Back button in the left side of the toolbar:
iWD : Tutorial. Build 805: 27 April 2010. Copyright 2010, M/Gateway Developments Ltd. All Rights Reserved
19
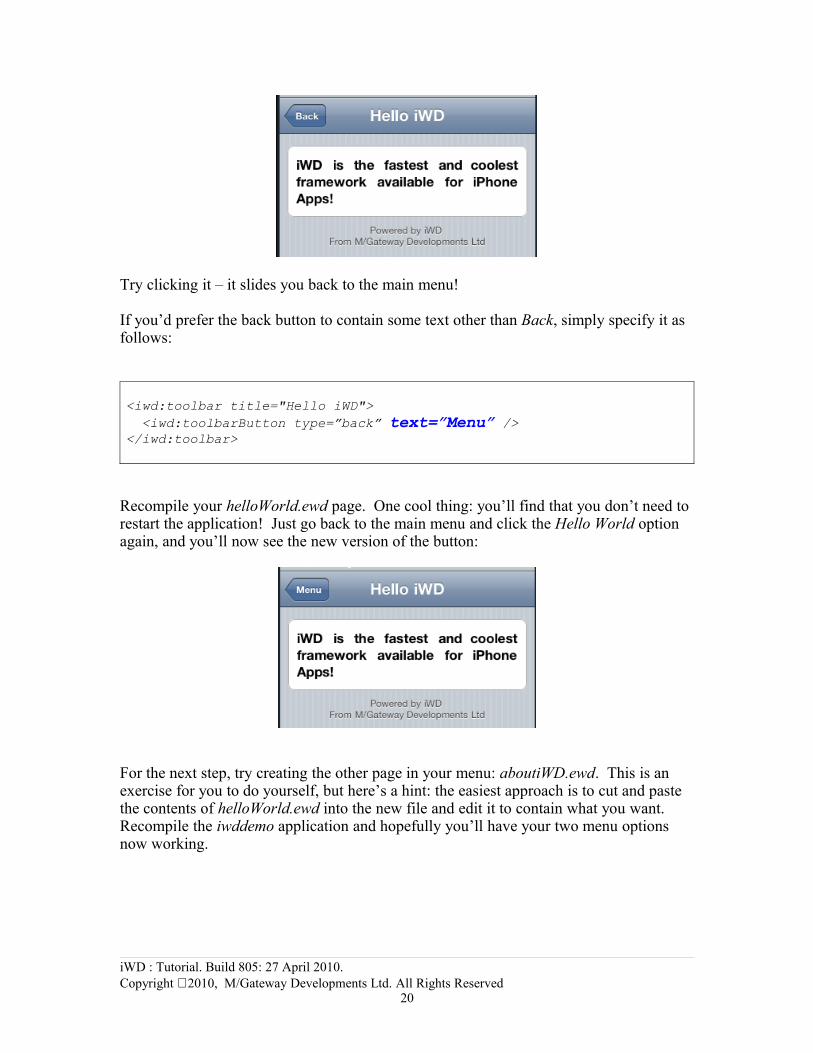
Try clicking it – it slides you back to the main menu!
If you’d prefer the back button to contain some text other than Back, simply specify it as follows:
<iwd:toolbar title="Hello iWD"> <iwd:toolbarButton type=”back” text=”Menu” /></iwd:toolbar>
Recompile your helloWorld.ewd page. One cool thing: you’ll find that you don’t need to restart the application! Just go back to the main menu and click the Hello World option again, and you’ll now see the new version of the button:
For the next step, try creating the other page in your menu: aboutiWD.ewd. This is an exercise for you to do yourself, but here’s a hint: the easiest approach is to cut and paste the contents of helloWorld.ewd into the new file and edit it to contain what you want. Recompile the iwddemo application and hopefully you’ll have your two menu options now working.
iWD : Tutorial. Build 805: 27 April 2010. Copyright 2010, M/Gateway Developments Ltd. All Rights Reserved
20

iWD’s Animated Transitions
Next let’s try some fun with iWD’s fancy animated transitions. You’ll see that by default the menu options use a slide-right transition and the Back button reverses that transition. You can use different transitions just by adding an attribute to each menu option, eg:
<ewd:config isFirstPage="false" pageType="ajax"><div> <iwd:menuPanel> <iwd:menuItem text="Hello World" nextpage="helloWorld" transition="cube" /> <iwd:menuItem text="About iWD" nextpage="aboutiWD" transition="swap" /> </iwd:menuPanel></div>
Recompile mainMenu.ewd, restart the application and log in. When you click the menu options, you should see these new transitions working. Notice how the back buttons automatically reverse the relevant transition!
You can try out the other supported transitions simply by editing the transition attribute. The options are:
• slide• swap• cube• pop• dissolve• fade• flip
iWD : Tutorial. Build 805: 27 April 2010. Copyright 2010, M/Gateway Developments Ltd. All Rights Reserved
21
Lesson 5: Adding a Dynamically-Generated Menu
So far we’ve seen iWD being used to simplify the creation of what is, in effect, a “static” iPhone application. That’s all well and good, and certainly iWD can be used for such simple applications that display fixed information and data, but where iWD really comes into its own is in the creation of fully dynamic, database-driven iPhone web applications. iWD makes use of Caché as a back-end database for your iPhone applications, and, as you’ll see, the integration is fully automated and extremely simple to control and manage.
The first thing we’ll do to demonstrate iWD’s slick integration with Caché is to add a dynamically-generated menu to our application: ie, a menu whose options are created programmatically, usually from data contained in the database. For example, we might want a menu of employees or a menu of registered users. Each time you run the application, this menu could be different as users or employees arrive or leave over time.
Let’s add a simple dynamic menu and see one in action. As in previous exercises, just follow the example below and see the results, and then we’ll analyse in detail what we did and how and why it worked.
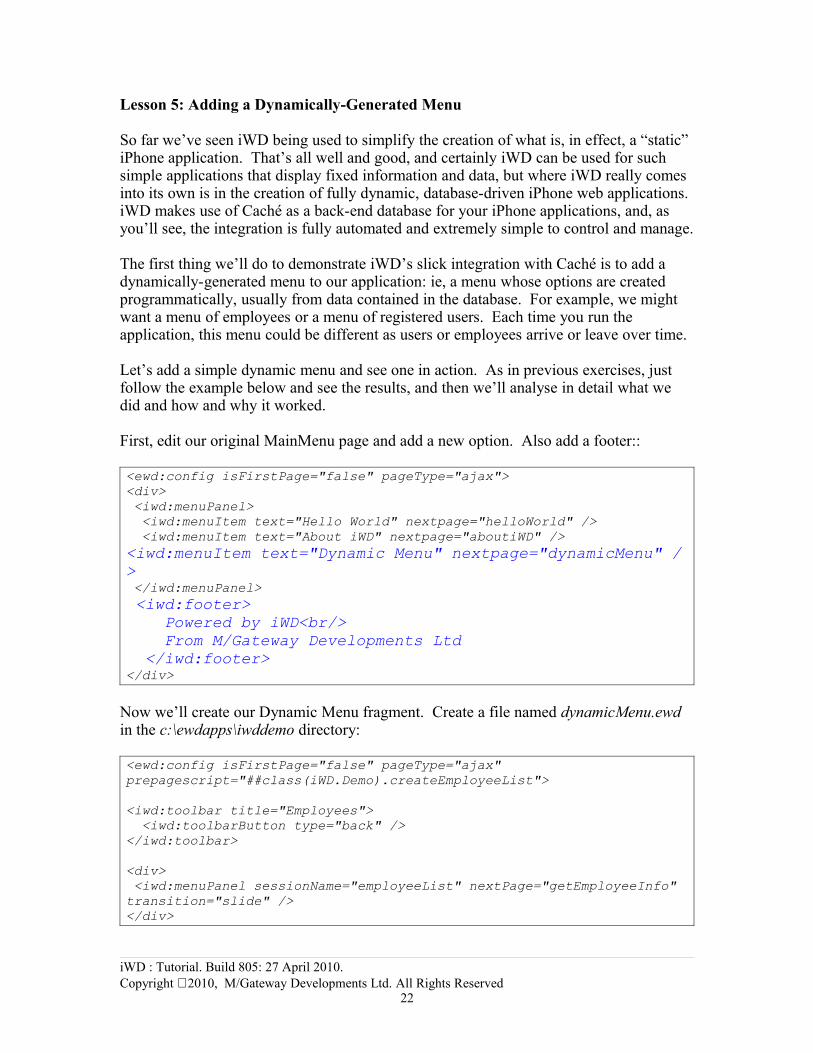
First, edit our original MainMenu page and add a new option. Also add a footer::
<ewd:config isFirstPage="false" pageType="ajax"><div> <iwd:menuPanel> <iwd:menuItem text="Hello World" nextpage="helloWorld" /> <iwd:menuItem text="About iWD" nextpage="aboutiWD" /><iwd:menuItem text="Dynamic Menu" nextpage="dynamicMenu" /> </iwd:menuPanel> <iwd:footer> Powered by iWD<br/> From M/Gateway Developments Ltd </iwd:footer></div>
Now we’ll create our Dynamic Menu fragment. Create a file named dynamicMenu.ewd in the c:\ewdapps\iwddemo directory:
<ewd:config isFirstPage="false" pageType="ajax" prepagescript="##class(iWD.Demo).createEmployeeList">
<iwd:toolbar title="Employees"> <iwd:toolbarButton type="back" /></iwd:toolbar>
<div> <iwd:menuPanel sessionName="employeeList" nextPage="getEmployeeInfo" transition="slide" /></div>
iWD : Tutorial. Build 805: 27 April 2010. Copyright 2010, M/Gateway Developments Ltd. All Rights Reserved
22

Finally, create a file named employeeInfo.ewd containing the following:
<ewd:config isFirstPage="false" pageType="ajax" prepagescript="##class(iWD.Demo).getEmployeeData">
<iwd:toolbar> <iwd:toolbarButton type=”back” /></iwd:toolbar>
<iwd:pageItem> <p> The employee you selected was <?= #employeeName ?> </p></iwd:pageItem>
Next you’ll need to open Caché Studio in the USER namespace and create a new class named iWD.Demo. Add two methods to it named createEmployeeList and getEmployeeData. Your completed class should look like this:
Class iWD.Demo Extends %Persistent{
ClassMethod createEmployeeList(sessid As %String) As %String{ s emp(1,"text")="Rob Tweed" s emp(2,"text")="Chris Munt" s emp(3,"text")="John Smith" s emp(4,"text")="George James" s emp(5,"text")="Helen Jones" s emp(6,"text")="Henry Jacob" s emp(7,"text")="Michael Kydd" s emp(8,"text")="Frank Ravenscroft" s emp(9,"text")="Sarah Walker" s emp(10,"text")="Karen Taylor" ; d deleteFromSession^%zewdAPI("employeeList",sessid) d mergeArrayToSession^%zewdAPI(.emp,"employeeList",sessid) QUIT ""}
ClassMethod getEmployeeData(sessid As %String) As %String{ s no=$$getRequestValue^%zewdAPI("menuItemNo",sessid) d mergeArrayFromSession^%zewdAPI(.array,"employeeList",sessid) s employeeName=array(no,"text") d setSessionValue^%zewdAPI("employeeName",employeeName,sessid) QUIT ""}
}
iWD : Tutorial. Build 805: 27 April 2010. Copyright 2010, M/Gateway Developments Ltd. All Rights Reserved
23

Compile the entire iwddemo application:
CSP: d compileAll^%zewdAPI(“iwddemo”,,”csp”)WebLink: d compileAll^%zewdAPI(“iwddemo”,,”wl”)
Save and compile the Caché class iWD.Demo.
Now try running the tutorial application again in your iPhone. You should first see the initial fixed menu:
Click the Dynamic Menu option and you should now see:
iWD : Tutorial. Build 805: 27 April 2010. Copyright 2010, M/Gateway Developments Ltd. All Rights Reserved
24

There’s our dynamically generated menu! Now click one of the names – eg Henry Jacob, and you should be taken to the next page which looks like this:
iWD : Tutorial. Build 805: 27 April 2010. Copyright 2010, M/Gateway Developments Ltd. All Rights Reserved
25

Clicking the back buttons should take you back to the previous pages as you’d expect. That’s all there is to a dynamic menu in iWD!
iWD : Tutorial. Build 805: 27 April 2010. Copyright 2010, M/Gateway Developments Ltd. All Rights Reserved
26
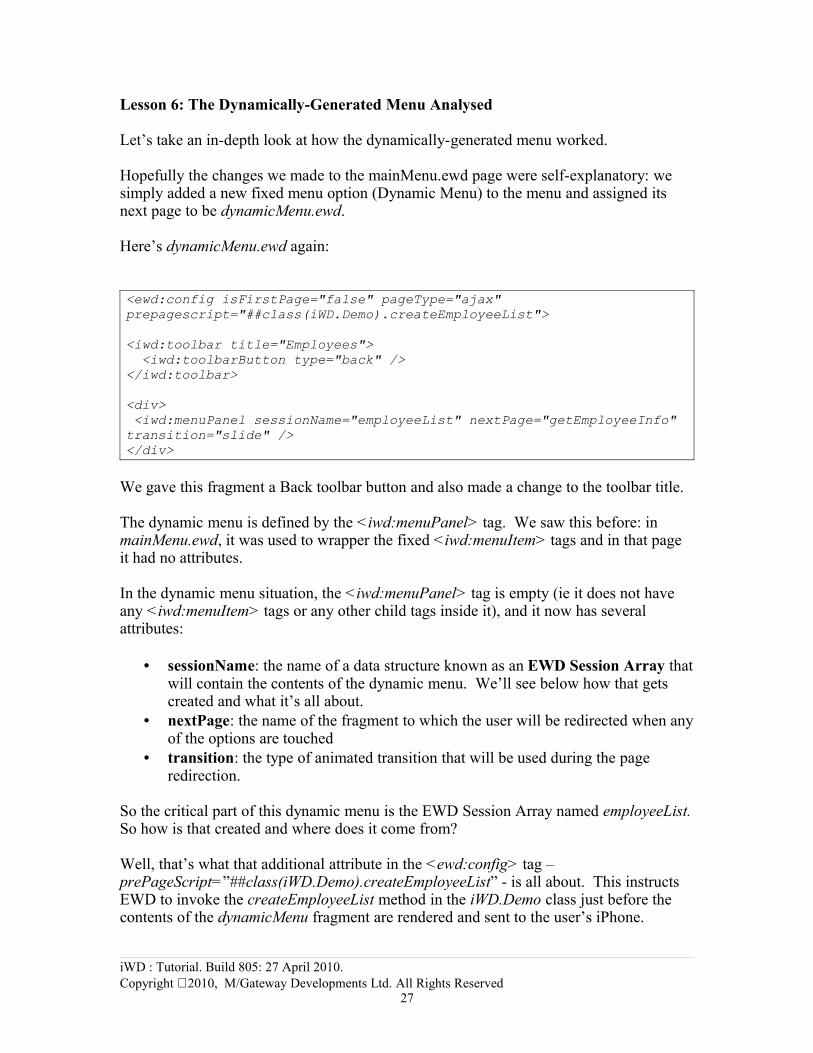
Lesson 6: The Dynamically-Generated Menu Analysed
Let’s take an in-depth look at how the dynamically-generated menu worked.
Hopefully the changes we made to the mainMenu.ewd page were self-explanatory: we simply added a new fixed menu option (Dynamic Menu) to the menu and assigned its next page to be dynamicMenu.ewd.
Here’s dynamicMenu.ewd again:
<ewd:config isFirstPage="false" pageType="ajax" prepagescript="##class(iWD.Demo).createEmployeeList">
<iwd:toolbar title="Employees"> <iwd:toolbarButton type="back" /></iwd:toolbar>
<div> <iwd:menuPanel sessionName="employeeList" nextPage="getEmployeeInfo" transition="slide" /></div>
We gave this fragment a Back toolbar button and also made a change to the toolbar title.
The dynamic menu is defined by the <iwd:menuPanel> tag. We saw this before: in mainMenu.ewd, it was used to wrapper the fixed <iwd:menuItem> tags and in that page it had no attributes.
In the dynamic menu situation, the <iwd:menuPanel> tag is empty (ie it does not have any <iwd:menuItem> tags or any other child tags inside it), and it now has several attributes:
• sessionName: the name of a data structure known as an EWD Session Array that will contain the contents of the dynamic menu. We’ll see below how that gets created and what it’s all about.
• nextPage: the name of the fragment to which the user will be redirected when any of the options are touched
• transition: the type of animated transition that will be used during the page redirection.
So the critical part of this dynamic menu is the EWD Session Array named employeeList. So how is that created and where does it come from?
Well, that’s what that additional attribute in the <ewd:config> tag – prePageScript=”##class(iWD.Demo).createEmployeeList” - is all about. This instructs EWD to invoke the createEmployeeList method in the iWD.Demo class just before the contents of the dynamicMenu fragment are rendered and sent to the user’s iPhone.
iWD : Tutorial. Build 805: 27 April 2010. Copyright 2010, M/Gateway Developments Ltd. All Rights Reserved
27

Pre-Page Scripts are a vitally important part of iWD: they provide the means by which you can go and fetch data from the Cache database and make them available for the iPhone application. The way you do this is to run whatever query you need to execute, and then transfer the results into what’s known as the EWD Session. You can create either EWD Session Variables or Session Arrays.
So what are EWD Session Variables and Arrays?
They are data structures that persist for the lifetime of the user’s iWD session. What this means is that once they are created, they are available to and can be used in any subsequent iWD page in the application that the user sees on his/her iPhone.
EWD Session Variables can either be simple name/value pairs, or they can be sparse, multi-dimensional arrays.
The purpose of a Pre-Page Script is always the same: to transfer data from the back-end Cache database into one or more EWD Session Variables or Arrays. Those EWD Session Variables or Arrays are, in turn, used by various EWD and iWD custom tags whose job is to display the contents of those EWD Session Variables or Arrays in a particular way.
You create, manipulate and manage EWD Session Variables and Arrays by using API methods that are built into and provided by EWD. These are comprehensively documented in an API Guide: you’ll find links to this in the M/Gateway web site.
So let’s take a look at our dynamic menu example. The pre-page script that will be executed – createEmployeeList – looks like this:
ClassMethod createEmployeeList(sessid As %String) As %String{ s emp(1,"text")="Rob Tweed" s emp(2,"text")="Chris Munt" s emp(3,"text")="John Smith" s emp(4,"text")="George James" s emp(5,"text")="Helen Jones" s emp(6,"text")="Henry Jacob" s emp(7,"text")="Michael Kydd" s emp(8,"text")="Frank Ravenscroft" s emp(9,"text")="Sarah Walker" s emp(10,"text")="Karen Taylor" ; d deleteFromSession^%zewdAPI("employeeList",sessid) d mergeArrayToSession^%zewdAPI(.emp,"employeeList",sessid) QUIT ""}
In this demo script, we’re not actually accessing a database: we’re using hard-coded values for our list of names and putting then into a local array named emp. This is just to avoid the extra step of defining a database of names for this example.
iWD : Tutorial. Build 805: 27 April 2010. Copyright 2010, M/Gateway Developments Ltd. All Rights Reserved
28

The local array structure is important: the first subscript is the position in the menu that the option will appear, starting at 1. The second subscript must be “text”.
Once fully populated, the local array is then merged into the EWD Session using the EWD API method mergeArrayToSession, creating a persistent Session Array named employeeList. Notice that before we used the mergeArrayToSession method, we first invoked the deleteFromSession method. Although unnecessary in this example, it is always good practice to call this first, in order to ensure that the Session Array into which you’re merging the local array is initially empty.
Notice the calling interface for the Pre-Page Script. All scripts called by iWD pages have this same interface:
ClassMethod [methodName](sessid As %String) As %String
In other words, Pre-Page Script methods always have a single string parameter named sessid, and return a string value. The sessid variable is important: it is passed automatically by EWD’s run-time engine to the method, and uniquely idenitifies the user’s EWD Session. The sessid variable is required by all EWD’s API methods that manage and manipulate the EWD Session.
Notice also that the Pre-page script finishes with QUIT “”. Again this is important. You must add the null string return value after the QUIT otherwise you’ll get a run-time error.
Normally, of course, you’d obtain the list of names by running a query, eg an SQL query, against some table(s) or class(es) in your Caché database, and you’d then copy the resultSet into the local array. The end result would be the same: you’d create a local array with the same structure as shown in the example above, containing the relevant names extracted from the database, and in the appropriate order for display in the dynamic menu.
So, in our example, the Pre-Page Script named createEmployeeList is invoked before the page is rendered, and the EWD Session Array named employeeList is populated with the required data. This is then used by the <iwd:menuPanel> tag:
<iwd:menuPanel sessionName="employeeList" nextPage="getEmployee-Info" transition="slide" />
The purpose of the <iwd:menuPanel> tag, of course, is to use the contents of the employeeList Session Array and display it as a correctly formatted menu in the iPhone.
Now let’s take a look at what happens when a user touches one of the menu options. You’ll notice that there is only one nextpage defined in the <iwd:menuPanel> tag. So, unlike the <iwd:menuItem> tags that redirect a user to a specific nextpage for each menu option, in the dynamic menu the user is always redirected to the same nextpage fragment, irrespective of the option that was touched.
iWD : Tutorial. Build 805: 27 April 2010. Copyright 2010, M/Gateway Developments Ltd. All Rights Reserved
29

In our example, the page to which the user is redirected is getEmployeeInfo.ewd. So let’s take a look at what it does. Here’s what it contained:
<ewd:config isFirstPage="false" pageType="ajax" prepagescript="##class(iWD.Demo).getEmployeeData">
<iwd:toolbar> <iwd:toolbarButton type=”back” /></iwd:toolbar>
<iwd:pageItem> <p> The employee you selected was <?= #employeeName ?> </p></iwd:pageItem>
What this page does is to display the name that the user selected. You can see that it does this by using the syntax <?= #employeeName ?>. What this means is “the value of the EWD Session Variable named employeeName”.
So where does the Session Variable named employeName come from? Well, that’s the purpose of this fragment’s Pre-Page Script named ##class(iWD.Demo).getEmployeeData".
Let’s take another look at this method:
ClassMethod getEmployeeData(sessid As %String) As %String{ s no=$$getRequestValue^%zewdAPI("menuItemNo",sessid) d mergeArrayFromSession^%zewdAPI(.array,"employeeList",sessid) s employeeName=array(no,"text") d setSessionValue^%zewdAPI("employeeName",employeeName,sessid) QUIT ""}
What this is doing is actually pretty straightforward. It first gets the number of the menu option that was touched by getting the value of the incoming Request value named menuItemNo:
s no=$$getRequestValue^%zewdAPI("menuItemNo",sessid)
This is a reserved Request name and is generated automatically by the <iwd:menuPanel> tag. All instances of the <iwd:menuPanel> will generate this same Request variable.
The method then reverses what we did in the previous Pre-Page Script: it merges the contents of the EmployeeList Session Array into a local array – this time we’ve named it array:
d mergeArrayFromSession^%zewdAPI(.array,"employeeList",sessid)iWD : Tutorial. Build 805: 27 April 2010. Copyright 2010, M/Gateway Developments Ltd. All Rights Reserved
30

We can now look up the name for the number that was touched against the local array:
s employeeName=array(no,"text")
Finally we save this name into a new EWD Session Variable. This time we’ll use a simple name/value pair, and name it employeeName:
d setSessionValue^%zewdAPI("employeeName",employeeName,sessid)
So, after the Pre-Page Script has run to completion, we now have the selected employee’s name available in the EWD Session. We can therefore display it in the page:
The employee you selected was <?= #employeeName ?>
So, if you click the third menu option (John Smith), the next page to which you’re redirected will display:
The employee you selected was John Smith
Now that you (hopefully!) understand how EWD’s Session variables and arrays are used in our example, here’s an exercise for you:
Convert the pre-page script in dynamicMenu.ewd to build a list of employees from a proper Caché class or table, instead of using a hard-coded local array.
You might have a class or table already present that you could use. Alternatively you could define a new class and use the Populate method to build a dataset. Don’t create too many records or your menu will become too long and will take too long to send to the iPhone and be too long for a user to practically scroll through. That having been said, the iPhone’s touch gestures make quite long lists very usable – 100 options is probably not an unreasonable upper limit to use, but you’ll need to use your own judgement as to a sensible maximum.
iWD : Tutorial. Build 805: 27 April 2010. Copyright 2010, M/Gateway Developments Ltd. All Rights Reserved
31

Lesson 7 Adding a Login Form
We’ll now take a look at another way in which we can interact with the back-end Cache database: forms. Let’s start with an example of a simple but extremely useful form: the login form.
The login form will request a username and password and then pass that information back to Cache where we can check the validity of the login credentials. Typically you’ll have some type of user authentication function available that you can plug into, or perhaps you just have a simple database of usernames and their associated passwords.
Either way, a login form requires validation to be performed at the back-end: this isn’t something that could be done locally within the browser.
So, let’s amend our Hello World application so that the first thing that comes up is a login form. Only if a valid username and password is entered will the user be allowed to proceed to the main menu.
Here’s the login form fragment that you should name login.ewd
<ewd:config isFirstPage="false" pageType="ajax"><div>
<iwd:form> <iwd:graytitle text="Login" /> <iwd:formpanel> <iwd:formfield type="text" name="username" text="Username" /> <iwd:formfield type="password" name="password" text="Password" /> <iwd:formfield type="submit" name="submit" text="Login" onSubmit-ted="##class(iWD.Demo).login" nextPage="mainMenu" transition="swap" /> </iwd:formpanel> </iwd:form> </div>
Compile this new page using do compilePage^%zewdAPI(“iwddemo”,”login”,,”csp”) or do compilePage^%zewdAPI(“iwddemo”,”login”,,”wl”) as appropriate.
Next, open up the class iWD.Demo in Cache Studio and add a new method named login as follows:
iWD : Tutorial. Build 805: 27 April 2010. Copyright 2010, M/Gateway Developments Ltd. All Rights Reserved
32

ClassMethod login(sessid As %String) As %String{ set username=$$getSessionValue^%zewdAPI(“username”,sessid) if username=”” QUIT “You must enter a username” if username’=”rob” QUIT “Invalid username” set password=$$getSessionValue^%zewdAPI(“password”,sessid) if password=”” QUIT “You must enter a password” if password’=”tweed” QUIT “Invalid password” QUIT ""}
}
Save and compile the class.
Now restart the iwdDemo application in your iPhone. You should now be presented with the login form:
iWD : Tutorial. Build 805: 27 April 2010. Copyright 2010, M/Gateway Developments Ltd. All Rights Reserved
33

If you touch the username or password fields, the iPhone’s virtual keyboard will pop up:
Try just clicking the login form’s submit button and you should see:
iWD : Tutorial. Build 805: 27 April 2010. Copyright 2010, M/Gateway Developments Ltd. All Rights Reserved
34
The login class has been hard-coded to accept a username of rob and a password of tweed. Try entering these, click the Login button and you should be redirected to the main menu.
So we now have a username/password-protected iPhone application! The only possible way a user can get to the demo application’s main menu, or indeed any other page is by first correctly logging in with a valid username and password. EWD’s built-in tokenized URLs ensure that this cannot be circumvented in any way.
iWD : Tutorial. Build 805: 27 April 2010. Copyright 2010, M/Gateway Developments Ltd. All Rights Reserved
35

Lesson 8: The Login Form Analysed
OK, so now let’s take a detailed look at that login form and its associated back-end script.
Here’s the login.ewd page again:
<ewd:config isFirstPage="false" pageType="ajax"><div>
<iwd:form> <iwd:graytitle text="Login" /> <iwd:formpanel> <iwd:formfield type="text" name="username" text="Username" /> <iwd:formfield type="password" name="password" text="Password" /> <iwd:formfield type="submit" name="submit" text="Login" onSubmit-ted="##class(iWD.Demo).login" nextPage="mainMenu" transition="swap" /> </iwd:formpanel> </iwd:form> </div>
You’ll notice the following tags:
The <iwd:form> tag: this is used to surround all the tags relating to a form and must be present.
The <iwd:graytitle> tag displays the specified text as a grey title, as its name implies.
The <iwd:formpanel> tag creates a white panel container for the form’s fields.
Each form field is defined using an <iwd:formfield> tag. Here you see three types of form fields in use: a text field for the Username, a password field for the Password, and a submit field for the Login button.
When these are processed by EWD’s compiler, they are converted to corresponding standard HTML <input> tags, but specially styled for the iPhone.
Each formfield must have a name or id attribute, but not both. EWD will automatically add the one that is missing and set the id and name to the same values. This ensures that the fields can be correctly processed by the Javascript that EWD generates and by the Caché back-end scripts, using the one name as a reference.
When a form’s Submit button is pressed, EWD automatically transfers the values of each field to a correspondingly named EWD Session Variable. The name that you assign to each formfield is used for the corresponding EWD Session Variable. So in this example, when the Login button is clicked, EWD will create two session variables named username and password respectively that contain the values entered by the user. Note
iWD : Tutorial. Build 805: 27 April 2010. Copyright 2010, M/Gateway Developments Ltd. All Rights Reserved
36

that the names are case sensitive – the EWD Session name will be exactly as specified in the formfield’s name attribute.
Now that the values have been transferred to the Cache back-end as EWD Session Variables, the next thing that EWD does is to fire the onSubmitted Caché method, if one is specified in the Submit formfield. The purpose of an onSubmitted method is to validate the form field values and, if appropriate, save them into the database.
In our simple login form, we just need to validate the form fields – we don’t need to save them back into the database.
The onSubmitted attribute in the Submit formfield was:
onSubmitted="##class(iWD.Demo).login"
So now let’s take a closer look at that method:
ClassMethod login(sessid As %String) As %String{ set username=$$getSessionValue^%zewdAPI(“username”,sessid) set password=$$getSessionValue^%zewdAPI(“password”,sessid)
if username=”” QUIT “You must enter a username” if username’=”rob” QUIT “Invalid username” if password=”” QUIT “You must enter a password” if password’=”tweed” QUIT “Invalid password” QUIT ""}
}
Notice the calling interface is identical to the Pre-Page scripts we used for the dynamic menu: there is a single string input parameter named sessid, and the method returns a string.
The first thing we do is get hold of the values of the EWD Session Variables that were generated by EWD from the formfields: username and password. For simple text and password fields, EWD will have created simple name/value pair Session Values, so we use the EWD API method getSessionValue to access their values.
Now it’s a simple matter of testing the values of the username and password variables. In a production system you’d, of course, check the username and password against your user authentication database or sub-system. In this demo example, we’re just using a hard-wired pair of valid values. So we first check to see whether the username or password are empty, null string values. Then we test to see if the username is rob and the
iWD : Tutorial. Build 805: 27 April 2010. Copyright 2010, M/Gateway Developments Ltd. All Rights Reserved
37

password is tweed. Notice what we’re doing in the event of an erroneous value: we’re simply Quitting the method with a non-null string value. The result of this will be for EWD to pop up a Javascript alert window with that string value in it. Hence, when we just clicked the Submit button without entering a username or password, the first condition it failed on was:
if username=”” QUIT “You must enter a username”
and up popped the corresponding alert in the iPhone:
Field validation in iWD is as simple as that!
As long as the user enters invalid usernames and/or passwords, all they’ll get is the error alert windows popping up and the form will remain on the iPhone.
OK so what if the user enters a valid username and password. The answer is that the method quits with a null value: QUIT “”
If an onSubmitted method quits with a null value, EWD will now takes note of the Submit formfield tag’s nextpage and transition attributes, in our example:
nextPage="mainMenu" transition="swap"
So EWD now redirects the user to the mainMenu.ewd fragment and uses an animated swap transition. We could, of course, have used any of the standard transitions:
iWD : Tutorial. Build 805: 27 April 2010. Copyright 2010, M/Gateway Developments Ltd. All Rights Reserved
38

o slideo cubeo swapo dissolveo fadeo flipo pop
You can hopefully see how trivially simple and intuitive iWD makes the handling of forms! Once you start using iWD, you’ll soon wonder why most other web application environments make the handling of forms such a complex and tortuous process!
Before we finish this section, let’s just do two more things.
First, an exercise for you: try modifying the login method to validate against a proper user authentication database that is stored in Caché. You may already have one for your other Caché applications, in which case try linking it in. If not, define a simple class to hold usernames and passwords and define a few members of it. Then hook it into the login method.
Second, let’s make use of the fact that the username is now saved in an EWD Session Variable and use it in another fragment. Let’s display it in the helloWorld page. Simply modify helloWorld.ewd to look like the following:
<ewd:config isFirstPage="false" pageType="ajax"><iwd:toolbar title="Hello iWD"> <iwd:toolbarButton type="back" text="Menu" /></iwd:toolbar>
<br /><iwd:graytitle text="Hello <?= #username ?>" />
<iwd:pageItem> <p> iWD is the fastest and coolest framework available for iPhone Apps! </p></iwd:pageItem>
<iwd:footer> Powered by iWD<br/> From M/Gateway Developments Ltd</iwd:footer>
Reccompile this page, go back to the main menu and select the Hello World option. This time you should see:
iWD : Tutorial. Build 805: 27 April 2010. Copyright 2010, M/Gateway Developments Ltd. All Rights Reserved
39
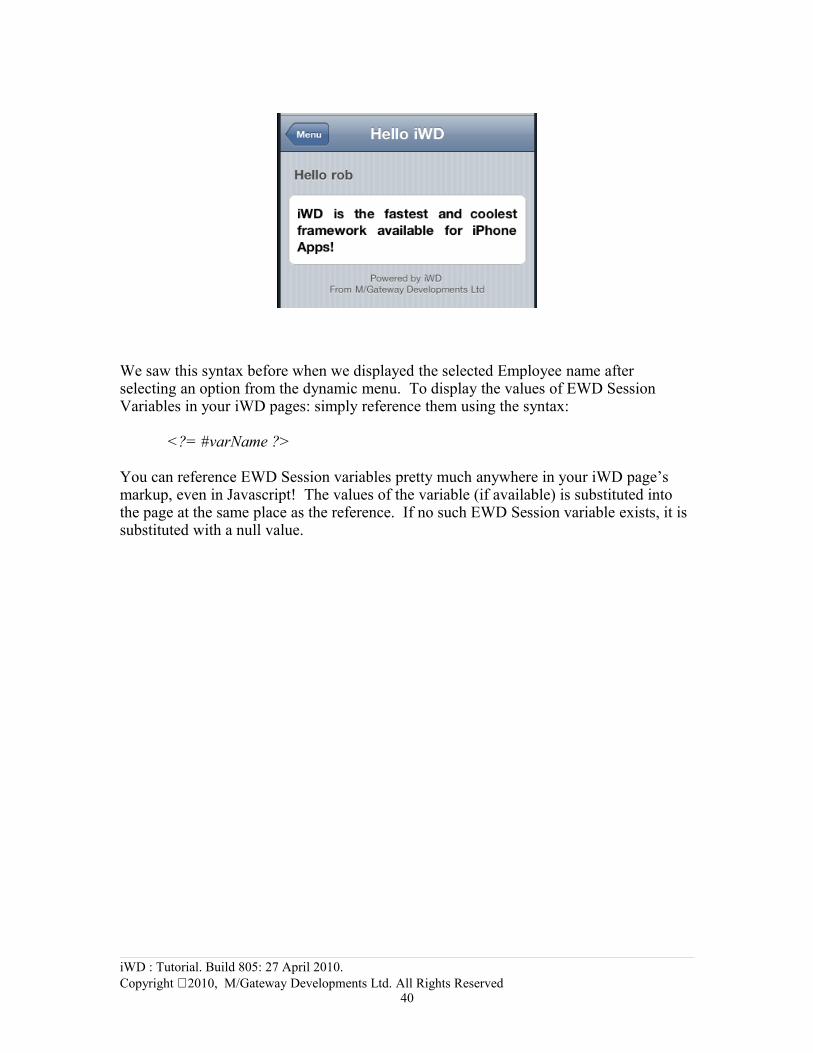
We saw this syntax before when we displayed the selected Employee name after selecting an option from the dynamic menu. To display the values of EWD Session Variables in your iWD pages: simply reference them using the syntax:
<?= #varName ?>
You can reference EWD Session variables pretty much anywhere in your iWD page’s markup, even in Javascript! The values of the variable (if available) is substituted into the page at the same place as the reference. If no such EWD Session variable exists, it is substituted with a null value.
iWD : Tutorial. Build 805: 27 April 2010. Copyright 2010, M/Gateway Developments Ltd. All Rights Reserved
40

Lesson 9. Some More On the EWD Session
Understanding the EWD Session and the role it plays in iWD/EWD applications is crucial to really getting to grips with iWD. So let’s take a dive into what the EWD Session is all about.
User Sessions and EWD Session Storage
In fact let’s start right back the URL you use to start an EWD application. For example in the case of our iwddemo application you’ll have used a URL similar to one of the following (your IP address or domain name will be different of course):
- CSP: http://192.168.1.100/csp/ewd/iwddemo/index.csp- WebLink: http://192.168.1.100/scripts/mgwms32.dll?
MGWLPN=LOCAL&MGWAPP=ewdwl&app=iwddemo&page=index
In both cases, what we’re doing is requesting the page named index.ewd from the iWD application named iwddemo. We are allowed to do this with a simple “static” URL because index.ewd was configured to be a “First Page”:
<ewd:config isFirstPage=”true”>
What happens when you invoke this URL is that EWD creates you a new, unique Session ID. This is simply an integer value but it is unique to you, the user. Each time you click a link or button in an iWD page, you’re sending a URL back to the Cache server that identifies your Session ID via a set of randomly-generated name/value pairs that were added to the URL by EWD.
When a Pre-Page script or onSubmitted method is invoked by your iWD page, your unique sessid is passed into the method by EWD. Your calls to the EWD Session API methods can therefore access your own specific Session storage – ie your EWD Session Variables and Arrays.
Your EWD User Session typically ends when you stop accessing the iWD application: by default your session expires after 20 minutes of inactivity. After that period of inactivity, EWD will no longer allow any further access to that User session or its associated Session Storage, and any EWD Session Variables and Arrays for that session will eventually be garbage-collected by EWD.
Designer versus Programmer
You’ve seen in this tutorial that an iWD application consists of two distinct parts:
• The iWD pages or fragments
• Back-end methods: ie Pre-page Scripts and OnSubmitted methods
iWD : Tutorial. Build 805: 27 April 2010. Copyright 2010, M/Gateway Developments Ltd. All Rights Reserved
41
These are often referred to as the “front end” and “back end” respectively.
One of the key concepts of EWD and hence of iWD is that these two parts of an applica-tion can be developed by two different people:
• Front-end design can be carried out by a web application designer
• Back-end method development can be carried out by a programmer who is famili-ar with Cache, the data models that are available and business logic that is also available
The two halves of an iWD application require different disciplines and knowledge, and iWD allows each half to be developed by the correct person with the correct skills. In-deed the designer of the front-end does not have to know anything about the back-end in order to create his/her part of the application. Similarly, the programmer can develop all the scripts needed by an iWD application without really having to know anything about how or why they are being used.In practice, of course, many iWD applications will be developed by one or more people who adopt both roles of designer and programmer, but iWD provides a very important separation between design and programming.Unlike probably most web application development environments, in EWD and in iWD, there is no use of “data binding”. In other words, the front-end page definitions have no direct access to back-end data. This is deliberate and, contrary to widespread belief in the industry, turns out to be highly advantageous.There’s a critical problem with data binding: it irrevocably intertwines the front end design to the back-end data model. Whilst fine for rapid development of quick demon-stration applications, for real-world applications it is distinctly bad news for downstream maintenance and change. Let’s face it: all real-world applications, no matter how simple and trivial, change over time. With data binding, if the front-end design needs changing, it will almost certainly have an impact on the back-end database. Similarly, changes to the back-end database schema will almost certainly impact on the front-end design logic. The result is a time-consuming, complex and unnecessary mess that consumes hours of development time, and/or hinders or completely prevents enhancements to the applica-tion.EWD takes a totally different approach and deliberately separates and de-couples the front-end from the back-end. However, it provides an intermediate boundary layer between the two: the EWD Session which each can access. The diagram below summar-ises the architecture:
iWD : Tutorial. Build 805: 27 April 2010. Copyright 2010, M/Gateway Developments Ltd. All Rights Reserved
42

Thus, the front-end designer has access to and can reference and use EWD Session Vari-ables and Arrays in his/her pages. The designer does not need to know where they came from originally: he/she simply needs to know that they need to exist and their structure (eg a simple name/value pair or a multi-dimensional array with a particular structure).As far as the designer is concerned, the EWD Session Variables or Arrays come from:
• The actions of Pre-Page scripts or, in some circumstances, onSubmitted methods (also known in EWD as Action Scripts)
• Forms being submitted
Meanwhile, the back-end programmer’s task is simply to move data between the back-end database and the EWD Session:
• His/her Pre-Page Scripts will run queries and transfer the results into EWD Ses-sion Variables and/or Arrays, ready for the EWD page that invoked them;
• His/her onSubmitted methods will validate form fields that have been transferred automatically by EWD into the Session, and, if they are OK, then save them back into the database.
The two participants can therefore work together, but separately. The front-end design can be changed significantly without affecting the back-end database, and often without even affecting the Pre-Page Scripts and onSubmitted methods. Conversely, the back-end database can be altered without any impact on the front-end design: provided the new database schema can be mapped in and out of the original EWD Session structures, the front-end will still operate identically.There’s another great benefit of this architecture. An iWD application can be fully de-veloped using dummied-up, hard-coded data (that’s what we’ve done in this tutorial). Once the front-end is agreed upon, the back-end scripts and methods can be edited by a database programmer to maintain the original EWD Session data structures but now us-
iWD : Tutorial. Build 805: 27 April 2010. Copyright 2010, M/Gateway Developments Ltd. All Rights Reserved
43

ing the real database and real business logic. The change from design prototype to fully operational system requires no further work by the designer!There’s a further benefit: it is quite possible to migrate an iWD application from one back-end database technology to another. Provided the new scripts maintain the same EWD Session data structures, the front-end design will neither know nor care that it’s be-ing driven by an entirely different back-end database!
iWD : Tutorial. Build 805: 27 April 2010. Copyright 2010, M/Gateway Developments Ltd. All Rights Reserved
44

To be continued….
iWD : Tutorial. Build 805: 27 April 2010. Copyright 2010, M/Gateway Developments Ltd. All Rights Reserved
45