itzy bitzy bar and restaurant pos - free website … -2- itzy bitzy bar and restaurant pos software...
TRANSCRIPT

Itzy Bitzy Bar and
Restaurant POS Operation Manual
Copyright by Carter Computer Solutions November 2001 For Info contact
Carter Computer Solutions (905) 934-1413
Email: [email protected] Revised April 2007

Page -2- Itzy Bitzy Bar and Restaurant POS Software License ~~~~~~~~~~~~~~~~ SOFTWARE LICENSE You may use this program for an evaluation period of 30 days, but after that you are required to register if you are going to continue to use it. Refer to the ORDER.FRM file for registration instructions. You may freely copy or distribute the Itzy Bitzy Bar and Restaurant POS Demo package so long as it's contents are not modified in any way and they are distributed together, and no fee is charged for the program itself. You may not attempt to modify, reverse compile, translate, or disassemble the software in whole or in part. You may not distribute to others registered versions of this software. The registration fee licenses one copy of the program to be run on one computer at any one time. DISCLAIMER This software is provided on an "as is" basis without warranty of any kind, expressed or implied, including but not limited to the implied warranties of merchantability and fitness for a particular purpose. The author will not be liable for any special, incidental, consequential, indirect or Similar damages due to loss of data or any other reason, even if the author or an agent of the author has been advised of the possibility of such damages. In no event shall the author's liability for any damages ever exceed the price paid for the license to use the software, regardless of the form of the claim. The person using the software bears all risk as to the software quality and performance. The license agreement and warranty shall be construed, interpreted, and governed by the laws of the Province of Ontario, Canada.

Page -3- This Manual is designed to give you a Basic outline how to run the program. I have tried to KISS the program (Keep It Simple Stupid), but as you choose the various options and I add more features operation can branch off in different directions. I try here to show it with popular options. Thank You for trying Itzy Bitzy Bar and Restaurant POS. The program at present is designed to run independently or with a master and up to three other station for a total of four. Each workstation can be assigned four designated window printers, one at the local station and the others either as local or network printers through Windows. Stations can share printers. Run ‘Itzysetup.exe’ to install the program. Running for FIRST Time Once installed, from Start - Programs select Smallbar or icon When Program is started before using it go to setup in program, name and password at this point are both one. Go to Station type and make a selection. If not Master and or not installed in default location.

Page -4- Use Master for Standalone, but leave the remotes blank. When you select Master or Remote you will have to click on each of the input boxes needed and build the directory for each to the directory of the program and find the file ‘Tables.dat’ and click save. If using a network this has to be done on each Station. PRINTERS
Go to printer selection, select your printer for each of the positions and click OK. All four OK’s must be clicked before you can save your changes. If you use a lineprinter instead of a POS printer you could notice delays when ever it prints. Next pick options. Here you can select what you want to print and what not to print. If you do not have a printer hooked up at this time delete (uncheck) any thing that has to do with printing and drawer release. (In readings & reset do only viewing, not printing. Manager void will also look for a printer on the station.)
Tax Tables

Page –5- Next You nedd to setup your Tax Tables. This screen is found under Setup. Taxes are calculated on the base amount. There are four taxes available. You enter the description, first tax break point, and the rate.
Group Setup
Groups is where you total Departments together: example all Food departments, you can combine departments: sandwiches, appetizers, main dishes etc. into one group for a total of them all on your readings In this screen you assign names to your Groups. Departments are assigned to them in the Department Setup screen
Page -6-
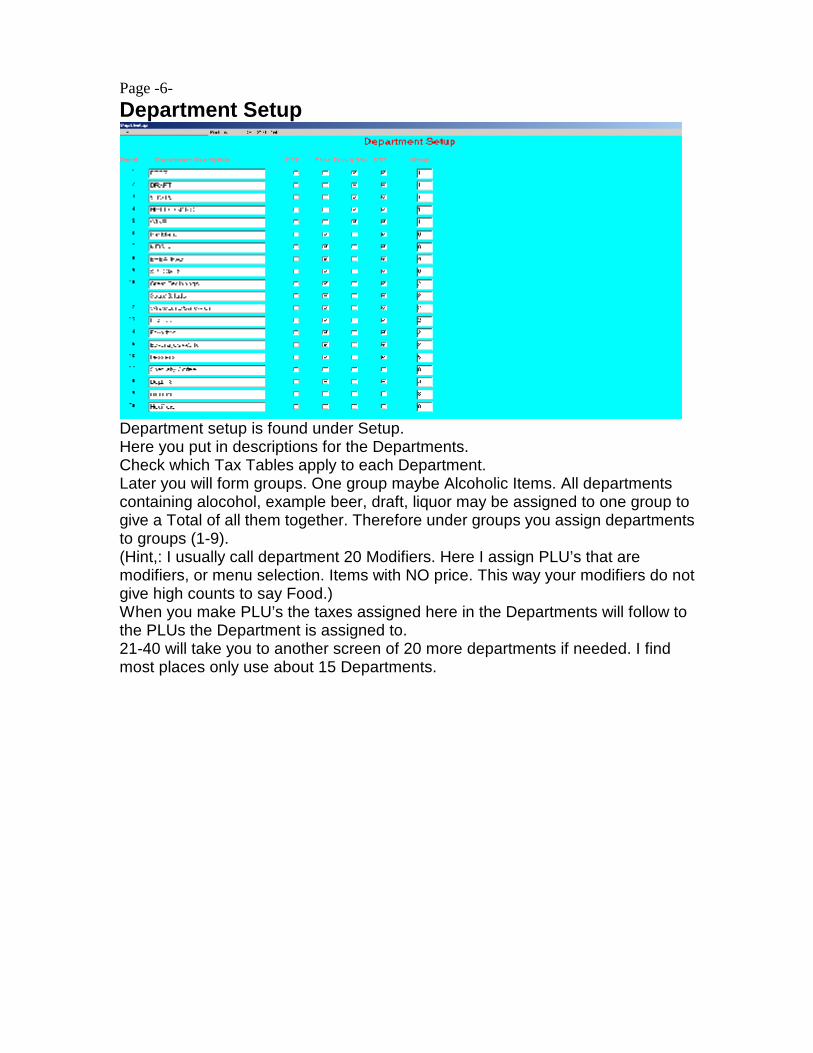
Department Setup
Department setup is found under Setup. Here you put in descriptions for the Departments. Check which Tax Tables apply to each Department. Later you will form groups. One group maybe Alcoholic Items. All departments containing alocohol, example beer, draft, liquor may be assigned to one group to give a Total of all them together. Therefore under groups you assign departments to groups (1-9). (Hint,: I usually call department 20 Modifiers. Here I assign PLU’s that are modifiers, or menu selection. Items with NO price. This way your modifiers do not give high counts to say Food.) When you make PLU’s the taxes assigned here in the Departments will follow to the PLUs the Department is assigned to. 21-40 will take you to another screen of 20 more departments if needed. I find most places only use about 15 Departments.

Page -7-
PLU SETUP
PLU# You can pick a number for the PLU’s from 1 to 2000. (Hint: I usually use my departments to organize my PLU’s, example Food, I would use numbers 100-199, liquor 200-299, etc.) PLU 991 to PlU 998 are reserved for open keys (example Open Liquor). PLU 999 is reserved for returning to main screen(Home). Reserve 950 to 991 for future enhancements to the program. Edit PLU# -click item on list on the left PLU Description Here you put in the description of the PLU, example Food, Steak, Hamburger, etc. Price Here you put in the price of the item, or leave it at zero if a modifier or menu header. Associated Department Here you put the department number the item is associated with. You can view Available departments with the Department drop down list. Again I use Department 20 for items with no price to keep their count separate. Goto Condiment Table This tells which condiment table (modifiers) to go to, example Steak to table of how done, then that one could got Choice of potato type, etc. Prints Chit on Printer Tell which printer to print the chit on (1-4), example Bar, Kitchen. A “0" does not print on a chit.

Page -8- Button Color Click on text box to bring up a choice of color to choose from by clicking on desired color. Font Color Click on text box to bring up a choice of color to choose from by clicking on Desired color. Prev - Next Will save present Plu information and advance or backup one to the next PLU# ***if you do not use one of these the changes will be lost*** Cancel Changes - put present PLU back to previous settings. Finished – will save the final changes and give the option to send them to the Remotes. Single Word Find – type in a word and press enter. A list of all the PLUs containing that word will open up.

Page -9-
CONDIMENT TABLES (MODIFIERS)
One main rule here is Table #1 is always the Main Screen If you pick one then go to upper left and pick main menus then build the one you pick. This allows you to have three starting points (example Breakfast, Lunch, Supper). First ‘Enter Table #’ you wish to Build (1-99) and press ‘Enter’. Header PLU is the first entry, this Plu could be example Potato Type and will show at the top of the screen when shown. (You can click on the item on the PLU list, then double click on the position you wish the item to be.) The rest of the choices 1 to 40 builds the items in the table to be shown on the screen. (Hint, I usually use the 40th position for PLU 999 (Home) to take you back to the main screen, especially on screens having multiple chooses such as pizza toppings). When you have the table built to your liking press save to save the present table. If you put a table number in the ‘Next Table’ position this will override any “Next Table” you have in the PLU’s setup. If left ‘0' then the screen will go to the Condiment Table set in the PLU setup. Use Quantity Keys for this Table – if t checked the quantity keys will appear when This Table is used and vanish when leaving this table. Save, after you make any changes to a table click SAVE to register the changes for table.

Exit, is used after you save your last table and are finished with building tables at the moment. If using a network you will be asked if you wish to send changes to remote stations, answer YES. As seen drop down lists are available to help you find tables and PLU’s numbers. Option Pages

Page -10-
SERVER SETUP
Here you set up the Server’s name to print on bills, chits, etc. and assign them a number 1 to 99. After changing each server’s information save the changes. Can assign a secret code (1-9999)to each server. This code is use when signing in for each sale. Can assign drawer one to the servers you wish the drawer to pop open for. Security Level – is used if security option is being used, giving seven levels of security to various operation. Disable Tablemap and Cover Count – if these features are being used checking this option will disable them for this server. (May be used for example the Bar Tender)

Page -11- MANAGER SETUP
Put in a manager name. Click on the manager code and enter a one or two character code. The secret code box lights up, click on it and enter a secret code. Save changes on Exit.
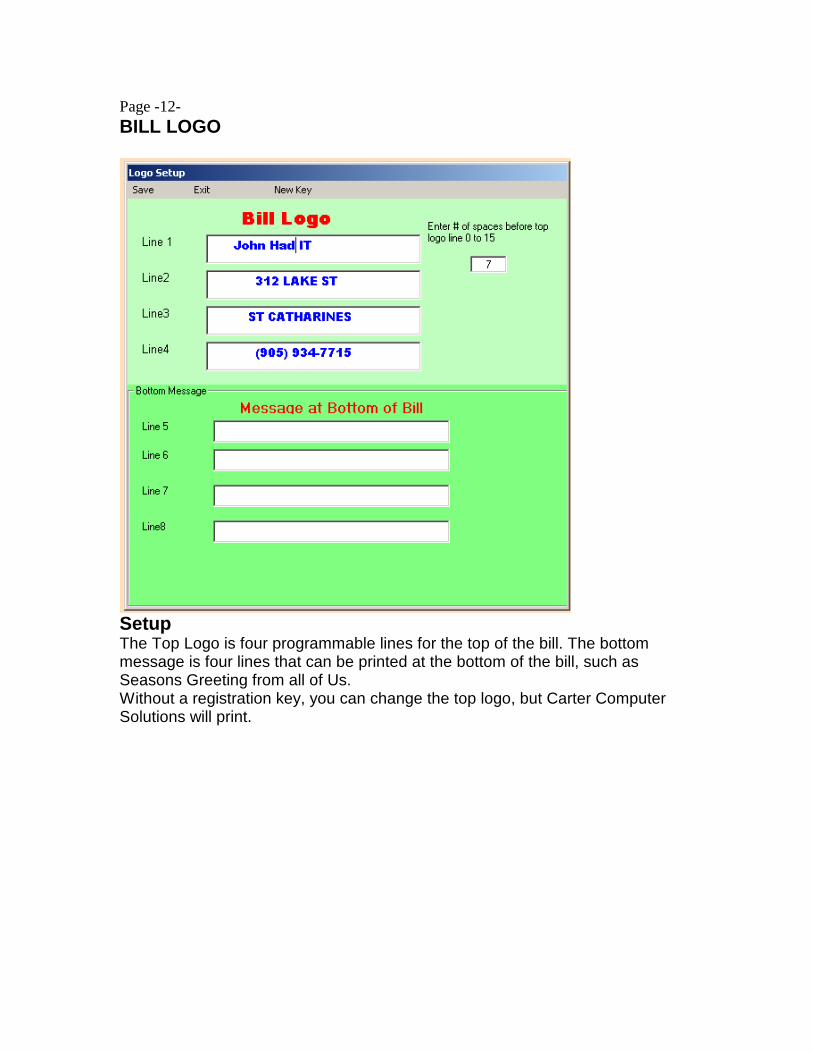
Page -12- BILL LOGO
Setup The Top Logo is four programmable lines for the top of the bill. The bottom message is four lines that can be printed at the bottom of the bill, such as Seasons Greeting from all of Us. Without a registration key, you can change the top logo, but Carter Computer Solutions will print.

Page -13- DAILY READ RESET
From the Home Page click on the Daily read reset button. The one column allows you to View the various readings. The bottom two in each column do not include Tables not closed. Viewing does not affect totals’ The left column will print the various reports. Totals are not affected. The reset side only works when all tables are closed. Resetting Clears the associated Totals, they will be zero when completed. Resetting the Departments resets the Department Group totals. The groups achieve their totals from the departments. Multi Station View OPERATION Once onto the Sale Screen – do not – use the keyboard any more, Keypads will be on the screen when input is needed. To get to the POS screen on the Home Page click on ‘POS’ button. Simple Sale Input in your server secret code number on the numeric keypad on the screen, then press Server# button on the lower left side. (If using tablemapping press Exit in upper left corner). Using the 40 item keys, example food, liquor etc enter your sales items (once you enter an item you can not put in a table number).

Page -14- To enter an Open Price (Open Food) on an open key touch the Open Price Key (example Open Food) to open the numeric keypad, enter the amount touch the “Open Key”. (When all items are entered press Tender on the lower right side. No more items can be added to the sale at this time. A tender screen will pop up. You can enter the amount tendered on the numeric keypad then press: Cash Tendered, Debit, or Credit Card. If it is the exact amount paid you can press the Cash Tendered, Debit, or Credit Card and it will accept tender amount equal to sale. Along with the tender keys there is a quick tender key, in the example $40. Pressing it is like doing $40 Cash Tendered. Sale is finished. If the unit is setup for server stay down you can now start entering the items for the next sale. If not set for server stay down you will have to enter your server number again to start the next sale (most common).
TABLE SERVICE Table Service Sign in entering your server secret code on the numeric keypad, then press “Server#”.
Yellow Tables are available. Green Tables are ones Server signed on has open. Red Tables are ones being used by another Server.

Page -15- New Table (If using tablemapping touch any of the yellow table representations, these are tables not in use. If using separate checks for each person press separate checks after entering each persons order and for the final person press service.) if not using table map enter the number of the table being served, press ” New Table” . Enter your items for the sale upto this point. When all items are entered press “Service” to automatically print the items on the chits for the order at example the kitchen and bar. At this time the station is freed up for the next order to be placed and your order stored for recall later. Pressing “Final” at this point instead of “Service” will do the above plus print a presentation bill you can present to the customer.(Or keep for your reference). Adding to Previous Table Sign In (If using tablemapping press the green layout item for the table. If using separate checks for the table a list will come up to choose from, the right 2 digit in each number represent the table number) When not using table map enter the table number on numeric keypad and press “Table Add On”. Previous items will show in the view screen. If not sure of the table number press Server Tables on the top bar and a screen will pop up listing tables you have open and their amount to date. Click on the one you need and it will open. Enter new items then store table again with “Service” or “Final” if customer is ready for a bill. (You can also “tender at this point if Customer is paying at same time, but once tender is pressed the table is closed and can not be added to anymore.) Tendering Table Sign In Enter the table number on numeric keypad then press “Table Add On”. Previous items will show in the view screen. If not sure of the table number press Server Tables on the top bar and a screen will pop up listing tables you have open and their amount to date. Click on the one you need and it will open.

Page -16- Press “Tender” and the tender screen will pop up. Now you can tender the same as in a simple sale (Once Tender is press there is no going back to add more items to the sale).
Error Correct When entering items you make a mistake hitting “Error Correct” will erase the last item pressed and let you choose again. Void While still within a table you notice a mistake a few items back you can void that item by high lighting the line to void then press void. It will show on the screen etc. This is necessary in case it is an item that was Serviced already, it will now print on the chit at proper place showing to not make it. Manager Void This is peformed by the manager. This is to void an item form your records if for some reason after a sale is completed something was not paid for. Post Receipt If station is set up not to issue receipts on every sale and a customer asks for a receipt. After the sale is tendered you can press “Post Receipt” to print a copy of the bill.
Paid Out Sign In (Cash will be deducted from the Cash in Drawer total for that Server) On the typewriter keyboard that pops up enter the amount to be paid out (no Next enter the Reason for the pay out then press enter. Then click OK on the top form. A receipt will be printed keep this to hand in with your cash.

Page -17- Split Check
Sign in, (Exit Table Map if open) touch Split Check. Now pick the Table to split then key in the number of the new Table to split to. Click on Item to move, then click on Move Button. .When all desired are transferred save using appropriate selection at bottom. Transfer Checks
Here is where you can Join Two Tables together so one person pays. Transfer another Servers Table to yourself. Transfer a Patron from one location to another.

Page -18-
TableMapping Table Mapping is available You can setup -99 tables of various sizes and shapes. -30 partitions for walls, bar etc. The tables default to yellow in colour. When the server signs in the available tables will show up in yellow, tables the server has open in green, and tables other servers have open in red. When starting a new table if the quests at the table indicate they wish separate checks. You enter the first quest order, press separate check button, enter the next etc. until the last one then click on service instead of separate checks for that quest. (Remember you can only have a total of 199 open checks at a time.) When re-opening a table if more then one check is assigned to table a list of Page -18- checks assigned to that table will appear. Pick the one you need. (Example three quests at table 2 with separate checks, the list will show 2, 102, and 202. The 02 indicates the table and the previous number(s) indicate the quest. The first person when opening the table is the 2.) NOTE: make sure the display resolution is in the resolution you will be using when developing the Tablemap, it is the only screen that will not resize automatically due to a lot of hidden info behind each table.
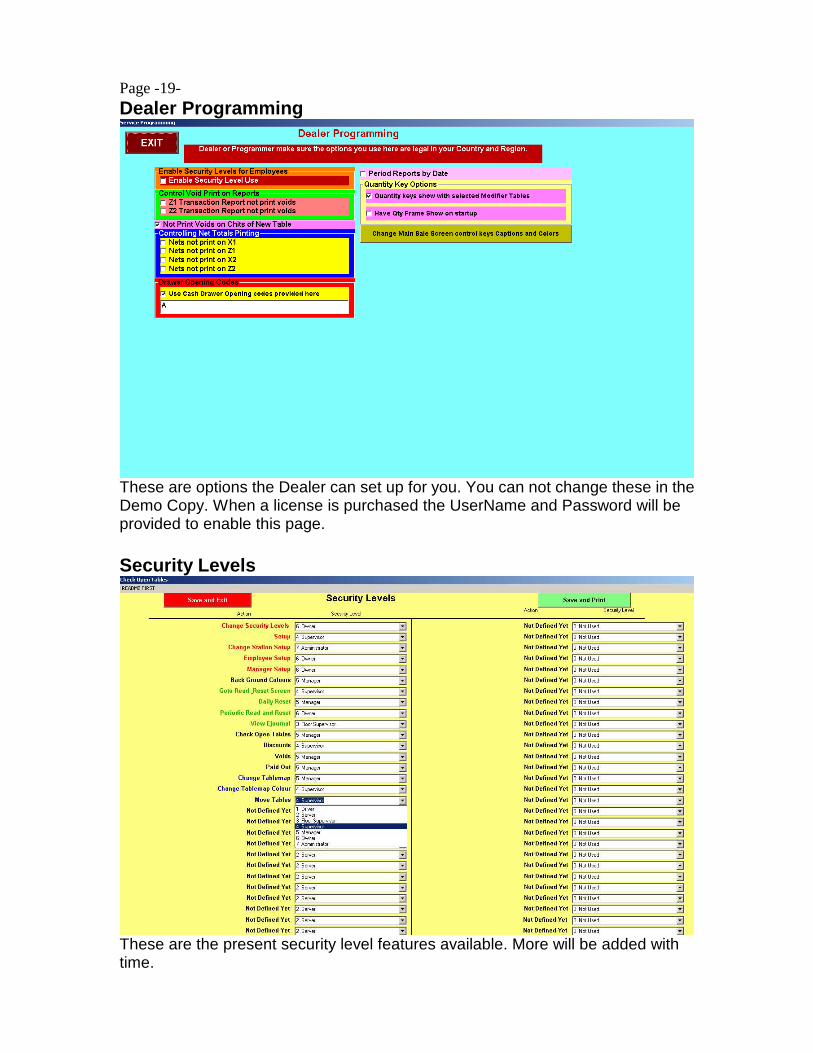
Page -19- Dealer Programming
These are options the Dealer can set up for you. You can not change these in the Demo Copy. When a license is purchased the UserName and Password will be provided to enable this page. Security Levels
These are the present security level features available. More will be added with time.
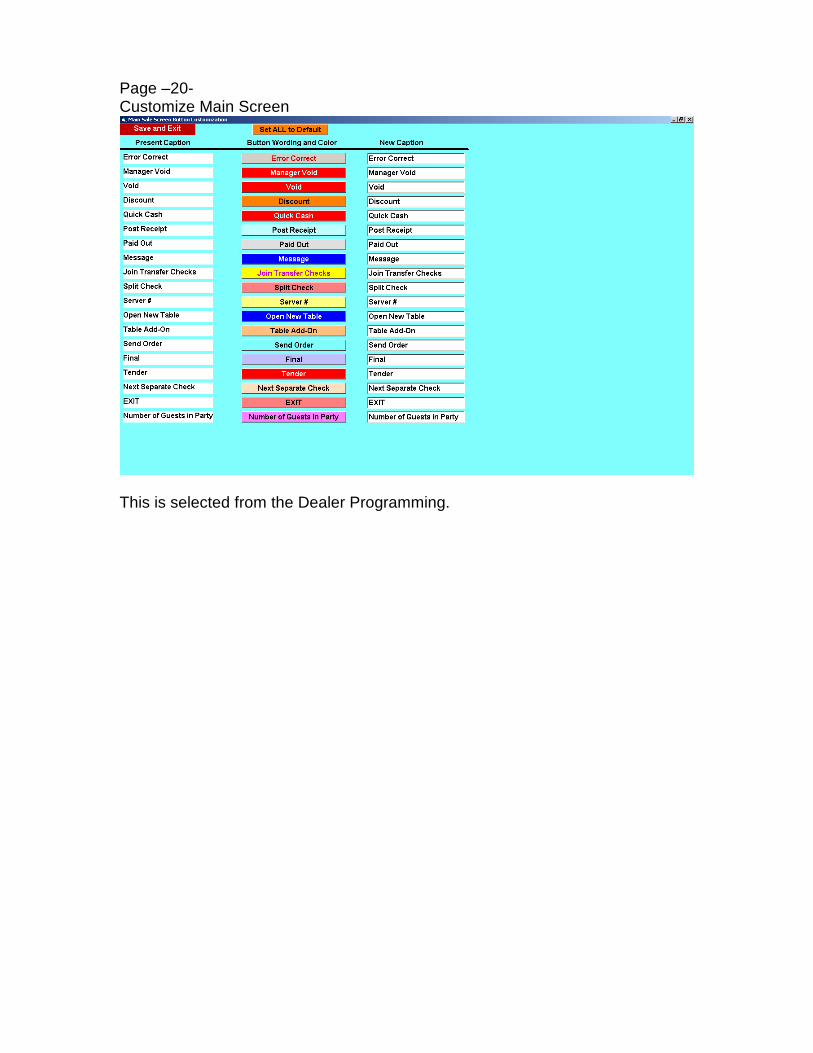
Page –20- Customize Main Screen
This is selected from the Dealer Programming.

Appendix A-I System Suggestions Have Customers using Pentium II -I suggest something a little faster as the program grows with at least - 512MB memory - 80G Drive - CPU does not have to be a race horse
- at least one serial port for each remote printer, example kitchen (Serial cable come be ran for considerable length). Can get USB to Serial adaptors - 17” Touchscreens seem to have a good price point at this time. 15”
work well to. - Preferred operating system at this time is XP Home
Vista is still in its infancy and some of the POS printer manufacturers do not have drivers built printers with Vista at time of this writing.
For Printers -presently using Star TSP100 for station printers -Epson TM 200 series printers work will for the kitchen, etc.
= like a Dot Matrix for the Kitchen, They make noise so cook knows there is an order and they do not turn black if exposed to heat.
-have tried TM-88 series printers Samsung SP275 TM-60 Old Star SP300 Old TM-85 Cash Drawer -if using a Cash Drawer you need one that attaches to the printer, (make sure you have the right cable for the printer you are using.) -the above printers all have Cash Drawer connectors on them. Have tried to keep the program simple so no high power equipment is needed.