isip biller registration process - icici bank - zendesk · pdf filehere’s what you need...
TRANSCRIPT

THE iSIP BILLERREGISTRATIONPROCESS
FOR ICICI BANK

Congratulations on registering your iSIP. An Internet-based Systematic Investment Plan (iSIP) with FundsIndia will allow you to:
To kick-start your iSIP with FundsIndia, you just have to complete one last step. You have to add the chosen Asset Management Company (AMC) as a biller through your internet banking portal.
To guide you through this process, we have prepared this process chart for you.
• Consolidate all your investments under one online account• Manage and track the performance of all your investments online• Avail advisory services from the best investment experts in India

Here’s what you need to do.
1. Click here to login to ICICI’s internet banking portal.2. Sign in using your Login ID and password.3. Once you’ve logged in, click on ‘PAYMENTS & TRANSFER’, and then select ‘MANAGE BILLERS’.
Step 1

1. You will now see the following screen in front of you. Click on the ‘REGISTER NOW’ button under the ‘Telecom, Insurance and other utilities’ option.
Step 2
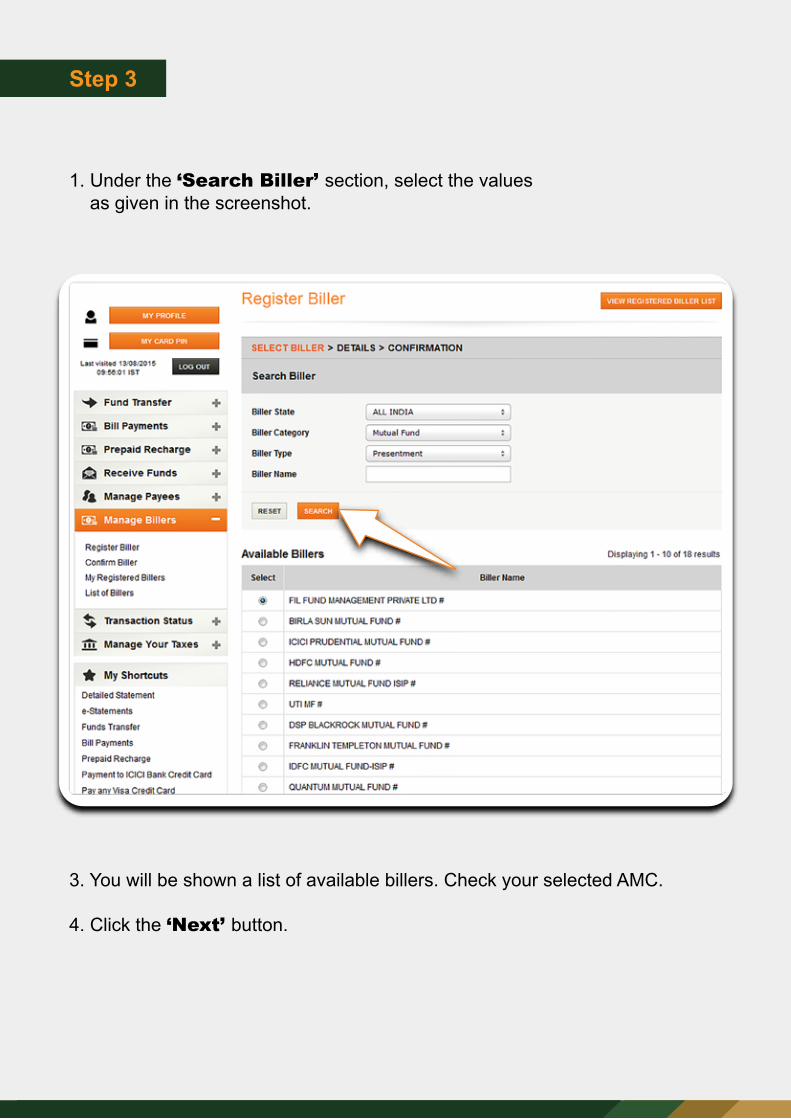
1. Under the ‘Search Biller’ section, select the values as given in the screenshot.
3. You will be shown a list of available billers. Check your selected AMC.
4. Click the ‘Next’ button.
Step 3

1. In the following screen, enter a ‘Nickname’ for the biller. Make sure it is descriptive enough so that you can identify it later.
5. ‘Unique Registration No.’ (URN) is what you had received when you registered your iSIP on the Fundsindia platform. Please enter that number in the URN field.
2. Select ‘Yes’ for ‘Auto Pay Required’ so that you don’t have to remember to pay every month. The amount will be automatically debited from your bank account.
3. Select ‘Full Amount’ for ‘Auto Pay Mode’. 4. Select the ‘Bank Account’ with which you have registered with FundsIndia.
6. Indicate that you agree with the terms and conditions.
7. Click ‘Next’.
Enter Nickname
Select “Yes”
Step 4

1. In the ensuing screen, verify the entered details, and click ‘SUBMIT’. A confirmation screen will appear.
Step 5

1. Go to the ‘Manage Billers’ screen.
2. At the bottom of the page, you will see the ‘My Registered Billers’ option. Click on the ‘View’ button.
Step 6
You now need to approve the biller using a One Time Password (OTP) that will be sent on your bank-registered number. You should receive the OTP within 15 minutes of registering the biller. For this:

Enter URNreceived by SMS
1. You will see the following screen. Select the biller from the list of ‘Pending Registrations’.
2. Enter the OTP you’ve received by SMS inside the ‘Unique Reference Number’ box.
4. A confirmation screen will appear. You can take a printout, or save the confirmation screen for future reference.
3. Click the ‘CONFIRM’ button.
Step 7

Congratulations! Your iSIP is now set up. Be sure to renew,or extend your iSIP before it expires.
Happy investing!
Step 8