isharkfin user manual - fao.org · les opinions exprimées dans e produit d’information sont...
TRANSCRIPT

ISHARKFIN USER MANUAL
Jürgen Heine, PhD Researcher and Software Engineer Department of Computer Sciences University of Vigo Pontevedra, Spain
Elisa Pérez Costas Research Assistant Department of Ecology and Animal Biology University of Vigo Pontevedra, Spain
Monica Barone, PhD Fisheries Consultant Fisheries and Aquaculture Department Food and Aquaculture Organization of the United Nations Rome, Italy
and
Castor Guisande González Professor in Ecology Department of Ecology and Animal Biology University of Vigo Pontevedra, Spain
ENGLISH
The designations employed and the presentation of material in this information product do not imply the
expression of any opinion whatsoever on the part of the Food and Agriculture Organization of the United
Nations (FAO) concerning the legal or development status of any country, territory, city or area or of its
authorities, or concerning the delimitation of its frontiers or boundaries. The mention of specific companies
or products of manufacturers, whether or not these have been patented, does not imply that these have
been endorsed or recommended by FAO in preference to others of a similar nature that are not mentioned.
The views expressed in this information product are those of the author(s) and do not necessarily reflect
the views or policies of FAO.
FRANÇAIS
Les appellations employées dans ce produit d’information et la présentation des données qui y figurent
n’impliquent de la part de l’Organisation des Nations Unies pour l’alimentation et l’agriculture (FAO)
aucune prise de position quant au statut juridique ou au stade de développement des pays, territoires,
villes ou zones ou de leurs autorités, ni quant au tracé de leurs frontières ou limites. La mention de sociétés
déterminées ou de produits de fabricants, qu’ils soient ou non brevetés, n’entraîne, de la part de la FAO,
aucune approbation ou recommandation desdits produits de préférence à d’autres de nature analogue qui
ne sont pas cités. Les opinions exprimées dans ce produit d’information sont celles du/des auteur(s) et ne
reflètent pas nécessairement les vues ou les politiques de la FAO.
ESPAÑOL
Las denominaciones empleadas en este producto informativo y la forma en que aparecen presentados los
datos que contiene no implican, por parte de la Organización de las Naciones Unidas para la Alimentación y
la Agricultura (FAO), juicio alguno sobre la condición jurídica o nivel de desarrollo de países, territorios,
ciudades o zonas, o de sus autoridades, ni respecto de la delimitación de sus fronteras o límites. La mención
de empresas o productos de fabricantes en particular, estén o no patentados, no implica que la FAO los
apruebe o recomiende de preferencia a otros de naturaleza similar que no se mencionan. Las opiniones
expresadas en este producto informativo son las de su(s) autor(es), y no reflejan necesariamente los puntos
de vista o políticas de la FAO.

Contents
1. Installation and language settings ............................................................................................................. 4
2. Identifying sharks fins ................................................................................................................................ 5
2.1 Preparing photographs ...................................................................................................................... 5
2.2 Interactive identification ................................................................................................................. 13
2.3 Identification from file ..................................................................................................................... 15
3. Further functionality ................................................................................................................................ 17
3.1 List of species ................................................................................................................................... 17
3.2 Export taxonomy ............................................................................................................................. 20
4. Updates.................................................................................................................................................... 22
ANNEX - Standard photographs of shark fins, and tissue sampling for genetic analysis ................................ 24
iSharkFin is an expert system for the identification of shark fins from their shape. Starting from a standard
photograph of the fin, the interactive process conducts the user to select some characteristics of the fin and
to measure its shape receiving, as an automatic response, the shark species to which the fin belongs.
1. Installation and language settings To install iSharkFin, download it from the web page and execute the installer. Accept the end user licence
agreement and choose where you want the program to be installed. After finishing the installation process,
launch the program by executing “iSharkFin.exe”.
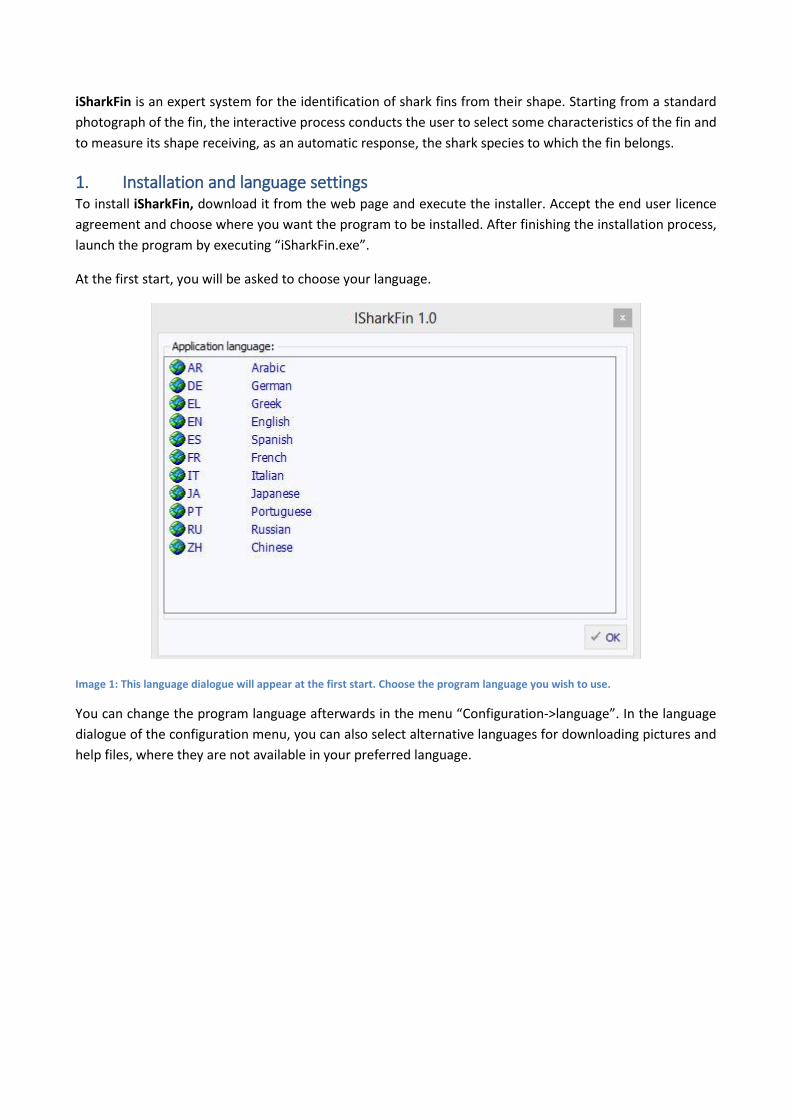
At the first start, you will be asked to choose your language.
Image 1: This language dialogue will appear at the first start. Choose the program language you wish to use.
You can change the program language afterwards in the menu “Configuration->language”. In the language
dialogue of the configuration menu, you can also select alternative languages for downloading pictures and
help files, where they are not available in your preferred language.
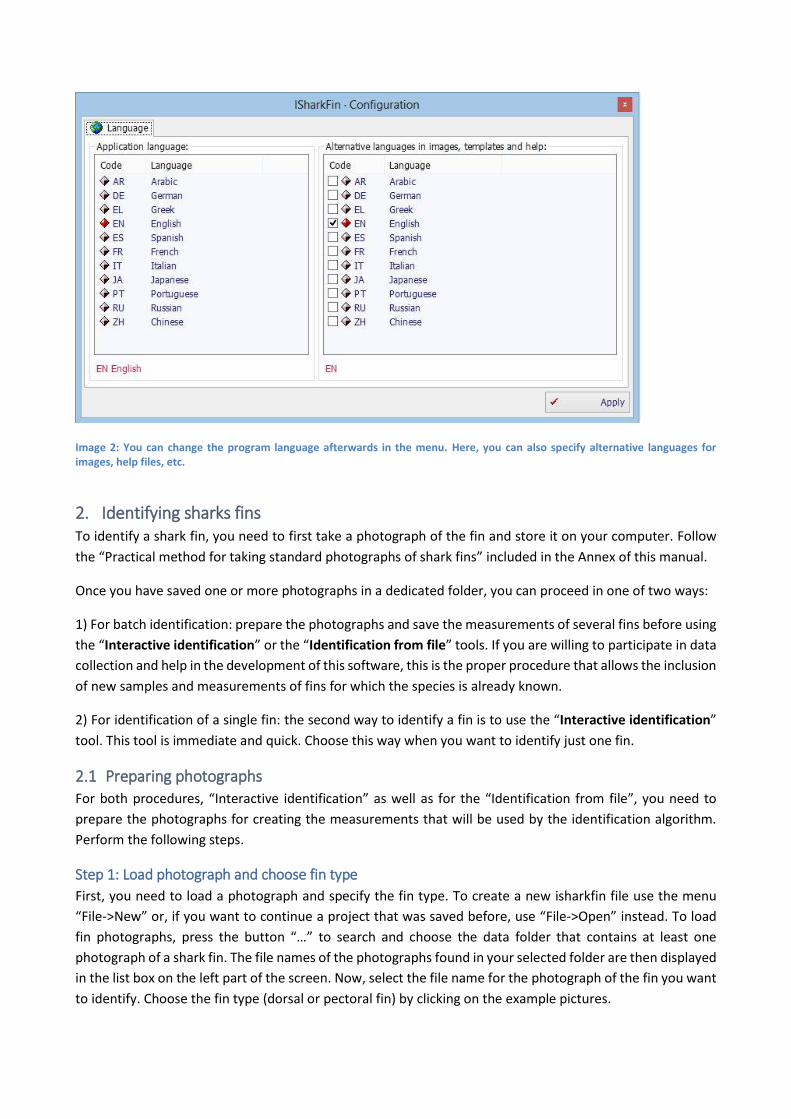
Image 2: You can change the program language afterwards in the menu. Here, you can also specify alternative languages for images, help files, etc.
2. Identifying sharks fins To identify a shark fin, you need to first take a photograph of the fin and store it on your computer. Follow
the “Practical method for taking standard photographs of shark fins” included in the Annex of this manual.
Once you have saved one or more photographs in a dedicated folder, you can proceed in one of two ways:
1) For batch identification: prepare the photographs and save the measurements of several fins before using
the “Interactive identification” or the “Identification from file” tools. If you are willing to participate in data
collection and help in the development of this software, this is the proper procedure that allows the inclusion
of new samples and measurements of fins for which the species is already known.
2) For identification of a single fin: the second way to identify a fin is to use the “Interactive identification”
tool. This tool is immediate and quick. Choose this way when you want to identify just one fin.
2.1 Preparing photographs
For both procedures, “Interactive identification” as well as for the “Identification from file”, you need to
prepare the photographs for creating the measurements that will be used by the identification algorithm.
Perform the following steps.
Step 1: Load photograph and choose fin type
First, you need to load a photograph and specify the fin type. To create a new isharkfin file use the menu
“File->New” or, if you want to continue a project that was saved before, use “File->Open” instead. To load
fin photographs, press the button “…” to search and choose the data folder that contains at least one
photograph of a shark fin. The file names of the photographs found in your selected folder are then displayed
in the list box on the left part of the screen. Now, select the file name for the photograph of the fin you want
to identify. Choose the fin type (dorsal or pectoral fin) by clicking on the example pictures.
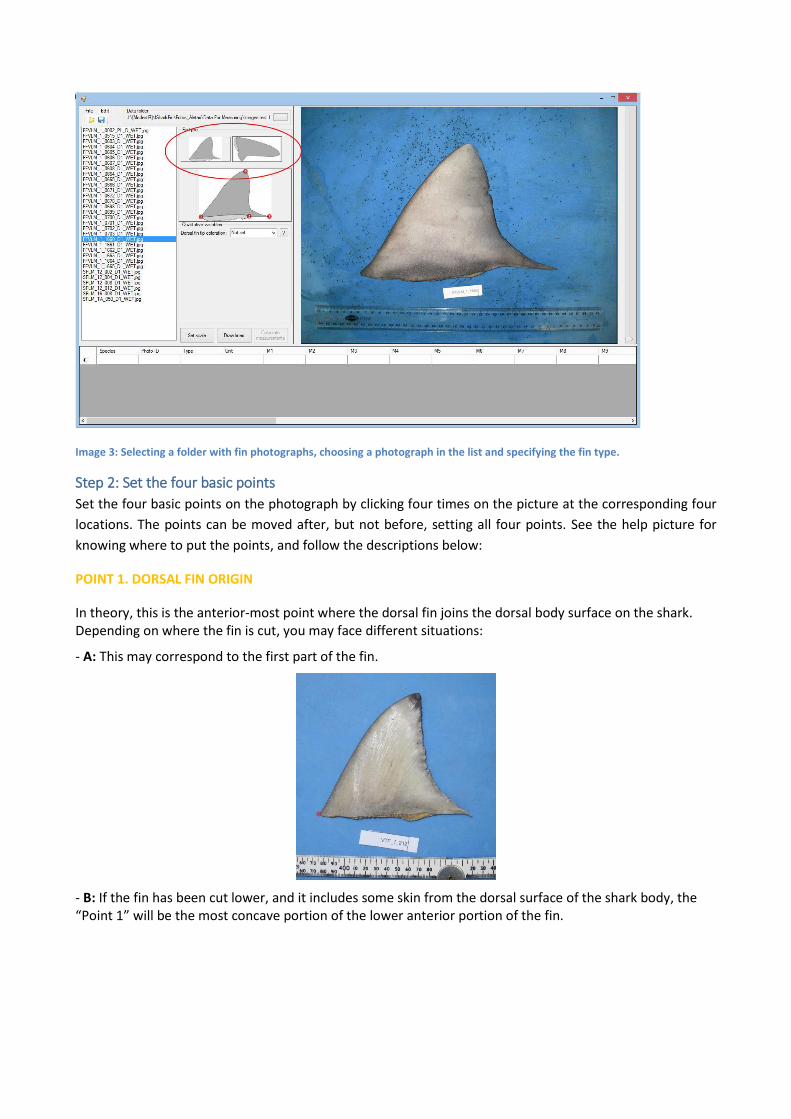
Image 3: Selecting a folder with fin photographs, choosing a photograph in the list and specifying the fin type.
Step 2: Set the four basic points
Set the four basic points on the photograph by clicking four times on the picture at the corresponding four
locations. The points can be moved after, but not before, setting all four points. See the help picture for
knowing where to put the points, and follow the descriptions below:
POINT 1. DORSAL FIN ORIGIN
In theory, this is the anterior-most point where the dorsal fin joins the dorsal body surface on the shark. Depending on where the fin is cut, you may face different situations:
- A: This may correspond to the first part of the fin.
- B: If the fin has been cut lower, and it includes some skin from the dorsal surface of the shark body, the “Point 1” will be the most concave portion of the lower anterior portion of the fin.
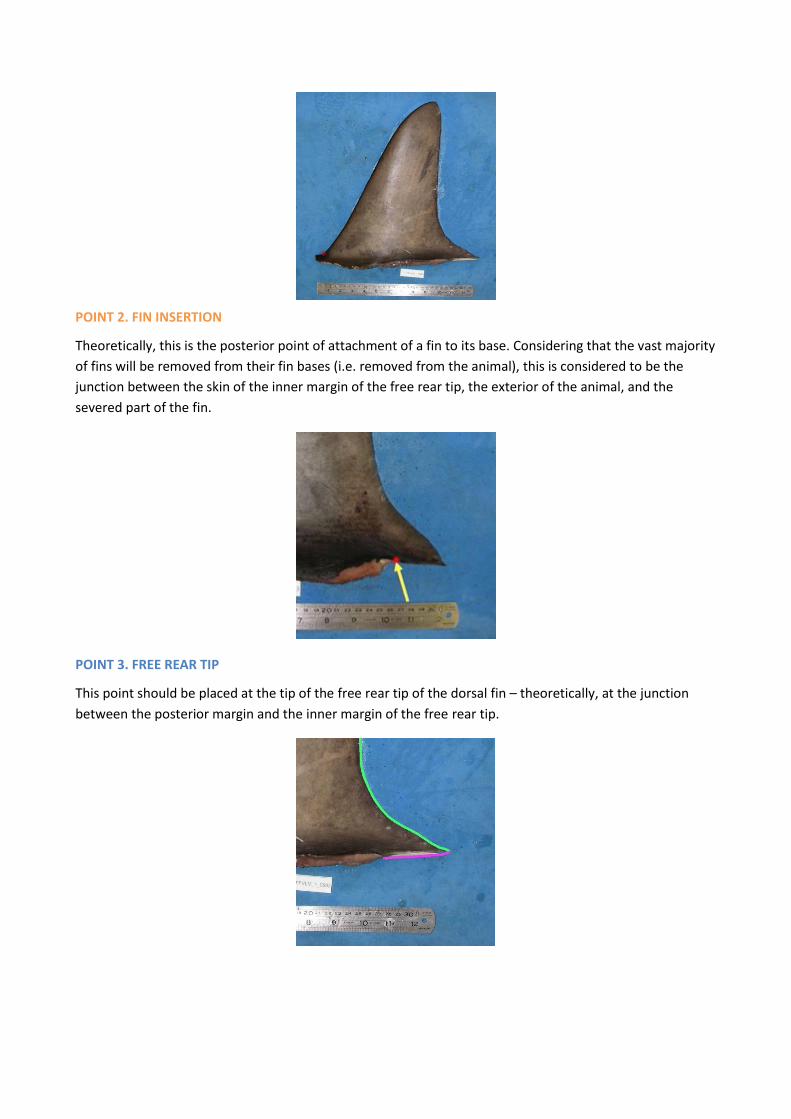
POINT 2. FIN INSERTION
Theoretically, this is the posterior point of attachment of a fin to its base. Considering that the vast majority
of fins will be removed from their fin bases (i.e. removed from the animal), this is considered to be the
junction between the skin of the inner margin of the free rear tip, the exterior of the animal, and the
severed part of the fin.
POINT 3. FREE REAR TIP
This point should be placed at the tip of the free rear tip of the dorsal fin – theoretically, at the junction
between the posterior margin and the inner margin of the free rear tip.
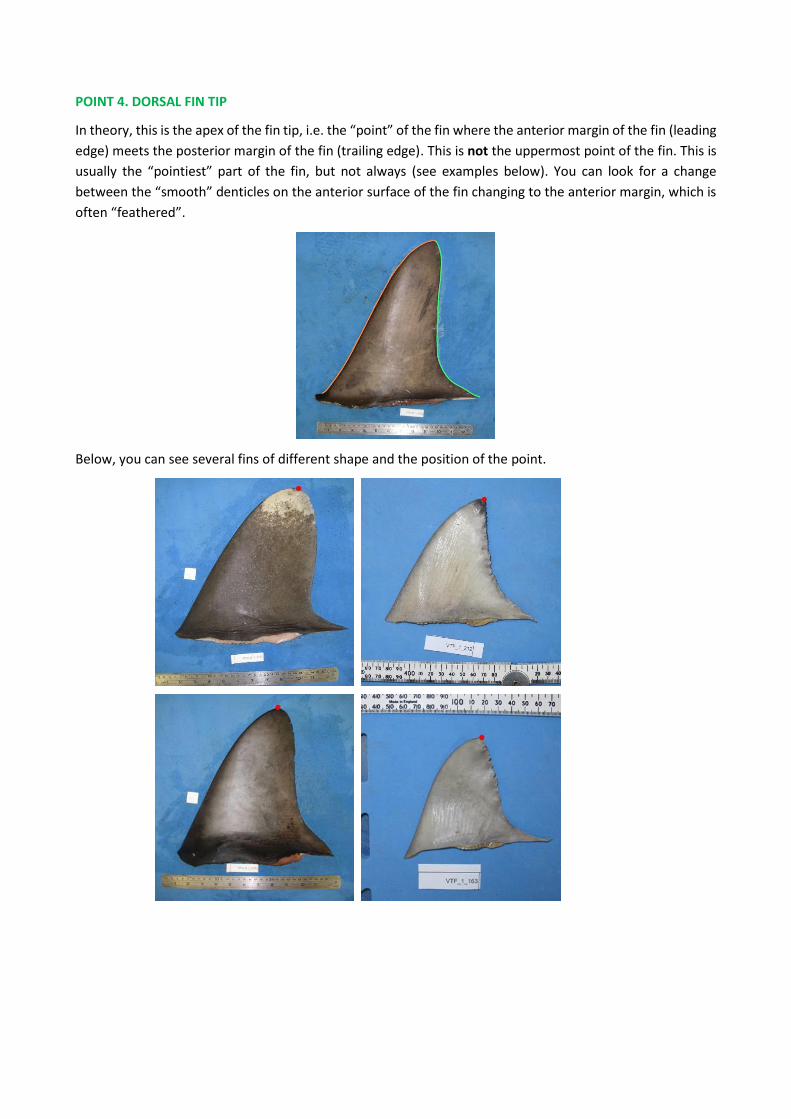
POINT 4. DORSAL FIN TIP
In theory, this is the apex of the fin tip, i.e. the “point” of the fin where the anterior margin of the fin (leading
edge) meets the posterior margin of the fin (trailing edge). This is not the uppermost point of the fin. This is
usually the “pointiest” part of the fin, but not always (see examples below). You can look for a change
between the “smooth” denticles on the anterior surface of the fin changing to the anterior margin, which is
often “feathered”.
Below, you can see several fins of different shape and the position of the point.
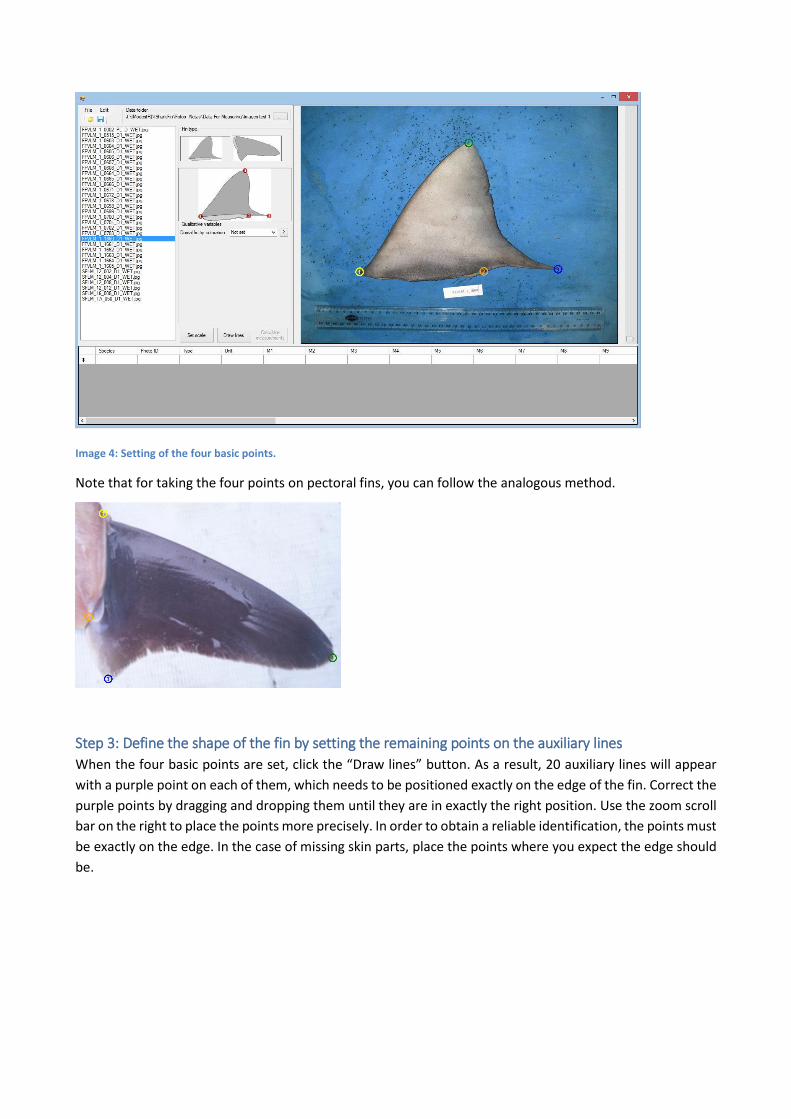
Image 4: Setting of the four basic points.
Note that for taking the four points on pectoral fins, you can follow the analogous method.
Step 3: Define the shape of the fin by setting the remaining points on the auxiliary lines
When the four basic points are set, click the “Draw lines” button. As a result, 20 auxiliary lines will appear
with a purple point on each of them, which needs to be positioned exactly on the edge of the fin. Correct the
purple points by dragging and dropping them until they are in exactly the right position. Use the zoom scroll
bar on the right to place the points more precisely. In order to obtain a reliable identification, the points must
be exactly on the edge. In the case of missing skin parts, place the points where you expect the edge should
be.
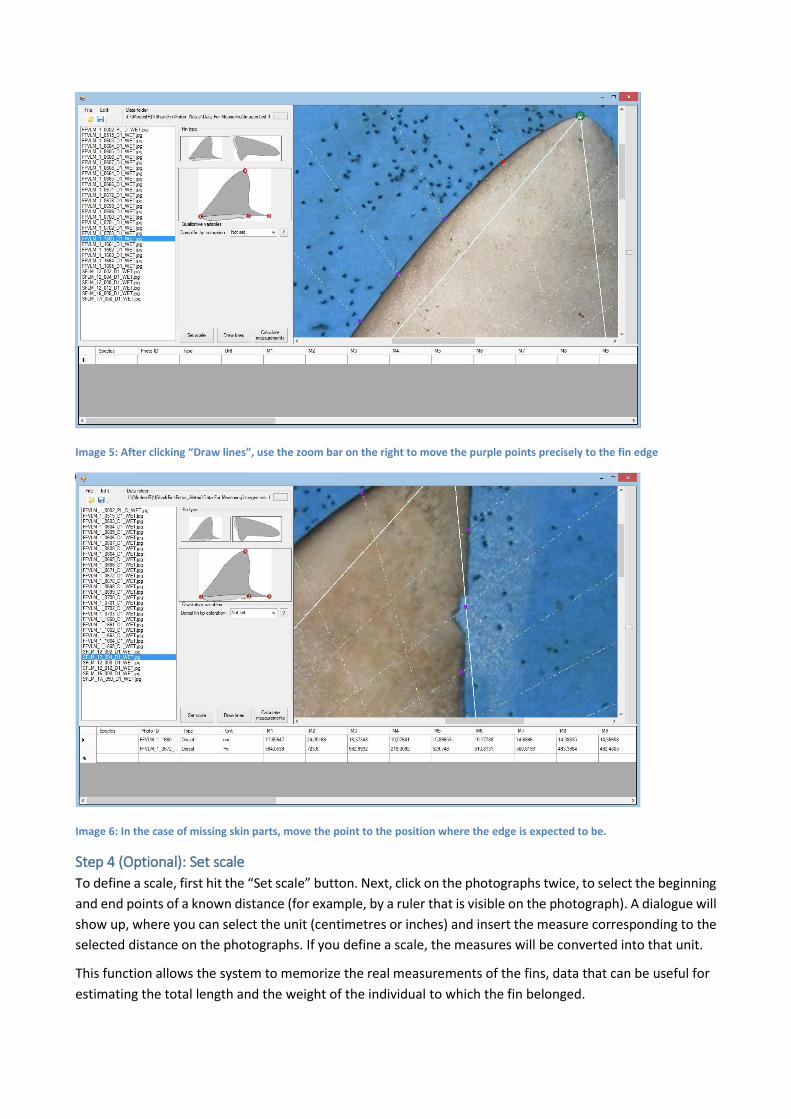
Image 5: After clicking “Draw lines”, use the zoom bar on the right to move the purple points precisely to the fin edge
Image 6: In the case of missing skin parts, move the point to the position where the edge is expected to be.
Step 4 (Optional): Set scale
To define a scale, first hit the “Set scale” button. Next, click on the photographs twice, to select the beginning
and end points of a known distance (for example, by a ruler that is visible on the photograph). A dialogue will
show up, where you can select the unit (centimetres or inches) and insert the measure corresponding to the
selected distance on the photographs. If you define a scale, the measures will be converted into that unit.
This function allows the system to memorize the real measurements of the fins, data that can be useful for
estimating the total length and the weight of the individual to which the fin belonged.
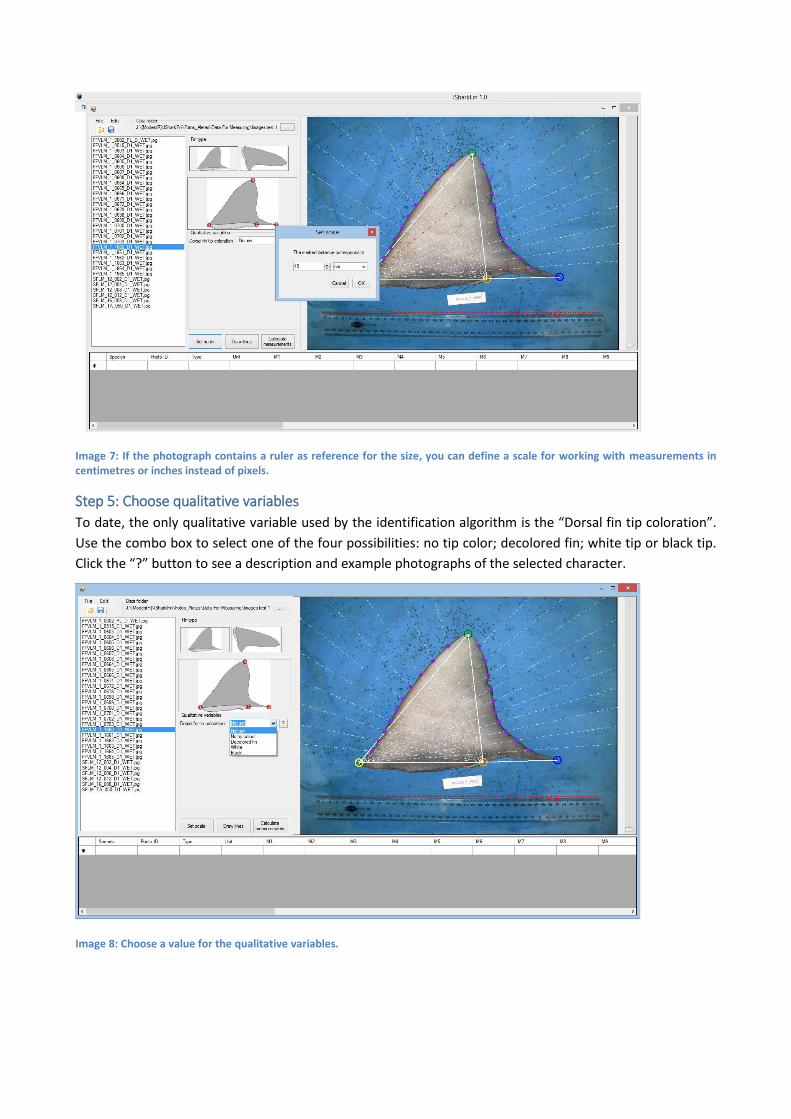
Image 7: If the photograph contains a ruler as reference for the size, you can define a scale for working with measurements in centimetres or inches instead of pixels.
Step 5: Choose qualitative variables
To date, the only qualitative variable used by the identification algorithm is the “Dorsal fin tip coloration”.
Use the combo box to select one of the four possibilities: no tip color; decolored fin; white tip or black tip.
Click the “?” button to see a description and example photographs of the selected character.
Image 8: Choose a value for the qualitative variables.
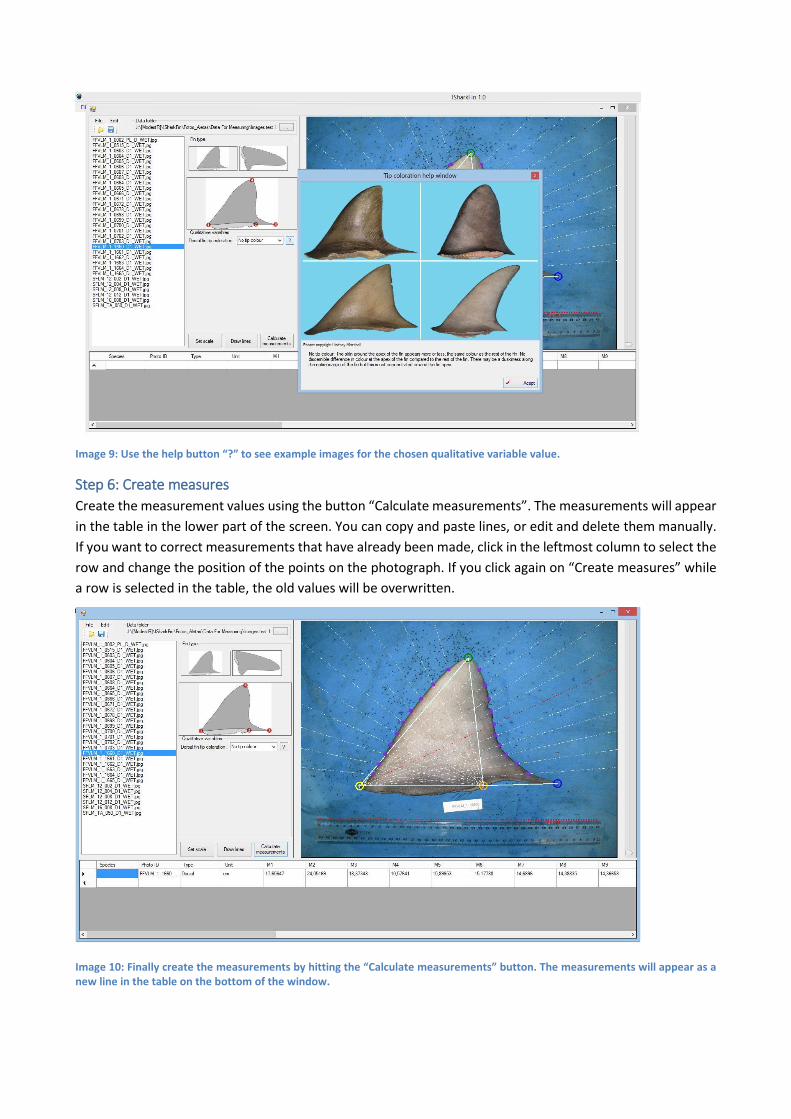
Image 9: Use the help button “?” to see example images for the chosen qualitative variable value.
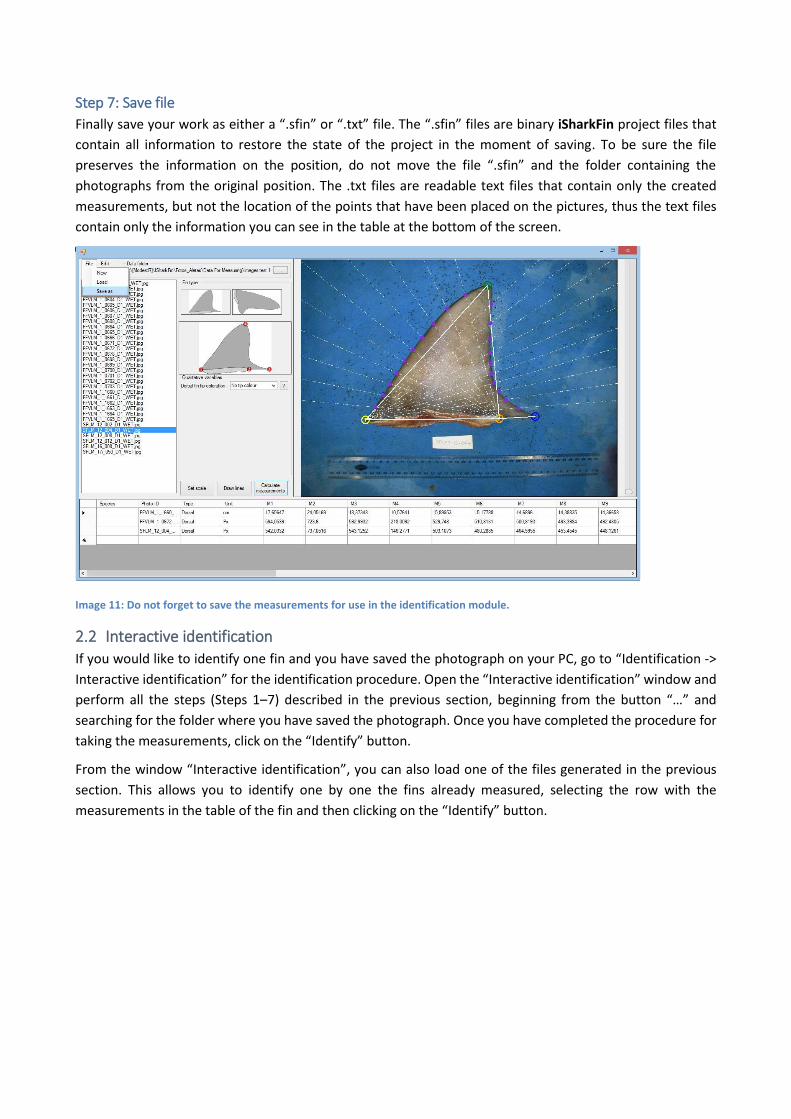
Step 6: Create measures
Create the measurement values using the button “Calculate measurements”. The measurements will appear
in the table in the lower part of the screen. You can copy and paste lines, or edit and delete them manually.
If you want to correct measurements that have already been made, click in the leftmost column to select the
row and change the position of the points on the photograph. If you click again on “Create measures” while
a row is selected in the table, the old values will be overwritten.
Image 10: Finally create the measurements by hitting the “Calculate measurements” button. The measurements will appear as a new line in the table on the bottom of the window.
Step 7: Save file
Finally save your work as either a “.sfin” or “.txt” file. The “.sfin” files are binary iSharkFin project files that
contain all information to restore the state of the project in the moment of saving. To be sure the file
preserves the information on the position, do not move the file “.sfin” and the folder containing the
photographs from the original position. The .txt files are readable text files that contain only the created
measurements, but not the location of the points that have been placed on the pictures, thus the text files
contain only the information you can see in the table at the bottom of the screen.
Image 11: Do not forget to save the measurements for use in the identification module.
2.2 Interactive identification
If you would like to identify one fin and you have saved the photograph on your PC, go to “Identification ->
Interactive identification” for the identification procedure. Open the “Interactive identification” window and
perform all the steps (Steps 1–7) described in the previous section, beginning from the button “…” and
searching for the folder where you have saved the photograph. Once you have completed the procedure for
taking the measurements, click on the “Identify” button.
From the window “Interactive identification”, you can also load one of the files generated in the previous
section. This allows you to identify one by one the fins already measured, selecting the row with the
measurements in the table of the fin and then clicking on the “Identify” button.
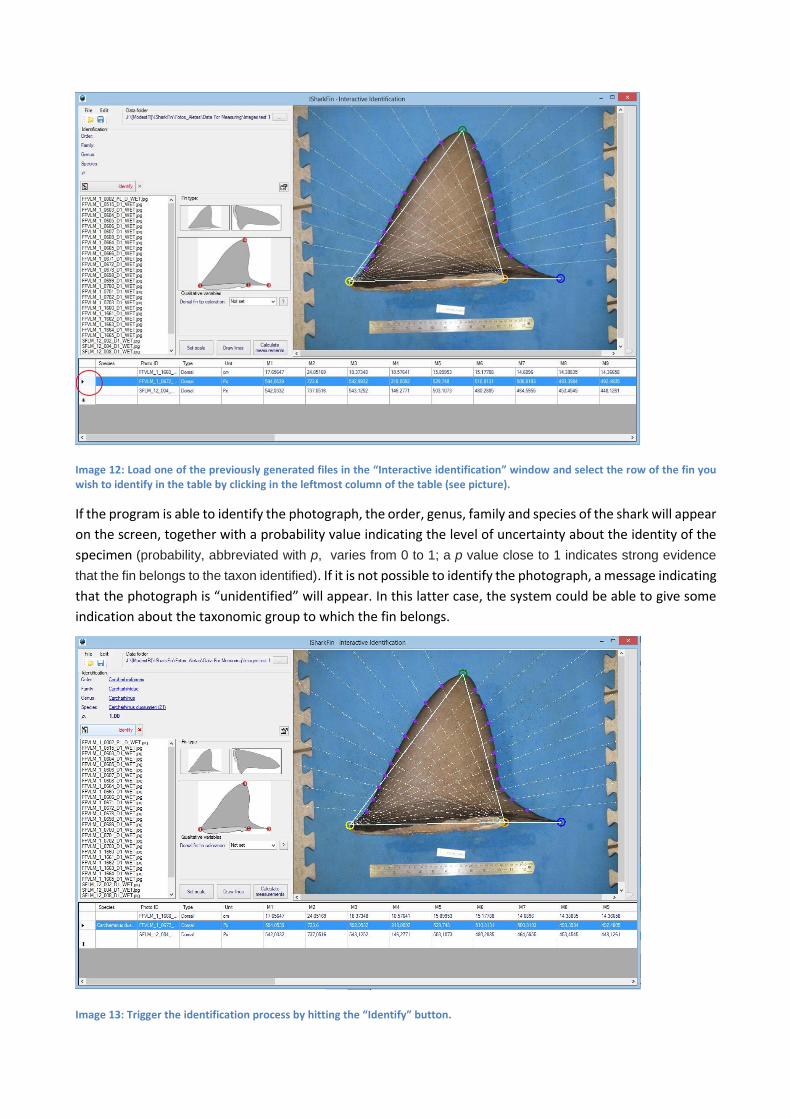
Image 12: Load one of the previously generated files in the “Interactive identification” window and select the row of the fin you wish to identify in the table by clicking in the leftmost column of the table (see picture).
If the program is able to identify the photograph, the order, genus, family and species of the shark will appear
on the screen, together with a probability value indicating the level of uncertainty about the identity of the
specimen (probability, abbreviated with p, varies from 0 to 1; a p value close to 1 indicates strong evidence
that the fin belongs to the taxon identified). If it is not possible to identify the photograph, a message indicating
that the photograph is “unidentified” will appear. In this latter case, the system could be able to give some
indication about the taxonomic group to which the fin belongs.
Image 13: Trigger the identification process by hitting the “Identify” button.

If you already have some information about the order, family or genus of the species, it is possible to give
hints to the expert system. To do, click the small button “Direct selection” at the bottom right within the
identification area. This makes a combo box appear where you can select the known order, genus or family,
before triggering the identification process by hitting the “Identify” button.
Image 14: You may give hints if you have information about the order, family or genus of the fin on the photograph.
2.3 Identification from file
To follow this procedure, you need to have first created a file with data of the measurements, as explained
in the “Preparing photographs” section. If you have already created such files, go to “Identification ->
Identification from file” in the menu. Select the input file by using the “Load” button. The input file may be
either in the .sfin or .txt format. You can check the data table in an external editor by clicking the buttons
with the notepad or Excel icons. Finally, click the button “Identify” and see the result in the table. You can
save the results by using the save button.
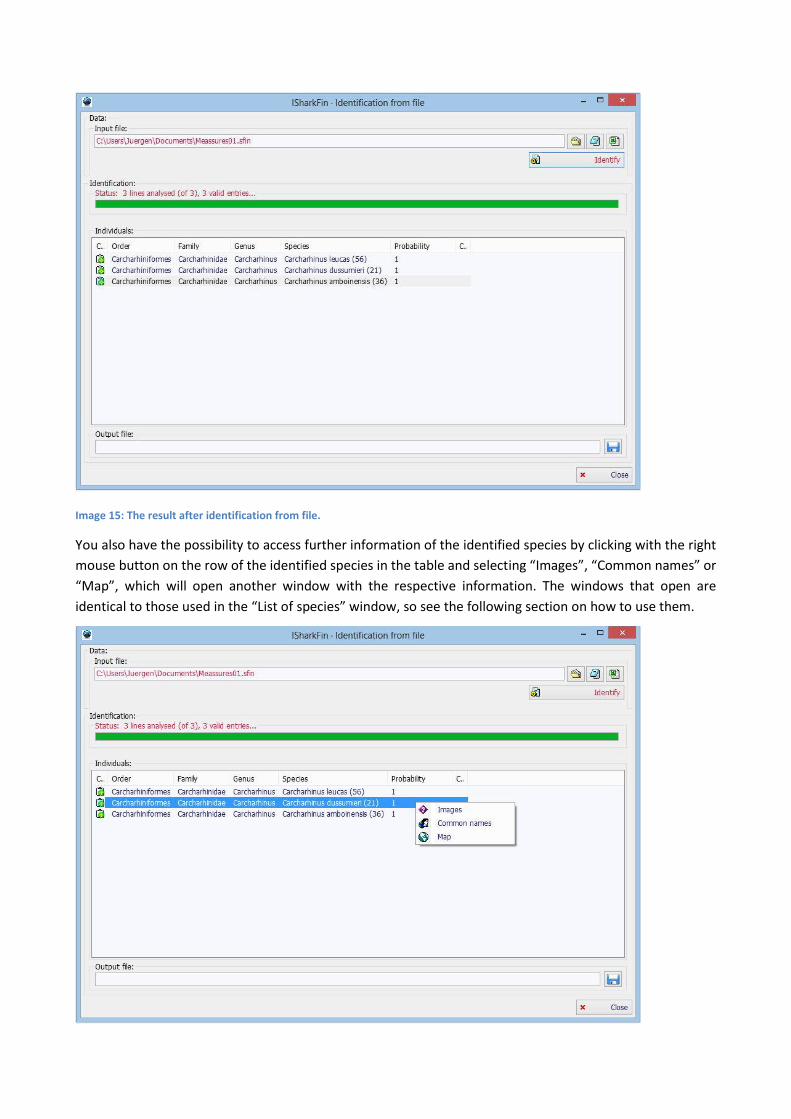
Image 15: The result after identification from file.
You also have the possibility to access further information of the identified species by clicking with the right
mouse button on the row of the identified species in the table and selecting “Images”, “Common names” or
“Map”, which will open another window with the respective information. The windows that open are
identical to those used in the “List of species” window, so see the following section on how to use them.

Image 16: Access further information on the identified species by right clicking on the result in the table.
3. Further functionality Besides identifying sharks, you can browse the database and taxonomy tree used by iSharkFin. It contains
pictures, distribution maps and Internet links to further information on the different orders, genus, families
and shark species.
3.1 List of species
To see the taxonomy tree, go to “Species->List of species” in the main menu. The list of species is not limited
to the shark species for which the identification of fins is possible, but contains a complete checklist of sharks
(www.ipez.es). A window will show up where you can browse the tree and see further information, pictures
and Internet links. Small icons “C”, “O”, “G”, “F” and “E” used in the tree stand for “class”, “order”, “genus”,
“family” and “species” (last one appears in red while the rest of them are in blue). At species level, a
parenthesis with extra information, for example “(6D,7P)” may appear. This means that for the selected
species measures from 6 dorsal and 7 pectoral fins are available in the database and used in the identification
algorithm.
The taxonomy tree window also has a search function, and it is possible to search by scientific name, common
name and synonym. Use the different search options “Name starts with search term” (B), “Name ends with
search term” (E), “Name contains search term” (M) or limit the search to only order, family, genus or species
level.
Image 17: The taxonomy tree used by iSharkFin with the possibility to search entries and additional information such as photographs, common names, distribution maps and links.
If no picture of the species is shown in the picture box, this means that there is no picture available on your
local hard disk. However, there may be a picture available on the iSharkFin server. To search for pictures on
the iSharkFin server, proceed as follows:
1) Right click on the picture box and select “Multi language”.

Image 18: Right click on the (empty) picture box to look for pictures on the iSharkFin server or to access further information such as distribution maps or common names.
2) A dialogue will appear where you will see a list with information on the availability of the pictures in
the different languages. To download one of them, select it and click “Download from iSharkFin
server” on the bottom of the window.
Image 19: Select the picture you want to download and click “Download from ISharkFin server”.

Image 20: Example of picture downloaded from the server.
in addition to downloading pictures, you can use the context menu of the picture box, opening it with a click of the right mouse button, to open a window with information about common names of the species in local languages of the different countries and to see a distribution map of the species, where available. The names can be ordered by common name, by the countries where the name is used, and by language.
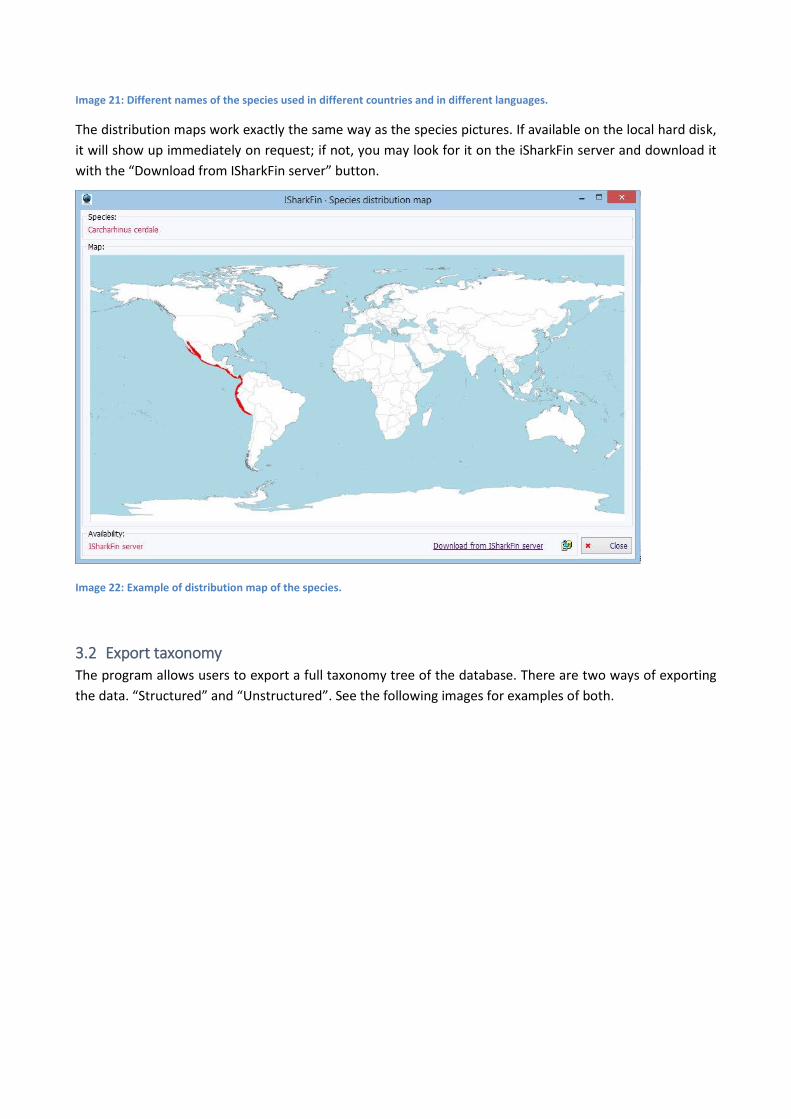
Image 21: Different names of the species used in different countries and in different languages.
The distribution maps work exactly the same way as the species pictures. If available on the local hard disk,
it will show up immediately on request; if not, you may look for it on the iSharkFin server and download it
with the “Download from ISharkFin server” button.
Image 22: Example of distribution map of the species.
3.2 Export taxonomy The program allows users to export a full taxonomy tree of the database. There are two ways of exporting
the data. “Structured” and “Unstructured”. See the following images for examples of both.
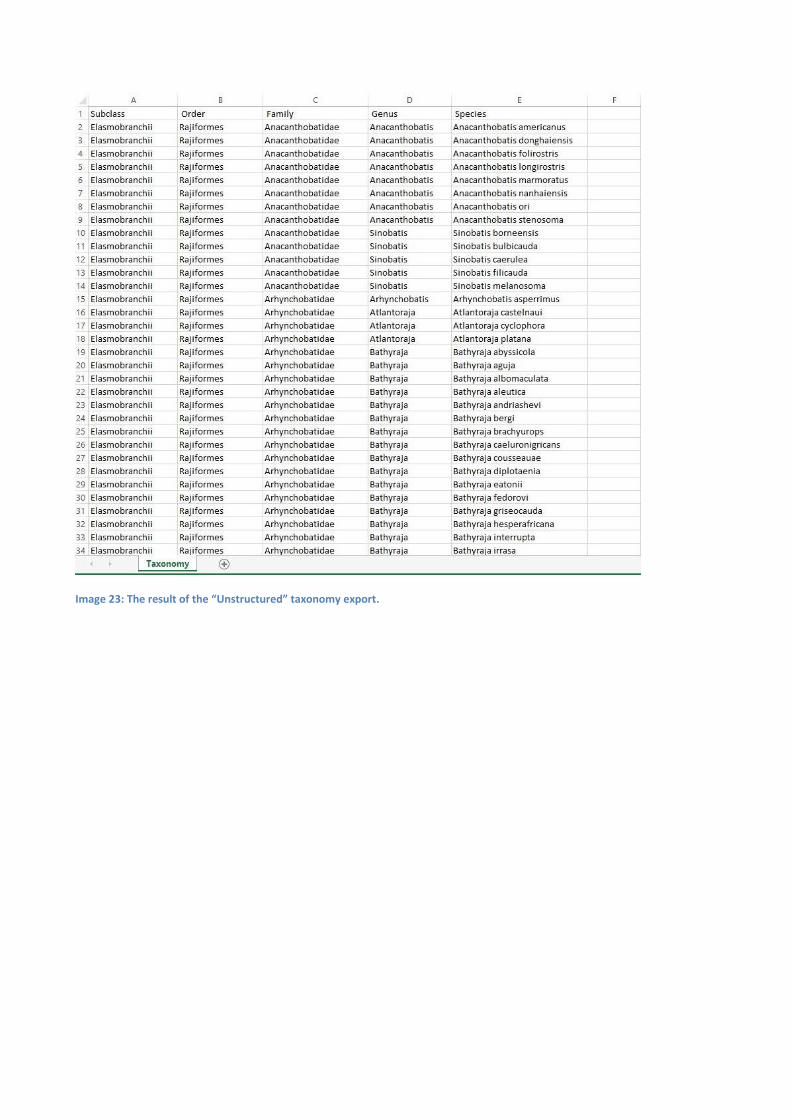
Image 23: The result of the “Unstructured” taxonomy export.
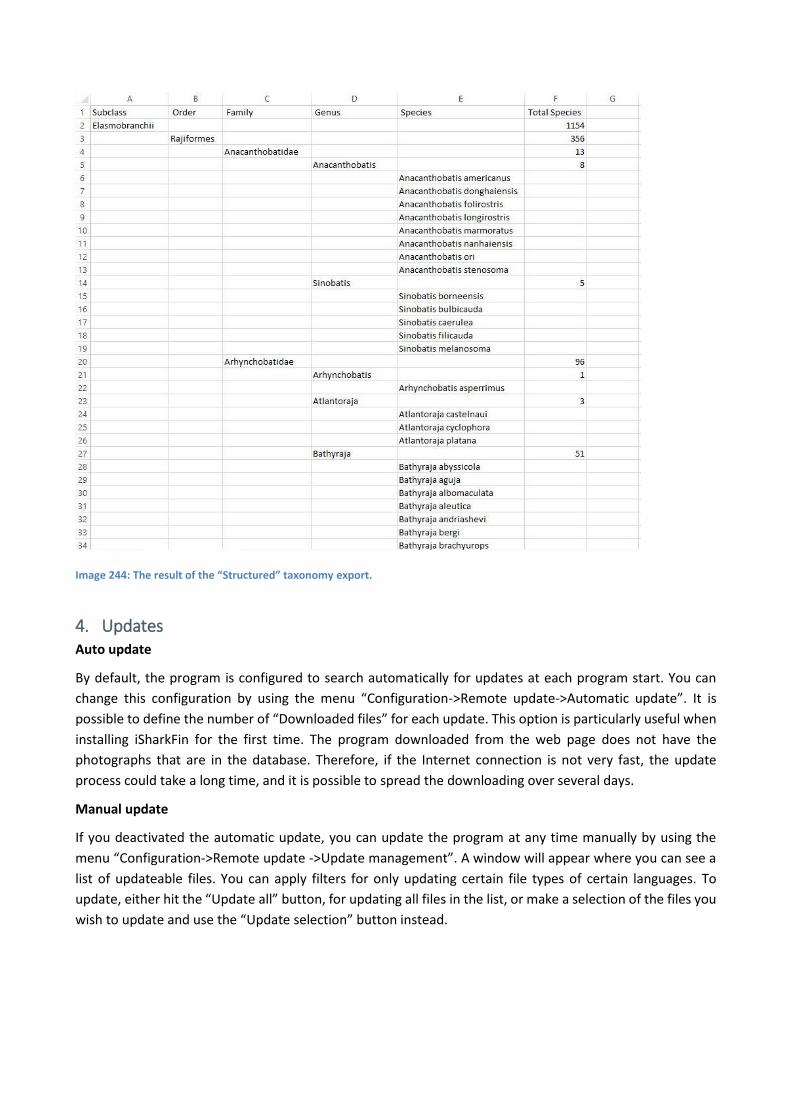
Image 244: The result of the “Structured” taxonomy export.
4. UpdatesAuto update
By default, the program is configured to search automatically for updates at each program start. You can
change this configuration by using the menu “Configuration->Remote update->Automatic update”. It is
possible to define the number of “Downloaded files” for each update. This option is particularly useful when
installing iSharkFin for the first time. The program downloaded from the web page does not have the
photographs that are in the database. Therefore, if the Internet connection is not very fast, the update
process could take a long time, and it is possible to spread the downloading over several days.
Manual update
If you deactivated the automatic update, you can update the program at any time manually by using the
menu “Configuration->Remote update ->Update management”. A window will appear where you can see a
list of updateable files. You can apply filters for only updating certain file types of certain languages. To
update, either hit the “Update all” button, for updating all files in the list, or make a selection of the files you
wish to update and use the “Update selection” button instead.
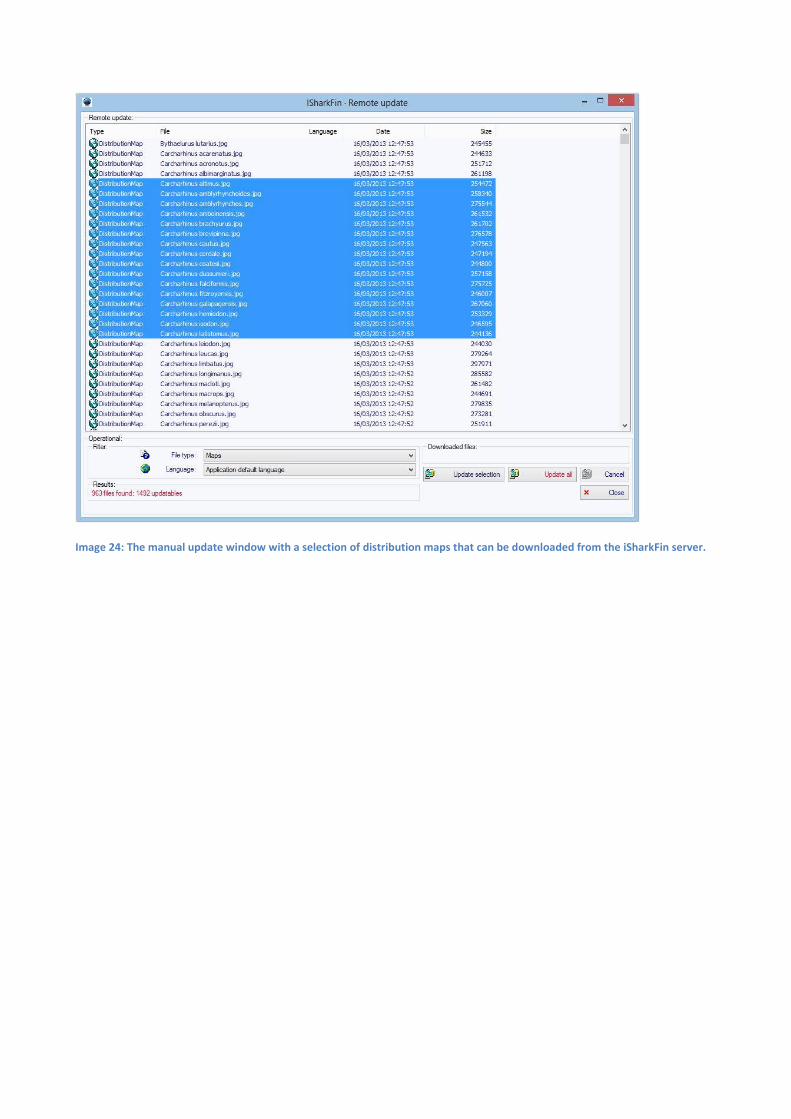
Image 24: The manual update window with a selection of distribution maps that can be downloaded from the iSharkFin server.
ANNEX - Standard photographs of shark fins, and tissue sampling for genetic analysis
PRACTICAL PROTOCOL STANDARD PHOTOGRAPHS OF SHARK FINS, AND T ISSUE SAMPLING FOR G ENETIC ANALYSIS
Lindsay Marshall, PhD Fisheries Scientist and Natural History Artist Brisbane, Australia [email protected] Jenny Giles, PhD Postdoctoral Fellow NOAA National Marine Fisheries Service Forensic Unit/ University of California Davis Veterinary Genetics Laboratory Northwest Fisheries Science Center Seattle, United States of America [email protected] and Monica Barone, PhD Fisheries Consultant Fisheries and Aquaculture Department Food and Aquaculture Organization of the United Nations Rome, Italy [email protected]
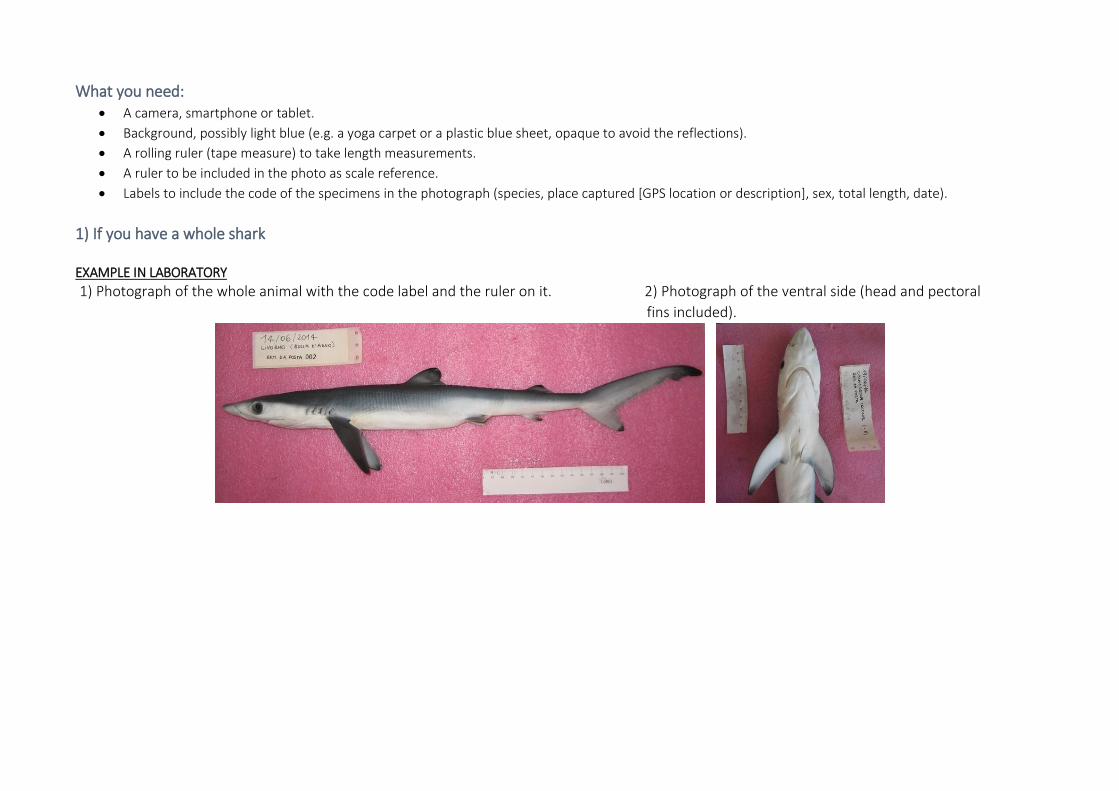
What you need: A camera, smartphone or tablet.
Background, possibly light blue (e.g. a yoga carpet or a plastic blue sheet, opaque to avoid the reflections).
A rolling ruler (tape measure) to take length measurements.
A ruler to be included in the photo as scale reference.
Labels to include the code of the specimens in the photograph (species, place captured [GPS location or description], sex, total length, date).
1) If you have a whole shark EXAMPLE IN LABORATORY
1) Photograph of the whole animal with the code label and the ruler on it. 2) Photograph of the ventral side (head and pectoral
fins included).
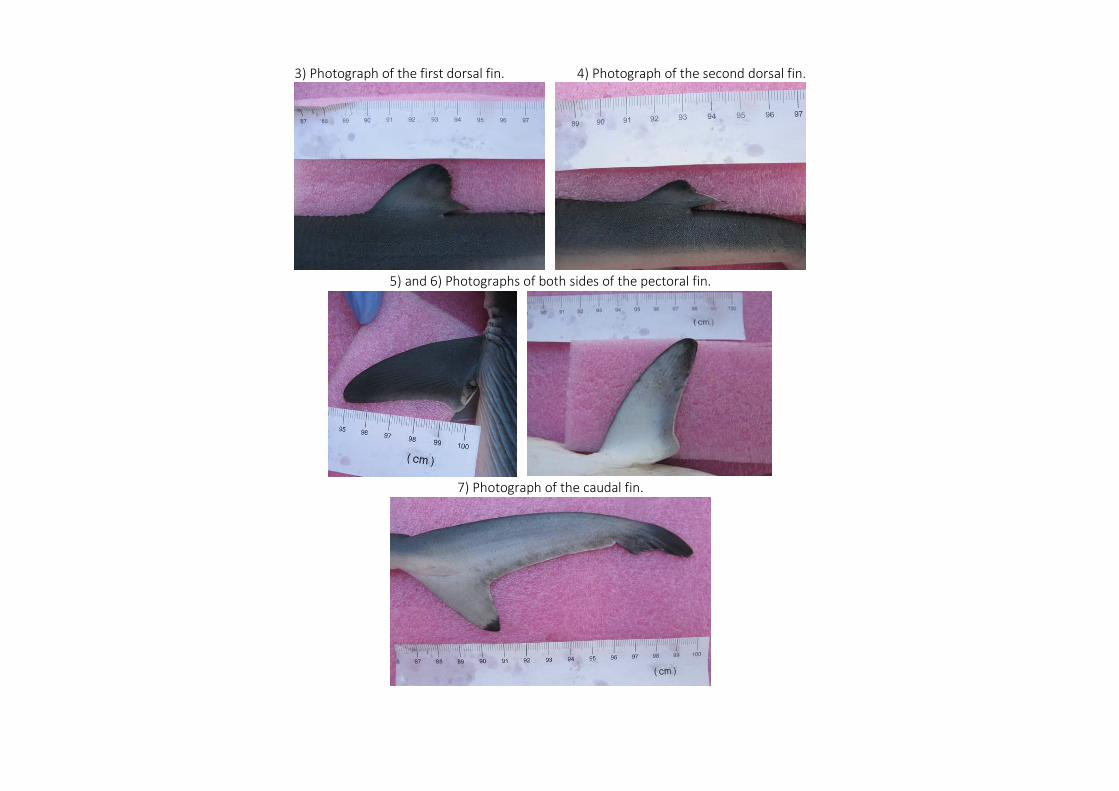
3) Photograph of the first dorsal fin. 4) Photograph of the second dorsal fin.
5) and 6) Photographs of both sides of the pectoral fin.
7) Photograph of the caudal fin.
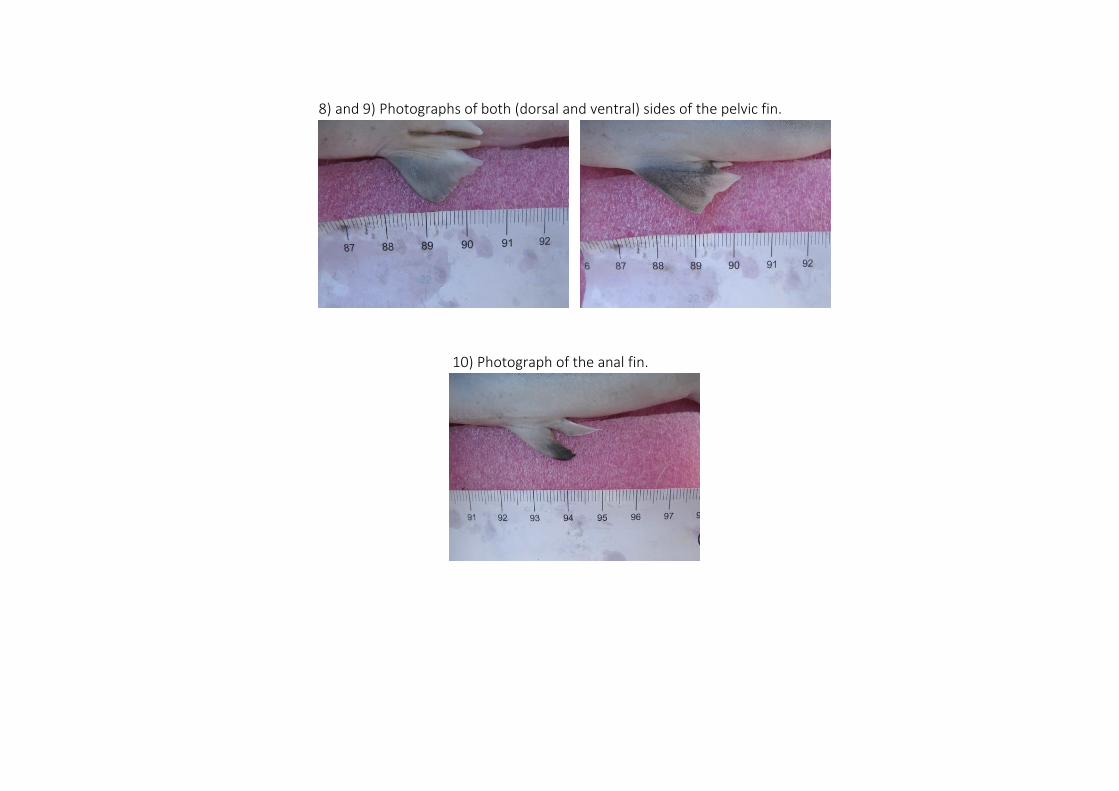
8) and 9) Photographs of both (dorsal and ventral) sides of the pelvic fin.
10) Photograph of the anal fin.
EXAMPLE AT THE LANDING SITE
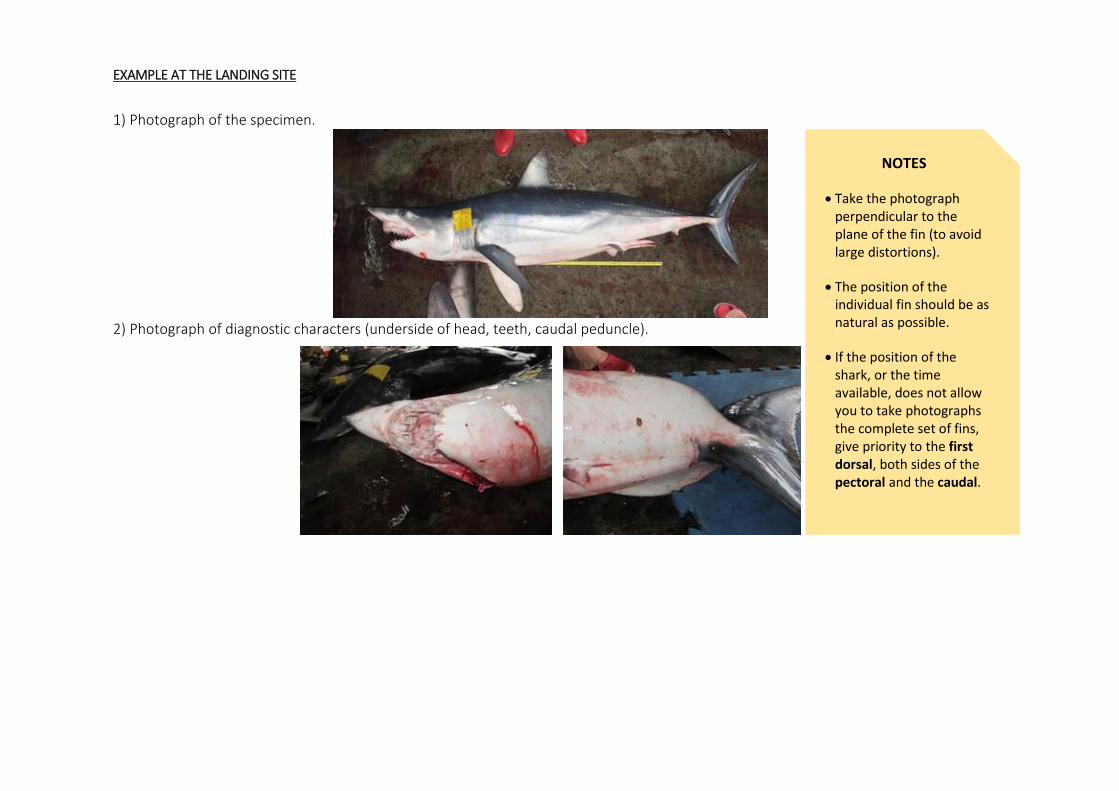
1) Photograph of the specimen.
2) Photograph of diagnostic characters (underside of head, teeth, caudal peduncle).
NOTES
Take the photograph perpendicular to the plane of the fin (to avoid large distortions).
The position of the individual fin should be as natural as possible.
If the position of the shark, or the time available, does not allow you to take photographs the complete set of fins, give priority to the first dorsal, both sides of the pectoral and the caudal.
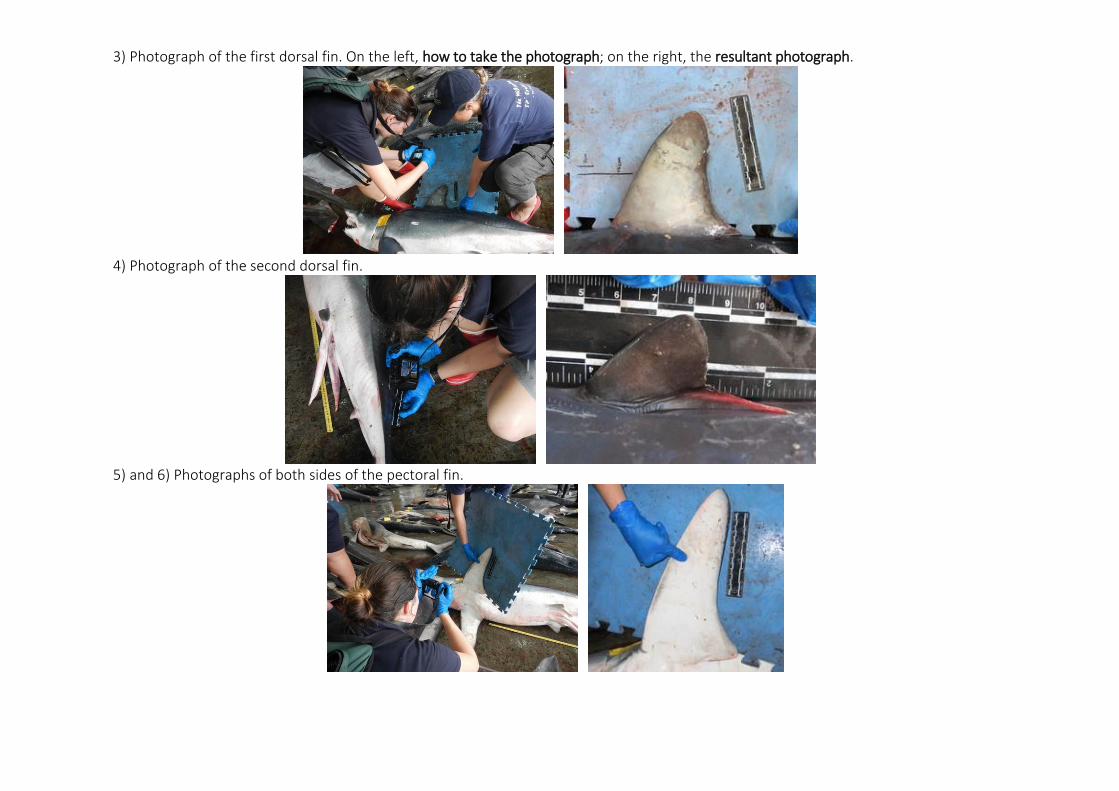
3) Photograph of the first dorsal fin. On the left, how to take the photograph; on the right, the resultant photograph.
4) Photograph of the second dorsal fin.
5) and 6) Photographs of both sides of the pectoral fin.
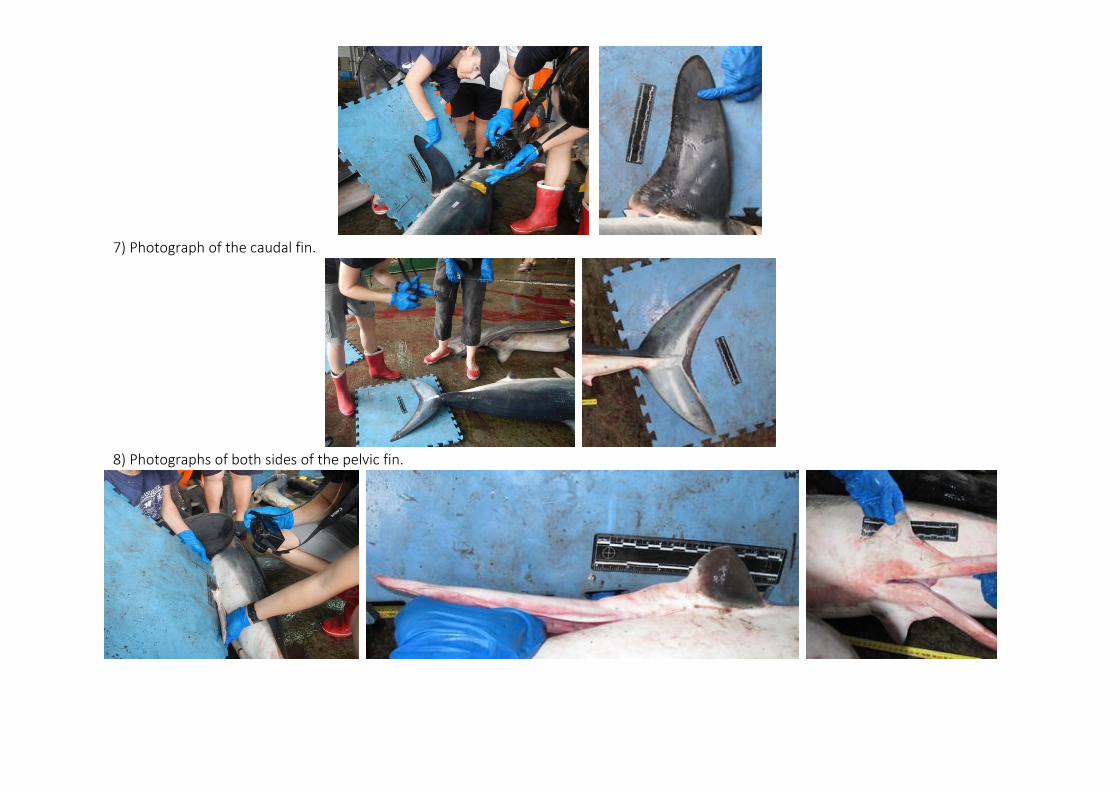
7) Photograph of the caudal fin.
8) Photographs of both sides of the pelvic fin.

9) Photographs of the anal fin.
2) Examples of photographs of fins removed Take pictures of the fin on a homogenous background with a ruler and possibly a label with the specimen code in the photograph.
Make sure the specimen is in the most natural position possible, e.g.:
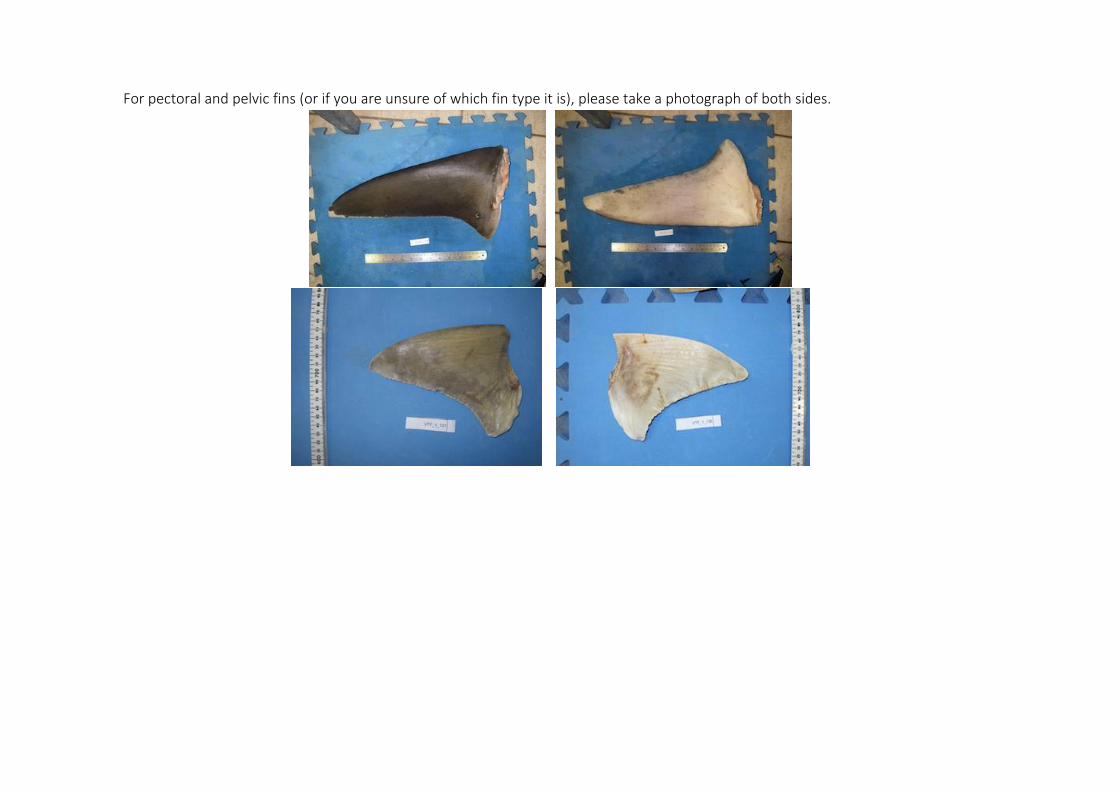
For pectoral and pelvic fins (or if you are unsure of which fin type it is), please take a photograph of both sides.
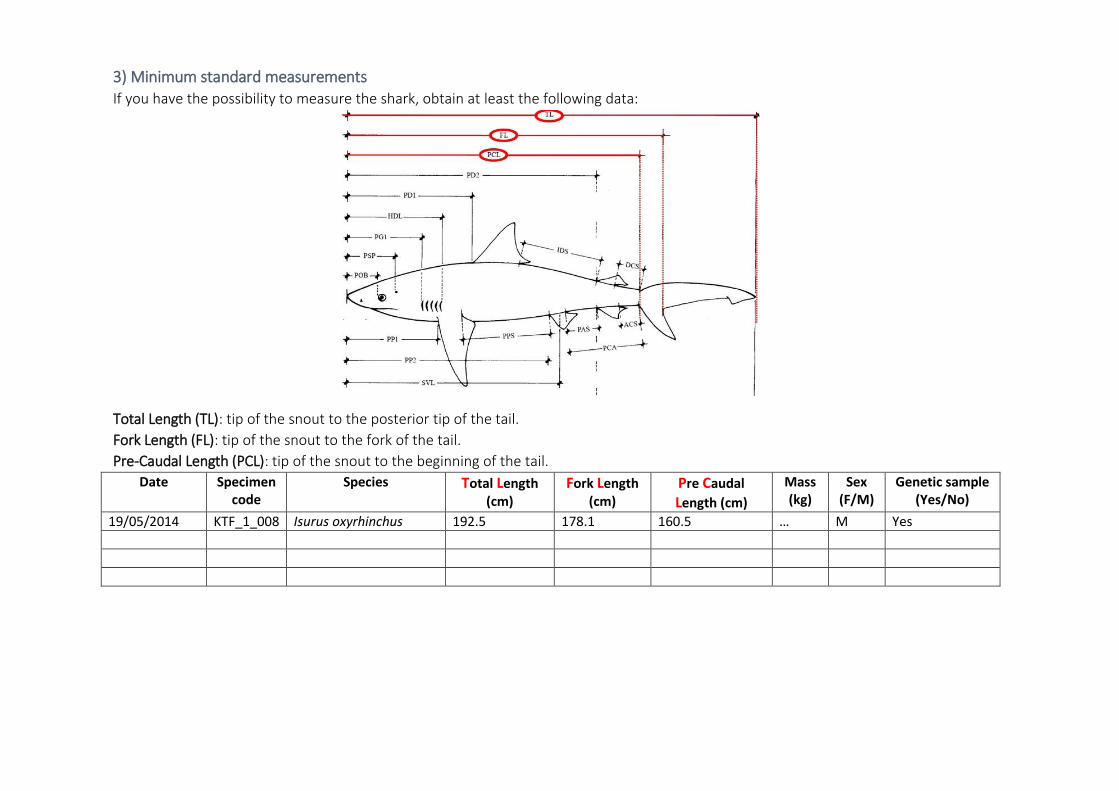
3) Minimum standard measurements If you have the possibility to measure the shark, obtain at least the following data:
Total Length (TL): tip of the snout to the posterior tip of the tail.
Fork Length (FL): tip of the snout to the fork of the tail.
Pre-Caudal Length (PCL): tip of the snout to the beginning of the tail.
Date Specimen code
Species Total Length (cm)
Fork Length (cm)
Pre Caudal
Length (cm)
Mass (kg)
Sex (F/M)
Genetic sample (Yes/No)
19/05/2014 KTF_1_008 Isurus oxyrhinchus 192.5 178.1 160.5 … M Yes
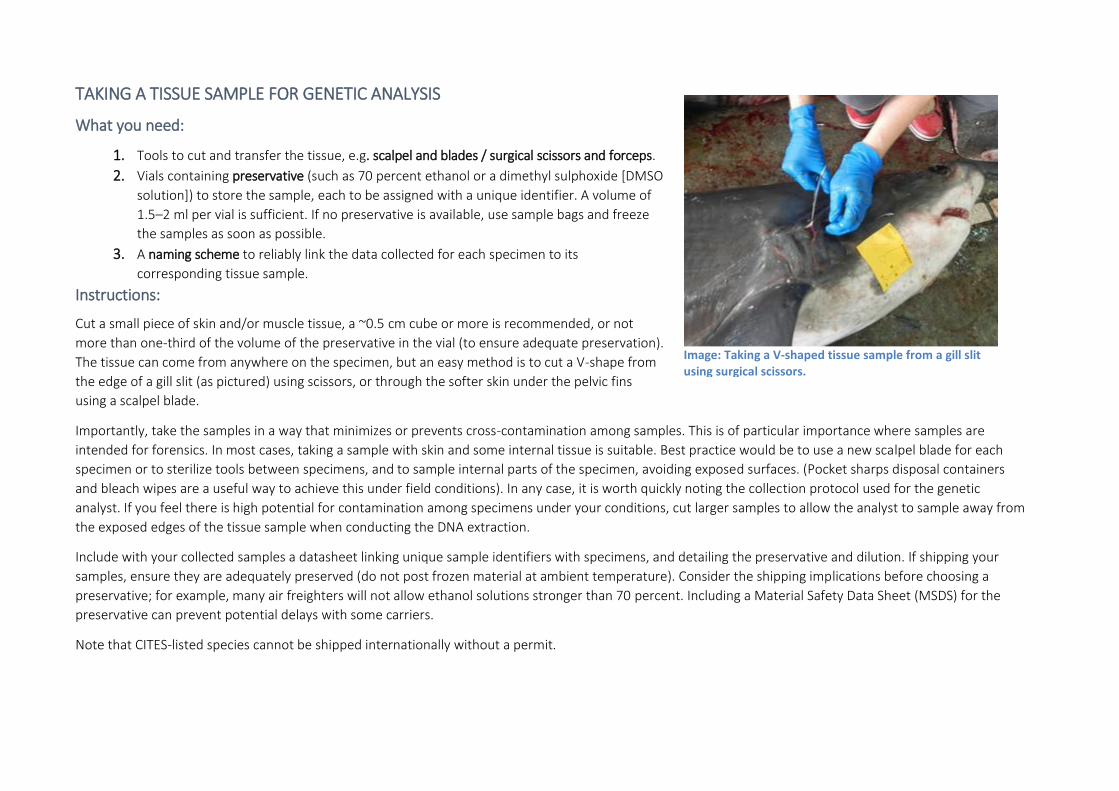
TAKING A TISSUE SAMPLE FOR GENETIC ANALYSIS
What you need:
1. Tools to cut and transfer the tissue, e.g. scalpel and blades / surgical scissors and forceps.
2. Vials containing preservative (such as 70 percent ethanol or a dimethyl sulphoxide [DMSO
solution]) to store the sample, each to be assigned with a unique identifier. A volume of
1.5–2 ml per vial is sufficient. If no preservative is available, use sample bags and freeze
the samples as soon as possible.
3. A naming scheme to reliably link the data collected for each specimen to its
corresponding tissue sample.
Instructions:
Cut a small piece of skin and/or muscle tissue, a ~0.5 cm cube or more is recommended, or not
more than one-third of the volume of the preservative in the vial (to ensure adequate preservation).
The tissue can come from anywhere on the specimen, but an easy method is to cut a V-shape from
the edge of a gill slit (as pictured) using scissors, or through the softer skin under the pelvic fins
using a scalpel blade.
Importantly, take the samples in a way that minimizes or prevents cross-contamination among samples. This is of particular importance where samples are
intended for forensics. In most cases, taking a sample with skin and some internal tissue is suitable. Best practice would be to use a new scalpel blade for each
specimen or to sterilize tools between specimens, and to sample internal parts of the specimen, avoiding exposed surfaces. (Pocket sharps disposal containers
and bleach wipes are a useful way to achieve this under field conditions). In any case, it is worth quickly noting the collection protocol used for the genetic
analyst. If you feel there is high potential for contamination among specimens under your conditions, cut larger samples to allow the analyst to sample away from
the exposed edges of the tissue sample when conducting the DNA extraction.
Include with your collected samples a datasheet linking unique sample identifiers with specimens, and detailing the preservative and dilution. If shipping your
samples, ensure they are adequately preserved (do not post frozen material at ambient temperature). Consider the shipping implications before choosing a
preservative; for example, many air freighters will not allow ethanol solutions stronger than 70 percent. Including a Material Safety Data Sheet (MSDS) for the
preservative can prevent potential delays with some carriers.
Note that CITES-listed species cannot be shipped internationally without a permit.
Image: Taking a V-shaped tissue sample from a gill slit using surgical scissors.