iq/max sync user guide - macrotel.com.ar€¦ · 2.11.4 add a preferred point of contact to the...
TRANSCRIPT

Unigy 4.0IQ/MAX Sync User Guide
Part Number: B02200569, Release: 00IPC Systems, Inc., Confidential and Proprietary
December 2, 2016

© Copyright 2016 IPC Systems, Inc. All RightsReserved.

Table of ContentsRevision List for Unigy V4.0.........................................................................................................7
Preface ............................................................................................................................................9
Chapter 1: Introducing IQ/MAX Sync......................................................................................111.1 IQ/MAX Sync ...................................................................................................................................................111.2 Voice services ................................................................................................................................................... 151.3 Unigy Soft Client online help ........................................................................................................................... 171.4 Keyboard shortcuts............................................................................................................................................ 191.5 Free seating ....................................................................................................................................................... 22
Chapter 2: Working with IQ/MAX Sync.................................................................................. 232.1 Conferences........................................................................................................................................................232.2 Log in ................................................................................................................................................................232.3 System tray controls ..........................................................................................................................................262.4 Define user preferences......................................................................................................................................272.5 Set presence information ...................................................................................................................................282.6 CLI..................................................................................................................................................................... 29
2.6.1 Configure CLI settings for line buttons.............................................................................................. 312.6.2 Retrieve CLI information .................................................................................................................. 312.6.3 Toggle CLI display ............................................................................................................................ 322.6.4 Suppress outgoing CLI values ........................................................................................................... 33
2.7 Sign out ............................................................................................................................................................. 332.8 Shut down ......................................................................................................................................................... 342.9 Navigate the IQ/MAX Sync user interface .......................................................................................................34
2.9.1 Use the Home application...................................................................................................................352.9.2 Window management ........................................................................................................................ 362.9.3 FastFind ............................................................................................................................................. 37
2.10 Line buttons ...................................................................................................................................................... 402.11 Directories..........................................................................................................................................................40
2.11.1 Use the Directories application.......................................................................................................... 412.11.2 Navigate directories............................................................................................................................ 442.11.3 Display your personal directory .........................................................................................................452.11.4 Add a preferred point of contact to the Button Sheet ........................................................................ 492.11.5 Manage local Outlook contacts ......................................................................................................... 49
2.12 Button Sheet and Favorites ............................................................................................................................... 512.12.1 Use the Button Sheet ......................................................................................................................... 512.12.2 Fixed button area ............................................................................................................................... 542.12.3 Floating button areas ..........................................................................................................................562.12.4 Pagination .......................................................................................................................................... 56
3
IPC Systems, Inc., Confidential and Proprietary Unigy 4.0IQ/MAX Sync User Guide
2.12.5 Use the Favorites application..............................................................................................................572.13 History ...............................................................................................................................................................59
2.13.1 Configure history preferences ............................................................................................................602.13.2 Use the History application................................................................................................................ 612.13.3 View call history event details ...........................................................................................................64
2.14 Device applications ...........................................................................................................................................672.14.1 Use a device application..................................................................................................................... 67
2.15 Communication Barrier status messages........................................................................................................... 68
Chapter 3: Manage calls with IQ/MAX Sync and a turret......................................................693.1 Use QuickDial ...................................................................................................................................................703.2 Answer a call .....................................................................................................................................................713.3 Audible alerts .................................................................................................................................................... 71
3.3.1 Record warning tone...........................................................................................................................723.4 Hunt ...................................................................................................................................................................723.5 Active call options............................................................................................................................................. 73
3.5.1 Privacy ............................................................................................................................................... 733.5.2 Hold ................................................................................................................................................... 743.5.3 Barge in...............................................................................................................................................75
3.6 Intercom............................................................................................................................................................. 753.6.1 Intercom group calls .......................................................................................................................... 76
3.7 Diversion............................................................................................................................................................793.7.1 One-button diversion.......................................................................................................................... 803.7.2 Diversion status display......................................................................................................................803.7.3 Line diversion..................................................................................................................................... 813.7.4 Intercom diversion.............................................................................................................................. 81
Chapter 4: Manage multiparty calls.......................................................................................... 834.1 Conferences........................................................................................................................................................83
4.1.1 Unsupervised conferences ................................................................................................................. 834.1.2 Conferencing scenarios ......................................................................................................................84
4.2 Duplex conference............................................................................................................................................. 874.3 Simplex broadcast .............................................................................................................................................87
Chapter 5: Button programming .............................................................................................. 895.1 Add a line button ...............................................................................................................................................915.2 Add a function button ....................................................................................................................................... 92
5.2.1 Function buttons ................................................................................................................................ 935.3 Add a point of contact button ............................................................................................................................945.4 Add a DICM button .......................................................................................................................................... 955.5 Add a speed dial button .....................................................................................................................................96
4
December 2, 2016 IPC Systems, Inc., Confidential and Proprietary

5.6 Add a simplex broadcast button.........................................................................................................................975.7 Add a conference (preset) broadcast button.......................................................................................................985.8 Add an intercom diversion button .....................................................................................................................995.9 Add a direct dial line diversion button.............................................................................................................1005.10 Edit a button ....................................................................................................................................................1025.11 Copy a button ..................................................................................................................................................1035.12 Move a button ................................................................................................................................................. 1035.13 Swap buttons ...................................................................................................................................................1035.14 Remove a button ............................................................................................................................................. 104
Appendix A: Installation and administration ........................................................................ 105A.1 Hardware and software requirements for the Unigy Soft Client..................................................................... 105A.2 CDI user configuration requirements ..............................................................................................................105A.3 Installation, upgrade, rollback, and uninstall procedures................................................................................ 106
A.3.1 Install the Unigy Soft Client software ............................................................................................. 106A.3.2 Remote Soft Client installation ........................................................................................................108A.3.3 Upgrade the Unigy Soft Client software – Microsoft Windows 32-bit............................................111A.3.4 Upgrade the Unigy Soft Client software – Microsoft Windows 64-bit............................................112A.3.5 Roll back the Unigy Soft Client software – Microsoft Windows 32-bit.......................................... 114A.3.6 Roll back the Unigy Soft Client software – Microsoft Windows 64-bit ......................................... 115A.3.7 Uninstall the Unigy Soft Client software..........................................................................................117A.3.8 Configure the Soft Client network connection................................................................................. 118A.3.9 Determine the current Soft Client software version ........................................................................ 119
A.4 Registration .....................................................................................................................................................119
Appendix B: Differences between desktop devices and Soft Clients.....................................121
Index............................................................................................................................................133
5
IPC Systems, Inc., Confidential and Proprietary Unigy 4.0IQ/MAX Sync User Guide

6
December 2, 2016 IPC Systems, Inc., Confidential and Proprietary

Revision List for Unigy V4.0Cisco Line Sharing• Cisco and the Cisco logo are trademarks or registe...
Policy Engine Communication Barriers• Communication Barrier status messages For Unigy en...
Issue (Defect)115423• If the description for a button is longer than the...
7
IPC Systems, Inc., Confidential and Proprietary Unigy 4.0IQ/MAX Sync User Guide

8
December 2, 2016 IPC Systems, Inc., Confidential and Proprietary

Preface
About this GuideThis guide provides information for users of IQ/MAX Sync. It explains how to use IQ/MAX Sync tomanage voice communications on an associated turret, and describes IQ/MAX Sync features,applications, call management tasks, and button programming. It also provides installation andadministration details.
Copyright notices• IPC, the IPC logo, Alliance MX, IQ/MAX, MAXaccess, Nexus Suite, Unigy, Blue Wave, and the
Unigy and Blue Wave logos are trademarks of IPC Systems, Inc.
• Microsoft, Windows, Excel, Outlook, Lync, Microsoft OCS, Microsoft Office CommunicationsServer, Active Directory, and Internet Explorer are trademarks of Microsoft Corporation.
• Oracle, Java, and MySQL are trademarks of Oracle.
• Red Hat and Enterprise Linux are trademarks of Red Hat, Inc.
• Dell and PowerEdge are trademarks of Dell, Inc.
• Intel and Xeon are trademarks of Intel Corporation in the U.S.
• NICE and the NICE logo are trademarks of NICE Systems Ltd. and/or its subsidiaries.
• Verint is a registered trademark of Verint Systems Inc.
• Radisys is a trademark of Radisys Corporation.
• NetGuardian 832A is a trademark of DPS Telecom.
• ConferenceManager is a trademark of Sonexis Technology Inc.
• Cisco and the Cisco logo are trademarks or registered trademarks of Cisco and/or its affiliates.
• All other brand and product names used in this document are trademarks or registered trademarks oftheir respective owners.
Document ConventionsThis topic describes the typographic conventions used in this manual:
• To indicate a user interface item to select or click:
Click Help. The Help dialog box opens.
Style Note: This is a san-serif bold font.
• To indicate a sequence of UI clicks:
Click File ➤ New ➤ Command.
Style Note: This is a san-serif bold font.
• To indicate window, screen, or panel names:
The Help dialog box opens.
Style Note: This is an italicized font.
• To indicate text to be typed or entered for user input or command names:
9
IPC Systems, Inc., Confidential and Proprietary Unigy 4.0IQ/MAX Sync User Guide
Type install at the prompt and press Enter.
Style Note: This is a Fixed-Width Bold font.
Type ls -al at the prompt and press Enter.
Style Note: This is a Fixed-Width Bold font.
• To indicate variables to be typed or entered:
Type yourpassword and press Enter.
Style Note: This is a Fixed-Width Bold Italic font.
• To indicate screen text such as prompts:
At the Enter your password prompt, type your password.
Style Note: This is a Fixed-Width font.
• To indicate file and directory names:
The error.log file is stored in /var/log.
Style Note: This is a Fixed-Width font.
• For references to other documents:
Refer to the Security Administrator Guide .
Style Note: This is an italicized font.
Space Designator
When the user needs to type a space in a command, a single space is used in the command text.
Key Combinations
Many instructions include key combinations where it is necessary to press two keys simultaneously. Forexample, when CTRL+C is specified, it means press and hold down the Control key and press C at thesame time.
Note styles
NoteThis is a Note and is used to alert you to important information.
TipThis is a Tip and is used to provide helpful suggestions or hints.
CautionThis is a Caution and is used to alert you to any procedures in which extreme caution must be used.
WarningThis is a Warning and is used to alert you to dangerous situations or procedures that must be completedin a specific manner to prevent a dangerous or damaging situation.
10 Preface
December 2, 2016 IPC Systems, Inc., Confidential and Proprietary
1 Introducing IQ/MAX SyncThe combination of a turret and IQ/MAX Sync provides users with the latest in high-speed voicecommunications technology.
The turret provides fast access to hoot circuits, intercom, dial tone lines and private lines. Multiplesimultaneous voice streams are supported by using a combination of speaker channels and handset voicepaths.
IQ/MAX Sync provides turret users with a Soft Client that can be used to manage a turret from a laptopor desktop computer.
Both the turret and IQ/MAX Sync have access to applications such as contact management and eventhistory.
1.1 IQ/MAX SyncIQ/MAX Sync is a licensed Unigy Soft Client product that provides communications management for anassociated turret. IQ/MAX Sync supports easier button programming than the turret and providesquicker access to call management applications.
IQ/MAX Sync enables a user to manage contacts and control a turret from a laptop or desktop computer.IQ/MAX Sync can be used to customize the way a user interacts with the turret, using a combination ofthe graphical user interface on a computer and the turret's controls. It can also be used to managecontacts, view communications history, program buttons, and manage presence information from thedesktop. IQ/MAX Sync can be used to place calls or to answer calls ringing on the turret; but all voicecommunications are established and managed through the associated turret.
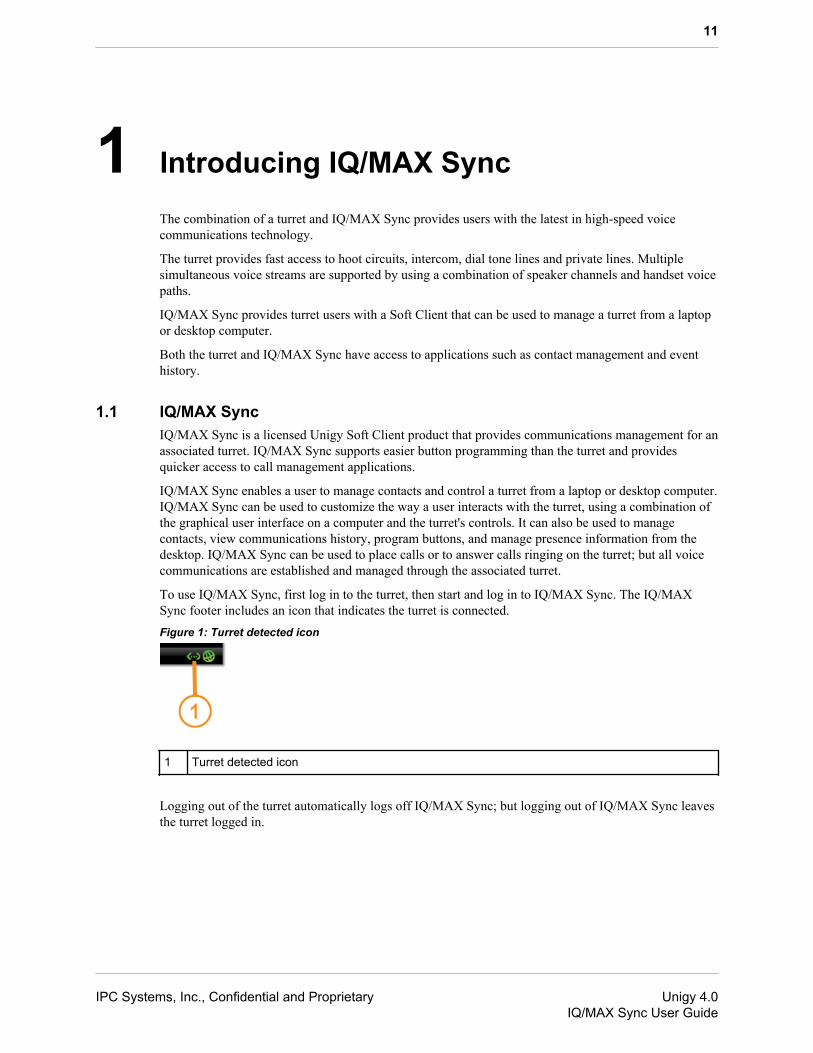
To use IQ/MAX Sync, first log in to the turret, then start and log in to IQ/MAX Sync. The IQ/MAXSync footer includes an icon that indicates the turret is connected.Figure 1: Turret detected icon
1 Turret detected icon
Logging out of the turret automatically logs off IQ/MAX Sync; but logging out of IQ/MAX Sync leavesthe turret logged in.
11
IPC Systems, Inc., Confidential and Proprietary Unigy 4.0IQ/MAX Sync User Guide
Note
• The Unigy Soft Client does not support Remote Desktop access from a remote computer into acomputer where the Soft Client software is installed. You must perform all actions locally on your SoftClient computer.
• If the zone that your IQ/MAX Sync is registered with is different from the zone your turret is registeredwith, the turret zone is the controlling zone for supported features, functionality, and if applicable,delegated authentication. The system changes the value in the Primary property in the Unigy ClientConfiguration Tool to match the turret value.
• Do not start an action on a turret then finish it in IQ/MAX Sync, as doing so can result in unpredictablebehavior; for example, selecting a speaker channel on a turret and seizing a line for the call in IQ/MAXSync.
ApplicationsIQ/MAX Sync provides access to features through the following applications:
• Home: Hotlist access to frequently used contacts and function keys. The Home application can beused to search shortcuts, view contact details, make calls, and execute functions.
• Favorites: Quick access to contacts used on a regular basis.
• Directories: Contact details, including point of contact information. The Directories applicationincludes information from the Unigy enterprise directory, a personal directory, and local contacts thatare managed through Microsoft Outlook.
• History: Detailed information about the user's call history.
• Button Sheet: A Button Sheet layout that resembles the Button Module on a turret. It can be used toaccess lines, contacts, speed dials, functions, and other programmable features through the ButtonSheet.
NoteAny authorized device applications appear below the standard application buttons.
IQ/MAX Sync user interfaceIQ/MAX Sync displays as a compact communicator on the desktop.
The following figure shows the elements of the IQ/MAX Sync main window.
12 1.1: IQ/MAX Sync
December 2, 2016 IPC Systems, Inc., Confidential and Proprietary

Figure 2: IQ/MAX Sync main window
1 Title bar: Identifies IQ/MAX Sync.
2 Message area: Shows messages or presence information.
3 Toolbar: Provides general controls. From left to right, the icons in this area access voice mail (notapplicable), launch the Button Sheet, and open the Dial Pad.
4 Application title: Displays the name of the active application.
5 Search box: Provides an entry form for searches.
6 Application display area: Displays information for the active application. Click or right-clickentries in this area to perform actions for an entry.
7 Resize control: Mouse over the top of the application menu bar. When the resize pointer (<–>) isdisplayed, click and drag the pointer up or down to resize the application display area.
8 Application menu bar: Provides control information for the active application. The menu icon atthe left provides access to the application menu; the menu options differ depending on theapplication.
1.1: IQ/MAX Sync 13
IPC Systems, Inc., Confidential and Proprietary Unigy 4.0IQ/MAX Sync User Guide
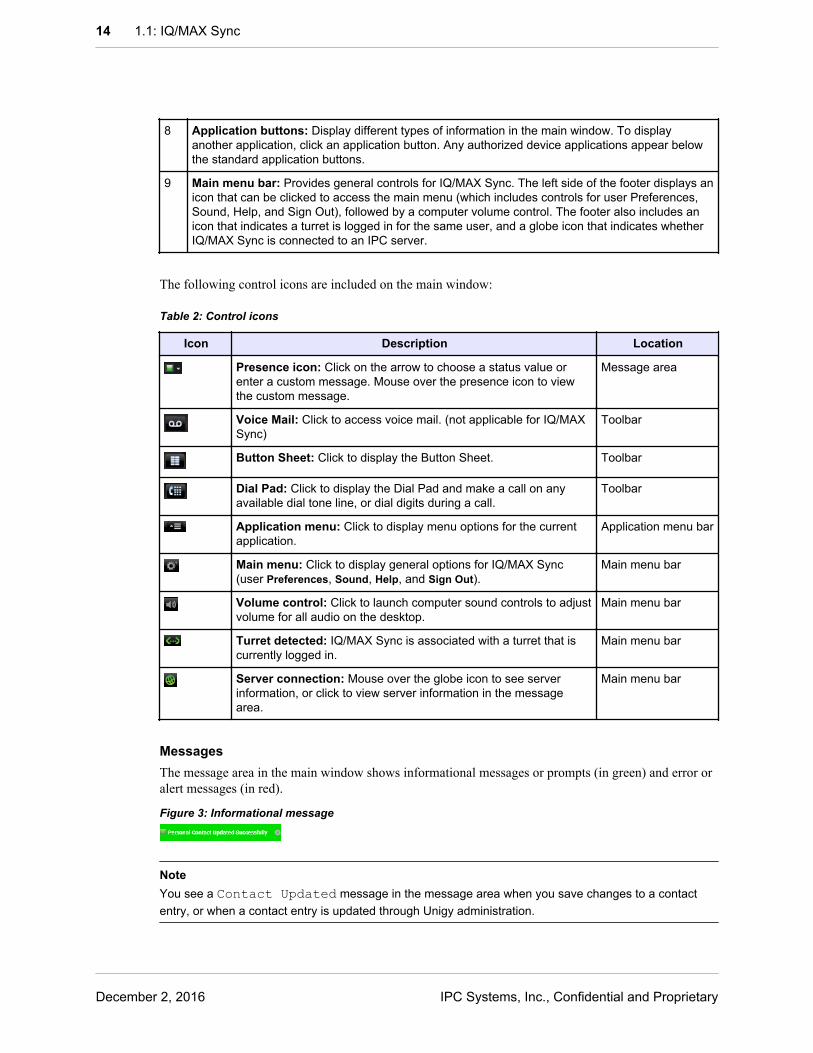
8 Application buttons: Display different types of information in the main window. To displayanother application, click an application button. Any authorized device applications appear belowthe standard application buttons.
9 Main menu bar: Provides general controls for IQ/MAX Sync. The left side of the footer displays anicon that can be clicked to access the main menu (which includes controls for user Preferences,Sound, Help, and Sign Out), followed by a computer volume control. The footer also includes anicon that indicates a turret is logged in for the same user, and a globe icon that indicates whetherIQ/MAX Sync is connected to an IPC server.
The following control icons are included on the main window:
Table 2: Control icons
Icon Description Location
Presence icon: Click on the arrow to choose a status value orenter a custom message. Mouse over the presence icon to viewthe custom message.
Message area
Voice Mail: Click to access voice mail. (not applicable for IQ/MAXSync)
Toolbar
Button Sheet: Click to display the Button Sheet. Toolbar
Dial Pad: Click to display the Dial Pad and make a call on anyavailable dial tone line, or dial digits during a call.
Toolbar
Application menu: Click to display menu options for the currentapplication.
Application menu bar
Main menu: Click to display general options for IQ/MAX Sync(user Preferences, Sound, Help, and Sign Out).
Main menu bar
Volume control: Click to launch computer sound controls to adjustvolume for all audio on the desktop.
Main menu bar
Turret detected: IQ/MAX Sync is associated with a turret that iscurrently logged in.
Main menu bar
Server connection: Mouse over the globe icon to see serverinformation, or click to view server information in the messagearea.
Main menu bar
MessagesThe message area in the main window shows informational messages or prompts (in green) and error oralert messages (in red).
Figure 3: Informational message
NoteYou see a Contact Updated message in the message area when you save changes to a contactentry, or when a contact entry is updated through Unigy administration.
14 1.1: IQ/MAX Sync
December 2, 2016 IPC Systems, Inc., Confidential and Proprietary
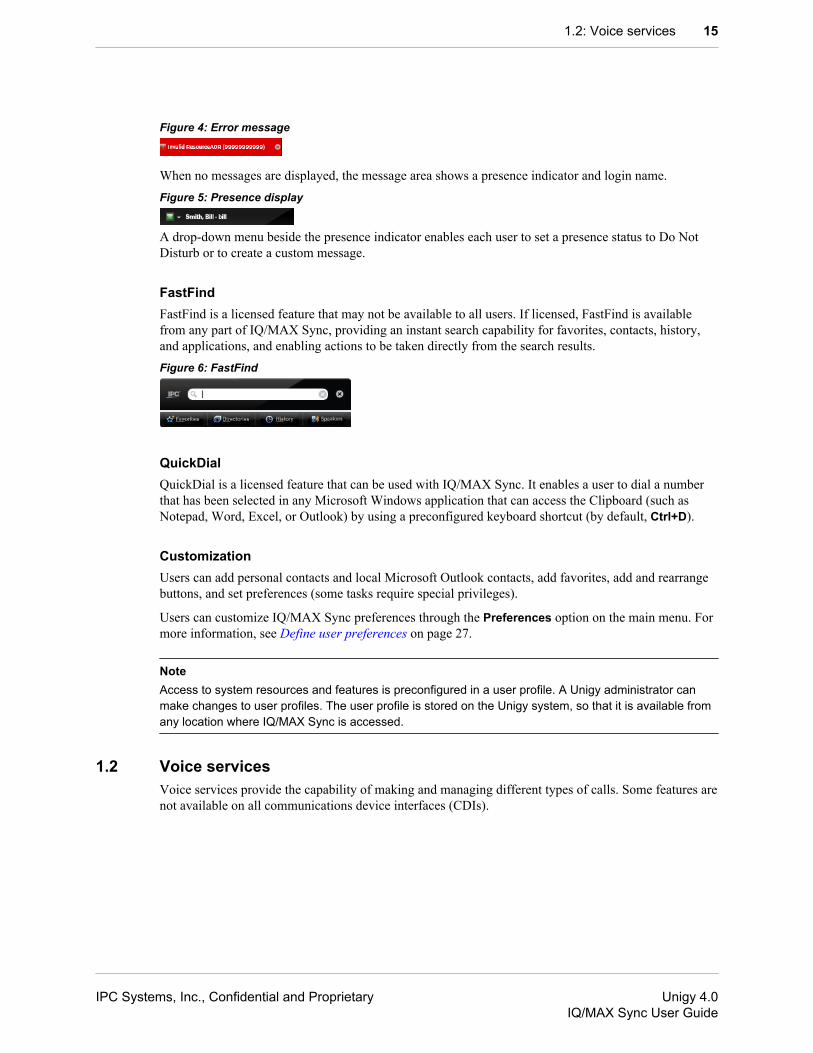
Figure 4: Error message
When no messages are displayed, the message area shows a presence indicator and login name.Figure 5: Presence display
A drop-down menu beside the presence indicator enables each user to set a presence status to Do NotDisturb or to create a custom message.
FastFindFastFind is a licensed feature that may not be available to all users. If licensed, FastFind is availablefrom any part of IQ/MAX Sync, providing an instant search capability for favorites, contacts, history,and applications, and enabling actions to be taken directly from the search results.Figure 6: FastFind
QuickDialQuickDial is a licensed feature that can be used with IQ/MAX Sync. It enables a user to dial a numberthat has been selected in any Microsoft Windows application that can access the Clipboard (such asNotepad, Word, Excel, or Outlook) by using a preconfigured keyboard shortcut (by default, Ctrl+D).
CustomizationUsers can add personal contacts and local Microsoft Outlook contacts, add favorites, add and rearrangebuttons, and set preferences (some tasks require special privileges).
Users can customize IQ/MAX Sync preferences through the Preferences option on the main menu. Formore information, see Define user preferences on page 27.
NoteAccess to system resources and features is preconfigured in a user profile. A Unigy administrator canmake changes to user profiles. The user profile is stored on the Unigy system, so that it is available fromany location where IQ/MAX Sync is accessed.
1.2 Voice servicesVoice services provide the capability of making and managing different types of calls. Some features arenot available on all communications device interfaces (CDIs).
1.2: Voice services 15
IPC Systems, Inc., Confidential and Proprietary Unigy 4.0IQ/MAX Sync User Guide
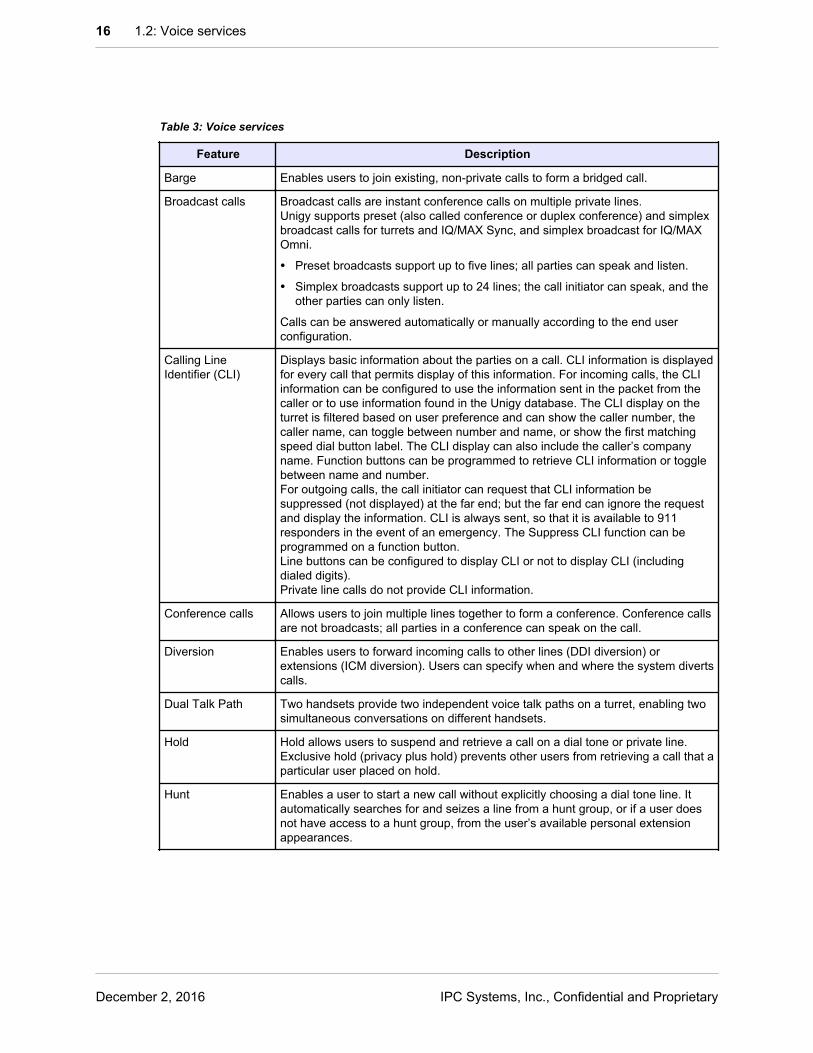
Table 3: Voice services
Feature Description
Barge Enables users to join existing, non-private calls to form a bridged call.
Broadcast calls Broadcast calls are instant conference calls on multiple private lines.Unigy supports preset (also called conference or duplex conference) and simplexbroadcast calls for turrets and IQ/MAX Sync, and simplex broadcast for IQ/MAXOmni.
• Preset broadcasts support up to five lines; all parties can speak and listen.
• Simplex broadcasts support up to 24 lines; the call initiator can speak, and theother parties can only listen.
Calls can be answered automatically or manually according to the end userconfiguration.
Calling LineIdentifier (CLI)
Displays basic information about the parties on a call. CLI information is displayedfor every call that permits display of this information. For incoming calls, the CLIinformation can be configured to use the information sent in the packet from thecaller or to use information found in the Unigy database. The CLI display on theturret is filtered based on user preference and can show the caller number, thecaller name, can toggle between number and name, or show the first matchingspeed dial button label. The CLI display can also include the caller’s companyname. Function buttons can be programmed to retrieve CLI information or togglebetween name and number.For outgoing calls, the call initiator can request that CLI information besuppressed (not displayed) at the far end; but the far end can ignore the requestand display the information. CLI is always sent, so that it is available to 911responders in the event of an emergency. The Suppress CLI function can beprogrammed on a function button.Line buttons can be configured to display CLI or not to display CLI (includingdialed digits).Private line calls do not provide CLI information.
Conference calls Allows users to join multiple lines together to form a conference. Conference callsare not broadcasts; all parties in a conference can speak on the call.
Diversion Enables users to forward incoming calls to other lines (DDI diversion) orextensions (ICM diversion). Users can specify when and where the system divertscalls.
Dual Talk Path Two handsets provide two independent voice talk paths on a turret, enabling twosimultaneous conversations on different handsets.
Hold Hold allows users to suspend and retrieve a call on a dial tone or private line.Exclusive hold (privacy plus hold) prevents other users from retrieving a call that aparticular user placed on hold.
Hunt Enables a user to start a new call without explicitly choosing a dial tone line. Itautomatically searches for and seizes a line from a hunt group, or if a user doesnot have access to a hunt group, from the user’s available personal extensionappearances.
16 1.2: Voice services
December 2, 2016 IPC Systems, Inc., Confidential and Proprietary

Table 3: Voice services (continued)
Feature Description
Intercom Enables a user to make point-to-point calls to any user on the Unigy network.These include intercom group calls:
• One-way intercom broadcasts
• Group answer calls (becomes a point-to-point call with the first party to answer)
• Group talkback calls (any party can answer and speak)
A CDI user can have a personal extension for line calls and an intercomextension, using the same number or different numbers.
Internal calls Internal calls use internal lines to reach an extension, and are initiated by dialinganother user without selecting ICM first. Internal and external calls default to thehandset instead of the speaker. Internal lines cannot be included in broadcasts.
Lines Resource elements used to establish external calls between users.
Line status Displays the status of lines to which a user has access.
Momentary privacy Briefly turns privacy on for the first user to answer a call. This prevents a secondperson from answering the same incoming call within a specified interval after thefirst person answers. The interval is set by a Unigy administrator; the default isone second.
Mute Allows a user to mute incoming and outgoing call audio streams. On turrets,handset and HFM muting mutes the handset and microphone transmit talk path.Speaker muting controls set in user profiles may affect the ability of speaker usersto listen or speak on a call.
Privacy Makes an active call session private, preventing other users from barging in to thecall. Privacy is not applicable for intercom calls.
Signal Transmits an audible signal on a manual ring-down (MRD) line to alert the distantend that a call is coming in on the line.
Transfer Transfers an active dial tone line call to another line or personal extension.Intercom calls cannot be transferred.
1.3 Unigy Soft Client online helpThe Unigy Soft Client products offer user interface (context-sensitive) help that provides productinformation and guidance to help you understand and use the features of each product. This topicdescribes the help and how to access the help topics.
Two types of end users use the Soft Client products. Traders who interact with customers (IQ/MAXOmni and IQ/MAX Sync) and those who support these users (Pulse Enterprise). The Soft Client userinterface is very similar for all of the Soft Client products, but each has its own view.
For more detailed information, refer to the user guide for your product; that is, the IQ/MAX Omni UserGuide , IQ/MAX Turret User Guide , IQ/MAX Edge Turret User Guide , IQ/MAX Sync User Guide, orPulse Enterprise User Guide .
The following types of help are available:
• Full help system
• User interface help
1.3: Unigy Soft Client online help 17
IPC Systems, Inc., Confidential and Proprietary Unigy 4.0IQ/MAX Sync User Guide
Full help systemThe full help system provides access to all of the user interface help topics. It includes the followingoptions on the menu bar:
• Contents: hierarchical table of contents based on the Soft Client UI structure
• Index: locate information through alphabetized index entries
• Search: full-text search engine that searches on text strings
• Print: print individual help pages
You can access this help from the Soft Client Login window and main window by clicking the help icon(?) in the title bar, or by pressing Shift + ? on the keyboard. You can also access this help by clickingthe Show Tripane link in each user interface help topic.
To locate or print help information, do the following:
• To locate a help topic in the Contents list, click the Contents tab, then navigate through the list tofind the topic. Click the expand button (+) to display the topics within a content bookmark. Click thecollapse button (-) to hide the topics.
• To search for information based on keywords, click the Search tab, type one or more search terms,then click Search. To highlight the search terms in the search results, select the Highlight check box.
• To locate information through index entries, click the Index tab, scroll to the index entry, then clickthe entry link.
• To print the current help topic, click the Print tab, select a printer, specify any print properties, thenclick Print.
User interface helpUser interface help provides contextual information for each of the Unigy Soft Client user interfaceelements, including windows, displays, panels, and dialog boxes. It also provides information on thecomponents that comprise these interfaces including fields, icons, buttons, and menu options. You canaccess this help by clicking or pressing the associated help control. The control you use is based on thetype of interface as described in the following table. The system displays the help in a browser window.
NoteYour user account might not have the licenses required to access some of the interface elementsdescribed in this table.
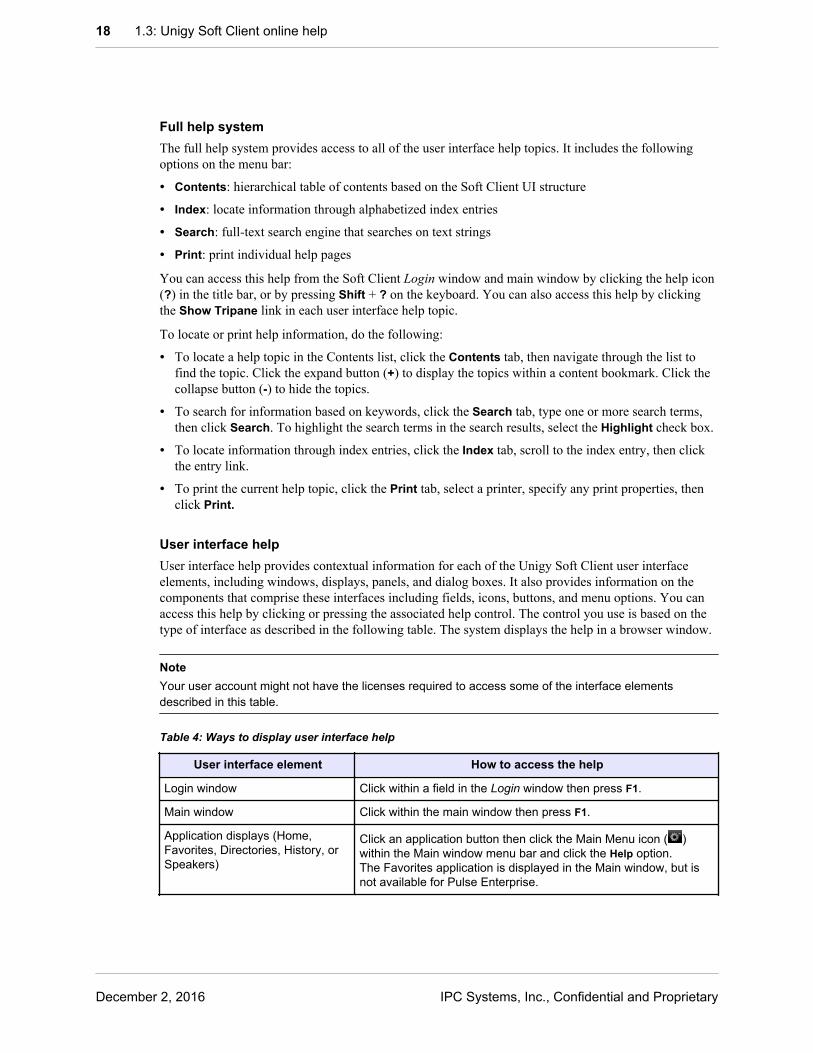
Table 4: Ways to display user interface help
User interface element How to access the help
Login window Click within a field in the Login window then press F1.
Main window Click within the main window then press F1.
Application displays (Home,Favorites, Directories, History, orSpeakers)
Click an application button then click the Main Menu icon ( )within the Main window menu bar and click the Help option.The Favorites application is displayed in the Main window, but isnot available for Pulse Enterprise.
18 1.3: Unigy Soft Client online help
December 2, 2016 IPC Systems, Inc., Confidential and Proprietary
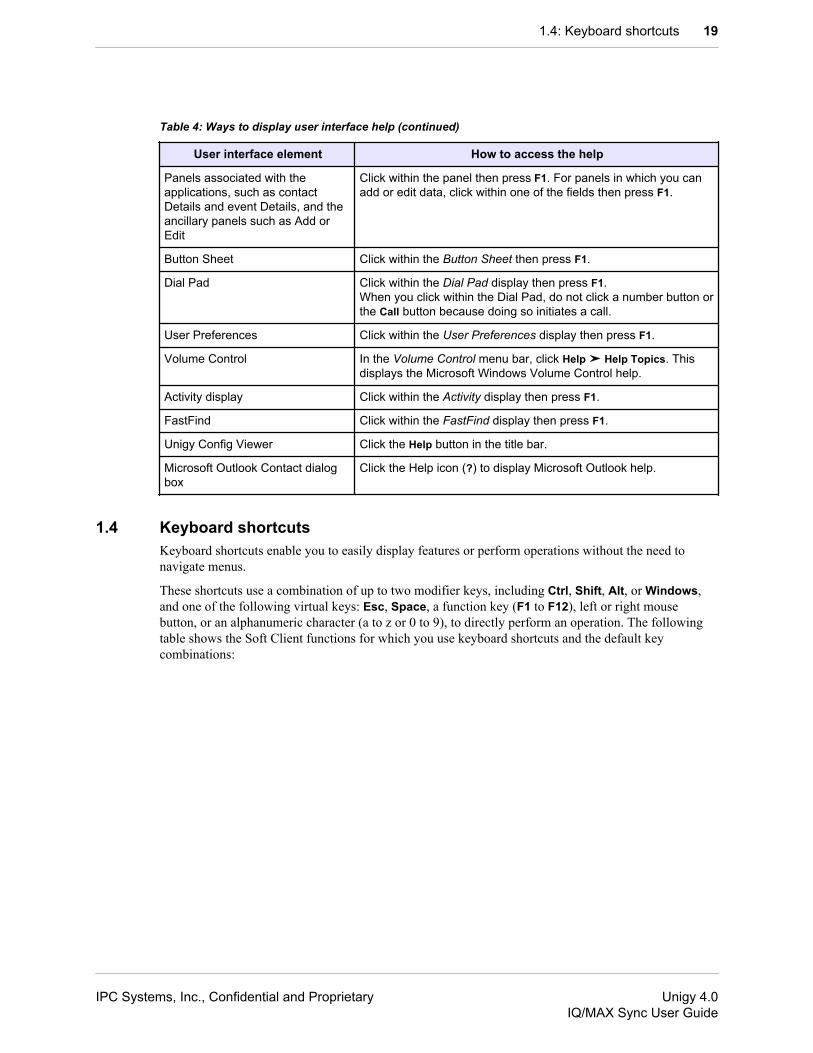
Table 4: Ways to display user interface help (continued)
User interface element How to access the help
Panels associated with theapplications, such as contactDetails and event Details, and theancillary panels such as Add orEdit
Click within the panel then press F1. For panels in which you canadd or edit data, click within one of the fields then press F1.
Button Sheet Click within the Button Sheet then press F1.
Dial Pad Click within the Dial Pad display then press F1.When you click within the Dial Pad, do not click a number button orthe Call button because doing so initiates a call.
User Preferences Click within the User Preferences display then press F1.
Volume Control In the Volume Control menu bar, click Help ➤ Help Topics. Thisdisplays the Microsoft Windows Volume Control help.
Activity display Click within the Activity display then press F1.
FastFind Click within the FastFind display then press F1.
Unigy Config Viewer Click the Help button in the title bar.
Microsoft Outlook Contact dialogbox
Click the Help icon (?) to display Microsoft Outlook help.
1.4 Keyboard shortcutsKeyboard shortcuts enable you to easily display features or perform operations without the need tonavigate menus.
These shortcuts use a combination of up to two modifier keys, including Ctrl, Shift, Alt, or Windows,and one of the following virtual keys: Esc, Space, a function key (F1 to F12), left or right mousebutton, or an alphanumeric character (a to z or 0 to 9), to directly perform an operation. The followingtable shows the Soft Client functions for which you use keyboard shortcuts and the default keycombinations:
1.4: Keyboard shortcuts 19
IPC Systems, Inc., Confidential and Proprietary Unigy 4.0IQ/MAX Sync User Guide
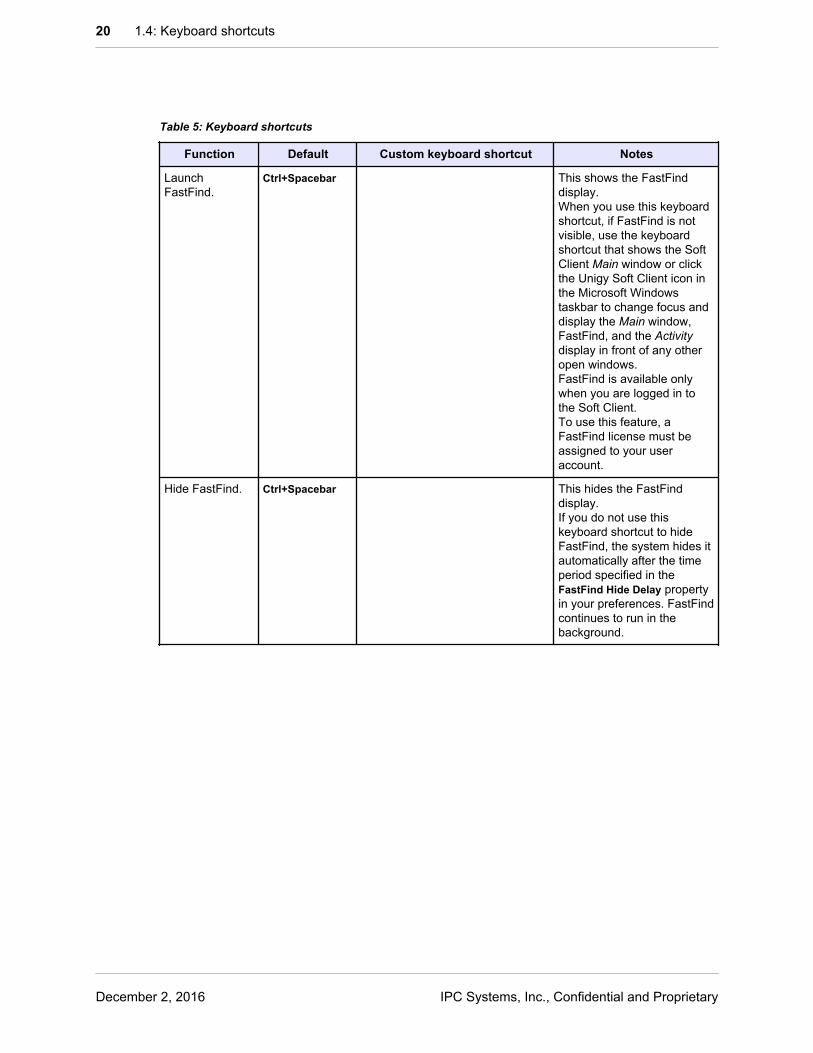
Table 5: Keyboard shortcuts
Function Default Custom keyboard shortcut Notes
LaunchFastFind.
Ctrl+Spacebar This shows the FastFinddisplay.When you use this keyboardshortcut, if FastFind is notvisible, use the keyboardshortcut that shows the SoftClient Main window or clickthe Unigy Soft Client icon inthe Microsoft Windowstaskbar to change focus anddisplay the Main window,FastFind, and the Activitydisplay in front of any otheropen windows.FastFind is available onlywhen you are logged in tothe Soft Client.To use this feature, aFastFind license must beassigned to your useraccount.
Hide FastFind. Ctrl+Spacebar This hides the FastFinddisplay.If you do not use thiskeyboard shortcut to hideFastFind, the system hides itautomatically after the timeperiod specified in theFastFind Hide Delay propertyin your preferences. FastFindcontinues to run in thebackground.
20 1.4: Keyboard shortcuts
December 2, 2016 IPC Systems, Inc., Confidential and Proprietary

Table 5: Keyboard shortcuts (continued)
Function Default Custom keyboard shortcut Notes
Initiate a callwith QuickDial.
Ctrl+D This dials a call to theselected number.When you use this keyboardshortcut, if the call initiationdisplay is not visible, use thekeyboard shortcut that showsthe Soft Client Main windowor click the Unigy Soft Clienticon in the MicrosoftWindows taskbar to changefocus and display the Mainwindow, call initiation display,and the Activity display infront of any other openwindows. It is not necessaryto see the call initiationdisplay to make a call, butthis can be useful if the callfails or to confirm that thecorrect number is beingdialed.If the format of the number isnot correct or the number isnot available in the clipboard,the system displays an errormessage in the messagearea at the top of the Mainwindow.QuickDial is available onlywhen you are logged in tothe Soft Client with IQ/MAXOmni or IQ/MAX Sync.To use this feature, aQuickDial license must beassigned to your useraccount.
Show or hide theSoft Client Mainwindow.
Alt+U This toggles to show or hidethe Soft Client Main windowand Activity display.Depending on the currentwindow focus, you mighthave to activate thiskeyboard shortcut twice todisplay the Main window.You can also show and hidethe Main window by clickingthe Unigy Soft Client icon inthe Microsoft Windowstaskbar; however, when youuse the icon to hide the Mainwindow, the Activity displayremains visible.
1.4: Keyboard shortcuts 21
IPC Systems, Inc., Confidential and Proprietary Unigy 4.0IQ/MAX Sync User Guide
To use a keyboard shortcut, press the keys in the order specified; for example, to activate the keyboardshortcut CTRL+ALT+L, press and hold the Ctrl key, Alt key, then L key. To activate the keyboardshortcut CTRL+ALT+LEFT MOUSE, press and hold the Ctrl key and Alt key then click the left buttonon your mouse.
A Unigy administrator can customize the keyboard shortcuts to avoid conflicts with pre-defined orcustom operating system or application shortcut keys. If you find that a keyboard shortcut does not workproperly or overrides a keyboard shortcut you use for a different operation within an application, contactyour Unigy administrator. If the administrator changes the default keyboard shortcuts, print this page,and in the Custom keyboard shortcut column, enter the specific key combinations for your reference.If a Unigy administrator changes one or more keyboard shortcuts from the Unigy Management Systemwhile you are logged in to the Soft Client, log out then log in to update your profile.
NoteThe Microsoft Surface Pro on-screen keyboard does not include some of the keys that are assigned tothe default Soft Client keyboard shortcuts. If you cannot use the keyboard shortcuts, either add anexternal keyboard or ask your Unigy administrator to change the keyboard shortcuts to use compatiblekeys.
1.5 Free seatingFree seating is the ability for an end user to log in to any turret within a Unigy enterprise and get thesame user profile as on the user's own turret. User preferences, controls, directories, and communicationhistory are available to an end user from any turret.
NoteFree seating is supported only within the Unigy enterprise; an end user cannot free seat from Unigy toAlliance MX, or from Alliance MX to Unigy.
IQ/MAX Sync users need access to both IQ/MAX Sync and a turret.
22 1.5: Free seating
December 2, 2016 IPC Systems, Inc., Confidential and Proprietary
2 Working with IQ/MAX Sync
2.1 ConferencesThe conference feature allows lines to be added to a call. The conference feature is for lines only, andcannot be used with intercom calls.
While in conference mode, lines can be added or removed as needed. Conference mode is turned onduring a call or before a call is initiated. When using IQ/MAX Sync with a turret, conference mode canbe enabled using the turret, then lines can be added using line buttons on the turret or IQ/MAX Sync.
Note
• Only one conference of any kind per handset.
• Any Unigy user in a conference can add a line to a conference.
• Only handset users can add a dial tone line to a conference.
• A conference can not be created from a speaker call.
If a conference call is initiated and then put on hold, the result depends on whether the unsupervisedconference feature is available:
• If the unsupervised conference feature is not enabled, each conference line is placed on individualhold. To re-establish the conference, the conference button must be pressed, and each line must beadded back to the call.
• If the unsupervised conference feature is enabled, the conference can continue without the conferenceinitiator, as described in Unsupervised conferences on page 83. The unsupervised conferencefeature can only be used for calls that include more than two lines and no other traders who barged in.
If the call is released, the conference ends and all lines are released. You can remove a party that youadded to a conference by pressing the button that was used to add the party.
There is no defined limit for a number of parties in a conference call in Unigy. The number of parties ina conference is limited by system capacity and activity. Each end user can add up to 32 lines inconference. Other end users can barge in, adding more lines to the conference.
2.2 Log inIQ/MAX Sync provides non-voice call control operations for an associated turret (for example, using thedirectory or initiating a call); the turret provides all voice communications. To use IQ/MAX Sync, youmust have access to a turret. Log in to the turret first, then log in to IQ/MAX Sync.
Logging in provides access to all of the communication functions configured in your user profile. Ifauthorized, you can log in from any location that can connect to your Unigy enterprise. However, theUnigy Soft Client does not support Remote Desktop access from a remote computer into a computerwhere the Soft Client software is installed. You must perform all actions locally on your Soft Clientcomputer.
23
IPC Systems, Inc., Confidential and Proprietary Unigy 4.0IQ/MAX Sync User Guide
NoteThe Unigy Soft Client does not support Remote Desktop access from a remote computer into a computerwhere the Soft Client software is installed. You must perform all actions locally on your Soft Clientcomputer.
Review the following log in considerations:
• You can log in to a Soft Client product with your login credentials from only one computer at a time.
• Before you log in to IQ/MAX Sync, log in to the associated turret.
• You cannot concurrently log in to a turret and IQ/MAX Omni or Pulse Enterprise.
• You can log in to only one voice communications device at a time. For example, if you log in whileyou have an active session on another device or another Soft Client, the system displays the ForceLogin button. You can cancel the log in request or perform a forced log in, which logs you off theoriginal session and logs you in to a new session.
• If auto login is enabled, the system logs you in automatically using the stored credentials and productinformation you specified when you selected Auto Login. You can turn off auto login when you arelogged in by right-clicking the Unigy Application icon in the Microsoft Windows System Tray andchoosing Disable AutoLogin.
• If you can access both IQ/MAX Sync and IQ/MAX Omni, you can force a log off from IQ/MAXSync by logging in to IQ/MAX Omni, which displays the message Logged in Elsewhere.Click the Force Login button to force a log off from IQ/MAX Sync and the associated turret and tolog you in to IQ/MAX Omni.
• If you force a log off when there are active calls, the calls are dropped. This behavior is different fromAlliance MX where forced log off is not permitted when there are active calls.
• If you are logged off due to a system failure or because you stopped the UnigyClient.exeprocess, wait approximately 30 seconds before logging in again. If you have not waited long enough,you will see the Force Login button in the Login window.
• The Unigy Soft Client does not support Remote Desktop access from a remote computer into acomputer where the Soft Client software is installed. You must perform all actions locally on yourSoft Client computer.
• In the following scenario, you will see unexpected behavior if you attempt to log in too soon: Youhave access to IQ/MAX Omni and IQ/MAX Sync and have Auto Login set to automatically log youin to IQ/MAX Sync when you log in to the Soft Client. You log in to a turret and IQ/MAX Sync.After working with IQ/MAX Sync, you decide you want to log in to IQ/MAX Omni, so you log offof IQ/MAX Sync and the turret. When you log in to IQ/MAX Omni, the system displays the messageLog on to turret and try again because it attempts to auto log in to IQ/MAX Sync, butyou are not logged in to a turret. You then click Cancel and immediately enter your login credentials.Instead of seeing a list of the available products, you again see the message Log on to turretand try again. To enable the Soft Client to display the list of available products so you can login to IQ/MAX Omni, wait at least ten seconds after you click Cancel before you log in.
• To optimize turret access, Unigy limits the number of IQ/MAX Sync login sessions it allows to beactive at one time. If you are logging in to IQ/MAX Sync and the system does not permit you to login, try again later.
• You might be restricted from logging in to any Soft Client product if a BCP failover occurred and thebackup zone login session capacity has been reached. If the system continues to reject your loginattempts, contact your Unigy administrator.
24 2.2: Log in
December 2, 2016 IPC Systems, Inc., Confidential and Proprietary

1. Log in to the turret using your extension number.
2. Start the Unigy Soft Client on your computer by clicking the Windows Start button then clicking AllPrograms ➤ IPC Systems Inc ➤ Unigy Client.If you do not have Microsoft Outlook open, the system displays the message NOTICE: Pleaseopen Outlook to download local contacts. You are not required to open Outlook;however, if you are using your Outlook contacts as local contacts within IQ/MAX Sync open Outlookto access these contacts. Click OK to continue with the log in.If auto login is not enabled, the Login window opens; otherwise IQ/MAX Sync opens.
3. Type your user name in the Name field and your password in the Password field.
NoteThe Name field is not case sensitive; but the Password field is.
4. If applicable, select either of the following options:
• To use stored credentials and a specific license mode to log in automatically when you start theSoft Client, select the Auto Login check box. Selecting this option automatically enables the SaveLog On Credentials option and saves your credentials and license mode selections for futurelogins. When you log in, the system does not display the Login window.
• To store your login credentials so that you do not have to re-enter them each time you start the SoftClient, select the Save Log On Credentials check box. When you log in, the system displays theLogin window so you can select the Soft Client product you want to access.
5. Click Login.If you have access to more than one Unigy Soft Client product, the Available License Mode field isenabled so you can select a product. If you have access to only one product, the product opens.
6. If applicable, select the IQ/MAX Sync license mode and click Continue.
IQ/MAX Sync opens and loads your user profile.
NoteIf you selected Auto Login, the license mode used for login will be used automatically for your nextlogin.
The IQ/MAX Sync footer includes an icon that indicates the turret is connected.Figure 7: Turret detected icon
1 Turret detected icon
If your login is unsuccessful, you receive an error message.
Login scenarios
2.2: Log in 25
IPC Systems, Inc., Confidential and Proprietary Unigy 4.0IQ/MAX Sync User Guide
If you are signed out of IQ/MAX Sync due to a system failure or because you stopped the Unigy SoftClient process, wait approximately 30 seconds before logging in again. If you have not waited longenough, you will see the Force Logoff button on the Login window.
In the following scenario, you will see unexpected behavior if you attempt to log in too soon: You arelicensed to IQ/MAX Omni and IQ/MAX Sync and have auto login set to automatically log you in toIQ/MAX Sync when you log in to the Soft Client. You log in to a turret and IQ/MAX Sync. Afterworking with IQ/MAX Sync, you decide you want to log in to IQ/MAX Omni, so you sign out ofIQ/MAX Sync and the turret. You log back in to the Soft Client, which displays the message Log onto turret and try again because it attempts to auto log in to IQ/MAX Sync, but you are notlogged in to a turret. You then click Cancel and immediately enter your login credentials. Instead ofseeing a list of your licensed products, you again see the message Log on to turret and tryagain. To enable the Soft Client to display the list of licensed products so you can log in to IQ/MAXOmni, wait at least ten seconds after you click Cancel before you log in.
If you have IQ/MAX Omni and IQ/MAX Sync licenses, are logged in to a turret and IQ/MAX Sync, andyou attempt to log in from the same or another computer with the same user ID and password, one of thefollowing occurs:
• If you log in to IQ/MAX Omni, the message Logged On Elsewhere is displayed. Click ForceLogin to log out of IQ/MAX Sync and the turret and log in to IQ/MAX Omni.
• If you log in to IQ/MAX Sync, the message No Force Login in Sync is displayed and theForce Login button is disabled. You cannot perform a forced login to IQ/MAX Sync; however, youcan log in to IQ/MAX Omni by clicking Cancel then logging in to IQ/MAX Omni. The messageLogged In Elsewhere is displayed and the Force Login button is enabled. Click Force Loginto log out of the turret and IQ/MAX Sync and log in to IQ/MAX Omni.
2.3 System tray controlsWhen you start the Unigy Client, the system tray in the lower right corner of the Windows desktopdisplays a Unigy icon. You can right-click the Unigy icon to access Unigy Soft Client controls.
NoteThe Unigy icon is not available until you start the Unigy Client.
The Unigy icon in the system tray includes the following right-click options:
• Unigy Config Viewer: Access the Unigy Config Tool dialog to view or modify the connection tobackroom resources.
• Disable AutoLogin: Turn off the Auto Login option if it has previously been enabled on the Loginwindow.
• Sign Out: Log out of the Soft Client and return to the Login window.
• Upgrade: (only shown when an update is available) Remove the current version of the Soft Clientand install an update. (Microsoft Outlook and Office Communicator must be closed.) This processdoes not affect any existing user configuration.
• Rollback: (if the server is an older version than the installed Soft Client) Remove the current versionof the Soft Client and install the older version. (Microsoft Outlook and Office Communicator must beclosed.)
• Exit: Exit the Soft Client completely and close all windows.
26 2.3: System tray controls
December 2, 2016 IPC Systems, Inc., Confidential and Proprietary

2.4 Define user preferencesYou can define user preferences to control the operation of IQ/MAX Sync.
Figure 8: Main menu icon
1 Tools menu icon
1. To display user preferences, click the main menu icon at the bottom of the main window and clickPreferences.
2. Select or enter values for these fields:
• FastFind Hide Delay: (6-60 seconds) Length of time FastFind is displayed without activity beforethe window is hidden.
• CLI Preference: Display preference for active and incoming caller information (also affects callhistory displays):
• Name: Display the contact name.
• Number: Display the line number.
• Toggle: Alternate between name and number displays. (Call history shows the name.)
• Match Label: Display the label on a line button associated with the call. (Call history shows thelabel.)
• Language: Your language for display messages.
• Date Display Format: Format for date displays (also affects call history displays).
• Time Display Format: Format for time displays (also affects call history displays).
• Fast Paging Speed: (1-3 pages/second) Paging speed when the Page Up or Page Down control isheld down in the Button Sheet.
• ICM Ring: Ringtone for incoming intercom calls.
• High Priority Ring: Ringtone for incoming high priority calls.
• Low Priority Ring: Ringtone for incoming low priority calls.
• Progress Bar Held Shown: (Yes or No) Whether to show a duration bar for held calls.
• Progress Bar Incoming Shown: (Yes or No) Whether to show a duration bar for incoming calls.
• Enable ICM AutoAnswer: Indicates whether intercom and broadcast calls are answeredautomatically or manually. This feature does not apply to IQ/MAX Sync and does not changeHFM on a turret.
2.4: Define user preferences 27
IPC Systems, Inc., Confidential and Proprietary Unigy 4.0IQ/MAX Sync User Guide
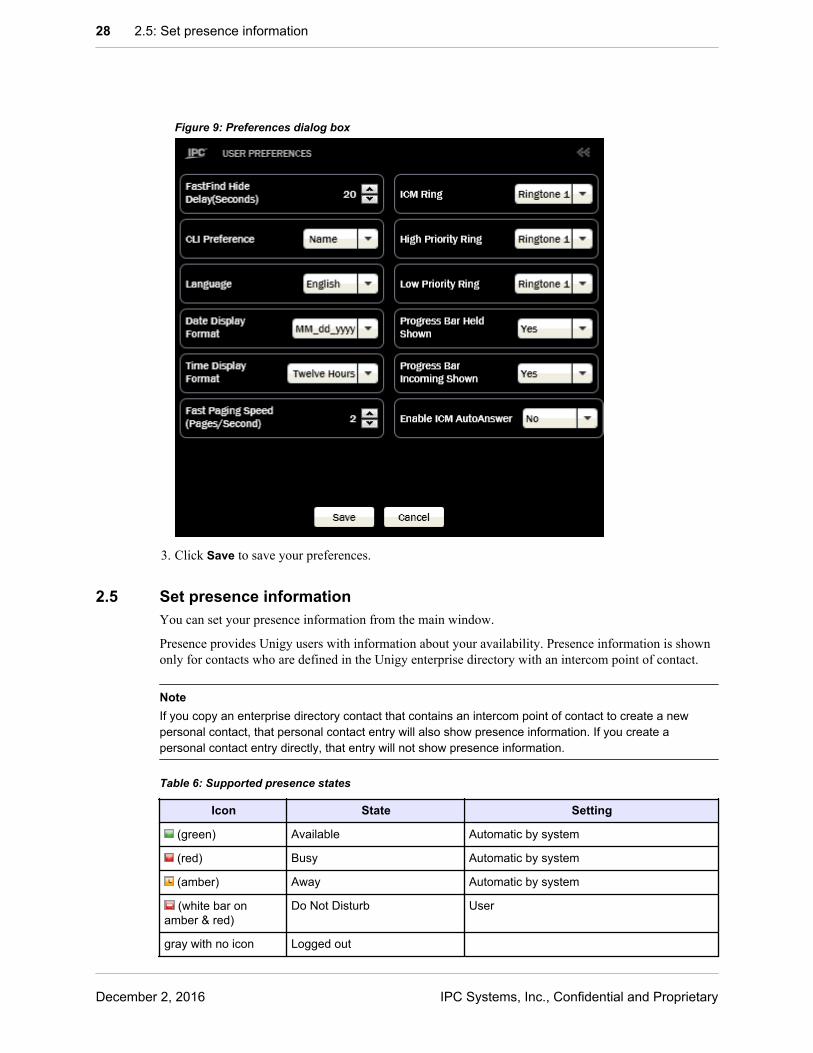
Figure 9: Preferences dialog box
3. Click Save to save your preferences.
2.5 Set presence informationYou can set your presence information from the main window.
Presence provides Unigy users with information about your availability. Presence information is shownonly for contacts who are defined in the Unigy enterprise directory with an intercom point of contact.
NoteIf you copy an enterprise directory contact that contains an intercom point of contact to create a newpersonal contact, that personal contact entry will also show presence information. If you create apersonal contact entry directly, that entry will not show presence information.
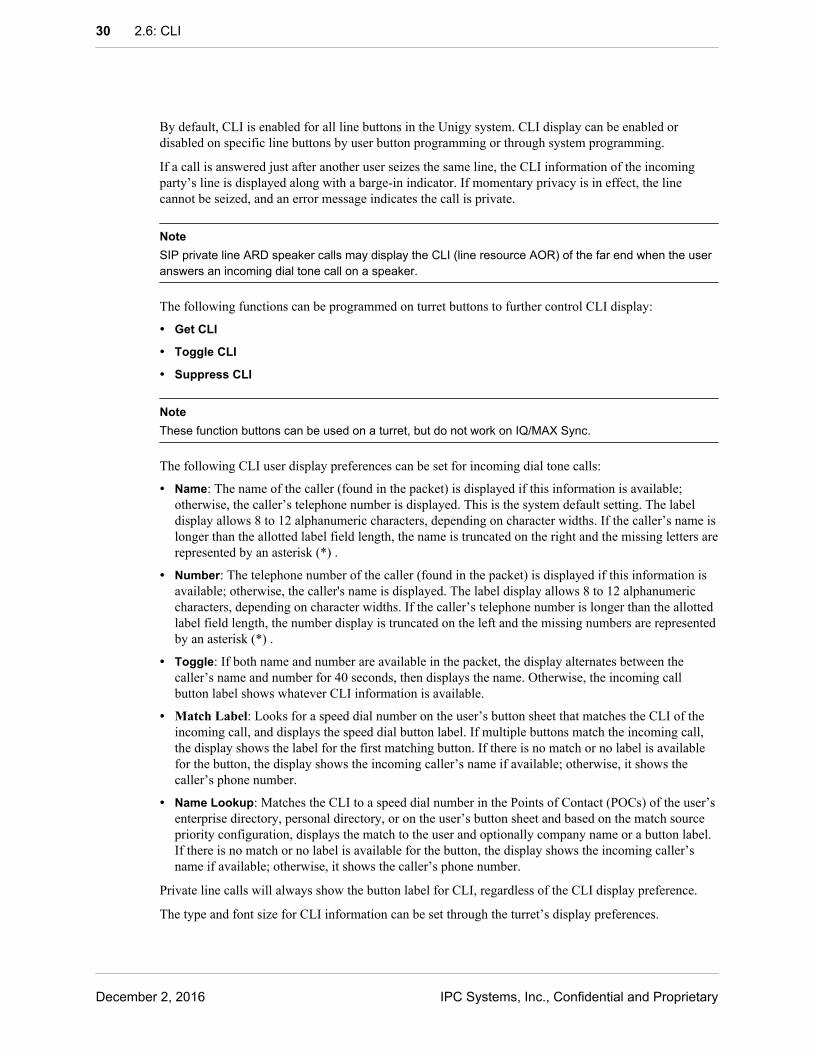
Table 6: Supported presence states
Icon State Setting
(green) Available Automatic by system
(red) Busy Automatic by system
(amber) Away Automatic by system
(white bar onamber & red)
Do Not Disturb User
gray with no icon Logged out
28 2.5: Set presence information
December 2, 2016 IPC Systems, Inc., Confidential and Proprietary

Presence information is normally based on the activity for each user. For example, if you are busy on acall, your presence information is automatically set to Busy. Depending on the line type and lineconfiguration, Unigy system response to presence status during the call setup time will vary. After a callis connected, presence status is consistent for all line types.
To indicate that you are not available for calls when your phone is not in use, you can set your status toDo Not Disturb. You can also set a custom message to be displayed with your presence information.
1. To set your presence information, choose from the drop-down list next to your login name in themessage area at the top of the main window.Access the drop-down list by clicking the down arrow next to the presence indicator:Figure 10: Presence menu
1 Drop-down menu for presence options
The following options are available:
• Do Not Disturb
• Reset Status (refreshes your status information from the system)
• Custom Message
2. To set a custom message, choose Custom Message from the presence settings.
a) On the Set Custom Message dialog, type the message you want to display.Figure 11: Set Custom Message dialog
b) Click Set.
View a custom message for a contact by mousing over the presence indicator on a contact entry.Figure 12: Custom presence message on a contact entry
1 Custom presence message on a contact entry
2.6 CLIOn a turret, Calling Line Identification (CLI) displays the name, button label, or phone number of theparty placing an incoming call. It may also display the calling party’s company name. If the CLI featureis enabled and CLI information is available for the caller, the information is displayed based on userpreference until the call is released. CLI information may not be available for some calls.
CLI information for a call is shown on a turret line button or floating button label. The CLI informationcan include the priority assigned to the line button associated with the call.
2.6: CLI 29
IPC Systems, Inc., Confidential and Proprietary Unigy 4.0IQ/MAX Sync User Guide
By default, CLI is enabled for all line buttons in the Unigy system. CLI display can be enabled ordisabled on specific line buttons by user button programming or through system programming.
If a call is answered just after another user seizes the same line, the CLI information of the incomingparty’s line is displayed along with a barge-in indicator. If momentary privacy is in effect, the linecannot be seized, and an error message indicates the call is private.
NoteSIP private line ARD speaker calls may display the CLI (line resource AOR) of the far end when the useranswers an incoming dial tone call on a speaker.
The following functions can be programmed on turret buttons to further control CLI display:
• Get CLI
• Toggle CLI
• Suppress CLI
NoteThese function buttons can be used on a turret, but do not work on IQ/MAX Sync.
The following CLI user display preferences can be set for incoming dial tone calls:
• Name: The name of the caller (found in the packet) is displayed if this information is available;otherwise, the caller’s telephone number is displayed. This is the system default setting. The labeldisplay allows 8 to 12 alphanumeric characters, depending on character widths. If the caller’s name islonger than the allotted label field length, the name is truncated on the right and the missing letters arerepresented by an asterisk (*) .
• Number: The telephone number of the caller (found in the packet) is displayed if this information isavailable; otherwise, the caller's name is displayed. The label display allows 8 to 12 alphanumericcharacters, depending on character widths. If the caller’s telephone number is longer than the allottedlabel field length, the number display is truncated on the left and the missing numbers are representedby an asterisk (*) .
• Toggle: If both name and number are available in the packet, the display alternates between thecaller’s name and number for 40 seconds, then displays the name. Otherwise, the incoming callbutton label shows whatever CLI information is available.
• Match Label: Looks for a speed dial number on the user’s button sheet that matches the CLI of theincoming call, and displays the speed dial button label. If multiple buttons match the incoming call,the display shows the label for the first matching button. If there is no match or no label is availablefor the button, the display shows the incoming caller’s name if available; otherwise, it shows thecaller’s phone number.
• Name Lookup: Matches the CLI to a speed dial number in the Points of Contact (POCs) of the user’senterprise directory, personal directory, or on the user’s button sheet and based on the match sourcepriority configuration, displays the match to the user and optionally company name or a button label.If there is no match or no label is available for the button, the display shows the incoming caller’sname if available; otherwise, it shows the caller’s phone number.
Private line calls will always show the button label for CLI, regardless of the CLI display preference.
The type and font size for CLI information can be set through the turret’s display preferences.
30 2.6: CLI
December 2, 2016 IPC Systems, Inc., Confidential and Proprietary

The following table lists line and connection types supported by Unigy with an indication of whetherCLI information is supported for outgoing and incoming calls.
Table 7: CLI support for line types
Line or connection type Connected party information(outgoing calls)
Calling party information(incoming calls)
Private manual ringdown N/A N/A
Private auto ringdown N/A N/A
Analog dial tone not supported not supported
DDI name and number name and number
DPNSS not supported number only
Euro ISDN number only number only
INS 1500 number only number only
QSIG name and number name and number
NAPRI not supported number only
SIP name and number name and number
2.6.1 Configure CLI settings for line buttonsFor each line button defined in your IQ/MAX Omni or IQ/MAX Sync Button Sheet, you can configurehow CLI information should be displayed for an incoming call on that line.
Your preferences specify how calling line identity (CLI) information is displayed. You can also definefunction buttons to get CLI information for incoming calls (regardless of line button settings), toggleCLI displays between name and number, or suppress your CLI information for an outgoing call.
1. Navigate to a line button on the Button Sheet.
2. Right-click the button and choose Edit Button from the context menu.
3. Click Adv Features to display advanced line settings.
4. Choose one of the following options from the drop-down list of values for the Priority Preferencefield:
• high: Display as a high priority call.
• low: Display as a low priority call.
5. Choose one of the following options from the drop-down list of values for the CLI Preference field:
• CLI: Display CLI information for active and incoming calls.
• No CLI: Do not display CLI information for active and incoming calls. (CLI information is stillstored in history events and is available when using the Retrieve CLI function.)
2.6.2 Retrieve CLI informationYou can use a preprogrammed Retrieve CLI button on a turret to display the name or phone number foran incoming call.
2.6: CLI 31
IPC Systems, Inc., Confidential and Proprietary Unigy 4.0IQ/MAX Sync User Guide
NoteThis function can be programmed in IQ/MAX Sync, but the function button is only operational on theassociated turret. Line status and CLI information is always shown on the turret, not on IQ/MAX Sync.
When you receive a call, calling line or party information (CLI or CPI) is normally shown on the linebutton for the call. If there is too much information to fit on the button, the CLI information may betruncated. If the line button is set to not display CLI information, the information may not appear at all.
You can press the Get CLI button to display information for the caller, even if the line button is set to notdisplay CLI information.
The caller’s name or phone number is displayed, according to your CLI display preferences. For moreinformation, see Define user preferences on page 27.
For an active or ringing call, press the Retrieve CLI button.If caller information is available, the turret handset area display shows full CLI information for thecaller.
NoteIf you have privileges to program buttons, you can program this feature on a function button, or it canbe preprogrammed through Unigy administration. The function identifier to use when programming abutton is Retrieve CLI. The default button label is Retrieve CLI; but you can change the label whenprogramming the button. For information about programming function buttons, see Add a functionbutton on page 92.
2.6.3 Toggle CLI displayUse a preprogrammed Toggle CLI button on a turret to switch from the current default CLI display(name or number) to the alternative CLI display.
NoteThis function can be programmed in IQ/MAX Sync, but the function button is only operational on theassociated turret. Line status and CLI information is always shown on the turret, not on IQ/MAX Sync.
When you receive a call, any calling line or party information (CLI or CPI) is normally shown on theline button or floating button for the call.
To change the display for incoming calls, press the Toggle CLI button.The CLI display for the incoming call switches from the current default setting (name or phonenumber) to the alternative option: from name to number, or from number to name.
NoteIf you have privileges to program buttons, you can program this feature on a function button, or it canbe preprogrammed through Unigy administration. The function identifier to use when you program abutton is Toggle CLI. The default button label is Toggle CLI; but you can change the label whenprogramming the button. For information about programming function buttons, see Add a functionbutton on page 92.
32 2.6: CLI
December 2, 2016 IPC Systems, Inc., Confidential and Proprietary

2.6.4 Suppress outgoing CLI valuesBefore placing a call, you can use a preprogrammed Suppress Outgoing CLI button on a turret tosuppress display of your calling party identification at the distant end.
NoteThis function can be programmed in IQ/MAX Sync, but the function button is only operational on theassociated turret. Line status and CLI information is always shown on the turret, not on IQ/MAX Sync.
You must press the Suppress Outgoing CLI button before a call. You cannot suppress CLI informationfor an active call, because the request to not display CLI is sent when the call is established.
NoteCLI suppression ends after each call. To suppress CLI information for new calls, you must enable thefeature again.
1. To block your calling information for a call, press the Suppress Outgoing CLI button.The Suppress Outgoing CLI button is highlighted to indicate that the feature is enabled.
2. Initiate the call.No calling identity information appears at the remote end.
NoteIf you have privileges to program buttons, you can program this feature on a function button at yourturret or through IQ/MAX Sync, or it can be preprogrammed through Unigy administration. Thefunction identifier to use when you program a button is Suppress Outgoing CLI. The default button labelis Suppress Outgoing CLI; but you can change the label when programming the button. For informationabout programming function buttons, see Add a function button on page 92.
2.7 Sign outSign out to return to the Login window without exiting.
NoteIf you exit without signing out, the system automatically signs you out. See Shut down on page 34.
If you log off the turret, IQ/MAX Sync is automatically signed off; but if you sign out of IQ/MAX Sync,the turret remains logged in.
1. Right-click the Unigy Application icon, in the system tray at the bottom right of your computerdesktop, and choose Sign Out.Figure 13: Sign out from Unigy Application
2.7: Sign out 33
IPC Systems, Inc., Confidential and Proprietary Unigy 4.0IQ/MAX Sync User Guide

1 Unigy Application icon
2 Sign Out option
You can also click Sign Out on the main menu.The system signs you out, then displays the Login window.
2. To shut down, right-click the Unigy Application icon in the system tray and choose Exit.
2.8 Shut downShut down (exit) when you do not need to have turret emulation on your computer.
NoteIf you exit without signing out, the system automatically signs you out. To sign out without exiting, see Sign out on page 33.
To shut down, right-click the Unigy Application icon in the system tray (at the bottom right of yourdesktop) and choose Exit.Figure 14: Exit the Unigy Application
1 Unigy Application icon
2 Exit option
2.9 Navigate the IQ/MAX Sync user interfaceThe IQ/MAX Sync interface provides access to favorites, contacts, history, and buttons, and enables youto initiate calls for an associated turret. Buttons, icons, and menus help you manage yourcommunications.
By default, the main window displays after you log in to IQ/MAX Sync. You can display applications inthe main window to access different types of information and controls.
A search box is included on the main window to enable you to search entries within each application.
If you are assigned appropriate privileges, you can also use a keyboard shortcut (Ctrl + spacebar) toopen a FastFind dialog that can be used to search for all types of entries across IQ/MAX Sync.
For illustrations of the IQ/MAX Sync graphical user interface, see IQ/MAX Sync on page 11.
1. To display an application in the IQ/MAX Sync main window, click one of the following buttons:
• Home
• Favorites
34 2.8: Shut down
December 2, 2016 IPC Systems, Inc., Confidential and Proprietary
• Directories
• History
Any authorized device applications appear below the standard application buttons.
NoteButtons for applications that are not available in IQ/MAX Sync are grayed out and cannot be selected.
The selected option displays as an application in the main window. Each of the applications displaysentries that are specific to that application.
2. Click an entry to expand it.The entry expands to show more information and control icons.
3. To perform an action related to an entry on an application, right-click the entry and choose an optionfor the entry from the context menu.
NoteYou can also choose options from the application menu to perform actions for the application or for aselected entry.
4. To view the Button Sheet for your station, click the Button Sheet icon in the Toolbar near the top ofthe main window.The Button Sheet displays in a separate window. You can use buttons to initiate calls or performfunctions.
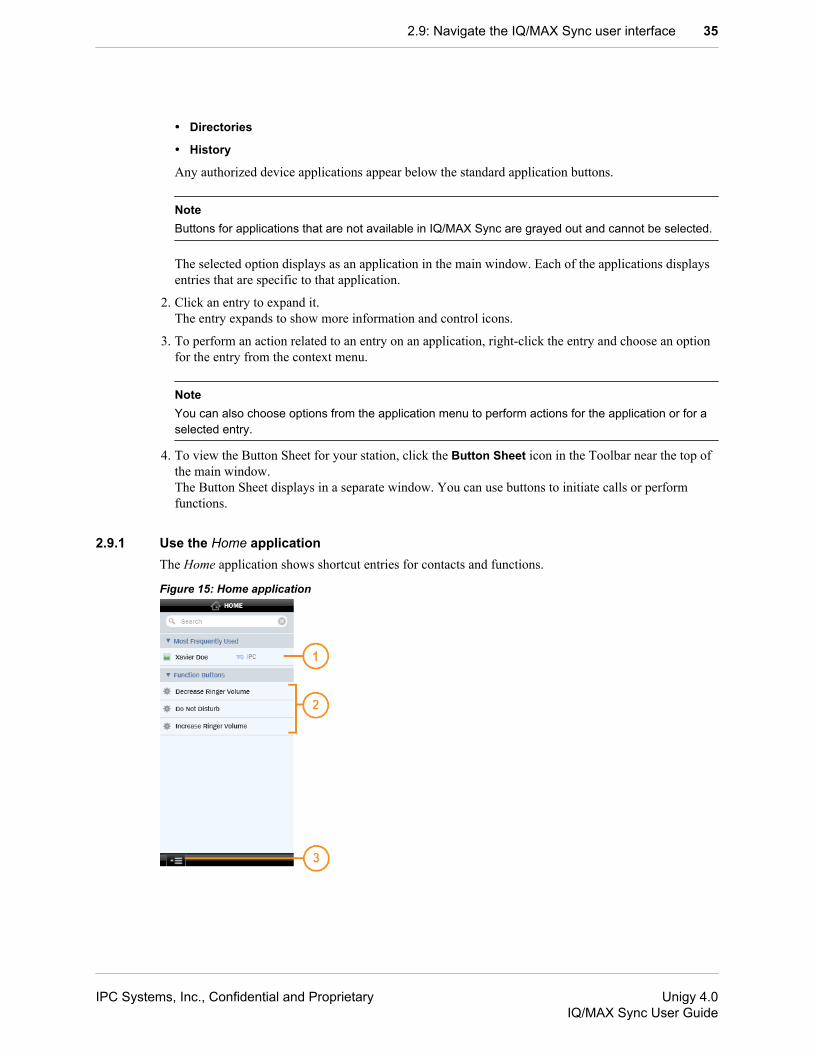
2.9.1 Use the Home applicationThe Home application shows shortcut entries for contacts and functions.
Figure 15: Home application
2.9: Navigate the IQ/MAX Sync user interface 35
IPC Systems, Inc., Confidential and Proprietary Unigy 4.0IQ/MAX Sync User Guide

1 Most Frequently Used shortcuts
2 Function Buttons shortcuts
3 Application menu
The shortcuts that appear in the Home application are Most Frequently Used contacts and FunctionButtons.
• The Most Frequently Used shortcuts include the 25 contacts that have been most frequently used.
• The Function Buttons shortcuts include the most frequently used function buttons defined for youruser profile.
NoteYou can use a shortcut entry to perform actions appropriate to the type of entry, such as calling a contactor executing a function.
1. To view shortcut entries, click the Home button.The Home application displays shortcuts grouped by type under the following headings: MostFrequently Used and Function Buttons.
2. To collapse or expand a group of shortcut entries, click on the group heading.
3. To search for shortcut entries, enter search characters in the search field.As you type, entries that include the characters you have typed so far are shown. The matchingcharacters are underlined in the results.
4. To sort entries by contact last name, click Sort by A-Z or Sort by Z-A on the Home application menu.
5. To view more information about a contact entry, click the entry.The entry expands to show additional details and displays control icons you can use to performactions. You can also right-click an entry to display a shortcut menu.
2.9.2 Window managementThe main window is the basic interface for IQ/MAX Sync; it is displayed after you log in.
You can move, minimize, or close the main window, display applications within the main window, andview or launch other displays that provide more information or controls. Other displays include slide-outpanels attached to the main window and separate displays on the desktop.
Minimize a windowYou can minimize any window that contains a standard minimize control ( _ ) in the upper right corner.Click the control to minimize the window, and it collapses to an icon on the task bar. Click the icon inthe taskbar to redisplay the window.
Resize the application display area in the main windowYou can resize the application display area of the main window using the control at the top of theapplication menu bar. Click the control and drag up or down to change the height of the applicationdisplay area.
36 2.9: Navigate the IQ/MAX Sync user interface
December 2, 2016 IPC Systems, Inc., Confidential and Proprietary
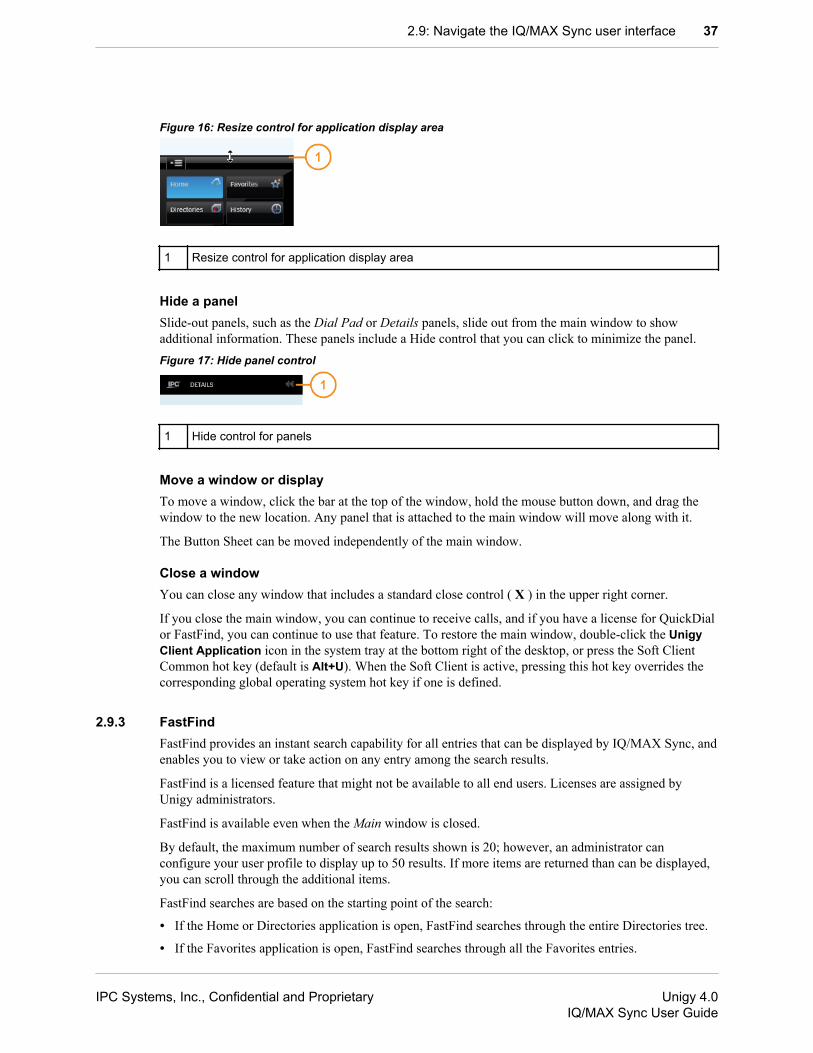
Figure 16: Resize control for application display area
1 Resize control for application display area
Hide a panelSlide-out panels, such as the Dial Pad or Details panels, slide out from the main window to showadditional information. These panels include a Hide control that you can click to minimize the panel.Figure 17: Hide panel control
1 Hide control for panels
Move a window or displayTo move a window, click the bar at the top of the window, hold the mouse button down, and drag thewindow to the new location. Any panel that is attached to the main window will move along with it.
The Button Sheet can be moved independently of the main window.
Close a windowYou can close any window that includes a standard close control ( X ) in the upper right corner.
If you close the main window, you can continue to receive calls, and if you have a license for QuickDialor FastFind, you can continue to use that feature. To restore the main window, double-click the UnigyClient Application icon in the system tray at the bottom right of the desktop, or press the Soft ClientCommon hot key (default is Alt+U). When the Soft Client is active, pressing this hot key overrides thecorresponding global operating system hot key if one is defined.
2.9.3 FastFindFastFind provides an instant search capability for all entries that can be displayed by IQ/MAX Sync, andenables you to view or take action on any entry among the search results.
FastFind is a licensed feature that might not be available to all end users. Licenses are assigned byUnigy administrators.
FastFind is available even when the Main window is closed.
By default, the maximum number of search results shown is 20; however, an administrator canconfigure your user profile to display up to 50 results. If more items are returned than can be displayed,you can scroll through the additional items.
FastFind searches are based on the starting point of the search:
• If the Home or Directories application is open, FastFind searches through the entire Directories tree.
• If the Favorites application is open, FastFind searches through all the Favorites entries.
2.9: Navigate the IQ/MAX Sync user interface 37
IPC Systems, Inc., Confidential and Proprietary Unigy 4.0IQ/MAX Sync User Guide
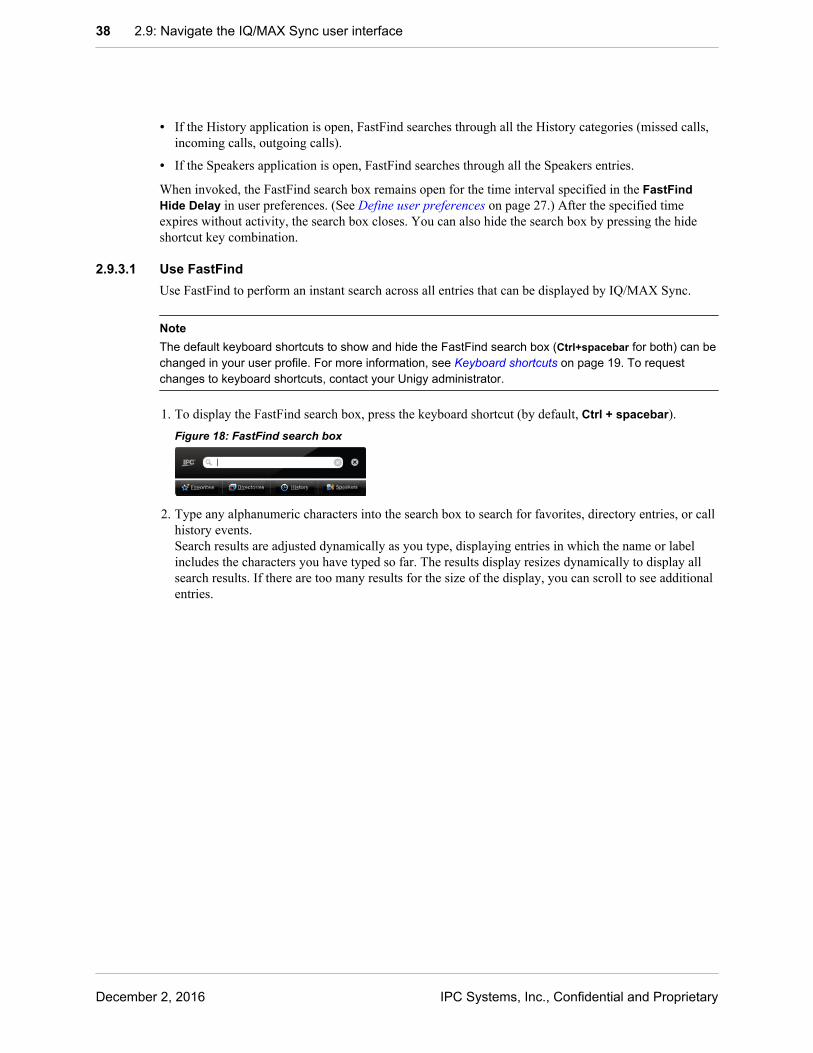
• If the History application is open, FastFind searches through all the History categories (missed calls,incoming calls, outgoing calls).
• If the Speakers application is open, FastFind searches through all the Speakers entries.
When invoked, the FastFind search box remains open for the time interval specified in the FastFindHide Delay in user preferences. (See Define user preferences on page 27.) After the specified timeexpires without activity, the search box closes. You can also hide the search box by pressing the hideshortcut key combination.
2.9.3.1 Use FastFindUse FastFind to perform an instant search across all entries that can be displayed by IQ/MAX Sync.
NoteThe default keyboard shortcuts to show and hide the FastFind search box (Ctrl+spacebar for both) can bechanged in your user profile. For more information, see Keyboard shortcuts on page 19. To requestchanges to keyboard shortcuts, contact your Unigy administrator.
1. To display the FastFind search box, press the keyboard shortcut (by default, Ctrl + spacebar).Figure 18: FastFind search box
2. Type any alphanumeric characters into the search box to search for favorites, directory entries, or callhistory events.Search results are adjusted dynamically as you type, displaying entries in which the name or labelincludes the characters you have typed so far. The results display resizes dynamically to display allsearch results. If there are too many results for the size of the display, you can scroll to see additionalentries.
38 2.9: Navigate the IQ/MAX Sync user interface
December 2, 2016 IPC Systems, Inc., Confidential and Proprietary
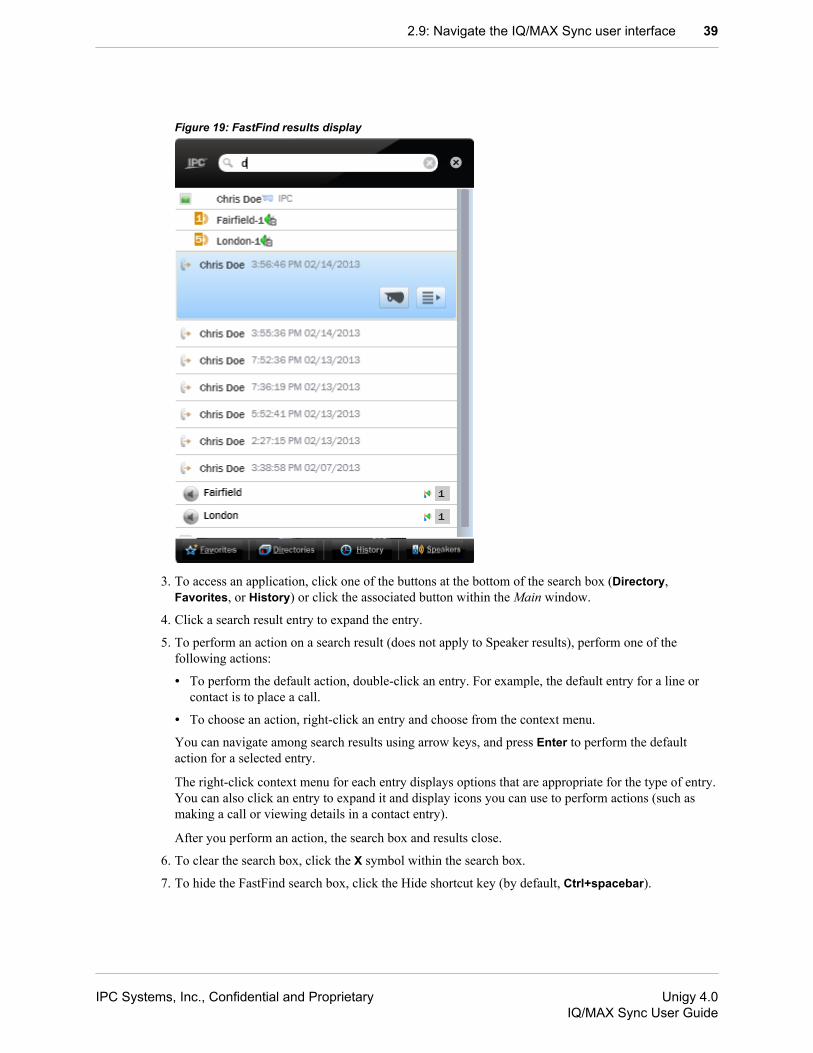
Figure 19: FastFind results display
3. To access an application, click one of the buttons at the bottom of the search box (Directory,Favorites, or History) or click the associated button within the Main window.
4. Click a search result entry to expand the entry.
5. To perform an action on a search result (does not apply to Speaker results), perform one of thefollowing actions:
• To perform the default action, double-click an entry. For example, the default entry for a line orcontact is to place a call.
• To choose an action, right-click an entry and choose from the context menu.
You can navigate among search results using arrow keys, and press Enter to perform the defaultaction for a selected entry.
The right-click context menu for each entry displays options that are appropriate for the type of entry.You can also click an entry to expand it and display icons you can use to perform actions (such asmaking a call or viewing details in a contact entry).
After you perform an action, the search box and results close.
6. To clear the search box, click the X symbol within the search box.
7. To hide the FastFind search box, click the Hide shortcut key (by default, Ctrl+spacebar).
2.9: Navigate the IQ/MAX Sync user interface 39
IPC Systems, Inc., Confidential and Proprietary Unigy 4.0IQ/MAX Sync User Guide
2.10 Line buttonsYou can program line buttons on the Button Sheet for making or answering internal and external calls.Up to 600 line or feature buttons can be programmed on IQ/MAX Sync.
The following types of lines can be programmed on any empty buttons:
• Private lines, including:
• Point-to-point private lines
• Hoot lines for external multipoint calls
• Open Connexion lines for internal multipoint calls
• Dial tone lines
• Speed dial numbers
• Conference (preset) or simplex broadcasts to multiple lines
A line button definition includes a button descriptor (label), an identifier for the line, and additional linepreferences. For more information, see Add a line button on page 91
In IQ/MAX Sync, line buttons are used to initiate calls, which then are established on the associatedturret. All status information for lines and calls is shown on the turret.
Although status information is not shown on IQ/MAX Sync line buttons, you can also click a line buttonon the IQ/MAX Sync Button Sheet to answer an incoming call that is displayed on the turret.
2.11 DirectoriesDirectories provide access to contacts, including point of contact details and a search capability. Youcan place calls to contacts through any directory entry that has a point of contact (POC) entry for a line,intercom, or speed dial number. Within the Directories application, you can view contact informationfrom enterprise, personal, and local directories. You can add, edit, and delete contacts for your personaland local directories.
NoteA private line cannot be called through the directory unless the line is available on the Button Sheet.
The Unigy system provides the following levels of contact data:
• Enterprise Directory: An organizational directory that includes contacts throughout the Unigyenterprise and any system-defined counterparties. Within the Directories application, you can displaythe enterprise directory to view contact entries for any contacts that your user profile enables you toaccess. Contacts can be organized through categories.
NoteThe enterprise directory is created and maintained within the Unigy Management System. You cannotadd or modify contact information in the directory. If a Unigy administrator adds or removes directorycategories, you must log off then log on to see the changes.
The default name for this directory is "Default Directory," but the name can be configured.
• Personal Directory: Personalized subset of copied enterprise directory entries, plus any personalcontacts that you add.
40 2.10: Line buttons
December 2, 2016 IPC Systems, Inc., Confidential and Proprietary
If you copy a contact record from the enterprise directory to create a new personal contact record, thepersonal record is not updated when changes are made to the original in the enterprise directory, andany changes you make to a personal contact are not reflected in the enterprise directory.Your personal directory is stored centrally, so that it is available wherever you log in.
NotePersonal directories are only for your use, and cannot be viewed by other users. The personaldirectory has a flat structure; it does not support folders or groups.
• Local Contacts folder: IQ/MAX Sync also provides a Local Contacts folder for contacts fromMicrosoft Outlook. The Local Contacts folder is only available when running on a computer whereOutlook is installed and running.
Within directories, contact entries provide a record for a particular Unigy user or counterparty. Multiplecontact records within the Enterprise directory for the same person can exist if the records are includedin different folders or included in multiple directories (such as Enterprise and Personal directories).
Contact records include the following information:
• First name
• Last name
• Company name
• Point of contact (POC) information
• Notes
• Address information
The Soft Client displays address information for a single address from the UMS, if the address exists, inthis order: Other, Business, and Home.
Within the contact record, you can have up to 10 points of contact. Points of contact can include PrivateWire, ICM (intercom), and Speed Dial.
Buttons on the Button Sheet or entries in the Favorites application can refer to specific points of contact.A point of contact assigned to a button must be defined as a contact entry in your Personal directory orthe Enterprise directory. Buttons can have labels that are set independently of contact entries, or can usedefault labels.
2.11.1 Use the Directories applicationYou can view user information in contact entries through the Directories application, or from a contactentry in any other application.
Note
• Some options may only be available when viewing a contact record in the Directories application.
• You see a Contact Updated message in the main window message area when you savechanges to a contact entry, or when a contact entry is updated through Unigy administration.
1. To view user directory information, click the Directories button on the main window.The Directories application displays user contact entries in a summary format. You can scroll up anddown to see additional entries.
2.11: Directories 41
IPC Systems, Inc., Confidential and Proprietary Unigy 4.0IQ/MAX Sync User Guide

Figure 20: Directories application
The summary format displays a presence icon (if the entry has an intercom point of contact), thecontact name, the preferred point of contact (not actionable), and the company name.
2. To display additional user information, click an entry.The entry expands to show the presence icon, contact name, the preferred point of contact (a phone orintercom icon), company name, and a View Contact Details icon.
Click the preferred point of contact icon to initiate a call with the contact. The intercom icon can beused to make an intercom call, and the handset icon can be used to initiate a speed dial or private linecall.Figure 21: Intercom icon
Figure 22: Handset (line) icon
3. To search for entries by contact name, type characters in the search box.Figure 23: Search box
The list is updated as you type to show entries that include the characters you have typed. Thematching characters are underlined in the results. Click the X icon in the search box to clear thesearch string.
4. To view additional details, click the View Contact Details icon.Figure 24: View Contact Details icon
The contact details are presented as a separate Details panel that slides out from the main window.The Details panel provides contact profile information such as phone numbers, address information,and notes.
For personal contacts, an Edit button enables you to make changes to the entry. (You cannot editenterprise directory entries.) For more details, see Edit a personal contact on page 48.
42 2.11: Directories
December 2, 2016 IPC Systems, Inc., Confidential and Proprietary
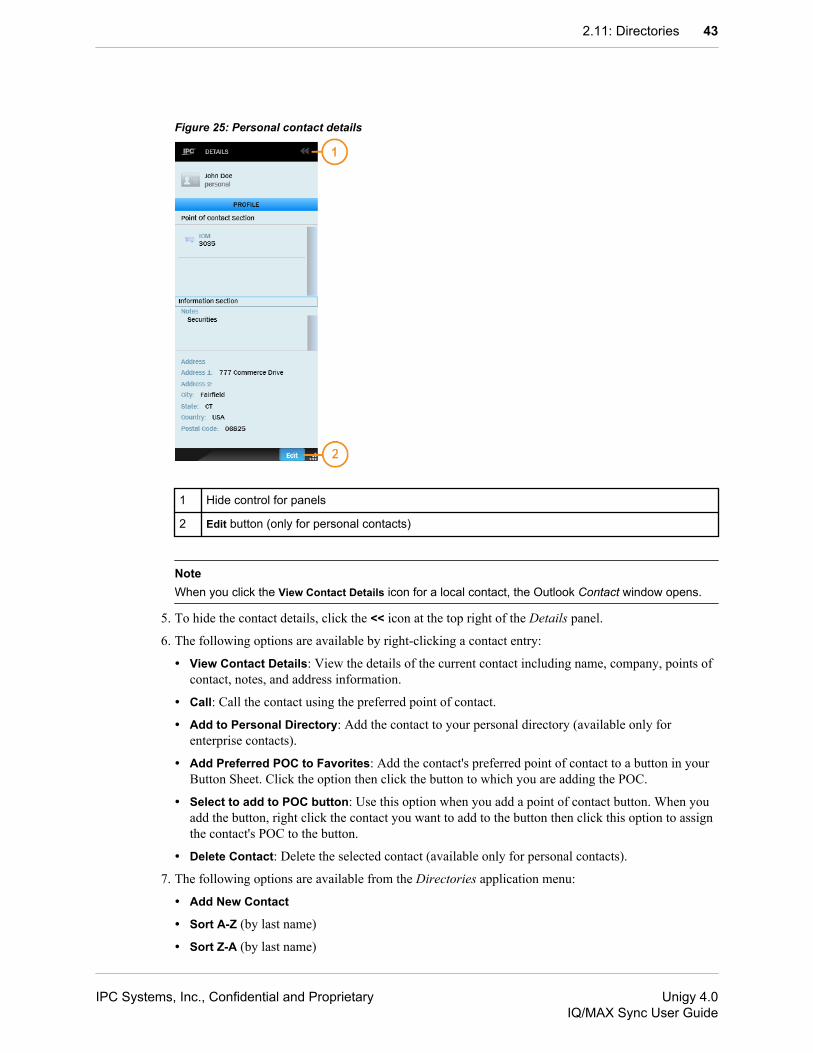
Figure 25: Personal contact details
1 Hide control for panels
2 Edit button (only for personal contacts)
NoteWhen you click the View Contact Details icon for a local contact, the Outlook Contact window opens.
5. To hide the contact details, click the << icon at the top right of the Details panel.
6. The following options are available by right-clicking a contact entry:
• View Contact Details: View the details of the current contact including name, company, points ofcontact, notes, and address information.
• Call: Call the contact using the preferred point of contact.
• Add to Personal Directory: Add the contact to your personal directory (available only forenterprise contacts).
• Add Preferred POC to Favorites: Add the contact's preferred point of contact to a button in yourButton Sheet. Click the option then click the button to which you are adding the POC.
• Select to add to POC button: Use this option when you add a point of contact button. When youadd the button, right click the contact you want to add to the button then click this option to assignthe contact's POC to the button.
• Delete Contact: Delete the selected contact (available only for personal contacts).
7. The following options are available from the Directories application menu:
• Add New Contact
• Sort A-Z (by last name)
• Sort Z-A (by last name)
2.11: Directories 43
IPC Systems, Inc., Confidential and Proprietary Unigy 4.0IQ/MAX Sync User Guide

2.11.2 Navigate directoriesWithin the Directories application, you can view contact information from enterprise, personal, andlocal directories.
The following figure shows the key controls for the Directories application:Figure 26: Directories application controls
1 Directories button
2 Folder View icon
3 List View icon
1. From the main window, click the Directories button to display contact information.The application displays contacts from all directories.
2. Click the Folder View icon in the application menu bar.The Directories application displays a list of the directories that are available to you.
NoteThe names of directories and their organization into subdirectories are defined centrally, and are likelyto be different in different organizations.
3. Click a directory.The Directories application displays any subdirectories, as well as the contact entries in the selecteddirectory. A breadcrumb display above the entries shows which directory you are viewing and whereit is in the directory structure (for example, Directories > UserName-PersonalDir).
44 2.11: Directories
December 2, 2016 IPC Systems, Inc., Confidential and Proprietary
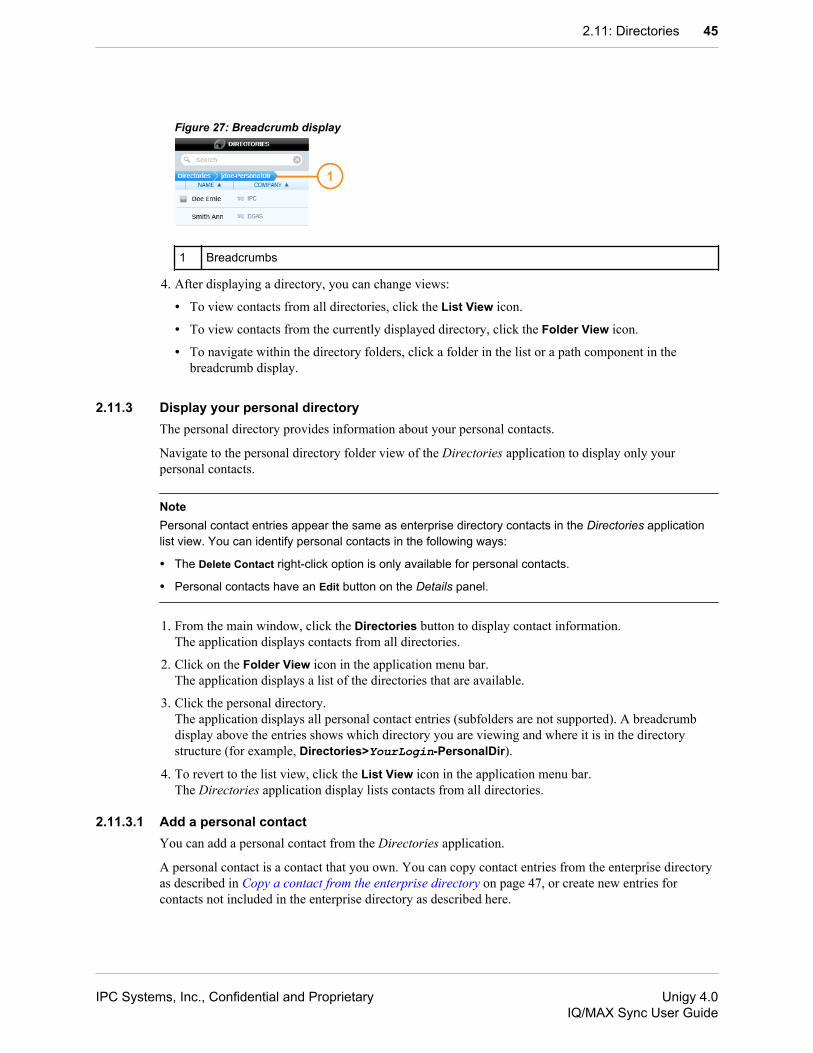
Figure 27: Breadcrumb display
1 Breadcrumbs
4. After displaying a directory, you can change views:
• To view contacts from all directories, click the List View icon.
• To view contacts from the currently displayed directory, click the Folder View icon.
• To navigate within the directory folders, click a folder in the list or a path component in thebreadcrumb display.
2.11.3 Display your personal directoryThe personal directory provides information about your personal contacts.
Navigate to the personal directory folder view of the Directories application to display only yourpersonal contacts.
NotePersonal contact entries appear the same as enterprise directory contacts in the Directories applicationlist view. You can identify personal contacts in the following ways:
• The Delete Contact right-click option is only available for personal contacts.
• Personal contacts have an Edit button on the Details panel.
1. From the main window, click the Directories button to display contact information.The application displays contacts from all directories.
2. Click on the Folder View icon in the application menu bar.The application displays a list of the directories that are available.
3. Click the personal directory.The application displays all personal contact entries (subfolders are not supported). A breadcrumbdisplay above the entries shows which directory you are viewing and where it is in the directorystructure (for example, Directories>YourLogin-PersonalDir).
4. To revert to the list view, click the List View icon in the application menu bar.The Directories application display lists contacts from all directories.
2.11.3.1 Add a personal contactYou can add a personal contact from the Directories application.
A personal contact is a contact that you own. You can copy contact entries from the enterprise directoryas described in Copy a contact from the enterprise directory on page 47, or create new entries forcontacts not included in the enterprise directory as described here.
2.11: Directories 45
IPC Systems, Inc., Confidential and Proprietary Unigy 4.0IQ/MAX Sync User Guide
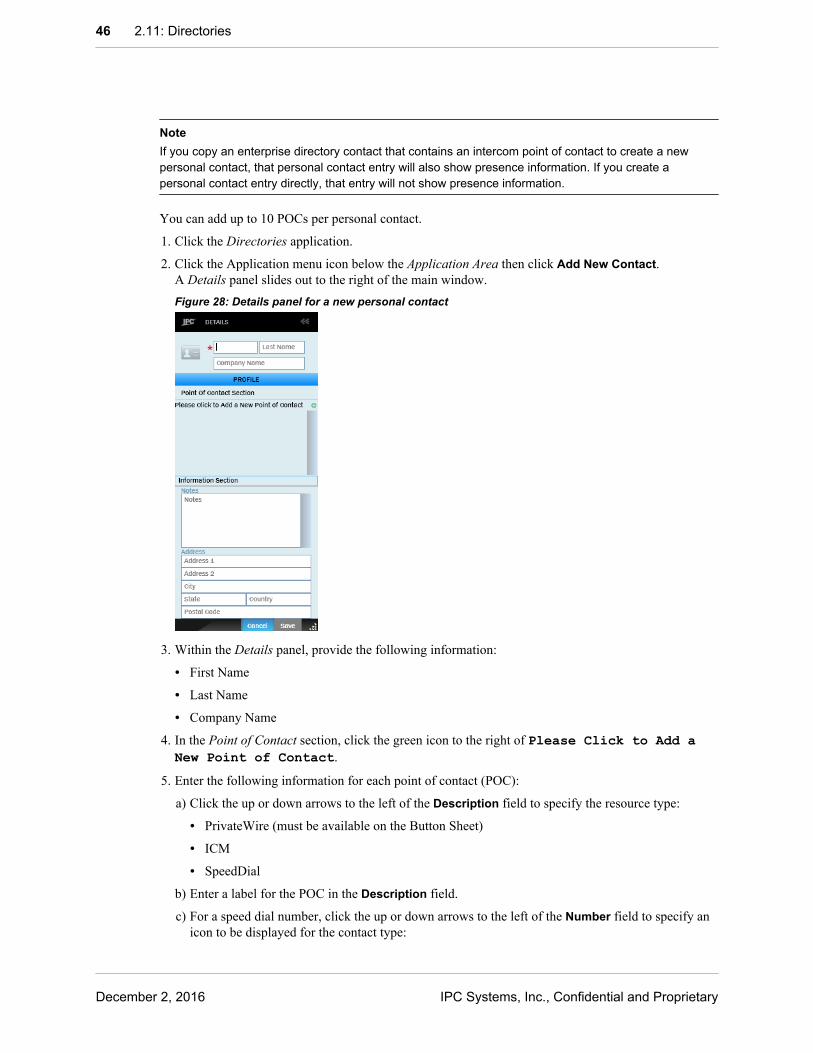
NoteIf you copy an enterprise directory contact that contains an intercom point of contact to create a newpersonal contact, that personal contact entry will also show presence information. If you create apersonal contact entry directly, that entry will not show presence information.
You can add up to 10 POCs per personal contact.
1. Click the Directories application.
2. Click the Application menu icon below the Application Area then click Add New Contact.A Details panel slides out to the right of the main window.Figure 28: Details panel for a new personal contact
3. Within the Details panel, provide the following information:
• First Name
• Last Name
• Company Name
4. In the Point of Contact section, click the green icon to the right of Please Click to Add aNew Point of Contact.
5. Enter the following information for each point of contact (POC):
a) Click the up or down arrows to the left of the Description field to specify the resource type:
• PrivateWire (must be available on the Button Sheet)
• ICM
• SpeedDial
b) Enter a label for the POC in the Description field.
c) For a speed dial number, click the up or down arrows to the left of the Number field to specify anicon to be displayed for the contact type:
46 2.11: Directories
December 2, 2016 IPC Systems, Inc., Confidential and Proprietary

• Mobile
• Work
• Home
• None (do not display an icon)
d) Enter the line number, extension, or phone number in the Number field.
NoteA speed dial number is not validated. Private wire and intercom numbers are validated after entry orwhen you click Save.If you enter an invalid number, an error message displays in the message area on the main windowand the POC number is discarded. Enter a valid number to continue.You may need to click in another field in order to enable the Save button.
6. To identify the preferred point of contact, click the radio button to the left of the POC entry.By default, the first POC is preferred.
7. To add another point of contact, click the green + button.
8. To delete a point of contact, click the red - button to the right of the corresponding POC.
9. In the Informational Section, enter information in the following fields:
• Notes
• Address:
• Address 1
• Address 2
• City
• State
• Country
• Postal Code
10. Click Save to save the entry in your personal directory.
NoteYou cannot save a contact with an empty POC entry. Delete any empty POC entries before saving.
2.11.3.2 Copy a contact from the enterprise directoryCopy a contact from the Unigy enterprise directory to create a new contact entry in your personaldirectory.
You can copy an enterprise directory entry from the Directories application.
NoteIf you copy an enterprise directory contact that contains an intercom point of contact to create a newpersonal contact, that personal contact entry will also show presence information. If you create apersonal contact entry directly, that entry will not show presence information.
2.11: Directories 47
IPC Systems, Inc., Confidential and Proprietary Unigy 4.0IQ/MAX Sync User Guide

Personal contacts can be edited or deleted. Any changes you make to a personal contact do not affect theenterprise directory contact from which it was copied, and a personal contact entry is not updated if thecorresponding enterprise directory contact is edited.
1. Right-click a directory entry and choose Add to Personal Directory.The message area indicates that the personal contact entry was created. The enterprise directorycontact entry is copied and creates a new contact entry in your personal directory. The personalcontact uses the same label; in the main directory list view the copy looks the same as the originalenterprise contact.
2. To differentiate the personal contact, you can edit it and change the name or company values.
2.11.3.3 Edit a personal contactEdit a personal contact through the Directories application.
You can make changes to a personal contact entry that appears in the main Directories applicationdisplay or in the personal directory folder view.
Note
• For personal contacts that were copied from the enterprise directory, any changes you make to thepersonal contact do not affect the enterprise directory contact from which it was copied.
• You cannot make any changes to contacts from the enterprise directory; the Edit button is notavailable for enterprise directory contacts.
1. Right-click a personal contact entry and choose View Contact Details.A Details panel slides out to the right of the main display.
2. Click Edit on the Details panel.3. Make any necessary changes to the information on the Details panel.
• To add a point of contact (POC), click the green + button. You can have up to 10 POCs for eachcontact entry.
• To delete a POC, click the red - button to the right of the corresponding POC.
• To edit a POC, change the value in the Number field.
NoteIf you enter an invalid POC number (except a Speed Dial number), the system displays themessage Invalid User AOR, disables the Save button, and retains the valid POC, but displaysthe invalid POC. You can click Cancel to close the Details panel, then verify the new number for thePOC and click Edit on the Details panel to enter it.
By default, the first POC is the preferred point of contact. You can change the preferred POC byclicking the radio button next to a POC.
4. Click Save to save the changed entry in your personal directory.You may need to click in another field to enable the Save button.
2.11.3.4 Delete a personal contactYou can delete personal contacts through the Directories application.
Your personal directory stores contact information that you have copied from the enterprise directory, aswell as contacts you have added. You can delete personal directory contacts through the mainDirectories application display or through your personal directory.
48 2.11: Directories
December 2, 2016 IPC Systems, Inc., Confidential and Proprietary

NoteYou cannot delete contacts from the enterprise directory. The Delete Contact option is not available forenterprise directory contacts.
1. (optional) To be sure you are working with a personal directory entry, you can display the personaldirectory:
a) On the Directories application display, click the Folder View icon in the application menu bar.The application displays a list of the available directories.
b) Click your personal directory.The application displays the contacts in your personal directory.
2. Right-click the contact entry to be deleted and choose Delete Contact from the shortcut menu.The application presents a message asking you to confirm the removal of the contact and allassociated points of contact.
3. Confirm that you want to remove the contact.
The contact is removed from your personal directory.
2.11.4 Add a preferred point of contact to the Button SheetFrom a contact entry, you can add a preferred point of contact button to your Button Sheet.
1. Open the Button Sheet and navigate to a page with an empty button.
2. Open the Directories application and navigate to the contact entry that contains the point of contact tobe added.
3. Right-click the directory contact entry and choose Add Preferred POC to Favorites from the contextmenu.All empty buttons are highlighted.
4. Click the button to which you want to add the POCThe button is populated with information from the contact entry and the message ButtonUpdated Successfully is displayed..
2.11.5 Manage local Outlook contactsWith Outlook integration, local Microsoft Outlook contacts are automatically available through theLocal Contacts folder in the Directories application. You can go through the IQ/MAX Sync interface toadd, edit, or delete existing local contacts in Outlook.
If Outlook is open when you log in, any contacts defined in Outlook are available as contacts in yourlocal directory. If Outlook is not open or configured on your computer, local contacts are not available.
Your local Outlook contacts are only available to you, and are not added to the Unigy enterprisedirectory.
1. In the Directories application, click the Folder View icon in the application menu bar.
2.11: Directories 49
IPC Systems, Inc., Confidential and Proprietary Unigy 4.0IQ/MAX Sync User Guide
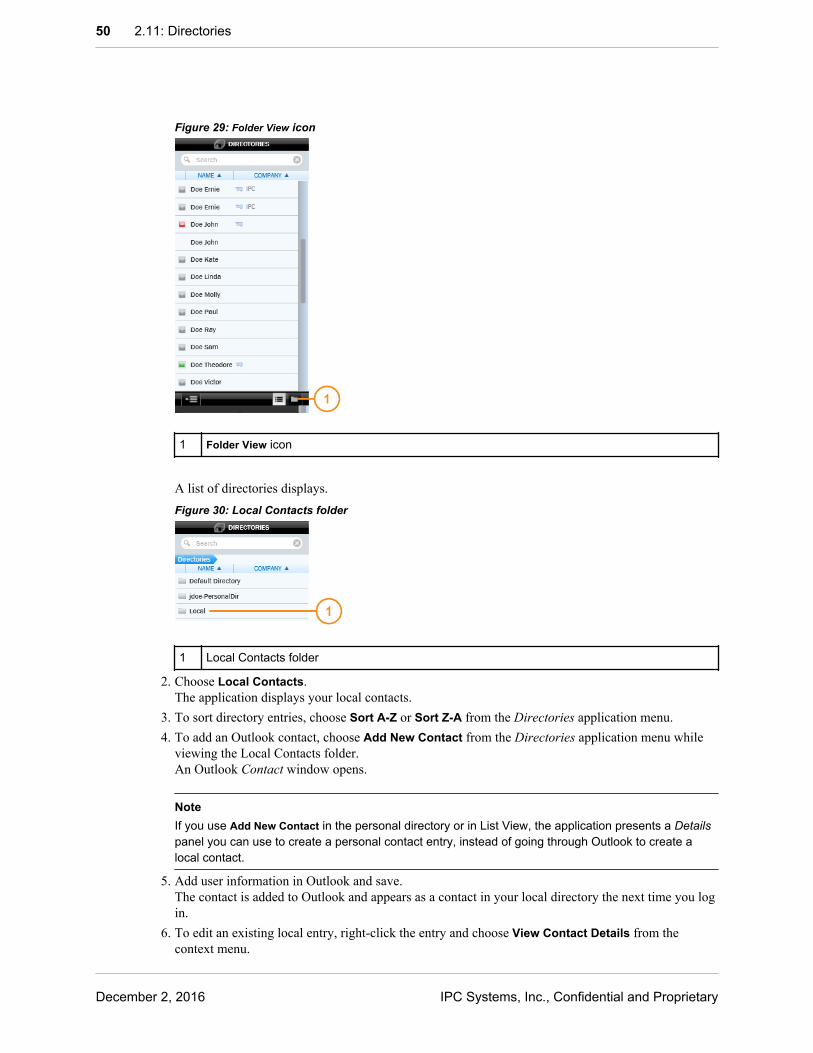
Figure 29: Folder View icon
1 Folder View icon
A list of directories displays.Figure 30: Local Contacts folder
1 Local Contacts folder
2. Choose Local Contacts.The application displays your local contacts.
3. To sort directory entries, choose Sort A-Z or Sort Z-A from the Directories application menu.4. To add an Outlook contact, choose Add New Contact from the Directories application menu while
viewing the Local Contacts folder.An Outlook Contact window opens.
NoteIf you use Add New Contact in the personal directory or in List View, the application presents a Detailspanel you can use to create a personal contact entry, instead of going through Outlook to create alocal contact.
5. Add user information in Outlook and save.The contact is added to Outlook and appears as a contact in your local directory the next time you login.
6. To edit an existing local entry, right-click the entry and choose View Contact Details from thecontext menu.
50 2.11: Directories
December 2, 2016 IPC Systems, Inc., Confidential and Proprietary
An Outlook Contact window opens. You can edit the information as needed.
7. To delete an existing local entry, right-click the entry and choose Delete Contact from the contextmenu.If you click Yes on the confirmation dialog, the entry is deleted from your Local Contacts folder andOutlook.
8. To call a local contact, right-click the entry and choose Call from the context menu.
2.12 Button Sheet and FavoritesIQ/MAX Sync displays button information on the Button Sheet and in the Favorites application.
Button Sheet: The Button Sheet contains programmed buttons that you can use to place calls or performfunctions. Buttons can be preprogrammed for you through Unigy administration; or if you havepermission, you can program buttons yourself. Access the Button Sheet by clicking the Button Sheeticon on the main window.
Favorites application: The Favorites application lists points of contact (POCs). The list is generatedautomatically from button definitions on your Button Sheet that include a valid point of contact,including speed dial buttons, private line buttons and direct intercom buttons. Dial tone lines (includingvoice mail resources) are not included. Access the Favorites application by clicking the Favoritesbutton on the main window. The Favorites application is displayed, but is not available for use withinPulse Enterprise.
NoteIf the description for a button is longer than the system can display within the boundaries of the button,the description is truncated and the remaining characters are represented by an asterisk (*); for example,the description Mary Smith - Office Phone will be displayed in Favorites as Mary Smith - Offic* (18characters) and in the Button Sheet as Mary Smi* (8 characters), or if the text for your buttons is set towrap to a second line, as Mary Smith - O* (14 characters). The number of characters displayed variesbased on the character width and whether the description includes spaces or special characters; forexample if you remove the spaces and hyphen from the description illustrated above, the descriptiondisplayed in Favorites is MarySmithOfficeP* (16 characters) and in the Button Sheet as MarySmit* (8characters), or with text wrapping enabled, MarySmithOfficePho* (18 characters).
2.12.1 Use the Button SheetWithin the Button Sheet, you can add, edit, and delete various types of buttons.
The IQ/MAX Sync Button Sheet mimics the appearance of a Button Module on a turret. It displays a listof buttons in a two-column view with a variable number of rows. IQ/MAX Sync supports up to 600buttons, shown in pages.
Each buttons page has three sections, separated by a blue divider:
• The top section shows buttons in numerical sequence for the current page of the Button Sheet (at leastsix rows). The number of rows shown on each page depends on the number of rows for fixed andfloating buttons.
• The second section is the fixed button area. Depending on the size of the fixed button area, the lastten buttons defined in the Button Sheet (591 through 600) are shown in the same location on thedisplay as you page through the Button Sheet. For more information, see Fixed button area on page54.
2.12: Button Sheet and Favorites 51
IPC Systems, Inc., Confidential and Proprietary Unigy 4.0IQ/MAX Sync User Guide

• The third section displays floating buttons. On turrets, floating buttons display status information forcalls associated with a button that is not currently displayed on a Button Module. The float area is notused by IQ/MAX Sync. For more information, see Floating button areas on page 56.
You can adjust the number of rows shown in each section by dragging the borders between the sections.No more than six rows can be used for fixed and floating buttons.
The following types of buttons are supported:
• Line
• Function
• Point of Contact
• Speed dial
• Direct ICM
• Broadcast
• Diversion
For more information, see Button programming on page 89.
You can arrange buttons to meet your needs by dragging and dropping a button to a new position on thesame page, copying and pasting buttons, or swapping a button with another button.
1. To open the Button Sheet, click the Button Sheet icon in the Main window Toolbar.Figure 31: Button Sheet icon
1 Button Sheet icon
The Button Sheet opens in a separate window on the desktop.
52 2.12: Button Sheet and Favorites
December 2, 2016 IPC Systems, Inc., Confidential and Proprietary
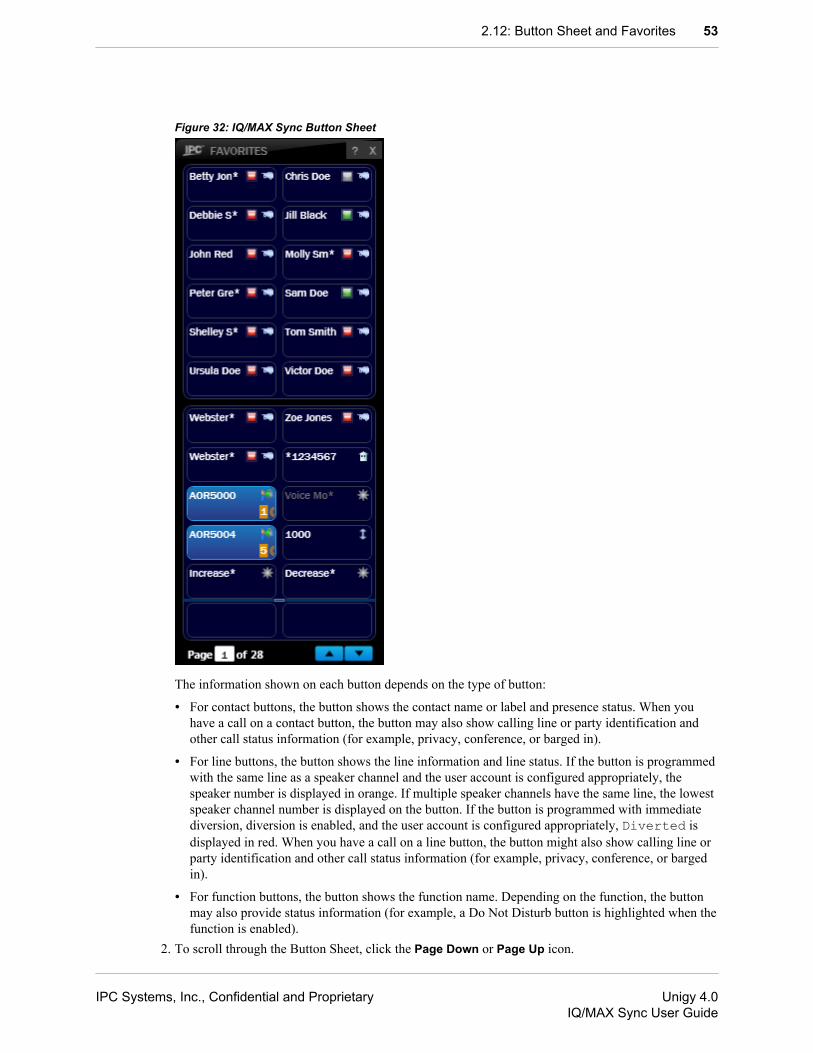
Figure 32: IQ/MAX Sync Button Sheet
The information shown on each button depends on the type of button:
• For contact buttons, the button shows the contact name or label and presence status. When youhave a call on a contact button, the button may also show calling line or party identification andother call status information (for example, privacy, conference, or barged in).
• For line buttons, the button shows the line information and line status. If the button is programmedwith the same line as a speaker channel and the user account is configured appropriately, thespeaker number is displayed in orange. If multiple speaker channels have the same line, the lowestspeaker channel number is displayed on the button. If the button is programmed with immediatediversion, diversion is enabled, and the user account is configured appropriately, Diverted isdisplayed in red. When you have a call on a line button, the button might also show calling line orparty identification and other call status information (for example, privacy, conference, or bargedin).
• For function buttons, the button shows the function name. Depending on the function, the buttonmay also provide status information (for example, a Do Not Disturb button is highlighted when thefunction is enabled).
2. To scroll through the Button Sheet, click the Page Down or Page Up icon.
2.12: Button Sheet and Favorites 53
IPC Systems, Inc., Confidential and Proprietary Unigy 4.0IQ/MAX Sync User Guide

A page number indicator on the bottom left of the window shows the currently displayed page withinthe Button Sheet.
3. To go to a specific page, enter the page number in the page number box at the bottom of the windowand press Enter.
4. To perform the action for a button, click the button.
The action performed depends on the button type:
• Seizes a line (line button).
• Performs a function (function button).
• Initiates a call (speed dial, Point of Contact, or broadcast button). – broadcast calls are supportedonly for IQ/MAX Sync
• Enables a feature (diversion button).
5. Right-click options for buttons include:
• Call (line, Direct Intercom, or POC button): Place a call.
• View Contact Details (for Point of Contact buttons): Display the contact profile.
• Copy Button: Copy an existing button definition and paste it to an empty position on any page ofthe Button Sheet.
• Move Button: Move an existing button assignment to another button.
• Remove Button: Remove an existing button assignment.
• Edit Button: Change settings for an existing button definition (not available for diversion buttons).
• Add Button (only for an empty button): Add a button definition.
• Paste Button (only for an empty button): Paste an existing button definition (selected by usingCopy Button or Move Button) into an empty position on any page of the Button Sheet.
6. To close the Button Sheet, click the ( X ) control in the upper right corner.
2.12.2 Fixed button areaThe fixed area of the Button Sheet displays buttons that appear in the same position on the display forevery page of the Button Sheet.
The fixed area is located in the second section of the Button Sheet, separated from the top and bottomsections by blue dividers.
54 2.12: Button Sheet and Favorites
December 2, 2016 IPC Systems, Inc., Confidential and Proprietary

Figure 33: Fixed and floating button areas
1 Fixed button area
2 Floating button area
The fixed button area remains in the same location on the display when you use the Page Up or PageDown buttons to scroll through the pages on your Button Sheet. For more information, see Paginationon page 56.
The number of rows in the fixed and float areas is initially configured in your user profile. You canadjust the fixed area size from zero to five rows (displaying up to ten buttons) by dragging the bluedividers above and below the fixed area. (If you only see one blue line, drag it up to set the combinedfixed and float area, then drag it down to adjust the fixed area. You will then see two blue lines.) Nomore than six rows can be used for the fixed and floating button areas.
The last ten buttons of the Button Sheet (591 through 600) are designated to display in the fixed buttonarea for every page of the Button Sheet. If you display fewer than ten buttons, the buttons closer to theend of the Button Sheet will be shown. For example, if you display only two buttons in the fixed area,buttons 599 and 600 will be shown.
NoteIf any buttons among the last ten are not shown in the fixed area, they are only available throughpagination.
Any type of button can be on the fixed area. The fixed area can have buttons programmed in your userprofile or, if you have privileges to program buttons, you can program them yourself. For moreinformation, see Button programming on page 89.
An existing button definition can be copied or moved to a button that displays in the fixed area.
2.12: Button Sheet and Favorites 55
IPC Systems, Inc., Confidential and Proprietary Unigy 4.0IQ/MAX Sync User Guide
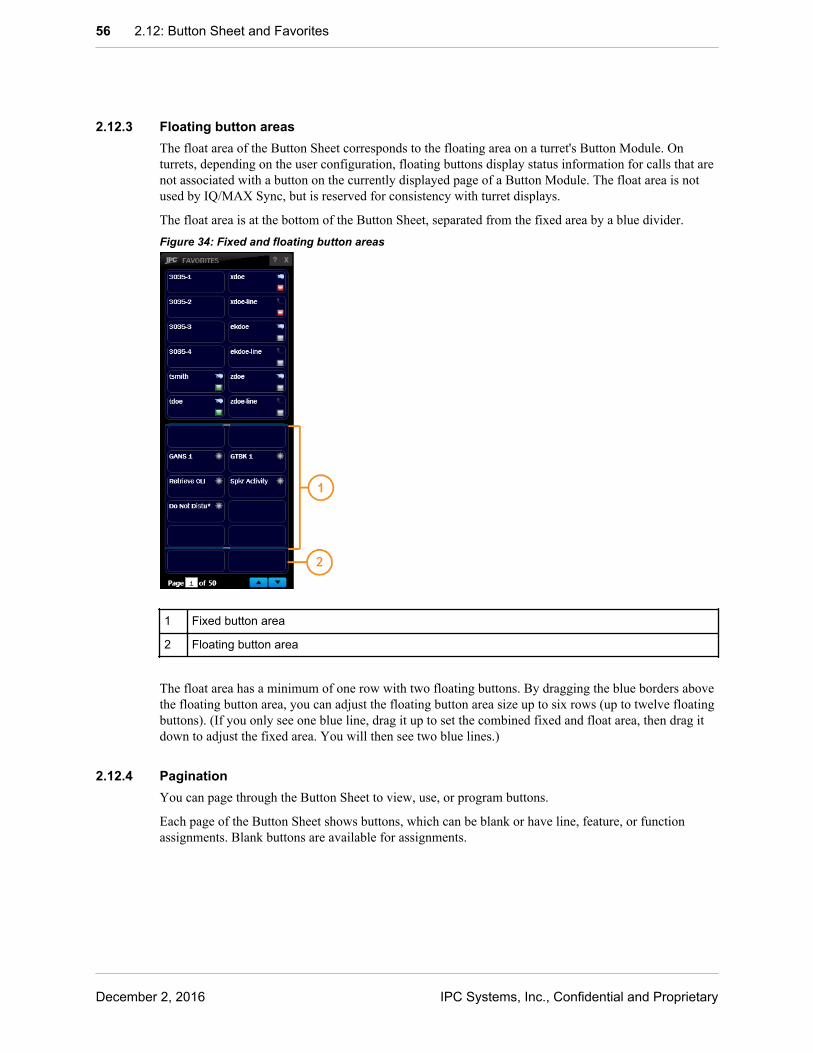
2.12.3 Floating button areasThe float area of the Button Sheet corresponds to the floating area on a turret's Button Module. Onturrets, depending on the user configuration, floating buttons display status information for calls that arenot associated with a button on the currently displayed page of a Button Module. The float area is notused by IQ/MAX Sync, but is reserved for consistency with turret displays.
The float area is at the bottom of the Button Sheet, separated from the fixed area by a blue divider.Figure 34: Fixed and floating button areas
1 Fixed button area
2 Floating button area
The float area has a minimum of one row with two floating buttons. By dragging the blue borders abovethe floating button area, you can adjust the floating button area size up to six rows (up to twelve floatingbuttons). (If you only see one blue line, drag it up to set the combined fixed and float area, then drag itdown to adjust the fixed area. You will then see two blue lines.)
2.12.4 PaginationYou can page through the Button Sheet to view, use, or program buttons.
Each page of the Button Sheet shows buttons, which can be blank or have line, feature, or functionassignments. Blank buttons are available for assignments.
56 2.12: Button Sheet and Favorites
December 2, 2016 IPC Systems, Inc., Confidential and Proprietary
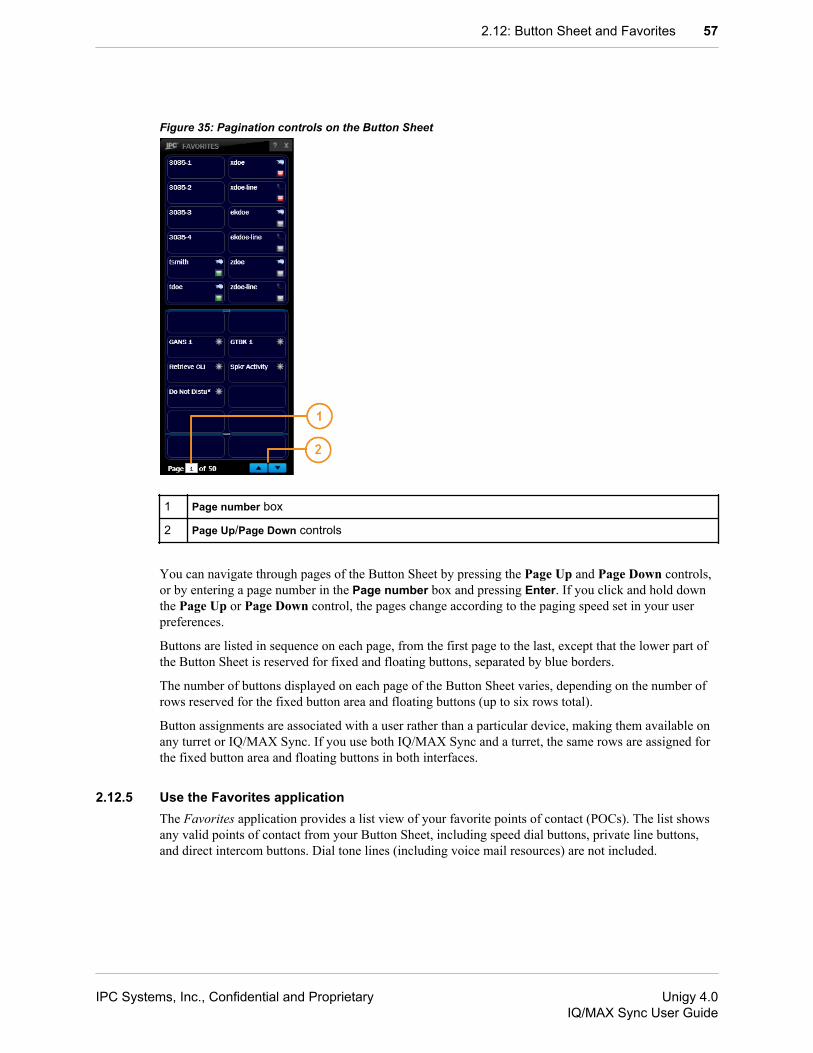
Figure 35: Pagination controls on the Button Sheet
1 Page number box
2 Page Up/Page Down controls
You can navigate through pages of the Button Sheet by pressing the Page Up and Page Down controls,or by entering a page number in the Page number box and pressing Enter. If you click and hold downthe Page Up or Page Down control, the pages change according to the paging speed set in your userpreferences.
Buttons are listed in sequence on each page, from the first page to the last, except that the lower part ofthe Button Sheet is reserved for fixed and floating buttons, separated by blue borders.
The number of buttons displayed on each page of the Button Sheet varies, depending on the number ofrows reserved for the fixed button area and floating buttons (up to six rows total).
Button assignments are associated with a user rather than a particular device, making them available onany turret or IQ/MAX Sync. If you use both IQ/MAX Sync and a turret, the same rows are assigned forthe fixed button area and floating buttons in both interfaces.
2.12.5 Use the Favorites applicationThe Favorites application provides a list view of your favorite points of contact (POCs). The list showsany valid points of contact from your Button Sheet, including speed dial buttons, private line buttons,and direct intercom buttons. Dial tone lines (including voice mail resources) are not included.
2.12: Button Sheet and Favorites 57
IPC Systems, Inc., Confidential and Proprietary Unigy 4.0IQ/MAX Sync User Guide

Figure 36: Favorites application
The Favorites application enables you to:
• View favorite points of contact
• Search by contact name
• Sort the list of favorites (does not affect the sequence on the Button Sheet)
• View the contact details
• Place calls to a favorite
You can add, edit, or remove favorites through the Button Sheet. For more details see Use the ButtonSheet on page 51. You can also add a preferred point of contact to Favorites by choosing Add PreferredPOC to Favorites from a Directories contact entry.
1. To open the Favorites application, click the Favorites button on the main window.The Favorites application is displayed. The application displays favorite contact entries in a summaryformat.
If there are more entries than fit on the application display, you can scroll up and down to viewadditional entries.
2. To search favorite entries, type characters in the search box.
58 2.12: Button Sheet and Favorites
December 2, 2016 IPC Systems, Inc., Confidential and Proprietary
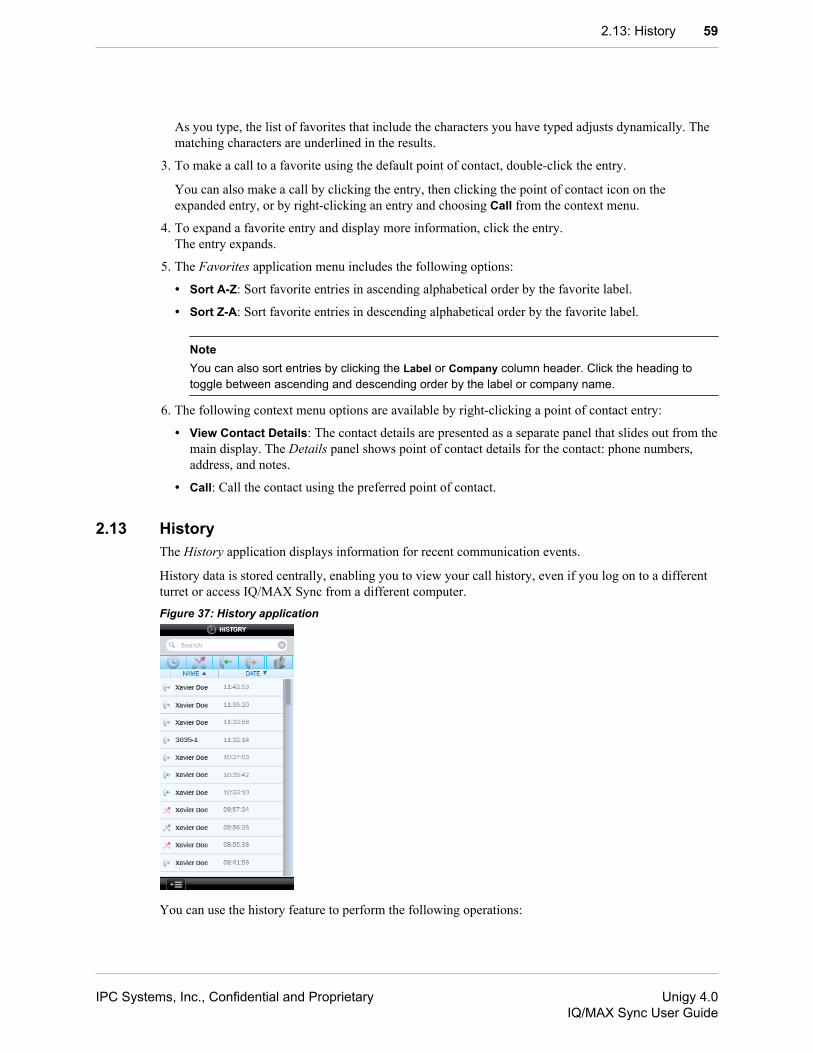
As you type, the list of favorites that include the characters you have typed adjusts dynamically. Thematching characters are underlined in the results.
3. To make a call to a favorite using the default point of contact, double-click the entry.
You can also make a call by clicking the entry, then clicking the point of contact icon on theexpanded entry, or by right-clicking an entry and choosing Call from the context menu.
4. To expand a favorite entry and display more information, click the entry.The entry expands.
5. The Favorites application menu includes the following options:
• Sort A-Z: Sort favorite entries in ascending alphabetical order by the favorite label.
• Sort Z-A: Sort favorite entries in descending alphabetical order by the favorite label.
NoteYou can also sort entries by clicking the Label or Company column header. Click the heading totoggle between ascending and descending order by the label or company name.
6. The following context menu options are available by right-clicking a point of contact entry:
• View Contact Details: The contact details are presented as a separate panel that slides out from themain display. The Details panel shows point of contact details for the contact: phone numbers,address, and notes.
• Call: Call the contact using the preferred point of contact.
2.13 HistoryThe History application displays information for recent communication events.
History data is stored centrally, enabling you to view your call history, even if you log on to a differentturret or access IQ/MAX Sync from a different computer.Figure 37: History application
You can use the history feature to perform the following operations:
2.13: History 59
IPC Systems, Inc., Confidential and Proprietary Unigy 4.0IQ/MAX Sync User Guide
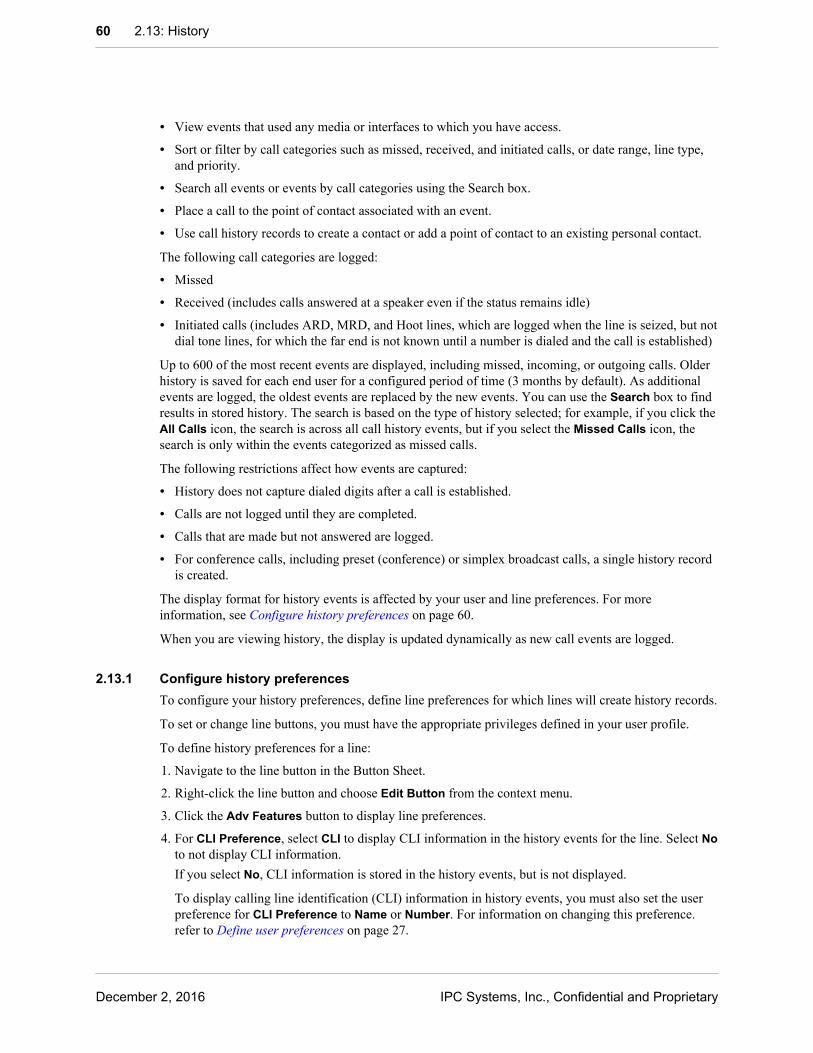
• View events that used any media or interfaces to which you have access.
• Sort or filter by call categories such as missed, received, and initiated calls, or date range, line type,and priority.
• Search all events or events by call categories using the Search box.
• Place a call to the point of contact associated with an event.
• Use call history records to create a contact or add a point of contact to an existing personal contact.
The following call categories are logged:
• Missed
• Received (includes calls answered at a speaker even if the status remains idle)
• Initiated calls (includes ARD, MRD, and Hoot lines, which are logged when the line is seized, but notdial tone lines, for which the far end is not known until a number is dialed and the call is established)
Up to 600 of the most recent events are displayed, including missed, incoming, or outgoing calls. Olderhistory is saved for each end user for a configured period of time (3 months by default). As additionalevents are logged, the oldest events are replaced by the new events. You can use the Search box to findresults in stored history. The search is based on the type of history selected; for example, if you click theAll Calls icon, the search is across all call history events, but if you select the Missed Calls icon, thesearch is only within the events categorized as missed calls.
The following restrictions affect how events are captured:
• History does not capture dialed digits after a call is established.
• Calls are not logged until they are completed.
• Calls that are made but not answered are logged.
• For conference calls, including preset (conference) or simplex broadcast calls, a single history recordis created.
The display format for history events is affected by your user and line preferences. For moreinformation, see Configure history preferences on page 60.
When you are viewing history, the display is updated dynamically as new call events are logged.
2.13.1 Configure history preferencesTo configure your history preferences, define line preferences for which lines will create history records.
To set or change line buttons, you must have the appropriate privileges defined in your user profile.
To define history preferences for a line:
1. Navigate to the line button in the Button Sheet.
2. Right-click the line button and choose Edit Button from the context menu.
3. Click the Adv Features button to display line preferences.
4. For CLI Preference, select CLI to display CLI information in the history events for the line. Select Noto not display CLI information.If you select No, CLI information is stored in the history events, but is not displayed.
To display calling line identification (CLI) information in history events, you must also set the userpreference for CLI Preference to Name or Number. For information on changing this preference.refer to Define user preferences on page 27.
60 2.13: History
December 2, 2016 IPC Systems, Inc., Confidential and Proprietary

5. For History Preference, select Yes to display the line in the history events or No to not display theline in history.
6. Click Save to save the line preference settings.
2.13.2 Use the History applicationYou can view communications and event history information through the History application.
1. To view history information, click the History button in the main window.The History application displays history information in a summary format. The top row of the Historydisplay shows icons for all calls, missed calls, incoming calls, and initiated calls.Figure 38: History application
Each entry displays an icon showing the type of communication, the contact name or number, and thetime (for calls received the same day) or the date.
By default, missed calls are displayed, with the most recent entries at the top of the list. You can sortentries by clicking the Name or Date column header.
You can scroll up or down to see additional entries.
2. To view calls by category, click the corresponding icon at the top of the History display.Figure 39: Call categories
1 All Calls: Displays up to 200 of your most recent call events. Older events can be displayed byusing Search.
2 Missed Calls: Displays missed calls. This is the default view.
2.13: History 61
IPC Systems, Inc., Confidential and Proprietary Unigy 4.0IQ/MAX Sync User Guide
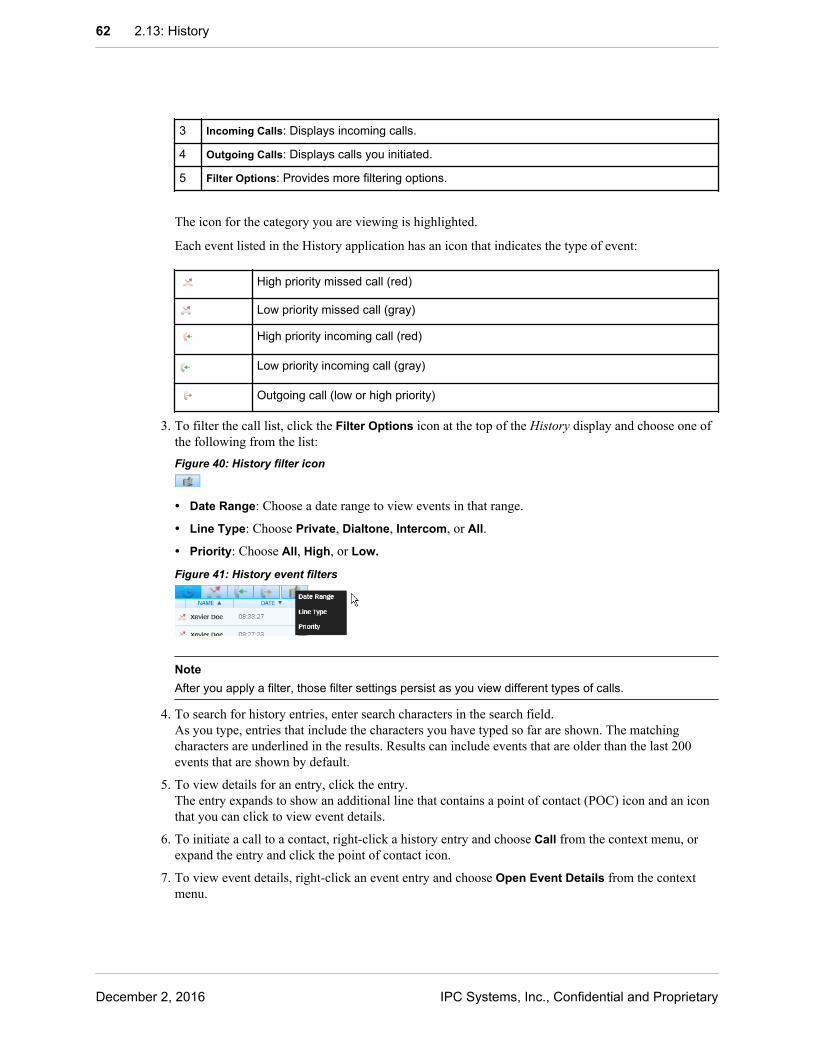
3 Incoming Calls: Displays incoming calls.
4 Outgoing Calls: Displays calls you initiated.
5 Filter Options: Provides more filtering options.
The icon for the category you are viewing is highlighted.
Each event listed in the History application has an icon that indicates the type of event:
High priority missed call (red)
Low priority missed call (gray)
High priority incoming call (red)
Low priority incoming call (gray)
Outgoing call (low or high priority)
3. To filter the call list, click the Filter Options icon at the top of the History display and choose one ofthe following from the list:Figure 40: History filter icon
• Date Range: Choose a date range to view events in that range.
• Line Type: Choose Private, Dialtone, Intercom, or All.
• Priority: Choose All, High, or Low.
Figure 41: History event filters
NoteAfter you apply a filter, those filter settings persist as you view different types of calls.
4. To search for history entries, enter search characters in the search field.As you type, entries that include the characters you have typed so far are shown. The matchingcharacters are underlined in the results. Results can include events that are older than the last 200events that are shown by default.
5. To view details for an entry, click the entry.The entry expands to show an additional line that contains a point of contact (POC) icon and an iconthat you can click to view event details.
6. To initiate a call to a contact, right-click a history entry and choose Call from the context menu, orexpand the entry and click the point of contact icon.
7. To view event details, right-click an event entry and choose Open Event Details from the contextmenu.
62 2.13: History
December 2, 2016 IPC Systems, Inc., Confidential and Proprietary

Figure 42: History Details panel
8. To create a new personal contact entry from an event record:
a) Click Create New Contact.The application presents a Details panel on which you can enter or edit contact information.Figure 43: Event Details panel
1 POC description field
2.13: History 63
IPC Systems, Inc., Confidential and Proprietary Unigy 4.0IQ/MAX Sync User Guide

NoteBy default, the first and last name for the contact associated with the history event are both includedin the POC description field (not in the First Name and Last Name fields). You can change thedescription and enter the first and last names into the appropriate name fields for the personalcontact; you must enter at least a first name for the contact.
b) Make any desired changes on the Details panel, then click Save.
9. To add the contact method as a new point of contact for an existing personal directory entry:
a) From the Details panel for the call event, click Add to Existing Contact.The application displays a list of personal contacts you can select in the main window.Figure 44: Add History event point of contact to an existing contact
b) Click a personal contact entry.
c) To add the POC from the history event as the preferred POC for the contact, click Yes on theconfirmation dialog. Click No to add the POC as an additional POC.
The POC for the history event is added as a POC for the selected personal contact.
NoteTo be added to the Number field, the POC number must be shown in the CLI information for the historyevent.
10. The following options are available on the History application menu:
• Sort A-Z
• Sort Z-A
2.13.3 View call history event detailsYou can view detailed communications event history through the History application.
1. To view history information, click the History button on the main window.The History application displays communications history information in a summary format. Eachentry shows an icon showing the type of communication, the contact name or calling line identifier,and the date or time.
The top row of the History application display shows a clock icon (click to view all calls), and iconsfor missed calls, incoming calls, and outgoing calls. By default, missed calls are shown when youfirst access the History application.
2. To redial a contact from a history event, right-click the event record and choose Call from the contextmenu, or expand the entry and click the point of contact icon.
3. To view calls by category, click the corresponding icon at the top of the History display.
64 2.13: History
December 2, 2016 IPC Systems, Inc., Confidential and Proprietary
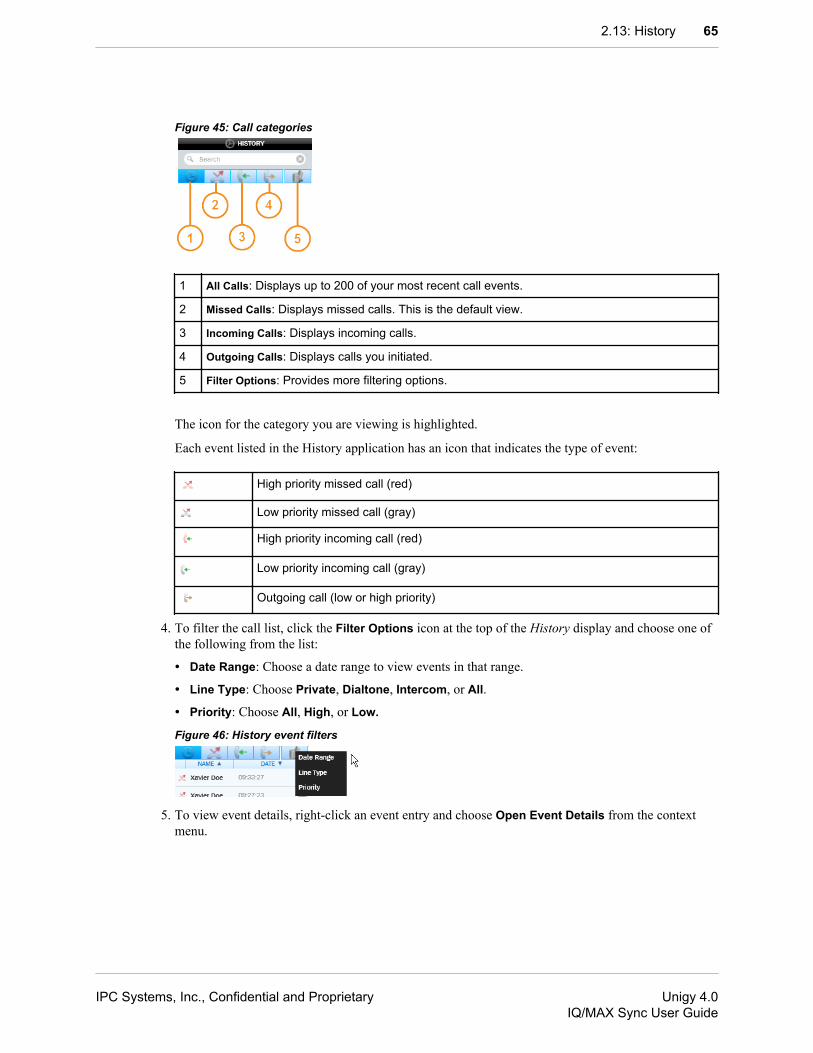
Figure 45: Call categories
1 All Calls: Displays up to 200 of your most recent call events.
2 Missed Calls: Displays missed calls. This is the default view.
3 Incoming Calls: Displays incoming calls.
4 Outgoing Calls: Displays calls you initiated.
5 Filter Options: Provides more filtering options.
The icon for the category you are viewing is highlighted.
Each event listed in the History application has an icon that indicates the type of event:
High priority missed call (red)
Low priority missed call (gray)
High priority incoming call (red)
Low priority incoming call (gray)
Outgoing call (low or high priority)
4. To filter the call list, click the Filter Options icon at the top of the History display and choose one ofthe following from the list:
• Date Range: Choose a date range to view events in that range.
• Line Type: Choose Private, Dialtone, Intercom, or All.
• Priority: Choose All, High, or Low.
Figure 46: History event filters
5. To view event details, right-click an event entry and choose Open Event Details from the contextmenu.
2.13: History 65
IPC Systems, Inc., Confidential and Proprietary Unigy 4.0IQ/MAX Sync User Guide
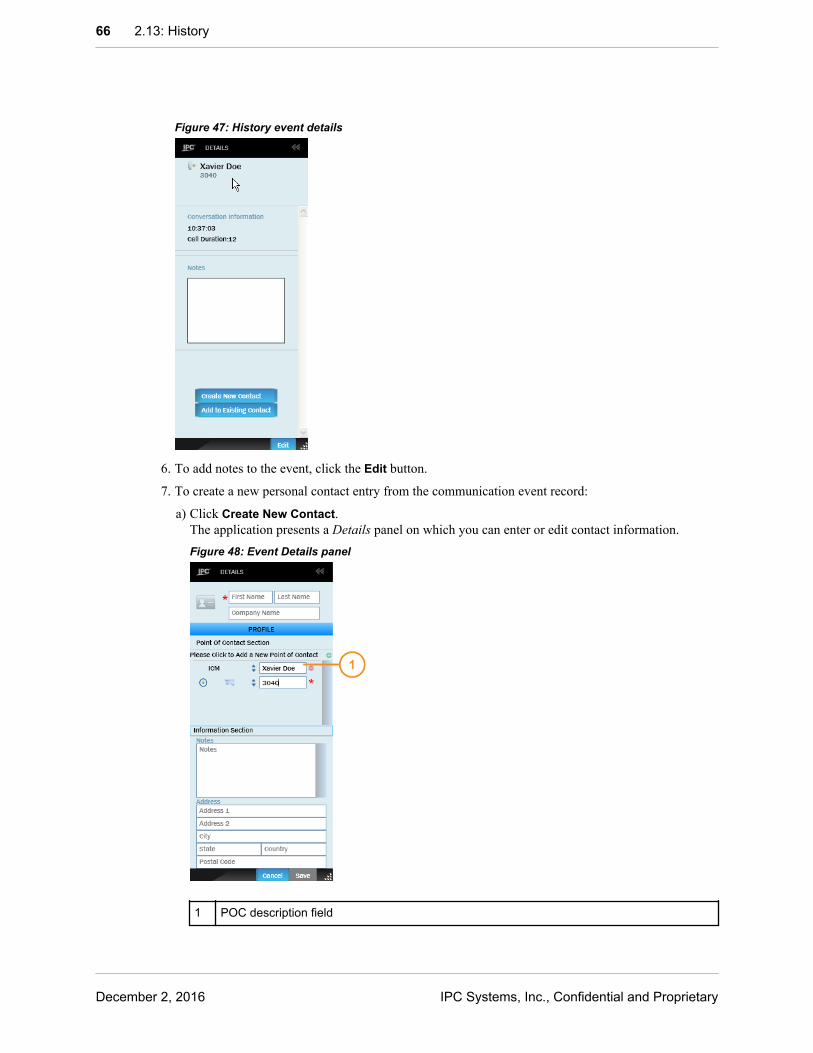
Figure 47: History event details
6. To add notes to the event, click the Edit button.
7. To create a new personal contact entry from the communication event record:
a) Click Create New Contact.The application presents a Details panel on which you can enter or edit contact information.Figure 48: Event Details panel
1 POC description field
66 2.13: History
December 2, 2016 IPC Systems, Inc., Confidential and Proprietary
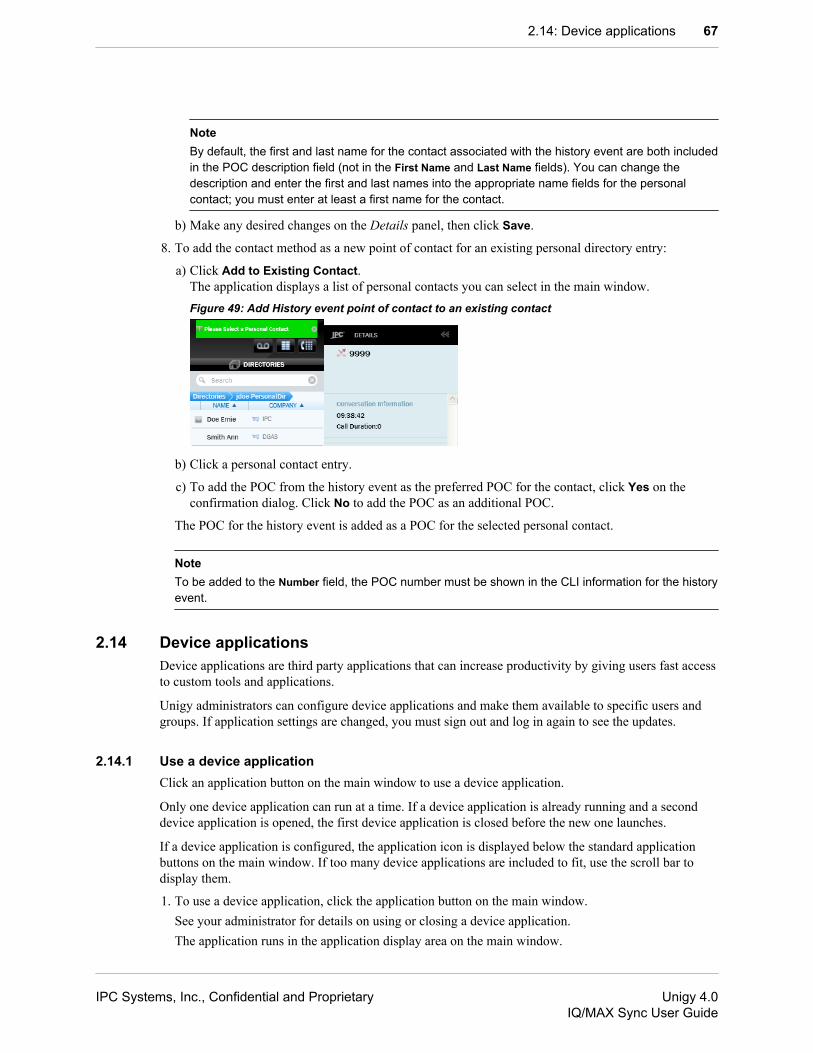
NoteBy default, the first and last name for the contact associated with the history event are both includedin the POC description field (not in the First Name and Last Name fields). You can change thedescription and enter the first and last names into the appropriate name fields for the personalcontact; you must enter at least a first name for the contact.
b) Make any desired changes on the Details panel, then click Save.
8. To add the contact method as a new point of contact for an existing personal directory entry:
a) Click Add to Existing Contact.The application displays a list of personal contacts you can select in the main window.Figure 49: Add History event point of contact to an existing contact
b) Click a personal contact entry.
c) To add the POC from the history event as the preferred POC for the contact, click Yes on theconfirmation dialog. Click No to add the POC as an additional POC.
The POC for the history event is added as a POC for the selected personal contact.
NoteTo be added to the Number field, the POC number must be shown in the CLI information for the historyevent.
2.14 Device applicationsDevice applications are third party applications that can increase productivity by giving users fast accessto custom tools and applications.
Unigy administrators can configure device applications and make them available to specific users andgroups. If application settings are changed, you must sign out and log in again to see the updates.
2.14.1 Use a device applicationClick an application button on the main window to use a device application.
Only one device application can run at a time. If a device application is already running and a seconddevice application is opened, the first device application is closed before the new one launches.
If a device application is configured, the application icon is displayed below the standard applicationbuttons on the main window. If too many device applications are included to fit, use the scroll bar todisplay them.
1. To use a device application, click the application button on the main window.See your administrator for details on using or closing a device application.The application runs in the application display area on the main window.
2.14: Device applications 67
IPC Systems, Inc., Confidential and Proprietary Unigy 4.0IQ/MAX Sync User Guide

2. To change the size of the application display area, click the top of the application menu bar and dragthe border up or down.When you sign out, the device application closes.
2.15 Communication Barrier status messagesFor Unigy enterprises that are integrated with the IPC Compliance Policy Engine, communicationbarrier policies are enforced.
If a Unigy end user attempts a call or action that is restricted by a compliance policy, then an errormessage is displayed on the end user’s CDI.
For example, if the end user attempts to call or transfer a call to a party that they are barred fromcommunicating with, Error Party Barred will be displayed in the CDI’s status area. Also, if theend user attempts to seize a barred line (directly or indirectly by joining a call that involves a barredline), then Error Line Barred will be displayed on the CDI.
68 2.15: Communication Barrier status messages
December 2, 2016 IPC Systems, Inc., Confidential and Proprietary

3 Manage calls with IQ/MAX Sync and aturret
You can use IQ/MAX Sync to access and manage favorites, use directories, view history, and initiatecalls. Once you have initiated or answered a call, all activity for the call is managed through the turret.
To use IQ/MAX Sync, you must log in to the turret first, then log in to IQ/MAX Sync.
Call answering
When using IQ/MAX Sync, incoming calls appear on the associated turret. You can answer a call on theturret. No call status information is displayed in IQ/MAX Sync.
Active call options
You can initiate a call from IQ/MAX Sync, but the call is established on the turret, and all remainingmanagement of the call is through the turret, including the following call options:
• Moving a call between the handset and hands-free mode
• Transferring
• Placing on hold
• Enabling privacy
• Adding lines to create a conference call
• Using speed dial buttons (after a call is established, any further calls must be made from the turret)
• Adjusting call volume
• Muting
• Releasing the call
Programmed button functions
You can perform some other calling functions by using function buttons on your Button Sheet:
• Initiating conference calls to a programmed list of lines
• Initiating broadcast or group intercom calls
• Enabling diversion
Initiate calls
1. Initiate a call using any of the following methods:
• Click a line, speed dial, point of contact, or broadcast button on the Button Sheet.
• Click the Dial Pad icon in the Toolbar on the main window, enter the number on the Dial Pad, andclick the Call button or press Enter. (The application performs an implicit hunt if you did notselect a line.)
To make an intercom call, select ICM from the drop-down list at the top of the Dial Pad, then dialthe extension number. You can also initiate group intercom calls through the drop-down list.
If you do not select the ICM option when dialing an extension, the call is established as an internalline call.
69
IPC Systems, Inc., Confidential and Proprietary Unigy 4.0IQ/MAX Sync User Guide
• Double-click an entry on the Favorites application.
• Right-click an entry on the History application and choose Call from the context menu, or expandthe entry and click the point of contact icon.
• To call a contact using the preferred point of contact, do one of the following:
• Double-click a directory contact entry.
• Right-click a contact entry and choose Call.
• Click the contact entry to expand it and click the preferred point of contact icon.
• To call a contact using a different point of contact, right-click the contact entry, choose ViewContact Details, and click the alternate point of contact on the contact profile.
• If you have a license for the QuickDial feature, highlight a number in any Microsoft Windowsapplication that can access the Clipboard (such as Notepad, Word, Excel, Outlook, or an Outlookcontact) and press the QuickDial keyboard shortcut (by default, Ctrl+D).
You can join (barge in to) an active call on a line if the call does not have privacy enabled.The call is established on the turret, and all call status information is shown on the turret.
2. Use the turret interface to continue the call.
3.1 Use QuickDialQuickDial enables users to dial a number selected in Microsoft Windows applications (such as Notepad,Word, Excel, or Outlook) and other applications that can access the Clipboard.
QuickDial is a licensed feature that can be used with IQ/MAX Sync. Licenses are assigned by Unigyadministrators.
To use the QuickDial feature, select a number in a document, then use the preconfigured keyboardshortcut to dial the number. The default keyboard shortcut is Ctrl+D, but your Unigy administrationmight have defined a different key combination. For more information, see Keyboard shortcuts on page19.
When a number includes alphabetic or special characters, the application strips these characters from thephone number selected then dials the call with the numeric digits. For example, if the value1800888our# is selected, the application removes our# from the value then attempts to dial thenumber 1800888. The same behavior is exhibited regardless of the location of the invalid characters.For example, the values our#1800888 and 1800our#888 also result in the application dialing thenumber 1800888. If the number is not valid, the application presents an error message, highlighted inred, in the message area at the top of the Main window.
NoteThe QuickDial feature refers to the currently active document to find the number. If multiple applicationsare open, use the QuickDial feature immediately after highlighting the number, and without navigating toany other application.
1. Select a number or contact to dial:
• Highlight a number in a document.
• To call an Microsoft Outlook 2007 contact, select the contact in Outlook. The Outlook add-inshows the contact number; clicking the contact initiates the call.
A Microsoft Outlook call is made using the first of the defined phone numbers for the contact.
70 3.1: Use QuickDial
December 2, 2016 IPC Systems, Inc., Confidential and Proprietary

The Call display at the top of the Outlook Contacts window shows the number that will be called.Figure 50: Outlook Contacts window
1 Selected Outlook contact
2 Number to be dialed
To call using a different contact phone number, open the Outlook contact record and highlight thenumber.
2. Press the QuickDial keyboard shortcut (by default, Ctrl+D).The highlighted number is dialed.Figure 51: Call initiation display
If the number format is not valid, the message area at the top of the Main window presents an errormessage, highlighted in red.
3.2 Answer a callTo answer an incoming call, select the call on the turret.
When using IQ/MAX Sync, incoming calls appear on the associated turret. No call status information isdisplayed in IQ/MAX Sync.
1. To answer the call, press the float or line button associated with the call on the turret.The call is established on the turret. All call controls and call status appear on the turret.
2. To end the call, press the Release button on the turret.
3.3 Audible alertsAudible alerts are used for communication activities that require the user's attention.
CDIs provide the following types of audible alerts:
• Alerts for incoming calls:
• Inbound PSTN ring tone
• Inbound private wire (PW) ring tone
3.2: Answer a call 71
IPC Systems, Inc., Confidential and Proprietary Unigy 4.0IQ/MAX Sync User Guide
• Inbound intercom ring tone
• Intercom connect splash tone
• Blocking tone: The user is trying to use Push-to-Talk on a line that is unavailable.
• Intrusion tone: A new user has barged in to an established call.
• Record warning tone: Indicates call is being recorded.
Audible alerts are configurable. Users can turn them on or off, and configure other ring tone preferencessuch as volume and pitch. The ring tone preferences set for each user are stored in the user’s profile, andapply to any turret they are using. Users can also configure different ring tones for each line button.
In addition to alerts, Unigy provides audible indications of call progress, such as dial tone, busy signals,ringing, and audible cues that a call is established.
3.3.1 Record warning toneA record warning tone (RWT) notifies parties in a call when the session is being recorded.
The record warning tone is played to all handset users on the call; it is not played on speaker channels.The record warning tone is not played for Alliance lines, intercom calls, or Open Connexion calls.Device-generated warning tones for handset or speaker calls are not present in digital recordings (IP andE1).
There is an inbound and an outbound record warning tone:
• Inbound tone - Played locally by the turret.
• Outbound tone - Played by the turret during point-to-point calls. During multi-party calls, the MediaManager plays the outbound tone.
The record warning tone is optional. It is enabled through system administration. The record warningtone is enabled for the zone and the end user. It must be enabled for the zone in order for the end user’ssettings to apply. Tone generation also depends on specific lines and intercom calls being configured asrecorded or not, record on demand settings, and the audio device being included in the assignedrecording mix profile.
Assuming the record warning tone is enabled for the zone and subject to the configuration of lines,intercom, record on demand settings, and the recording mix profile:
• The end user record warning tone setting controls the inbound record warning tone. It has no bearingon the outbound record warning tone.
• The outbound record warning tone is controlled by the zone setting.
When a call transitions between various call states (such as adding parties, transfers, transition betweenhandset and HFM), the record warning tone will restart. In these cases, you might hear the RWT morefrequently than expected.
NoteIf a user with no recording profile barges into a source line, then no inbound RWT is played. But if a userbarges into a destination line, the Media Manager plays the RWT for the user because the user is part ofthe destination line. The source of the tone (inbound or outbound) is not identifiable to the user.
3.4 HuntThe hunt feature enables access to available line appearances for a call without choosing a specific line.
72 3.4: Hunt
December 2, 2016 IPC Systems, Inc., Confidential and Proprietary
If hunt is enabled and a call is initiated using a hunt button or the dial pad without choosing a line, animplicit hunt is performed automatically to search for and seize an available line appearance. Dependingon the digits dialed, the system locates a dial tone line or a Unigy extension. Hunt searches within a huntgroup, or if access is not available to a hunt group, within a users's personal extension appearances. Ahunt group is a predefined set of dial tone line appearances that are available to the hunt feature.
If the selected line appearance is shown on multiple line buttons, the button with the lowest number isgreen to indicate that the line appearance is being used, while other buttons that refer to the lineappearance are blue, indicating that the line is busy. If no line is available, an error message is displayed.
The hunt function can be included in the definition for a speed dial button.
When you seize a line then press a hunt with speed dial, the CDI performs the speed dial on the seizedline. It does not release the seized line, then hunt, then perform the speed dial.
The implicit hunt capability is enabled or disabled in each user's profile settings. If implicit hunt is notenabled, a line appearance must be chosen before placing a call.
3.5 Active call options3.5.1 Privacy
The privacy feature prevents other users from intruding during a call.
This feature keeps conversation private during the call and while a call is on hold.
NotePoint-to-point intercom calls are always private.
Key features include:
• Privacy can be turned on or off before accessing a line, or during a point-to-point line call.
• Privacy is only valid for two-party handset calls.
• Privacy turns off after a PBX transfer is cancelled.
Privacy cannot be used for:
• Internal transfer
• Preset broadcasts
• Simplex broadcasts
• Open Connexions
• Speaker-line calls
• A line that is being used by more than two parties
Momentary privacyMomentary privacy turns on privacy when the first user answers a call. Momentary privacy is invokedwhether a call has privacy enabled or not. The default duration is 1 second, configurable through theUMS.
This feature is useful during peak periods, when there is the potential for two or more users to answerthe same ringing line. If each user assumes they have barged into an active conversation, they could allrelease control of the call, thus abandoning the call.
3.5: Active call options 73
IPC Systems, Inc., Confidential and Proprietary Unigy 4.0IQ/MAX Sync User Guide

To compensate for these types of situations, momentary privacy is turned on for a short time when thefirst user answers the call. The length of this momentary privacy period is configurable, and the privacyexpires after the configured period of time. When momentary privacy expires, the call can be bargedinto normally.
When momentary privacy is active:
• The privacy icon does not indicate that privacy is enabled.
• Calls put on hold do not go on exclusive hold.
• Momentary privacy works regardless of how privacy is set.
• The privacy feature is unaffected by momentary privacy, such that privacy can be enabled at anytime.
3.5.2 HoldThe hold feature enables a user to suspend and retrieve a call on a dial tone or private line. A user canalso place calls on hold and have them retrieved by other Unigy users.
When you place a call on hold, the call displays on a dark green background on the associated turret linebutton, and the line button displays a flashing Hold indicator. If a hold duration bar is enabled in youruser profile and your user preferences, a duration bar shows how long the call has been on hold. Forcalls placed on hold by other Unigy users, the call displays on a dark blue background on the associatedturret line button, and the line button displays a flashing Hold indicator.
If privacy is enabled on a call and the call is put on hold, only the user who put it on hold can retrievethe call. For more information, see Exclusive hold on page 74.
Note
• Intercom calls cannot be placed on hold.
• Open Connexion lines cannot be placed on hold.
• A call cannot be put on hold if any Unigy user moves the line to an active speaker, because thespeaker keeps the line active.
• If a call is put on hold by a distant user external to the Unigy system, there is no indication of the holdin Unigy. Only the distant user can retrieve the call.
• If another Unigy user barges in on a line, the line cannot be put on hold.
3.5.2.1 Exclusive holdIf privacy is enabled on a call, placing the call on hold puts it on exclusive hold.
Only the user who places a call on exclusive hold can retrieve it. If the call was placed on exclusive holdfrom a turret with multiple handsets, the user at that turret can retrieve the call using a different handset.
If other users try to pick up the held call, they receive a message indicating that the call is private and arenot allowed to access the line.
A line on exclusive hold appears as a call on hold (dark green), with a privacy icon, for the user whoplaced it on exclusive hold. To other users, the line displays a busy indication (blue).
74 3.5: Active call options
December 2, 2016 IPC Systems, Inc., Confidential and Proprietary

Note
• When a call is retrieved from exclusive hold, privacy is not enabled by default; privacy must be re-enabled either before or after retrieving the call.
• Privacy and exclusive hold are not available for multiparty calls.
A line on exclusive hold can be released without retrieving it in the following ways:
• The line is released at the other end. (This requires a line that supports forward disconnect.)
• The user logs off and logs back on.
• A forced line clear is performed on the line. This cannot be performed through the Soft Client orIQ/MAX Sync.
3.5.3 Barge inYou can join a call in progress (barge in) if privacy is not enabled on the line.
When a call is in progress, additional users can barge in, creating a multiparty call. This can occur in thefollowing situations:
• A user joins a point-to-point call.
• New users join an established conference call.
• Two users answer the same incoming call. When momentary privacy is enabled, one of the two userswill be able to barge after the configured interval (by default, 1 second).
If the call is on a line that has privacy enabled, new users cannot barge in. You cannot barge in tointercom calls.
When you join a call in progress and the intrusion tone feature is enabled, the turret displays your nameon the button for the call and plays an intrusion tone.
If more users join the call, the status shows the most recent person to join.
When you barge into a call, everyone on the call who is using a handset sees a barge in indication (!).
The intrusion tone feature is enabled or disabled for each zone. If intrusion tones are enabled at the zonelevel, a Unigy administrator can enable or disable the feature for individual end users. If the intrusiontone feature is not enabled, the tone is not played and the barge information is not displayed. Intrusiontones are generated for handset line calls, private line, and dial tone calls under the following conditions:
• Handset call when only handsets are used on the bridge.
• Handset and speaker calls when the handsets on the call globally mute pending speakers. An intrusiontone is not played for speaker calls.
The intrusion tone frequency and cadence are defined in the country base. For most countries it is asingle short duration tone, however, for some countries, the tone is repeated periodically. A repeatingtone stops playing when all callers who barged in to the call leave the call.
3.6 IntercomIntercom enables end users to make calls to other end users in the same enterprise without using a line.Any end user who has an assigned intercom extension and is logged into the system can place andreceive an intercom call.
3.6: Intercom 75
IPC Systems, Inc., Confidential and Proprietary Unigy 4.0IQ/MAX Sync User Guide

NoteAn end user’s intercom extension and personal extension can be the same (this is the system default),but a Unigy administrator can configure them to be different. For example, in a migration scenario acustomer may wish to retain existing extensions as personal and also create new intercom extensions fortheir users. Personal extensions and intercom extensions can only contain numeric values.A Unigy intercom extension can have up to 20 digits. The number of digits to dial for an intercom call inthe enterprise is set in the UMS.On IQ/MAX and IQ/MAX Edge turrets, when dialing an intercom extension that has fewer digits than thenumber of digits specified in the UMS, pad the number with leading zeros. On IQ/MAX TOUCH turrets,padding is optional. On Pulse devices and Soft Clients, do not pad the number.If your personal extension is greater than 9 digits, you cannot free seat to a communication device thathas not been upgraded to Unigy v2.0.1.5 or later. Also, if you have an intercom extension greater than 9digits, a communication device that has not been upgraded to at least Unigy v2.0.1.5 cannot place orreceive an intercom call for you. Enterprises with communication devices running Unigy v2.0.1 codeshould limit the maximum number of digits for an intercom call to 9 until the entire Unigy enterprise isupgraded to Unigy v2.0.1.5 or later.If the Unigy enterprise interops with an Alliance MX site, the intercom extension must meet the AllianceMX limit of 2-6 digits for an extension.
Intercom calls can be placed using the directory, call history, programmed intercom buttons, or bydialing the intercom extension as an intercom call.
NoteIf an intercom extension is dialed without selecting the ICM function, the call is established as an internalline call. If the user’s intercom extension is different from the personal extension, be sure to use ICM andthe intercom extension number.
The following restrictions apply to intercom calling:
• Only one intercom call can be active at a time.
• Intercom calls cannot be put on hold.
• Intercom calls cannot be transferred.
• Parties cannot be added or conferenced into an intercom call.
For information about group intercom calling, refer to the UMS online help (or Intercom group calls onpage 76).
3.6.1 Intercom group callsAn intercom group call connects all members of a predefined internal user group (broadcast group)simultaneously.
An intercom group call can reach any Unigy users who are logged in and able to answer. Users can beincluded in a call even if they are logged in somewhere other than their usual location.
You can initiate an intercom group call with different options for answering the call:
• Group call (No answer back): Only the call initiator can talk (one-way audio only).
• Group answer (GANS): Only the call initiator can talk until the first person answers. Then the callbecomes a point-to-point intercom call with the first user who answers. All other users are dropped.
76 3.6: Intercom
December 2, 2016 IPC Systems, Inc., Confidential and Proprietary

• Group talk back (GTBK): Anyone on the call can answer and use the Push-to-Talk control to talk andbe heard by everyone else. All users remain on the call, and any number of users can talk.
Intercom group calls do not pend. To receive a group intercom call, a user must:
• Not be on an intercom call.
• Have hands-free mode (HFM) speaker enabled and idle.
• Have an available talk path.
Otherwise the user cannot receive the call, and has no way to know the group intercom call was missed.
Be aware of the following:
• A user who initiates an intercom group call will know that a call is connected only when at least oneuser has answered that call.
• If two users dial a group call to the same group number at the same time, this might result in creatingtwo group calls and users receiving the group call will be randomly divided between the two calls.
Intercom group calls differ from preset and simplex broadcast calls. For more information, see Duplexconference on page 87 and Simplex broadcast on page 87.
3.6.1.1 Initiate an intercom group call (broadcast)You can place a call to an intercom group using the Dial Pad on the main window. By default, anintercom group call is a broadcast call, in which only the initiator can speak and the remote parties canonly listen.
When using the Dial Pad, click the down arrow in the number entry box to access a drop-down list ofoptions, including Group.Figure 52: Dial Pad icon and drop-down options
1 Dial Pad icon
2 Drop-down list for the Dial Pad
A call to an intercom group establishes a call to an internal intercom broadcast group.
1. To dial a call, click the Dial Pad icon in the main window.The Dial Pad slides out to the right.
2. Click the down arrow for the Dial Pad drop-down list and choose Group.The message area prompts you for a group ID.
3. Enter the group ID number in the number entry box.The group must be configured in the Unigy system.
3.6: Intercom 77
IPC Systems, Inc., Confidential and Proprietary Unigy 4.0IQ/MAX Sync User Guide
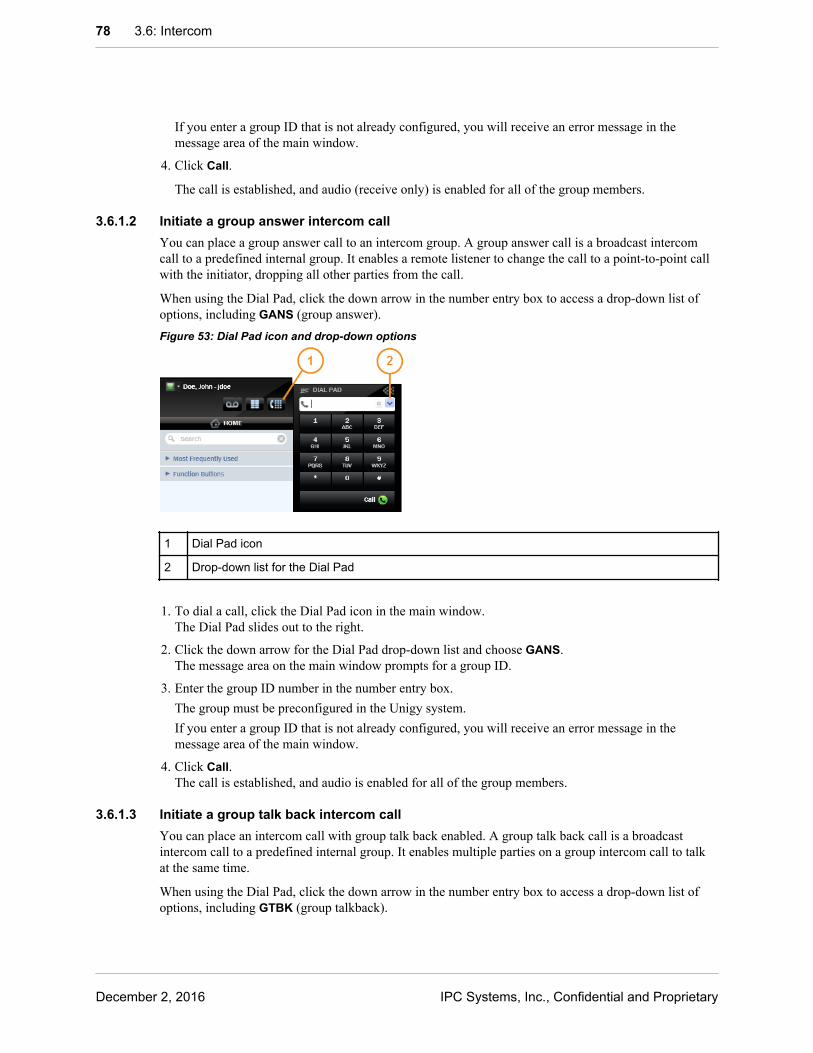
If you enter a group ID that is not already configured, you will receive an error message in themessage area of the main window.
4. Click Call.
The call is established, and audio (receive only) is enabled for all of the group members.
3.6.1.2 Initiate a group answer intercom callYou can place a group answer call to an intercom group. A group answer call is a broadcast intercomcall to a predefined internal group. It enables a remote listener to change the call to a point-to-point callwith the initiator, dropping all other parties from the call.
When using the Dial Pad, click the down arrow in the number entry box to access a drop-down list ofoptions, including GANS (group answer).Figure 53: Dial Pad icon and drop-down options
1 Dial Pad icon
2 Drop-down list for the Dial Pad
1. To dial a call, click the Dial Pad icon in the main window.The Dial Pad slides out to the right.
2. Click the down arrow for the Dial Pad drop-down list and choose GANS.The message area on the main window prompts for a group ID.
3. Enter the group ID number in the number entry box.The group must be preconfigured in the Unigy system.If you enter a group ID that is not already configured, you will receive an error message in themessage area of the main window.
4. Click Call.The call is established, and audio is enabled for all of the group members.
3.6.1.3 Initiate a group talk back intercom callYou can place an intercom call with group talk back enabled. A group talk back call is a broadcastintercom call to a predefined internal group. It enables multiple parties on a group intercom call to talkat the same time.
When using the Dial Pad, click the down arrow in the number entry box to access a drop-down list ofoptions, including GTBK (group talkback).
78 3.6: Intercom
December 2, 2016 IPC Systems, Inc., Confidential and Proprietary

Figure 54: Dial Pad icon and drop-down options
1 Dial Pad icon
2 Drop-down list for the Dial Pad
1. To dial a call, click the Dial Pad icon in the main window.The Dial Pad slides out to the right.
2. Click the down arrow for the Dial Pad drop-down list and choose GTBK.The message area prompts for a group ID.
3. Enter the group ID number in the number entry box.The group must be preconfigured in the Unigy system.If you enter a group ID that is not already configured, you will receive an error message in themessage area of the main window.
4. Click Call.The call is established, and audio is enabled for all of the group members.
Call recipients see a Group Talkback control: a GTBK control on the Activity display or, for turretusers, a floating GTBK button on the Contextual Call Display.
3.7 DiversionIncoming dial tone line and intercom calls can be diverted to another destination.
Diversion can be programmed by users (with appropriate privileges) or in the UMS by an administrator.
Only one diversion for the same extension and diversion condition (such as Busy) can be turned on atone time. Enabling diversion for the same extension and an identical or overlapping condition (such asBusy or ring no answer) cancels the previous setting. For lines, a dual diversion button can beprogrammed to specify different destinations for the Busy and Ring no answer (RNA) conditions.
Note
• A user may need to enable both line and intercom diversion to ensure that all calls to that user arediverted. Depending on administrative settings, a user can have different personal and intercomextensions.
• Only line calls can be diverted to voice mail.
Supported diversion types include:
3.7: Diversion 79
IPC Systems, Inc., Confidential and Proprietary Unigy 4.0IQ/MAX Sync User Guide

• Immediate: All incoming line and intercom calls are immediately forwarded.
• Busy: Incoming intercom calls are forwarded when one of the following is true: (1) hands-free modeis enabled and the user is on a call; (2) hands-free mode is enabled and a call is pending; or (3) hands-free mode is disabled.
If the Do Not Disturb function is enabled, intercom calls are not diverted; they pend without ringing.
An incoming line call to a busy extension is forwarded if the system setting for the extension is toreturn a Busy response to the calling party.
• Ring no answer (RNA): Incoming line calls are diverted after ringing for a specified period of timewithout an answer when Do Not Disturb is enabled, or when hands-free mode is disabled on a turret.Calls pend for a preset amount of time when this condition is enabled.
• Busy or ring no answer (BRNA): Incoming line calls are diverted if the user is on a call or does notanswer after the specified number of rings when Do Not Disturb is enabled, or when hands-free modeis disabled on a turret. Calls pend for a preset amount of time when this condition is enabled.
• Dual Divert: Divert line calls to different destinations for busy and ring/no answer conditions. Dualdivert applies to line diversion only.
• No diversion: All incoming calls go to the extension. When intercom calls are made to a turret andthe hands-free mode is available, they can be answered automatically.
3.7.1 One-button diversionA preprogrammed diversion button can be used to turn diversion on and off for calls to Unigyextensions or for intercom or line calls. A button can be programmed for each diversion condition:immediate, busy, ring no answer (RNA), or busy ring no answer (BRNA).
With one-button diversion, the same button turns diversion on and off for a particular condition andextension. Each diversion button is specific to an extension or line, diversion type, and diversiondestination.
A no diversion button can also be set up to turn off all types of diversion for an extension with a singlebutton press.
When multiple users have buttons for identical line diversions (same type, destination, and extensions),any of the users can use the button to enable diversion for all users of the line. For example, if all of theusers in a group attend the same daily meeting and have the same line diversion button settings for themeeting, any users in the group can set diversion for the entire group by pressing the diversion button ontheir button sheet.
Diversion can also be configured on the device, without the use of buttons, through Settings.
3.7.2 Diversion status displayWhen a button is programmed for diversion and turned on, the button is highlighted to indicate thatdiversion is enabled; a label can be provided for the button to indicate the type of diversion. The buttonis highlighted only if it exactly matches the diversion in effect (line, type, and destination).
When one-button diversion is turned on, the diversion button displays a blue light. If diversion is turnedoff, the button has no light.
On a turret, the following status messages display when extensions are diverted:
• If a call is diverted, the caller sees a message stating the name and number to which they have beendiverted.
80 3.7: Diversion
December 2, 2016 IPC Systems, Inc., Confidential and Proprietary

• If a call is diverted and pends, the caller sees a message displaying the extension to which the callwas diverted and at which user the call is pending.
• There is no message notifying the extension receiving the call that the call is diverted; for thereceiving party, the call is indistinguishable from non-diverted calls.
For a diversion button that is added for a line, if the Diversion Type is Immediate, diversion is enabled,and the user account is configured appropriately, DIVERTED is displayed in red on the button.
If multiple users have the same diversion programming, the diversion buttons at all extensions displaythe same highlighting.
3.7.3 Line diversionUsers can divert incoming dial tone line calls from their extensions to another destination. This feature isalso known as call forwarding.
Using line diversion, calls can be diverted from a user’s extension to any phone number or anotherextension.
Diversion can be preprogrammed in each user's profile. If a user has the necessary privileges, the usercan also program diversion through their device. Each diversion button is specific to a line, diversiontype, and diversion destination.
The maximum number of diversion hops is set through Unigy administration. After a maximum numberof hops that are not answered, a caller is diverted to a destination number for the Unigy system, or to theoriginal user’s voice mail, depending on administration settings.
3.7.4 Intercom diversionA point-to-point intercom call can be diverted to another Unigy end user on a local site or on a remotesite that is available through a direct global intercom connection.
Intercom calls can be diverted only to other Unigy intercom users who can receive an intercom call.
Intercom diversion cannot be used for the following types of calls:
• Group answer (GANS)
• Group talkback (GTBK)
• Group calls
With appropriate privileges, end users can program diversion at their devices, or a Unigy administratorcan program diversion. End users can program intercom call diversion only for their own extensions.
NoteThe maximum digits for intercom is an automatic system setting, equal to the intercom extension length.
3.7: Diversion 81
IPC Systems, Inc., Confidential and Proprietary Unigy 4.0IQ/MAX Sync User Guide

82 3.7: Diversion
December 2, 2016 IPC Systems, Inc., Confidential and Proprietary

4 Manage multiparty callsWhen using IQ/MAX Sync with an associated turret, you can initiate calls, including broadcast calls; butall management of active calls occurs on the turret. When establishing a conference, you can seize a lineusing IQ/MAX Sync, but you must use the turret controls to enter conference mode and add lines.
4.1 ConferencesThe conference feature allows lines to be added to a call. The conference feature is for lines only, andcannot be used with intercom calls.
While in conference mode, lines can be added or removed as needed. Conference mode is turned onduring a call or before a call is initiated. When using IQ/MAX Sync with a turret, conference mode canbe enabled using the turret, then lines can be added using line buttons on the turret or IQ/MAX Sync.
Note
• Only one conference of any kind per handset.
• Any Unigy user in a conference can add a line to a conference.
• Only handset users can add a dial tone line to a conference.
• A conference can not be created from a speaker call.
If a conference call is initiated and then put on hold, the result depends on whether the unsupervisedconference feature is available:
• If the unsupervised conference feature is not enabled, each conference line is placed on individualhold. To re-establish the conference, the conference button must be pressed, and each line must beadded back to the call.
• If the unsupervised conference feature is enabled, the conference can continue without the conferenceinitiator, as described in Unsupervised conferences on page 83. The unsupervised conferencefeature can only be used for calls that include more than two lines and no other traders who barged in.
If the call is released, the conference ends and all lines are released. You can remove a party that youadded to a conference by pressing the button that was used to add the party.
There is no defined limit for a number of parties in a conference call in Unigy. The number of parties ina conference is limited by system capacity and activity. Each end user can add up to 32 lines inconference. Other end users can barge in, adding more lines to the conference.
4.1.1 Unsupervised conferencesThe unsupervised conference feature places a conference of multiple dial tone or private lines on hold,while enabling the far end parties to continue the call. A conference call becomes an unsupervisedconference call when the conference call is put on hold by a Unigy user and there are no other Unigyusers on that call.
The unsupervised conference feature is configured at the zone level through the Unigy ManagementSystem using the Zone Configuration panel (Configuration ➤ Enterprise ➤ System ➤ Zones).
83
IPC Systems, Inc., Confidential and Proprietary Unigy 4.0IQ/MAX Sync User Guide
NoteIn a multizone Unigy enterprise, IPC recommends configuring unsupervised conference the same in allzones. If the zones are configured differently, the unsupervised conference feature will only functionproperly when all lines and end users participating in the conference are from zones that have theunsupervised conference setting enabled.
If unsupervised conference is enabled, pressing the Hold key places the conference in a simulated holdcondition, but leaves the lines in the call active and bridged together so that all parties in the call cancontinue to talk with each other.
If unsupervised conference is not enabled, pressing the Hold key puts each line on hold individually, andthe parties cannot continue talking to each other. To re-establish the conference, a user must press theConference key again and add each of the lines.
During an unsupervised conference, the status of the lines appears as active (U-busy) on the extension ofthe user who initiated the conference, as well as for all other users. If the conference line supportsforward disconnect, when a party on the call releases a line, the conference status is updated to indicatethat the line is no longer part of the conference.
After placing the call on hold, the call initiator can rejoin the call by pressing the Conference key or byselecting any of the lines included in the conference. Other Unigy users can barge in to the conference orresume the unsupervised conference by pressing the button of one of the lines in the call.
The following rules apply to this feature:
• If a conference includes another Unigy user who has barged in to the call, the conference call cannotbe put on hold and become an unsupervised conference. For example, if there are one or more bargedusers on the conference and a user attempts to place the conference on hold, that user is removedfrom the conference, the call is not placed on hold, and the conference continues as a normalconference.
• If a conference call initiator places a conference on hold and then rejoins the conference, the initiatorcan continue to add and remove lines for that conference.
• Lines in an unsupervised conference can only be removed by a user that added the line. The lines thatthe initiator added cannot be removed by others. A Unigy user who barges in to an unsupervisedconference can add lines and remove only the lines that they added.
• Preset and simplex broadcast do not support unsupervised conferences. Conferences placed on holdare supervised conferences, even if unsupervised conference is enabled for all of the zones in theenterprise. If a conference starts as a preset or simplex broadcast conference, when hold is activated,the system places all lines in the call on individual hold (I-Hold). Simplex broadcast is supported forIQ/MAX Omni, but preset broadcast is not. Neither preset nor simplex broadcast are supported forPulse Enterprise.
• Only one conference of any kind can be conducted per handset. For example, if a user places aconference call on a left handset and then puts it on hold, the conference continues as an unsupervisedconference. The user can make another call on that handset (including a preset or simplex broadcast),but cannot create another conference.
4.1.2 Conferencing scenariosThis topic describes Unigy conferencing scenarios that involve feature interactions such as barge in andunsupervised conference and explains the resulting status indication of the lines participating in theconference. It also discusses permissions for adding and removing lines while in a conference.
These scenarios are applicable to:
84 4.1: Conferences
December 2, 2016 IPC Systems, Inc., Confidential and Proprietary
• Both turret and Soft Client end users.
• All line types (that is, dial tone and private lines).
NoteReferences to users in these scenarios means a Unigy end user. When referring to a far-end call party, itcould be either a Unigy or a non-Unigy user.
Terminology for button status indication:
• I-Busy: I am busy on a call using a button representing a selected line. A line button representing anI-Busy line is green.
• U-Busy: You are busy on a call using a button representing a selected line. This is the statusindication for a line on which someone else is active, or has put a call on exclusive hold. It indicatesthe line is in use by another user. A line button representing a U-Busy line is blue.
• I-Hold: I placed a call on hold using the line represented by the button. A line button representing anI-Hold line is flashing dark green.
• U-Hold: You placed a call on hold using the line represented by the button. A line buttonrepresenting a U-Hold line is dark blue.
• Idle: The line is available for use. Note, however, that for speakers the line can show idle even if theline is in use. This would occur if the line’s Display Status When on Speaker property is notenabled. This setting is generally used for private lines.
• Incoming: An indication that there is an incoming call for the line represented by the button. There isan option for this display, high priority indication and low priority indication.
Scenario 1: Rules for adding and removing lines in a conference1. User A makes a call on Line 1.
Result: Line 1 shows I-Busy to User A and U-Busy to all others in the system.
2. User A conferences in Line 2, which creates a conference call.
Result: Line 2 shows I-Busy to User A and U-Busy to all others in the system.
3. User B barges in to Line 1.
Result: Line 1 also now shows I-Busy to User B. Line 2 continues to show U-Busy to User B.
Both User A and User B have the ability to add lines to this conference. User A can remove the linesthat User A has added. User B can remove the lines that User B has added.
Scenario 2: Conference creator puts conference on unsupervised hold, then creatorresumes the conference1. User A creates a conference with 3 lines on the left handset.
Result: All lines show I-Busy to User A and U-Busy to all others in the system.
2. User A presses hold and an unsupervised conference is created.
Result: All lines show U-Busy to User A and all others in the system.
3. User A resumes conference by pressing left conference or one of the 3 line buttons.
Result: All lines show I-Busy to User A and U-Busy to everyone else.
User A can remove any line from the conference since User A was the unsupervised conference creator.
4.1: Conferences 85
IPC Systems, Inc., Confidential and Proprietary Unigy 4.0IQ/MAX Sync User Guide

Scenario 3: Conference creator puts conference on unsupervised hold, then a differentuser resumes the conference1. User A creates a conference with 3 lines on the left handset.
Result: All lines show I-Busy to User A and U-Busy to all others in the system.
2. User A presses hold and an unsupervised conference is created.
Result: All lines show U-Busy to User A and all others in the system.
3. User C resumes conference by pressing one of the 3 line buttons.
Result: All lines show I-Busy to User C and U-Busy to everyone else.
User C cannot remove any line from the conference since User A added those line to the conference.
Scenario 4: Barging a conference, then conference creator removes the lineThis scenario describes the status indications that result after a user barges a conference and then theconference creator removes that line from the conference.
1. User A makes a call on Line 1.
Result: Line 1 shows I-Busy to User A and U-Busy to all others in the system.
2. User A conferences in another user on Line 2.
Result: Line 2 now also shows I-Busy to User A and U-Busy to all others in the system.
3. User B barges in to Line 1.
Result: Line 1 now also shows I-Busy to User B.
4. User A removes Line 1 from the conference.
Result: Line 1 is removed from the conference and goes idle in the system. However, Line 1continues to display as I-Busy to User B. While User B remains on the call, status changes on Line 1are not displayed to User B. When User B releases from that call, the system status of the Line 1 isupdated and represents subsequent status changes.
Scenario 5: Barging a conference, then far-end drops1. User A makes a call on Line 1.
Result: Line 1 shows I-Busy to User A and U-Busy to all others in the system,
2. User A conferences in Line 2.
Result: Line 2 shows I-Busy to User A and U-Busy to all others in the system.
3. User B barges in to Line 1.
Result: Line 1 now also shows I-Busy to User B.
4. The far-end of Line 1 releases, which drops the line out of the conference.
Result: Line 1 is dropped from the conference and goes idle in the system and for User A. User Bcontinues to be in the conference call with User A and the far-end of Line 2. User B continues to seethe status of Line 1 as I-Busy. While User B remains on the call, status changes on Line 1 are notdisplayed to User B. When User B releases, User B then sees the system status of Line 1 and anysubsequent changes to it.
86 4.1: Conferences
December 2, 2016 IPC Systems, Inc., Confidential and Proprietary
4.2 Duplex conferenceDuplex conference, also referred to as Conference and preset broadcast, is an instant conference for upto five parties, in which all parties can speak and listen on the call. It uses two-way audio.
Preset broadcasts connect up to five lines so that multiple parties can be contacted with a single buttonpress. Only the following types of lines can be included in the broadcast:
• Automatic ringdown (ARD)
• Manual ringdown (MRD) configured to auto-signal
• Manual ringdown (MRD) with the speaker on at the far end
If a line in the broadcast is not configured to signal, the speaker must be on at the far end to be includedin the conference, because there is no way to dial or signal the far end when a preset broadcast button ispressed.
Note
• Once a broadcast call is established, additional lines can be added or removed using the Conferencebutton; the Conference button is enabled by default. The original set of lines cannot be removed exceptby ending the call.
• Privacy is not available for broadcast calls.
Preset broadcast must be enabled for an end user group or a specific end user through Unigyadministration.
When this feature is enabled for the system and you have user privileges to program buttons, you canprogram the feature at your turret or on the IQ/MAX Sync Button Sheet.
You must have line buttons on your Button Sheet for the lines you want to add before you can includethose lines on a preset broadcast button.
Duplex broadcast does not support unsupervised conferences. Conferences placed on hold aresupervised conferences, even if unsupervised conference is enabled for all of the zones in the enterprise.If a conference starts as a preset or simplex broadcast conference, when hold is activated, the systemplaces all lines in the call on individual hold (I-Hold).
Preset broadcast calls are available only for turrets and IQ/MAX Sync.
4.3 Simplex broadcastA simplex broadcast is an instant conference call that broadcasts to as many as 24 lines simultaneously.Only the broadcast initiator can transmit; other parties can only listen and cannot talk to the initiator orto each other. It uses one-way audio.
A simplex broadcast connects multiple parties with a single button press. Only the following types oflines can be included in the broadcast:
• Automatic ringdown (ARD)
• Manual ringdown (MRD) configured to auto-signal
• Manual ringdown (MRD) with the speaker on at the distant end
If a line in the broadcast is not configured to signal, the speaker must be on at the distant end to beincluded in the conference, because there is no way to dial or signal the far end when a preset or simplexbroadcast button is pressed.
4.2: Duplex conference 87
IPC Systems, Inc., Confidential and Proprietary Unigy 4.0IQ/MAX Sync User Guide
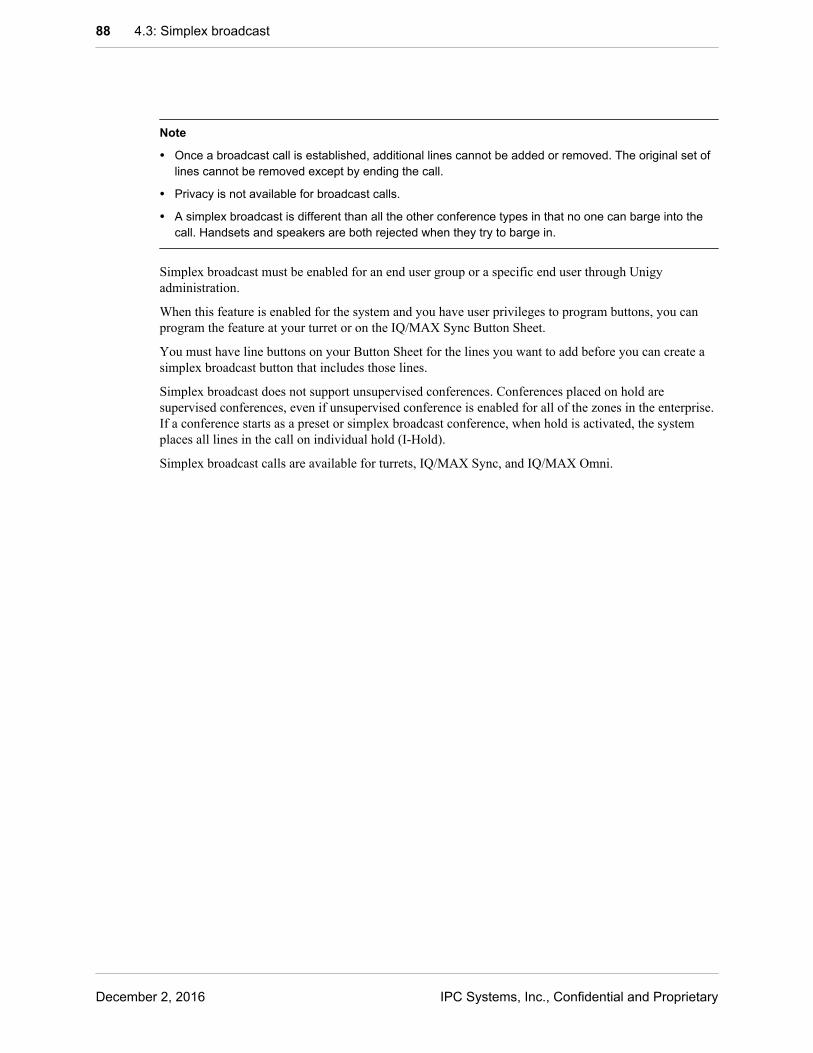
Note
• Once a broadcast call is established, additional lines cannot be added or removed. The original set oflines cannot be removed except by ending the call.
• Privacy is not available for broadcast calls.
• A simplex broadcast is different than all the other conference types in that no one can barge into thecall. Handsets and speakers are both rejected when they try to barge in.
Simplex broadcast must be enabled for an end user group or a specific end user through Unigyadministration.
When this feature is enabled for the system and you have user privileges to program buttons, you canprogram the feature at your turret or on the IQ/MAX Sync Button Sheet.
You must have line buttons on your Button Sheet for the lines you want to add before you can create asimplex broadcast button that includes those lines.
Simplex broadcast does not support unsupervised conferences. Conferences placed on hold aresupervised conferences, even if unsupervised conference is enabled for all of the zones in the enterprise.If a conference starts as a preset or simplex broadcast conference, when hold is activated, the systemplaces all lines in the call on individual hold (I-Hold).
Simplex broadcast calls are available for turrets, IQ/MAX Sync, and IQ/MAX Omni.
88 4.3: Simplex broadcast
December 2, 2016 IPC Systems, Inc., Confidential and Proprietary
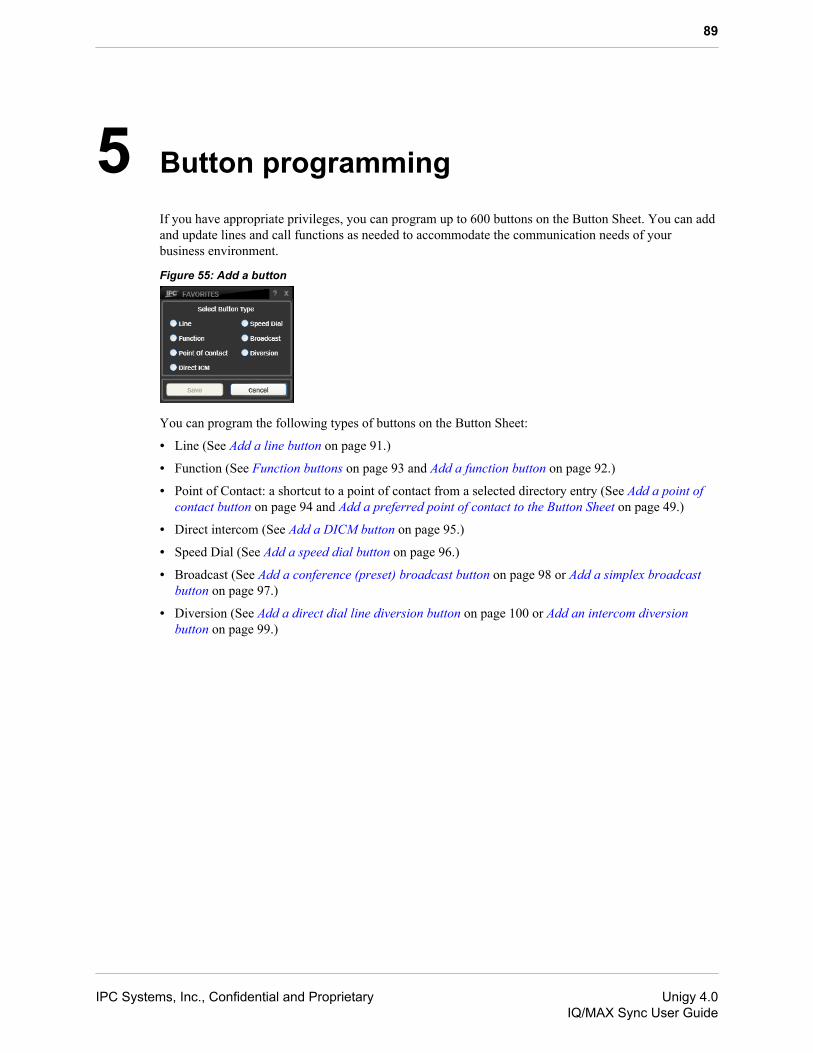
5 Button programmingIf you have appropriate privileges, you can program up to 600 buttons on the Button Sheet. You can addand update lines and call functions as needed to accommodate the communication needs of yourbusiness environment.
Figure 55: Add a button
You can program the following types of buttons on the Button Sheet:
• Line (See Add a line button on page 91.)
• Function (See Function buttons on page 93 and Add a function button on page 92.)
• Point of Contact: a shortcut to a point of contact from a selected directory entry (See Add a point ofcontact button on page 94 and Add a preferred point of contact to the Button Sheet on page 49.)
• Direct intercom (See Add a DICM button on page 95.)
• Speed Dial (See Add a speed dial button on page 96.)
• Broadcast (See Add a conference (preset) broadcast button on page 98 or Add a simplex broadcastbutton on page 97.)
• Diversion (See Add a direct dial line diversion button on page 100 or Add an intercom diversionbutton on page 99.)
89
IPC Systems, Inc., Confidential and Proprietary Unigy 4.0IQ/MAX Sync User Guide
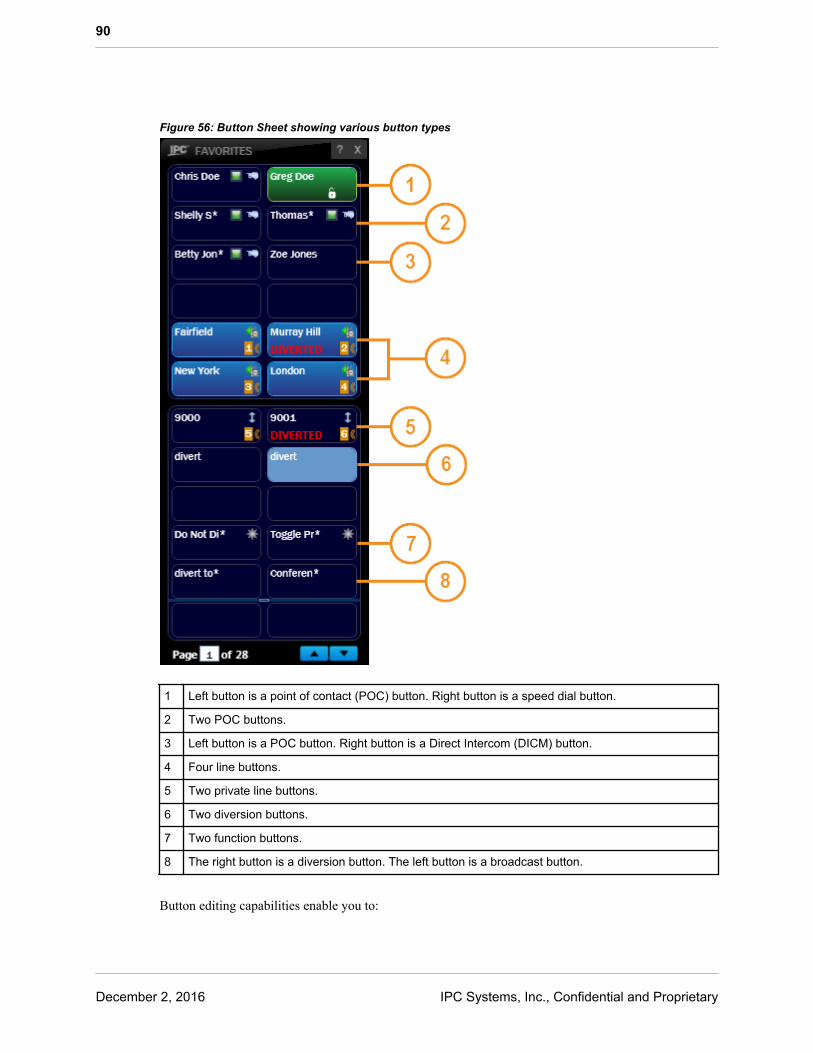
Figure 56: Button Sheet showing various button types
1 Left button is a point of contact (POC) button. Right button is a speed dial button.
2 Two POC buttons.
3 Left button is a POC button. Right button is a Direct Intercom (DICM) button.
4 Four line buttons.
5 Two private line buttons.
6 Two diversion buttons.
7 Two function buttons.
8 The right button is a diversion button. The left button is a broadcast button.
Button editing capabilities enable you to:
90
December 2, 2016 IPC Systems, Inc., Confidential and Proprietary
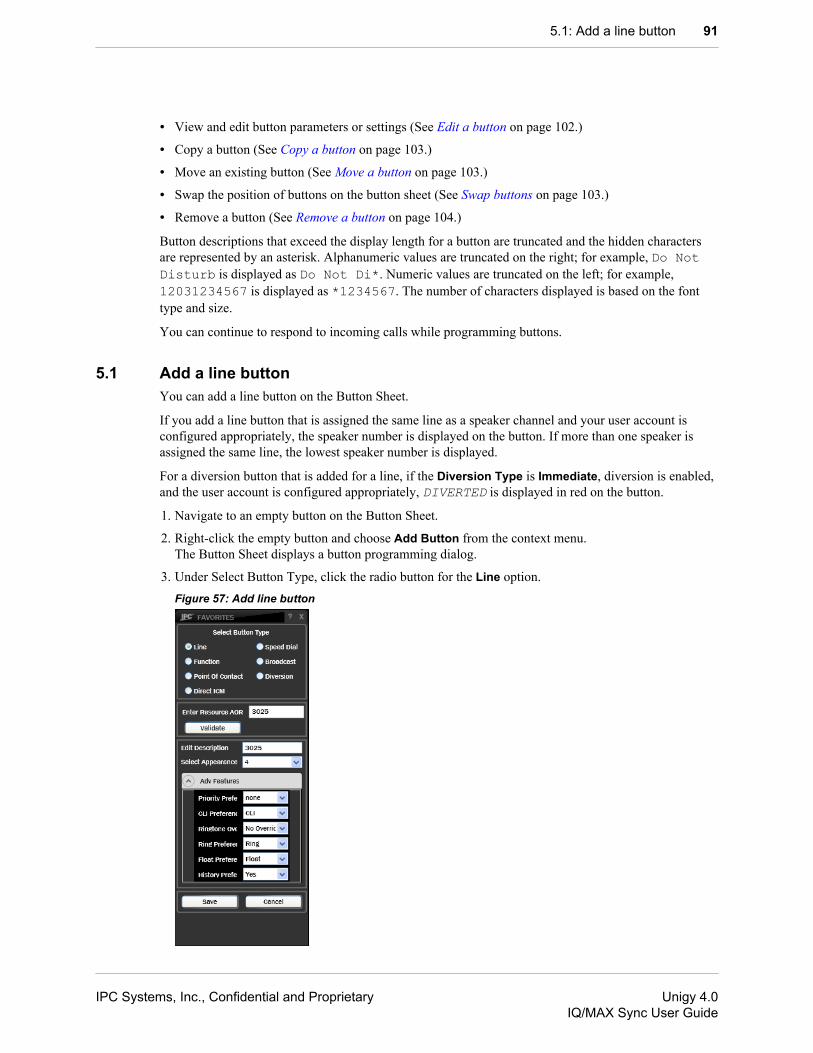
• View and edit button parameters or settings (See Edit a button on page 102.)
• Copy a button (See Copy a button on page 103.)
• Move an existing button (See Move a button on page 103.)
• Swap the position of buttons on the button sheet (See Swap buttons on page 103.)
• Remove a button (See Remove a button on page 104.)
Button descriptions that exceed the display length for a button are truncated and the hidden charactersare represented by an asterisk. Alphanumeric values are truncated on the right; for example, Do NotDisturb is displayed as Do Not Di*. Numeric values are truncated on the left; for example,12031234567 is displayed as *1234567. The number of characters displayed is based on the fonttype and size.
You can continue to respond to incoming calls while programming buttons.
5.1 Add a line buttonYou can add a line button on the Button Sheet.
If you add a line button that is assigned the same line as a speaker channel and your user account isconfigured appropriately, the speaker number is displayed on the button. If more than one speaker isassigned the same line, the lowest speaker number is displayed.
For a diversion button that is added for a line, if the Diversion Type is Immediate, diversion is enabled,and the user account is configured appropriately, DIVERTED is displayed in red on the button.
1. Navigate to an empty button on the Button Sheet.
2. Right-click the empty button and choose Add Button from the context menu.The Button Sheet displays a button programming dialog.
3. Under Select Button Type, click the radio button for the Line option.Figure 57: Add line button
5.1: Add a line button 91
IPC Systems, Inc., Confidential and Proprietary Unigy 4.0IQ/MAX Sync User Guide

4. Enter the identifier for the line in the Enter Resource AOR field.The identifier must be a resource address of record (AOR) that has been defined through Unigyadministration. For information about resource AORs, contact your Unigy administrator. You canenter a line number or a known personal extension number (not intercom if it is different from thepersonal extension).
5. Click Validate to verify that the line identifier is valid.If validation fails, error messages are displayed in the main window message area and next to theValidate button on the button programming dialog.
The button programming dialog displays additional fields, including Edit Descriptor, SelectAppearance, and a button for Adv Features.
6. Enter the button label in the Edit Descriptor field.
7. If you are creating a button for a dial tone line or extension, you can select an appearance numberusing the Select Appearance field.
8. To program line preferences, click the Adv Features button.
9. Set advanced line preferences as follows:
• Priority Preference: (low or high) Priority for calls originating on this line.
• CLI Preference: (CLI or No CLI) Display or suppress CLI information for the line. (If you chooseNo CLI, CLI information is still stored in history events.)
• Ringtone Override: (No Override or Ringtone 1 - Ringtone 18) Specify a ringtone to overridethe default ringer, or No Override to use the default ringtone.
• Ring Preference: (Ring, Single Ring, or No Ring) Settings for incoming calls on the line.
• Float Preference: (Float or No Float) Display calls from this line on a floating button if the linebutton is not currently displayed (only affects turrets).
• History Preference: (yes or no) Whether to include calls on this line in call history records.
10. Click Save.
Result: The line button is added.
5.2 Add a function buttonProgram function buttons in the Button Sheet.
For information on the functions you can assign to buttons, refer to Function buttons on page 93.
1. Right-click an empty button in the Button Sheet and choose Add Button from the context menu.The Button Sheet displays the button programming dialog box.
2. Under Select Button Type, click the radio button for the Function option.The system displays a list of functions you can assign to the button.
92 5.2: Add a function button
December 2, 2016 IPC Systems, Inc., Confidential and Proprietary
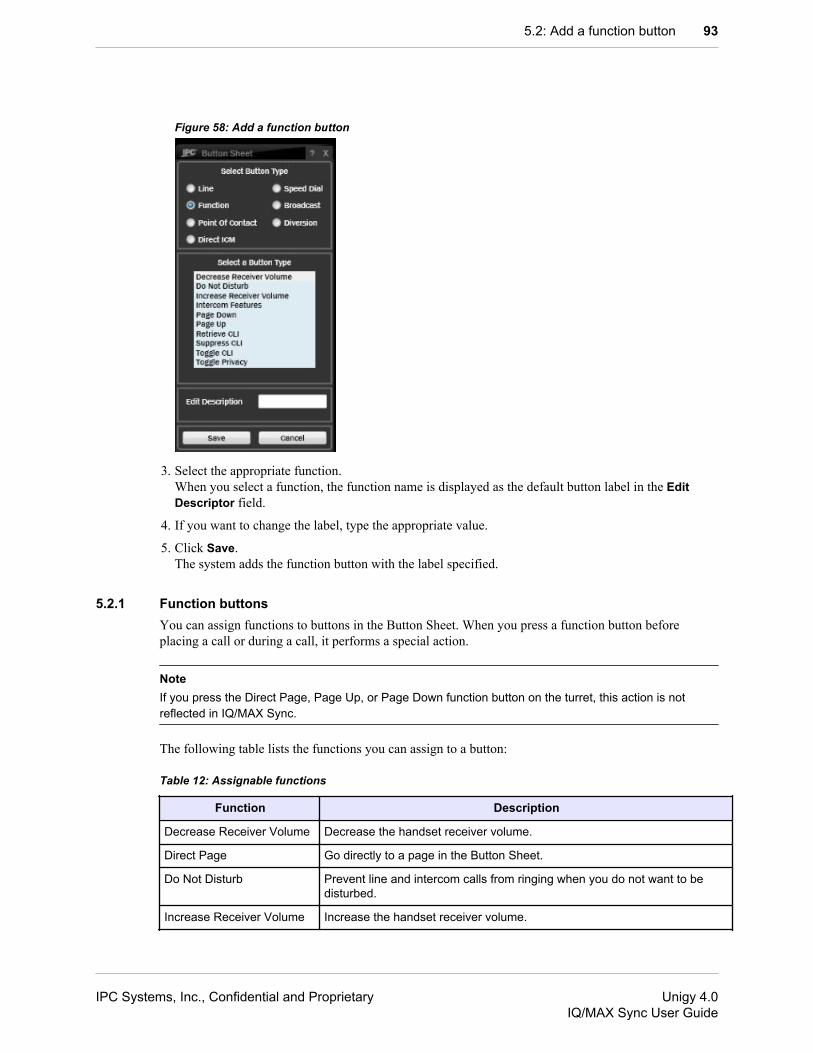
Figure 58: Add a function button
3. Select the appropriate function.When you select a function, the function name is displayed as the default button label in the EditDescriptor field.
4. If you want to change the label, type the appropriate value.
5. Click Save.The system adds the function button with the label specified.
5.2.1 Function buttonsYou can assign functions to buttons in the Button Sheet. When you press a function button beforeplacing a call or during a call, it performs a special action.
NoteIf you press the Direct Page, Page Up, or Page Down function button on the turret, this action is notreflected in IQ/MAX Sync.
The following table lists the functions you can assign to a button:
Table 12: Assignable functions
Function Description
Decrease Receiver Volume Decrease the handset receiver volume.
Direct Page Go directly to a page in the Button Sheet.
Do Not Disturb Prevent line and intercom calls from ringing when you do not want to bedisturbed.
Increase Receiver Volume Increase the handset receiver volume.
5.2: Add a function button 93
IPC Systems, Inc., Confidential and Proprietary Unigy 4.0IQ/MAX Sync User Guide
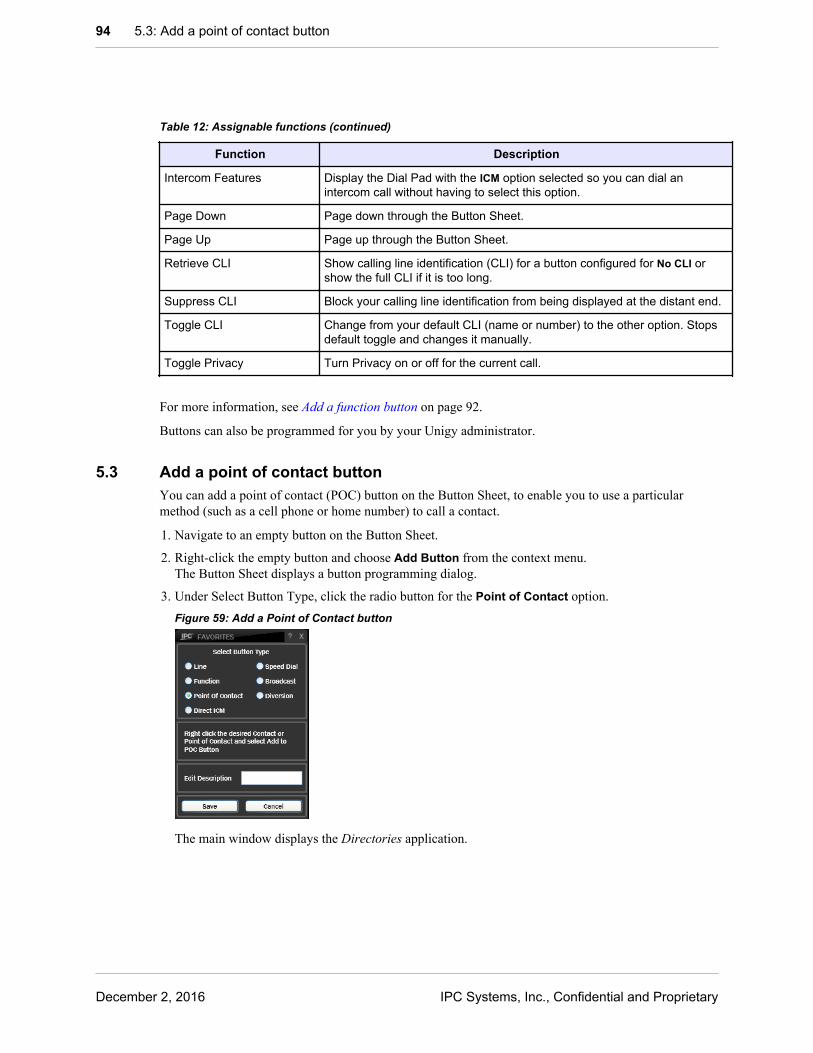
Table 12: Assignable functions (continued)
Function Description
Intercom Features Display the Dial Pad with the ICM option selected so you can dial anintercom call without having to select this option.
Page Down Page down through the Button Sheet.
Page Up Page up through the Button Sheet.
Retrieve CLI Show calling line identification (CLI) for a button configured for No CLI orshow the full CLI if it is too long.
Suppress CLI Block your calling line identification from being displayed at the distant end.
Toggle CLI Change from your default CLI (name or number) to the other option. Stopsdefault toggle and changes it manually.
Toggle Privacy Turn Privacy on or off for the current call.
For more information, see Add a function button on page 92.
Buttons can also be programmed for you by your Unigy administrator.
5.3 Add a point of contact buttonYou can add a point of contact (POC) button on the Button Sheet, to enable you to use a particularmethod (such as a cell phone or home number) to call a contact.
1. Navigate to an empty button on the Button Sheet.
2. Right-click the empty button and choose Add Button from the context menu.The Button Sheet displays a button programming dialog.
3. Under Select Button Type, click the radio button for the Point of Contact option.Figure 59: Add a Point of Contact button
The main window displays the Directories application.
94 5.3: Add a point of contact button
December 2, 2016 IPC Systems, Inc., Confidential and Proprietary
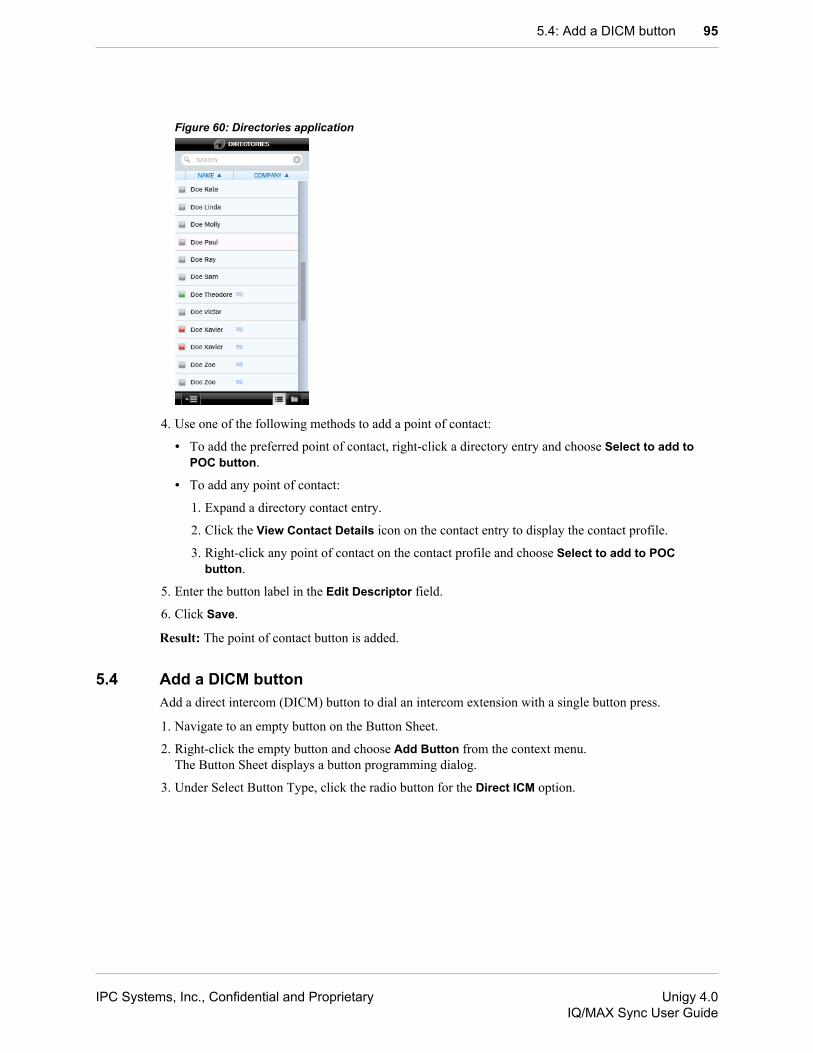
Figure 60: Directories application
4. Use one of the following methods to add a point of contact:
• To add the preferred point of contact, right-click a directory entry and choose Select to add toPOC button.
• To add any point of contact:
1. Expand a directory contact entry.
2. Click the View Contact Details icon on the contact entry to display the contact profile.
3. Right-click any point of contact on the contact profile and choose Select to add to POCbutton.
5. Enter the button label in the Edit Descriptor field.
6. Click Save.
Result: The point of contact button is added.
5.4 Add a DICM buttonAdd a direct intercom (DICM) button to dial an intercom extension with a single button press.
1. Navigate to an empty button on the Button Sheet.
2. Right-click the empty button and choose Add Button from the context menu.The Button Sheet displays a button programming dialog.
3. Under Select Button Type, click the radio button for the Direct ICM option.
5.4: Add a DICM button 95
IPC Systems, Inc., Confidential and Proprietary Unigy 4.0IQ/MAX Sync User Guide

Figure 61: Adding a Direct ICM button
4. Enter the extension number in the ICM Extension field.
5. Enter the label for the button in the Edit Description field.
6. Click Save.
Results: You can click the programmed button to place an intercom call to the programmed extension.Status information and call controls are shown on the Activity display.
5.5 Add a speed dial buttonYou can add a speed dial button on the Button Sheet to enable you to dial a number with a single buttonpress.
Once a call is established, you cannot use a speed dial button in IQ/MAX Sync; any additional callsmust be placed from the turret.
1. Navigate to an empty button on the Button Sheet.
2. Right-click the empty button and choose Add Button from the context menu.The Button Sheet displays a button programming dialog.
3. Under Select Button Type, click the radio button for the Speed Dial option.Figure 62: Add a speed dial button
4. Enter the speed dial number.
96 5.5: Add a speed dial button
December 2, 2016 IPC Systems, Inc., Confidential and Proprietary

You can include the special function P (Pause) in the number. This pauses dialing while callprocessing is completed.
5. Enter the label for the button in the Edit Descriptor field.6. To add an icon that identifies the type of number, click one of the radio buttons: Home, Work,
Mobile, or None. If you click the radio button for None, no identifying icon is associated with thespeed dial button.
7. To specify a line or the hunt function, click the Adv Features button and click a radio button for oneof the options.
• Line: After choosing the Line option, enter the resource AOR for the line, then click Validate.Once the line is validated, the dialog displays a Select Appearance field that you can use tospecify the appearance number for a dial tone line.
• Hunt: Hunt for any available line.
• No Line/Hunt
8. Click Save.
The speed dial button is added.
5.6 Add a simplex broadcast buttonTo initiate a simplex broadcast, configure a broadcast button on your Button Sheet.
NotePulse Enterprise does not support simplex broadcast buttons.
Only private wire lines (including both hoot and non-hoot lines, but not Open Connexion lines) can beadded to a simplex broadcast (up to 24 lines per broadcast).
1. Open the Button Sheet by clicking the Button Sheet icon in the main window Toolbar.The Button Sheet opens in a separate window on the desktop.
2. If necessary, go to a page that contains an empty button.3. Right-click an empty button and choose Add Button from the context menu.
The Button Sheet displays a button programming dialog.4. Under Select Button Type, click the radio button for the Broadcast option.
The button programming dialog displays selectors for broadcast types.5. Click the radio button for Simplex Broadcast.
The dialog displays a button that enables you to add private lines.6. Click Select Private wire Lines.
The view changes to the Button Sheet.7. Page through the Button Sheet and select any private lines to be added to the broadcast group.
The line buttons are highlighted as you choose them. To deselect a selected line re-click the button.
NoteTo exit without selecting lines, right-click and choose Finished, then within the button programmingdialog, click Cancel.
8. After selecting or deselecting the lines, right-click a button that is not one of the private line buttonsyou selected then click Finished to return to the button selection panel. Wait until the buttonprogramming dialog displays the list of private lines you selected.
5.6: Add a simplex broadcast button 97
IPC Systems, Inc., Confidential and Proprietary Unigy 4.0IQ/MAX Sync User Guide
9. To make additional changes to line selections:
• Click the x symbol on a line to remove it from the group.
• Click Select Private wire Lines again to add more lines.
10. Enter a label for the broadcast in the Edit Descriptor field.
11. Click Save.
The broadcast group is saved to the button. You can initiate a call to the group by clicking the button.
5.7 Add a conference (preset) broadcast buttonTo initiate a preset broadcast, configure a broadcast button on your Button Sheet.
NoteIQ/MAX Omni and Pulse Enterprise do not currently support preset broadcast buttons.
Only private wire lines (including both hoot and non-hoot lines, but not Open Connexion lines) can beadded to a preset broadcast (up to five lines per broadcast).
1. Open the Button Sheet by clicking the Button Sheet icon in the main window Toolbar.The Button Sheet opens in a separate window on the desktop.
2. If necessary, go to a page with an empty button.
3. Right-click an empty button and choose Add Button from the context menu.The Button Sheet displays a button programming dialog.
4. Under Select Button Type, click the radio button for the Broadcast option.The button programming dialog displays selectors for broadcast types.
5. Click the radio button for Conference Broadcast.The dialog displays a button that enables you to add private lines.
6. Click Select Private wire Lines.The view changes to the Button Sheet.
7. Page through the Button Sheet and select up to five private lines to be added to the broadcast group.The line buttons are highlighted as you choose them. To deselect a selected line, re-click it.
NoteTo exit without selecting lines, right-click and choose Finished, then within the button programmingdialog, click Cancel.
8. After selecting or deselecting the lines, right-click a button that is not one of the private line buttonsyou selected then click Finished to return to the button selection panel. Wait until the buttonprogramming dialog displays the list of private lines you selected.
9. To make additional changes to line selections:
• Click the x symbol on a line to remove it from the group.
• Click Select Private wire Lines again to add more lines.
10. Enter a label for the broadcast in the Edit Descriptor field.
11. Click Save.
Result: The broadcast group is saved to the button. You can initiate a call to the group by clicking thebutton.
98 5.7: Add a conference (preset) broadcast button
December 2, 2016 IPC Systems, Inc., Confidential and Proprietary

5.8 Add an intercom diversion buttonYou can add an intercom diversion button in the Button Sheet.
Note
• If intercom diversion (busy) is enabled for an extension when intercom calls are active or pending atthe extension, only new intercom calls will be diverted.
• If you do not have a free button, you cannot enable diversion.
1. Navigate to an empty button on the Button Sheet.
2. Right-click the empty button and choose Add Button from the context menu.The Button Sheet displays a button programming dialog.
3. Under Select Button Type, click the radio button for the Diversion option.Figure 63: Set intercom diversion
4. Under Select Diversion Type, click the radio button for ICM (intercom).
5. Specify the ICM Diversion Type:
• No Diversion
• Immediate
• Busy
• Ring/No Answer
• Busy/Ring/No Answer
6. In the Divert To Number field, enter the intercom extension number to which calls should bediverted.
7. Under Select Implementation Type, click one of the radio buttons:
• Save to Button: The diversion properties you set are saved to a button. The button can be used toenable the programmed diversion, and is highlighted when diversion is enabled.
For this option, enter a button label in the Edit Description field (required).
5.8: Add an intercom diversion button 99
IPC Systems, Inc., Confidential and Proprietary Unigy 4.0IQ/MAX Sync User Guide
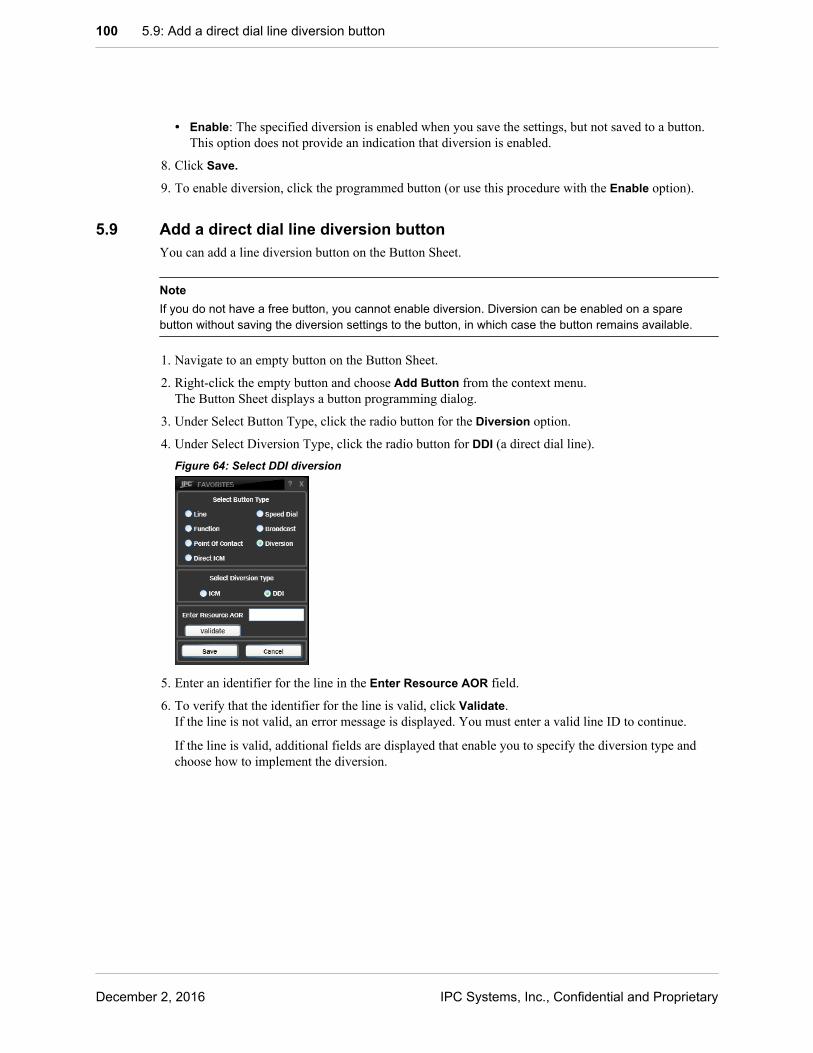
• Enable: The specified diversion is enabled when you save the settings, but not saved to a button.This option does not provide an indication that diversion is enabled.
8. Click Save.
9. To enable diversion, click the programmed button (or use this procedure with the Enable option).
5.9 Add a direct dial line diversion buttonYou can add a line diversion button on the Button Sheet.
NoteIf you do not have a free button, you cannot enable diversion. Diversion can be enabled on a sparebutton without saving the diversion settings to the button, in which case the button remains available.
1. Navigate to an empty button on the Button Sheet.
2. Right-click the empty button and choose Add Button from the context menu.The Button Sheet displays a button programming dialog.
3. Under Select Button Type, click the radio button for the Diversion option.
4. Under Select Diversion Type, click the radio button for DDI (a direct dial line).Figure 64: Select DDI diversion
5. Enter an identifier for the line in the Enter Resource AOR field.
6. To verify that the identifier for the line is valid, click Validate.If the line is not valid, an error message is displayed. You must enter a valid line ID to continue.
If the line is valid, additional fields are displayed that enable you to specify the diversion type andchoose how to implement the diversion.
100 5.9: Add a direct dial line diversion button
December 2, 2016 IPC Systems, Inc., Confidential and Proprietary

Figure 65: DDI diversion implementation type
7. Click the down arrow for the DDI Diversion Type field and choose one of the following diversiontypes:Figure 66: DDI diversion types
• No Diversion
• Immediate
• Busy
• Ring/No Answer
• Busy/Ring/No Answer
• Dual Divert
8. Enter the diversion destination:
• For the Immediate, Busy, Ring/No Answer, or Busy/Ring/No Answer options, enter the numberin the Divert To Number field.
5.9: Add a direct dial line diversion button 101
IPC Systems, Inc., Confidential and Proprietary Unigy 4.0IQ/MAX Sync User Guide

Figure 67: Diversion number
• For the Dual Divert option, enter destination numbers for both conditions:Figure 68: Dual diversion numbers
9. For the Select Implementation Type section, click one of the following radio buttons:Figure 69: Diversion button descriptor
• Save to Button: The diversion properties you set are saved to a button. The button can be used toenable the programmed diversion, and is highlighted when diversion is enabled.
For this option, enter a button label in the Edit Description field (optional).
• Enable: The specified diversion is enabled when you save the settings, but not saved to a button.This option does not provide an indication that diversion is enabled.
10. Click Save.If you did not enter a button label, an error dialog is displayed. Close that dialog, enter a description,and click Yes to confirm and save the button.
The line diversion is added. If you saved to a button, you can click the button to enable the diversionprogrammed on the button.
5.10 Edit a buttonYou can edit programmed buttons on the Button Sheet for lines, functions, points of contact, speeddialing, and broadcasts.
NoteYou cannot edit a diversion button.
1. Navigate to the button to be edited on the Button Sheet.
2. Right-click the button and choose Edit Button from the context menu.The Button Sheet displays the settings for the button.
102 5.10: Edit a button
December 2, 2016 IPC Systems, Inc., Confidential and Proprietary

3. Make changes to settings as needed.For information about settings, see the topic on adding the appropriate type of button.
4. Click Save.
5.11 Copy a buttonYou can copy a button on the Button Sheet and paste it onto an empty button.
Copying a button may be useful when assigning an existing button to your fixed button area, or whencreating a copy on any page that makes accessing the button more convenient.
1. Navigate to the button to be copied on the Button Sheet.
2. Right-click the button and choose Copy Button from the context menu.
3. Navigate to an empty button.You can copy the original button to an empty button on any page of the Button Sheet (including afixed button).
4. Right-click the empty button and choose Paste Button from the context menu.
The original button is copied to the new button, but the original is not affected by the copy operation.Both the original and the new button have identical settings.
5.12 Move a buttonYou can move a programmed button on the Button Sheet to an empty button on any page, including afixed button displayed on any page.
1. Navigate to the button to be moved on the Button Sheet.
2. Use one of the following methods to move the button:
• Drag the button to an empty button on the same page.
• To move the button to an empty button on any page:
1. Right-click the button and choose Move Button from the context menu.
2. Navigate to an empty button on any page.
3. Right-click the empty button and choose Paste Button from the context menu.
Results: The original button definition is moved to the new button. The original button is blank andavailable for reassignment.
5.13 Swap buttonsYou can swap the positions of existing buttons on the Button Sheet.
You can swap buttons only if they are on the same page of the Button Sheet.
1. Navigate to the page of the Button Sheet that contains the buttons to be swapped.
2. Click and hold down one of the buttons, then drag it onto the other button.
Results: The positions of the buttons are swapped.
NoteIf you drag the button onto an empty button, the original button definition is moved to the new buttoninstead of being swapped with another button.
5.11: Copy a button 103
IPC Systems, Inc., Confidential and Proprietary Unigy 4.0IQ/MAX Sync User Guide

5.14 Remove a buttonYou can delete a programmed button on the Button Sheet.
1. Navigate to the button to be deleted on the Button Sheet.
2. Right-click the button to be deleted and choose Remove Button from the context menu.
3. On the confirmation dialog, click Yes.
Results: The button assignment is removed. The button is blank and available for new assignments.
104 5.14: Remove a button
December 2, 2016 IPC Systems, Inc., Confidential and Proprietary
A Installation and administration
A.1 Hardware and software requirements for the Unigy Soft ClientThe Soft Client can be installed on various Microsoft Windows-based devices that have sufficientstorage and memory resources.
Hardware requirementsThe following hardware is required to support the Soft Client software on a Windows-based desktop orlaptop computer:
• Sound card (as supported by the operating system).
• Network card (as supported by the operating system).
• Hard disk with at least 100 MB of free space for stored files plus 2 GB of space while running theSoft Client.
• RAM with at least 3 GB of available memory.
Running the Soft Client on Microsoft Surface Pro 3 and Surface Pro 4 is also supported.
NoteThe Microsoft Surface Pro on-screen keyboard does not include some of the keys that are assigned tothe default Soft Client keyboard shortcuts. If you cannot use the keyboard shortcuts, either add anexternal keyboard or ask your Unigy administrator to change the keyboard shortcuts to use compatiblekeys.
Software requirementsThe following software is required to support the Soft Client products:
• Microsoft Windows 7, 8.1, or 10 (32-bit or 64-bit)
• Microsoft .NET Framework 4.5
• Microsoft Outlook 2010 or 2013 (32-bit or 64-bit) – required only for integration with Outlookcontacts
The Microsoft Outlook add-in supports dynamic update of local contacts. If you find that the changesare not updating dynamically, log out of the Soft Client then log in to see the contact changes.
For the latest software requirement information, refer to the Unigy Product Compatibility Matrix(available only to IPC personnel).
A.2 CDI user configuration requirementsTo enable access to communication device interfaces (CDIs), Unigy administrators create and configureuser definitions in the Unigy Management System (UMS). Additional configuration is needed to enableaccess to specific CDI features.
To enable a user to access a CDI, the following configuration is required:
105
IPC Systems, Inc., Confidential and Proprietary Unigy 4.0IQ/MAX Sync User Guide

• Define the user as an end user. This action automatically creates a contact record.
• Associate the end user with an end user group.
• Assign a home zone for the end user.
• Assign a personal extension to the user. Optionally, a separate intercom extension can be assigned.Otherwise, the personal extension is also the intercom extension for the user.
• Add an intercom point of contact to the contact record. An intercom point of contact for the user mustexist in order for the user's presence information to be displayed in the system.
• Assign a user license to turret, Pulse, and Pulse Enterprise users. IQ/MAX Omni licenses are assignedautomatically from a pool of licenses when a user logs in. IQ/MAX Sync is included in the turretlicense.
Once the above configuration is in place, a user with access to a CDI can log in. Additionalconfiguration is needed to enable the following basic CDI capabilities:
• Users can be assigned privileges that enable them to program their CDIs.
• Button assignments can be created by a Unigy administrator or by an end user if the user hassufficient privileges.
• To support hoot capabilities, Open Connexion lines or standard hoot lines must be defined andassigned to speaker channels. Lines can be assigned to speaker channels by a Unigy administrator orby an end user if the user has sufficient privileges. Speaker channel licensing requirements vary. SoftClient users and IQ/MAX TOUCH users must be assigned speaker channel licenses. Other deviceusers may need extra speaker channel licenses if they are not part of the standard deviceconfiguration.
• To make users available through directories, add the user contact to the enterprise directory or otherdirectory categories.
Additional administration may be required to provide access to some system features or advanced CDIfeatures.
Details about user configuration through the UMS are available in the Features Configuration Guide.
A.3 Installation, upgrade, rollback, and uninstall proceduresA.3.1 Install the Unigy Soft Client software
The Soft Client is installed on desktop or laptop computers, that are running the Microsoft Windowsoperating system, to provide communication services through the computer’s audio interface, or whenusing IQ/MAX Sync, to provide communication management for an associated turret.
Prerequisites: Before installing the Soft Client software, complete the following tasks:
• Because the Soft Client software can be installed programmatically by an administrator, determinewhether it is already installed by clicking Start ➤ All Programs. If IPC Systems Inc ➤ UnigyClient is in the Start menu, the software is installed.
• Review the Hardware and software requirements for the Unigy Soft Client on page 105 and ensurethat your computer has the required resources.
• Ensure that you can log in to the computer with an account that has administrator privileges.
• Determine whether the client computer has the Microsoft Windows 32-bit or 64-bit operating system.
106 A.3: Installation, upgrade, rollback, and uninstall procedures
December 2, 2016 IPC Systems, Inc., Confidential and Proprietary
• Obtain the IP address or virtual IP address (VIP) for the zone from which you are installing the SoftClient software.
• Obtain the Soft Client home zone IP address or VIP.
Installation options
The following installation options are available. Both can run interactively, initiated by each end user, orsilently as a background process initiated remotely by a Unigy administrator. For information on remoteinstallation, refer to Remote Soft Client installation on page 108.
• Full installation: Installs all Soft Client components. This topic describes the full installationprocedure.
• Upgrade: Update packages provide fixes, new features, and other changes. An automated updatemodule checks periodically for updates. When the system detects a new update, a black box isdisplayed in the lower right corner of the Unigy Application (Soft Client) icon in the MicrosoftWindows System Tray. For more information on installing updates, see Upgrade the Unigy SoftClient software – Microsoft Windows 32-bit on page 111 or Upgrade the Unigy Soft Client software– Microsoft Windows 64-bit on page 112.
You can uninstall the software by rerunning the Soft Client installer program or from the MicrosoftWindows Remove a program utility within the Control Panel. The Uninstall process removes all SoftClient files, folders, and shortcuts. For information on this procedure, refer to Uninstall the Unigy SoftClient software on page 117.
To perform an interactive full installation:
1. In a browser, access the Soft Client installer .msi file with one of the following URLs:
• Microsoft Windows 32-bit: https://ip_or_vip/image/UnigyClientInstaller-x86.msi
• Microsoft Windows 64-bit: https://ip_or_vip/image/UnigyClientInstaller.msi
ip_or_vip is the IP address of the appliance in a Unigy standalone zone or the virtual IP address(VIP) of the HA zone from which you are installing the software.
2. Click Run to initiate the installation, or Save to download the .msi file to your computer.If you download the file, double-click it to start the installation.
3. When you are prompted to confirm that you want to run the program, click Run.The Welcome to the Unigy(TM) Client Setup Wizard window is displayed.
4. Click Next.5. In the End user License Agreement, read the terms of use, select the I accept the terms in the
License Agreement check box, then click Next.If any prerequisites have not been completed, the wizard prompts you to complete them beforecontinuing.
6. In the Destination Folder window, confirm the default installation location or use the Change buttonto specify a new location then click Next.
7. In the Install Options window, select one, both, or neither of the following options then click Next:
a) Select the Create Shortcut on Desktop check box if you want the system to add a Unigy Client(Soft Client) shortcut to the desktop in addition to the shortcut it creates in the Microsoft WindowsStart menu.
b) Select the Install Outlook Add-in check box to provide dynamic integration with MicrosoftOutlook contacts.
A.3: Installation, upgrade, rollback, and uninstall procedures 107
IPC Systems, Inc., Confidential and Proprietary Unigy 4.0IQ/MAX Sync User Guide
8. In the Ready to install Unigy(TM) Client window, click Install.
9. If you see the User Account Control message box, click Yes.The installation begins. After it completes, the Completed the Unigy(TM) Client Setup Wizardwindow is displayed indicating that the installation is complete. After a brief delay, the Unigy ConfigTool dialog box is displayed.
10. In the Unigy Config Tool dialog box, configure the connection to the home zone or to a DHCP serveras described in Configure the Soft Client network connection on page 118 then click Save.
11. In the Save message box, click OK.
12. In the Unigy Config Tool dialog box, click Close.
13. In the Completed the Unigy(TM) Client Setup Wizard window, click Finish.
Results:
• The installer creates the IPC Systems Inc folder and Unigy Client and Unigy Client ConfigurationTool short cuts in the Microsoft Windows Start ➤ All Programs menu. Use the Unigy Clientshortcut to run the Soft Client and use the Unigy Client Configuration Tool shortcut to change theconfiguration or to redirect the Soft Client to a different zone if a BCP plan is activated.
• If you selected the Create Shortcut on Desktop option, the system adds the shortcut to the desktop.
• If you selected the Install Outlook Add-in option, the system installs and enables the add-in withinMicrosoft Outlook.
NoteRestarting the client computer after the installation is not required.
A.3.2 Remote Soft Client installationTo eliminate the need for Unigy Soft Client end users to install and upgrade the Soft Client software ontheir computers, you can create a script or run commands that use a shell tool to silently install andconfigure the software on each user's computer. You can also use this process to upgrade or uninstall thesoftware.
In the interactive Soft Client installation procedure, each end user runs theUnigyClientInstaller-x86.msi program (32-bit) or the UnigyClientInstaller.msiprogram (64-bit) from a browser, responds to the installation wizard prompts, then enters the IP addressof a Unigy standalone zone or the VIP of an HA zone with which the Soft Client communicates forconfiguration and call processing. The wizard prompts include the license agreement, location to whichthe software is installed, whether the installation is for all users of the computer or only the current user,whether the user wants a Soft Client desktop shortcut, and whether the user wants to install theMicrosoft Outlook Add-in. This procedure is quick, simple, and straightforward, but it can be automatedto allow the end users to focus on their primary job responsibilities rather than installing software.
The installer programs support silent installation, which installs and configures the software without theneed for end user interaction. If a version of the software is already installed, you can use a script toupgrade or uninstall the current version. By default, the silent installation uses the default installationresponses to the installation wizard prompts; that is, it accepts the license agreement, installs thesoftware to C:\Program Files (x86)\IPC Systems Inc\Unigy Client for all users ofthe computer, installs the Microsoft outlook Add-in, and does not add a desktop shortcut (however, itadds the Unigy Client and Unigy Config Viewer executables to the Microsoft Windows Start menu).
You can run the silent installation command from within a shell tool to install the Soft Client softwareon end user computers from a remote location, or if you do not have access to these tools, you can use
108 A.3: Installation, upgrade, rollback, and uninstall procedures
December 2, 2016 IPC Systems, Inc., Confidential and Proprietary

the command to install the software locally on each computer without the need to respond to theinstallation wizard prompts.
Verify the following requirements before you run the installation commands:
• The client computers must meet the Soft Client hardware and software requirements specified in Hardware and software requirements for the Unigy Soft Client on page 105.
• The client computers must be accessible at the time the script runs, or the script must be programmedto run the installation when the client computers become available.
• If the commands are run from a Microsoft Windows command prompt, they must be run withAdministrator privileges.
The installation command includes the following options and information:
• Command option that specifies whether the command installs or uninstalls the software.
• URL that identifies the location of the installer file. You can specify one of the following:
• Standard installation URL, https://ip_vip/image/UnigyClientInstaller-x86.msi (32-bit) or https://ip_vip/image/UnigyClientInstaller.msi (64-bit),where ip_vip is the IP address of the appliance in a standalone zone or the VIP of an HA zonefrom which you are installing the software.
• Folder on a network drive or a local drive on the computer running the script. Copy the installerfile from the CCM or ACCM to this location.
• Command option and associated parameters that specify that the installation is to run in silent (quiet)mode with no user interface displayed, and no user interaction required.
• IP address or VIP of the home zone that provides configuration and call processing support. Theinstallation program writes this value to the Unigy database. After the installation completes, endusers can view, and if necessary, change the value with the Unigy Config Viewer tool.
• The following optional parameters:
• INSTALLDESKTOPSHORTCUT: creates a desktop shortcut. The default is "" (false). Specify 1to create the icon.
• INSTALLOUTLOOKADDIN: installs the Microsoft Outlook Add-in for dynamicallysynchronizing local contacts. The default is 1 (true). Specify "" to prevent installation of the Add-in.
• Logging parameter that specifies the name of the installation log file. The log files are stored in%LOCALAPPDATA%\IPC Systems Inc\UDA\logs. The installation log records theinstallation process, displays messages, and at the end, indicates the success or failure of theinstallation. Do not include spaces in the log file name. The following success or failure messages aredisplayed in the log file for an installation or uninstallation:
• When an installation succeeds, the log includes this message at the end of the file: Product:Unigy Client -- Installation completed successfully.
• When an uninstallation succeeds, the log includes the message Product: Unigy Client -Removal completed successfully.
• If the installation fails because the client computer does not have the required softwareprerequisites, the log includes messages that inform you what software needs to be installed orupgraded.
• If a previous version of the software is installed, the log contains a message that instructs you touninstall the software before you install the new version.
A.3: Installation, upgrade, rollback, and uninstall procedures 109
IPC Systems, Inc., Confidential and Proprietary Unigy 4.0IQ/MAX Sync User Guide

• If Microsoft Outlook, Office Communicator, or Microsoft Lync are open when you run theuninstall command, the log includes a message that instructs you to close these applications beforerunning the installation.
• If the command contains invalid parameters, the installation fails and no information is written tothe log file.
Sample commands are described in the following sections:
Installing the Soft Client softwareThe following sample commands use Microsoft's msiexec utility to perform different types ofinstallations. The examples use the 64-bit installer.
• This command runs the installation in silent mode, installs the Microsoft Outlook Add-in, and writesthe installation events to a log file.msiexec /i msiLocation/image/UnigyClientInstaller.msi /qn ccsip=ip_vip /log logFile
• This command runs the installation in silent mode, adds the Unigy Client icon to the desktop, installsthe Microsoft Outlook Add-in, and writes the installation events to a log file:msiexec /i msiLocation/image/UnigyClientInstaller.msi /qn ccsip=ip_vip INSTALLDESKTOPSHORTCUT=1 /log logFile
• This command runs the installation in silent mode, adds the Unigy Client icon to the desktop,prevents installation of the Microsoft Outlook Add-in, and writes the installation events to a log file:msiexec /i msiLocation/image/UnigyClientInstaller.msi /qn ccsip=ip_vip INSTALLDESKTOPSHORTCUT=1 INSTALLOUTLOOKADDIN="" /log logFile
In these commands, msiLocation is the location of the installer file, ip_vip is the home zone IPaddress or VIP, and logFile is the name of the installation log file. The log file is a text (.txt) file.
Upgrading and Uninstalling the Soft Client softwareTo upgrade the Soft Client software, you must uninstall the current version then install the new version.The following command uninstalls the software and writes the process events to a log file:
msiexec /log logFile /passive /uninstall {4F08922F-22F9-4082-8B36-3E6D150317E4}
logFile is the name of the log file and the product ID,{4F08922F-22F9-4082-8B36-3E6D150317E4}, is a unique GUID that identifies the installer file. Thevalue must be enclosed within braces.
ImportantWhen you uninstall the software, Microsoft Outlook, Office Communicator, and Microsoft Lync must beclosed on each client computer before you run the script.
Pushing the Soft Client software to one or more computersTo push the Soft Client software to one or more end user computers, or to uninstall the software fromthese computers, use a remote shell tool such as Microsoft's PsExec, or ssh tools such as OpenSSH,copSSH, or WinSSHD. The following example illustrates the use of PsExec to install the software ontothree end user computers.
110 A.3: Installation, upgrade, rollback, and uninstall procedures
December 2, 2016 IPC Systems, Inc., Confidential and Proprietary
NoteYou can download and extract the PsExec files from the Microsoft SysInternals website. If you downloadthe files to C:\Windows\System32\, you will not have to specify a file path when you run thecommands.
1. Open the Microsoft Windows Command Prompt.
2. Run PsService.exe to start the PsExec server service.
3. To start PsExec and instruct it to run the installation program on the end user computers, type thefollowing command then press Enter.
PsExec \\computer1,computer2,computer3 cmd -w For computer1, computer2, and computer3, enter the computer name or IP address of eachcomputer on which you are installing the software.
4. Type the silent installation command that was described previously then press Enter:msiexec /i msiLocation/UnigyClientInstaller.msi /qn ccsip=ip_vip /log logFile
The log file is created on the end user computers.
You can use the same procedure for uninstalling the software. Substitute the uninstallation command forthe installation command.
A.3.3 Upgrade the Unigy Soft Client software – Microsoft Windows 32-bitThis topic describes how to upgrade the Soft Client software on a Microsoft Windows 32-bit clientcomputer.
For information on upgrading the Soft Client software in a Microsoft Windows 64-bit environment,refer to Upgrade the Unigy Soft Client software – Microsoft Windows 64-bit on page 112.
When you access the Soft Client, if a new software version is available, the Unigy Client icon in theMicrosoft Windows System Tray displays the upgrade indicator and the Upgrade option is displayed inthe Unigy Client menu.Figure 70: Unigy Client icon showing the upgrade indicator
Prerequisite:
Before you initiate the upgrade, close the Unigy Soft Client, Microsoft Outlook, Office Communicator,and Microsoft Lync, as applicable, to enable the system to uninstall the current software version beforeit installs the new version.
NoteTo upgrade the Soft Client software on Microsoft Windows 32-bit systems, you cannot use the Upgradeoption in the Unigy Client menu as you can with Windows 64-bit systems; instead you must manuallyuninstall the current version then install the new version.
A.3: Installation, upgrade, rollback, and uninstall procedures 111
IPC Systems, Inc., Confidential and Proprietary Unigy 4.0IQ/MAX Sync User Guide

1. Uninstall the current Soft Client software version by performing the procedure Uninstall the UnigySoft Client software on page 117.
2. Install the new software from a browser by accessing the URL https://ip_or_vip/image/UnigyClientInstaller-x86.msi, where ip_or_vip is the IP address or virtual IP address(VIP) of the zone from which you are running the installation.
3. Click Run.
4. If you are prompted to confirm that you want to run the program, click Run.The Welcome to the Unigy(TM) Client Setup Wizard window is displayed.
5. Click Next.
6. In the End-User License Agreement window, read the Terms of Use, select the I accept the terms inthe License Agreement check box, then click Next.
7. In the Destination Folder window, confirm the default installation location or click Change tospecify a new location then click Next.
8. In the Install Options window, select one, both, or neither of the following options then click Next:
a) Select the Create Shortcut on Desktop check box if you want the system to add a Unigy Client(Soft Client) shortcut to the desktop in addition to the shortcut it creates in the Microsoft WindowsStart menu.
b) Select the Install Outlook Add-in check box to provide dynamic integration with MicrosoftOutlook contacts.
9. In the Ready to Install Unigy(TM) Client window, click Install.
10. If you see the User Account Control message box, click Yes.The installation begins. After it completes, the Completed the Unigy(TM) Client Setup window isdisplayed. After a brief delay, the Unigy Config Tool dialog box is displayed.
11. In the Unigy Config Tool dialog box, confirm or configure the connection to the home zone or to aDHCP server as described in Configure the Soft Client network connection on page 118 then clickSave.
12. In the Save message box, click OK.
13. In the Unigy Config Tool dialog box, click Close.
14. In the Completed the Unigy(TM) Client Setup Wizard window, click Finish.
A.3.4 Upgrade the Unigy Soft Client software – Microsoft Windows 64-bitThis topic describes how to upgrade the Soft Client software on a Microsoft Windows 64-bit clientcomputer.
For information on upgrading the Soft Client software in a Microsoft Windows 32-bit environment,refer to Upgrade the Unigy Soft Client software – Microsoft Windows 32-bit on page 111.
When you access the Soft Client, if a new software version is available, the Unigy Client icon in theMicrosoft Windows System Tray displays the upgrade indicator and the Upgrade option is displayed inthe Unigy Client menu.Figure 71: Unigy Client icon showing the upgrade indicator
Prerequisite:
112 A.3: Installation, upgrade, rollback, and uninstall procedures
December 2, 2016 IPC Systems, Inc., Confidential and Proprietary
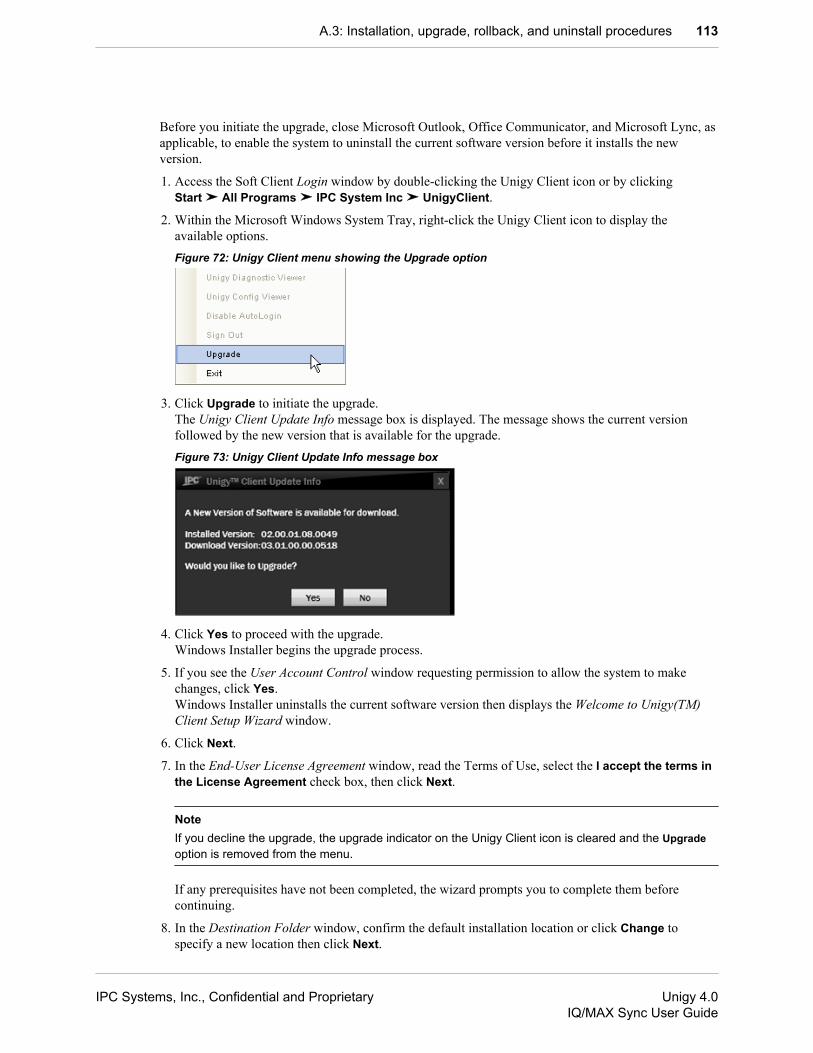
Before you initiate the upgrade, close Microsoft Outlook, Office Communicator, and Microsoft Lync, asapplicable, to enable the system to uninstall the current software version before it installs the newversion.
1. Access the Soft Client Login window by double-clicking the Unigy Client icon or by clickingStart ➤ All Programs ➤ IPC System Inc ➤ UnigyClient.
2. Within the Microsoft Windows System Tray, right-click the Unigy Client icon to display theavailable options.Figure 72: Unigy Client menu showing the Upgrade option
3. Click Upgrade to initiate the upgrade.The Unigy Client Update Info message box is displayed. The message shows the current versionfollowed by the new version that is available for the upgrade.Figure 73: Unigy Client Update Info message box
4. Click Yes to proceed with the upgrade.Windows Installer begins the upgrade process.
5. If you see the User Account Control window requesting permission to allow the system to makechanges, click Yes.Windows Installer uninstalls the current software version then displays the Welcome to Unigy(TM)Client Setup Wizard window.
6. Click Next.
7. In the End-User License Agreement window, read the Terms of Use, select the I accept the terms inthe License Agreement check box, then click Next.
NoteIf you decline the upgrade, the upgrade indicator on the Unigy Client icon is cleared and the Upgradeoption is removed from the menu.
If any prerequisites have not been completed, the wizard prompts you to complete them beforecontinuing.
8. In the Destination Folder window, confirm the default installation location or click Change tospecify a new location then click Next.
A.3: Installation, upgrade, rollback, and uninstall procedures 113
IPC Systems, Inc., Confidential and Proprietary Unigy 4.0IQ/MAX Sync User Guide
9. In the Install Options window, select one, both, or neither of the following options then click Next:
a) Select the Create Shortcut on Desktop check box if you want the system to add a Unigy Client(Soft Client) shortcut to the desktop in addition to the shortcut it creates in the Microsoft WindowsStart menu.
b) Select the Install Outlook Add-in check box to provide dynamic integration with MicrosoftOutlook contacts.
10. In the Ready to Install Unigy(TM) Client window, click Install.
11. If you see the User Account Control message box, click Yes.The installation begins. After it completes, the Completed the Unigy(TM) Client Setup window isdisplayed. After a brief delay, the Unigy Config Tool dialog box is displayed.
12. In the Unigy Config Tool, confirm or configure the connection to the home zone or to a DHCP serveras described in Configure the Soft Client network connection on page 118 then click Save.
13. In the Save message box, click OK.
14. In the Unigy Config Tool dialog box, click Close.
15. In the Completed the Unigy(TM) Client Setup window, click Finish.
A.3.5 Roll back the Unigy Soft Client software – Microsoft Windows 32-bitIf the Unigy software is rolled back to a previous version, you must roll back the Unigy Soft Clientsoftware on the client computers to the same version. This topic describes how to roll back the softwareon a Microsoft Windows 32-bit client computer.
For information on rolling back the Soft Client software in a Microsoft Windows 64-bit environment,refer to Roll back the Unigy Soft Client software – Microsoft Windows 64-bit on page 115.
When you access the Soft Client, if the Unigy software is at a lower version than the current Soft Clientversion, the Unigy Client icon in the Microsoft Windows System Tray displays the rollback indicatorand the Rollback option is displayed in the Unigy Client menu. The system also displays the tool tipUnigy - Roll Back to Old Version when you move your mouse over the icon.
Figure 74: Unigy Client icon showing the rollback indicator
Prerequisite:
Before you initiate the rollback, close the Unigy Soft Client, Microsoft Outlook, Office Communicator,and Microsoft Lync, as applicable, to enable the system to uninstall the current software version beforeit installs the lower version.
NoteTo roll back the Soft Client software on Microsoft Windows 32-bit systems, you cannot use the Rollbackoption in the Unigy Client menu as you can with Windows 64-bit systems; instead you must manuallyuninstall the current version then install the lower version.
1. Uninstall the current Soft Client software version by performing the procedure Uninstall the UnigySoft Client software on page 117.
2. Install the lower software version from a browser by accessing the URL https://ip_or_vip/image/UnigyClientInstaller-x86.msi, where ip_or_vip is the IP address or virtual IPaddress (VIP) of the zone from which you are running the installation.
3. Click Run.
114 A.3: Installation, upgrade, rollback, and uninstall procedures
December 2, 2016 IPC Systems, Inc., Confidential and Proprietary
4. If you are prompted to confirm that you want to run the program, click Run.The Welcome to the Unigy(TM) Client Setup Wizard window is displayed.
5. Click Next.
6. In the End-User License Agreement window, read the Terms of Use, select the I accept the terms inthe License Agreement check box, then click Next.
7. In the Destination Folder window, confirm the default installation location or click Change tospecify a new location then click Next.
8. In the Install Options window, select one, both, or neither of the following options then click Next:
a) Select the Create Shortcut on Desktop check box if you want the system to add a Unigy Client(Soft Client) shortcut to the desktop in addition to the shortcut it creates in the Microsoft WindowsStart menu.
b) Select the Install Outlook Add-in check box to provide dynamic integration with MicrosoftOutlook contacts.
9. In the Ready to Install Unigy(TM) Client window, click Install.
10. If you see the User Account Control message box, click Yes.The installation begins. After it completes, the Completed the Unigy(TM) Client Setup window isdisplayed. After a brief delay, the Unigy Config Tool dialog box is displayed.
11. In the Unigy Config Tool dialog box, confirm or configure the connection to the home zone or to aDHCP server as described in Configure the Soft Client network connection on page 118 then clickSave.
12. In the Save message box, click OK.
13. In the Unigy Config Tool dialog box, click Close.
14. In the Completed the Unigy(TM) Client Setup Wizard window, click Finish.
A.3.6 Roll back the Unigy Soft Client software – Microsoft Windows 64-bitIf the Unigy software is rolled back to a previous version, you must roll back the Unigy Soft Clientsoftware on the client computers to the same version. This topic describes how to roll back the softwareon a Microsoft Windows 64-bit client computer.
For information on rolling back the Soft Client software in a Microsoft Windows 32-bit environment,refer to Roll back the Unigy Soft Client software – Microsoft Windows 32-bit on page 114.
When you access the Soft Client, if the Unigy software is at a lower version than the current Soft Clientversion, the Unigy Client icon in the Microsoft Windows System Tray displays the rollback indicatorand the Rollback option is displayed in the Unigy Client menu. The system also displays the tool tipUnigy - Roll Back to Old Version when you move your mouse over the icon.
Figure 75: Unigy Client icon showing the rollback indicator
Prerequisite
Before you perform this procedure, close Microsoft Outlook, Office Communicator, and MicrosoftLync, as applicable, to enable the system to uninstall the current software version before it installs thelower version.
1. Access the Soft Client Login window by double-clicking the Unigy Client icon or by clickingStart ➤ All Programs ➤ IPC System Inc ➤ UnigyClient.
2. Right-click the Unigy Client icon in the Microsoft Windows System Tray then click Rollback.
A.3: Installation, upgrade, rollback, and uninstall procedures 115
IPC Systems, Inc., Confidential and Proprietary Unigy 4.0IQ/MAX Sync User Guide

The Unigy™ Client Info message box prompts you to confirm that you want to roll back from thecurrently Installed Version to the Download Version.
3. Click Yes.
4. If you see the User Account Control message box requesting permission for the system to makechanges, click Yes.The system uninstalls the higher version software then presents the Unigy Client(TM) wizard.
5. Perform one of the following procedures based on the software version you are rolling back to:
• For versions prior to Unigy v3.0, do the following:
1. In the License Agreement window, read the Terms of Use, click I Agree then click Next.
2. In the Welcome to the Unigy(TM) Client Setup Wizard window, click Next.
3. In the Select Installation Folder window, accept the default folder or click Browse to select adifferent folder. Also, select either Everyone, to install the software for all users who can log into the client computer, or Just me, to install the software for only your use, then click Next.
4. In the Unigy Client, window, select the Create Shortcut on Desktop check box if you want theinstaller to add a shortcut icon to your desktop, then click Next.
5. In the Confirm Installation window, click Next.
6. The installer begins the installation process.
7. If you see the User Account Control message box requesting permission for the system to makechanges, click Yes.
The installer installs the software then displays the Installation Complete window. After a briefdelay, followed soon after by the Unigy Configuration Tool message box with the messageUnable to resolve CCM IP through DHCP services. Please enter CCMIP manually. Reason: No data received from DHCP server!
8. In the Unigy Configuration Tool message box , click OK.
9. In the Unigy Config Tool dialog box, configure the connection to the home zone or to a DHCPserver as described in Configure the Soft Client network connection on page 118 then clickSave.
10. In the Save message box, click OK.
11. In the Unigy Config Tool dialog box, click Close.
12. In the Installation Complete window, click Close.
• For Unigy v3.0 or higher, do the following:
1. In the Welcome to the Unigy(TM) Client Setup Wizard window, click Next.
2. In the End-User License Agreement window, read the Terms of Use, select the I accept theterms in the License Agreement check box, then click Next.
3. In the Destination Folder window, accept the default installation location or click the Changebutton to specify a new location then click Next.
4. In the Install Options window, select one, both, or neither of the following options then clickNext:
• Create Shortcut on Desktop: select this check box if you want the system to add a UnigyClient (Soft Client) shortcut to the desktop in addition to the shortcut it creates in theMicrosoft Windows Start menu.
116 A.3: Installation, upgrade, rollback, and uninstall procedures
December 2, 2016 IPC Systems, Inc., Confidential and Proprietary
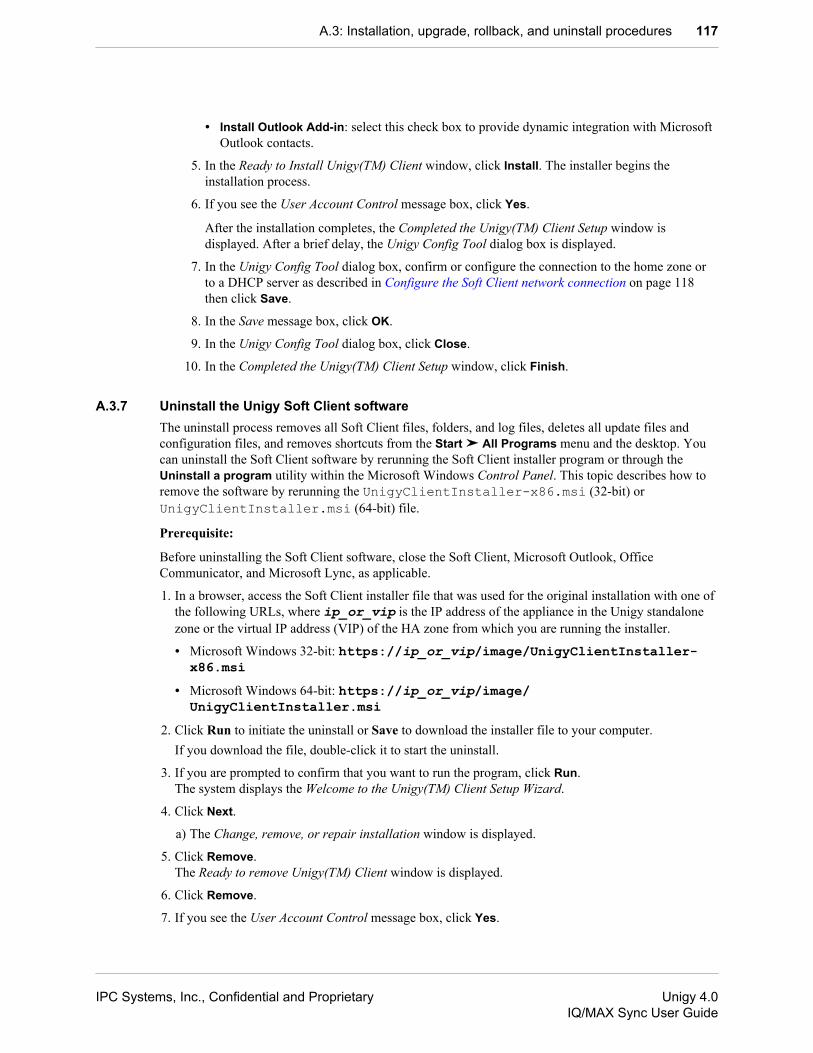
• Install Outlook Add-in: select this check box to provide dynamic integration with MicrosoftOutlook contacts.
5. In the Ready to Install Unigy(TM) Client window, click Install. The installer begins theinstallation process.
6. If you see the User Account Control message box, click Yes.
After the installation completes, the Completed the Unigy(TM) Client Setup window isdisplayed. After a brief delay, the Unigy Config Tool dialog box is displayed.
7. In the Unigy Config Tool dialog box, confirm or configure the connection to the home zone orto a DHCP server as described in Configure the Soft Client network connection on page 118then click Save.
8. In the Save message box, click OK.
9. In the Unigy Config Tool dialog box, click Close.
10. In the Completed the Unigy(TM) Client Setup window, click Finish.
A.3.7 Uninstall the Unigy Soft Client softwareThe uninstall process removes all Soft Client files, folders, and log files, deletes all update files andconfiguration files, and removes shortcuts from the Start ➤ All Programs menu and the desktop. Youcan uninstall the Soft Client software by rerunning the Soft Client installer program or through theUninstall a program utility within the Microsoft Windows Control Panel. This topic describes how toremove the software by rerunning the UnigyClientInstaller-x86.msi (32-bit) orUnigyClientInstaller.msi (64-bit) file.
Prerequisite:
Before uninstalling the Soft Client software, close the Soft Client, Microsoft Outlook, OfficeCommunicator, and Microsoft Lync, as applicable.
1. In a browser, access the Soft Client installer file that was used for the original installation with one ofthe following URLs, where ip_or_vip is the IP address of the appliance in the Unigy standalonezone or the virtual IP address (VIP) of the HA zone from which you are running the installer.
• Microsoft Windows 32-bit: https://ip_or_vip/image/UnigyClientInstaller-x86.msi
• Microsoft Windows 64-bit: https://ip_or_vip/image/UnigyClientInstaller.msi
2. Click Run to initiate the uninstall or Save to download the installer file to your computer.If you download the file, double-click it to start the uninstall.
3. If you are prompted to confirm that you want to run the program, click Run.The system displays the Welcome to the Unigy(TM) Client Setup Wizard.
4. Click Next.
a) The Change, remove, or repair installation window is displayed.
5. Click Remove.The Ready to remove Unigy(TM) Client window is displayed.
6. Click Remove.
7. If you see the User Account Control message box, click Yes.
A.3: Installation, upgrade, rollback, and uninstall procedures 117
IPC Systems, Inc., Confidential and Proprietary Unigy 4.0IQ/MAX Sync User Guide
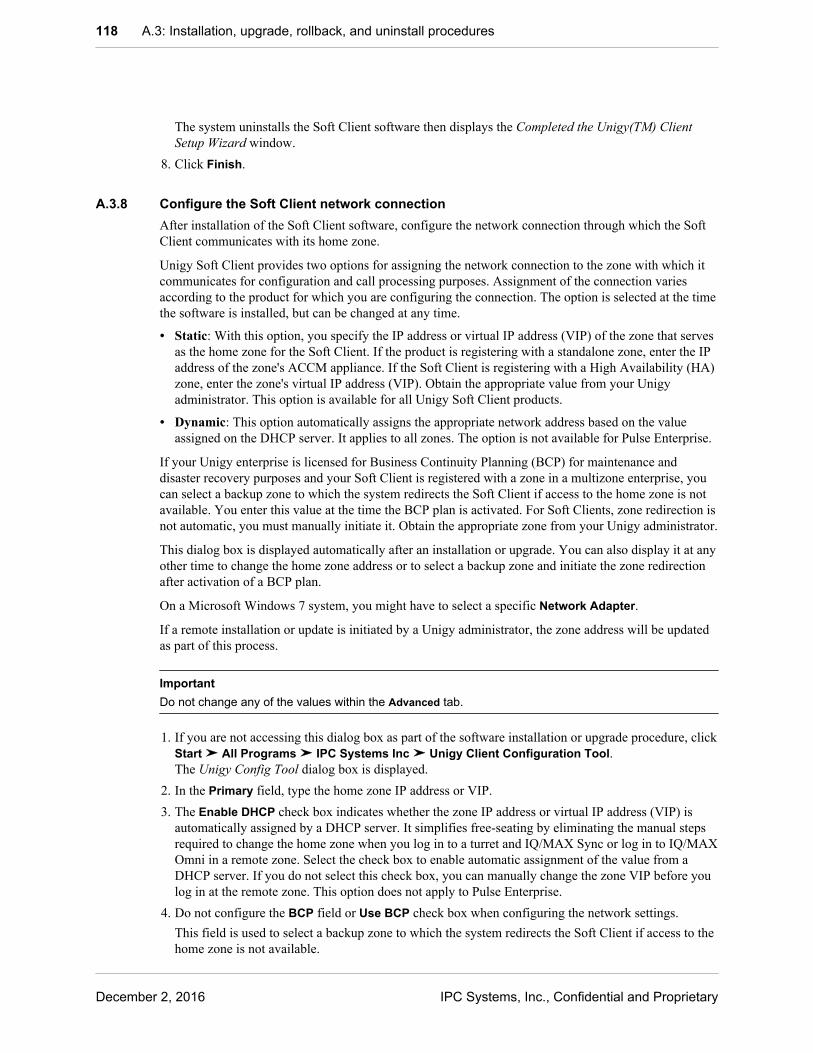
The system uninstalls the Soft Client software then displays the Completed the Unigy(TM) ClientSetup Wizard window.
8. Click Finish.
A.3.8 Configure the Soft Client network connectionAfter installation of the Soft Client software, configure the network connection through which the SoftClient communicates with its home zone.
Unigy Soft Client provides two options for assigning the network connection to the zone with which itcommunicates for configuration and call processing purposes. Assignment of the connection variesaccording to the product for which you are configuring the connection. The option is selected at the timethe software is installed, but can be changed at any time.
• Static: With this option, you specify the IP address or virtual IP address (VIP) of the zone that servesas the home zone for the Soft Client. If the product is registering with a standalone zone, enter the IPaddress of the zone's ACCM appliance. If the Soft Client is registering with a High Availability (HA)zone, enter the zone's virtual IP address (VIP). Obtain the appropriate value from your Unigyadministrator. This option is available for all Unigy Soft Client products.
• Dynamic: This option automatically assigns the appropriate network address based on the valueassigned on the DHCP server. It applies to all zones. The option is not available for Pulse Enterprise.
If your Unigy enterprise is licensed for Business Continuity Planning (BCP) for maintenance anddisaster recovery purposes and your Soft Client is registered with a zone in a multizone enterprise, youcan select a backup zone to which the system redirects the Soft Client if access to the home zone is notavailable. You enter this value at the time the BCP plan is activated. For Soft Clients, zone redirection isnot automatic, you must manually initiate it. Obtain the appropriate zone from your Unigy administrator.
This dialog box is displayed automatically after an installation or upgrade. You can also display it at anyother time to change the home zone address or to select a backup zone and initiate the zone redirectionafter activation of a BCP plan.
On a Microsoft Windows 7 system, you might have to select a specific Network Adapter.
If a remote installation or update is initiated by a Unigy administrator, the zone address will be updatedas part of this process.
ImportantDo not change any of the values within the Advanced tab.
1. If you are not accessing this dialog box as part of the software installation or upgrade procedure, clickStart ➤ All Programs ➤ IPC Systems Inc ➤ Unigy Client Configuration Tool.The Unigy Config Tool dialog box is displayed.
2. In the Primary field, type the home zone IP address or VIP.3. The Enable DHCP check box indicates whether the zone IP address or virtual IP address (VIP) is
automatically assigned by a DHCP server. It simplifies free-seating by eliminating the manual stepsrequired to change the home zone when you log in to a turret and IQ/MAX Sync or log in to IQ/MAXOmni in a remote zone. Select the check box to enable automatic assignment of the value from aDHCP server. If you do not select this check box, you can manually change the zone VIP before youlog in at the remote zone. This option does not apply to Pulse Enterprise.
4. Do not configure the BCP field or Use BCP check box when configuring the network settings.This field is used to select a backup zone to which the system redirects the Soft Client if access to thehome zone is not available.
118 A.3: Installation, upgrade, rollback, and uninstall procedures
December 2, 2016 IPC Systems, Inc., Confidential and Proprietary

5. In the Network Adapter list, generally you accept the default value Let Windows Choose, however,if you cannot open the Soft Client, you might have to select a specific adapter.Obtain the appropriate adapter name from your Unigy administrator. If you manually change theadapter and your network connection changes, for example, if you access the Soft Client through aVPN connection, you must change the adapter value for the new adapter.
6. Click Save.The Save message box is displayed.
7. Click OK.The information you entered is saved, but the Unigy Config Tool dialog box remains open.
8. Click Close.
A.3.9 Determine the current Soft Client software versionThe current version of the Unigy Soft Client software is available from the Soft Client Help menu andthe Microsoft Windows Uninstall or Change a Program application.
1. To view the version within the Soft Client help menu:
a) Log in to the Soft Client.
b) In the Main window toolbar, click the Help icon (?) then click About.The version is displayed in the About information box.
2. To view the version in the Microsoft Windows Uninstall or Change a Program application:
a) On the Microsoft Windows Desktop, click Start ➤ Control Panel ➤ Programs ➤ Uninstall aProgram.
b) Click the Unigy(TM) Client program.The version is displayed in the status bar at the bottom of the window.
A.4 RegistrationWhen a CDI (turret, Pulse, Soft Client, or Pulse Mobile) starts, it registers with a Unigy zone forconfiguration and call processing purposes.
A Unigy administrator enables device registration for each zone in the enterprise through the UnigyManagement System (UMS). When registration is enabled, new CDIs automatically register with azone.
Registration information includes the extension, device type, communications policy, device name,device ID, location, and IP address. Unigy stores this information and associates it with your user loginto establish a session or to close a session when you log out. Unigy uses registration information tomanage all sessions associated with a device ID or user.
The zone that was initially assigned to a CDI is its home zone. This zone creates and manages the CDIrecord and provides services for the CDI. Administrators cannot change a CDI's home zone from theUMS. To change the home zone, the zone IP address or VIP must be changed on the CDI, the CDI mustbe removed from the database, and it must re-register with the new home zone.
The only time CDIs can connect to a zone that is not their home zone is when a BCP plan is activated;this is known as CDI roaming. It occurs when the home zone is not available and the CDIs areredirected to a backup zone. The system automatically redirects turrets and Pulse devices to the backupzone. Soft Client redirection is a manual process. You can log in to a CDI only if registration is enabled,your CDI is registered with a zone, the home zone or a backup zone is available and has not reached its
A.4: Registration 119
IPC Systems, Inc., Confidential and Proprietary Unigy 4.0IQ/MAX Sync User Guide

maximum capacity, and your user account and device have the appropriate licenses assigned. If youcannot log in, contact your Unigy administrator.
120 A.4: Registration
December 2, 2016 IPC Systems, Inc., Confidential and Proprietary
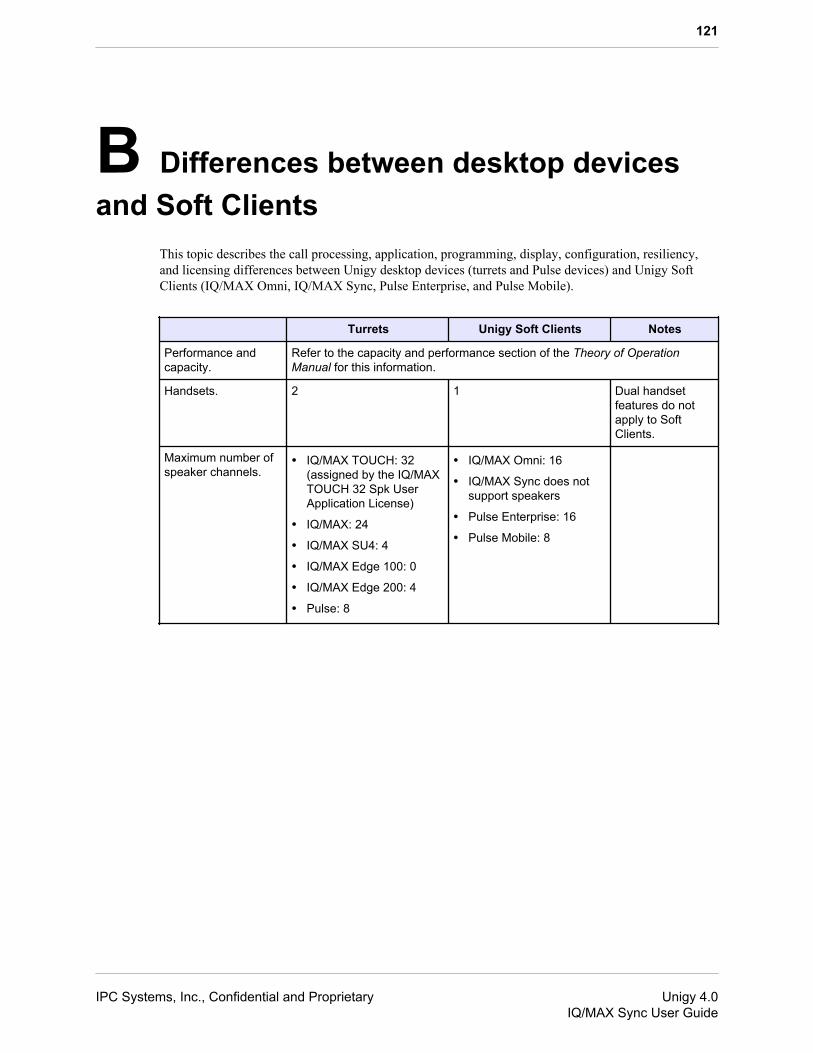
B Differences between desktop devicesand Soft Clients
This topic describes the call processing, application, programming, display, configuration, resiliency,and licensing differences between Unigy desktop devices (turrets and Pulse devices) and Unigy SoftClients (IQ/MAX Omni, IQ/MAX Sync, Pulse Enterprise, and Pulse Mobile).
Turrets Unigy Soft Clients Notes
Performance andcapacity.
Refer to the capacity and performance section of the Theory of OperationManual for this information.
Handsets. 2 1 Dual handsetfeatures do notapply to SoftClients.
Maximum number ofspeaker channels.
• IQ/MAX TOUCH: 32(assigned by the IQ/MAXTOUCH 32 Spk UserApplication License)
• IQ/MAX: 24
• IQ/MAX SU4: 4
• IQ/MAX Edge 100: 0
• IQ/MAX Edge 200: 4
• Pulse: 8
• IQ/MAX Omni: 16
• IQ/MAX Sync does notsupport speakers
• Pulse Enterprise: 16
• Pulse Mobile: 8
121
IPC Systems, Inc., Confidential and Proprietary Unigy 4.0IQ/MAX Sync User Guide

Turrets Unigy Soft Clients Notes
Speaker channellicenses (SCLs)Each license supportsfour speakerchannels.
Below are the number ofSCLs included with a turretsoftware license (TSL) foreach device personality, andwhere applicable, thenumber of additional SCLsthat a Unigy administratorcan assign:
• IQ/MAX TOUCH: noSCLs are included bydefault, can add up to 32speaker channels.
• IQ/MAX: includes 2 SCLsfor 8 speaker channels, 4additional SCLs can beadded.
• IQ/MAX Mini 4: includes 1SCL for 4 speakerchannels.
• IQ/MAX Edge 100: noSCLs available.
• IQ/MAX Edge 200:includes 1 SCL for 4speaker channels.
• Pulse: includes 1 SCL for4 speaker channels, 1additional SCL can beadded.
No SCLs are included bydefault, so a Unigyadministrator must assignthe number of SCLsrequired. Below are thenumber of licenses availableto assign for each product.
• IQ/MAX Omni: 0 to 4SCLs.
• IQ/MAX Sync does notsupport speakers.
• Pulse Enterprise: 0 to 4SCLs.
• Pulse Mobile: 0 to 2SCLs.
Voice paths. Multiple voice paths basedon the number of handsetsand speaker channels.
1 voice pathHandset and speaker callsshare the same voice path.Received audio is asummation of all channelsconnected and transmitaudio goes to all active calls.
122
December 2, 2016 IPC Systems, Inc., Confidential and Proprietary
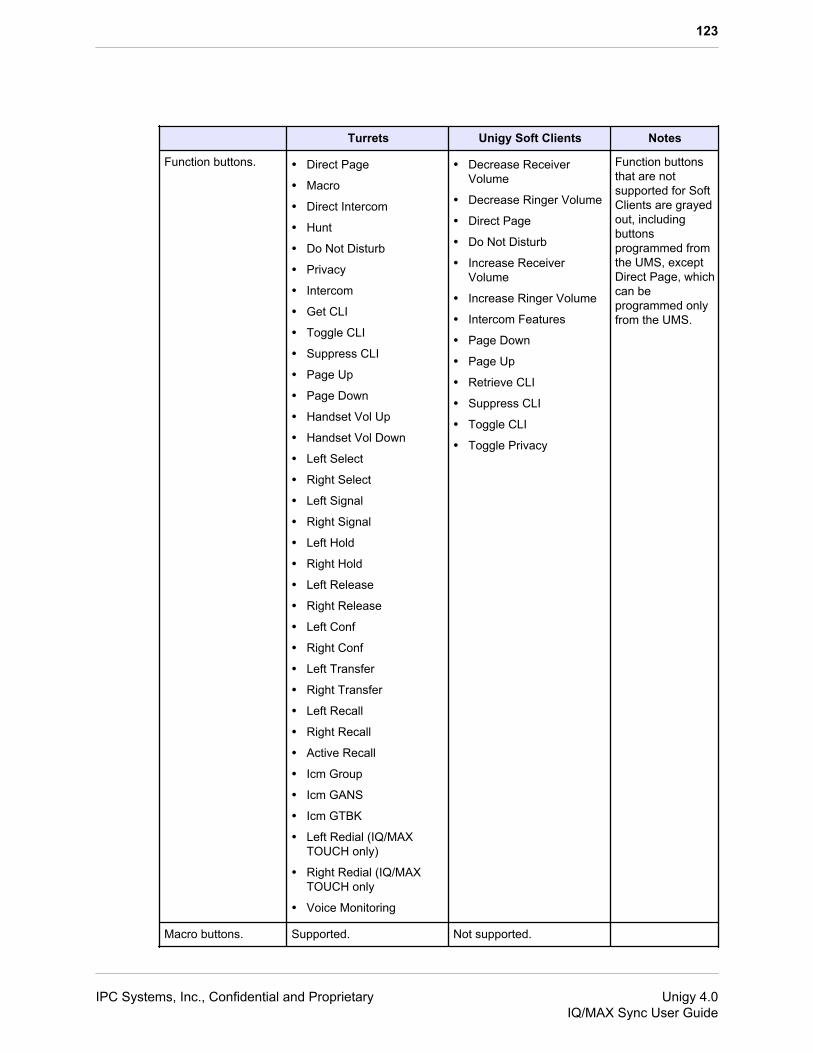
Turrets Unigy Soft Clients Notes
Function buttons. • Direct Page
• Macro
• Direct Intercom
• Hunt
• Do Not Disturb
• Privacy
• Intercom
• Get CLI
• Toggle CLI
• Suppress CLI
• Page Up
• Page Down
• Handset Vol Up
• Handset Vol Down
• Left Select
• Right Select
• Left Signal
• Right Signal
• Left Hold
• Right Hold
• Left Release
• Right Release
• Left Conf
• Right Conf
• Left Transfer
• Right Transfer
• Left Recall
• Right Recall
• Active Recall
• Icm Group
• Icm GANS
• Icm GTBK
• Left Redial (IQ/MAXTOUCH only)
• Right Redial (IQ/MAXTOUCH only
• Voice Monitoring
• Decrease ReceiverVolume
• Decrease Ringer Volume
• Direct Page
• Do Not Disturb
• Increase ReceiverVolume
• Increase Ringer Volume
• Intercom Features
• Page Down
• Page Up
• Retrieve CLI
• Suppress CLI
• Toggle CLI
• Toggle Privacy
Function buttonsthat are notsupported for SoftClients are grayedout, includingbuttonsprogrammed fromthe UMS, exceptDirect Page, whichcan beprogrammed onlyfrom the UMS.
Macro buttons. Supported. Not supported.
123
IPC Systems, Inc., Confidential and Proprietary Unigy 4.0IQ/MAX Sync User Guide
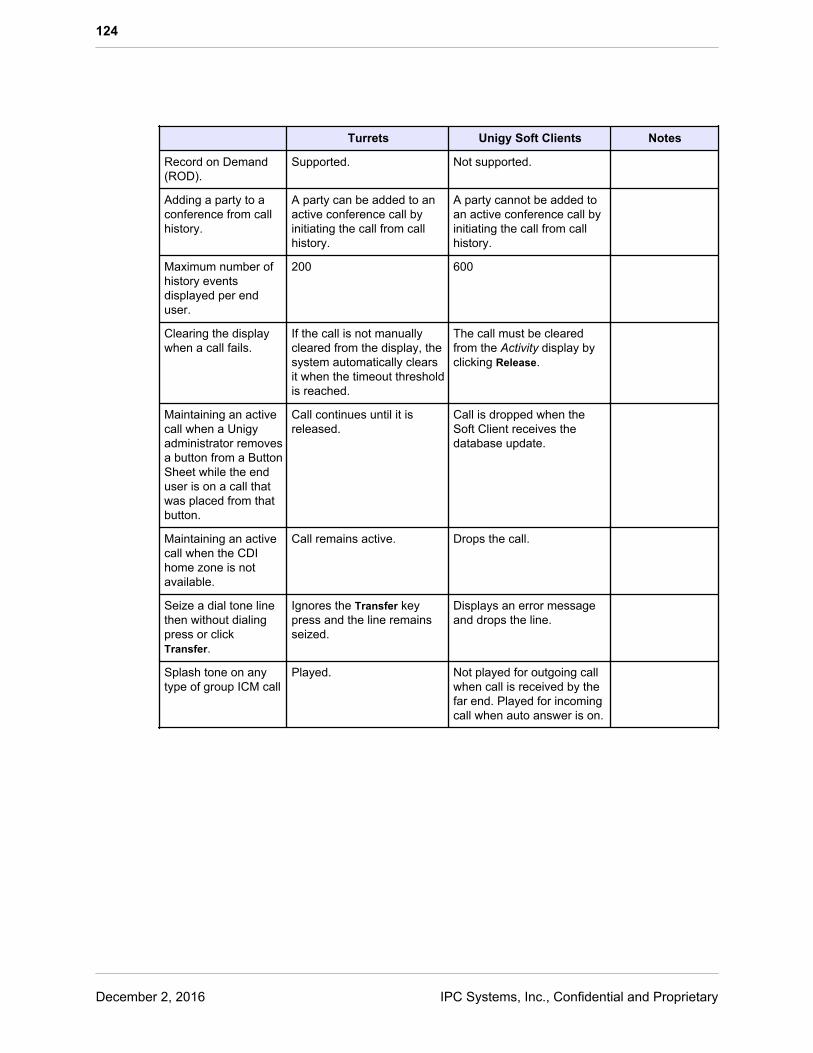
Turrets Unigy Soft Clients Notes
Record on Demand(ROD).
Supported. Not supported.
Adding a party to aconference from callhistory.
A party can be added to anactive conference call byinitiating the call from callhistory.
A party cannot be added toan active conference call byinitiating the call from callhistory.
Maximum number ofhistory eventsdisplayed per enduser.
200 600
Clearing the displaywhen a call fails.
If the call is not manuallycleared from the display, thesystem automatically clearsit when the timeout thresholdis reached.
The call must be clearedfrom the Activity display byclicking Release.
Maintaining an activecall when a Unigyadministrator removesa button from a ButtonSheet while the enduser is on a call thatwas placed from thatbutton.
Call continues until it isreleased.
Call is dropped when theSoft Client receives thedatabase update.
Maintaining an activecall when the CDIhome zone is notavailable.
Call remains active. Drops the call.
Seize a dial tone linethen without dialingpress or clickTransfer.
Ignores the Transfer keypress and the line remainsseized.
Displays an error messageand drops the line.
Splash tone on anytype of group ICM call
Played. Not played for outgoing callwhen call is received by thefar end. Played for incomingcall when auto answer is on.
124
December 2, 2016 IPC Systems, Inc., Confidential and Proprietary
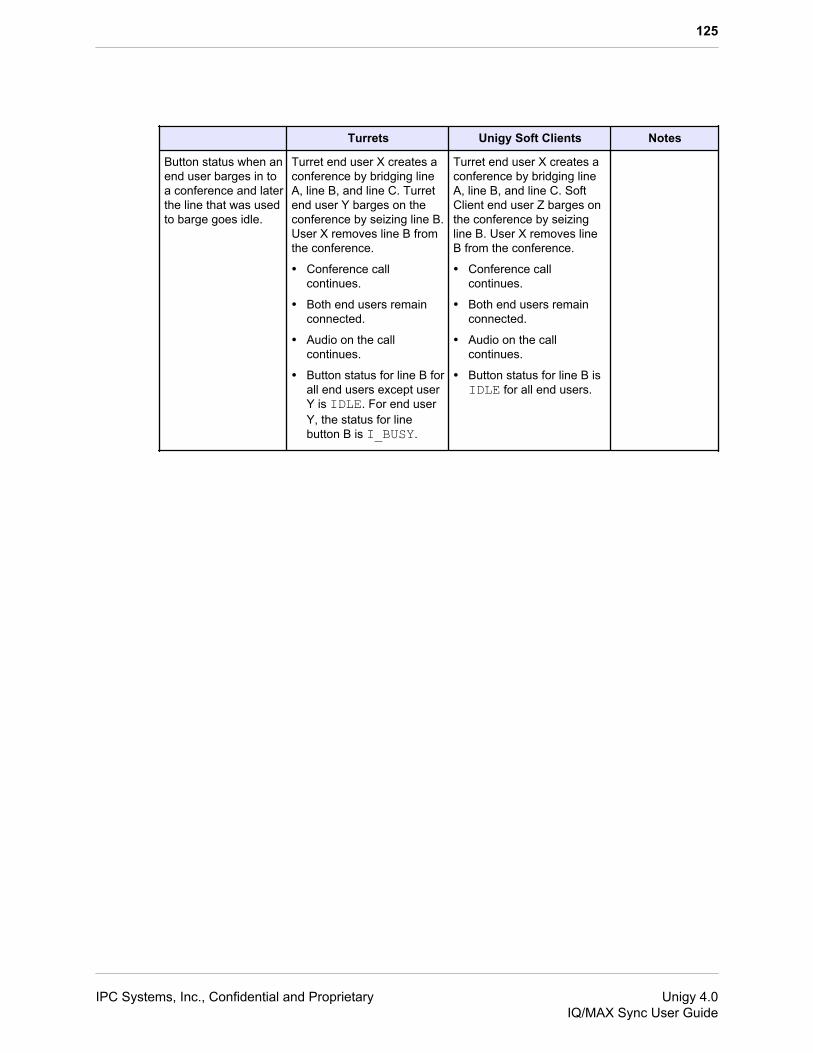
Turrets Unigy Soft Clients Notes
Button status when anend user barges in toa conference and laterthe line that was usedto barge goes idle.
Turret end user X creates aconference by bridging lineA, line B, and line C. Turretend user Y barges on theconference by seizing line B.User X removes line B fromthe conference.
• Conference callcontinues.
• Both end users remainconnected.
• Audio on the callcontinues.
• Button status for line B forall end users except userY is IDLE. For end userY, the status for linebutton B is I_BUSY.
Turret end user X creates aconference by bridging lineA, line B, and line C. SoftClient end user Z barges onthe conference by seizingline B. User X removes lineB from the conference.
• Conference callcontinues.
• Both end users remainconnected.
• Audio on the callcontinues.
• Button status for line B isIDLE for all end users.
125
IPC Systems, Inc., Confidential and Proprietary Unigy 4.0IQ/MAX Sync User Guide
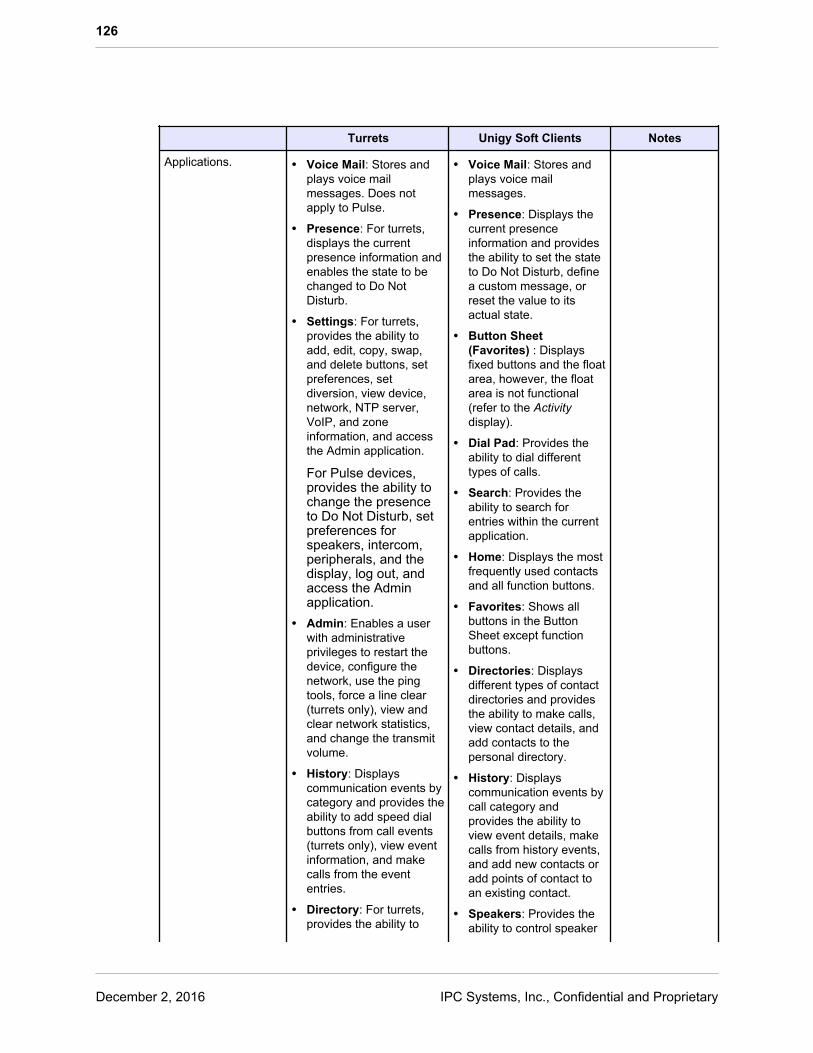
Turrets Unigy Soft Clients Notes
Applications. • Voice Mail: Stores andplays voice mailmessages. Does notapply to Pulse.
• Presence: For turrets,displays the currentpresence information andenables the state to bechanged to Do NotDisturb.
• Settings: For turrets,provides the ability toadd, edit, copy, swap,and delete buttons, setpreferences, setdiversion, view device,network, NTP server,VoIP, and zoneinformation, and accessthe Admin application.
For Pulse devices,provides the ability tochange the presenceto Do Not Disturb, setpreferences forspeakers, intercom,peripherals, and thedisplay, log out, andaccess the Adminapplication.
• Admin: Enables a userwith administrativeprivileges to restart thedevice, configure thenetwork, use the pingtools, force a line clear(turrets only), view andclear network statistics,and change the transmitvolume.
• History: Displayscommunication events bycategory and provides theability to add speed dialbuttons from call events(turrets only), view eventinformation, and makecalls from the evententries.
• Directory: For turrets,provides the ability to
• Voice Mail: Stores andplays voice mailmessages.
• Presence: Displays thecurrent presenceinformation and providesthe ability to set the stateto Do Not Disturb, definea custom message, orreset the value to itsactual state.
• Button Sheet(Favorites) : Displaysfixed buttons and the floatarea, however, the floatarea is not functional(refer to the Activitydisplay).
• Dial Pad: Provides theability to dial differenttypes of calls.
• Search: Provides theability to search forentries within the currentapplication.
• Home: Displays the mostfrequently used contactsand all function buttons.
• Favorites: Shows allbuttons in the ButtonSheet except functionbuttons.
• Directories: Displaysdifferent types of contactdirectories and providesthe ability to make calls,view contact details, andadd contacts to thepersonal directory.
• History: Displayscommunication events bycall category andprovides the ability toview event details, makecalls from history events,and add new contacts oradd points of contact toan existing contact.
• Speakers: Provides theability to control speaker
126
December 2, 2016 IPC Systems, Inc., Confidential and Proprietary
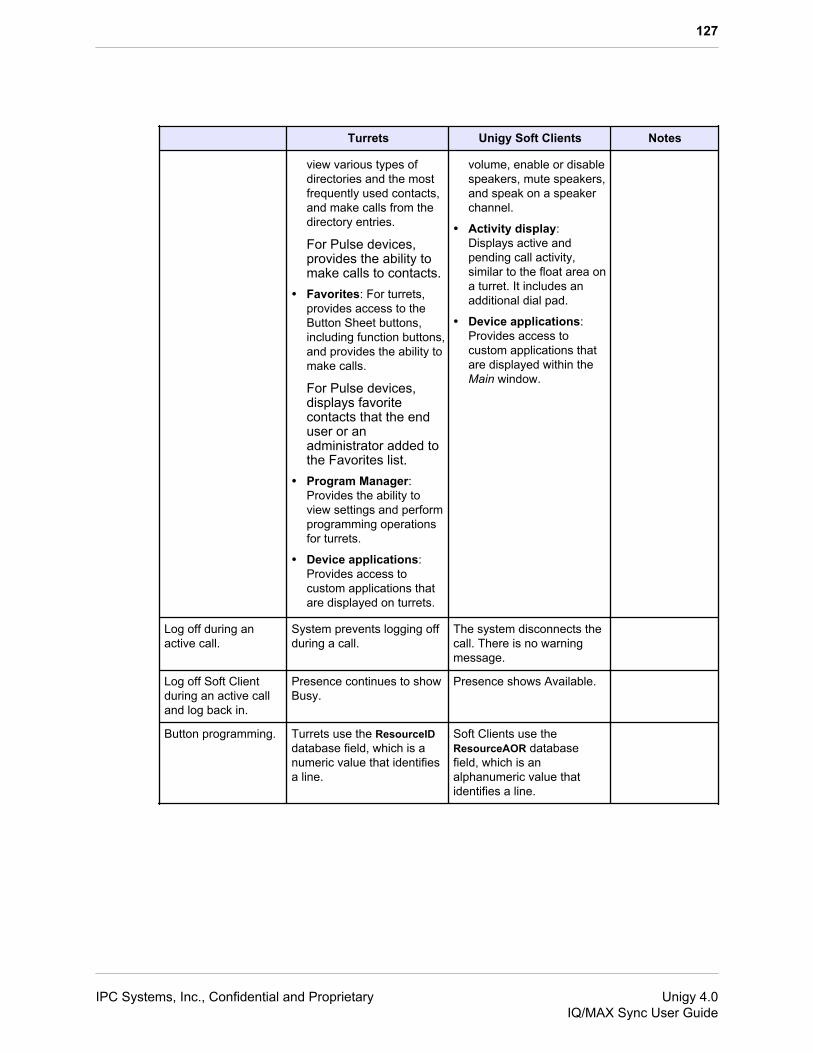
Turrets Unigy Soft Clients Notes
view various types ofdirectories and the mostfrequently used contacts,and make calls from thedirectory entries.
For Pulse devices,provides the ability tomake calls to contacts.
• Favorites: For turrets,provides access to theButton Sheet buttons,including function buttons,and provides the ability tomake calls.
For Pulse devices,displays favoritecontacts that the enduser or anadministrator added tothe Favorites list.
• Program Manager:Provides the ability toview settings and performprogramming operationsfor turrets.
• Device applications:Provides access tocustom applications thatare displayed on turrets.
volume, enable or disablespeakers, mute speakers,and speak on a speakerchannel.
• Activity display:Displays active andpending call activity,similar to the float area ona turret. It includes anadditional dial pad.
• Device applications:Provides access tocustom applications thatare displayed within theMain window.
Log off during anactive call.
System prevents logging offduring a call.
The system disconnects thecall. There is no warningmessage.
Log off Soft Clientduring an active calland log back in.
Presence continues to showBusy.
Presence shows Available.
Button programming. Turrets use the ResourceIDdatabase field, which is anumeric value that identifiesa line.
Soft Clients use theResourceAOR databasefield, which is analphanumeric value thatidentifies a line.
127
IPC Systems, Inc., Confidential and Proprietary Unigy 4.0IQ/MAX Sync User Guide

Turrets Unigy Soft Clients Notes
Message that isdisplayed when thesystem rejects anattempt to add aninvalid party to aconference.For example, a SoftClient end userconnects to line15101 to a speakerchannel to make aspeaker call. The linerings and the far endresponds on a turret.The Soft Client userbarges on line 15101from a button in theButton Sheet thenclicks Conference andattempts to add line15103 to theconference. Becauseline 15101 is on aspeaker call, thisaction is not allowed.
Message displayed, PartyAddition Rejected.
Message displayed,Request Denied .
Message that isdisplayed when anattempt to place a callon hold is rejectedwhen Auto Select/Holdis set to Hold.For example, a SoftClient end user seizesa dial tone line for aspeaker call thenseizes another linewithout releasing theprevious line.
A message indicating thatthe line is not placed on holdis not displayed, but amessage for the new seizedline is displayed.
The system displays themessage Can't placethis call on hold.
Button number froman end user's ButtonSheet can bedisplayed on aspeaker channelwhen the line that thebutton serves isconnected to aspeaker channel.
Supported. Not supported.
Show the speakersymbol on a linebutton in Favoriteswhen another enduser has the line on aspeaker.
End users see the speakersymbol in Favorites on allline buttons where the line ison a speaker, regardless ofwhether it is their speaker oranother end user's speaker.
End users can see thespeaker symbol only forlines that are on theirspeakers.
128
December 2, 2016 IPC Systems, Inc., Confidential and Proprietary
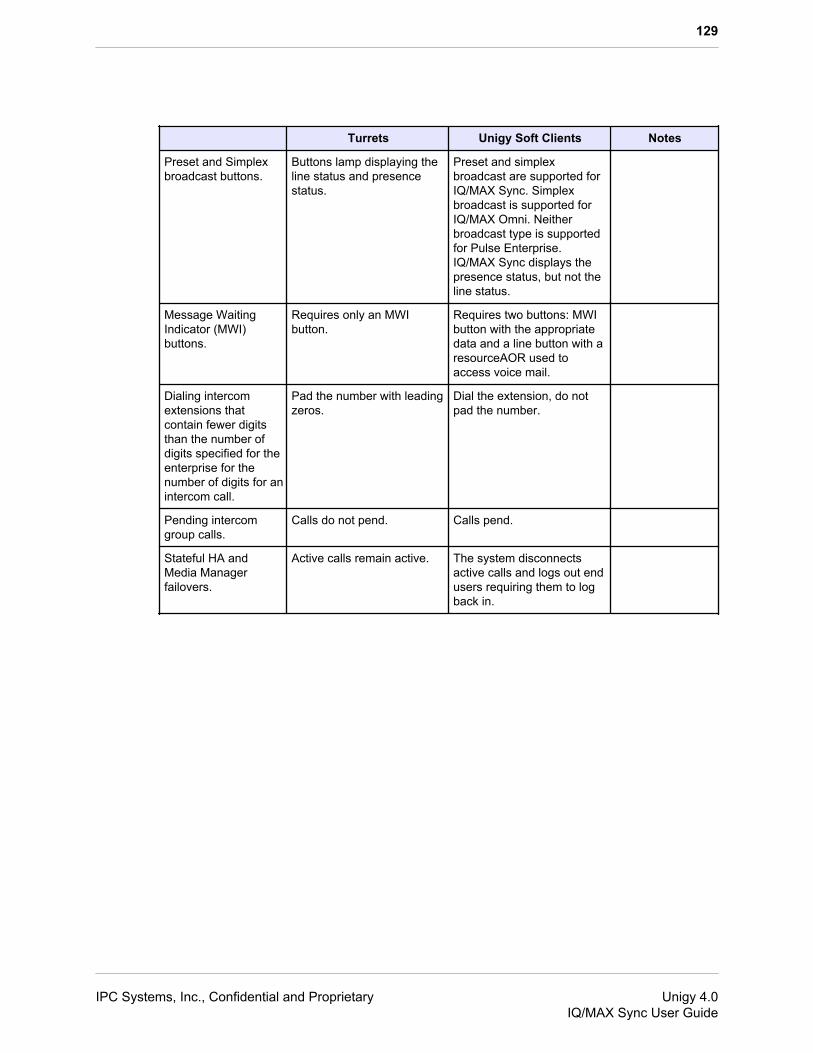
Turrets Unigy Soft Clients Notes
Preset and Simplexbroadcast buttons.
Buttons lamp displaying theline status and presencestatus.
Preset and simplexbroadcast are supported forIQ/MAX Sync. Simplexbroadcast is supported forIQ/MAX Omni. Neitherbroadcast type is supportedfor Pulse Enterprise.IQ/MAX Sync displays thepresence status, but not theline status.
Message WaitingIndicator (MWI)buttons.
Requires only an MWIbutton.
Requires two buttons: MWIbutton with the appropriatedata and a line button with aresourceAOR used toaccess voice mail.
Dialing intercomextensions thatcontain fewer digitsthan the number ofdigits specified for theenterprise for thenumber of digits for anintercom call.
Pad the number with leadingzeros.
Dial the extension, do notpad the number.
Pending intercomgroup calls.
Calls do not pend. Calls pend.
Stateful HA andMedia Managerfailovers.
Active calls remain active. The system disconnectsactive calls and logs out endusers requiring them to logback in.
129
IPC Systems, Inc., Confidential and Proprietary Unigy 4.0IQ/MAX Sync User Guide

Turrets Unigy Soft Clients Notes
CDI licenses. • Turret
Enterprise TraderLicense: assignedlicense, required, oneper turret end user,enforced at log in.
• Pulse
Pulse User License:assigned license,required, one per Pulseend user, enforced atlog in.
• IQ/MAX Omni
• Omni User License:anonymous license,one perIQ/MAX Omniend user, enforced atlog in.
• Enterprise TraderLicense: assignedlicense, required ifaccess to a turret isalso required, one perend user, enforced atlog in.
• FastFind license:assigned license,optional, one per enduser.
• Quick Dial license:assigned license,optional, one per enduser.
• IQ/MAX Sync
• Enterprise TraderLicense: assignedlicense, required, oneper IQ/MAX Sync enduser, enforced at login.
• FastFind license:assigned license,optional, one per enduser.
• Quick Dial license:assigned license,optional, one per enduser.
• Pulse Enterprise andPulse Mobile
• Pulse User License:assigned, required,one per PulseEnterprise or PulseMobile end user,enforced at log in.
• One of the following:Pulse EnterpriseIntercom only softwarelicense or Pulse
130
December 2, 2016 IPC Systems, Inc., Confidential and Proprietary

Turrets Unigy Soft Clients Notes
Enterprise Intercom &Hoot software license:required, one perPulse Enterprise orPulse Mobile end user,enforced at log in.
• FastFind license:assigned license,optional, one per enduser.
Mobility licenses. Required when free seatingat a different address fromthe home location.
Not required.
BCP. The system automaticallyredirects the devices to abackup zone during planactivation.
The system logs end usersoff during plan activation.They must manually redirectthe Soft Client to a backupzone then log in.
Redirecting a SoftClient is donewithin the UnigyClientConfigurationTool.
Changing theresource zone for anOpen Connexion linethat is assigned to aspeaker channel.Change the resourcezone to a differentzone during an activecall then change thezone back to theoriginal resourcezone.
Turrets automaticallyattempt to reseize the line onthe speaker channel.
Soft Clients do not attemptto reseize the line. Endusers must seize the line onthe speaker channel to makeit active.
Delete a point ofcontact that isprogrammed on abutton from the UMS.
The button is removed fromFavorites.
The button remains in theButton Sheet, but isdisabled.
The end usersmust reboot theirCDI to see thechange.
131
IPC Systems, Inc., Confidential and Proprietary Unigy 4.0IQ/MAX Sync User Guide

132
December 2, 2016 IPC Systems, Inc., Confidential and Proprietary
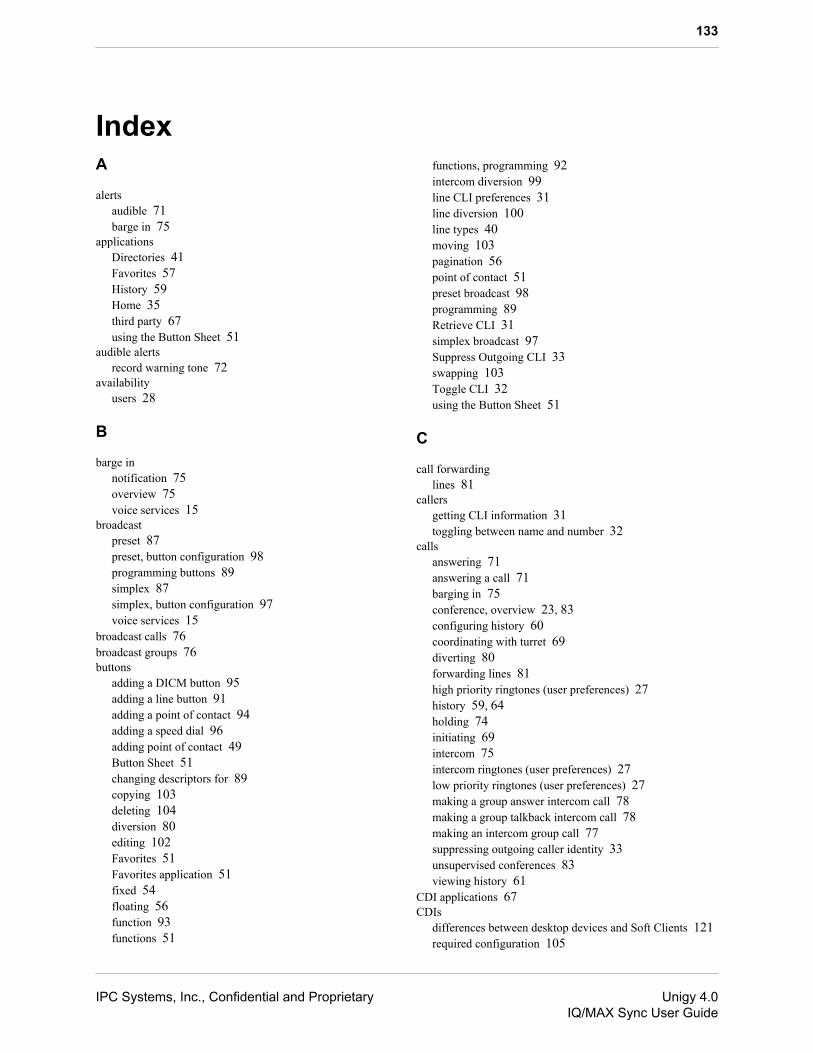
133
IndexA
alertsaudible 71barge in 75
applicationsDirectories 41Favorites 57History 59Home 35third party 67using the Button Sheet 51
audible alertsrecord warning tone 72
availabilityusers 28
B
barge innotification 75overview 75voice services 15
broadcastpreset 87preset, button configuration 98programming buttons 89simplex 87simplex, button configuration 97voice services 15
broadcast calls 76broadcast groups 76buttons
adding a DICM button 95adding a line button 91adding a point of contact 94adding a speed dial 96adding point of contact 49Button Sheet 51changing descriptors for 89copying 103deleting 104diversion 80editing 102Favorites 51Favorites application 51fixed 54floating 56function 93functions 51
functions, programming 92intercom diversion 99line CLI preferences 31line diversion 100line types 40moving 103pagination 56point of contact 51preset broadcast 98programming 89Retrieve CLI 31simplex broadcast 97Suppress Outgoing CLI 33swapping 103Toggle CLI 32using the Button Sheet 51
C
call forwardinglines 81
callersgetting CLI information 31toggling between name and number 32
callsanswering 71answering a call 71barging in 75conference, overview 23, 83configuring history 60coordinating with turret 69diverting 80forwarding lines 81high priority ringtones (user preferences) 27history 59, 64holding 74initiating 69intercom 75intercom ringtones (user preferences) 27low priority ringtones (user preferences) 27making a group answer intercom call 78making a group talkback intercom call 78making an intercom group call 77suppressing outgoing caller identity 33unsupervised conferences 83viewing history 61
CDI applications 67CDIs
differences between desktop devices and Soft Clients 121required configuration 105
IPC Systems, Inc., Confidential and Proprietary Unigy 4.0IQ/MAX Sync User Guide

CLIfor line buttons 31function buttons 29getting caller information 31line preferences 91Retrieve CLI function 31retrieving information 29setting user preferences 29suppressing 29suppressing outgoing information 33Toggle CLI function 32toggling between name and number 32toggling name and number 29using Suppress Outgoing CLI function 33voice services 15
CLI Preferencefor history displays 60line preferences 60user preferences 60
communications historyevent details 64
conferenceduplex 87preset 87simplex 87
conference broadcast 87conferences
overview 23, 83scenarios 84–86unsupervised 83voice services 15
configurationfor CDI users 105Soft Client network connection 118
configurepreset broadcast 97, 98
contactsadding a point of contact button 94adding a speed dial button 96adding local 49adding point of contact to Favorites 49adding to personal directory 45copying from enterprise directory 47deleting personal 48editing 48navigating directories 44personal 40personal, editing 48programming shortcuts for 89viewing 41
context-sensitive help 17, 18CPI 31customization
user preferences 27
D
Date Display Formatfor history displays 60
DDIsetting diversion 100
default directory 40desktop devices
differences from Soft Clients 121device applications
overview 67using 67
devicesfree seating 22registration 119
DICM buttonadding 95
directoriesenterprise 40local 40navigating 44overview 40personal 40personal, displaying 45
Directories applicationviewing 41
diversionintercom 81intercom, setting 99line, setting 100lines 81one-button 80status display 80voice services 15
Do Not Disturb 93dual talk path 15duplex conference 87
E
enterprise directorycopying a contact 47definition 40displaying 44
eventsviewing history 61
exclusive holdoverview 74
exit 34
134
December 2, 2016 IPC Systems, Inc., Confidential and Proprietary
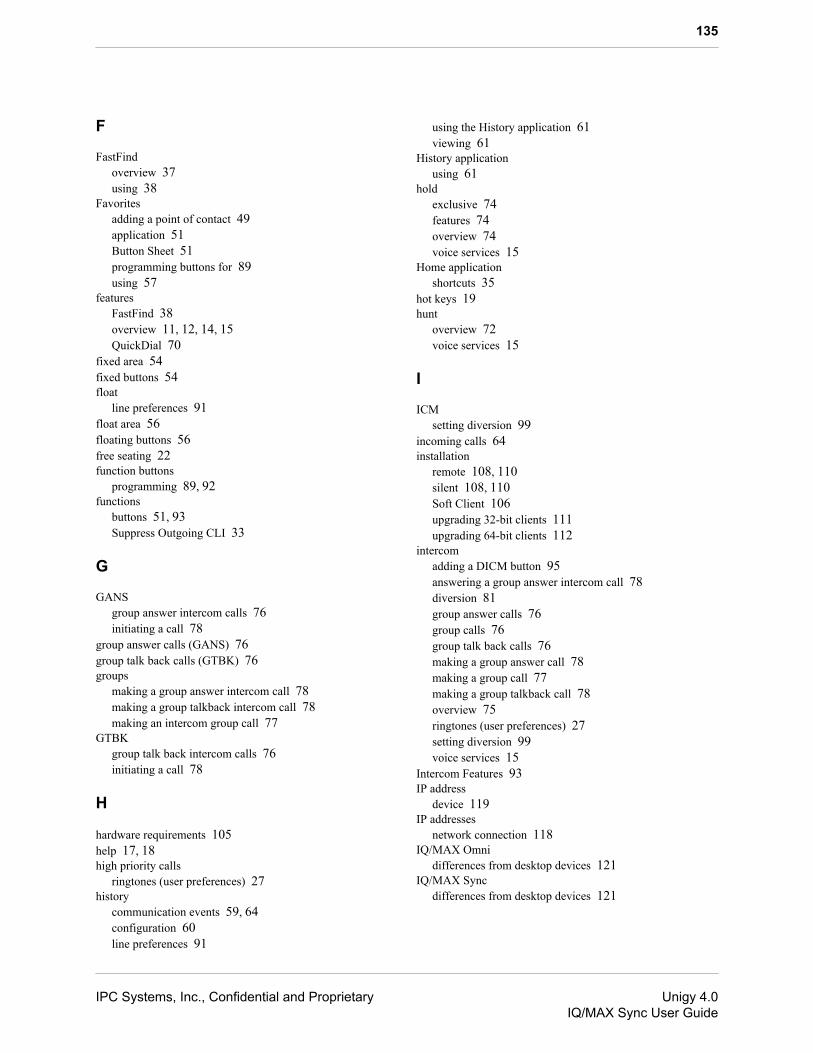
F
FastFindoverview 37using 38
Favoritesadding a point of contact 49application 51Button Sheet 51programming buttons for 89using 57
featuresFastFind 38overview 11, 12, 14, 15QuickDial 70
fixed area 54fixed buttons 54float
line preferences 91float area 56floating buttons 56free seating 22function buttons
programming 89, 92functions
buttons 51, 93Suppress Outgoing CLI 33
G
GANSgroup answer intercom calls 76initiating a call 78
group answer calls (GANS) 76group talk back calls (GTBK) 76groups
making a group answer intercom call 78making a group talkback intercom call 78making an intercom group call 77
GTBKgroup talk back intercom calls 76initiating a call 78
H
hardware requirements 105help 17, 18high priority calls
ringtones (user preferences) 27history
communication events 59, 64configuration 60line preferences 91
using the History application 61viewing 61
History applicationusing 61
holdexclusive 74features 74overview 74voice services 15
Home applicationshortcuts 35
hot keys 19hunt
overview 72voice services 15
I
ICMsetting diversion 99
incoming calls 64installation
remote 108, 110silent 108, 110Soft Client 106upgrading 32-bit clients 111upgrading 64-bit clients 112
intercomadding a DICM button 95answering a group answer intercom call 78diversion 81group answer calls 76group calls 76group talk back calls 76making a group answer call 78making a group call 77making a group talkback call 78overview 75ringtones (user preferences) 27setting diversion 99voice services 15
Intercom Features 93IP address
device 119IP addresses
network connection 118IQ/MAX Omni
differences from desktop devices 121IQ/MAX Sync
differences from desktop devices 121
135
IPC Systems, Inc., Confidential and Proprietary Unigy 4.0IQ/MAX Sync User Guide

K
keyboard shortcuts 19
L
linesadding a button 91appearances 91buttons 40CLI preferences for buttons 31configuring history 60diversion 81hunt 72preferences 60, 91priority 91programming 40setting diversion 100user preferences 40voice services 15
local contactsadding 49
local directorydefinition 40displaying 44
log in 23log out 33login
free seating 22low priority calls
ringtones (user preferences) 27
M
missed calls 64momentary privacy 73mute
voice services 15
N
navigationuser interface 34
networksconfiguring connection 118
notificationbarge in 75
O
one-button diversion 80online help 17, 18outgoing calls 64
Outlookadding local contacts 49
P
Page Down 93Page Up 93pagination
buttons 56panels
hiding 36, 37personal contacts
adding 45deleting 48
personal directorycopying contact to 47definition 40displaying 44, 45editing a contact 48
point of contactadding to Favorites 49buttons 51
point of contact buttonadding 94
preferencesdefining 27
presencesetting 28
preset broadcastbutton configuration 98
priorityfor lines 91
privacyexclusive hold 74momentary 73voice services 15
programmingfunction buttons 92preset broadcast button 98simplex broadcast button 97
Pulse devicesdifferences from Soft Clients 121
Pulse Enterprisedifferences from desktop devices 121
Pulse Mobiledifferences from desktop devices 121
pushing the Soft Client software 108, 110
Q
QuickDialusing 70
quiet installation 108, 110
136
December 2, 2016 IPC Systems, Inc., Confidential and Proprietary

quiet uninstallation 108, 110
R
recordingwarning tone 72
registration 119remote installation 108, 110remote uninstallation 108, 110requirements
hardware 105software 105
Retrieve CLI 93Retrieve CLI function
using 31ring tones
overrides 91priority 91
ringtonespreferences 27
routing planshunt 72hunt group 72
S
searchFastFind 37
shortcut buttons 89shortcuts
viewing 35shut down 34sign out 33, 34silent installation 108, 110silent uninstallation 108, 110simplex
broadcast 87conference 87
simplex broadcastbutton configuration 97
Soft Clientinstalling 106requirements 105rolling back 32-bit clients 114rolling back 64-bit clients 115software version 119system tray controls 26uninstalling 117upgrading 32-bit clients 111upgrading 64-bit clients 112version 117voice services 15
Soft Clients
configuring network connection 118differences from desktop devices 121
software requirements 105software version
Unigy Soft Client 119speed dial
adding a button 96configuring buttons 89line selection 72
statusaudible alerts 71users 28
status messagescommunication barrier 68
Suppress Outgoing CLI 93Suppress Outgoing CLI function
using 33system tray
controls 26
T
Time Display Formatfor history displays 60
Toggle CLI 93Toggle CLI function
using 32Toggle Privacy 93tones
warning 72transfers
voice services 15turrets
coordinating with IQ/MAX Sync 69differences from Soft Client s 121voice services 15
U
Unigy Clientsystem tray controls 26
Unigy Soft Clientrequirements 105rolling back 32-bit clients 114rolling back 64-bit clients 115software version 119upgrading 32-bit clients 111upgrading 64-bit clients 112version 117
uninstallSoft Client 117
uninstallationremote 108, 110
137
IPC Systems, Inc., Confidential and Proprietary Unigy 4.0IQ/MAX Sync User Guide
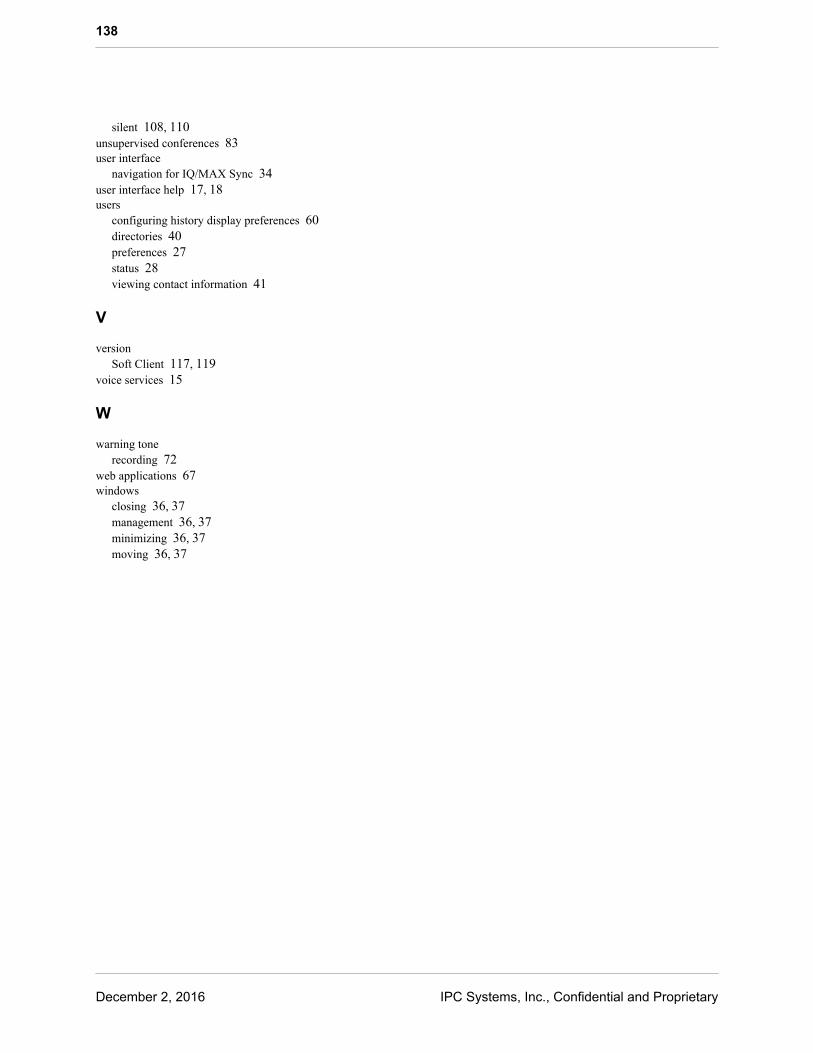
silent 108, 110unsupervised conferences 83user interface
navigation for IQ/MAX Sync 34user interface help 17, 18users
configuring history display preferences 60directories 40preferences 27status 28viewing contact information 41
V
versionSoft Client 117, 119
voice services 15
W
warning tonerecording 72
web applications 67windows
closing 36, 37management 36, 37minimizing 36, 37moving 36, 37
138
December 2, 2016 IPC Systems, Inc., Confidential and Proprietary


Part Number: B02200569, Release: 00IPC Systems, Inc.
777 Commerce DriveFairfield, CT 06825-5500 USA