ipad mini - p4.zdassets.com · ipad mini digi icracked likes to stay on the safe side of repairs,...
TRANSCRIPT
Digitizer Replacement GuideiPad Mini
Product Installation Best Practices

iPad Mini Digi
©2014 iCracked, Inc. All rights reserved. iOS, all Apple product names, and Apple logos are trademark property of Apple, Inc.
The content of this document is for iCracked Inc.’s suggested best practices for product use and installation Users of this document are not permitted to
copy, sell, reproduce, distribute, or otherwise share this content, either in part or as a whole, with others. Misuse of the content will be viewed as a violation of any license, employment agreement, or independent affiliate relationship
with iCracked.

iPad Mini Digi
iCracked likes to stay on the safe side of repairs, and by using ESD (Electrostatic Discharge) safe tools and equipment, you can be sure to avoid static damage to your mobile device.
ESD damage is difficult to diagnose as its effect isn’t usually immediately apparent, but sensitive sections of the logic board can, nevertheless, get weakened by static, and in turn become non-functional over time. While installing an iCracked touch screen digitizer or an LCD screen, doing a repair with ESD safety in mind can save the long-term circuitry and functionality of the device.
ESD SAFETY!
iPad Mini Digi
It is important that you understand that safety glasses should be worn when working on the iPad; there is a high risk of eye injuries from the digitizer glass being removed as it tends to break up into small shards that could land in your eye.
Every day an estimated 1000 people suffer from an eye injury at work. Approximately 10% of these injuries are severe enough to require days away from work to recover. While the financial cost of these injuries is substantial, no dollar figure can adequately reflect the personal toll these incidents take on the injured iTech.
EYE SAFETY!

iPad Mini Digi
RECOMMENDED TOOLS AND PARTS
iSesamo Opening ToolESD safe nylon spudgerESD safe tweezersESD safe #00 Phillips screwdriverGuitar PicksSafety GlassesNitrile or powder-free latex glovesHot air gun or Honton 2020PDI adhesive remover padDental Floss
iPad Mini Digitizer
Tools Required: Parts Needed:
3M Tape Primer (Highly Recommended)Soft-bristled brush (makeup brush)
Optional:
iPad Mini Digi
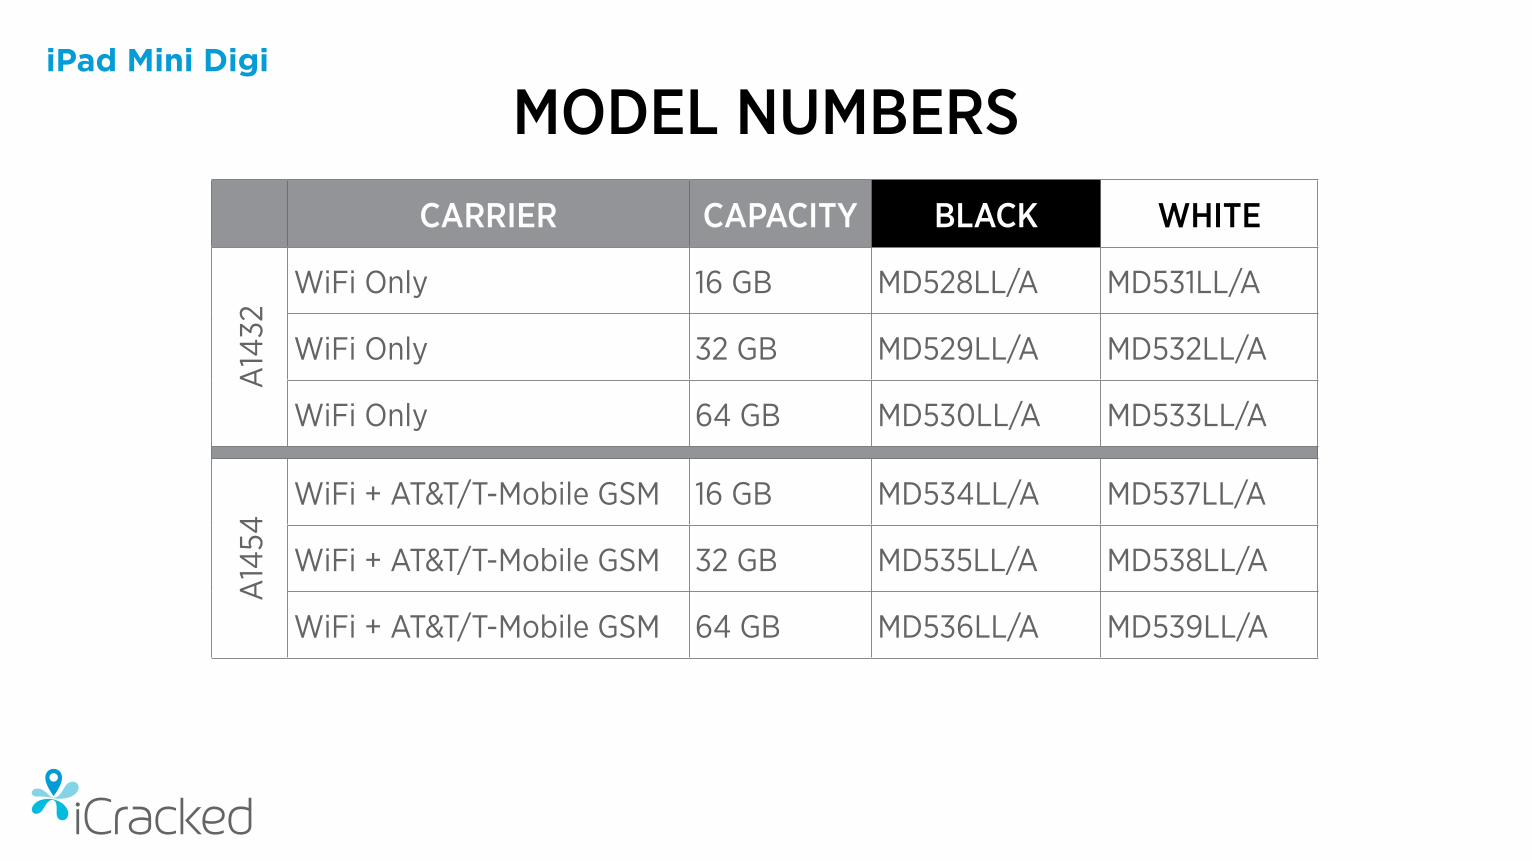
CARRIER CAPACITY BLACK WHITEA
1432
WiFi Only 16 GB MD528LL/A MD531LL/A
WiFi Only 32 GB MD529LL/A MD532LL/A
WiFi Only 64 GB MD530LL/A MD533LL/A
A14
54
WiFi + AT&T/T-Mobile GSM 16 GB MD534LL/A MD537LL/A
WiFi + AT&T/T-Mobile GSM 32 GB MD535LL/A MD538LL/A
WiFi + AT&T/T-Mobile GSM 64 GB MD536LL/A MD539LL/A
MODEL NUMBERS

iPad Mini Digi
MODEL NUMBERSCARRIER CAPACITY BLACK WHITE
A14
55WiFi + Verizon CDMA 16 GB MD540LL/A MD543LL/A
WiFi + Verizon CDMA 32 GB MD541LL/A MD544LL/A
WiFi + Verizon CDMA 64 GB MD542LL/A MD545LL/A
WiFi + Verizon CDMA 16 GB ME215LL/A ME218LL/A
WiFi + Verizon CDMA 32 GB ME216LL/A ME219LL/A
WiFi + Verizon CDMA 64 GB ME217LL/A ME220LL/A
iPad Mini Digi
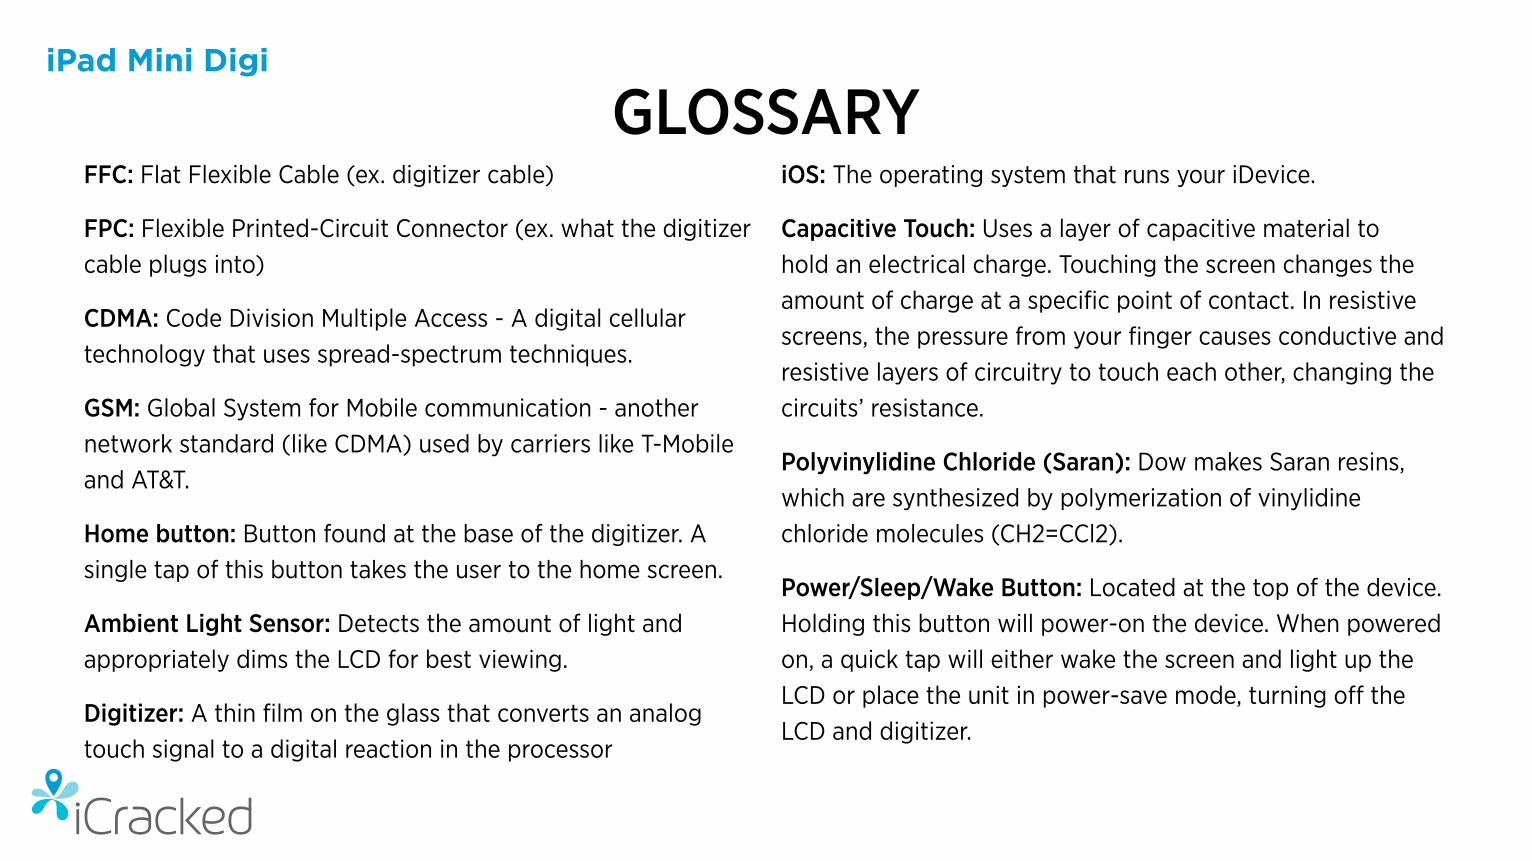
FFC: Flat Flexible Cable (ex. digitizer cable)
FPC: Flexible Printed-Circuit Connector (ex. what the digitizer cable plugs into)
CDMA: Code Division Multiple Access - A digital cellular technology that uses spread-spectrum techniques.
GSM: Global System for Mobile communication - another network standard (like CDMA) used by carriers like T-Mobile and AT&T.
Home button: Button found at the base of the digitizer. A single tap of this button takes the user to the home screen.
Ambient Light Sensor: Detects the amount of light and appropriately dims the LCD for best viewing.
Digitizer: A thin film on the glass that converts an analog touch signal to a digital reaction in the processor
iOS: The operating system that runs your iDevice.
Capacitive Touch: Uses a layer of capacitive material to hold an electrical charge. Touching the screen changes the amount of charge at a specific point of contact. In resistive screens, the pressure from your finger causes conductive and resistive layers of circuitry to touch each other, changing the circuits’ resistance.
Polyvinylidine Chloride (Saran): Dow makes Saran resins, which are synthesized by polymerization of vinylidine chloride molecules (CH2=CCl2).
Power/Sleep/Wake Button: Located at the top of the device. Holding this button will power-on the device. When powered on, a quick tap will either wake the screen and light up the LCD or place the unit in power-save mode, turning off the LCD and digitizer.
GLOSSARY

iPad Mini Digi
ASSESS AND INFORM
It will be impossible to place new glass into this frame without some modification. It is EXTREMELY IMPORTANT that you inform the customer of the issues involved with re-shaping or filing the frame, so that expectations are appropriately set. The back plate can be modified with hand tools and a small polishing grinder or file. The repair will not look perfect, but will allow you to install the glass correctly.
When repairing an iPad, check the metal frame for damage, dents and dings.
It’s obvious that this unit was dropped on the corner by the flattened frame.
Here’s a new piece of glass that’s about to be installed onto the unit. The glass has the original rounded corner that WILL NOT fit into the damaged aluminum back plate as-is.
parts shown are from iPad 2
info relevant for all iPads

iPad Mini Digi
• Before working on any iOS device, we recommend testing all of the functions that are described in the iTech app.
• Power off the device before performing any repairs!
• If you have any questions regarding the use of the product before starting a repair, contact an iCracked Regional Manager, or use the SOS button in the iTech app for customer support.
IMPORTANT!
iPad Mini Digi
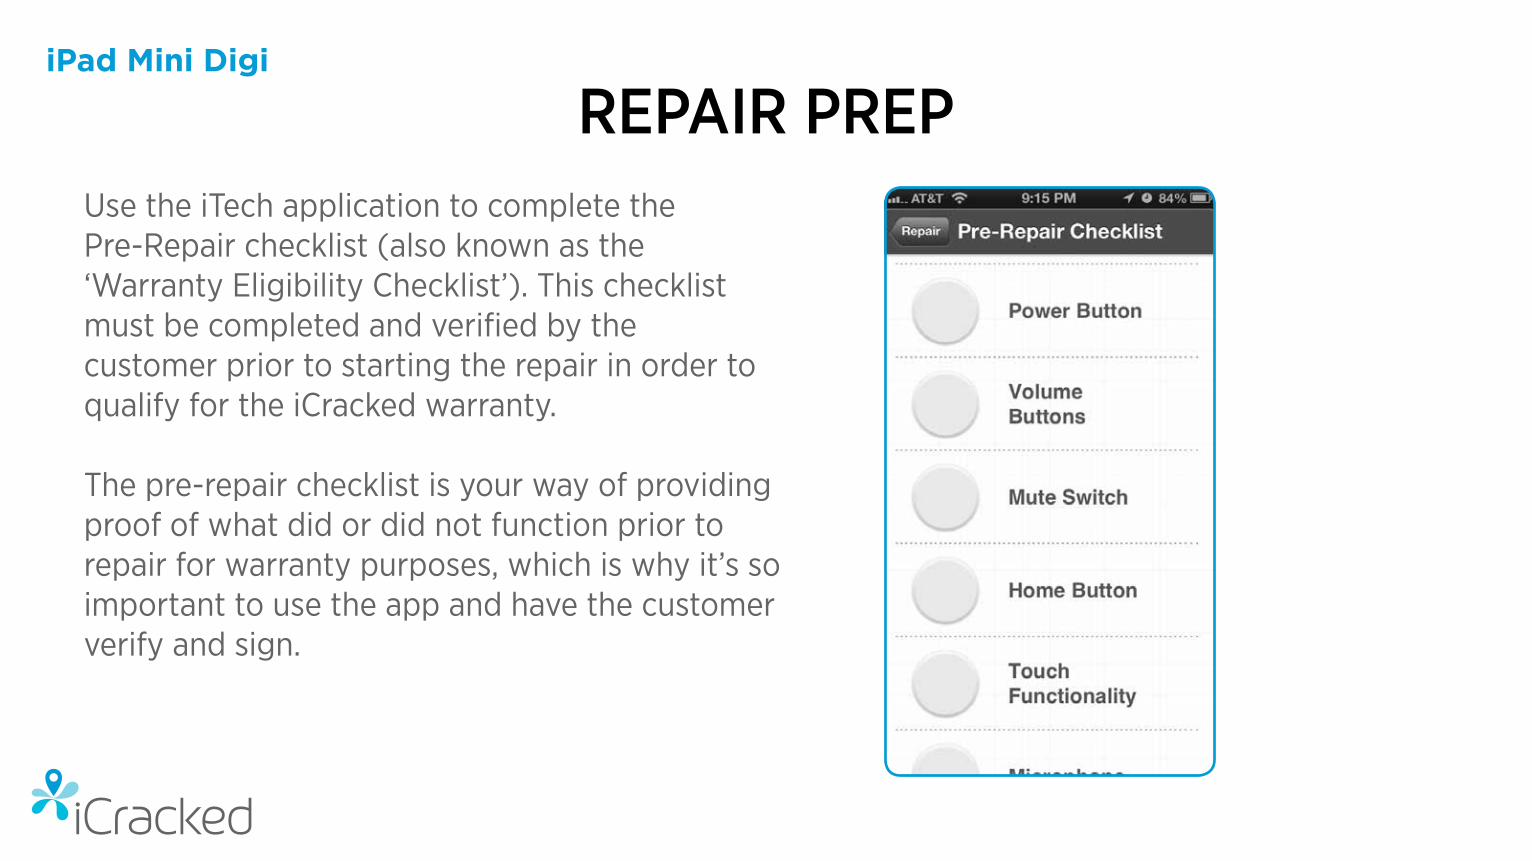
Use the iTech application to complete the Pre-Repair checklist (also known as the ‘Warranty Eligibility Checklist’). This checklist must be completed and verified by the customer prior to starting the repair in order to qualify for the iCracked warranty.
The pre-repair checklist is your way of providing proof of what did or did not function prior to repair for warranty purposes, which is why it’s so important to use the app and have the customer verify and sign.
REPAIR PREP

iPad Mini Digi
REPAIR PREPBecause the home button can only be used when the display assembly is installed, it’s a good idea to turn on “Assistive Touch” before powering down the Device.
Enable Assistive Touch on your device:
Tap Settings > General > Accessibility > Assistive Touch > Slide to ON.

iPad Mini Digi
Hold the power/sleep button down until “slide to power off” shows up on the screen. Slide the arrow from left to right.
If the digitizer is not functioning:Power off the iPad by holding down both the power/sleep button and the home button until the Apple™ logo shows up. Continue holding down until the screen goes black, then release.
If the power button does not function:Using assistive touch, touch the white bubble > Device > press and hold “Lock Screen” until the “slide to power off” drops down, and then slide the arrow from left to right.
POWER DOWN TO BEGIN

iPad Mini Digi
IMPORTANT!
INSTRUCTIONS• Be VERY cautious near any plastic components and around the LCD, especially in areas exposed through bro-ken glass • Angle the nozzle between 30-45° degrees, pointed at the outer edges of the iPad • Continually move the air flow around the edges of the iPad to get even heat around the digitizer. Do NOT stay in the same spot for more then 5 seconds• Using an infrared thermometer, maintain 100-120°F temp• Avoid directing heat at any area where the digitizer is badly damaged and the LCD is exposed. Any heat expo-sure to the LCD can cause irreparable damage
The hot air gun can produce 1000°F of flameless heat used to heat the adhesive under the glass of the digitizer. It can be dangerous if misused. Follow these instructions and safety warnings.
HEAT GUN SAFETY• Do not point directly at your skin, it will burn you! Keep face, hands, hair, clothing, etc., away from the air stream• Maintain about a 2 inch distance from any object to en-sure unrestricted airflow• Connect to a grounded outlet to avoid risk of fire or eclectic shock• Never operate the gun lying on its side or leave unat-tended. Always hold it securely in the hand• Wear safety glasses• Never use a heat gun if overly tired, taking medication, or under the influence of drugs or alcohol• Do not use near flammable liquids or explosives• Don’t touch the nozzle! Cool for 3-5 minutes after unit is turned off

iPad Mini Digi
Digitizer Removal
1step
The iPad digitizer is attached by adhesive between the glass and frame. Moving in a circular motion around the frame, heat all four sides of the digitizer using the hot air gun. Once the glass reaches a temperature between 100° and 120° the adhesive will begin to loosen up.
NOTE: Prevent fingerprints and physical harm from glass shards by wearing nitrile or powder-free latex gloves while working on the iPad.

iPad Mini Digi
2step
Start by inserting an iSesamo or a metal spudger between the aluminum frame and the glass.
Keep your heat gun ready as the digitizer will continue to cool. Frequently applying heat will keep the adhesive loose and allow removal of the digitizer assembly.
Apply Heat
iPad Frame
Display/Screen
Insert Tool Here

iPad Mini Digi
3step
Using the iSesamo or metal spudger, start along the top edge of the iPad Mini to heat and lift the glass.
Once you have an opening, insert a guitar pick to prevent the glass from adhering back to the frame.
NOTE: On a badly damaged digitizer, pieces of glass will break off as you start heating and lifting the digitizer.
If the LCD is exposed from a badly damaged digitizer DO NOT apply direct heat onto the LCD.
Twist and Lift

iPad Mini Digi
4step Create A Gap
Heat up the left and right sides. Using the nylon spudger run down the left and right side, inserting guitar picks as you move.
NOTE: Depending on how badly the glass is cracked, you may have to continually insert the iSesamo under various sections of the digitizer.

iPad Mini Digi
5step
When there is enough room to grab the top section of the digitizer, lift it away from the body of the iPad. If the adhesive is too difficult to separate, use the hot air gun on the glass to soften the adhesive.
Partial Removal

iPad Mini Digi
Due to the construction of the iPad Mini, the digitizer cable cannot be disconnected until the mid-plate and EMI shield are removed.
Lay the digitizer down, but be careful to not rip or tear the digitizer cable.
Note Digitizer Cable
6step

iPad Mini Digi
Clean any debris that has fallen onto the LCD by using a dust off blower or clean makeup brush.
Clear Debris
7step

iPad Mini Digi
Remove and set aside the foam that rests over the UPPER and LOWER right corner of LCD screw. Set the foam aside to re-install later.
Transfer Foam
8step
UPPER
LOWER
iPad Mini Digi
9step
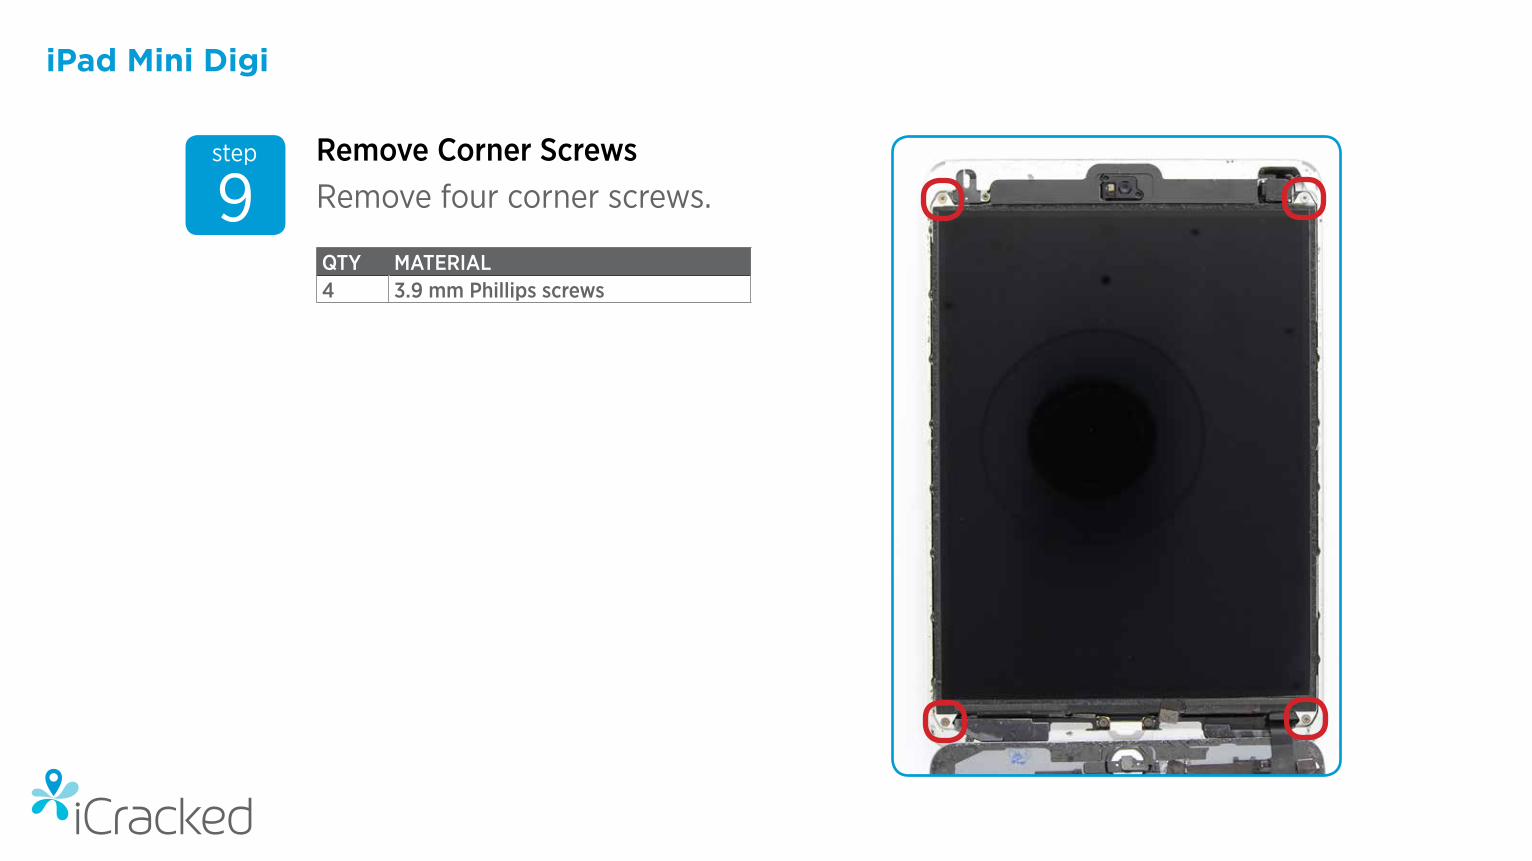
Remove four corner screws.Remove Corner Screws
QTY MATERIAL4 3.9 mm Phillips screws

iPad Mini Digi
10step
Gently peel the EMI tape from the bottom of the LCD on the left and right side.
Note: The 4G/LTE version of the iPad mini has EMI tape at the top edge of the LCD that must be peeled back.
EMI Tape
TOP
BOTTOM

iPad Mini Digi
11step
Cut a length of dental floss about 24 inches.
Use the iSesamo to GENTLY lift one upper LCD corner and feed the dental floss underneath. Do the same to the opposite corner.
With a side to side motion, like a saw, slowly move toward the bottom of the iPad. This will break loose the adhesive between the back side of the LCD and the mid-plate cover.
Then GENTLY lift the LCD.
Floss LCD

iPad Mini Digi
GENTLY lift the LCD from the top of the iPad. Rest the LCD flat on top of the Digitizer.
CAUTION: If the digitizer is badly damaged, you may want to lay a sheet of paper or microfiber cloth between the LCD face and the digitizer.
Partial Removal
12step
iPad Mini Digi
13step
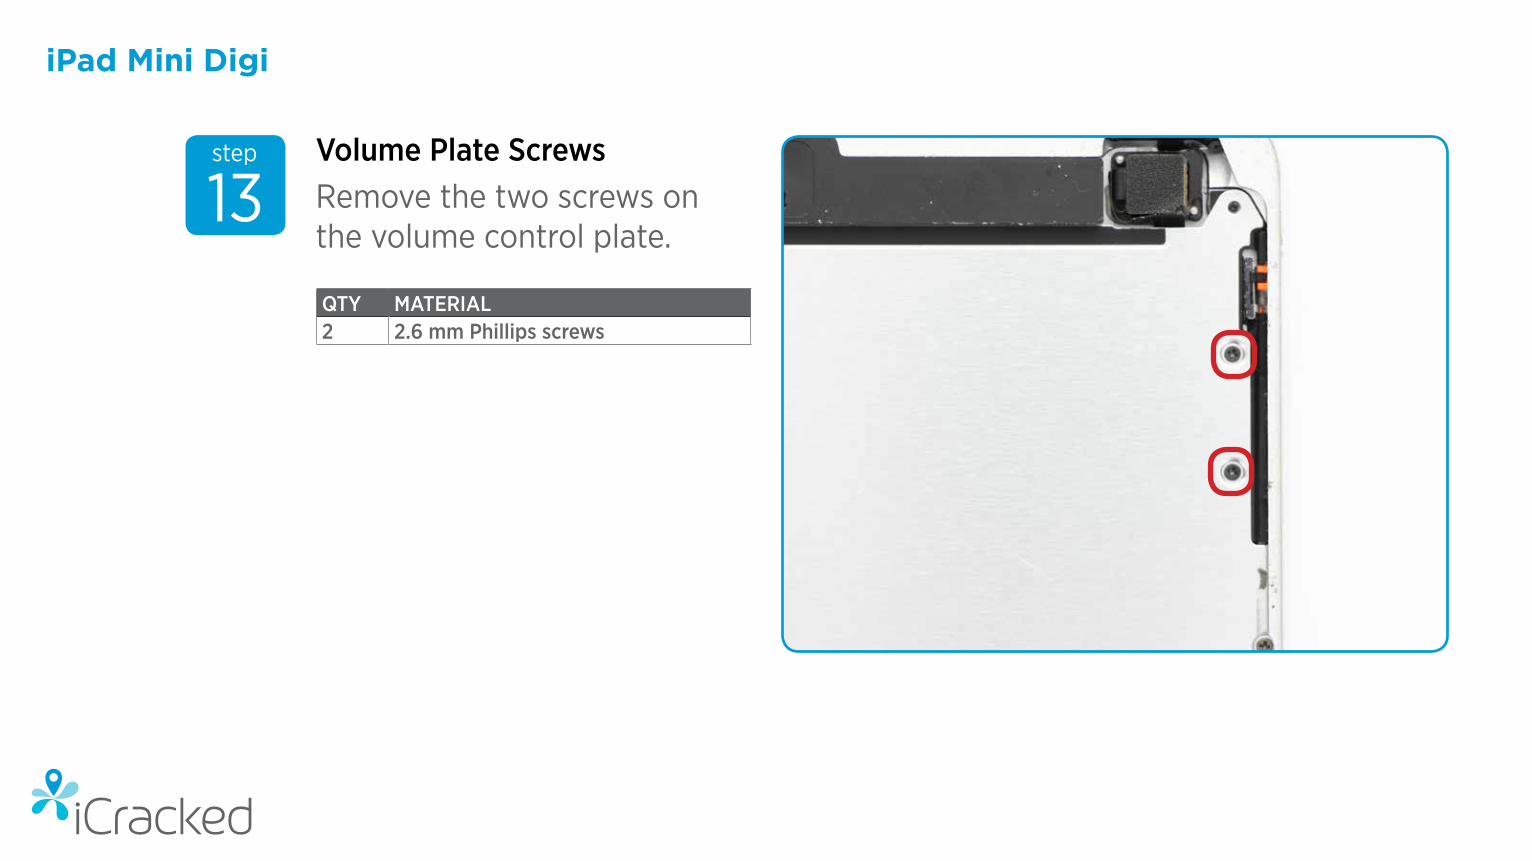
Remove the two screws on the volume control plate.
Volume Plate Screws
QTY MATERIAL2 2.6 mm Phillips screws

iPad Mini Digi
Remove the 1.7mm Phillips screws which secure the mid-plate to the frame.
CAUTION: The LEFT side of the iPad Mini has magnets that hold the smart cover to the frame. From the inside, the magnetic poles are reversed; if your screwdriver touches these magnets it will de-magnetize your screwdriver.
Mid-plate Screws
14step
QTY MATERIAL14 1.7 mm Phillips screws (Wi-Fi)13 1.7 mm Phillips screws (4G)

iPad Mini Digi
15step
Slide the mid-plate to the right side, as shown, and lift the left side upward to remove.
Remove Mid-Plate

iPad Mini Digi
IMPORTANT!
WARNINGIf you feel you accidentally powered on the iPad, DO NOT
disconnect any cables!!
You can cause irreparable damage.
You must disconnect the battery to prevent electrical shock to the iPad components!

iPad Mini Digi
Remove the three 1.3 mm Phillips screws of the EMI shield.
Remove the EMI Shield.
Remove EMI Shield
16step
QTY MATERIAL3 1.3mm Phillips screws

iPad Mini Digi
Use the FLAT edge of a spudger and disconnect the battery from the battery connector.
NOTE: Lift ONLY the battery cable. Do NOT lift the battery connection on the logic board, which will cause irreparable damage.
Disconnect Battery Cable
17step

iPad Mini Digi
Using the pointed edge of the spudger, disconnect the LCD connector from the logic board.
Disconnect LCD
18step

iPad Mini Digi
Using the pointed edge of a spudger, disconnect the digitizer connector from the logic board.
Disconnect Digi
19step
iPad Mini Digi
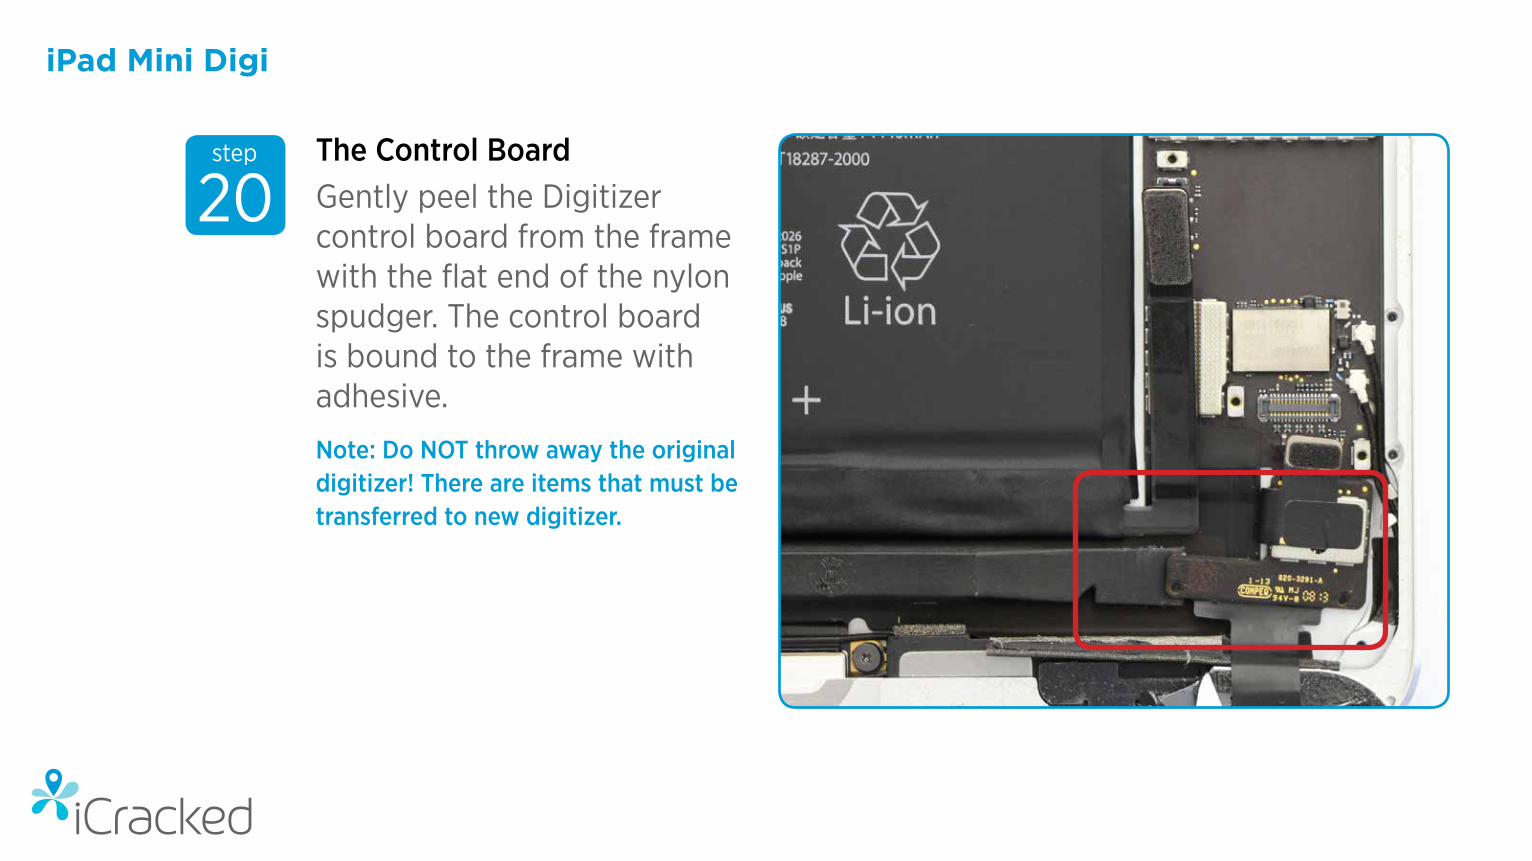
Gently peel the Digitizer control board from the frame with the flat end of the nylon spudger. The control board is bound to the frame with adhesive.
Note: Do NOT throw away the original digitizer! There are items that must be transferred to new digitizer.
The Control Board
20step
iPad Mini Digi
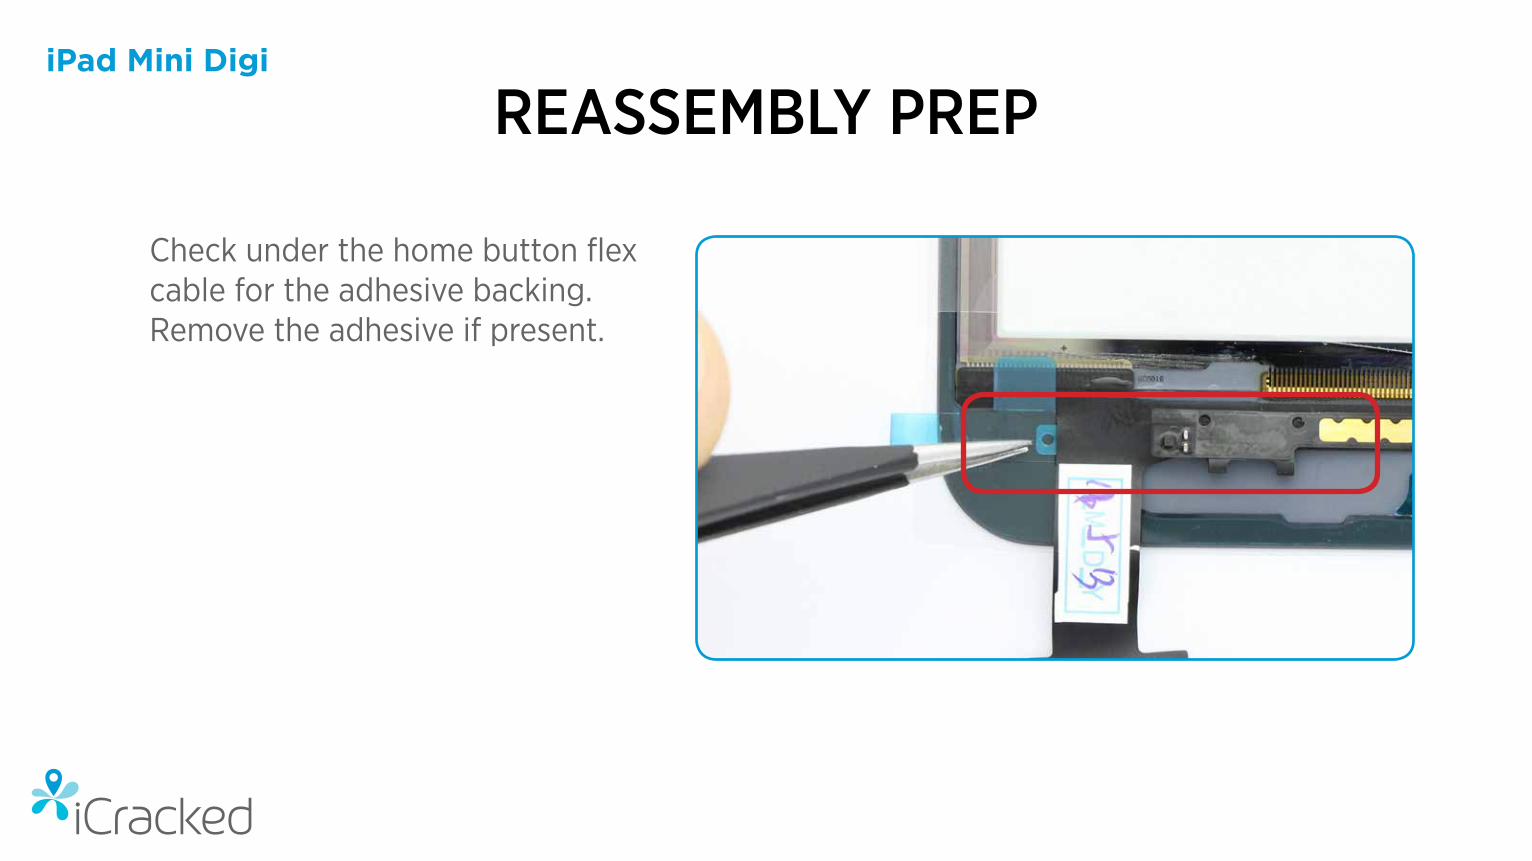
Check under the home button flex cable for the adhesive backing. Remove the adhesive if present.
REASSEMBLY PREP
iPad Mini Digi
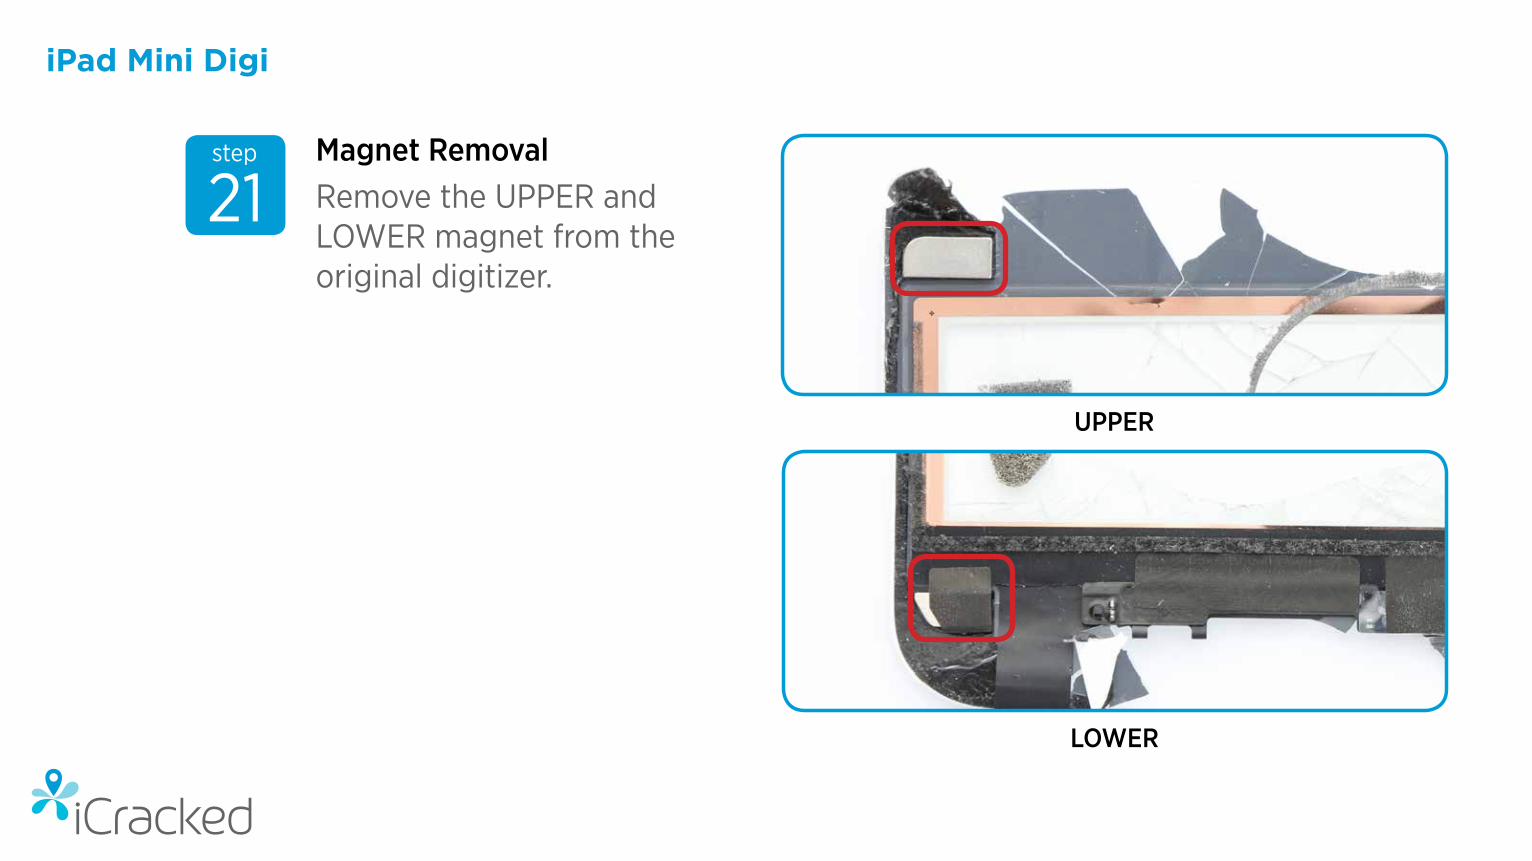
Remove the UPPER and LOWER magnet from the original digitizer.
Magnet Removal
21step
LOWER
UPPER

iPad Mini Digi
Remove the EMI tape covering the home button flex cable.
Tape Removal
22step

iPad Mini Digi
23step
Remove the EMI tape (including the clear tape) next to the home button magnetic/sleep/wake sensor.
Tape Removal

iPad Mini Digi
24step
Check the new digitizer for the presence of lower EMI tape running from left to right. If it is not installed, remove it from the old Digitizer and transfer it to the new one.
EMI Tape Transfer
24step EMI Tape Transfer
iPad Mini Digi
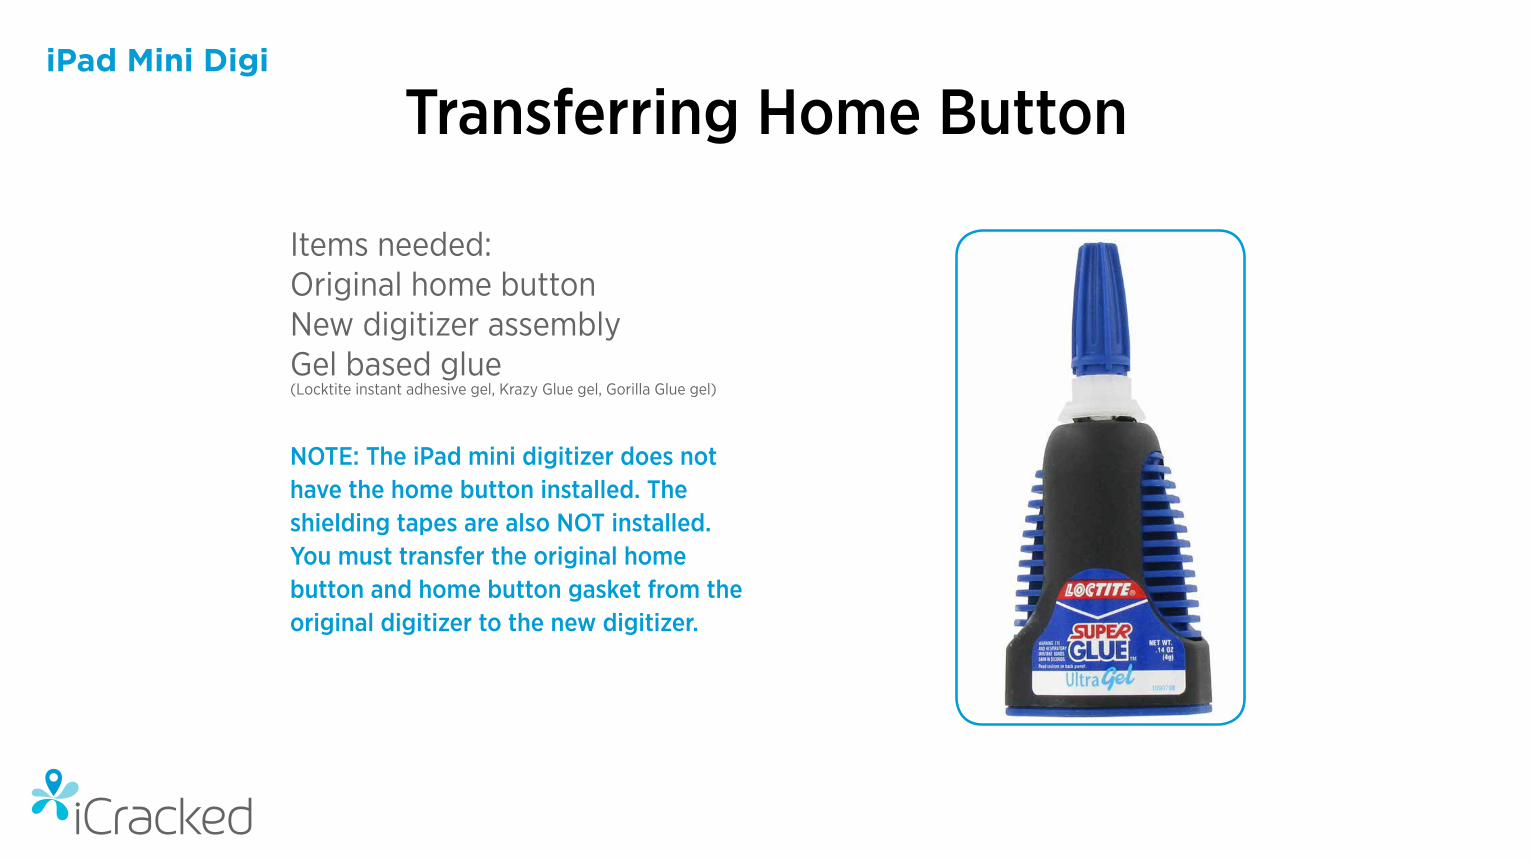
Items needed: Original home buttonNew digitizer assemblyGel based glue (Locktite instant adhesive gel, Krazy Glue gel, Gorilla Glue gel)
Transferring Home Button
NOTE: The iPad mini digitizer does not have the home button installed. The shielding tapes are also NOT installed. You must transfer the original home button and home button gasket from the original digitizer to the new digitizer.
iPad Mini Digi
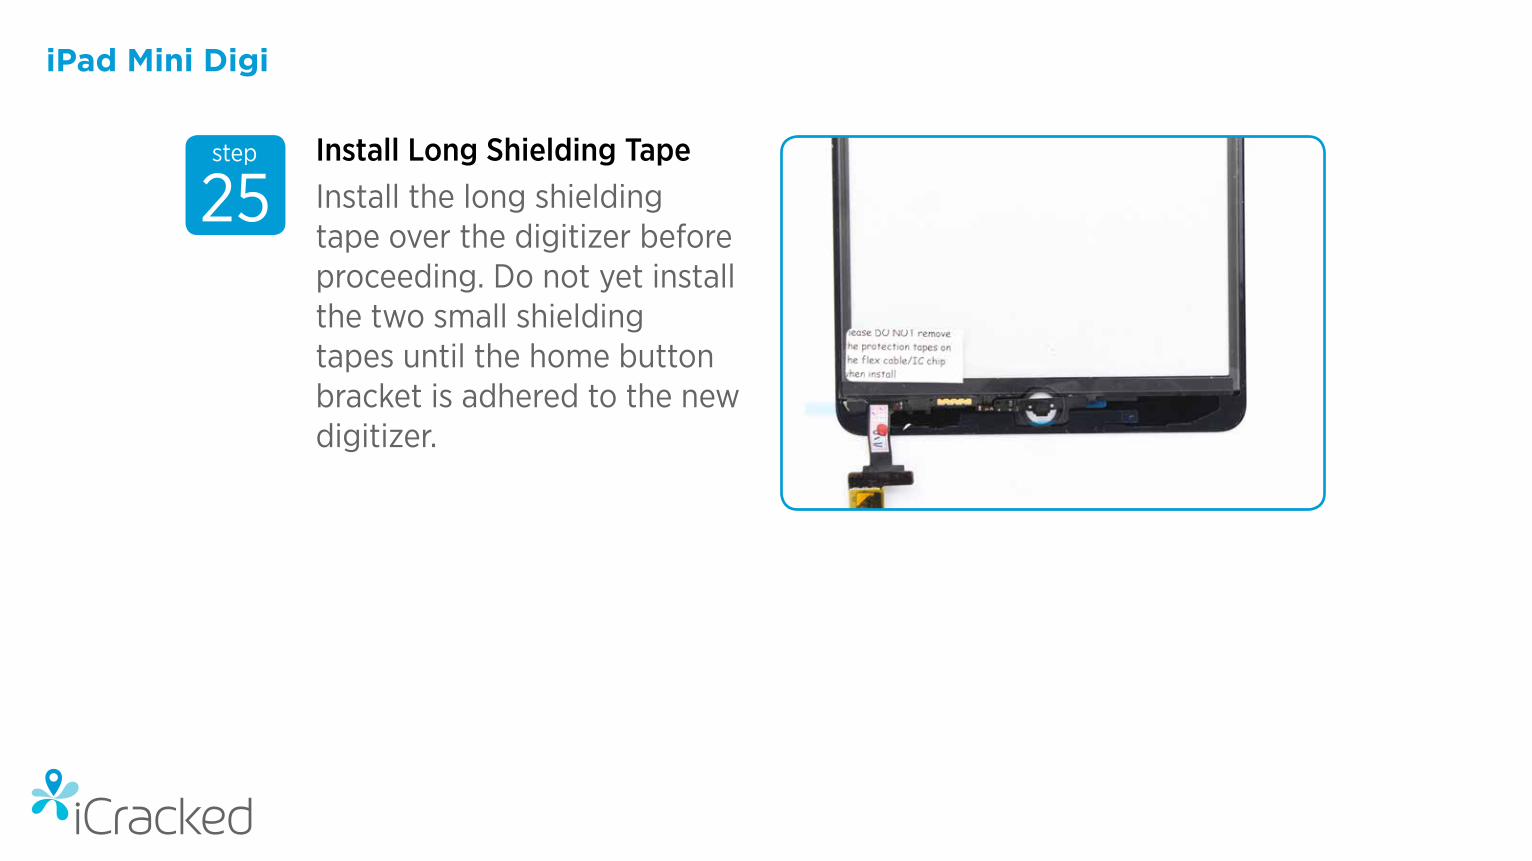
Install Long Shielding Tape
25step
Install the long shielding tape over the digitizer before proceeding. Do not yet install the two small shielding tapes until the home button bracket is adhered to the new digitizer.
iPad Mini Digi
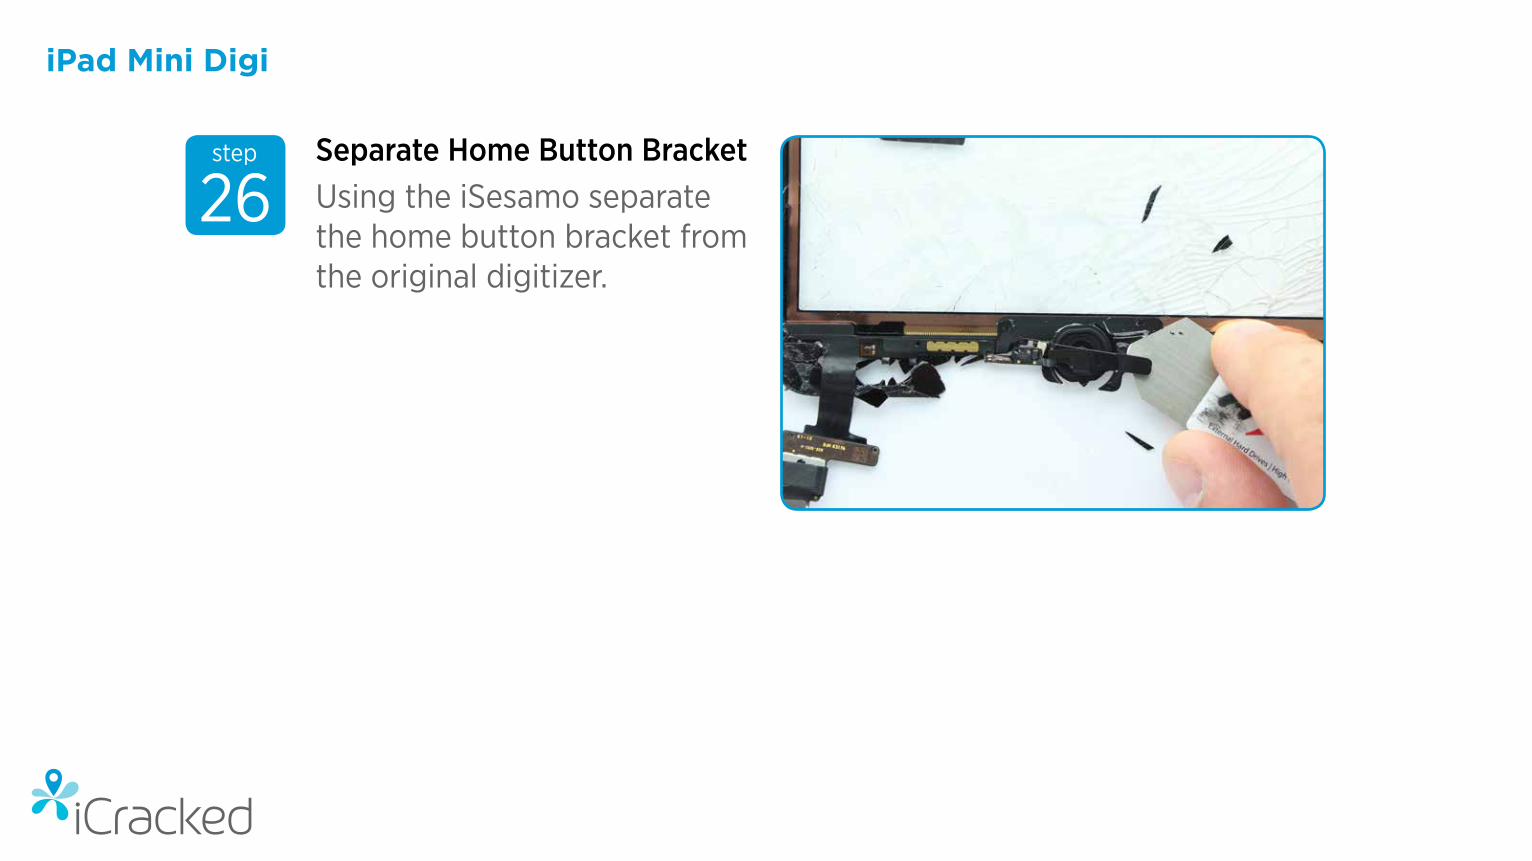
Separate Home Button Bracket
26step
Using the iSesamo separate the home button bracket from the original digitizer.

iPad Mini Digi
Peel Home Button & Gasket
27step
Peel the home button and home button gasket from the original digitizer.

iPad Mini Digi
Remove Spacer
28step
If the spacer is still adhered to the home button gasket you MUST remove the spacer or the home button will sit to high into the new digitizer.
You can either separate the spacer from the gasket or peel off the spacer from the new digitizer and place the old home button into its place.
Gasket and spacer removed
Home button spacer

iPad Mini Digi
Prep Home Button Installation
29step
On the new digitizer, the home button bracket is not yet adhered to the glass but the spacer is installed.
Prep Home Button InstallationOn the new digitizer, the home button bracket is not yet adhered to the glass but the spacer is installed.

iPad Mini Digi
30step
Gently move the home button bracket out of the way.
DO NOT rip or tear the home button flex cable, you must be extremely gentle with this cable.
Fold Back Flex Cable

iPad Mini Digi
31step
Place home button into the new digitizer’s home button hole. Ensure the alignment pins on the backside are parallel to the digitizer.
Install Home Button

iPad Mini Digi
32step
Rest the home button bracket over the alignment pins. Adjust the home button as needed to ensure the pins pass through the bracket.
Note: The adhesive backing on the home button bracket has NOT been removed yet.
Align Home Button
iPad Mini Digi
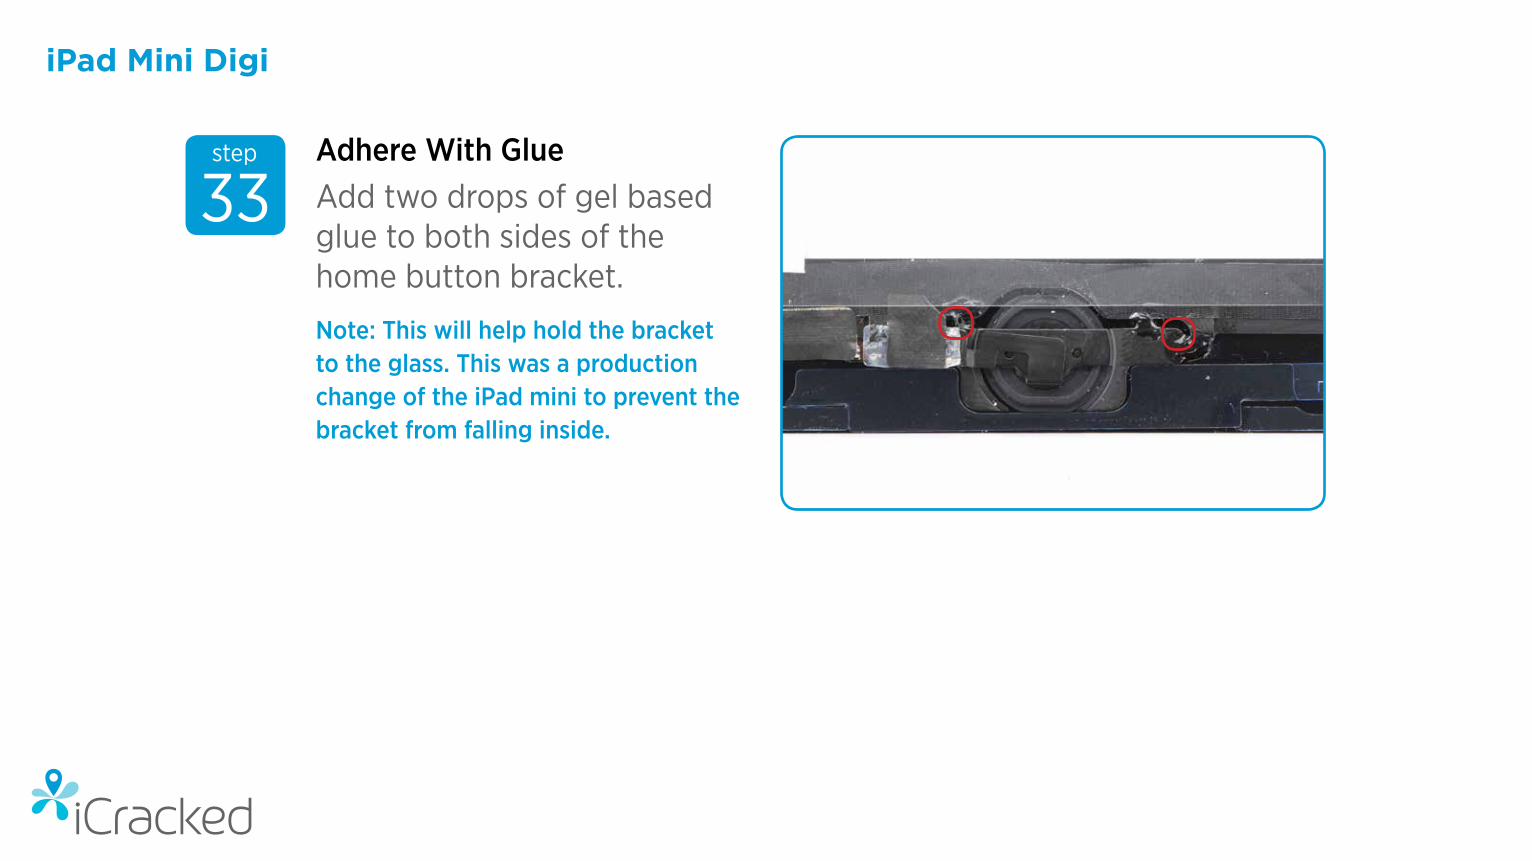
33step
Add two drops of gel based glue to both sides of the home button bracket.
Note: This will help hold the bracket to the glass. This was a production change of the iPad mini to prevent the bracket from falling inside.
Adhere With Glue
iPad Mini Digi
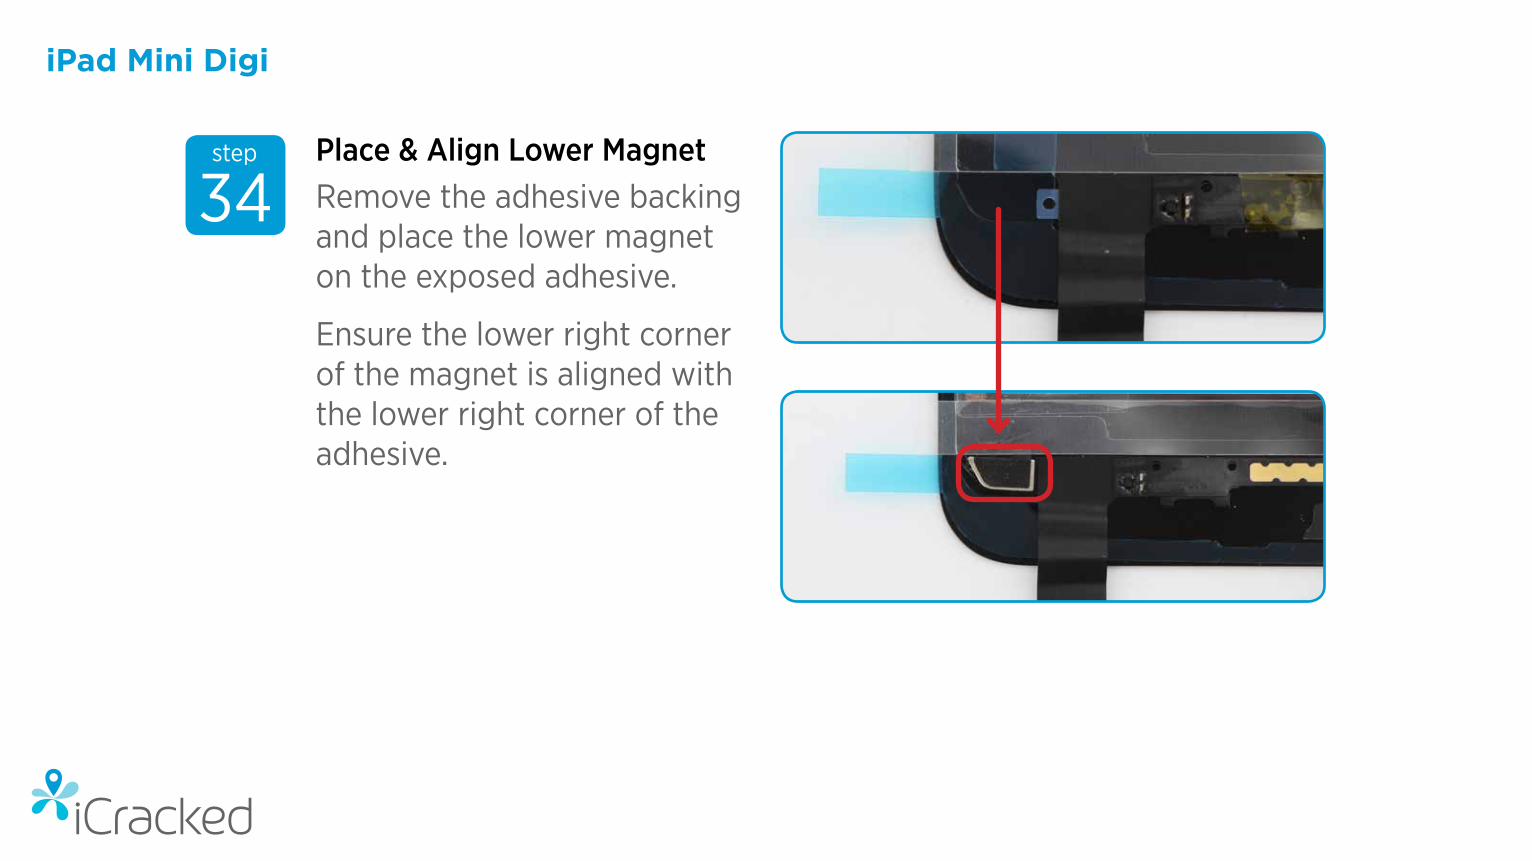
Place & Align Lower Magnet
34step
Remove the adhesive backing and place the lower magnet on the exposed adhesive.
Ensure the lower right corner of the magnet is aligned with the lower right corner of the adhesive.

iPad Mini Digi
Looking at the new digitizer, you will see the adhesive area where the magnet should rest.
Ensure the upper magnet’s lower right corner is aligned with the lower right corner of the adhesive.
Note: This view is from the upper left corner of the underside of digitizer.
Place & Align Upper Magnet
35step

iPad Mini Digi
Install the EMI tape so that the clear tape is aligned exactly as shown, next to the home button magnetic/sleep/wake sensor.
NOTE: The clear plastic sticker underneath must also be transferred.
Set EMI Tape
36step
iPad Mini Digi
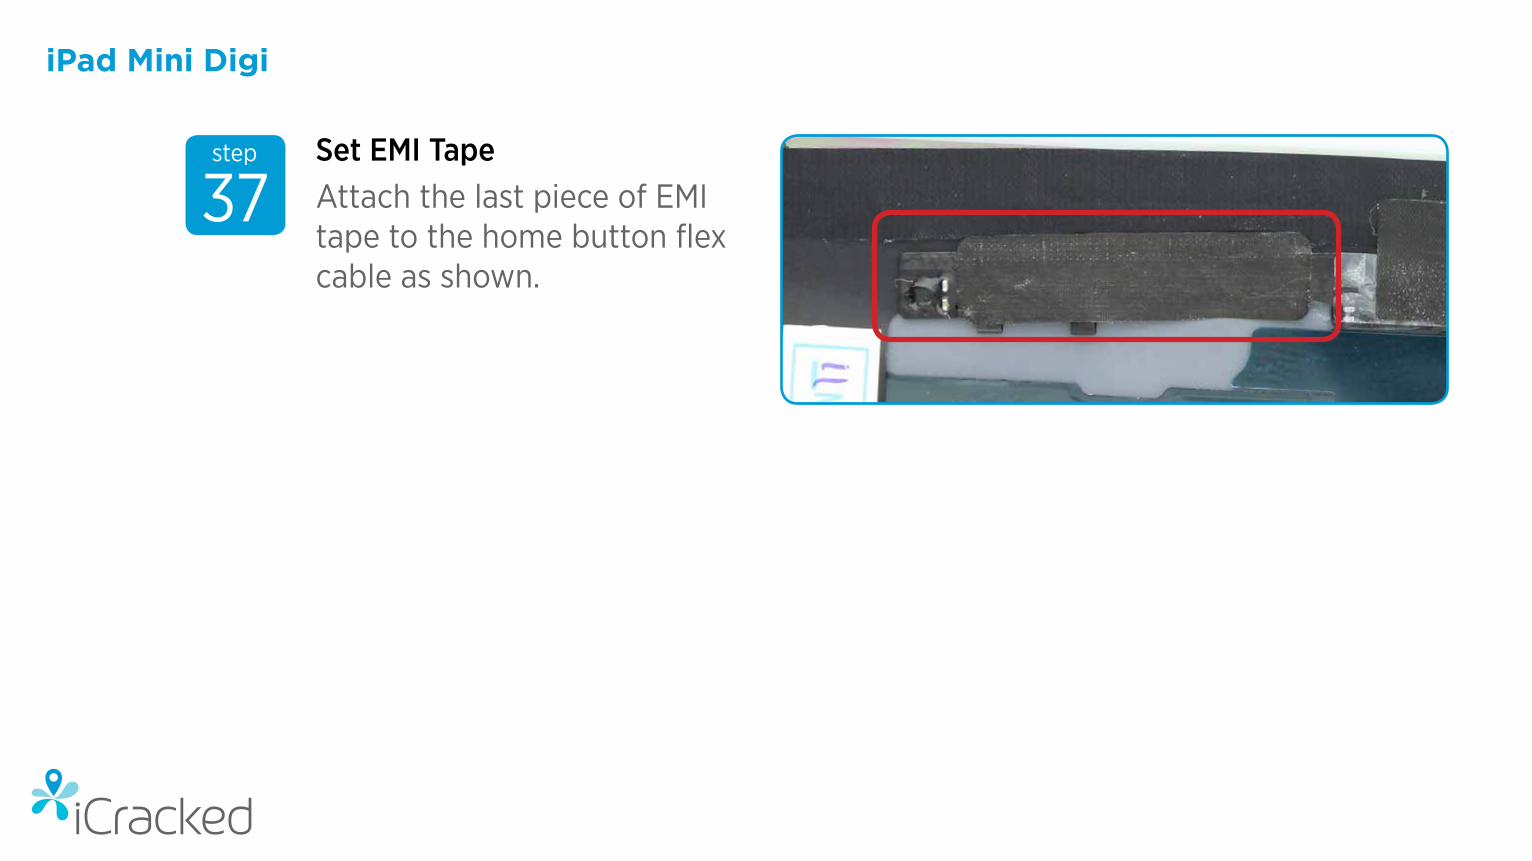
Attach the last piece of EMI tape to the home button flex cable as shown.
Set EMI Tape
37step

iPad Mini Digi
38step Transfer Foam
Transfer the tape and foam pad from the original control board to the new control board.
Note: A razor blade is the easiest tool for removing the tapes and foam. Slide gently underneath, then pull with tweezers.
same parts reversed

iPad Mini Digi
IMPORTANT!CLEANING TIPS AND SAFETY INFORMATION
• iCracked recommends PDI adhesive tape remover pads. Dab on and let sit for 2-3 min.
• Take caution and use only what you need on a cleaning pad or cotton swab. Many adhesive removal liquids will cause irreparable corrosive damage to electronic components.
• Wear protective gloves; jagged edges of the iPad frame can be extremely sharp.
• Do not use a hot air gun to loosen adhesive.
• If using a citrus-based cleaner, dab onto lint-free cloth or cleaning pad. Dab on and let sit for 2-3 min.
• Acetone-based cleaners are highly flammable and must be used in a well-ventilated area. Acetone should not be used near open flame or combustible material. Acetone will also damage plastics if it flows into closed areas such as the speaker assembly.
iPad Mini Digi
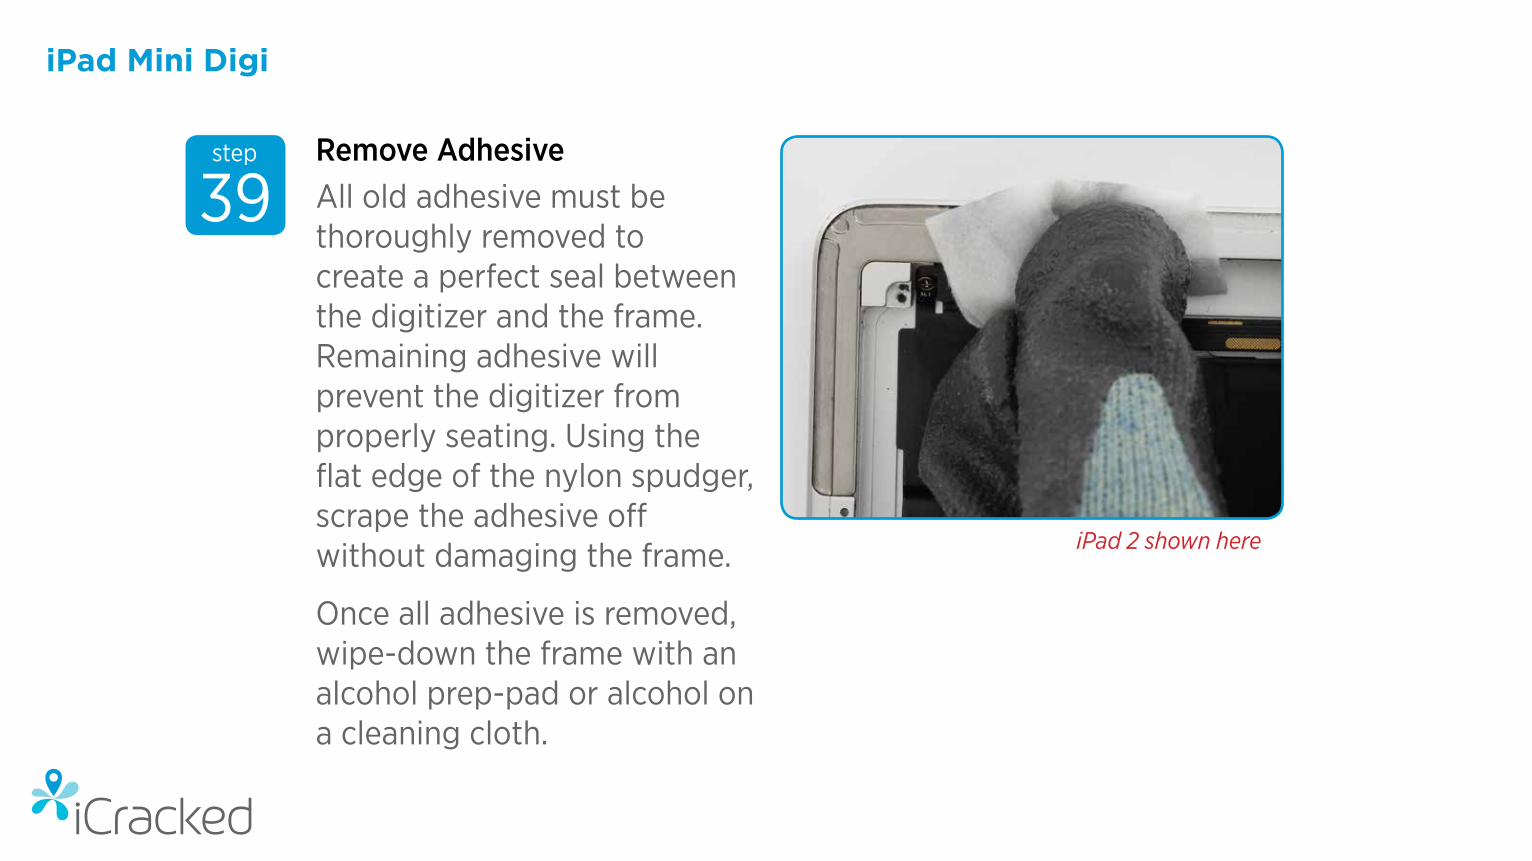
39step
All old adhesive must be thoroughly removed to create a perfect seal between the digitizer and the frame. Remaining adhesive will prevent the digitizer from properly seating. Using the flat edge of the nylon spudger, scrape the adhesive off without damaging the frame.
Once all adhesive is removed, wipe-down the frame with an alcohol prep-pad or alcohol on a cleaning cloth.
Remove Adhesive
iPad 2 shown here

iPad Mini Digi
40step
Inspect the metal frame for damage or dents.
Most dents in the frame can be flattened with a wide-blade flathead screwdriver and a small hammer. Avoid any damage to the frame by always pointing the blade outward to avoid accidentally harming internal components.
A jagged or bent corner will likely have to be filed smooth. Be careful to keep metal shavings out of the iPad.
Frame Inspection

iPad Mini Digi
The best way to tell if the new digitizer is going to fit properly is to flip the digitizer upside down and see if it fits between all four corners of the frame. By testing the fit of the new digitizer upside-down, you will protect the internal cables connect to that digitizer.
Perfect Fit Test
41step

iPad Mini Digi
iCracked highly recommends 3M™ Tape Primer #94, available in the iTech Shop. It promotes a strong bond to the frame.
Apply a very thin, uniform coating to the bonding surface.
Allow the primer to dry thoroughly before applying tape, approximately 5 min at room temperature. Keep the primed surface free of contaminants prior to applying the digitizer.
REASSEMBLY PREP

iPad Mini Digi
42step
Connect the digitizer to the logic board and ensure that the digitizer control board is sitting flush inside the iPad mini frame.
CAUTION: Do NOT force the connector onto the logic board. It is very fragile and can be easily damaged or bent.
Reconnect Digi Cable

iPad Mini Digi
Attach the LCD flex cable to the logic board.
Connect the LCD
43step
iPad Mini Digi
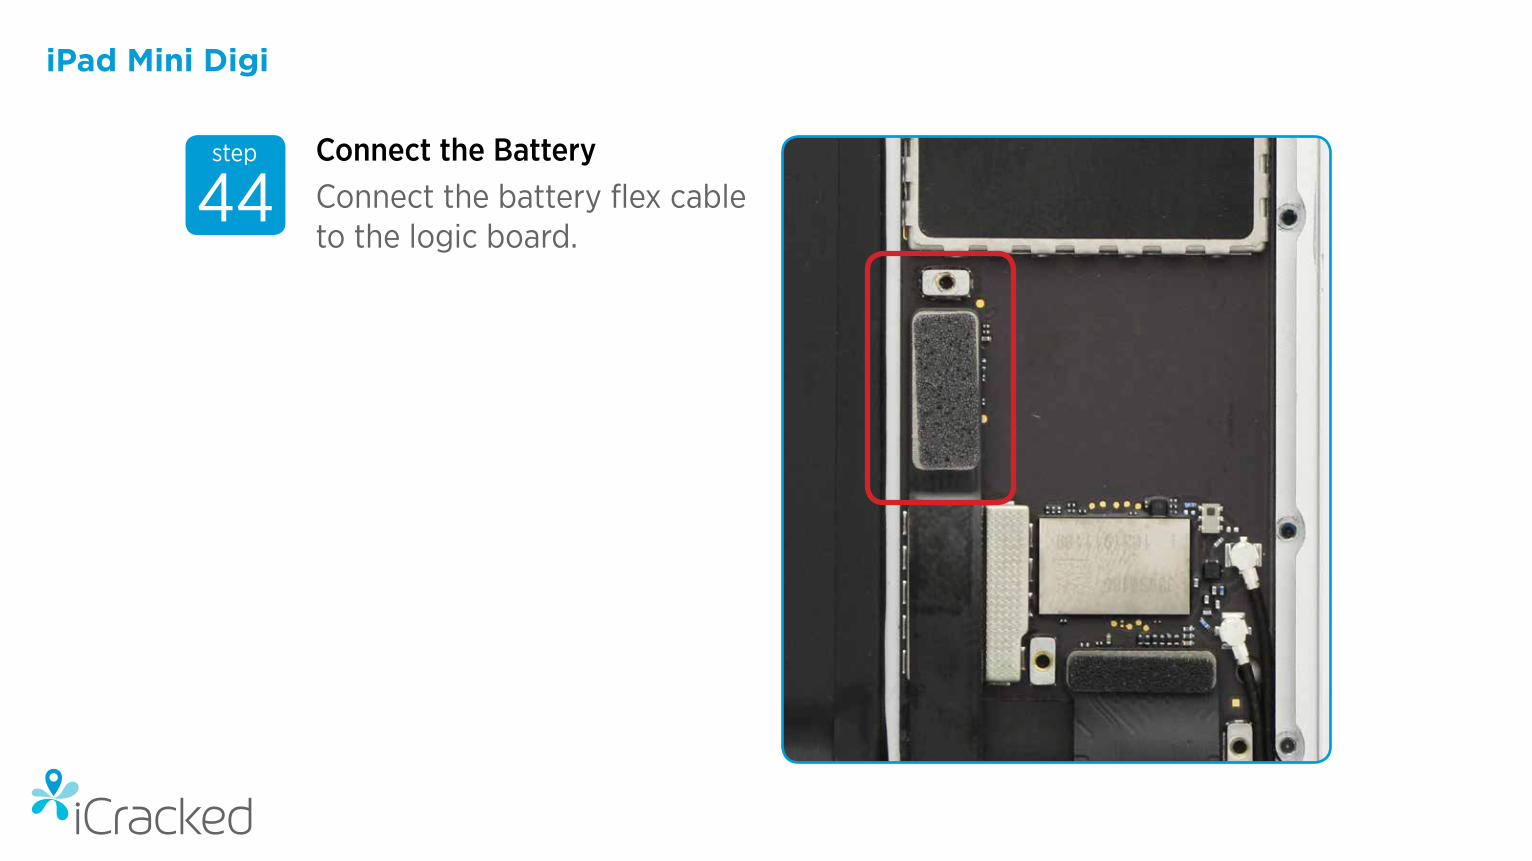
44step
Connect the battery flex cable to the logic board.
Connect the Battery
iPad Mini Digi
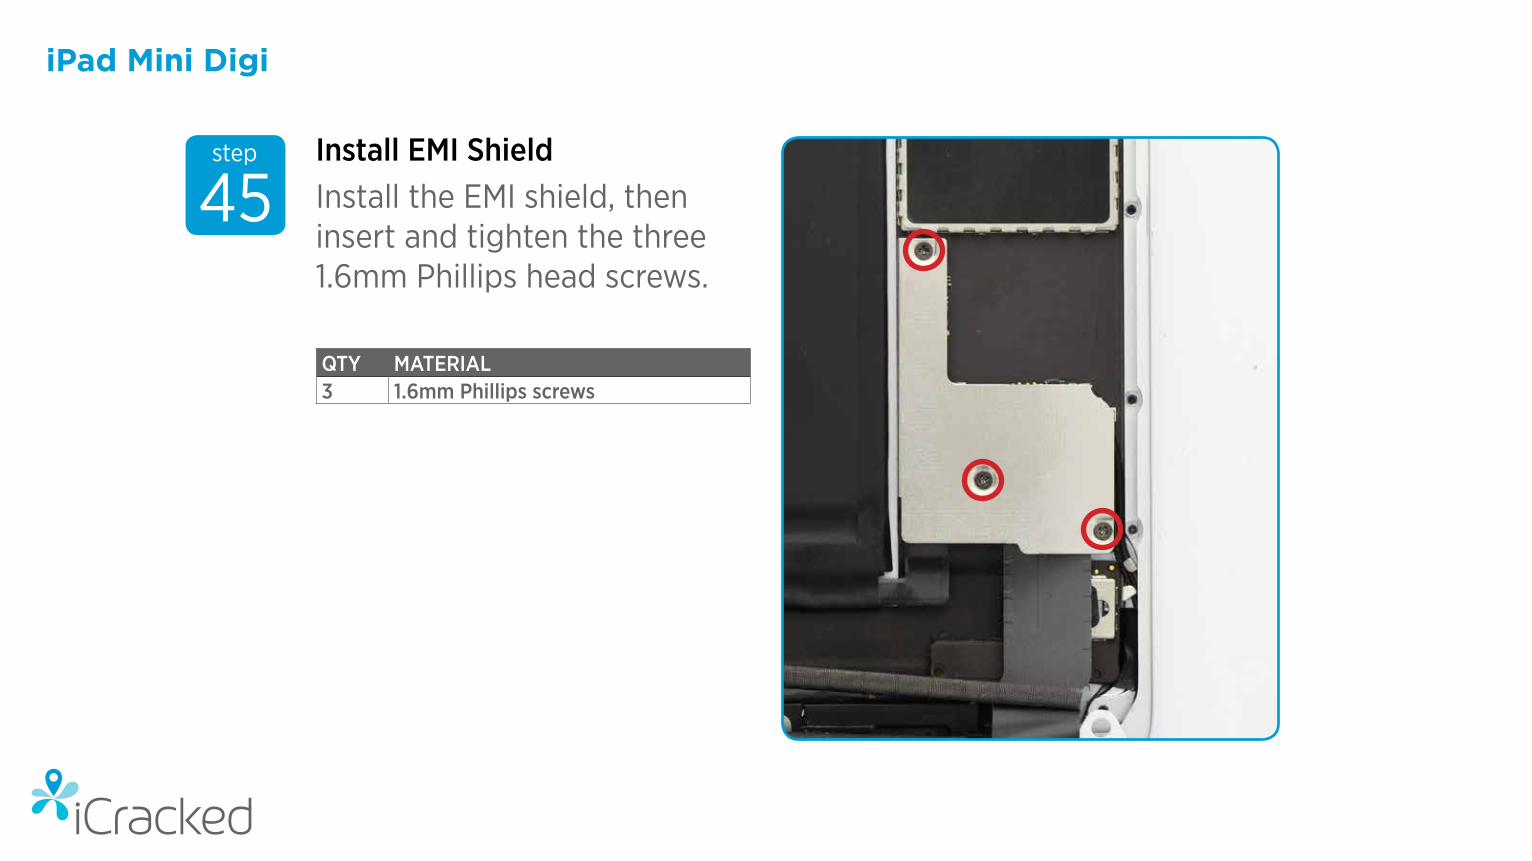
45step
Install the EMI shield, then insert and tighten the three 1.6mm Phillips head screws.
Install EMI Shield
QTY MATERIAL3 1.6mm Phillips screws
iPad Mini Digi
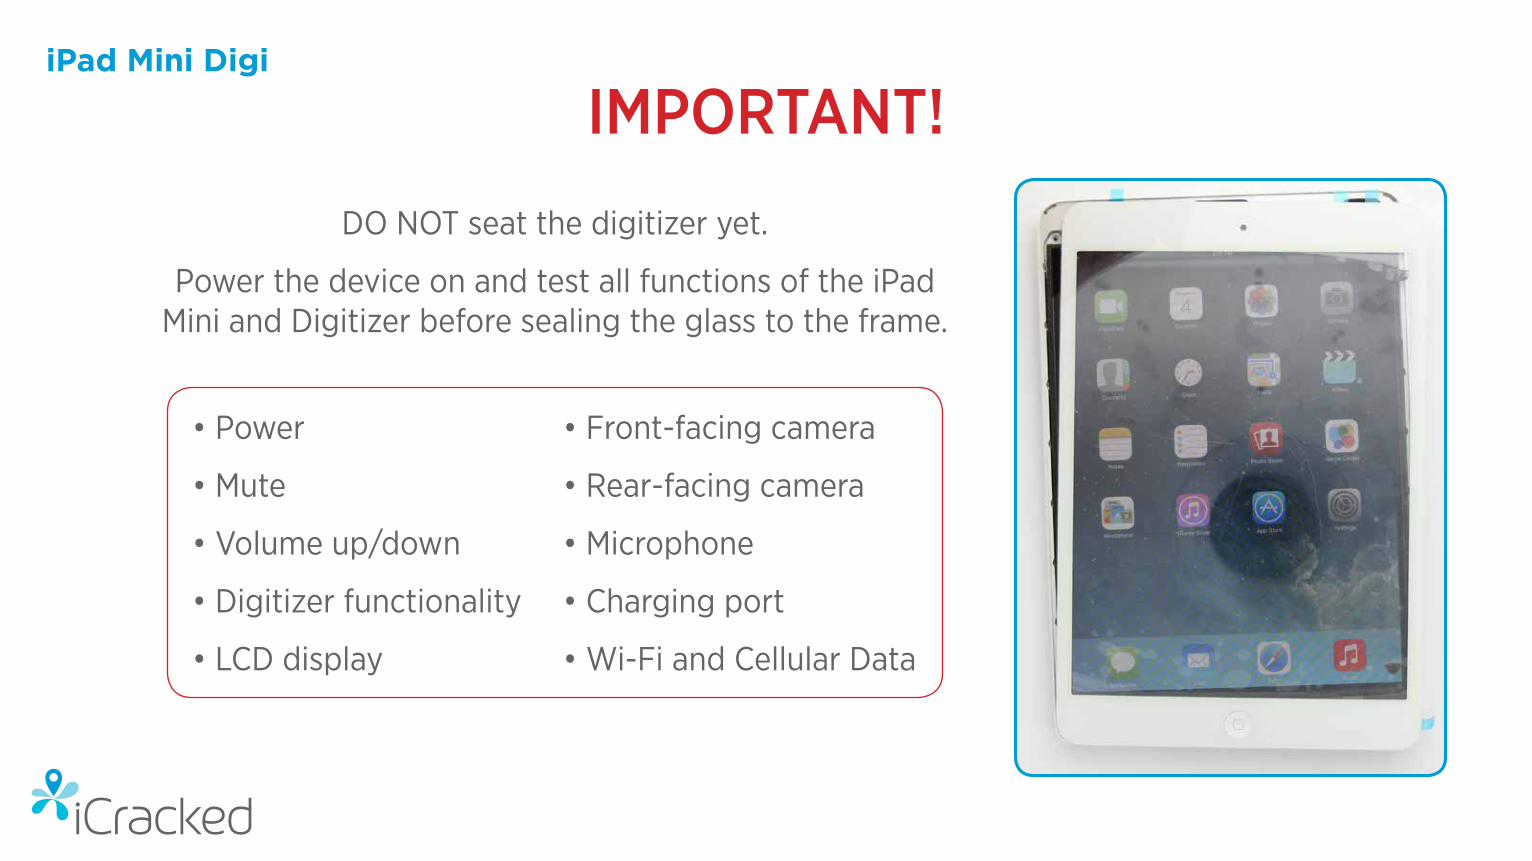
IMPORTANT!
• Power
• Mute
• Volume up/down
• Digitizer functionality
• LCD display
• Front-facing camera
• Rear-facing camera
• Microphone
• Charging port
• Wi-Fi and Cellular Data
DO NOT seat the digitizer yet.
Power the device on and test all functions of the iPad Mini and Digitizer before sealing the glass to the frame.

iPad Mini Digi
46step
Once all tests are completed, power-off the iPad Mini.
Install the mid-plate, insert the two Phillips screws over the volume control cable and lightly turn the screws. Do NOT tighten yet.
Install Mid-Plate
QTY MATERIAL2 2.6mm Phillips screws
iPad Mini Digi
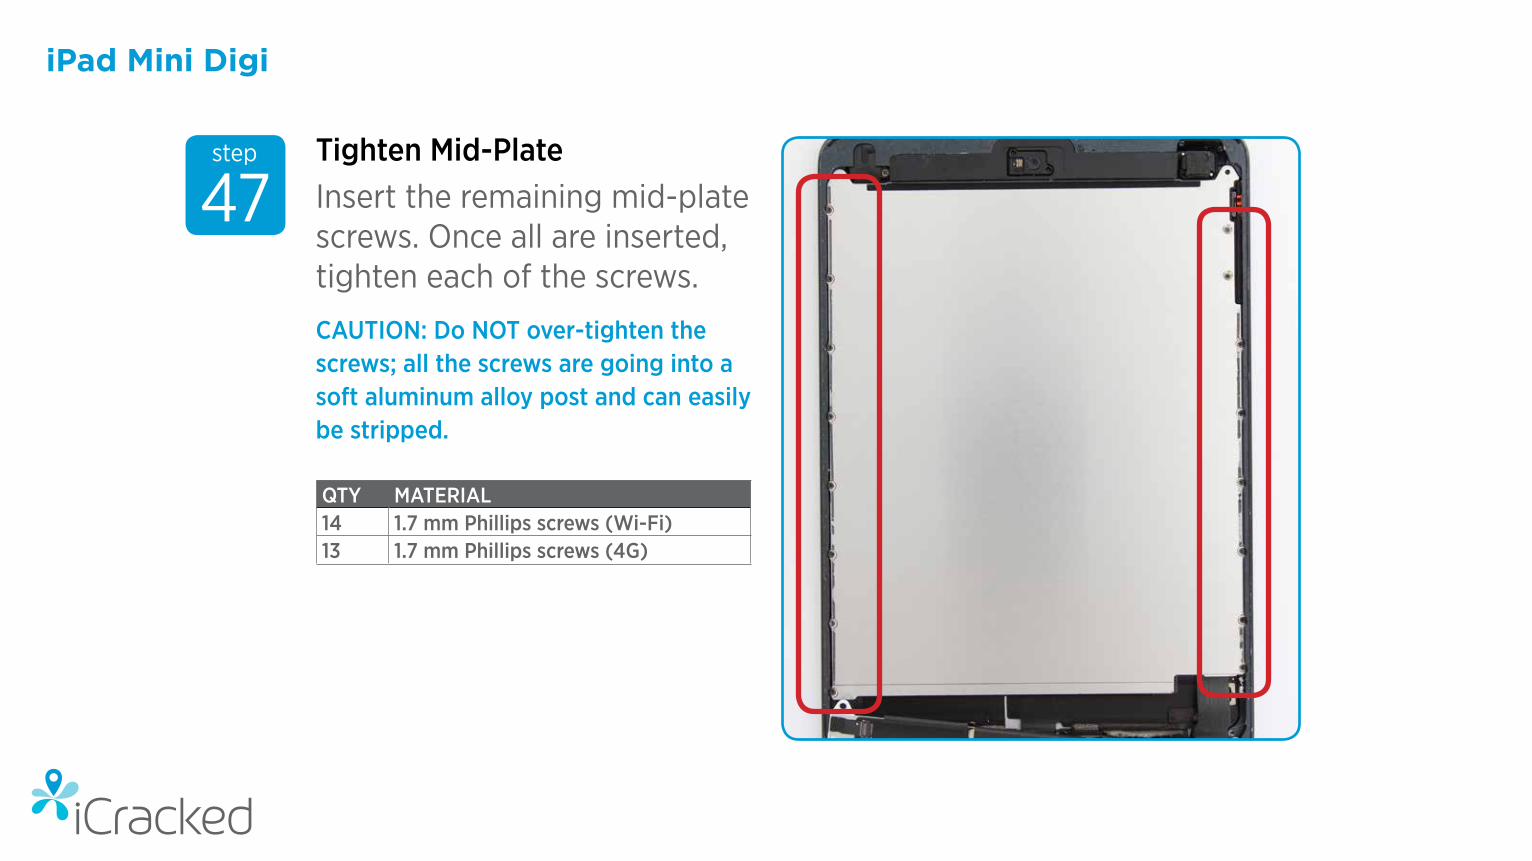
47step
Insert the remaining mid-plate screws. Once all are inserted, tighten each of the screws.
CAUTION: Do NOT over-tighten the screws; all the screws are going into a soft aluminum alloy post and can easily be stripped.
Tighten Mid-Plate
QTY MATERIAL14 1.7 mm Phillips screws (Wi-Fi)13 1.7 mm Phillips screws (4G)
iPad Mini Digi
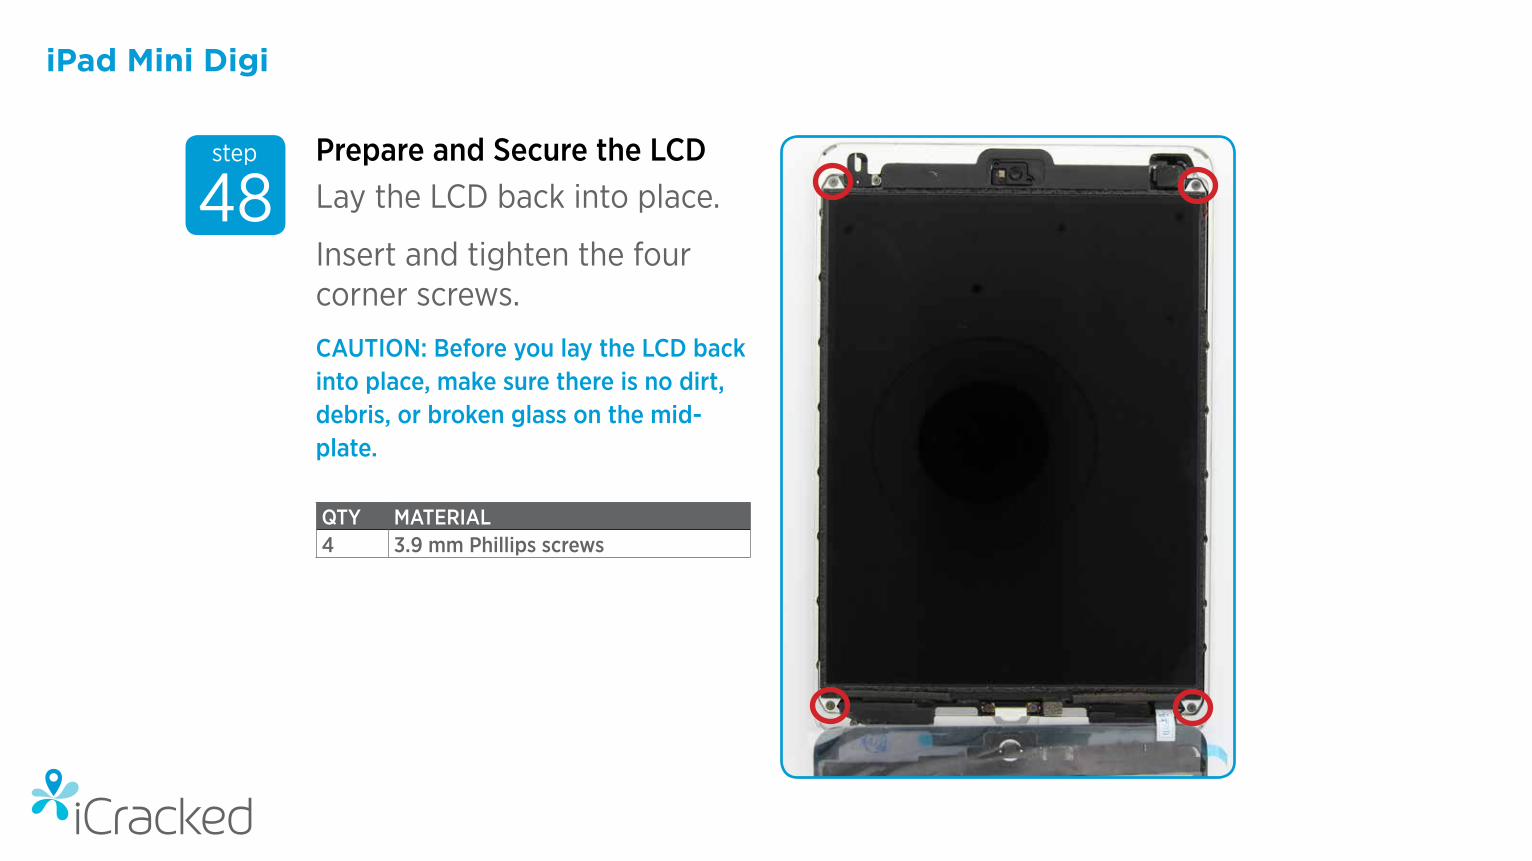
48step
Lay the LCD back into place.
Insert and tighten the four corner screws.
CAUTION: Before you lay the LCD back into place, make sure there is no dirt, debris, or broken glass on the mid-plate.
Prepare and Secure the LCD
QTY MATERIAL4 3.9 mm Phillips screws

iPad Mini Digi
49step
Fold the LCD EMI tapes back onto the LCD at the bottom edge.
Note: If the iPad Mini is a 4G/LTE model there is also a strip of EMI tape at the top center of the LCD.
EMI Tape
iPad Mini Digi
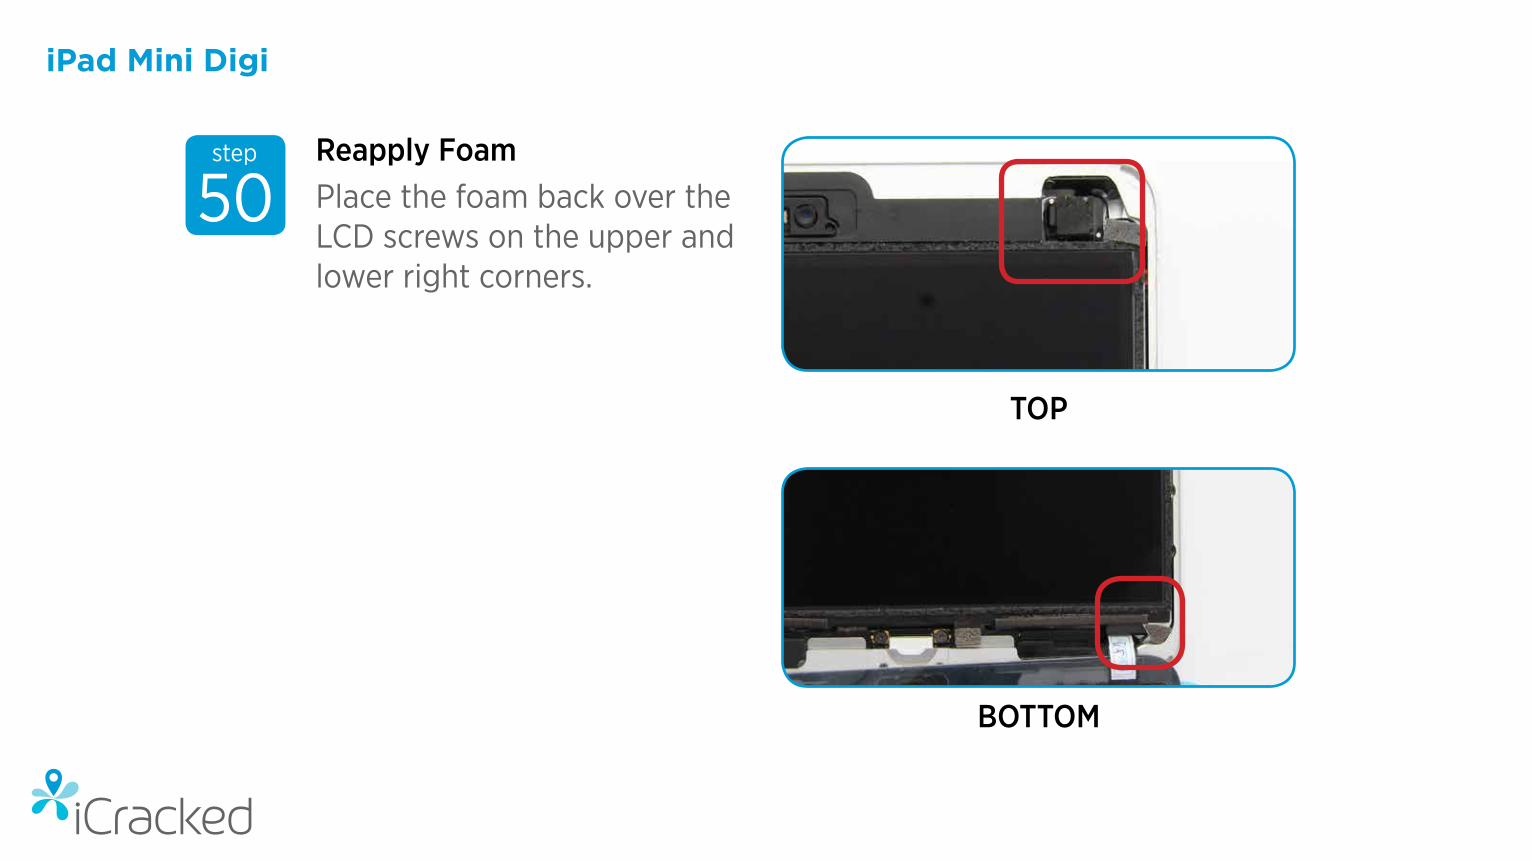
50step
Place the foam back over the LCD screws on the upper and lower right corners.
Reapply Foam
TOP
BOTTOM
iPad Mini Digi
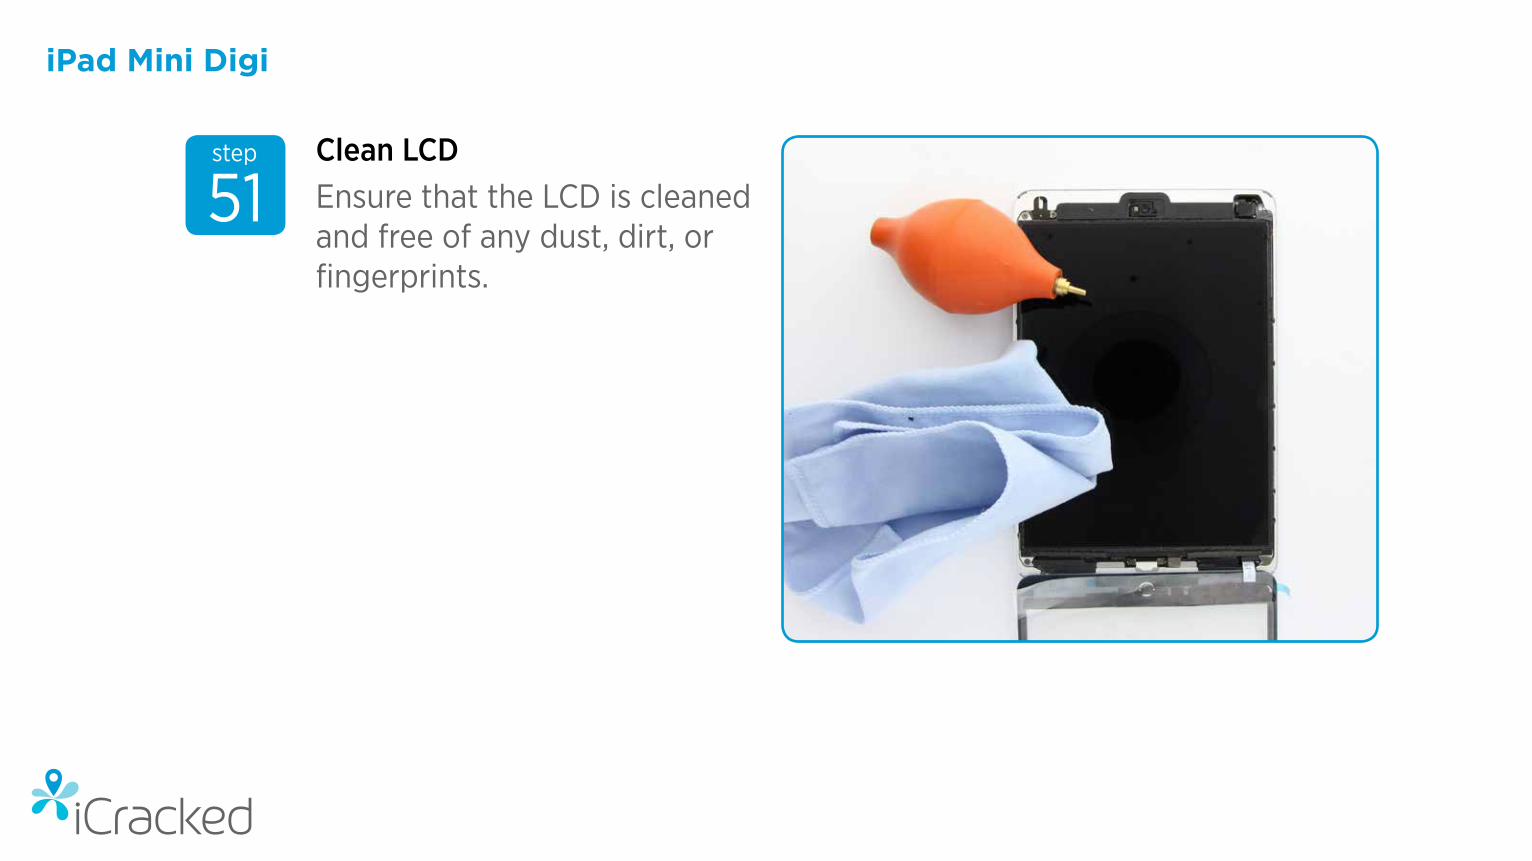
51step
Ensure that the LCD is cleaned and free of any dust, dirt, or fingerprints.
Clean LCD

iPad Mini Digi
52step
Once again, power on and test all features of the iPad Mini.
Perform another test-fit of the digitizer to ensure the magnets are correctly placed and are not preventing perfect seating of the screen.
Re-Test Functions

iPad Mini Digi
53step
Peel off the digitizer’s interior protective film.
Note: Wear powder-free latex or nitrile gloves to avoid applying fingerprints on the inside of the digitizer.
Remove Film

iPad Mini Digi
54step
Remove all remaining adhesive backing with the exception of the single piece resting under the digitizer flex cable.
Remove Adhesive Backing

iPad Mini Digi
55step
Set the TOP half of the digitizer into the frame, making sure the front-facing camera plate aligns and drops into place.
Align Digitizer

iPad Mini Digi
56step
Peel off the last piece of digitizer adhesive backing, making sure the digitizer flex cable does not stick to the adhesive.
Remove Final Adhesive Backing

iPad Mini Digi
57step
Using a nylon spudger, with one smooth motion, GENTLY push the digitizer flex cable inward and rest the lower portion of the digitizer into the frame. The digitizer flex cable should set with a gentle curve, as shown.
CAUTION: Do not pinch or force the digitizer flex cable.
Digi Cable Flex Curve

iPad Mini Digi
58step
If properly installed, all four digitizer corners will sit just below the metal frame. If any corners remain in a raised position, remove and clean beneath them.
Rest In Frame

iPad Mini Digi
59step
Make sure to recycle the iPad mini control board. These are reused on digitizers.
Recycle
iPad Mini Digi
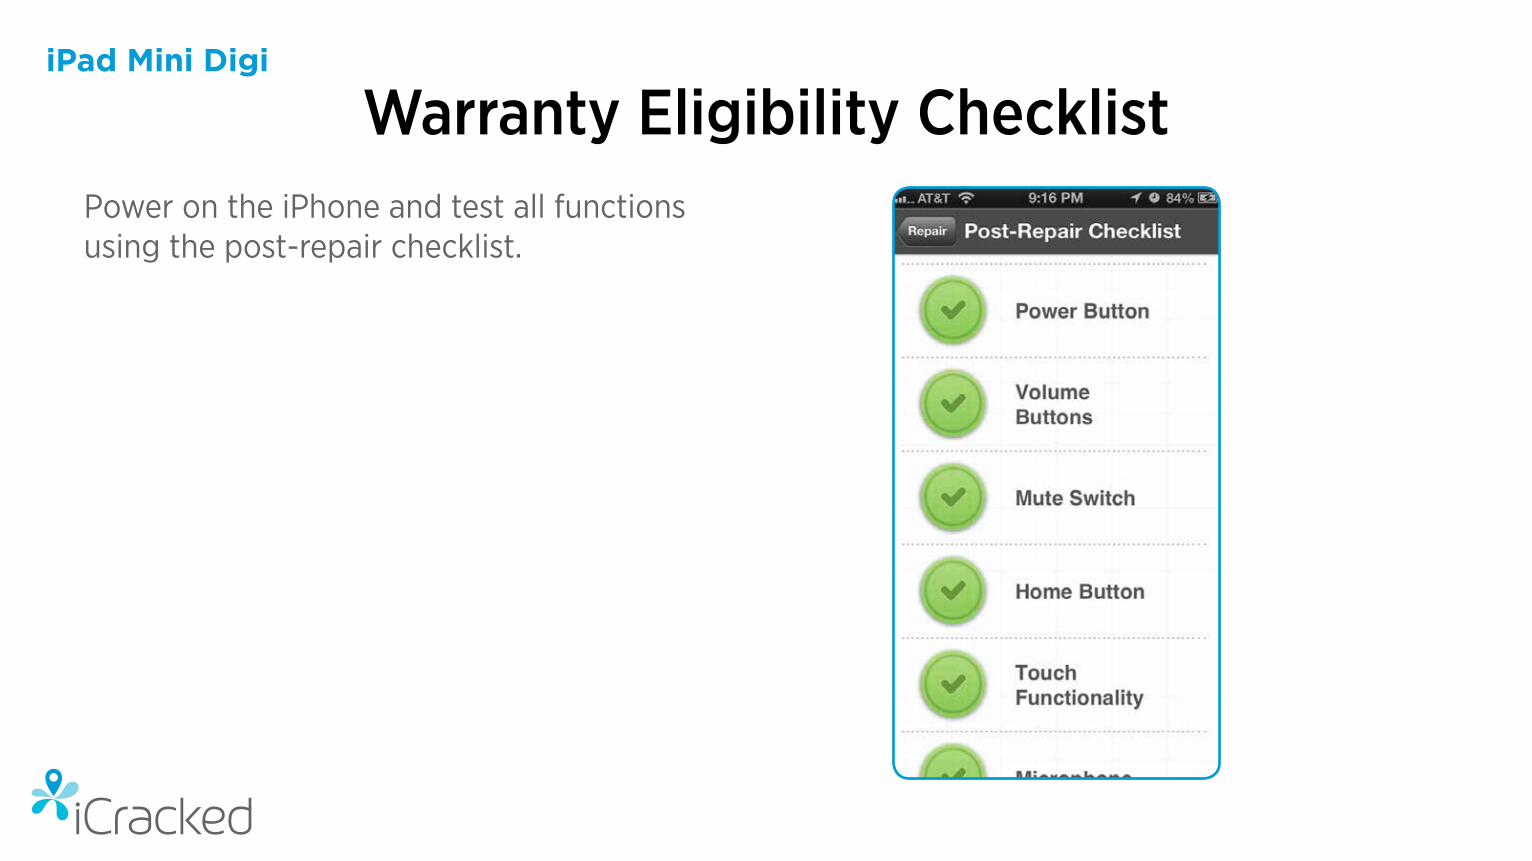
Power on the iPhone and test all functions using the post-repair checklist.
Warranty Eligibility Checklist

iPad Mini Digi
To disable assistive touch on your device:
Tap Settings > General > Accessibility > Assistive Touch > Slide to OFF.
POST-REPAIR
iPad Mini Digi
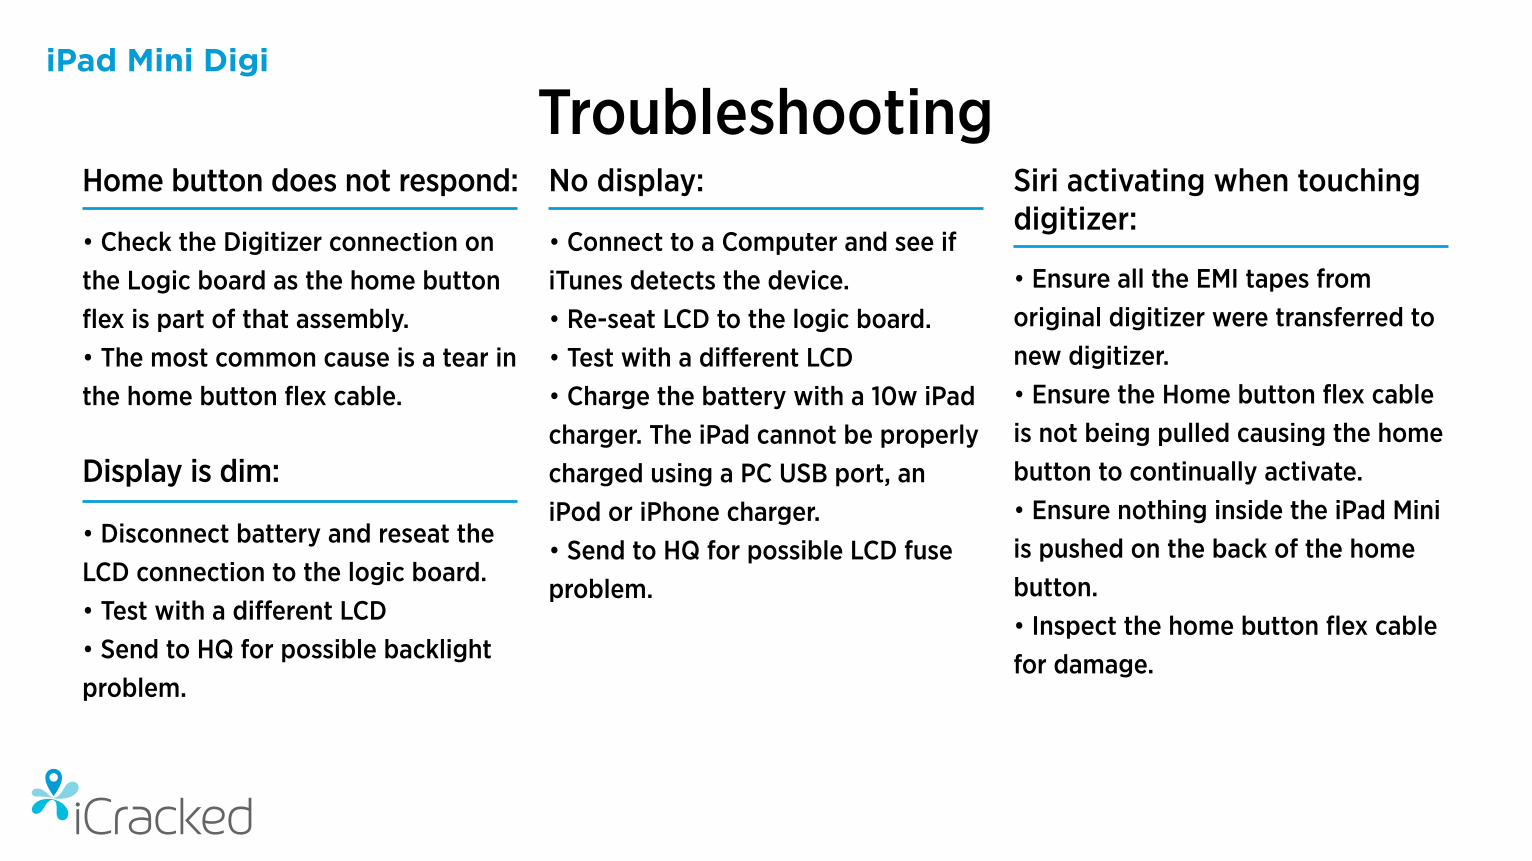
Troubleshooting
• Ensure all the EMI tapes from original digitizer were transferred to new digitizer.• Ensure the Home button flex cable is not being pulled causing the home button to continually activate.• Ensure nothing inside the iPad Mini is pushed on the back of the home button.• Inspect the home button flex cable for damage.
Siri activating when touching digitizer:
• Connect to a Computer and see if iTunes detects the device.• Re-seat LCD to the logic board.• Test with a different LCD• Charge the battery with a 10w iPad charger. The iPad cannot be properly charged using a PC USB port, an iPod or iPhone charger.• Send to HQ for possible LCD fuse problem.
No display:
• Check the Digitizer connection on the Logic board as the home button flex is part of that assembly.• The most common cause is a tear in the home button flex cable.
• Disconnect battery and reseat the LCD connection to the logic board.• Test with a different LCD• Send to HQ for possible backlight problem.
Home button does not respond:
Display is dim:

iPad Mini Digi
Troubleshooting
• Ensure the digitizer connection is seated onto the logic board and the foam over the top is in place.• Inspect digitizer cable for damage.• Inspect the digitizer connection on the logic board for damaged or miss-ing pins.
• Inspect the home button flex cable for damage.• Check the magnet on lower right side of glass for proper positioning.• Re-seat the Digitizer connection on logic board.
• Ensure all the EMI tape from origi-nal digitizer were transferred to new digitizer. The piece of clear tape is the most common cause of this problem.• Inspect the home button flex cable for damage.• Contact HQ for RMA or re-solder the home button flex cable.
Touch doesn’t activate digitizer: The Sleep/Wake function does not work with new digitizer:
Sleep/Wake activates when pressing the glass: