investigations and treatment - getty.edu · ter of late gothic sculpture—was intended to ... the...
TRANSCRIPT

Investigations andTreatment
P A R T F O U R
278
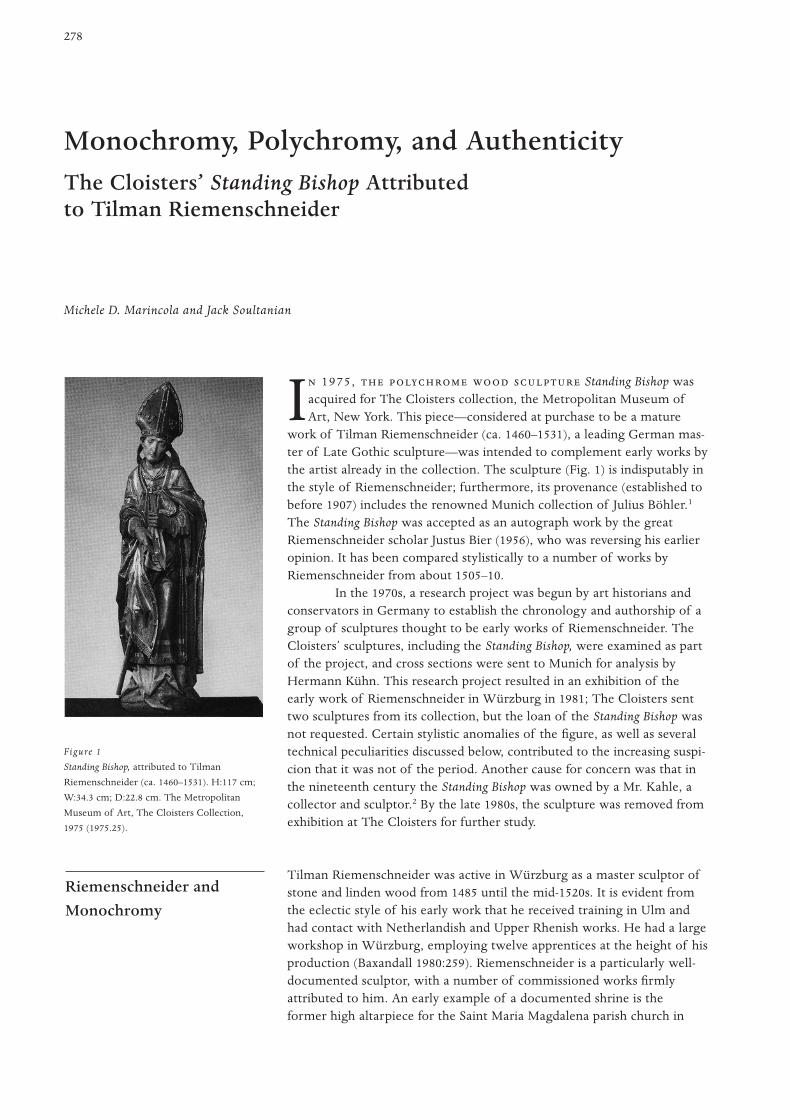
I 1975 , Standing Bishop wasacquired for The Cloisters collection, the Metropolitan Museum ofArt, New York. This piece—considered at purchase to be a mature
work of Tilman Riemenschneider (ca. 1460–1531), a leading German mas-ter of Late Gothic sculpture—was intended to complement early works bythe artist already in the collection. The sculpture (Fig. 1) is indisputably inthe style of Riemenschneider; furthermore, its provenance (established tobefore 1907) includes the renowned Munich collection of Julius Böhler.1
The Standing Bishop was accepted as an autograph work by the greatRiemenschneider scholar Justus Bier (1956), who was reversing his earlieropinion. It has been compared stylistically to a number of works byRiemenschneider from about 1505–10.
In the 1970s, a research project was begun by art historians andconservators in Germany to establish the chronology and authorship of agroup of sculptures thought to be early works of Riemenschneider. TheCloisters’ sculptures, including the Standing Bishop, were examined as partof the project, and cross sections were sent to Munich for analysis byHermann Kühn. This research project resulted in an exhibition of theearly work of Riemenschneider in Würzburg in 1981; The Cloisters senttwo sculptures from its collection, but the loan of the Standing Bishop wasnot requested. Certain stylistic anomalies of the figure, as well as severaltechnical peculiarities discussed below, contributed to the increasing suspi-cion that it was not of the period. Another cause for concern was that inthe nineteenth century the Standing Bishop was owned by a Mr. Kahle, acollector and sculptor.2 By the late 1980s, the sculpture was removed fromexhibition at The Cloisters for further study.
Tilman Riemenschneider was active in Würzburg as a master sculptor ofstone and linden wood from 1485 until the mid-1520s. It is evident fromthe eclectic style of his early work that he received training in Ulm andhad contact with Netherlandish and Upper Rhenish works. He had a largeworkshop in Würzburg, employing twelve apprentices at the height of hisproduction (Baxandall 1980:259). Riemenschneider is a particularly well-documented sculptor, with a number of commissioned works firmlyattributed to him. An early example of a documented shrine is theformer high altarpiece for the Saint Maria Magdalena parish church in
Riemenschneider andMonochromy
Monochromy, Polychromy, and AuthenticityThe Cloisters’ Standing Bishop Attributed to Tilman Riemenschneider
Michele D. Marincola and Jack Soultanian
Figure 1
Standing Bishop, attributed to Tilman
Riemenschneider (ca. 1460–1531). H:117 cm;
W:34.3 cm; D:22.8 cm. The Metropolitan
Museum of Art, The Cloisters Collection,
1975 (1975.25).

Münnerstadt, commissioned in June 1490 and completed by September1492. This retable is particularly important because it is the earliest exam-ple of an altar that was decorated in a monochromatic, as opposed topolychromatic, technique (Staatliche Museen Berlin 1981:117). The recog-nition of the practice of creating umpolychromed works appears in theart historical literature as early as 1912 (Lossnitzer 1912:139ff.), althoughthe observation of a distinct coating on the wood surface is not publisheduntil more than fifty years later, as first reported by Oellermann (1966).The subject has also been taken up, to varying degree, by Wilm(1923:114–18), Lill (1940), Willemsen (1962), Paatz (1963:79–82, 86–93),Taubert (1967), Baxandall (1980:42–48), Melzl and Buchenrieder (1980),Oellermann (1981), Westhoff and Haussmann (1987), Rosenfeld (1990),and Westhoff (1993), among others.
Many of Riemenschneider’s early works in wood were decoratedin the traditional medieval manner, with lifelike flesh tones, burnishedgold robes with matte blue linings, silvered armor, elaborate textile imita-tions, and other painterly attempts at verisimilitude. Riemenschneiderworked with Fassmaler (painters), who executed the Fassung (painted andgilded decoration) of wood sculptures carved by Riemenschneider and hisworkshop. With the Münnerstadt altarpiece, however, a radical departurefrom tradition is encountered: the surface of the pale linden wood is cov-ered not with layers of preparation, metal leaf, and paint but with a thinlyapplied, transparent, brown-to-black pigmented glaze. Riemenschneider,while continuing to produce polychrome sculpture, created altarpiecesusing this technique well into the sixteenth century, as did other sculptorsworking in Germany, including Veit Stoss, Hans Leinberger, NiklausWeckmann, and Henrik Douvermann. These sculptures, somewhat inaccu-rately termed monochromes,3 are sometimes further embellished with redfor the lips and for wounds, and with black for the eyes; there are alsoexamples where the flesh tones and attributes are painted, leaving thebalance of the figure brown (Westhoff and Haussmann 1987; Rosenfeld1990). Since the sculptor could not rely on painting to convey the rich vari-ation of texture and gloss that was appreciated on medieval sculpture, heoften elaborated the surface with a range of knives and punches to createa similar effect. Monochromatic relief sculpture can display a particularlyimpressive range of surface embellishment in this fashion.
For a number of reasons, the identification of a sculpture as amonochrome is especially complex. The pigmented glaze layer itself, asmuch a penetrating colorant as a distinct coating, can be difficult to recog-nize during examination and is usually preserved only in traces. Themedieval sculptor’s practice of painting the eyes directly on the wood dur-ing manufacture (perhaps to set the gaze of the figure or to help positionthe form during carving) can be mistaken for the finished eyes of a mono-chrome work. In addition, a transparent surface coating applied directly tothe wood may serve as a final, intentional decorative layer, or as a woodsealant for subsequent ground and paint layers. After their creation, mono-chromes were occasionally brightly overpainted, obscuring the originalappearance of the sculpture. The most famous example of such an alter-ation is the Münnerstadt altarpiece, which was finished and delivered as amonochrome, then redecorated twelve years later with a traditional poly-chromy by Veit Stoss (Staatliche Museen Berlin 1981:117). This redecora-tion was later removed from the sculptures, taking with it much of the
279M , P, A

monochromy. Sculptures that are sometimes confused with monochromesmay actually be polychrome figures that had been stripped with lye, apractice common to the nineteenth century. During an investigation,therefore, it is important to bear in mind that a suspected monochromemay actually be an unfinished sculpture (Rosenfeld 1990), or a work thathas lost its original polychromy.
Samples of the wood from the support of the Standing Bishop wereremoved for microscopic identification and radiocarbon dating analysis.The wood was identified as a species of the genus Tilia, exhibiting thephysical characteristics of limewood, or linden (Quirk 1989). Radiocarbondating analysis, using accelerator mass spectrometry, gave an adjustedcalendar age range for the wood of 1280–1440 .., indicating that thetree was felled in the medieval period (Tamers 1989).
Examination of the techniques used to sculpt the figure yieldedseveral interesting observations. Macroscopic and radiographic examina-tion of the Standing Bishop revealed that the figure was carved from asingle piece of relatively knot-free wood, except the hands and attributes,which were attached separately. The back of the Standing Bishop was nothollowed out, as is customary with late medieval wooden figural sculp-ture, but was flattened with an adze; several practice cuts with a chiselare to be found on the back as well (Fig. 2). Although (to the best of theauthors’ knowledge) no other Riemenschneider sculptures of this sizecarved three-quarters in the round were treated in this manner, thereare other Late Gothic sculptures of a similar scale with flattened backs(Tångeberg 1989:161). Marks from the sculptor’s bench, which held the login a horizontal position while it was carved, are preserved on the sculp-ture. A hole (diameter approx. 2.2 cm; depth approx. 3.7 cm), now filledwith wood and painted, remains in the top of the miter, where a dowel orpin had held the log fast at one end. Beneath a modern pine base, added tothe bottom, are found rectangular impressions from the knives that hadsecured the log at the other end (Fig. 3). Since they are so close together, itis likely that the impressions in the bottom resulted from separate skewer-ings in the bench. Although sculptors’ benches are thought to have beenused in Germany until the early twentieth century, these marks are almostidentical to those found on indisputably medieval works of art (vonUllman 1984).
Restorations to the figure include sections of the hands andcrosier staff, the sudary (handkerchief held by a bishop), and the plinth. Itwas also detected that carved decoration is obscured by the thick groundlayer; this is noticeable especially at the edge of the cope, where an undu-lating craquelure has developed that follows the punch work beneath. Inaddition, the backs of the gloves have been incised with a pattern of over-lapping circles (executed with a compass?) surrounded by shallow half-moons. Detailed carving that is covered by subsequent paint layers doesnot alone provide proof of the sculpture’s original monochromy, sinceFassmaler sometimes obscured or corrected details of carving when theydecorated sculptures. Rather, it may be taken in this case as corroborativeevidence of a change of appearance for the Standing Bishop.
Techniques ofManufacture: TheStanding Bishop Support
280 Marinco la and Sou l tan i an
Figure 2
Standing Bishop, back view.

At first glance, much of the polychromy appears to be medieval. Thereare traces of several different restoration campaigns on the surface. A fairamount of overpaint is evident on the figure—especially in the hair,gloves, collar, back of the sculpture, and plinth—and probably dates towhen the attributes, fingers, and plinth were renewed. The balance of thepolychromy—the flesh tones and garments—appears to belong to the sameperiod. The burnished water gilding on the cope exhibits some regildingand a craquelure usually associated with a certain amount of aging; exten-sive retouching and a developed craquelure pattern are seen in the fleshtones and the cope lining. Many of the surfaces bear fine parallel scratchesleft from a mechanical removal of overpaint layers. The miter and cha-suble were cleaned of their overpaints in this fashion (there are traces oftwo overpaints on the chasuble) but in such a way as to remove most ofthe red- and green-glazed silver leaf, revealing the red preparatory bolelayer. It appears likely from the exceedingly smooth surface and from faintdepressions visible in raking light that this bole layer was later polished,probably with an agate, to give it the appearance of a deliberate decorativelayer (Hückel 1978). The flesh tones consist of lead white, with the addi-tion of vermilion and charcoal black, and the alb is decorated with a thinlayer of lead white. All pigments were identified with polarized lightmicroscopy (PLM) and confirmed, as necessary, with energy-dispersiveX-ray spectrometry.
A closer look at the polychromy, however, reveals several aspectsthat are inconsistent with an early-sixteenth-century date. The decorativescheme of gold banding on a glazed silver garment is unusual for theperiod. In addition, the small size and thinness of the gold leaves are moretypical of, although not restricted to, a nineteenth-century gilding. Apreparatory ground of calcium carbonate in animal glue, executed in atleast two layers, extends over the entire sculpture, with the exception ofthe face and hair. In these areas, the color appears to have been applieddirectly on the wood. The fringe of the cope is coarsely painted in analternating pattern of white, red, and blue, the latter two decorated withgold highlights. The red areas are constructed not in the typical multilayerfashion, but in a single layer consisting of a mixture of red lead, red earthpigments, and charcoal. The blue lining of the cope and the fringe (bothheavily retouched with artificial ultramarine) was executed in two layers,as was common in medieval practice. The choice of materials, however,indicates a more recent date for the blue: it consists of a coarsely groundlayer of azurite, with the addition of dolomite, lead white, and a smallamount of barium sulfate (identified by energy-dispersive X-ray spectrom-etry), supported on a finely ground layer of the same mixture of pigments.Barium sulfate was first proposed as an artists’ pigment about 1782 and didnot reach widespread commercial application (often as an extender forlead white) until the early nineteenth century (Feller 1986). Its presence onthe figure provides a terminus post quem for the blue areas, and, since theblue appears contemporary with the balance of the decoration, in all like-lihood for the entire polychromy.
Further study of the Standing Bishop was carried out in an effortto reconcile the difference between the apparent age of the wood and thatof the paint and gilding layers. No trace of earlier polychrome layers was
Polychromy
281M , P, A
Figure 3
Detail of marks that are a result of securing
the sculpture in the sculptor’s bench, found
beneath the modern base.

found below the ground. Excavations made through the flesh tones of theface, however, revealed an additional, intermittent dark layer between thepaint and the wood that consists of small black particles (identified byPLM as charcoal) in a brown colored, brittle, water-soluble binder. Thislayer is found under the ground and directly on the wood in all areas ofthe sculpture, except the modern replacements. There appears to be a con-scious modulation of this layer, with pigment applied more thickly to thefringe and more thinly to flat areas of the sculpture. The eyes, which werepartially cleaned of their paint before the figure entered the conservationstudio, have the pupils and edges of the irises rendered in black directly onthe wood. An excavation in the area of the mouth revealed, under thepaint layers, a red glaze that was applied to the wood. Excavations throughthe paint and ground layers to the wood found wood-boring beetle holesthat were filled with ground; the pigmented glaze, however, stopped at theedge of the holes, indicating that the glaze predates not only the infesta-tion but also the polychromy. It appeared from these investigations thatthe Standing Bishop was originally a monochrome.
Cross sections of the paint layers, together with the wood, weretaken from several areas for further characterization of the pigmentedglaze. No trace of a dirt or dust layer was found beneath the glaze, indicat-ing that it was applied shortly after the figure was carved. A cross sectionfrom the area of the mouth (Fig. 4) shows quite clearly the red pigment (ared lake, probably madder lake) and its binder penetrating the pores of thewood support. On top of this layer are occasional particles of charcoalthat are separated from the subsequent overpaint by a very thin, brightlyfluorescing layer. This intermittent coat of black pigment corresponds tothe layer found directly on the wood over the balance of the figure.
Initial inquiries into the binding medium of the pigmented glazewere made. Media analysis is particularly difficult in this case due to themicroscopic remains of the layer, interference from the wood, and con-tamination from the overlaying ground layers and consolidation treat-ments. Infrared or amino-acid analysis, therefore, was not attempted. Forthe present study, the placement of the binding medium into one (ormore) of three broad categories of material was made using ultravioletmicroscopy in conjunction with fluorescent stains. The stains were appliedto the cross sections with felt-tip markers that had been loaded with a
282 Marinco la and Sou l tan i an
Figure 4
Microphotograph of a cross section from the
bottom lip of the Standing Bishop: (1) the
wood substrate, (2) the red lake glaze, (3) the
glaze pigmented with charcoal, and (4) the
pink overpaint. Normal light, 340.

specific fluorochrome,4 and the sections were examined under highmagnification in ultraviolet light. Staining of cross sections with triphenyl-tetrazolium chloride (TTC) (4% in methanol) for carbohydrates gave apositive reaction in the region of the pigmented glaze (Fig. 5). The appli-cation of fluorescein isothiocyanate (FITC) (0.25% in acetone) for proteinsproduced a positive reaction above the glaze, as well as in discrete portionsof the layer that correspond to cracks in the glaze. The fluorochromeRhodamine B (0.25% in ethanol) for drying oils gave negative results inthe glaze but reacted quite positively for some of the later polychromy.The absorption of TTC in the pigmented glaze, indicating the presence ofcarbohydrates, points perhaps to the use of polysaccharide gums, appliedalone or in conjunction with a plasticizer such as honey. The use of fruit-tree gums for painting on wood is mentioned by Theophilus in the twelfth-century treatise Schedula diversarum artium as a rapidly drying alternativeto oil colors (Hawthorne and Smith 1963:32–33); these gums were espe-cially used in tempera systems on account of their emulsion-building prop-erties, and can be combined with linseed oil, balsams, egg, or casein.Gums increase the adhesion of paint films to hygroscopic substrates andimpart an enamel-like gloss to the paint surface (Schramm and Hering1988:124–26). With the knowledge that the glaze layer on the StandingBishop appears to contain carbohydrates, a possible avenue for furthercharacterization might be simple-sugar ratio analysis.5
Several autograph works by Riemenschneider have been examined in thecourse of conservation treatments for traces of their original surface deco-ration. The results have been published and will only be summarized hereas they compare with the findings for The Cloisters’ Standing Bishop.
Individual sculptures belonging to the Münnerstadt altarpiecewere investigated in 1977–78 and traces of a pigmented surface coatingwere found on many of them (Fig. 5). This layer is described as consistingof a protein (animal glue) and a tiny amount of oil-binding black particles(charcoal), red or yellow oxides, and occasionally lead white. The eyes(irises, pupils, folds of the eyes, and eyebrows) are rendered in black, andthe mouths in red, directly on the wood; pigmented glaze is found overthese areas. The pigmented material has penetrated deeply into the pores
Comparative Material
283M , P, A
Figure 5
Microphotograph of a cross section from a
fold in the chasuble, stained with triphenylte-
trazolium chloride (TTC) and fluorescein
isothiocyanate (FITC): (1) the wood substrate;
(2) the glaze pigmented with charcoal,
exhibiting a positive reaction for carbohy-
drates; (3) a separation layer between the
glaze and the later ground, exhibiting a posi-
tive reaction for proteins; and (4) the ground
layer. UV light, blue-violet filter, 31,132.

of the wood and exhibits few characteristics of a discrete layer (StaatlicheMuseen Berlin 1981:318).
The Altar of the Holy Blood, commissioned by the city ofRothenburg for the church of Saint Jakob in 1501 and delivered in install-ments until 1505, underwent a technical examination in the early 1960s.Both the linden wood figures and the shrine and foliate ornaments carvedfrom spruce were coated with a pigmented glaze composed of egg whiteand oils (egg tempera?) with the addition of ochre, charcoal, gypsum,and lead white (perhaps as a dryer). This glaze was found directly onthe wood, and also under the painted eyes and lips, as on The Cloisters’Standing Bishop and the Münnerstadt altarpiece. As with these works, notrace of a dirt or dust layer was found beneath the pigmented glaze, andlater restorations bear no sign of the coating, indicating that it must havebeen applied shortly after the sculpting of the figures (Oellermann 1966).
Similar coatings have been identified on other works byRiemenschneider, including the Crucifix from Saint Nickolaus in Eisingen(Melzl and Buchenrieder 1980), the altarpieces of the Coronation of theVirgin in Saint Jakob, Rothenburg ob der Tauber (Melzl and Buchenrieder1980), and the Crucifixion in Dettwang (Oellermann 1966).
An interesting comparison can be drawn between The Cloisters’Standing Bishop and the figure of Saint Mary Magdalen from a crucifixionscene made in 1509–16 for the Zweifalten cloister and recently attributedto Niklaus Weckmann the Elder. Under a later polychromy from 1624, alayer of animal glue was found that is not pigmented; small losses at thedrapery borders, however, reveal a transparent glaze containing pigmentparticles (Westhoff and Haussmann 1987). This seems to be an attempt tocontrast the cooler toned borders with the balance of the draperies andcalls to mind the Standing Bishop, which appears to have a deliberatelystrengthened application of its pigmented glaze in the fringe.
The presence of a transparent, pigmented glaze applied over painted eyesand lips—which appears, both in terms of material content and applicationmethod, to be similar to other coatings found directly on the wood of late-fifteenth- and early-sixteenth-century sculpture—is a strong indication ofthe original monochrome appearance of the Standing Bishop. Both materialanalysis and tool mark traces suggest the wooden support was felled andcarved in the Middle Ages. On the basis of cross-section analysis, the glazeappears to date to the period of the carving, and not to the nineteenth-century polychromy visible today. While the results of this investigationcannot offer proof of authenticity, the presence of a decorative layer notdescribed in the literature until well after the sculpture was known sup-ports a medieval date for the creation of the Standing Bishop.
The authors would like to thank William D. Wixom; Michel David-Weill,chairman of the Department of Medieval Art; and The Cloisters, theMetropolitan Museum of Art, for permission to publish this sculpture.Thanks also to Bodo Buczynski, chief conservator at the StaatlicheMuseen Preussischer Kulturbesitz Berlin, for reviewing the paper andmaking several helpful suggestions. The authors are grateful, as well,to Mark Wypyski, associate research scientist at the Sherman FairchildCenter for Objects Conservation, the Metropolitan Museum of Art, who
Acknowledgments
Conclusion
284 Marinco la and Sou l tan i an

performed the energy-dispersive X-ray spectrometric analysis. Thanks alsoto Christopher McGlinchey, associate research chemist in the ShermanFairchild Paintings Conservation Center, the Metropolitan Museum ofArt; and Richard Wolbers, associate professor of Paintings Conservation,University of Delaware/Winterthur Art Conservation Program, for theirassistance with cross-section analysis. Also, thanks to Hiltrud Jehle, con-servator at the Staatliche Museen Preussischer Kulturbesitz Berlin; andErwin Emmerling, conservator at the Bayerisches Landesamt fürDenkmalpflege, for assistance with references.
1 The Cloisters, the Metropolitan Museum of Art, department file no. 1975.25, catalog card 3.
2 See note 1.
3 This term is currently undergoing discussion in Germany; for purposes of convenience, the
English word monochrome shall here designate nonpolychromed sculpture.
4 The authors are indebted to Richard Wolbers, associate professor of Paintings Conservation,
Winterthur/University of Delaware Program in Art Conservation, for supplying the markers.
5 The authors are grateful to Richard Newman, research scientist, Department of Objects
Conservation and Scientific Research, Museum of Fine Arts, Boston, for this suggestion.
Baxandall, M.
1980 The Limewood Sculptors of Renaissance Germany. New Haven and London: Yale
University Press.
Bier, J.
1956 St. Andrew in the work of Tilmann Riemenschneider. The Art Bulletin
38(December):215–23.
Feller, R. L.
1986 Barium sulfate—natural and synthetic. In Artists’ Pigments: A Handbook of their History
and Characteristics, vol. 1, ed. R. L. Feller, 47–64. Cambridge: Cambridge University
Press; Washington, D.C.: National Gallery of Art.
Hawthorne, J. G., and C. S. Smith
1963 On Divers Arts: The Treatise of Theophilus. Chicago: University of Chicago Press.
Hückel, A.
1978 Forschung zum Frühwerk Tilman Riemenschneiders. Examination report, The
Cloisters, New York.
Lill, G.
1940 Die Moosburger Reliefs von Hans Leinberger nach ihrer Konservierung. Pantheon
(25):190–94.
Lossnitzer, M.
1912 Veit Stoss: Die Herkunft seiner Kunst, seine Werke, und sein Leben. Leipzig: Verlag
Julius Zeitler.
Melzl, E., and F. Buchenrieder
1980 Der Eisinger Kruzifixus von Tilman Riemenschneider. Jahrbuch der Bayerischen
Denkmalpflege 34:89–110.
Oellermann, E.
1966 Die Restaurierung des Heilig-Blut-Altares von Tilmann Riemenschneider. Bericht des
Bayerischen Landesamts für Denkmalpflege 24(1965):75–85.
References
Notes
285M , P, A
1981 Erkenntnisse zur ursprünglichen Oberflächengestalt des Münnerstädter Magdalenen-
Altares: Möglichkeiten einer Rekonstruktion. In Tilman Riemenschneider—Frühe Werke,
ed. Staatliche Museen Preussischer Kulturbesitz Berlin, 318–21. Regensburg, Germany:
Mainfränkischer Museum Würzburg.
Paatz, W.
1963 Süddeutsche Schnitzaltäre der Spätgotik. Heidelberg, Germany: Carl Winters,
Universitätsverlag.
Quirk, J. T.
1989 Report of wood analysis, dept. file no. 1975.25. The Cloisters, New York.
Rosenfeld, J.
1990 Die nichtpolychromierte Retabelskulptur als bildreformerisches Phänomen im ausgehenden
Mittelalter und in den beginnenden Neuzeit. Hamburg: Verlag an der Lottbek.
Schramm, H. P., and B. Hering
1988 Historische Malmaterialien und ihre Identifizierung. Graz, Austria: Akademische Druck-
und Verlaganstalt.
Staatliche Museen Preussischer Kulturbesitz Berlin
1981 Tilman Riemenschneider—Frühe Werke. Regensburg, Germany: Mainfränkischer
Museum Würzburg.
Tamers, M.
1989 Report of carbon-14 analysis, dept. file no. 1975.25. The Cloisters, New York.
Tångeberg, P.
1989 Holzskulptur und Altarschrein: Studien zu Form, Material und Technik; Mittelalterliche
Plastik in Schweden. Munich: Callwey.
Taubert, J.
1967 Zur Oberflächengestalt der sog. ungefassten spätgotischen Holzplastik. Städel-Jahrbuch
(NF I):119–39.
von Ulmann, A.
1984 Bildhaurertechnik des Spätmittelalters und der Frührenaissance. Darmstadt, Germany:
Wissenschaftliche Buchgesellschaft.
Westhoff, H.
1993 Holzsichtige Skulptur aus der Werkstatt des Niklaus Weckmann. In Meisterwerke
Massenhaft: Die Bildhauerwerkstatt des Niklaus Weckmann und die Malerei in Ulm um 1500,
135–45. Ulm, Germany: Süddeutsche Verlagsgesellschaft.
Westhoff, H., and B. Haussmann
1987 Zweifalten und Alpirsbach—zwei monochrome Altäre? Zeitschrift für Kunsttechnologie
und Konservierung 1(10):125–30.
Willemsen, E.
1962 Beobachtungen zur Oberflächenstruktur niederrheinischen Skulpturen. Jahrbuch der
Rheinischen Denkmalpflege (24):189–97.
Wilm, H.
1923 Die Gotische Holzfigur. Leipzig: Verlag Klinkhardt and Biermann.
286 Marinco la and Sou l tan i an

287
T is on the river Thames near Oxford. Ithas been a prosperous town since the early Middle Ages; its abbey,of which little survives, was founded in the late seventh century.
Saint Helen’s parish church may be the one mentioned in late-tenth-century records, but the present five-aisled building dates mainly fromthe thirteenth to sixteenth centuries. The Lady Chapel was founded inthe mid–thirteenth century by William le Reeve, whose name was laterrecorded on its ceiling. The chapel is situated at the east end of the innernorth aisle of the church, adjacent to the chancel. Its ceiling originally hadthirteen pairs of figures on each side (i.e., a total of fifty-two), sloping upto a flat soffit 1.32 m (4 ft. 4 in.) wide. Around the cornice, at purlin level,a hymn to the Virgin Mary is painted in black letter script, with an inscrip-tion recording the chapel’s benefactors, notably William Cholsey (d. 1373),who paid for the roof. Also present on the inscription is an indulgencegranted by Pope Boniface IX in 1391; this suggests that the ceiling maydate from the last decade of the fourteenth century.1 Borenius (1936),Preston (1936), and Liversidge (1965) discuss the history at greater length;it is sufficient here to add that close examination while the ceiling was dis-mantled refutes Tristram’s suggestion (1955:64) that the inscription wasadded later. The costumes of many of the kings of the House of David,with their broadly splayed cuffs and pointed shoes, are in accord with adate in the 1390s. (English panel paintings of the fourteenth century arefairly rare. This author has recently cleaned the rood screen at All Saints’Church, Clifton, Bedfordshire, where two female saints have similarsplayed cuffs.)
The figures depicted are the ancestors of Christ listed in Matthew1:6–16 (Table 1). On the south side, the sequence began with a giantrecumbent figure of Jesse, and continued with the kings of Judah up tothe Babylonian captivity. Each king is paired with an Old Testamentprophet bearing an inscribed scroll; most of these Latin texts and juxta-positions of figures have subtle theological significance. (Several of thesetexts continue in use as Advent antiphons in our own time.) On the northside, the series continues with the great spiritual ancestor Moses (unlikethe kings, the prophets are not in chronological order) and leads to SaintJoseph, from the New Testament, and the Annunciation group (Fig. 1).The archangel Gabriel is the only figure wearing a gold-embroidered
Conservation of the Fourteenth-Century Ceilingat Saint Helen’s Church, Abingdon
Anna C. Hulbert

garment. Unfortunately, the figure of Mary is badly damaged after sixhundred years adjacent to a damp exterior wall at the east end of thechapel. Between them, Christ is shown crucified on the lily, which is hismother’s emblem; this seems to have been a peculiarly English devotionalsubject.2 Here, the combination of the Lily Crucifix with the Jesse Treegives a special meaning to the prophecy in Isaiah 11:1: “Et egredietur virgade radice Iesse, et flos de radice eius ascendit.” Only in Latin is the “rodthat shall come forth from the stem of Jesse” clearly referred to as aflower. This is extensively discussed by Watson (1934).
One of the most interesting features of this Jesse Tree is the care-ful characterization of the individual kings. In every case in which theBible gives information about a monarch’s life, the artist has taken painsto portray his personality and has succeeded with remarkable vividness.It should be remembered that the Bible had recently been translated intoEnglish by the reformer John Wyclif (d. 1384) and his circle, and it had notyet come to be regarded as seriously heretical to study it in English. Thismaster painter might, therefore, have had an unprecedented opportunityto read it himself. Below the figures, their names were painted on a seriesof horizontal boards at wall-plate level. Three godly kings—Asa, Josaphat,and Hezekiah—have square-cut gemstones in their crowns; the rest havevarieties of cabochon. Such cutting was a relatively new technique(Campbell 1991:136).
The ceiling is constructed of straight-grained, quartersawn oak of primequality, imported from the Baltic area.3 The ceiling may, in fact, have beenbuilt very slightly later than the aforementioned papal indulgence. Theconstruction is somewhat unusual in that the tracery is built up from sev-
Technique
288 Hulber t
Table 1 Figure panels on the ceiling of Saint Helen’s Church, Abingdon
Pairs on south side
1. Jesse* and David**
2. Nathan (with Jesse’s legs) and Solomon**
3. Ahijah and Roboam**
4. Prophet** and Abijah**
5. Prophet** and Asa
6. Baruch and Josaphat
7. Amos(?)** and Jehoram
8. Elijah and Uzziah
9. Patriarch Jacob and Joatham
10. Hosea** and Achaz
11. Nahum and Hezekiah
12. Micah** and Manasses**
13. Prophet** and Amon**
* fragment
**missing
Pairs on north side
1. Moses and Josiah
2. Jeremiah and Jeconiah
3. Zephania and Salathiel
4. Obadiah and Zorobabel
5. Haggai and Eliakim**
6. Habakkuk and Zadok
7. Jonah and Eleazar
8. Zechariah and Mathan
9. Malachi and unidentified king
10. Joel and unidentified king
11. Isaiah and King Jacob (?)
12. Saint Joseph and archangel Gabriel
13. Lily Crucifix and the Virgin Mary
Figure 1
Saint Joseph, the archangel Gabriel, the Lily
Crucifix, and the Virgin Mary; panels from
the east end of the north side of the Lady
Chapel ceiling, conservation nearly complete.

eral layers of thin planks (Fig. 2). These layers were secured by woodenpegs; but because all the medieval rafters have disappeared, it is not knownhow the whole ceiling was originally attached to the roof.
The tracery overlay of the soffit forms a lattice pattern withbosses of lion masks and other small foliage designs. Most of these bossesretain some color. The sloping figure panels are framed in pairs undercrocketed ogee “canopies”: thirteen ogee arches on each side, with finials,and little pinnacles in between. The components retain many incisedsetting-out (layout) lines. The various parts were numbered, using smallpunches. These figures represent one of the earliest examples of arabicnumerals being used by an English artisan, although some were employedby sculptors at Wells (ca. 1240), which the masons of the time seem tohave had difficulty in reading.4
The figure panels are, on average, just over 2 m (7 ft.) long, nearly30 cm (1 ft.) wide, and about 7 mm thick, sometimes less. Some retain dis-tinct marks from the adze used to prepare the surface. The front surfacewas finished by planing. The panels are numbered in pairs, 1–13, usingsmall punches on the north side (Fig. 3), and cruder figures cut with anauger and a chisel on the south side. Both sets are arabic numerals andboth contain a few fragments of fourteenth-century color. It is possiblethat the large, crude set was designed differently simply to distinguish thesouth side from the north when the panels went to the painter’s studio.There are also incised lines marking the exact location of the tracery andframes. The frames in their medieval position protected the paint whenthe panels were later cleaned with soda, so their outline is clear and accu-rately follows the incised setting-out lines. (It appears that the painter hadbeen told that the panels were “a foot” wide, and he had prepared car-toons in advance without allowing for the width of the frames, becausethe figures are slightly cramped, often encroaching on the incised outline,and have sometimes been slimmed down by allowing the background ver-milion to overlap them.) Traces of yellow were found on the crockets andin crevices elsewhere. Its hardness and pale lemon hue are characteristic oflead-tin yellow. English medieval oil gilding invariably was applied oversome kind of reddish or orange ochre, so it seems clear that this yellowwas a substitute for gold.
Each panel received an extremely thin priming of glue and chalk,barely filling the wood grain; in some places it cannot be seen under themicroscope in a cross section. The top end remains bare wood, as itextends above the cornice. The area behind the tracery overlay, in thespandrels of the ogee arch, is green like the backboarding of the soffitoverhead. This green is built up of a pale undercoat containing lead whiteand a rich, resinous glaze. The rest of the panel received a further under-coat of red ochre.
The vine was presumably added next, with black underdrawing;it is continuous and gradually tapers across both rows of panels, from agnarled and much-pruned stem springing from Jesse, to fine twigs belowthe Annunciation. The stem is buff colored with green shading, and theleaves modeled with white veins laid over glazes (Fig. 4). There are manytendrils but no grapes. The figures standing on the vine display a rich andvaried palette, with much use of crimson and other glazes. Many paintsamples were taken during work in order to monitor the cleaning process,
289C F -C C S . H ’ C, A
Figure 2
Diagram of the tracery overlay of panels
shown in Figure 1, through which the green
background may be seen at the top of each
panel (compare with Fig. 7).
Figure 3
Detail of the panels of prophet Zechariah
and King Mathan, showing the arabic
number eight in the corner of each panel
and incised setting-out lines for positioning
the tracery frames.

and others are being analyzed.5 They include vermilion, red lead, leadwhite, carbon black, azurite, malachite, copper green, a range of ochres,and two unidentified colors, a crimson lake and a translucent purple. Thegold, which is applied on an oil mordant, was used with restraint. It isfound on the crowns and scepters of the kings, Josaphat’s belt, and on thehalos of the Annunciation group, Gabriel’s cope, and Christ’s loincloth.(Water gilding, which has solubility characteristics completely differentfrom oil gilding, is fairly uncommon on English medieval woodwork.) Thevermilion background was obviously applied last, possibly with the panelsalready in situ, since a few neat, square-headed tacks bearing scraps thatappeared to be of vermilion were found among many corroded nailheadsof different periods that studded the edges of the panels. The tracery wasthen laid over the panels, and evidently pegged through them; it must havebeen polychromed before assembly, as there are no paint splashes on thefigure panels. Among the last components to fit into position were the cor-nices and name boards, which were secured with nails, being much heavierthan the rest.
The faces are modeled in shades of pink in the normal manner,with one particularly interesting exception—that of the Moses figure(Fig. 5). Here, flat pink was applied over the head and neck, followed bygray on the hair and beard. When this had dried, the features and curls ofhair were boldly drawn by brush in black—a glass painter’s technique.6
During the Reformation, evidently following the edict of 1547–48 againstimages, the three panels depicting Gabriel, the Virgin Mary, and the LilyCrucifix were concealed with a pinkish overpaint. Similar pink was foundat Clifton, where the backgrounds are also vermilion, and on those roodscreen panels at Ranworth, Norfolk, and Pilton, Devon, with red back-grounds. Presumably, the parishioners wished to spoil their polychromedfurnishings as little as possible while keeping within the law. It was proba-bly E. T. Long who removed most of this pink layer at Abingdon, duringhis 1935 work mentioned below.
At some stage, before any of the medieval framework was dis-placed, attempts were made to clean the ceiling with caustic soda (sodiumhydroxide). Caustic soda was still occasionally used to clean English poly-chromy well into the twentieth century; it tends to raise the grain of thewood, and leaves oak surfaces a dull gray. It saponifies an oil medium,and—although it was usually rinsed off areas where it was not intended tostrip the paint—its residue leaves the medieval oil paint permanently sensi-tive to any form of moisture. The ceiling may also have been dismantledand given a reddish resin varnish. Certainly, the nine westernmost panelson the north side, from Moses to Haggai, were taken down to be over-painted in 1854 or 1856, together with their name boards.7 Until the over-paint was removed, between 1989 and 1991, these nine panels were thebrightest in the ceiling and the most widely reproduced.
All of the panels were taken down in 1872, and the structural tim-bers of the roof completely renewed. The panels and their tracery werereassembled in a mixed sequence, thirteen panels from the south side andone from the north having been discarded. It must have been at this timethat the polychromy was stripped from the tracery of both figures andsoffit, although the soffit backboarding retained its richly glazed green.
Previous Interventions
290 Hulber t
Figure 5
Face of Moses (detail).
Figure 4
Vine below the feet of King Zadok (detail).

These green areas were coated with a layer of thin black paint. The figurepanels were nailed back onto horizontal softwood planks, at right anglesto the grain of the fragile medieval panels.
In 1935, Long completed his very careful cleaning of the paintings,which resulted in Borenius’s appreciative publication (1936). However, hewas obliged to work in situ, and thus did not attempt a complete cleaningof the most fragile areas (notably the vine, onto which much caustic sodahad run). Consequently, Borenius makes several inaccurate observationsabout the color. Long is recorded to have applied a “preservative,” which atthat date may well have been wax (Ballantyne and Hulbert 1993; Plummerand Hulbert 1990), or possibly size; traces of the latter were encounteredduring cleaning.
Blown-air central heating was later installed in the church, causingextreme fluctuations in relative humidity. During a winter weekend earlyin 1983, conservators recorded a drop in the relative humidity from 75% to30% in the vicinity of the ceiling. Some twenty years of similar conditionshad not only loosened the paint but also considerably degraded the oak.The figure panels, being constrained by many nails, were seriously weak-ened, but the tracery overlay survived in much stronger condition. It hadprobably suffered less stress because its design is pierced (Fig. 2). In addi-tion to flaking paint and damaged wood, the ceiling was caked with dirtdeposited by the current of hot air.
Early in 1983, when repairs to the tiled roof were about to begin, thechurch architect, John Glanfield, requested a report on the ceiling. Thepaint was found to be flaking so badly that it was imperative to secure itwithout delay. Paint consolidation was carried out over several weekends.This turned out to be extremely fortunate, for the presence of the conser-vators during weekends allowed them to observe the sharp rise in temper-ature and the associated drop in humidity on Saturday afternoons, afterthe heat had been turned on in readiness for Sunday worship; this wasinstantly diagnosed as the cause of the loose paint. In a March 1983 report,the author tentatively suggested that the Lady Chapel might be isolatedfrom the effects of the blown-air heating by placing glass tympana in itsarches. Before this scheme could be implemented, however, a great dealof investigation needed to be done. Meanwhile, for the foreseeable future,the parish had funds only for emergency work.
Since there appeared to be some wax on the panels already, and itwas evident that a facing would have to remain on the paintings for someyears, a mixture of beeswax and dammar (7:1) was chosen as a consoli-dant, melted through Japanese mulberry tissue with hot-air blowers andheated spatulas. The proportion of dammar was kept low, so that it couldeasily be removed if it did have to remain on the paintings for many years.A heat-melt adhesive has a great advantage over one requiring a solvent,in that shrinkage problems are minimized. Great care was taken to ensureadequate penetration of the wax so there would be no danger of the tissuepulling off the paint surface. The green area behind the tracery overlayscould not be treated at this stage.
Expense precluded modification of the entire heating system,but the parish began to monitor the environment within the chapel.Conditions produced at the ceiling by the full blast of the nearby heating
“First Aid” and Preliminary Work
291C F -C C S . H ’ C, A

outlet were compared to those produced by blocking the arcades withtemporarily installed polythene (polyethylene sheet) tympana.8 The intro-duction of these barriers caused the relative humidity—which had previ-ously ranged from 40% to 70% or more—to level off to around 60–65%;the temperature—which had similarly fluctuated, from 6 °C to 34 °C—also became far more stable. In due course, it was clear that a permanentglass tympanum blocking each arch would provide effective protection forthe ceiling, while allowing some air to circulate at ground level.
The ceiling’s most complex problems were those involving the woodwork,which clearly demanded expertise in joinery. Accordingly, a preliminaryreport was prepared in 1983 by Hugh Harrison, consultant in the conser-vation of woodwork.9 There were innumerable splits in both tracery andpanels, frequently associated with corroded nails, and the medieval timberwas in extremely fragile condition. A great deal of water must have seepedin before the 1872 repair of the roof, and the panels had suffered from fun-gal and insect attack. After the paint on the figure panels had been consoli-dated, three panels on the north side (Eleazar, Zechariah, and Mathan)were taken down in 1983 for investigation and were cleaned as fundsbecame available during 1983–85.
In 1988, when John Glanfield retired, Martin Caroe took over aschurch architect. Caroe was responsible for coordinating the major part ofthe work and for assembling the varied team of specialists. Dismantlingwork was resumed in 1989 (Fig. 6); the last components came down in1991. The many nails attaching the ceiling to the softwood planking werecarefully sawn off behind the panels and their corroded heads laterextracted from the oak. Softwood wedges sandwiched between smallpieces of very thick Melinex, and inserted close to each attachment point,were used to gently pry apart the layers of woodwork.10 Occasionally,splinters became detached from rotten edges, but these, however tiny,
Dismantling andDocumentation
292 Hulber t
Figure 6
North side of ceiling during dismantling.
These were among the best-preserved figure
panels. Note the construction of the soffit,
above, and a section of the cornice with
inscription, on the right.

were labeled and eventually adhered back in position. The most difficultpanels to remove were, of course, the first in each row, as it was not easyto reach the 1872 nails. During work, an 1854 penny was discovered, withthe date 1872 added to the adjacent woodwork in pencil. (In 1991, a newfive-pence piece was similarly hidden during reassembly.)
When the tracery overlays had been removed, the green back-grounds, which could not be reached previously, were faced with Eltolenetissue and consolidated with beeswax and dammar (4:1). The edges of thepanels that had been covered by the frames were similarly treated.11
Each component was carefully numbered, labeled, and mapped sothe position of even the smallest piece was precisely located. For the soffit,this involved a scale drawing on transparent overlays representing the layerstructure of the tracery. Reports were produced at the completion of eachstep of the work, resulting in a massive amount of documentation.12
In 1989, a photogrammetric record was made before further dis-mantling took place. A very important aspect was the tracing of eachfigure panel to scale as soon as it was cleaned (Fig. 7). Thick transparentMelinex or acetate sheet was used, and every detail recorded, down tothe last nail hole. A full-scale photocopy was made of every tracing andmounted on hardboard to be used when sorting the tracery into its origi-nal order (for which the early peg holes were important evidence) andwhen fitting the new, concealed aluminum housing. This saved wear andtear on the paintings.
The tracings were also reduced in size in order to provide handyline drawings. These proved invaluable when checking the continuity ofthe vine trail—and, consequently, the original order of the panels—becausesoda-damaged details could be shown far more clearly in the drawings thanin a photograph, and missing outlines could be recovered from survivingpaint fragments. The lettering on the name boards also was traced where itwas damaged (probably by soda residue) and this process proved an invalu-able aid in deciphering some of the less legible names. Fortunately, the
293C F -C C S . H ’ C, A
Figure 7
Panels from Moses to Haggai, north side.
These were the nine figures previously over-
painted.

black paint had left a clear yellowish stain on the white background whereit had been washed off during the early attempts at cleaning.
All parts of the ceiling were routinely photographed at significantstages of work, in color and in black and white. Before any wax consolida-tion was carried out in 1983, the faintest areas of the painting were pho-tographed on infrared film, but this did not reveal anything significant. Inaddition, rubbings were made of several interesting toolmarks, setting-outlines, et cetera.
The repair of all the woodwork and the removal of corroded nails,together with the cleaning of all bare oak surfaces, the green soffit back-boarding, name boards, and cornice inscriptions were carried out in theDevon workshop. The finest available quartersawn English oak was usedfor all repairs, but it was difficult to match the superb quality of the origi-nal timber. Poly(vinyl acetate) emulsion was selected as the adhesive forunpainted wood, since in this context it should prove adequately resoluble,and it is less sensitive to changes in humidity than traditional animal glue.A 20% solution of Paraloid B72 in xylene was used to consolidate decayedwood; the same resin was mixed with oak sawdust and used for fillings.Owing to the extreme thinness of the priming layer, it was often impossibleto prevent the wood consolidant from reaching the paint surfaces, so it hadto be safe for the paint as well as for the wood.
Splits in the tracery were glued and, where appropriate, reinforcedwith oak pegs. Lost pieces of carving that created an unsightly gap in thedesign or weakened a component were replaced, with care taken to mini-mize disturbance to the broken surface of the medieval wood. Some longsplits in the panels were reinforced with V-shaped oak wedges at the back.
A special problem was posed by the discovery, behind the figureof Moses, of a tapered sliver on one of the panels discarded in 1872.Vermilion and green paint and incised lines identified it as coming fromthe upper part of a figure panel, but the foliage was painted much closerto the top of the panel than any other part of the vine. It seemed likely,therefore, that the figure had been a recumbent Jesse at the bottom of thepanel, with some foliage above his head. This was confirmed when tinyfragments of dark crimson were found to match the drapery coveringJesse’s giant feet at the bottom of Nathan’s panel. (The recumbent figureoriginally spanned three panels, the middle one being that of the lostDavid.) The sliver was accordingly mounted in a recess in a new panel thatwas fractionally thicker than the medieval ones, and could thus be restoredto its correct position.
Nahum’s panel had occupied the easternmost position on thesouth side since 1872 and had become damp from contact with the exteriorwall. It was consolidated before being taken to the Devon workshop. Notonly was the wood seriously damaged by fungal attack, with cracks acrossthe grain, but the panel had bowed across its width, creating a huge bulge.Before the facing could be removed, the back of the panel had to be thor-oughly impregnated with Paraloid B72 (it absorbed about half a liter). Thepanel could not be enclosed in a fume hood because it was necessary toconstantly monitor the paint surface for seepage of consolidant; therefore,the work was done outdoors where the xylene evaporated rapidly in themild English sun. Fortuitously, it was discovered that the panel could beconsiderably flattened while warm; it was carried indoors, gently weighted,
Woodwork Repair
294 Hulber t
and left to cool. The panel remained flat when the consolidant had fullyhardened. Probably the same effect could have been achieved on a vacuumhot table, but since none of the other panels had bowed in this way, therewas no occasion to explore further this purely accidental discovery. Its suc-cess probably depended on the combination of warmth and the precisemoment at which the solvent had almost, but not quite, evaporated.
Before the 1983 facing was removed from the figure panels, the paintsurface was further impregnated with beeswax and dammar (3:1).
Isopropyl alcohol proved to be the most useful solvent for theold varnish; there was no danger of dissolving the fixing wax. However,a wide range of solvents were used on different areas. A 3% solution ofammonia was occasionally used, but with caution, for fear of reactivatingthe alkaline residue remaining from the previous intervention with soda.The special problems caused by the soda have been discussed elsewhere(Hulbert 1994). For the initial softening of overpaint, a commercial paintstripper (green label Nitromors), applied on a very small brush, was fre-quently indispensable. After this had been rinsed off with white spirit, theoverpaint was sufficiently soft to respond to milder solvents.13 The authorhas worked on more than thirty English medieval rood screens and churchpanel paintings, which over the centuries have usually received at least onecoating that is now harder than the original polychromy. Experience hasshown that a strong solvent used quickly and carefully, especially when itsaction depends on its vapor’s reaching the surface of the overpaint from thegel, is far safer than prolonged use of milder solvents, which may begin toact on the original paint before the overpaint is soft enough to respond togentle scraping. Preliminary tests with a wide range of solvents confirmedthat this was the case with the overpainted panels at Abingdon. The mostvaluable tool, however, was a scalpel kept very sharp with a Belgian sharp-ening stone. A large part of the work on every panel was done under abinocular microscope at 310 magnification.14
The various clues by which the original sequence of the figure panels wasrediscovered have already been published in detail (Hulbert 1992:19–20).Each prophet could be identified by his text. The name boards couldbe correctly positioned through reference to the list of kings in SaintMatthew’s Gospel. There was nothing on the figure panels to identify theindividual kings. However, by establishing the continuity of the vine trail,kings could be placed between the correct prophets, so that when theprophets were lined up with their names, the names of the kings wouldalso be below the proper panels. The arabic numerals also confirmed thesequence, but the cruder numerals on the south side were not recognizeduntil they were already in the correct order.
It was obviously essential to support the panels in some kind ofhousing that would not restrict movement, as the nails had. Since thechapel is just under 8 m (26 ft.) long, and the slope of the rafters creates atapering space that absolutely precludes any additional thickness in theassembly of panels and tracery, this called for some ingenuity. After longdiscussions with colleagues, grant-giving bodies, and diocesan authorities,the following solution was devised by Hugh Harrison. All of the compo-nents were first fitted together in the workshop and then taken to the
Reassembly
Cleaning
295C F -C C S . H ’ C, A

church for reassembly. (Tracery components were pegged together in theirrespective sections.)
Aluminum was obtained in an H-shaped section to fit the panels.The slots of the H were lined with balsa wood (pretreated with insecti-cide) and the lengths of aluminum cut as necessary. Pieces that would bevisible through apertures in the tracery were cut away. In places, distortionhad occurred; such places required extra welded aluminum. Keyhole slotswere cut to correspond with screws in the back of the tracery, which wereinserted into existing, plugged holes; the slots were designed to allowsome movement. (The screwheads were isolated from the panels by thebalsa wood.)
The soffit was the last part to come down and the first to go up. Itwas secured with brass screws through existing holes. The aluminum sec-tions were then accurately positioned, using the tracery as a guide (alreadyslotted into place), and screwed to the softwood boarding, which had beenretained. The tracery was unslotted, and the vertical pieces of aluminumunscrewed one at a time. One panel was inserted into the balsa-lined hous-ing; the aluminum was then screwed back, using the same holes so thetracery would still fit the keyhole slots. The process was repeated until allthe panels were in place and the tracery was slotted over them (Fig. 8). Afurther piece of aluminum was used to prevent each panel from slippingdown. Holes had been predrilled for the vertical members of the frames,and the attachment of small individual items, such as finials, was alsostraightforward. Before the panels were in place, brackets were positionedand the cornice and inscription boards attached, using the old nail holes.The name boards were similarly fixed to blocks at the bottom. Stainlessor nonferrous screws were used throughout and any visible heads coveredwith pigmented wax.
296 Hulber t
Figure 8
A portion of the south side of the ceiling dur-
ing reassembly. King Asa, Prophet Baruch,
and King Josaphat; some of the panels dam-
aged by early attempts at cleaning. Note the
blank panel on the right, with reconstruction
of the vine trail under way.

The thick plaster into which the edges of Mary’s and Nahum’spanels had been deeply embedded was removed from the east wall andreplaced with a thin layer of traditional lime and sand, feathered off justshort of the ceiling.
After cleaning, the panels were very lightly waxed. Most unsightly lacunaewere retouched in watercolor using a stippling technique, and gold powderin gum arabic was used to repair gilded areas. No imaginative reconstruc-tion was attempted, and faces (with the exception of the tip of Joel’s noseand Mary’s cheek and chin) were left untouched. The thinnest possible var-nish was applied, as the panels had to travel from one workshop to anotherand be stored wrapped in Melinex, and a normal thickness of varnishwould not dry while thus wrapped.
When all the panels were back on site, more retouching was doneto minimize the uneven effect of varied damage. The vine trail on thesouth side, much of which would have been invisible from ground level,was reconstructed by filling in the vermilion background only, using thetracing as a guide. A further thin dammar varnish matted with beeswaxwas applied in situ. A few details were finished with pigments in a mediumof the same varnish.
Watercolor was also used for retouching the lettered boards.These were sealed with beeswax and dammar (3:1). A 4:1 mixture wasused to polish all bare wood.
New oak was spirit stained to match the old. (The fourteen lostpanels had been replaced in 1872 with very poor wood.) New blank panelswere made, and the tops painted and glazed green behind the tracery over-lays, using artists’ acrylic paints. The vine was then reconstructed in out-line to join with surviving adjacent panels, using raw umber pastel crayon,and the whole surface was toned down with raw umber acrylic appliedwith a sponge. Red watercolor was then applied by the same method, tosimulate the vermilion background, leaving a “ghost” shape suggesting afigure but in no way reconstructing it. Finally, these panels were varnished.Acrylic paints were also used to color some modern sections of nameboard. This technique satisfactorily restores continuity to the composition,while remaining clearly distinguishable from the original painting.15
The stone cornice below the ceiling was cleaned, and the plasteredwalls of the chapel limewashed, the lime being pigmented to a warm tone.
New electric lighting was installed. Unfortunately, it is impossible to avoidall reflection; had a more matte varnish been selected, the pigments wouldnot have been as satisfactorily saturated. There is also a fine chandelier,dated by C. C. Oman to the early seventeenth century, and attributed tothe Low Countries.16 The candles of the chandelier are lit only for majorfeasts of the Church, including feasts of the Blessed Virgin, and areunlikely to burn for more than six hours a year. The chandelier hangs wellbelow the ceiling, and its beauty is such that the small amount of sootmay be disregarded, especially if low-soot candles can be obtained
Environmental monitoring continues, and results are regularlystudied. One of the humidity monitors has been positioned on the chande-lier. The ceiling is checked at close quarters by the author every few years.
Lighting and Display
Retouching and Varnishing
297C F -C C S . H ’ C, A

Smoke detectors have been placed in the church; one is attached to thetruss at the west end of the ceiling, and there is a loud siren on the tower.17
It is a rare privilege to work on objects that are still in use for their originalpurpose, and it is fully appropriate that the ceiling should be enhanced bya sympathetic modern tapestry,18 which takes up the theme of the Cross,associated with the church’s patron, Saint Helen. Embroiderers within theparish designed kneelers that echo the vine trail. The ceiling was blessedby the bishop of Oxford on the last Sunday in Advent 1991, when the Biblereadings for the season referred to Jesse.
Saint Helen’s is an Anglican (Church of England) parish church.The congregation is responsible for raising the funds for maintenance,either from local donations or from charitable trusts and governmentfunds. Work was carried out by private conservators after approval wasobtained from diocesan authorities and any grant-giving bodies involved.The whole project demonstrated excellent and happy teamwork amongall the specialists involved.
In addition to all those named in the notes, warm thanks are due to theReverend David Manship, Rector of Saint Helen’s, and to many parish-ioners who provided practical help, hospitality, and support. During thesecond phase of work, the Reverend Allan Doig (curate) was responsiblefor a huge amount of organization, and the master and governors ofChrist’s Hospital, who administer medieval almshouses beside the church,generously assisted with facilities.
At different stages of the work, the following people participatedin the Herbert Read team: Stuart Anderson, Laurence Beckford, GarethBrown, Bob Chappell, Clare Cully, Ruth Davis, John Gentry, Dave Harvey,David Luard, Torquil McNeilage, Russell Powell, Richard Stokoe, StephenWebb, and Brett Wright. The author’s assistants were Mary Baker, AnnBallantyne, Liz Cynddylan, Elwira Pluta, Jane Rutherfoord, Eddie Sinclair,and Katherine Stainer-Hutchins. Simon Egan polished paint samples. JohnMatthews, of Wessex Press in Wantage, took extraordinary trouble overthe reduction photocopies of my tracings. Local builder Alan Norridgewas endlessly helpful with many essential tasks.
The National Heritage Memorial Fund and English Heritagecontributed two-thirds of the cost of the work; the parish raised therest, assisted by Saint Andrew’s Trust of Wells, the Council for theCare of Churches (Pilgrim Trust), the Sainsbury Trust, the AbingdonEnvironmental Trust, Christ’s Hospital, Abingdon, and numerous localbusinesses and individuals. The project won a National Art CollectionsFund award, which was added to these donations.
1 “Relaxation of four years and four quadragene to penitents . . . the like to penitents who on the
four feasts of St. Mary the Virgin similarly visit and give alms to her altar in the church of St.
Helen, Abingdon.” 2 Kal. March 1391 (Bliss and Twemlow 1902:407).
2 Fourteen examples are listed in Hildburgh (1925; 1932) and Edwards (1979). There is another
on a window mullion at Wellington, Somerset.
Notes
Acknowledgments
Conclusion
298 Hulber t

3 The ceiling was closely examined by Gavin Simpson and Robert Howard of the Department
of Classical and Archaeological Studies at the University of Nottingham. For their den-
drochronological and other findings, see Howard and coworkers (1992:53, 56).
4 The author’s attention was drawn to this fact by Jerry Sampson, a consultant archaeologist
who undertook archaeological observation throughout the project.
5 Analysis is being carried out by Caroline Babington at the conservation studio of the Historic
Buildings and Monuments Commission for England (English Heritage).
6 Michael Liversidge of the Department of History of Art at the University of Bristol (to whom
I am much indebted for his continuing art historical input) has drawn my attention to the very
close affinity of the Abingdon paintings with the contemporary work of Thomas the glazier of
Oxford. Harvey (1975), in his chapter on painting, comments on the association between
glaziers and other painters.
7 Mieneke Cox, of the parish, drew my attention to a letter from a “Miss D’Arcy,” who recol-
lected the event. The repainting was done by Emma Dodson, the vicar’s daughter, under the
direction of the architect, Mr. Clacy. D’Arcy recorded the disintegration of panels during this
dismantling, which may have caused the project to be abandoned. Art historians have accord-
ingly judged the Abingdon master by the poor quality of Dodson’s work. D’Arcy’s letter is
quoted among the Preston papers in the Berkshire Record Office, File D/EP 7/63. Reading,
England.
8 This was done under the direction of R. J. Noyes of the Culham Laboratories; the late Keith
Dawson of the Rutherford Laboratories, Harwell; and David Saunders of the National Gallery,
London. William Bordass, building scientist, later continued the measurements.
9 Harrison, at that time, was the managing director of the Devon ecclesiastical joiners, Herbert
Read Ltd., a firm established in 1888, combining traditional joinery skills with those of mod-
ern conservation. He is now an independent consultant.
10 The materials mentioned here and in the following sections—such as Melinex, Eltolene, and
Paraloid B72—are available from most conservation materials suppliers.
11 This was carried out by conservators from Herbert Read Ltd.
12 The reports were produced by the author and Hugh Harrison. The documentation was even-
tually collated by Jerry Sampson.
13 The Nitromors was a commercial paint stripper in gel form, containing methylene chloride. It
was an old formula that may now be unobtainable.
14 Similar methods were used for the polychromed items cleaned by Herbert Read’s team, for
which the author was consultant.
15 The technique was devised with the assistance of conservator Ann Ballantyne.
16 Installation of the electric lighting was carried out under the direction of Martin Caroe,
in consultation with Ronald Clough. For chandelier dating, see Oman 1937. Martin Caroe
designed the glazed tympanum at the west end of the chapel as an extension of the
nineteenth-century screen below, and the glass has been lettered with a translation of
the text on Mary’s scroll by calligrapher David Peace.
17 The environmental monitoring is carried out by William Bordass, environment consultant,
and Martin Caroe.
18 The tapestry is the work of weaver Bobbie Cox.
Ballantyne, A., and A. Hulbert
1993 19th and early 20th-century restorations of English mediaeval wall paintings: Problems
and solutions. In Peintures murales: Journées d’études de la S.F.I.I.C. [French section of the
International Institute for Conservation]. Champs-sur-Marne: S.F.I.I.C.
References
299C F -C C S . H ’ C, A

Bliss, W. H., and J. A. Twemlow, eds.
1902 Calendar of Entries in the Papal Registers Relating to Great Britain and Ireland, Vol. 4: Papal
Letters, A.D. 1362–1404. London: Eyre and Spottiswoode.
Borenius, T.
1936 An English painted ceiling of the late fourteenth century. Burlington Magazine
68(399):268–76.
Campbell, M.
1991 Gold, silver and precious stones. In English Medieval Industries: Craftsmen, Techniques,
Products, ed. J. Blair and N. Ramsay, 107–66. London: Hambledon Press.
Edwards, J.
1979 Lily-crucifixions in the Oxford district. The Oxford Art Journal 2:43–45.
Harvey, J.
1975 Mediaeval Craftsmen. London: Batsford.
Hildburgh, W. L.
1925 An alabaster table of the Annunciation with the crucifix: A study in English
iconography. Archaeologia 74(2nd series 24)203–32.
1932 Some further notes on the Crucifix on the Lily. Antiquaries Journal 12:24–26.
Howard, R. E., R. R. Laxton, C. D. Litton, and W. G. Simpson
1992 Nottingham University tree-ring dating laboratory results (list 44). Vernacular
Architecture 23:51–56.
Hulbert, A.
1992 The recovery of the Jesse Tree sequence of panels in St. Helen’s, Abingdon. In The
Conservator as Art-Historian, ed. A. Hulbert, J. Marsden, and V. Todd, 19–20. London:
United Kingdom Institute for Conservation.
1994 A useful method of cleaning soda-damaged mediaeval panels. Picture Restorer
6(autumn):8–10.
Liversidge, M. J. H.
1965 The Fourteenth Century Decorated Ceiling in St. Helen’s, Abingdon. Church guidebook.
Abingdon.
Oman, C.
1937 English brass chandeliers. Archaeological Journal 93:263–82.
Plummer, P., and A. Hulbert
1990 English polychromed church screens and the problems of their conservation in situ.
In Cleaning, Retouching and Coatings, ed. J. S. Mills and P. Smith, 47–51. London,
International Institute for Conservation of Historic and Artistic Works.
Preston, A. E.
1936 The fourteenth century painted ceiling at St. Helen’s Church, Abingdon. Berkshire
Archaeological Journal 40(2):114–41.
Tristram, E. W.
1955 English Wall Painting of the Fourteenth Century. London: Routledge and Kegan Paul.
Watson, A.
1934 The Early Iconography of the Tree of Jesse. London: Humphrey Milford and Oxford
University Press.
300 Hulber t

301
D , the interior of few churchesin New France could rival that of the Ursuline Chapel, in thecomplexity of iconography, the richness of carving, or the extent
and variety of gilded and polychromed surfaces. It was one of the rareinteriors to survive the bombardment of Quebec City by the British in1759. It has also been spared from fire and saved from the dispersal thatoften accompanies changing tastes. Today, it is the only assemblage of fur-nishings from the French regime that is nearly intact, making it one of theoldest extant in North America. For these reasons, it is exceptional.
The first Ursulines arrived in New France in 1639 to establish aschool for girls. In 1642, they moved to a building situated on the heights ofQuebec City, on a plot of land that their convent still occupies today. Aninitial fire in 1650 and a second in 1686 obliged them to completely rebuildtwice. After the second fire, they had to wait until 1723 before their newchapel was finished. It was a stone building, featuring a nave (or outerchapel), reserved for the general population; a sanctuary, later to be embell-ished with the rich carved furnishings that are the subject of this article;and, to the right (liturgical south) of the sanctuary, the nuns’ chapel, aplace of prayer for the Ursulines and their pupils (Fig. 1). Since this was acloistered community, the nuns’ chapel was enclosed by a screen.
The Interior Decor of the Ursuline Chapel in Quebec CityResearch and Conservation
Claude Payer, Marie-Claude Corbeil, Colombe Harvey, and Elizabeth Moffatt
Figure 1
Floor plan of the Ursuline Chapel, in Quebec
City, as it is today.

Located mainly in the sanctuary, the furnishings were provided over a ten-year period, between 1726 and 1736. First, the pulpit was installed on thenorth wall at the junction of the nave and the sanctuary. This was followedby the Sacred Heart altar and altarpiece,1 which were situated within arecessed bay on the north wall, facing the nuns’ chapel. Finally, the mainaltar and altarpiece at the east end were completed, facing down the navetoward the congregation. Included in the ensemble were a few statues andolder reliquaries salvaged from the fire that destroyed the earlier structure.
The iconography chosen by the nuns for this group of sculpturesis among the most elaborate ever created in Quebec. The main altarpiece,constructed in the form of a triumphal arch, symbolizes a gate leadingto heaven (Fig. 2). It contains statues of Saint Joseph, the patron of NewFrance; Saint Augustine, one of the Church fathers whose rule theUrsulines follow; and Saint Ursula, the patroness of the community.Reliefs of the Annunciation adorn the panels of the sacristy doors, andthe pedestals bear reliefs of Saint Peter, Saint Paul, Saint John the Baptist,and Saint John the Evangelist—veritable pillars of the Catholic Church.The high-altar painting, an Adoration of the Shepherds, is in an expertlycarved, arched frame adjoined by four Corinthian columns with twinpilasters (Fig. 3). A relief of The Good Shepherd embellishes the richlydecorated tabernacle, which contains a number of saints’ relics.
The convent archives contain the 1730 contract for the main altar-piece and balustrade, signed by Pierre-Noël Levasseur (1690–1770), one ofthe most illustrious members of the Levasseur dynasty, a family of sculp-tors and craftsmen famous in New France. Historians also attribute to him(or at least to his family) the pulpit and the Sacred Heart altarpiece.2 Thecontract mentions approval of a drawing initially submitted by the artist,but now lost. All of these architectural structures, including their decora-tive reliefs and motifs, statues, and items of furniture, were carved inwood, chiefly white pine and basswood, and were assembled using tradi-tional joinery techniques.
The Decor
302 Pay er, Corbe i l , Har vey, and Mo ffat t
Figure 2
The interior of the Ursuline Chapel, prior to
the 1901 demolition, showing the main altar-
piece, the pulpit, and the balustrade (photog-
rapher unknown). Archives des Ursulines de
Québec A1-142 (copy print, May 1993).

All polychromy and gilding, however, were excluded from thecontract and were carried out by the nuns themselves. It is known that anumber of the Ursulines were painters, and that the order operated a cele-brated gilding workshop that served parishes and communities in andaround Quebec City (Porter 1975).3 They meticulously executed all thegilding and polychromy for their chapel according to traditional tech-niques, a task that probably continued for three years following the com-pletion of the sculpture, just in time to celebrate the 1739 centenary of thenuns’ arrival in New France. All visible parts of the wood were first cov-ered with a gesso ground. The flat beds of the wooden architecture, aswell as the walls, the background of niches, and the hollows of the pilastercapitals, were painted pale blue. Many sections of molding in the entab-lature, pedestals, outlines of doors and panels, and the fluting of thecolumns and conch shells were painted black to imitate ebony. The stat-ues’ hands and faces, the cherubs, and the angel heads were painted withflesh tints. With one exception, the clothing and wings of the figures werewater gilded. The column capitals and lintels, tabernacles, and reliquaries,as well as the wall appliqués and ornamental motifs, were also completelygilded. The gilders made great use of recutting: incising geometric andfloral motifs directly into the white ground (Fig. 4). Gold leaf was appliedover a reddish brown bole, then burnished with agate stone in selectedareas to create contrasts in brilliance. As a finishing touch to the gilding,
303I D U C Q C
Figure 3
The high altar painting being taken down for
treatment in February 1994.
Figure 4
Tabernacle of the Sacred Heart altar, with
statuettes and reliquaries. Various motifs
resulting from recutting the gesso ground dur-
ing the gilding operations can be seen on the
surface of the tabernacle.

many hollows were highlighted with red watercolor. These different sur-face treatments produced visual contrasts, accentuated in the evening bygleaming candles and during the day by lateral light from broad windows.Two large windows draped in red were situated to the left of each of thealtarpieces, producing a dramatic raking light (Fig. 5).
In 1901, however, during work to enlarge the nuns’ chapel, it wasdiscovered that the walls of the outer chapel and sanctuary building werebadly deteriorated. It was decided that the furnishings would be disas-sembled and reinstalled the following year in a completely new buildingerected on the same site. While the new structure essentially adopted thesame form as the old one, the architect increased its scale: the vault wasraised, the side chapel expanded, the fenestration modified, and thebalustrade (communion table) simplified. Elements of the sculpted decorwere also modified to suit their new home. Architectural elements on thewalls that served to integrate the furnishings and the architecture wereeliminated, including parts of the entablature of the Sacred Heart altar-piece and the pulpit. The springing of the principal vault is now muchhigher than that of the main altarpiece, breaking the original continuity ofhorizontal lines in the decor. The raising of the vault also created largevoids above the altarpieces, which the architect filled with appliqués andother accessories (Fig. 6). Elimination of the large side windows resulted inthe loss of the raking light on the altarpieces and, thus, a flattening of therelief and a dulling of the Baroque character of the work. The contrastsof color and brilliance, the sculptural relief, and the richness of surfacefinishes accentuated by the various light sources of day and night hadcreated an effect that was both grand and theatrical. A large part of thisdisappeared in 1902 during the reconstruction of the building.
Repairs and changes to the gilding and to the painted surfaces,which had been carried out at various times over the years, also con-tributed to changing the balance of forms and colors. For example, dullcolors (white and beige) applied over the blue backgrounds have dimin-ished the impression of volume that the backgrounds originally conveyed.
304 Pay er, Corbe i l , Har vey, and Mo ffat t
Figure 5
John Richard Coke-Smyth, Interior of the
Chapel of the Ursuline Convent, Québec, 1838;
watercolor on paper with graphite underdraw-
ing, highlights of body color, 25.5 3 28.5 cm.
This watercolor shows the decor a century
after it was created: the pulpit, the balustrade,
and part of the two altarpieces. A side win-
dow provides dramatic raking light for the
main altarpiece. The red drape filters the light
and accentuates the contrasts between gilded
surfaces and blue-colored walls.
Figure 6
The side altar and altarpiece, called the Sacred
Heart altarpiece. In 1902, the empty space
above the sculpted decor was filled with a
stained glass window and other accessories.

As a result, we now have an early-twentieth-century building thatsomewhat clumsily houses extremely important early-eighteenth-centuryfurnishings. Despite the building and the overpaints, the decor still retainsmuch of its majesty and refinement. Its age, history, and uniqueness,together with its high artistic and technical qualities, have earned it thedesignation of a historic monument by the Government of Quebec underthe Cultural Property Act, as well as the recognition by art historiansacross Canada as a jewel of the nation’s cultural heritage. Today, thechapel continues to serve the Ursuline community and the public as aplace of prayer.
In 1988, at the nuns’ request, the Centre de conservation du Québec(CCQ) submitted a report and proposals concerning conservation of thedecor. At that time, it was concluded that the furnishings and decorativeelements were suffering from surface abrasion; flaking of the gilding andpolychromy; damage from wood-boring insects; and cracks, marks, andlosses due, among other things, to the work of 1901–2. The bright, con-trasting water gilding had been covered, in large part, by dull layers of oilgilding and bronze paint, and the statues’ faces had been darkened bycrude overpaints. The ebonized surfaces had been covered with a matteblack paint, now dusty and lifeless. The report recommended a long-termprogram. Most urgent was the aim of the first stage: to preserve thedecor—that is, to undertake a treatment designed to slow the deteriora-tion of the sculpted works. Only then could the second phase—namely,the aesthetic treatment—be undertaken. The goal was to understand thedecor by systematically documenting it, to consolidate its structural andsurface elements, and to carry out several preventive measures. Anyattempt to improve its appearance without ensuring the survival of itscomponent parts would be fruitless.
After a couple of years, during which the decor received its desig-nation as a historic monument and the necessary funds were secured, thenuns gave the CCQ a mandate to implement the first phase of this conser-vation program. With grants from the provincial and federal governmentsand the financial participation of the Ursuline community, a small team ofsculpture conservators with expertise in polychromed wood was formed.An advisory committee was created to serve as a forum for discussion of allmajor questions. The committee consisted of Ursuline nuns, CCQ mem-bers, a delegate from the Canadian Conservation Institute (CCI), a repre-sentative of the Quebec Department of Culture and Communications, andan art historian acting as special advisor to the Ursulines. This ad hoc com-mittee met whenever necessary. Work proceeded over a four-year perioduntil the fall of 1995. The scope and resources involved make this in situproject a first in Canada. The project has also taken on an exceptional char-acter by virtue of the uniqueness of the object being treated.
Apart from the consolidation of an insect-damaged column, alloperations were carried out in the chapel itself. Each of the three sectionsof the decor was scaffolded in turn for access. An enclosed workshop waslaid out in the nave to offer a suitable space for treatment of the movableelements, for all writing and drawing, and to separate the conservatorsfrom visitors, since the chapel is open to the public during the tourist
The Conservation Program
305I D U C Q C
season. The workshop area, measuring 9 m by 4 m, consisted of a verysimple freestanding structure made of wood and drywall boards. It wasilluminated with daylight-balanced, UV-filtered fluorescent lights, andsufficient electrical outlets were provided for all equipment. The workshopalso contained a photography area, worktables, storage space for tools,and an area for a computer, a tool we found indispensable.
On a job site of this complexity, documentation is both crucial and com-plex. All parts of the decor have been measured, probed, photographed,drawn, and described in writing. The CCQ photographer took black-and-white photographs and 35 mm color slides, and sometimes color 4 3 5 in.transparencies and X rays. A draftsperson did most of the drawings fromblack-and-white 8 3 10 in. prints; these drawings were complemented andannotated by the conservators. Types of joints and hardware; tool marks;evidence of modifications, additions, and removals; losses and areas of dam-age; and the many layers of original finishes and overpaints were all noted.
The computer (a word processor, with a laser printer) allowed usto standardize written documentation and add to it as work proceeded,and to establish adequate files without needing to leave the premises or toemploy a secretary. Diskettes and hard copies were kept on the job site;backup diskettes were stored elsewhere. The user-friendly software pack-age (WordPerfect for Windows), compatible with equipment at the CCQ,enabled each of the conservators to enter data and consult that of others.It was considered too expensive and complicated to digitize the visual data(photos and drawings).
The wood, gold-leaf alloys, pigments, and paint media were analyzed by ateam of conservation scientists from the Canadian Conservation Institutein Ottawa. CCI made this a major research project and designated a coordi-nator, who also served as CCI’s representative on the advisory committee.
By removing the paint in small areas layer by layer and preparingcross sections, it was possible to determine the original appearance of thesculpted furnishings. The following sections will discuss the original mate-rials (i.e., the wood, the ground, the polychromy of the architectural ele-ments and of the carved figures, and the gilding), as well as the generalcomposition of the overpaints. The results of the analyses of the originalpaint layers are summarized in Table 1.
Methods of analysis
Three types of samples were taken: fragments of wood, cross sections ofpaint or gilding, and particles of paint or varnish. The wood samples wereexamined by incident light and polarized light microscopy.
The paint and gilding cross sections were prepared according tostandard methods but were dry polished with progressively finer, cush-ioned abrasives.4 This method of polishing was preferred to the conven-tional method, which uses an alumina suspension in water, in order toavoid dissolving the water-sensitive paint layers. The cross sections wereexamined by light and fluorescence microscopy, generally with a 340magnification, and then by scanning electron microscopy. The latter attimes made it possible to distinguish layers of very similar color but of
Materials Analysis
The Documentation
306 Pay er, Corbe i l , Har vey, and Mo ffat t

different composition. Conversely, light microscopy helped to distinguishlayers of identical composition that were separated by a very fine layer ofdirt or that were of slightly different colors. By combining the two meth-ods, it was therefore possible to establish the stratigraphy of the sampleswith greater precision. Examination by scanning electron microscopy(SEM) was coupled with analysis by X-ray energy spectrometry. The latterallows the detection of chemical elements with an atomic number equalto or greater than 11 (sodium). Furthermore, certain layers of paint wereanalyzed in situ by X-ray microdiffractometry using a 30 µm collimator.
The composition of the alloys used for the gold leaf was deter-mined by X-ray energy spectrometry combined with SEM.
Identification of the pigments and extenders in the samples ofpaint particles was done by X-ray diffraction using a Gandolfi camera, andby polarized light microscopy. The nature of the medium was determinedby Fourier-transform infrared (FT-IR) spectroscopy using a diamond cellmicrosampling device and an infrared microscope accessory. This methodalso served to confirm and complement identification of the pigments inthe sample. Samples of some layers of the cross sections were also ana-lyzed in this way. Infrared spectroscopy and gas chromatography wereused to analyze some varnish samples.
Wood identification and dendrochronology
Most of the wood in the altarpieces and pulpit was identified as eitherwhite pine (Pinus strobus) or basswood (Tilia spp.). White pine seems tohave been used mostly for the Sacred Heart altarpiece, while basswoodwas used for the main altarpiece, with the exception of the tabernacle,which was made of white pine. The two statuettes on the Sacred Hearttabernacle and the frame of the painting above them, as well as the angelssitting on top of the main altarpiece, are made of white oak (Quercus spp.,subgenus Leucobalanus).
In the case of the basswood and white oak, it is impossible to dis-tinguish between European and North American species by microscopy.Pinus strobus, on the other hand, is a soft pine indigenous to northeastern
307I D U C Q C
Painted architecture Painted parts of carved figures Gilded parts
Blue surfaces Black surfaces Flesh tints Hair Water gilding Ochre surfaces
Highlights red ochre or vermilion, calcite, and gum arabic
Gilding Prussian blue, charcoal black, vermilion, lead raw sienna, matting glue yellow ochre, and polychromy calcite, and protein calcite, and protein white, lead burnt umber, calcite,
carbonate, and calcite, trace lead gold leaf silicates, and drying oil white, drying oil, protein
and protein bole: burnt sienna, red ochre, charcoal black, kaolin, calcite, and protein
Size calcite and protein
Ground calcite and protein
Table 1 Composition of original paint layers

North America, and was a rare import into Europe in the seventeenthcentury. Dendrochronology, which was provided by the Centre d’EtudesNordiques (CEN) of l’Université Laval, in Quebec City, helped to confirmthe origin of the white pine more specifically (Delwaide and Fillion 1993;1994).5 The growth curves from elements of the tabernacles were a veryclose match to the curves established by the CEN for Pinus strobus grownin Quebec and for a beam of white pine that had been taken from a wingof the Ursuline convent rebuilt in 1688. This leaves no doubt as to the ori-gin of the white pine for many elements of the decor. Analysis of thewood also demonstrated that the butternut ( Juglans cinerea) frame of thehigh altar painting must have been carved in New France as well, sincebutternut is found only in North America.
Dendrochronology was also used to estimate the age of the twotabernacles. The tabernacles were not specifically mentioned either in theaccount books or in the contract for the main altarpiece. Some historiansbelieved that the Sacred Heart tabernacle was of French origin, a theorydisproved by identification of the wood as Pinus strobus (Fig. 4). One schoolof thought held that one of the two tabernacles had been carved byJacques Leblond de Latour, an artist who died in 1715. However, analysisof the growth rings of the white pine has set the probable year of fellingat 1721 for the Sacred Heart tabernacle and 1719 for the main tabernacle(Delwaide and Fillion 1993; 1994); this would rule out the participation ofde Latour and suggests that the tabernacles are probably the work ofPierre-Noël Levasseur. The main tabernacle could have been modified,however, and the limited number of measuring areas leave the dating andorigin of some of its components in doubt.
Ground
The first layer observed in the cross sections is the ground. This layer, lyingdirectly on top of the wood, is generally a typical gesso composed of cal-cite in a protein medium.6 However, there are a few exceptions. In asample from the central motif of the Sacred Heart altarpiece, dolomiteappears instead of calcite. In samples taken from the pedestals and theentablature, a mixture of calcite and gypsum was identified; the mediumcould not be identified because of interferences due to the gypsum in theinfrared spectrum. In a sample from the flesh tints of the angel with thetrumpet (Fig. 7), the ground is composed of calcite and protein, but a traceof drying oil was also detected. This oil may be from the oil-based layerapplied over the ground (see “Polychromy of the carved figures” section).
On the ground, there quite often appears to be a layer of size; insome cases, it appears as a brownish transparent layer, in others as a yel-lowish infiltration in the upper part of the ground layer. The brownishlayer and yellowish infiltration were analyzed and proved to have the samecomposition as the ground. A layer of size would make the ground lessporous, preventing penetration of the medium from the paint applied overit, in order to obtain bright and resistant colors.7
Polychromy of the architectural elements
Most surfaces of the altarpieces and the pulpit—that is, the backgroundsand flat surfaces—as well as the robes of the angels sitting on top of theside altarpiece, were painted pale blue. In general, the blue layer containsPrussian blue and calcite in a protein medium. In some cases, gypsum and
308 Pay er, Corbe i l , Har vey, and Mo ffat t
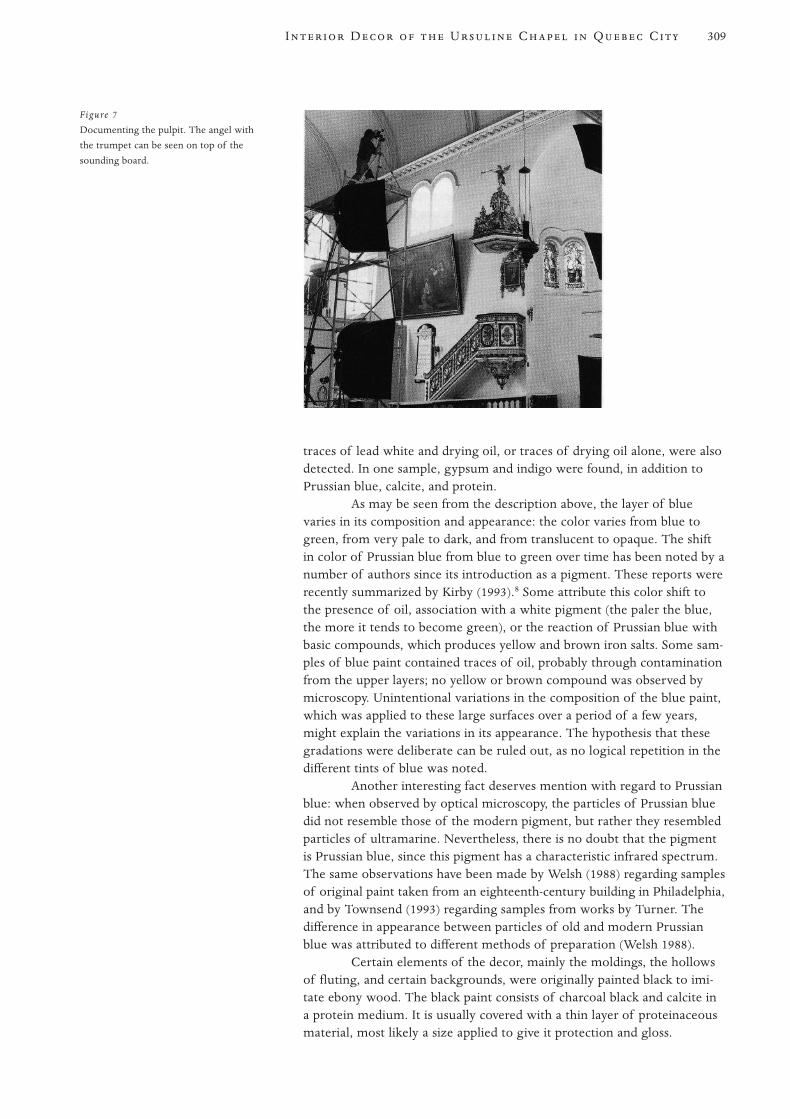
traces of lead white and drying oil, or traces of drying oil alone, were alsodetected. In one sample, gypsum and indigo were found, in addition toPrussian blue, calcite, and protein.
As may be seen from the description above, the layer of bluevaries in its composition and appearance: the color varies from blue togreen, from very pale to dark, and from translucent to opaque. The shiftin color of Prussian blue from blue to green over time has been noted by anumber of authors since its introduction as a pigment. These reports wererecently summarized by Kirby (1993).8 Some attribute this color shift tothe presence of oil, association with a white pigment (the paler the blue,the more it tends to become green), or the reaction of Prussian blue withbasic compounds, which produces yellow and brown iron salts. Some sam-ples of blue paint contained traces of oil, probably through contaminationfrom the upper layers; no yellow or brown compound was observed bymicroscopy. Unintentional variations in the composition of the blue paint,which was applied to these large surfaces over a period of a few years,might explain the variations in its appearance. The hypothesis that thesegradations were deliberate can be ruled out, as no logical repetition in thedifferent tints of blue was noted.
Another interesting fact deserves mention with regard to Prussianblue: when observed by optical microscopy, the particles of Prussian bluedid not resemble those of the modern pigment, but rather they resembledparticles of ultramarine. Nevertheless, there is no doubt that the pigmentis Prussian blue, since this pigment has a characteristic infrared spectrum.The same observations have been made by Welsh (1988) regarding samplesof original paint taken from an eighteenth-century building in Philadelphia,and by Townsend (1993) regarding samples from works by Turner. Thedifference in appearance between particles of old and modern Prussianblue was attributed to different methods of preparation (Welsh 1988).
Certain elements of the decor, mainly the moldings, the hollowsof fluting, and certain backgrounds, were originally painted black to imi-tate ebony wood. The black paint consists of charcoal black and calcite ina protein medium. It is usually covered with a thin layer of proteinaceousmaterial, most likely a size applied to give it protection and gloss.
309I D U C Q C
Figure 7
Documenting the pulpit. The angel with
the trumpet can be seen on top of the
sounding board.

Polychromy of the carved figures
The decor includes several full-length sculptures of saints and angels, aswell as winged angel heads and masks. The clothes of most full-lengthsculptures were entirely water gilded; this technique will be discussed inthe next section. The robes of the two angels in the Sacred Heart altar-piece were originally painted in the pale blue previously described, andwere embellished with water-gilded stars. Therefore, this section will dis-cuss more specifically the remaining parts of the polychromy—that is, theflesh tints and hair of the figures.
In all the samples of flesh tints, lead white and lead carbonate in adrying oil were identified. The red pigment used to tint the paint a fleshcolor was not detected by any analytical technique. Microscopy showsvery few red particles, which made identification difficult. However, on thebasis of the microscopic examination of the particles, we may assume thepigment to be vermilion.9
The brown hair of the angels in the side altarpiece was paintedwith a mixture of raw sienna, burnt umber, calcite, and a small amount oflead white in a mixture of drying oil and protein.
Gilding
The original layer of gold leaf is set on a reddish brown bole composedof burnt sienna, red ochre, charcoal black, calcite, and kaolin in a proteinmedium. The gold on sand found in a few spots at the top of the mainaltarpiece and of the two tabernacles is applied on a yellow bole that con-sists of quartz, yellow ochre, calcite, and clays in a collagen-type proteinmedium (Fig. 8).
The composition of the gold leaf varies from 21.5 to 24 carat. Sixdifferent compositions were found. Most gold-leaf samples were alloyedwith silver and copper, and just one contained only copper in additionto the gold.
In some samples, the original gold is covered with a thin layer ofeither varnish or matting glue (size). In one sample from the pulpit, thislayer was composed of calcite and silicates in a mixture of protein anddrying oil; on a reliquary, it was essentially drying oil; on a wall appliquéand on the robe of an angel, the varnish was made of copal dissolved inlinseed oil; on the reliefs of the main altarpiece pedestals, it was linseedoil. We may assume that the matting layers are original, since the applica-tion of a matting agent is part of the traditional technique of gilding. It isless obvious, however, whether the layers of varnish are original. It shouldbe mentioned that most of the reliquaries and appliqués came from otherplaces in the convent, and that several were not contemporary to thechapel. It is therefore possible that they were varnished when they wereinstalled in the chapel in order to give them a finish (a patina) that inte-grated well with the rest of the furnishings.
Certain parts of the gilded areas, sometimes complete motifs inthe case of the pulpit, were painted yellow, no doubt to economize ongold leaf but also to create contrasts. For example, in the upper part of thepulpit, every second gadroon is gilded, and the others are painted yellow.The yellow paint is composed of yellow ochre, calcite, and silicates in aprotein medium. In certain samples, the yellow paint was covered withsize, which was identified in a sample taken from the pulpit as a mixture ofcalcite and animal glue.
310 Pay er, Corbe i l , Har vey, and Mo ffat t
Figure 8
Detail of the main altarpiece showing part
of the entablature, the upper part of the left
niche, and the head of the statue of Saint
Augustine.

Quite fine and often translucent red highlights were applied in thehollows of the gilding and the parts painted yellow, accentuating the effectof depth and volume. On the pulpit, red ochre and gum arabic were used;on the angel with the trumpet, vermilion and calcite (also in gum arabic)were used.
We may conclude that the parts to be gilded were first defined byapplication of the bole. Next, the gold leaf was applied and burnished inplaces, the ungilded surfaces were painted yellow, and then the red high-lights were added. Here, the order of the gilding operations, as well as theapplication of red highlights with watercolor, are variations on the tradi-tional gilding technique. It was usually the custom to first yellow the hol-low areas, then apply the bole, and finally add the gold leaf (Watin1773:149–60).
Composition of the overpaints
The original blue surfaces were overpainted more often than surfaces ofother colors. They were first repainted blue, most likely at the end of theeighteenth century. In some places, one or two additional layers of bluepaint were observed, which could be localized overpaints. All blue layerswere applied using a technique similar to the original. The blue was latercovered with a pink overpaint layer composed of lead white, vermilion,Prussian blue, drying oil, and a significant amount of barium sulfate, whichindicates that the overpaint was applied after the end of the eighteenthcentury (Feller 1986:47–64). The pink layer is covered with five white over-paints, all containing lead white and drying oil, except for the last one,which consists of lithopone (barium sulfate and zinc sulfide) and calcite.
The dark-colored surfaces, such as the black elements and thebrown angel hair, in general, were overpainted only once. The ebony blackwas overpainted in a matte black. The flesh tints were overpainted threeor four times. The layer visible now, like the last white overpaint, containslithopone. In addition to lead white, the second layer contains bariumsulfate, indicating that this overpaint, like the pink overpaint, was appliedafter the end of the eighteenth century. The flesh tints of the angel withthe trumpet contain fewer layers, the number varying from one place toanother. We may assume that this angel has at times been partially over-painted, perhaps while left in place over the sounding board, the result beingthat some parts were difficult to reach and were therefore left unpainted.
The two tabernacles, as well as the shafts of the columns andpilasters, are now entirely covered with oil gilding. The other water-gildedsurfaces have been preserved, although there has been much retouchingwith oil gilding and bronze paint. Many of the ochre parts in the gildedareas were overpainted once.
In summary, the decor as a whole has undergone major changesin color scheme: the backgrounds, initially pale blue, were changed to pinkand then to white. Certain elements changed drastically in appearance:some gilded motifs were painted; others that had originally been paintedare now covered in bronze paint; some elements initially painted blackwere repainted white. Most of the black and gilded elements underwentless obvious transformations: the black motifs were overpainted in matteblack; the flesh tints were repainted in a cruder fashion; and the water-gilded surfaces were partially regilded in oil or were covered with bronzepaint (Fig. 9).
311I D U C Q C
Figure 9
The statue of Saint Joseph and Child, in the
upper niche of the main altarpiece. The angel
heads on either side of the niche were origi-
nally painted with flesh tints.

Surface consolidation
The old surface finishes—gilding and polychromy—were unevenly afflictedby problems of extensive lifting and flaking, which had increased overtime. For example, the gilding on the frame of the high altar painting hadflaked badly, while the surface on the capitals of nearby columns wasmuch better preserved. Gilding made from a different formula, as well asthe two layers of water gilding on the frame, may explain this phenome-non.10 In other areas, water infiltration had caused the damage. Most ofthe cleavage was between the ground and the wood; therefore, the firsttask was the systematic consolidation of the lifted layers—which provedto be a long and arduous process.
Various methods and materials were considered for consolidation:animal glue, wax-resin mixtures, acrylic, and polyvinyl acetate (PVA). Thegoal was to find an adhesive that was simple and safe to use. On a job sitewhere many of the tasks are performed on scaffolds, often in uncomfort-able positions without an air evacuation system, it is essential to use a non-toxic adhesive that is easy to prepare, apply, and remove. The productwould also need to retain its physical properties (good flexibility in particu-lar) over the long term in order to accommodate the movements of thewood during summer-winter environmental changes. Animal glue doesnot have this elasticity.11 Wax-resin mixtures have the great disadvantageof impregnating and darkening the matte colors, although one was used(unbleached beeswax mixed with dammar resin, 10:1) in the few instanceswhere cupping required a gap filler between the ground and the wood. Afew acrylics met these requirements,12 but Jade 403, a polyvinyl acetateemulsion that is well known in the North American conservation commu-nity, was finally selected. The authors already had a great deal of experi-ence with it, and a study undertaken at CCI confirmed its exceptionalchemical and physical properties.13 It is easily applied by brush, it can bethinned with water, and a little wetting agent can also be added to assist inpenetration.14 Since it contains water, it can soften the ground slightly andfacilitate repositioning of the flakes.
Surface cleaning
Concurrent with the surface consolidation, the surfaces were cleaned.First, dust and debris were removed with a brush and a vacuum cleaner.Then the water-sensitive surfaces were cleaned with Stoddard solvent, andother surfaces were cleaned with saliva or water with a wetting agentadded.15 This eliminated the accumulated dust, fly specks, and candle-waxaccretions. A multitude of nails, pins, and miscellaneous fasteners werealso removed during the cleaning process. The matting glue on the origi-nal gilding was retained, even though it had oxidized and become dust-laden. No overpaint was removed, because any aesthetic treatment wasexcluded from the first phase of the project .
Wood consolidation
The joints, fastenings, and anchorings were systematically checked, andwere reinforced if necessary. When practical, elements were remountedusing stainless steel screws or other hardware that would allow for easydismantling, both to facilitate future work and to ensure rapid disassemblyin case of fire or other emergencies. Split and broken pieces were reglued
Treatment
312 Pay er, Corbe i l , Har vey, and Mo ffat t

with hide glue or fish glue.16 Pine additions, such as brackets, dowels, andinlays were made only when required for the solidity of the structure.When it was necessary to provide support for small surfaces, impregnationwas performed with Jade 403, and fillings were made with fine oak saw-dust mixed with Jade.
The main altarpiece had been attacked by wood-boring insects(Anobium punctatum). The four columns and their pedestals suffered dam-age, particularly columns 1 and 4 (numbered from left to right) (Fig. 2).The shafts are trunks of basswood, partly hollowed at the ends by thesculptor. Shaft 4 was so fragile that it no longer supported its gilded sur-face in many places; therefore it was imperative to stabilize the weakenedwood. Column 4 had to be removed, and the column shaft was treated inthe laboratory. Impregnation with Acryloid B72, a consolidant often usedfor degraded wood, was deemed impractical—first, because of the needto provide high mechanical strength for an element of considerableweight that supports the entablature; and, second, because problems wereanticipated in evaporating such a large quantity of solvent. A large massof wood partially sealed by gilding would require many consecutive appli-cations of resin, interrupted with lengthy periods of evaporation. AralditeAY103,17 a two-part epoxy, was chosen as an adequate alternative becauseof its long-term stability, low viscosity, moderate exothermic reaction,and fairly rapid polymerization (Down 1984). It was injected throughsmall openings, taking maximum advantage of the access offered bysplits and losses.
Long-term preservation of polychromed and gilded wood demands stabletemperature and relative humidity conditions. The Ursulines were awareof this, and various preventive measures were discussed. However, invest-ment in a climate control system for the building was felt to be an exces-sive option. The building is of masonry construction with double-panedwindows; it is heated in the cold season by a network of hot-water pipes;and thermal insulation is present above the plaster vault. While imperfect,this system ensures a fairly regular temperature and prevents most abruptchanges in relative humidity. The months of July and August are a criticalperiod, however, when rapid variations of relative humidity have beenrecorded. The seasonal transition in spring and autumn is gradual; rela-tive humidity decreases in a fairly uniform manner, from an average of60% in July and August to a level of 29% in January. The temperatureranges from 20 °C to 24 °C in summer, and is maintained between 22 °Cand 24 °C as soon as the heating system is activated. A sophisticated sys-tem to control relative humidity might create disastrous situations in theevent of a breakdown, and could trigger the swift deterioration of a build-ing that was not designed to withstand a relative humidity of 40% or 45%in winter. Major modifications to the building would be necessary beforeinstalling humidity control. Simple preventive measures, such as loweringthe chapel temperature a few degrees in winter months, should preventmost future damage to the polychromy and gilding.
The nuns remain in charge of maintenance of the premises andhave implemented suggested preventive measures, which include improve-ment of the electrical system; installation of sprinklers, smoke detectors,and an alarm system; and UV filtration on the windows.
Preventive Measures andAmbient Conditions
313I D U C Q C

The four-year preservation program of Canada’s oldest church interiorwas a testing ground for large-scale treatment, as well as for analytical andhistorical research. Each day, comparing the results of examination, analy-sis, and historical research proved challenging and essential. For example,dendrochronology helped clarify conflicting attributions to artists.
Of major importance was the identification of both the tradi-tional techniques used by the artists and artisans for this group of furnish-ings and the variations they introduced to these techniques. The originalpolychromy and gilding method may be summarized as follows: applica-tion on all visible surfaces of an animal-glue gesso ground, protected by acoat of size; followed by water gilding and water-based paint everywhereexcept the flesh tints, which were painted in oil; and, in order to obtainbright and resistant colors, application of a thin protective layer of size onall water-sensitive surfaces, except the large blue areas. It is possible thatno size was ever brushed on the blue, presumably to blend the decor withthe blue-painted walls of the chapel. Another possibility is that the bluesurfaces had been sized but were later washed prior to being repainted, atheory supported by the fact that no layer of dirt was observed on top ofthe original blue paint.
Another reward of this project was the establishment of aninventory of the alterations (addition, modification, and removal) that hadbeen made to the furnishings, hence providing a precise scheme of theoriginal layout.
As mentioned earlier, various overpaints and regildings havealtered the color and tonal balance of the decor. Most regrettably, thereconstruction work of 1902 compromised the original architectural planand diminished the stylistic unity of the chapel’s interior. The authorstherefore believe that, to do justice to the furnishings of the chapel, thepreservation work already undertaken must be followed by a second,development phase designed to restore the brilliance of the decor and partof the original contrast. This could involve major work in exposing origi-nal surfaces. Regarding the water gilding and flesh tints, tests indicate thatthe rather dull overpaints could be removed without damaging the origi-nal surfaces beneath. If the same cannot be reasonably done for the bluebackgrounds and black moldings—whether because of the difficulty ofuncovering matte, fragile, water-soluble paint layers or because of theirlack of uniformity (variations in the blues)—it would be possible tosimulate their colors and finishes by painting over the present overpaints.The missing forms, particularly the parts of repetitive architectural ele-ments, such as the capital and frieze foliage, could be carved and finishedto match existing elements. Furthermore, the colors of the walls and thevault could be modified to restore, to some degree, the original relation-ships of volumes and tones. The vault, for example, could be overpaintedwith a darker color to make it appear lower. Artificial lateral lighting couldbe used to simulate the original daytime atmosphere.
The decisions on this possible second phase are yet to be made.The Ursuline nuns will make the final decision on the nature and extent oftreatment, based on recommendations made by the advisory committee.The authors believe that the extensive research and preliminary treatmentthat has been done since 1988 will help to demonstrate the importance ofcontinuing work to preserve this treasure of the cultural heritage.
Conclusion
314 Pay er, Corbe i l , Har vey, and Mo ffat t

315
The authors thank Michel Cauchon, director of the Centre de conserva-tion du Québec (CCQ), and Gérard Lavallée, Guy-André Roy, and JeanTrudel, art historians, for their support and related research during thisproject. They are also indebted to sisters Rita Coulombe and JacquelineFortier of the Order of Saint Ursula, and the members of the conventcouncil and the Ursuline museum. Gratefully acknowledged is the assis-tance of the conservators who took part in the project: Fiona Graham,Claire Pichot, Nora Nagy, Anne Courcelle, Jacques Vereecke, SandrineBarbe, Anne Lapointe, Isabelle Paradis, Jean-Pierre Thibaut, PhilippeFèvre, Bernard Vallée, Patrick Albert, Jérôme-René Morissette, AubertGérard, Jean-Albert Glatigny, Anne-Sophie Augustyniak, Désy Fischer andAriane Segelstein. Special thanks is due to David Miller and Greg Young,conservation scientists at the Canadian Conservation Institute (CCI).Appreciation is also extended to photographers Michel Elie and JacquesBeardsell, to draftsperson Danielle Filion, and to all colleagues at CCQand CCI who helped in the editing of this article.
1 The altarpiece (retable, in French) is the architectural furnishing that covers the wall behind the
altar; it usually contains statues and a painting. The tabernacle is the elaborate gilt eucharistic
reserve that sits on the altar table. The altar consists of both the tabernacle and the table, and
it stands in front of the altarpiece.
2 On the history, style, and iconography of the chapel, see Trudel 1972.
3 The Ursulines operated a gilding workshop from around 1650 until 1828. They were the first
in New France to engage in such an activity and progressively transmitted their expertise to
many other communities.
4 Micro-mesh grades 1500 to 12000.
5 The CEN researchers have established reference series for a few Quebec conifers: tamarack
(Larix laricina), black spruce (Picea mariana), white spruce (Picea glauca), white pine (Pinus
strobus), Canadian hemlock (Tsuga canadensis), and Eastern cedar (Thuja occidentalis). This tech-
nique has, as yet, been little used in Canada in the arts.
6 In most cases, the FT-IR analysis did not permit a more precise identification of the protein
medium. However, in some samples, the proteinaceous medium was further characterized as
a collagen-type protein, such as rabbit-skin or bone glue.
7 A thin white layer containing lead white and lead carbonate in a drying oil is also present
immediately under the layer of blue paint, in some of the parts originally painted blue.
8 Jo Kirby plans to undertake research to investigate the phenomenon of the greening of
Prussian blue.
9 This conclusion is supported by various lists of shipments to the Ursulines in the 1720s and
1730s (Archives des Ursulines de Québec 1680–1755, 1682–1761), in which vermillon (vermil-
ion) is mentioned several times. These lists include other materials related to painting and
gilding, such as noir de fumée (lampblack), safran (saffron), ocre jaune (yellow ochre), ocre rouge
(red ochre), terre d’ombre (umber), blanc de céruse (lead white), blanc de litharge (litharge), san-
guine (sanguine), gomme arabique (gum arabic), rognure de parchemin (parchment clippings),
rognure de gant (glove clippings), blanc d’Espagne (calcium carbonate), and craie blanche (white
chalk). There is no reference in the shipment lists to Prussian blue, but cendre bleue (azurite) is
repeated many times. Azur (lapis lazuli) is also mentioned occasionally. It can be assumed that
Prussian blue, a recent discovery at that time, was sent from France as a substitute for tradi-
tional, more expensive blue pigments.
10 The frame of the high altar painting is the only element that has been regilded with water
gilding. Close examination shows that the altarpiece may originally have been designed to
accommodate an older framed painting.
Notes
Acknowledgments
I D U C Q C

11 Rabbit-skin and fish glues are sometimes used for surface consolidation on sculptures that are
kept in controlled environments.
12 The following acrylic adhesives were considered: Rhoplex AC-33, Plextol B-500, and Lascaux
498HV (see Materials and Suppliers).
13 The study, conducted by Down et al. 1992, covered the following characteristics of various
resins, in natural aging: pH, volatile emission, yellowing, and flexibility (modulus of elasticity,
elongation at break, cohesive tensile strength). The report states that Jade is actually a vinyl
acetate copolymerized with ethylene.
14 The stock solution of Jade 403 was thinned 1:1 with water in small (30 ml) bottles, and a drop
of wetting agent was added to each bottle. The wetting agent was Aerosol OT solution, 75%
(w/w) aqueous (see Materials and Suppliers).
15 Aerosol OT solution (see note 15) was added to tap water. Saliva was preferred to water in
cases of small and intricate surfaces that were sensitive to a wet cotton swab. It is easier to
adjust the moisture content of a swab with saliva, and saliva is somewhat more active than
water, which often proves useful.
16 When a long setting time was necessary for fine adjustment, liquid fish glue (sold as high-tack
fish glue) was used undiluted at room temperature. In most cases, however, hide glue (no. 135
grade hide glue—4 parts glue in 5 parts water) was the first choice; it must be heated and sets
rapidly but allows for some adjustment. Glue was chosen rather than acrylics or other synthet-
ics, as it was compatible with any residue of old glue that might remain even after cleaning
the surfaces.
17 Araldite AY103 resin, with H956 hardener, was mixed in batches of 200 g, and was preheated
to 45 °C to start the reaction; then 20 g of acetone (10%) was added to further lower its vis-
cosity. Only a small amount of resin was injected in an opening at any given time, to prevent
any buildup of temperature. Polymerization was complete in less than twenty-four hours.
Other epoxies were considered, such as Epo-Tek 301-2, which is more fluid than the AY103 but
which takes days to polymerize, making large-scale impregnation impracticable.
Acryloid B72, Rohm and Haas Co., Independence Mall Street, Philadelphia, PA 19105.
Aerosol OT solution, Fisher Scientific Ltd., 112 Colonnade Road, Nepean, Ontario, K2E 7L6,
Canada.
Araldite AY103 resin, with H956 hardener, Ciba-Geigy Canada Ltd., Polymers Division,
7030 Century Avenue, Mississauga, Ontario, Canada, L5N 2W5.
Epo-Tek 301-2, Epoxy Technology Inc., 14 Fortune Drive, Billerica, MA 01821-3972.
Jade no. 403, TALAS, Technical Library Services Inc., 213 West 35th Street, New York,
NY 10001-1996.
Lascaux 498HV, Lascaux Farbenfabrik, Riedmuhlestrasse 19, Bruttiselem, Switzerland.
Liquid fish glue, Norland Products Inc., 695 Joyce Kilmer Ave., New Brunswick, NJ 08902.
Sold as high-tack fish glue by Lee Valley Tools Ltd., 1080 Morrison Drive, Ottawa, Ontario,
K2H 8K7, Canada.
Micro-mesh grades 1500 to 12000, Micro-Surface Finishing Products Inc., 1217 West Third Street,
Wilton, IA 52778.
No. 135 grade hide glue, Bjorn Industries Inc., 551 King Edward Road, Charlotte, NC 28211.
Plextol B-500, Rohm and Haas Germany Ltd., Postfach 4242, Kirchenallee, D-6100 Darmstadt,
Germany.
Rhoplex AC-33, Rohm and Haas Canada Inc., 2 Manse Road, West Hill, Ontario,
M1E 3T9, Canada.
Materials and Suppliers
316 Pay er, Corbe i l , Har vey, and Mo ffat t
Archives des Ursulines de Québec
1682–1761 Temporel, affaires de France, Envois de marchandises, factures et connaissements
[Canadian archive].
1680–1755 Temporel, affaires de France, Envois de marchandises, mémoires [Canadian archive].
Delwaide, A., and L. Fillion
1993 Analyse dendrochronologique de deux pièces de bois provenant du tabernacle latéral de la
chapelle des Ursulines, Ville de Québec. Quebec City: Laboratoire de dendrochronologie,
Centre d’études nordiques, Université Laval.
1994 Analyse dendrochronologique de neuf pièces de bois provenant du retable principal de la chapelle
des ursulines, Ville de Québec. Quebec City: Laboratoire de dendrochronologie, Centre
d’études nordiques, Université Laval.
Down, J. L.
1984 The yellowing of epoxy resin adhesives: Report on natural dark aging. Studies in
Conservation 31:159–70.
Down, J. L., M. A. MacDonald, J. Tétreault, and R. S. Williams
1992 Adhesive Testing at the Canadian Conservation Institute: An Evaluation of Selected Poly(vinyl
acetate) and Acrylic Adhesives. Environment and Deterioration Research Report No.
1603. Ottawa: Canadian Conservation Institute.
Feller, R. L.
1986 Barium sulfate: Natural and synthetic. In Artists’ Pigments: A History of Their History and
Characteristics, ed. R. L. Feller, 47–64. Washington, D.C.: National Gallery of Art.
Kirby, J.
1993 Fading and colour changes of Prussian blue: Occurrences and early reports. National
Gallery Technical Bulletin 14:63–71.
Porter, J. R.
1975 L’art de la dorure au Québec. Quebec City: Editions Garneau.
Townsend, J. H.
1993 The materials of J. M. W. Turner: Pigments. Studies in Conservation 38:231–54.
Trudel, J.
1972 Un chef-d’oeuvre de l’art ancien du Québec, La chapelle des Ursulines. Quebec City: Les
presses de l’Université Laval.
Watin, J. F.
1773 L’art du peintre, doreur et vernisseur. 2d ed. Paris: Grangé Durand.
Welsh, F. S.
1988 Particle characteristics of Prussian blue in an historical oil paint. Journal of the American
Institute for Conservation 27:55–63.
References
317I D U C Q C

I that so little early English painted furnitureexists today, considering the fragile nature of painted surfaces and thevagaries in taste. Understandably, therefore, the elaborately carved and
painted tester bedstead at Agecroft Hall (ca. 1580–1630) (Fig.1), and itscompanion painted chest of drawers (ca. 1650–75) (Fig. 2), have createdmuch interest both here and abroad.1
The Agecroft Association purchased the bed in 1974 at an auctionon the grounds at Burderop House, Wiltshire, England. The chest ofdrawers, sold at the same auction to a private collector, was purchased byAgecroft in 1978.
With the assistance of a team of specialists, Agecroft began aresearch project in 1994 in an attempt to resolve many of the questionsconcerning the painted tester bedstead (a rare example of early Englishpainted furniture): How and when was the bed constructed and what alter-ations have been made to it over the centuries? What are the carved decora-tive motifs on this unusual bed, and how do they relate to styles of theperiod? How was the bed originally finished, and when was it polychromed?How do the form and painted decoration of the chest of drawers relate tothe bed? Finally, how does the bed relate to the early-seventeenth-centurywall paintings found in the southeast bedroom of Burderop House in
318
The Painted Tester Bedstead at Agecroft Hall
Elizabeth Howard Schmidt
Figure 1
Painted tester bedstead (ca. 1580–1630) from
Burderop House, Wiltshire, England, now at
Agecroft Hall, Richmond, Virginia.
Figure 2
Painted, joined chest of drawers (ca. 1650–75)
at Burderop House, Wiltshire, England, a
companion to the painted tester bedstead at
Agecroft Hall.

Wiltshire, England? This article examines available evidence and confirms adate of the late sixteenth or early seventeenth century for the painted bed-stead, and shows that Burderop House was probably the original setting forthe bed and its companion chest of drawers.
Construction and alterations
The form of the Agecroft bed is typical of sixteenth- and early-seventeenth-century English tester bedsteads that belonged to the middle and upperclasses of society. A great bed, furnished with rich textile curtains andcoverlets, was usually the owner’s most important possession. Rarely wasthere more than one elaborately decorated bed in a house.
Predominantly oak, the Agecroft bed is constructed in severalsections—bedstock, headboard, tester, and two main footposts of six partseach. Although little is known about construction practices in this era, fur-niture such as the Agecroft bed, made by country joiners, was generallyconstructed with materials purchased “off the peg” (e.g., precarved mold-ing) or with materials supplied by the owner (Chinnery 1979:48–50).
Each rail of the bedstock is attached by a mortise-and-tenon jointto the headboard. It is somewhat unusual that the foot of the bedstock,which has its own low, freestanding footposts with turned finials, is alsotenoned to the main footposts supporting the tester. Tester bedsteads ofthis period had turned wooden stakes, known as bedstaves, placed around thebedrails to prevent the many layers of bedding from slipping onto the floor.The bedstaff holes, each 2.54 cm (1 in.) in diameter and 5.08 cm (2 in.) deep,are still visible along the top of the footrails on the Agecroft bedstock.
Changes made through time to the bed are significant in estab-lishing a date. Most of these changes were made to the bedstock. Theoriginal support for the bedding was roping, attached to the bedstock onall four sides. Later, the bedstock was lowered 17.78 cm (7 in.), and therope holes on the bed rails and the lower headboard were plugged andpainted over. Presumably, at that time, a canvas support for the beddingwas attached to the bedrails. Beneath the present canvas support, attachedto the bedstock with nineteenth-century cut nails, are the cutoff remainsof earlier forged nails.
When the bedstock was lowered, the bottom register of the head-board became more visible (Fig. 3). On tester bedsteads of the period,the lowest register usually was not decorated because the occupantsslept propped on large bolsters and pillows (due to the belief that it wasunhealthy to sleep lying down); therefore, this area would not be visible.The lowest register of the Agecroft bed, however, has a series of fourarched panels carved in low relief, which are blue and white with a red-grained paint background. This red graining, covering the now visibleplugged rope holes, indicates that the bed was painted after the bedstockwas lowered. Household inventories indicate that canvas-supported bed-steads existed concurrently with roped bedsteads from the sixteenth cen-tury;2 therefore, the conversion from roped to canvas support could haveoccurred early in the bed’s history.
Decoration
Much of the charm of English furniture of this period is the unique charac-ter of each piece. Scholars have cited numerous Continental designers,
Bedstead
319P T B A H

including Hans Vredeman De Vries and Jacques Androuet Ducerceau, whoproduced pattern books in the sixteenth century as sources for the decora-tive vocabulary in English Renaissance architecture and furnishings (Wells-Cole 1981; Forman 1971). Certainly there are elements, includingarchitectural motifs, terminal figures with baskets of flowers on theirheads, and fantastic animals, that obviously derive from these sources. Itis very unlikely, however, that a provincial artisan such as the carver of theAgecroft bed would have seen the pattern books in their original form. Thecarver, therefore, must have created another version of these exotic motifs.
The main register of the Agecroft bed has a decorative schemethat is seen frequently on overmantels, chests, and beds of the period.Three terminal figures are depicted: a dark-skinned male on each side anda fair, blond female in the center. Each figure terminates in an elaborateshield, decorated with a stylized, carved animal face (Fleming, Honour,and Pevsner 1976:283).3 Three identical white baskets of stylized, pinkfruitlike flowers with green leaves rest on the heads of the figures.
The two inset panels on the main register, framed by green acan-thus leaves, contain arches supported by pairs of facing lions (smiling andwinged), an ancient motif of heraldic symmetry.4 Beneath the arches, apair of inner panels depicts carved, stylized pink carnations in variousstages of flowering. Although stylized flowers were often used in archedpanels on furniture and other carved or inlaid decoration, these flowershave no known exact parallel.
An interesting feature on almost all beds of this type is the pres-ence of satyr figures somewhere on the headboard. Could this ancientsymbol of lust be reinterpreted here as a symbol of fertility? The satyrs on
320 Schmidt
Figure 3
Detail of the headboard. The red graining and
plugged rope holes on the lowest register pro-
vided clues to dating the paint.

the Agecroft bed rest on a cornice on each side of the main register. Theyhave pointed ears, blond hair, large black eyes, red lips, and no arms. Theirlegs and hooves are like those of a goat, with carved and detailed, brown-painted hair on the flanks. Around each of their waists is a black belt witha curious rectangular-shaped boss on the front. The figures are finishedonly on the front and one side, indicating that they were carved as aflanking pair.
The third and top register of the Agecroft headboard depicts twolarge, green sea monsters with pointed white teeth, each one swallowing afish. The heads of the two monsters are joined in the center of the bed bya carved tasseled cord. Each tail ends in a spiral attached to a red rosettethat has been cut in half at each end of the panel.
A headboard quite similar to the Agecroft example is on the GreatBed of Ware, now at the Victoria and Albert Museum in London. Thisoversized bed, almost 3.35 m (11 ft.) square, has been the subject of muchspeculation since it was mentioned in Shakespeare’s Twelfth Night, first per-formed in 1601 (Thornton 1976).5 The terminal figures on the Great Bedof Ware are very similar to the Agecroft examples. The beds differ in thatthe figures (including the satyrs) on the Great Bed of Ware are painted,whereas the rest of the bed is unpainted.
Like the sea monsters on the third and top register of the head-board of the Agecroft bed, the fire-breathing, interlocking dragons on thevalance have spiral tails attached to red rosettes, and their heads are joinedby a short cord.6 Victor Chinnery, an authority on English oak furniture,notes that these particular animal decorations on the Agecroft bed are typ-ical of certain decorative elements found primarily in southwest England,where Burderop House is located. Indeed, the motif of paired dragonswith spiraling tails is a consistent feature on the crests of Gloucestershirechairs (Fig. 4).7
The winged figures in the four corners of the underside of thetester are probably the most striking and unusual decoration on theAgecroft bed (Fig. 5). They are realistic male heads with flowing, flamingred hair, black mustaches, and short blond beards. The use of the tasseledcords and the technique of the carving suggest that the sea monster sec-tions, the dragons on the valance, and the winged figures were carved bythe same person. The traditional guilloche and acanthus-leaf decorationon the main footposts is less imaginative than the carving elsewhere onthe bed. The footposts are somewhat atypical, however, in that each hastwo large bulbous turnings rather than the usual massive plinth sur-mounted by posts with a single bulbous turning.8
Early-nineteenth-century documents from Burderop House list a paintedchest of drawers in association with the painted bed. The chest is made intwo sections with an assortment of wood—oak, walnut, elm, and pine—which leaves little doubt that it was intended from the beginning to bepainted (Chinnery 1979:90–91, 207, 209). Although the chest is painted in anaive and cursory manner compared to the bed, the motifs—terminalfigures, flower panels, and the barely visible tasseled cord between seamonsters—are obviously taken from the bed.
Although the form of the Agecroft chest of drawers is typicalfor the third quarter of the seventeenth century, many questions remainregarding the piece. From a purely visual examination, it is impossible to
Chest of Drawers
321P T B A H
Figure 4
Detail of a 1640 joined armchair (illustrated in
Chinnery 1979:457, 86, fig. 4).
Figure 5
Detail of winged red-haired man with black
mustache and blond beard from the Agecroft
bed, underside of the valance.
determine the relative dates of the bed and the chest of drawers. A paintanalysis in conjunction with a thorough structural study of the chest ofdrawers will help to provide insight into this question.
The form of the Agecroft painted bed, its construction, and its decorativeelements all suggest a late-sixteenth- or early-seventeenth-century date offabrication. However, questions remain about the original finish and theage of the current polychromy. To better understand the surface history,Agecroft conservator, Sandy Jensen, and Colonial Williamsburg conserva-tor Carey Howlett took small samples from various locations and made apreliminary microscopic analysis. James Martin, director of AnalyticalServices and Research at Williamstown Art Conservation Center, carriedout additional microscopy and chemical analysis of selected pigments andbinders. Martin analyzed samples using four microscopic techniques:stereomicroscopy, polarizing light/fluorescence microscopy (PLM/FM),Fourier-transform infrared (FT-IR) microspectroscopy, and scanning elec-tron microscopy with energy-dispersive spectrometry (SEM-EDS).9
The stratigraphy of paint layers and coatings was first determinedby examining samples in cross section. This layering was then related topaints and clear coatings present on a section of detached headboardmolding. Minute samples were taken from the molding for analysis ofspecific pigments, coatings and binders.
The analysis revealed three historic decorative treatments thatremained largely intact on most of the bed’s surface: (1) an early trans-parent amber-colored varnish; (2) a thin layer of red paint; and (3) a morecomplex layering, involving a base coat of red paint, a graining glaze, andpolychrome details (Martin 1995).10
The wood substrate and amber-colored varnish
In sample cross sections, the wood fibers adjacent to the early coatingappear very dark, suggesting oxidation due to prolonged exposure to lightand air. The amber-colored coating itself appears to be a tree resin, proba-bly pine rosin (Martin 1995).11 Though probably transparent when applied,it is now yellowed, somewhat discontinuous, and heavily fissured, typicalof an aged coating. The oxidation of the wood suggests that the compo-nents of the bed may have remained unfinished for some time after theirconstruction, then received a thin coating of transparent varnish. Thepoor condition of the varnish indicates that it served as the finish coat formany years prior to the application of paint. Carved elements support thehypothesis that the bed’s maker intended the natural oak to be the showsurface. The carver employed decorative punch work in the ground areasto heighten the contrast between the ground and the raised carvings. Suchwork is both unusual and unnecessary on surfaces designed to receivepolychromy; painted contrasts are far simpler to achieve yet more dra-matic in effect.
The thin layer of red paint
The earliest pigmented layer is a thin red paint applied directly above thedeteriorated varnish (sample cross sections reveal the paint flowing intofissures in the old resin layer). The paint consists of red iron oxide and leadwhite in a protein binder (Martin 1995).12 This layer was applied after the
Paint Analysis of the Bed
322 Schmidt

bedrails were lowered and the mattress support was changed from a ropeto a canvas support; the thin red paint is the earliest layer found on thewooden plugs that fill the original rope holes.
The final decorative treatment
The polychromy currently visible on the bed is the third (and final) decora-tive scheme. It is considerably more complex than the earlier coatings andconsists of an ochre-colored base coat, two red-graining layers, poly-chromed details, and a final coat of varnish. The ochre-colored layer, com-posed of lead white and red iron oxide in oil, serves as the primer for thegreen, blue, black, red, and white elements, but it also appears as the visi-ble ochre layer in many areas. The two red-graining layers were appliedabove the ochre and consist of a lower opaque layer of red lead, hematite,yellow iron oxide, and lead white (or litharge); and a transparent upperlayer composed of red lake. The upper layers of polychromy await furtheranalysis but include a blue made from lead white, indigo, and smalt in anoil binder. The varnish above this decorative scheme has been character-ized as a tree resin—possibly copal (Martin 1995).13
Dating the three paint schemes
The date of application for each of the three decorative schemes remainssomewhat conjectural. The initial resin coating may have been appliedwithin a few years after the elements of the bed were carved—in the latesixteenth or early seventeenth century. The second scheme—the thin redlayer—was obviously applied after the bed support was converted fromrope to a canvas support. This alteration occurred as early as the mid–seventeenth century, a date consistent with the forged nails associated withthe canvas support and the materials used in the red paint. The final poly-chromatic scheme was certainly applied a good while after the bed wasmade, as indicated by the weathered, deteriorated condition of the earliercoatings; however, all of the materials thus far identified (pigments,binders, and varnish) were in use in the 1600s, and it is conceivable thatthis decorative scheme dates from late in that century. Further analysis mayprovide more conclusive information about the age of the polychromy.
The unexpected discovery in 1978 of early-seventeenth-century wallpaintings—during extensive alterations to Burderop House, where thebed and chest of drawers were acquired—may be significant in tracing thehistory of the pieces (Fig. 6).
The manor of Burderop existed as early as the fourteenth centuryunder the holdings of the Abbot of Hyde. The Stephens family ownedBurderop from the early sixteenth century until trustees for ThomasStephens (IV) sold the house in 1619 to William Calley I, a wealthyLondoner with court connections. Documents indicate that a “new . . .Mansion howse” had been built on the property shortly before Calley’spurchase; however, nothing is known of changes made to the house afterhe became the owner.14 A drastic reconstruction in the Georgian style,both interior and exterior, took place in 1730, leaving little evidence of theearlier structure. When the present owners of the house undertook reno-vation in 1978, the removal of eighteenth-century paneling unexpectedlyrevealed wall paintings in four of the first-floor rooms.15
Burderop House: TheOriginal Setting for the Bedand Chest of Drawers?
323P T B A H

The most complete wall paintings were found in the southeastbedroom, covering the west and the north walls. They depict a stylizedlandscape with animals, foliage, and buildings, divided by trompe l’oeilcolumns. An integral part of the decoration is the coat of arms of WilliamCalley I painted above the fireplace on the north wall. This coat of arms isevidence that the wall paintings were applied sometime between 1619,when Calley acquired the house, and before his death in 1641.
The leaded-glass casement window, painted in the trompe l’oeilstyle in the center of the west wall, is strangely out of context with thelandscape scene. The large blank area beneath this window measuresapproximately 173 cm by 208 cm, the same dimensions as the headboardof the Agecroft tester bed. An image of an earlier wall painting is barelyvisible beneath the surface of the blank area. This trompe l’oeil painting,depicting lozenge-shaped paneling, may have been the original setting forthe painted bed, if a pre-1619 date for the bed is correct.16
Although the form and decoration of the Agecroft bed appears tobe from an earlier date than the style of the more sophisticated wall paint-ing at Burderop House, there can be little doubt that the wall painting wasplanned to surround a bed the same size as the Agecroft bed. The bedwould have been placed in the center of the wall beneath the painted win-dow. The wall paintings were designed to accommodate the doors at theextreme left and right of the wall. A second door on the right was insertedlater, destroying most of the painted column and the foliage on that side.
A search for documents that refer to the painted bed and thepainted chest of drawers has revealed little information. The earliest docu-mented evidence of the presence of the pieces in Burderop House is an1824 inventory of the contents. By that time, the bed and chest of drawershad been banished to the attic. They were located in room 21, which islisted as the “Image Attic.” The bed is described as the “Image Bedstead,”and the chest of drawers as “painted drawers with Key.” The word imaging,an old term for painting and carving, suggests that the name had beenattached to the bed early in its history.17 According to an 1829 inventory,the bed and chest of drawers were still in the attic; however, the bed isdescribed as the “Carved bedstead,” while the chest of drawers isdescribed as “painted Drawers and Key.”18
The last nineteenth-century reference to the presence of thepieces in Burderop House is the 1882 inventory, which lists an “Antique
324 Schmidt
Figure 6
Photomontage of seventeenth-century wall
painting, west wall of southeast room at
Burderop House, Wiltshire, England.
Four post Bedstead” and an “Antique Chest Drawers” in the “Blue BedRoom.”19 By this time, it appears that the bed and chest of drawers werereturned to the first floor, possibly because of the late-nineteenth-centurytaste for Elizabethan and Jacobean furnishings. Correspondence in the fileat Agecroft from the time of the 1974 auction states that the bed was sleptin until the time of the sale.20 The surviving relative, Sir Henry Langton, isquoted as stating that the bed and chest of drawers had been at BurderopHouse for many years, probably from the time the pieces were made(Warner 1974).21 One may conclude that this statement is true, given theevidence from the nineteenth-century inventories and the bed’s associationwith the early-seventeenth-century wall painting described here.
The painted tester bedstead at Agecroft Hall should be recognizedas an extremely rare example of early English painted furniture. The formand construction of the bed and its decorative motifs are typical of theperiod and support the circa 1580–1630 date. Evidence from the bed’sfinishes does not contradict the proposed date. The paired dragon motifon the valance ties the bed to the southwest of England, the site ofBurderop House, whose inventories from 1824, 1829, and 1882 link thepainted chest of drawers and painted tester bedstead and place themtogether in the house. Wall paintings applied between 1619 and 1641 in thesouthwest bedroom reveal a space that is the same approximate dimensionas the bed’s headboard, suggesting that Burderop House was the originalsetting for the bed.
The Agecroft painted tester bedstead and its companion paintedchest of drawers are worthy of further investigation. Research and paintanalysis are ongoing on both of the pieces. A more thorough search ofBurderop House family papers is being conducted to document the houseas the original setting for the bed and chest of drawers. Continuedresearch on the wall paintings may throw new light on their relationshipto the painted tester bedstead.
The author wishes to acknowledge a number of people without whoseassistance this project would not have been possible: conservators F. CareyHowlett and Sandy Jensen, who spent many hours examining the bed andthe paint samples; scientist James Martin, who provided the informationfor the paint analysis section; and Margaret Taylor, who advised on theorganization of this article. The staff at Agecroft Hall, Richmond, Virginia,has been an invaluable help, especially the curator of collections, MaryAnne Caton, and trustee Jane Paden. The Agecroft Association providedoffice support and the funds for the paint analysis of the bed and chest ofdrawers. In England, Victor Chinnery assisted and advised the authorthroughout this project. The staff of the Wiltshire County CouncilConservation Laboratory, Frances Collard of the Furniture Department atthe Victoria and Albert Museum, Nick Molyneux of English Heritage, andgenealogist Pat Hughes have provided much useful information.
1 Agecroft Hall is a Tudor period house that was moved from Lancashire, England, to
Richmond, Virginia, in the 1920s. It is now a museum furnished with a collection of English
Tudor and early Stuart furnishings. The term tester bedstead is found in contemporary inven-
tories; however, it is used interchangeably with the word bed throughout this article. Tester
comes from the Latin testa, meaning covering.
Notes
Acknowledgments
325P T B A H

2 Chinnery (1994a) substantiates that these means of support existed concurrently: “In sixteenth
and seventeenth century inventories ‘corded bedsteads’ and ‘canvas-bottomed’ or ‘sacking-
bottom bedsteads’ are found very much in parallel.”
3 These human figures, the bottom halves of which end in pedestals, are called terms. Some
authors refer to these figures as atlantes (male) and caryatids (female).
4 It is quite curious that the pair of lions on the proper left have the remains of what appear to
be wooden dowels clenched between their teeth, and there are similar holes in the mouths of
the other lions, where dowels would have been.
5 The reference to the bed speaks of a sheet “big enough for the bed of Ware” and appears in
act 3, scene 2 of the play. The decorative scheme on the headboard is the same as the Agecroft
example, except that the Great Bed of Ware, which is more refined in workmanship, has the
female figure placed on the proper right side and not, as usual, in the center between two males.
6 The dragon panels appear to have been carved to fit this bed and are mitered at the corners.
7 There are comparable dragons over a stone doorway at University Farm House in the village
of Moreton-in-Marsh, Gloucestershire, near Burderop House (Chinnery 1994b).
8 Other examples of footposts similar to those on the Agecroft bed are the well-documented
bed at Montacute House, a bed at Athelhampton House (recently destroyed by fire), and the
bed in the Rupert Room at Sudeley Castle.
9 Polarized light/fluorescence microscopy (PLM/FM) was performed at Colonial Williamsburg
and at the Williamstown Center using an Olympus BH-2 polarizing light microscope equipped
for epi-fluorescence illumination. Fourier-transform infrared (FT-IR) microspectroscopy was
performed at the Williamstown Center using a Spectra-Tech IR Plan Research microscope
coupled with a Nicolet Magna 550 optical bench; samples were prepared neat on Spectra-Tech
diamond cells and analyzed for 32–512 scans at 4 cm21 using Happs-Genzel apodization.
Scanning electron microscopy with energy-dispersive spectrometry (SEM-EDS) was performed
by the Williamstown Center using a Cambridge Stereoscan 100 SEM equipped with a Tracor
(now Noran) EDS detector; samples were mounted on aluminum stubs, carbon coated for
conductivity, and analyzed at 15–25 kV.
10 See also the chapter by Martin in this volume.
11 The coating, characterized by FT-IR, is rapidly soluble in acetone, causing later layers to
release from the wood and presenting certain problems for solvent treatment of the bedstead.
12 The protein binder was characterized by FT-IR, and the pigments by PLM/FM.
13 Binders and coating were characterized by FT-IR; pigments were identified using PLM and
SEM-EDS.
14 Pat Hughes in an unpublished manuscript, “The History of Burderop House,” document 4,
WRO 1178/38. Agecroft Hall.
15 The wall paintings, which were removed from Burderop House in 1978, are in the Wiltshire
County Council Conservation Laboratory, where they are currently being treated.
16 Hughes, “Burderop House,” document 8, WAM xxx 141/2. One can only speculate as to when
the bed came to Burderop House. However, due to the apparent mental instability of Thomas
Stephens (IV), the house was sold to Calley by trustees, and Stephens died in 1631 in the
house of friends. It is certainly possible under these circumstances that furnishings were sold
with the house.
17 Hughes, “Burderop House,” document 4, WRO 1178/53. The items listed in the inventory
indicate that these second-floor attic rooms were furnished for use and were not simply
storage areas.
18 Hughes, “Burderop House,” document 5, WRO 1178/53.
19 Hughes, “Burderop House,” document 6, WRO 1178/411/3.
326 Schmidt
20 Further evidence of the bed’s antiquity and importance is the exemption of the bed from
death duties when the contents of the house were assessed upon the death of Major General
Charles Pleydell Calley on 14 February 1932.
21 Warner quotes Sir Henry Langton, nephew of the late Miss Calley.
Chinnery, V.
1979 Oak Furniture, The British Tradition. Woodbridge, England: Antique Collectors’ Club.
1994a Letter to Curator of Collections, Mary Anne Caton. Agecroft Hall, 7 August.
1994b Telephone conversation with the author, 16 September.
Fleming, J., H. Honour., and N. Pevsner
1976 The Penguin Dictionary of Architecture. Harmondsworth, England: Penguin Books.
Forman, B.
1971 Continental furniture craftsmen in London, 1511–1625. Furniture History 7:1–120.
Martin, James
1995 Analysis of samples from the Agecroft Hall bed. Report, October, Williamstown Art
Conservation Center.
Thornton, P.
1976 The Great Bed of Ware. Victoria and Albert Museum Masterpieces, Sheet 8. Victoria
and Albert Museum, London.
Warner, R.
1974 Letter to John Williams, Director, Agecroft Hall, 24 May.
Wells-Cole, A.
1981 An oak bed at Montacute. Furniture History 18:1–19.
References
327P T B A H

T of the second wing ofEuropean Decorative Arts at the Royal Ontario Museum hasafforded the conservators and curators the opportunity to examine
in detail many of the japanned pieces in the collection. This furniture hasbeen in storage for many years because some of the pieces were consid-ered unexhibitable due to their poor condition.
The type of japanning evidenced on these cabinets first becamepopular in the seventeenth century, as contacts with the Far East throughthe Dutch East Indies Company and the East India Company becamemore frequent. As the popularity increased, the demand could not be metby Asian lacquerwares alone. Early attempts to import the raw lacquerand to cultivate the trees that produce it failed, and, although it was beingimported to England by the mid–eighteenth century, it was considered toodangerous for common use. Robert Dossie writes in The Handmaid to theArts (1764:408), “Its poisonous qualities are almost constantly fatal to thosewho work with it any length of time and sometimes even on very slightmeddling with it.” New formulas were developed to produce a hard lus-trous surface. This collection of four cabinets demonstrates severaldifferent techniques of japanning in use during the seventeenth, eigh-teenth, and nineteenth centuries.
This is a typical late-seventeenth-century japanned cabinet on an elaboratesilver gilded stand (Fig. 1). Prior to examination by conservators, this cabi-net was believed to be wholly from the seventeenth century; however,suspicions were first aroused when this piece was seen in good lighting.The exterior was severely damaged (Fig. 2), while the interior retained asmooth, refined surface (Fig. 3). The protection afforded by the closeddoors was not sufficient to explain the drastic difference in condition. Also,under ultraviolet light the interior and exterior surfaces had their own dis-tinct fluorescence. It was clear that the cabinet had been refinished, proba-bly during the nineteenth century.
The cabinet was originally finished with a traditional Europeanjapanning technique, using shellac or seed lac as the resin. The decorationwas completed by suspending gold and other metals within the layers ofshellac. In some areas the metal powders appear to have been appliedusing a sprinkling technique, while in other areas the metal appears tohave been mixed up as a paint, then applied. The molding between the
English Seventeenth-Century Cabinet
328
Four Japanned Cabinets: A Variety of Techniques
Marianne Webb

drawers and the interior of the drawers were speckled. The random distri-bution of the speckling suggests that the powders were applied by sprin-kling, as opposed to brushing. The interior and exterior had been finishedin a similar manner, except that there were also areas of raised decorationapplied on top of the black shellac finish of the doors.
The designs are typical of the chinoiserie of the period, exhibitingChinese landscapes, figures, and birds. While they are not exact reproduc-tions of the designs shown in Stalker and Parker’s 1688 book, A Treatise ofJapaning and Varnishing, some of the landscapes and floral arrangementsare very similar in appearance.
Examination and X rays were done in the Royal Ontario Museum’sConservation Department, and chemical analysis was carried out at theCanadian Conservation Institute (Miller and Moffat 1994), to reveal thehistory of the piece since its fabrication. Analysis revealed that the exteriorof the cabinet was completely refinished in the nineteenth century. Crosssections showed that a heavy black-pigmented layer was applied over theoriginal design; the cabinet was then redecorated using shellac and, inmany areas, an oil medium. Instead of the fine technique of suspendinggold powders in the layers of decoration, the gold leaf was simply stuckon in large patches with an oil mordant. Flakes of gesso and gold in thecrevices of the stand suggest that the surface was regilded with gold leafat this time. Evidence indicates that there was also a later restoration,probably just prior to the cabinet’s arrival at the museum in 1960. Thelater gilding had been removed to reveal the original silver leaf surface. In
329F J C
Figure 1
English japanned cabinet, dated 1695, as it
appeared shortly after restoration in 1960.
Figure 2
Front of the cabinet, showing the deteriorated
state of the nineteenth-century finish. Note
long vertical cracks through each door.
Figure 3
Interior of the cabinet in 1990. The original
surface is in remarkably good condition.
addition, a poly(vinyl acetate) (PVA) varnish had been applied to the badlydeteriorated front.
X-ray photographs were taken to determine if any of the originalsurface remained. Three images appear on the X-ray photographs: theimage on the front of the doors, that on the back of the doors, and a thirdimage hidden by the refinishing. Tracings on Mylar sheets were done ofthe front and back images. By superimposing the tracings, the differencesbetween the original image and the nineteenth-century refinishing couldbe seen. In several areas, buildings were added where there had previouslybeen delicate floral arrangements. Rocks and hills had been removed fromthe design, and figures were added in the foreground. In addition, theraised areas that had been decorated with plants were simply paintedblack, eliminating them from the overall scheme.
When the piece arrived in the lab, an evaluation of its conditionwas carried out. Shrinkage in the main body of the door panels had causeda large split through the center of each door, running from top to bottom.These splits had run through the entire thickness of the doors. In addition,numerous small splits were evident at the lower edges, where the horizon-tal cross pieces met the vertical panels. Losses in the surface layers on bothsides of the doors were extensive along the edges of these cracks.
The interior and the exterior of the cabinet each had a distinctset of problems, due to their different histories. The interior sides of thedoors and the drawer fronts presented surfaces that had been tamperedwith the least and were also in the best condition. On the interior of thedoors, the surface was flaking badly in several areas. This appears tohave been caused, again, by the overall dimensional change in the wood.Evidently, the flaking had been dealt with before by the application of aspirit varnish. On the surface of some drawers, losses had been infilledwith this later varnish. The speckling on the moldings between drawershad been overpainted in heavy black varnish, probably shellac with lamp-black. This later overpaint was delaminating in some areas, revealing theoriginal speckled finish.
The exterior had undergone many changes, each of these leaving itsmark on the surface. The overall appearance at the time the cabinet enteredthe lab was very “plastic,” with numerous gray blisters caused by delamina-tion of the PVA varnish. There were also numerous small losses where thenineteenth-century finish appeared to be separating from the seventeenth-century finish. This separation had been going on for some time, as the PVAlayer had infilled many of the earlier losses. Some areas of decoration havebeen lost. The original raised gesso areas on the front are dry and crumblingwith numerous losses, as well. In addition, the nineteenth-century oil gildingon the front and sides has been shrinking over time, leaving the gold decora-tion with an alligatored, patchy appearance. In fact, the oil gilding andbronze powder designs on the sides have deteriorated to the point at whichmuch of the design can no longer be seen.
Before any consolidation was attempted, the surface was cleanedof loose dirt with a brush or soft cotton cloth. The PVA layer wasremoved, as it was delaminating and had failed to consolidate the flakingsurface. Solvent tests confirmed that toluene would remove the PVA var-nish without disturbing the underlying, earlier work. The doors weredetached so this could be carried out horizontally by rolling toluene swabsover the surface within a portable fume hood.
330 Webb

Experiments were also carried out to determine the best methodfor consolidating the friable shellac finishes on the interior without dis-turbing the cabinet’s appearance; additional consolidants would only serveto disturb the lustrous finish on the interior. Tests were conducted usinga tacking iron with a 1 mm tip to soften the small flakes and then pressthe molten shellac back into place without the use of an adhesive. Thismethod was used to adhere tenting and lifting on both the interior andexterior of the cabinet. The result is a sound surface that retains its origi-nal character. The raised gesso areas on the exterior were consolidated bybrushing on a 5% rabbit-skin-glue solution, while the losses were infilledwith 6% poly(vinyl alcohol) and whiting mixed with lampblack and rawumber dry pigments. The surface of raised area fills were sealed with 30%dammar varnish in toluene and mineral spirits (1:1), then inpainted withivory black in the same medium.
Two small “windows” were made by lifting off the nineteenth-century finish with a scalpel; this revealed exquisite but incomplete decora-tion. Due to the brittle nature of the original finish, as well as X-rayevidence indicating an incomplete surface, it was decided that there wouldbe no attempt to restore the previous seventeenth-century finish. The onlyother work that was carried out was to give the front of the exterior doorsa coat of dammar varnish in an attempt to unify the patchy appearanceof the finish. The dammar matches the surface of the piece much moreclosely than the former PVA varnish.
The second case is a pair of French encoignures dated to 1750 (Fig. 4).During this period it was popular in France to incorporate the use ofAsian lacquer panels into the fabric of typical European cabinets. Thesepieces are a combination of Asian (probably Chinese) and European lac-quer. The Asian lacquer panels have been split in half, the wood shaveddown to a 2 mm veneer, bent into a curved shape, and applied to thedoors. The curved doors are standard panel construction with a rigidframe and a fixed panel, both constructed of oak. The bent shape wasachieved by a steaming-and-hardening process, as opposed to cutting thewood in a curve. In each case, the interior of the door was veneered inmahogany; the rest of the cabinet was fabricated around the door. Thefront of each cabinet was japanned in the style of the Chinese panelattached to it. It is interesting that the Chinese panel was completelyrepainted at the time of construction in order to better match the Frenchjapanning. The overpaint follows most of the design with surprising accu-racy; for example, each needle of the pine trees has been precisely cov-ered. However, in some areas there are design changes; certain trees havebecome rocks, and, in one case, a gold horse has been transformed into adapple gray mare (Fig. 5).
Samples from the doors and japanned panels of both cabinetswere sent to the Canadian Conservation Institute (CCI) (Miller, Helwig,and Sirois 1994) for analysis to confirm that the overpaint on the doors wascontemporary with the fabrication of the cabinets. Photomicrographs andpigment analysis confirmed that this is the case. Analysis also revealed thatthe major component in the japanning was the diterpene resin sandaracwith a fairly large amount of larch resin added. The usual larch foundin old recipes is Venice turpentine, the diterpene oleoresin from the
A Pair of FrenchEncoignures
331F J C
Figure 4
One of the pair of eighteenth-century French
encoignures before conservation. Note the
difference between the condition of the door
and the surrounding cabinet.

European larch Larix decidua; however, as the larch diterpenes present inthese samples are not found in the European larch, it may instead be theSiberian larch, Larix siberica. The triterpene resin elemi is also present, aswell as monoterpenes characteristic of oil of spike. Oil of spike, producedfrom the lavender plant Lavandula latifolia, was used as a slow-drying sol-vent for lacquers and varnishes. Elemental analysis on the metallic powdersused to produce the decoration indicated they were made from a variety ofalloys. In one sample, there was a high amount of tin, which differs fromthe expected copper-zinc alloys usually used in this type of decoration.
The poor condition of these cabinets, primarily due to the originalconstruction methods, was exacerbated by poor storage over the years. It isnot surprising that the main carcass (framework) of the cabinets, and thejapanning on them, have fared better than the panel doors. In the originalfabrication of the oak frame doors, the wood was put under a great deal ofstress to achieve a curved surface. This stress has been relieved in differentways on each door. On the door of the cabinet featuring a hunting scene(Figs. 4, 5), the stress has been relieved by a large split up the center of thedoor, and the vertical panel has warped inward along the split. In the caseof the second door, featuring a landscape (Fig. 6), the curved horizontalpieces of the panel frame have straightened out. A difference of 10 mmbetween the vertical part of the panel and the horizontal member hascaused the Chinese panel veneer to shred at the juncture point, as shown inFigure 6. The surrounding lacquer understandably has lifted, and much has
332 Webb
Figure 6
Detail of second cabinet of the pair of
eighteenth-century encoignures before treat-
ment. Warped door with landscape design
shows large split in veneer panel and extensive
overfilling to compensate for the damage.
Figure 5
Detail of the door shown in Figure 4, illustrat-
ing the extensive cracking, as well as the
abraded area around the edges. Note the
French overpaint on the Asian panel, espe-
cially the repainting of the horse and the trees
transformed into rocks.

been lost in all four corners of the panel. The damage to the wood veneeron the interior of the door is much the same, with splits and areas of liftingcorresponding to the distortions of the oak base.
Both doors exhibit a series of tented cracks, at 5–10 mm intervals,running over the entire surface. This stress-cracking phenomenon hasbeen well documented by Kenzo Toishi and Hiromitsu Washizuka(1987:170–72) on pieces in Japan. In the case of these two cabinets, thestress was undoubtedly induced, in each instance, by gluing a flat Chinesepanel to a curved surface. The cracks in each of the doors cross the grainof the wood of the underlying panel. Figure 4 shows this cracking in thefirst cabinet running horizontally over the vertical wooden panel and verti-cally over the horizontal members of the oak panel. This problem hasbeen observed on other examples of French furniture in which Asianpanels were glued to a locally made carcass. The National Gallery of Artin Washington, D.C., has a number of pieces by Jean Desforges, all exhibit-ing the same stress cracking (National Gallery of Art 1993).
The carcasses of the French cabinets were in much better condi-tion than their doors, primarily due to the original construction methods.The curved shape on each front section was achieved by cutting the woodinto that form. There are cracks between the joins of the four pieces thatmake up the front, but this is to be expected. The numerous small lossesof the original japanning run with the grain of the wood, indicating thatthey have been loosened over the years by repeated shrinking and swellingof the wood, not by stresses set up in the initial construction.
It is natural that cabinets exhibiting this inherent vice would haveundergone repairs at some point prior to arriving at the Royal OntarioMuseum. There was evidence of at least two previous restorations to thepair. At one point in time the edges of the Chinese panel were readheredto the oak panel on both cabinets. At this time, the surface of the panelwas severely abraded in an attempt to flatten the lifting lacquer. There is a3 cm strip around the edge of each panel, in which all the European over-paint has been stripped off and the Asian lacquer stripped back to the baselayer. The abraded area was then overpainted in black varnish, with bronzepaint to imitate the decoration. The particle size of the later bronze paintwas much larger, and the execution did not match the refined technique ofthe one first used. During this first restoration, losses to the panel wereinfilled with gesso and inpainted to match the surface.
A later restoration was carried out during the 1940s at the RoyalOntario Museum, in which an attempt was made on each cabinet to rec-oncile the different levels of the warped panel. A water-soluble putty wasapplied to the corners of the cabinet to level out the distortions; unfortu-nately, much of the design was covered in this process. These crude fillsand the surrounding area have extensive black overpaint with bronze paintdecoration. The same restoration method was carried out on cracksbetween wood members on the carcass itself.
The conservation treatment of these cabinets was time consum-ing, but not particularly difficult. The doors were detached from the cabi-nets to better facilitate the work of removing the 1940s fills and overpaint.Once the surface of the lacquer was clear, the structural work could begin.The interior wood veneer was easily removed with a spatula, as the animalglue was very dry and brittle. The horizontal oak pieces could not bedetached from the lacquer panel on the front, so reshaping had to be donein place. Several shallow cuts were made across the grain at the point of
333F J C

maximum warp, until the oak board could be pulled back into its originalcurve. Cold fish glue was applied to the cuts. Then the piece was clampedinto the new shape until dry.
Once the distortions were corrected, one could see the extensivedamage that had been caused by the warp. The wooden portion of thelacquer veneer had itself been distorted, and in some areas the wood hadbeen shredded. The lacquer surface, unable to accommodate these changes,had lifted and flaked off in great quantities, while the remaining flakes hadcupped. In most cases, the lacquer was sufficiently pliable that it could belaid flat using clamps. Where it was too brittle to flatten without breaking,it was softened prior to gluing by using a thermal sheet controlled with arheostat to about 50 °C. Cold fish glue, with 10% ethanol added as a wet-ting agent to facilitate the flow under the surface, was injected to holddown both the distorted lacquer and its wooden base. The consolidationtook several months, as no more than a few square centimeters could bedone in a single day. The lacquer has a powerful “memory” of its distortedstate, so a great number of clamps were required. In addition, large quanti-ties of fish glue could not be used at one time because an excess of mois-ture would cause marks on the oriental lacquer surface.
Following consolidation, the veneer was replaced, and losses wereinfilled using 8% poly(vinyl alcohol) and whiting. The surface of the fillswere inpainted with Acrysol WS-24 (an acrylic emulsion) and aniline dyeto imitate the oriental lacquer. The japanned areas were inpainted withLiquitex acrylic medium and mica-based pigments, instead of the metallicpowders used originally. These mica pigments match very closely theeffect of the metal powder but have the added advantage of not tarnishingover time.
The fourth cabinet is mentioned only briefly here as a work in progress. Itis an English corner cupboard, dated about 1750 (Fig. 7). Although itarrived at the museum with feet, it was originally a wall cabinet; the loca-tion of the drawer near the base, and holes to secure it on the wall, isclear evidence of its first purpose. It now looks like it was decorated in ablack-and-gold chinoiserie style; however, again this was not its originalappearance. The front has been revarnished many times; and over thecenturies each of these layers has discolored, giving the background thedark brown color it now possesses. Close inspection of the interiordrawer, which escaped revarnishing, indicates that the original color wasmuch different. Although the old varnish has itself somewhat discolored,the initial blue color can be seen in the areas that have been protected bythe gilding.
Analysis of the pigments and resins (Miller and Helwig 1994)with Fourier-transform infrared (FT-IR) spectroscopy, scanning electronmicroscopy (SEM), and microscopy at the Canadian Conservation Instituteshow that the ground layer was carried out using lead white and smalt(Fig. 8). The varnish layers directly on this ground layer were made usingsandarac as the main resin, with additions of colophony and a smallamount of larch resin. Traces of pinenes and verbenone would indicatethat turpentine was used as a solvent. Smalt was added to this varnishrecipe to make a type of colored varnish for the second layer, while subse-quent layers contained the same varnish alone. A thin orange-red pig-
An English CornerCupboard
334 Webb
Figure 7
Eighteenth-century English corner cupboard.

mented layer was found immediately under the gilding. This approach,and the resin used, correspond nicely to recipes found in the publicationsof both Stalker and Parker (1971) and Dossie (1764) for colored japanning.The later layers that had been applied at various times over the originalfinish were determined to be shellac, natural resins, and (in one area)linseed oil.
Unfortunately, time did not permit a complete treatment of thispiece. The small losses of varnish that exposed the smalt and lead whitebase layer were toned in with Soluvar and pigment as a temporary solu-tion until a complete treatment could be carried out.
Although it is not necessary to carry out detailed chemical analysis of everypiece of japanning before beginning conservation treatment, in the casesdiscussed here it has been most beneficial. The additional information hashelped decide the overall treatment approach, and has also given a greaterunderstanding of the actual methods used in the history of these pieces.
It is readily apparent that a glossy black finish is not necessarilyshellac. A great many natural resins were used to achieve the hard glossysurface of lacquer. A look at the literature of the time tells us to expectto find many complicated formulas. Indeed, they are often more compli-cated than the paintings of that time, for which we have a large body ofknowledge.
These four cabinets demonstrate in concrete terms exactly howperplexing it can be to visually differentiate between the various formulas.If there are facilities available for the detailed study of pieces in one’s care,that study should be encouraged in order to build up a catalogue of infor-mation concerning these finishes. It is time that these pieces of furniturebe given the same consideration as is given to fine art. Certainly, the mak-ers had the highest regard for their works; to quote Stalker and Parker(1971:10), “You must not expect to raise a noble piece from dross or rub-bish; to erect a Louvre or Escurial with dirt or clay, nor from a commonLog to frame a Mercury.”
Acrysol WS-24, Rohm and Haas Co., Independence Mall Street, Philadelphia, PA 19105.
Poly(vinyl alcohol), BDH, 350 Evans Avenue, Toronto, Ontario, M8Z 1K5, Canada.Materials and Suppliers
Conclusion
335F J C
Figure 8
Photomicrograph of the various surface lay-
ers on the cabinet shown in Figure 7. From
bottom to top, they are as follows: ground
layer of smalt and lead white in an unknown
medium, sandarac-based varnish with smalt
pigment, clear sandarac-based varnish, thin
red-pigmented layer under gilding, later shel-
lac layer applied on top.
Dossie, R.
1764 The Handmaid to the Arts. 2d ed. London: J. Nourse Bookseller.
Miller, David, and Kate Helwig
1994 Analysis of the finish on an English corner cupboard from the Royal Ontario
Museum. CCI Analytical Report, ARS No. 3313.2. Ottawa, Canada: Canadian
Conservation Institute.
Miller, David, Kate Helwig, and Jane Sirois
1994 Analysis of japanning on a pair of French encoignures from the Royal Ontario
Museum. CCI Analytical Report, ARS No. 3313.1. Ottawa, Canada: Canadian
Conservation Institute.
Miller, David, and Elizabeth Moffat
1994 Analysis of varnish and gilding mordants from a late 17th century japanned
cabinet. CCI Analytical Report, ARS Nos. 3009, 3009.1. Ottawa, Canada: Canadian
Conservation Institute.
National Gallery of Art
1993 Eighteenth Century Decorative Arts. Gallery guide. Washington D.C.: National Gallery
of Art.
Stalker, John, and George Parker
1971 A Treatise of Japaning and Varnishing. 1688. Reprint, London: Alec Tiranti.
Toishi, Kenzo, and Hiromitsu Washizuka
1987 Characteristics of Japanese Art That Condition Its Care. Tokyo: Japanese Association
of Museums.
References
336 Webb

337
J . , in his book titled How Shall We Paint Our Houses?A Popular Treatise on the Art of House-Painting: Plain and Decorative(1868:18–19), describes the transformation in the painting of American
buildings in the second half of the nineteenth century as follows:
The business of house-painting has so outgrown its former insignificant pro-
portions that its past and present features have almost lost their resemblance.
Today, more money is expended on painting a single edifice than would have
sufficed to paint every house in a respectable-sized town thirty years ago, and
the amount of capital, skill and intelligence now required to conduct the busi-
ness successfully in cities and large towns, was not dreamed of at the time.
The Hunnewell cottage in Wellesley, Massachusetts, designed byJohn Sturgis and built in 1871, exemplifies the zenith reached in exteriorarchitectural painting in the second half of the nineteenth century (Fig. 1).The original paint scheme consisted of eight bold paint colors, selected to
The Hunnewell CottagePreservation and Re-creation of a Nineteenth-Century Exterior Paint Scheme
Andrea M. Gilmore
Figure 1
Hunnewell cottage, west elevation, Wellesley,
Massachusetts, photographed before 1879.
Original paint scheme.

highlight the wooden architectural elements of the cottage: visible “stickstyle” framing, bargeboards, gable overhangs, gable brackets, incised detailin the vertical board sheathing of the dormers, and the beveled edges ofthe porch columns and bargeboards. They also complemented the masonryof the first story and the glazed tiles set into the brick at the junction ofthe first and second stories. In his choice of paint for the Hunnewell cot-tage, Sturgis illustrated the integral role that paint color played in hisdesign. His work clearly reflects the statement made in the Devoe paintbook, Exterior Decoration, of 1885 (1976:19):
Today, the architect, where he values his reputation and is desirous of giving
his clients perfect satisfaction, is as solicitous of the color effect as of the gen-
eral design of his work.
Exuberant late-nineteenth-century exterior paint schemes, such asthat found on the Hunnewell cottage, often had relatively short lives. Theywere costly to maintain and repaint, and because these schemes arrivedtoward the end of the Victorian era, they fell out of favor within twentyto thirty years of their creation. In the case of the Hunnewell cottage, theoriginal eight-color scheme was never repainted. When the library wasadded to the south elevation in 1879, the cottage was painted with the everpopular late Victorian scheme of red siding and dark green trim.
During most of the twentieth century, the important role of colorin the design of Victorian architecture has been ignored. Grand QueenAnne and stick style houses have often been painted a single color, mini-mizing the effect of their ornamental architectural elements. In recentyears, however, as interest in Victorian architecture has been rekindled,buildings are again being painted with the rich colors used in the secondhalf of the nineteenth century.
Efforts to re-create appropriate and accurate exterior paintschemes for Victorian buildings have met with varying levels of success.The least accurate of these methods have used colors that are not appro-priate to the Victorian period. The California “painted ladies” of the 1970sare representative of this type of pseudo-Victorian paint treatment (Mossand Winker 1987). Victorian schemes have been re-created more appropri-ately with colors specified in nineteenth-century house-painting guides.These recommend specific colors for different architectural elements andcontain color chips that can be used to create alternative schemes. Themost accurate restorations involve analysis of paint samples removed froma building to identify the original colors and the architectural elements onwhich they were used. This level of analysis was undertaken to identifythe original paint colors on the Hunnewell cottage.
As re-created, the eight-color scheme documents the original, com-plex, late-nineteenth-century paint scheme. It reveals the important rolethat color played in the design of this cottage, particularly in the scheme’srelationship to the masonry materials, whose colors it replicates, and to thearchitectural elements it highlights. Further, it illuminates the role colorplayed in Victorian architecture in general, dispelling the mystery and myththat surround the selection of paint colors for Victorian buildings.
The appearance of elaborately colored Victorian houses in the secondhalf of the nineteenth century coincides with dramatic changes that wereHistorical Background
338 Gi lmore

occurring in the American building industry. The rapid growth of theindustries that produced building materials and the expansion of the rail-roads across the country transformed American house design and con-struction. The boxlike shapes of the timber-frame houses of the eighteenthand early nineteenth centuries were replaced with balloon-framed housesconstructed with 5 cm (2 in.) dimensional lumber and wire nails. Thesehouses had irregular floor plans, asymmetrical facades, and roofs formedby monumental gables that were punctuated with dormers, turrets, andtowers. They were trimmed with mass-produced doors, windows, sheath-ing (shingles, clapboards, and vertical boards), and machine-turned ormachine-cut ornamental trim. To accentuate the three-dimensional quali-ties of the design and the variety of materials used to sheathe and orna-ment the exterior surfaces, painters used the newly available, boldlycolored, ready-mix paints on these houses.
Devoe, writing in 1885 about Queen Anne style houses, says thefollowing about the use of paint colors to pick out exterior architecturalfeatures (Moss and Winkler 1987:26):
It [the Queen Anne style] furnishes an opportunity for the greatest display of
taste in coloring and exterior decoration. The many fronts, diversified as to
materials, with visible framing shingle or smooth covering, the gables, the
porches, etc., all provide a means for the employment of parti-colored
effects, the most attractive and artistically valuable features of modern house
painting, and one that the old box-pattern house, with its plain flat front,
does not readily admit of.
The proliferation of nineteenth-century house designs and paintschemes was facilitated by the publication of architectural pattern booksand house-painting guides. The pattern books provided house plans, detaildrawings of architectural trim, and materials specifications for Victorianhouses of varying size and style. The house-painting guides included chro-molithographs of houses painted with combinations of colors. These com-binations were chosen to illustrate how different paint colors could beused with varying architectural styles and how architectural details couldbe highlighted with different paint colors. The colors in the chromolitho-graphs typically were keyed to paint-color chips that were also included inthe house-painting guides. In Devoe’s house-painting guide (1885), most ofthe houses shown have paint colors for four elements: body, trim, blinds,and sash. The notable exception is plate 2, which is painted with a combi-nation of seven colors: first story body, second story body, trim, blinds,sash, peaks and side dormer, and roofs.
Conservators of nineteenth-century architecture are seeking,through paint research, to understand how the information in the patternbooks and painting guides was put into practice. This work involves thedetailed examination of houses that were built and the identification oftheir original paint colors. The Hunnewell cottage afforded an opportunityfor a paint study of this type, which revealed a paint scheme that docu-ments the use of Victorian design and colors found in pattern books andpainting guides. However, the Hunnewell cottage paint scheme exceedsthose specified in the house-painting guides in terms of the number of col-ors used and the complexity of their application. The cottage’s complexityreveals the need for paint analysis to accurately document nineteenth-century exterior paint schemes. Furthermore, the integral relationship of
339H C
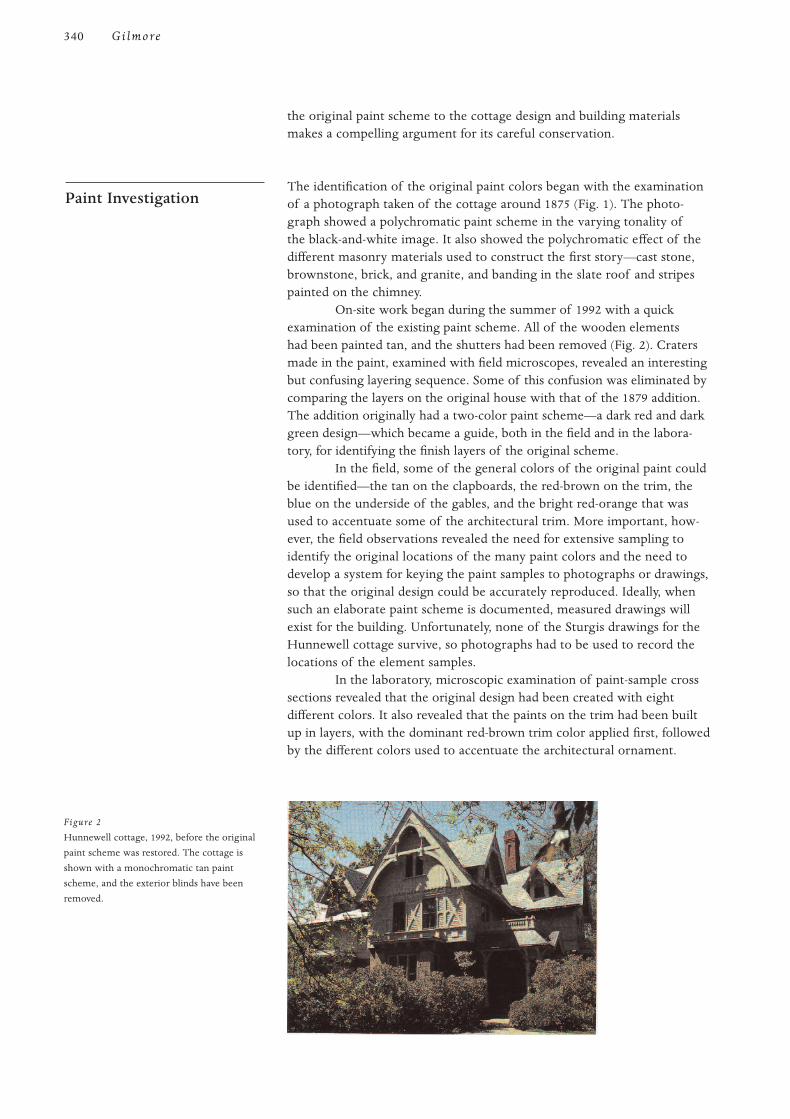
the original paint scheme to the cottage design and building materialsmakes a compelling argument for its careful conservation.
The identification of the original paint colors began with the examinationof a photograph taken of the cottage around 1875 (Fig. 1). The photo-graph showed a polychromatic paint scheme in the varying tonality ofthe black-and-white image. It also showed the polychromatic effect of thedifferent masonry materials used to construct the first story—cast stone,brownstone, brick, and granite, and banding in the slate roof and stripespainted on the chimney.
On-site work began during the summer of 1992 with a quickexamination of the existing paint scheme. All of the wooden elementshad been painted tan, and the shutters had been removed (Fig. 2). Cratersmade in the paint, examined with field microscopes, revealed an interestingbut confusing layering sequence. Some of this confusion was eliminated bycomparing the layers on the original house with that of the 1879 addition.The addition originally had a two-color paint scheme—a dark red and darkgreen design—which became a guide, both in the field and in the labora-tory, for identifying the finish layers of the original scheme.
In the field, some of the general colors of the original paint couldbe identified—the tan on the clapboards, the red-brown on the trim, theblue on the underside of the gables, and the bright red-orange that wasused to accentuate some of the architectural trim. More important, how-ever, the field observations revealed the need for extensive sampling toidentify the original locations of the many paint colors and the need todevelop a system for keying the paint samples to photographs or drawings,so that the original design could be accurately reproduced. Ideally, whensuch an elaborate paint scheme is documented, measured drawings willexist for the building. Unfortunately, none of the Sturgis drawings for theHunnewell cottage survive, so photographs had to be used to record thelocations of the element samples.
In the laboratory, microscopic examination of paint-sample crosssections revealed that the original design had been created with eightdifferent colors. It also revealed that the paints on the trim had been builtup in layers, with the dominant red-brown trim color applied first, followedby the different colors used to accentuate the architectural ornament.
Paint Investigation
340 Gi lmore
Figure 2
Hunnewell cottage, 1992, before the original
paint scheme was restored. The cottage is
shown with a monochromatic tan paint
scheme, and the exterior blinds have been
removed.

Samples of each of the finish paints identified in cross sectionwere exposed with a scalpel and matched to Munsell color standards.Color matching did not involve any adjustment for color change over time,beyond a sampling strategy that located well-protected samples in thicklayers that were judged to be the truest colors surviving on the cottage.The colors used to re-create the original paint scheme are given in Table 1.
Because it would have been prohibitively time-consuming andcostly to sample and prepare a cross section for every architectural ele-ment, after the original colors were identified in the laboratory, fieldmicroscopes were used to confirm their location on many of the exteriorsurfaces. This proved to be a particularly important strategy for verifyingthe locations of different colors, as some of the high gables were availablefor examination only after the painting contract began and the gablesbecame accessible from the ladders and scaffolding.
Field microscopes were also used throughout the contract to ver-ify paint locations and to establish boundaries between the different colors.Identifying the boundaries was one of the more challenging tasks involvedin re-creating the original scheme, since so many colors were used on suchcomplexly shaped architectural elements. Boundaries were established bycutting a channel in the paint, approximately 3 mm wide, across the sus-pected boundaries of the different architectural elements and viewing thesides of the channels using a field microscope to identify where the colorchanges occurred.
The findings of the paint study were recorded in a report thatdocumented the procedures used to identify the original colors. Thereport made recommendations for re-creating the original paint schemeof the cottage and was used to prepare the specifications for the job.
The re-creation of the original paint scheme posed several conservationand technical challenges. The conservation issues involved the question ofhow to preserve original paint evidence and how to prepare the surfacesfor repainting. The technical challenges involved transmitting the paintcolor information to a paint contractor for accurate replication.
The existing exterior paint surfaces exhibited the typical agingcharacteristics of one hundred years of paint buildup (cross sectionsrevealed that the cottage had been painted eight times) and weathering.Many of the painted surfaces were alligatored, and others were peeling;
Re-creating the OriginalPaint Scheme
341H C
Table 1 The eight colors used to re-create the original paint scheme on the Hunnewell cottage
Architectural element Munsell color notation Color
Clapboards 10 YR 5/2 brown
Wood trim (principal color) 2.5 YR 3/4 dark red
Blinds and window sash 5 Y 3/1 dark olive green
Underside of overhanging gables 7.5 BG 7.4 sky blue
Vertical board sheathing 25 Y 6/6 mustard yellow
Incised detail in vertical board sheathing 7.5 Y 4/2 olive green
Gable brackets 5 YR 2/4 dark red
Ornamental wood trim highlighting 10 R 5/10 orange

paint loss had fully exposed the wood of some elements. Most of the paintwas lead based, adding a further consideration to all surface preparations.
Traditional restoration of an original paint scheme would haveinvolved stripping all of the alligatored and deteriorated exterior paint. (Itwas estimated that about 90% of the painted surfaces would have had tohave been stripped.) Stripping would have created a clean, smooth sub-strate for repainting. It would also have removed layers of paint that hadfilled in around the carved ornamentation and restored the depth anddetail of the carving.
In recognition of the significance of the exterior paint schemepreserved on the Hunnewell cottage, however, it was decided that a muchmore conservative approach to surface preparation would be undertaken.Instead of stripping all of the aged paint surfaces, all of the well-bondedpaint—even if alligatored—was preserved. Peeling paint was scraped byhand, and areas of paint loss were feathered into the adjoining paint edgeand lightly sanded. The surfaces were then primed, and a finish coat ofpaint applied. The decision was made to apply only a single coat of finishpaint, rather than the two coats traditionally used for a high-quality paintjob, in a effort to minimize paint buildup. Since many of the trim elementswere, by the nature of the paint scheme, to have multiple paint layers,limiting the base layers to two coats seemed an important long-termpreservation decision. However, adequate coverage was not possible withone finish coat on the dark green of the sash and shutters; therefore, twocoats were applied in these areas.
The level of surface preparation chosen balanced the goals of(1) preserving as much of the early paint as possible and (2) preparing thesurfaces so the new paint would be adequately bonded to ensure a durablepaint surface.
The next task was to prepare a specification so the work could becompetitively bid, using a standard specification for exterior painting on ahistoric building. The bid was sent to three prequalified painting contrac-tors. Each contractor was interviewed at the cottage to ensure that heunderstood the condition of the existing paint, the level of surface prepa-ration specified, and the complexity of the paint scheme to be re-created.Contractors also were told that the contract would be supervised by thearchitectural conservator who had conducted the paint research and thatthe conservator would have access to the scaffolding so that paint colorlocations could be verified throughout the duration of the contract.
The contractor selected had extensive experience painting larger,multicolored Victorian houses. He also had an immediate understandingof the conservation goals as they related to the original paint scheme andsurface preparation. Furthermore, he was sensitive to the need for fielddecisions based on the exposure of additional paint evidence during thecourse of the contract.
Because the groundwork for the contract had been carefully laid,the actual painting project went very smoothly. The degree of surfacepreparation was reviewed on each elevation of the building and tailored tothe amount of paint deterioration encountered. Since Munsell color stan-dards are not commercially available paint colors, finish paints were cus-tom mixed and approved prior to application. Several colors requiredadjustment: the heavily pigmented colors found on the cottage were rela-tively challenging to re-create using the modern bases of commercialpaints, and it took several attempts to achieve an accurate color match.
342 Gi lmore

Biweekly meetings facilitated regular review of the placement of colors,making detailed drawings specifying color locations unnecessary.
The sequence of work was as follows:
1. Pressure washing of the surfaces to remove dirt and pigeonexcrement. (Pressure washing is not generally recommendedas part of paint preparation for a historic building; however,because of the pigeon excrement and general surface soiling,it was deemed necessary for this project.)
2. Scraping and sanding of the deteriorated paint. Sanded sur-faces were wiped with a rag dipped in mineral spirits toremove dust prior to painting.
3. Priming with a gray oil-based primer.4. Application of a finish coat of oil-based paint. As in the origi-
nal painting, the principal exterior paint colors were applied,followed by the colors used to accentuate the architecturalornament.
Figures 3 and 4 show the completed paint scheme.
The paint study and the re-creation of the original paint scheme on theHunnewell cottage revealed the important role played by paint analysisand the conservation of exterior architectural paints in the preservation ofVictorian architecture. The full range and placement of colors on the cot-tage could not have been determined without the thorough sampling andanalysis of the original paints, nor could the architect’s full design intenthave been understood without knowledge of the exterior paint colors.
Summary
343H C
Figure 3
Hunnewell cottage, 1995. Original paint
scheme re-created.
Figure 4
Hunnewell cottage, 1995. Detail of the entry
porch column.

The tan, monochromatic, prerestoration paint scheme obscuredthe incised detail in the vertical boards in the dormers; the beveled edgesof the stick framing, porch columns, and bargeboards; and the ornamentalbrackets of the overhanging gables. Painted in eight colors, this architec-tural detail has now become an intricate three-dimensional design whosecomplexity is akin to the delicate pattern and colors found on the glazedtiles that Sturgis set in the brick band at the top of the first story.
The author would like to acknowledge Jane Hunnewell, who undertookthe paint study and restoration of the Hunnewell cottage. Her intellectualcuriosity and love for her family home provided the conservation teamwith the opportunity to retrieve this remarkable nineteenth-century exte-rior color scheme.
Devoe, F. W.
1976 Exterior Decoration. 1885. Reprint, Philadelphia: Athenaeum.
Masury, John W.
1868 How Shall We Paint Our Houses? A Popular Treatise on the Art of House-Painting: Plain and
Decorative. New York: D. Appleton.
Moss, Roger W., and Gail Caskey Winkler
1987 Victorian Exterior Decoration. New York: Henry Holt.
References
Acknowledgments
344 Gi lmore

I House-Painting, Carriage-Painting and Graining, John W.Masury (1881:243)1 concisely describes the desired qualities of thecarriage finish: “To show the best possible colors, the light must be
reflected, not from a flat, opaque surface, but from a surface which hasbeneath it a depth of continuous colored particles reaching way downthrough the successive coats of varnish to the groundwork.” This deep,jewel-like surface was achieved by selecting combinations of base colorsand glazes that complemented each other. The use of colored varnishesand glaze layers to tone paint layers before varnishing was considered oneof the more subtle aspects of carriage painting and one that separatedexperienced painters from amateurs. This was an area in which thepainter’s aesthetic abilities could be highlighted. One British writer (Shinnie1902:480) complained that “the French and Americans seem to excel us inthis. They operate with great daring in the glazing of contrasts, but withbrilliant effects.” Gardner describes glazing in the following way (1885:170):
The art of giving a ground-color a different shade or richness by coating it
with a transparent glaze or thin wash. The pigment, such as carmine, ultra-
marine blue, etc. is mixed with varnish to form a sort of colored varnish, not
a solid covering, and then applied the same as varnish to a ground quite near
the color of the glaze.
While there were some minor variations from shop to shop, theindustry had fairly standardized methods for applying carriage paint. Inaddition to aesthetics, durability was a primary consideration. The finishhad to stand up to the jarring shock of cobblestone or brick city streetswithout becoming too brittle and breaking off. Finishes were also sub-jected to extremes of weather. The process was both labor and materialsintensive, involving the application of up to two dozen layers of slow-drying paint and varnish, many of which were almost completely rubbedoff again, in order to obtain a flawlessly smooth finish. Trade literaturefrom the close of the century shows that over the years the overall numberof layers decreased, in an effort to cut costs and speed up the process. Inhis book, The Carriage Painter’s Companion, Masury writes that it takes fiftydays of labor to paint a coach (1871:182). In comparison, in AutomobilePainting and Carriage and Wagon Painting, a paint sequence requiring onlyten to twelve days is described (Vanderwalker 1917:150–53). A letter to the
345
Technology and Conservation of DecorativeSurface Systems of Horse-Drawn Vehicles
Marc A. Williams, Merri M. Ferrell, and Jennifer Baker

editor in an 1880 issue of Coach Painter boasts of completing a successfulpaint job in only twenty-one days (Ferrell 1983:81). Also, most carriagepainting manuals distinguish between “heavy work,” such as coaches ordrags, and “light work,” such as buggies or sulkies, with the former requir-ing much more effort to achieve the desired finish. A direct correlation wasmade between the quantity of time it took to complete a paint job and itsquality; this was something about which many painters felt strongly, as isevident in the following quote (Masury 1881:222–23):
The case of the captive children of Israel has its parallel in the carriage-trade,
and that the carriage-painter is oftentimes required to perform a labor more
difficult of accomplishment than was required of the Jewish bondsmen by
their Egyptian taskmasters. To make sun-dried bricks without straw may, so
far as we know, be within the limit of human ingenuity; but to begin and
complete the painting and varnishing of a carriage—so as to secure the best
results as to durability—in the space of two weeks, is a feat beyond the skill
of any man who ever yet painted carriages on this mundane sphere.
By the last quarter of the nineteenth century, the commercial paint indus-try was well established, and carriage painters no longer needed to preparetheir own paints or varnishes. However, many carriage painters continuedto grind and mix their own formulas, and writers of manuals gave instruc-tions on how to do this while also promoting their favorite brands(Gardner 1875:27). It was not unusual to buy proprietary compounds andmix them together to get various formulations for ground coats, or toalter paint colors by adding dry pigments or mixing paints together. Trademanuals contained long lists of how to mix and match different colors.
To understand the process involved in painting a carriage, it isnecessary to become familiar with the materials and the terminology used.Many of the materials, such as linseed oil, are still available and require noexplanation. Other terms, such as keg-lead, are specific compounds that nolonger exist. Still other terms, such as japan or the all-encompassing var-nish, cover an entire range of mixtures that seem to be kept deliberatelyvague by manufacturers trying to keep trade secrets, as well as promotetheir range of products. In Modern Carriage and Wagon Painting (1911:23),Frederick Maire writes, “Japans do not differ much from varnishes andunder that name all kinds of liquid stuff is sold in the market which havenothing much in common but the name under which they are sold. Theformulas for making them differ so much that it is really impossible to givea clear definition of them.”
Also, different sources sometimes contradict each other as toingredients of similarly named materials. Descriptions often contain termsthat themselves are unfamiliar and go undefined. The following definitionsare found in Everybody’s Paint Book, by Franklin B. Gardner (1905:171–73):
White lead: a pigment made by subjecting the metallic lead to the fumes, or
corroding influences of vinegar, when it becomes a fine white powder. Keg-
lead, or tub-lead: white lead ground in huge mills while mixed with linseed oil.
Rough Stuff: a rough-grained paint designed to level over any hollows or
imperfections. . . . It is composed of some cheap ochre or other hard and
gritty pigment. . . . Take equal parts of dry-white lead and Grafton paint or
Materials and Terminology
346 Wil l iams, Fe r re l l , and Baker

English filling (an earth) and mix them with equal parts of rubbing varnish
and brown japan; grind loosely through the paint-mill; then thin to a working
consistency with raw linseed oil one part, turpentine two parts. Japan Drier or
Brown Japan: a drier for paints made by boiling linseed oil with substances
which give it drying properties, such as manganese, sugar of lead [lead
acetate], red-lead, litharge, etc. and adding for a body, gum shellac or inferior
varnish gums. Black Japan: a solution of asphaltum in linseed oil or varnish.
Linseed oil and lead white were probably the two most universalingredients in carriage paint. Generally, raw linseed oil was preferred overboiled, especially for foundation coats. In his paper on carriage painting,Robert Shinnie writes (1902:478), “The use of boiled linseed oil hasentirely disappeared.” Gardner emphasizes only using raw linseed whenmaking keg-lead (1875:22). In an 1880 article in The Coach Painter, “LiquidsEmployed in Painting,” the writer states (Ferrell 1983:103):
Linseed oil, which is the most common vehicle used for oil painting, is usu-
ally mixed with pigments in two forms—as raw linseed oil, and as a drying or
boiled oil. . . . Experience has taught that it is better to give to the mixture a
drying property with japan, than to boil the oil and thus increase its oxidizing
power. And we find most painters have discarded almost entirely that black
gummy material Boiled oil, from the paint bench.
By 1911, however, linseed oil is mentioned less favorably in the lit-erature. Maire (1911:23) writes, “Linseed oil is sparingly used in carriagepainting,” and that “the old adage . . . ‘oil is the life of paint’ must be for-gotten when it comes to carriage painting.” He also states that the “princi-pal and only use made of linseed oil is in the primary or foundation coats.”
The term japan was one that was frequently used for a variety ofmeanings. As one of the above definitions indicates, japan usually referredto a metallic drying agent added to paint in order speed up the oxidationof the linseed oil. But black japan refers to a varnish layer that was fre-quently applied over gilded surfaces. There are several references to theuse of asphaltum as a toning layer over gilding (Gardner 1885:35). Japanwas also used as a size for gilding. In Modern Pigments and Their Vehicles,Frederick Maire writes (1908:214), “It is a very hard matter to give a truedefinition of what is really meant by the term japan, notwithstanding thedaily use of it in the paint shop. . . . It is needless to say that japans vary asmuch in their composition as they do in their qualities.” Maire goes on togive three different definitions for japan—one as a drier, as described ear-lier, and one as an enamel that is used for baked-on finishes. The thirdclass, he writes, “which are for grinding and applying coach colors, areproperly varnishes and of such are the gold sizes and coach japans, and inreality should be classed among the medium grades of varnish.” An ad inThe Carriage Painter’s Companion (Masury 1871:14) lists “Coach Makers’Japan, For Binding and Hardening Paints,” but adds, “It is made from thefinest Shellac.” This is one of the few references to the use of shellac incarriage painting.
The term varnish is the most general of all in the carriage trade.The success of the paint job depended on a high-quality varnish job toachieve a deep, glassy surface. Much attention was paid to the quality ofvarnishes and the skill of the artisan applying it. Once again, the compo-sition and terminology are kept deliberately vague by manufacturers,
347T C D S S

although the most commonly cited ingredients are linseed oil as a binder,copal as the resin, and turpentine as a solvent. Oil-resin varnish mixtureswere by far the most popular type. One book states, “Quick drying hardvarnishes, such as used on furniture is not suited to varnishing painted sur-faces, especially if the work be exposed to the weather” (Masury 1881:181).Everybody’s Paint Book defines carriage varnish as being “made by meltingcopal gum, mixing it with linseed oil and adding a drier to it, then thinningto the proper consistency with turpentine” (Gardner 1905:174).
Most manuals and magazine articles emphasized the importanceof high-quality materials in both paints and varnishes. As one writer states,“Labor or wages bring the greater item of cost in carriage painting; it isnot affected either way by the quality of materials used. The difference, ifany, is in favour of the highest grade of goods being used. On the paintingof one carriage the difference in cost is too small to be reckoned on”(Shinnie 1902:481).
Although few carriage painters mixed their own varnishes, theywere encouraged to be knowledgeable about ingredients and manufactur-ing processes. The Hub magazine even ran a six-part series on copal, trac-ing it from its source through manufacturing. The articles suggest that theterm was used for any fossilized resin found off the coast of East Africathat was insoluble in either water or alcohol. Conversely, gums weredescribed as any water-soluble plant exudate (not fossilized); resins as anyalcohol-soluble plant exudate; and gum-resins, such as myrrh and gam-boge, as plant exudates that can only be obtained by bruising the tree. Onearticle also suggests that, while copal is the most desired ingredient forhigh-grade varnishes, using other materials, such as dammar, kauri, animé,and sandarac, was acceptable for lower grade varnishes (Houghton1871:132, 156).
Manufacturers also made a wide variety of varnishes for any con-ceivable application. Whether there were any differences inside the cans, oronly in the labels, is unknown. An advertisement for Murphy and Companyvarnish makers lists six different varnishes and one japan for finishing. Thevarnishes have names such as “wearing body,” “hard drying body,” and“elastic carriage,” each with a specialized function (Masury 1871:14).
Painters were aware of the yellowing effect of the varnish, evenwhen new, and complained that it made blues and blacks appear greenish.To reduce this effect, varnishes were also used as vehicles for pigments incarriage painting. All the layers of varnish except the last one would betoned with pigments and were referred to as coloring varnishes, which weredifferent from glazes in that they could be rubbed out between coats, andglazes could not.
One place where there was some variation in varnish ingredientswas over white paint. Although paleness in color was considered an impor-tant quality of a high-grade varnish, carriage painters complained thatwhite still turned yellow under the standard varnish. As a remedy, Gardnerrecommended substituting dammar for copal (1905:7). Sometimes whiteswere left unvarnished. Instead, the varnish was mixed into the final twocoats of paint to make it glossier, and then polished with pumice stonewhen dry (Schriber 1891:69).
Carriage painters had the same wide range of natural, commer-cial, and synthetic pigments that were available to other painters at theend of the nineteenth century. Books were divided between those thatadvised using prepared colors (frequently published by paint companies)
348 Wil l iams, Fe r re l l , and Baker

and those that recommended grinding and preparing colors from dry pig-ments, linseed oil, turpentine, japan, and varnish. In The Complete Carriageand Wagon Painter, the author, Fritz Schriber (1891:17), lists twenty-fivedifferent pigments and instructions for grinding and mixing them to makea wide range of colors. Schriber states, “Prepared paints are perhaps tosome a blessing, but he who would use economy in his own work mustsurely mix and grind his own colors.” In The Carriage Painter’s IllustratedManual (1875), Gardner also lists a sample of thirty-six pigments (in How toPaint, 1885, he lists forty-six), with directions on how to grind them in thesame manner as in Schriber’s book. Gardner also recommends the use ofprepared colors from Masury and Whiton, Globe Lead Works (1875:27),“as superior to anything else of the kind I ever tried.”
Painters were advised to know about pigments and their origins,mainly in order to be on constant guard against adulterated and impurematerials. Many of the long-established naturally derived pigments, suchas earths and lakes, continued to be popular alongside the newer syntheti-cally derived pigments (Hub 1889:352). Carmine was the most expensivepigment that was widely used by carriage painters, and because of itsprice, it was only used in glaze coats. Made from cochineal, it cost aboutUS$3.50 an ounce in the 1880s, whereas other pigments were sold by theU.S. pound, pint, or gallon, costing anywhere from $2.00 to $8.00 perpound. Consequently, other red lakes, such as Munich lake, were oftensubstituted to save money. Carmine was frequently applied over vermilionfor a deep brilliant red.
There was no uniform nomenclature for describing pigments,especially synthetic ones. An article in the Hub complains that recipescopied from English carriage publications contain color terminologyunfamiliar to Americans in the trade, such as Berlin blue, Cassel earth,and Paris red. Also, tertiary colors and tints, such as “drabs, buffs, olives,browns,” varied from one painter to the next (Hub 1888:422).
Trade magazines also had articles on how to do fancy work, suchas scrollwork, monograms and crests, gold-leaf striping, faux caning, usingtransfer ornaments, and bronze powder stenciling. Good carriage painterswere expected to be skilled in all of these techniques. Monograms andheraldry, in particular, were an area of carriage painting that became asubspecialty within the trade, and their design and layout was a favoritetopic for paint-shop columns.
One of the primary goals of a good carriage paint job was to unify anassortment of parts, made of a variety of materials by different depart-ments, into a harmonious, aesthetically pleasing unit. The body panels ofa carriage required more extensive attention than the gear of a carriage.In larger companies, the two separate components might be painted indifferent departments. Although the gear—which was always part metaland part wood—required fewer coats of paint, they also required skill andeffort to make the two different materials appear as one component and tobuild up layers on complex shapes.
There were two prevailing methods of carriage painting duringthe second half of the nineteenth century, the “old” method, which usedkeg-lead and linseed oil to fill the grain, and the “new” or “putty knife”method, which used a proprietary compound known as PWF (PermanentWood Filler or Patent Wood Filler, depending on the source), containing
Paint Stratigraphy
349T C D S S

silicate or mineral pigments in linseed oil as a thick putty. Most carriage-painting books described one or both of these methods, and there wasconstant argument in trade publications as to which was superior.Although painting guides varied somewhat in number of layers, dryingtime, or proportions, general methods and materials were fairly consistent.
The “old” method of carriage painting started with several leadcoats, five being a typical number. The first two were primers, the third a“putty” coat to fill any depressions. The coats were made up of varyingproportions of linseed oil, lead white, japan drier, turpentine, and varnish.The putty coat also contained whiting. The first coat was primarily linseedoil, which was gradually reduced as more japan drier and lead white wereadded with each successive coat. The process was similar for the body andthe gear up to this point, except that the gear was sanded, as the nextseries of coats was applied only to the body (Masury 1881:198–200).
The next several (five to seven) coats were known as the roughcoats or rough stuff. These were made of English filling (an inexpensive earthpigment such as yellow ochre), lead white, varnish, japan, linseed oil, goldsize, and turpentine. The amount of oil was reduced with each successivecoat. The final layer was known as a guide coat. A layer of yellow ochrewas mixed with japan and turpentine, applied, and allowed to dry. Thenthe entire coat was removed with pumice so any imperfections wouldshow up. These were filled and sanded. The rough coats were applied onlyto carriage bodies, not to the gear (Masury 1881:200–202).
After all of this surface preparation, the final color layers (termedcolor coats, in that period) were actually quite thin. Typically, two layers ofpaint were applied. As they became available, commercially prepared paints,with their much more finely ground pigment particles, quickly replacedhand-mixed paints. Striping coats could be applied either over or under thefinal varnish, depending on their width and color (Burgess 1881:120).
Varnishing was considered the most critical part of the carriagefinish. The body usually received five coats—four rubbing coats and a finalvarnish—and the gear received two. The rubbing coats were usually pig-mented to reduce yellowing and were rubbed out between coats.
Most of the materials used in carriage painting required very longdrying times. The lead priming coats usually required three to four daysper coat, and the remaining coats were always allowed to dry overnight, ifnot longer. This was one reason why painters were constantly looking forways to shorten the painting process.
The “new” method of carriage painting, also called the Americanmethod, differed from the above method in that the first five lead coats werereplaced with one or two coats of PWF. This was a proprietary compoundthat was sold ready-made, starting around 1867. It saved time because fewercoats were needed, and the painter did not have to spend time running itthrough the paint mill. Silica, flint, or earth pigments were substituted forlead white as the wood grain filler, although it still may have containedsome lead component. In an ad in the Hub, PWF was promoted for its “sim-plicity of application—uniformity of work. Non-injury to health, cleanli-ness, economy of time, labor and cost” (Hub 1878:313). Another ad in theHub boasted that it was safer, and prevented “painter’s colic” (Hub 1893:87).Many articles in the “Paint Shop” column of the Hub make references to thehazards of lead, indicating that workers were aware of its toxicity. Painters
350 Wil l iams, Fe r re l l , and Baker

were advised to wash their hands before eating lunch, not to eat in the paintroom, and not to wear paint-covered clothing home.
In studying the techniques of carriage painters, it is necessary to alsobecome familiar with repainting techniques. Repainting and revarnishing ofvehicles was very common, and many manufacturers did a brisk business incarriage maintenance and upkeep. Carriages could be repainted as often asonce a year, although it was probably more common to just revarnishannually and repaint after two to five years, depending on use and color.Certain colors, particularly those made with lakes, were especially fugitive.A table in The Art and Craft of Coachbuilding (Philipson 1897:148) rates thedurability of different paint colors after either two or five years. Scarlet lakeis described as “dull pinkish red,” and crimson lake is described as “almostgone.” In contrast, madder red, true Naples yellow, and artificial ultrama-rine are listed as having no change of hue.
Both magazines and trade manuals made numerous references torepainting and revarnishing. A variety of different techniques were used,depending on the degree of damage to be repaired and the customer’sbudget. A letter to the editor in the Hub asks about the best way to removevarnish without damaging the paint. The response gives three choices ofchemicals: spirits of ammonia; strong potash water or lye; or a mixtureof carbolic acid, creosote, and turpentine (Hub 1878:286). The CompleteCarriage and Wagon Painter also gives instructions on revarnishing, but rec-ommends removing the old varnish mechanically with pumice, instead ofchemically (Schriber 1891:152).
There were many ways that carriages were refinished. The mostdrastic method was to take a hot iron and burn off the old paint down tothe wood. Gardner (1875:67) recommends the use of a “furnace patentlamp” to remove old paint. The carriage was then repainted in the samemanner as new carriages. Other methods were to sand off the varnish andcolor coats, leaving the rough and primer coats; or to just sand off the var-nish, but leave the color coats, and apply new color coats and varnish.These methods were more economical for the customer. Frequently, thebody of the carriage was stripped down to the wood by either burning orsanding, but the running gear was only sanded down to the rough coatand then repainted. As time went on, less and less effort was put into sur-face preparation and repainting. A less professional repainting job wouldbe to apply just a coat of black to the entire vehicle.
A chart of sleigh repainting prices, from Brewster and Companyof New York City (1897), shows the choices available for repainting. Eightdifferent options are listed, priced according to the amount of laborrequired. The most inexpensive option ($0.25) was “blacking off” the ironwork, or repainting it black to hide the rust. Other choices listed werepaint runners and touch-up all over—$2.00; touch-up and varnish body—$3.00; japan stripe and varnish body—$5.00; recolor, japan, stripe, andvarnish body—$7.00; burn off and repaint body—$7.00; paint runners,touch-up, and varnish gear—$3.00; paint runners, recolor, stripe, and var-nish gear—$7.00; cut down, repaint, stripe, and varnish gear—$9.00. Theprices listed are for a cutter (a small sleigh), and show the amount of laborfor each operation. For larger sleighs, the prices increased accordingly.
Repainting
351T C D S S

Another chart gives prices for repainting and restriping gears. Thechoices are to “cut down” or “scrape off” the old paint, with scrapingbeing the more expensive option. Also, separate prices were given withineach of these two options as to with or without a final rubbing varnish.Brewster and Company’s “Revised Price List for Painting C.P’s. April 10,1897” lists four options. The prices, given for comparison, are for “Dragsor Perch Breaks”: new price without any striping—$35.00; repair pricewhen less rubbing coat, not striped—$31.00; paint rims, touch-up, and var-nish—$16.00; recolor; striping additional: 1 coat— $26.00, 2 coats—$28.00.The price list for the body work is similar, with an additional column for“Addl. cost burning off old bodies.”
While general painting materials and techniques were applied to a widevariety of vehicles, the examination and conservation treatment of aConcord coach (ca. 1866) provided an opportunity to examine specificmethods. In 1813, Lewis Downing moved to Concord, New Hampshire,from Lexington, Massachusetts, and began making modest buggies(Concord and gig wagons)—vehicles with no springs and the bodies fas-tened to the rear axle. In 1826, he contracted with J. Stephen Abbot ofSalem, Massachusetts, a journeyman coach-body builder, to build severalcoach bodies. These were the prototypes for what became known asConcord coaches. Their primary design feature was the use of leatherthoroughbraces as a method of suspending the body from the runninggear. This softened the ride considerably, allowing comfortable transit overquite rough roads. With the success of these vehicles, the partnership ofDowning and Abbot was formed.
In 1847, the partnership dissolved. Downing formed LewisDowning and Sons. Abbot worked alone until 1852, when he united withhis son as J. S. and E. A. Abbot. The two firms merged in 1865 as Abbot,Downing and Company. In 1873, a corporation was formed, also absorbingthe competing firm of Harvey, Morgan and Company. The new incorpo-rated name was Abbot-Downing Company. By the second quarter of thetwentieth century, pressures from both the railroad and the automobilehad greatly reduced the demand for their products, and the Abbot-Downing Company closed its doors.
The Concord coach body generally was primed in a thin leadprimer to allow penetration into the wood. This was followed after dryingwith a coat of lead primer, then with four or five coats of rough stuff. Aftersufficient drying, it was rubbed as smooth as glass with lump pumice andwater, then thoroughly washed and dried. Two coats of ground color wereapplied to this surface. A coat of quick-drying varnish was applied nextand was allowed to dry for several days. It was rubbed with groundpumice in water, and the body was ready for ornamentation.
Ornamenters were skilled painters, often filling their spare timewith the painting of portraits or landscapes for private patrons. The mostwell known was John Burgum, a young Englishman, who joined J. S. andE. A. Abbot’s shop, eventually working for Abbot, Downing and Companyafter the merger. His career lasted until the early twentieth century, and hewas responsible for factory decoration on many of the surviving Abbot-Downing coaches. As was the practice of the time, ornamenters usuallypainted only the decorative panels on the doors and on the driver’s seatriser. These were popular or unique images that could be determined by
The Concord Coach
352 Wil l iams, Fe r re l l , and Baker

the purchaser of the coach. The letterers were responsible for the scroll-work, much of which was quite ornate, as well as for striping and letter-ing. Following an appropriate drying time for the paint, one or two coatsof protective varnish were applied.2
The Museums at Stony Brook’s collection of 250 carriages includes fivevehicles made by Abbot, Downing and Company: a Standhope gig; a Hackpassenger wagon; a twelve-passenger coach and companion mountainwagon; and a nine-passenger Concord coach, which underwent conserva-tion treatment (Fig. 1). Because of their famed strength and durability,Concord coaches were a primary means of most public overland travelprior to the advent of an extended railroad system. Following the comple-tion of the transcontinental railroad and the more prevalent use of the railsystem as a means of long-distance travel, the ubiquitous Concord coachwas utilized again for short-distance transportation by commercial lines toservice hotels, towns, and areas not accessible by rail.
Perhaps more than any other vehicle type, the Concord coachholds a special place in the collective American experience. Although theywere made in New Hampshire and used throughout the United States,South America, Australia, and other regions requiring rugged overlandtransport, they are most closely associated with the romance of theAmerican West. However, Concord coaches in original, historical condi-tion are increasingly rare. Because of their romantic appeal, they havebeen collected and restored to suit individual tastes without strict respectfor authenticity. Many eastern coaches have been repainted and remodeledto conform to a western prototype, and their history and integrity as arti-facts have been permanently altered or distorted. Alarming numbers ofhistoric vehicles were destroyed from overuse for television and movieproductions of Westerns.
The Museums’ Concord coach was donated by Webster Knight IIin 1962. Its serial number, 124, corresponds to the Abbot-DowningCompany order book (1866)3 that records the following description:
Stony Brook’sConcord Coach
353T C D S S
Figure 1
Overall view of the Museums at Stony
Brook’s Concord coach before treatment,
proper left side.

One Nine Passenger Stage Coach 3 seats inside 3 on a seat middle seat
3 fold. . . . Paint Body Green Carriage Straw Letter “Allen House” (on Top
Rail) “Sam Allen & Son” (on false sill to foot board) Neat orniment on Door &
Foot board panel No border but striped. Same as City Coach Lined Russet
Lea(ther) Lined. Damask head & fringe En. lea(ther) Curtains Damask lined
Leather apron. Top and Rack Canvas. Done sure (completed) June 1st 1866”
The coach was used by Charles E. Fuller, who worked as a stagedriver from 1865 to 1882 for the Fall River Stage Line and Pauldings’Express, both of which were based in New Bedford, Massachusetts.Between 1883 and 1901, Fuller was the proprietor of the MattapoisettStage Line, also in New Bedford. It is believed that during this time period,the coach was acquired secondhand by Fuller, and the body was repaintedits current straw color. This was enhanced on the body panels by broadstriping of black and Indian red. Finer striping of green and red traced thebroader striping. The paintings on the door panels depicted a lighthouseand a seascape on one door and a stagecoach under attack by Indians onthe other. This ornamental painted surface is typical of the artistry appliedto coaches and other public or commercial vehicles.
Unfortunately, the Museums’ coach had suffered from outdoorexposure, most likely during a time of abandonment when the importanceof such vehicles as cultural artifacts had not yet been recognized. The coachunderwent conservation treatment between 1991 and 1993 at the Fremont,New Hampshire, studio of American Conservation Consortium, Ltd.
A primary concern in the conservation treatment of a horse-drawn vehi-cle is the determination of the historic presentation surface. Does theoriginal painted surface survive? Do later paint schemes relate to the his-toric period of use? Is relatively recent repainting important or significant?Ideally, these sorts of determinations are made by the curator, if thevehicle is owned by a museum, after reviewing the results of analysis andtesting. However, if the vehicle is privately owned, the conservator oftenmust function in a quasi-curatorial role, attempting to guide the prefer-ences of the owner toward a responsible choice.
Once a determination of the historic significance of each paintscheme is made, the condition of each of these layers can have an impor-tant contribution to the design of a treatment. A later repainting thatremains in good condition may be preferred as the aftertreatment presen-tation surface. Remember, the vehicle was repainted for a reason. Often,this was due to degradation of the earlier layers. In addition, earlier layersmay have been damaged in the surface preparation for the newer paint. Ofcourse, exposing an earlier layer will require destruction of the later, butstill historically important, paint.
A final consideration is the technical feasibility of removing laterlayers from earlier ones. Often, the materials used are very similar in theircomposition. Separating a more recent sandarac-based paint layer, forexample, from a similar earlier one can be extremely tedious and prohibi-tively expensive, or even technically impossible. Since the vast majority ofsurviving horse-drawn vehicles dates from after 1850, the diversity ofmaterials used in their decoration leads to equally diverse conservationchallenges.
General ConservationConcerns
354 Wil l iams, Fe r re l l , and Baker

The Museums at Stony Brook’s Concord coach presented many of thesechallenges. While the coach was in rather good structural condition, itssurfaces were both degraded and complex. To the eye, it appeared thattwo complete paint schemes survived from the period of use. There werealso several repaintings of specific areas that were of uncertain time peri-ods. Paint crazing, cleavage, and loss were extensive, particularly on therunning gear. The surface varnish layers were embrittled, discolored, andfriable, lending the coach body an uneven orangy appearance. Was thiscolor due to the effect of aging of the coatings or did it represent an inten-tional coloration or glazing by the painter?
To assist the curator and the conservator in understanding the his-tory and sequencing of the layers, as well as to provide technical insightsinto the painting materials, seven small paint samples were taken formicroscopic examination. The samples were taken at the edges of existinglosses to minimize the aesthetic impact. They were mounted in resincubes, polished, and examined by means of fluorescence microscopy byRichard Wolbers.4
Photomicrographs and a report of the analysis permittedseveral significant determinations to be made. They confirmed that thebody of the coach had been painted twice during the period of its historicuse. Primer layers were inconsistent from one sample to another, butthey appeared to be black over blue over light red. This concurred withthe shop tradition of using as a primer whatever color was left overfrom another job. The earliest body color was a dark (almost black)green. This corresponded to the description of the coach in the Abbot-Downing order book when it left the factory. On top of this green weresix varnish layers, each with characteristic weathering fissures andentrapped dirt, indicating that they each had been separated by an inter-val of time. A thick layer of straw-colored body paint was found directlyover the sixth layer of varnish, and it had penetrated into the fissures. Sixmore weathered varnish layers were applied over the straw-colored paint.There was no evidence of revarnishings or repaintings after the periodof use (Fig. 2).
The cross sections revealed that the six most recent varnish layersover the straw-colored paint did not contain pigments or other colorants.Therefore, it was concluded that the orangy color was due to weathering,aging, and discoloration of the varnish layers, and that it was not intendedby the coach painter. The nature of the varnish layers and the nature ofthe striping were very similar, both identified as natural plant resins in thecross sections.
Three of the samples related to specific areas of the coach body.The sample taken from the green border of the seascape medallion on thecentral panel of the door shown in Figure 1 indicated that the medallionwas painted on top of five of the varnish layers over the straw-coloredpaint. The sixth varnish layer was applied over the medallion, indicatingthat the medallion was added near the end of the period of use of thecoach. It also indicated that special care needed to be taken around themedallions during treatment, as any solvent that would remove the var-nish layers would also remove the paintings on top of the varnish. While asample was not taken from the stagecoach medallion, it appeared to havebeen applied at the same time and in the same manner as the seascapemedallion.
Conservation Treatment
355T C D S S
Figure 2
Schematic diagram of cross section viewed in
UV light, from an area of red striping on the
Stony Brook Concord coach. Note the origi-
nal paint on the bottom, with six weathered
varnish layers over it, then the thick straw-
colored paint, over which are the striping and
six more weathered varnish layers.

Visual examination in combination with the cross section fromthe driver’s seat riser showed a gray primer beneath dark green paint thatwas consistent in color with the rest of the body. On top of the greenpaint was a slightly transparent red paint that appeared to be in a varnishmedium. An eagle was painted over the red layer at the center of thepanel. Two orangy varnish layers were applied over the red paint andeagle. Visual observation showed three faint striping lines around theperimeter of the riser panels. These were on top of the dark green paintlayer but beneath the red layer. All of the layers on the riser appeared todate from the historic period of use. However, it was not possible to deter-mine exactly when the red paint was applied. It was clear that it did notexist at the time of manufacture, since it obscured the original green paintand striping.
The sample from the top frieze lettering, “
,” showed multiple layers of paint, indicating that the names hadbeen repainted a number of times. Colors included yellows, reds, blacks,blue-greens, and whites. It was not possible to establish a comprehensiblesequence of lettering and backgrounds from the sample.
The cross section taken from a wheel spoke on the proper rightside indicated that eight straw-colored paint layers existed. While therewere some slight variations of the shade of straw, this represented a con-scious attempt to maintain the same running-gear color throughout time.Each of these layers had its own unique striping pattern, both in designand color, varying primarily from brown to black. One to three weatheredvarnish layers were over each paint layer, all appearing to belong to thehistoric period of use. Losses in the paint layers penetrated to differentdepths, and each subsequent repainting flowed into these losses. Thiscreated its own set of treatment concerns.
The information gathered from the paint samples suggested sev-eral general treatment approaches that were discussed by the curator andthe conservator. A primary consideration in the treatment of the coachwas the discovery, interpretation, and presentation of the various painthistories. Since all of these dated from the period of historic use of thecoach, all had valid historic integrity. Unfortunately, it was not technicallypossible to reveal earlier decorative surfaces without destroying the lateroverlying paint. This paradox is common to many horse-drawn vehicles, aswell as to other painted decorative objects. The history of changes in dec-orative preferences throughout time can be, in itself, as significant as theoriginal appearance of an object.
Several potential solutions existed for the coach. First, it couldhave been stabilized only and preserved in its pretreatment condition; how-ever, the existing mottled orange color was created only by the discoloredvarnish over the straw-colored paint. This was not an intentional effect,and it greatly distorted the appearance of the coach as it had been whenowned and used by a known historic figure, Charles E. Fuller. A secondoption was to return the coach as closely as possible to its appearancewhen used by Fuller. This would have required removal of the degradedupper varnish layers and inpainting of losses into lower layers to fully re-create the straw-colored paint scheme. A third choice was removal of allof the six upper varnish layers, the straw-colored paint and the six lowervarnish layers to reveal the original dark green paint on the body—a solu-tion that appeared to be technically feasible. However, the straw-coloredpaint corresponded to ownership and use of the coach by Fuller; this layer
356 Wil l iams, Fe r re l l , and Baker

was in relatively good condition, and the overall condition of the lowergreen layer was unknown. Although the coach could have been photo-graphed before treatment in extreme detail, this approach would havedestroyed the straw-colored paint history. A fourth option that fell midwaybetween the latter two was to preserve the straw-colored paint on one sideand expose the green paint on the other side. A partial history of thestraw-colored paint would have been preserved, but the coach as a wholemay have appeared disjointed, and this option would clearly have been inac-curate as a representation of the coach’s actual appearance when in use.
The approach that was chosen was a variation on the secondoption. The later degraded varnish layers were removed. Areas of naturalwear were preserved, however, complete with naturally revealed earlierdecorative paint. In addition, several “windows” were opened into earlierlayers at appropriate locations, while still preserving the overall unifiedappearance of a straw-colored coach.
The first treatment step taken after analysis and photography ofthe coach was the setting down of loose and lifted paint. On the runninggear, this was done with dilute, hot hide glue brushed around the entirecircumference of loose areas and losses with an artist’s brush. This waschosen because the paint layers in composite were quite thick and stiff,and a strong adhesive was needed. Loose paint on the body was reattachedwith Acryloid B72 (approximately 20% in toluene). B72 was selected dueto its reversibility, stability, thermoplasticity, and workability. Where neces-sary, lifted paint was set down with gentle pressure from a heated spatulaand tacking iron. However, many of the lifted areas of paint overlappedneighboring paint due to shrinkage of the wood beneath it. It was not pos-sible to return paint in such situations back to plane. This was most preva-lent on the wheel spokes.
With the painted surfaces stabilized, the next treatment step wasthe removal of the six degraded varnish layers over the straw-colored bodypaint. These natural plant resins were soluble in many organic solvents,including denatured alcohol and acetone, as well as abietic acid soap. Thisimplied that they were rather pure resins without the addition of poten-tially cross-linking components, such as oils. Unfortunately, while the var-nish was readily soluble, the varnish layers beneath the straw-colored paintwere equally as easily dissolved. As the solvent reached the straw-coloredpaint surface, it penetrated to the underlying varnish through the exten-sive cracks and crazing in the paint, removing the straw-colored paint atthe crack edges. Even the use of gelled solvents did not prevent this prob-lem. A second concern was that the narrow red and green striping on topof the straw-colored paint was executed using a similar varnish-basedmedium. As the surface of the straw-colored paint was reached, the strip-ing was in danger of being dissolved along with the overlying varnish.
Initially, alternating applications of denatured alcohol and acetoneon cotton pads and swabs were used to remove the body coating. Thisproved to be less than satisfactory, however, as the length of time the sol-vent needed to remain on the surface to dissolve all six varnish layers alsocaused a slight softening of the varnish beneath the straw-colored paint,with subsequent paint loss. The only alternative was to leave part of thediscolored varnish in place over the straw-colored paint. This resulted in a perceptibly mottled color due to varying varnish thickness. Theappearance was judged to be acceptable by the curator but was not ideal.Continued experimentation indicated that better results could be obtained
357T C D S S

with a more aggressive solvent that removed the varnish much morequickly. Thus, less manipulation of the surfaces was required and the sol-vent was in contact with the surfaces for a much shorter time. Use of anaggressive solvent allowed more complete removal of the varnish layerswith less disruption through the crazing. The solvent n,n-dimethyl-formamide (DMF) proved to be highly effective and was used for varnishremoval on the coach body.5 Varnish layers on the narrow horizontal panelbelow the rear window on the proper left side were not removed but wereallowed to remain undisturbed as a record of the pretreatment conditionof the coach (Fig. 3).
Since the red and green striping on the body panels had beenapplied in a varnish medium similar to the varnish layers that wereremoved, special care was required. A band of varnish on and around thestriping was left undisturbed during the overall varnish removal with DMF.Varnish was removed extremely carefully from the striping with denaturedalcohol on swabs. Residual varnish was left in place rather than risk loss ofthe striping by attempting to remove all of the varnish. The color shiftcaused by the remaining varnish was unobtrusive. This process wasextremely tedious and delicate but was successful in preserving the strip-ing, while also creating a harmonious appearance of the coach body.
The painted medallions on the door panels had been applied ontop of five of the six varnish layers. Therefore, a border of about half acentimeter of varnish was allowed to remain around the medallions. Thiswas done to prevent solvent from softening the varnish beneath the paintdue to capillary action, which would cause paint loss. The final border ofdiscolored varnish around the panels was removed mechanically with ascalpel. The presence of the five layers of discolored orange varnishbeneath the medallions somewhat distorted the paint colors, especially inareas of crazing. Fortunately, the distortion was very minor and was visu-ally acceptable, as there was no known method of treatment to remedythis problem.
Tests of varnish removal on the running gear were not successful.Processes that removed the darkened varnish layers also removed the strip-ing. This was due in many areas to the presence of striping on top of the
358 Wil l iams, Fe r re l l , and Baker
Figure 3
Detail of the proper left rear of the coach
after treatment. The degraded varnish was
left intact on the narrow panel. Also, a small
“window” was opened to the earliest dark
green paint layer.

varnish. Another contributing factor was the numerous layers that wereconcurrently exposed, allowing solvents to work on lower, exposed varnishlayers and removing paint above them. For these reasons, the varnish lay-ers were left intact on the running gear. The relatively undistorted straw-colored paint color, due to fewer varnish layers on the running gear,harmonized with the body color of the coach after its varnish wasremoved. Running gear surfaces were cleaned with distilled water on cot-ton pads and swabs. This was chosen in preference to a detergent becauseit would not leave behind any residue that required rinsing. The uneven-ness of the surfaces would have made rinsing detergent residues verydifficult. In addition, tests indicated that cleaning with distilled water alonewas as effective as cleaning with a detergent. The varnish was removedwith DMF in limited areas where the varnish layers were thicker andcreated darker orange discolorations.
Two coats of B72 in toluene (approximately 20%) were brushedonto the painted surfaces of the body and running gear. These served asan isolating barrier to separate inpainting and later protective varnishesfrom the original surfaces. In addition, it consolidated areas that sufferedfrom fine crazing and potential paint insecurity. B72 was chosen not onlyfor its well-known properties of reversibility and stability but also becauseit was insoluble in mineral spirits—the intended solvent for the protectivevarnish to be applied in a later treatment step.
Paint losses were inpainted with artists’ acrylics by NancyGarrison, a decorative painting specialist. These totaled thousands ofareas. After the approximate base color was applied, each area was tonedindividually to harmonize with the subtle nuances of color surroundingit. This was particularly complex on the running gear, where previouslosses and repaintings to both the paint and varnish layers had created amultitude of shades. As requested by the curator, lower decorative paintthat showed through, including striping, was not inpainted. This created aslight patchwork effect, but allowed a glimpse into earlier paint histories.In addition, areas of natural wear from use were not inpainted.
As a final protective coating on all painted surfaces, two coats ofAcryloid B67 (approximately 20% in mineral spirits) were brushed on. B67was chosen specifically to provide a solubility that was different from theB72, thus allowing for its future removal, while leaving the B72 undis-turbed. In addition to protecting from dust and dirt, this coating opticallysaturated the paint colors of both the original paint and the inpaint. Itcreated a gloss that approached the original level, although the effects ofcrazing and losses of the paint resulted in a surface that was less smoothand probably less glossy than a factory finish. Since the coach was now amuseum artifact that reflected both its previous use and the passage oftime, this was an appropriate presentation appearance.
Several “windows” were opened at strategic locations on thecoach. On the proper right side, a “window” exposed the lower layers ofthe frieze between the letters W and B of “ .” The mostrecent lettering was light yellow on a darkish red background. Beneaththis could be seen the ghosted image of a previous application of “
” in a slightly different location. Removal of the latest paintrevealed a bright orange-yellow letter on a black background. Furtherremoval showed a lower layer of a straw-colored letter on a darkish redbackground. It was not possible to determine which letters were present,as only a small area was visible.
359T C D S S

A small square “window” was opened with denatured alcoholthrough the straw-colored paint and underlying varnish layers to the darkgreen paint on the narrow panel beneath the rear window of the properleft side, which had had its varnish layers left intact. The green paint washeavily weathered, with straw-colored paint in the network of weatheringfissures (Fig. 3). Although it could not be confirmed that the paint over allthe surfaces was in the same condition, this discovery supported the deci-sion not to remove the straw-colored paint in an attempt to return thecoach to its earliest appearance.
The window units in the doors of the coach had ghosted pinstrip-ing beneath a black surface paint. In areas of wear, it was apparent that theoriginal dark green paint was present beneath the later black paint. Theblack paint was removed from the outside of the proper right window.The revealed off-white striping was in good condition. Also discovered wasbroader black striping around the perimeter of the door, as well as aroundthe perimeter of the panel. This was in subtle contrast to the dark greenbackground.
A “window” was opened on the proper left driver’s seat riser toreveal a complete pattern of the lower dark green paint with striping(Fig. 4). The newly visible paint was in surprisingly good condition. Thecentral of the three striping lines was a red color, with the outer lineswhite. During examination of the seat riser for treatment, a barely per-ceptible raised image of “.. .” was discovered on the bottom ofboth sides of the seat riser beneath black paint. The black paint wasremoved to reveal yellow letters on a dark green background. Beneaththe current “.. .” was a ghosted image of an even earlier version ofthe same lettering.
The upper paint layers on the running gear were removed on thetwo rear panels flanking the center of the rear axle (Fig. 5). The proper leftpanel showed the second most recent paint sequence and was marked witha small “2” in artists’ acrylics. The top of the proper right panel was thepaint on the third level beneath the surface (“3”), and the bottom of thispanel was the fourth level (“4”).
360 Wil l iams, Fe r re l l , and Baker
Figure 4
Detail of the proper left driver’s seat riser
after treatment. The lettering “.. .” was
discovered beneath black paint. In the lower
right corner, the red varnish-based paint was
removed to show the original dark green
paint and striping.
Figure 5
“Windows” were opened into the second,
third, and fourth paint layers from the top on
the rear axle, revealing their unique striping
patterns.

The conservation treatment of the Concord coach was successful in meet-ing its objectives. The surfaces of the coach were stabilized, a more accu-rate historic presentation appearance was provided, information aboutprevious surface histories was gathered, and glimpses of the earlier deco-rative paint schemes were revealed (Fig. 6). The success was a result ofeffective communication between the conservator and the curator.Analysis and testing provided information on which decisions could bebased. In addition, unexpected discoveries were made, which required fur-ther discussion and the choosing of alternatives. Rather than an exception,this experience appears to be common in the treatment of horse-drawnvehicles. The diversity of materials used and the varying repaintings andpretreatment conditions of such vehicles create an endless range of treat-ment needs and options, which is responsible for both the anguish and thejoy of working on these unique cultural artifacts.
Funding for the conservation treatment of the Concord coach was madepossible by a Conservation Project Support Grant from the Institute ofMuseum Services (a federal agency), and contributions from Mrs. J. CecilFerguson, Mrs. F. Henry Berlin, Leighton H. Coleman, John E. Day, theConcord Coach Society, and American Conservation Consortium.
1 The majority of the reference books for this article are from the Carriage Reference Library at
the Museums at Stony Brook.
2 Much of the information for this section was taken from the writings of Edwin Burgum, the
son of the ornamenter. New Hampshire Historical Society, Archives and Manuscripts, Burgum
Papers, ca. 1939.
3 The authors are indebted to Jim Wilke for providing this information.
4 Richard Wolbers, 4 Furness Lane, Wallingford, PA 19086. Wolbers is one of the pioneers of
selective staining of paint/varnish cross sections to allow not only for determination of
stratigraphy, but also for gross material characterization.
5 DMF and most other organic solvents are toxic. Appropriate safety precautions should be
used, including ventilation, respirators, and gloves.
Notes
Acknowledgments
Conclusion
361T C D S S
Figure 6
Overall view of the coach after treatment,
proper right side.

Acryloid B67 and Acryloid B72, Rohm and Haas Co., Independence Mall Street,
Philadelphia, PA 19105.
Abbot-Downing Company
1866 Order books, 1858–1902, 1 June 1866. New Hampshire Historical Society, Archives and
Manuscript Division, 30 Park Street, Concord, New Hampshire.
Brewster and Company
1897 Painting prices—1897. Brewster and Company inventory, Rare Books and Manuscripts
Division, New York Public Library, New York.
Burgess, J. W.
1881 A Practical Treatise on Coach Building. London: Crosby Lockwood.
Ferrell, Merri M., ed.
1983 The Coach Painter 1880. New York: New York Exposition Press.
Gardner, Franklin B.
1875 The Carriage Painter’s Illustrated Manual. New York: S. R. Wells.
1885 How to Paint. New York: Fowler and Wells.
1905 Everybody’s Paint Book. New York: M. T. Richardson.
Houghton, George W. W.
1871 Gum copal. The Hub 13.
Hub, The
1878 The perishing of varnish. The Hub 20(September).
1888 Color nomenclature. The Hub 30(September).
1889 Three sources of beautiful colors. The Hub 31(August).
1893 The Hub 35( June).
Maire, Frederick
1908 Modern Pigments and Their Vehicles. New York: John Wiley and Sons.
1911 Modern Carriage and Wagon Painting. Chicago: Frederick Drake.
Masury, John W.
1871 The Carriage Painter’s Companion. New York: John W. Masury.
1881 House-Painting, Carriage-Painting and Graining. New York: D. Appleton.
Philipson, John
1897 The Art and Craft of Coachbuilding. London: George Bell and Sons.
Schriber, Fritz
1891 The Complete Carriage and Wagon Painter. New York: M. T. Richardson.
Shinnie, Robert
1902 1896 carriage painting. Papers Read before the Institute of British Carriage Manufacturers,
1883–1901. Aspley Guise, England: Dowager Press.
Vanderwalker, F. N.
1917 Automobile Painting and Carriage and Wagon Painting. Chicago: Frederick J. Drake.
References
Materials and Suppliers
362 Wil l iams, Fe r re l l , and Baker

T , an omnibus 7 m long, was also called abarge because of its size (Fig. 1). The largest vehicle of this type,the Pride of the Nation, was 11 m long. These types of public
conveyances were used in urban and resort areas in the United States totransport large numbers of people and were decorated profusely withornamental, painted motifs, such as landscapes, scrollwork, striping, andother popular pictorial motifs. It was a common practice to name vehiclesused for public transportation; similar vehicles included the Concordia,the Pride of the Nation, and the Hiawatha. The Grace Darling was namedafter an English lighthouse keeper’s daughter who was instrumental inthe 1838 rescue of survivors of the shipwrecked Forfarshire. Grace becamea national heroine in England. Her fame precipitated many forms of com-memoration—from poetry to pottery—and her name was applied tosteamships, locomotives, and horse-drawn carriages.
The Grace Darling was built around 1880 by the Concord CarriageCompany, a carriage-making firm that occupied the old state prison shopsin Concord, New Hampshire. The firm was listed in The Leading BusinessMen of Concord as the manufacturer of “Heavy Trucks, Wagons, Caravans,
363
The Importance of Conservation to Research: A Case Study
Merri M. Ferrell
Figure 1
Overall view of the omnibus Grace Darling,
built ca. 1880 by the Concord Carriage
Company, Concord, N.H.
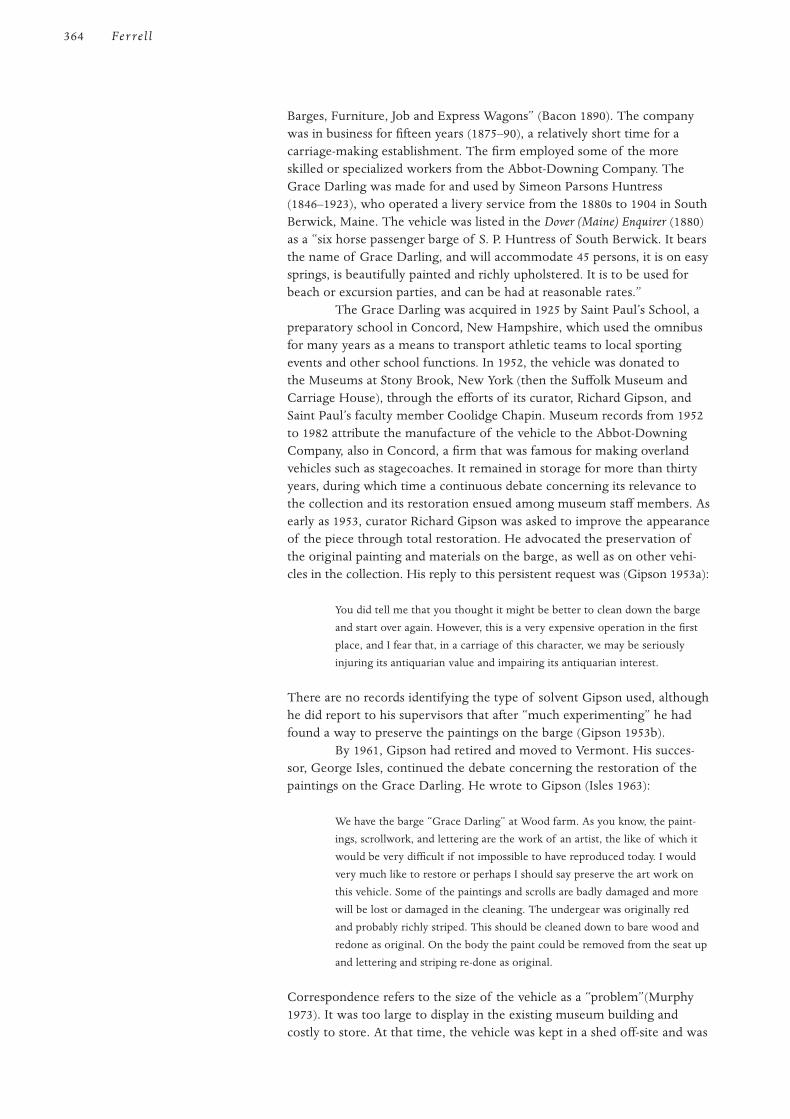
Barges, Furniture, Job and Express Wagons” (Bacon 1890). The companywas in business for fifteen years (1875–90), a relatively short time for acarriage-making establishment. The firm employed some of the moreskilled or specialized workers from the Abbot-Downing Company. TheGrace Darling was made for and used by Simeon Parsons Huntress(1846–1923), who operated a livery service from the 1880s to 1904 in SouthBerwick, Maine. The vehicle was listed in the Dover (Maine) Enquirer (1880)as a “six horse passenger barge of S. P. Huntress of South Berwick. It bearsthe name of Grace Darling, and will accommodate 45 persons, it is on easysprings, is beautifully painted and richly upholstered. It is to be used forbeach or excursion parties, and can be had at reasonable rates.”
The Grace Darling was acquired in 1925 by Saint Paul’s School, apreparatory school in Concord, New Hampshire, which used the omnibusfor many years as a means to transport athletic teams to local sportingevents and other school functions. In 1952, the vehicle was donated tothe Museums at Stony Brook, New York (then the Suffolk Museum andCarriage House), through the efforts of its curator, Richard Gipson, andSaint Paul’s faculty member Coolidge Chapin. Museum records from 1952to 1982 attribute the manufacture of the vehicle to the Abbot-DowningCompany, also in Concord, a firm that was famous for making overlandvehicles such as stagecoaches. It remained in storage for more than thirtyyears, during which time a continuous debate concerning its relevance tothe collection and its restoration ensued among museum staff members. Asearly as 1953, curator Richard Gipson was asked to improve the appearanceof the piece through total restoration. He advocated the preservation ofthe original painting and materials on the barge, as well as on other vehi-cles in the collection. His reply to this persistent request was (Gipson 1953a):
You did tell me that you thought it might be better to clean down the barge
and start over again. However, this is a very expensive operation in the first
place, and I fear that, in a carriage of this character, we may be seriously
injuring its antiquarian value and impairing its antiquarian interest.
There are no records identifying the type of solvent Gipson used, althoughhe did report to his supervisors that after “much experimenting” he hadfound a way to preserve the paintings on the barge (Gipson 1953b).
By 1961, Gipson had retired and moved to Vermont. His succes-sor, George Isles, continued the debate concerning the restoration of thepaintings on the Grace Darling. He wrote to Gipson (Isles 1963):
We have the barge “Grace Darling” at Wood farm. As you know, the paint-
ings, scrollwork, and lettering are the work of an artist, the like of which it
would be very difficult if not impossible to have reproduced today. I would
very much like to restore or perhaps I should say preserve the art work on
this vehicle. Some of the paintings and scrolls are badly damaged and more
will be lost or damaged in the cleaning. The undergear was originally red
and probably richly striped. This should be cleaned down to bare wood and
redone as original. On the body the paint could be removed from the seat up
and lettering and striping re-done as original.
Correspondence refers to the size of the vehicle as a “problem”(Murphy1973). It was too large to display in the existing museum building andcostly to store. At that time, the vehicle was kept in a shed off-site and was
364 Fer re l l

eventually moved to renovated lumber sheds that were adapted in 1976 aspermanent on-site storage for the carriage collection.
In 1982, a committee of consultants was engaged to evaluate thescope and content of the carriage collection as part of a five-year planassociated with developing interpretive exhibitions for a new carriagemuseum. In keeping with a growing trend in the museum profession, theretention of only “typical” artifacts that reflected “normative patterns ofownership and use” was advised. Curatorial opinion was based on collec-tions’ survival, as well as on the preservation of documents referring tothe production and use of a class of objects, without considering earlierprejudices that may have led to the wholesale disposal of a quantity ofsimilar objects that would posit the few existing artifacts in a classificationdeemed “typical.” The mere size of the Grace Darling, as well as its pro-fuse ornamentation, seemed extraordinary and atypical; a recommenda-tion followed to dispose of the vehicle. The recommendation was notfollowed, and research was conducted to justify retaining this type of vehi-cle. The research revealed that thousands of these types of vehicles weremade and used for public transportation, but as their usefulness abated,the desire and means to retain them and the respect for them as artifactsdiminished. The size of these objects—and particularly the expense andthe amount of space required to store them—as well as their obsolescenceand their demoted status as useless nonart, contributed to their destruc-tion. The famous Pride of the Nation, made by John Stephenson, washitched to a tractor during the 1920s and pulled around the country as atype of sideshow object until it eventually disintegrated. Another example,the Maplewood, had its pillars and roof sawed off to fit it through a lowdoorway in a storage facility. Many other carriages either were left outsideto disintegrate or were simply destroyed. This type of object thus becamerare not because few were made but because so many were destroyed, andthe records of the industry documenting their manufacture and use werediscarded or lost. The dearth of these types of artifacts and their societaland technical function also have been misinterpreted, thus furtherinfluencing institutional commitment to acquisition and preservation.
Through research, the Grace Darling was identified as a significant vehicletype, and this influenced the decision to place it prominently in the newcarriage museum. To prepare the vehicle for exhibition and to improve itsappearance, it was decided that it should be conserved. The conservationof the Grace Darling was a departure from the more common practiceof restoration. The term restoration, when used by carriage collectors orrestorers, means the removal of original materials and the replacementof those materials with modern equivalents. This practice, whether bydefault or intention, results in a series of compromises based on the avail-ability of materials and the interpretation of fabrication methods, as wellas the application of these components to specific vehicles. The professionof carriage restoration is crowded with amateurs ill-equipped to interpretthe objects they restore. If carriages were simply constructed craft objectsmanufactured by hand, the reproduction of parts and materials would berelatively easy to accomplish. Carriages were, however, complex, compos-ite objects created by an industry composed of subdivided labor and sub-industries that supplied the primary industry with metal and wood parts,fittings, textiles, and other materials. The majority of horse-drawn vehicles
Advocacy for ConservingHorse-Drawn Vehicles
365I C R

in American museums today were made and used during the last half ofthe nineteenth century. They were manufactured in factories, and thespecialized machinery and conditions of manufacture are difficult, if notimpossible, to reproduce. The woodworking machinery used for the bodyand undercarriage, the large Jacquard looms used for weaving thousandsof yards of coach lace, and the mass production techniques and patternsfor the manufacture of malleable cast iron parts are no longer available.Because the primary industry is no longer viable, the multiple sub-industries that produced the auxiliary products were also phased out.Restorers are challenged to find compatible materials and to interpret theexisting materials on their vehicles. It is typical for the silhouette to bepreserved but for the original materials to be destroyed. By subtractingconstruction details and original materials from the general body ofpreserved material available for study, the restorer robs the vehicles ofsignificant historical content, diverse expression, original aesthetic inten-tion, and mechanical ingenuity. Unfortunately, third- and fourth-generationrestorations have become the standard by which the authenticity of horse-drawn vehicles in original condition are measured.
Vehicles in original condition speak volumes about the technicaland aesthetic details expressed by carriage manufacture. The details thatare preserved reveal much about their fabrication, as well as the tastes ofthe designer, finisher, or owner. Carriages, like other objects that representthe material culture of a particular period, offer complex information onthe general aesthetic of the people who made and used them. The types ofmaterials—from textiles to interior fittings—that were used in constructingan individual carriage are part of its aesthetic. Carriage painting, rangingfrom simple color application and striping to complete pictorial programsand gold-leaf scrollwork, was an important aspect of the trade. Paintingprotected the wood and metal structure and unified or emphasized thevarious parts and materials, giving the vehicle its overall aesthetic charac-ter. As recorded in the Henry Baird publication The Painter, Gilder, andVarnisher’s Companion (1870:20), “in ornamenting and striping a carriage, itrequires considerable taste and judgment . . . to preserve and show in themost graceful manner the workmanship of the builder.”
Carriage painting was a specialized skill and an integral part ofthe larger system of carriage manufacturing. Prospective painters enteredthe trade as apprentices and became familiar with their materials throughthe repetition of rigorous tasks, such as grinding pigments, preparingsurfaces, and applying and rubbing down successive coats of varnish.Additional instruction in the trade was available through technical schoolsand numerous instruction manuals and periodicals that were published forthe industry. Instruction could vary from practical topics—such as recipesfor “rough stuff” or filler, or processes for applying color and varnishcoats—to advice on how to keep the painted surface glossy and smooth.Aesthetic instruction was available in written descriptions, accompanied byprinted images, of an array of decorative devices that offered painters arich vocabulary of ornamentation to apply to sleighs, wagons, and com-mercial and public vehicles.
Nineteenth-century carriage ornamentation was as varied and aseclectic as decorative arts. In particular, commercial vehicles were elabo-rately decorated in order to satisfy their dual function as mobile advertise-ment and conveyor of goods and services. One author (Hillick 1906:109)wrote that painting trade vehicles was
366 Fer re l l

a limitless art, resourceful, restive, responsible to an admirable degree to the
ever-varying side lights of technical skill. All that art can be anywhere the
broad surface of the modern business vehicle invitingly offers to display. Its
worth as an advertising medium, as an agency through which business stabil-
ity and enterprise may be widely heralded, has been fully learned. Thus the
evolution of the present elaborately painted and decorated business wagon
has come about.
Vehicles were decorated with simple or elaborate designs, striping, andborders in various styles: letters; numbers; faux finishes imitating caning,wood, or plaids; landscapes, people and animals. Within the profession ofcarriage painting, the ornamental painter was the highest paid and mostrespected because of the skill and specialization of his trade, and commer-cial vehicles offered the best opportunity to show the painter’s artistic abil-ities. In describing the requisites of the commercial vehicle or “wagon”painter, M. C. Hillick (1906:110) wrote,
He must know well how to build a beautiful and durable surface. He should
be a first-class colorist, understanding all the features of color mixing and
fully conversant with the lays of harmony and contrast. He will likewise find
it necessary to be an unexcelled master of the varnish brush, a skilled striper,
wagon letterer, and decorative painter of established ability.
Unfortunately, because of contemporary attitudes about horse-drawnvehicles—which are influenced by factors such as size, obsolescence, orutilitarianism—examples of carriage painting have perished due to neglector to total restoration. The artistry of the decorative surface of the GraceDarling omnibus had been acknowledged since the Dover Enquirer firstrecorded its service in 1880, but total restoration had been considerednumerous times since the acquisition by the Museums at Stony Brook.
The Grace Darling omnibus was structurally sound and did not requirephysical stabilization. However, much of the detail of the paintings wasobscured by layers of the historic varnish and successive layers of variouscoatings and dirt that had accumulated for decades. The first challenge ofthe project involved finding a conservator who would work on an objectof this type. The size of the vehicle required conservators to work on-sitein less than ideal conditions in a storage shed. Numerous interviews withpainting and objects conservators were conducted before a professionalconservator willing to work on the Grace Darling was secured. All candi-dates supported the project in theory, but were unwilling to undertake thework. In 1983, the Museums at Stony Brook contracted with Fine ObjectsConservation—a group of conservators and assistants supervised by LindaMerk-Gould—to perform the work. The first step of treatment was toidentify a solvent or combination of solvents to remove the accumulatedlayers of varnish, shellac, linseed oil, and grime from the original paint,without disturbing the glaze coats of transparent pigments that con-tributed to the unmistakable depth and hue of the vehicle’s painted sur-faces. These layers had combined over the years to form a dark, reticulatedsurface that did not respond to initial solvent testing. Paintings conserva-tor Rustin Levinson assisted in this phase of the project. Cross-sectionalanalysis was not used at this time.
Conservation Treatment of the Omnibus
367I C R
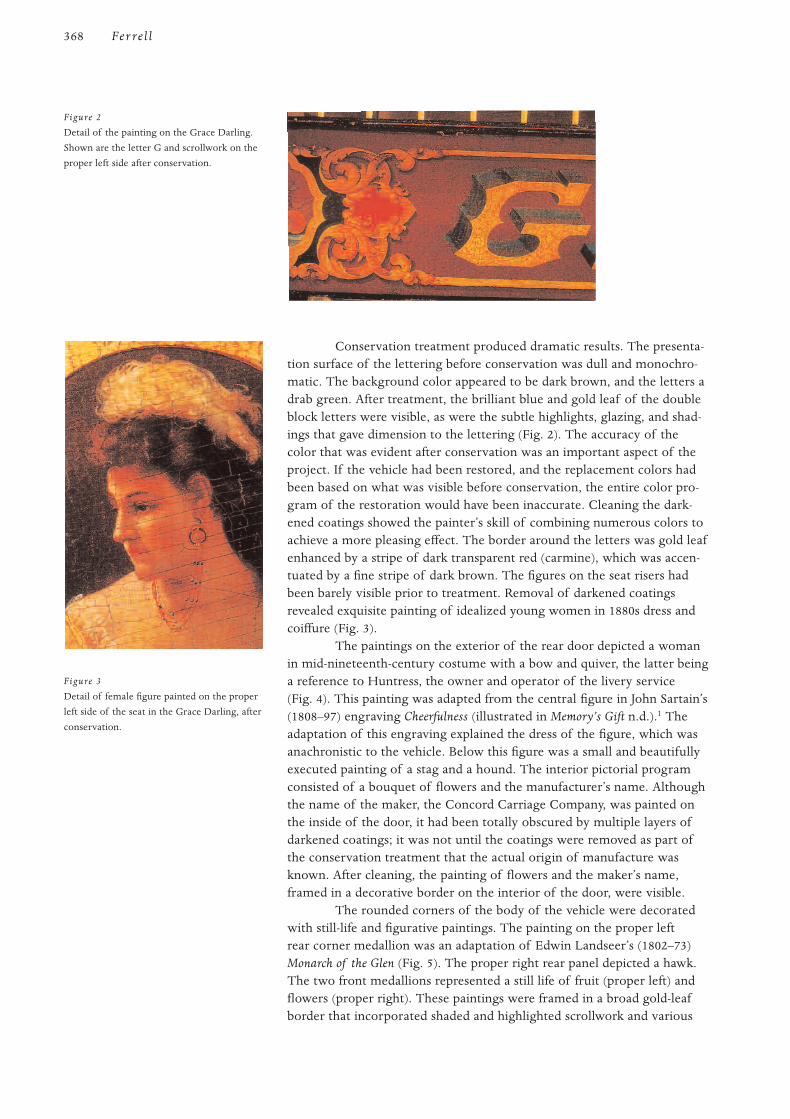
Conservation treatment produced dramatic results. The presenta-tion surface of the lettering before conservation was dull and monochro-matic. The background color appeared to be dark brown, and the letters adrab green. After treatment, the brilliant blue and gold leaf of the doubleblock letters were visible, as were the subtle highlights, glazing, and shad-ings that gave dimension to the lettering (Fig. 2). The accuracy of thecolor that was evident after conservation was an important aspect of theproject. If the vehicle had been restored, and the replacement colors hadbeen based on what was visible before conservation, the entire color pro-gram of the restoration would have been inaccurate. Cleaning the dark-ened coatings showed the painter’s skill of combining numerous colors toachieve a more pleasing effect. The border around the letters was gold leafenhanced by a stripe of dark transparent red (carmine), which was accen-tuated by a fine stripe of dark brown. The figures on the seat risers hadbeen barely visible prior to treatment. Removal of darkened coatingsrevealed exquisite painting of idealized young women in 1880s dress andcoiffure (Fig. 3).
The paintings on the exterior of the rear door depicted a womanin mid-nineteenth-century costume with a bow and quiver, the latter beinga reference to Huntress, the owner and operator of the livery service(Fig. 4). This painting was adapted from the central figure in John Sartain’s(1808–97) engraving Cheerfulness (illustrated in Memory’s Gift n.d.).1 Theadaptation of this engraving explained the dress of the figure, which wasanachronistic to the vehicle. Below this figure was a small and beautifullyexecuted painting of a stag and a hound. The interior pictorial programconsisted of a bouquet of flowers and the manufacturer’s name. Althoughthe name of the maker, the Concord Carriage Company, was painted onthe inside of the door, it had been totally obscured by multiple layers ofdarkened coatings; it was not until the coatings were removed as part ofthe conservation treatment that the actual origin of manufacture wasknown. After cleaning, the painting of flowers and the maker’s name,framed in a decorative border on the interior of the door, were visible.
The rounded corners of the body of the vehicle were decoratedwith still-life and figurative paintings. The painting on the proper leftrear corner medallion was an adaptation of Edwin Landseer’s (1802–73)Monarch of the Glen (Fig. 5). The proper right rear panel depicted a hawk.The two front medallions represented a still life of fruit (proper left) andflowers (proper right). These paintings were framed in a broad gold-leafborder that incorporated shaded and highlighted scrollwork and various
368 Fer re l l
Figure 3
Detail of female figure painted on the proper
left side of the seat in the Grace Darling, after
conservation.
Figure 2
Detail of the painting on the Grace Darling.
Shown are the letter G and scrollwork on the
proper left side after conservation.

forms of striping. The intricate red and blue striping of the undercarriagehad been covered with yellow paint. This style of striping was popularfrom around 1875 to 1880 for business wagons. Patterns for this style ofstriping appear in numerous trade journals and painting manuals. The redand blue striping on the off-white undercarriage complemented the similarpaint scheme on the seat rail.
The interior paintings were obscured completely by dark varnish andother coatings. These paintings had not been detected until they were con-served. The paintings were divided by the roof pillars and consisted of aprogram of twelve landscapes and seascapes in ellipses framed by a gray,Eastlake-style border (Fig. 6). These paintings provided the first evidenceleading to identifying the artist who painted the Grace Darling. Initialresearch for an exhibition on preeminent American carriage makers, that
Uncovering and Preservingthe Evidence
369I C R
Figure 4
Overall view of the rear door of the Grace
Darling, showing the lettering and vehicle
number, and the figure adapted from John
Sartain’s engraving, Cheerfulness.
Figure 5
Detail of proper left rear corner of the Grace
Darling, showing the adaptation of Edwin
Landseer’s Monarch of the Glen.
Figure 6
Detail of painting in the interior of the Grace
Darling, after conservation. This is the work
that led to identification of John Burgum as
the carriage painter.

included the Abbot-Downing Company, led to the first encounter withthe extensive archival holdings at the New Hampshire Historical Society.2
During the review of the company records, the sketchbooks of JohnBurgum were consulted. Burgum’s sketchbooks showed a series ofsketches made in 1879 and 1880 of landscapes that were dated, with noteson the location. One particular sketch of a wreck was identical in compo-sition and format to one painted on the interior of the Grace Darling.Unfortunately, this was not accepted as irrefutable proof of the authorshipof the paintings, although labels and related museum texts written afterthis discovery attributed the paintings to him.
The Grace Darling was placed on exhibition in the carriage museum in1987. In 1991, with funding assistance from the Early American IndustriesGrants-in-Aid program, researching the work of John Burgum continued.The archives of the New Hampshire Historical Society in Concord, NewHampshire, include the diaries, sketches, and paintings of John Burgum(1826–1907), who was the chief ornamental painter for the Abbot-Downing Company. Burgum was born in Birmingham, England. Heserved his apprenticeship with clock-dial painter Christopher Wright,who provided his early training as an ornamental painter. He came tothe United States in 1850 and became a coach painter in Boston and inConcord, New Hampshire, where he worked for the Abbot-DowningCompany (Camden 1982).
Burgum’s diaries (1863–1900) chronicle his daily activities andexpenditures. Some entries are accompanied by sketches. Burgum’s pri-mary occupation was with the Abbot-Downing Company, which special-ized in trade, overland, and public vehicles that required extensivedecoration as commercial vehicles. His diaries indicate that he expandedhis trade to the painting and decorating of fire-fighting vehicles for theAmoskeag Manufacturing Company in Manchester, New Hampshire; theConcord Carriage Company and Harvey and Company, both in Concord,New Hampshire; and the Union Carriage Shop and Cobb and Company ofQueensland, Australia. He also painted portraits, banners, and small paint-ings on rocks and shells, which he executed during summer camping tripsto Rye Beach or the White Mountains in New Hampshire. In addition, hetaught an art class to pupils who were mostly young women. He regularlyvisited the Boston Museum of Fine Art, where he derived considerableinspiration, as well as ideas, for his coach work. During his trips to Boston,he purchased art supplies and periodicals. He copied images found in litho-graphs or engravings onto horse-drawn vehicles. In his diaries, he referredto taking some of his images from published material as “hunting updesigns.” Others he painted from life. He also purchased a variety ofpainter’s instruction manuals. He extended his ornamental painting to fur-niture, and his diaries record the painting of blanket chests, chair backs,and trays. In 1874, he became a member of the Art Association, and by1878 he was assisted by his eldest son, Edwin, who also trimmed carriagesand made sails.
Many of the images in Burgum’s ornamental vocabulary becamestock ornaments and were repeated on the vehicles, pebbles, shells, andcanvases he painted. In his 13 July 1879 entry, he recorded that he madesketches of Little Boar’s Head, the rocks at Major Stott’s, and the wrecks
John Burgum,Carriage Painter
370 Fer re l l

on the beach. Several of his designs and sketches from life were convertedto prick patterns to be transferred onto vehicles. Among these were thelocal landscapes and places of interest that he sketched from life, as wellas copies of the works of Edwin Landseer, especially Monarch of the Glen,which he painted on at least four vehicles. He often mentioned Landseerby name, such as, “worked down at the shop on foot board to StewartsHotel Coach, laid in Landseers group of dogs” (Burgum 1878). In theentries of his 1880 diary, he wrote (Burgum 1880):
June 30, 1880—worked on the Barge 19 hours. Painted Monarch of the Glen
on the corner and put the lights on one corner and painted flowers in
another.
July 7, 1880—worked on the Barge 101⁄2 hours, finished the figures on the
door and foot board.
July 8, 1880—worked on the barge 91⁄2 hours inside putting in landscapes and
seaviews.
July 12, 1880—A cool pleasant day. Finished Huntresses Barge, worked 4 hours
on it. Edwin traced the ornament on the 5th wheel sized and gilded it. I
put the first coat of asphaltum on.
This entry provided irrefutable evidence that John Burgum painted theGrace Darling. It was indeed a “Barge,” and featured Monarch of the Glenand flowers on its body panel corners. Landscapes and seascapes that werepainted in the interior were clearly visible after conservation. The referenceto “Huntresses” barge is a direct reference to Simeon Parsons Huntress, thename of the proprietor of the livery service who commissioned the manu-facture and decoration of the omnibus.
It took John Burgum 142 hours to paint the Grace Darling. Thevehicle was much admired during its many years of service, from its origi-nal function as a livery vehicle to its role as a conveyor of students andyoung athletes well into the age of the automobile. As a museum artifact,its preservation became an issue of debate, and the vision and advocacy ofRichard Gipson kept the paint intact, if covered by experimental coatings.Conservation returned the piece to a condition in which its original artistrycould be visible and appreciated and ultimately led to the discovery ofthe artist responsible for its extensive ornamentation. The Grace Darlingremains one of very few horse-drawn vehicles in original condition whoseartist is known and documented. Countless other examples of the carriagepainters’ art have been stripped and sanded from their surfaces. Regardlessof how an object is presented, interpreted, or described, its authenticityand physical integrity are what make it a powerful material document andgive it the potential to inspire and educate. It is fortunate that an exampleof the artistry of carriage painting remains to inspire others to a higherregard for original paint and to seek conservation methods rather thanrestoration as an ethical and desirable way to preserve the historic integrityof horse-drawn vehicles.
The author is grateful to the Institute of Museum Services for supportinga part of this conservation project, and to the Early American IndustriesAssociation Grants-in-Aid program, which provided funding for theresearch that identified John Burgum as the artist of Grace Darling.
Acknowledgments
371I C R

Additional thanks to Linda Merk-Gould, Carol Warner, Deb Brown, AaronStoltzfus, and others who worked on this challenging project; and toLynton Gardiner, whose photographs communicate the artistry of thepiece to a larger audience.
1 The author is indebted to Martha Pike for this reference.
2 Burgum Family Papers and Abbot-Downing Company Records are on file at Manuscripts
Division, New Hampshire Historical Society, Concord, New Hampshire.
Bacon, G. F.
1890 The Leading Business Men of Concord. Boston: Mercantile Publishing.
Burgum, J.
1878 Diary entry, 2 October. Manuscripts Division, New Hampshire Historical Society,
Concord, New Hampshire.
1880 Diary entry, 30 June–12 July. Manuscripts Division, New Hampshire Historical Society,
Concord.
Camden, T. E.
1982 Register including biographical sketch. Burgum Family papers. Manuscripts Division,
New Hampshire Historical Society, Concord.
Dover (Maine) Enquirer
1880 29 July, South Berwick, Maine.
Gipson, R.
1953a Memorandum to author, Suffolk Museum and Carriage House, Stony Brook, New
York, 20 January.
1953b Memorandum to author, Suffolk Museum and Carriage House, Stony Brook, New
York, 9 February.
Hillick, M. C.
1906 Practical Carriage and Wagon Painting. Chicago: Press of Charles H. Webb.
Isles, G.
1963 Correspondence to R. Gipson, 11 September. Suffolk Museum and Carriage House,
Stony Brook, New York.
Memory’s Gift
N.d. New York: Leavitt and Allen.
Murphy, C. P.
1973 Memorandum to Jane des Granges, Suffolk Museum and Carriage House, Stony
Brook, New York, 17 July.
Painter, Gilder, and Varnisher’s Companion, The
1870 Philadelphia: Henry Carey Baird.
References
Notes
372 Fer re l l

I , the first assemblages of folk artwere gathered by collectors who found great aesthetic appeal in thesometimes quaint and often curious expressions of artists who worked
outside the mainstream of art. Abby Aldrich Rockefeller was a pioneer inthe collecting of American folk art. She began collecting during the 1920swhen folk art was mostly ignored by others. In 1935, she loaned a largepart of her collection to the Colonial Williamsburg Foundation, and in1939, this loan became a gift. The Abby Aldrich Rockefeller Folk ArtCenter (AARFAC) was constructed at Colonial Williamsburg in 1957 byJohn D. Rockefeller Jr. as a memorial to his wife.
The AARFAC collection contains more than 3,300 objects fromthe eighteenth, nineteenth, and twentieth centuries and reflects the innatecreative skills of many craftspeople and artisans. The collection includesbanners, toys, furniture, sculpture, decoys, figures, signs, weather vanes,whirligigs, carousel animals, tools, and advertisements.
In early 1987, the curatorial and administrative staff, in collabora-tion with Foundation conservators, selected 182 objects to go on a travel-ing exhibition to nine cities across America. The purpose of the exhibitionwas to share AARFAC’s exceptional collection of American folk art with abroader audience while its building was closed for expansion and renova-tion. After the chosen objects were surveyed, those requiring treatmentprior to travel were sent to the various laboratories in the Departmentof Conservation. The treatments ranged in complexity from simplesuperficial cleaning to more complicated structural stabilization and cos-metic reintegration. After the traveling exhibition, these objects werereturned to Williamsburg in 1991. Along with 250 additional objects, theywere installed in the new wing at AARFAC, which added an additional1767 m2 (19,000 sq. ft.) of exhibition and storage space to the museum.This additional group of objects was also surveyed, and conservation treat-ment was performed on those with the greatest need.
In total, 155 of the objects treated were of painted wood, and thesurvey and subsequent conservation produced a prodigious amount ofdocumentation. A review of the treatment records made it clear that therewere relationships between construction methods and current condition. Itis this information that forms the basis for this article.
373
The Treatment of Painted Wooden Folk Art
Stephen L. Ray and Julie A. Reilly

Discussions of treatment of folk art frequently begin with a multitude ofdefinitions to convince the reader of its complex and varied nature. Folkart objects are complex and varied, and so is their conservation. Bottlecaps, house paints, shells, ribbons, discarded bits of tool, and swirls ofcandle soot are but a few of the materials encountered as componentsof these objects.
Folk art often displays the creativity of the maker in unique andintriguing decorative schemes—direct outgrowths of the artist’s experi-ence and imagination. This creativity can be expressed in varied imagerywith decorative elements often composed of uncommon and inherentlyshort-lived materials, many of which have proved incompatible with theunderlying structure or surface finishes. For example, soot or smoke usedfor decorating surfaces is inherently fragile.
The aesthetic sensibilities of collectors like Mrs. Rockefeller informour understanding of the objects and the way they appear in collectionstoday. New, shiny, clean, complete, and smooth are not words that describethe objects that folk art collectors assembled or expected to see in dealersalesrooms or museum exhibitions. Rather, early collectors preferredobjects that were unchanged by restorers or museum professionals, withevidence of use and age being an integral part of the objects’ appearance.
Because it was often functional as well as decorative, folk art usu-ally reflects a repair-and-maintenance history. For example, decoys wererepaired and touched up, weather vanes and whirligigs were flattened andrepainted, and trade figures were repaired after repeated mistreatment orwere repainted in more fashionable colors (Fig. 1). There is a subtle dis-tinction between a repair and ongoing maintenance. Whether successful ornot, both strive to prolong the functional nature of the object, and bothusually involve the application of additional materials. Maintenance tendsto comprise additions that reflect the history or function of the object overtime—additions that may be worthy of preservation. Repairs, by contrast,particularly those made after an object attains “collectible” status, some-times consist of alterations or additions that not only disturb the appear-ance of an object but may misrepresent its historical context or function.Examples of maintenance techniques and repairs are discussed on the fol-lowing pages.
As viewed today in an exhibition, a folk art object represents morethan simply an aesthetic creation, the product of the hand and eye of itsmaker working in a specific time and place. It also represents a collectivehistory of use, beginning with its maker and continuing with its ownersand subsequent collectors, dealers, curators, and patrons. The object’sfunction over time is an integral part of its interpretation and is a featurethat is as important to preserve as the object itself.
Although it is risky to attempt to place all folk art into generalized cate-gories, an evaluation of the objects examined revealed four primary meansof construction: solid or log construction, hollow construction, board con-struction, and joined construction. Construction types are often mixedwithin a single object (e.g., a toy may consist of both solid and joined con-struction). However an object is made, a correlation exists between theconstruction method and types of damage found on its painted surface.The following paragraphs explain the categories of construction, thenaddress paint-surface problems commonly associated with each type. Paint
Construction Techniquesand Condition
General Technology and Condition
374 R ay and Re i l ly
Figure 1
The Race Track Tout, tobacconist figure, during
treatment. H:184.78 cm. This figure had up to
four additional layers of paint applied either
as routine maintenance or to change its color
scheme. Mechanical excavation under the
microscope revealed the colors exposed on
various parts of the figure (AARFAC,
56.705.3).

problems independent of construction type, such as abrasion from mis-handling, functional damage resulting from the wear of moving parts(e.g., whirligigs, weather vanes, or toys), or inherent deterioration of thepaint, are outside the purview of this article.
Solid or “log” construction
Objects in this category are made from a single, solid block of wood or asolid block composed of several pieces of wood. In the latter case, thetechniques for joining the various blocks include dowels, pins, mortise-and-tenon joints, glue joints, nails and screws, and various combinationsof these techniques. Examples of objects in this category include decoys,toys, trade figures, and other decorative sculptures.
Damage typically appears in these objects in the form of radialsplits and checks. The splits can manifest themselves as barely visible hair-line cracks or as large openings. They may move very subtly with environ-mental changes (i.e., opening and closing as the wood responds to changesin relative humidity). Similar damage may occur at the interface of jointsand laminations, particularly if the grain of one piece of wood is at rightangles to another piece. Other damage includes breakage of projectingelements, dents, scrapes and scratches, and worn and abraded surfaces.
Historically, repair and maintenance techniques have varied.Shims were often inserted into large splits, and other filling materials, suchas plaster or commercial wood fillers, may have been used. Broken ele-ments were reglued. Nails, screws, and other metal hardware, such asangle irons or “L” brackets, were used as supporting or fastening devices.These traditional repairs generally disguised the symptoms of structuralfailure without addressing its underlying cause: the inherent instability ofwood. As a result, the structural problems encountered in these objectstoday include not only the initial unstable cracks, but additional shrinkage,splits, and breakage associated with added metal hardware and rigid orunstable shims.
Damage to the paint is most obvious adjacent to splits and cracks,where the film is broken and chipped. However, damage may also appearelsewhere on the surface. This occurs because, in log construction, thepaint may be stressed by the extremely uneven dimensional response ofthe log’s outer surface to fluctuating relative humidities. Around its cir-cumference, the log may experience pronounced dimensional change(tangential shrinking and swelling), while dimensional change will beimperceptible along its length. The paint, on the other hand, experiencesa slight dimensional change that is equal in all directions. The differingresponses of the two materials place stresses upon the paint, whichmay cause it to tent, lift, or check across the grain of the wood (seeMecklenburg, Tumosa, and Erhardt herein).
Conservation of these types of objects relies on skills rangingfrom woodworking to paint consolidation. Treatment may include leavingthe object as is; removing old fills, shims, and hardware; or replacing oldnails and screws with less invasive materials. Fills can be replaced withmore stable, conservation-quality materials (i.e., microcrystalline waxes,bulked epoxies, vinyl spackling compounds, etc.). If necessary, paint sur-faces can be consolidated, and losses inpainted.
The Race Track Tout, a tobacconist figure (Fig. 2), illustrates dam-age related to radial cracks, as well as previous repairs. This figure was sent
375T P W F A
Figure 2
The Race Track Tout, tobacconist figure, before
treatment, showing the radial split that ran
the entire length of the figure. Remnants of a
wooden repair shim remain wedged inside the
split. It was uncertain if the shim had ever
been glued in place. Paint loss is visible along
the edges of the split.

to the Objects Conservation Lab for an investigation of the remains of awood shim inserted in the back, and for repair of damage to the feet andbase. The curators were also interested in what changes had been made tothe original paint scheme. With the exception of the arms, the figure hadbeen carved from one “log.” A radial split on the back of the figure ranfrom the top of the hat downward through the head and body and into thecrotch. The split appeared again in the base, and another radial split ranat right angles to it. This caused the base to break into four sections andresulted in extensive damage to the feet and ankles. The entire figurerested on an original stand composed of four wide boards nailed togetherto form a box. As a result of the splits and shrinkage, the figure had col-lapsed into its stand. Repair attempts had been made using numerous nails.In addition, the proper left arm was broken at the elbow, and it had beenreattached using nails and an angle iron fastened with screws.
The treatment of this figure involved removing all nails, screws,and the angle iron, and regluing the separated elements with hot hideglue. Two 6 mm wooden dowels were inserted through existing nailholes in the elbow as additional support in this area. Because large gapsremained in the base, which prevented proper alignment of the four sec-tions, it was reassembled using a carvable epoxy paste to fill gaps and toprovide added strength. The original stand was too fragile to support theweight of the figure; therefore, a wooden insert was constructed. Theinsert, a box, was fitted inside the original stand to hold the figure at theproper height in relation to the sides of the stand. The sides of the standwere tacked to the sides of the insert with a hot-melt adhesive. The spliton the back of the figure was filled with a wall of microcrystalline wax(Victory White Wax) approximately 6 mm thick. No attempt was made tofill the entire gap. In addition, all later paint layers were removed. This wasaccomplished using various solvent systems and mechanical methods.
Hollow construction
Objects in this category are made from blocks and/or boards joined toform a hollow cavity, with a carved outer surface. This method of con-struction reduces some of the problems noted in log construction. Notonly does it reduce the weight of large objects, but hollow constructionpermits a more even dimensional response of the wood to environmentalchanges. Splits and separations in the wood tend to be common but aretypically narrower than those found in objects made from solid blocks orlogs. The techniques for joining the wood components include mortise-and-tenon or lap joints, glue joints, nails, and screws. Characteristicexamples in this category are carousel figures.
Structural damage is characterized by separation of the joints,with associated distortion and occasional misalignment of the woodencomponents. Projecting elements can be loose, detached, or missing, andthe high points of the carving may be very worn or abraded.
Traditional repairs on objects of this type of construction includeattempts at filling the gaps, adding shims, replacing carved sections, andreworking mortise-and-tenon joints. Nails, screws, and different types ofbracing were added to stabilize separations and breaks. Additional gluewas applied to old damages, and internal repairs were made. The natureof the structure and attempts at repair affect the condition of the paint.Cracked and lifted paint is often found at the interface of joined pieces
376 R ay and Re i l ly

because of differences in the movement of the various components. Paintdamage is also commonly caused by poor repair techniques, such as theuse of incompatible or rigid gap-fillers or the improper addition of nails,screws, or dowels. Finally, paint loss is associated with the reworking ofmisaligned components.
Conservation treatment for this type of object may include leav-ing the object as is, adding fills, removing old fills and replacing them withmore stable materials, separating and realigning poorly repaired joints, orremoving nonoriginal nails and screws. Paint surfaces may be consolidatedand inpainted, with the extent of treatment guided by a sensitivity to thehistoric use of the object. Since these objects no longer serve the functionoriginally intended, the conservator has the option of making repairs thatare not as strong but also not as structurally invasive as earlier repairs mayhave been.
A carousel figure of a lion illustrates the problems associatedwith hollow construction. The body and head are hollow, and the legs arecarved from solid blocks made from several joined pieces of wood. Joinmethods include glue and large wood screws. The screw heads were coun-tersunk and covered with wood plugs.
Due to long-term usage, exposure to weather extremes, and repairand maintenance practices, there were numerous separations between thevarious wood joints, and the legs were loose. Attempts had been made torepair and stabilize the figure with numerous finishing and common nails,and splits and losses were associated with these repairs. Remnants of afilling material were found in some of the gaps and nail holes. Some sec-tions of the wood forming the body had been reshaped to fit the mis-aligned sections more closely together. Lost portions of the object hadbeen replaced. The front legs, originally extended forward to give the liona leaping effect, were cut at the knees and reworked to place their upperand lower sections at right angles. This probably was done to reduce thelength of the figure to fit in the home of a collector. The painted surfacewas in an extremely degraded condition, showing evidence of past repaint-ing and stripping of paint using mechanical and chemical means.
Treatment of this figure included removal of all nails and otherpast repairs and realignment and regluing of the joints. The front legswere disassembled, and new wood added and carved in order to return thelegs to a more natural position. Photographic evidence of similar figureswas used as the basis for this decision. The painted surface was consoli-dated using an acrylic resin.
Board construction
Objects in this category are made from joined boards or planks.Techniques for joining the boards include butt joints, lap or dovetail joints,and metal or wood battens. Nails or screws may also join elements.Examples of objects include trade signs, weather vanes, and decoratedstorage boxes.
Structural damage includes splits and separations at the joints,cracks at the sites where battens have been attached, and varying degreesof warpage. Scratches and dents are common, as is damage to the corners.
Traditional repairs usually involved methods to secure the boards.Regluing and attaching additional battens or straps on the reverse werecommon techniques, and fill materials were often added to larger gaps.
377T P W F A

These repairs and fills frequently exacerbated problems, restraining thenatural movement of the wood and resulting in additional splits, warpage,and paint loss. Additional paint loss may be associated with the species ofwood and the manner in which the board was sawn. Plainsawn boardsare often found in this type of construction, and a distinct earlywood/latewood pattern may become apparent because of poor paint adhesion tothe denser latewood of a species such as yellow pine. Though losses fromlatewood may be extensive, the paint remaining on the earlywood surfacemay be very stable because of strong adhesion.
Techniques developed for the treatment of panel paintings some-times apply to the conservation of folk art objects made of joined boards.Treatment options may include the removal of added restraints; the designof new nonrestraining supports; and the consolidation, filling, and inpaint-ing of paint losses. Provision for maintaining the object in a controlled envi-ronment is a highly recommended practice, as it is for all folk art objects.
As an example, the painted Sutton fireboard in the AARFAC collec-tion (AARFAC, 56.110.1) had been constructed from four random-widthboards. Two original battens were attached to the back with iron nails, andtwo thick iron straps were later attached adjacent to each batten with ascrew into each board. The restraint placed on the boards by the battensand the added iron straps resulted in extensive splitting along most of thelength of the top board. The splits emanated from the screw sites andresulted in paint loss and some planar distortion. In an attempt to relievesome of the restraint, treatment included removal of the iron straps. Wherepossible, damage was stabilized by injecting hot hide glue into the splits.
Joined construction
Objects in this category are made from numerous pieces of wood joined invarious ways, depending on the function of the object. Such objects includewhirligigs, toys, and small sculptural figures. Join techniques include the useof nails, screws, metal plates, and other hardware; glue joints for fixed con-nections; pins, dowels, mortise-and-tenon or lap joints, et cetera.
Repairs seen on these types of objects include additional nailsand/or screws to secure split or separated elements, and replacement ofdetached and lost components. Past repair attempts may have also ren-dered the object nonfunctional by restraining its moving parts.
Damage encountered includes loose joints, misaligned and/ormissing parts, replacement parts made of incompatible materials, andadded fasteners. Paint loss may have occurred at joins and in areas associ-ated with repairs. Mechanical wear from friction of moving elements mayhave resulted in structural instability. Damage to the paint also occurs atthe interface of the joined elements. In those objects where one part rubsagainst another (as in the case of a whirligig), abrasion to the paint surfaceis usually encountered. Damage is also found at the site of metal fastenerswhere star-shaped or circular crackle patterns in the paint define the headsof nails or screws. In some cases, the nail or screwhead has been pushedout of the wood to some extent, with associated loss to the paint layer.
The Politician (Fig. 3), a small sculptural figure, is constructed ofa number of joined elements. The radiograph (Fig. 4) shows numerousnails, most of which were used to assemble the object. The screws secur-ing the arms at the shoulders, due to their suspected modern manufacture,may be replacements. A merganser decoy (Fig. 5) illustrates how a previ-
378 R ay and Re i l ly

ous repair can cause misalignment of joined elements. The normal lightphotograph shows the slight misalignment at the interface of the neck andbreast. A radiograph of this decoy showed that the addition of an internaliron pin and nails held the neck out of alignment with the breast.
Various techniques are utilized for the conservation of theseobjects. Treatment options may include leaving the object as is, designingand attaching mechanical supports and mounts, or applying additionaladhesive to weakened joints. Old repairs or added fasteners may beremoved and replaced with more stable materials, although great caremust be taken to distinguish original materials from later additions.Protruding nails may be pushed back into place if the condition of thepaint allows. Paint surfaces damaged by repairs or later attachments maybe consolidated, and losses filled and painted. Areas abraded by the frictionof original moving parts, however, are evidence of historic usage andshould not be inpainted.
Given the variety of materials and techniques utilized by folk artists—many of which are fragile and unstable—it is impossible to standardizetreatment approaches and materials. Furthermore, the repair and mainte-nance history of these objects complicates treatments because the preser-vation of evidence of repair and maintenance is frequently desirable.Thoughtful discussion among curators, owners, and conservators is essen-tial in developing a sensitive treatment plan.
Case History
379T P W F A
Figure 3
The Politician, before treatment. H:60.64 cm.
This small figure is an example of a joined
construction object. The buttons, bow tie, and
cape are made of painted leather (AARFAC,
63.705.1).
Figure 4
The Politician, during treatment. Radiograph
illustrating the large number of nails used to
fasten the various components. The large
white block in the head area is a dowel used
to secure the hat to the head.
Figure 5
Merganser drake decoy, before treatment.
Note the slight misalignment at the interface
of the neck and breast (AARFAC, 78.702.1).

The Clown, a polychromed tobacconist figure (Fig. 6), was carvedfrom a solid piece of eastern white pine. The head was carved separatelyand inserted into a large recess in the shoulders, and the outer elbows areadditional pieces of wood that were laminated to the main “log” of thebody. The base, a replacement, is composed of five thick pieces of woodnailed together to form a box approximately 46 cm square. Two 42 cmlong iron bolts had been inserted through the underside of the base intoholes drilled into each leg, to secure the figure to the base. Nuts weresecured to the ends of the bolts through mortises carved into the calf ofeach leg. The mortises were filled with plugs of wood. Additional supportwas provided by a tree branch nailed between the rear top edge of thebase and the crotch of the figure.
Although the figure was in relatively stable condition, several fea-tures caused concern for curatorial and conservation staff. The head por-tion was loose, and fill material in the base of the neck was insecure andcrumbling. The head seemed to be out of proportion to the rest of thefigure, and an old repair on the side of the nose was loose. The color andcharacter of the head was also inconsistent with the remainder of thefigure. In addition, areas of darkened overpaint up to 7–8 cm in diameterwere visible on the higher points of the figure. Both feet were heavilydamaged and had been nailed back together; the nails had caused addi-tional splitting of the wood, and the pieces were very poorly aligned.
Further examination revealed two large radial splits, filled with ahard puttylike material, running through the left side of the body from thebase of the neck to the crotch. The splits had enlarged the recess in theshoulders, allowing the head to shift position. There was also a radial spliton the rear of the head (Fig. 7). This split and a large loss on the top of thehead had been filled with the same material that was used at the base ofthe neck. Through visual inspection, the material appeared to be plaster.Apparently the head became detached at some point, possibly as the resultof a forward fall (such a fall could also explain the broken feet and dam-aged nose). In a poor attempt to repair the damage, the head was improp-erly reattached in the position seen in Figure 6.
Microscopic examination of the paint layers at the edges of lossesand cracks showed the presence of a white ground layer. Above theground, the legs and portions of the costume were painted red, and thenvarious colored details were added. A clear coating, now very yellowed,had been applied over the paint. Examination revealed that the darkenedareas of paint on the high points were areas of retouching applied tocamouflage losses and abrasions to the original paint layers. Tests withvarious solvents showed that the head had been completely overpainted,presumably to hide the fill materials and to brighten the overall appear-ance. Overpaint matched the color of the original paint as altered by thediscolored clear coating (e.g., areas originally painted blue had turnedgreen because of the yellowed varnish; these had simply been overpaintedwith green).
During treatment to extract the crumbling fill material, the headwas removed (Fig. 8). This revealed additional fill material from a pastrestoration: crumpled brown paper bags and plaster stuffed into the neckcavity. Because the figure had been used outdoors, water had seeped intothe cavity and had caused extensive damage to the wood. After a thoroughcleaning of the cavity to remove loose debris, the deteriorated wood was
380 R ay and Re i l ly
Figure 6
The Clown, tobacconist figure, ca. 1860, before
treatment. H:187.32 cm. This figure may be a
portrait of George L. Fox, who was a clown
and an actor. The figure was used to advertise
cigars named after George W. Childs, a pub-
lisher and philanthropist (AARFAC, 56.705.2).

consolidated with Acryloid B72, and the head was reattached in its properposition with a carvable epoxy paste (Araldite AV 1253).
To stabilize the figure, it was detached from the base by firstremoving the tree branch, which was determined to be a twentieth-century addition and inappropriate for current exhibition purposes (it wasplaced in storage). The wood plugs on the calves were then removed; thebolts were extracted through the underside of the base, and the baseremoved. The nails that held portions of the feet to the legs were thenextracted. The split, misaligned feet were reassembled and adhered withhot hide glue. Two 5.08 cm (1⁄2 in.) diameter stainless steel pins, 40.6 cm inlength, were used to secure the figure to the base instead of the iron bolts.The pins, which had a 10.2 cm square plate welded to one end, wereinserted through the bottom of the base, and wood screws were used tofasten the plate to the underside of the top of the base. The figure wasthen lowered onto the pins, and the wood plugs were adhered in positionwith hot hide glue.
Solvent tests were conducted to determine the solubility of thepaint layers. Based on these tests, the overpaint was removed with acetoneor propanol in a methyl cellulose gel and, when necessary, a commercialpaint stripper for the more intractable areas. During this process, the dis-colored coating was also removed. This proved to be an advantage in thecleaning of the head, which retained nearly intact, stable, original paint,with disturbed areas adjacent only to the split and loss. The losses andcracks exposed by removal of the overpaint were filled with Perma-FillReady Mixed Spackling Paste. Fills were sealed and isolated with AcryloidB72 and inpainted with Bocour Magna Colors (see list of Materials andSuppliers at the end of this article).
This discussion of construction methods, repair details, maintenance his-tory, and current condition has demonstrated that construction featurescan be used to loosely categorize painted wooden folk art for the purposes
Conclusion
381T P W F A
Figure 7
The Clown, during treatment. This photograph
shows the detached head with a radial split
and associated fill material, as well as damage
to the neck.
Figure 8
The Clown, during treatment, showing fill
material and extensive damage to the neck
cavity as a result of water infiltration.

of understanding current condition and developing potential treatmentoptions. Objects of a particular construction type (“log,” hollow, board, orjoined) exhibit definite patterns of maintenance practice, repair history,and loss and deterioration, which are evident in both the structural ele-ments and paint surfaces. Although knowledge of these patterns can aid inthe evaluation of problems affecting any folk art object, treatment optionsrarely fall into standardized approaches. Each object, due to its uniquematerial and aesthetic nature, warrants individualized thought and atten-tion from experienced conservators and knowledgeable curators for theformulation of appropriate conservation treatment methods.
Acryloid B72, Conservation Materials, Ltd., 100 Standing Rock Circle, Reno, NV 89511.
Araldite AV 1253 (carvable paste, wood), Ciba-Geigy Corporation, 4917 Dawn Avenue,
East Lansing, MI 48823.
Kwik Marine Paint and Varnish Remover, Klean-Strip division of W. M. Barr, Inc.,
Memphis, TN 38101.
Magna Colors, Bocour Artist Colors, Inc., Garnersville, NY 10923; distributed by Conservation
Materials, Ltd.
Methyl Cellulose, Talas, 213 West 35th Street, New York, NY 10001.
Perma-Fill Ready Mixed Spackling Paste, Bondfast Company, Bridgewater, NJ 08807; distributed
by Conservation Materials, Ltd.
Victory White Wax, Conservation Materials, Ltd.
Materials and Suppliers
382 R ay and Re i l ly

T -- , located in Little Rock, Arkansas,is one of fewer than 180 intact wooden carousels of the more than5,000 carousels that once operated in the United States (Morgan
1994). It is the only surviving example of an undulating-track carouselmanufactured by Spillman Engineering Corporation in the 1920s in NorthTonawanda, New York. It was a familiar sight on amusement ride circuits,including the Arkansas State Fair. In 1942, the forty hand-carved woodenhorses and four chariots found their way to War Memorial Midway inLittle Rock, where the carousel continued to operate until 1991 (Andersonand Story 1989). During its forty-nine-year period of operation, up tothirty layers of “park paint” were applied to the carousel animals as partof ongoing maintenance. Recent conservation surveys and treatments indi-cate that most of the original paint layers remain intact (Parker 1994).
Roads to extinction are often paved with good intentions.Numerous well-intended preservation attempts have compromised theintegrity of many wooden carousels; very few retain original painted sur-faces beneath restoration colors, and even fewer survive intact with theiroriginal surfaces exposed.1 Indeed, restoration efforts have put existingoriginal paint surfaces and designs on “the endangered list.” Carouselshave a long and important tradition in many cultures; we should apply thehighest conservation standards to the increasingly rare intact examples ofthis unique, painted wooden art form.
The first visual record of a carousel device appeared in a Byzantine bas-relief fifteen hundred years ago (Fried 1964:13). The word carousel is aderivation of carosello, a seventeenth-century Italian word meaning “littlewar,” which described a game that originated in twelfth-century Arabia inwhich horsemen rode in a circular pattern throwing clay balls filled withscented water at one another. This game of equestrian skill was probablythe ancestor of today’s familiar merry-go-round. In the royal courts ofFrance, the carousel evolved into a game in which lance-bearing horsemenriding at full speed attempted to spear gold rings. This variation led to thetradition of “catching the brass ring.” To train for these events, knightsmounted crude wooden horses attached by beams to a center pole.Servants or horses provided the turning power (Manns, Shank, andStevens 1986:9).
Carousels: A Brief History
383
Jeffrey: Horse of a Different Color
Rick H. Parker and Peter L. Sixbey
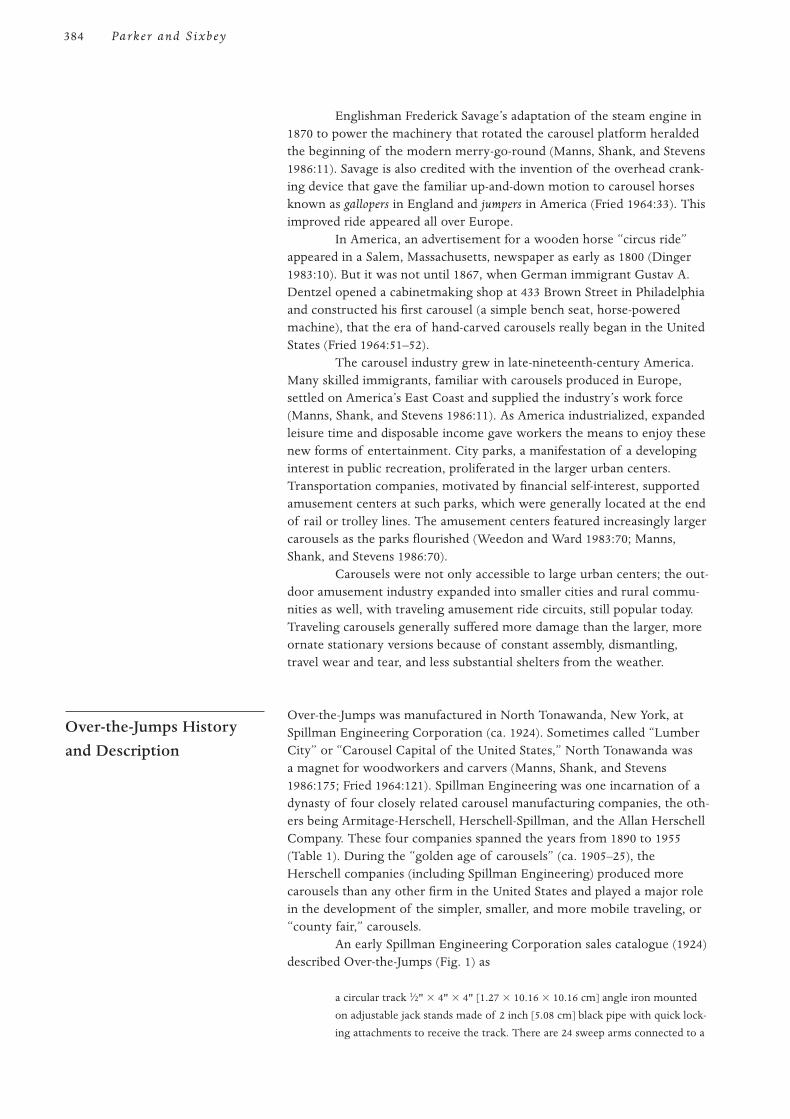
Englishman Frederick Savage’s adaptation of the steam engine in1870 to power the machinery that rotated the carousel platform heraldedthe beginning of the modern merry-go-round (Manns, Shank, and Stevens1986:11). Savage is also credited with the invention of the overhead crank-ing device that gave the familiar up-and-down motion to carousel horsesknown as gallopers in England and jumpers in America (Fried 1964:33). Thisimproved ride appeared all over Europe.
In America, an advertisement for a wooden horse “circus ride”appeared in a Salem, Massachusetts, newspaper as early as 1800 (Dinger1983:10). But it was not until 1867, when German immigrant Gustav A.Dentzel opened a cabinetmaking shop at 433 Brown Street in Philadelphiaand constructed his first carousel (a simple bench seat, horse-poweredmachine), that the era of hand-carved carousels really began in the UnitedStates (Fried 1964:51–52).
The carousel industry grew in late-nineteenth-century America.Many skilled immigrants, familiar with carousels produced in Europe,settled on America’s East Coast and supplied the industry’s work force(Manns, Shank, and Stevens 1986:11). As America industrialized, expandedleisure time and disposable income gave workers the means to enjoy thesenew forms of entertainment. City parks, a manifestation of a developinginterest in public recreation, proliferated in the larger urban centers.Transportation companies, motivated by financial self-interest, supportedamusement centers at such parks, which were generally located at the endof rail or trolley lines. The amusement centers featured increasingly largercarousels as the parks flourished (Weedon and Ward 1983:70; Manns,Shank, and Stevens 1986:70).
Carousels were not only accessible to large urban centers; the out-door amusement industry expanded into smaller cities and rural commu-nities as well, with traveling amusement ride circuits, still popular today.Traveling carousels generally suffered more damage than the larger, moreornate stationary versions because of constant assembly, dismantling,travel wear and tear, and less substantial shelters from the weather.
Over-the-Jumps was manufactured in North Tonawanda, New York, atSpillman Engineering Corporation (ca. 1924). Sometimes called “LumberCity” or “Carousel Capital of the United States,” North Tonawanda wasa magnet for woodworkers and carvers (Manns, Shank, and Stevens1986:175; Fried 1964:121). Spillman Engineering was one incarnation of adynasty of four closely related carousel manufacturing companies, the oth-ers being Armitage-Herschell, Herschell-Spillman, and the Allan HerschellCompany. These four companies spanned the years from 1890 to 1955(Table 1). During the “golden age of carousels” (ca. 1905–25), theHerschell companies (including Spillman Engineering) produced morecarousels than any other firm in the United States and played a major rolein the development of the simpler, smaller, and more mobile traveling, or“county fair,” carousels.
An early Spillman Engineering Corporation sales catalogue (1924)described Over-the-Jumps (Fig. 1) as
a circular track 1⁄2" 3 4" 3 4" [1.27 3 10.16 3 10.16 cm] angle iron mounted
on adjustable jack stands made of 2 inch [5.08 cm] black pipe with quick lock-
ing attachments to receive the track. There are 24 sweep arms connected to a
Over-the-Jumps Historyand Description
384 Parker and S ixbey

ballbearing center; on the other end a series of 24 special built wooden wheels
with 3⁄8 inch [0.95 cm] steel tires, and equipped with Timken roller bearings.
The diameter of Over-the-Jumps is 12.2 m (40 ft.) with a centerpole. According to the sales catalogue, “space required is 56 feet [17 m],4 to 5 hours time for erecting; [and] for space on a show train, it can becarried on three 18-foot [5.49 m] wagons.” The stationary walking plat-forms surround the mobile riding platform, and both are constructed ofwood planks. The riding platform is sectioned into 1.5 m (5 ft.) segments(twenty-four in all), with one wooden wheel between each segment(twenty-four wheels) (Fig. 2). Each wheel between the segments is approx-imately 61 cm (24 in.) in diameter, with thick wooden spokes, a cast-iron
385J : H D C
Table 1 History of the carousel in the United States and the Herschell factories
1800 Advertisement for a wooden horse “circus ride” in Salem, Massachusetts
1867 Gustav A. Dentzel constructs his first carousel
1870 Frederick Savage adapts steam engine to power carousels in England
1873 Allan Herschell/James Armitage form Tonawanda Engine and Machine Company
1890 Tonawanda Engine and Machine reorganized as Armitage-Herschell Company
1903 Allan Herschell/Edward Spillman buy out Armitage-Herschell and form
Herschell/Spillman Company—largest manufacturer of carousels
1915 Allan Herschell establishes Allan Herschell Company
1920 Herschell/Spillman reorganized as Spillman Engineering Corporation
1924 Over-the-Jumps manufactured by Spillman Engineering (ca. 1924)
1905–25 Golden age of the carousel in the United States
1945 Spillman Engineering Corporation bought out by Allan Herschell Company
1955 Allan Herschell Company goes out of business
Figure 1
According to the company’s sales catalogue,
“The track has several dips and hills, leaving
the participants riding the device in a per-
plexed state.”
Figure 2
In the latter days of the carousel’s operation
in War Memorial Park, in Little Rock,
Arkansas, the twenty-four wooden spoke
wheels were frequently soaked with water to
expand the wooden components in order to
help secure the cast-iron rims.

hub and a cast-iron rim. Each wheel is covered with a wood well above theriding platform “to protect the ladies’ dresses from any grease that is fre-quently collected by wheels from the track.” Each segment carries twohorses or one chariot, with one chariot occurring between each set of tenhorses. Beneath the riding platform is a cast-iron undulating track, alongwhich the wheels of the riding platform move the horses in an up-and-down galloping motion. Horses are mounted on the riding platform withtriangular stands. For power, the carousel requires a 10-horsepower electricor gasoline motor. The sales catalogue describes a “4 cylinder, one pieceremovable ‘L’ head heavy clutch tractor type motor, 31⁄4 3 5. It is equippedwith an American Bosch magneto, Zenith carburetor, duplex governor andOakes ballbearing fan.” The earning capacity of Over-the-Jumps was $220per hour (Spillman Engineering Corporation 1924).
Over-the-Jumps made its initial appearance at the AuroraExposition and Fair in Aurora, Illinois, on the C. A. Worthem World’s BestShows, 15 August 1924. It is probable that no more than five Over-the-Jumps machines were produced. References have been found to as many asfour to five companies that owned a machine: C. A. Worthem World’s BestShows; Rubin and Cherry Shows (Fig. 3); J. J. Jones Exposition; RoyalAmerican Shows; and possibly Siebrand Brothers (Dahlinger 1994).
The traveling circuit of amusement rides that brought Over-the-Jumps to Little Rock remains unknown. Nonetheless, the carousel found apermanent home in the city’s War Memorial Park in 1942, under a domedwood-frame structure that helped protect it from the elements. It operateduntil 1991, when it was dismantled for restoration. In 1989, the carouselwas placed on the National Register of Historic Places by former GovernorBill Clinton. In 1991, a nonprofit organization, Friends of the Carousel,formed to purchase the historic carousel and return it to operation afterlearning that, despite its listing on the National Register of Historic Places(Anderson and Story 1989), the carousel was in danger of being sold toout-of-state interests.
386 Parker and S ixbey
Figure 3
An Over-the-Jumps carousel as it appeared in
a Rubin and Cherry Show in the mid-1920s.

Most of the forty vertical jumping horses on Over-the-Jumps are typical ofthose produced by Spillman Engineering Corporation in the 1920s. Thehorses were generally more elaborate than their predecessors; jewels wereadded and intricate relief carvings appeared with more frequency on thetrappings (Dinger 1983:90). Identifiable features of Spillman horses (from1920 to 1945) include long heads; small, high-set eyes; pointed rumps; full,wavy manes; intricate ornamentation; high cantles and pommels; large nos-trils; jewels; and figures in relief. The romance sides of the horses (the sidesfacing outward) were elaborately carved, in contrast to the inward-facing,less-detailed surfaces, which were limited to mostly painted decoration.
The following is a description (Fried 1964:121) of the SpillmanEngineering Corporation carving shop:
The carving shop is just above the carpenters shop. Bodies, legs, heads, and
tails of the different animals are piled about in orderly profusion; also parts
of chariots, shields and cornices all of which are handcarved and very beauti-
ful. One of my first impressions of detail was the discovery that each foot of
the marvelously natured little horses was shod with a real horseshoe.
The Herschell companies, including Spillman EngineeringCorporation, used basswood for most of the construction, although someanimals were made with poplar. The wood was planed smooth and gluedup into boxes in a technique referred to as coffin construction (Schroeder1980). A standard animal consisted of six to seven boxes, with a box serv-ing for each major body part: the body, head, each leg, and possibly the tail(some animals had realistic tails made from horsehair). This type of con-struction allowed the wood to expand and contract with minimal splitting.Coffin construction also reduced the weight of animals, thus simplifyingthe transport and assembly of traveling carousels.
After assembly, each box was roughed out to approximate the formof the body part. Master sketches of each animal being carved were kepton the walls of the factory. Each animal was drawn life-size, and the draw-ings often included side, front, and rear views to help the carvers establishdimensionality (Brick 1994).
The factory carvers were divided into three distinct groups:apprentices, journeymen, and master carvers. The apprentices, many ofwhom began learning their craft as early as age five, worked almostexclusively on the legs, a fairly simple and undetailed part of the body.Journeymen worked on the bodies, carving the shoulders and saddles andsimpler decorative elements. Master carvers modeled the heads and finedetails, oversaw the finishing process of the entire animal, and effected atransition between the work of various carvers once the components wereassembled into the complete animal (Fraley 1983:13). The style of thesimpler “county fair animals” associated with traveling carousels wasinfluenced by the need for ease of packing, portability, and large-scaleproduction.
Production was greatly increased with the introduction of a dupli-cating process that used a pantographic cutting apparatus, which allowedone wood-carver to turn out vast amounts of woodwork in a year. InNorth Tonawanda, the carving machine, which could rough out four bod-ies at once, was first used in 1913 (Fried 1964:119). After figures came off
Wood-Carvers, Painters,and Horses
387J : H D C
the machine, skilled artisans completed the work by chiseling out detailsand hand carving important features.
The animals were then taken to the paint shop, where variouspainting, japanning, and gilding techniques and materials were used. Theanimals generally received a protective coating of shellac after painting(Brick 1994). Very little information exists on the various color schemesand decorations that were used, since few records remain today.
The work of carousel carvers and painters represents a mostimportant phase of American wood carving and painting, although histori-ans have generally failed to document it or acknowledge it as a contribu-tion to American art. Unfortunately, much information about carouselartists has been lost; company books were not always kept and recordsthat once existed have been destroyed or lost in fires or reorganizations.Many of the artists were known only by their first names, and very fewsigned their work (Fried 1964:117).
Carousels have been categorized as both folk art and fine art, andarguments have been made on both sides of the issue. Fried (1964:118) states:
The term “primitive” is generally used to designate unschooled, crude, naive,
or unsophisticated art. Most of our carousel carvers were unschooled in
sculpture, naive and unsophisticated in their art understanding, but it can
hardly be said that theirs was a “primitive art” nor because of its large com-
mercial use, can their art be termed “folk art.” Nor were there any signs of
crudeness in the products of the carousel manufacturers after the 1900s.
Carousel historian Tobin Fraley, in The Great American Carousel(1994a:70), echoes this notion of the carousel craftsperson as artist:
Although the basic motivation to produce carousels may have been the need
to make a living, the drive to create, for these craftsmen, must have gone
well past the bounds of just making money. There is no doubt that the
sculpting of wooden figures represented an expression of the maker as an
artist. The exacting detail, the sweeping flamboyance and the serious grace
and beauty of many of the figures created by these men reveal an ambition
beyond the creation of a seat on an amusement park ride.
An example in Over-the-Jumps is the painstaking effort taken to createdetails such as dappling and other hand-painted decoration.
Many wood-carvers employed by America’s industry were, in fact,very sophisticated not only in technical ability but in their understandingof design and art in general. Most received training through intensiveapprenticeships beginning at an early age, and some enrolled in art classesto enhance their careers. Carousel artists recognized for their exquisitedesigns and detailed carvings include Salvatore Cernigliaro, M. C. Illions,John Zalar, Daniel Muller, Harry Goldstein, Soloman Stein, CharlesCarmel, Frank Carretta, Charles Leopold, Eugene Drisco, and many oth-ers whose names are now lost but whose work remains as a testament totheir outstanding technical and artistic abilities (Fraley 1994b).
As with any other art form, no single label accurately describes ordefines carousel art. The degree of artistic sensibility in carousel figuresranges from the very naive to the highly sophisticated. Nonetheless, muse-ums have generally relegated carousel figures to folk art galleries and havefailed to adequately exalt the finer examples of carousel art. This charac-
388 Parker and S ixbey

terization of the carousel as “folk” art has influenced the approaches usedin past preservation attempts. Current debates about the position ofcarousel art within the spectrum of artistic expression will undoubtedlyimpact future conservation efforts.
Past restoration efforts have greatly compromised the integrity of numer-ous wooden carousels and carousel figures, in many cases resulting in thecomplete destruction of original painted surface coatings and decoration.Because carousels were built to turn a profit, repairs to the figures weregenerally executed as quickly and cheaply as possible. Nonetheless, wellinto the 1940s, a high level of restoration work was often performed bythe same highly skilled artisans who constructed and painted the woodenfigures. As this generation of artisans passed away, the quality of carouselrestoration declined.
At the advent of a carousel revival in the United States during the1960s and early 1970s, original paint was disregarded, and stripping, sand-blasting, and hot-bath dipping (which often separated glue joints) werestandard restoration methods. In the late 1970s, commercial strippers andcold-bath dipping were commonly used, and the carousel figures continuedto be stripped to bare wood. Common repair materials included polyesterresin (auto body fillers), epoxy adhesives and fillers, and automotive paints.
An oil-based enamel paint (referred to as “park paint”) was appliedin-house to carousel figures as an ongoing maintenance procedure foroperating carousels. It was a cheaper option than contracting with carouselcompanies for repainting (Walker n.d.). Paint analysis on the Over-the-Jump horses indicates that up to thirty layers of paint were applied overthe years. Park paint was generally applied by relatively unskilled workerswho had neither the time, desire, nor talent to duplicate original colorsand painting techniques. Consequently, the original artists’ intentions werecompletely obscured. These heavy, multiple layers of visually unimpressivepark paint have, however, provided the protection necessary to preservethe original paint layers.
Standards for fine arts conservation have rarely been applied tocarousel preservation. When Friends of the Carousel, the organizationformed to save Over-the-Jumps, contacted well-known U.S. carouselrestoration companies and requested restoration proposals and cost esti-mates, no company submitted a proposal that included preservation of theoriginal paint. A standard procedure appears to be the documentation oforiginal colors and designs, stripping the figures to bare wood, and com-plete repainting.
Recently, some restorers have used a more sensitive approach, inwhich windows are opened in various areas of the figures, original colorsand designs are documented, and the figures are repainted in the originalcolors and design over a stable layer of park paint. This method retains theoriginal paint beneath the protective layers of park paint (Ragan1988:31–32).
The conservation of culturally important objects such as Over-the-Jumps, which by tradition or necessity exist as functioning artifactsoutside a proper museum environment, presents formidable challenges. In1992, a general conservation survey of the forty carousel horses of Over-the-Jumps was conducted by Parker Restoration and ConservationServices, who then carried out treatment of “Jeffrey,” one of the forty
Past Restorations
389J : H D C

horses on the carousel (Fig. 4).2 Though the carousel project has onlybegun, the initial efforts on Jeffrey have already provided a wealth of infor-mation. Future study and conservation of this increasingly rare object—anintact wooden carousel—promise to fill many of the gaps in our knowl-edge of original carousel colors and design schemes, as well as the paint-ing techniques and materials used in the 1920s by Spillman EngineeringCorporation on this most impressive artifact, Over-the-Jumps, theArkansas carousel.
In 1992, the Friends of the Carousel contracted Parker Restoration andConservation Services to examine Over-the-Jumps for evidence of originalfactory paint schemes. Proposals already received from carousel restora-tion firms recommended the removal of paint to the bare wood prior torepainting, so the Friends wished to document the original scheme whileit was still possible to do so. If early colors were found, the informationcould improve the accuracy of the replication.
A cursory examination revealed many layers of park paint cover-ing the horses, but very little serious structural damage. The paint layerswere in poor condition and were covered with a thick, clear coating, pos-sibly polyurethane varnish. When applied, this coating had penetratedfissures in the paint on each horse, allowing solvent to reach an early var-nish layer and cause it to swell. This produced considerable disruption inthe upper paint layers and resulted in islands of separated paint. Flaking,tenting, and crazing paint; abrasions; and paint loss were common prob-lems on most of the horses.
Despite these problems, the condition of the horses looked verypromising. Several were randomly chosen for elementary tests, and a basicexamination was undertaken to search for early decoration beneath thepark paint. Solvent action was relatively unsuccessful in removing upperlayers, but dry scraping with a surgeon’s scalpel seemed successful inrevealing the earliest coatings. Because it seemed possible to recover muchof the factory paint scheme, the board of directors of the Friends of theCarousel agreed to deliver one of the horses to the laboratory for further
The Treatment
390 Parker and S ixbey
Figure 4
Jeffrey, before treatment.

exploration. After a review of the condition reports, Jeffrey, a horseexhibiting a range of the surface problems encountered on all of thehorses, was chosen as the best example for study.
The horse arrived at the laboratory in the spring of 1993. Uponarrival, six representative cross sections were taken from various portionsof the horse. Up to thirty layers of paint and varnish were present in someareas, while as few as fourteen were found in areas of wear. Visible lightmicroscopy and ultraviolet light microscopy, with the use of stains,3 indi-cated that the paint layers were all lead-based, oil-bound paints. Solventtests demonstrated that all of the paint binders had similar solubilityparameters. The samples revealed the original coatings in the followingorder: first, several layers of lead white primer were applied to the wood;a paint layer, believed to be the original factory paint, lay directly over theprimer in each sample; over the paint layer was a heavy varnish coating,which appeared to consist of several thin coats of similar solubility, sinceeach successive layer had coalesced with the previous one.
With as many as thirty coats of paint visible in the samples, abrilliant array of color emerged beneath the microscope, yet the recoveryof the factory paint remained the absorbing task. Solvents proved to beunsafe; while effective in swelling the upper layers, they penetrated thecracks between the islands of paint and swelled the early layers at thesame time. Several promising solvents were gelled in an attempt to controltheir activity, but this also proved unsatisfactory. Several scraping tech-niques were tried, but the paint was too thick and extremely brittle, andthe techniques were too time-consuming, considering the limited budgetfor the project.
However, the scraping trials confirmed that sound, intact earlylayers existed, and revealed interesting information about the factory paintscheme. Prior to examination, one authority suggested that only the morevisible, outward-facing sides of the horses would exhibit elaborate decora-tion, but this proved false. While the outer side certainly displayed morejewels and other carving, the inner side bore intricate painted trim anddetail executed in small, deft brushstrokes. Small painted elementsemerged all over the horse—pinstripes, painted patterns, and realistic dap-pling. The placement of the final detailing was surprising; areas expectedto show decoration were sometimes plain, while areas assumed to beundecorated often contained fine ornament.
The scraping worked well in some areas, revealing interestingundocumented details at every test site. As work progressed, however, itbecame apparent that past exposure to water in some areas had made theprimer layer very fragile and subject to damage; therefore, scraping washalted, and the primer consolidated where necessary using rabbit-skin glue.
So far, all trial techniques showed some success, but none provedefficient and consistently effective. An attempt was then made to locatesomeone who had dealt with a similar problem. Most literature regardingprevious carousel restorations reflected the standard commercialapproach—a cold-tank immersion to “get rid of the old paint,” therebyproducing a stable ground for repainting in appropriate colors. As this wasan unacceptable alternative, several objects conservators were consultedfor more sensitive methods of dealing with the numerous paint layers.Although some techniques worked, none proved suitably efficient for thetreatment of forty horses.
391J : H D C

As a workable plan had yet to be achieved, the cross sections werereexamined in a search for other possible approaches, and several moresamples were taken to aid in the study. When cross-section photographswere compared, the thick varnish over the factory paint stood out in eachsample (Fig. 5). If this layer of varnish could somehow be manipulated,the factory paint could be preserved.
The scraping had produced one helpful clue. The thick coating ofvarnish was very soft, while the layers of overpaint tended to be extremelybrittle. From looking at the cross sections, it seemed likely that heatapplied to the surface would further soften the varnish, allowing it to bemanipulated beneath the overpaint. Areas 7.6 cm (3 in.) square weremasked off with blotting paper, and a heat lamp was aimed at the exposedsurface. Using a scalpel, it was possible to work into the softened varnishlayer and lift all of the overpaint at one time.
Feelings of elation were premature, however, as concerns aroseabout the absorption of heat by the original paint, as well as by thewooden body of the horse. A hot-air gun, selected as a more controllableheat source, worked somewhat better but was cumbersome. It wasdifficult to use the heat gun, put it down, pick up a scalpel, and work theisland of paint free. This process produced an extremely brief window oftime in which to manipulate the softened varnish, and as a result therewas a tendency to apply too much heat to increase the working time. Thenext attempt, using a commercial hair dryer, worked fairly well, but pro-longed heat exposure was still an issue.
At this point, Robert Pennick, a colleague with considerable expe-rience in commercial paint removal, was consulted. A period of brain-storming produced a successful two-person technique: one person handleda heat gun, while the other used a scalpel to lift the islands of paint. Atfirst, this process varied in success, but it soon developed into a comfort-able rhythm and gave very acceptable results. Surface temperature wascontrolled by varying both the distance of the gun from the horse and theduration of exposure. The heat gun operated at a lower temperature thanthe heat lamp, yet it warmed a larger area. Very little heat was required toremove the upper layers of paint from the thick varnish. When an islandof paint began to move but resisted lifting, the heat was decreased justenough to keep the varnish warm (about the consistency of thickmolasses). This permitted the removal of small sections of the paintwith either forceps or the scalpel.
392 Parker and S ixbey
Figure 5
Photomicrograph from the saddle blanket of
Jeffrey, showing the thick varnish layer over
the original factory paint (yellow coating over
the lead white primer layer).

Because of wear, areas such as the saddle and knees had little orno varnish, and the later paint lay directly above the factory coatings inthese areas. They were carefully scraped at room temperature because theheat required to move the upper layers would also damage the originalpaint. Although there was considerable wear to paint in the saddle area,the color scheme remained clearly visible.
An object is usually repainted for a reason. As the overpaint wasremoved, additional wear was evident on Jeffrey. Though in good condi-tion considering this horse’s hard life, the factory coating on the flanks ofthe animal was worn by the mounting and dismounting of countless rid-ers. Improper storage and handling also had caused considerable damage,and the legs were damaged at points where they bore the weight of thehorse in storage. The horse had also been stored on its sides, resulting innumerous abrasions. There was evidence of water damage and exposureto the elements.
It is interesting to note that the first overpaint on top of the fac-tory decoration was a very good reproduction of the original. Great painshad been taken to replicate not only the color scheme but the articulatedbrushstrokes; the stippled pattern of the horse’s coat was expertly handled.Each successive coating, however, received less attention and appearedmore sloppy, culminating in the final coating, where a spray can was usedto shade the knees, tail, and mane.
The heat gun/scalpel process worked extremely well and was eco-nomically comparable to the “dip, strip, and total repaint” method men-tioned earlier. Control of the heat gun permitted the execution of verydelicate work. Often considered a rather brutal and crude tool, the heatgun produced remarkable results in the removal of overpaint from Jeffrey,and it suggested interesting possibilities for future applications.
After removal of the paint, considerable dark, thick varnish stillremained on the horse. A series of solvent mixtures with acetone, devisedusing a Teas diagram, was used to clear the varnish. While the varnish waseasily cleaned from the body of the horse, several underlying painted ele-ments (including the orange saddle trim, the dark green saddle blanket, andthe orange breast trim) were also easily lifted by this solution. A mixturewith less acetone was devised to clear the varnish residue from these areas.4
By this point in the process, the treatment deviated considerablyfrom the initial objective: finding the factory paint scheme prior to repaint-ing. In the beginning, there was little to indicate that intact paint schemesmight be found. Now, although the recovered surface coating was by nomeans in pristine condition, it was apparent that the original painted deco-ration, complete with previously undocumented details, could be saved. Aconjectural replication was unnecessary.
One of the early stated goals of the Friends of the Carousel wasto return the carousel to operation. Presented with new possibilities fortreatment of the horses, there were now mixed feelings by the boardmembers as to what should be done. All realized that subjecting Jeffrey tothe normal wear and tear of a functional carousel would jeopardize thesurvival of his fragile, newly revealed original painted decoration. Theentire board made the journey to the laboratory to view the horse priorto any filling or inpainting. Some felt the horses should remain untouched,to be displayed in “as is” condition, while others felt strongly that the pub-lic supporting the project would not properly understand the horses if
393J : H D C

damage were allowed to remain visible, that filling and inpainting shouldbe done to make a better public presentation. Above all, there was theaforementioned concern that these original surfaces would be damaged ifthe carousel was returned to operational status.
The ultimate fate of the carousel now hinges upon the resolutionof a dilemma; the desire to use and enjoy Over-the-Jumps as a functionalcarousel conflicts with the desire to preserve it as a historic and artisticwork. One of the charms of the carousel is that it is a one-of-a-kind ride;an integral part of the experience is the ride itself. While some on theFriends of the Carousel Board would like to see the horses displayed asobjects of art, others propose treating the carousel in a manner similar toa historic home: permitting limited use with the expectation of some wearand tear. If this plan is adopted, the horses will require a protective coatingthat is durable in order to withstand use by the public, clear so that thecolors are visible, and reversible (to meet conservation standards). Evenso, a coating alone will not prevent damage if the carousel is returned tooperation. Clearly, the dilemma of usage versus preservation requires care-ful deliberation by the board of directors.
As a result of the laboratory visit, the board authorized limitedfilling and inpainting of areas on Jeffrey where significant, visually distract-ing damage had occurred. Acrylic gesso, smoothed with xylene, was usedto level the major areas of loss, resulting in an immediate visual improve-ment to the horse. Dammar varnish was applied to saturate the colorsbefore inpainting. On the sides of the saddle (Fig. 6)—which was previ-ously considered too damaged for anything but repainting—a very faintshadow of a painted pattern simulating tooled leather was barely visible.This saddle area was given a barrier coating of poly(vinyl acetate) (PVAAYAF) in methyl alcohol and left as is for the time being.
Other than the saddle, roughly 85% of the horse retained originalpaint. The original artist obviously had a highly developed color sense,producing a diversity of colors by intermixing a limited palette of pig-ments. For example, the saddle brown is a mixture of dark green (phthalocyanine green) and cadmium orange. The dapple, which closely approxi-mates hair, is a dry-brush, stippled technique that has a far different char-acter than the airbrushed dapple used on many newly restored carouselhorses. The paint scheme was very carefully planned and executed,reflecting a skillful artist’s knowledge of colors and mixing.
394 Parker and S ixbey
Figure 6
Photomicrograph from the saddle area, show-
ing the lack of heavy varnish over the original
factory paint (brownish yellow over the lead
white primer) and the convoluted paint layers
above it.

Inpainting of Jeffrey was done with an Acryloid B72/xylene mix-ture and Maimeri Colors (with the exception of the phthalo cyanine green,which was a Magna Color, used because it produced a closer color match).5
After most damaged areas of the horse were inpainted, the saddlereceived further attention. The shadow pattern of the tooled design wasinpainted to enhance the definition of the overall pattern. Because of theextent of damage on the outer portion of the horse, however, the inpaint-ing in this area is somewhat conjectural. As more horses are treated, thecomplete pattern may appear elsewhere, allowing exact replication in afuture treatment. Of significance is the fact that this simulated tooling isnot documented in any of the literature researched thus far. If thesehorses had been cold-tank stripped, patterns such as these would havebeen lost forever.
After the inpainting was done, a protective coating of orange shel-lac was applied over the entire surface to simulate the amber appearanceof the factory varnish. This is by no means a final varnish, but a properformulation has not been decided upon at this time.
As a result of the work on Jeffrey (Fig. 7), treatment of a secondhorse, “Swift,” has begun. The work done on Jeffrey has been fruitful, asthe conclusions drawn from the initial treatment apply equally to the sec-ond horse, and therefore treatment of the outward-facing surface of Swiftproceeded quickly. On the inward-facing surface, however, the heat/scalpelprocess proved ineffective, probably because the horse had lain in water,which seriously damaged that side. Heat, even used minimally, was toodamaging to the original layers; consequently, the entire side had to becarefully scraped with a scalpel to remove the upper coatings.
395J : H D C
Figure 7
Jeffrey, after treatment.

The knowledge gained from the work on Jeffrey will aid in theformulation of future treatments for Over-the-Jumps horses. Each horsewill be examined microscopically to discover pertinent problems and todetermine the color scheme prior to treatment. The second and thirdhorses already exhibit hidden art comparable to that on Jeffrey, and there isreason to expect the emergence of additional remarkable ghosts from thepast as the project progresses. Meanwhile, plans for a long-term home forOver-the-Jumps are being prepared by the internationally known architectE. Fay Jones of Fayetteville, Arkansas. The pavilion, to be located on thegrounds of the Little Rock Zoo, will be a work of art designed to comple-ment the treasures it will house.
1 In the United States, the best example of a carousel with its original decoration intact is
Philadelphia Toboggan Company no. 6 in Burlington, Colorado. See Morton (n.d.).
2 As part of a fund-raising campaign established by Friends of the Carousel, “Jeffrey” was
named by his “adoptive pony parents.”
3 All samples were taken by scalpel and mounted in Extec clear polyester resin. The samples
were polished using successive grades of Micro-mesh abrasive from 60 to 12,000 grit. Samples
were viewed with a Nikon Alphaphot 2 ultraviolet light microscope. The stains used were
triphenyltetrazolium chloride (TTC) to identify carbohydrates; fluorescein isothiocyanate
(FITC) to identify proteins; Rhodamine B (RHOB) to identify lipids; tetramethyl Rhodamine
isothiocyanate (TRITC)—Texas Red—to identify proteins; and antimony pentachloride (APC)
to identify natural plant resins (see Materials and Suppliers).
4 For the Teas diagram, see Predicting Resin Solubility (1984), a technical bulletin available from
Ashland Chemical Company, P.O. Box 2219, Columbus, Ohio.
Acetone 45% Acetone 50%
Diacetone alcohol 25% Toluene 50%
Mineral spirits 30%
Acetone 30%
Diacetone alcohol 30%
Mineral spirits 40%
5 PVA AYAF, Acryloid B72, and Maimeri Colors are still available; however, the Magna Colors
have been discontinued.
Acryloid B72, Conservation Materials, Ltd., 100 Standing Rock Circle, Reno, NV 89511.
Extec, Excel Technologies, 99 Phoenix Avenue, Enfield, CT 06082.
FITC, RHOB, TRITC, TTC, Sigma Chemical, Box 14508, St. Louis, MO 63178.
Maimeri Colors, Conservation Materials, Ltd.
Micro-mesh abrasive, Micro-Surface Finishing Products, Box 818, Wilton, IA 52778.
PVA AYAF, Conservation Materials, Ltd.
Anderson, M., and K. Story
1989 National Register of Historic Places nomination, Over-the-Jumps. Arkansas Historic
Preservation Program, Little Rock, Ark.
References
Materials and Suppliers
Notes
396 Parker and S ixbey

Brick, E.
1994 Telephone conversation with the author.
Dahlinger, F.
1994 Telephone conversation with the author.
Dinger, C.
1983 Art of the Carousel. Green Village, N.J.: Carousel Art.
Fraley, T.
1983 The Carousel Animal. Berkeley, Calif.: Zephyr Press.
1994a The Great American Carousel, A Century of Master Craftsmanship. San Francisco:
Chronicle Books.
1994b History of restoration techniques. National Carousel Association Technical Assistance
Conference. Meridian, Miss.
Fried, F.
1964 A Pictorial History of the Carousel. Vestal, N.Y.: Vestal Press.
Manns, W., P. Shank, and M. Stevens
1986 Painted Ponies, American Carousel Art. Millwood, N.Y.: Zon International Publishing.
Morgan, B.
1994 Telephone conversation with the author.
Morton, W.
n.d. The restoration of Philadelphia Toboggan Company #6. In Carousel Manual, vol. 1,
9–16. N.p.: National Carousel Association.
Parker, R.
1994 Conservation condition/treatment report, Over-the-Jumps carousel figures. Parker
Restoration/Conservation Services, Gentry, Ark.
Predicting Resin Solubility
1984 Columbus, Ohio: Ashland Chemical.
Ragan, R.
1988 Saving original paint on carousel animals and pieces. Merry-Go-Roundup (winter).
Schroeder, R.
1980 The carousel horse. Fine Woodworking 23( July/August):62–64.
Spillman Engineering Corporation
1924 Over-the-Jumps sales catalogue A. North Tonawanda, N.Y.: Spillman Engineering
Corporation.
Walker, C.
n.d. Preservation of Park-Paint. Technical leaflet. Atlanta: National Carousel Association.
Weedon, G., and R. Ward
1983 Fairground Art. New York: Abbeville Press.
397J : H D C